
Have you checked out Area 1N yet? I explain my Echelons set up [Here].

Welcome to Area 4 Night mission Walk Through! This is first area in the night missions that enemy strength shown increases by 5,000 compared to 2,000 in previous area. So you can expect even your elite echelons to struggle under incoming dps. If you do not have well equipped and well maxed out echelons, be prepared to use additional echelons to spread out the overall damage incurred. I am still using same echelon set ups I explained in Area 1N Walkthrough, with minor change being my RF Echelon has since increased in Combat power via additional links. And frankly, I needed every bit of strength to beat 4-4.
One good thing about the Area 4 is that they are far more generous in turn limits at least from my perspective. So if you really want to clear missions and your squad is beat up, you can do tactical retreat via helipad, healing up from main screen and redeploying them fully healed at a trade of giving up S rank clear is possible. Well, let’s get started.
3 Echelons should be plenty with now help of Friends Echelon in order to clear current missions. One thing to keep in mind is that in Night missions, enemy movements are completely random. So be flexible with your movement. I can only give a general guide that will work most of the time, but minor adjustments will come from you, commander.
One important thing that will sound obvious but crucial if you are following my setup: If you don’t have HG in your squad and want to call in 2nd/Friend Echelon, you can’t because you don’t have vision of helipad. Which makes HG mandatory on first Echelon deployed on the mission. Keep this in mind!
-
4-1N
S-Rank condition: Kill all 10 unit in 4 turns
Required Squads: 1RF + 1AR + 1 Dummy [optional]
Shown enemy Str: 11,000

Map View. This map feels oddly similar from last area. Notice the separation of unit types from top to bottom. Enemy Str has not jumped that much since 3-4N.

RF echelon starting at top, AR on the bottom.

With spare action point, I spawned dummy echelon but it’s not a must. You should have spare turn to still clear the mission without it.

I was being dumb and didn’t see the route that can clear all enemies by turn 3 with 6 Action points you have. But since they give you extra turn to do it, you can be dumb like me. Suggested route is shown above.
-
4-2N
S-Rank condition: Kill all 8 unit in 4 turns
Required Squads: 2 [RF & AR/RF mix] + 1 Dummy Echelon
Shown enemy Str: 12,000

Map View. Starting with 2 combat Echelons on helipads on the left with your elite echelon starting on bottom left. Dummy echelon starts on the bottom right.

Move combat echelon one each to fight the enemy unit surrounding the helipad. Dummy echelon moves to swap with main echelon at the bottom, then main echelon moves to take helipad in the center.

On turn 2 you have 2 potential route. If there is an enemy unit on the radar next to center helipad, take red route. If there is no enemy on radar node, take yellow path. Depending on the movement you can either kill all units this turn or be able to finish it off on next turn.
-
4-3N
S-Rank condition: Kill all 10 unit in 4 turns
Required Squads: 2 AR + 1 Friend Echelon
Shown enemy Str: 14,000

Notice that I have no HG in the echelon so I have limited vision. This is decision i made because i don’t have well raised HG unit unless I pull them out of RF… and frankly i was being lazy. But with radar nodes under control I don’t have any issue next turn.
Turn 2 is all about setting up so that we clear the bottom half of the map and clear top half on next turn. Friend Echelon will make its way up on top left.
-
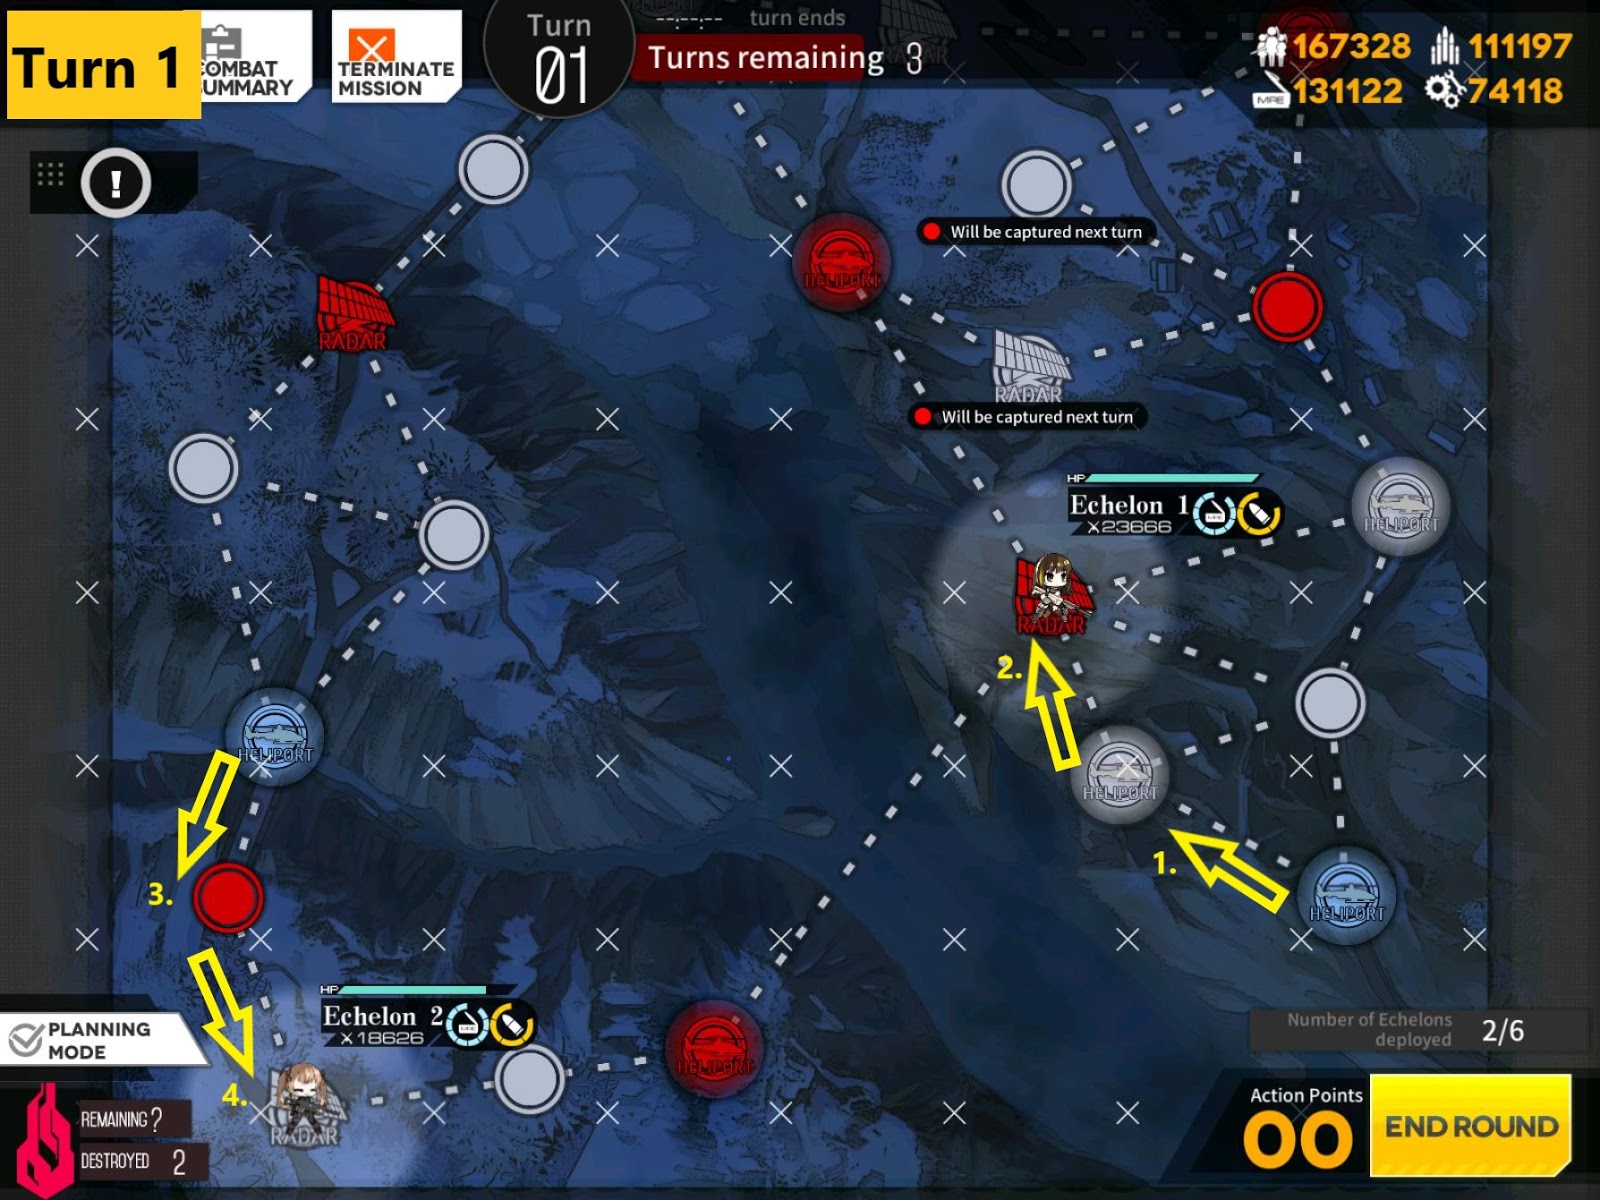
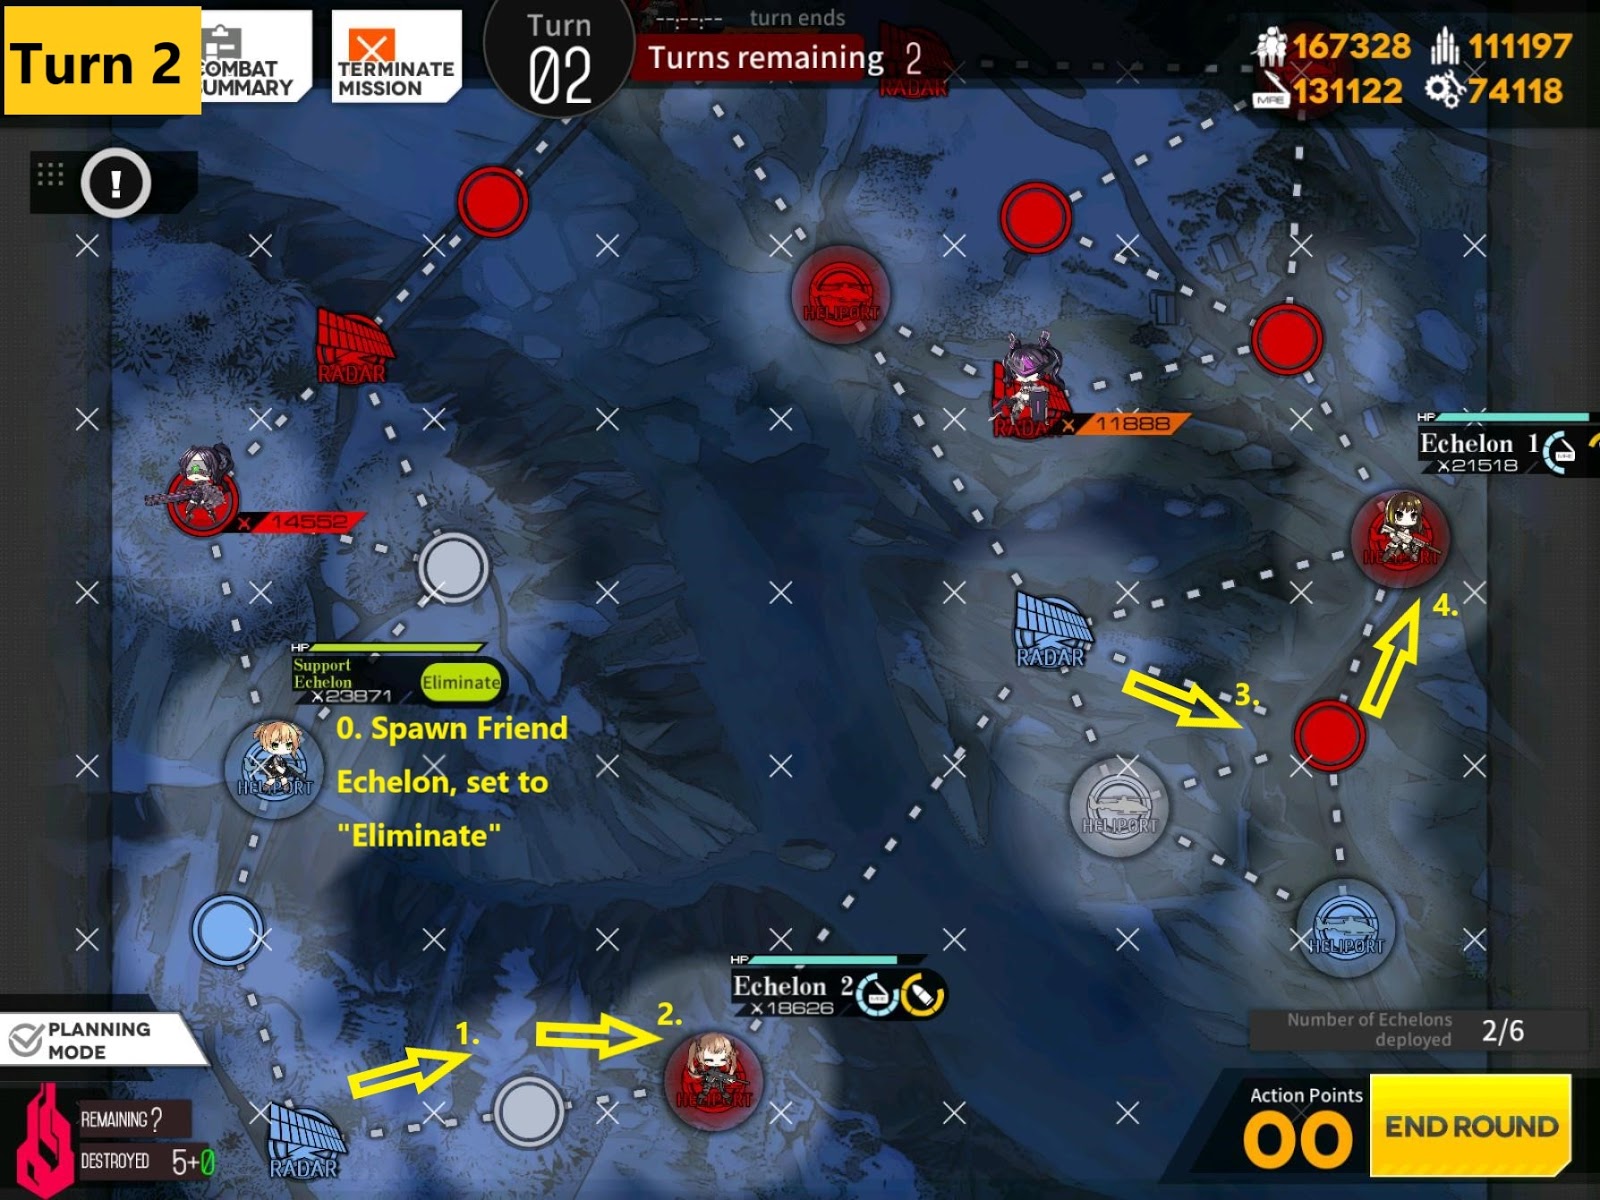
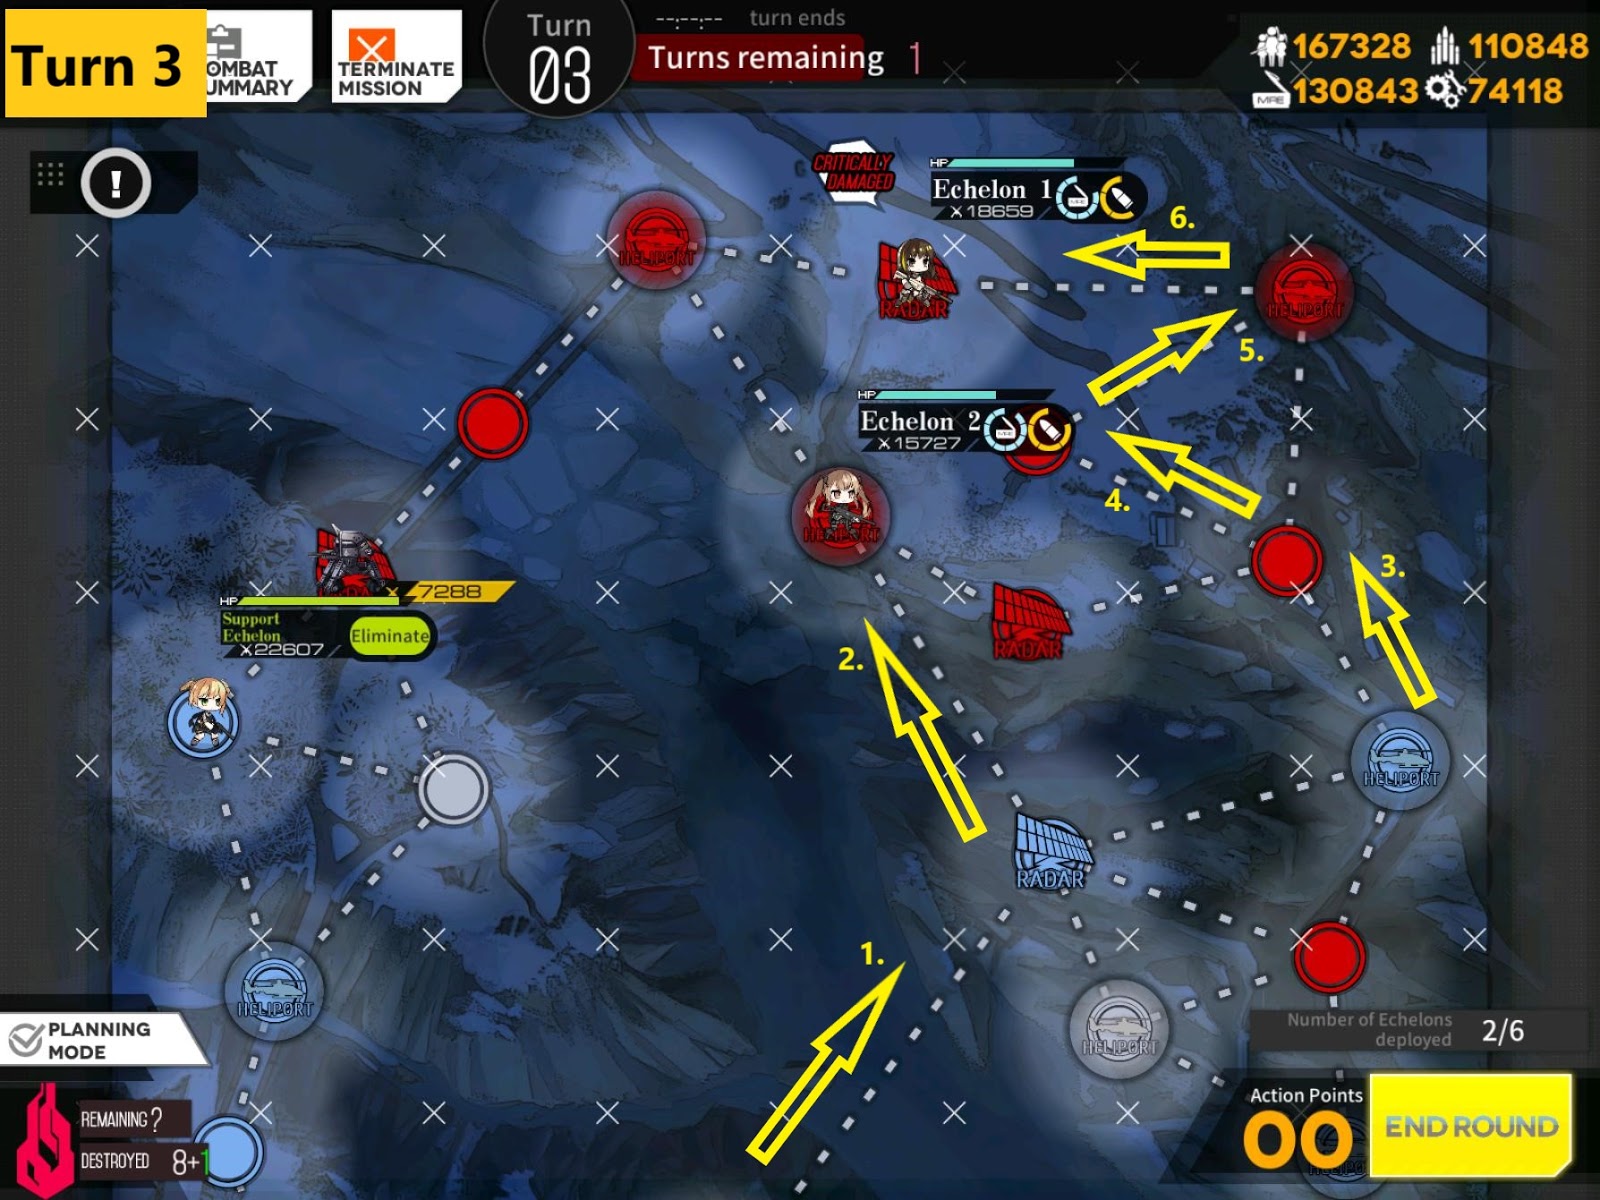
4-4N [Boss level]
S-Rank condition: Kill all 14 unit in 7 turns
Required Squads: 2 [RF & AR] + 1 Dummy Echelon + 1 Friend Echelon
Shown Enemy Str: 16,000


All the action on turn 1 happens on top. Move 1 to left, spawn Friend Echelon that can take on Armor units as well as sniper units then set to eliminate. Swap with RF echelon back to HQ, then RF echelon moves one down. Spawn a dummy unit on helipad, then move one more down to take enemy helipad.

AR echelon on the bottom moves 1 to left to take radar. RF echelon moves to take down Manticore. Dummy Echelon moves on the left to make sue that dummy echelon moves to left again to take helipad.
