


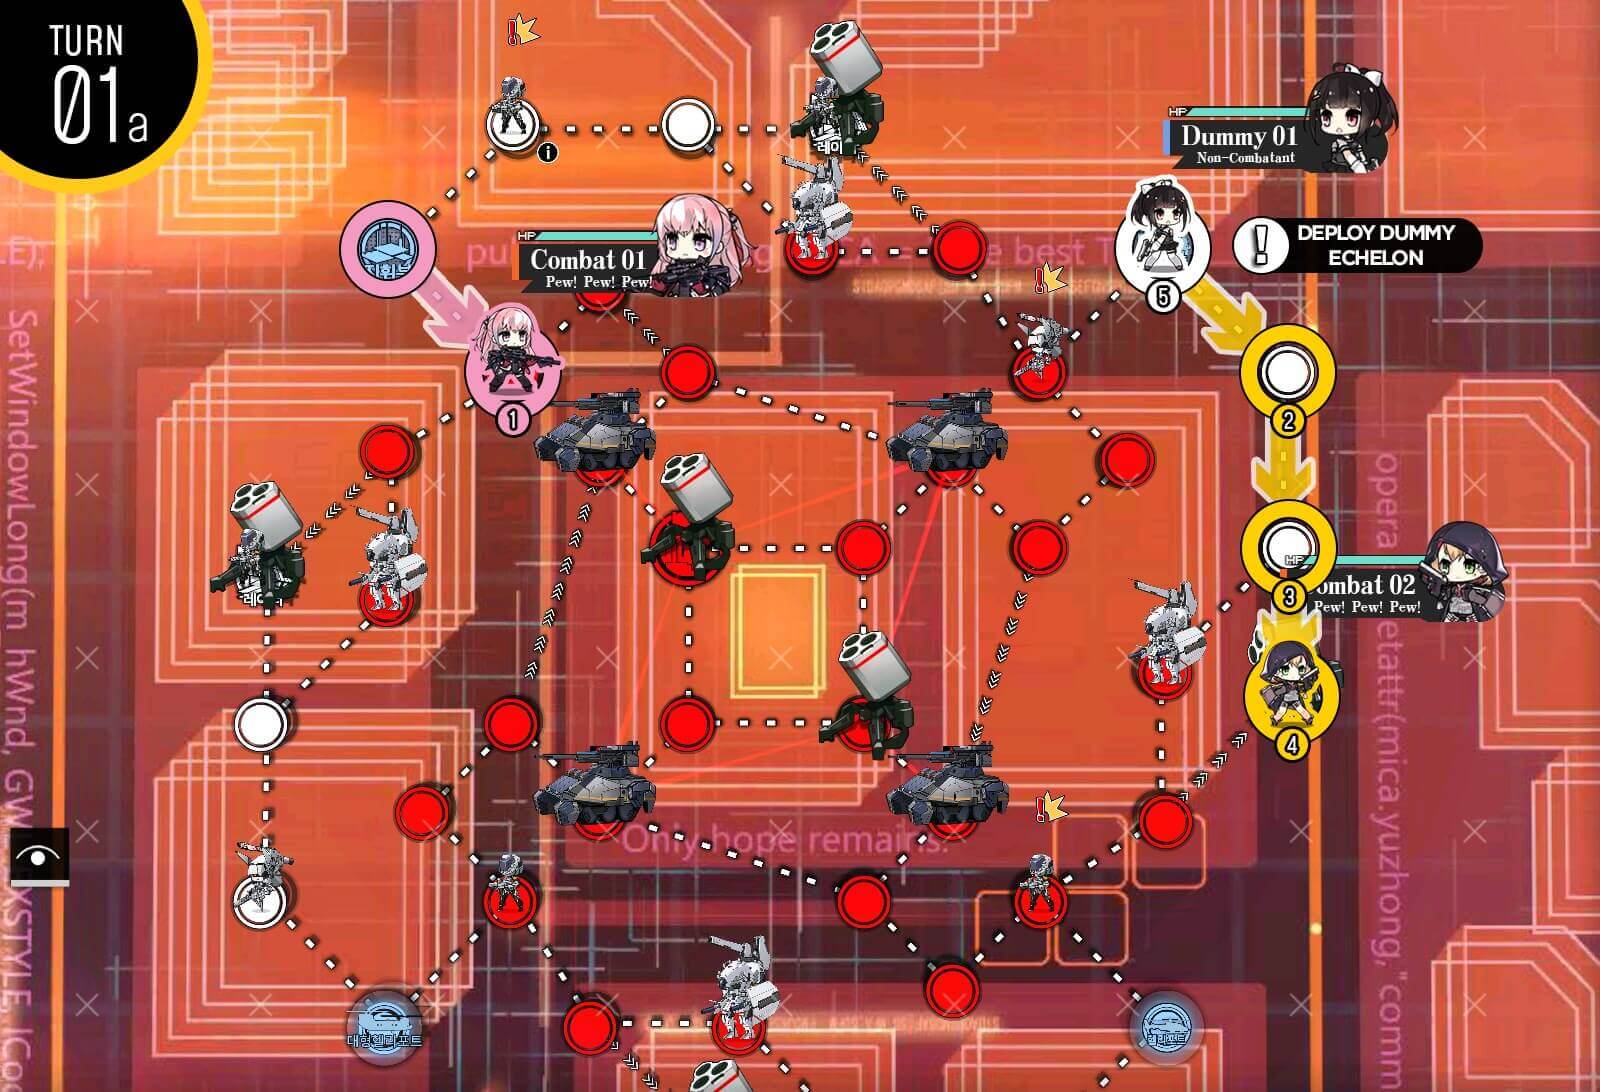
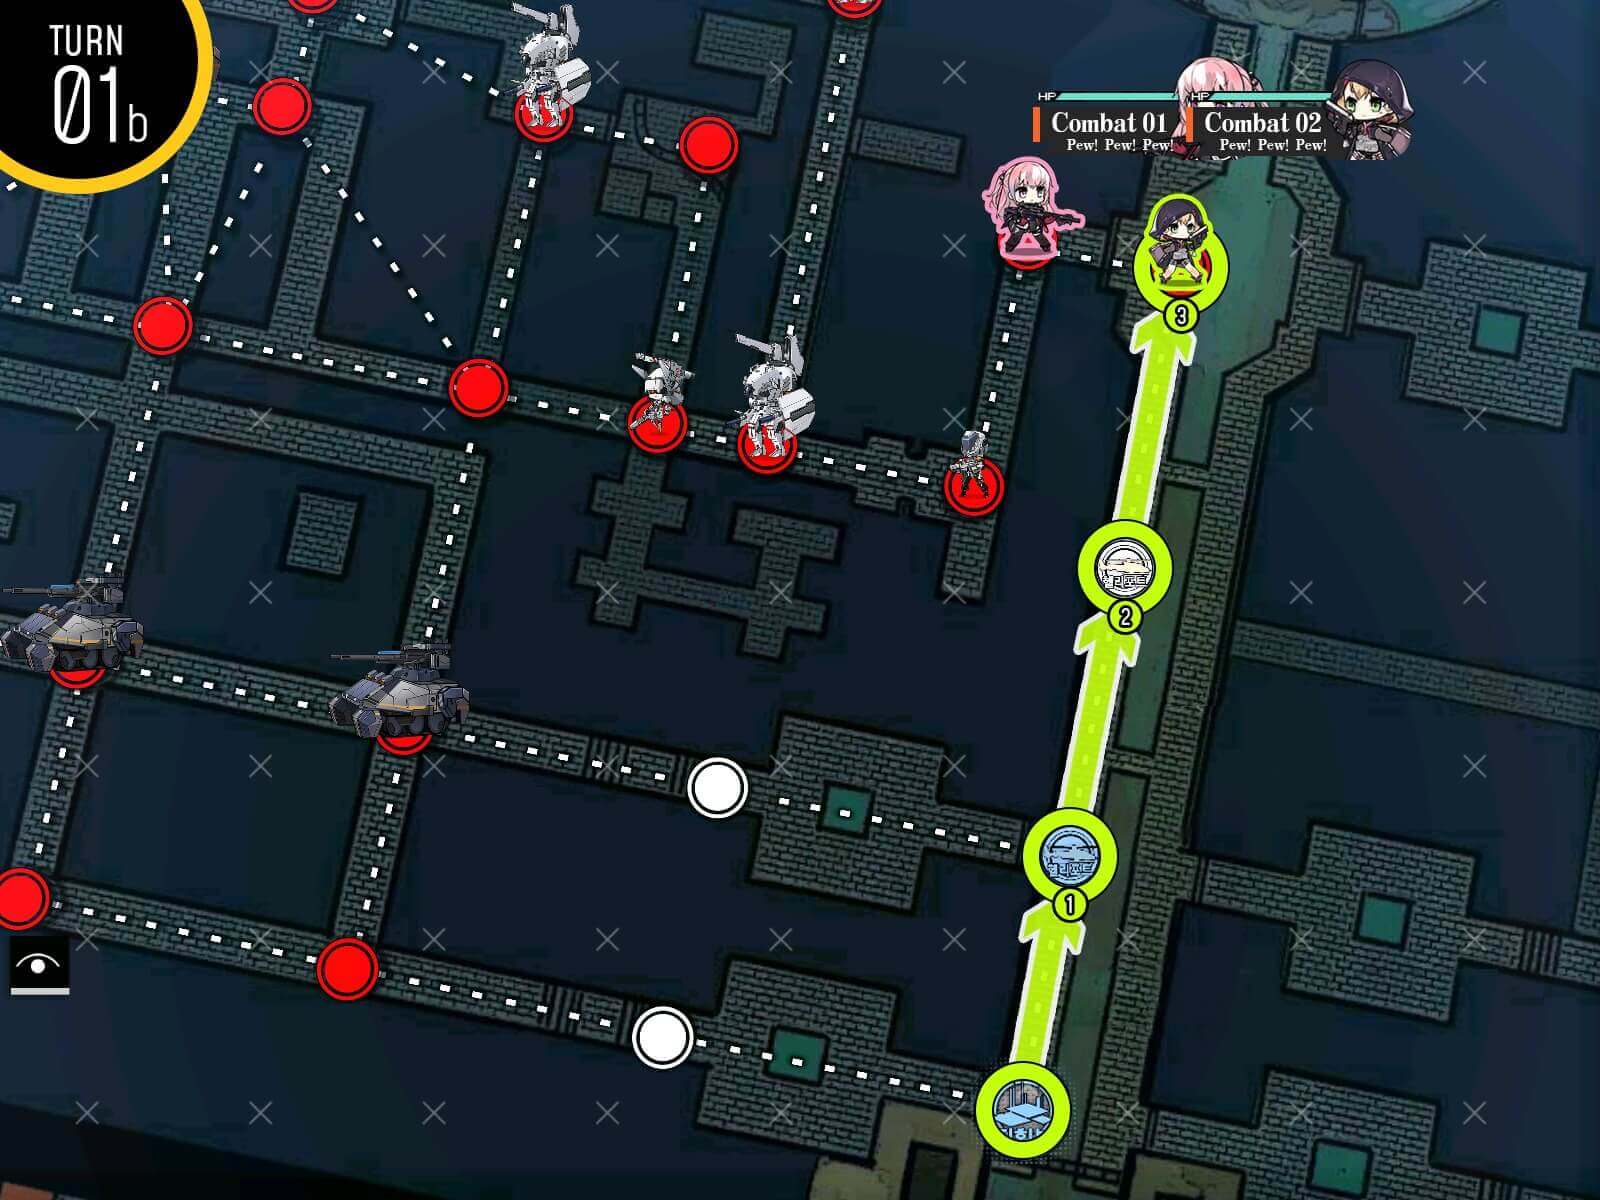
Turn 1a
Start with two combat echelon on both sides, with one capable of killing the Gundam unit on the right side. Combat echelon on the right side moves all the way down to the mentioned radar node. Deploy a dummy echelon on the heavy helipad. Combat echelon on HQ moves down one node.

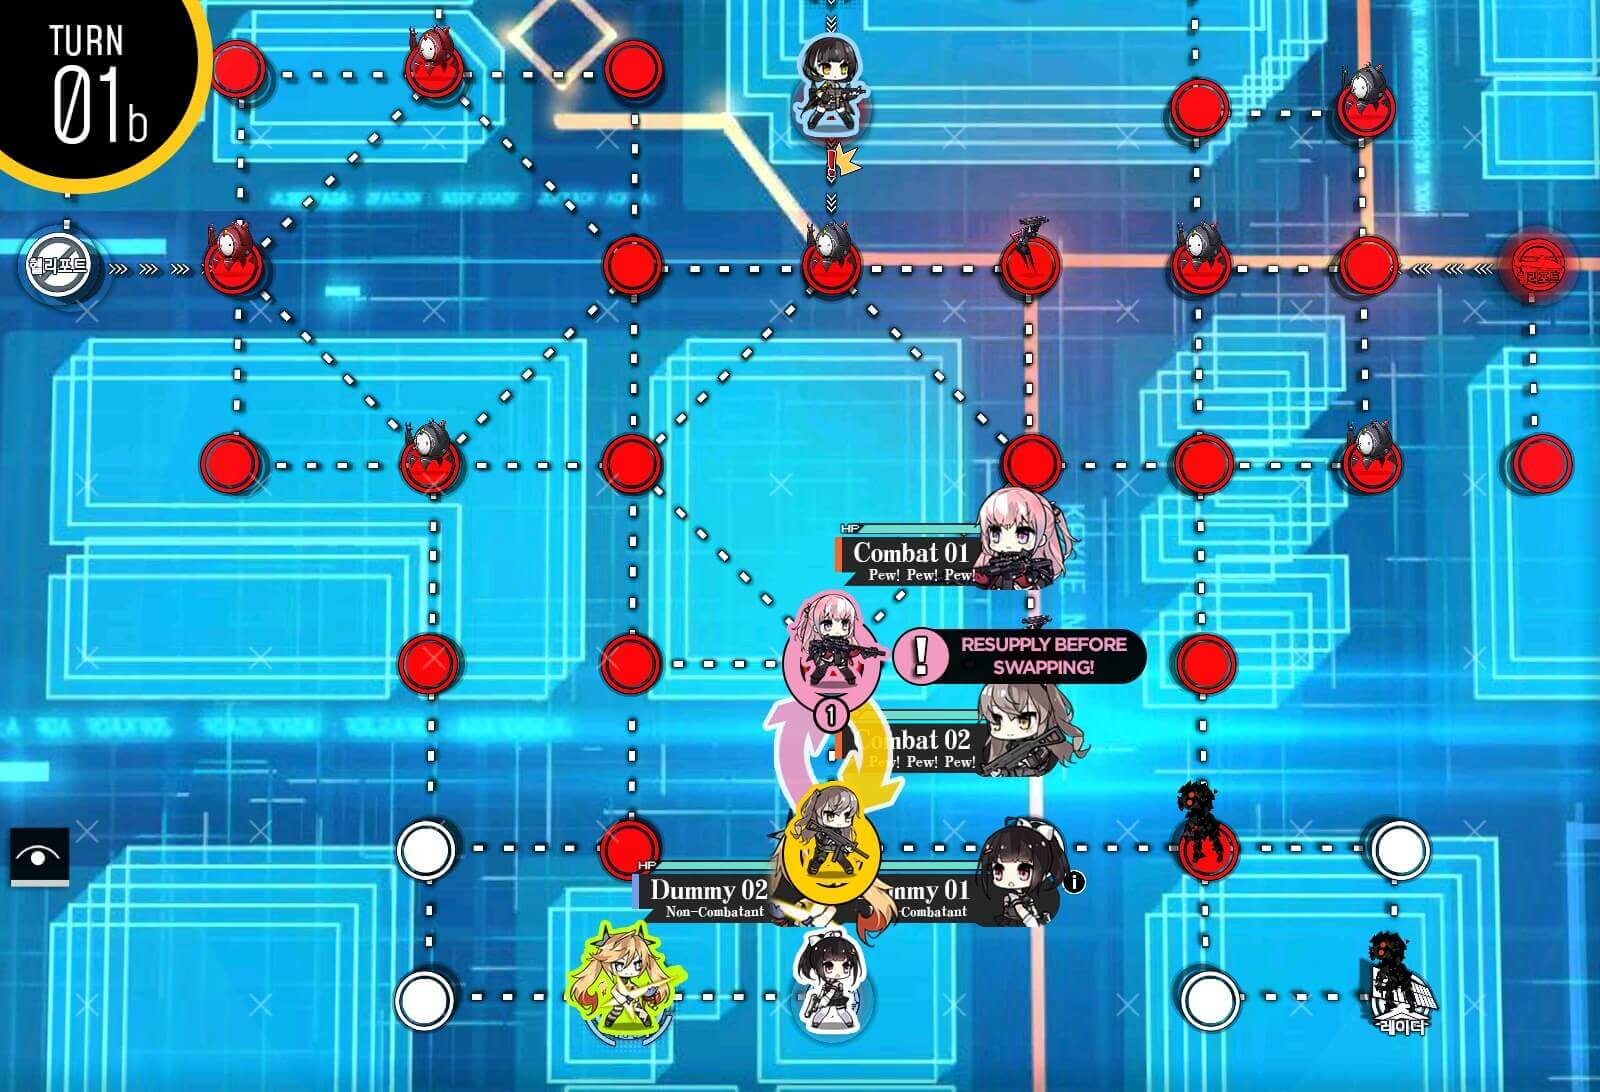
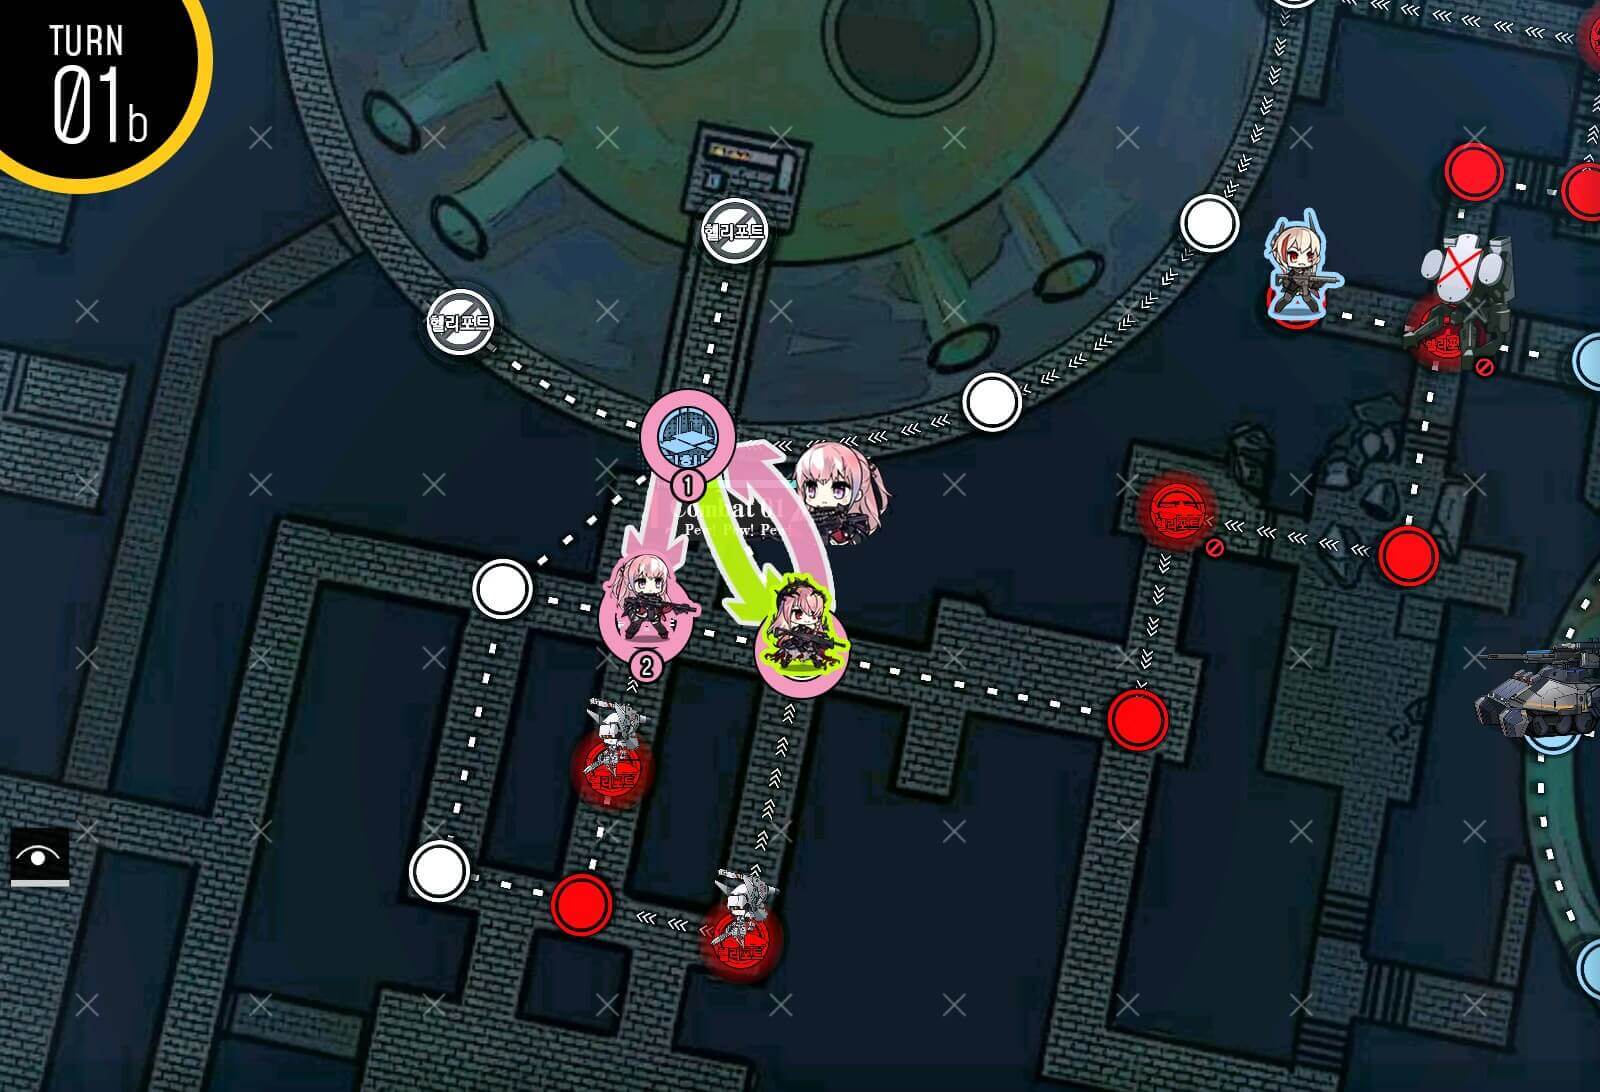
Turn 1b
Dummy echelon moves down one node and we deploy two friend echelons on each location with the 'Wait' command before ending the turn. This guide does not use Parachute fairy, so we will continue as if we did not used it.
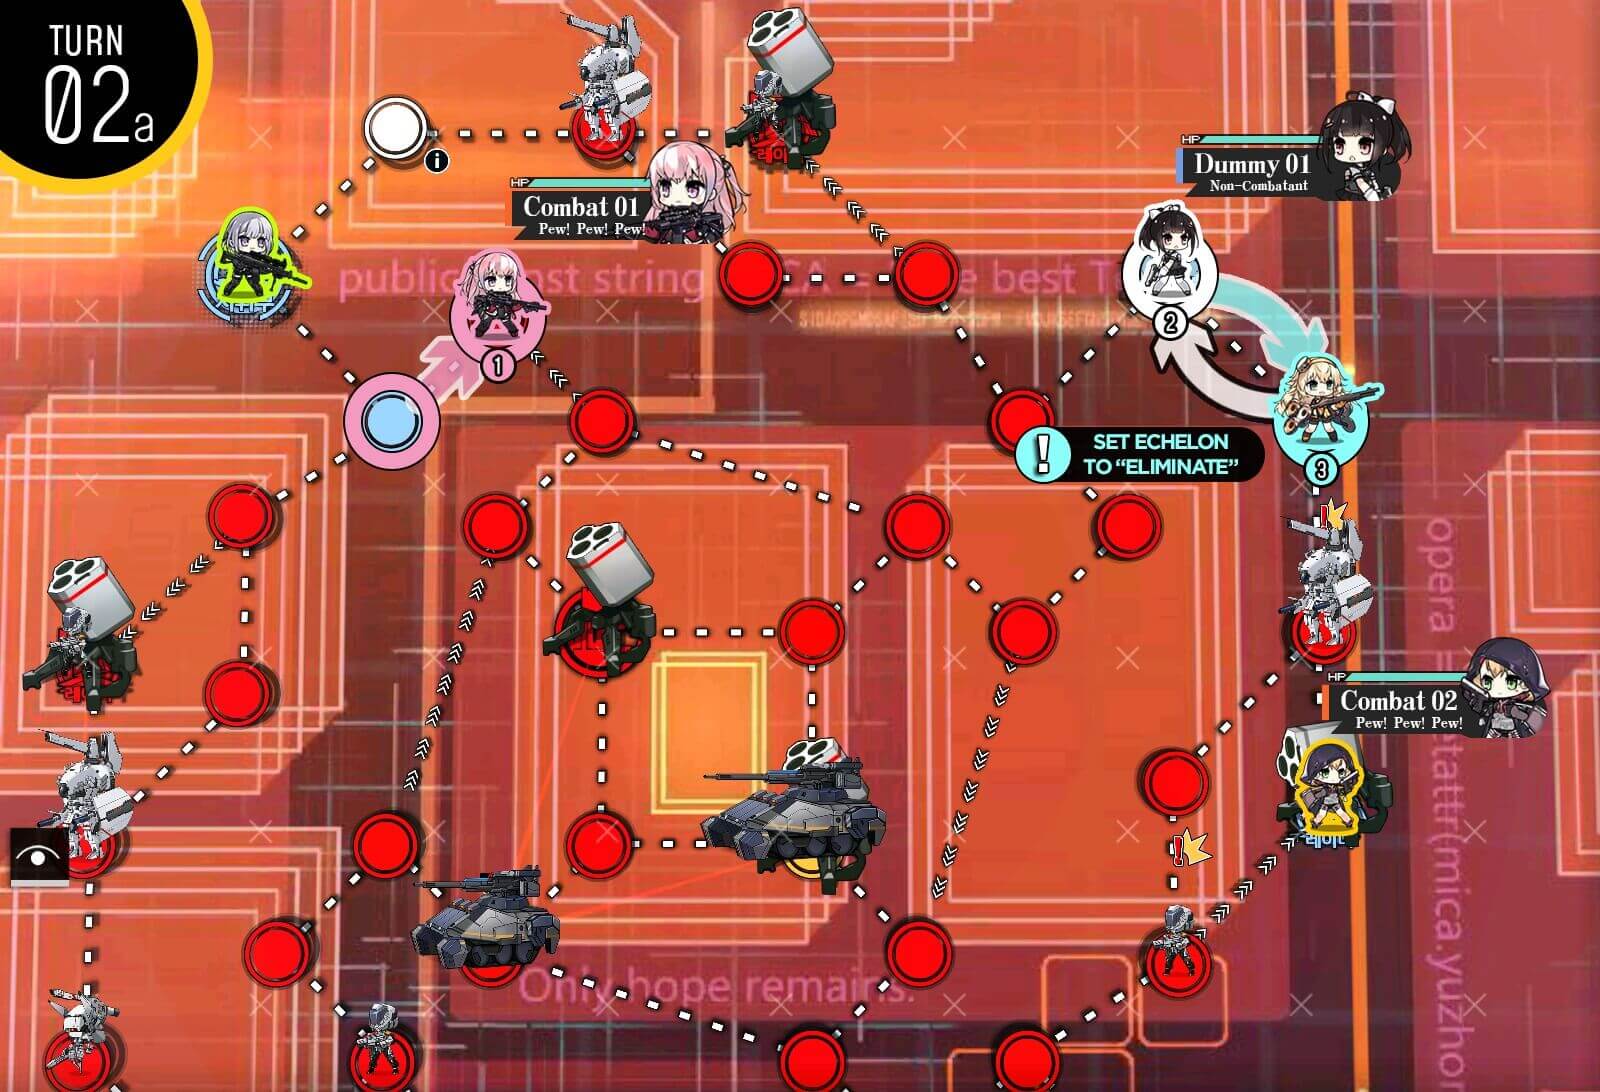
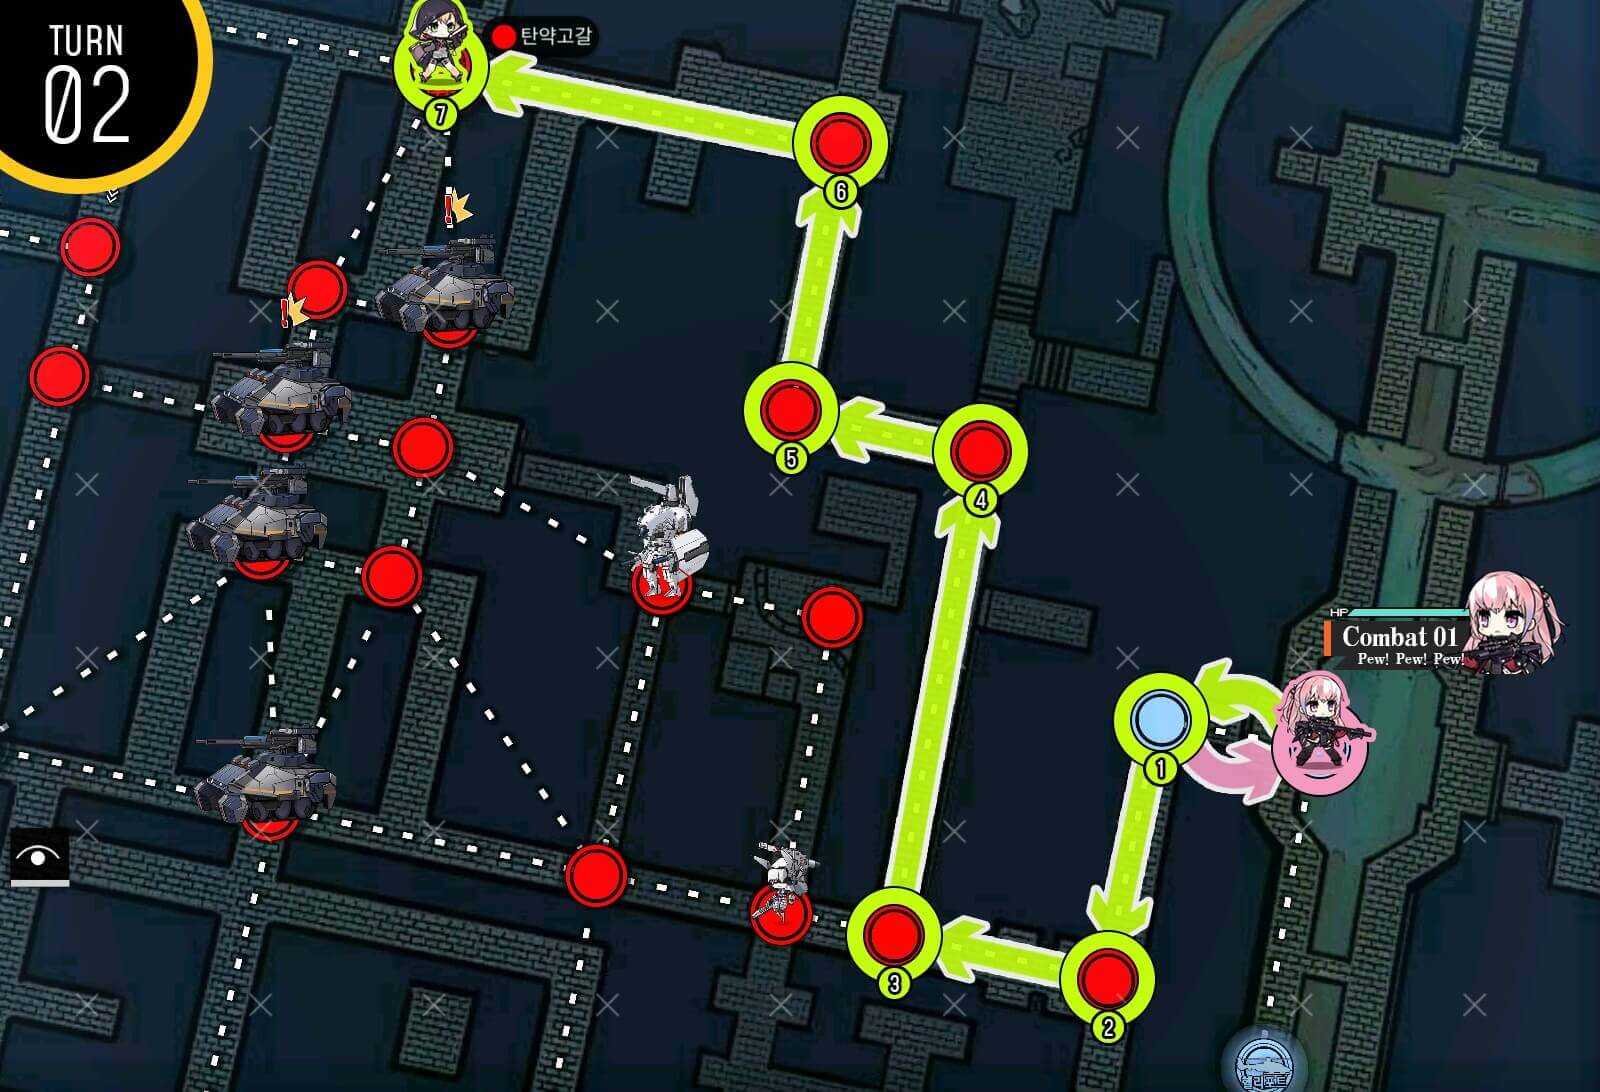
Turn 2a
At the start of the second turn we change the friend echelon on the right to 'Eliminate' then swap with dummy echelon. Combat echelon on the left side moves up one node. You may also notice that two of the tanks in the center has been 'canceled' out. This allows the dummy echelon to connect the supply line from the inside.
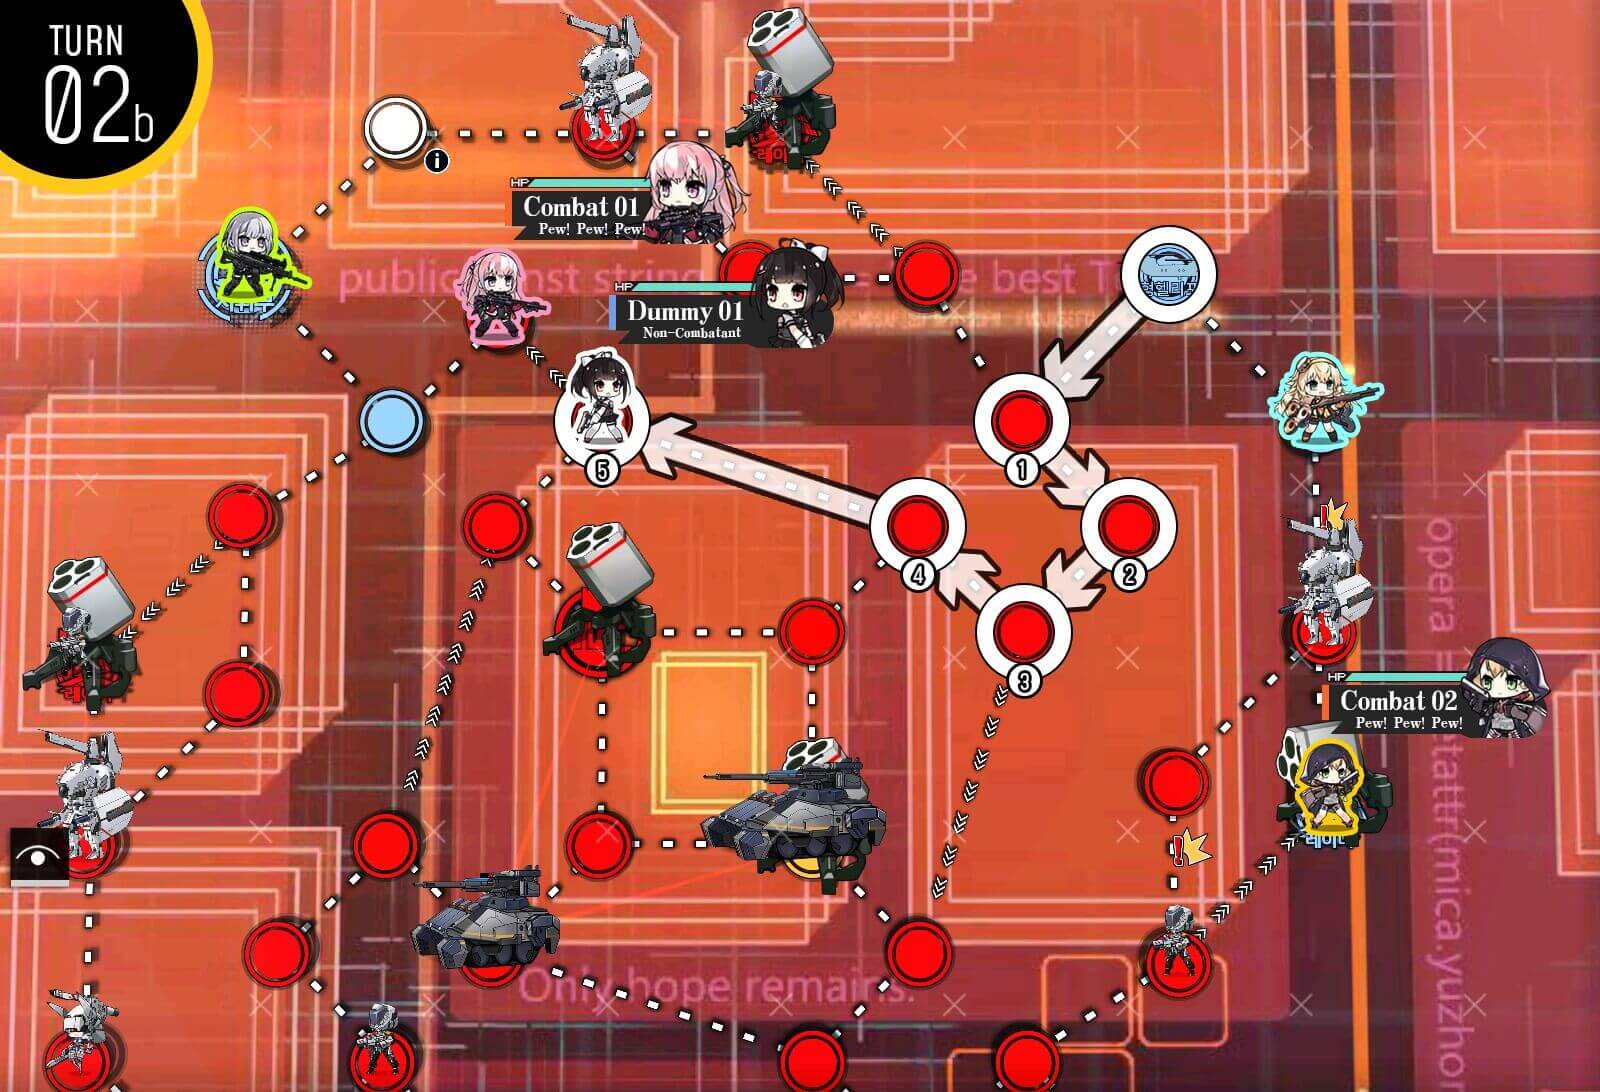
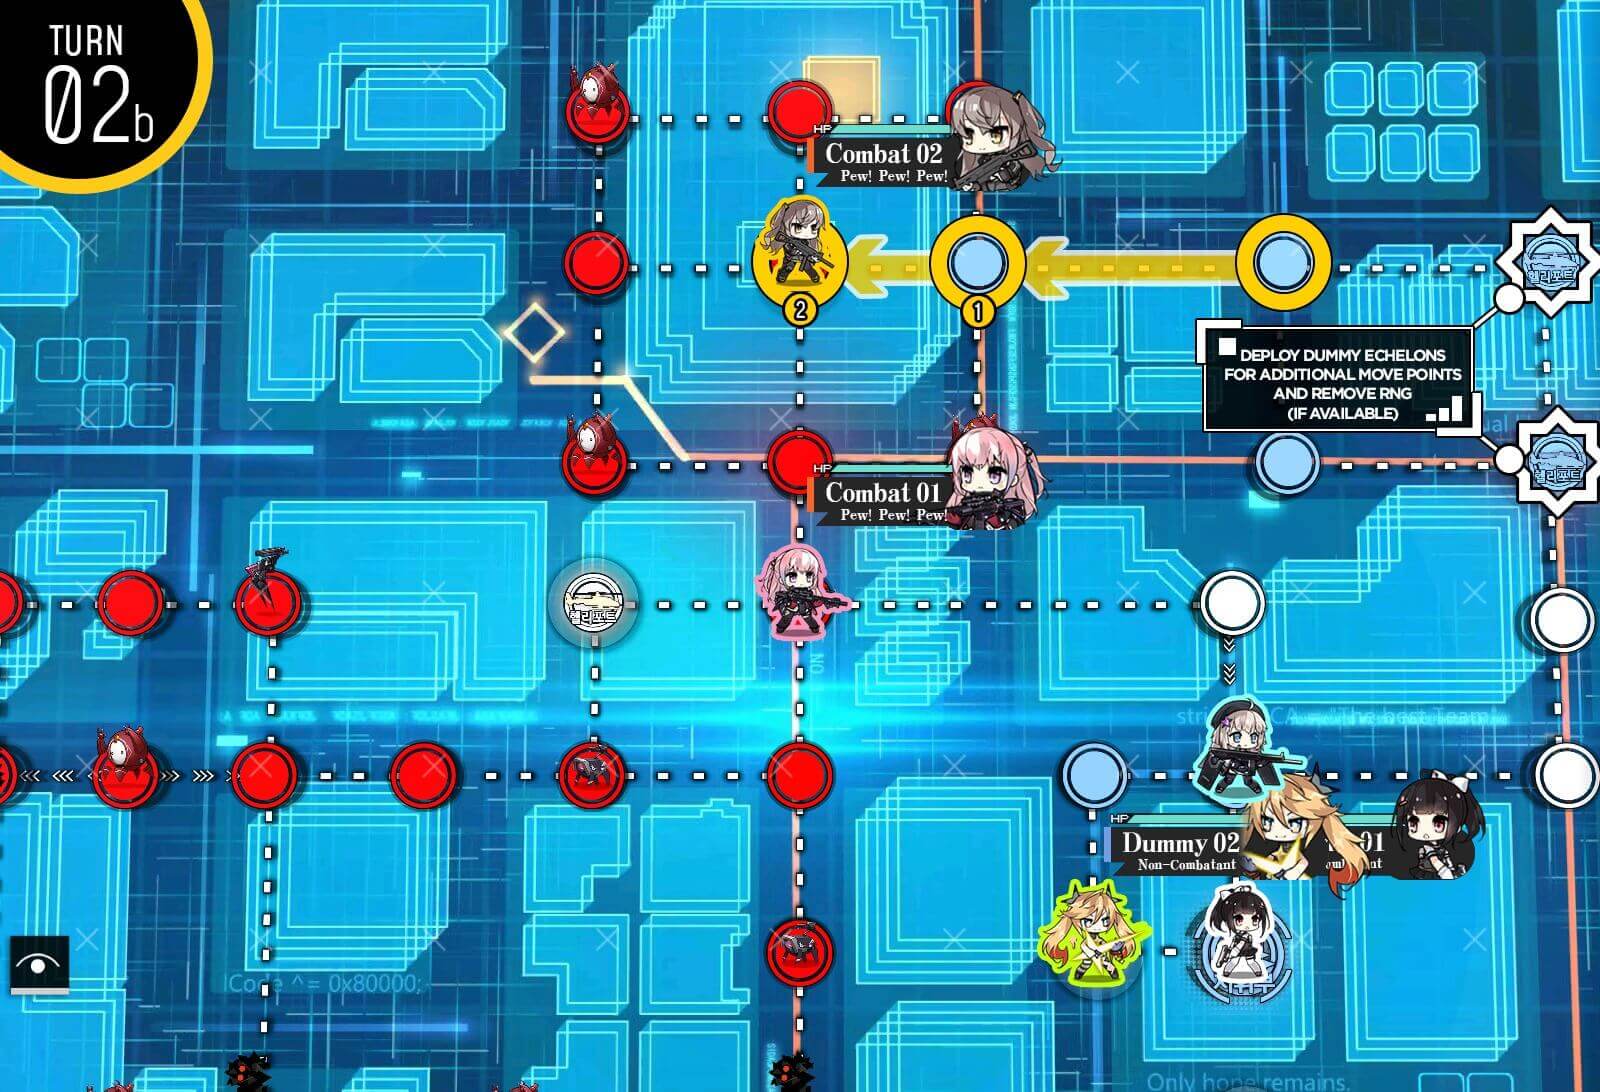
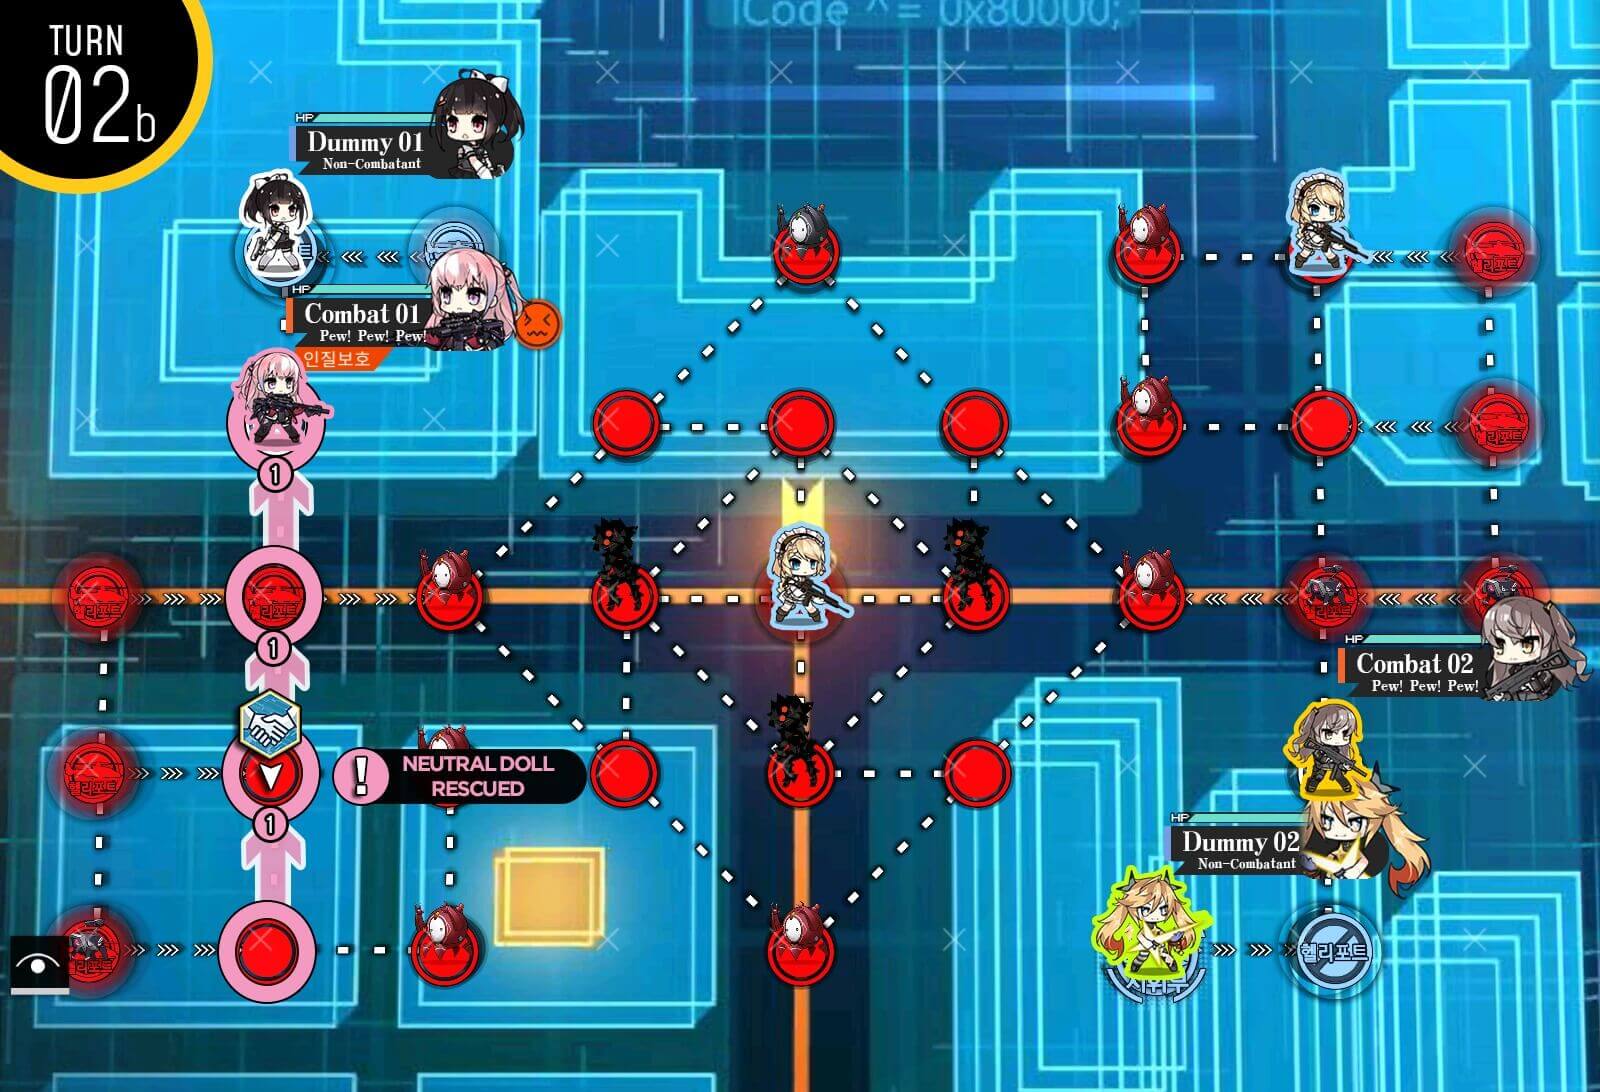
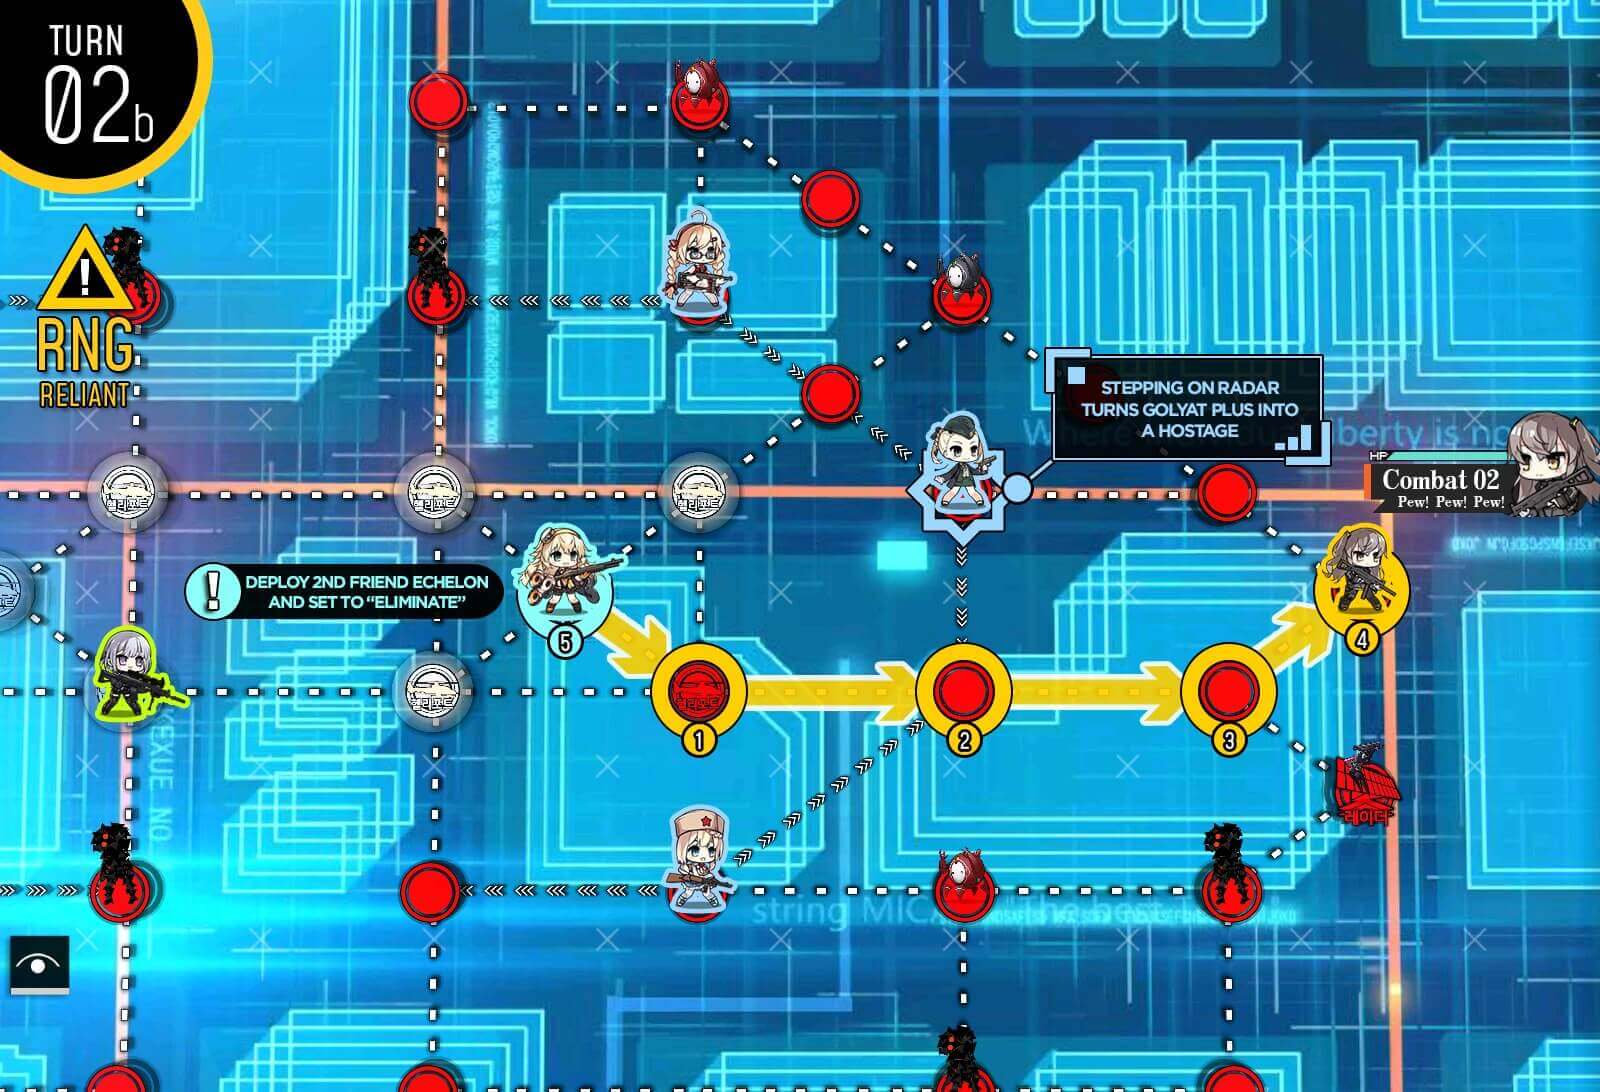
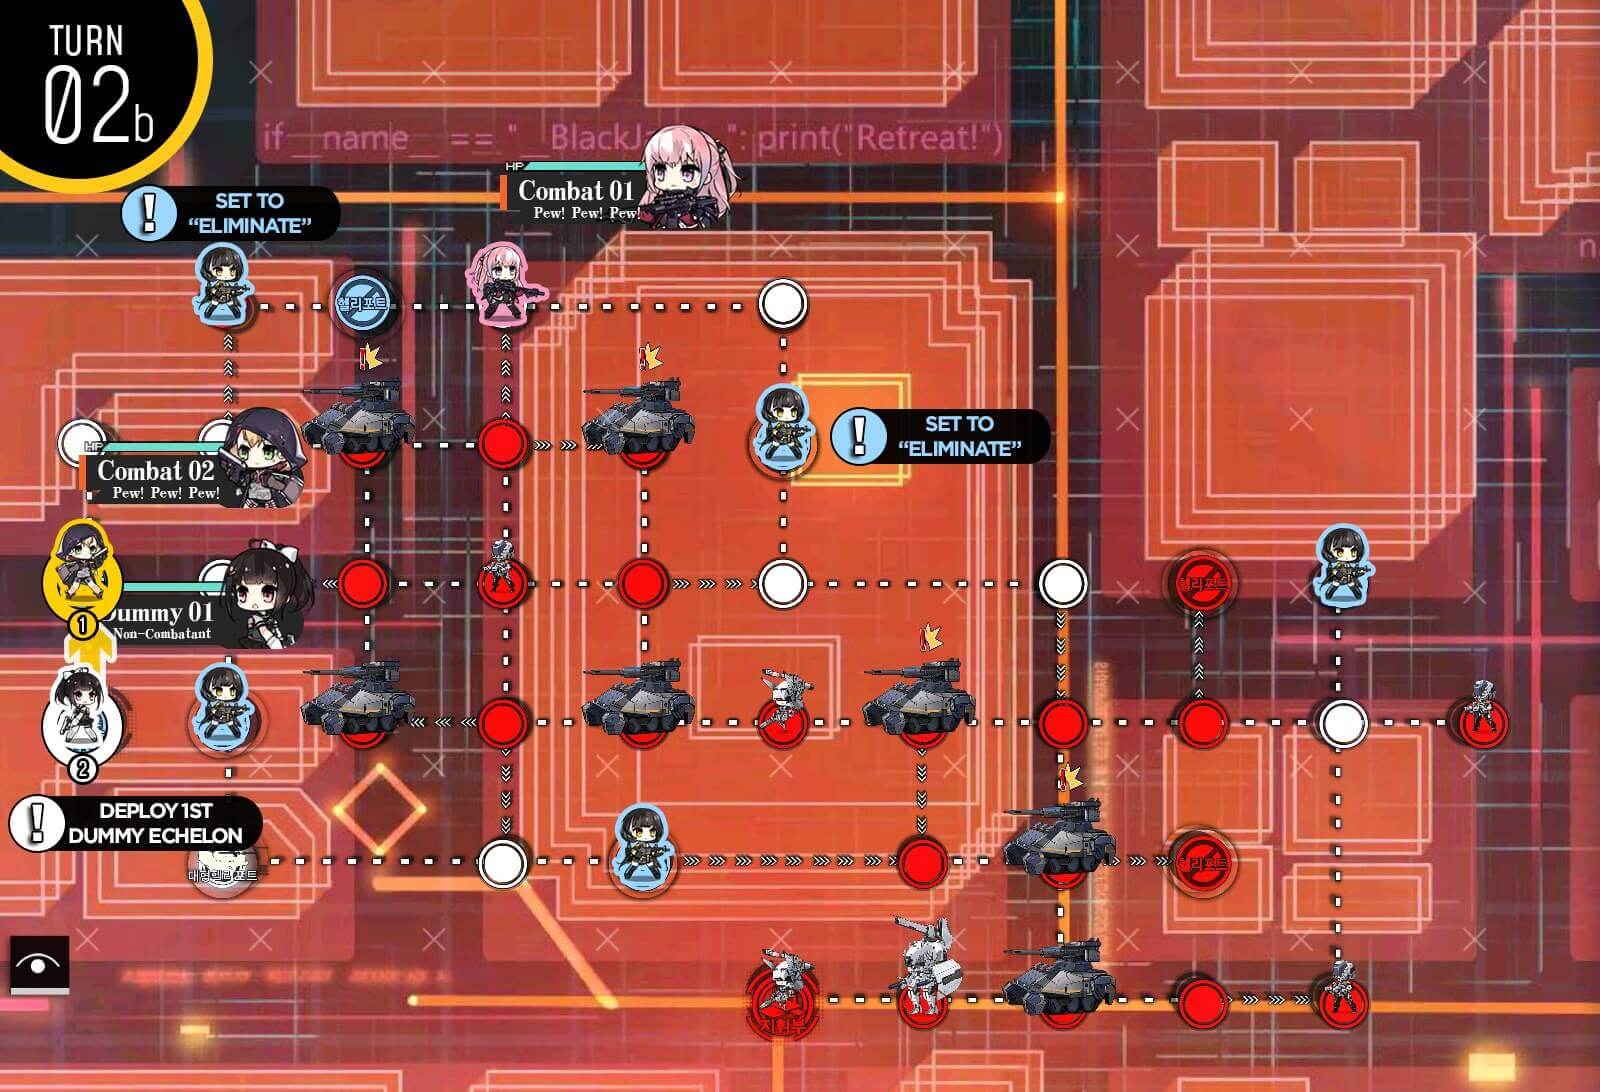
Turn 2b
Dummy echelon moves to the node adjacent to the combat echelon near the HQ before ending the turn.
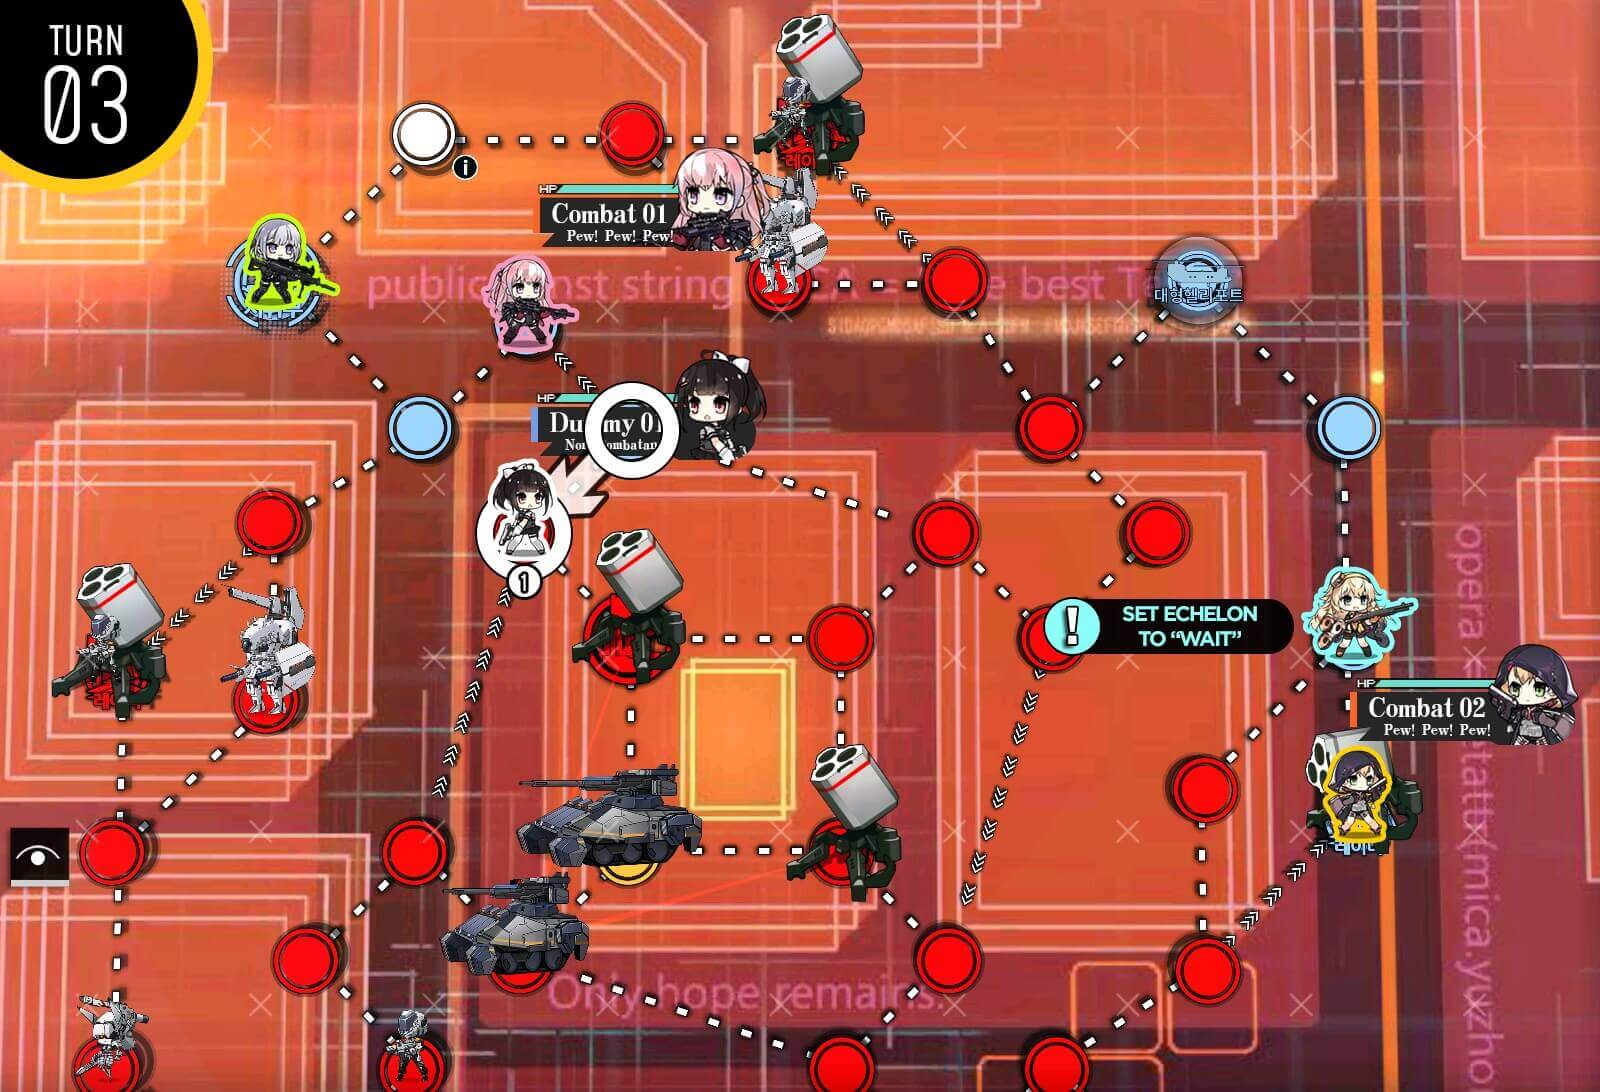
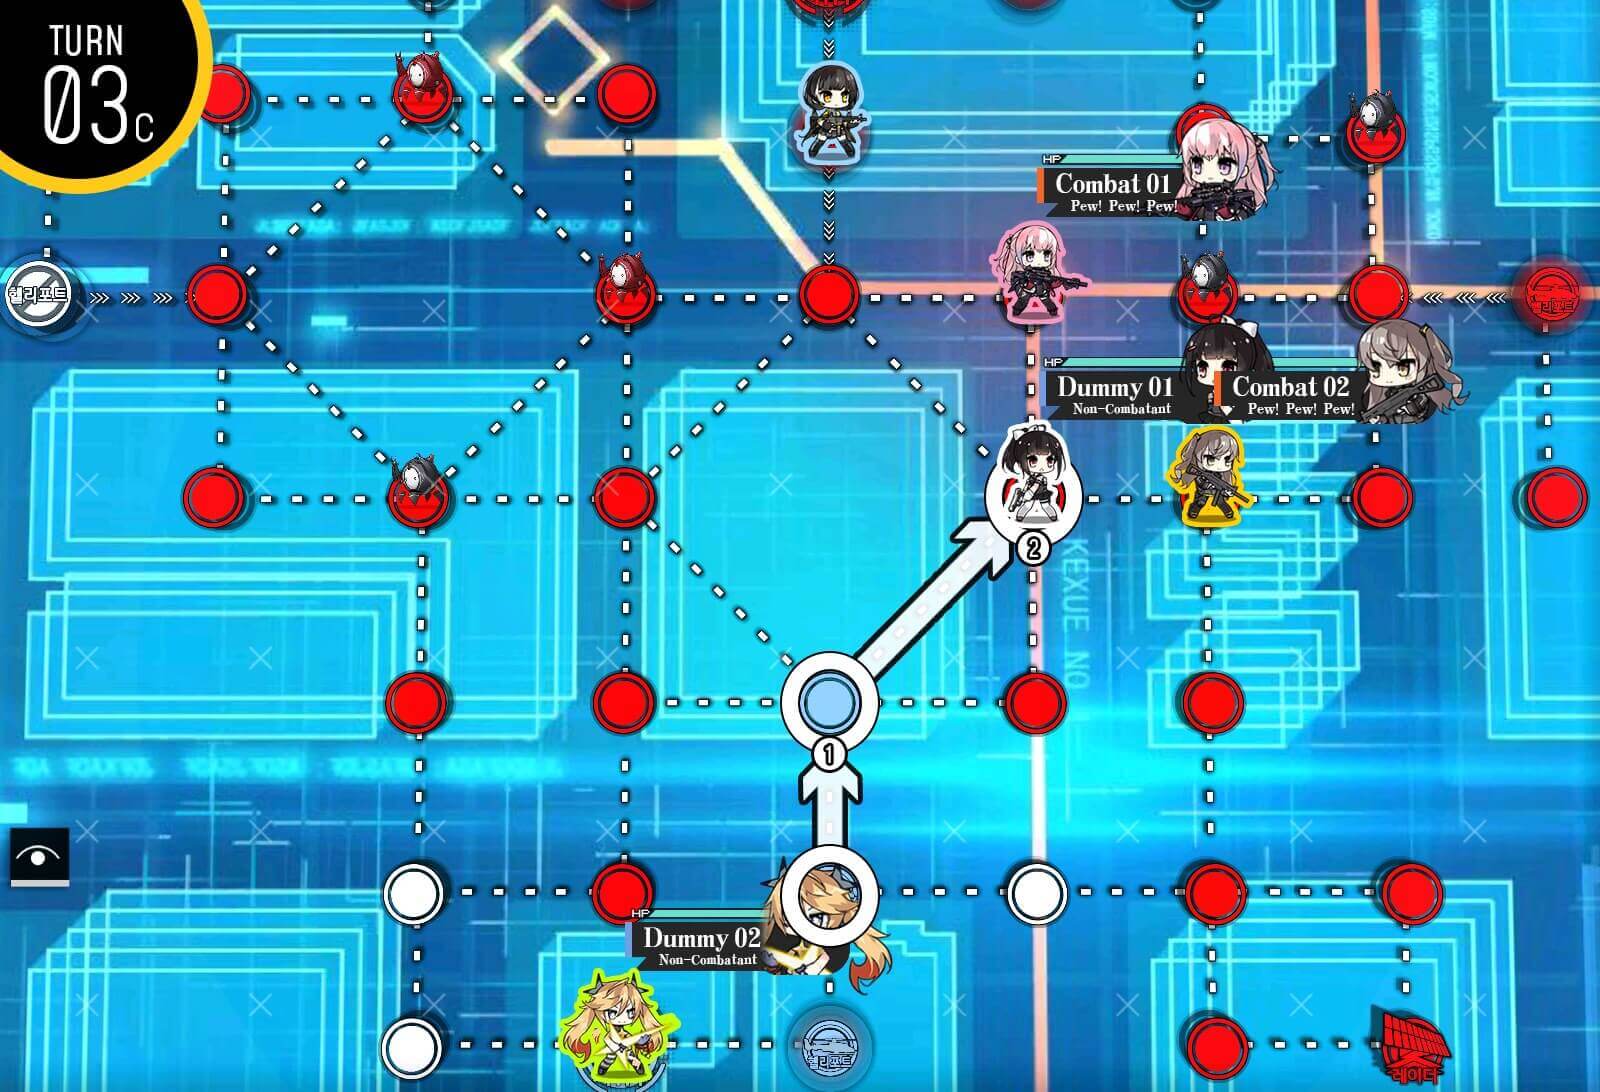
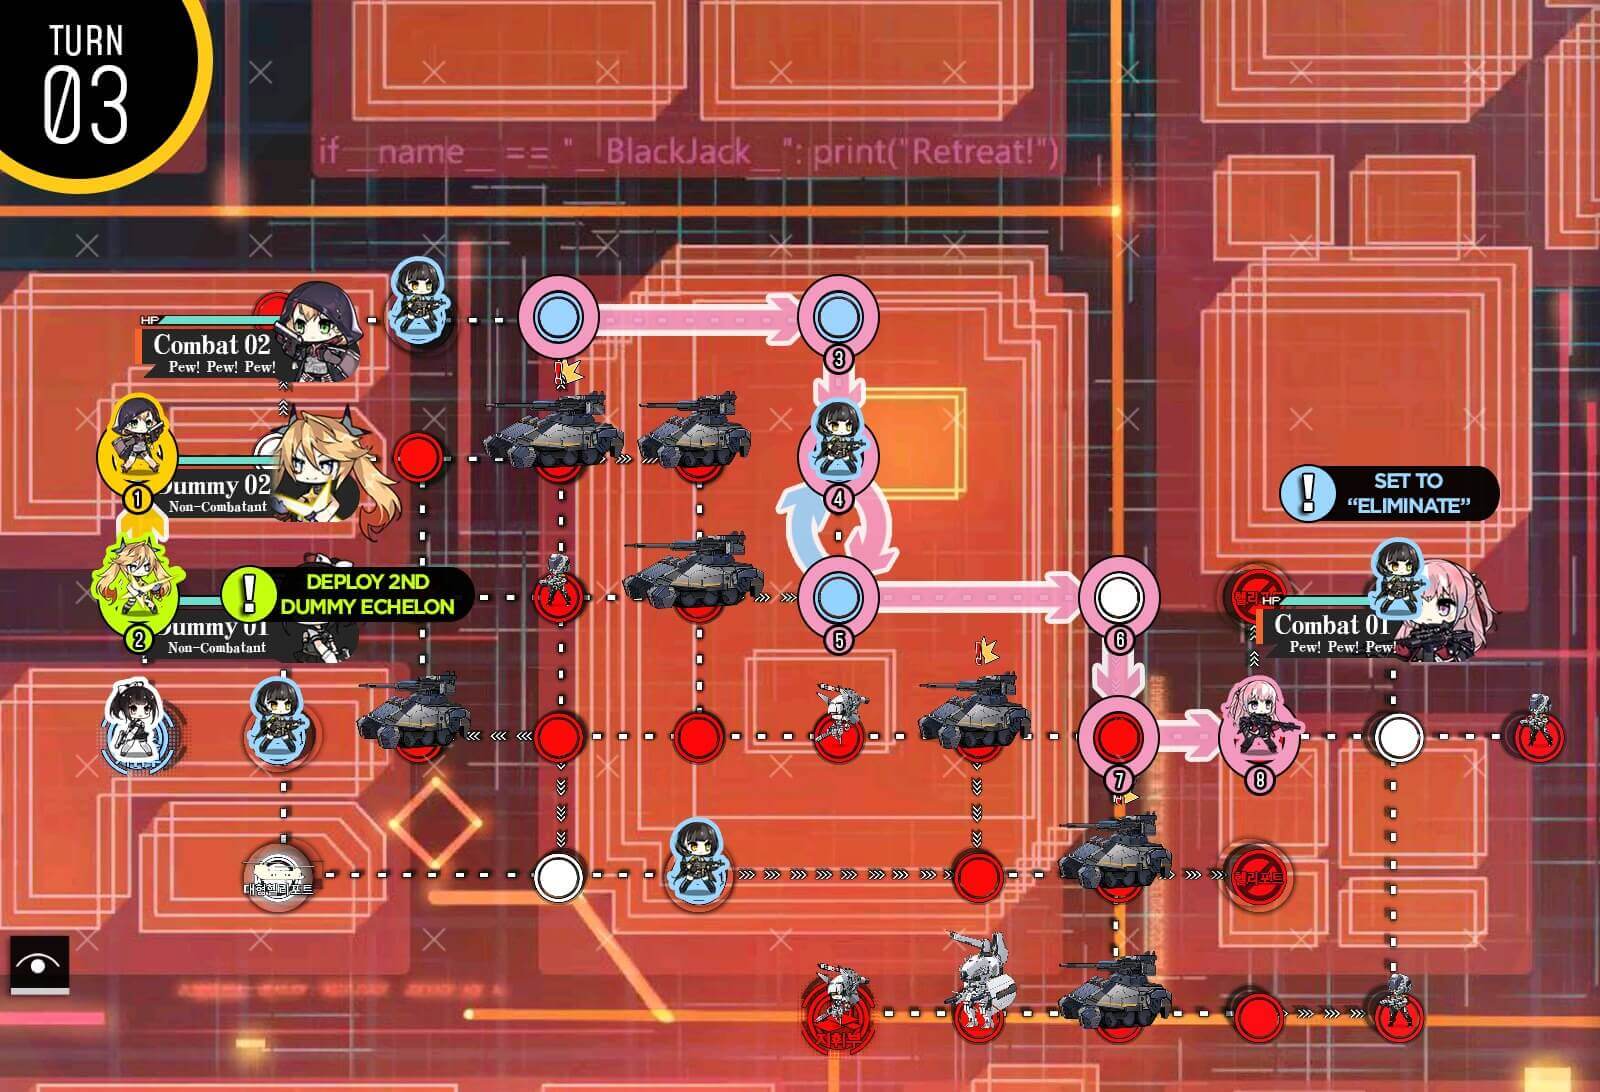
Turn 3
Change the friend echelon on the right side to 'Wait'. Dummy echelon moves down one node to continue forming the supply line to rally point.
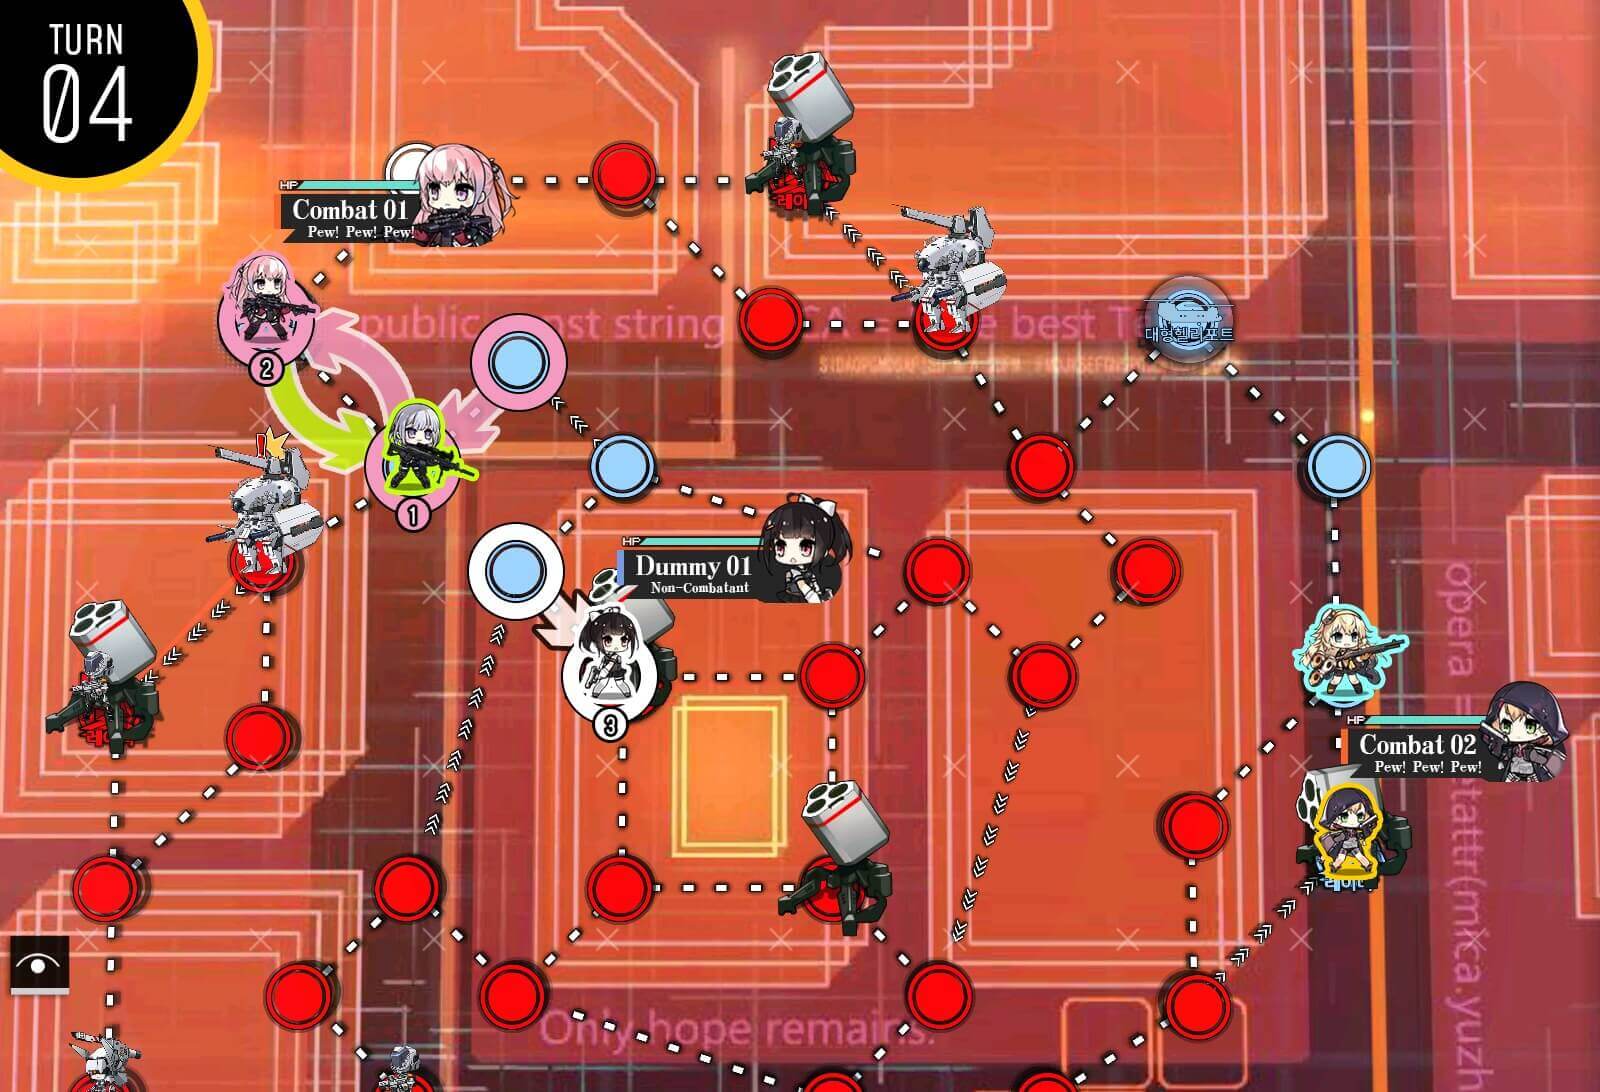
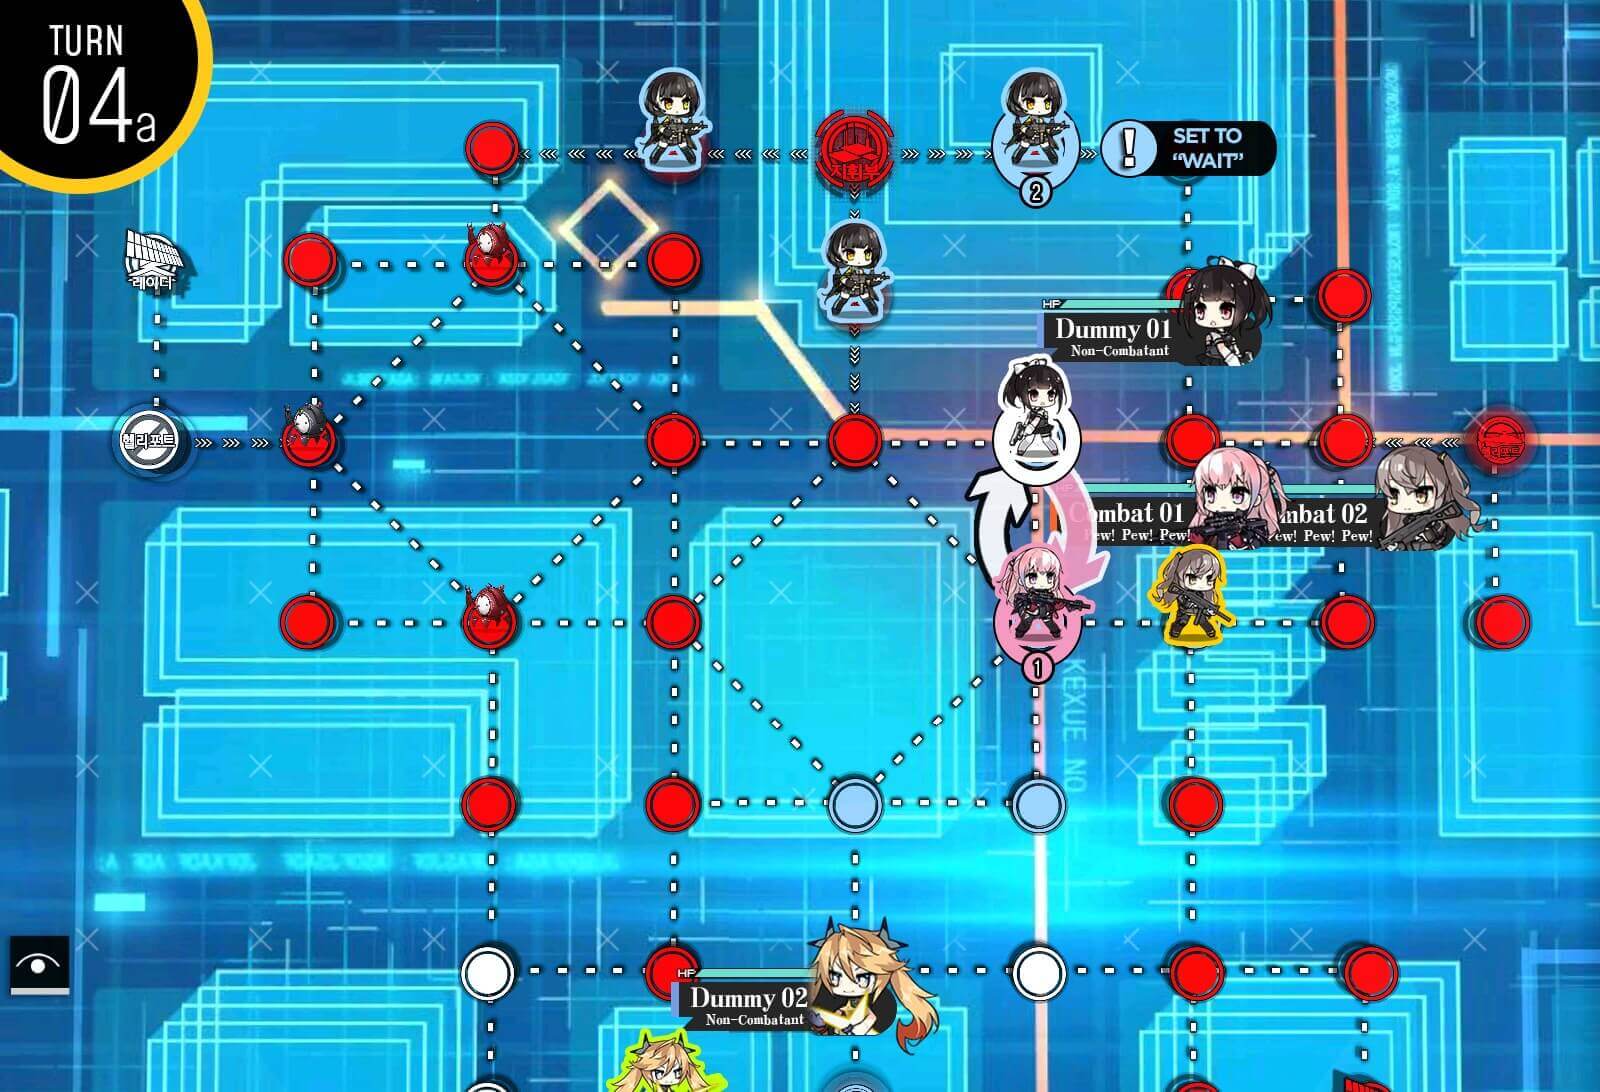
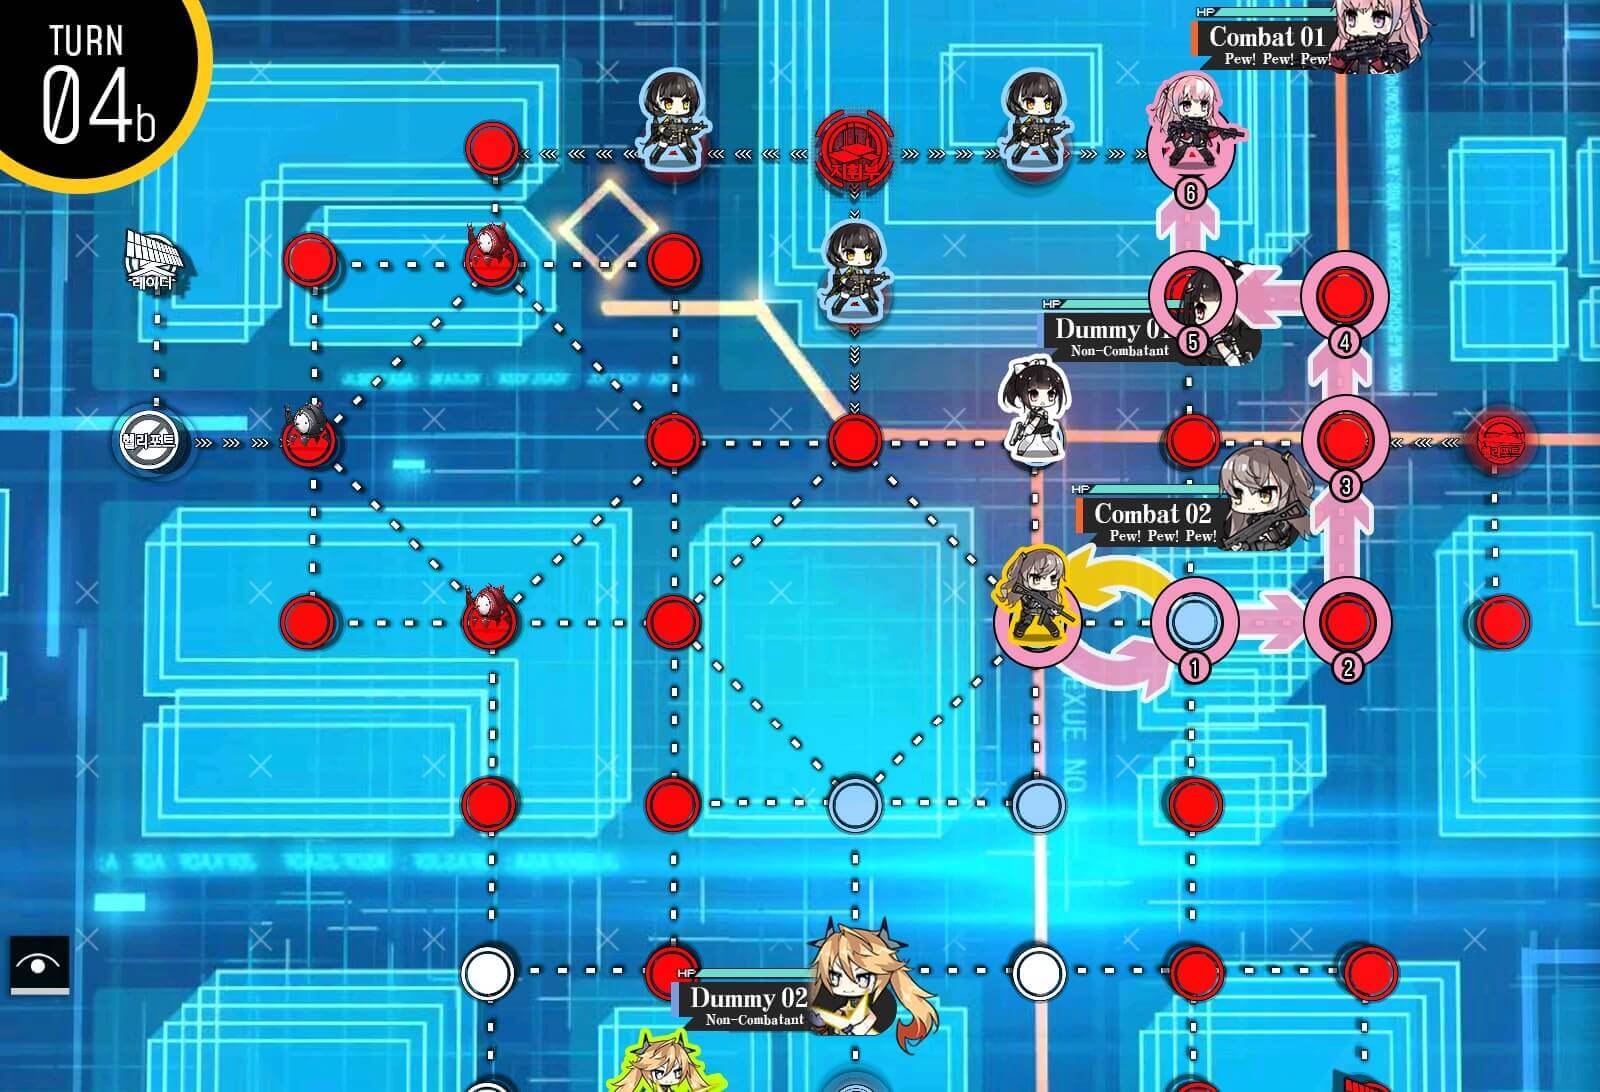
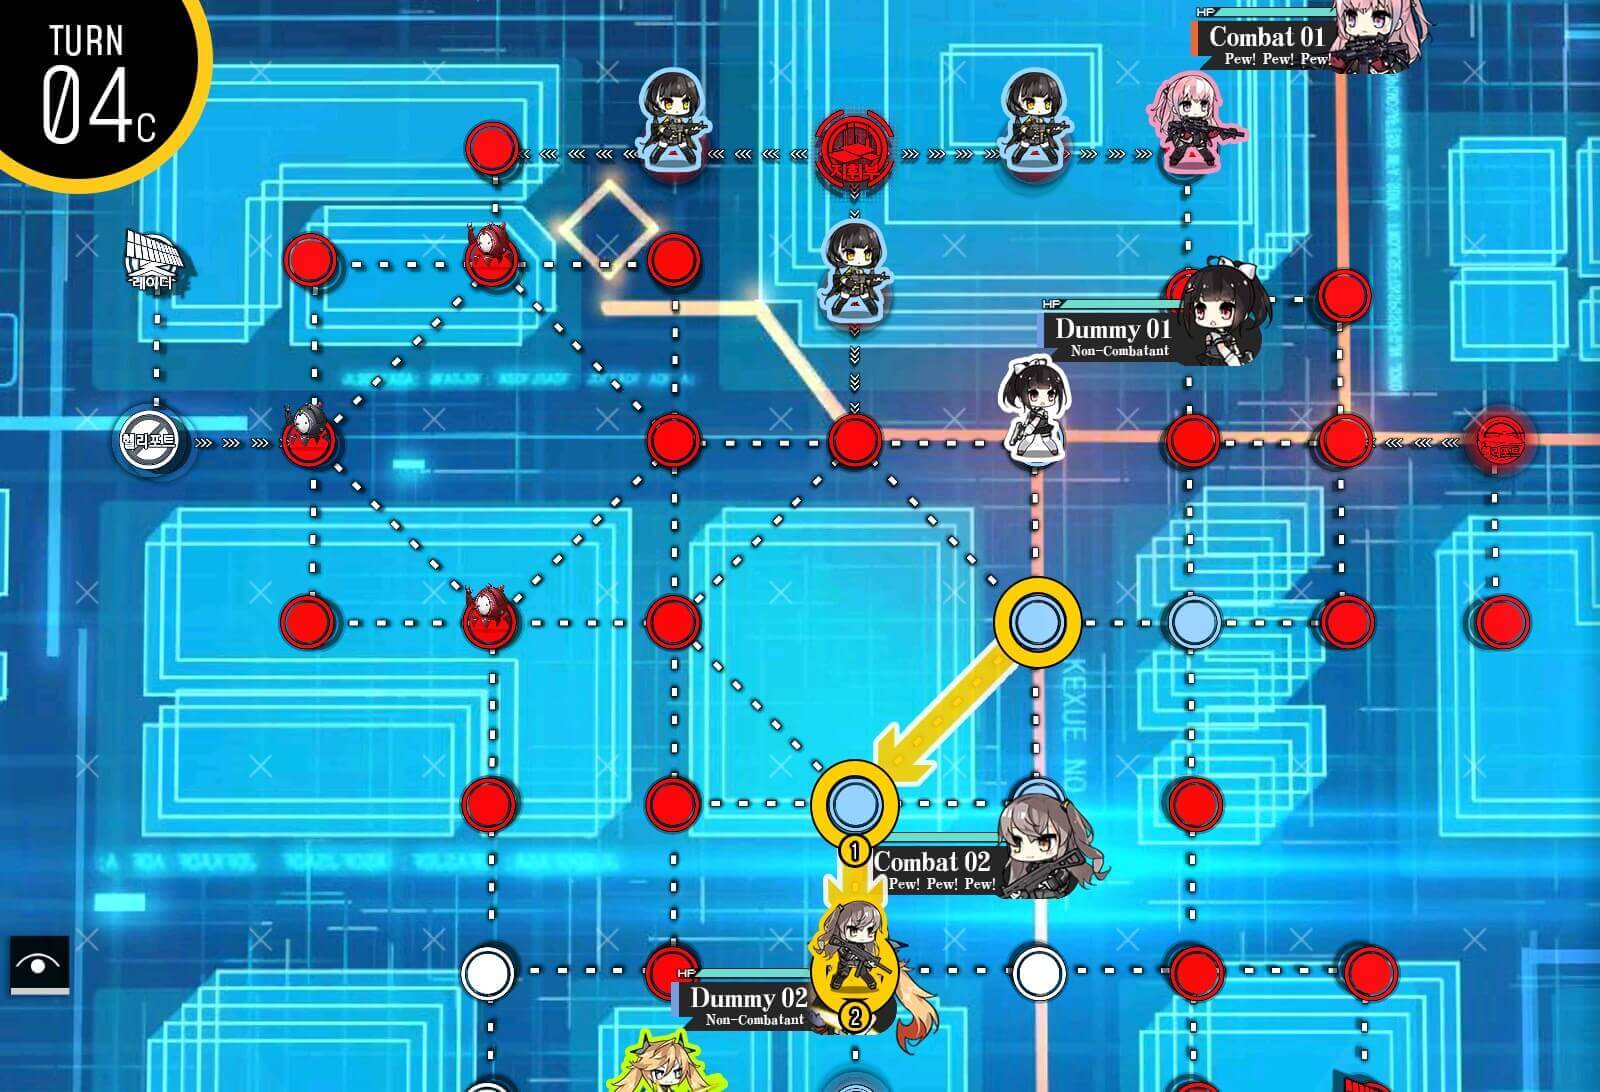
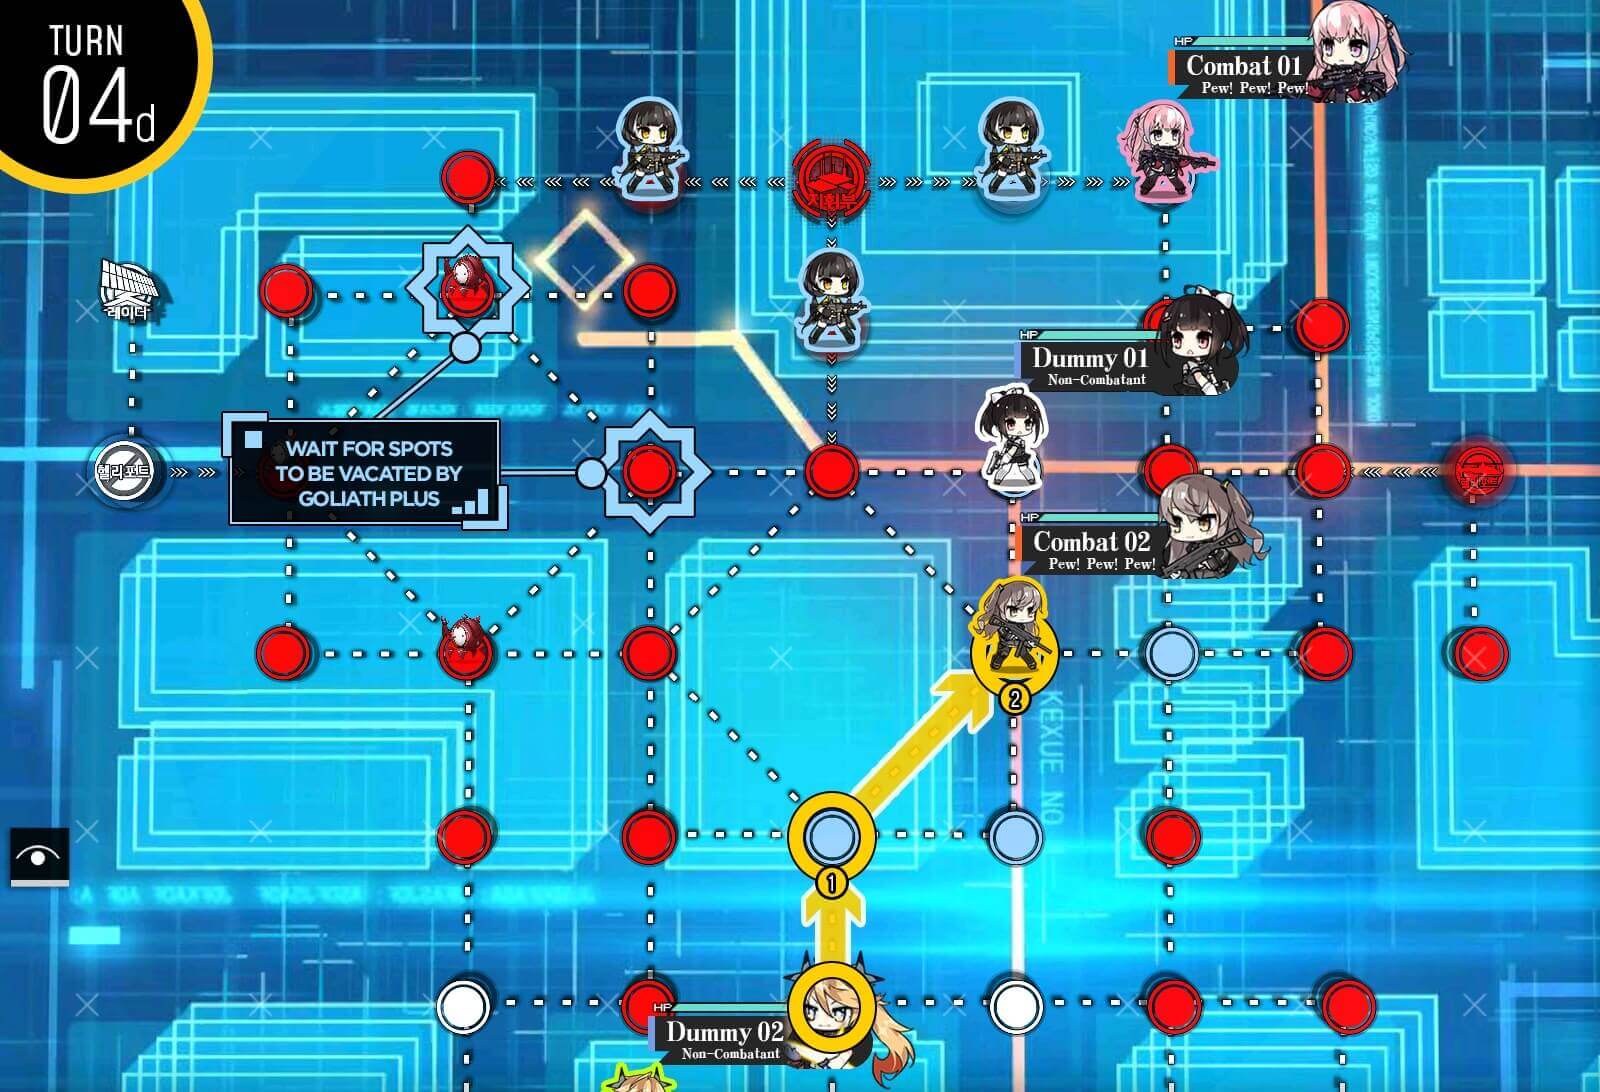
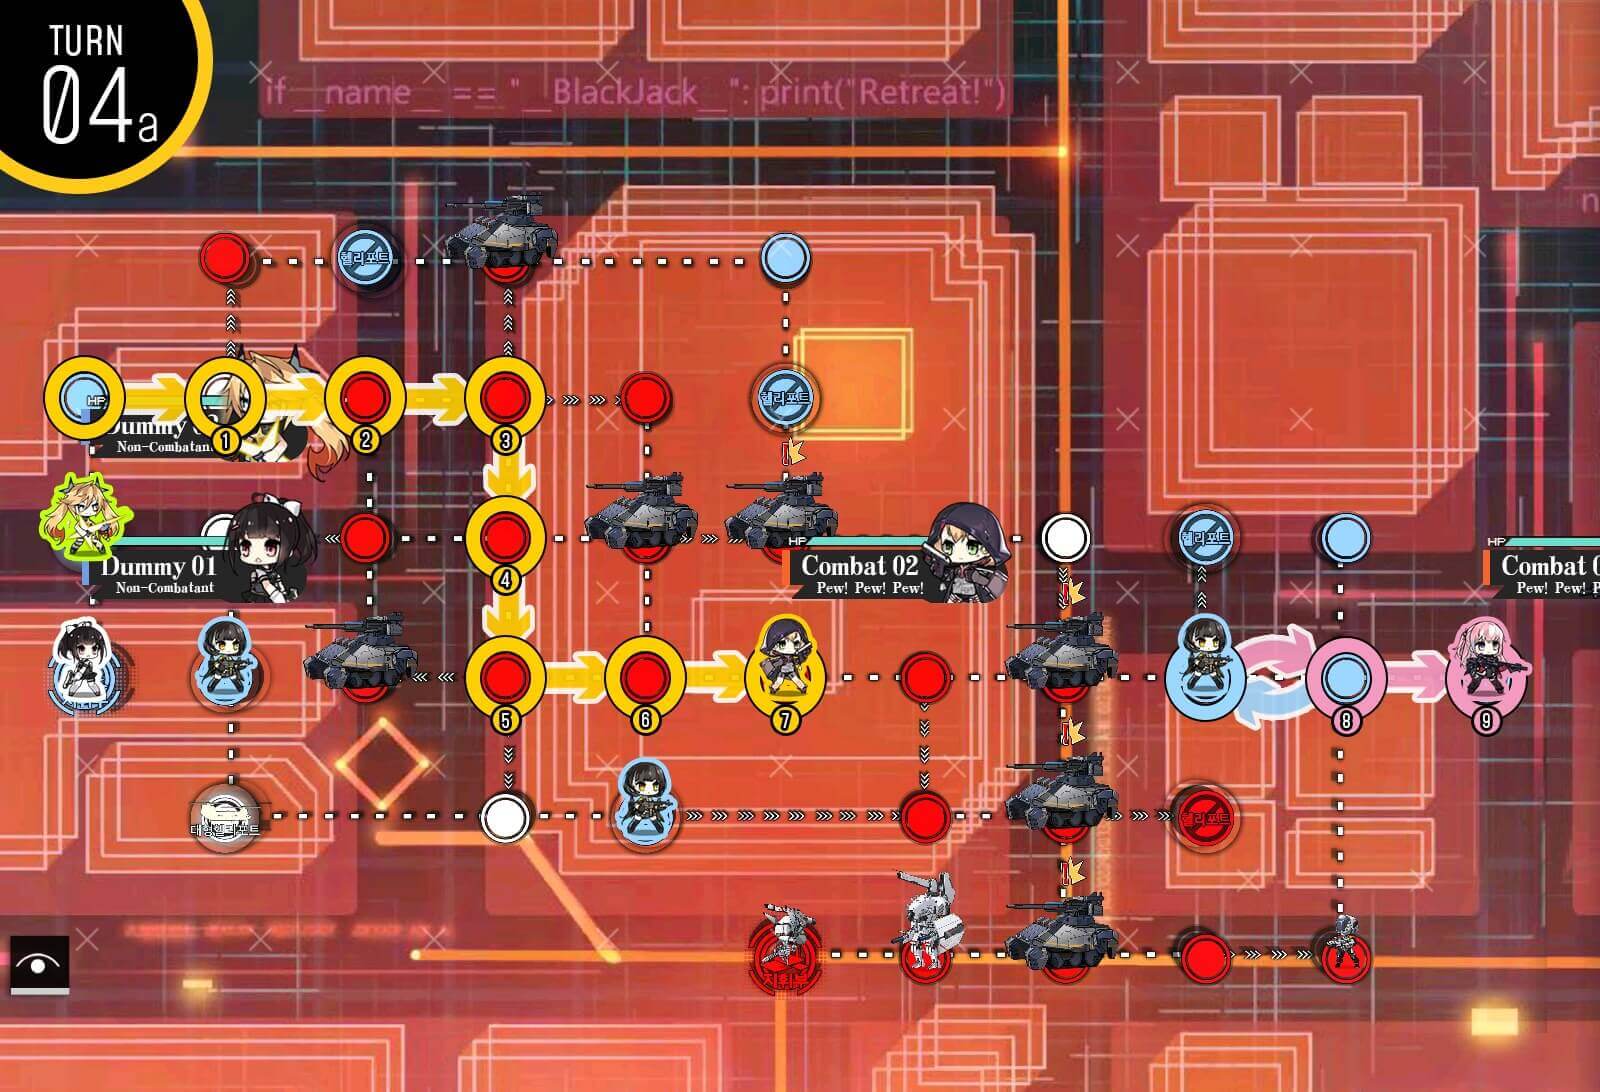
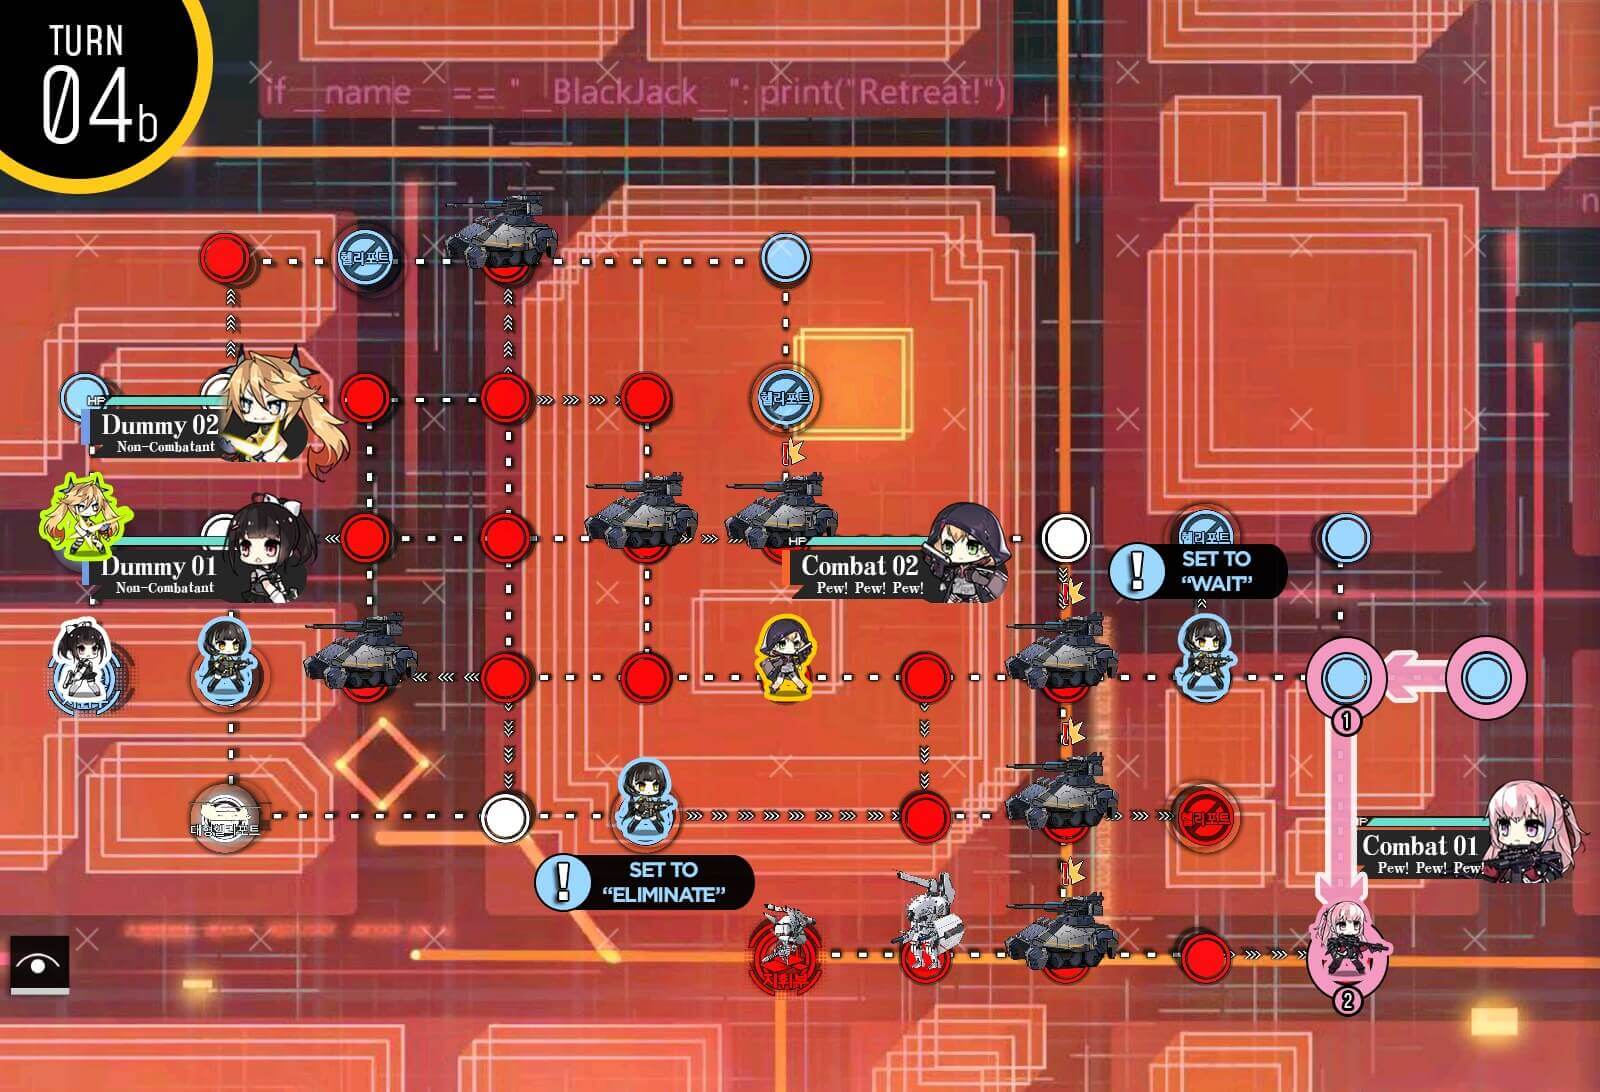
Turn 4
Dummy echelon moves to the rally point. For the Gundam near HQ, we move combat echelon down one node and swap with friend echelon on HQ.
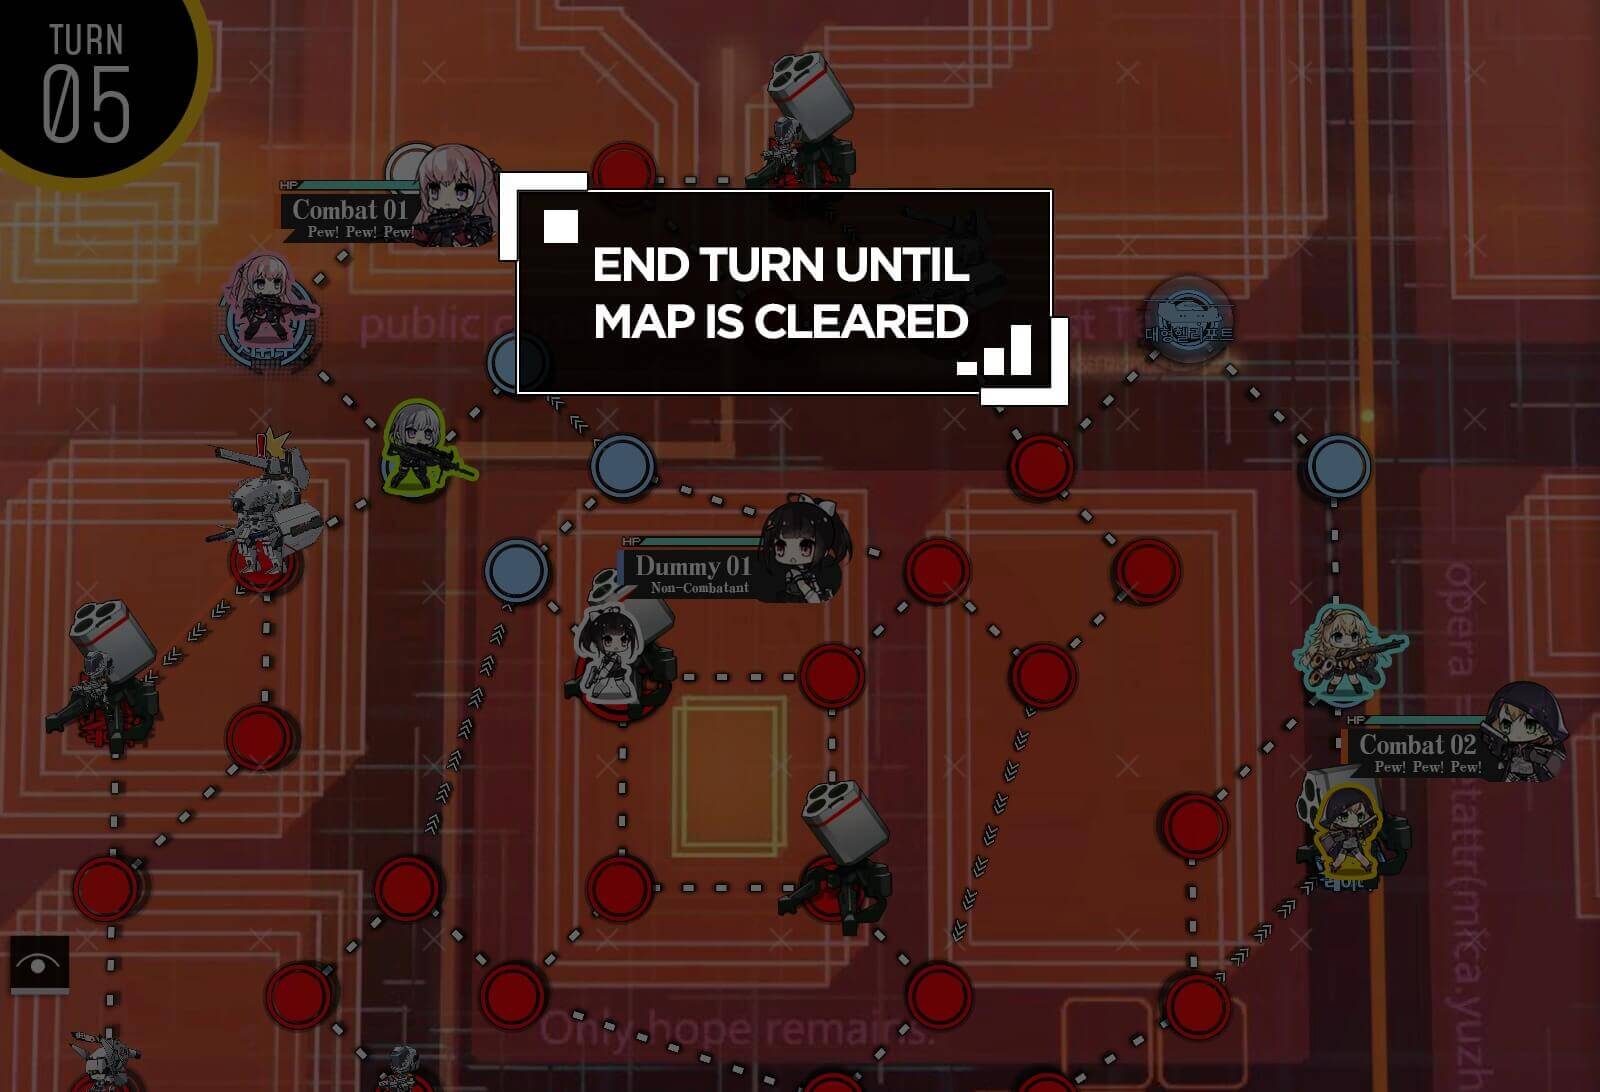
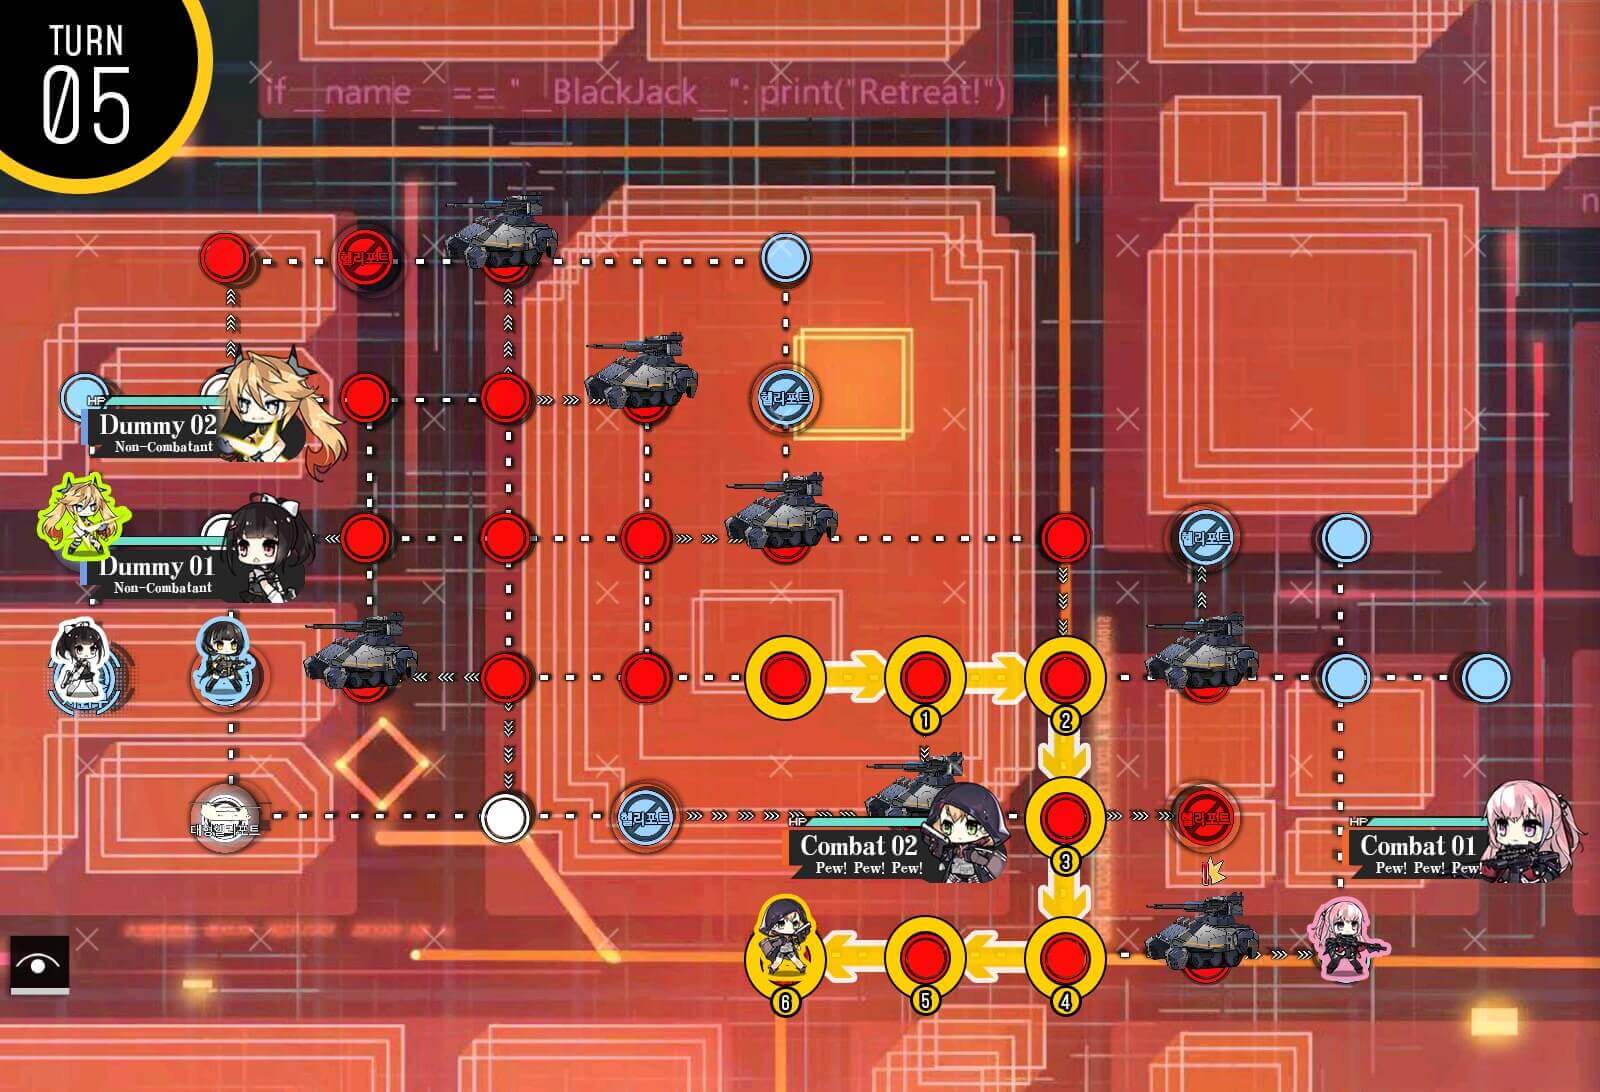
Turn 5
Once route is established, all we have to do is hit end turn until map is cleared.

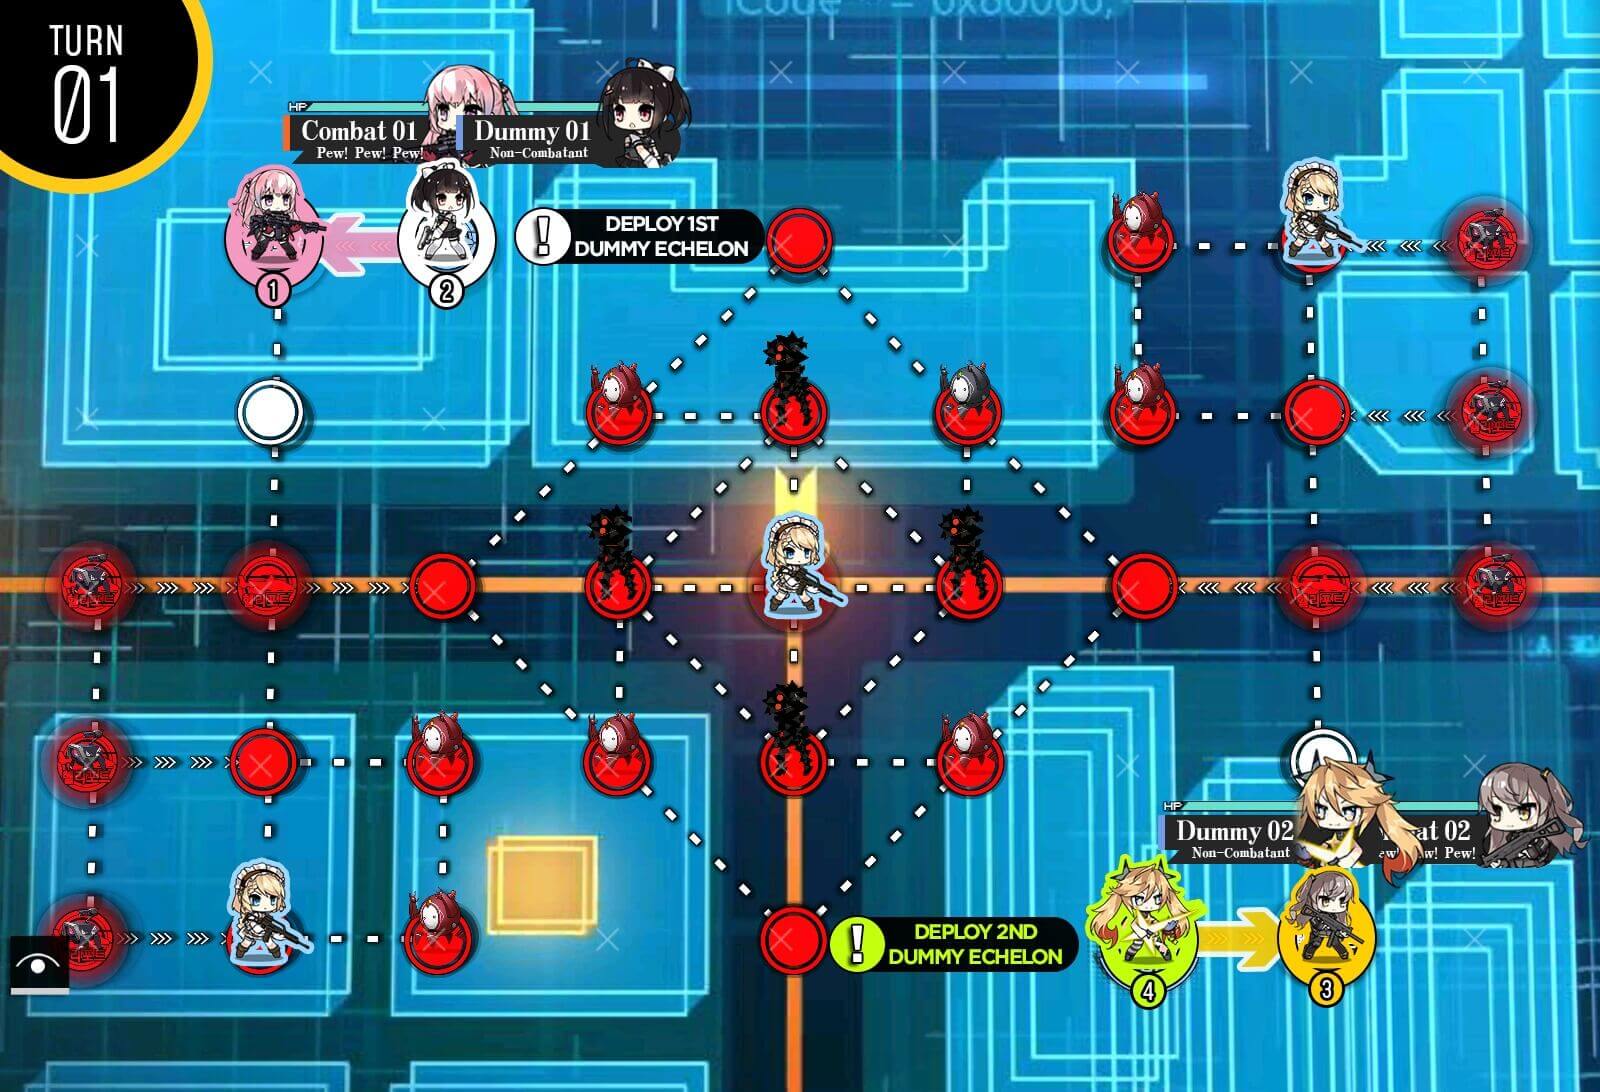
Turn 1a
Start with two combat echelons on the right two helipads and two dummy echelons on HQ and the nearby helipad. Move dummy on HQ up one node then deploy a friend echelon. Combat echelons start forming a chain towards the helipad in the center.

Turn 1b
Move combat team 2. Swap friend echelon's and dummy's position. Friend echelon will not need to move at all.
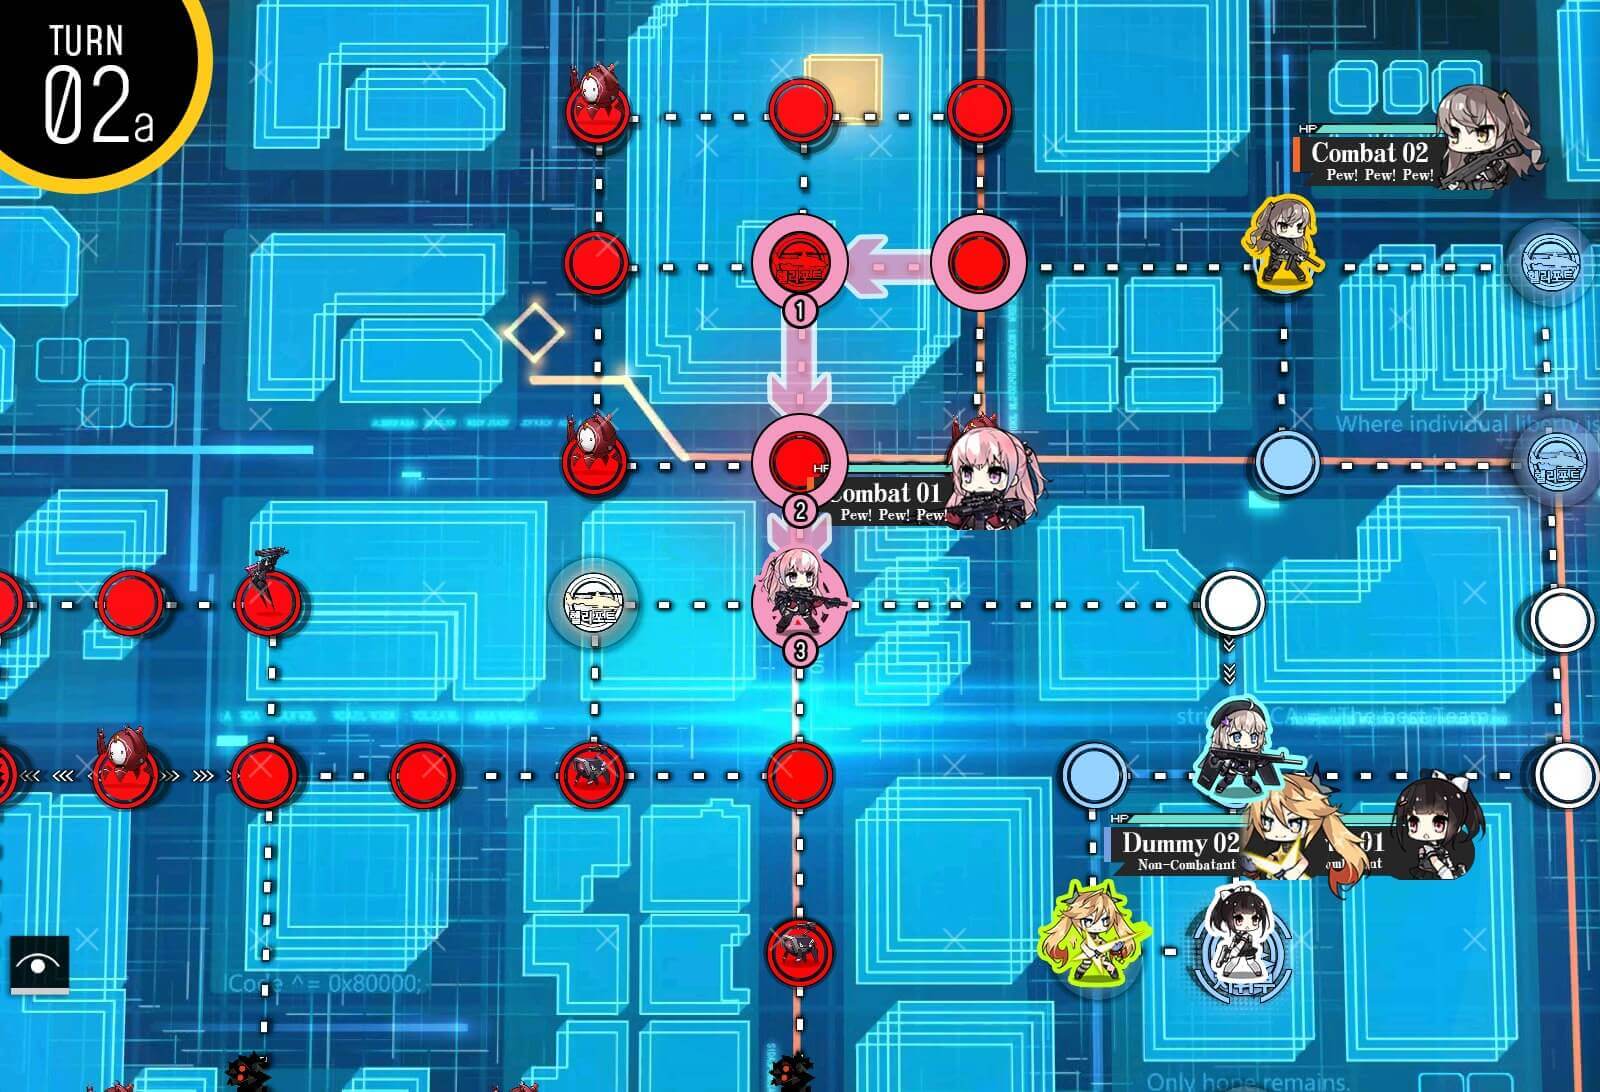
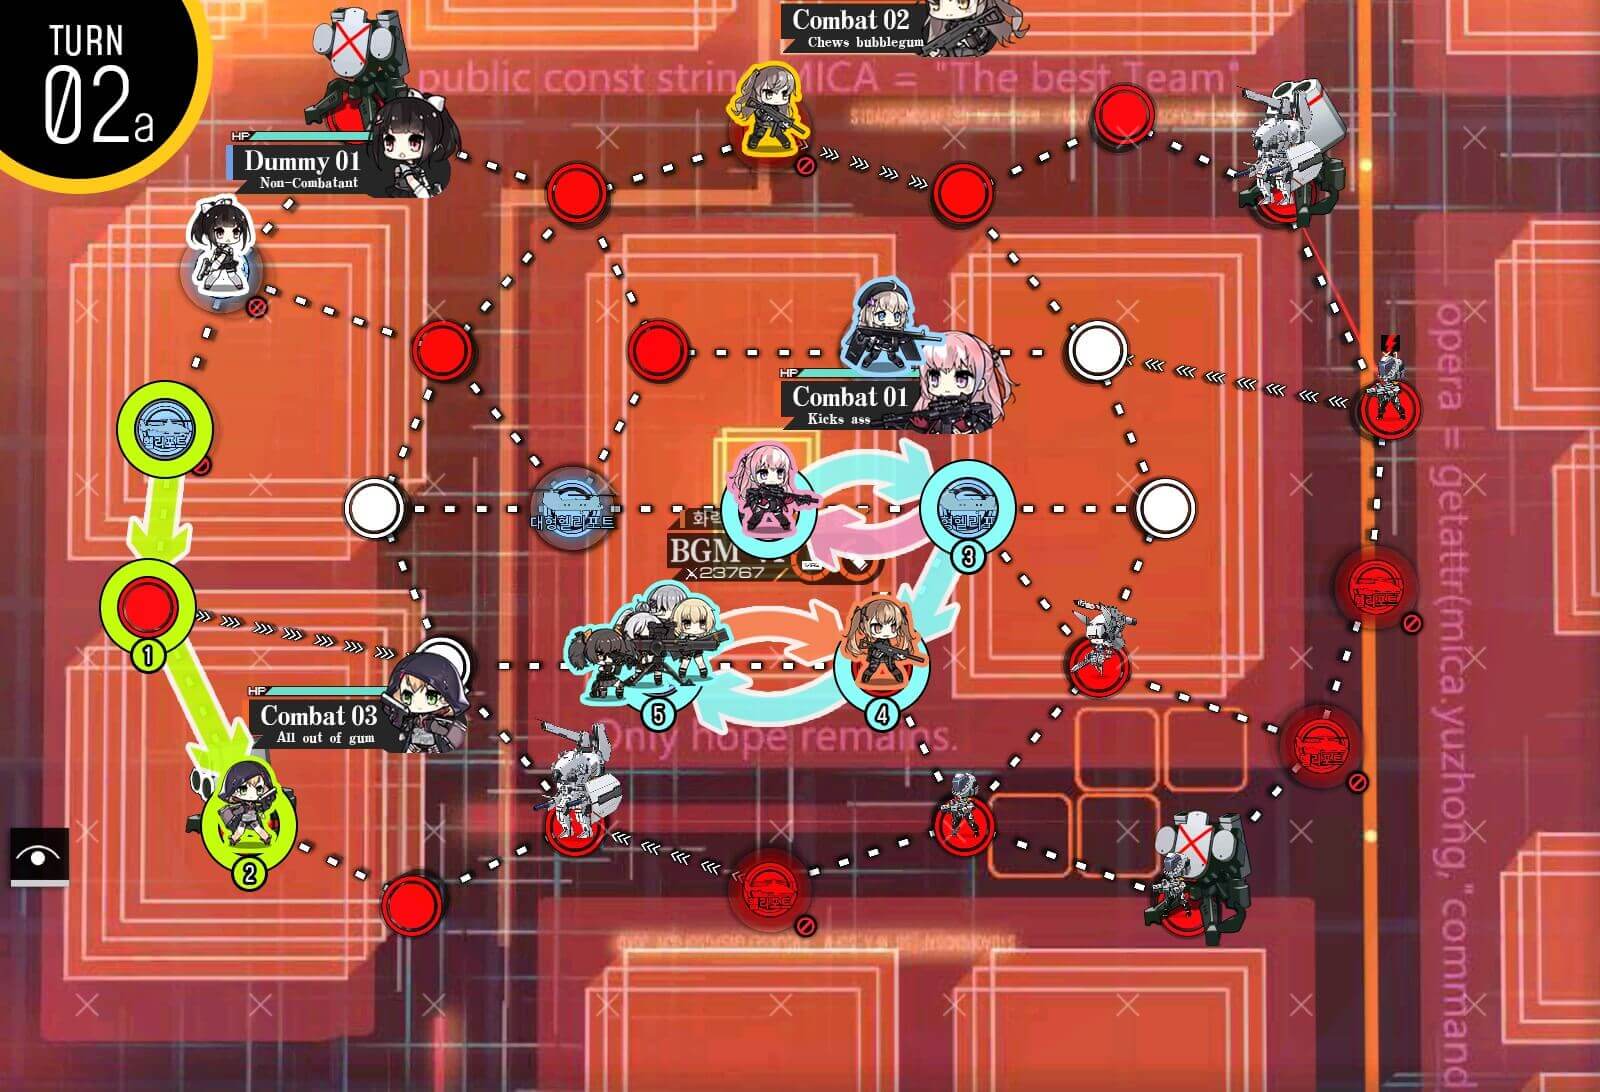
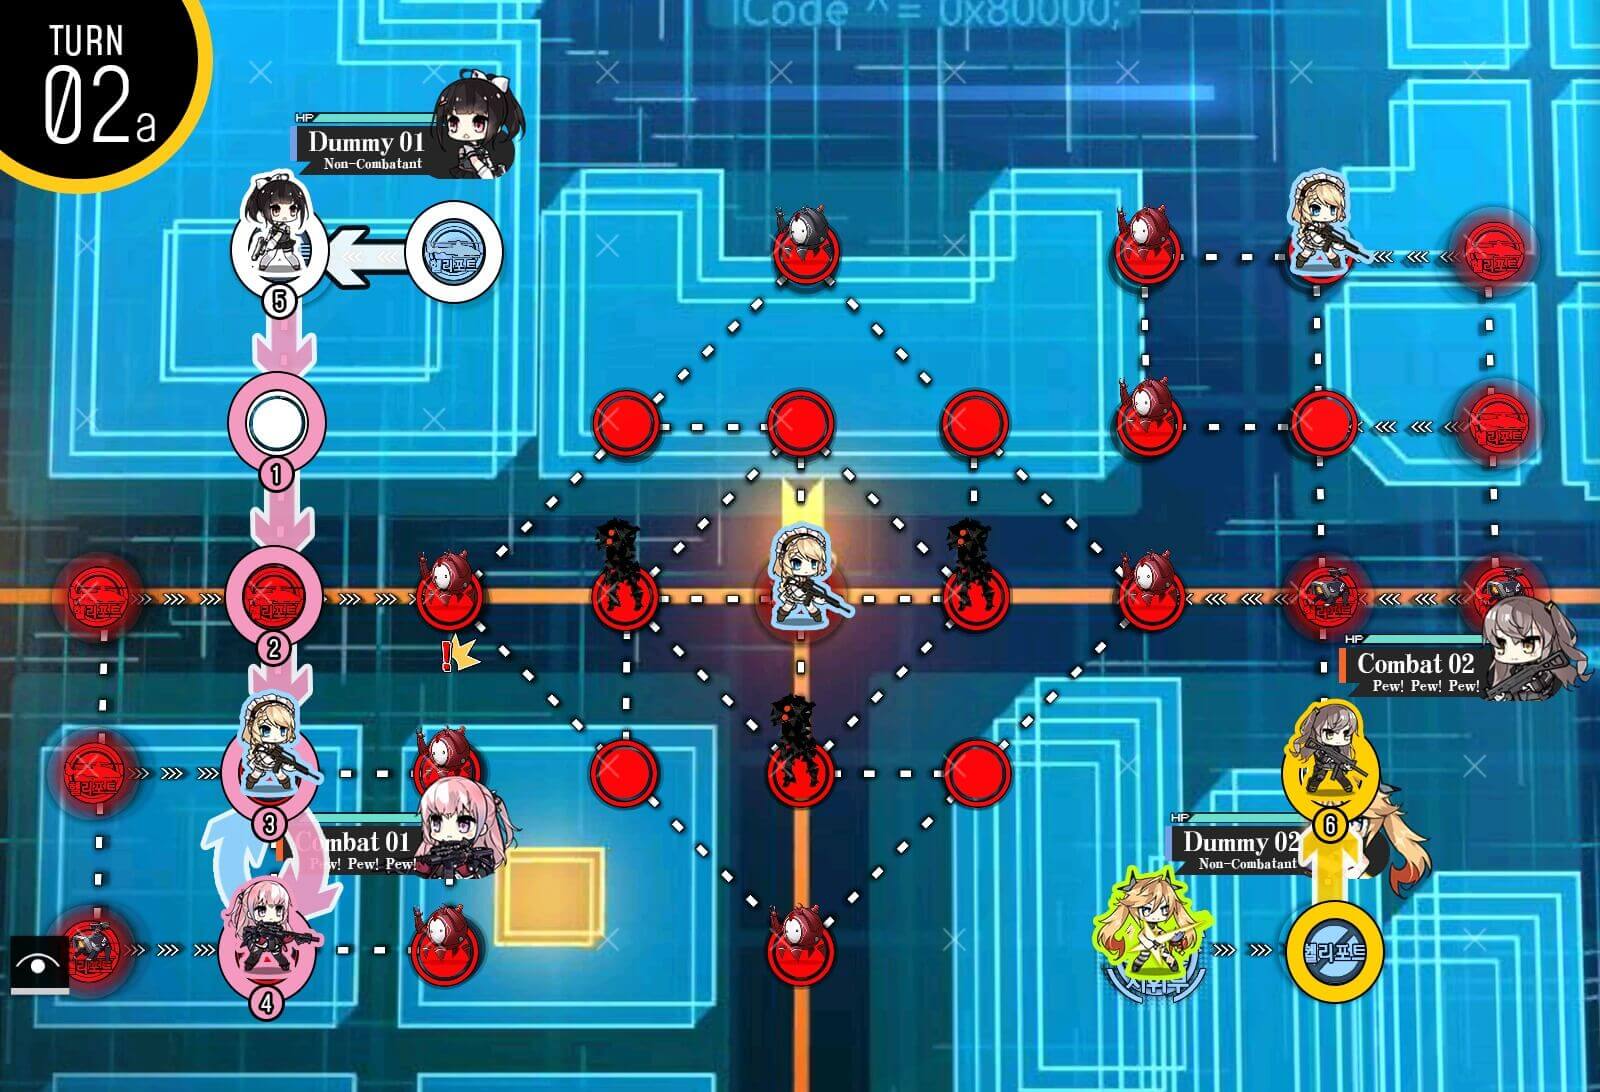
Turn 2a
On beginning of turn 2, combat echelon [1] goes in between the red beans while combat echelon in the rear steps on the center helipad. This is important as it prevents spawn of an additional red bean which will break the supply route on turn 8.
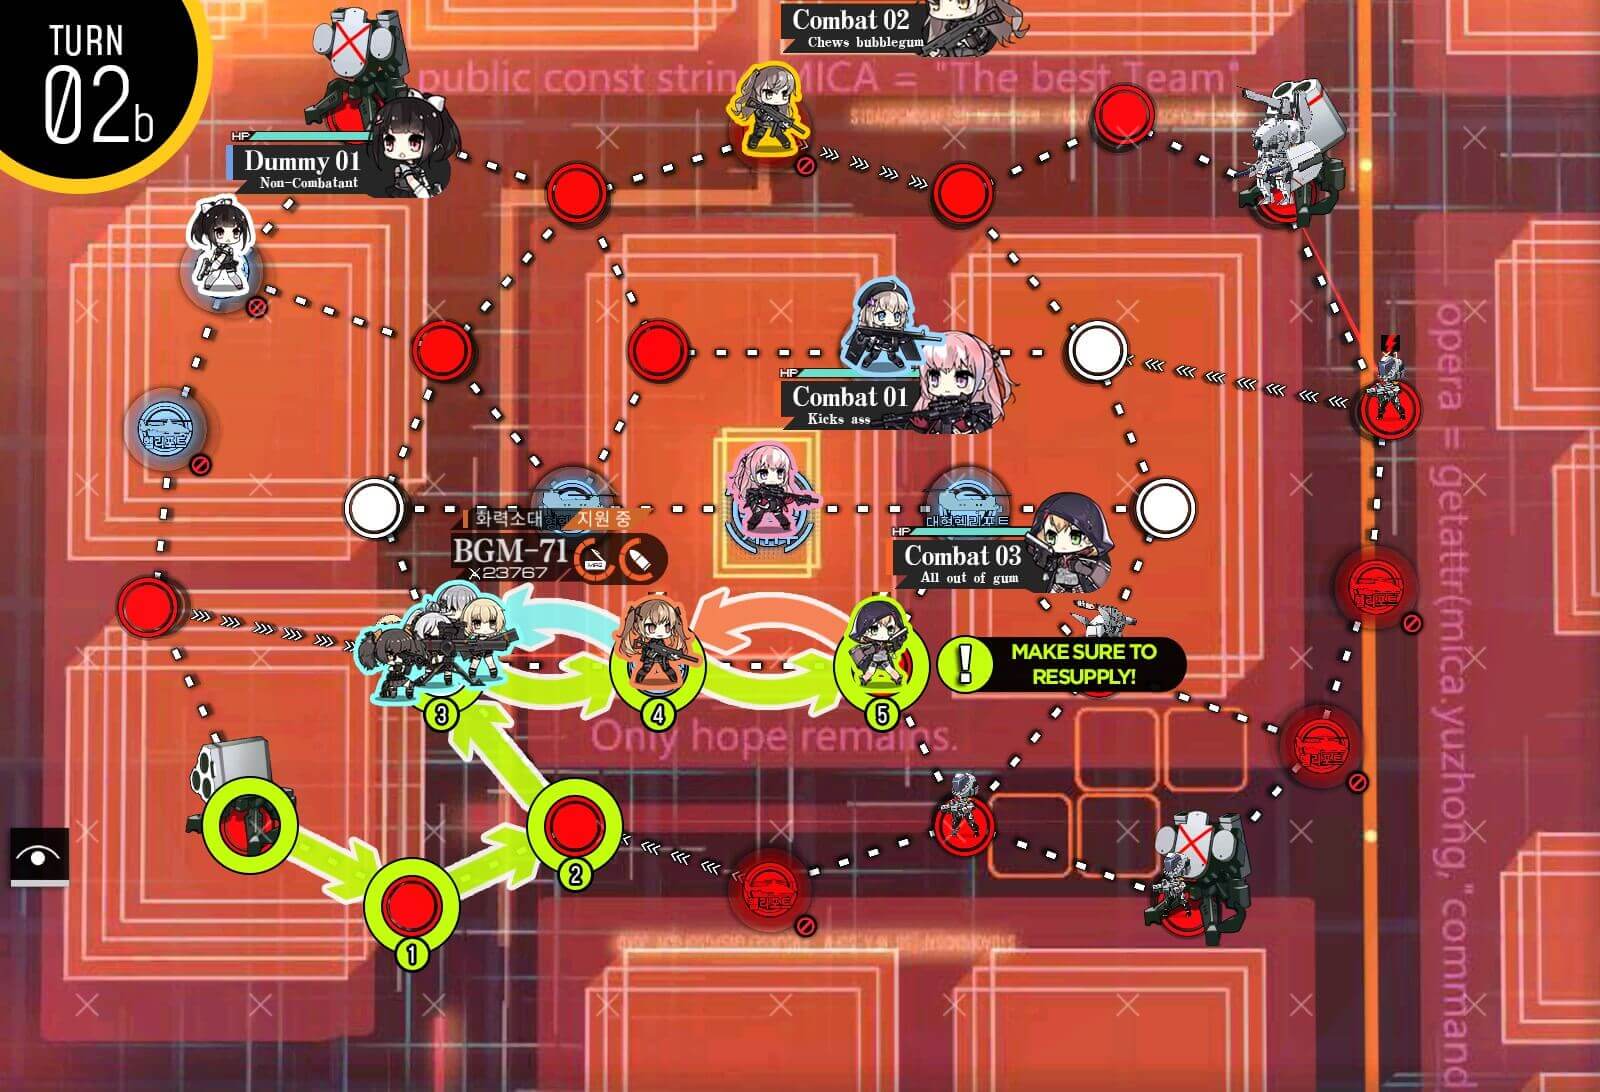
Turn 2b
IMPORTANT: If you have two additional dummy echelons you can deploy, I recommend doing so now on the helipads. This eliminates RNG on this map completely on future turn.

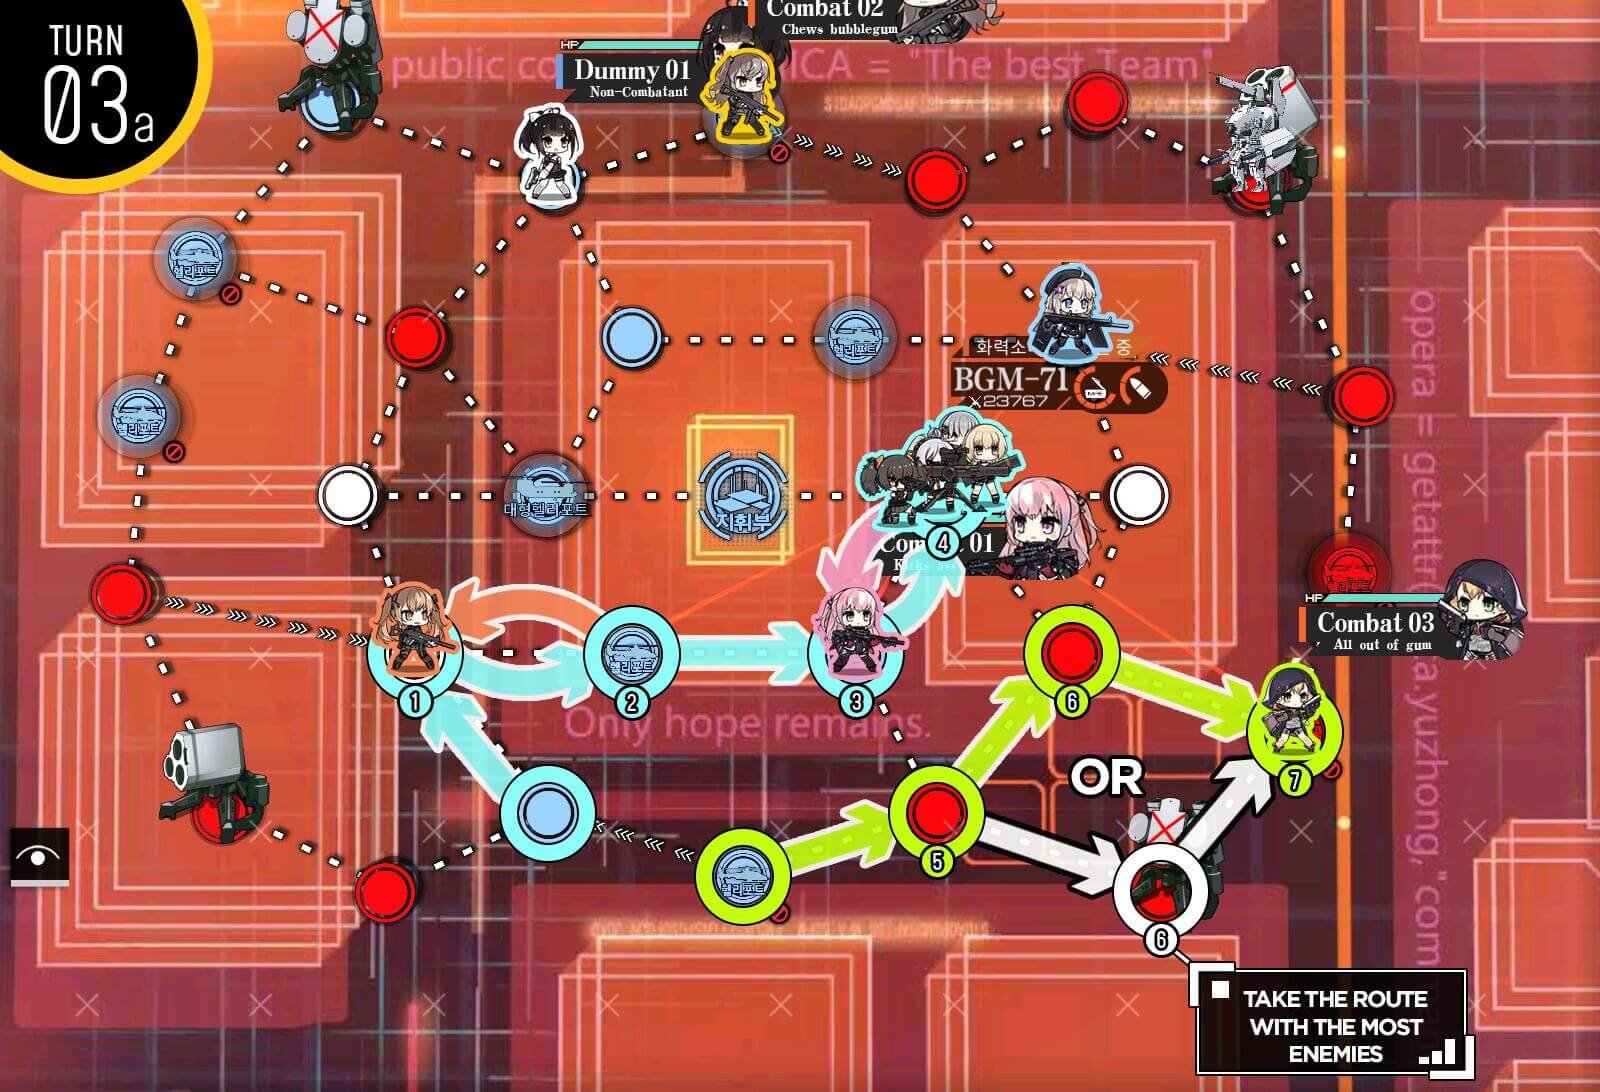
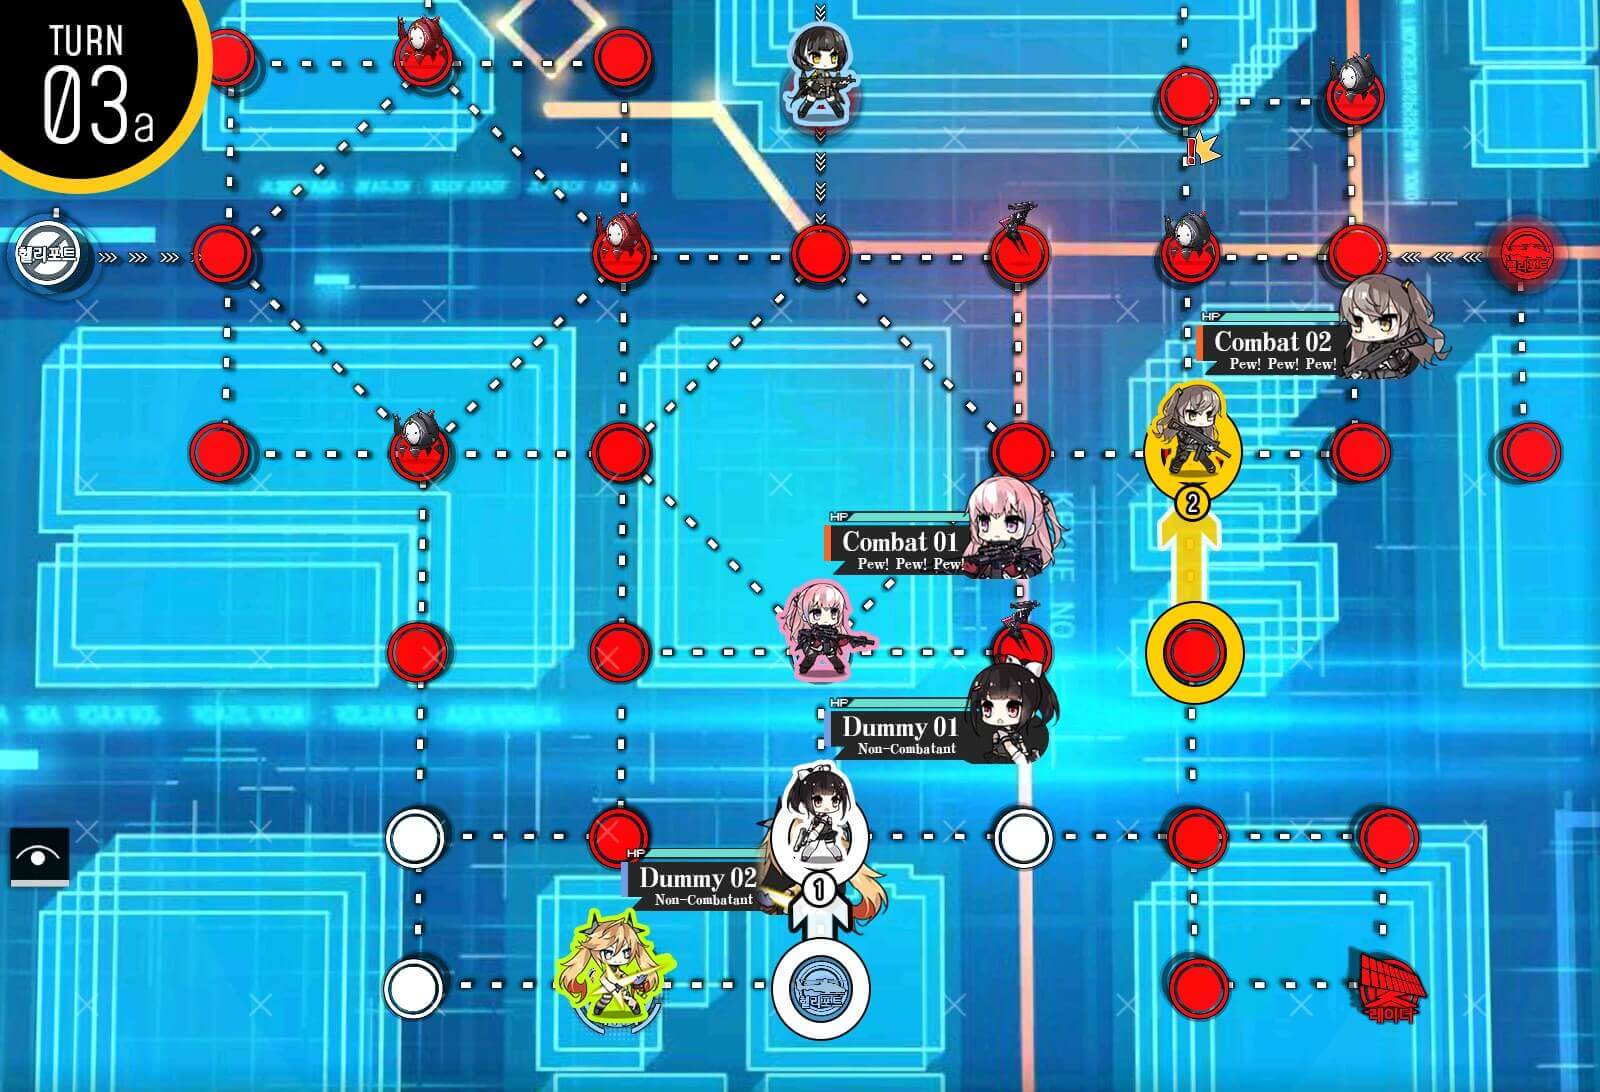
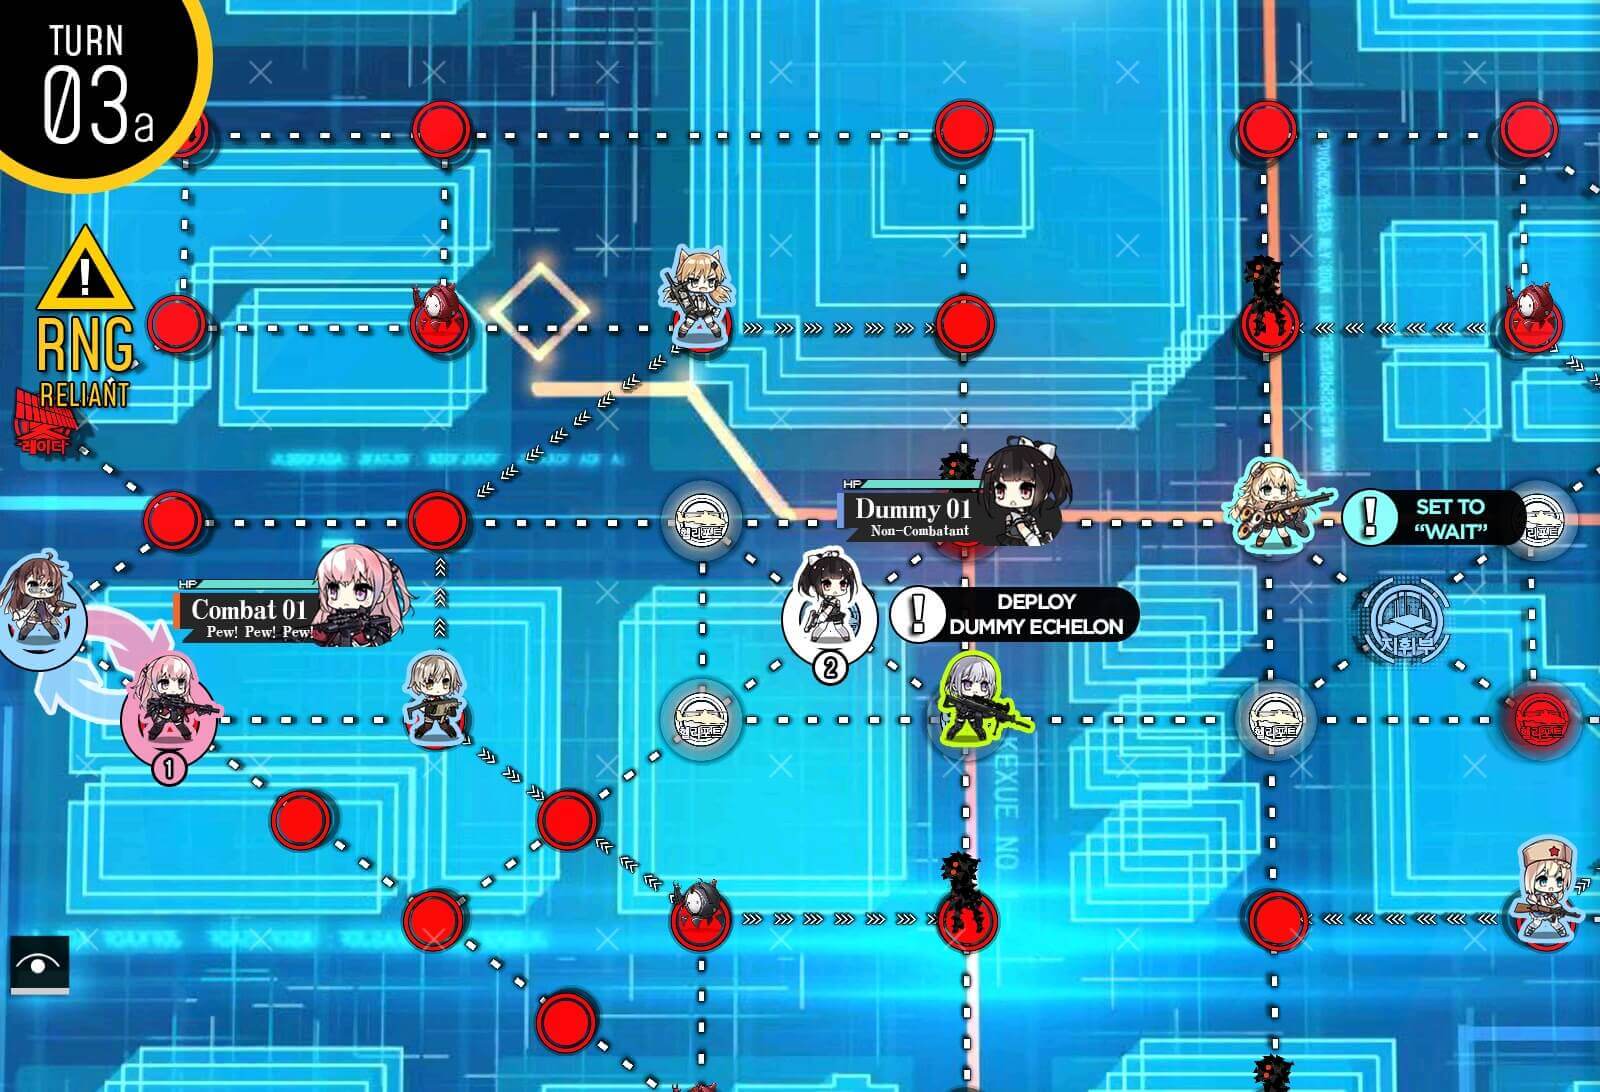
Turn 3a
Combat echelon 2 moves up to avoid getting attacked by red beans. Combat echelon 1 sweeps and kills all enemies on the bottom so that red beans near the rally point has clear path towards the combat echelon. It is also important to stop on that specific node. We are drawing aggro so that both beans move away from rally point.

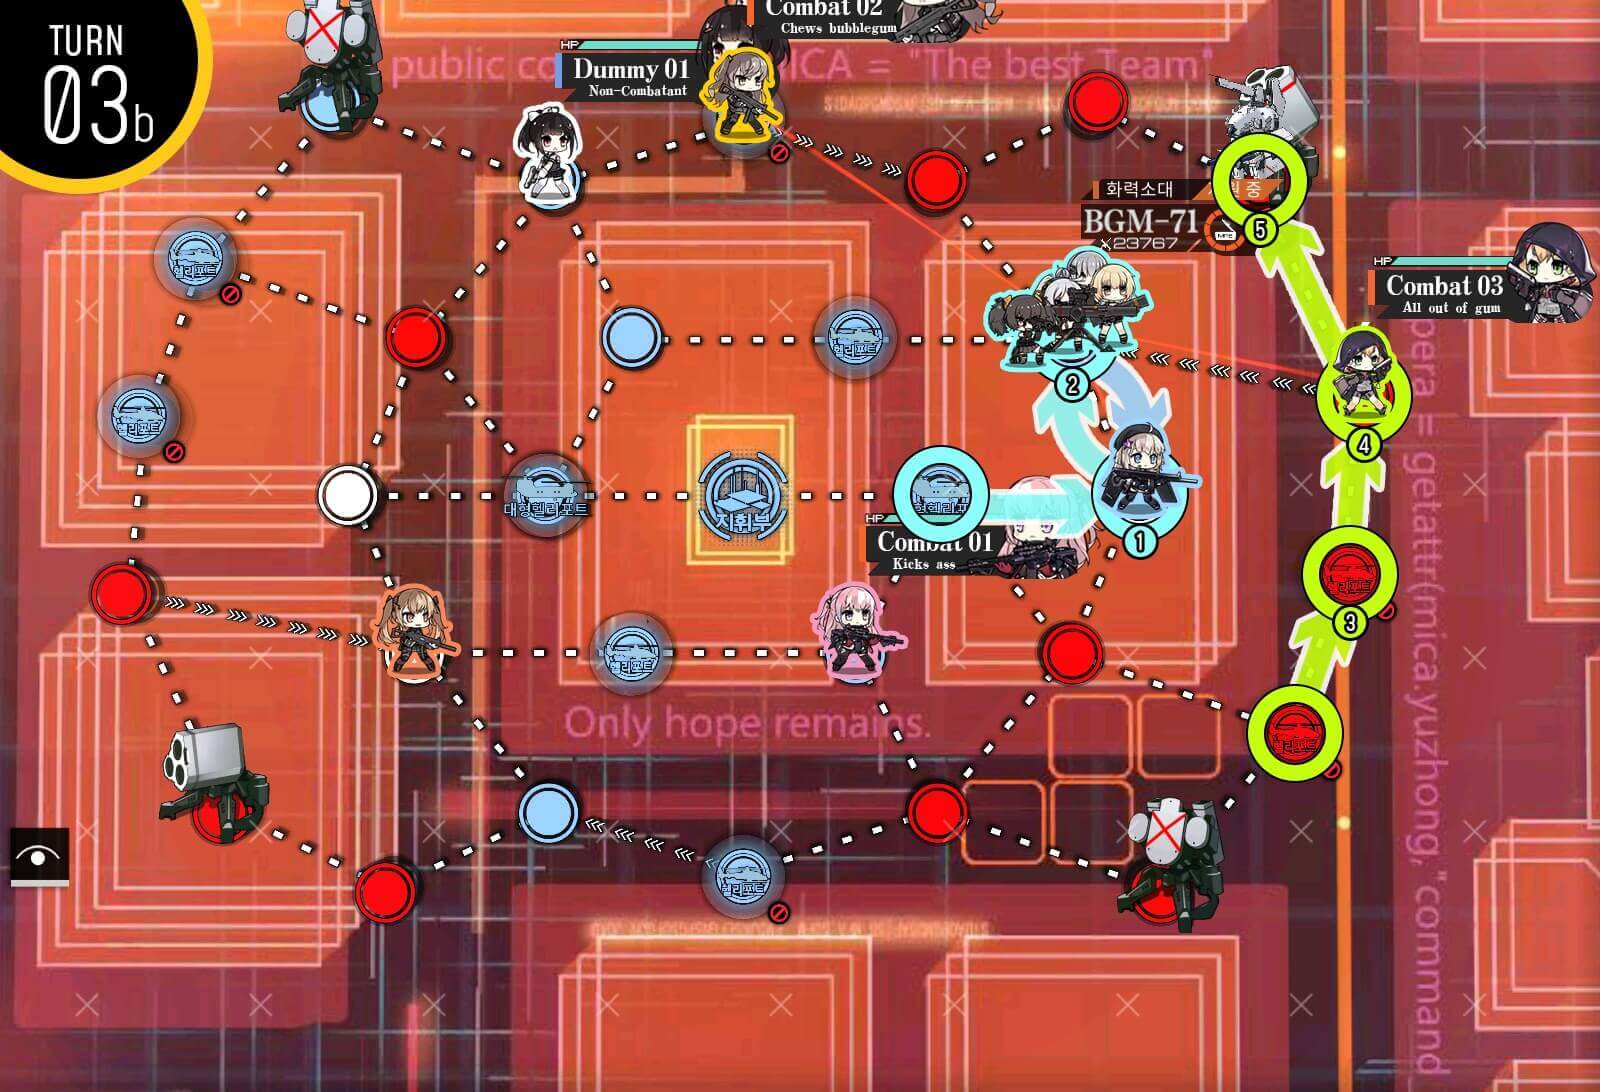
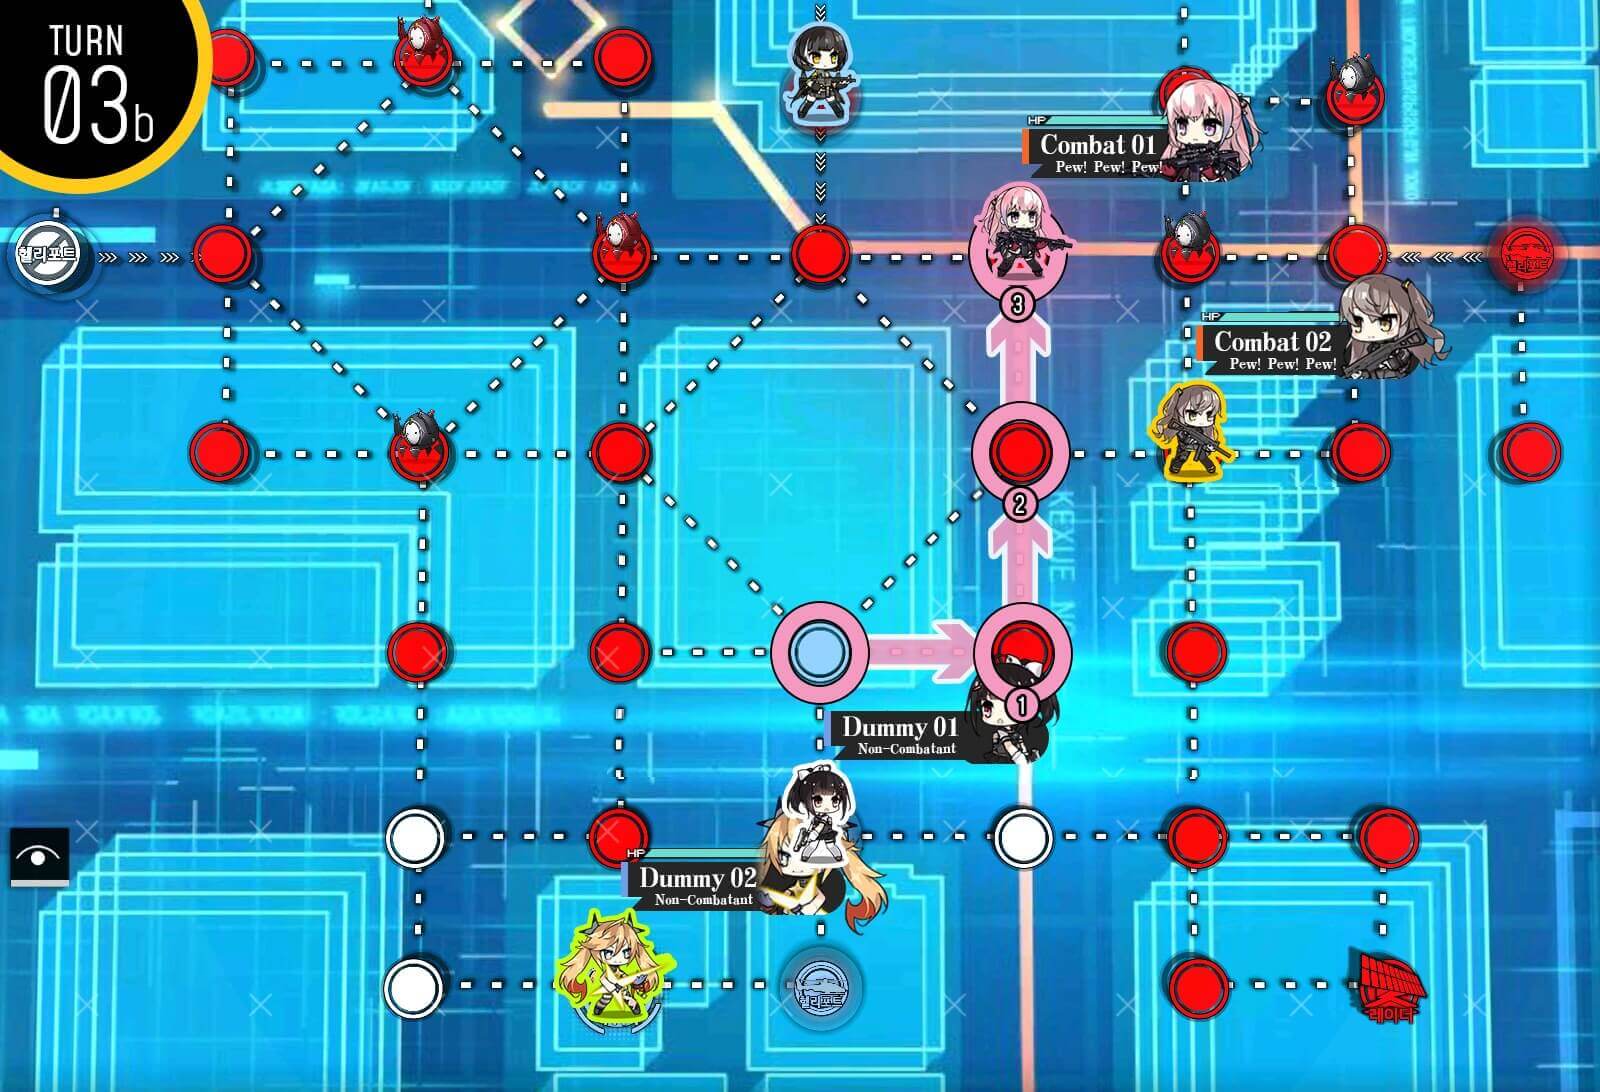
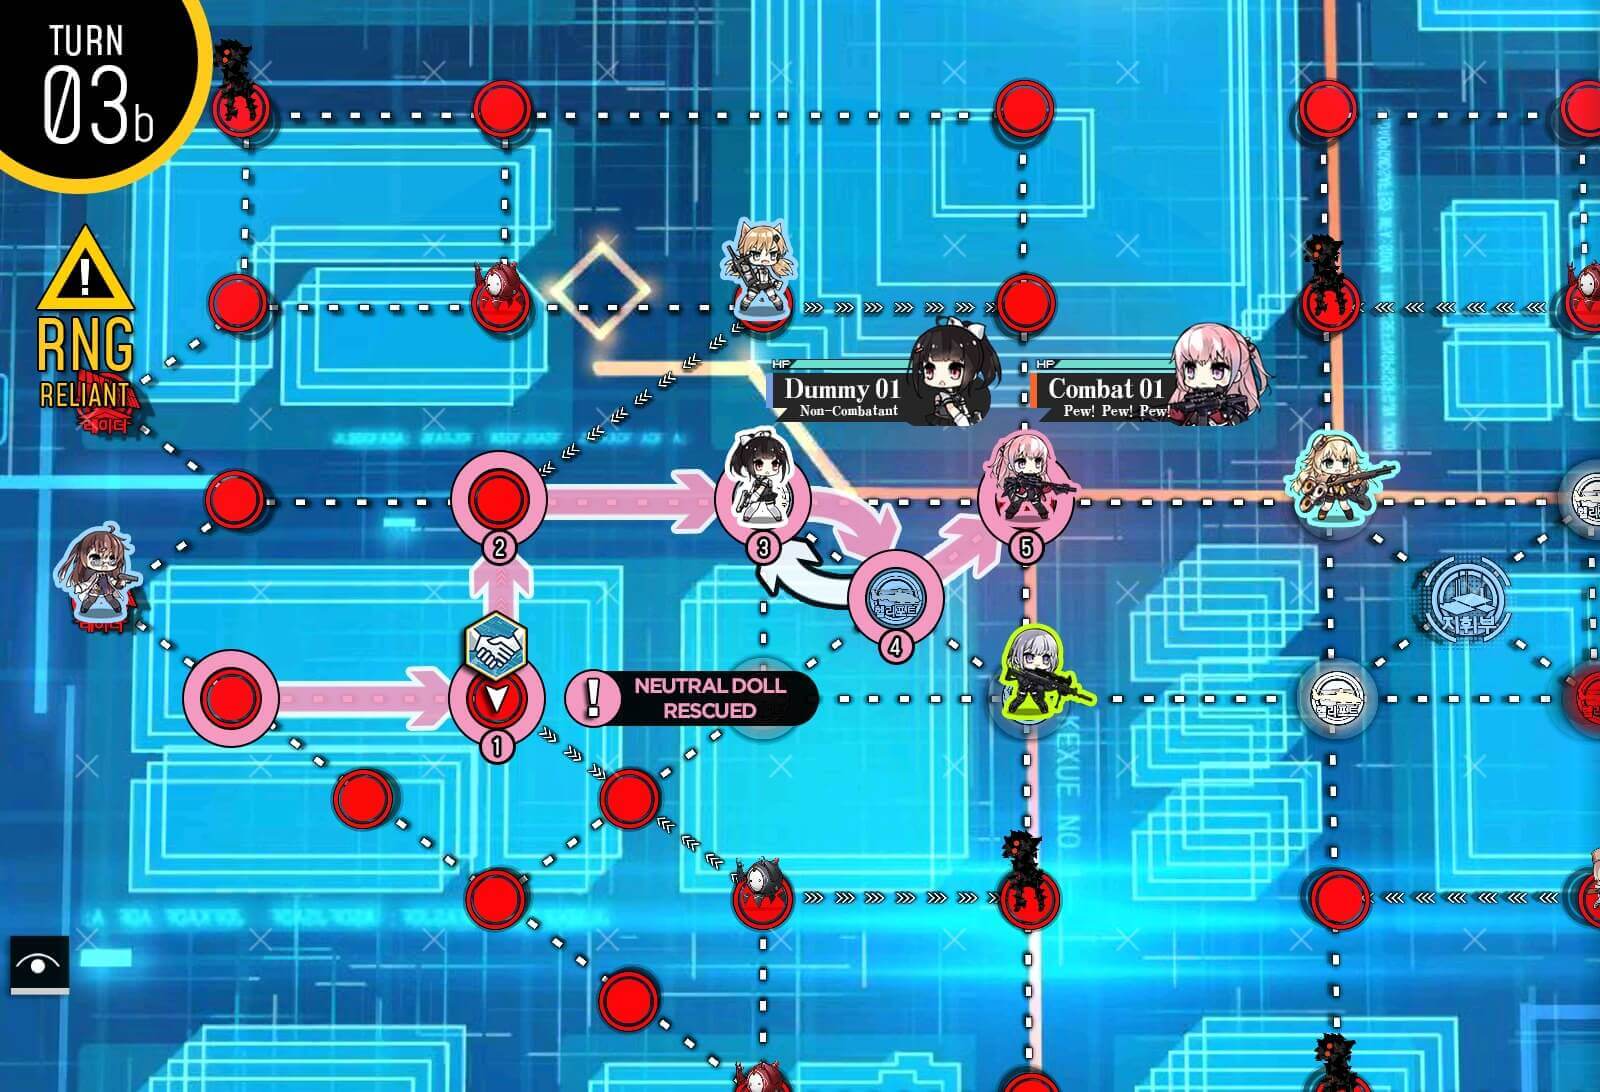
Turn 3b
Make sure to return here after sweeping.

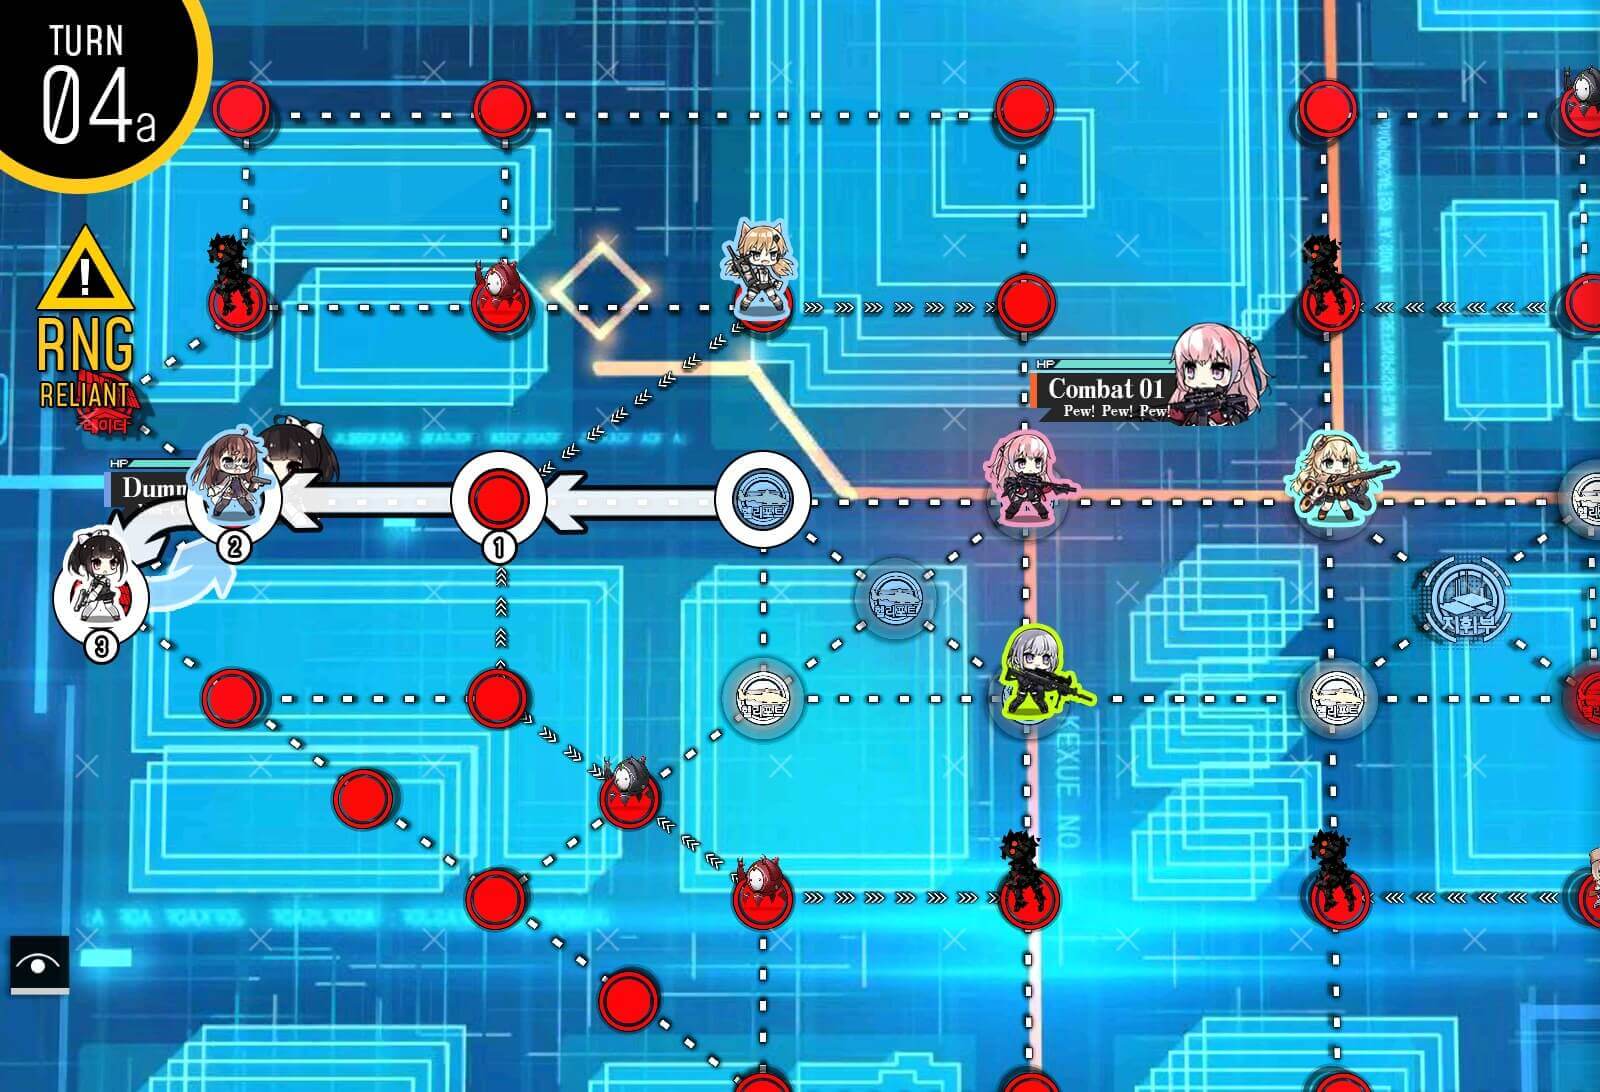
Turn 4
Combat echelon at the bottom moves away from the approaching red beans and takes the helipad at the center. Combat echelon at the top makes its way out of the grid of doom.
IMPORTANT: If you have 2 additional dummy echelons you can deploy, I recommend doing so now on the helipads. This eliminates RNG on this map completely on future turn.
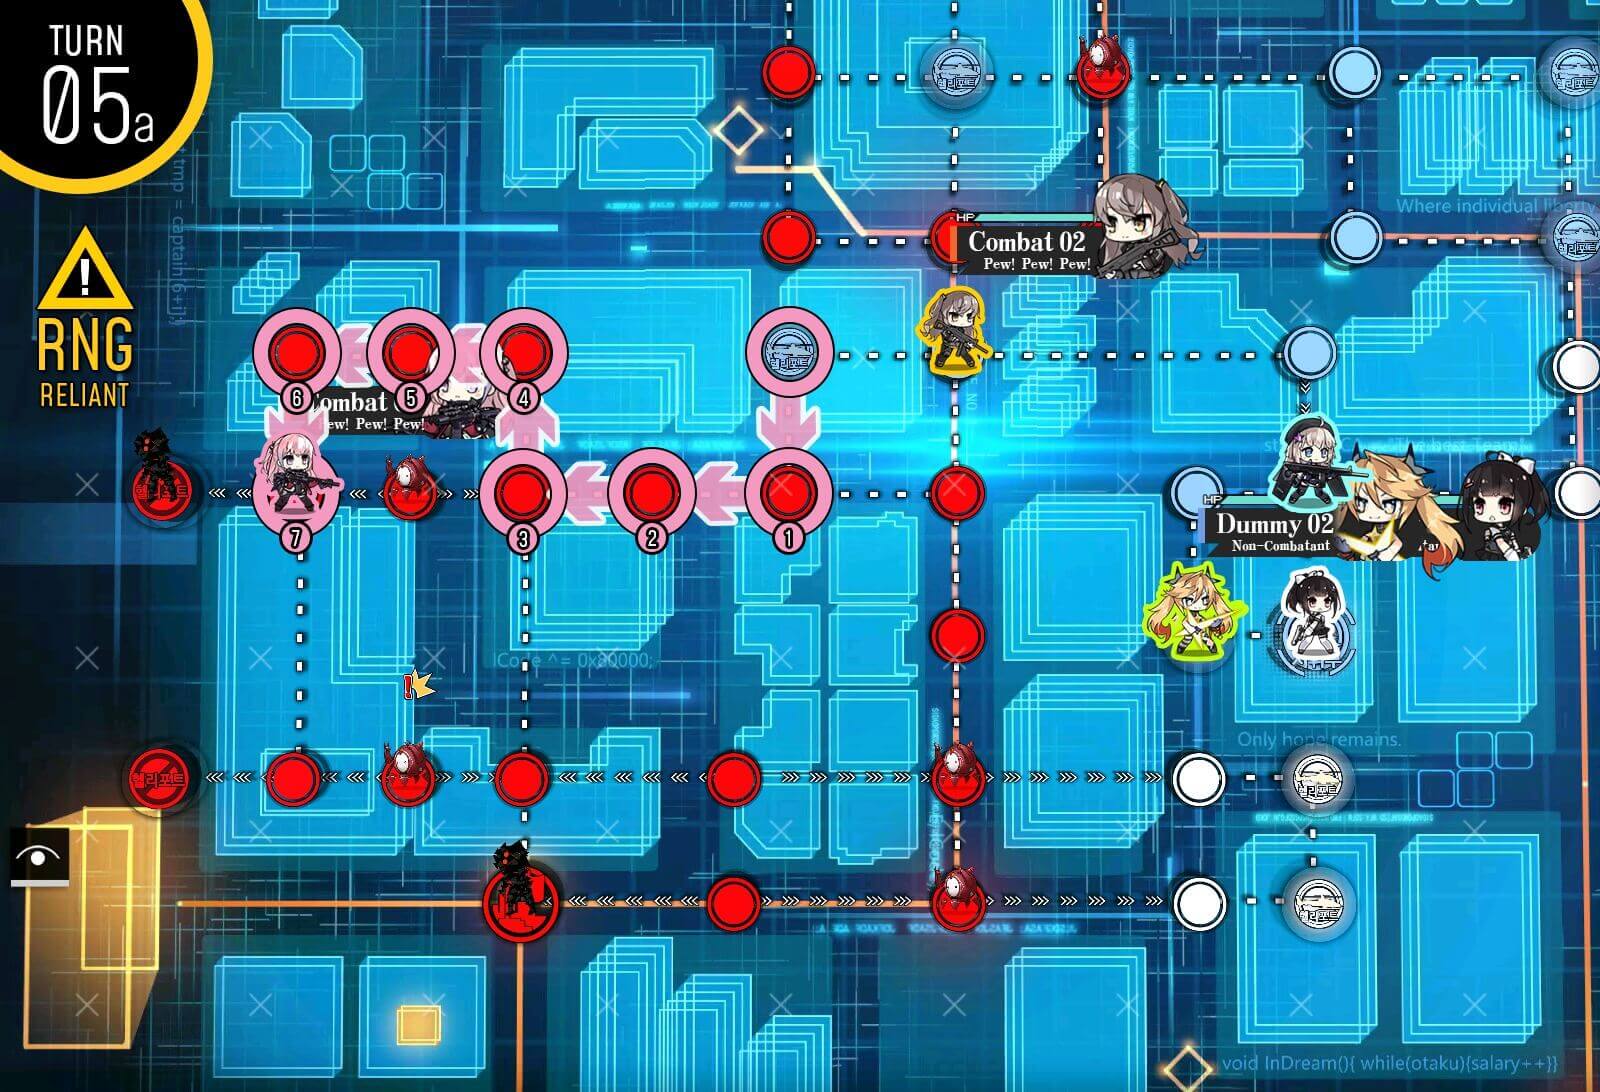
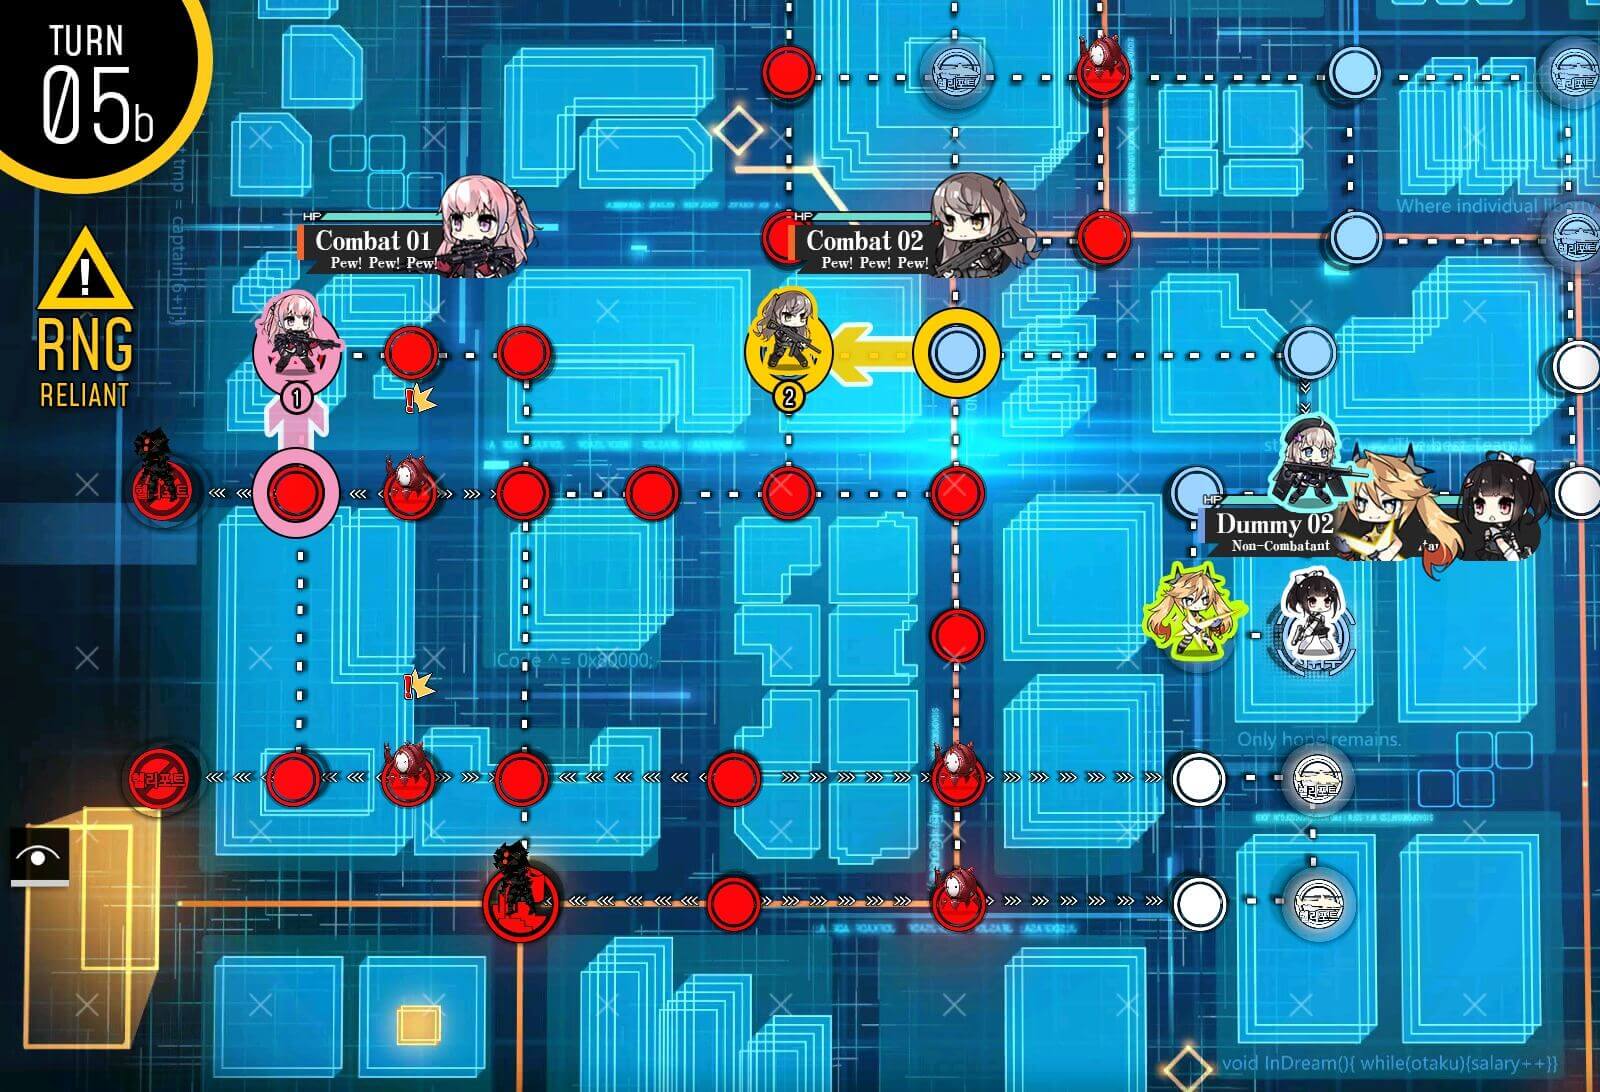
Turn 5a
RNG warning: This is where RNG strikes if you are restricted to 4 echelons. The node at the left of the bottom red bean on the pic needs to be clear of enemy units or red beans at the bottom will not properly aggro and either remain in place or block the path to rally point next turn. If this occurs reset is required. Combat echelon on helipad resupplies and clears path for red beans to move away from rally point. Second combat echelon moves onto the helipad to the left.

Turn 6a
If you properly cleared path for red beans, the path to the rally point is now clear for combat echelons to approach. Take nodes in the center area first.

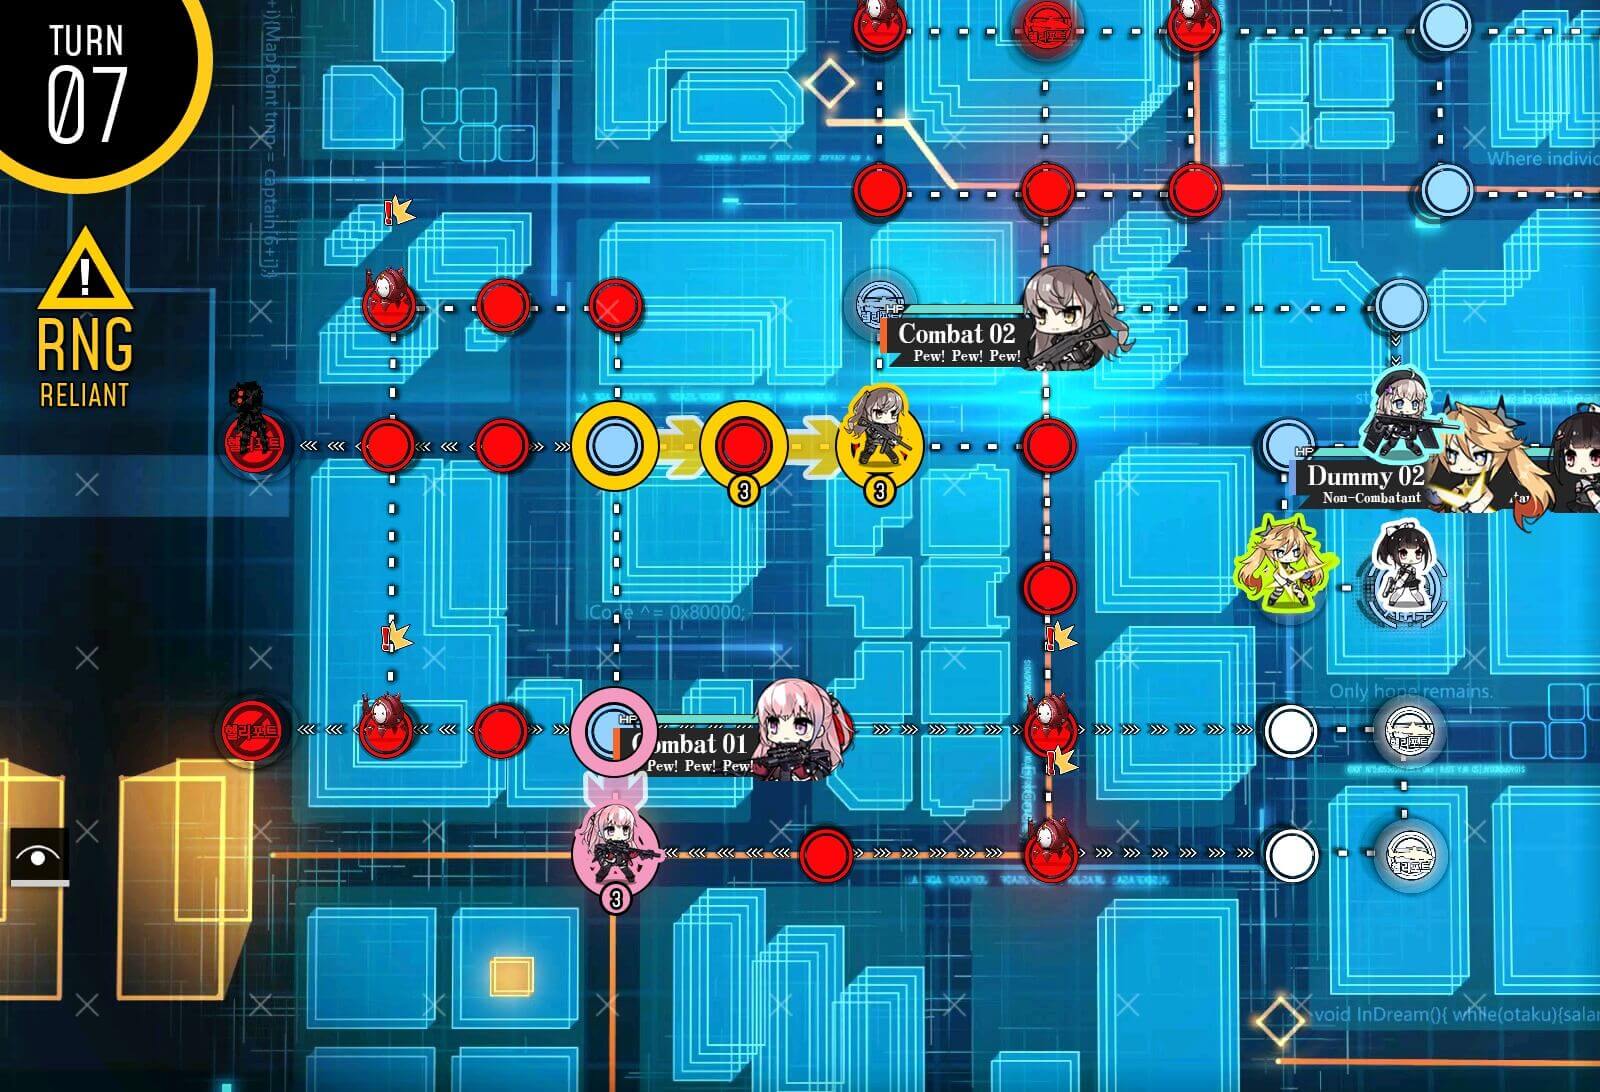
Turn 7
Now take the remaining nodes so that we can establish the supply route at the end of the turn.
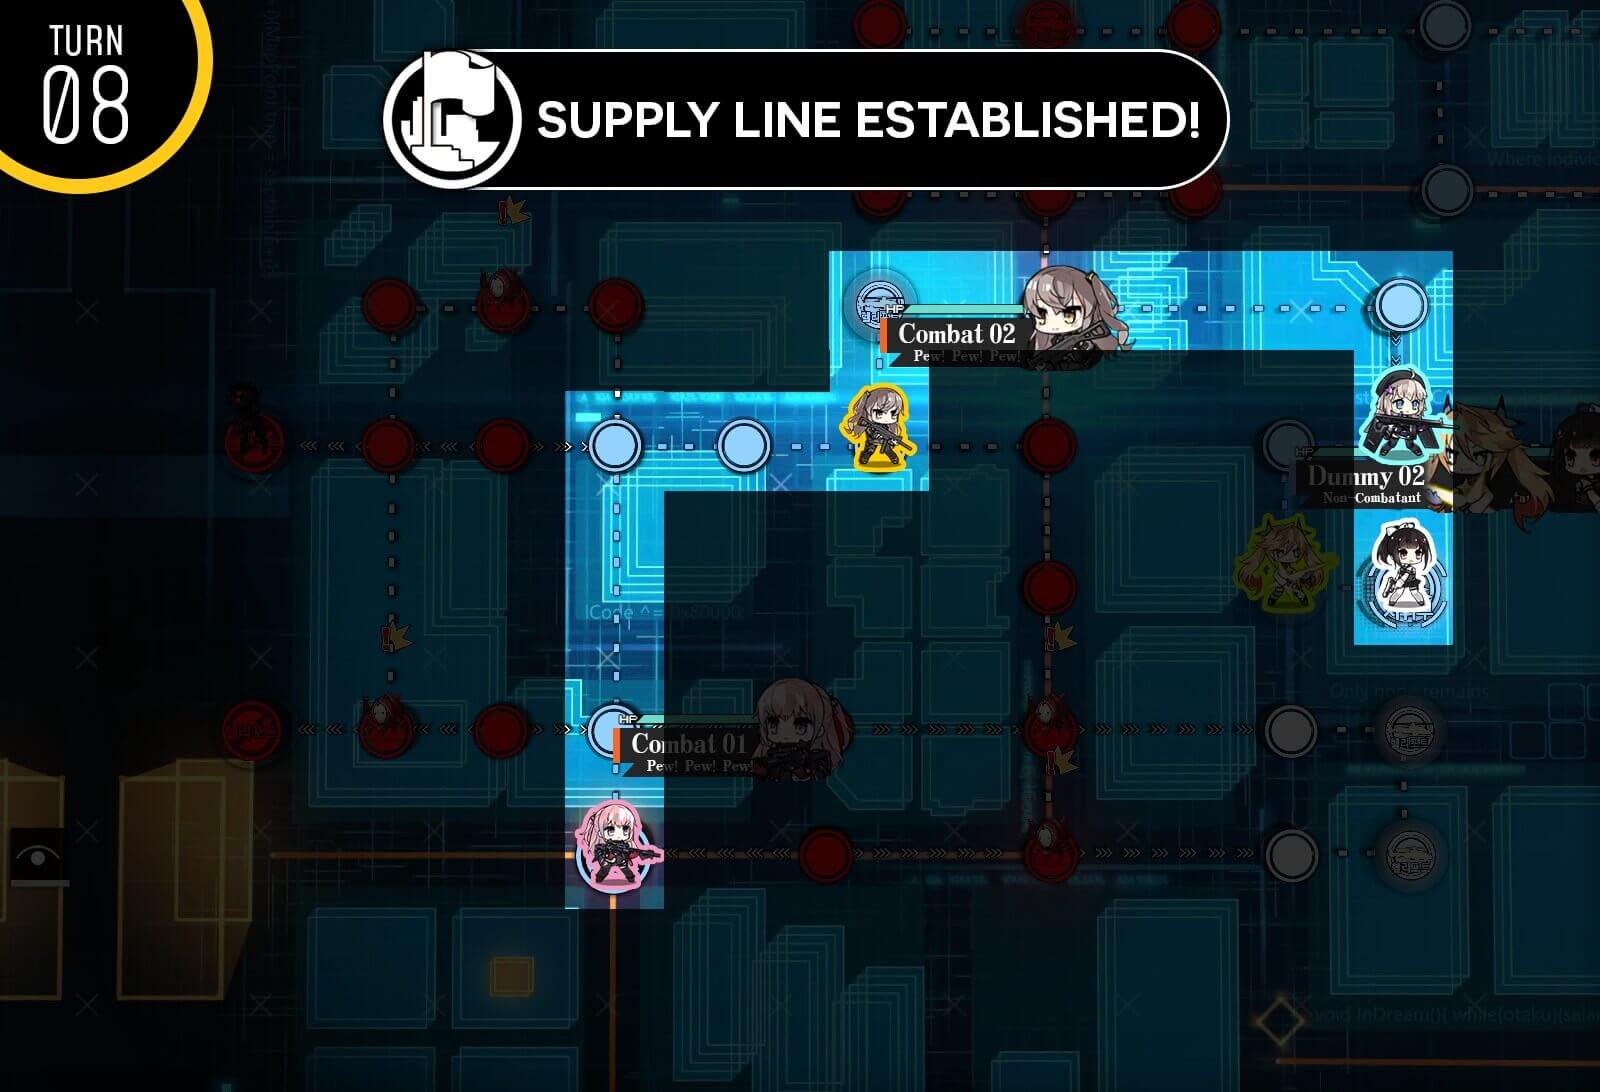
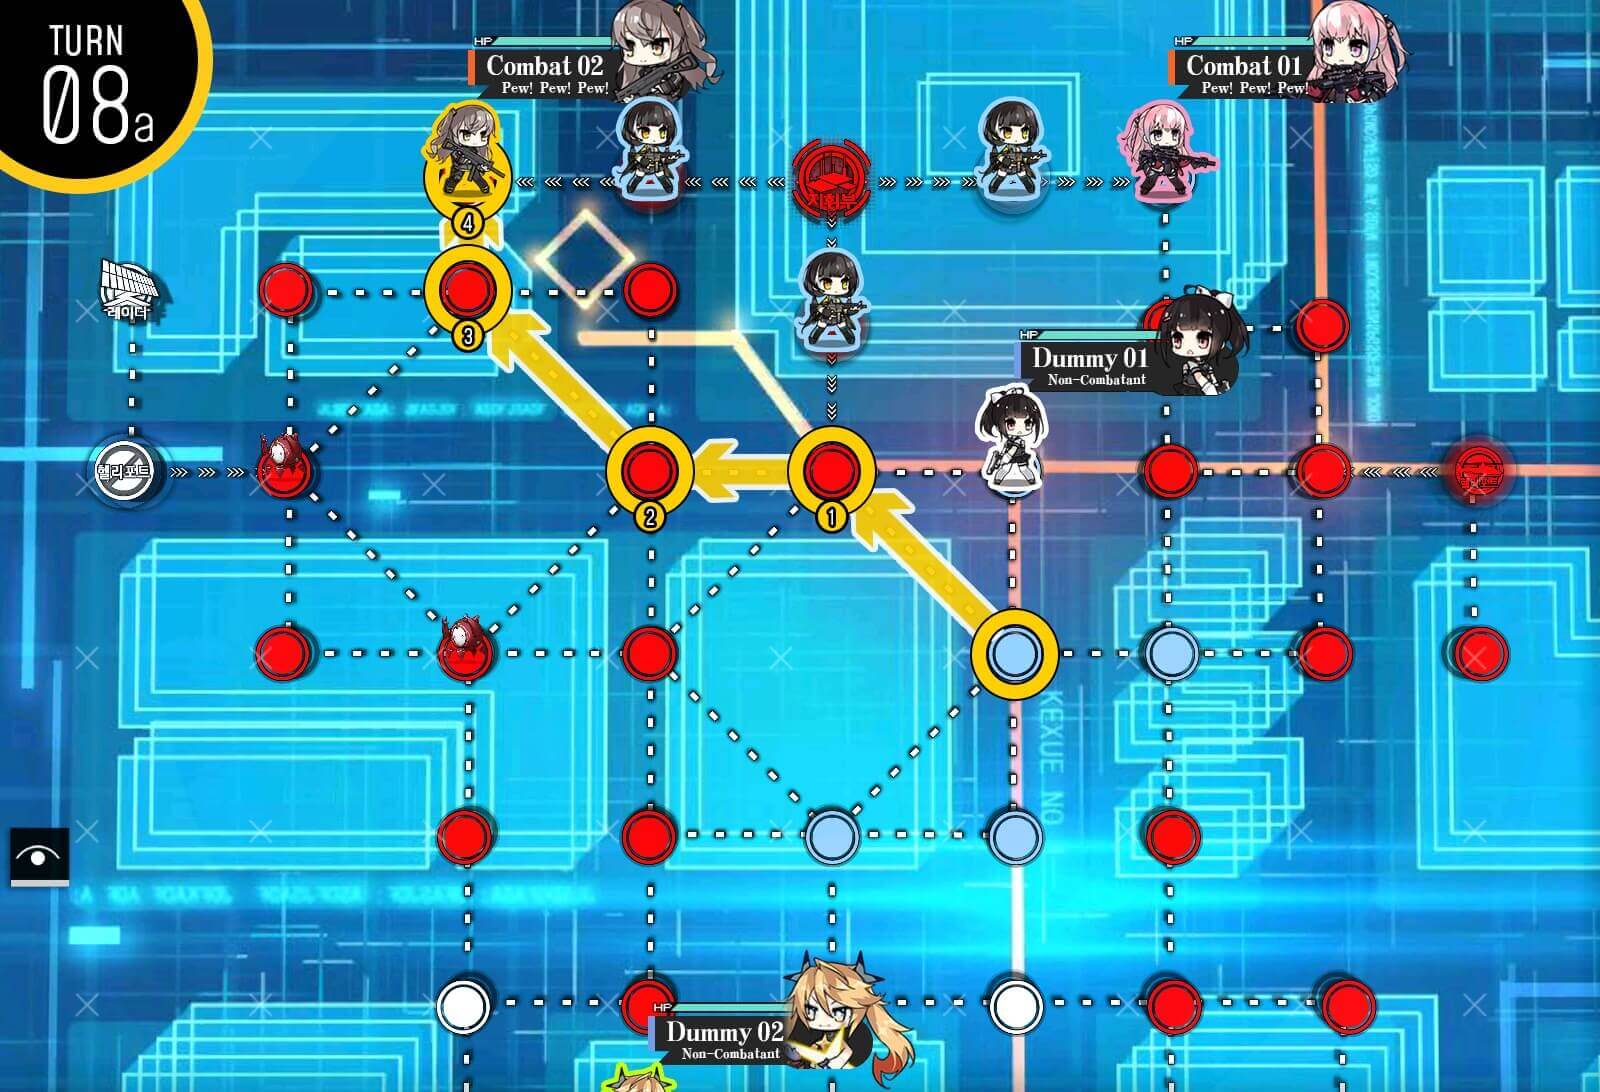
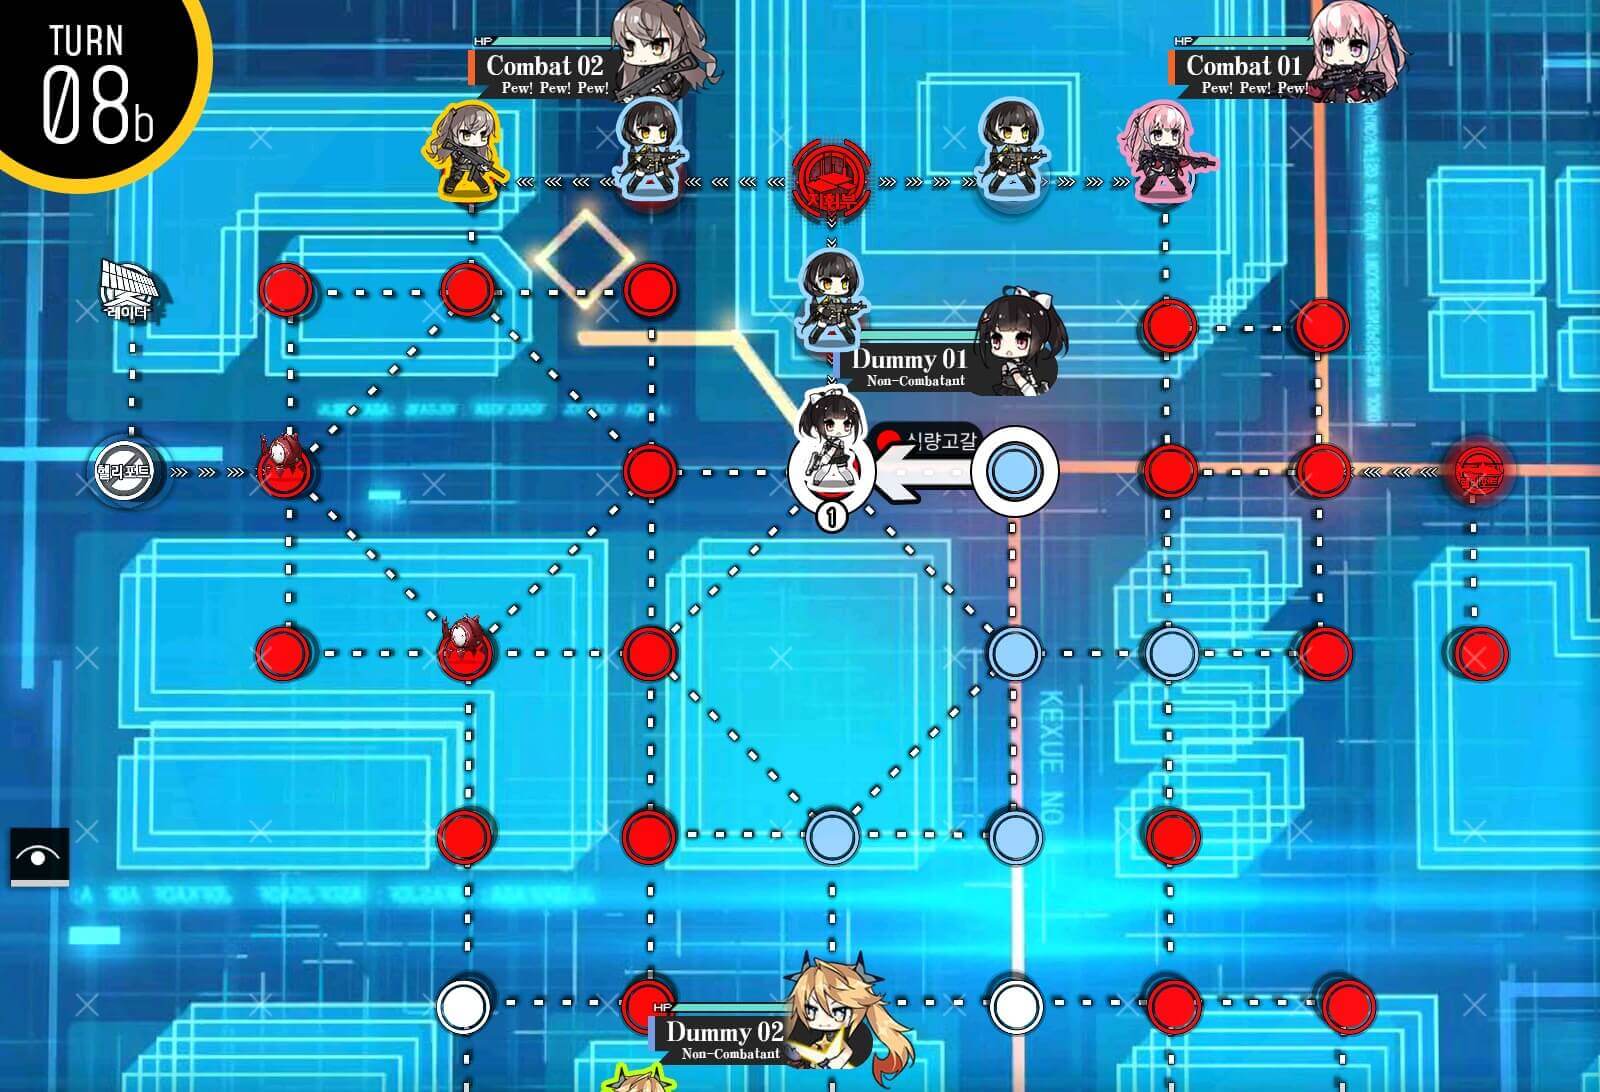
Turn 8
End turn until map is cleared.

Turn 1a
Start with RFHG echelon at the bottom left helipad, 2 AR echelons on the right side, dummy in the center and your best HOC in the heavy helipad on the left side. I strongly recommend RFHG echelon takes a Taunt Fairy to minimize damage between battles. RFHG echelon with support from HOC clears path all the way to left helipad. Then dummy and HOC swaps position and we deploy a friend echelon on the helipad where RFHG echelon was.

Turn 1b
Dummy echelon follows RFHG echelon and takes helipad above RFHG echelon. Combat echelon on the top right helipad goes around to take helipad at the center top. Deploy second friend echelon on the helipad where AR echelon was.
Turn 2a
RFHG echelon on the left side moves down to clear out the enemy on top of the enemy artillery support. HOC swaps positions with other teams to provide support to RFHG.
Turn 2b
RFHG kills the unit spawned from bottom helipad [this is RNG so it can be a tank, gundam, or just normal infantry] and perform another swap chain all the way to the node between two helipads. Make sure that supplies are topped off.
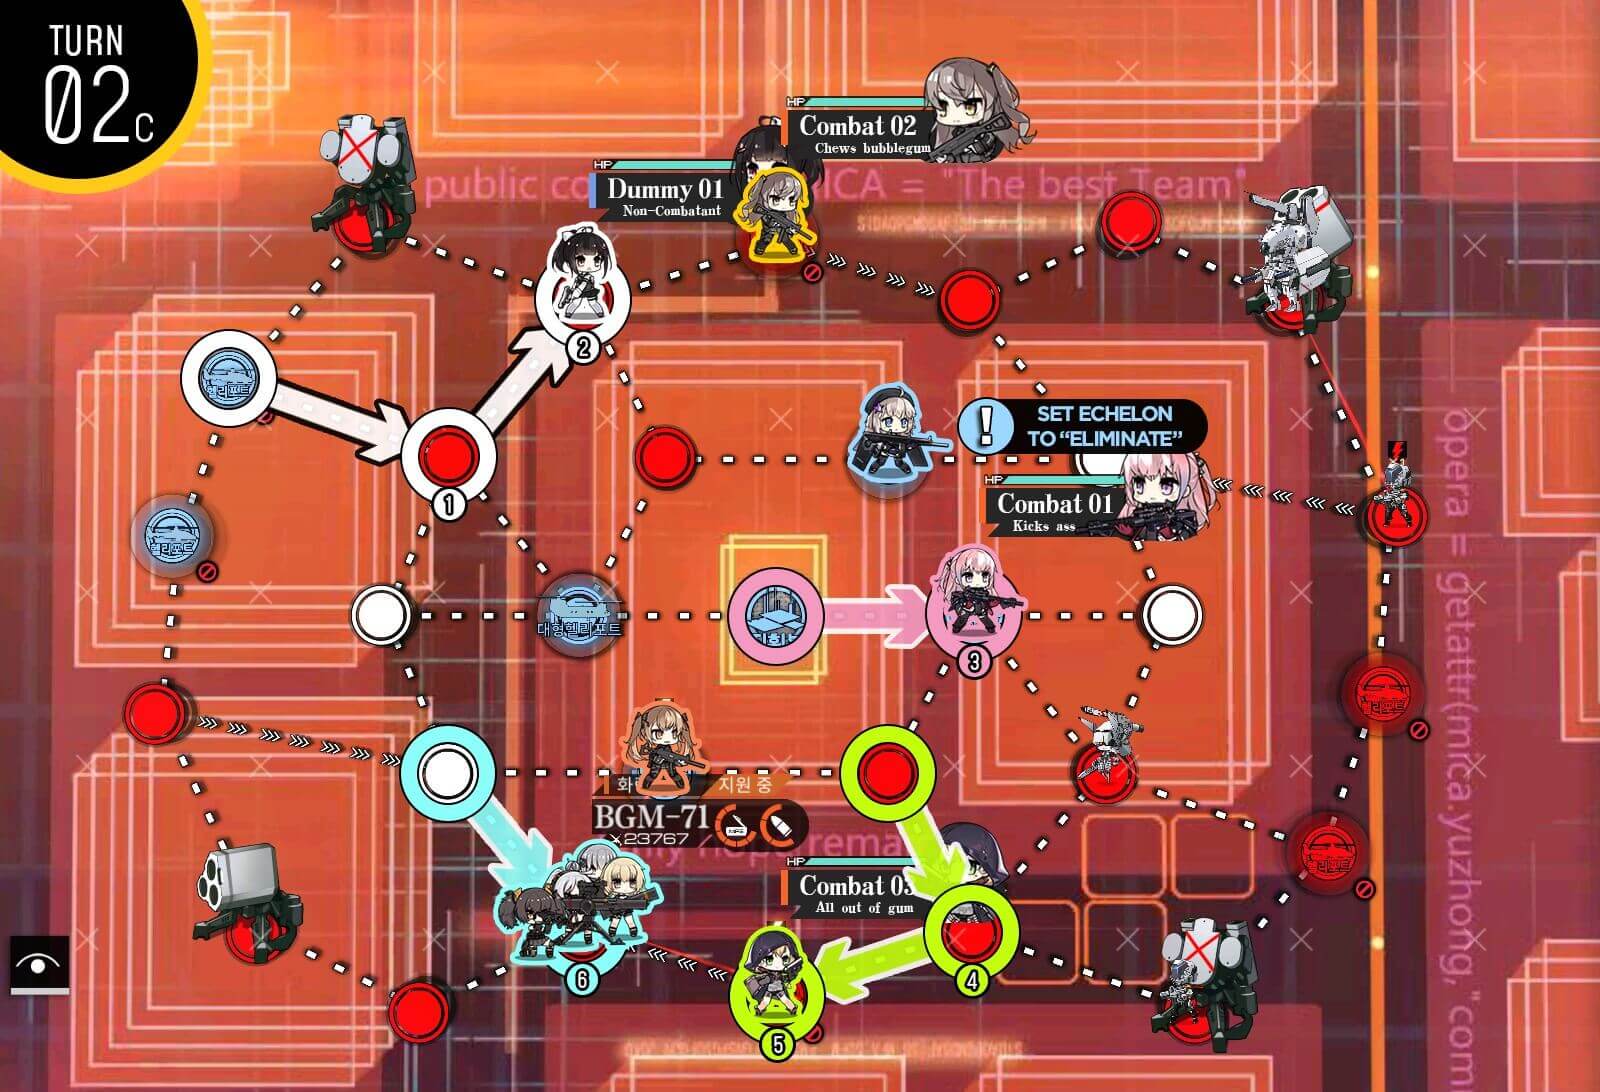
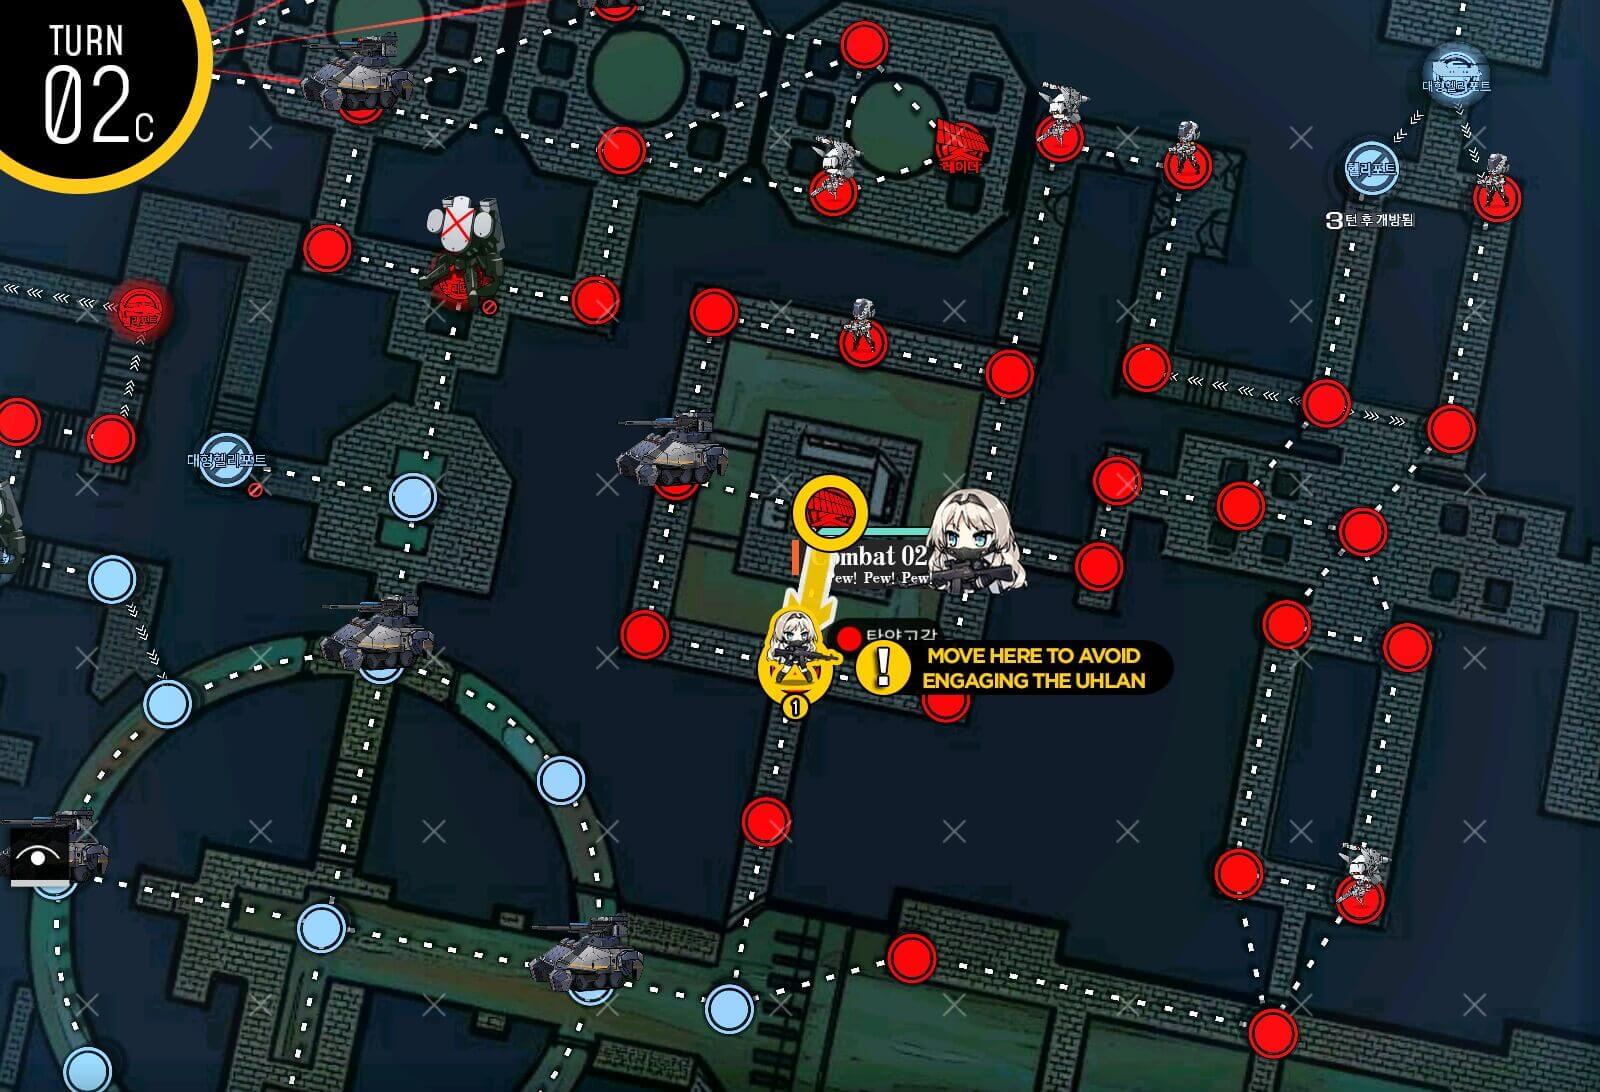
Turn 2c
RFHG echelon moves to take bottom center helipad and HOC moves down to allow capture. Dummy echelon also moves next to combat echelon on the top center helipad so it can be captured. AR echelon on the HQ moves right one to protect the helipad. Changing AI of friend echelon to 'Eliminate' is optional but saves an action point next turn.
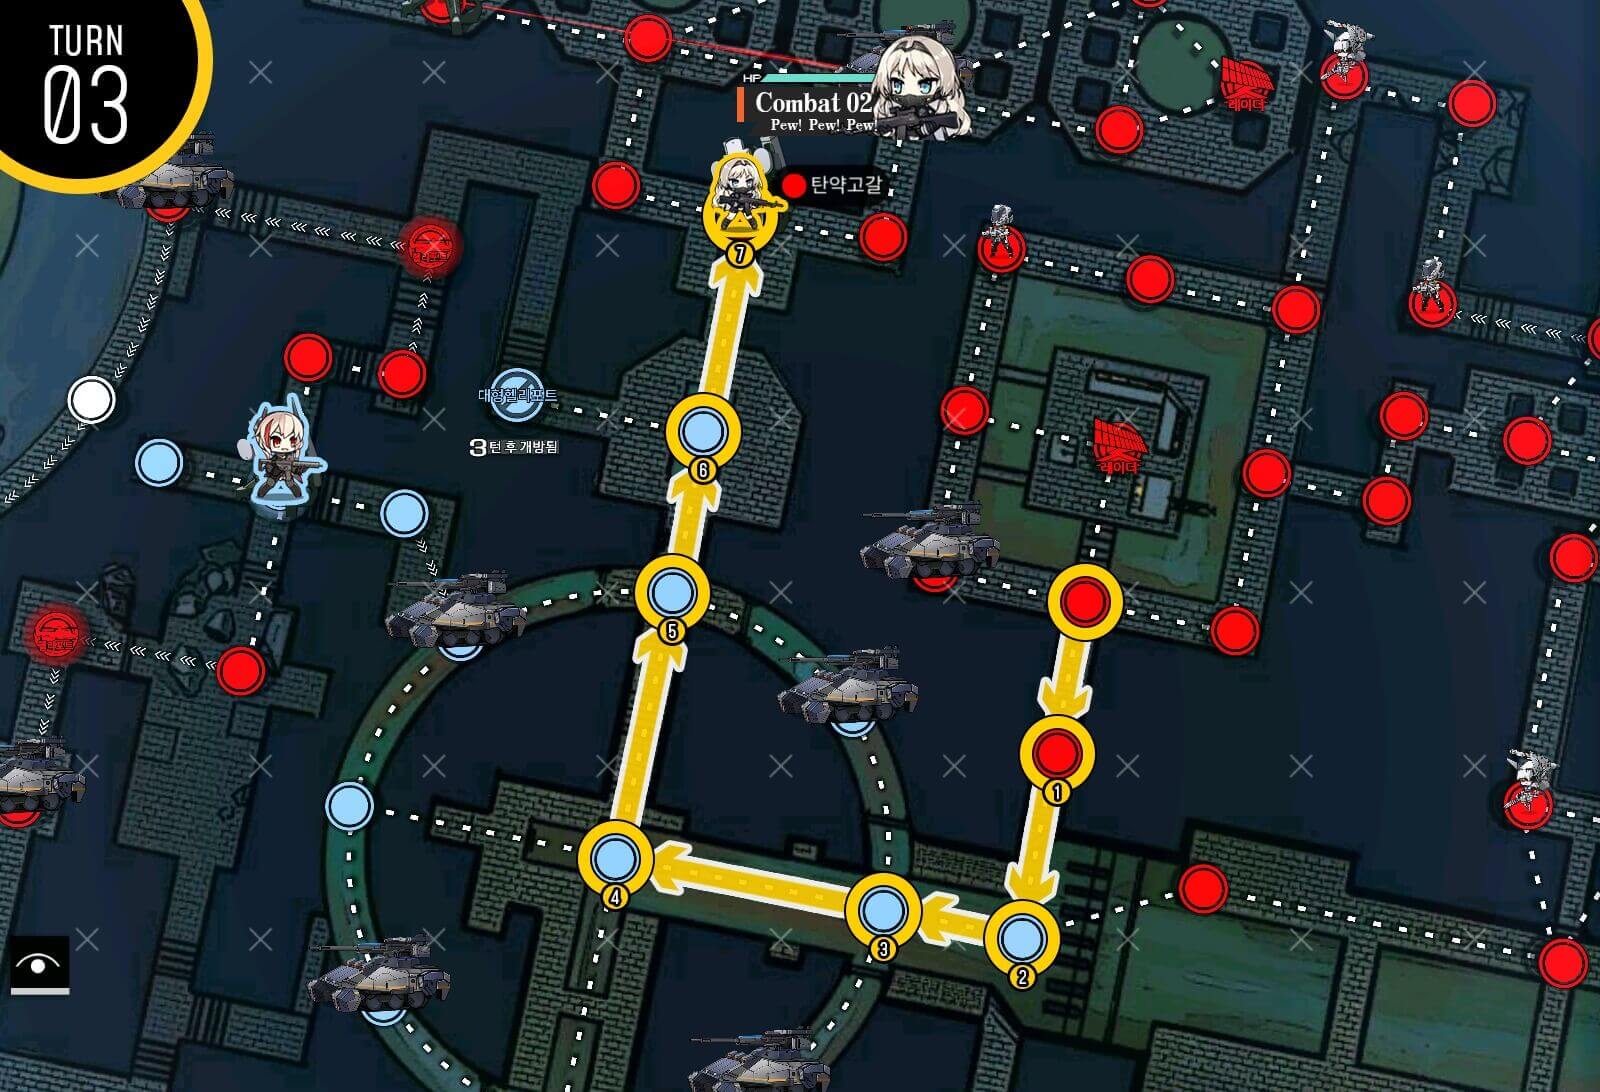
Turn 3a
On turn 3, we have to kill all the remaining units on the map. Properly position your HOC so that RFHG echelon receives support to kill units on the bottom side.
Turn 3b
Re-position HOC to top and kill the last enemy unit to clear the map for S-rank.
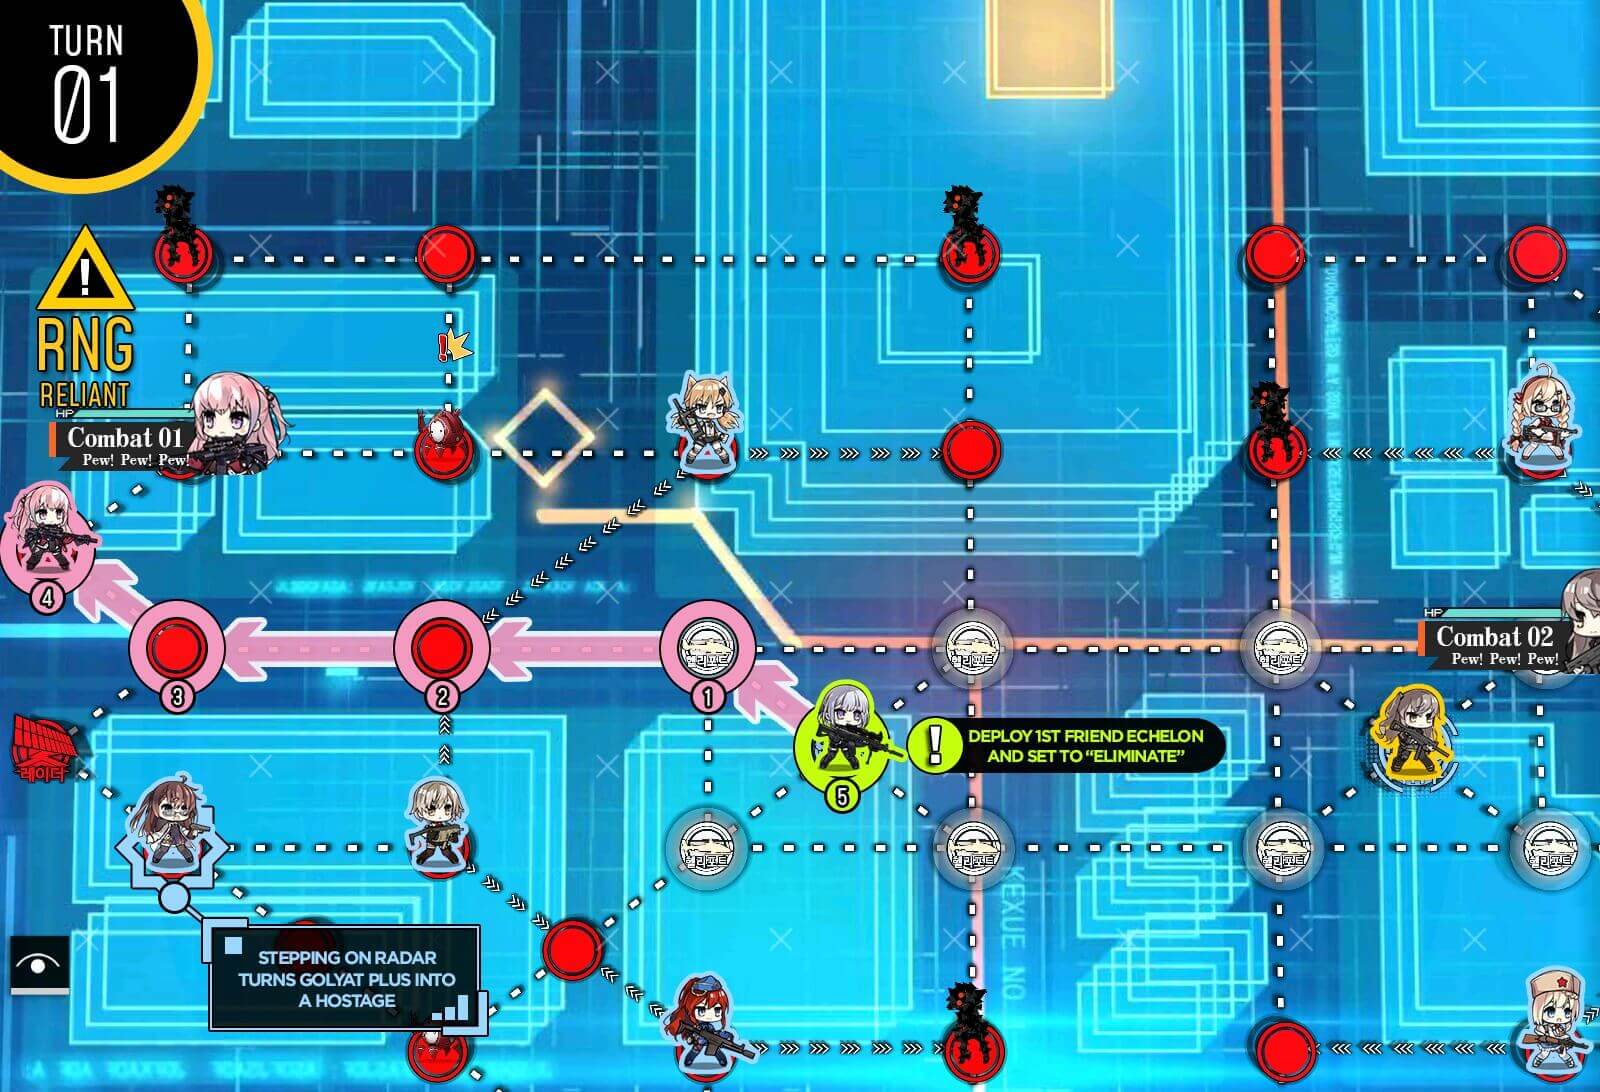
Turn 1
Start with two combat echelons on each location. Move out one node then deploy dummy echelons on each location before ending the turn.
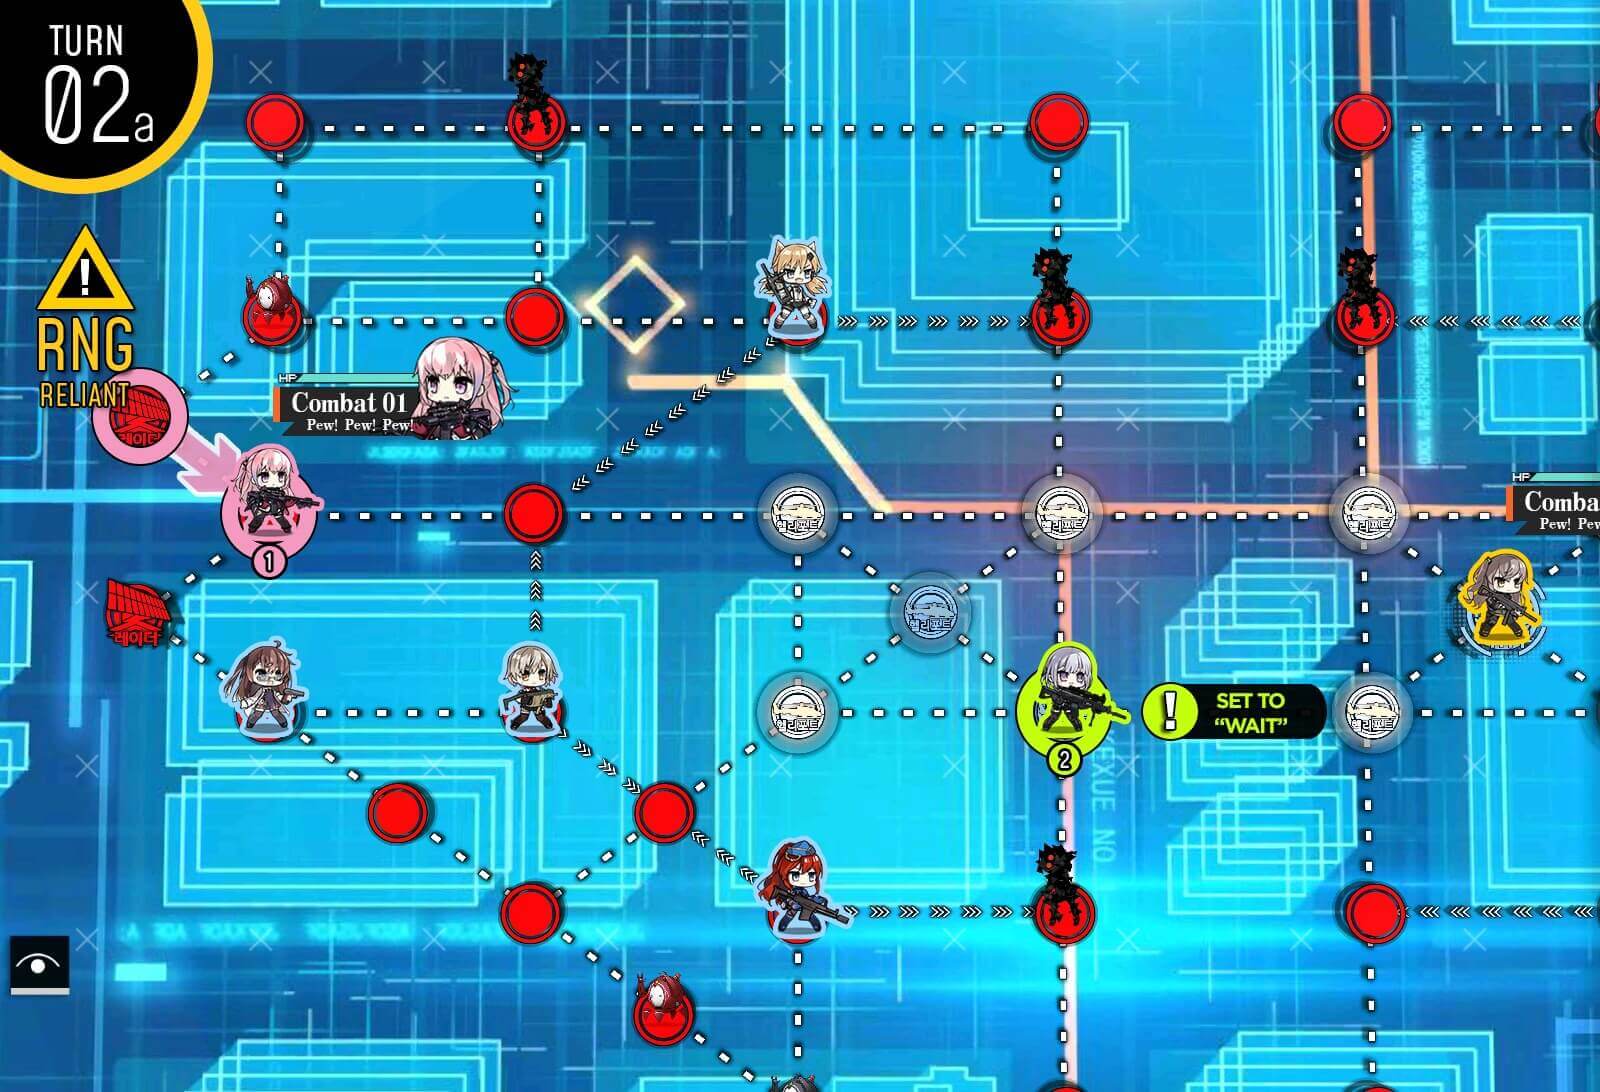
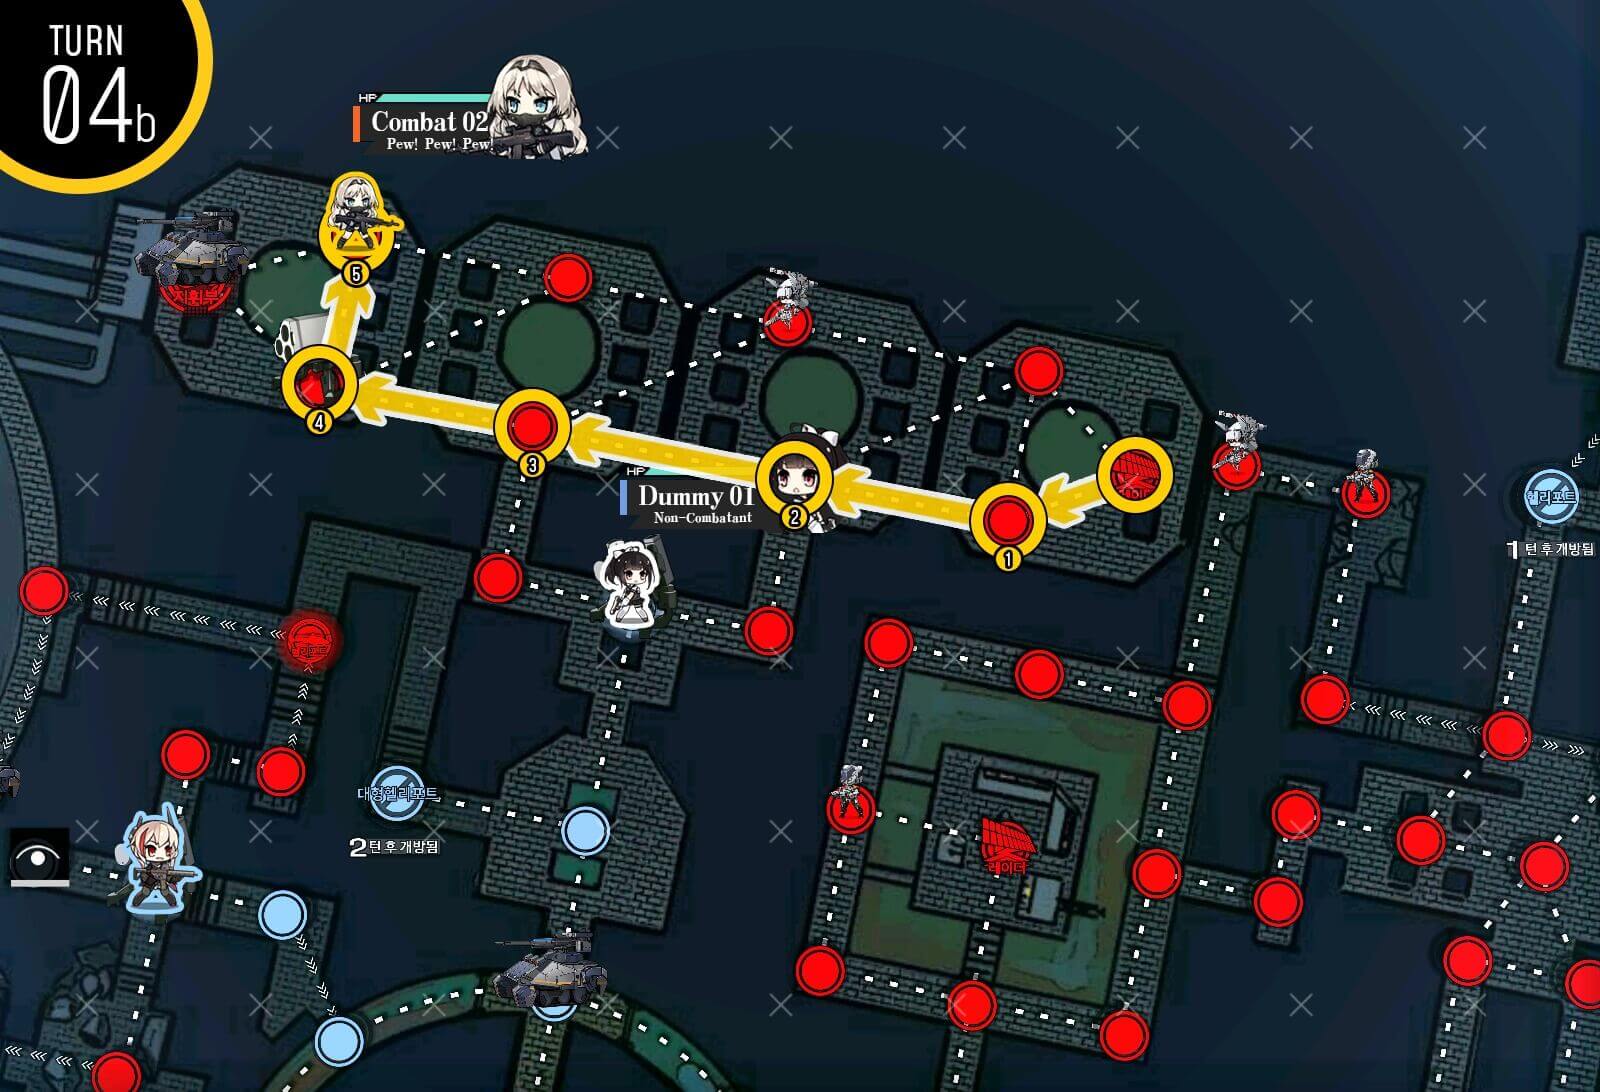
Turn 2a
Starting with the left side, combat echelon makes it all the way to the hostage then swaps position prior to rescuing to save move point. Combat echelon on the right side move up one.
Turn 2b
Combat echelon on the left rescues hostage and move all the way back up so that it's away from red beans' aggro range.
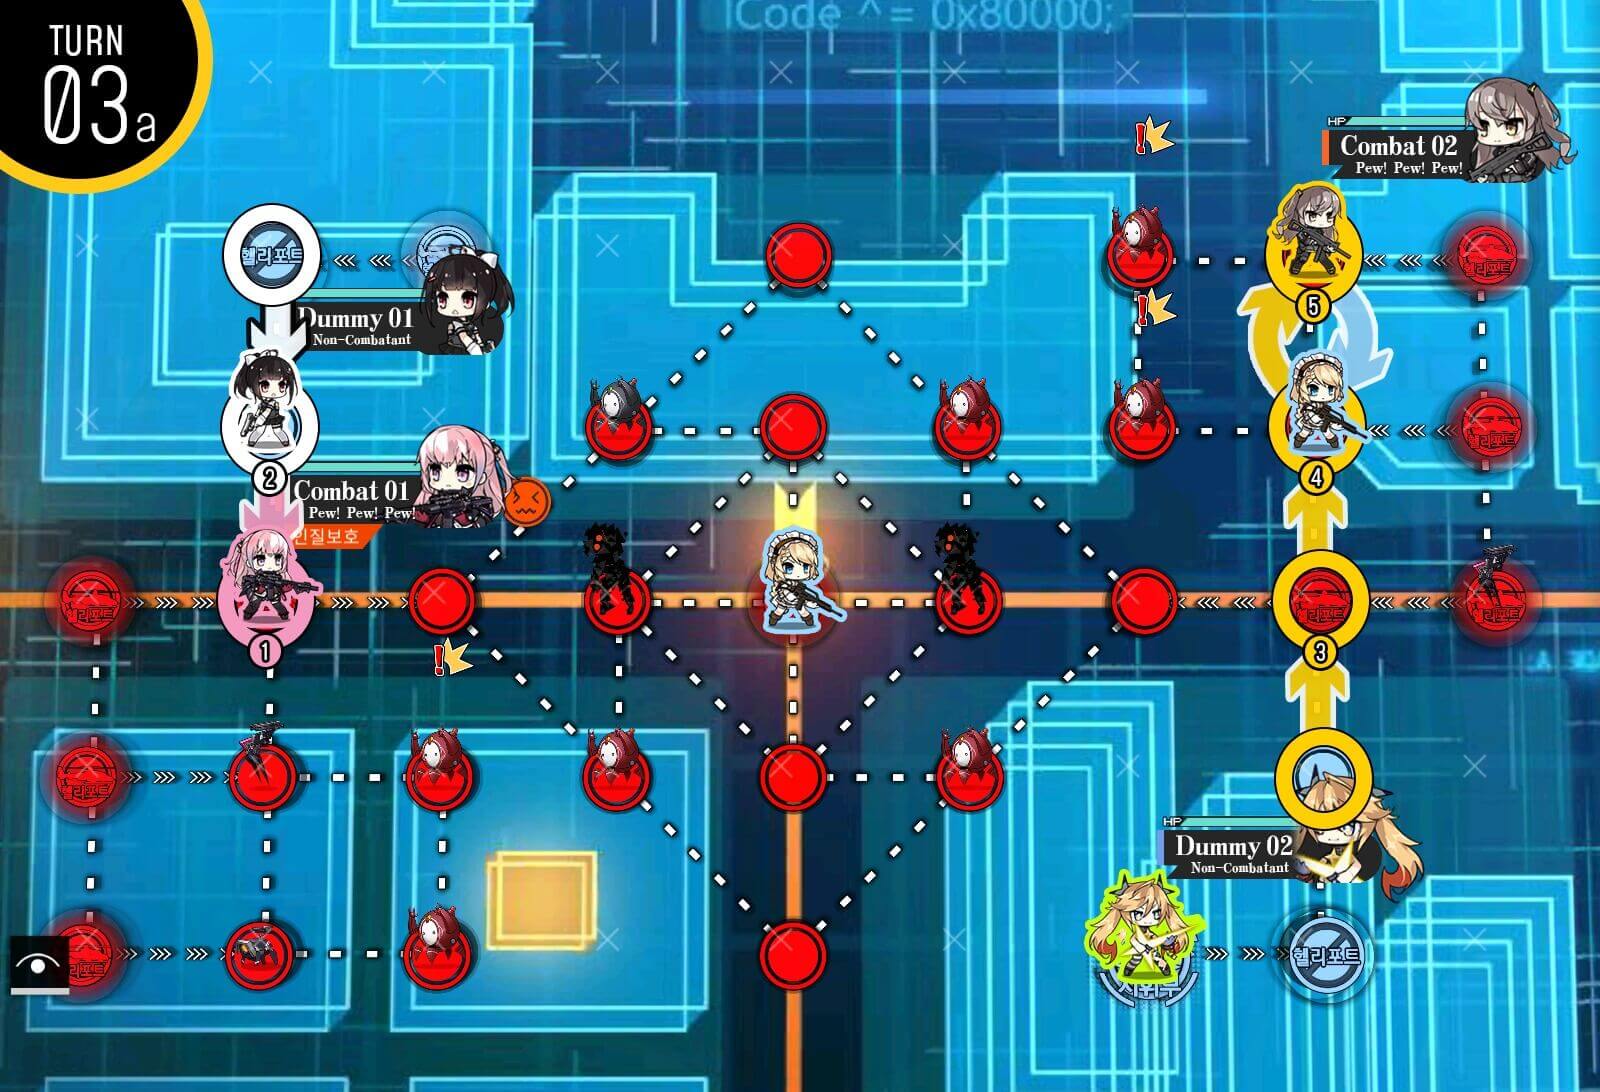
Turn 3a
Combat and dummy echelon on the left moves down one node each to control the helipad while combat echelon on the right side moves up to swap position with hostage.

Turn 3b
Rescue the hostage and move down to take helipad on the right side.
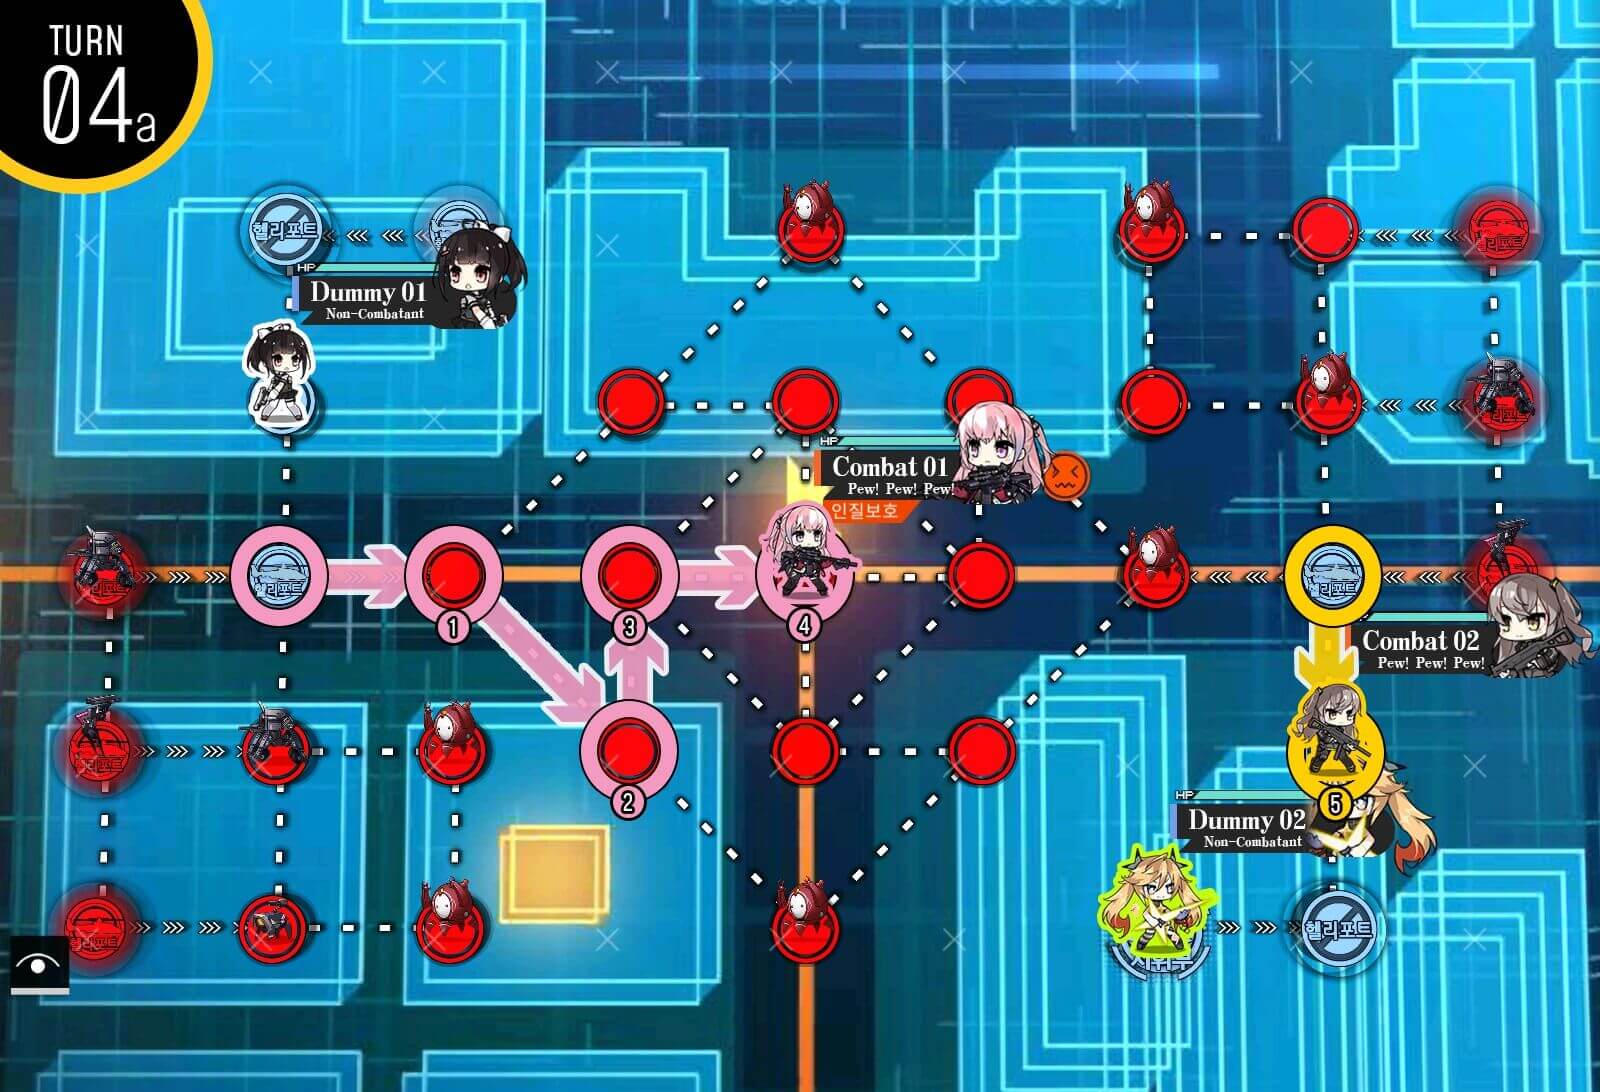
Turn 4a
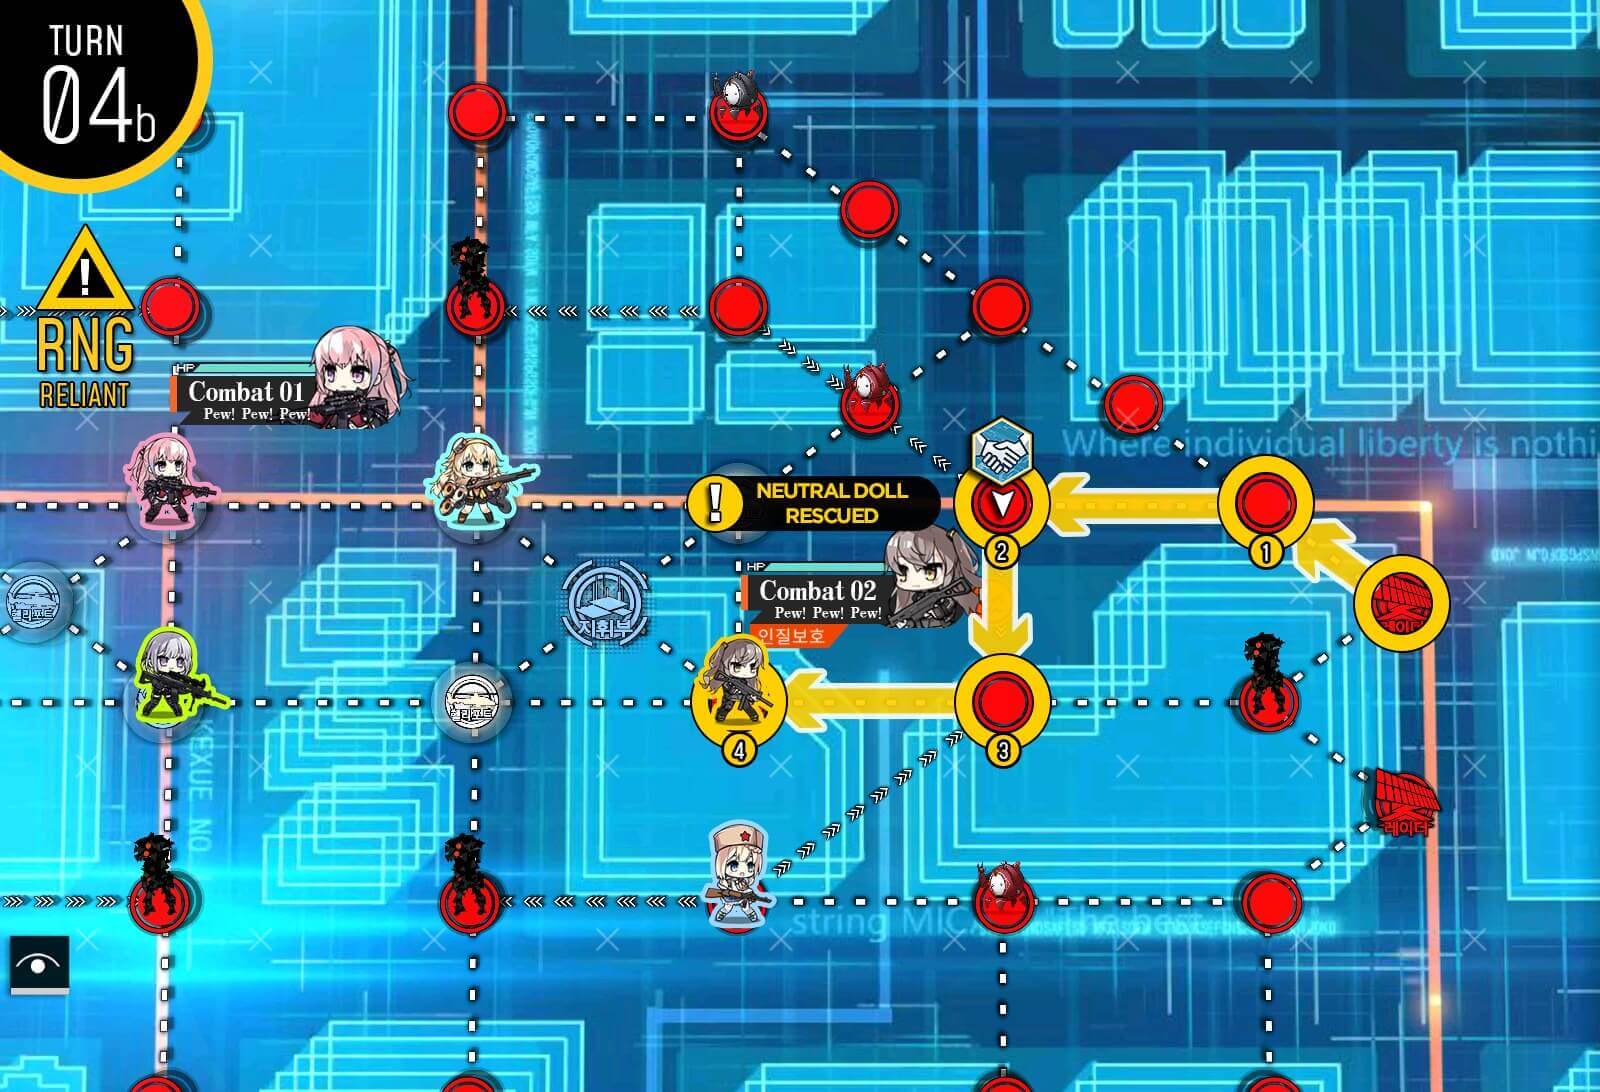
At the beginning of the turn two hostage automatically extracts. Left side combat echelon makes its way to center helipad to rescue hostage. Move down combat echelon on the right side down one so that it's away from the red bean.
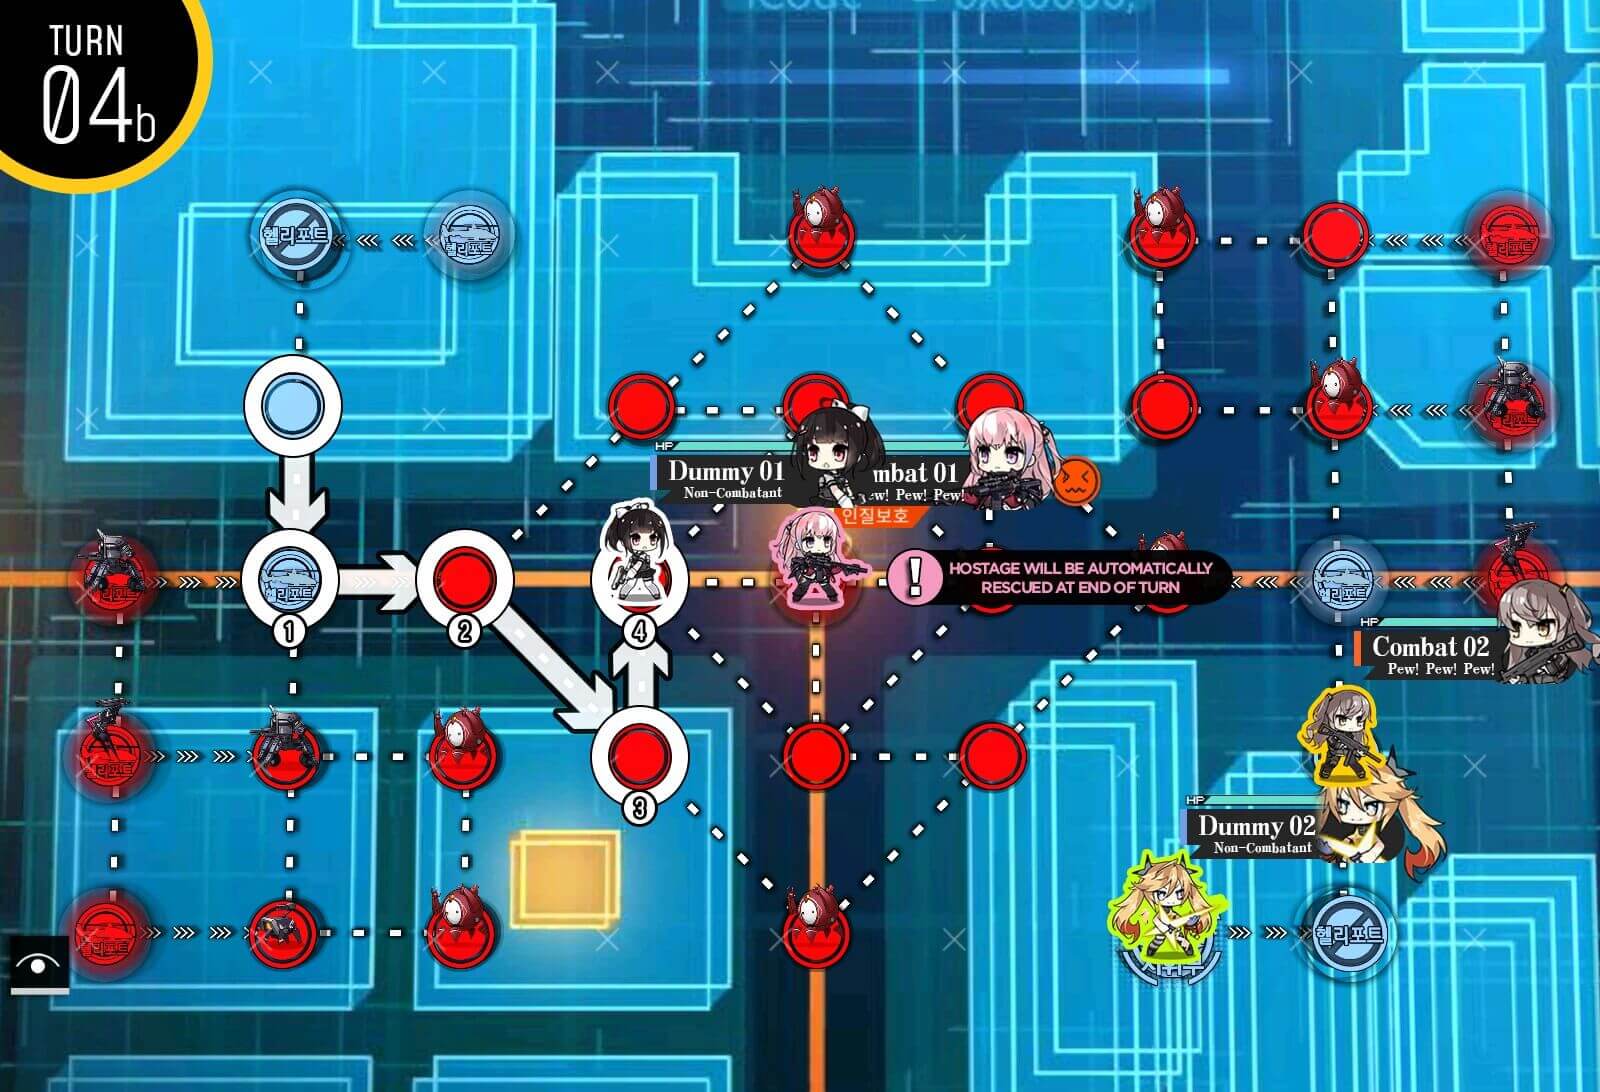
Turn 4b
Dummy echelon follows same path to combat echelon in the center and ending turn should automatically extract hostage next turn and clear the mission.

Turn 1a
Start with combat echelons on the outer deployment location and dummy in the middle helipad. Combat echelon on the HQ moves around left side and move on top of other combat echelon. Swap location and resupply. Deploy dummy echelon at the HQ before ending the turn. Once you kill the unit on top of combat echelon near helipad, black bean turns into a RO friend echelon. Make sure you change RO to 'Wait'.

Turn 2a
Combat echelon at the helipad clears out enemy units near the radar node at the bottom right. Stepping on the radar turns another black bean near enemy HQ to a friendly RO. Also change this to 'Wait' before ending the turn.

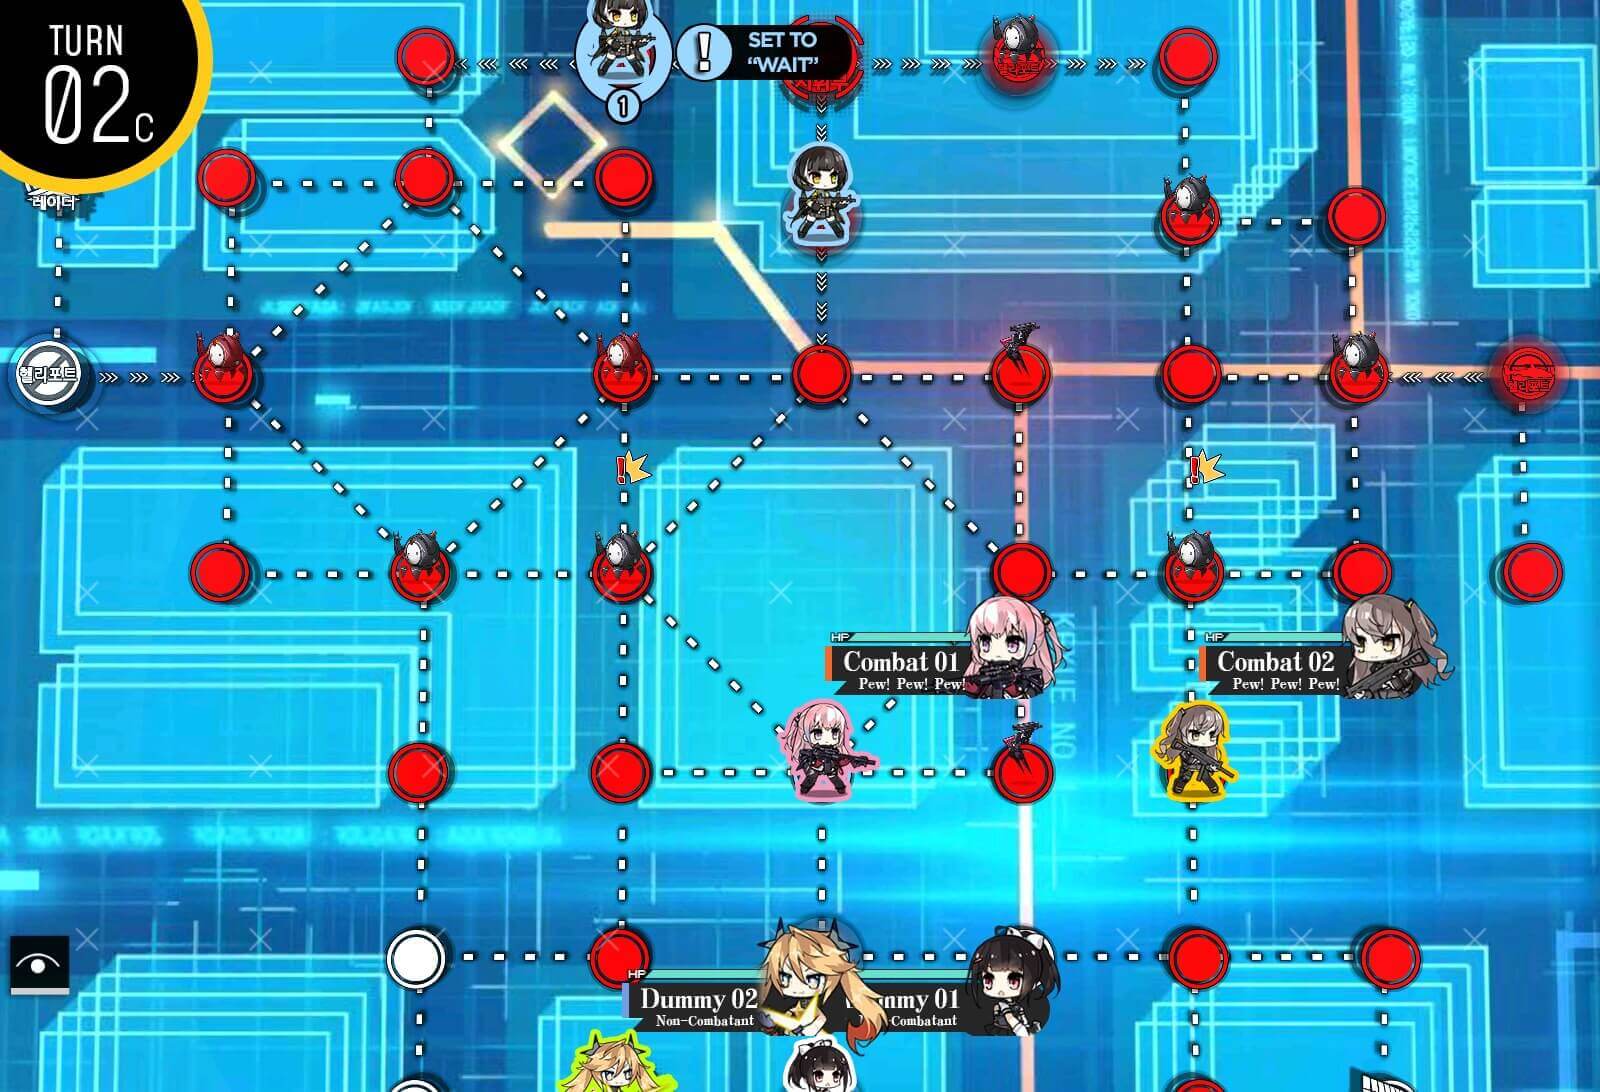
Turn 2c
Set marked RO to "Wait"
Turn 3a
Move up combat echelon on the right side up one and dummy echelon up one node as well.
Turn 3b
Combat echelon near HQ resupplies by swapping with dummy then moves up the right side of the square grid in the center.
Turn 3c
Dummy then follows behind.
Turn 4a
Combat echelons swap places and makes its way to the top right side, doing this unlocks the last RO friend echelon. Set RO to 'Wait' and now we will wait until red beans on the left side are out of the way to clear the map.
Turn 4c
Second combat echelon moves back to the helipad to resupply.

Turn 5~7
We are waiting until red beans are at the bottom left side of the grid and black bean on the top.
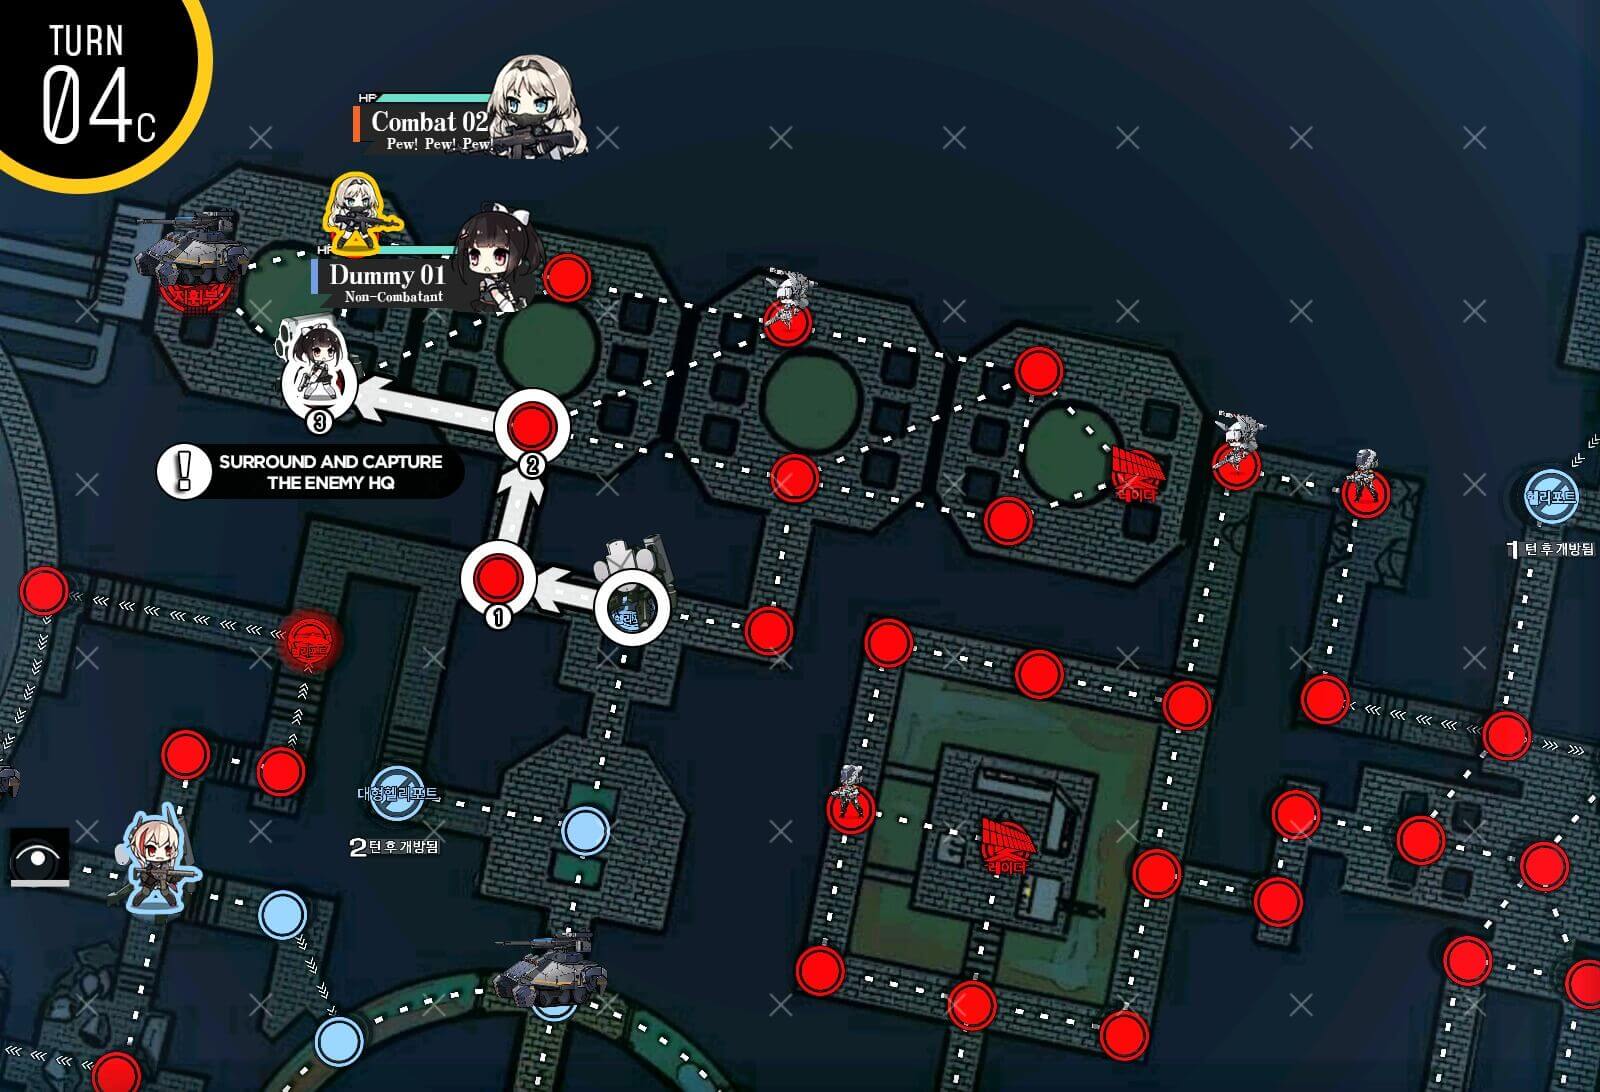
Turn 8a
Once the path is clear, send combat echelon into pocket next to RO on the left side then move dummy echelon to the node adjacent to the RO at the center. We should surround capture the HQ next turn.
Turn 1
This map is large but it can be divided into left side and right side. Start with two combat echelons on each deployment location. Combat echelon on the left side moves and hit the radar node which turns one of the enemy units to a hostage. Deploy a friend echelon at the helipad and set to 'Eliminate'.
Turn 2a
Move the combat echelon on the left down one node, away from the red bean. Change the friend echelon to 'Wait'.
Turn 2b
We are doing the same thing for the right side, stepping on the radar at the top right, then deploying friend echelon on HQ, setting to 'Eliminate'.
Turn 3a
Beginning of next turn, change setting of the friend echelon on the right side to 'Wait' and deploy dummy echelon on the starting helipad. Combat echelon on the left side move down and swaps position with hostage.
Turn 3b
Rescue the hostage closer to the starting helipad. Then move up and right to swap with dummy on the helipad. Extract hostage manually then clear out the enemy to the right.
Turn 4a
Start of next turn, dummy moves to left and swap location with the hostage.
Turn 4b
Then combat echelon at the right side picks up hostage and makes it to the helipad near HQ.
Turn 4c
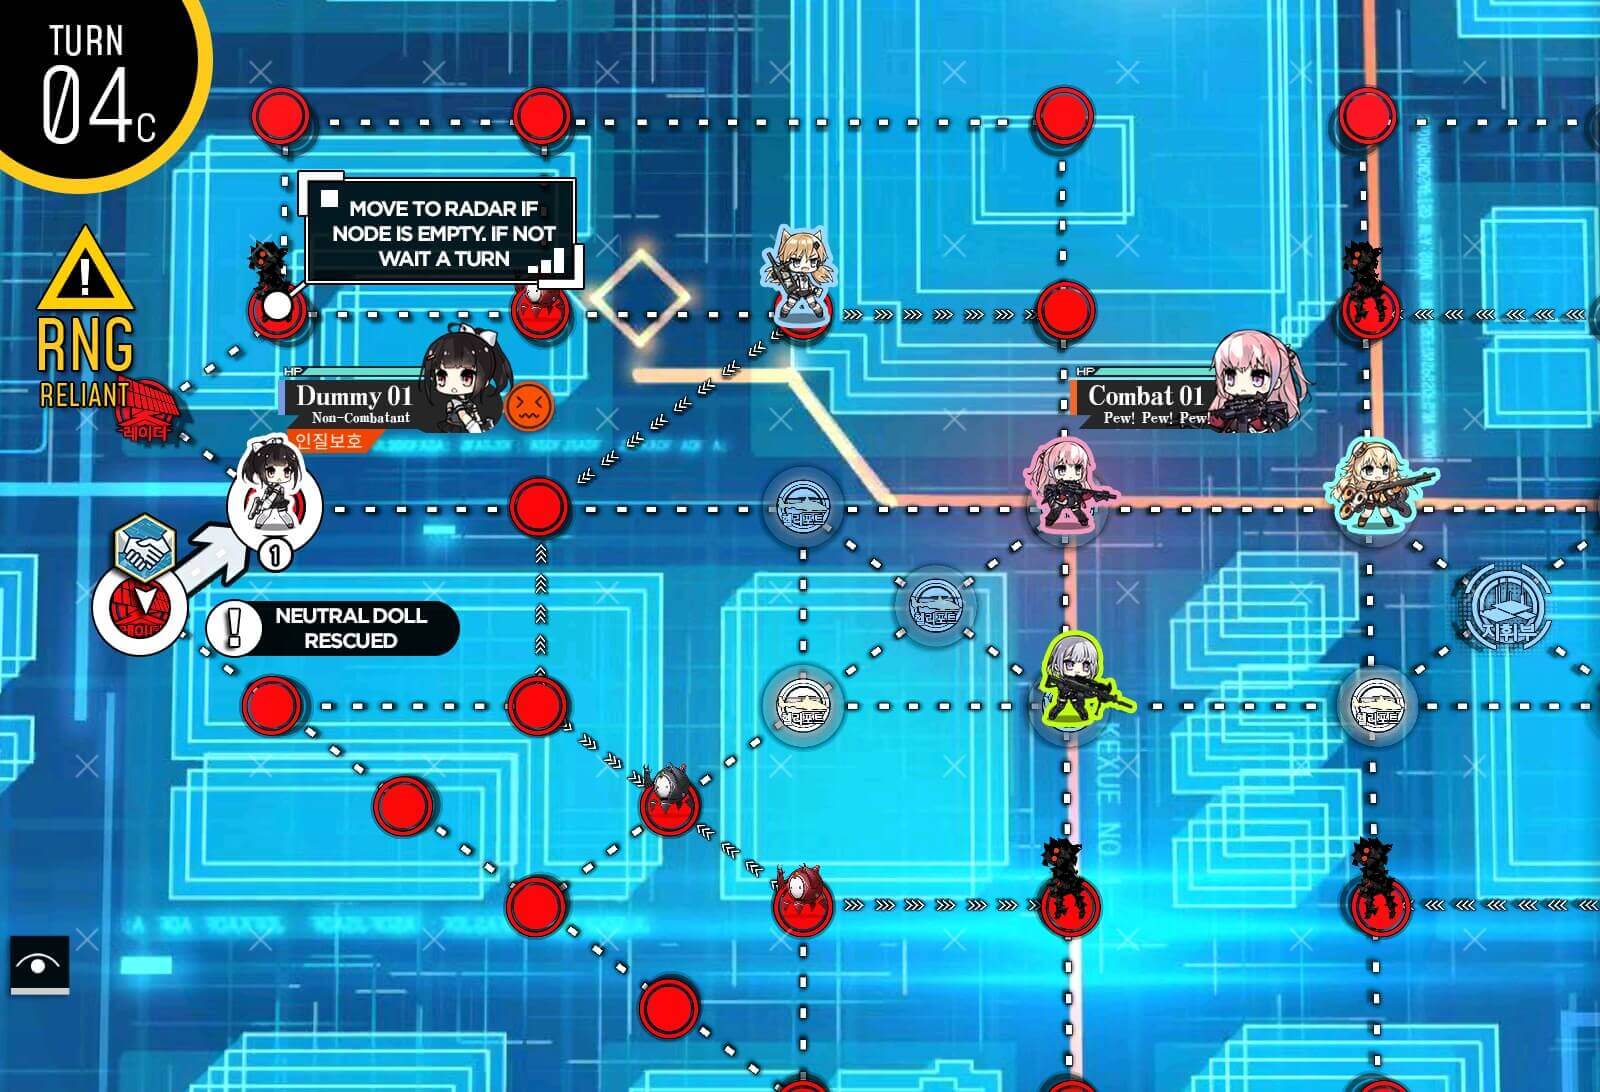
This is a bit of RNG as to where the cyber zombie is going to be but if the radar node is safe from the enemy aggro, rescue the hostage then move up to draw aggro from the red bean. If not you can just wait a turn and still get S-rank.
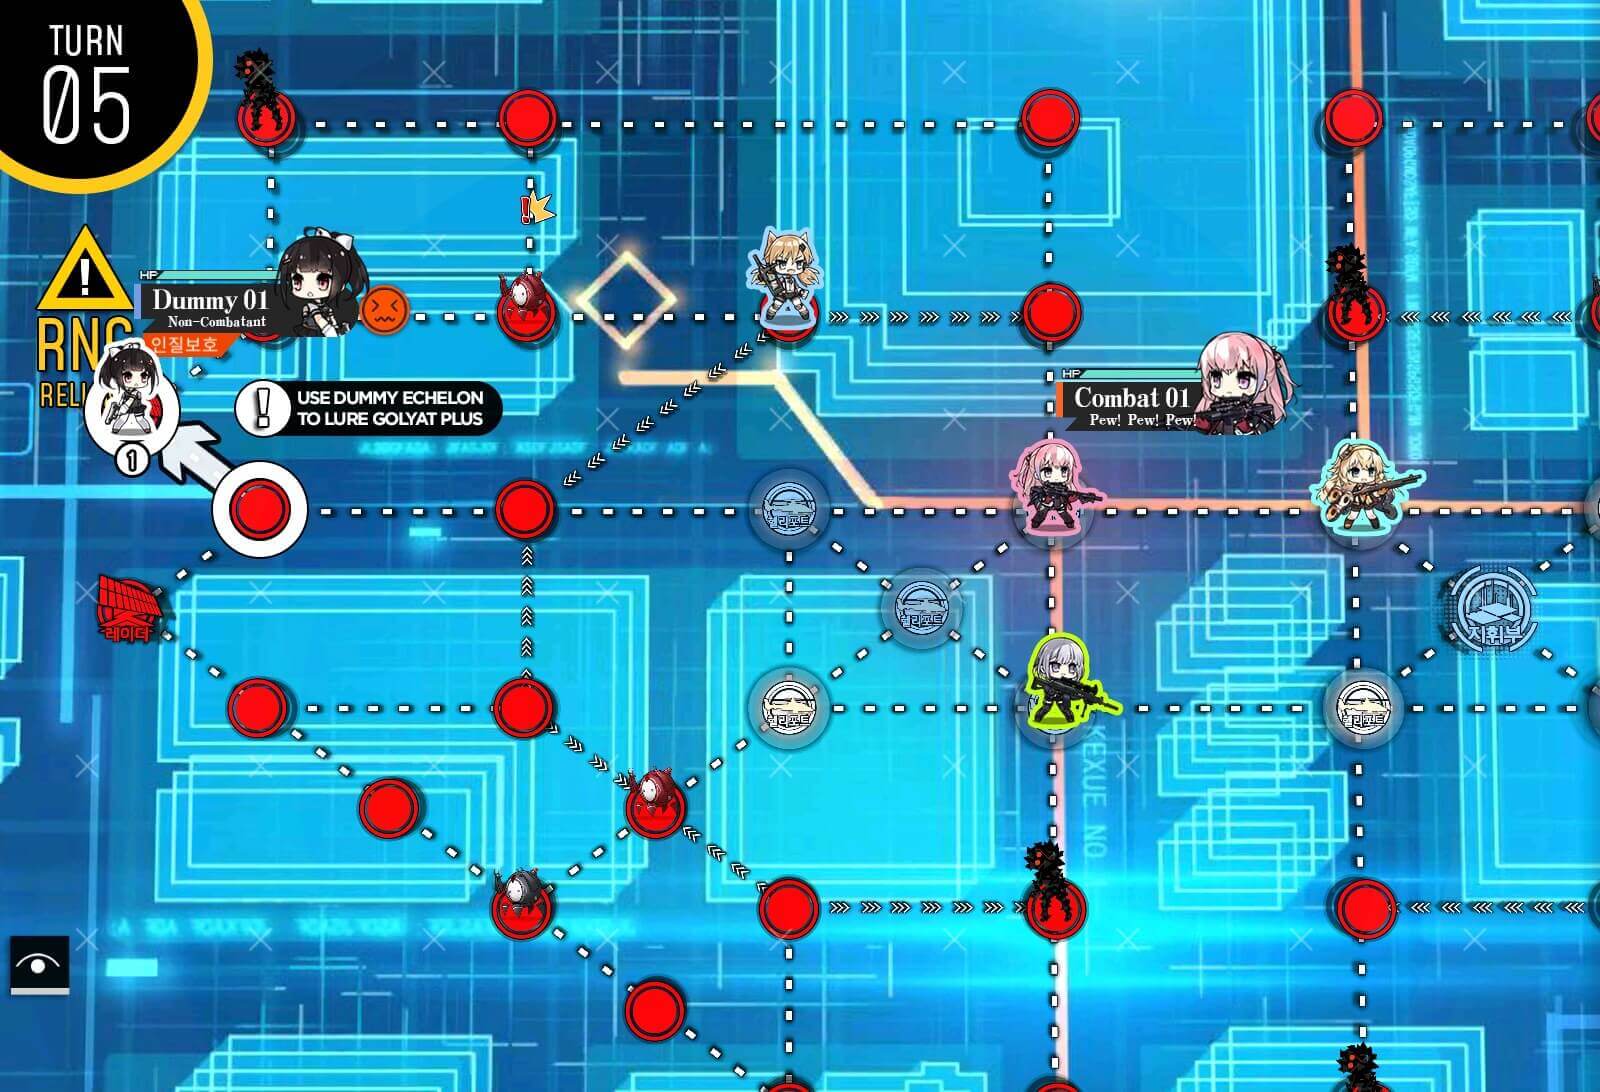
Turn 5
In this instance it was not safe, so I waited a turn then moved the dummy up one to draw aggro.
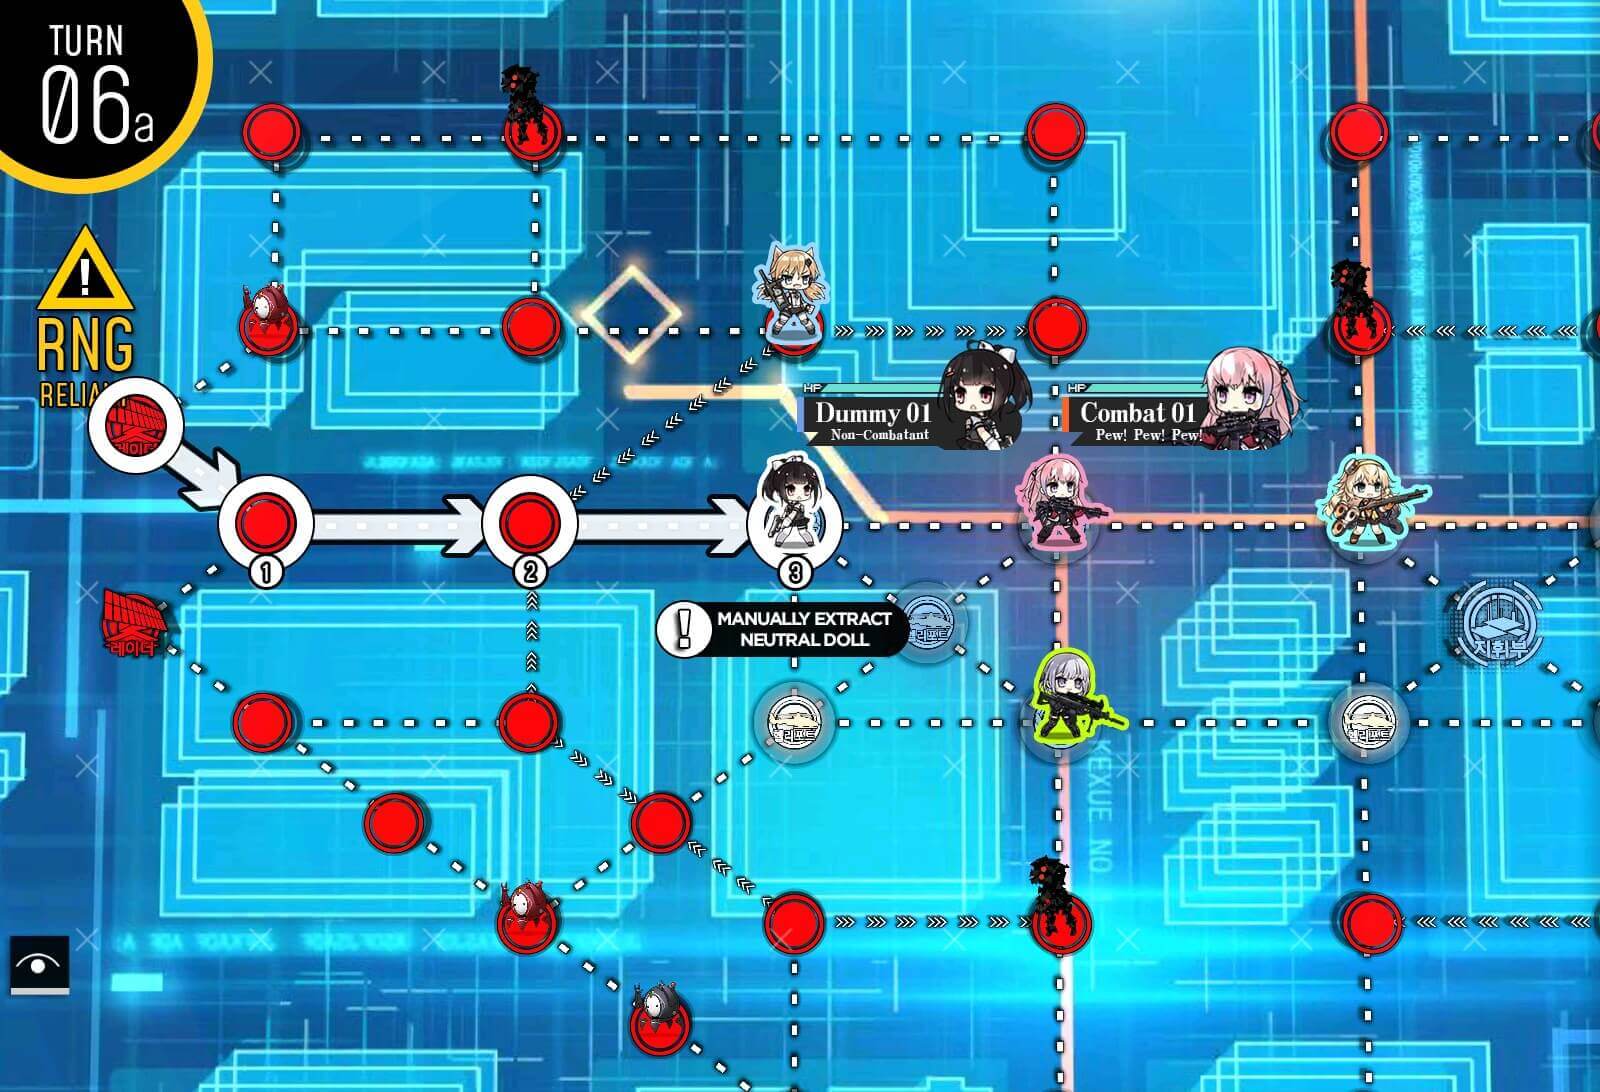
Turn 6a
Once red bean moves, dummy echelon move to extract the hostage manually at the helipad.

Turn 6b
Combat echelon on the left side move up and around to rescue the last hostage then manually extract at the same helipad.

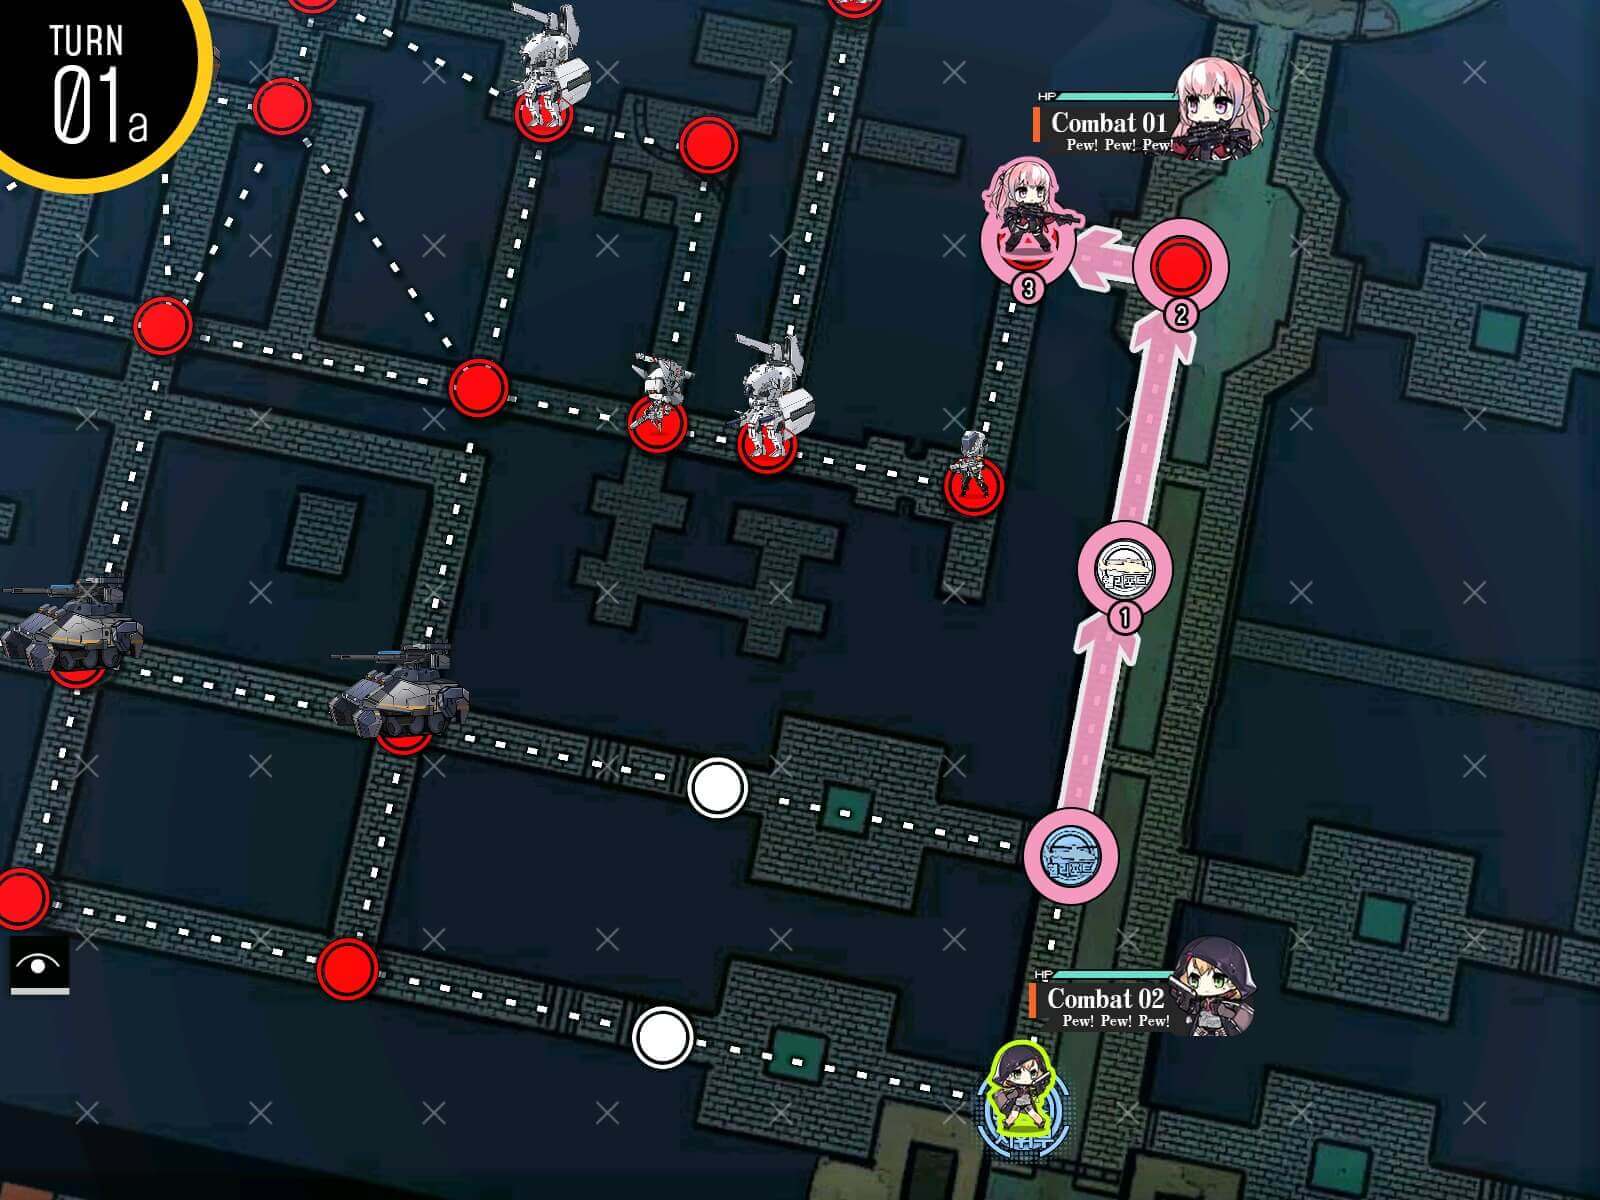
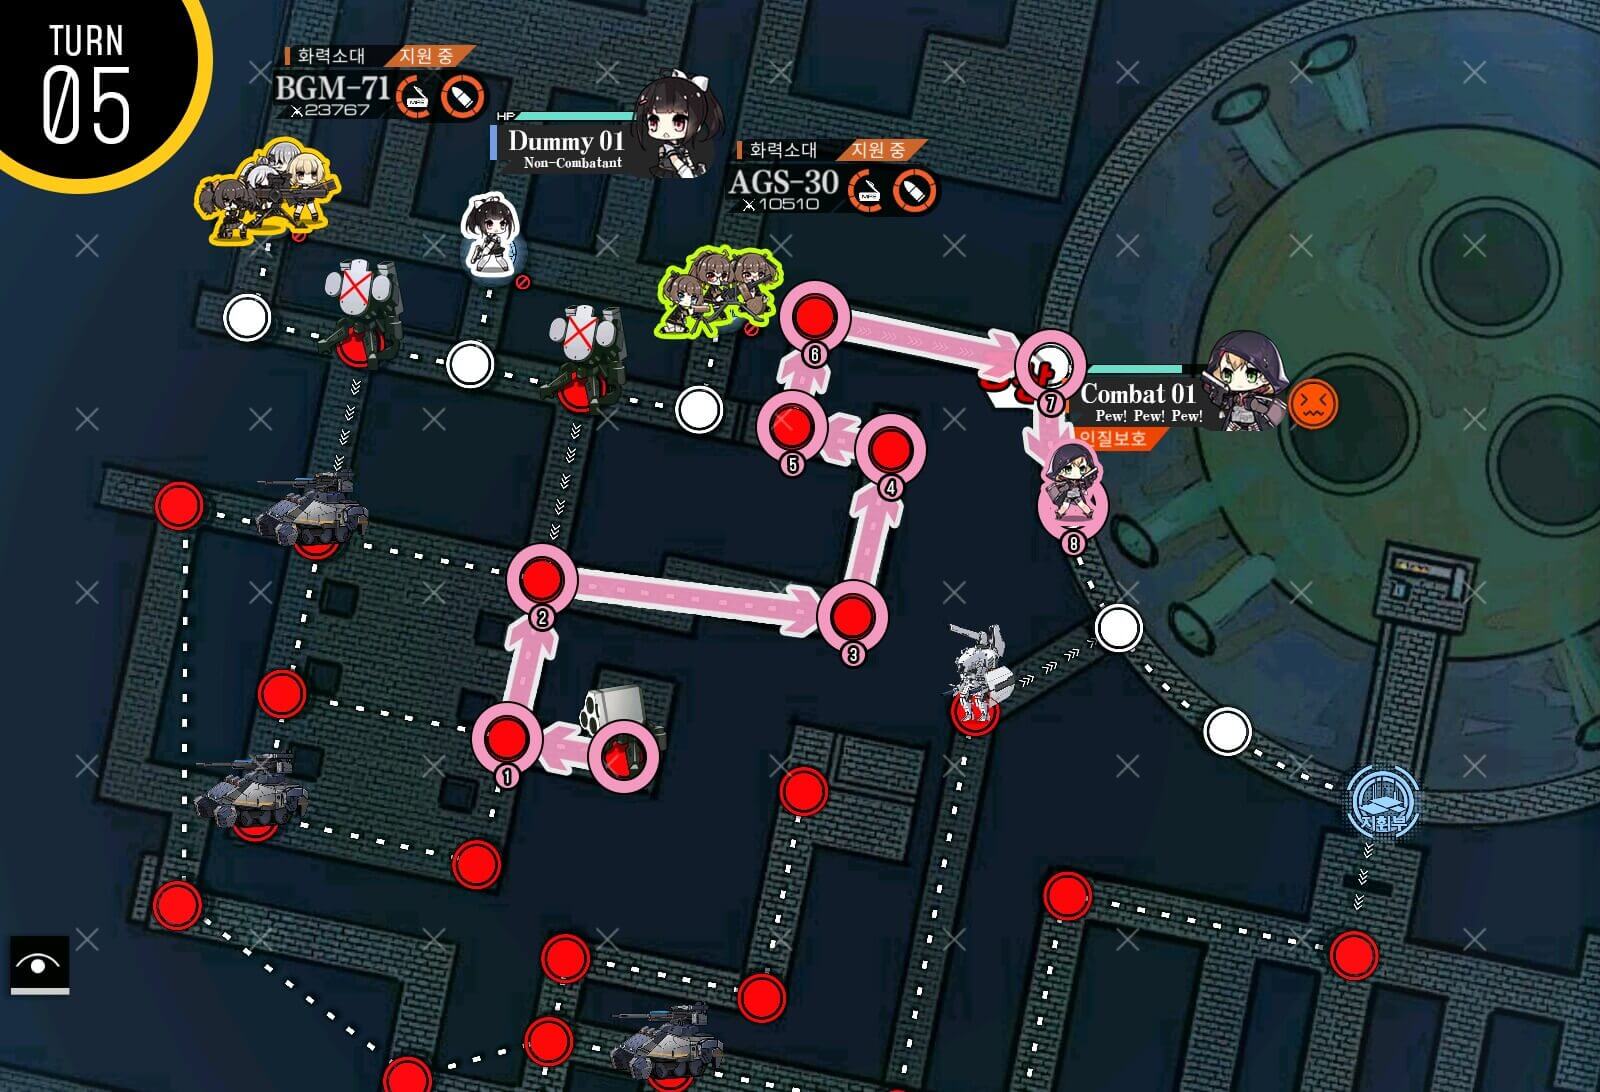
Turn 1
The task for RO friend units in this map is to draw aggro of Uhlans and clearing path for combat echelons to HQ. On first turn we are going to set them all to 'Wait'.Deploy your AR echelon on the HQ and move up to deploy RF echelon which will fight the Gundam and make it to HQ.

Turn 2a
On second turn, set the top two RO units to 'Eliminate'. AR echelon makes its way just past the closed helipad on the right.
Turn 2b
Then we move RF echelon up one node and deploy a dummy on HQ.
Turn 3
AR combat echelon moves along the outskirts and make way to right side. Set RO unit on far right to 'Eliminate'.
Move RF echelon on the left up one node and deploy a second dummy echelon on the newly captured helipad.
Turn 4a
RFHG echelon makes way through the center path between the tanks.
Turn 4b
Don't forget to set ROs accordingly. Set the rightmost RO to 'Wait' and bottommost RO to 'Eliminate'
Turn 5
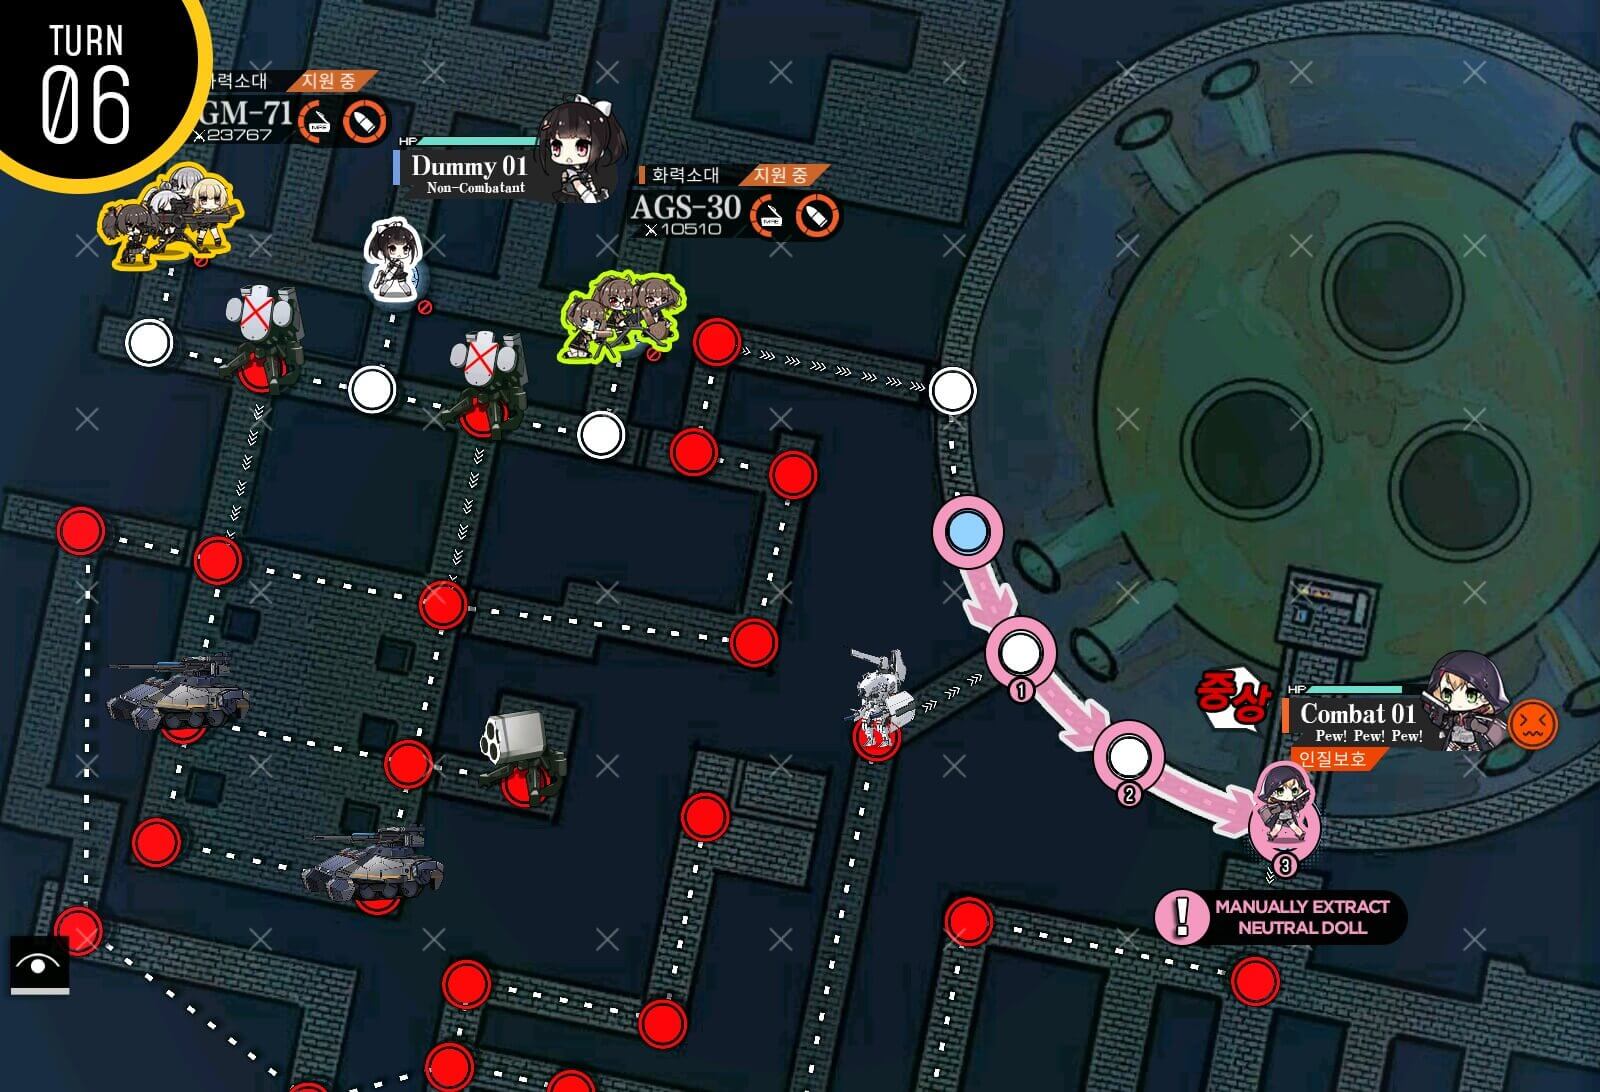
Now that the path is open for RFHG echelon, take HQ and end turn to clear the mission.
Turn 1
Start with combat echelon on the HQ and rest of dummies on the top left. They will not provide any meaningful support. Combat echelon swaps with hostage and end turn.

Turn 2
Rescue hostage and we have to fight enemy unit supported by enemy artillery. MAKE SURE THAT BATTLE SIMPLICATION IS OFF FOR THIS BATTLE or you don't get to see the warning sign of which T-doll is being targeted.
After you hear a round of the mortar fired, you have about a second before retreating to dodge the mortar or your unit will be heavily damaged.
NOTE: Uhlan spawns are random. Make sure that a gap appears so you can move in; if Uhlans are blocking the entrance, you will need to stop at a node where they are not alerted (e.g. Node 5). You may not get a S-rank if this happens.

Turn 3
We have to move out of tank's aggro range and make it to the enemy fire support which has the resupply node.

Turn 4
Resupply and wait for a turn for tank to move out of the way.
Turn 5
Make your way through the enemy units and stop short of the Gundam.
Turn 6
Return to HQ and manually extract to clear the mission. You also do have option to fight the Gundam on turn 2 instead of going left side, but this is not recommended as it will be a much tougher fight.
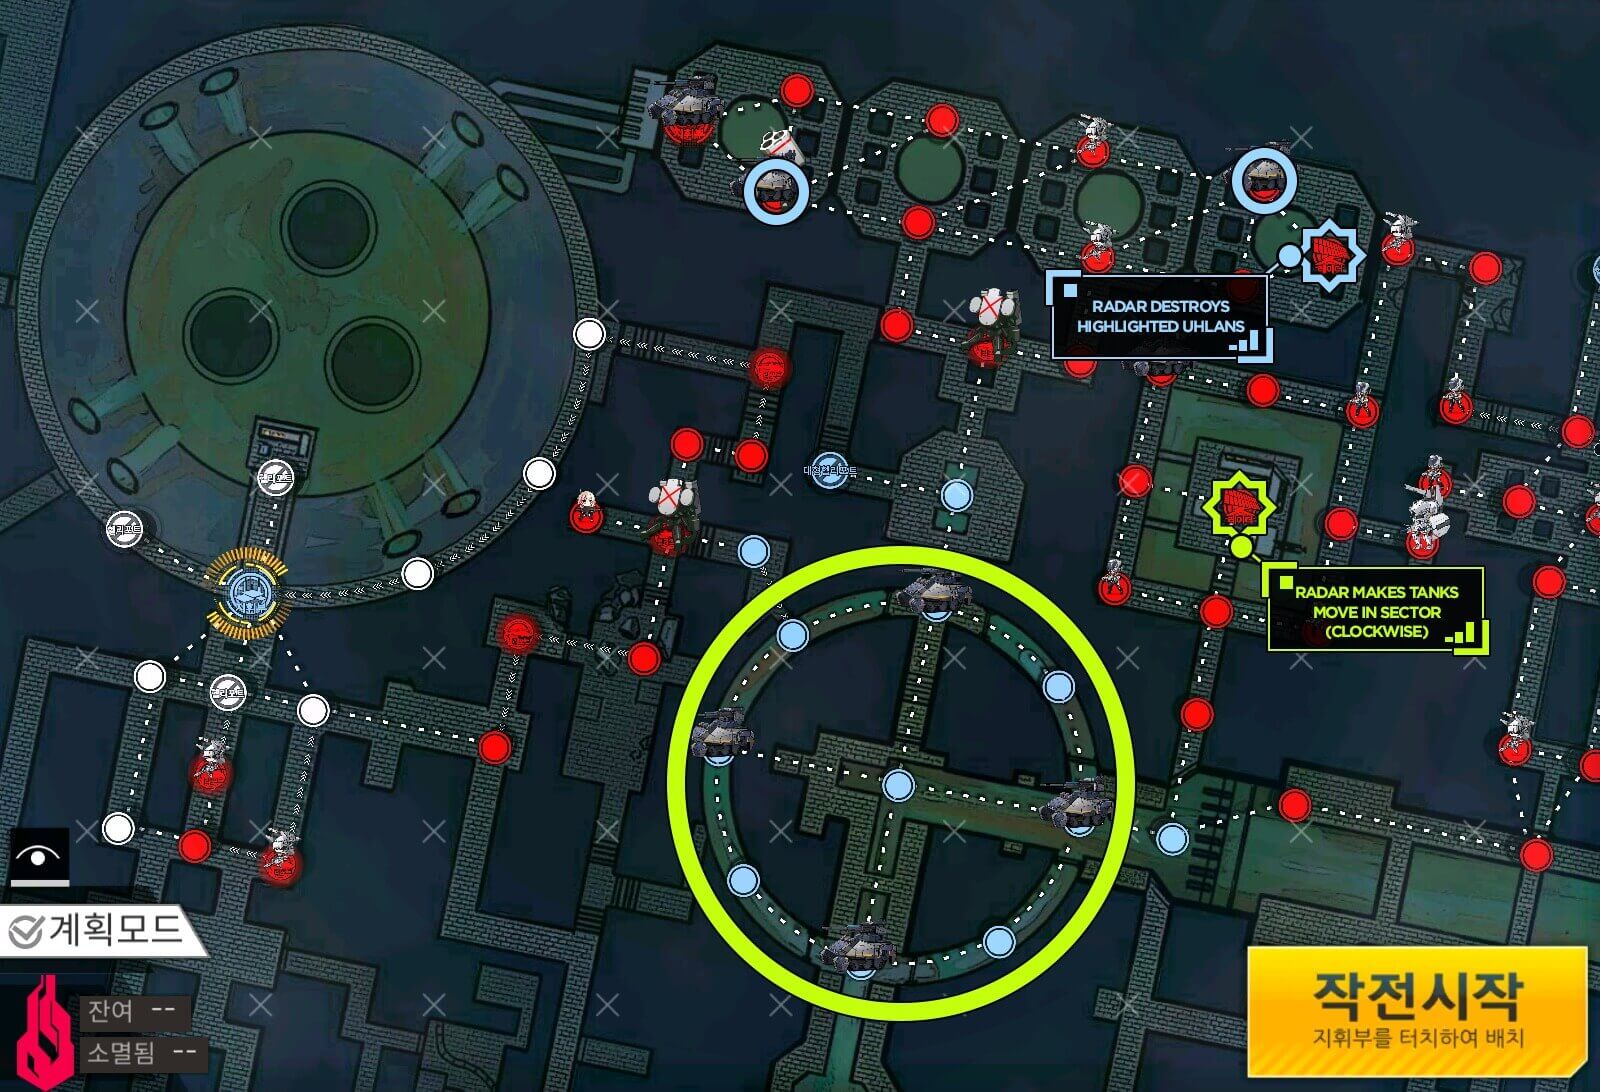
Turn 0
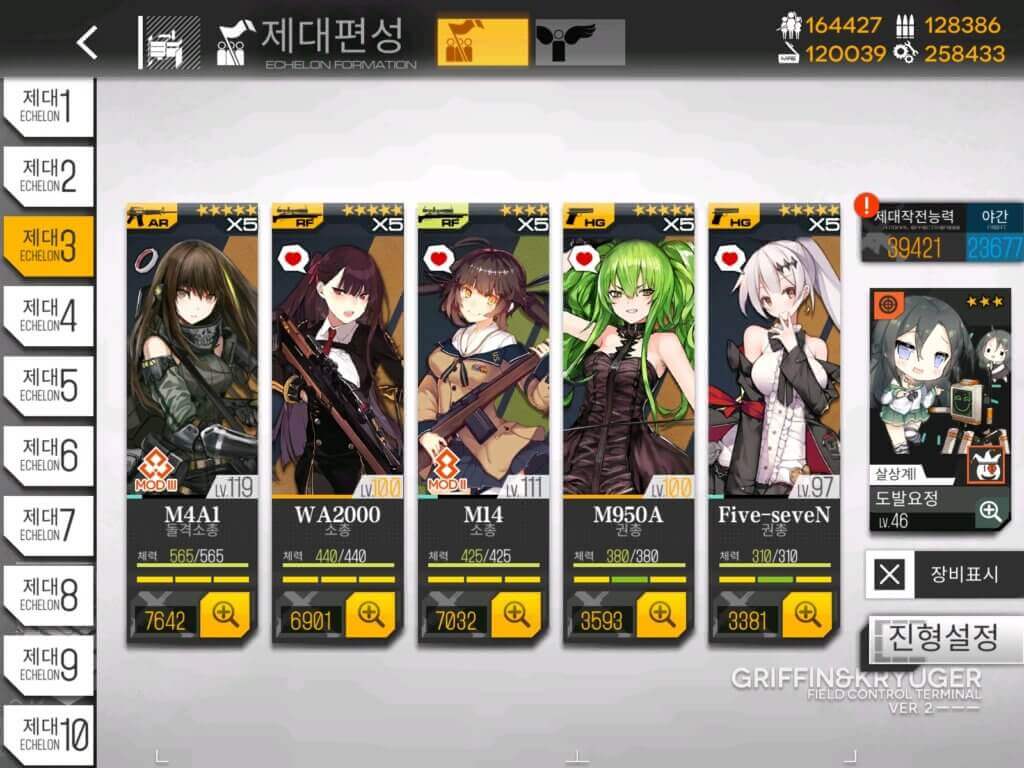
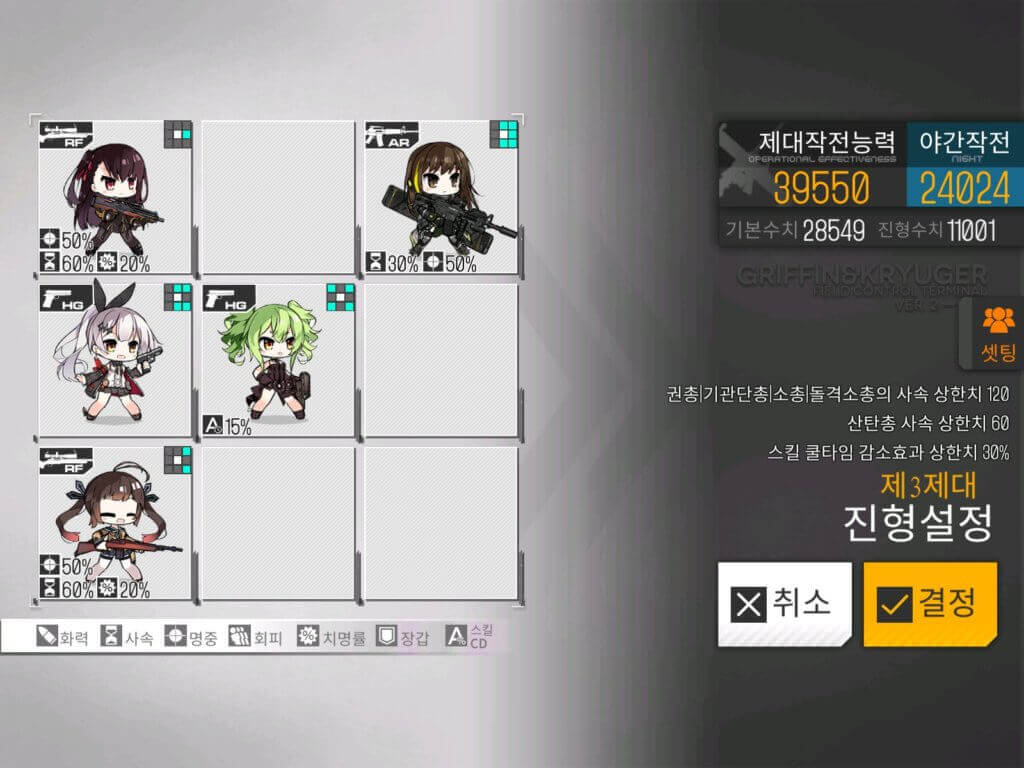
The main mechanic in this map is indicated above which is triggered by stepping on radar nodes. Both are essential to avoid fighting Uhlan tanks. I recommend using the 11-3E special mix RFHG team on the right side and just regular AR echelon on the HQ bottom left.
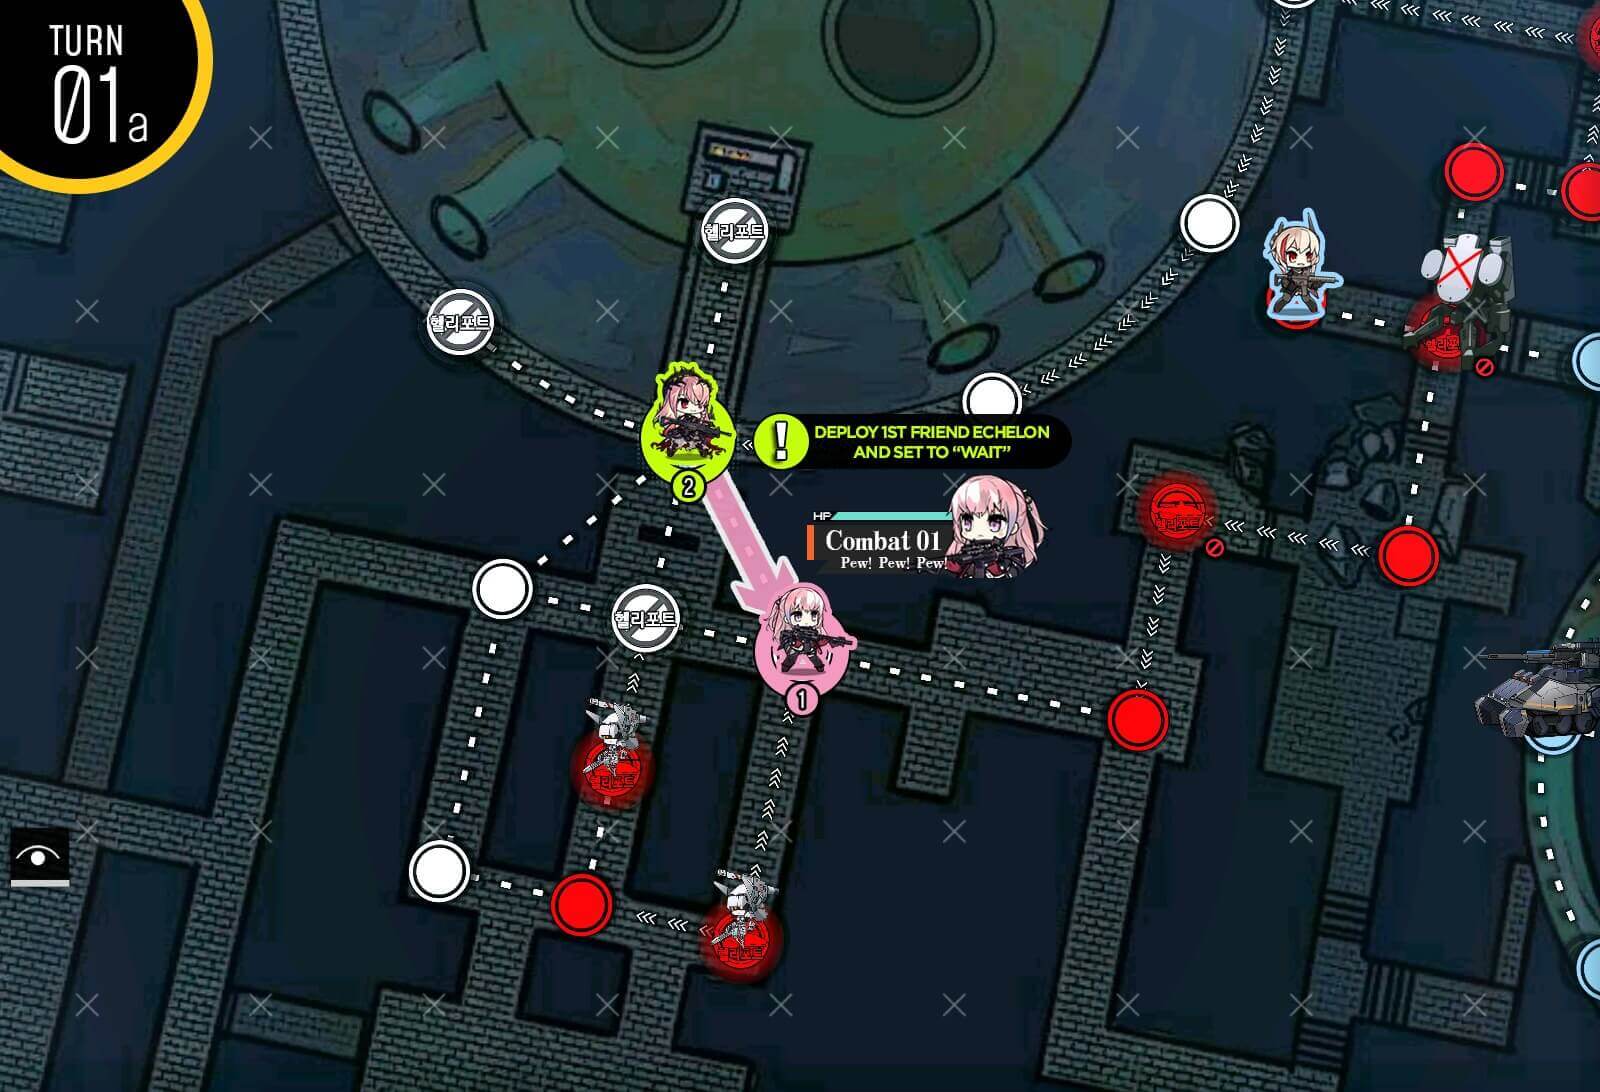
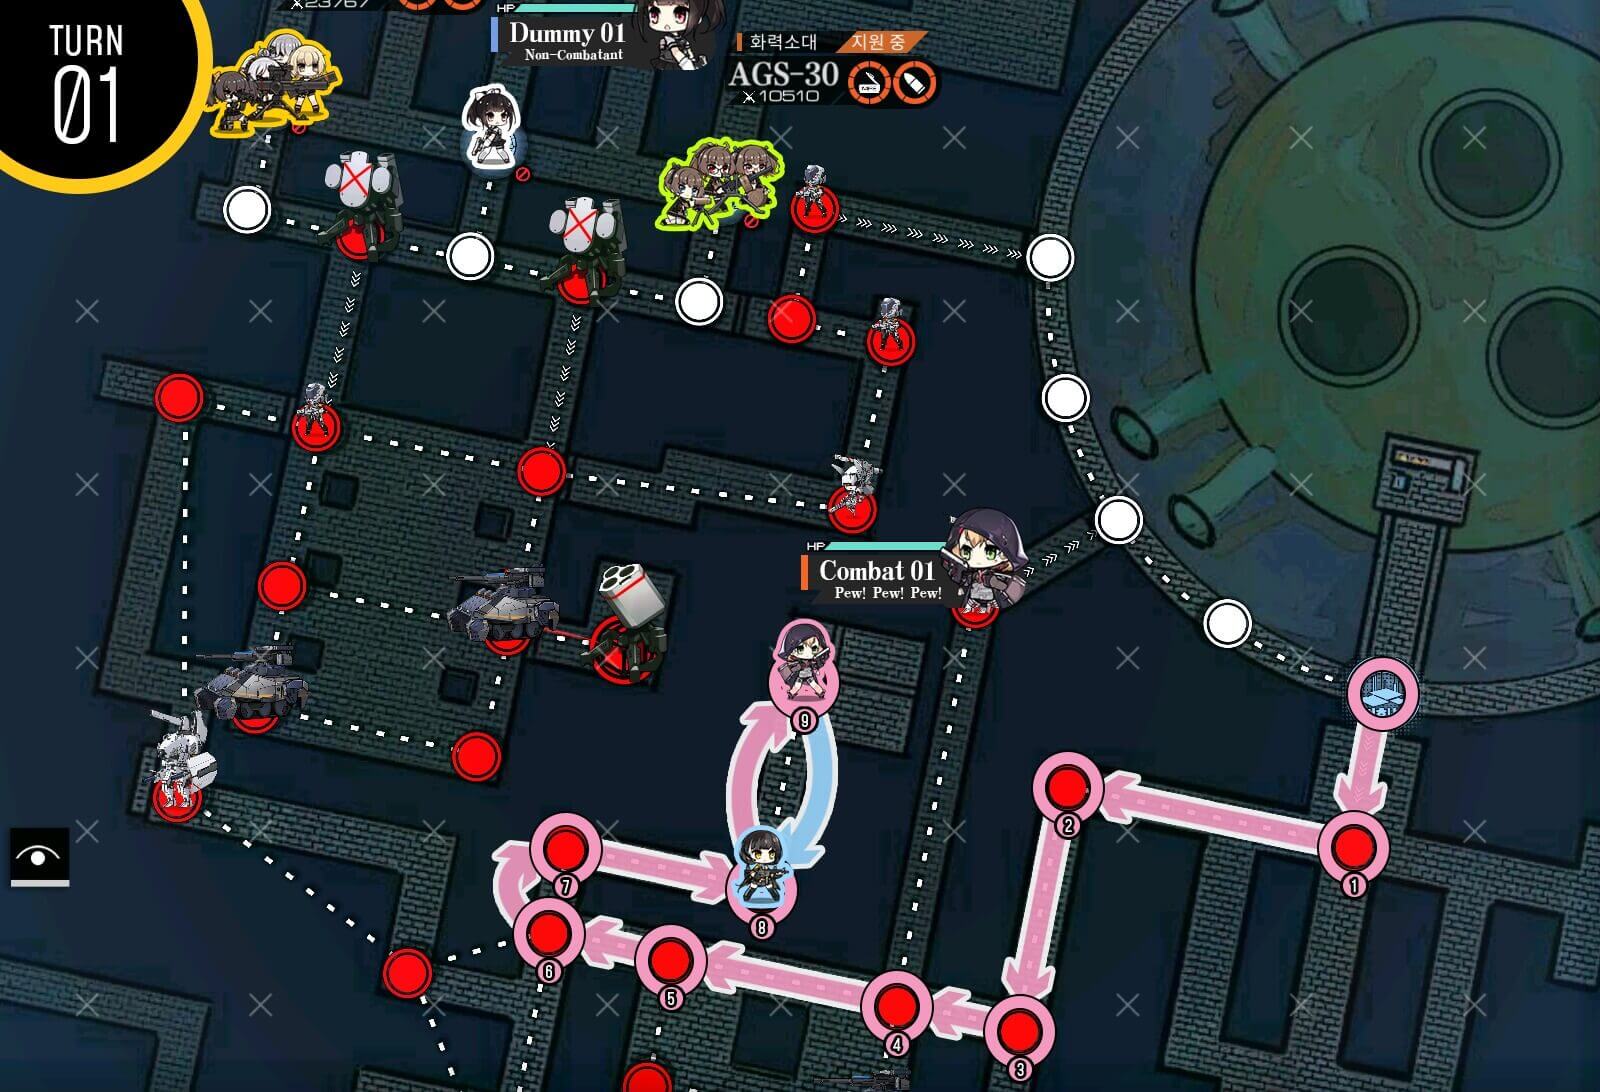
Turn 1a
Start with combat echelon near HQ moving down right and deploying friend echelon. All friend echelons will be set to 'Wait'.
Turn 1b
Swap with friend echelon on the HQ and move down center.
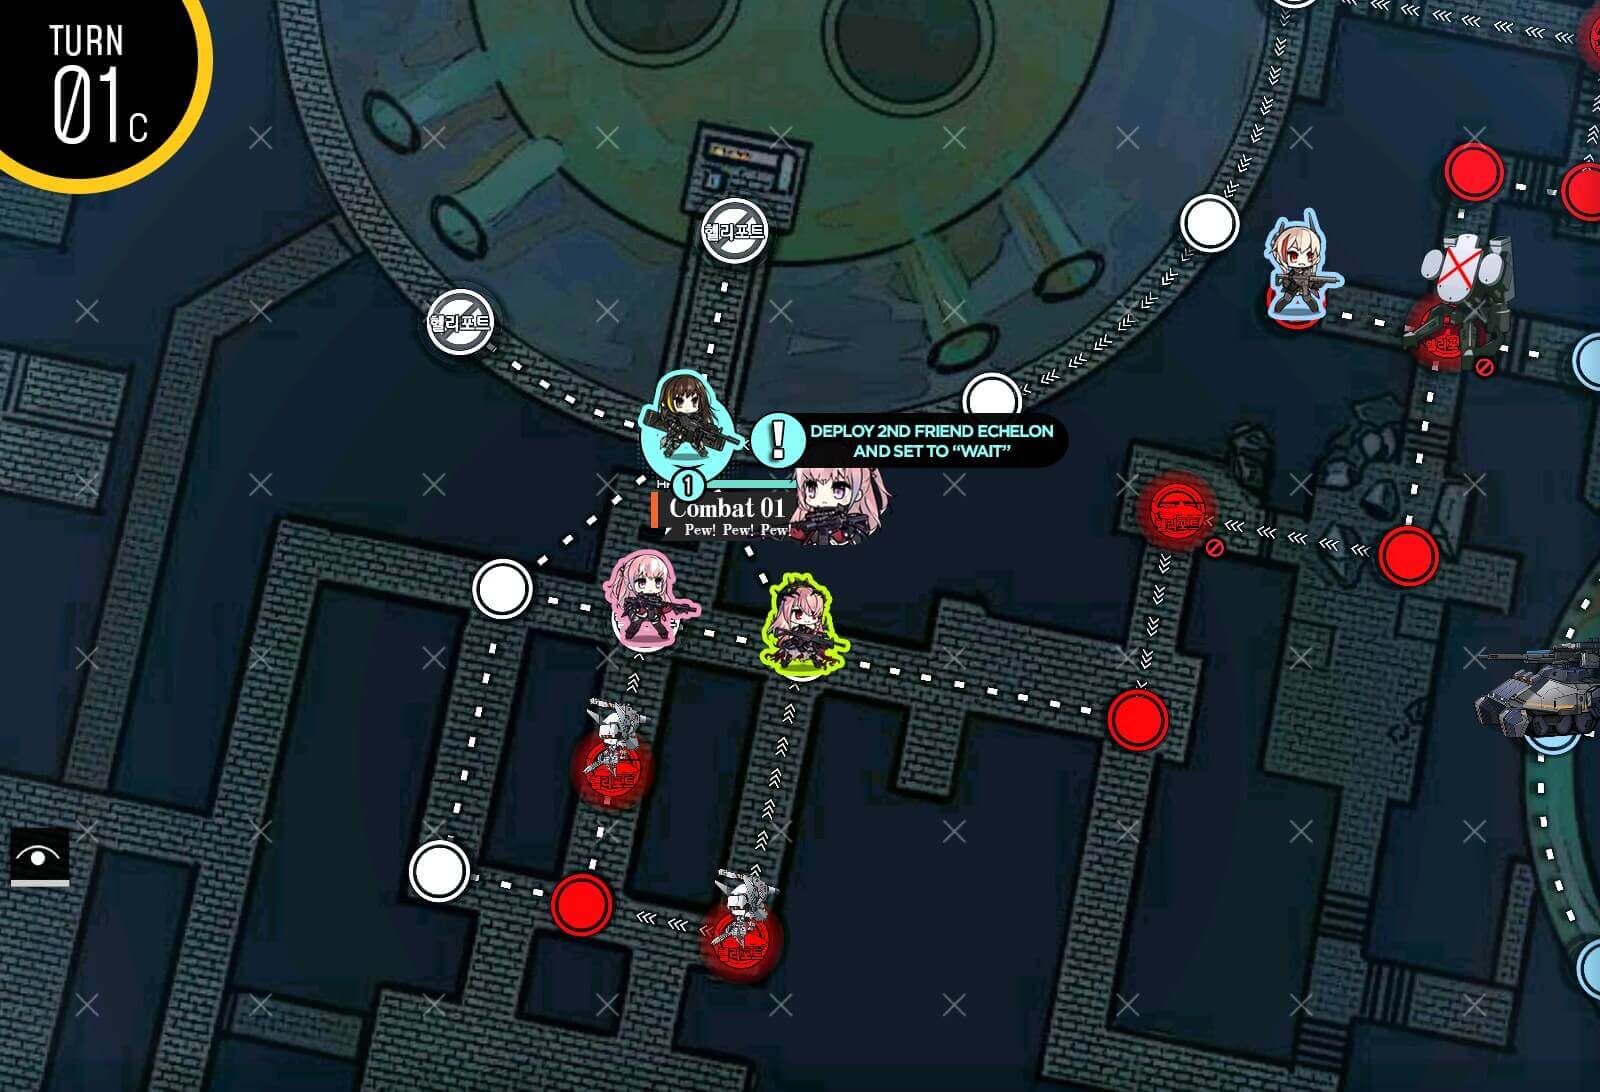
Turn 1c
Deploy a second friend echelon set to 'Wait'.
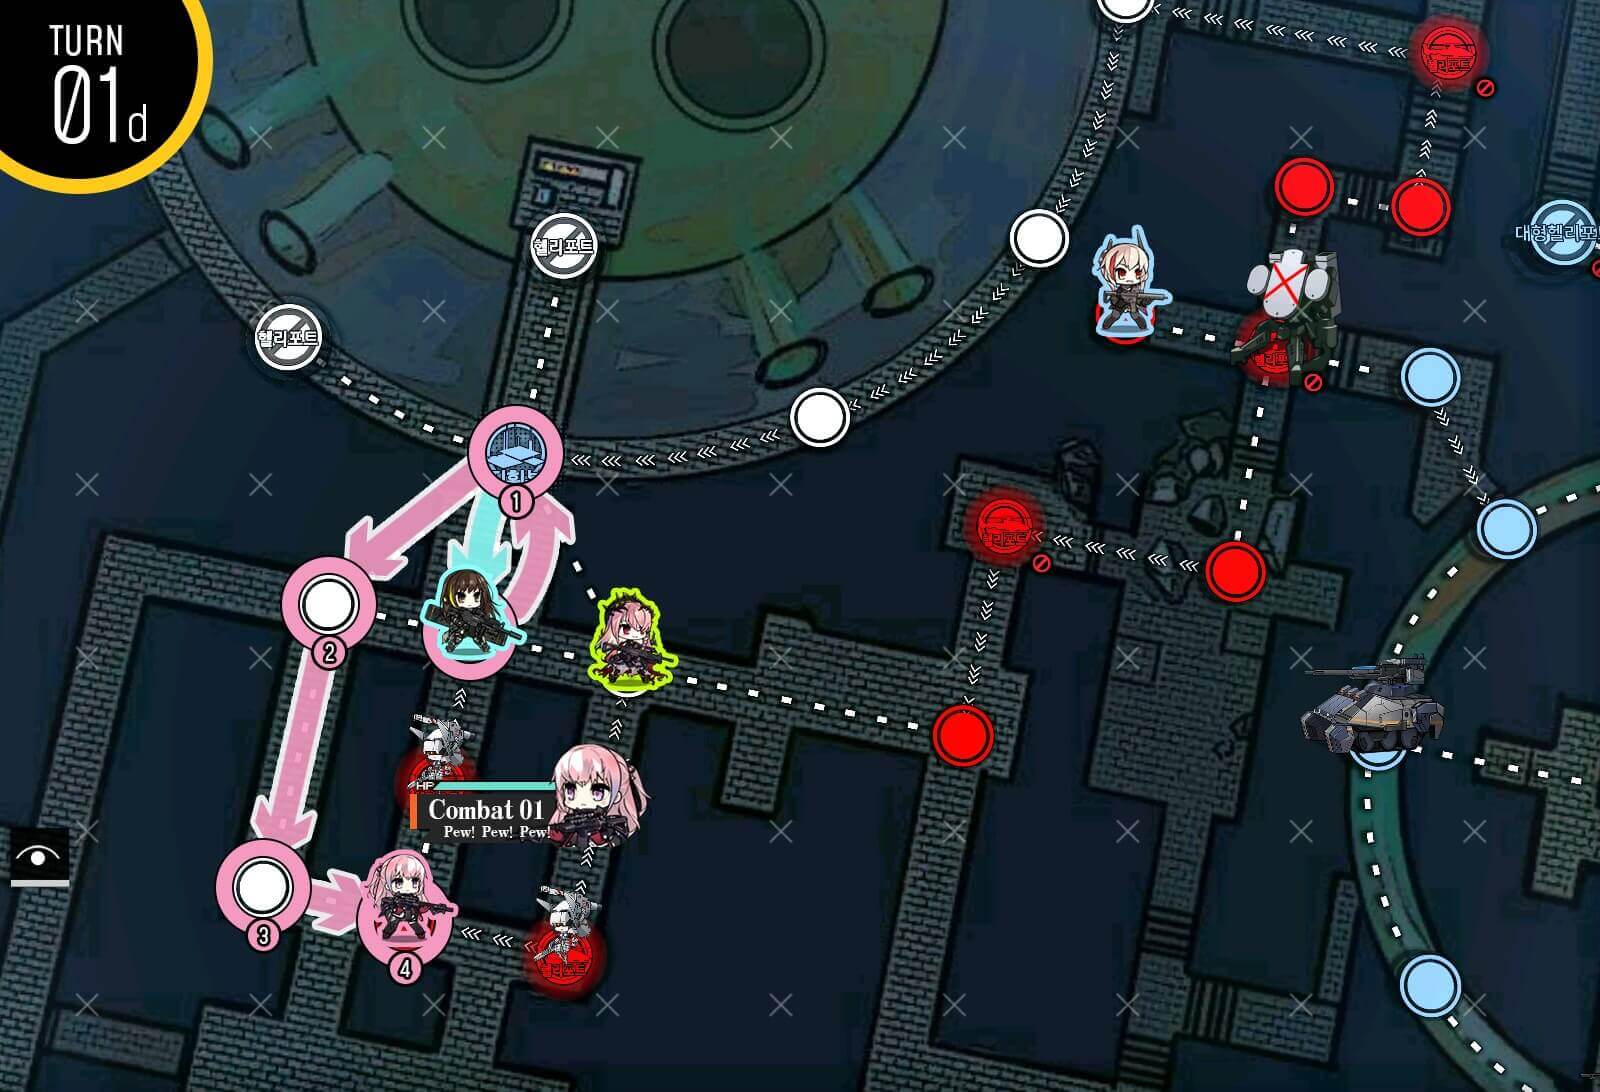
Turn 1d
Swap back to HQ and move around the left route to surround capture all enemy helipads near the HQ.

Turn 2a
On Turn 2, change command of SOP to 'Wait'. In future turns, friend echelons will get attacked by tanks and all you have to do is retreat them.
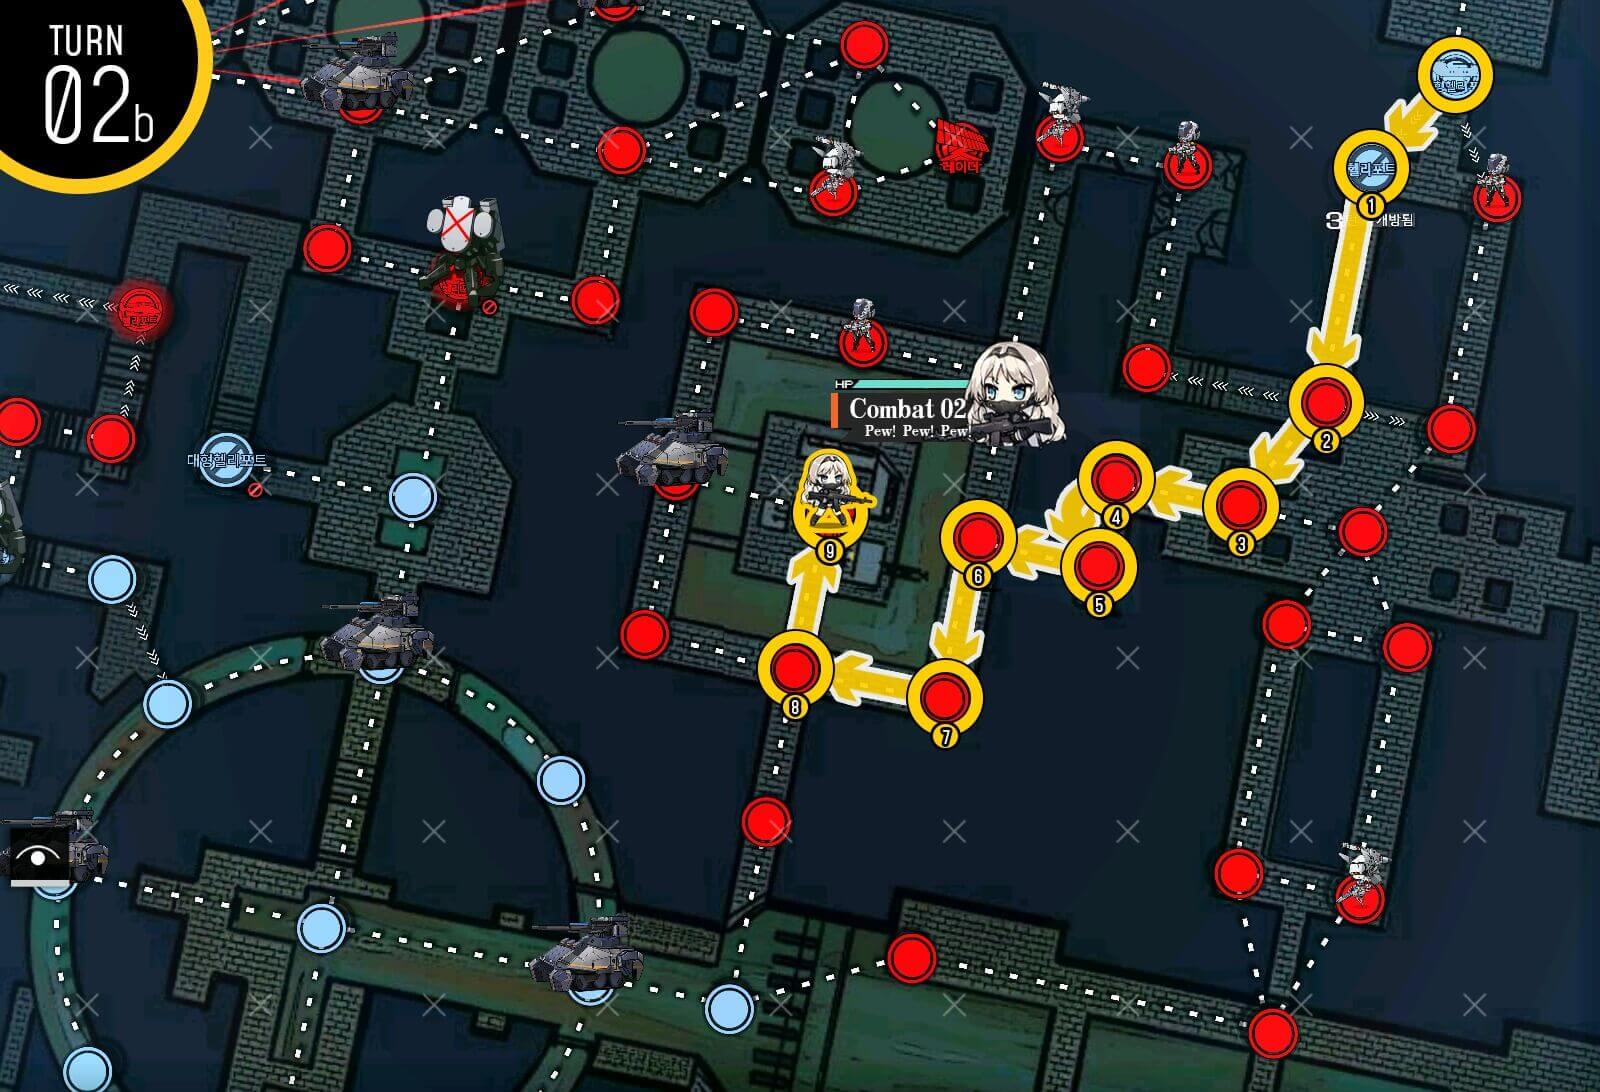
Turn 2b
RFHG echelon on top right moves down the left path and clear out enemies all the way to the radar node.
Turn 2c
Step on the radar and move back down to avoid aggroing the tank next to it.
Turn 3
As you can see the tanks in the circle has moved and opened path to the HQ. Take out the AA defense.

Turn 4a
On next turn, resupply combat echelon on the helipad and move to step on the radar to eliminate tanks save for the one on HQ. Deploy dummy echelon on the helipad so we can surround capture it.
Turn 4b
Use combat echelon to clear out enemy units nearby.
Turn 4c
Move up the dummy echelon to capture nodes surround HQ. Tank does not move so the map should be cleared next turn.