

Farm it please, no pressure of course, but do it.

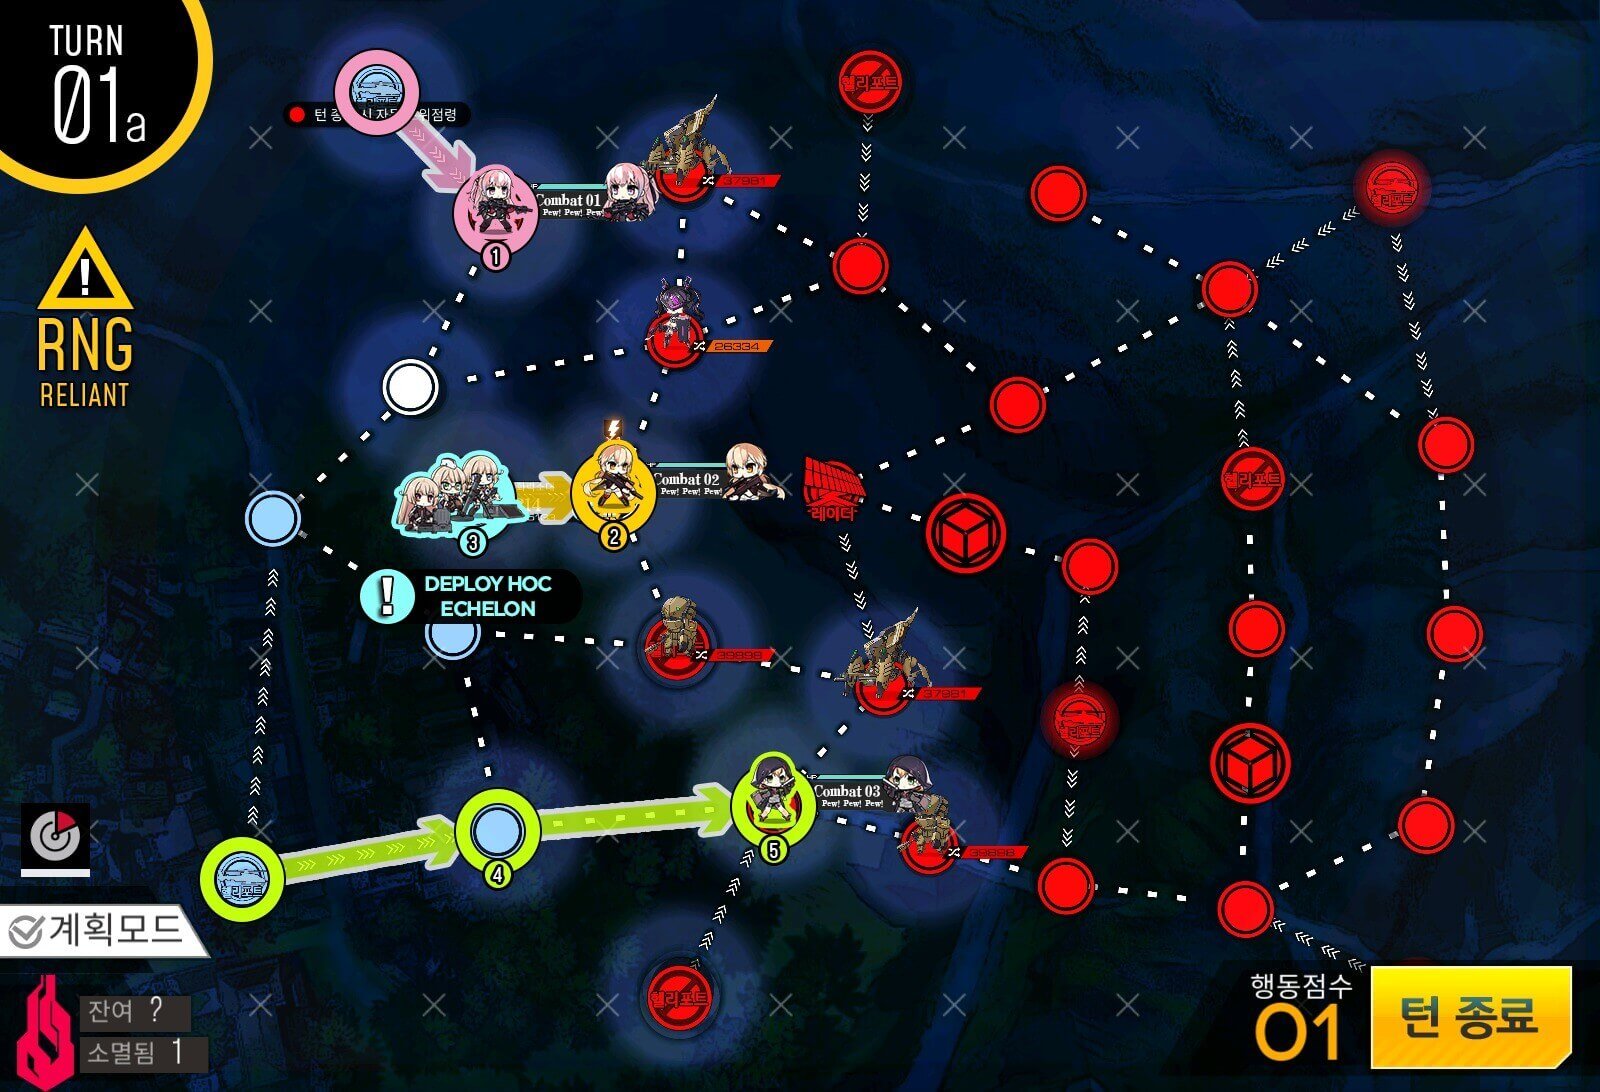
Turn 1
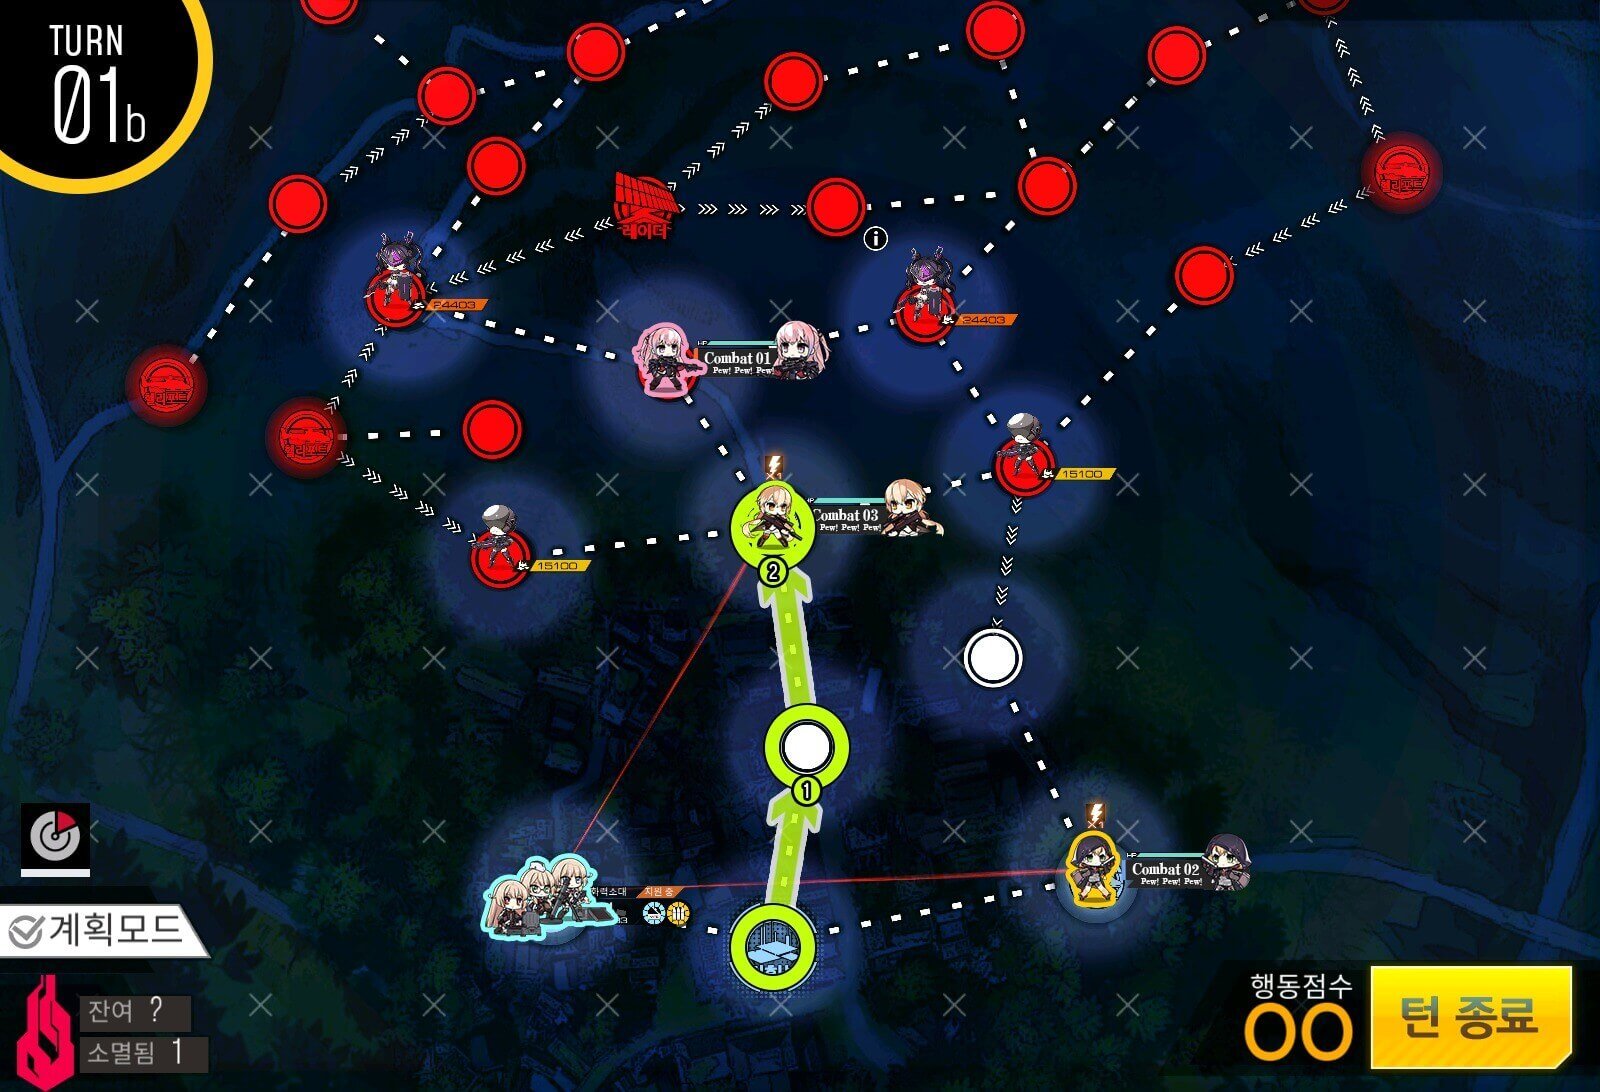
Each ARSMG moves once off the helipad. Deploy HOC in the center helipad [I picked 2B which gives additional debuff to enemy accuracy and longer support range]. RFHG moves to surround-capture the closed helipad at the bottom.
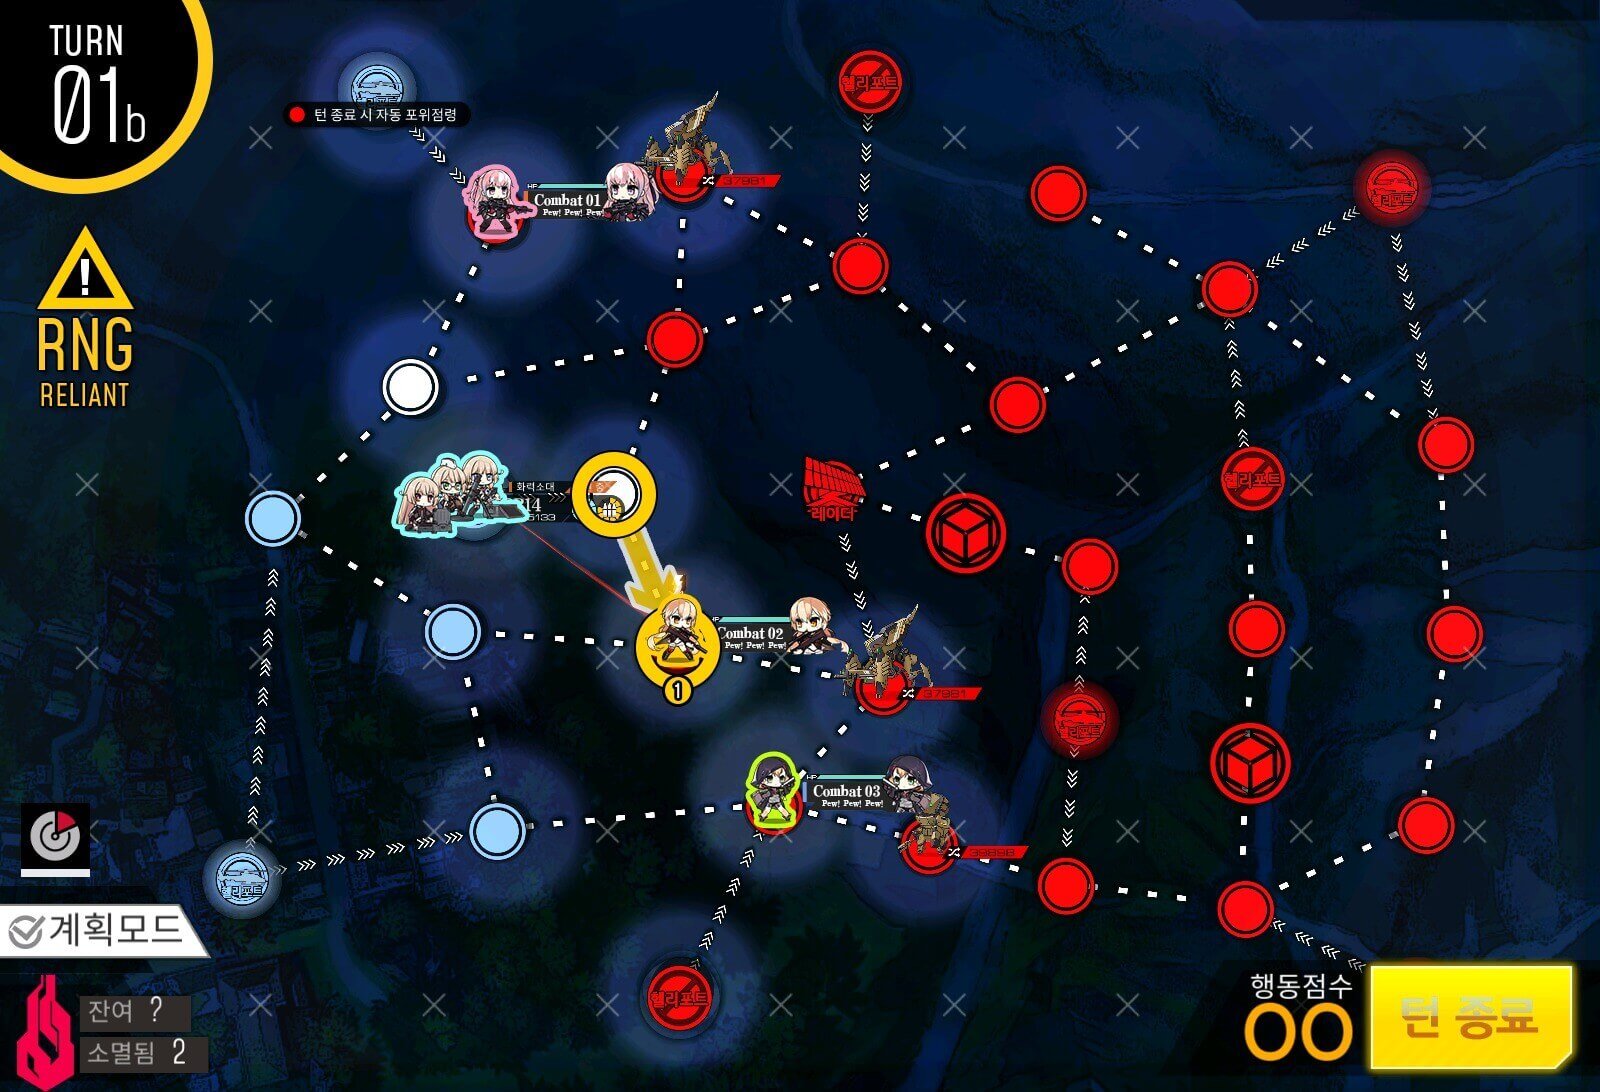
Turn 1b
ARSMG at the center moves down to take the closed helipad.
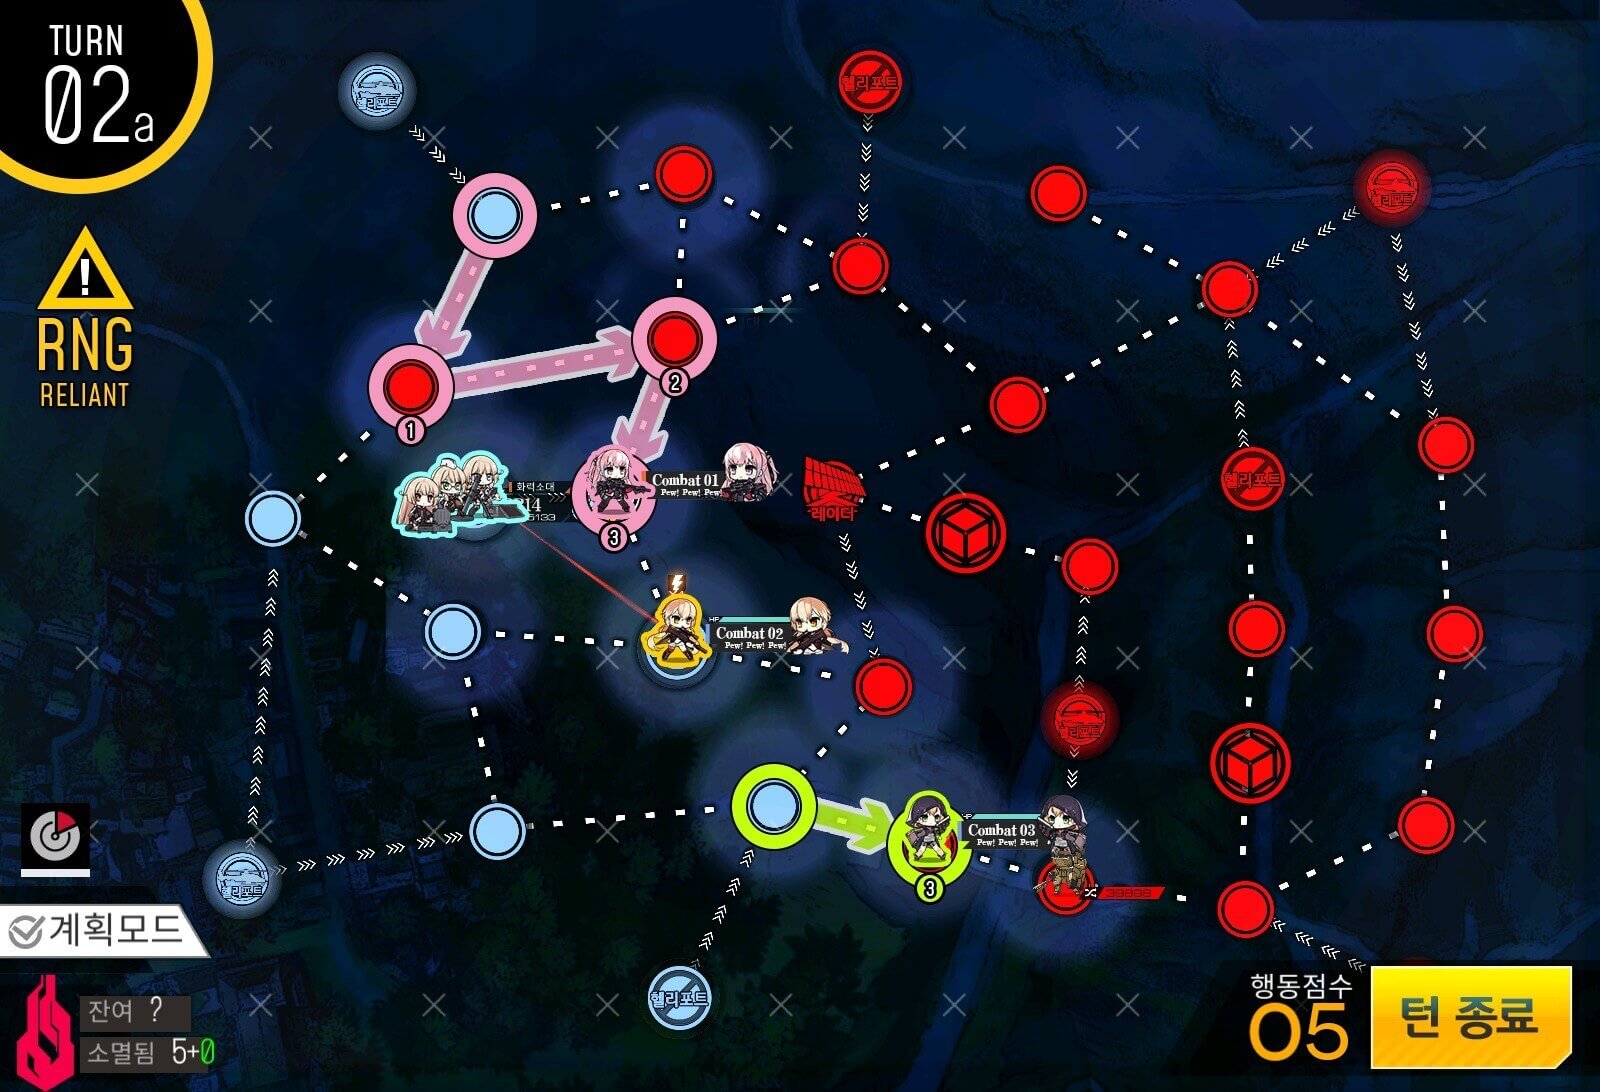
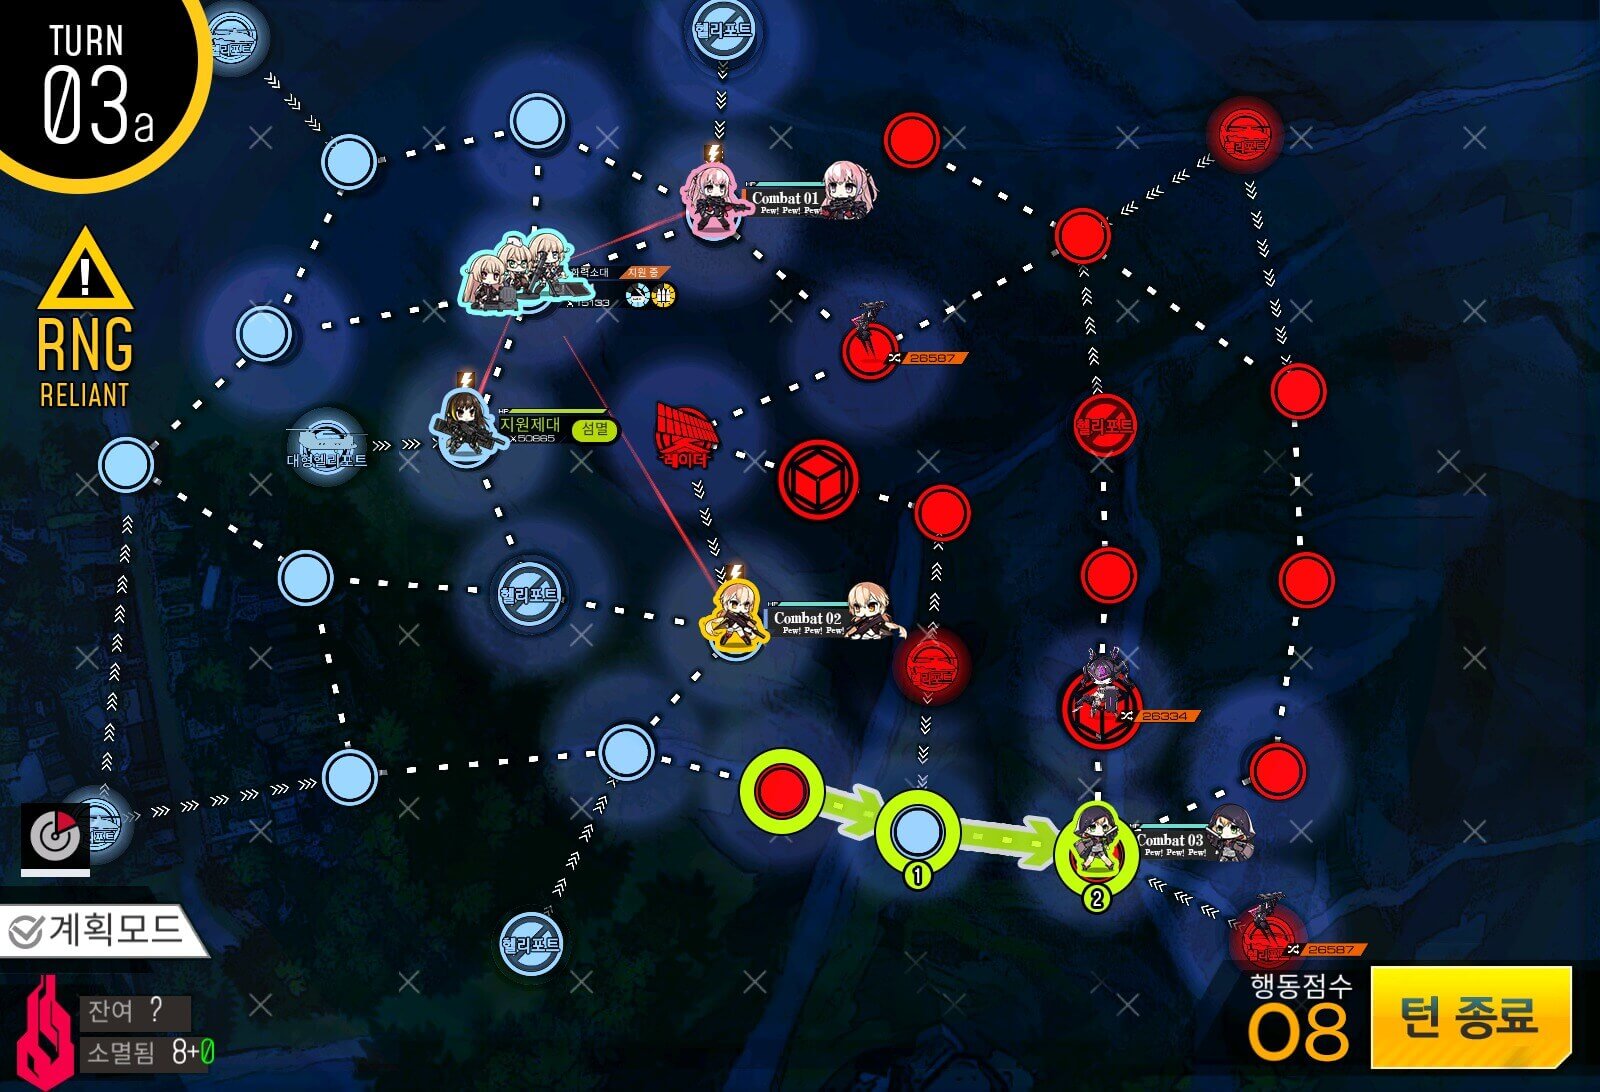
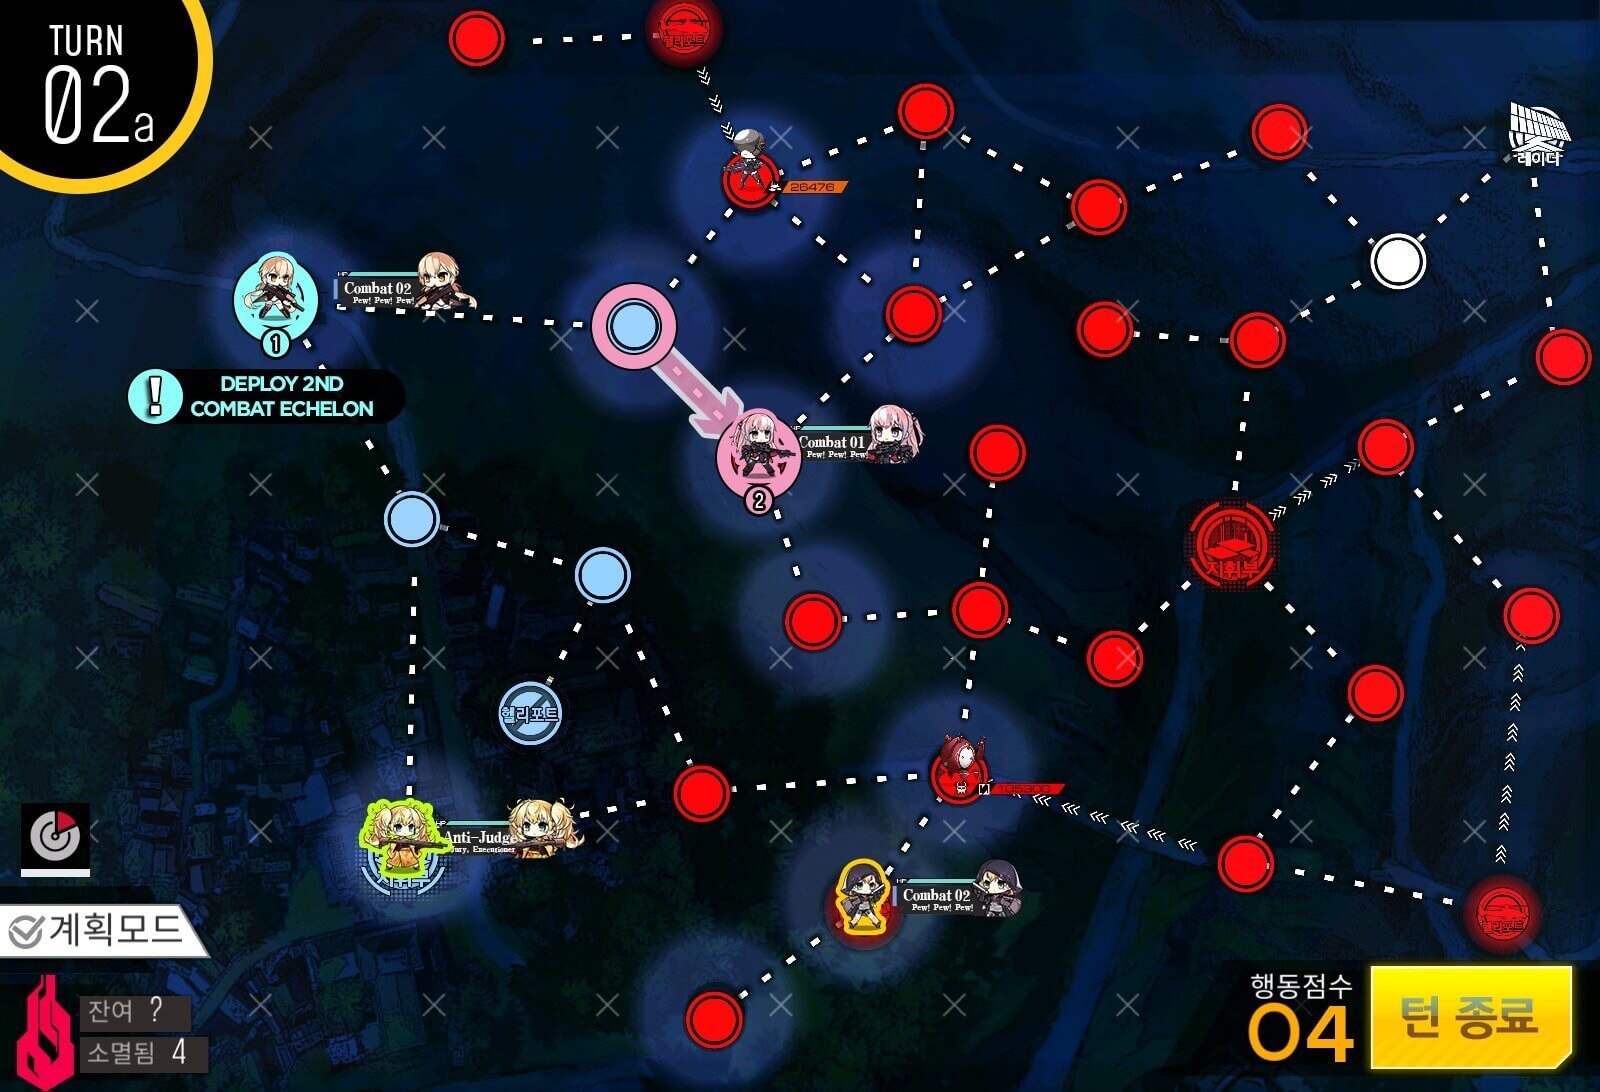
Turn 2a
Bottom two combat echelons move once to the right. Combat echelon at the top moves to mitigate all possible RNG-induced disruptions by an enemy unit that will occur in the last turn.
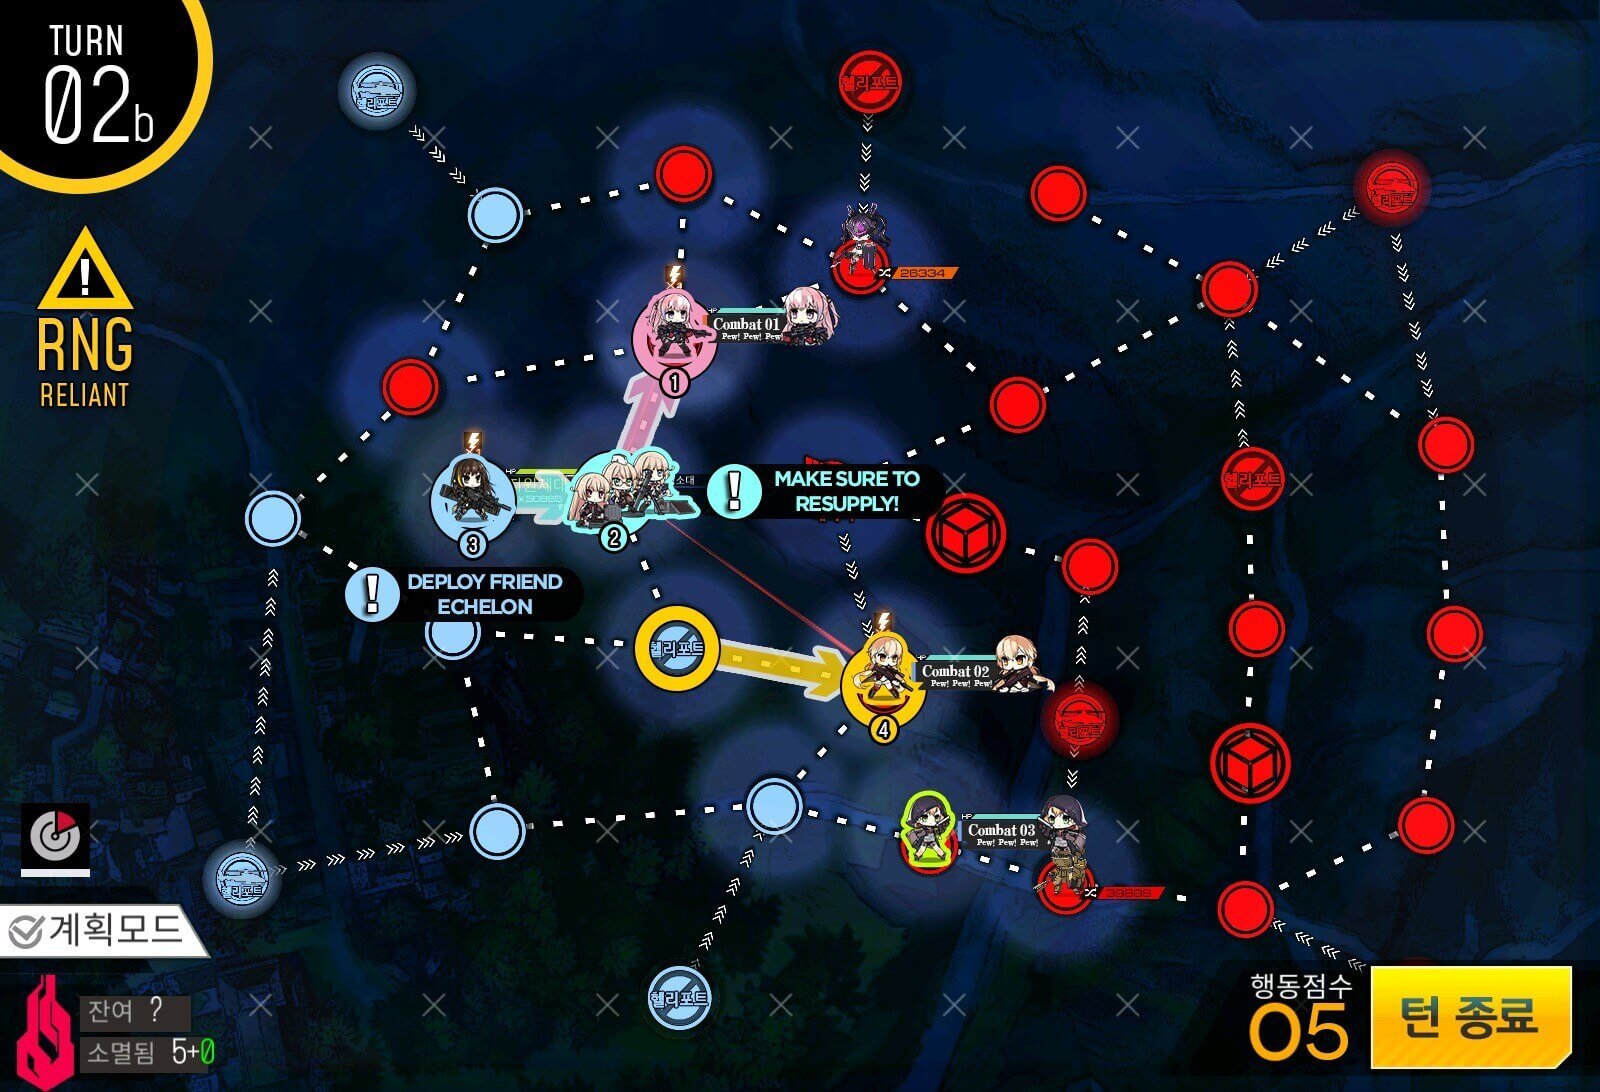
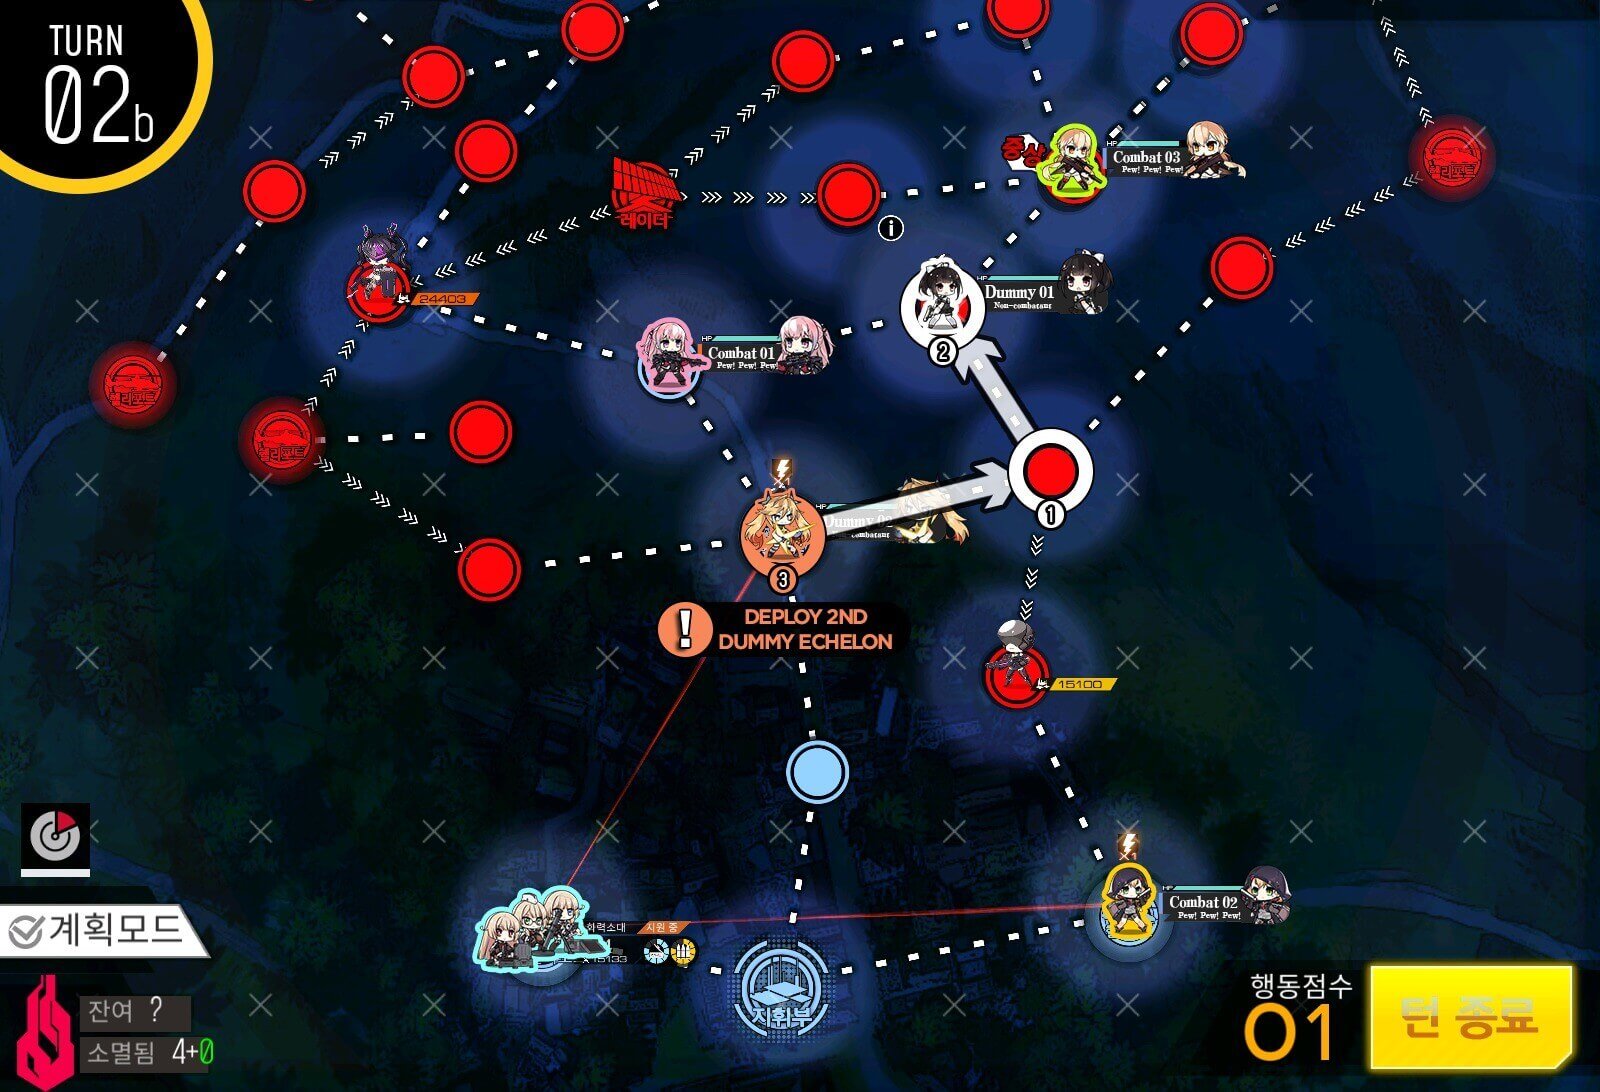
Turn 2b
HOC moves out AFTER resupplying, lastly deploy a friend echelon, set it to [Eliminate].
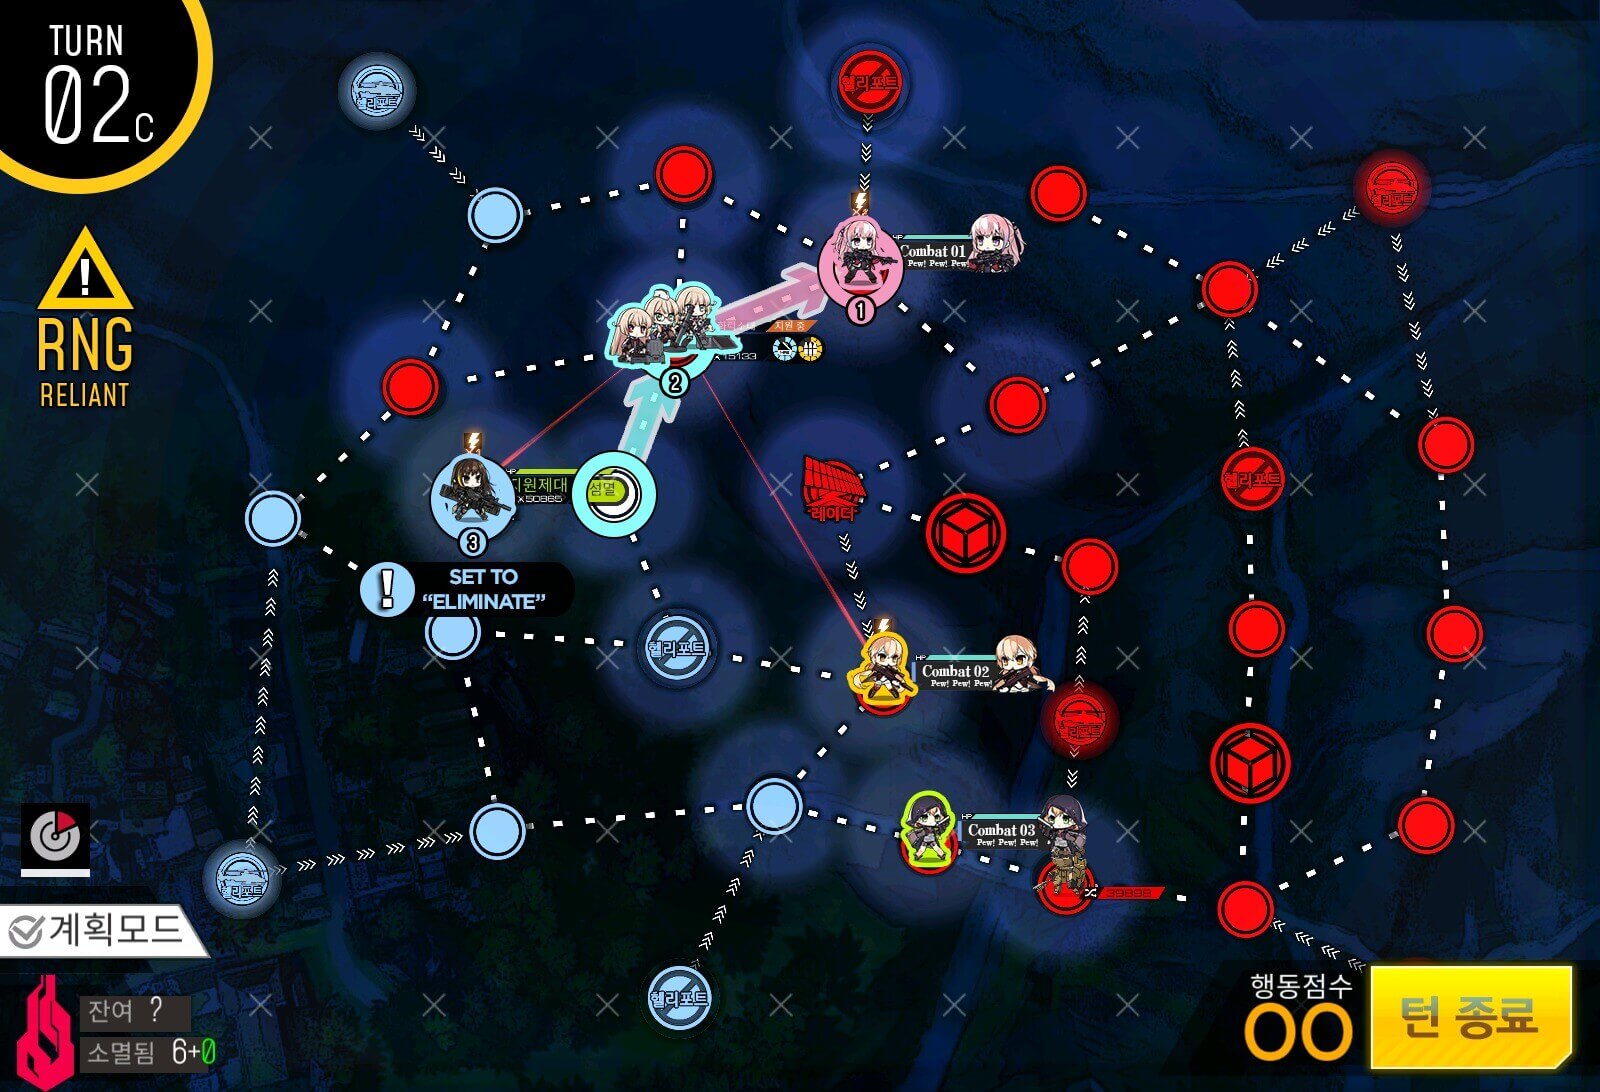
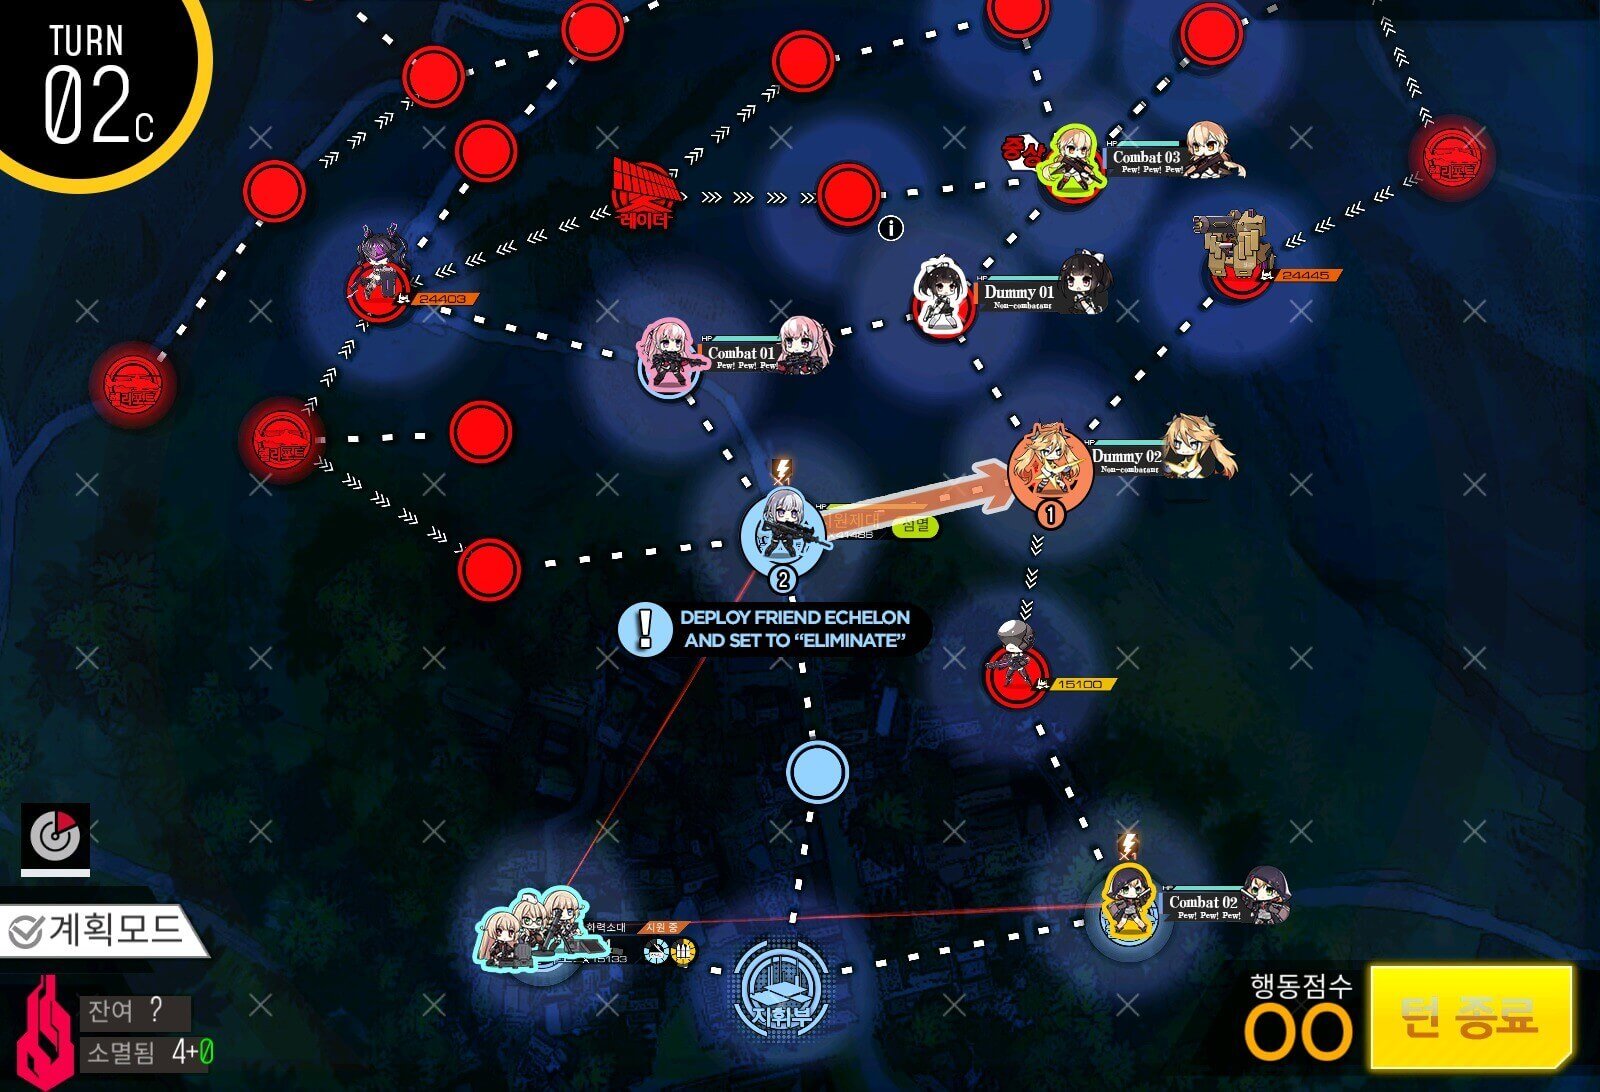
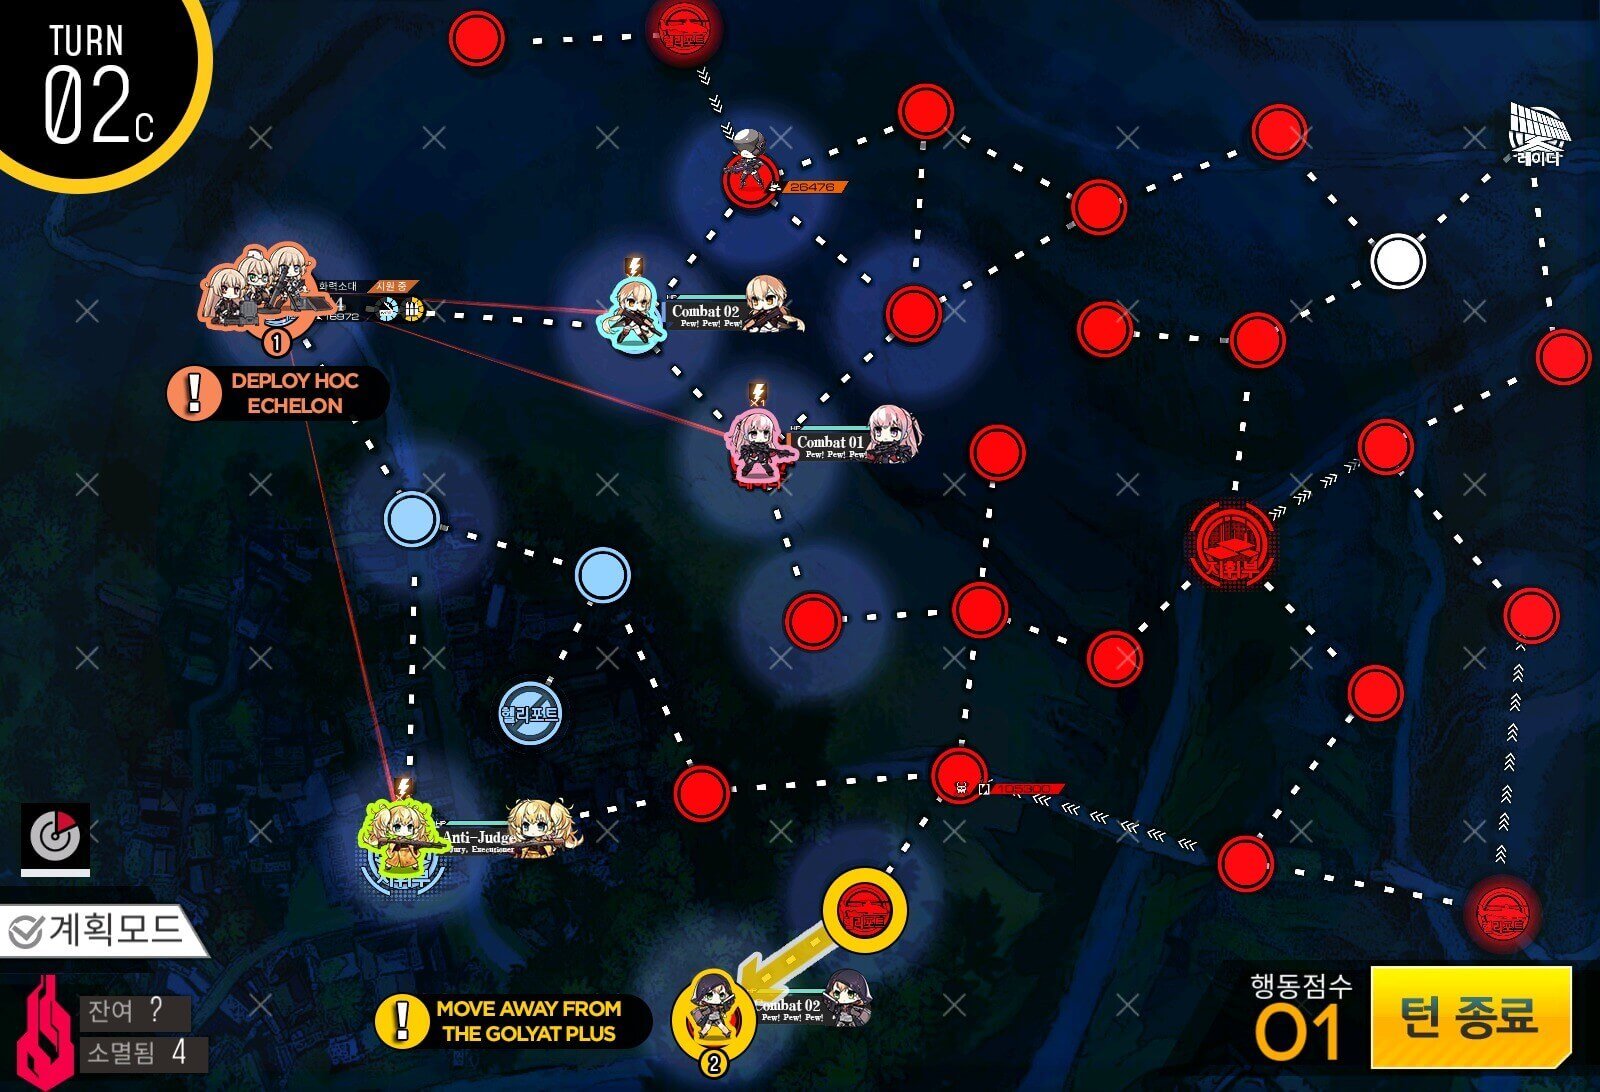
Turn 2c
Combat echelon and HOC move together to take the closed helipad on the top-center.
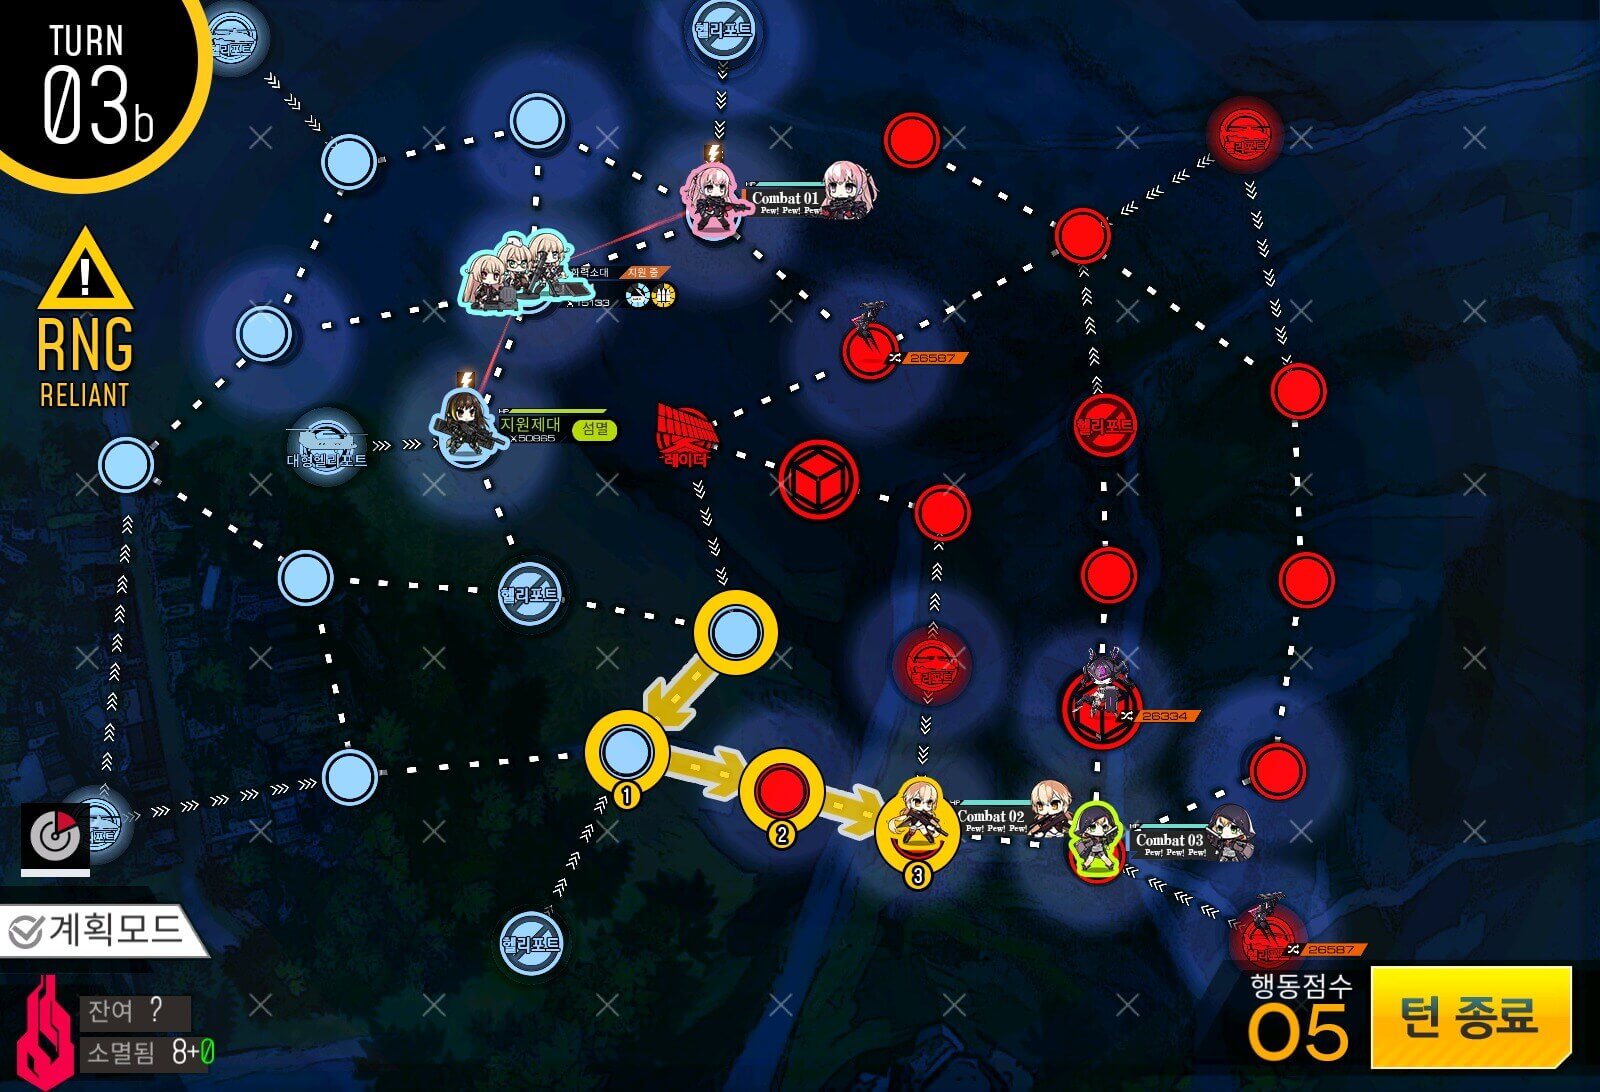
Turn 3b
Both combat echelons at the bottom head for the helipad at the bottom right corner. Keep an eye on the ammo supply, as one of echelon is likely to run out. It's also recommended that the RFHG team uses the resupply node just above it.

Turn 3c
Combat echelon next to the HOC also moves to resupply node at the center of the map. Both echelons are now resupplied.
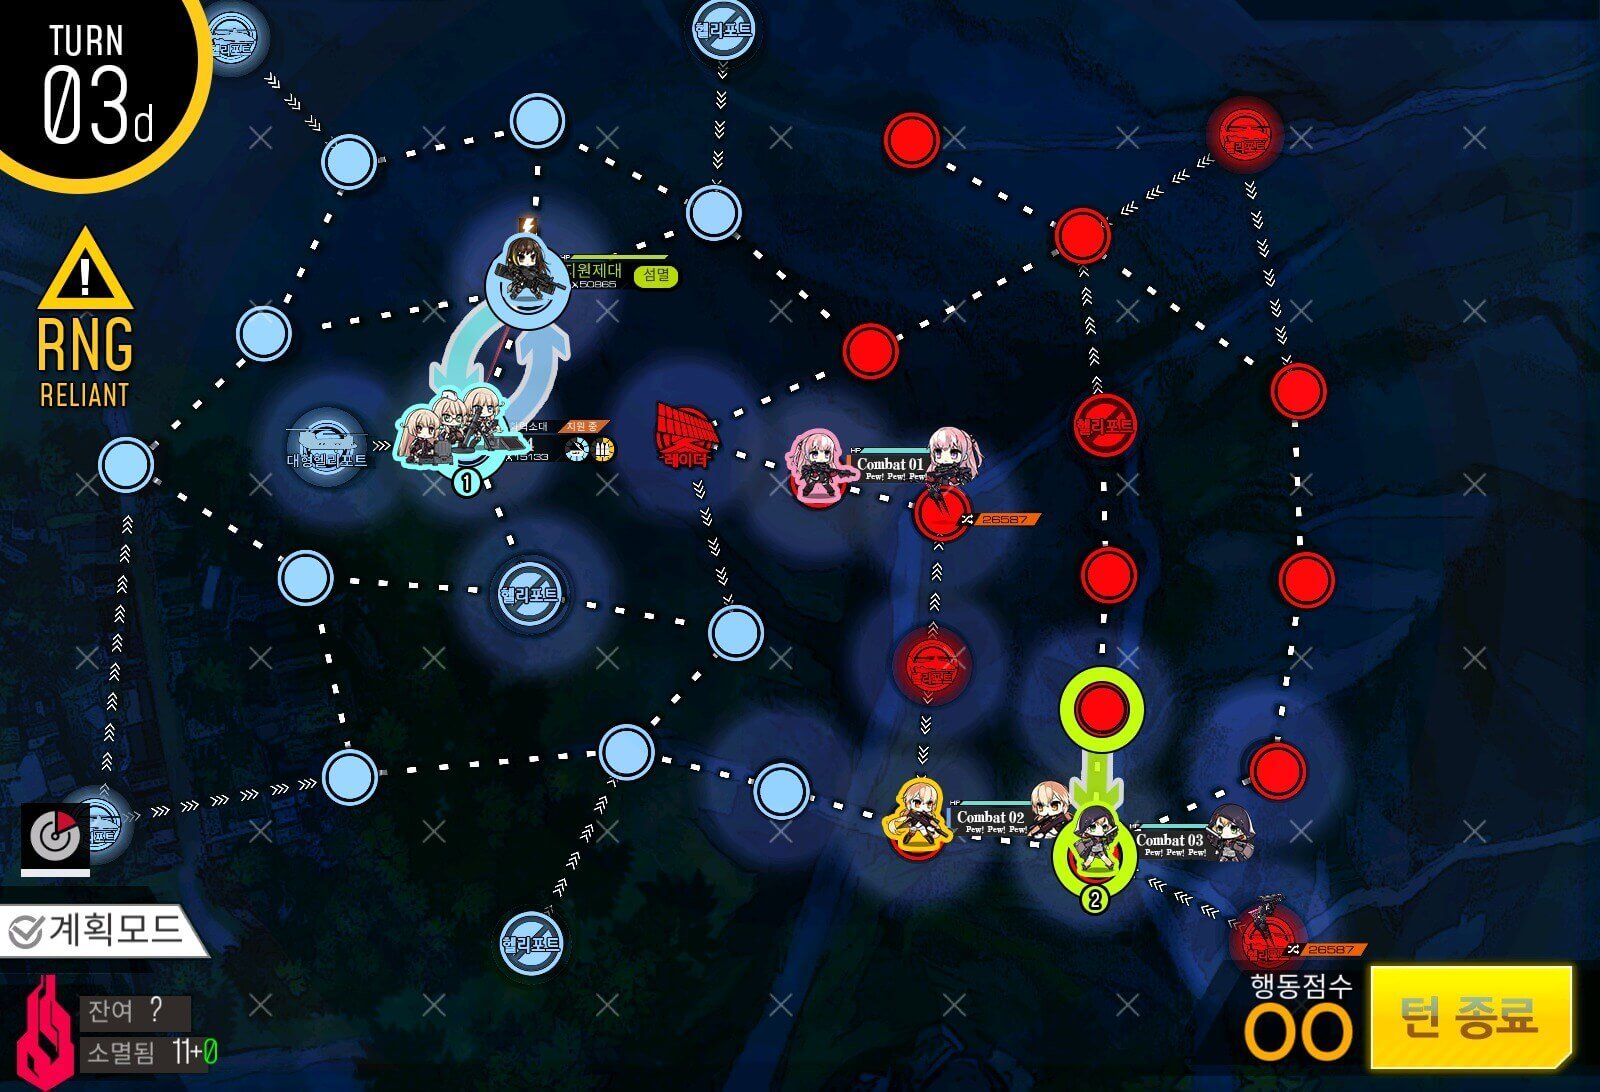
Turn 3d
Bring the RFHG echelon back down so that the helipad at the bottom right is surround-captured in the next turn.
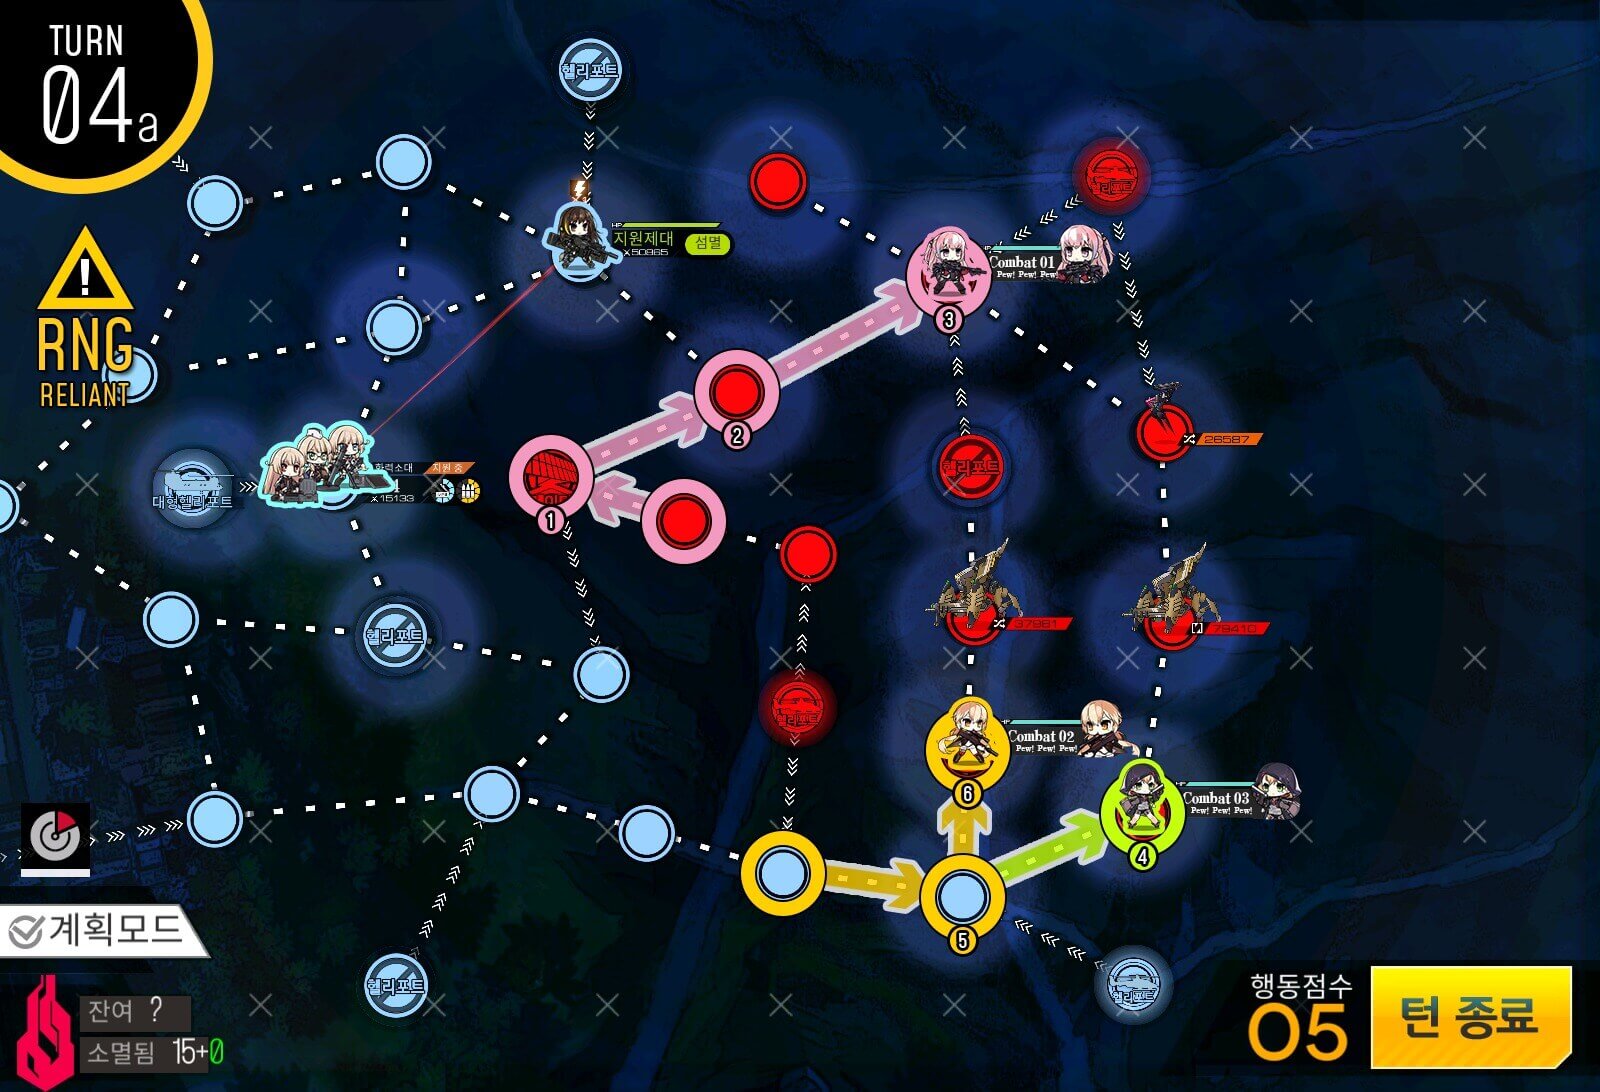
Turn 4a
Depending on RNG, you can either eliminate all enemy units this turn or you'll need one additional turn to kill 2 more spawned enemies next turn.Work on locating the remaining units on the map and position the HOC so that it can provide support.
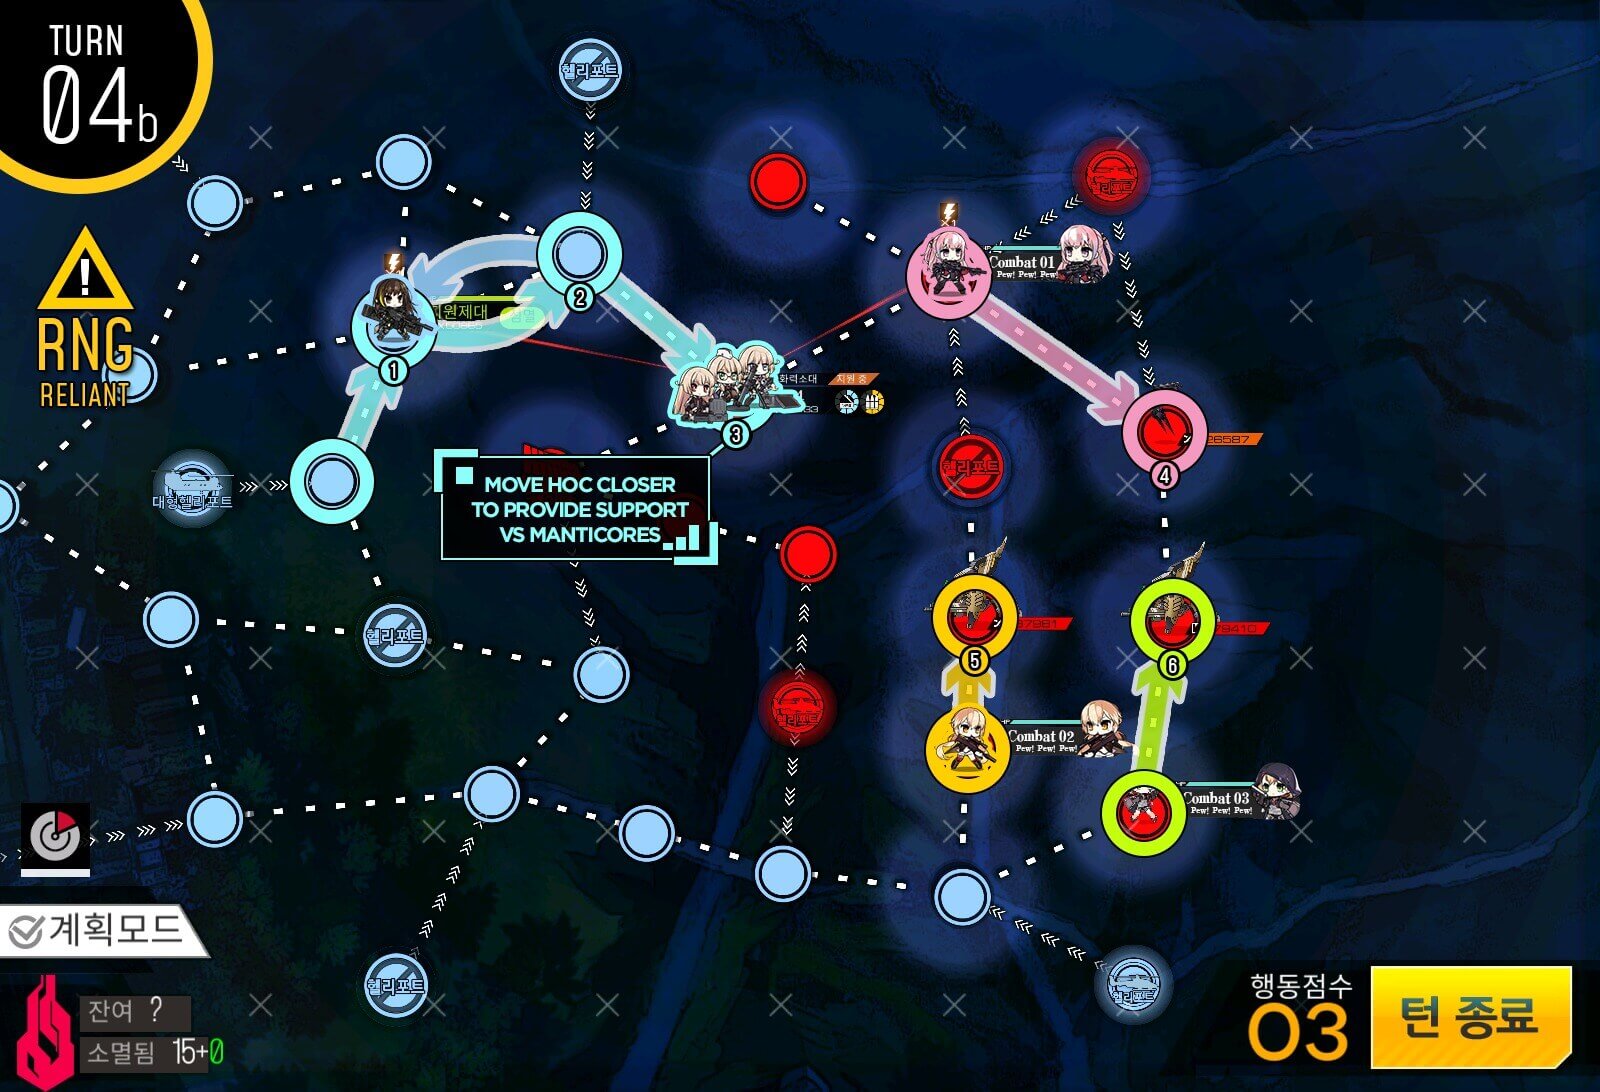
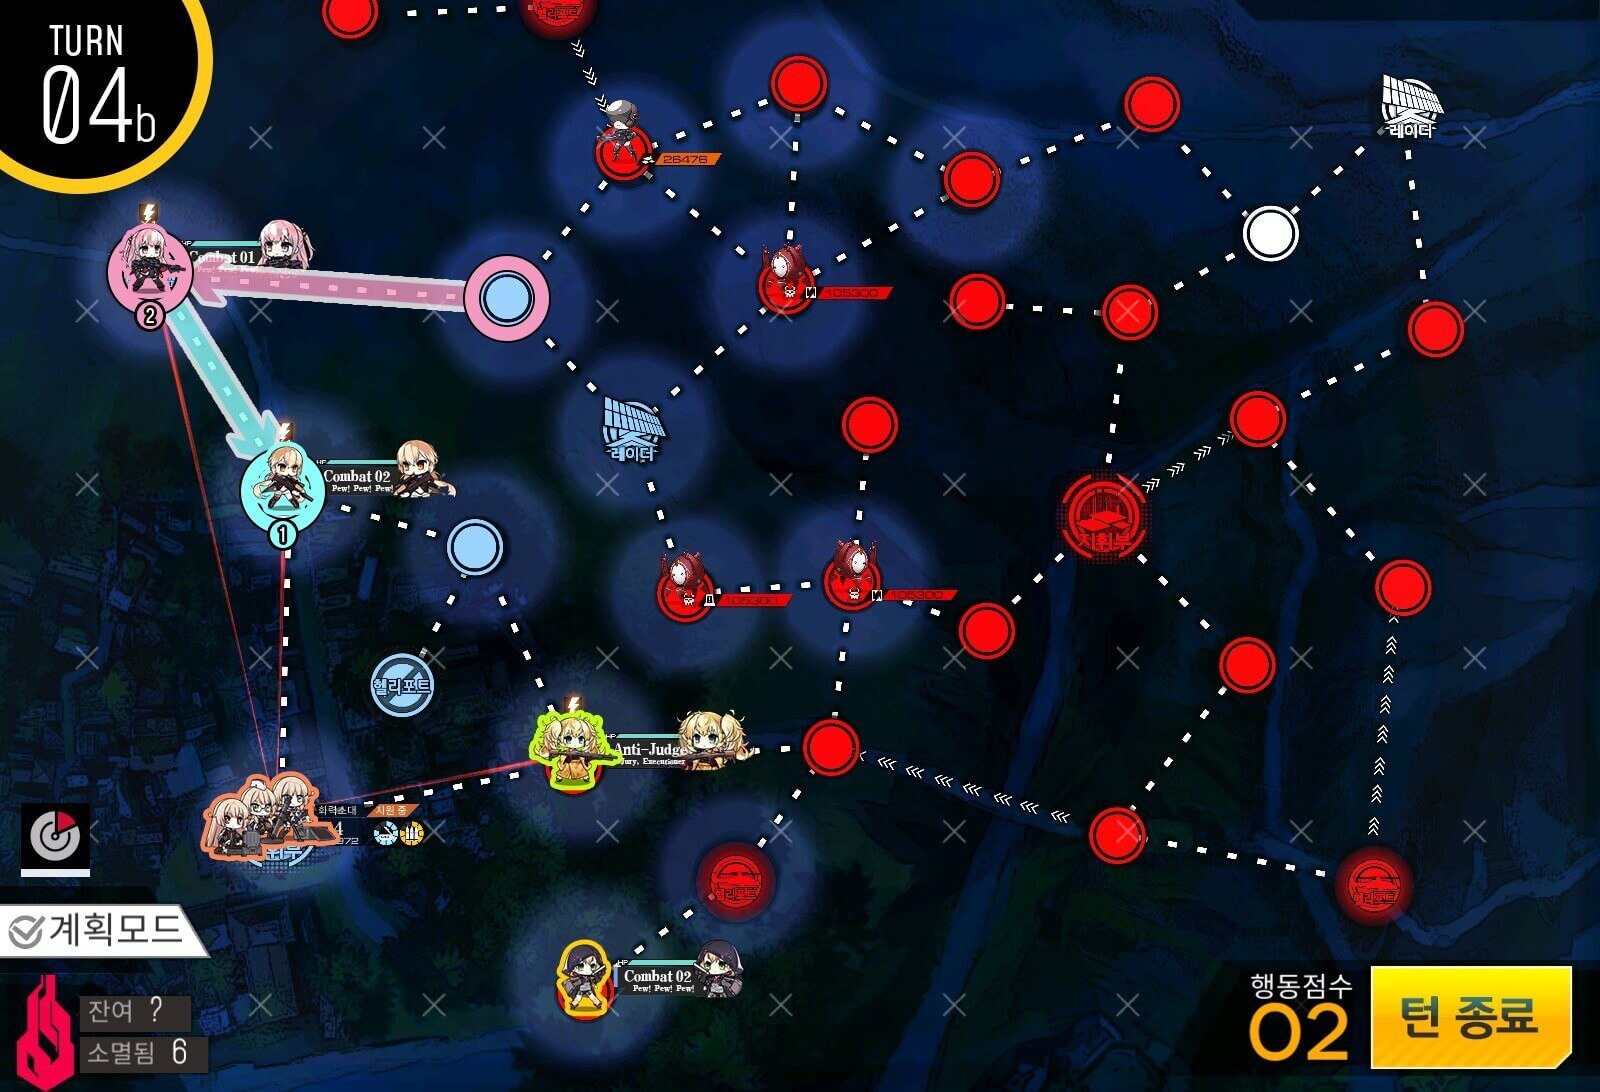
Turn 4b
Remember to use your fairy skills and HOC to minimize repair cost if possible.
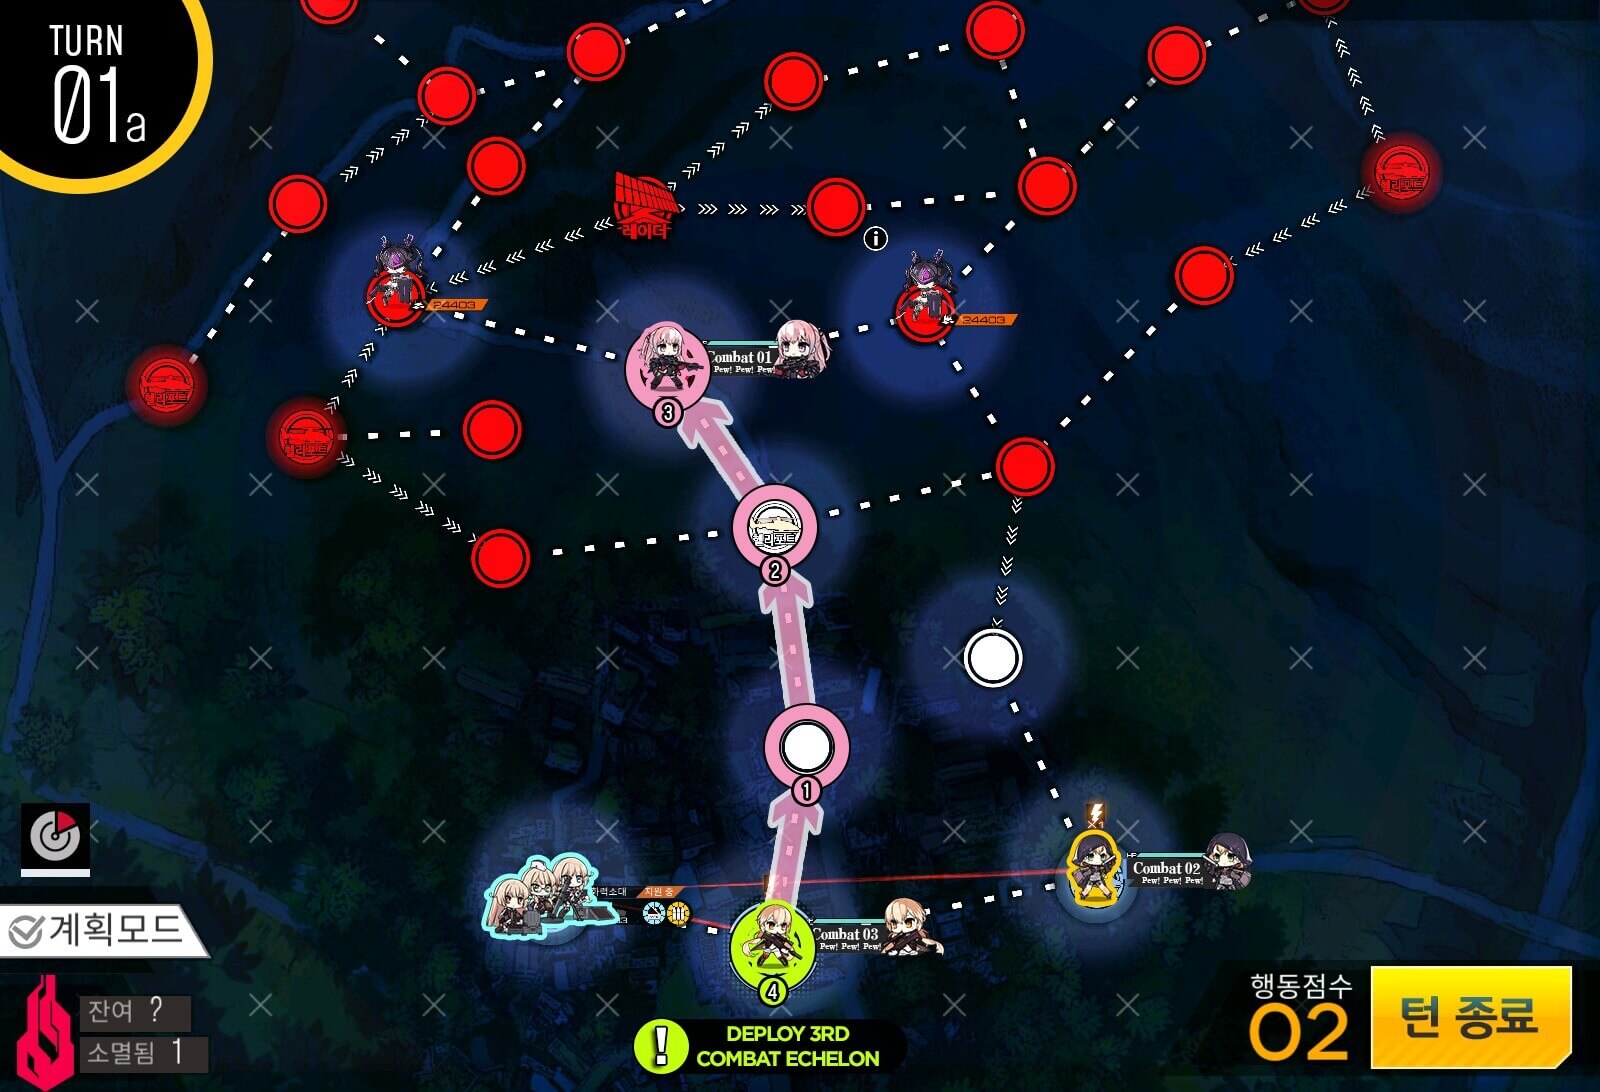
Turn 1a
Start with a HOC on the heavy helipad, AR echelon in the middle and RFHG team on the right helipad. Move the AR echelon up past the neutral helipad. Deploy a 2nd AR combat echelon by the HQ.
Turn 1b
2nd AR combat echelon moves up to the neutral helipad.

Turn 2a
Combat echelon at the helipad moves up towards the "i" icon node near the radar. As you can see, this node can only be taken surround-capturing. Therefore we are deploying two dummy echelons to follow behind the combat echelon to the right.
Turn 2c
After placing the two dummy echelons behind the AR echelon, deploy a friend echelon and set it to [Eliminate]. If the node to the left of the helipad is unoccupied, make sure to set the echelon to [Wait] instead.

Turn 2d
AR echelon swaps with both dummy echelons to the node next to the helipad. If you need to repair the echelon, this would be good time to do so by swapping with the friend echelon.
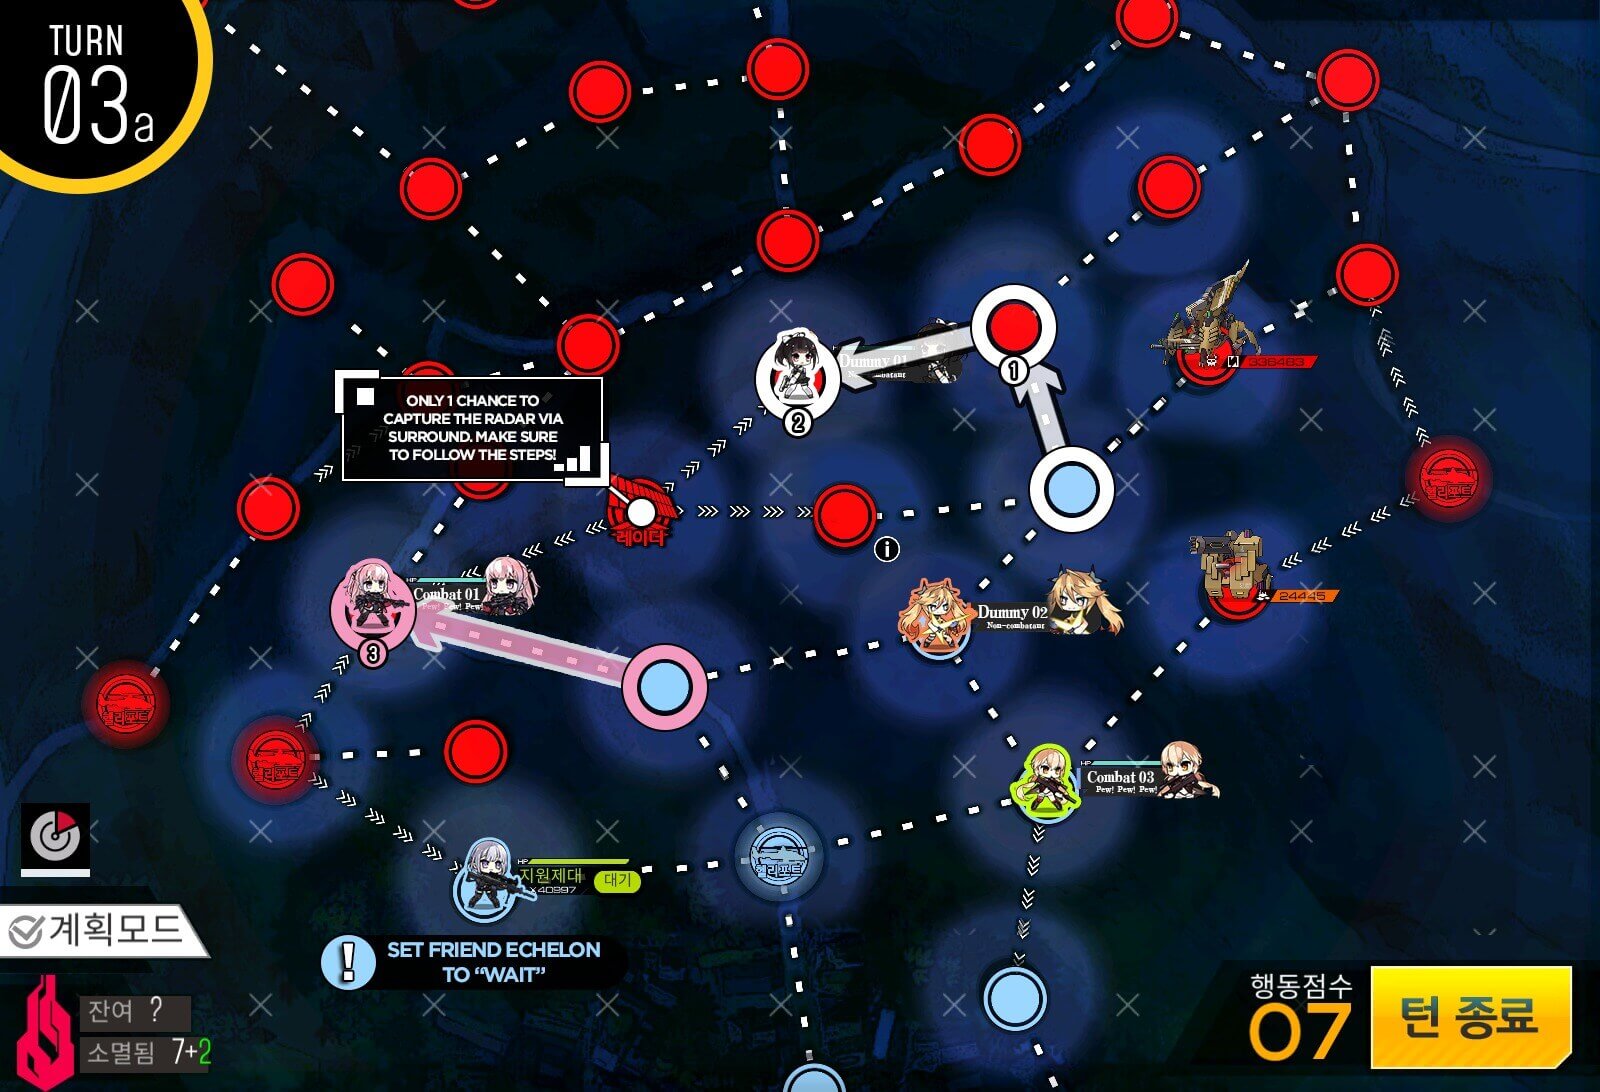
Turn 3a
Manticore units are approaching from the east and we have one turn to surround-capture the radar. Position both combat echelons and dummy echelons so that all nodes surrounding the radar are captured. This map also lets you retreat up to 3 echelons before the S-rank is invalidated upon clearing. Change the friend echelon to [Wait].

Turn 3b
Note that if you had previous set your echelon to [Wait] from Turn 2, set it to [Eliminate] now, then set it back to [Wait] after the next turn.


Turn 3d
With what spare moves you have available, move the HOC up towards the center helipad.
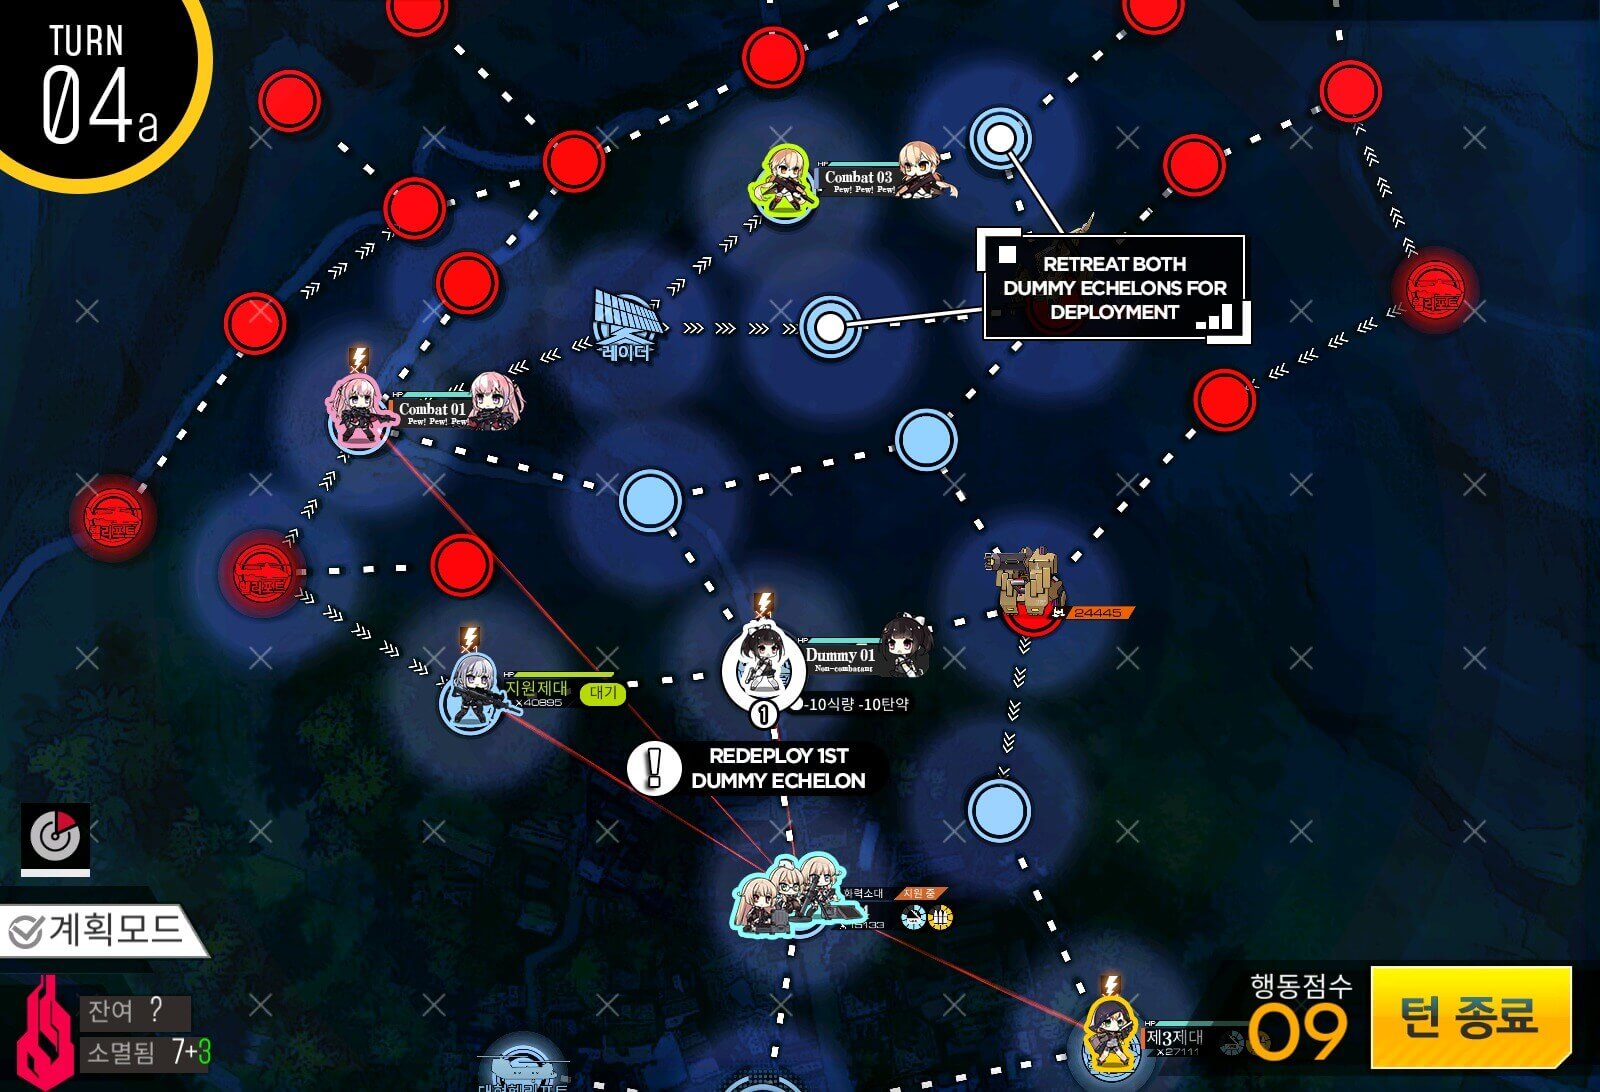
Turn 4a
At the beginning of the 4th turn, retreat both dummy echelons that are adjacent to the Manticore units. Then redeploy them at the center helipad in order to form a conga line to your AR echelon to the left of the radar node.
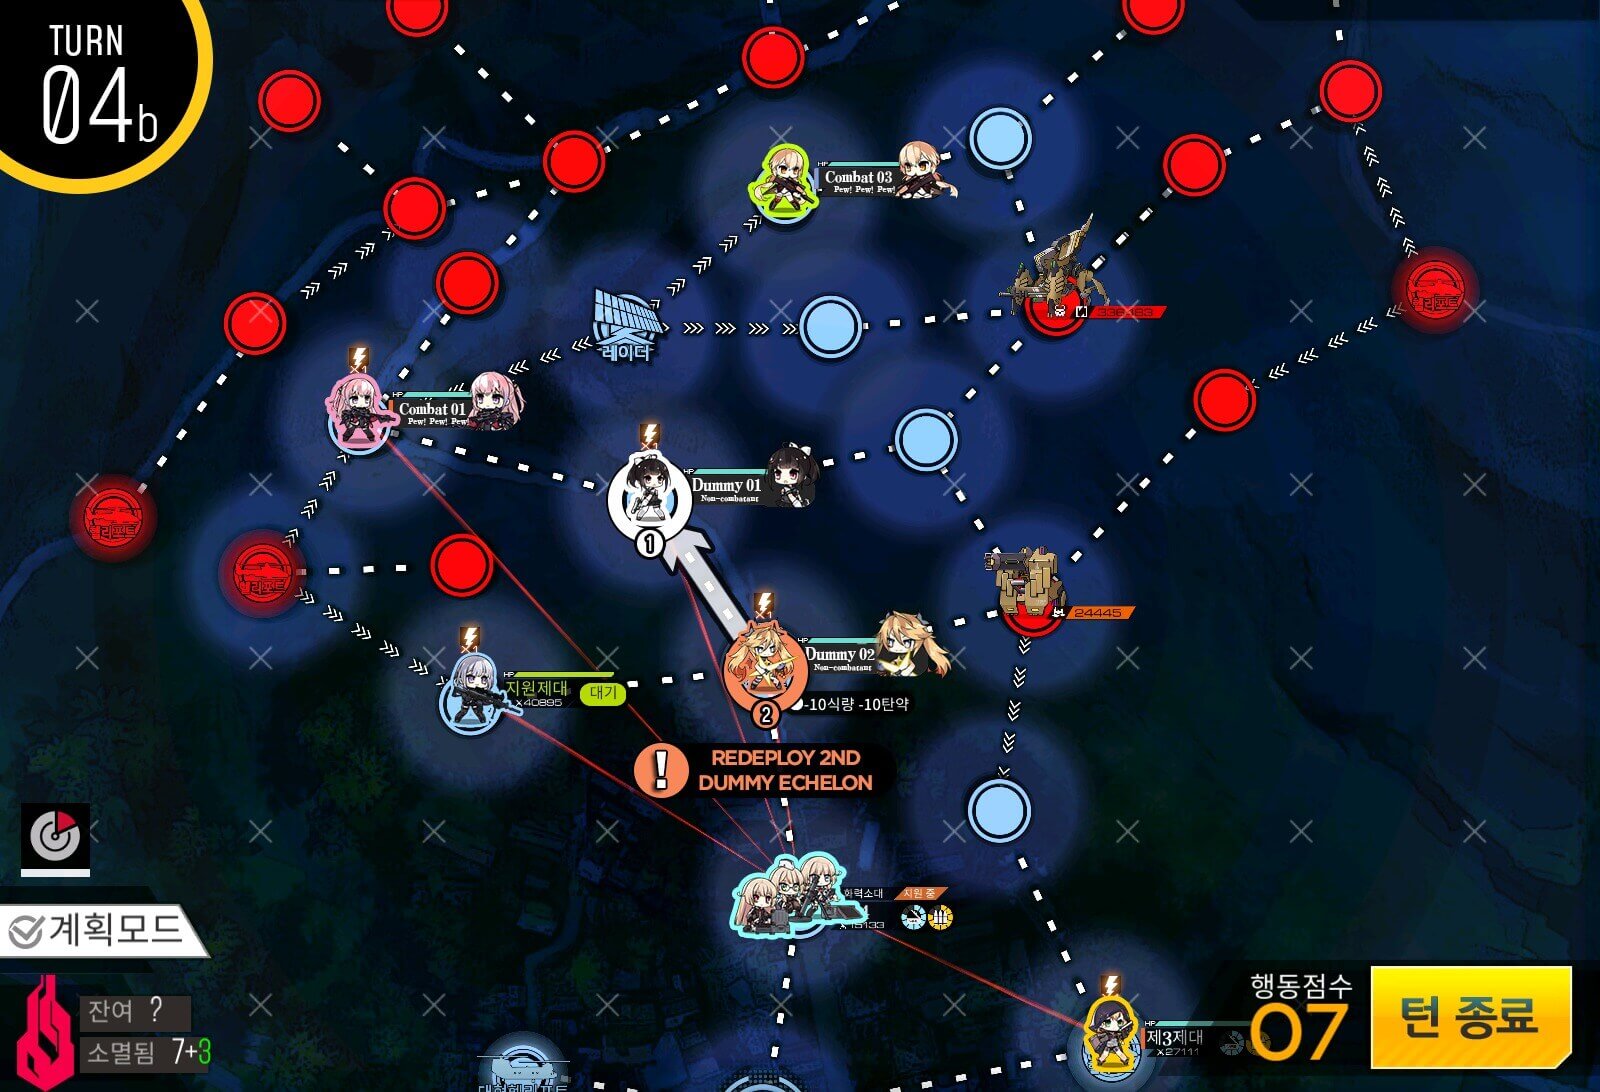
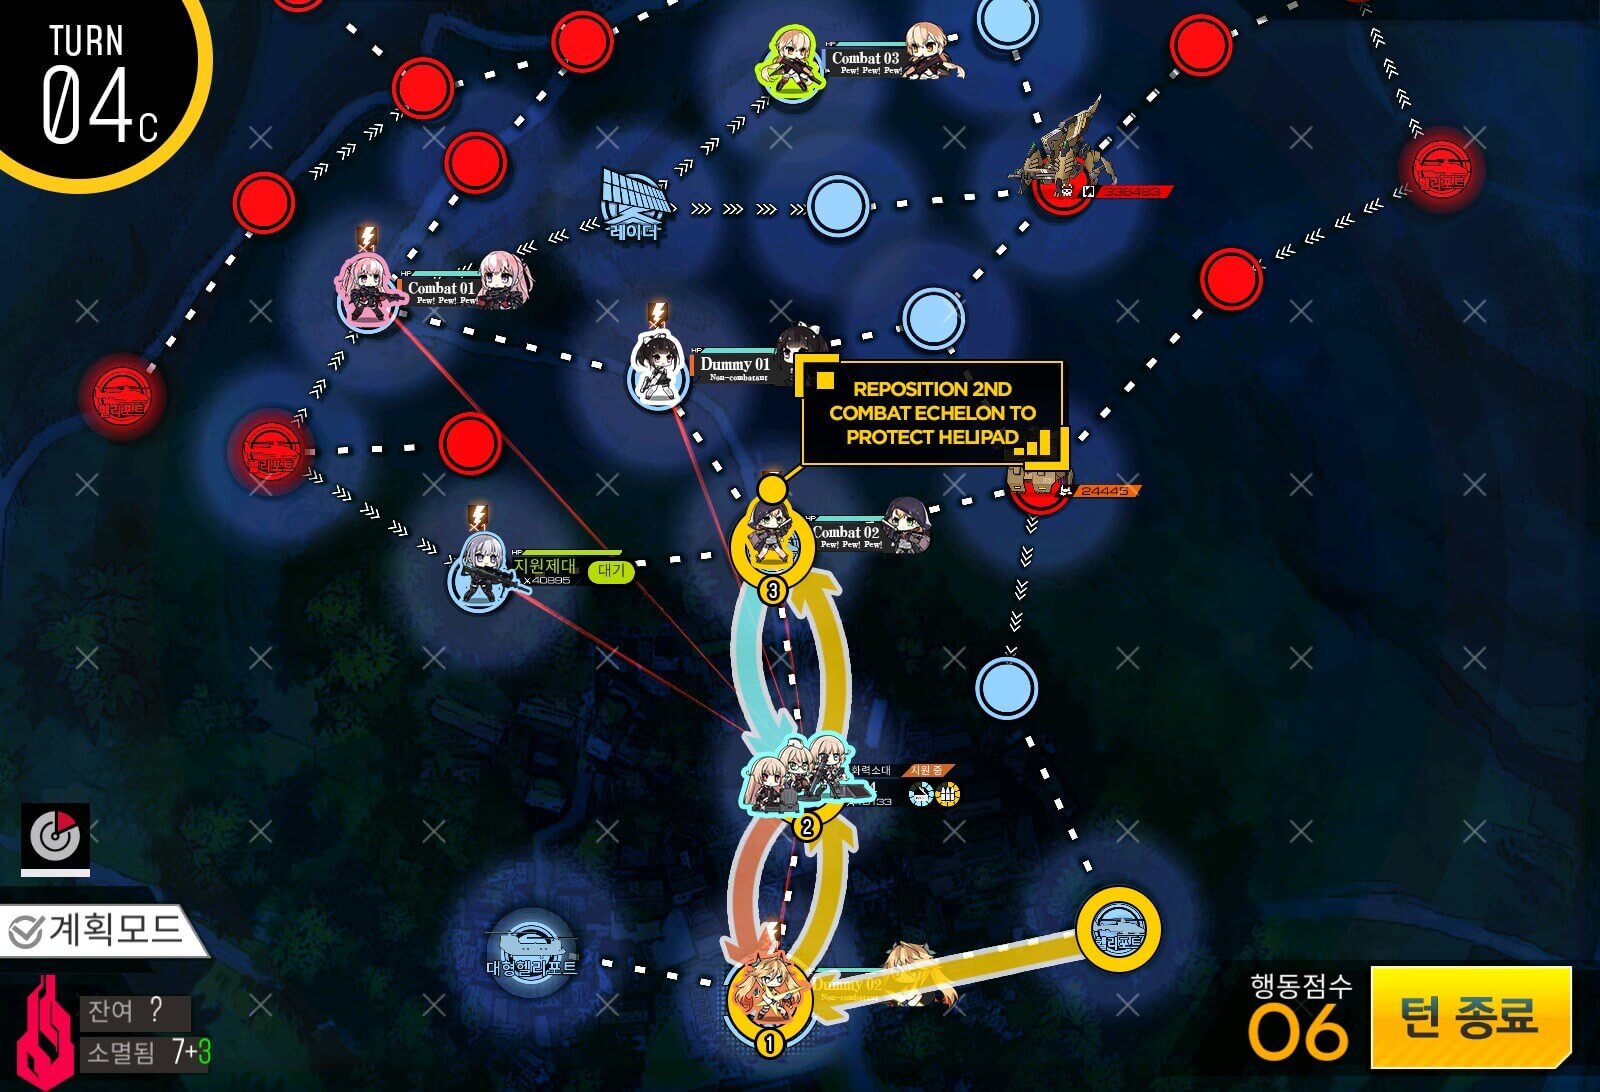
Turn 4b
Deploy the sent dummy echelon on the helipad to form the conga line. Because there are enemy units next to the helipad, we are going to move up the RFHG echelon next to the HQ up to the helipad.
Turn 4b
Move and swap the RFHG echelon up to the helipad. Position the HOC as needed, then hit end turn so that the Goliath Plus [red beans] moves out of the way to Thompson.
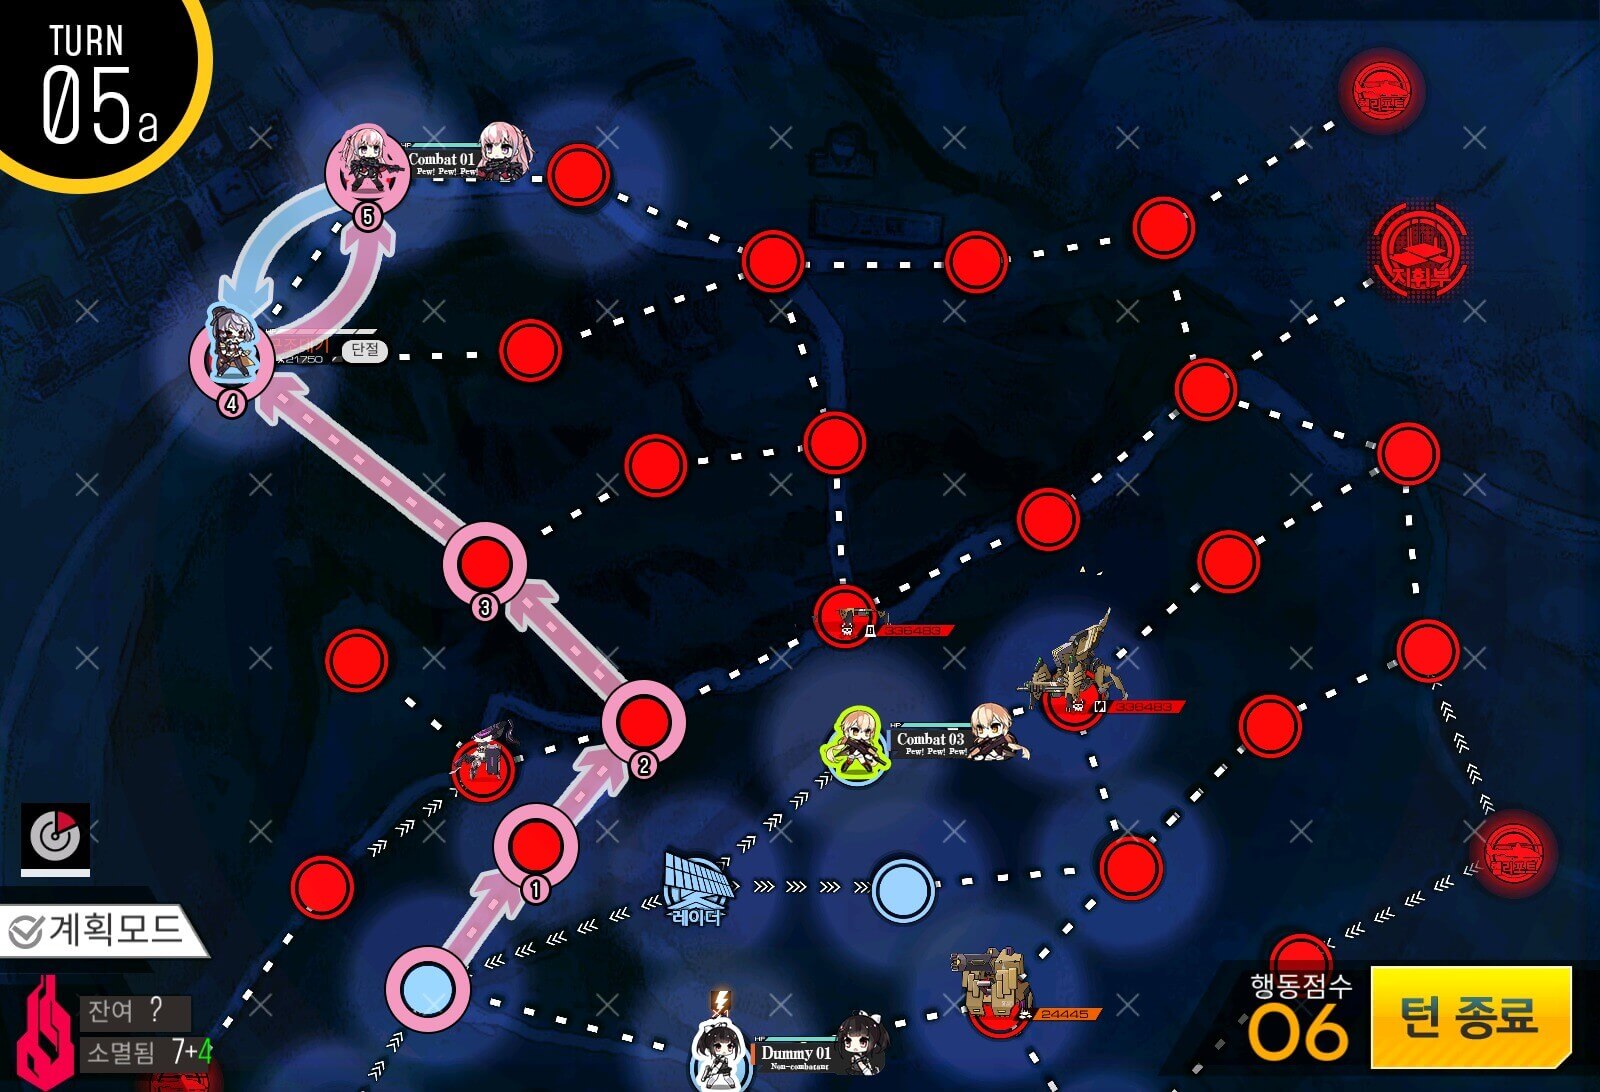
Turn 5a
Now that the hostage has been rid of any threats, head straight to the hostage unit and swap with it before rescuing.
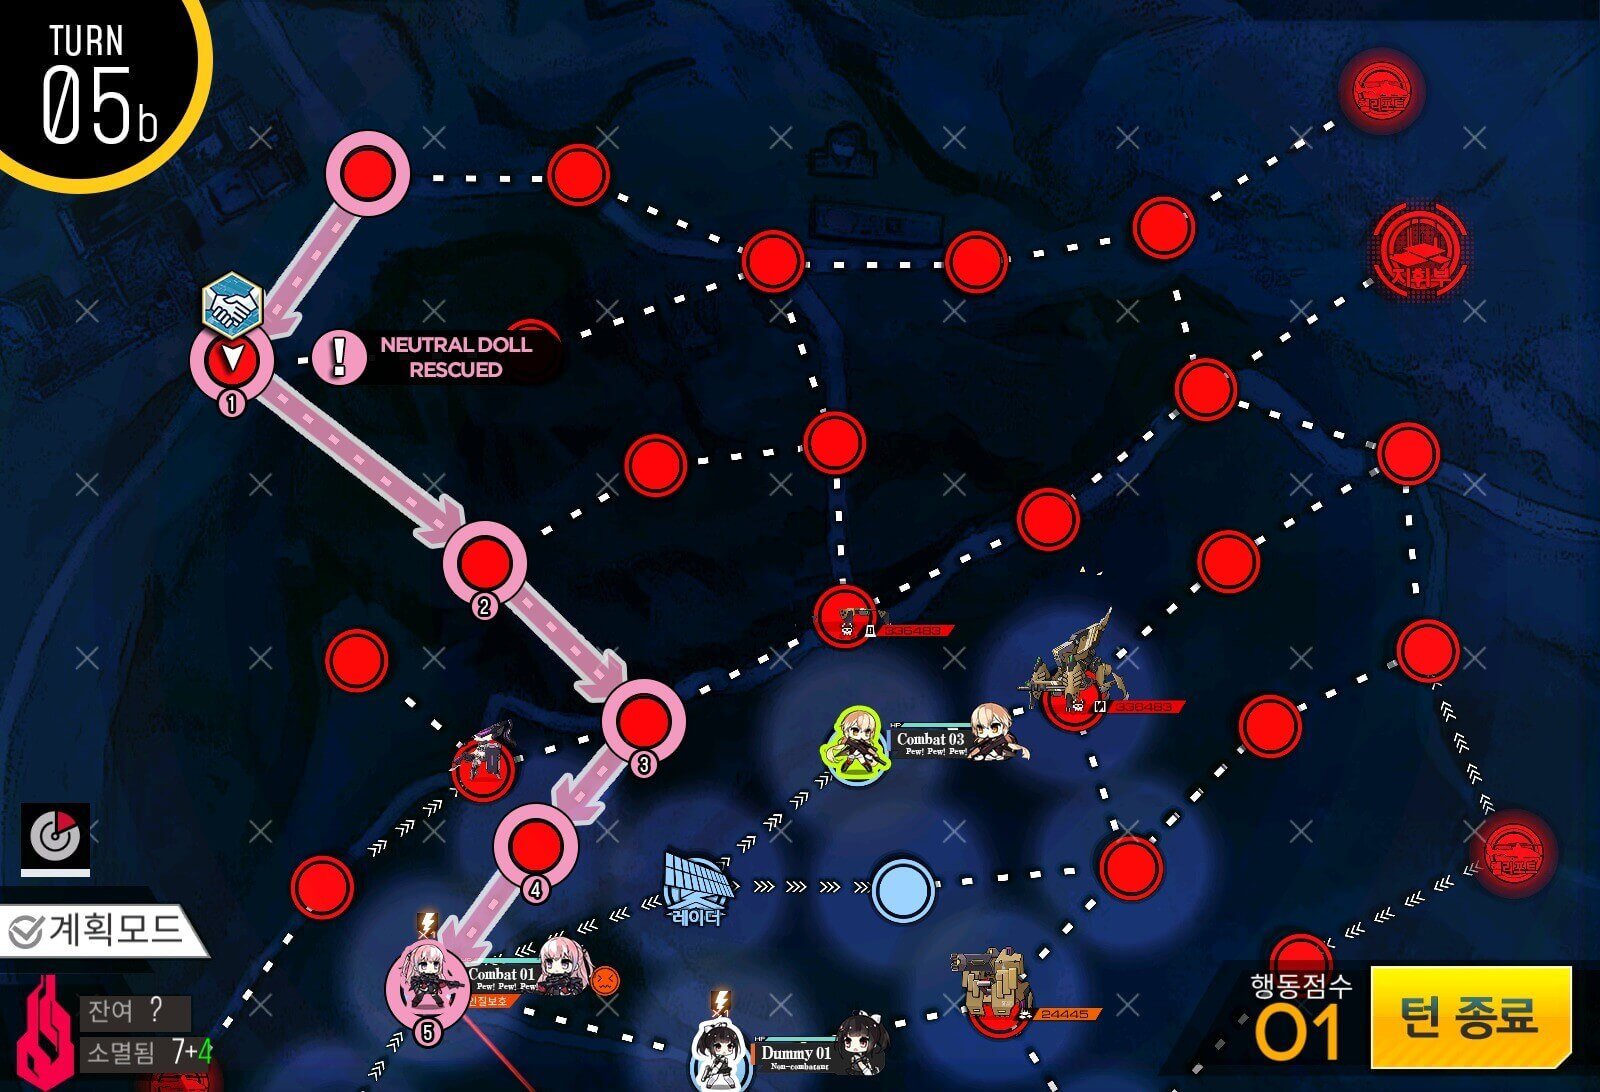
Turn 5b
Once you rescue the hostage, return to the starting location.
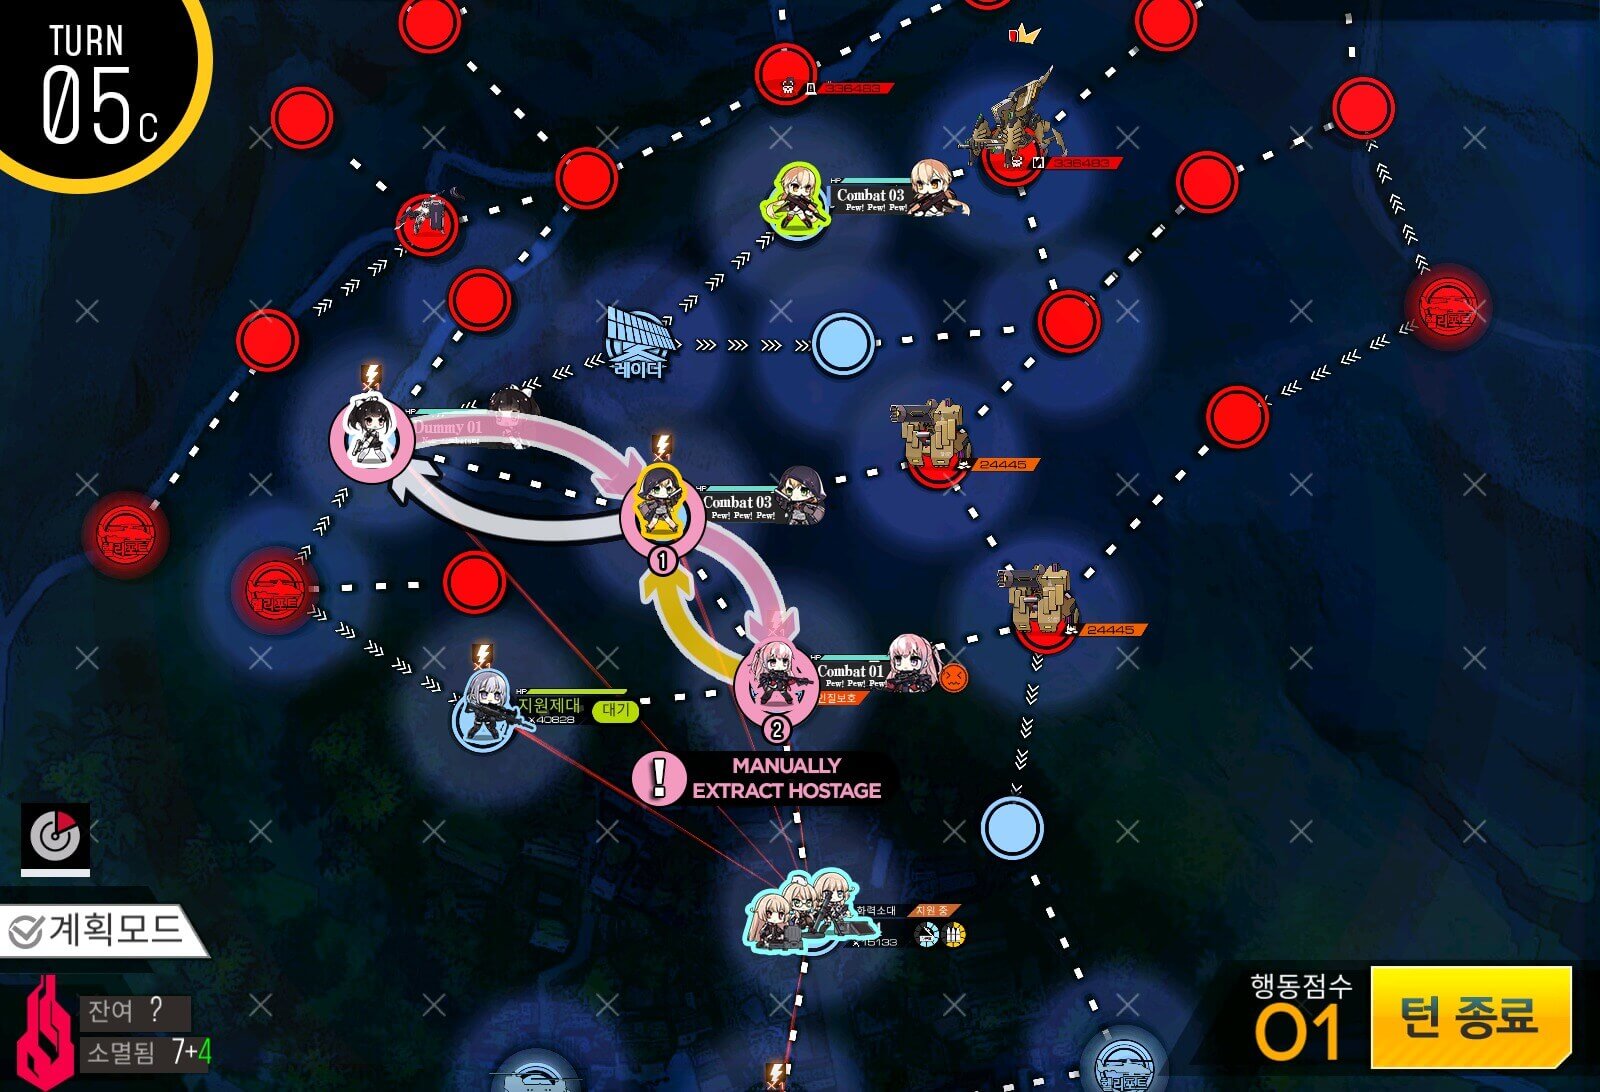
Turn 5b
All you have to do now is swap all the way to the helipad and manually extract to clear the mission.
Turn 1a
Start with the MG mix echelon at the bottom helipad and an AR echelon at the top. The MGSG team clears out the Dragoon unit and heads to the closed helipad with the AR echelon following behind.


Turn 1c
Swap the AR and MGSG's team's positions before ending the turn.
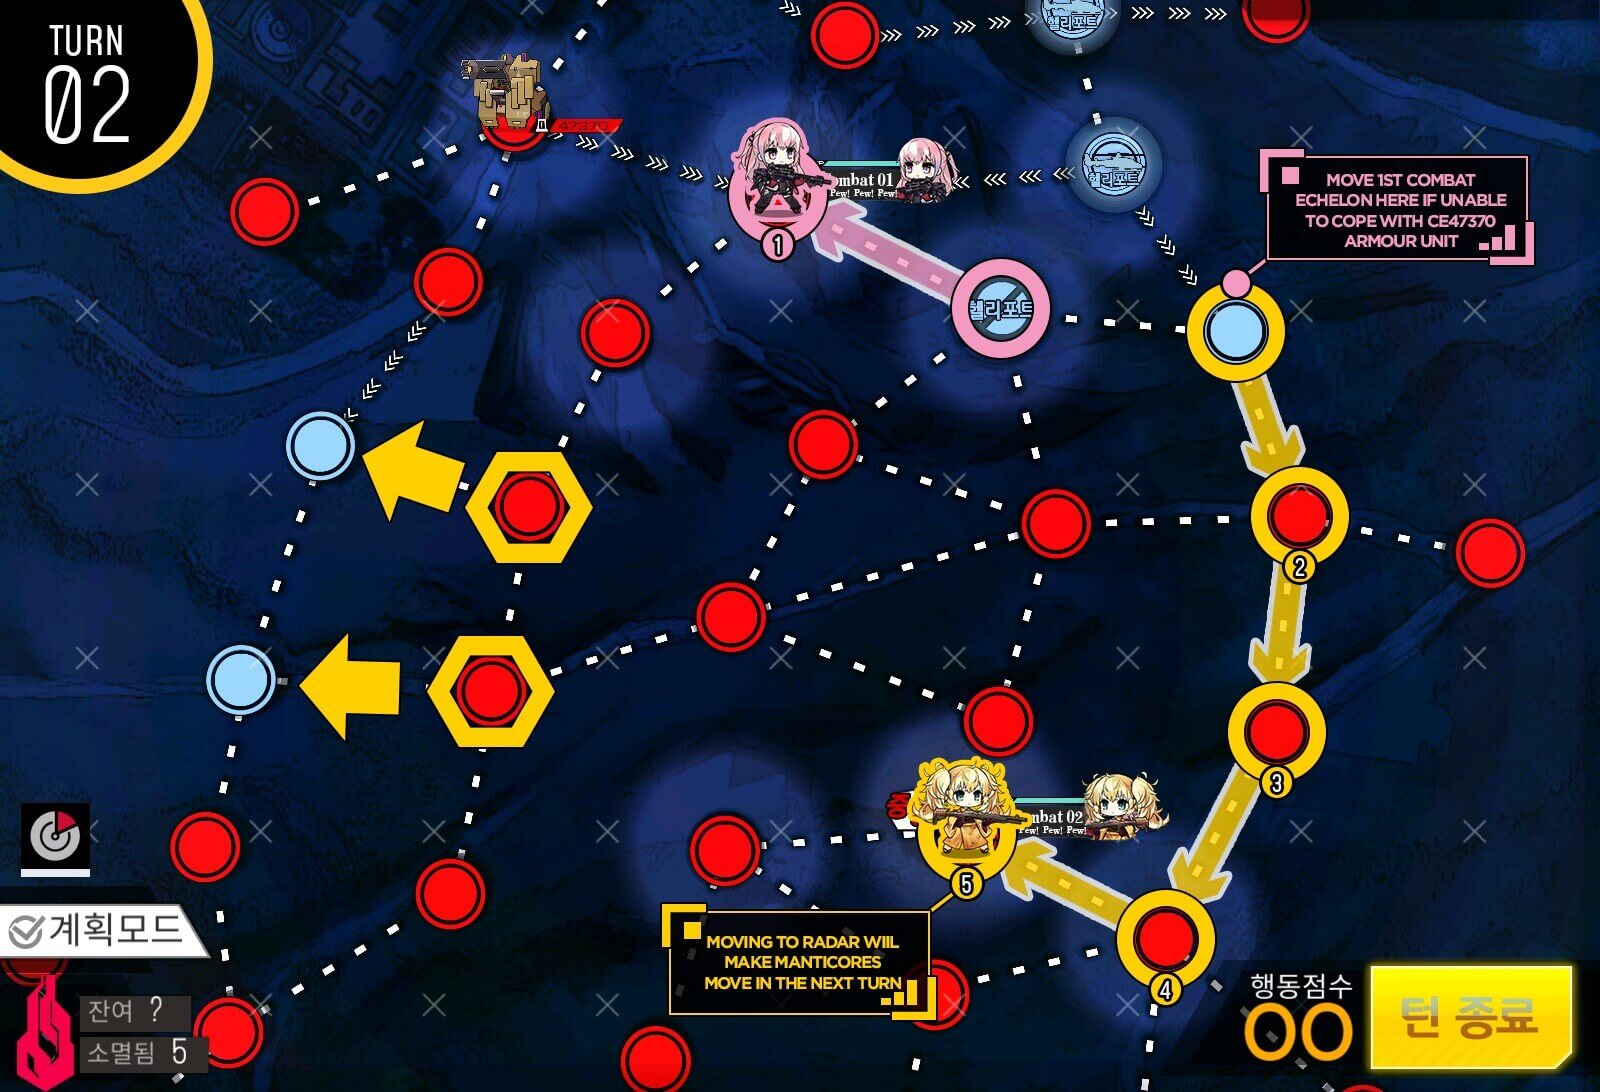
Turn 2
MGSG team moves straight to the radar node at the bottom. This changes the Manticore units in the marked areas to move out of the way [yellow arrow] next turn. Now you have two options on turn 2. If you want to aim for an S-rank clear and/or are confident in your AR echelon's ability to fight armored units, move the AR echelon to the left towards the Manticores. Otherwise, if you'd rather play it safe and don't care about the S-rank, you can move your AR echelon to the right [node marked purple].
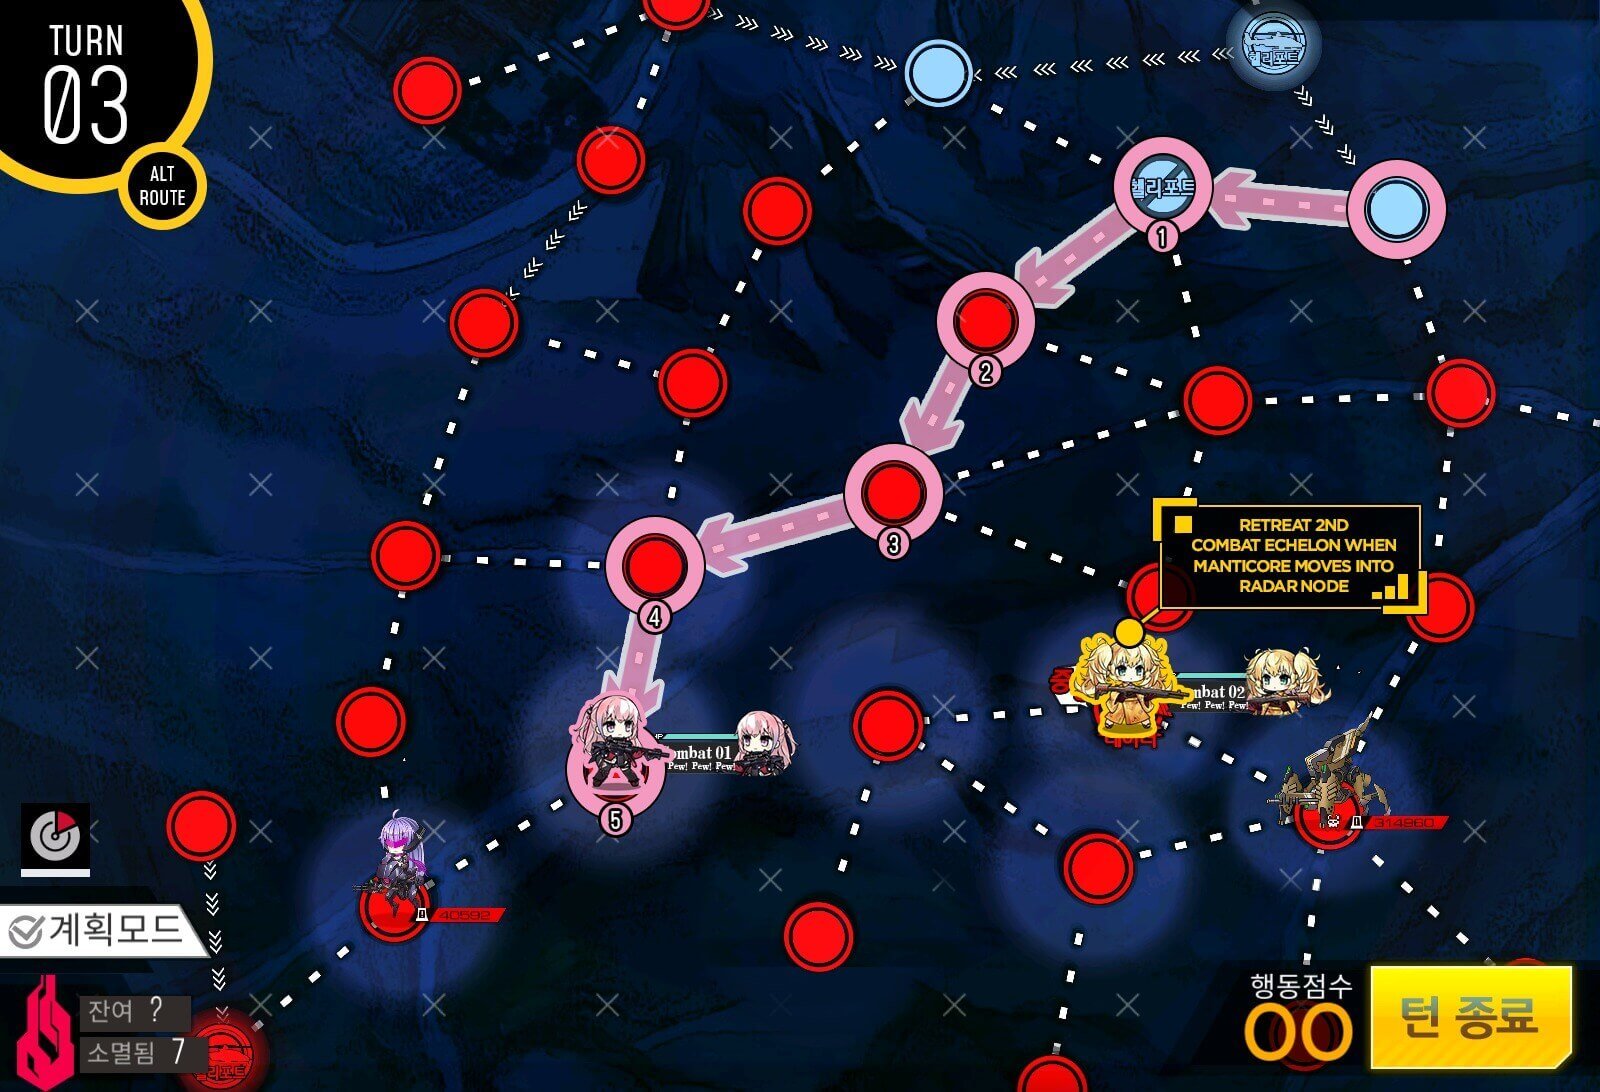
Turn 3c Alt
If you moved the echelon to the left, you can save your MGSG echelon from having to fight the Manticore unit by moving it to the left, in which case it will fight a Tarantula unit instead. After that, move your AR echelon through the Manticore blockage on the left. (?) If you moved your AR echelon to the right [purple], the AR echelon will be moved to the same place, but you will not move your MGSG team and let it run into the Manticore. Just retreat the team upon the start of the battle so that you don't have to worry about repairing it.
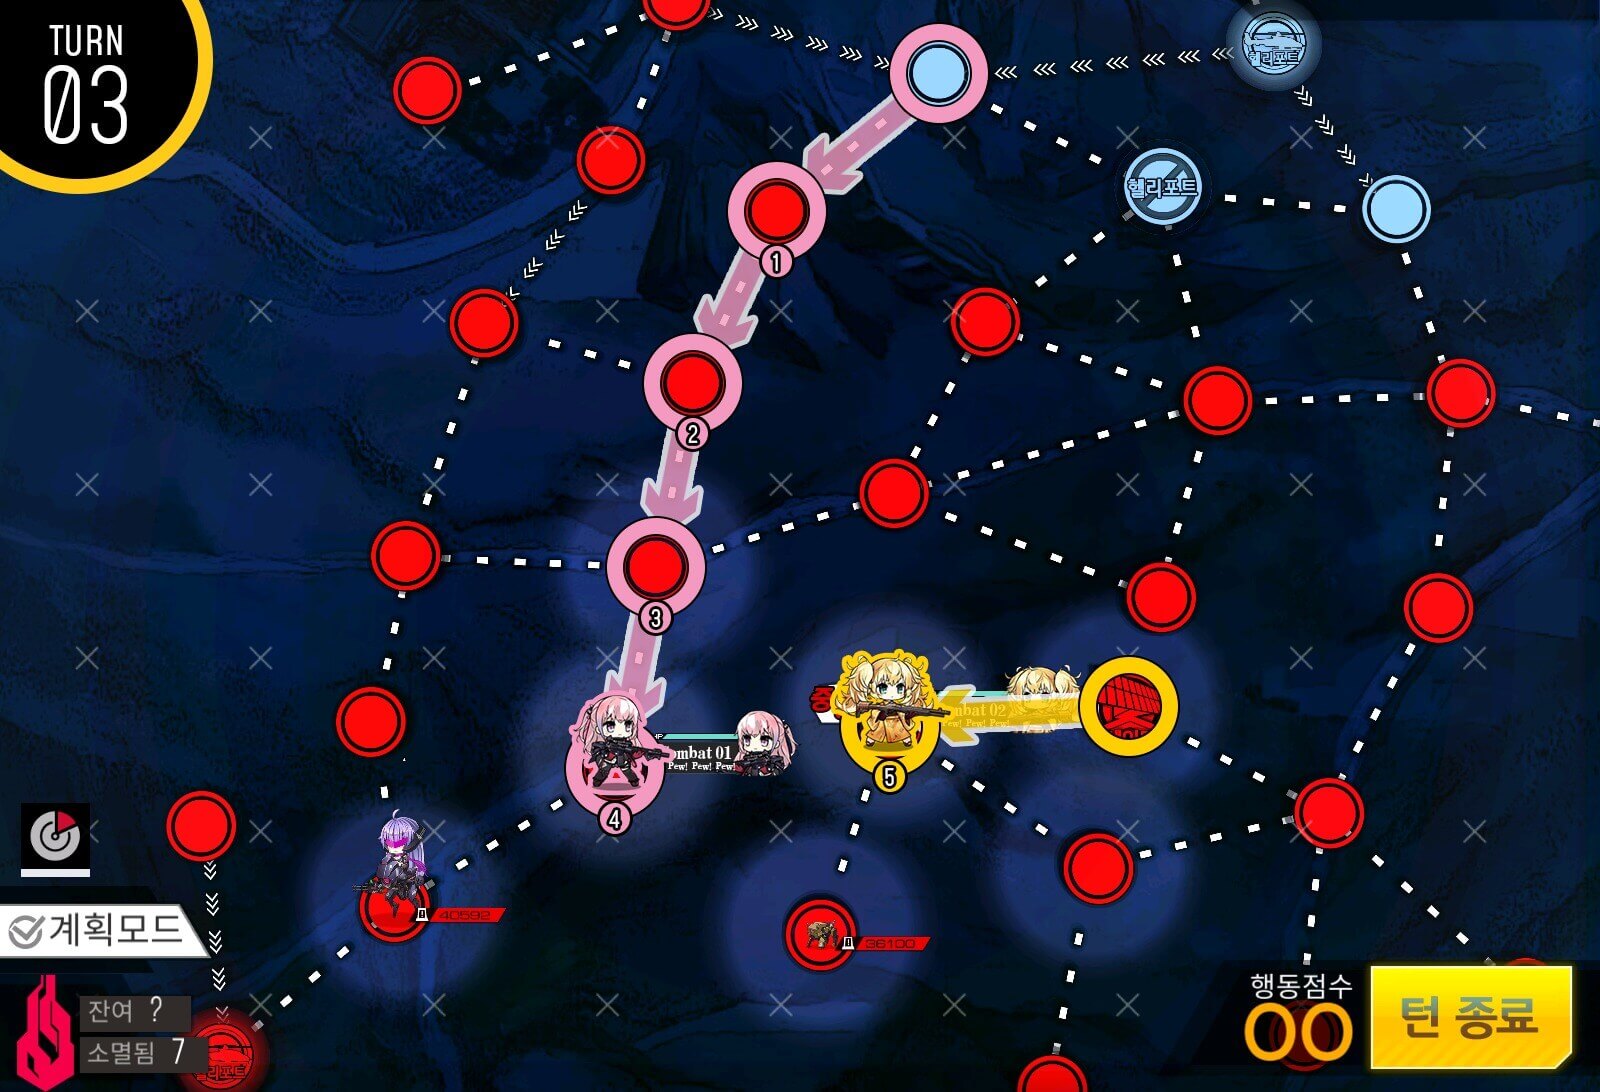
Turn 3c
Otherwise this.

Turn 4
Now all you have to do is move directly to the helipad and hit end turn to clear the mission.

Turn 1a
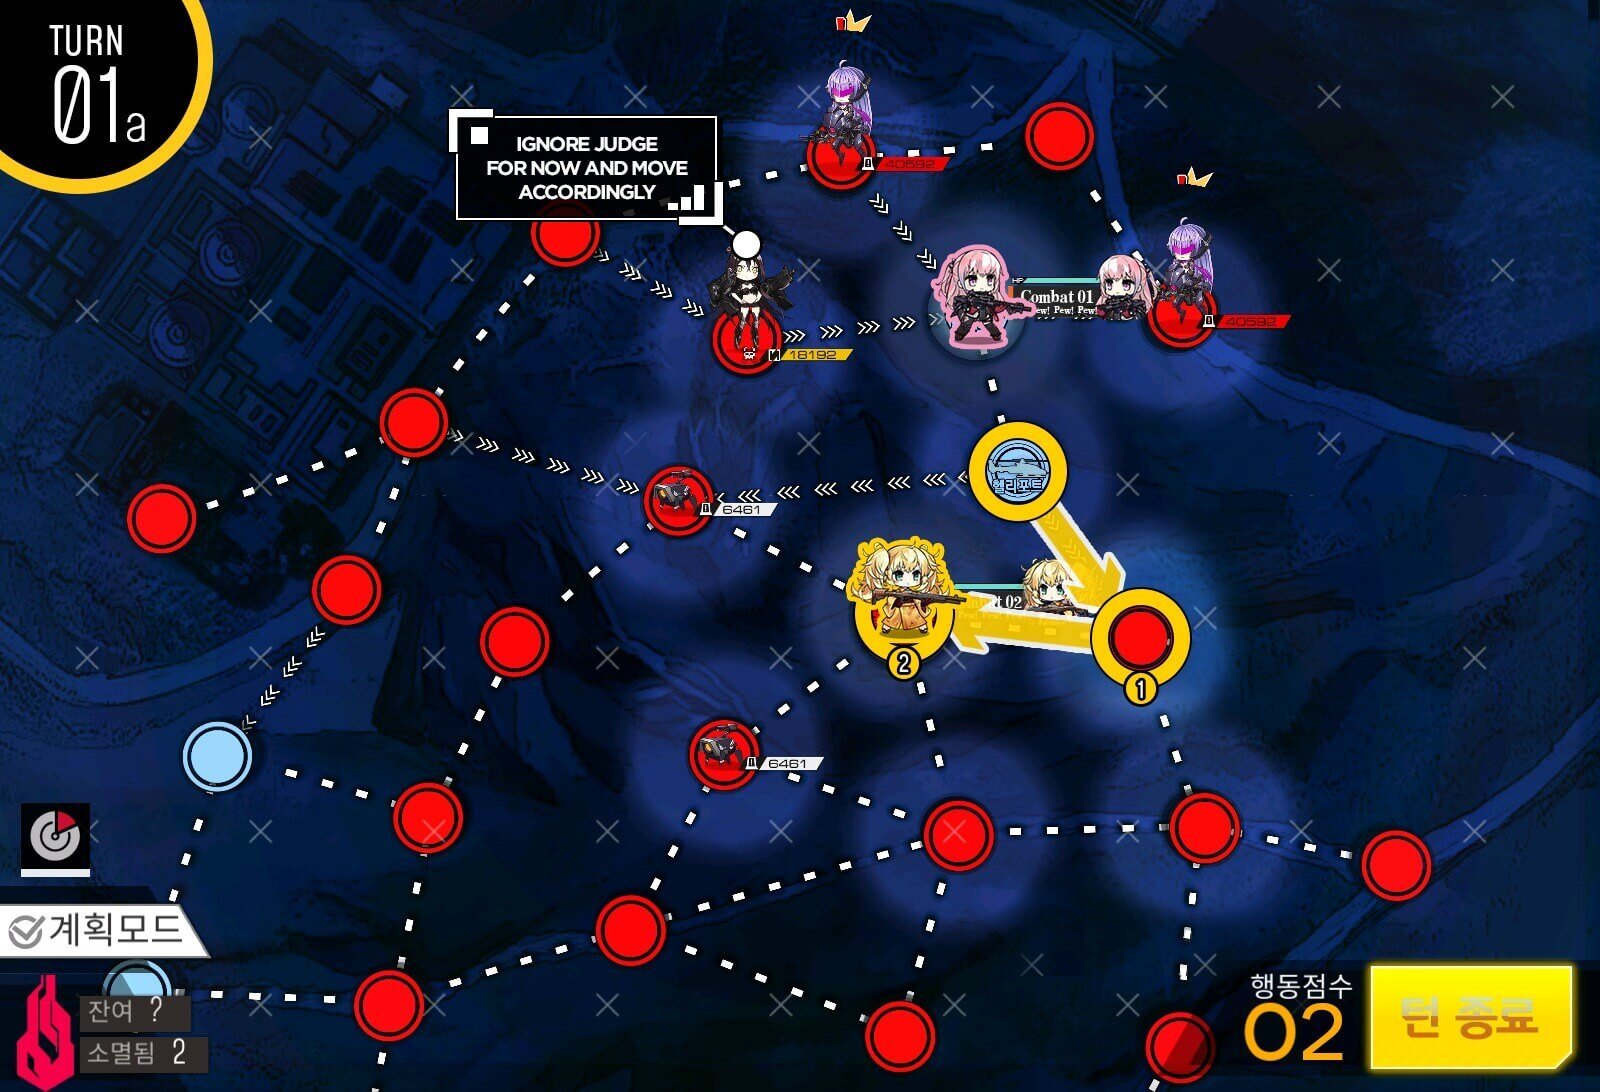
Start with a RF echelon by the HQ and an AR echelon at the top helipad. Move both teams once to the right. Deploy your anti-Judge echelon on your HQ, but leave it unsupplied until turn 5.

Turn 1b
The RF echelon continues to move towards the helipad at the bottom center of the map. This is to open up a path for the Goliath Plus patrolling nearby.
Turn 2a
Start of turn 2. Deploy your 2nd combat echelon at the top helipad and move it and the other combat echelon beside it towards the radar node. An echelon will have to remain on the radar node for 2 more turns in order to draw Goliath's aggro by the left of the enemy HQ to clear the path for turn 5.

Turn 2c
Deploy a HOC unit at the top helipad to provide support for the AR echelon. We are also going to move the RFHG echelon out of the Goliath Plus' aggro range.
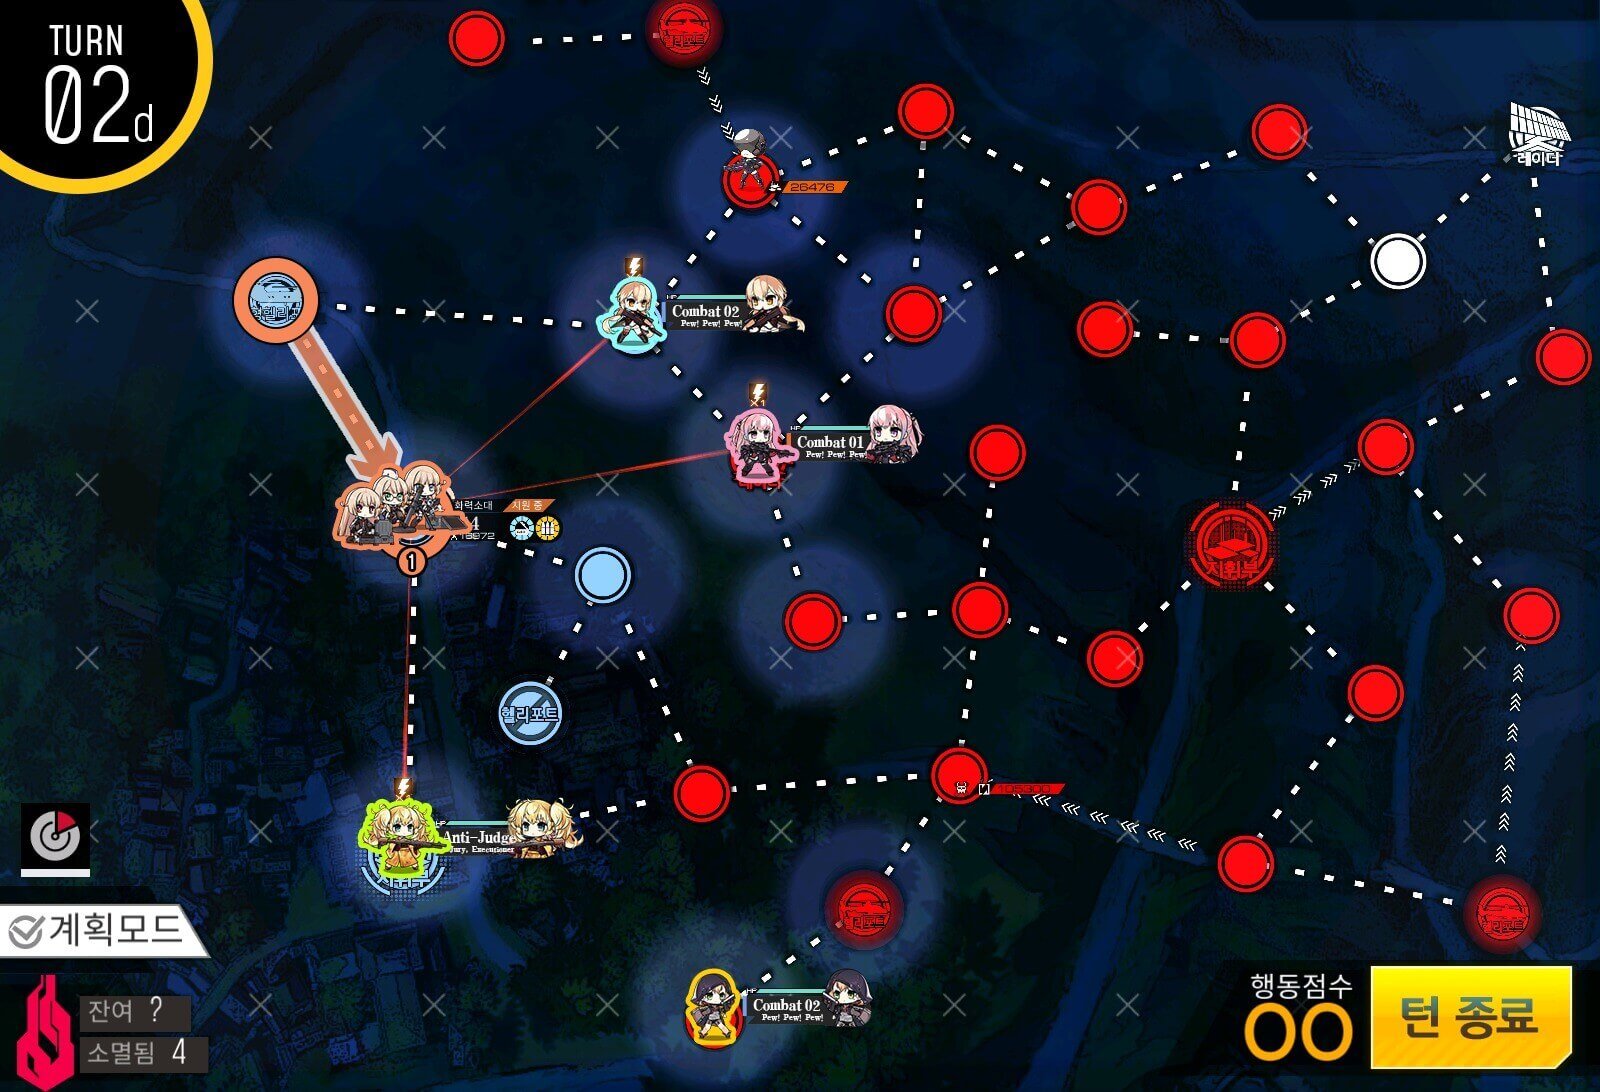
Turn 2d
With your spare movements, move the HOC down towards the anti-Judge echelon.

Turn 3
We don't have to do anything in this turn. If one of your AR echelons is in bad shape though, conga line-swap your echelons to put a stronger one in front of the enemy. You can also deploy backup MGSG teams if you want to have a second go at the Judge if the first battle fails.

Turn 4a
Now we have two Goliath Pluses near the AR echelons on the radar node. Bring back your AR echelons to safety as their job is done. Now we set up the HOC and anti-Judge echelon to rush the enemy HQ next turn.
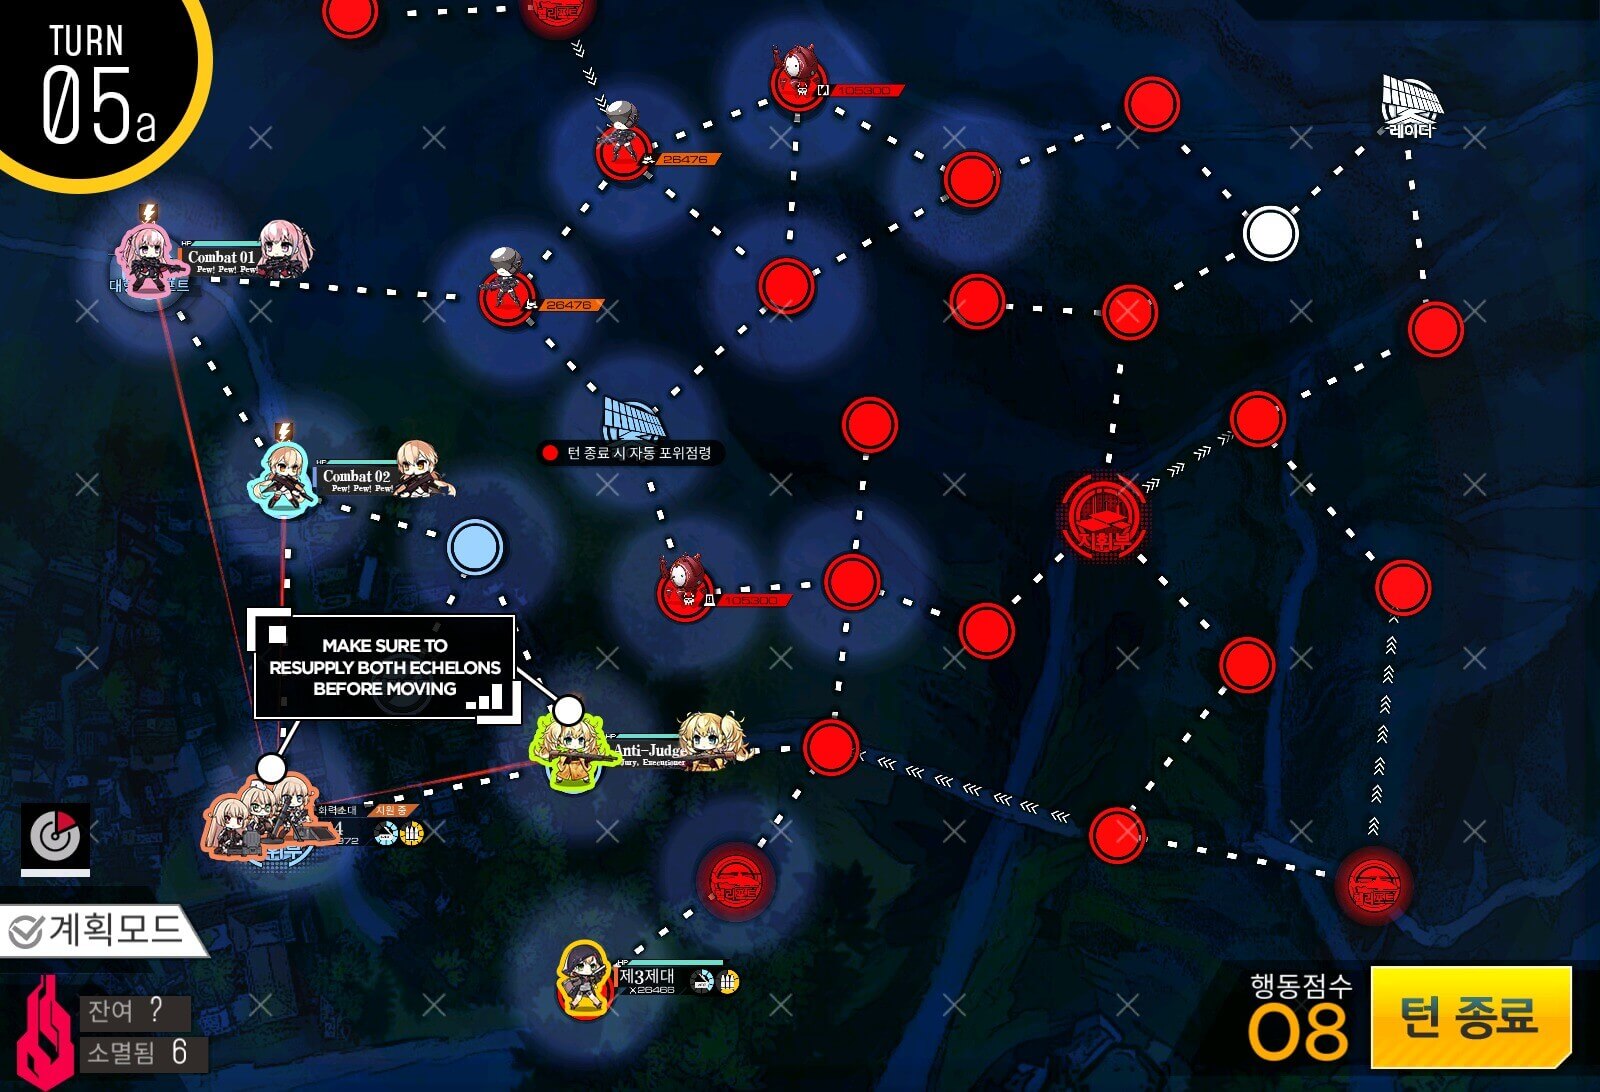
Turn 5a
Make sure to resupply both the echelon and HOC here.

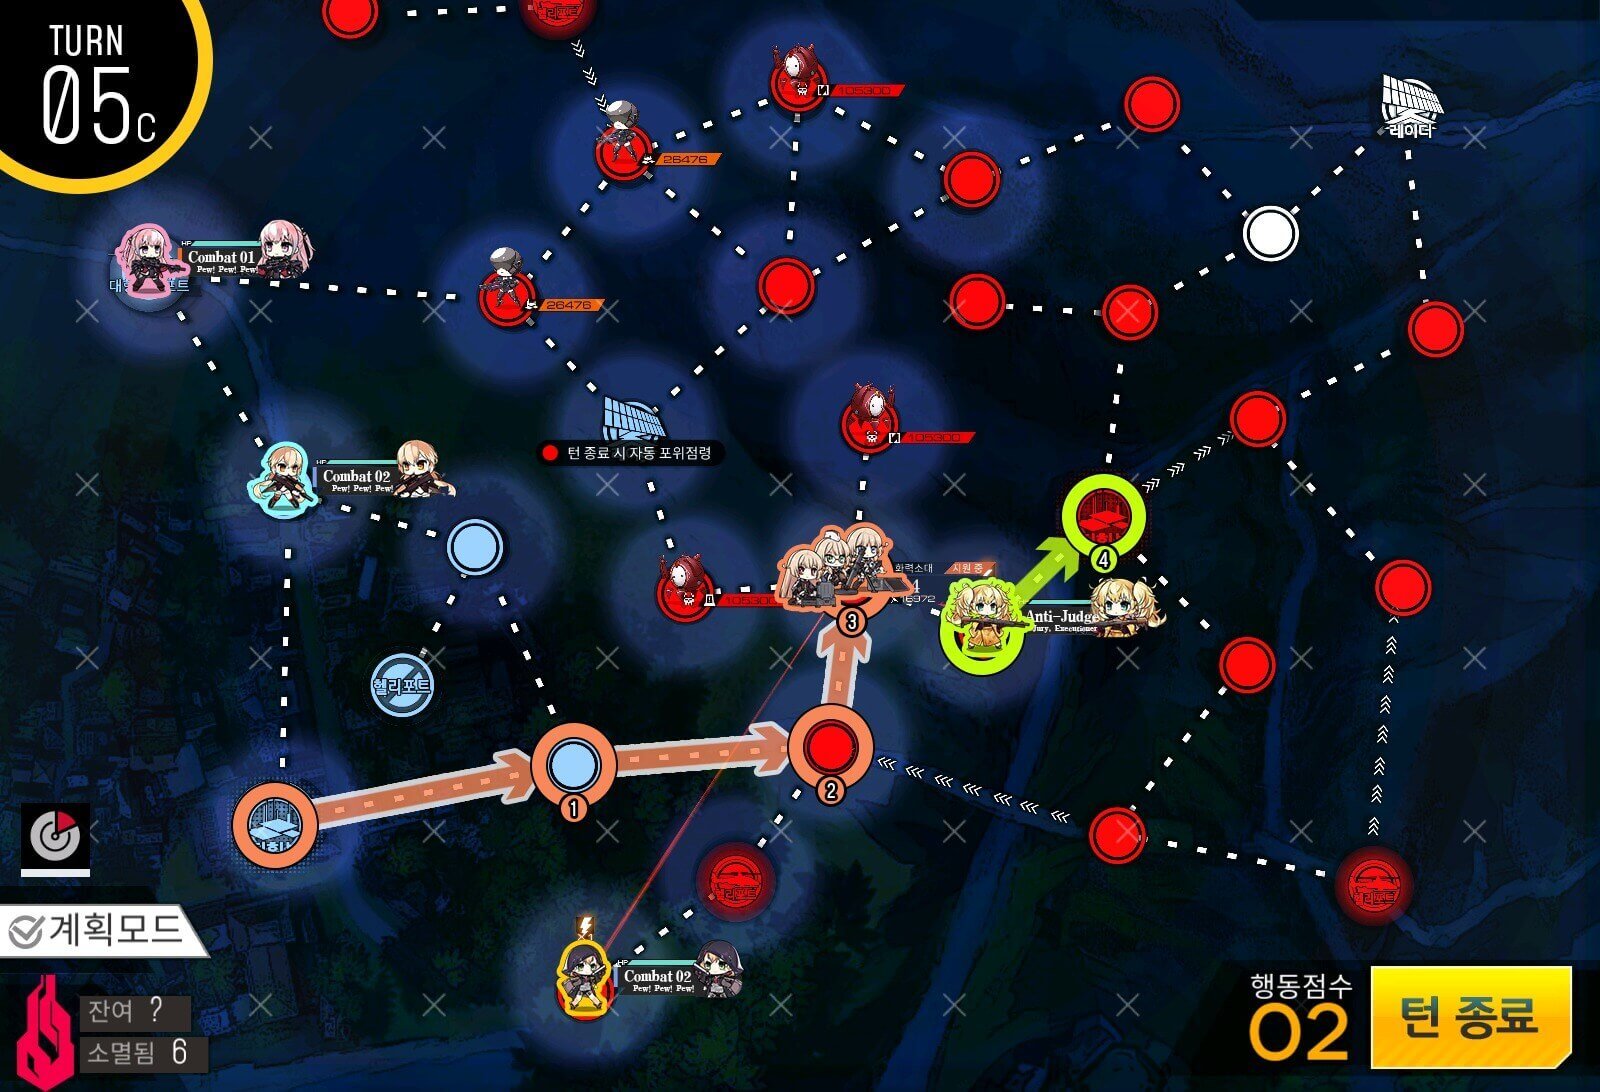
Turn 5b
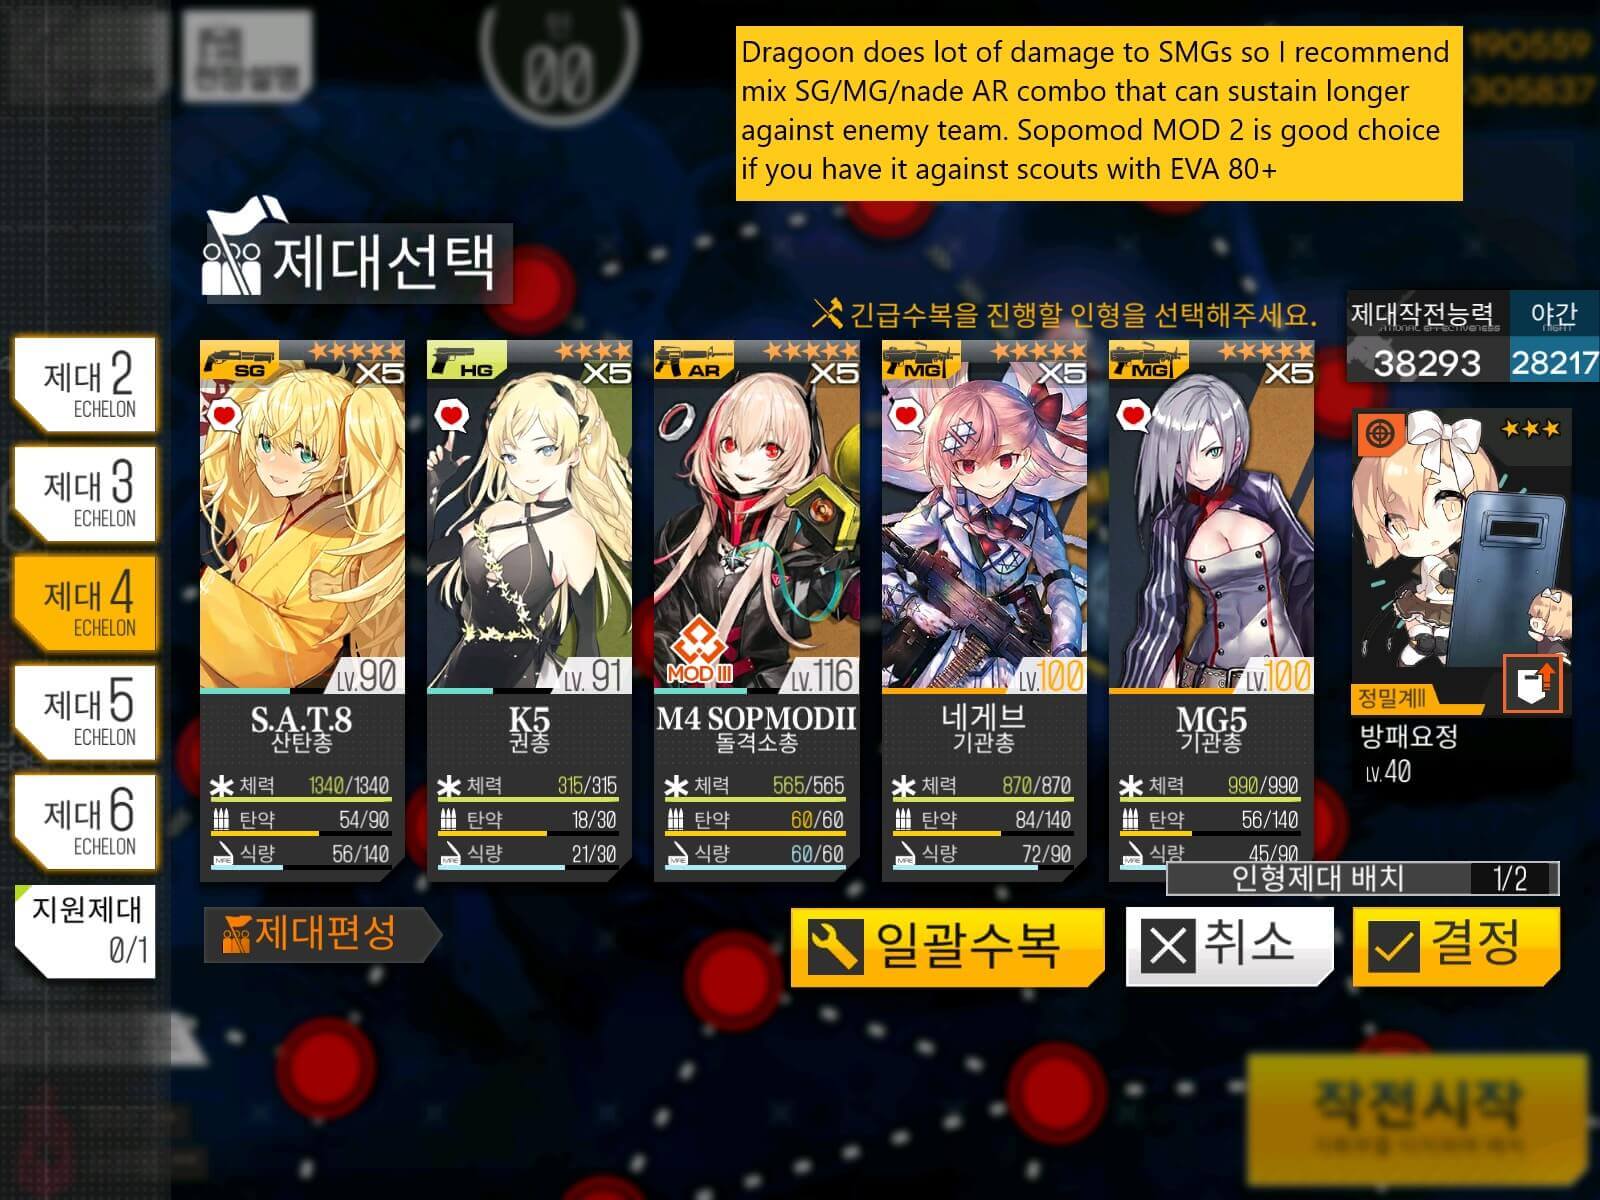
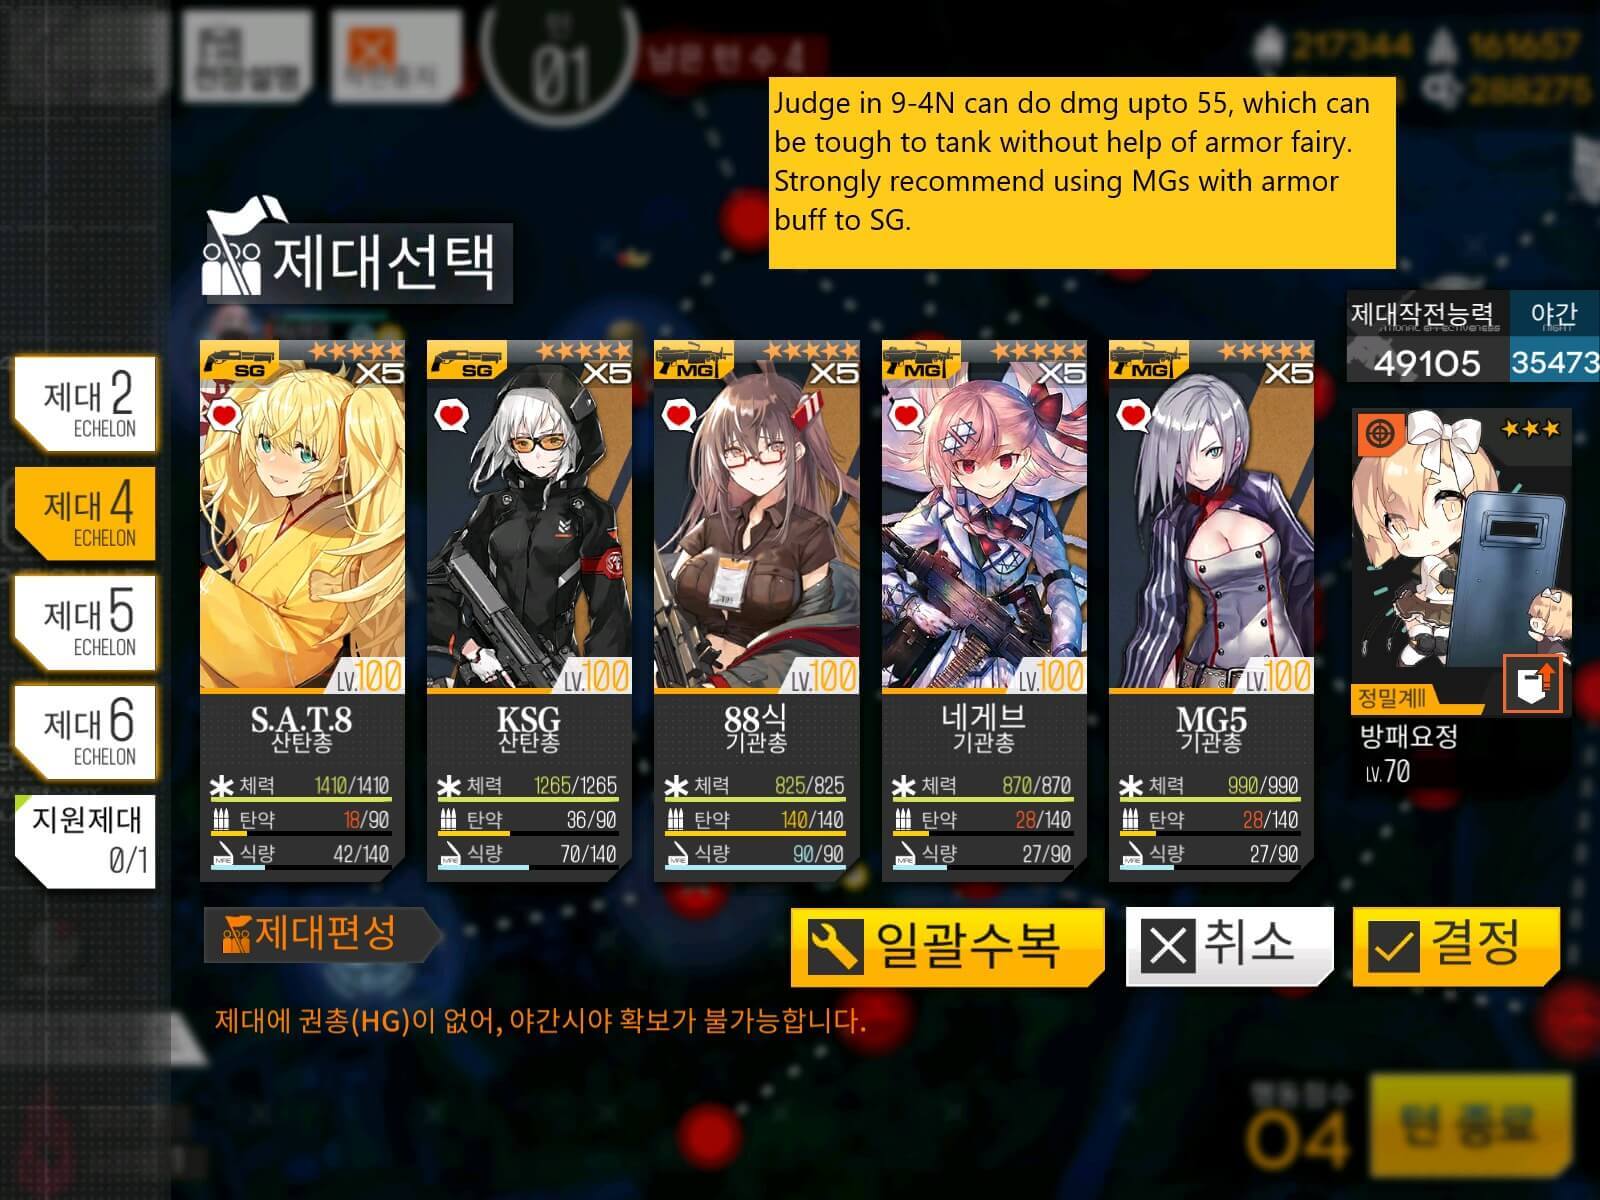
Make sure that before you go fight Judge, you've checked the following: Are my HOC and MGSG echelon supplied? Are my HOC and fairy skills turned on? The fight should be similar to the Judge fight in normal/emergency maps, but one recommendation would be to move your best MG to the front column with your 2 SGs and retreat the remaining MGs from the fight after they have dealt with the armored mobs that spawn with Judge.