


Arctic Warfare Map Guide
← Shown Enemy Strength: 2,000
Echelon[s] Required: 1
S-Rank condition: Kill 5 Units in 6 turns. Take HQ.
Welcome to Arctic Warfare! Hold on tight as we follow the stranded AR team members through an exciting and frosty adventure through the snowy mountains, where we do sick anime thingsss 'n stuff
Shown Enemy Strength: 2,000
Echelon[s] Required: 1
S-Rank condition: Kill 5 Units in 6 turns. Take HQ.
Welcome to Arctic Warfare! Hold on tight as we follow the stranded AR team members through an exciting and frosty adventure through the snowy mountains, where we do sick anime thingsss 'n stuff- The intro stage, which you can basically beat with just about any echelon you have. Not much to explain here but to just move along the path and making sure to resupply in Turn 3 before continuing.


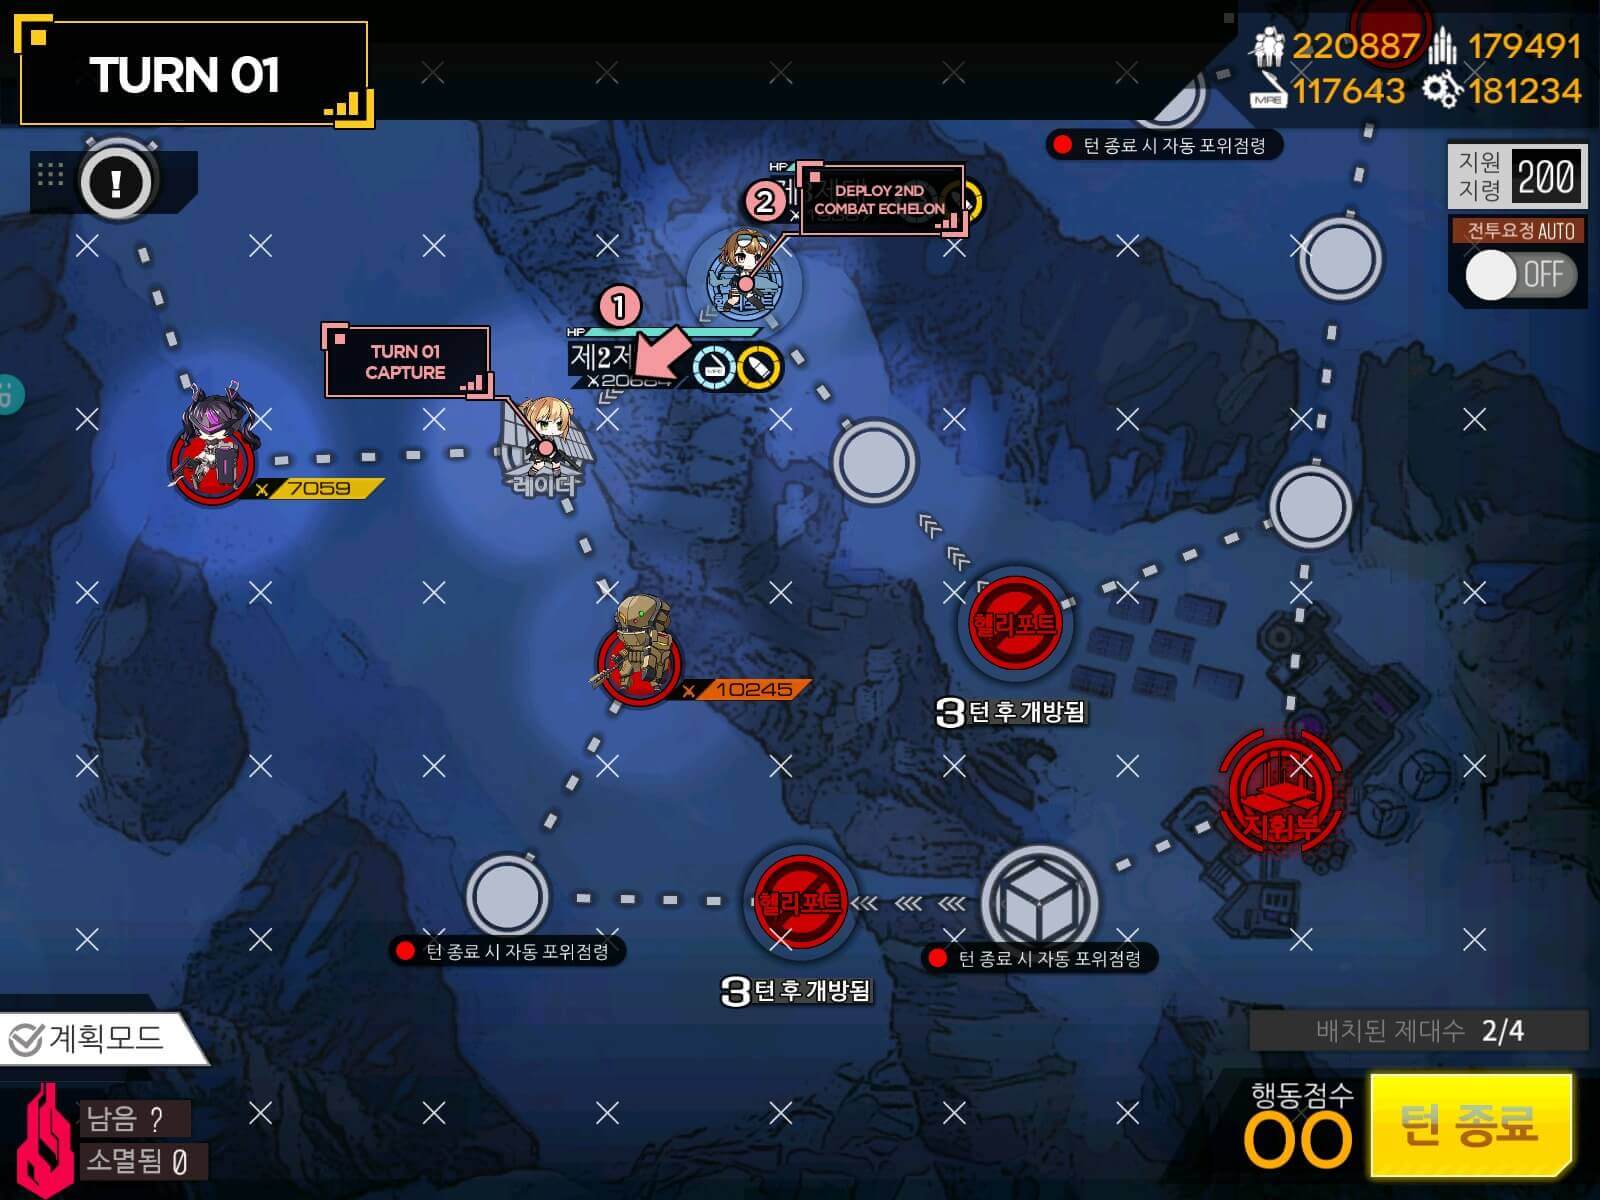
- Shown Enemy Strength: 3,000
Echelon[s] Required: 1 + 1 Dummy HG
S-Rank condition: Kill 6 Units in 7 turns. Take HQ.
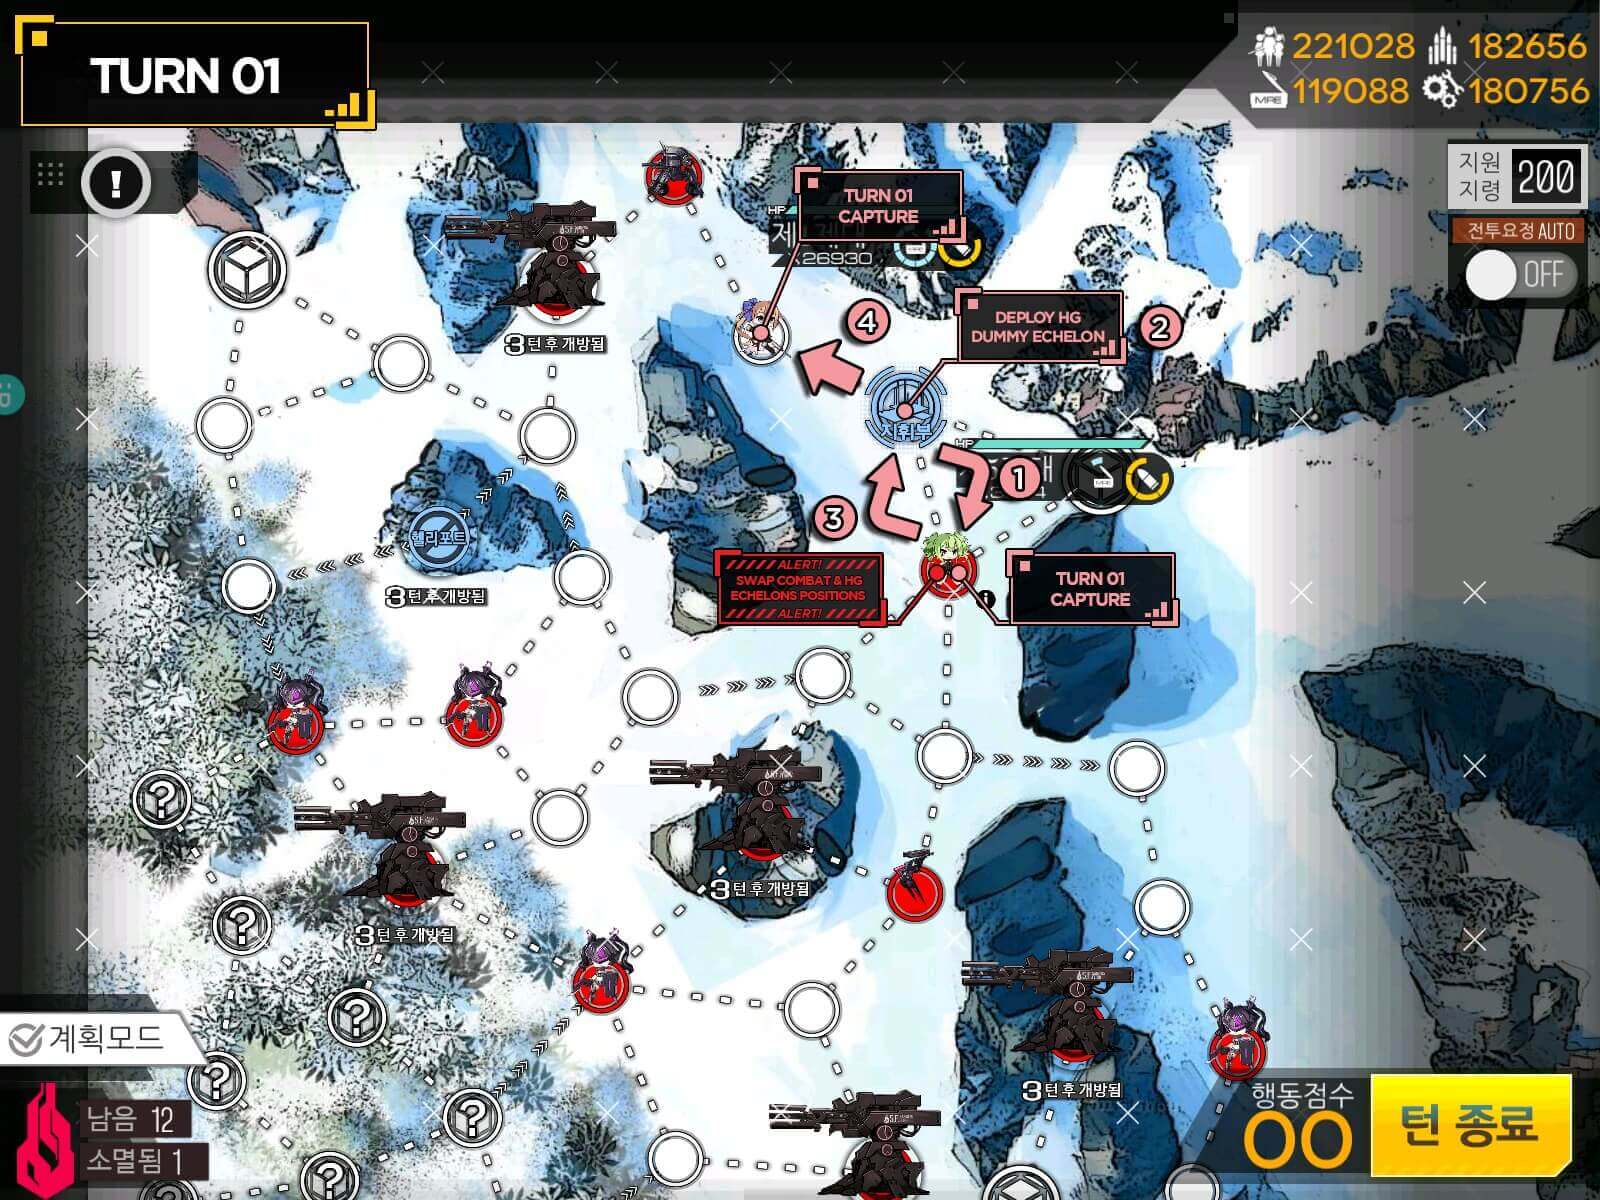
This map introduces us to the all too infamous, goliath-like but also incredibly sexy Jupiter Cannon. I will only cover the minimum echelons required for this mission.
- You may take the [green path if you wish to take out another Jupiter Cannon] before finally capturing the enemy HQ.
- Make sure your tanker (preferably a SMG with high health or just a SG) is positioned away from your DPS, as attacks from Jupiters in Artillery mode hit in a “+” AoE blast, so you don't want any T-Dolls to be adjacent. Position 3 or 6 is preferred. This strategy is bound to change with Jupiters growing stronger with every following stage.
- Stroll along the path marked and blow that Jupiter Cannon outta the fuckin' water, baby.


 is positioned away from your DPS, as attacks from Jupiters in Artillery mode hit in a “+” AoE blast, so you don't want any T-Dolls to be adjacent. Position 3 or 6 is preferred. This strategy is bound to change with Jupiters growing stronger with every following stage.")

- Shown Enemy Strength: 4,000
Echelon[s] Required: 2 + 1 Dummy HG
S-Rank condition: Kill 6 Units in 6 turns. Take HQ.
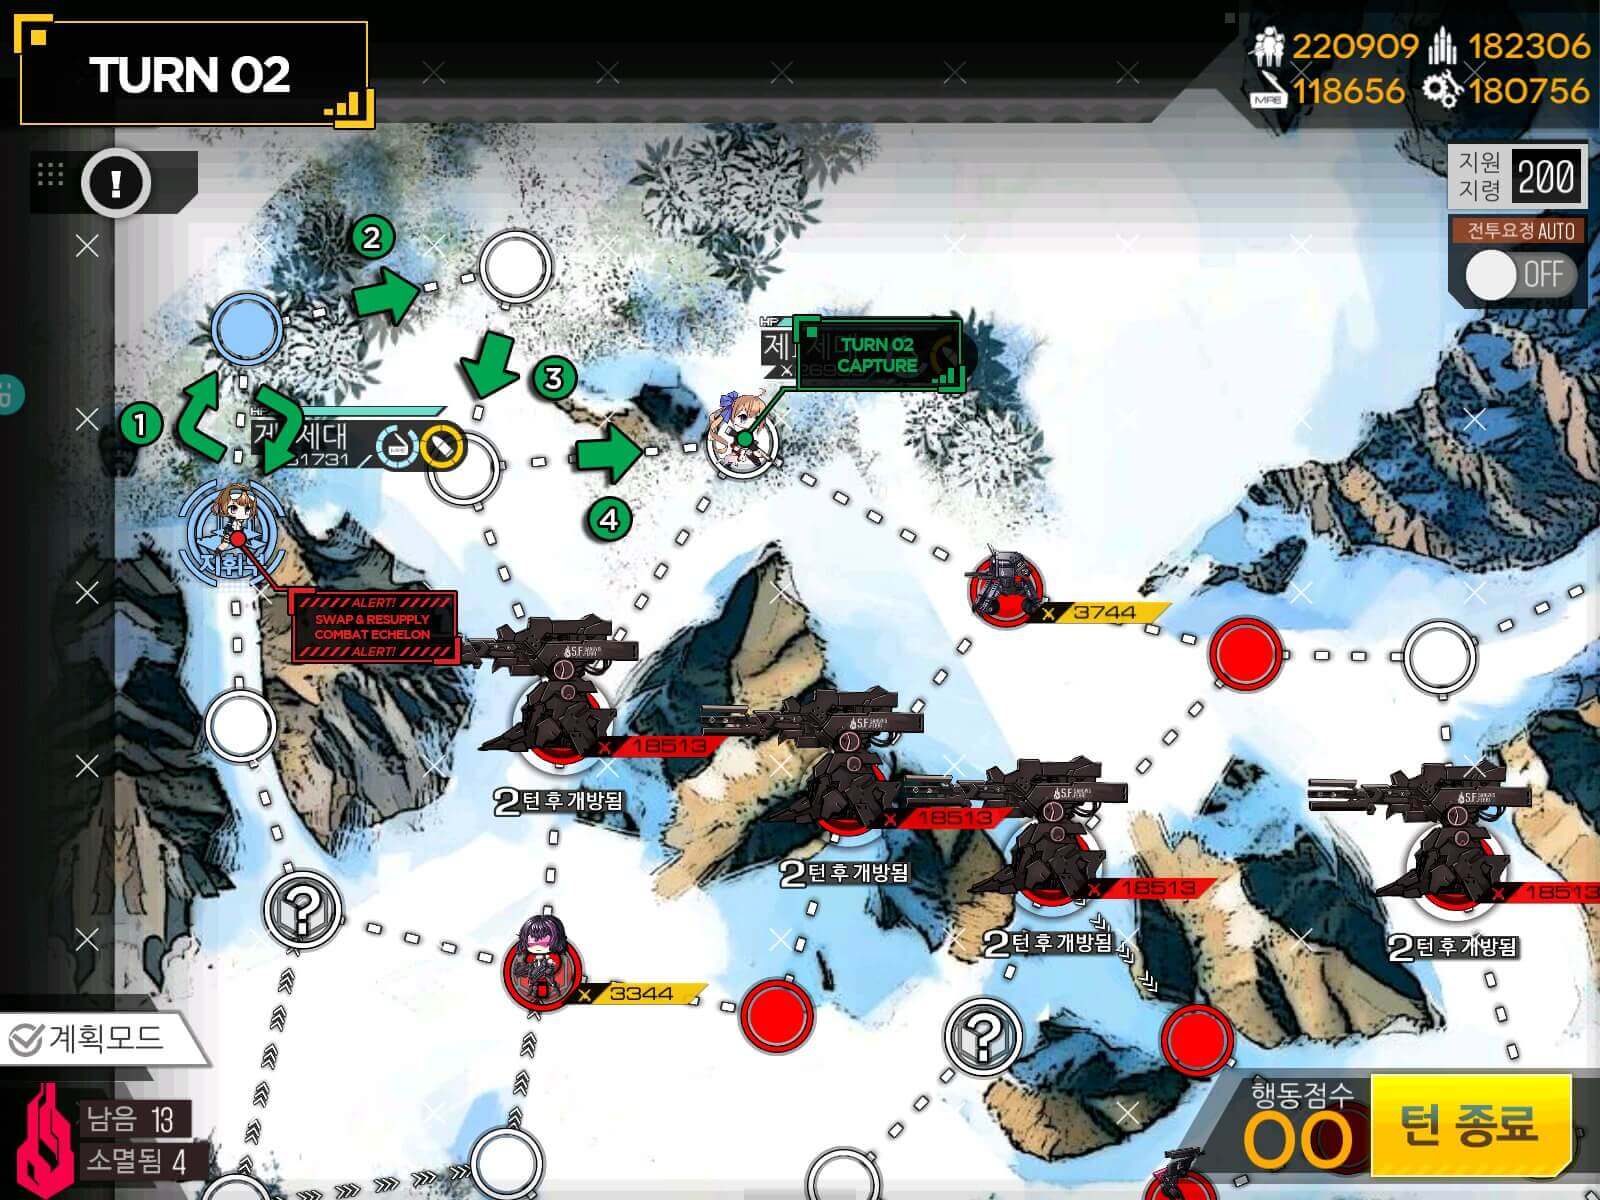
The only way in is through the “?” minefield, where you're 100% ambushed by enemies, guaranteed. This is one of the few maps where brute forcing a Jupiter would not be worth your time and you'd rather save your resources, due to the last minefield forcing you to fight, eventually causing you to run out.
- Bit of position swapping to get your dummy out of harm’s way. Your combat cchelon is taking out tje rest of the units in the area.
- This is where you don’t have much else to do, except for either setting up a strategy to surround the Jupiter or just doing nothing for the entirety of the turn. This part is entirely up to you.
- If you are lucky like me, you can only summon one echelon and take it to the end of the mission, but if there is an enemy unit that is not on the “?” node, or if it happens to run into you during the enemy's turn, you will most likely have to battle more than 5 times. Should this be the case, you can just summon another echelon that can take over for your prior team. You can even retreat your main echelon that was just sitting around doing nothing. You just won’t get a S-Clear, but if you are short on combat worthy echelons, this is not a bad way to clear the map.
- Exactly enough ammo to carry me to the HQ. All of these nodes will be ambushes so don’t try it if you don’t have enough ammo. Tried it? Now you know I wasn’t kidding.


- Shown Enemy Strength: 5,500
Echelon[s] Required: 2
S-Rank condition: Kill 7 Units in 16 turns. Take HQ. // Kill Boss Unit
Our first run into Gager. This guide will cover the procedure without using fairies.
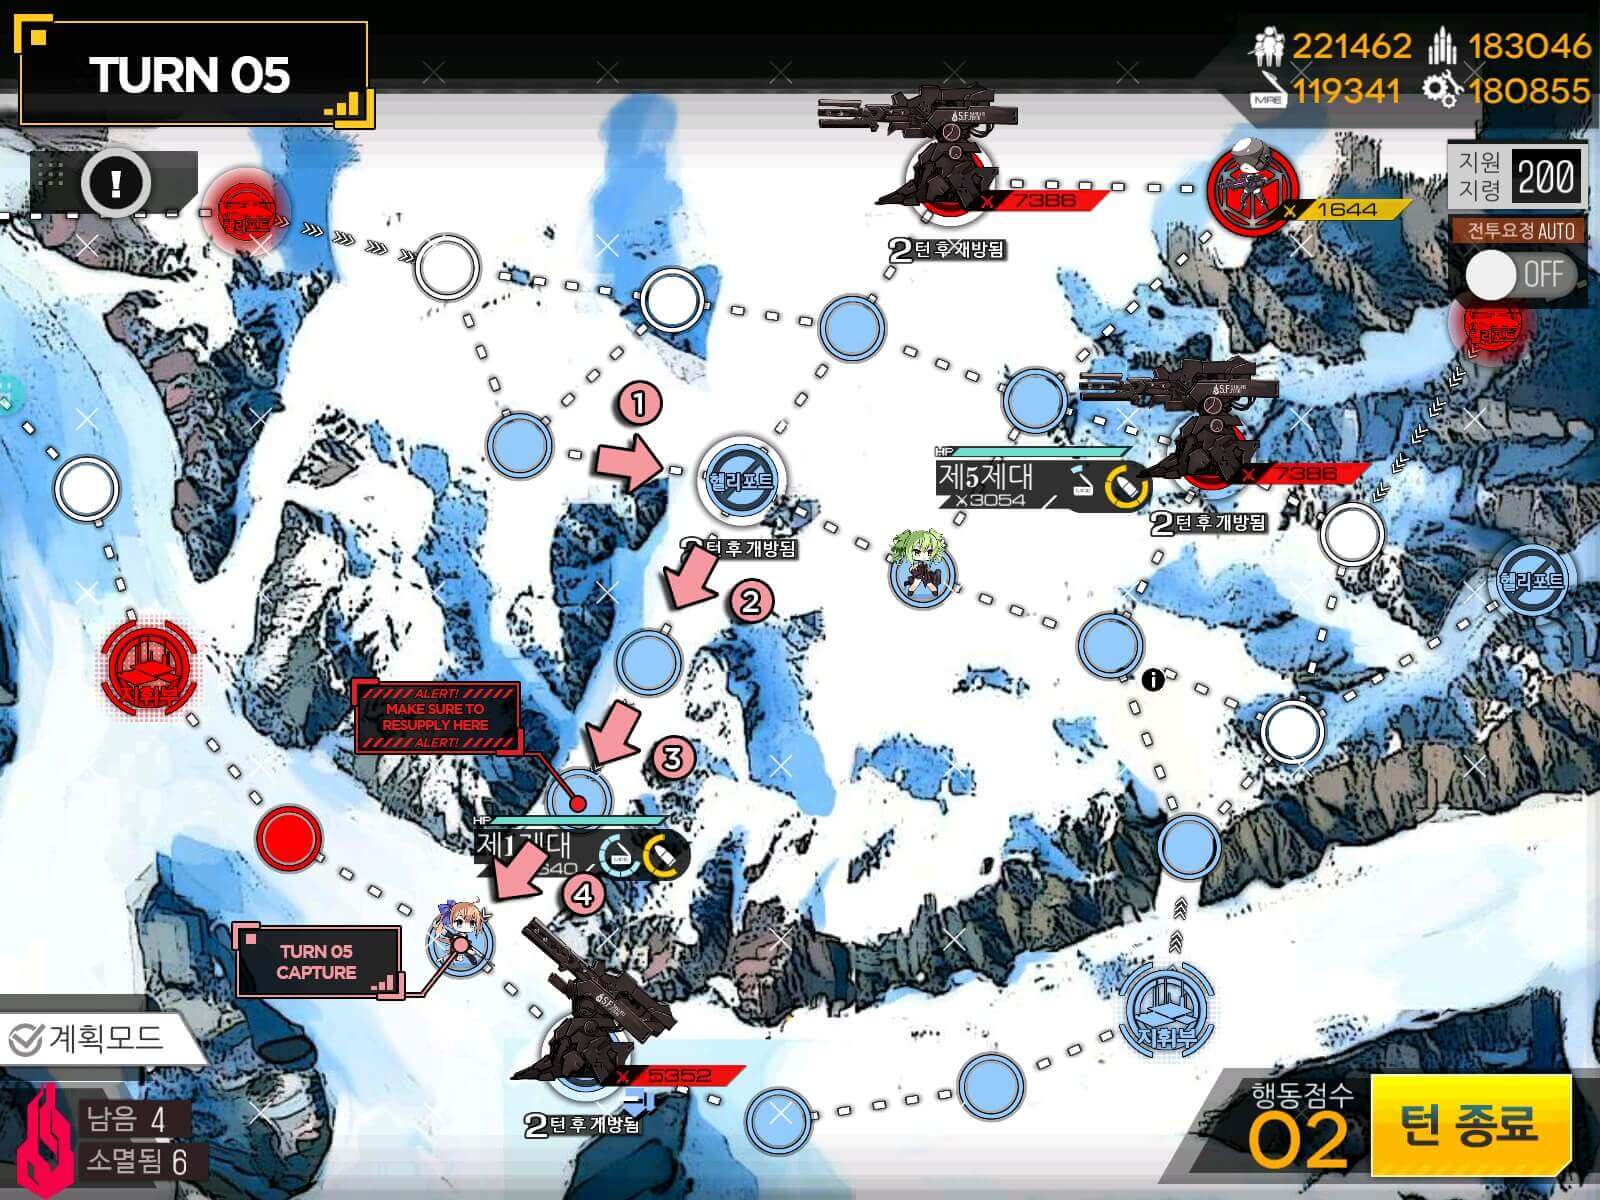
- The important part here is to resupply the main echelon that is going to take the long way around after summoning 2nd echelon. Swap and resupply on your HQ before moving further.
- Whether RNG likes you or not, you can run out of ammo at this point. Resupply here before proceeding.
- The next few turns are going to be all about managing your supplies while pursuing Gager. Very rarely, “?” nodes will ambush you with enemies, but if that happens you might have to adapt or go back to get new supplies.
- You can [take the Jupiter circle in green] to get resupplied if you need to, but if you have enough ammo, move in to take out Gager. [Her attacks have a row pattern. Watch out for the trigger. Move your dolls out of the way as soon as you can or retreat any targetted ones to avoid taking damage].
- Make sure your tanker (preferably a SMG with high health or just a SG) is positioned away from your DPS, as attacks from Jupiters in Artillery mode hit in a “+” AoE blast, so you don't want any T-Dolls to be adjacent. Position 3 or 6 is preferred. This strategy is bound to change with Jupiters growing stronger with every following stage.
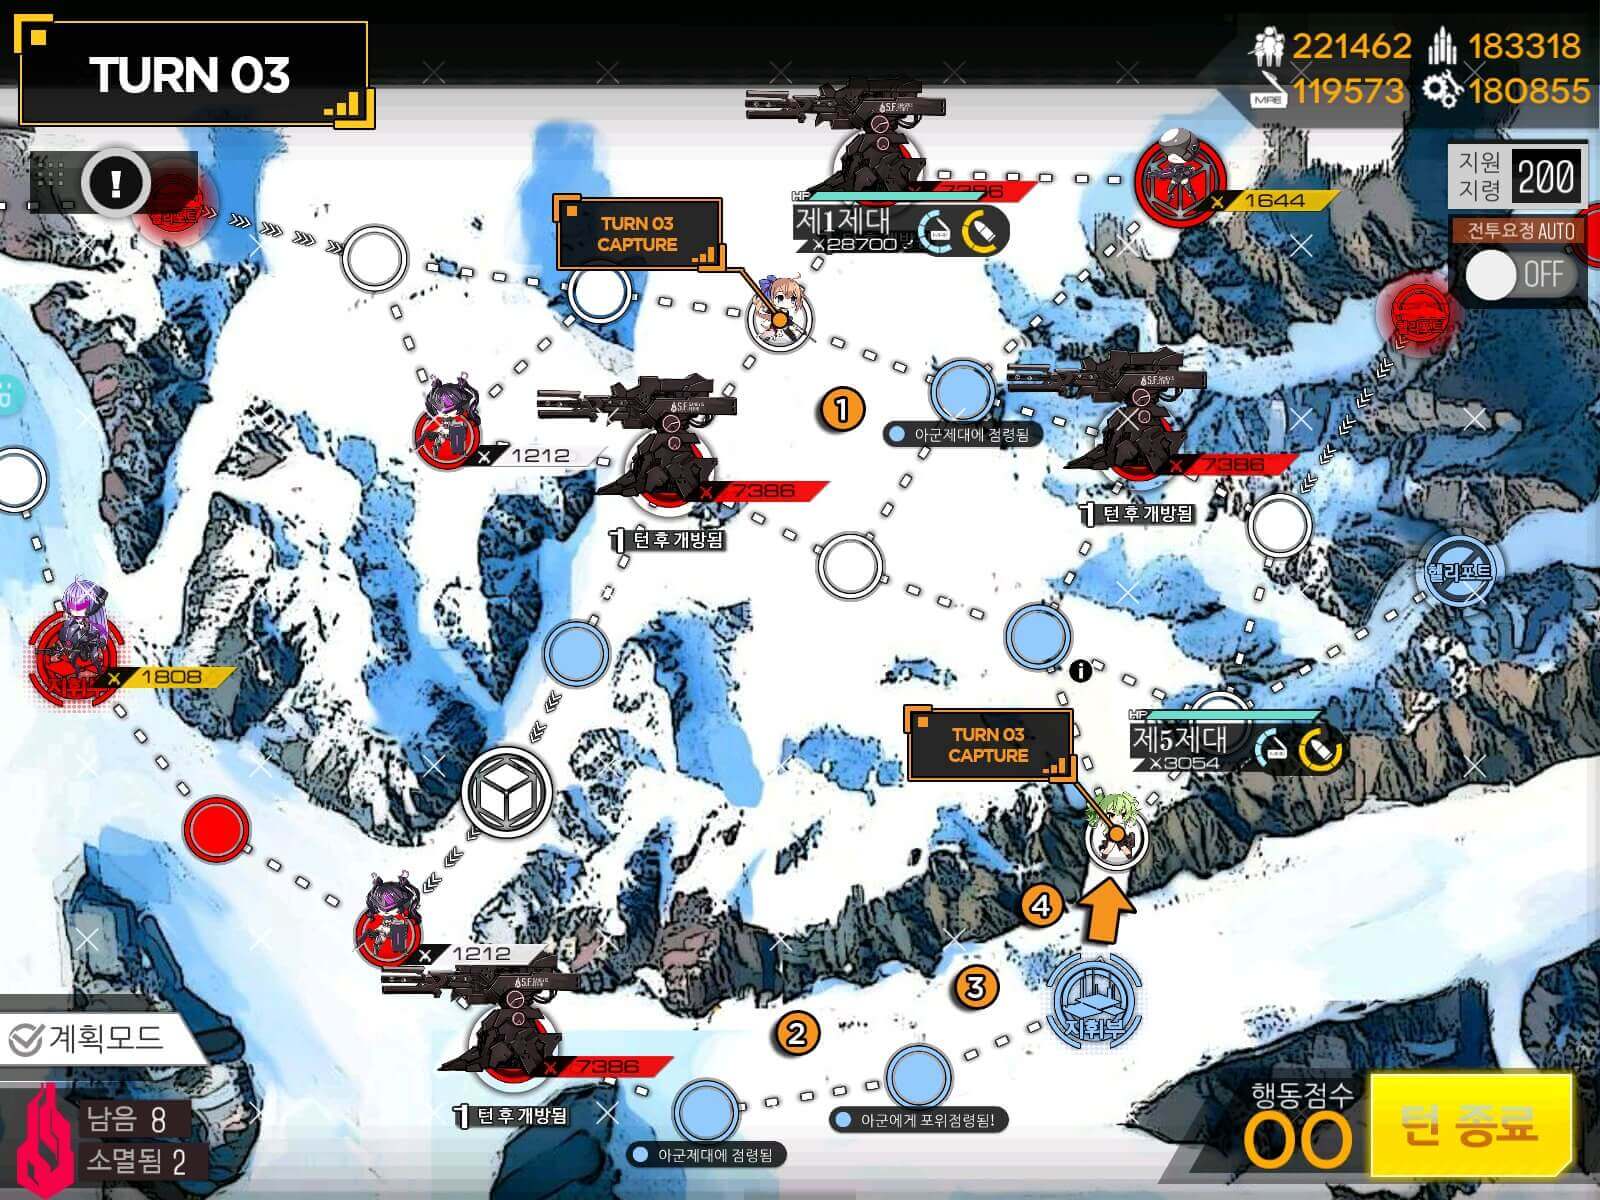
- This route kills 2 Jupiters. One of which disabled and the other at full strength. Repeat Turn 1 as usual and make sure to resupply as well.
Turn 2 is going to look a little different as we are looking to surround first Jupiter to turn it into our resupply point.
- Finish surrounding Jupiter.
- If your bottom echelon can take on a disabled Jupiter, you can go ahead and resupply using the swap method and march on all they way to brute force the 3rd Jupiter from the left as shown above. If not, you will just take 1 extra turn to finish the map like I did. Proceed to Gager to finish the mission.


- Gentlemen, I got some bad news. Chapter 2 of AW is all night only...
The map has a lot of information listed on it, so let me explain: If you are looking to avoid Jupiter cannon, you want to take the long way around [green path], or if you are looking to [brute force the Jupiter Cannon, take the red path]. Then follow the rest of the train of light blue to HQ.
For the [green path], your Jupiter Cannons' locations on the [helipads marked with the green pentagon] will be randomized. One of those helipads will have no Jupiter, so you should seek it out and find it. Go around the rest afterwards. There are 2 single-use supply points that you can use along the way to HQ. Use them wisely or wait for the helipad located under the supposed Jupiters to resupply if your timing's off.
- Make sure to spawn a 2nd echelon before moving your 1st echelon to the radar.
- This supply point is where your RNG will come into play. Find that empty helipad without no Jupiter, then proceed to move towards the HQ. If you need to, cross reference your path with the map above.
- Both paths take the same number of movement points, so just pick the one you think has the least enemies if you are worried about running out of ammo. If you are running low, go for that supply point on the top left of the map to be safe. You should be able to take the helipad on the next turn.
- Finito.


- Similar Play style as 2-1, only with a larger map. Watch out for the scout unit. The [green path is for bypassing], while the [red one is for brute forcing the Jupiter]. You do have to go through 2 fully operational Jupiter Cannons this time, so retreating and swapping like aggro between your two tanks would be optimal.
- Deploying a dummy echelon here is not mandatory, but it allows you to move around more. If you decide not to deploy one, the movement path will still remain the same.
- Because you have only 2 battles worth of ammo left, you will still need to either resupply above/wait for the temporary helipad to open up, or risk it if you don’t see a Jupiter cannon on the bottom left [can be 2 or 3 enemy units on the path to HQ].
- In my case, there was Jupiter blocking the shortest route, so I went around in through the [yellow path]. If there isn't one, go along the [green path after resupplying] if you'd rather play it safe.
- Same thing here as well. If it isn't blocked, go straight for the HQ. If it is blocked, take one extra turn going around and beating units. Make sure to resupply before heading to the HQ.


- It’s getting messier! Similar play style here with [green being the bypass path] and the [red one for brute forcing the Jupiter]. There is another path that I personally don’t recommend but it’s an option… the path through “!” landmines, which throw you into an ambush 99% of the time. However, the map can be done in a relatively short amount of time.
- Spawning a 2nd echelon will ensure the helipad will remain captured, just in case enemy units' RNG leads them to it. Also it guarantees either of the 3 potential paths taken can be finished in only 3 turns.
- Pick your path: your supply stock could potentially run a bit low if you have less than 4 battles worth of ammo left.
- Easy Victory.


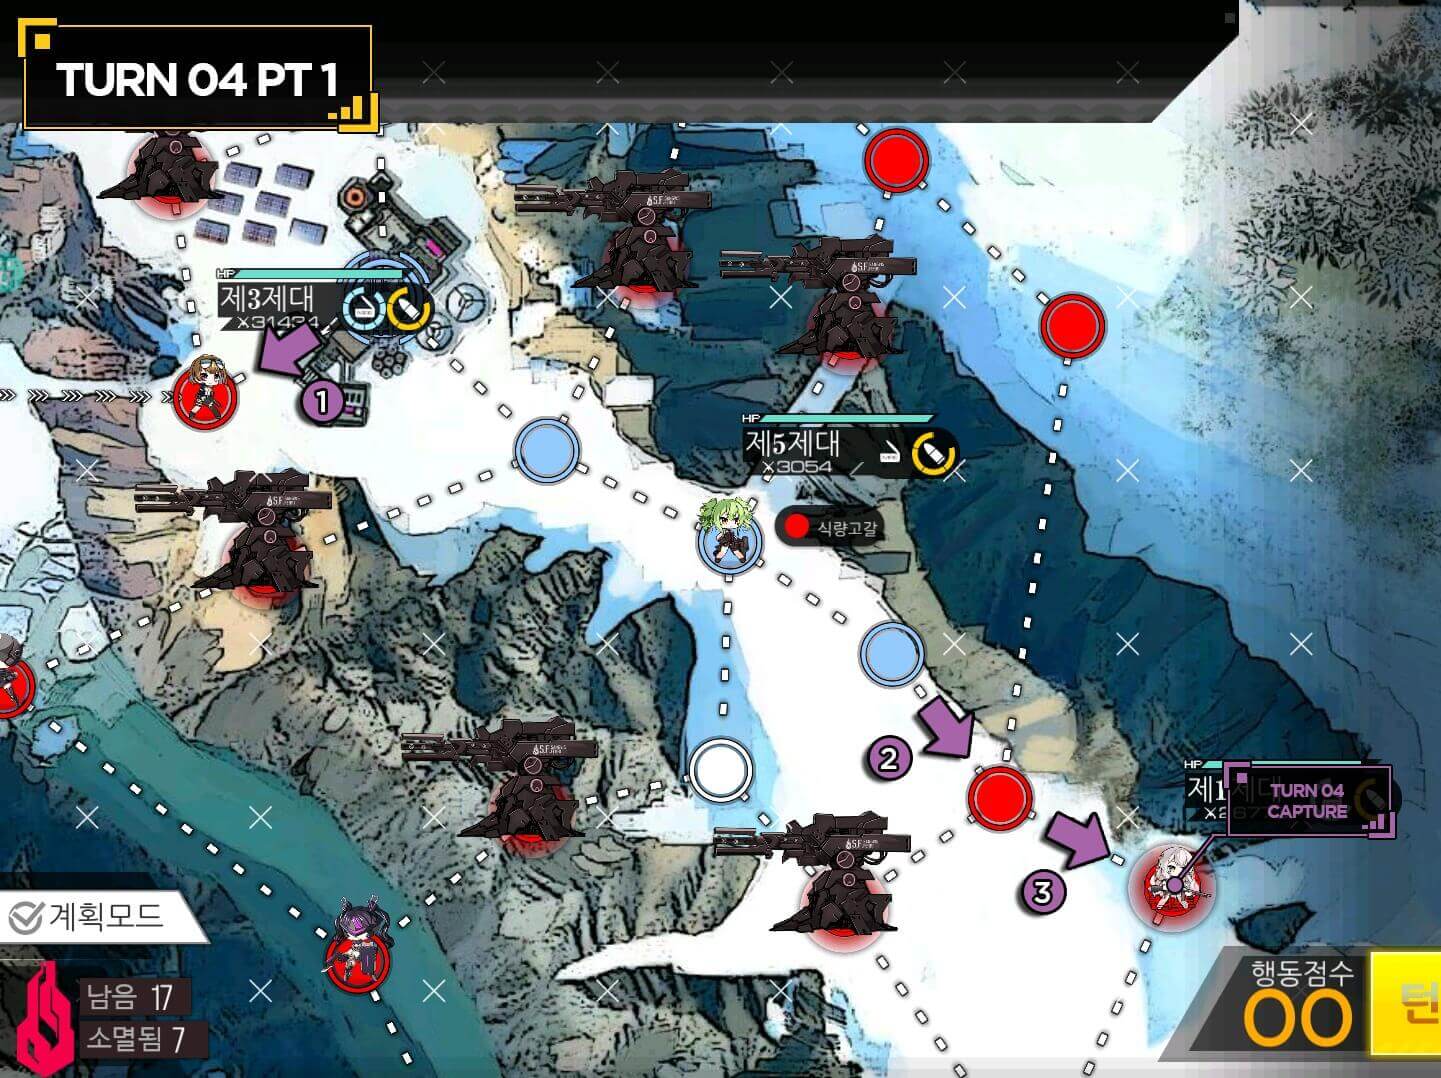
- Shown Enemy Strength: 10,000
Echelon[s] Required: 2
S-Rank condition: No Turn Limit. Kill BOSS unit.
This map will make many Shikikans cry in sheer agony… brace yourself. The easy route is long and treacherous, as one mistake can run an echelon out of supplies. the [green route followed by blue route] has only 2 resupply points. You will need to make them last. The other option is to go through the Jupiter… let’s just say it’s going to take quite the team. [2 SG 3 MG Echelon recommended]
This is a map I am not ashamed to reset in if the game clearly expresses its hatred towards me.
- Focus on taking the radar by the Jupiter Cannons. There’s a little “i” icon, indicating that one of the Jupiter cannons is an unfinished state and therefore weaker than fully operational platform. That will be our target on the next turn.
- With the radar captured, we can now spawn a 2nd echelon that will serve as our counter force. Having extra movement points will be important. Even when taking on a “weakened” Jupiter cannon, it would be best to keep the same formation as the one for the brute force method to minimize damage.
- Strut down along the path here. Resupply your echelon on the node on the way.
- There will be two paths to choose from here. Pick the one that either has 1 weakened or no Jupiter Cannon on its helipad. For me it was the one on the top.
- Take your time to resupply here before moving on. You will most likely get into 4 times before finally facing off the boss.
- One thing to note about the Boss is that you will benefit greatly from spreading your echelon out to a “X” formation before or once the battle starts, since she uses a similar weapon profile as the one of Jupiter cannons. She will launch rockets that will do AoE damage in a “+” shape so having your echelon spread out in a X minimizes the damage. Don’t expect to come out of this battle unharmed. One recommendation is, if Jaeger units are giving your T-Dolls a hard time, you can reset the targetting priority of your DPS by quickly moving them forward and back. These damages to SMGs add up over time quickly.


- Shown Enemy Strength: 11,000
Echelon[s] Required: 2 [RF echelon recommended]
S-Rank condition: No Turn Limit. Take HQ.
The first half of Chapter 3 will consist of night missions. This map constrains your movement via supplies. You will run out of them and will need to resupply, unless you are looking to retreat and respawn from the starting helipads after each Jupiter pass, which is is not advised.
- Take the radar node to get vision of all enemies and locations of Jupiter Cannons. There will be a path with either a fully operational, weakened, or no Jupiter Cannon. If it's weakened or absent If neither of the three paths from the right reveal weakened or no Jupiter Cannon, you will be forced to take the left most helipad.
- You'll be thrown in an ambush 100% on that "?" node. I personally decided to spawn my 2nd echelon early rather than move up to take helipad. We will resupply here before moving on.
- I first moved to take the helipad with my 2nd echelon following up close behind. There are armored units and regular units mixed in the area. So I would recommend using mixed echelons for the job unless your echelon already has sufficiently high enough CE or AP.
- Resupply and move to get into position to take the radar in the middle.
- Set out for the radar node. Watch for your ammo count as the echelon in charge of taking down the weakened Jupiter Cannon should at least have enough ammo for one more fight going into turn 6.
- Similarly with the 2nd turn, we have to locate the helipad with a weakened Jupiter Cannon or without one. If the next helipad you see has neither of those outcomes, expect it to be in the bottom most helipad, which requires you to go around. Again watch your ammo count to get into position.
- Once you resupply, make your way to the enemy HQ. If you get to helipad late and missed the turn in which it was open, wait for it to open again for another opportunity to resupply before continuing.
If you want to farm more equipment, now would be a good time to go do so with your 2nd echelon. Do watch out for the scout units close to your HQ.


- Shown Enemy Strength: 12,000
Echelon[s] Required: 2 [RF/mix echelon recommended] +1 Dummy HG
S-Rank condition: No Turn Limit. Take HQ.
The last night mission of this event. Again, same procedure as always: Find the helipad only with a weak or no Jupiter Cannon at all, resupply in between and get to the helipad safely. Scouts and Jaeger units on this map are no joke, so make sure you take at least one AoE AR or SMG to deal with them.
- This is where you can opt to not use a 2nd echelon at all, but rather use 2 HG dummy echelons and keep them on top of the hill, so that enemies will not be given any opportunity to get to them. You could go up to 3 echelons near the HQ to gain those extra movements if you have the ability to.
- You can go around the other way here straight to the supply node on the top left, but I decided to clear some units that could get to the RF echelon at the bottom and resupply as well.
- I took the shorter path because I found the weakened Jupiter on the first try. Should you be unlucky, you'll have to take the longer path which will cost you one extra turn.
- There are lot of enemy units here so make sure to resupply using the node.
- Resupply and all there’s left to do is to take the HQ.


- Shown Enemy Strength: 16,000
Echelon[s] Required: 3 [AR echelon with AOE skills recommended, MG echelon works great here] + 1 Dummy HG
S-Rank condition: Kill 12 Units in 10 turns. Take HQ.
The map that introduces Brutes. They are fast moving melee units that can be quite dangerous to the front line. Additionally, you will have to go the long way around to capture the enemy HQ, since you cannot physically move on to it. So only way is to surround-capture it.
For this guide I have limited my Echelon use to 4, but this map gets easier the more echelons past that you usefor the extra movement points. Warning: 4 Echelon method does not S rank the map 100% of the time.
Get your Crit scopes and AoE skills up to speed, it’s time to McFreaking lose it.
- Spawn a 2nd echelon for combat or HG dummy.
- Now that the base is starting to get threatened by enemies coming from either side, you should summon your 2nd combat echelon if you haven't already. Keep the Dummy HG in the middle between the combat echelons.
- By now your main echelon should be starting to get low on ammo. Use the swap-method to refill its ammo stock before moving it further down the alley. Then summon your 3rd combat echelon.
- Both the dummy HG and 1st echelon are each going to move twice to capture the Helipad on the bottom. If the dummy HG is being threatened by enemies from the top, swap their positions at the end with your 1st echelon. Move the 2nd echelon to the side of HQ to surround Jupiter cannon by HQ.
- This turn you're given a choice: Move up or down. Your decision will depend on the amount of enemy units present in the path.
You want to fight a total of 5 times or less, since you have no opportunity to resupply until you capture the helipad on each route. For me, this was the top route. You are looking to gain a node right on top of the one direction path that comes down to your HQ. [highlighted in red ovals].
- Now that the 2nd echelon does not need to defend the base from the top side, I have moved it to the bottom helipad to clear the path for the bottom side where it takes more than 5 battles to get to the next helipad.
- The 1st echelon finally ought to have capped the node next to Enemy HQ on one side. For the other echelons at the bottom of the helipad, it moves to while clearing the path. Don’t over do it if your echelons are taking hits more than you'd like them to. As long as there are other echelons, they can come around to kill the rest, you will be fine.
- 1st echelon moves all the way to the bottom
- We don’t have enough movement points to cap the HQ this turn via surrounding, so we are just going to move as close as we can for the next turn.
- Finally, move the rest of the echelons up the path to gain control of the 2 nodes next to HQ.
Done and done, you win!


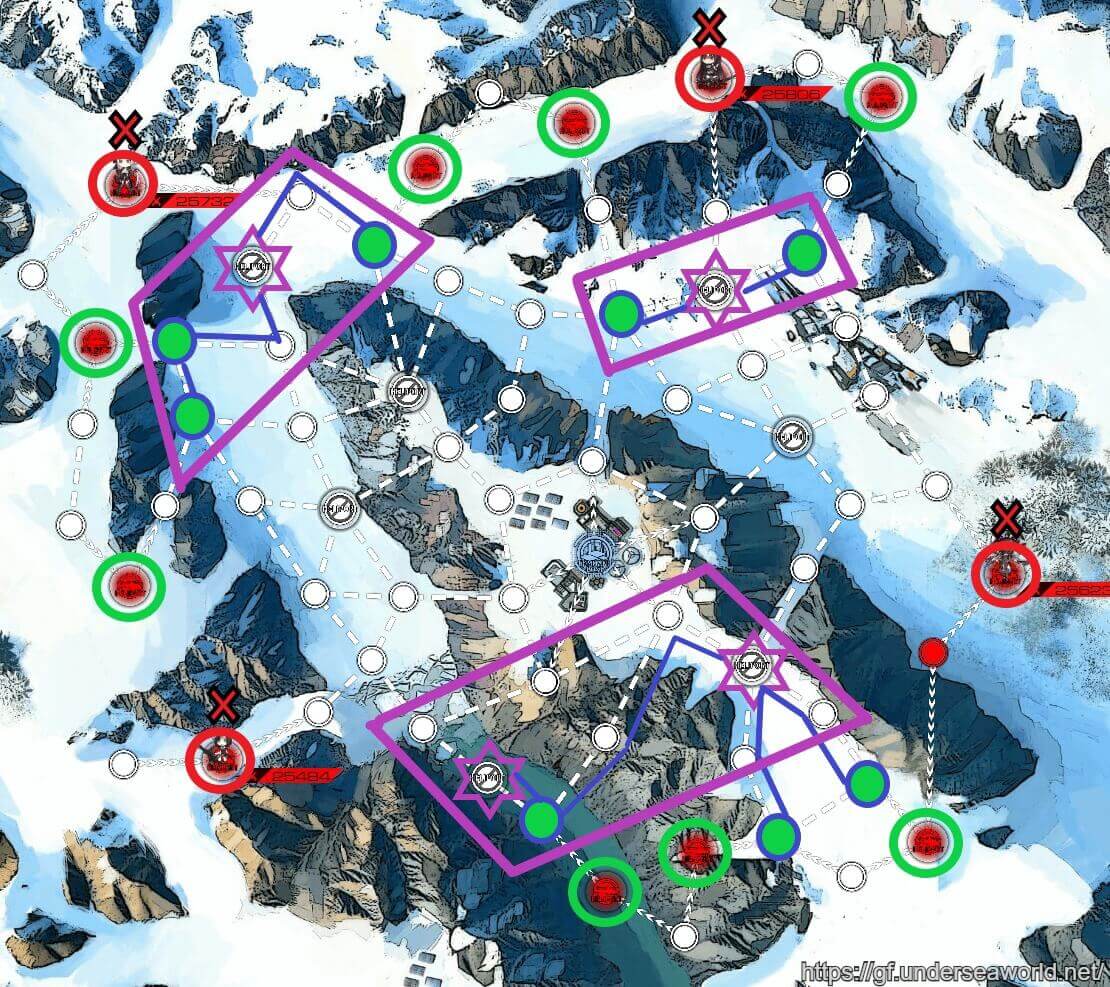
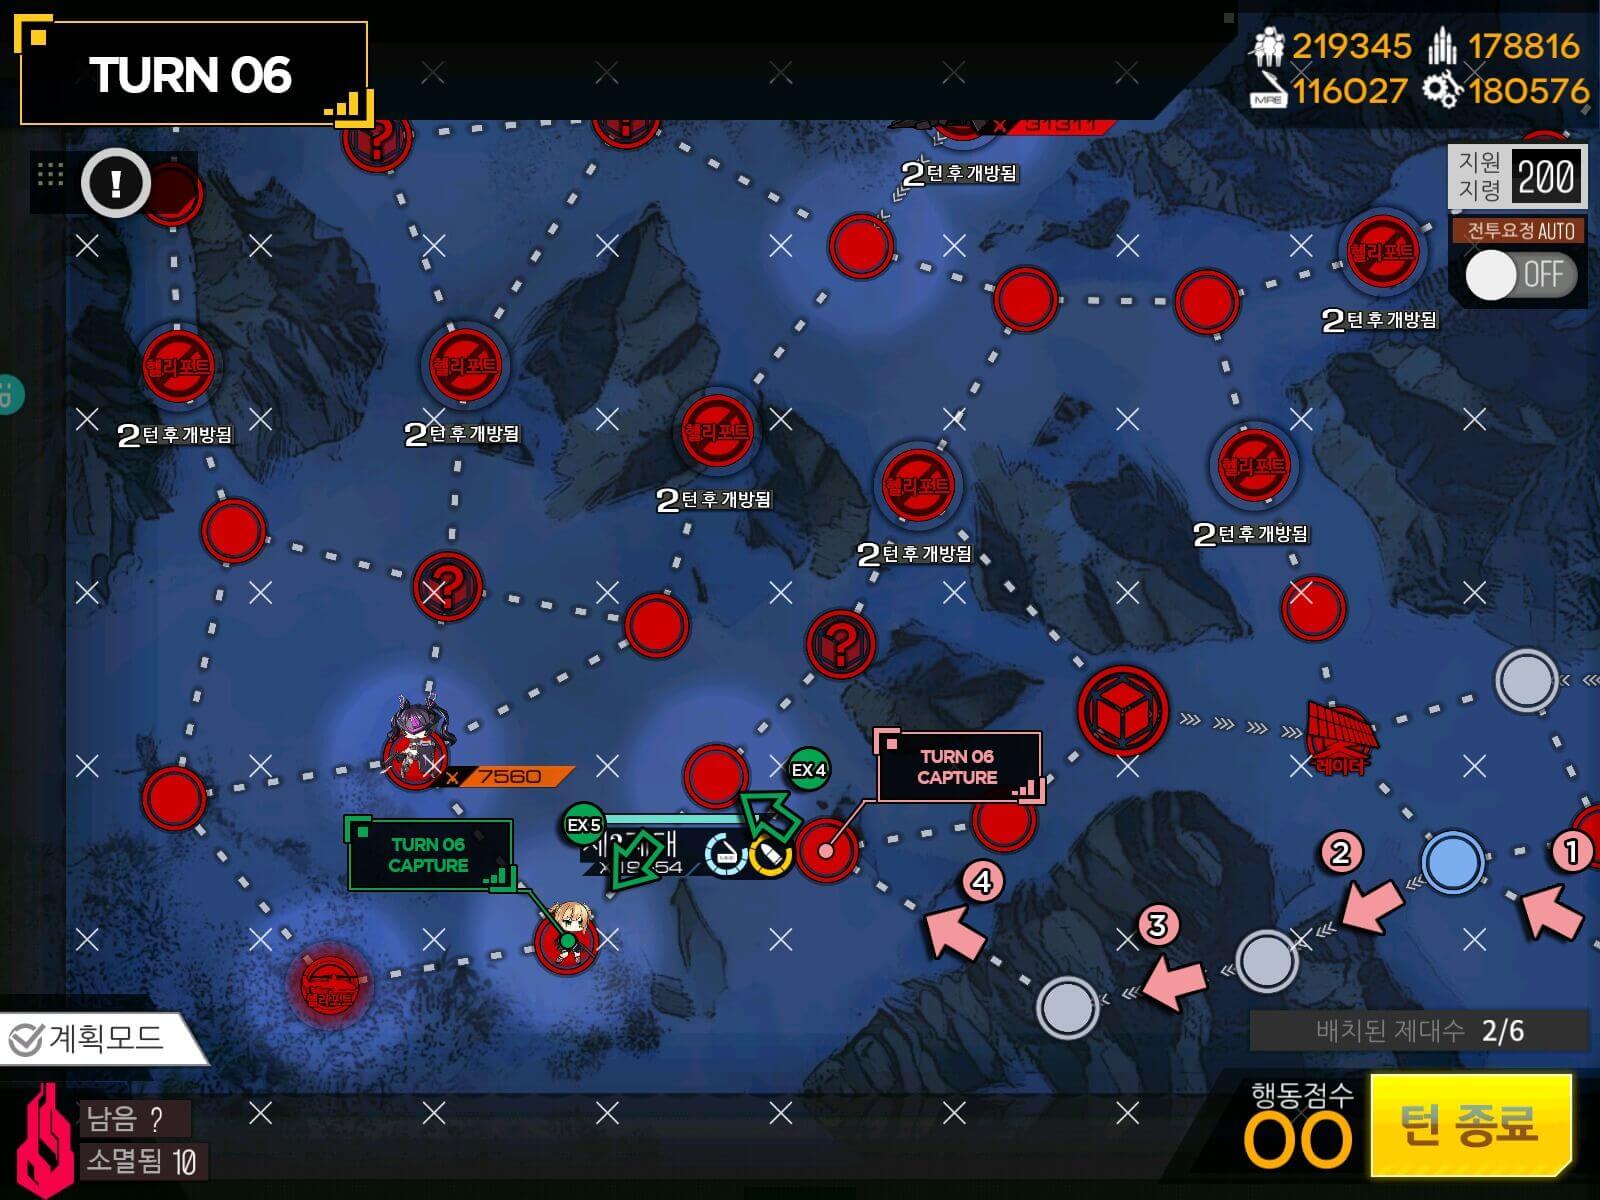
- ■Shown Enemy Strength: 20,000■Echelon[s] Required: 3 [AR echelons with AOE recommended] + 1 Dummy HG■S-Rank condition: Kill 12 Units in 14 turns. Take HQ.■Clear Requirement: Kill Architect 10* times. [This can change in EN server]
Map View: Again there’s no real easy way out of this one. Retreating, repairing echelon, then redeploying might not be an bad option here. This map is intimidating at first since there seems to be a lot of thing going on. But only thing you should be aware of is that main objective is to kill Architect.
After some editing we have the following annotation of the map
- Spawn an echelon to fend off potential enemy units from helipad on the right for the remaining points. This run can be heavily dependant on RNG, resulting in you either only taking 4 turns or longer than 6 turns. If you decide to deploy an additional echelon on the far right helipad, you have may have a chance to finish it in 4 turns with great RNG. If not, 6 is your average.
- The route indicated by the [solid green arrows] is when you know if you can take the helipad with your remaining ammo. If you cannot, resupply by backtracking before continuing. Why backtrack? Because both “?” Nodes on the way are highly likely to be an enemy ambush.
- If you get lucky, you do not need to wait another turn to capture the helipad, however in this case, you go for the Boss next turn after resupplying and repairing. If not like pictured above, just take another turn to cap the helipad and move on.
- In one turn I was waiting in, I went ahead and cleared the enemy unit that was standing between boss hunting echelon and Gager. This is also where you can decide whether it'll be worth forfeiting your S-rank for having your echelon fall back to heal up for 2 more boss fights. It's not a shot in the foot to do if it at least guarantees your map clear, so take it into consideration.
- Move in to beat the final boss of the map. As usual, watch out for her “+” shaped blast and you will be just fine.


Test