


Chapter I


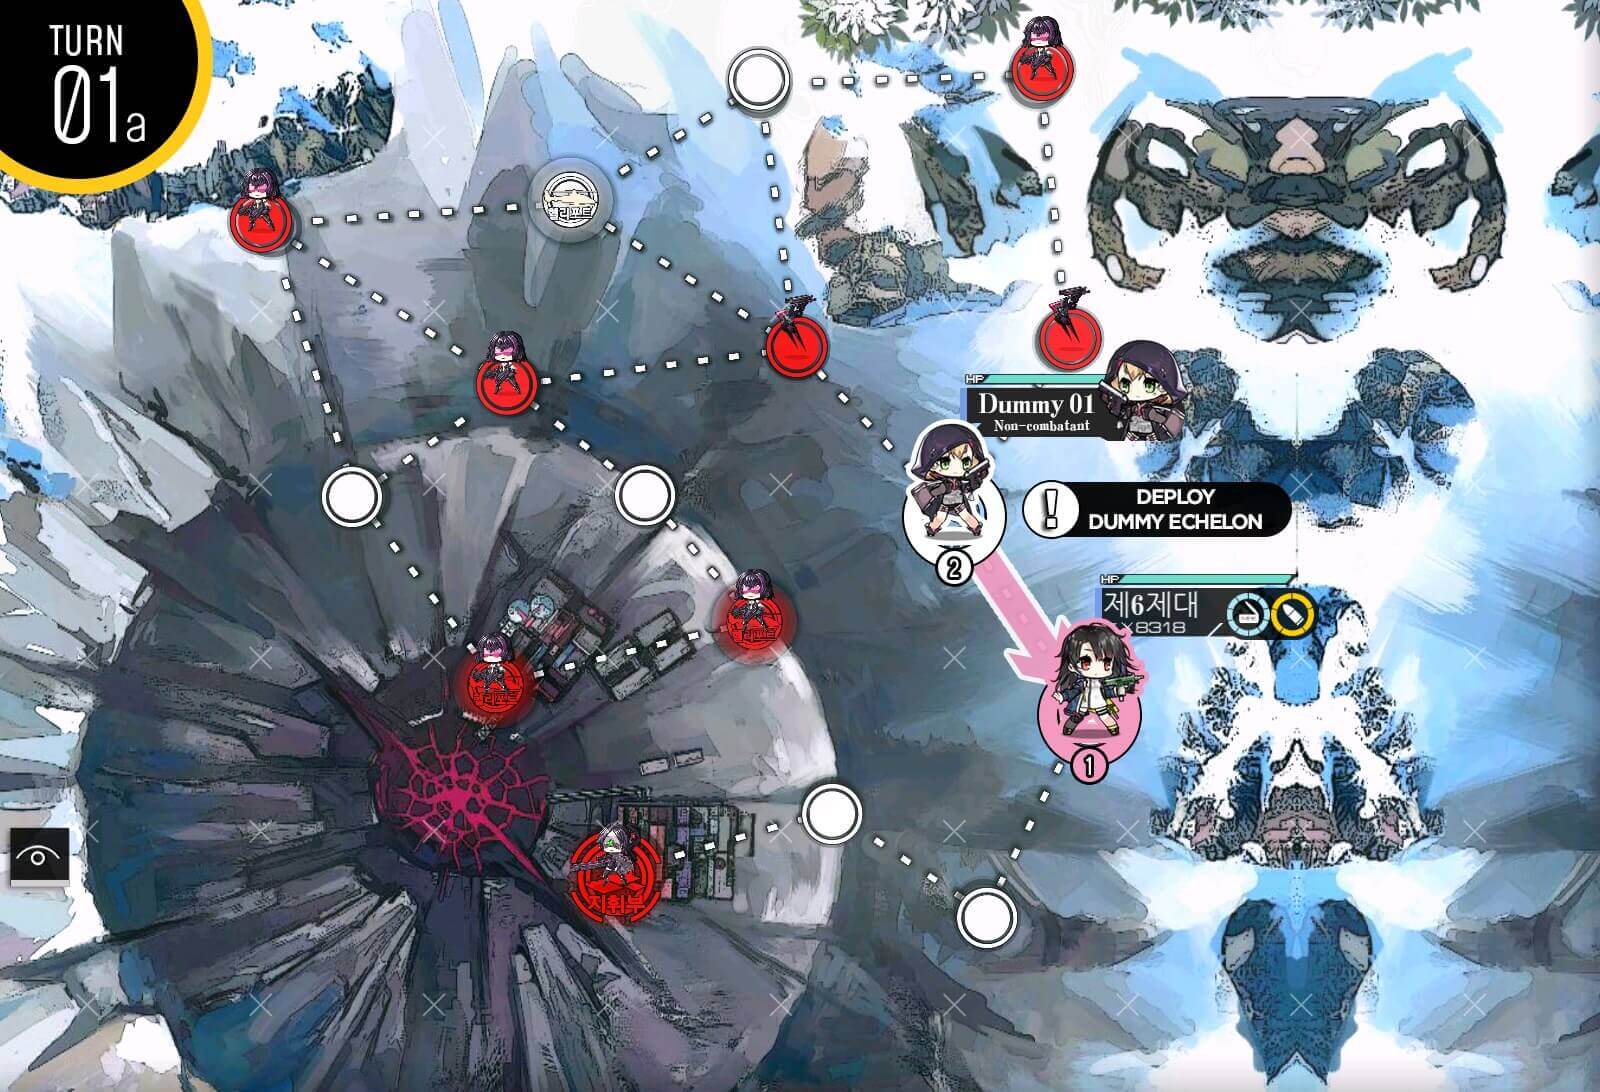
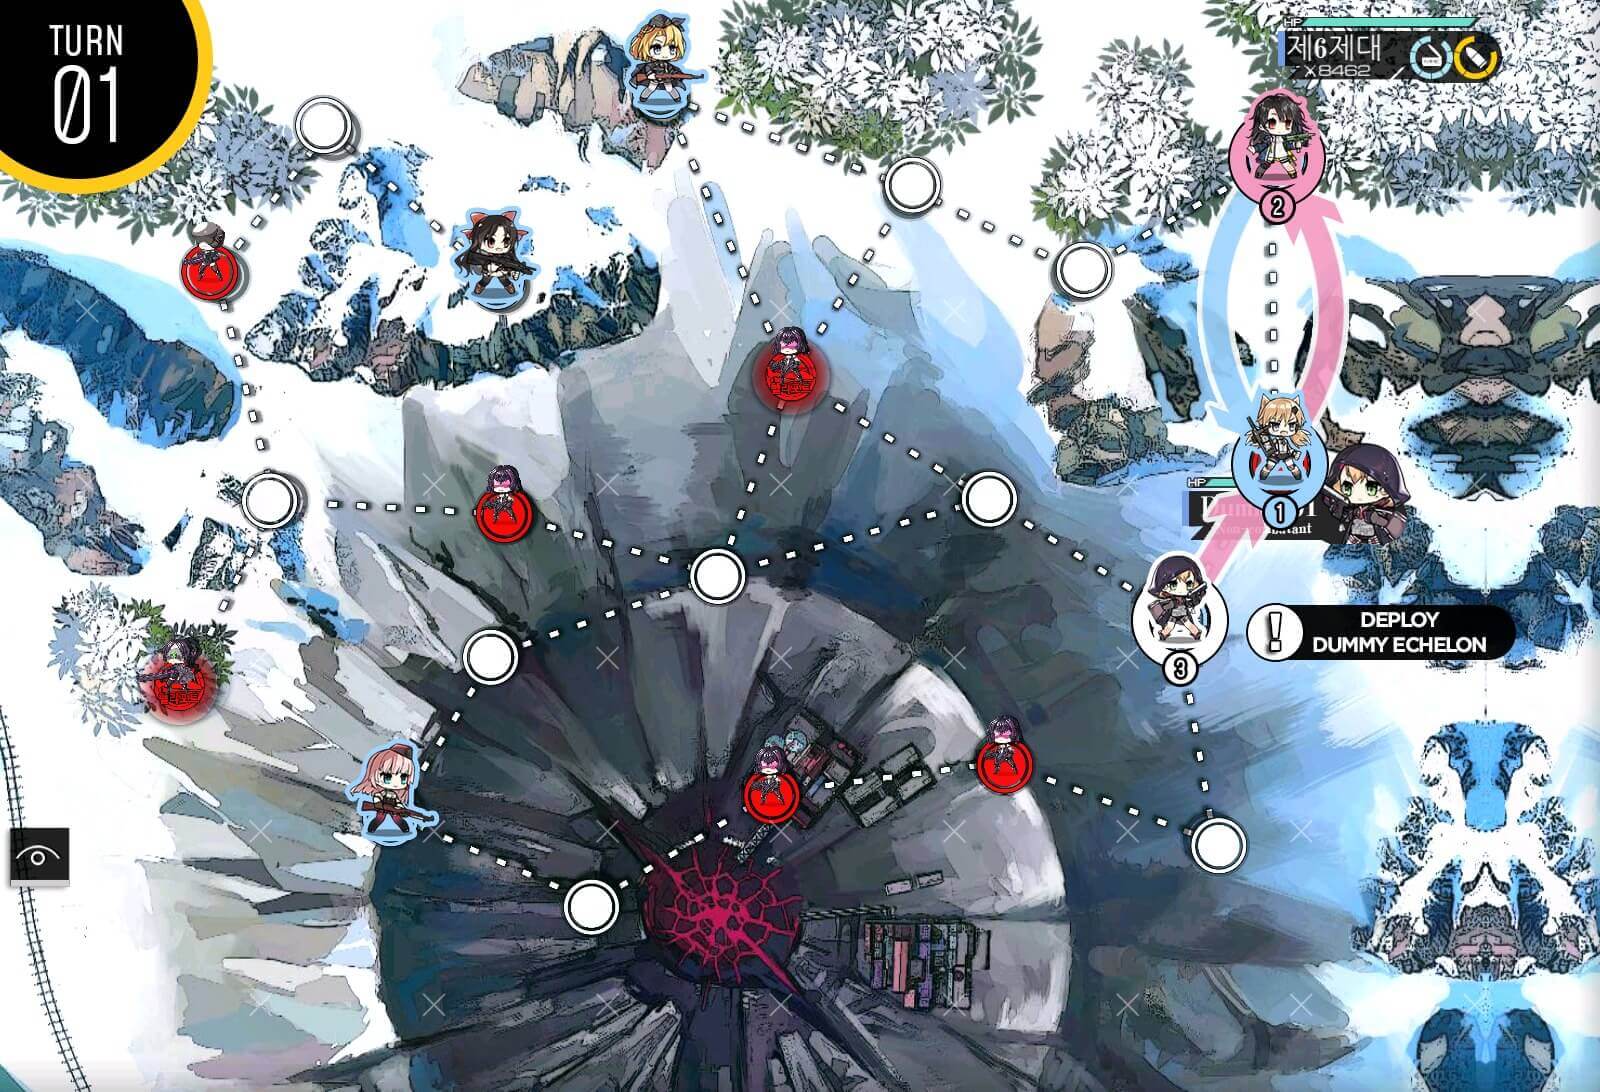
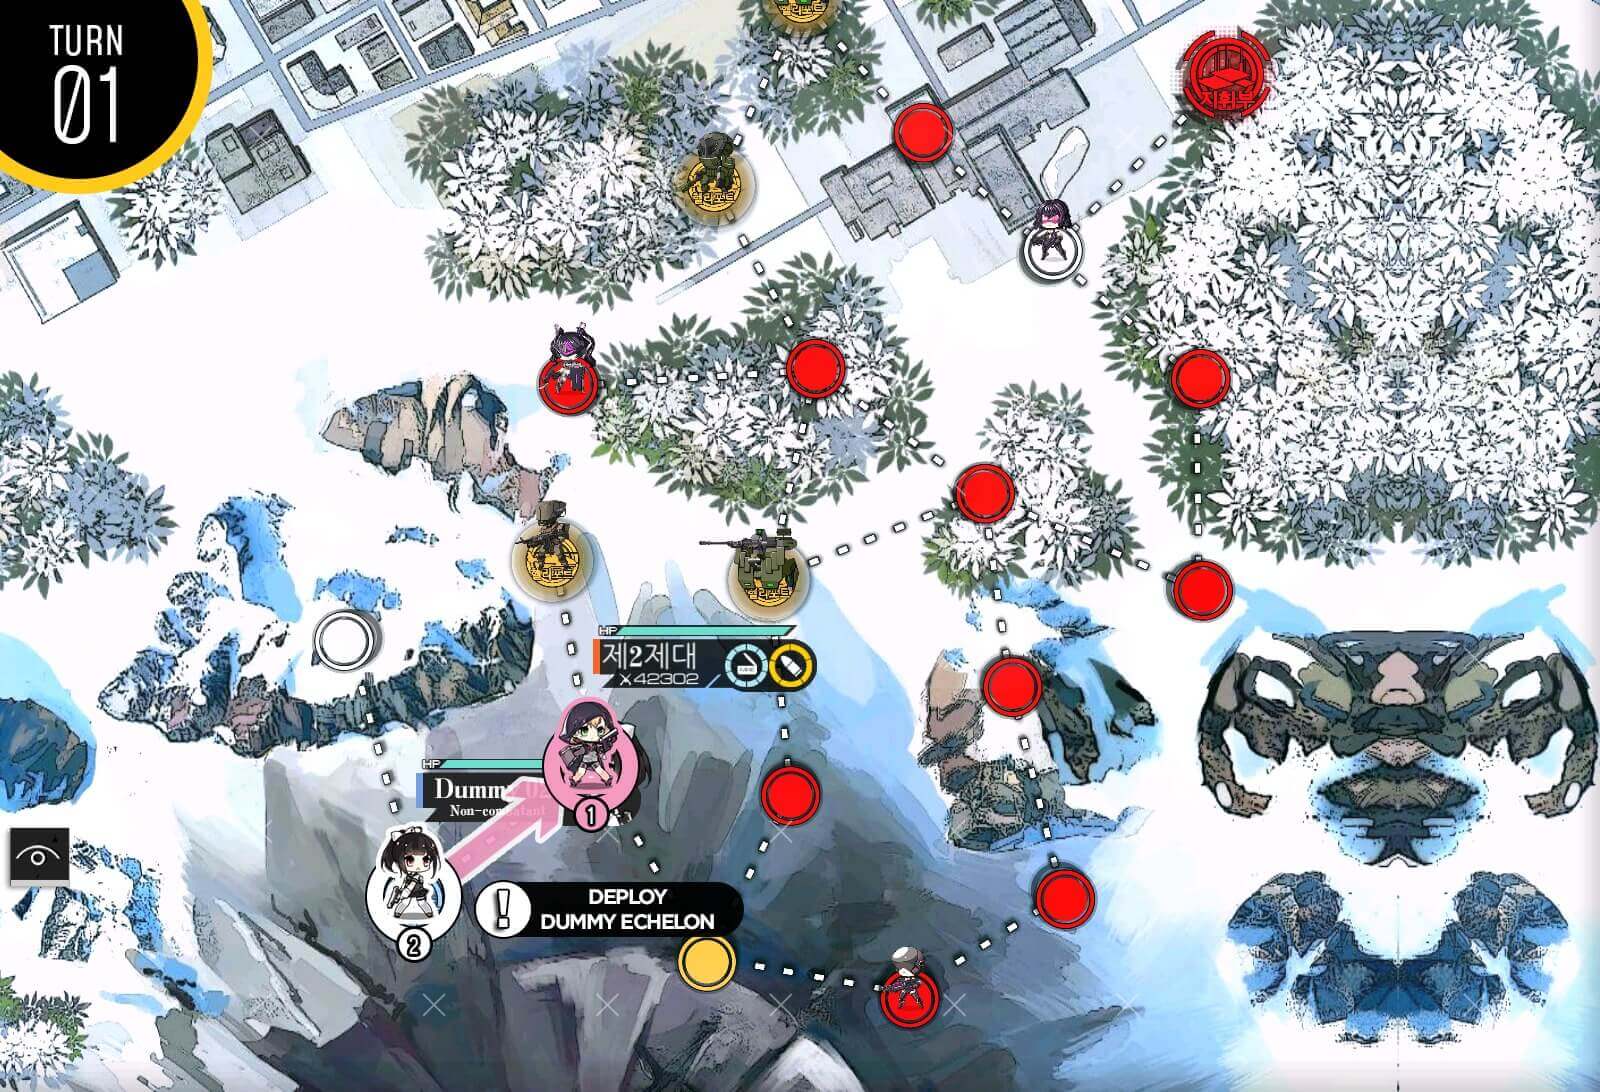
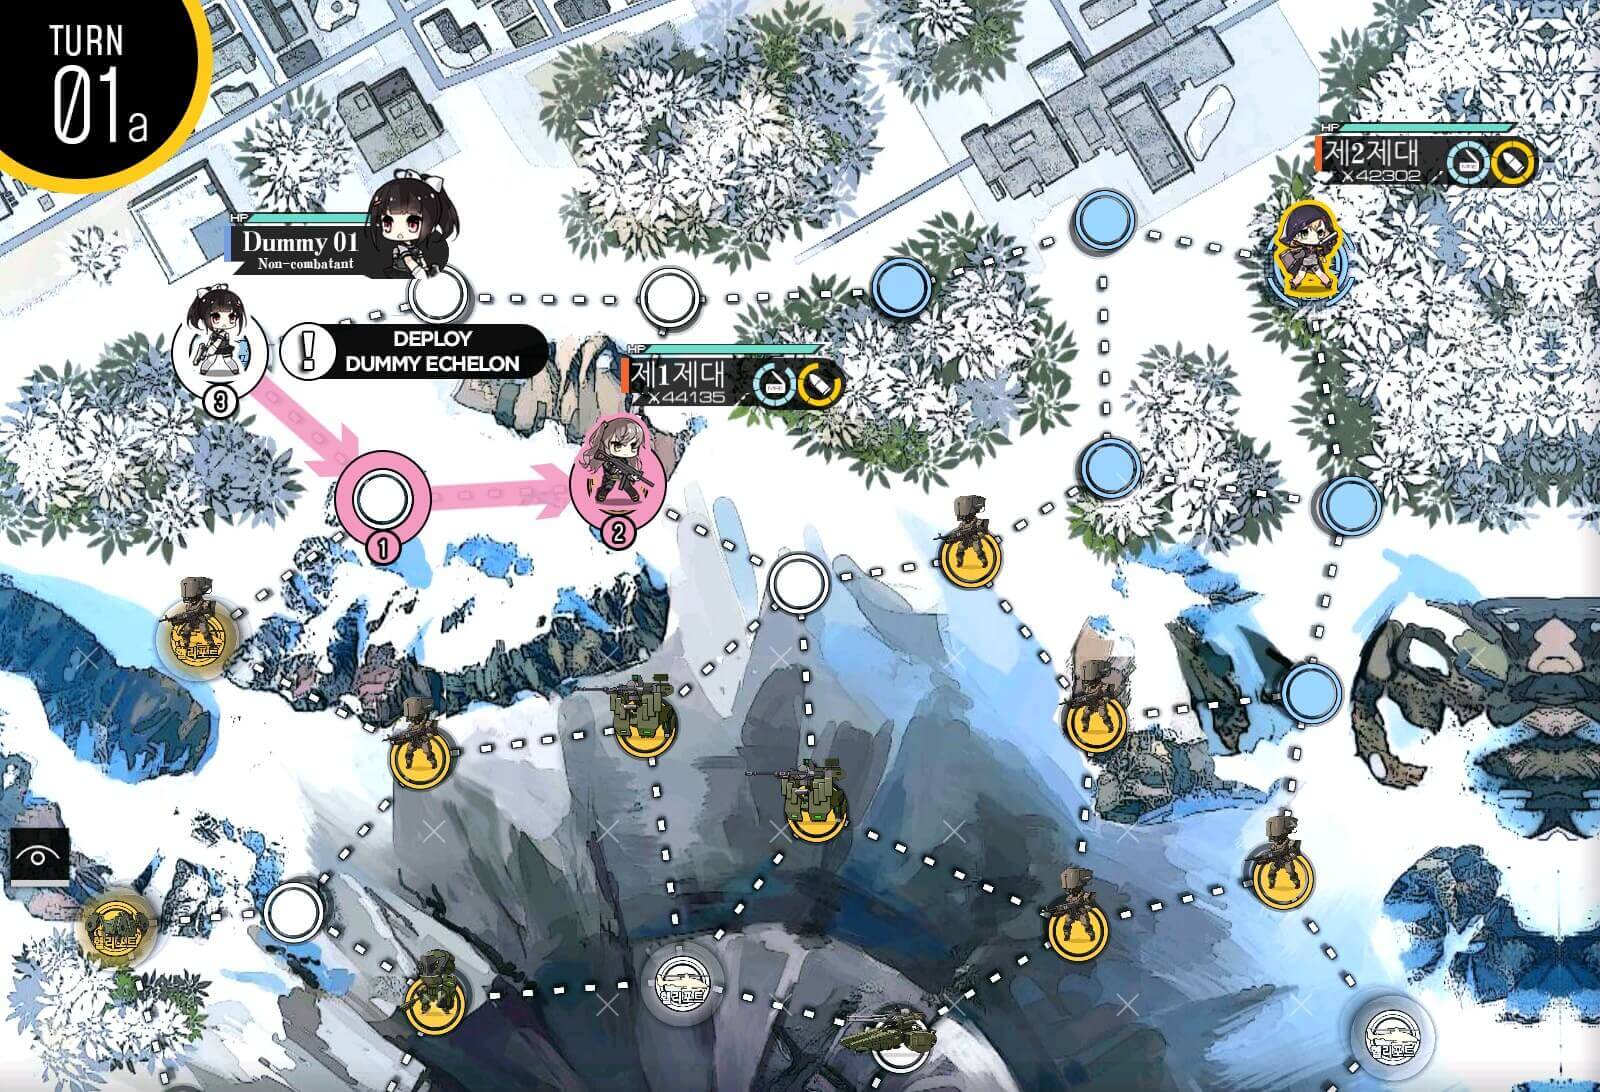
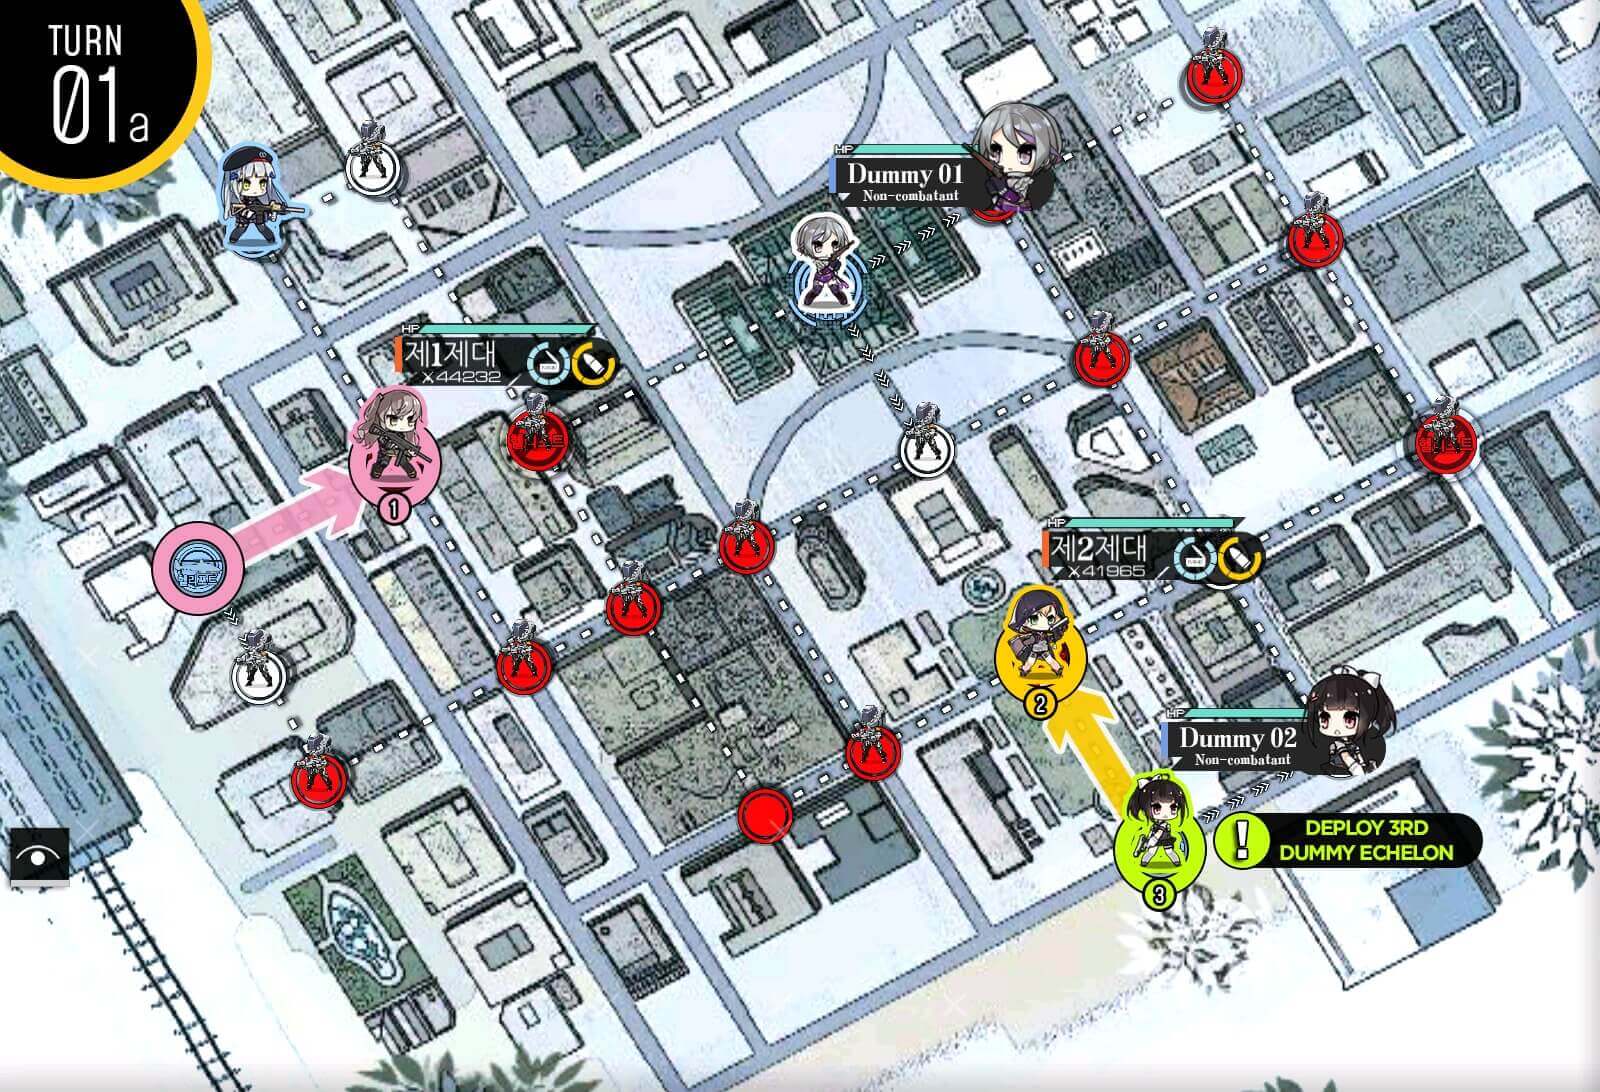
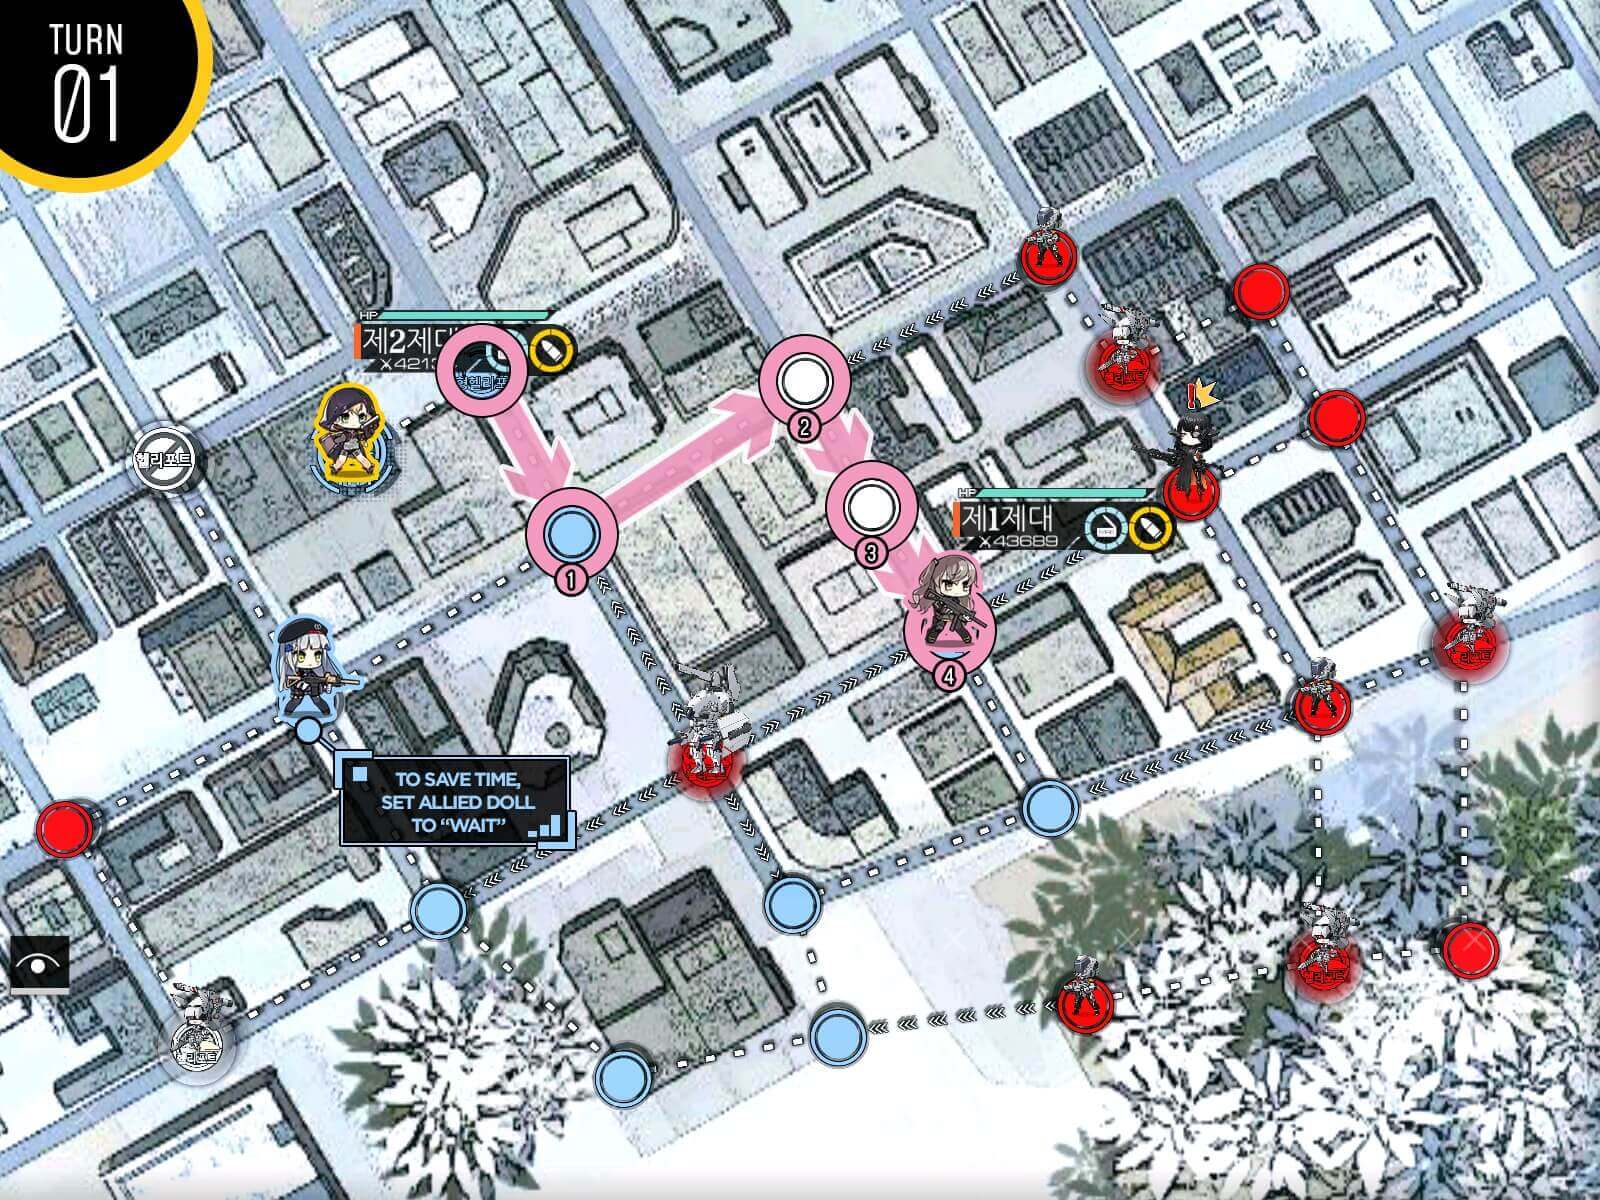
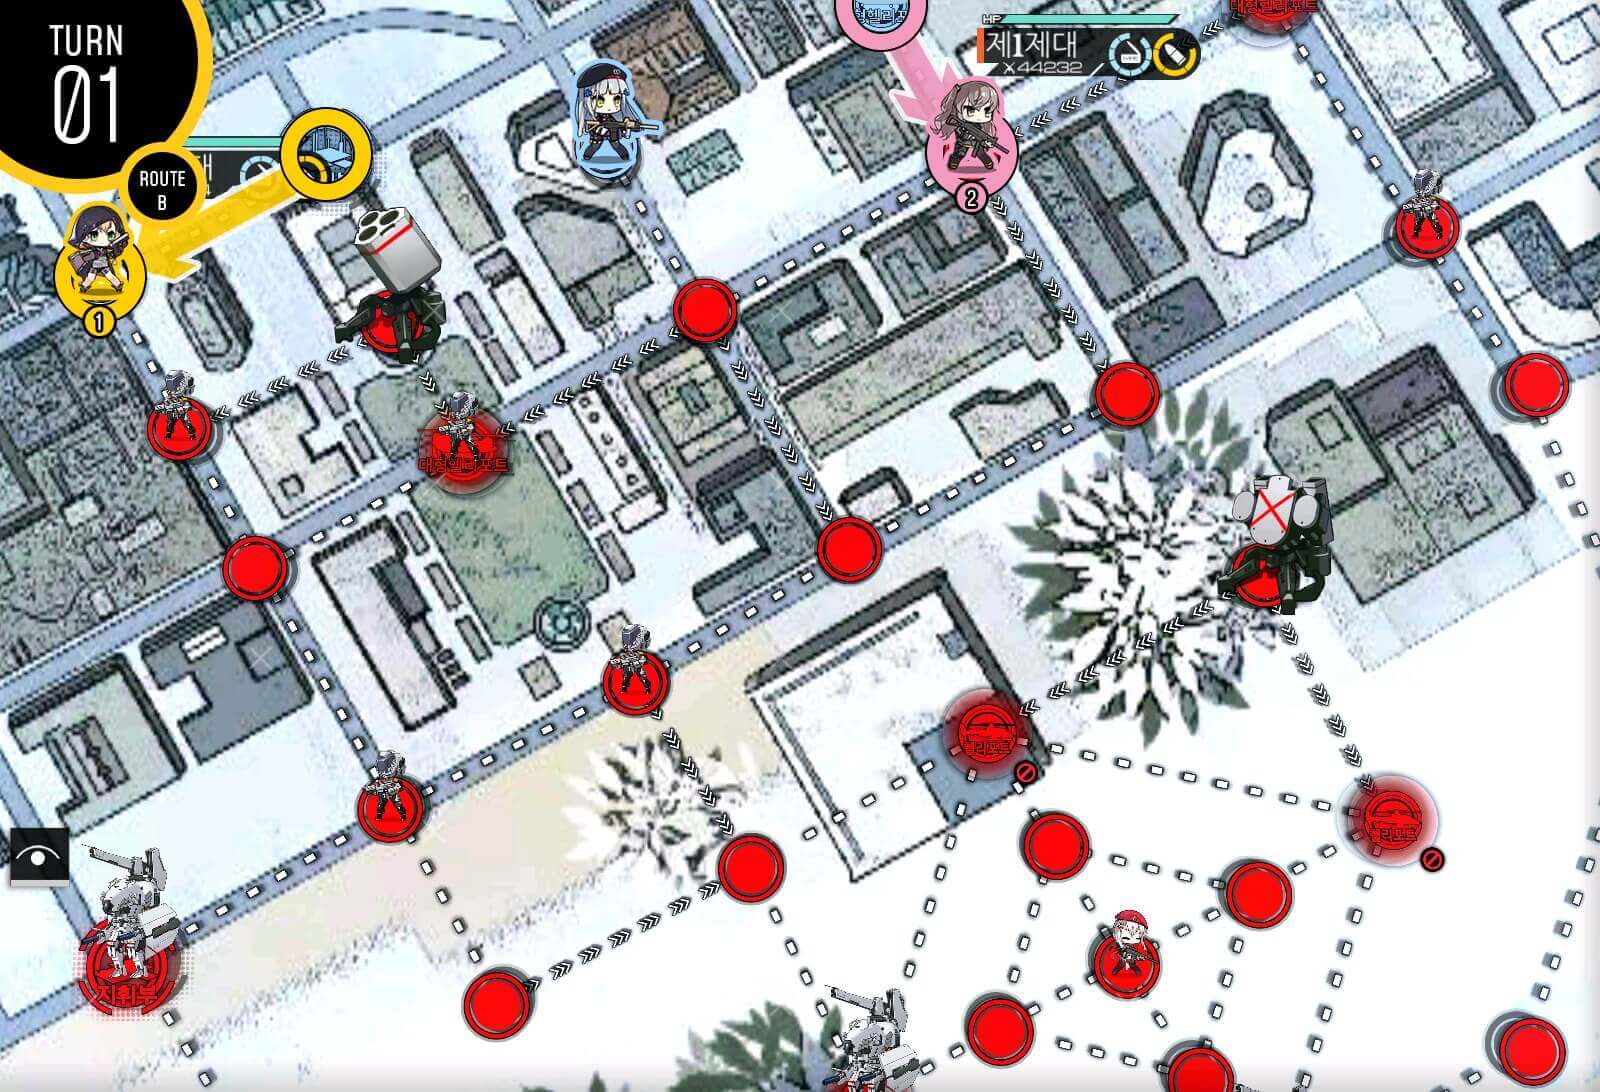
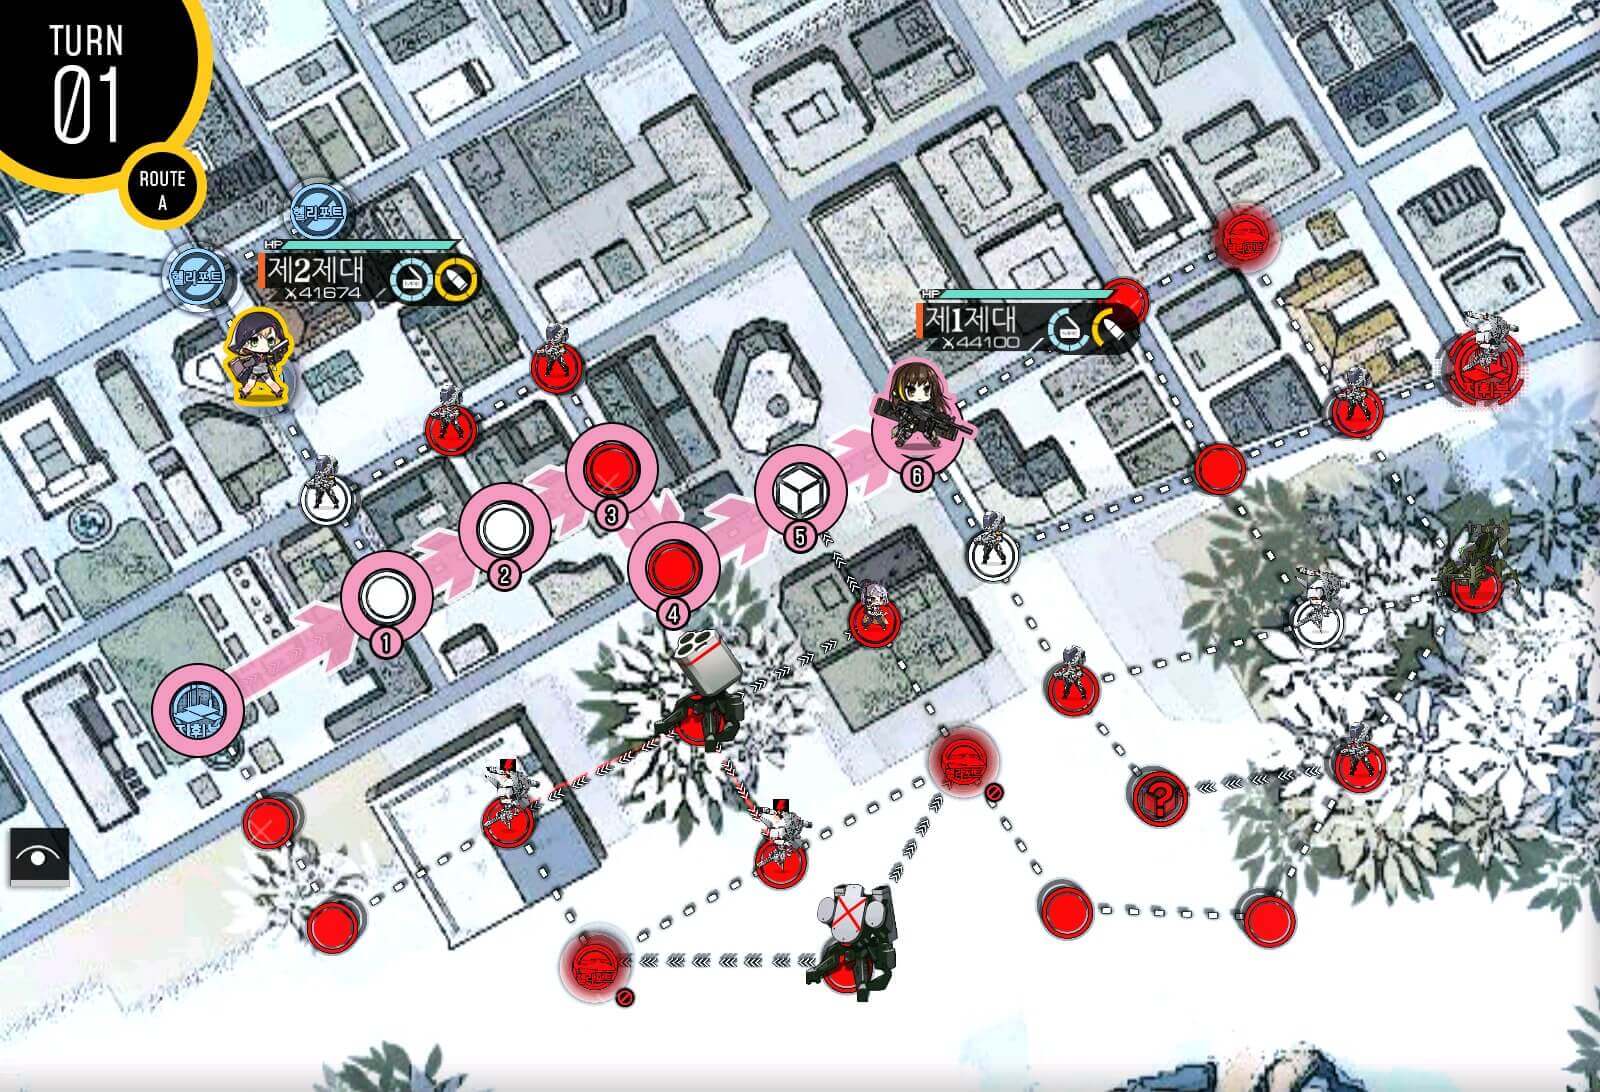
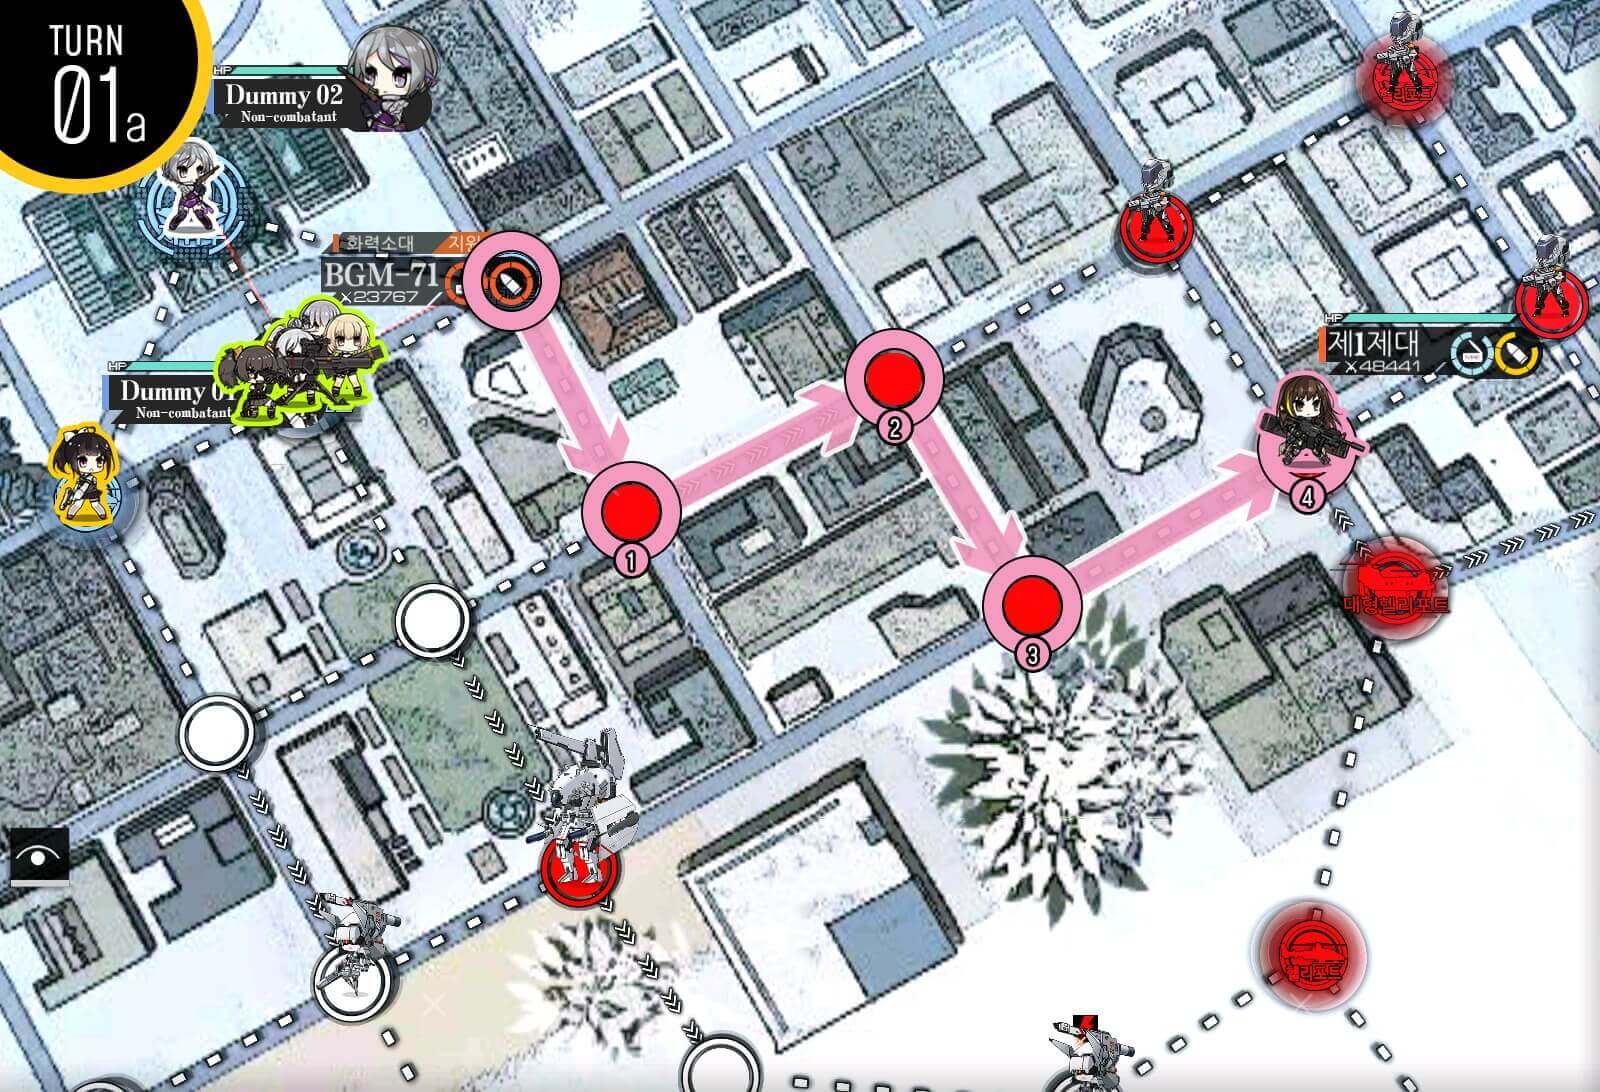
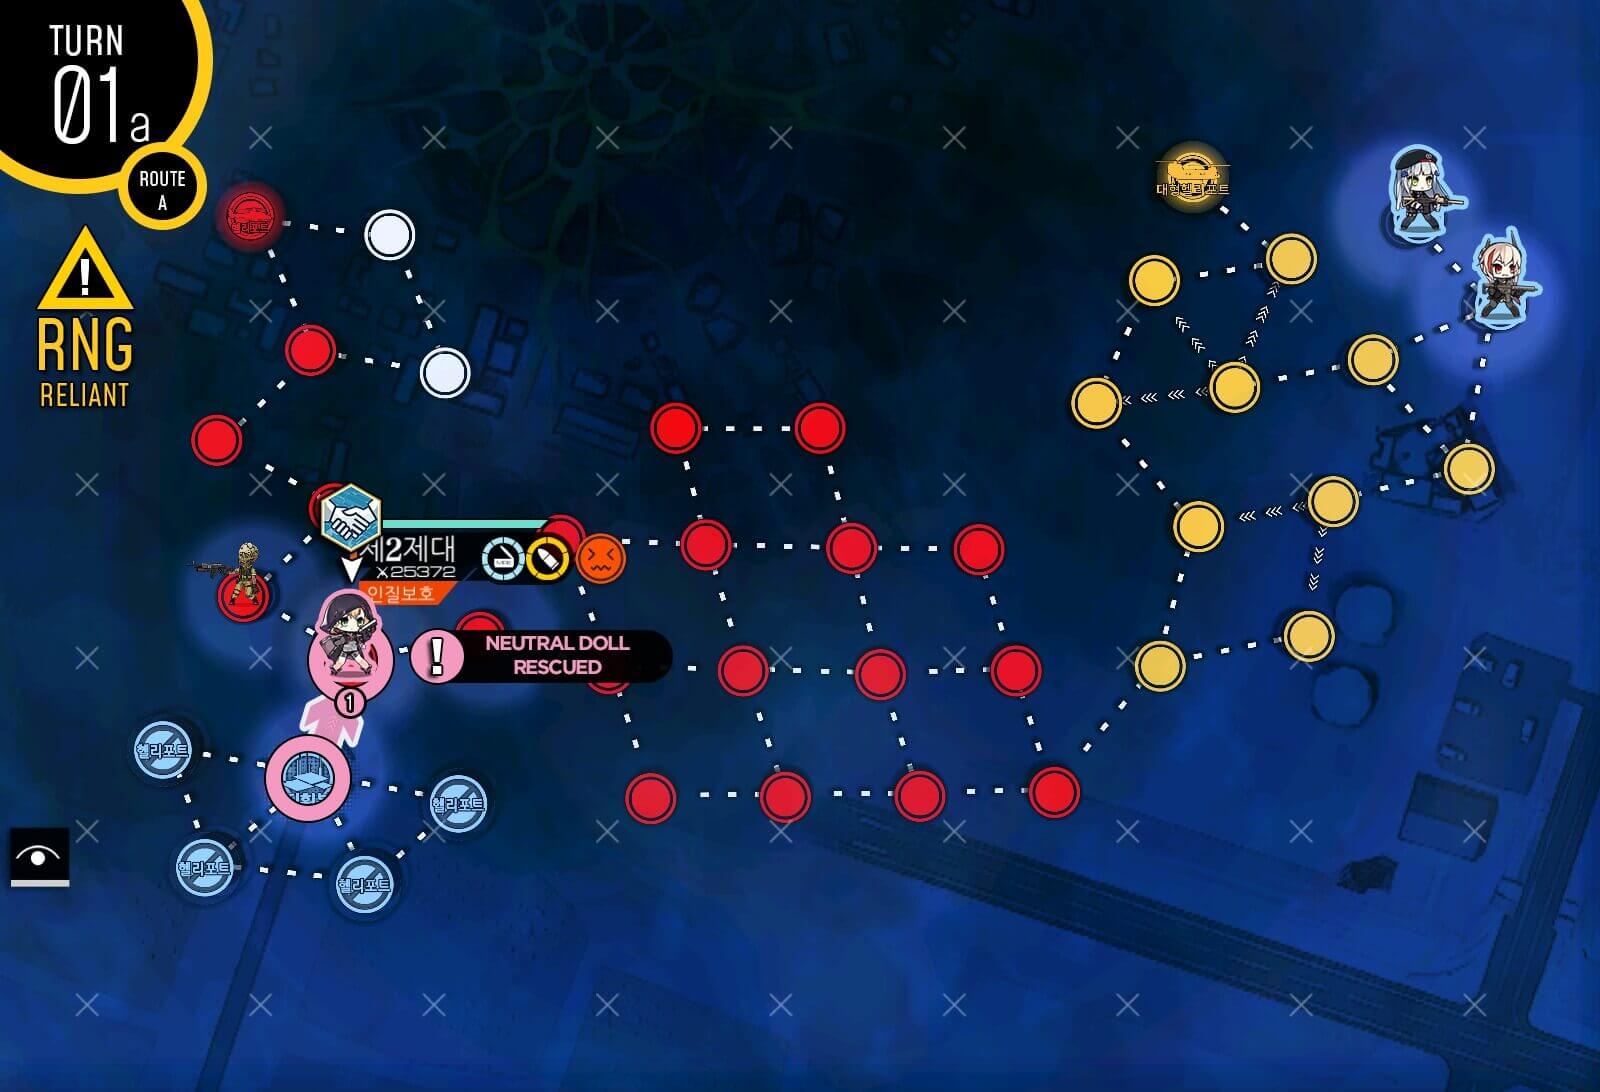
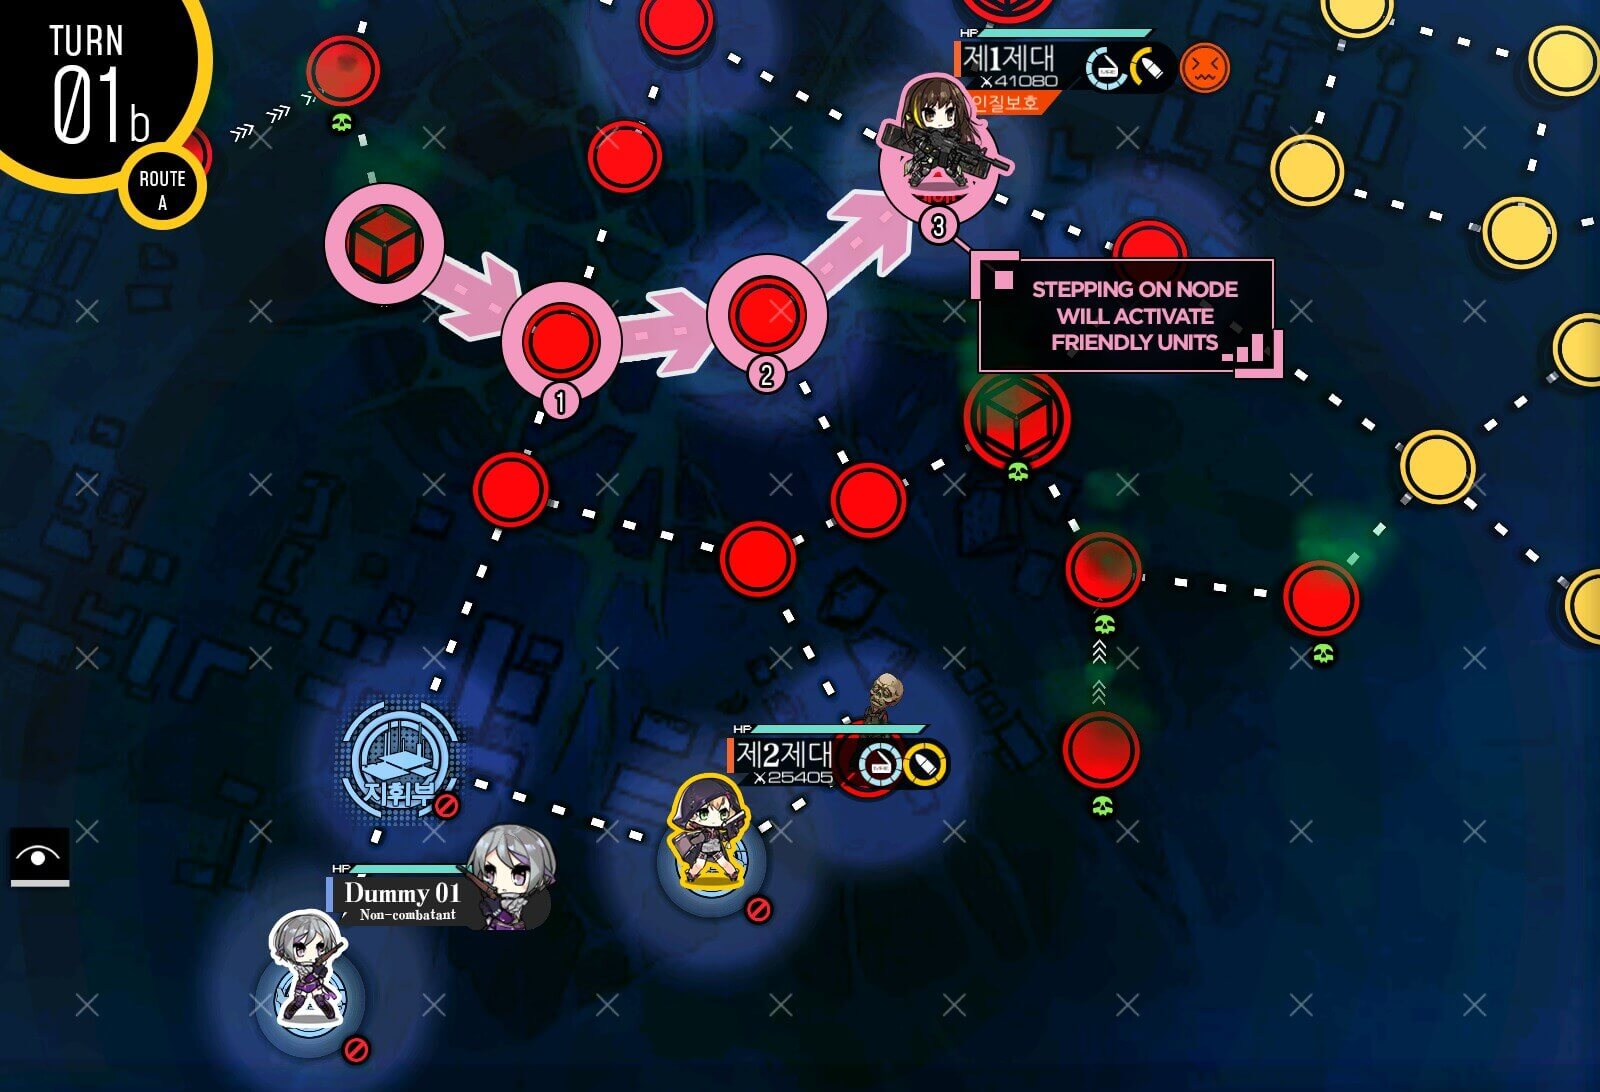
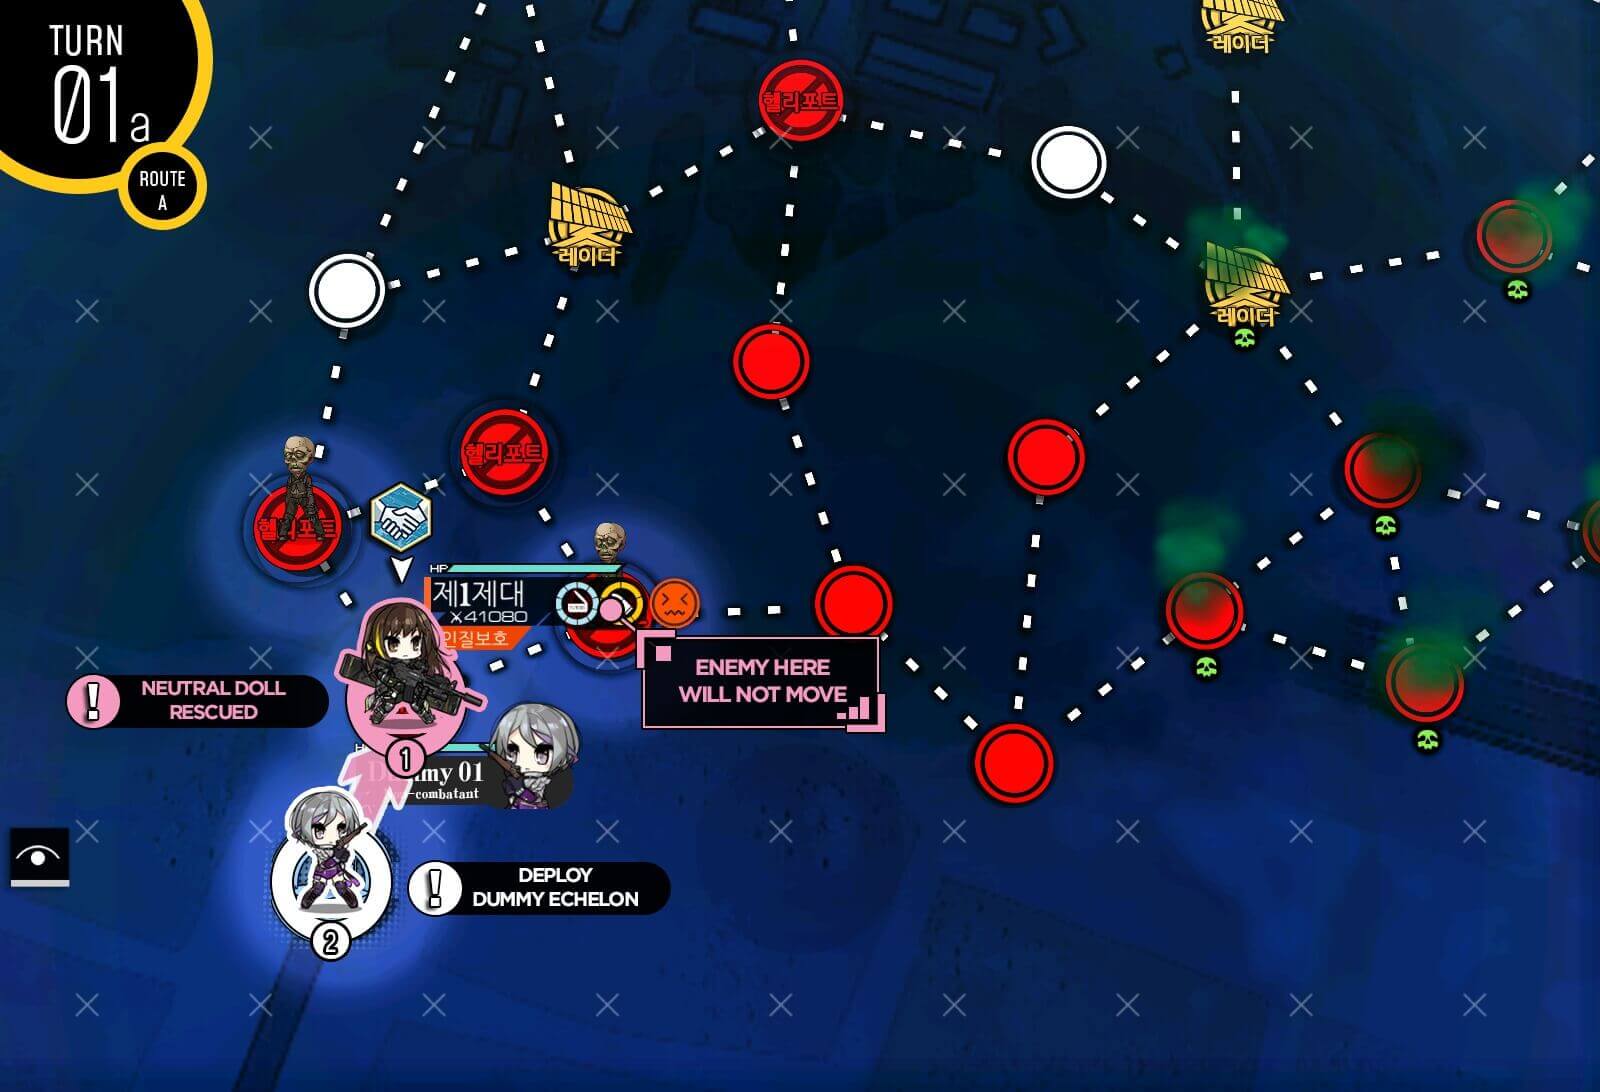
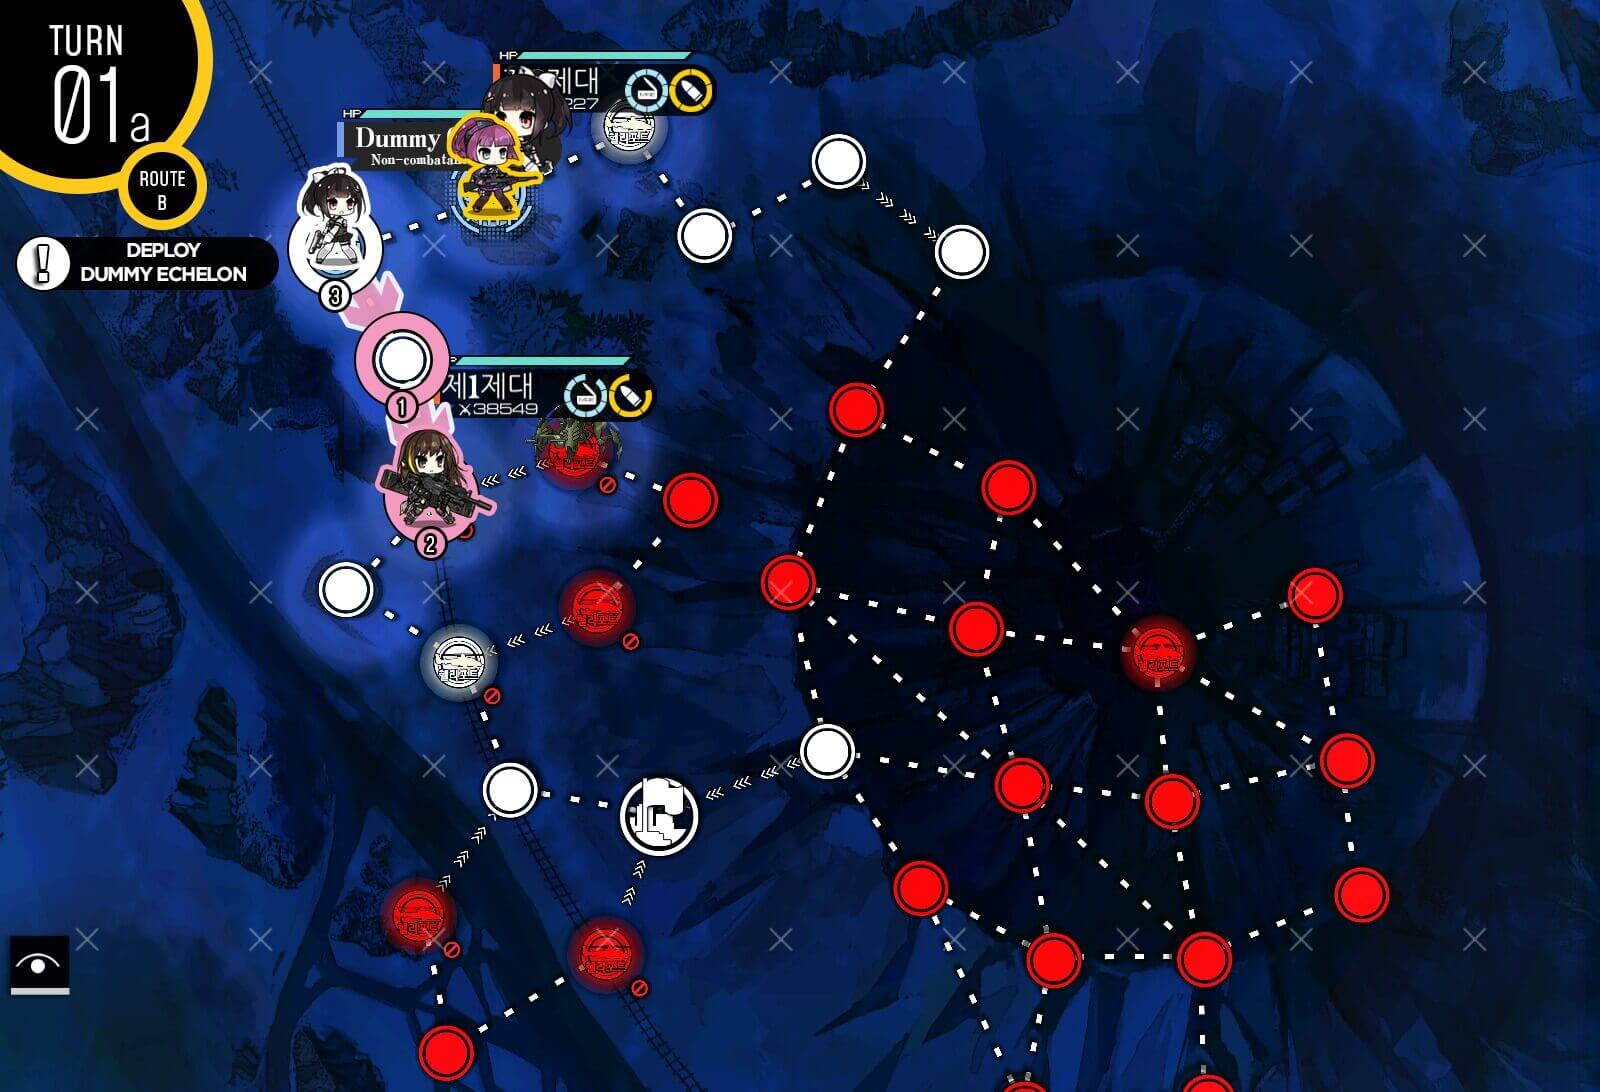
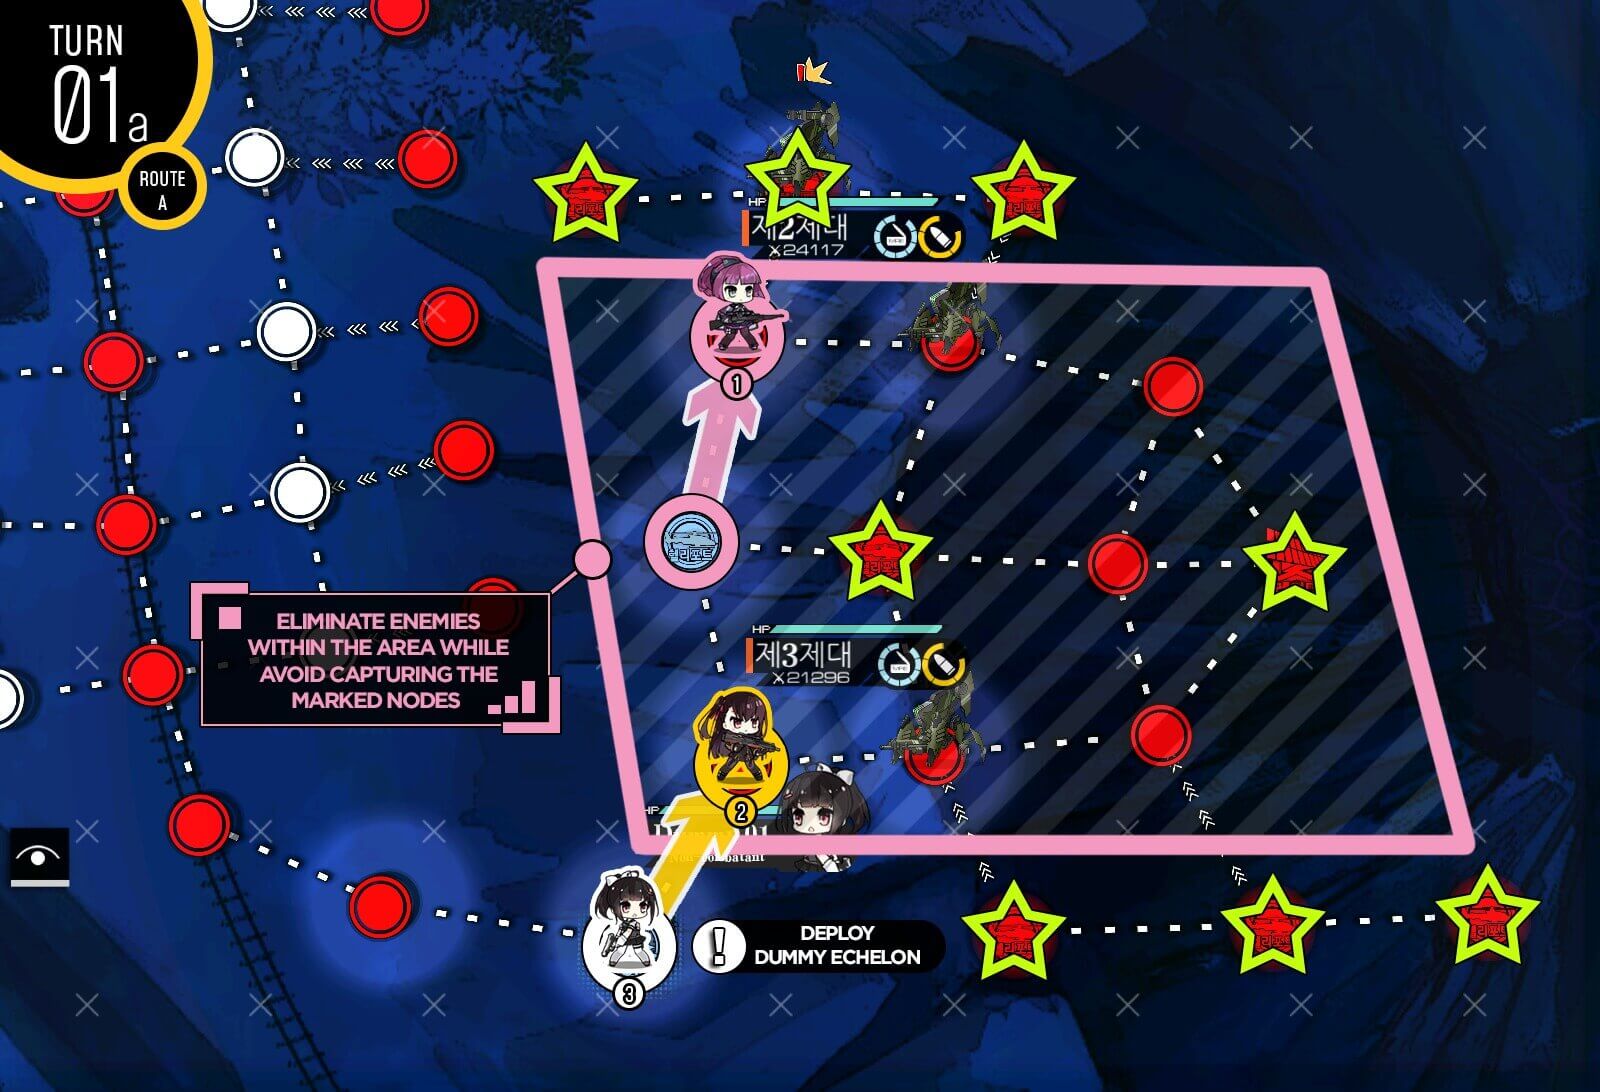
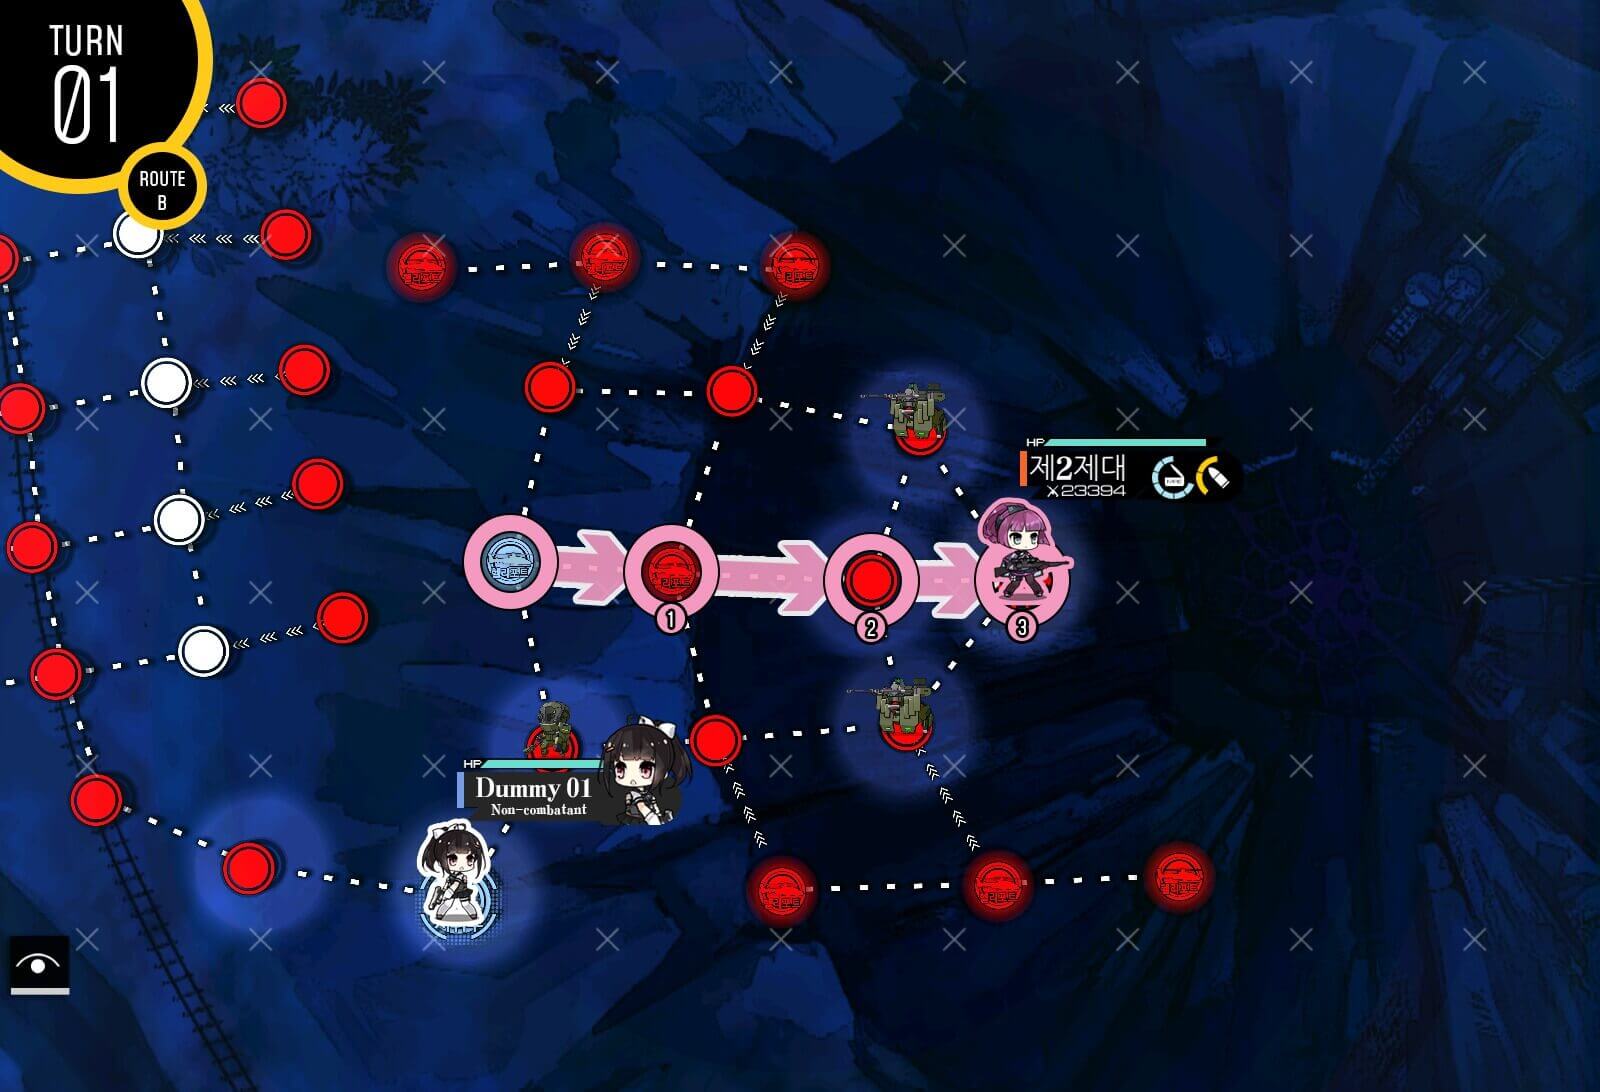
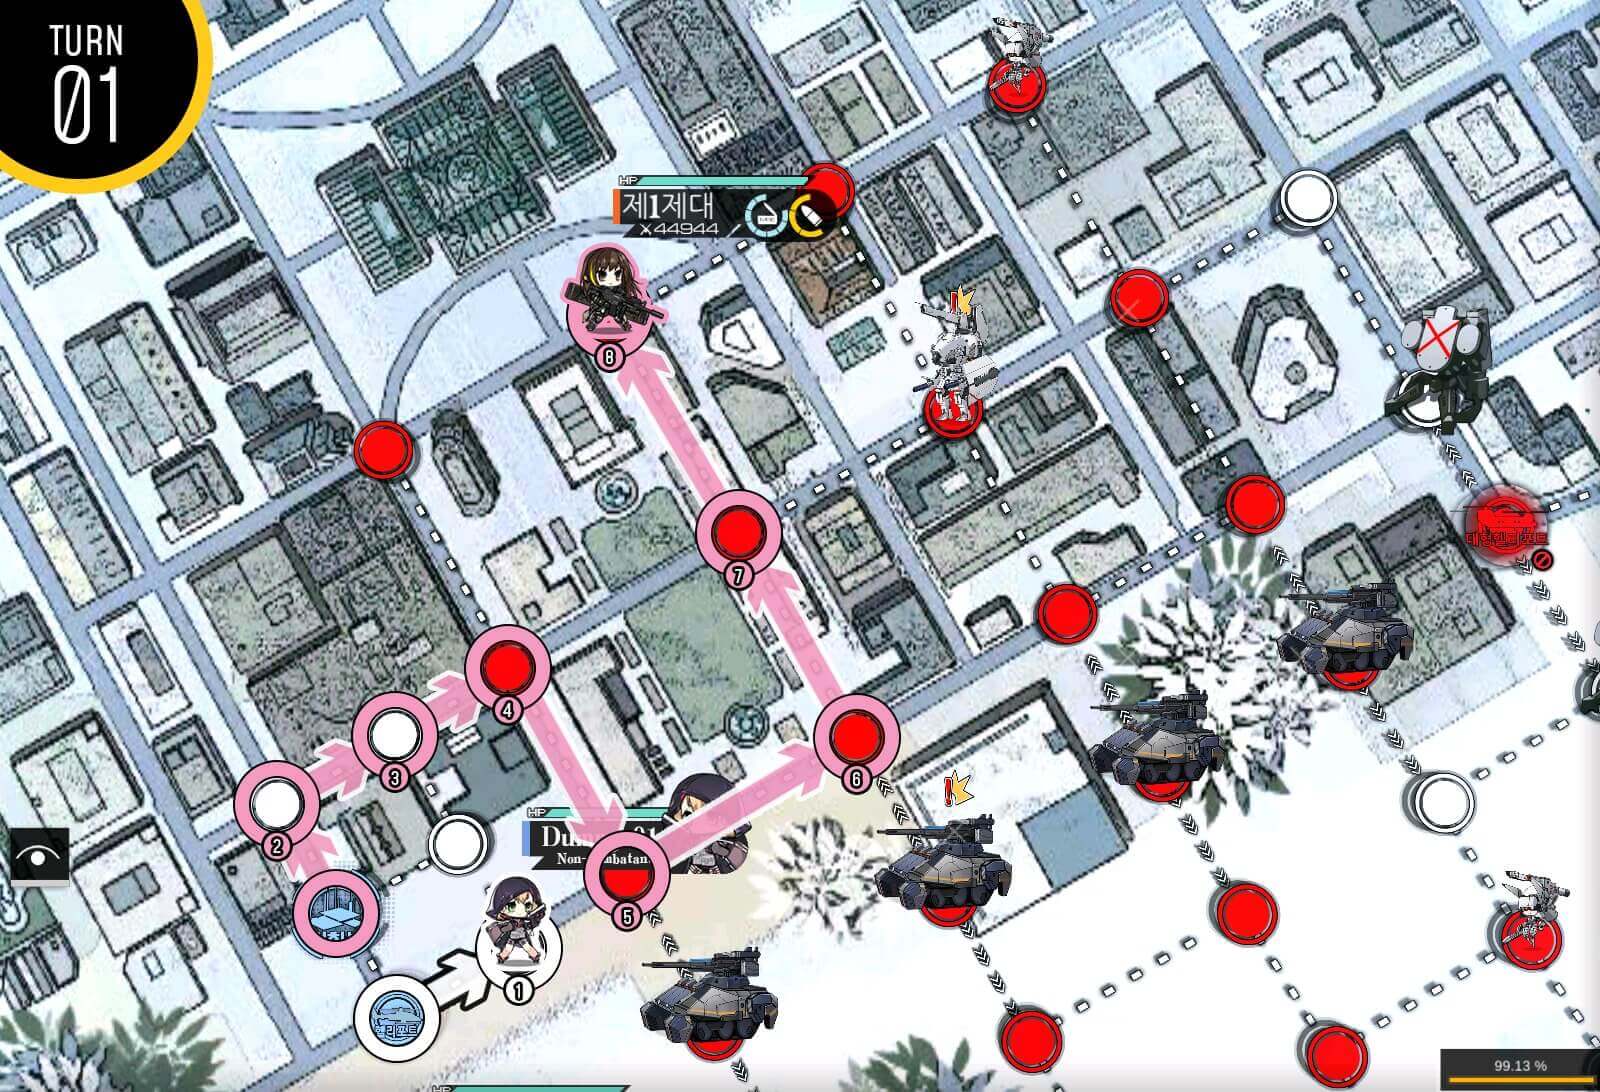
Turn 1a
Spawn and move down your combat echelon then deploy a dummy echelon.
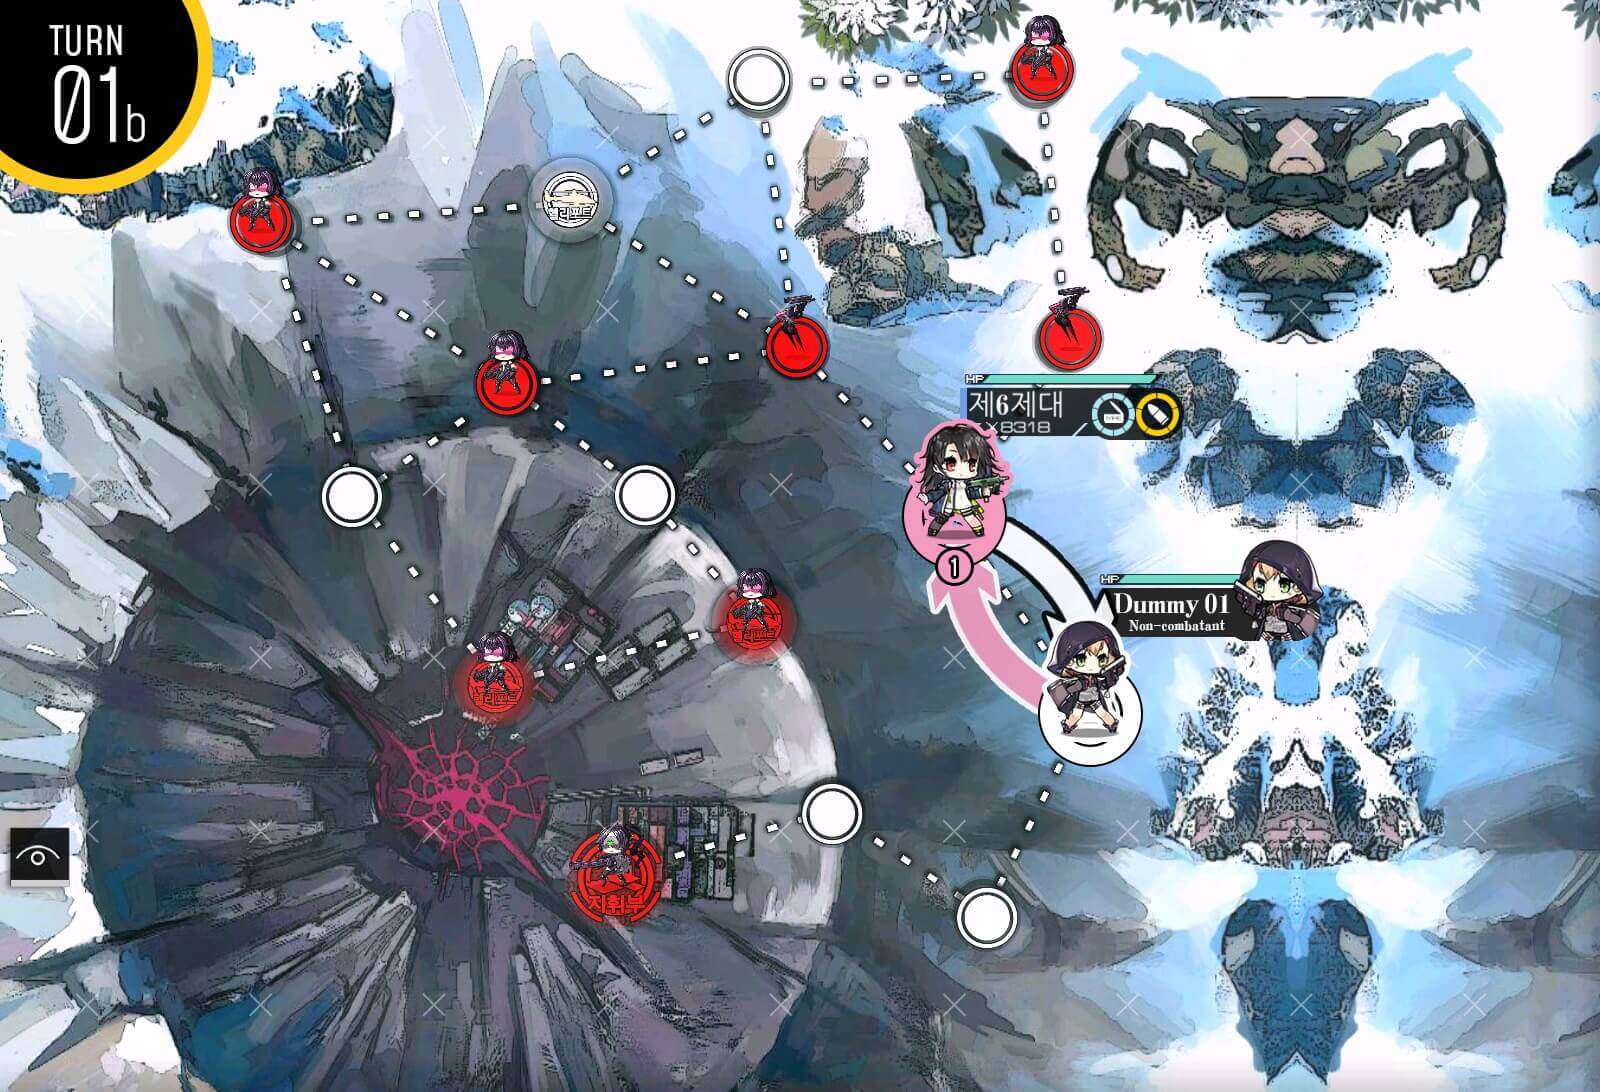
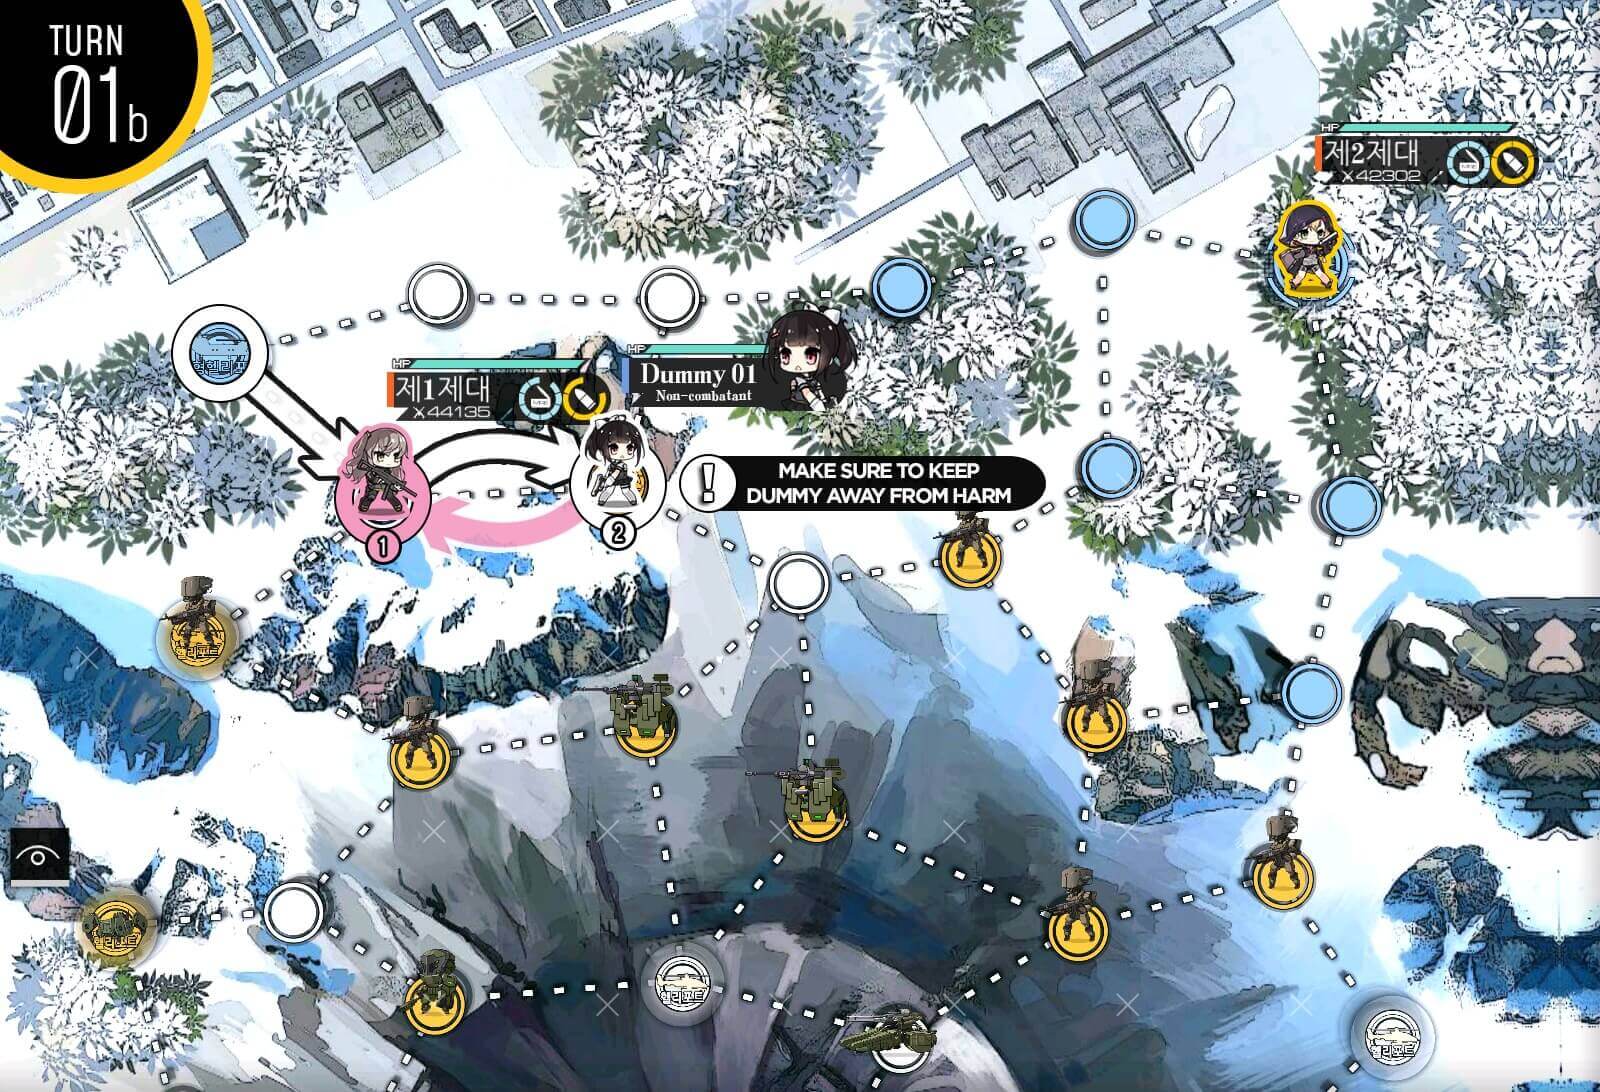
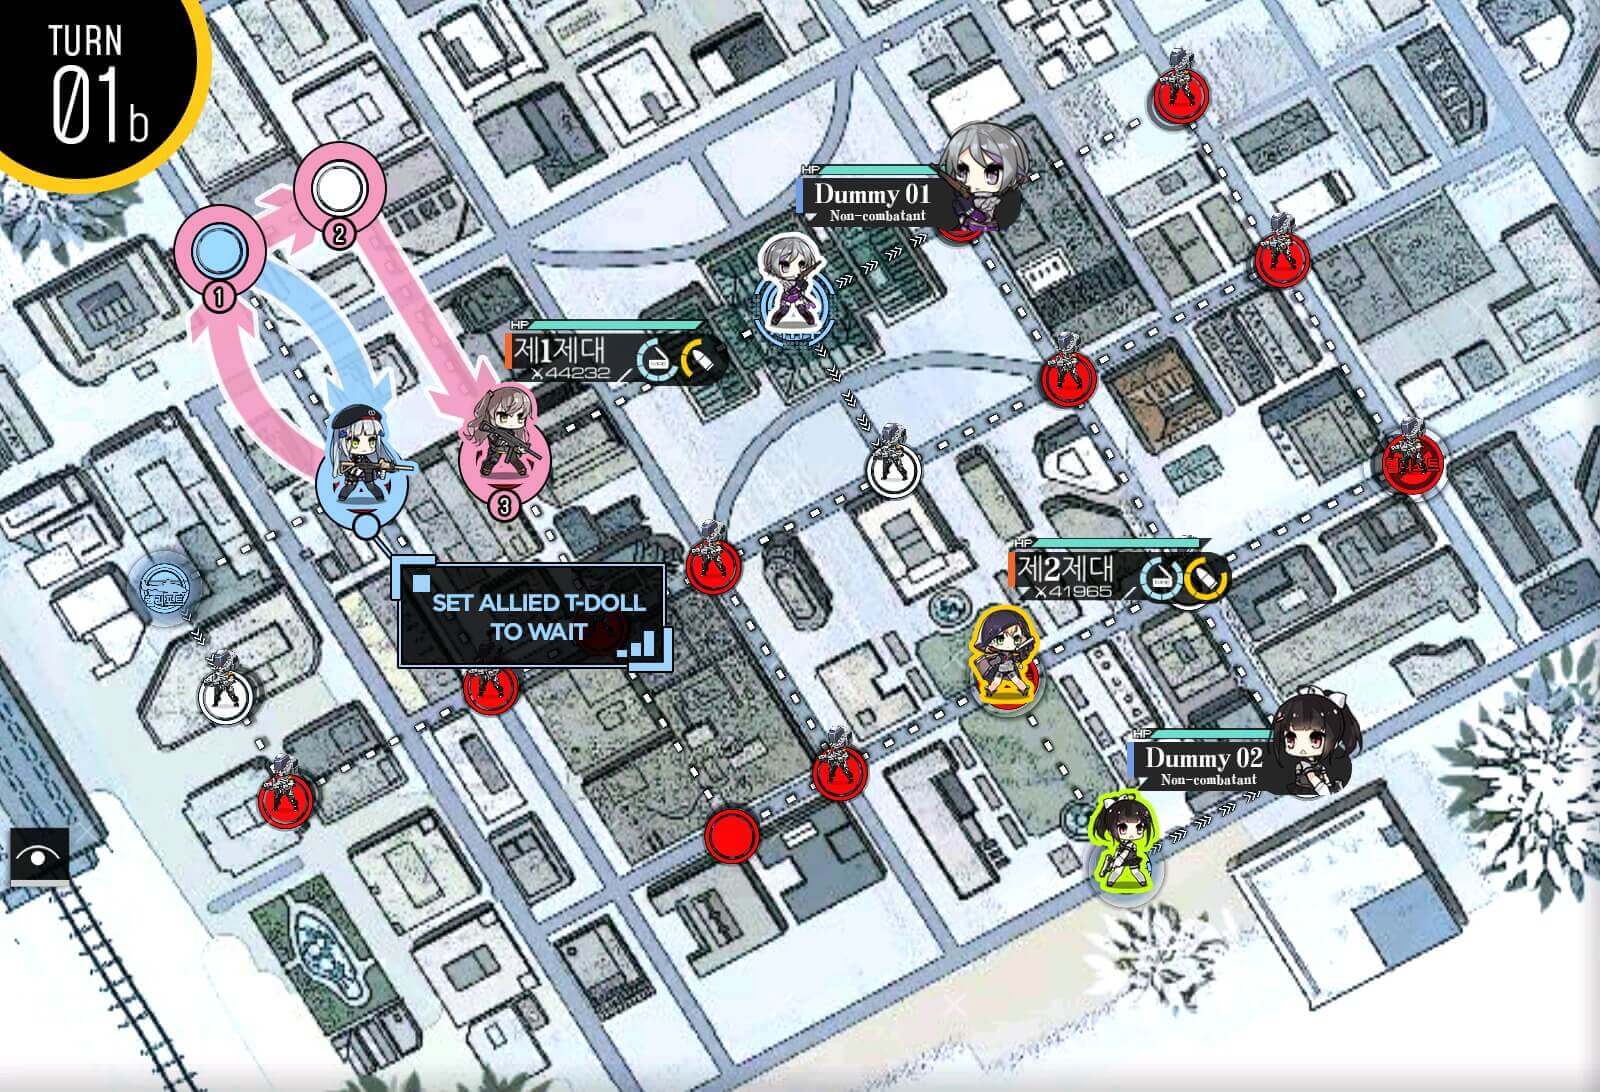
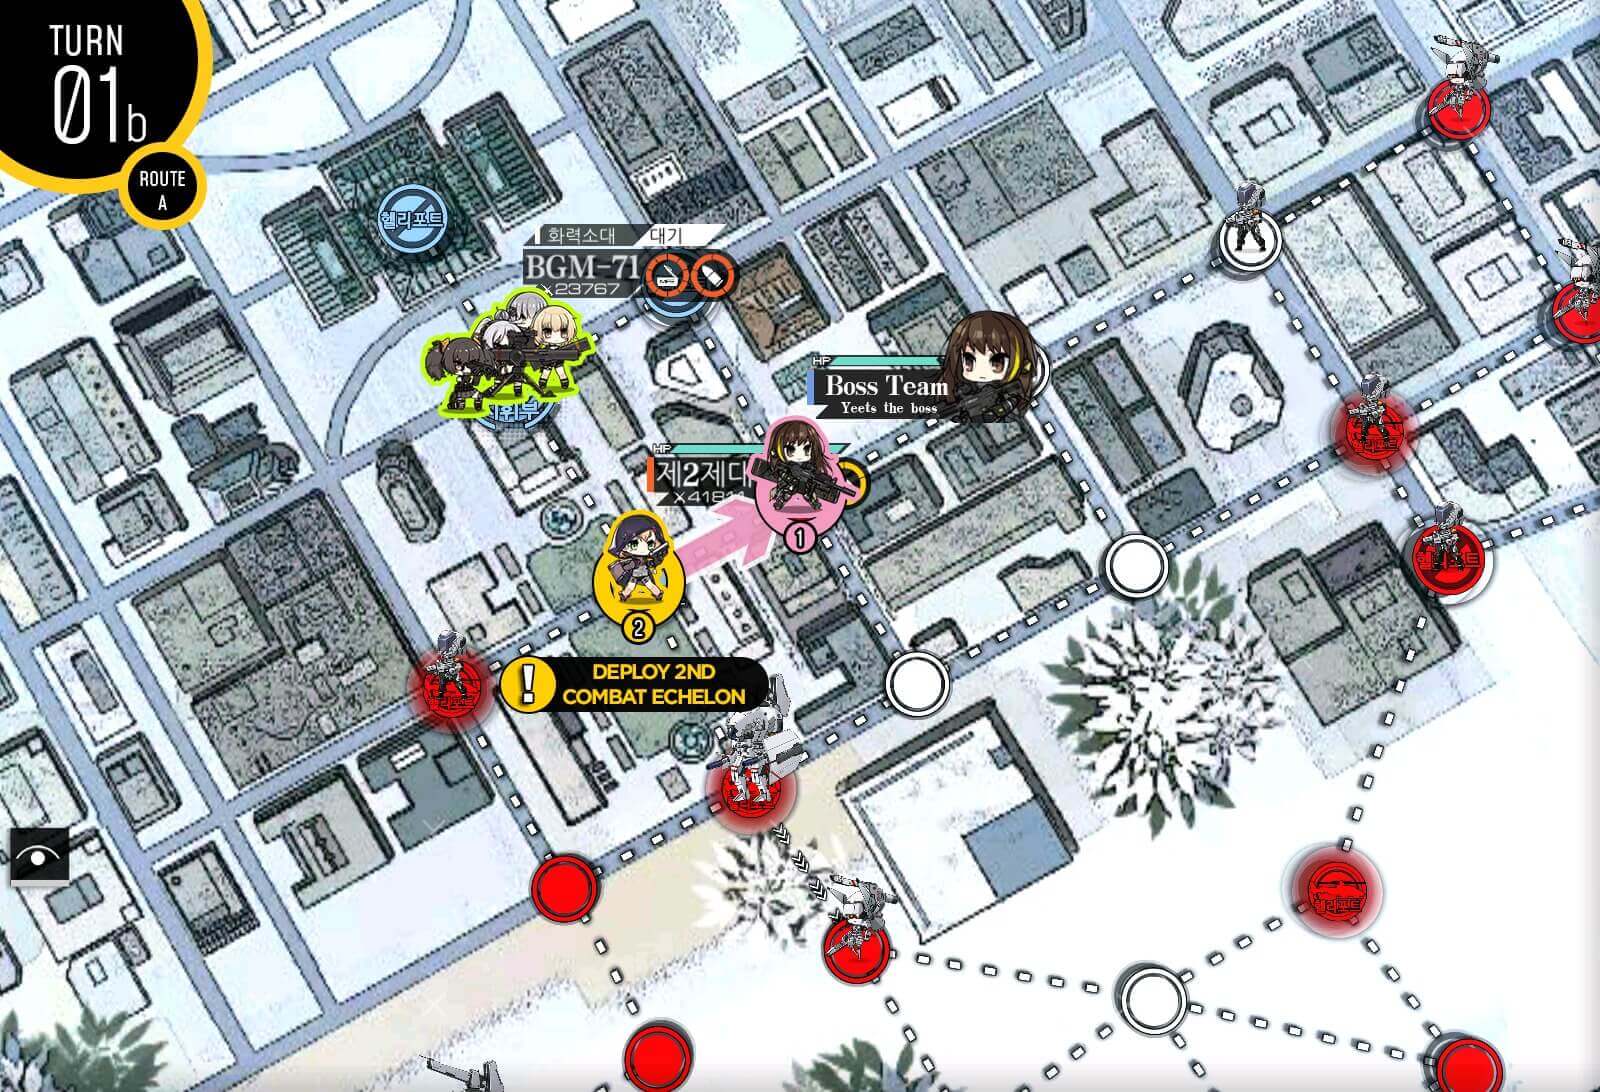
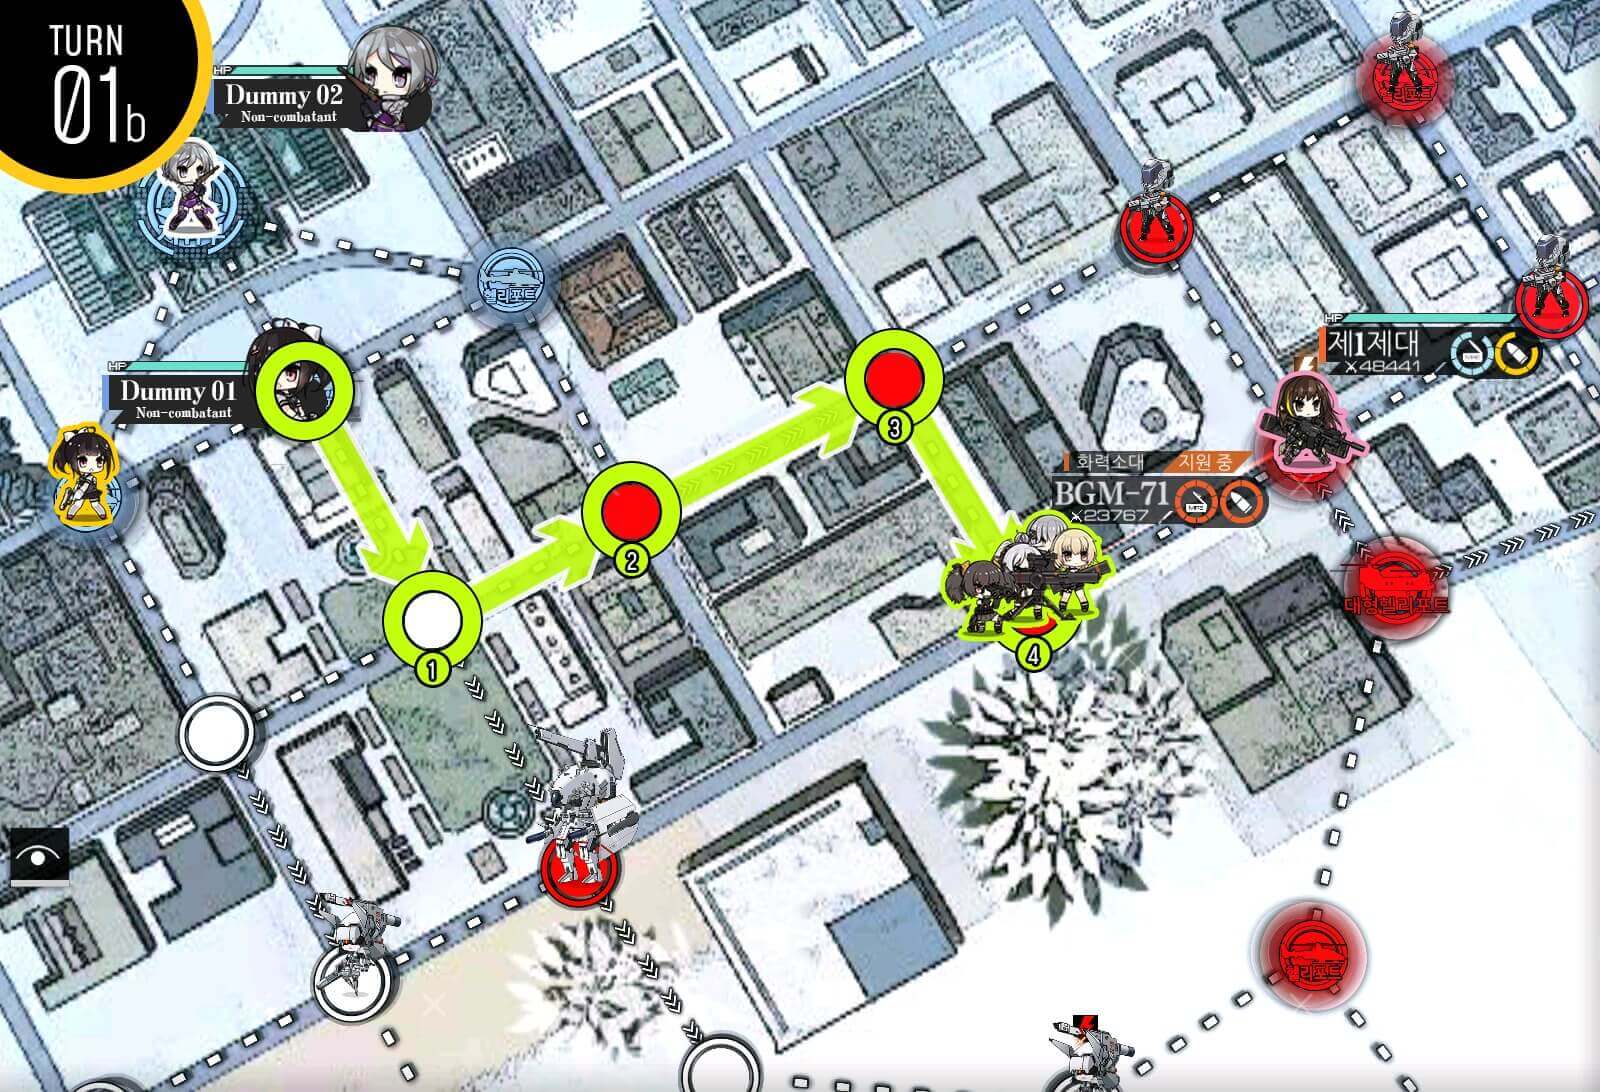
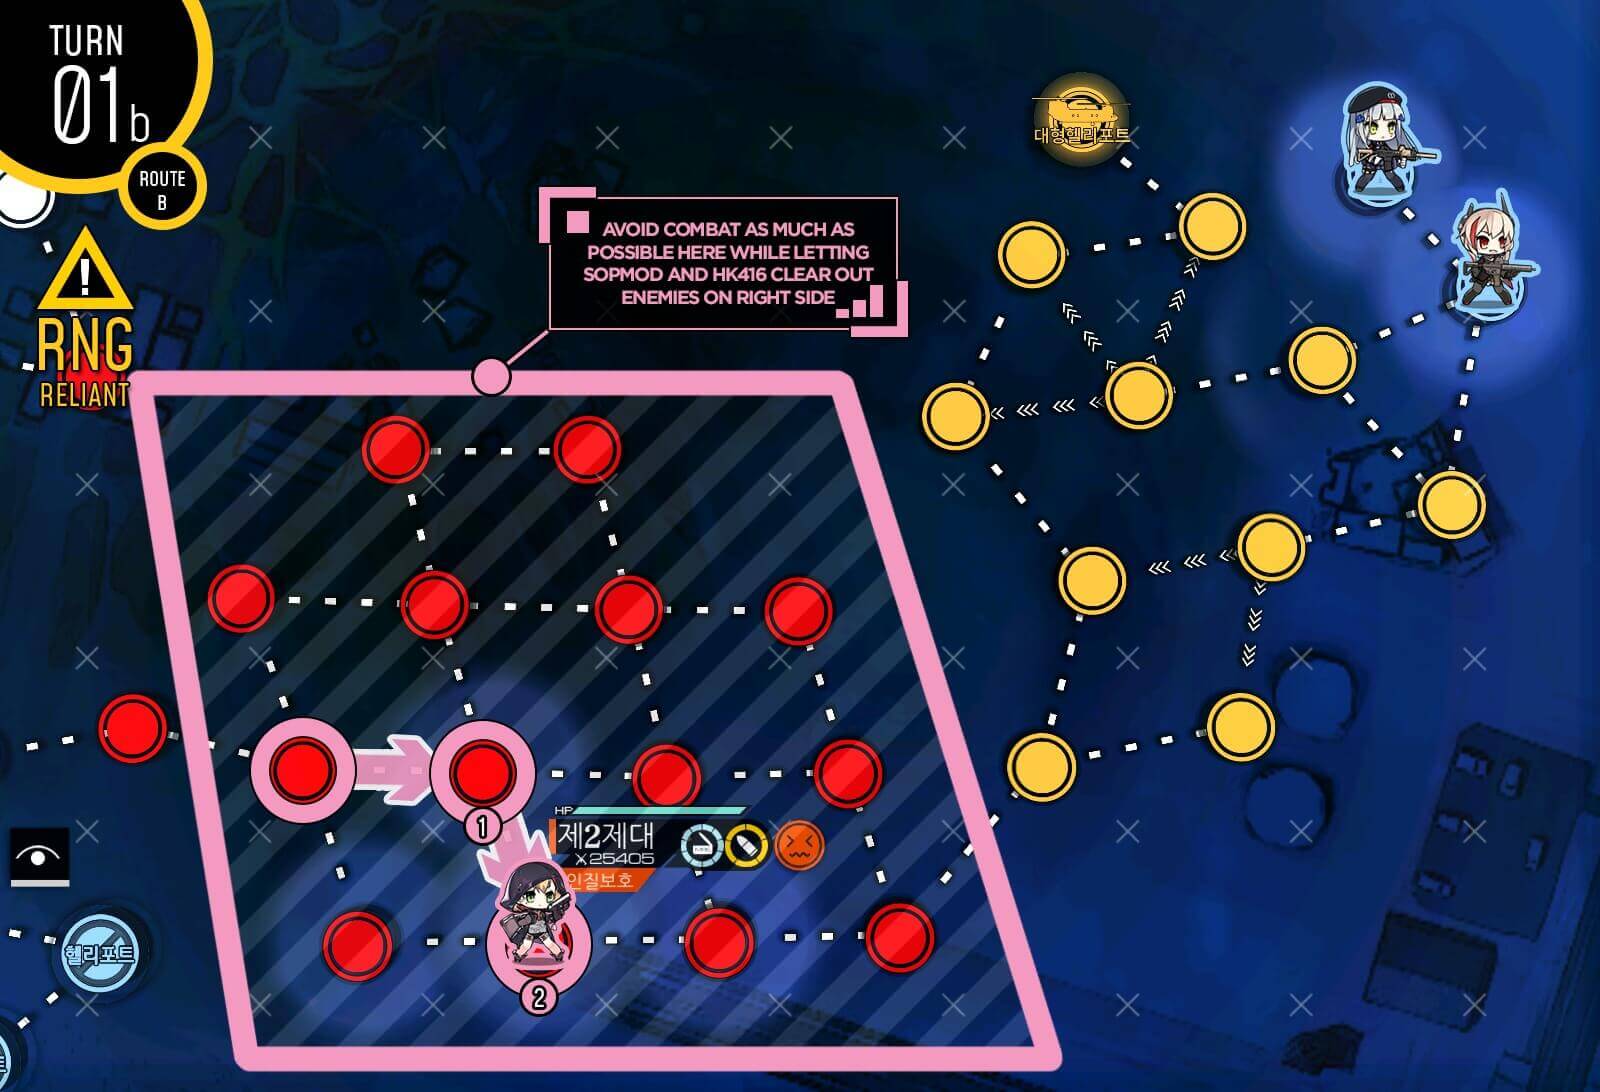
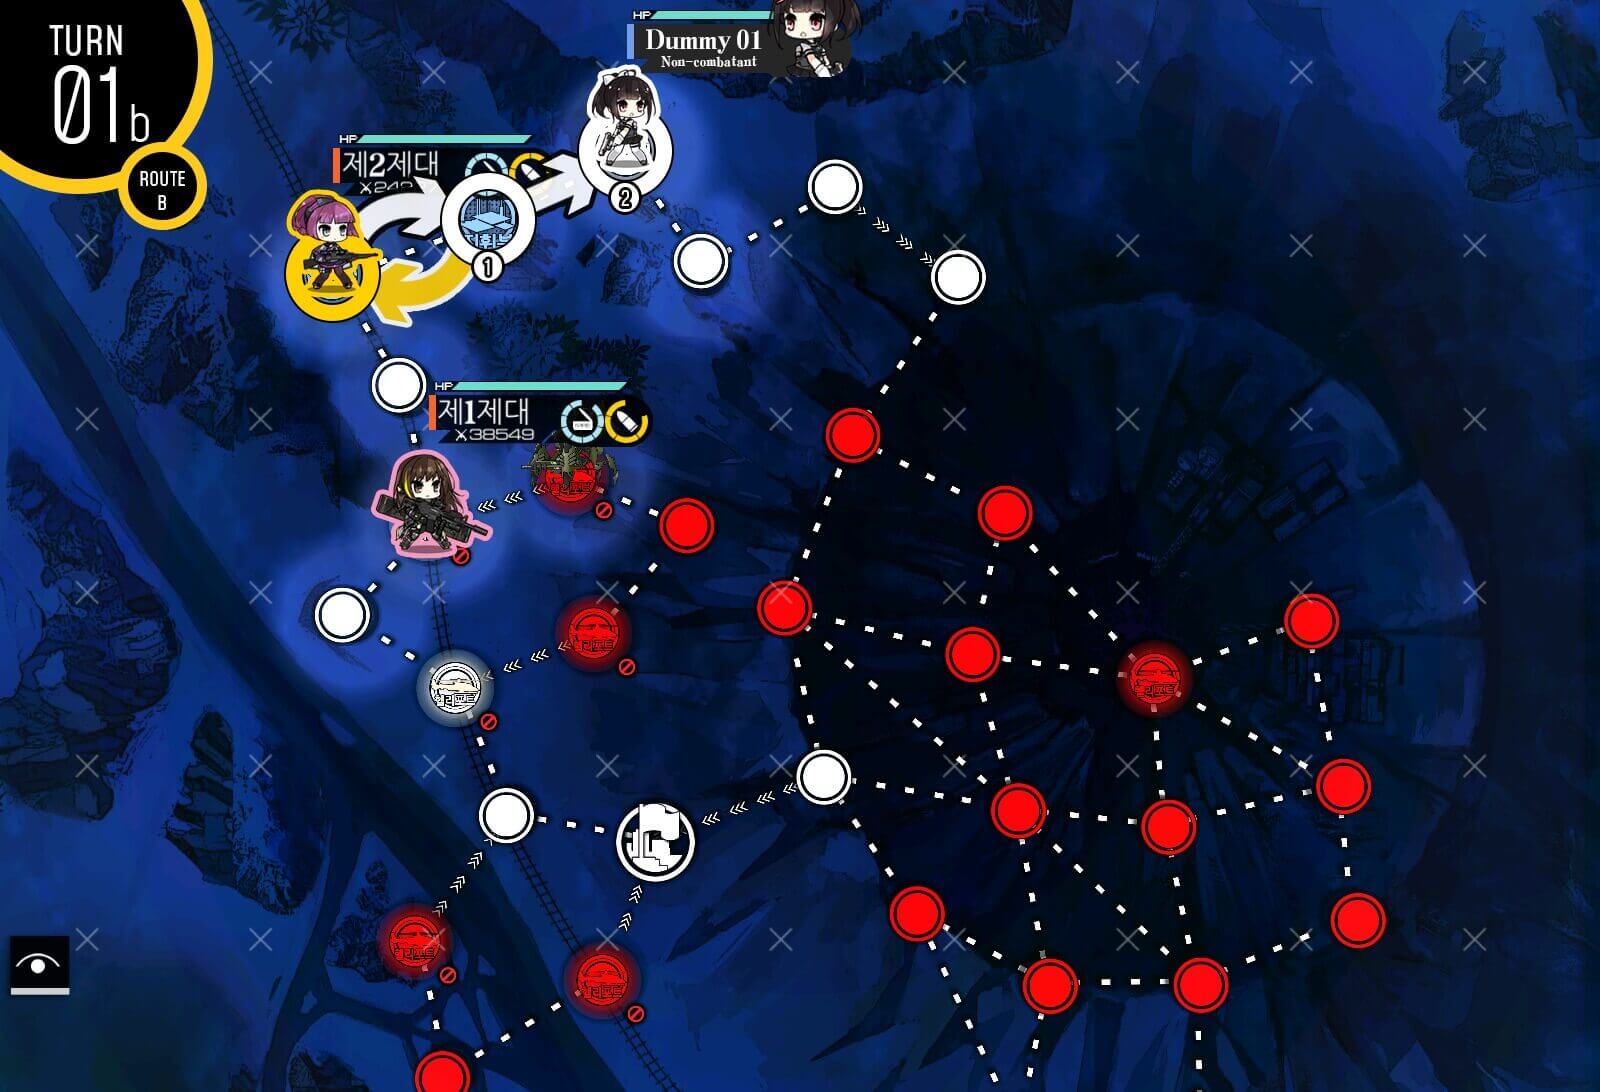
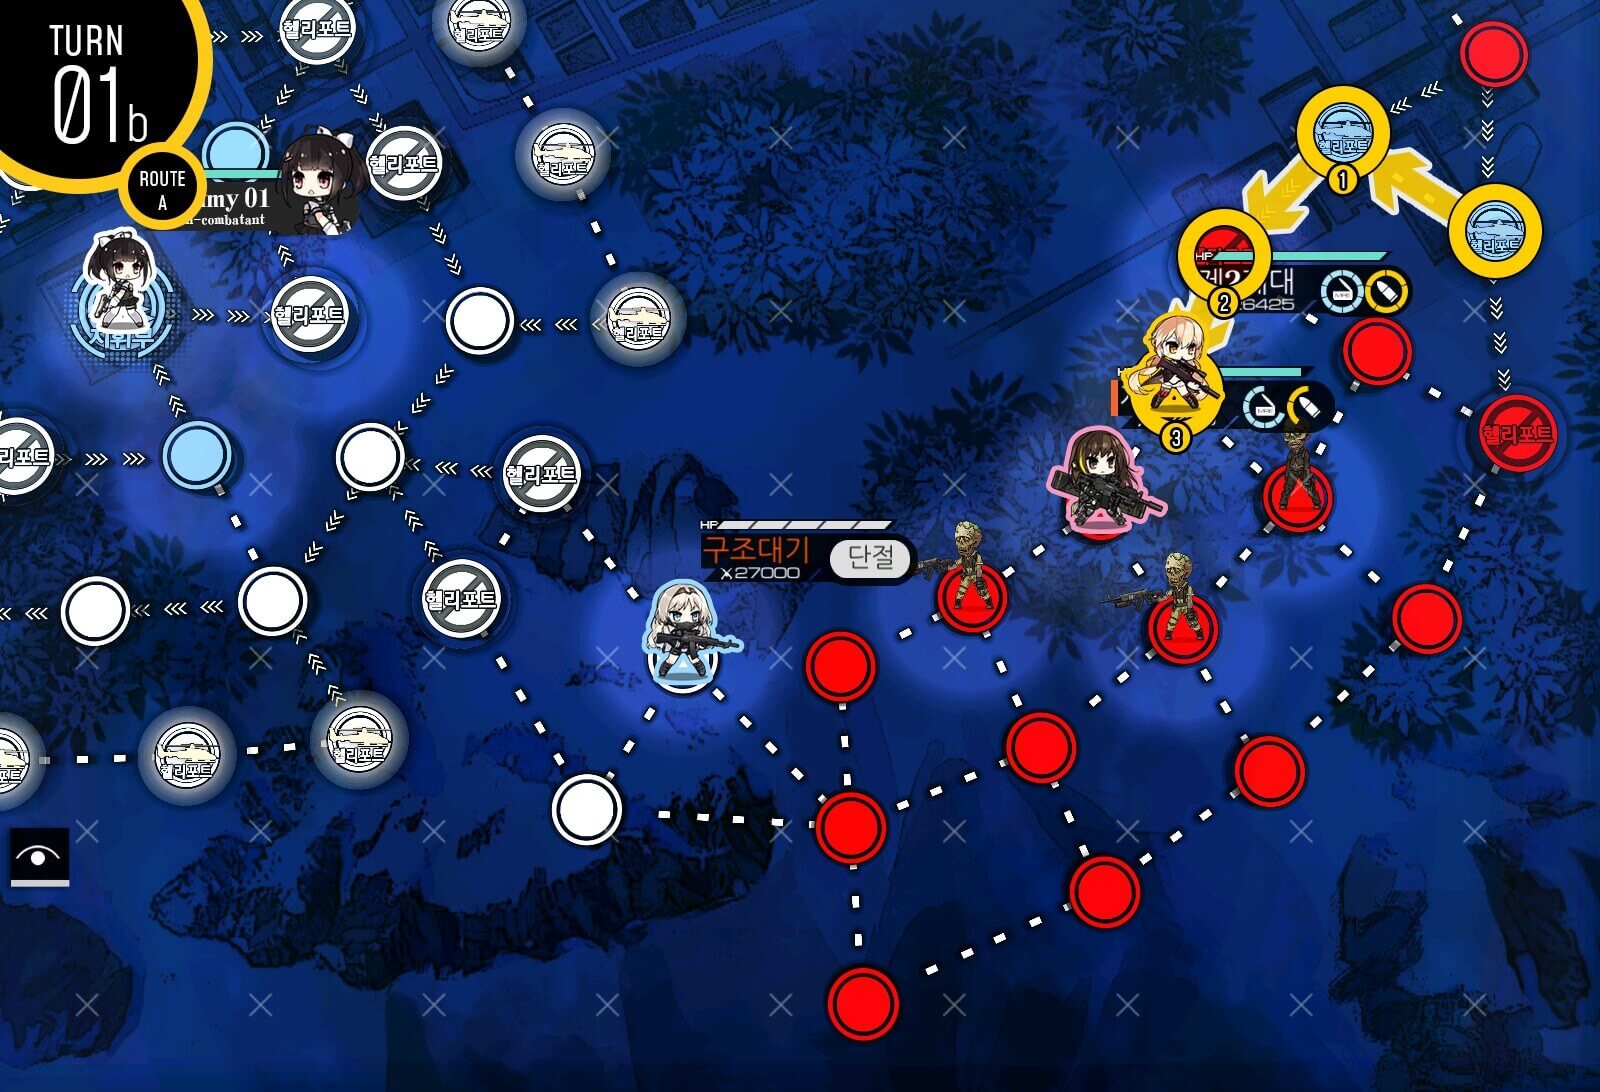
Turn 1b
Swap combat echelon's and dummy echelon's position before ending turn.
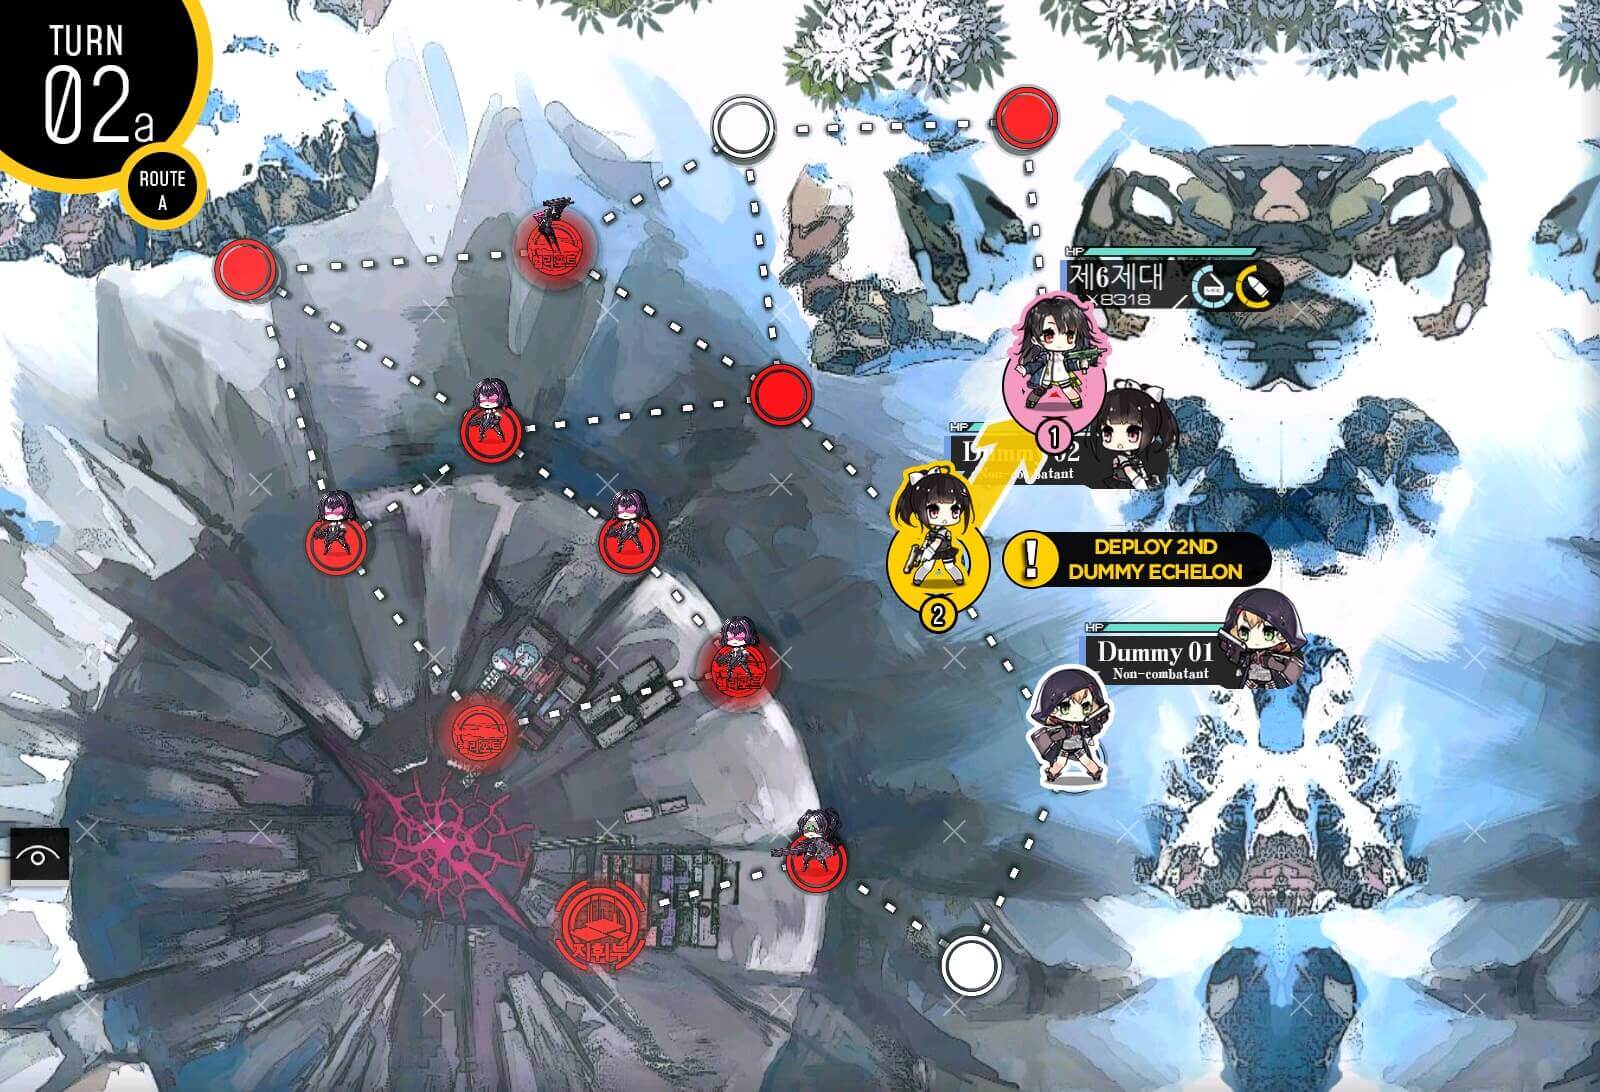
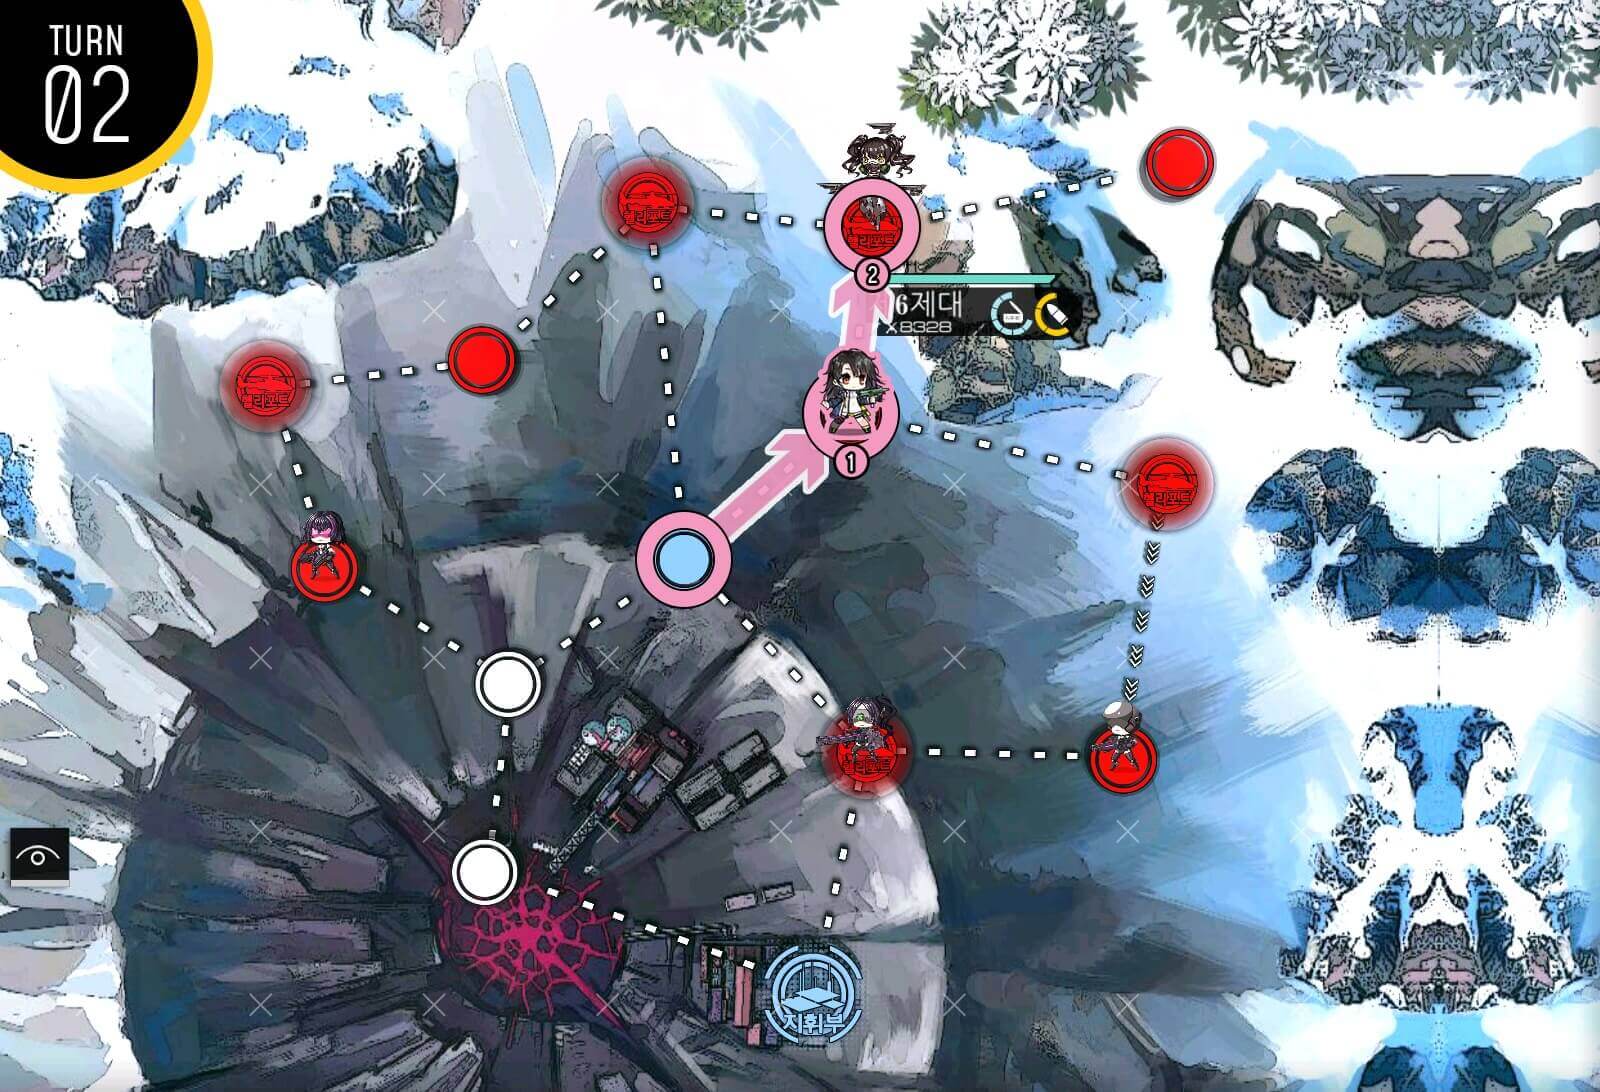
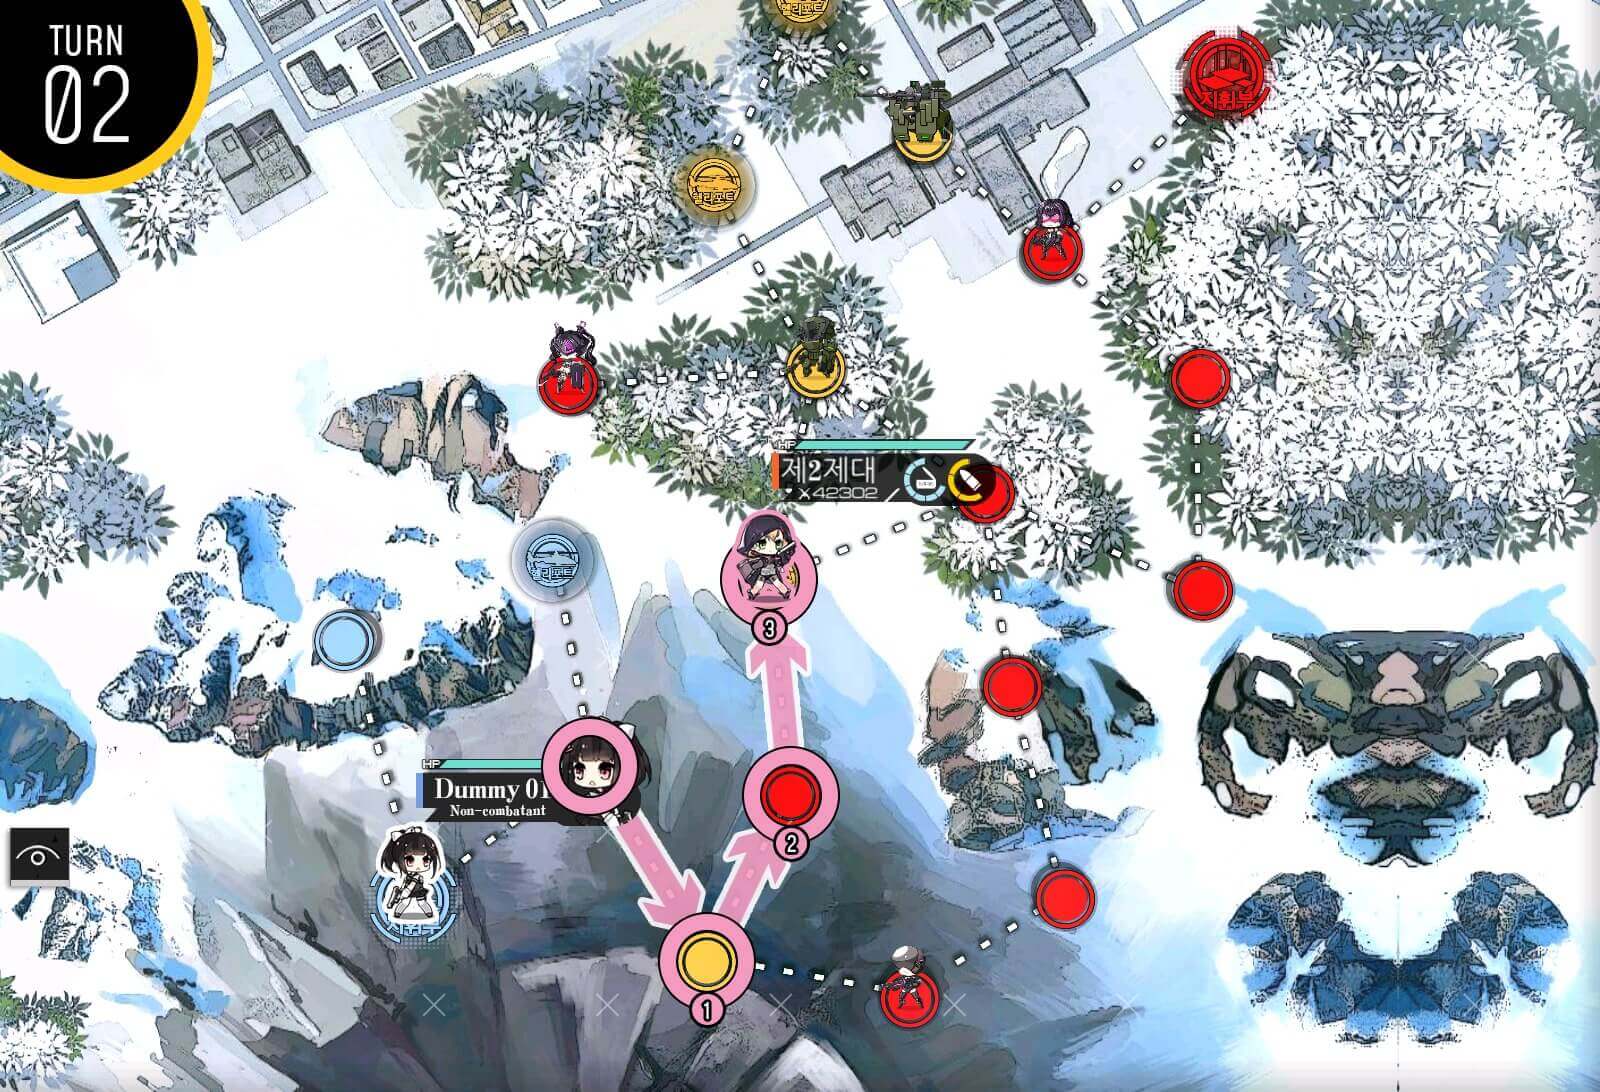
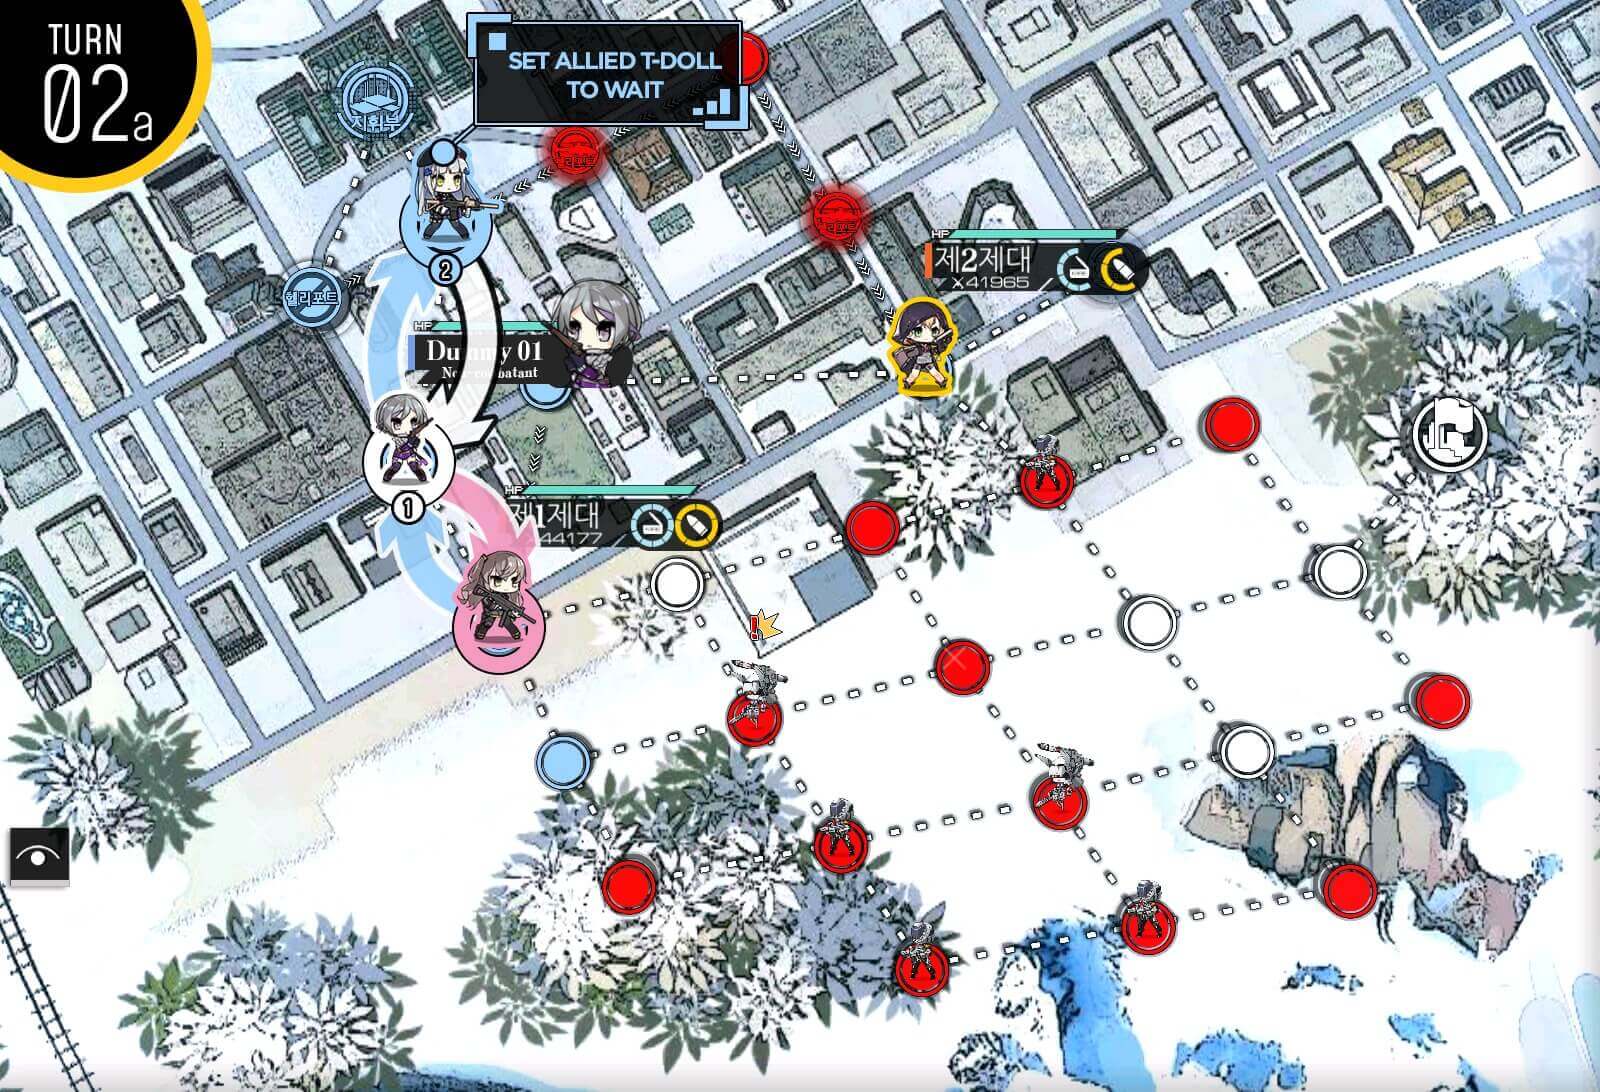
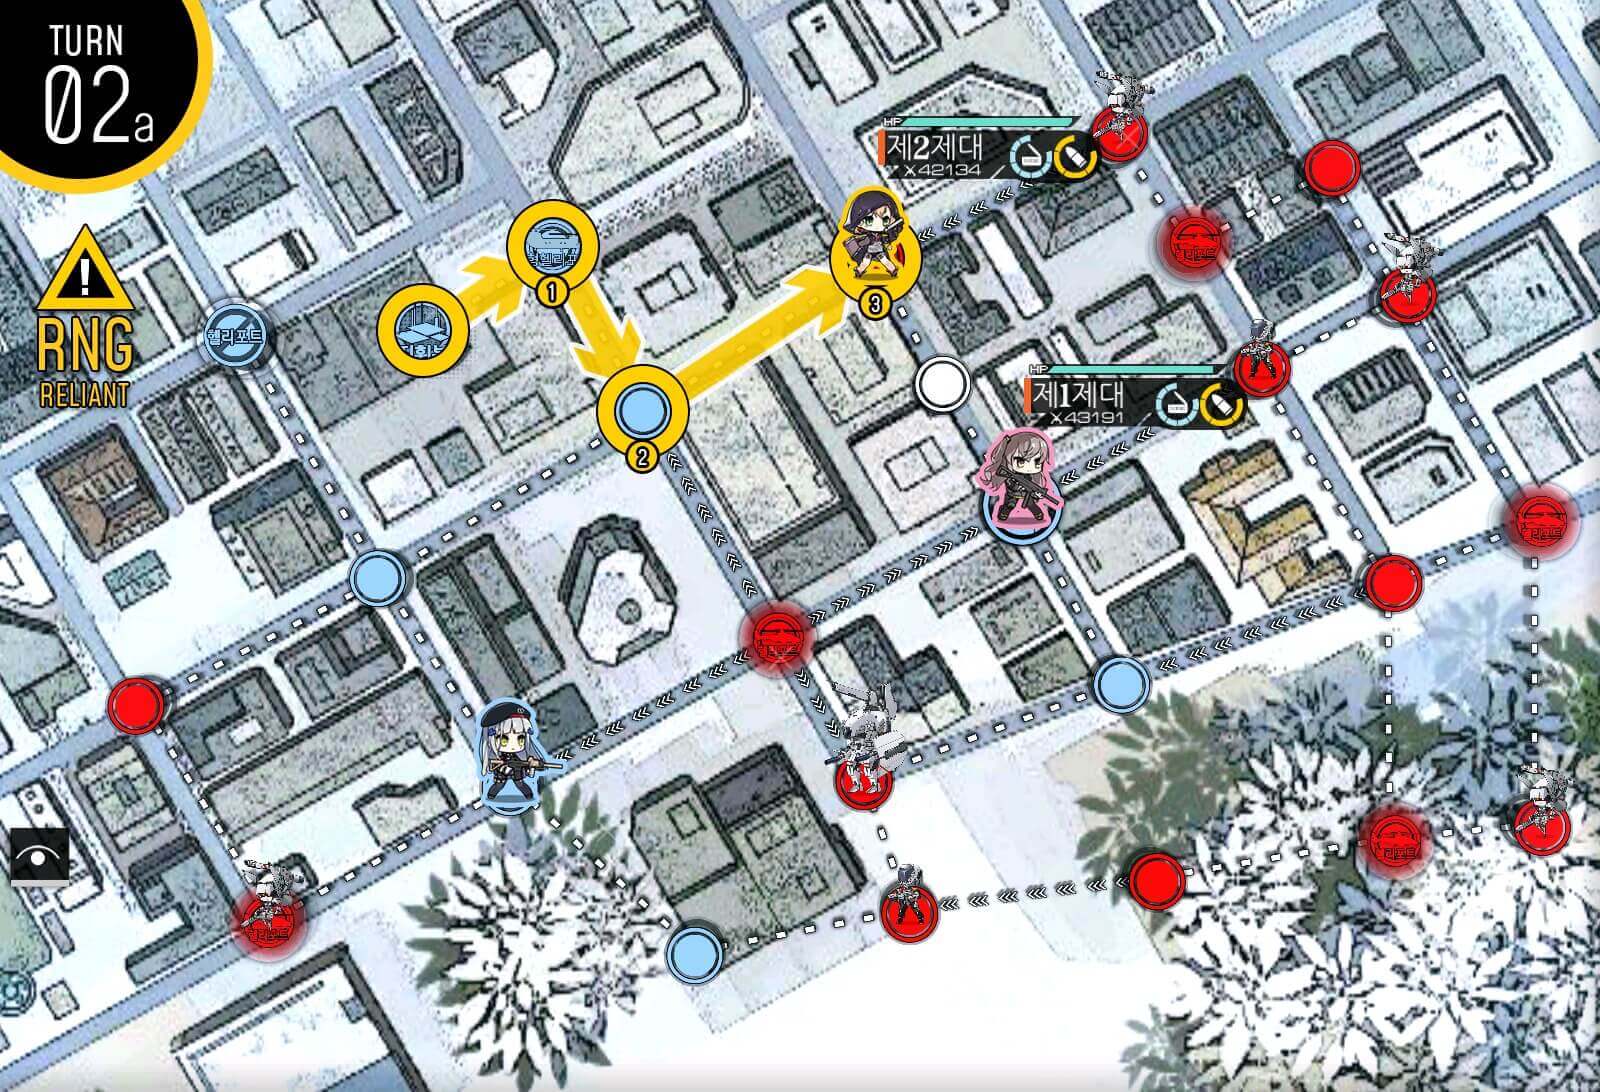
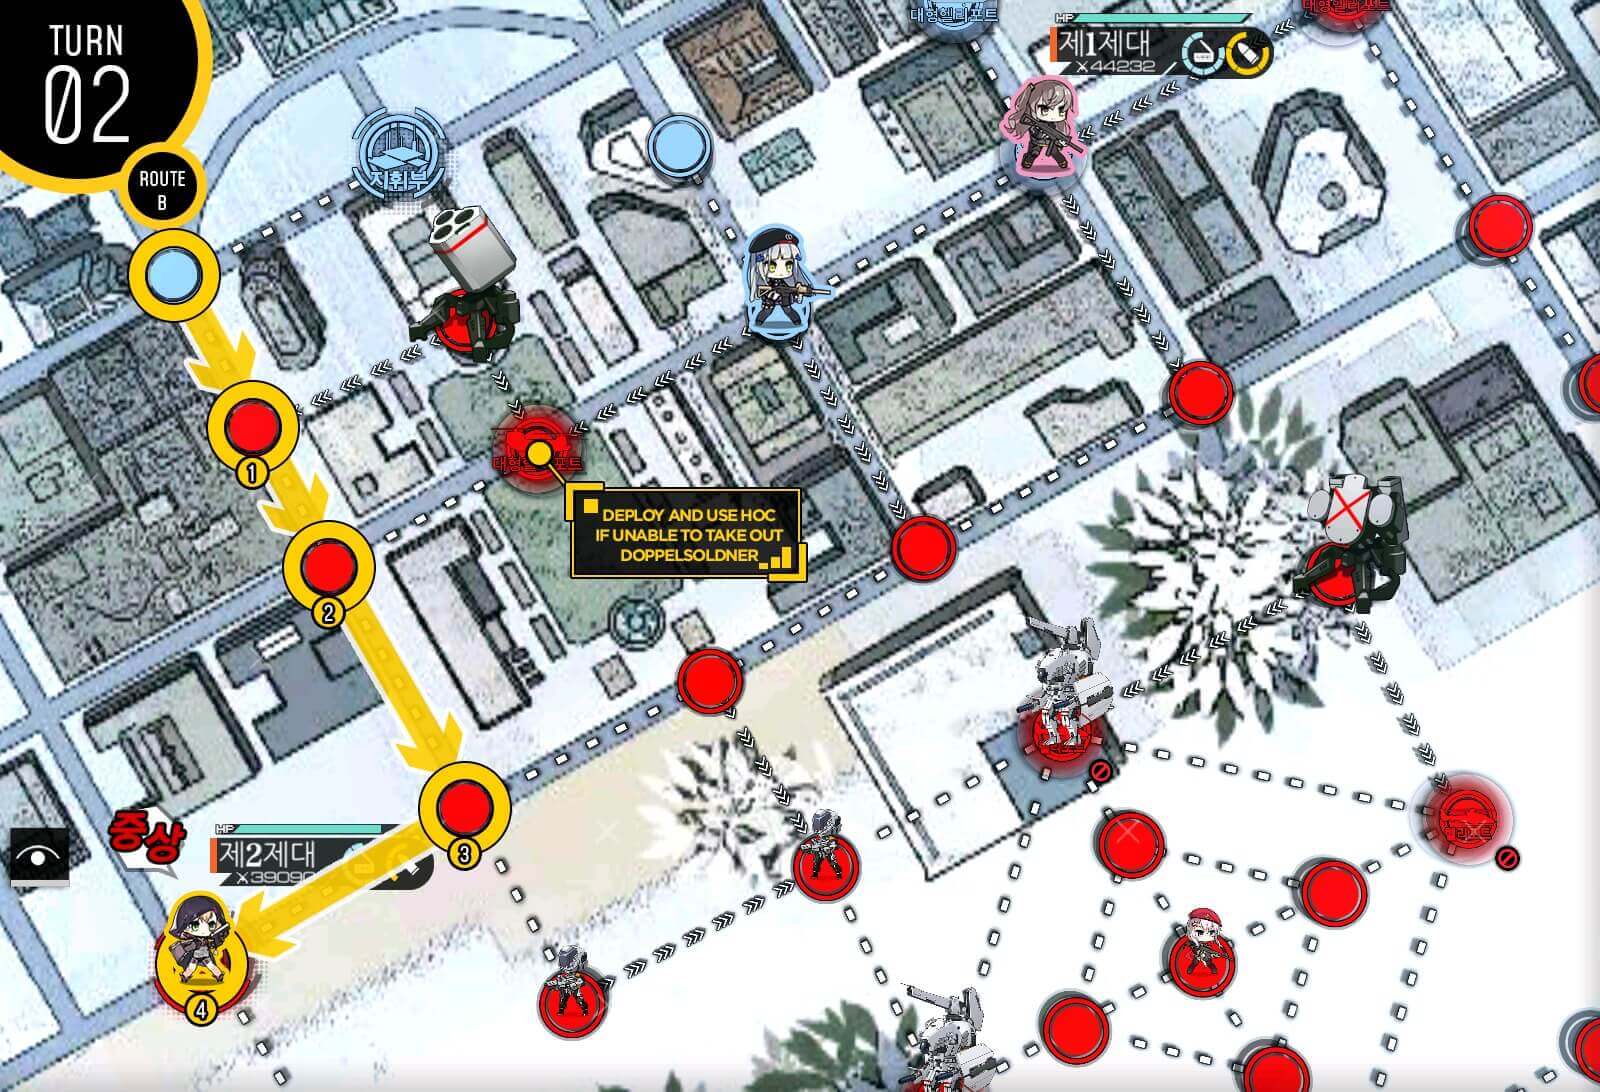
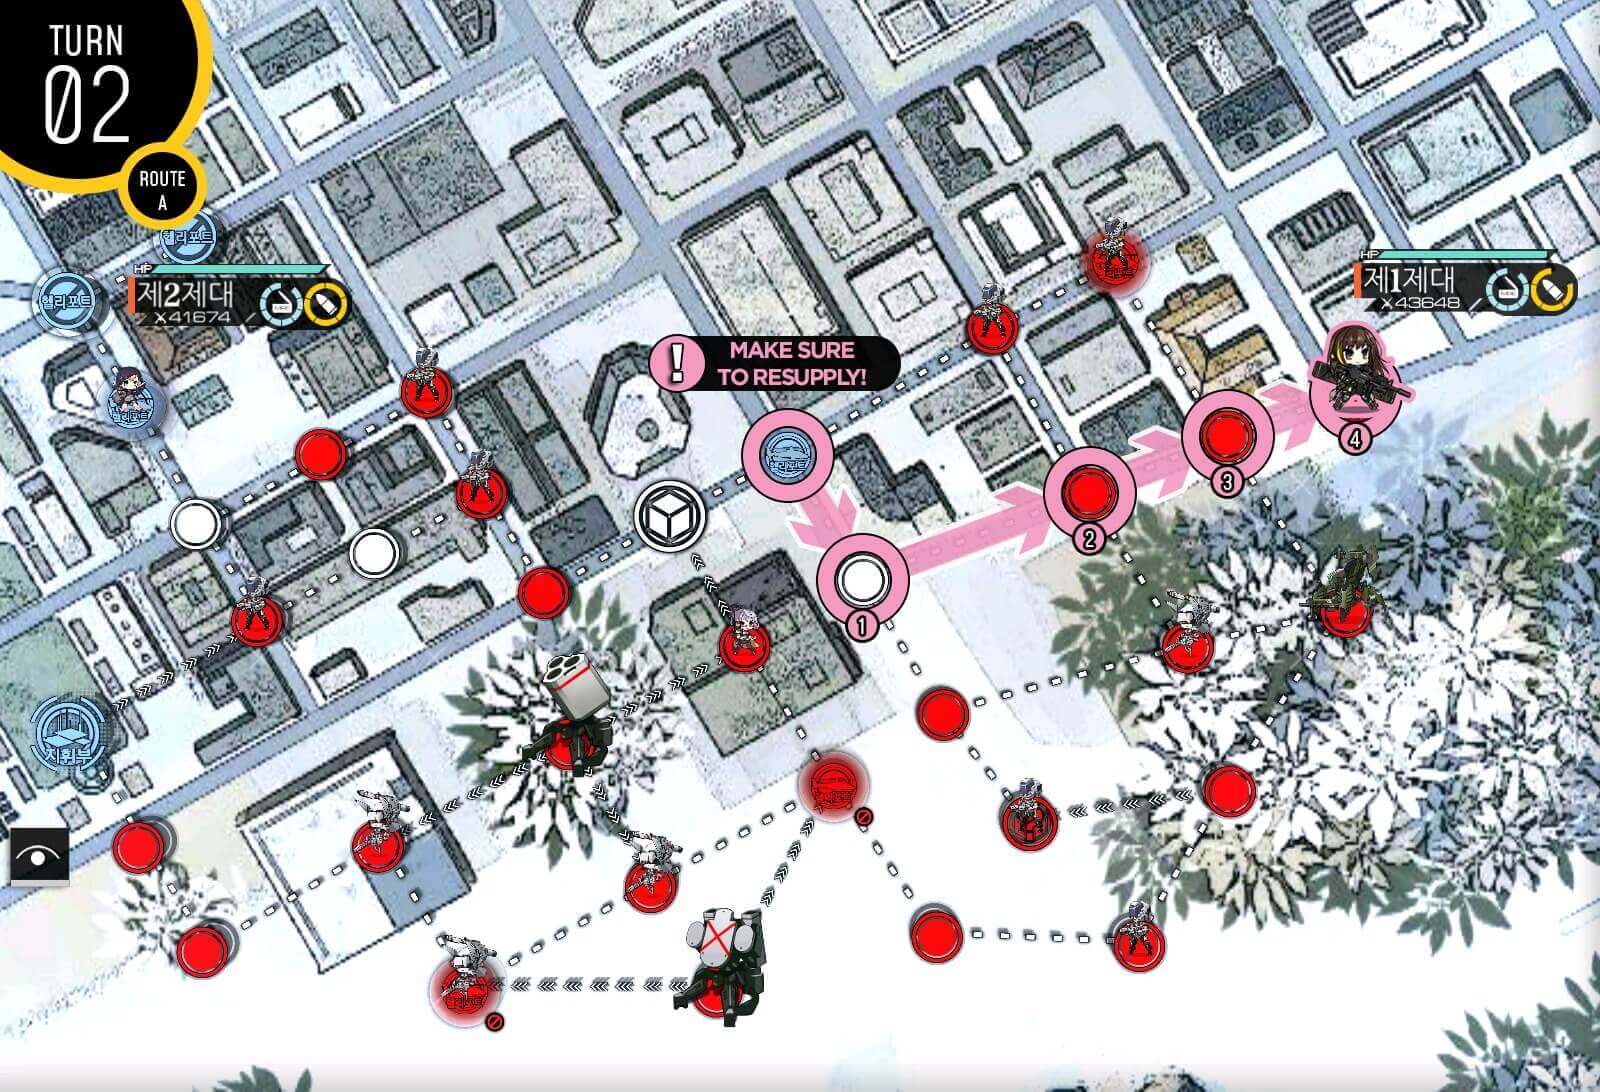
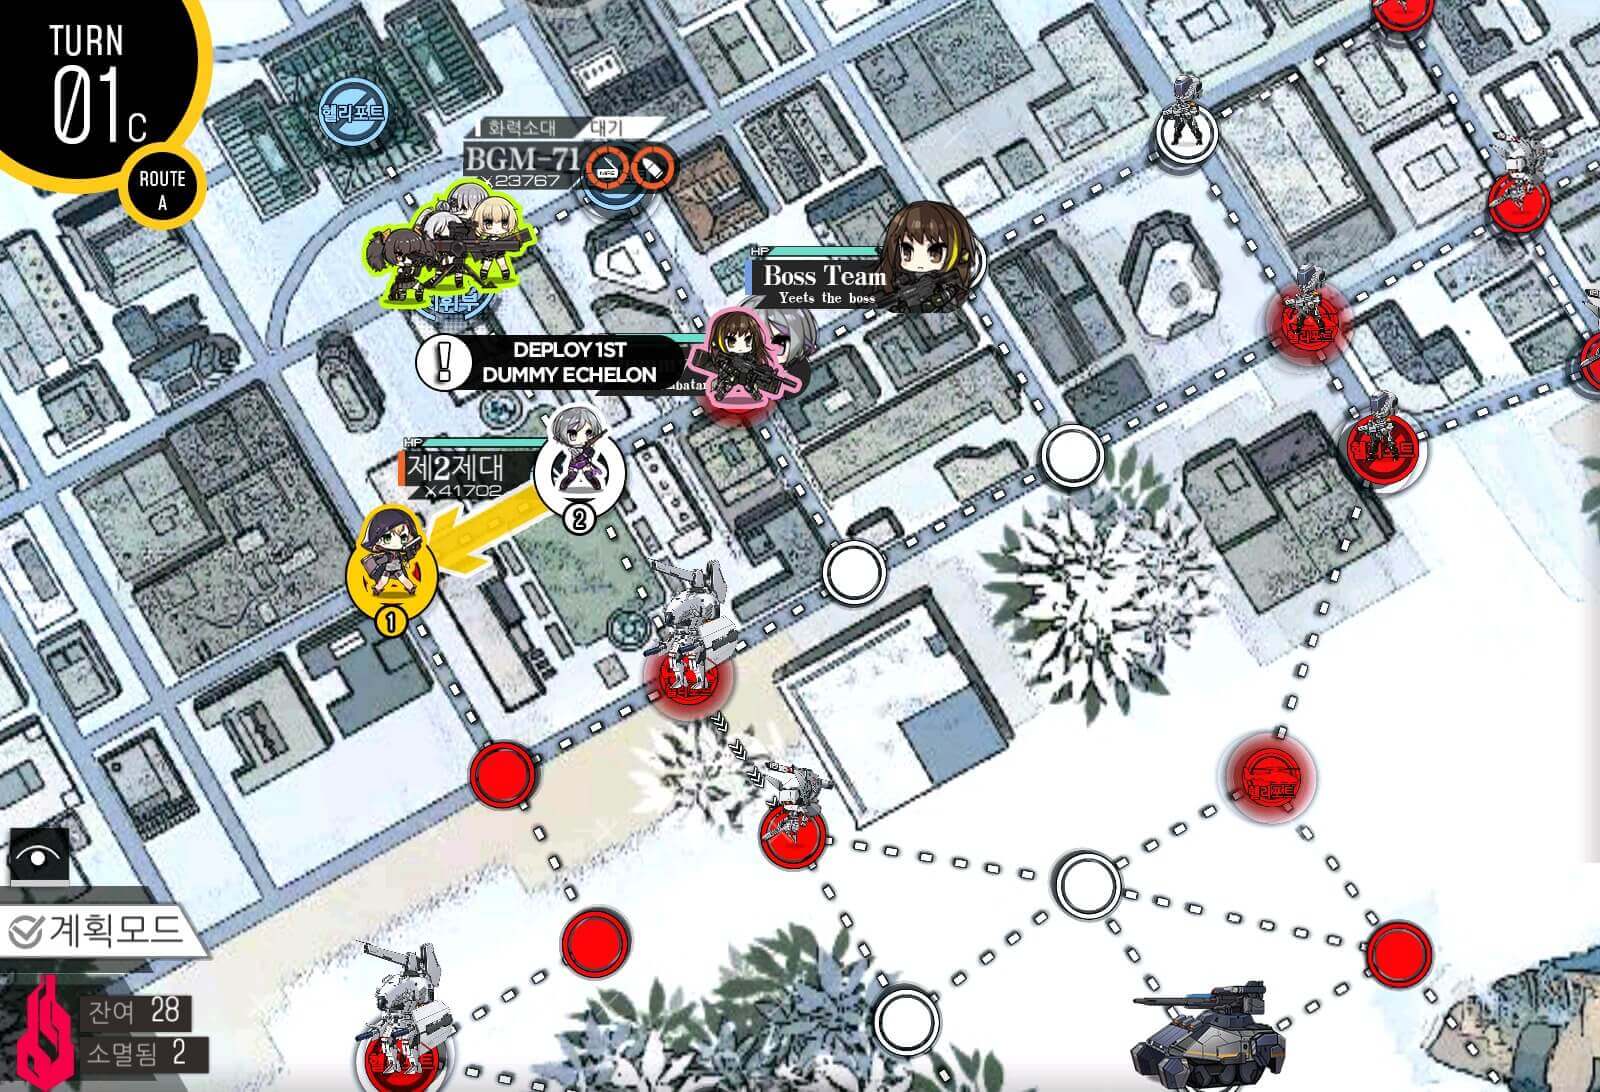
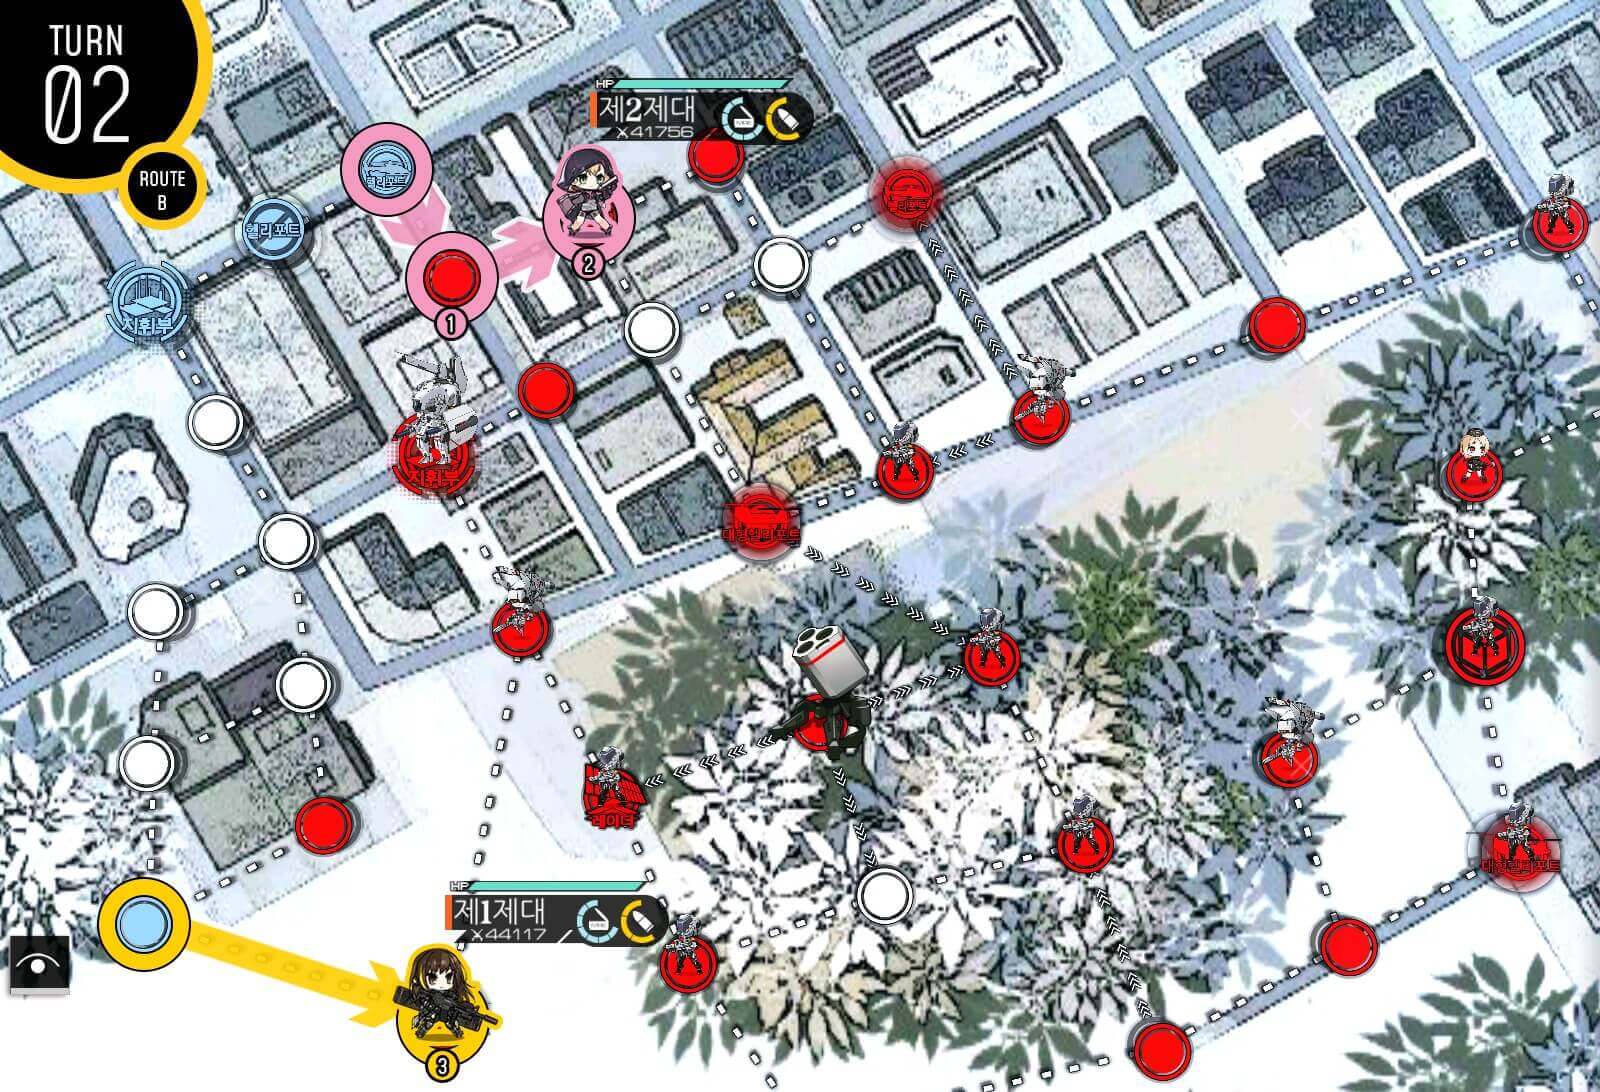
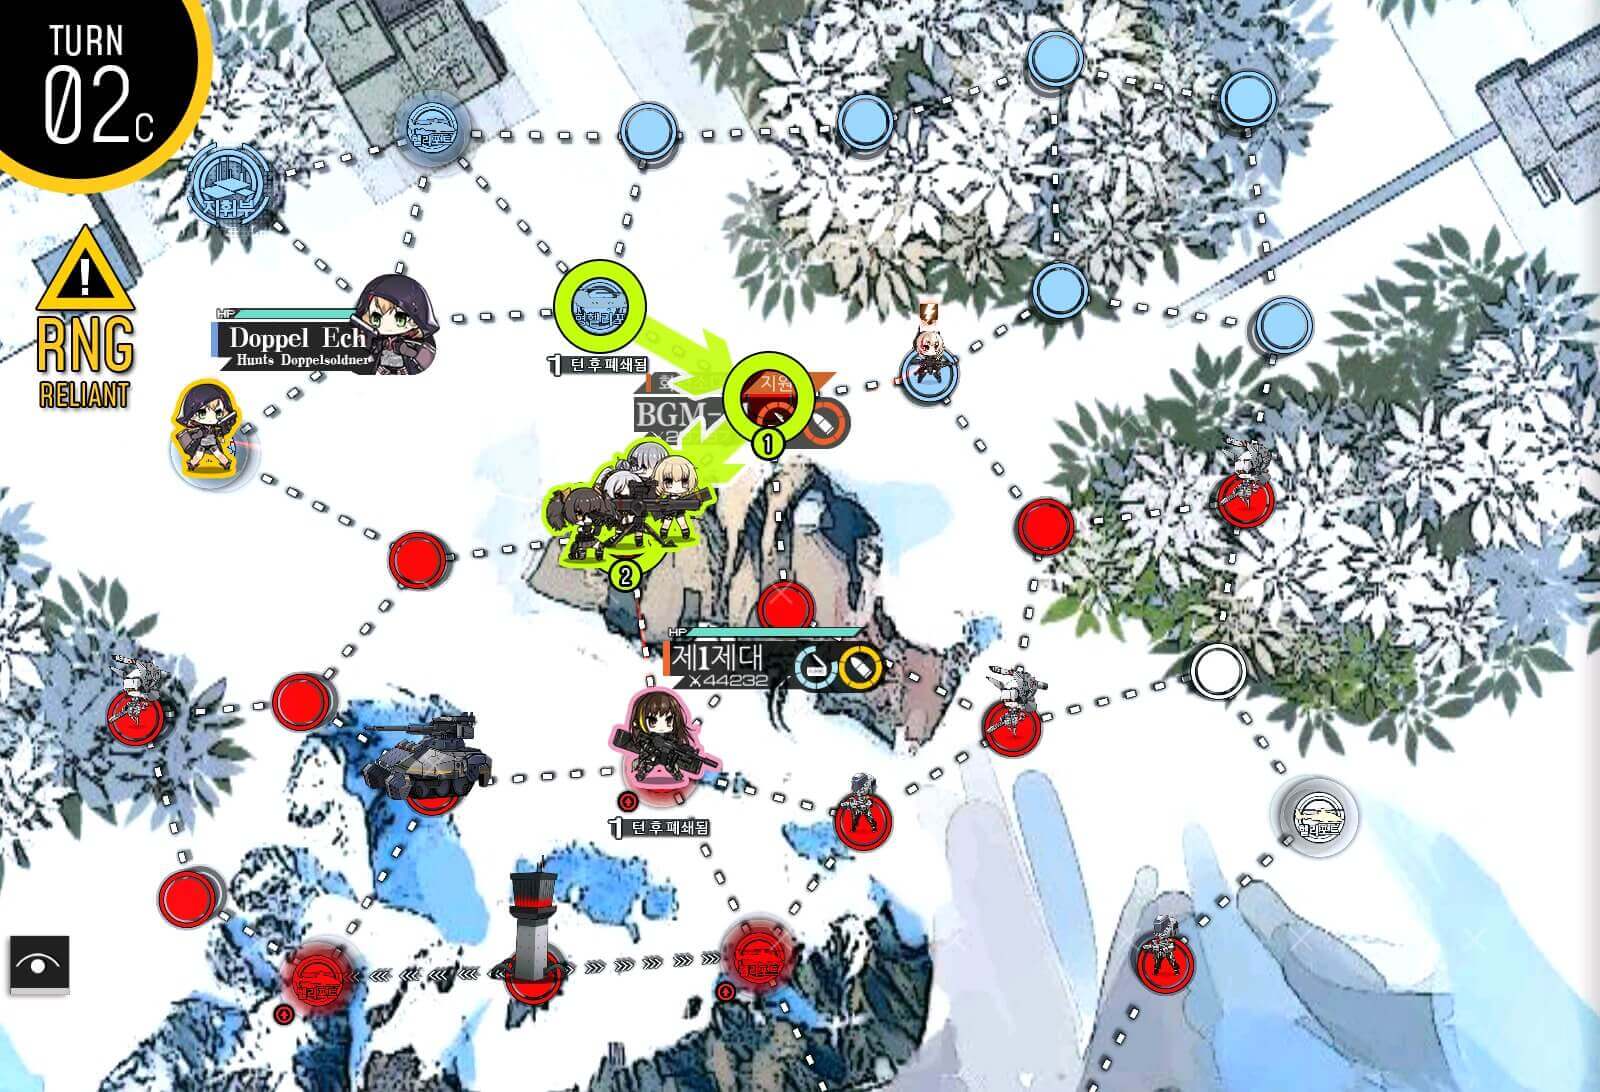
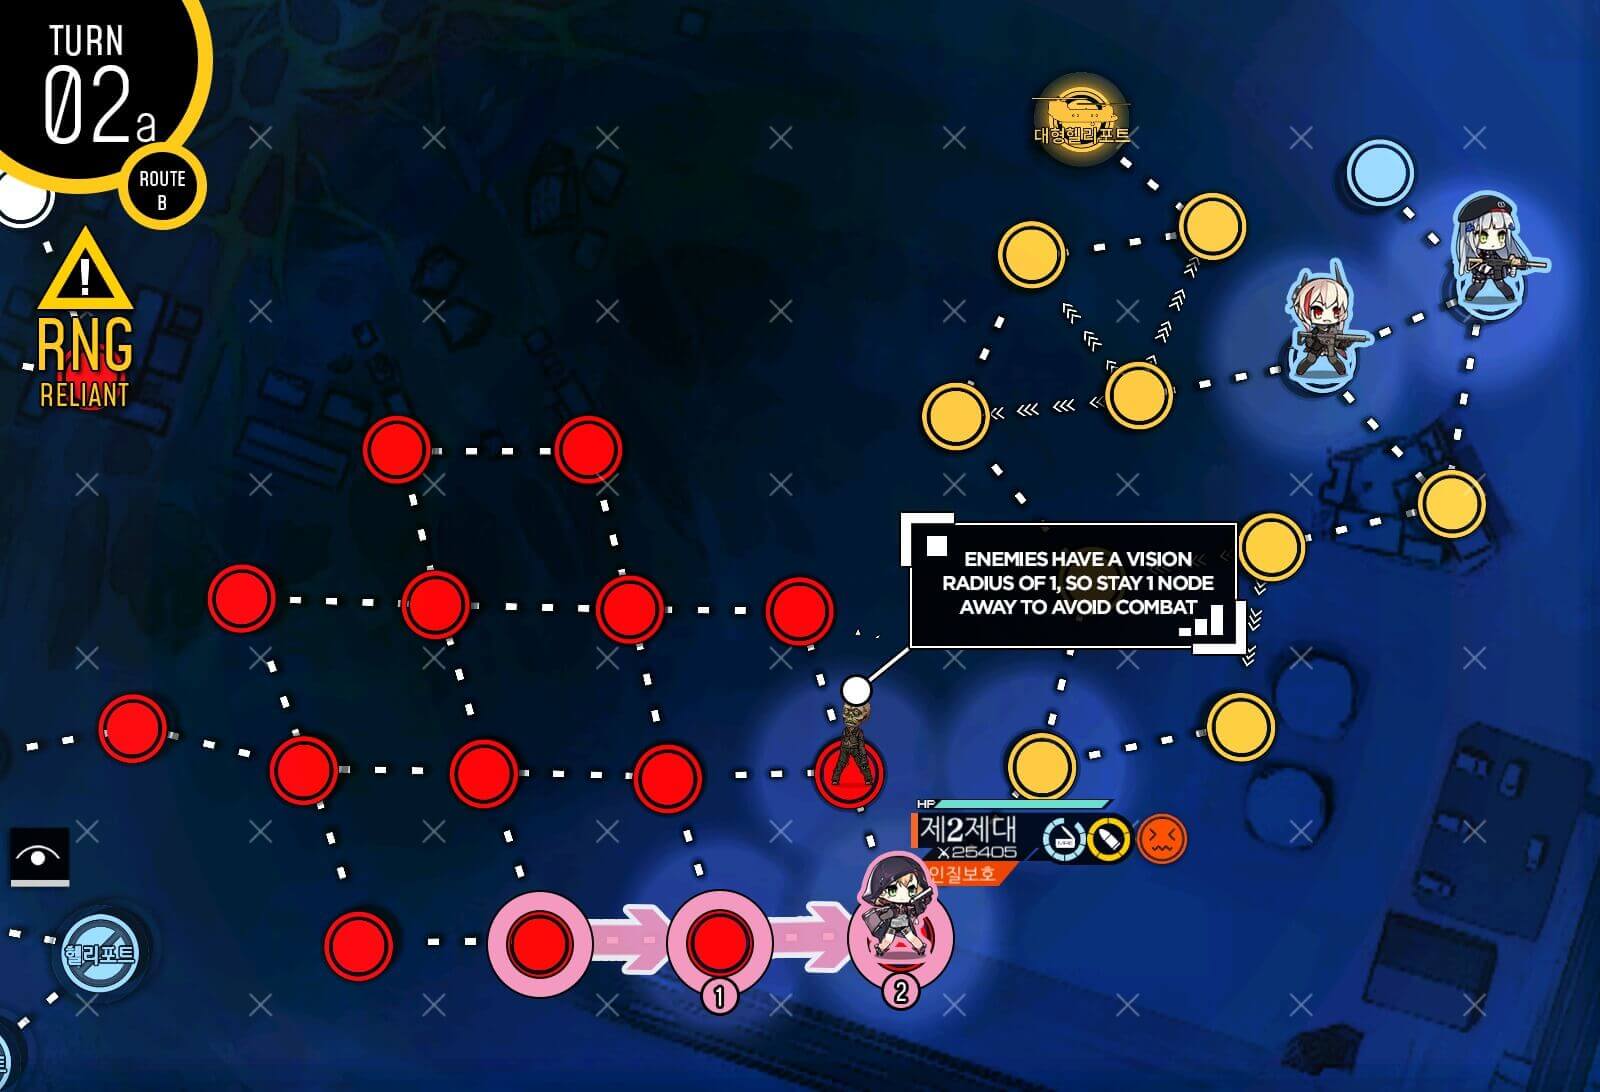
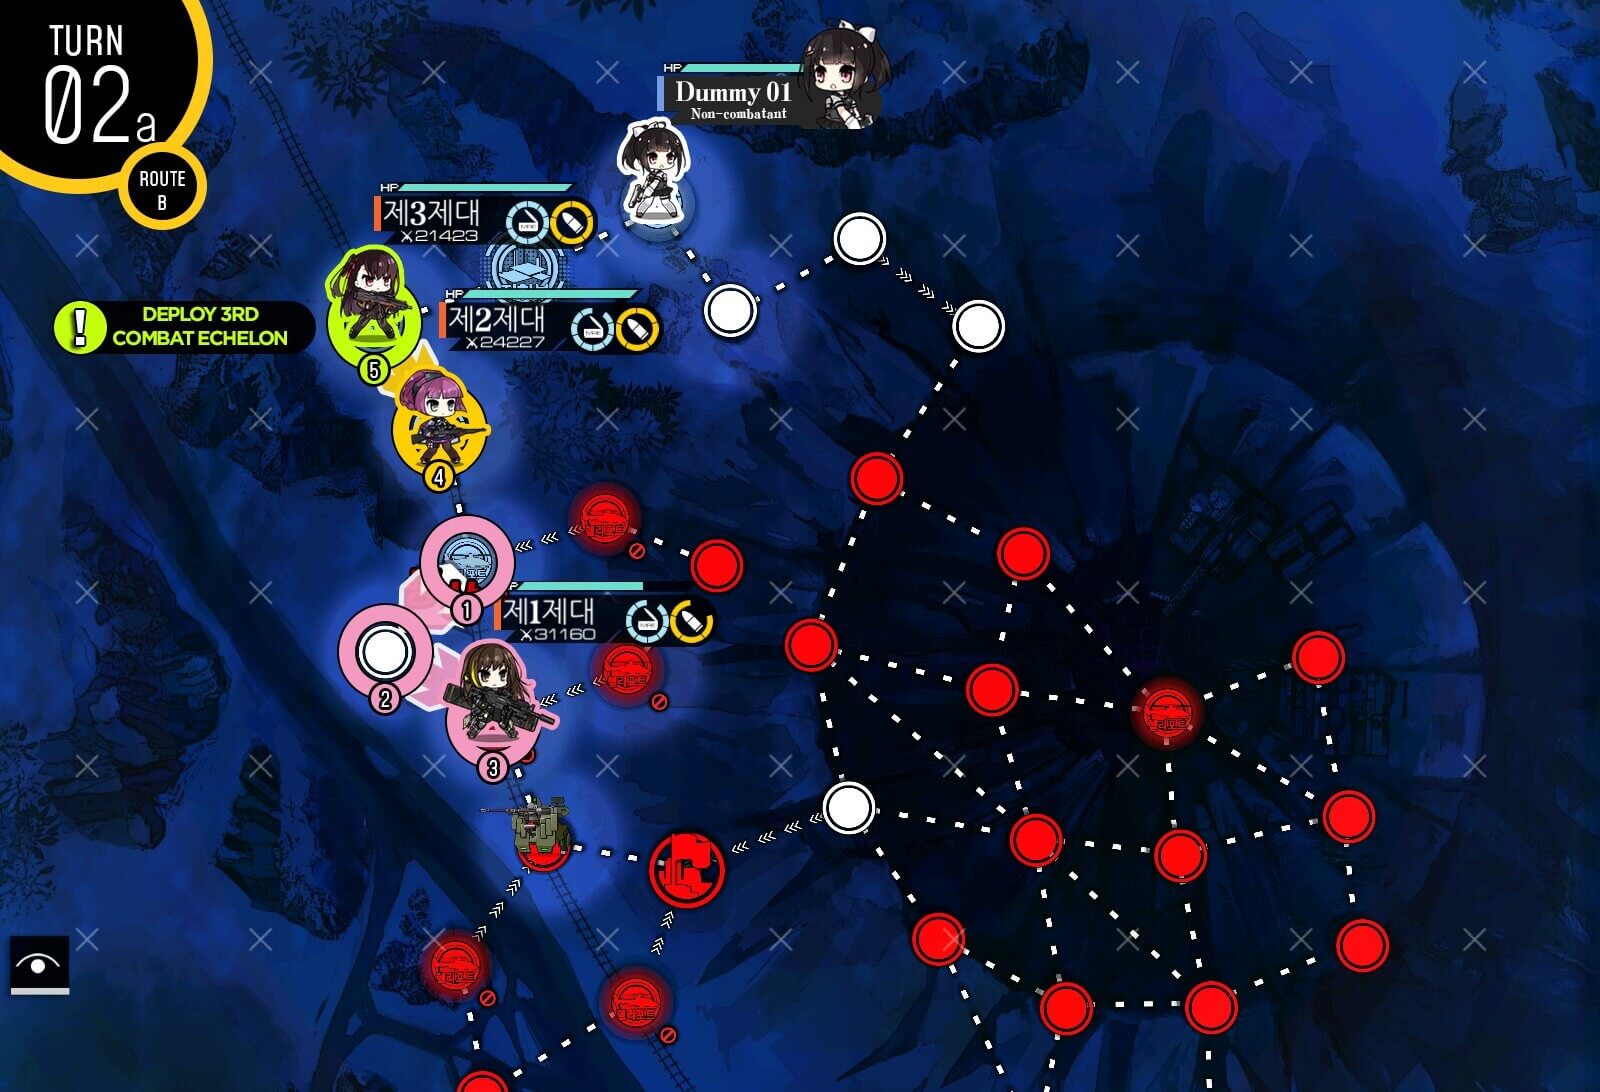
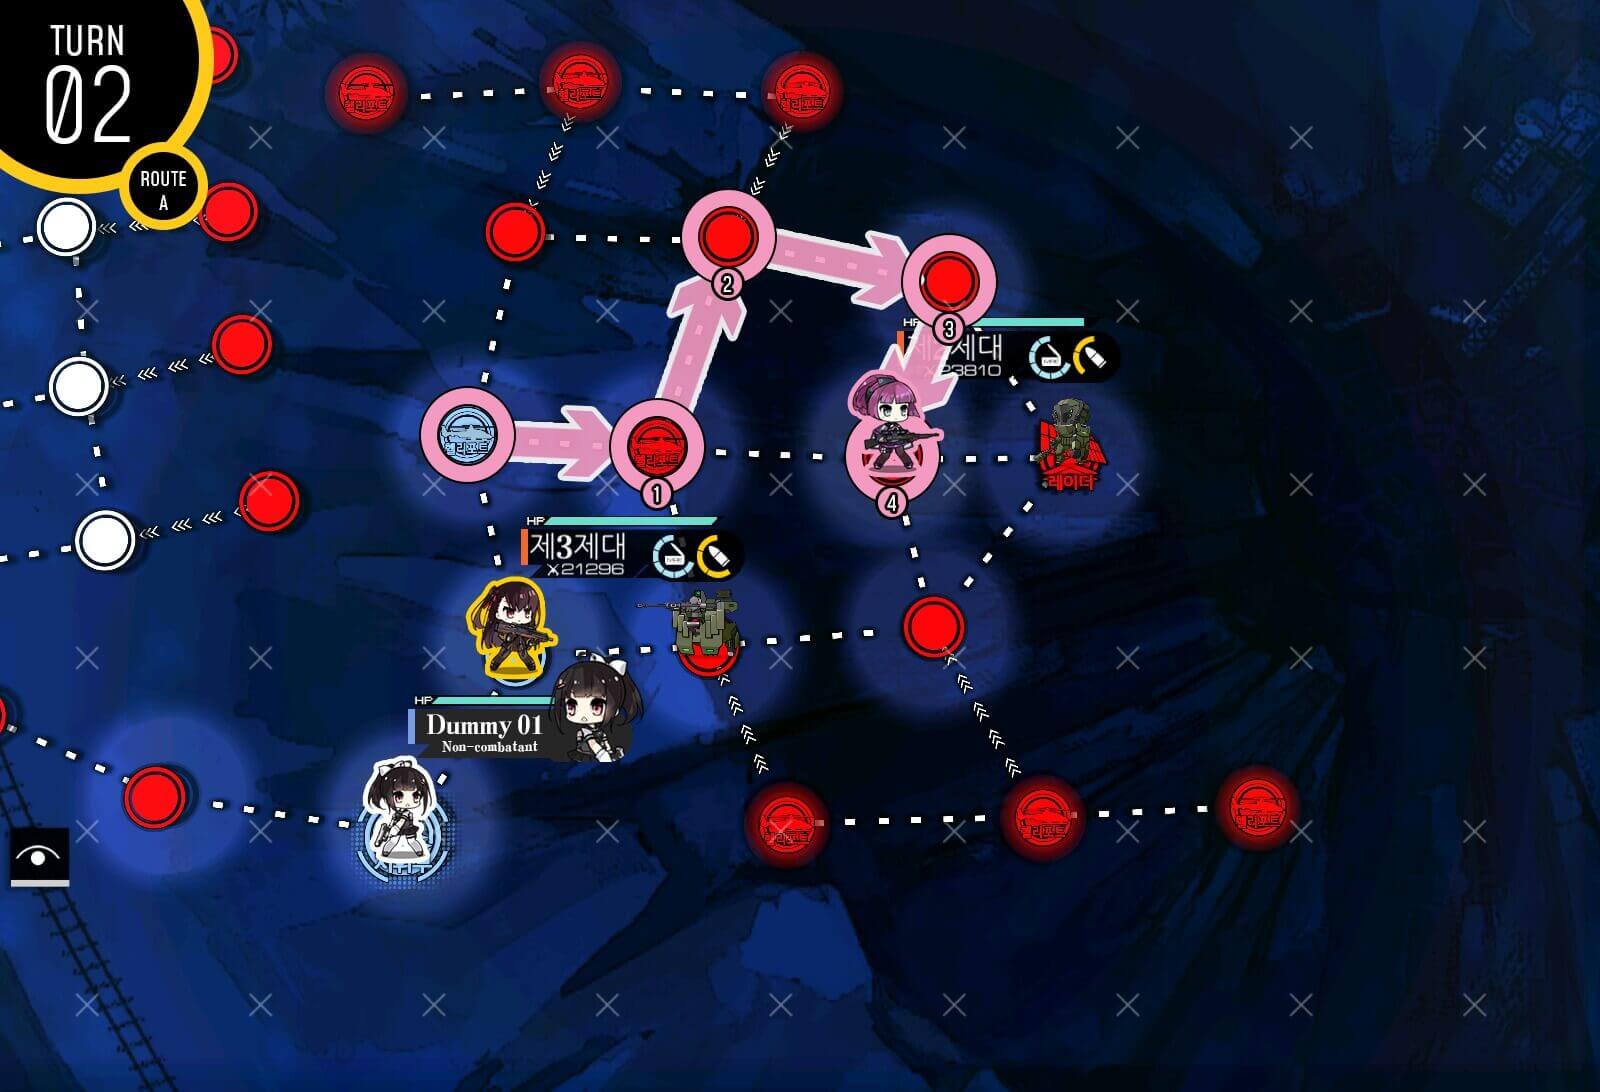
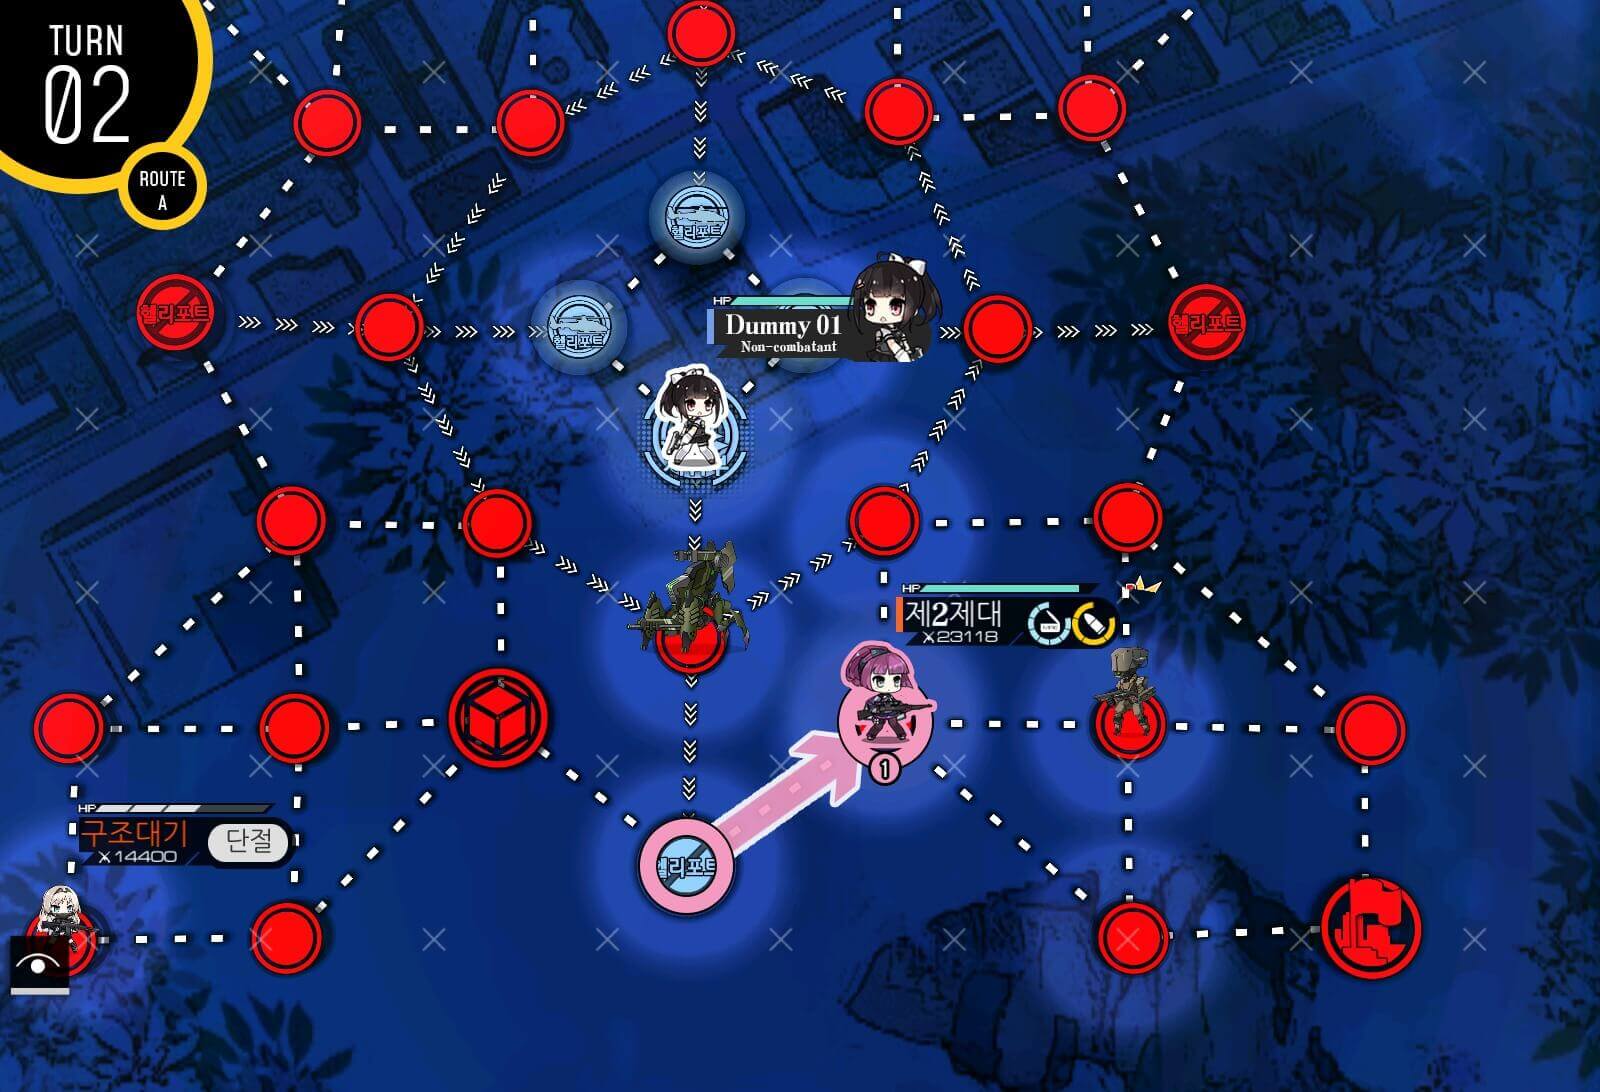
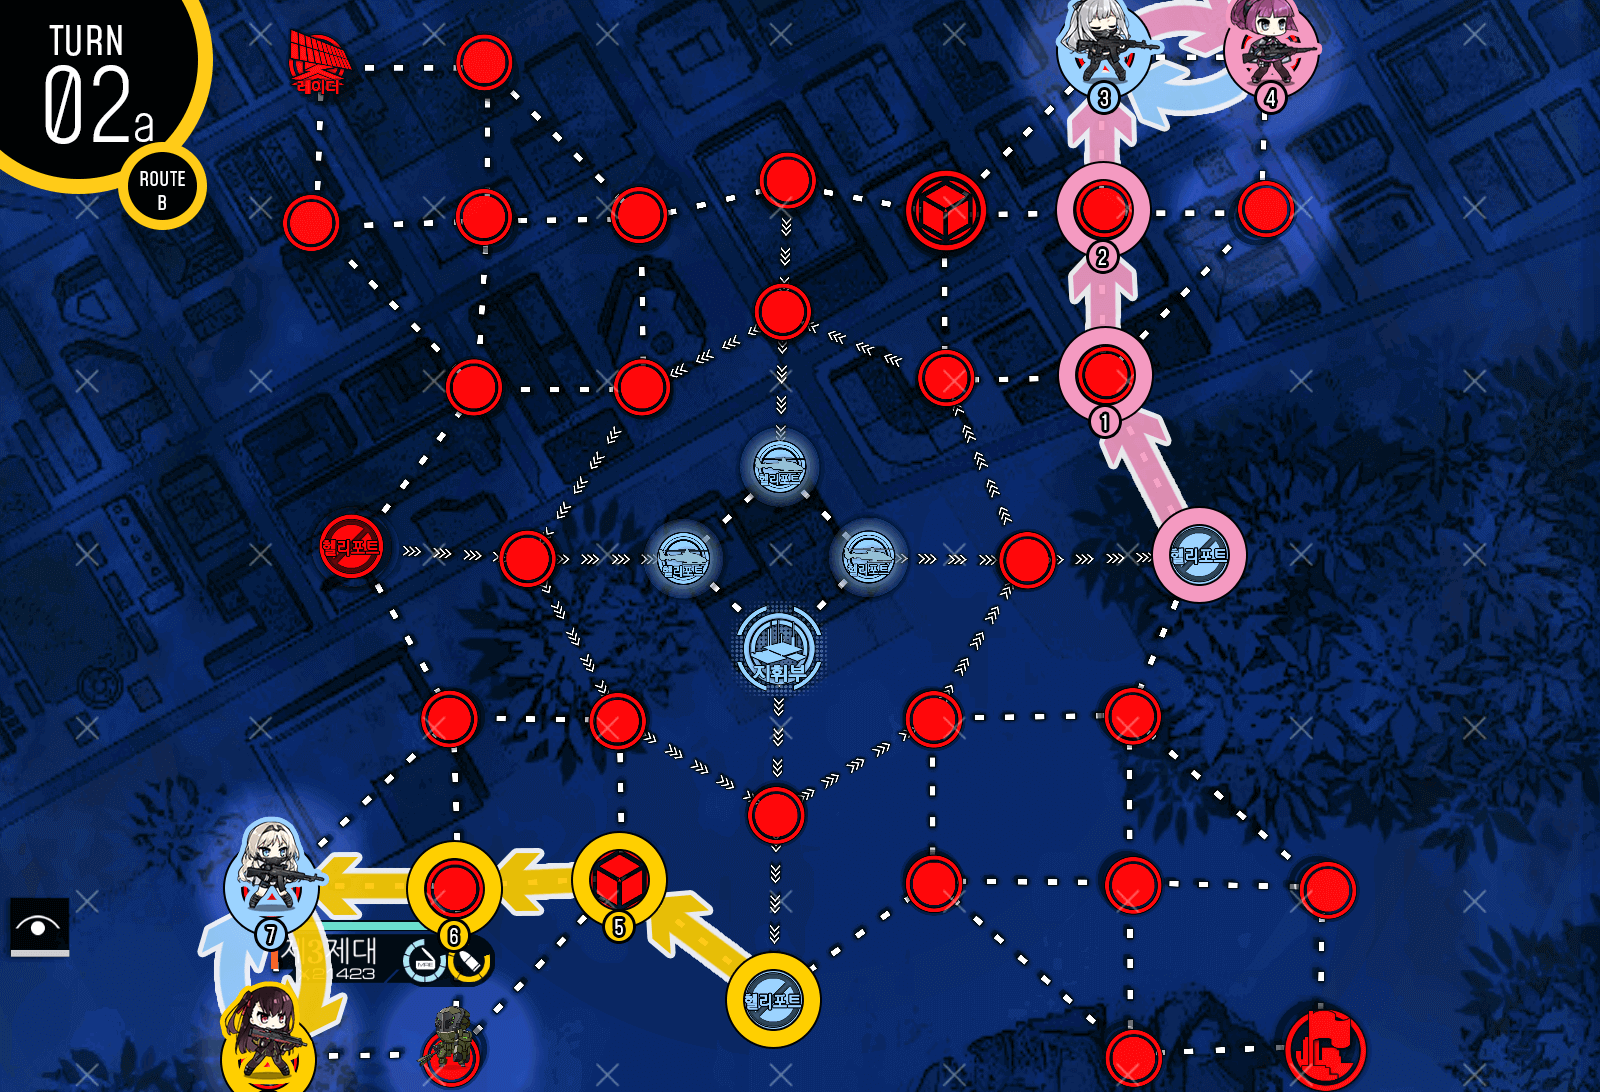
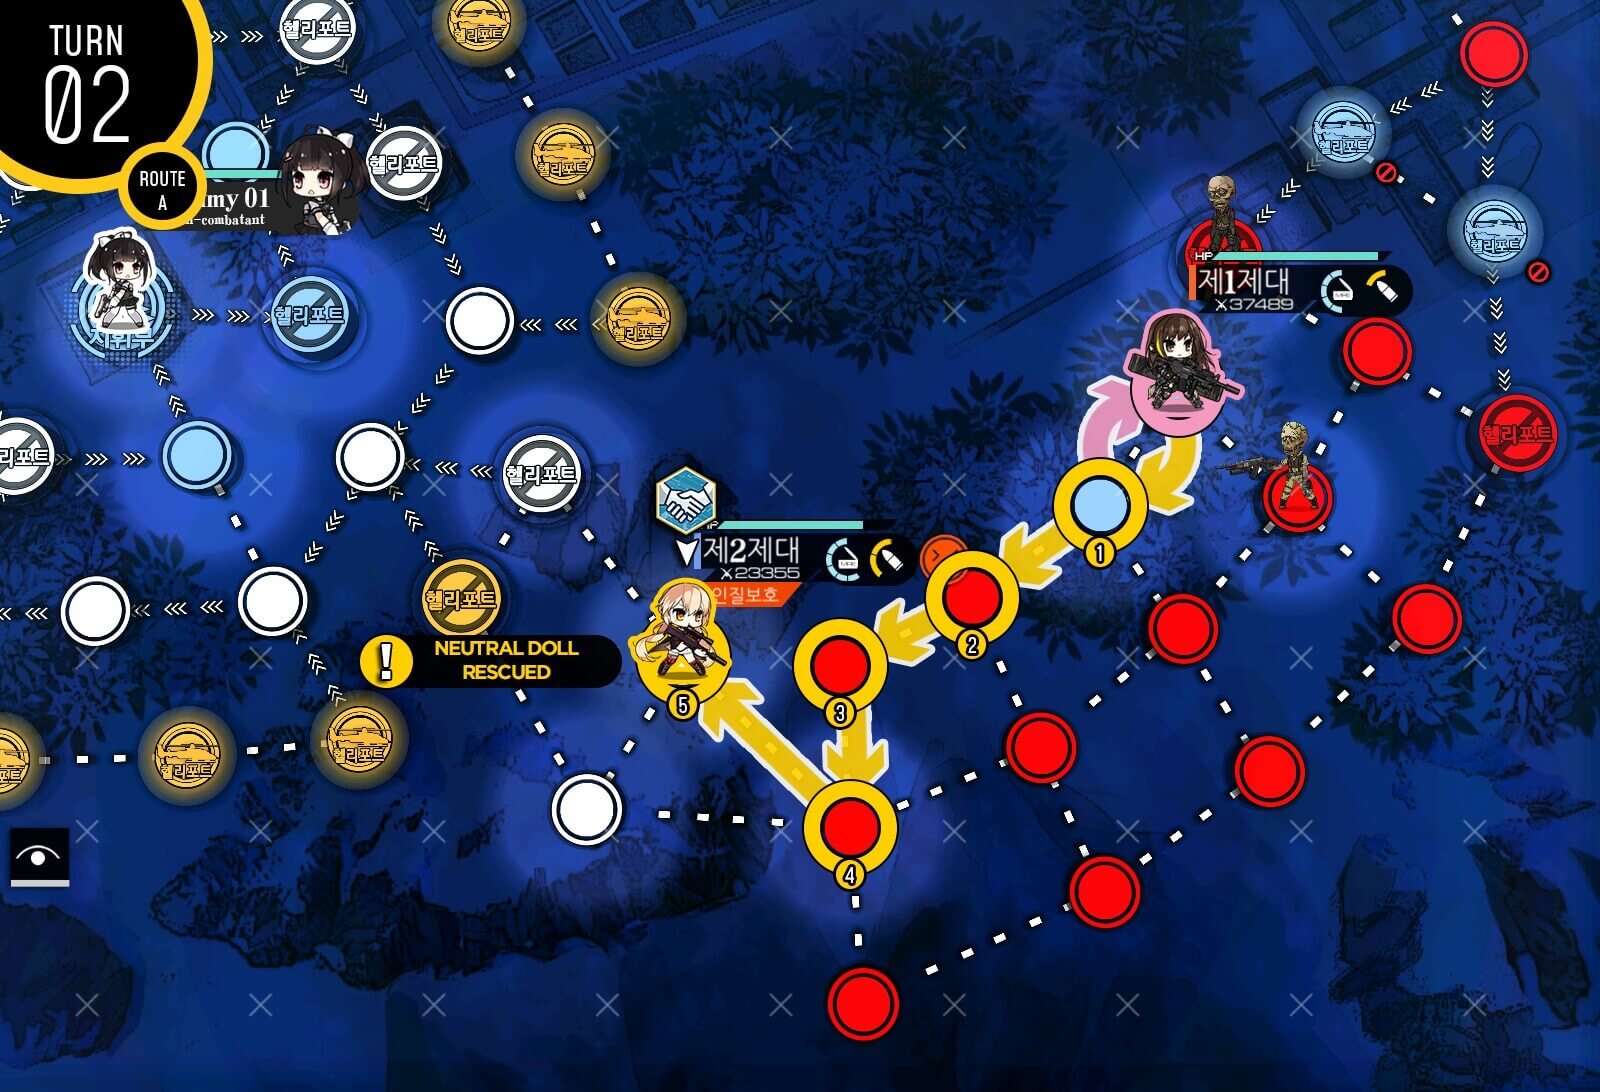
Turn 2a
Move combat echelon to the upper right node then deploy the second dummy echelon.
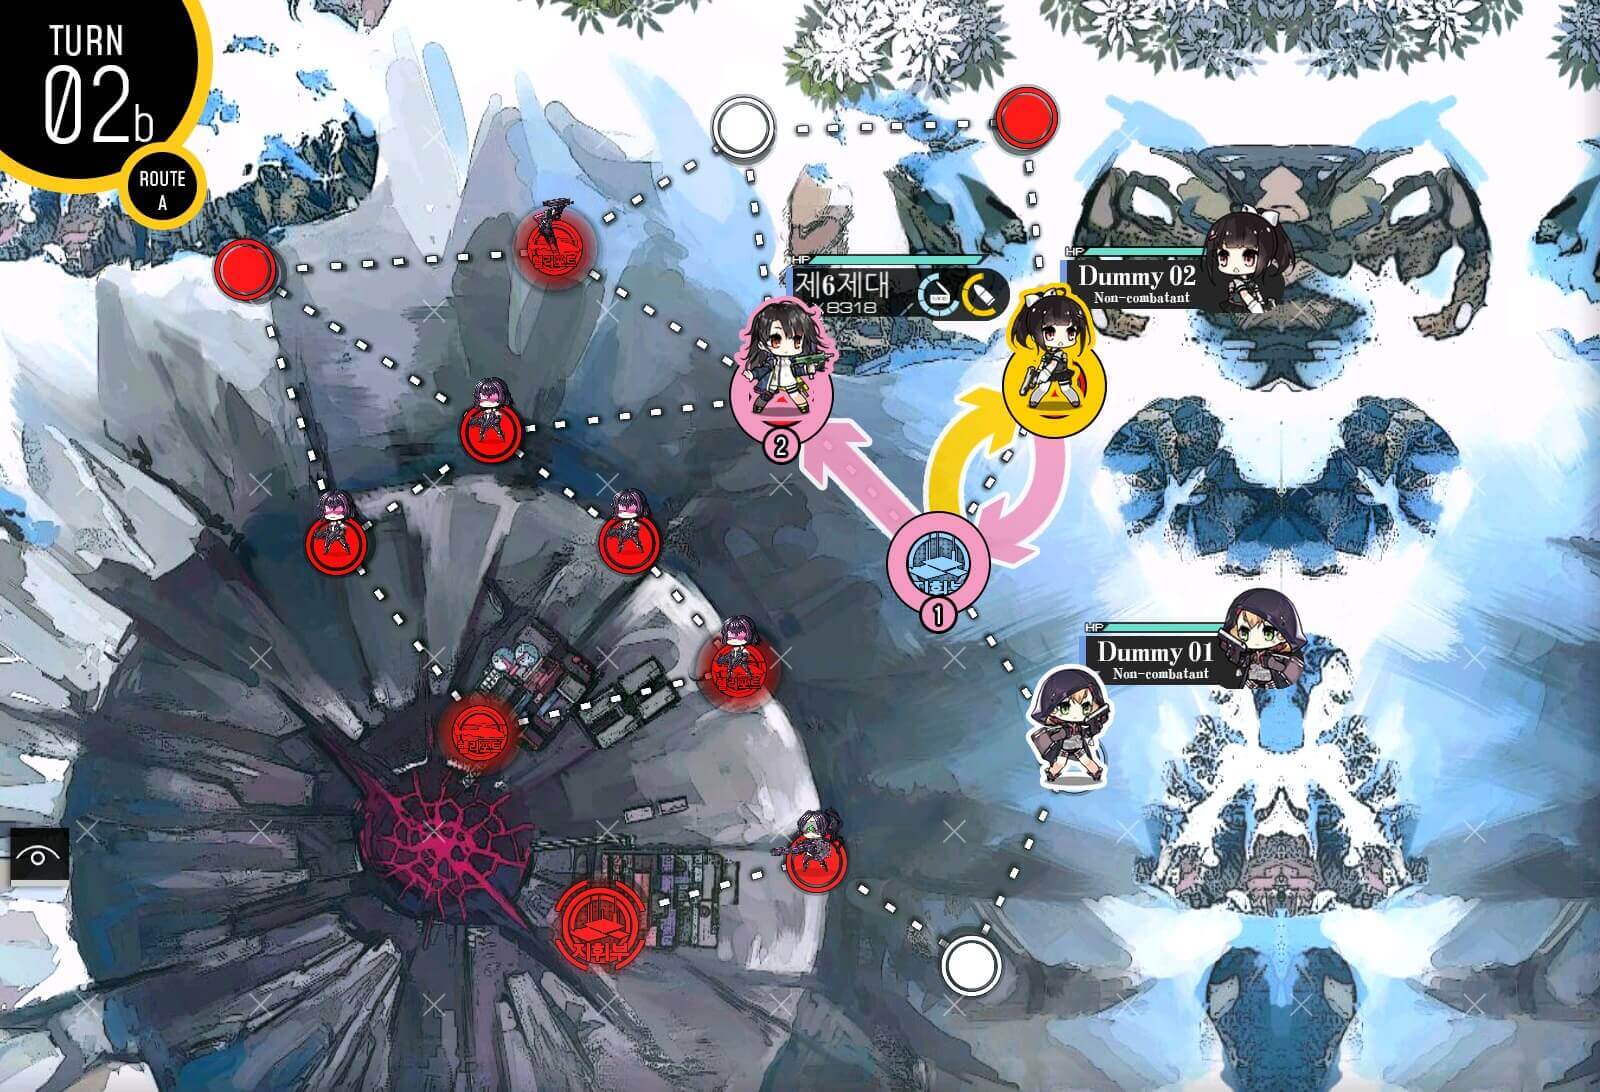
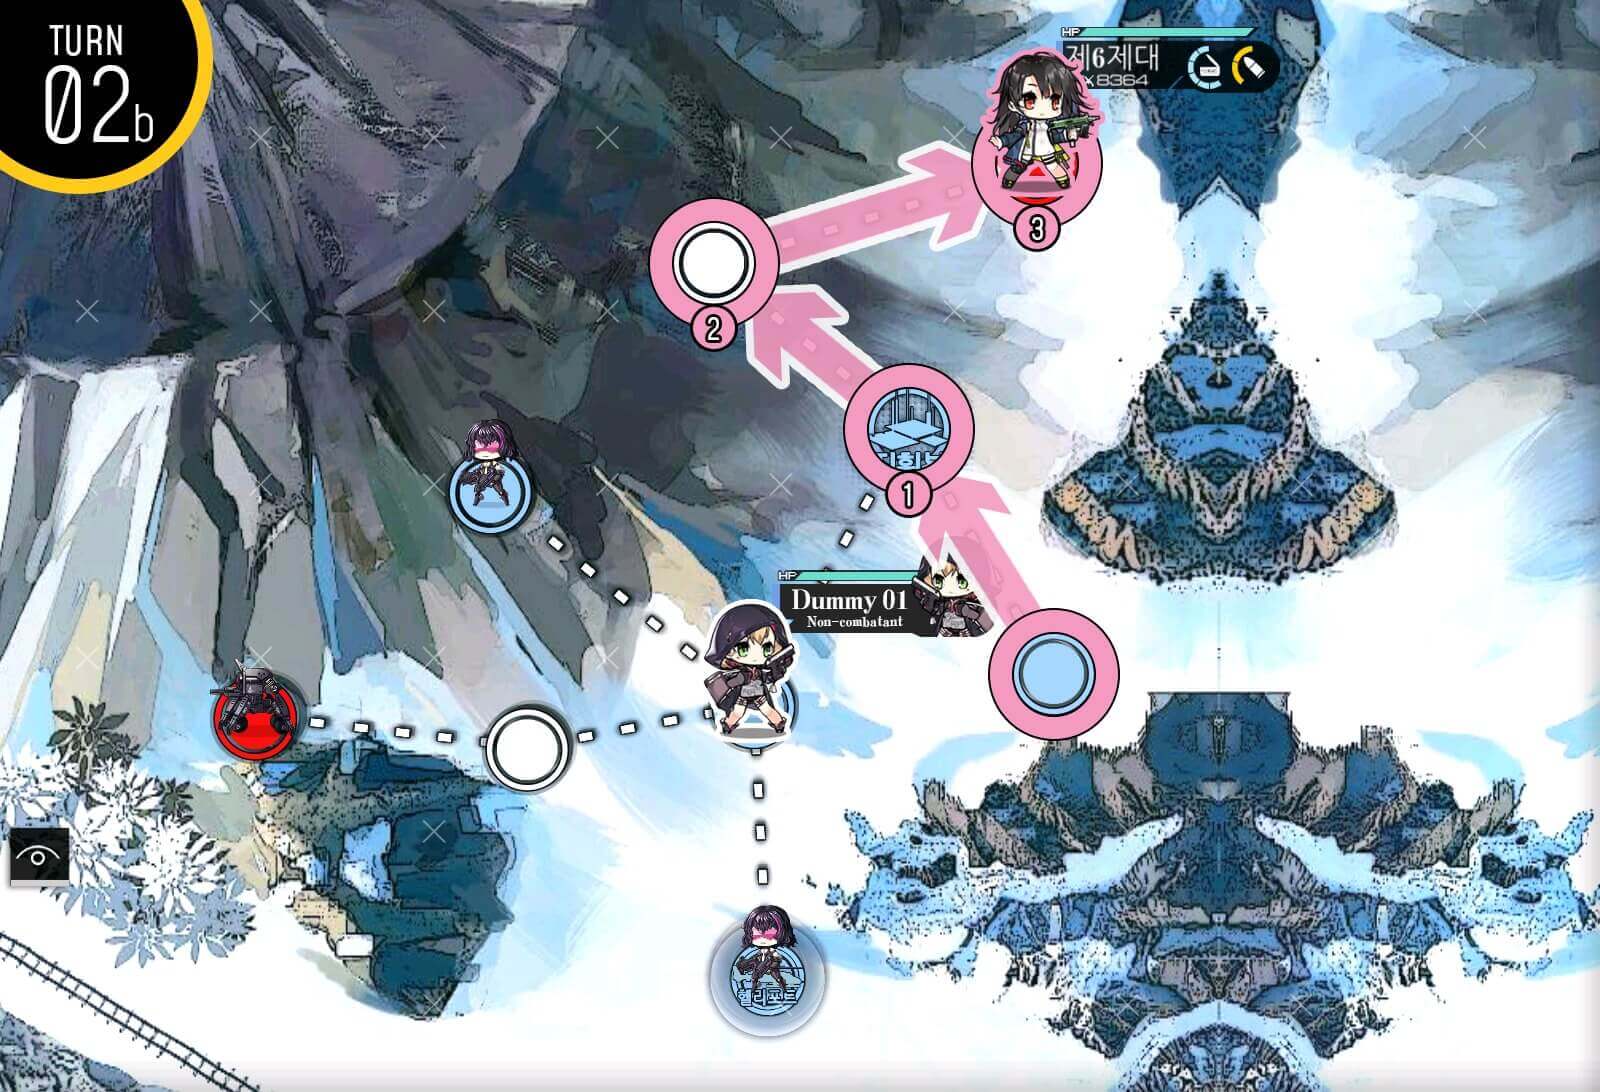
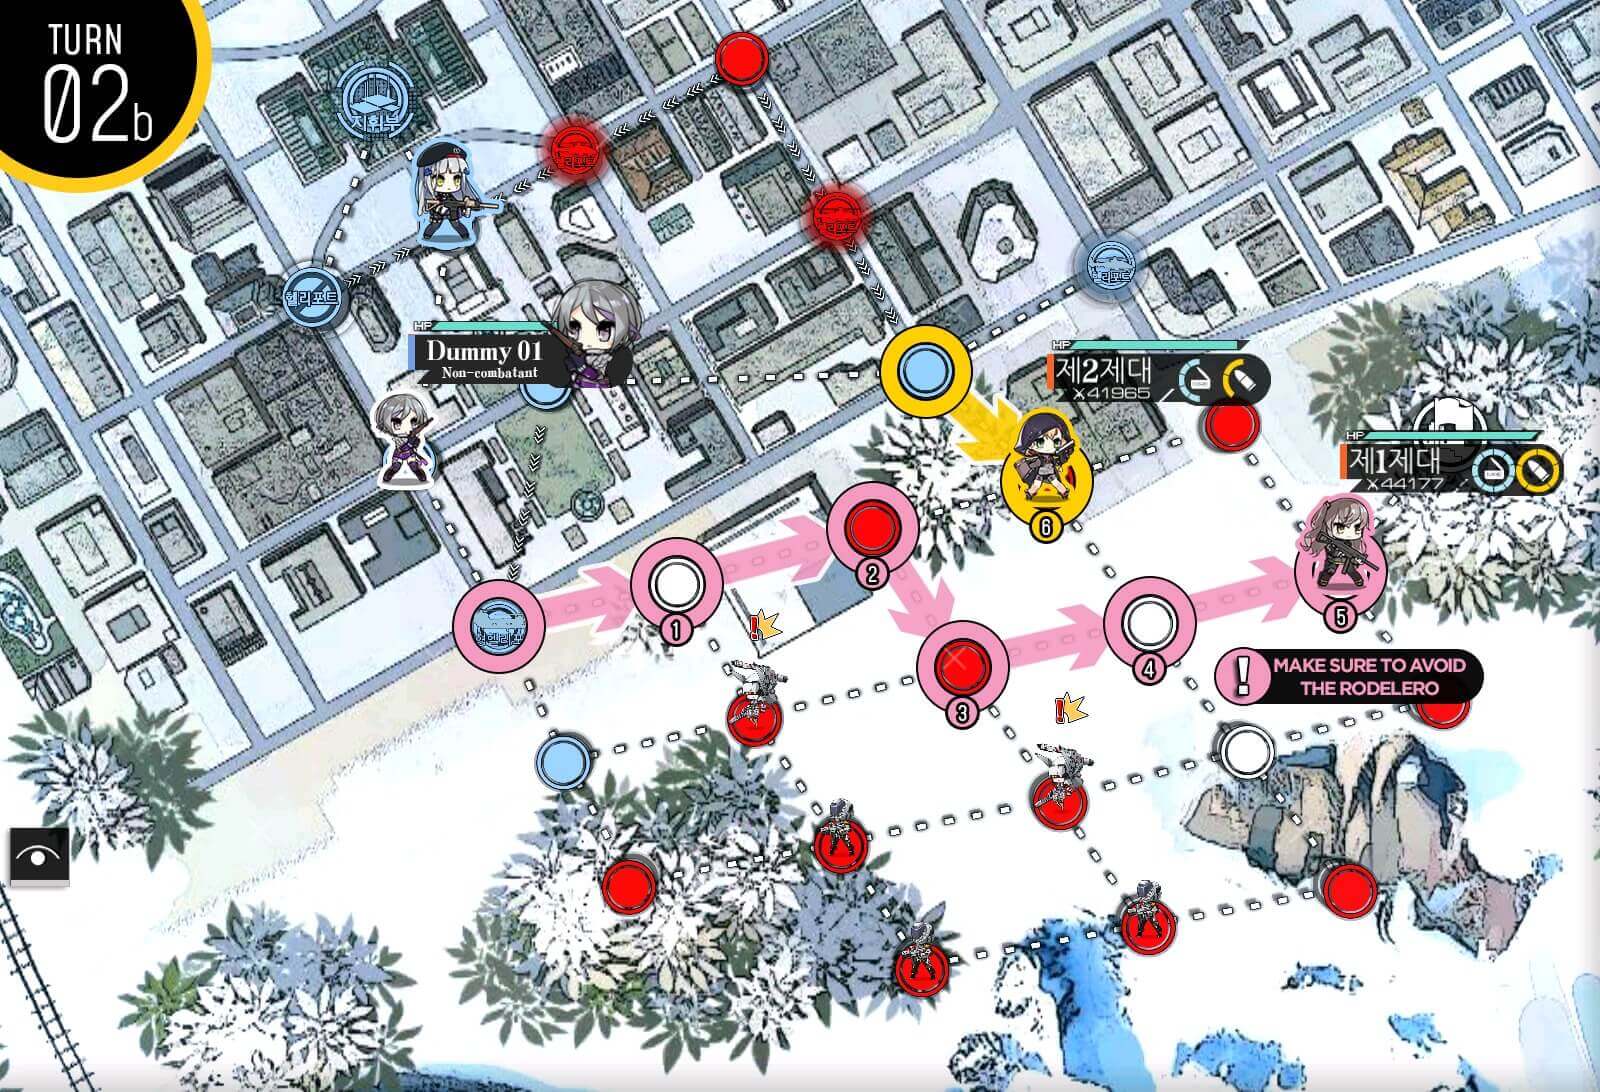
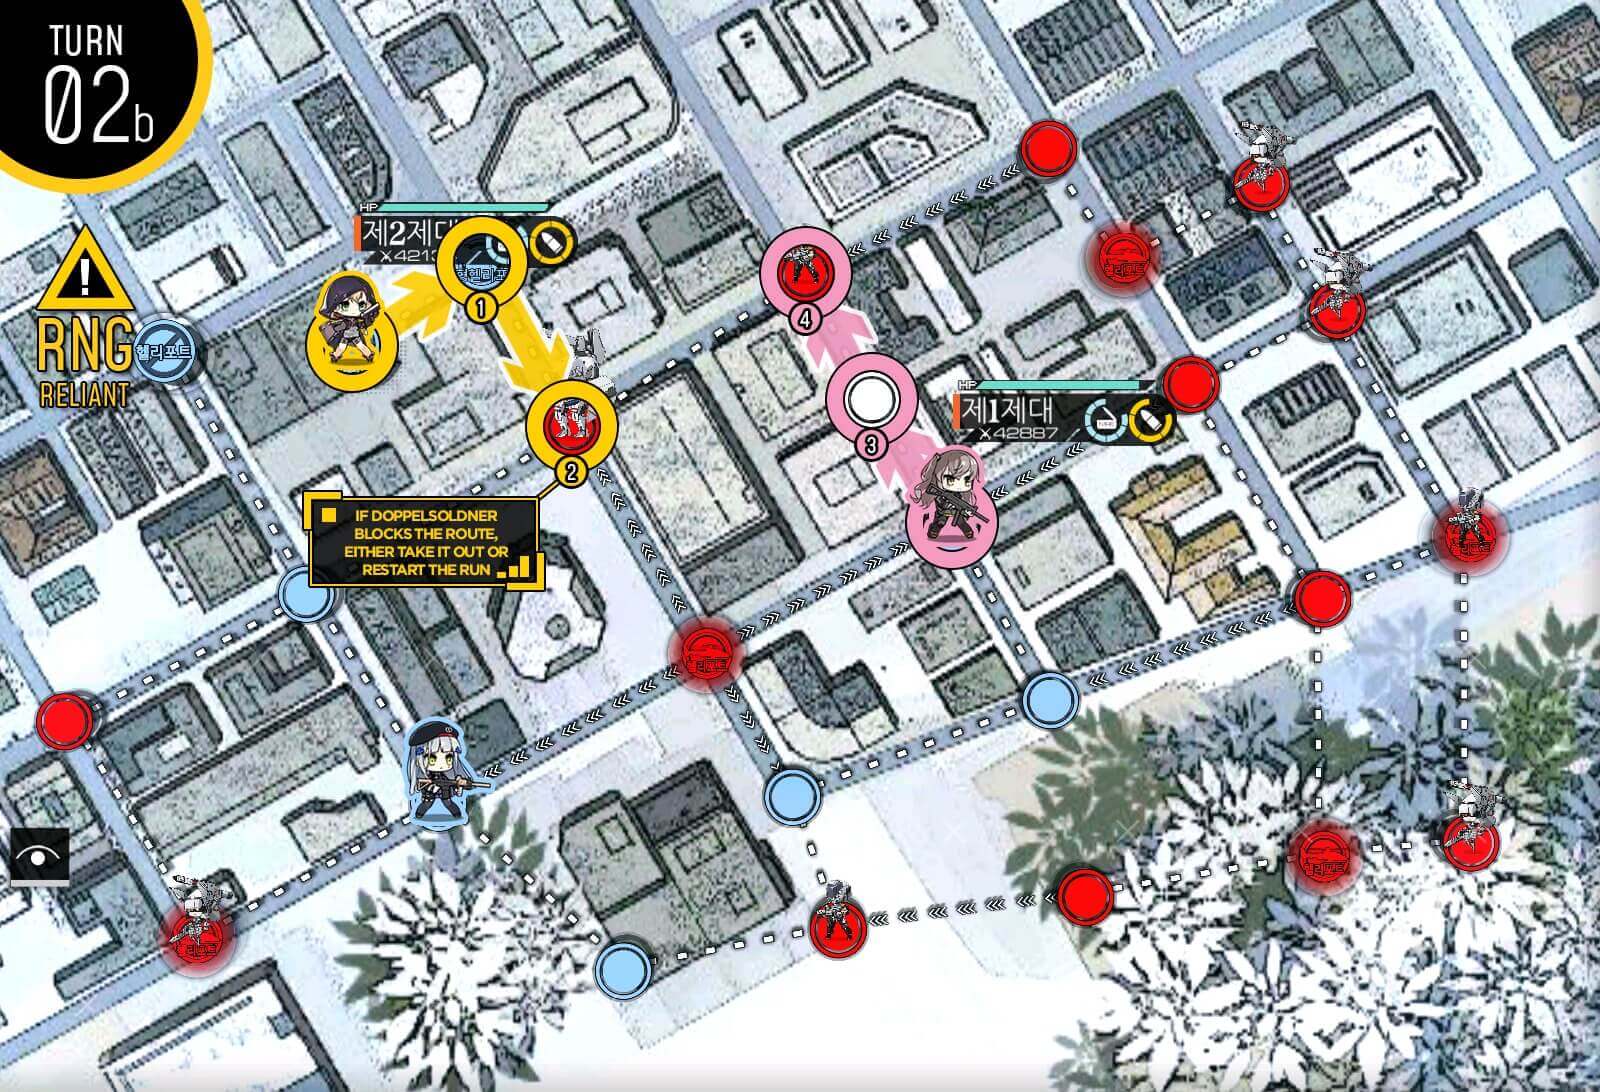
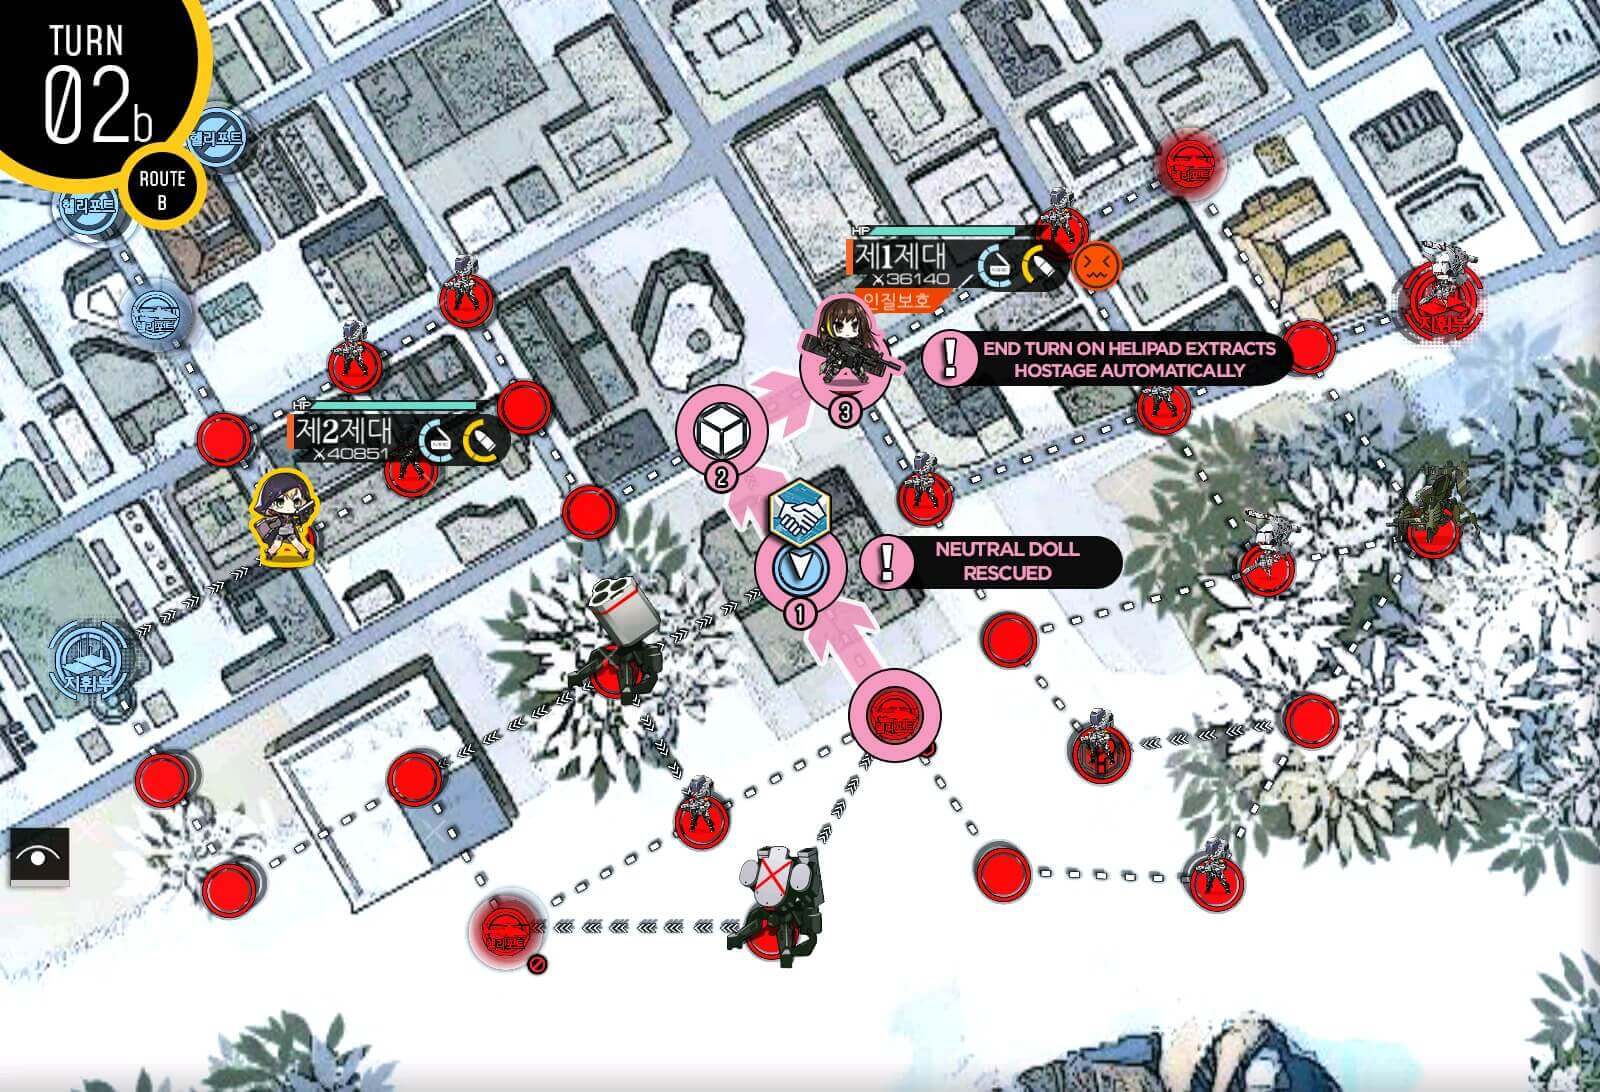
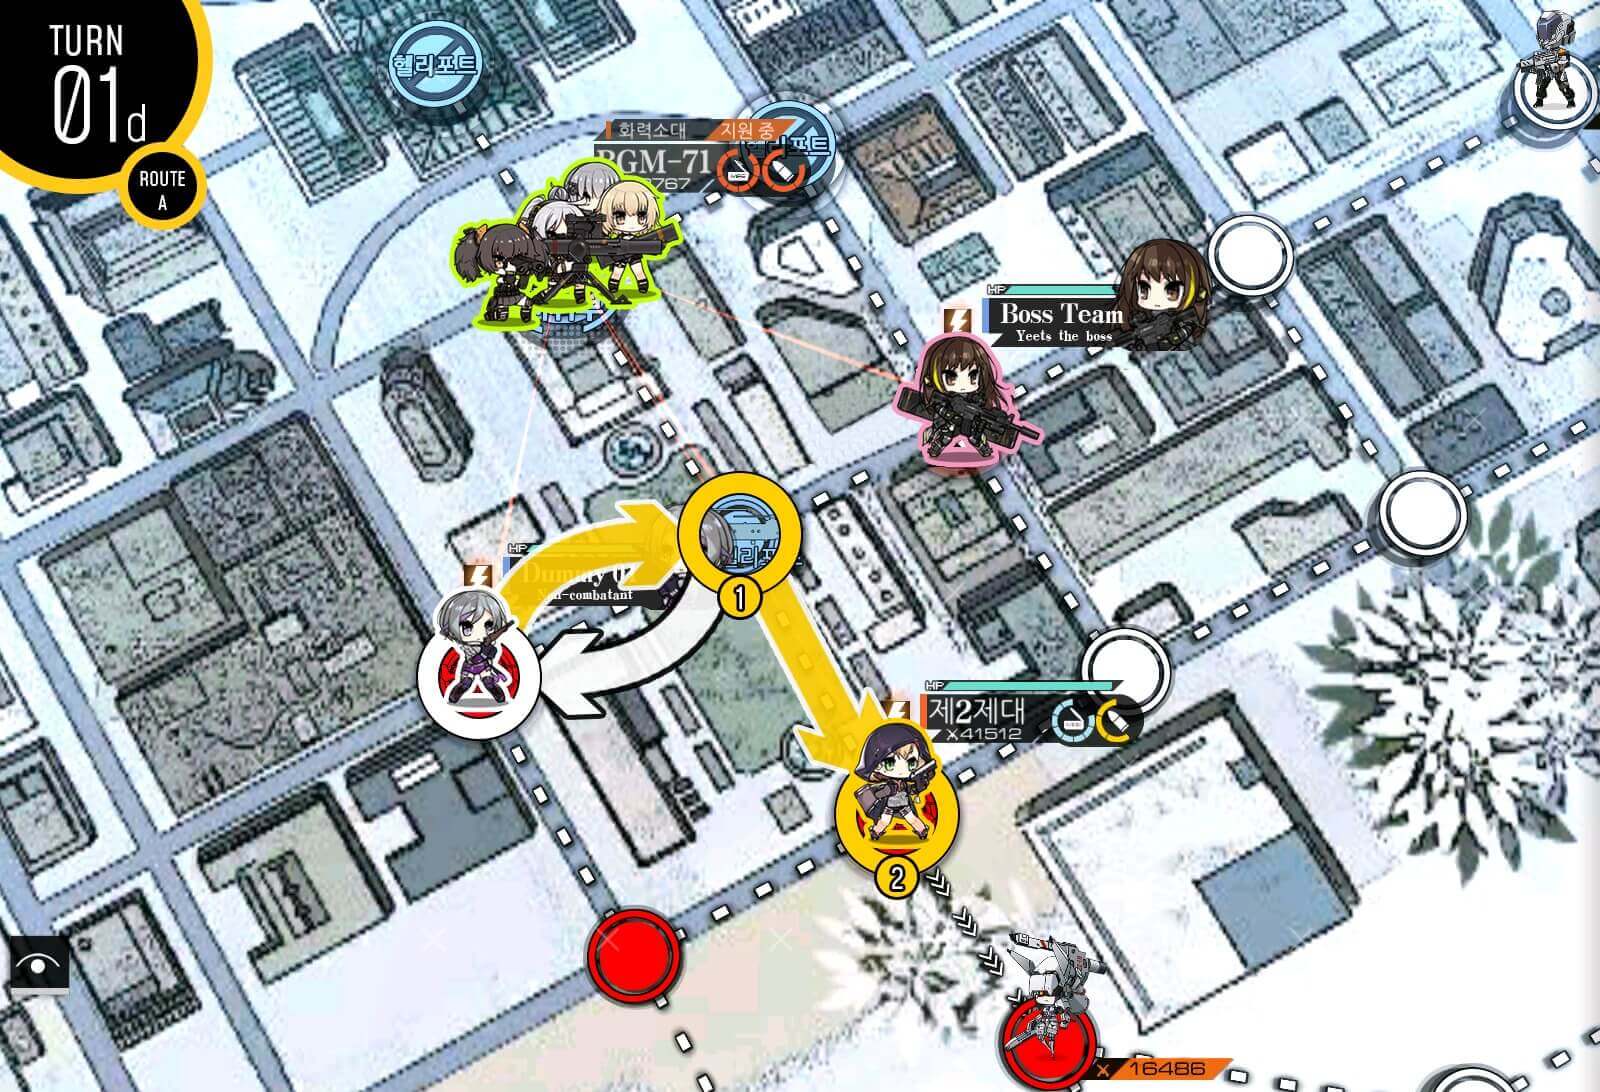
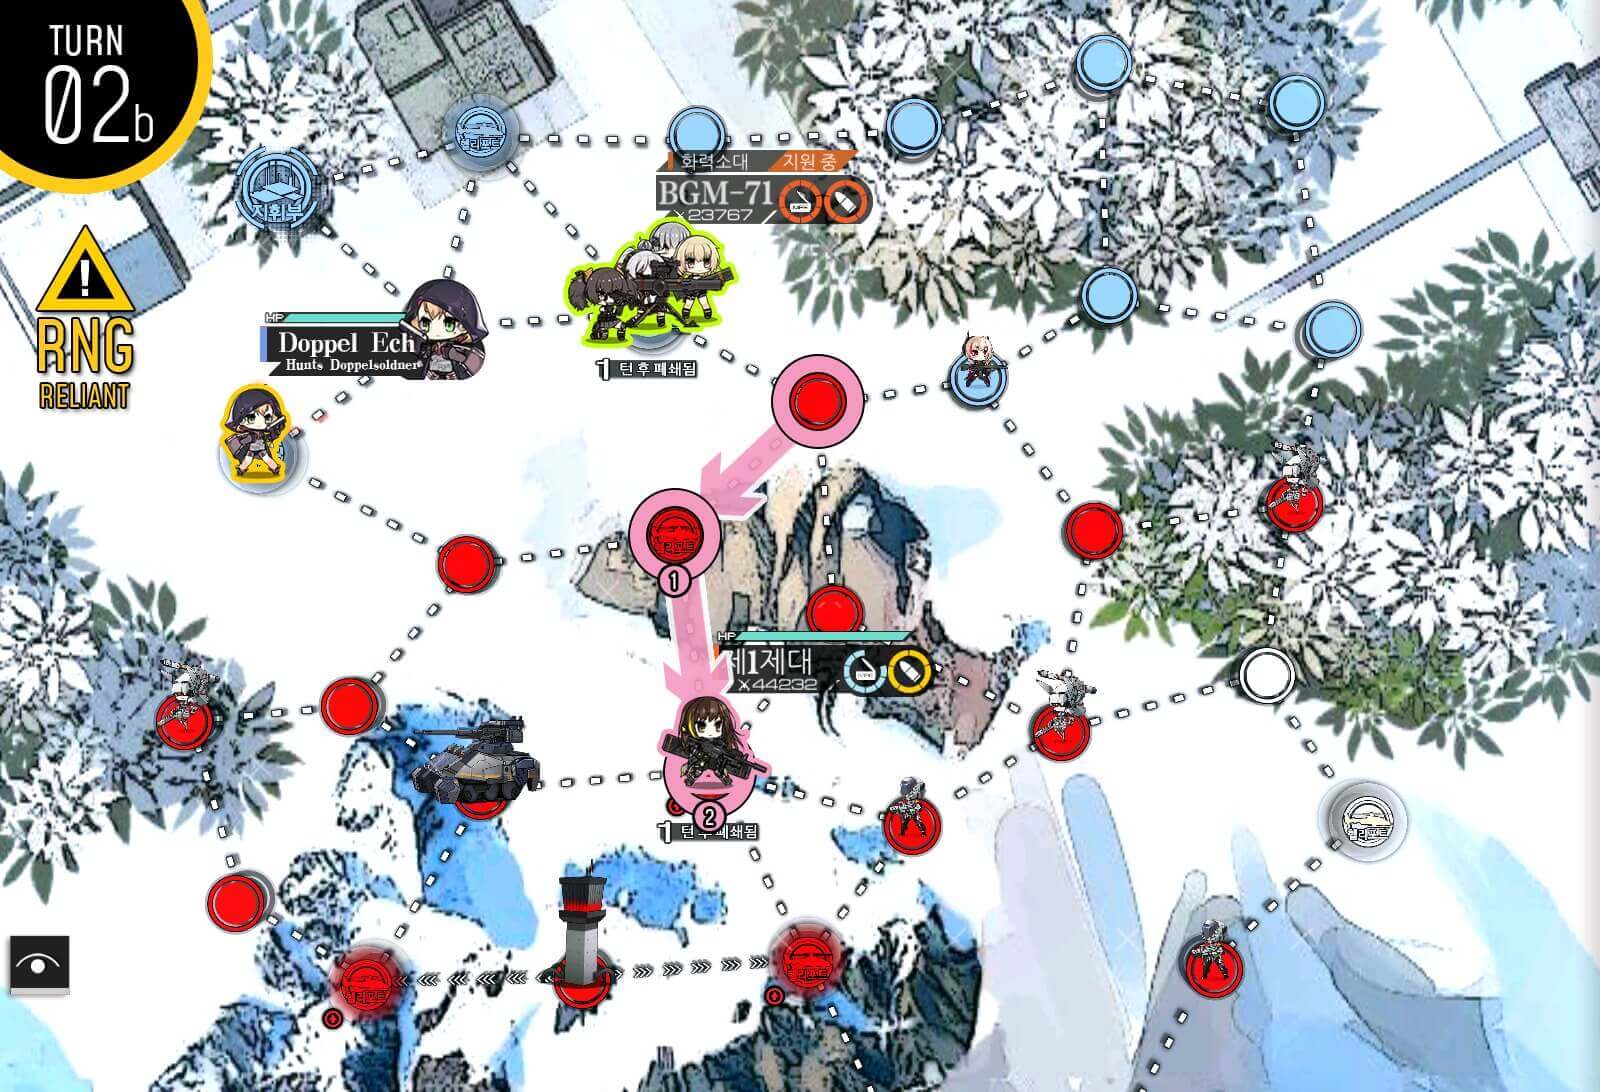
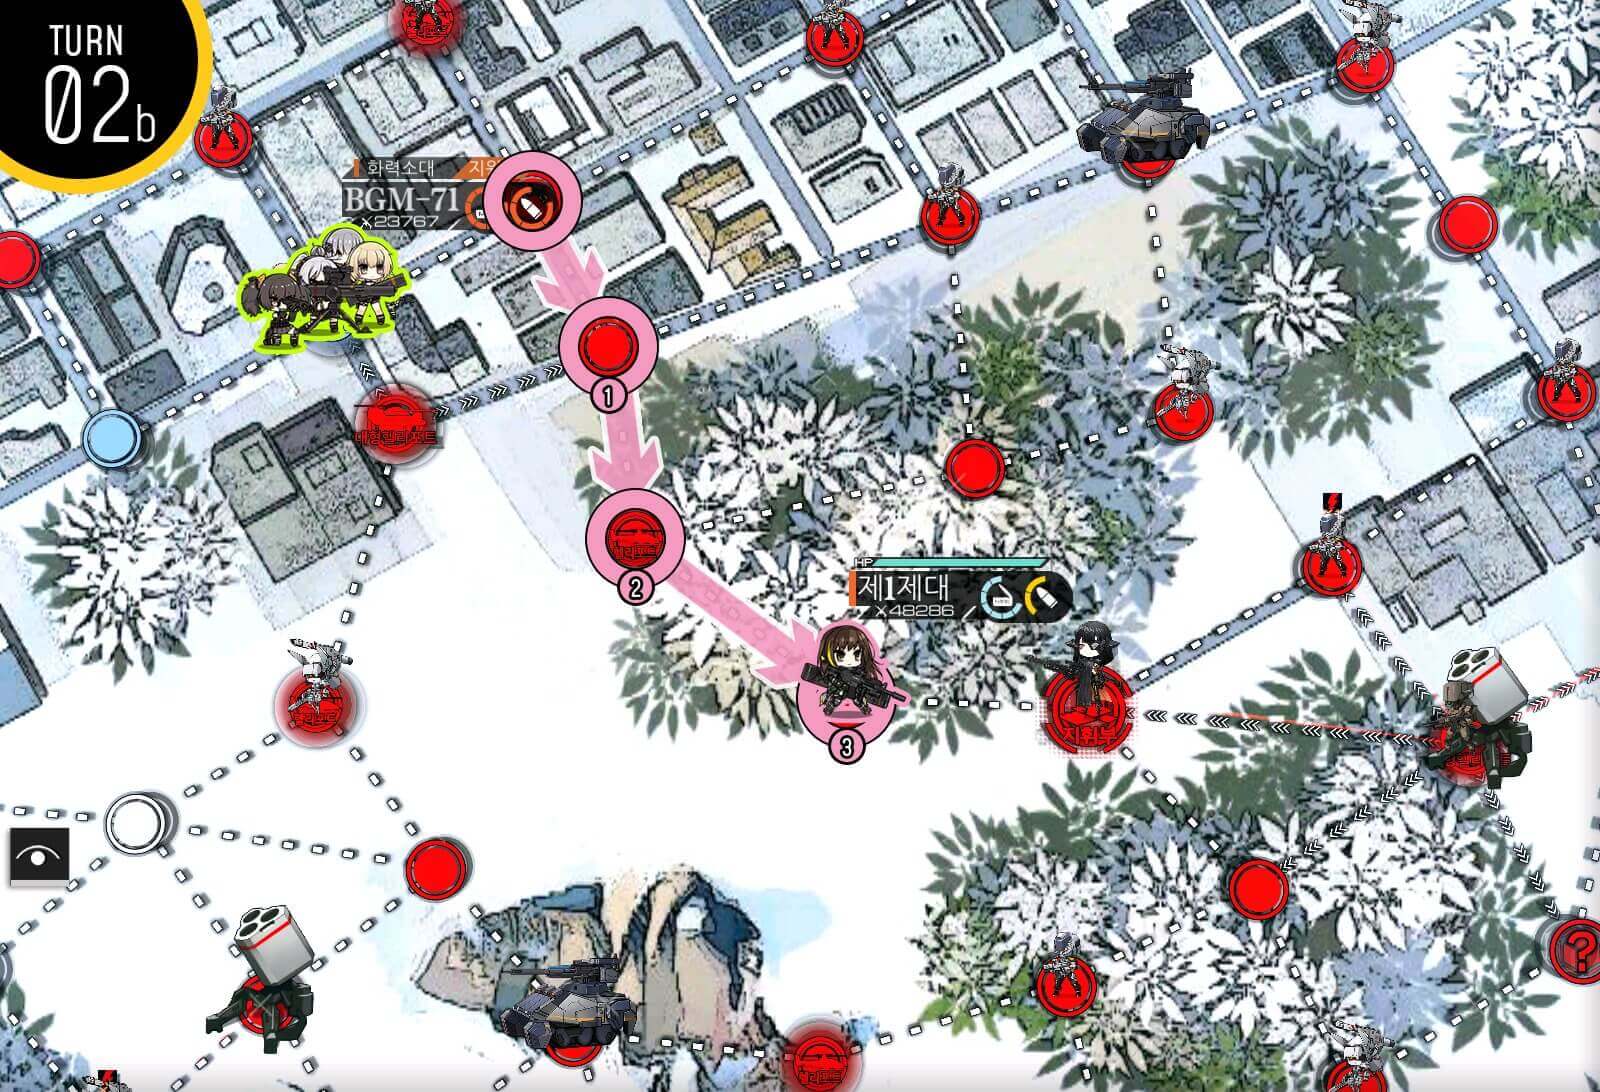
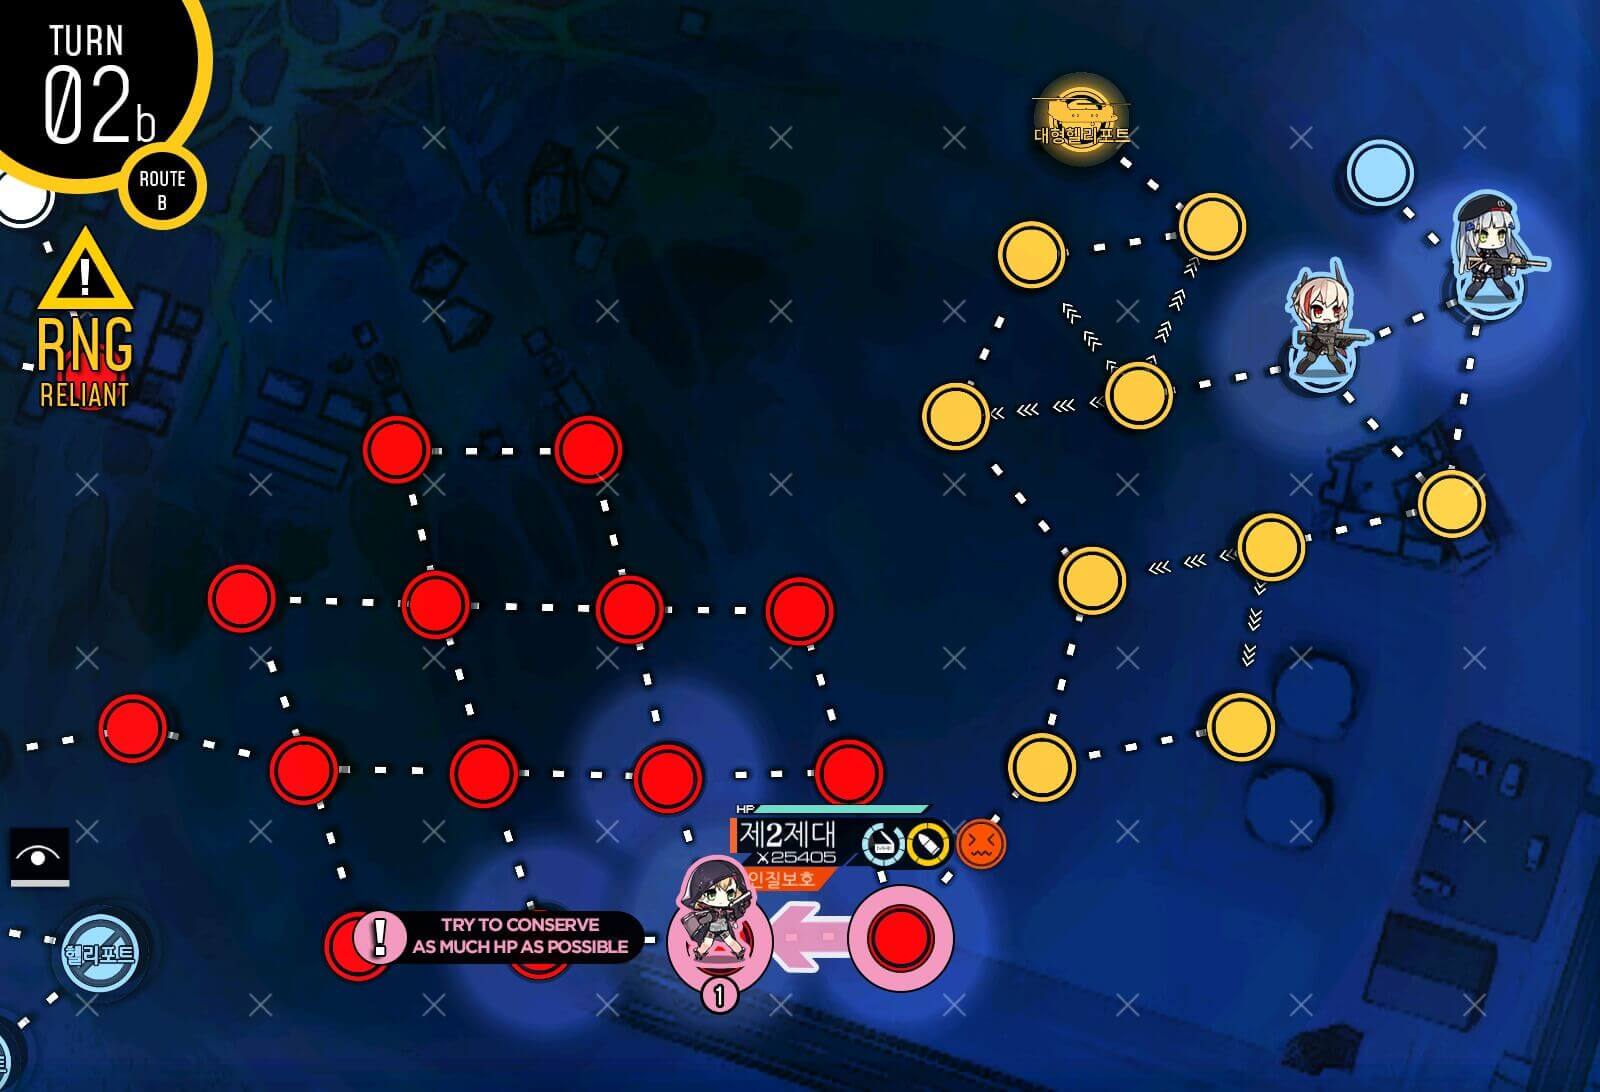
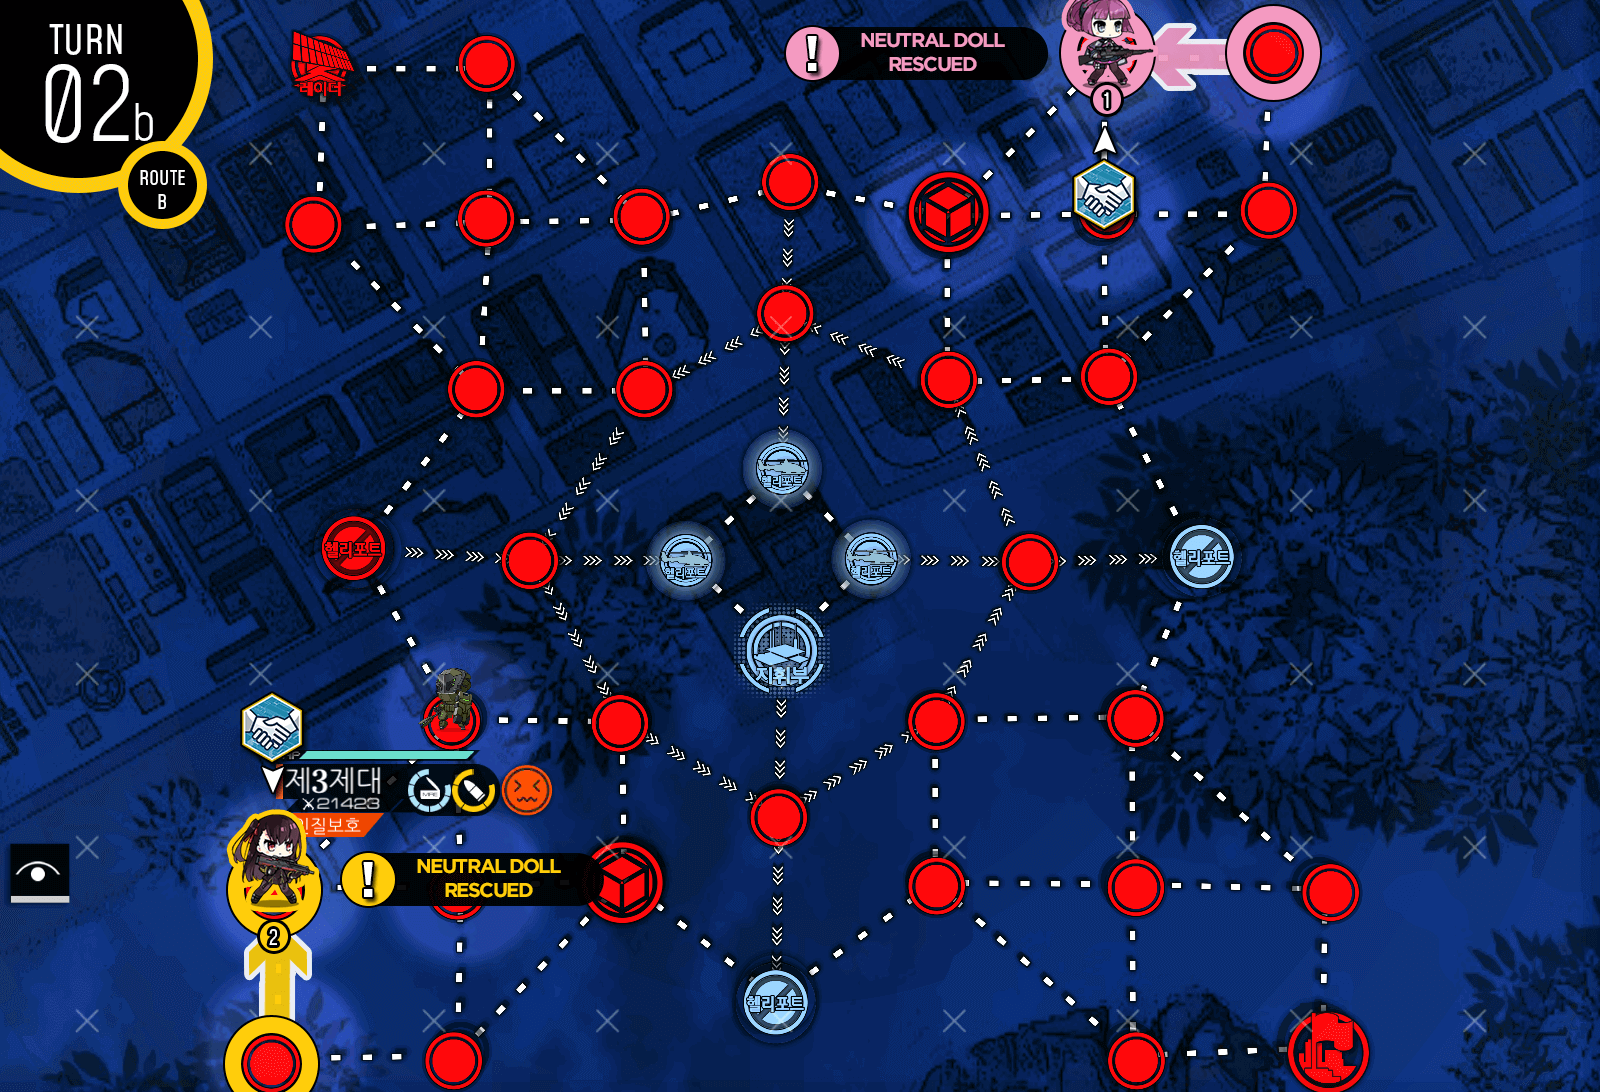
Turn 2b
Swap combat echelon with the second dummy echelon then move towards the upper left node.

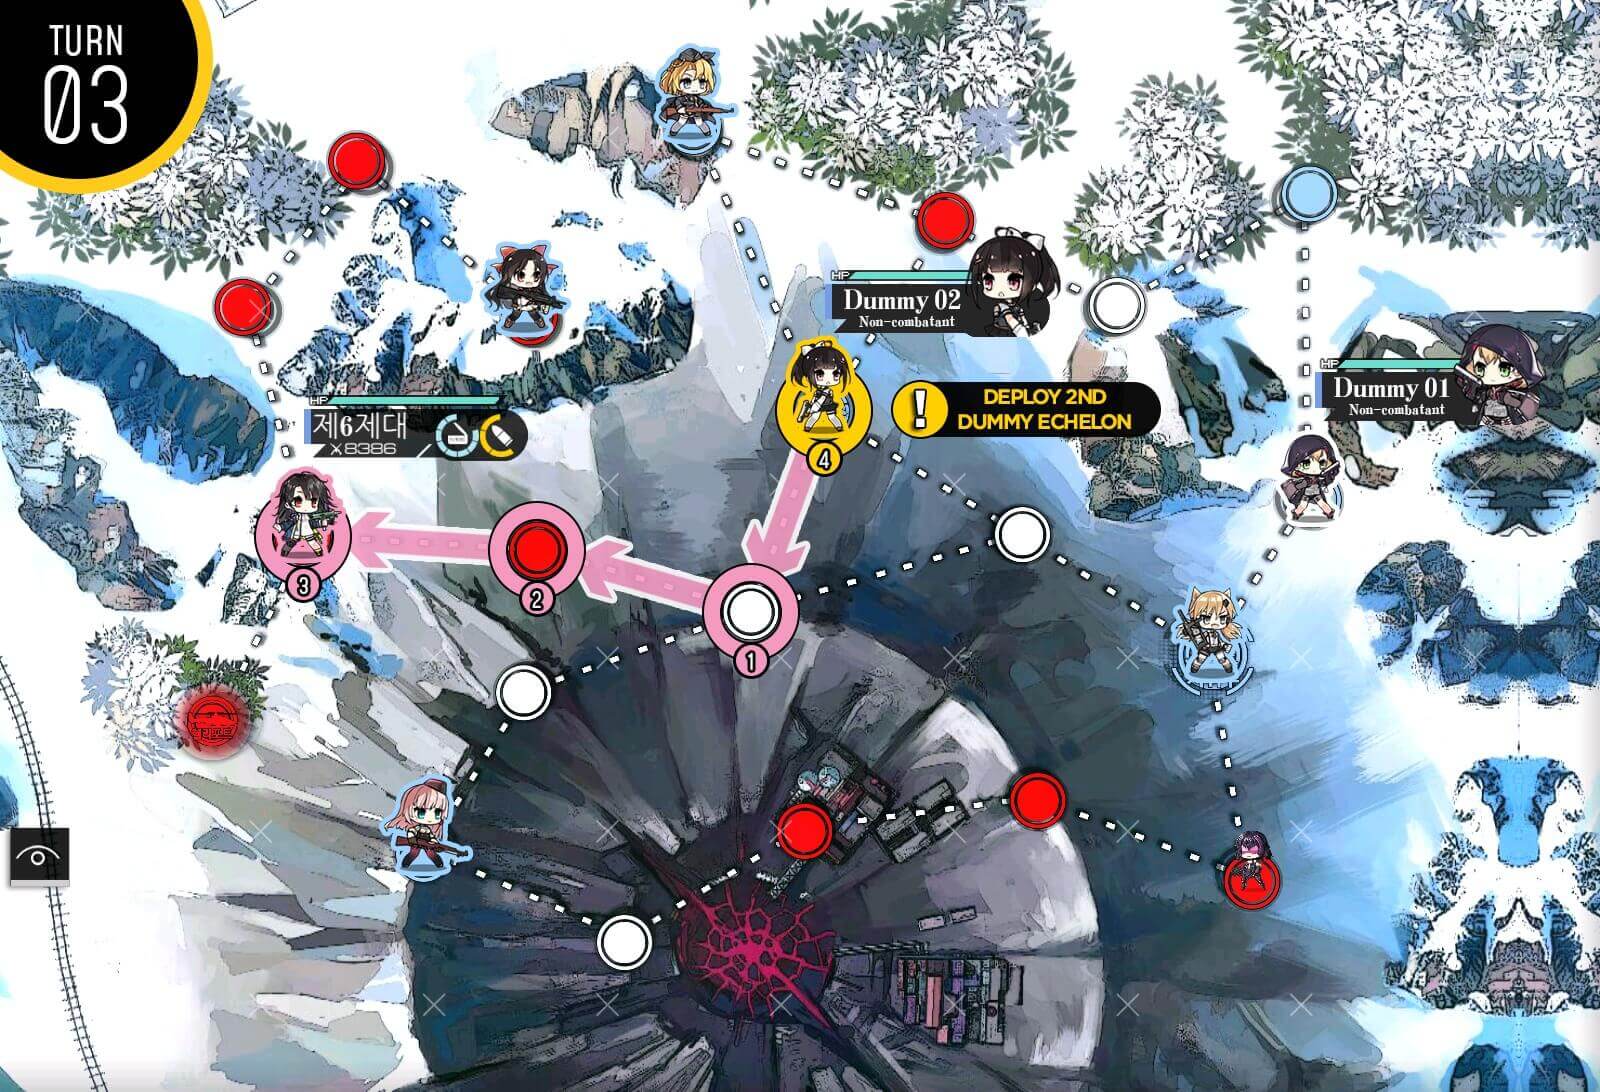
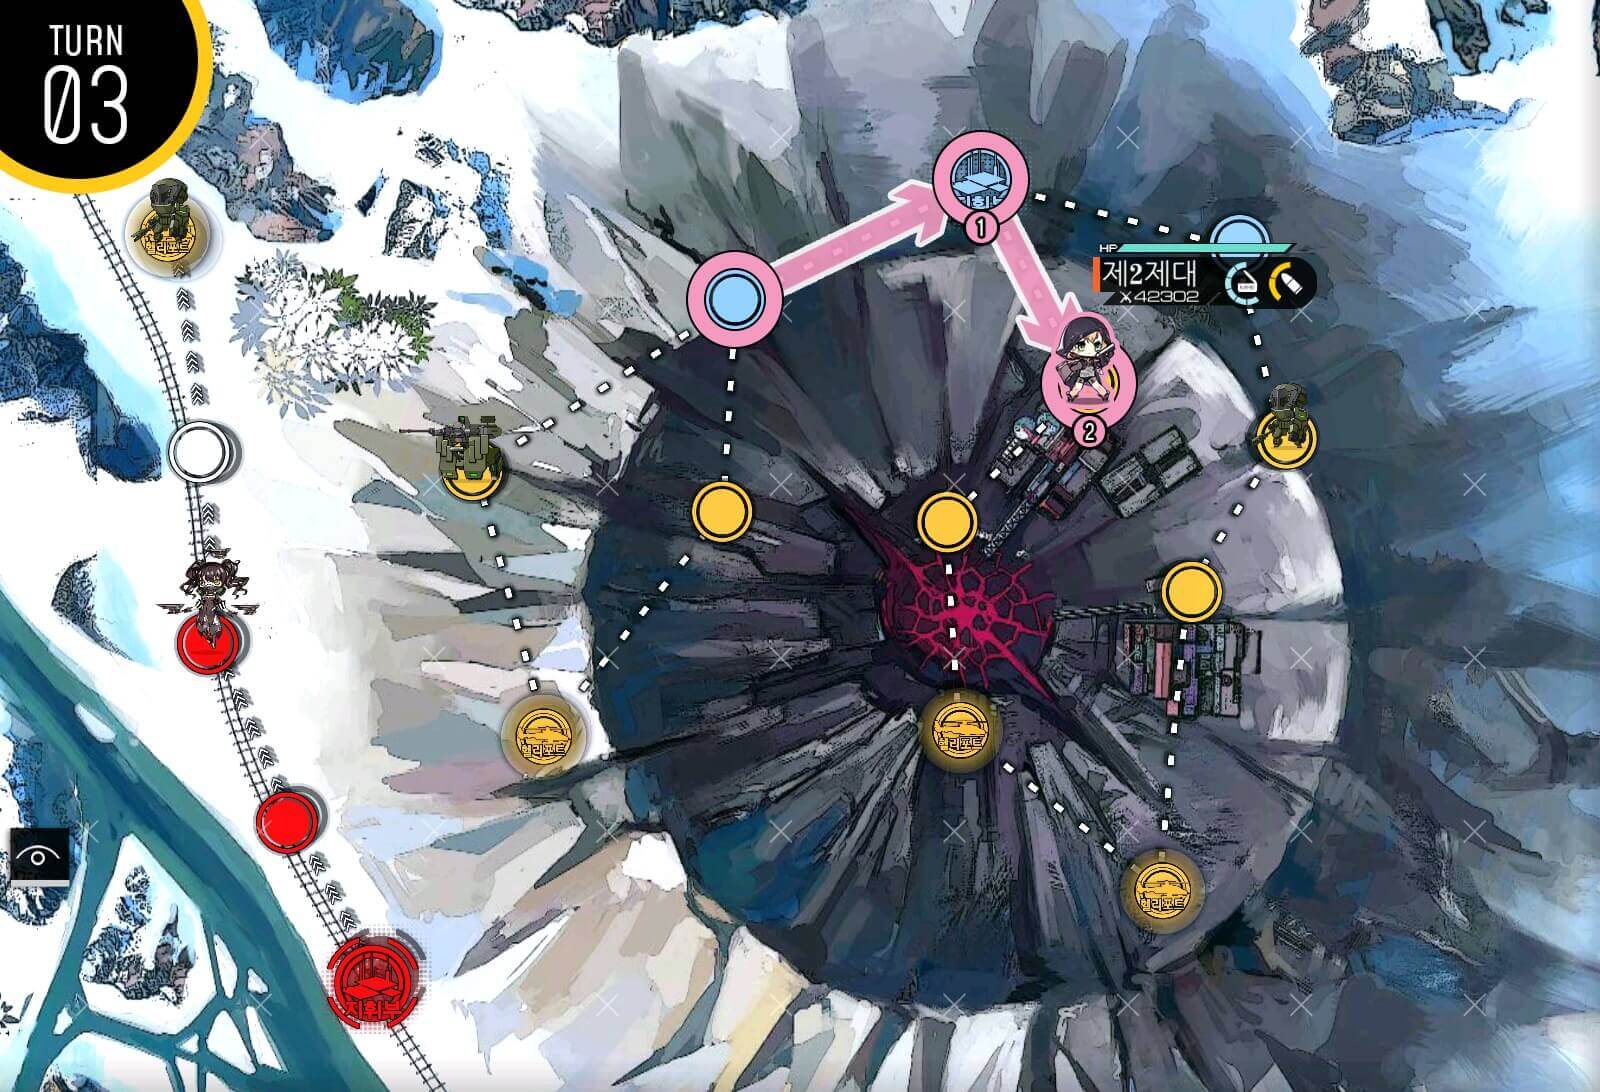
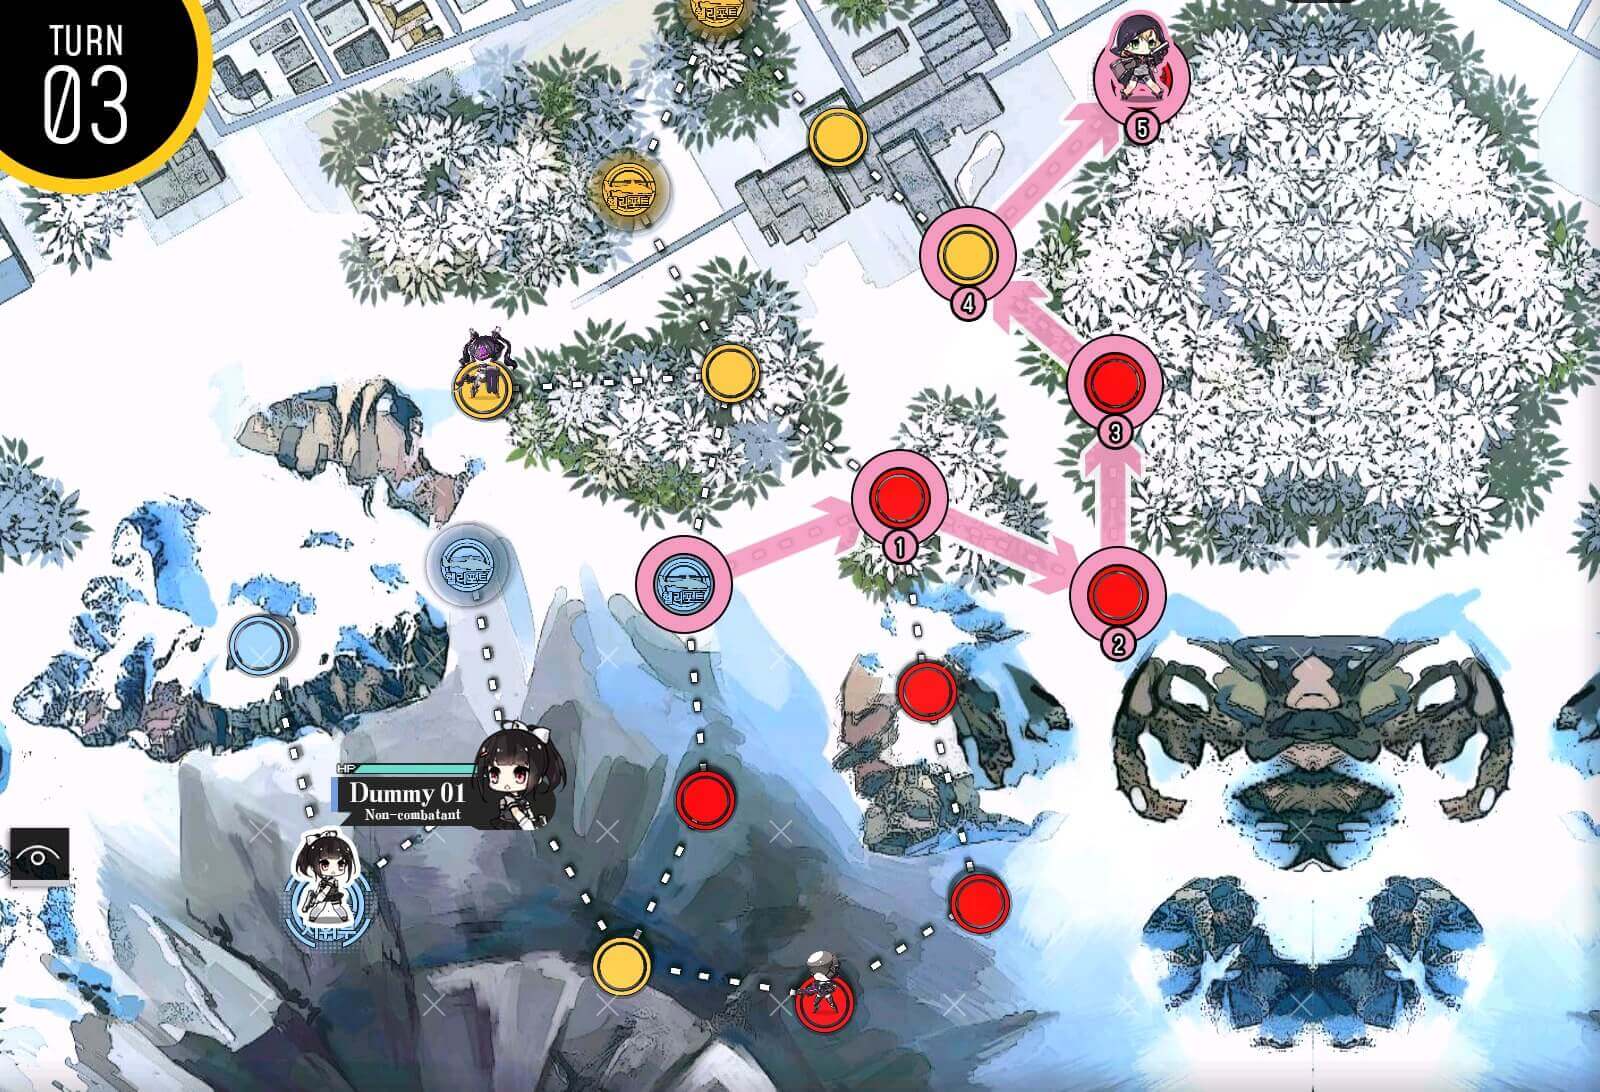
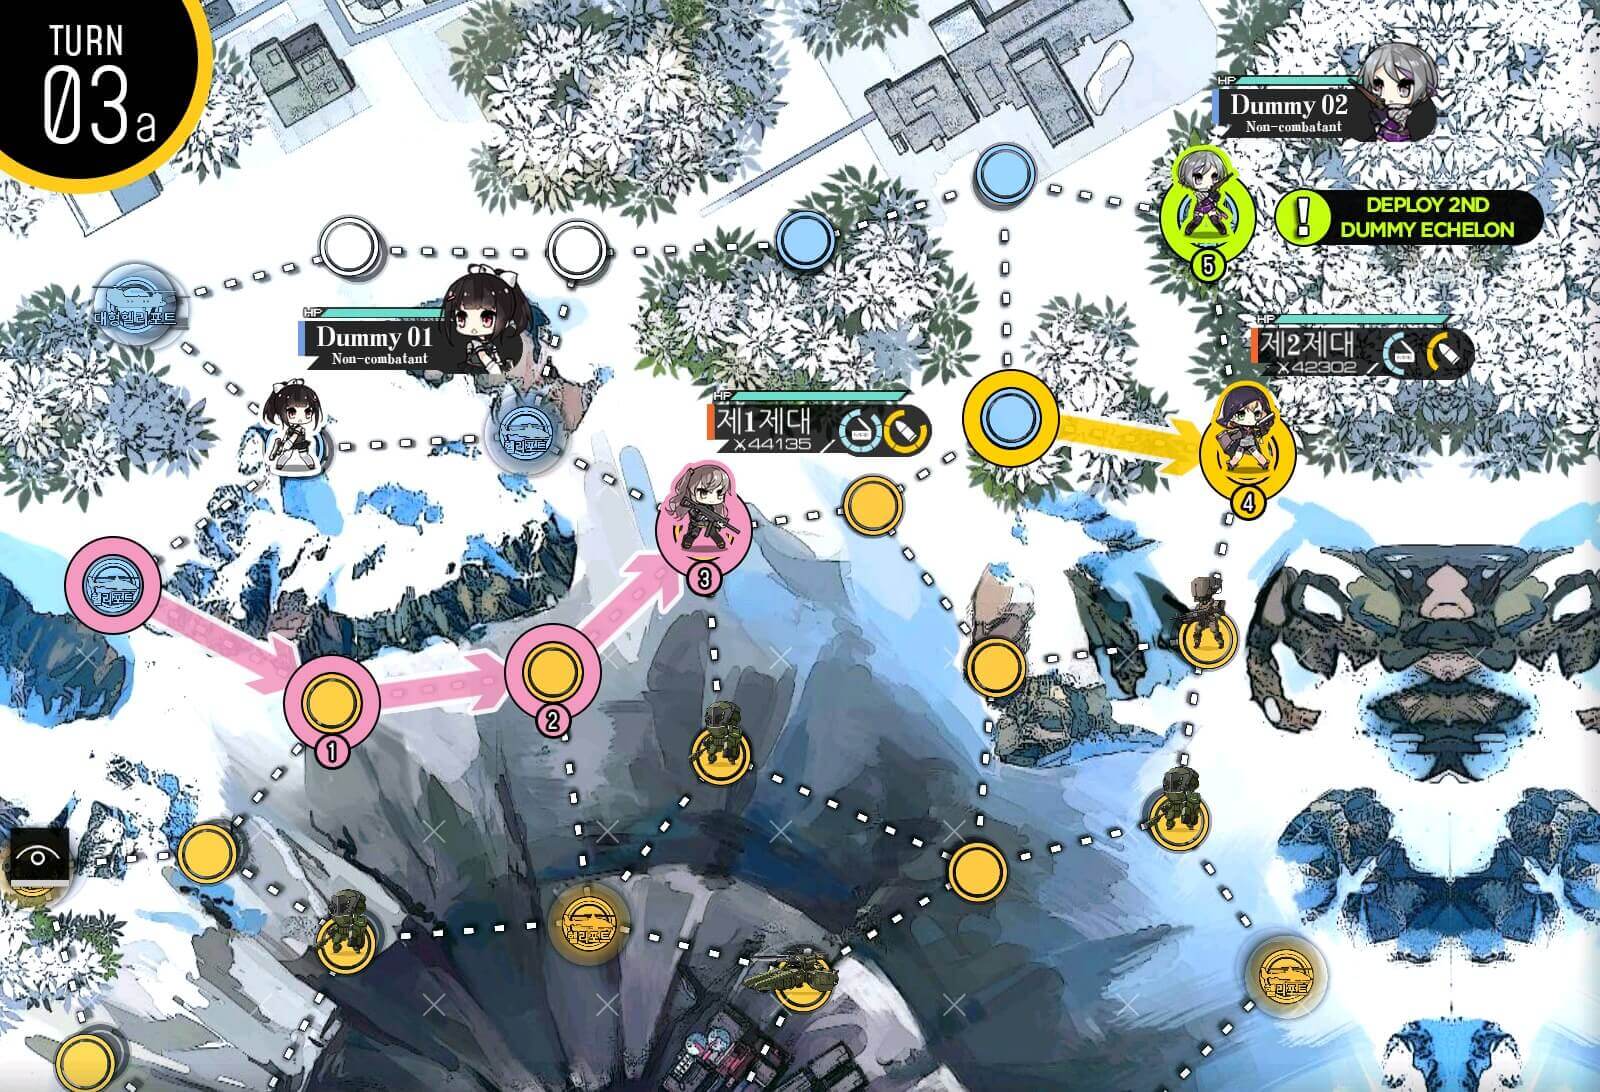
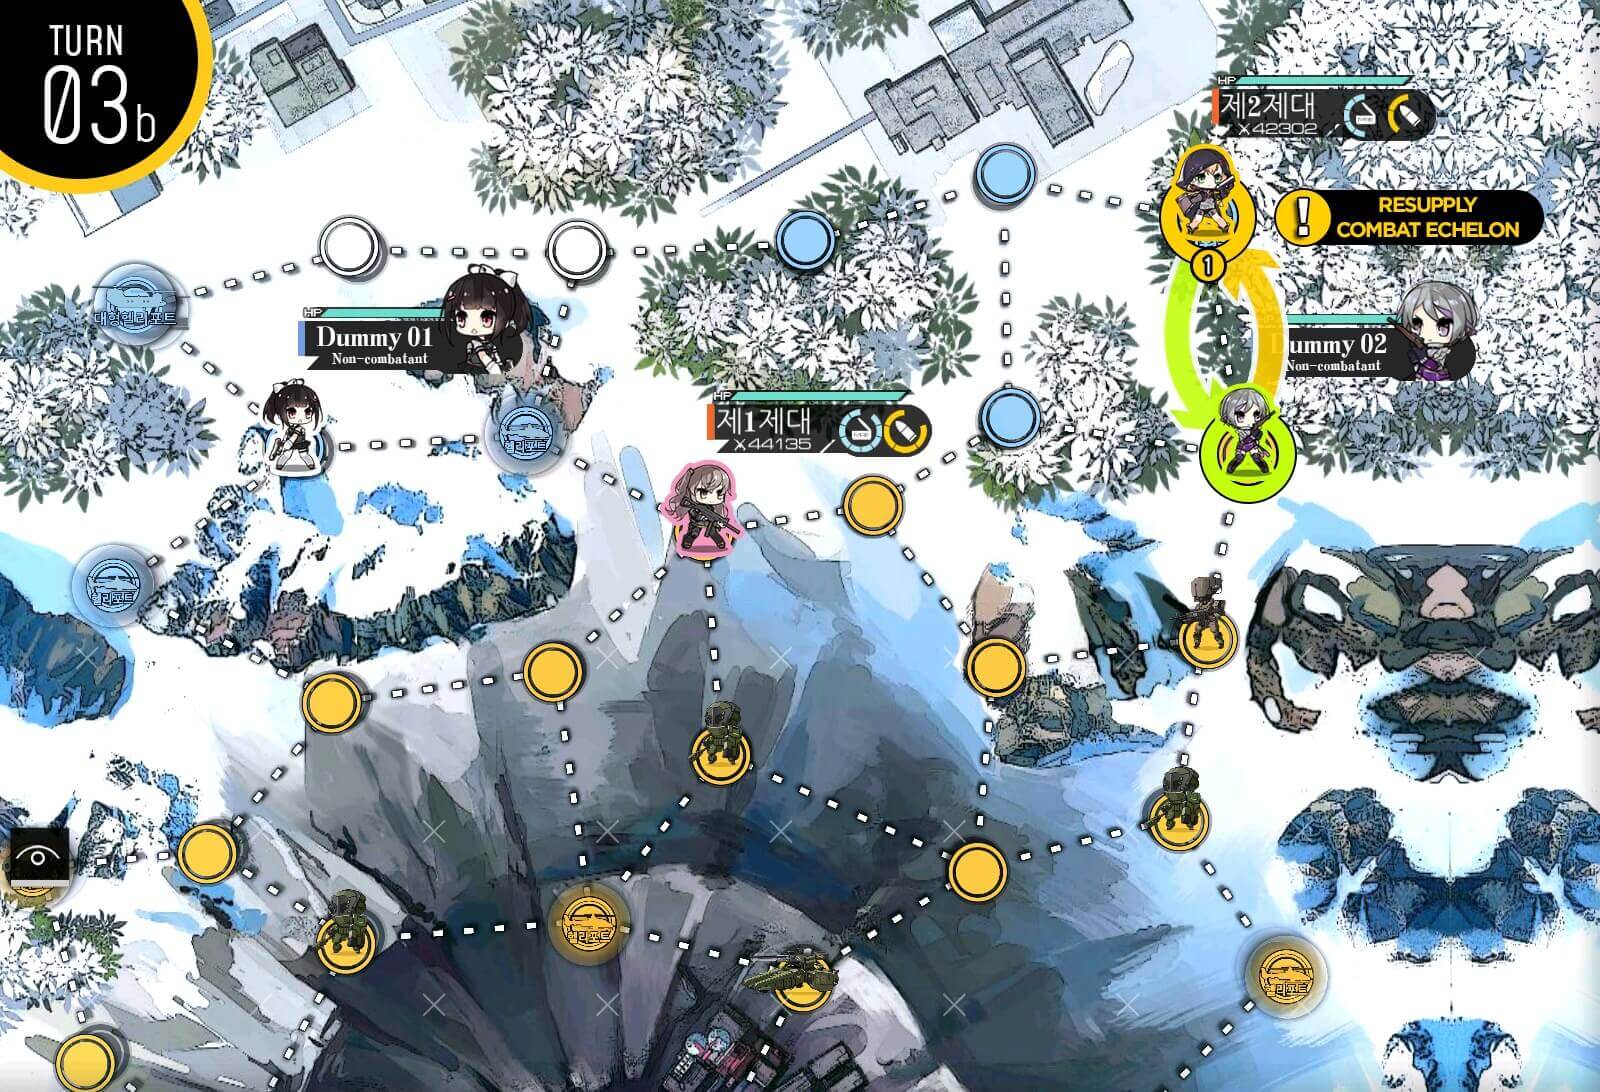
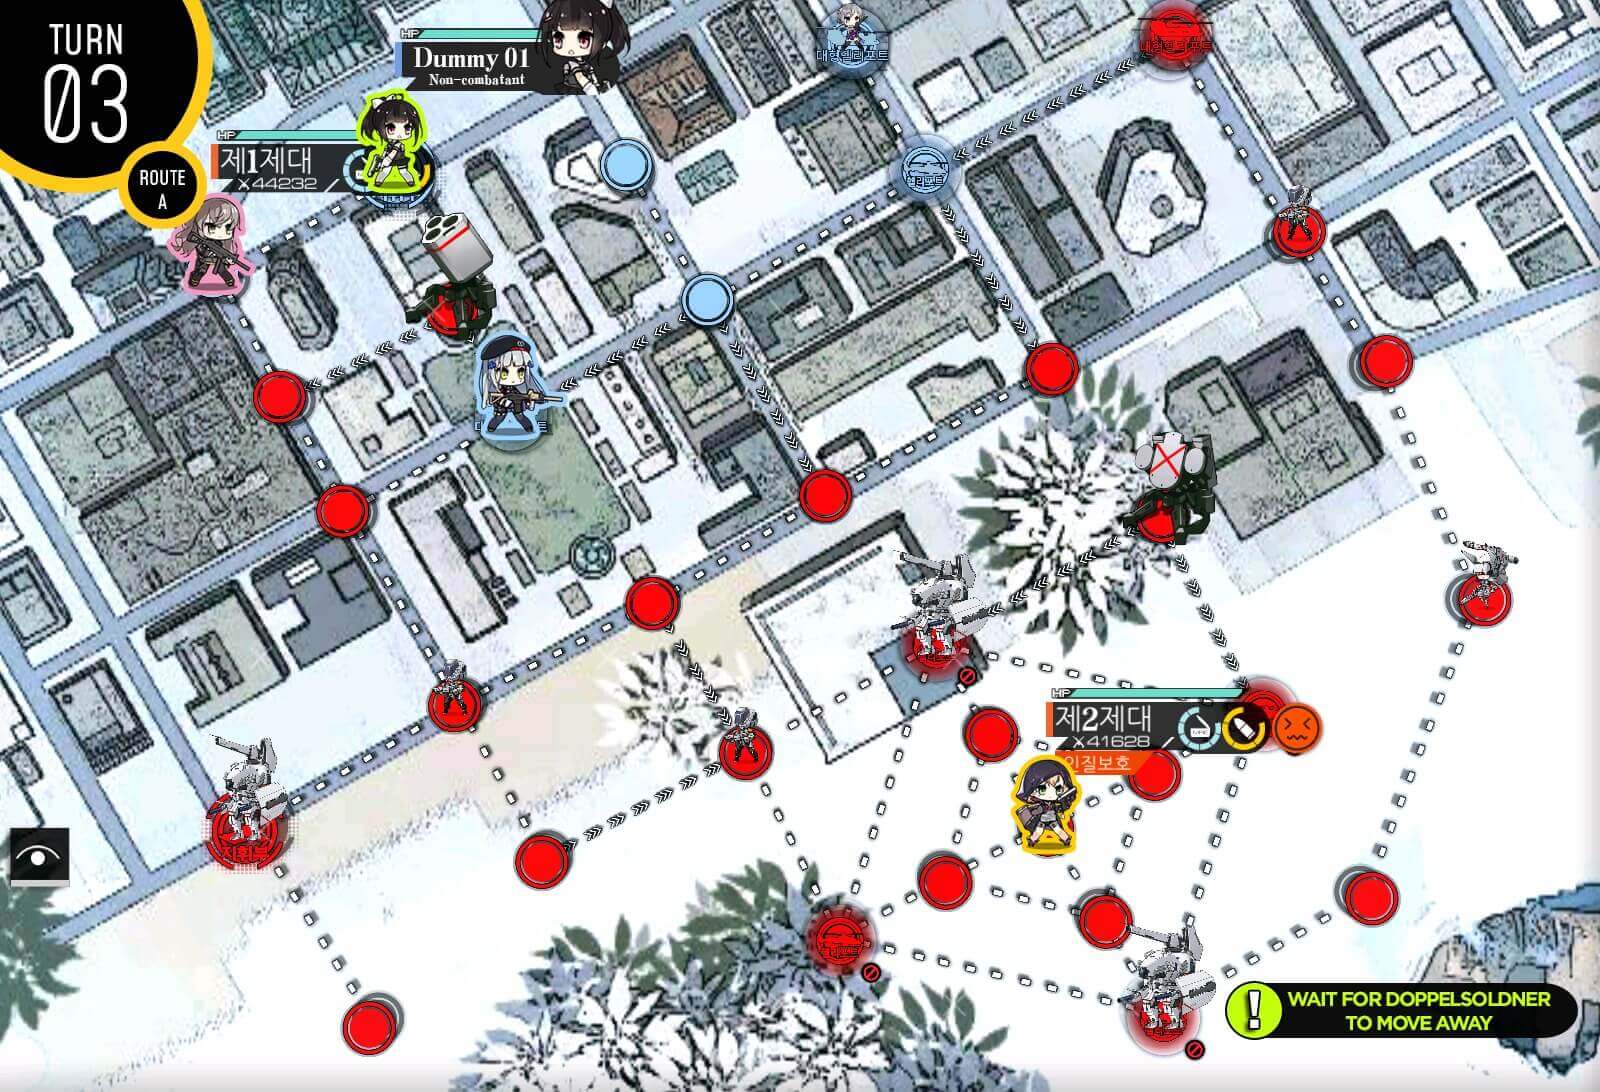
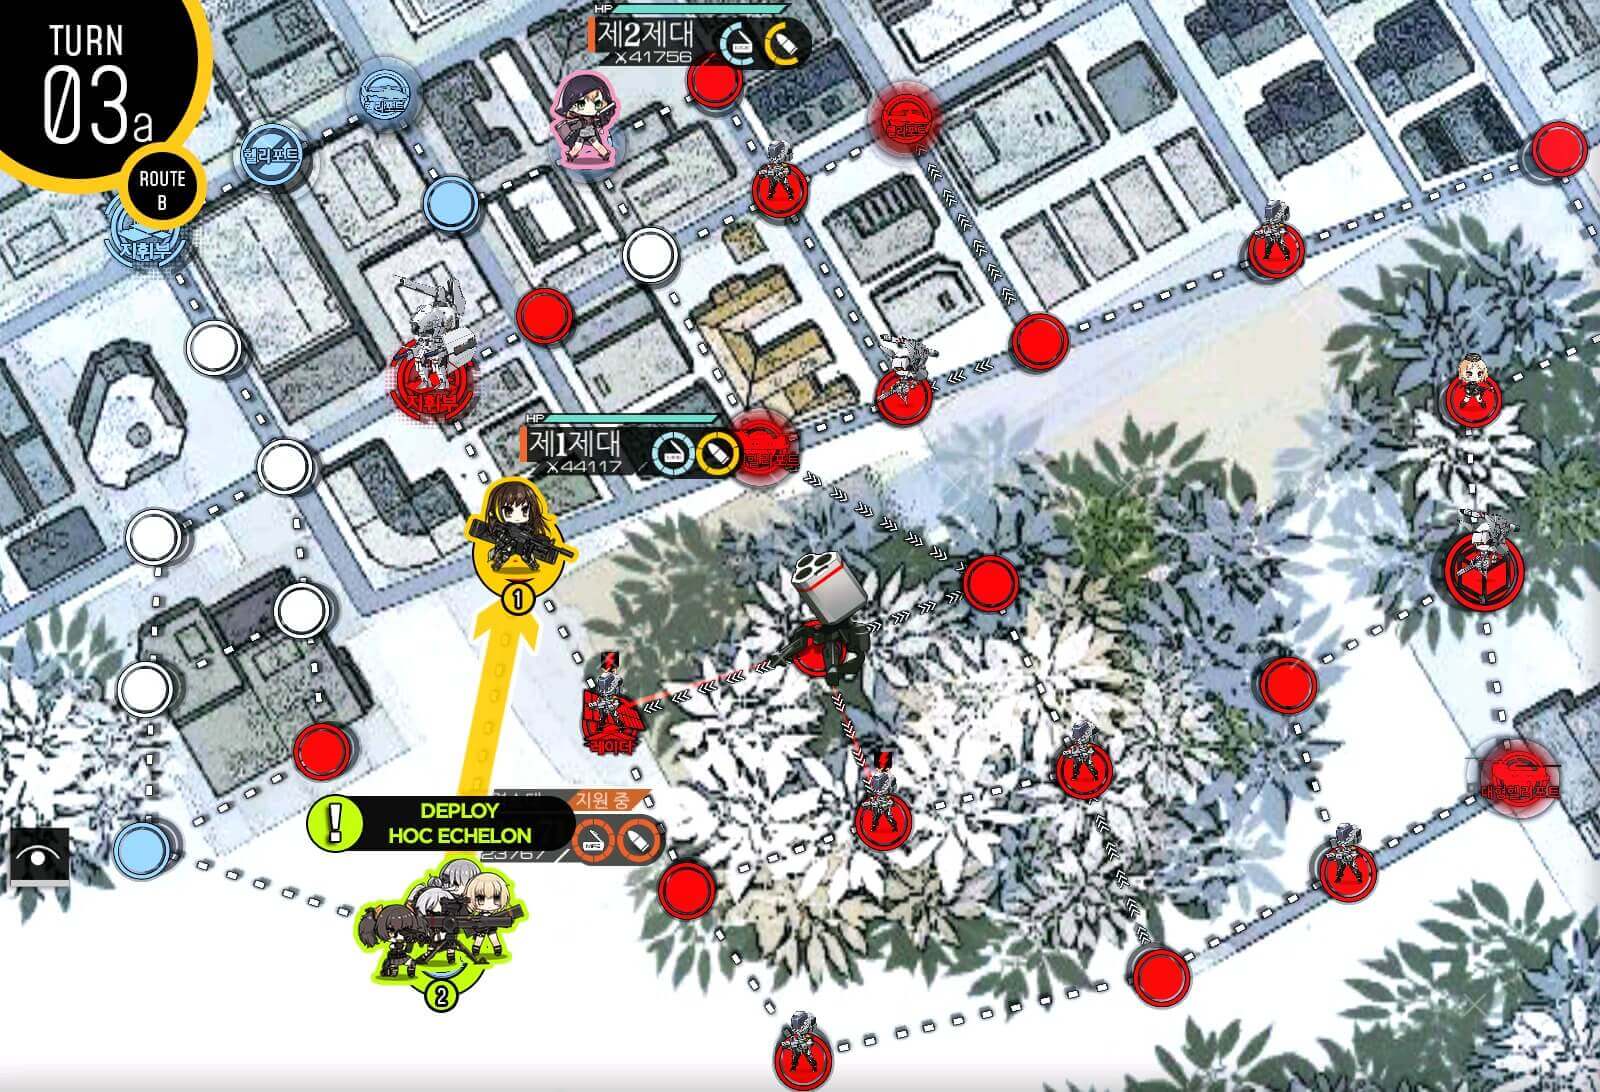
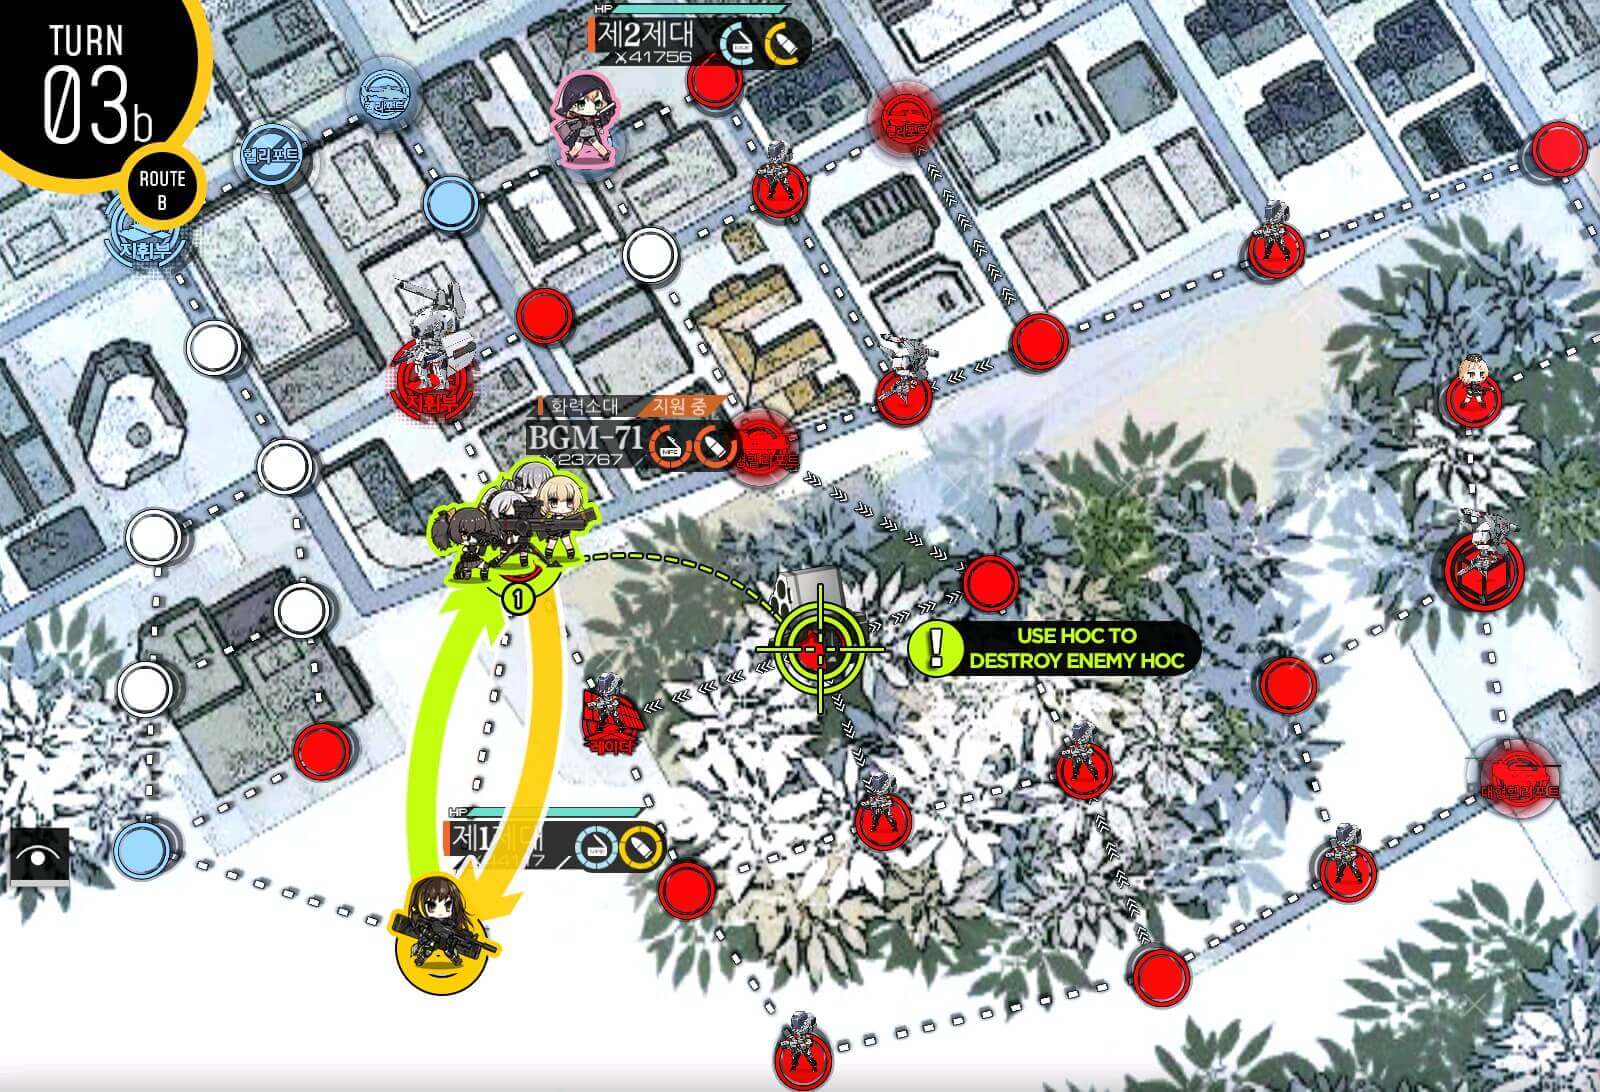
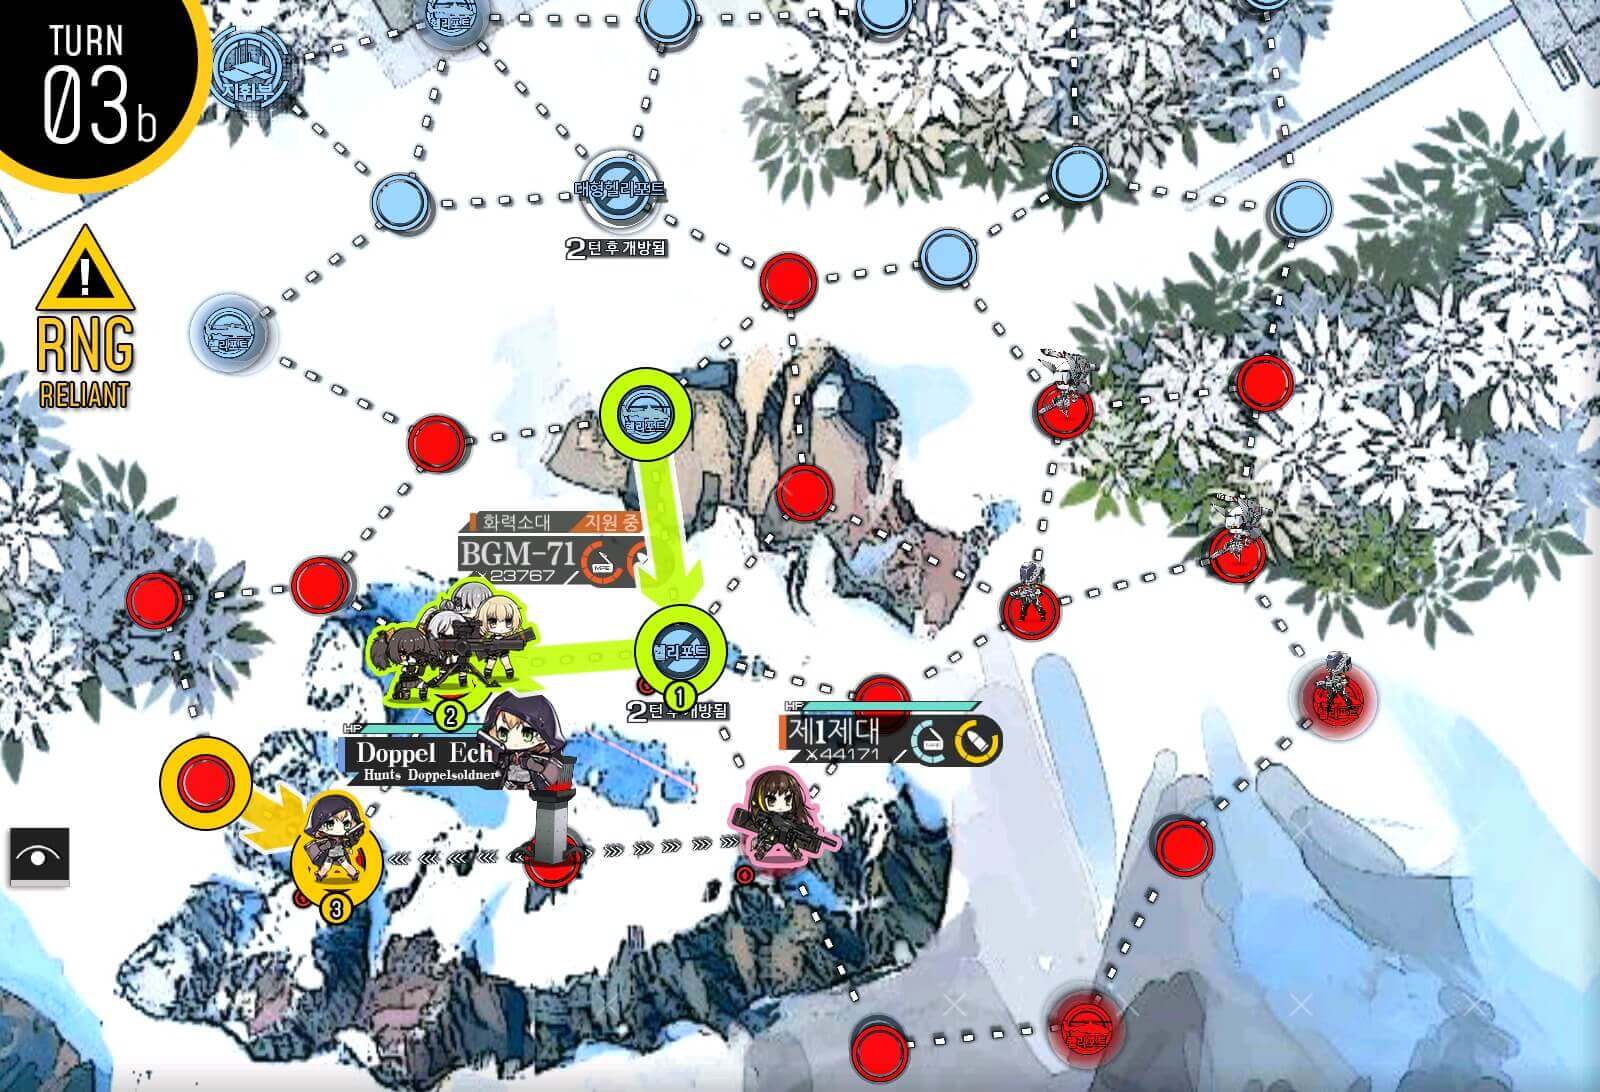
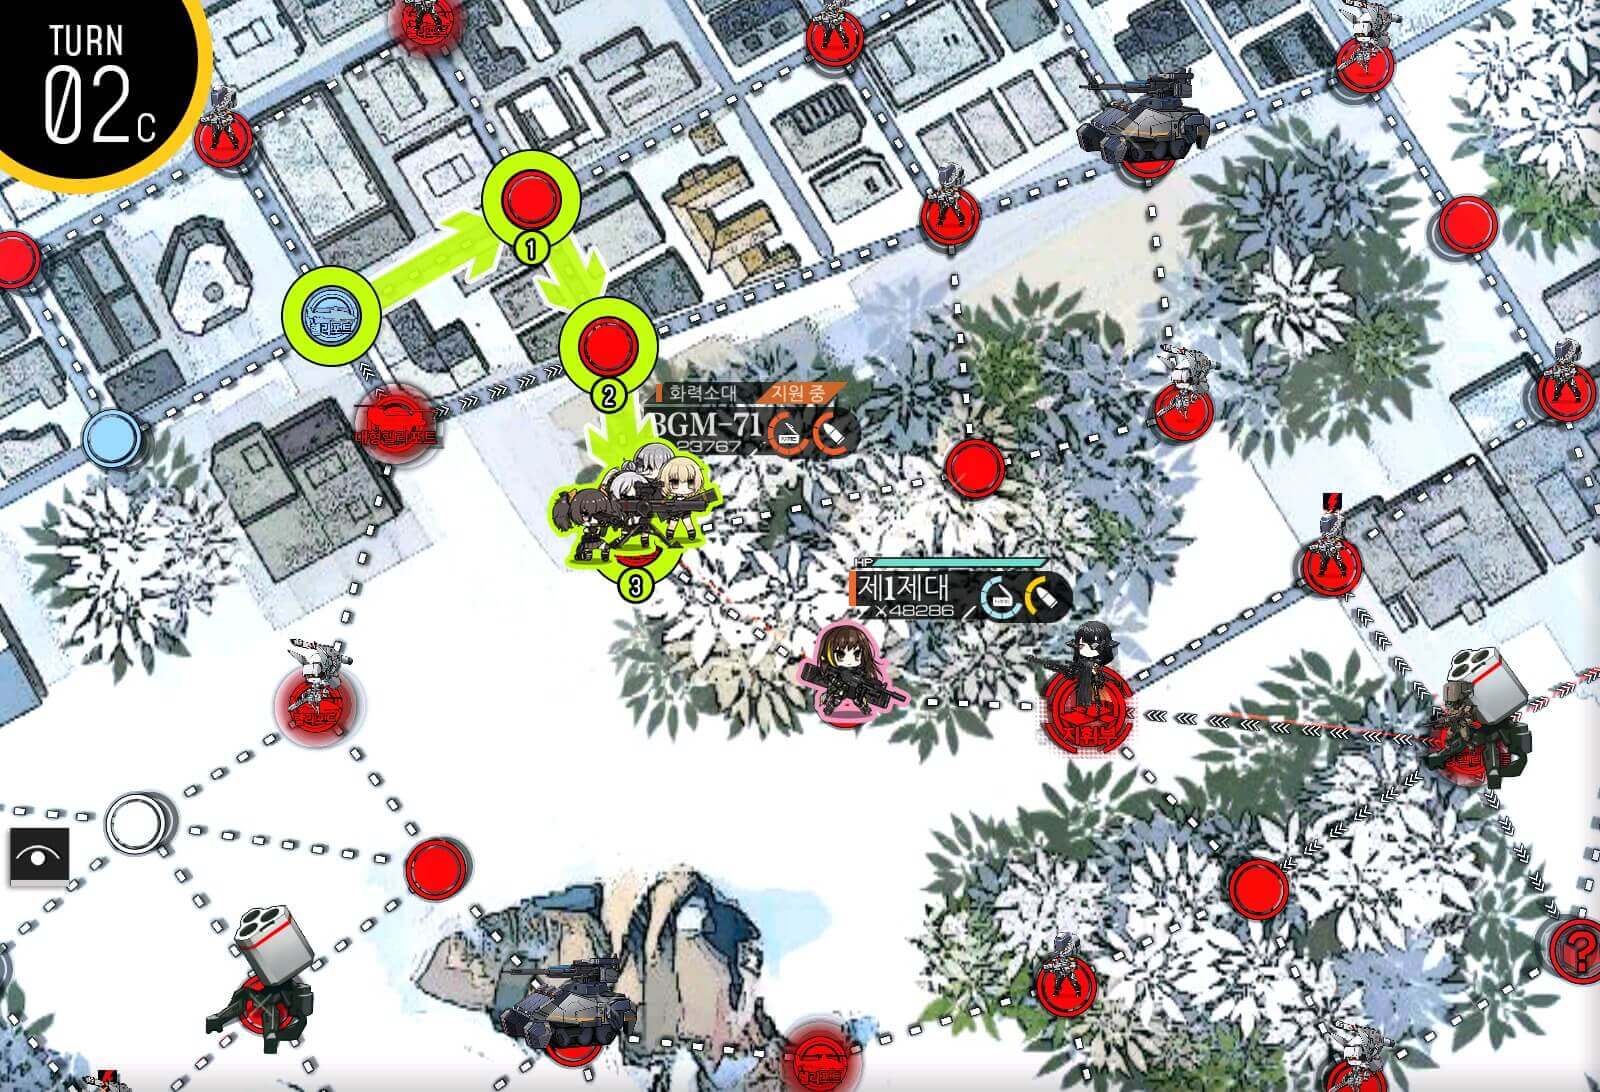
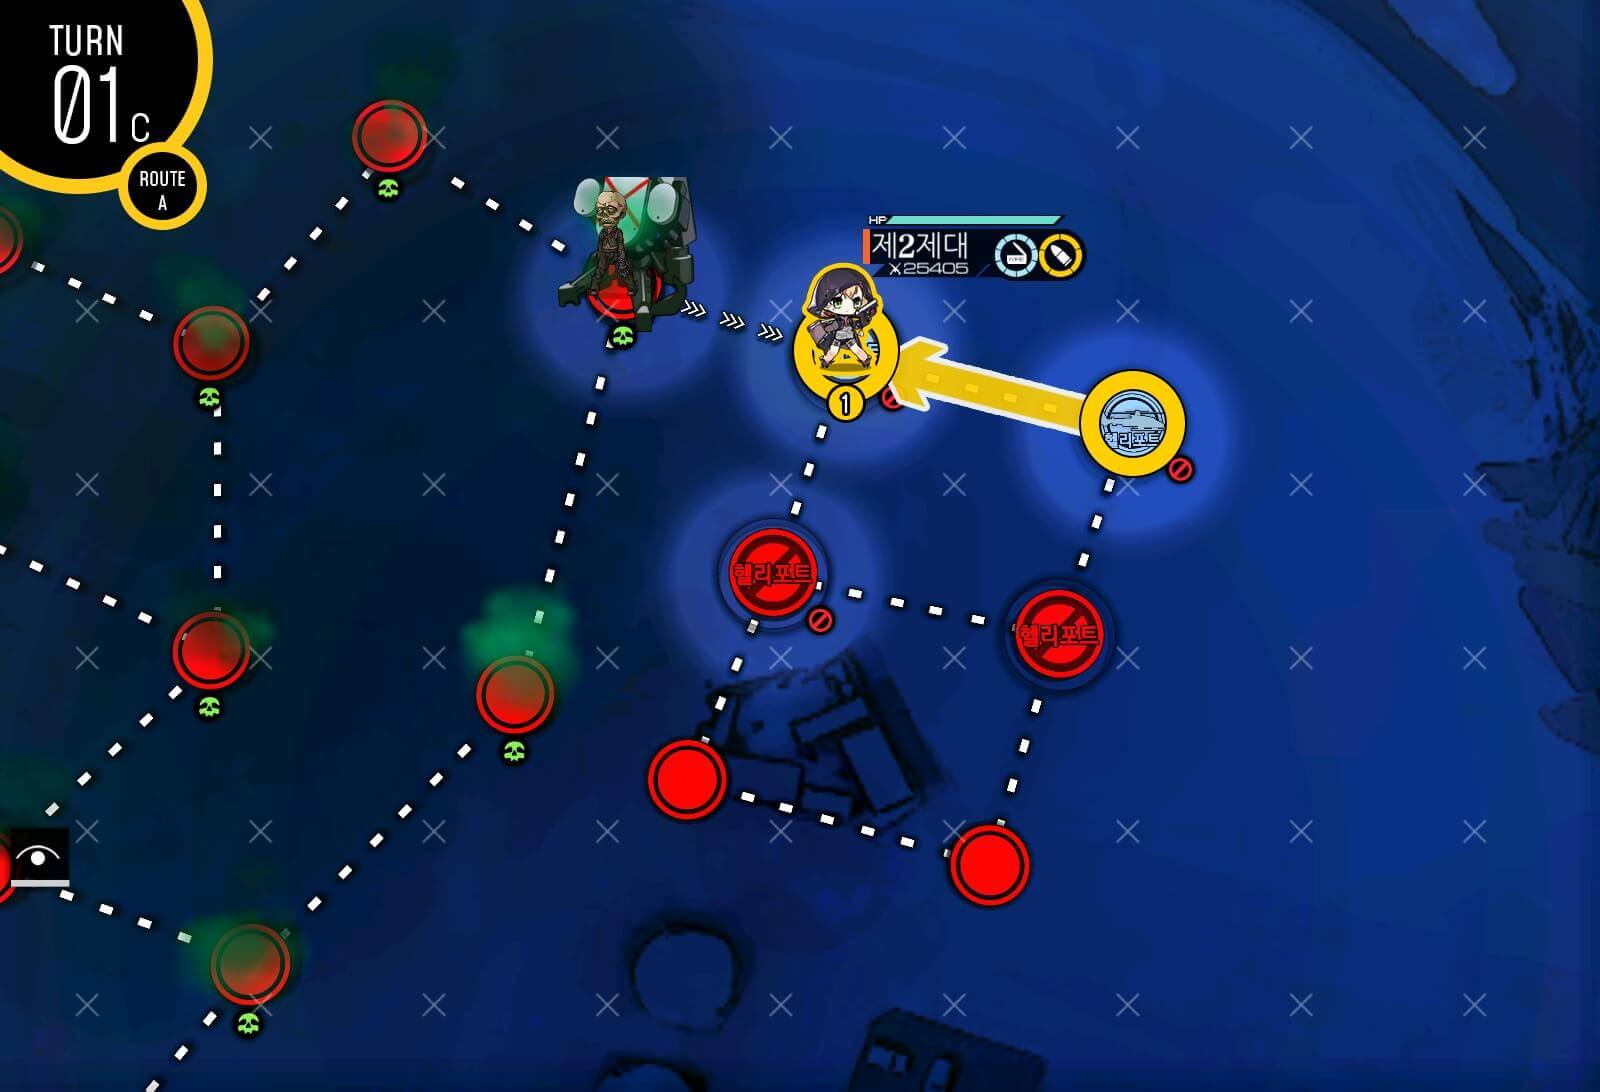
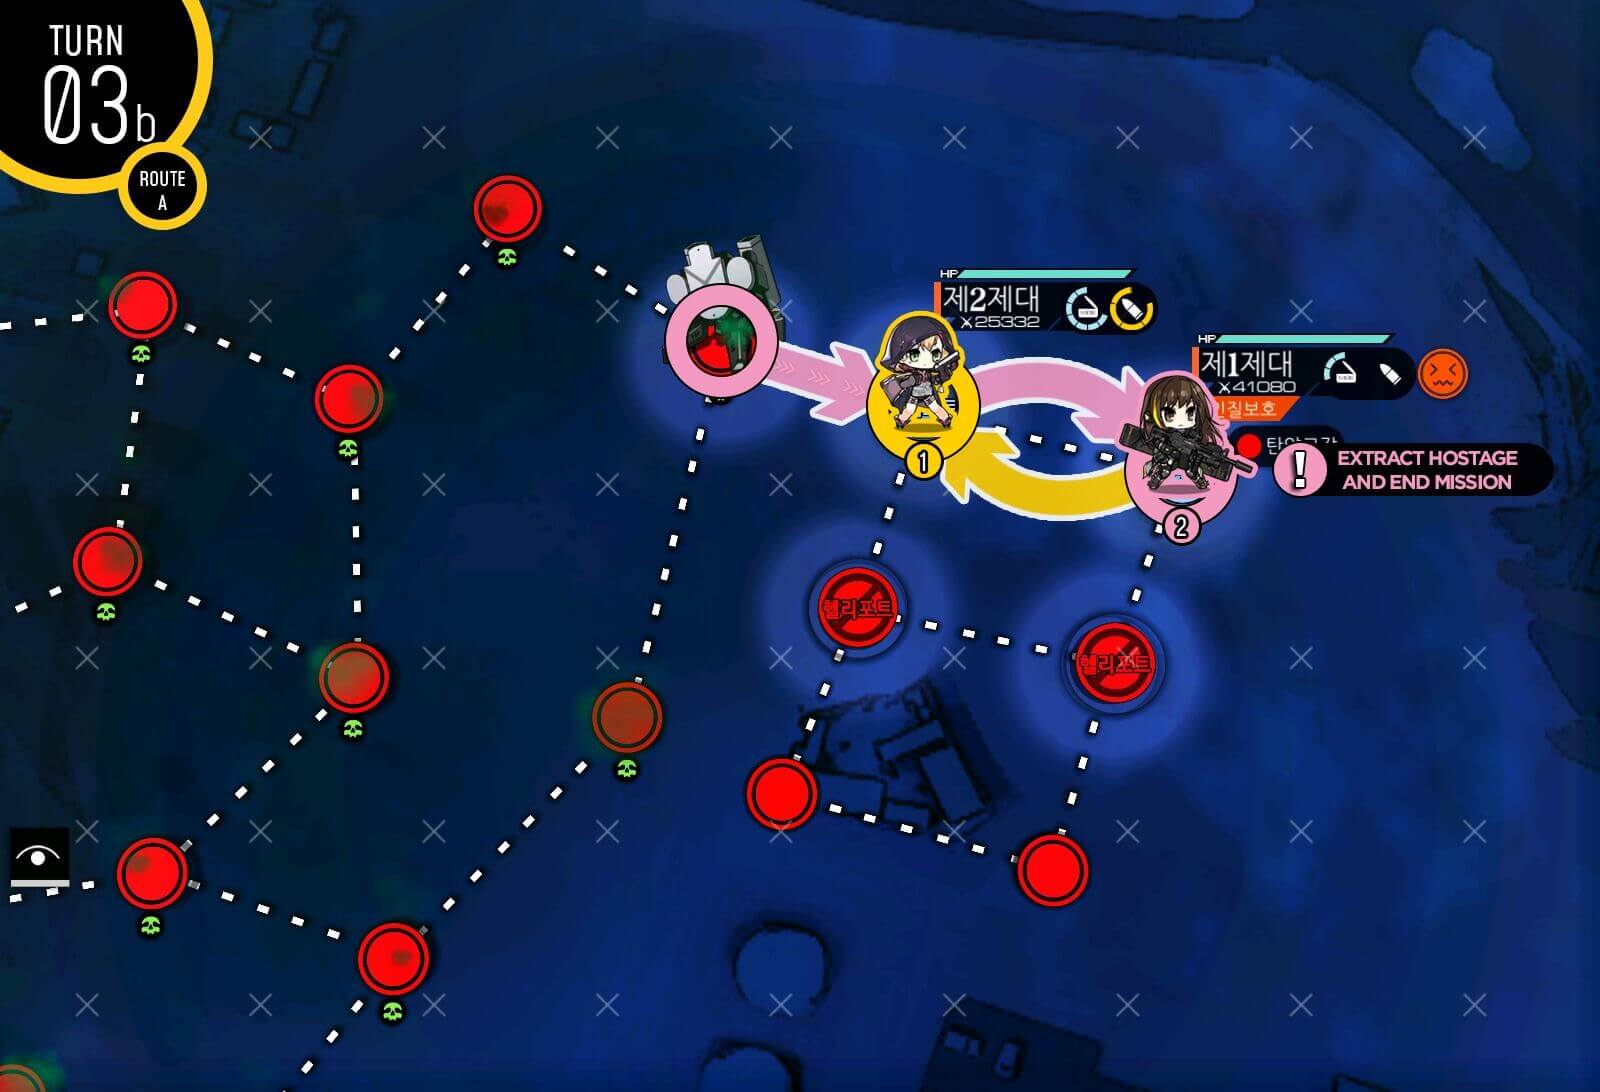
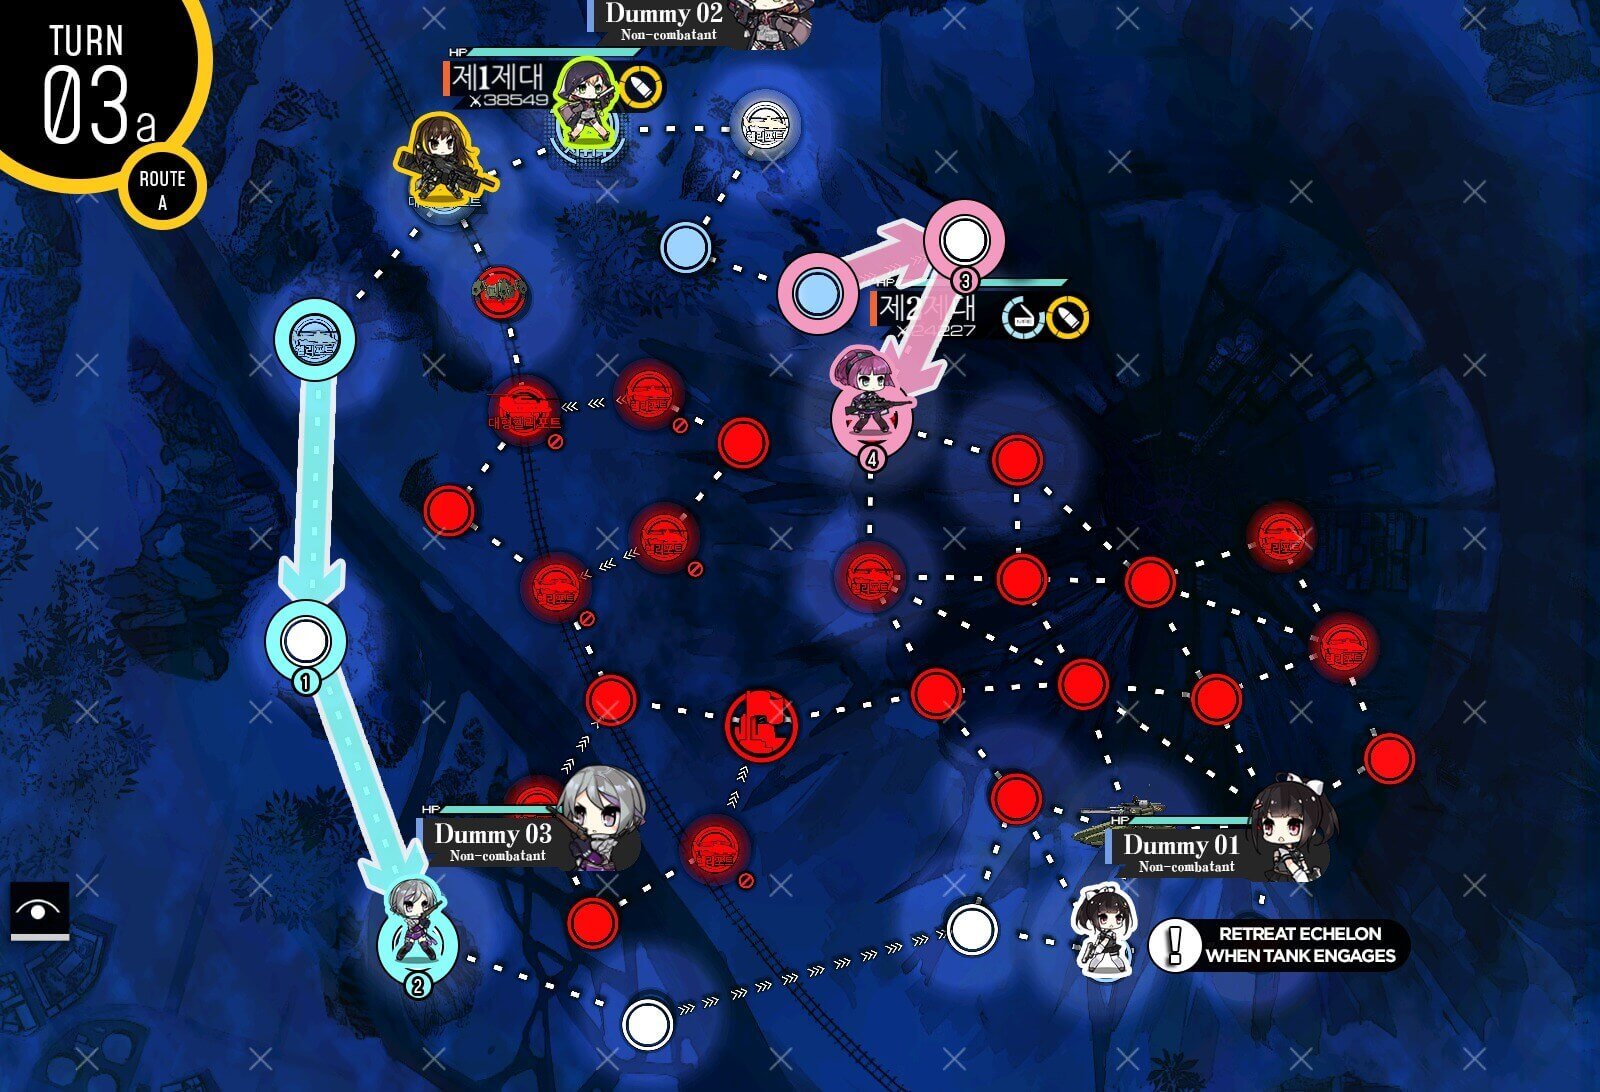
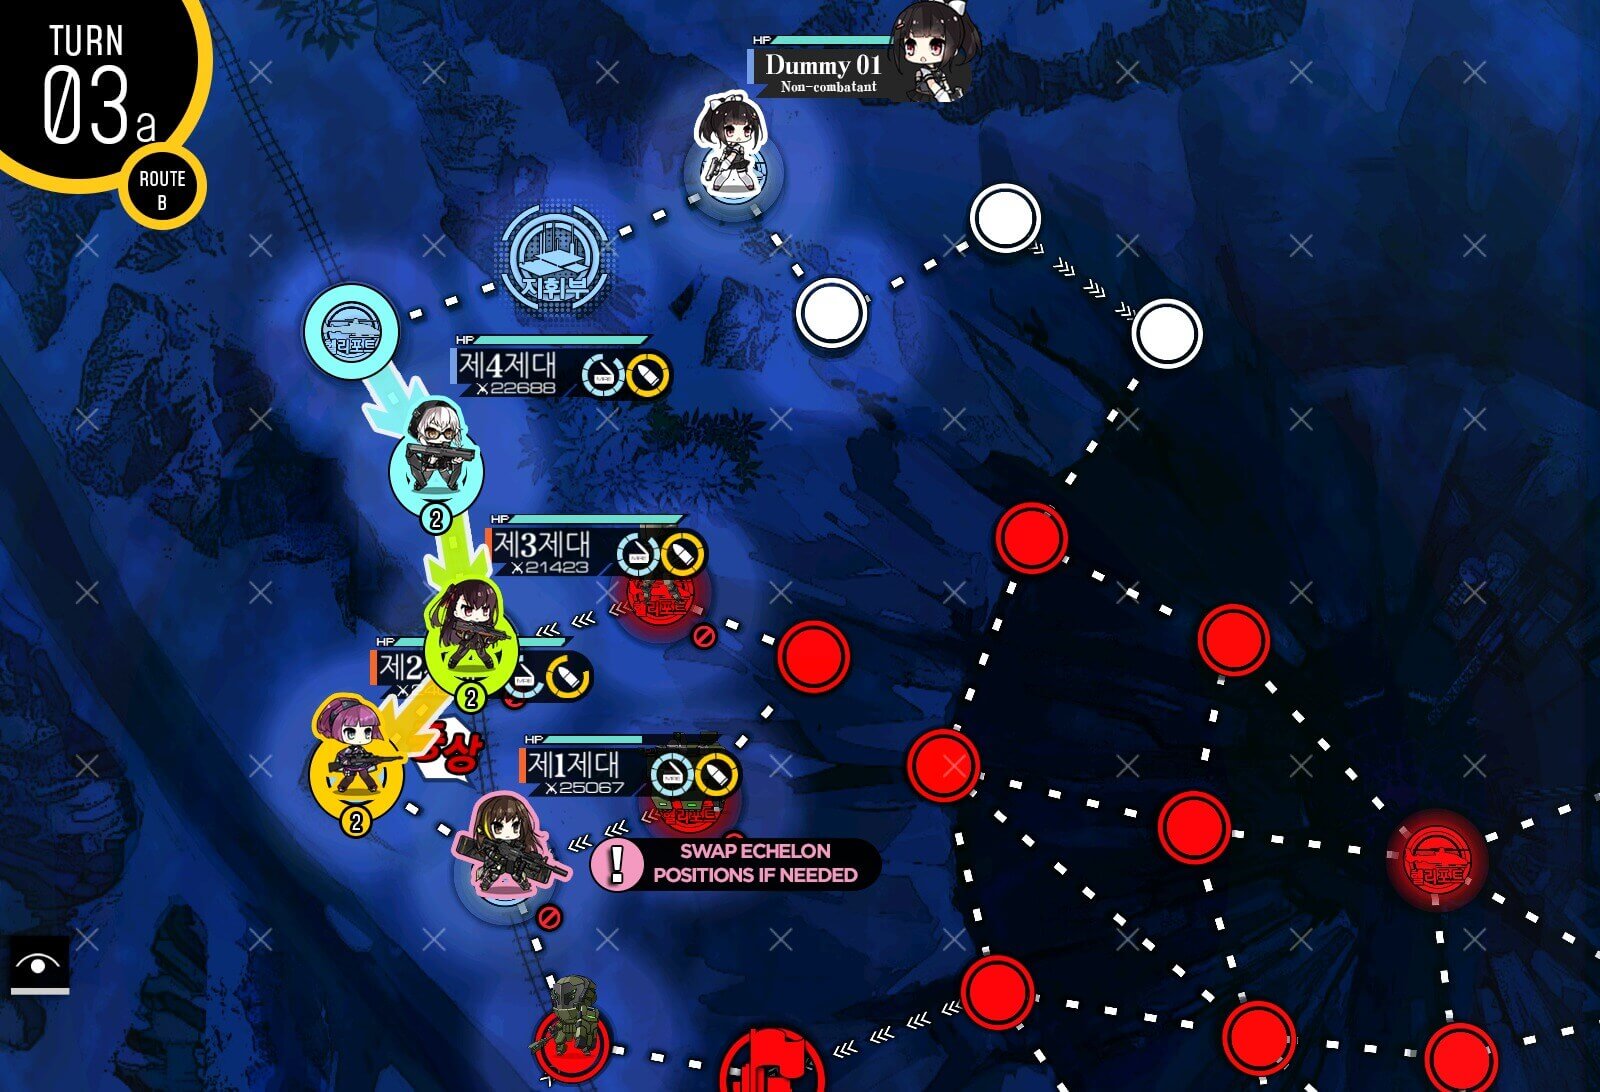
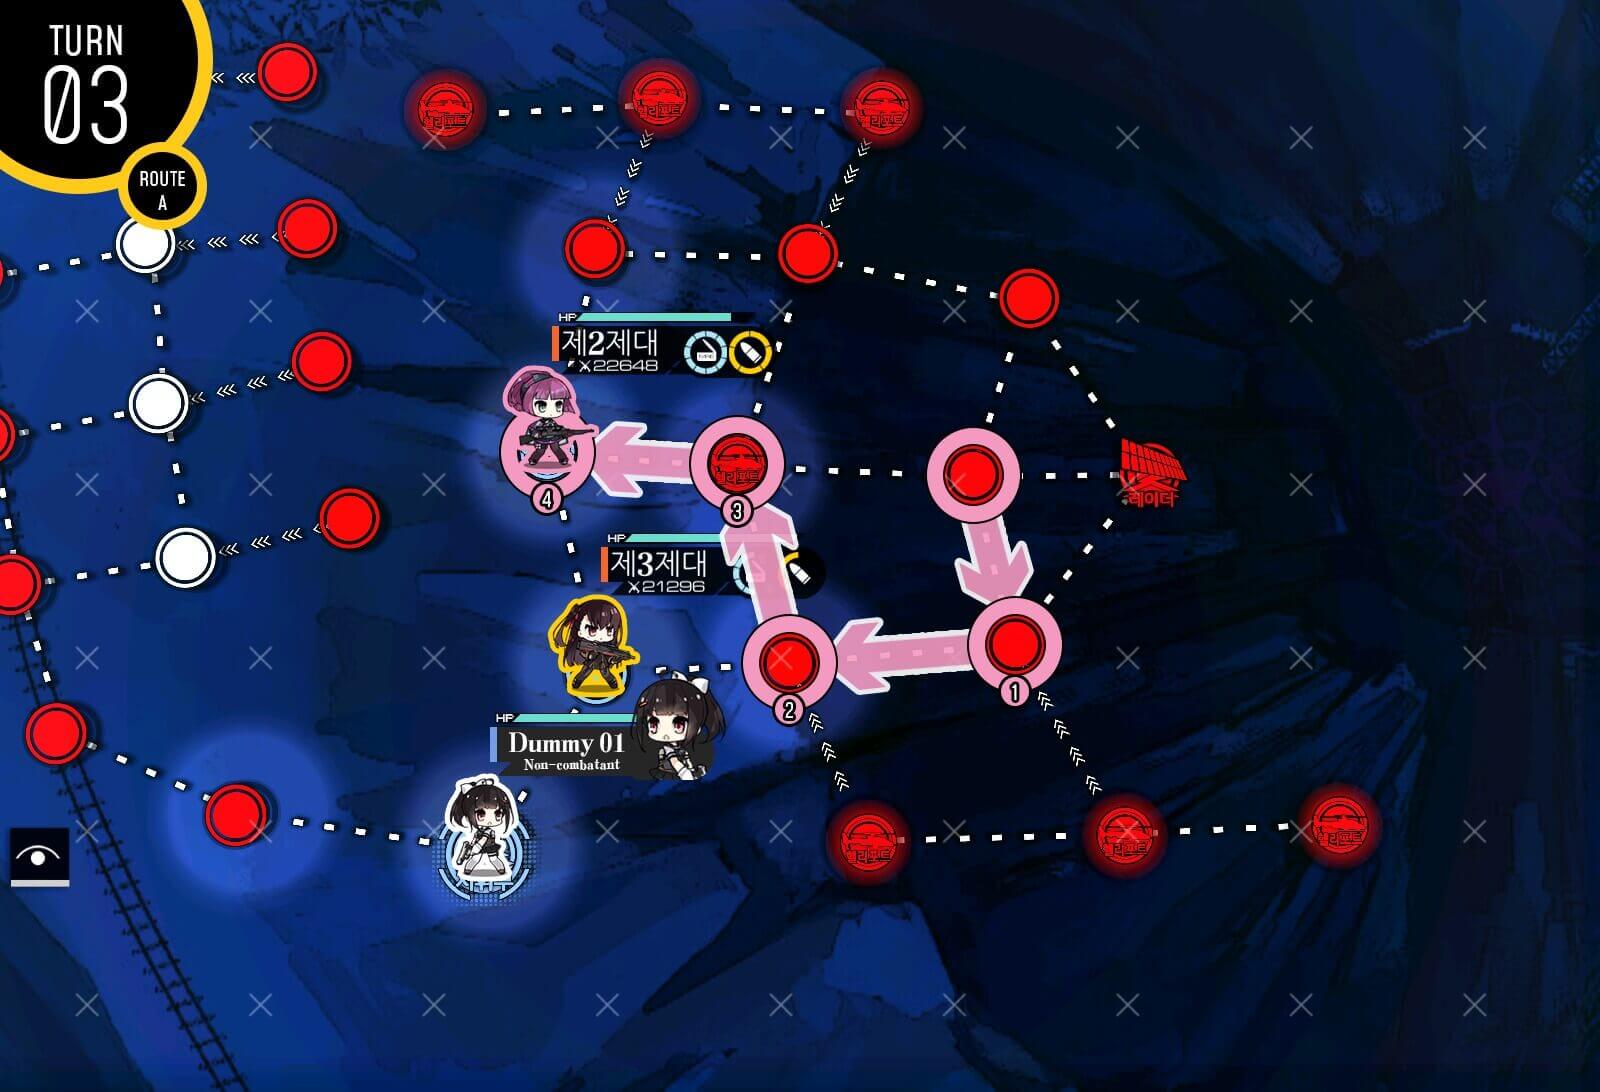
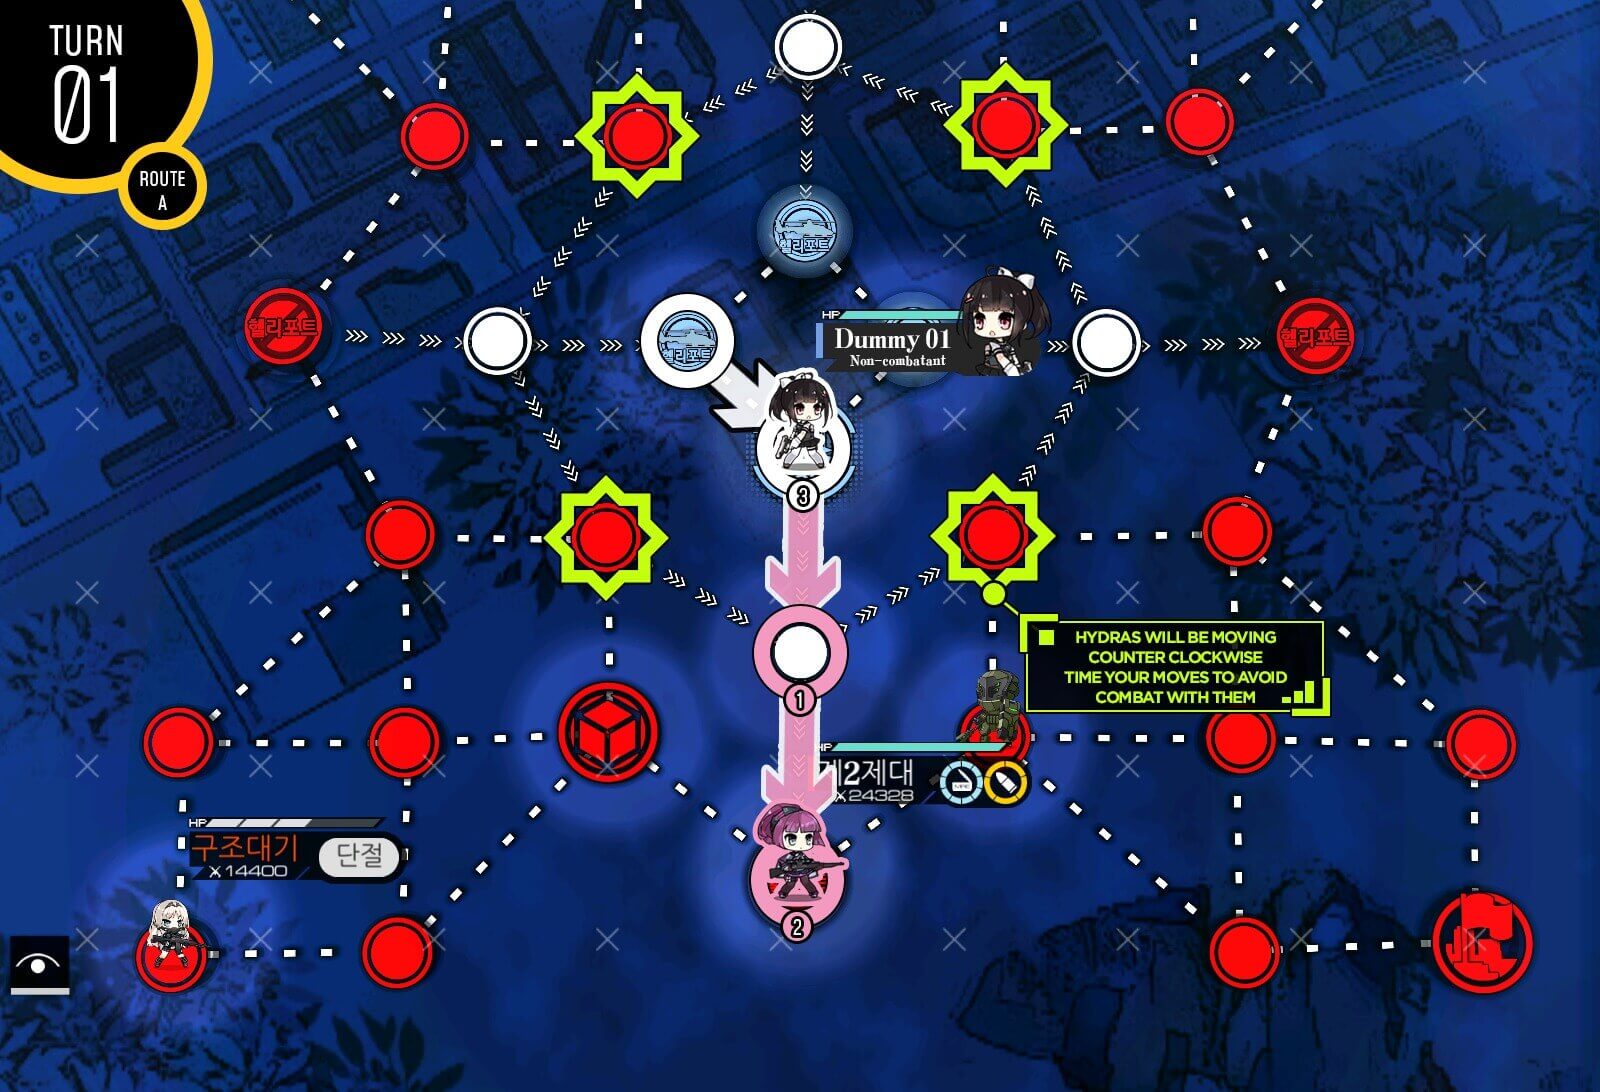
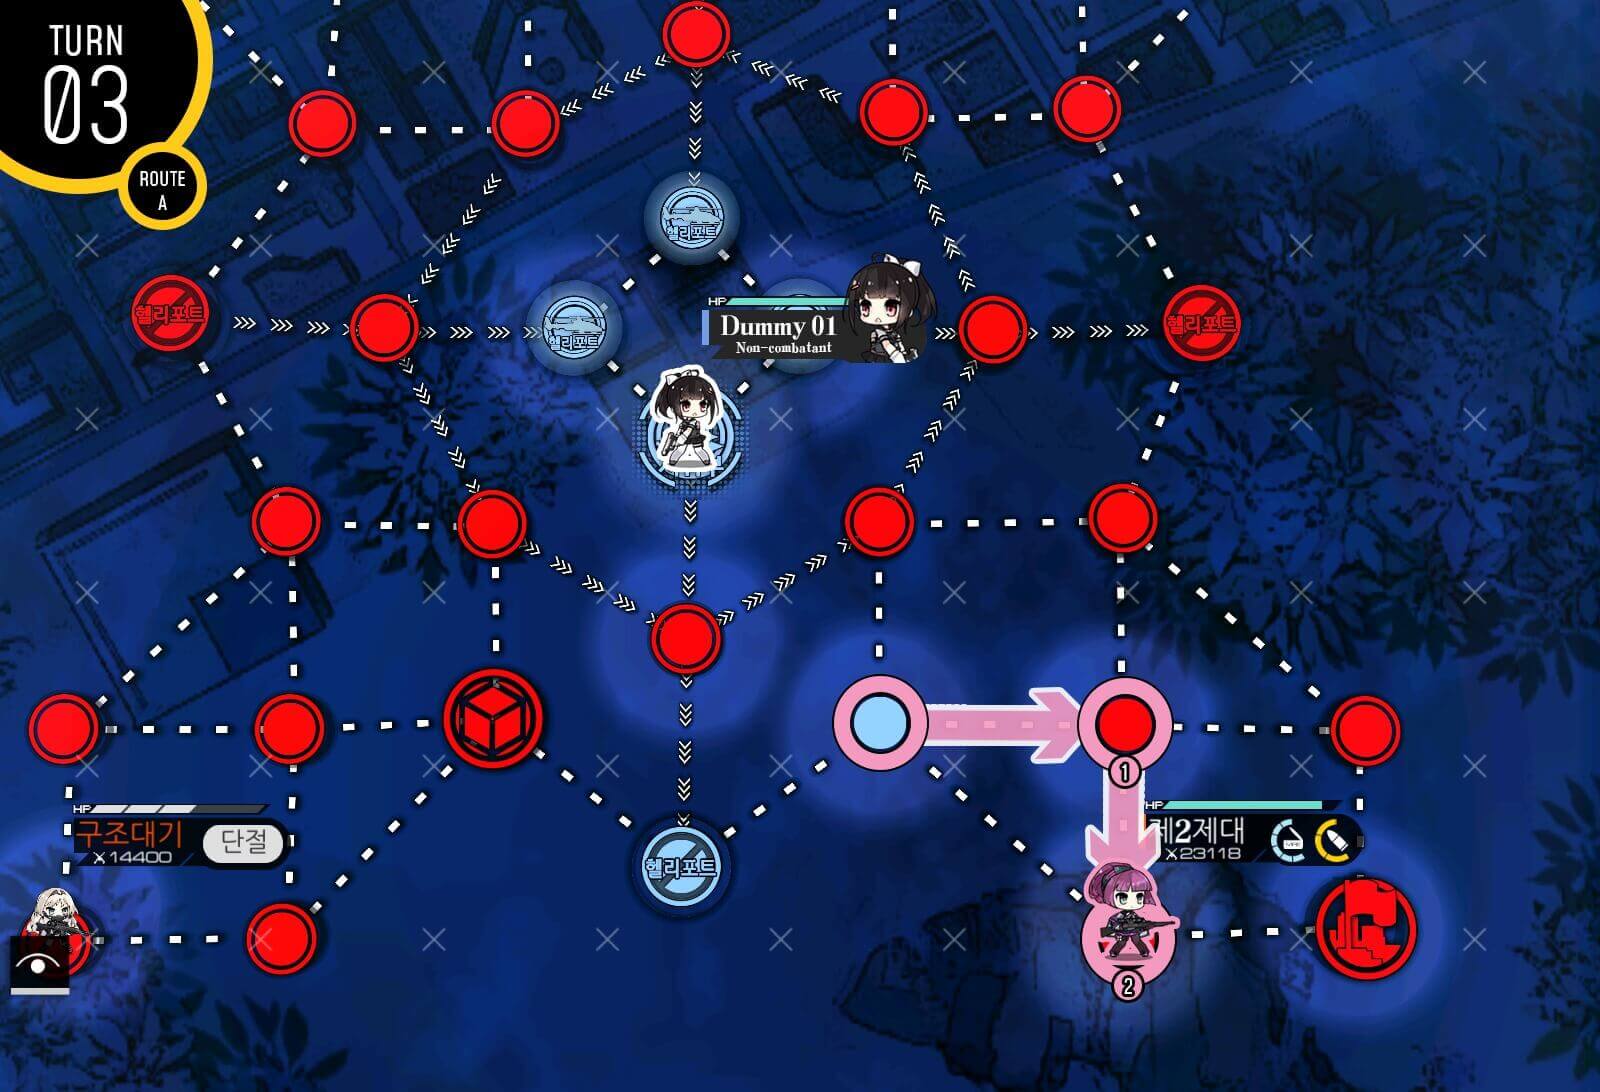
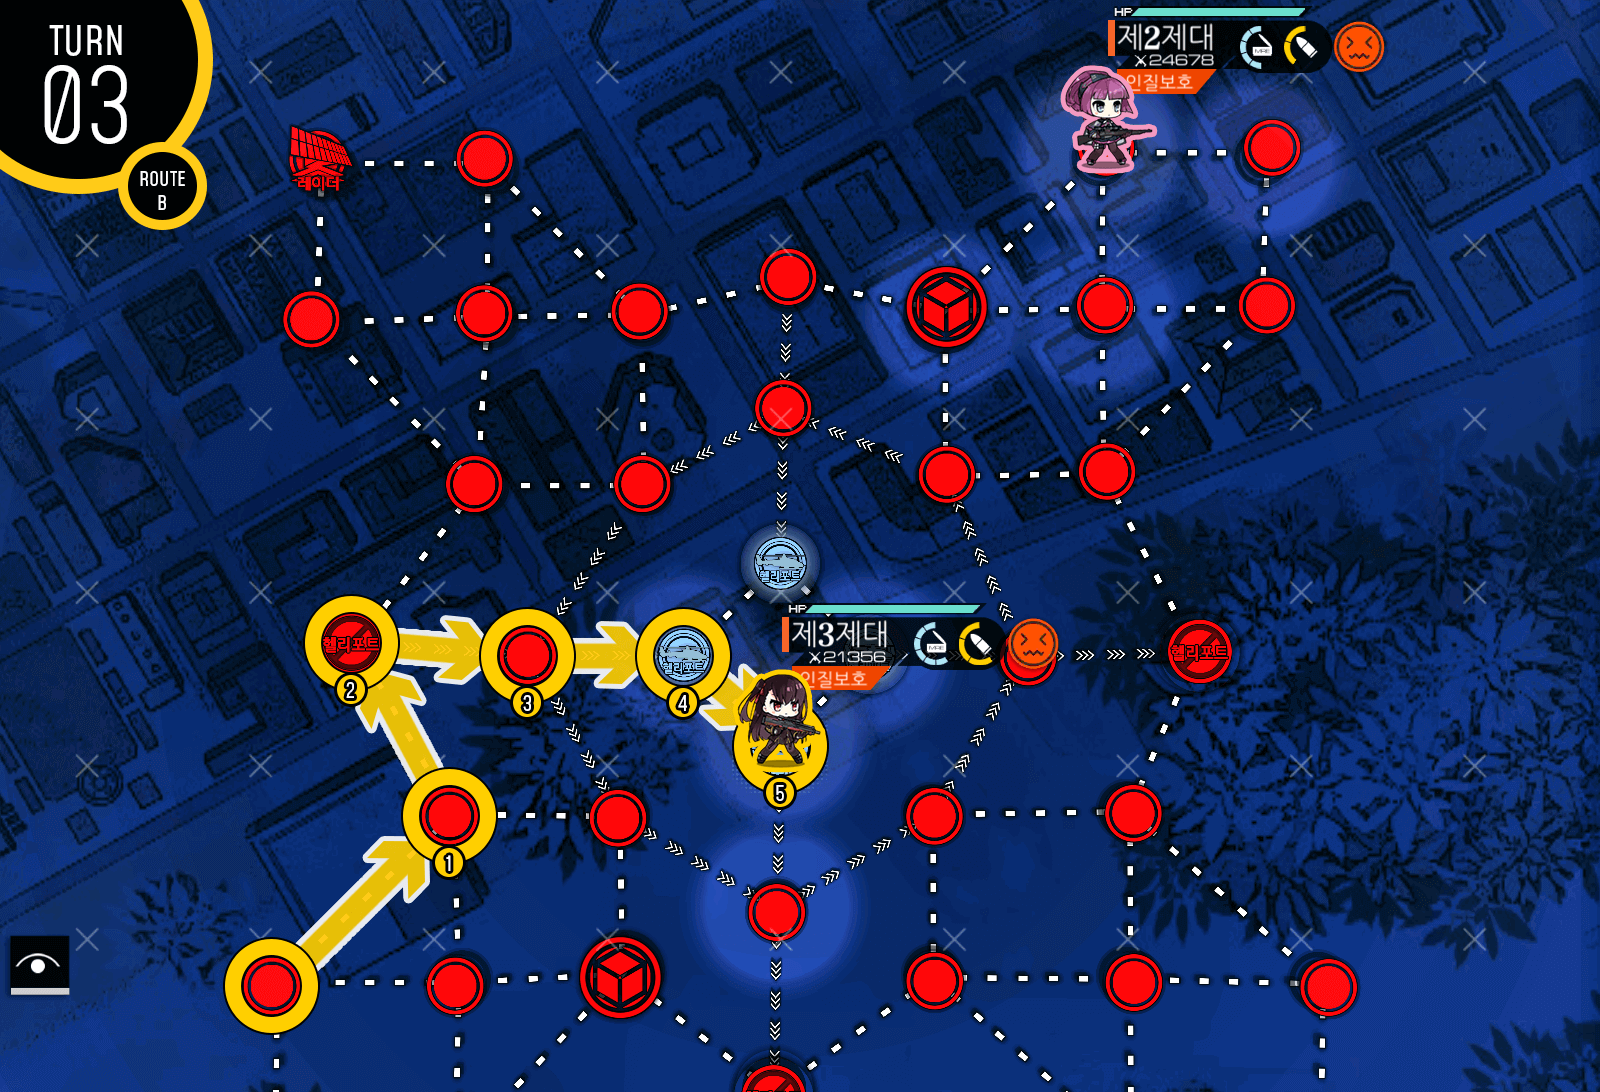
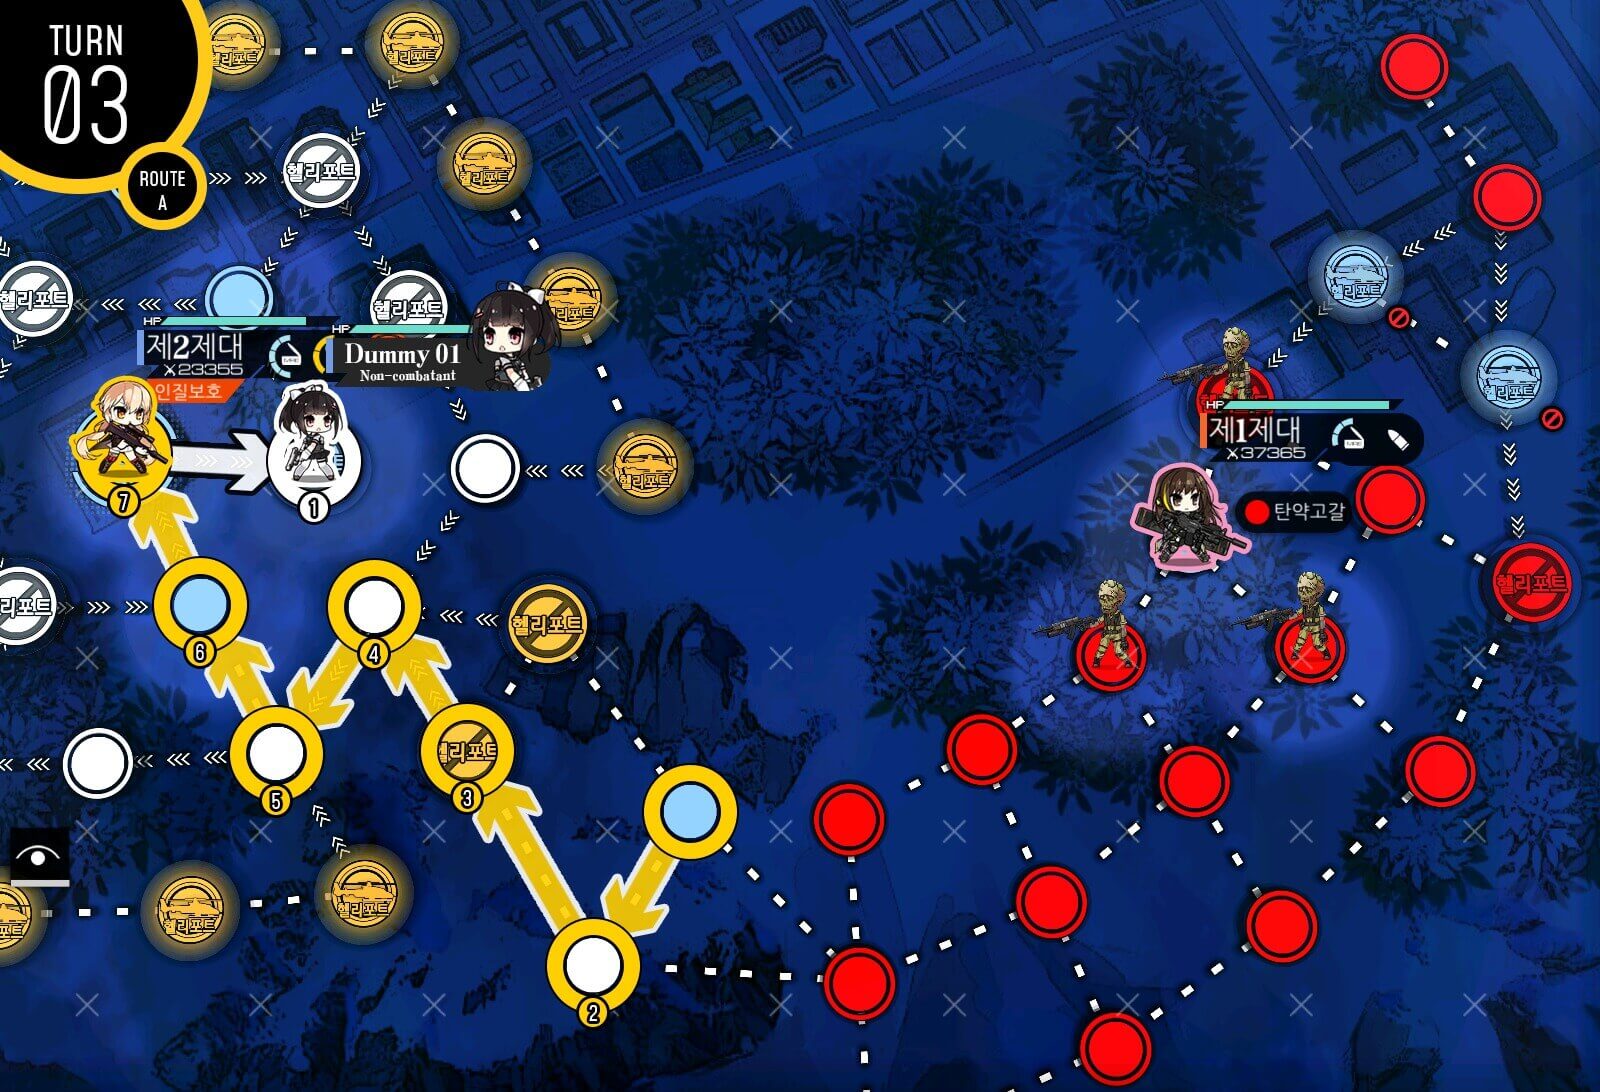
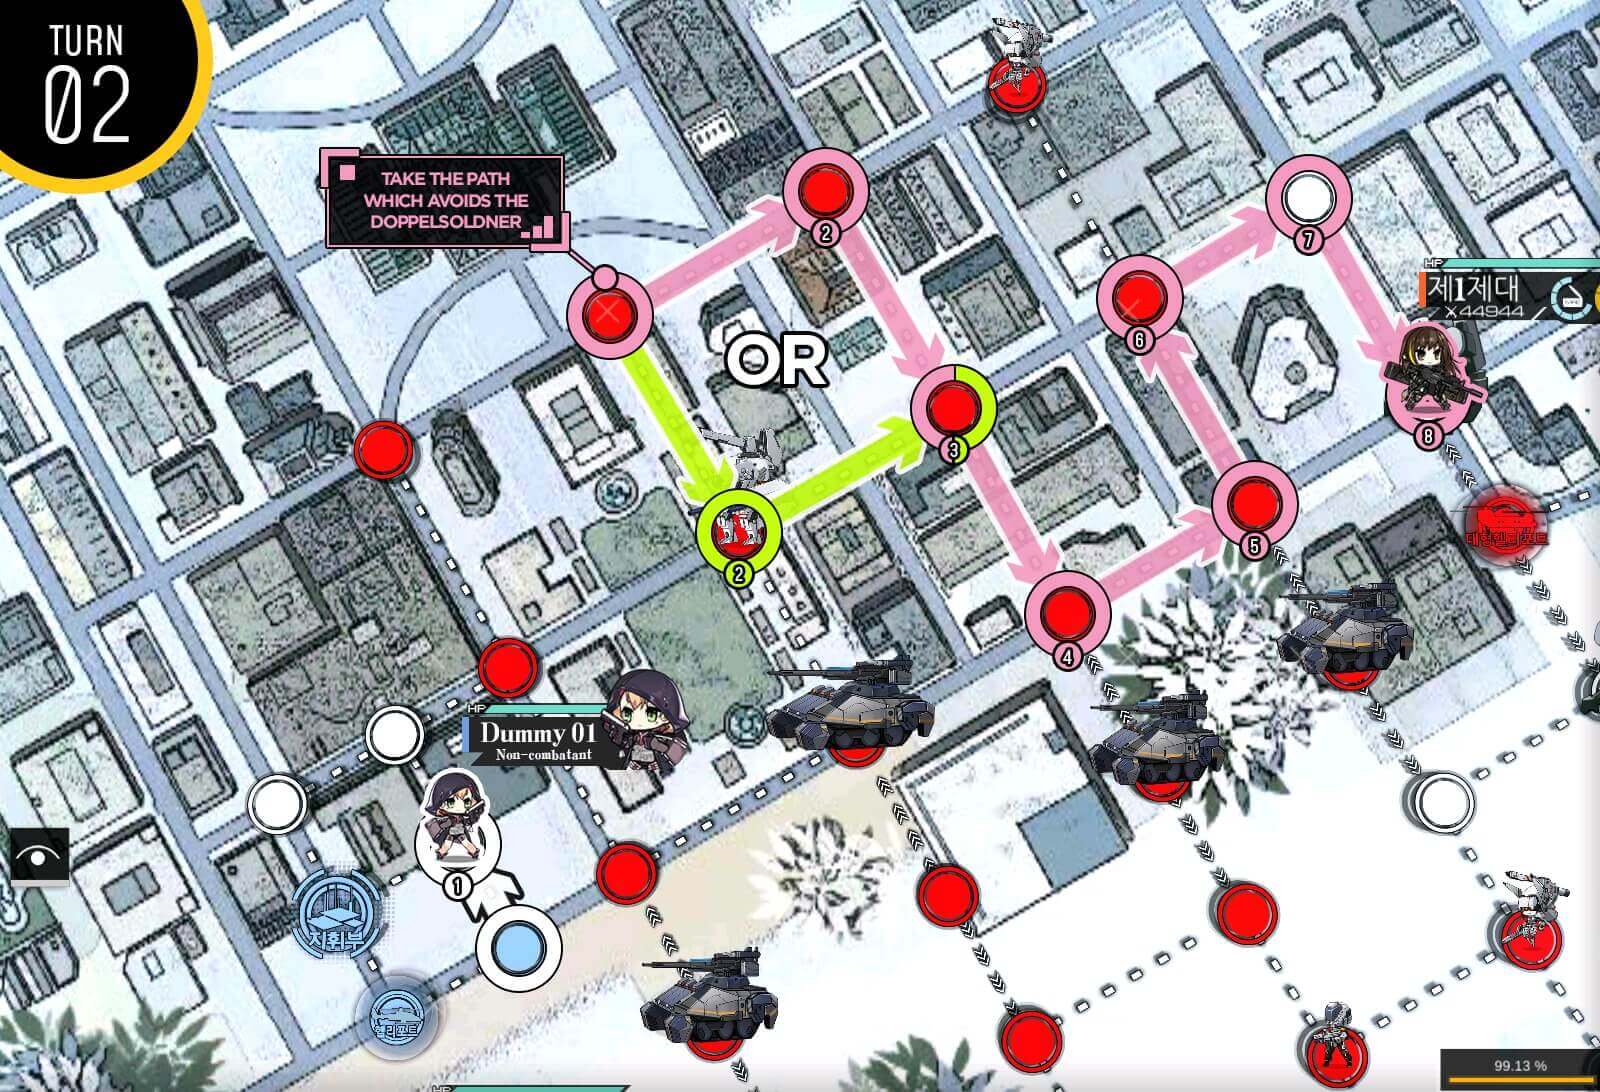
Turn 3a
At this point you have to take note of where enemy units are positioned. If there's any units left on the top right corner, take the roundabout way to the helipad [purple]. If not, take the red route to sweep the left side.
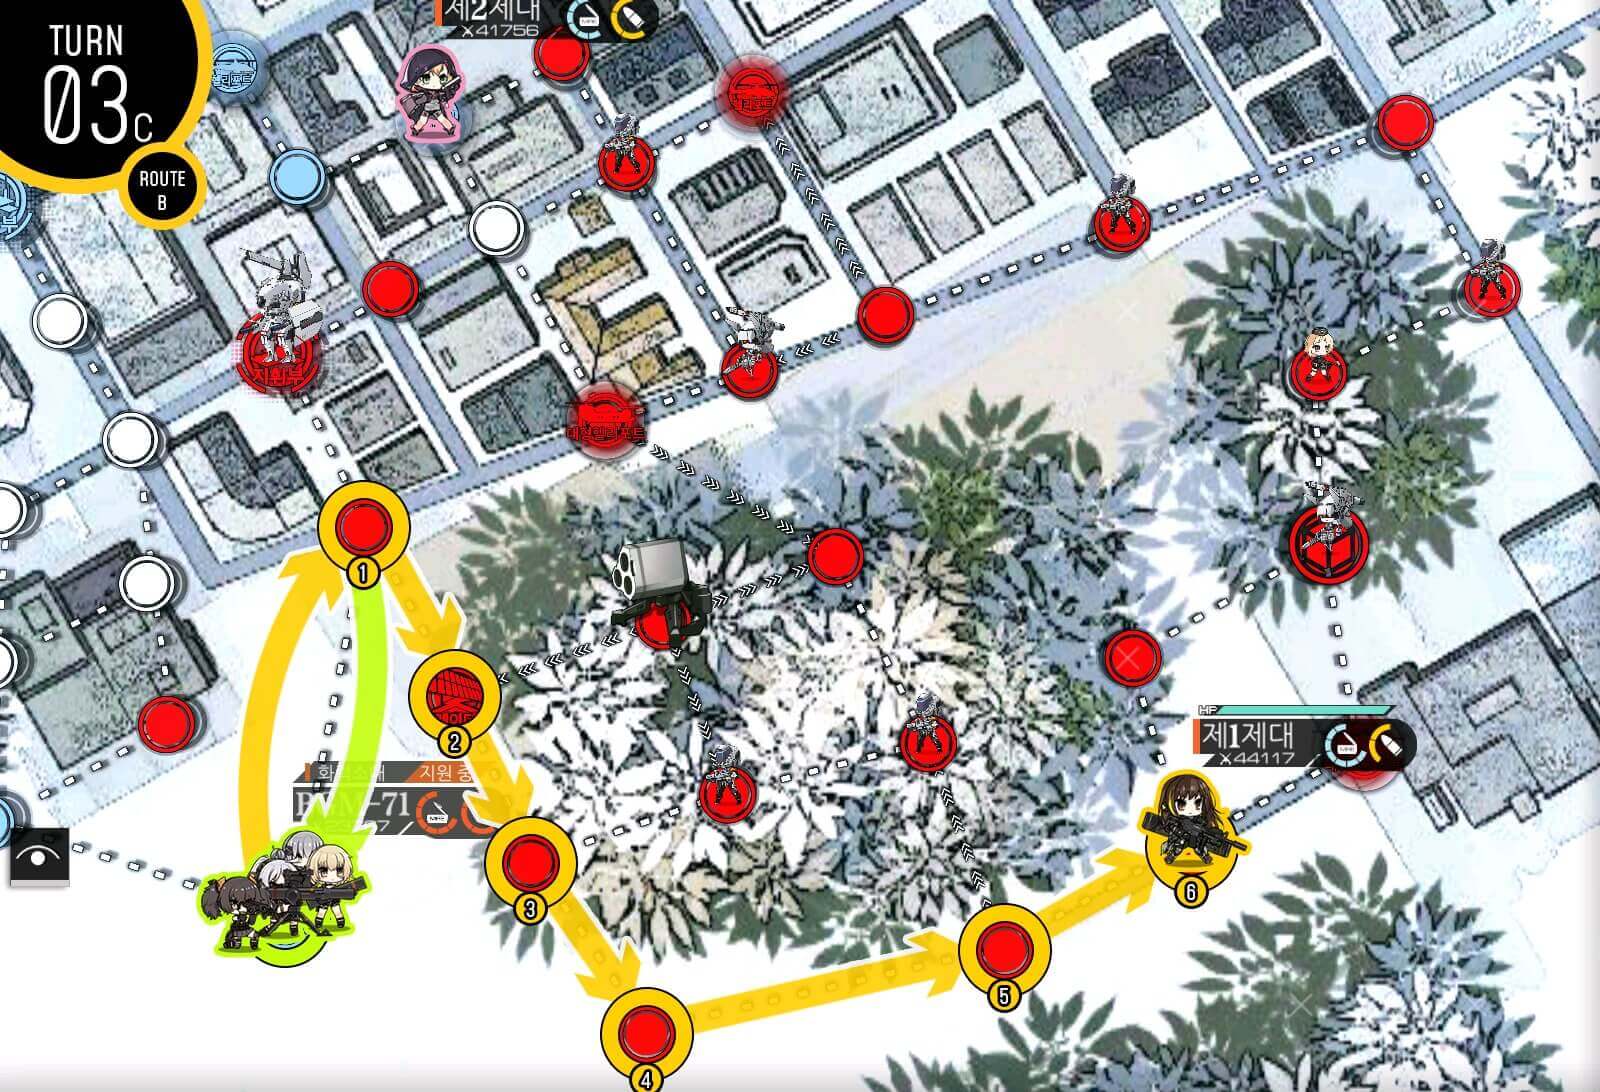
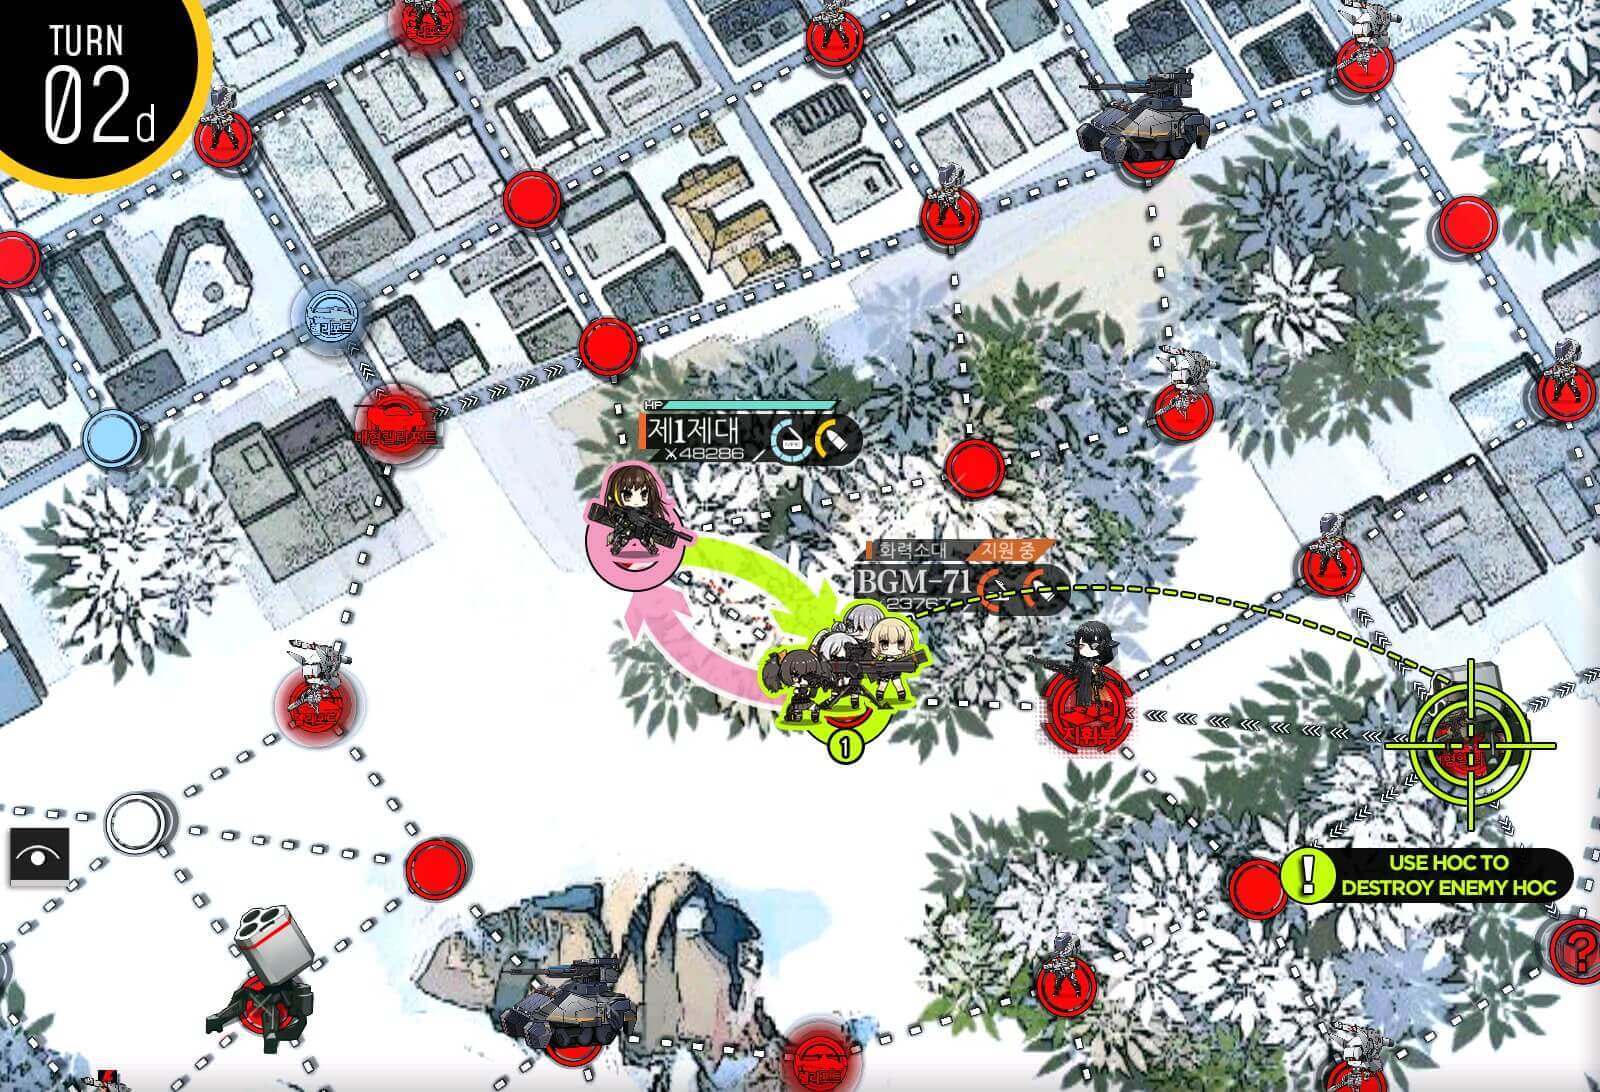
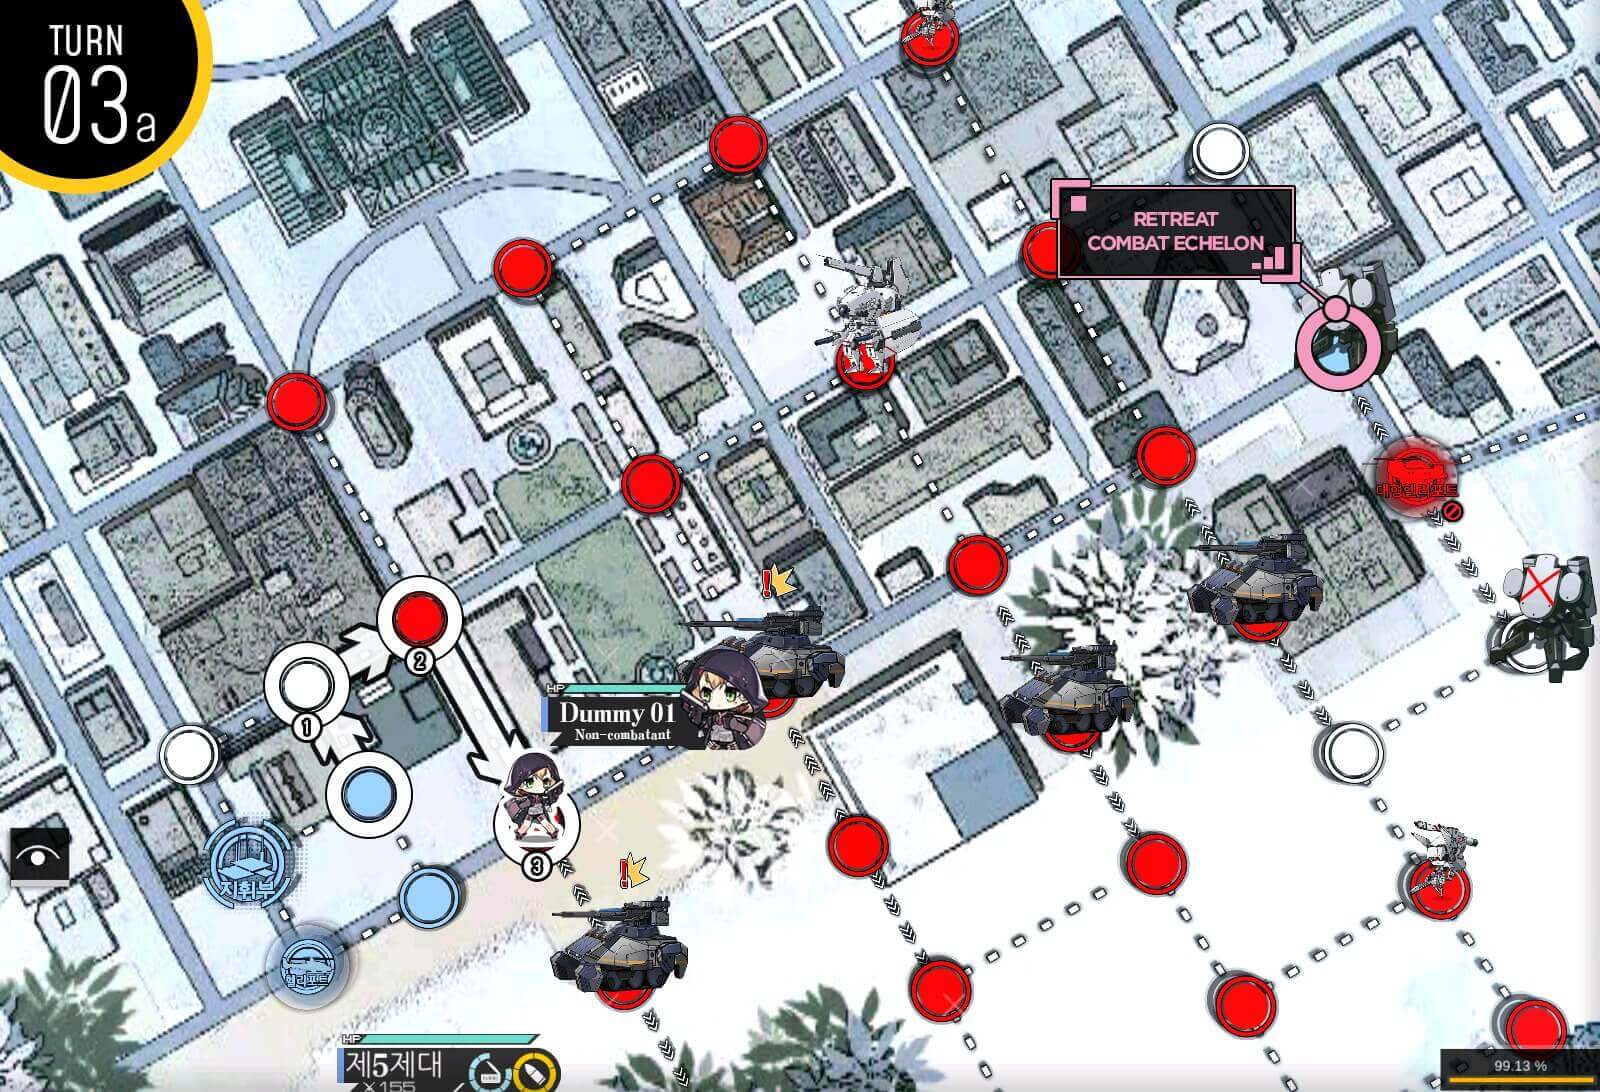
Turn 3b
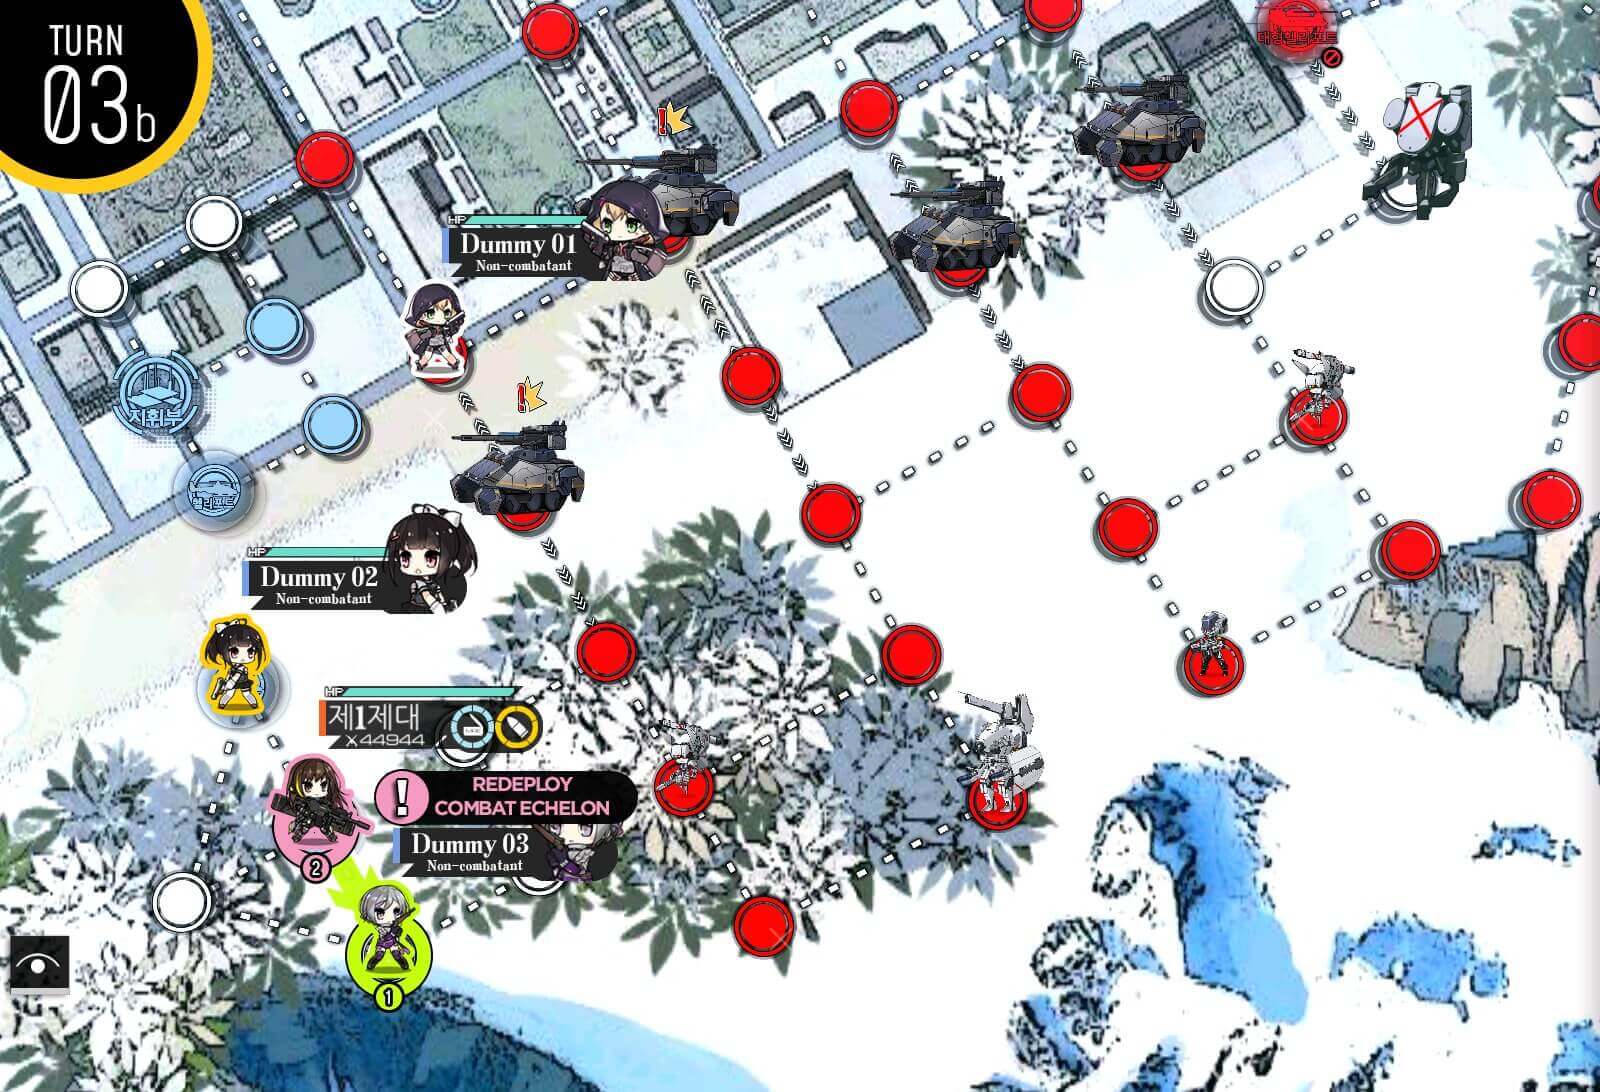
Sometimes your dummy echelon could be in danger from the bottom side. If that is the case, just move the first dummy up to the HQ. If not, move the second dummy echelon down to HQ.

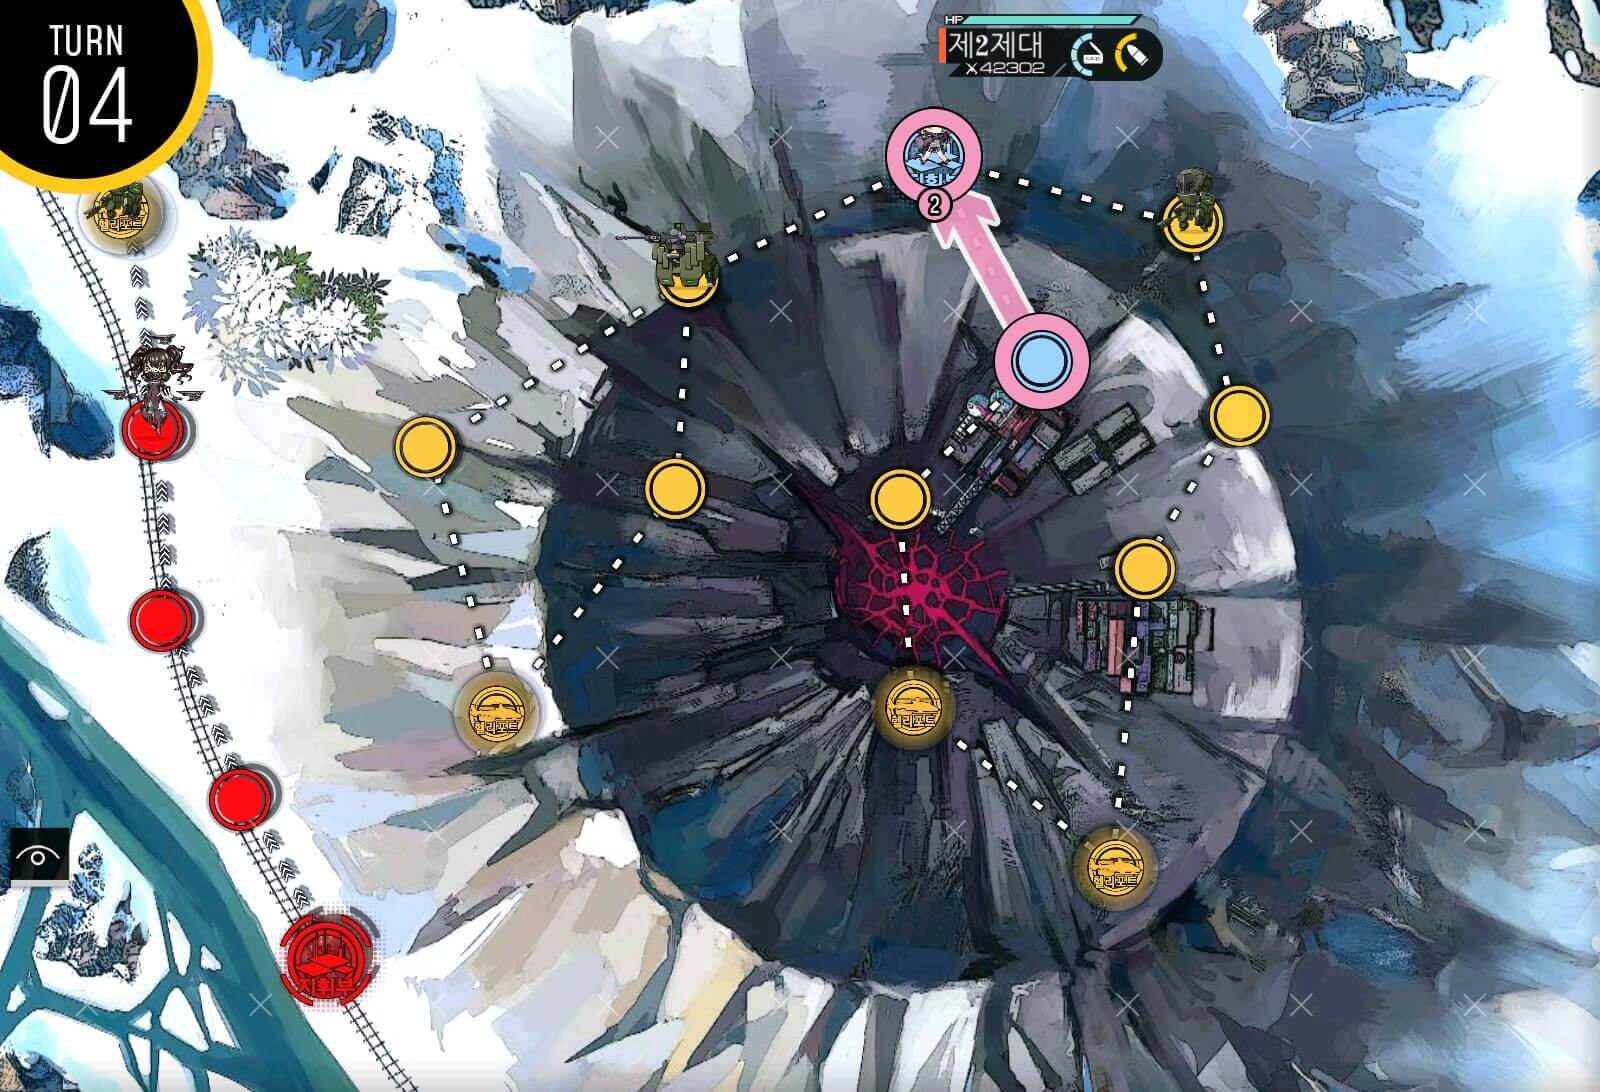
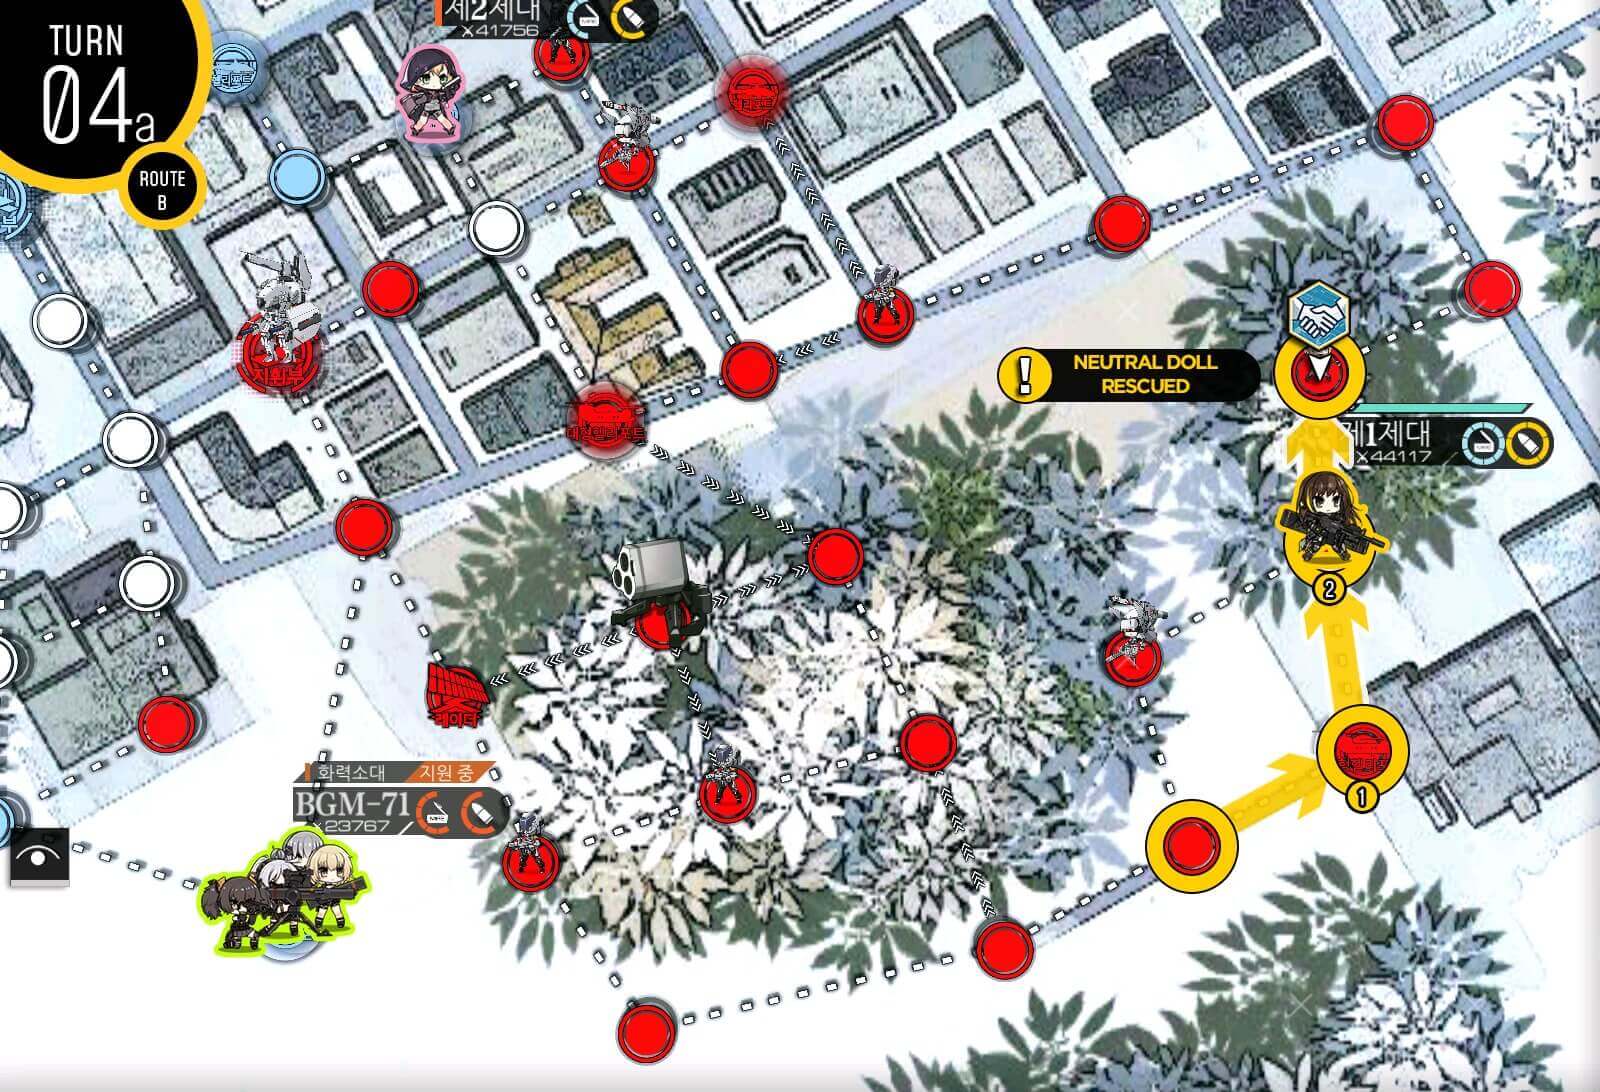
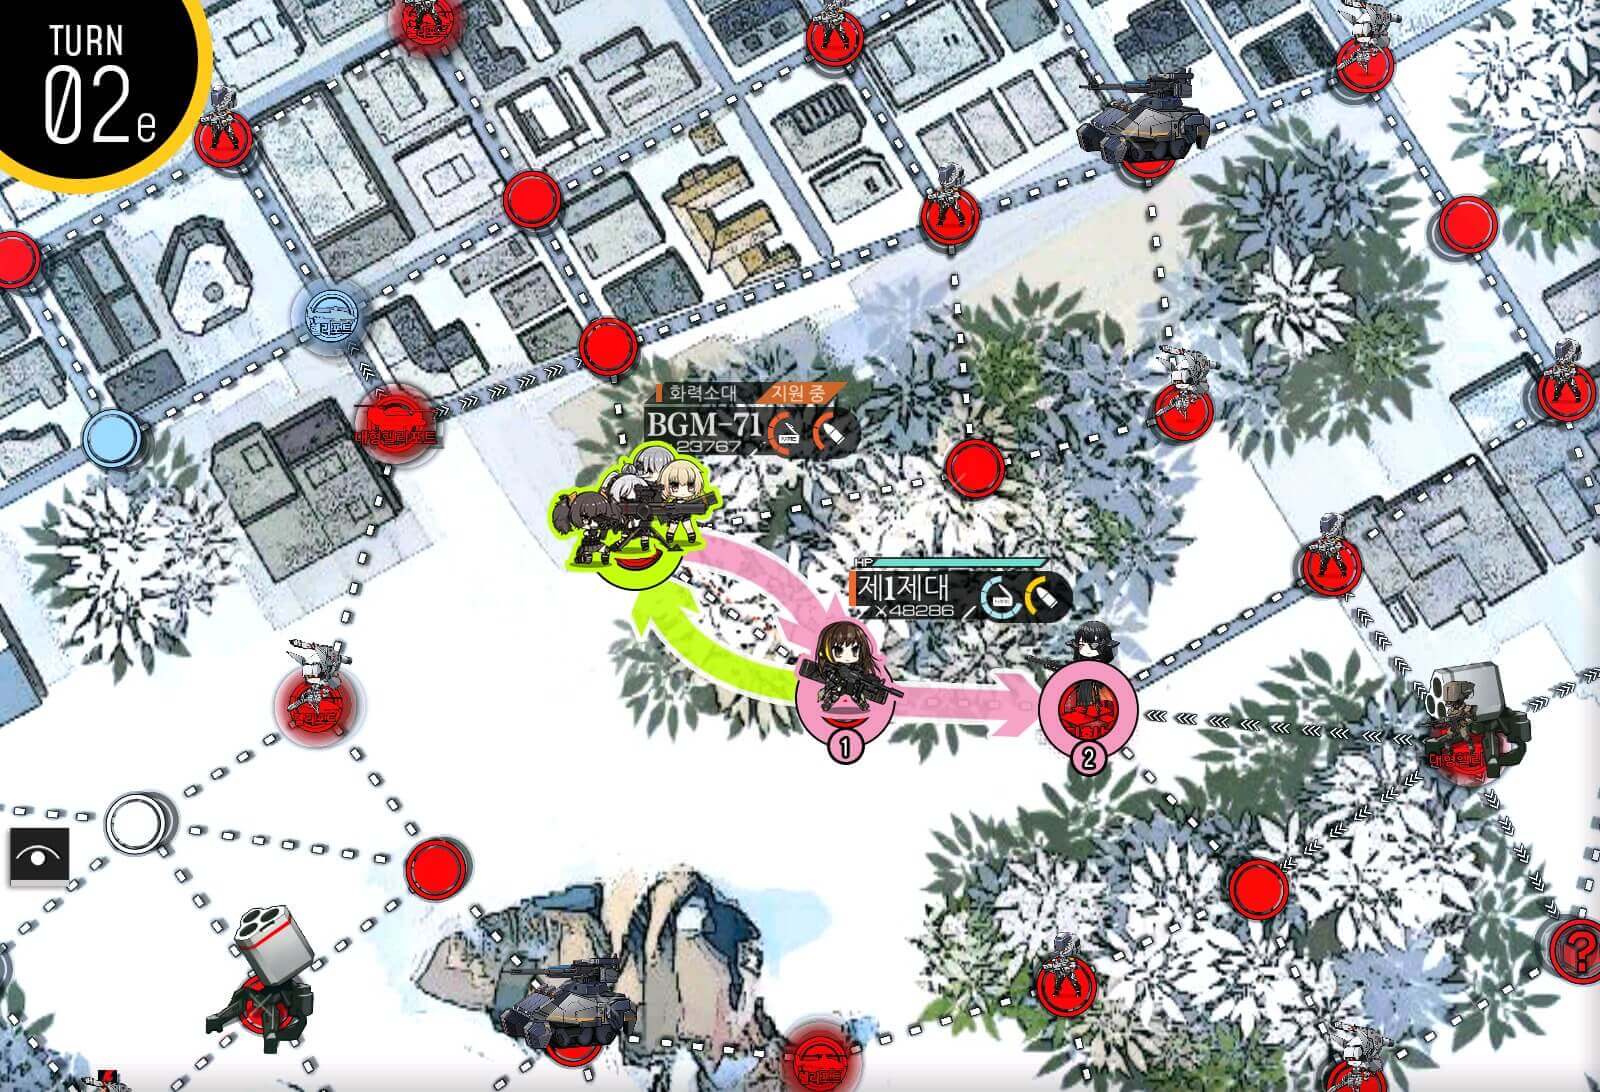
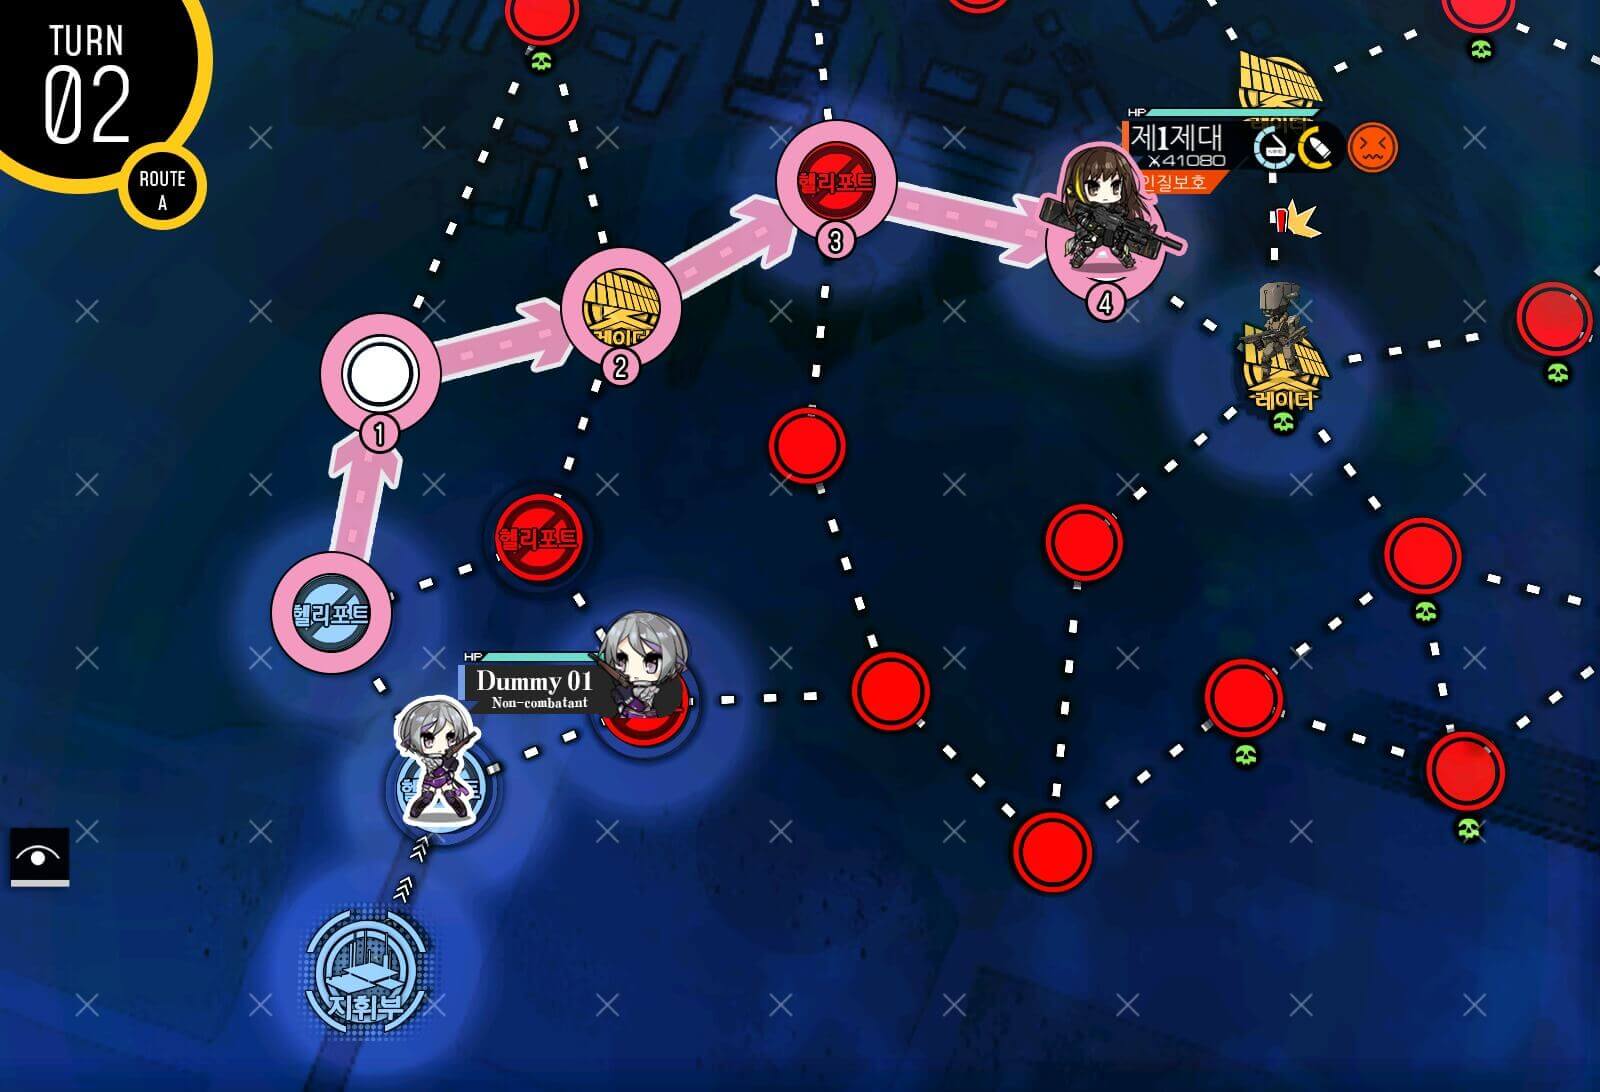
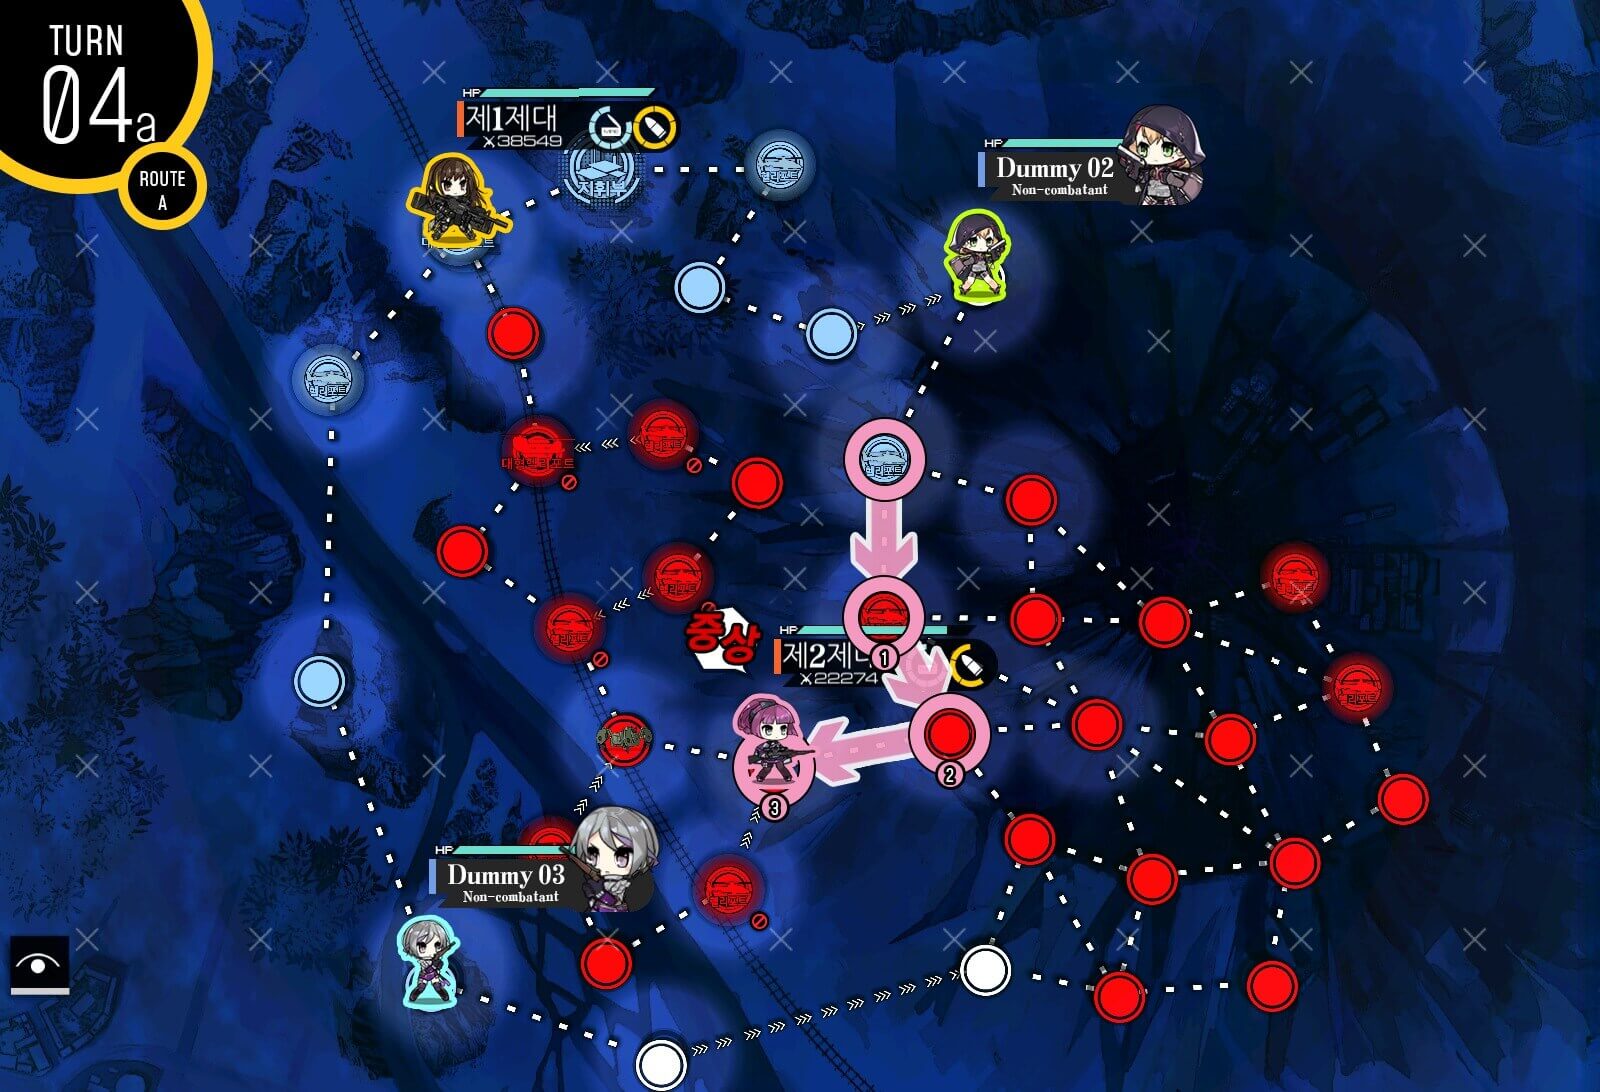
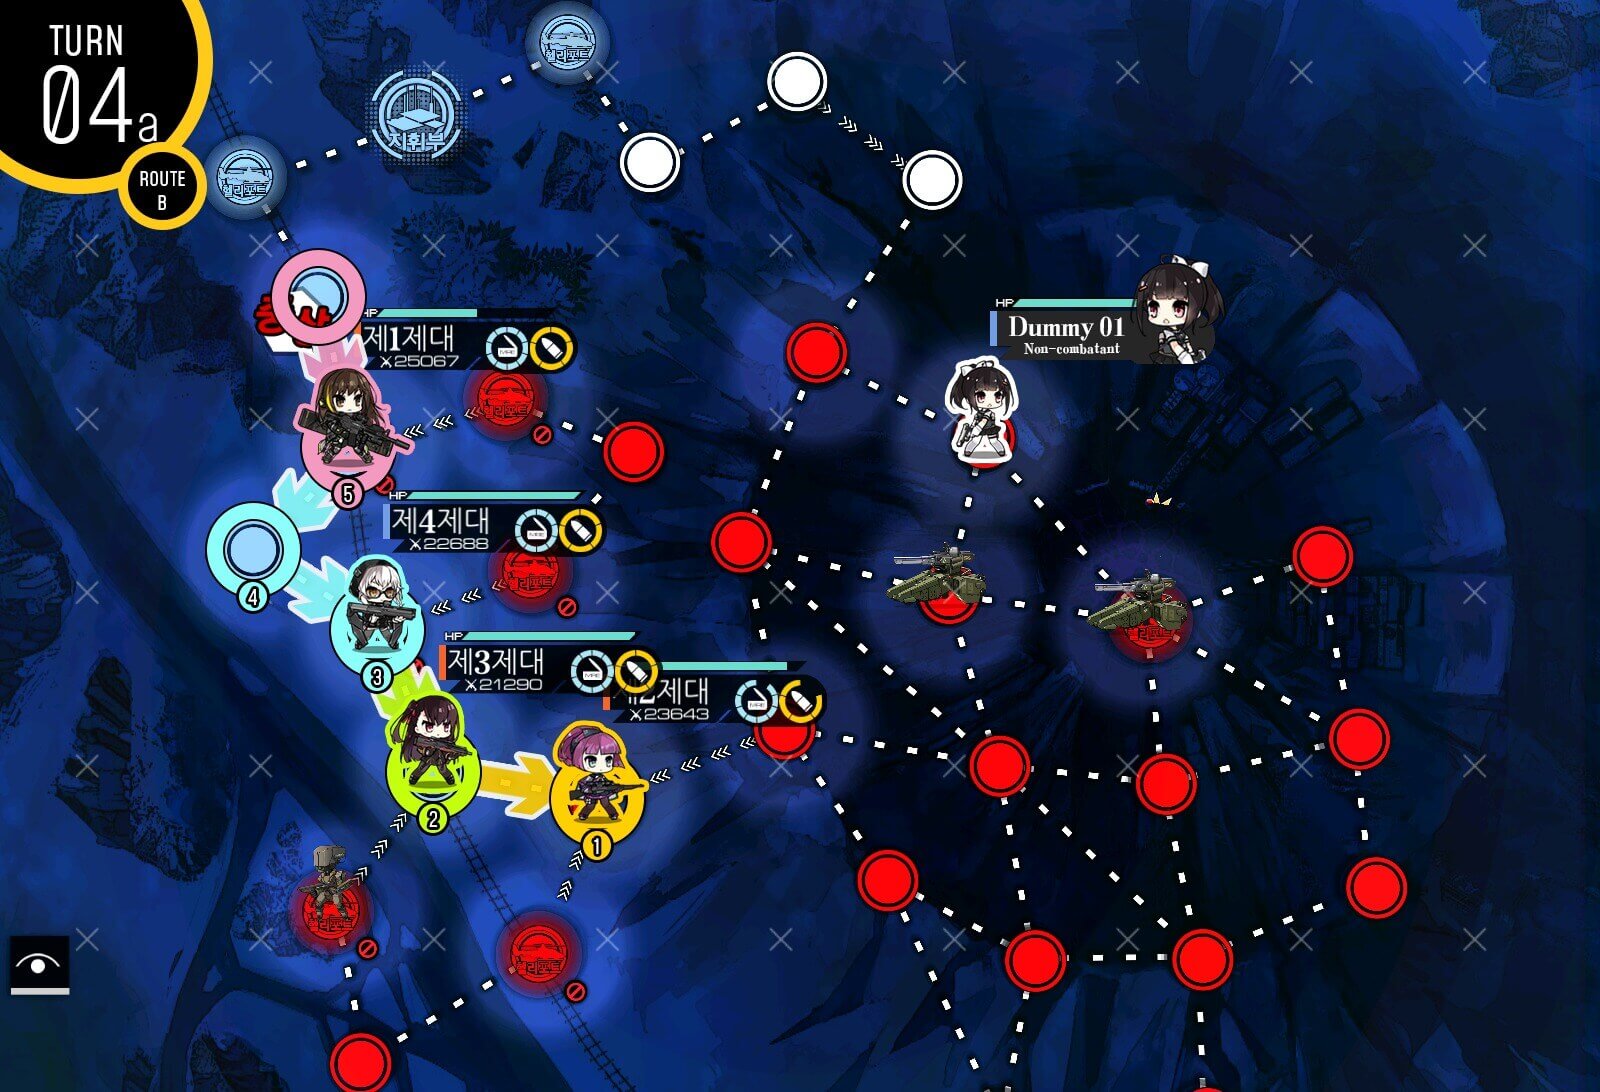
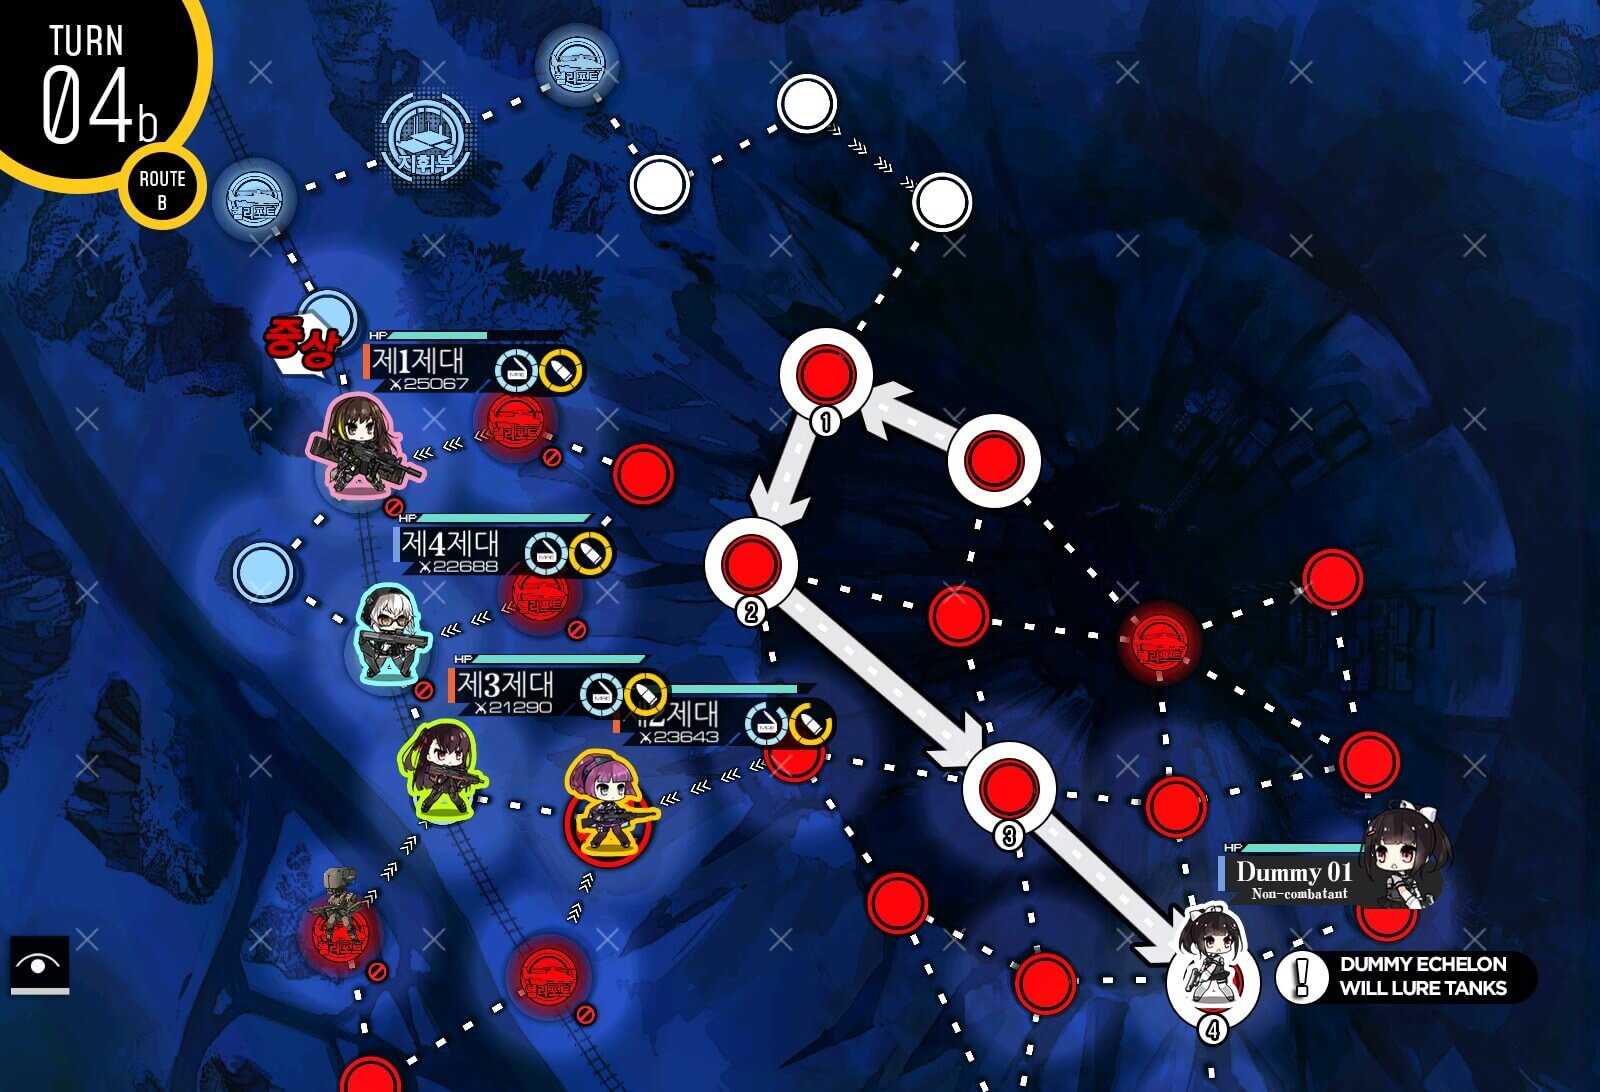
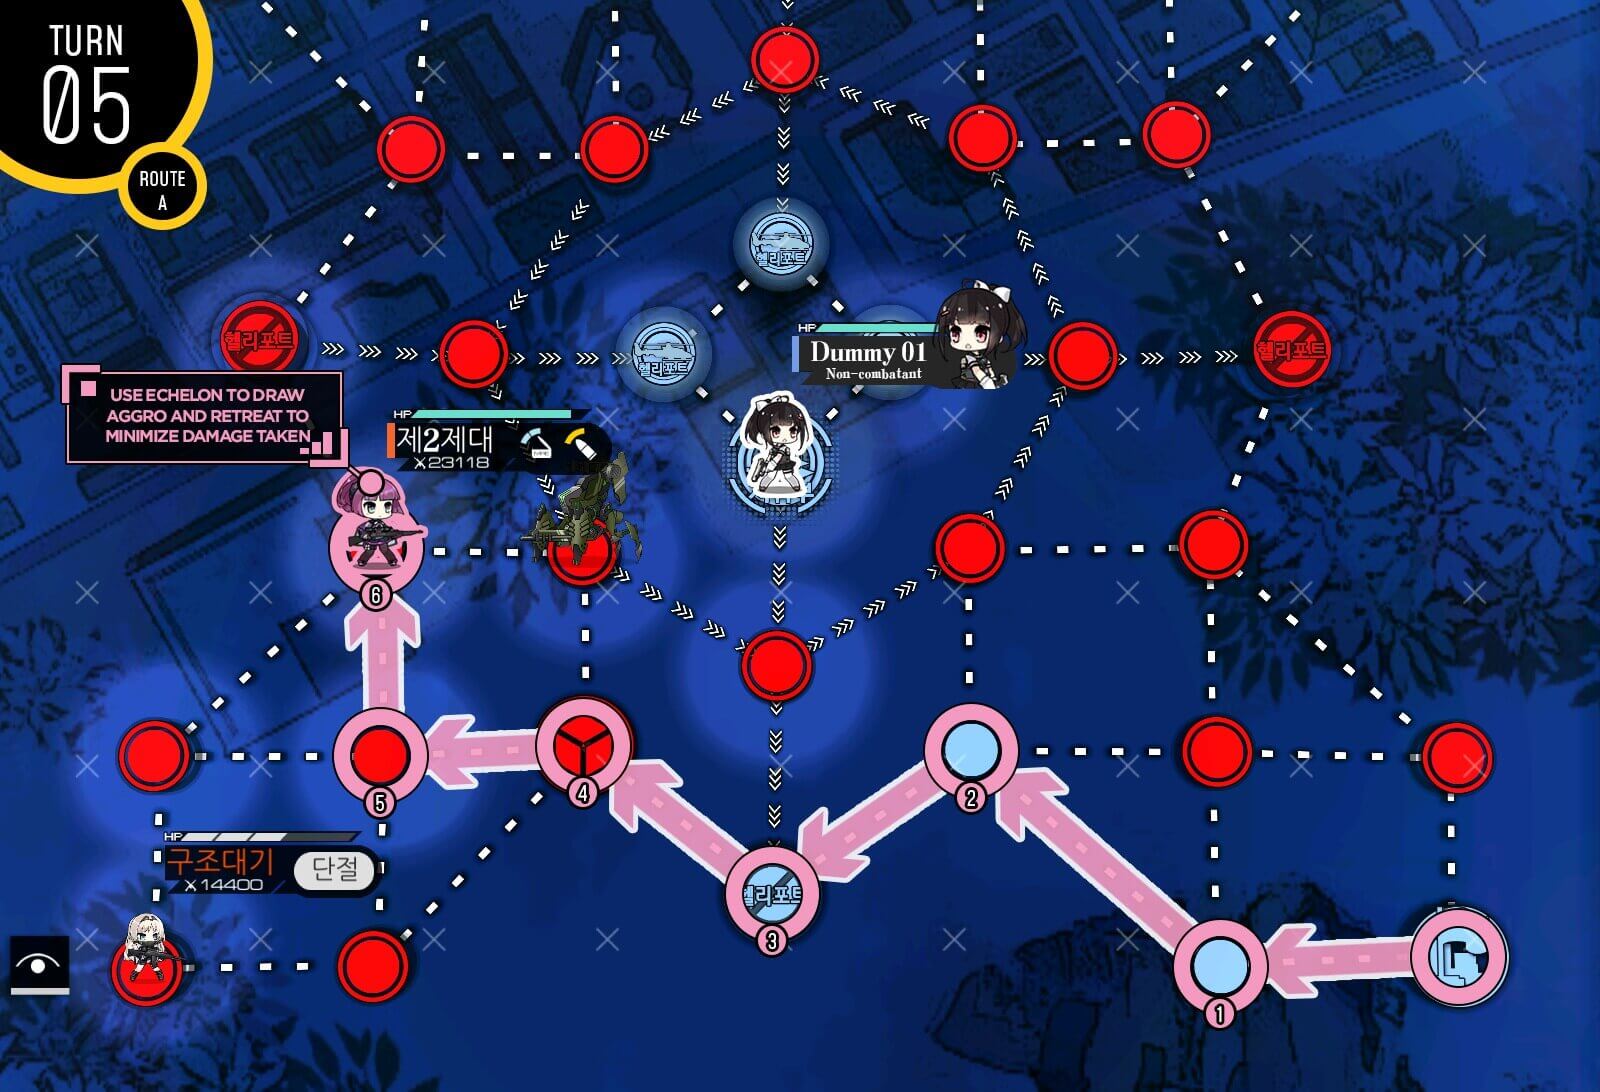
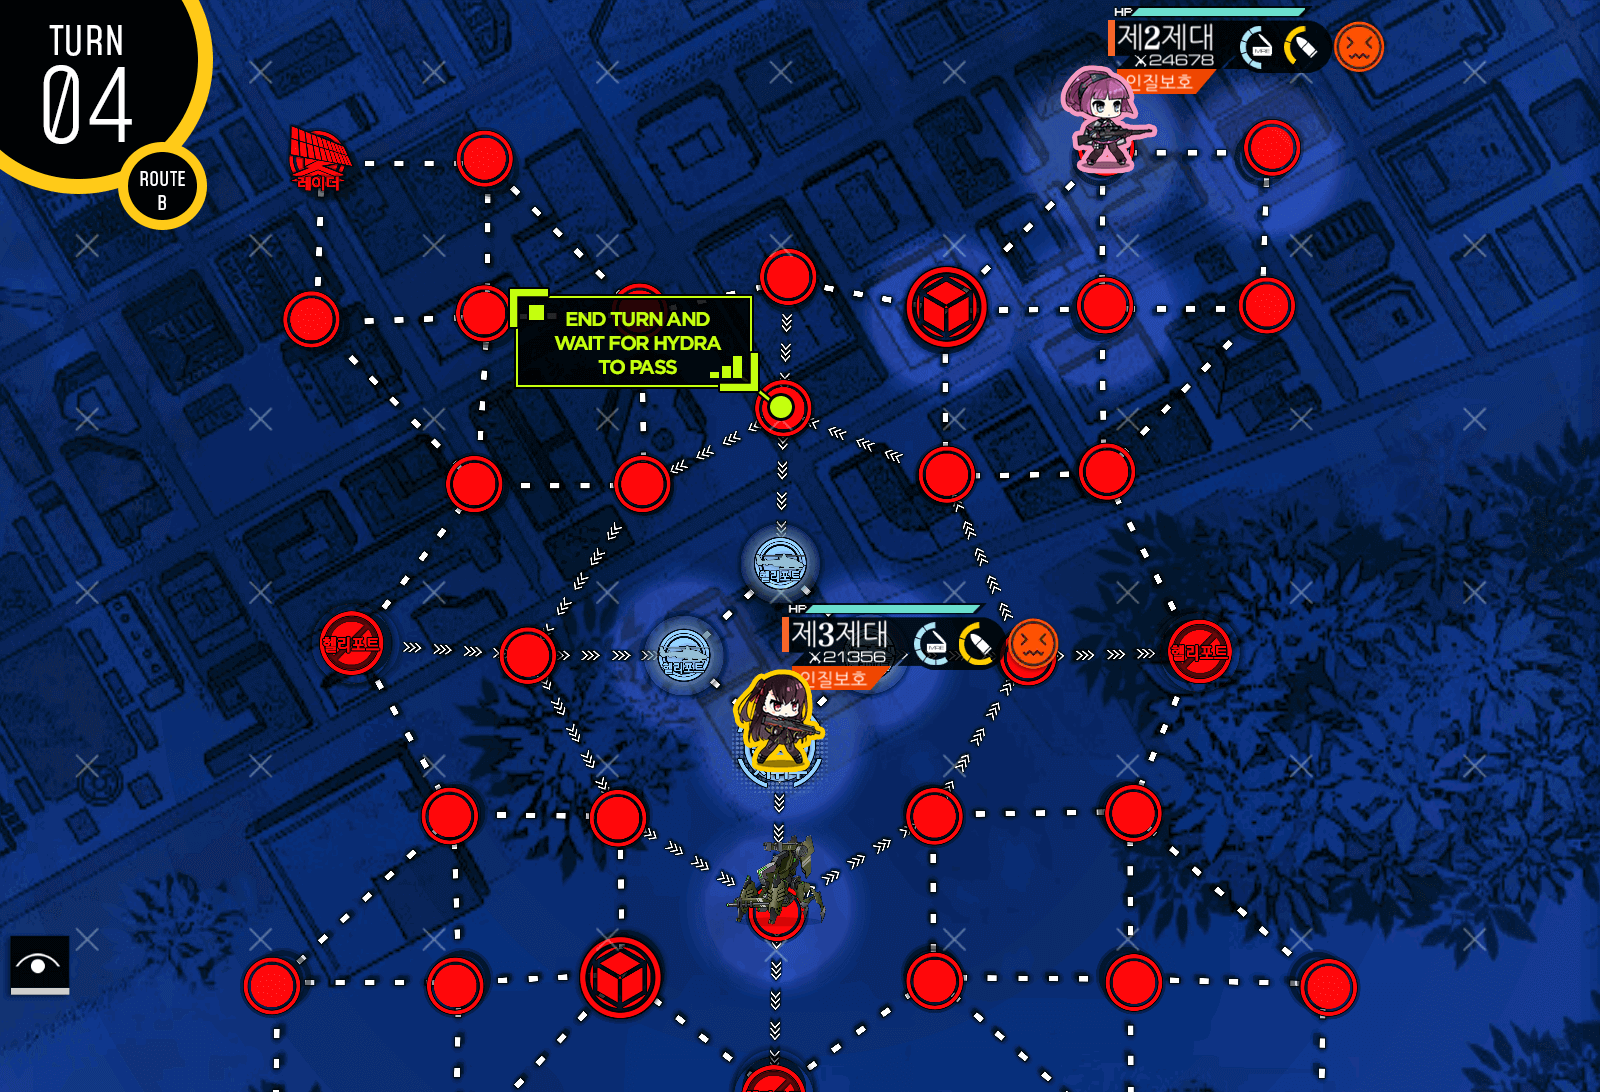
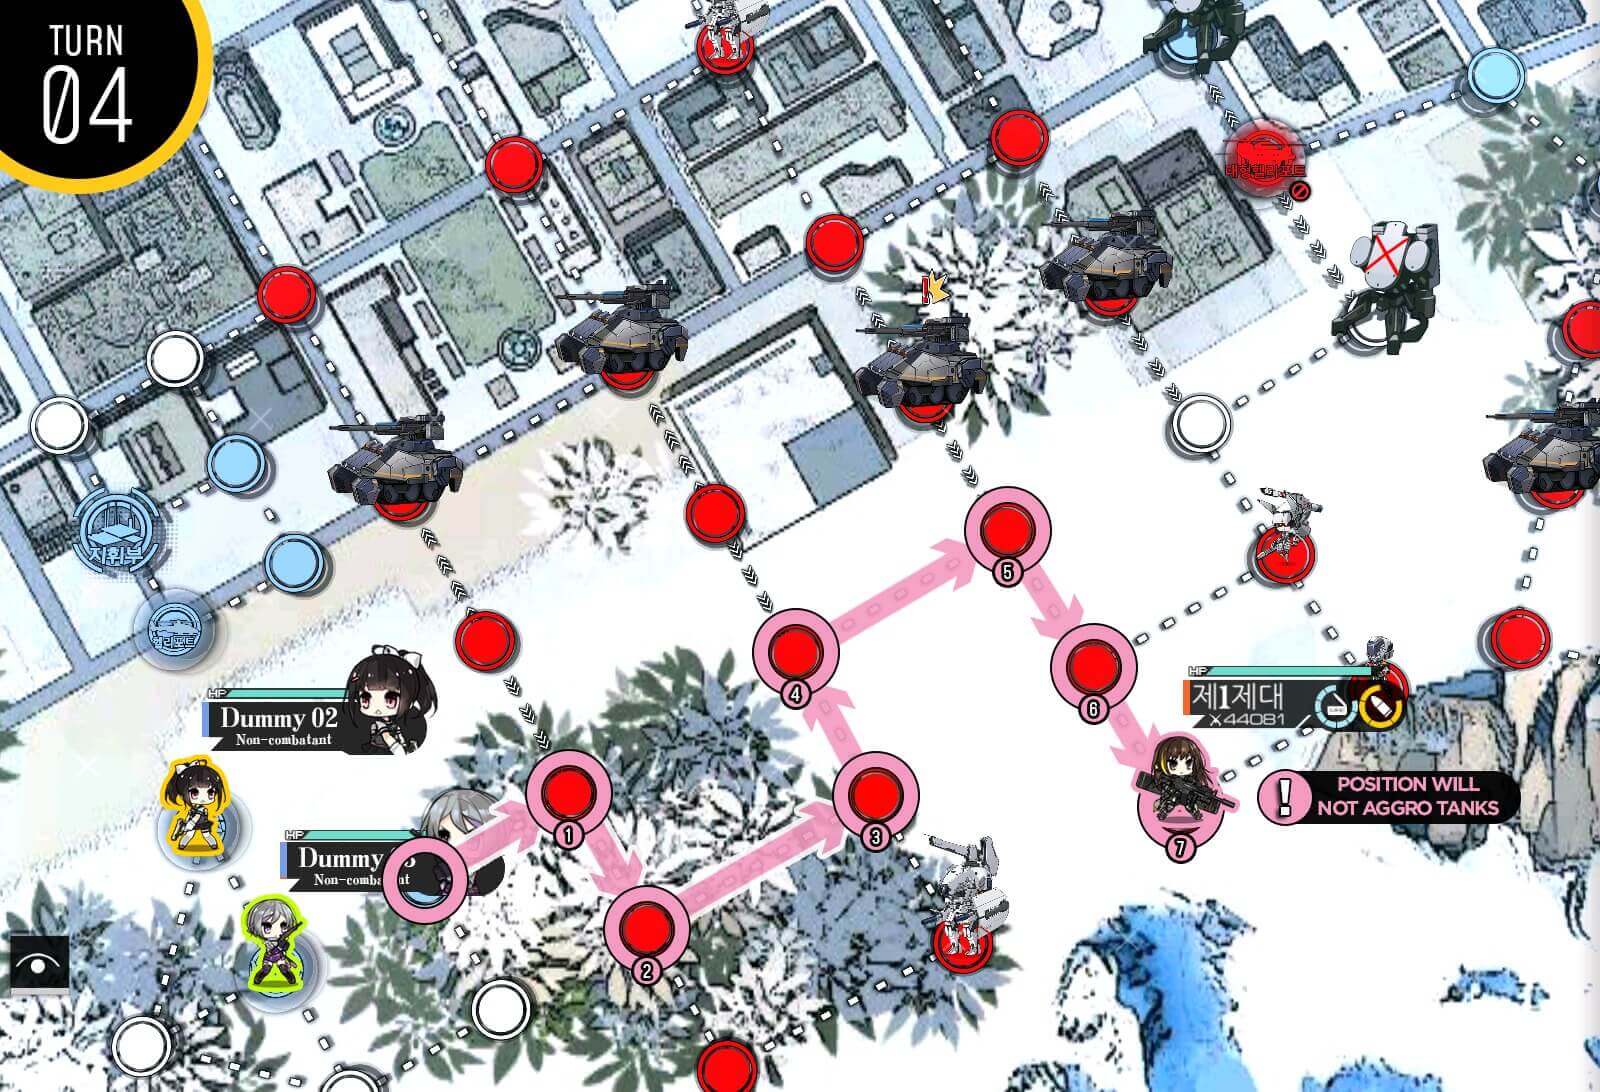
Turn 4
Combat echelon continues to sweep the left pocket. Don't forget to resupply at the helipad or you might be short on ammo! Once you have taken out all enemy units, move combat echelon towards the friendly HQ.
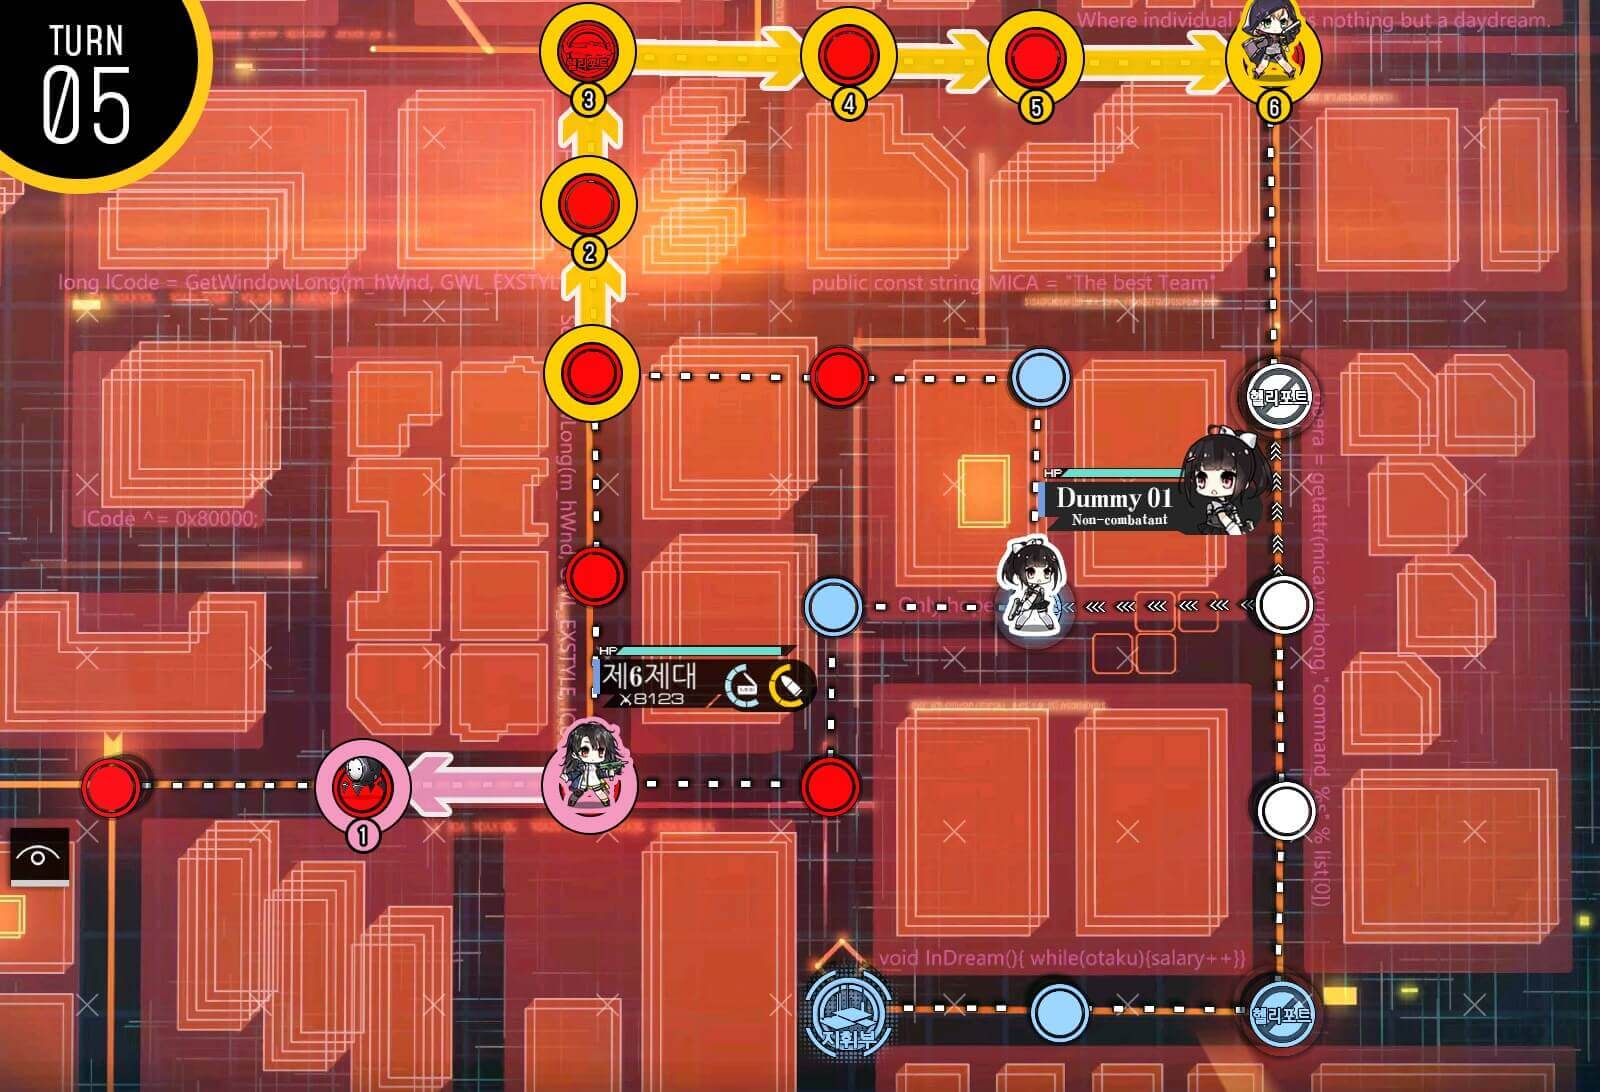
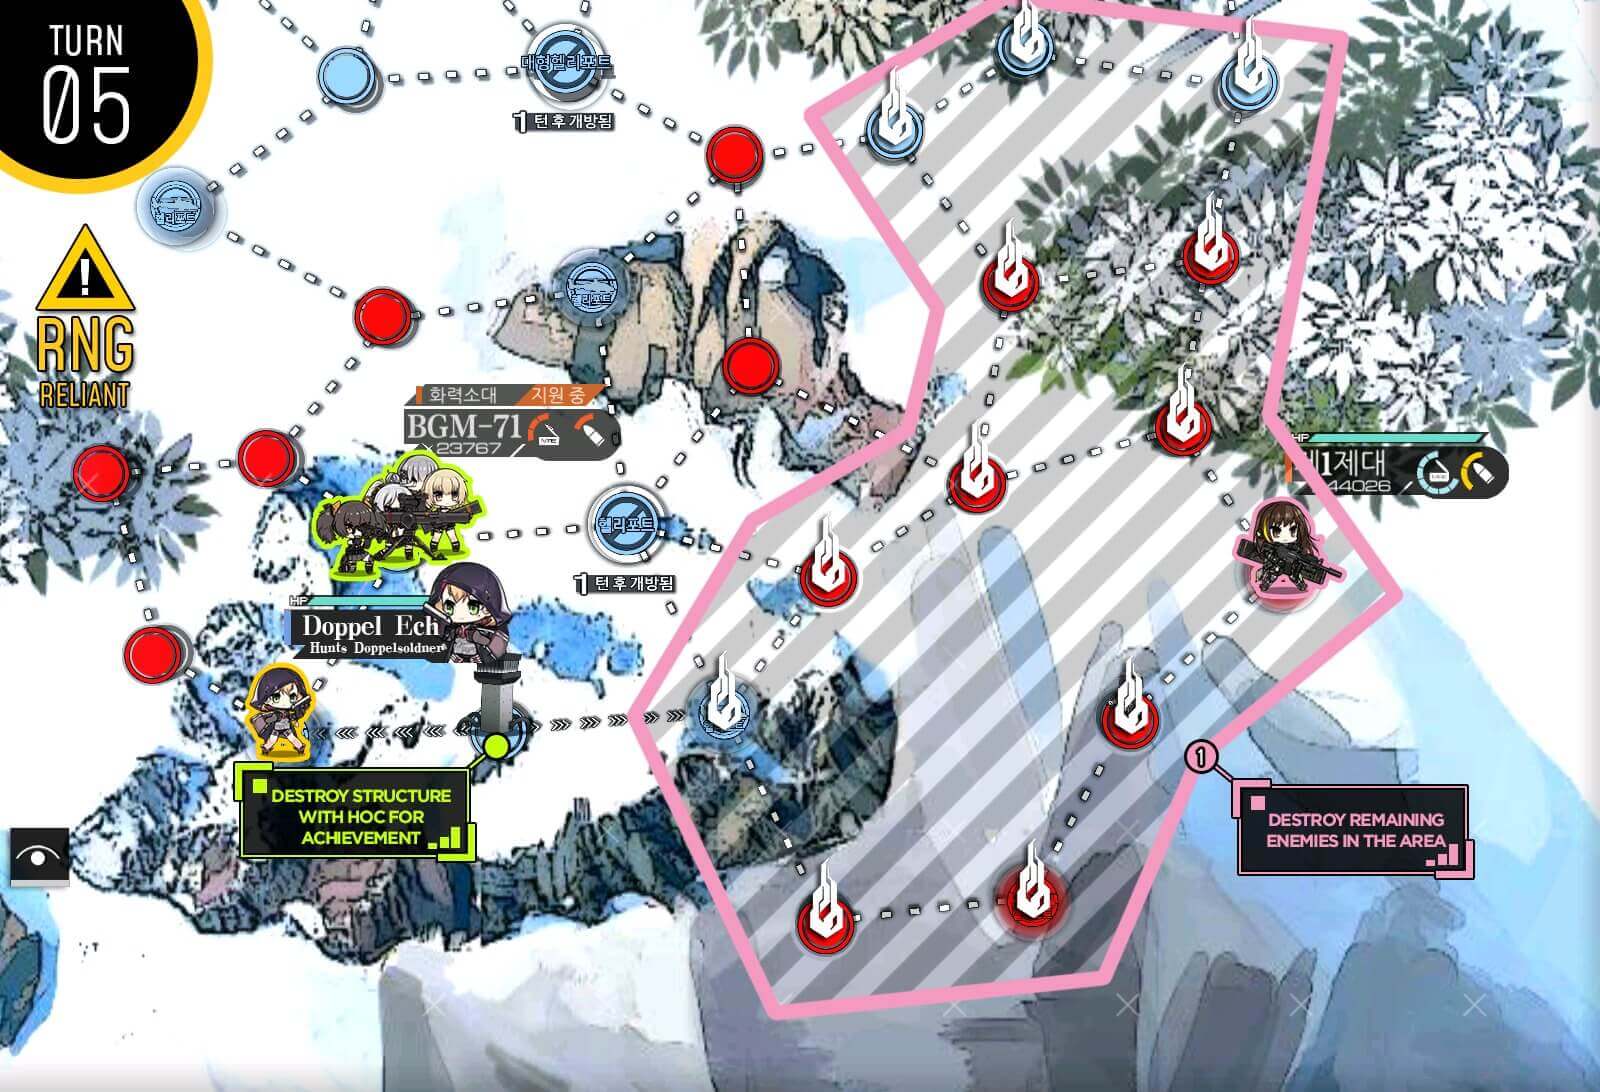
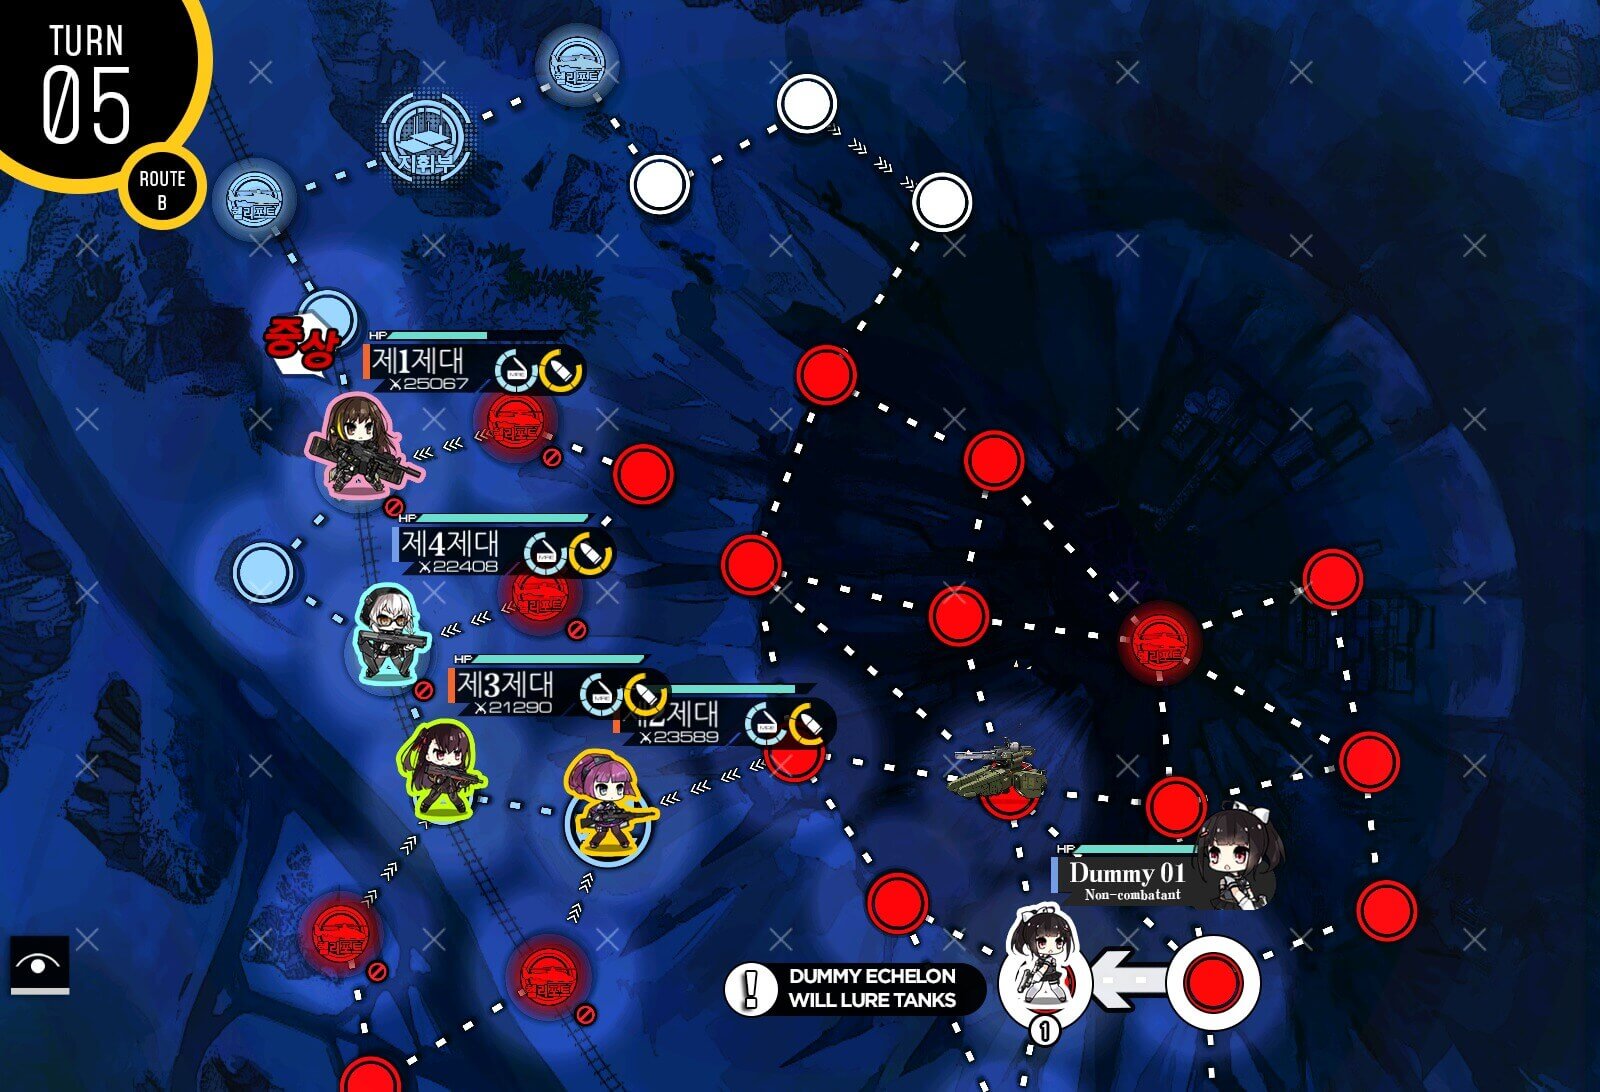
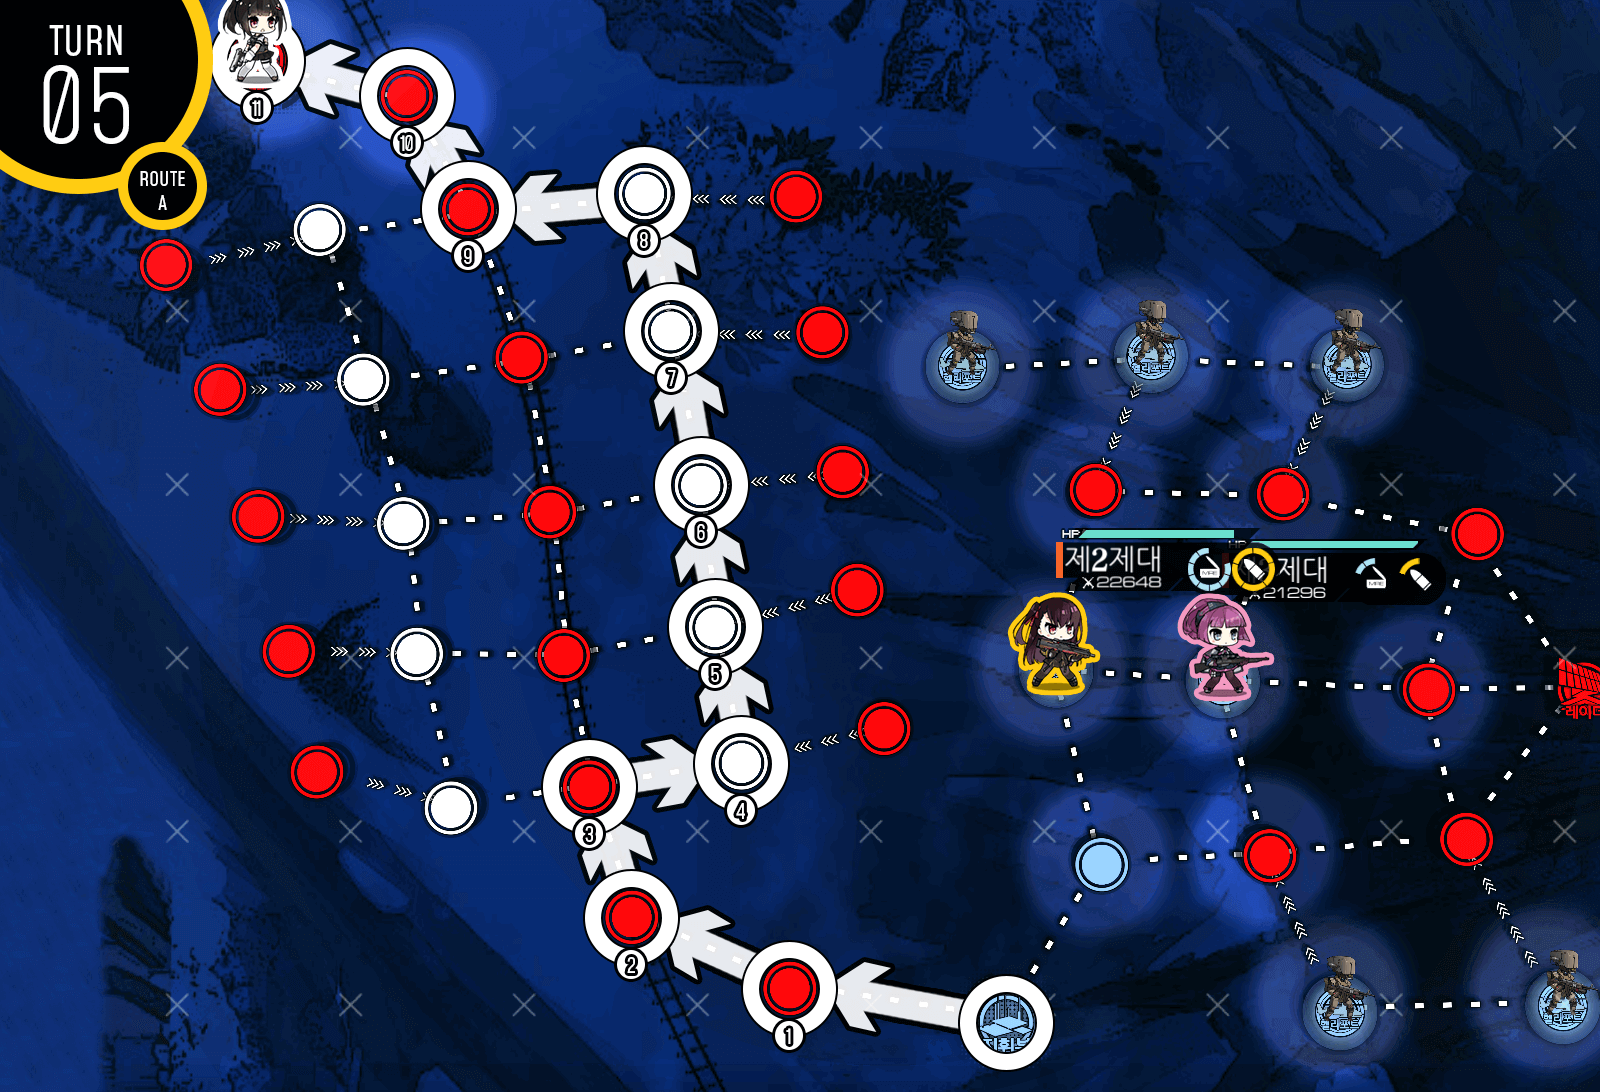
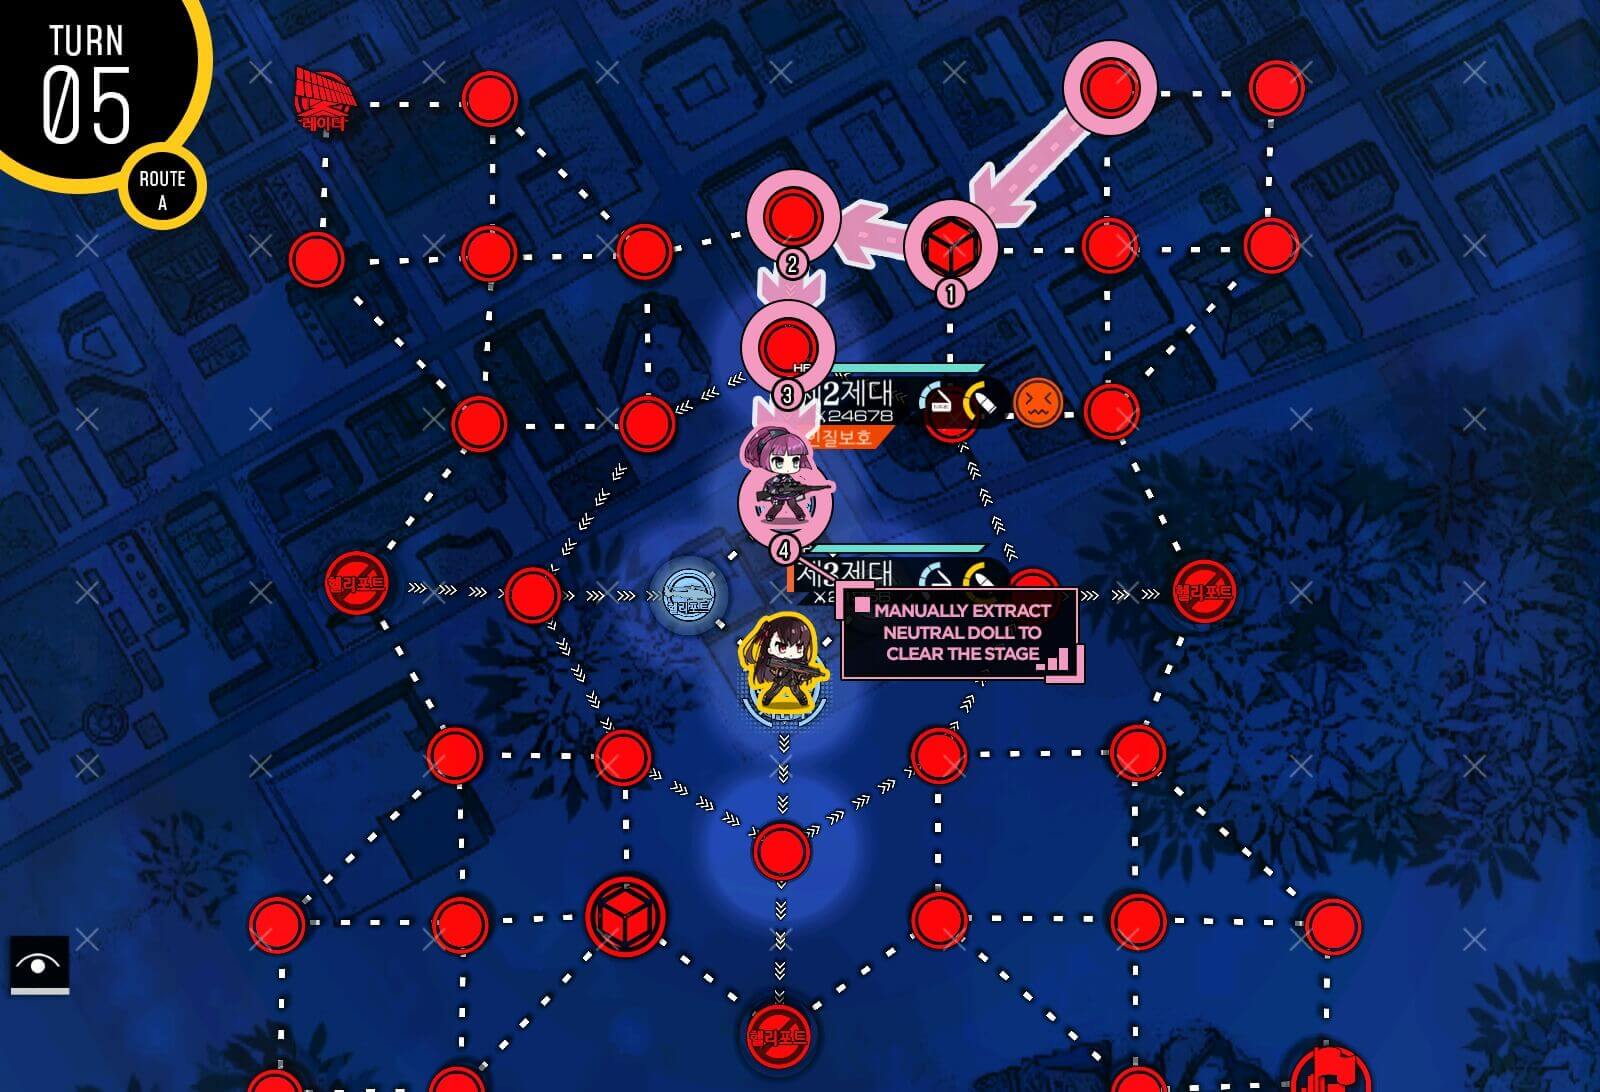
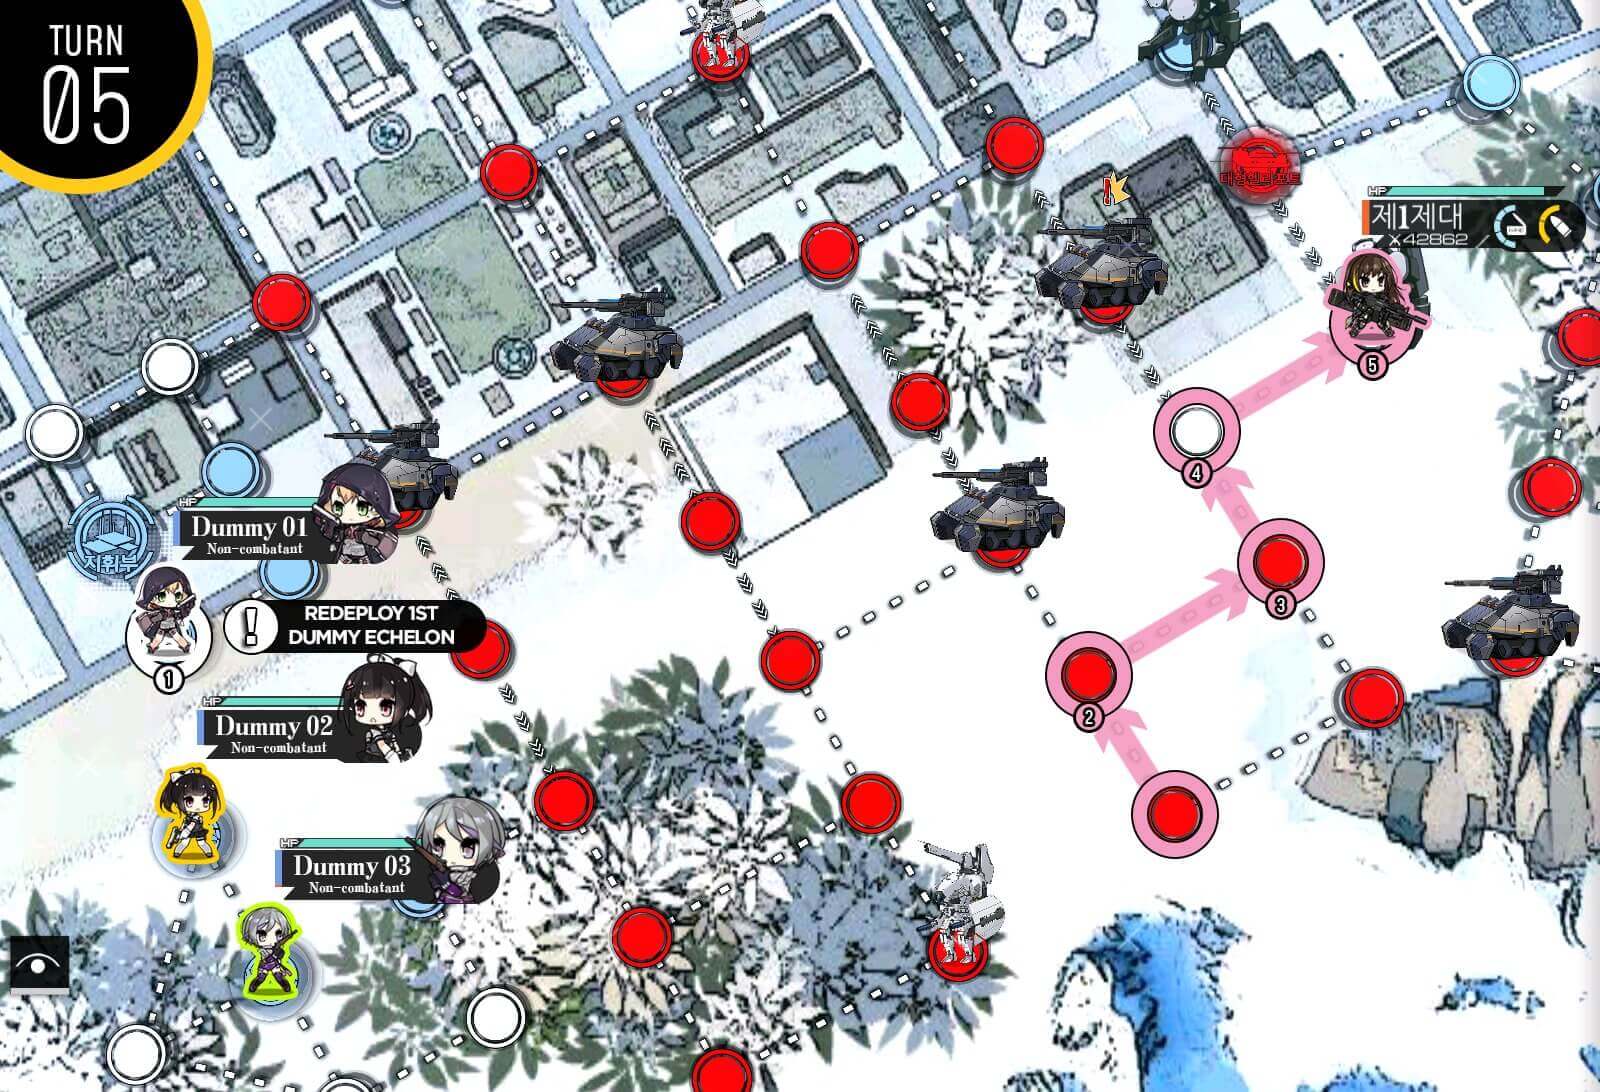
Turn 5
You should have enough move points to get to the last enemy unit, even if it's sitting on top of the enemy HQ.


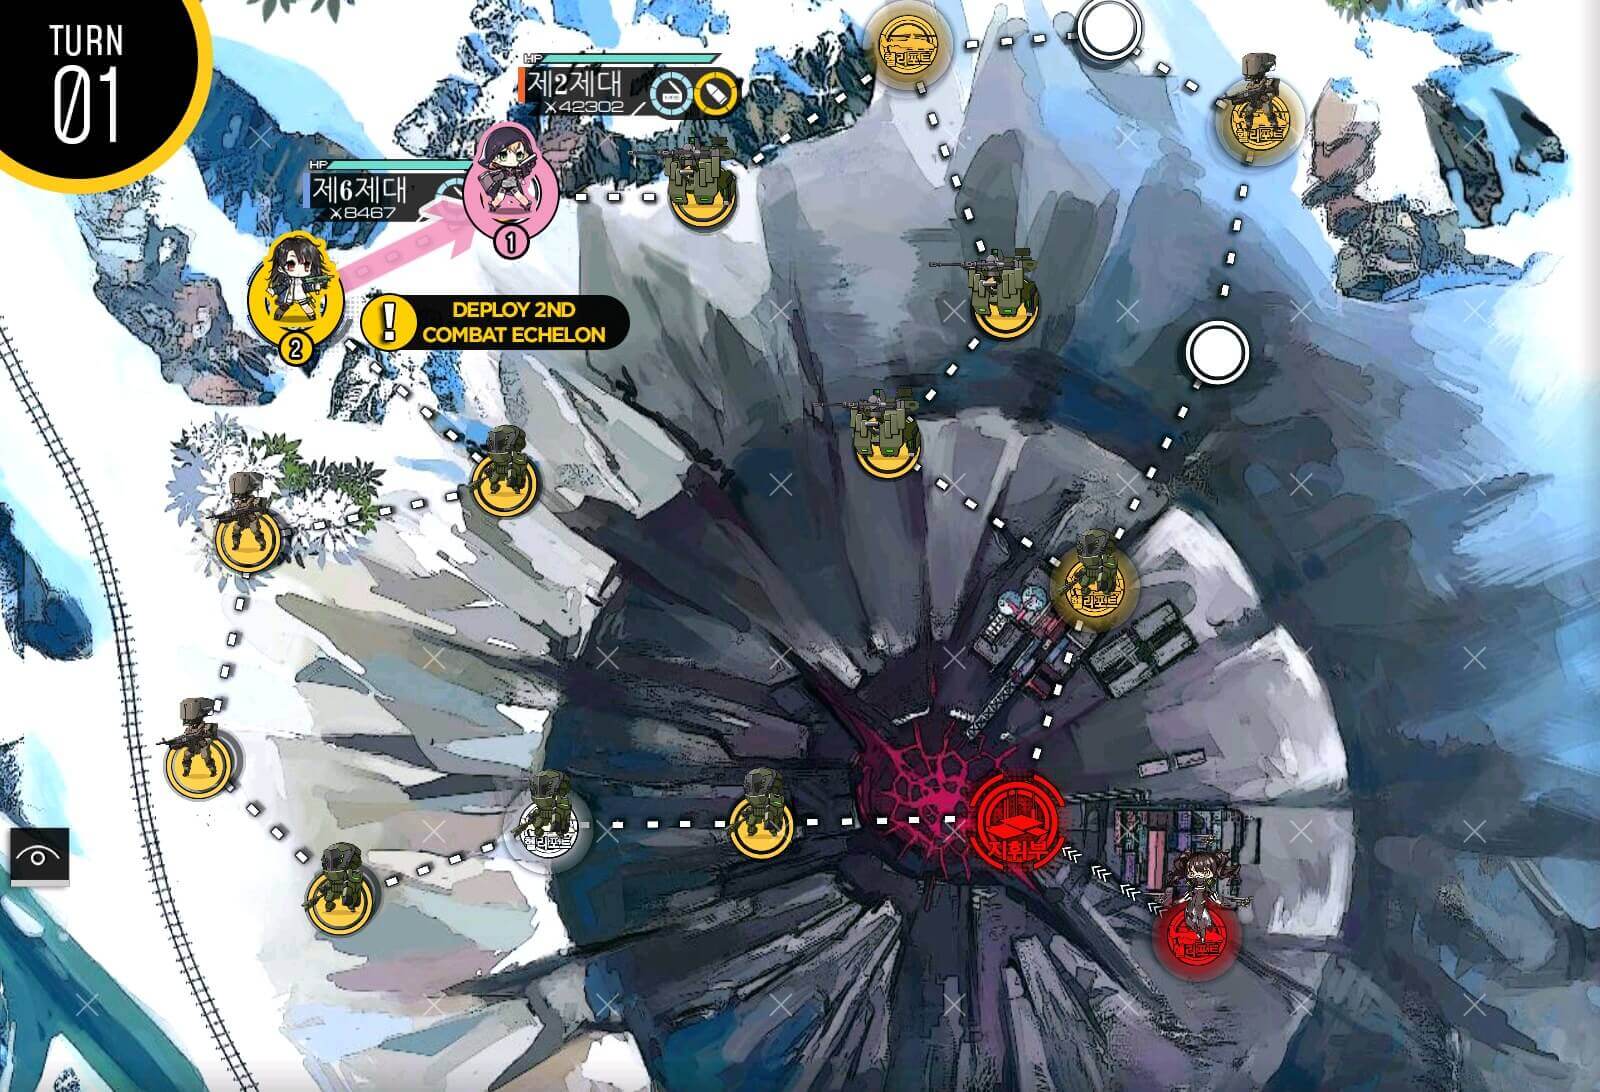
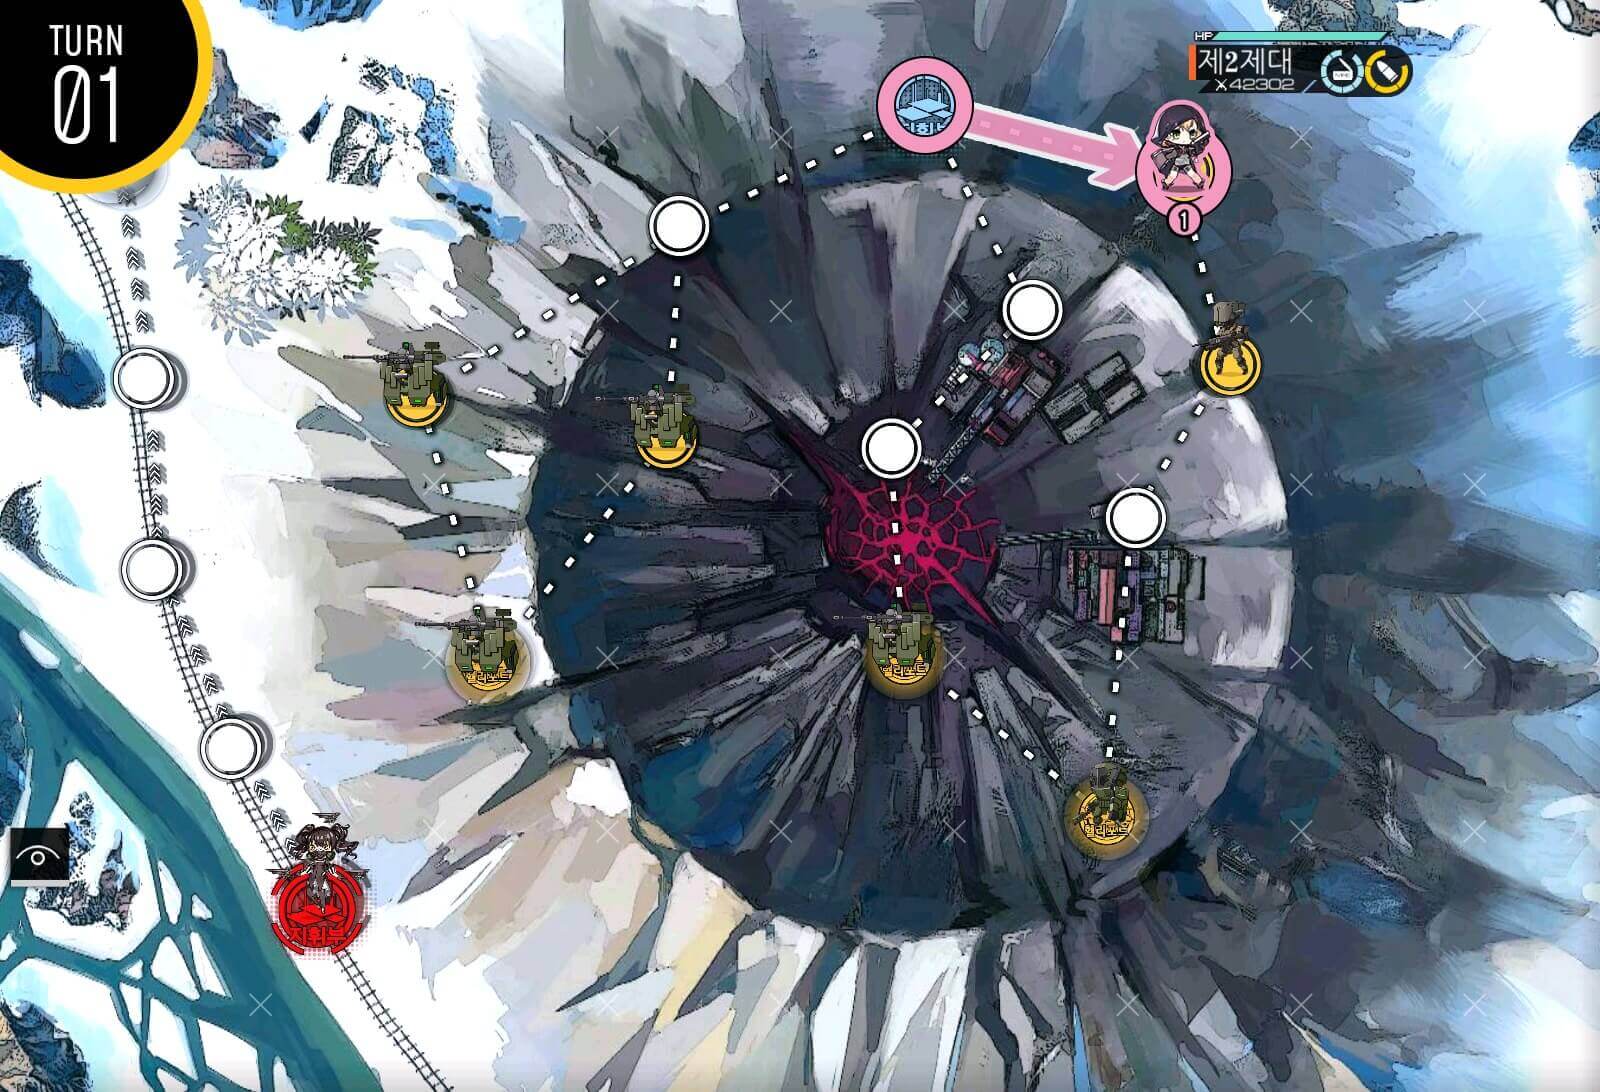
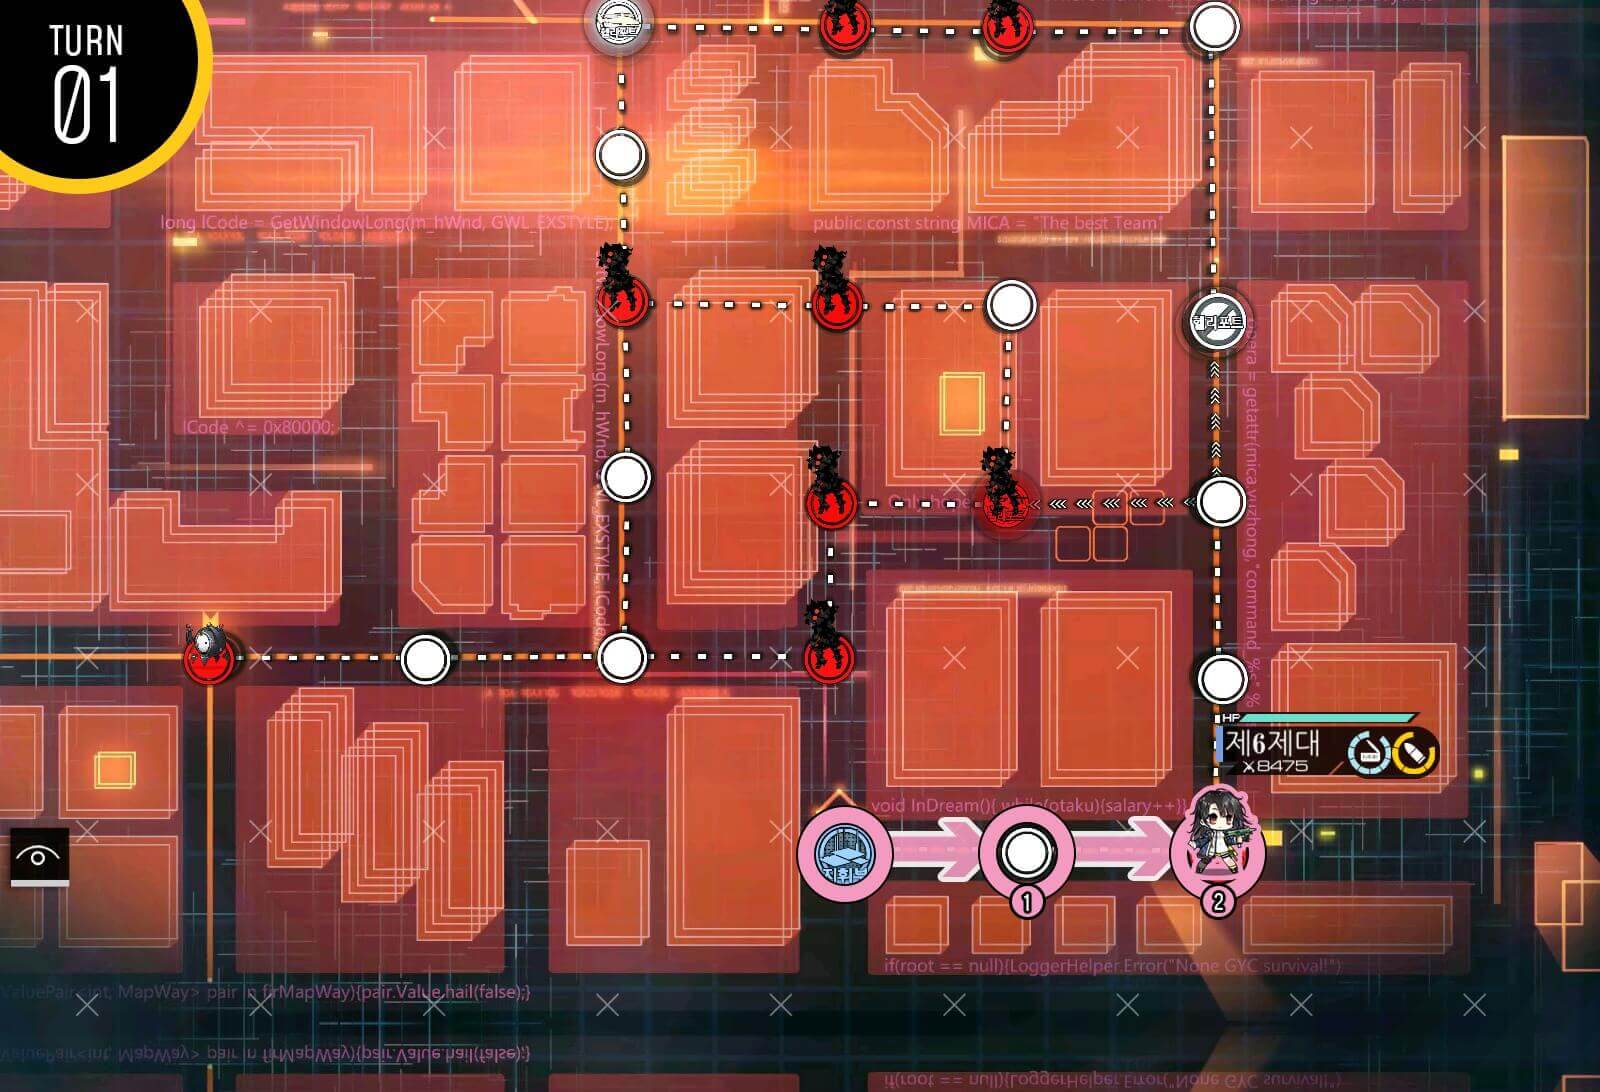
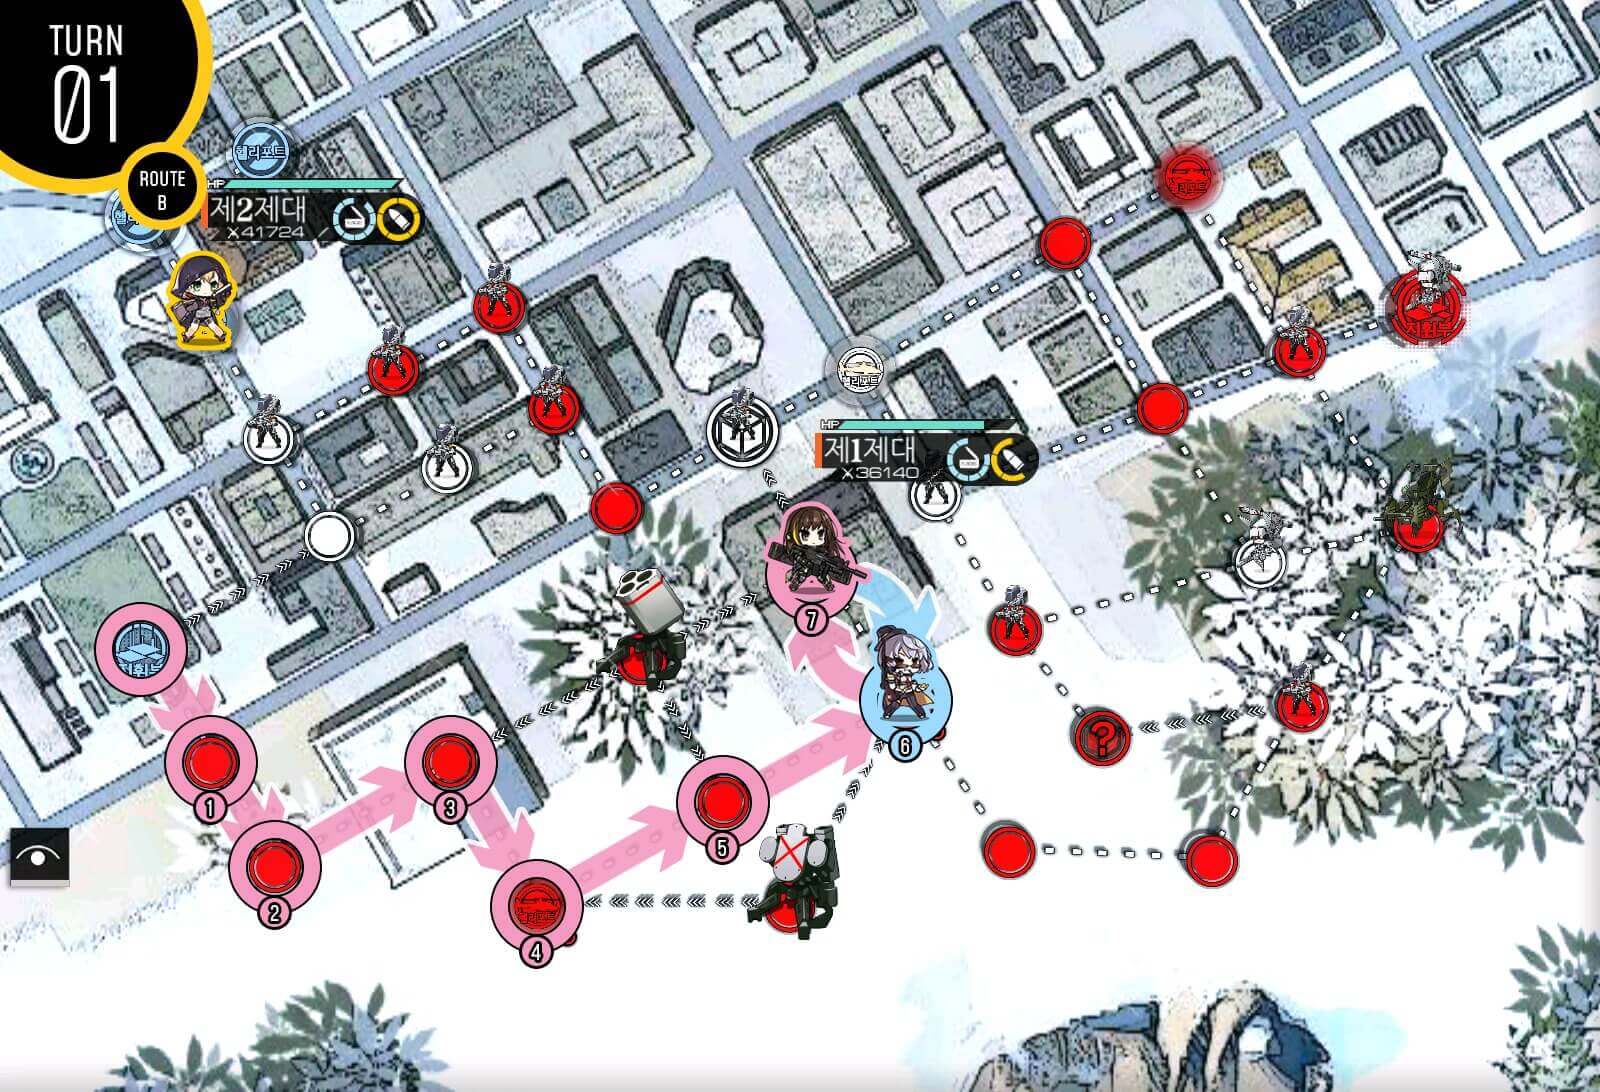
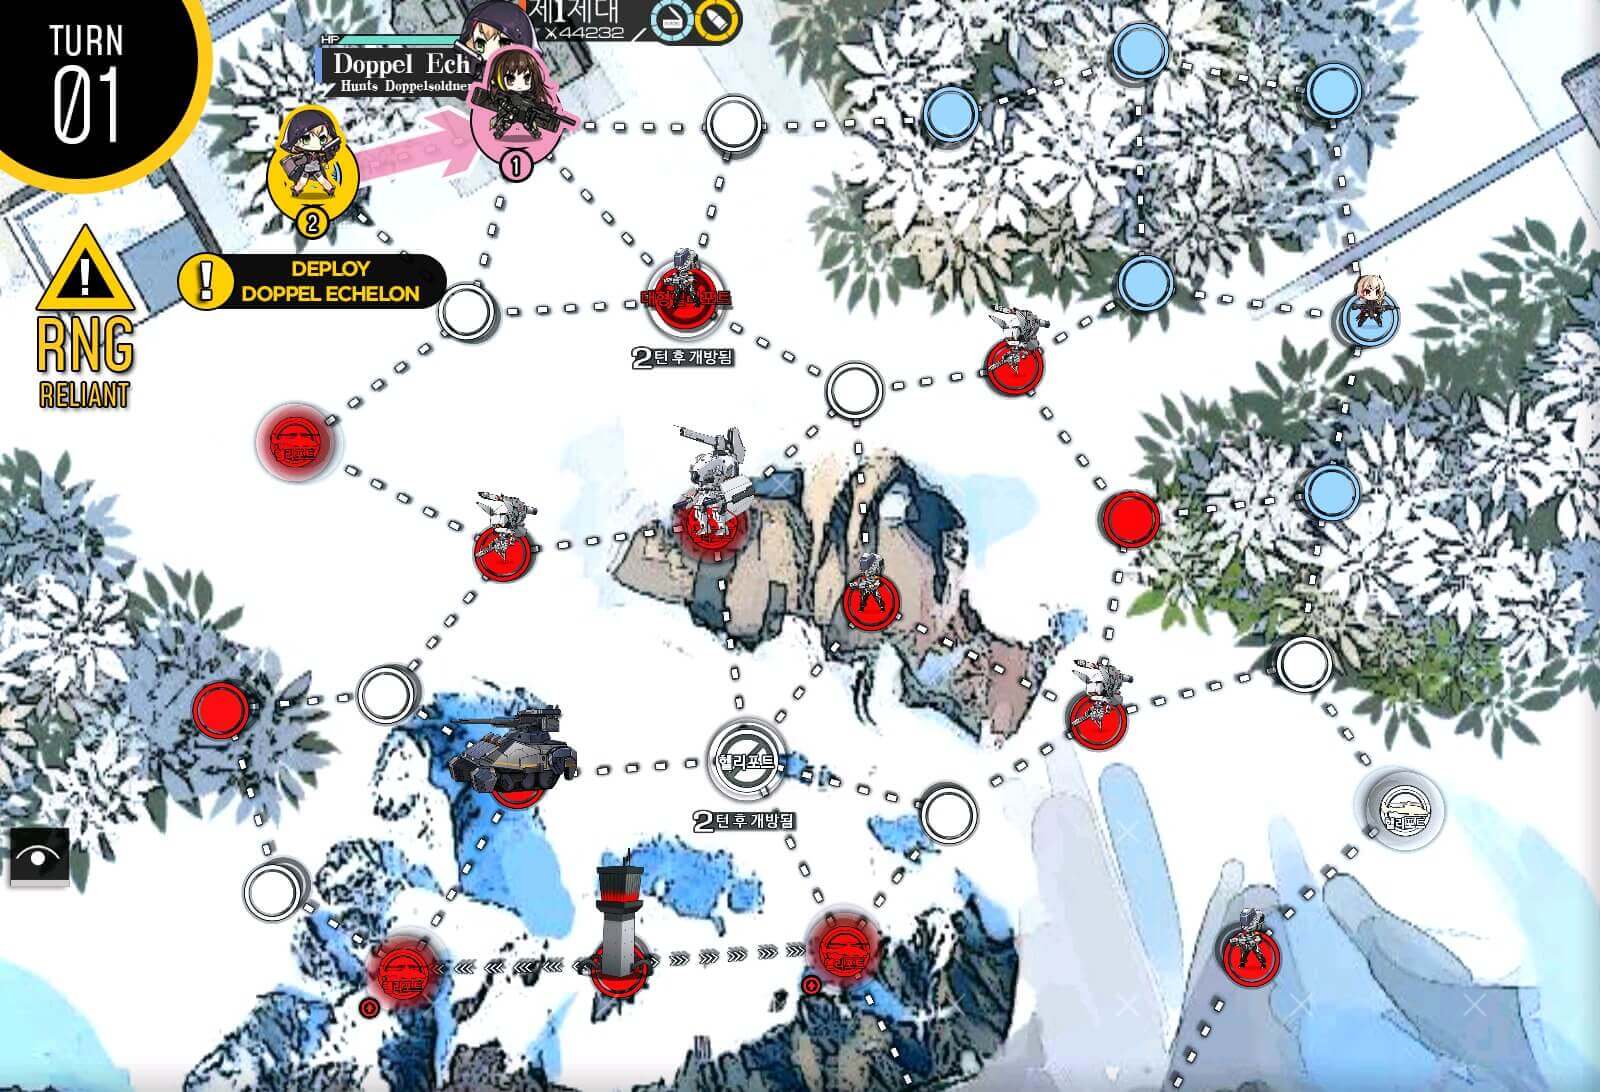
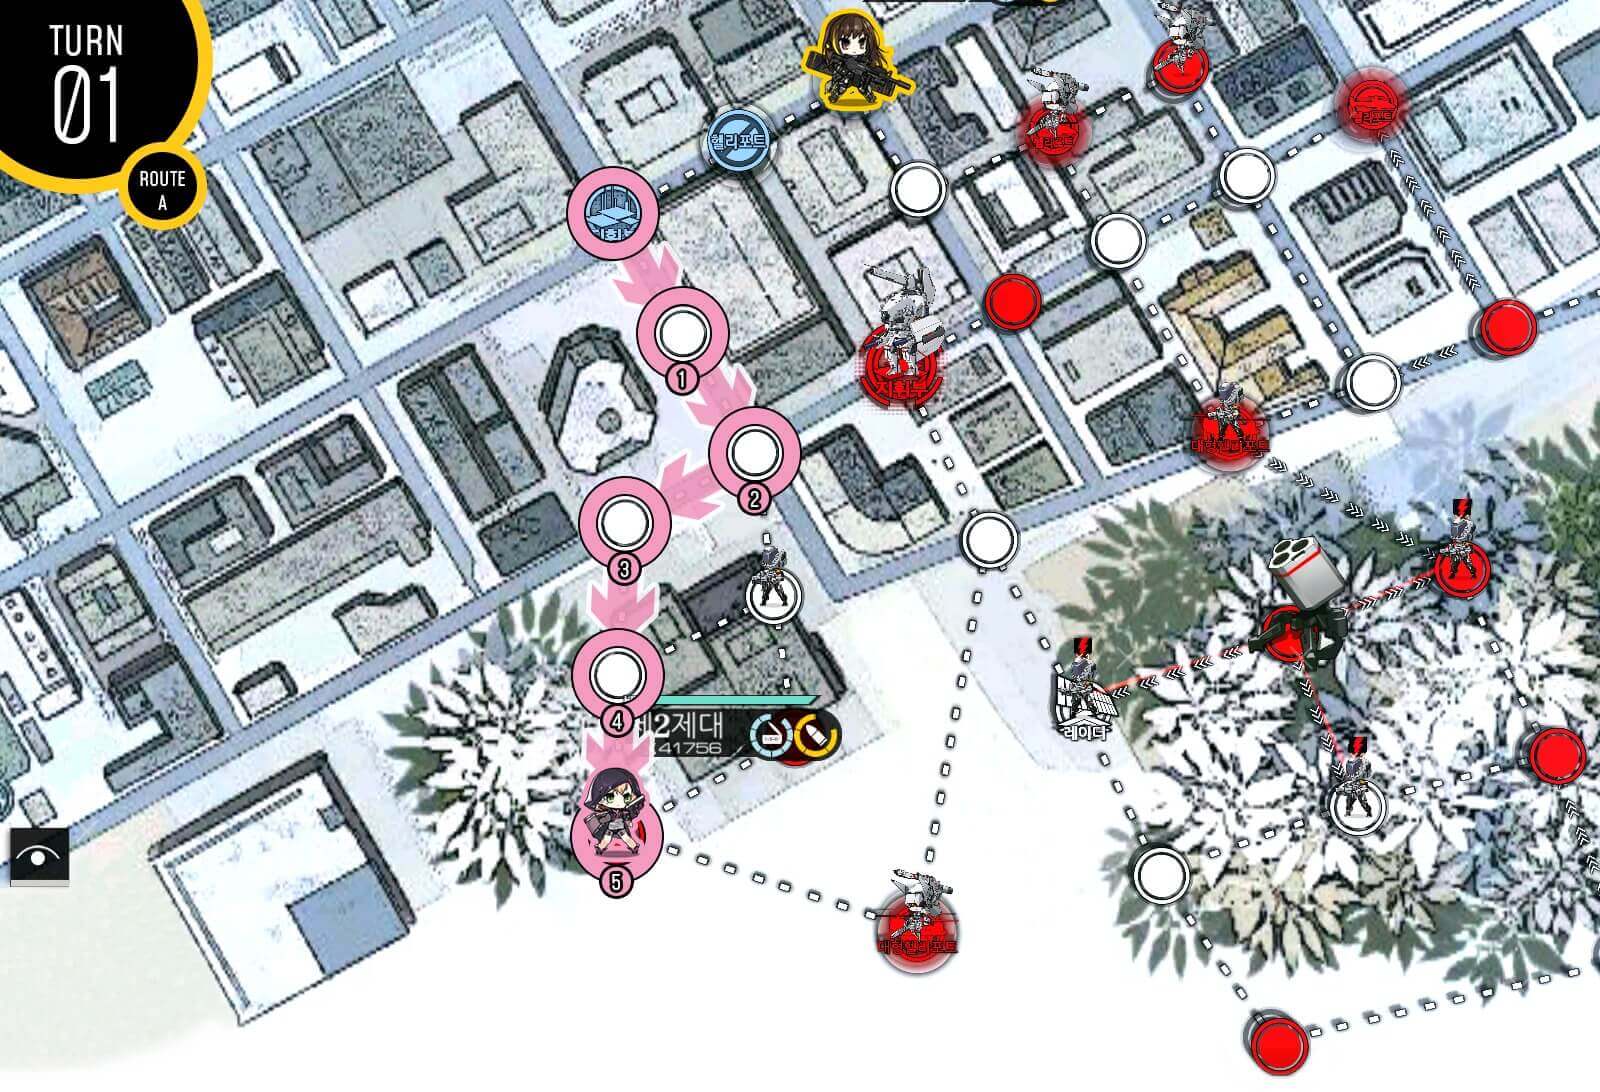
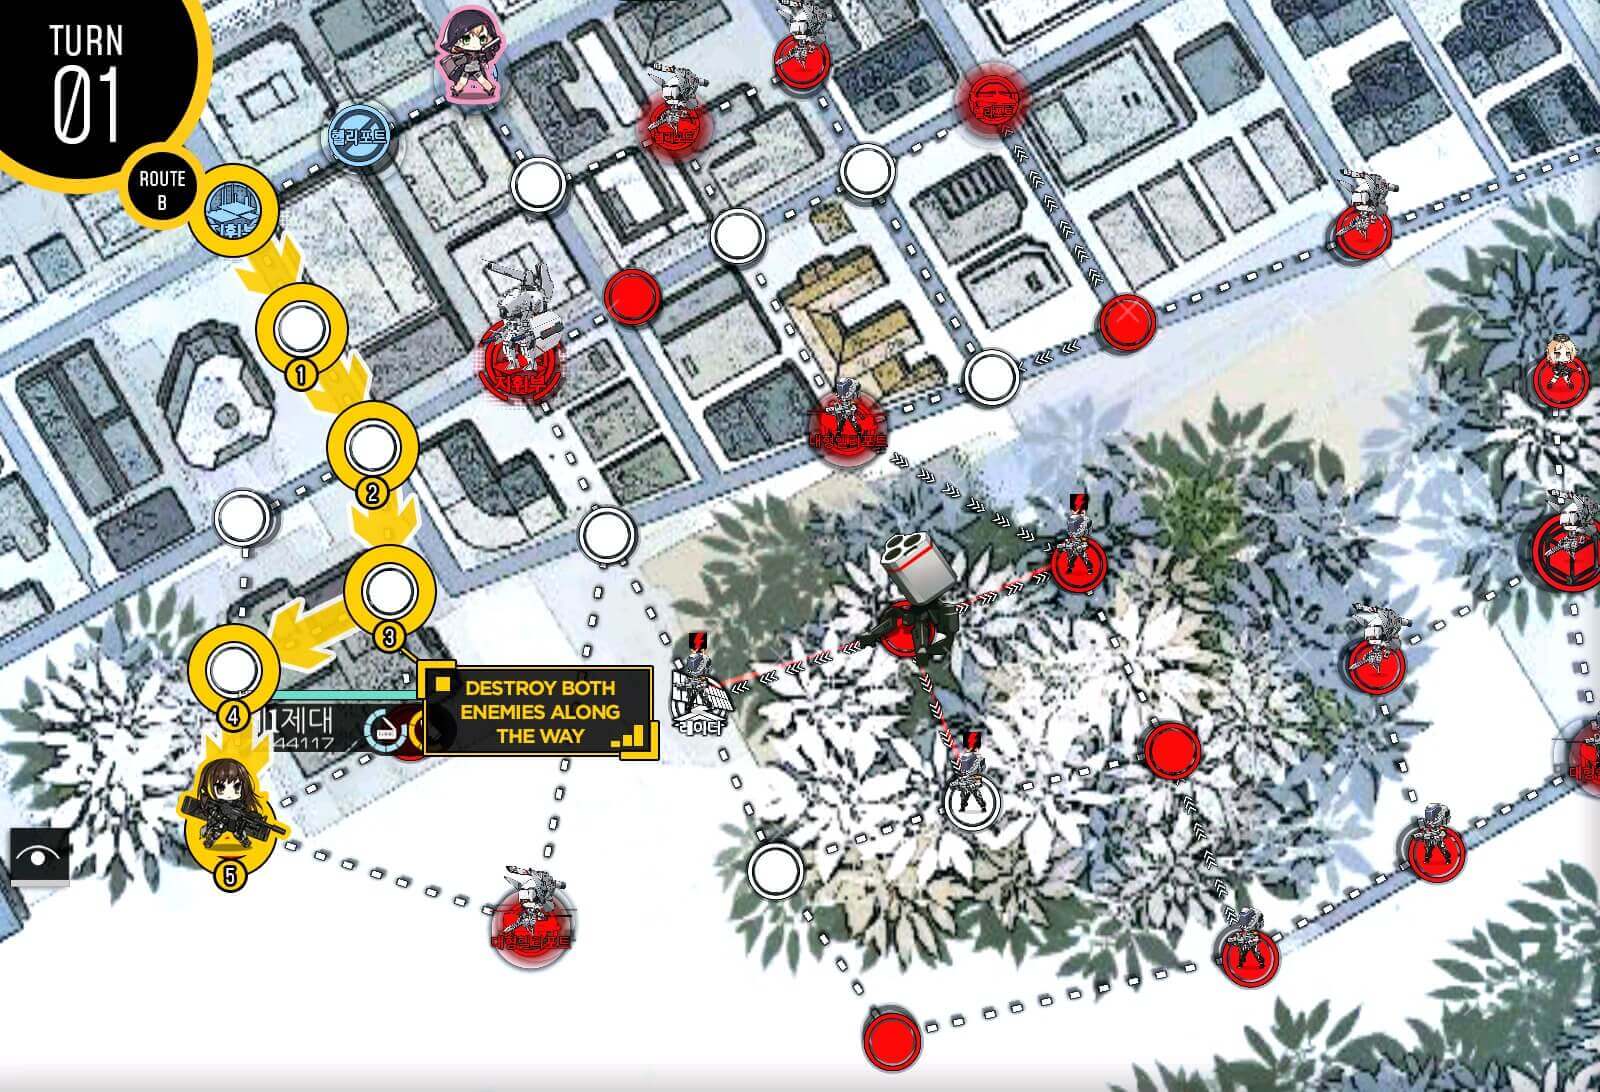
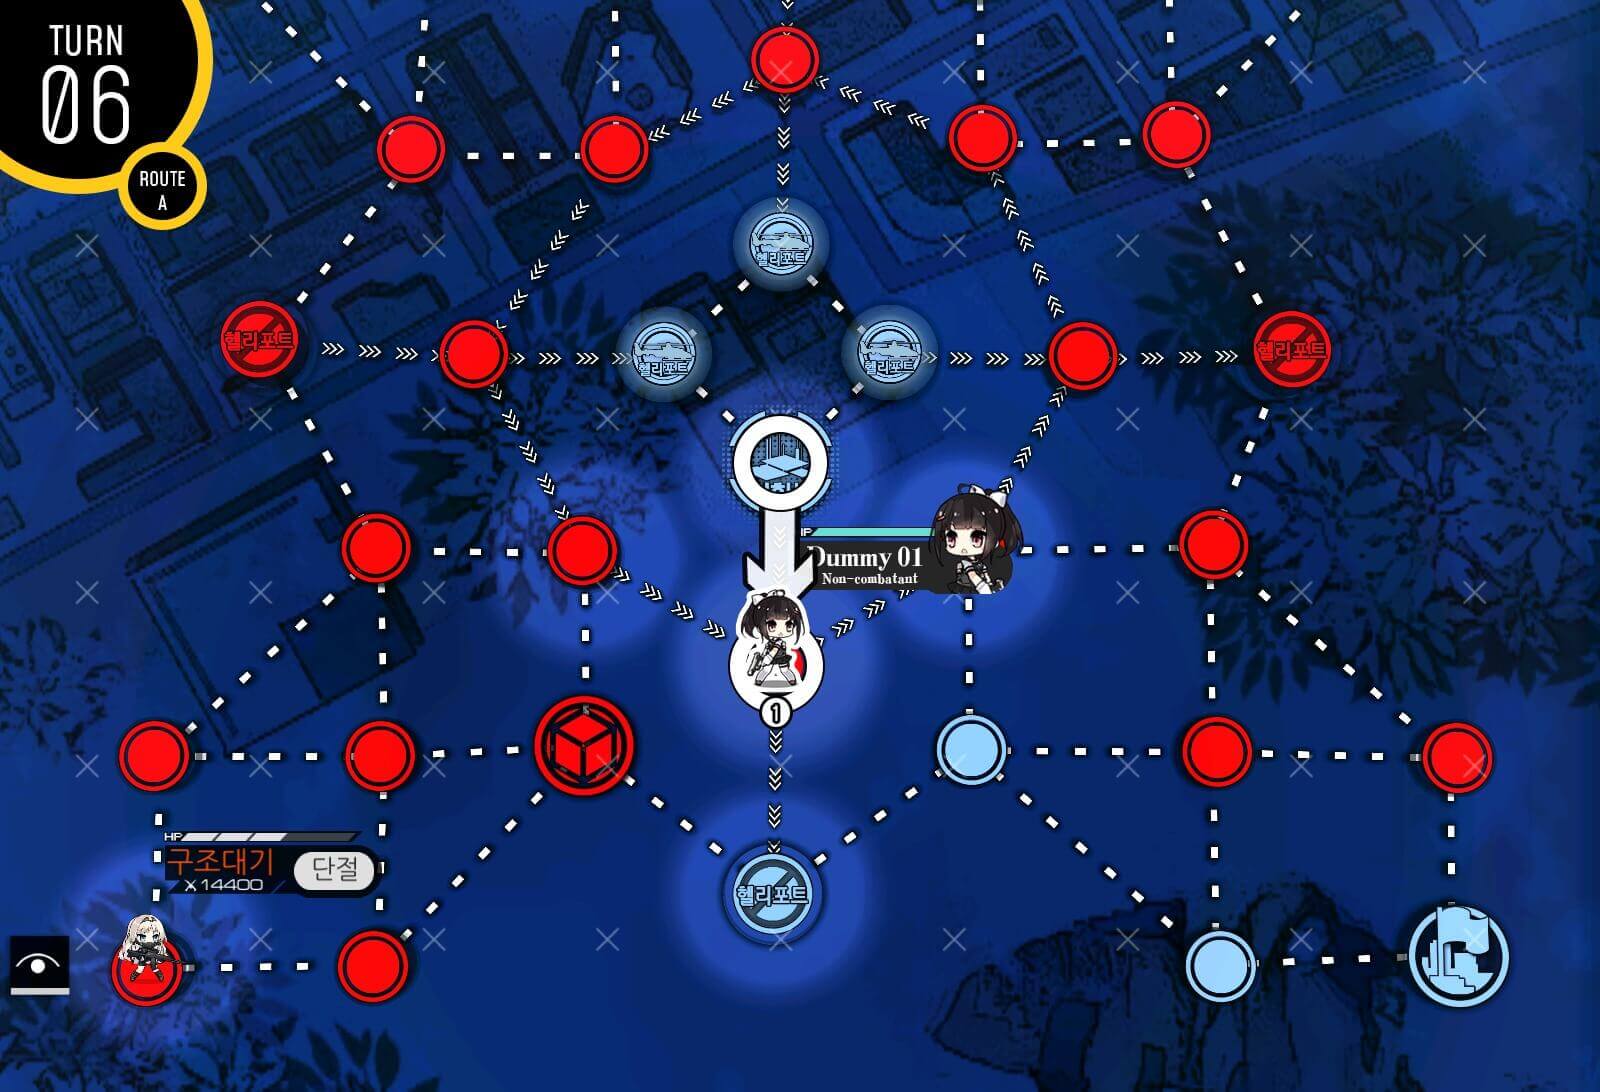
Turn 1
In this map we are going to utilize the fact that hostage T-dolls can take few hits [?] before dying. Start with killing a unit to the top right of HQ then swap with hostage at the top. Then deploy your first dummy echelon.

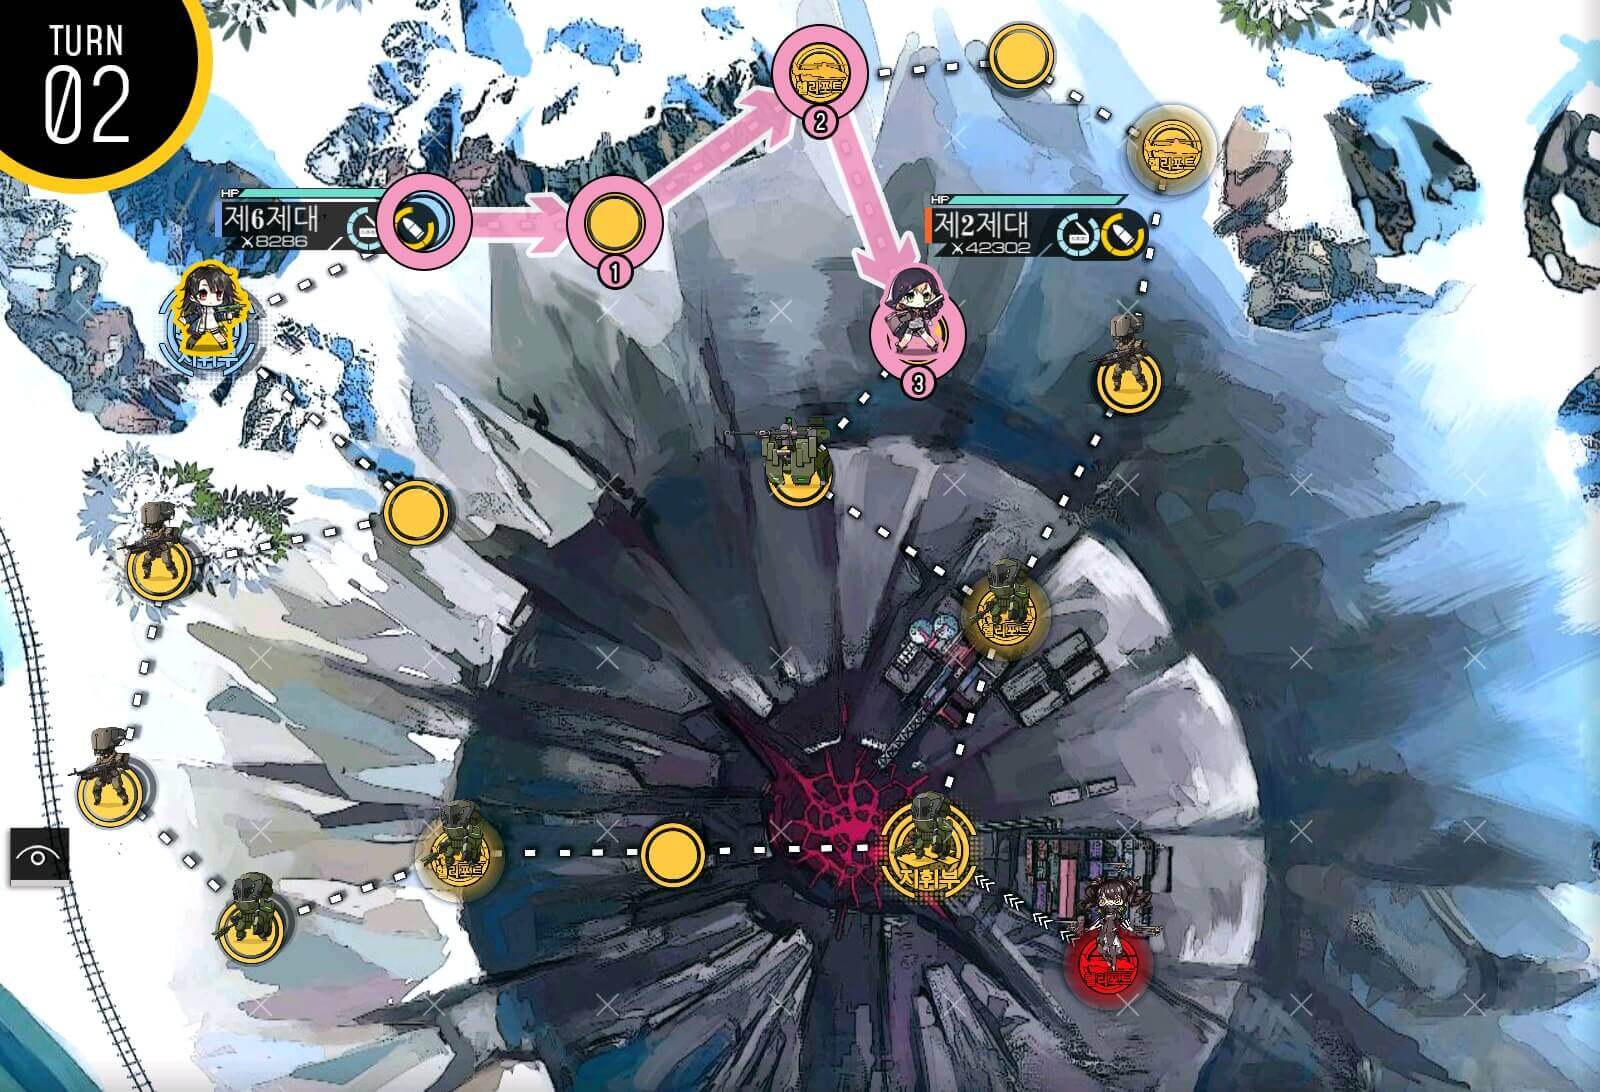
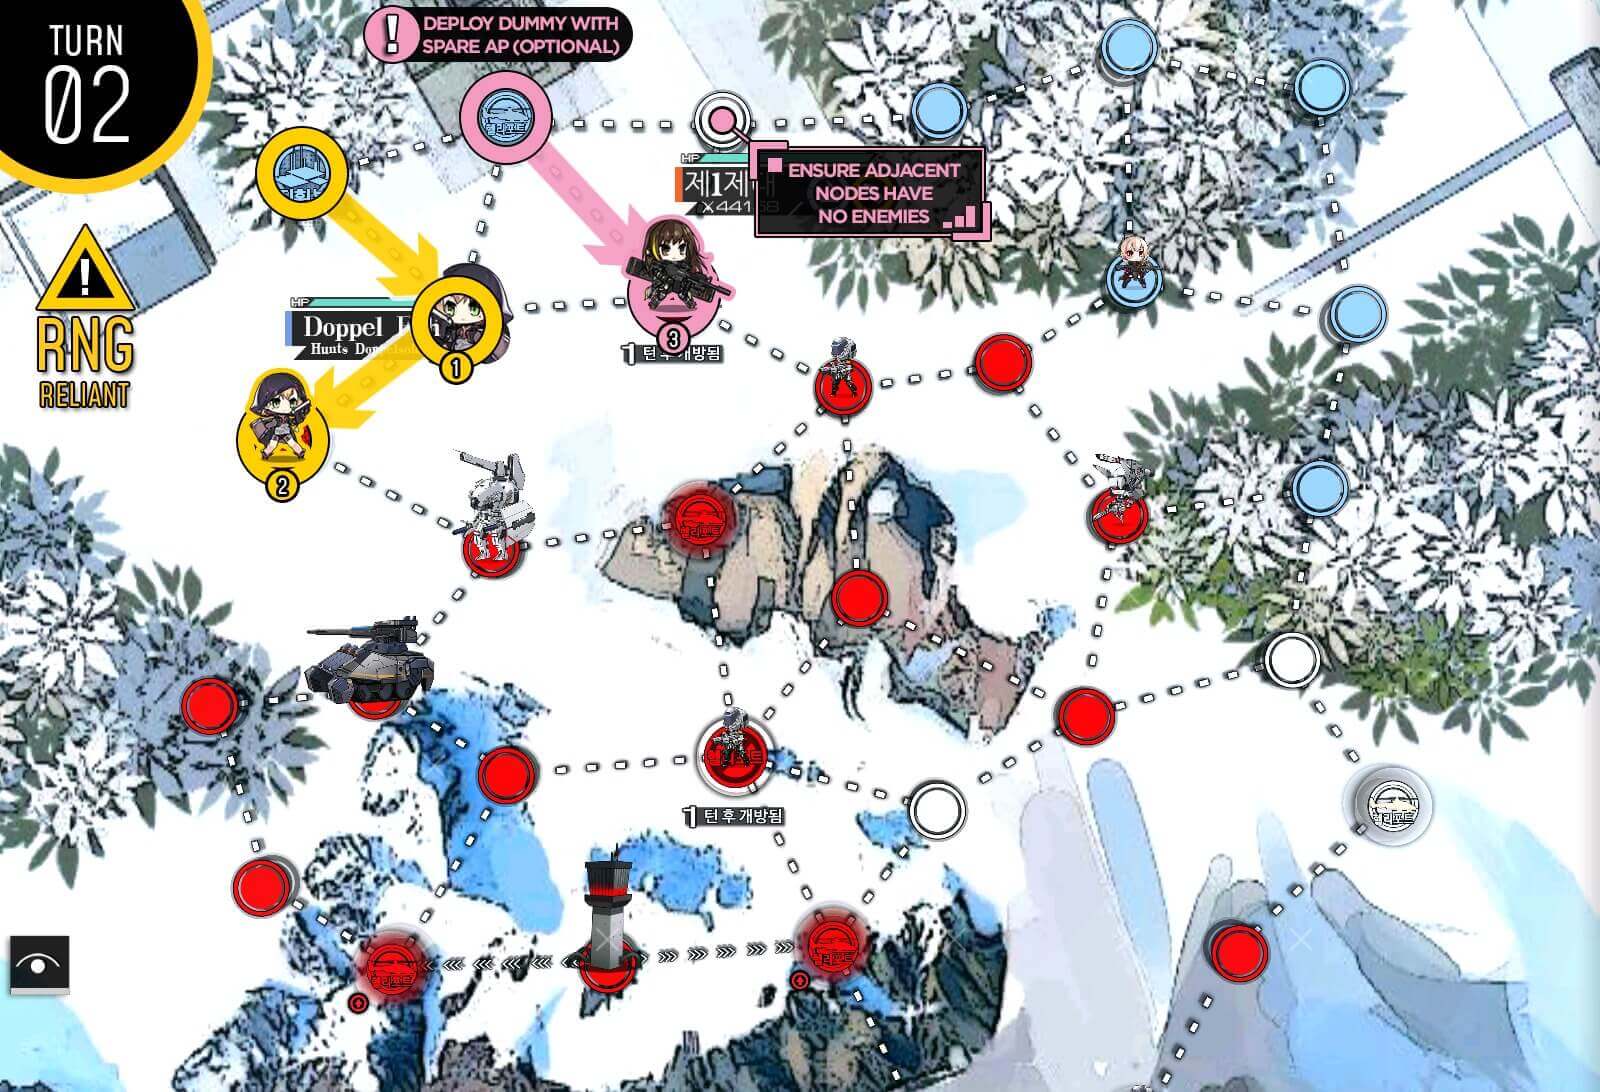
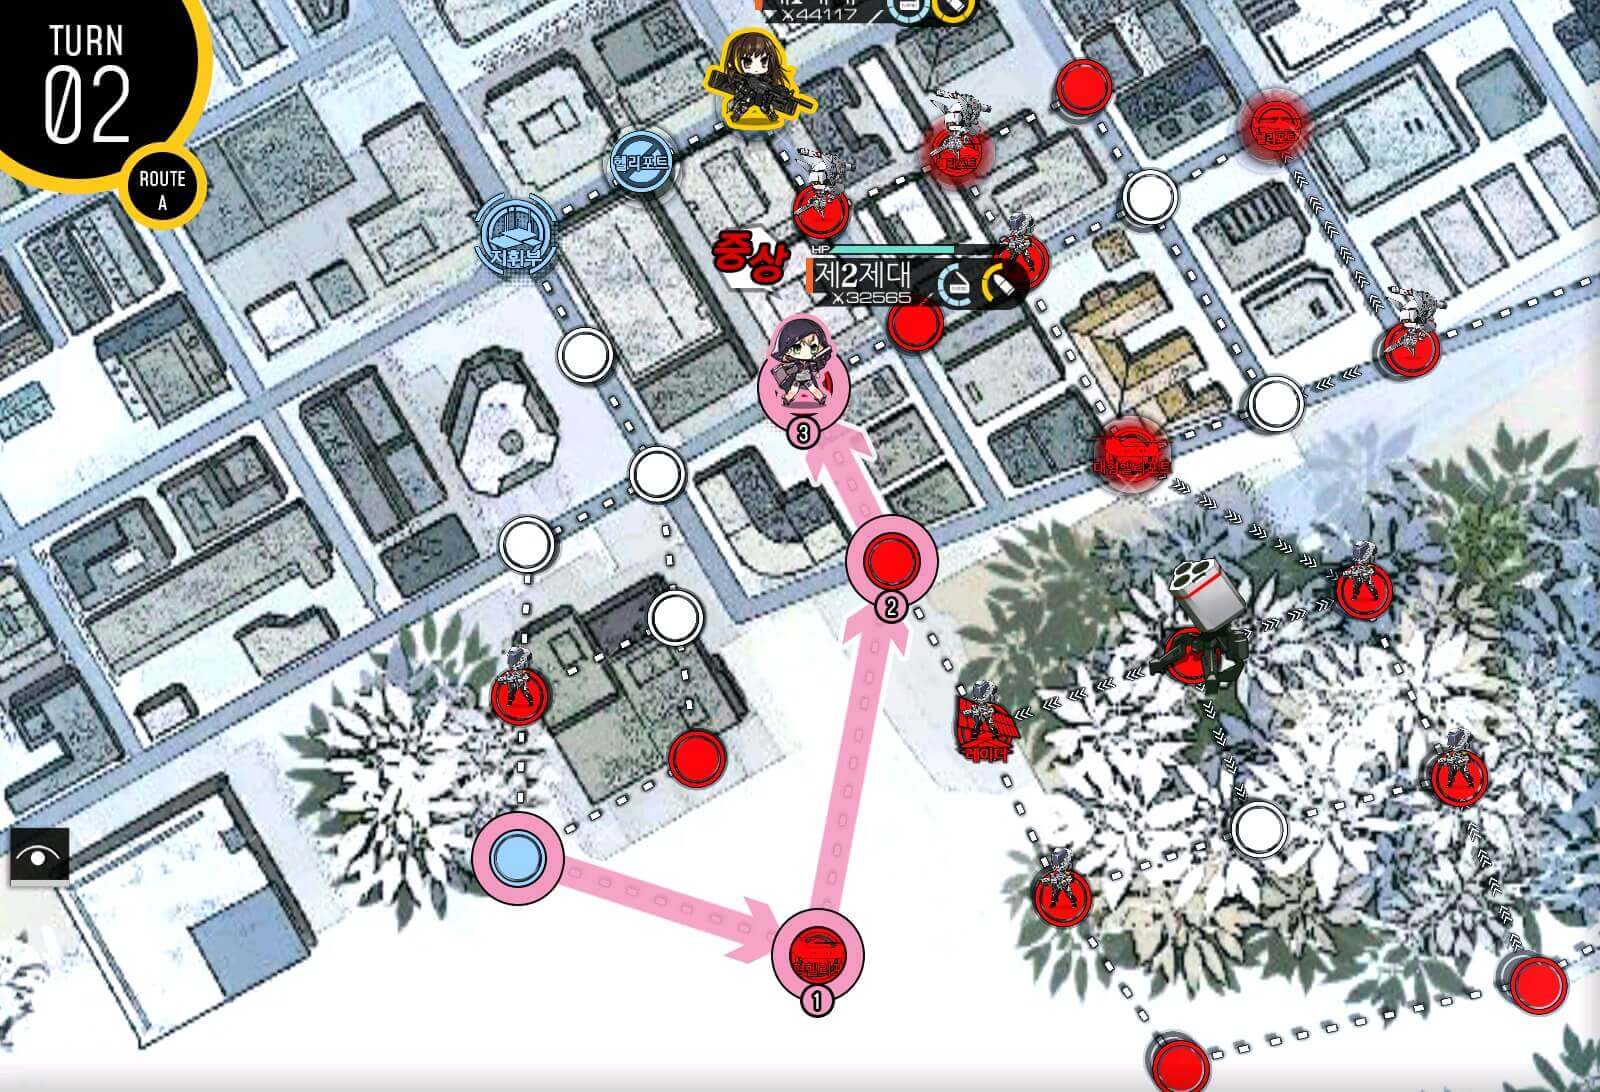
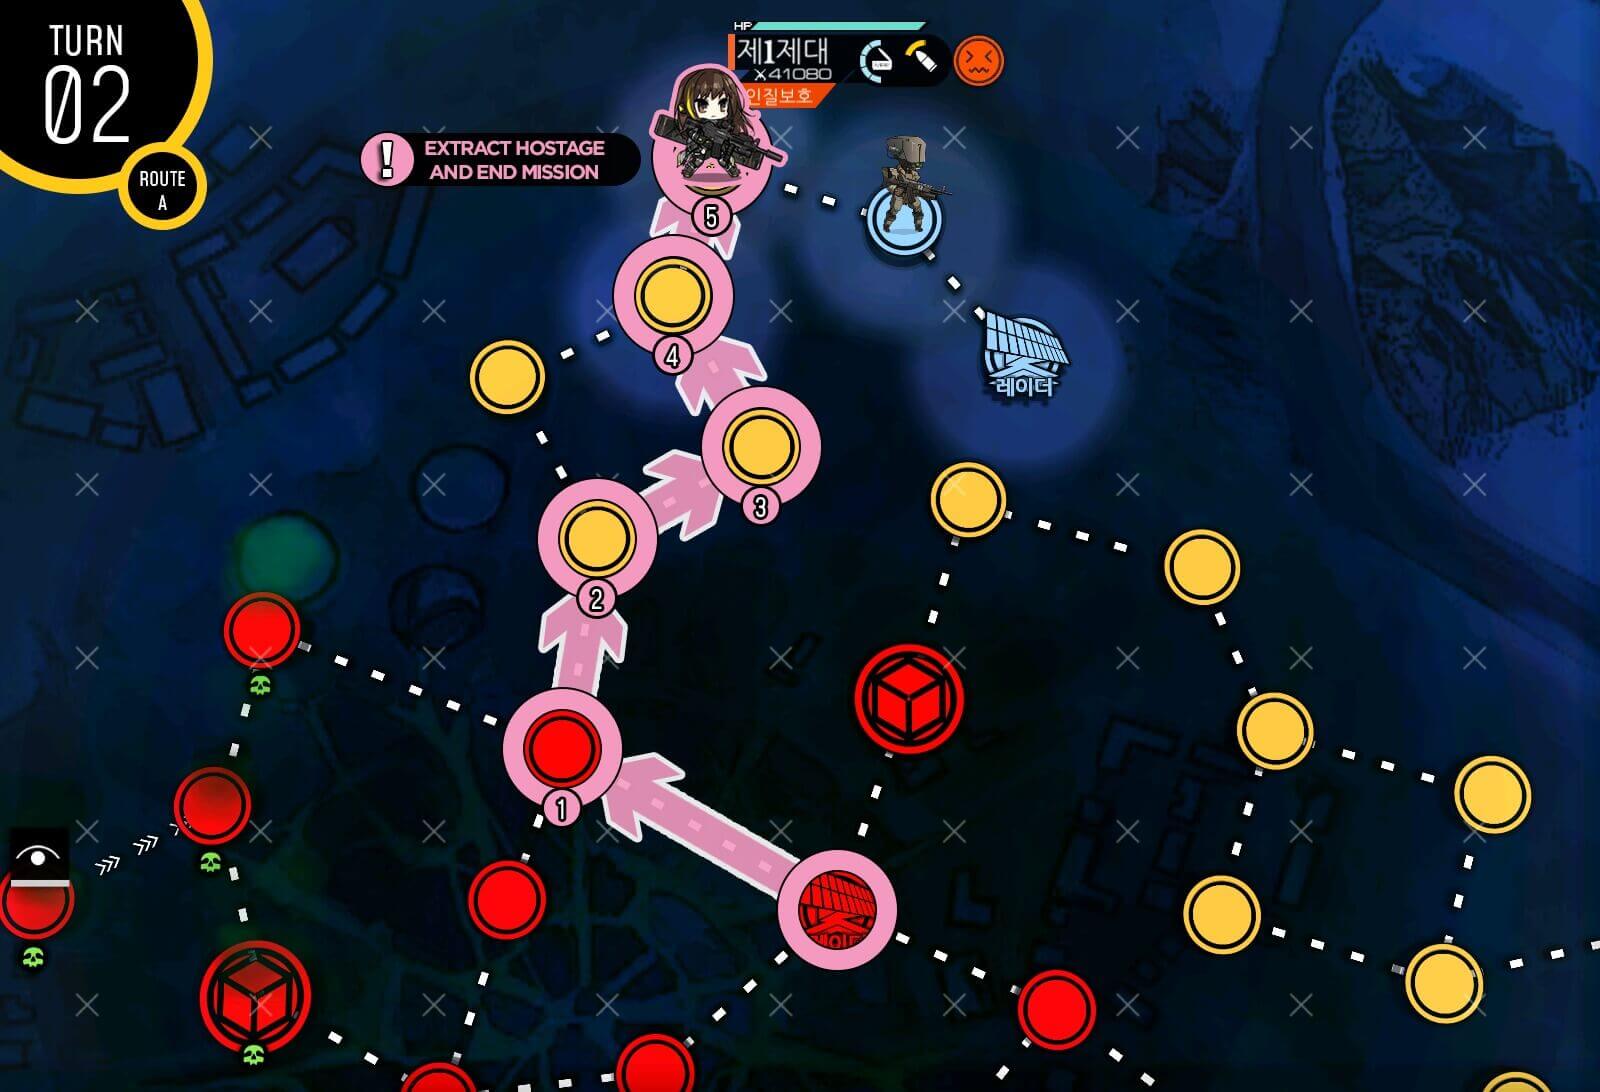
Turn 2
Combat echelon moves to the helipad at the center of the map. Swap dummy with hostage T-doll.
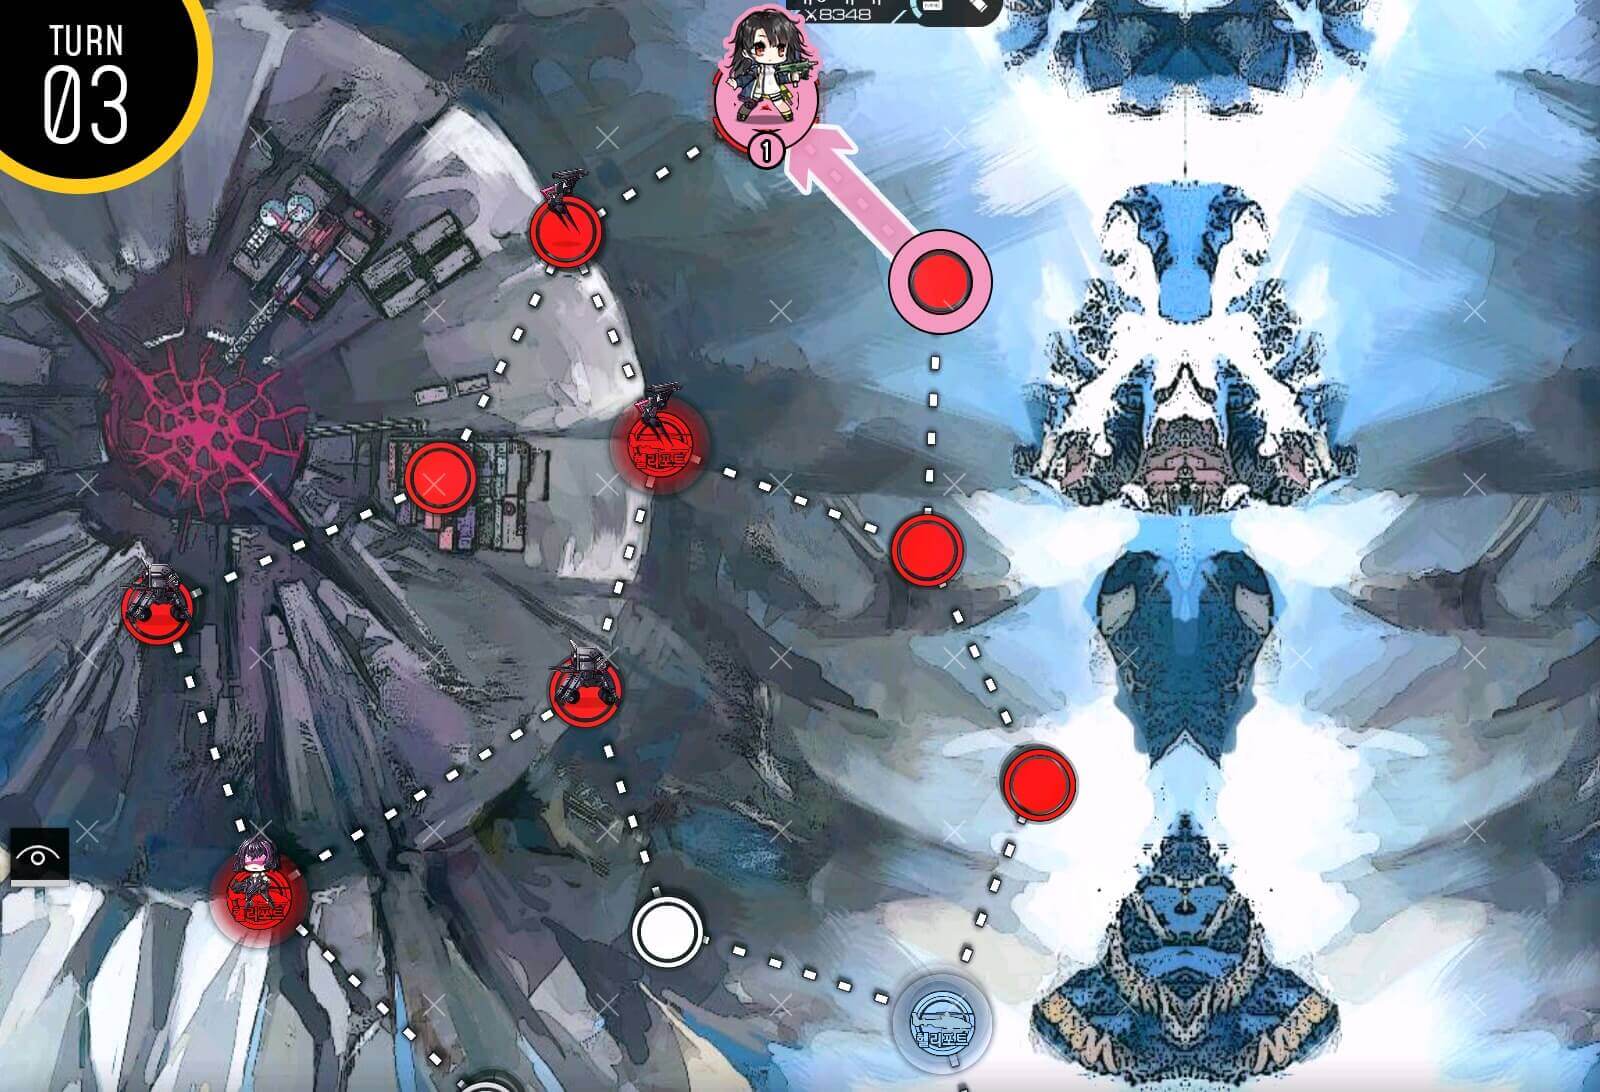
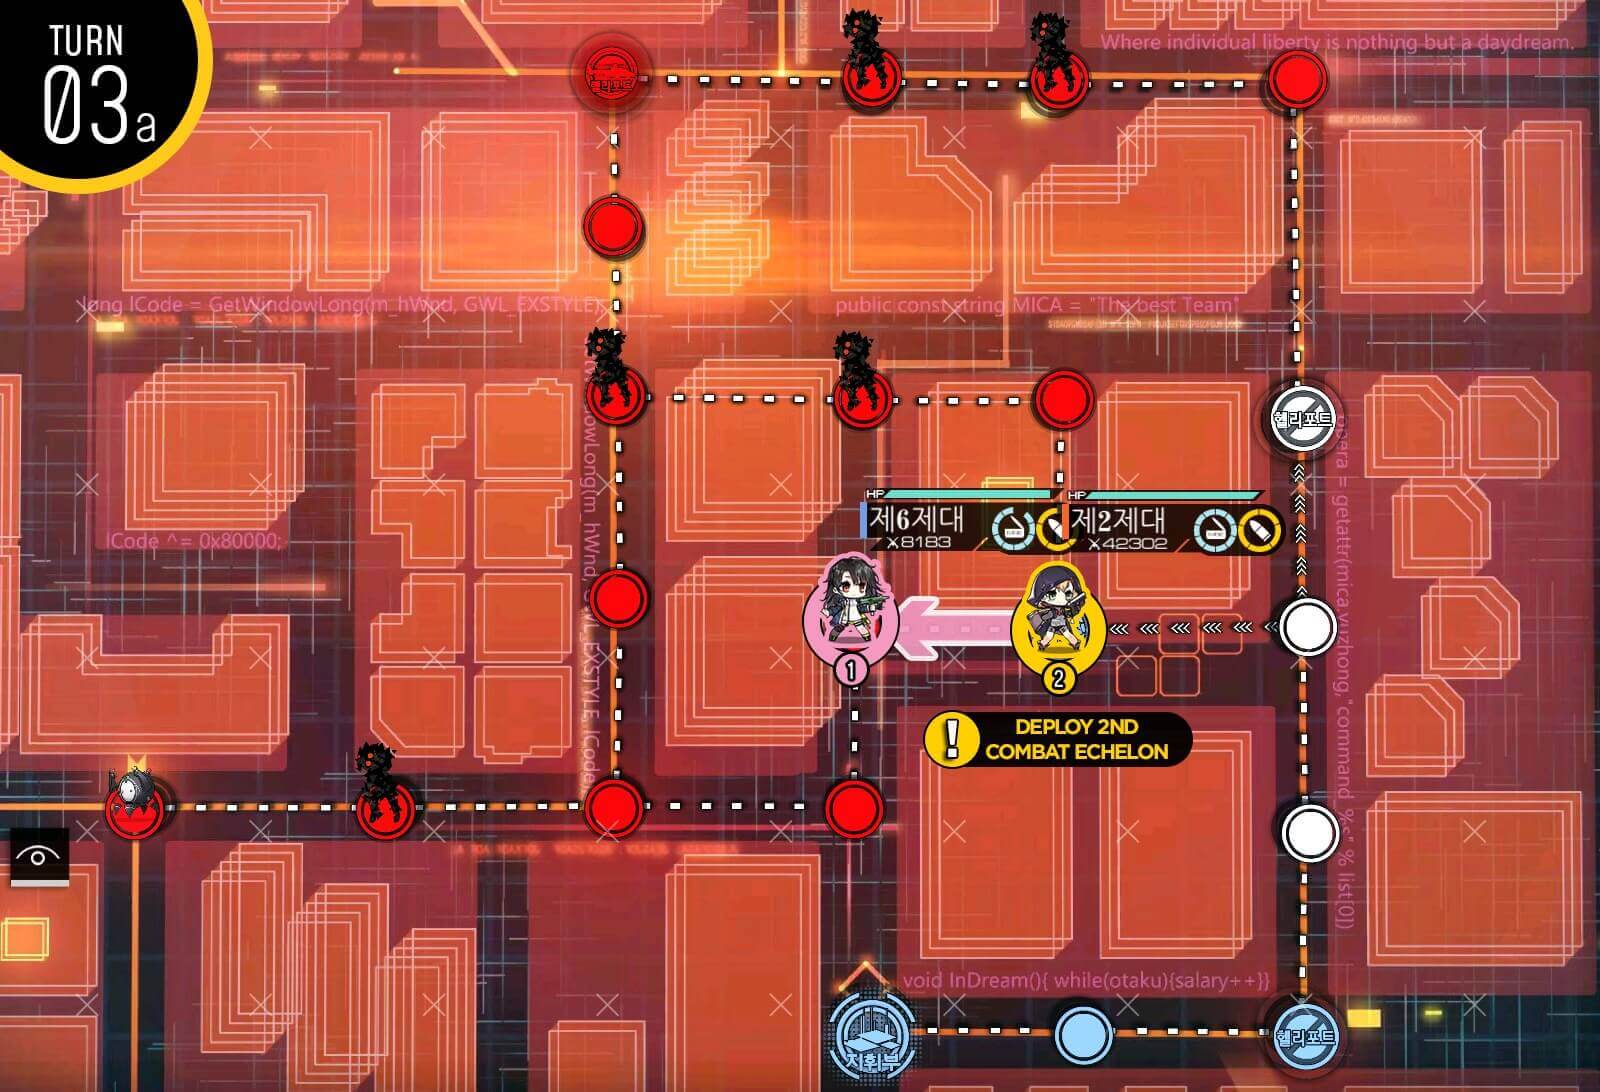
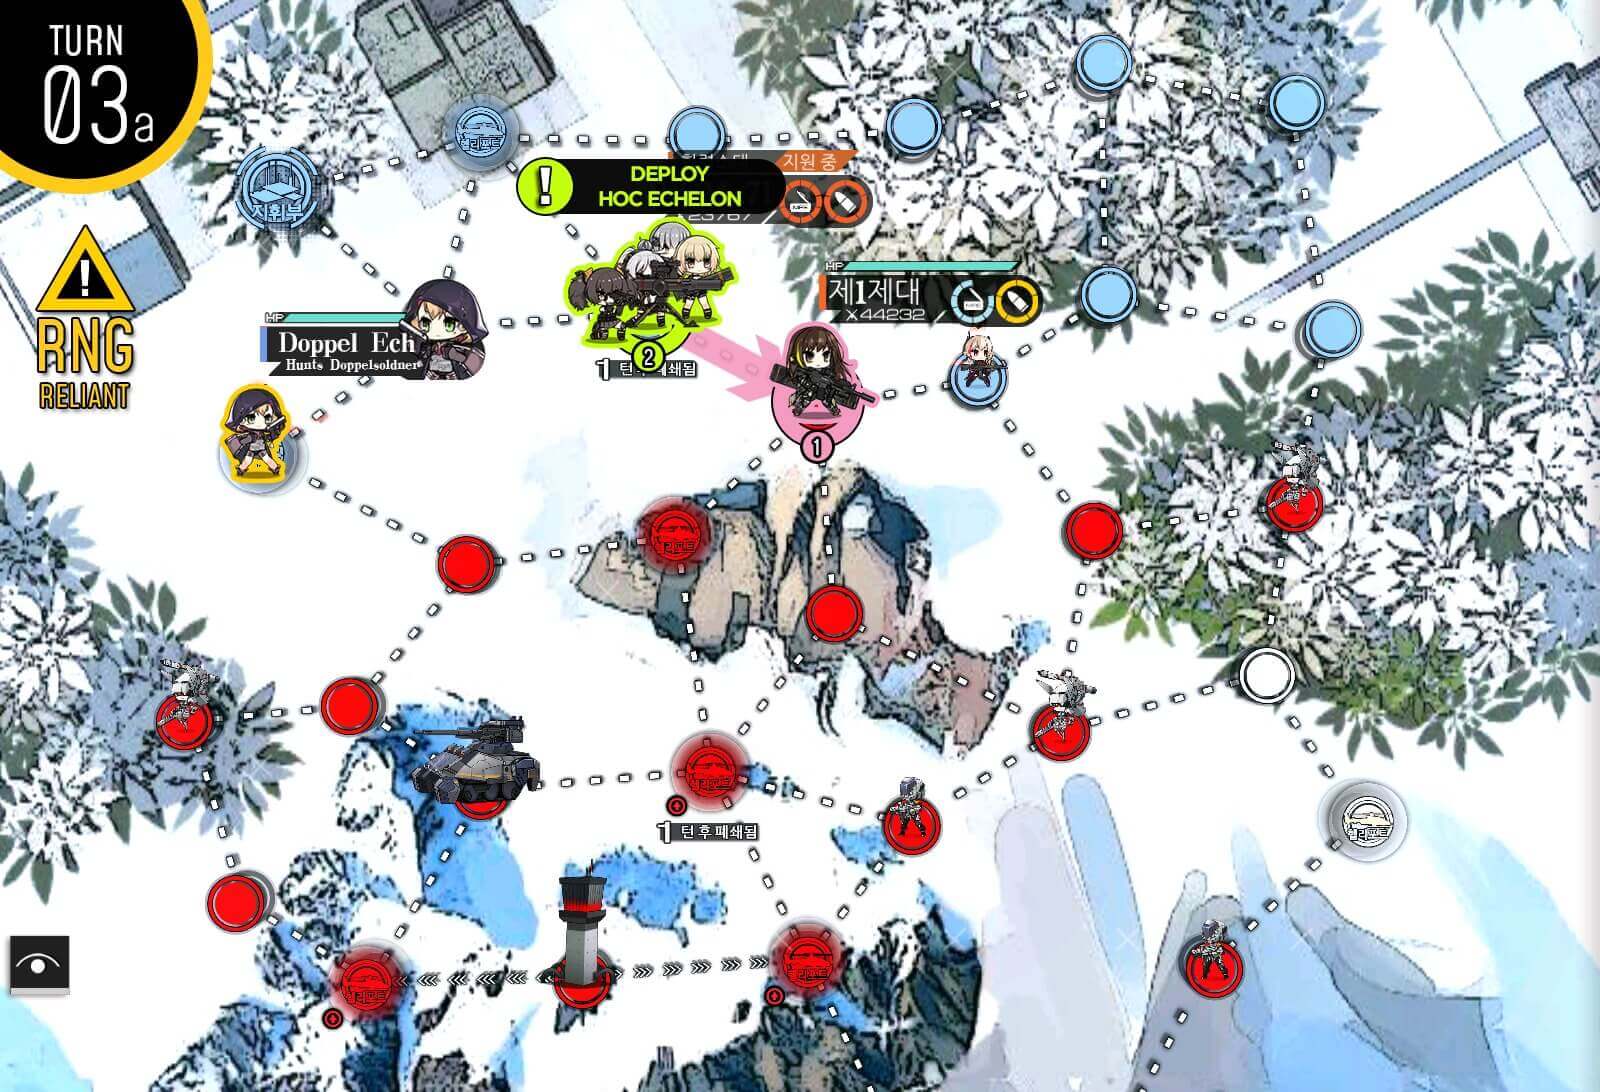
Turn 3
Combat echelon moves towards helipad on the left side. Then spawn your second dummy echelon at the center helipad.

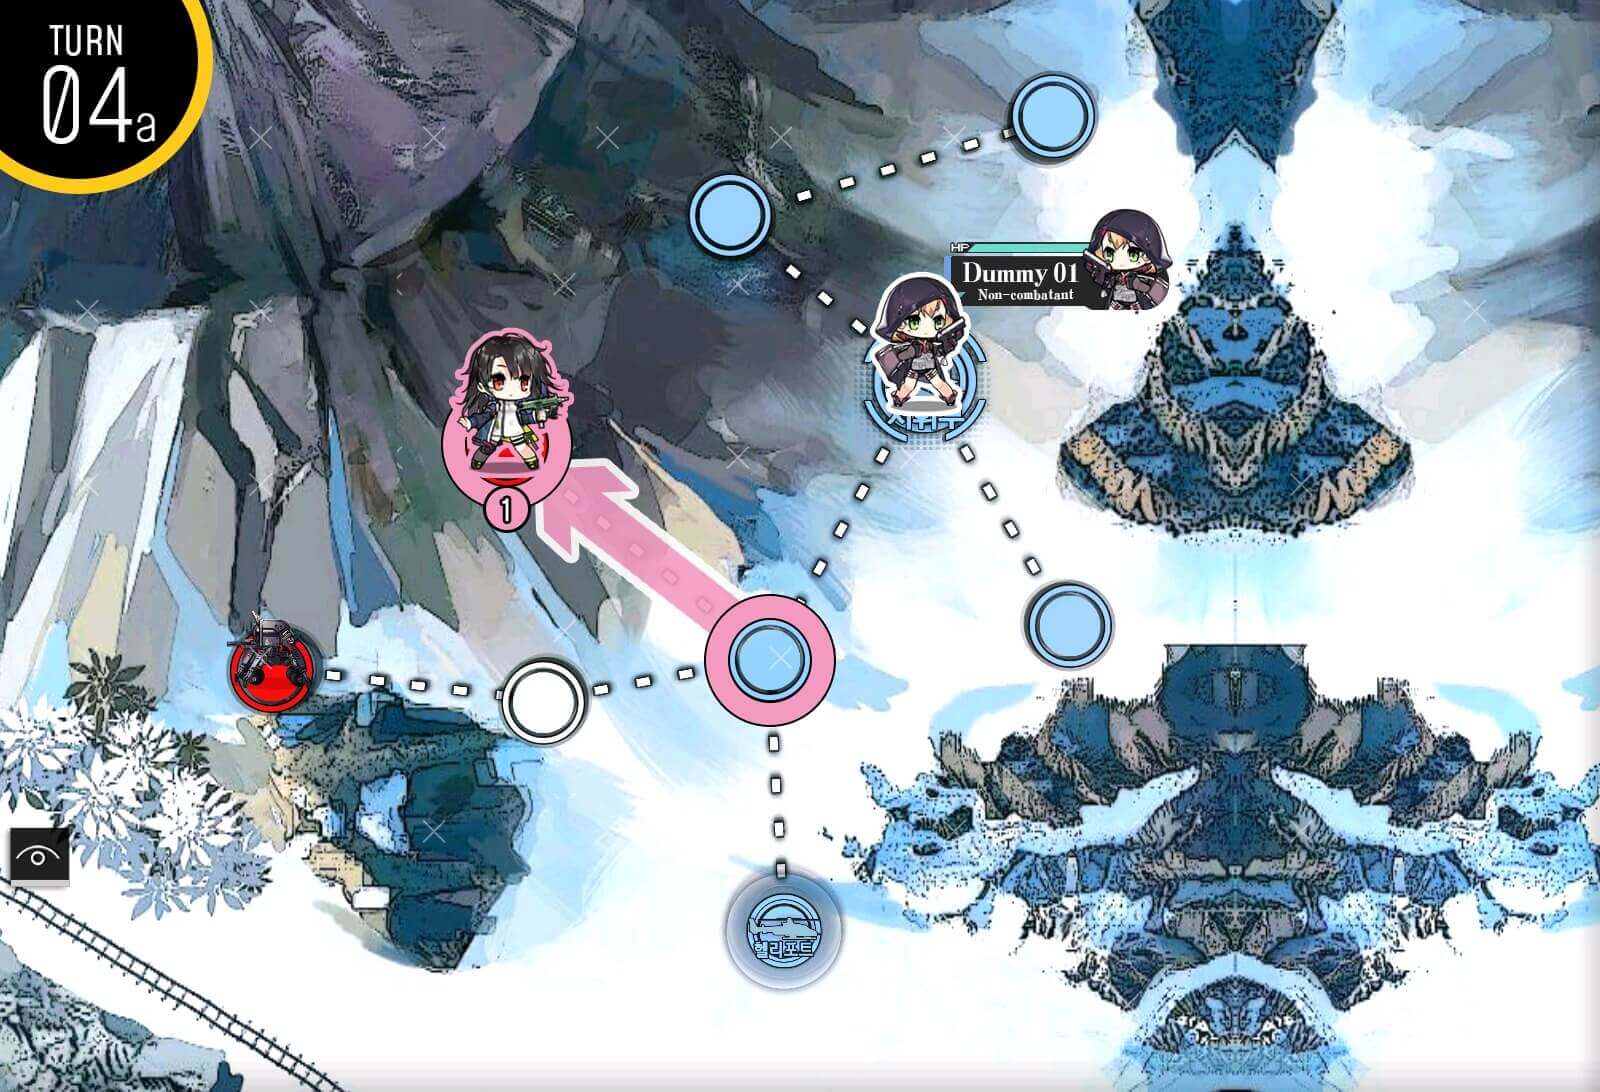
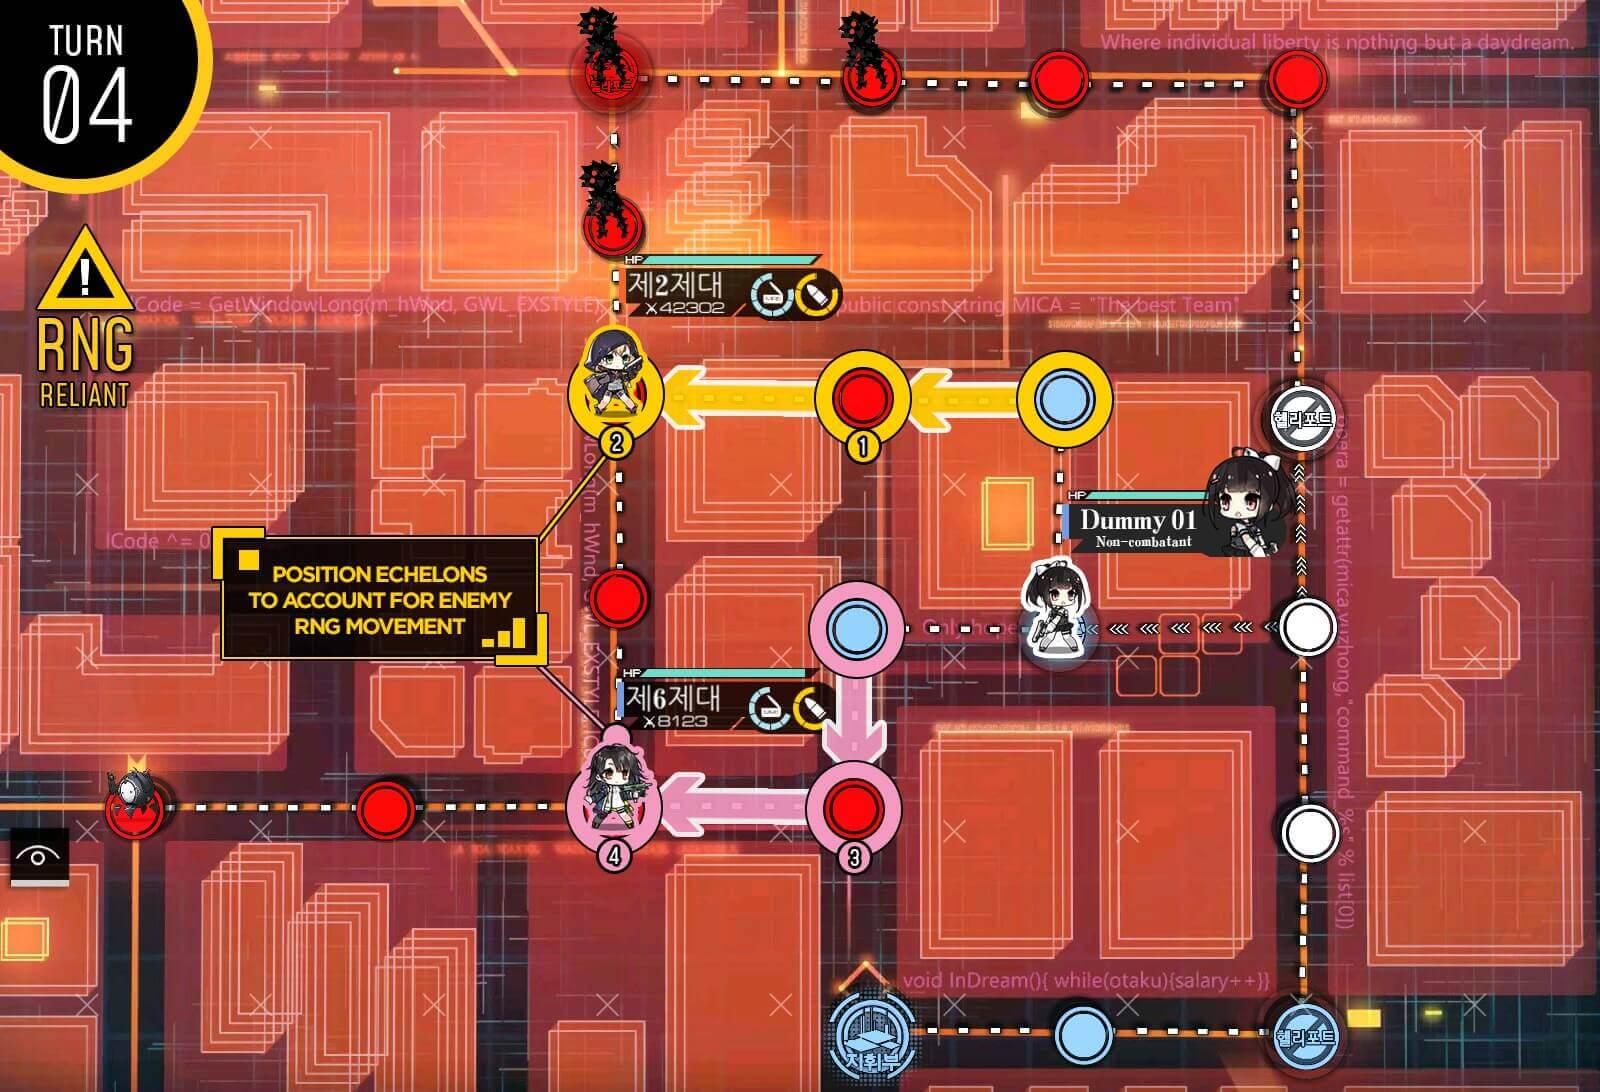
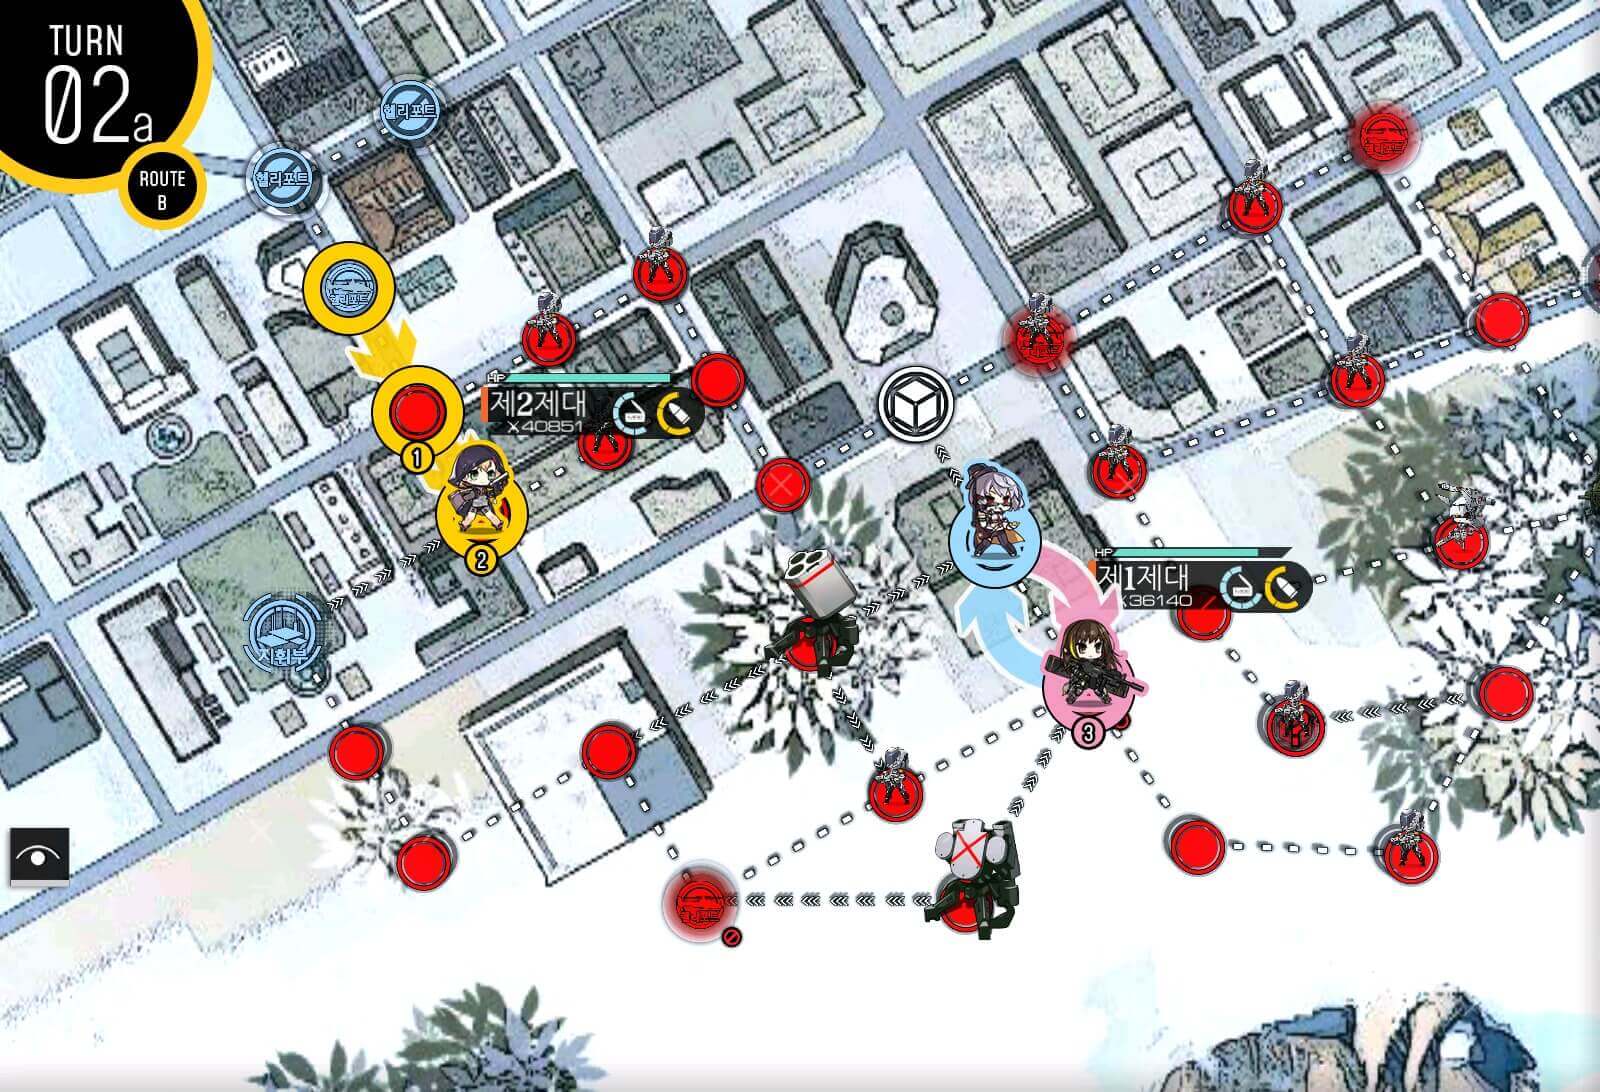
Turn 4a
Combat echelon moves on top of the helipad to prevent further enemy units from spawning. Second dummy echelon swaps with hostage T-doll.
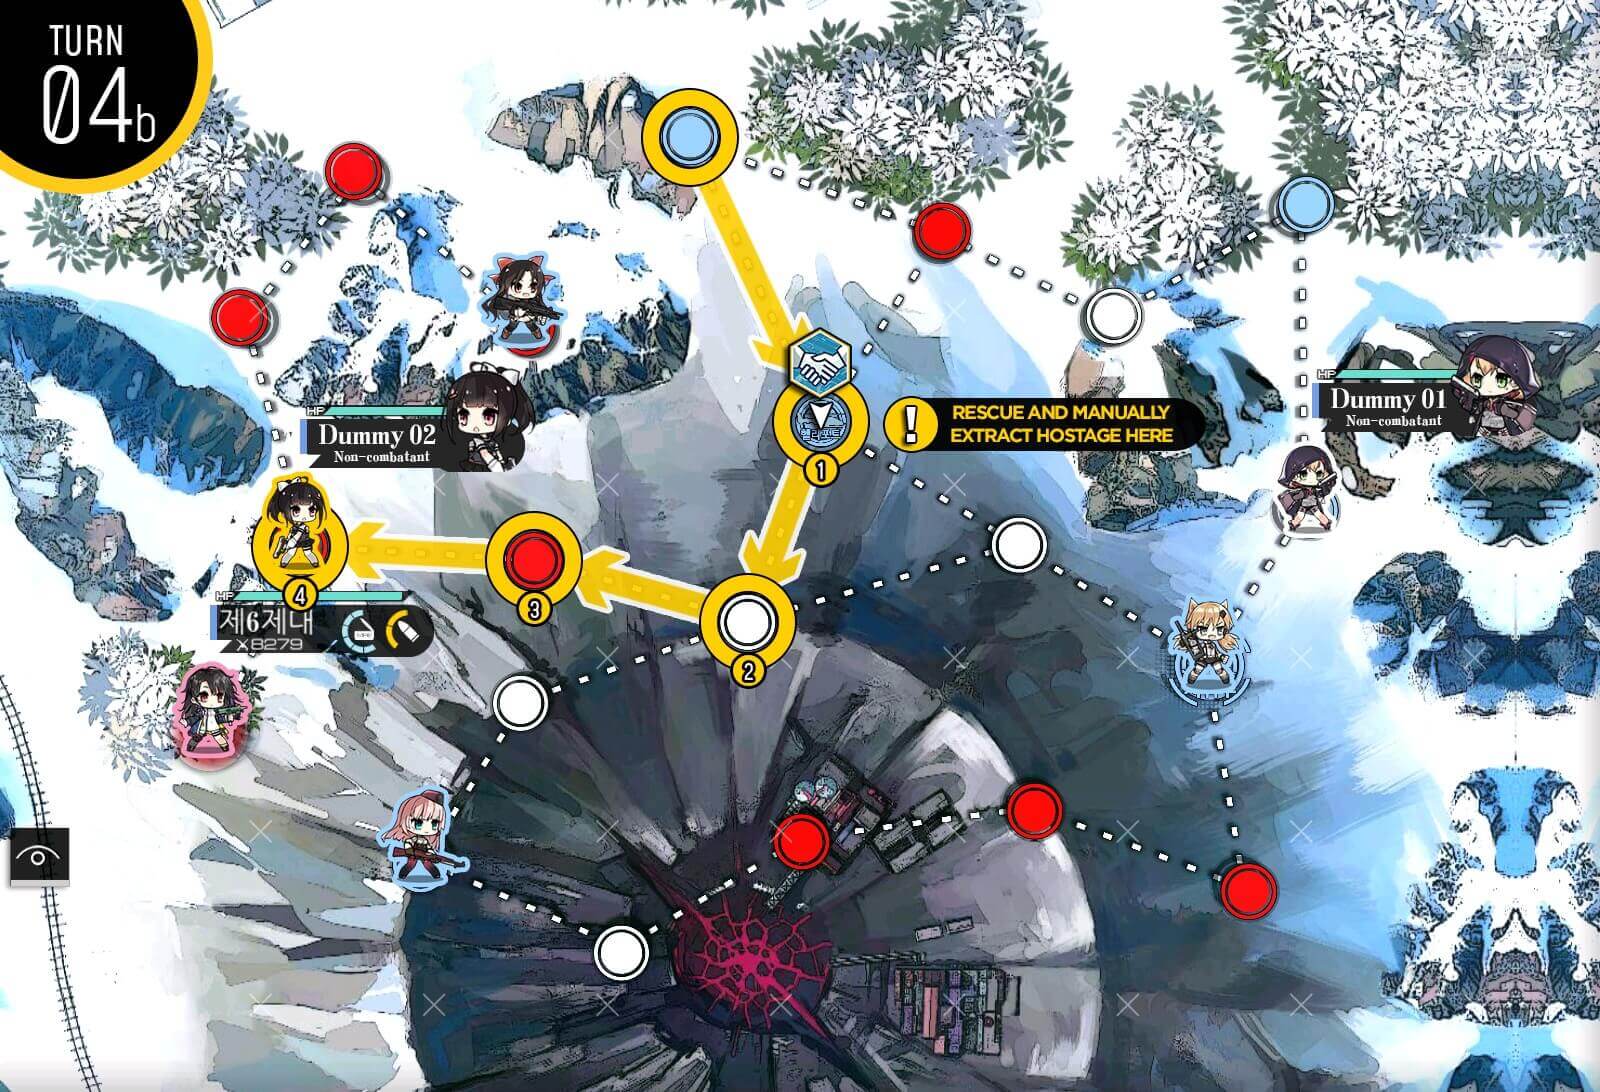
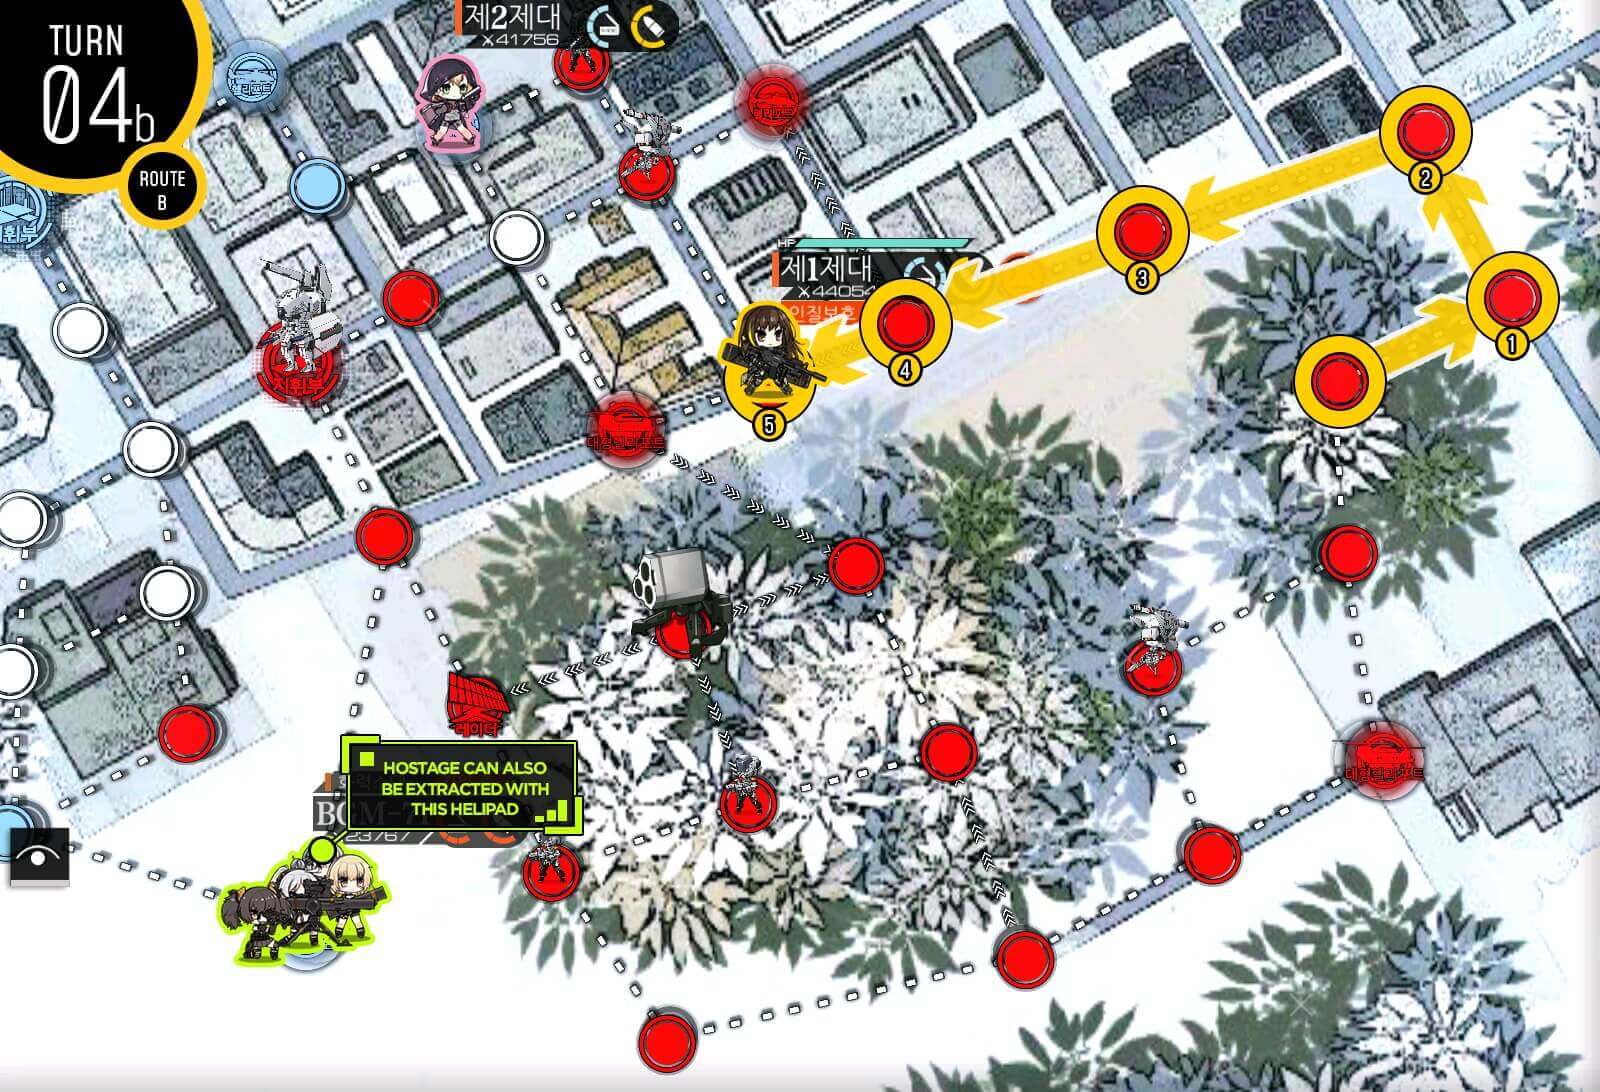
Turn 4b
Dummy rescues the hostage, immediately extracts it at the helipad then move towards combat echelon. If there's still enemy units to the north of the second dummy echelon, swap with combat echelon.

Turn 5a
Combat echelon or dummy echelon move towards the hostage. Always swap with hostage before rescuing when having to backtrack.

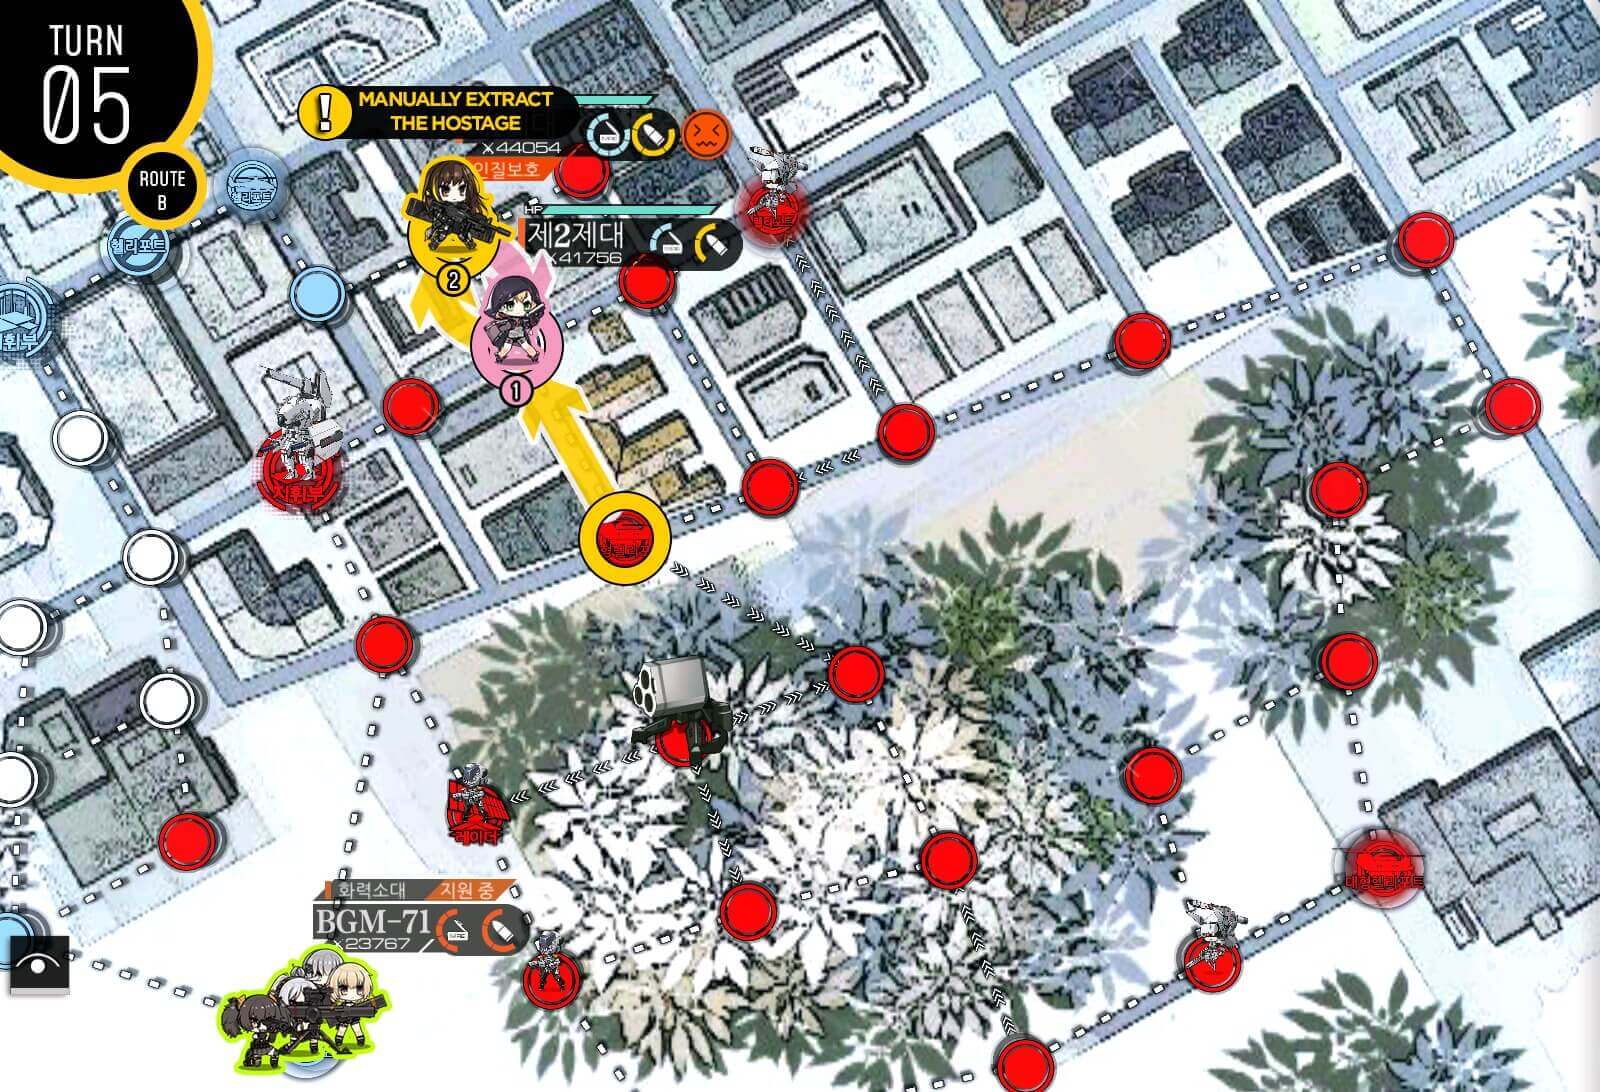
Turn 5b
Make your way to the helipad then extract manually. First dummy echelon at the HQ also rescues the hostage and manually extracts it.
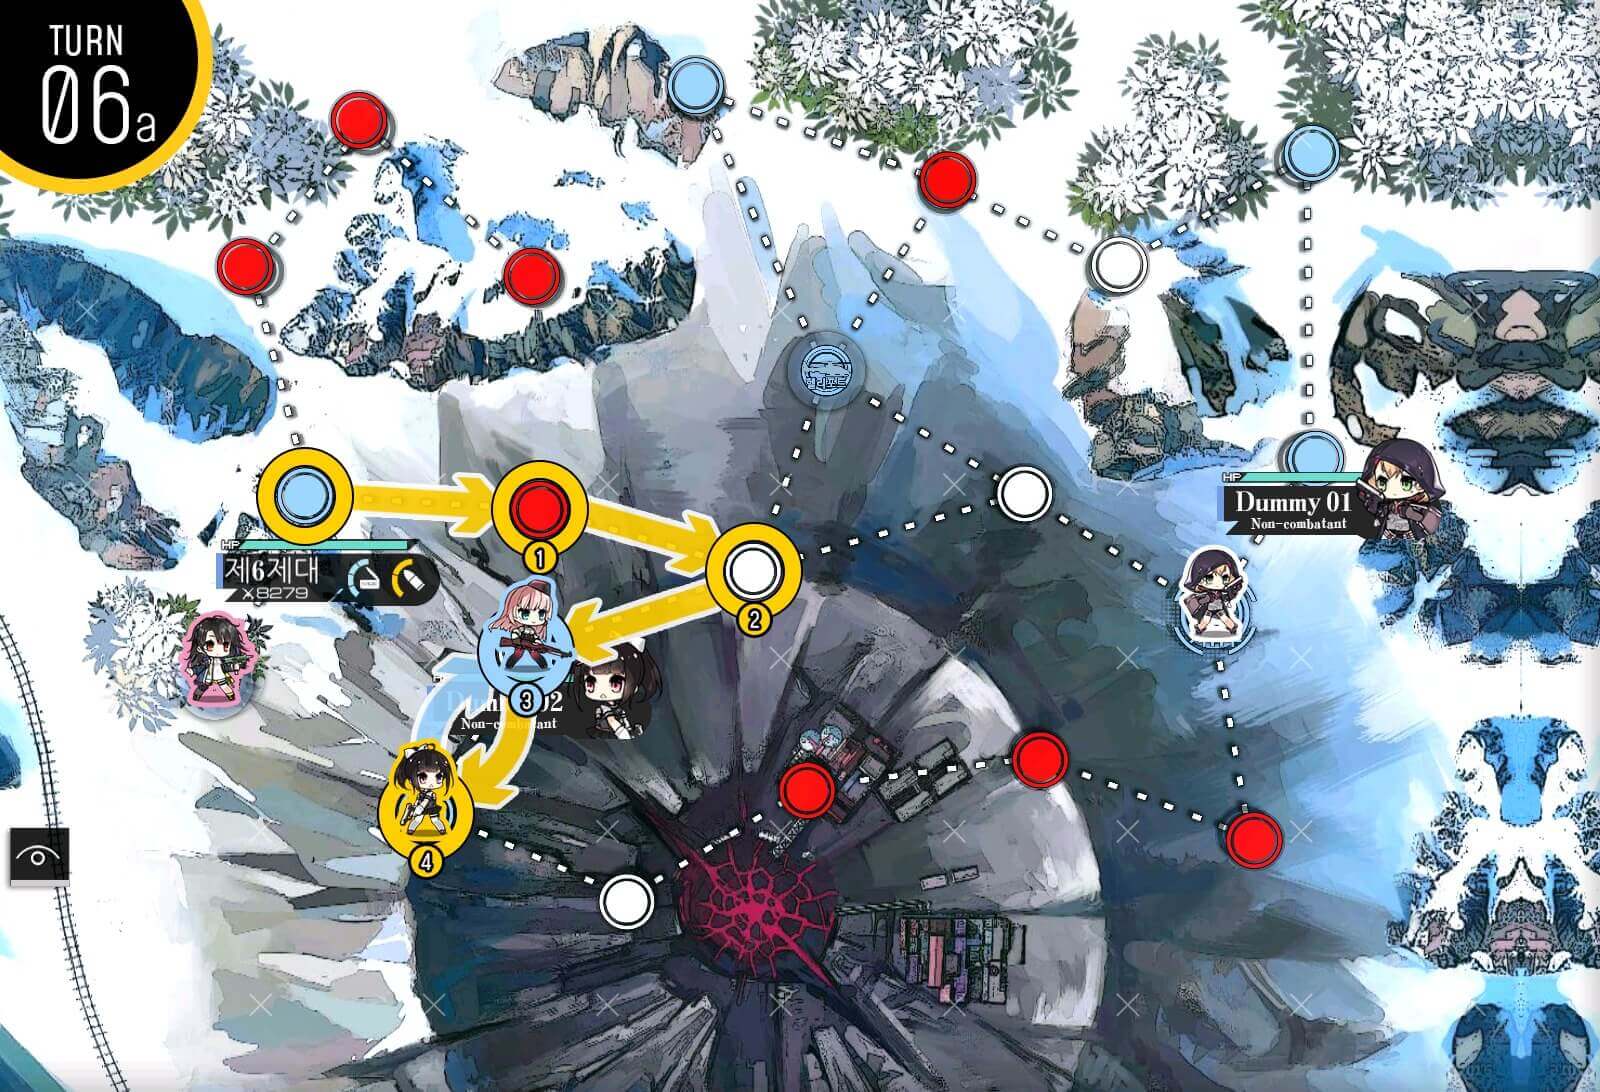
Turn 6a
Head to last hostage T-doll on the map, again make sure to swap prior to rescuing to save a move point.

Turn 6b
Extract hostage manually at the center helipad to clear the mission.
Turn 1
Due to armor presence in the map, level and link restriction has gone up dramatically. If you can beat 56 armor either through AP or firepower, that will make this map easier. Move combat echelon to right then deploy a second combat echelon.
Turn 2
At the start of the turn I recommend resupplying the first combat echelon by swapping to HQ before moving. After that is just moving straight to enemy HQ.

Turn 1
In this map we are just waiting for Scarecrow to make her way up to the helipad. You can deploy a second combat echelon if you are not confident that the first combat echelon is capable of handling all battles required. Start with the enemy unit to right of HQ.

Turn 2
Capturing nodes adjacent to HQ also prevents surround capture. Move combat echelon to the other end of HQ.
Turn 3
Take care of the enemy unit to south of HQ.
Turn 4
Move your unit to HQ and hit end turn to clear the mission.
Turn 1
This map is more of DPS check than anything. Well-leveled ARSMG team is rcommended. AoE skill or two will be helpful against digital zombies. Start with combat echelon at the HQ and have it make its way towards the helipad.

Turn 2
Take the next helipad to left of the fork.
Turn 3a
Deploy the second combat echelon after moving the first combat echelon to the left.

Turn 3b
Move the second combat echelon up one then deploy a dummy at the helipad.
Turn 4
Move your combat echelons to the shown positions on the map. This will minimize RNG to a point where you are able to get S-rank clear regardless of where enemy units move.
Turn 5
Clear out remaining enemy units on the map to clear the mission.
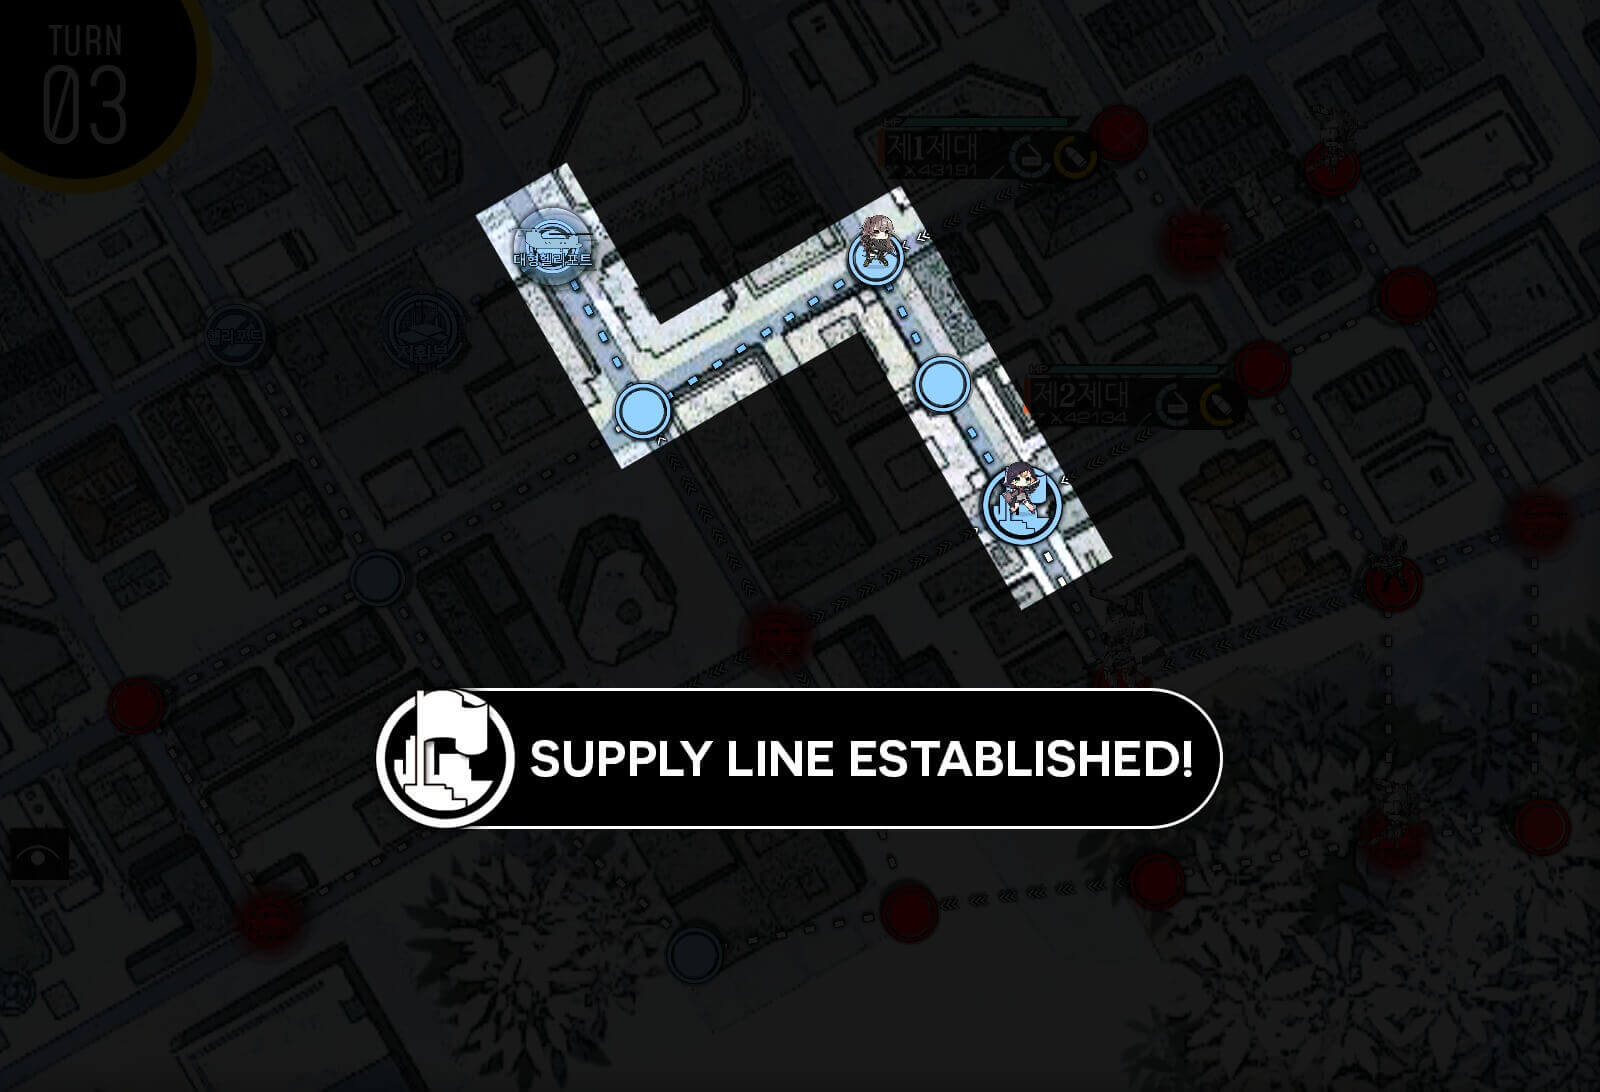
Turn 1a
Start with two combat echelons on each spawn point. Then move the combat echelon on the left side [first combat echelon] down to the nearby helipad followed by deploying the first dummy echelon.
Turn 1b
Move dummy echelon down next to first combat echelon then swap their positions before ending turn.

Turn 2
We are going to sweep one area of the map at a time using combat echelons. Swap first combat echelon's and first dummy echelon's position then sweep in clockwise direction ending on the helipad next to dummy echelon. Second combat echelon also moves to kill nearby unit.
Turn 3a
Both combat echelons continues to sweep the area while staying in proximity of the helipad and dummy echelon so resupply can be done with little or no move cost.
Turn 3b
Swap back to HQ to resupply then swap back.

Turn 3c
Move first dummy echelon one node to the right onto the helipad. Resupply now or at the beginning or next turn.

Turn 4
First combat echelon is going to sweep the left side of the map and will spend nearly all its ammo. Again make sure to resupply prior to moving.

Turn 5
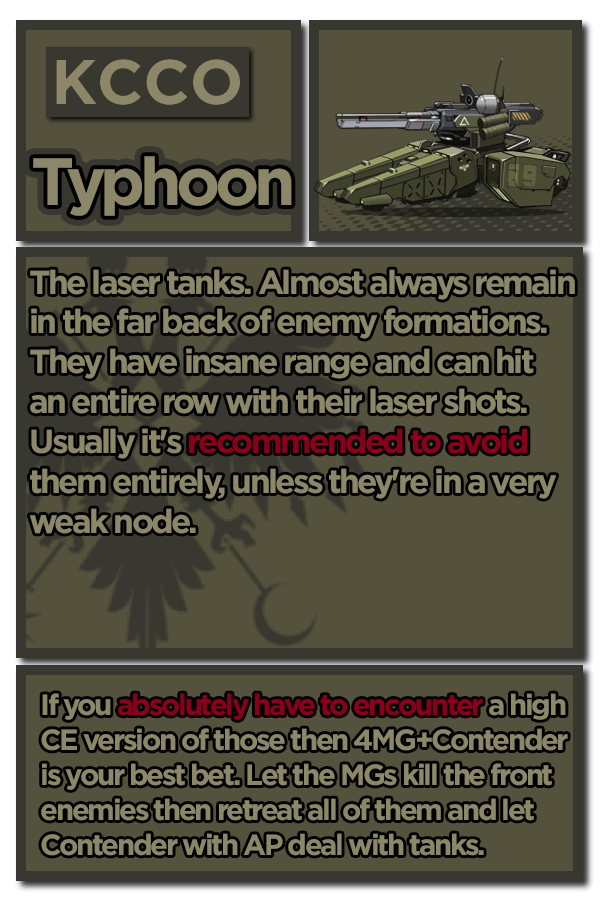
Now all you have to do is clear out the remaining units. For Typhoon unit, all you have to do is clear out the top and bottom row and put T-dolls on middle row and they will stay out of harm's way.
Chapter II
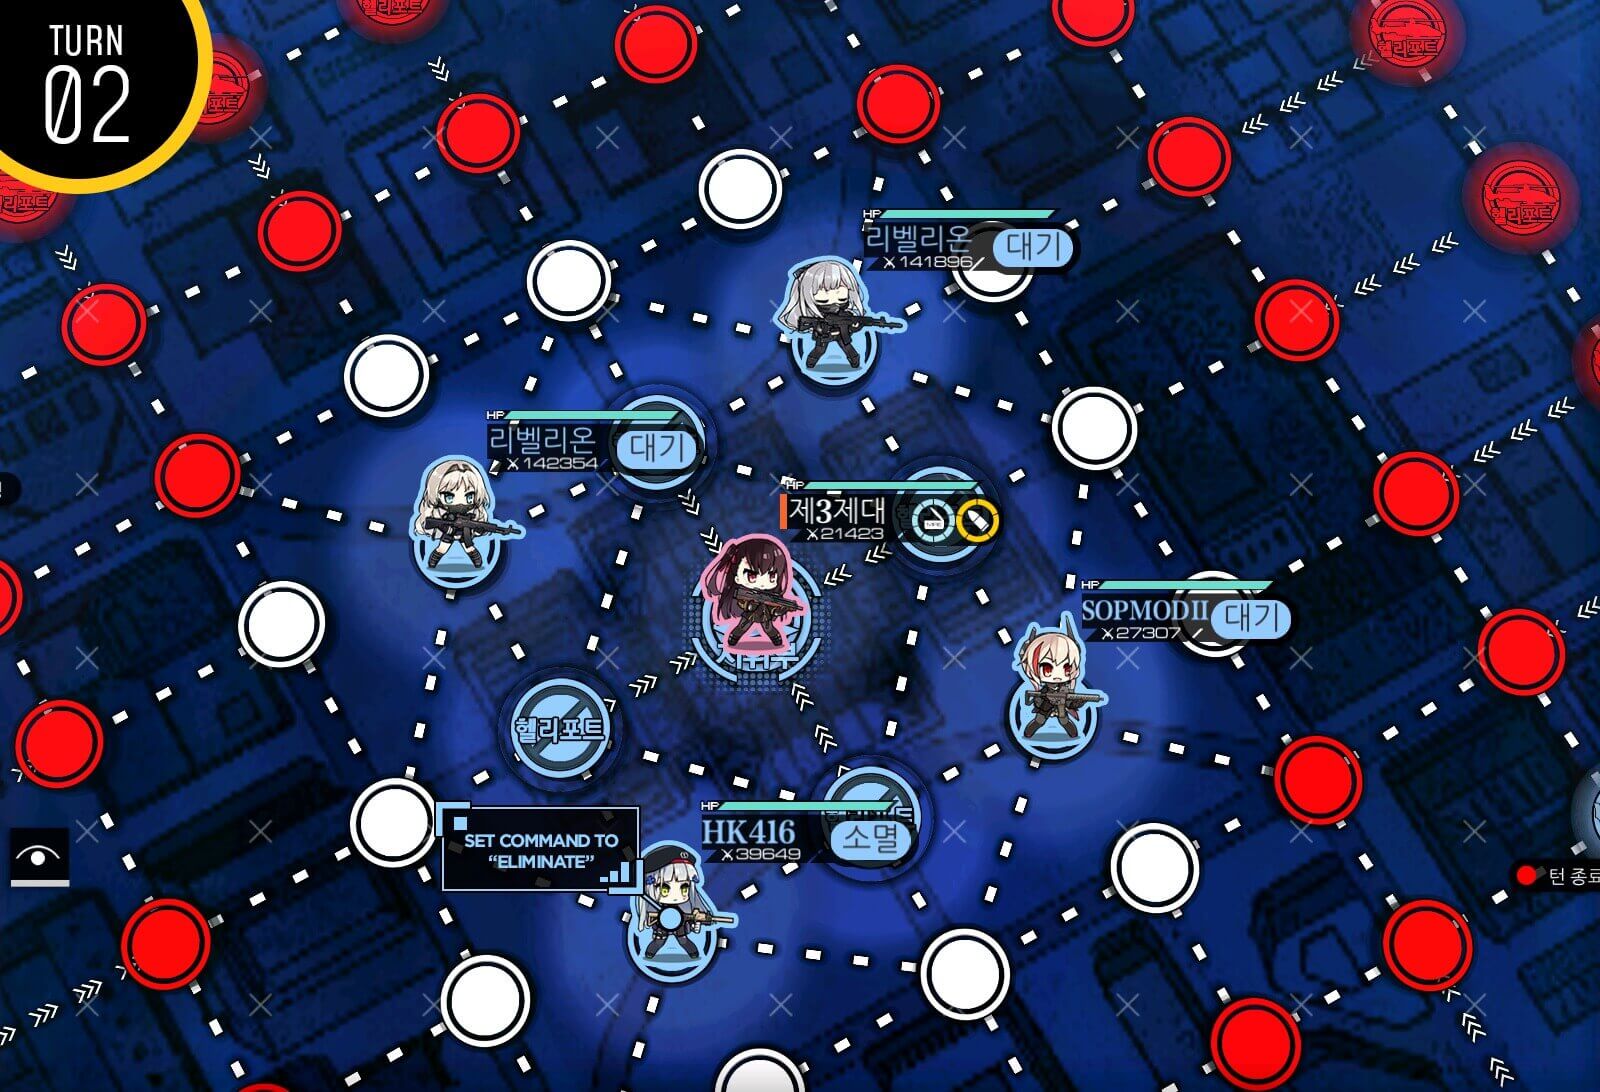
Turn 1a
Move combat echelon towards HK416. For the other echelon, move up one node followed by deploying second dummy echelon at the helipad.
Turn 1b
Combat echelon adjacent to HK416 swaps with her and move next to the first dummy echelon at the HQ. HK416 is set to 'Wait'. If you are not interested in S-rank clear, you can leave it as 'Eliminate'.

Turn 2a
Combat echelon near HQ swaps with the first dummy then resupplies prior to going over the one-directional path to right of the HQ. Goal is to eliminate all enemy units on the right side of the map [shown in pink shaded area]. Regardless of the path you take, make sure to park the first combat echelon next to the second combat echelon.

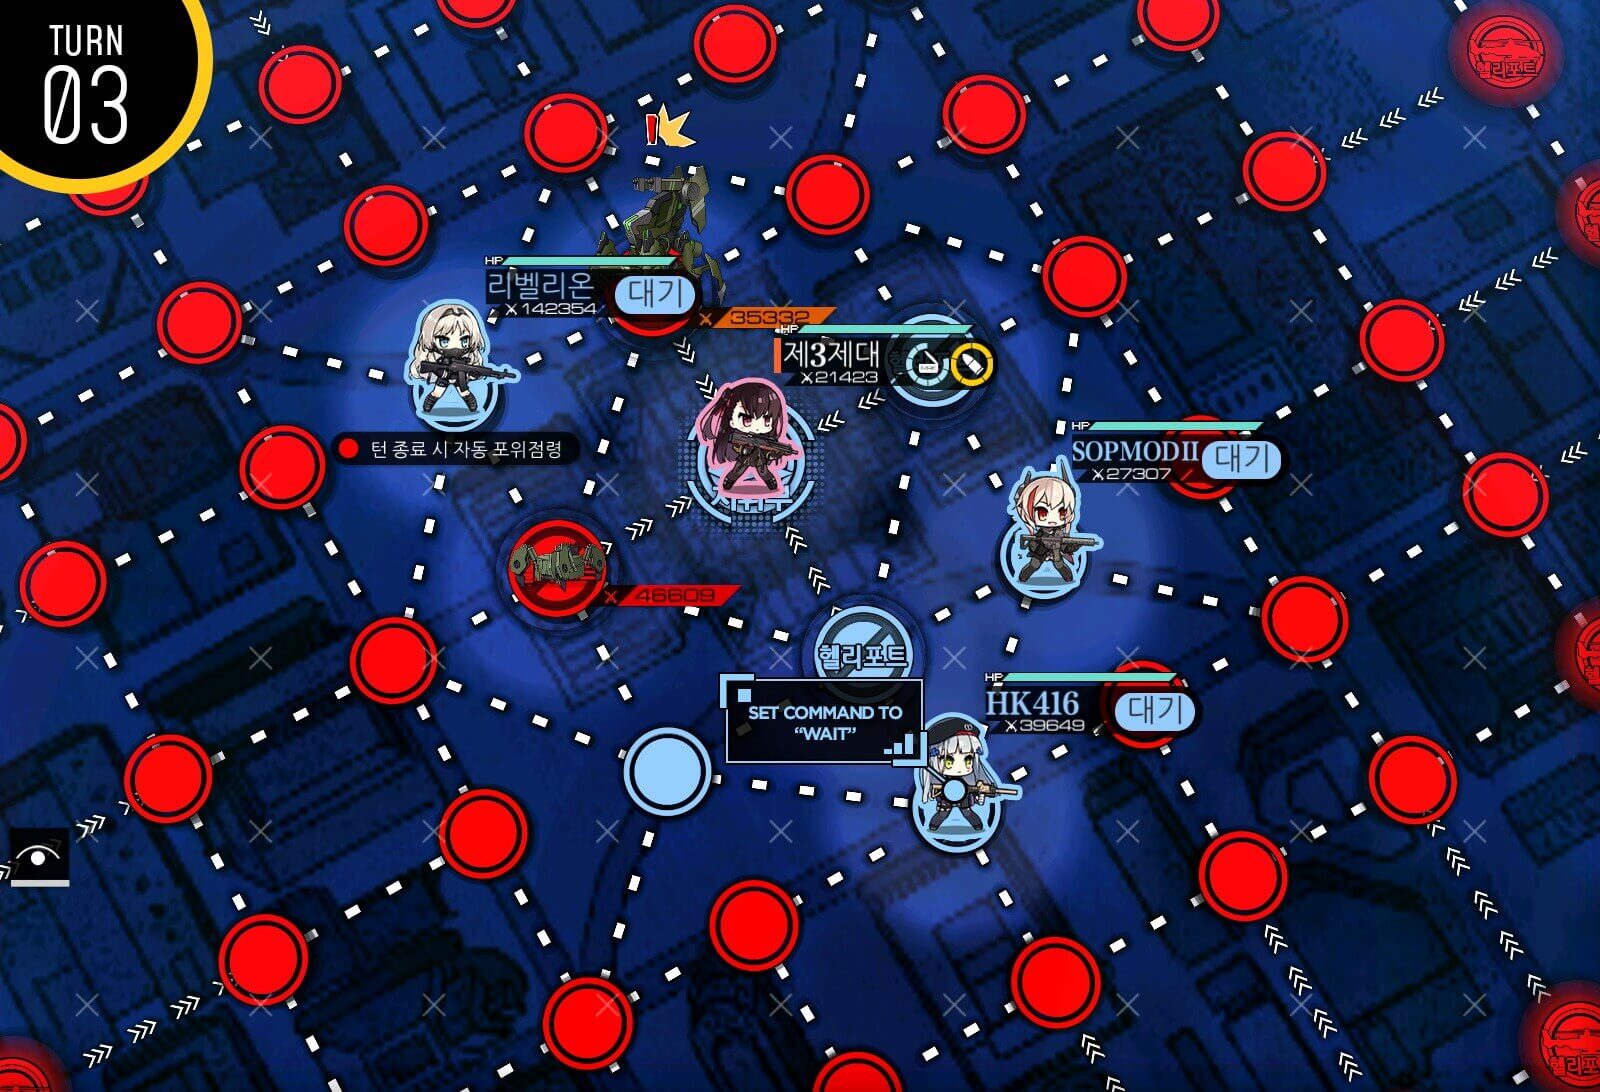
Turn 2b
Swap first combat and second combat echelons' position. Before moving again, swap with the second dummy echelon at the bottom helipad to resupply the first combat echelon. Use remaining move points to clear out enemy units near the first Dummy echelon to keep it out of harm's way.

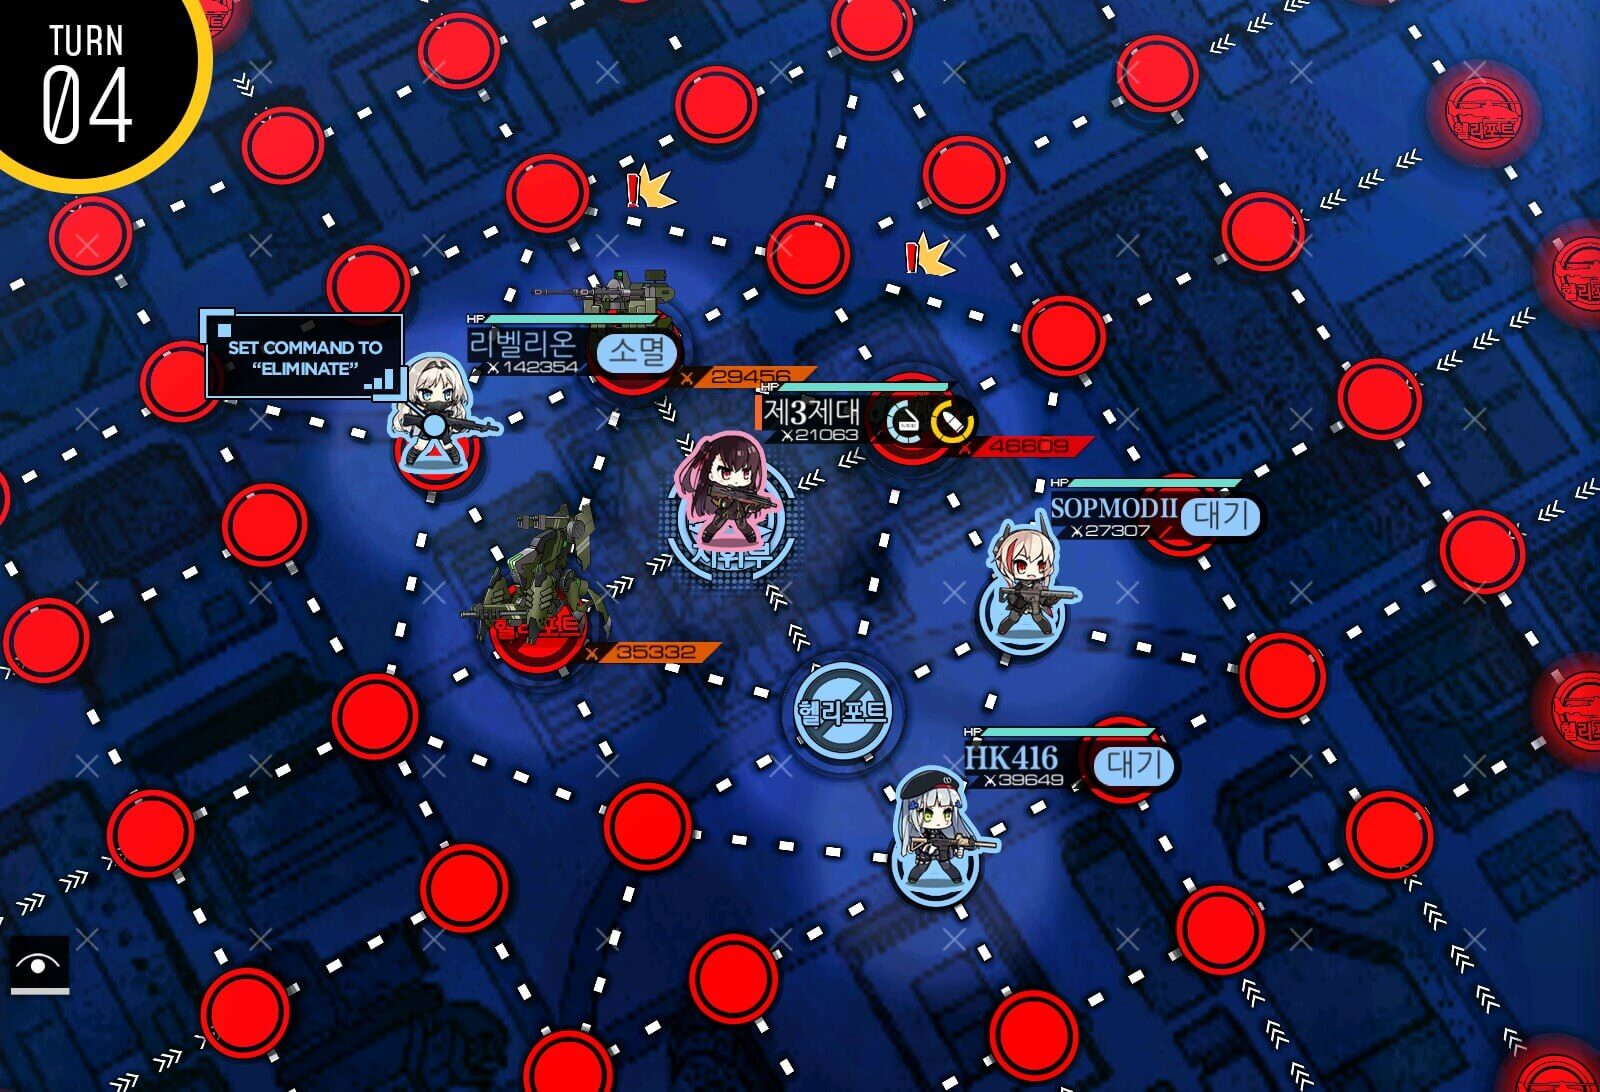
Turn 3
Last thing to do is to clear the enemy units on the map. If you forgot to resupply at the last helipad point, swap with HK416 then move to Helipad before clearing enemy units.

Turn 1
Start with two combat echelon on HQ/helipad. Combat echelon on the HQ moves down two nodes towards HK416. Deploy dummy echelon on HQ. Combat echelon on helipad moves one node to the left.WARNING: 416 here might not survive the two battles in a row. If this happens either spawn an additional echelon to deal with some weak enemies or restart.
Turn 2a
Dummy echelon moves down one towards combat echelon then swaps position with it. Weak enemy units spawn from helipads in the top corner. HK416 should be able to last up to 2 battles against enemy units but if you are lucky she will fight only once.
Turn 2b
Swap HK416 all the way up to the node next to HQ. Swap so that dummy echelon is in the middle and combat echelon at the helipad. Resupply here before moving.

Turn 3
Combat echelons makes path towards supply point. We are avoiding fights with Rodeleros in this solution but if you have a strong enough echelon and know how to fight against Rodeleros, it will be a relatively easy fight.

Turn 4
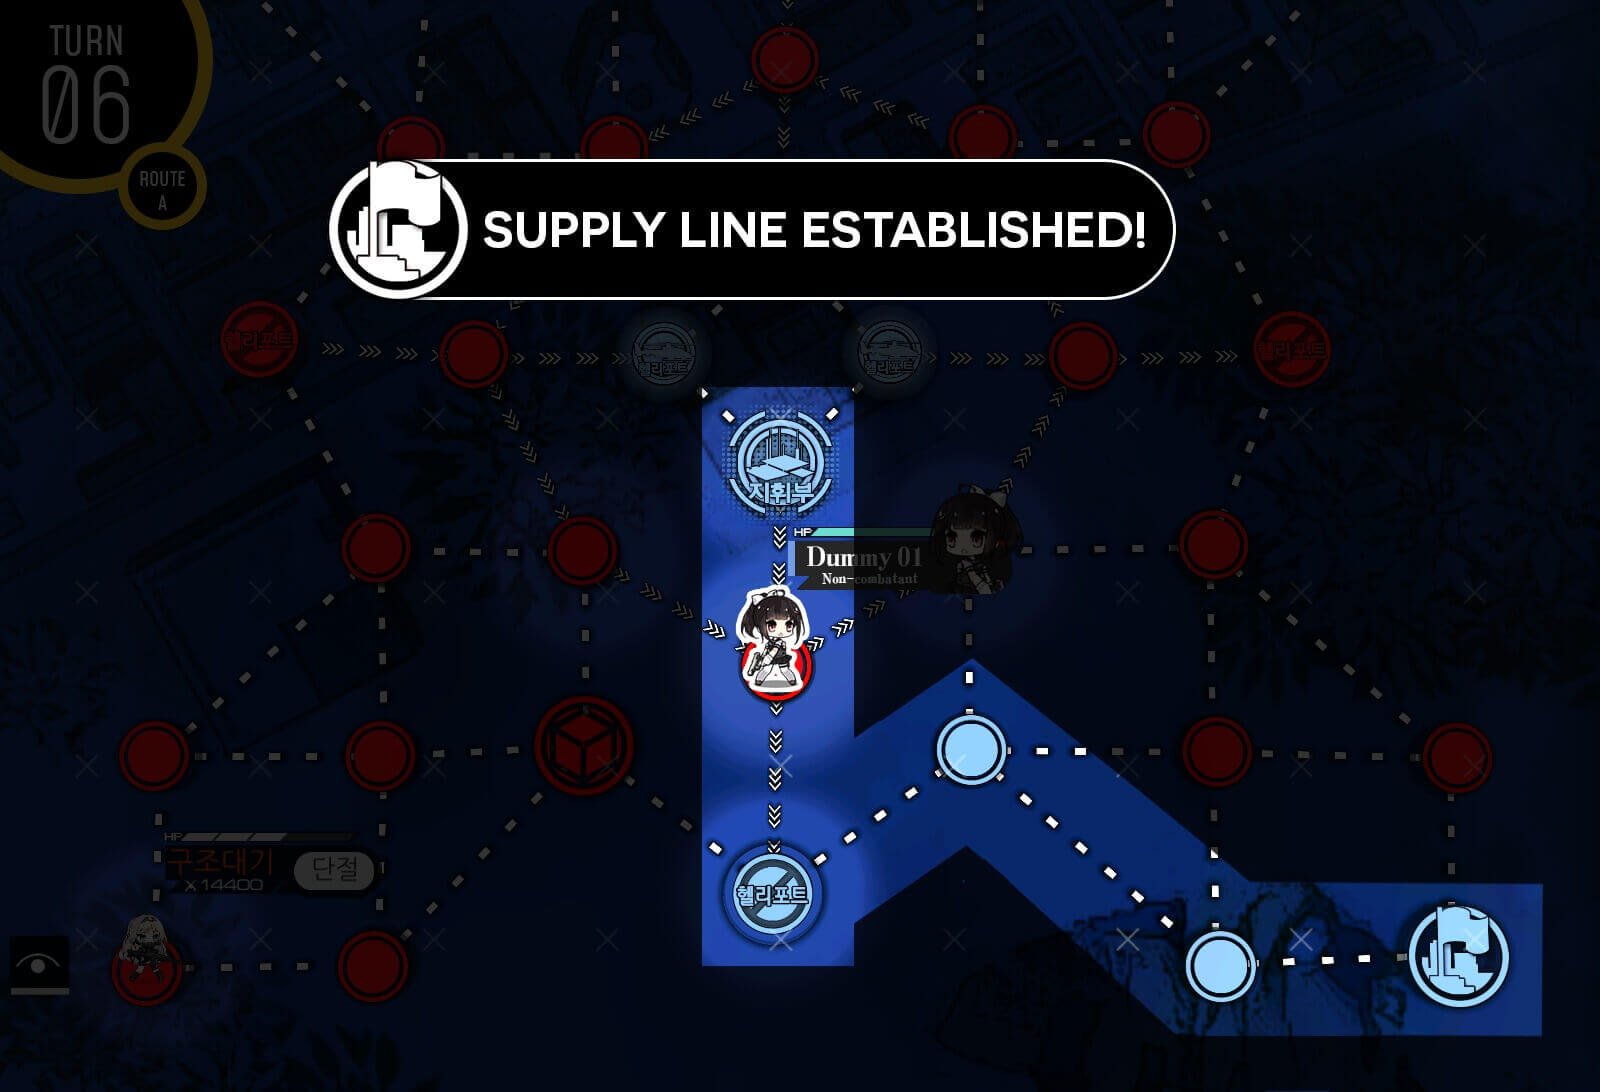
Once supply route is connected, all you have to do is making sure that it is not severed. If HK416 is looking rough, you can move combat echelon all they way back via swapping.
Turn 1
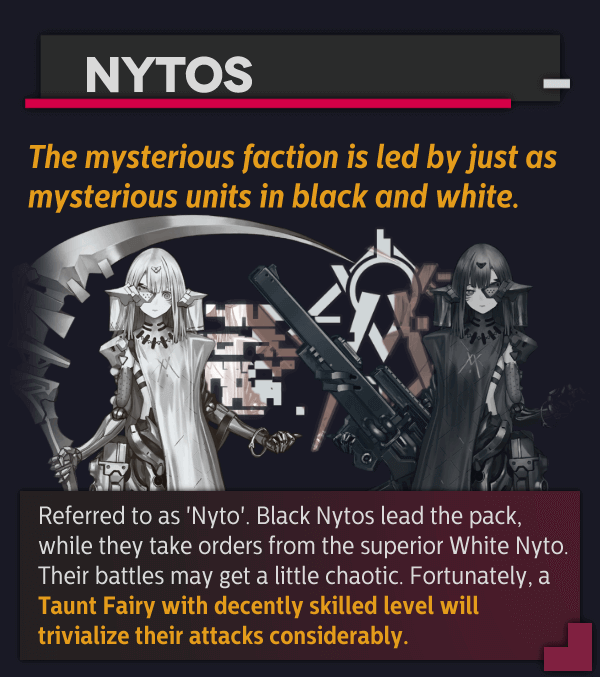
Start with two combat echelon on the HQ and helipad with the boss fight echelon at the helipad. We move the boss fight echelon all the way to the supply point and end turn. For HK416, she can go where she pleases as she will not impact any part of the mission. ***IF you are having issue, bring in BGM HOC to take down Nyto's shield spending extra turn.***
Turn 2a
Supply route should have been severed and we need to reestablish it. Second combat echelon from HQ moves along the same route as the boss fight echelon but stops at the junction. Fighting against Rodeleros is also relatively simple task.
Turn 2b
Sometimes Doppelsöldner will move towards the starting location and break supply route from multiple locations. In this case you just have to spend extra turns re-establishing the route using both echelons.
Now all you have to do is make sure that route is not broken for 2 turns!

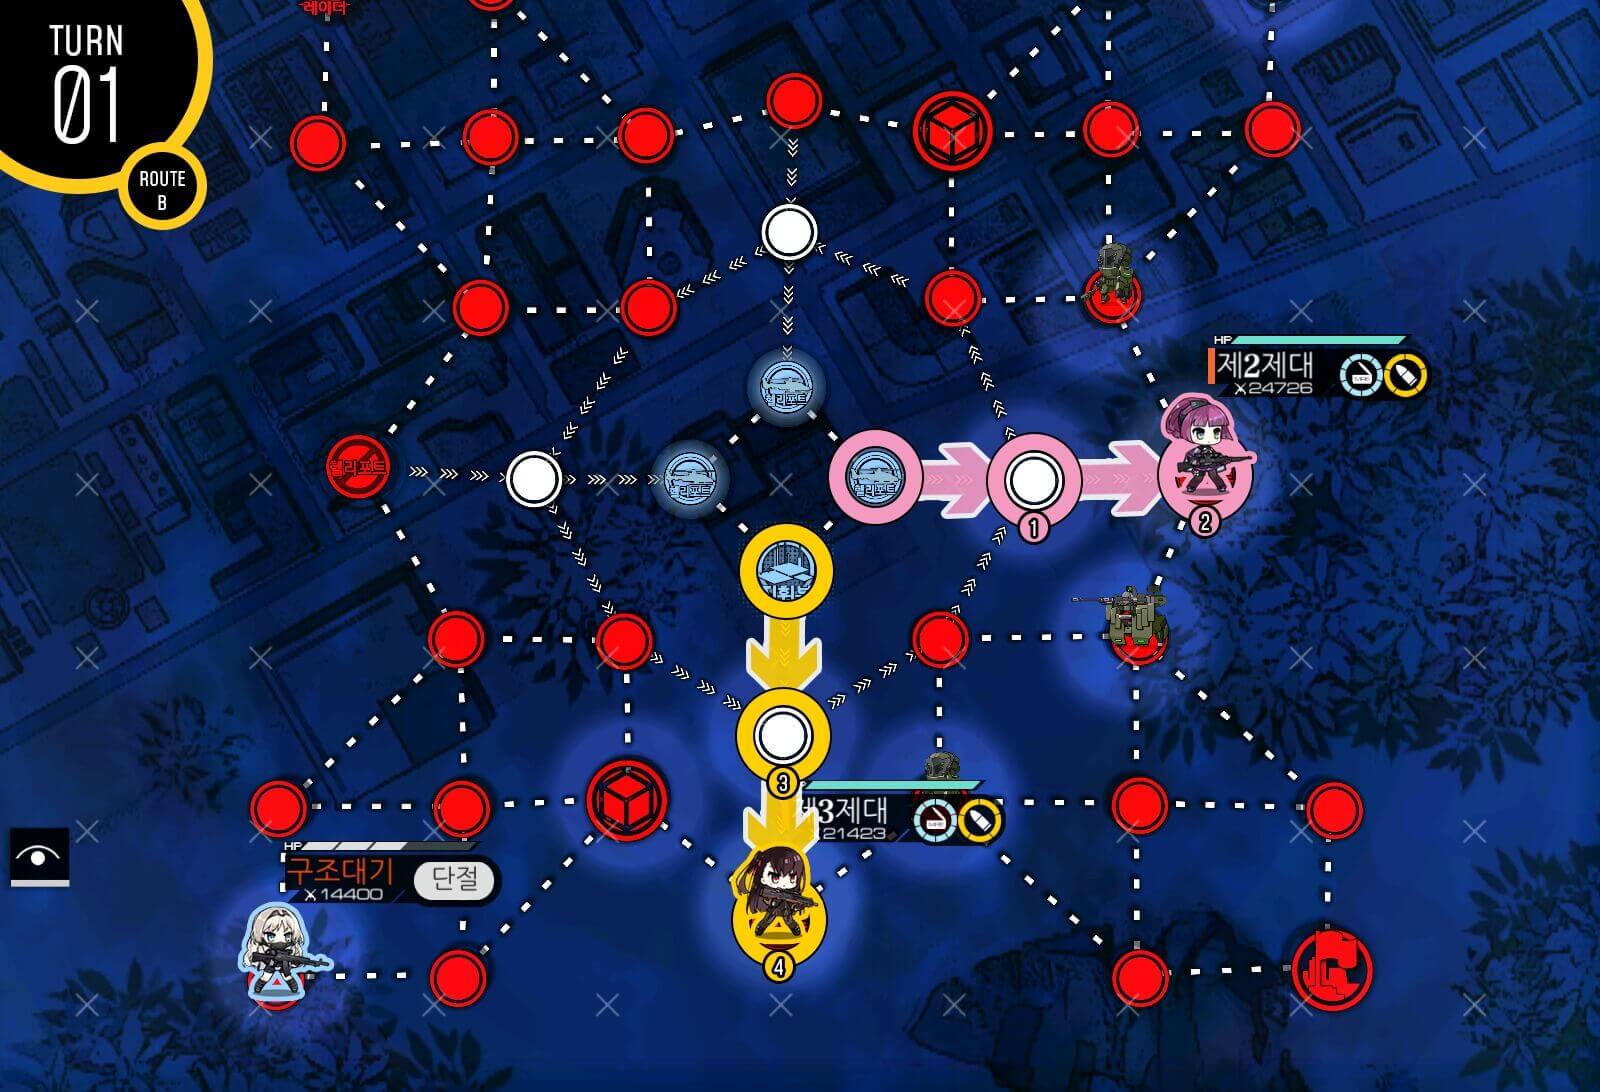
Turn 1
Start with both combat echelons on the HQ and helipad, combat echelon on the right side will be fighting more. Move both echelons one each then deploy dummy echelons on helipad/HQ.

Turn 2
At the beginning of the second turn, you should have 7 movement points total which is just enough to get to the hostage at the center area. The only variation should be the position of Doppelsöldner [gundam] on the way to the hostage which can be easily bypassed either way.
Turn 3
We are waiting for the Gundam to move out of the way this turn. Just hit end turn.

Turn 4
Move your way to the end of the path which is a large helipad. After hitting end turn, it will automatically extract the hostage next turn.
Turn 1
Bad ending route is straight forward but challenging because you have to fight Gundam units. Because there's 2 separate Gundam units in the battle it's hard to take out both in time before it launches AoE attack. I strongly recommend either using Taunt Fairy or Deploy HOC unit here to take down the shield.
Turn 2
Those who have Taunt Fairy or confident in their ability to kill with heavy damage go straight for Gundam, otherwise I recommend taking large helipad nearby and deploy BGM.
Turn 1
Unfortunately Rodeleros do not move in the bottom route so you just have to go through with enemy fire support unless you are willing to take extra few turns setting up using top route to take large helipad and deploy HOC. It's not huge damage so I don't think it's worth the resources spent. Swap with hostage before ending the turn.
Turn 2a
Swap back with hostage first before rescuing. Echelon defending the helipad moves down to prevent HQ from being surround captured.
Turn 2b
Move on to the large helipad and end turn. Mission should be cleared automatically.
Turn 1
This map has higher requirements for RFHG teams because there's a good chance they will fight against Gundam units without HOC support. Taunt fairy is recommended to minimize damage taken from AoE attack. If your echelons are well leveled and equipped, HOC is almost overkill against Uhlan [Tank]. SOPMOD II will be moving as she pleases and it's no big deal if we lose her to enemy units.
Turn 2
RFHG echelon move to the helipad south of HQ and ARSMG echelon takes large helipad so we can deploy HOC next turn.
Turn 3a
Deploy BGM HOC after moving ARSMG echelon right one node. Make sure that HOC's ammo is supplied and is actively supporting nearby units.

Turn 3b
ARSMG echelon clears path down to nearby helipad cluster. If Uhlan is in the way [RNG], make sure to move HOC right behind the echelon so that it gets the support.

Turn 3c
BGM HOC parks itself behind the ARSMG echelon. This should start stemming flow of enemy reinforcements.

Turn 4a
We are continuing to cut off the reinforcement by taking over all helipads around the enemy structure. Taking it out reduces the strength of enemy unit that comes out but we will also take out all helipads it buffs this turn. If Uhlan is at the position shown above where it's out of HOC's range, relocate HOC prior to engagement.

Turn 4b
Since Uhlan is at the position where it's out of HOC's range, we are relocating HOC prior to engagement.
Turn 5
Now that we have cut enemy reinforcements, all that is left is to kill remaining units on the right side of the map. This is where it's pretty RNG but it should not be impossible to clear since we have spare turns left.

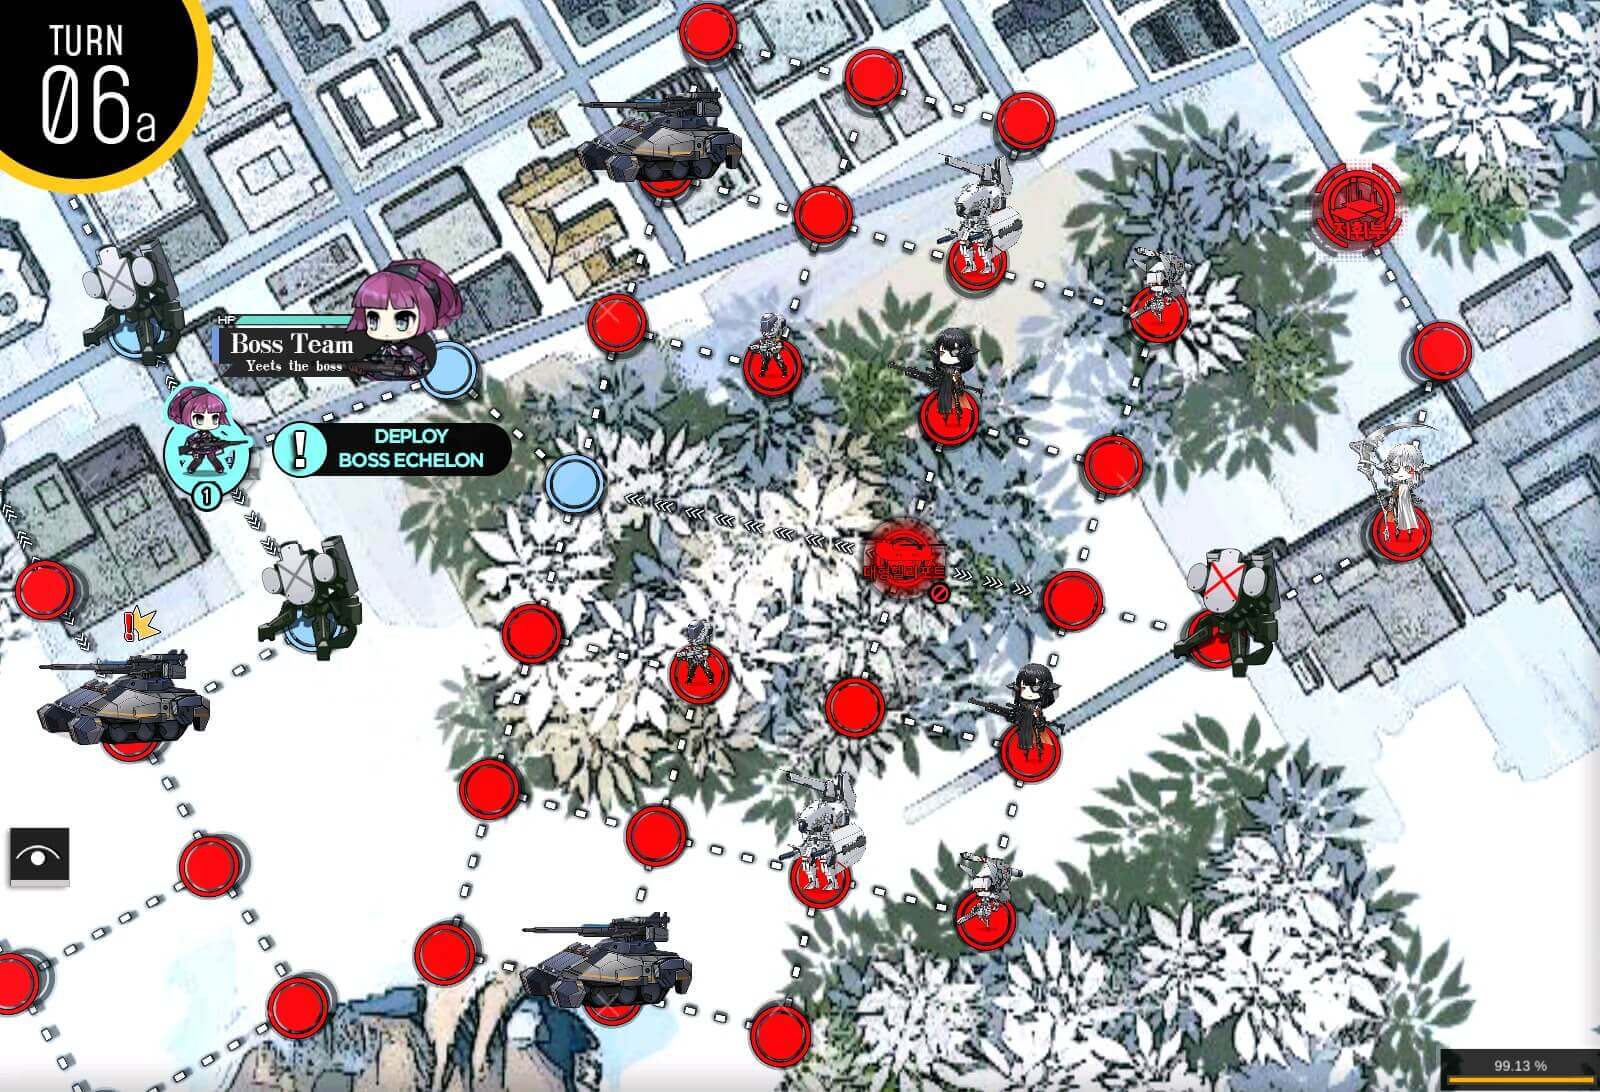
Turn 1a
Start with HOC at the large helipad followed by Boss Team. Swap their location and make sure both are supplied.
Turn 1b
Take out the enemy units to the right then deploy second combat echelon [Gundam kill team].
Turn 1c
Second combat echelon takes out the enemy unit to the left. Deploy first dummy on large helipad.
Turn 1d
Swap second combat echelon's and first dummy's location. Then second combat echelon takes out the Gundam unit to the south of large helipad.
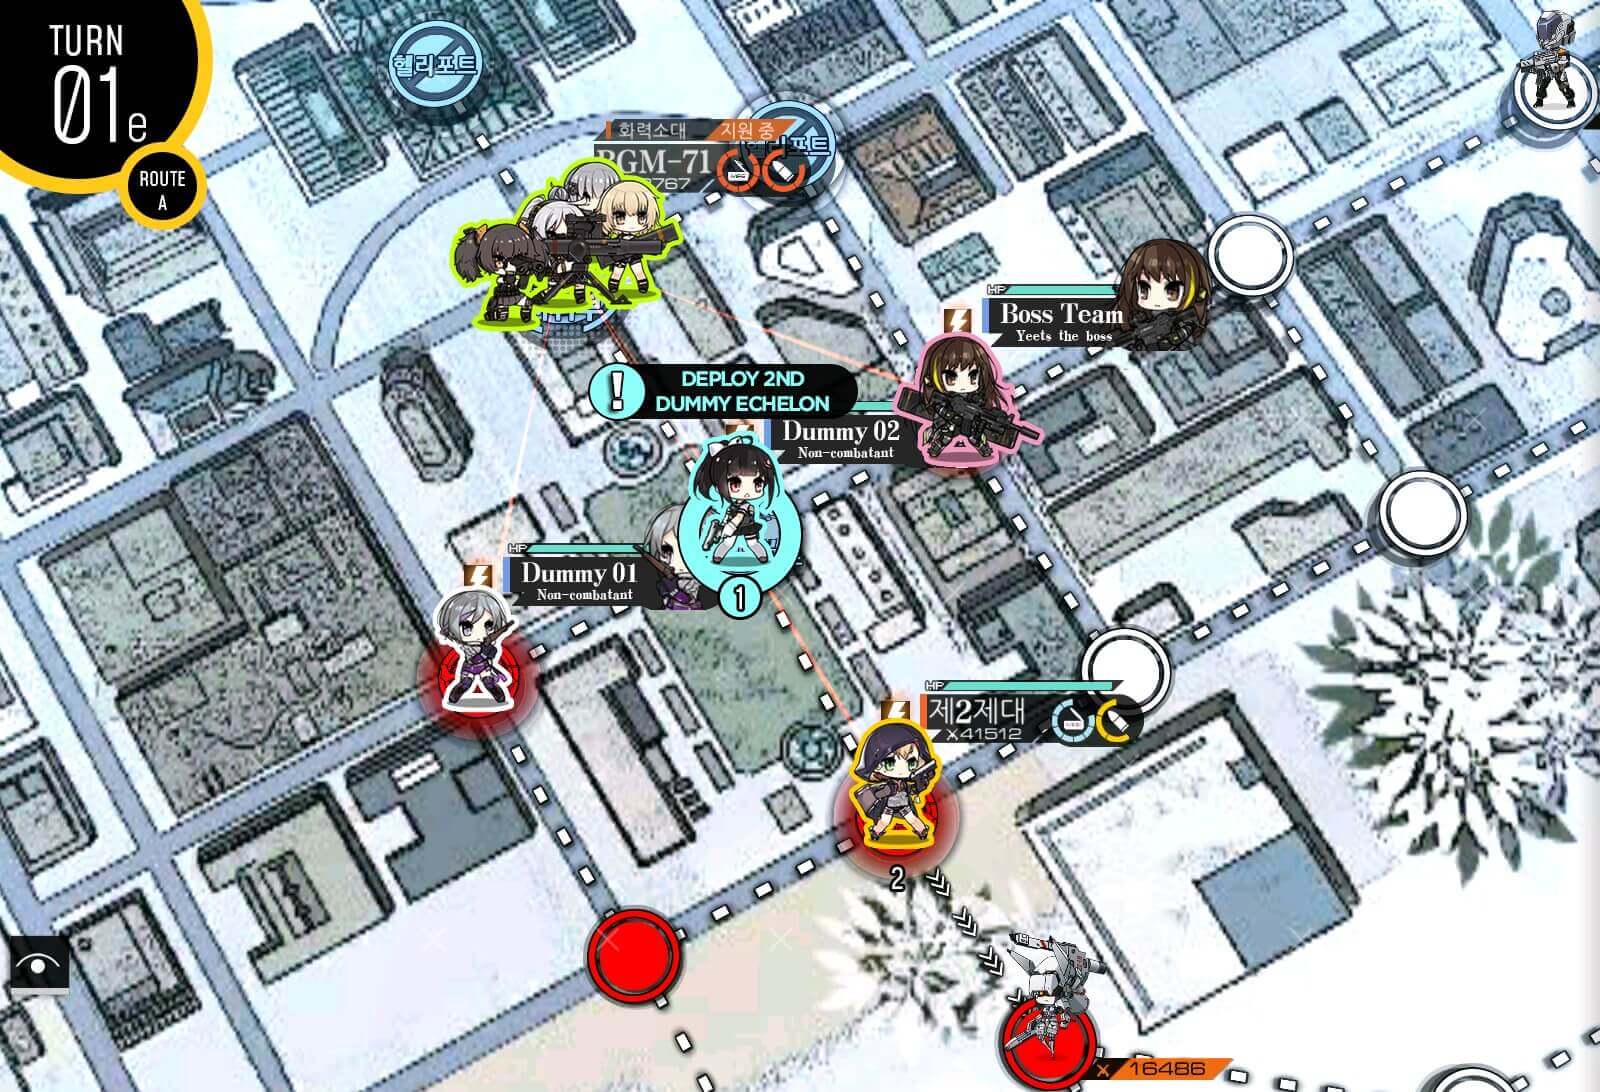
Turn 1e
Deploy the second dummy on the helipad.

Turn 1f
Before ending the turn, swap around the echelons so that Boss Team is at the south of the large helipad and second combat echelon is to the East.

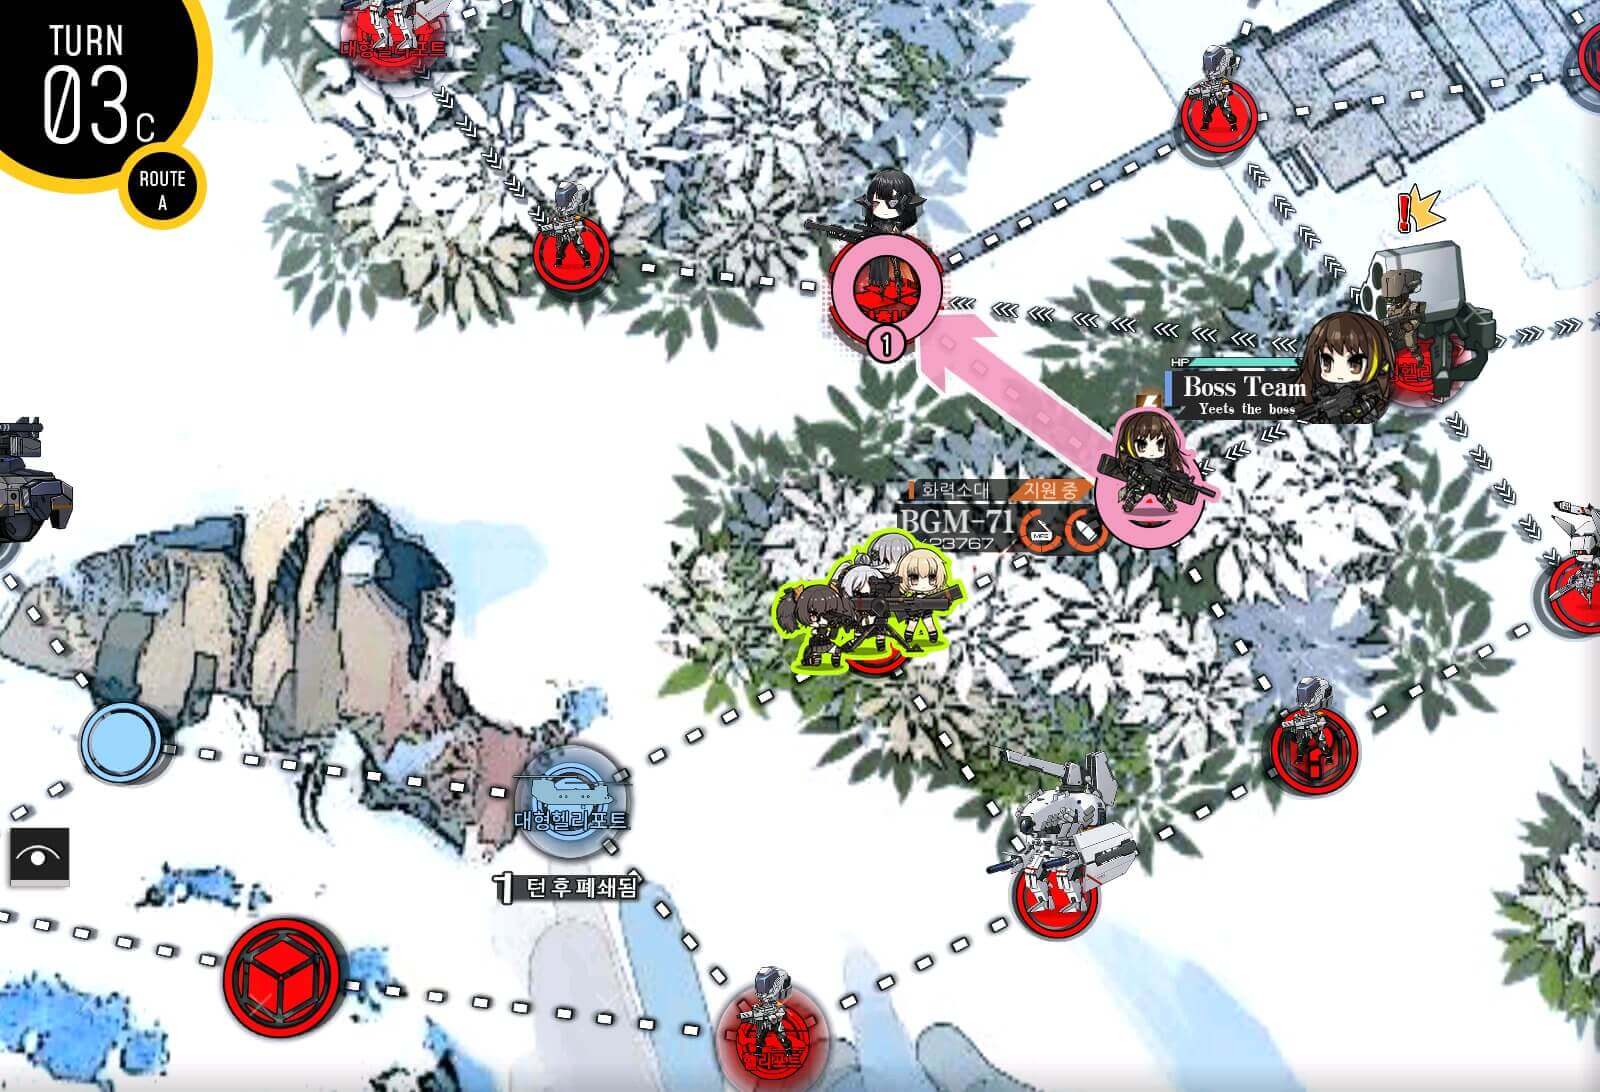
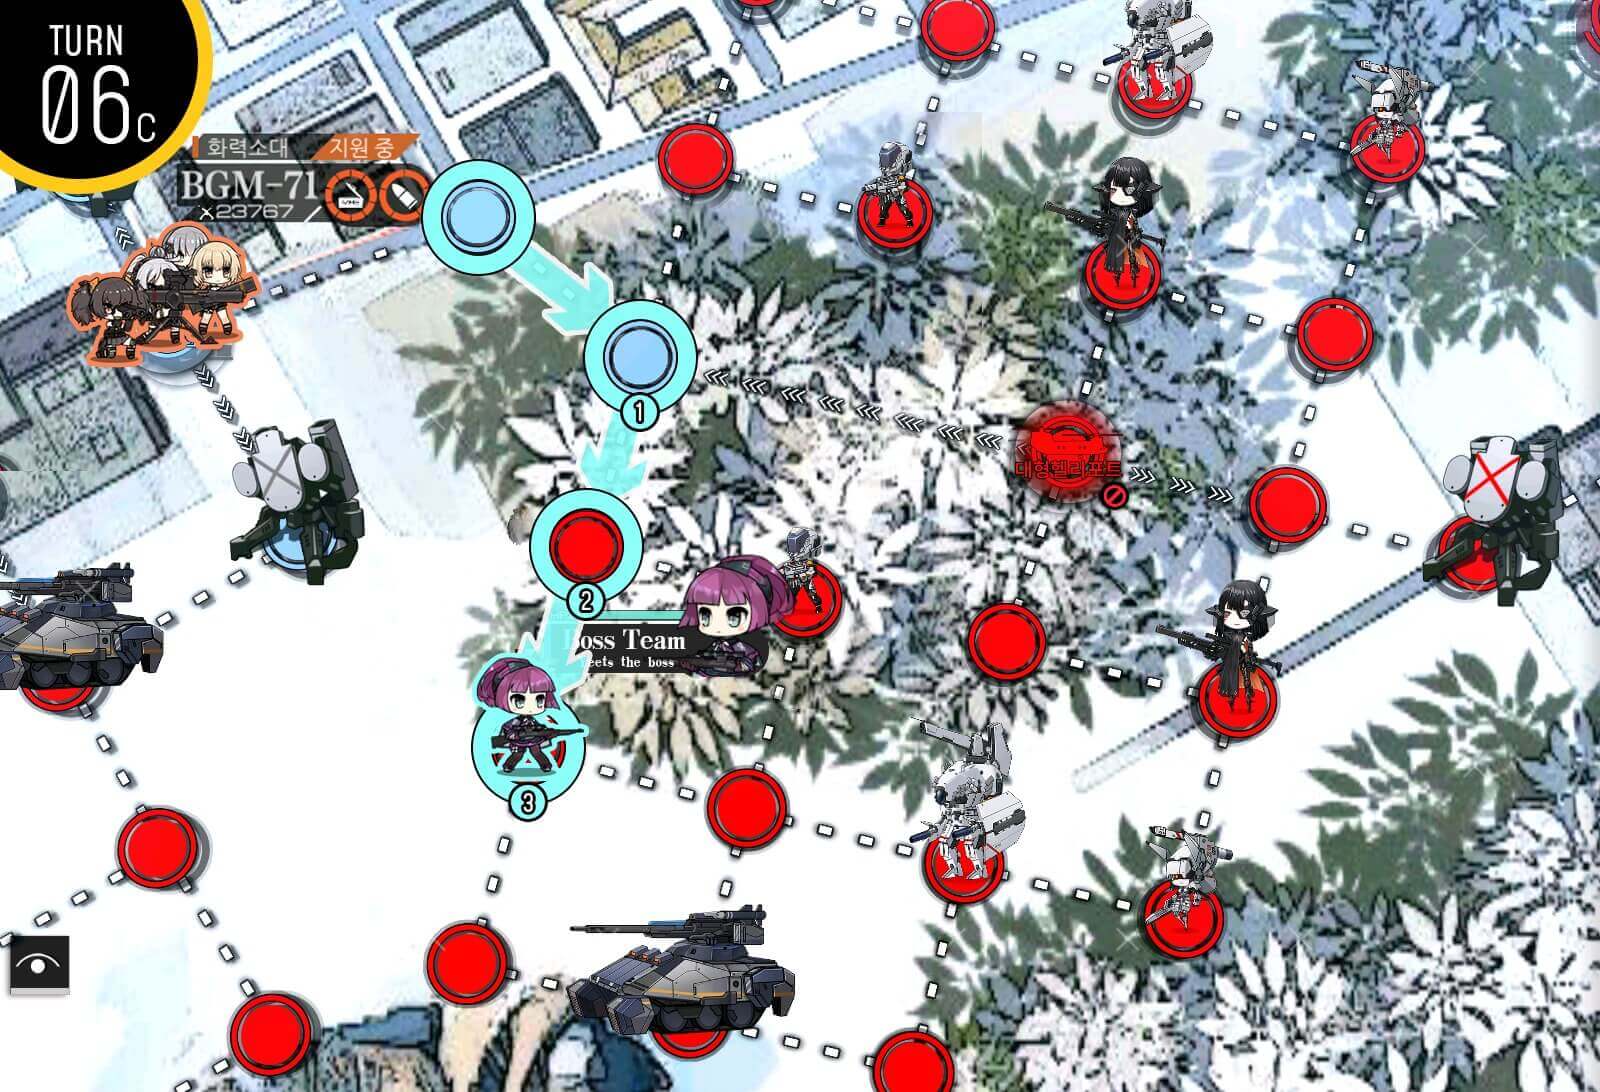
Turn 2a
At the beginning of the turn, resupply all combatants before moving. The path that you take to the designated location is to remove threat for the HOC that will be following behind the Boss team. Two specific node marked needs to be free of enemy units. If Gundam units on the way are giving you a though time, using RFHG echelon as Boss Team might not be a bad idea.
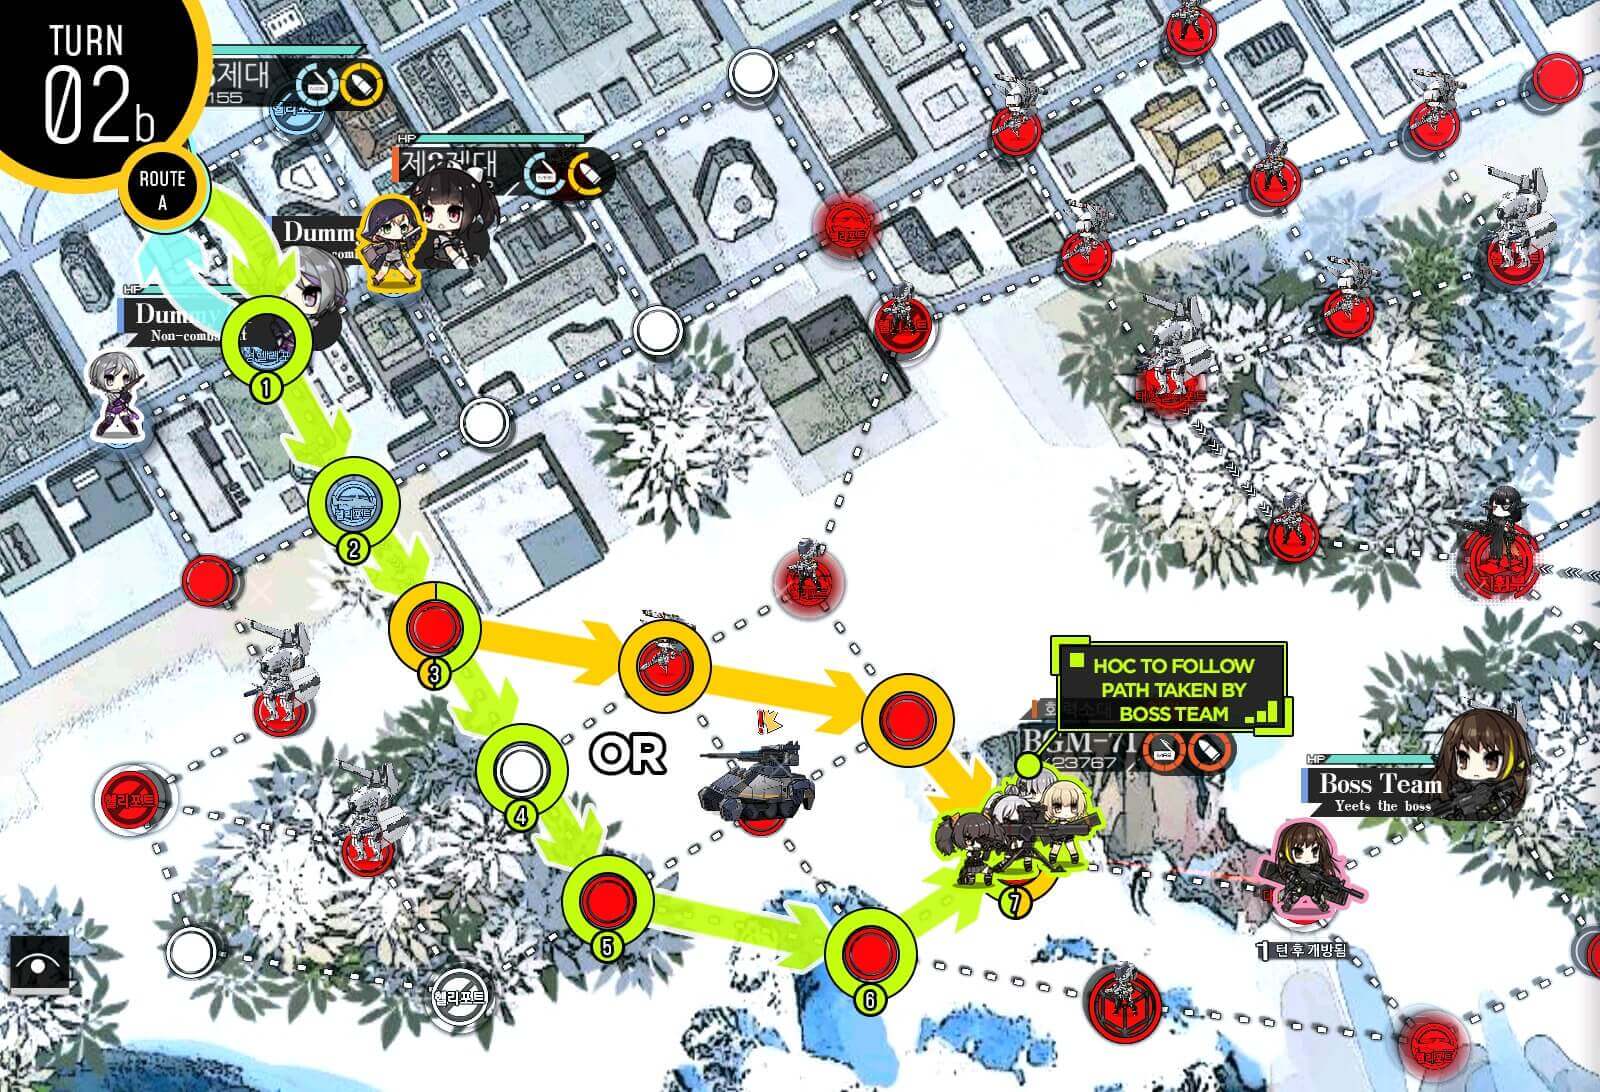
Turn 2b
HOC swaps with second dummy echelon and takes the same route as the Boss Team did.
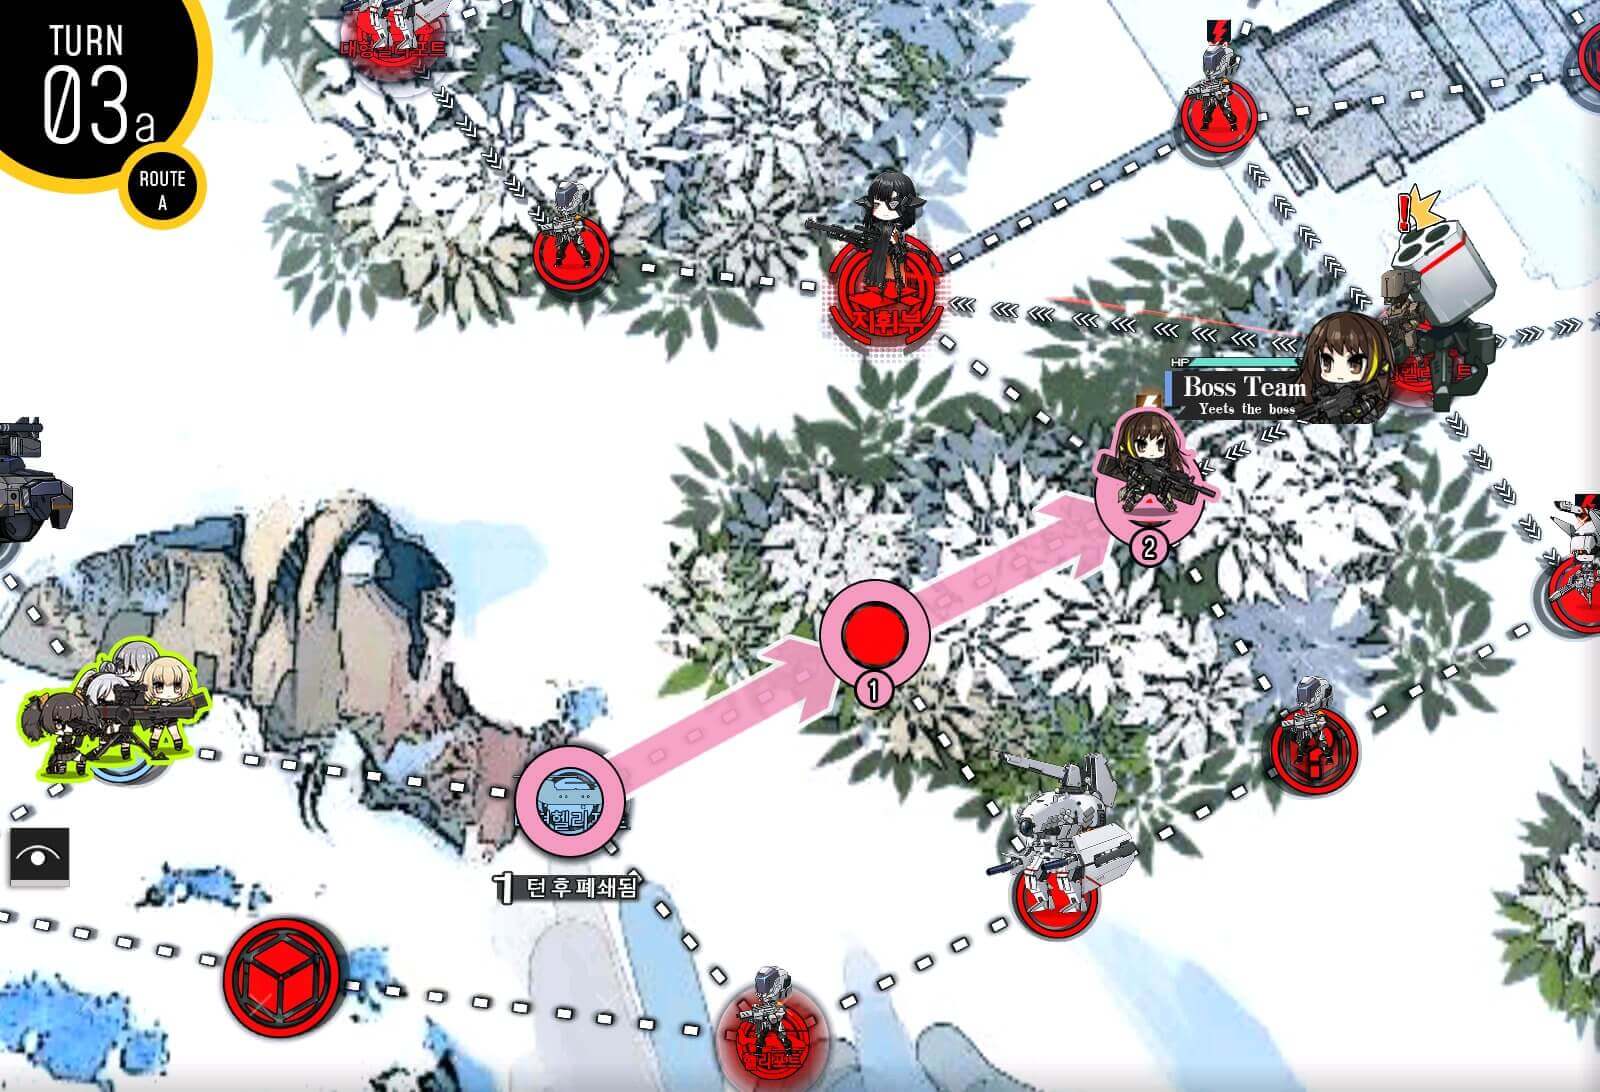
Turn 3a
If you have taken too much damage on the way, you can always forfeit the S clear and repair at the helipad prior to attacking Nyto. Boss Team moves up to the node next to Nyto but to minimize the damage taken we are going to use HOC to remove the enemy weapon platform.
Turn 3b
HOC moves up to shoot the weapon platform. This also puts HOC in range to support against Nyto.
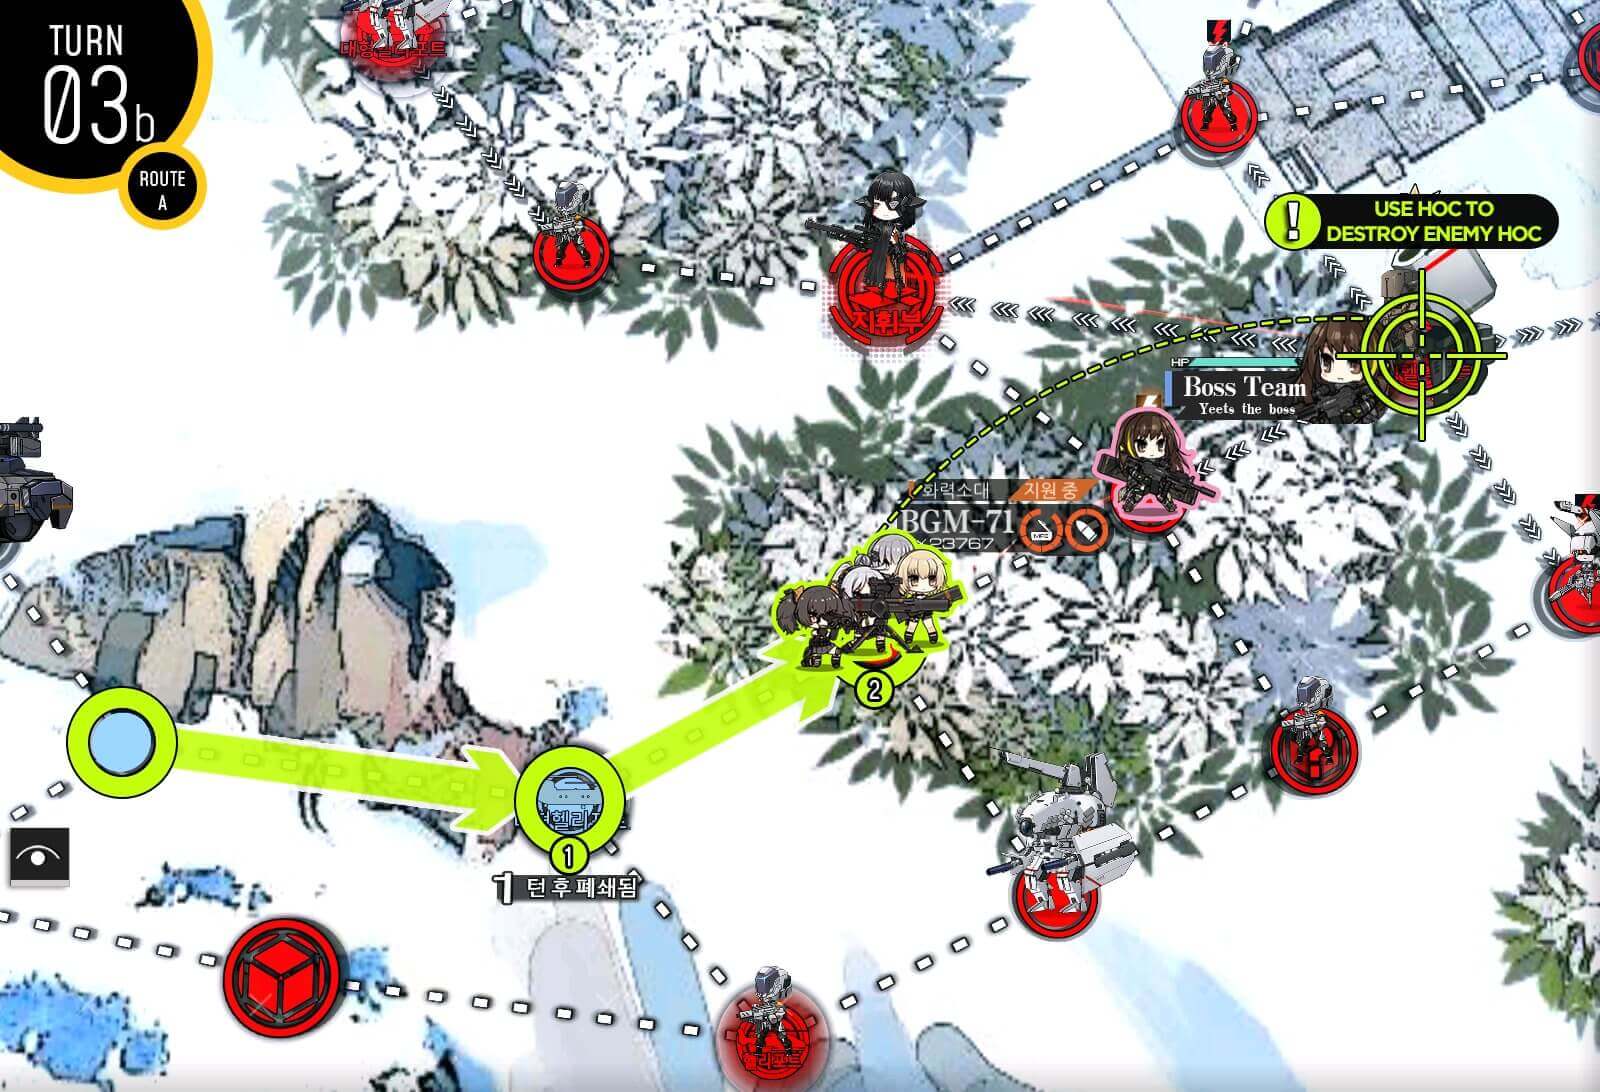
Turn 3c
Move Boss Team to kill Nyto. The pattern is exactly the same as the Nyto we fought in previous map but now has increased stats [Worst is FP going from 26 to 76 and Shield going from 30% to 50% ] so it won't be an easy fight. However if you follow the same tips given, it should not be an impossible fight.
Turn 1
This is relatively straightforward. Kill Gundam to capture the HQ. Deploy Combat echelon on HQ and dummy echelon on the other helipad. Make straight path towards HQ through bottom route.
Turn 2
If you do not have Taunt Fairy or want to minimize repair cost, I recommend capturing the large helipad at the bottom and deploying BGM HOC next turn before attacking. All you have to make sure is that you move dummy echelon away from incoming enemy units.
Turn 1
We are repeating basically what we did in Route A but slightly altered: we are deploying a second combat echelon on the helipad that's able to fight least a few times and we are killing both enemy units on the way down to the bottom large helipad.
Turn 2
First combat echelon takes large helipad for next turn and second combat echelon also moves to take additional helipad to buy more move points.
Turn 3a
First combat echelon resupplies and move up one to deploy HOC on large helipad.
Turn 3b
We then swap first combat echelon's and HOC's location so that HOC can attack enemy weapon platform from safety. [Make sure to click HOC and click on enemy weapon platform when it's glowing red!]
Turn 3c
Swap back and combat echelon moves towards the hostage T-doll.
Turn 4a
Rescue the hostage T-doll and resupply on temporary node. You have 2 options once you rescue the hostage: You can backtrack towards large helipad or go through the top route to one of the helipads up top. Most of the times it will be easier to backtrack but for sake of the guide I will take top route.
Turn 4b
If you are taking the top route there's not much else to do but go for the nearest helipad.
Turn 5
Manually extract hostage once on the helipad and the mission should be cleared.

Turn 1
RFHG echelon move to the helipad south of HQ and ARSMG echelon takes large helipad so we can deploy HOC next turn.

Turn 2a
Deploy BGM HOC after moving ARSMG echelon right one node. Make sure that HOC's ammo is supplied and is actively supporting nearby units.
Turn 2b
ARSMG echelon clears path down to nearby helipad cluster. If Uhlan is in the way [RNG], make sure to move HOC right behind the echelon so that it gets the support.
Turn 2c
BGM HOC parks itself behind the ARSMG echelon. This should start stemming flow of enemy reinforcements.

Turn 3a
We are continuing to cut off the reinforcement by taking over all helipads around the enemy structure. Taking it out reduces the strength of enemy unit that comes out but we will also take out all helipads it buffs this turn. If Uhlan is at the position shown above where it's out of HOC's range, relocate HOC prior to engagement.
Turn 3b
Since Uhlan is at the position where it's out of HOC's range, we are relocating HOC prior to engagement.

Turn 4
Now that we have cut enemy reinforcements, all that is left is to kill remaining units on the right side of the map. This is where it's pretty RNG but it should not be impossible to clear since we have spare turns left.
Turn 1a
Start by deploying Boss Team on the right helipad, HOC in the center large helipad, then fill the rest with dummy echelons. Combat echelon heads straight to helipad to the East of starting location.
Turn 1b
HOC follows behind, staying out of harm's way.

Turn 2a
After resupplying at the helipad, Boss Team scoots closer to the Gundam blocking the path. This is so that HOC gets into position to support.
Turn 2b
Boss Team moves right in front of Nyto, clearing out the remaining units on the way.
Turn 2c
HOC moves right behind Boss Team. If we were to fight now, Nyto will also have fire support so we need to fix this.
Turn 2d
Swap Boss Team and HOC to engage the enemy weapons platform. Destroy it and swap back.
Turn 2e
Same battle as Nyto in 2-7(A). Remember to turn auto skill off until Nyto activates skill to burst down her shield, leave position 5 empty at all times, and reset the targeting priority if mobs are putting too much pressure on tankers.
Chapter III
Turn 1a
Red zone is relatively simple to clear as you don't have to deal with Armor units but large wave of enemies with high HP. So I recommend setting up your ARSMG team with at least one AoE skill. Start is the same with the other route by rescuing the hostage.

Turn 1b
Then all you have to do is make beeline towards the helipad to the left side of the map. Once you end turn on it, mission should be cleared automatically next turn.

Turn 1a
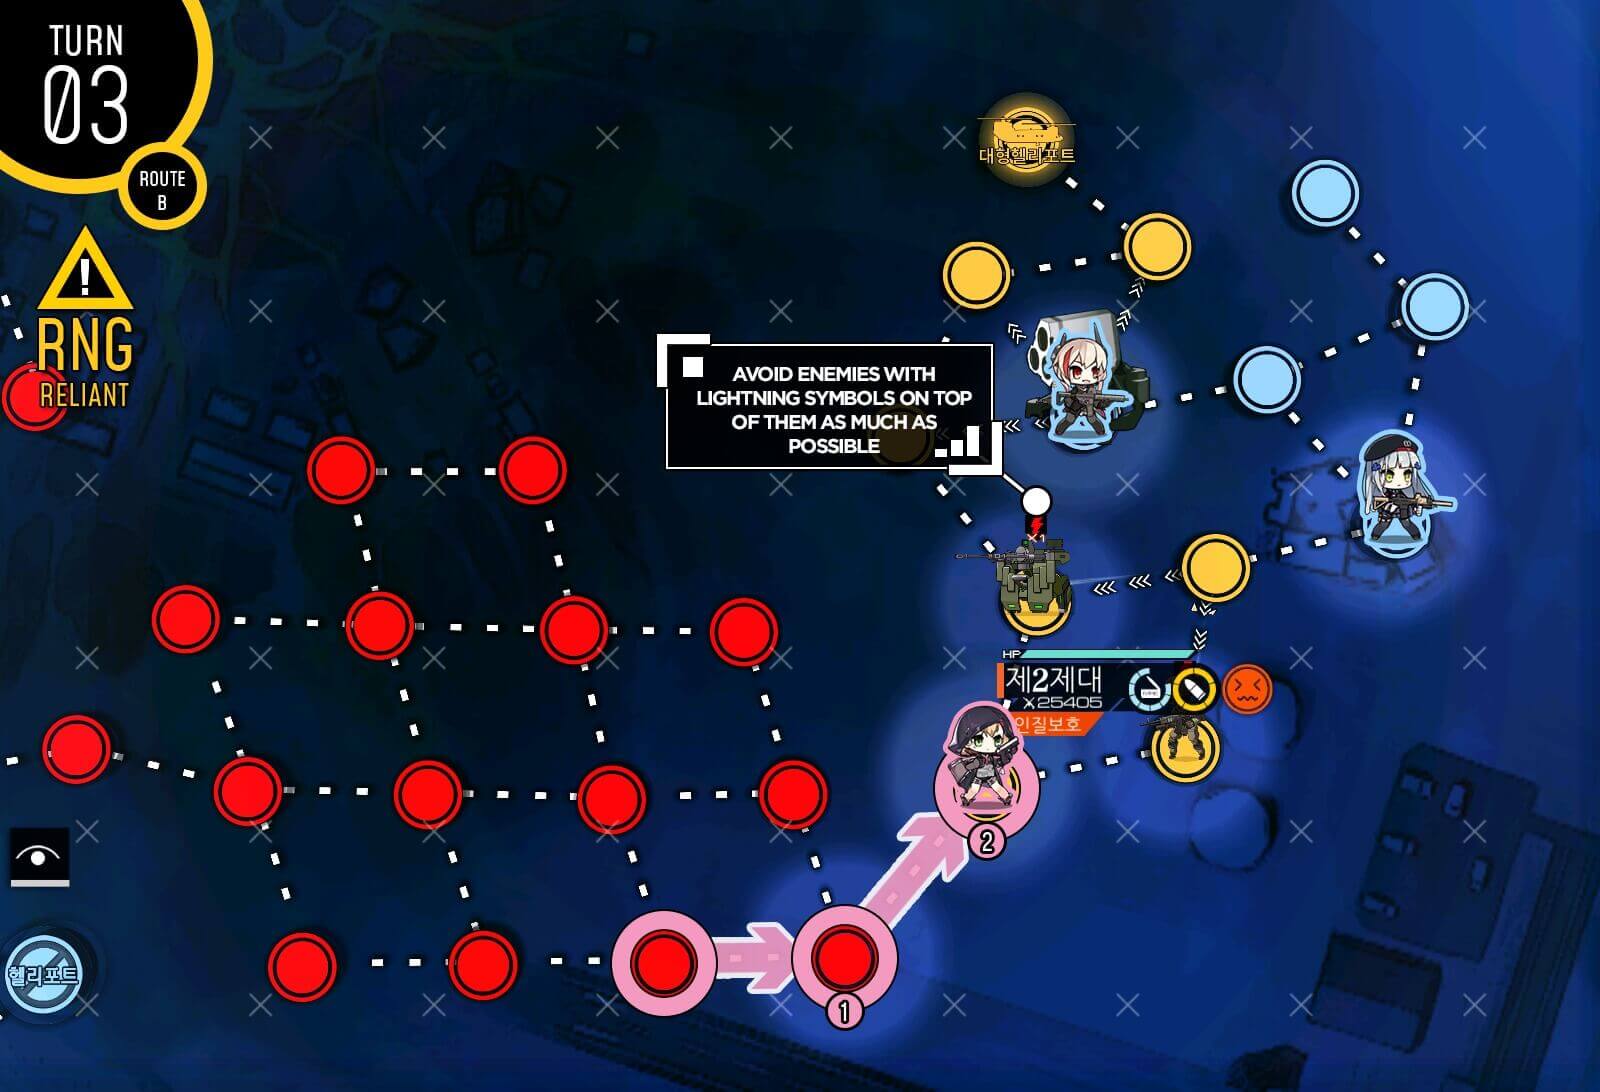
There's a restriction of one echelon for the map, so deploy your strongest echelon available that can kill a Hydra unit with armor values of 90. There's also a chance to fight large number of enemies so I recommend high RoF setups. After rescuing the hostage, take the right path to the large grid of nodes.
Turn 1b
The spawn of enemy locations at first turn is random and sometimes fight is unavoidable. You are given leeway up to 2 fights but I recommend avoiding combat as much as possible. When ending your turn, all adjacent nodes should not have enemy units visible.
Turn 2a
Continue moving towards the Yellow node but we cannot enter the area until HK and SOPMOD clears out the enemy fire support platform. Until then we are avoiding fights and staying in the grid.
Turn 2b
Again when ending the turn, you should not see any enemy units near by.
Turn 3
Now that HK416 is one node away from taking out enemy fire support, we can move into the yellow zone. Hit end turn to watch HK416 do the work. Don't worry about Allied units as they will require no control to beat units.
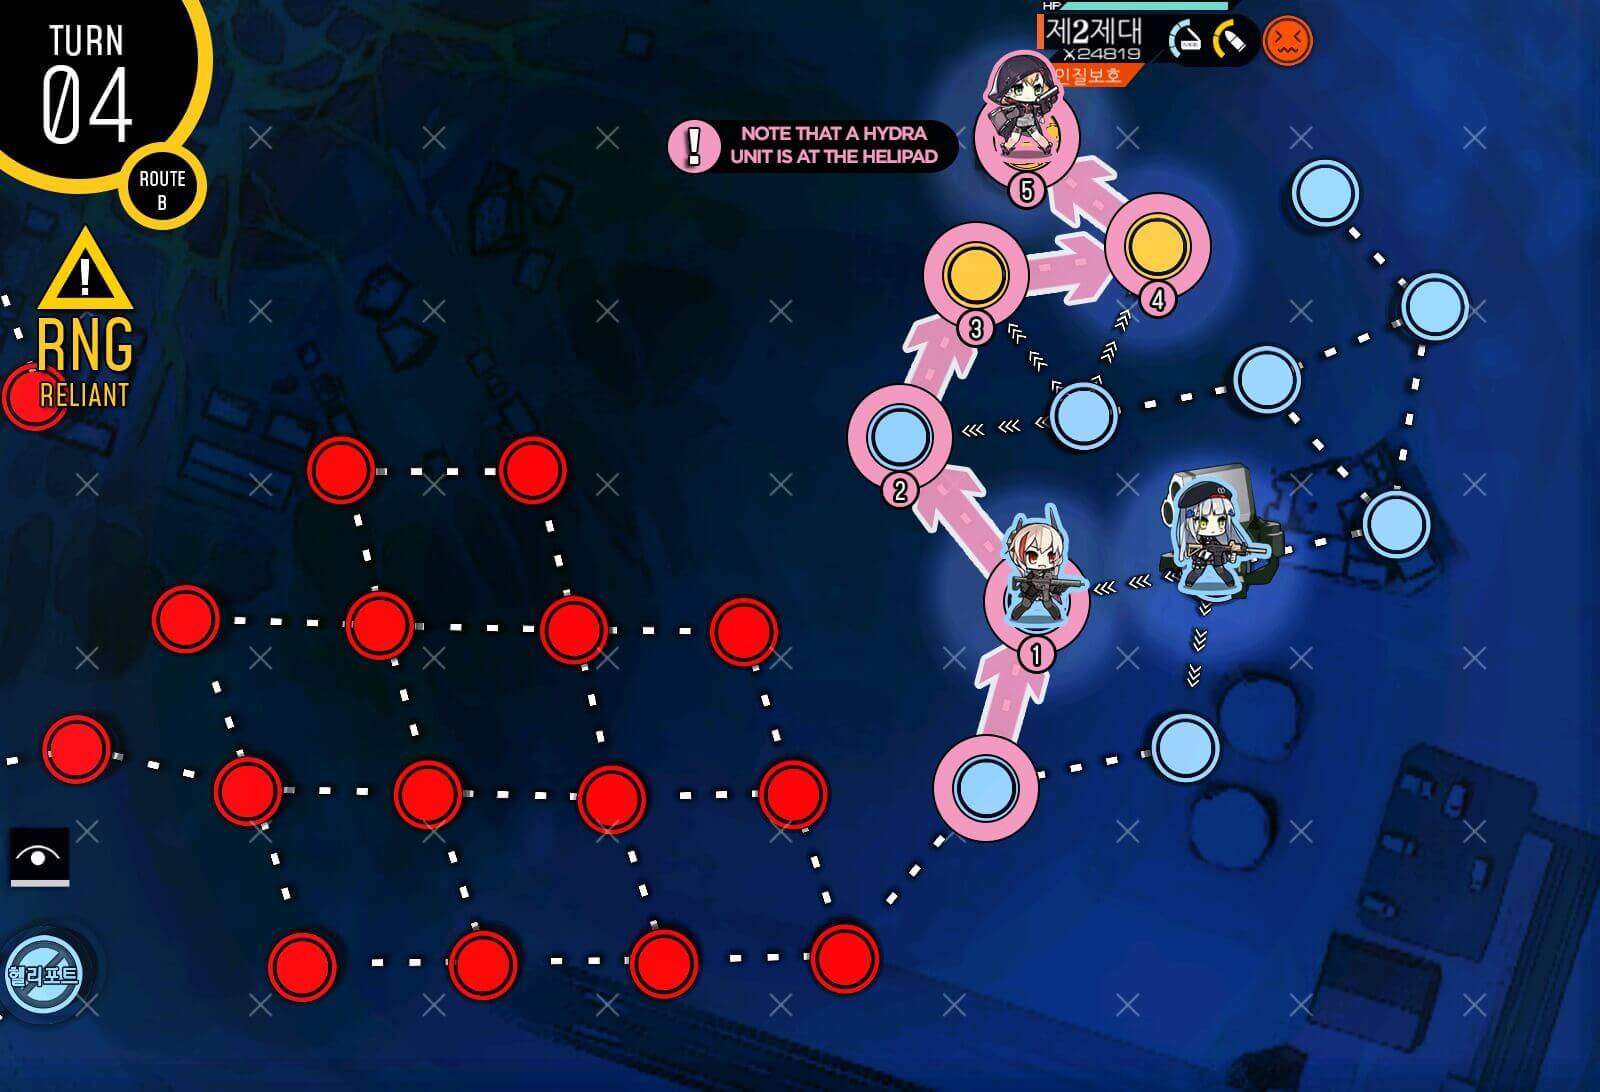
Turn 4
Now we make straight path towards the Large helipad. Helipad at the end is going to have Hydra units that will require bit of kiting work if your team is lacking in FP. Taunt fairy also works to buy some time while you burst it down. Once you are on helipad, hit end turn to clear the mission.

Turn 1a
Start by deploying two combat echelons on the front [HQ and helipad to its right] and dummy echelon on the rear helipad. Combat echelon on the HQ moves up one to rescue hostage then moves to the temporary resupply node to the left. This triggers the gimmick that kills Hydra and Typhoon units on the map. You can also resupply here if you like.
Turn 1b
Then we move right on over to the radar node in the middle of the map which will activate abandoned robotic units. You do not need to set up AI commands.
Turn 2
Next turn, you make straight path towards the yellow helipad to the north of the radar node. If there's any enemy units in the way you should be able to either destroy or avoid them [yellow zone]. Mission should be cleared automatically at the next turn. ***IMPORTANT: Combat echelon on helipad needs to move to HQ to defend against ELID which has chance to move in. ***
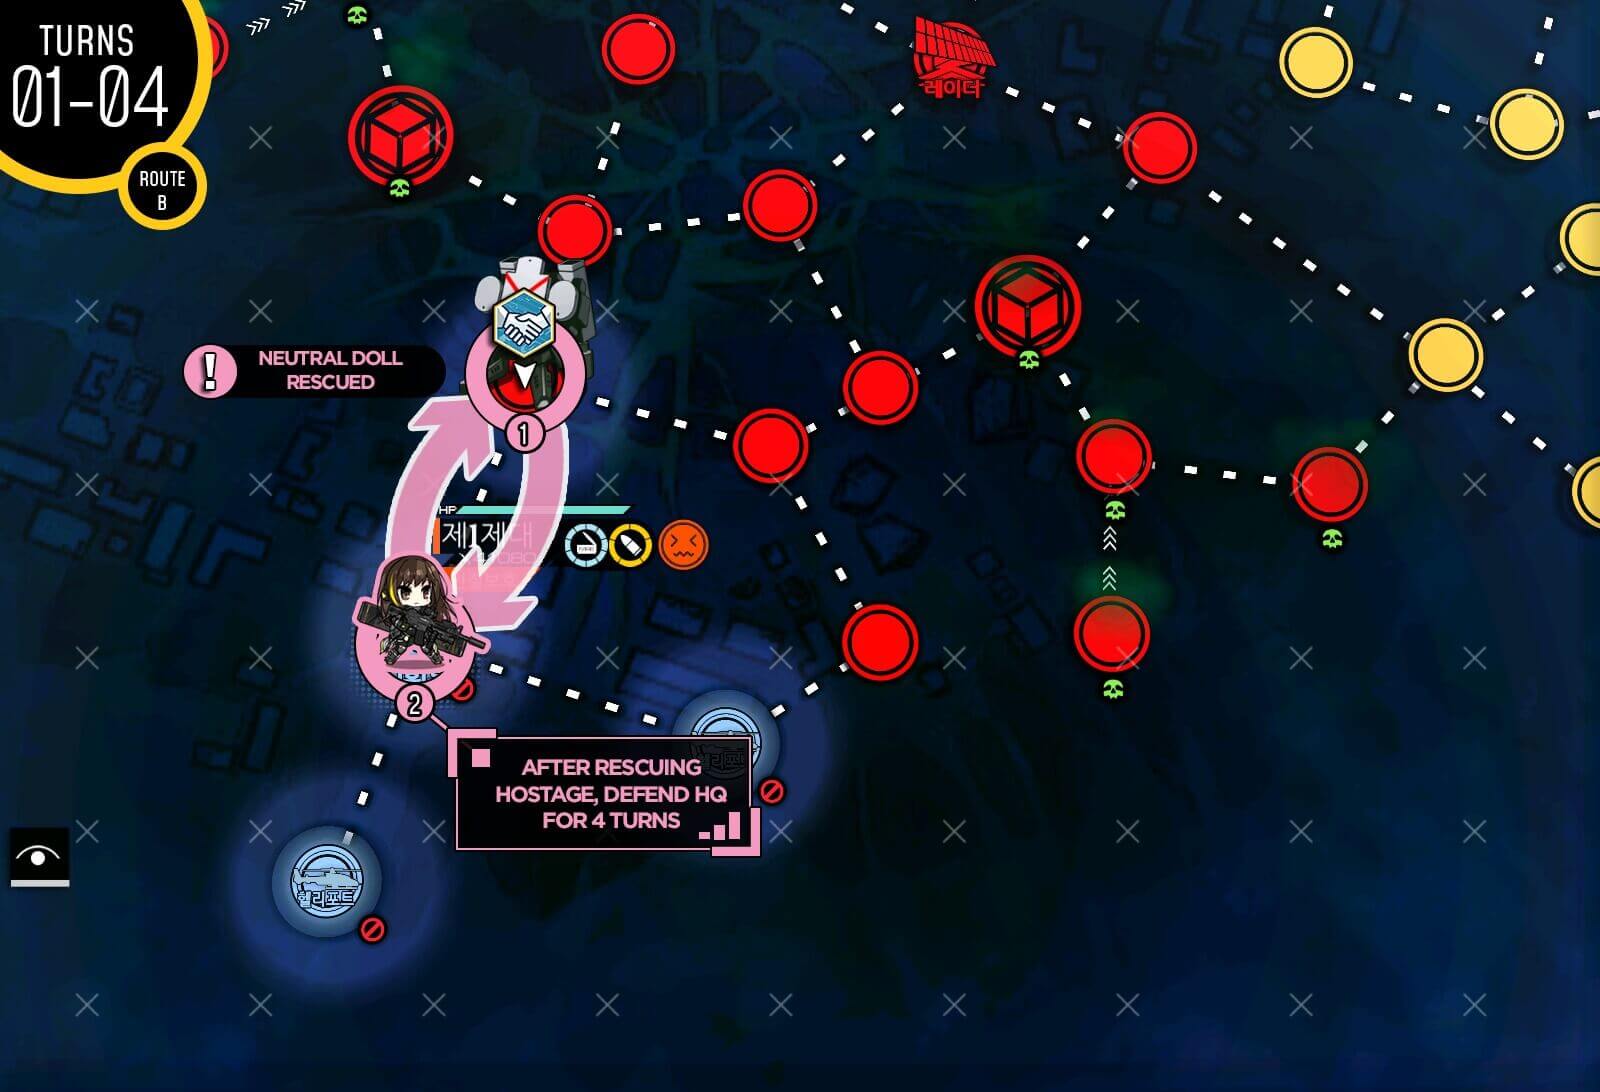
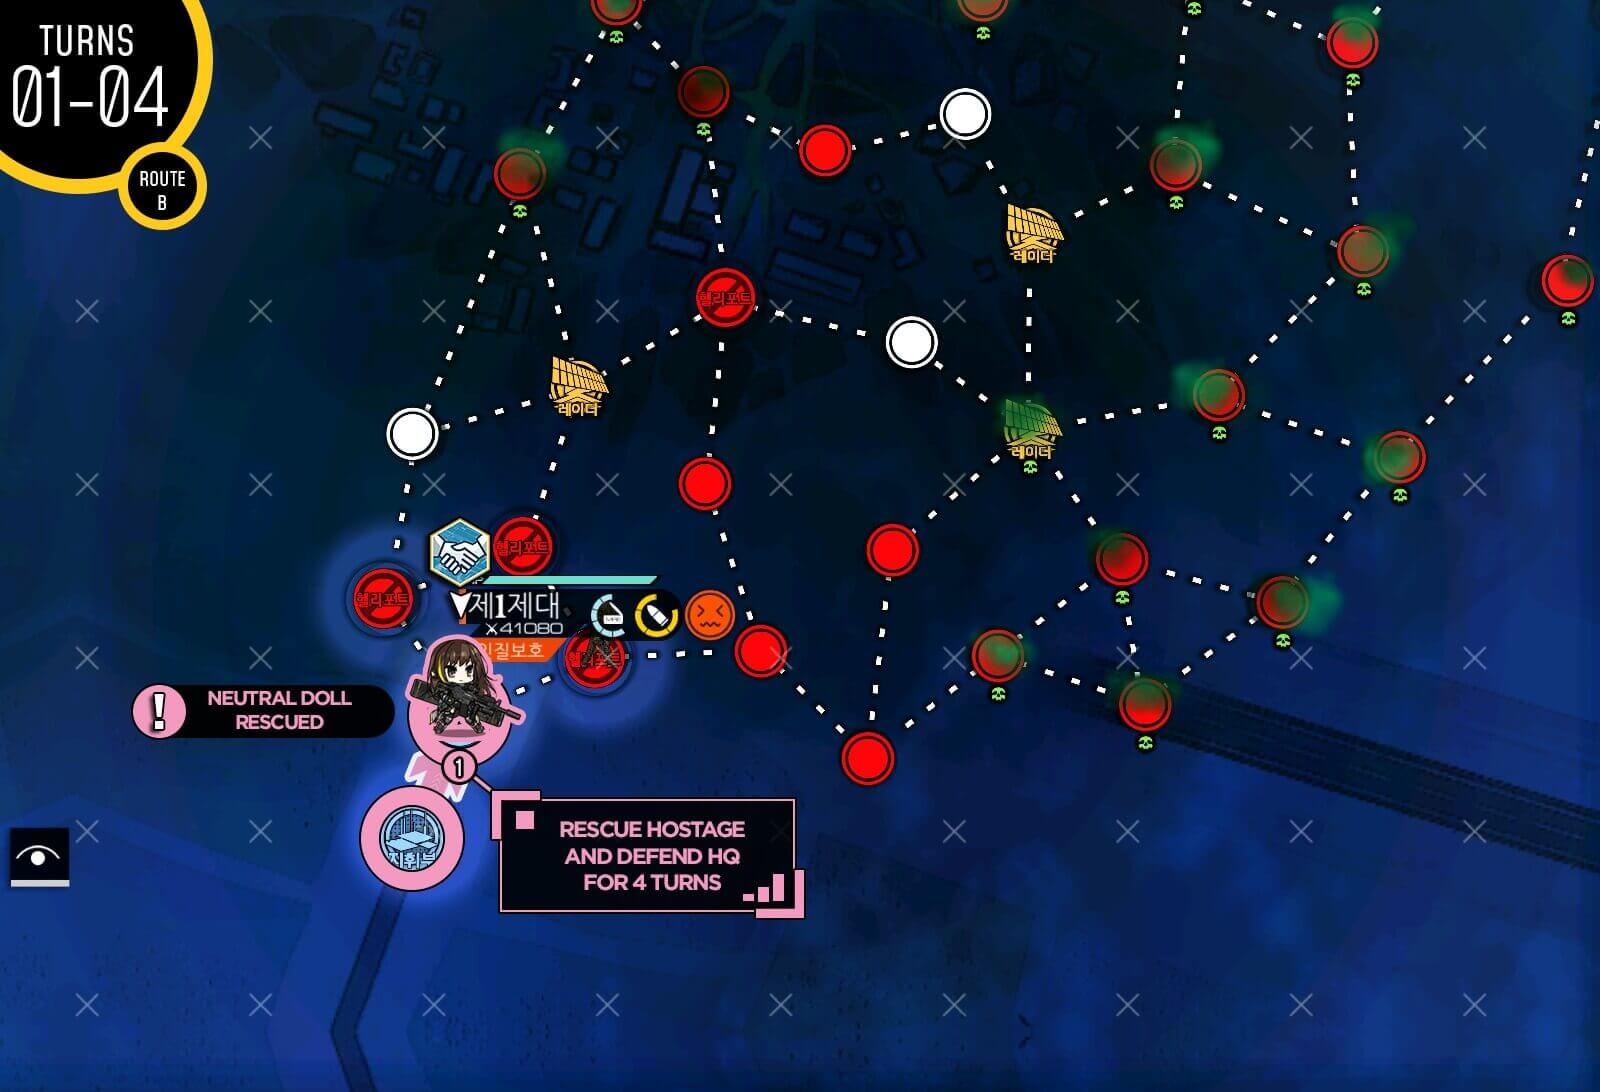
Turn 1-4
In this version of the map all you have to do is to rescue the hostage T-doll then return to the HQ to defend it until mission is cleared. You should fight at most 3 times which is relatively easy to beat.
Turn 1a
Start with two combat echelon, one on the left side of the map on the HQ and one on the right side helipad. Combat echelon on left side of the map moves up one to deploy dummy echelon on the HQ.

Turn 1b
Combat echelon moves one to the left and dummy follows behind. The ELID unit to the right of the dummy echelon should not move.
Turn 1c
With remaining moves, second combat echelon at the right side move to the left and gains an additional movement point for next turn.
Turn 2
The goal for the combat echelon with the hostage unit is to avoid combat as much as possible while heading to the right side of the map. Stop at the uncontested node between the radar nodes and the closed helipad.

Turn 3a
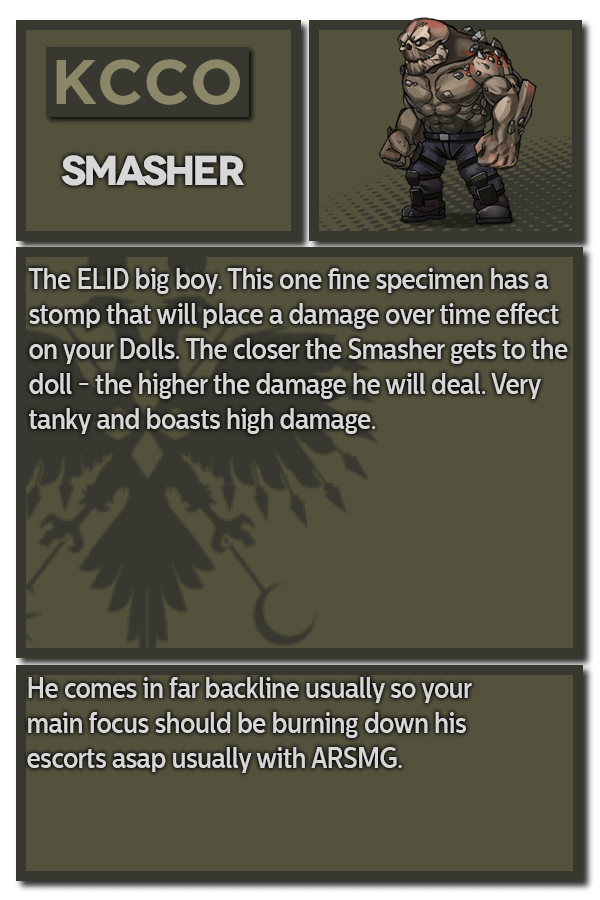
The trick is to avoid the Smasher units that roam the map. There is often one situated on the top side so we avoid that part. Destroy the AA platform that is preventing the extraction.
Turn 3b
Once the second combat echelon moves out of the way. Move combat echelon with hostage next to helipad then swap to extract the hostage.
Turn 1-4
All you have to do is to rescue the hostage and stick around for 4 turns. On 5th turn mission should be cleared automatically.

Turn 1
Start with dummy echelon on HQ and RFHG echelon on the helipad to the right. Move dummy to left and deploy second combat echelon that will be in charge of defending HQ. It will fight armor units as well so I recommend second RFHG if you can but a strong ARSMG team works. RFHG echelon moves to right and deploy second dummy echelon on helipad.

Turn 2
Dummy echelon on the left side moves all the way to the bottom. Deploy third dummy echelon or HOC if you do not have the echelon slots available. RFHG echelon move right up to the one-directional path.
Turn 3a
RFHG echelon continues to move forward while establishing a route to the supply point. Dummy echelon moves down two nodes. The dummy at the bottom will get run over by Typhoon but just quickly retreat. We will redeploy it later.

Turn 3b
Second dummy echelon near HQ follows RFHG echelon to the right side.
Turn 4a
RFHG echelon heads straight to the resupply point. It will fight against armor units and mine-bot that can be crippling if you are not careful. Hydra unit can be also deadly if you cannot kill the first two before it unleashes the AoE attack.

Turn 4b
Second dummy echelon follow behind but stops while it still provides vision to the helipad.
Turn 4c
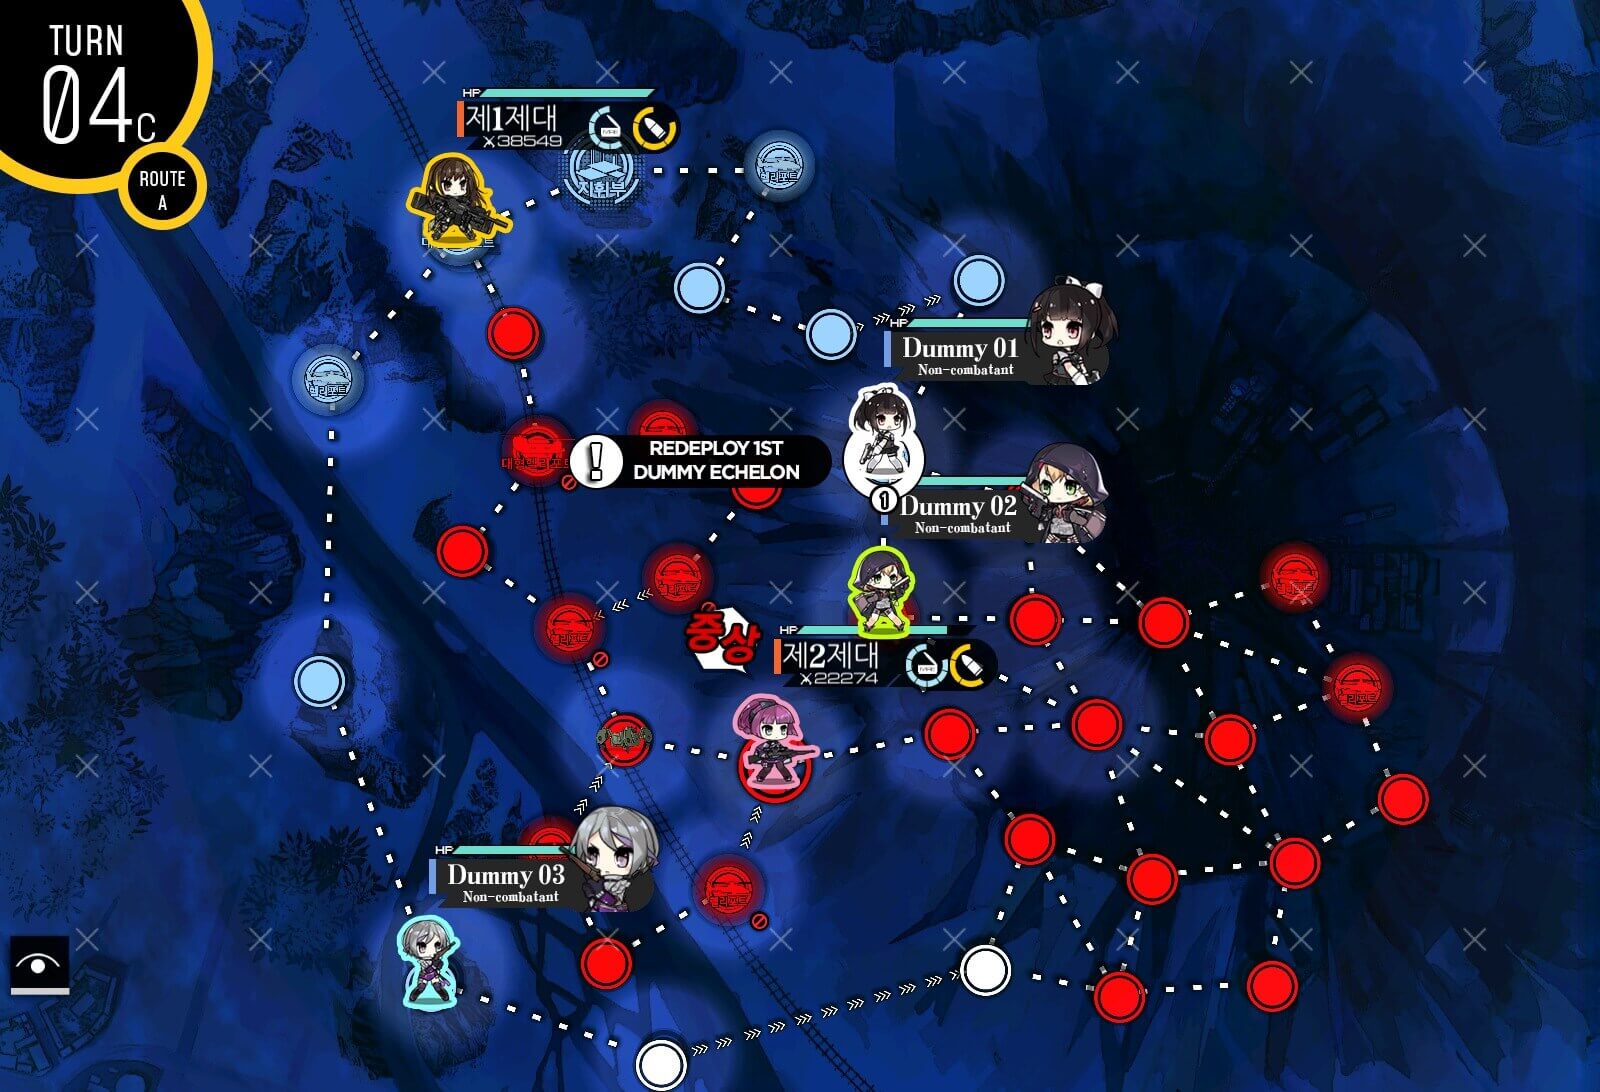
Redeploy the first dummy echelon that retreated and we will use it to establish the supply route this turn.
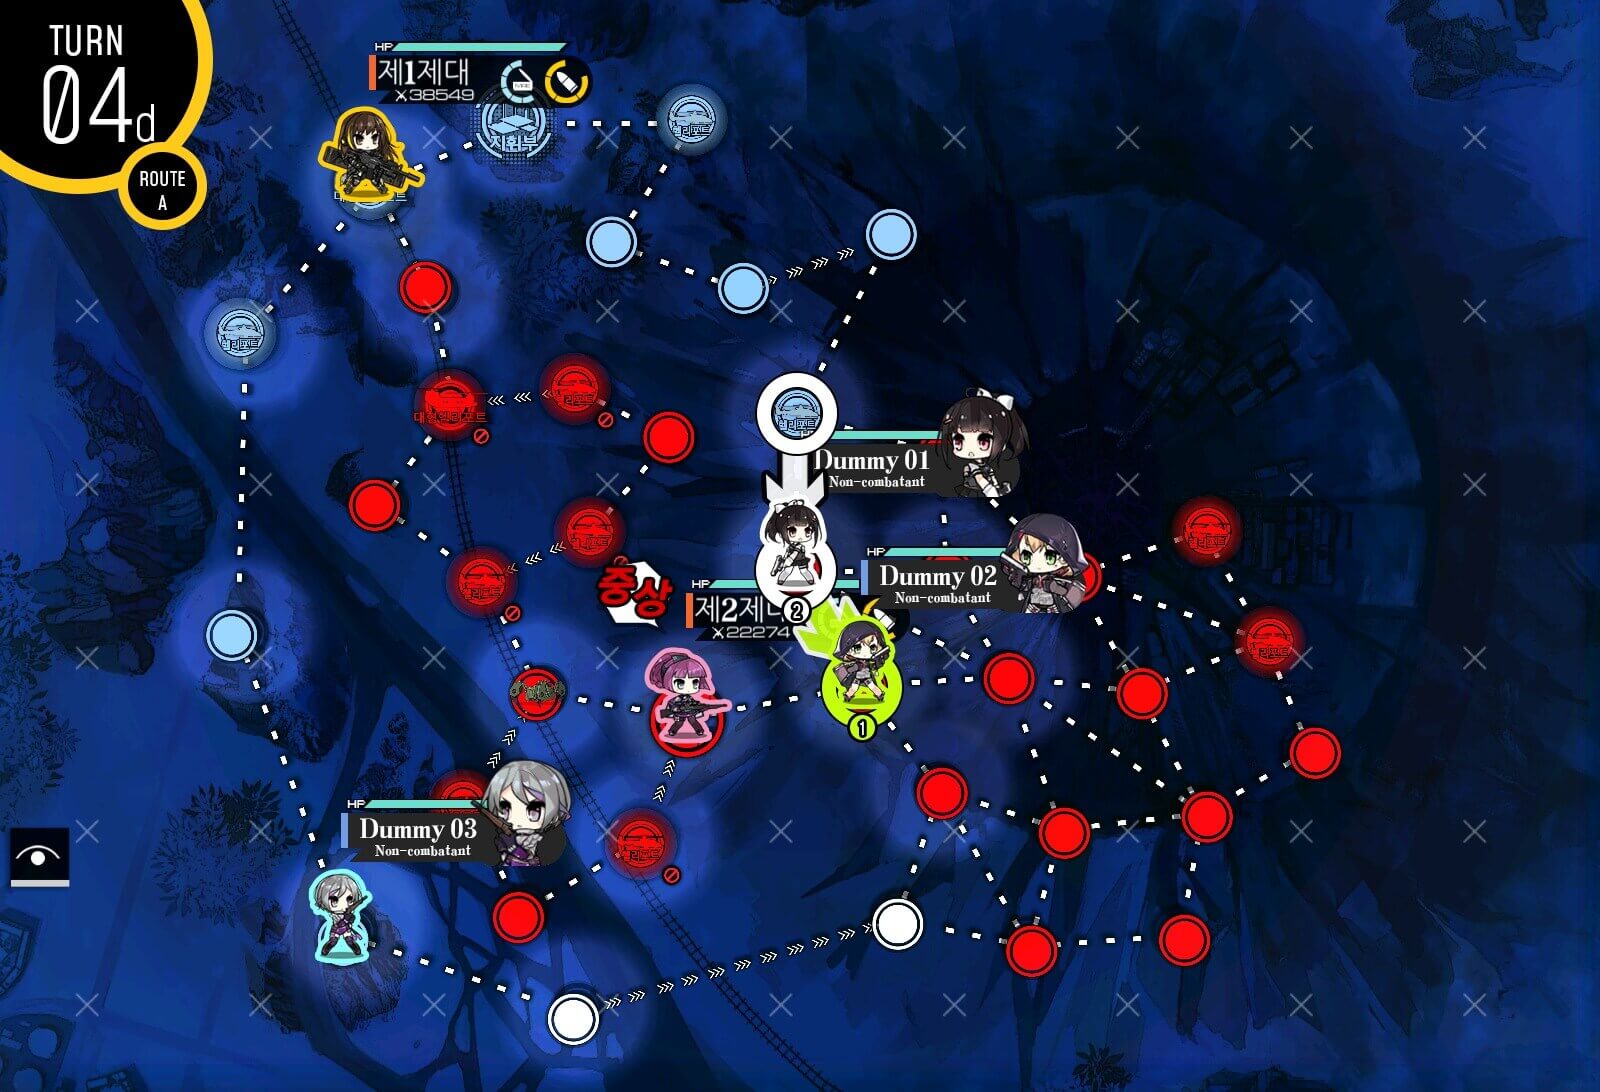
Turn 4d
Move both dummy echelons down to connect the route.
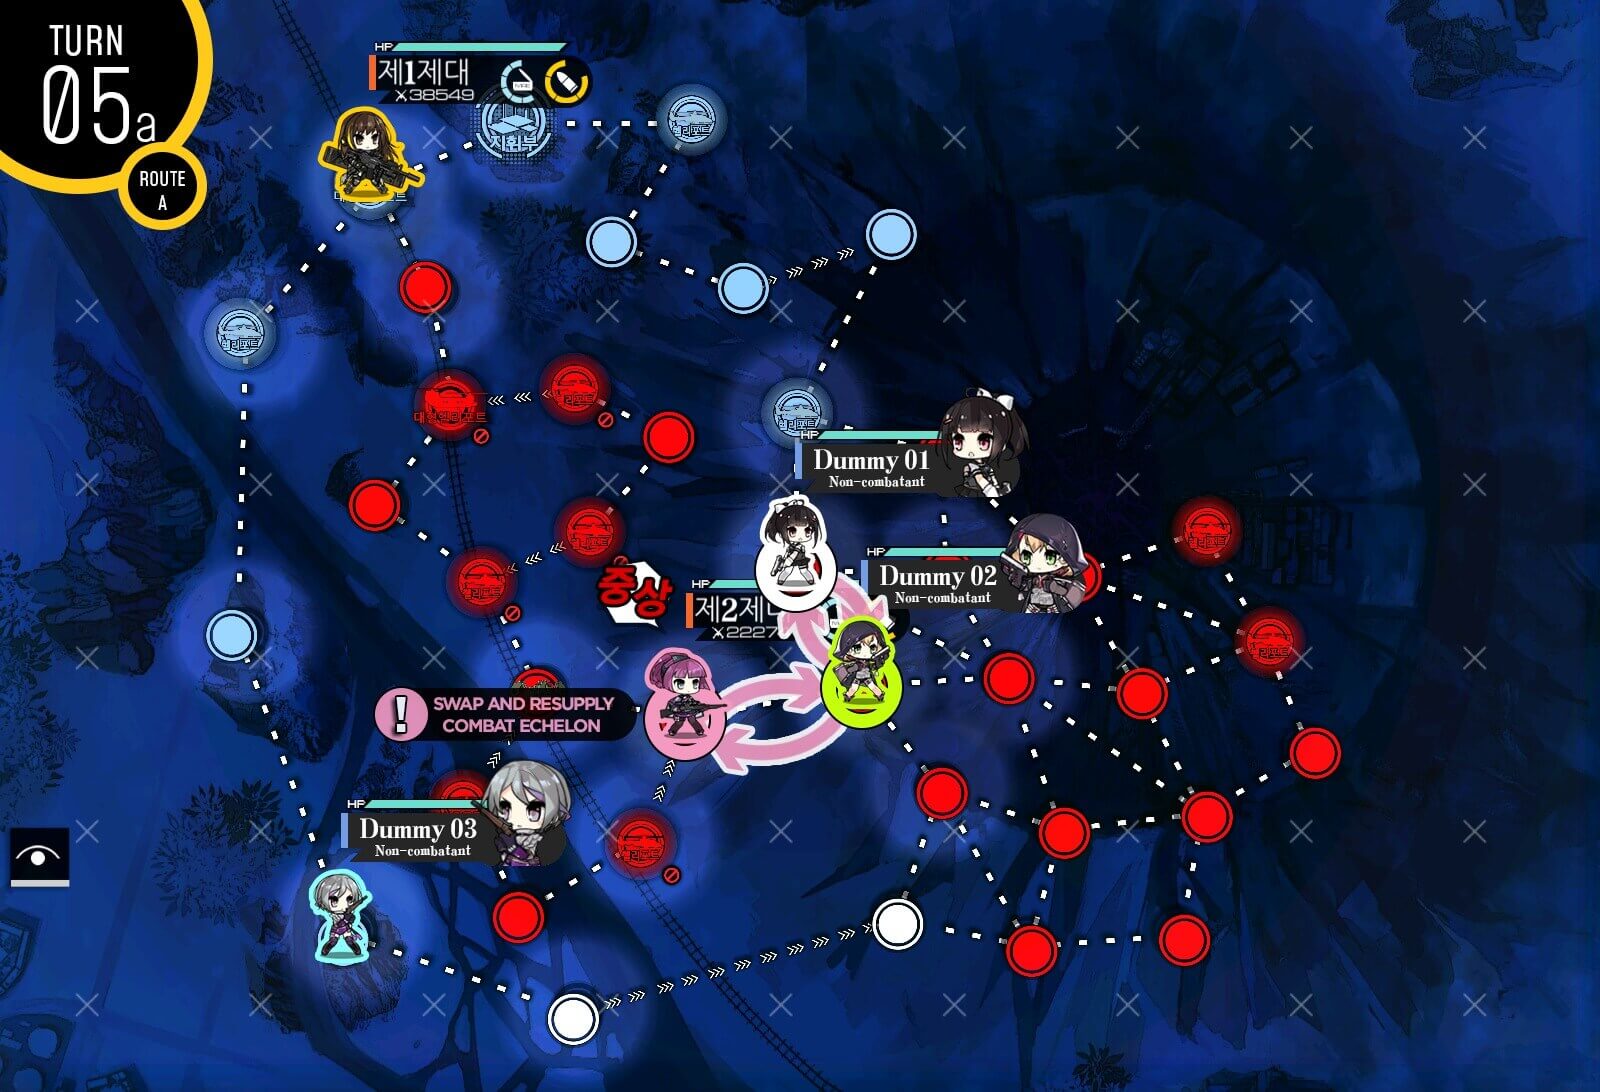
Turn 5a
If you need to, swap RFHG echelon with dummy echelons and resupply/repair at the helipad. Since we already retreated one echelon, S-rank has already been forfeited.
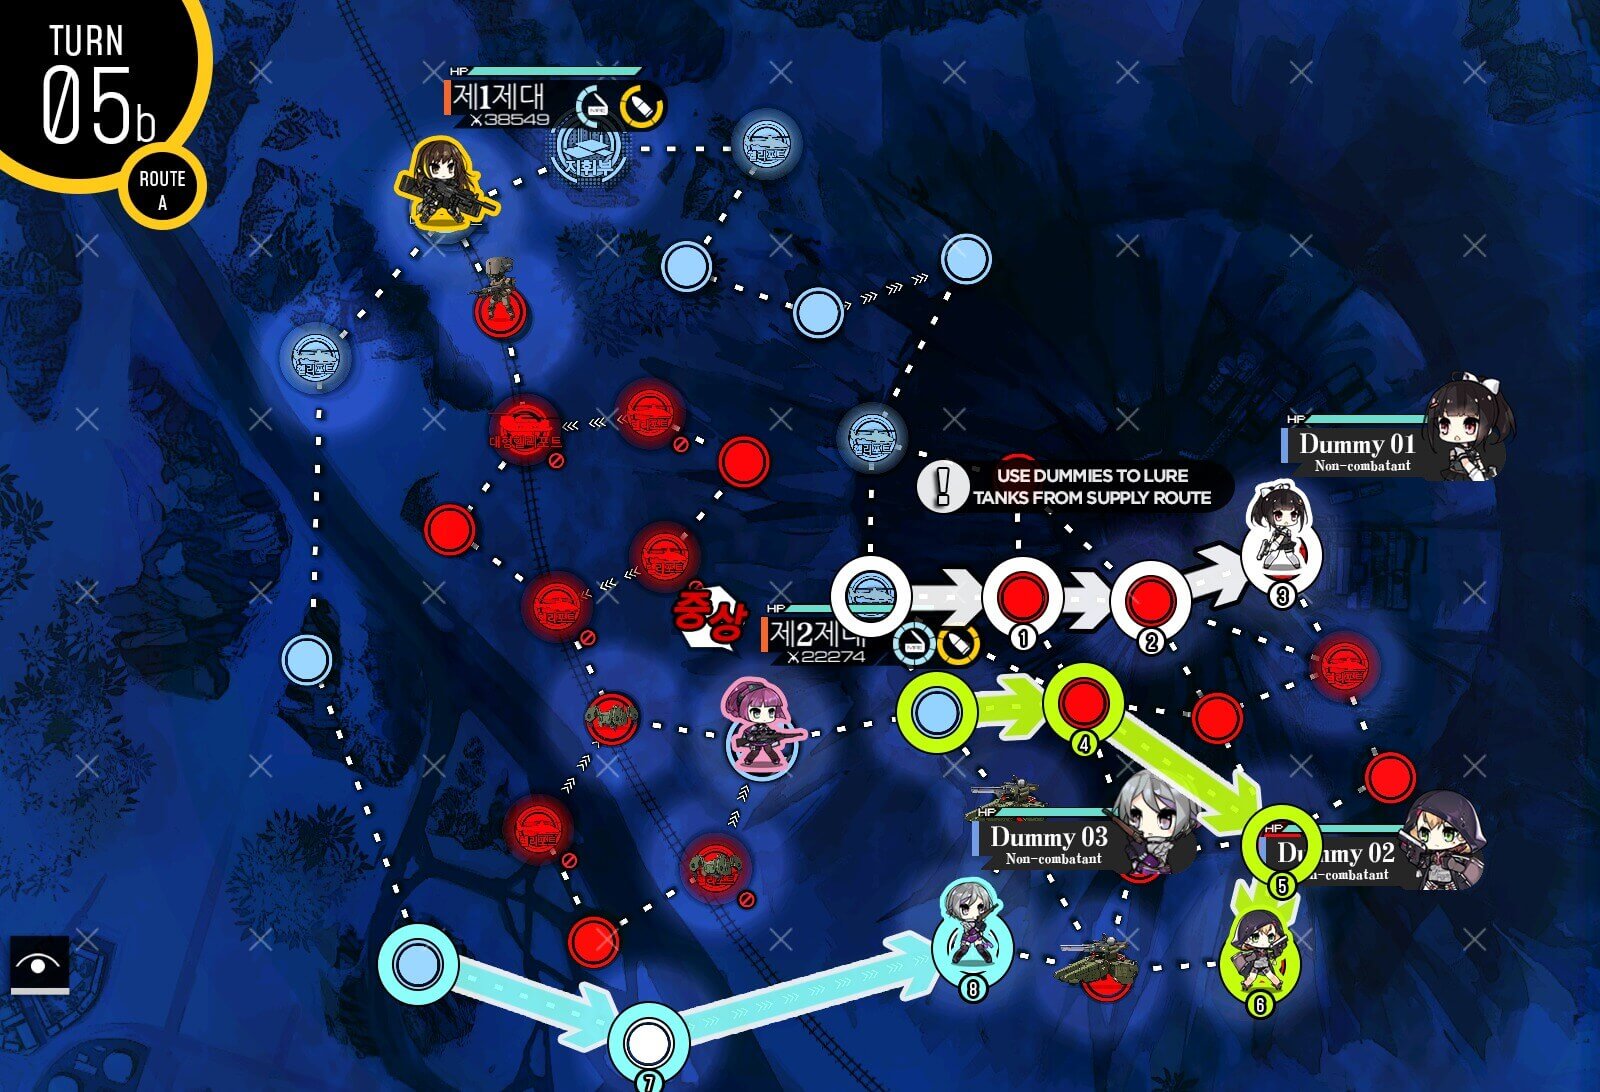
Turn 5b
You should see that Typhoons are approaching the supply route now and you need to buy least one more turn. So dummy echelons move so that they are closer than the RFHG echelon and further away from the supply route.

Turn 6
Just to make sure, throw another wave of dummy sacrifices to please the Typhoon menace. If you successfully defend the Supply route, you should clear the mission next turn automatically.
Turn 1a
Start with 2 combat echelons on the spawn location. I recommend that RFHG echelon is the leading edge and followed by either ARSMG or another RFHG if you have it. Occupy Helipad to the south then spawn dummy echelon at the helipad.
Turn 1b
Swap with combat echelon on HQ then take the helipad to its right.
Turn 2a
Combat echelon on leading edge moves to next helipad. Second combat echelon move down one and deploy third combat echelon.
Turn 2a
Combat echelon on leading edge moves to next helipad. Second combat echelon move down one and deploy third combat echelon.

Turn 2b
We are continuing the chain down to the helipad and deploying the fourth combat echelon at the helipad.
Turn 3a
Shift all combat echelon in the rear forward one node. If your leading echelon is badly damaged, you can swap to the back and put a fresh echelon on the leading edge.

Turn 3b
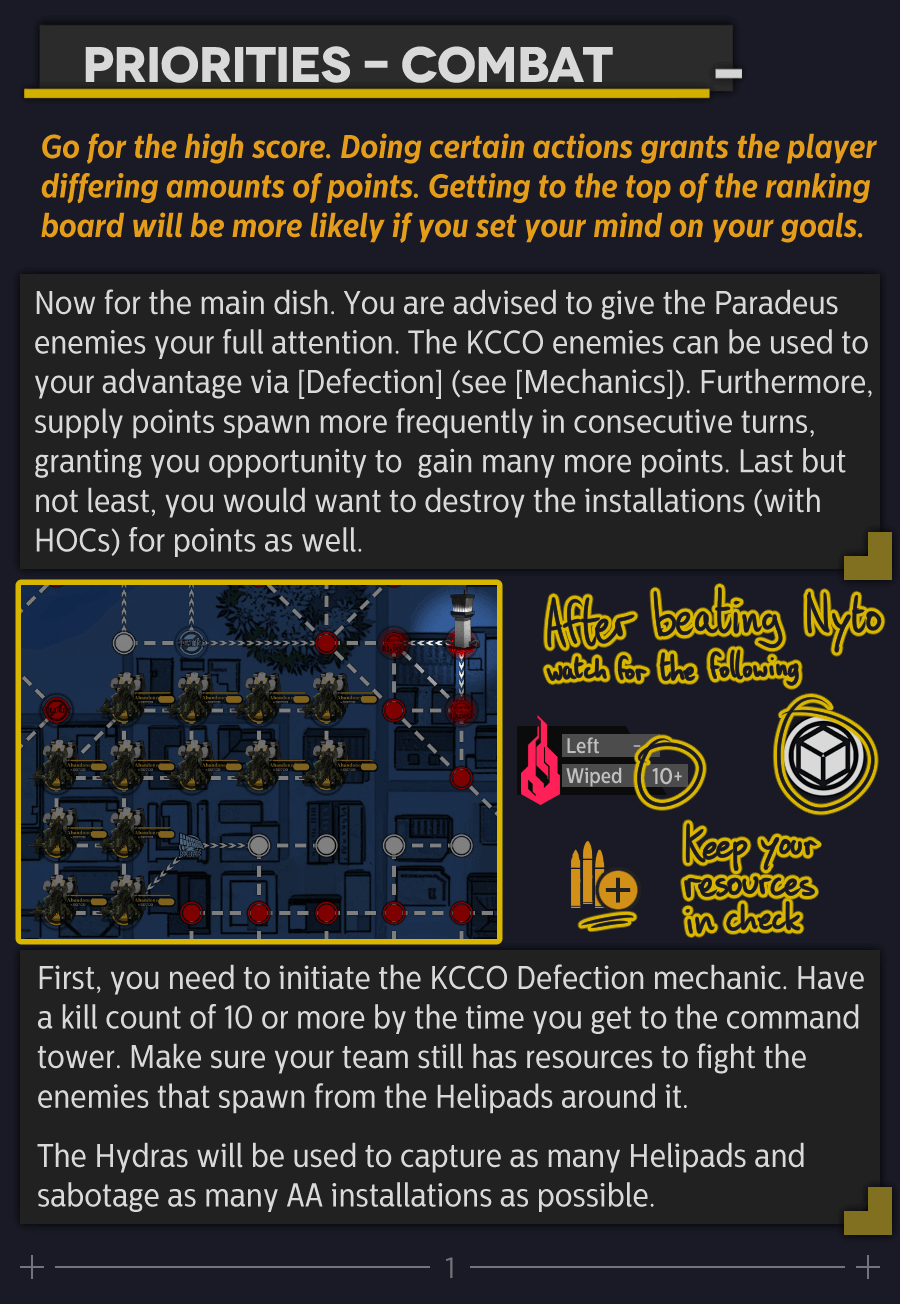
Dummy echelon moves into the the large grid of nodes. Two combat echelons in the front move forward one node each. As you can see there's Hydra unit in the front with 199 armor. So I recommend your best RFHG team in the lead.
Turn 4a
All combat echelon move into the position shown above. While the helipad they are standing on cannot retreat or deploy new units, you can still resupply on them. Dummy unit is now being approached by the Typhoon units so we need to play some tag.
Turn 4b
Move at least two nodes away from both tanks so it can act as bait one more turn after this.
Turn 5
Next turn we are moving the dummy one node away from Typhoon tank that is closer to the supply point. This removes the RNG that tank will move towards the RFHG instead of dummy unit.
Turn 6
Now we just hit end turn. If echelon supplies are low, make sure to resupply before ending turn.
Turn 1a
Start with two combat echelons on both spawn locations. Move both echelons up one node each, then deploy a dummy echelon at the HQ. Enemy units here are mostly armor so I recommend RFHG echelons for both, but MGSG could work for 2nd combat echelon if you are avoiding Hydras. It is very important that you DO NOT end your turn on ANY of the green stars marked on the map. This will either nullify the gimmick or clear the mission with the wrong ending route.

Turn 1b
First Combat echelon comes back down to the Helipad.
Turn 2
Because each of the nodes on the edge of the grid have Hydra units that we can't kill and will attack if you are within one node range, you have to route your way through and not end on any of them.
Turn 3
Once you clear out the remaining units, return to the starting helipad then resupply before ending the turn. What you will see is that there's going to be a random unit spawning from the enemy helipad in the center, which we need to kill.

Turn 4
Once you kill the enemy unit, you will see that Hydra units that were hiding in the corner become friendly. Now take the center helipad as well to gain extra an move point.
Turn 5
Now you should have enough move points to completely bypass all dangerous Hydra units and head to enemy HQ for mission clear.
Turn 1
This is straight forward objective which you just have to take the Radar node. Then you are done.
Turn 1
There's an echelon limit of two for the map, but we only need one echelon that is combat-able. Deploy the combat echelon at the HQ and a dummy on an adjacent helipad [which one doesn't matter]. The outer ring surrounding helipads and HQ have Hydra units that will rotate counter-clockwise every turn. So it is best to stay out of their sight unless we need to draw aggro. First turn, move combat echelon down two, then park the dummy on the HQ.
Turn 2
Now we are making a path to the supply point while not losing node control so we will have to move one node at a time.
Turn 3
Continue connecting the nodes on your way to the supply point.

Turn 4
The enemy unit just north of the supply point will not move even if you are right next to it. So you can ignore it.
Turn 5
Once you have connected a line to the supply point, travel back to the specific spot shown, and draw aggro of the Hydra unit. We will retreat and avoid any damage to the echelon and that's all we have to do.
Turn 6
Now that the Hydra unit is out of the ring, we can safely connect the supply route. Then you should be all set. Just keep hitting end turn until mission is cleared.
Turn 1
Our goal this time will be to rescue two hostages. Starts similarly but with two combat echelons this time. Because we are moving to rescue both at around the same time, we need to start with one on the HQ and one on the east helipad. Move to take the helipad nearby to gain more move points. If you have a Parachute Fairy, this would be a good time to use it on either echelon [in this guide the pink team would use it].
Turn 2a
Move towards the hostage on each end but we also have to take future moves into consideration. Swap with hostage T-dolls before rescuing them to save move points for later.
Turn 2b
Rescue hostage T-dolls before ending the turn.
Turn 3
We don't have enough move points to take both echelon into the ring so one echelon will have to wait. We are also positioning combat echelon on the HQ specifically because Hydra units can detect the combat echelon and walk into the inner ring if combat echelon sits on the west helipad. If you have a Parachute fairy, this would be a good time to use it to end the mission two turns early.
Turn 4
We wait another turn for Hydra to move out of the path.
Turn 5
Move straight for the north helipad and extract the hostage manually to clear the mission.

Turn 1a
For once the map is relatively simple to navigate with few gimmicks. The goal is to remove the enemy fire support platforms as you progress to minimize damage taken. Start with a combat echelon on the HQ and move it down to deploy a second combat echelon that will defend the base.

Turn 1b
Move through the enemy HOC and head towards the hostage.

Turn 2a
Because enemy movement is random here, you have to watch where enemy units will be while destroying the enemy HOCs. Keep an eye on enemy units with the thunderbolt icon.

Turn 2b
Once you destroyed all the platforms on the way, you can swap with hostage T-doll before ending the turn.

Turn 3
All you have to do now is to rescue the hostage. Run back to the HQ, swap, and manually extract to clear the mission.

Turn 1a
This is another straightforward map where most of the challenge is slogging through large waves of ELID zombies to the Hostage. I recommend deploying 2 ARSMG but the second echelon only fights twice so it can be another composition if you can't field it. Start off by deploying a dummy echelon at the HQ and two combat echelons at the helipads to the east. First combat echelon will clear out three enemy units so that the second combat echelon can follow behind.
Turn 1b
Second combat echelon [yellow] will swap next turn with the first combat echelon [pink].
Turn 2
Second combat echelon with more ammo swaps with the first combat echelon and then heads straight to the hostage T-doll.
Turn 3
On the 3rd turn, go down one node then head straight to the HQ. Move the dummy aside and move the combat echelon with the hostage T-doll to manually extract.

Turn 1
All you have to do this turn is to set all your allied teams to "Standby".
Turn 2
On second turn we will only change HK416 to 'Eliminate'.
Turn 3
During the enemy turn we lost AK-12 to the Hydra but that is okay. We now set HK416 back to 'Standby'.
If AN-94 was to run into a mine-bot, all you have to do is to move AN-94 to position 4 as soon as the battle begins. She will be able to kill the rest and prevent the armor units from running past her.
Turn 4
Finally all we have to do now is set AN-94 to 'Eliminate'. The Hydra unit is going to hurt so be prepared if you cannot burst it down right away. Once they are down, you are automatically done with the mission next turn.
Turn 1
Deploy your combat echelon at the HQ and fill the rest of the helipads with dummy echelons. Combat echelon moves to the corner of the map to draw Gundam's aggro and Tank's aggro. This also prevents the Tank further down the path from blocking your path next turn. With one remaining move, move the dummy near HQ.
Turn 2
Depending on where the Gundam moved, avoid that fight and head straight to the AA platform to destroy it. You might notice that the forbidden sign on the Helipad disappeared. This would be the time to use the dummy with Parachute Fairy to deploy and destroy the other AA platform on the other side. This guide does not use Parachute fairy, so we will continue as if we did not used it. With the remaining move point, move the dummy near HQ up one node.
Turn 3a
Retreat the combat echelon at the destroyed AA battery. Dummy echelon moves right next to the Tank unit to draw aggro next turn.
***There is a chance which tank closest to HQ will not have priority and still block the bottom path. If so you can restart the map. Another option is to deploy another dummy echelon [4th one].***
Turn 3b
On the bottom half of the map, move the dummy at the bottom helipad down one and redeploy the combat echelon. You can repair them if they are damaged before deploying.
***If you chose to deploy 4th dummy, you don't have to sacrifice the dummy to tanks, instead only swap dummy echelon and combat echelon's location and end turn.***

Turn 3c
Swap with dummy echelon and move up to a point where it is 2 nodes away from the tank. Because the Tank will attack the closer dummy echelon, it will not block the combat echelon's path next turn.
Turn 4
Use all the move points available to get to a location which will not draw aggro of the Tank near the AA platform.
Turn 5
Move to the AA platform to destroy it. Then deploy a dummy again on the helipad near HQ.
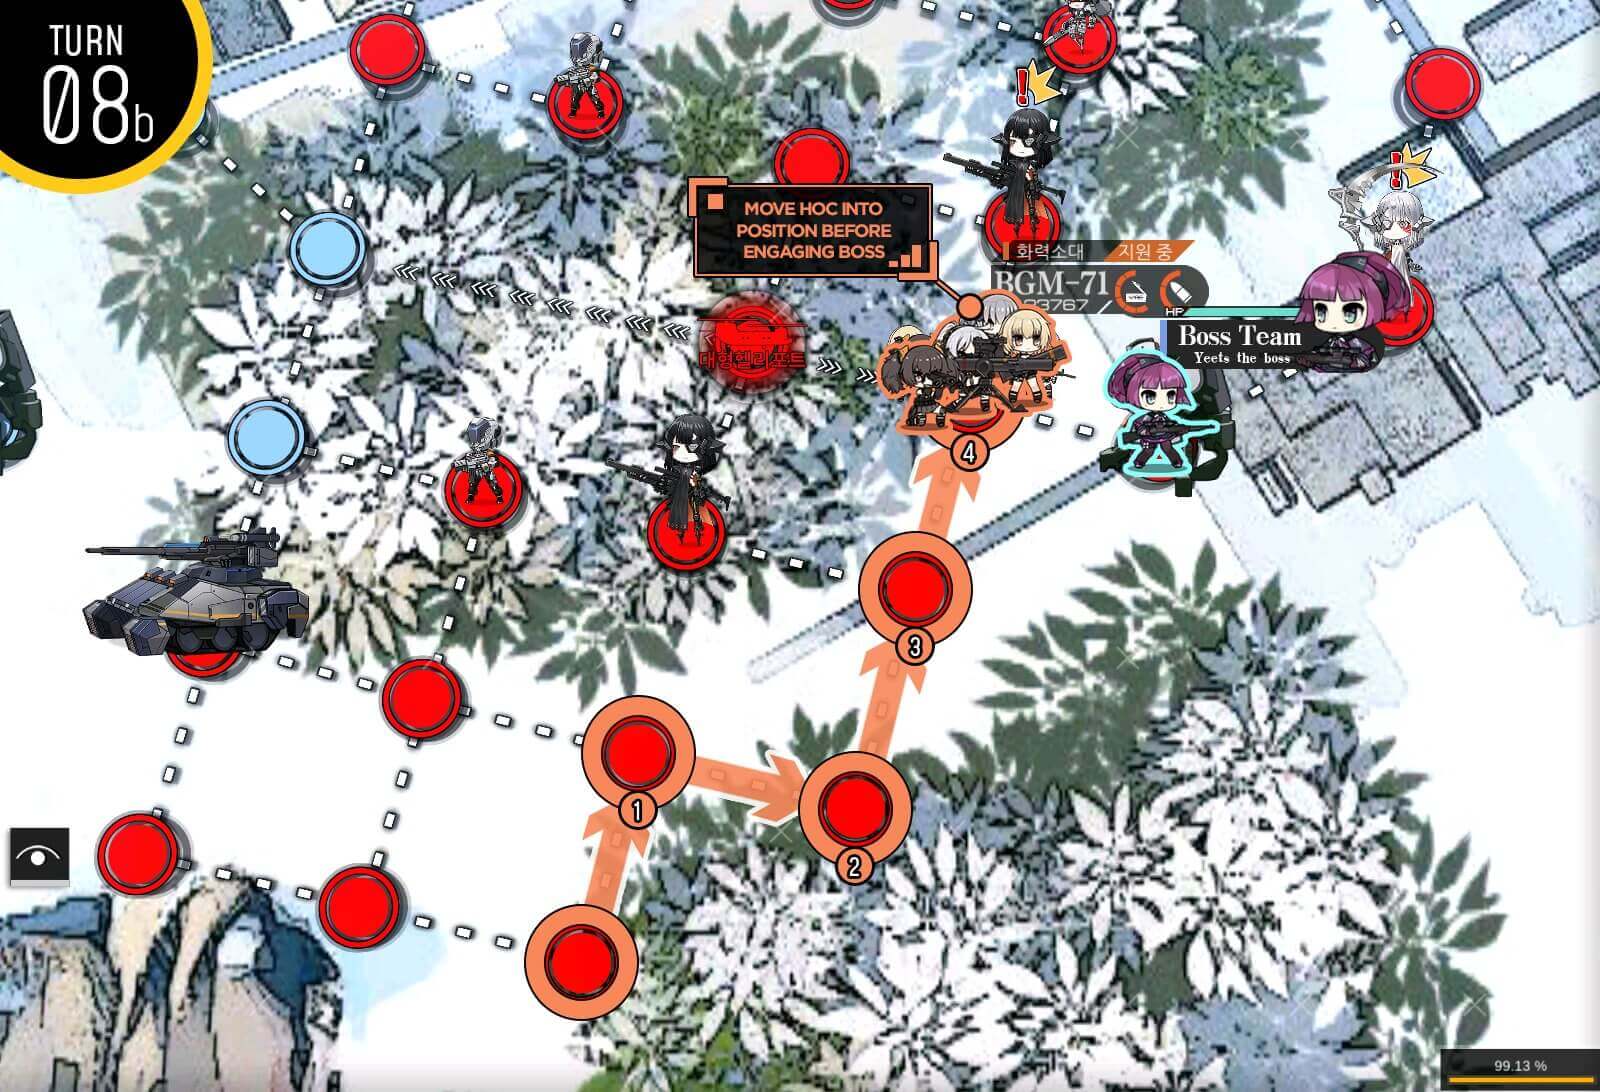
Turn 6a
At the beginning of the new turn, retreat the combat echelon used to destroy the AA platform and deploy the Boss Team. I personally recommend RFHG team since it has to fight a Gundam unit on the way. For Fairy I strongly recommend Taunt Fairy with max level to reduce damage taken by the T-dolls in the fights to come. I personally don't recommend Nuker type RF unless you know when to activate the skill. Otherwise best to use generic setup like RoF and FP.

Turn 6b
Move Boss Team one node then deploy BGM HOC. I selected BGM because it's given for free and has 100% chance to break shield when missile hits. This is important when Nytos have 50% shield to absorb damage. I do recommend leveling BGM to 60, and investing a few skill levels into skill 1. However, this is not mandatory.
Turn 6c
Move Boss Team towards the bottom path and at least two nodes away from the Tank. Even with HOC support, the Tank will be a tough and unnecessary fight.
Turn 6d
BGM follows right behind the Boss Team. You don't need to worry about the enemy unit next to the HOC as it will not move from that spot.

Turn 7a
Now that tank moved up, we go around it but stop before the Gundam.
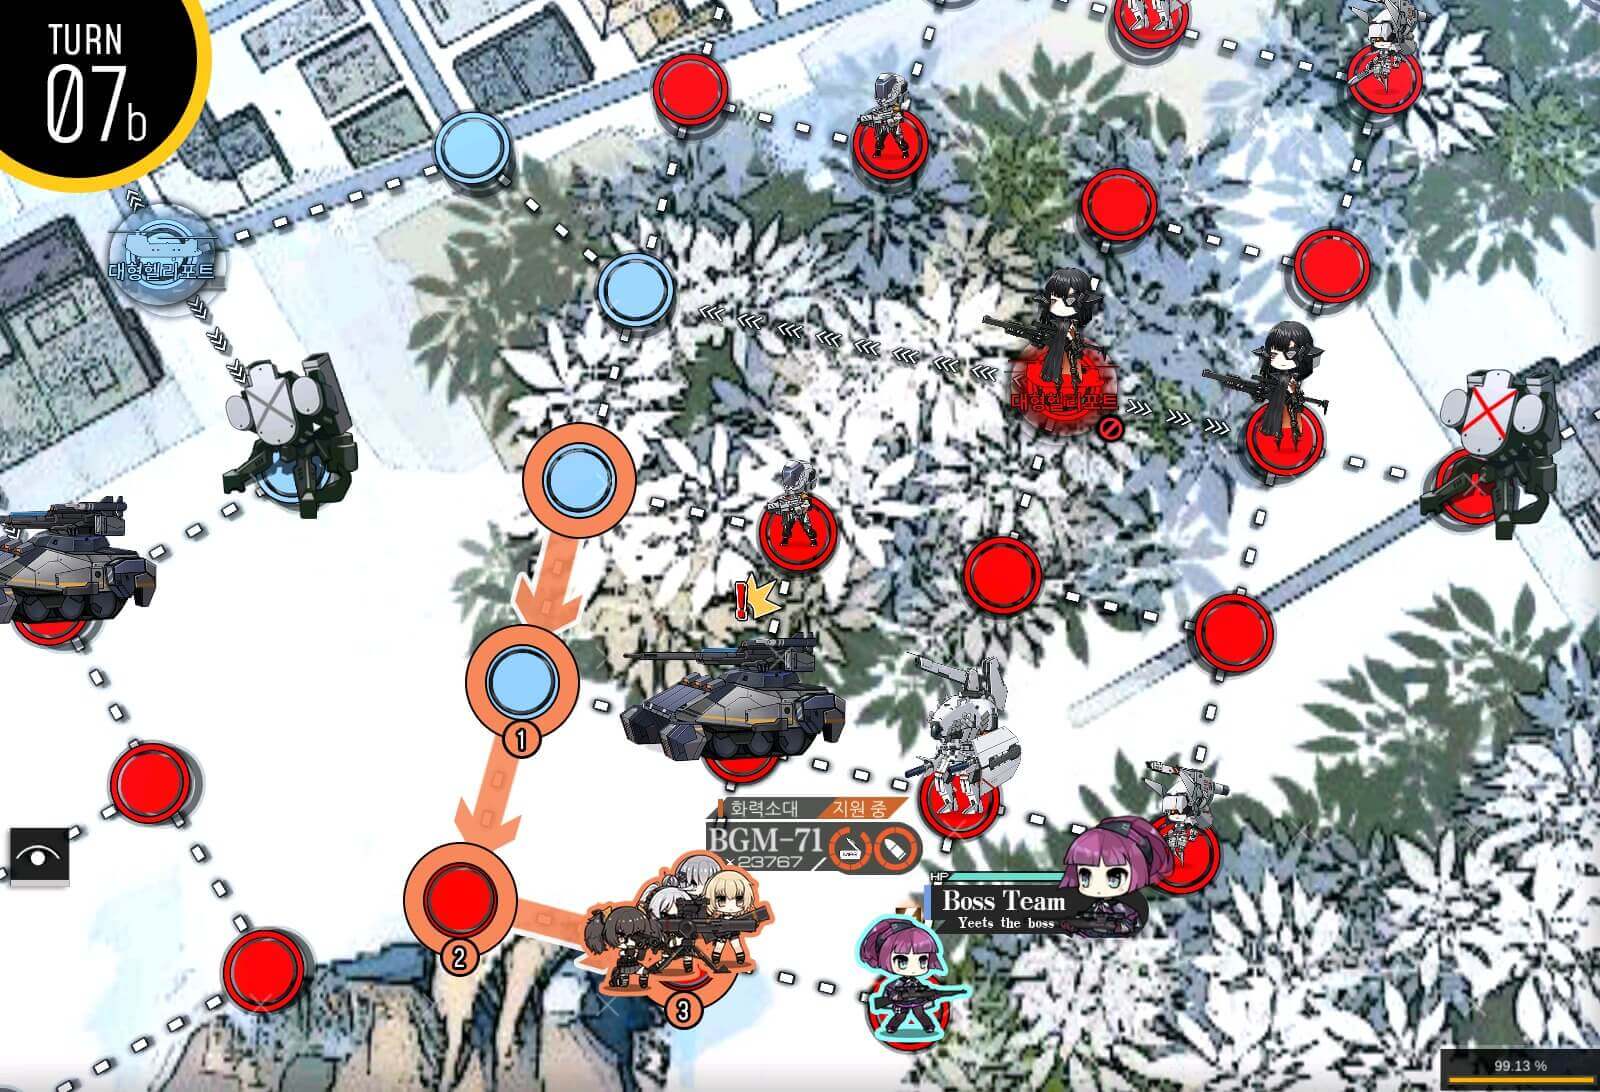
Turn 7b
BGM follows behind the Boss Team to provide support. This will make the Gundam fight easier.
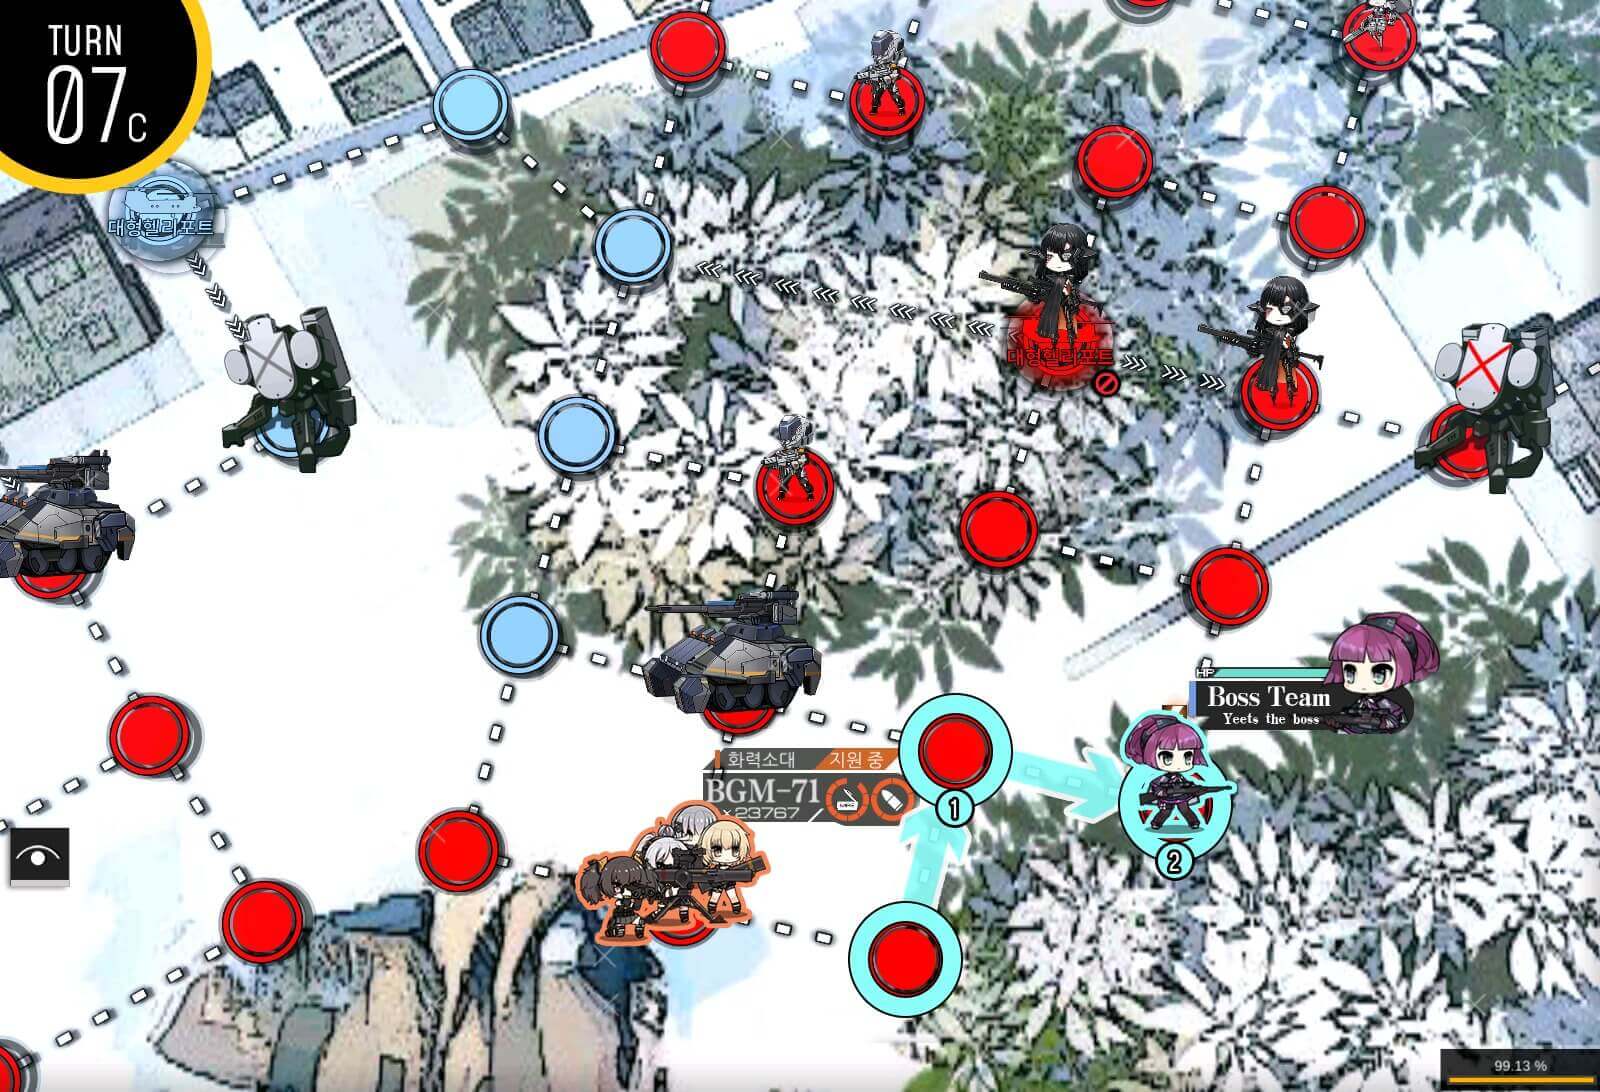
Turn 7c
Once you clear the Gundam and Laser Bats, move away from the Tank's detection range.

Turn 7d
BGM also moves so that it is least two nodes away from Tank before ending the turn.

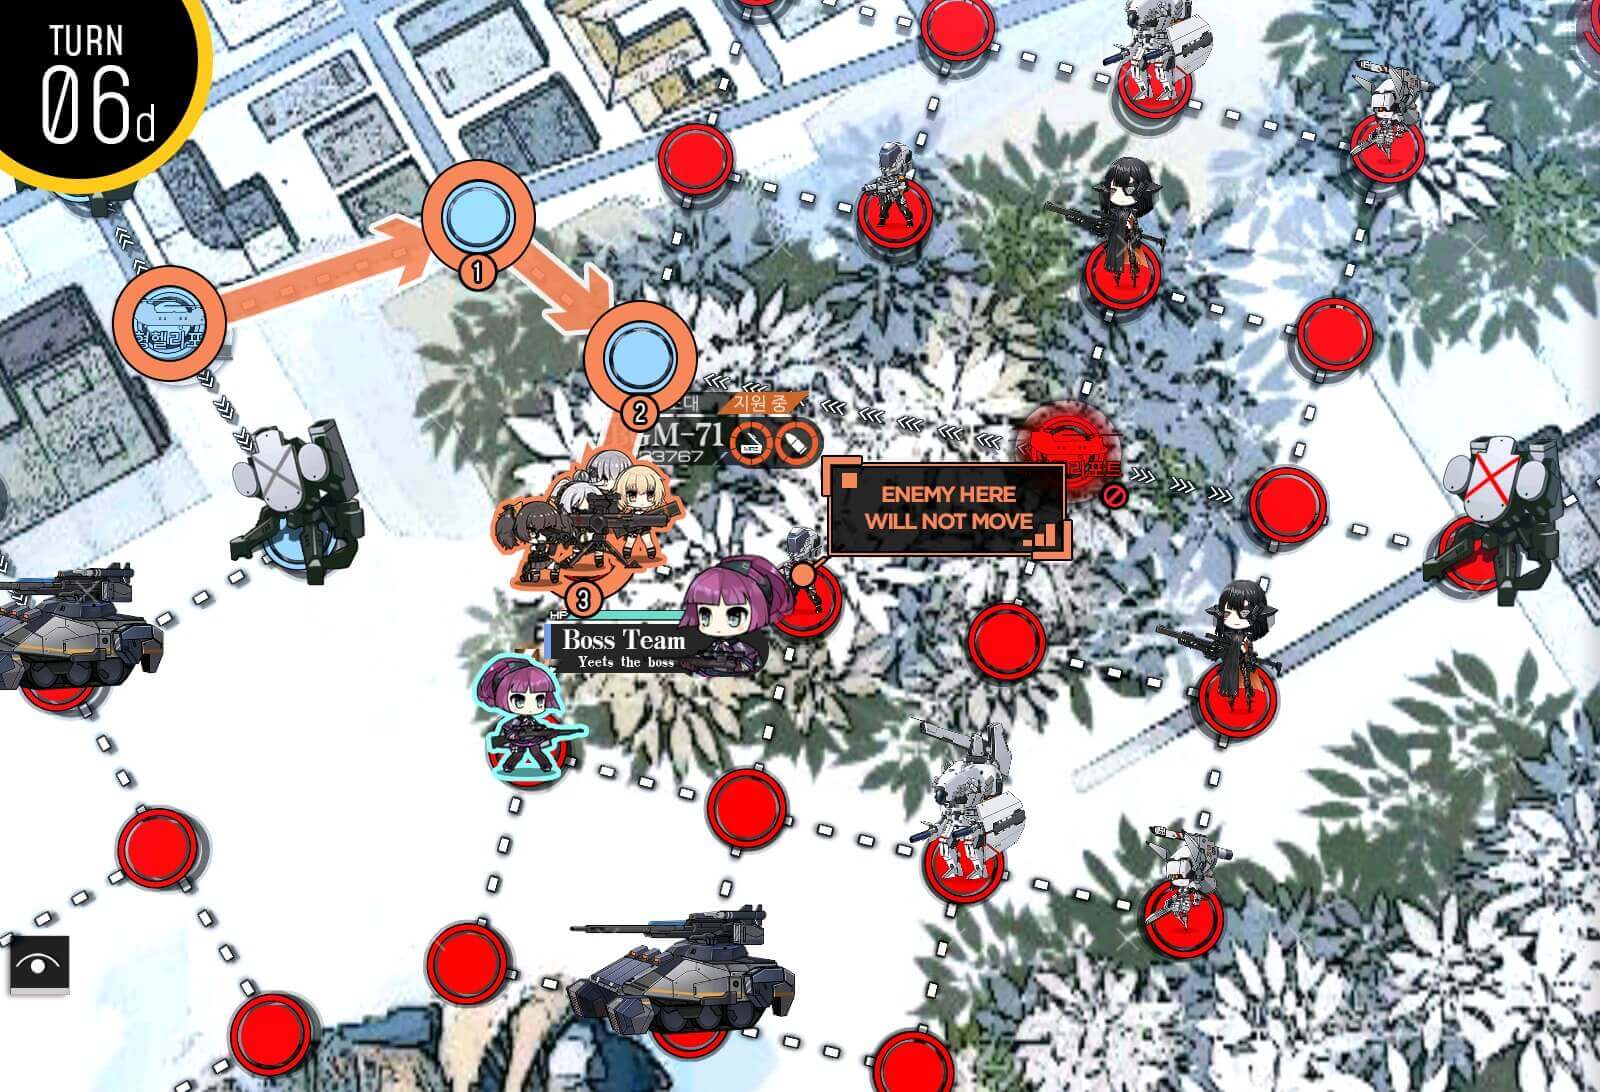
Turn 8a
Now that you can see that path is clear all the way up to the AA battery. Set up Boss Team right below the White Nyto.
Turn 8b
Bring BGM right behind the Boss Team and make sure that fire support is active before fighting Nyto. The video for the fight as well as some tips are below the last turn image.
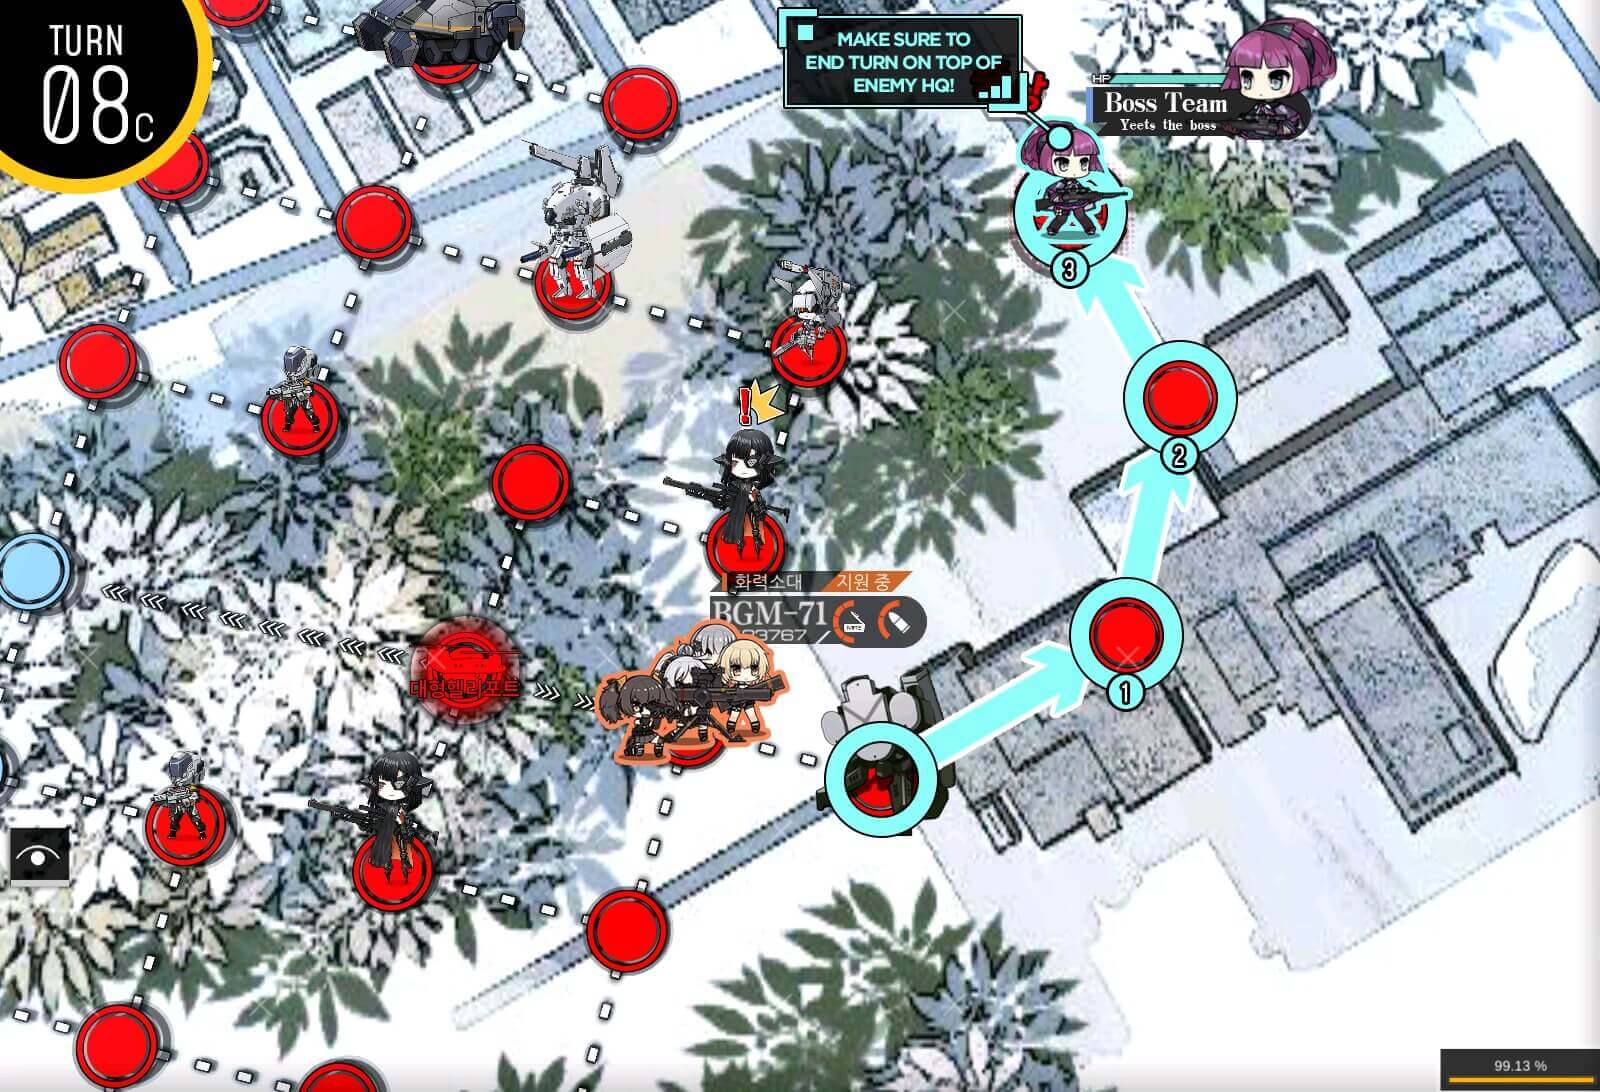
Turn 8c
Once you have successfully dispatched the Nytos, move to the enemy HQ and clear the mission!