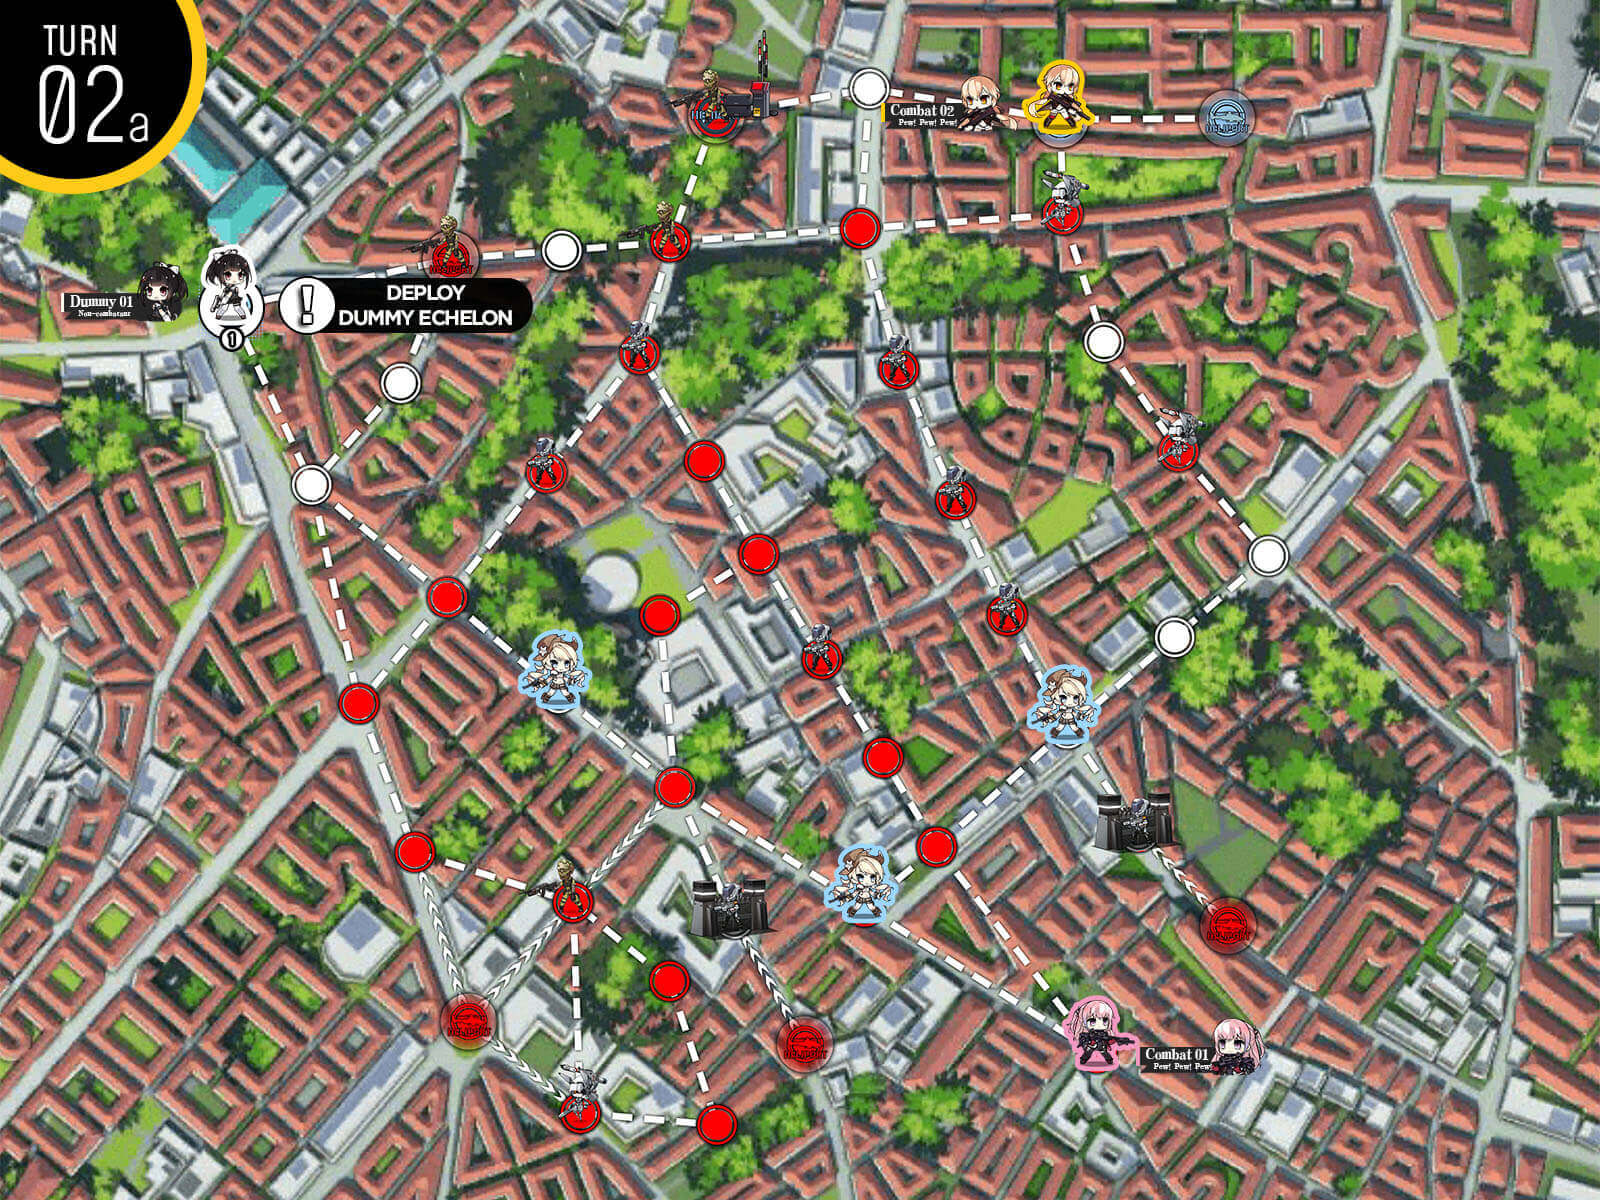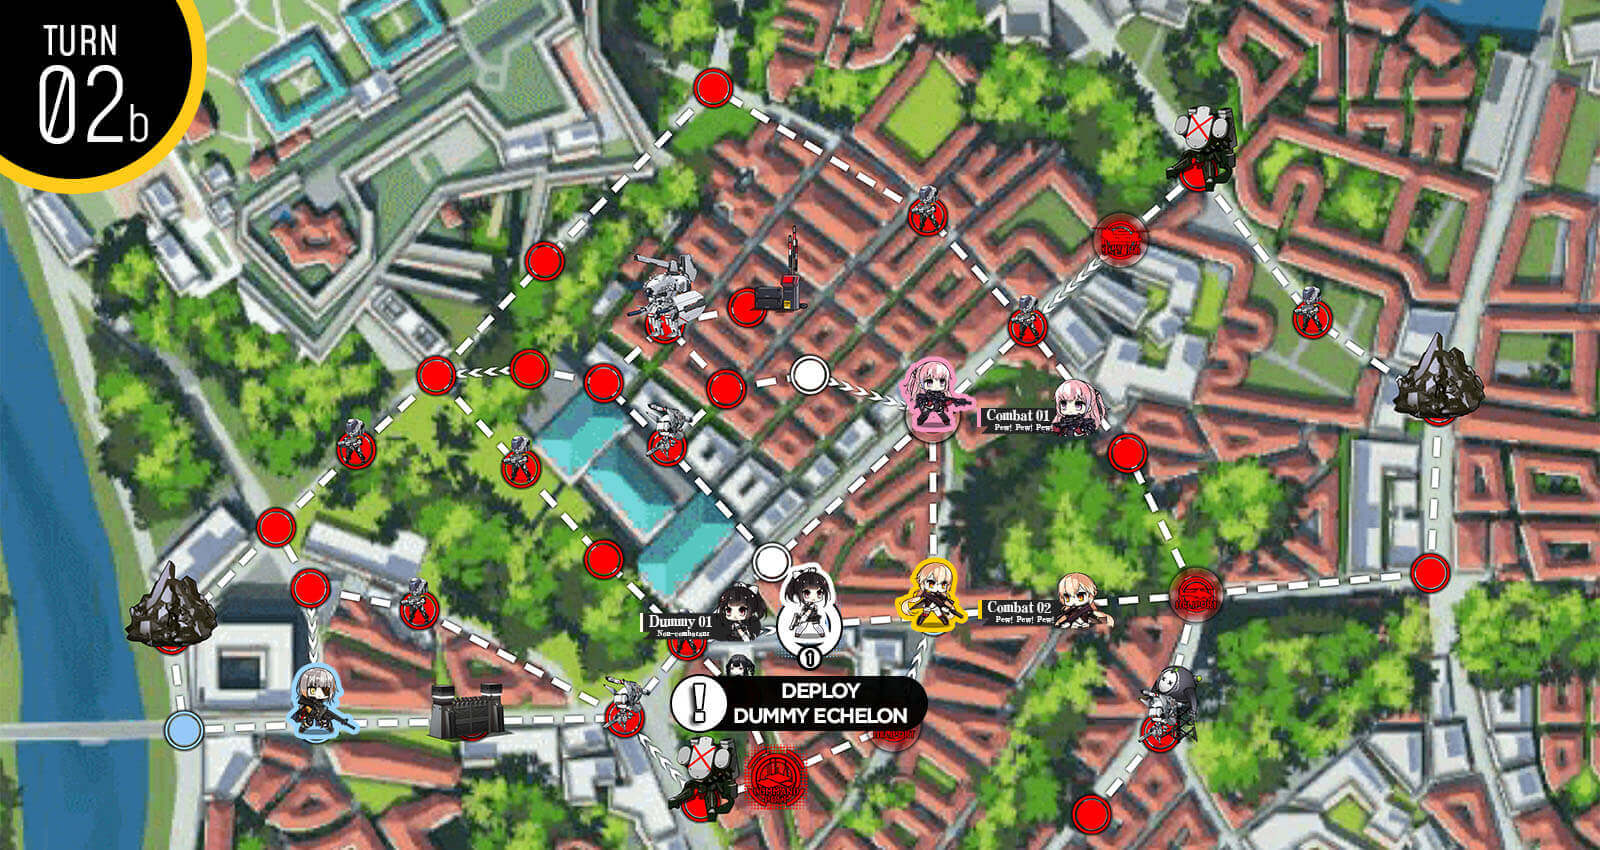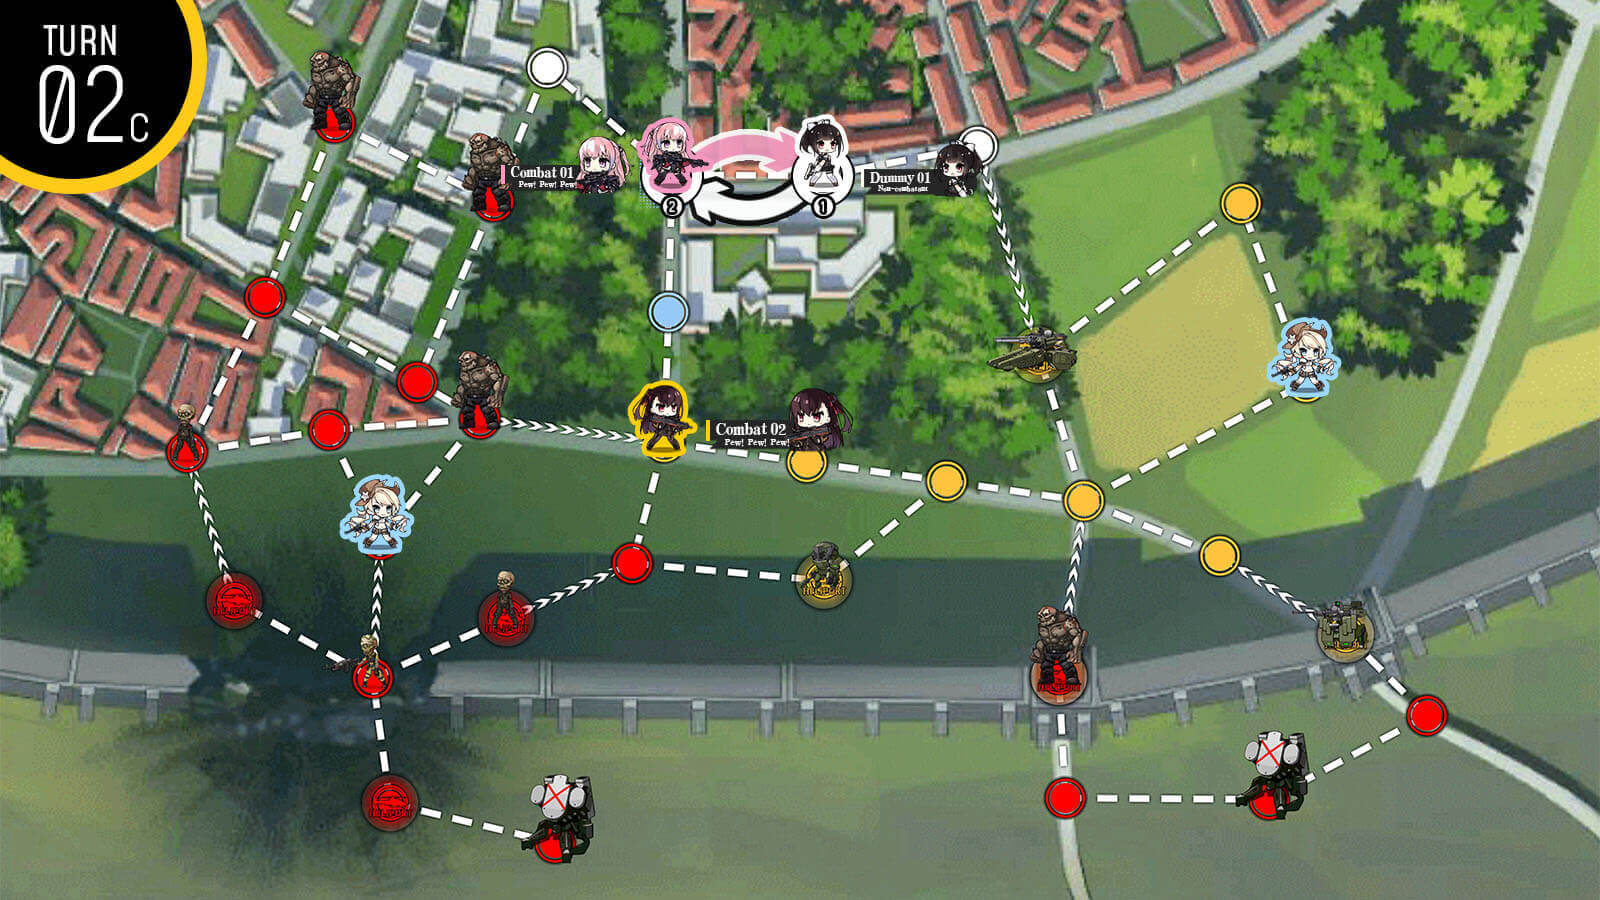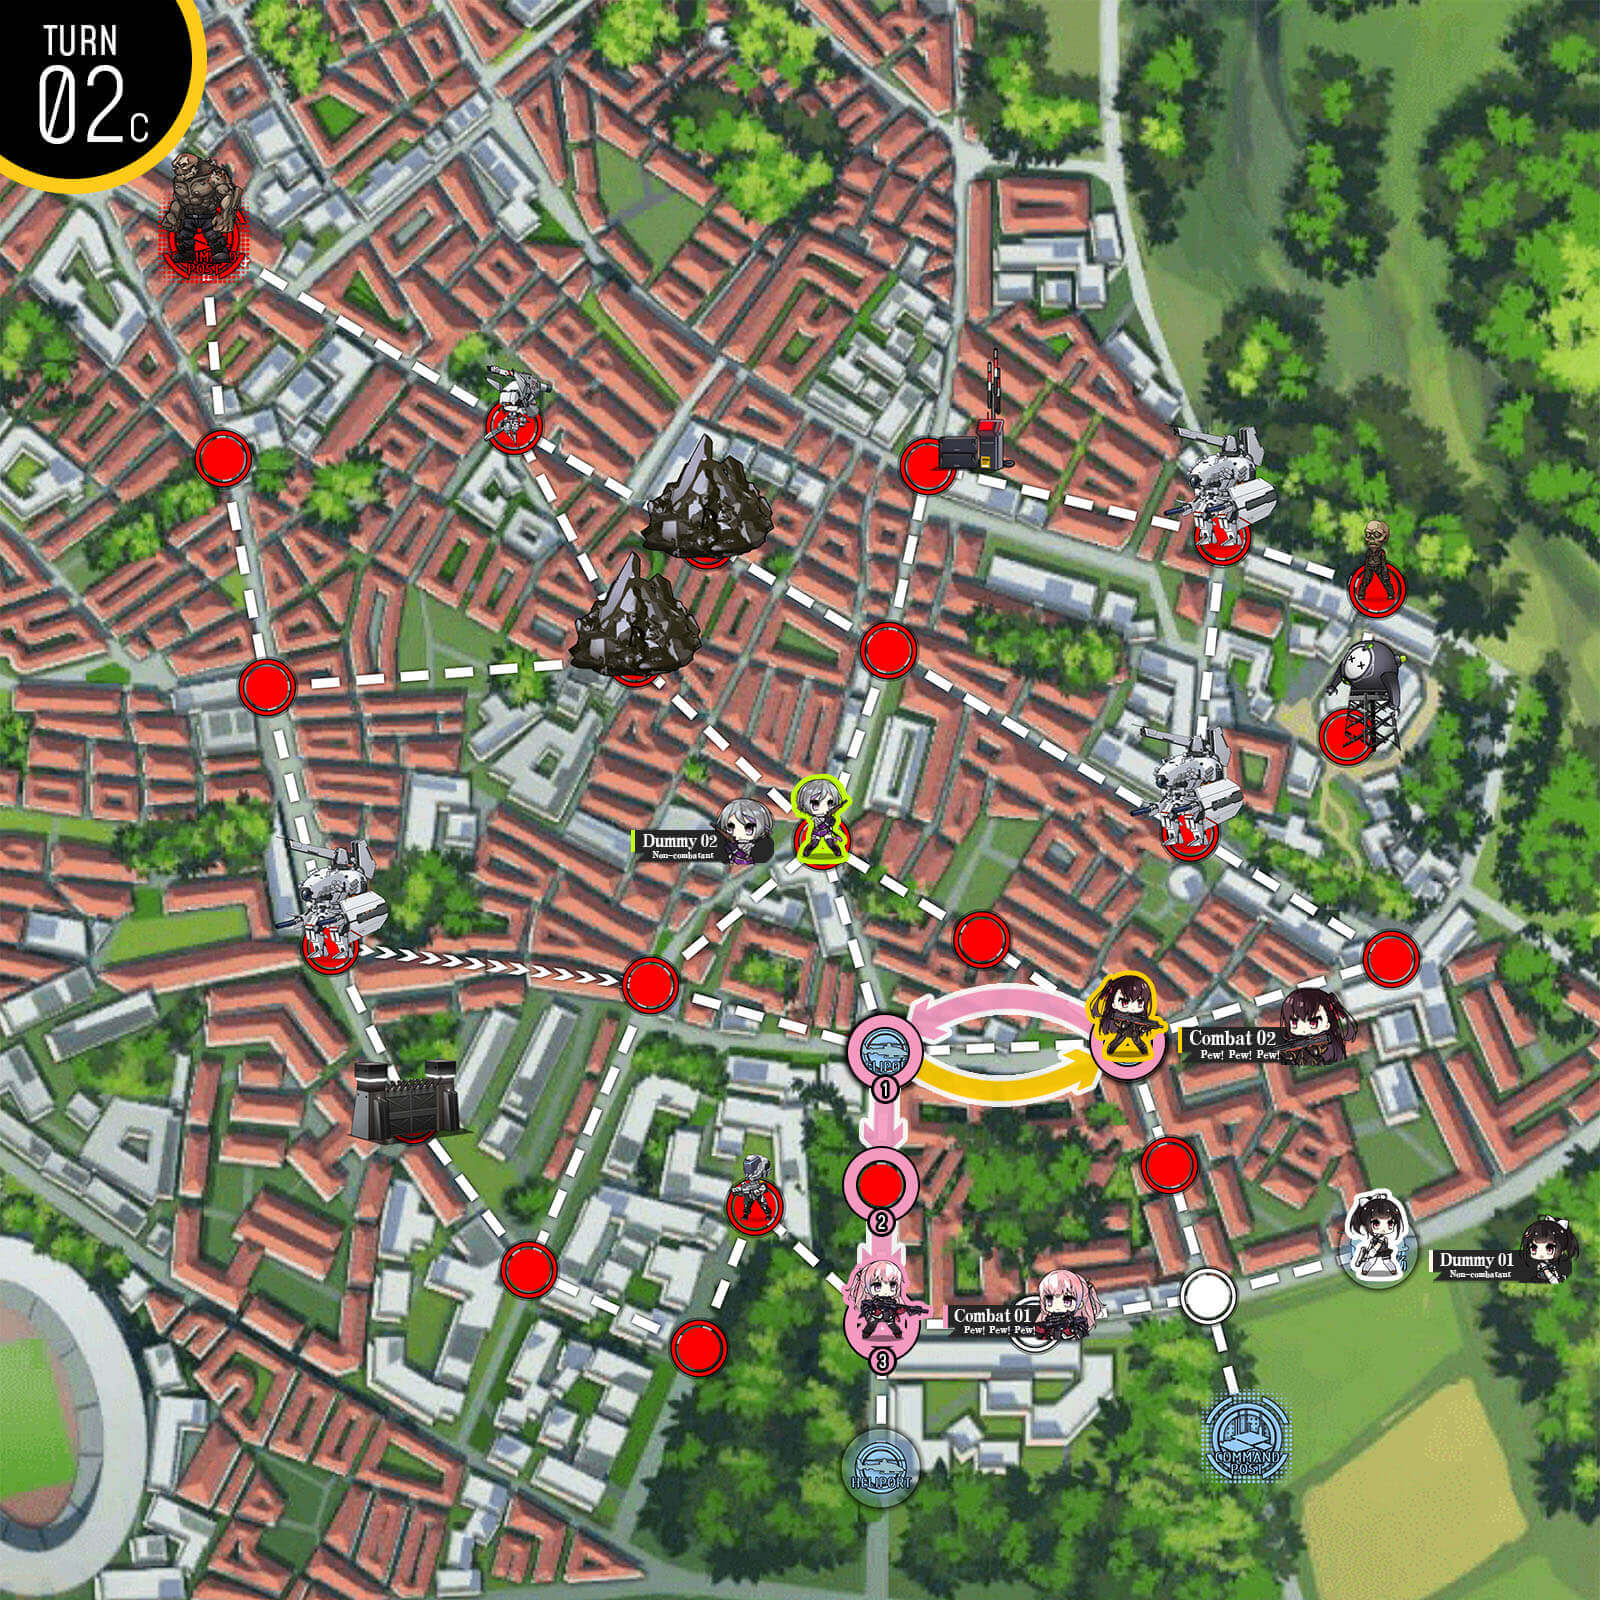


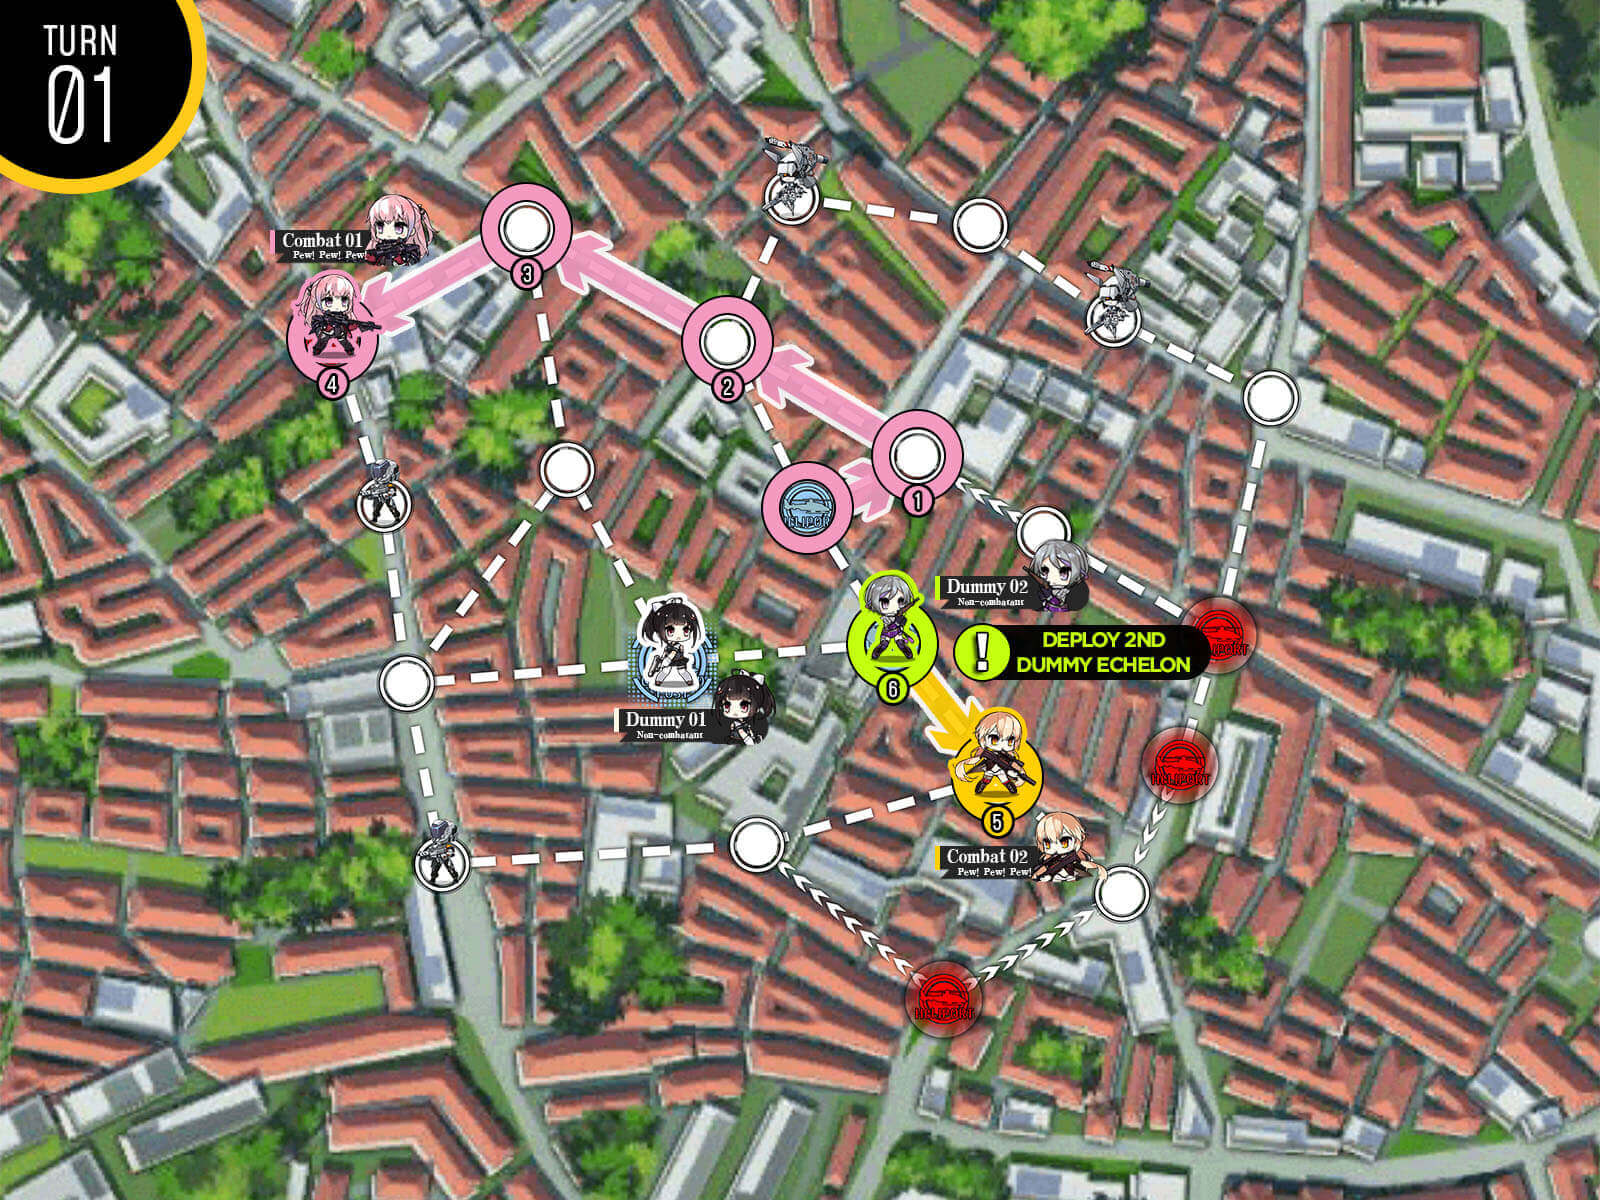
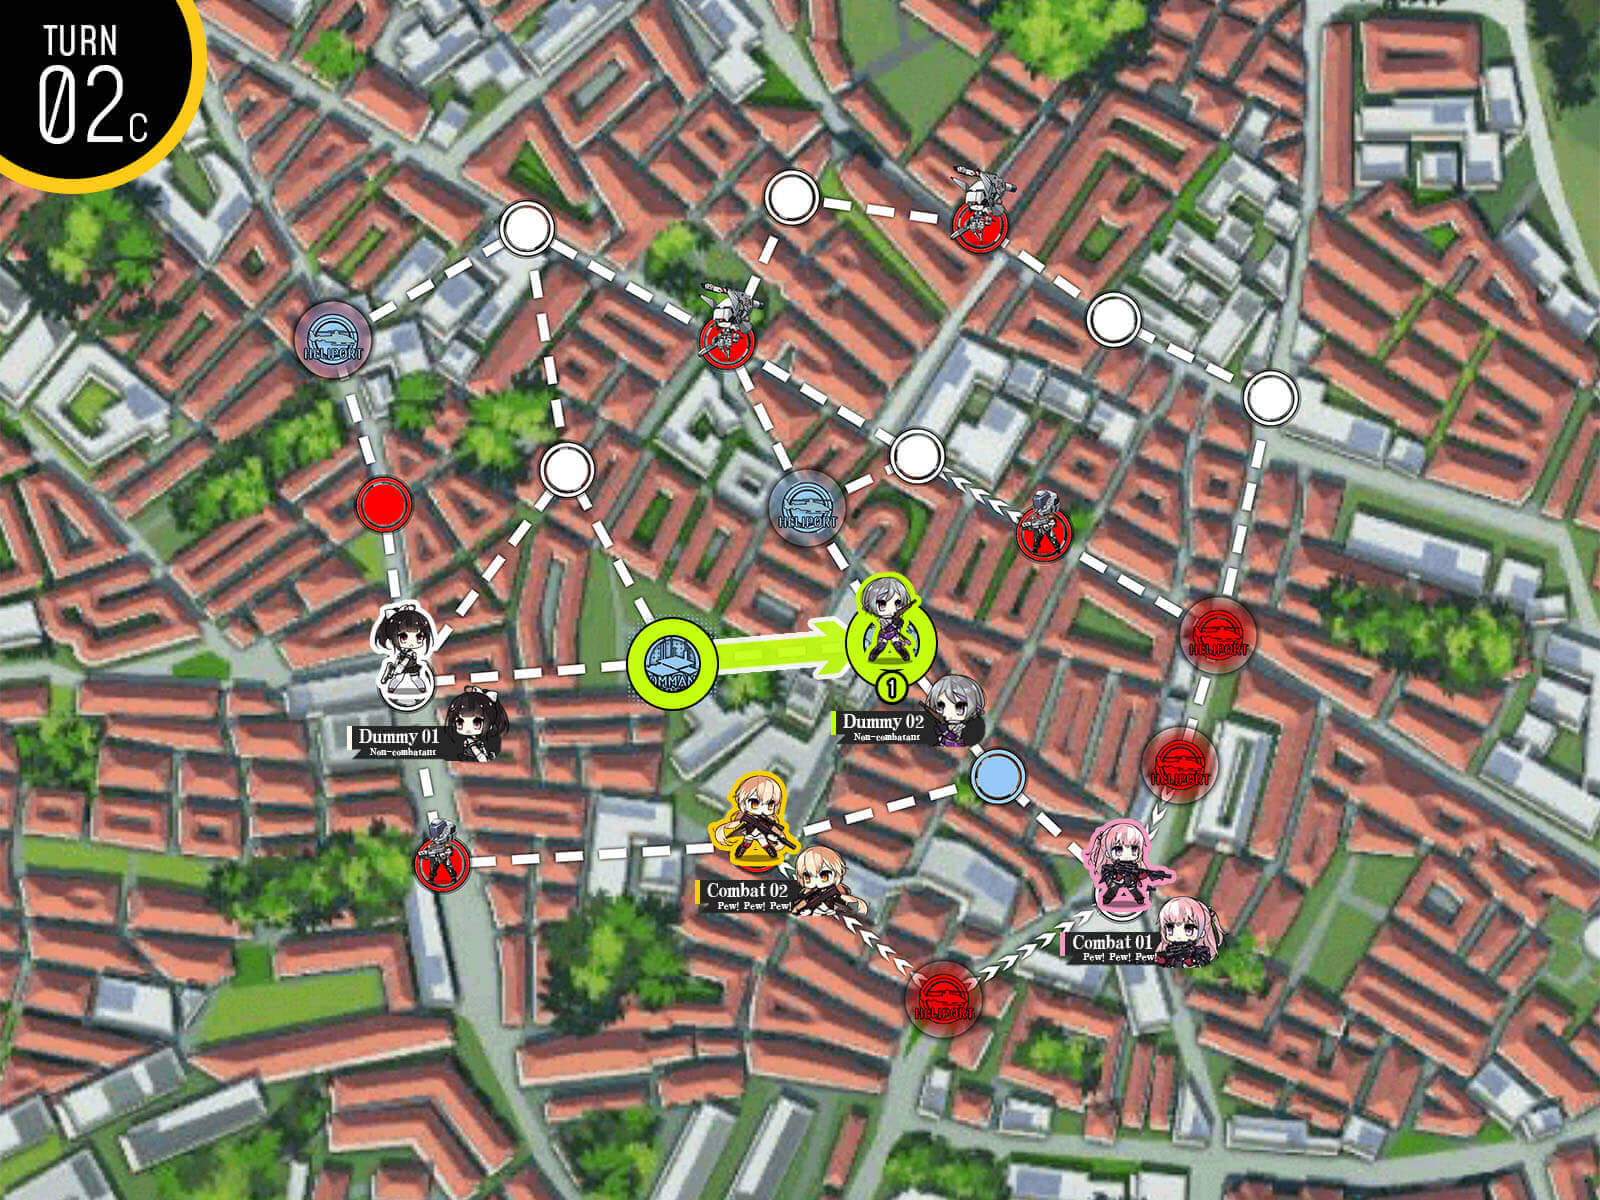
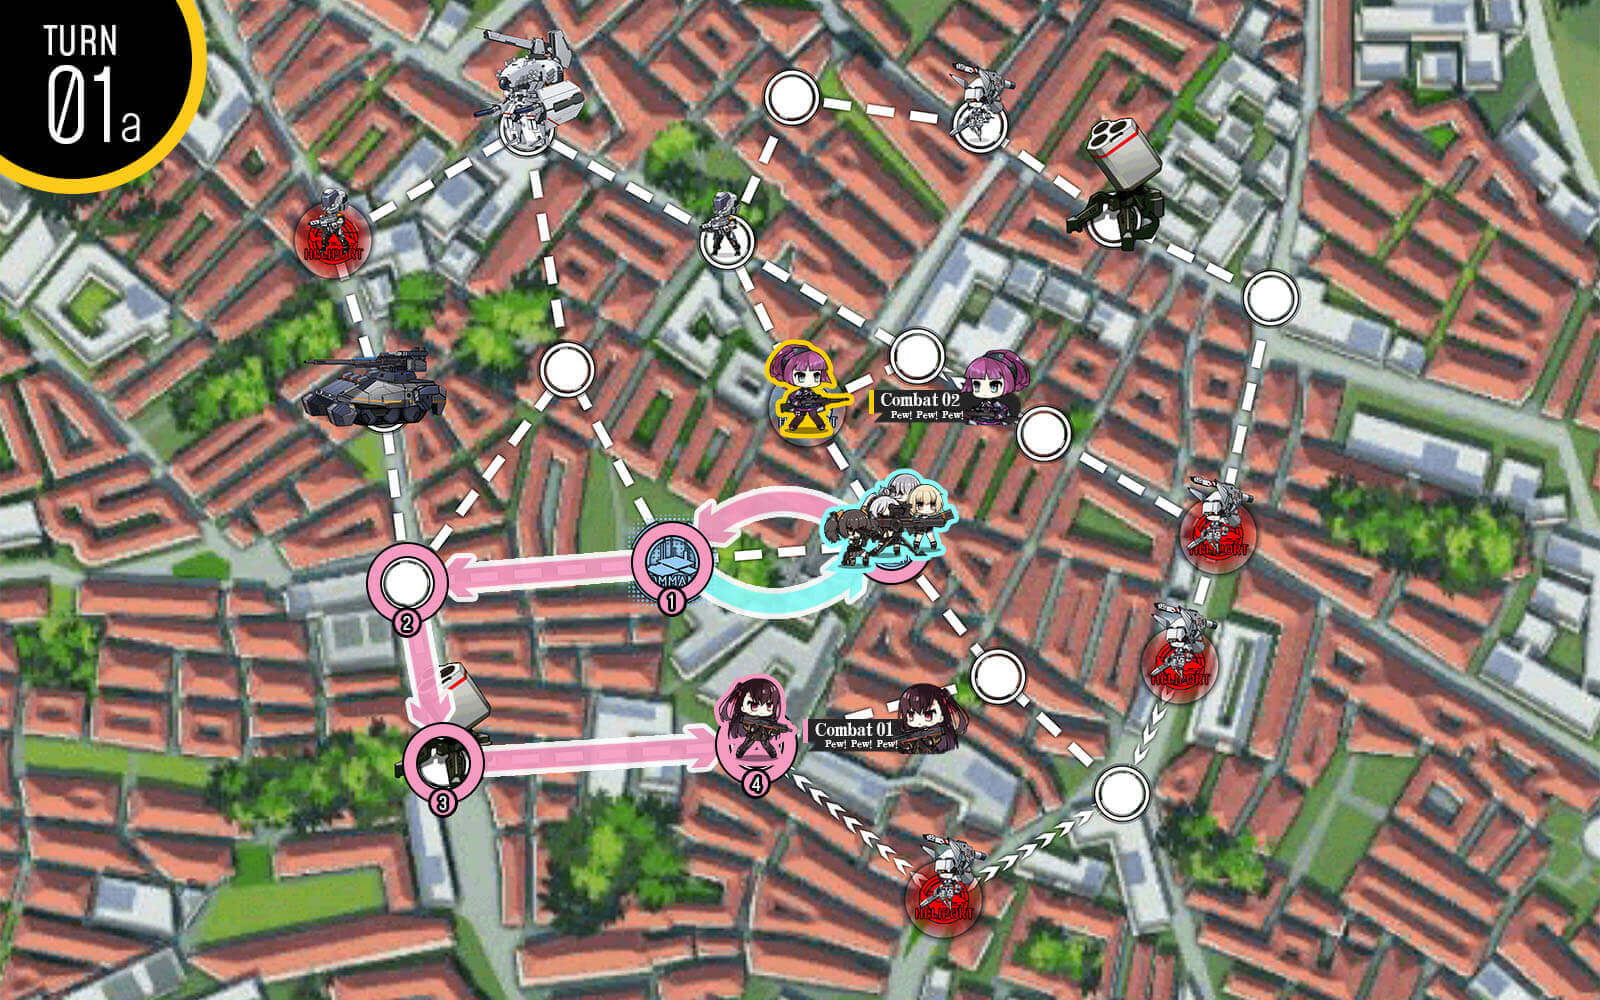
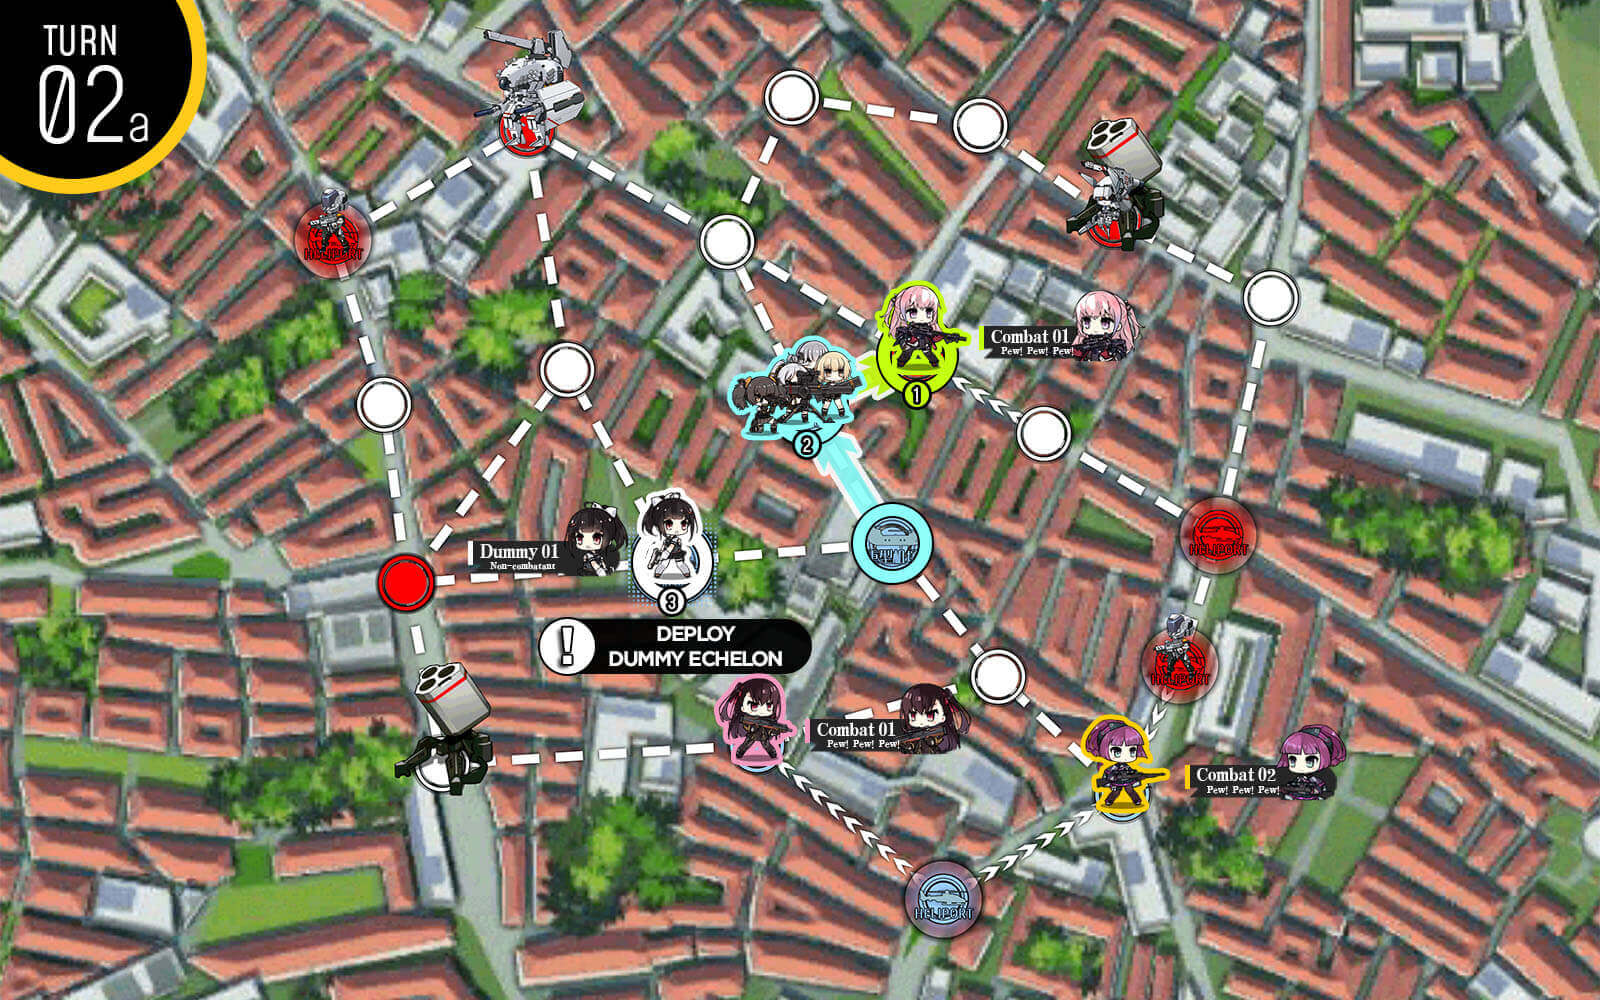
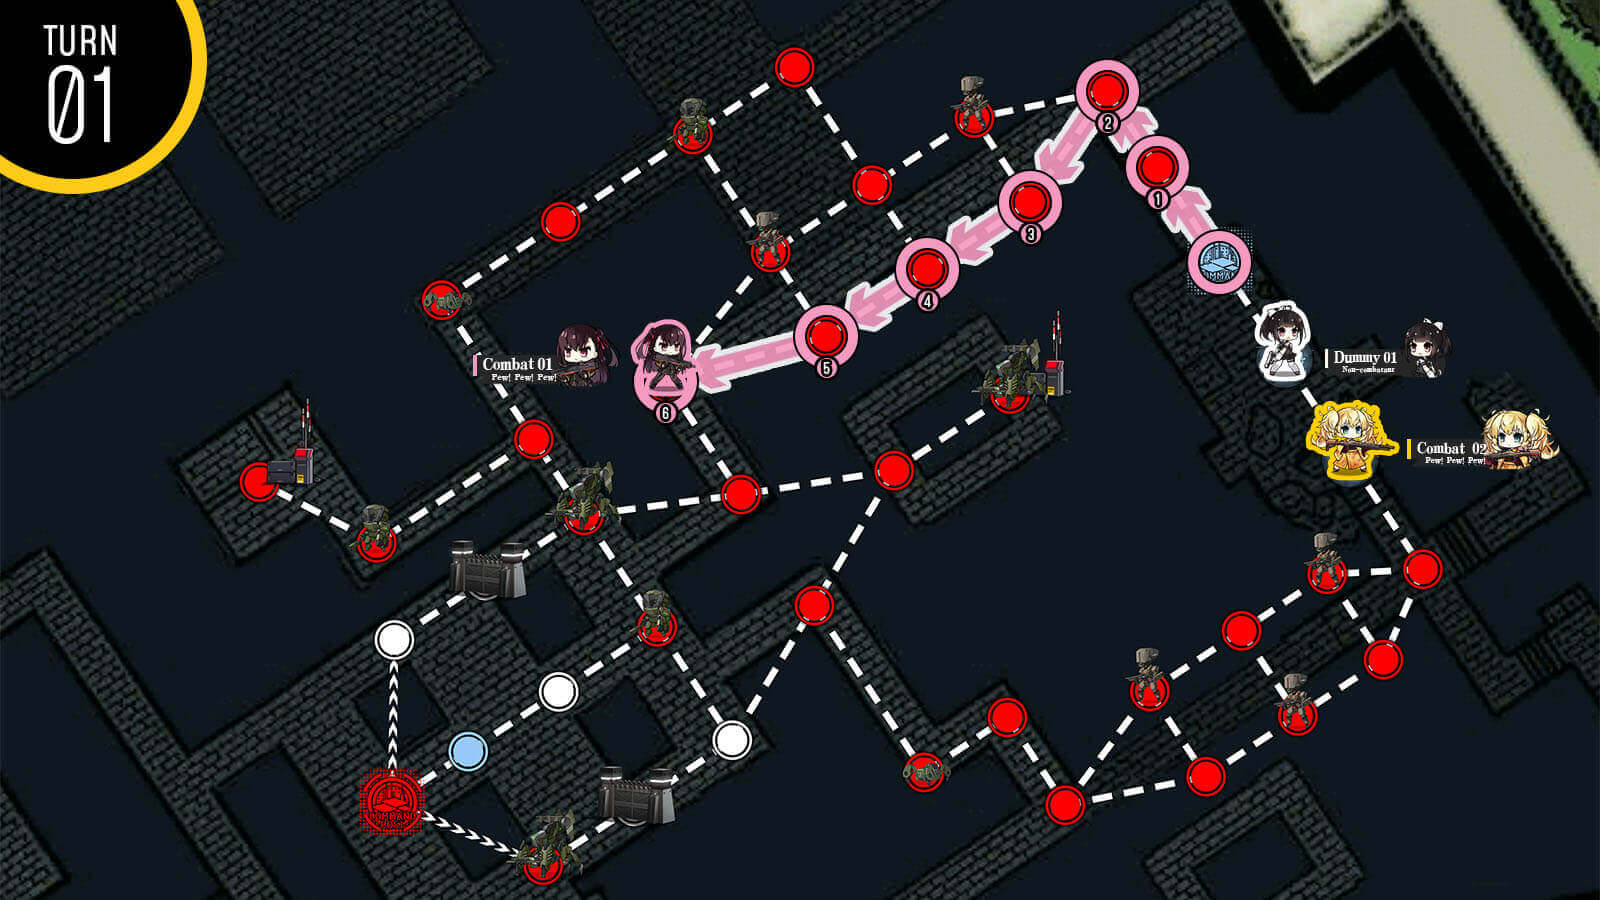
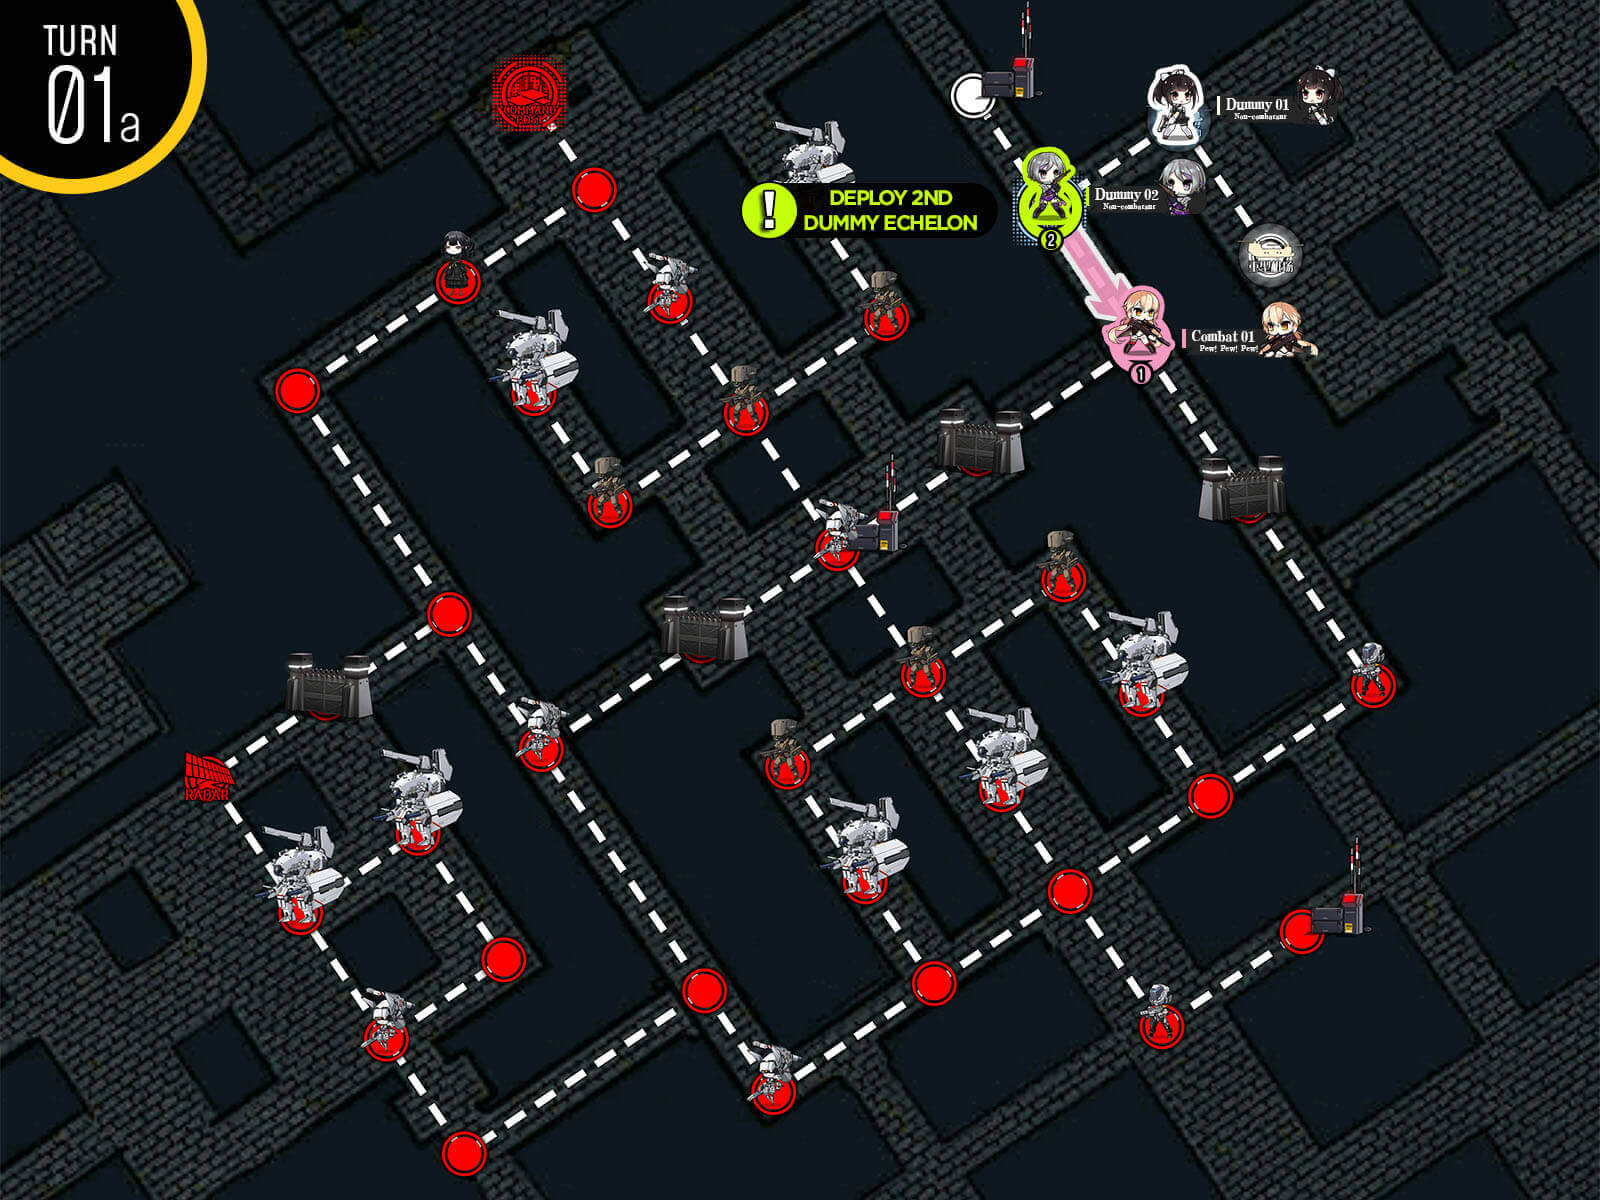
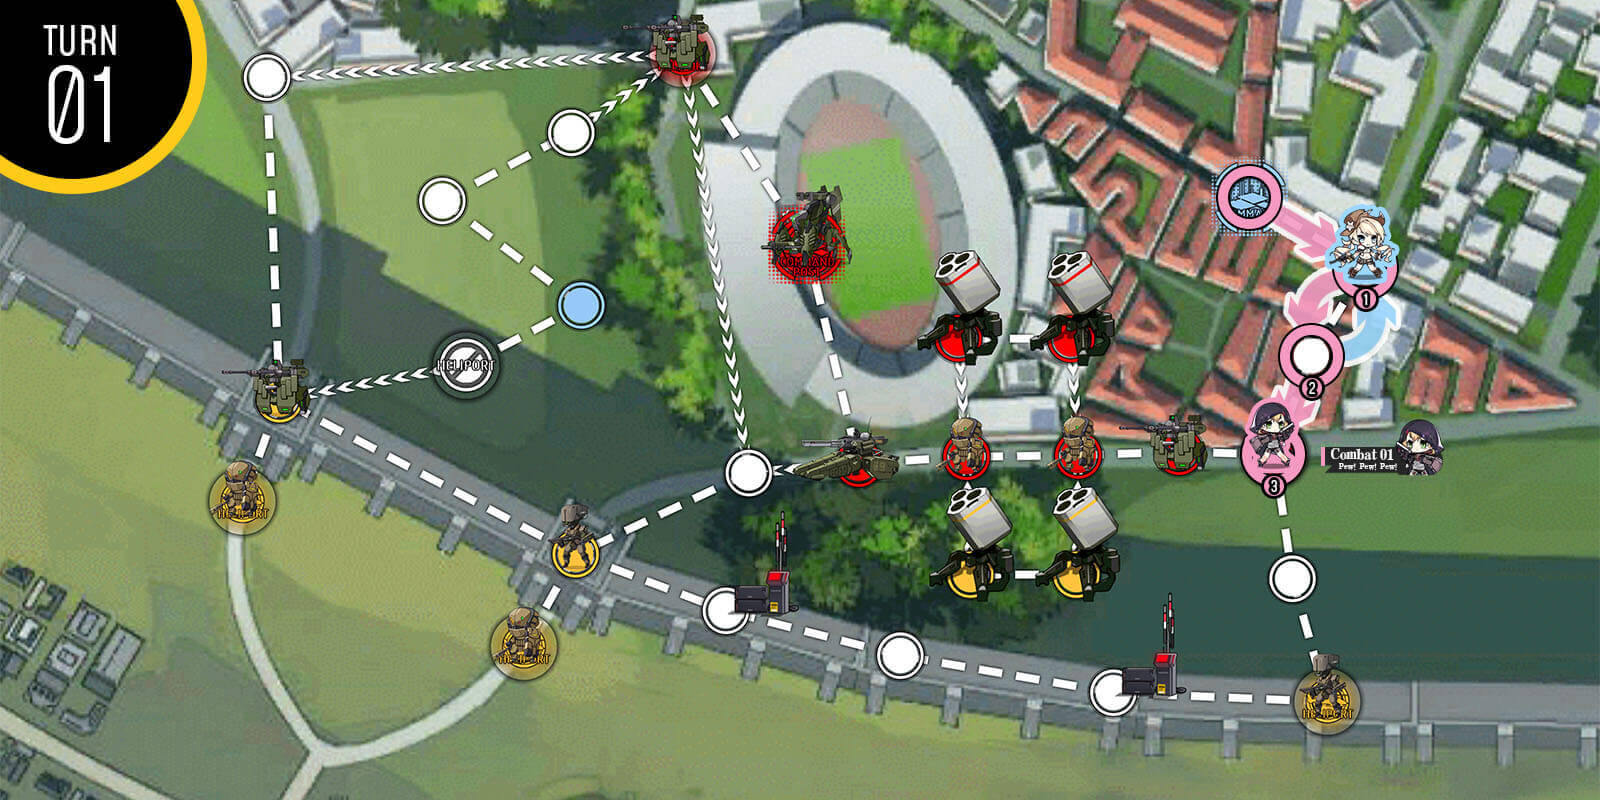
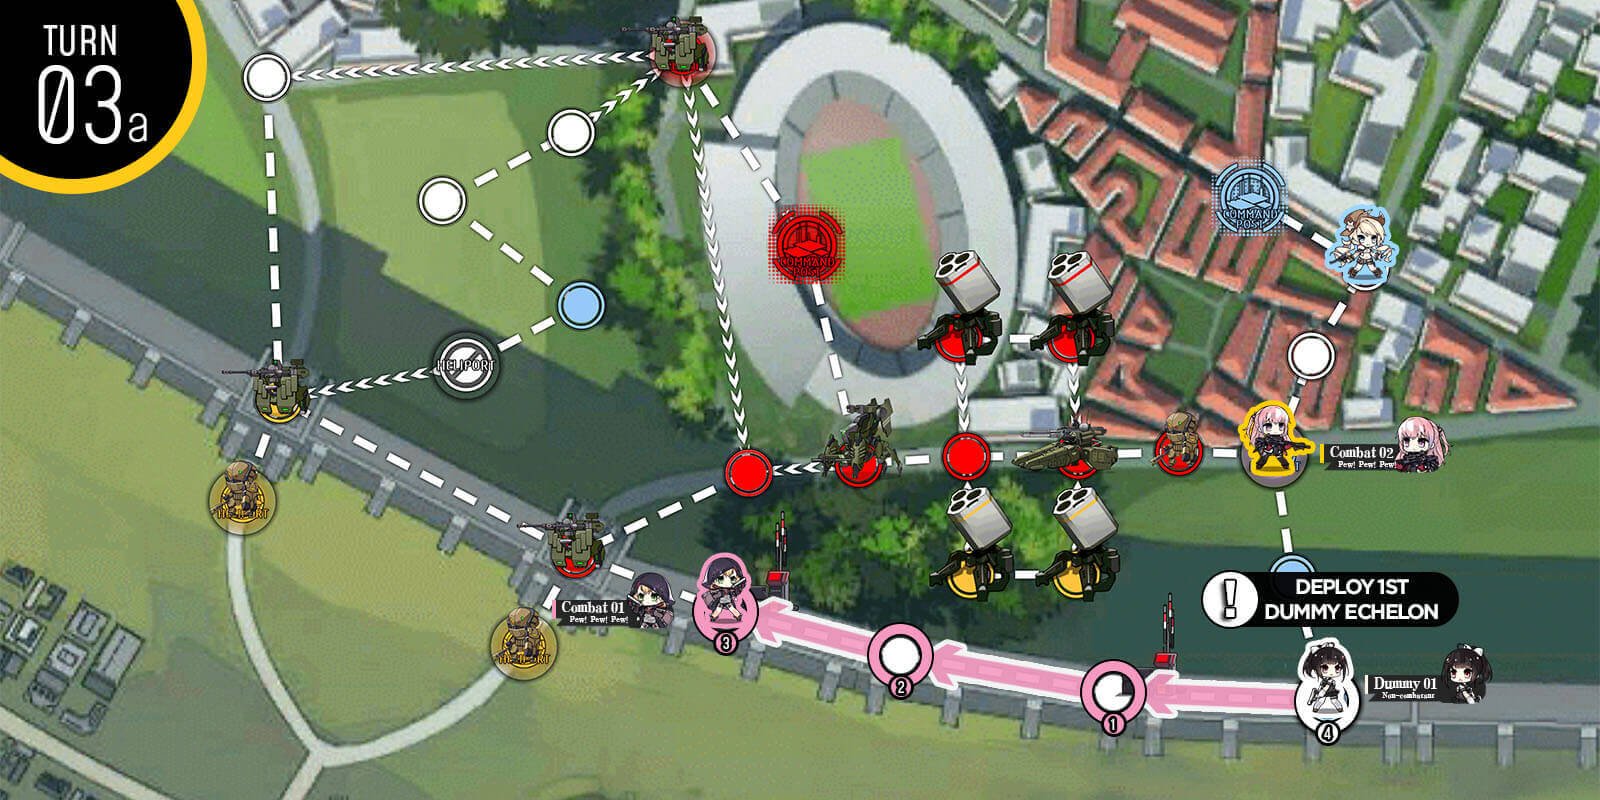
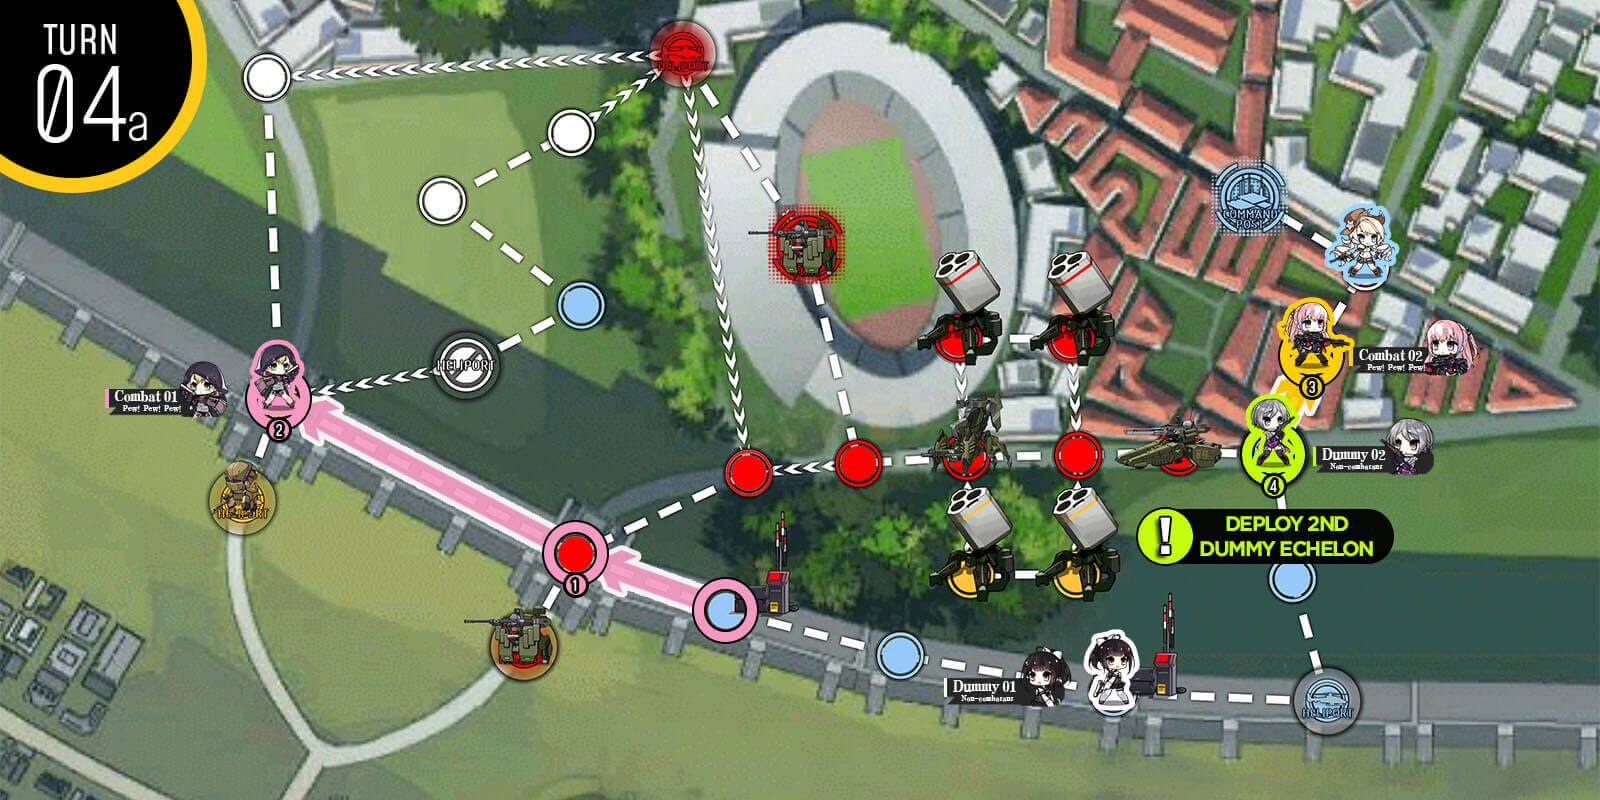
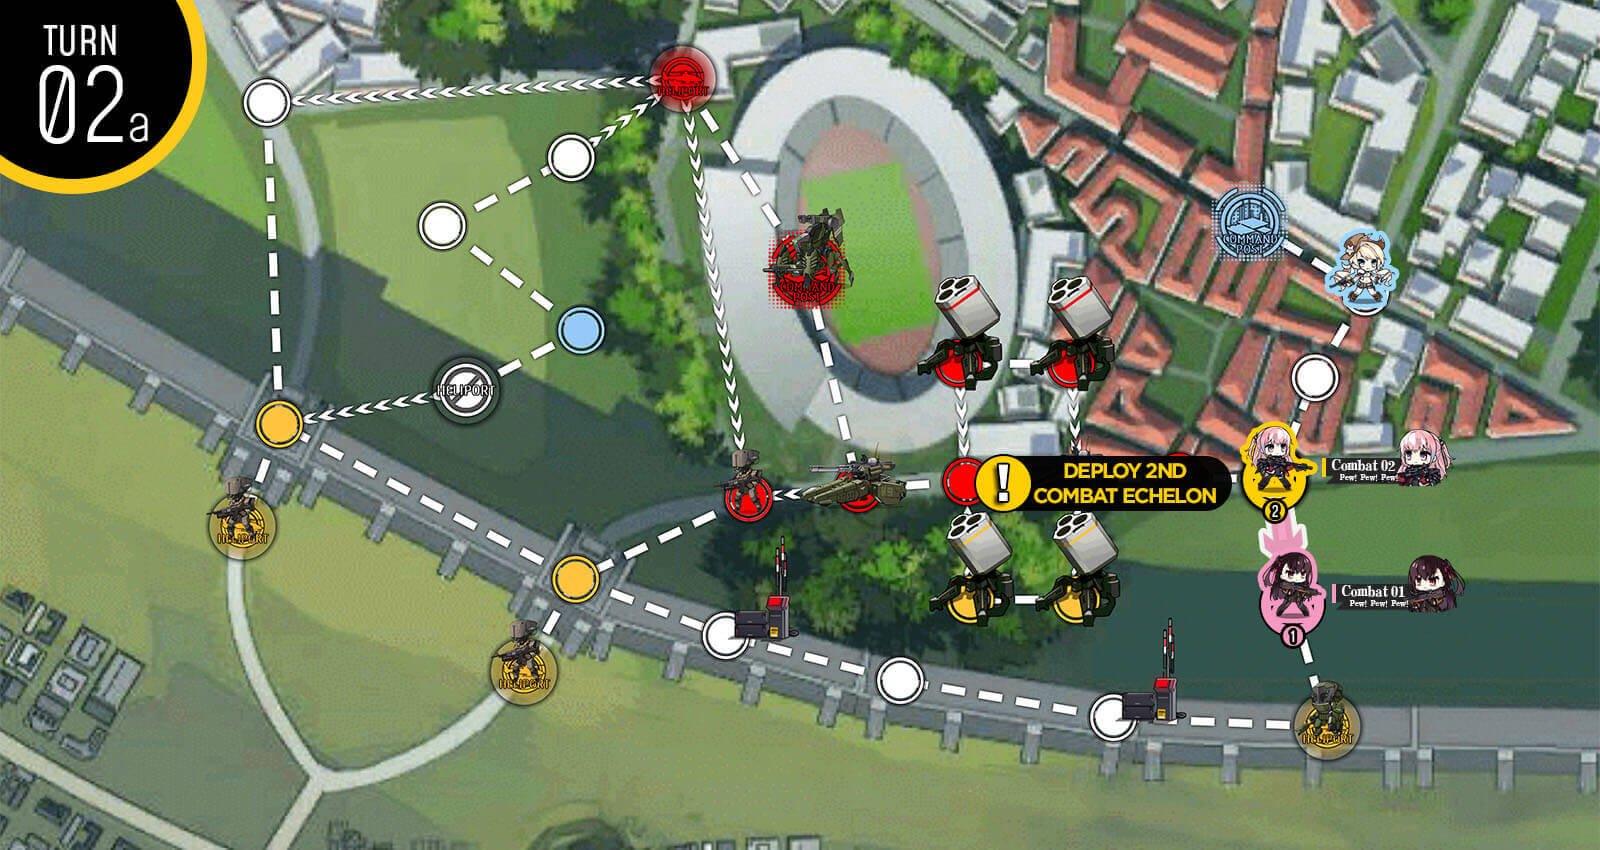
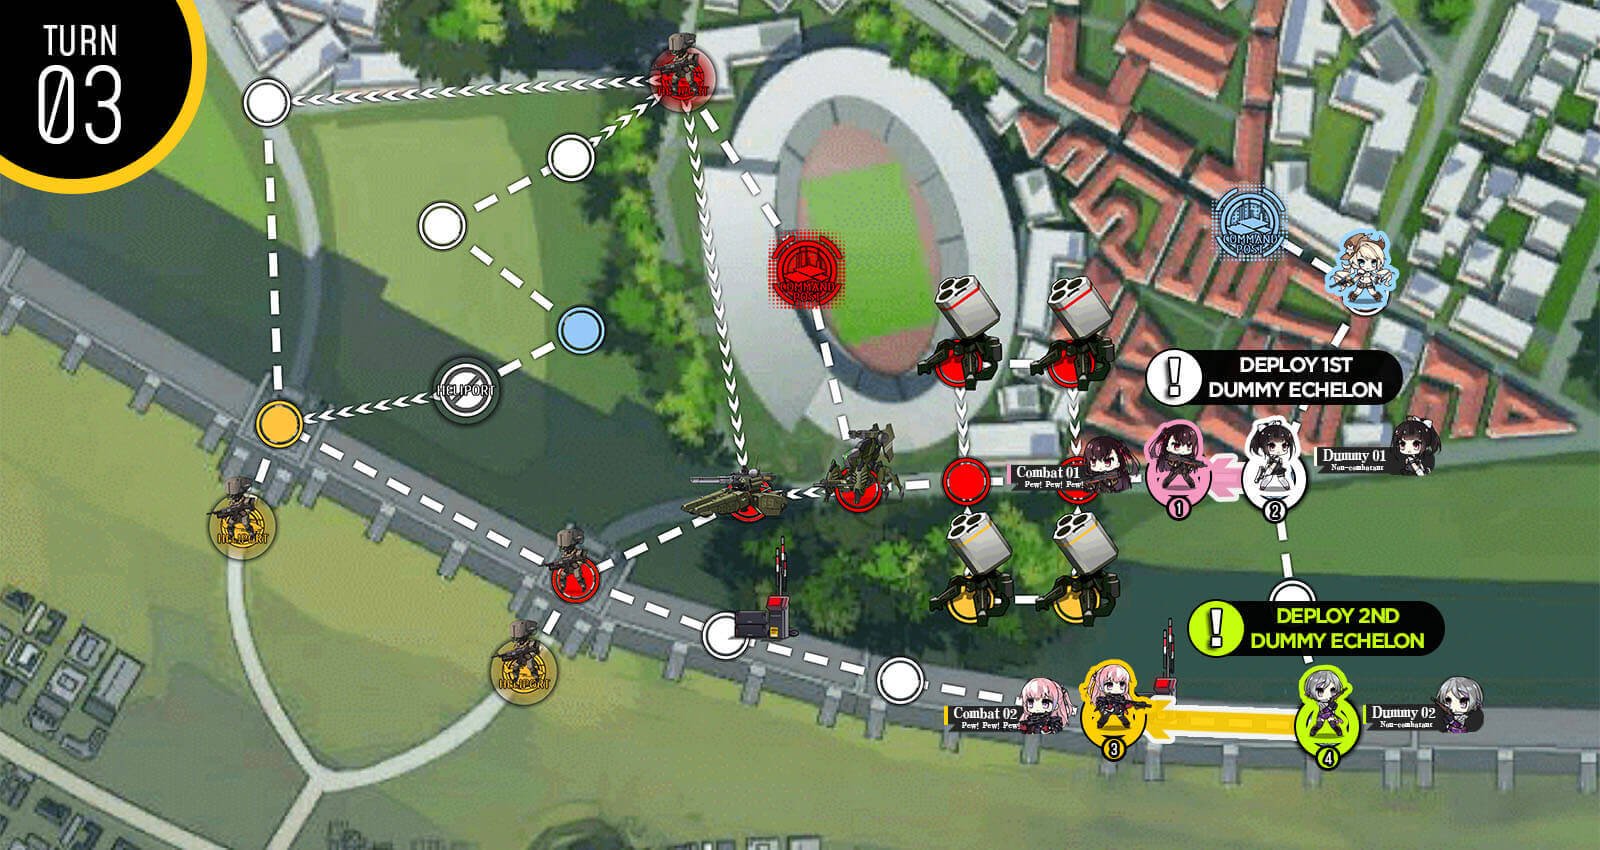
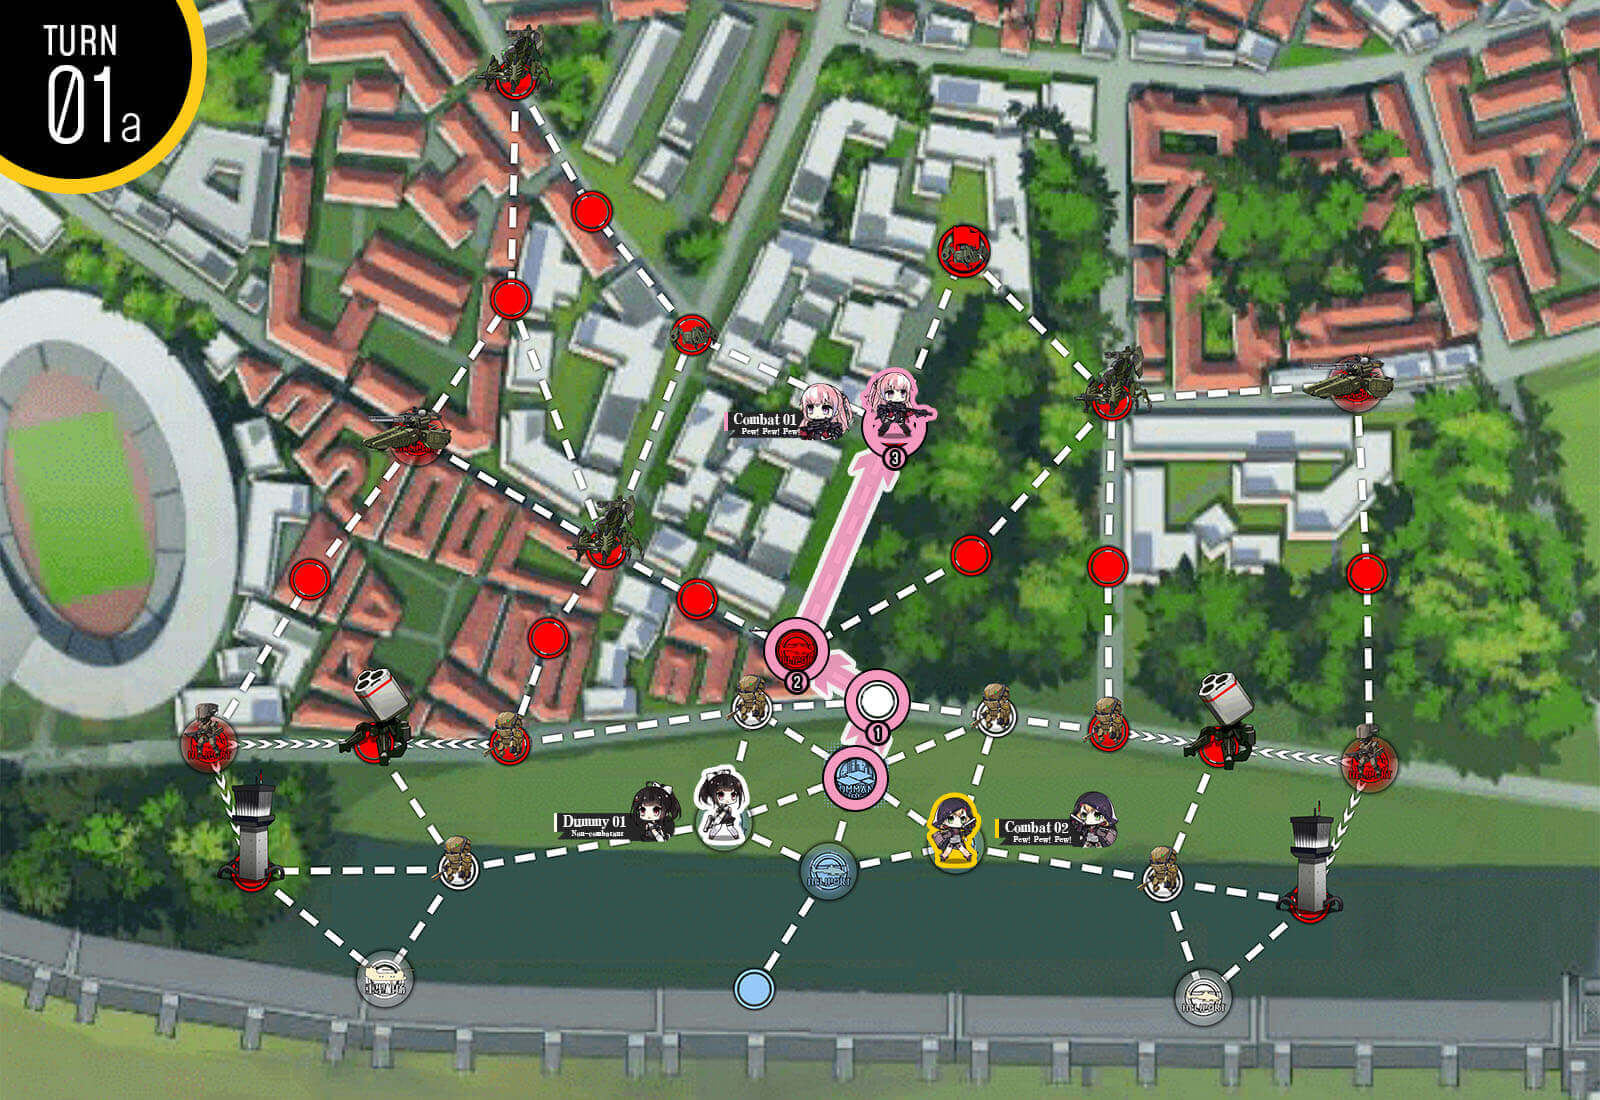
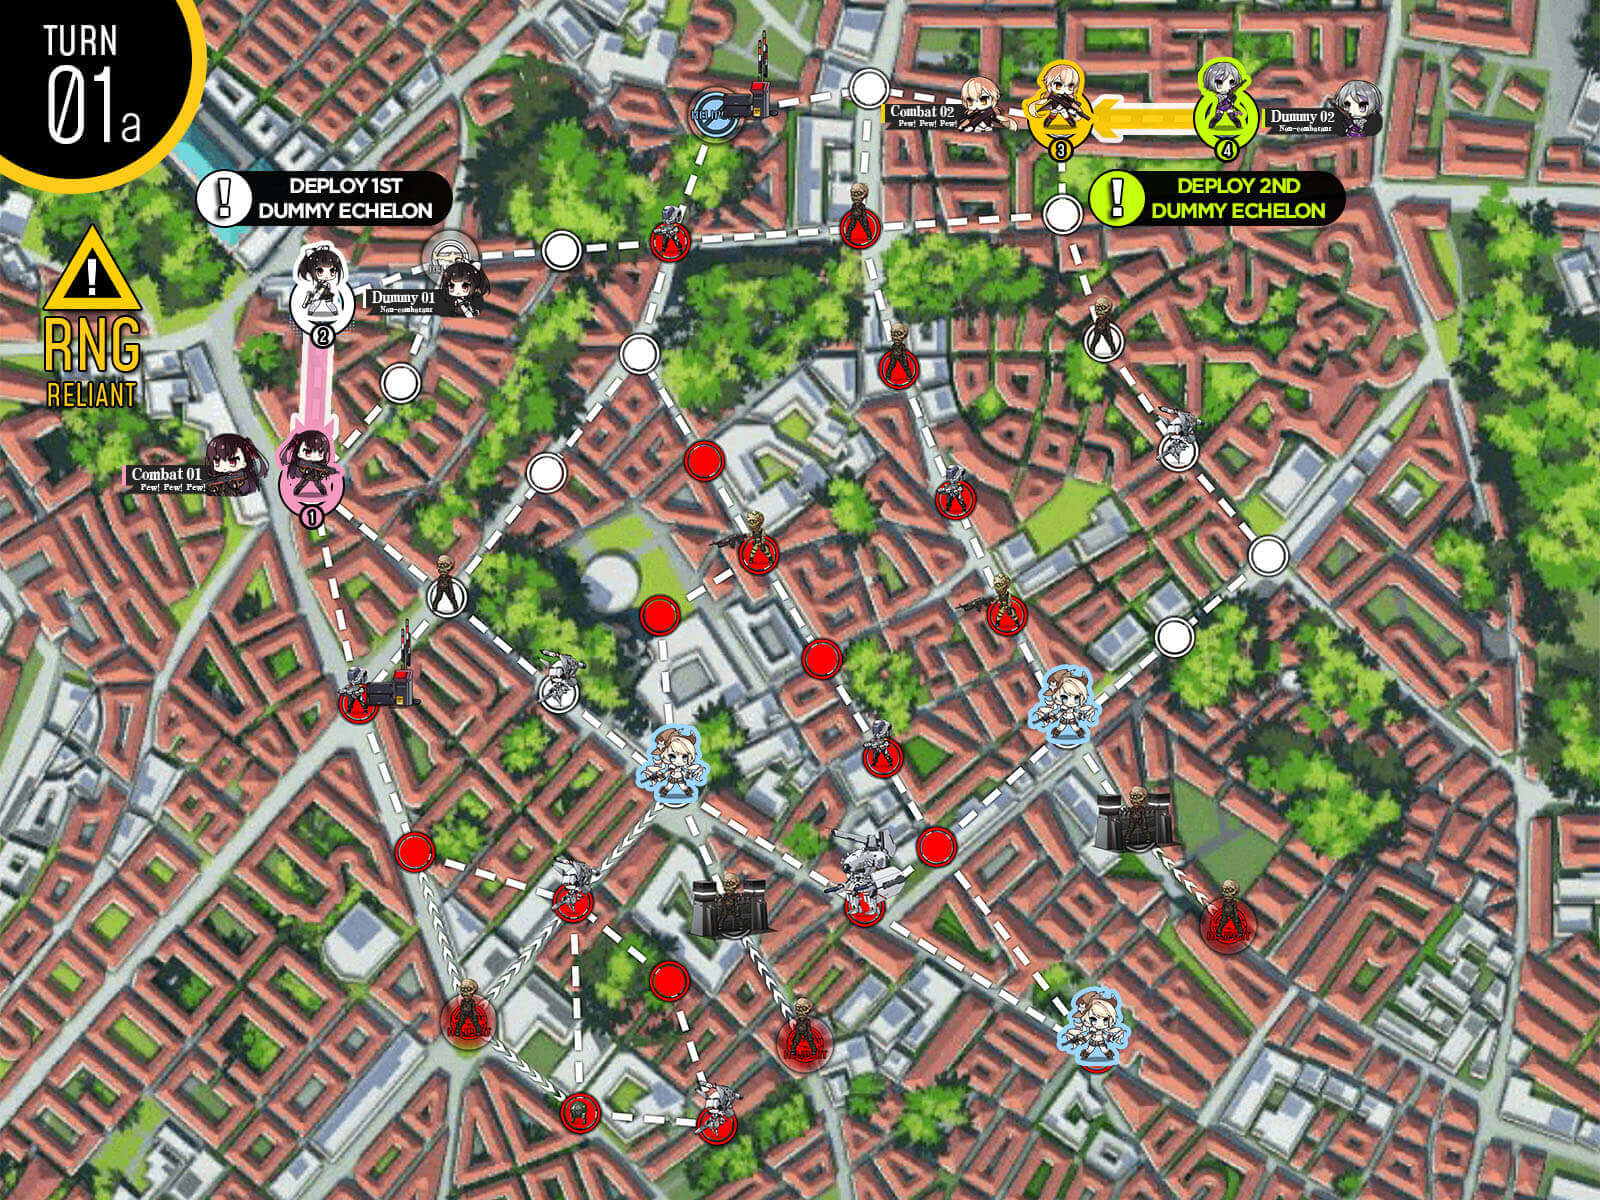
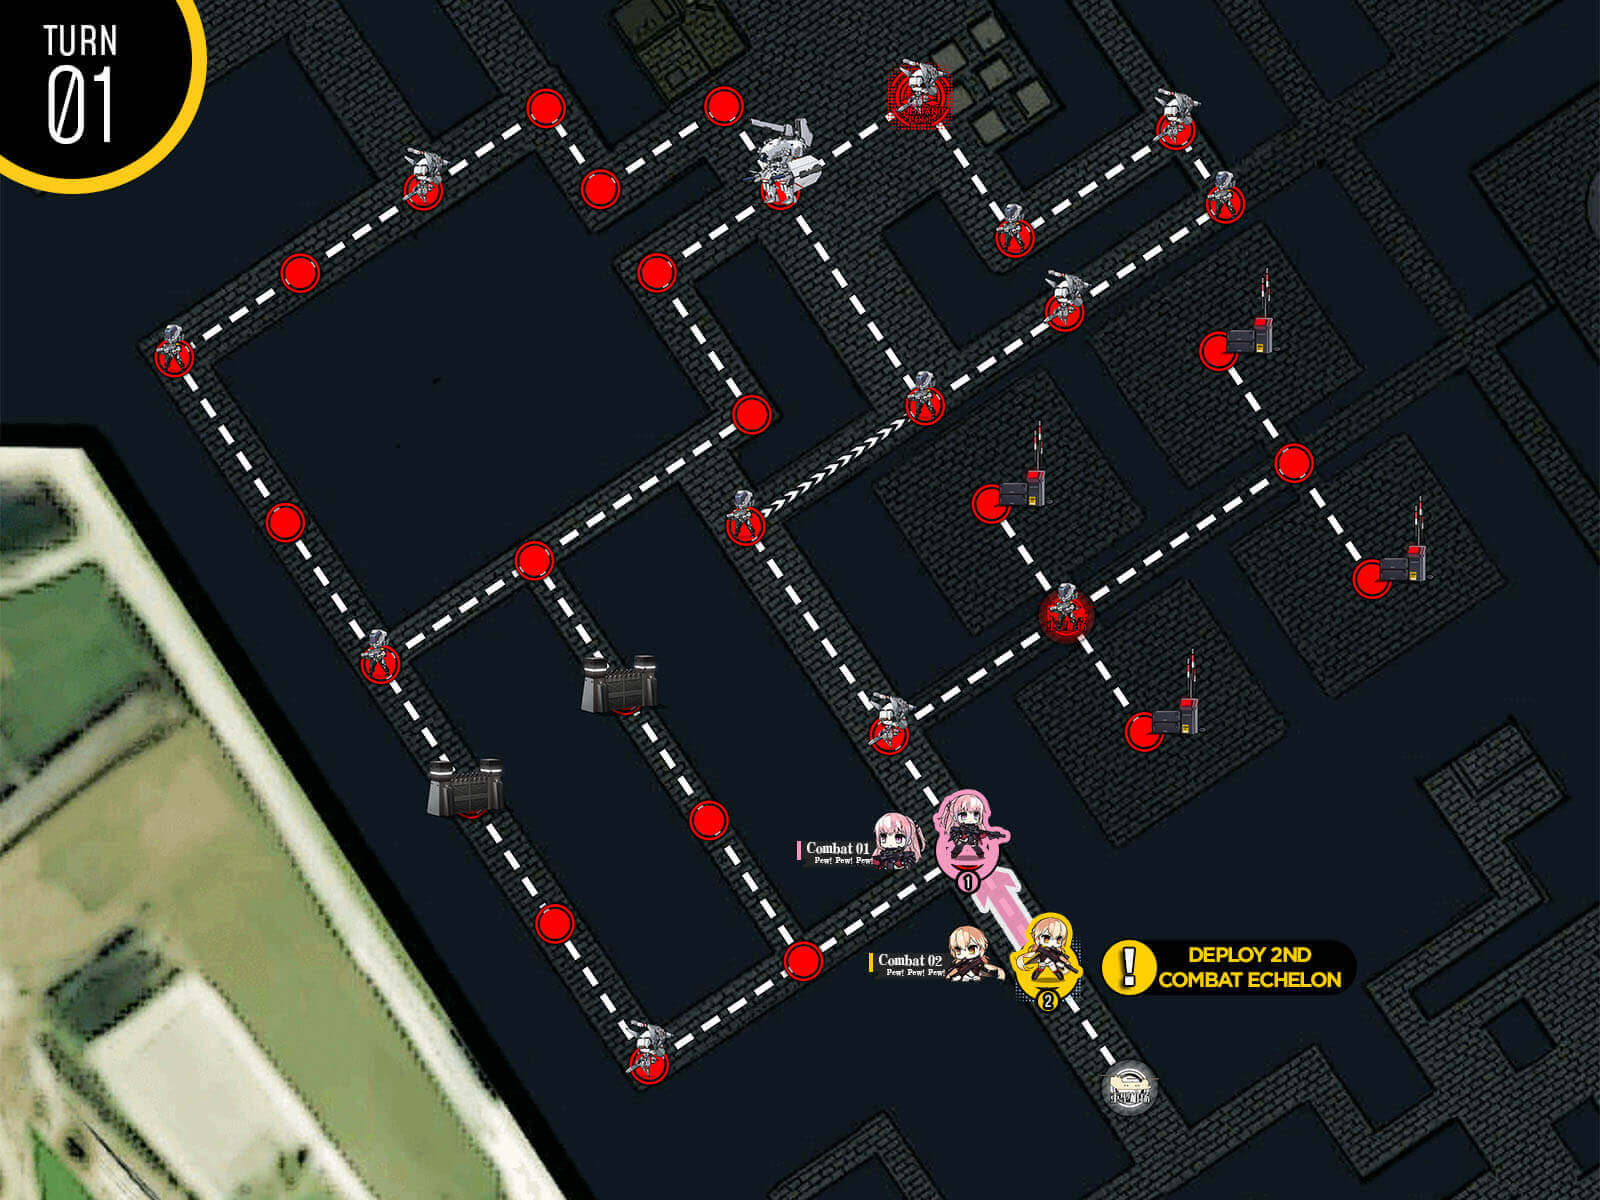
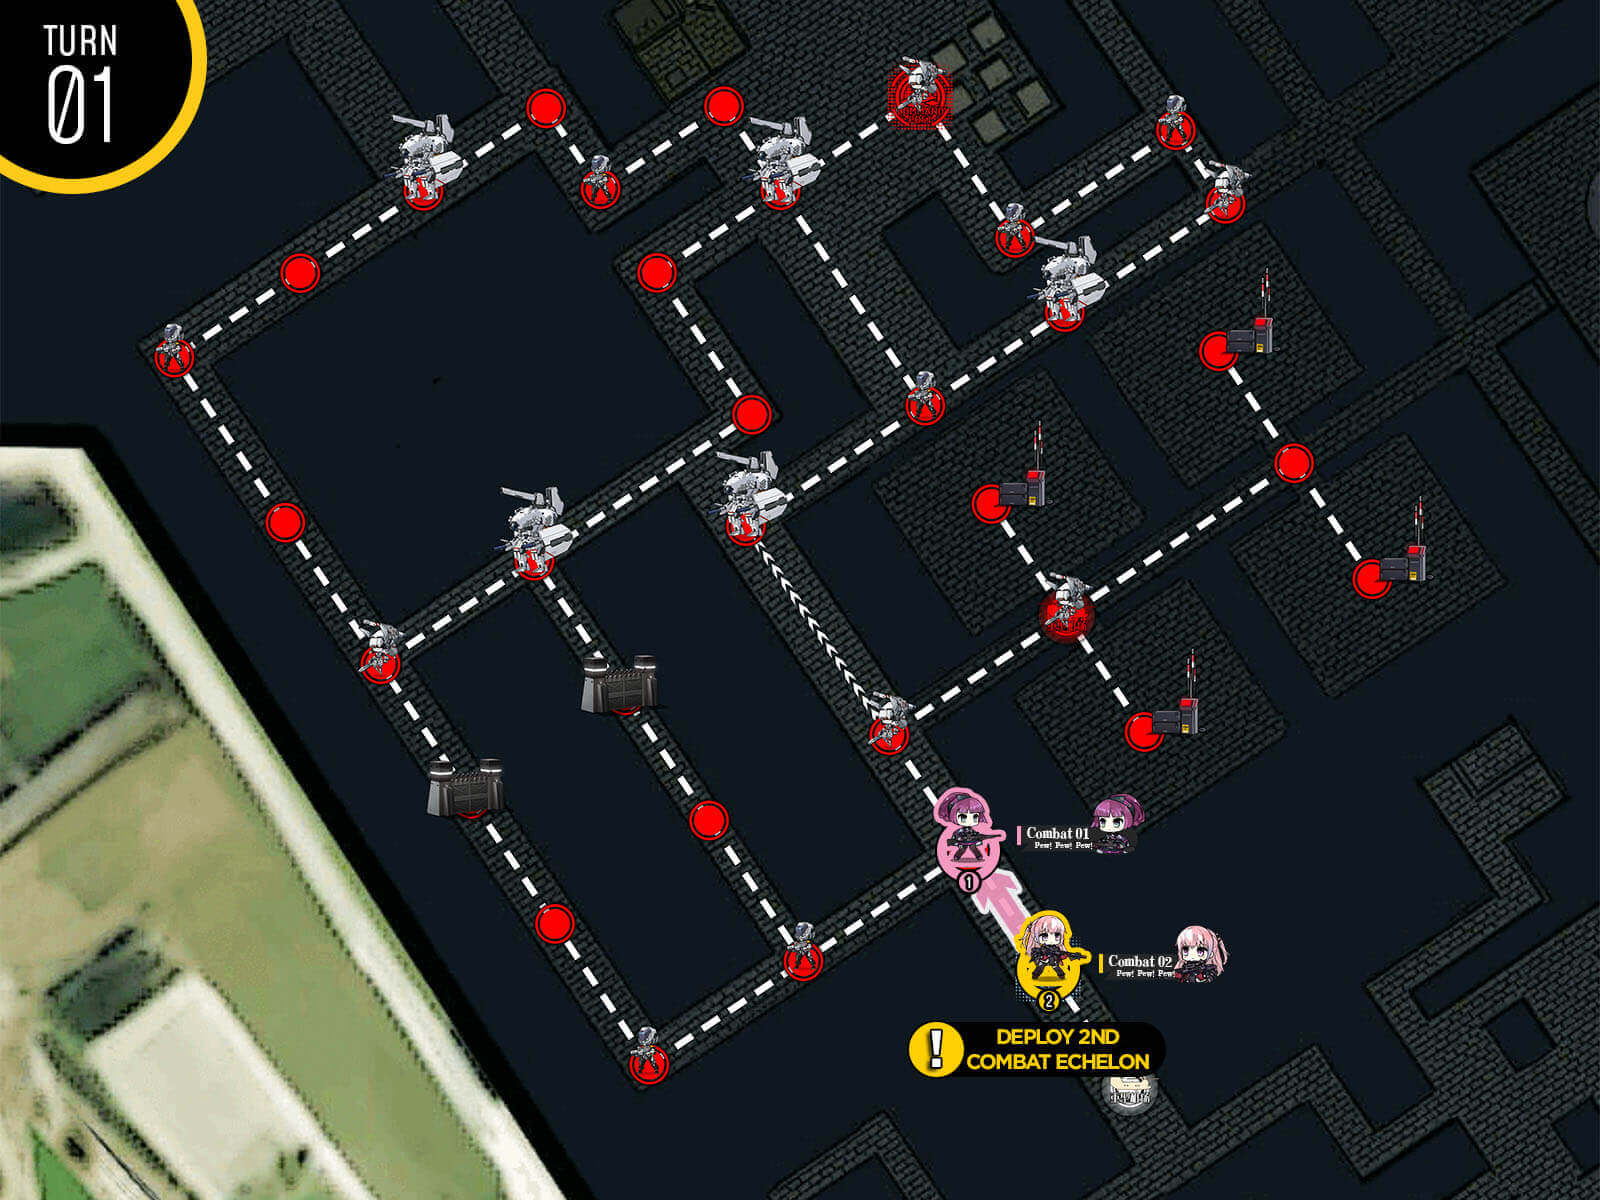
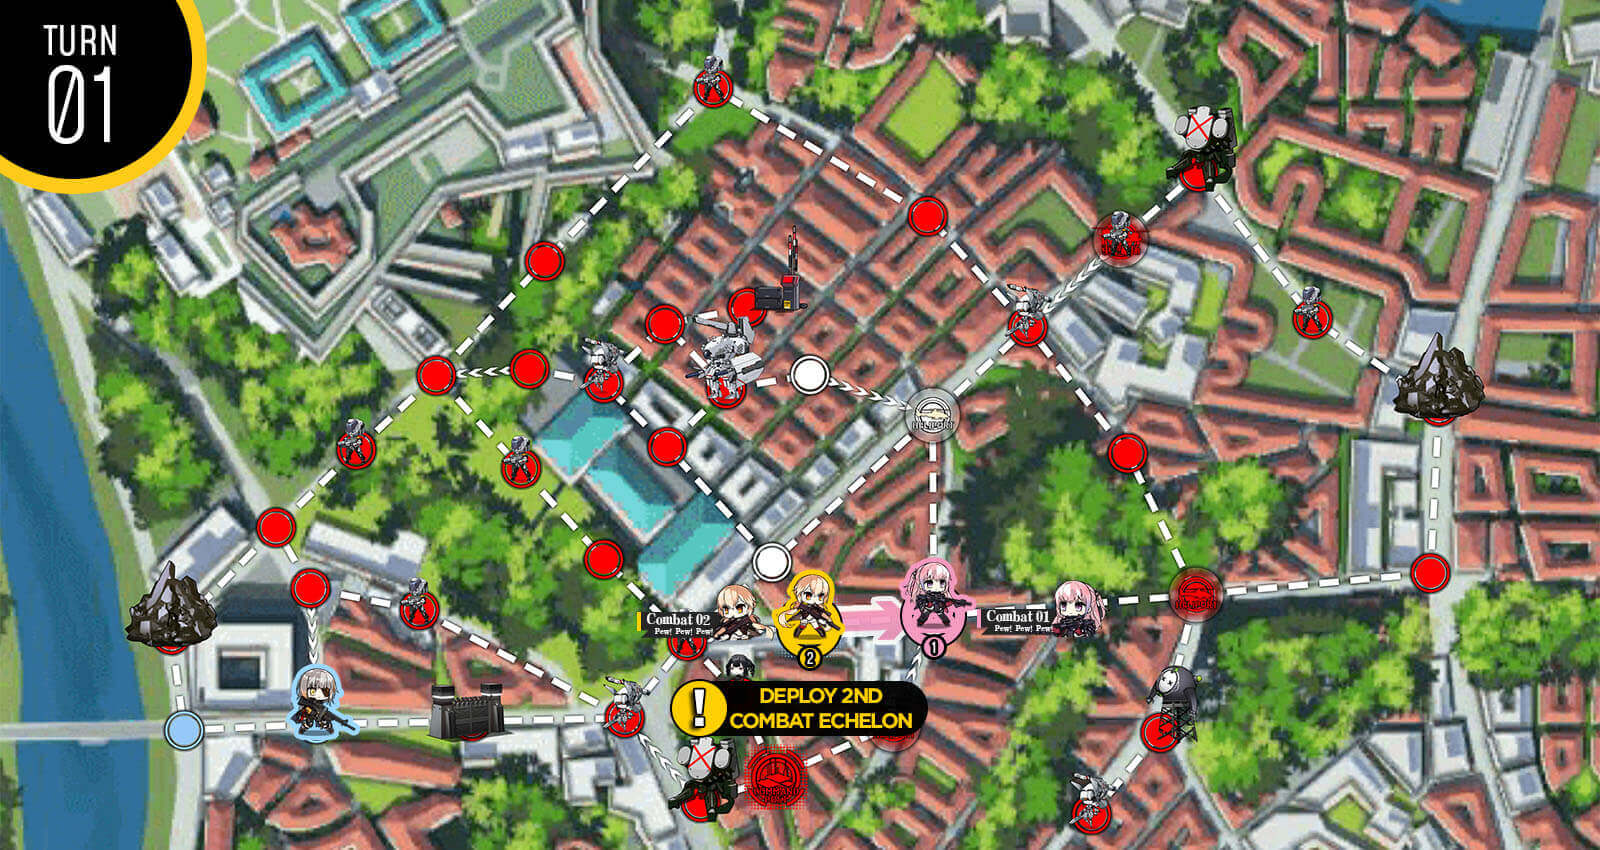
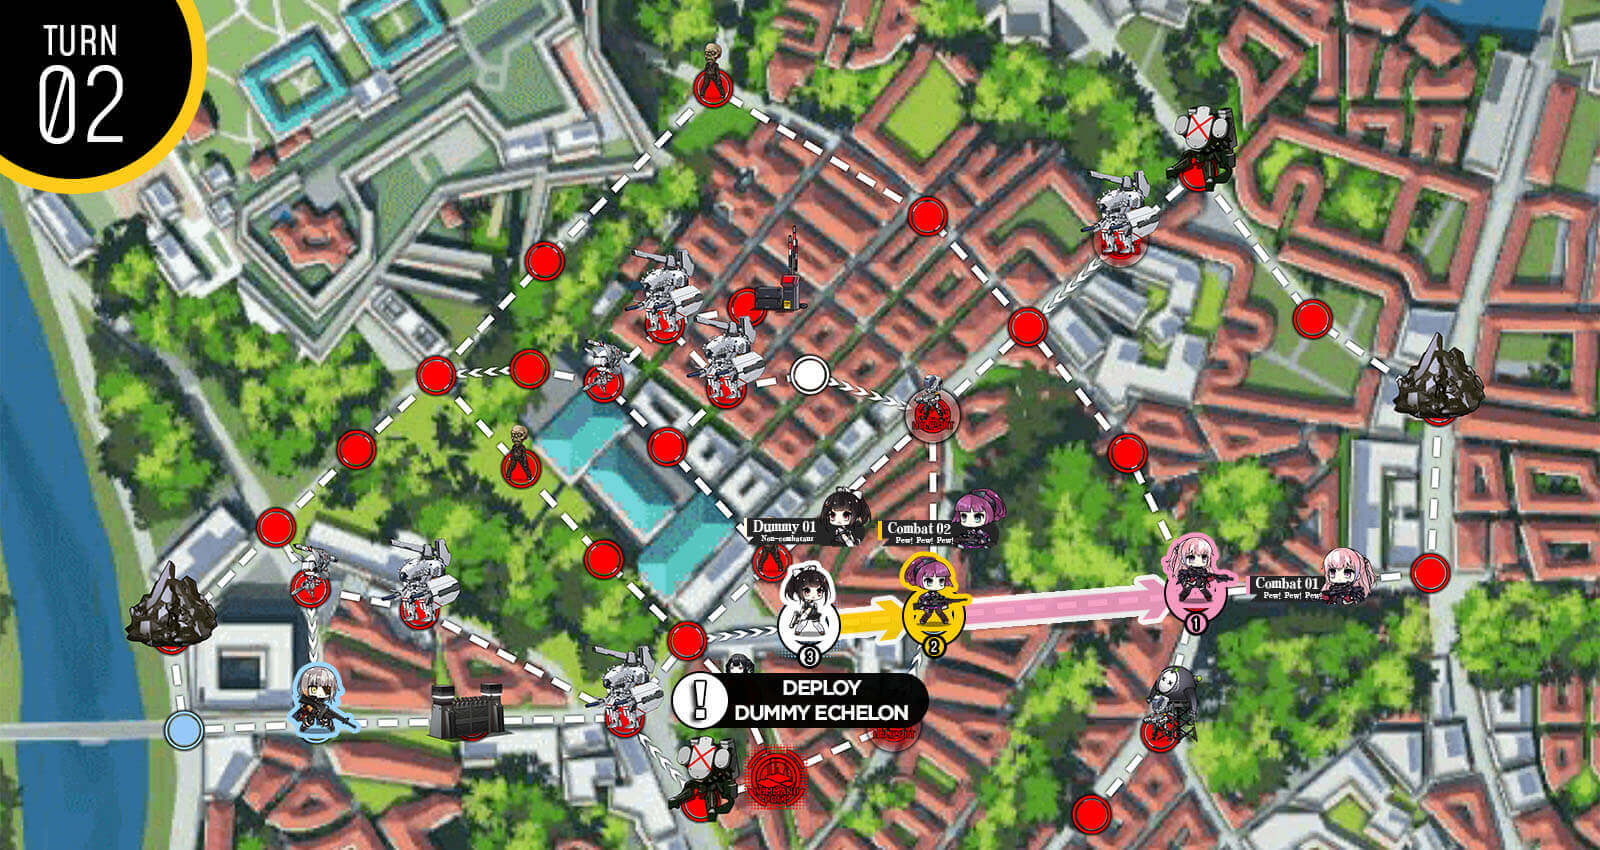
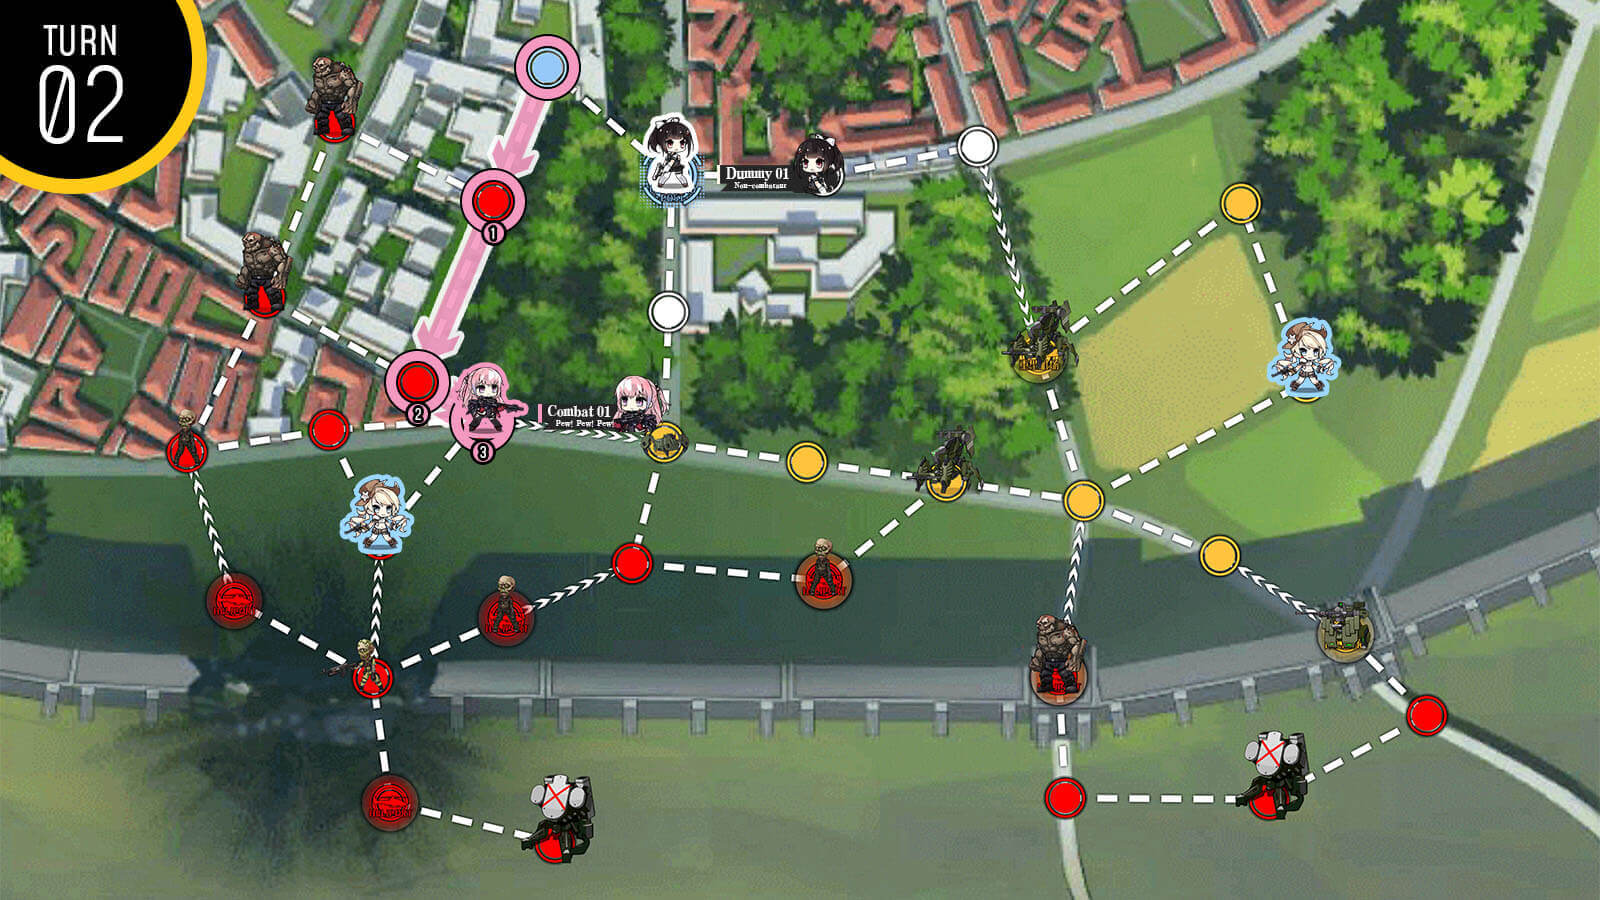
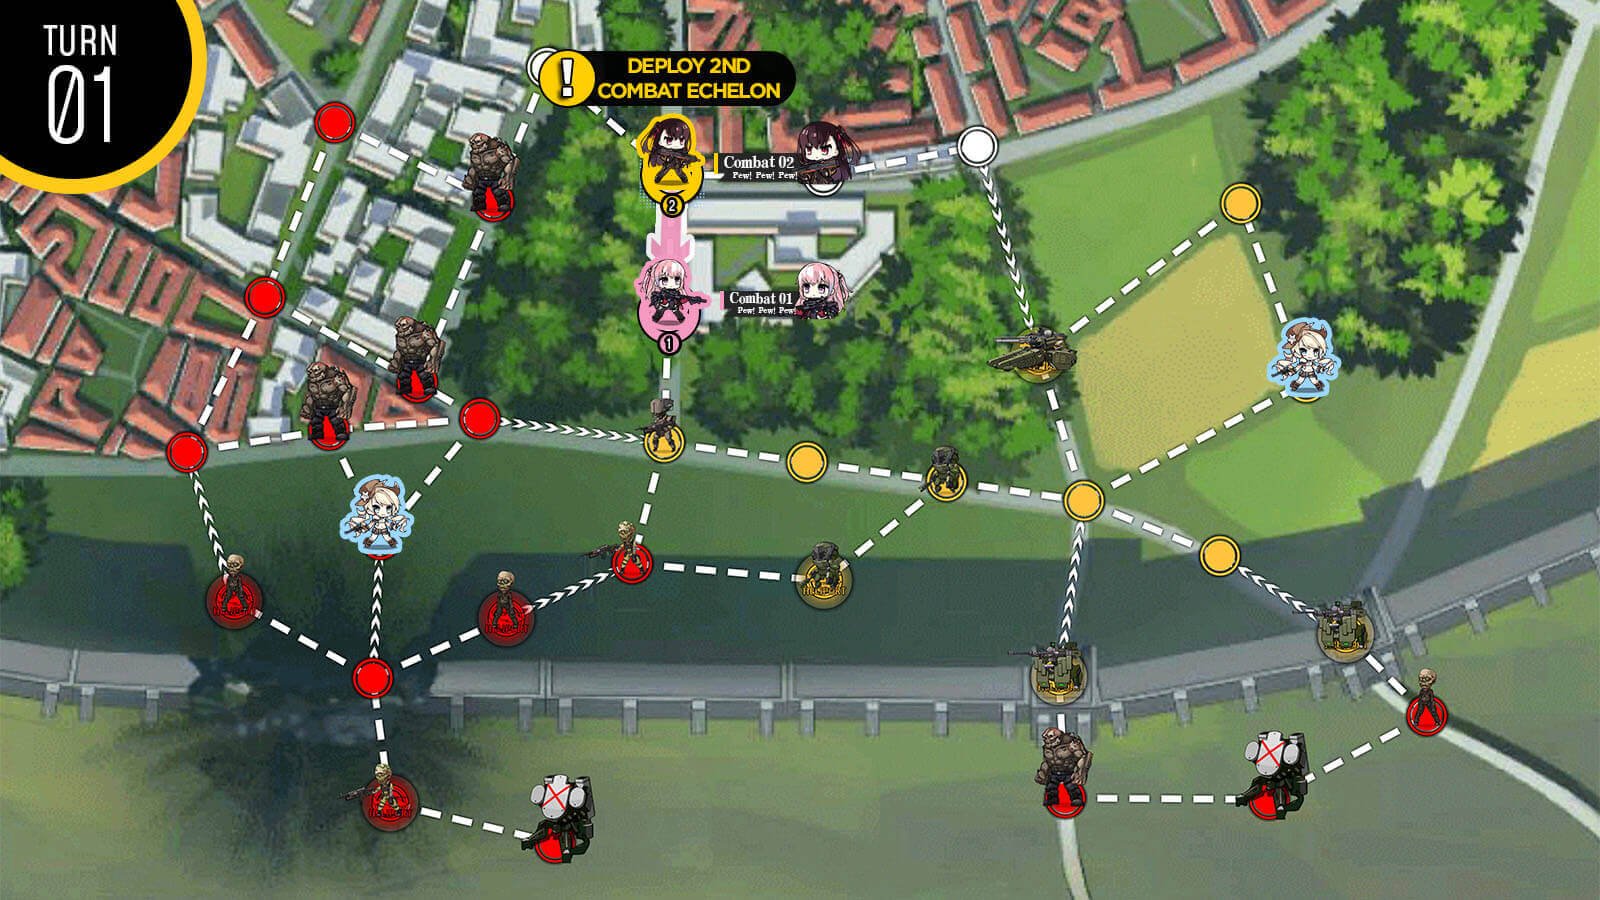
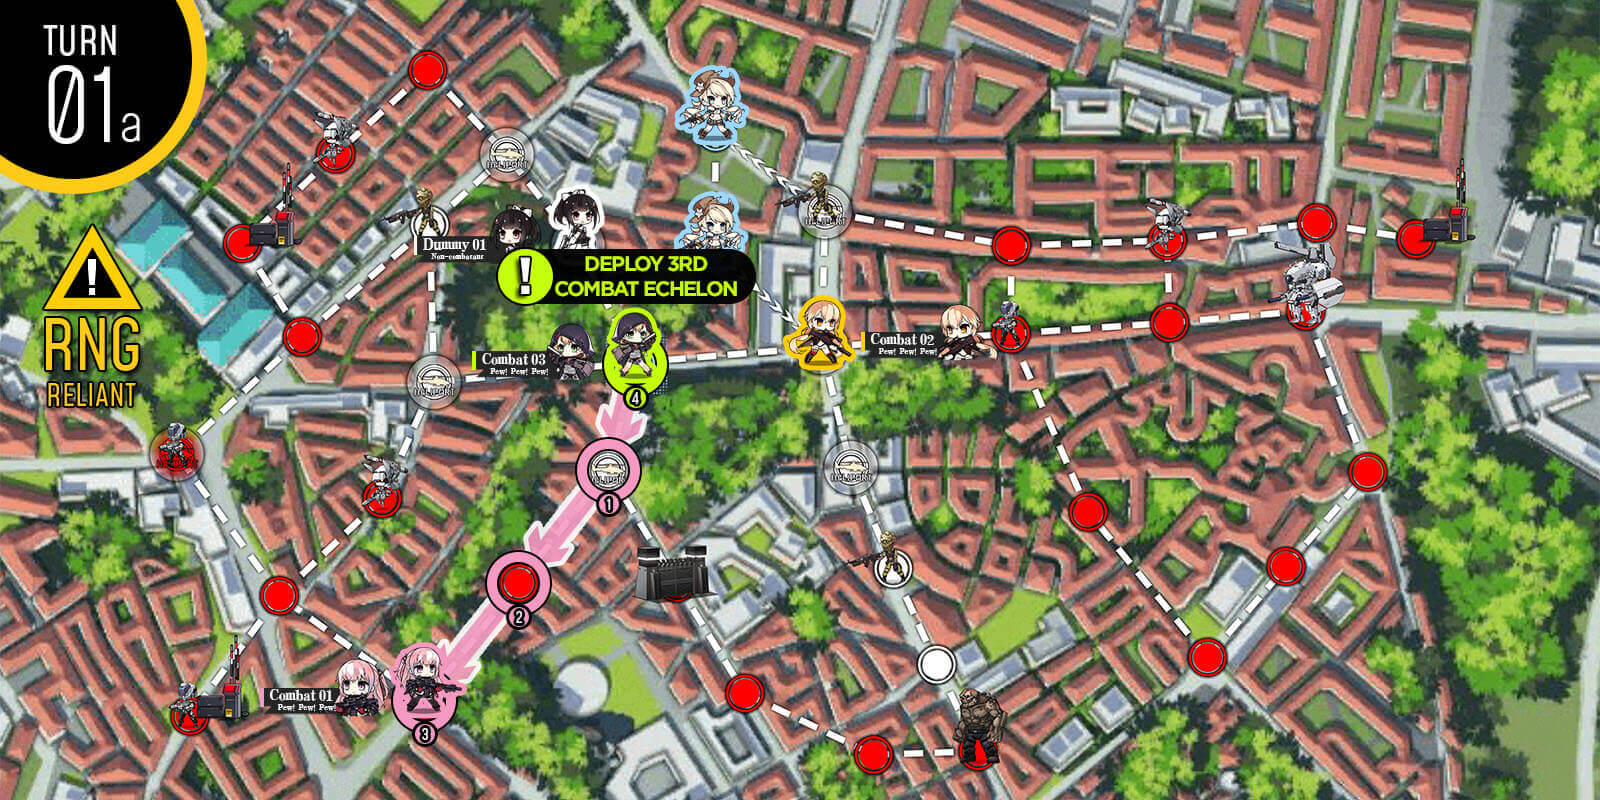
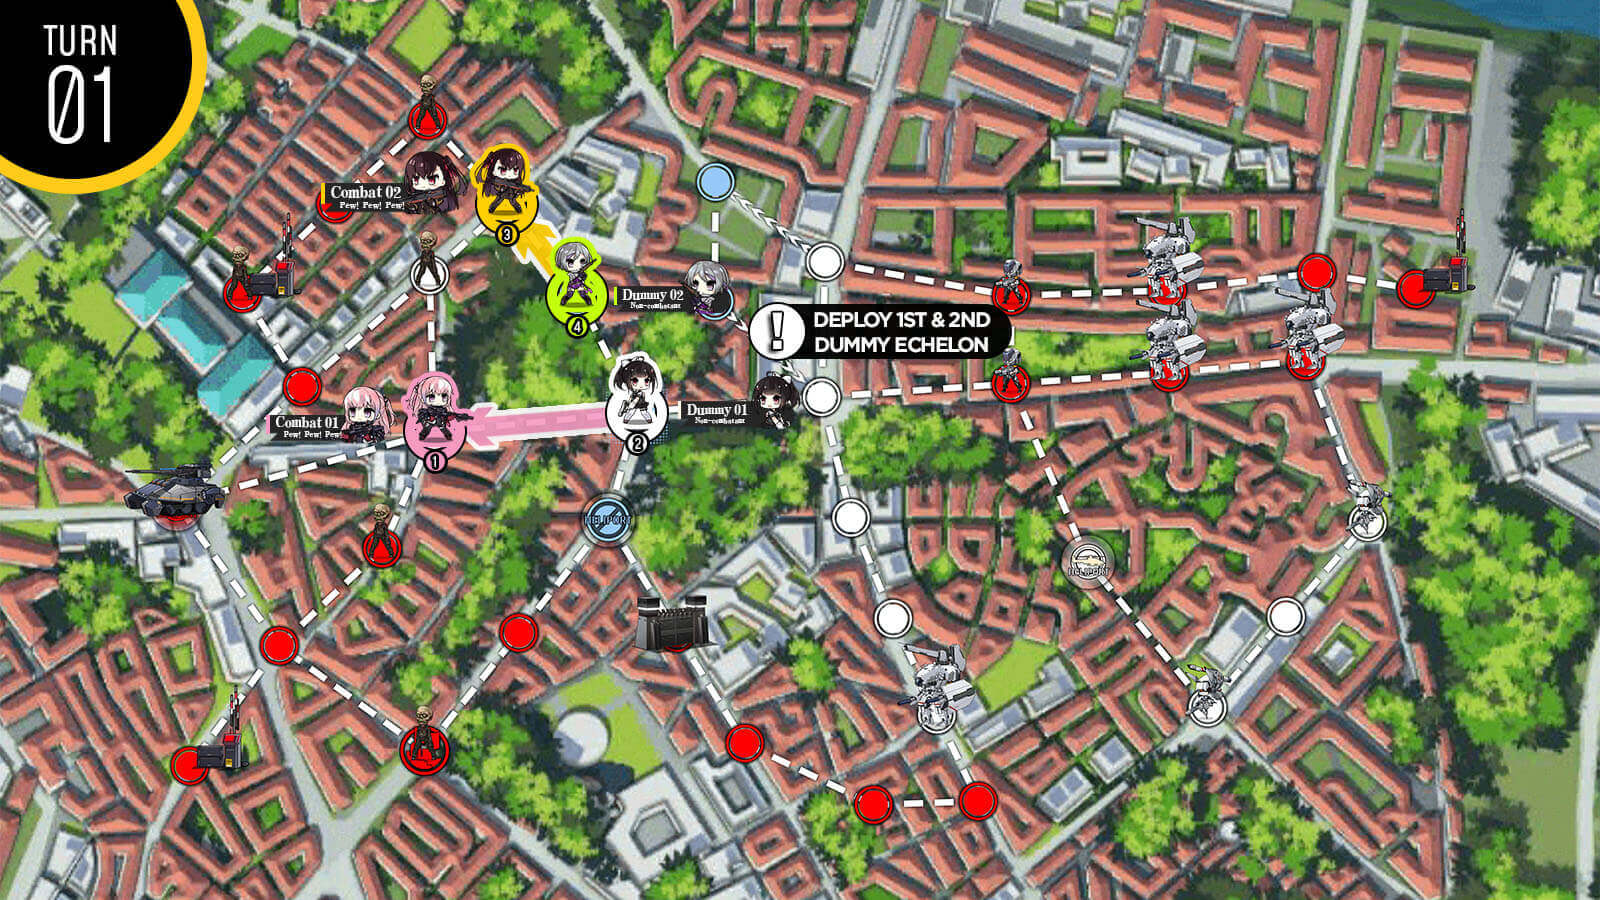
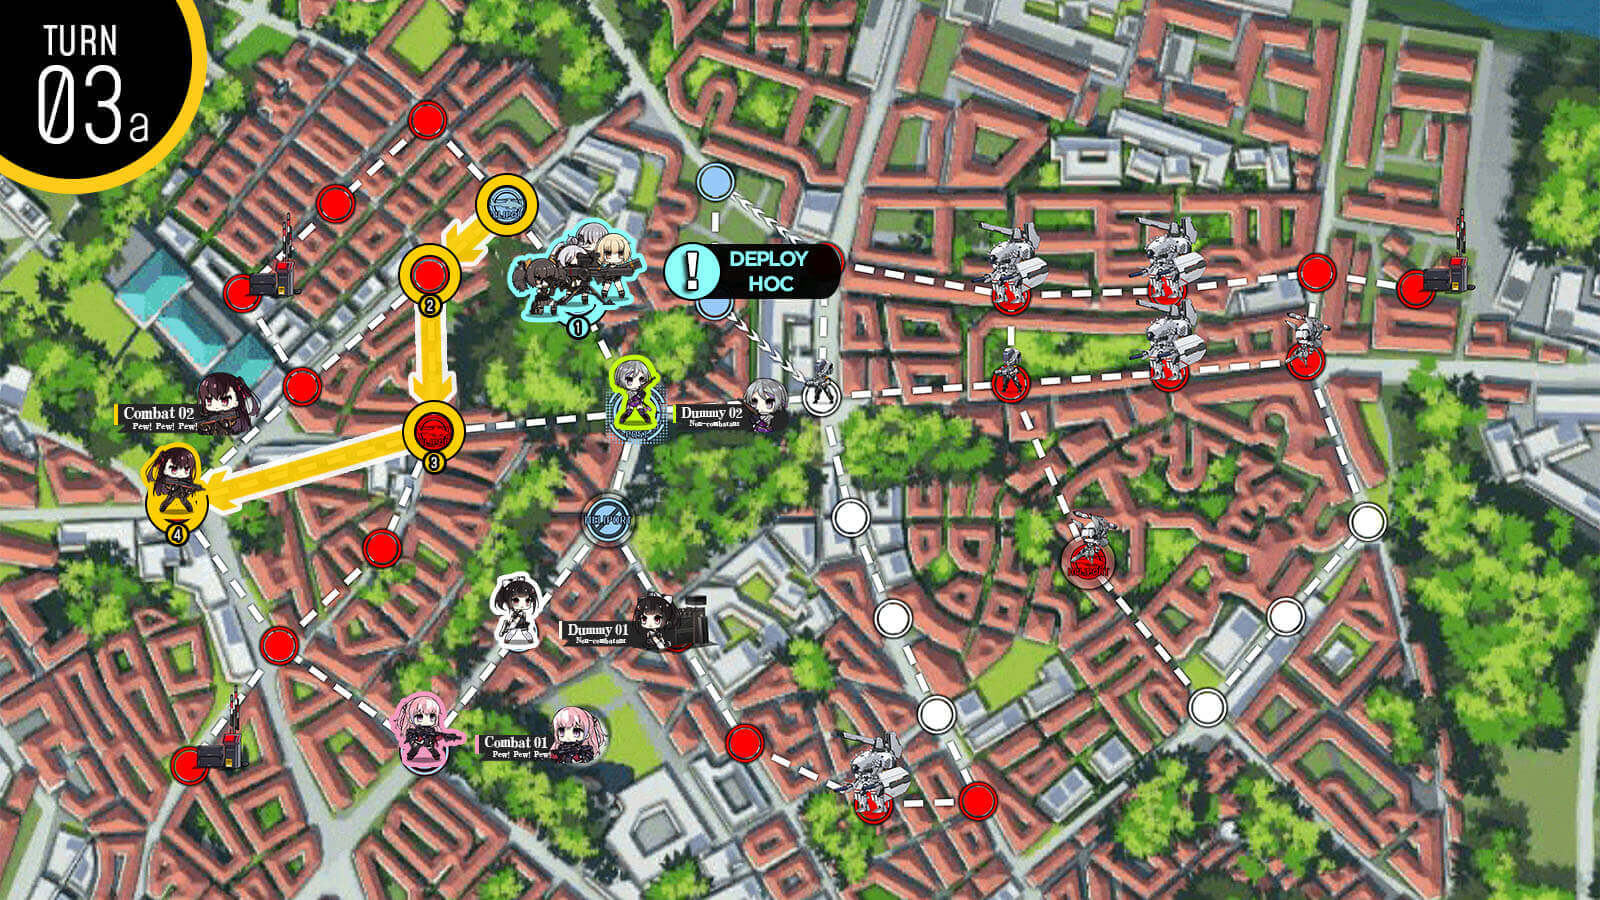
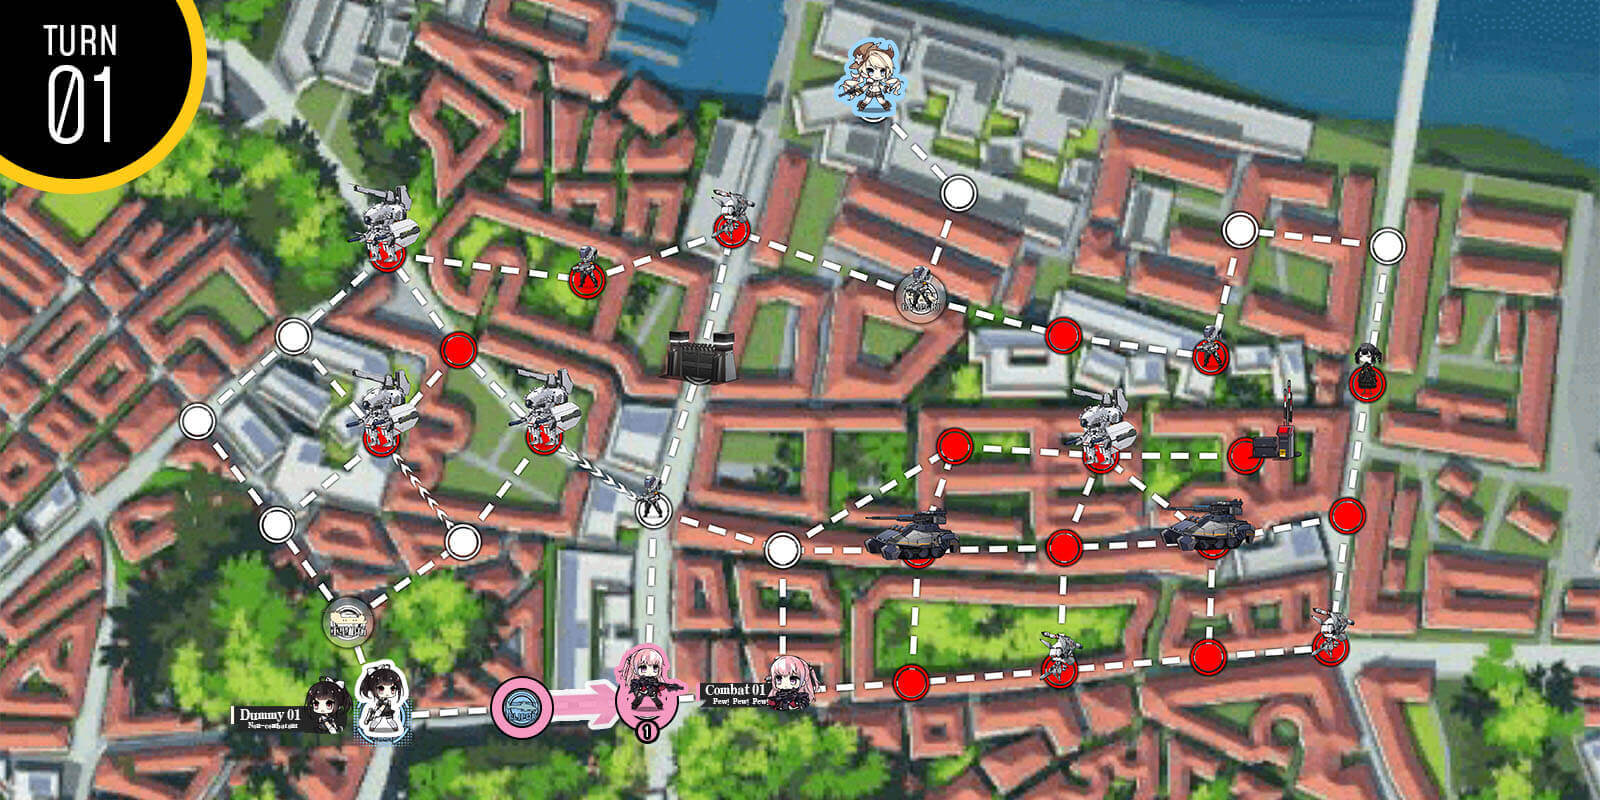
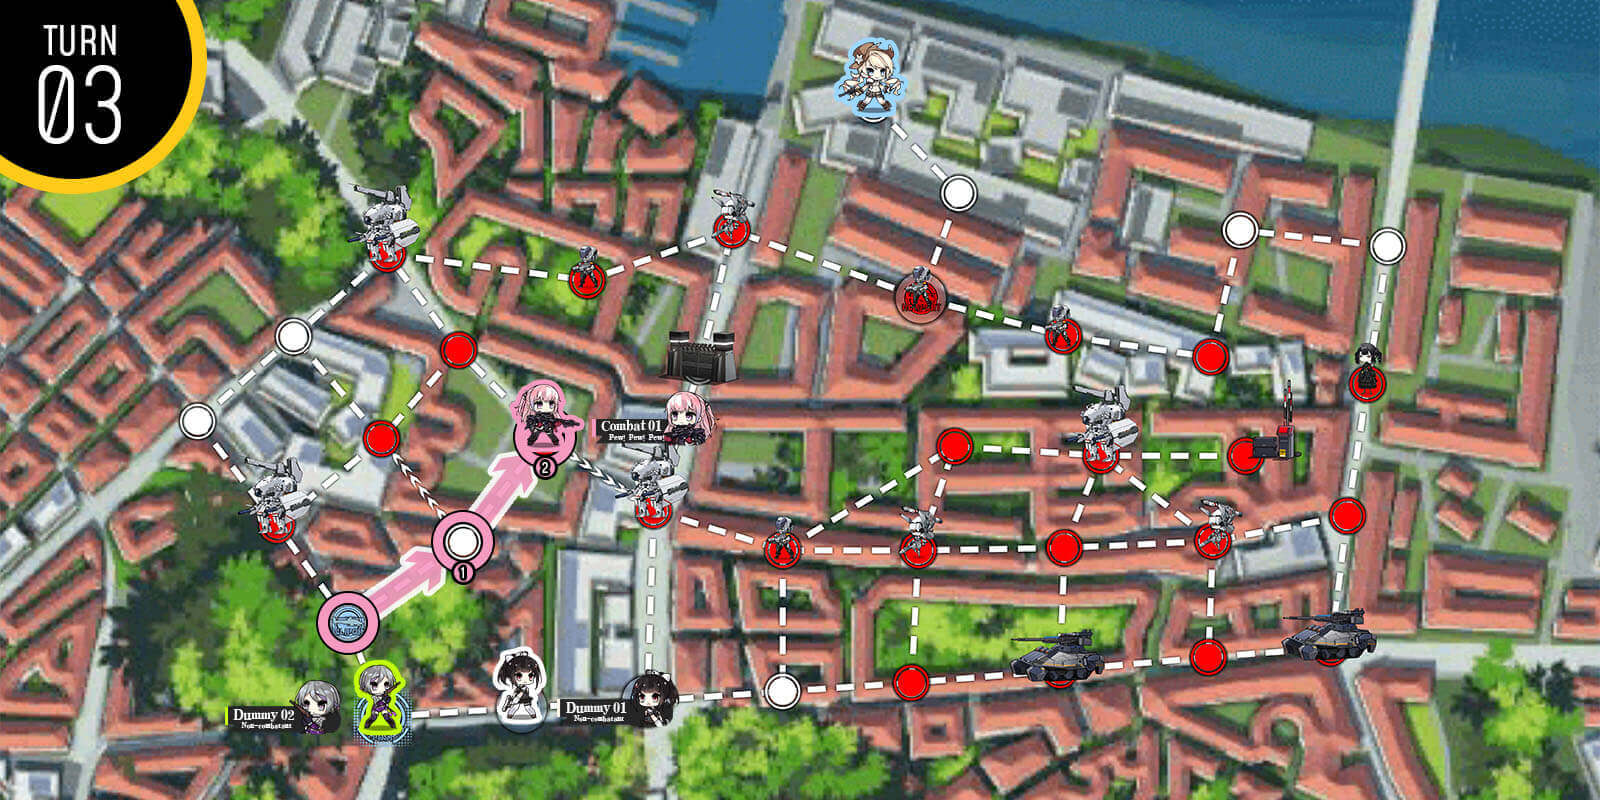
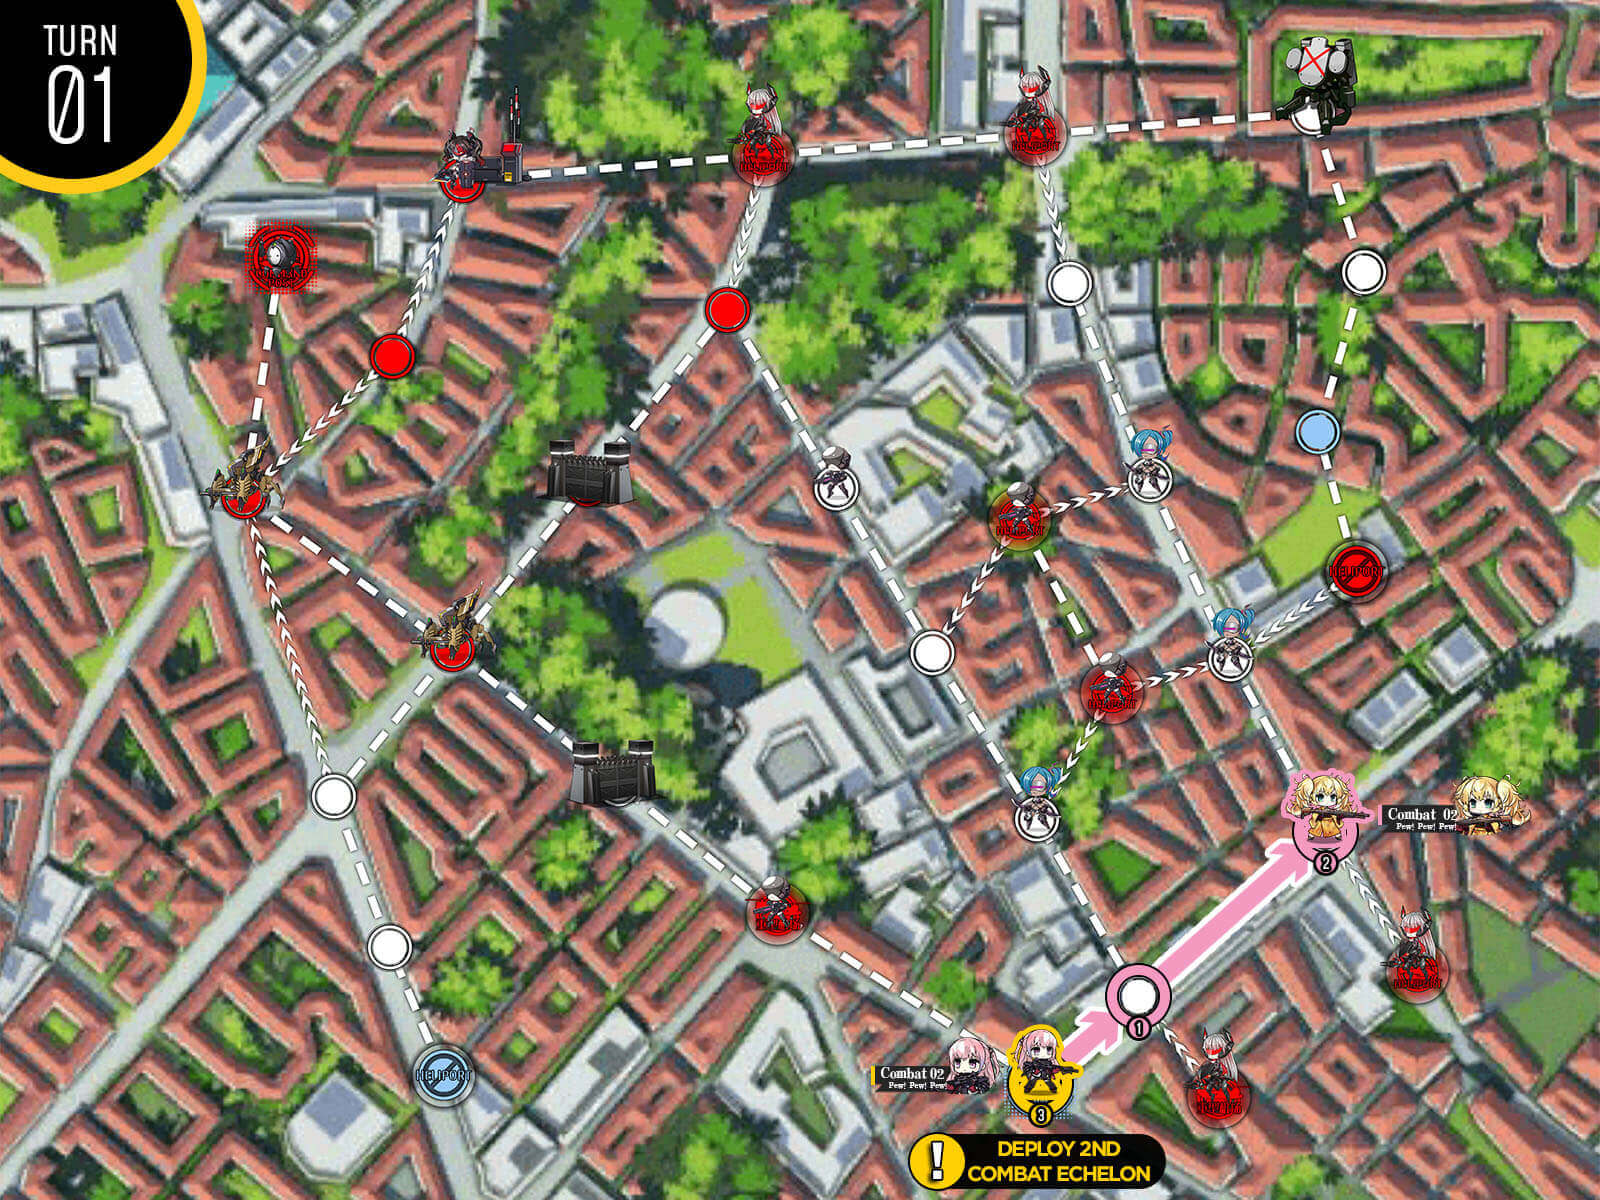
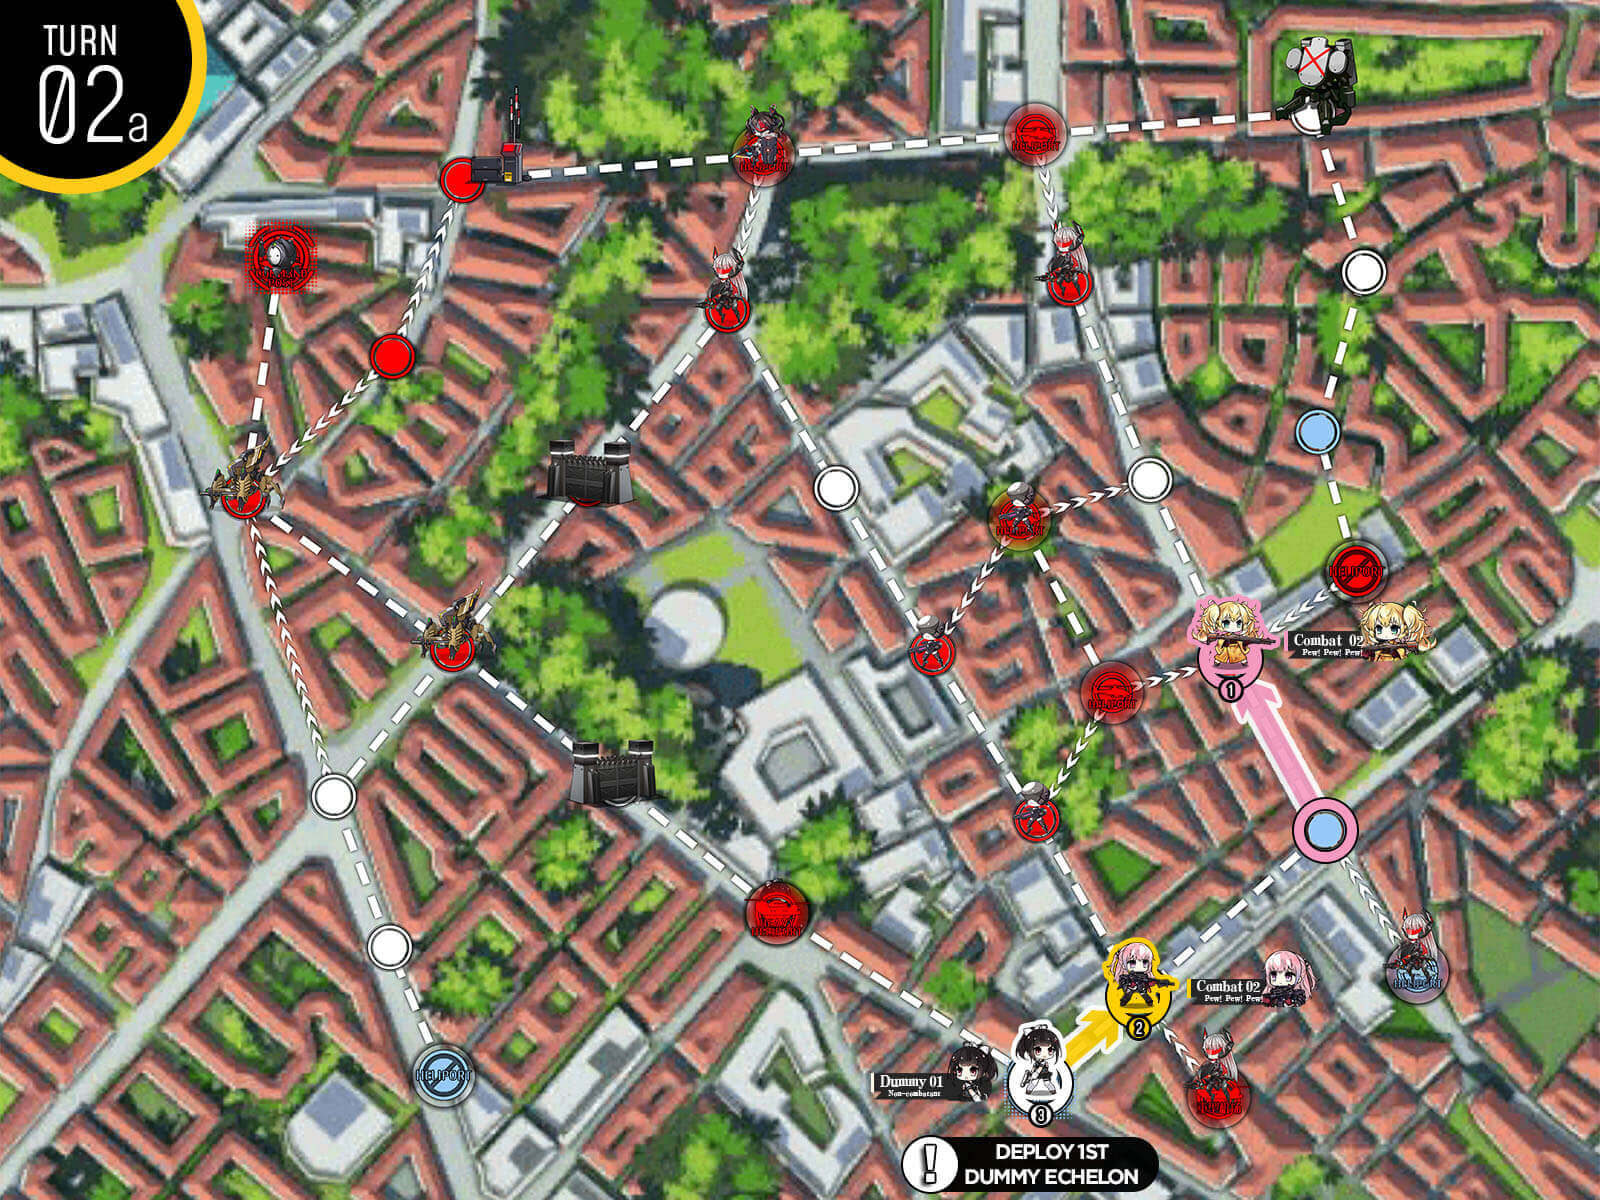
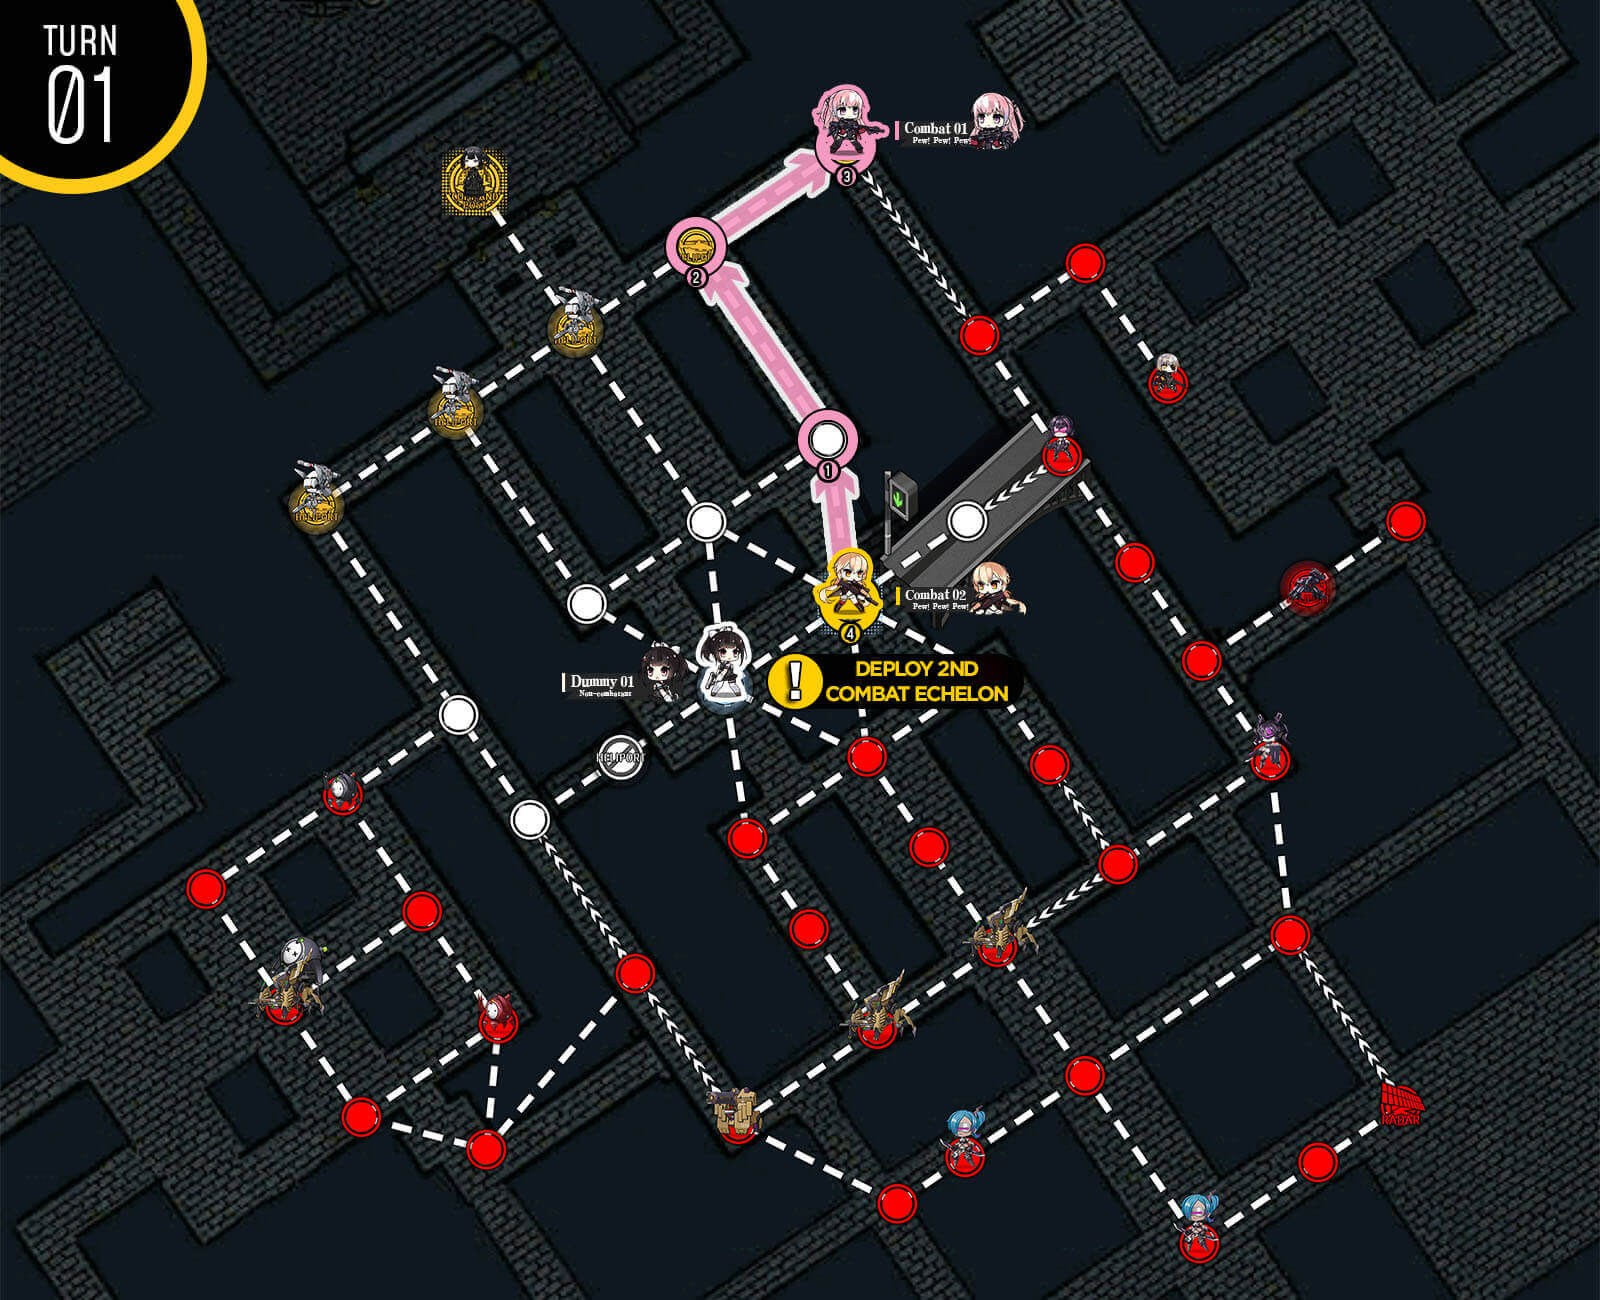
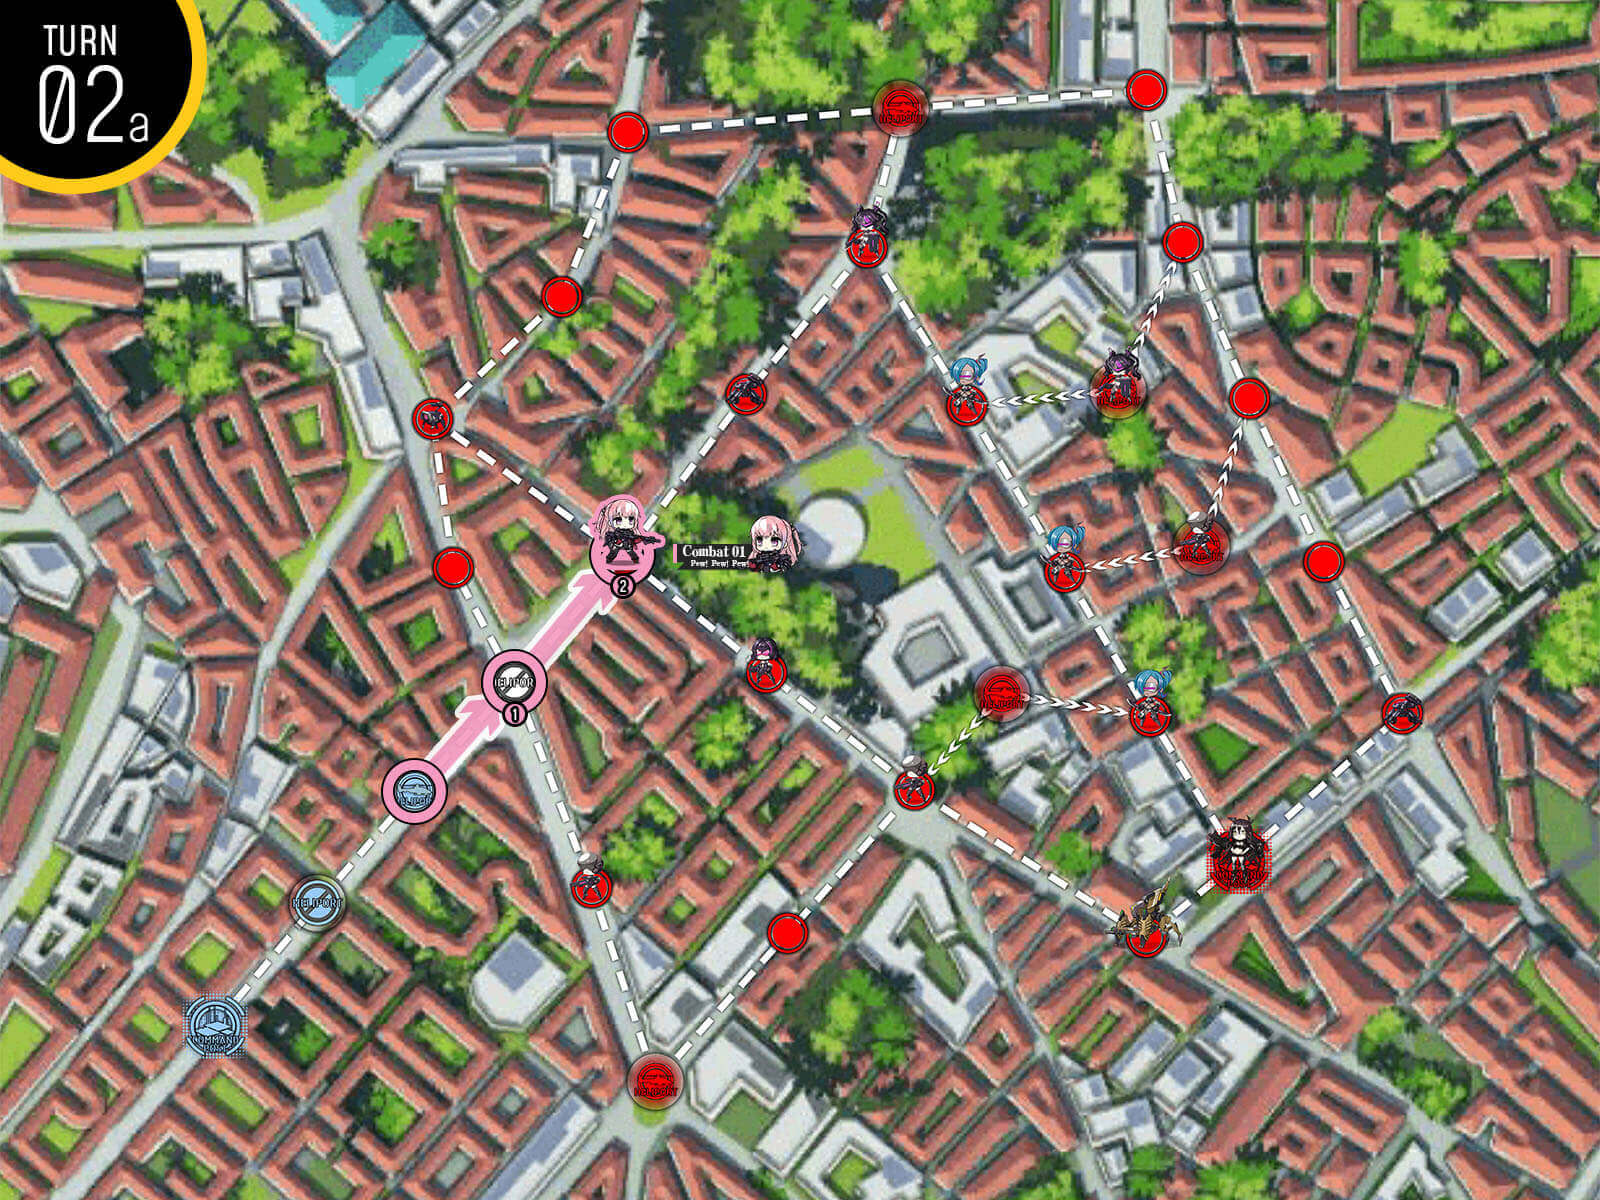
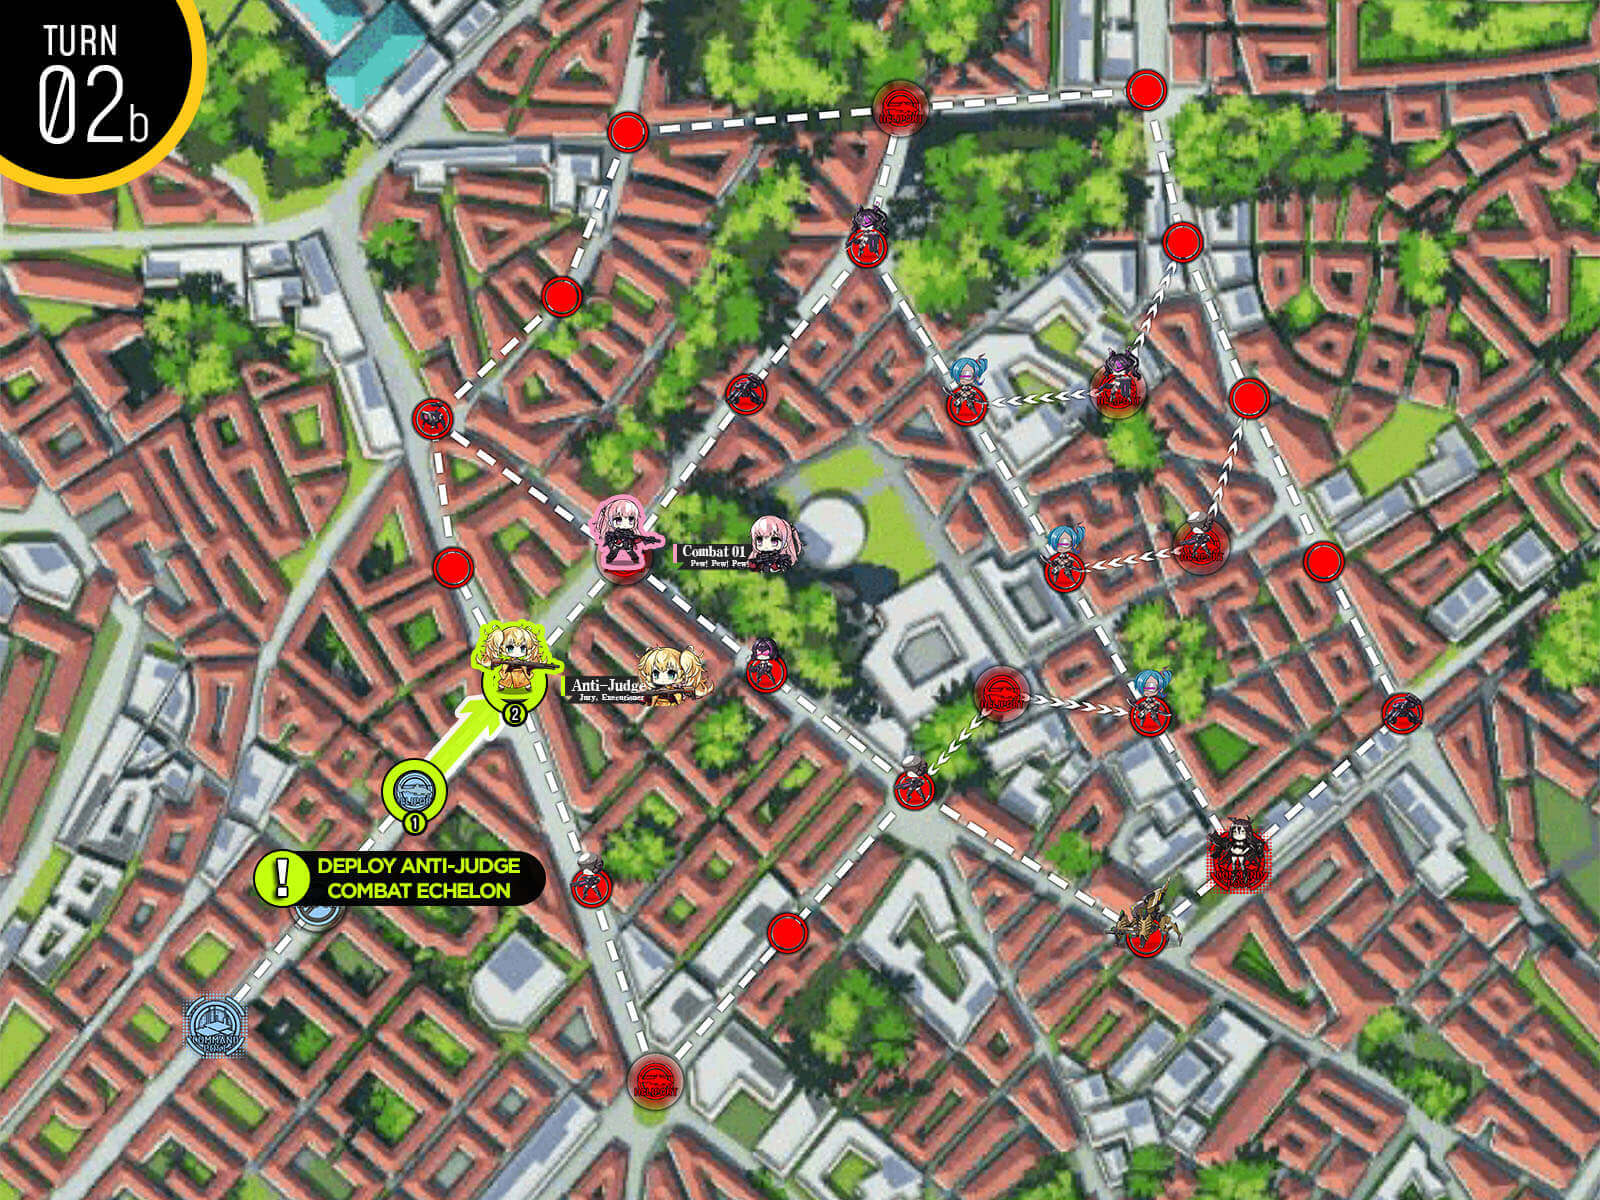
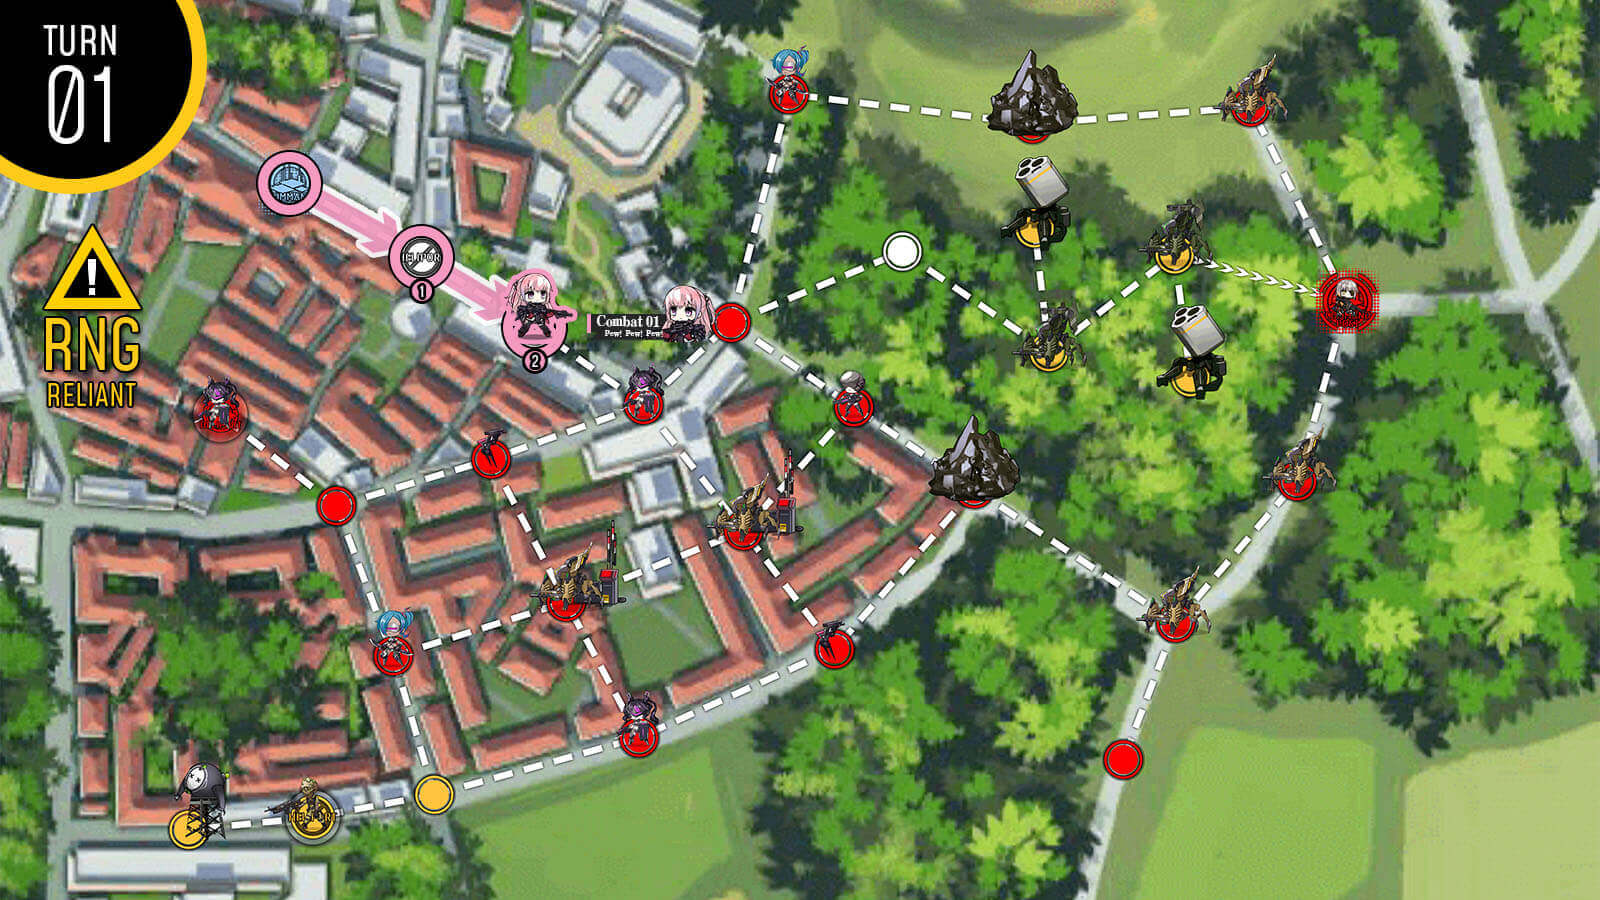
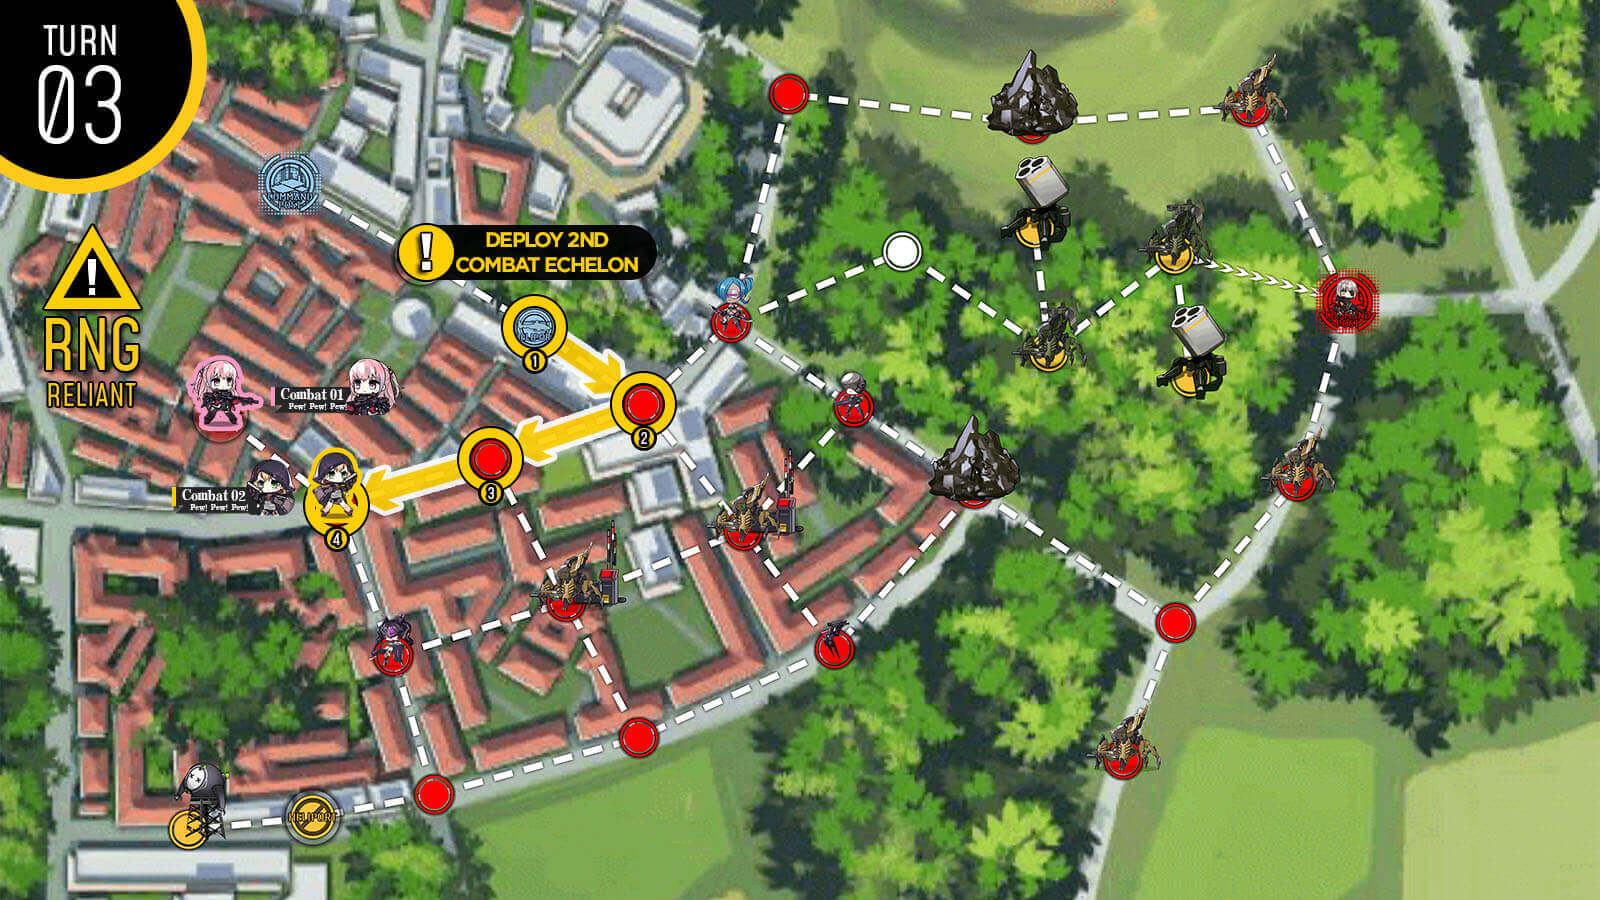
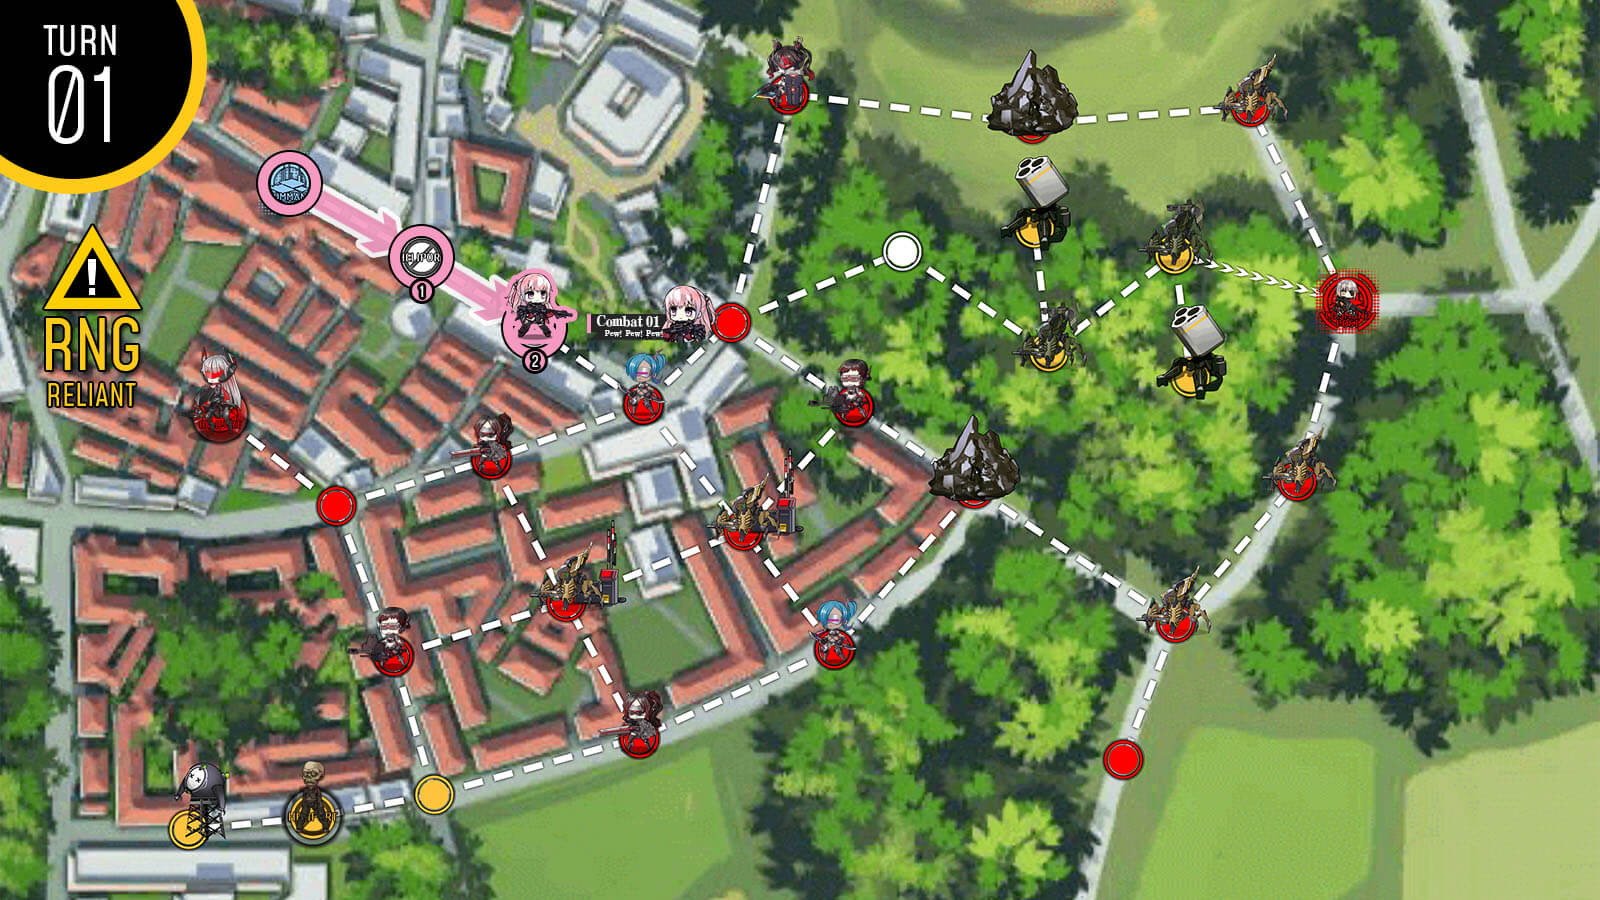
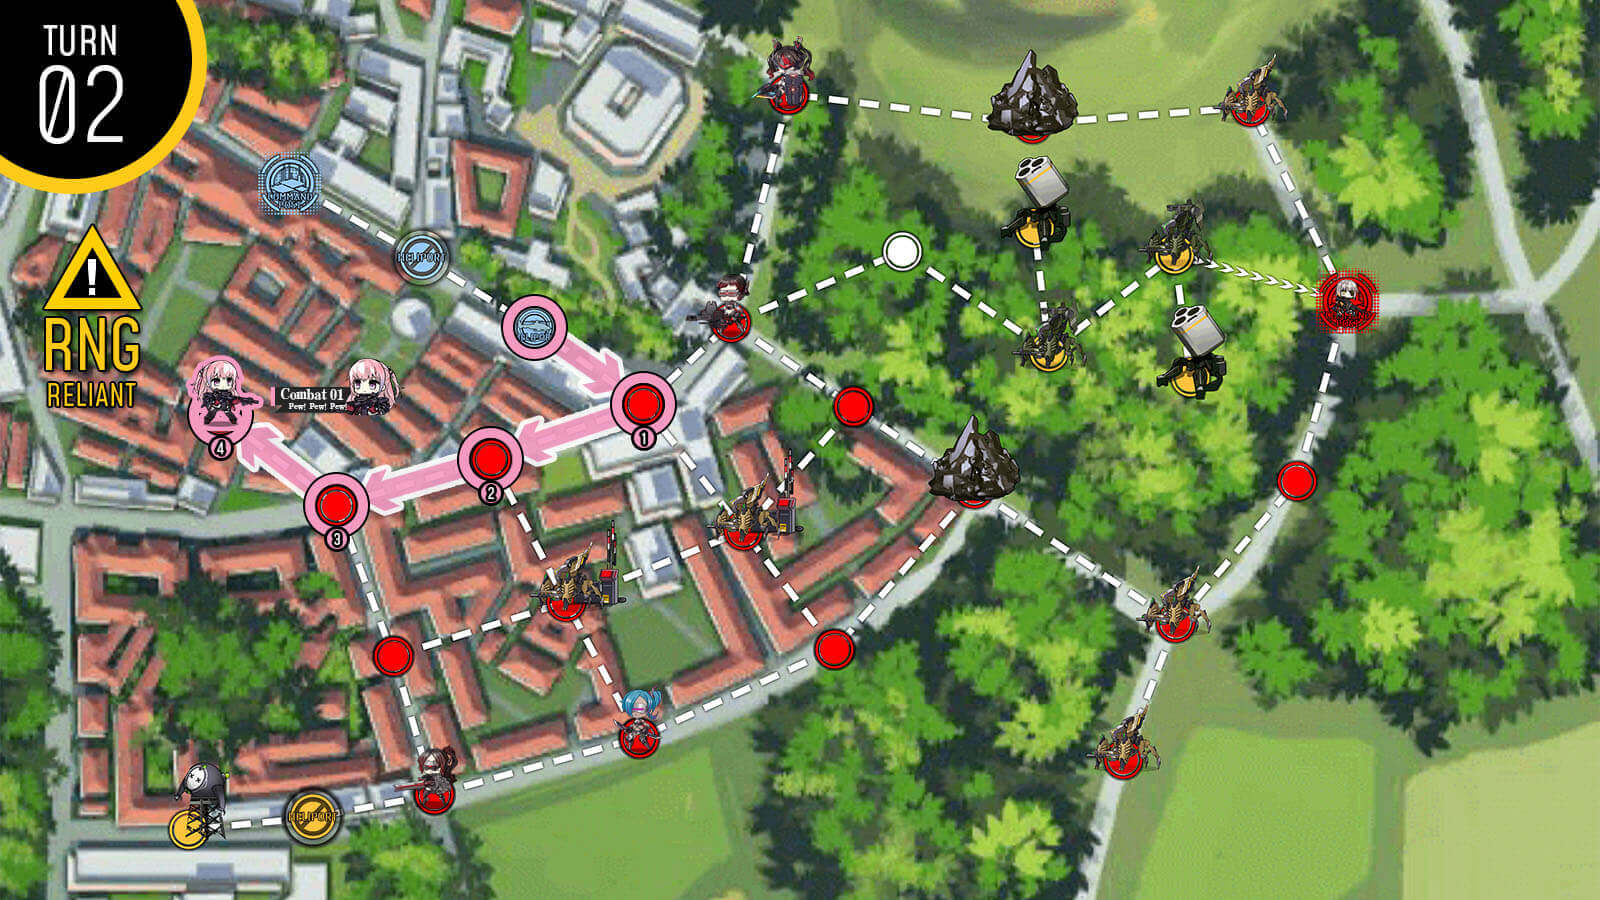
This requires 2 combat echelons but keep in mind that enemy levels are still relatively low and you can deploy an ARSMG echelon at level 40 and 3x links and you will be fine. Deploy combat echelons on the two helipads to the right of the HQ then dummy on the HQ. Combat echelon on the top helipad goes to take out the helipad on the left corner to prevent enemy units spawning there every turn. Move combat echelon next to HQ down one and deploy 2nd dummy echelon.
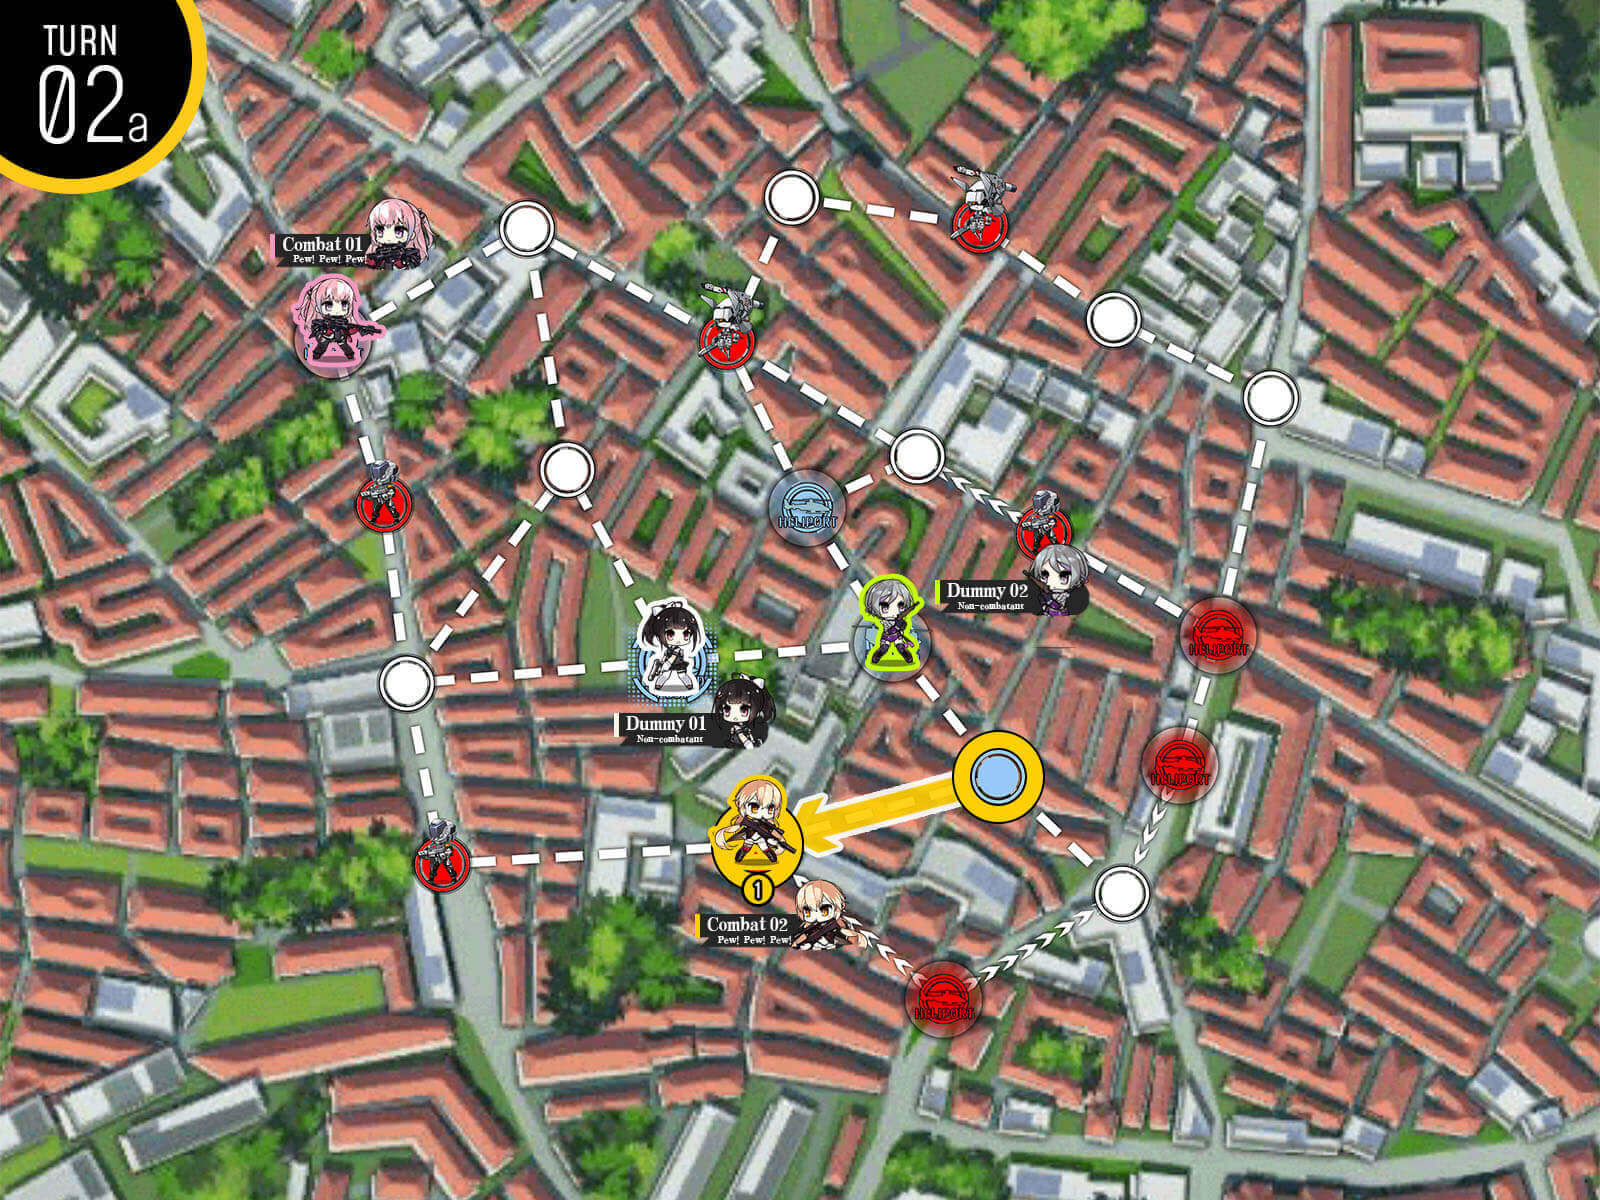
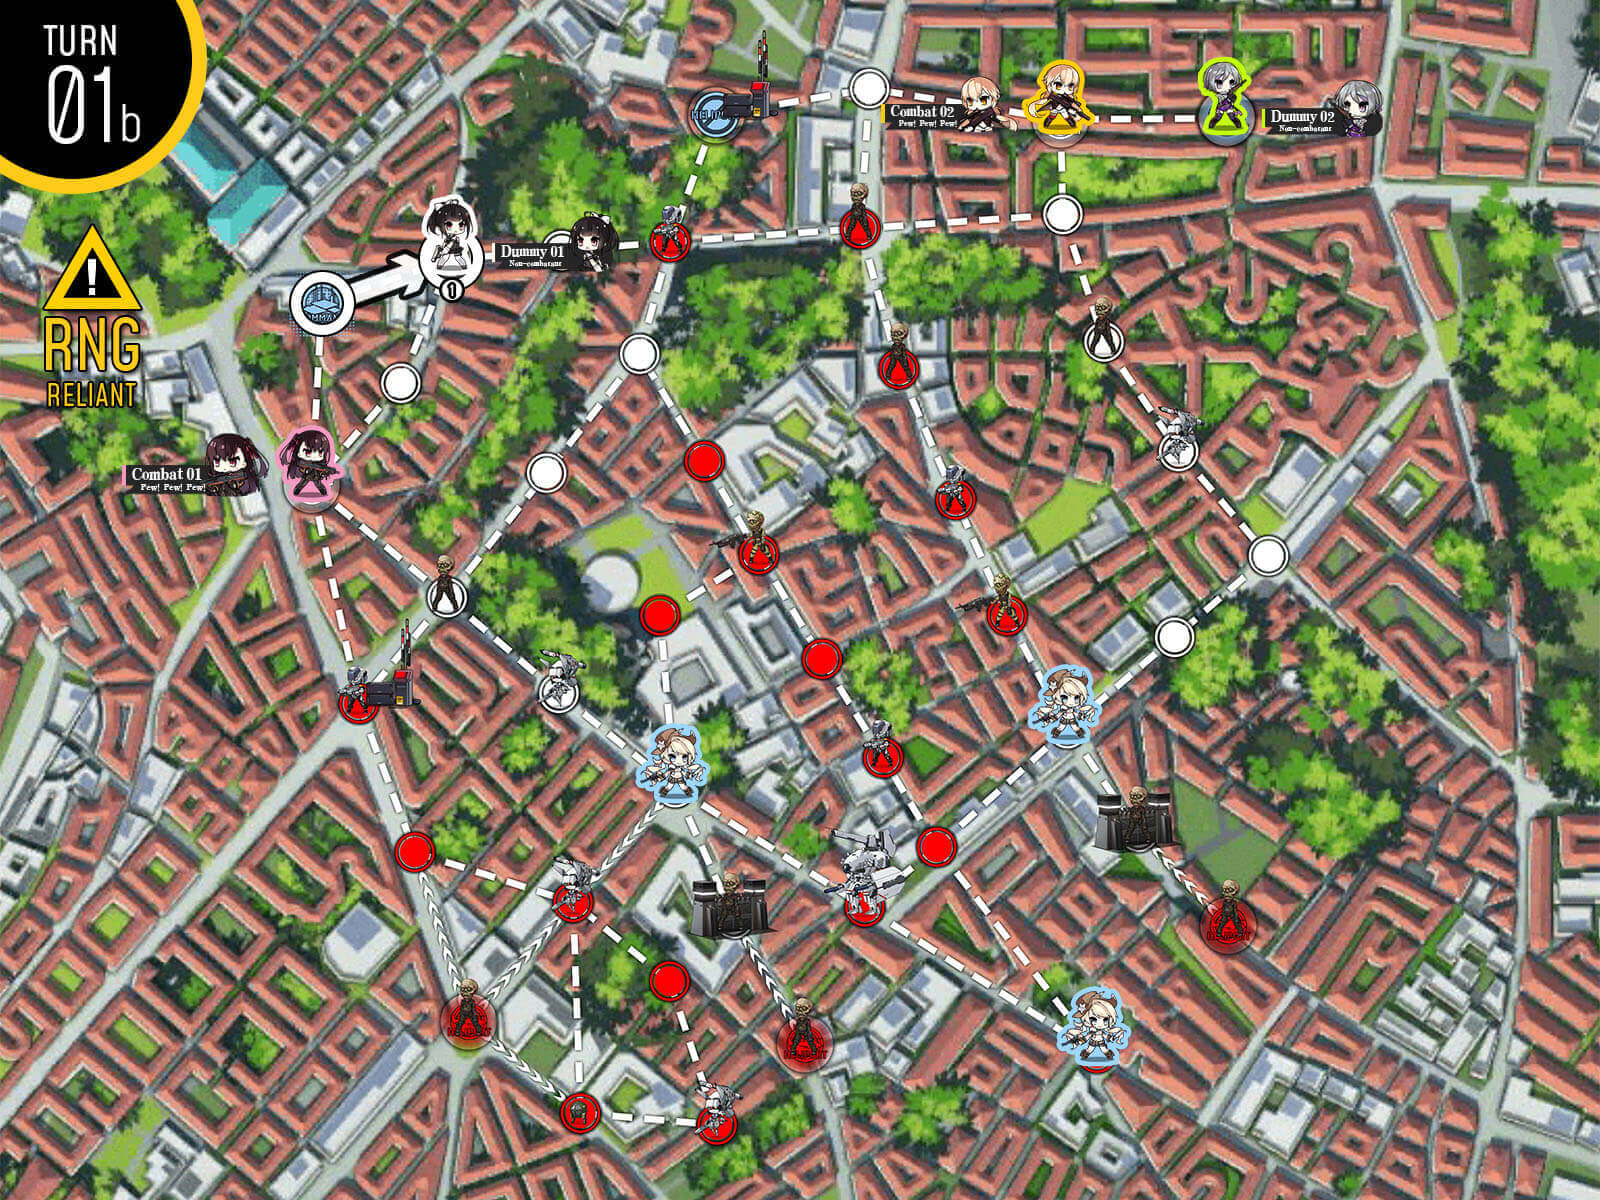
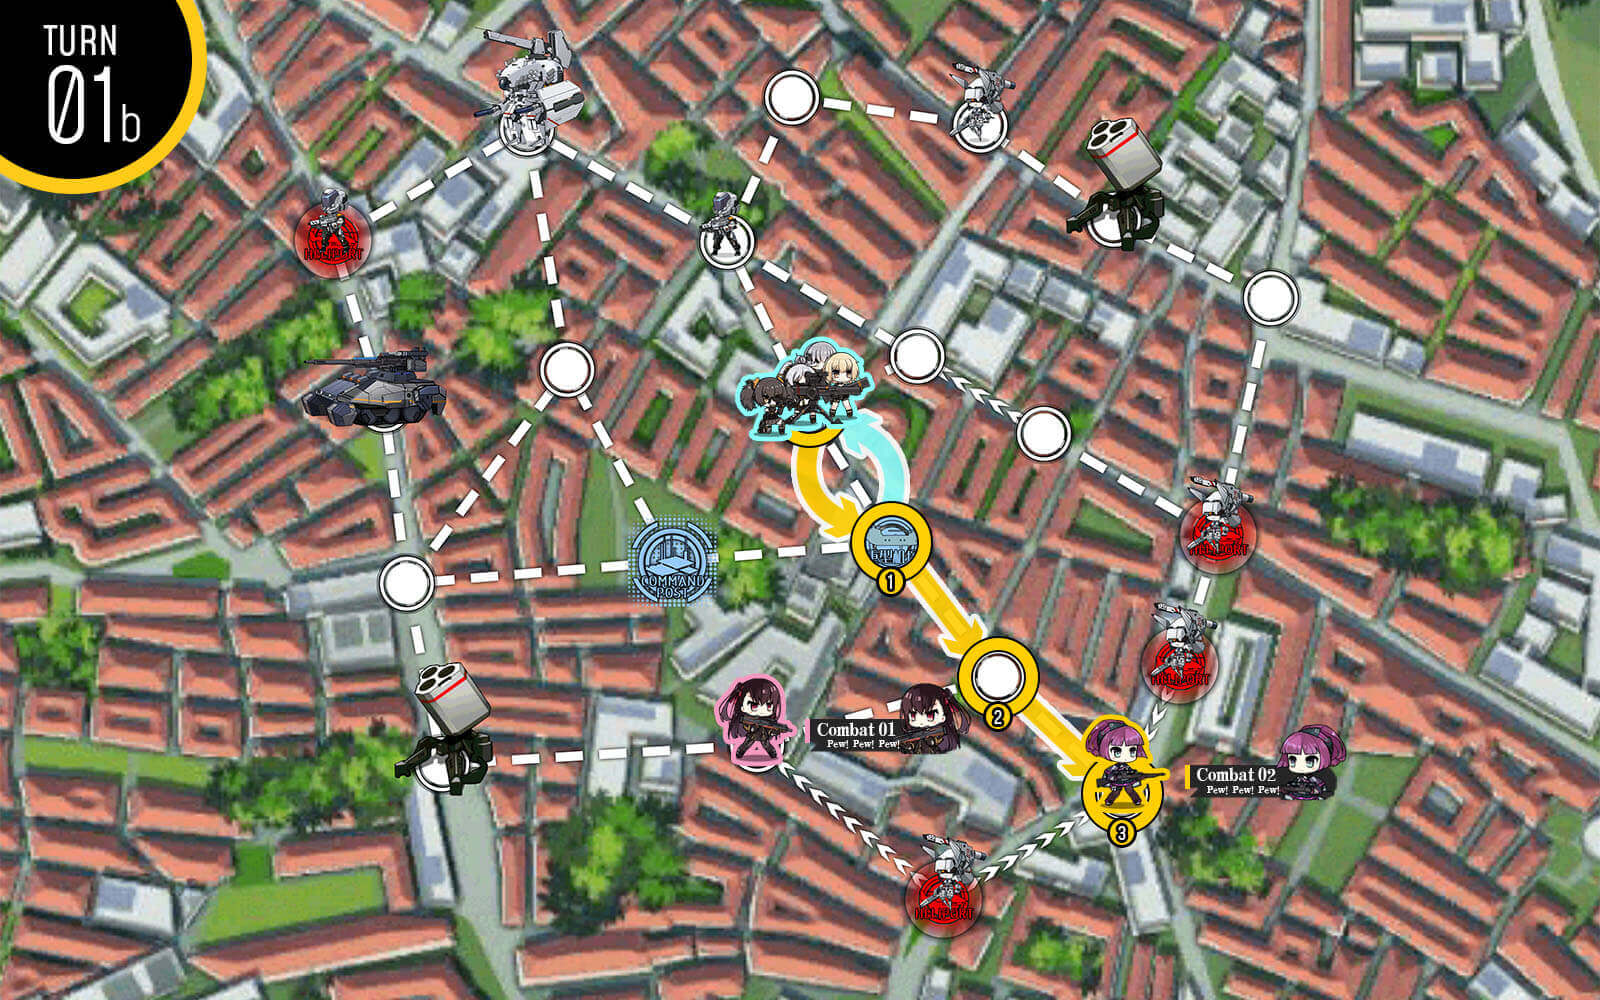
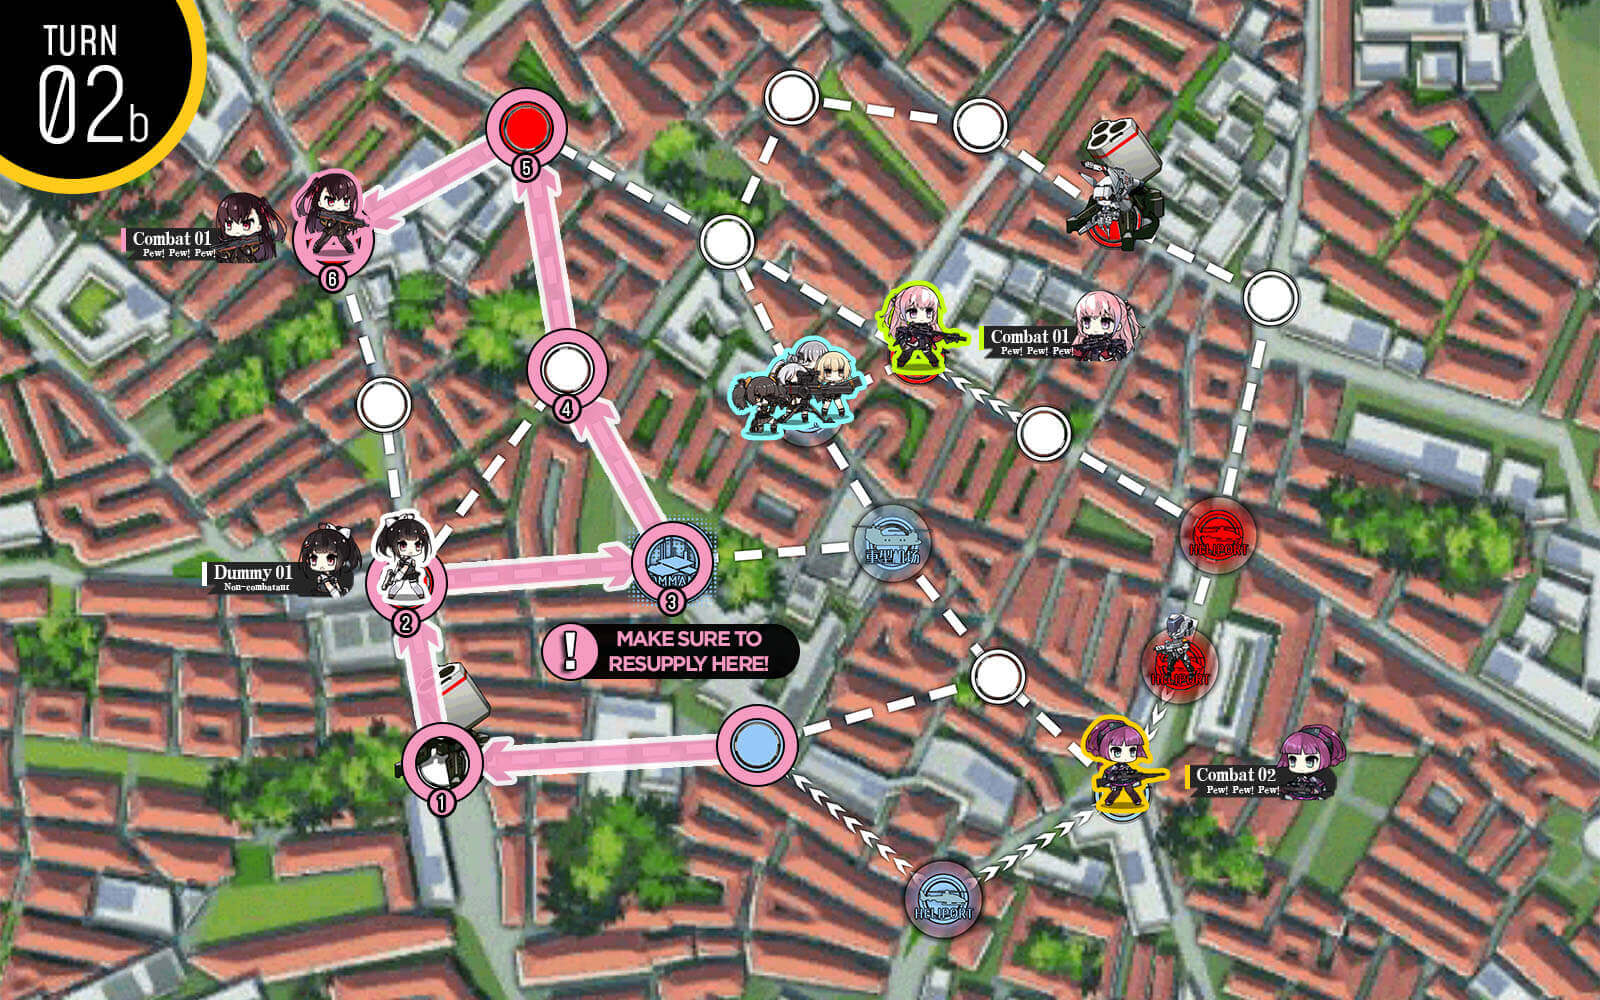
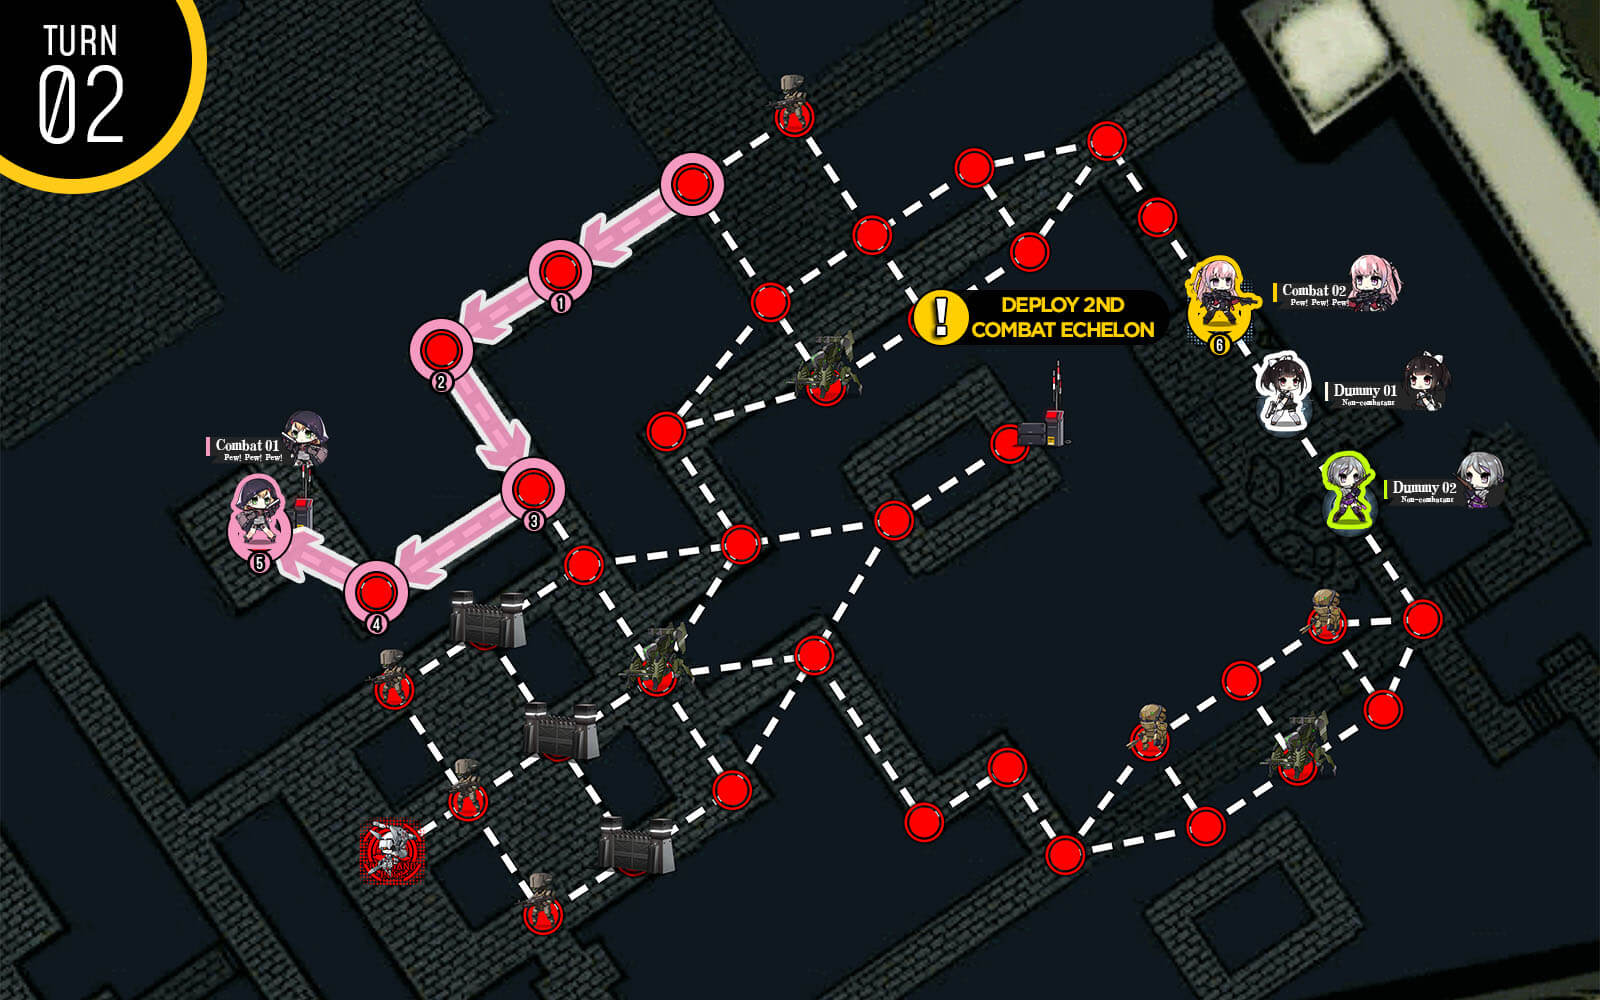
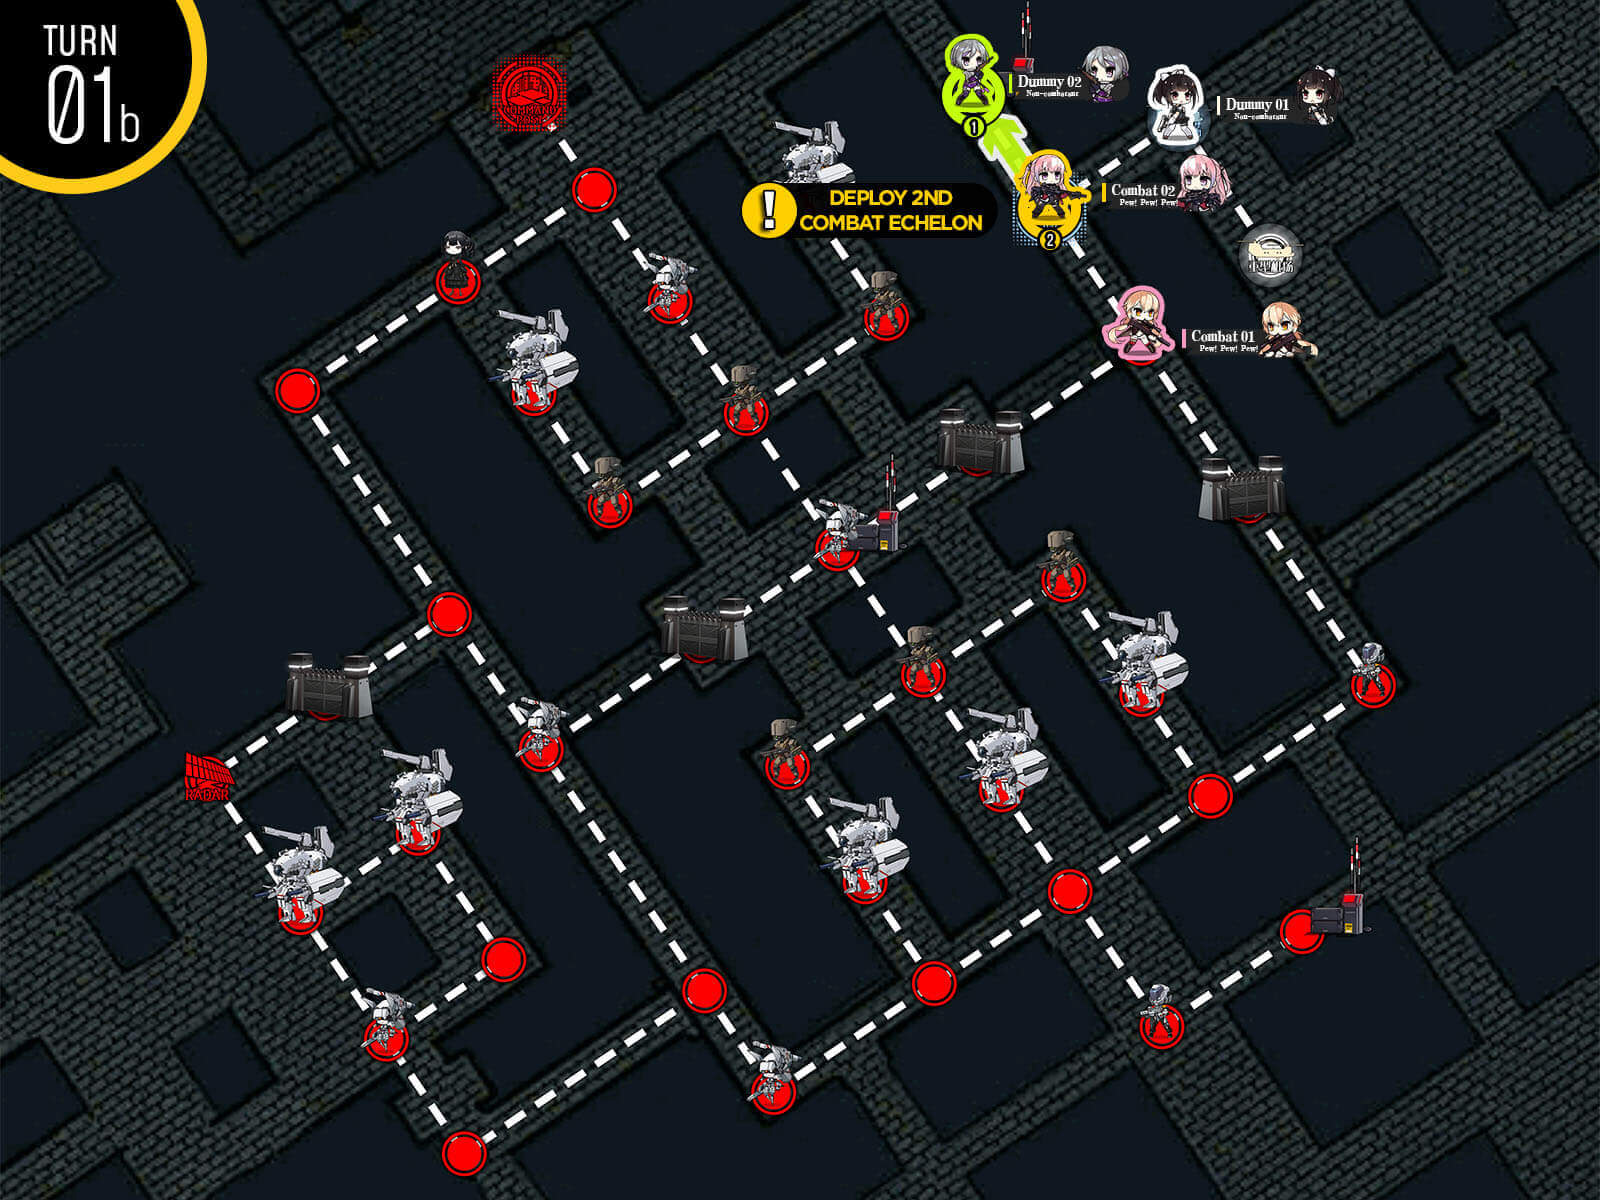
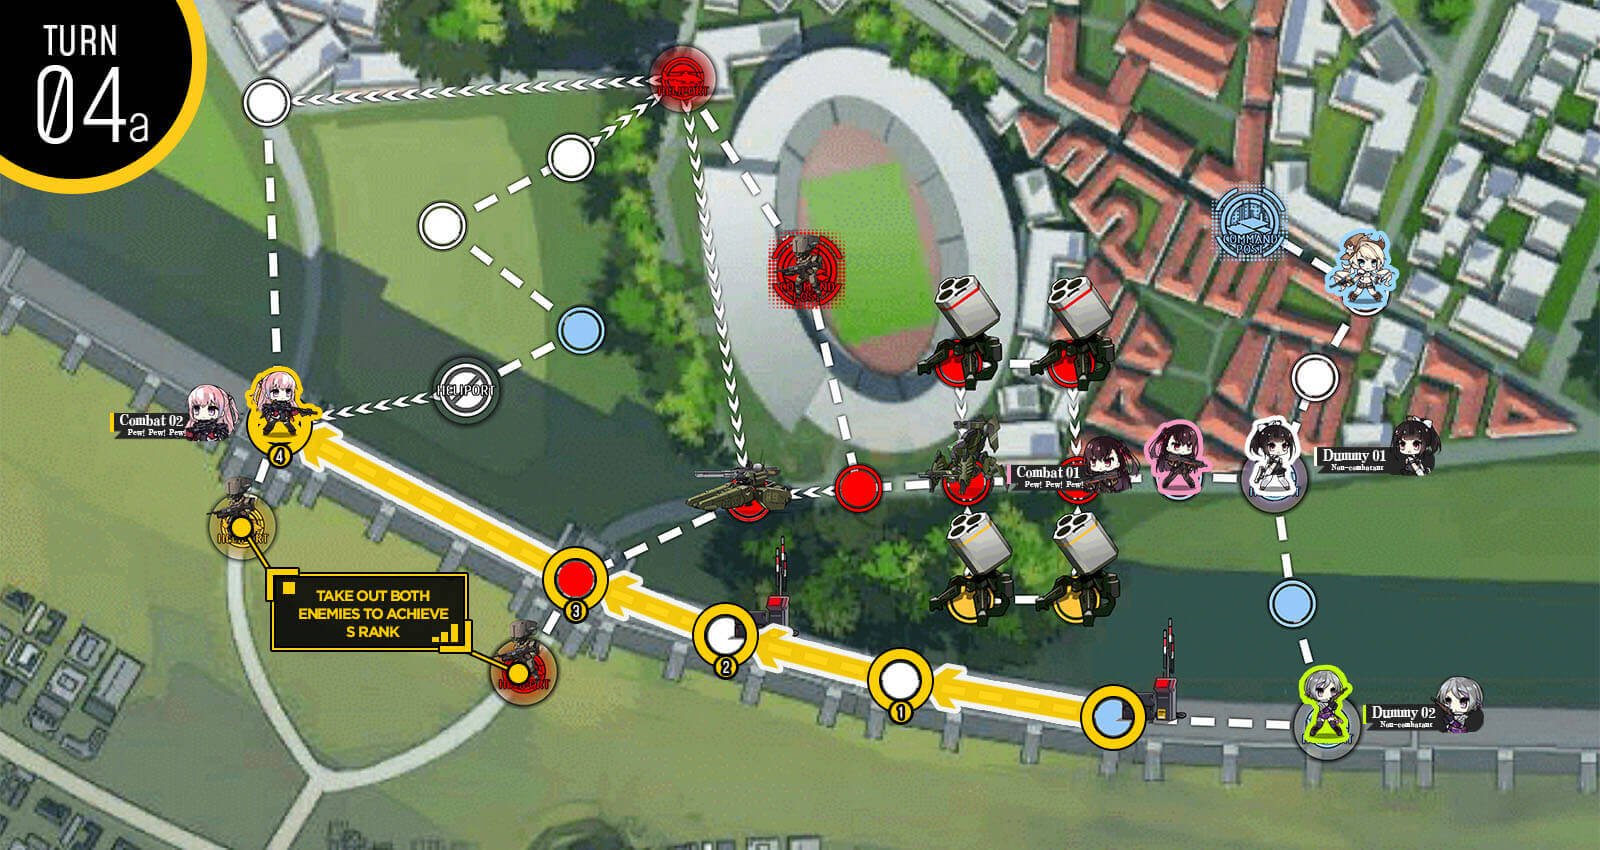
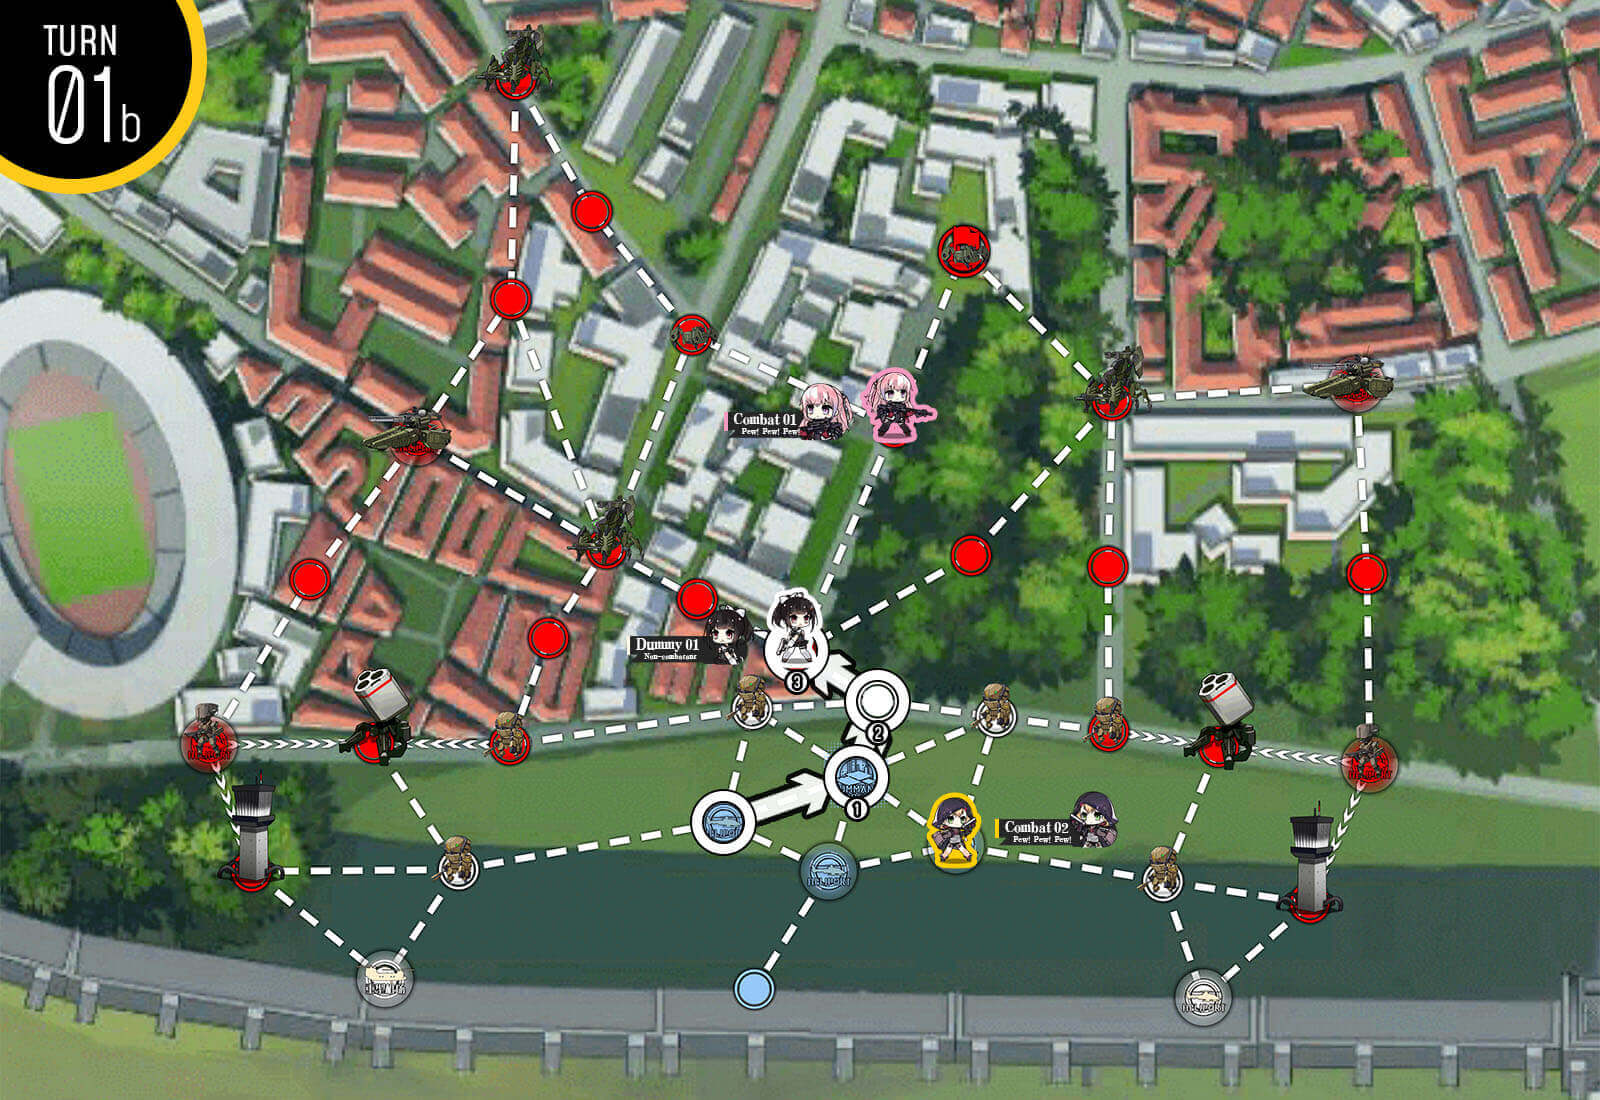
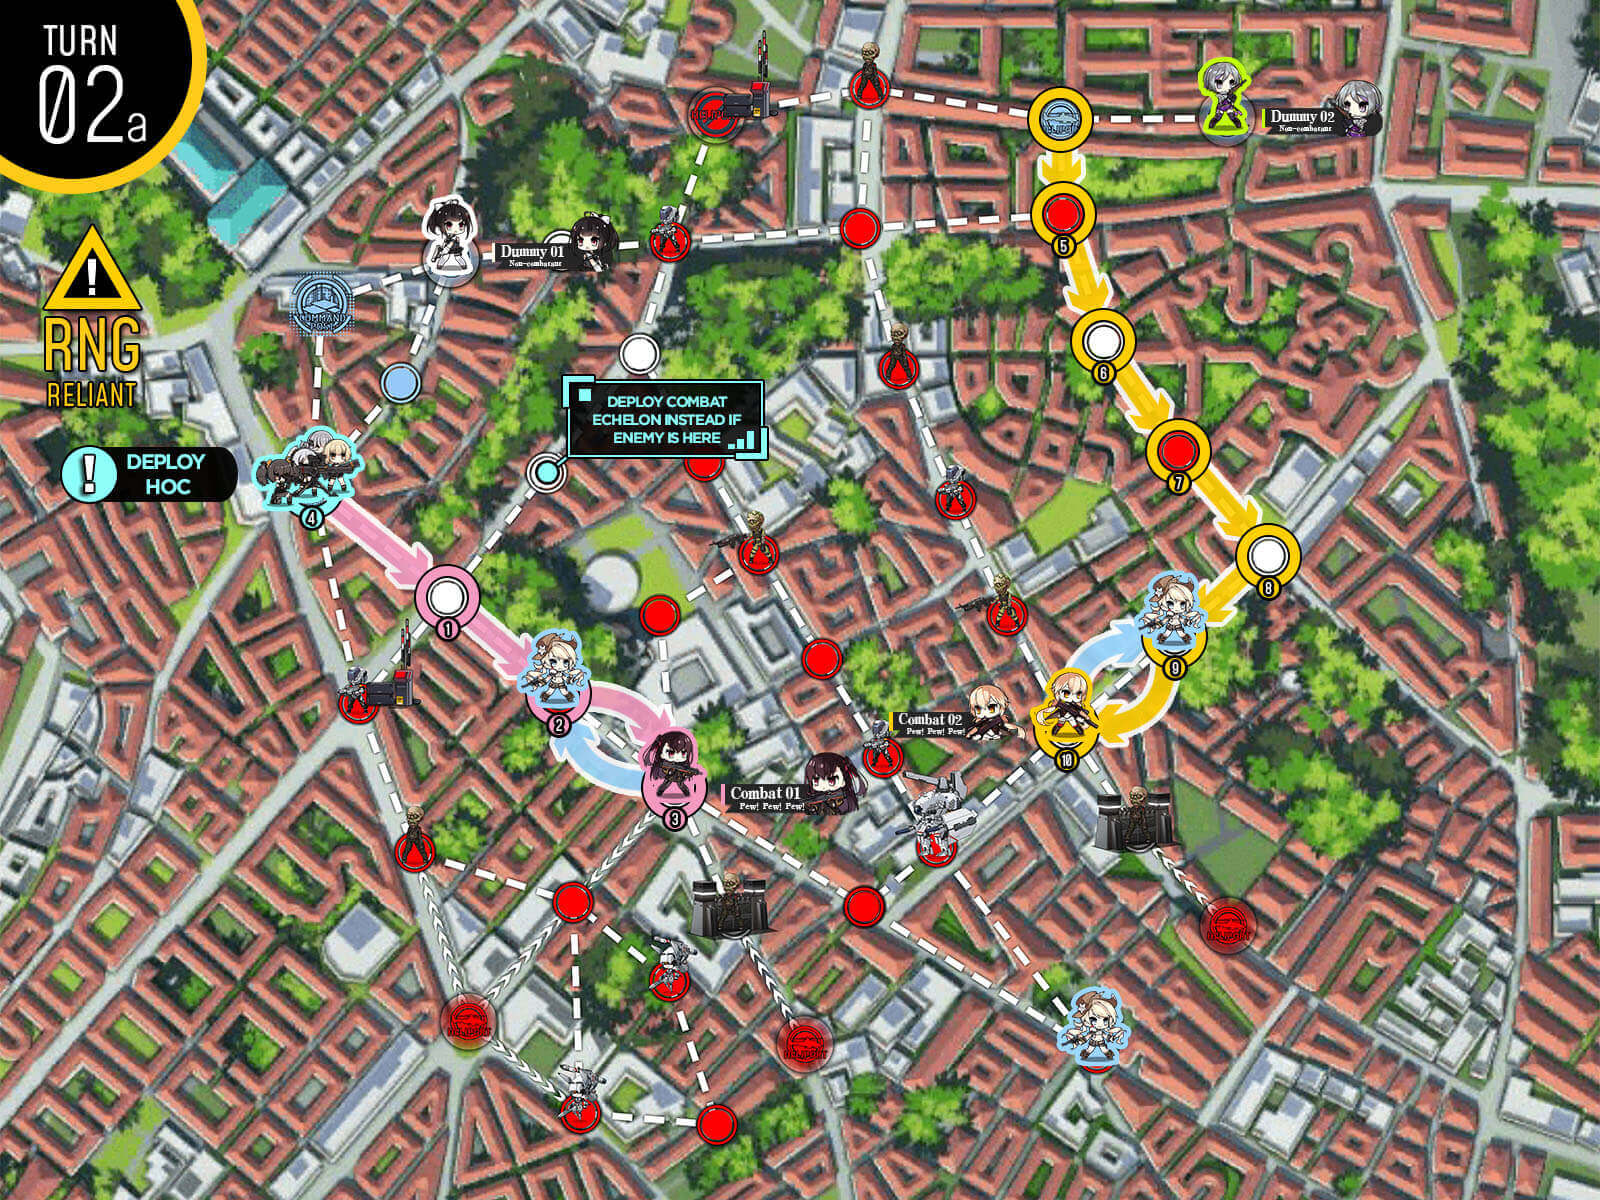
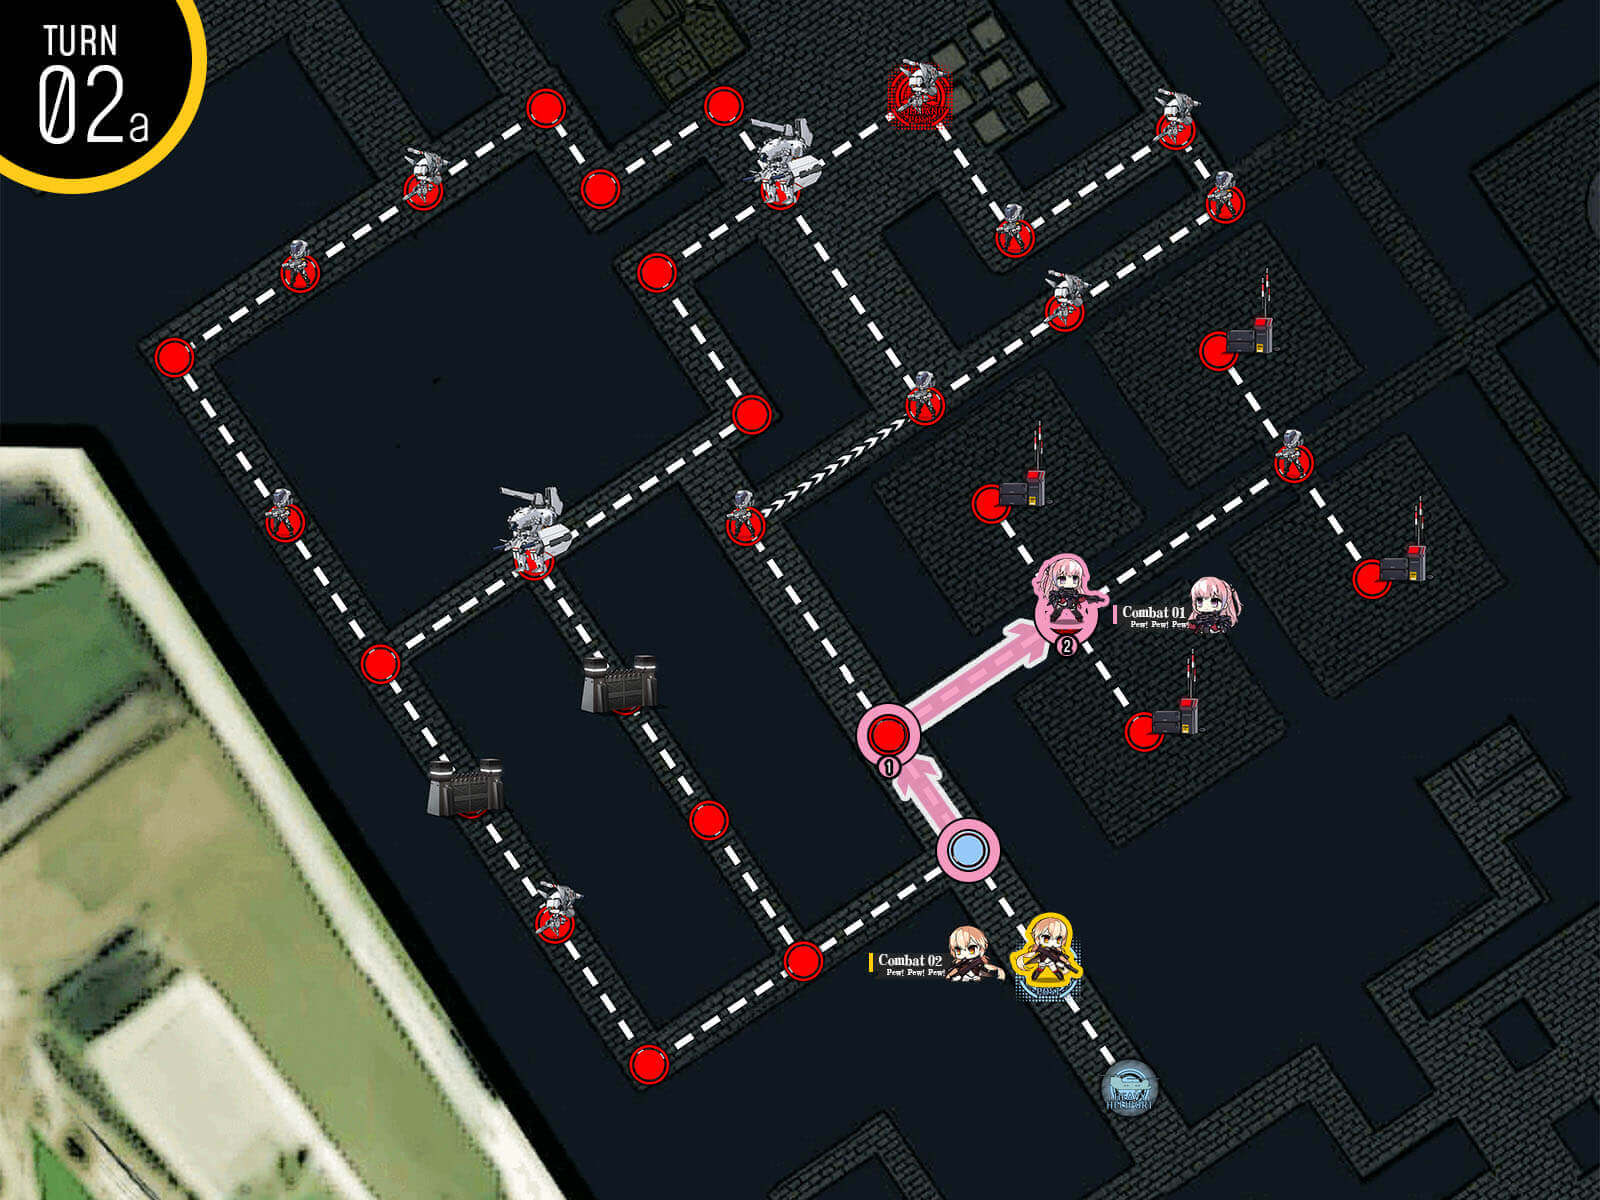
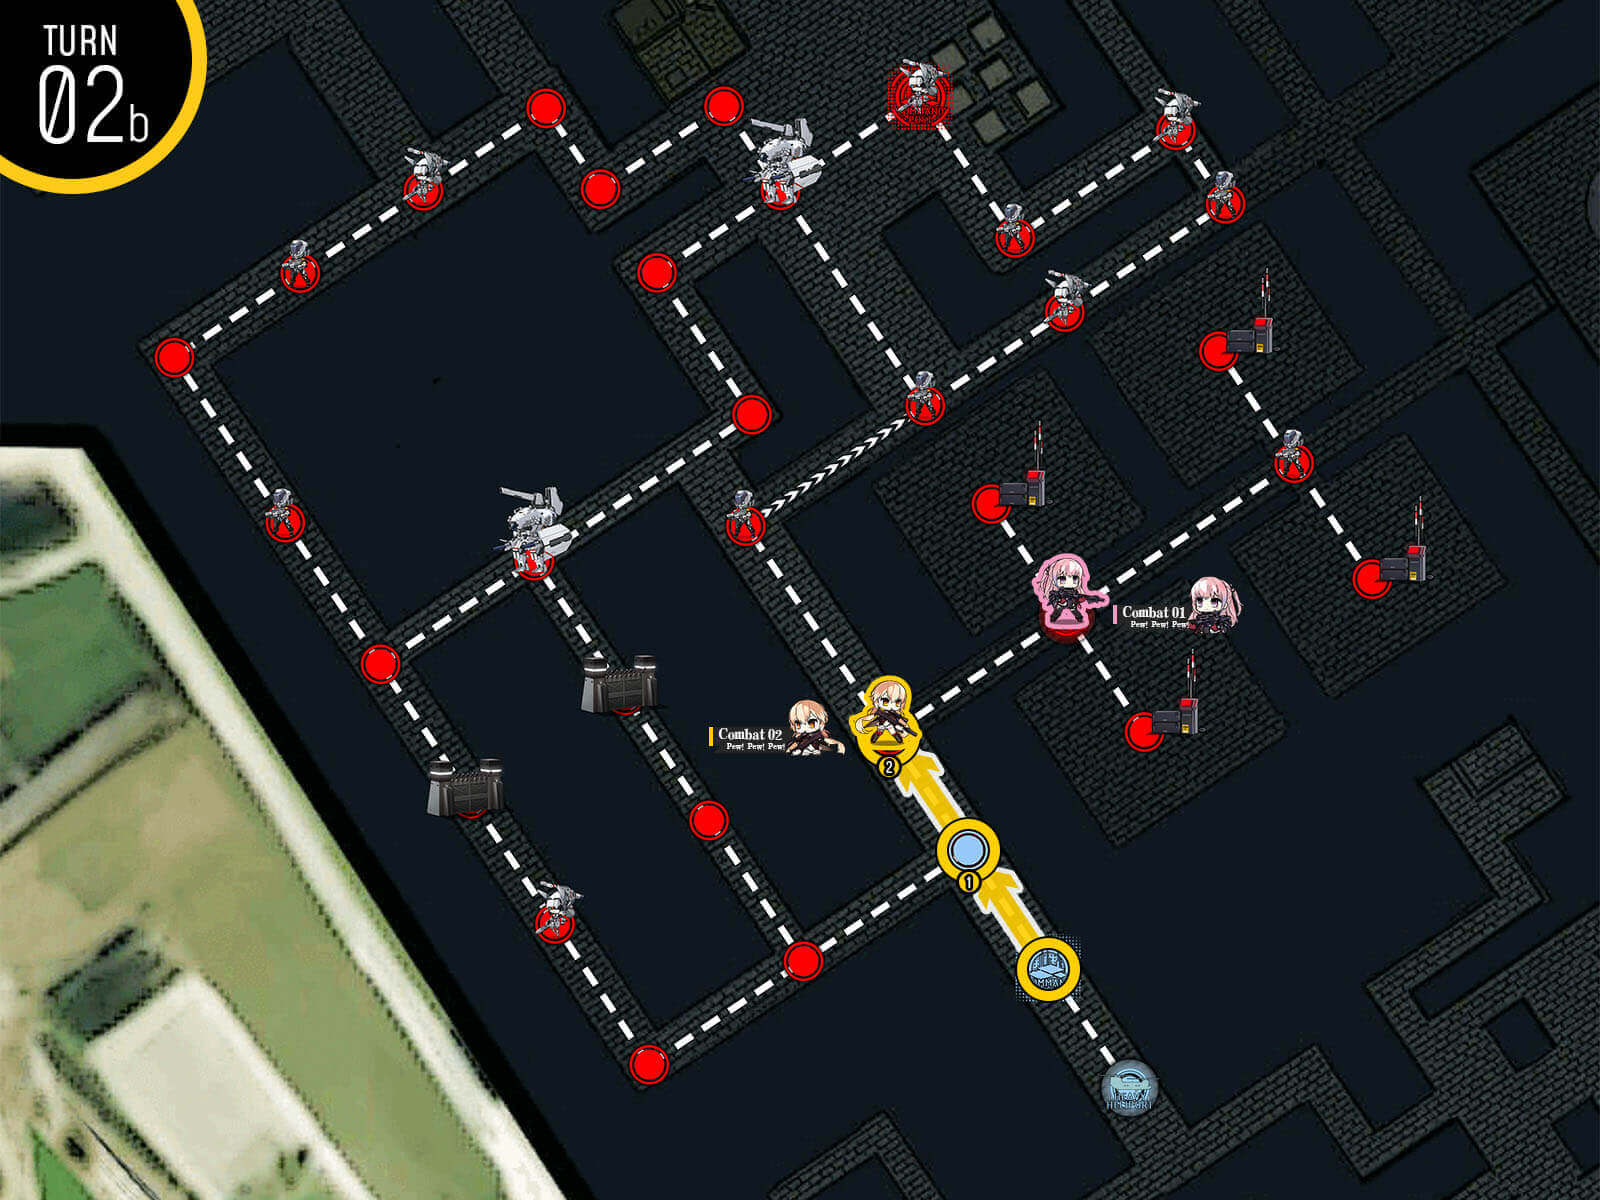
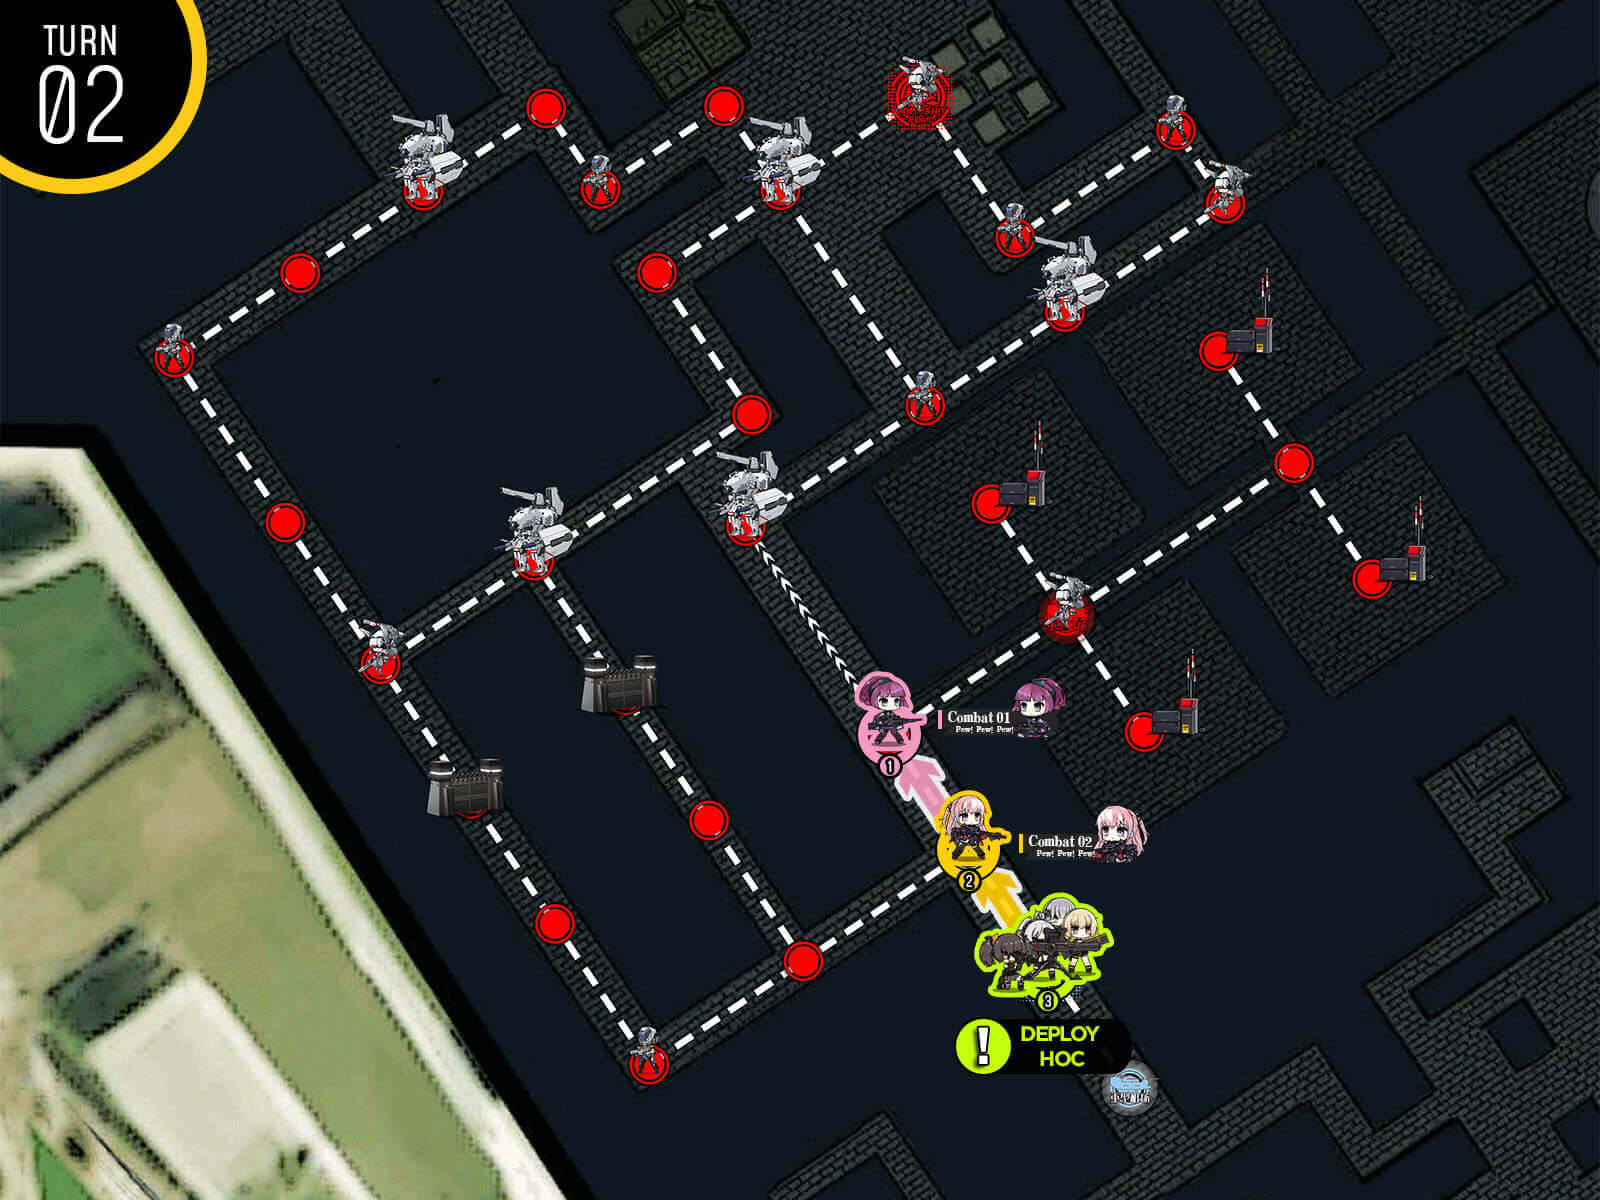
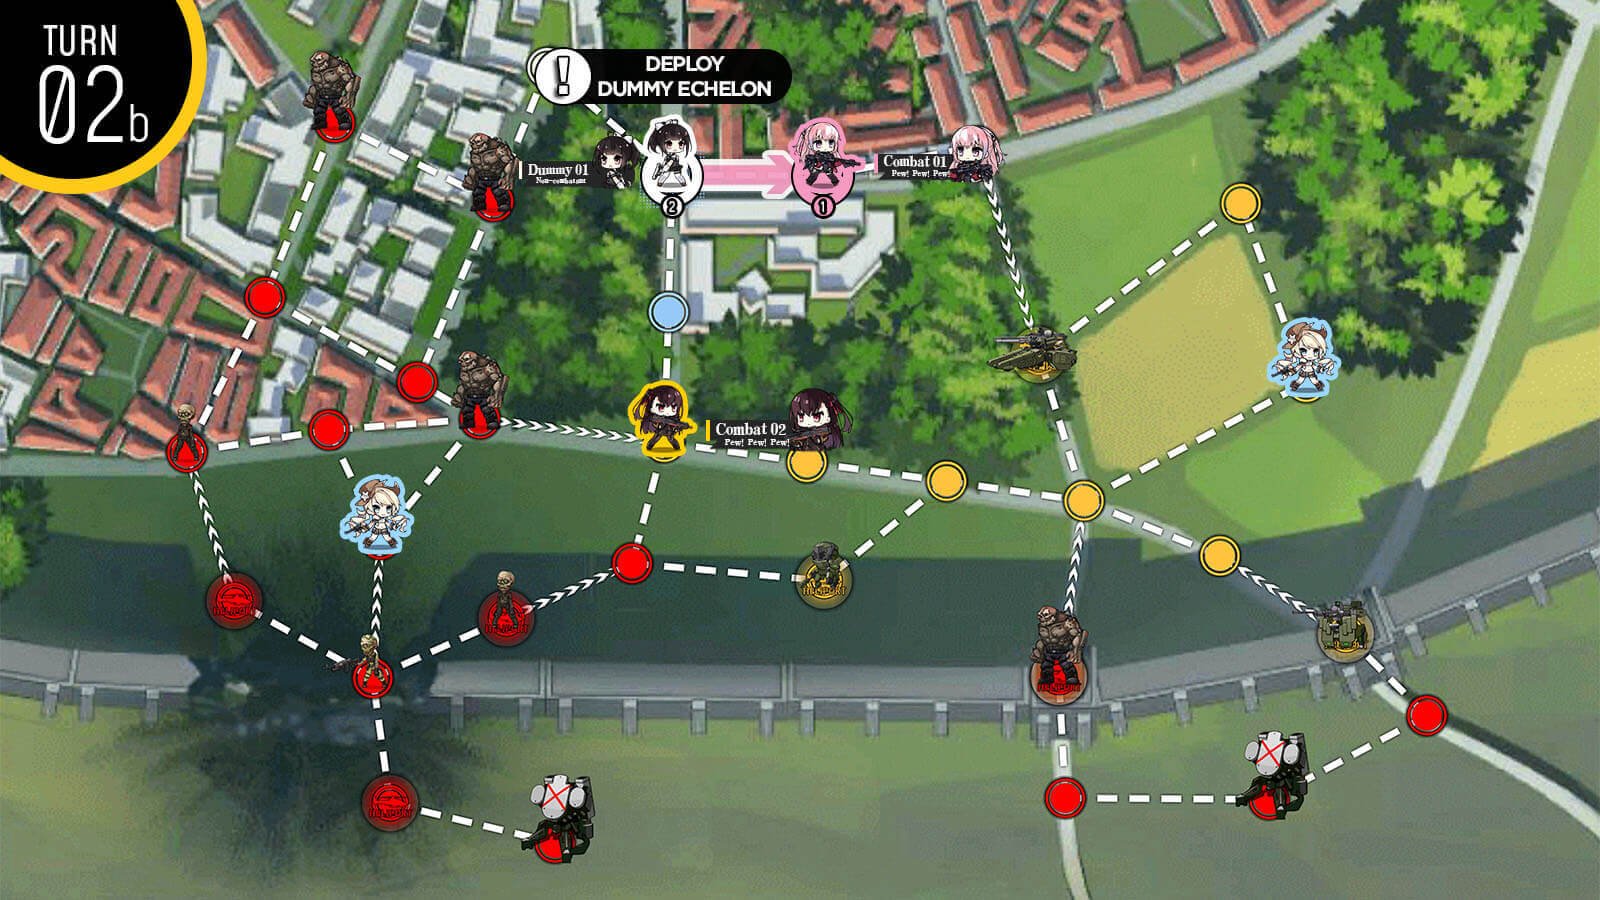
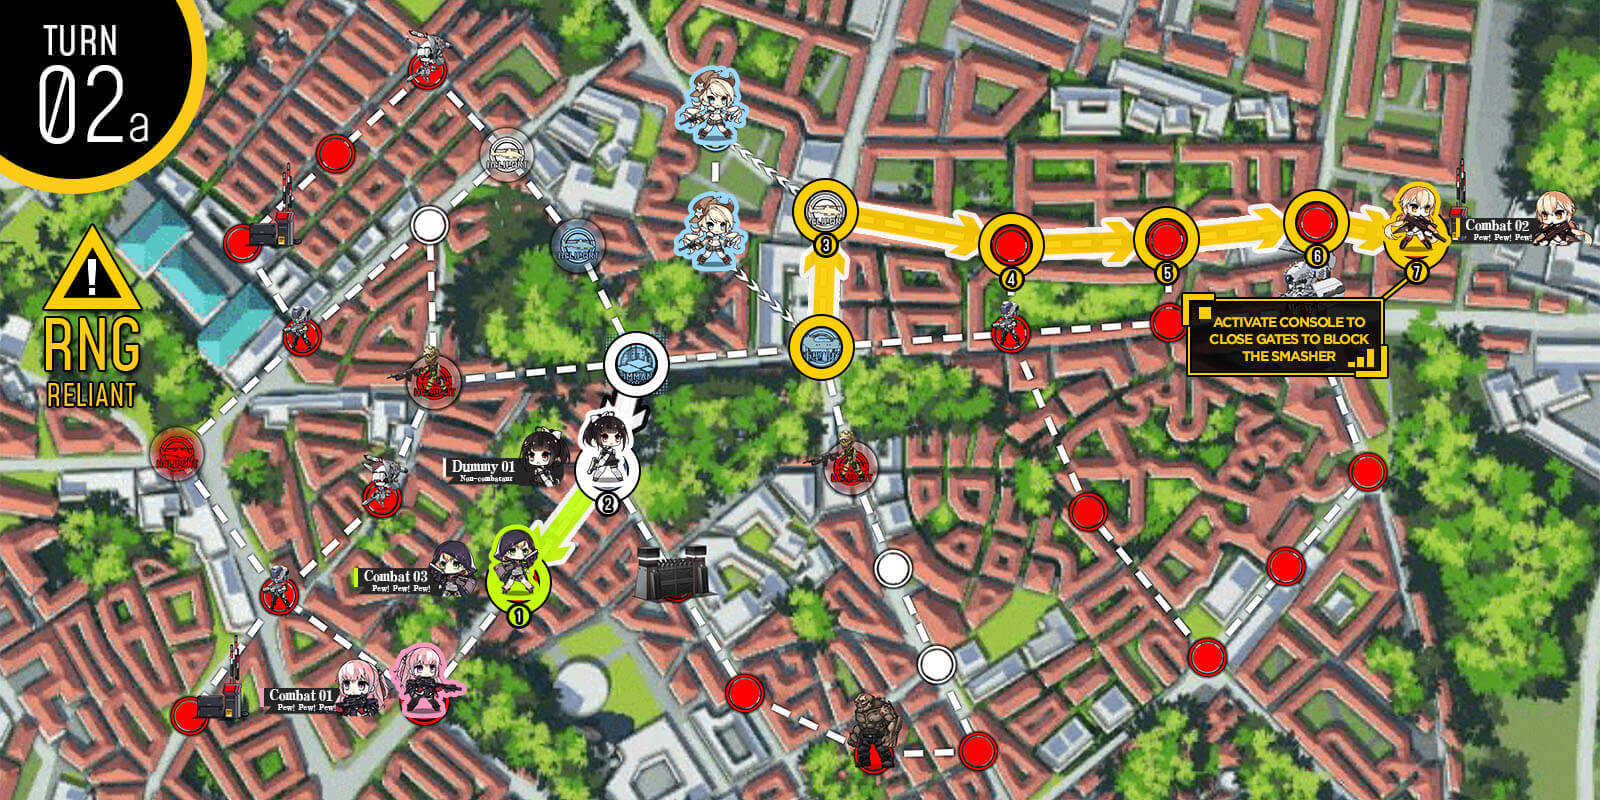
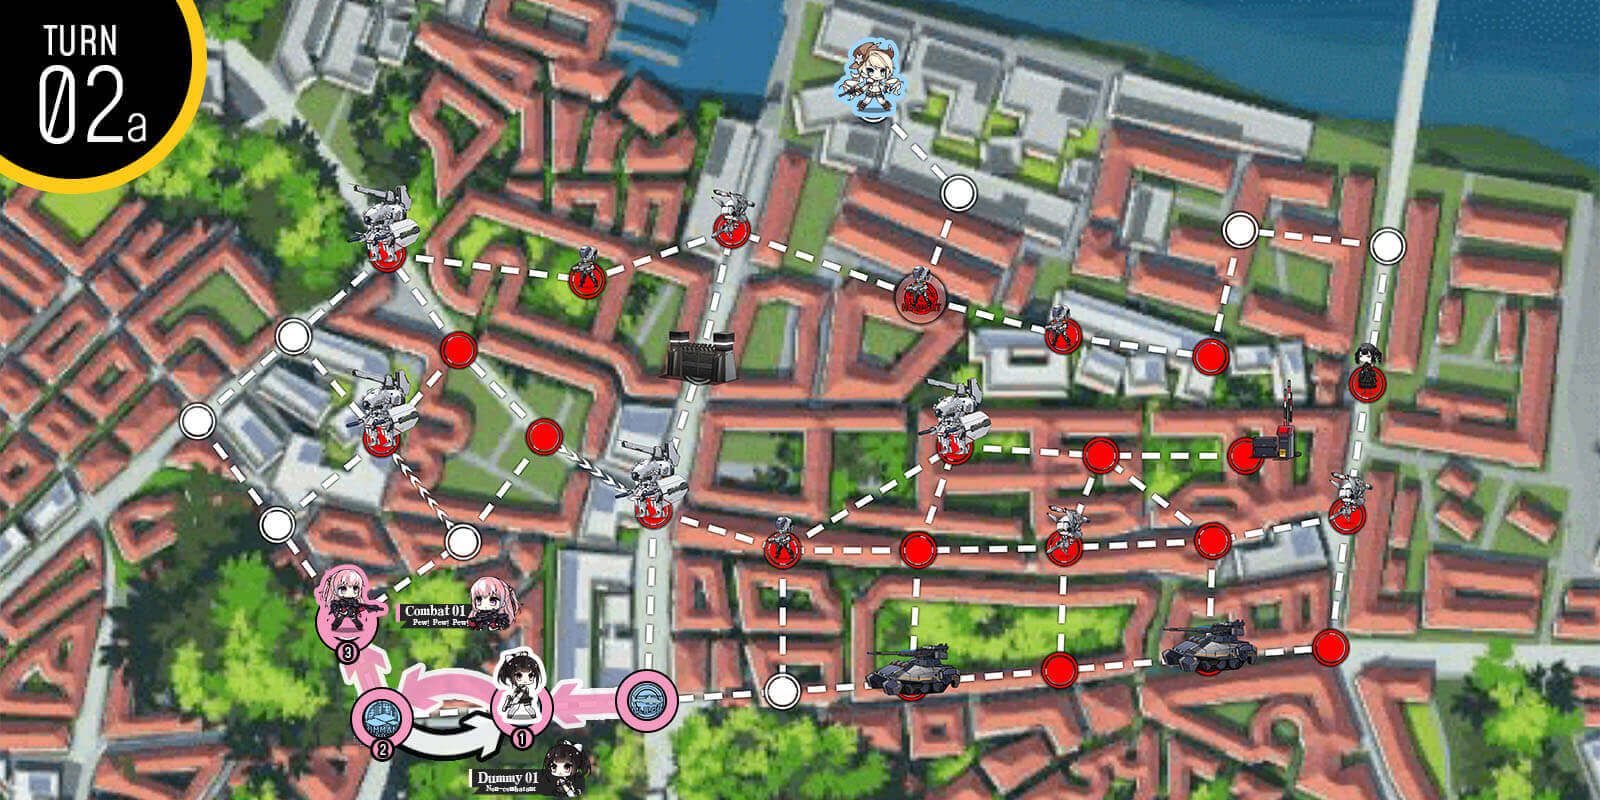
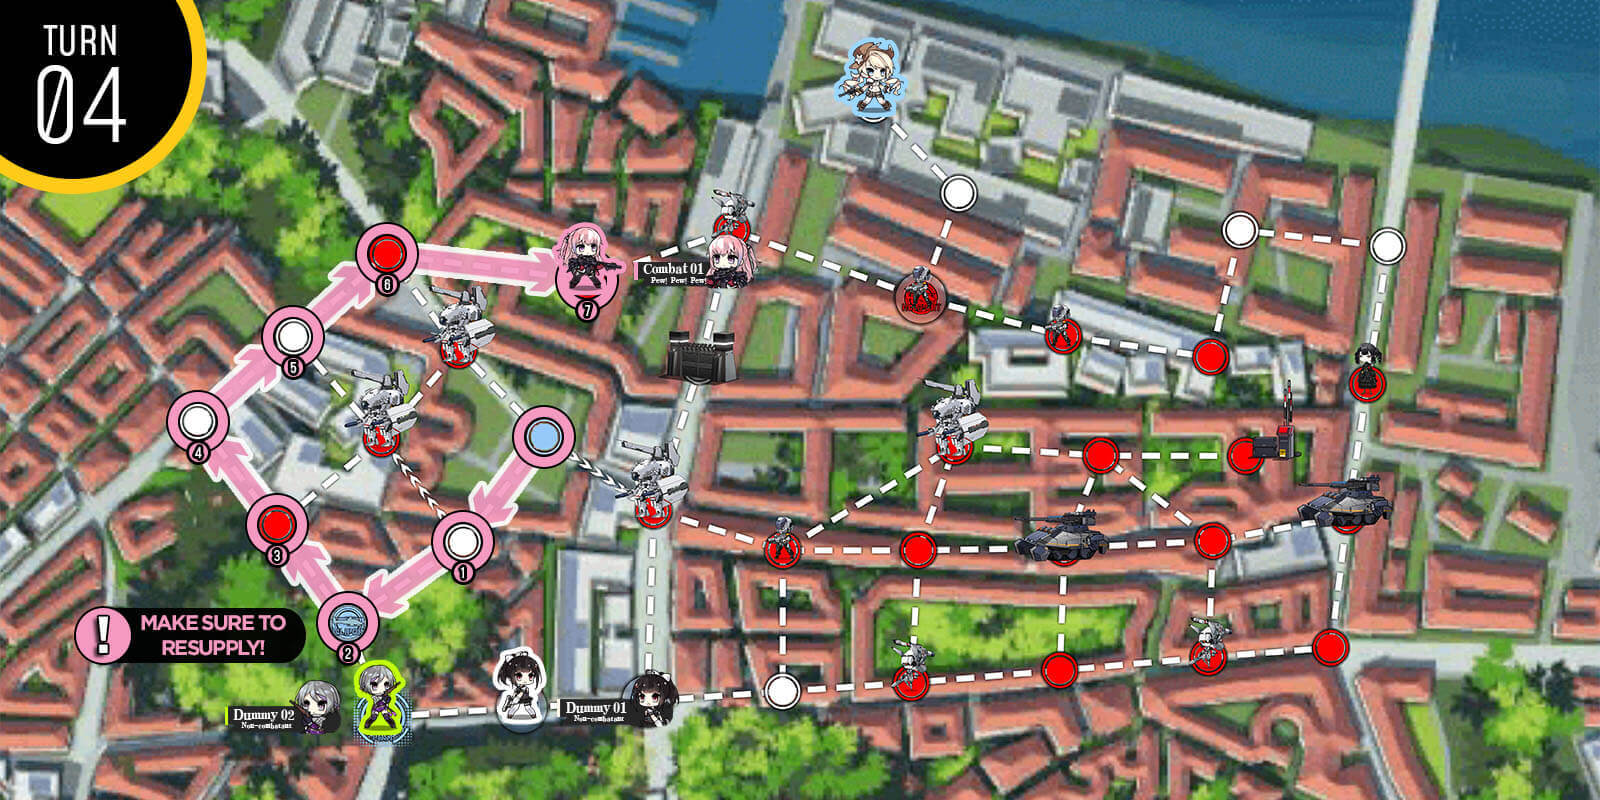
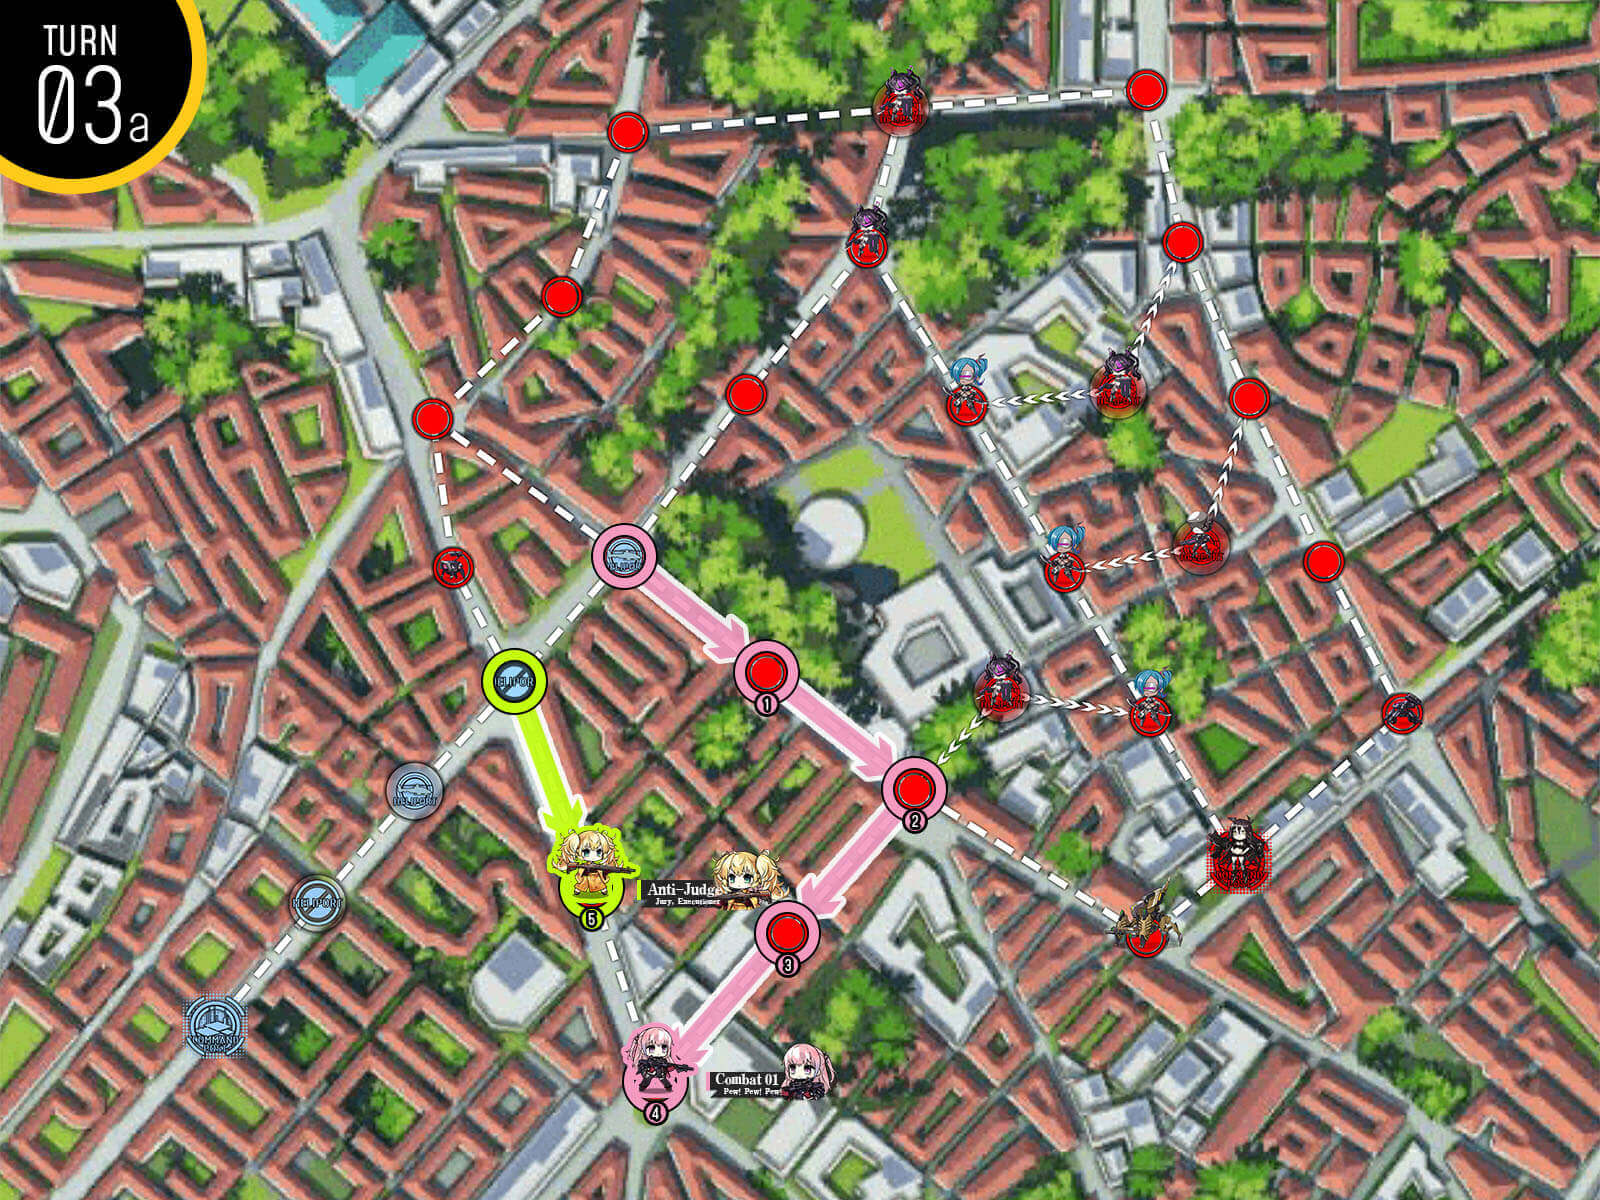
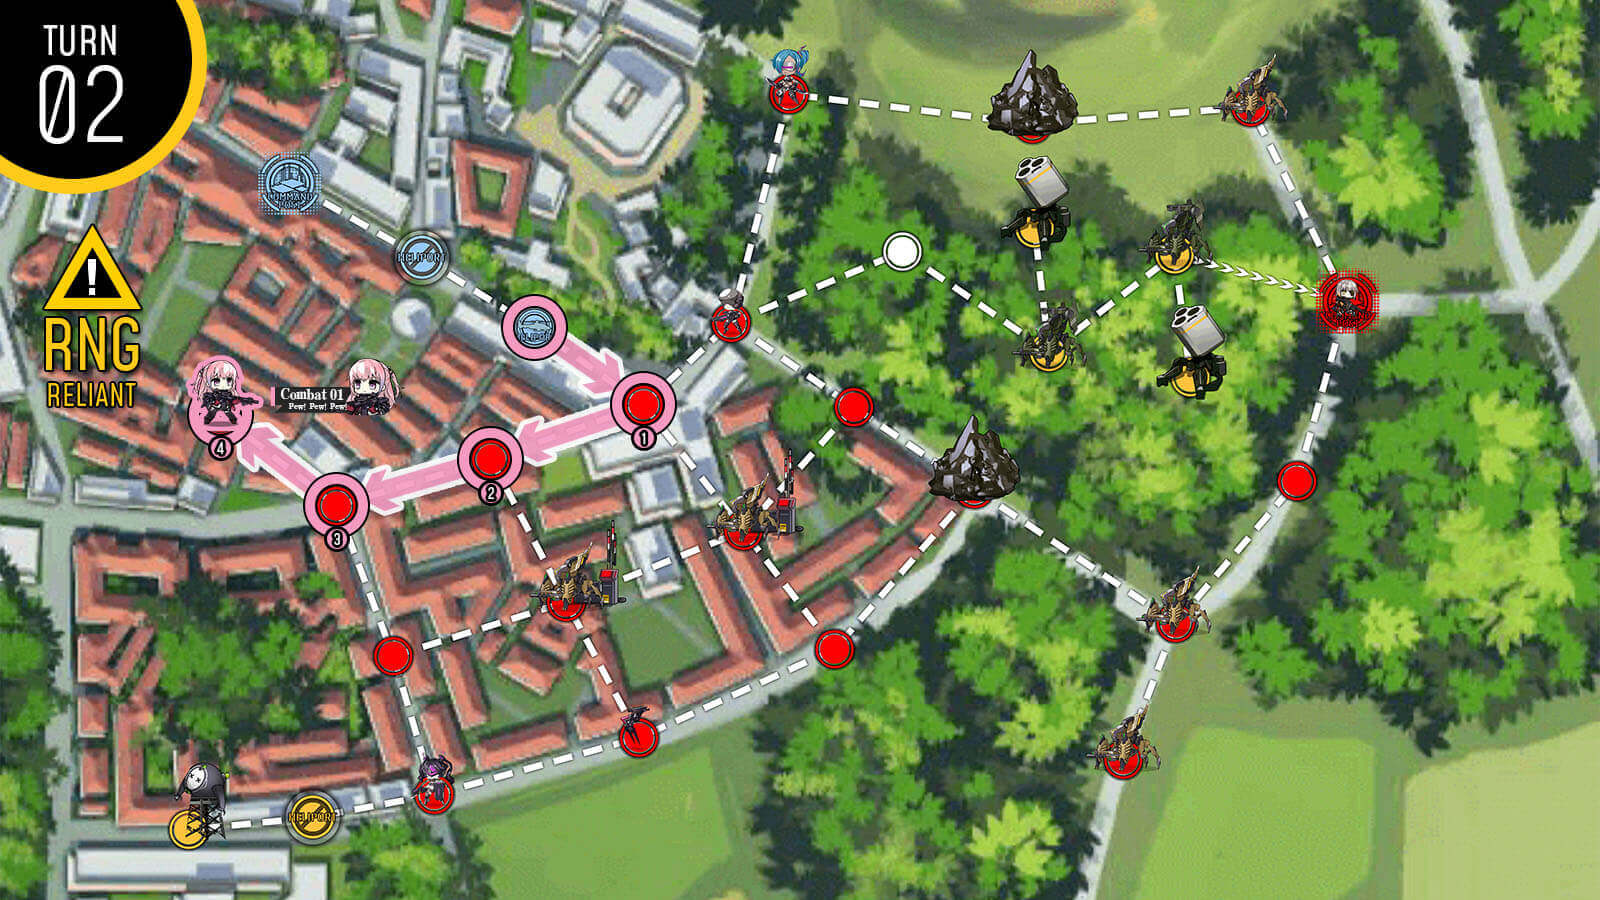
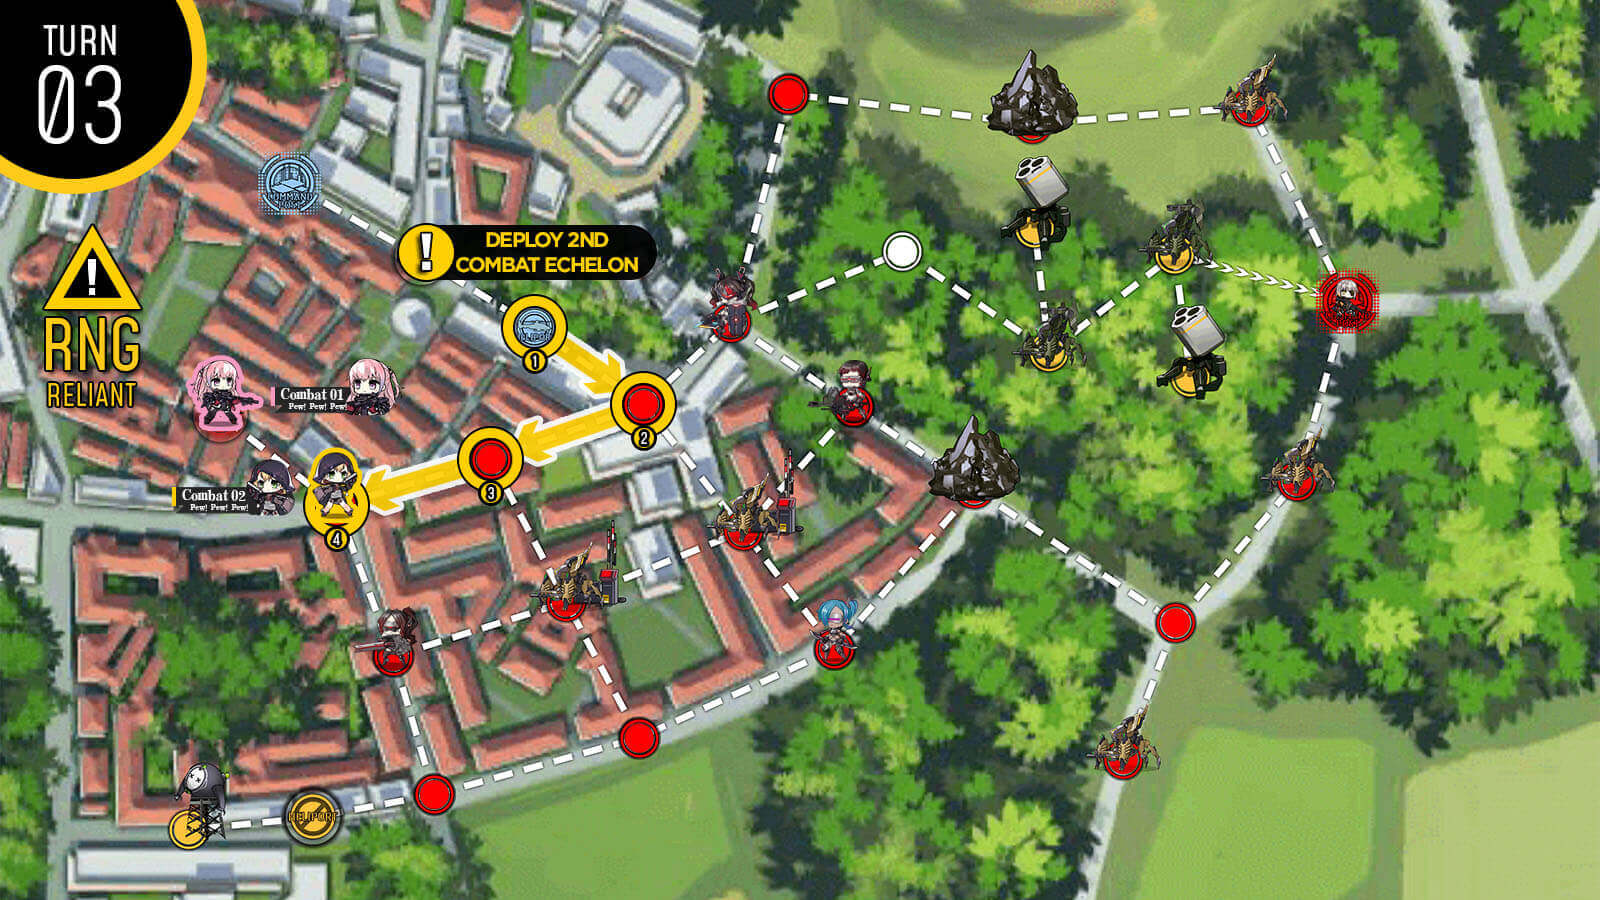
Combat echelon near the bottom of the map moves one node to the left.
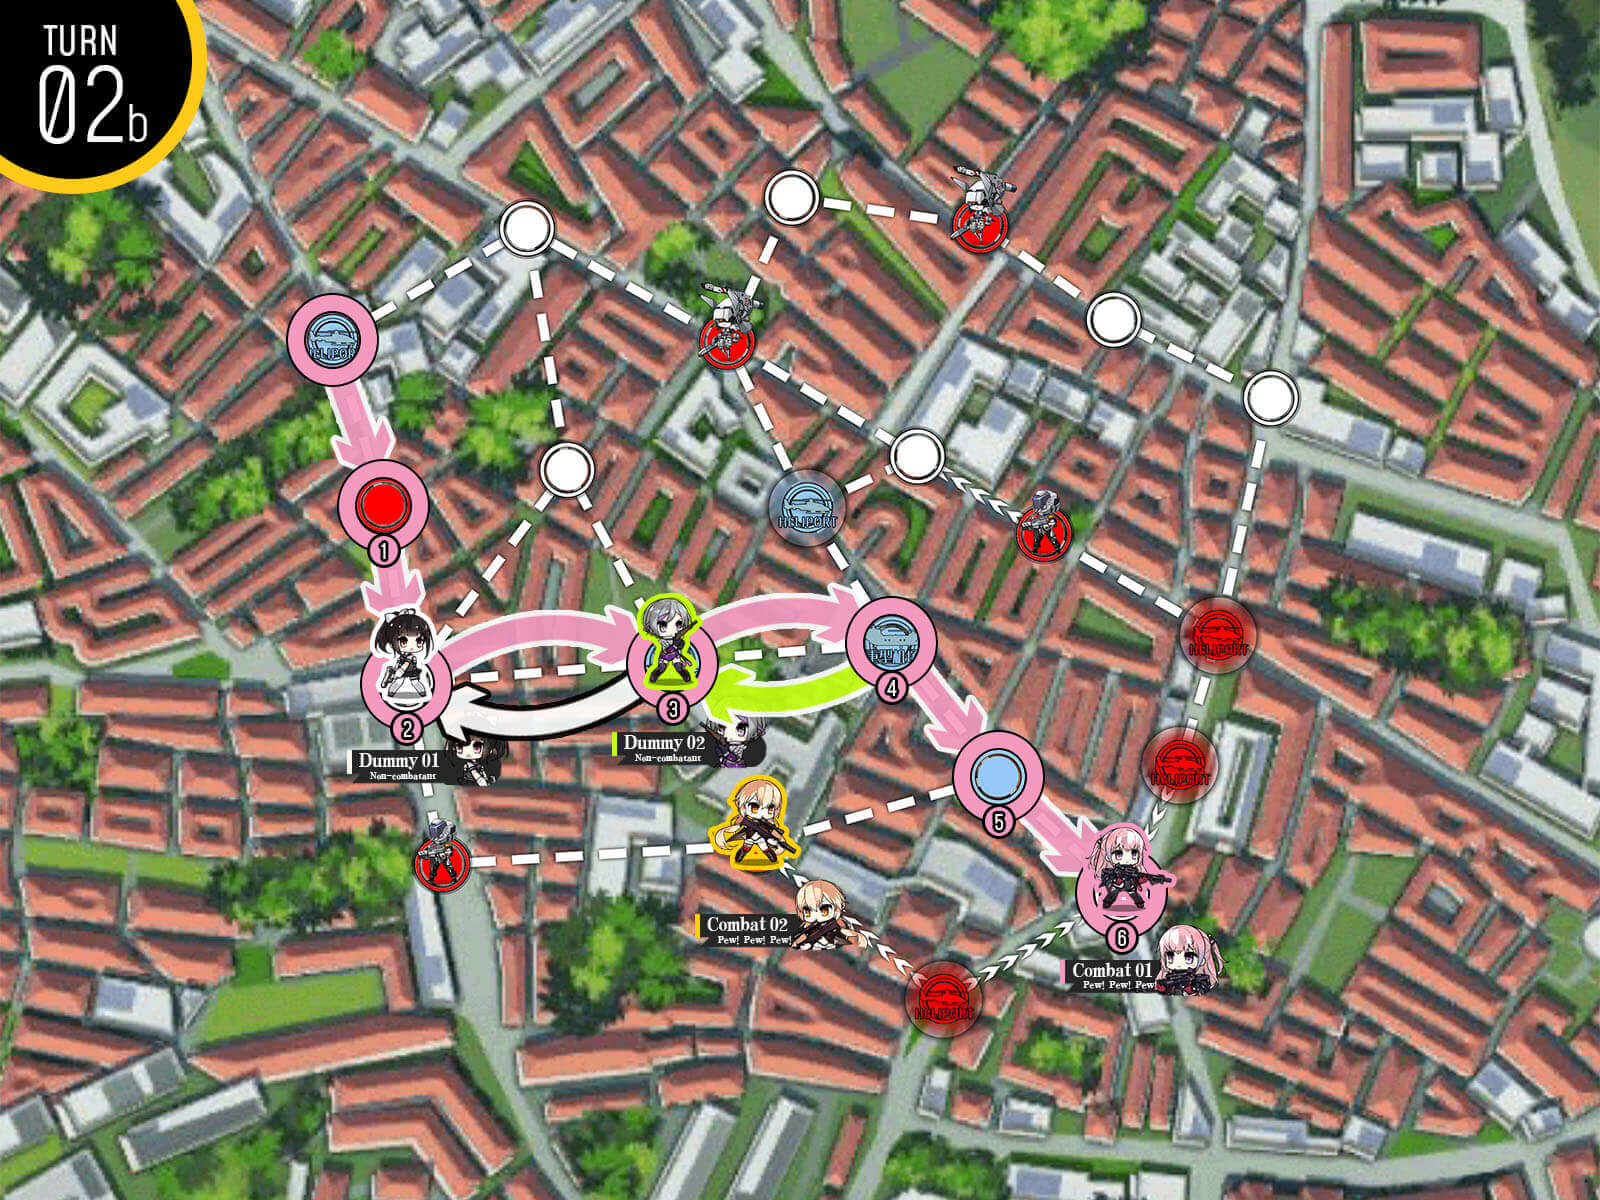
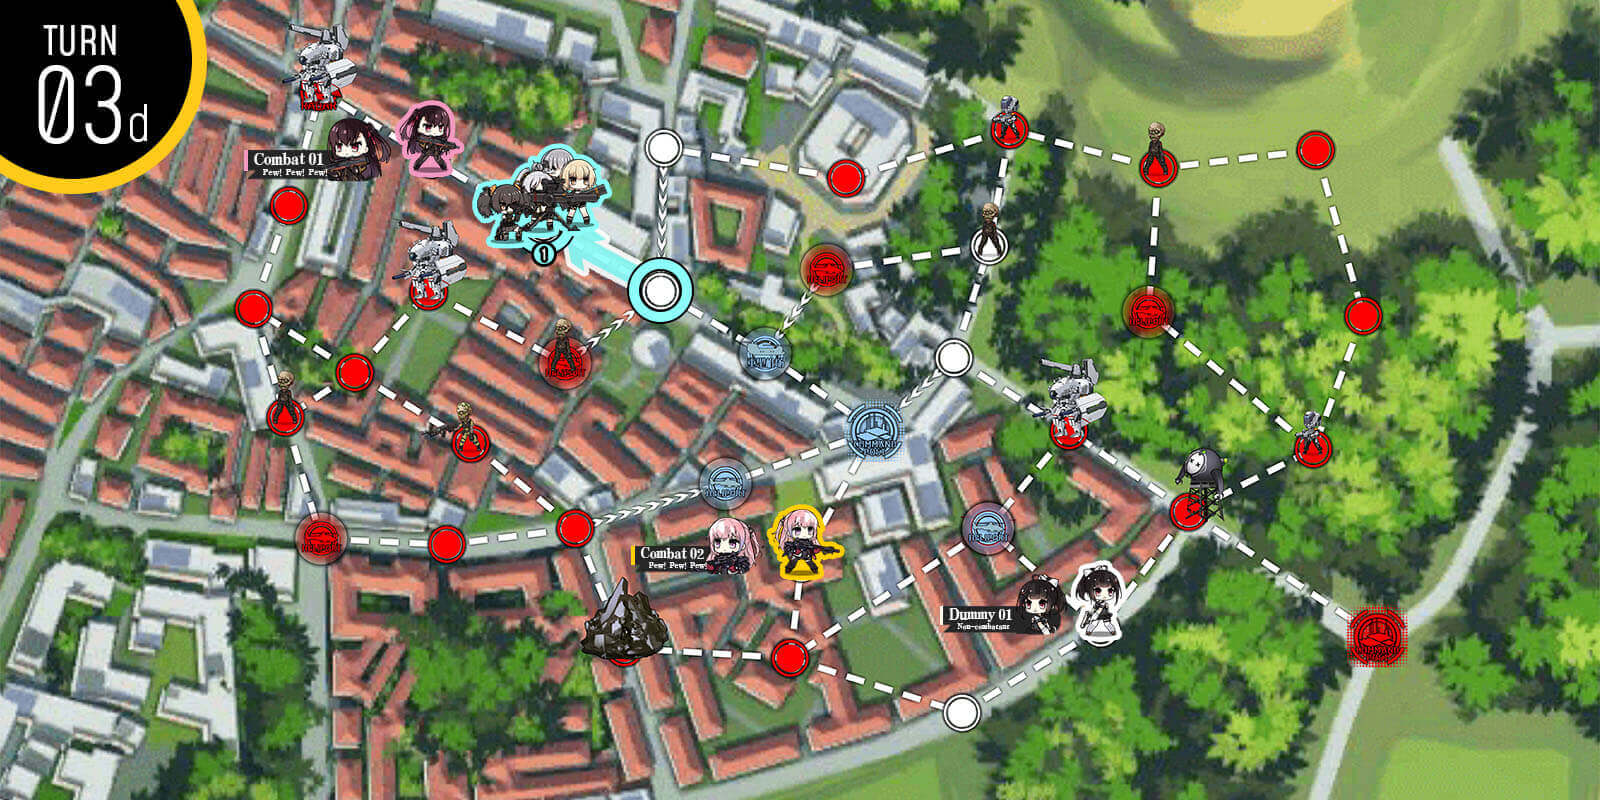
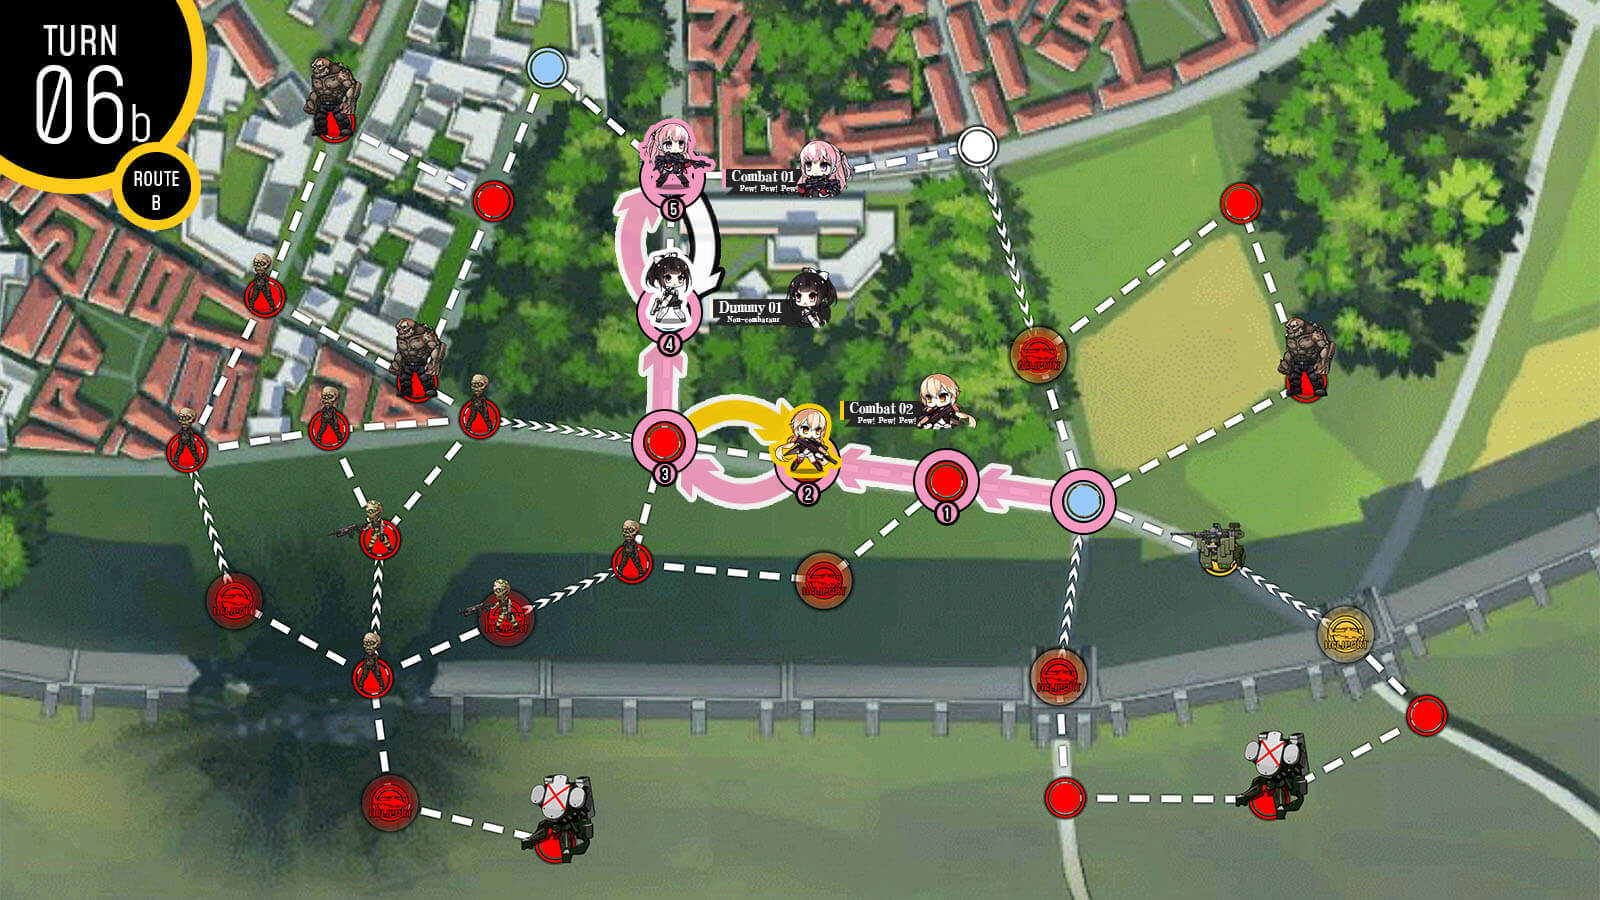
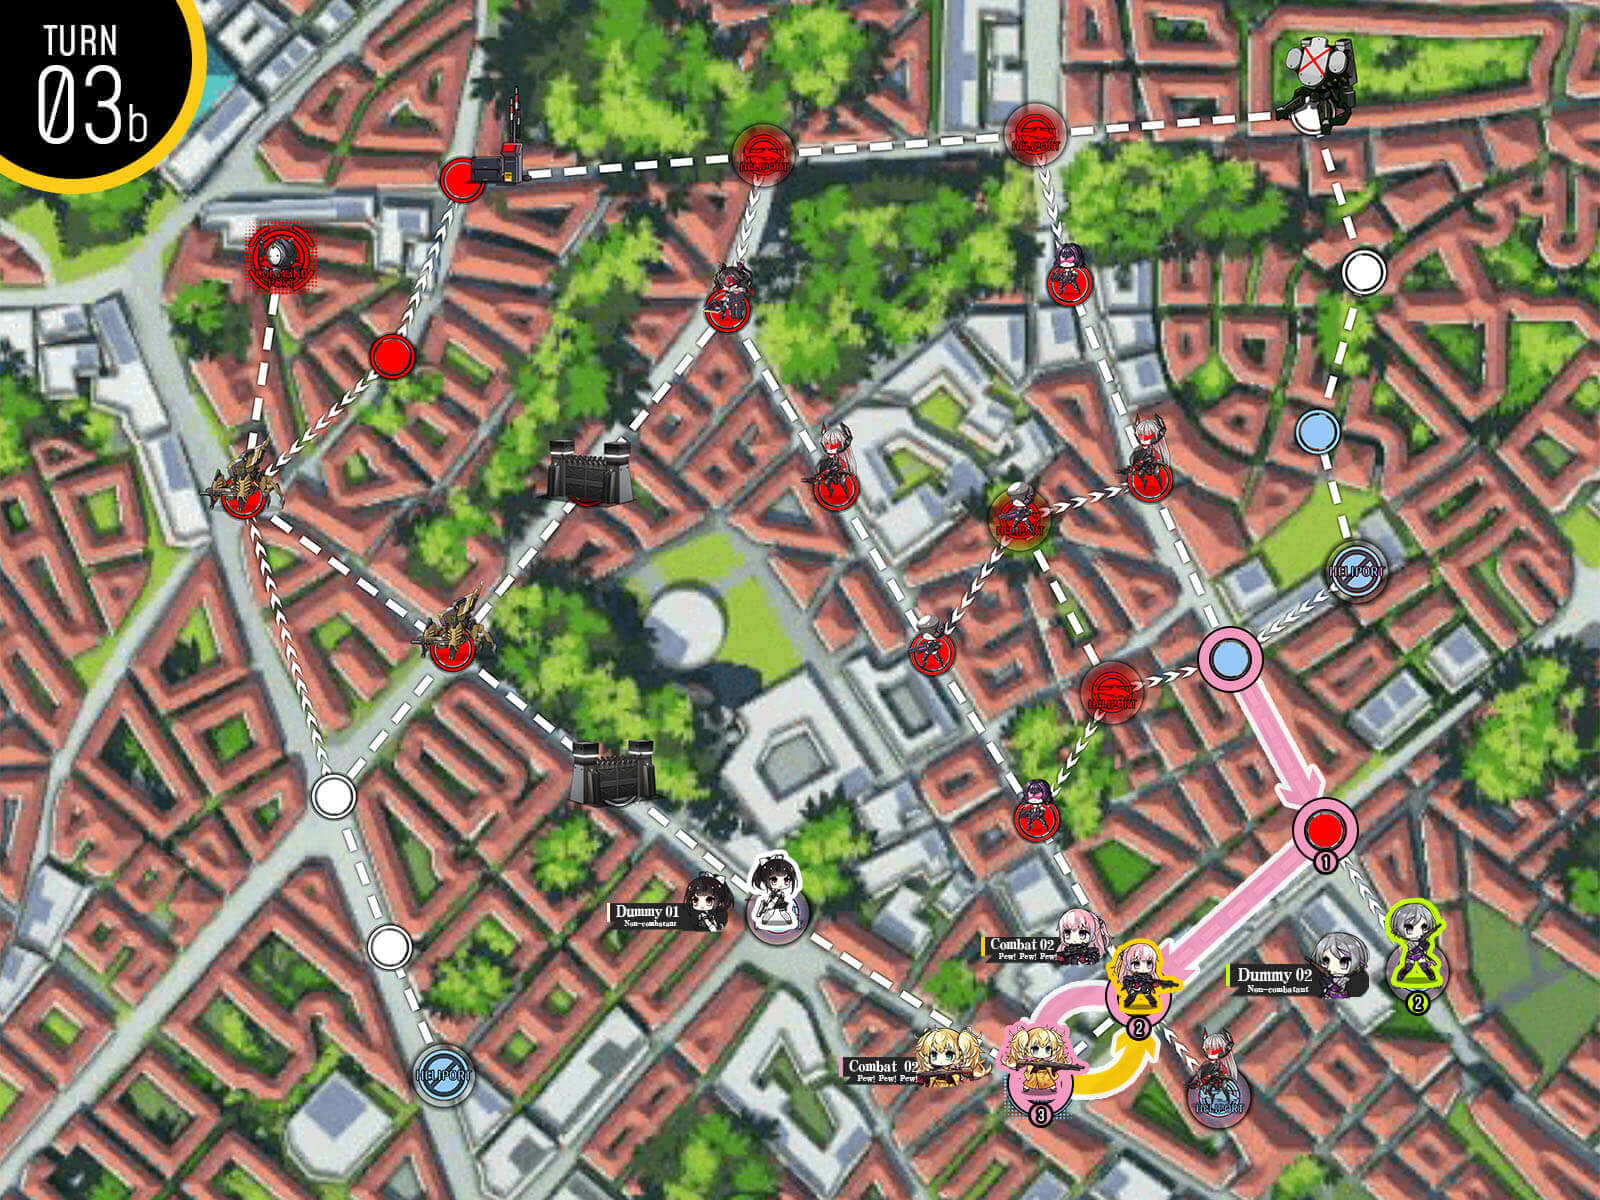
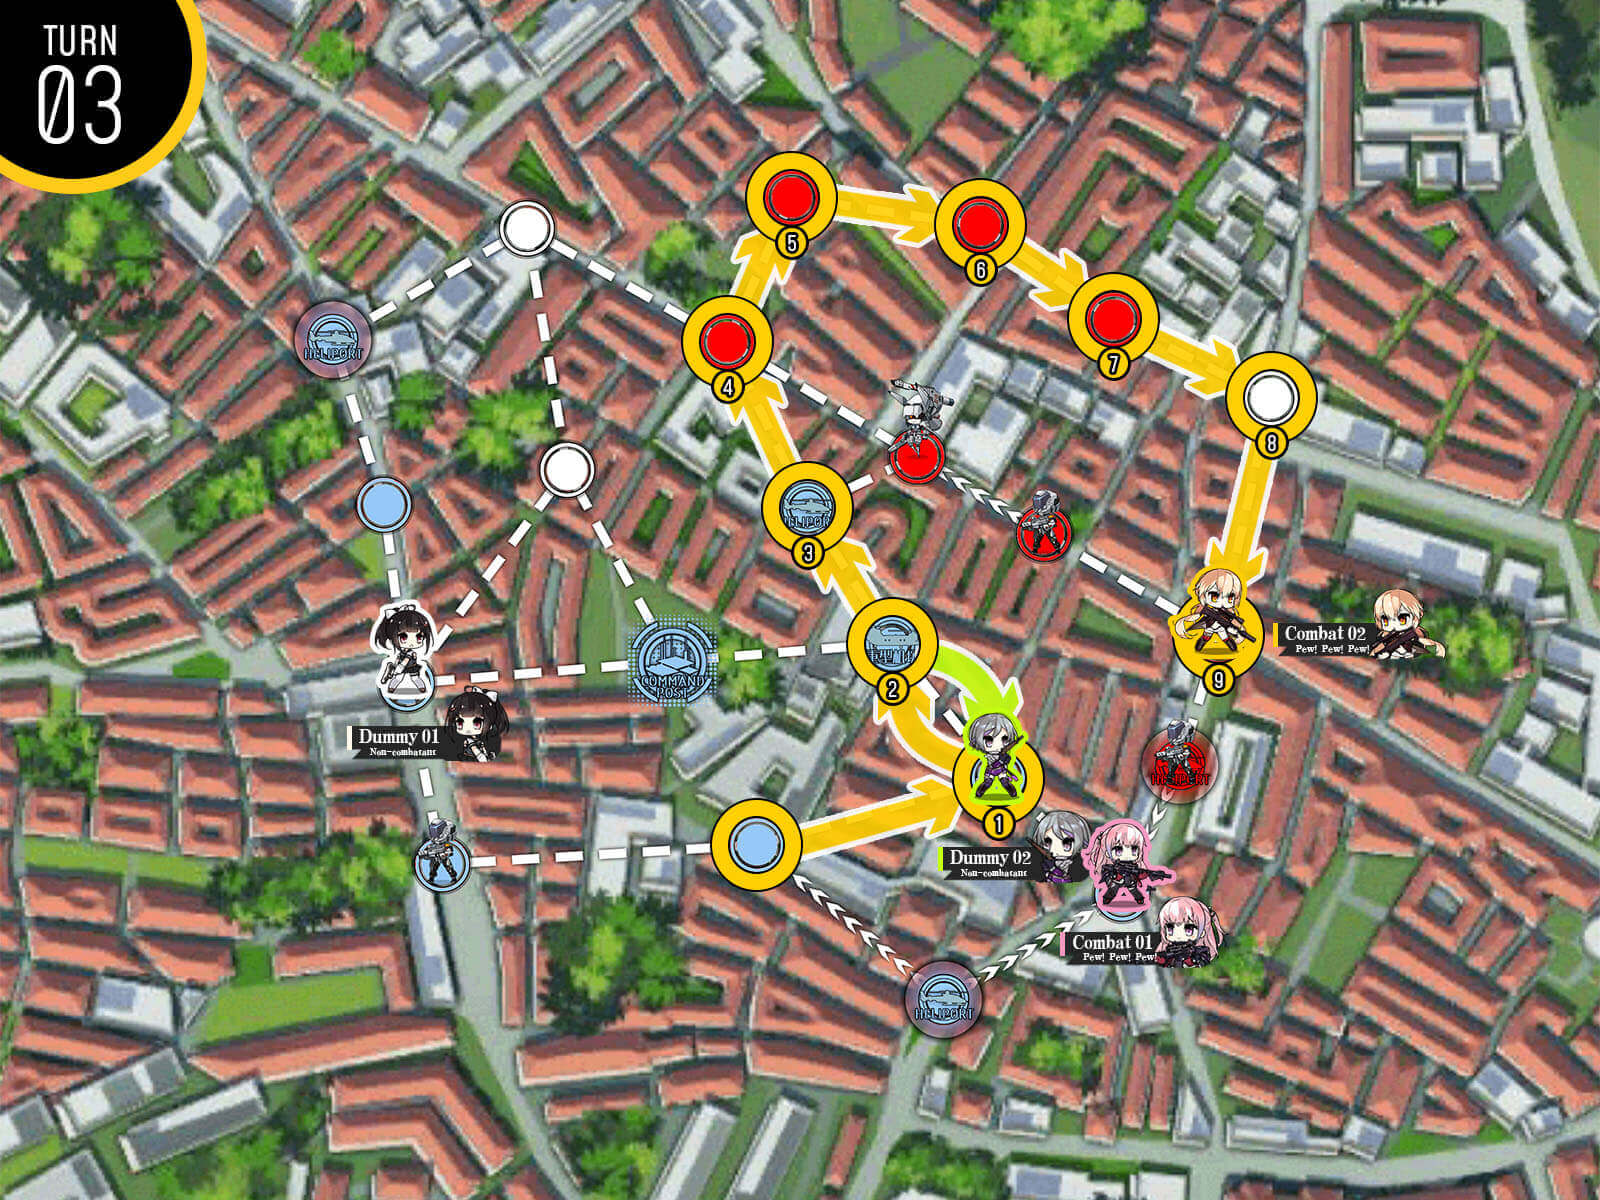
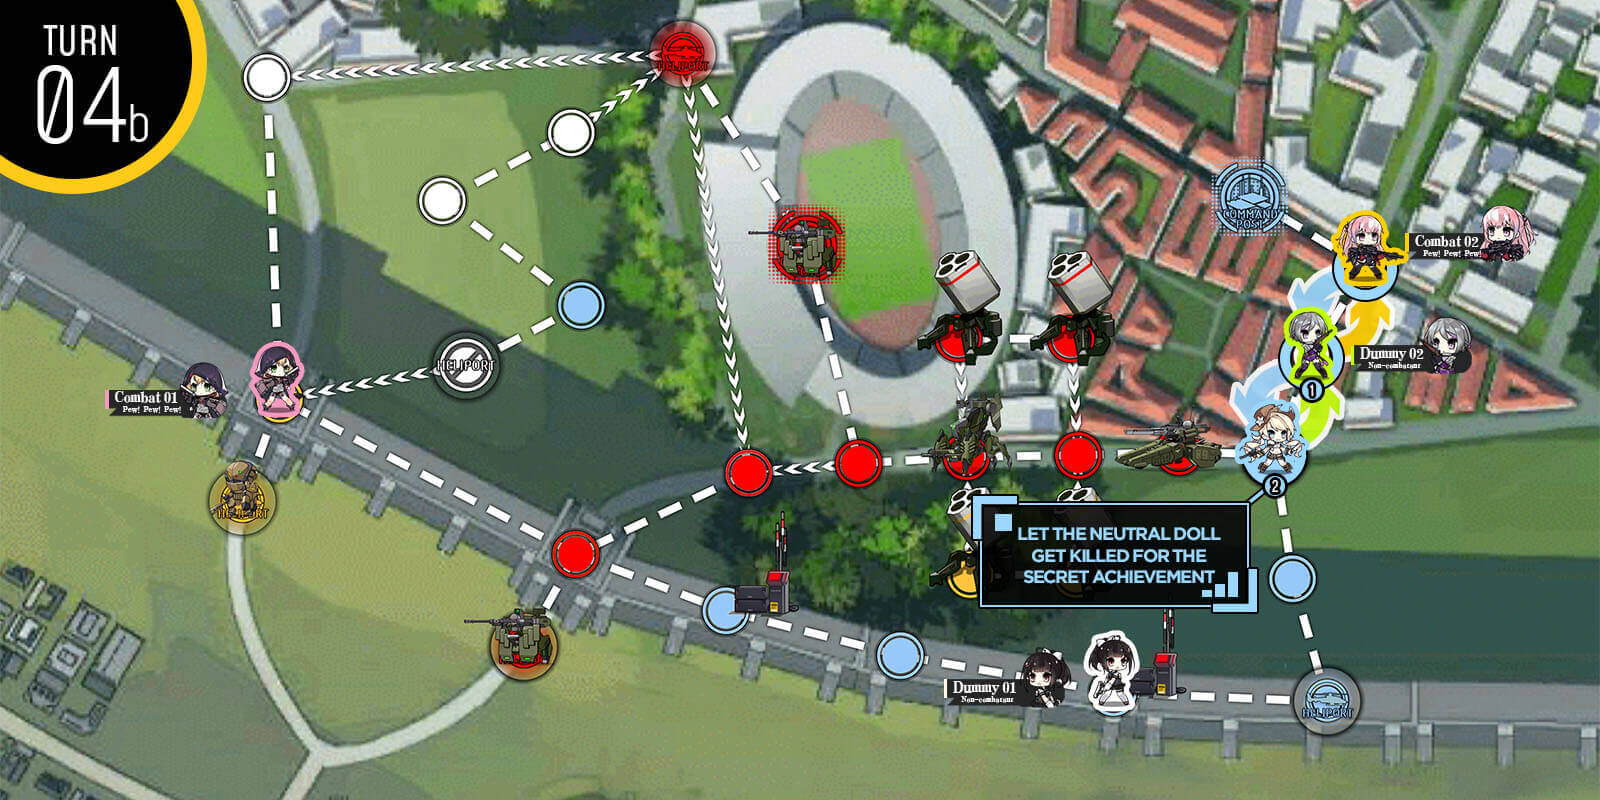
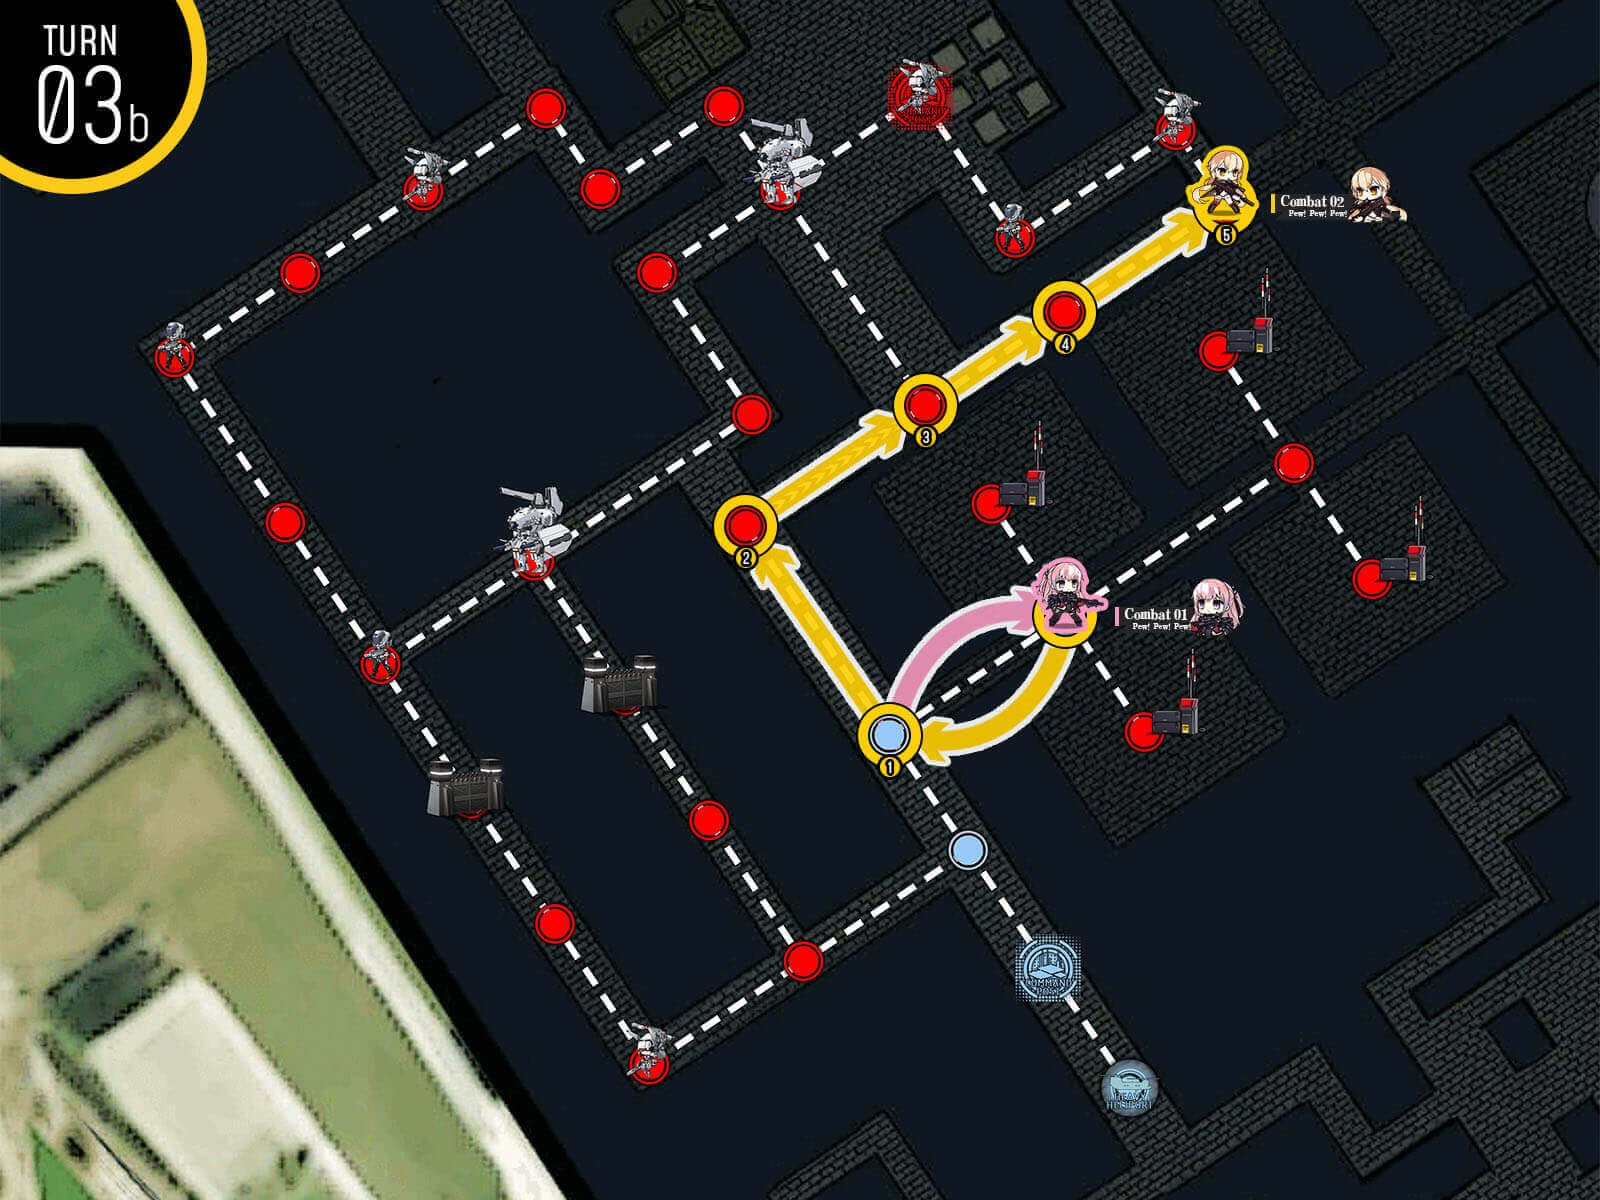
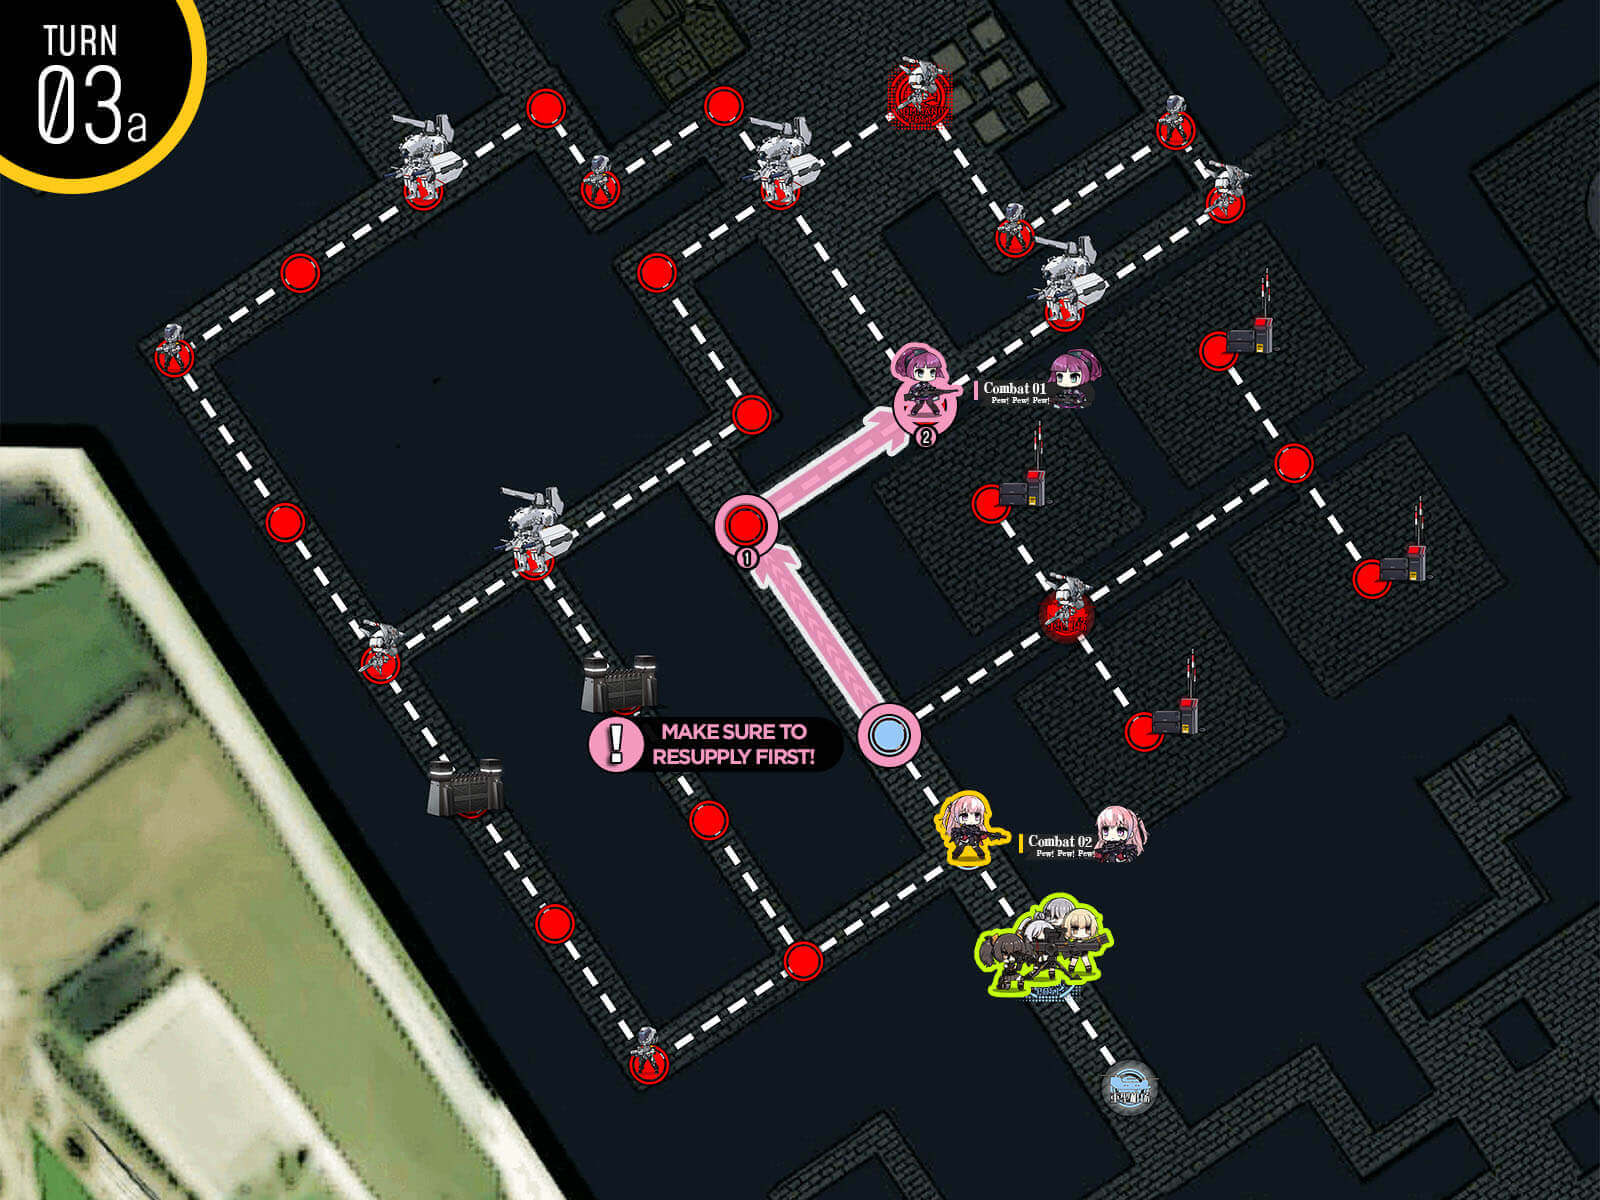
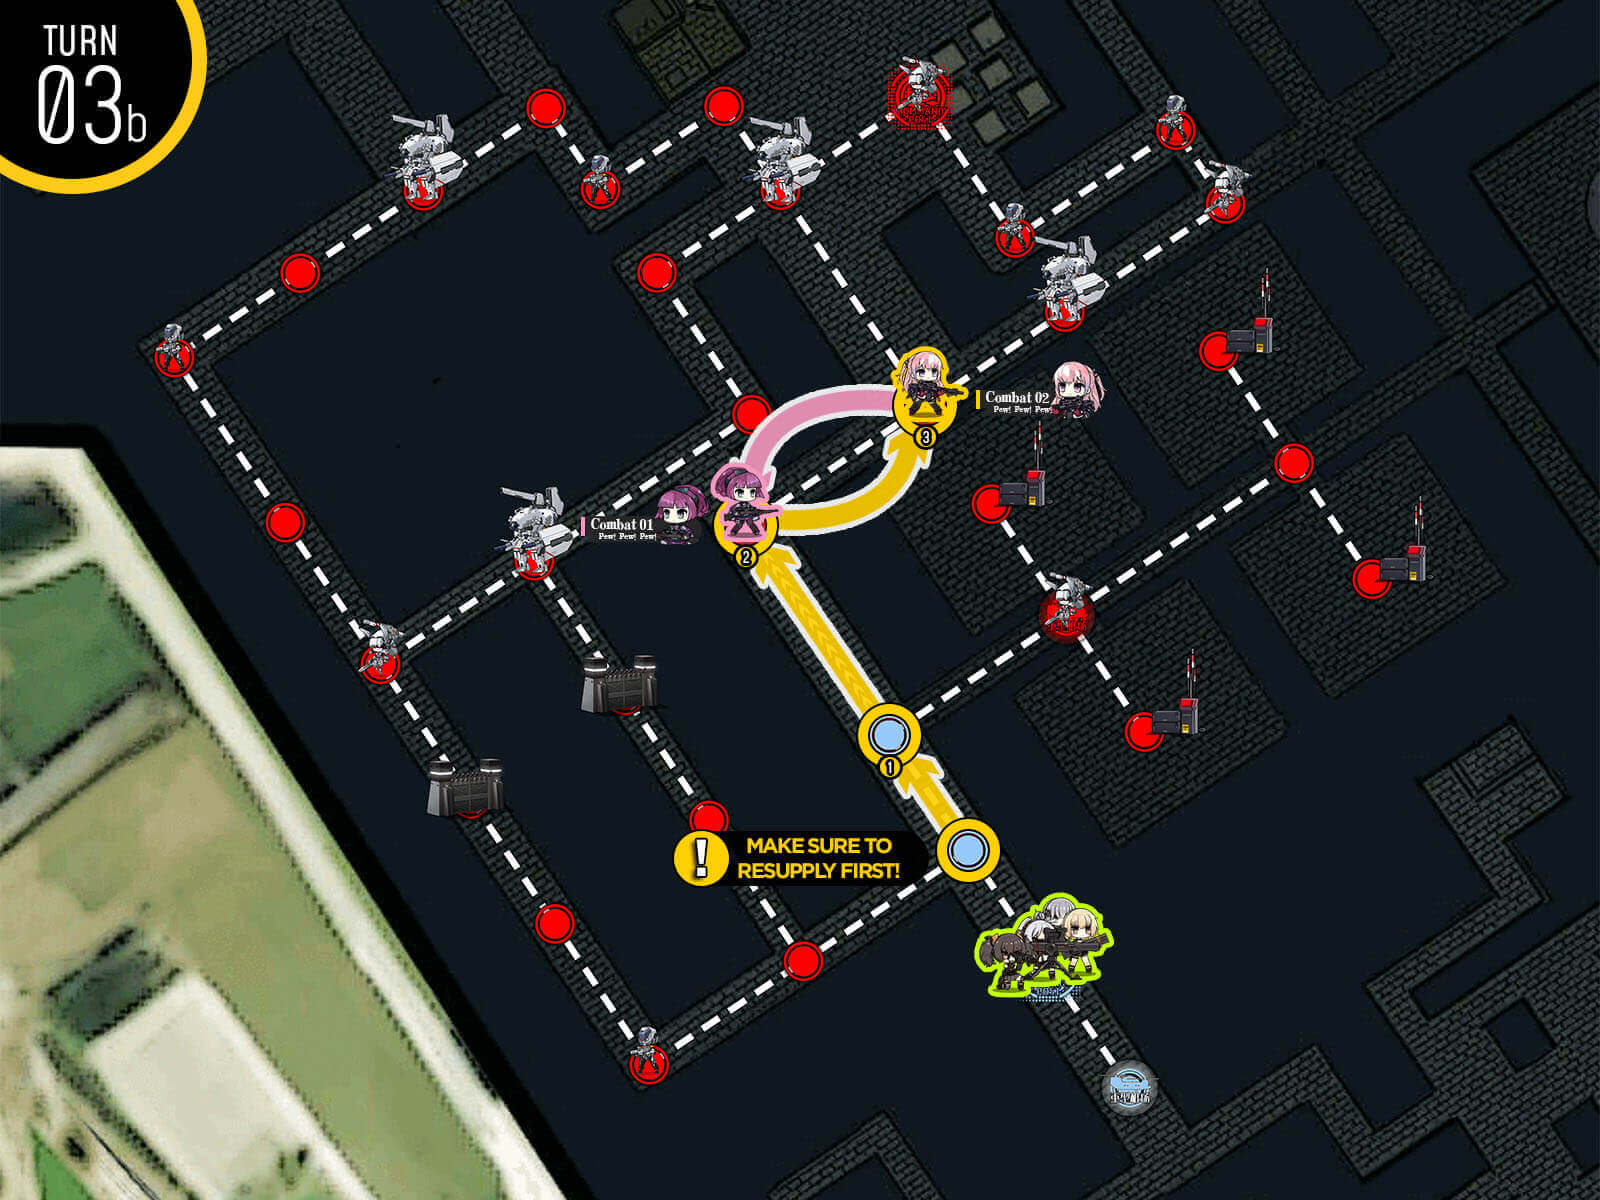
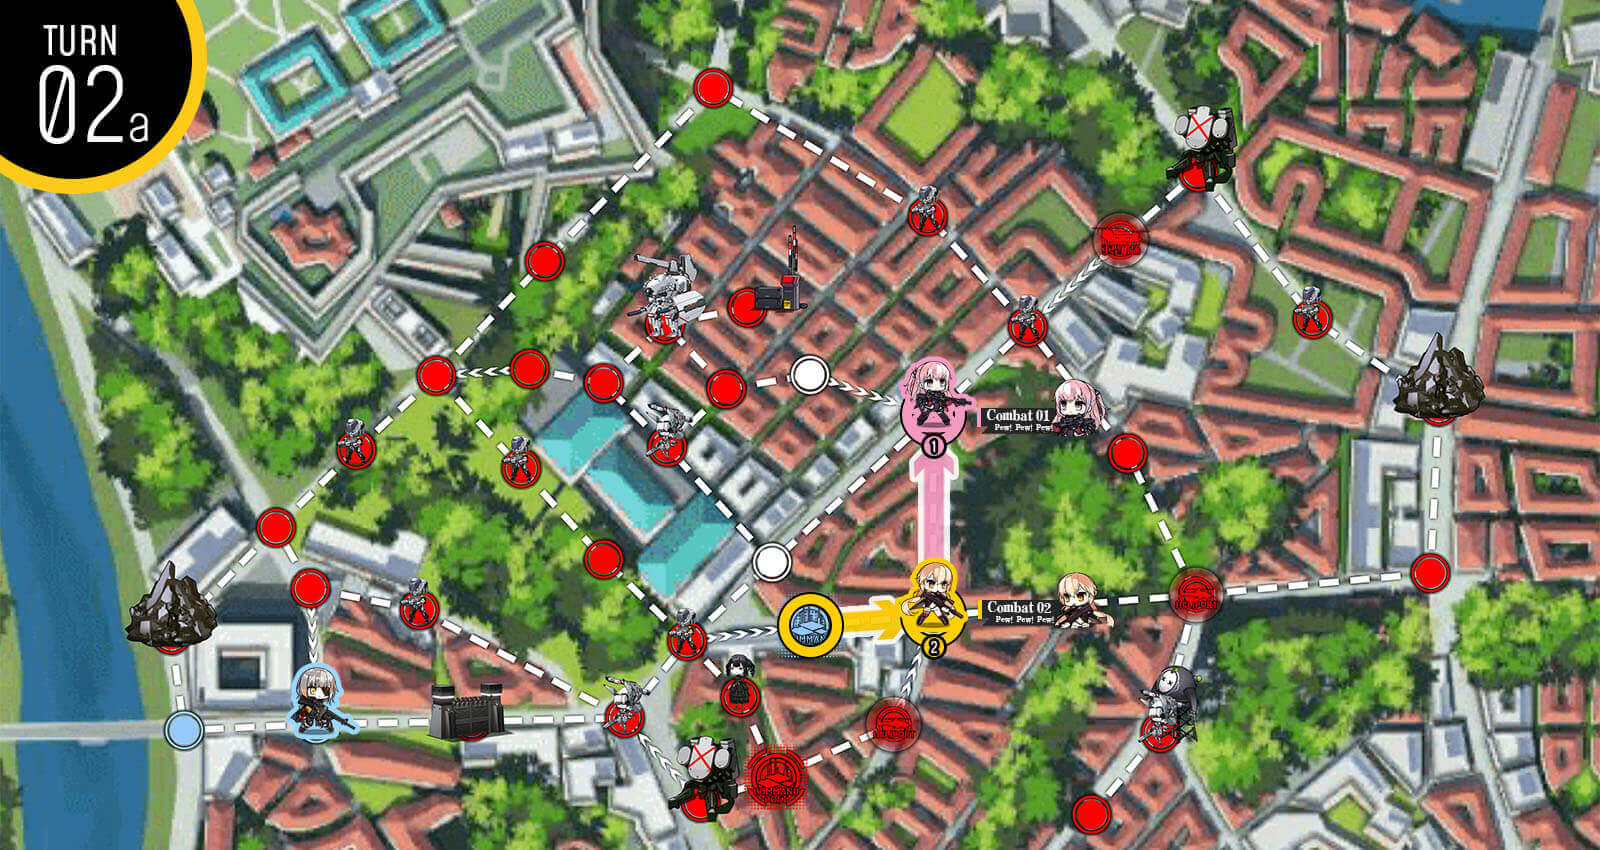
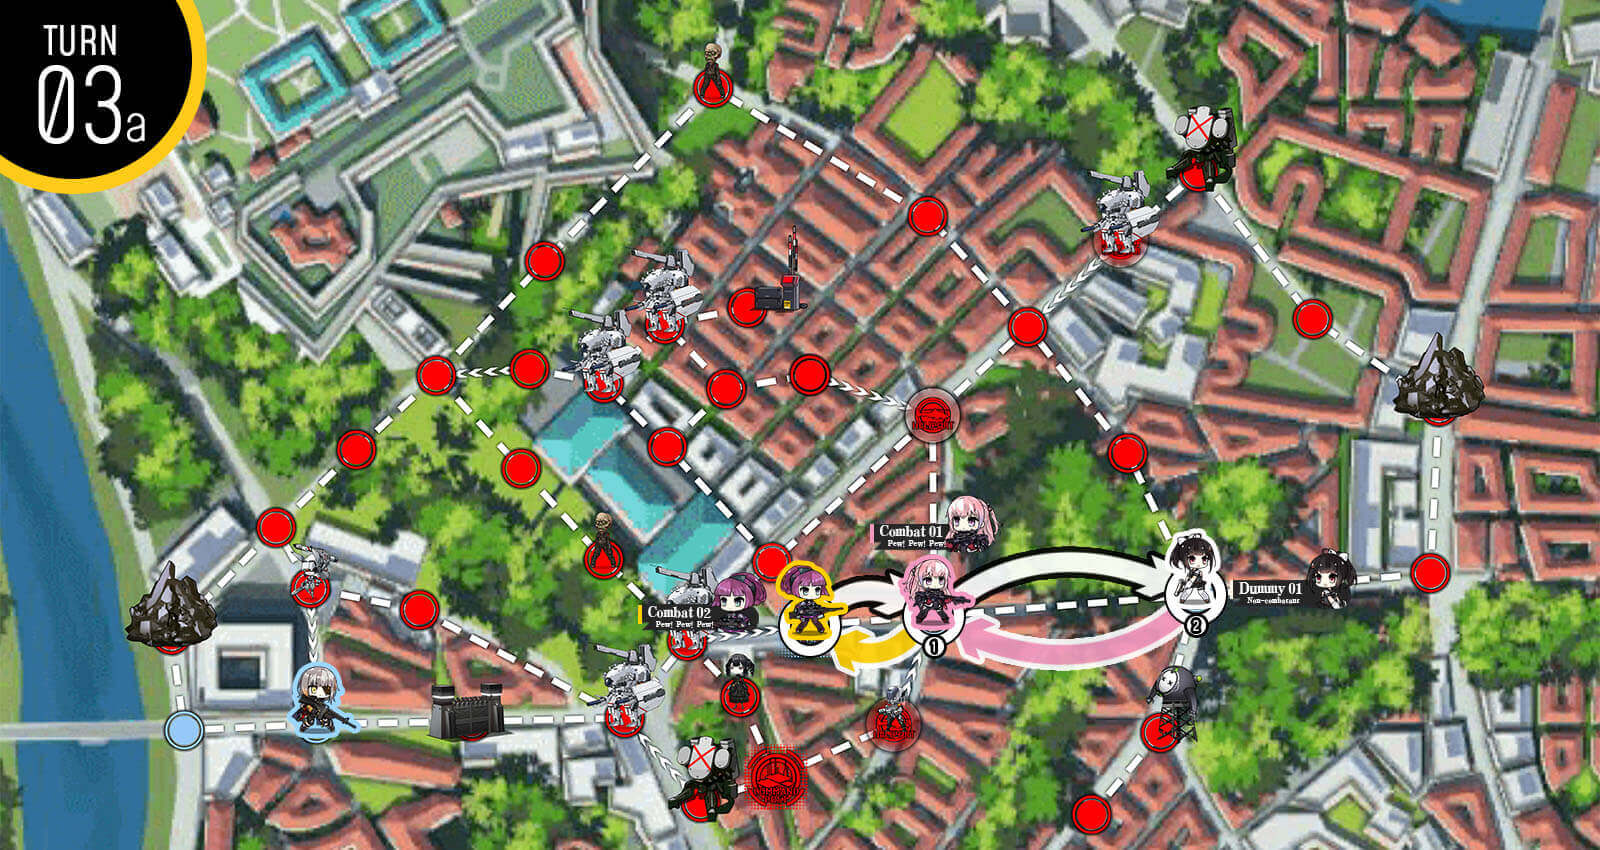
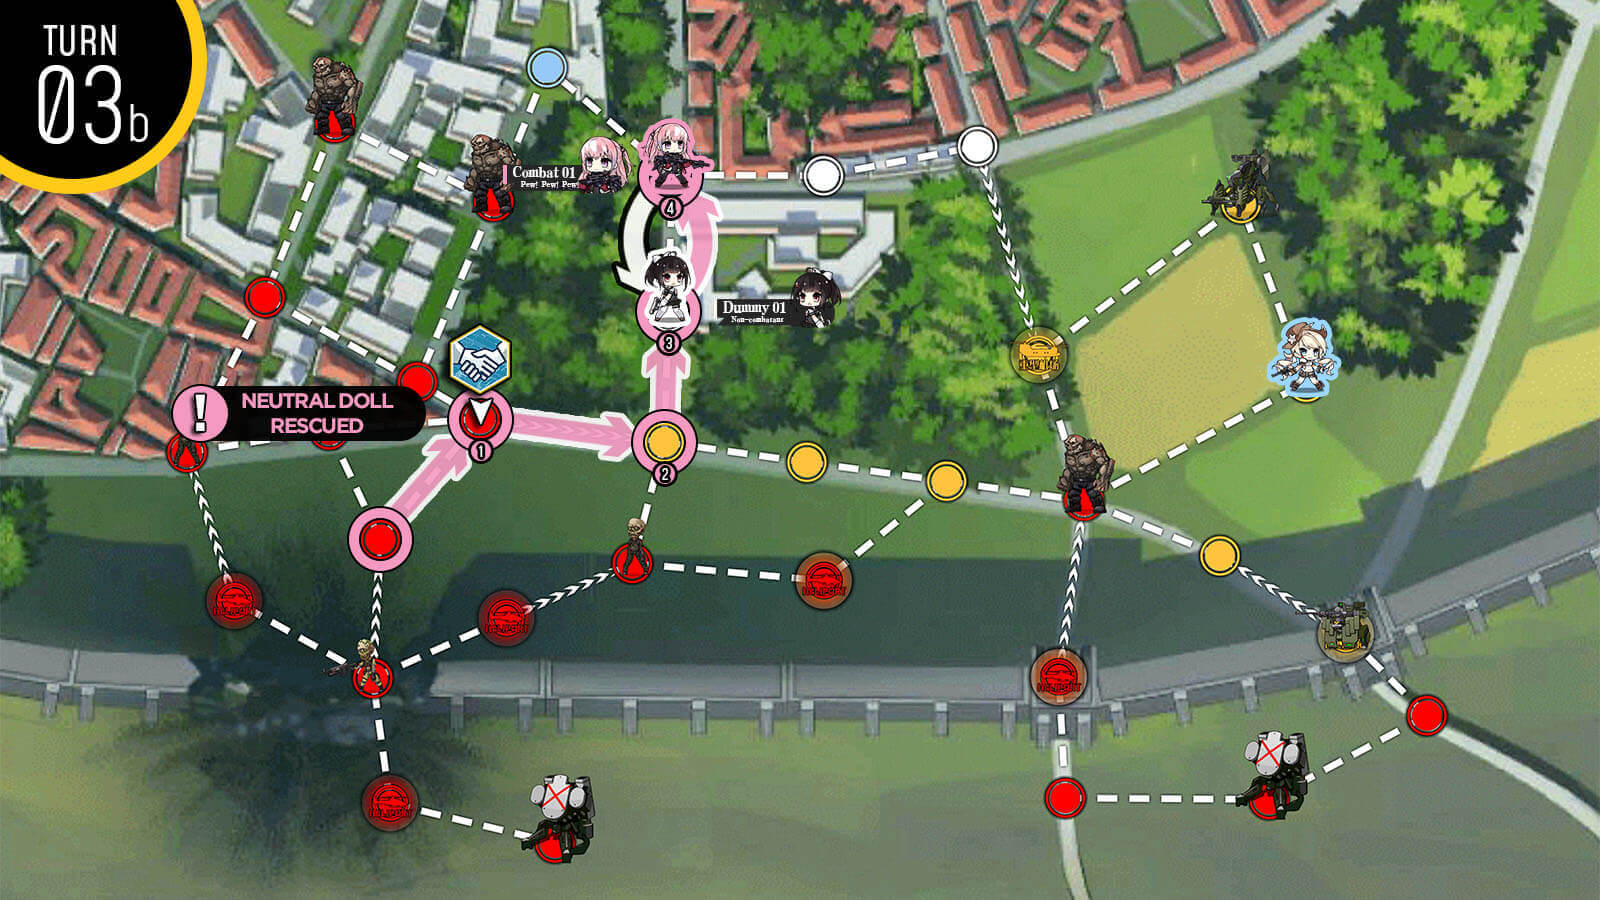
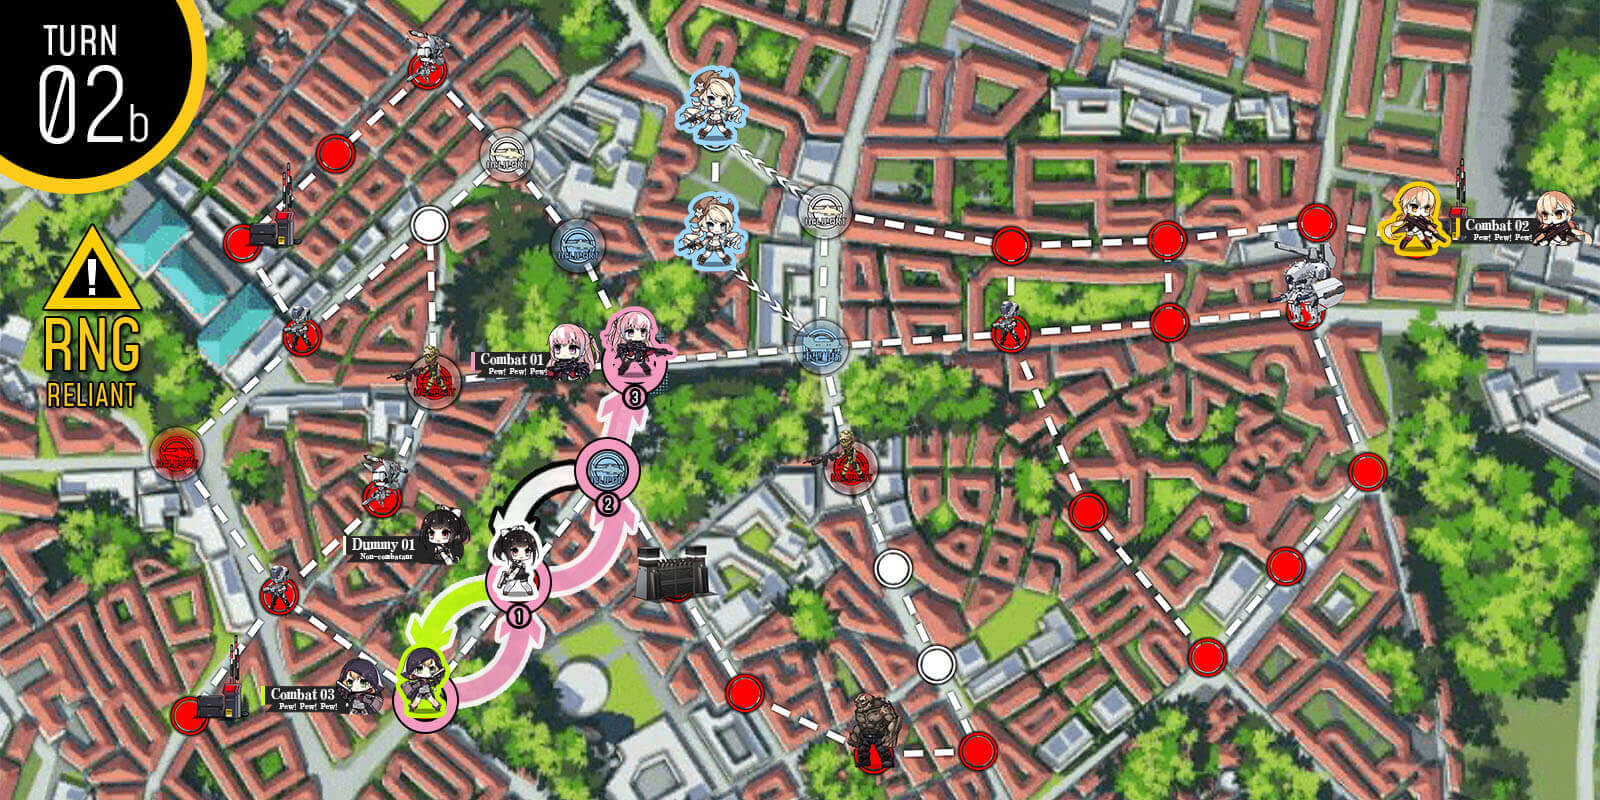
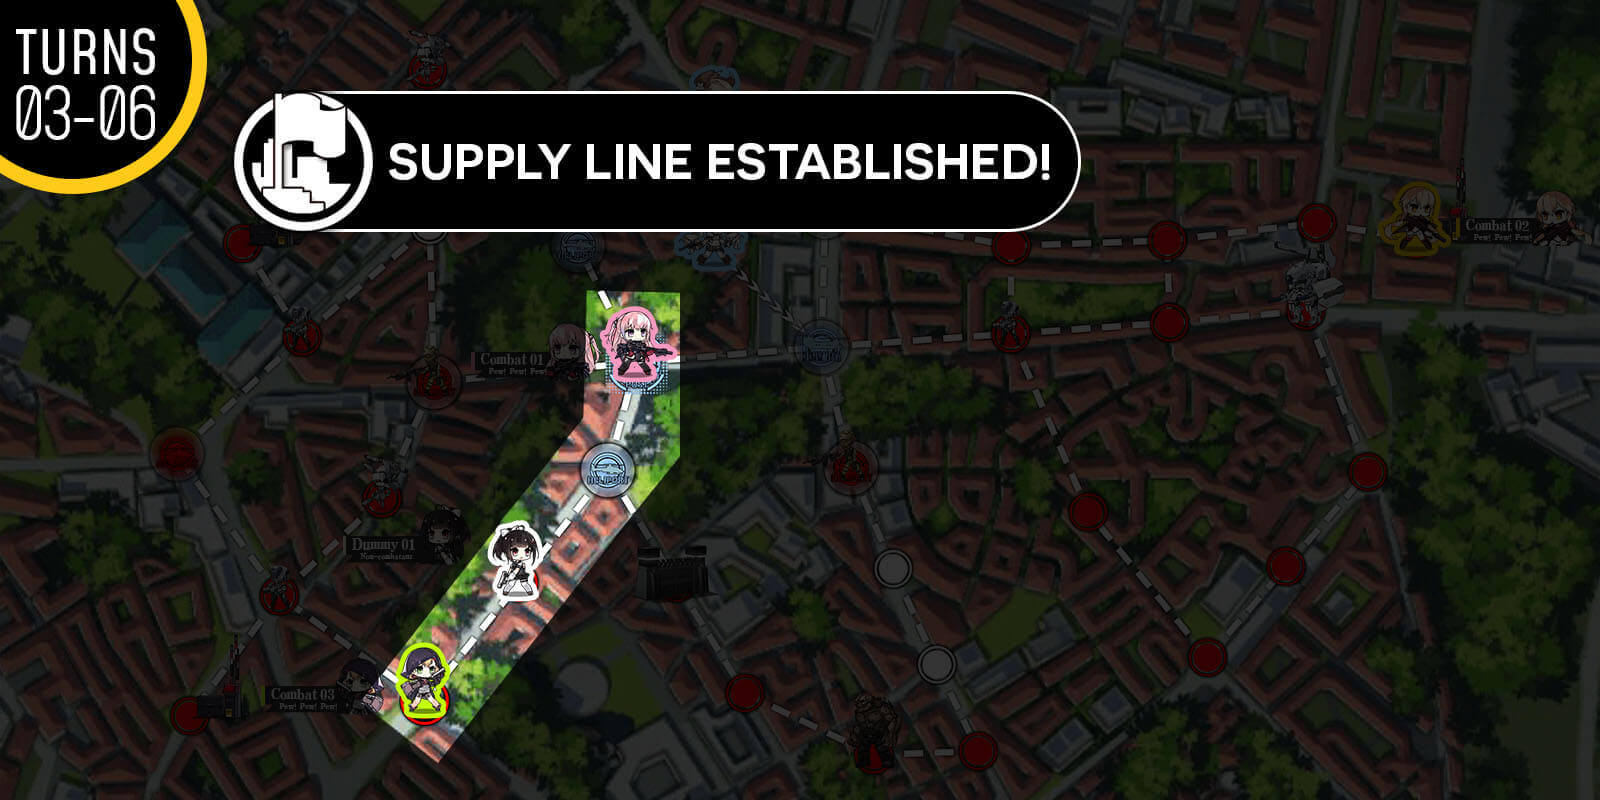
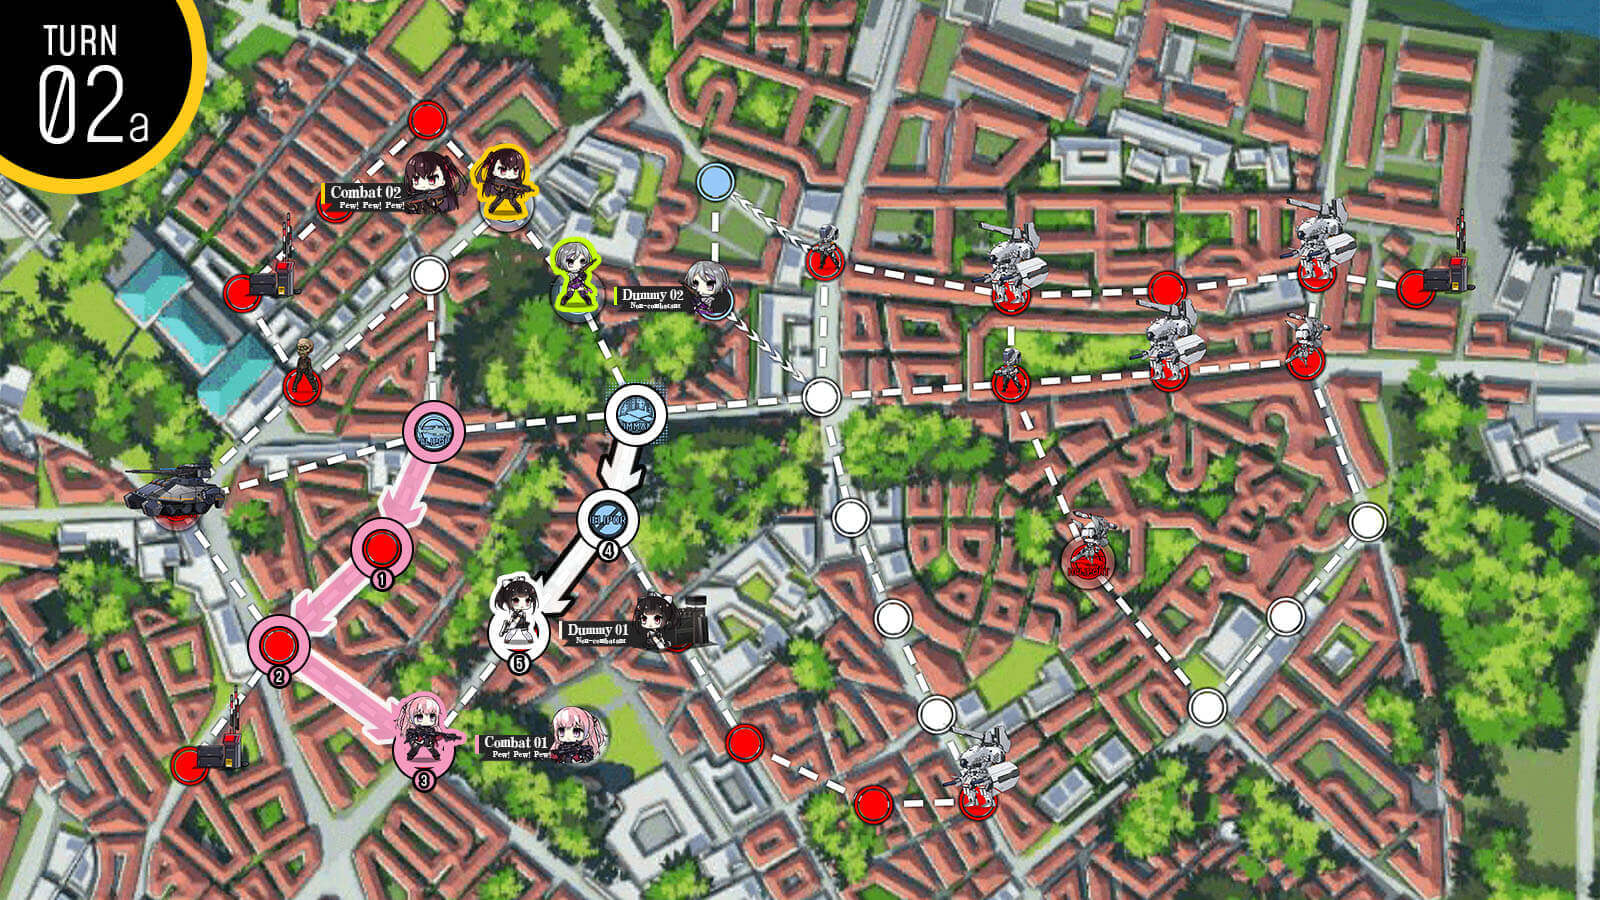
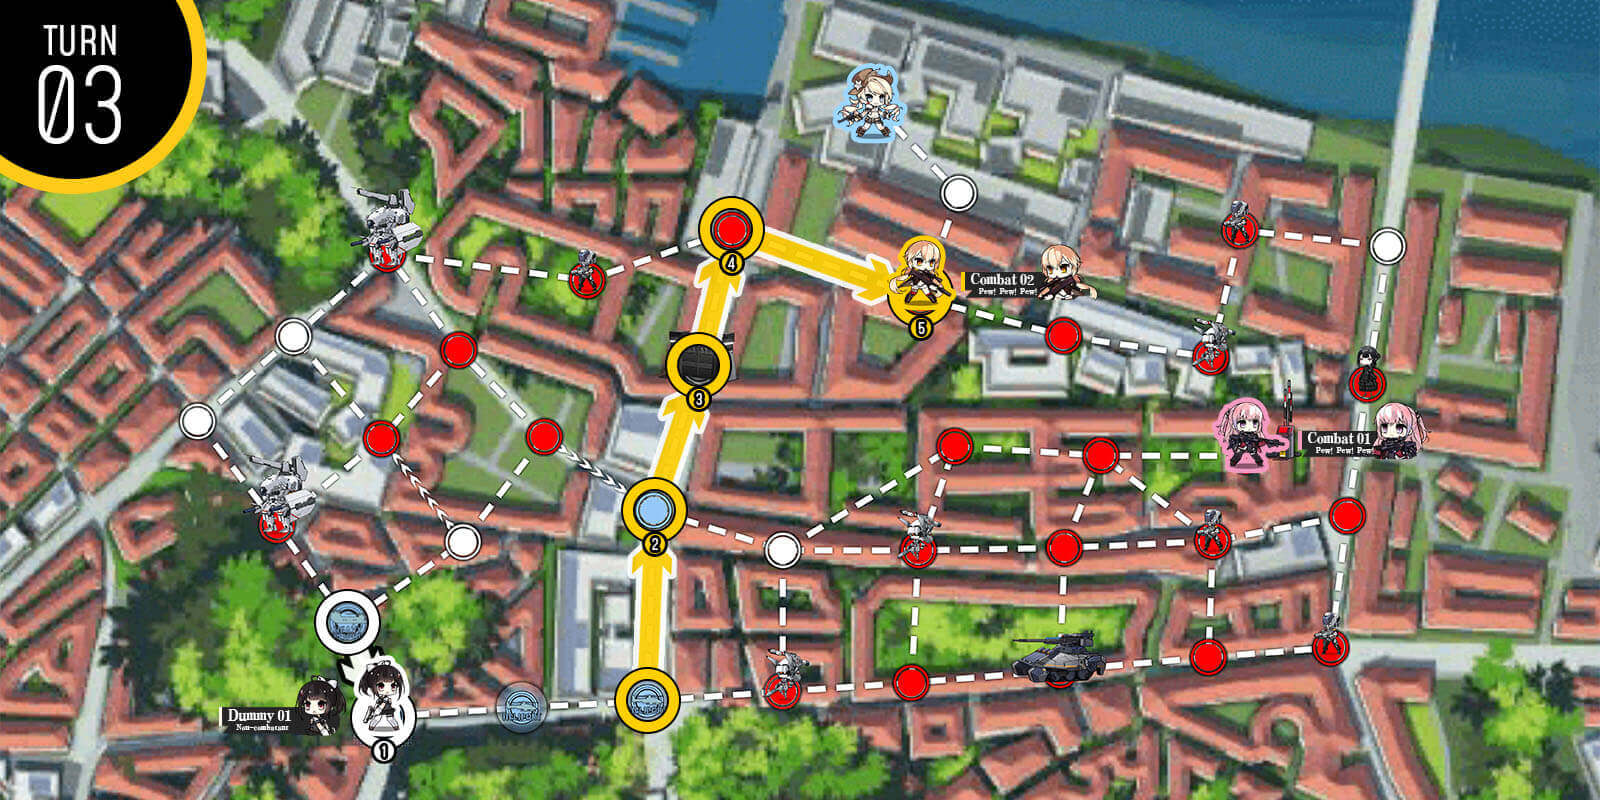
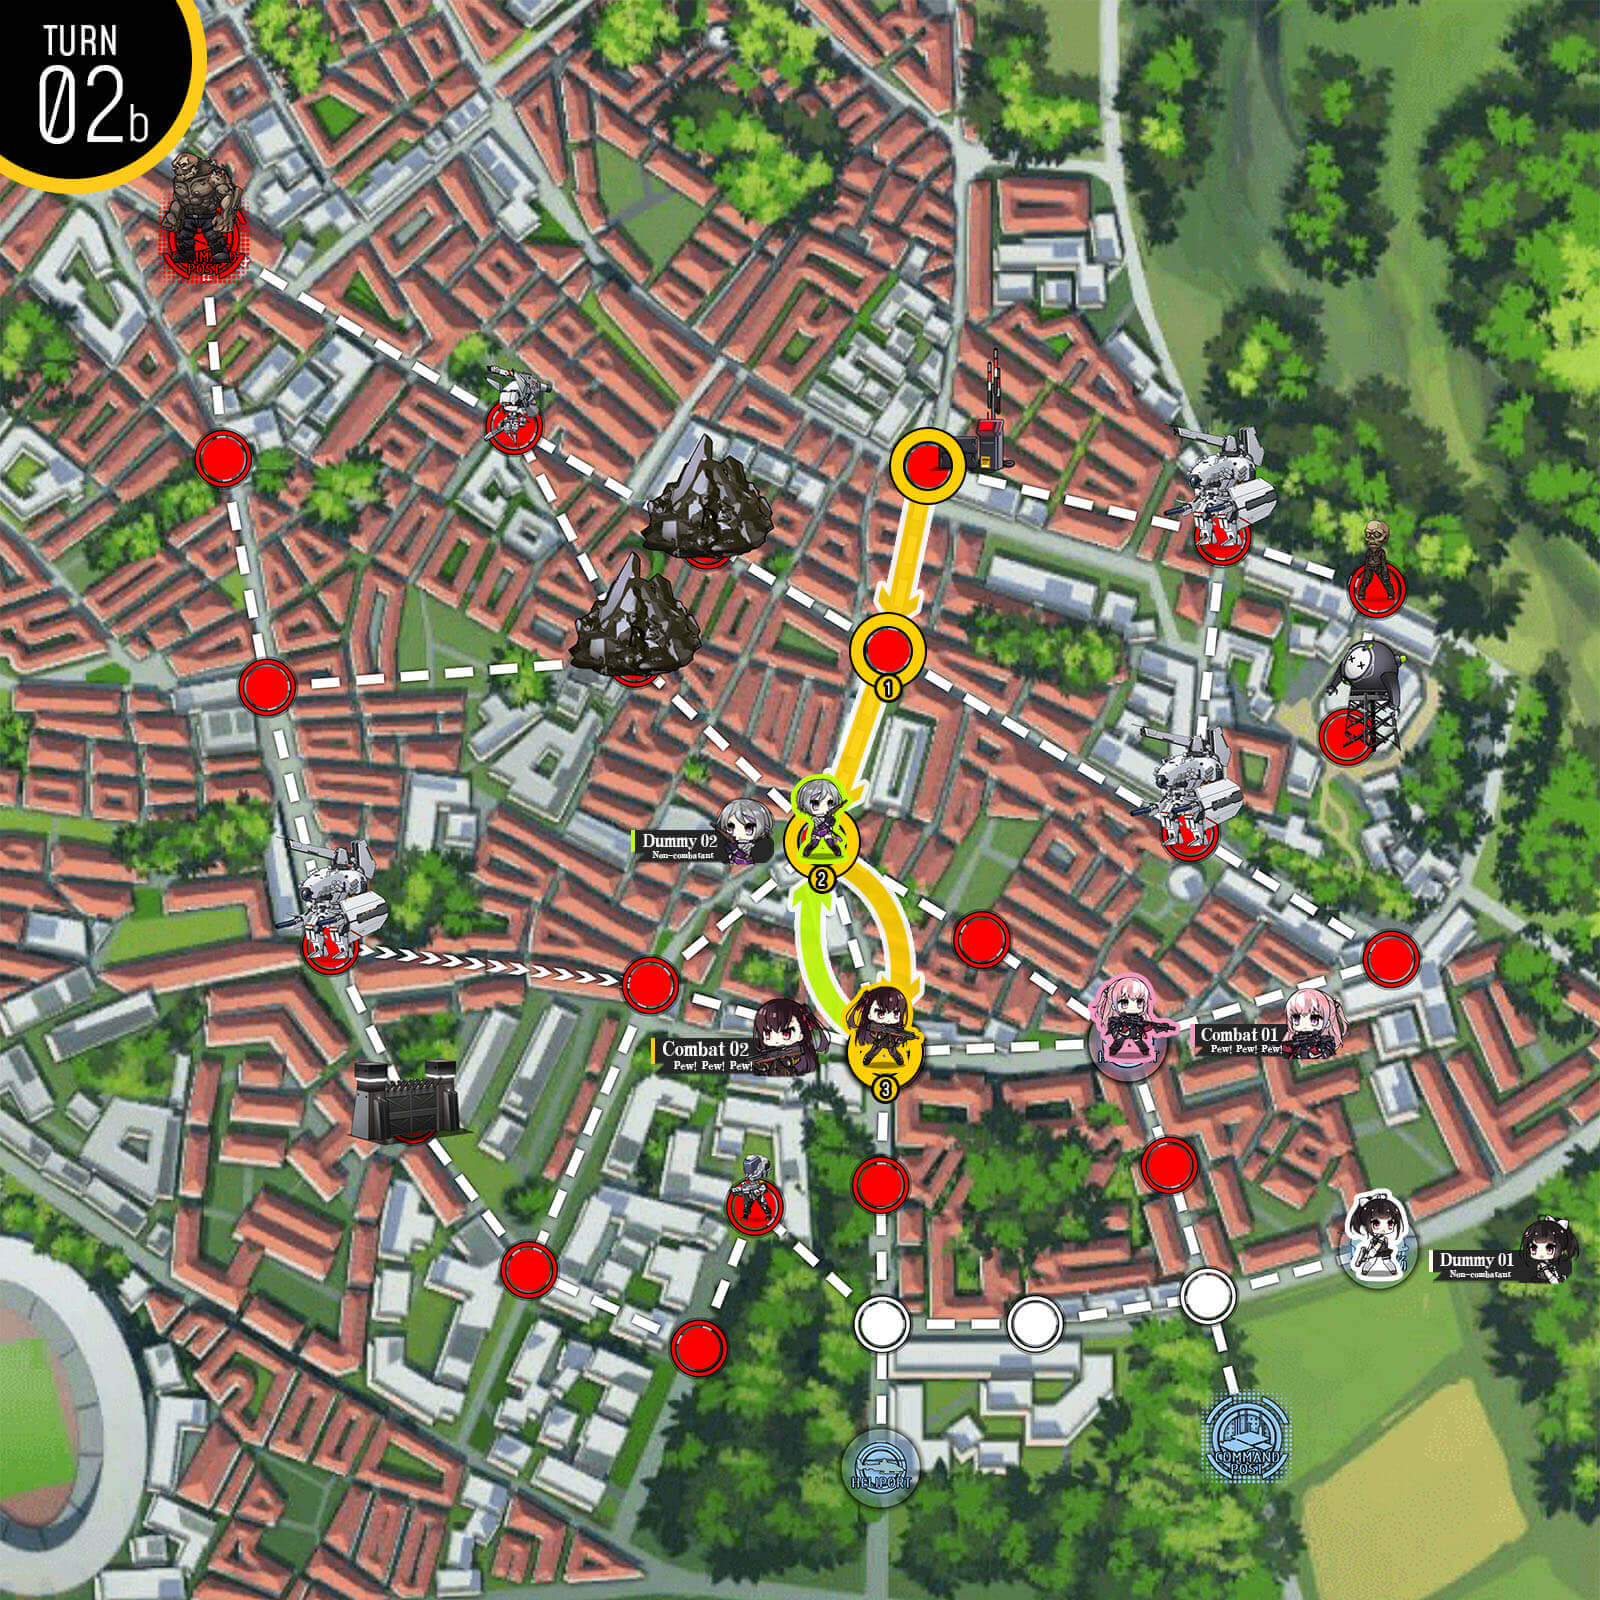
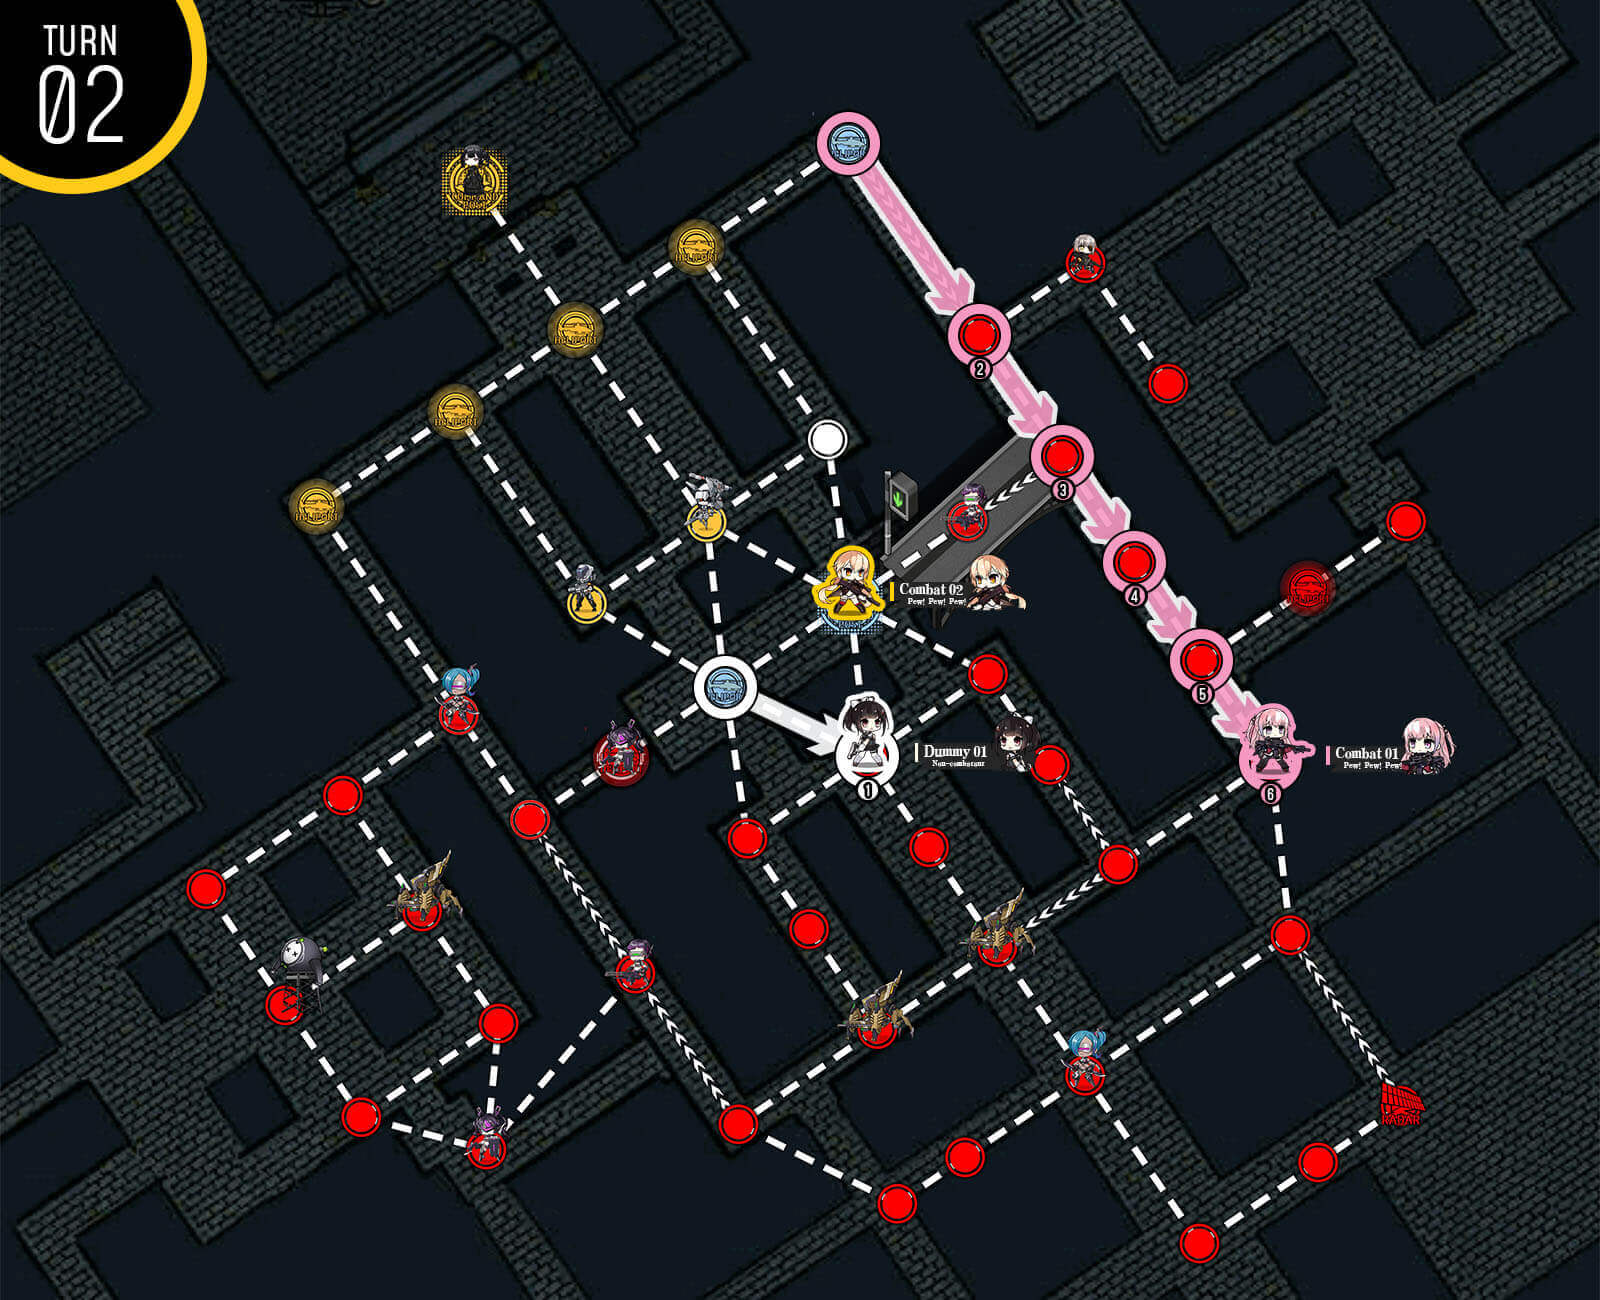
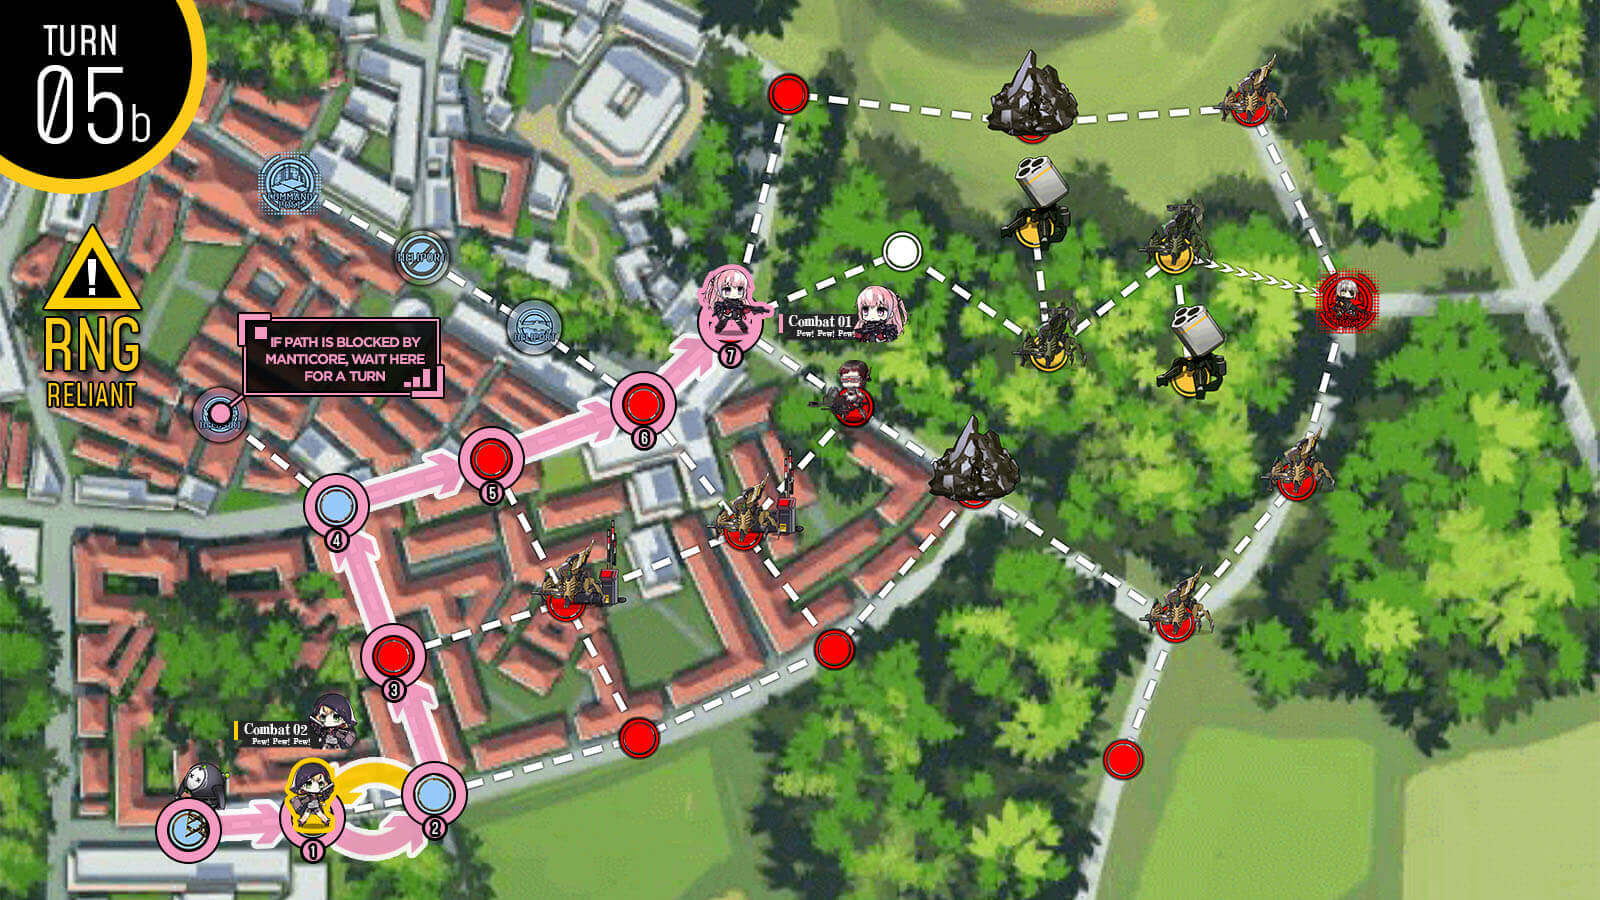
Then combat echelon at the top corner moves down to HQ, then swap with dummy echelons to the center [this saves some moves and protects dummies from RNG]. Resupply at HQ then move down to the node between the enemy helipads to surround capture one of the enemy spawn helipads.
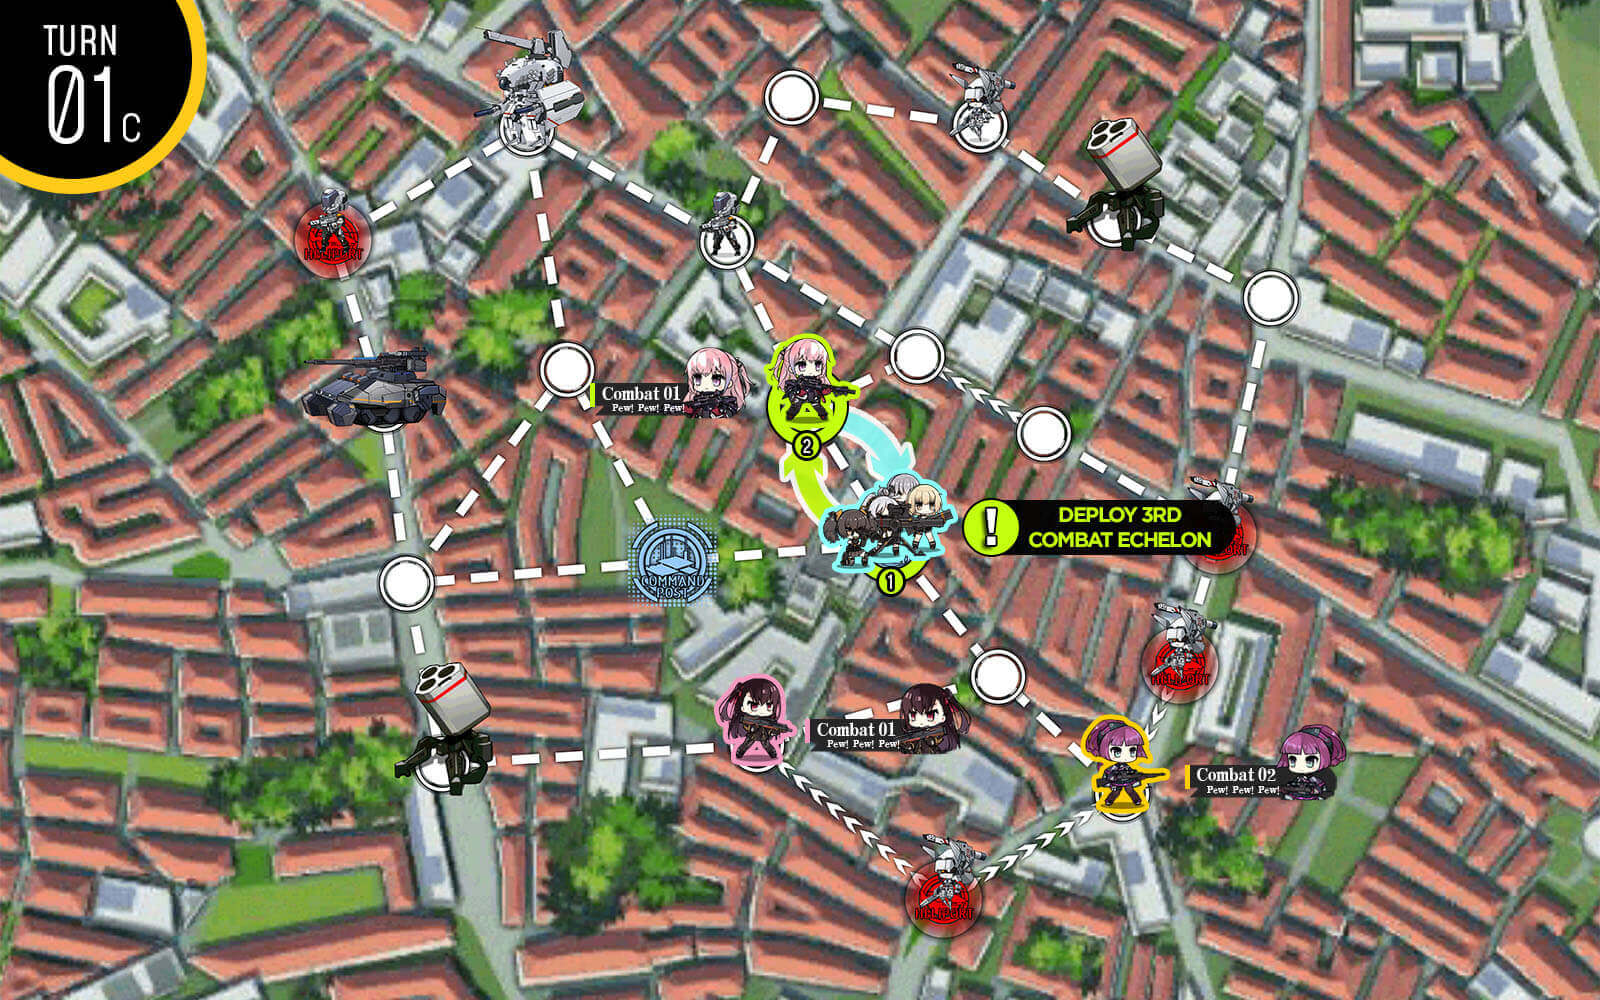
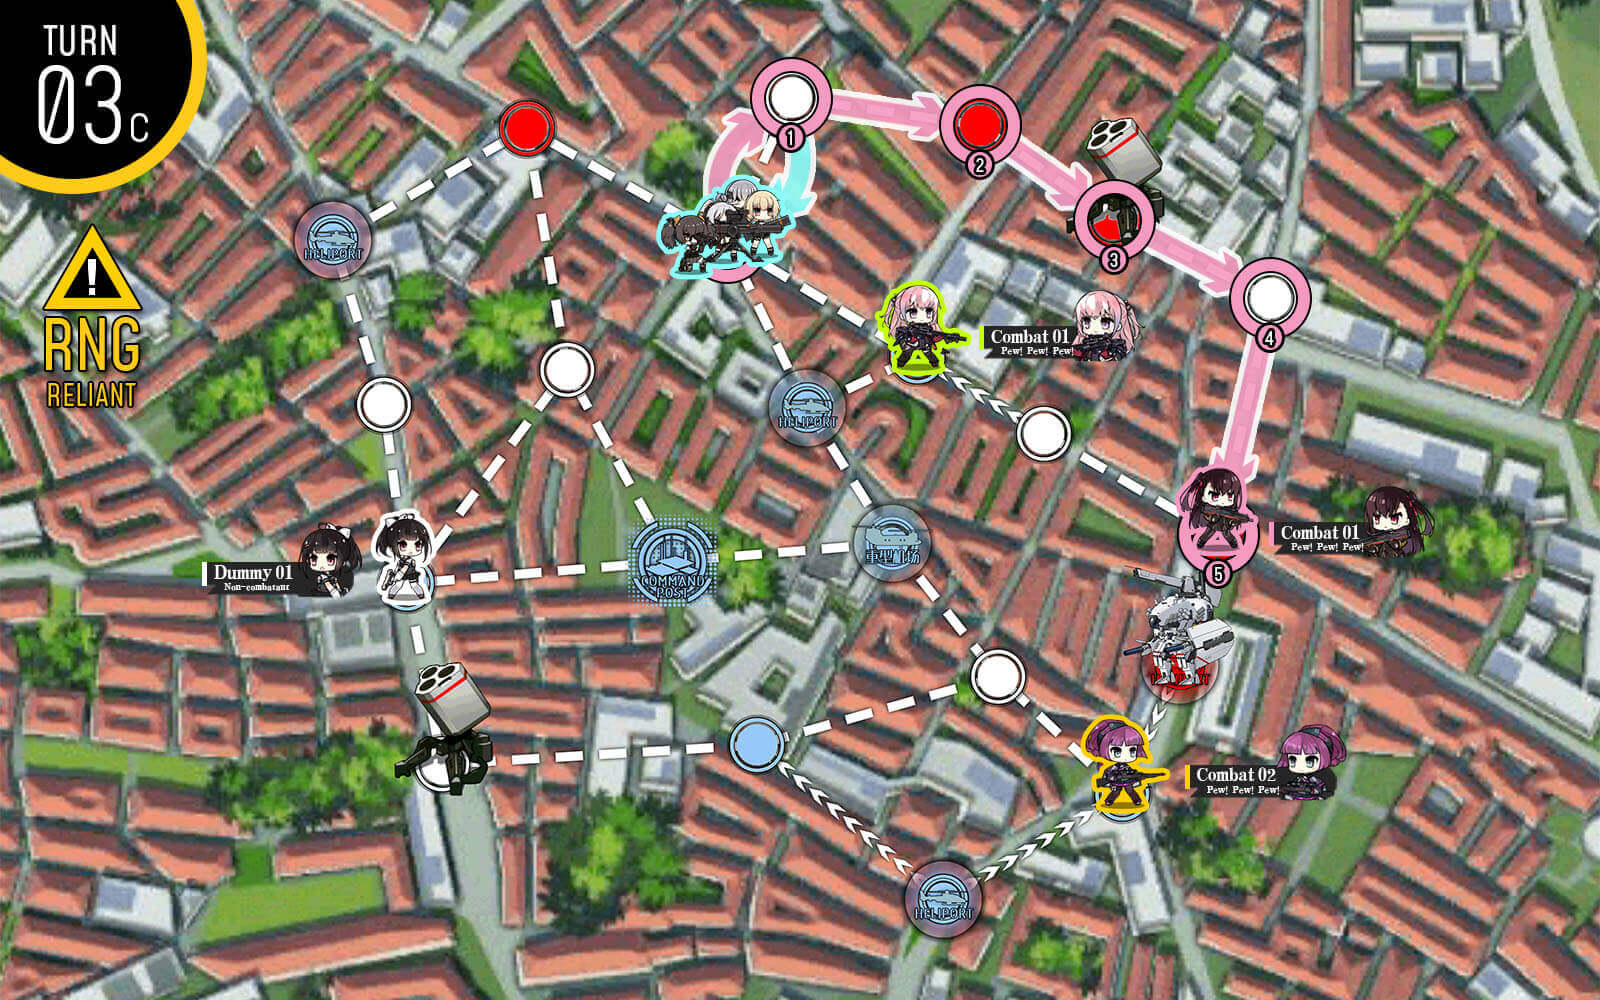
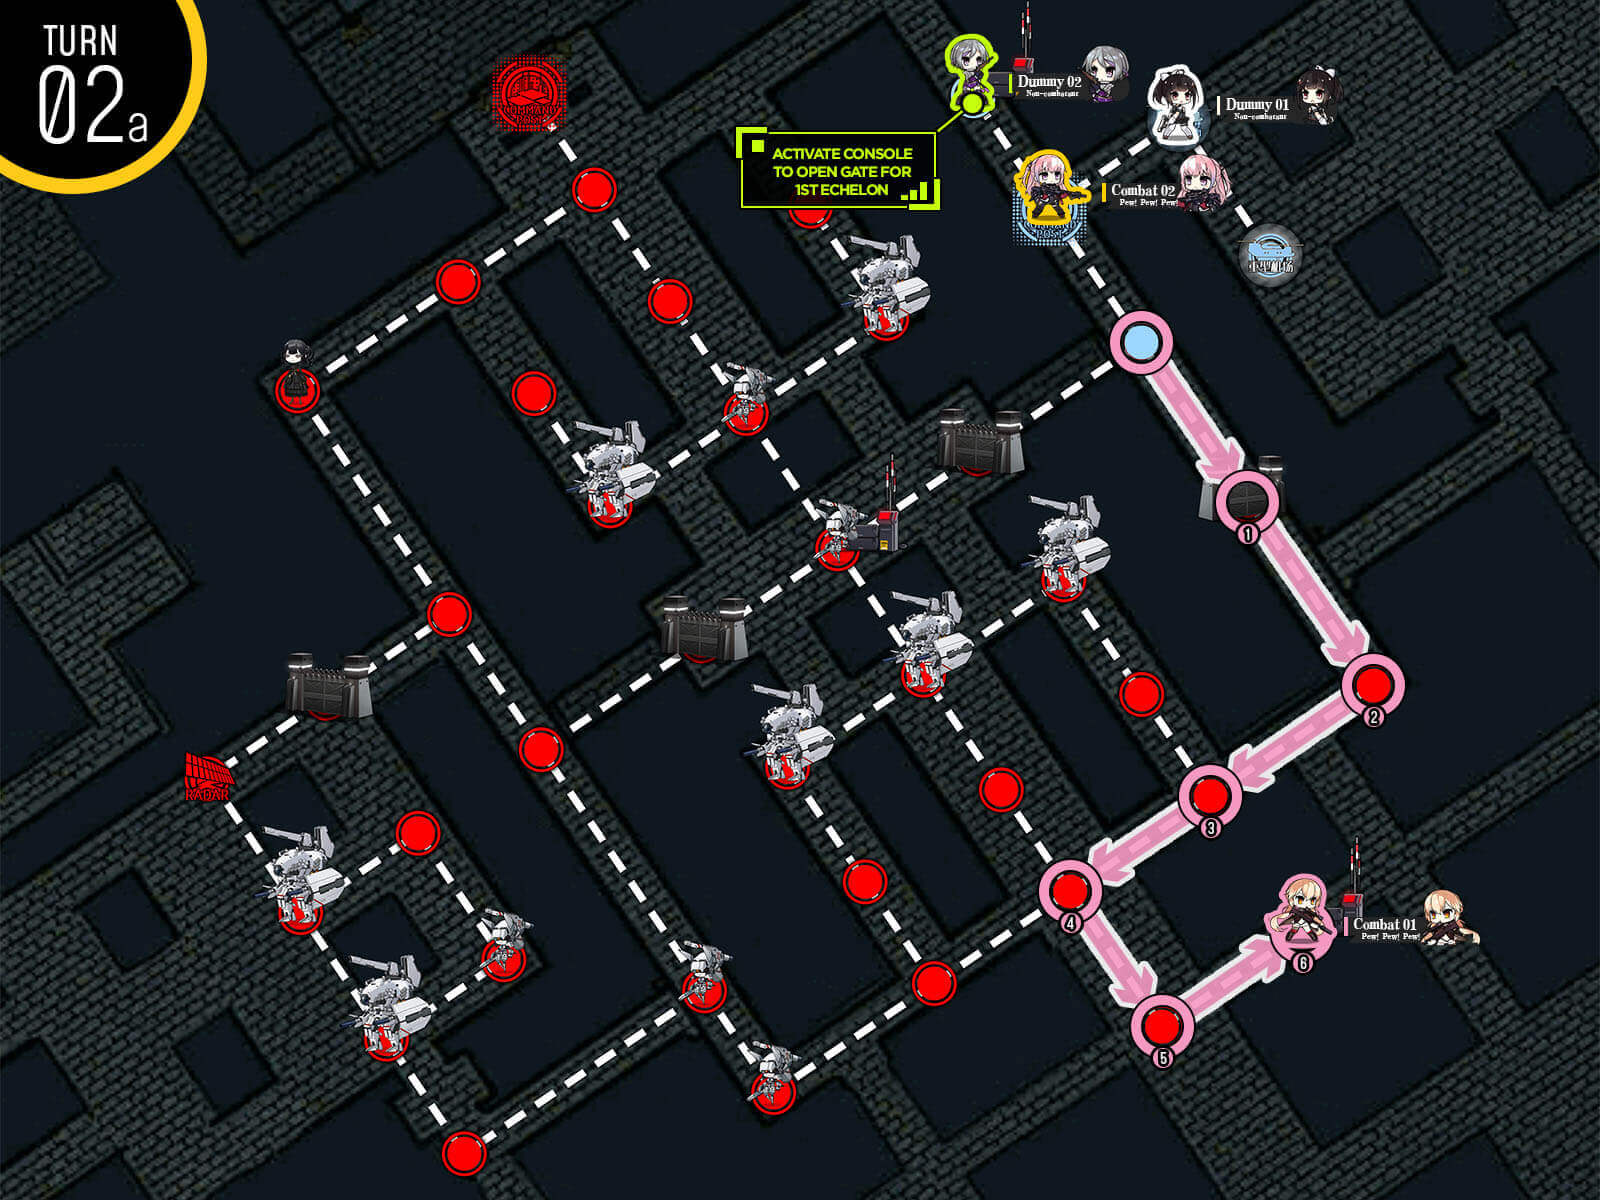
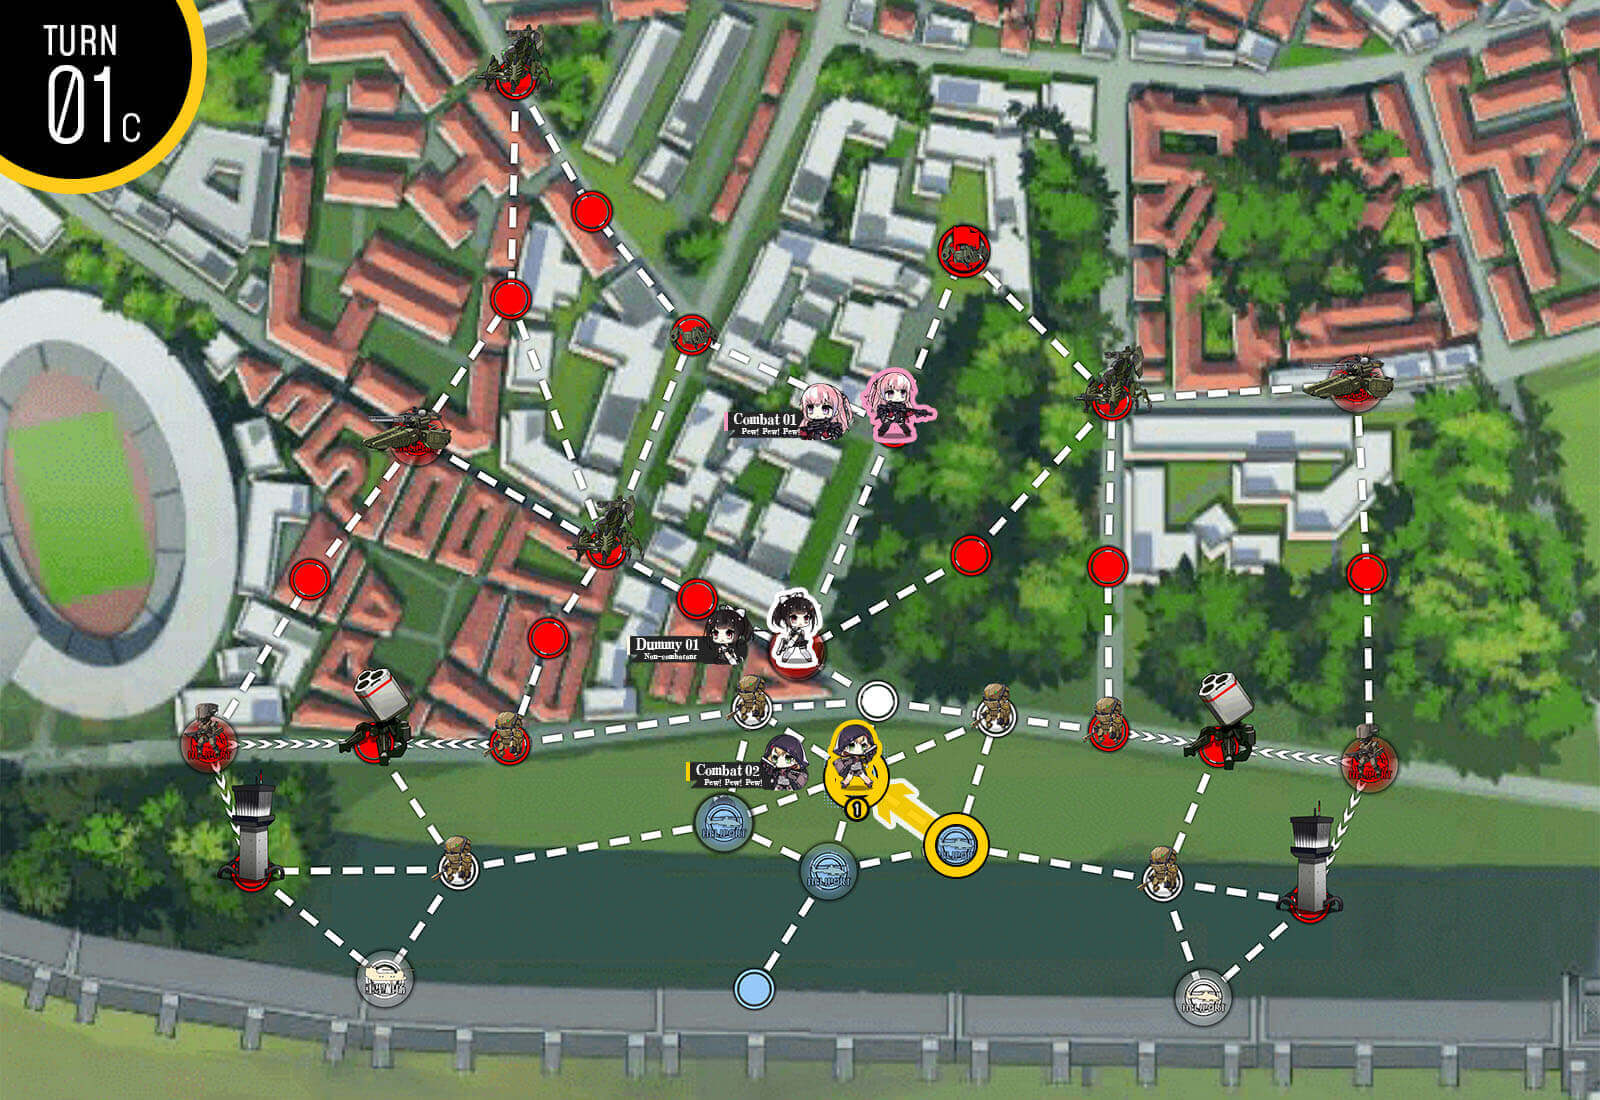
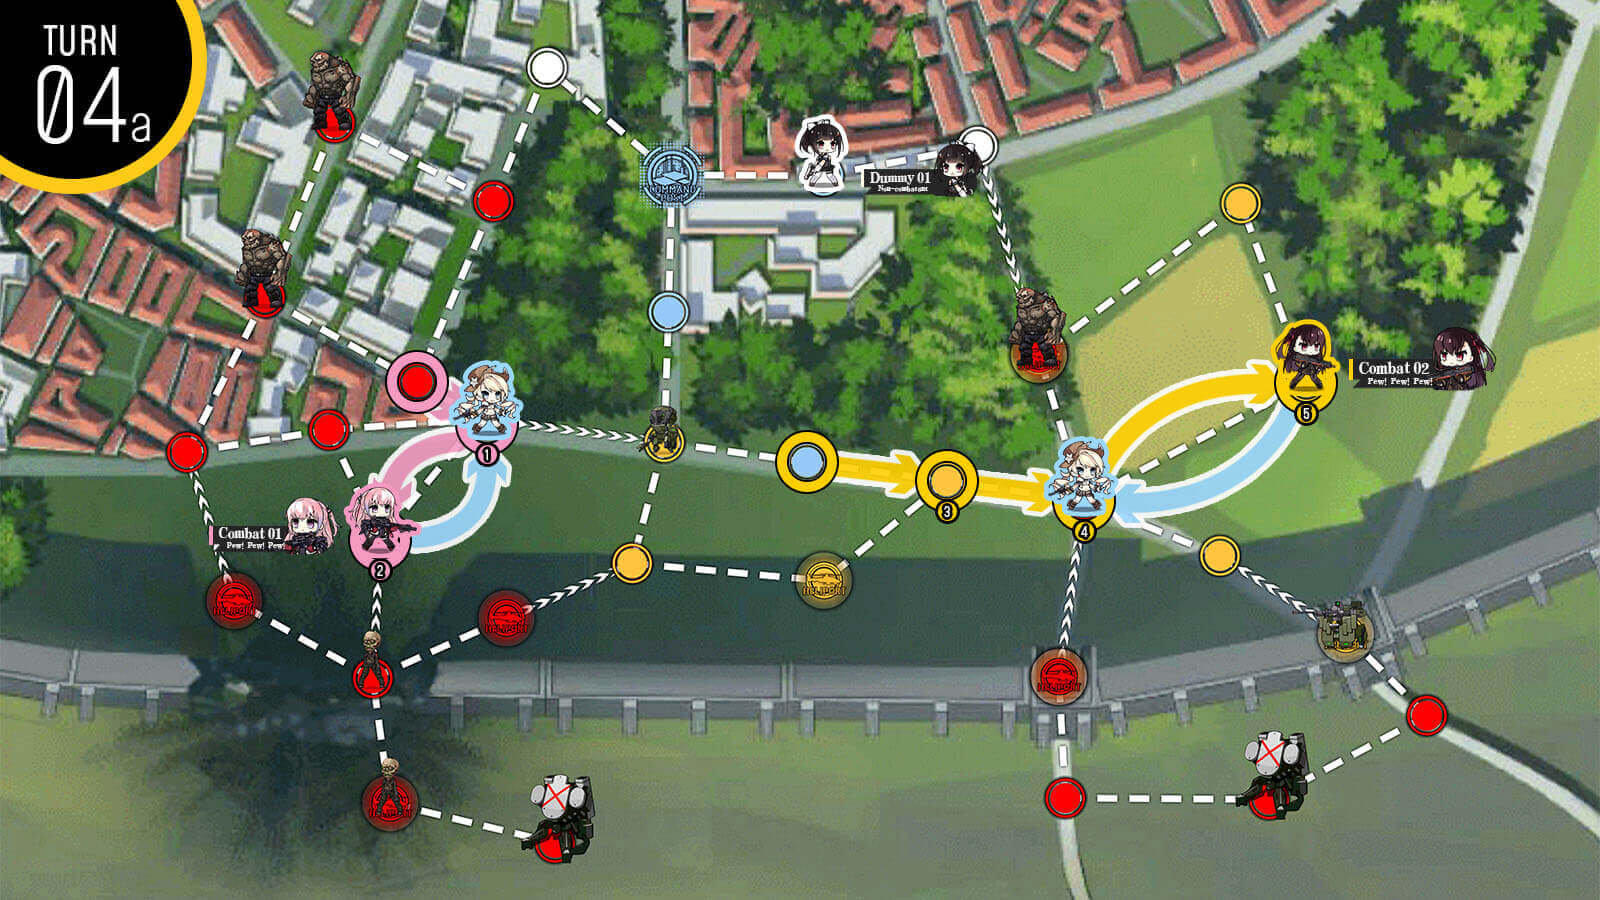
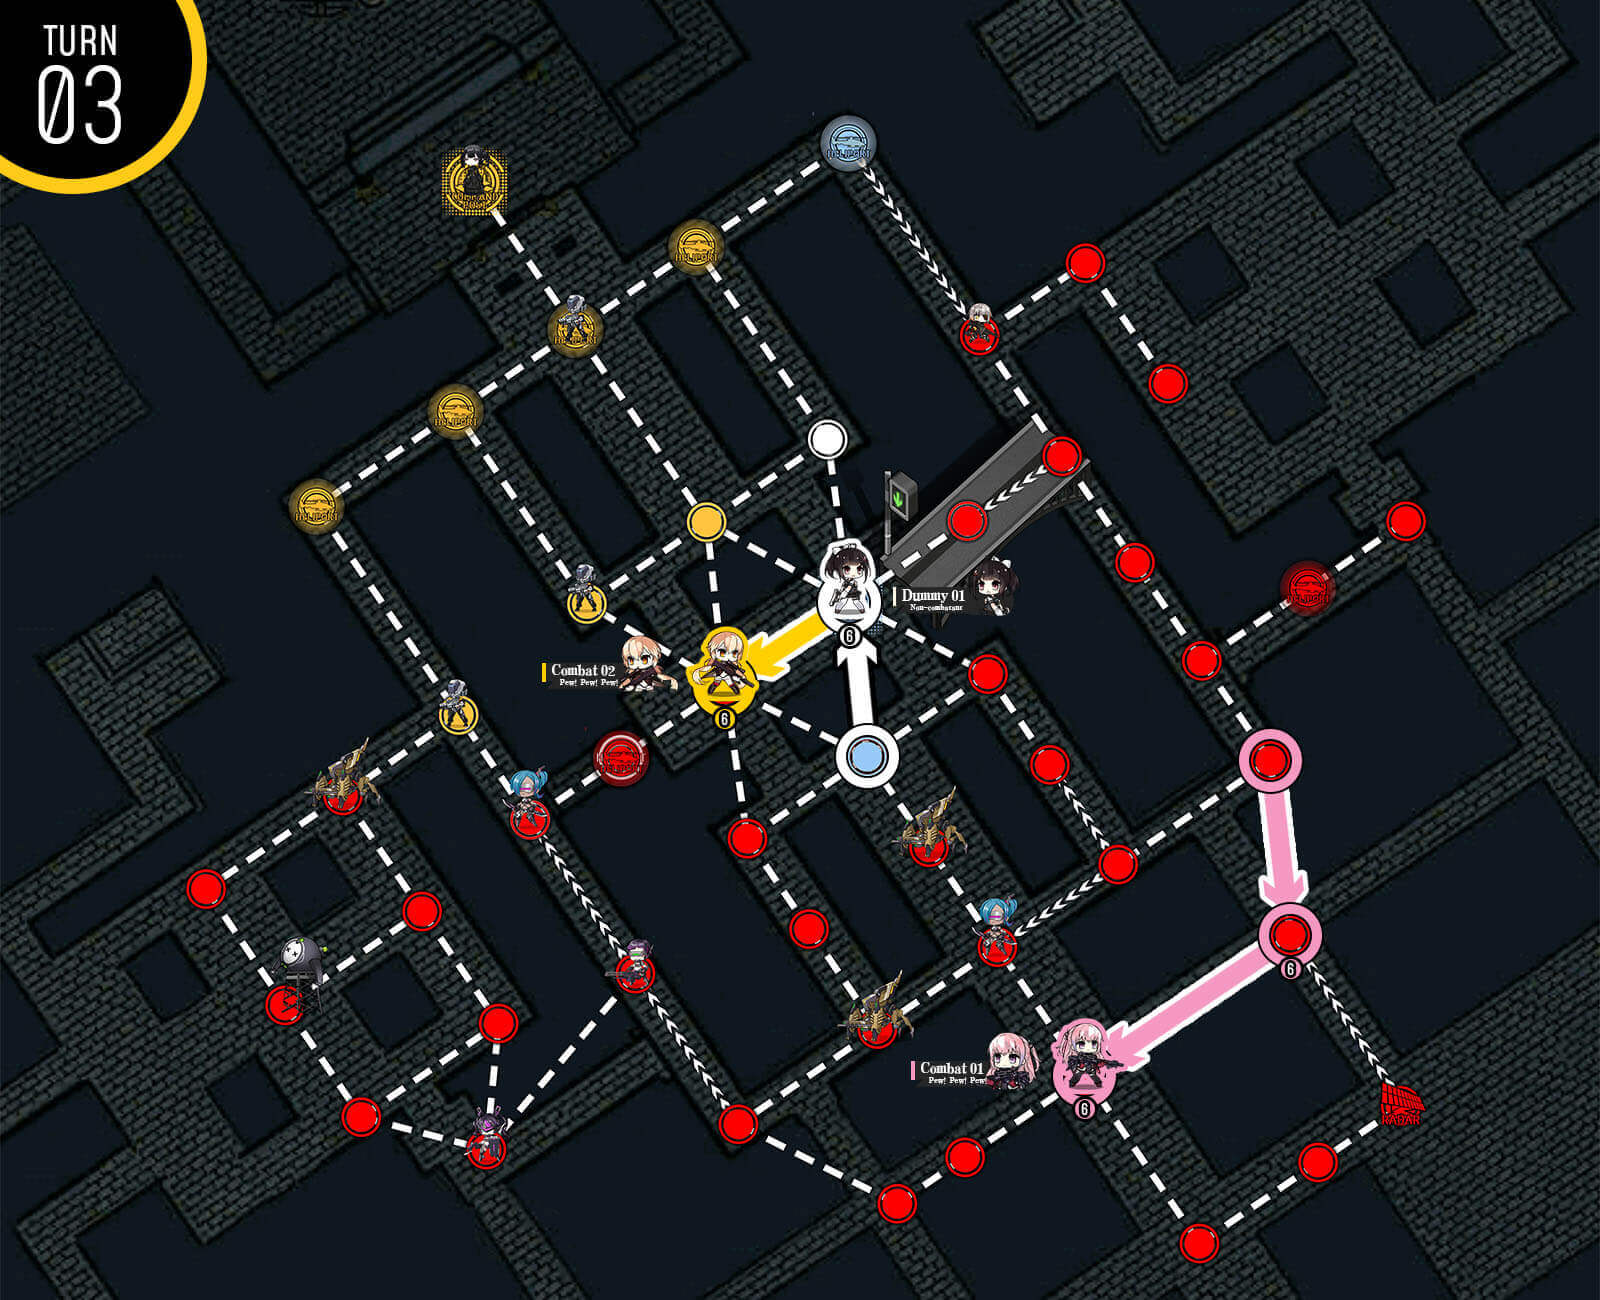
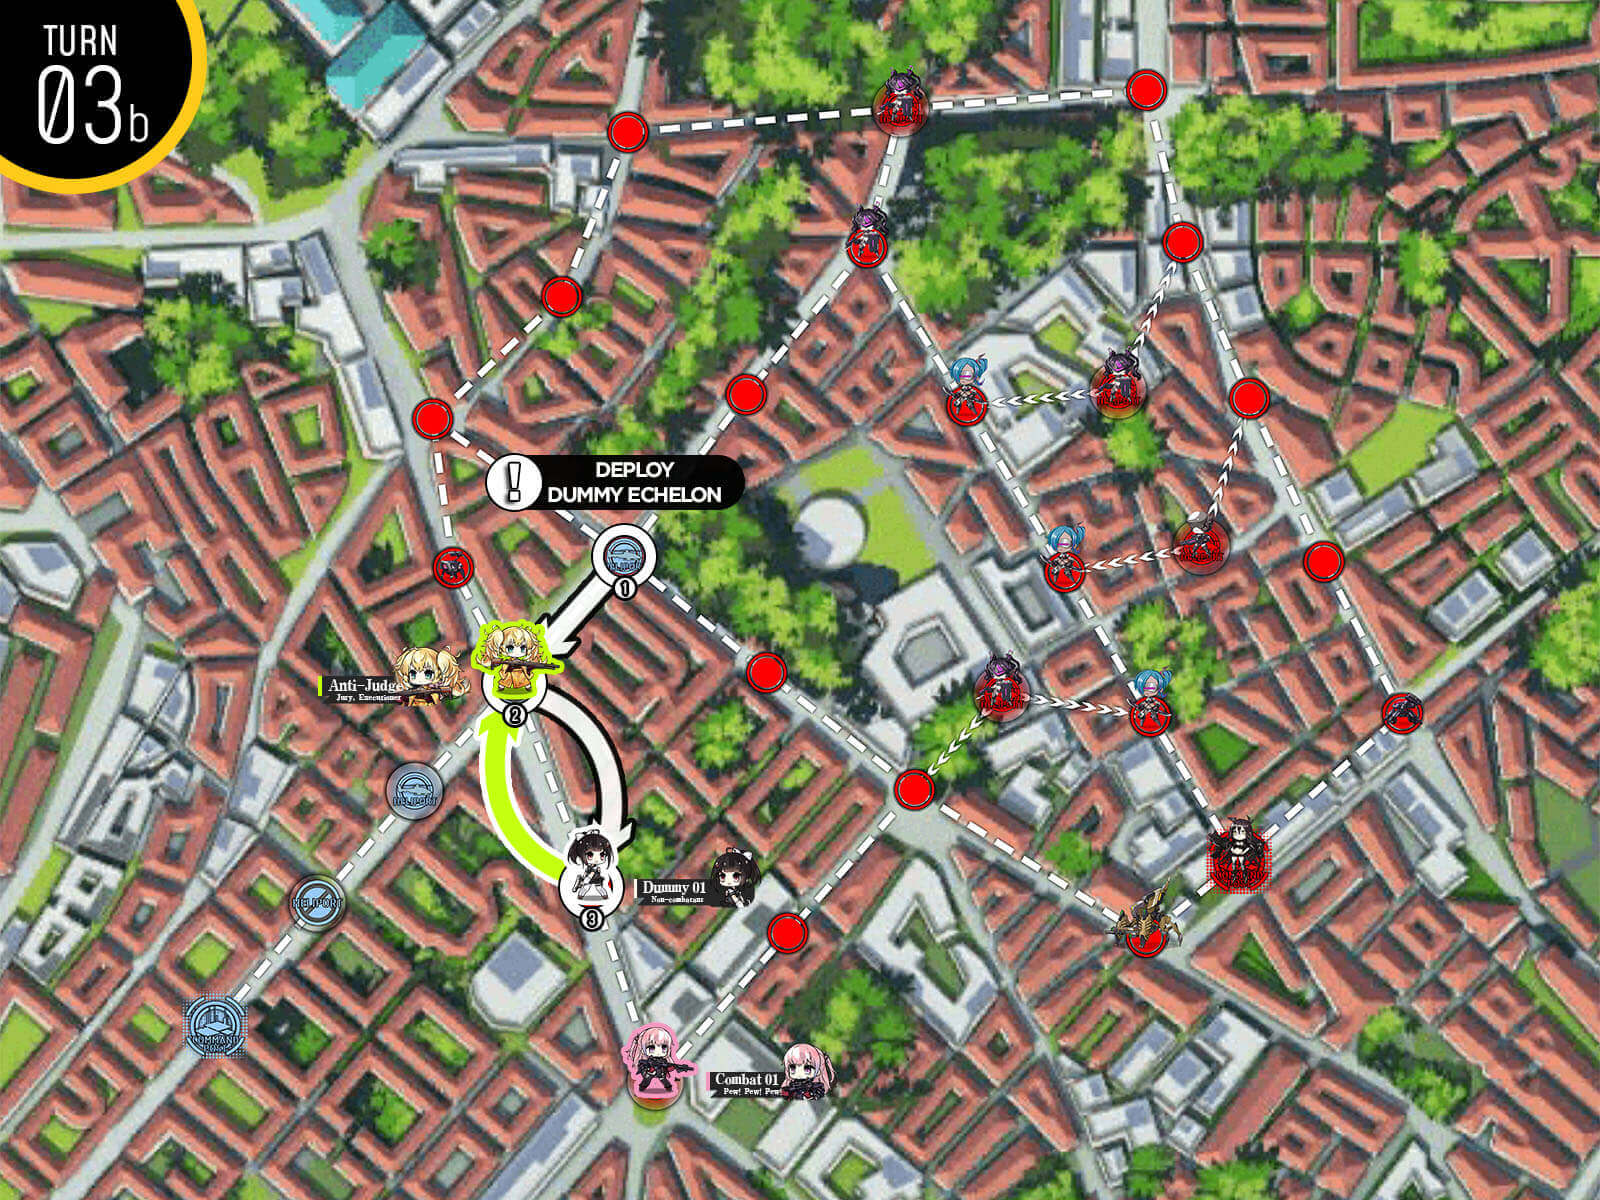
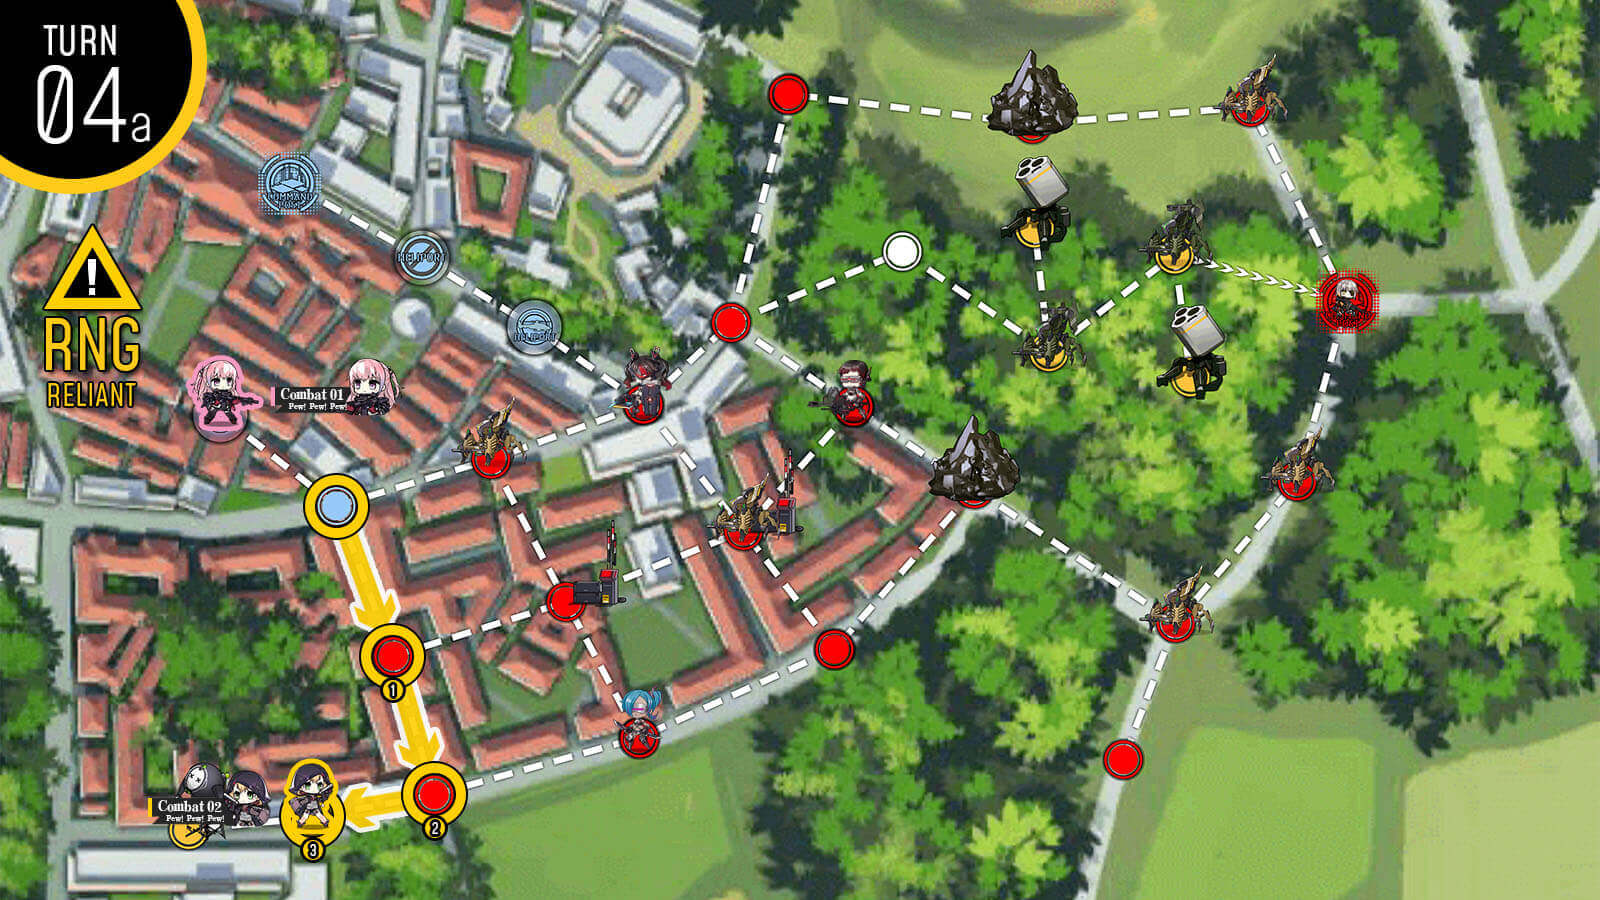
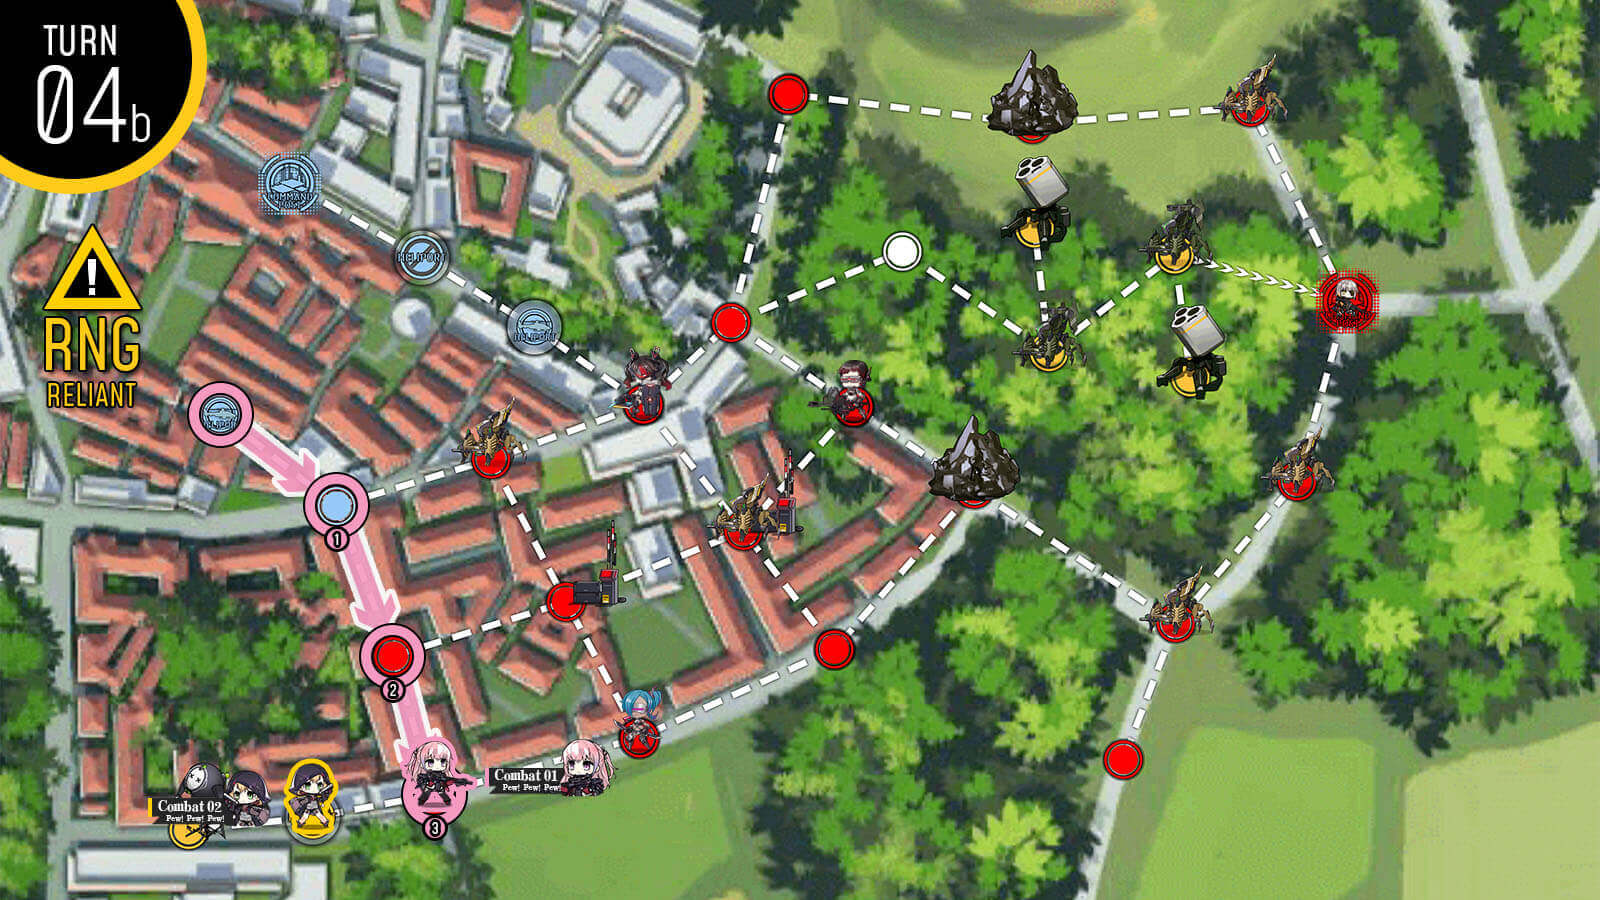
With one remaining move, move dummy on the HQ to the large helipad. This saves some action points next turn.
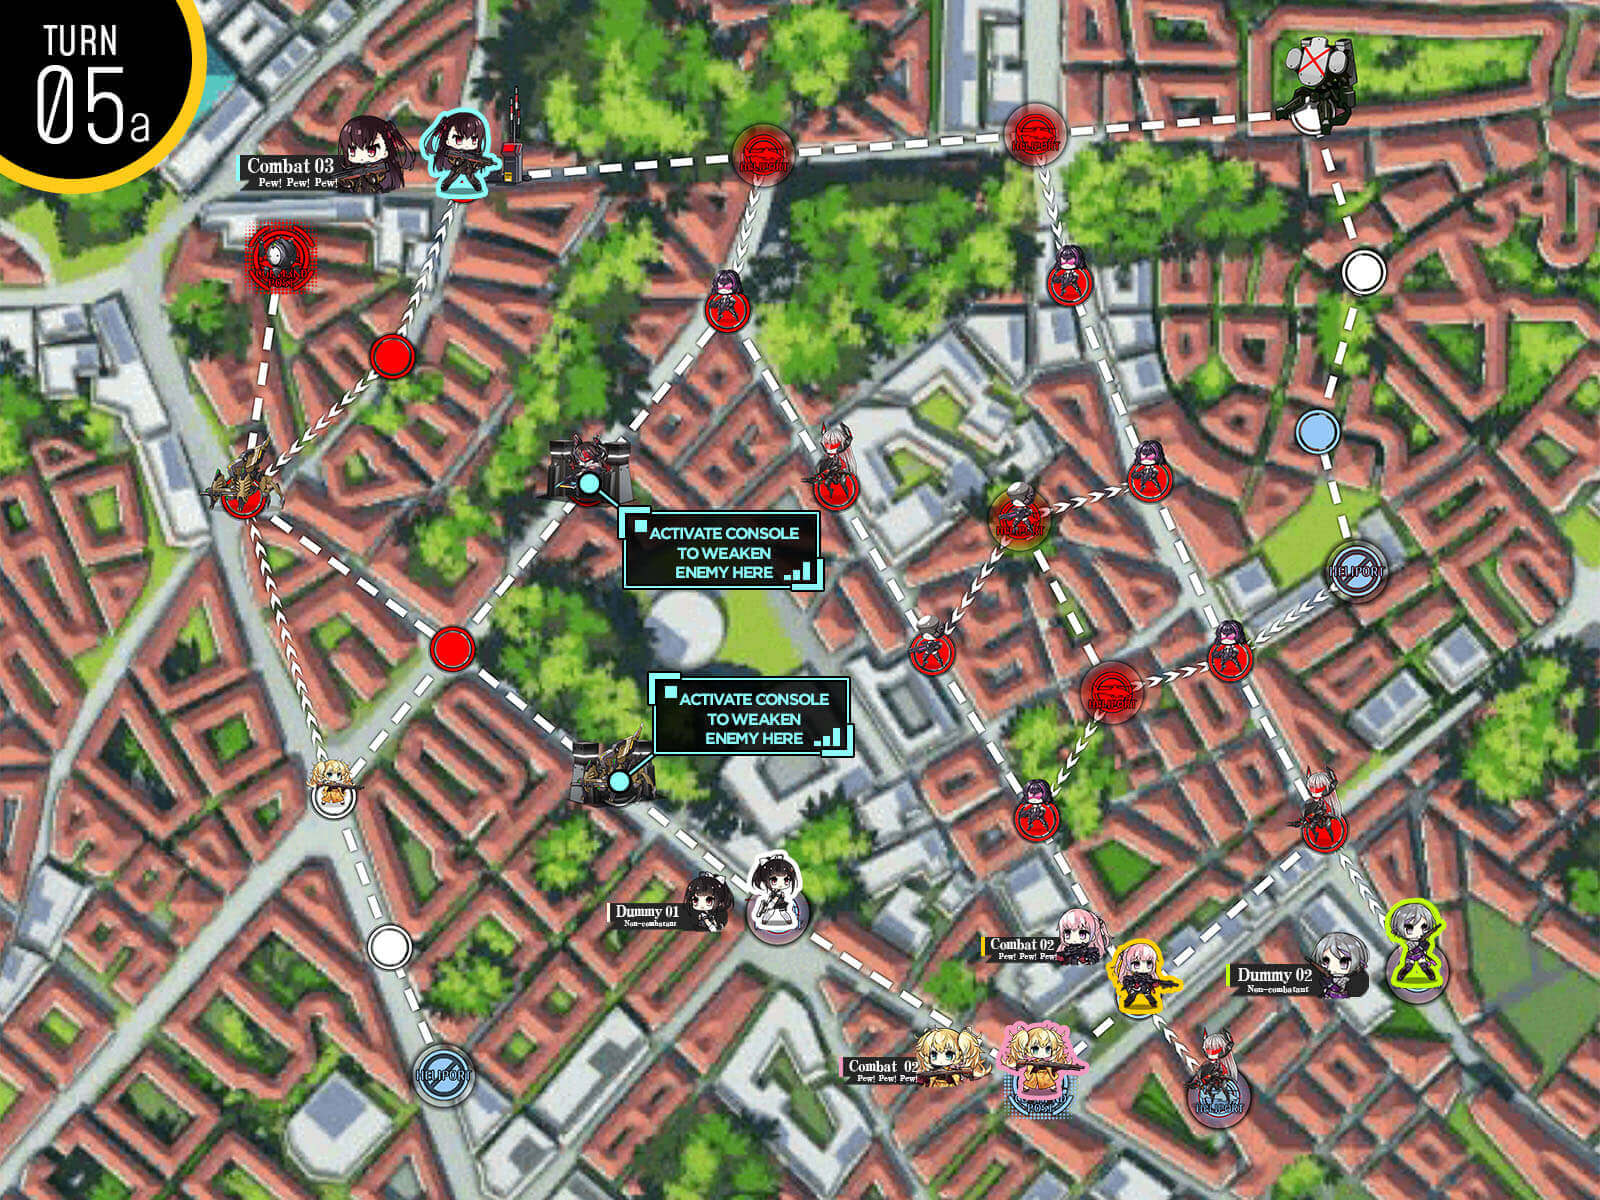
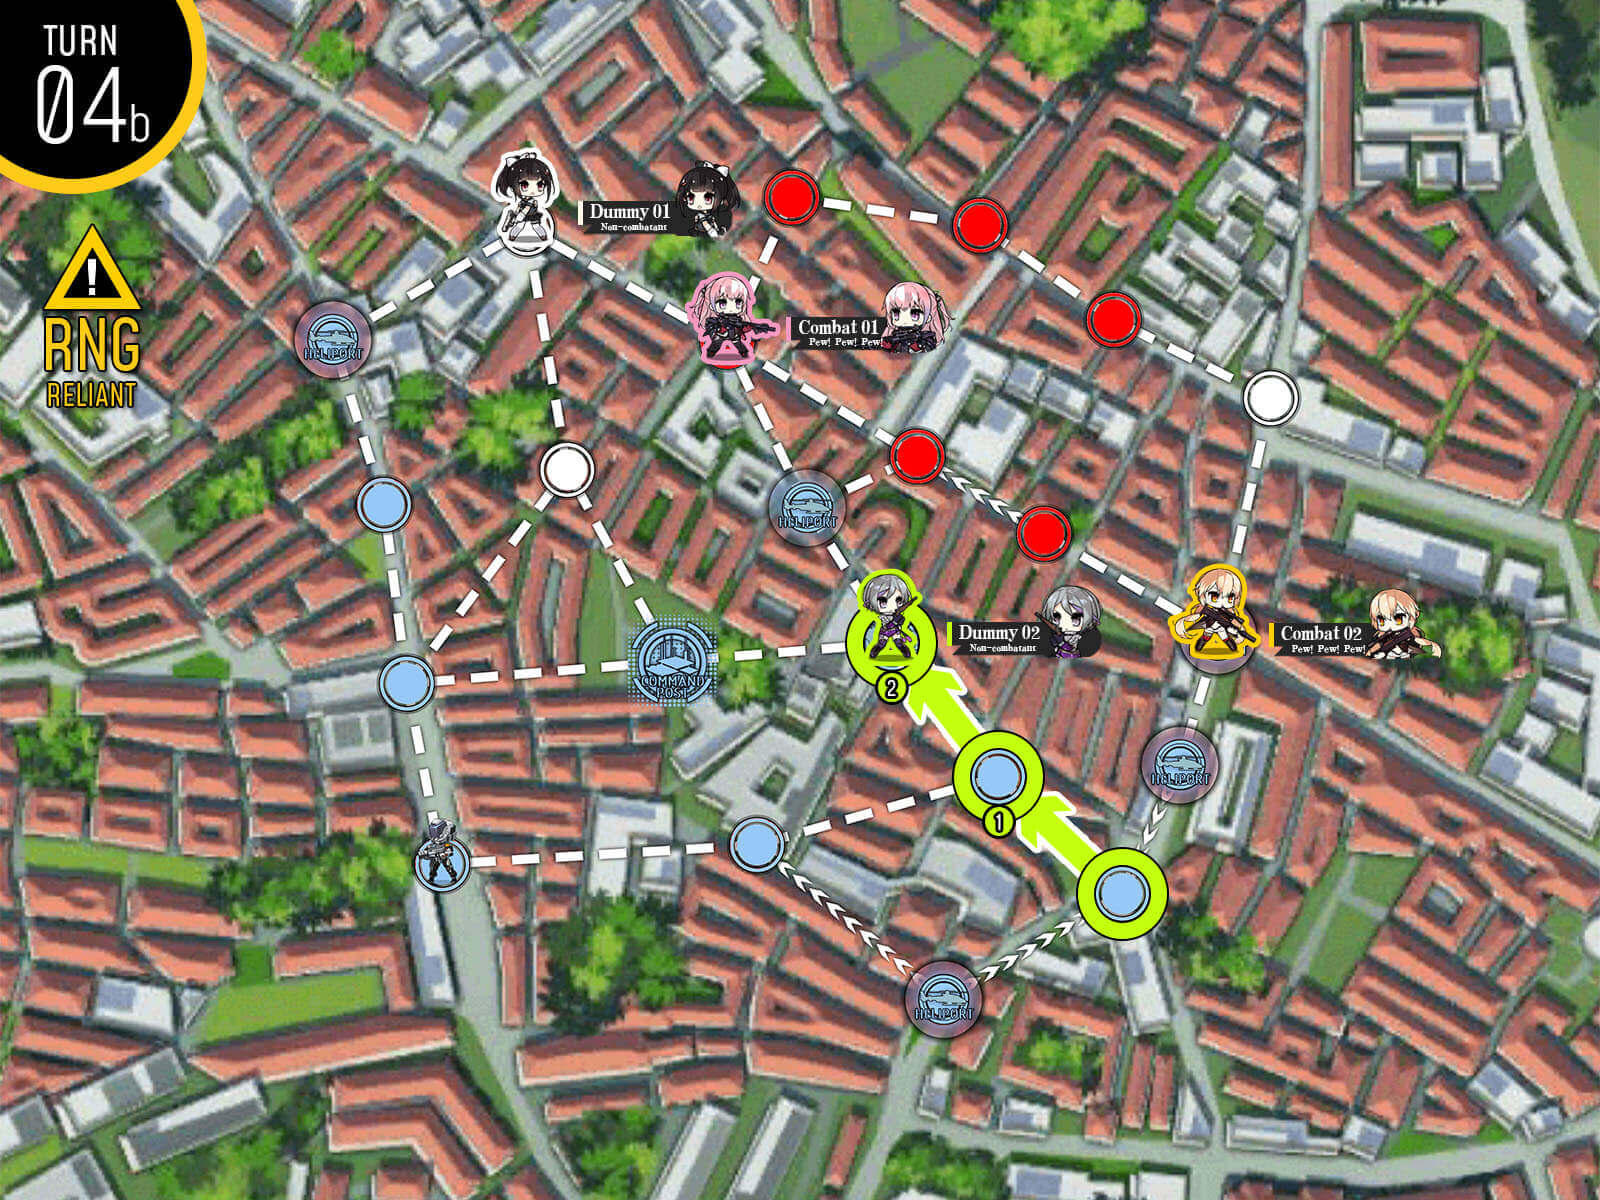
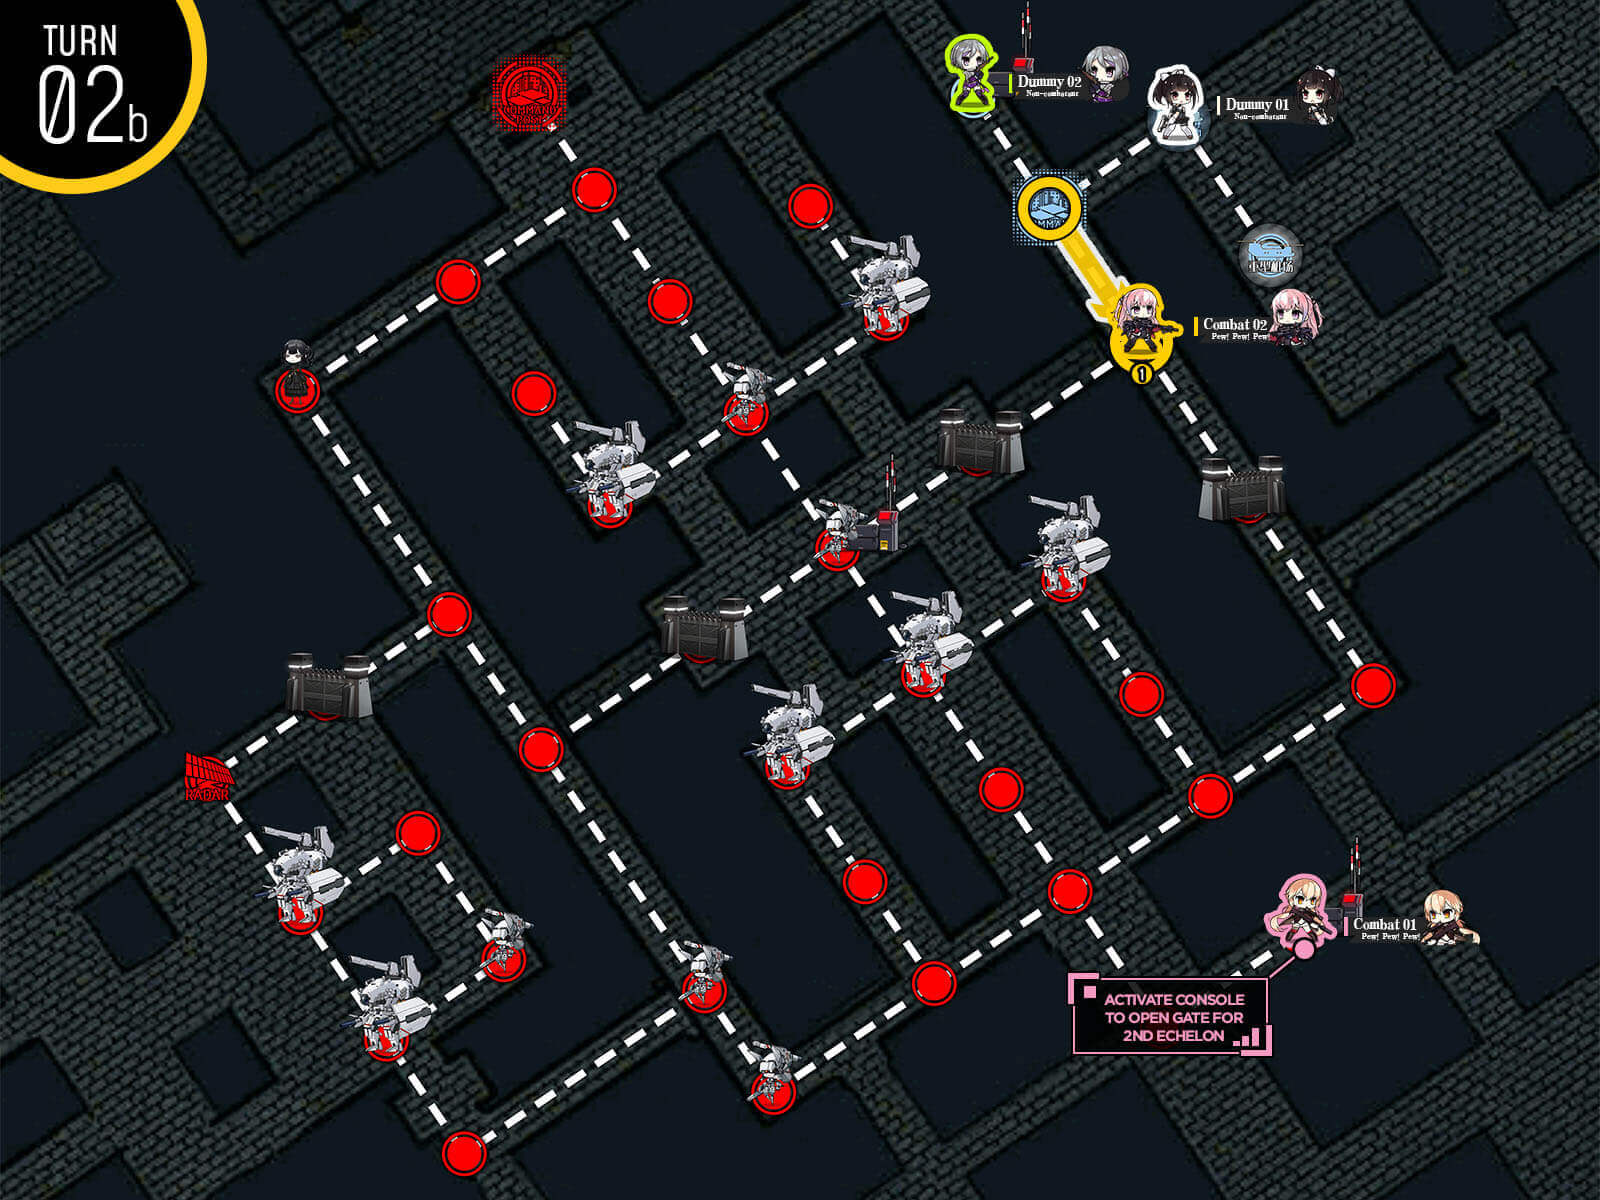
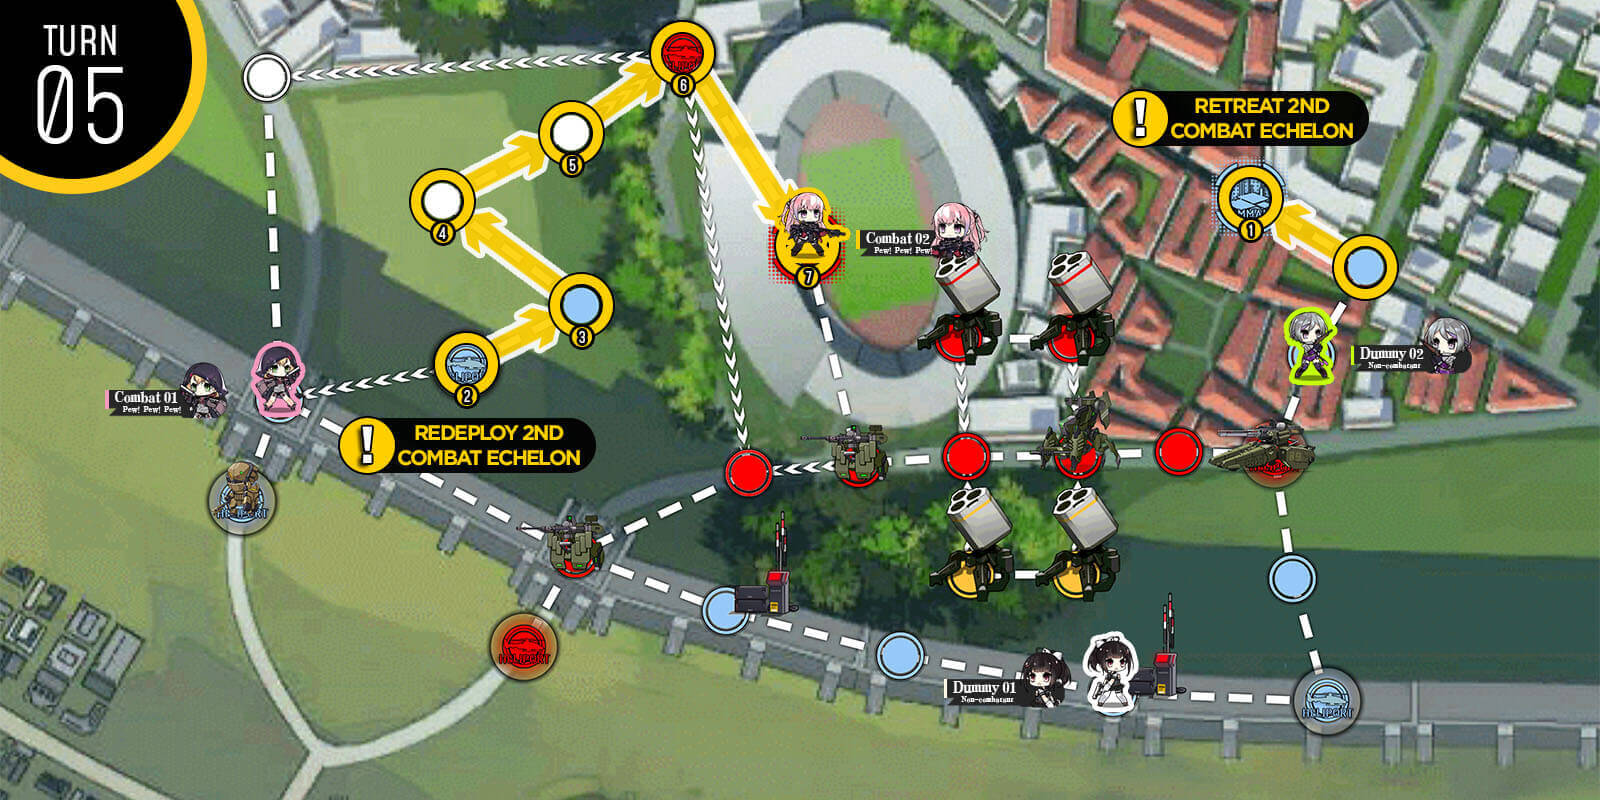
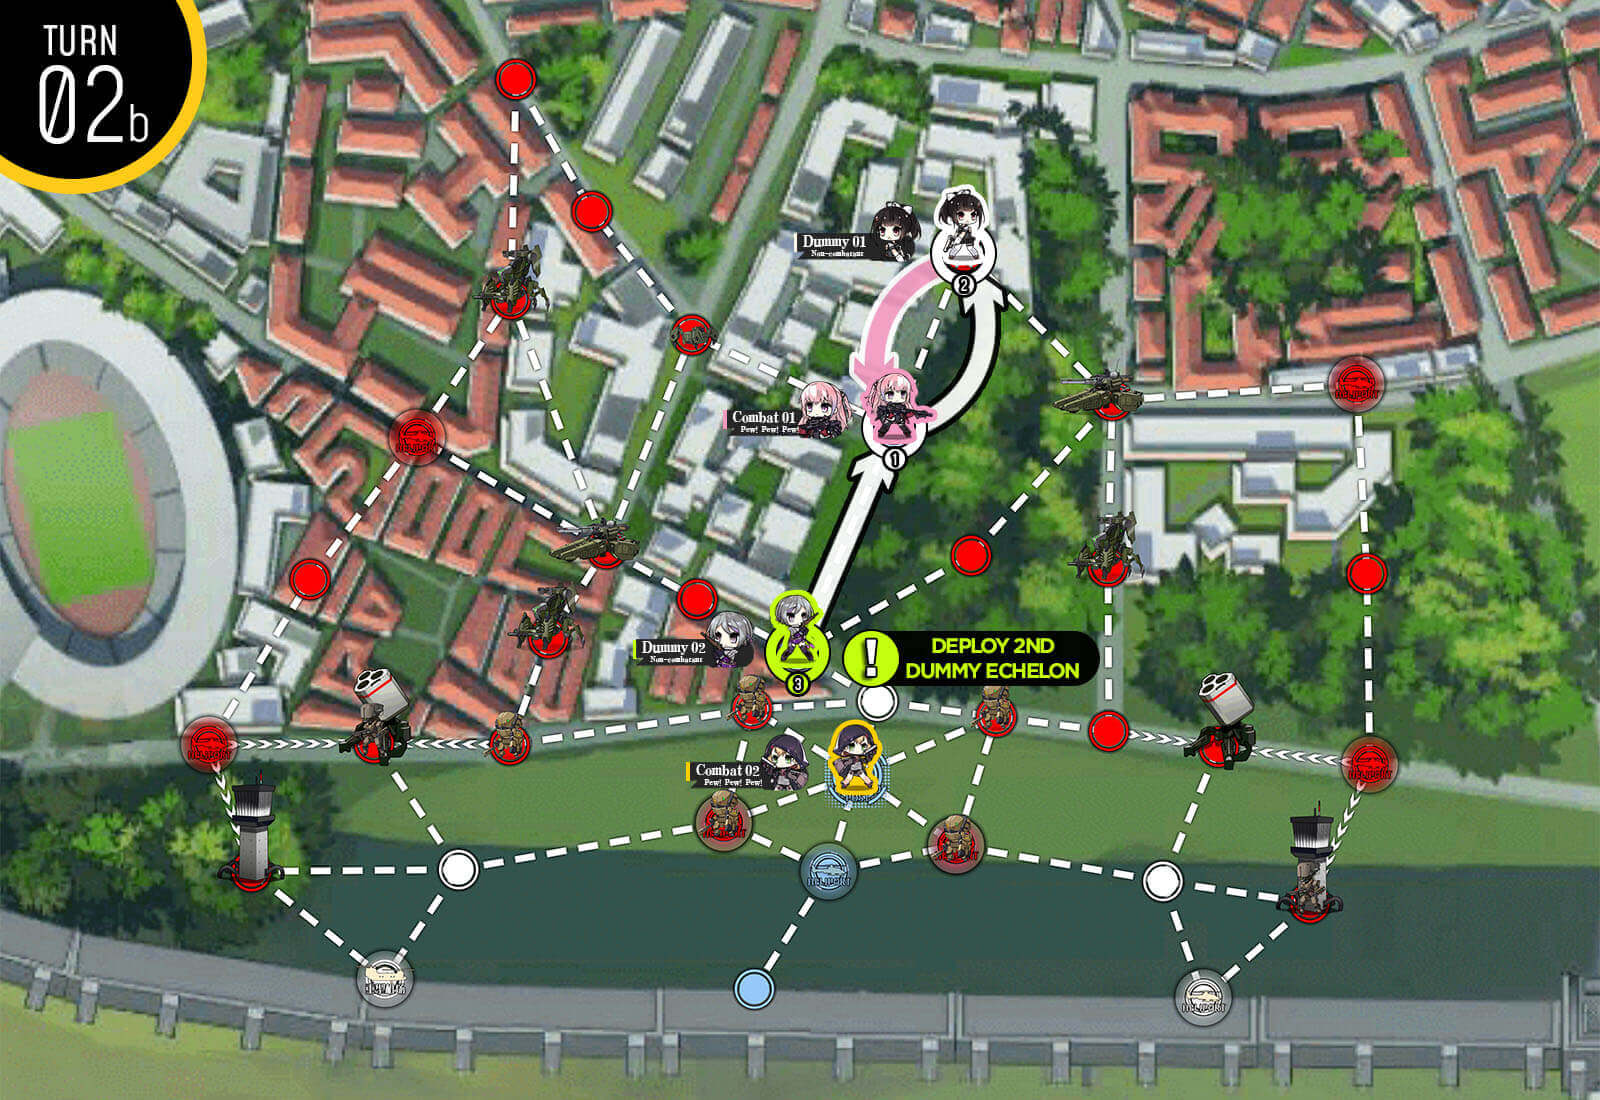
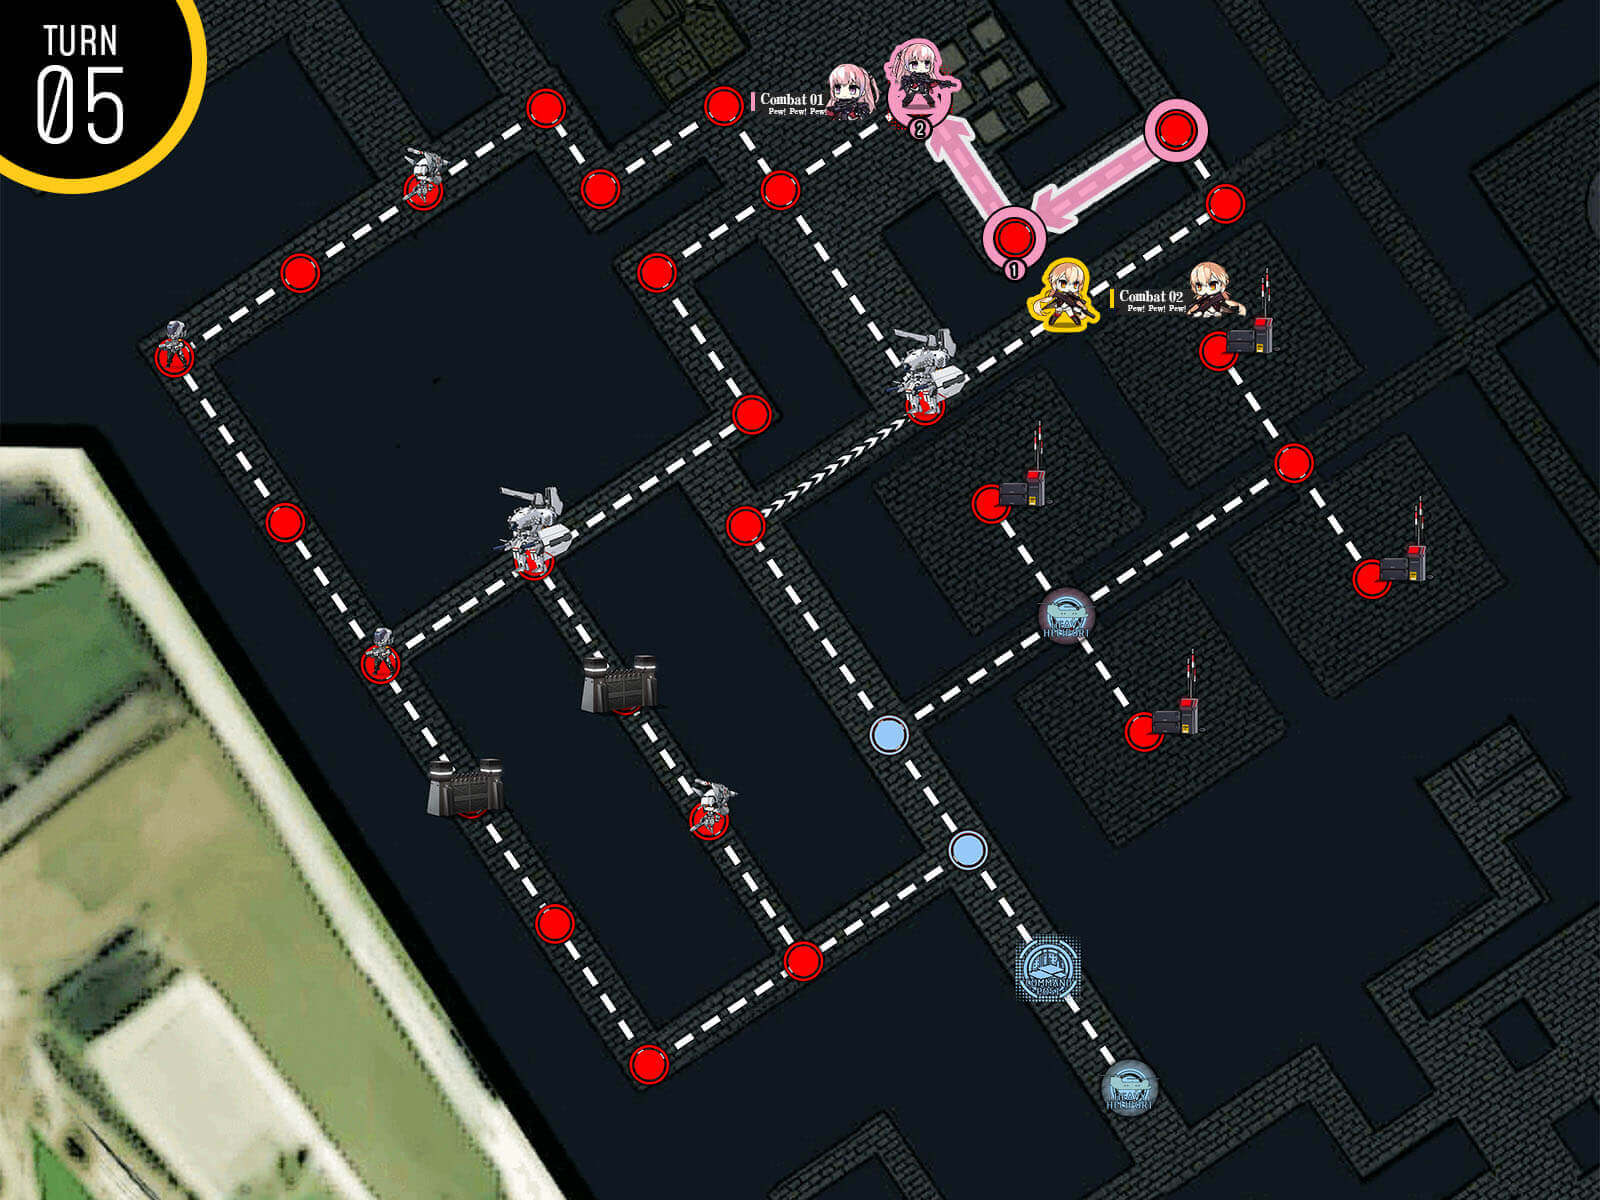
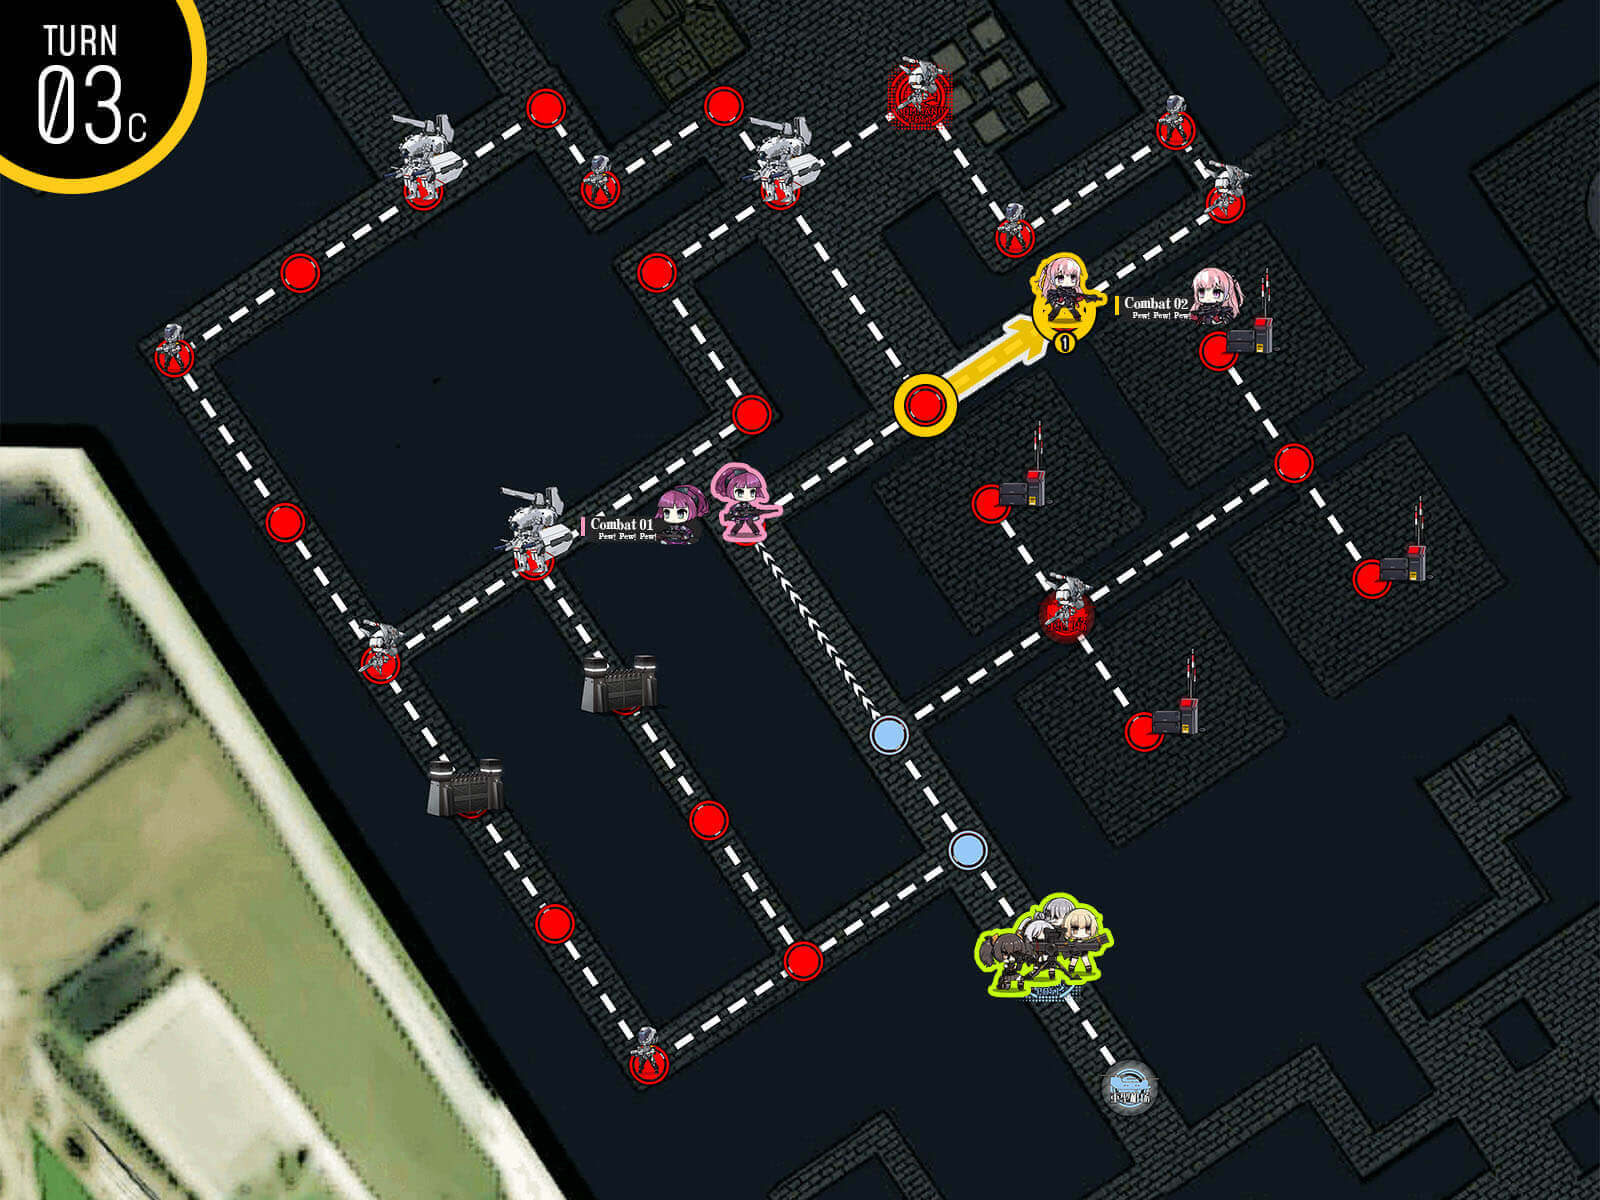
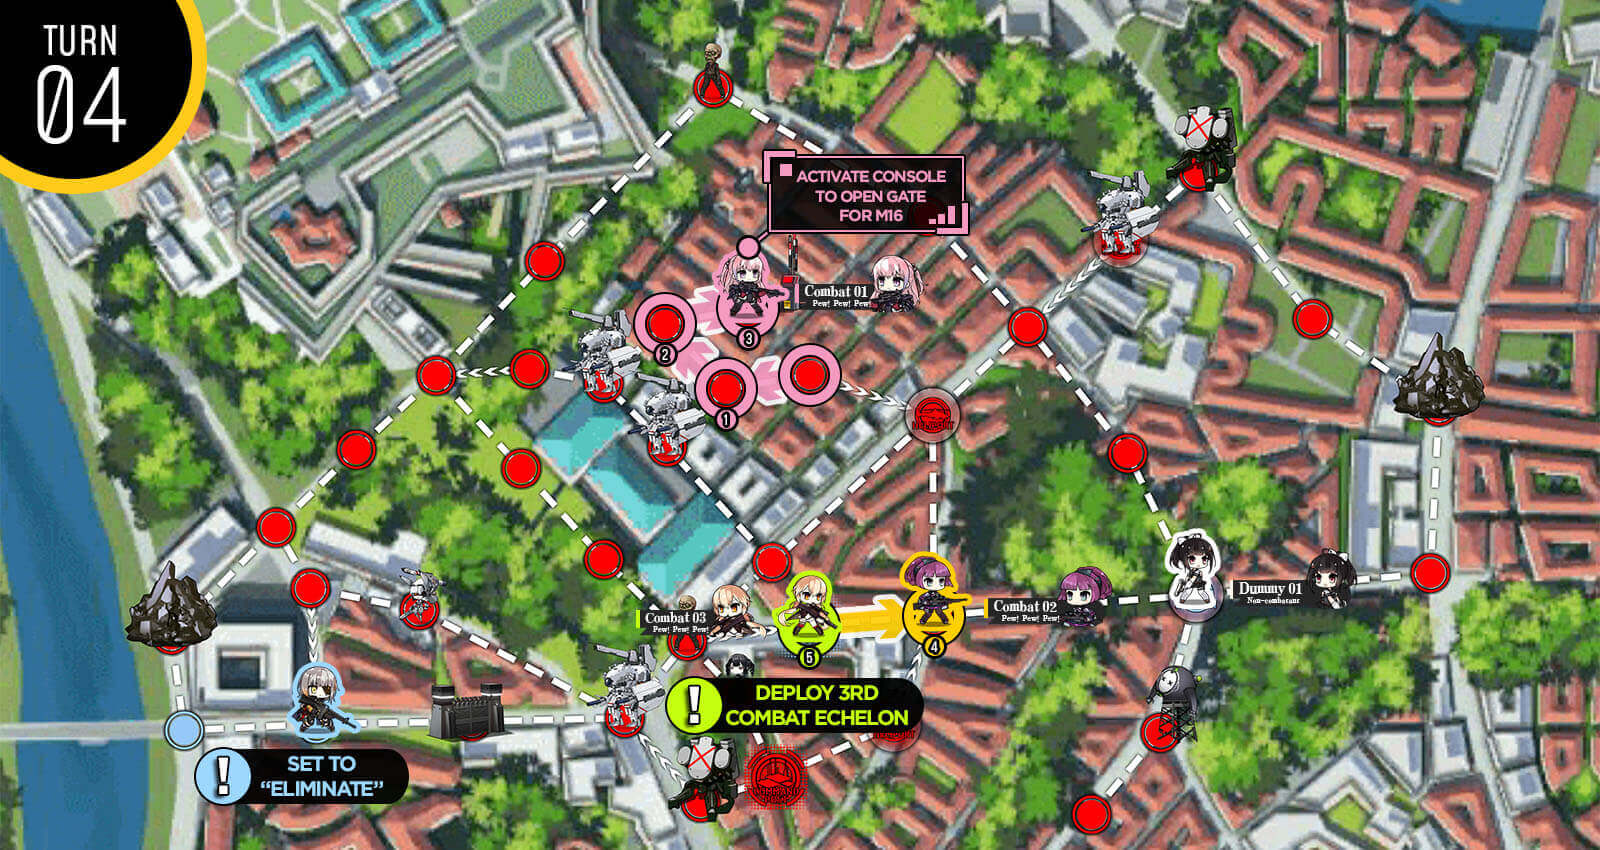
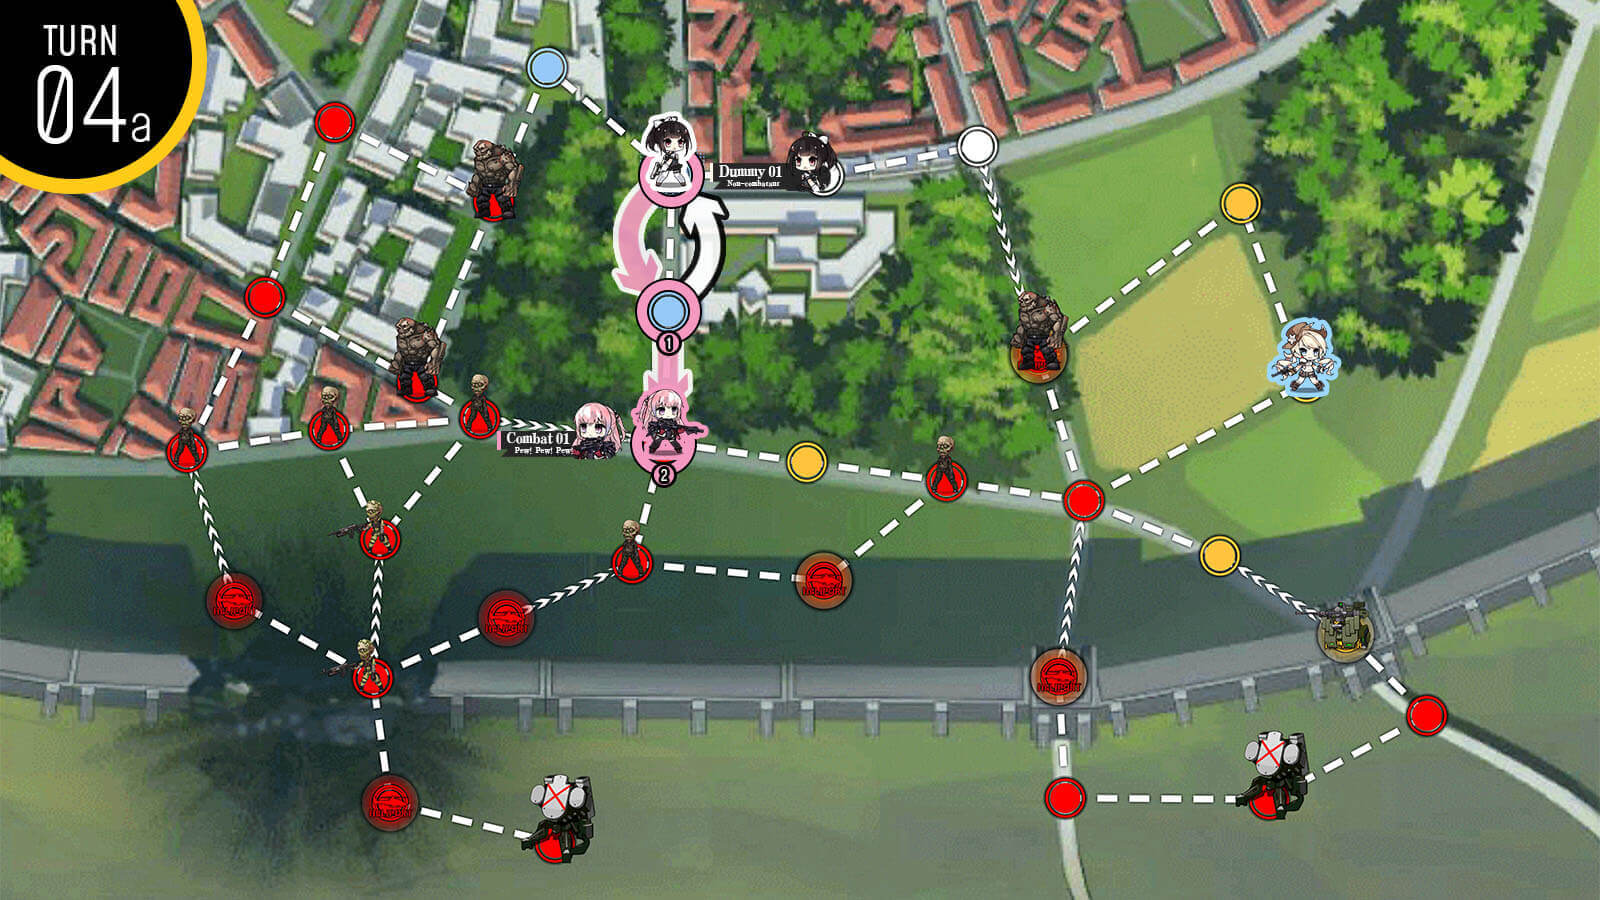
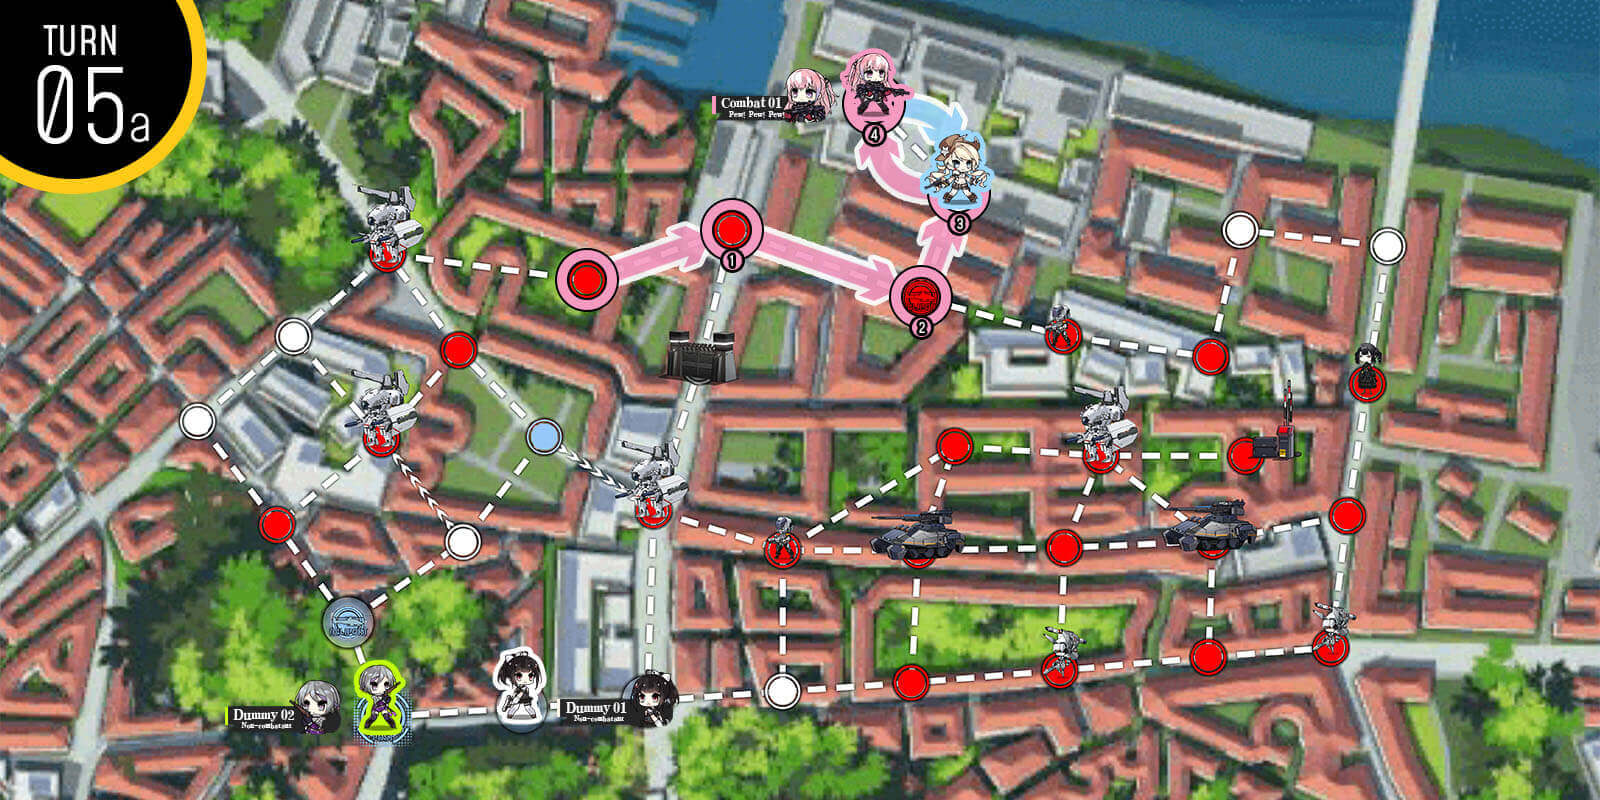
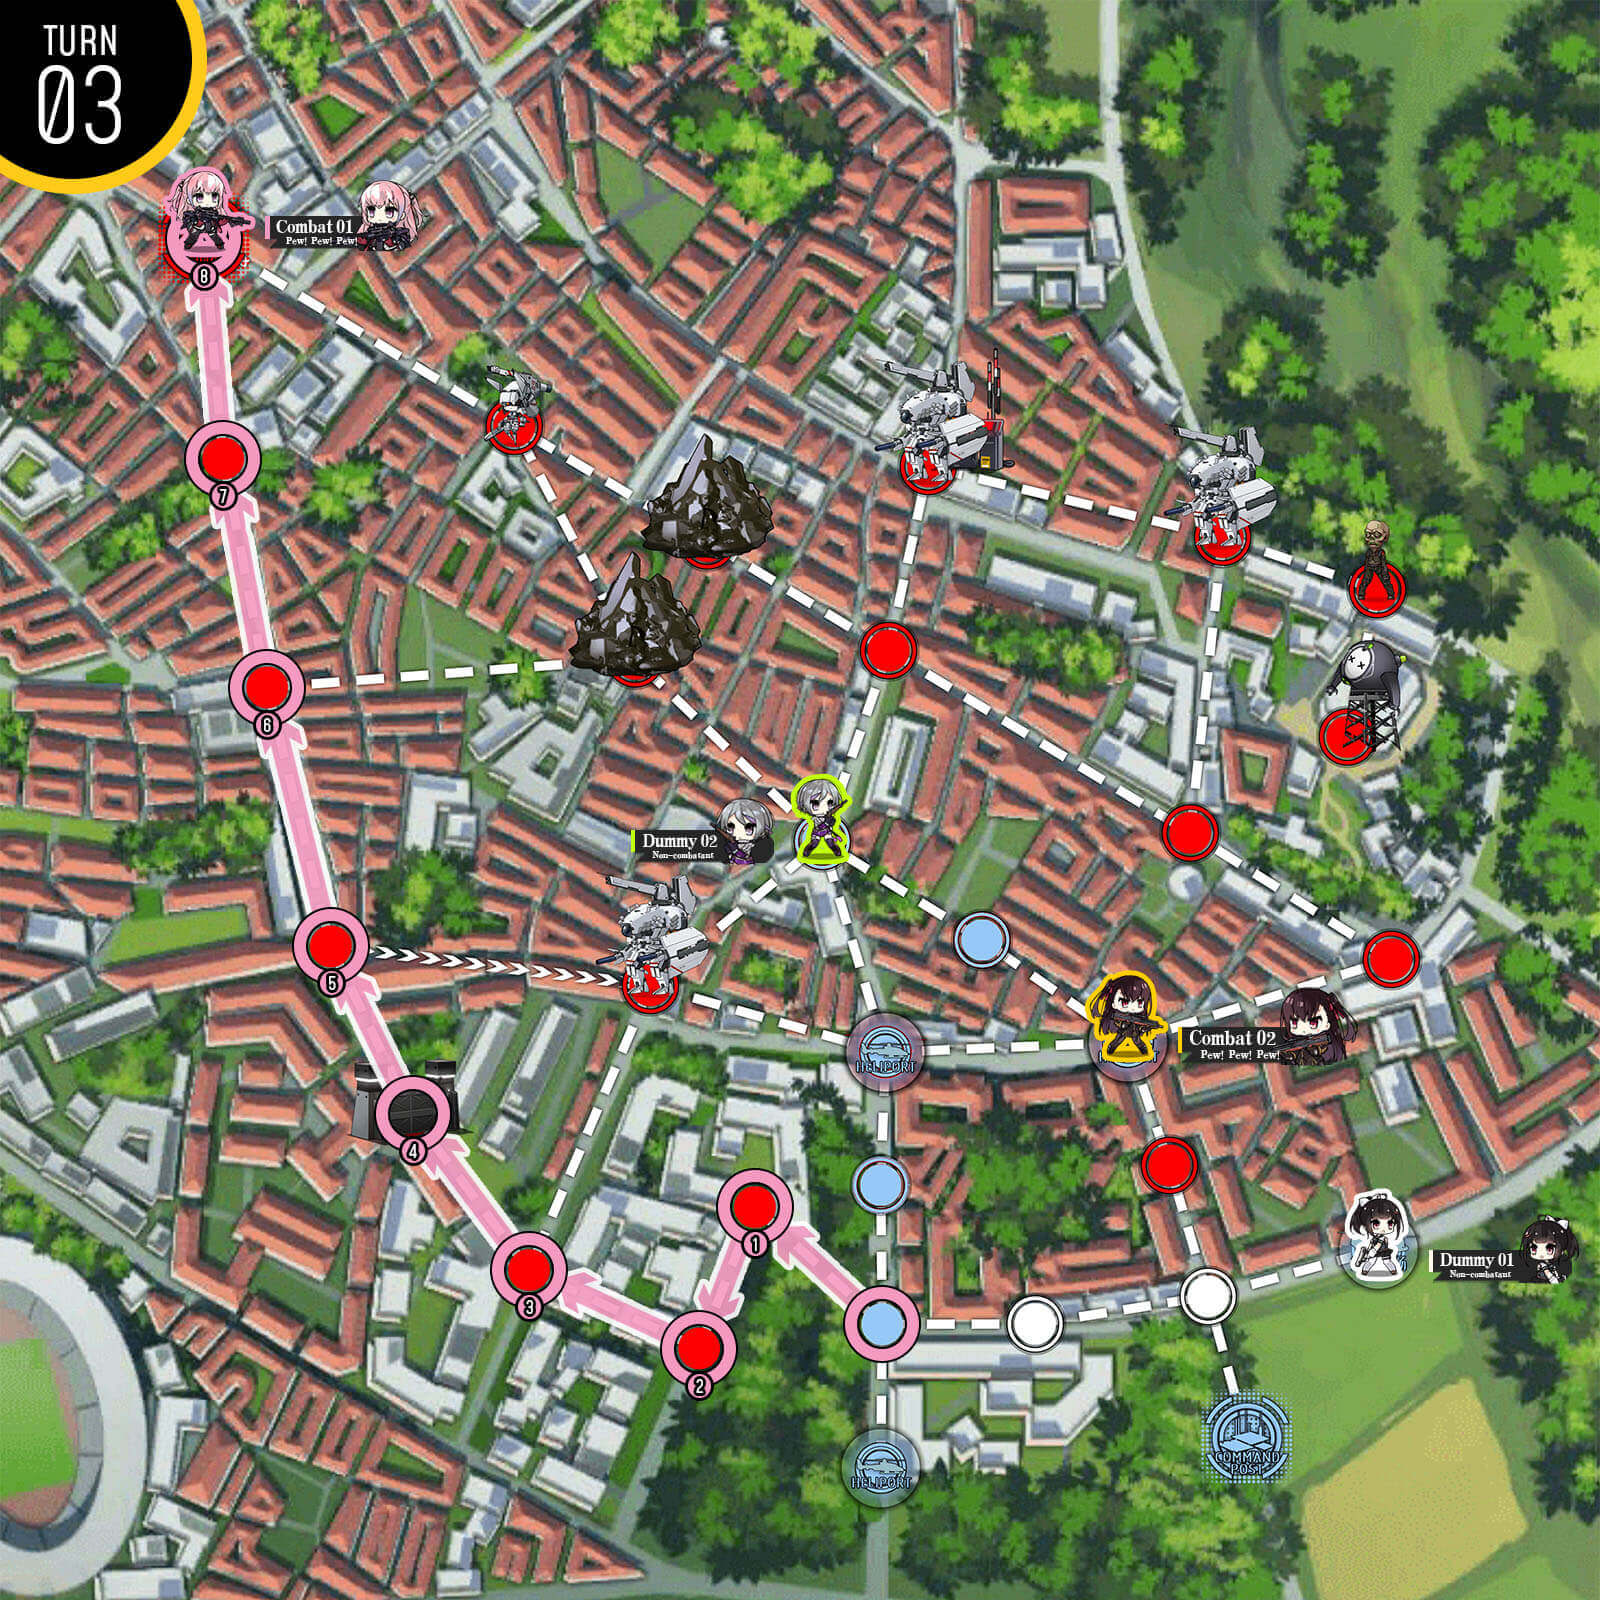
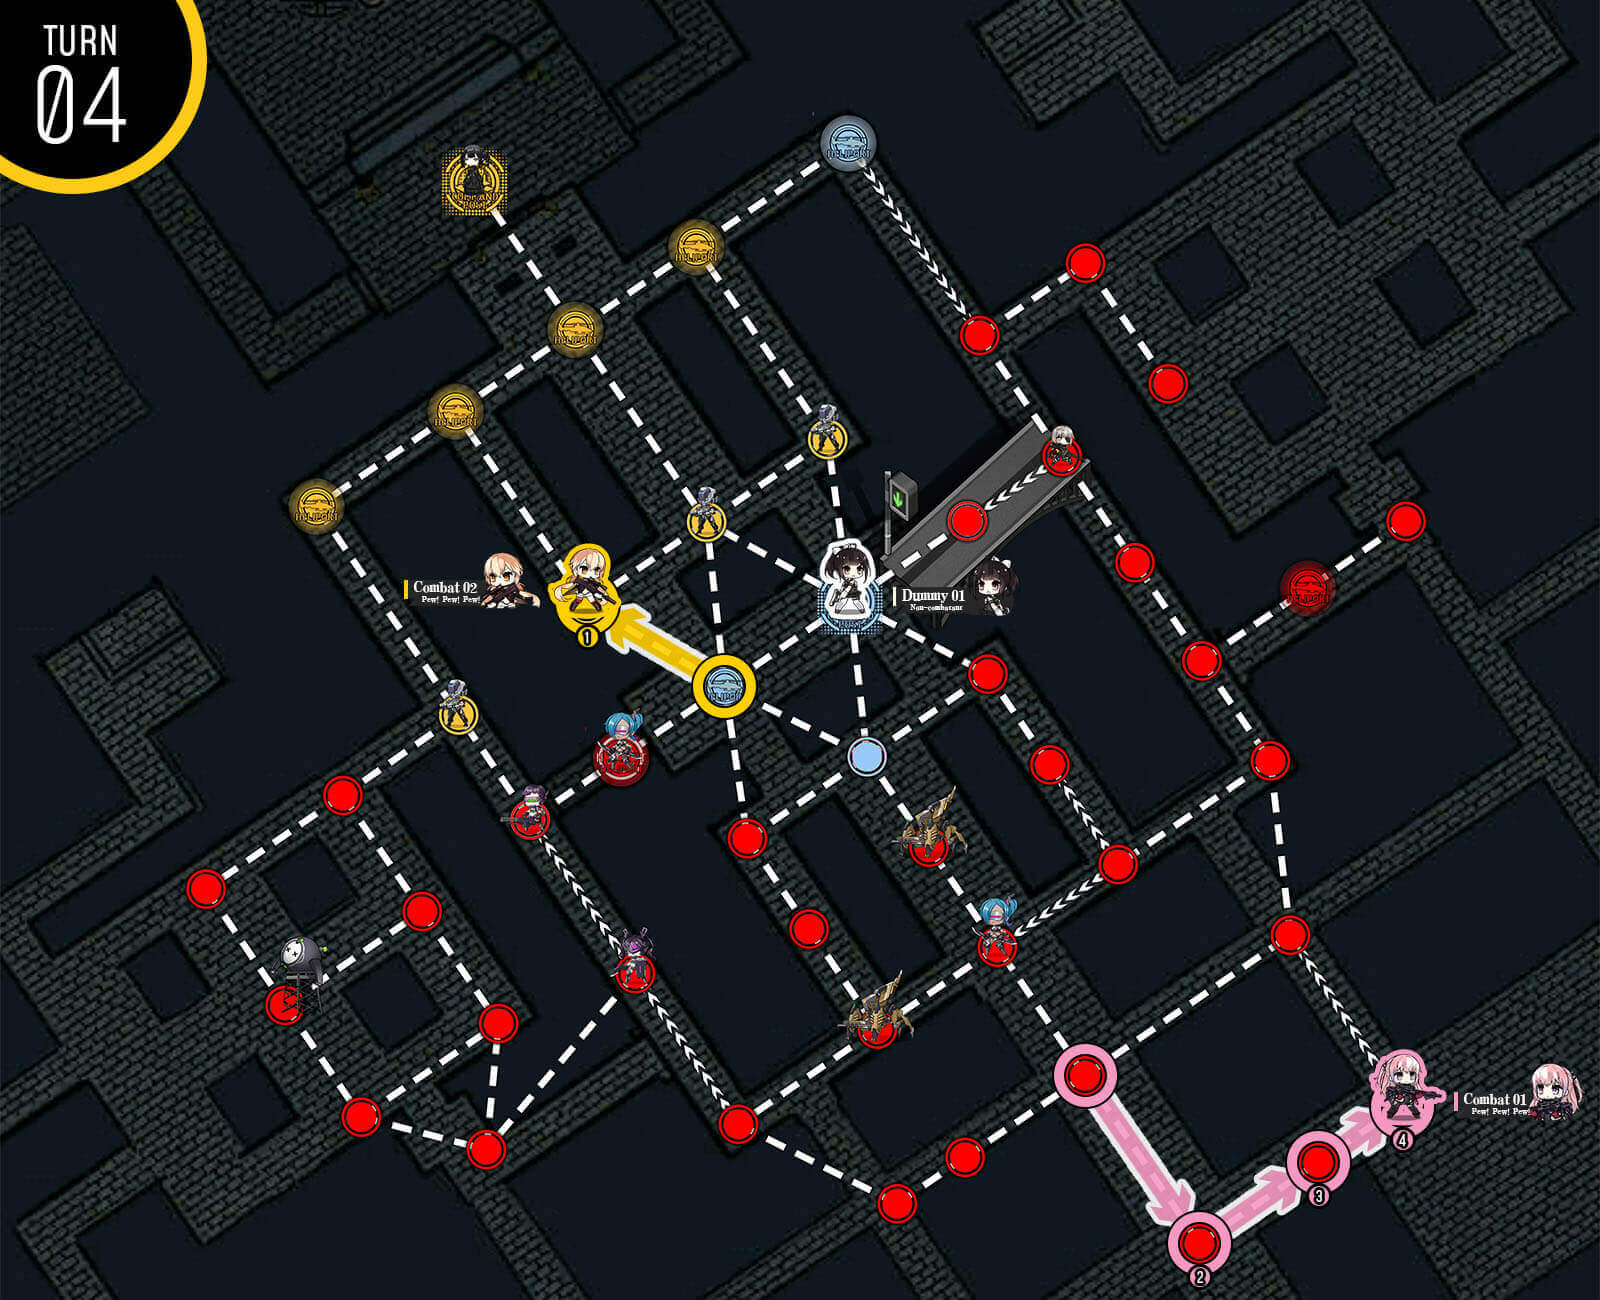
Combat echelon at the very bottom stays put and blocks any more enemy units from leaking from the right. Combat echelon closer to HQ moves around in large circle and blocks the last spawning helipad.
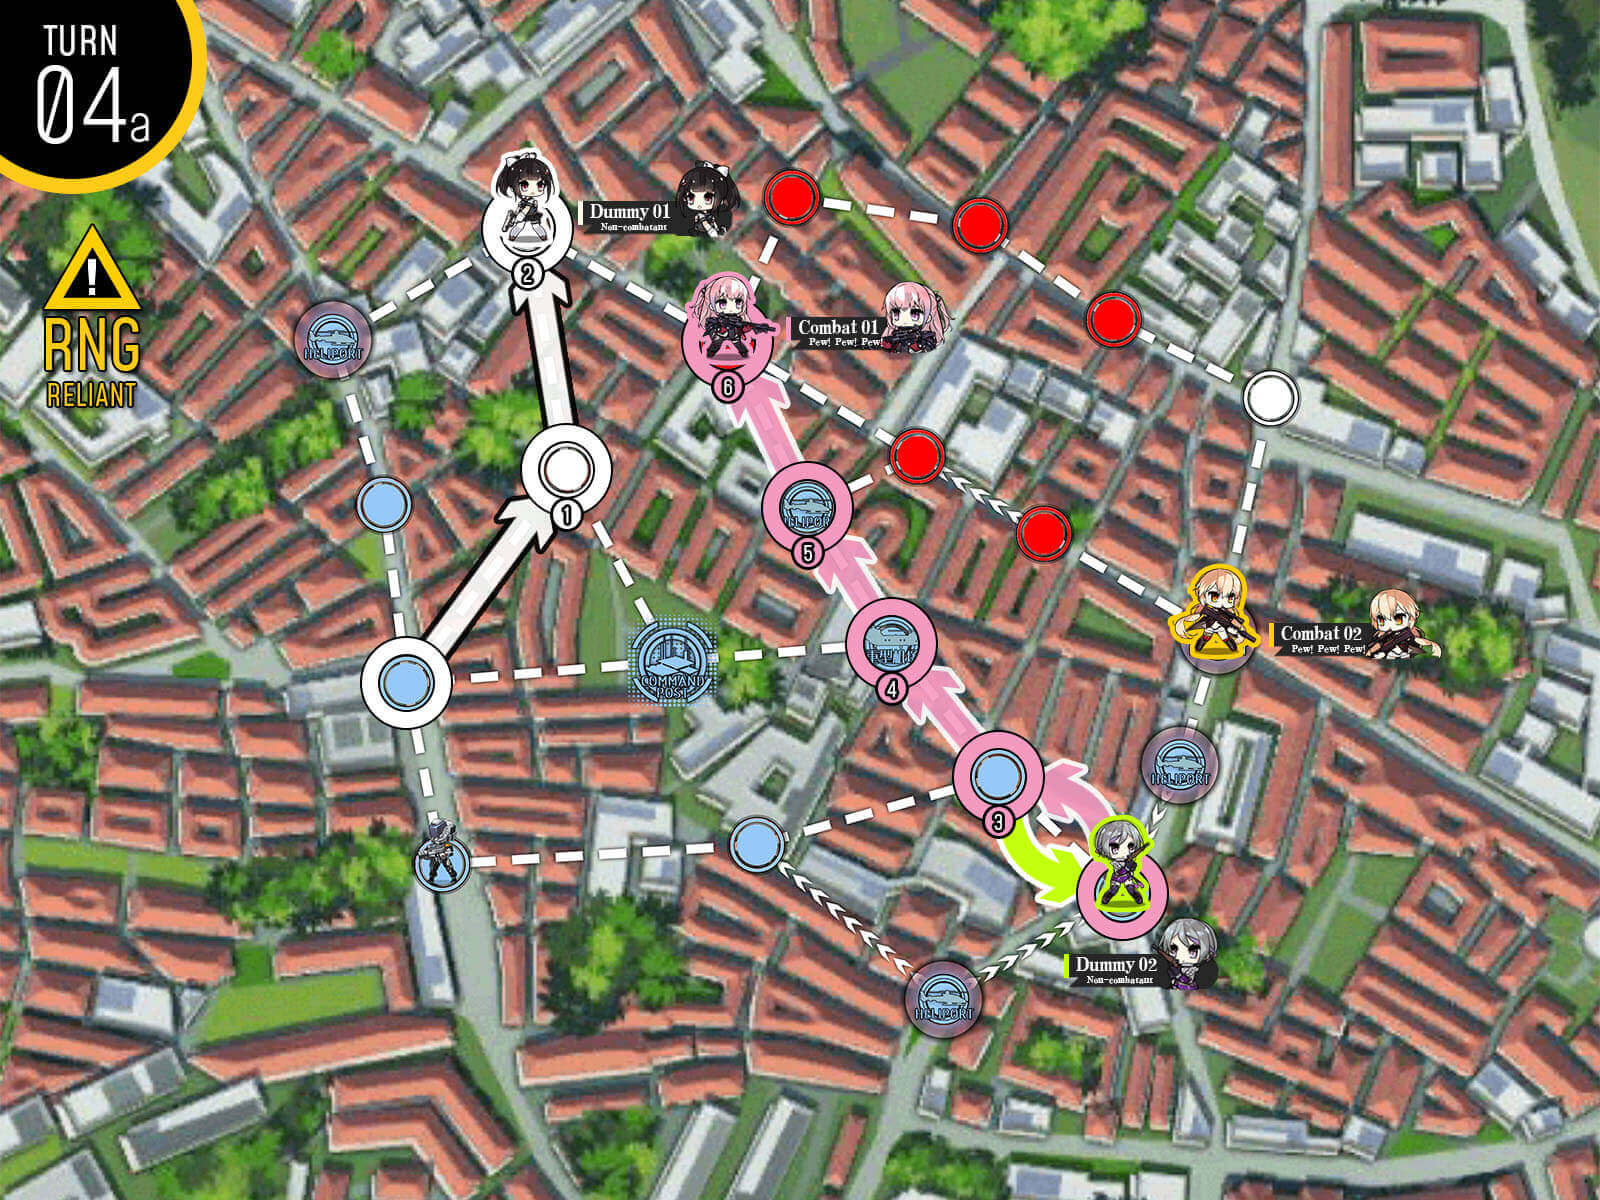
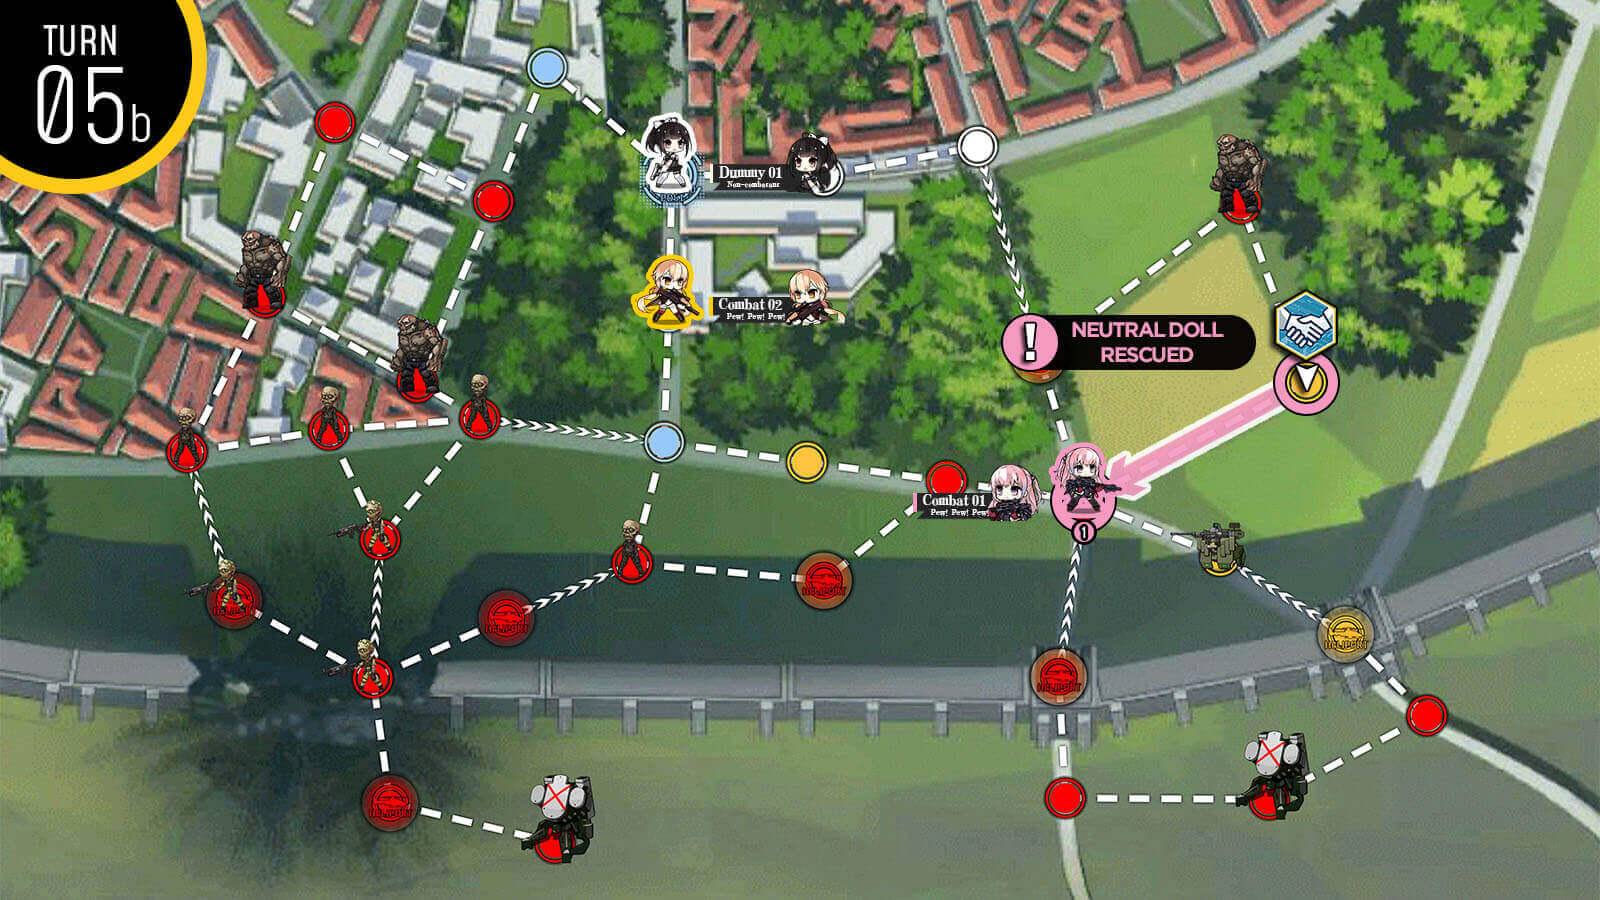
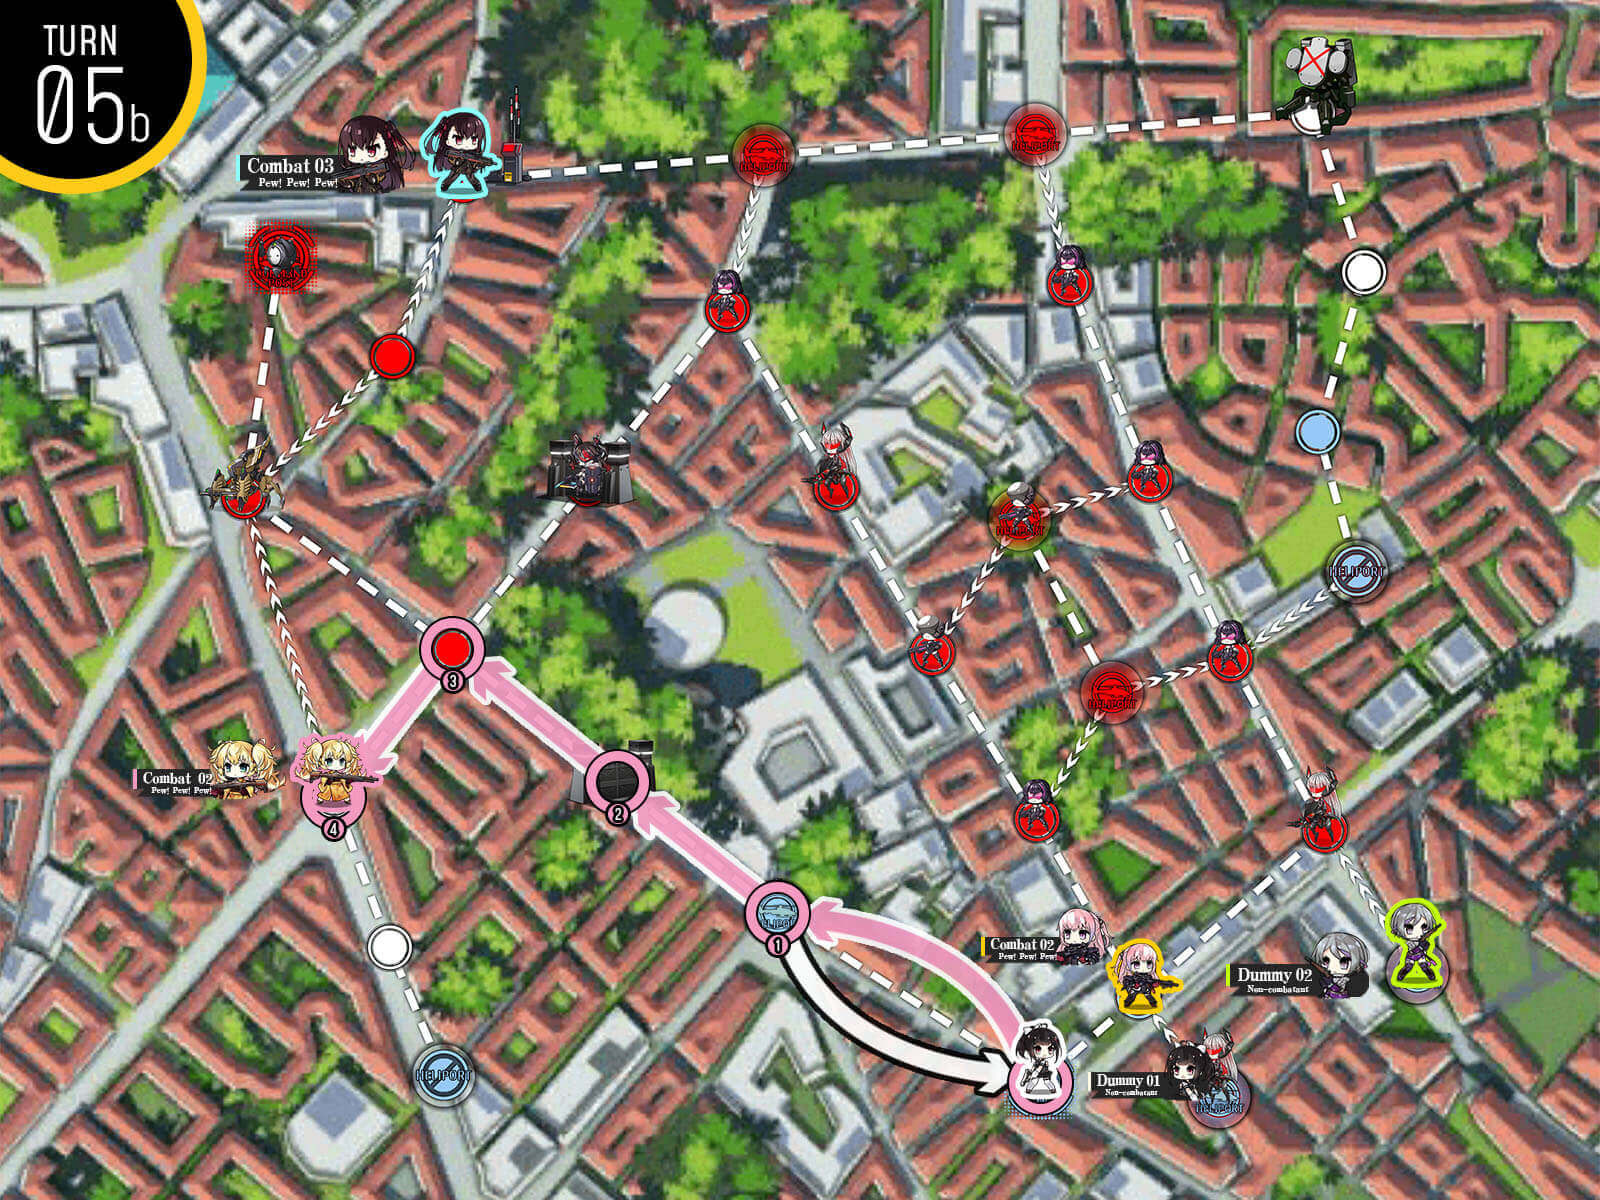
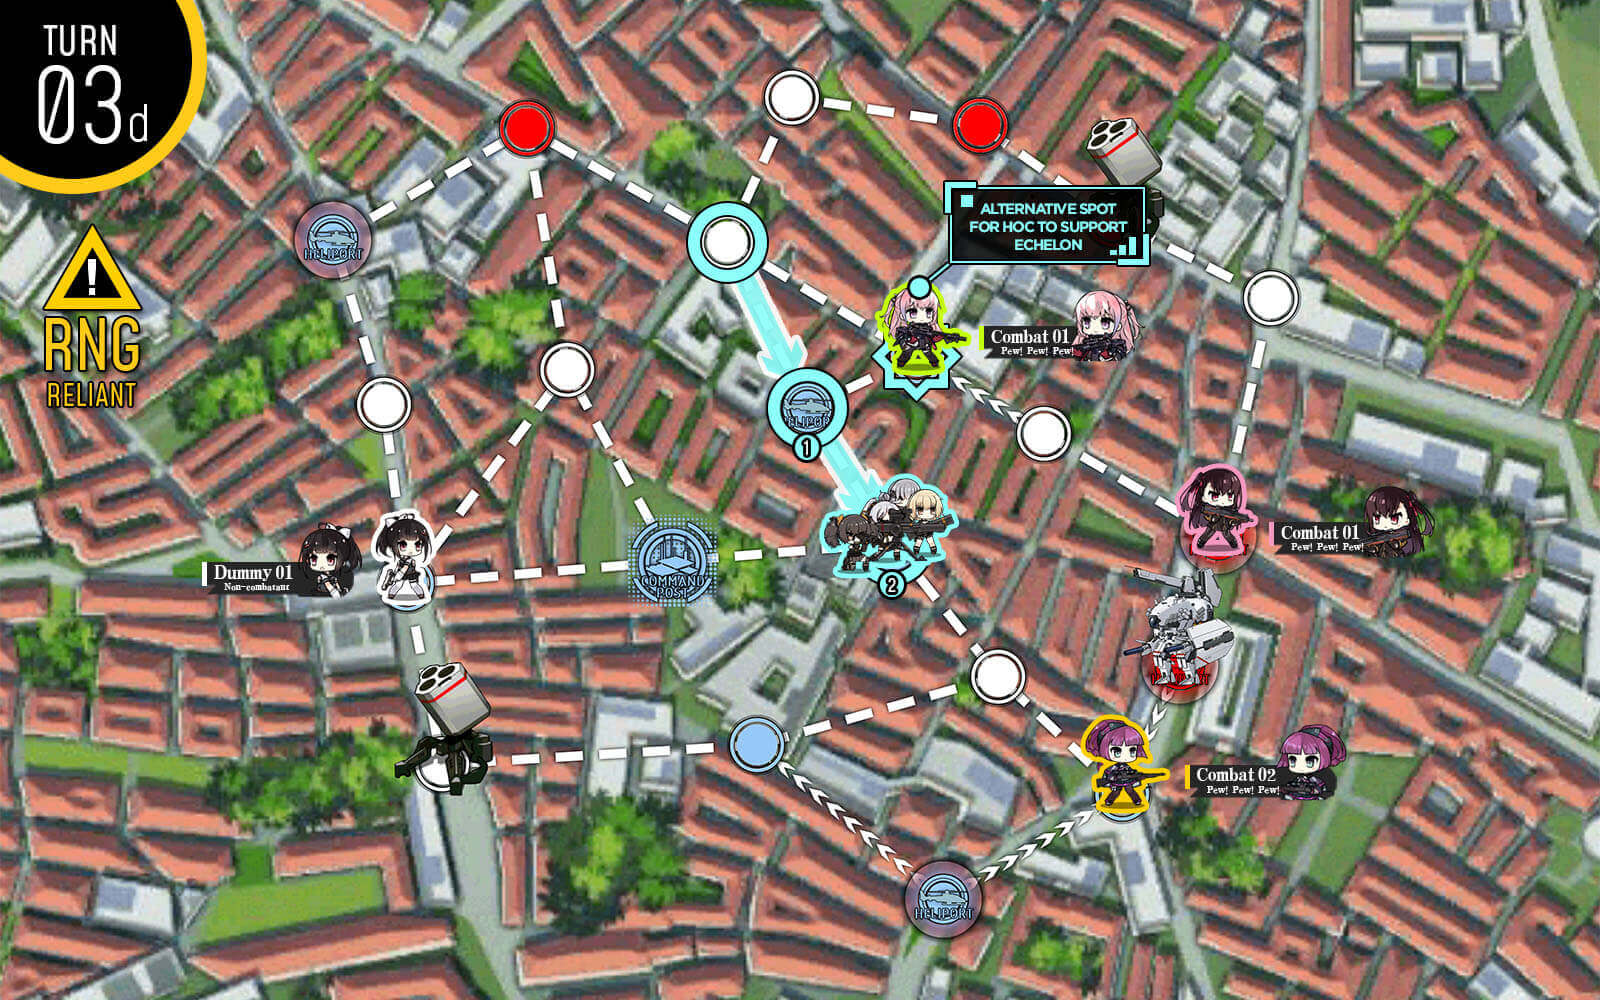
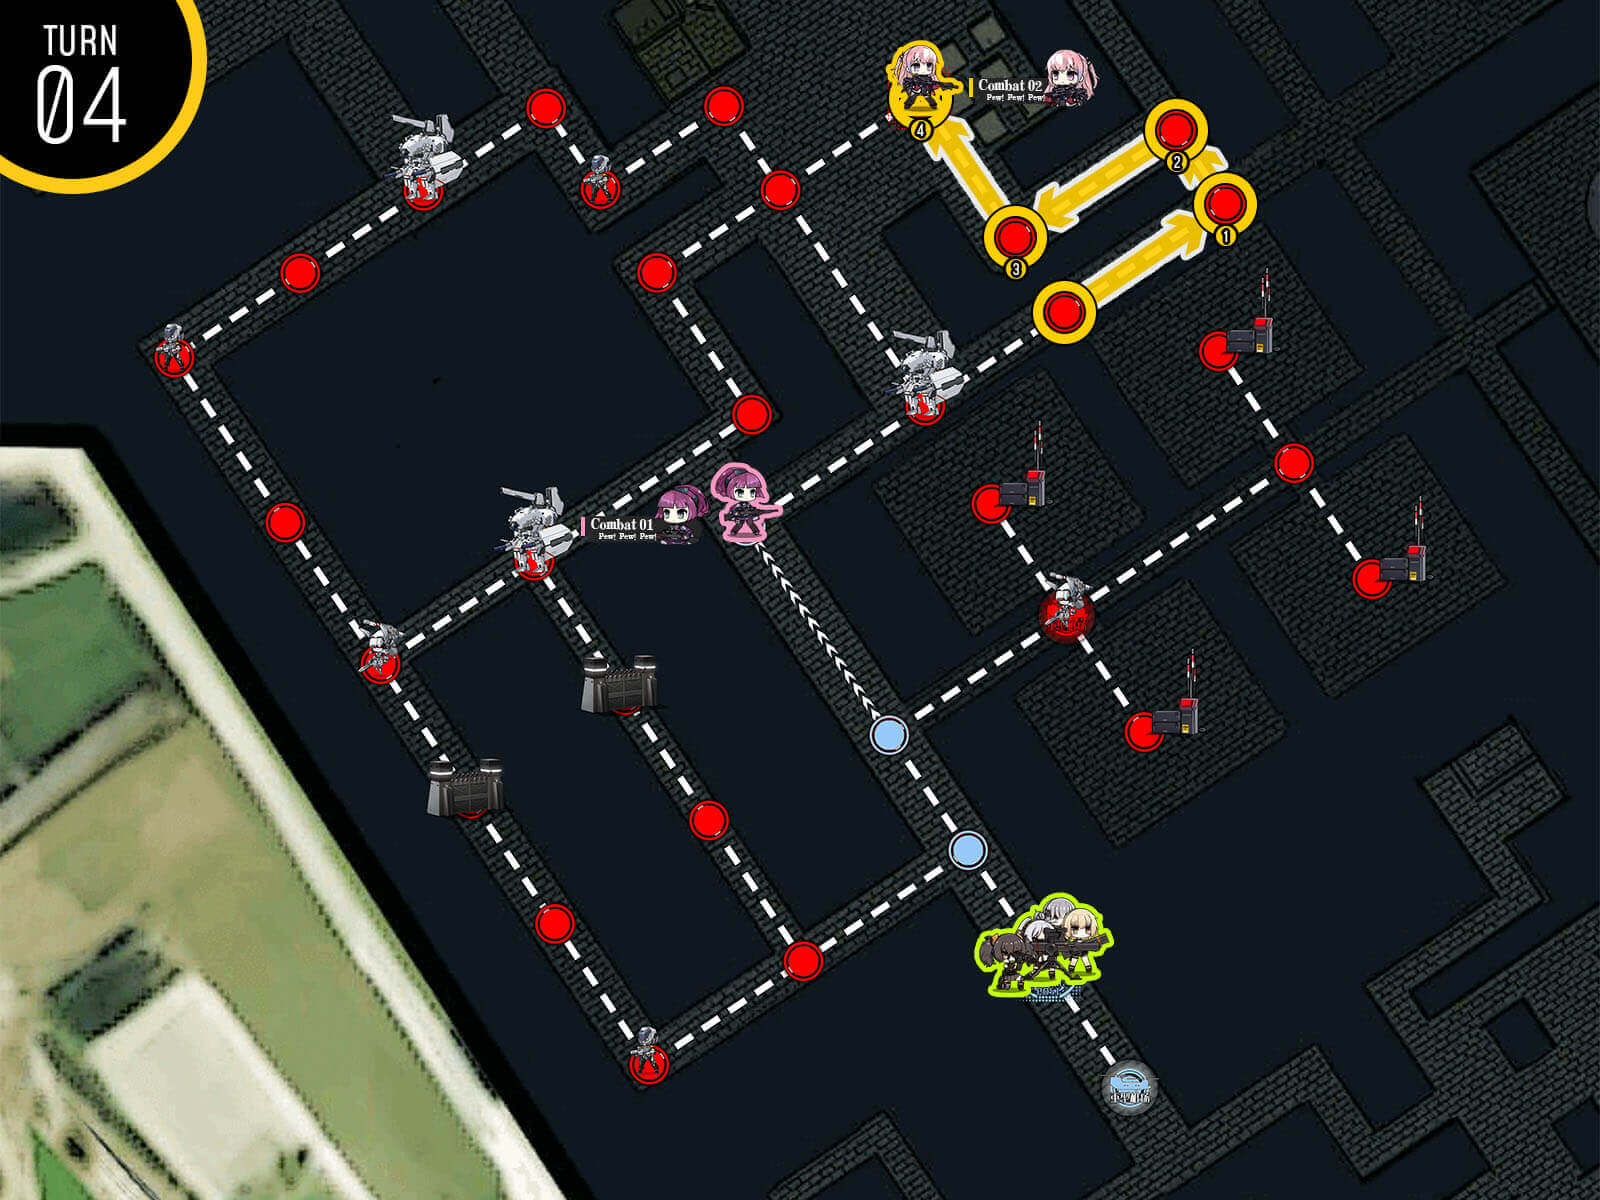
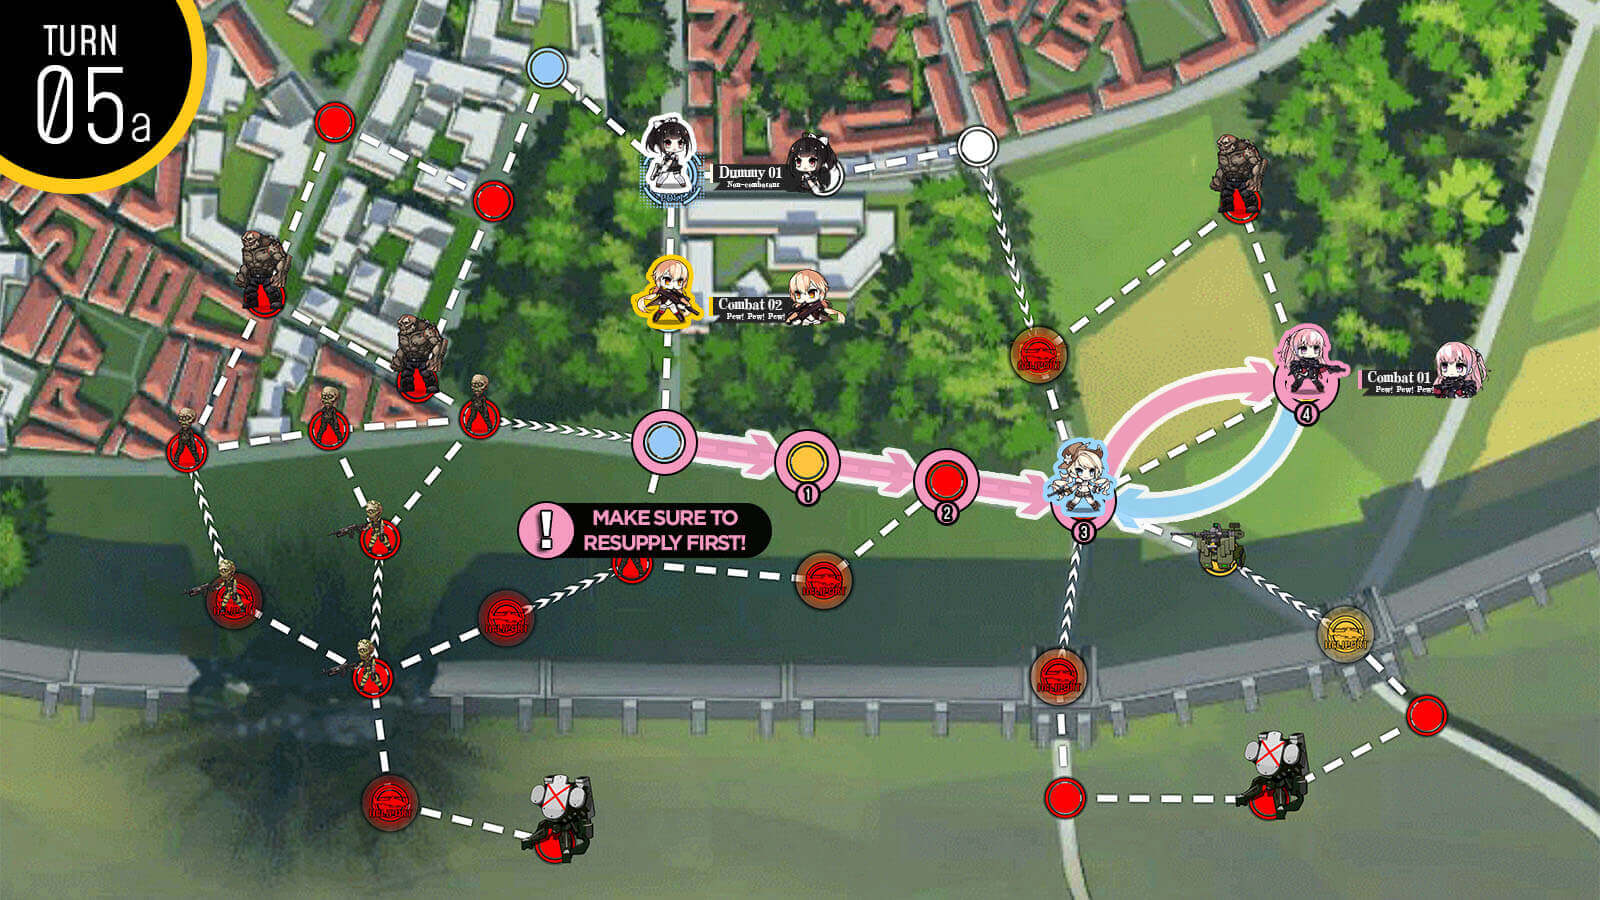
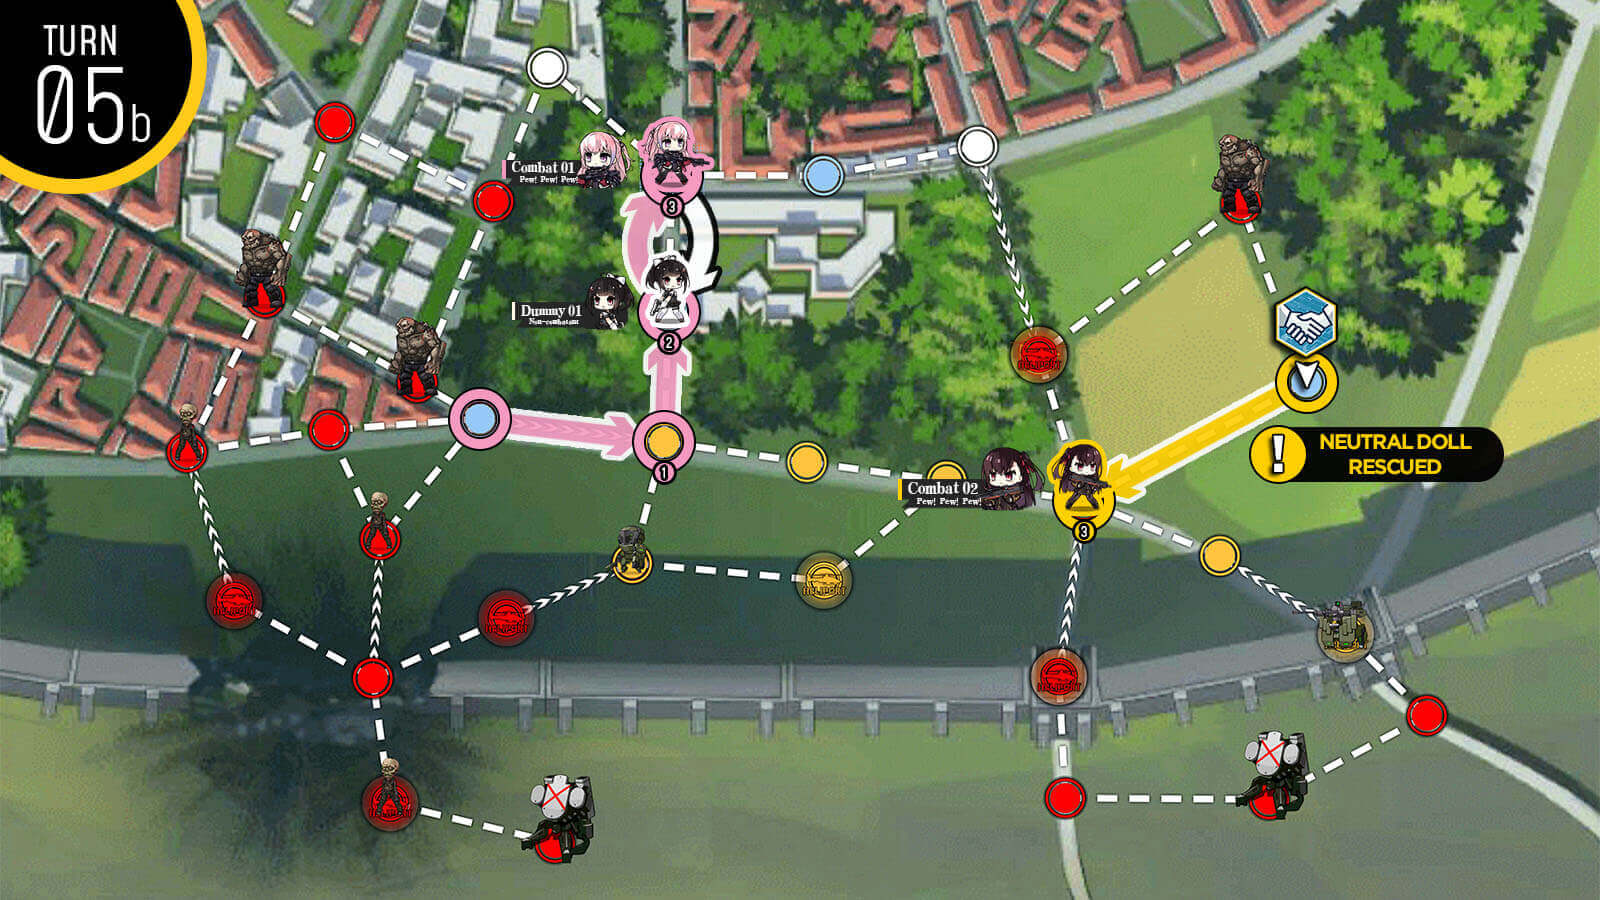
All that's left to do now is to control all nodes on the map before killing the last enemy unit in the bottom left corner. If RNG prevents you from keeping control of the helipads via surround capture, move the combat echelon unit at the bottom as shown to clear out the enemy near the center.
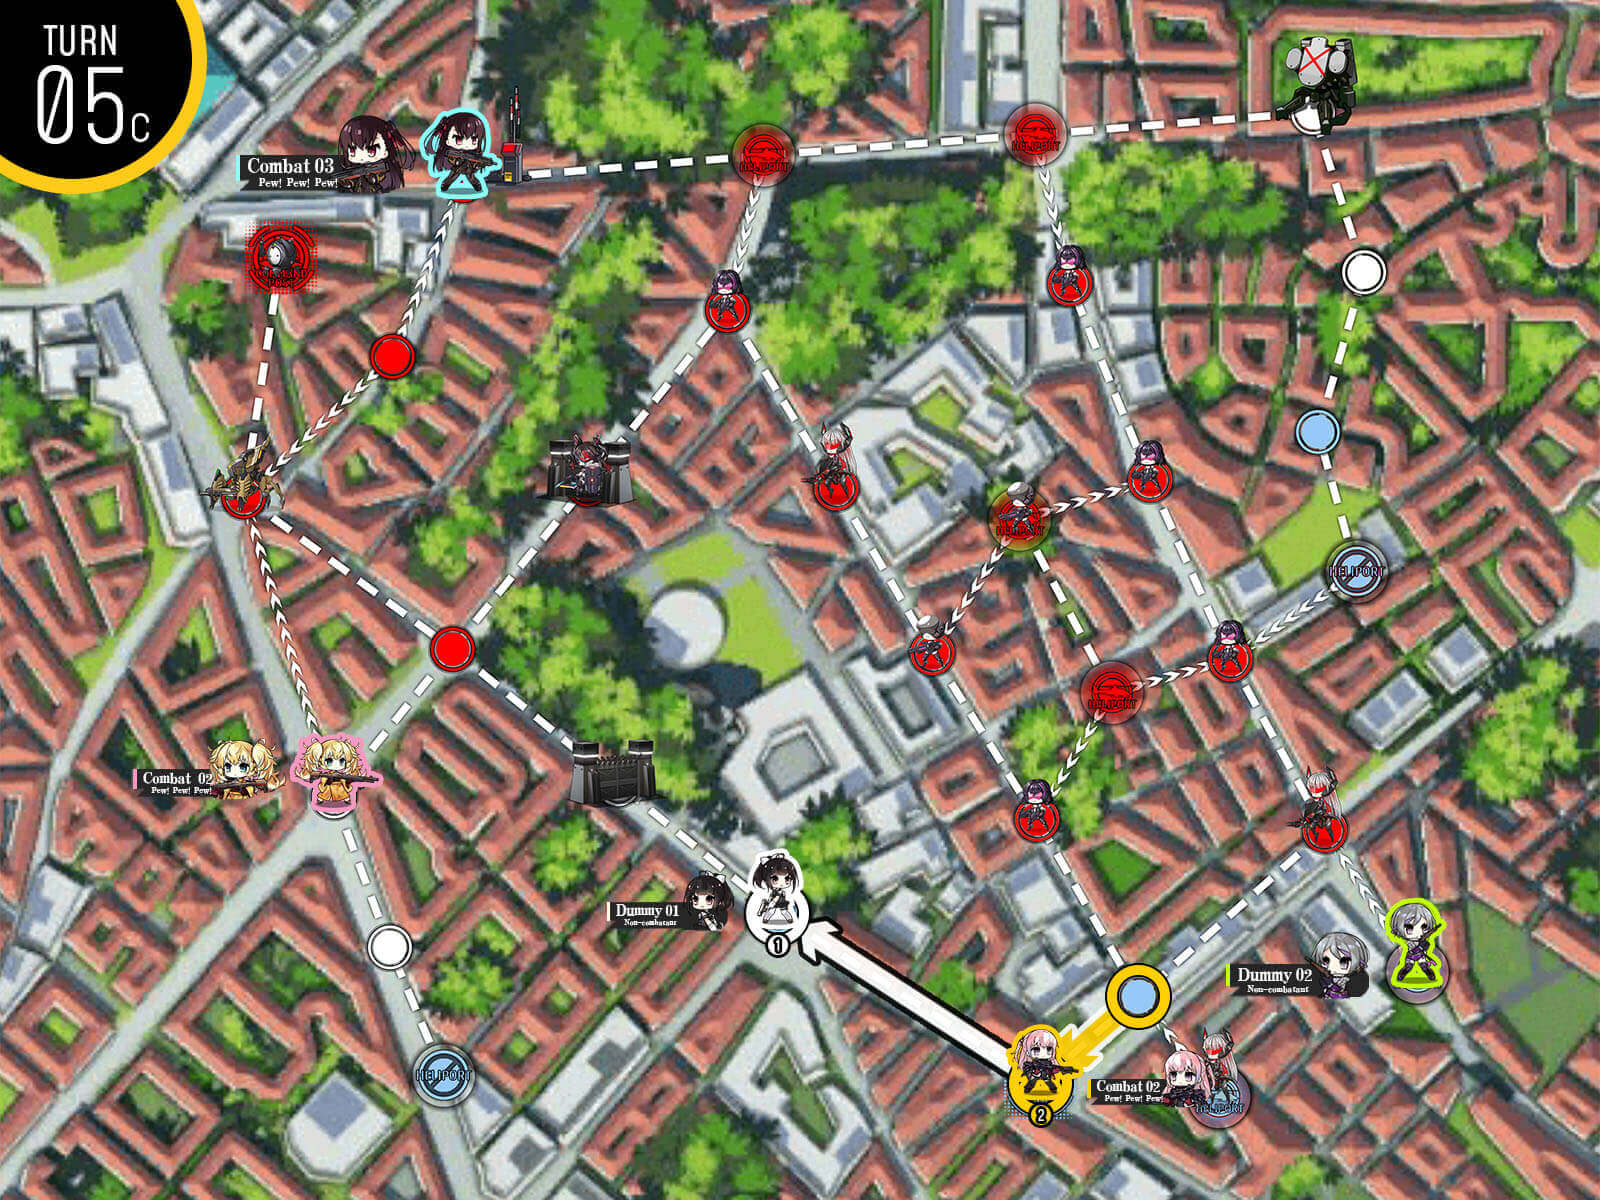
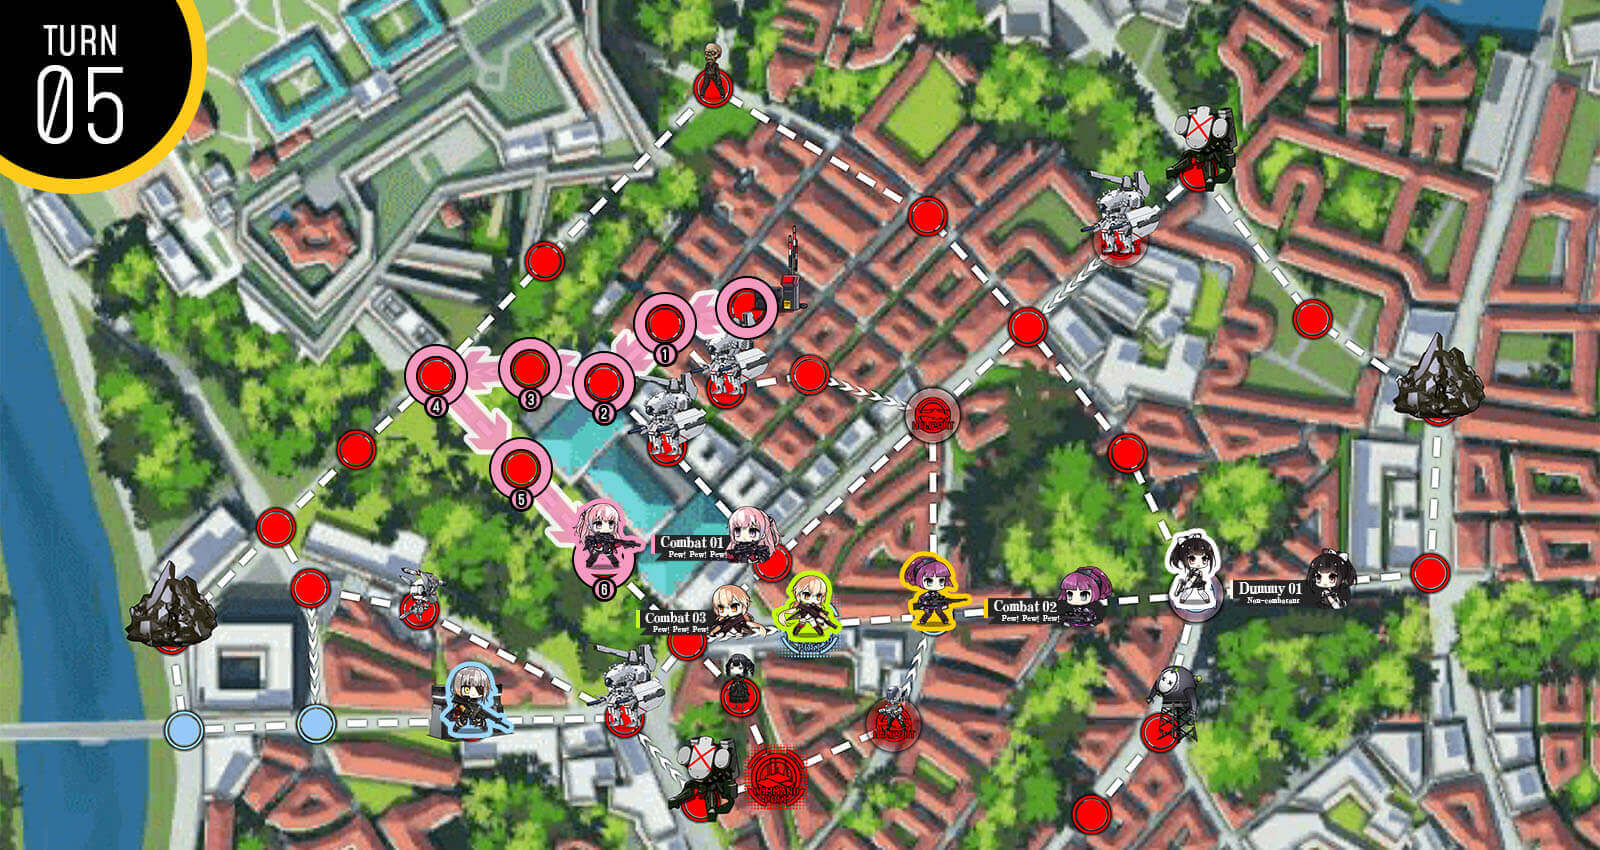
Continue moving echelons around to capture all nodes on the map.
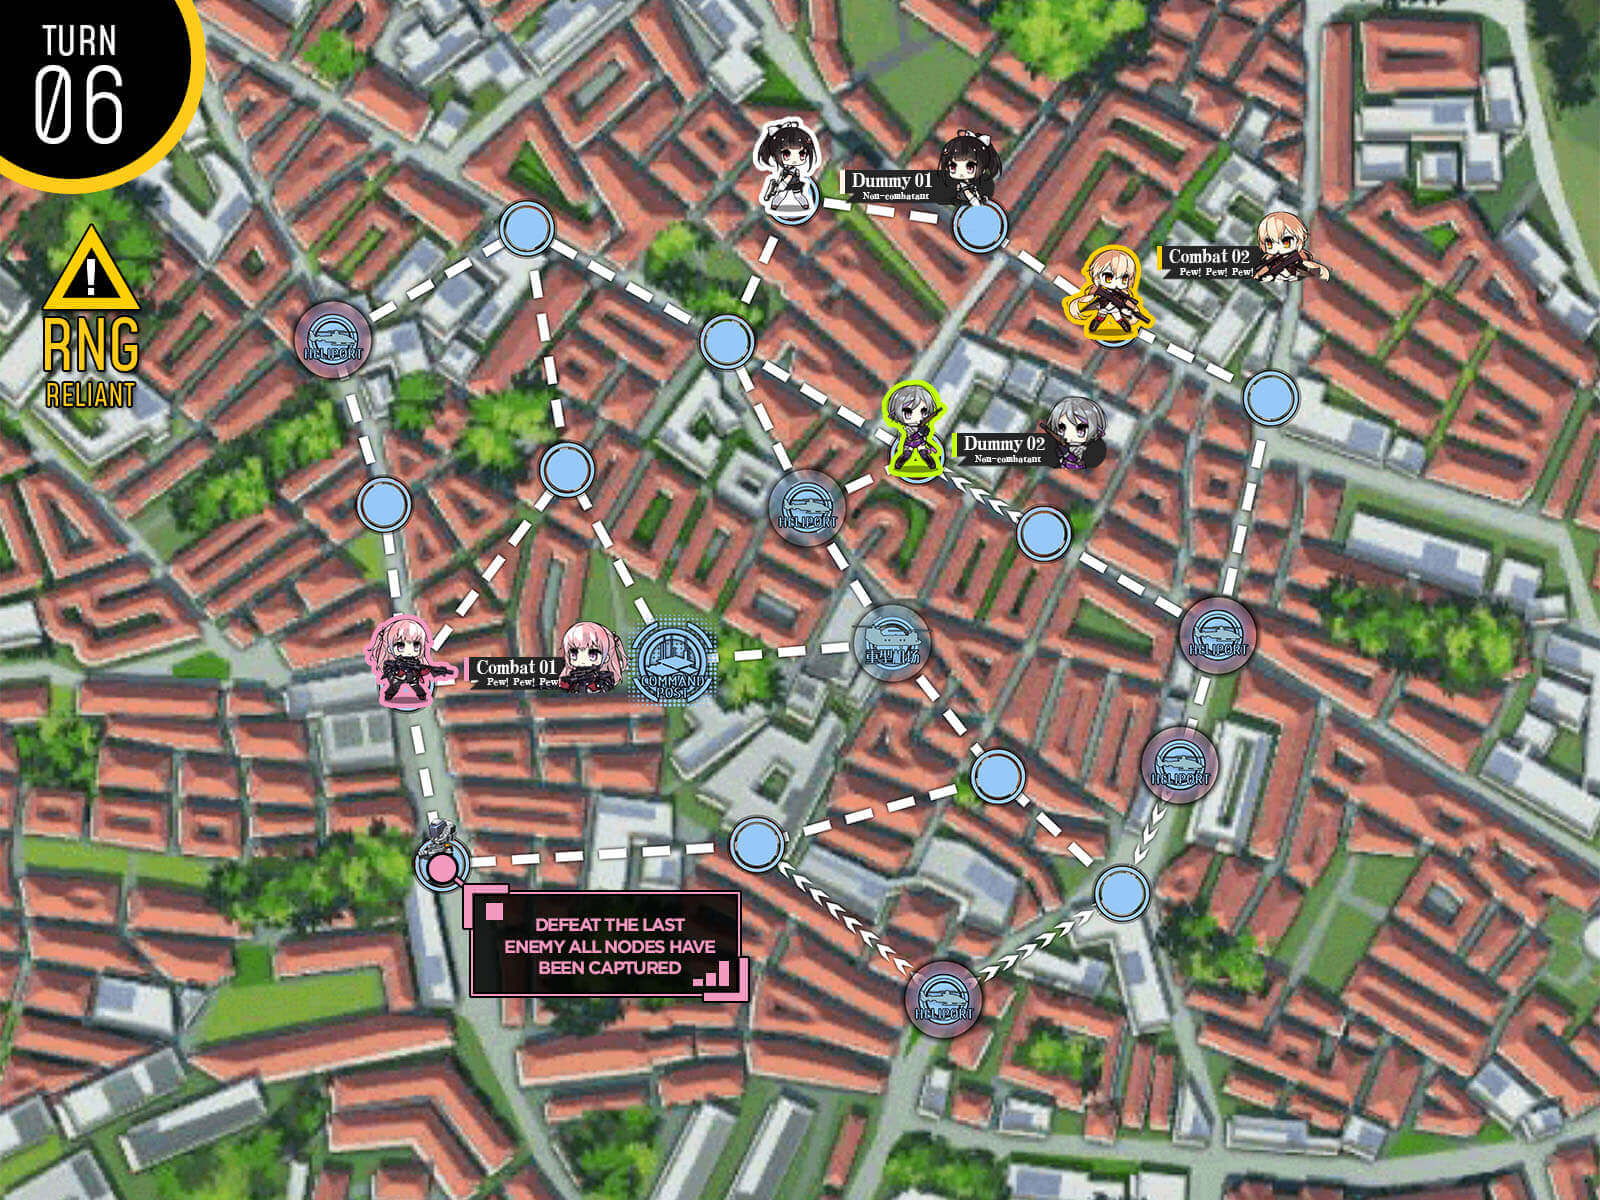
Once you have all nodes under your control, kill the last enemy unit at the bottom left.
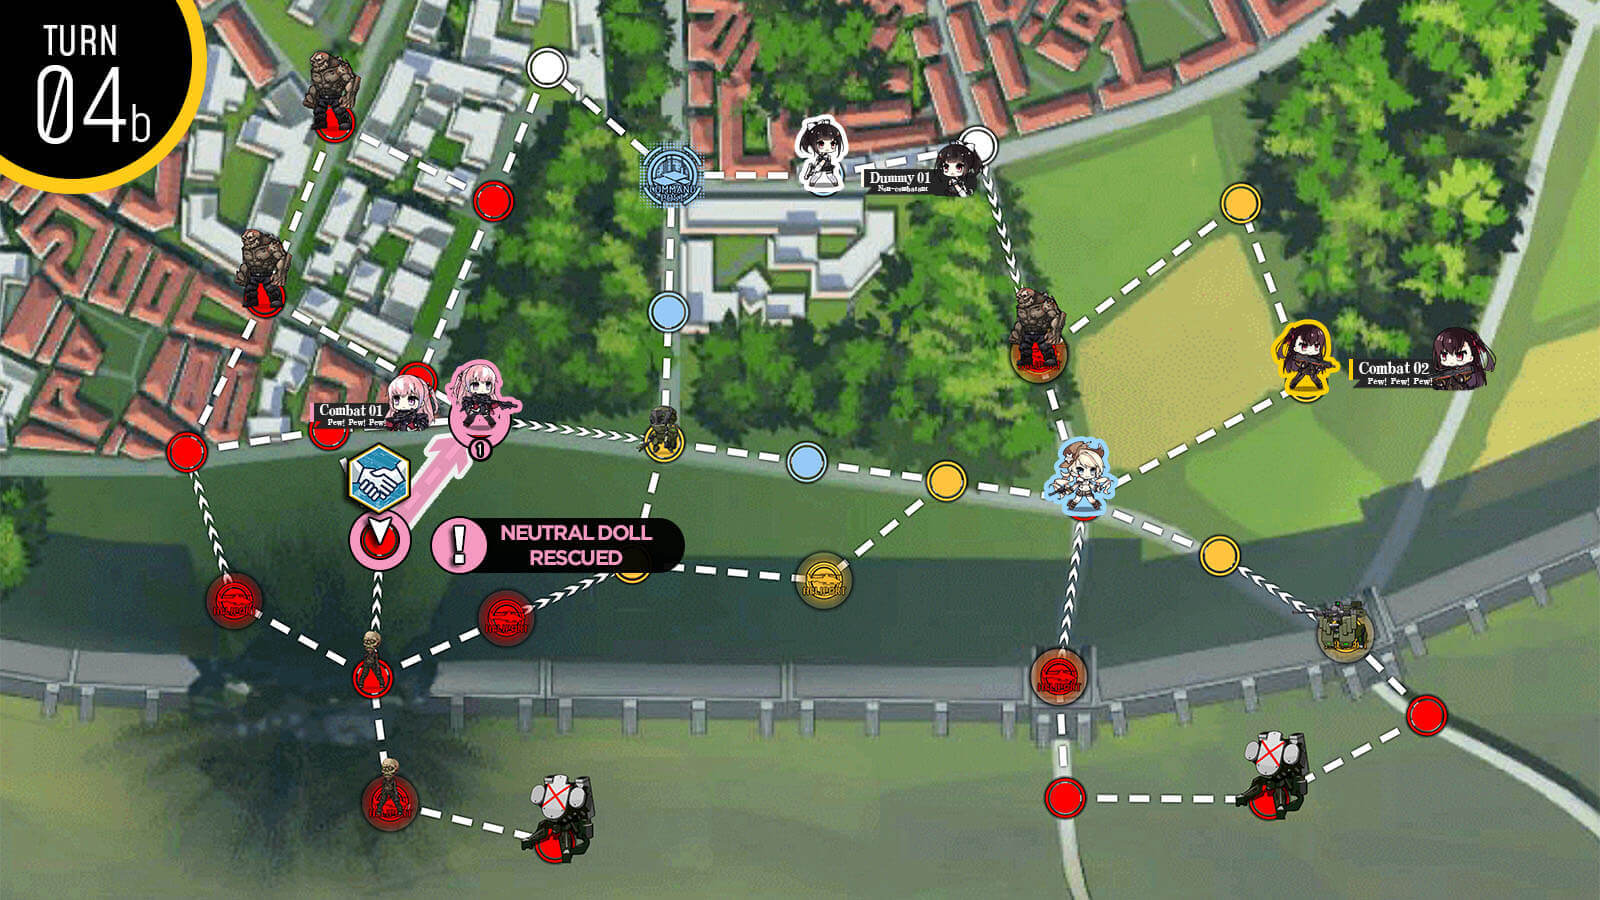
Swap echelon on the HQ and the HOC and remotely destroy enemy fire support platform. Revert the swap back to starting positions. Then combat echelon at the HQ goes through the bottom left corner to clear out the enemies near the destroyed enemy structure.
We then swap our other combat echelon with the HOC and move down to the bottom so that we can surround capture the helipad with one-way paths next turn.
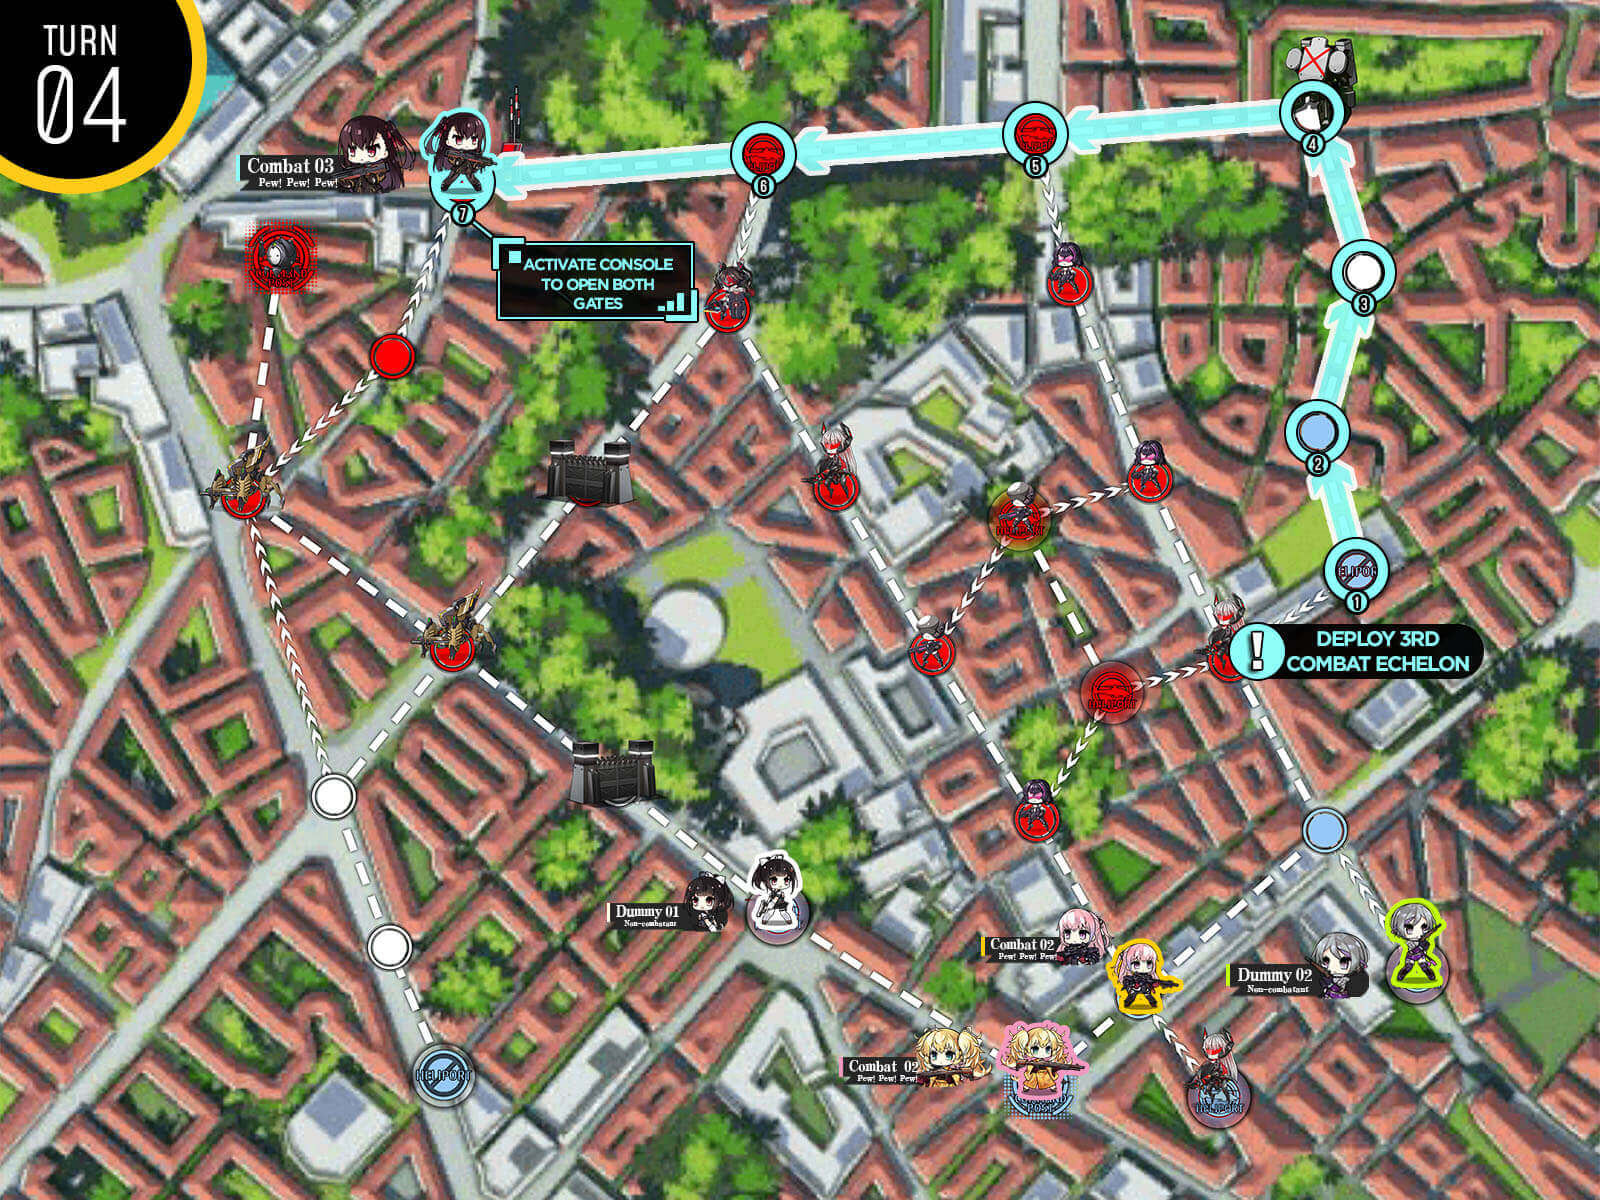
Finally we need to defend the top helipad in the center. Deploy 3rd combat echelon at the large helipad then swap location with the HOC.
We now work on getting the top left helipad under our control. First deploy a dummy echelon on the HQ that we can use to swap and resupply for the combat echelon.
Once we bring the combat echelon back up to the left of the HQ, swap and resupply the echelon. Move the 3rd combat echelon and HOC at the center so that HOC can provide support against the Gundam fight.

Once we bring the combat echelon back up to the left of the HQ, swap and resupply the echelon. Move the 3rd combat echelon and HOC at the center so that HOC can provide support against the Gundam fight.
Once we bring the combat echelon back up to the left of the HQ, swap and resupply the echelon. Move the 3rd combat echelon and HOC at the center so that HOC can provide support against the Gundam fight.

Once we bring the combat echelon back up to the left of the HQ, swap and resupply the echelon. Move the 3rd combat echelon and HOC at the center so that HOC can provide support against the Gundam fight.
Once we bring the combat echelon back up to the left of the HQ, swap and resupply the echelon. Move the 3rd combat echelon and HOC at the center so that HOC can provide support against the Gundam fight.
Once we bring the combat echelon back up to the left of the HQ, swap and resupply the echelon. Move the 3rd combat echelon and HOC at the center so that HOC can provide support against the Gundam fight.
Deploy the dummy echelon on the HQ and just hit end turn. You will see that we will gain lots of helipads on the center area.
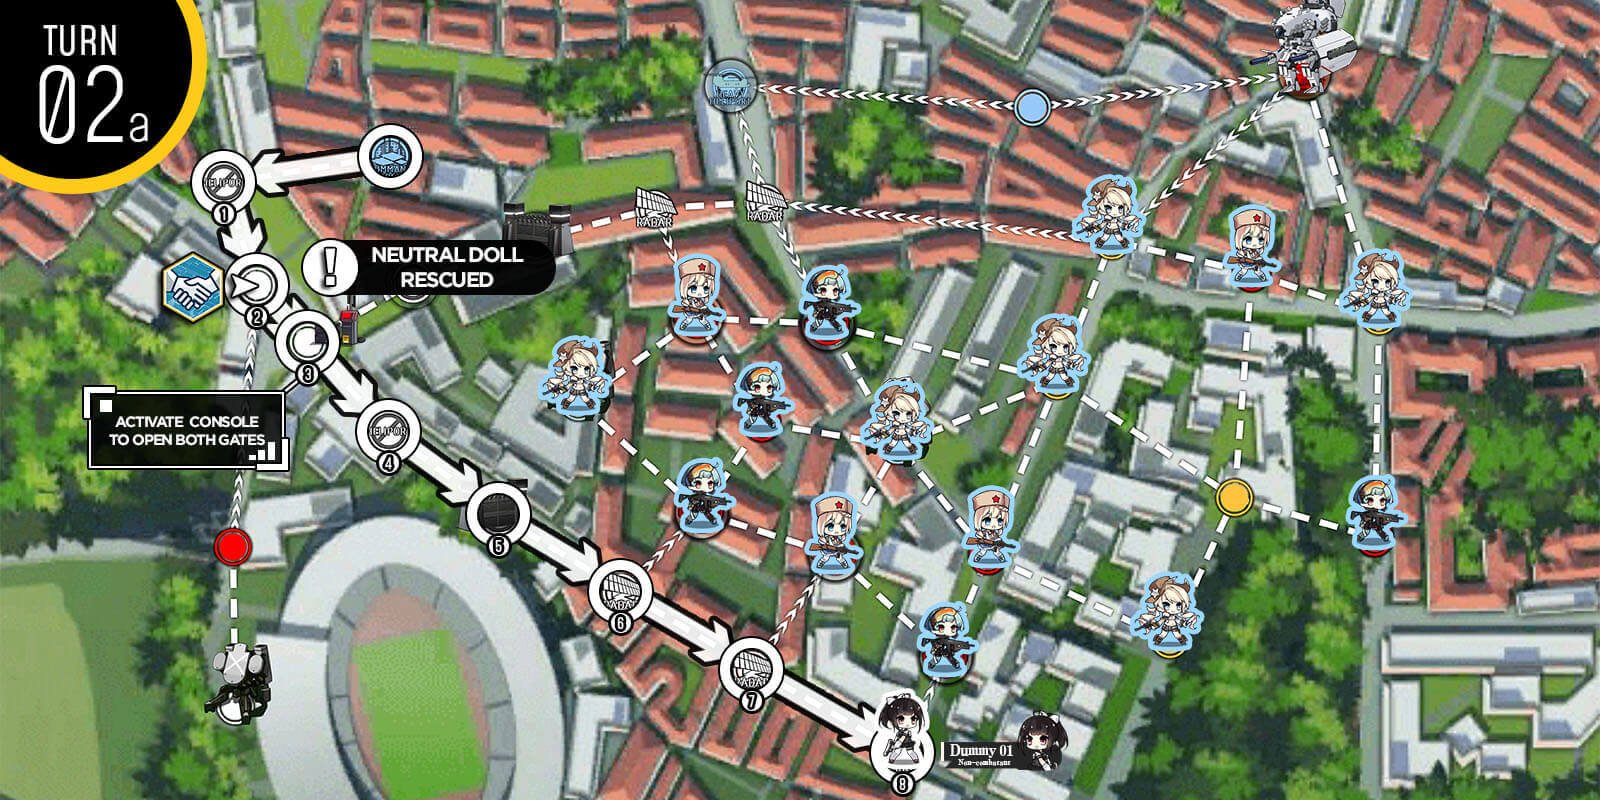
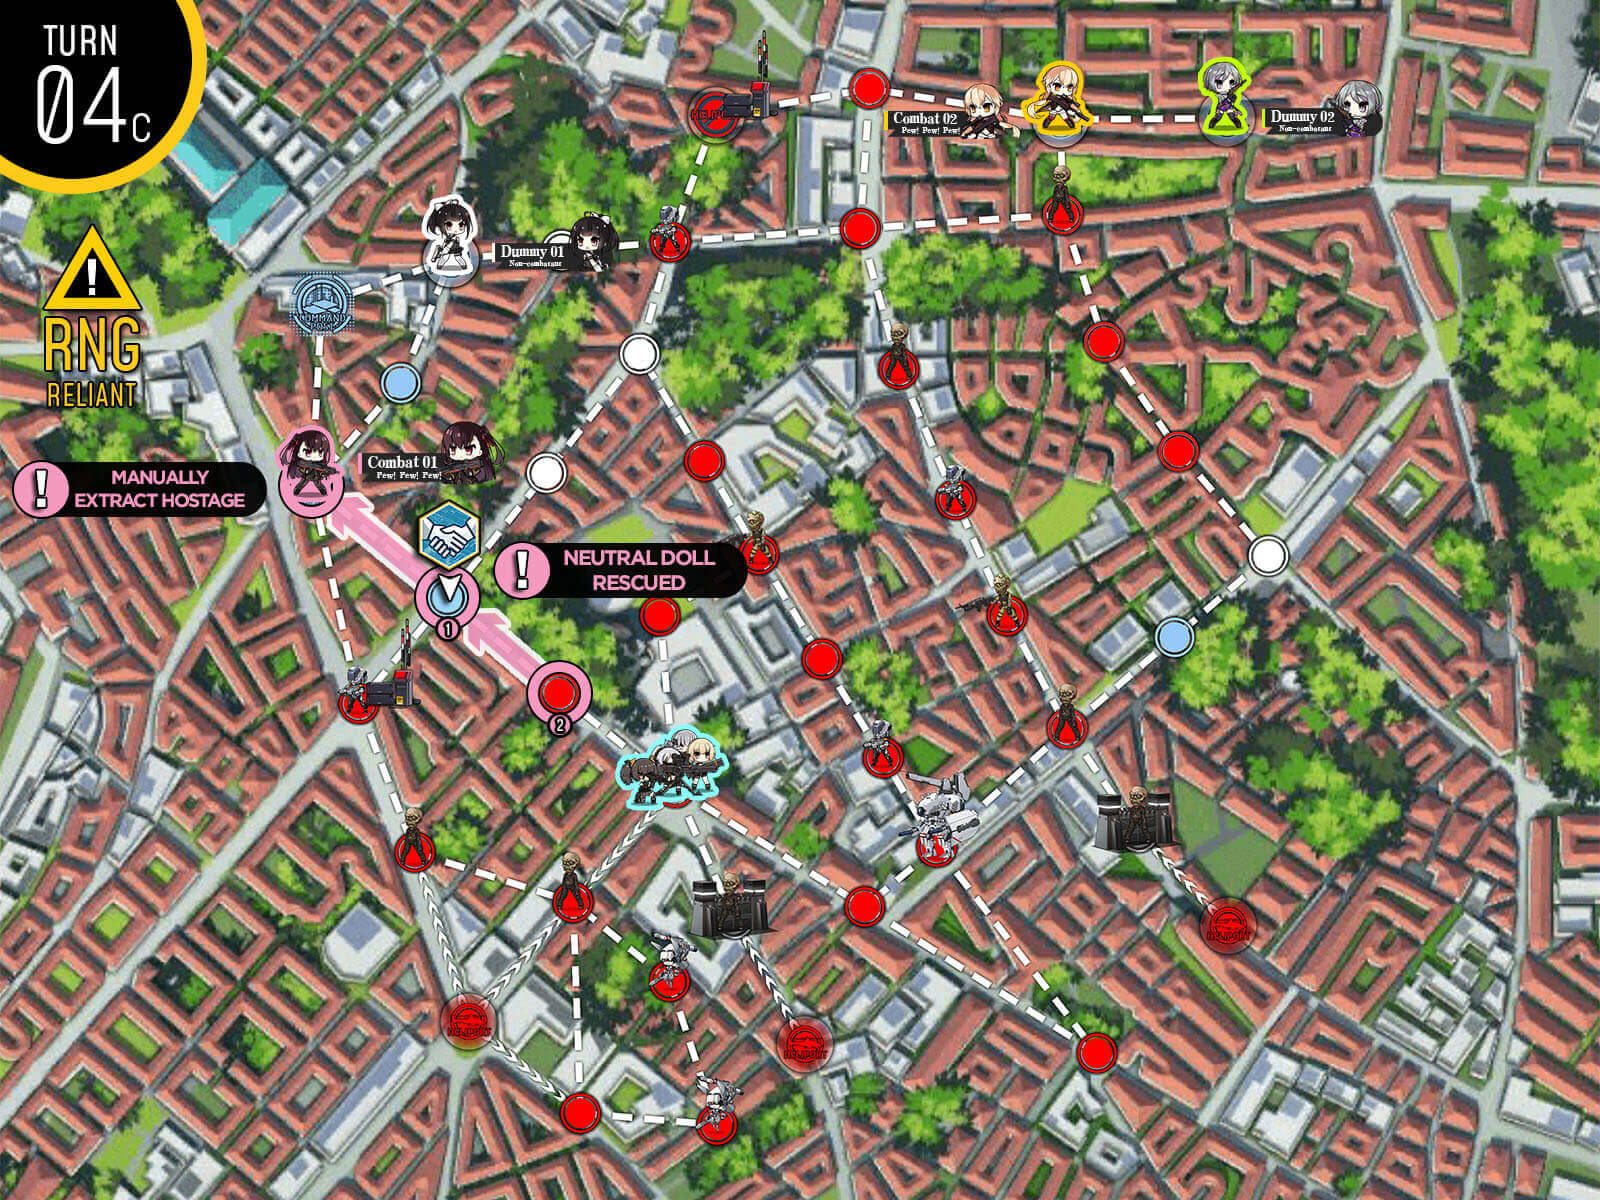
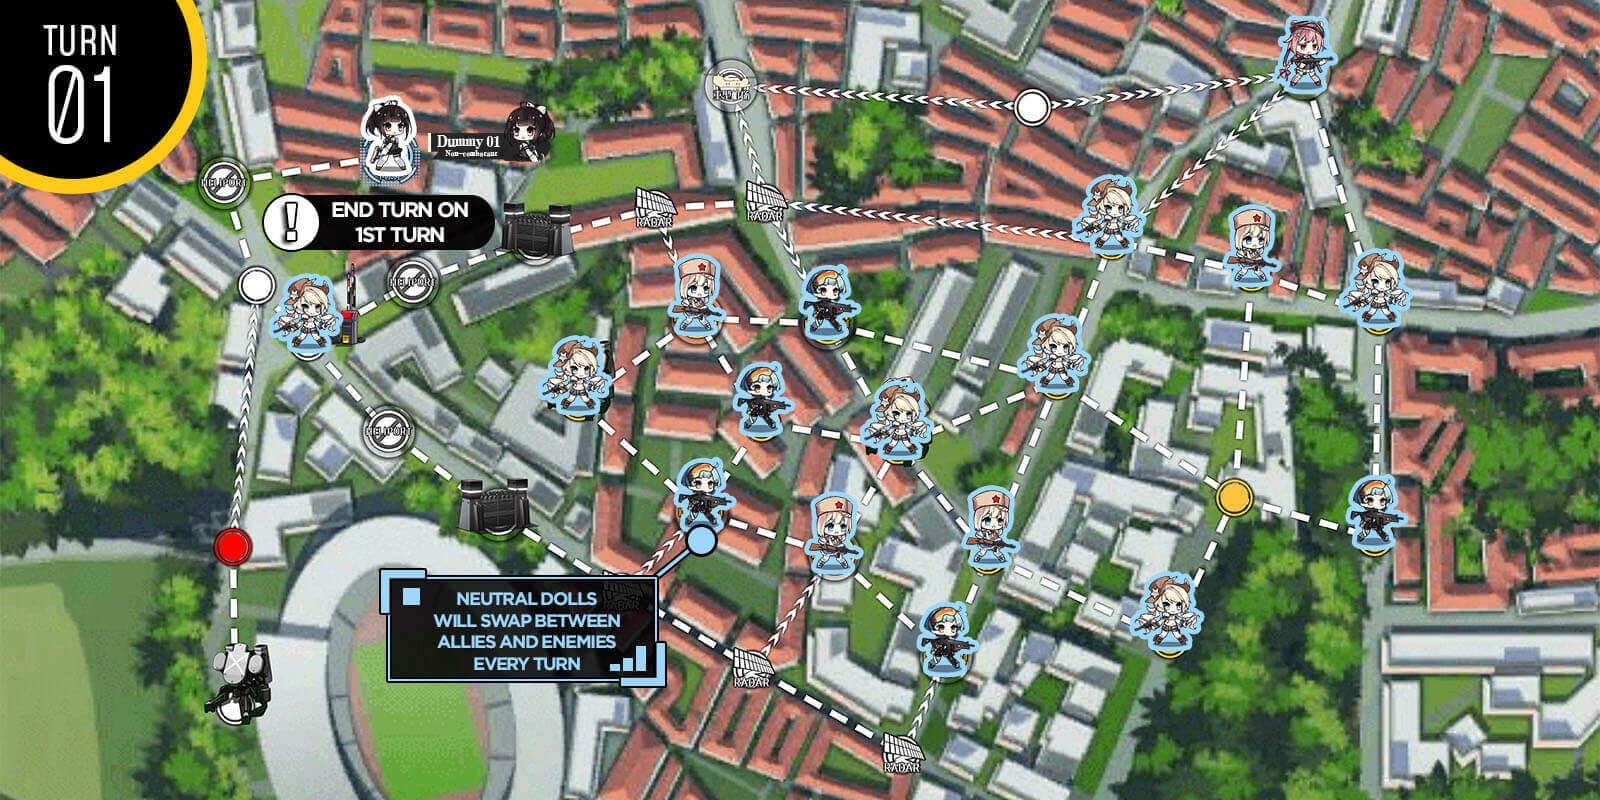
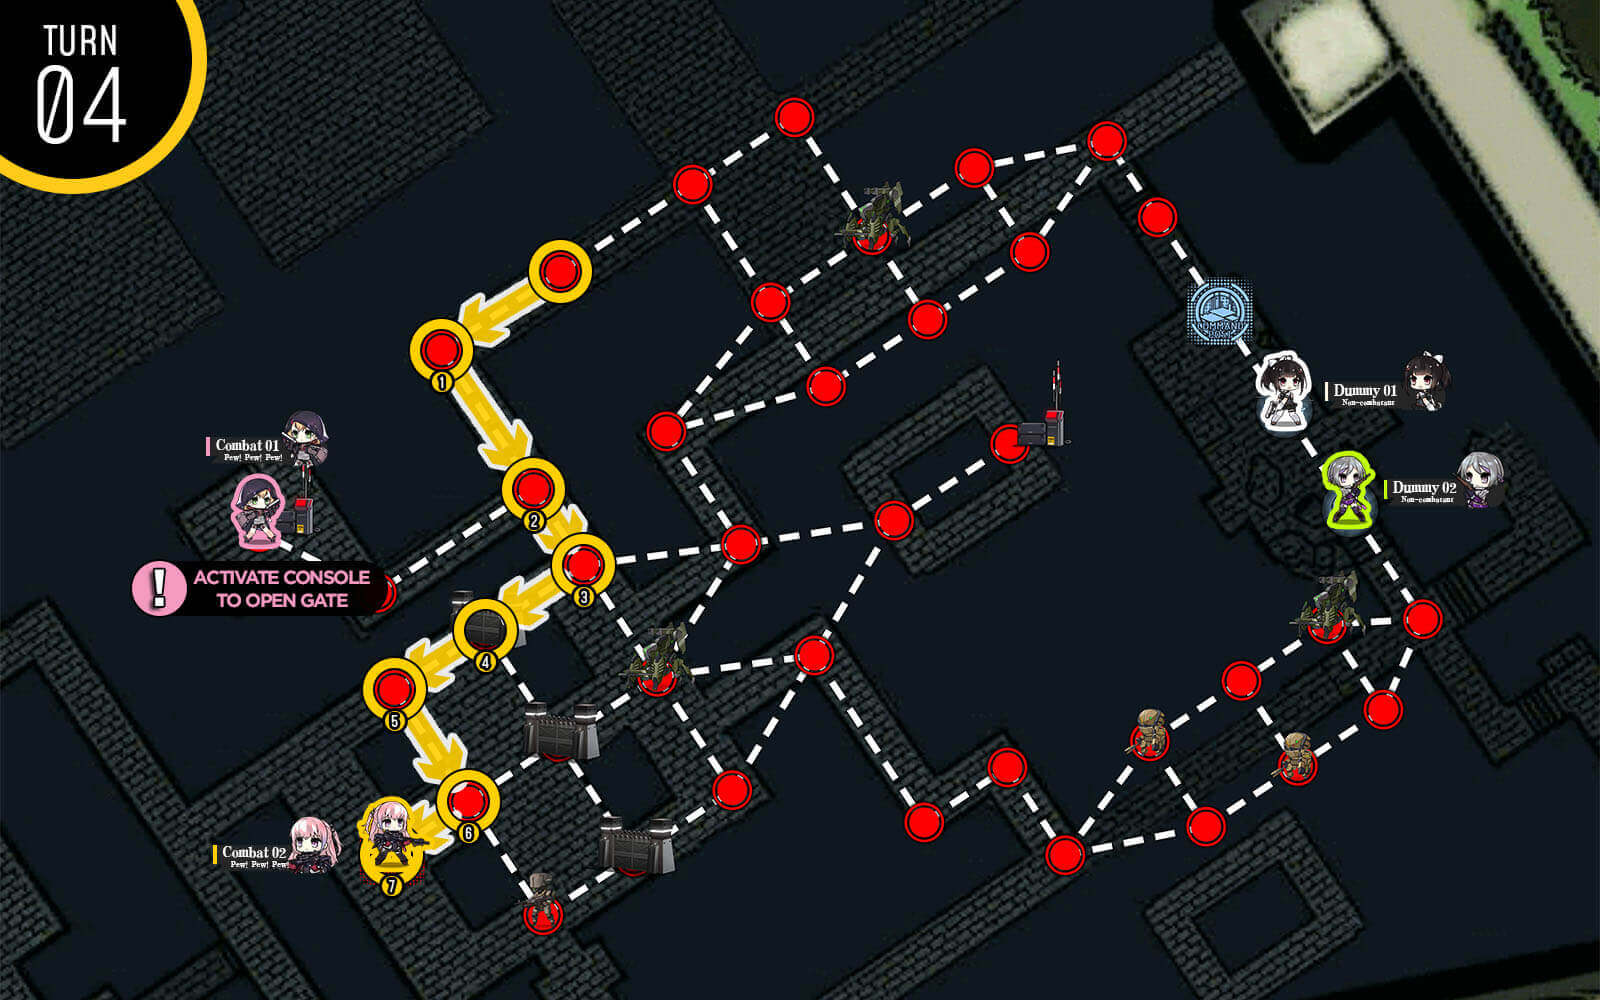
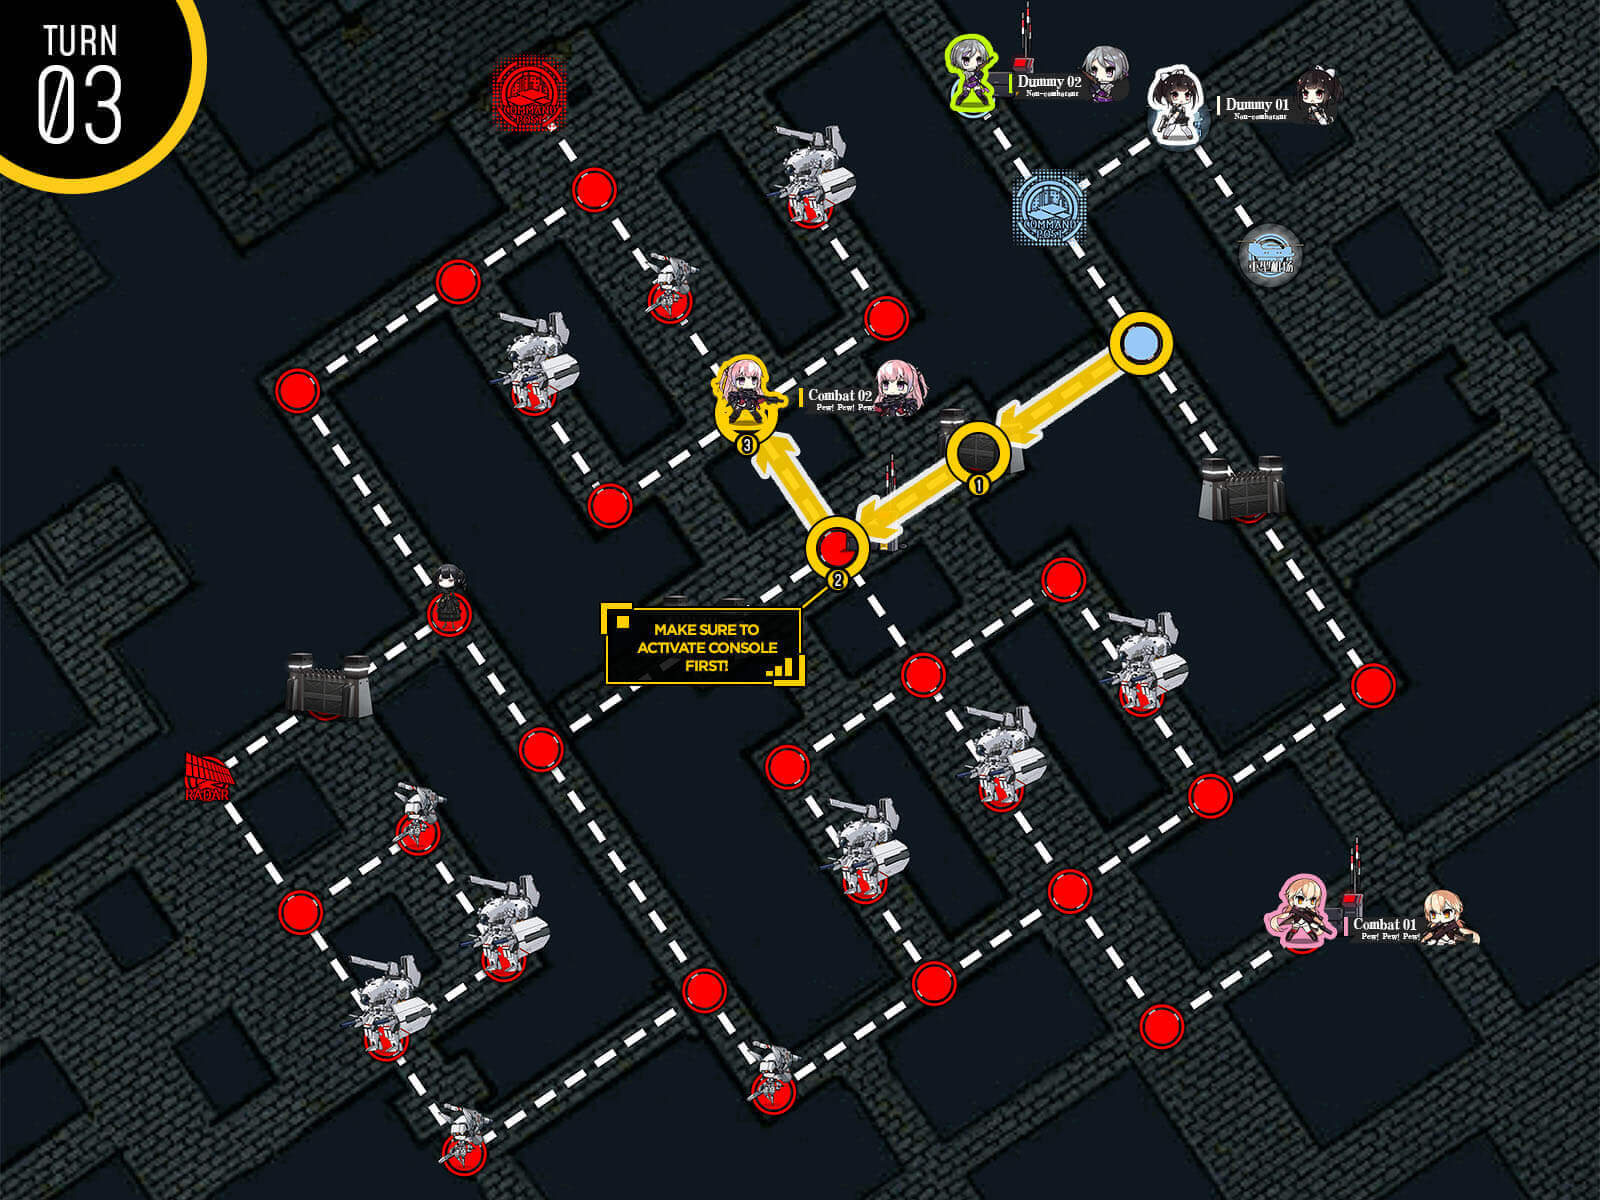
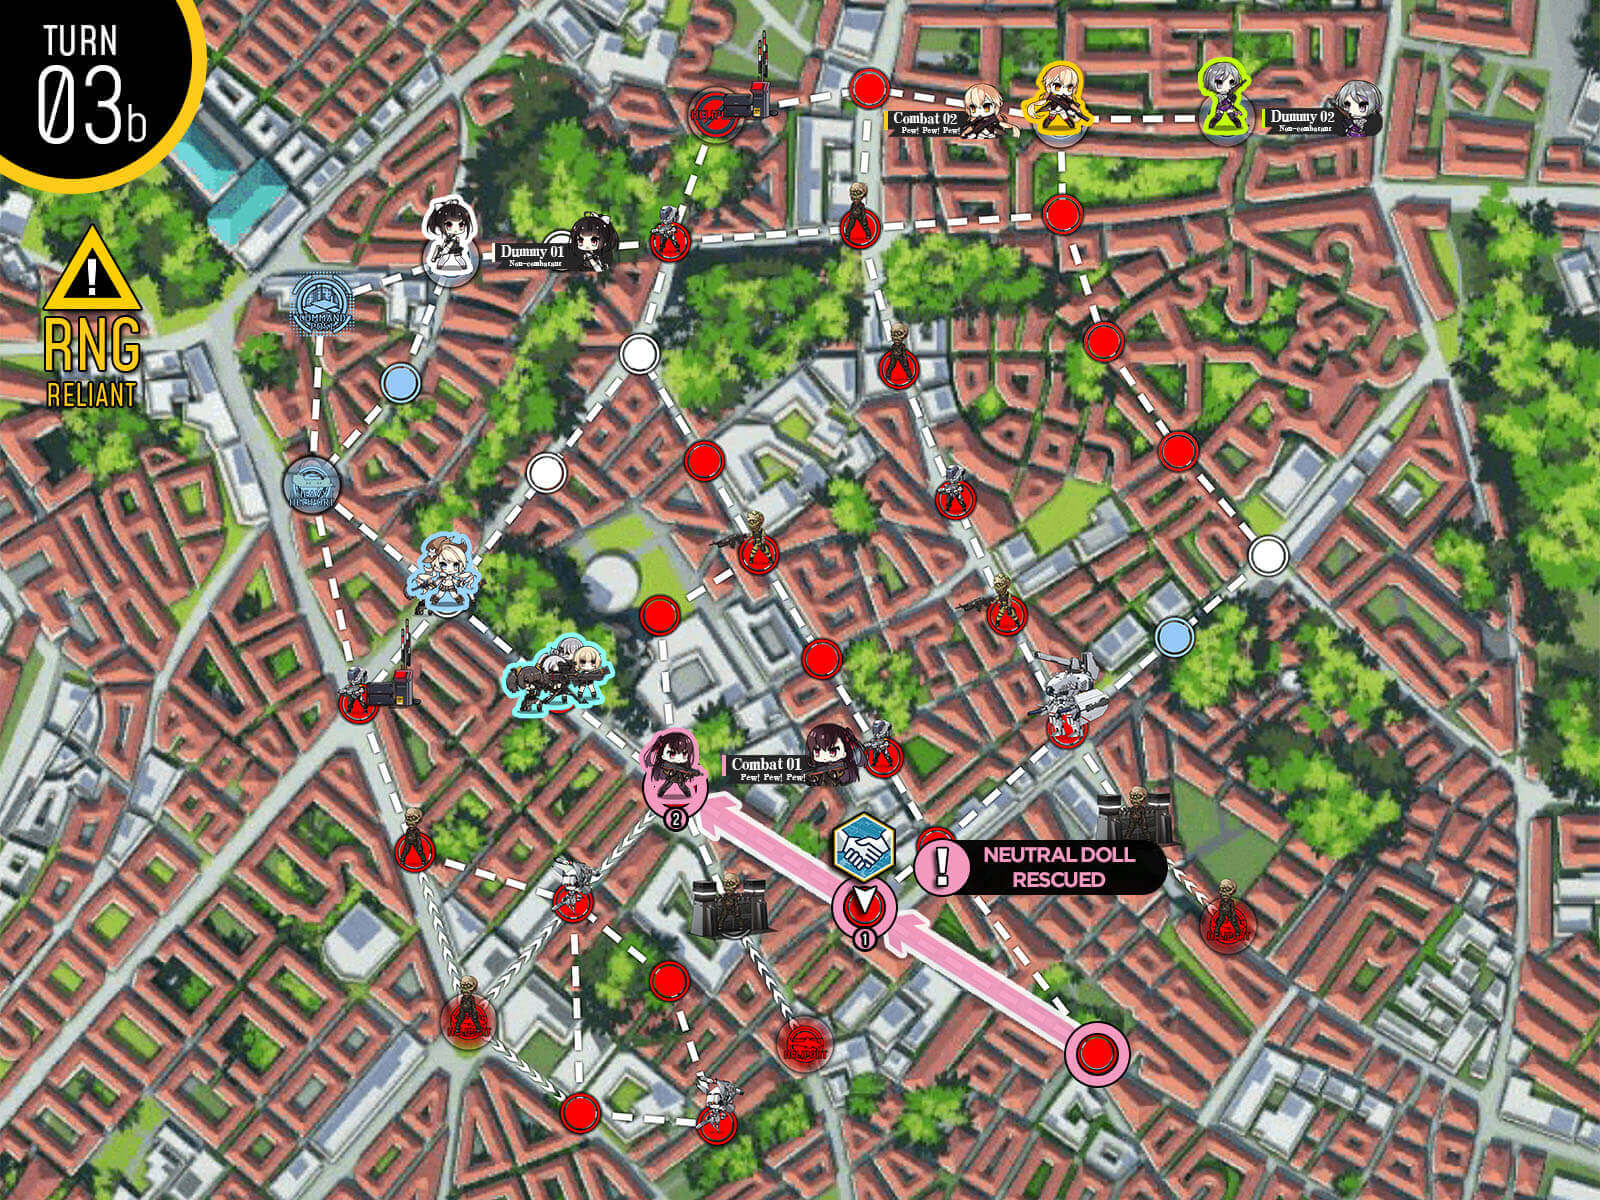
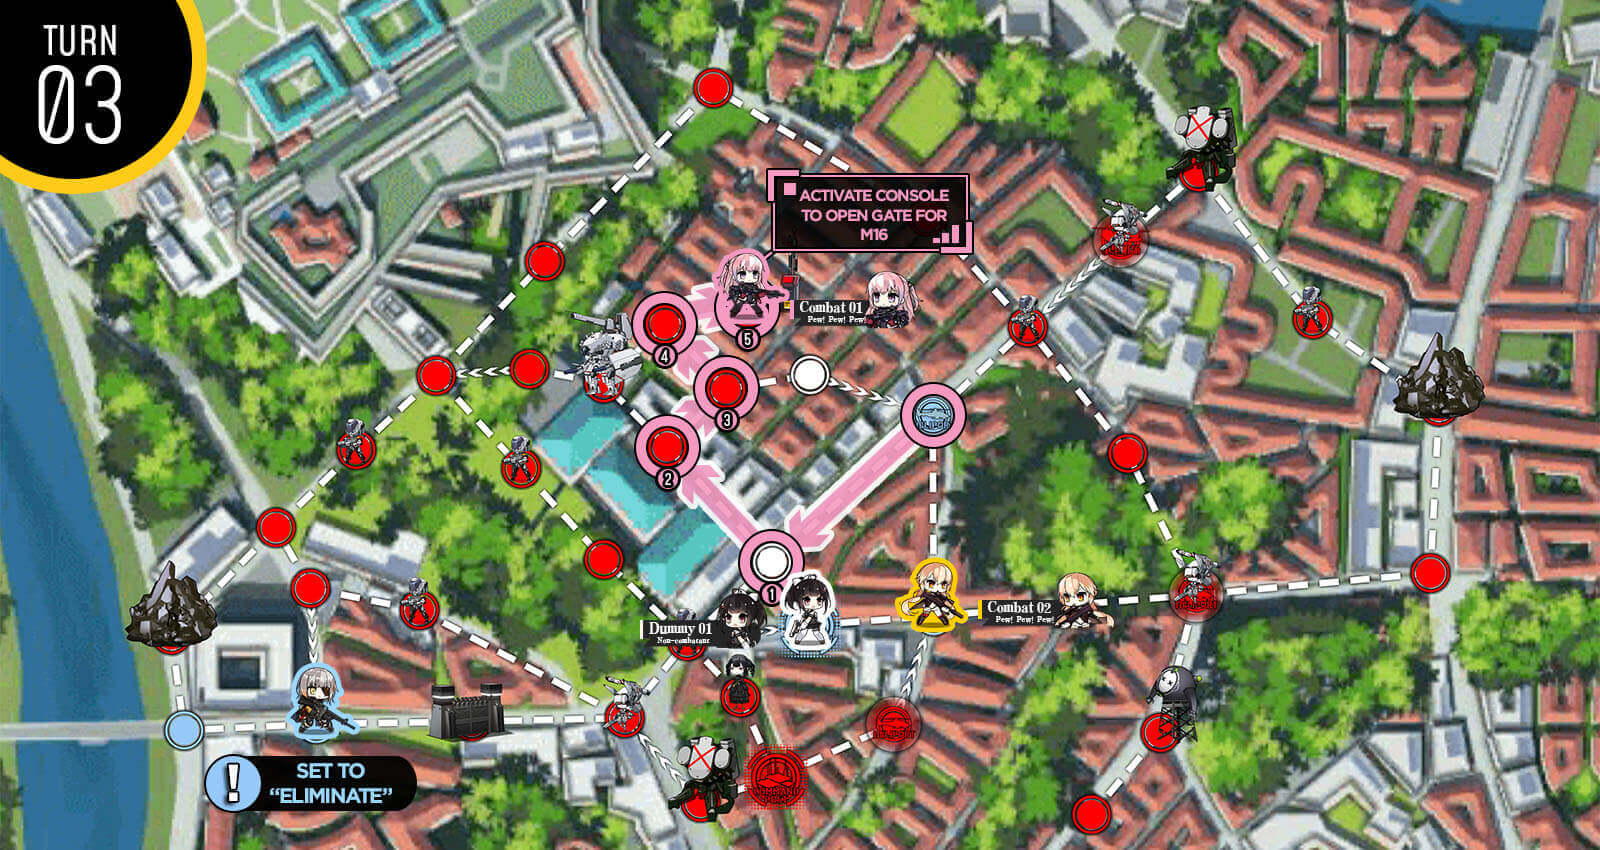
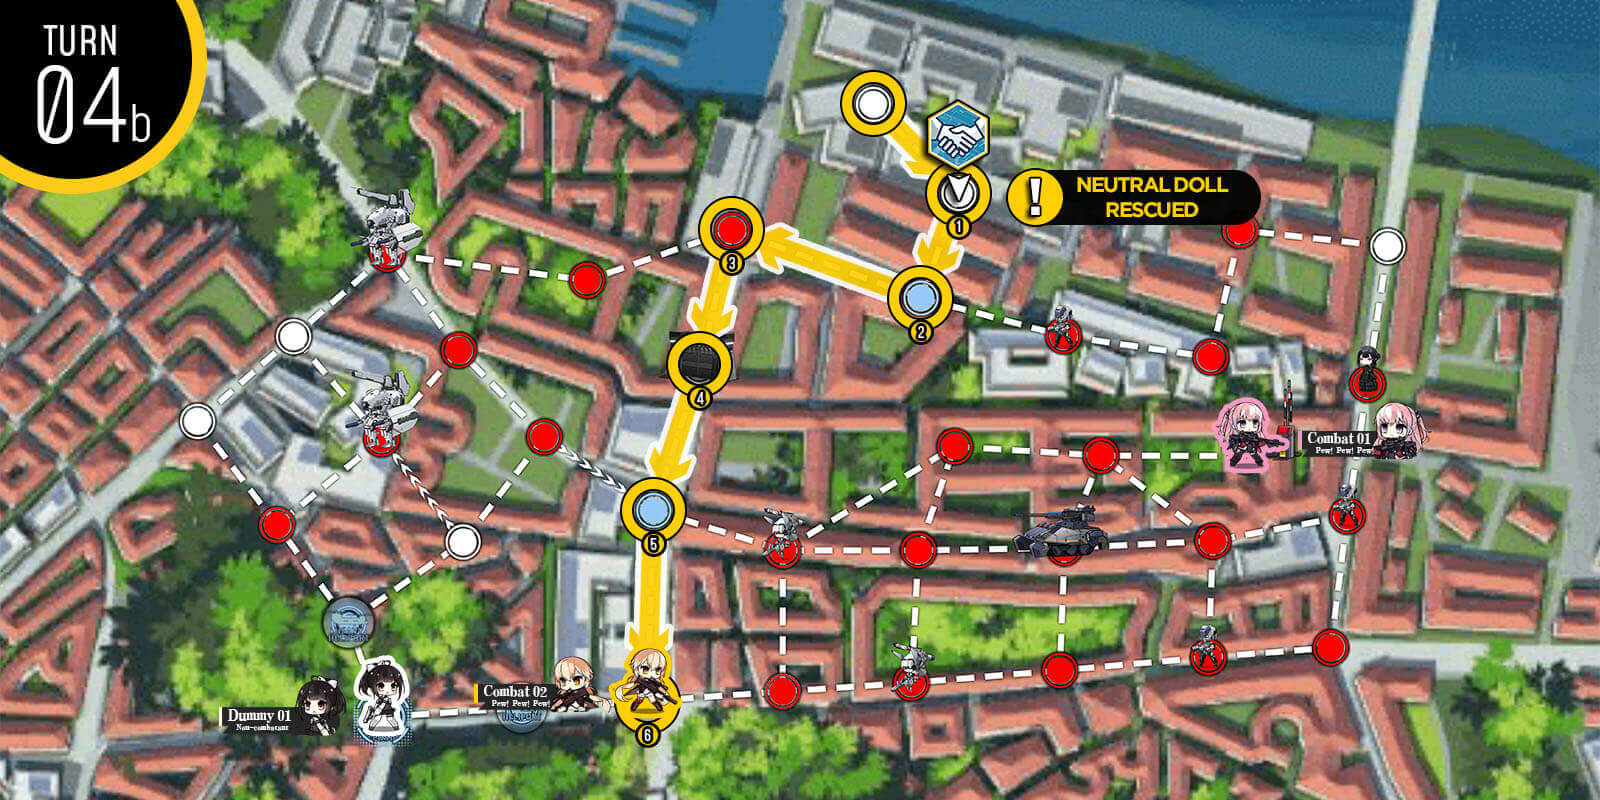
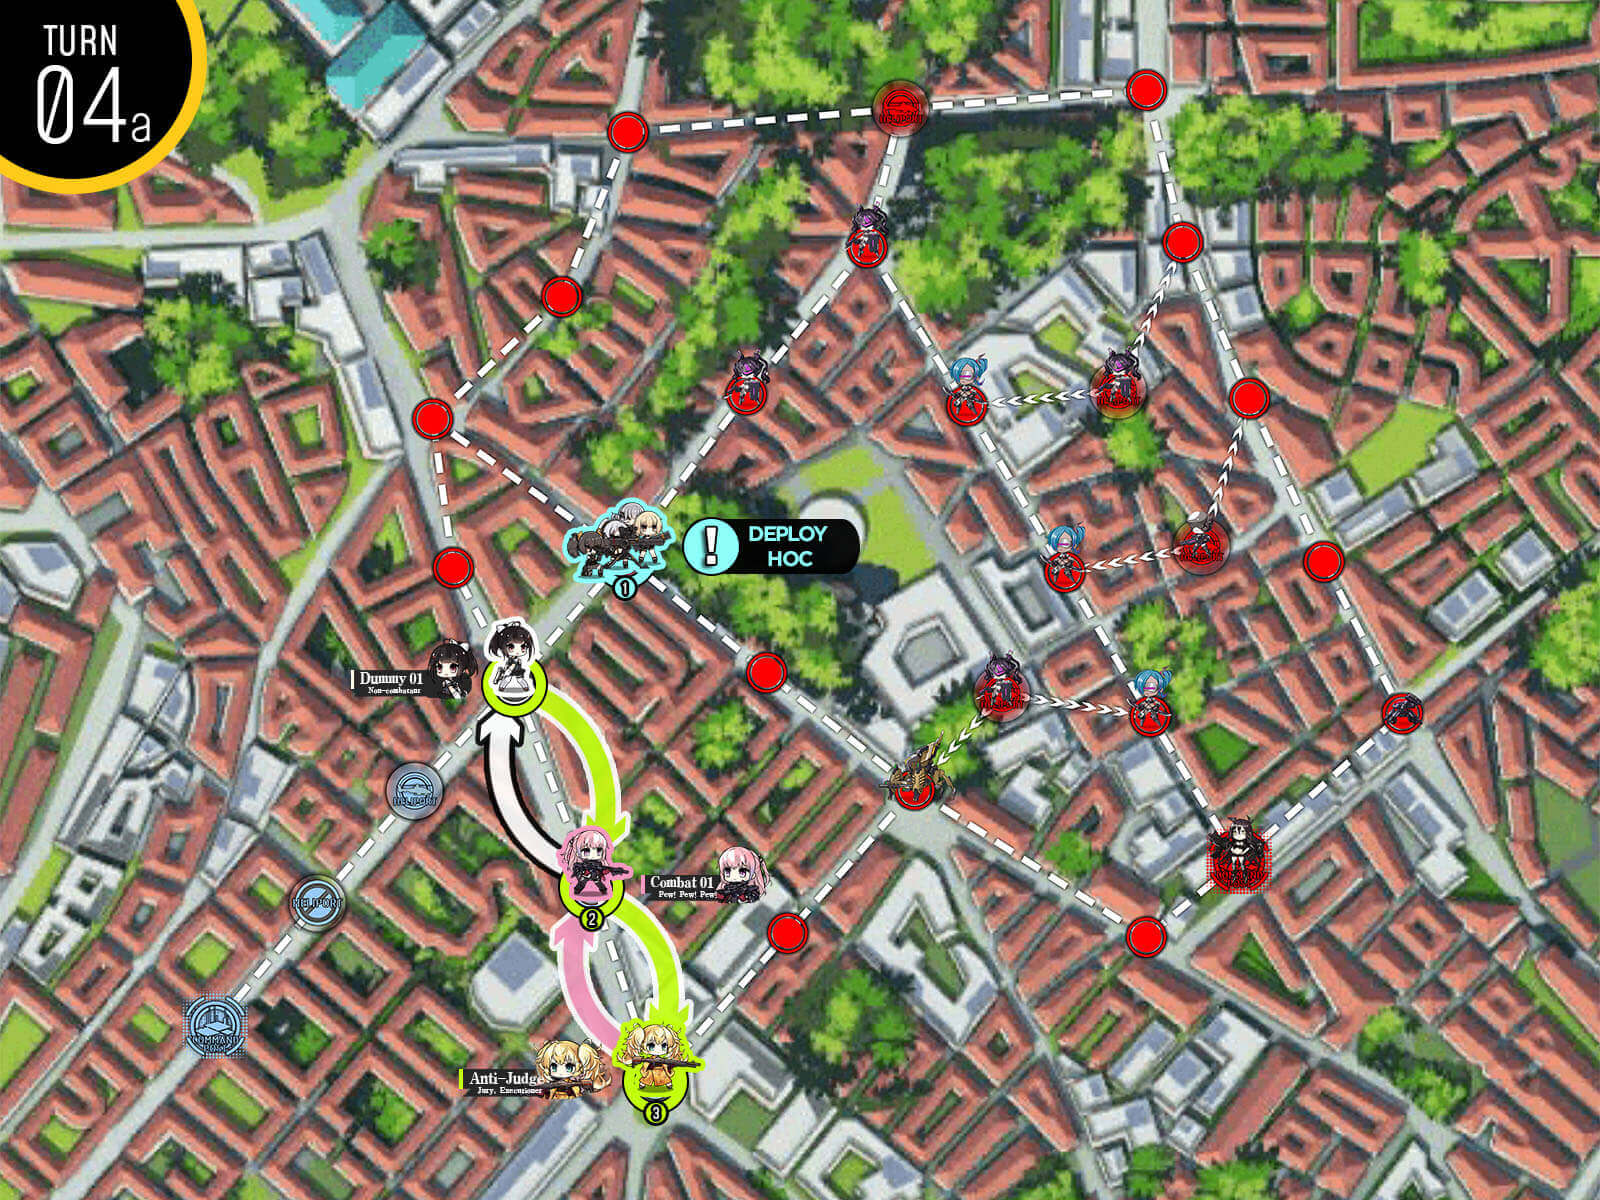
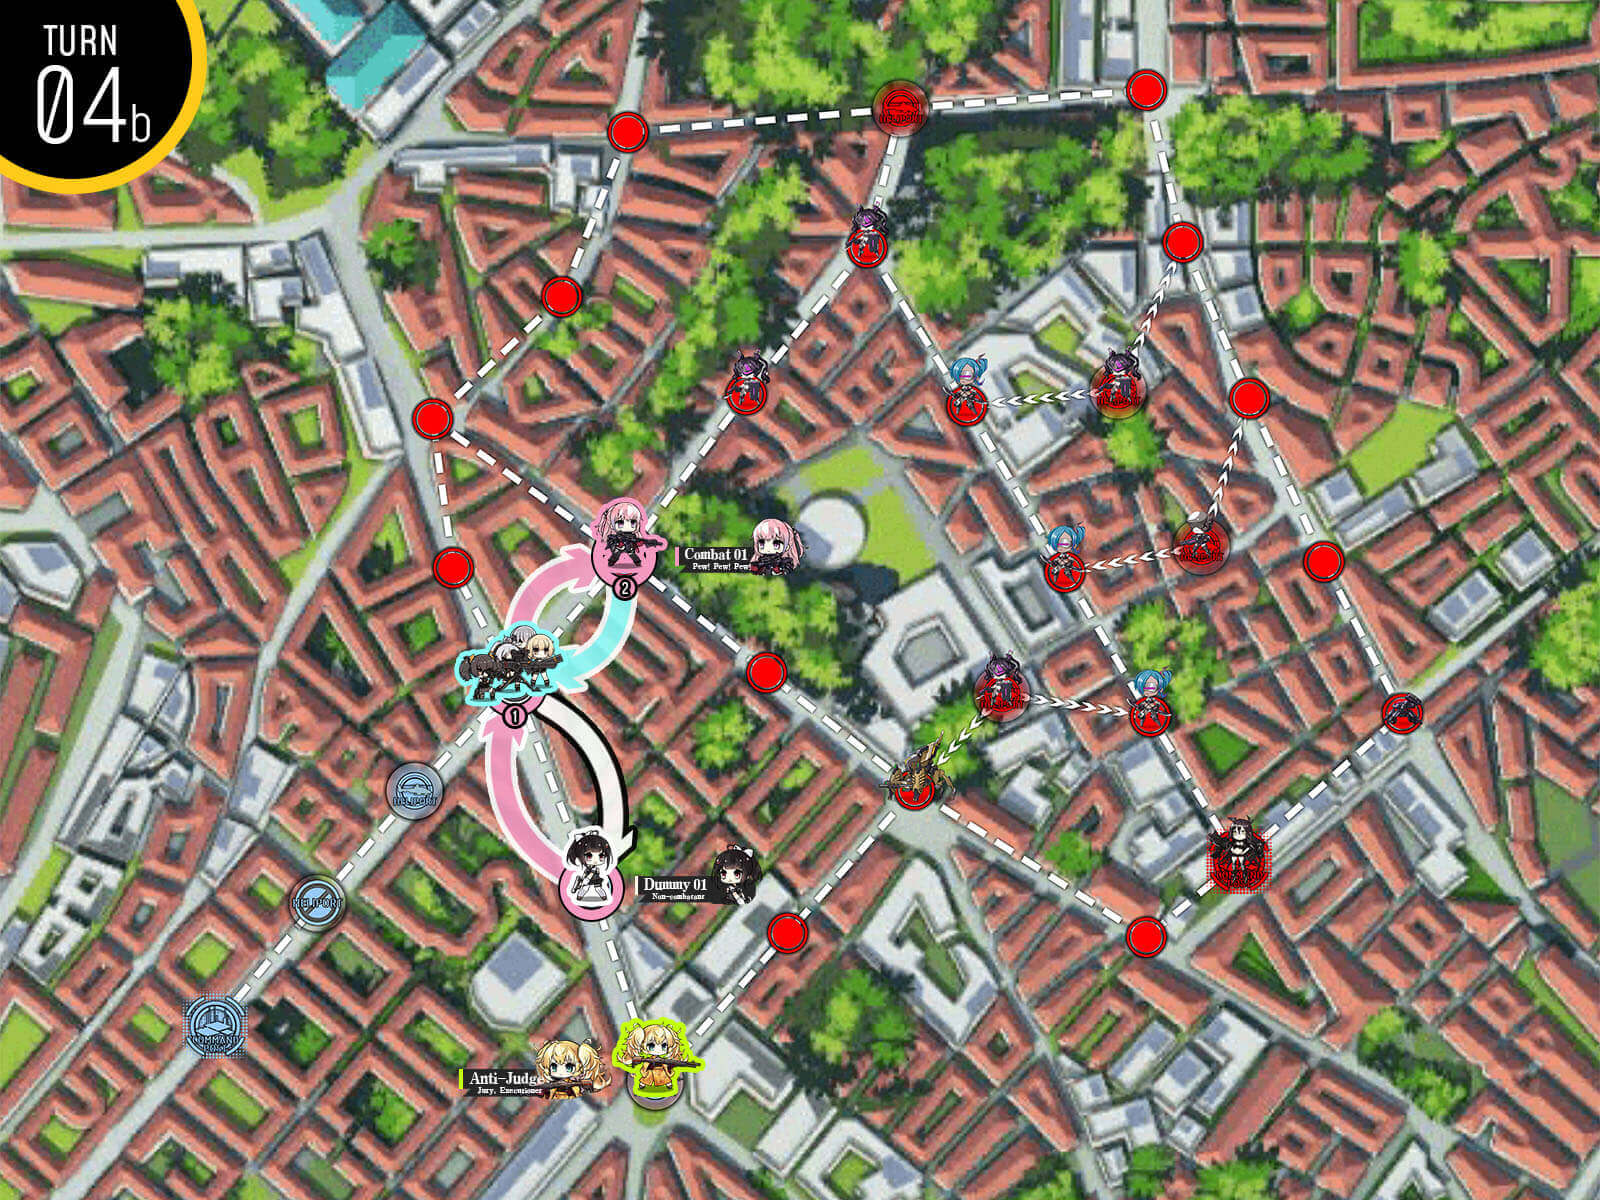
Move your dummy to extract the hostage then trigger the gate console to open gates. We are taking the bottom route. As you move, you will notice that stepping on certain nodes will change the AI units in the middle from friendly to enemy. Once you get to the end of the path, DO NOT CROSS over the one-way path.
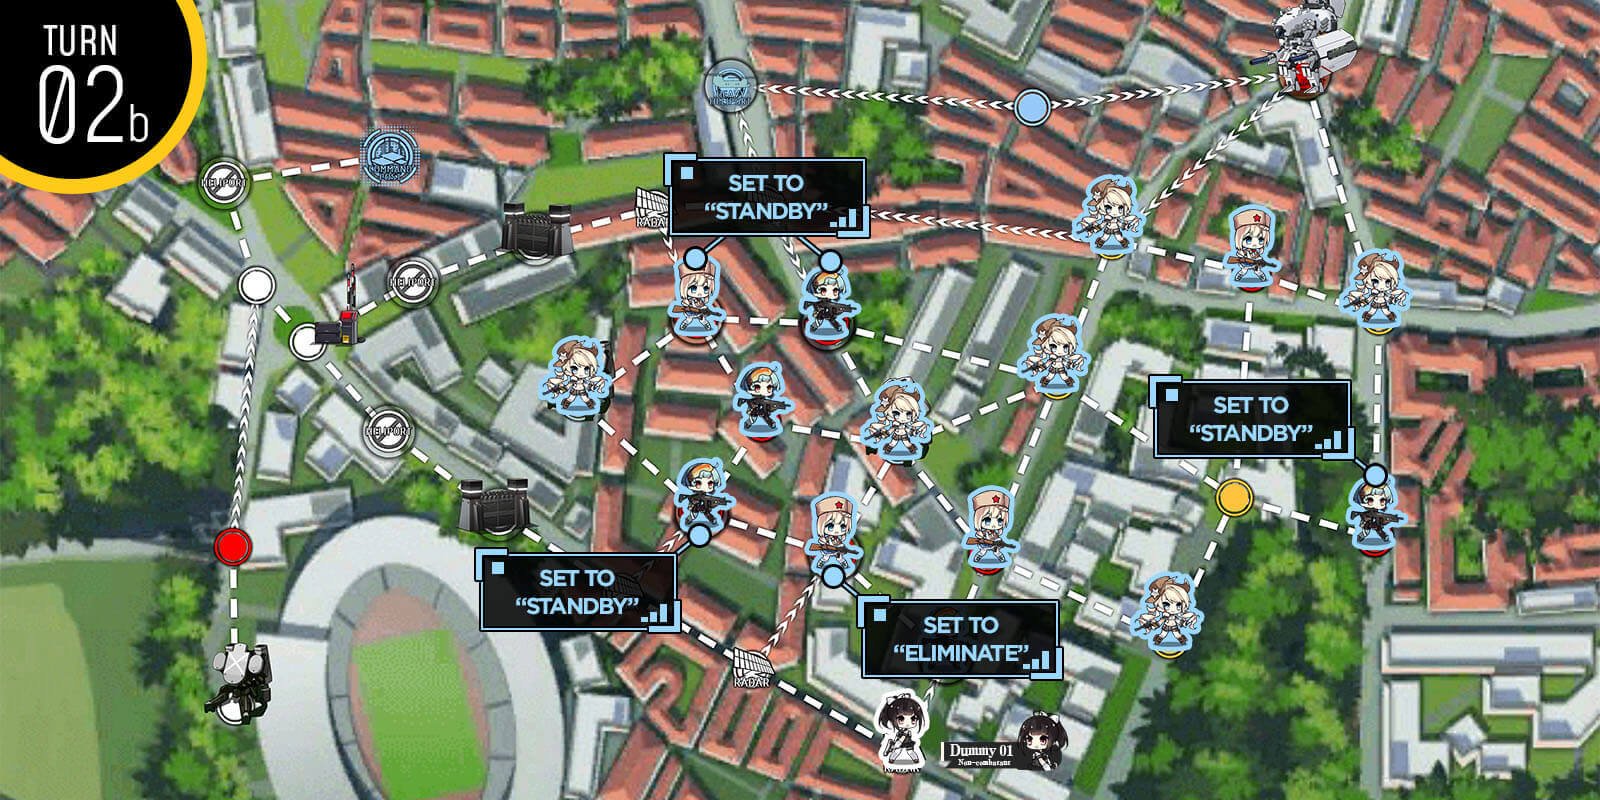
Change the AI settings of friendly units marked red to "Wait", and one marked with yellow to "Eliminate". This is very important. Then hit end turn. When the AI unit attacks, just quickly retreat as it has done its job.

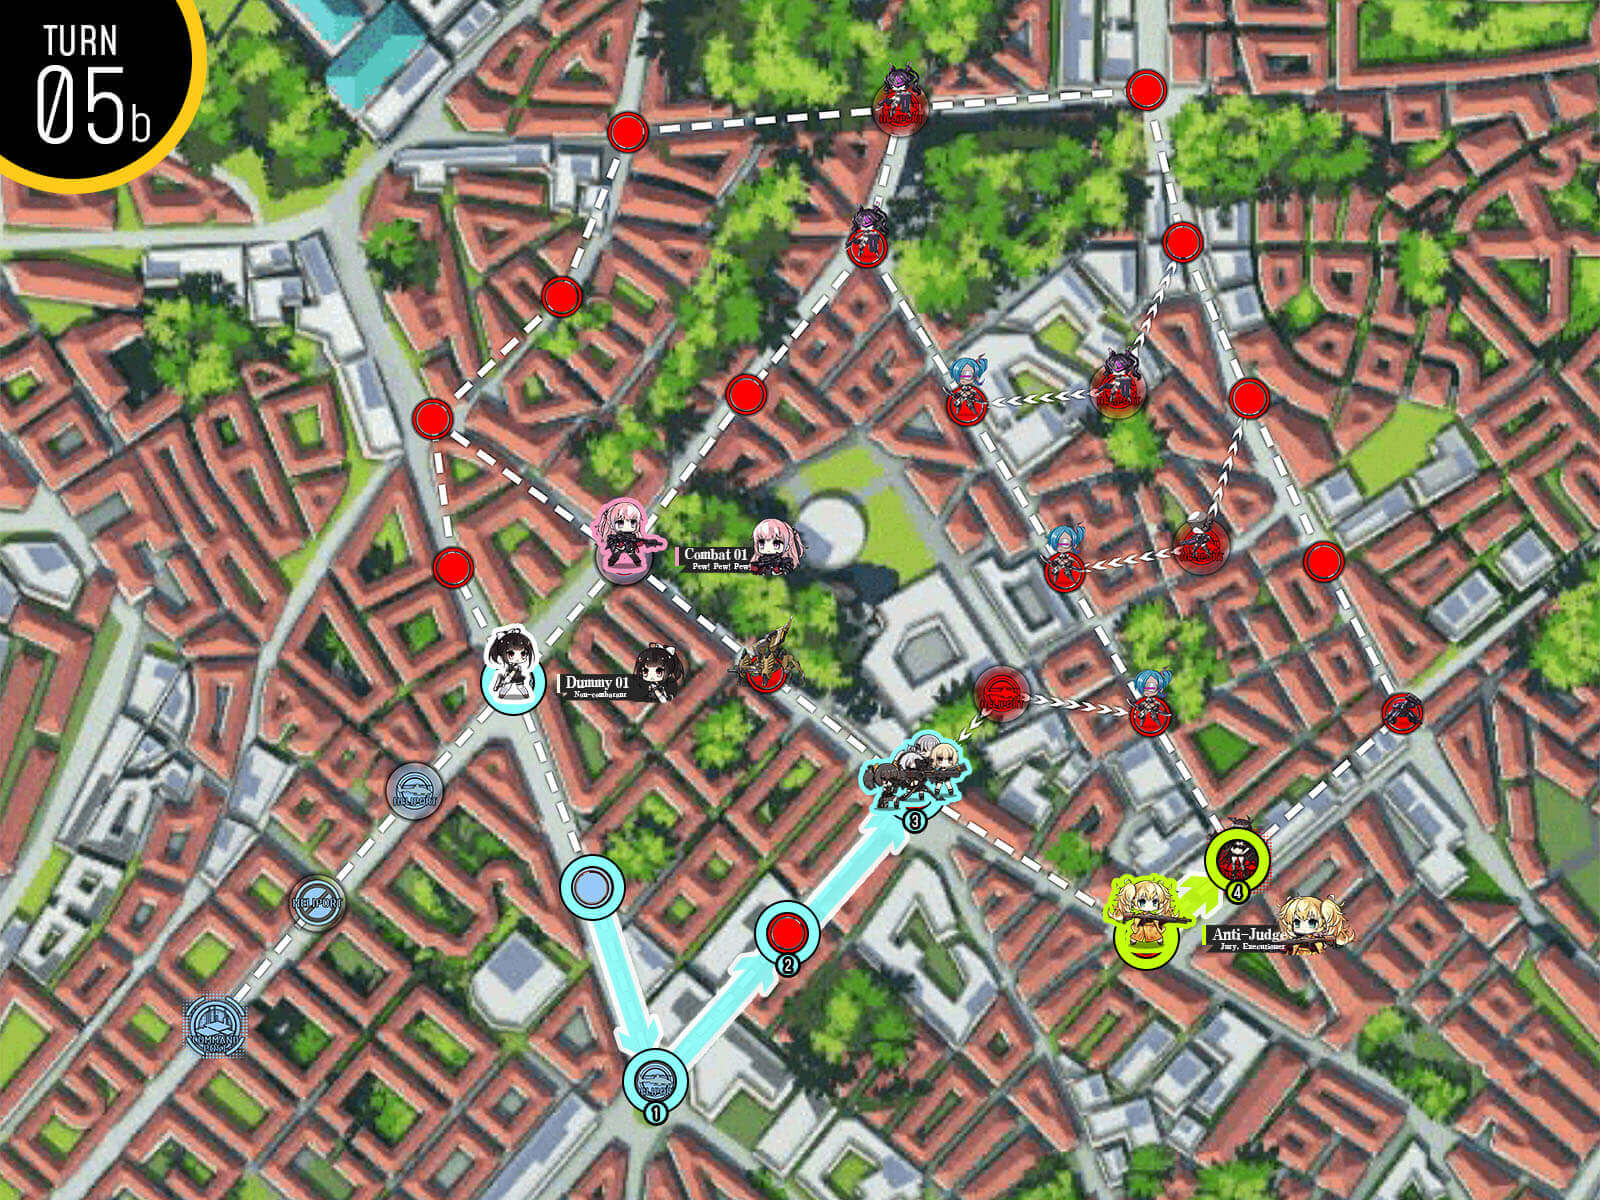
Now there is a path cleared by one AI unit. Take the middle one-way path then swap your way to the AA platform to the left. This being destroyed allows you to use the helipad at the top center and safely extract to clear the mission.

Continue swapping your way in a clockwise fashion and go directly to the helipad to extract the hostage and get your secret achievement reward.

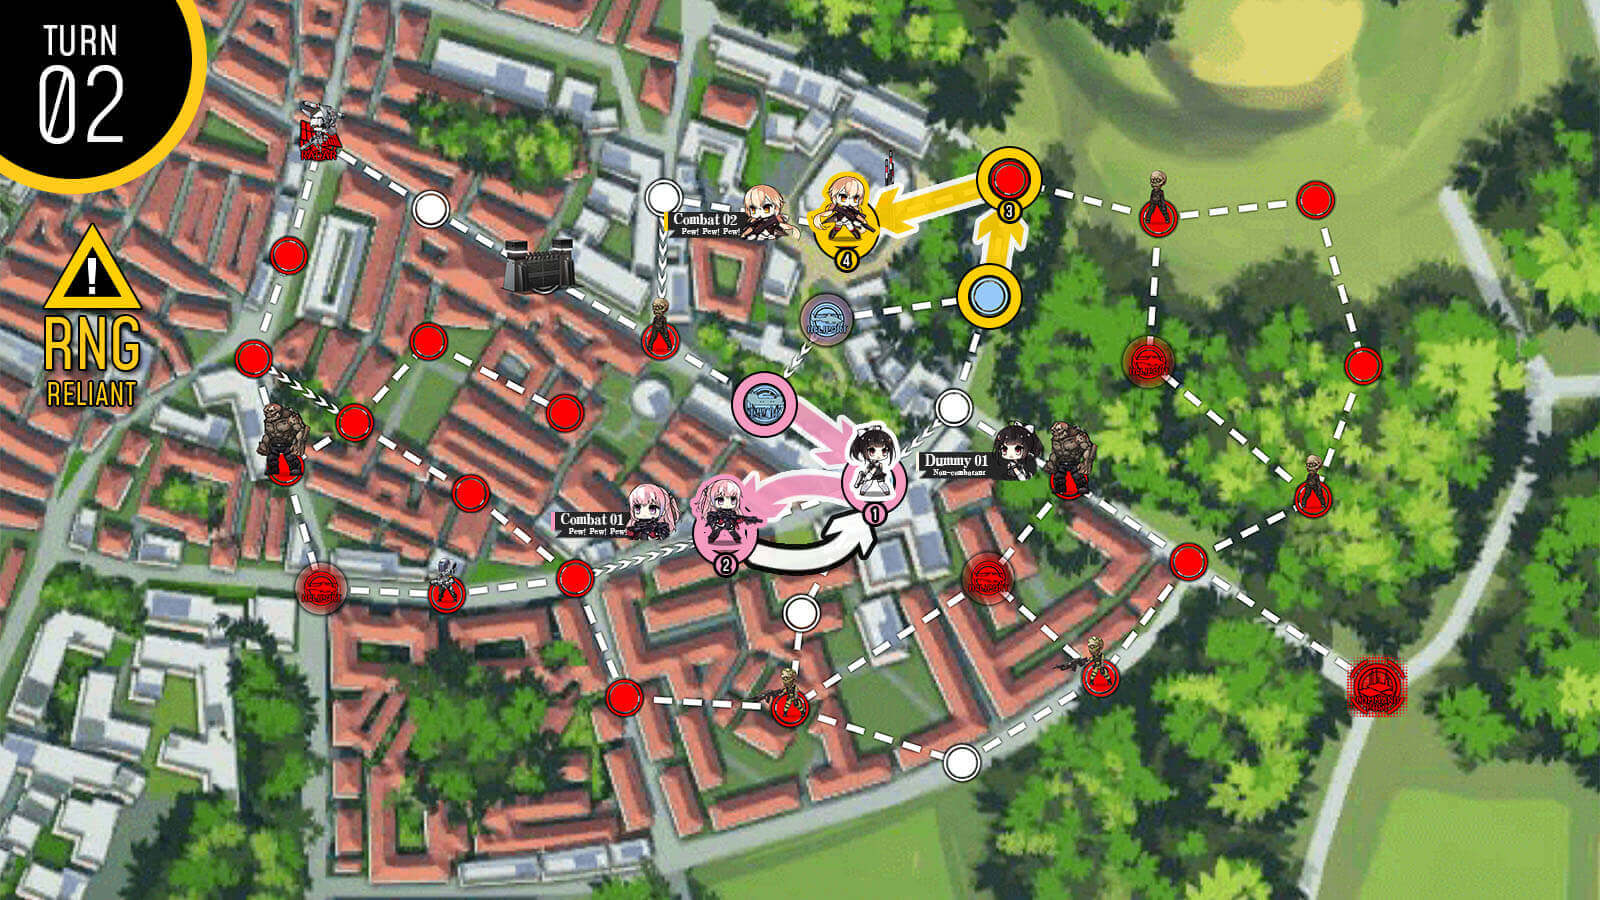
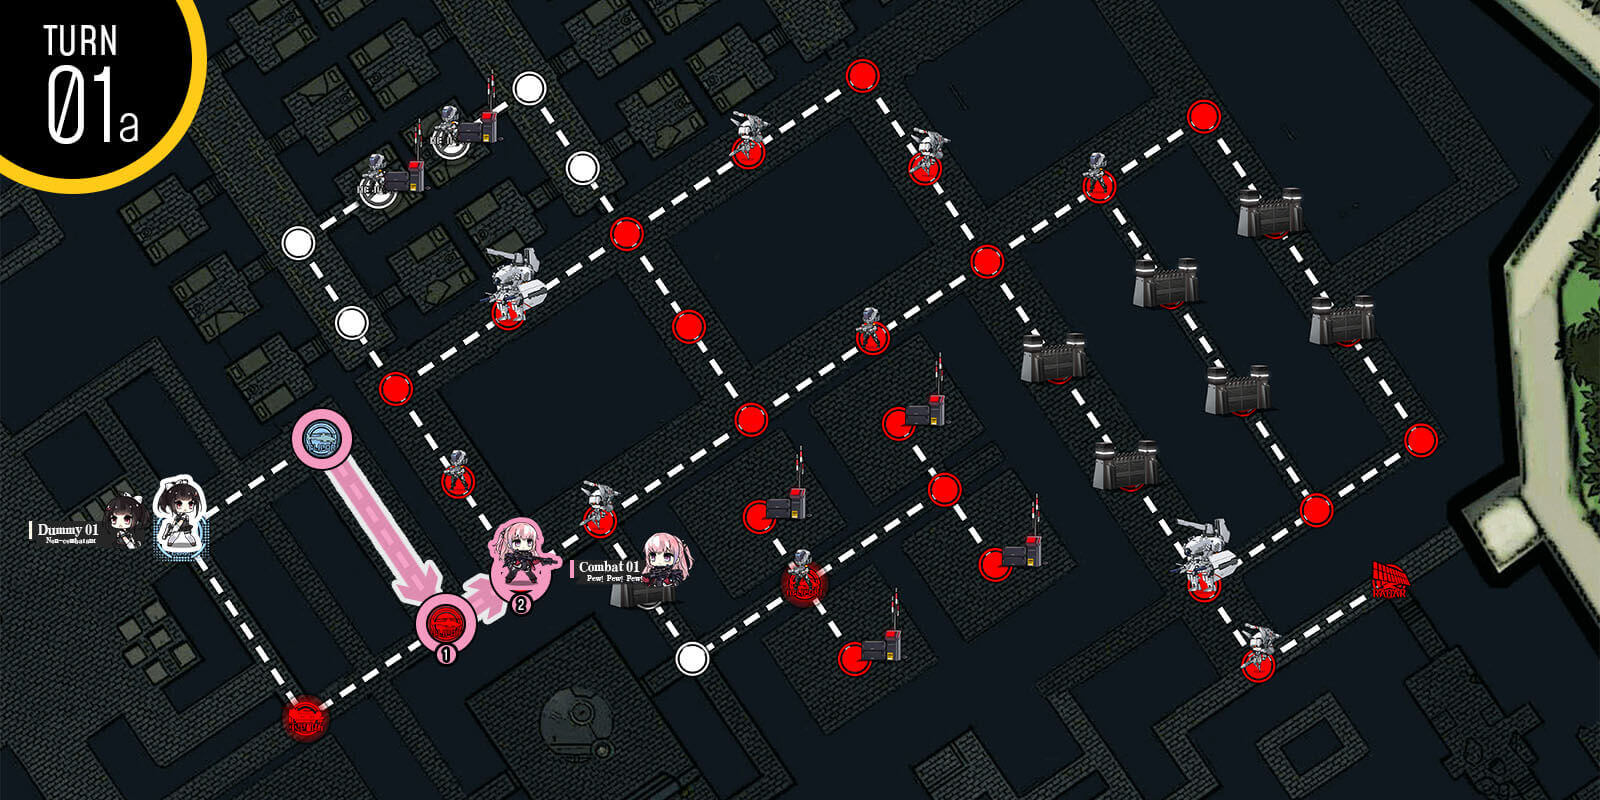
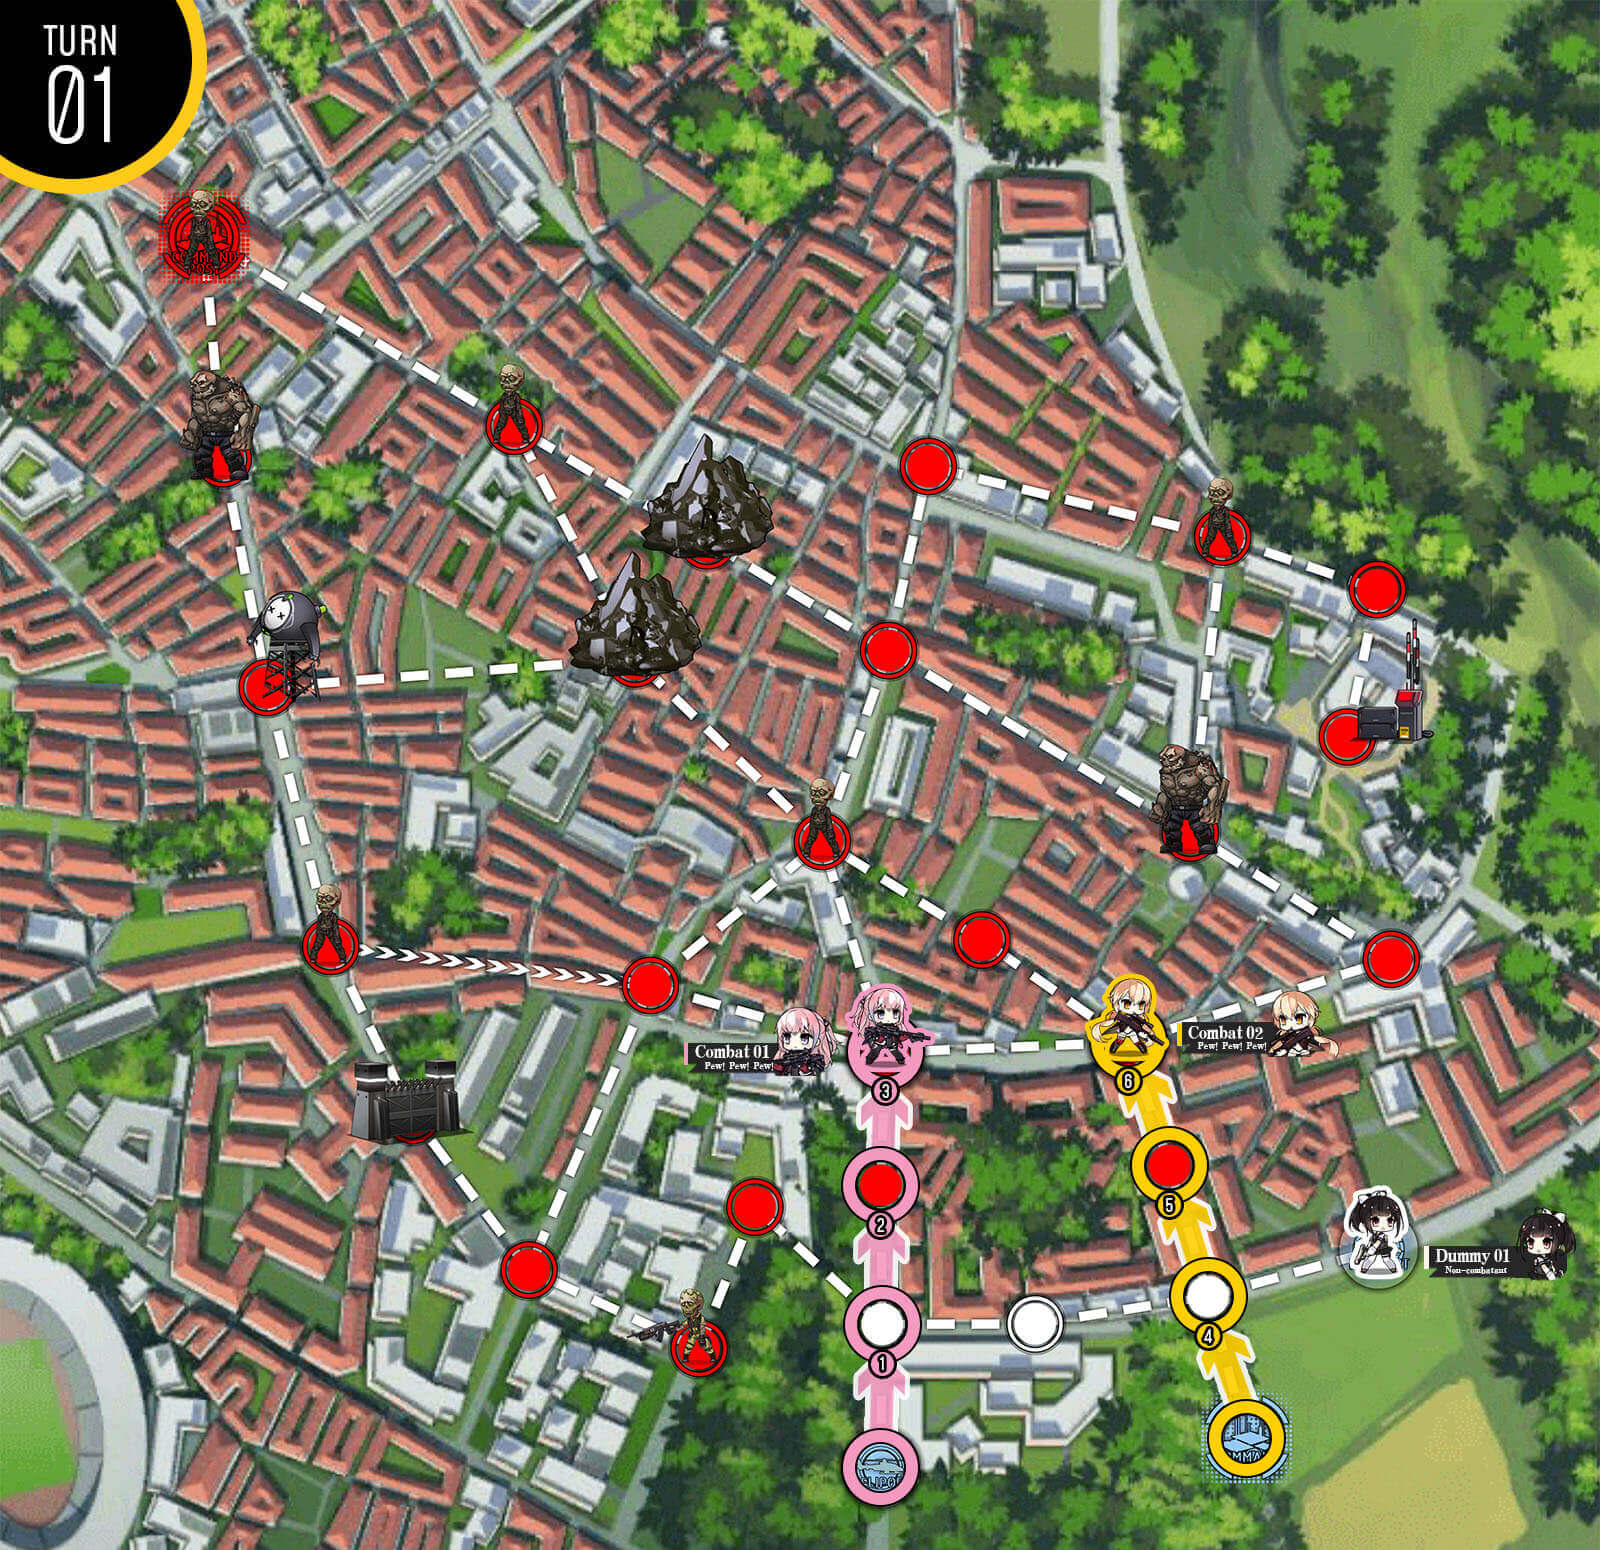
Start with your combat echelon on HQ and dummy echelon on the other 2 helipads. Combat echelon goes straight for the top route after clearing out armor units near hydra.
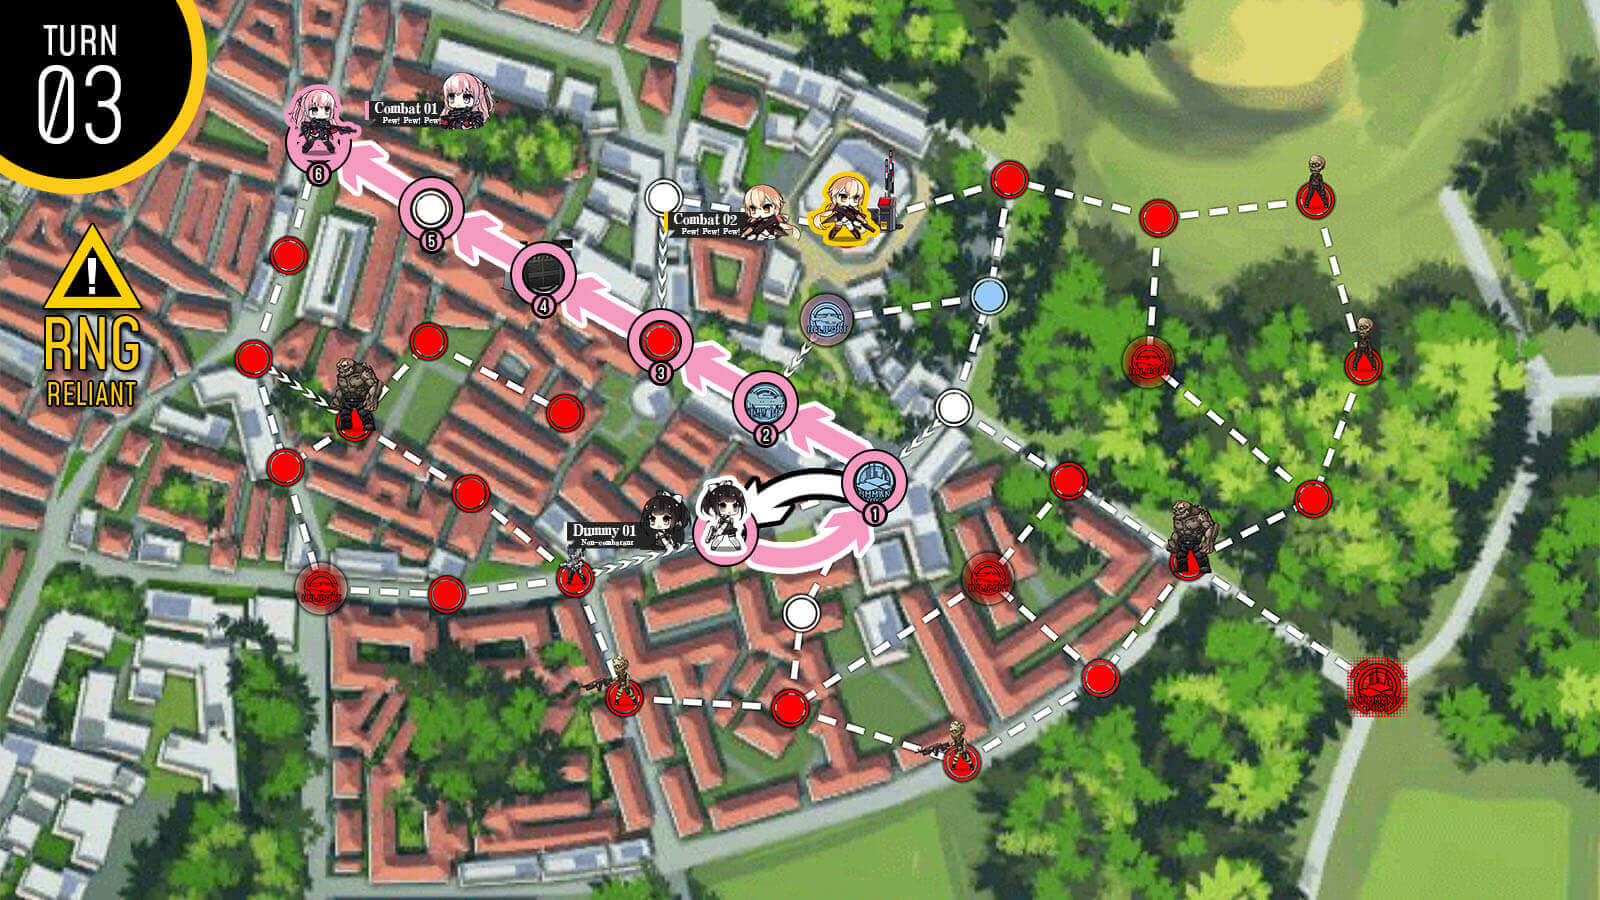
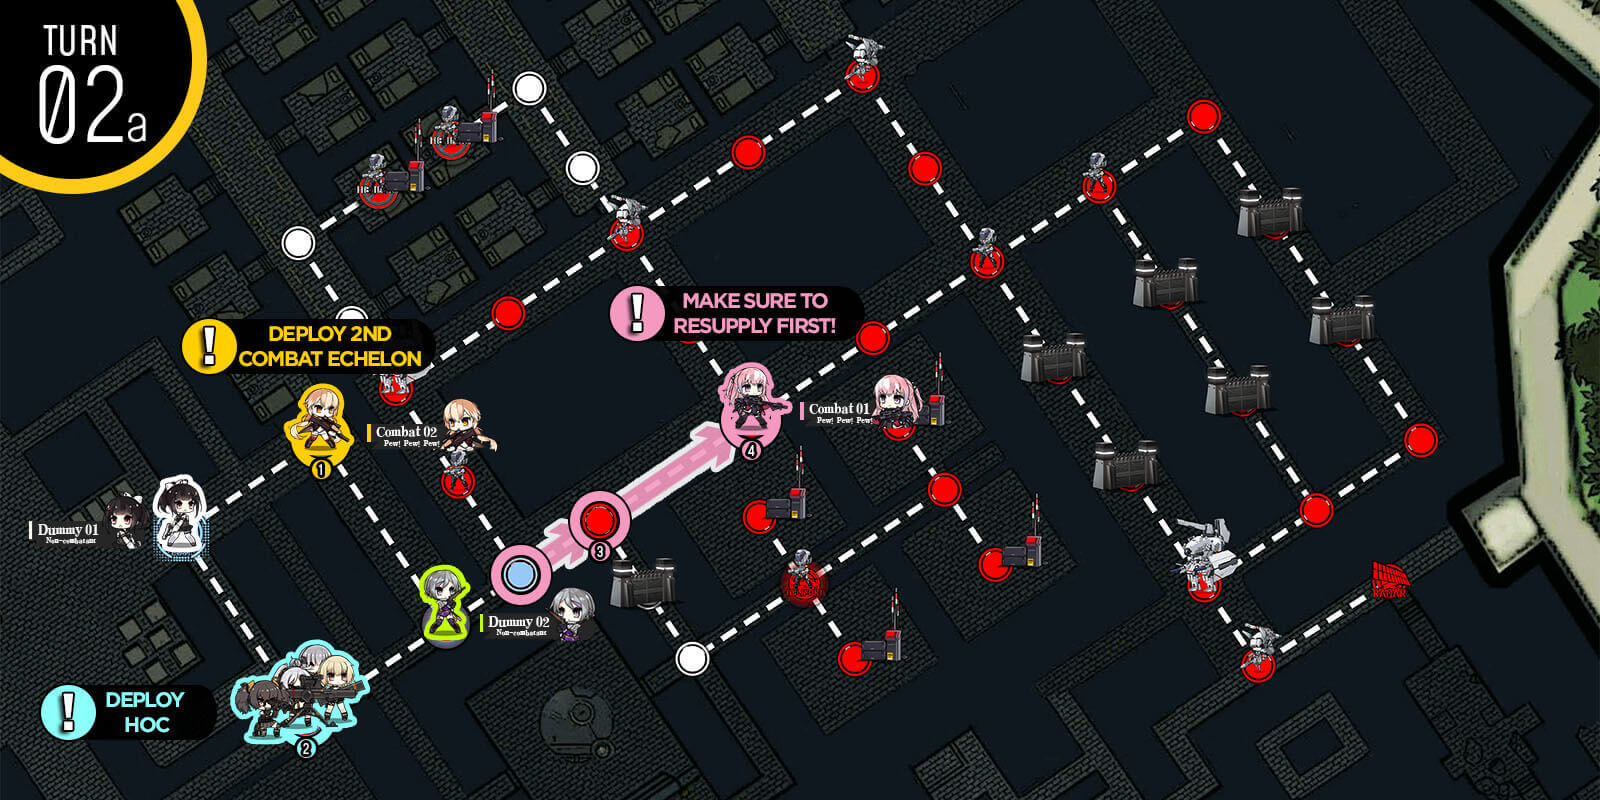
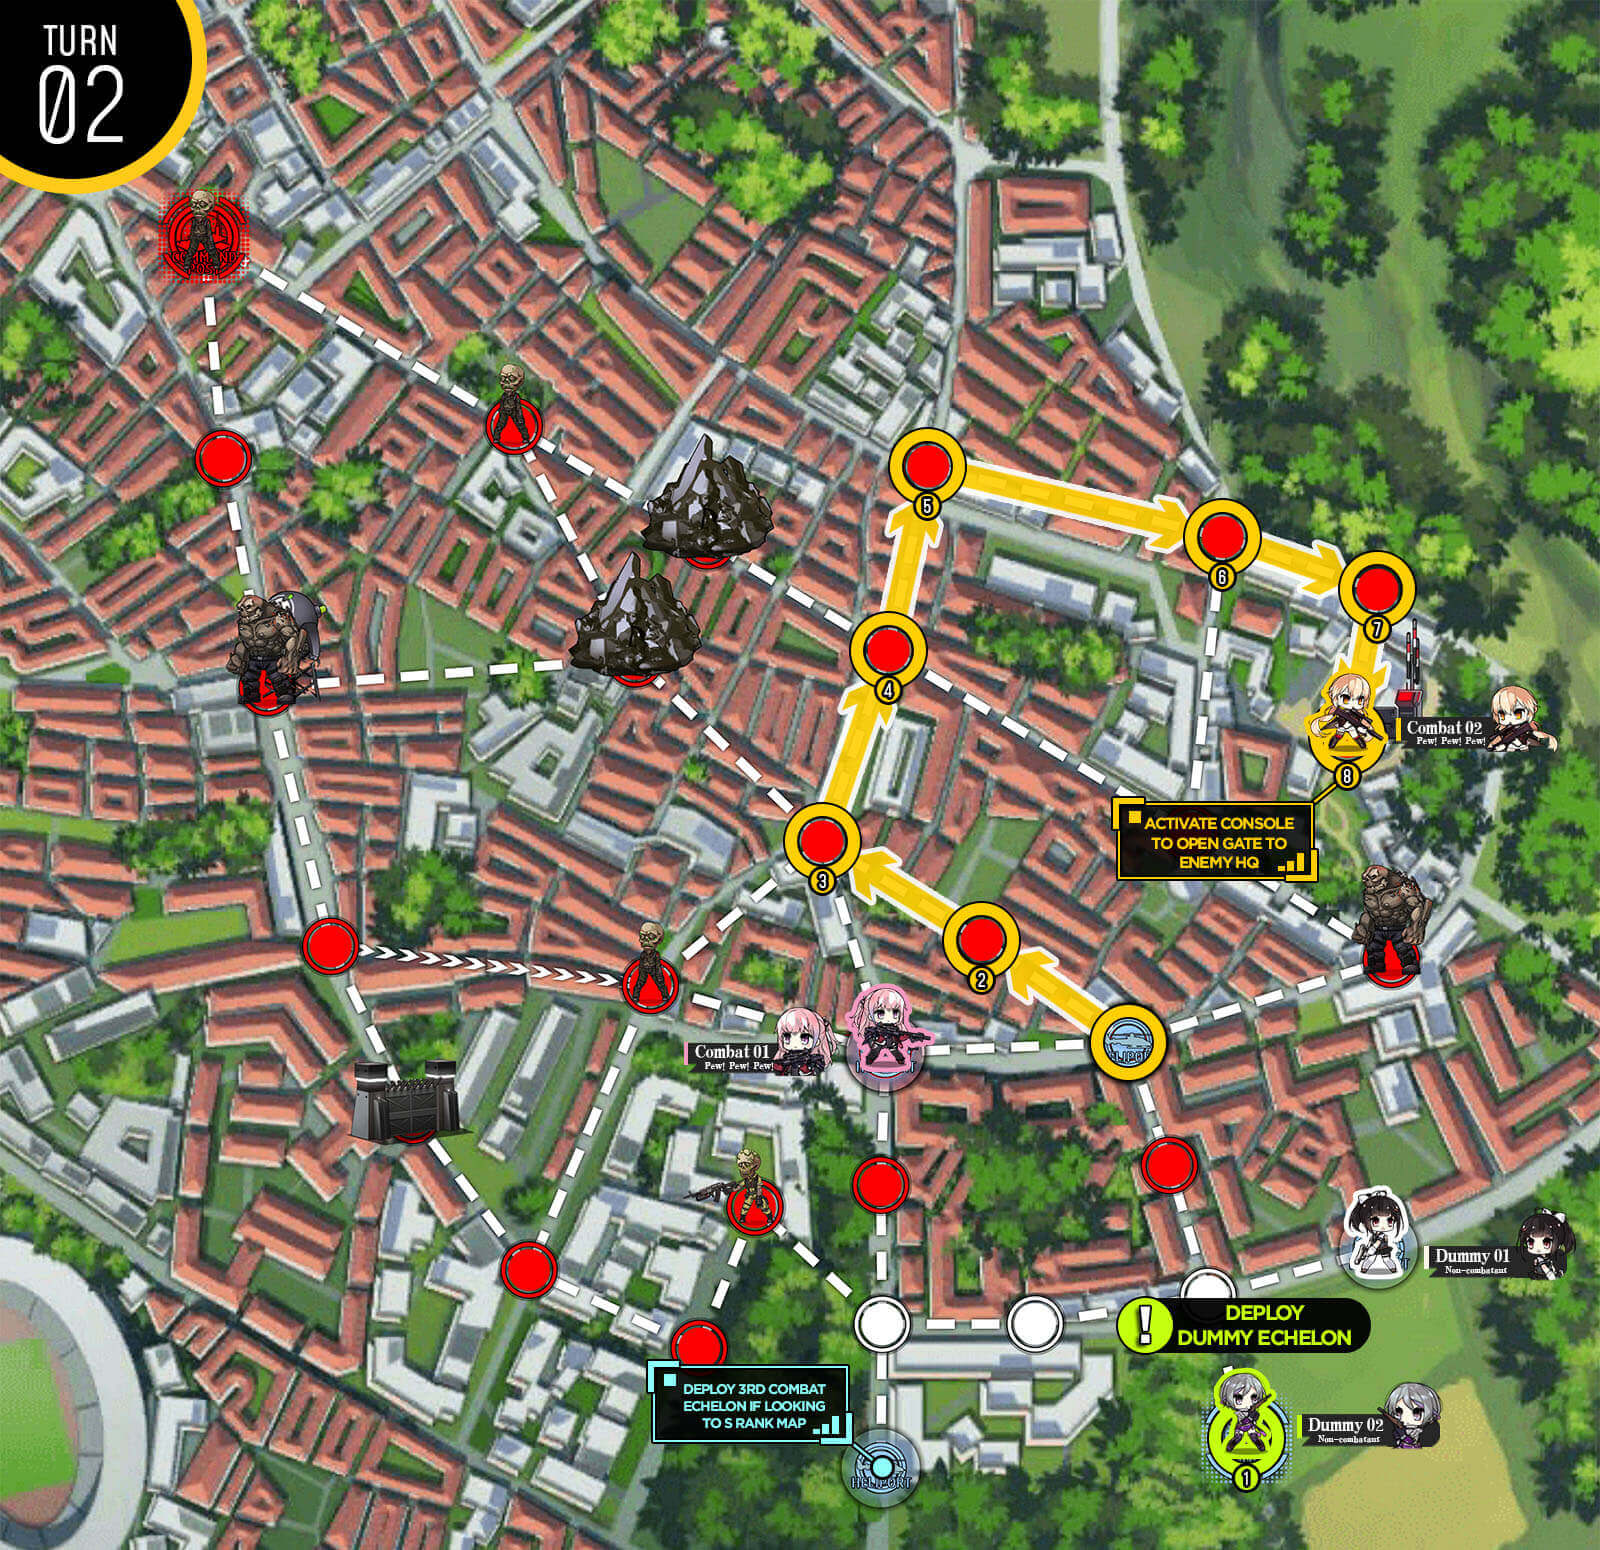
Combat echelon makes its way to the console and opens the path to the enemy HQ. With your remaining moves, deploy a 2nd combat echelon that will run to the HQ.

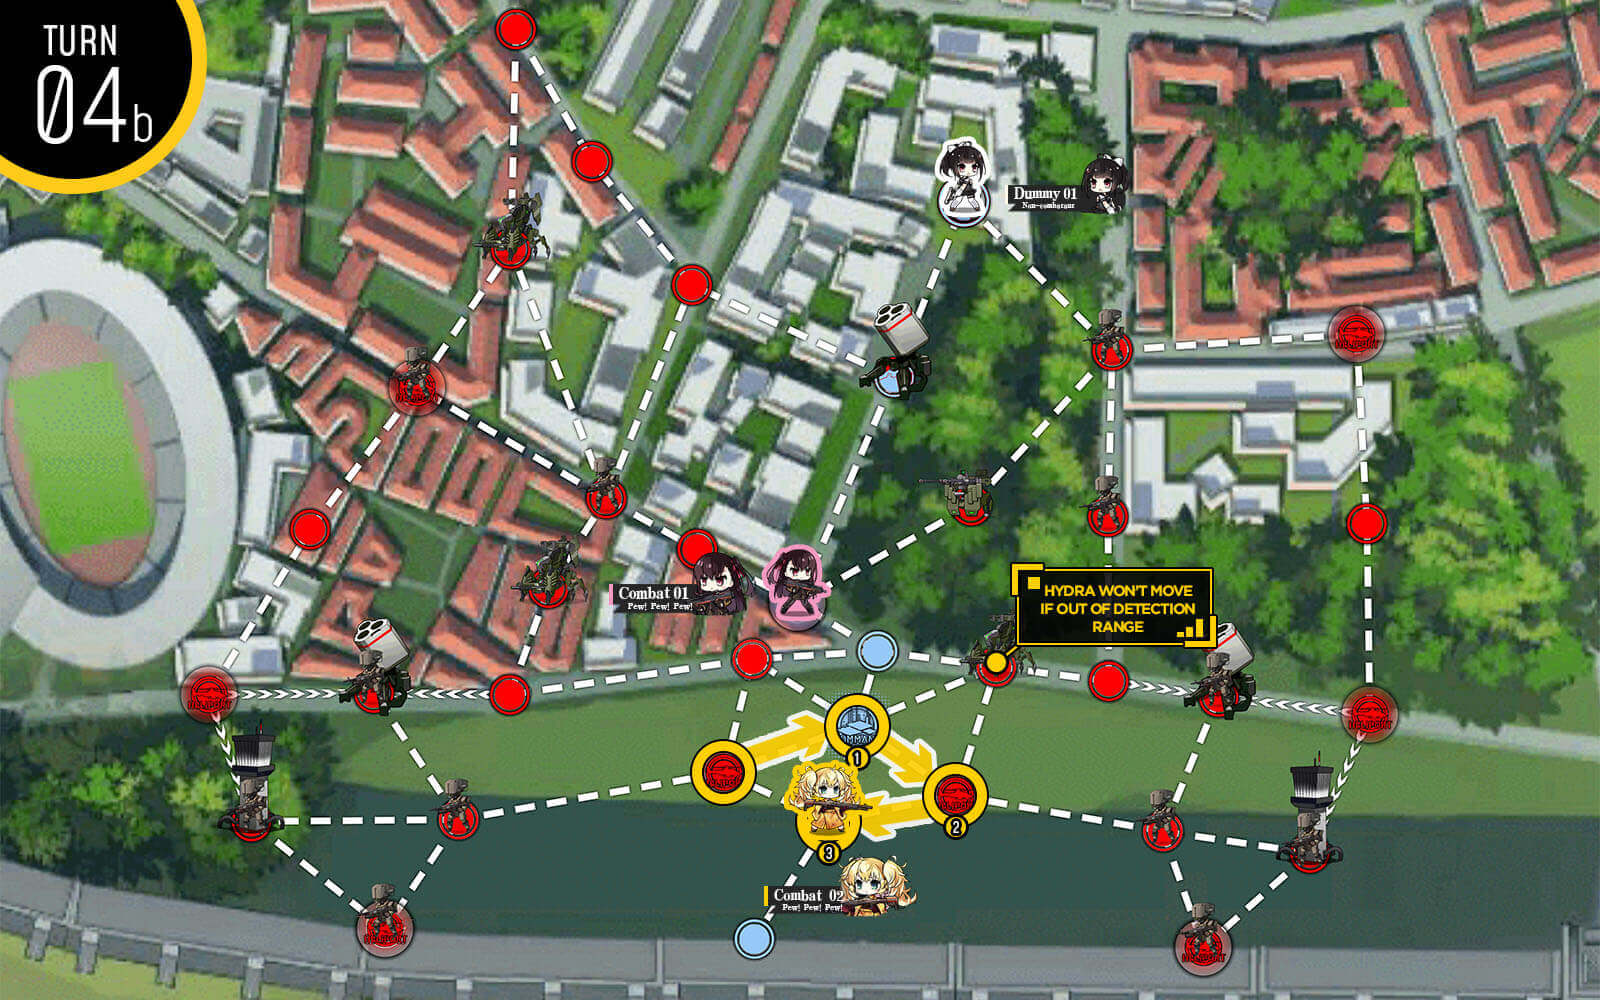
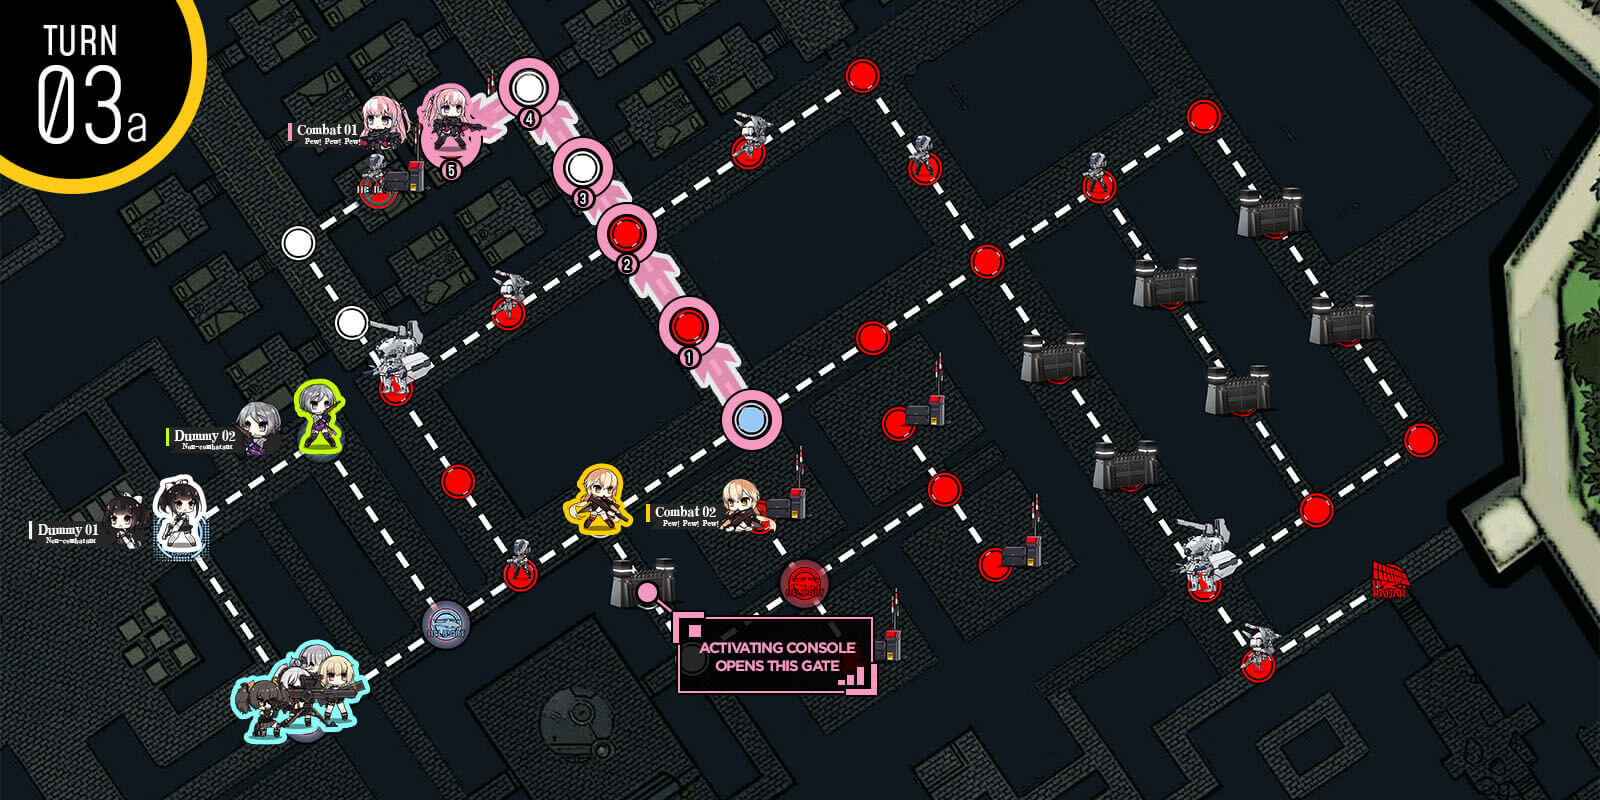
2nd combat echelon moves to the top path as well and make sure to stay out of the Hydra's detection range.
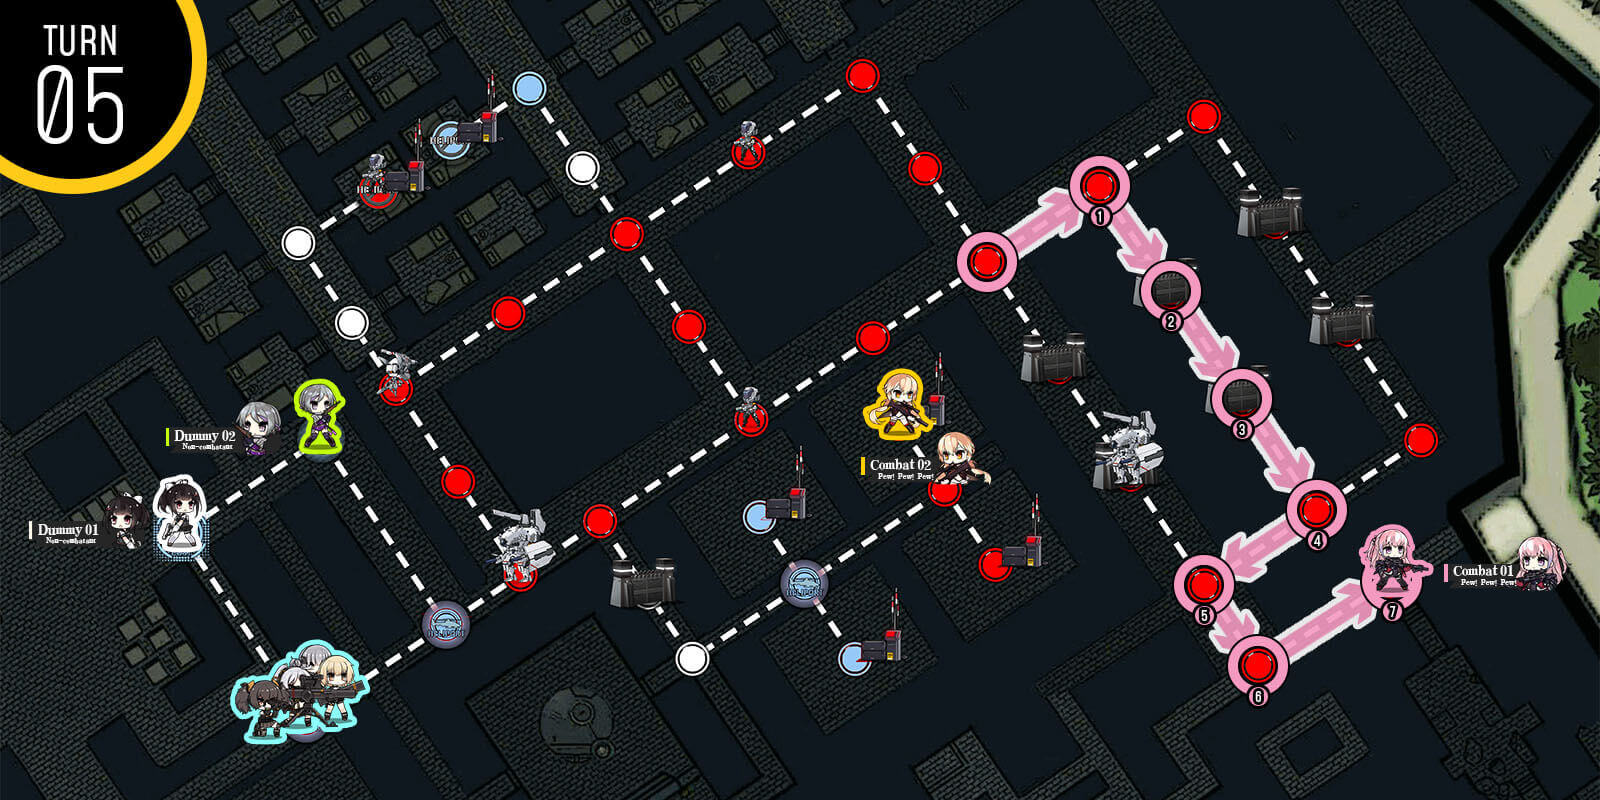
After that it's a short path to enemy HQ.
Start with a combat echelon on the HQ and the bottom helipad. Deploy dummy echelon at the center helipad. Combat echelon on the HQ moves through the top section and ends the move on the resupply node.
Combat echelon at the bottom side now moves through the bottom side.
Combat echelon at the top section of the map is now threatened by the Hydra unit that moved from the center. Simply move one node away from it after resupplying. Combat echelon at the bottom moves one node closer to the control panel. Deploy another dummy echelon and a HOC at the starting location to gain more move points in the future.
Combat echelon at the top continues to move away from the Hydra unit to safety. Combat echelon at the bottom activates the center control panel.

Combat echelon at the bottom moves through the open gate at the bottom.
Combat echelon at the top moves around the top to activate the control panel to open 2nd gate near the enemy HQ.
With remaining moves, combat echelon captures another node adjacent to enemy HQ.
Finally combat echelon at the top goes through Hydra unit at the top to capture all nodes needed to surround capture enemy HQ.
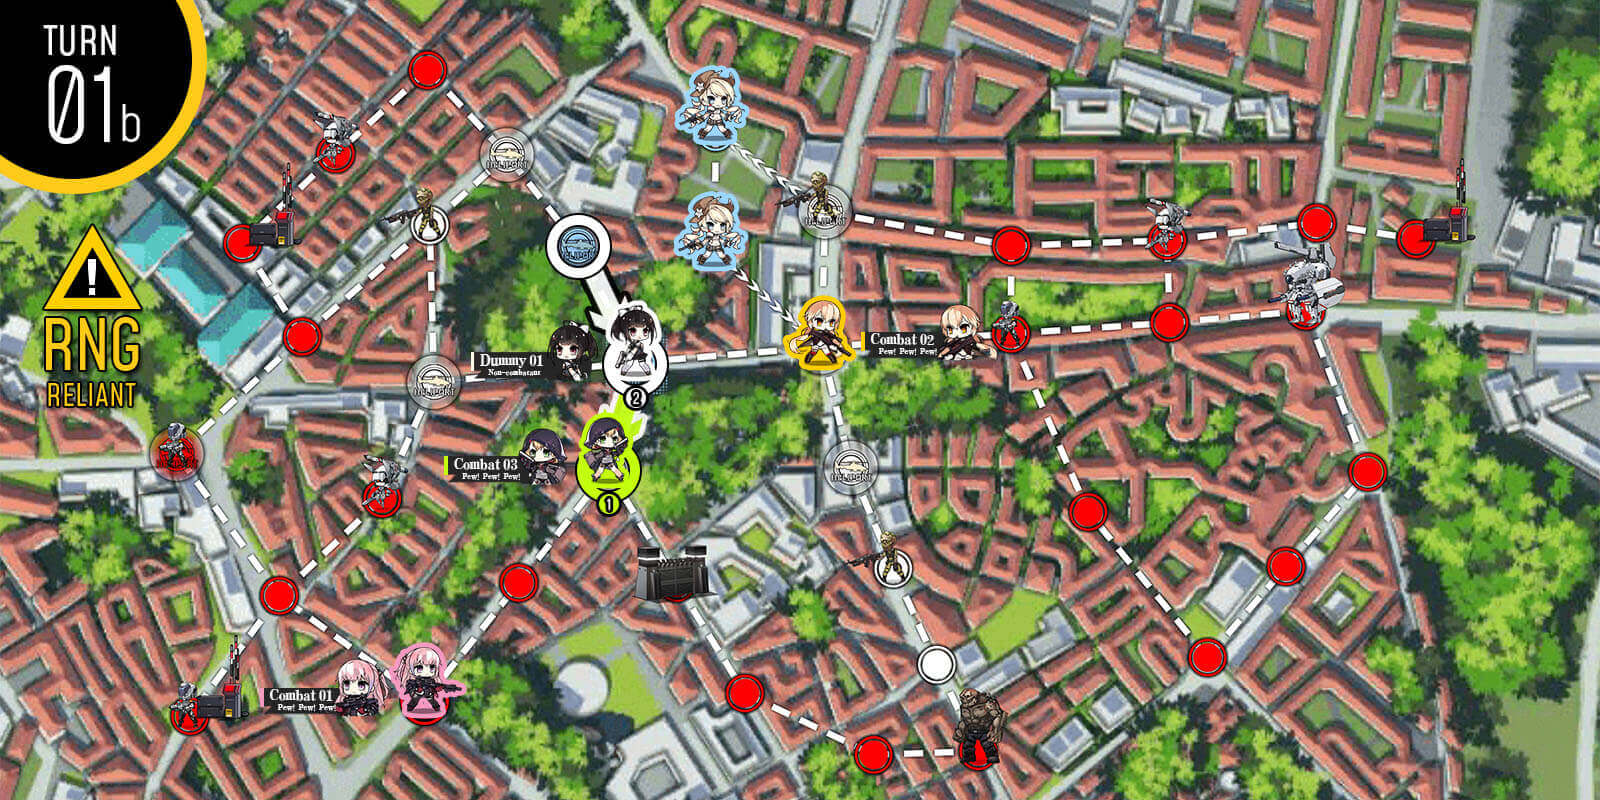
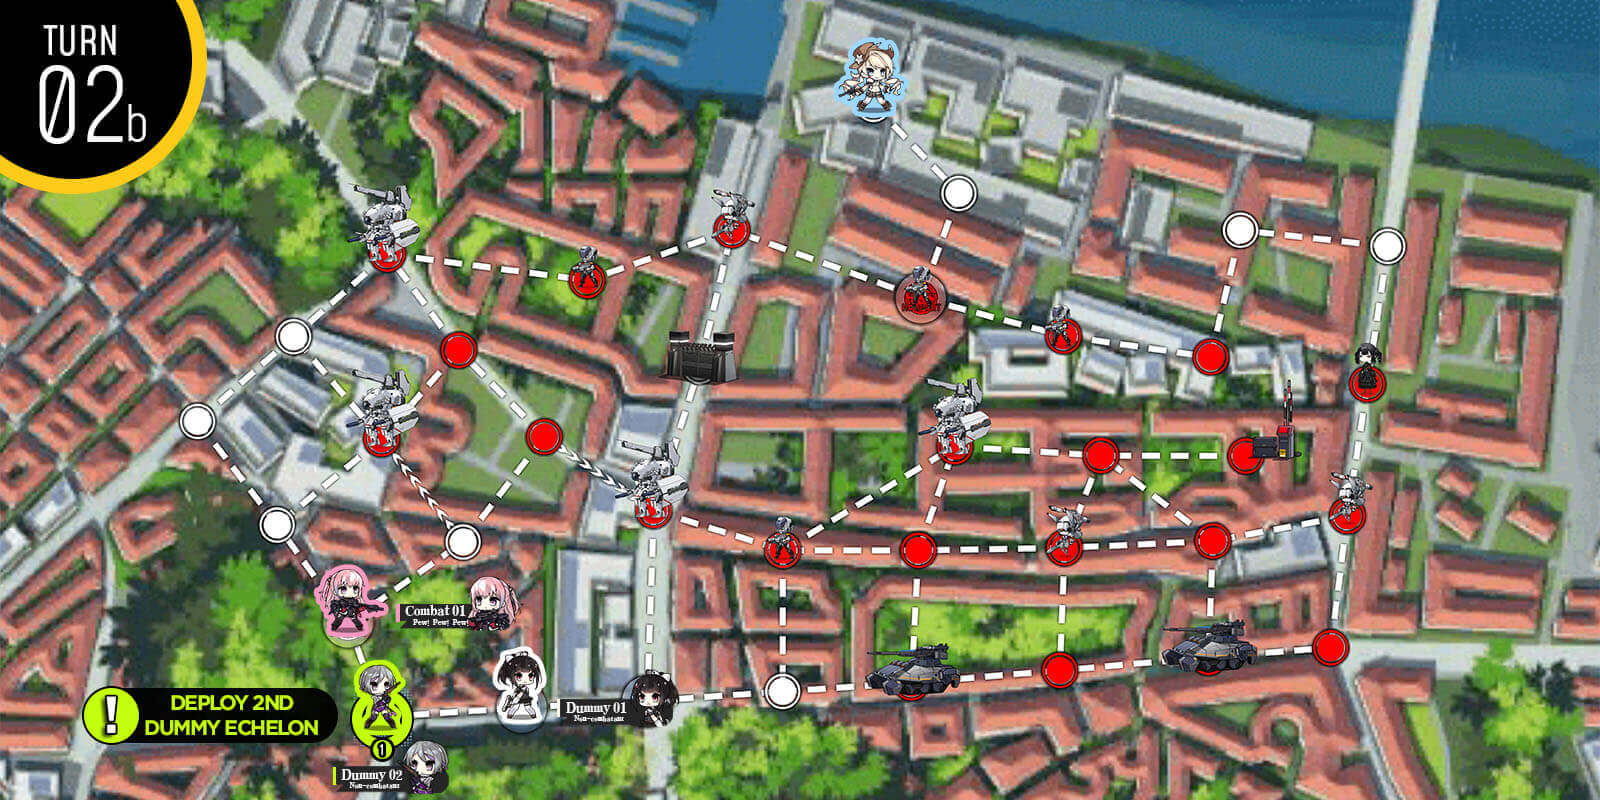
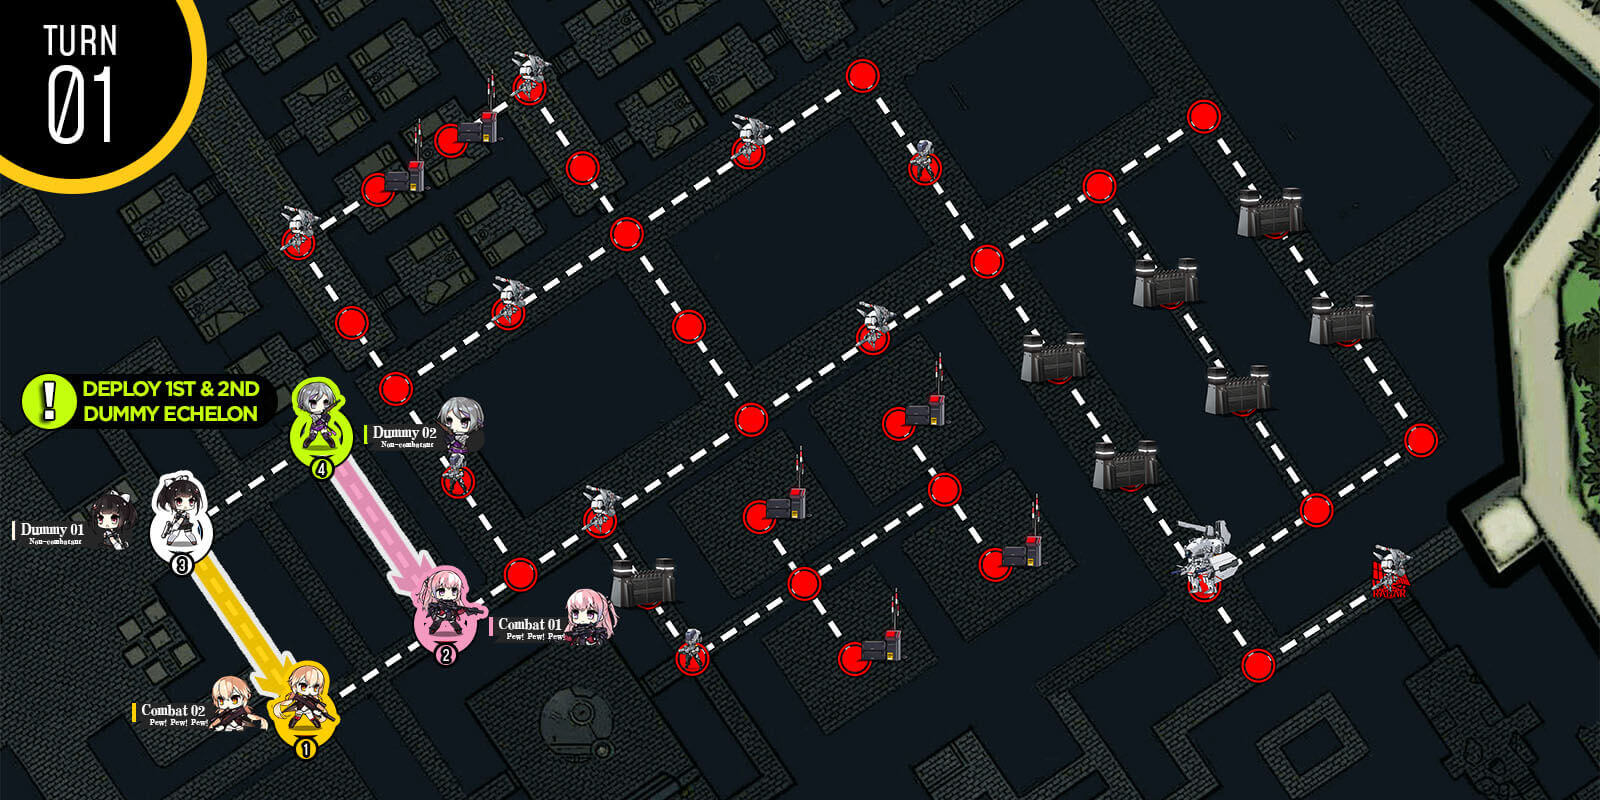
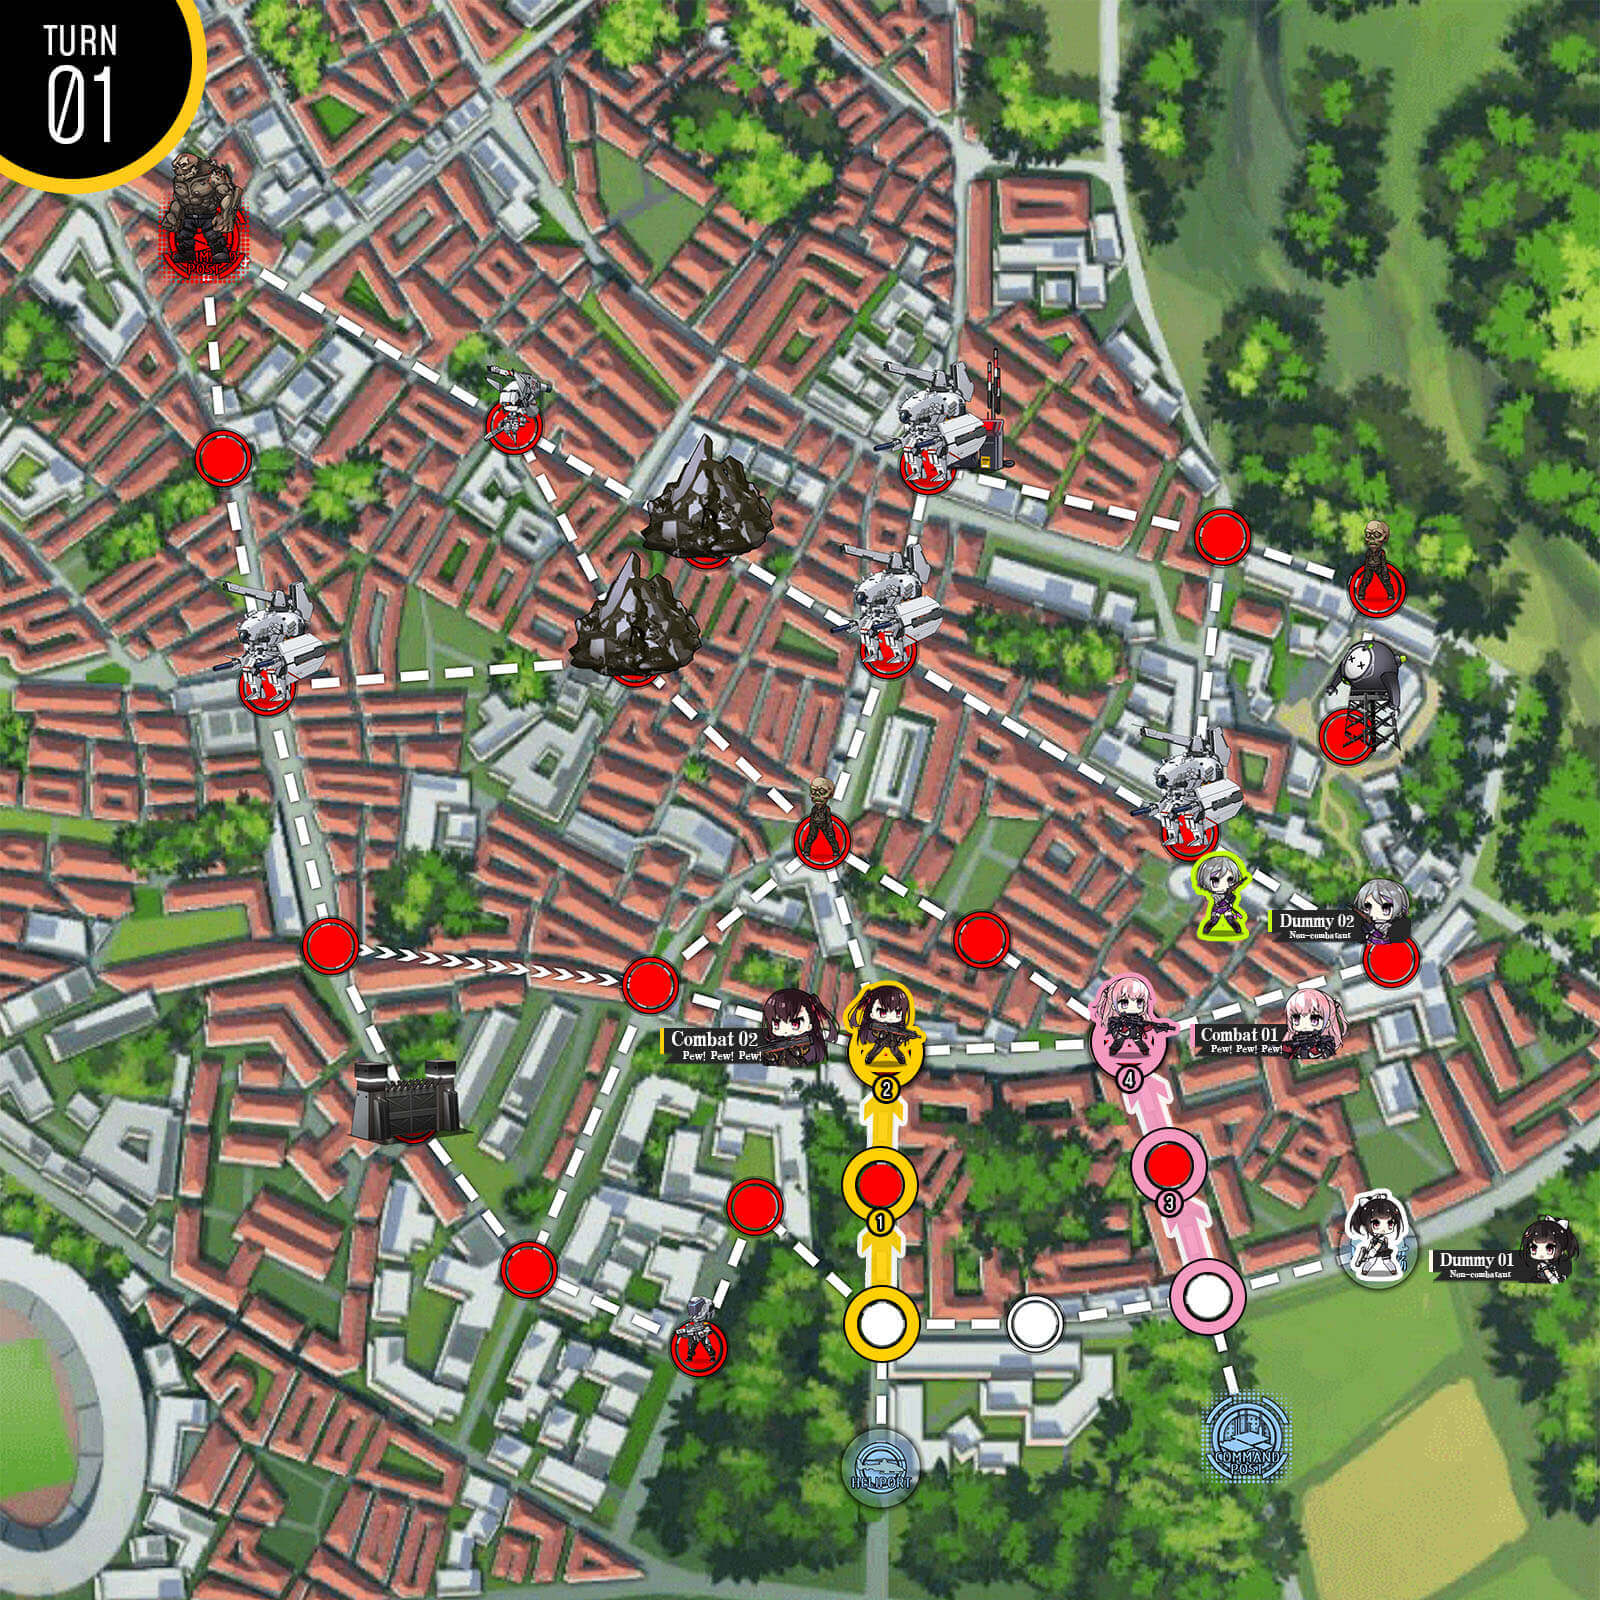
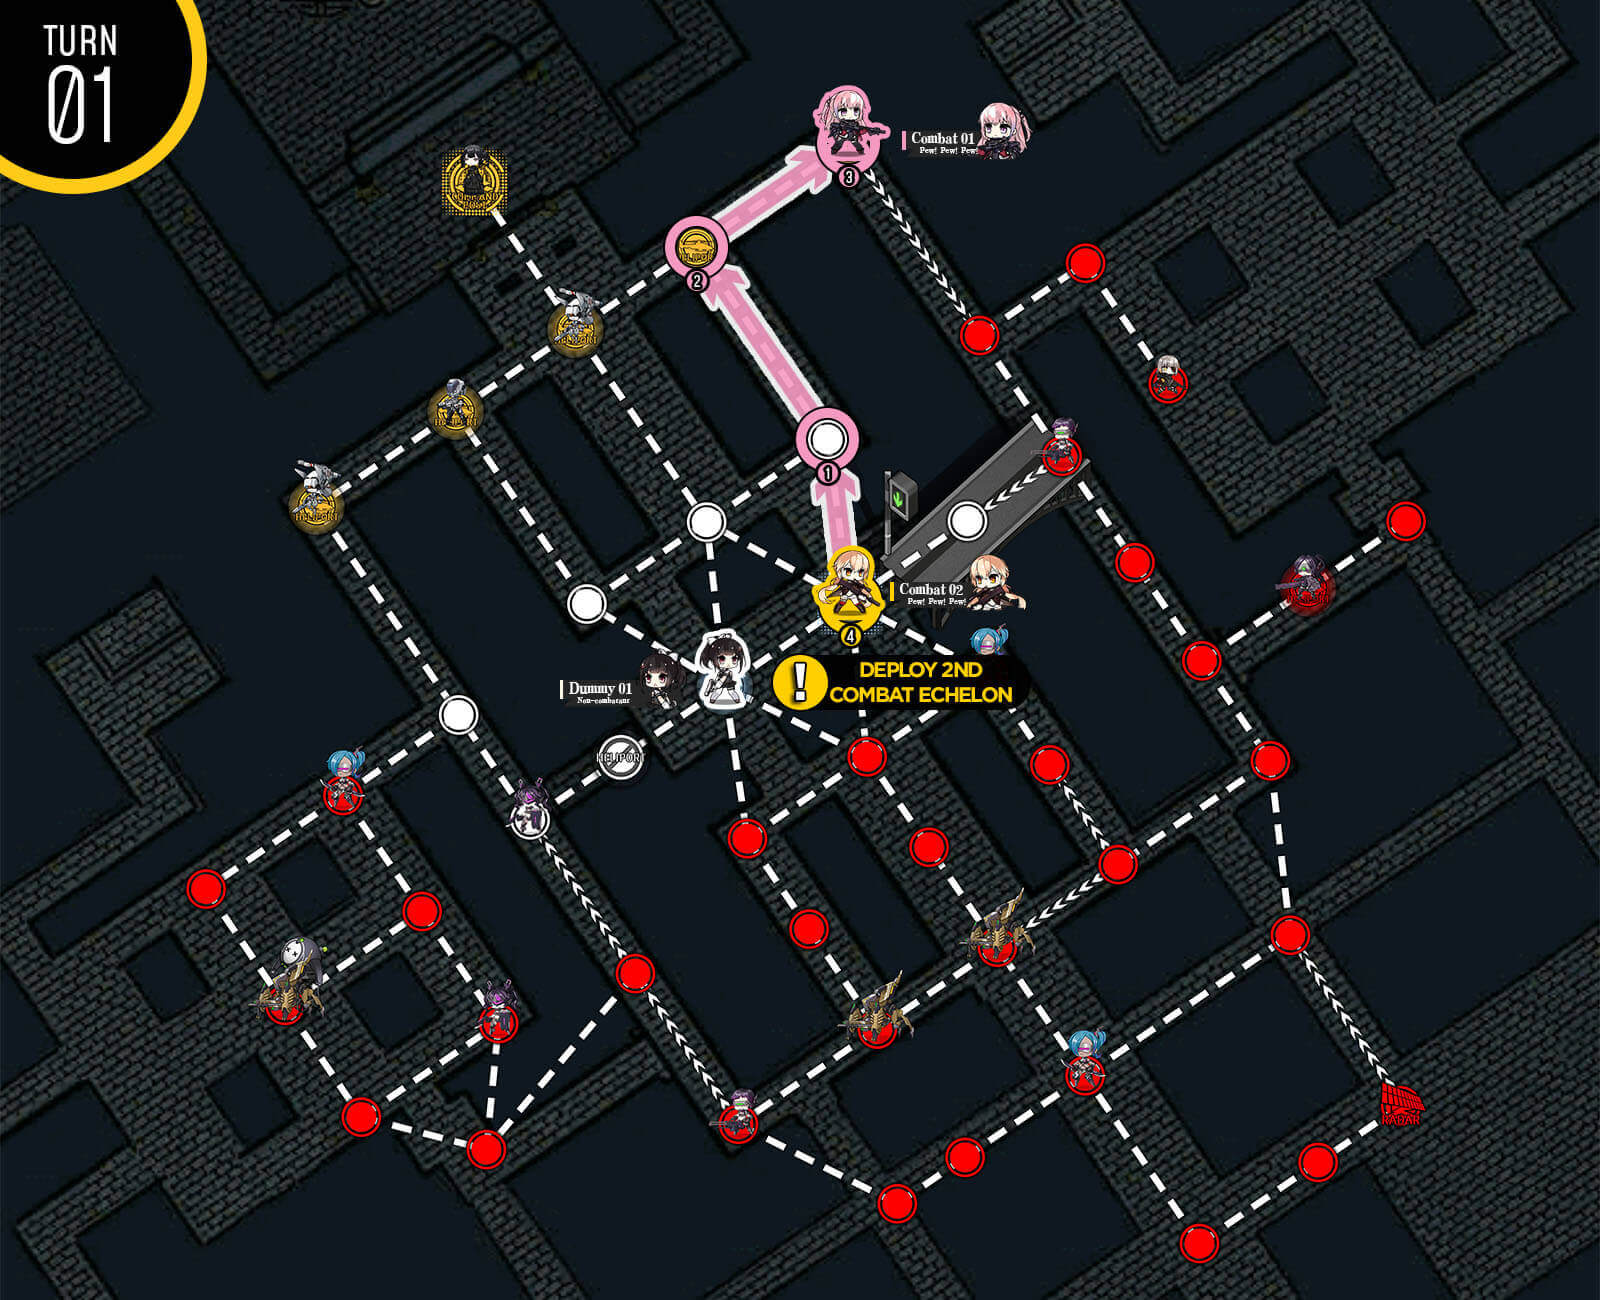
Start with a combat echelon on the HQ and dummy in the helipad. Move combat echelon down one and deploy a 2nd dummy echelon.
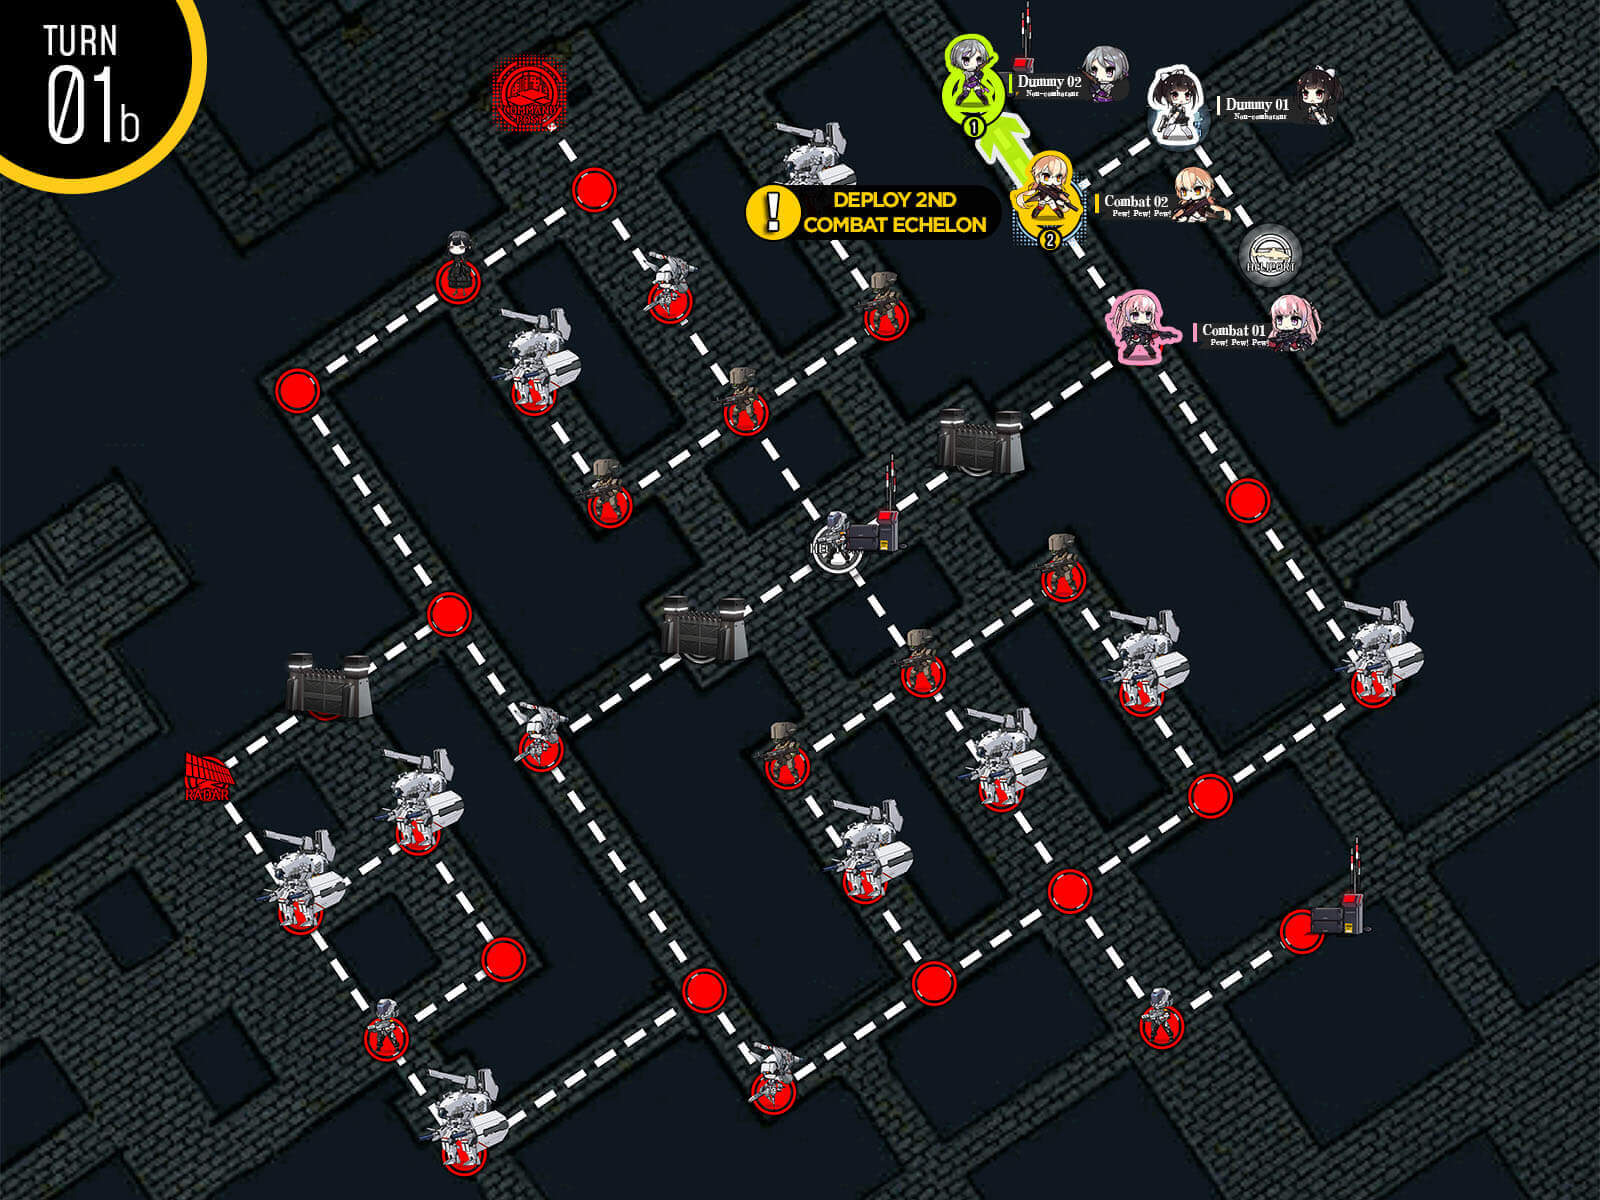
Move 2nd dummy up to the gate console then deploy 2nd combat echelon on HQ and end your turn.
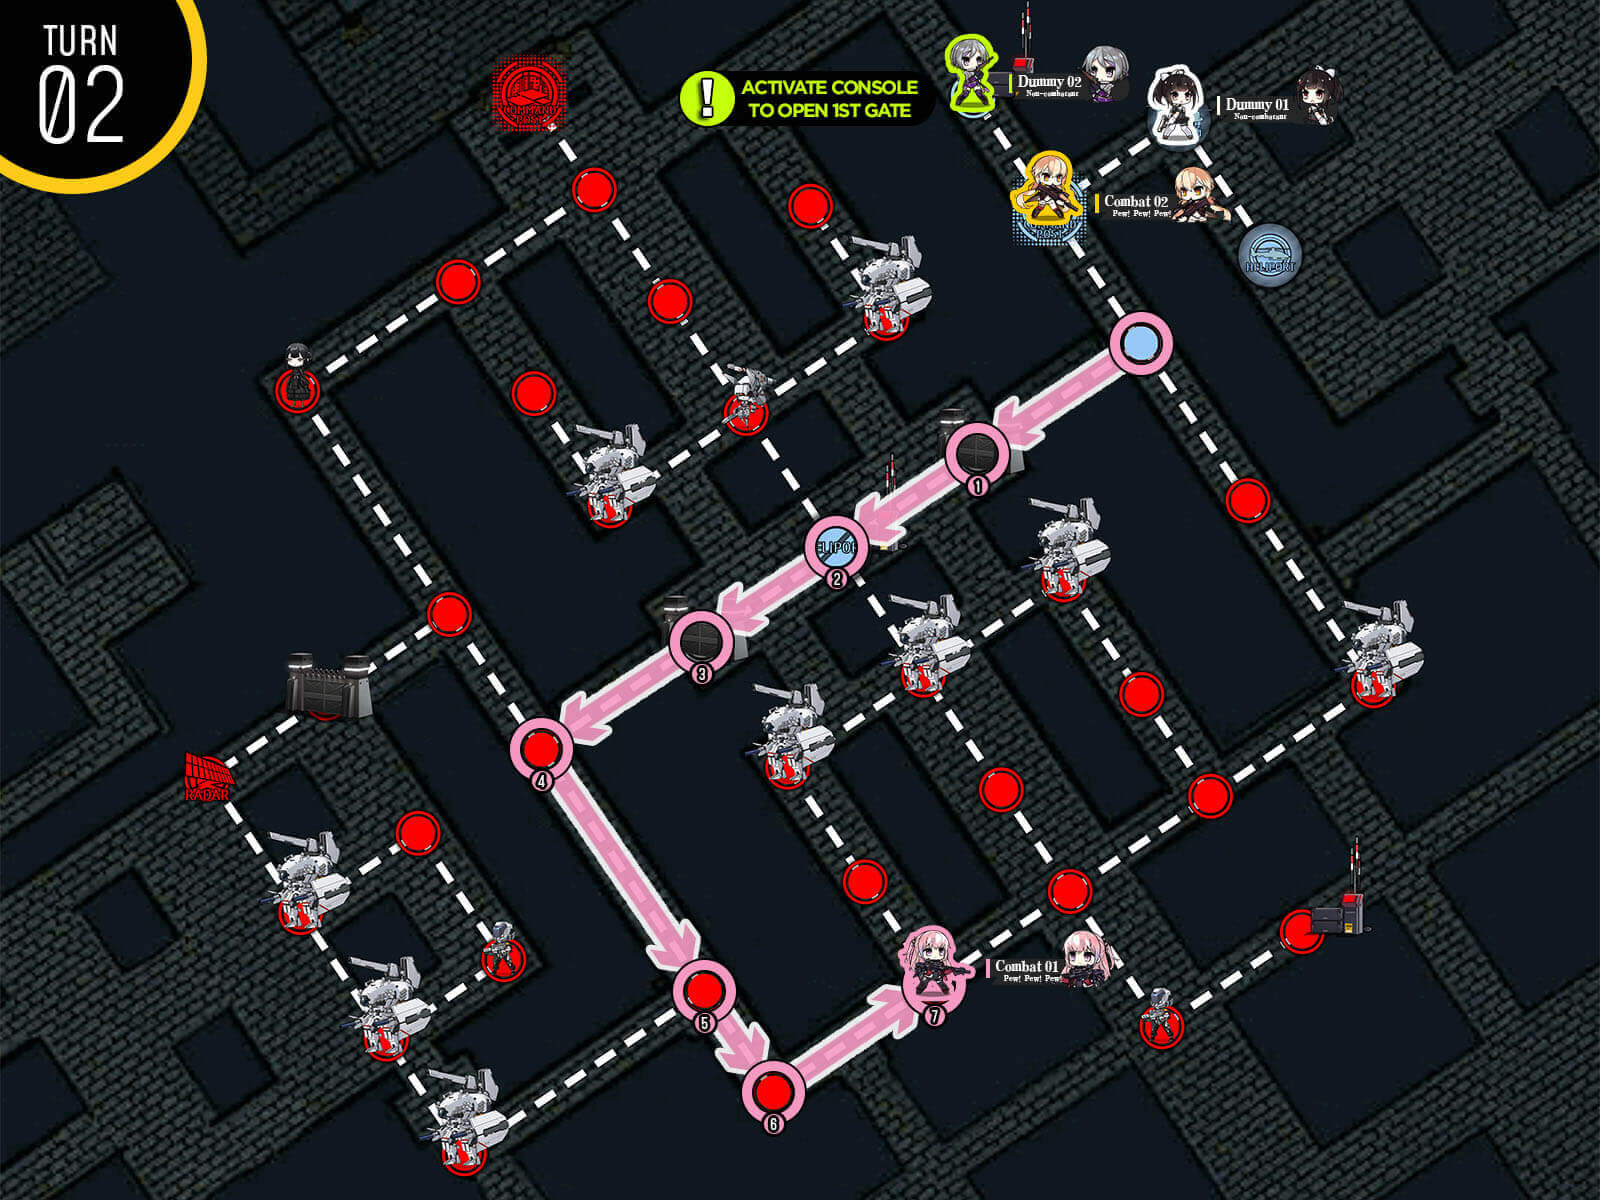
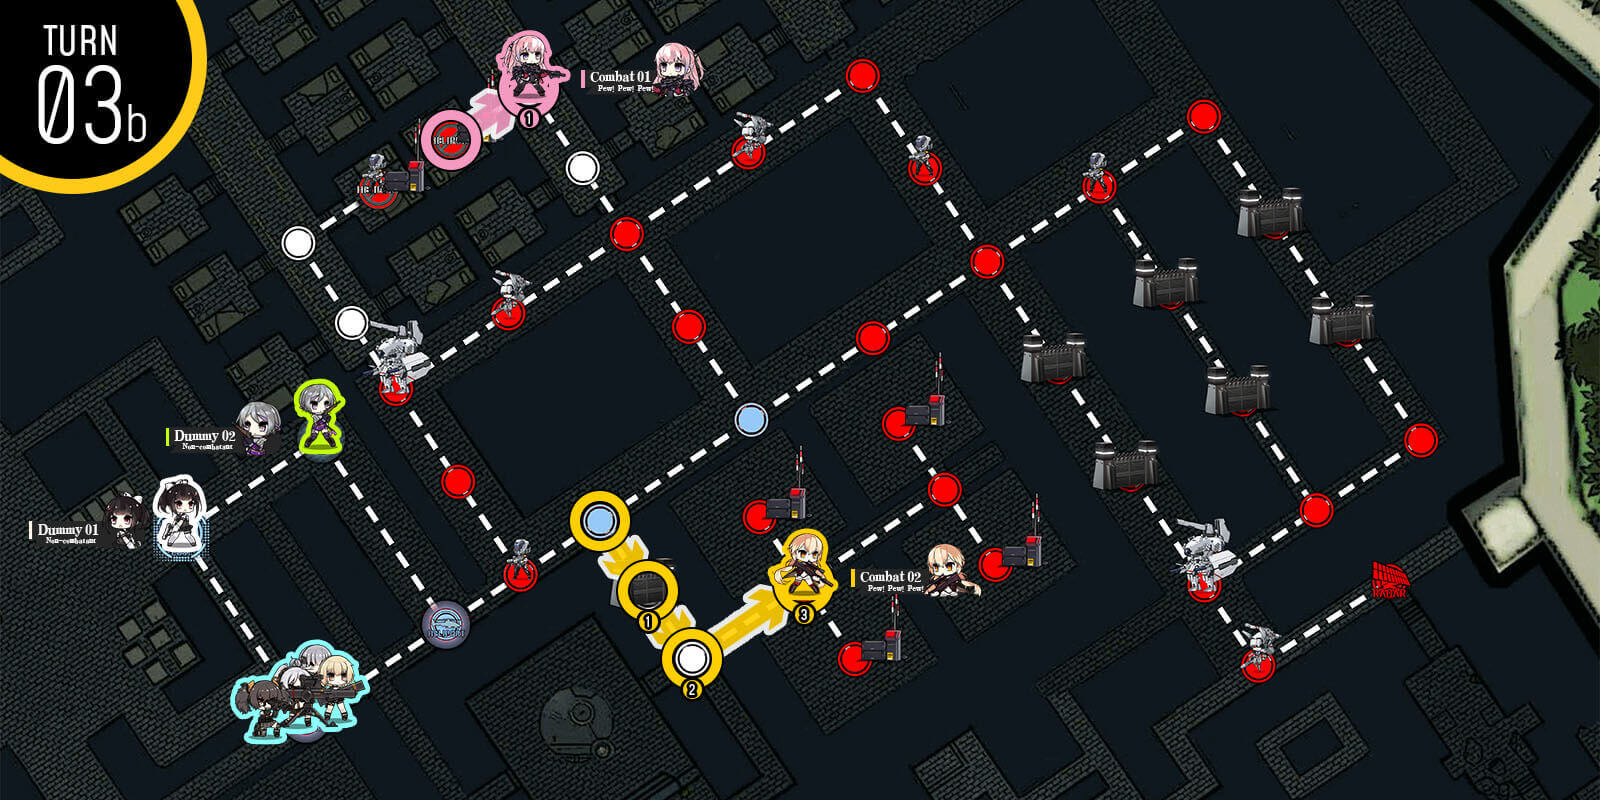
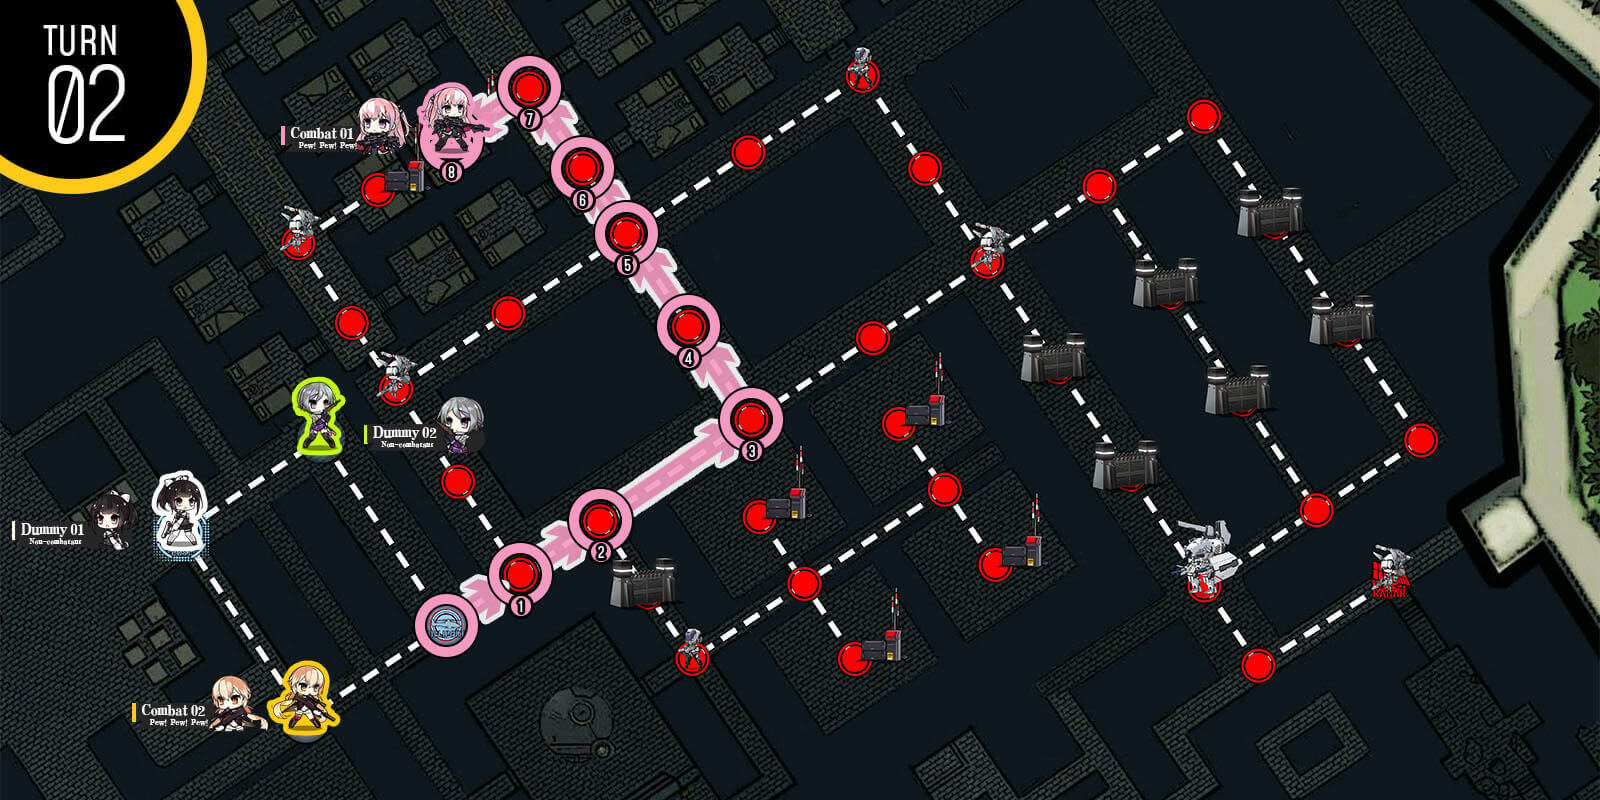
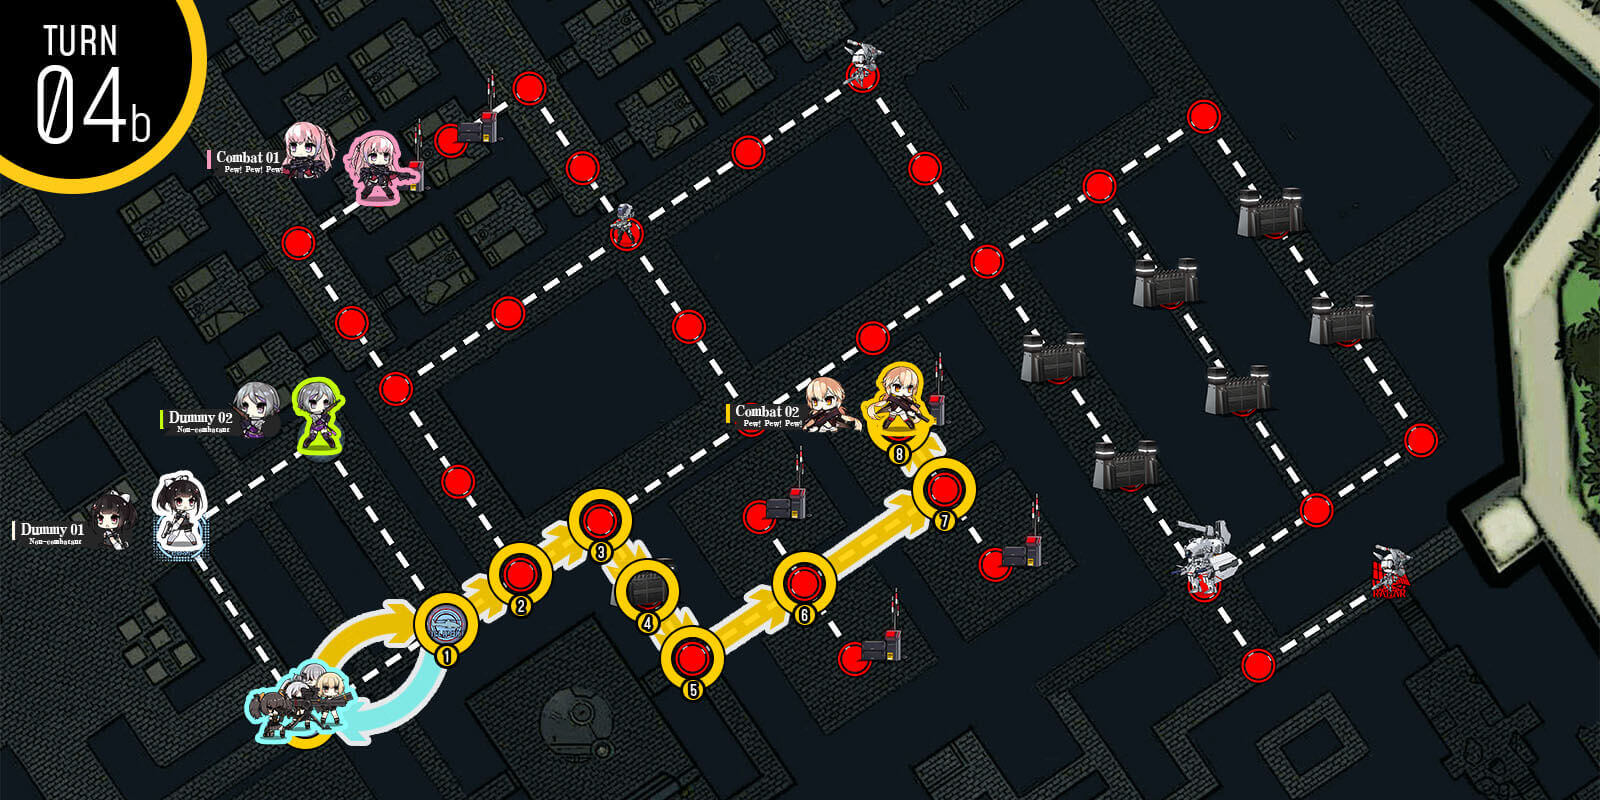
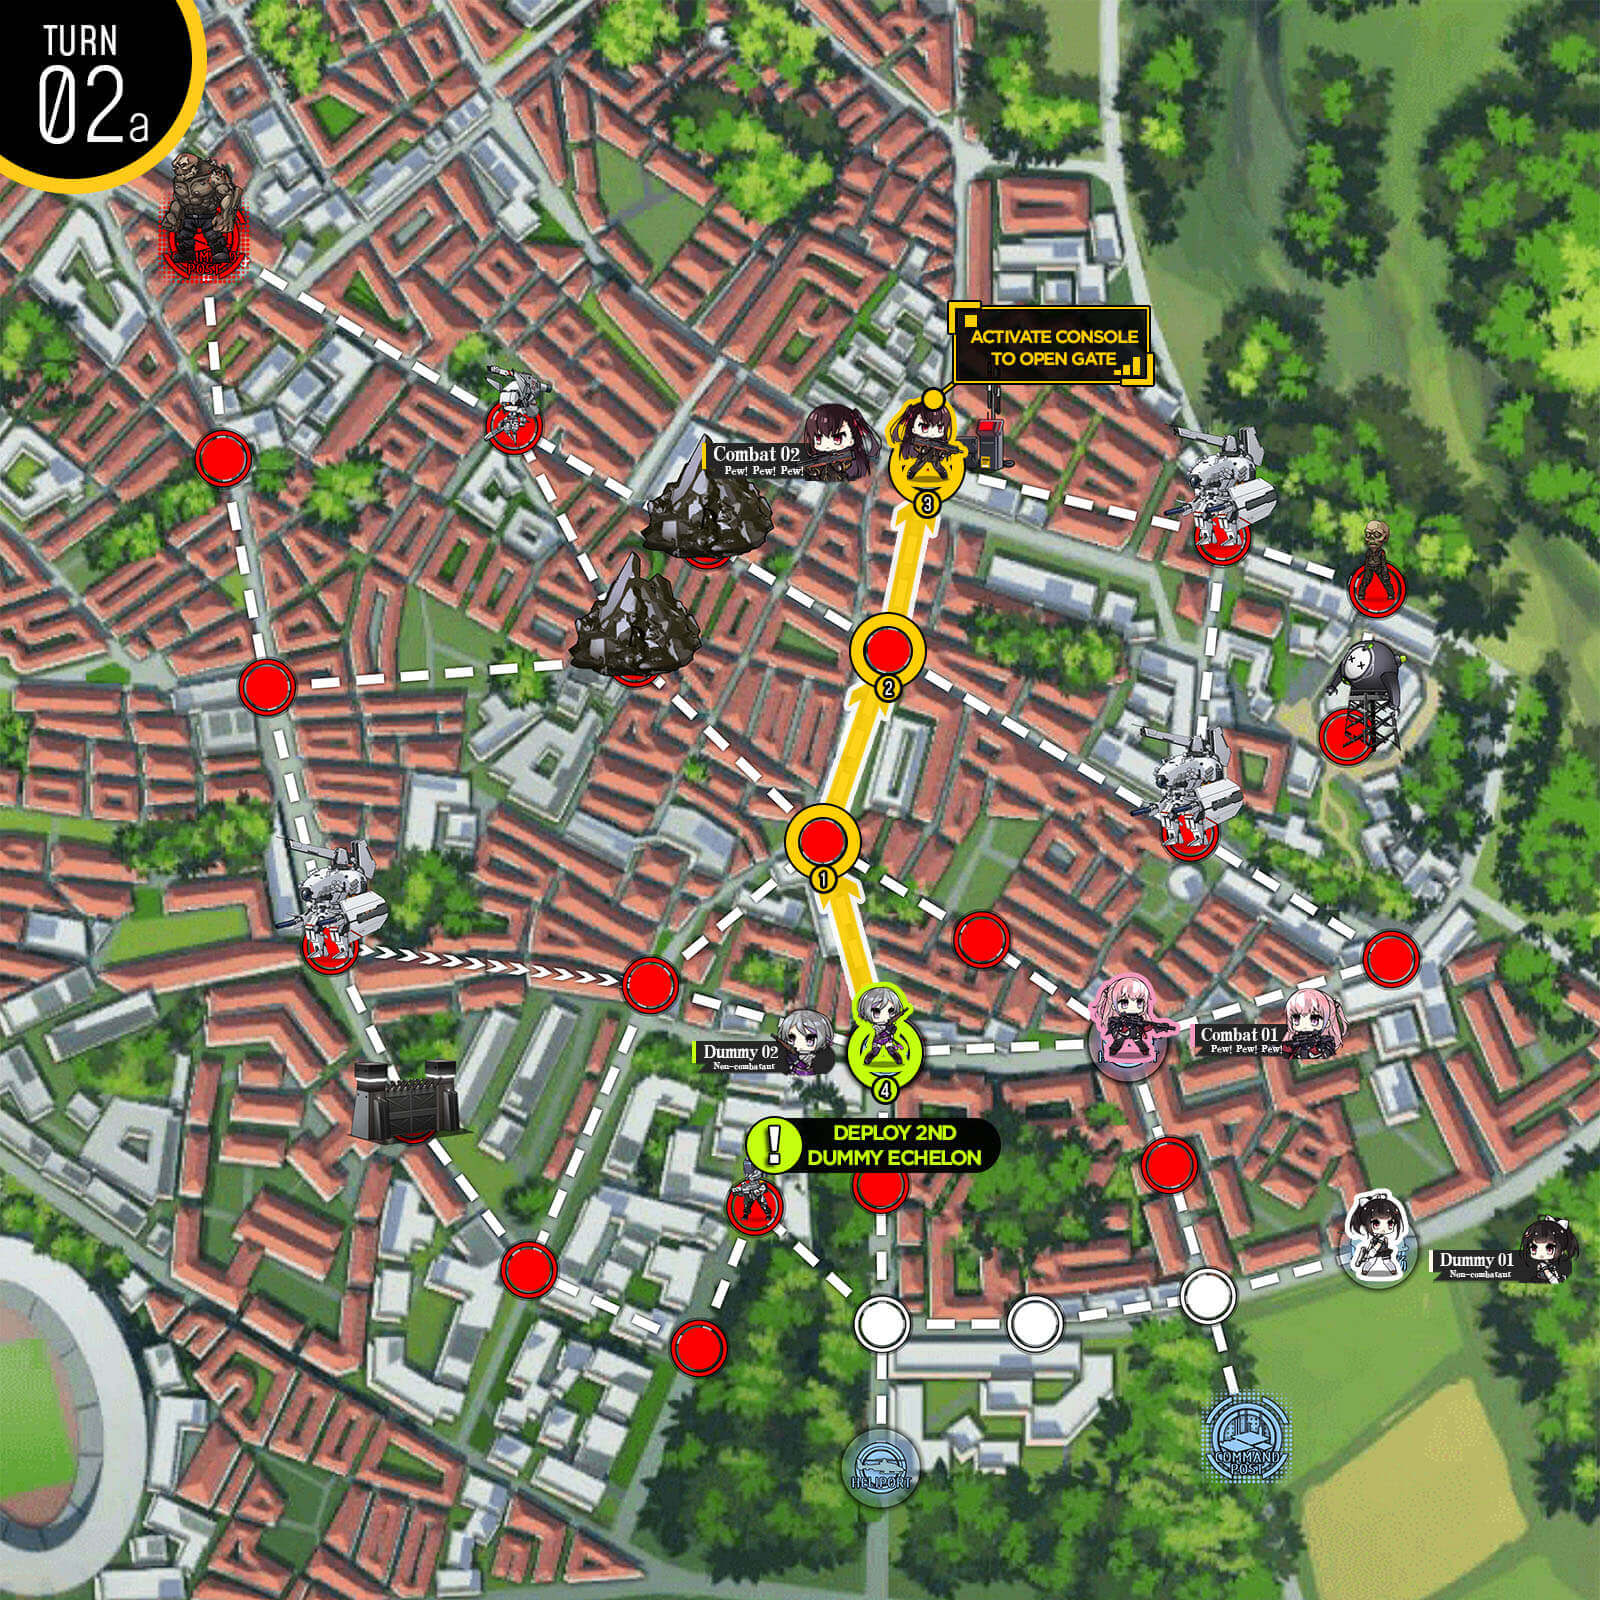
Use dummy echelon to toggle console. Take your combat echelon through the first gate and kill the unit at the center before activating the second console to open the next gate. Proceed to move towards the third console at the bottom of the map.
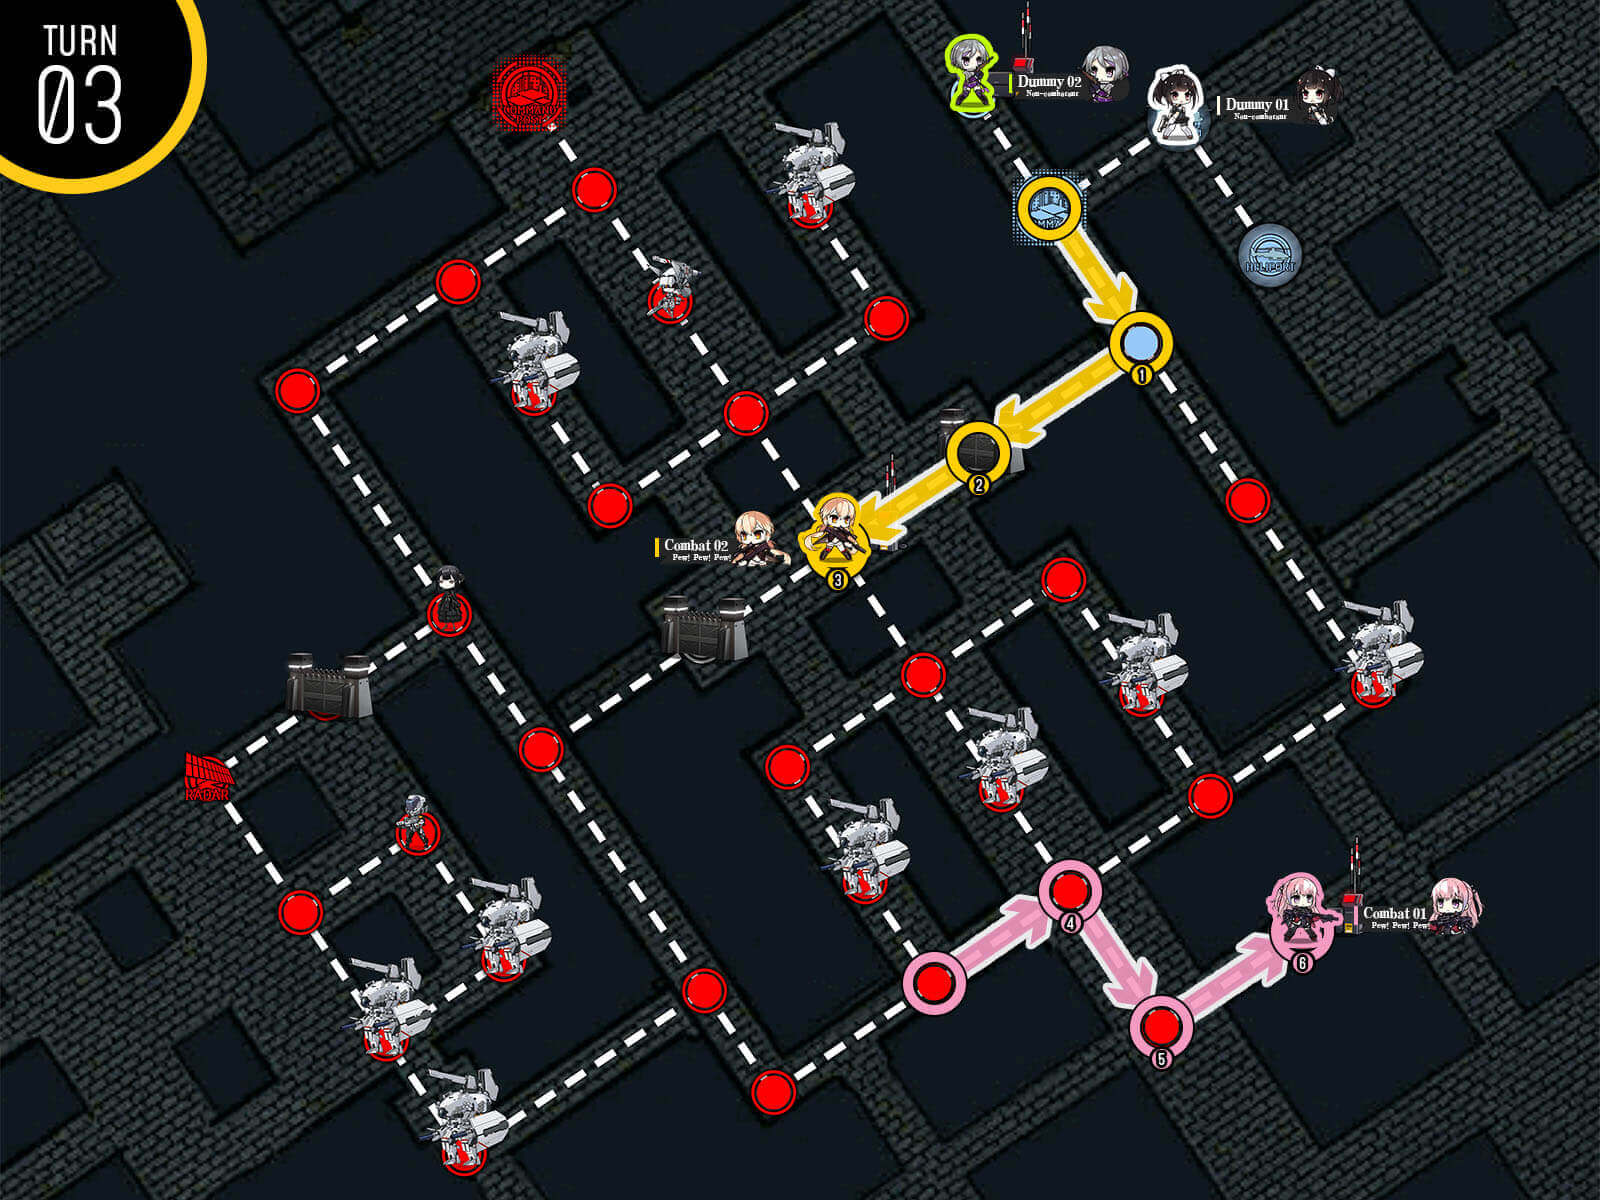
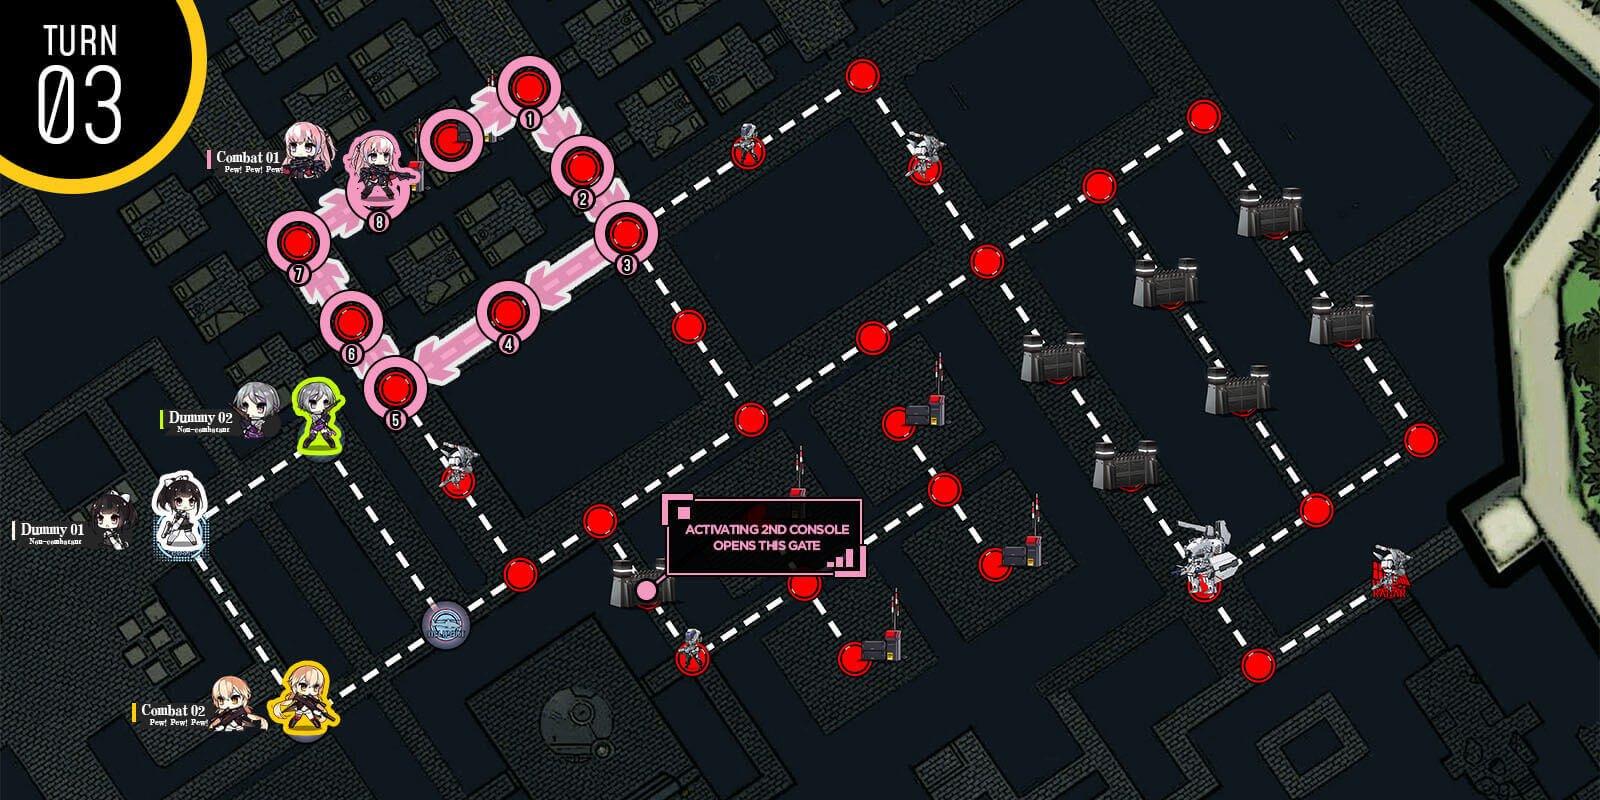
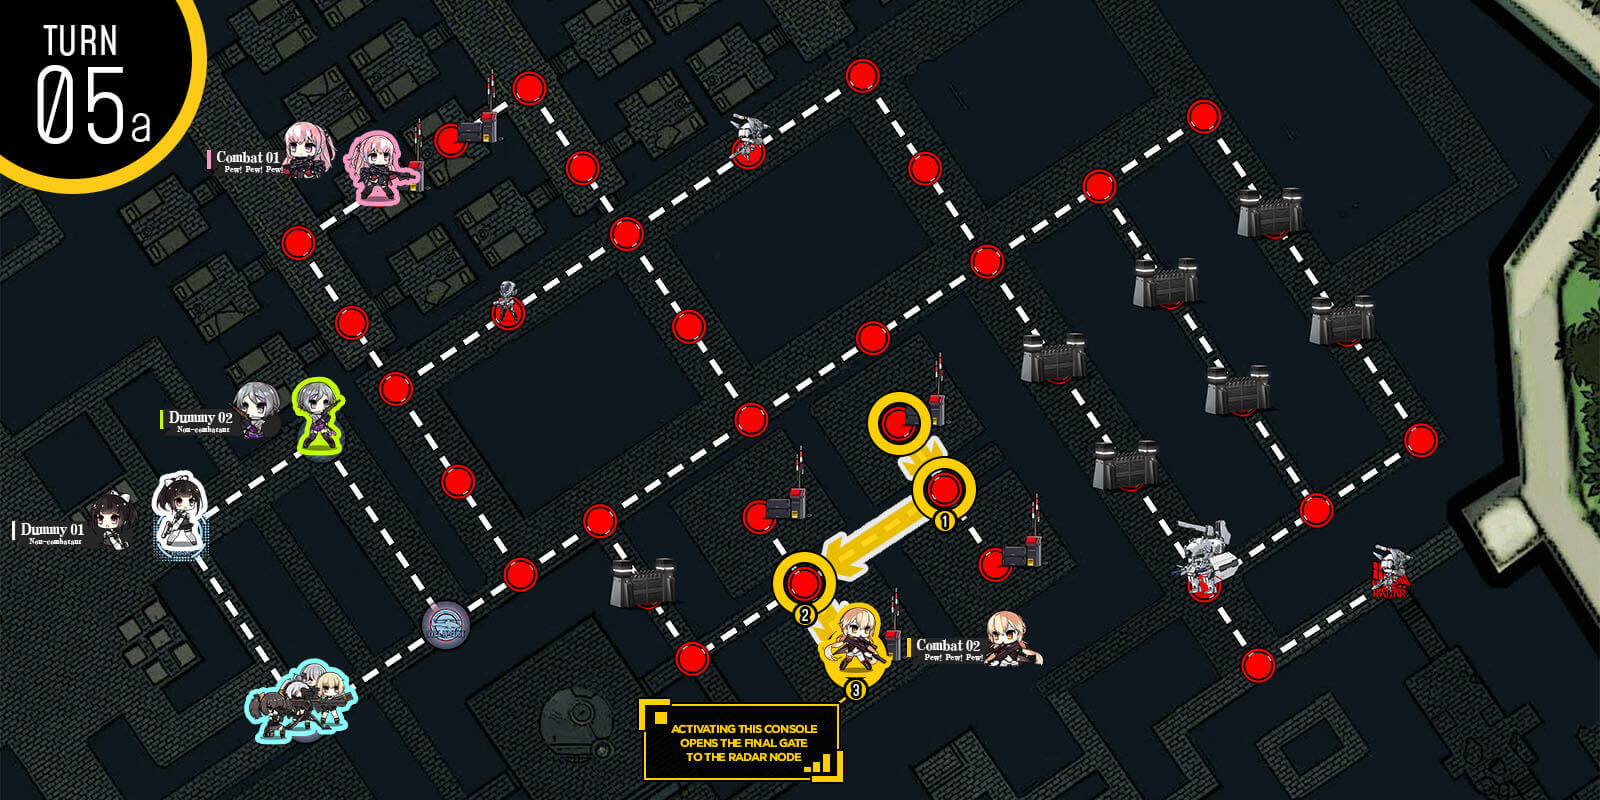
Combat echelon at the bottom moves to activate the third console which opens the gate to the radar node. Combat echelon at the HQ moves to the center node.
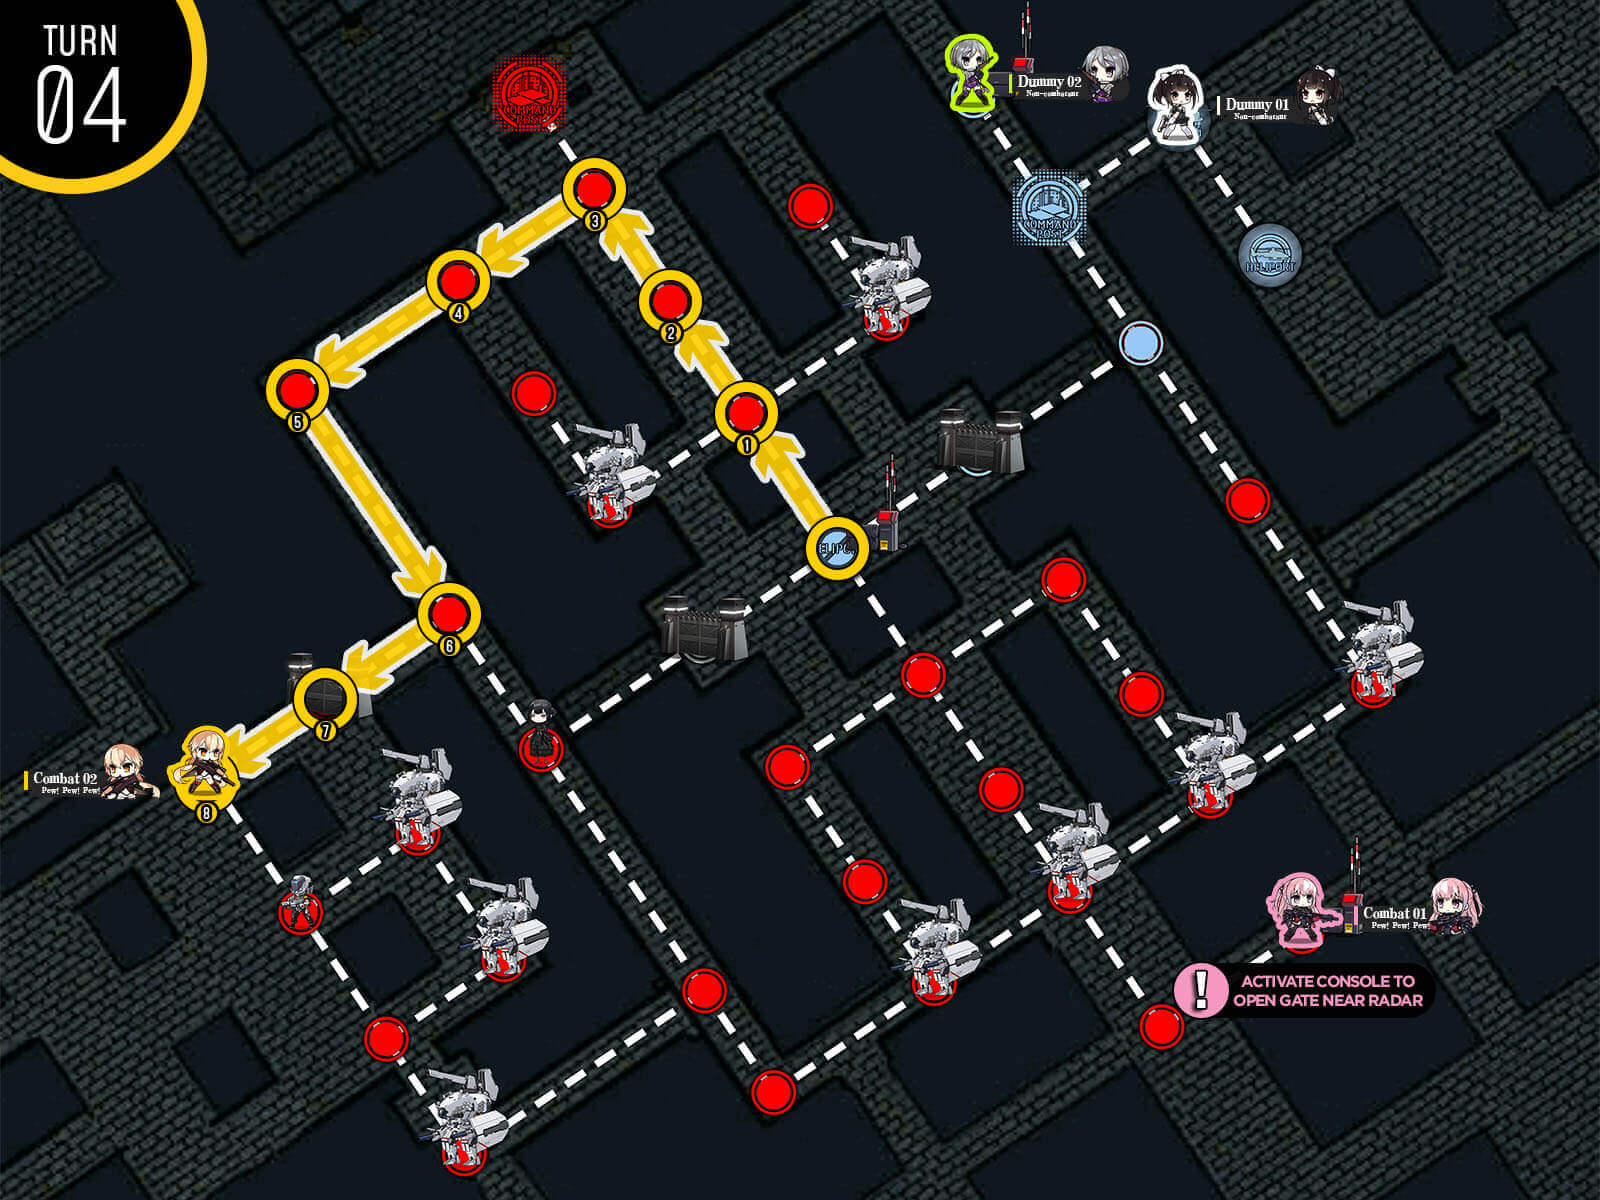
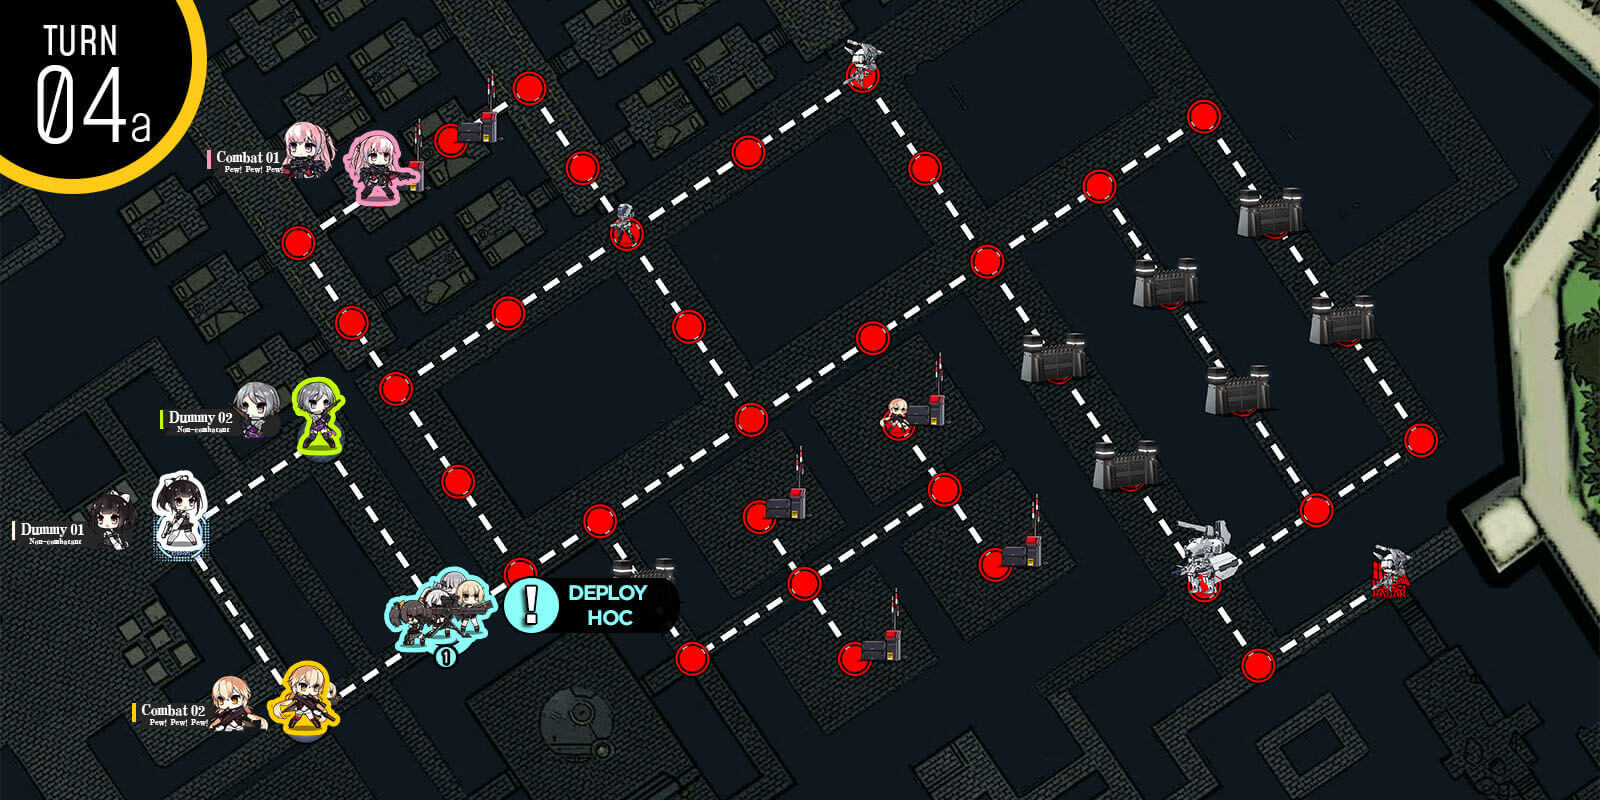
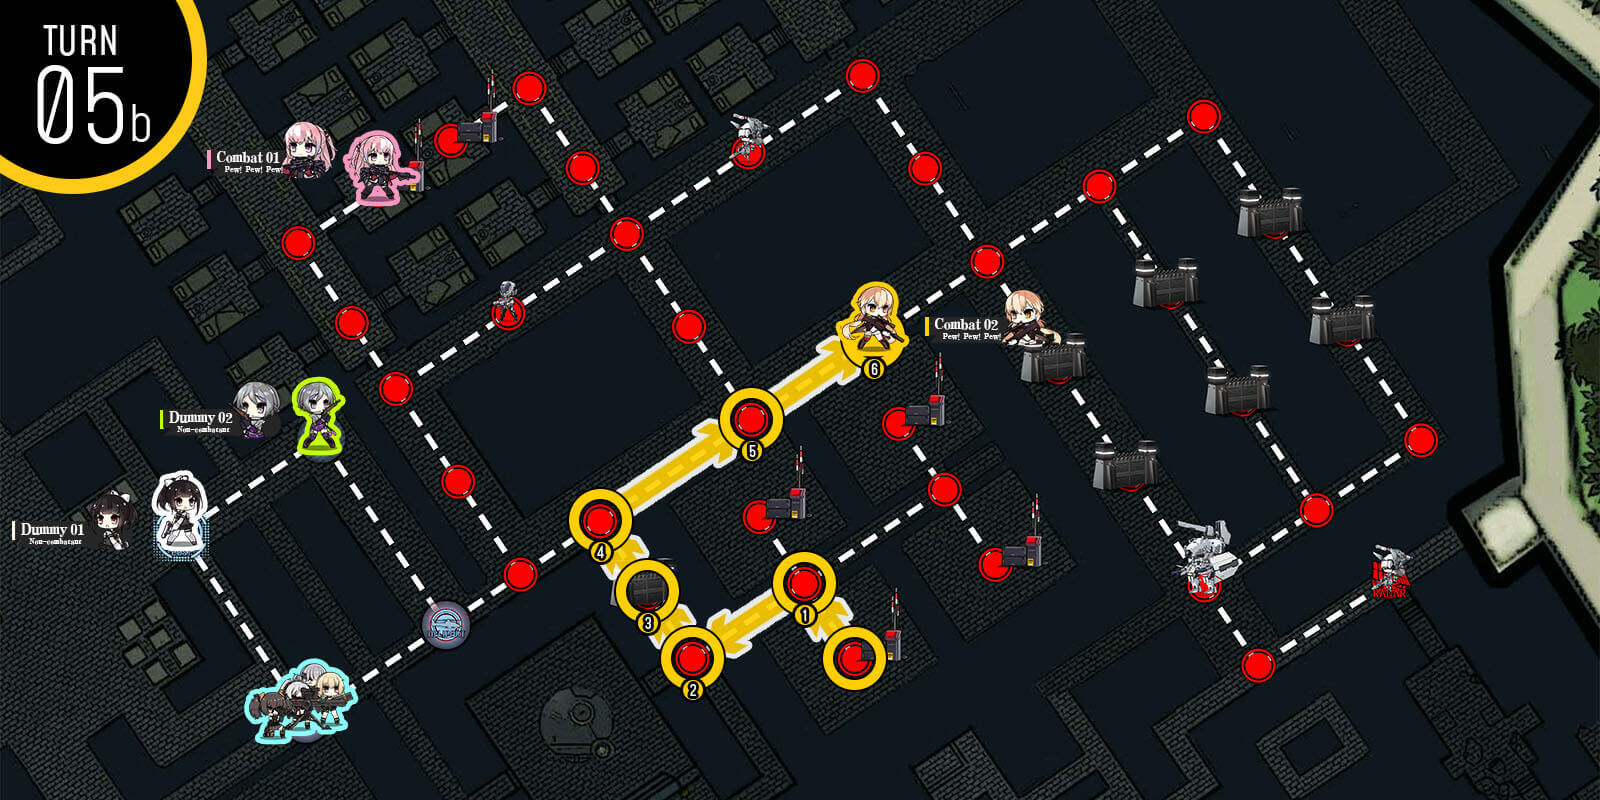
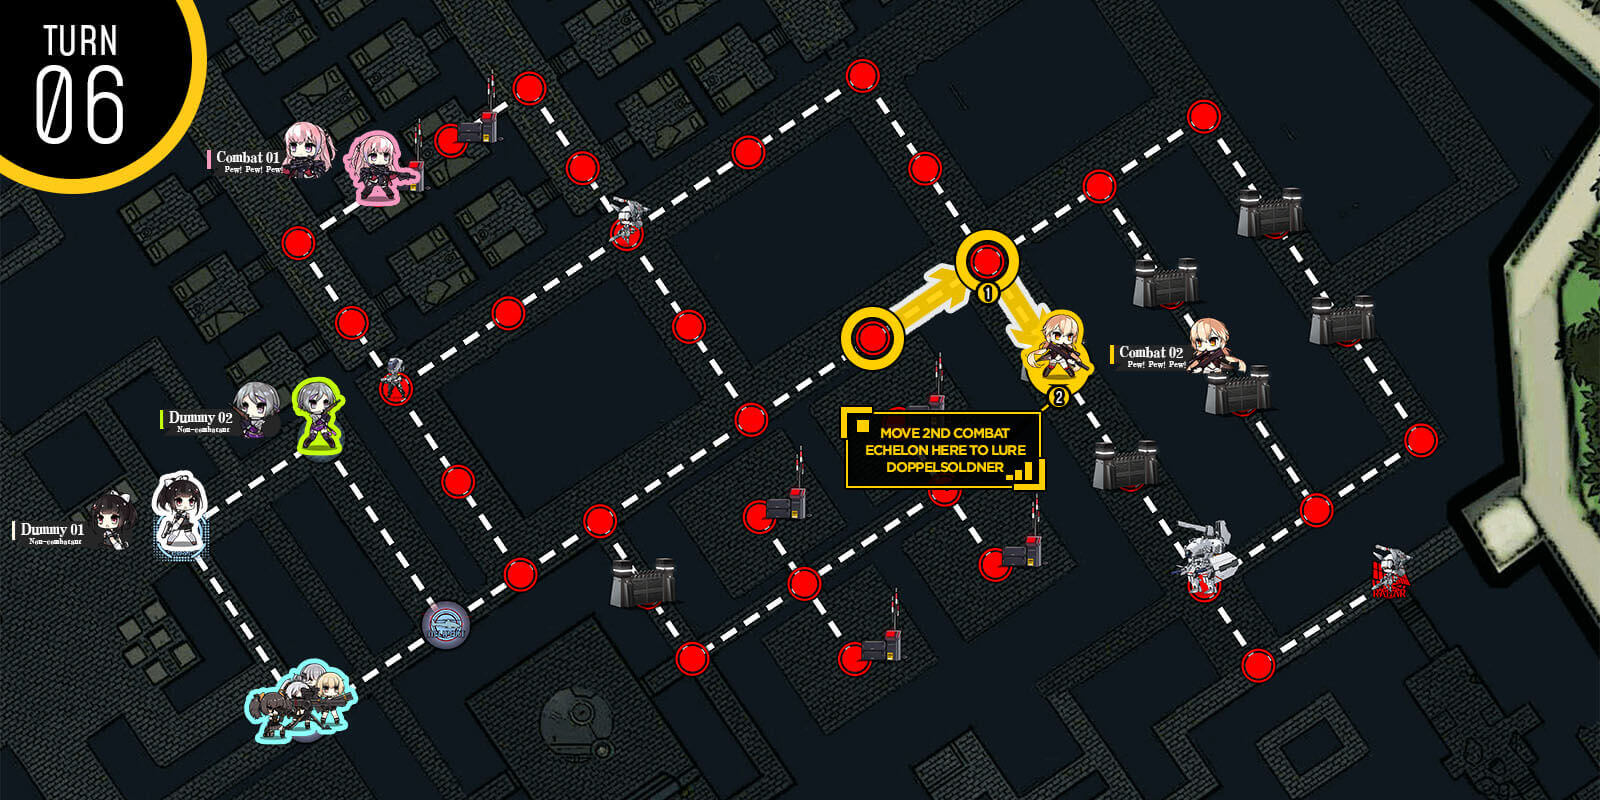
Once the Boss unit moves out of the way to the third gate, we go around the top side to the radar node and end turn to clear the mission.
Start with a combat echelon at the HQ and dummy on the helipad. Combat echelon moves down one so that we can deploy dummy echelon at the HQ.
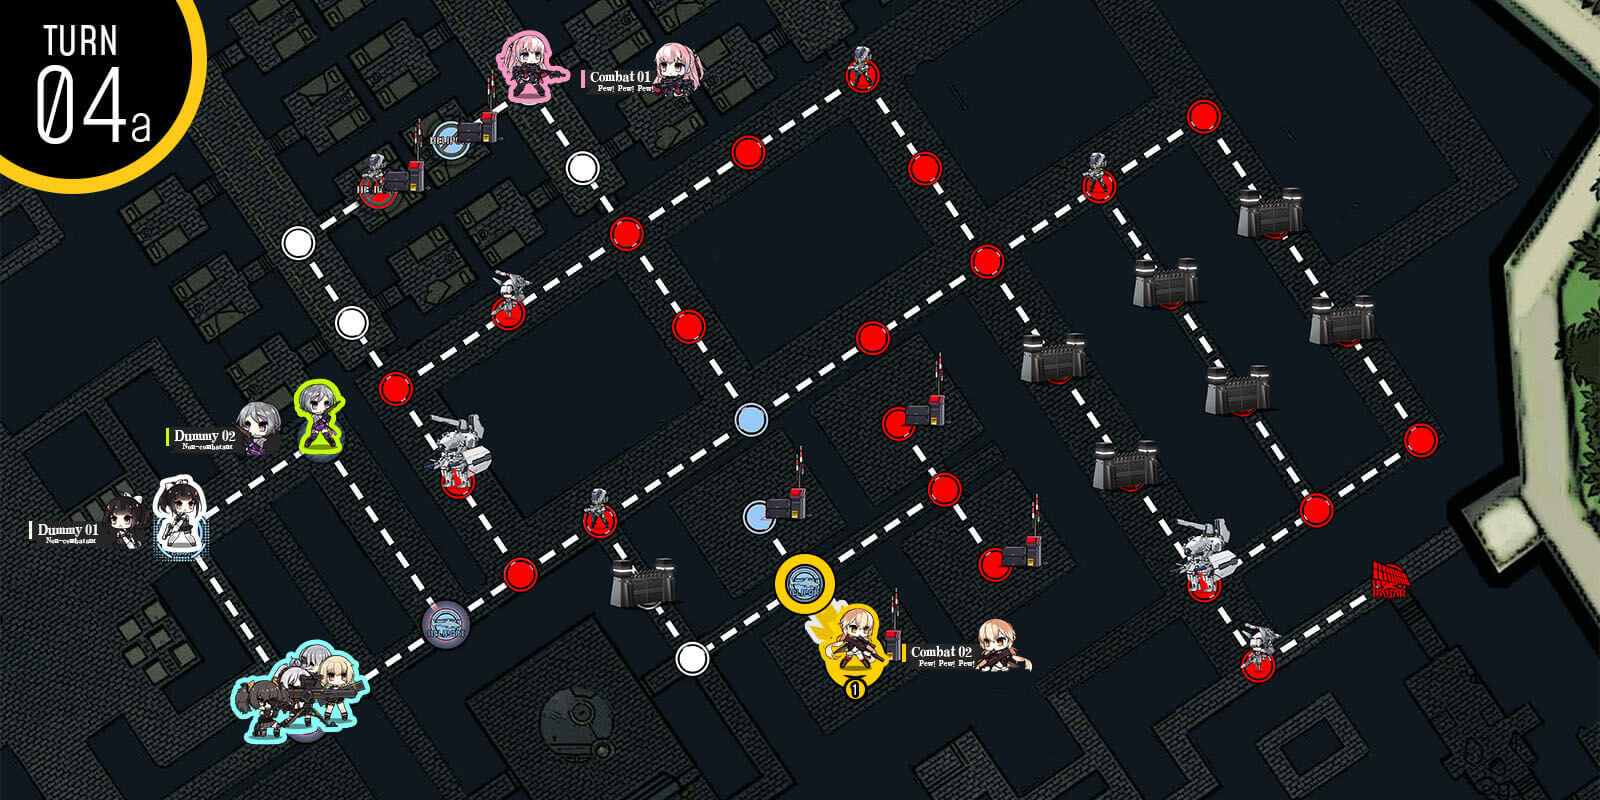
Dummy echelon moves up to control panel and opens the gate to the bottom right. With remaining move, deploy 2nd combat echelon.
1st combat echelon moves through opened gate and reaches the 2nd control panel to open the bottom left gate near the HQ.
Combat echelon at the HQ moves down one.
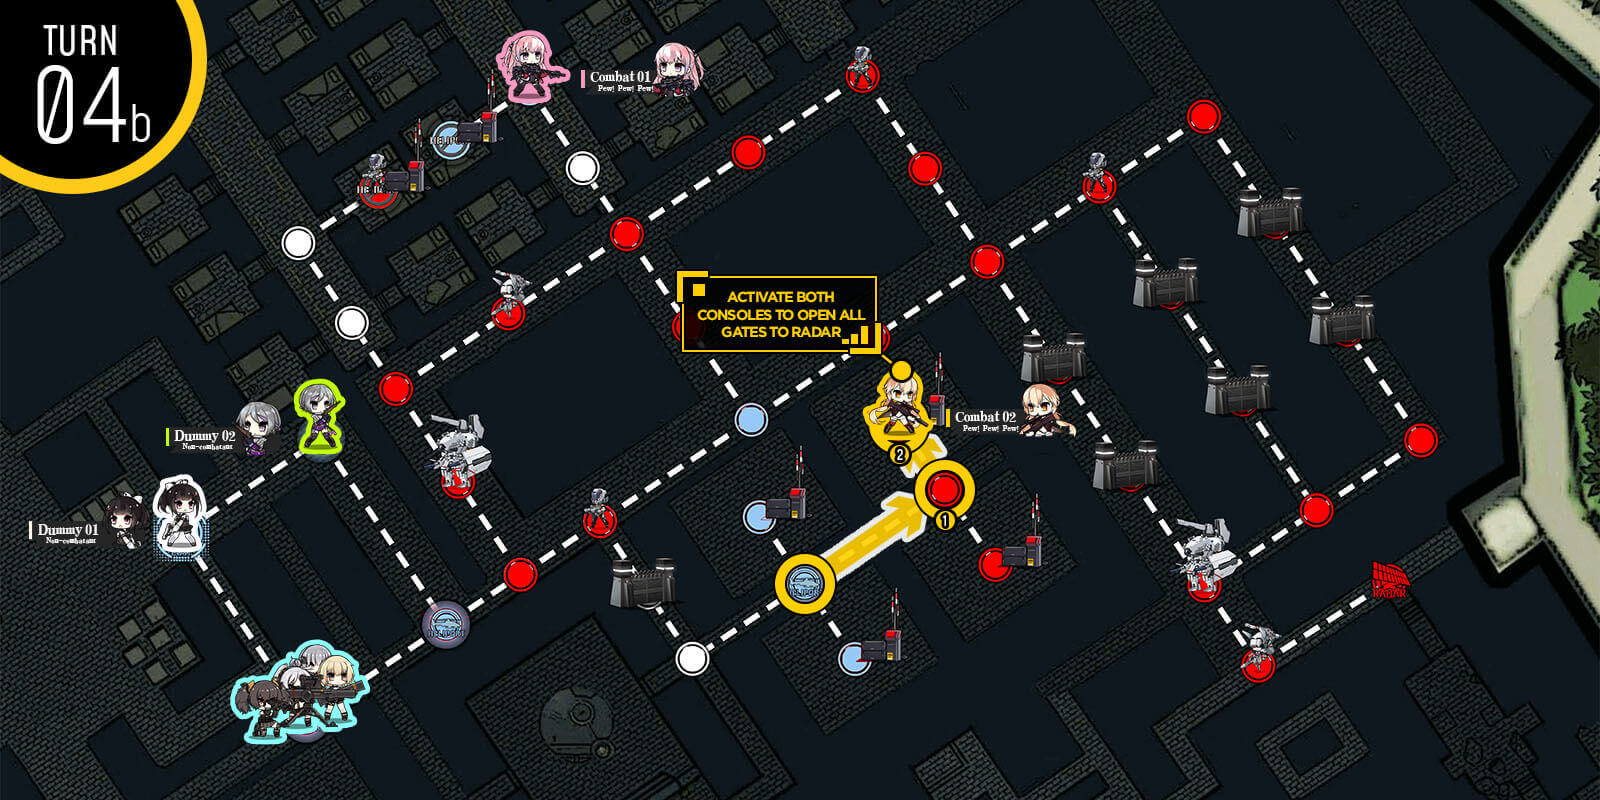
Combat echelon near the HQ moves through the new gate that opened and actives the 3rd control panel at the center. This should open the last gate in the way to the radar node. Then move up to the left.

Now you should have enough move points to get to the radar node without fighting Nyto. If you wish to fight Nyto you can wait another turn until she is at the gate, then crush her with the gate a few times until she is weakened. Go through and get to radar turn after that.
Start with a combat echelon that is able to reliably handle armored units with 54 armor. If you have a high level RFHG echelon that can kill hydra with 199 armor, deploy that instead. Combat echelon swaps with hostage [but not rescue], then moves to the occupied helipad.

Move down your combat echelon down one then deploy a 2nd combat echelon at the helipad. This combat echelon does need to be able to beat at least one 54 armor enemy towards the end. Swap the combat echelons' locations and the 2nd combat echelon moves down to the yellow helipad at the bottom.
2nd Combat echelon at the bottom moves to the console panel that is farther away from the helipad. Deploy a dummy echelon at the bottom helipad and move it to the console panel adjacent to the helipad. These consoles will be used when Hydra units are passing through the nodes with fire support platforms on either side.
Before you move check both console panels to trigger correct fire support platform to deal damage to the Hydra. 2nd combat echelon then moves to the bottom left so we can capture the helipad on the other side of the one way next turn. Move Combat echelon at the center helipad up one node towards the hostage then deploy 2nd dummy echelon at the helipad.
We are going to swap location with dummy and hostage, making it getting run over by the tank. This triggers the hidden achievement where hostage unit dies.
Finally last thing to do is to retreat the combat echelon near the HQ and redeploy at the open helipad next to one way path. Then move straight for the enemy HQ Another option is to deploy and third combat echelon if you are aiming for S-rank.

Start with combat echelon at the HQ and move to fight the weak[?] Hydra unit at the helipad.
Combat echelon moves down one and deploys the 2nd combat echelon. 2nd Combat echelon moves down to take helipad at the bottom.
Both combat echelons move one node to the left each. we then deploy 2 dummy echelons right next to combat echelons.
There are two control panels that activates two of the artillery platforms which can weaken the 30 Hydras to manageable level.
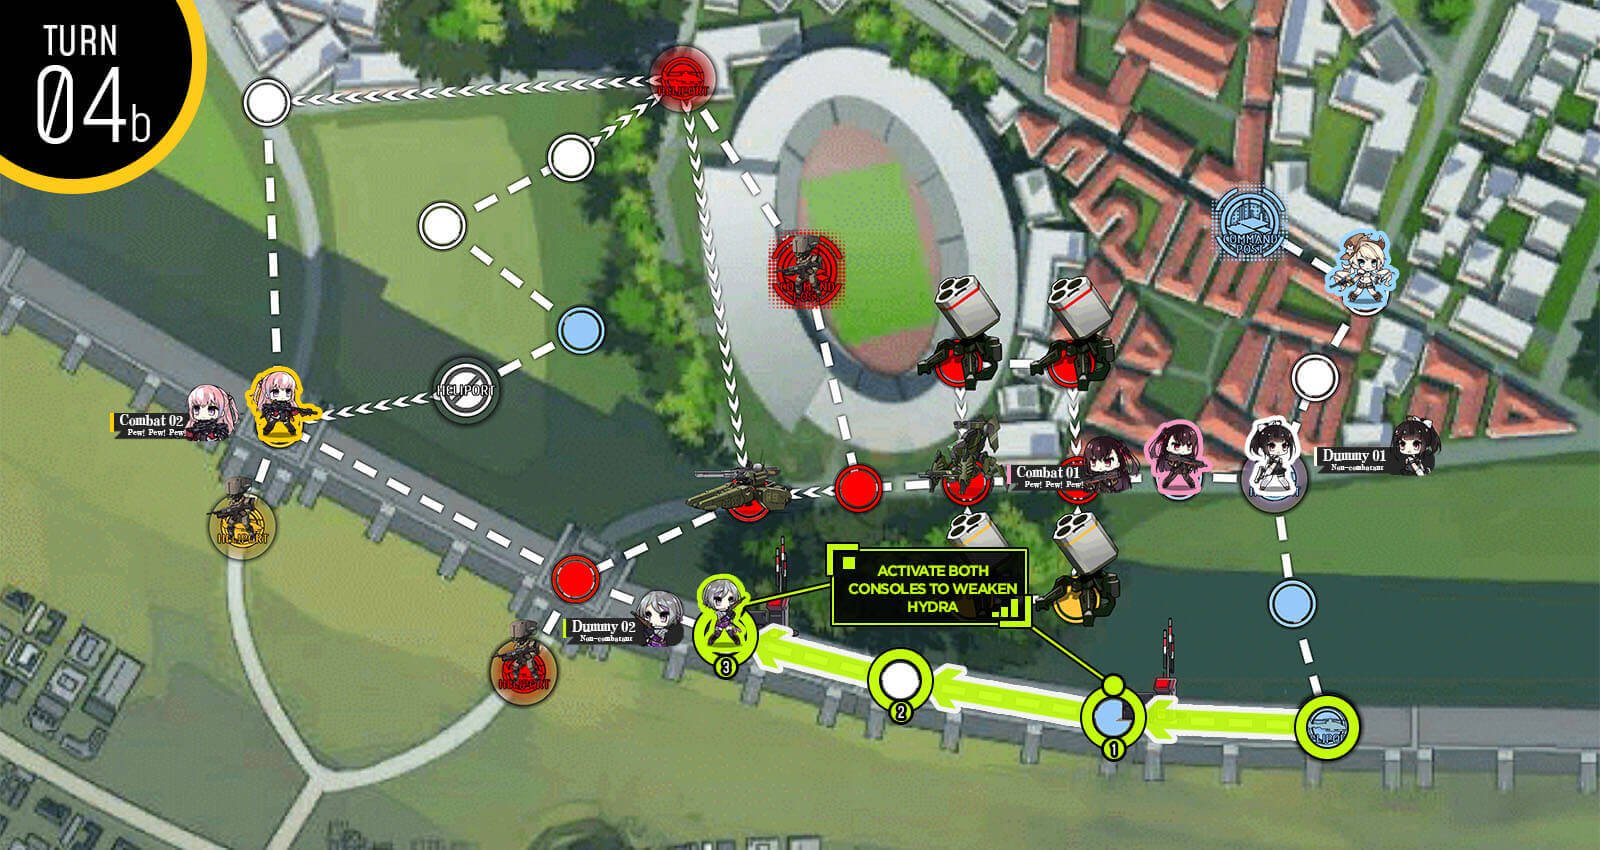
Use the bottom dummy echelon to trigger the one that can damage the Hydra on the left then proceed to move along the bottom to capture the node next to the one-way path. This ensures that we have another way to get to enemy HQ without fighting the Hydra unit.

Here you can take either this or the path on the next image.
Start with a combat echelon on HQ and the right helipad and dummy echelon on the left helipad.
Combat echelon on the HQ moves up to the node below the rally point and dummy echelon moves to helipad right below.
2nd combat echelon moves to HQ to defend from armor units.

Combat echelon at the top clears out the rally point.
Dummy unit moves up from the helipad then swaps position with combat echelon on the rally point. No enemy units should move into rally point from this point on.
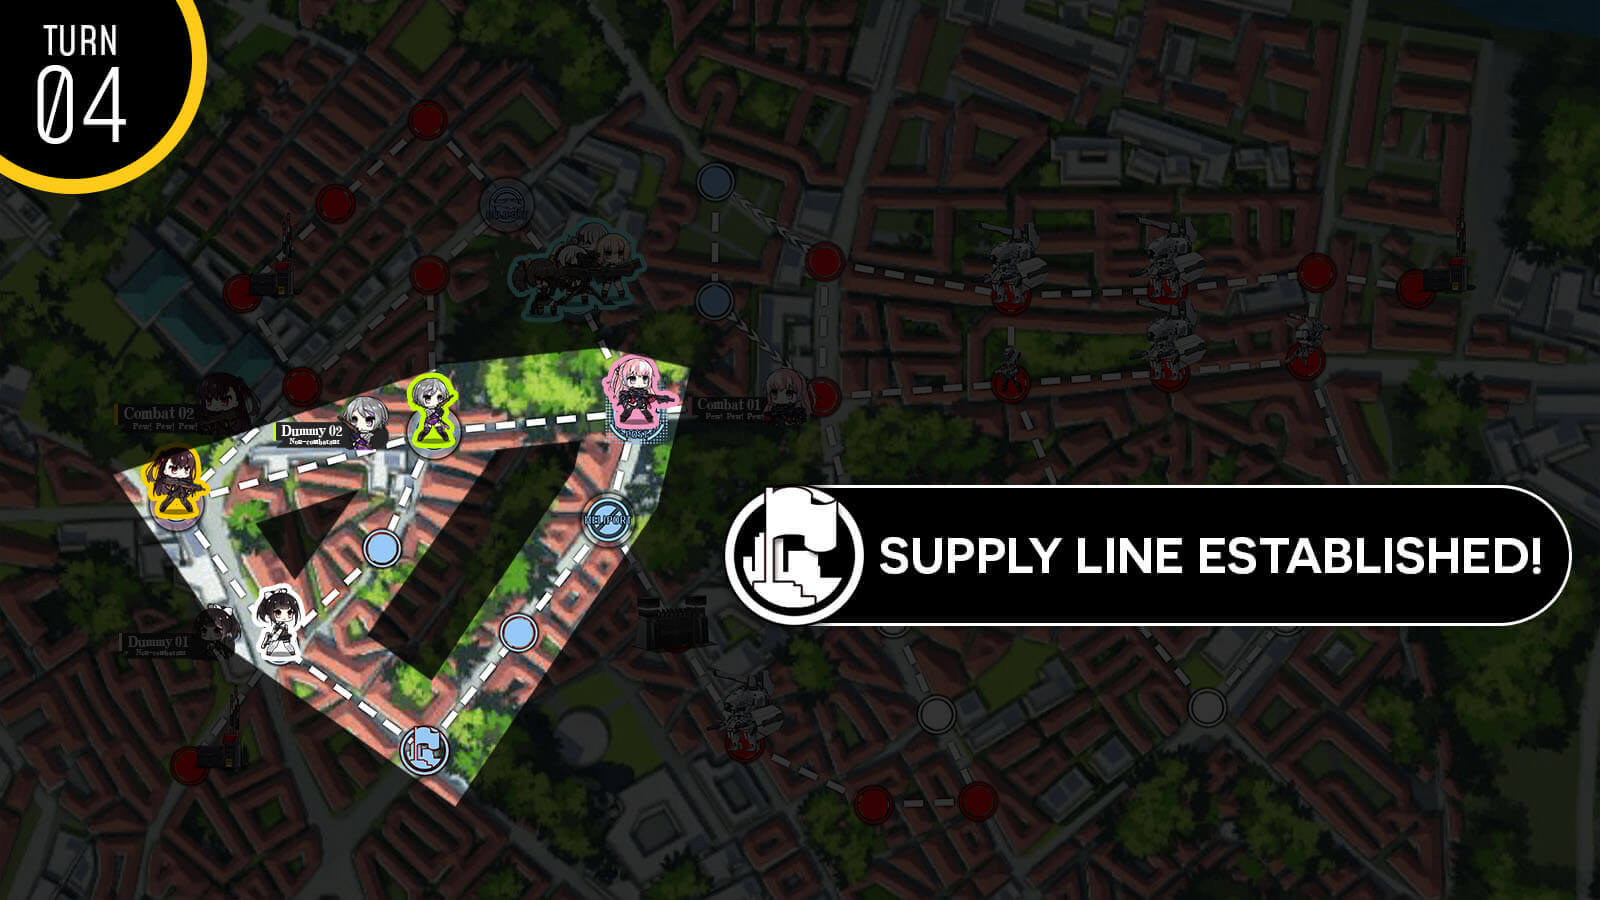
Next we deploy 2nd dummy echelon from the helipad north of HQ then move one to the right. This node should remain clear from enemy threat except for the Hydra unit. This establishes the supply route.
On third turn, combat echelon at the top move down to defend the helipad from being taken by typhoon tanks. There is only one tank at the middle row, so when the tank is about to fire, just simply retreat or move the T-dolls out of the middle row and you should have no issue beating it.
Hydra unit has approached near the HQ and unlike other enemy units, Hydra unit has AI that detects our friendly units adjacent to itself. Due to this we have to move dummy and combat echelon out of the way. Start with resupplying the 2nd combat echelon on the HQ and swap with 2nd dummy echelon. Then dummy echelon moves straight down to the little alcove under the helipad.

Since we cannot stay at the HQ this turn, we need to remove all surrounding KCCO units that is not Hydra. Sweep from left then down, but making sure to end your turn at least two nodes away from the hydra unit. In my case I decide to move combat unit to helipad just south of the HQ. At the beginning of next turn we clear the mission automatically.
Start with combat echelons at the HQ and right helipad with dummy or HOC at the left helipad or heavy helipad, respectively. Combat echelon moves up to fight the armor unit at the center helipad north of HQ then destroys the enemy structure.
Dummy/HOC follows behind and 2nd combat echelon parks itself at the HQ.

Combat echelon and dummy echelon move up towards the rally point and swaps positions so that dummy is sitting at the rally point. We should have supply route established at the end of the turn.

Combat echelon needs to defend the helipad between rally point and the HQ. So move down one node and end turn.
On the last turn, if there's Hydra unit nearby, Combat echelon at the HQ clears out nearby enemy units and moves out of the detection range. This should clear the mission at the beginning of the next turn.

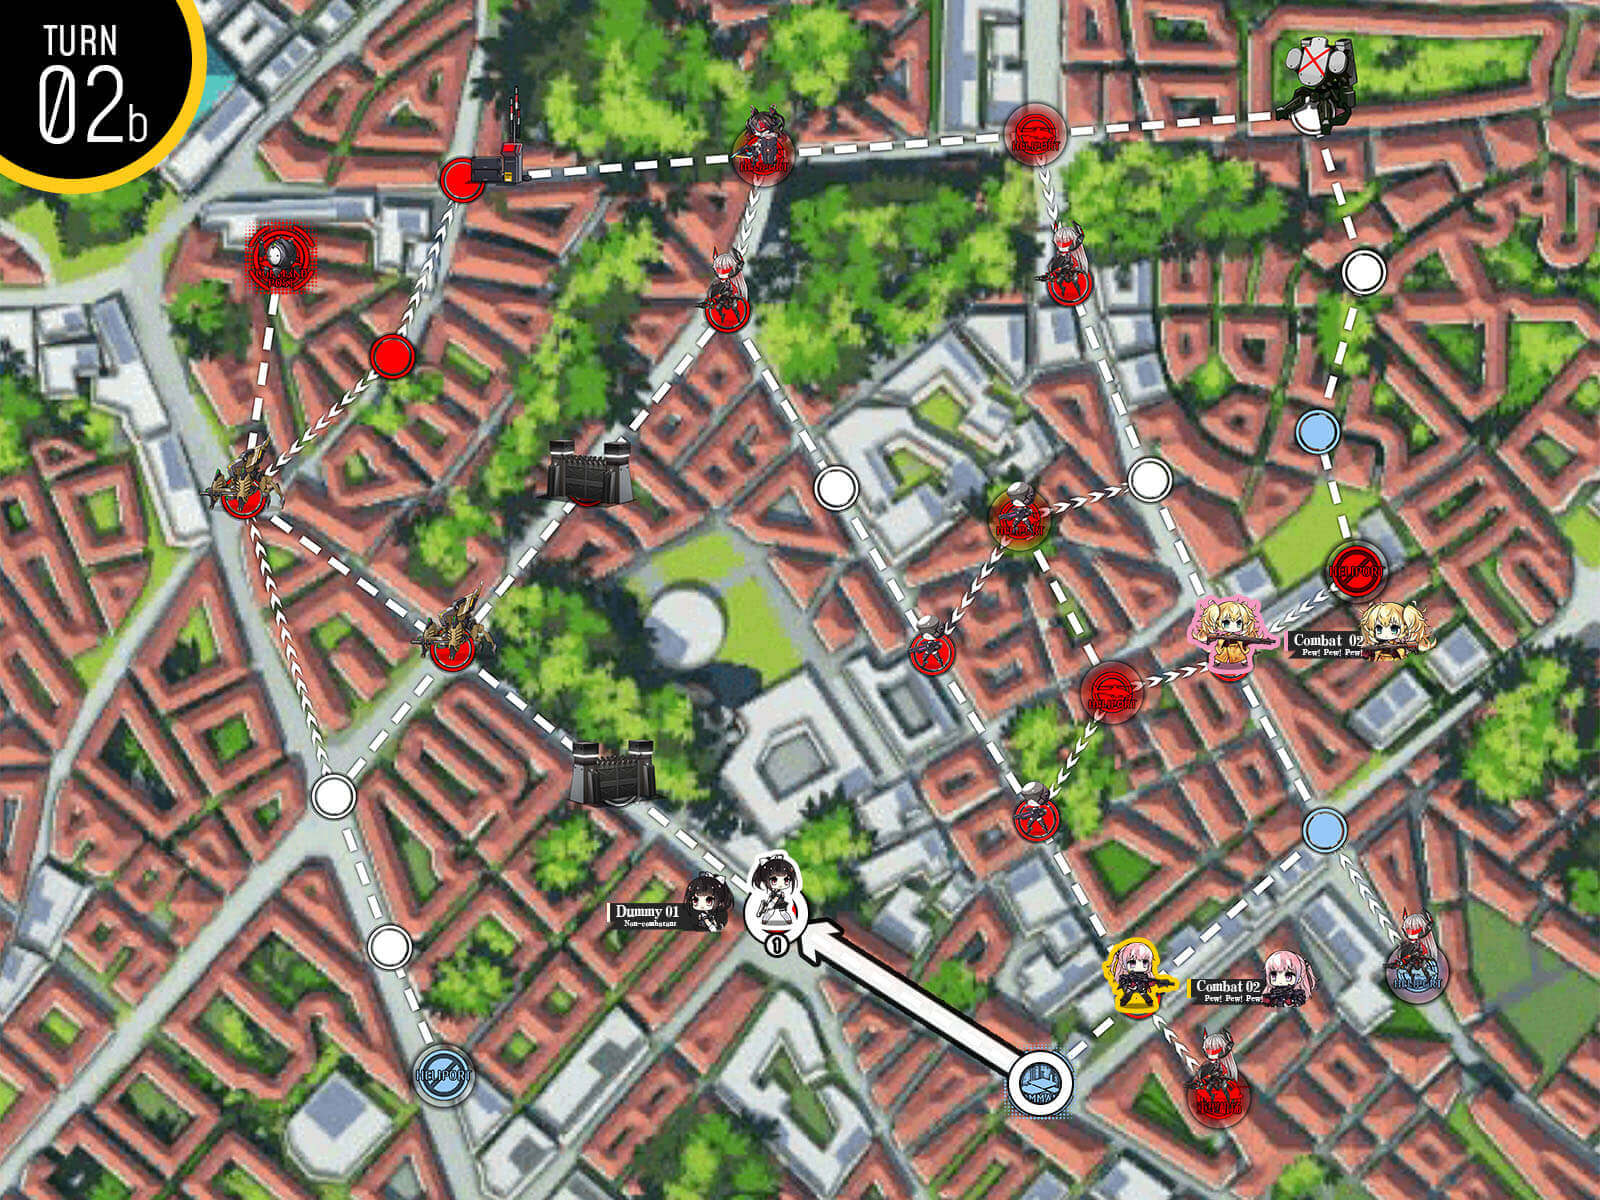
Start with 2 combat echelons on the HQ and top helipad and dummy echelon on the left helipad. Combat echelon at the HQ goes around the bottom to surround capture the helipad with an ELID standing on it. There's an element of RNG where the dummy echelon could be attacked by the enemy unit from the left or not. If you do not get attacked, you can head straight to radar node on turn 2.
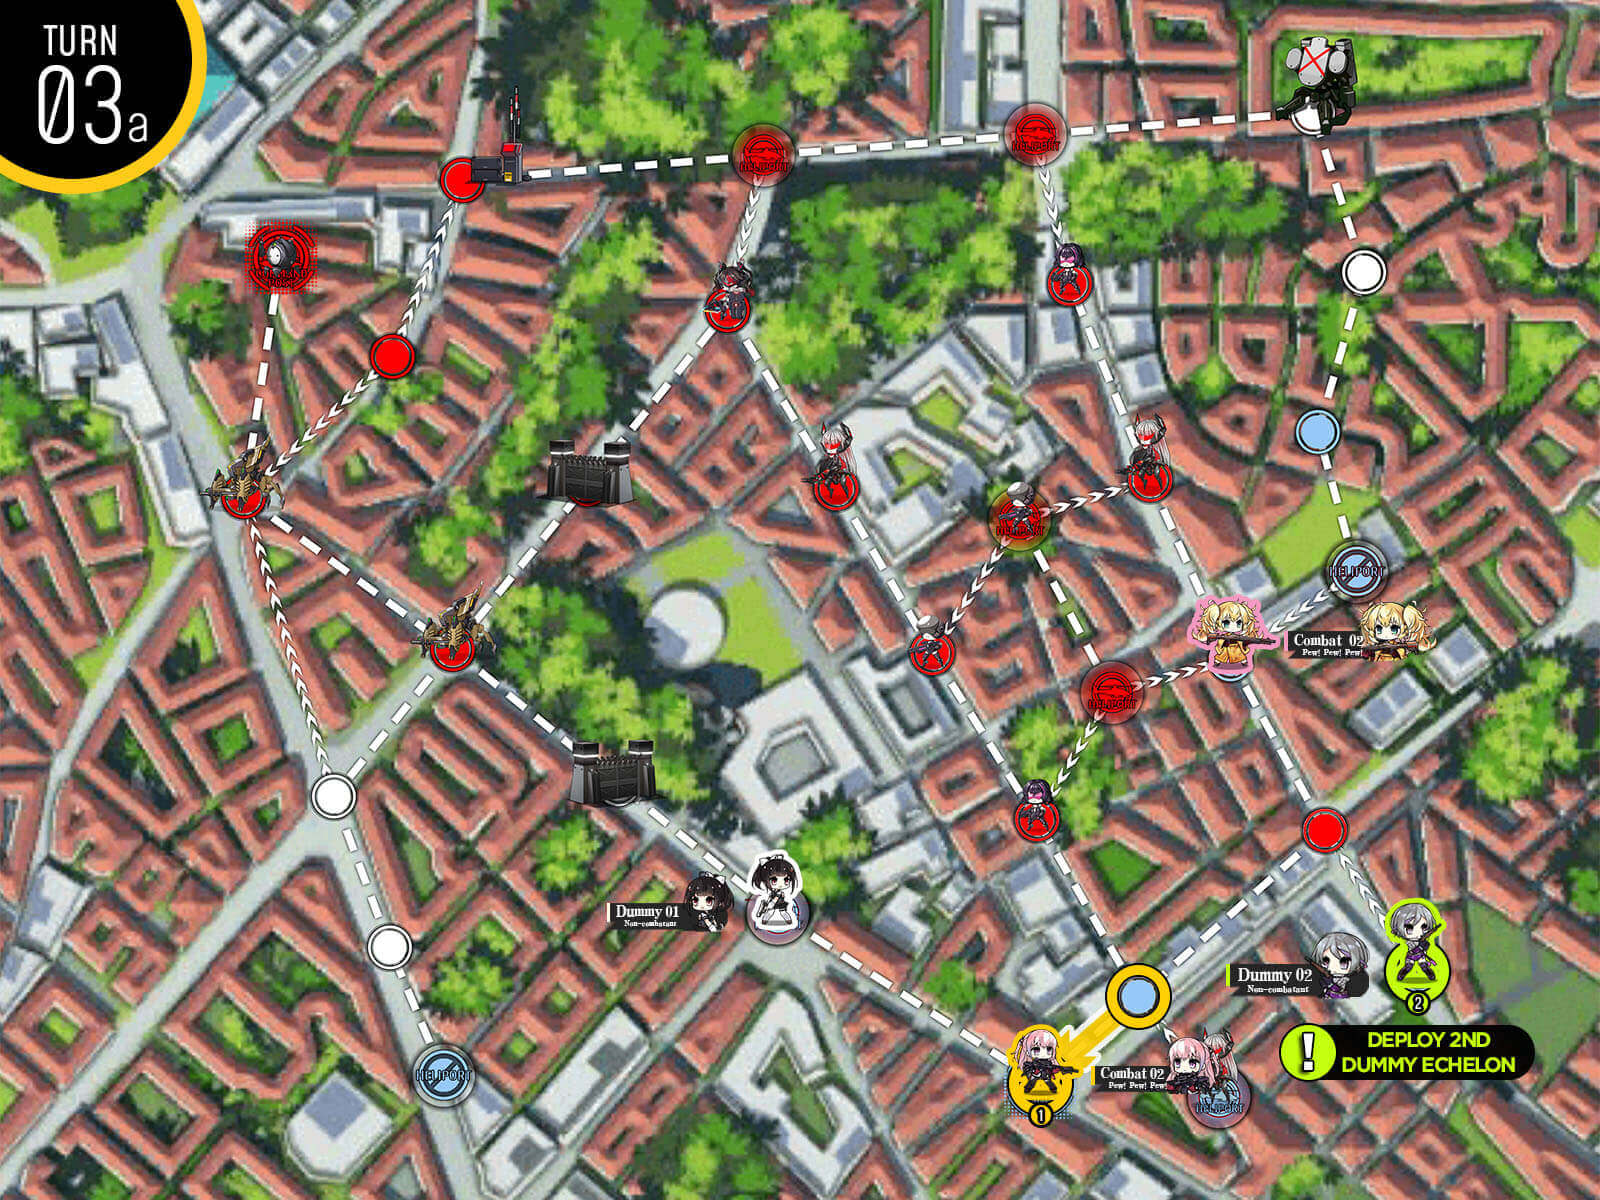
I have simulated the situation where you do get attacked and dummy was forced to retreat. In this case you call back the AR echelon near HQ to retake the helipad to the left then redeploy the dummy on the HQ. Combat echelon to the north of HQ moves up and left to activate the console panel which opens the gate. If you got lucky and dummy echelon did not get attacked last turn, you instead activate the console then head straight for the radar node to clear the mission this turn.
Now that we have enough move points to the radar node, head straight to it.
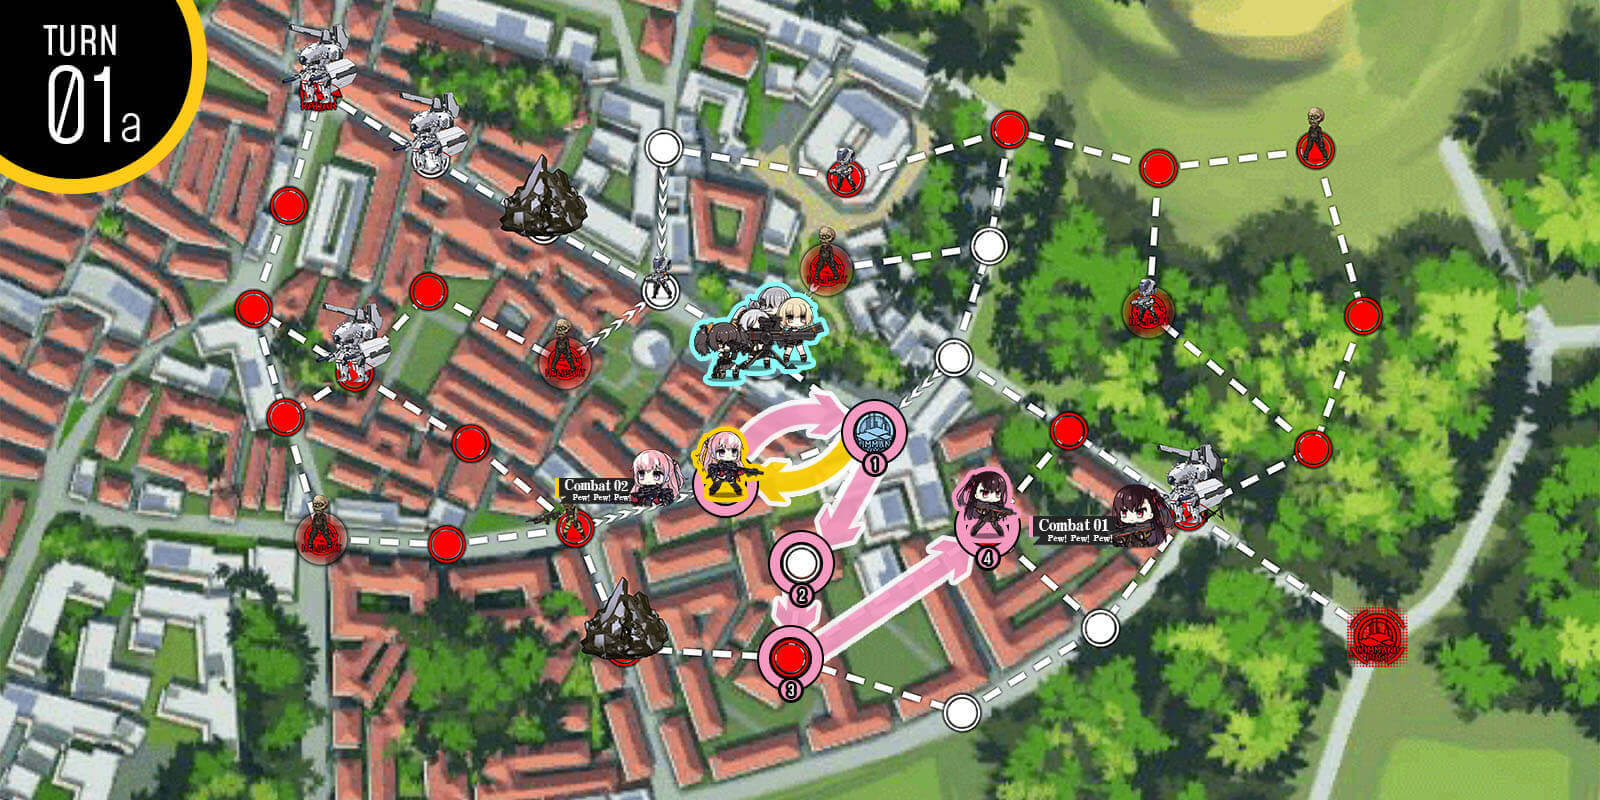
Start with Combat echelons on the bottom two helipads and HOC of your choice at the large helipad. Like normal map we are using combat echelon on the helipad to move towards the bottom but stopping short of the helipad near the Gundam. Then move combat echelon near the HQ moves to swap with HOC so that its protected from the zombie next turn. You are not required but could deploy another combat echelon at the empty helipad to gain more move points.
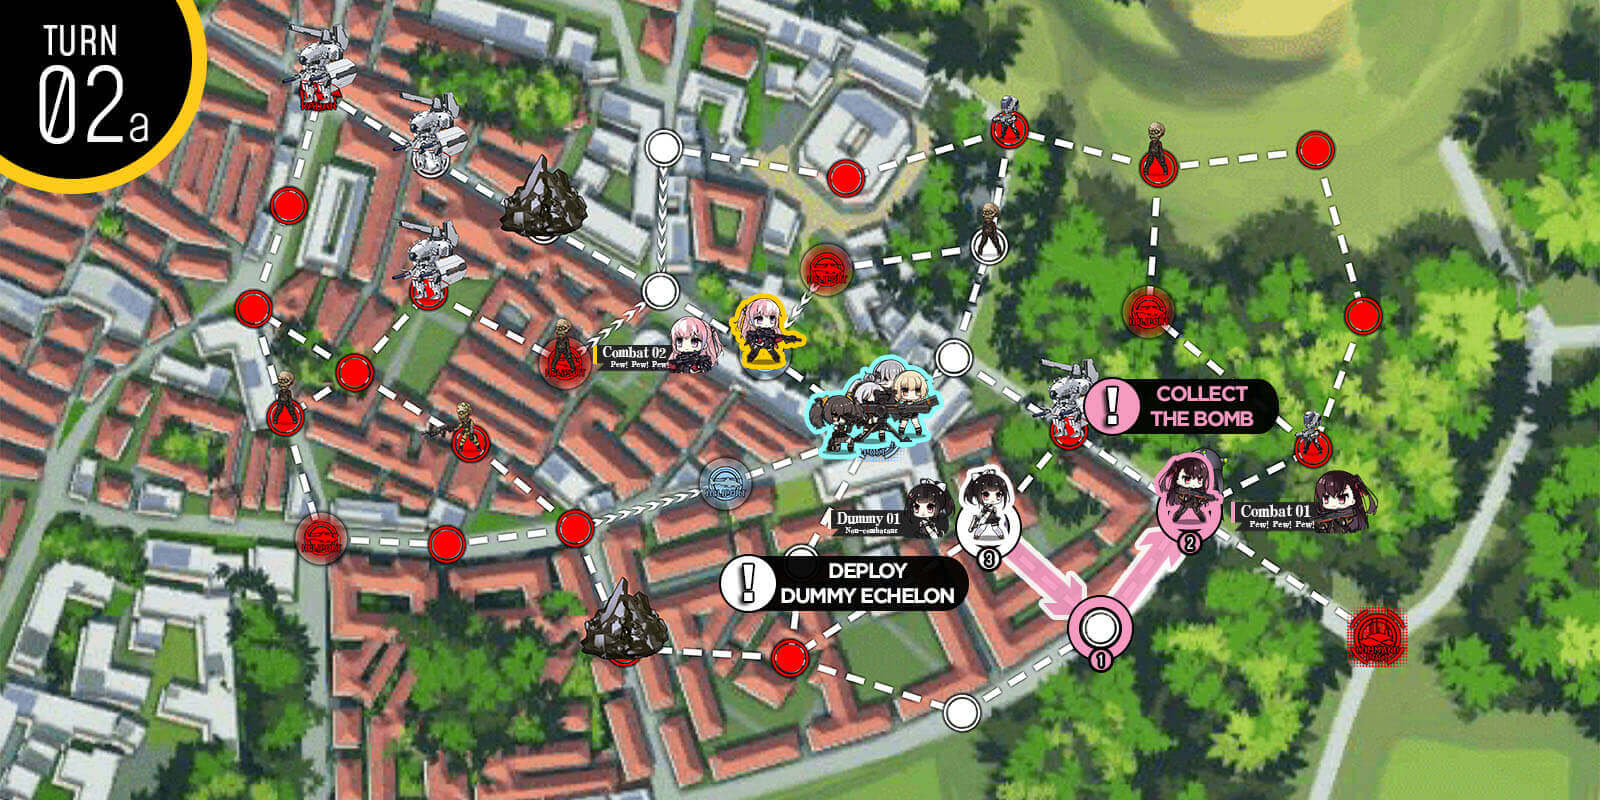
Combat echelon at the bottom helipad avoids the Gundam and goes towards the bomb and picks it up. We are also deploying a dummy echelon at the helipad the combat echelon just took off from.

Combat echelon with the bomb moves and swap with dummy so that dummy is least two nodes away from the Gundam. Then proceed to move back to HQ and swap onto the top helipad.
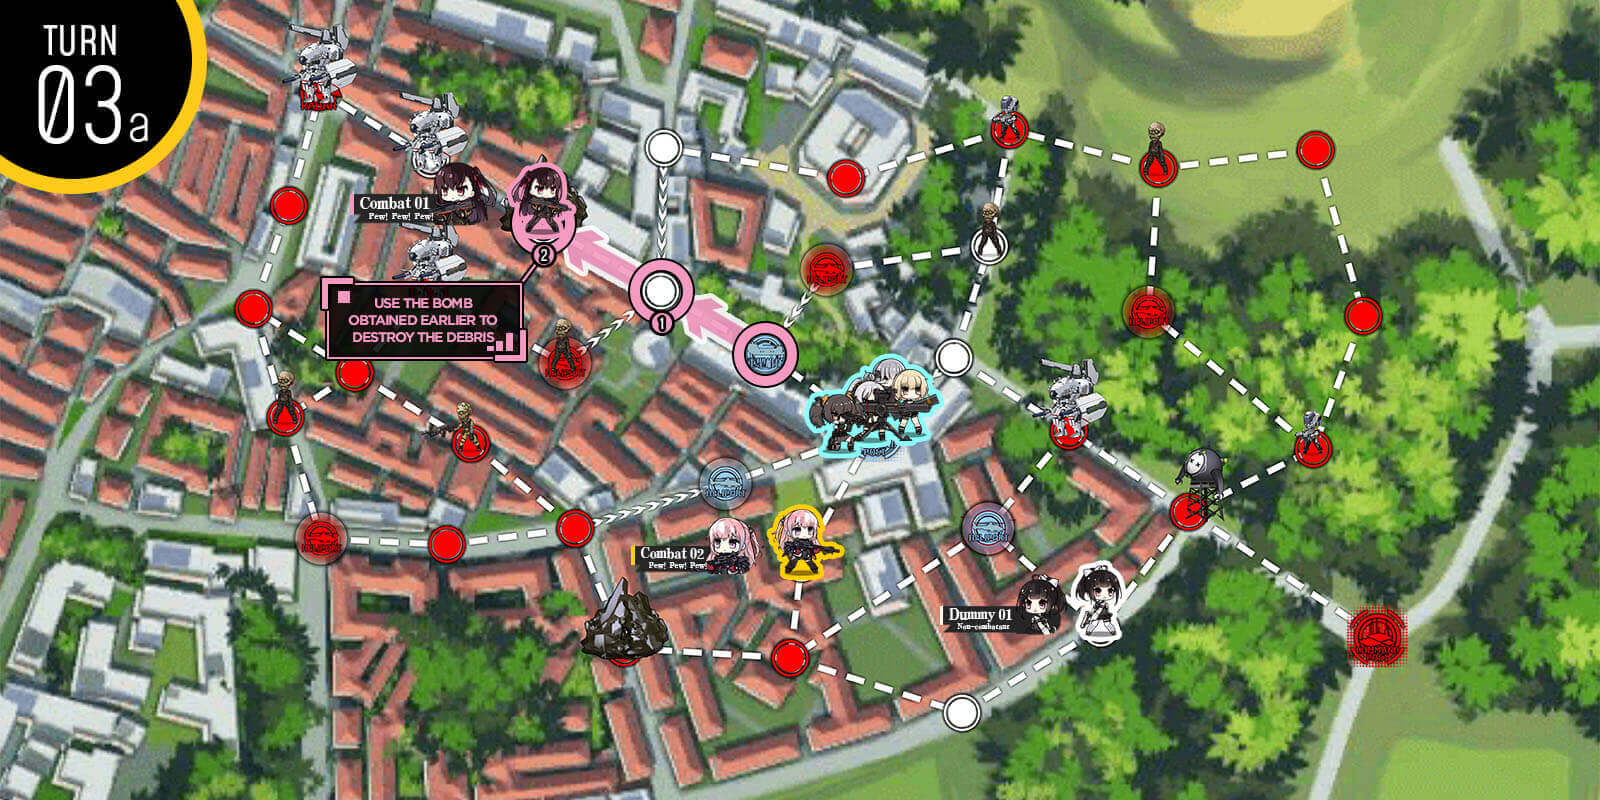
Once you make sure that the combat echelon and HOC is supplied, move to destroy the rockpile and beat the Gundams in the way with HOC's support. End your turn on the radar node to clear the mission.
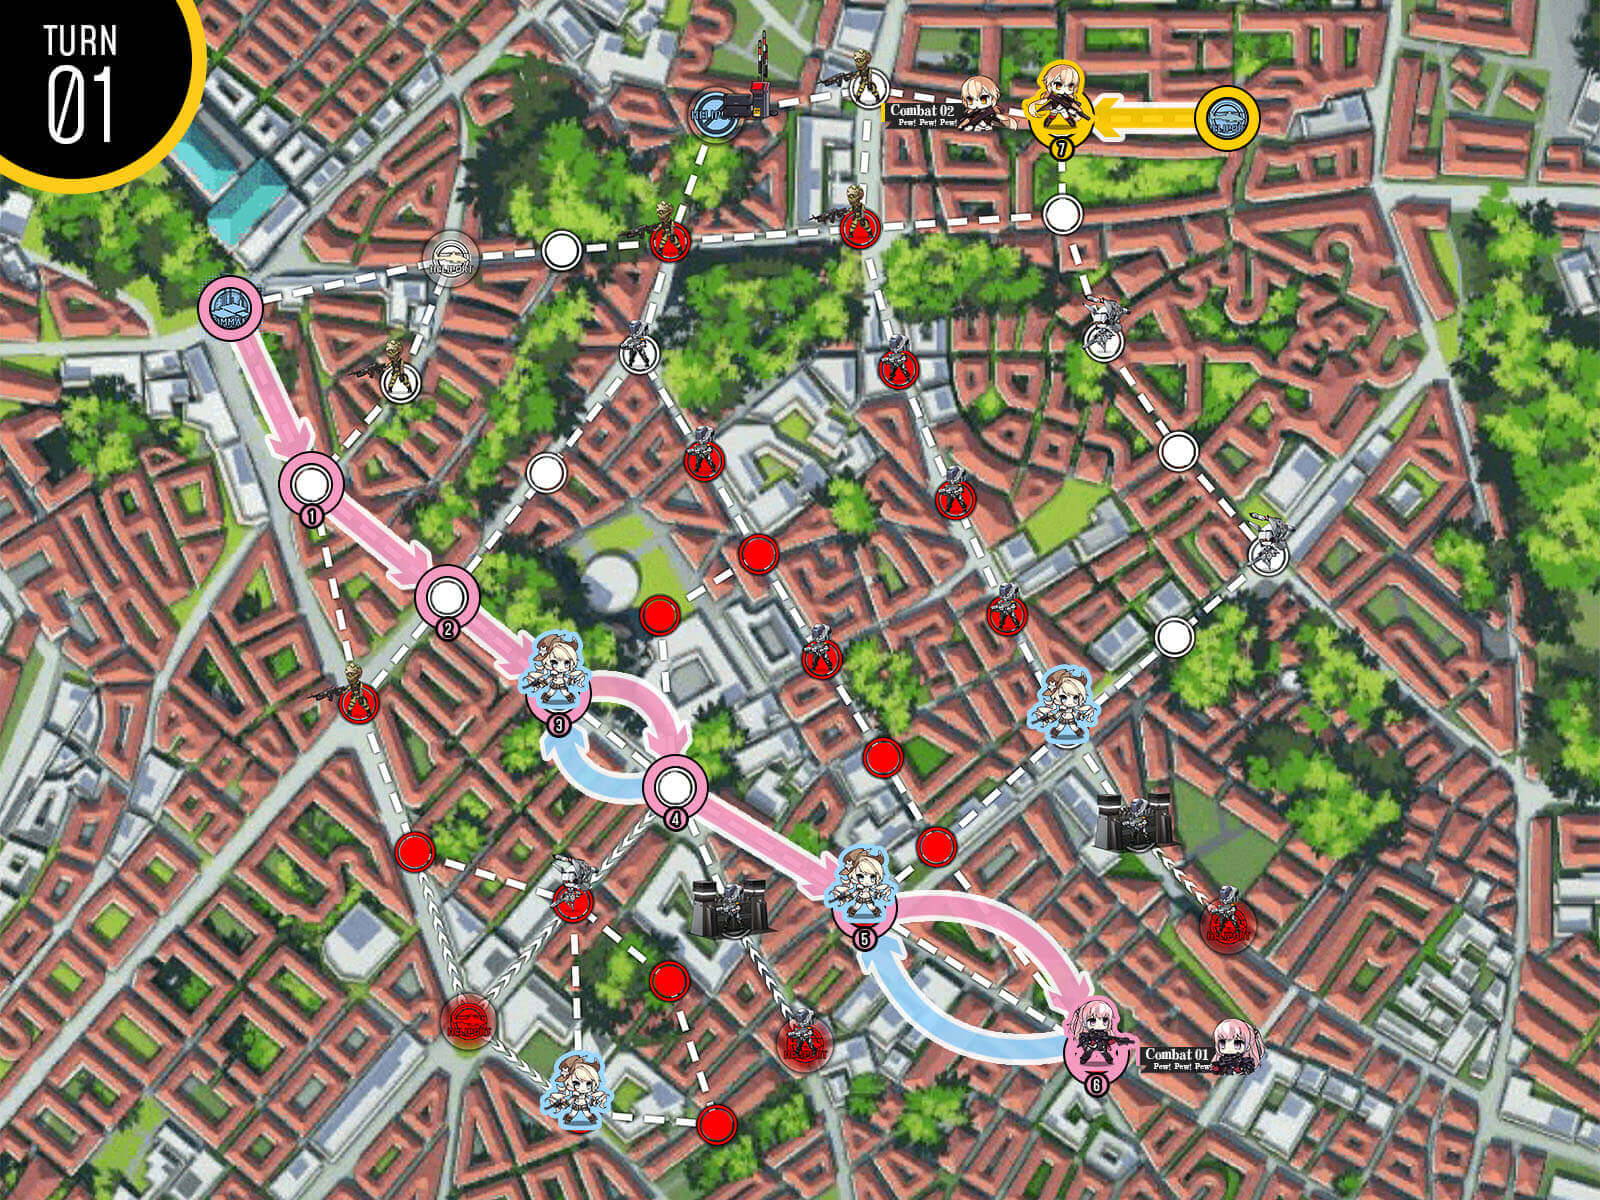
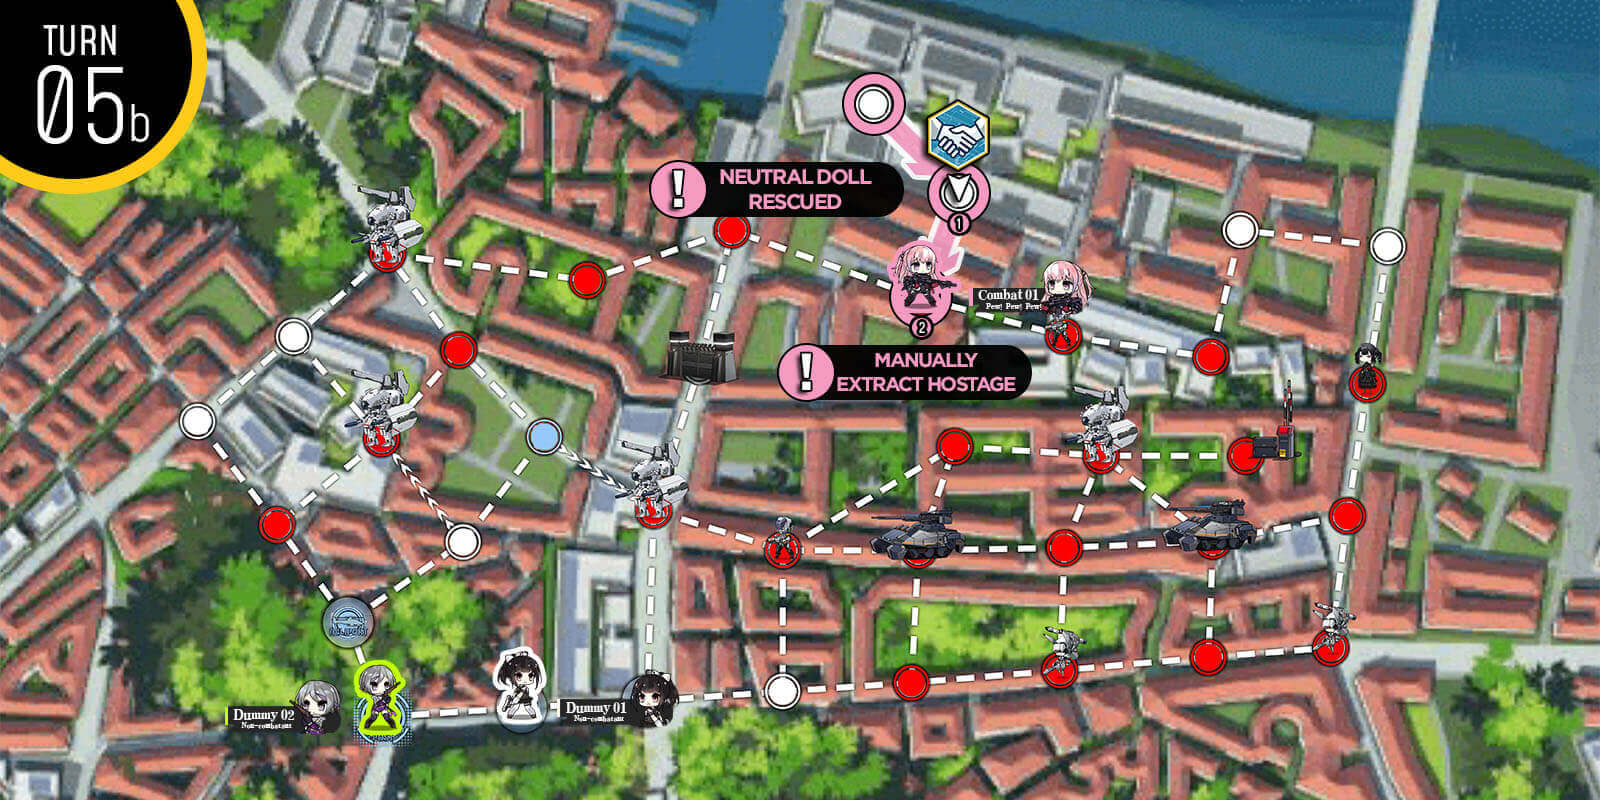
Start with two combat echelon on each starting location, with the stronger echelon on the HQ. Combat echelon on the HQ heads down the path with two hostages, swapping locations with both of them. Combat echelon at the right side of the map moves left and takes the open helipad.
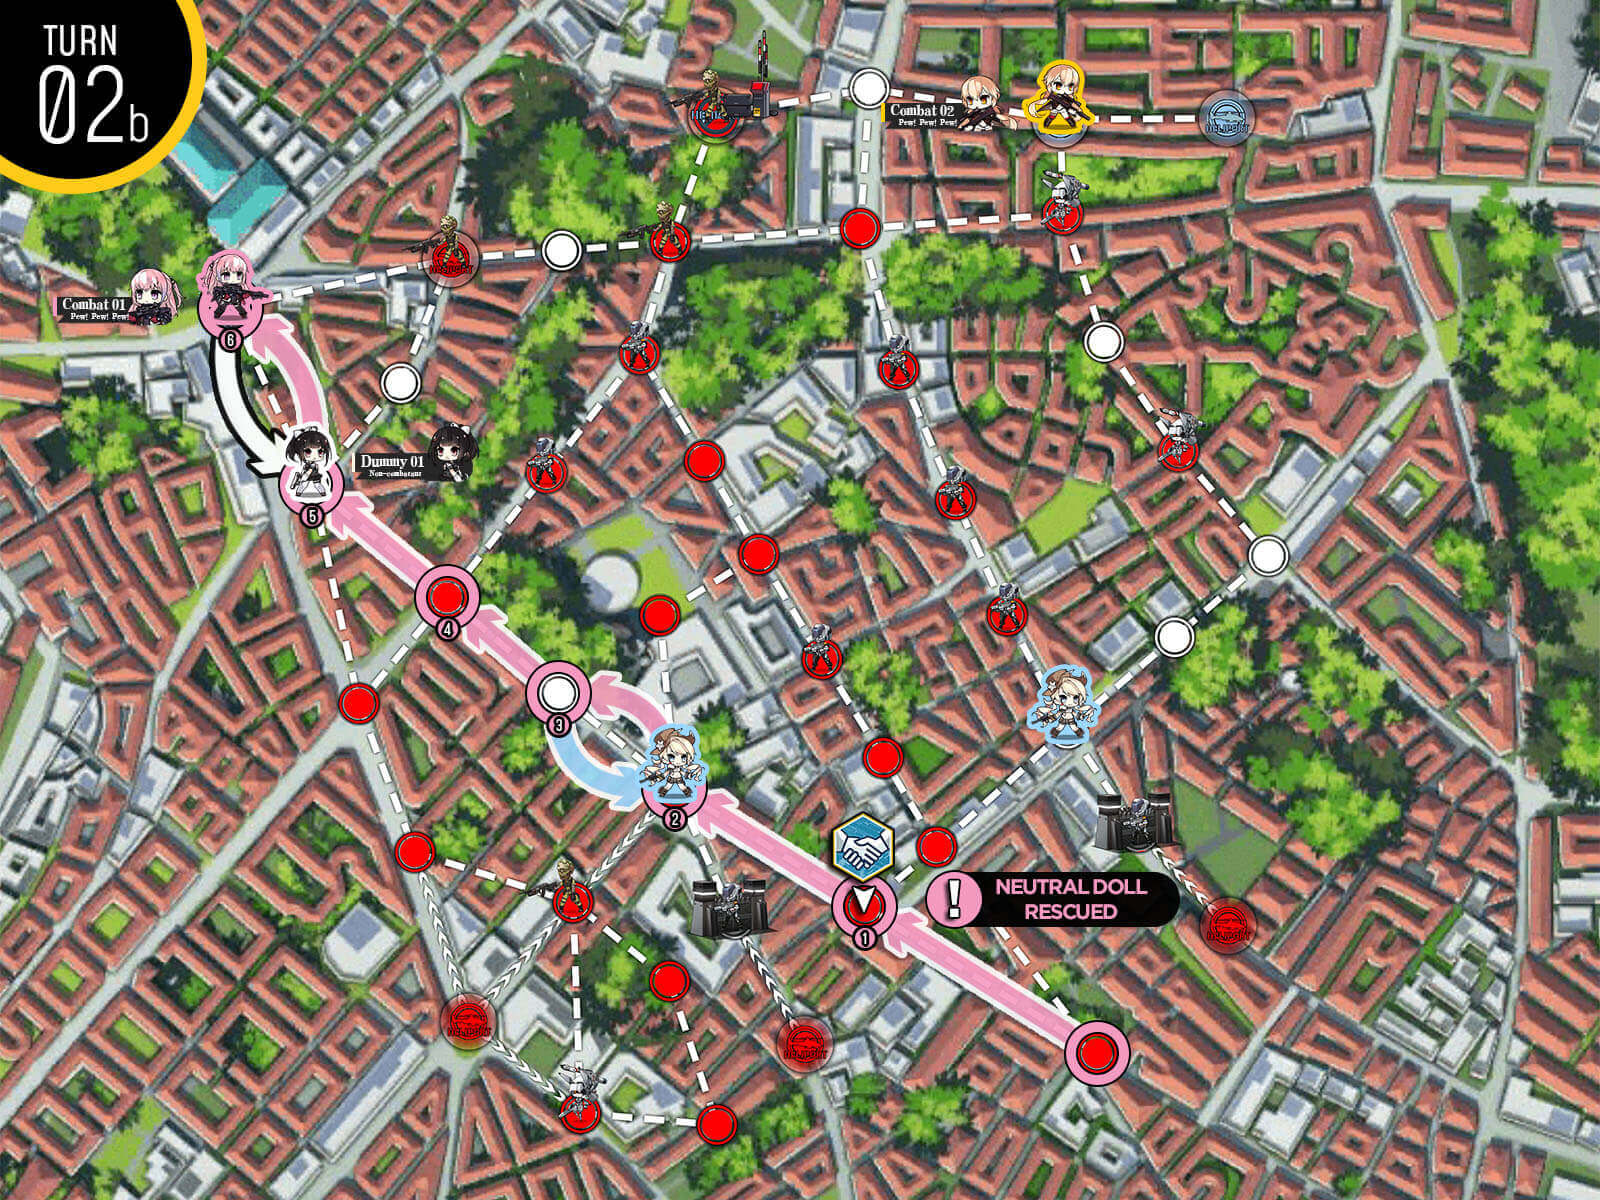
Rescue the hostage at the bottom of the map then move back up the street to the node right below the HQ. Deploy dummy echelon on the HQ and swap with combat echelon to manually extract the hostage. If there's an enemy unit next to the HQ, leave the combat echelon on the HQ to prevent it from being attacked.
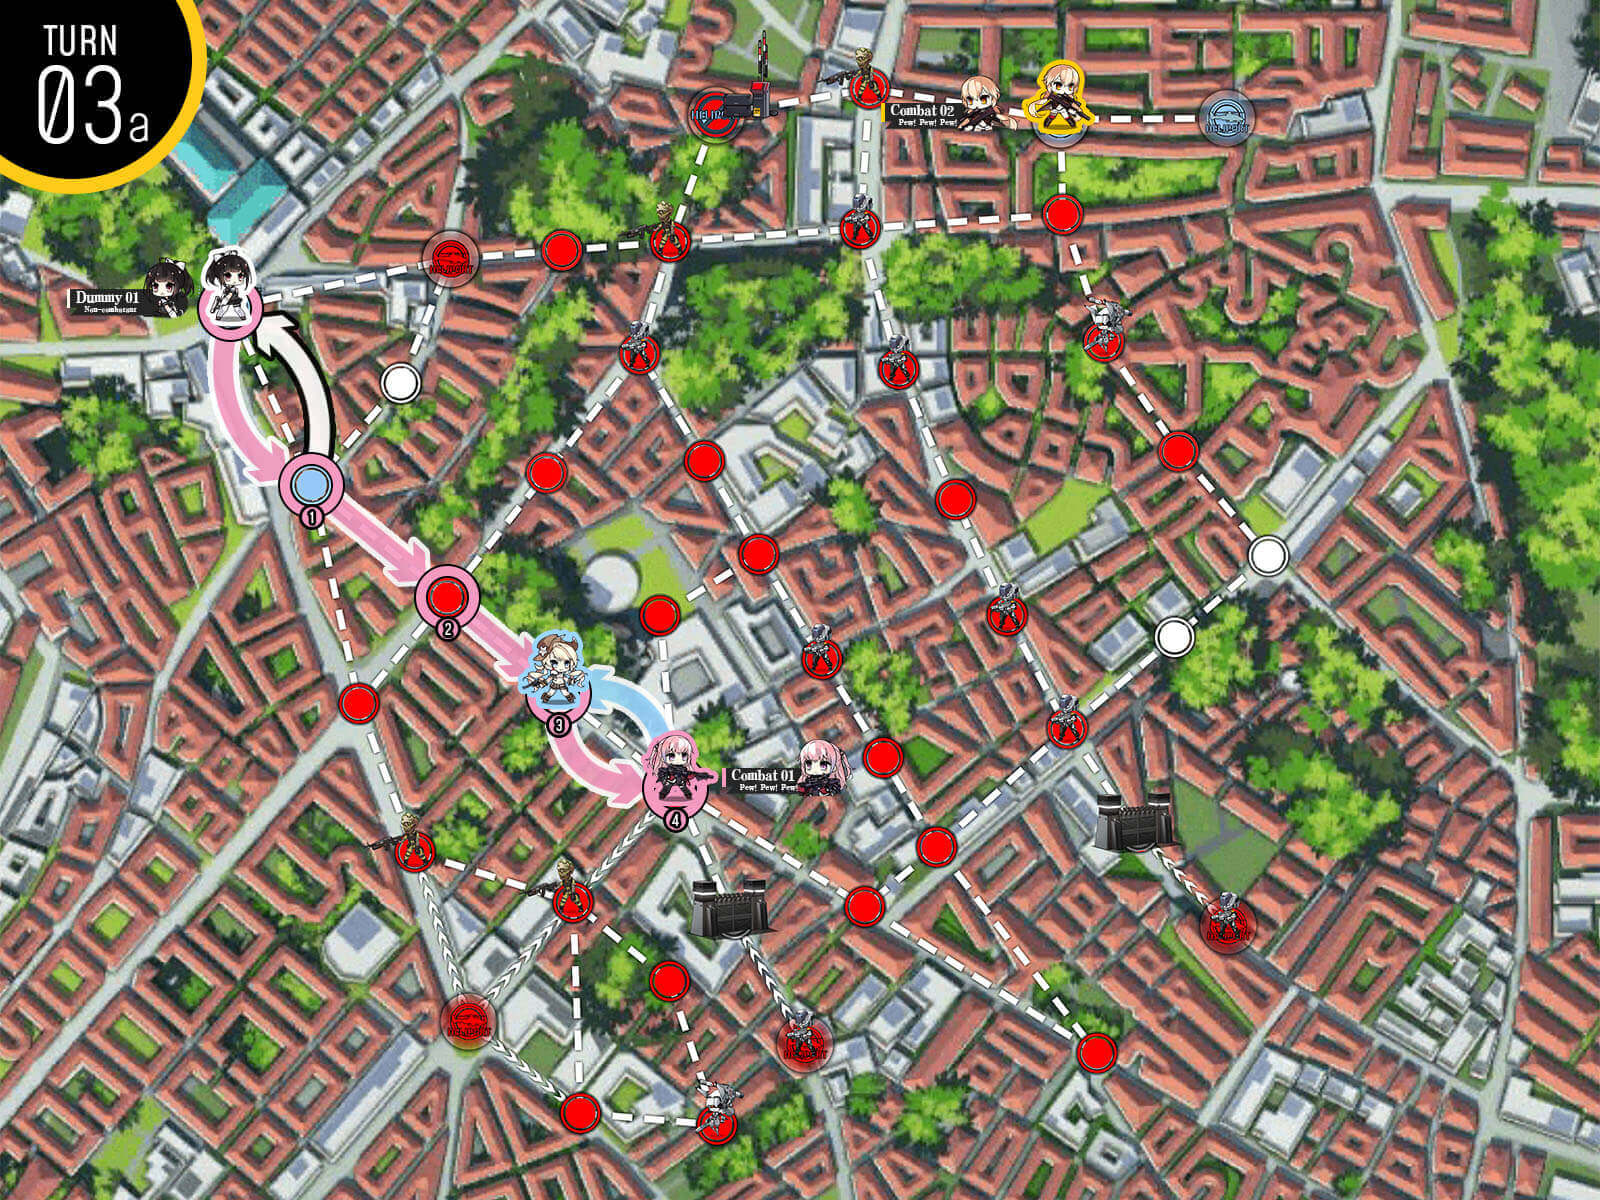
On our 3rd turn we get the last hostage down the street by swapping then rescuing.
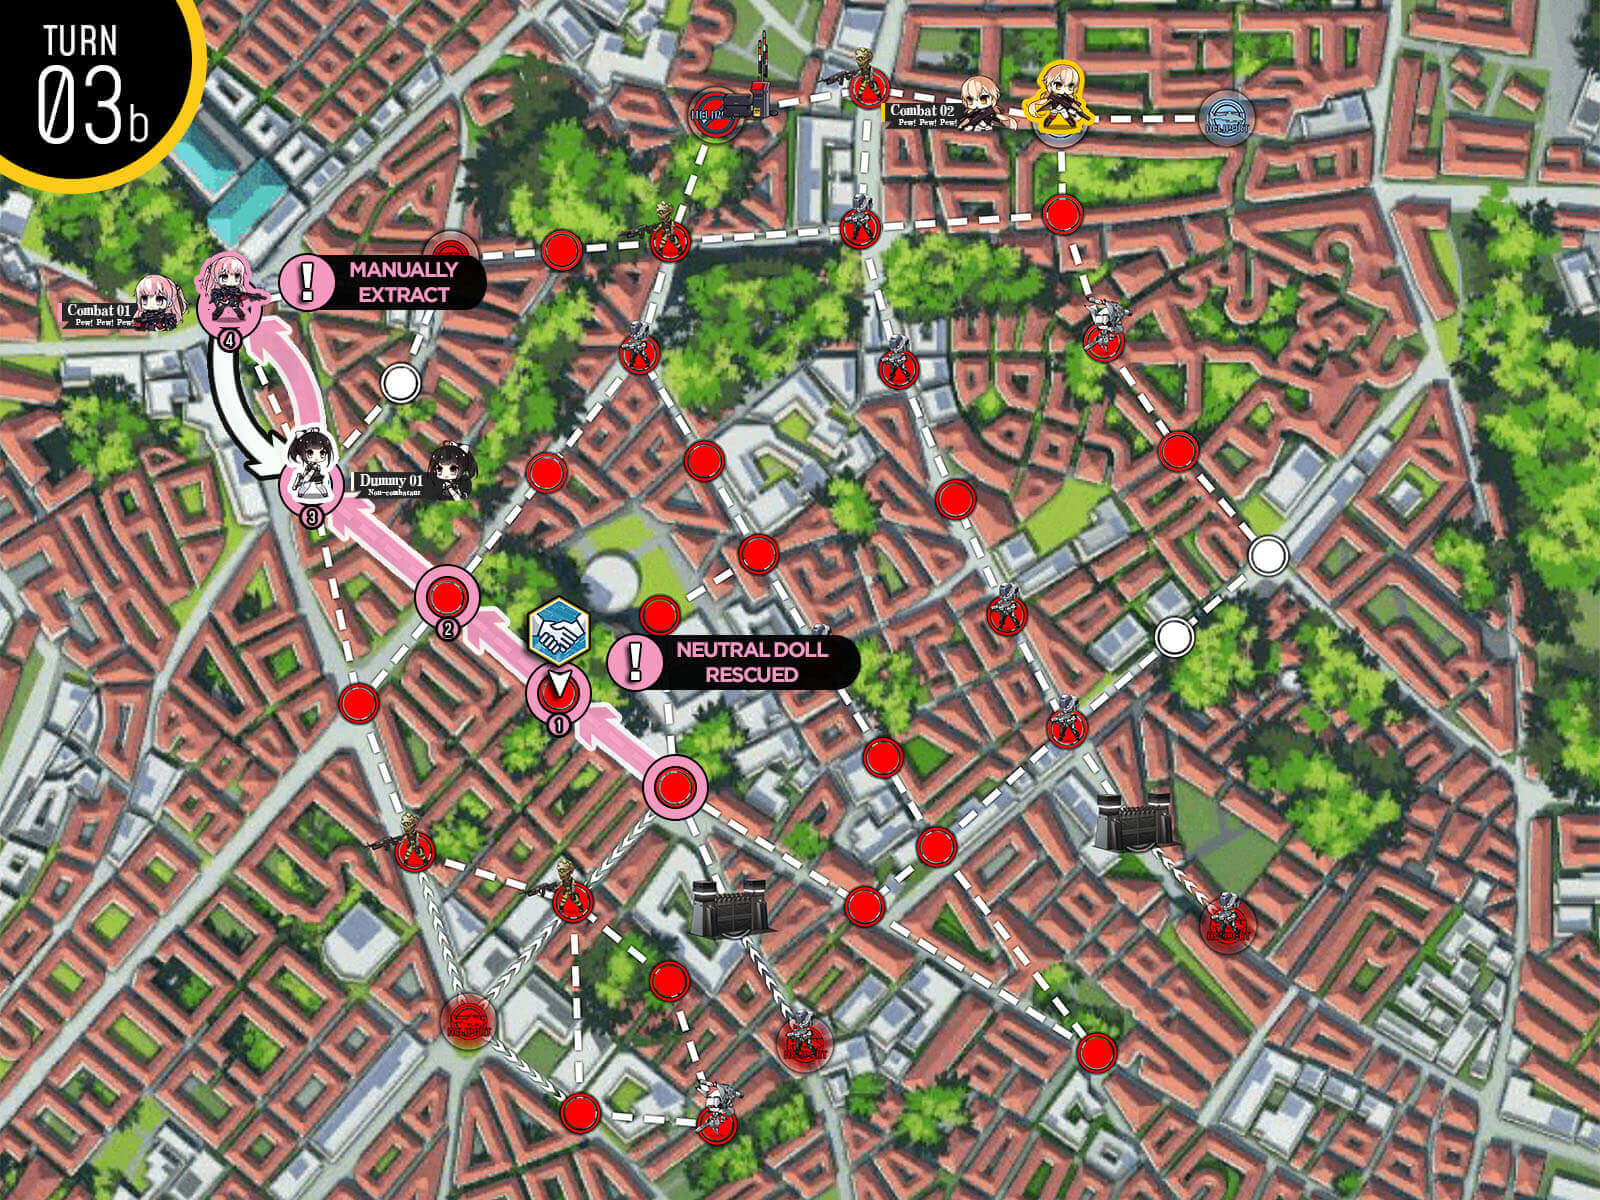
Return back to HQ then manually extract to clear the mission.
Start with two combat echelons on each starting location. Move combat echelons to take the nearby helipads then deploys dummy echelons on both starting locations. Dummy echelon on the HQ moves right to capture another helipad.
On turn 2, combat echelon on the right side fights its way through to the hostage and swaps first before rescuing. Then combat echelon at the HQ side moves down the street to swap with the hostage in front of the gate. Deploy HOC at the large helipad under the HQ then move it down to swap with the hostage as well. If you see an enemy unit at the spot marked above, you will have to deploy 3rd combat echelon instead and sandwich the hostage between the combat echelons to protect it. Then deploy HOC next turn.

RNG will either have kept the Gundam alive at the bottom or made it kill itself by running into the hostage. If it's still alive use HOC's support to clear it with the combat echelon and return to starting position. [Remember to swap before rescuing!]. Then combat echelon on the right side returns to the helipad next to dummy echelon.
Now all we have to do is to rescue two hostages and you should have plenty of move points to do so without any issue.
Start with a combat echelon on the HQ. Move up one node then deploy the 2nd combat echelon.
Combat echelon moves to the helipad near the console panels and 2nd combat echelon follows right behind.
Make sure to resupply all echelons prior to moving!
Combat echelon not on the helipad moves towards the HQ avoiding the Gundam. Move to kill 4 units and use last move point to move the other combat echelon off the helipad.

Combat echelon that moved ahead is now out of ammo so we bring the combat echelon at the bottom and swap positions.
Combat echelon finishes moving to HQ and clears the mission.
Start with combat echelon on the HQ and move up one then deploy 2nd combat echelon.
On the 2nd turn we move combat echelons up one each then deploy HOC at the large helipad then move it up to form a conga line.
Before we get moving, make sure both echelons are topped off on supplies. Then first echelon moves into the one-way path with HOC's support [Swap HOC's position and swap back after the battle].
2nd combat echelon near the HQ follow behind and goes through the one-way path. Swap 2nd combat echelon to the front so that it's prepared to fight 5 times to the HQ.
Move one node to the right to fight the Gundam. It's important to leave the three-way intersection open so that we don't have to fight the strong Gundam.
All that's left to do is fight your way to the HQ to clear the mission.
Start with two combat echelon on the HQ and the helipad. Then move each of them down one node each. Deploy 2 dummy echelons at the HQ and helipad.
Make sure the combat echelon at the front [one that will fight the most] full supply then go for the right control panel on the top side of the map. Activating it does not open the gate as it requires the 2nd control panel right next to it.
Combat echelon moves to the control panel on the other side. Once activated this should open the gate at the bottom near the starting location.
Deploying HOC is entirely optional and doesn't provide any additional benefit other than giving you one additional move point per turn.
2nd combat echelon at the bottom goes through the open gate and triggers the upper console panel on the further side.
Combat echelon then moves down and triggers the bottom panel on the closer side. This should open remaining gates towards the radar node.
Then we move towards the radar node.
Because there's a strong Gundam with 100% shields blocking the way we have to draw aggro and make it move. Move to the gate on the same row as the Gundam and end turn.

Once the Gundam moves out of the way, go around and take the radar to clear the mission.
Start with a dummy echelon on the HQ and the combat echelon on the helipad next to it. Move combat echelon down then out to the right. Deploy 2nd dummy echelon on the helipad then move it down to capture bottom two helipads.
At the start of the 2nd turn, deploy 2nd combat echelon on the helipad right of the HQ and swap with the dummy echelon below. Resupply both combat echelons by swapping positions and move two nodes to the right each. With one move left, deploy either HOC or 3rd dummy echelon on the empty large helipad.
Combat echelon that is further out moves up to the left and triggers the control panel. Move back one node to surround capture the helipad. 2nd combat echelon next to the gate goes through and takes another helipad next to the control panels.

combat echelon at the bottom triggers two control panels marked so that all six gates are open. Combat echelon at the top moves down and move to the closest gate to draw aggro of the Gundam.
Once Gundam moves out of the way, go around it and take the radar to clear the mission.
Start with combat echelon on the HQ. Move to the right then deploy 2nd combat echelon that will defend the HQ from being surrounded from the spawned enemies from the helipad just below.
Move combat echelon up one node to take helipad. Then move 2nd combat echelon right one and deploy dummy echelon at the HQ. Enemy on the left side of HQ does not move so it is safe to put a dummy there.
Combat echelon at the center helipad moves to activate the console as the Gundam moves out of the way. Make sure that M16's AI is set to "Eliminate".
Combat echelon at the console panel moves back to center helipad. We are just waiting for M16 to make her way towards the HQ.
To speed up the process, send combat echelon at the center helipad to node adjacent to M16. Then swap locations so that M16 can take out the Boss. If you are confident in your echelon's ability, you can fight the Nyto boss yourself and take the HQ this turn.
Now that M16 cleared the boss for us, swap the location and take the enemy HQ to clear the mission.
Start with combat echelon on the HQ and move to the right. Then deploy 2nd combat echelon. We do need to fight one Gundam with 189 armor so I suggest you bring out echelons capable of defeating one.
Both combat echelons each move one to the right. Deploy dummy echelon on the HQ and end turn.
Shuffle so that the dummy echelon is at the far right helipad away from fights.

1st combat echelon goes to the middle and 2nd combat echelon swaps position to HQ. 1st combat echelon moves up and goes into the nook near the gate console so that it's out of the strong Gundam's detection range.
1st combat echelon moves to activate the gate console which frees M16. Make sure M16 is set to "Eliminate". HQ is in danger of being surround captured. So we move combat echelon on the HQ to the right and deploy 3rd combat echelon on the HQ to defend from ELIDs.
Combat echelon at the console moves out of the death wheel to the left through one-way path. Get in position so that it is ready to swap with M16 next turn.
Move down with combat echelon and swap with M16 so that she can fight Nyto for us. If you are confident in your abilities and T-dolls, just fight Nyto yourself and take the HQ this turn.
*If attempting to fight Nyto, take over the heavy helipad at the top right corner and deploy HOC from there
Now that Nyto is out of the way, swap with M16 and take the HQ.
Start with combat echelon at the HQ. Move up towards the red zone [left] and deploy dummy echelon on the HQ.
Combat echelon moves down and kills the big zombie tagged as "Boss". This one actually doesn't have the Smasher in it [?]. The other two zombies are dangerous and should be avoided.

Swap with hostage unit.
Take the one way path to the right then up to HQ to manually extract the hostage. Resupply while you are here.
Move the combat echelon back down two nodes from the HQ and the dummy echelon down one so that we can deploy the 2nd combat echelon at the HQ

Swap.
At the beginning of the turn, resupply combat echelon at the bottom via swapping to HQ then back to starting position. Move towards the hostage then swap before rescuing. This is very important or you may have to fight the dangerous Smasher unit.

You have options where if you don't care about S-rank and want to minimize potential repair cost, you can move up one node and take helipad to extract next turn. Other way is to move back towards the HQ the way you came from. If you are short on ammo, see if you can the swap 2nd combat echelon down one node to clear out the enemy unit.
Start with combat echelon at the HQ and move down to deploy 2nd combat echelon.

At the beginning of 2nd turn, make sure combat echelons are all fully supplied before moving. Combat echelon below the HQ moves down one node to aggro the strong KCCO unit at the center.
Combat echelon at the HQ moves to the right then deploy dummy echelon at the HQ. Swap position so that dummy echelon is tucked away safely.

Combat echelon at the HQ moves through the left side of the map and parks itself between the two smasher units. One on the right always have the priority on moving first, so you should be able to handle this. Combat echelon at the bottom moves one node to the right to avoid fighting strong KCCO unit.
Combat echelon in the red zone moves to the right then swaps with the hostage unit before rescuing. Combat echelon in the yellow zone moves to the hostage and swaps position but does not rescue to avoid fighting the Smasher unit.
Combat echelon in the red zone takes one-way path to the right and moves to the node below the HQ. Dummy echelon moves to HQ from the right and swaps position to rescue hostage manually. With remaining move, rescue hostage on the right side.

If your combat echelon on the right side is looking rough, you can move up one node instead of going through the middle section to extract the hostage next turn. Otherwise, if you don't mind killing extra ELIDs, move through the middle section of the map and swap your way to the HQ and manually extract to clear the mission this turn.

Or do this.
Start with combat echelons on all starting positions with your weakest one on the right side since it only needs to fight once or twice at most [none if you are lucky]. Combat echelon on the HQ moves straight down to the rally point while combat echelon at the top helipad moves to open helipad south of the HQ. Deploy dummy echelon at the HQ then end turn.
The combat echelon at the helipad right of the HQ moves to control panel at the right side of the map and activate it to close the gate. Dummy echelon swaps location with combat echelon below then moves down to node above rally point so that we can establish the supply route. You should have your 1st combat echelon on the HQ and your 2nd combat echelon on the rally point with the dummy right above it.
All that's left to do is to defend HQ and rally point node from incoming enemy units until mission is cleared.
Donezo.
If you have a Parachute Fairy, you can establish supply route on turn 1 and don't need to worry about Gundams breaking your supply route. For non-para guide, start with 2 Combat echelons on each starting location. Move combat echelon at the top up one node and 2nd echelon one node to the left from the HQ. Deploy dummy echelons and end turn.
Combat echelon to left of the HQ moves down to the rally point. Dummy echelon at the HQ moves down to establish the supply route. Dummy echelon at the large helipad moves down to the HQ so we can deploy HOC next turn.

Sometimes Dummy cannot move to node adjacent to the rally point due to enemy RNG. We do have plenty of movement points left over, so just go ahead and use the Combat echelon at the rally point to clear out the enemy.
With the enemy tank approaching, we deploy HOC and use the combat echelon at the top to take out the Uhlan. Combat echelon on the upper helipad then moves to the left to capture the helipad.
Combat echelon at the rally point moves back up through the left path and back to HQ to defend from enemy units from the right side. Dummy echelons move in position so that we have multiple supply routes established through the left side.
Now that we have multiple supply routes, all we need to do is make sure that one of the routes remains intact at all times until we clear the mission.
Start with dummy echelon on the HQ and combat echelon on the right side. This combat echelon needs to fight against the weak Gundam with 77 armor. If you had issues with armor units in earlier chapters, I recommend mixing in a RF or using RFHG echelon. Move combat echelon two nodes to the right. We are planning to surround capture the helipad next turn.

Combat echelon moves towards the control panel. This opens the gate in the middle of the map. Dummy echelon moves up one node from the HQ so that we can get more move points in future turns.
Move dummy back to the HQ as it is now threatened by the Gundam. Deploy 2nd combat echelon and move through the gate towards the hostage.
Move up and swap with hostage before rescuing. Once rescued head straight to the helipad near the HQ as you should have just enough moves. Manually extract to clear the mission.
We are taking bit of different route this time compared to the normal map. Start with combat echelon on the helipad and dummy on the HQ. Move combat echelon to take the unoccupied helipad.
You will notice that Gundam unit near the one-way path has moved towards the combat echelon. We move away from the Gundam and have the combat echelon take the large helipad above the HQ. Then deploy 2nd dummy echelon on the HQ.
Move combat echelon up two nodes right next to the Gundam near the one-way path. This draws aggro of both Gundams to the left and opens a path behind them.
Now that path is open, go around the Gundams and take the back route to the hostage.
Go all the way to the hostage, swap then rescue. Then end your turn on the helipad below so that hostage is extracted automatically next turn.
Start with two combat echelons at the HQ and bottom center helipad. Deploy dummy echelon on the helipad on the right side. Move both combat echelon up 3 nodes each to take the helipads in the center area.
Combat echelon on the right side is threatened by the Smasher so we move around it to activate the console panel. Deploy either the dummy echelon on the HQ or combat echelon on the helipad to the left if aiming for S-rank.
Combat echelon on the center left helipad moves through the open gate on the left side to pick up the bomb. Use it on the rock pile on the right then go around the Smasher to take the enemy HQ.
Start with combat echelons at the bottom two starting location and dummy on the right large helipad. We do need to fight one Gundam unit so bring a RFHG team. Move combat echelons up to the helipads then end turn.
Combat echelon to the left moves up and takes out the weaker Gundam by the control panel. This opens the gate to the south. Deploy dummy echelon at the open helipad at the center.
Combat echelon returns back down, swaps with the dummy at the helipad then swaps again with the ARSMG echelon. ARSMG echelon then moves down two nodes.
ARSMG echelon runs straight to the enemy HQ and clears the mission. If you are looking for S-rank in this map, you can wait a turn and take out additional units by the bomb and the Rodel by the HQ.
Start with a combat echelon on the HQ. Move two nodes to the upwards and deploy 2nd combat echelon on the HQ.
Combat echelon on the upper side of the map moves up so that we can surround capture the helipad. Move combat echelon at the HQ upwards and deploy dummy echelon on the HQ and the bottom right helipad. Dummy at the HQ moves left to take the helipad.
Once closed helipad opens on the right side you can either deploy 3rd combat echelon or retreat the echelon at the bottom side via HQ then redeploy it. Then move straight for the console panel on the top side of the map. This opens the gates to allow Manticore units to move out of the way.
Start with combat echelon at the HQ then move two nodes upward. Deploy 2nd combat echelon and end turn.
Combat echelon at the HQ moves one node upwards so we can deploy a dummy echelon on the HQ. Dummy moves up to take the helipad. Combat echelon on the upper side also moves up to surround capture the helipad to the right side that opens up next turn.
Start with combat echelon at the HQ and a dummy on the helipad. Move combat echelon to the top right helipad occupied by 90wish. Then deploy a 2nd combat echelon at the HQ to defend it.
Combat echelon at the top helipad resupplies and heads down the one way path, to a point where we are two nodes away from the Manticore. Dummy echelon moves towards the Manticore unit to draw aggro and also to avoid incoming enemy unit from the side.
Combat echelon moves to the left to retake the helipad and dummy echelon moves to the HQ. Combat echelon at the bottom moves towards the radar node.
Combat echelon at the bottom reaches the radar node and we can clear the mission. If you want to get S-rank, clear a few more enemy units near the HQ to meet the requirement.
The strategy is exactly same as the normal version of the map, just with more difficult units. Start with combat echelon at the HQ and a dummy or another combat echelon on the helipad. Move straight up to the top right helipad controlled by 90wish. Then deploy another combat echelon at the HQ.
Combat echelon resupplies and moves down 5 nodes. Dummy echelon moves down to the center column to draw Manticore's aggro.
Combat echelon moves to retake the helipad then dummy echelon moves back to the HQ away from Manticore. Combat echelon continues to move towards the radar node at the bottom.

Combat echelon moves on top of the radar node to end turn. If you are going for S-rank, use combat echelon near the HQ to kill a few more units to meet requirement.
Combat echelon moves up two nodes to the next open helipad.
Move combat echelon up two nodes and head to the four-way intersection.
Deploy combat echelon that can fight Judge at the helipad then move up to the closed helipad below the 1st combat echelon.
Resupply 1st combat echelon then take the long way to the helipad at the bottom.
Deploy dummy echelon at the helipad then position it between the two combat echelon by swapping their positions.
Swap the echelons so the 1st combat echelon is on the closed helipad and the Judge echelon is on the bottom helipad with the dummy still in the middle. Deploy HOC at the large helipad.
If you don't have HOC available to you, deploy 2nd dummy or 3rd combat echelon capable of fighting against Judge. If HOC is deployed, swap so that combat echelon is defending the helipad.

Manticore has a 50/50 chance on moving either to the left or the bottom towards either helipad. All you have to do is to shuffle echelons positions and go around the Manticore.
Approach Judge along with HOC [or 3rd combat echelon to fight Judge 2nd time].
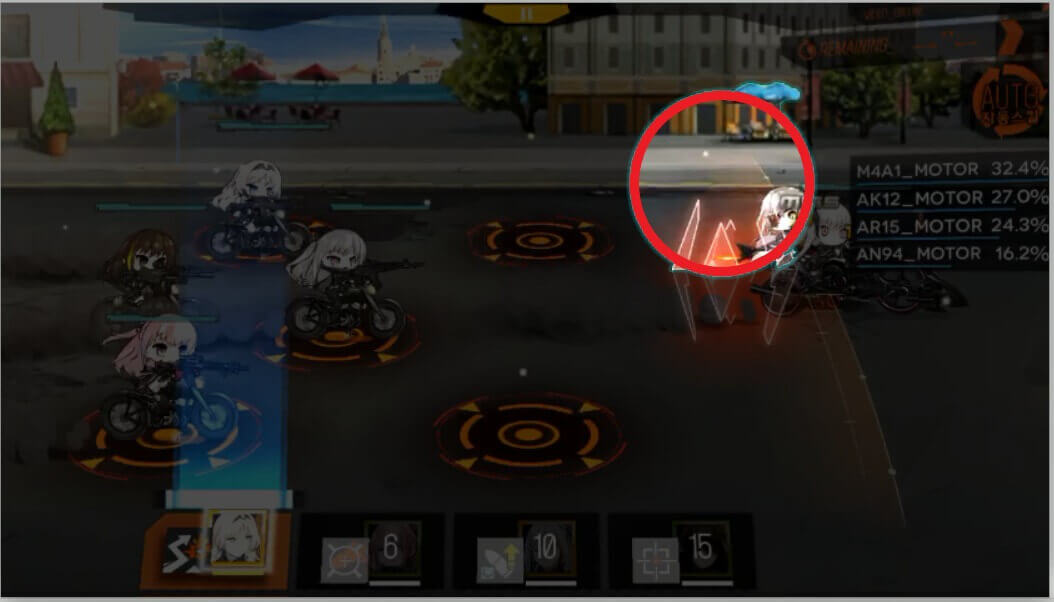
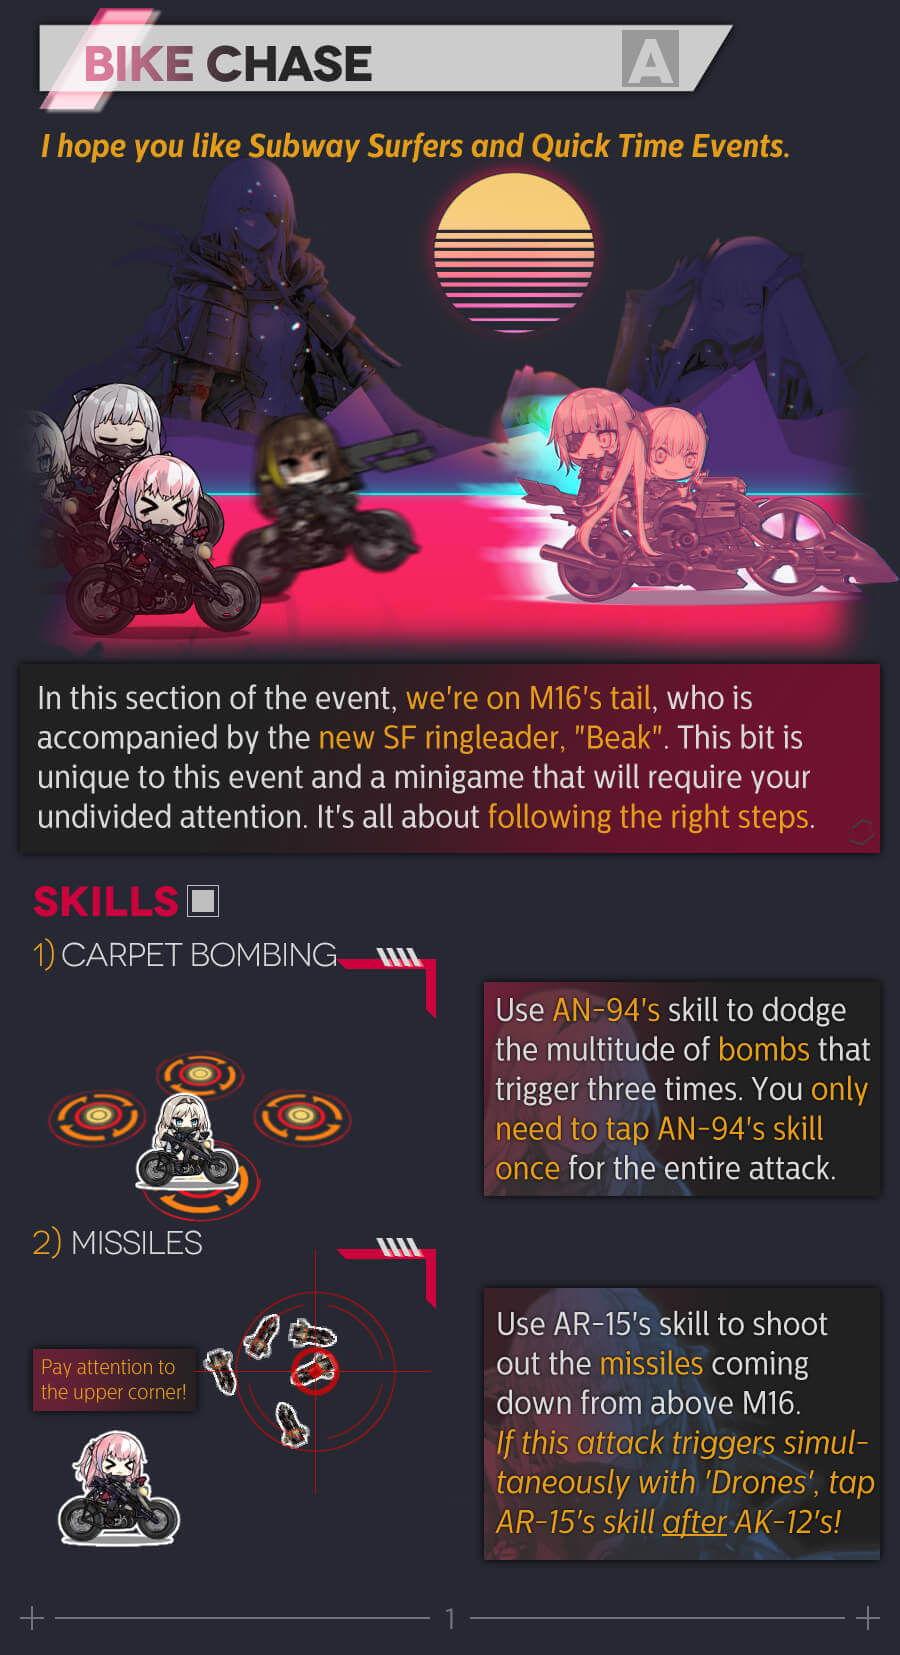
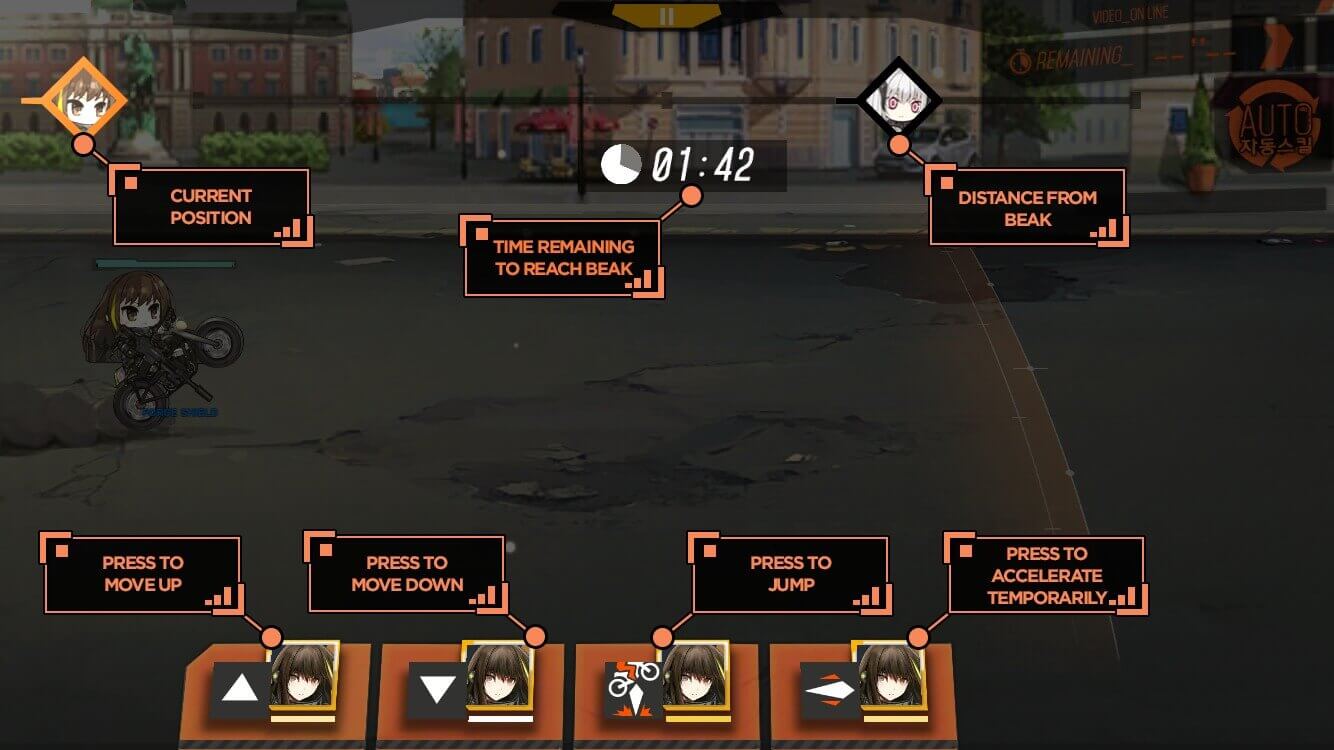
This is the recommended place to keep an eye on, where you can spot the Beak's skill prior to doing actual damage. Keep your fingers between the skill buttons to quicken your reaction time.
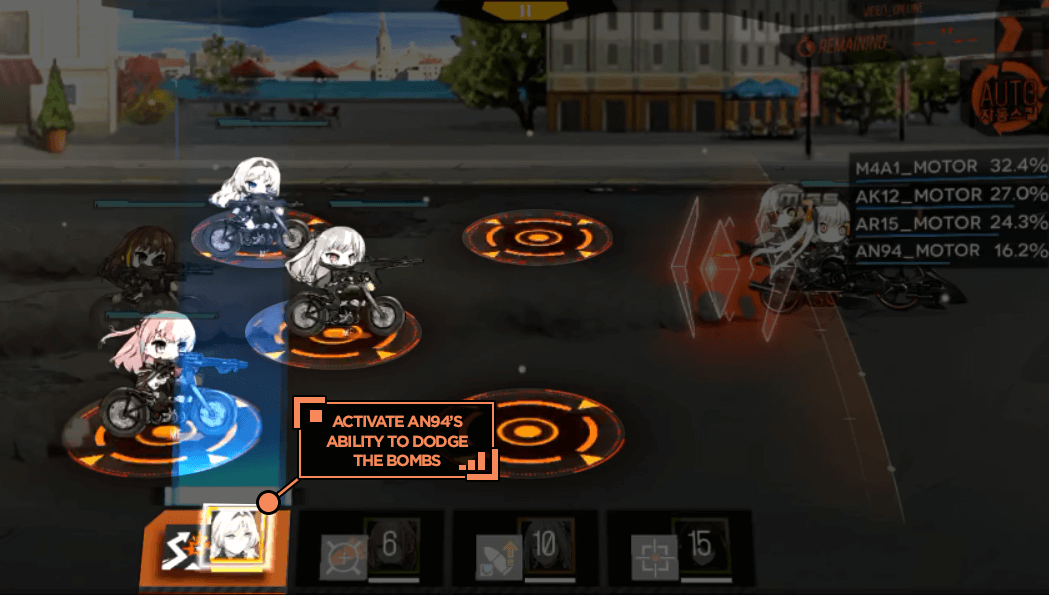
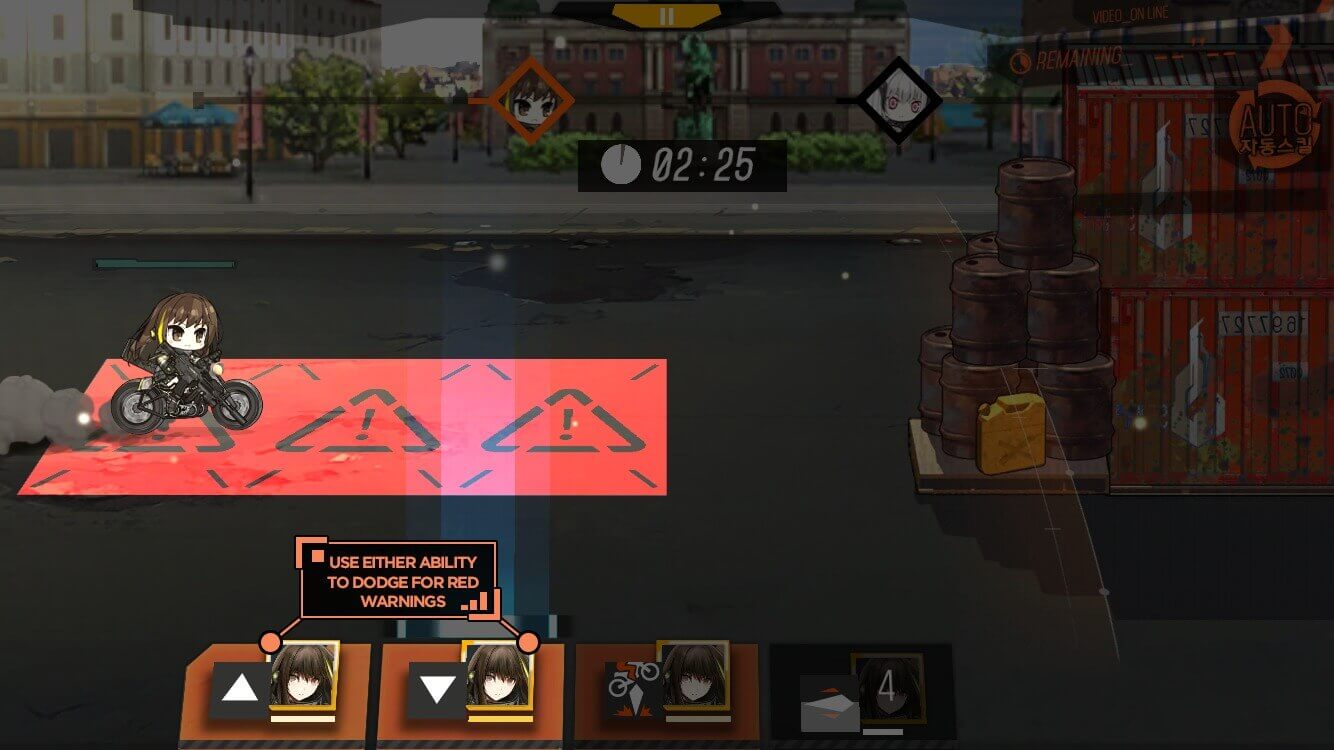
When you see the warning markers on the ground hit AN94's skill which will automatically evade all 3 carpet bombings. You don't have to click 3 times in rapid succession.
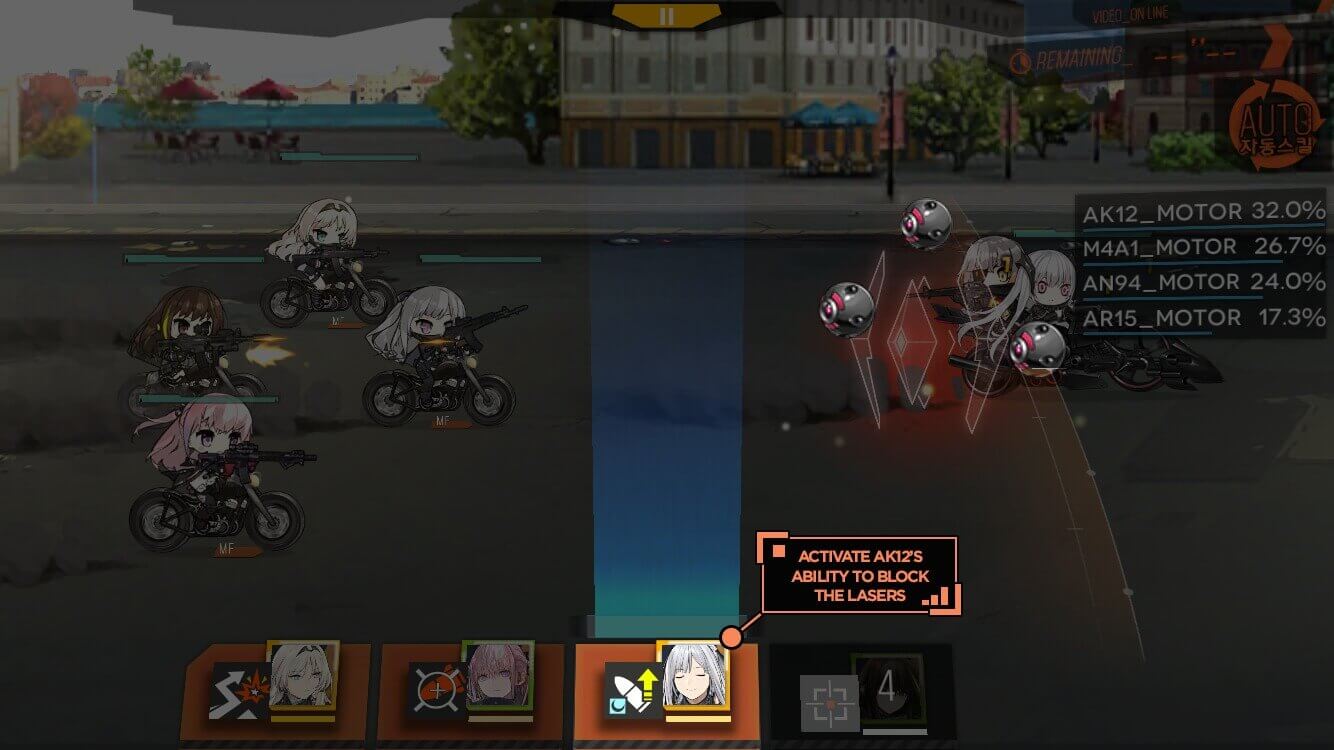
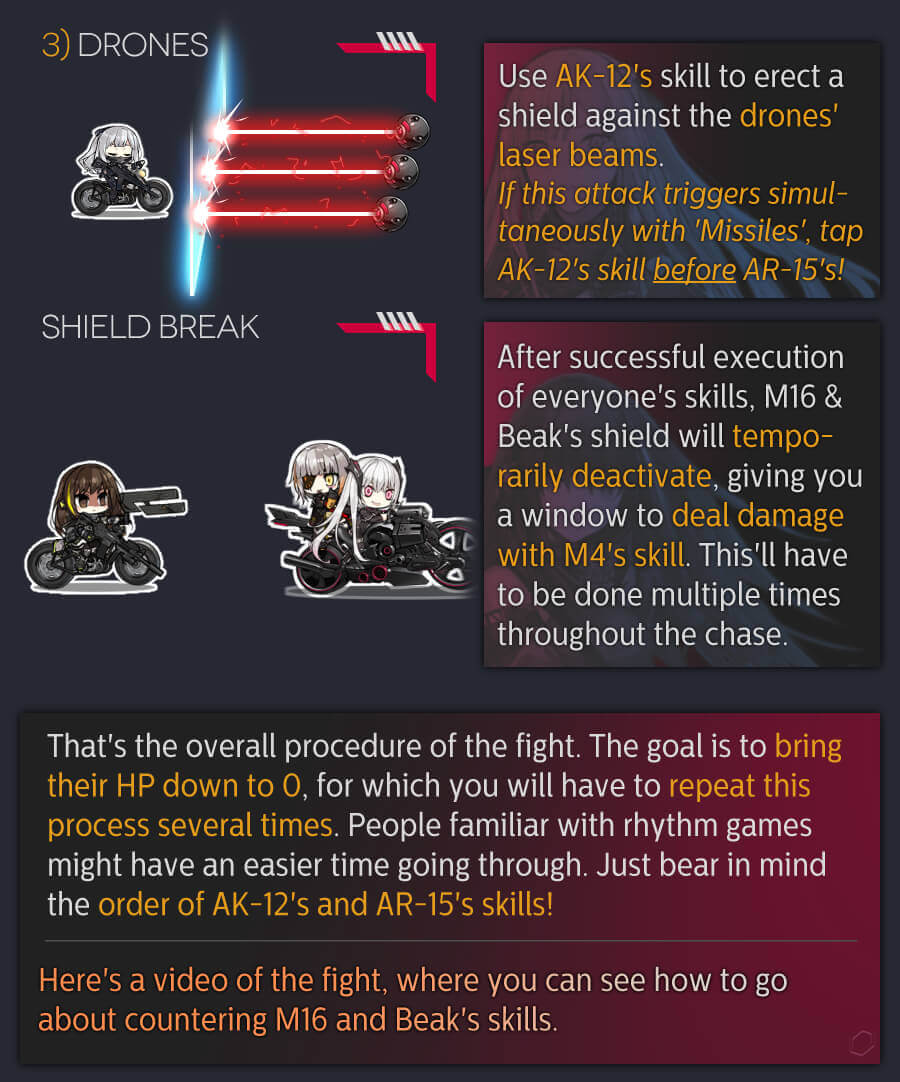
If you see the 3 drone/orb spawning near the M16, quickly tap AK-12's skill which will generate shields to block the lasers from hitting the bikes.
If you see the 3 drone/orb spawning near the M16, quickly tap AK-12's skill which will generate shields to block the lasers from hitting the bikes.
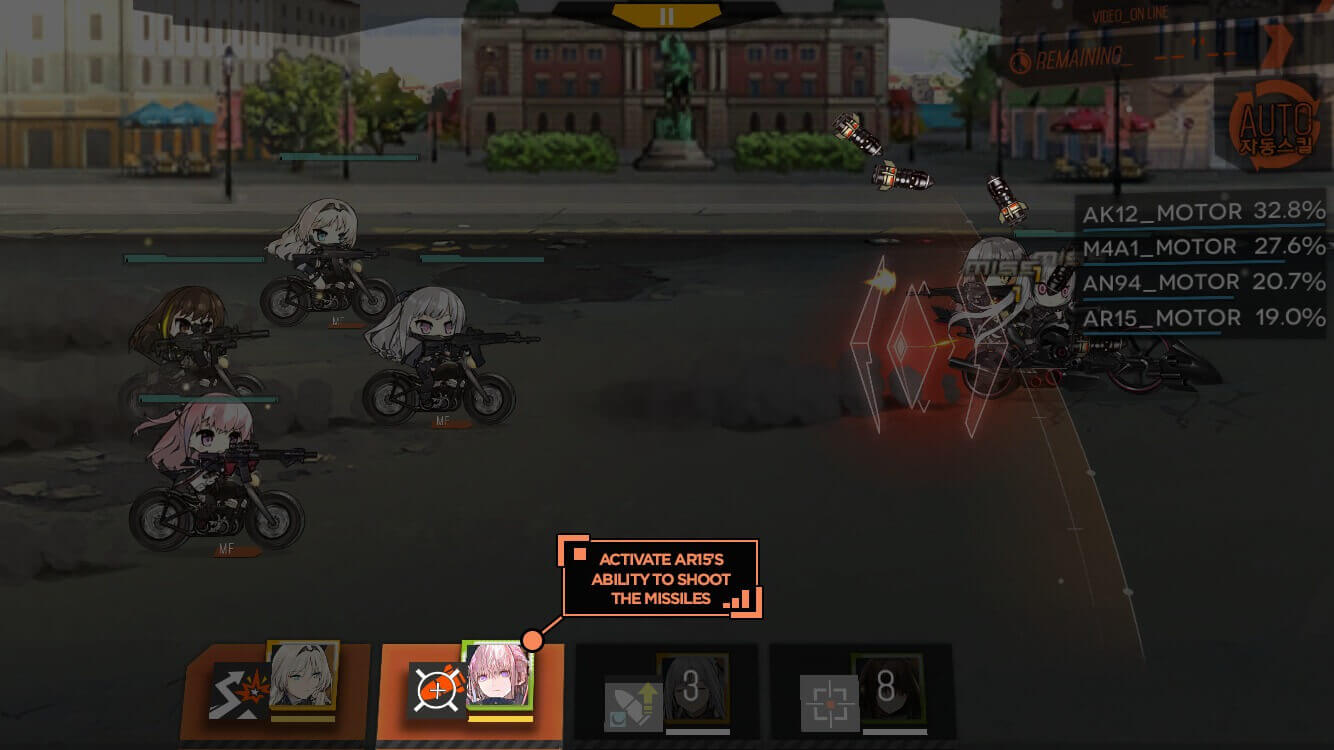
If you see multiple canisters being thrown by Beak, tap ST AR-15's skill to shoot them down.
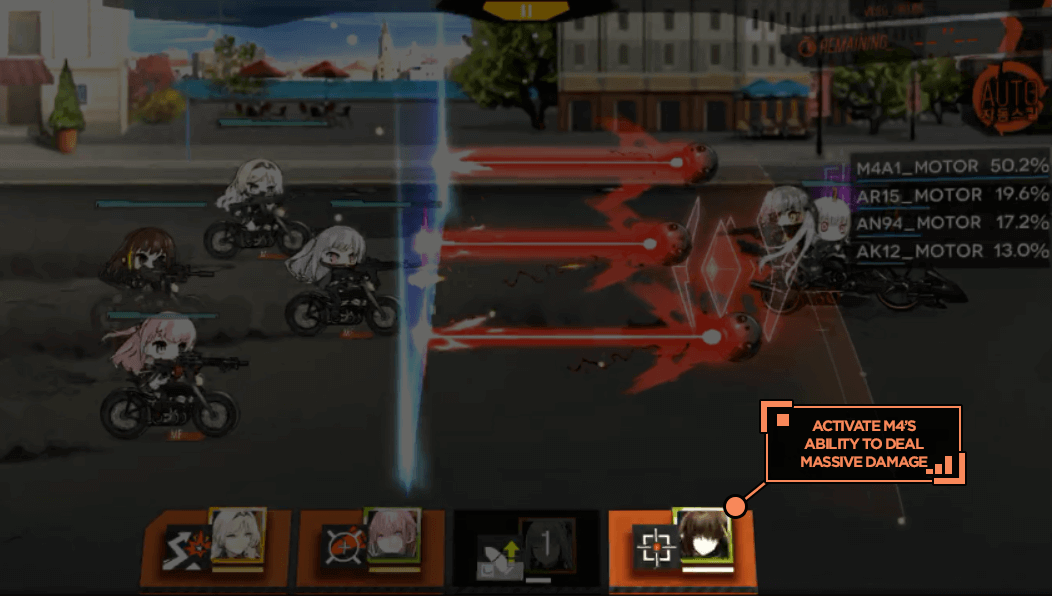
Lastly, when you successfully perform 3 evasion skills you should see Beak's shield come down. Use M4's skill to deal damage as this is the only significant source of damage. Repeat until Beak is down. Difficulty is increased as interval between attacks decrease. Tip: If you see the missiles and laser drones appear at the same time, always click AK-12's skill first then ST AR-15's skill 2nd.
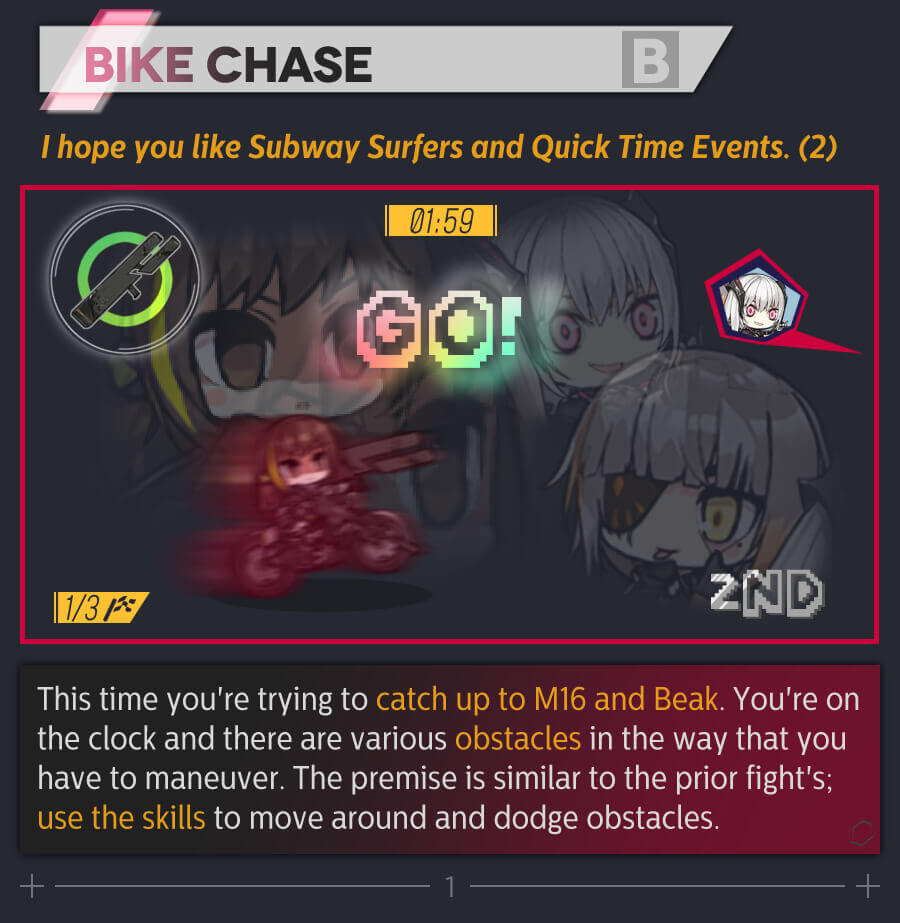
This is the recommended place to keep an eye on, where you can spot the Beak's skill prior to doing actual damage. Keep your fingers between the skill buttons to quicken your reaction time.
The up and down button moves M4 up or down one row. This becomes important as there's obstacles that blocks one or two rows. Since two rows could be blocked, it is best to keep M4 in the middle row as much as you can since these skills have short cooldowns.
This is the recommended place to keep an eye on, where you can spot the Beak's skill prior to doing actual damage. Keep your fingers between the skill buttons to quicken your reaction time.
Start with combat echelon at the HQ and move up two nodes to capture the open helipad. You do enter the Manticore's detection range but they will not be able to move this turn since they move first on the enemy's turn.
The enemy helipad at the left center continues to spawn new enemy units so it's important to block it.
Deploy 2nd combat echelon and bring it adjacent to the blocked helipad. This gives us a place to resupply and increases our move points.

Depending on RNG you can use a single echelon to grab the bomb and the helipad to increase the move point. If this is not the case you can move both echelon shown in the image. If you can't do this, take an extra turn to move one echelon at a time. I recommend using RFHG echelon to grab the bomb since you will need to fight Manticores at least once.

Take the bomb and move towards the rock pile at the top of the map. Take care not to stop next to the Manticore unit and resupply at the helipad nearby if you are out of ammo or taken too much damage.
Once you reach the rock pile, use the bomb to blow it up and take out the Hydra unit. Beat M16 or bring a fresh echelon from helipad near the HQ if your echelon is too damaged to fight.
Start with combat echelon at the HQ and move to capture helipad 2 nodes down. Again Manticore unit will not move even if it's in the range due to the Brute that is in the way.
We move to clear the enemy helipad in the left corner just like the normal version.
Deploy a new combat echelon and move to capture helipad together with 1st combat echelon.
Again we have a situation where it could be different for everyone where we just need one echelon to capture the helipad and acquire the bomb located at the bottom left corner of the map. If you require both echelons, adapt accordingly.
This is an example of what I've done to capture using both combat echelons [simulated].

Combat echelon moves to pick up the bomb and moves as closes as it can to the rock pile at the top of the map without being threatened by the Manticores in the center of the map.
If you need to repair and resupply, take an extra turn visiting the helipad located at the left corner.

Once you get to the rock pile, destroy it then fight your way through the Manticore to finish M16 off. If you fail on first attempt, you can redeploy more combat echelons at the HQ or nearby helipads and try again since there's no turn limit.
Start with your combat echelon on HQ and dummy echelon on the other 2 helipads. Combat echelon goes straight for the top route after clearing out armor units near hydra.
Combat echelon makes its way to the console and opens the path to the enemy HQ. With your remaining moves, deploy a 2nd combat echelon that will run to the HQ.
2nd combat echelon moves to the top path as well and make sure to stay out of the Hydra's detection range.
After that it's a short path to enemy HQ.
Start with a combat echelon on the HQ and the bottom helipad. Deploy dummy echelon at the center helipad. Combat echelon on the HQ moves through the top section and ends the move on the resupply node.
Combat echelon at the bottom side now moves through the bottom side.
Combat echelon at the top section of the map is now threatened by the Hydra unit that moved from the center. Simply move one node away from it after resupplying. Combat echelon at the bottom moves one node closer to the control panel. Deploy another dummy echelon and a HOC at the starting location to gain more move points in the future.
Combat echelon at the top continues to move away from the Hydra unit to safety. Combat echelon at the bottom activates the center control panel.
Combat echelon at the bottom moves through the open gate at the bottom.
Combat echelon at the top moves around the top to activate the control panel to open 2nd gate near the enemy HQ.
With remaining moves, combat echelon captures another node adjacent to enemy HQ.
Finally combat echelon at the top goes through Hydra unit at the top to capture all nodes needed to surround capture enemy HQ.
Start with a combat echelon on HQ and the right helipad and dummy echelon on the left helipad.
Combat echelon on the HQ moves up to the node below the rally point and dummy echelon moves to helipad right below.
2nd combat echelon moves to HQ to defend from armor units.
Combat echelon at the top clears out the rally point.
Dummy unit moves up from the helipad then swaps position with combat echelon on the rally point. No enemy units should move into rally point from this point on.
Next we deploy 2nd dummy echelon from the helipad north of HQ then move one to the right. This node should remain clear from enemy threat except for the Hydra unit. This establishes the supply route.
On third turn, combat echelon at the top move down to defend the helipad from being taken by typhoon tanks. There is only one tank at the middle row, so when the tank is about to fire, just simply retreat or move the T-dolls out of the middle row and you should have no issue beating it.
Hydra unit has approached near the HQ and unlike other enemy units, Hydra unit has AI that detects our friendly units adjacent to itself. Due to this we have to move dummy and combat echelon out of the way. Start with resupplying the 2nd combat echelon on the HQ and swap with 2nd dummy echelon. Then dummy echelon moves straight down to the little alcove under the helipad.
Since we cannot stay at the HQ this turn, we need to remove all surrounding KCCO units that is not Hydra. Sweep from left then down, but making sure to end your turn at least two nodes away from the hydra unit. In my case I decide to move combat unit to helipad just south of the HQ. At the beginning of next turn we clear the mission automatically.
Start with combat echelons at the HQ and right helipad with dummy or HOC at the left helipad or heavy helipad, respectively. Combat echelon moves up to fight the armor unit at the center helipad north of HQ then destroys the enemy structure.
Dummy/HOC follows behind and 2nd combat echelon parks itself at the HQ.
Combat echelon and dummy echelon move up towards the rally point and swaps positions so that dummy is sitting at the rally point. We should have supply route established at the end of the turn.
Combat echelon needs to defend the helipad between rally point and the HQ. So move down one node and end turn.
On the last turn, if there's Hydra unit nearby, Combat echelon at the HQ clears out nearby enemy units and moves out of the detection range. This should clear the mission at the beginning of the next turn.
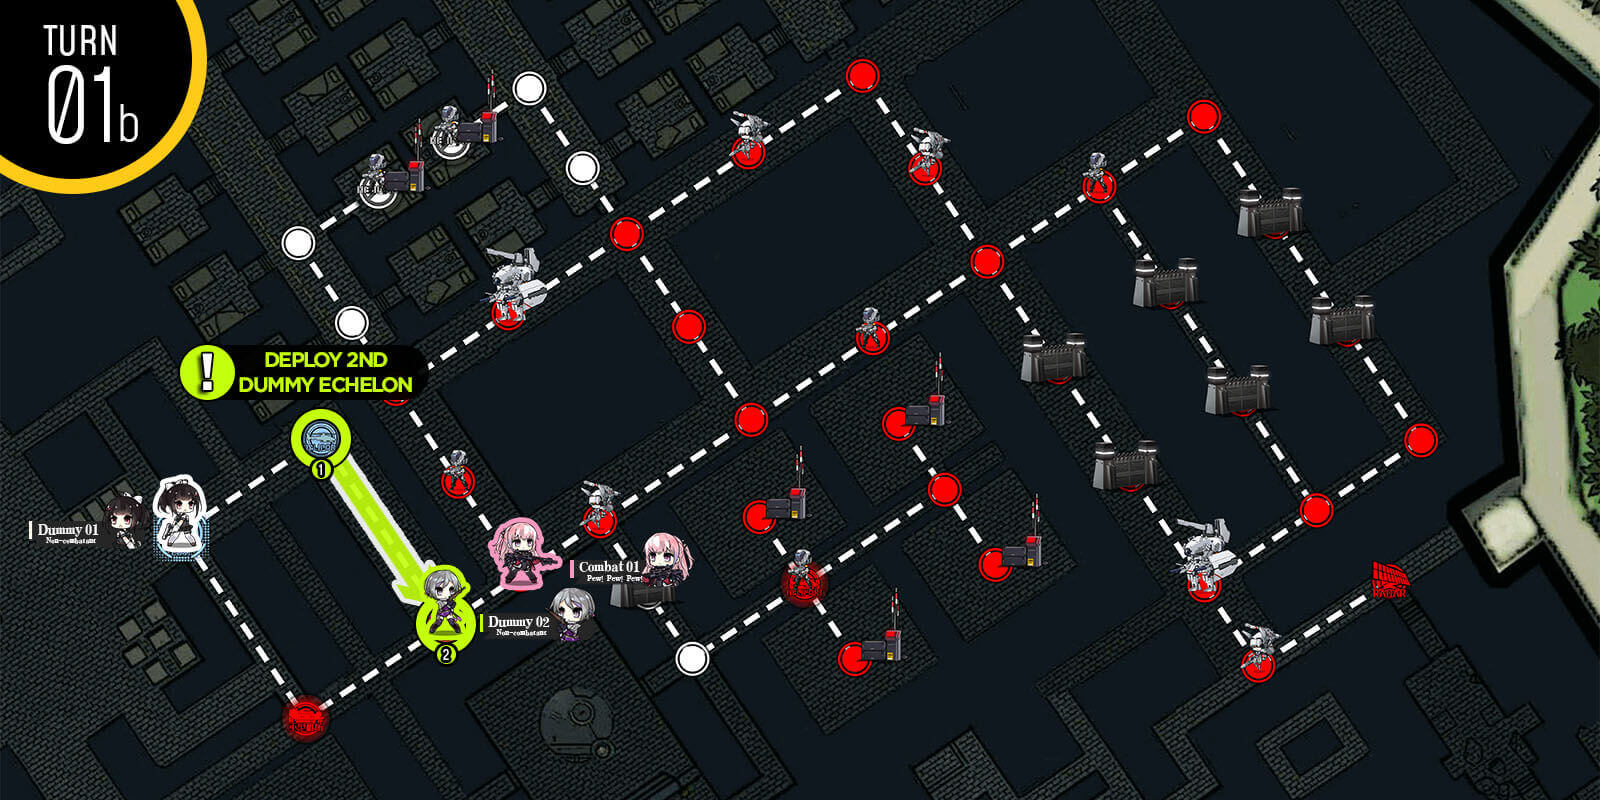
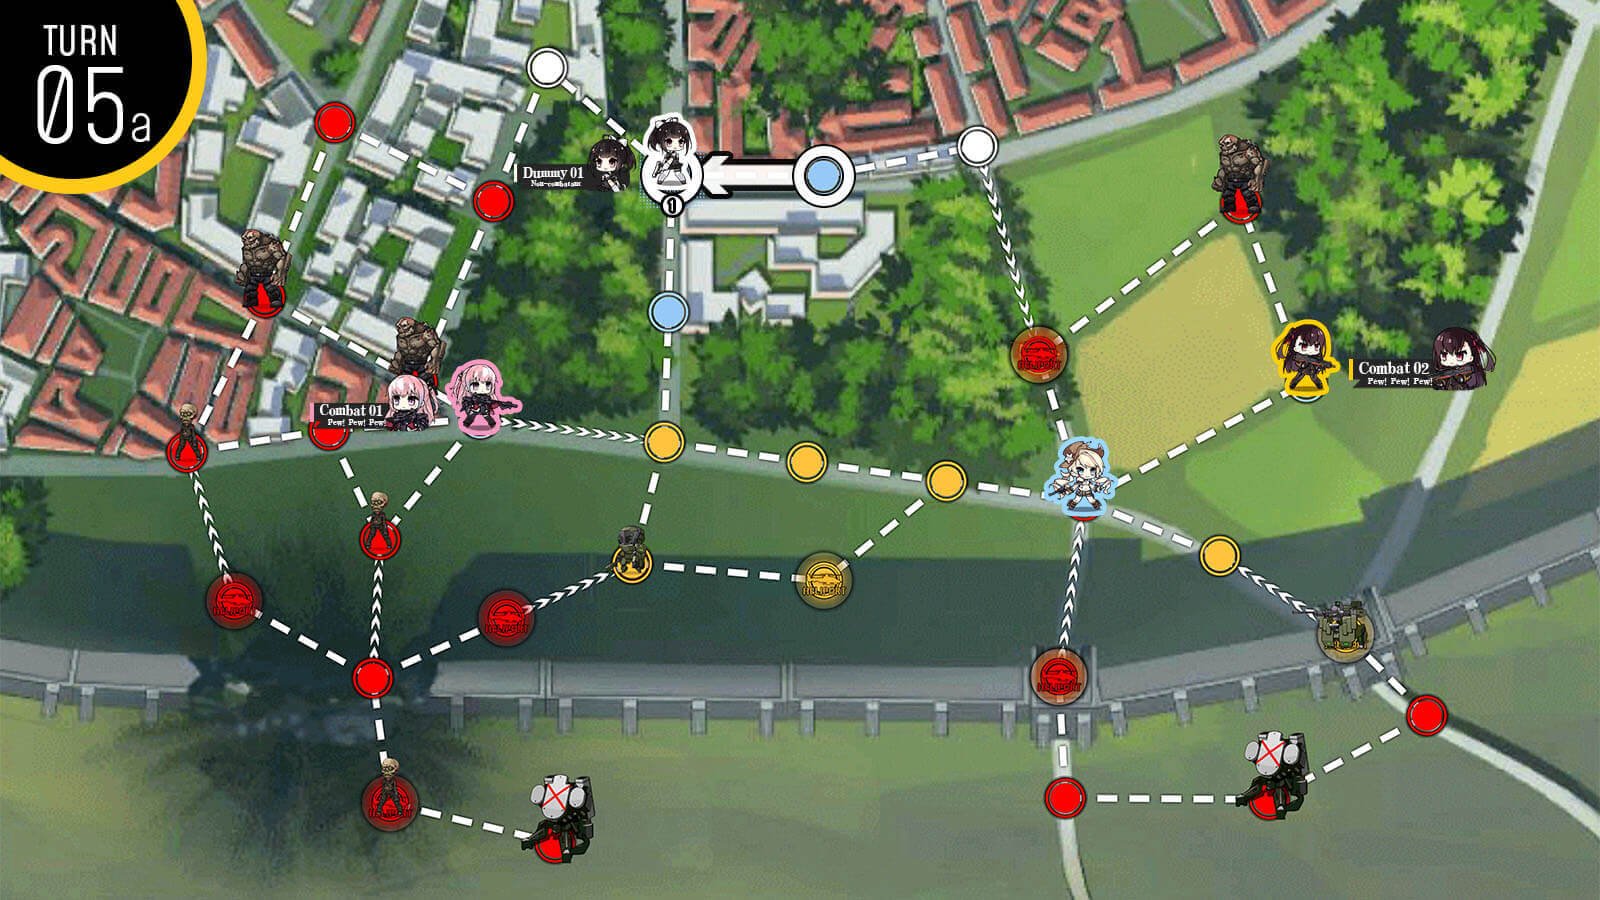
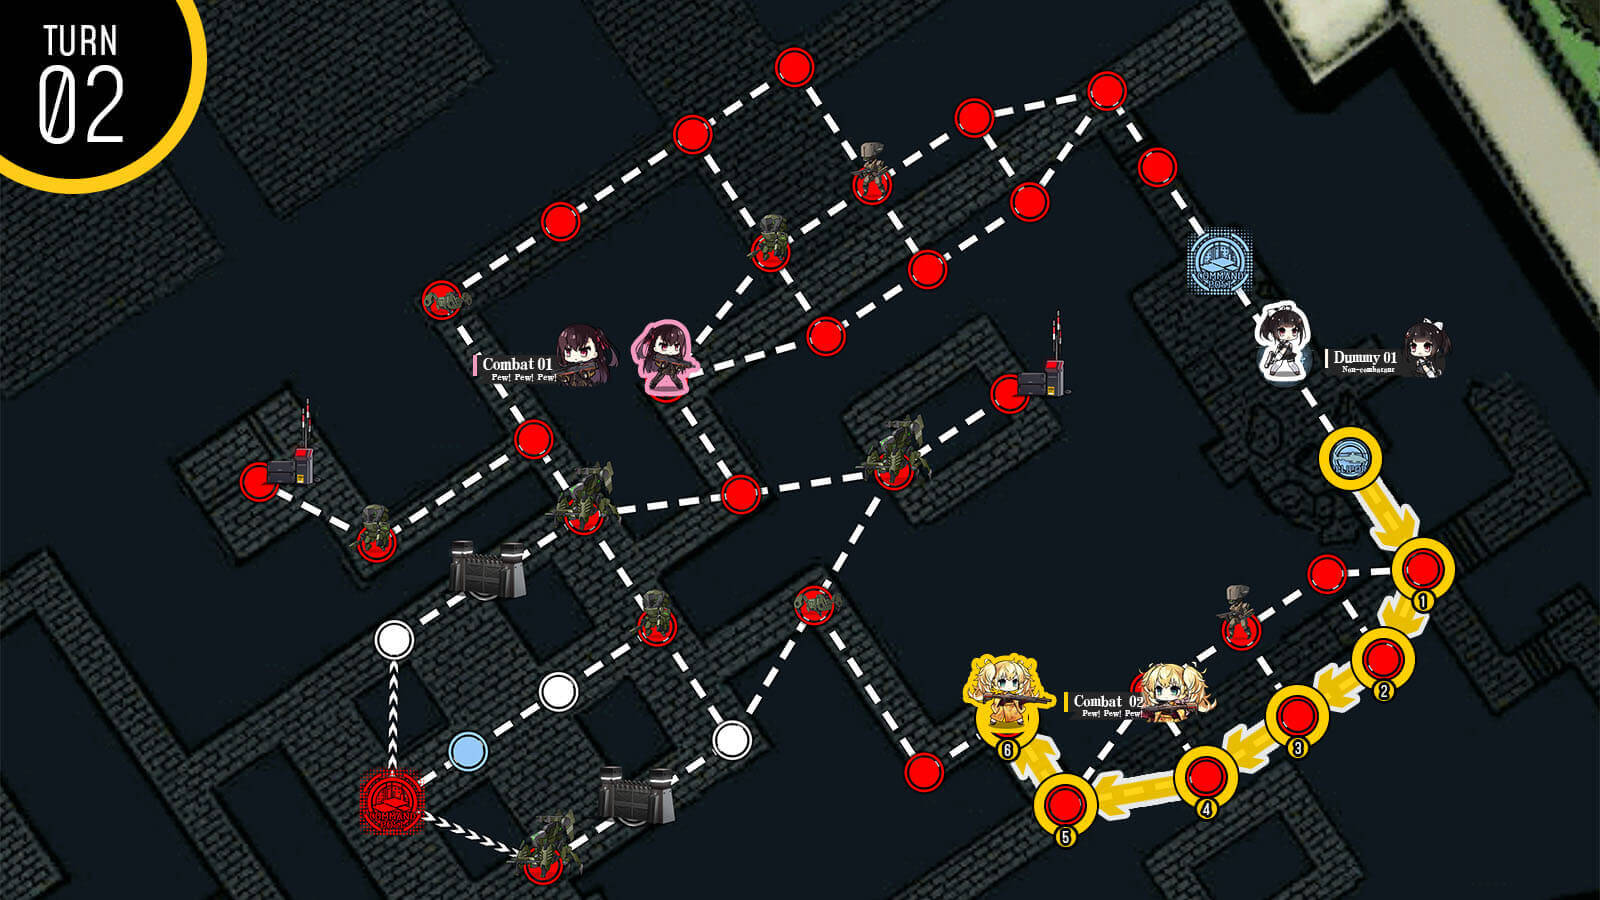
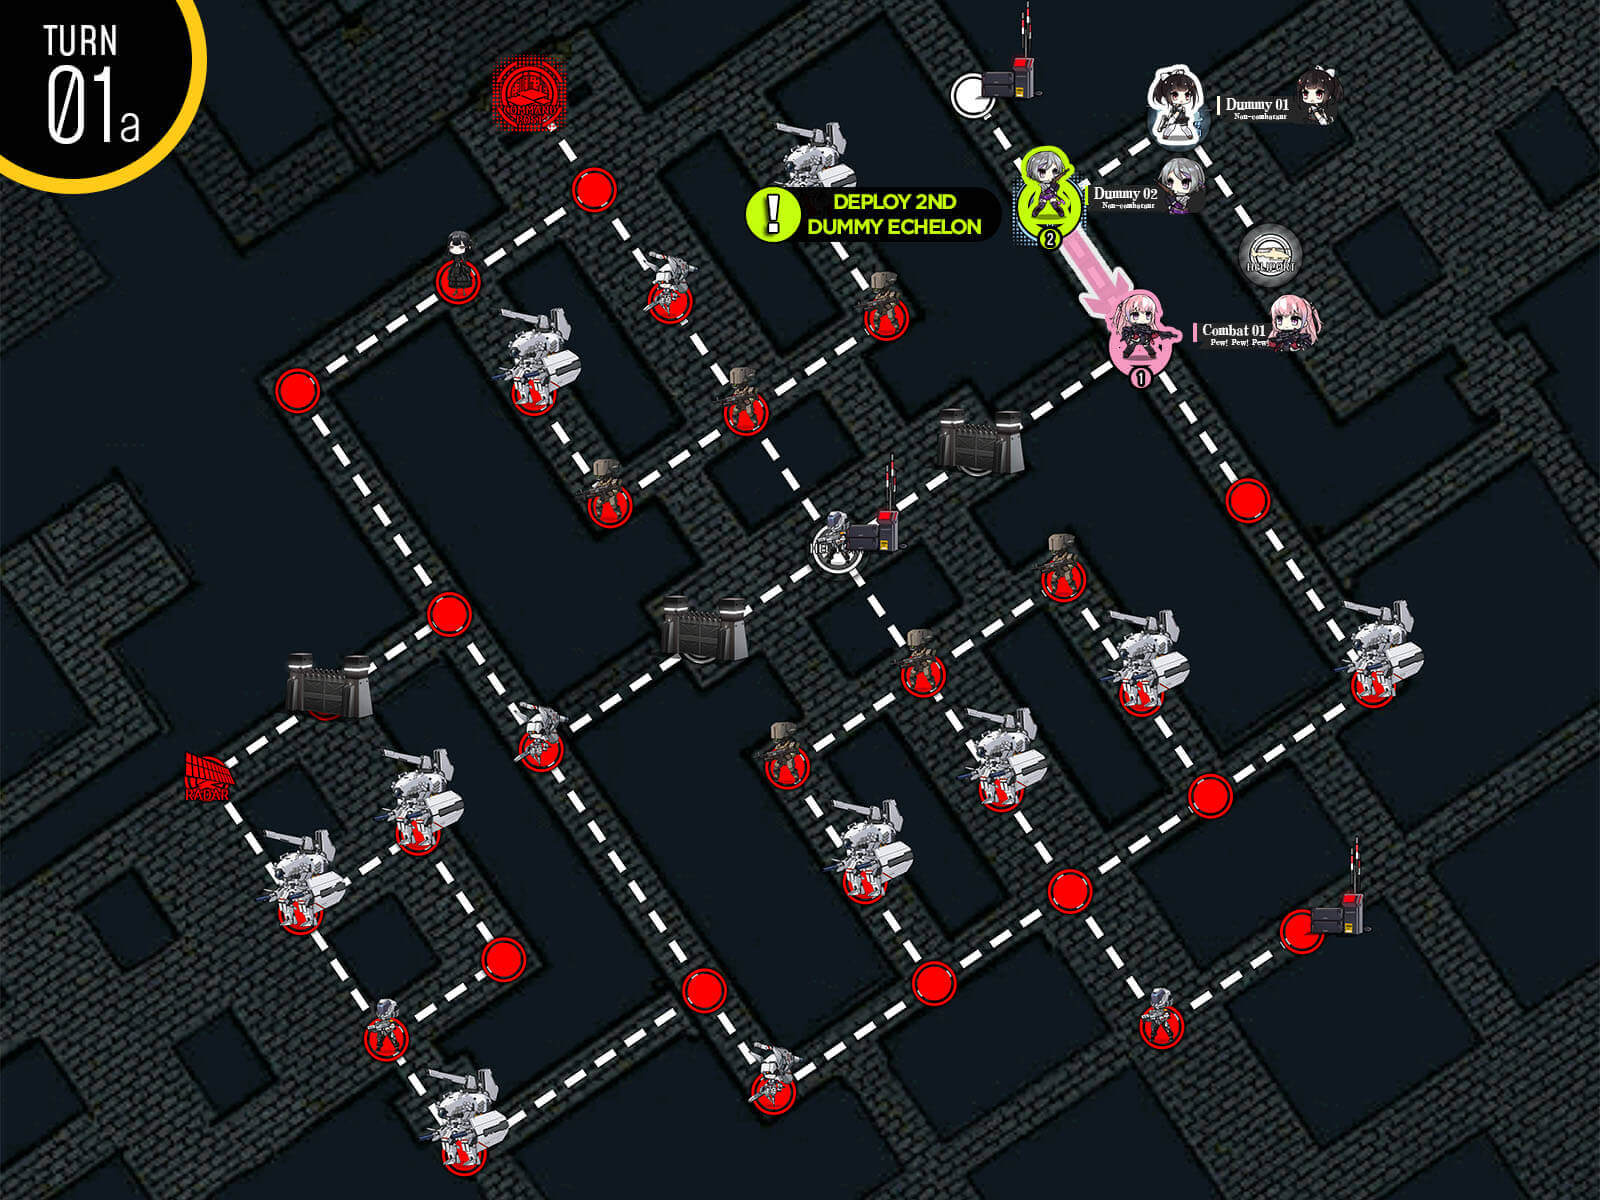
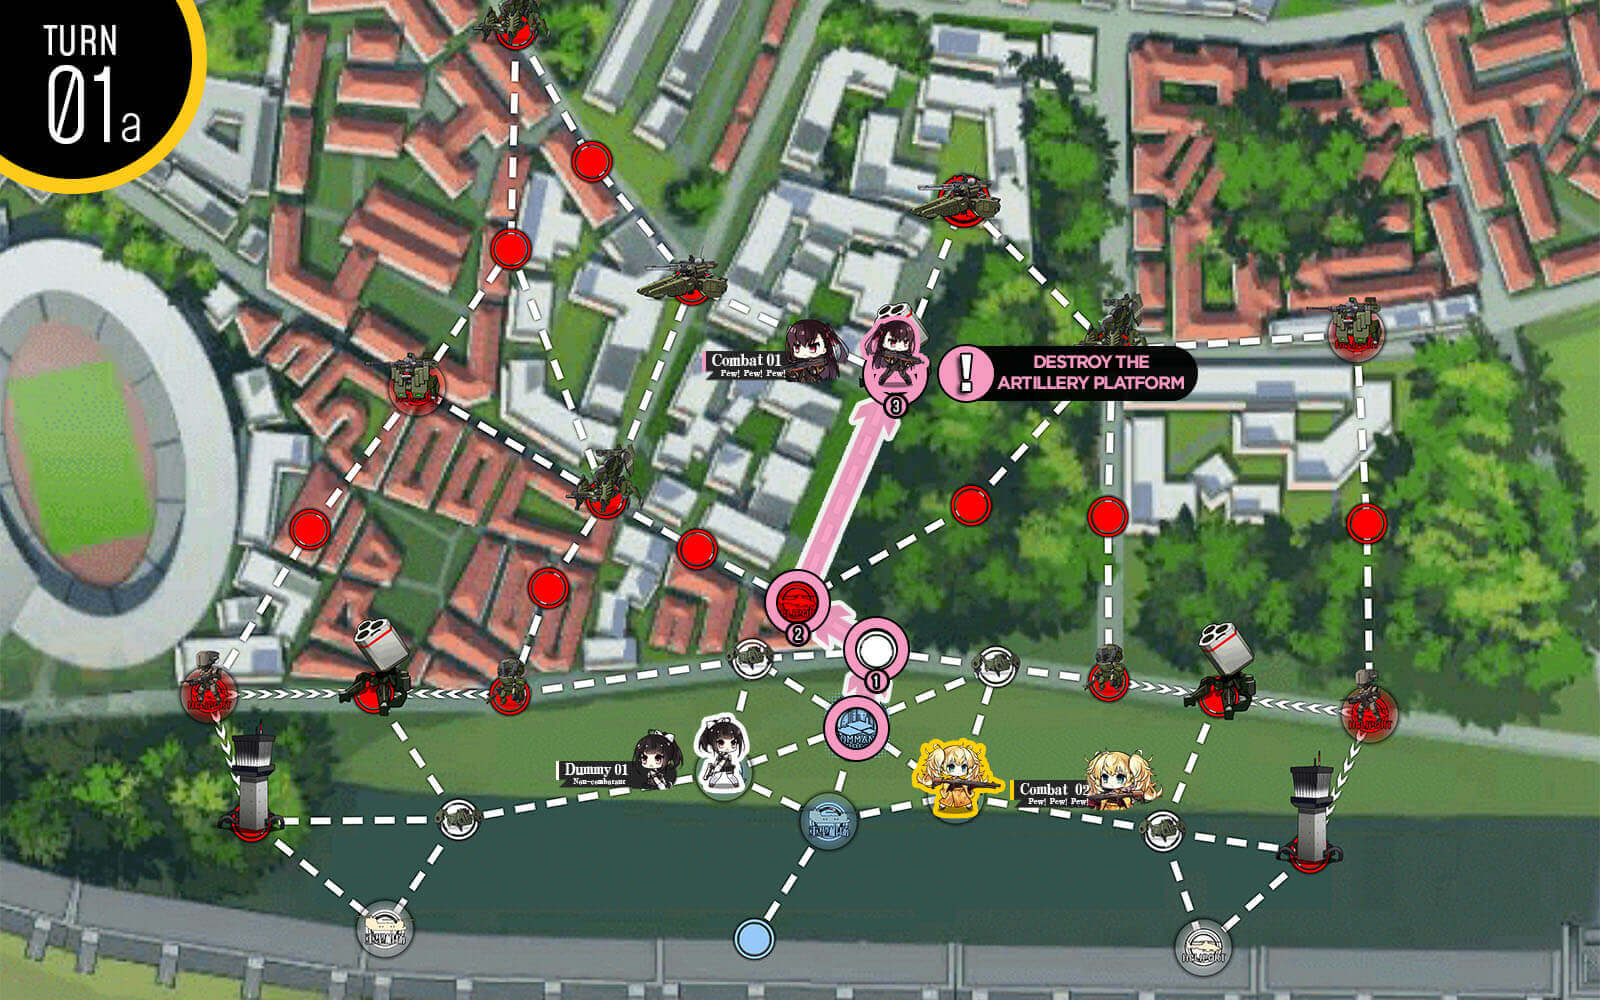
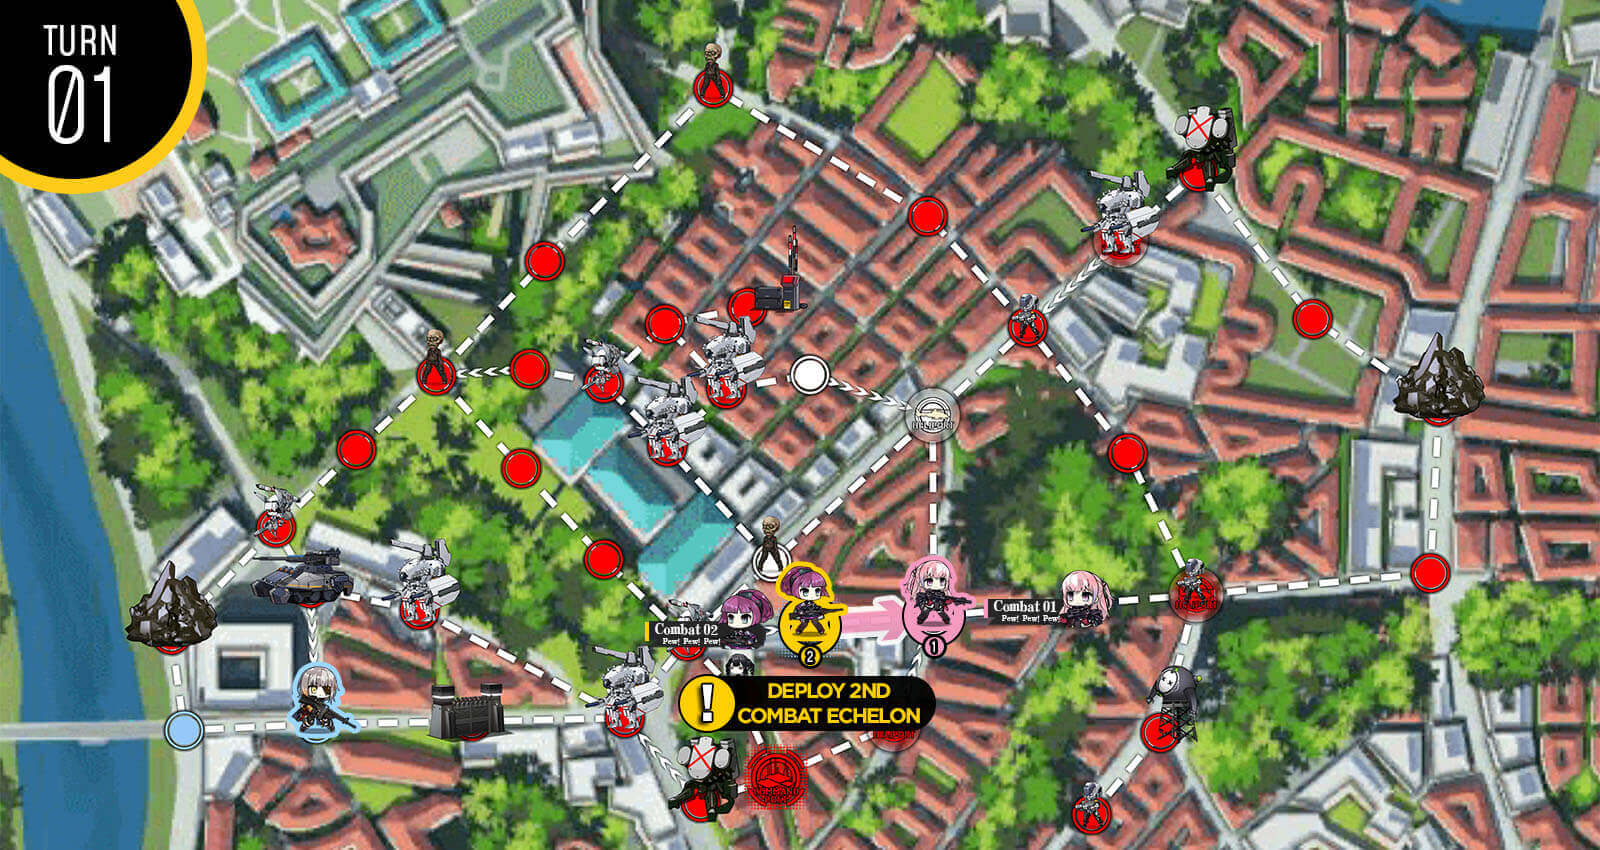
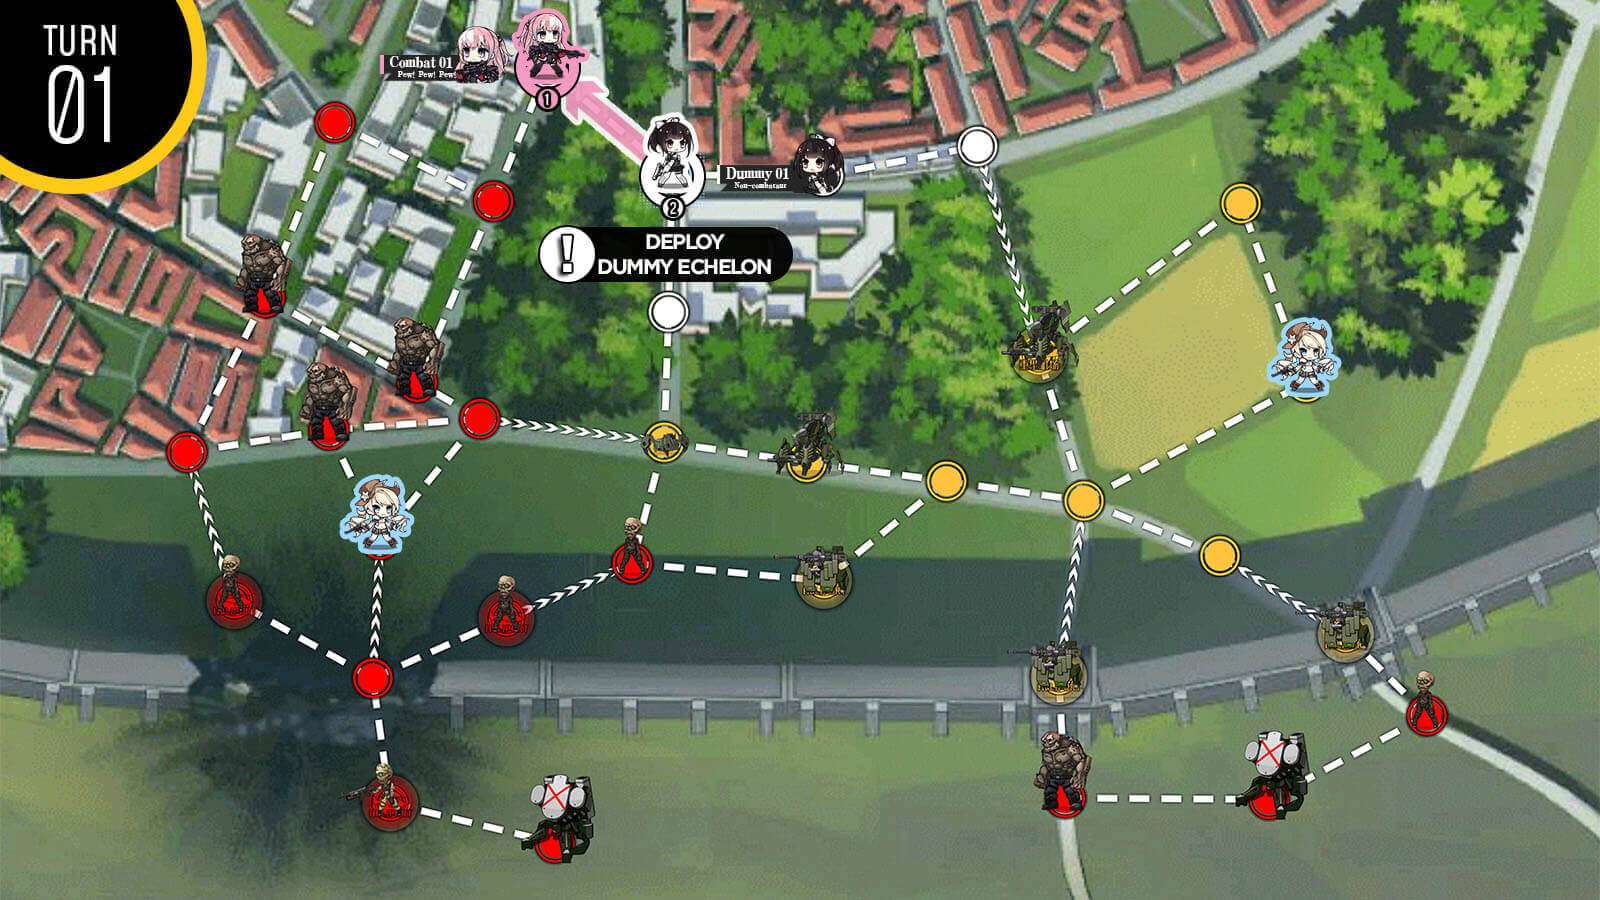
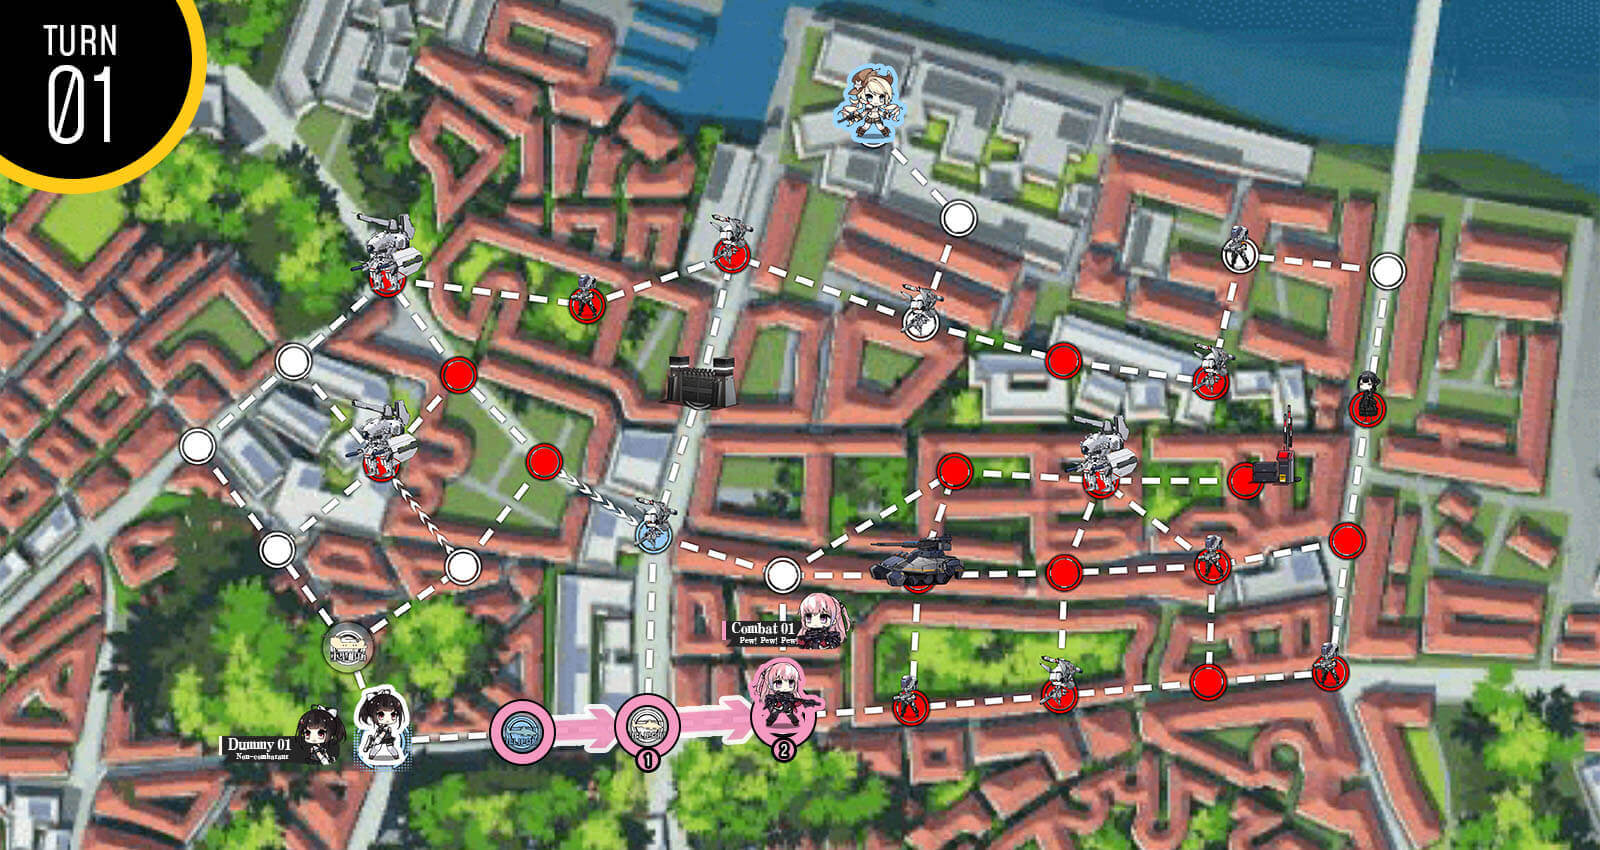
This requires 2 combat echelons but keep in mind that enemy levels are still relatively low and you can deploy an ARSMG echelon at level 40 and 3x links and you will be fine. Deploy combat echelons on the two helipads to the right of the HQ then dummy on the HQ. Combat echelon on the top helipad goes to take out the helipad on the left corner to prevent enemy units spawning there every turn. Move combat echelon next to HQ down one and deploy 2nd dummy echelon.
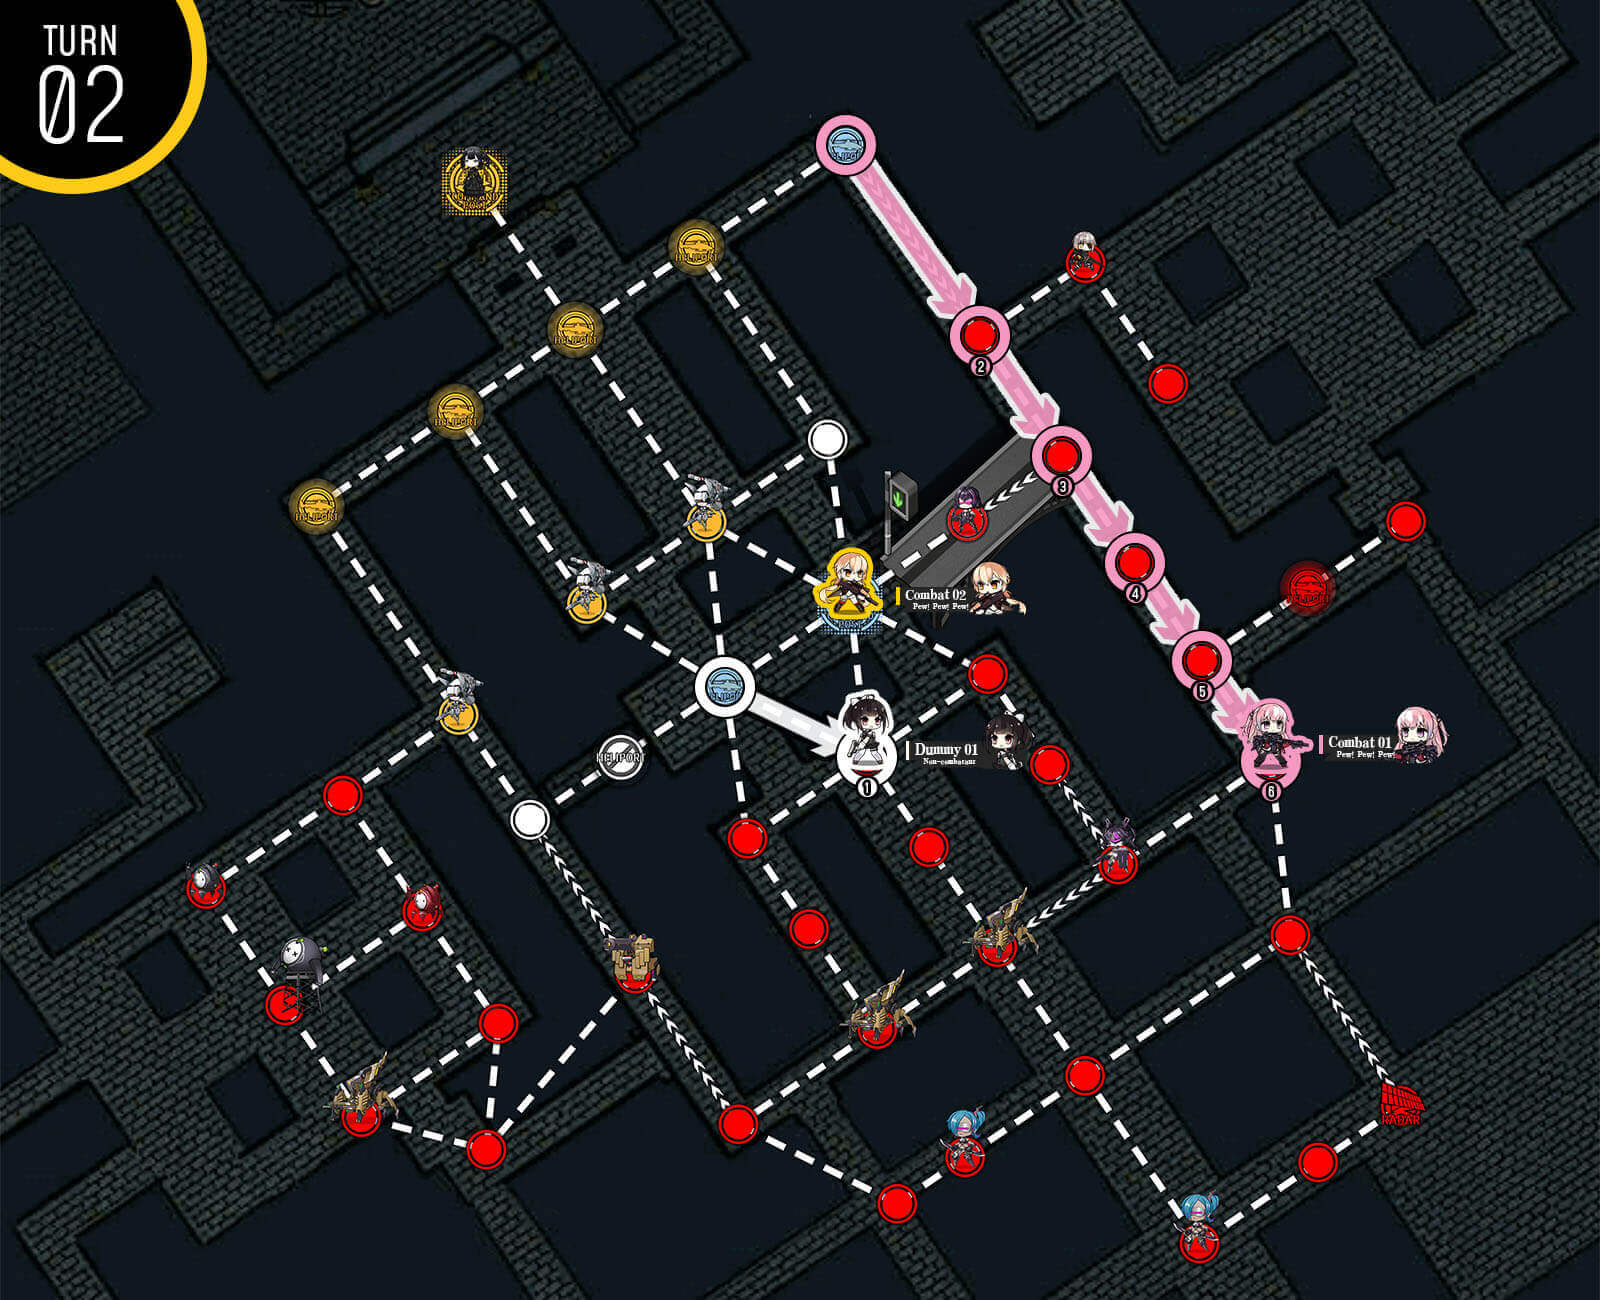
Combat echelon near the bottom of the map moves one node to the left.
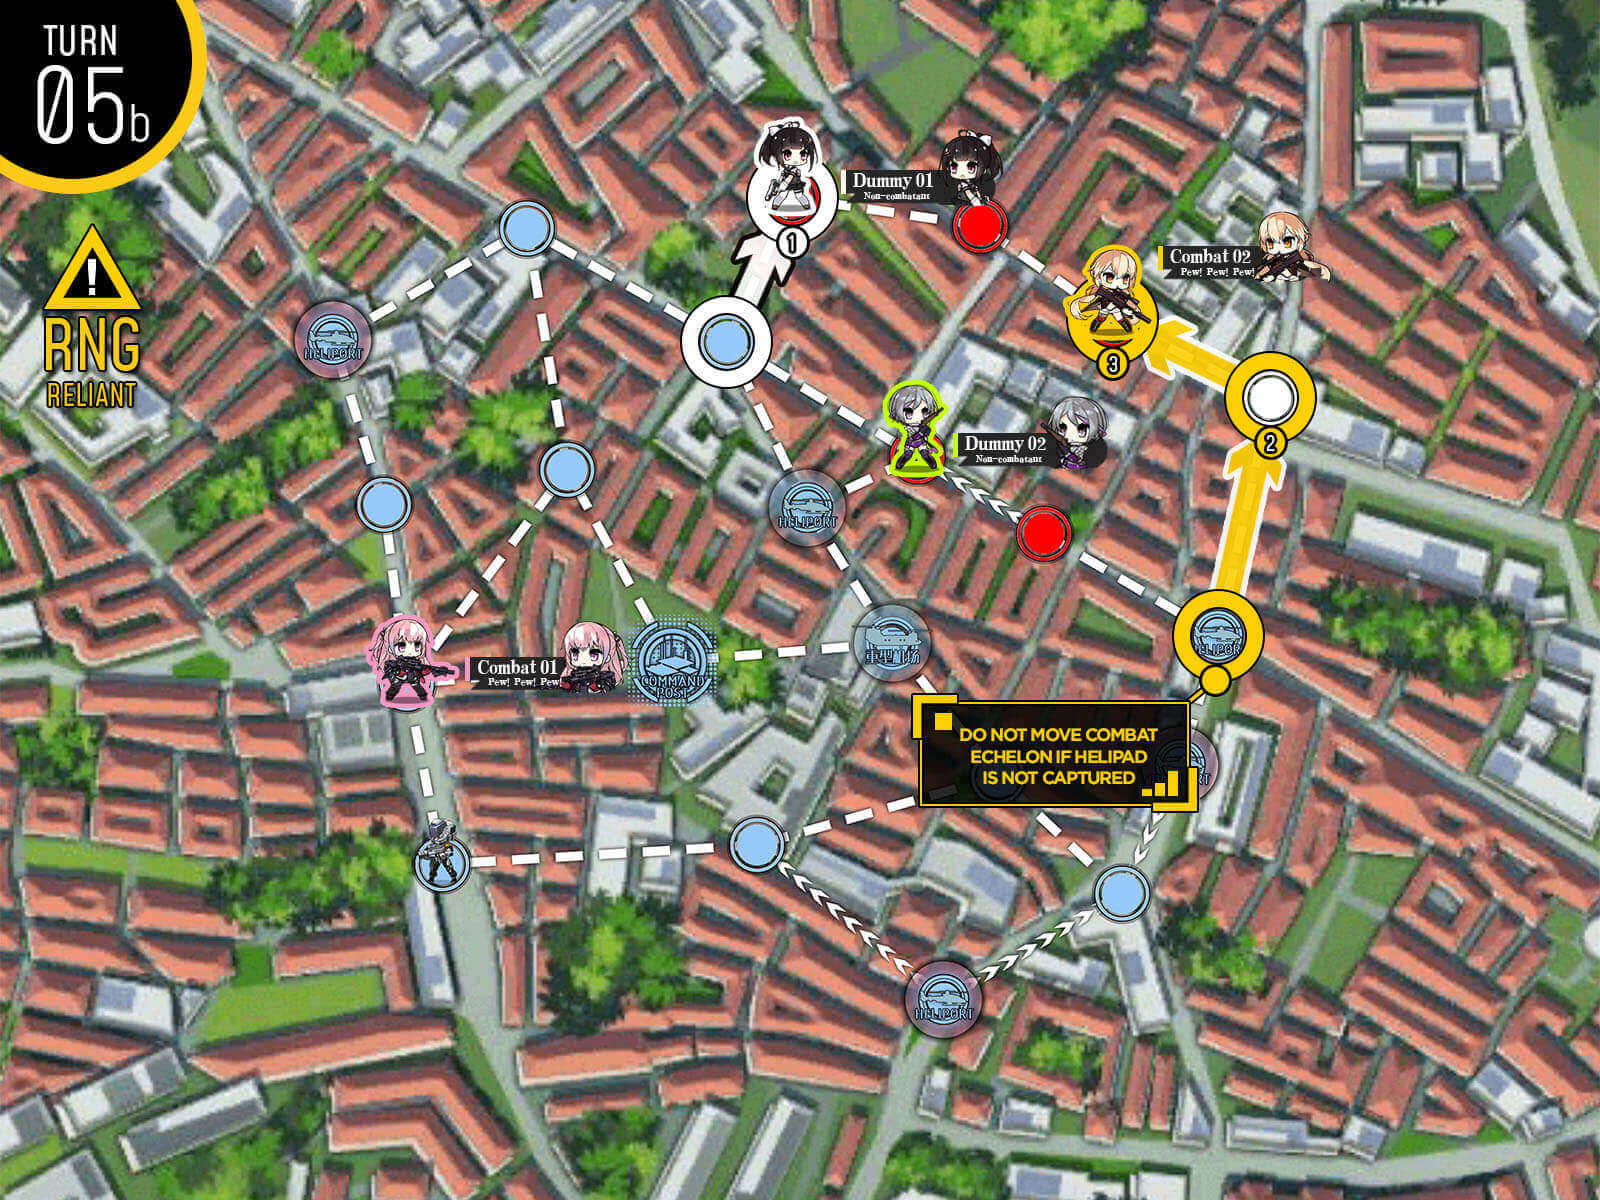
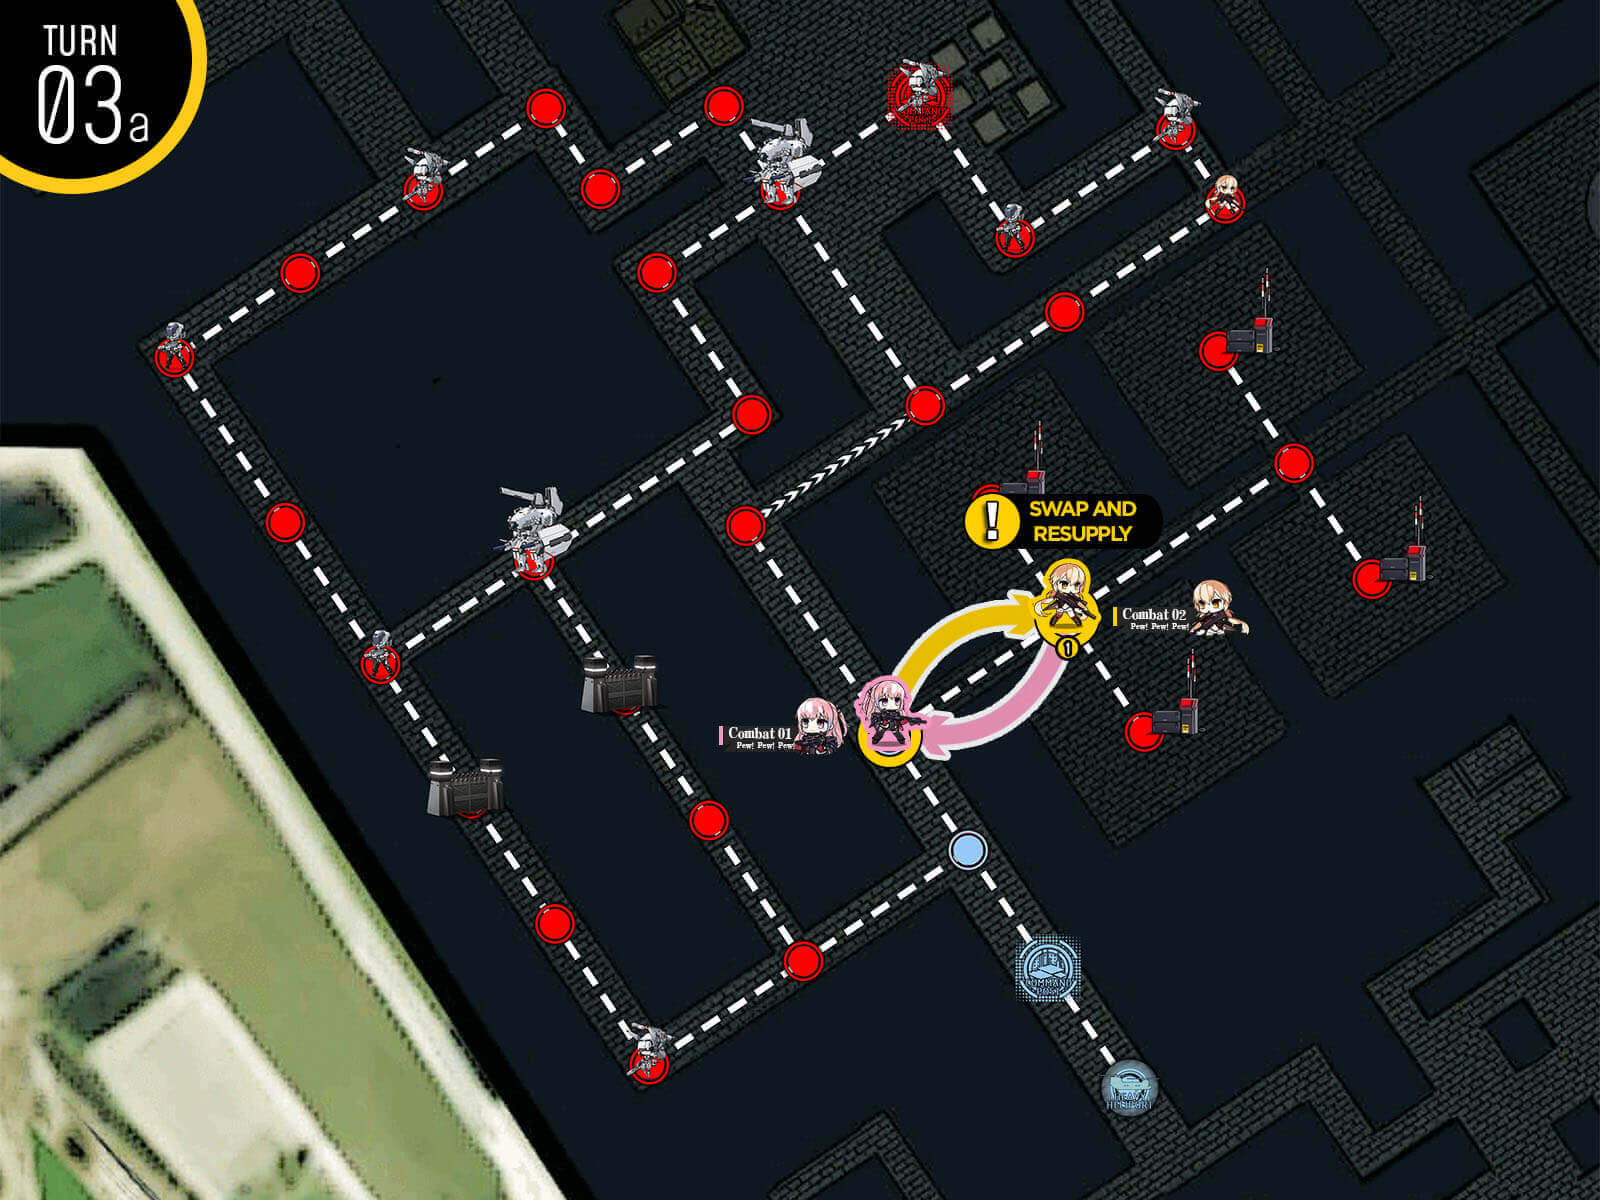
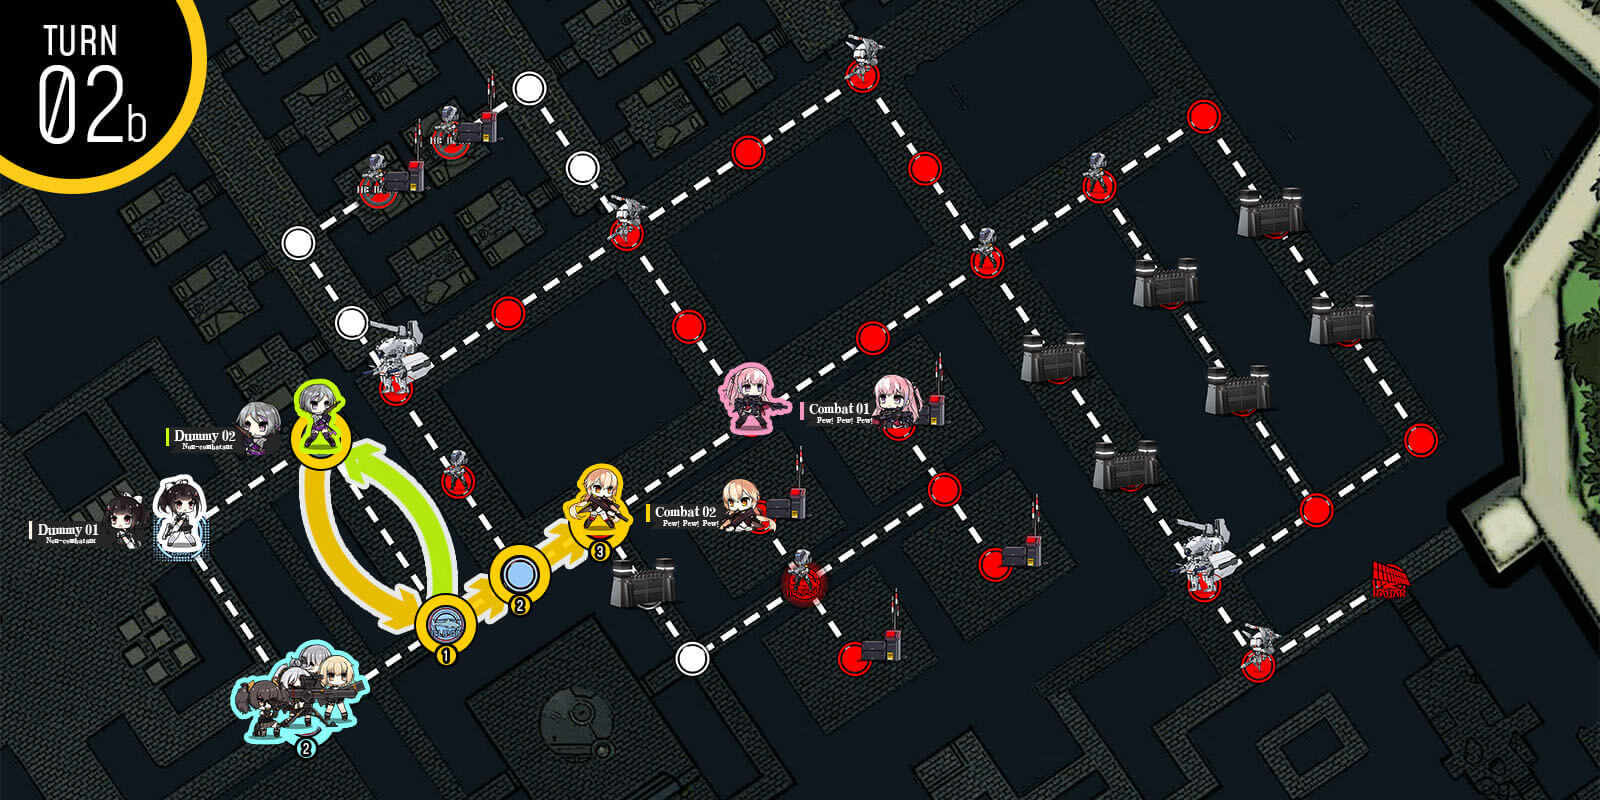
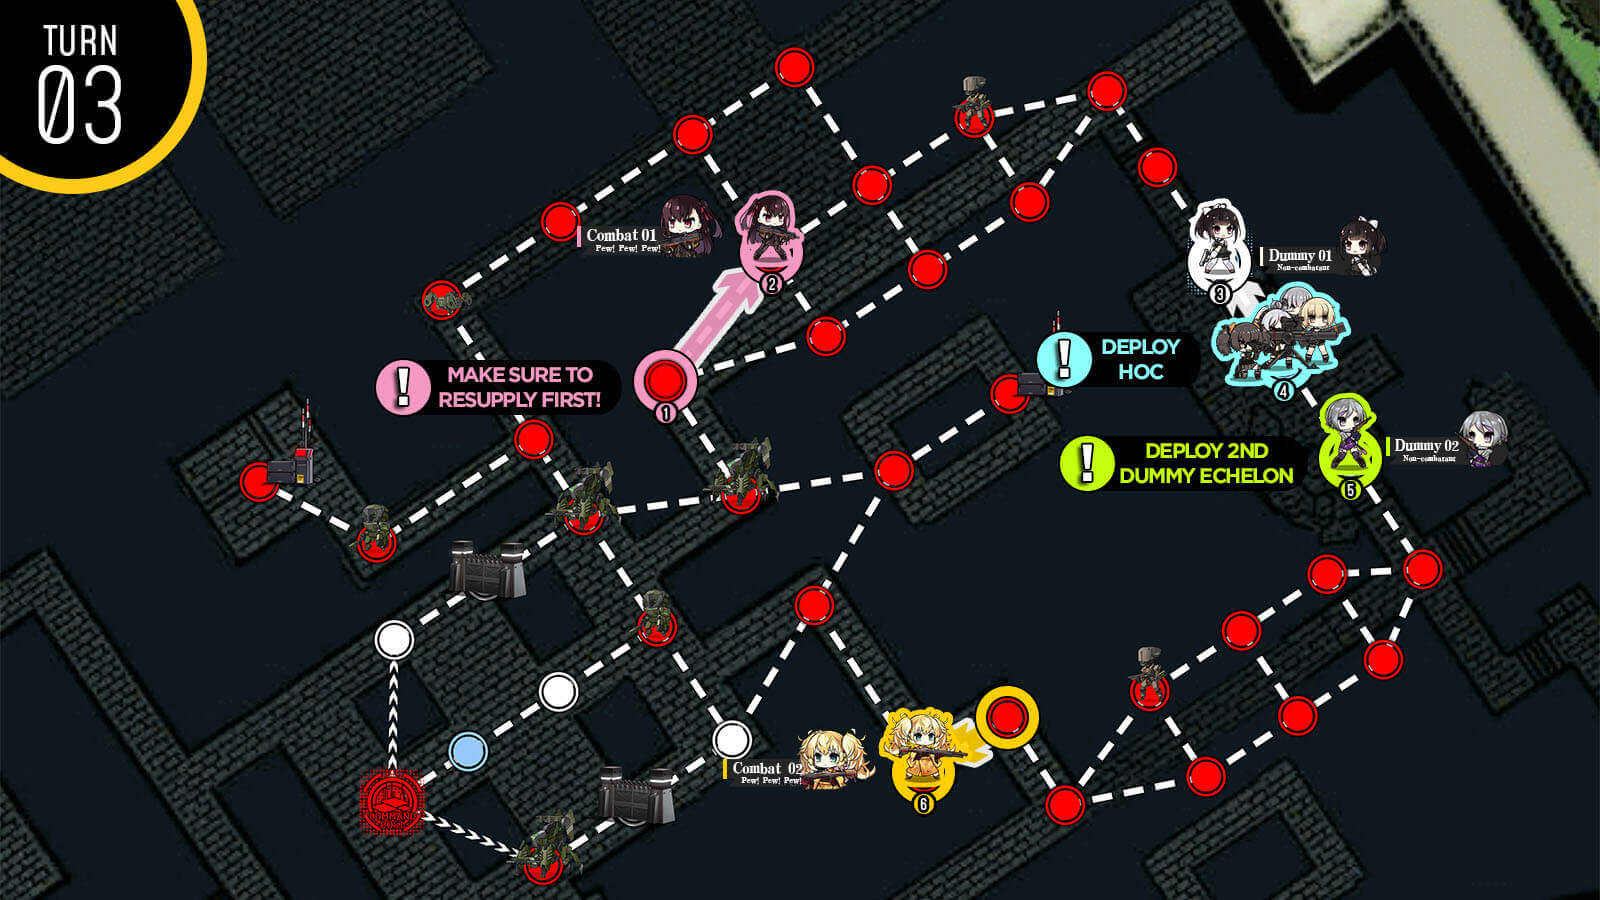
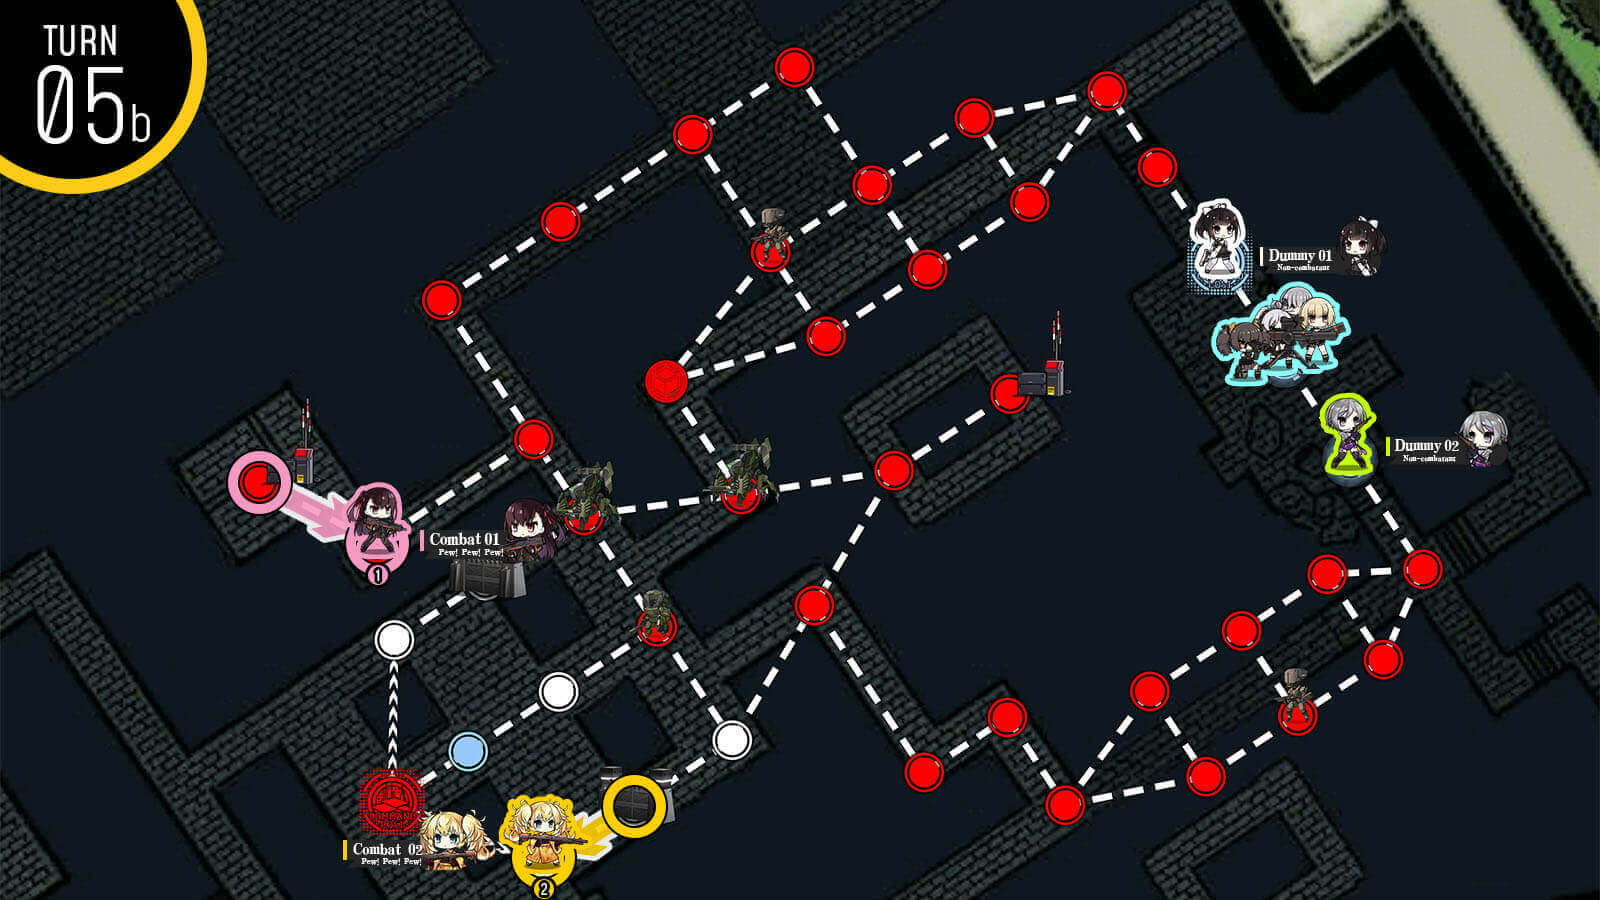
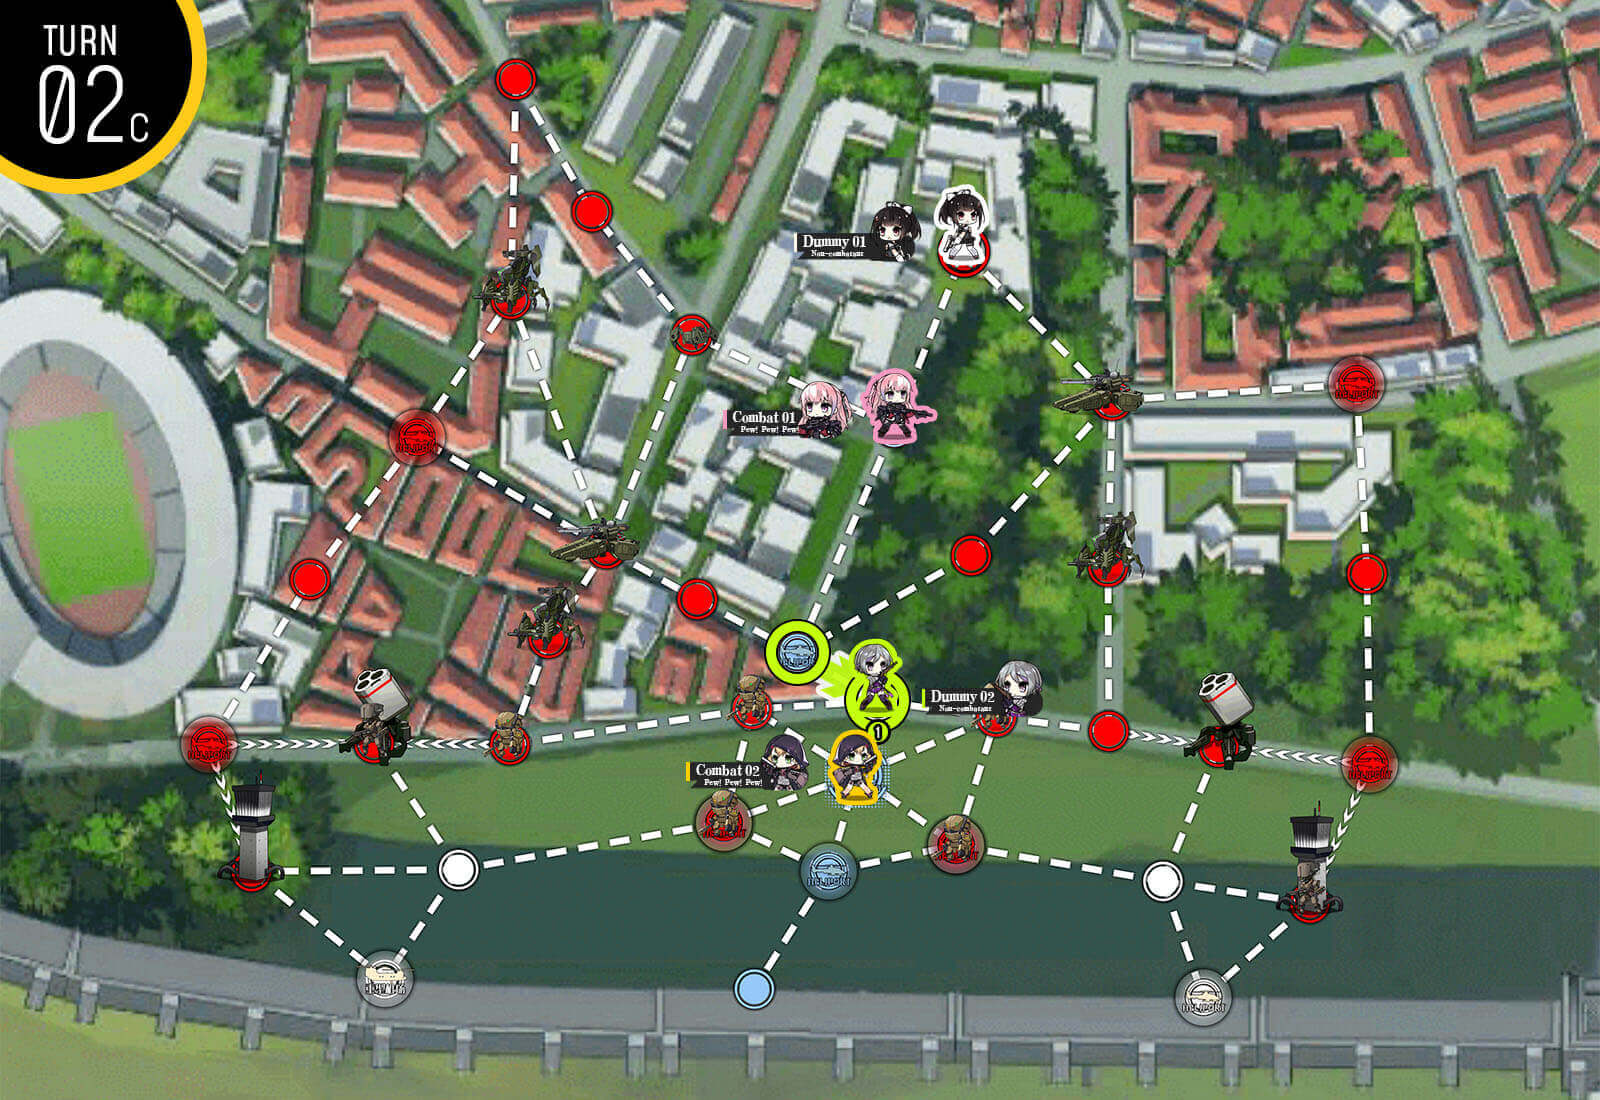
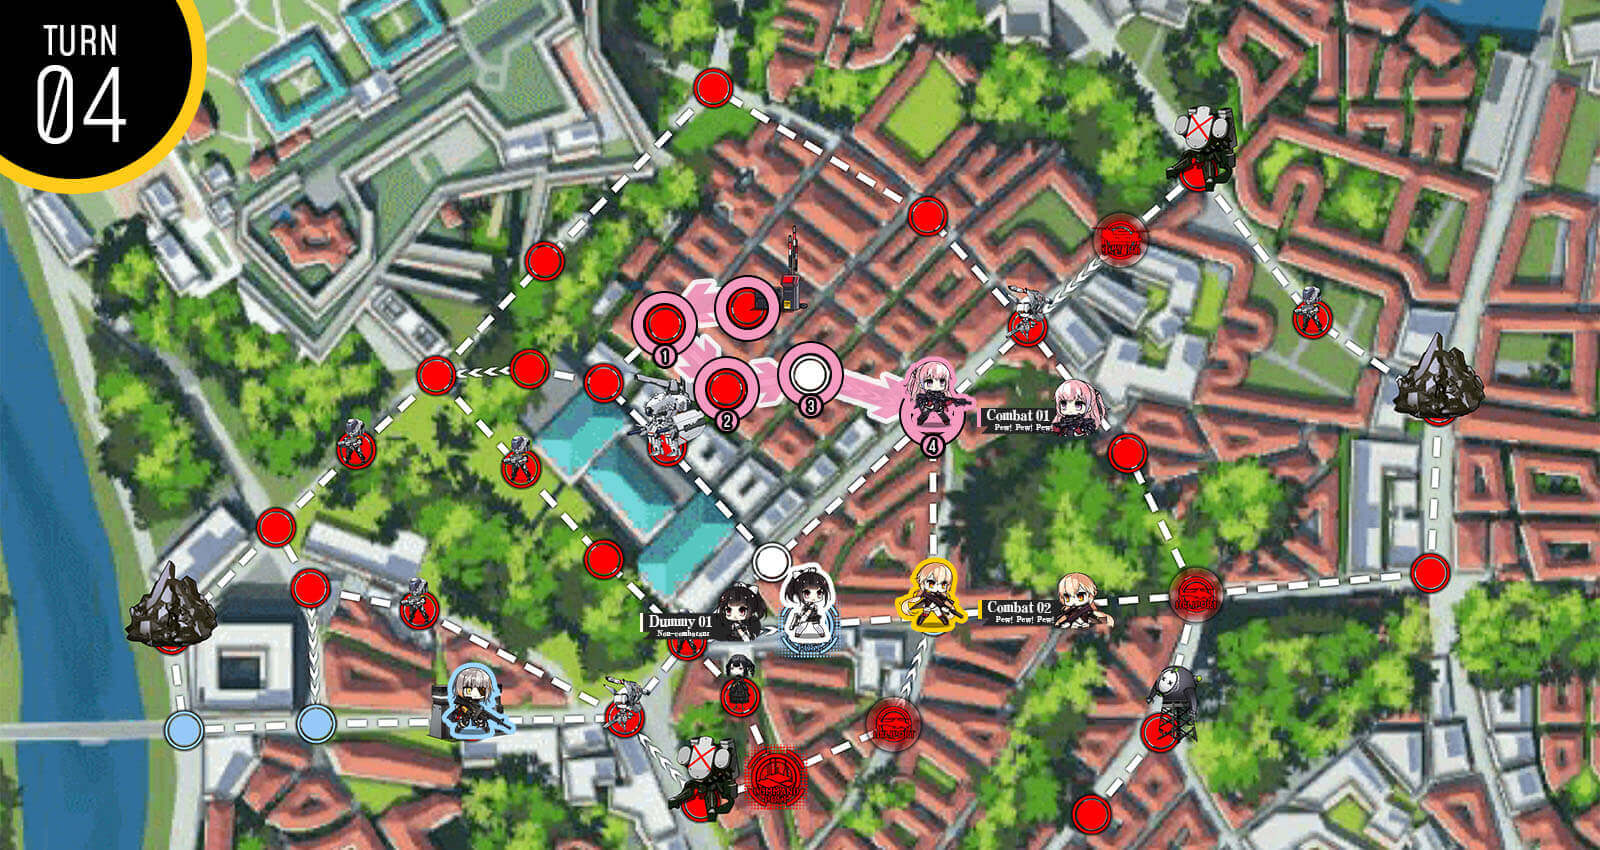
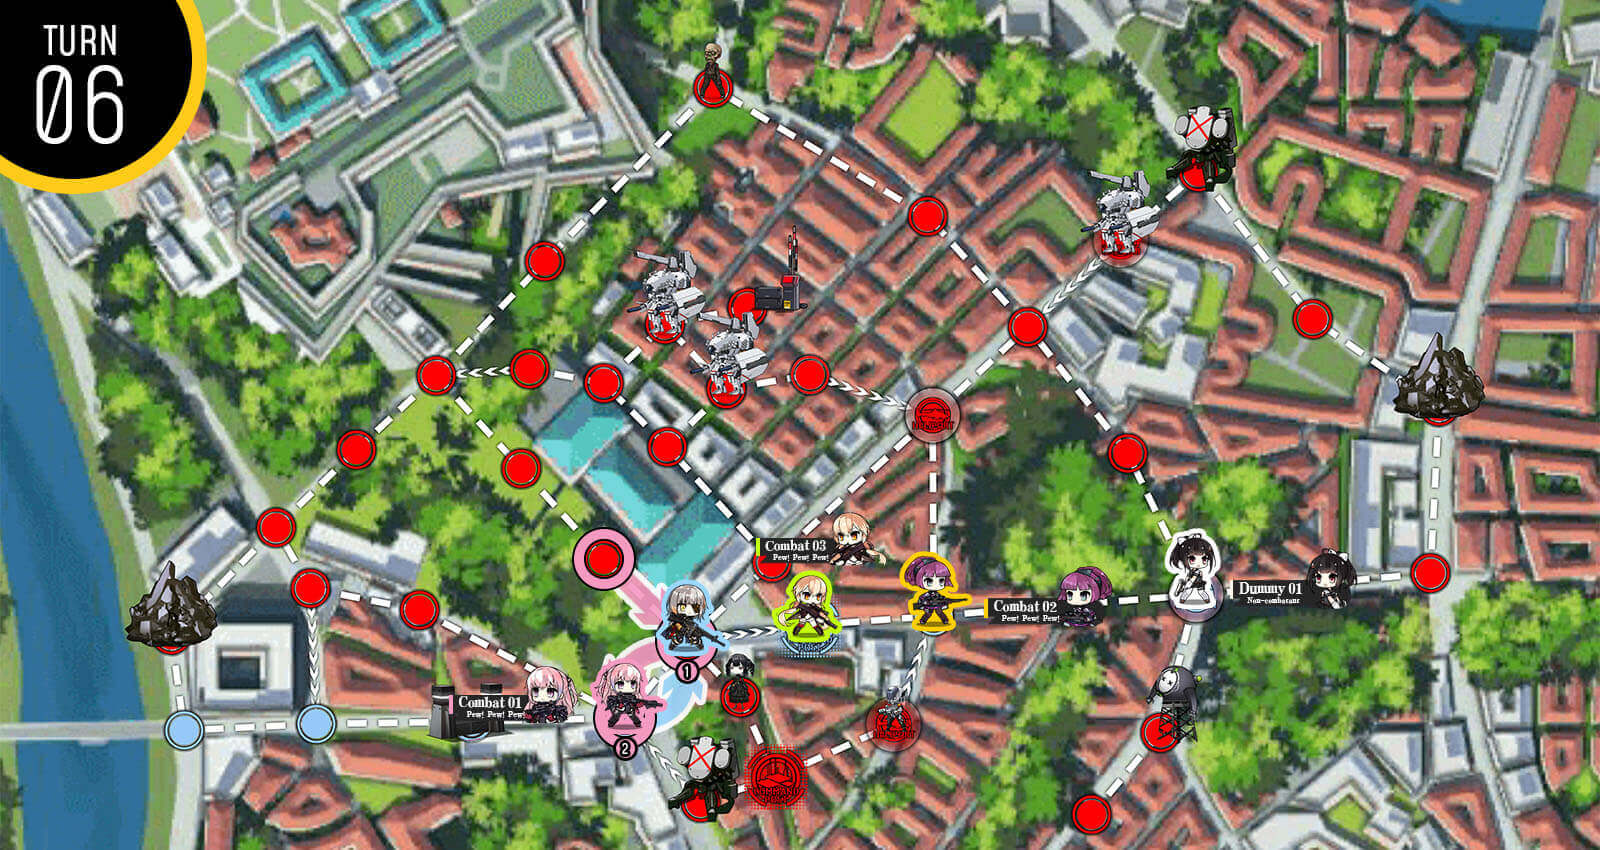
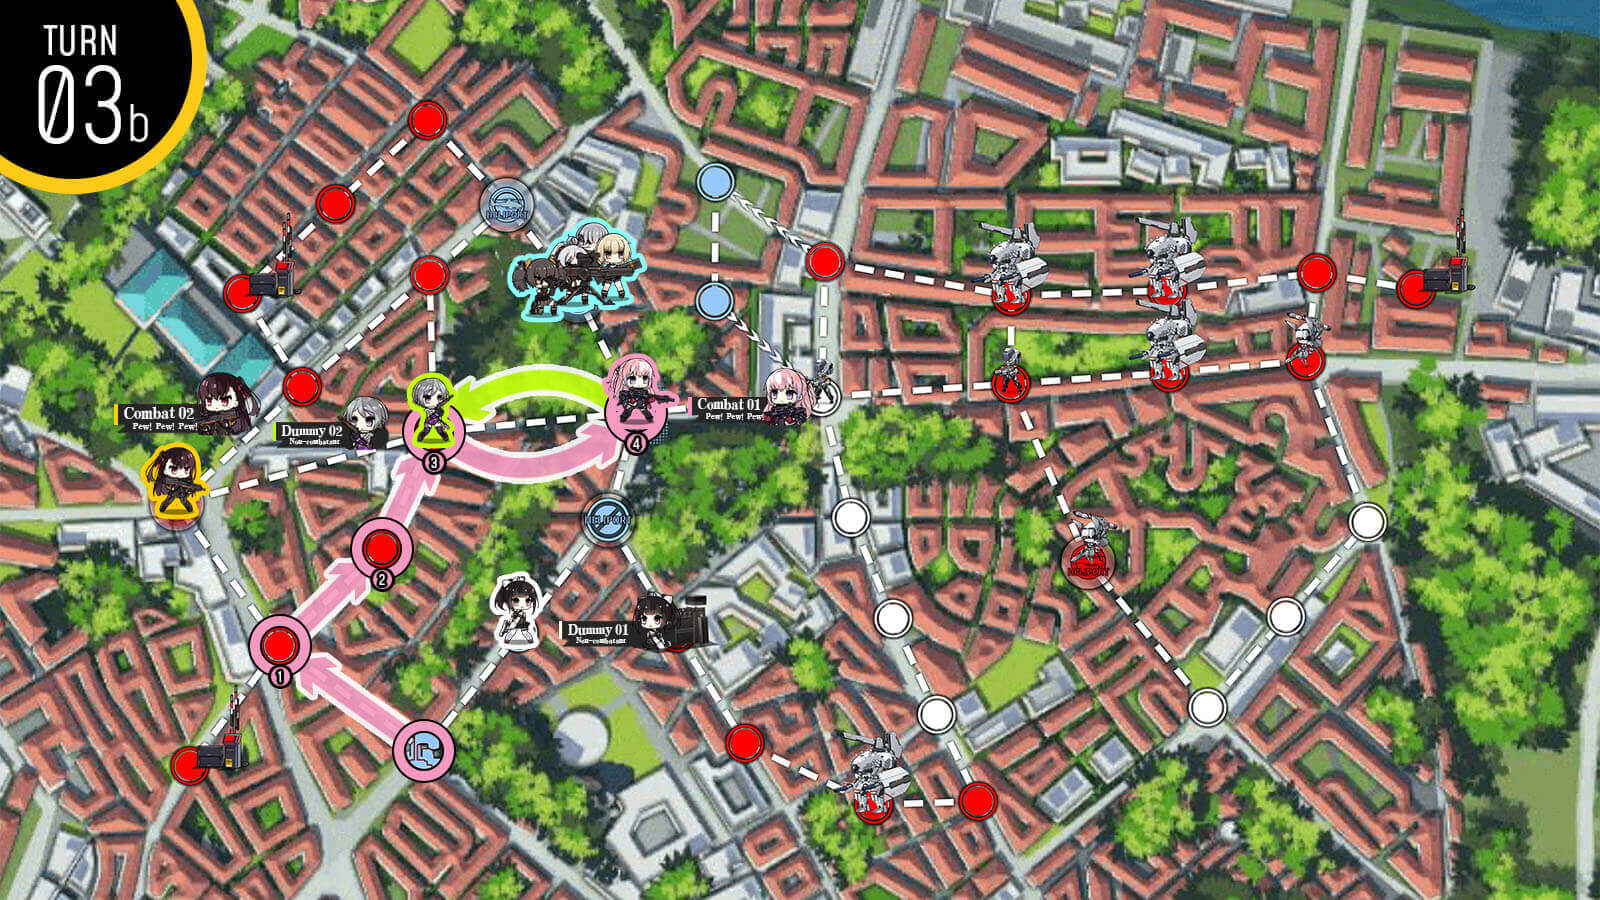
Then combat echelon at the top corner moves down to HQ, then swap with dummy echelons to the center [this saves some moves and protects dummies from RNG]. Resupply at HQ then move down to the node between the enemy helipads to surround capture one of the enemy spawn helipads.
With one remaining move, move dummy on the HQ to the large helipad. This saves some action points next turn.
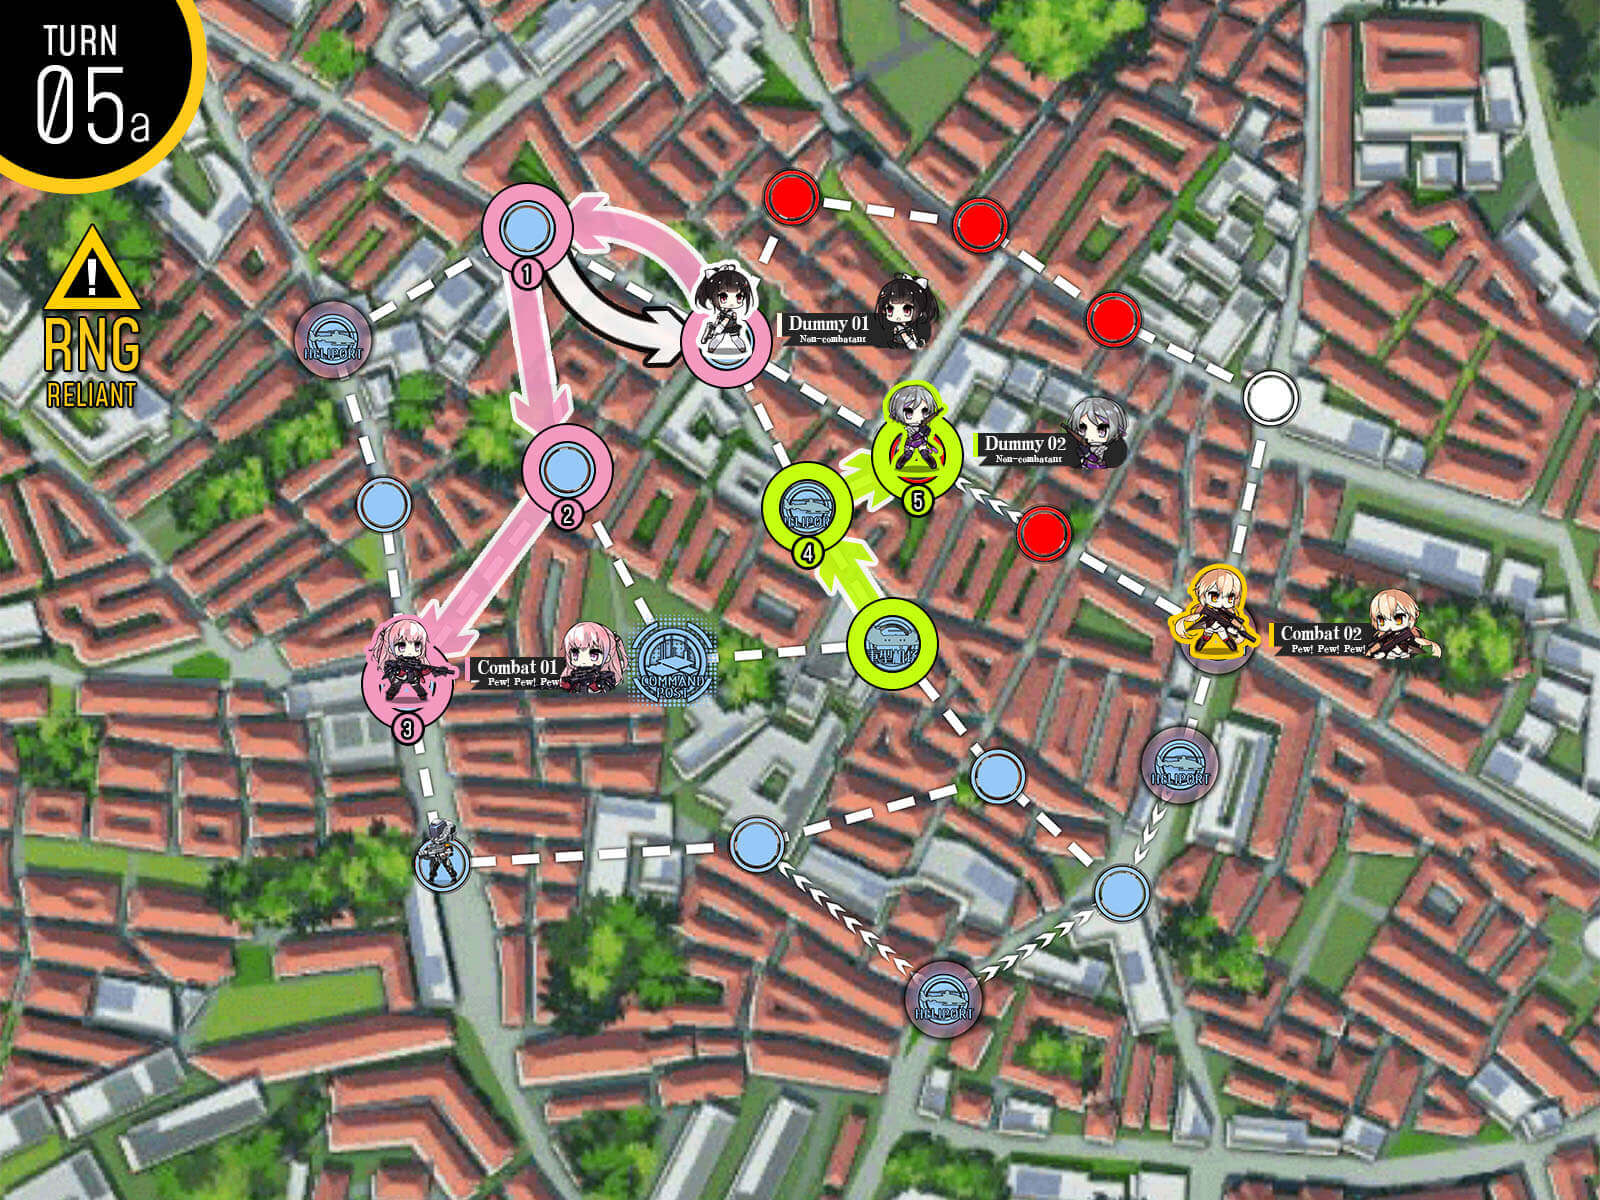
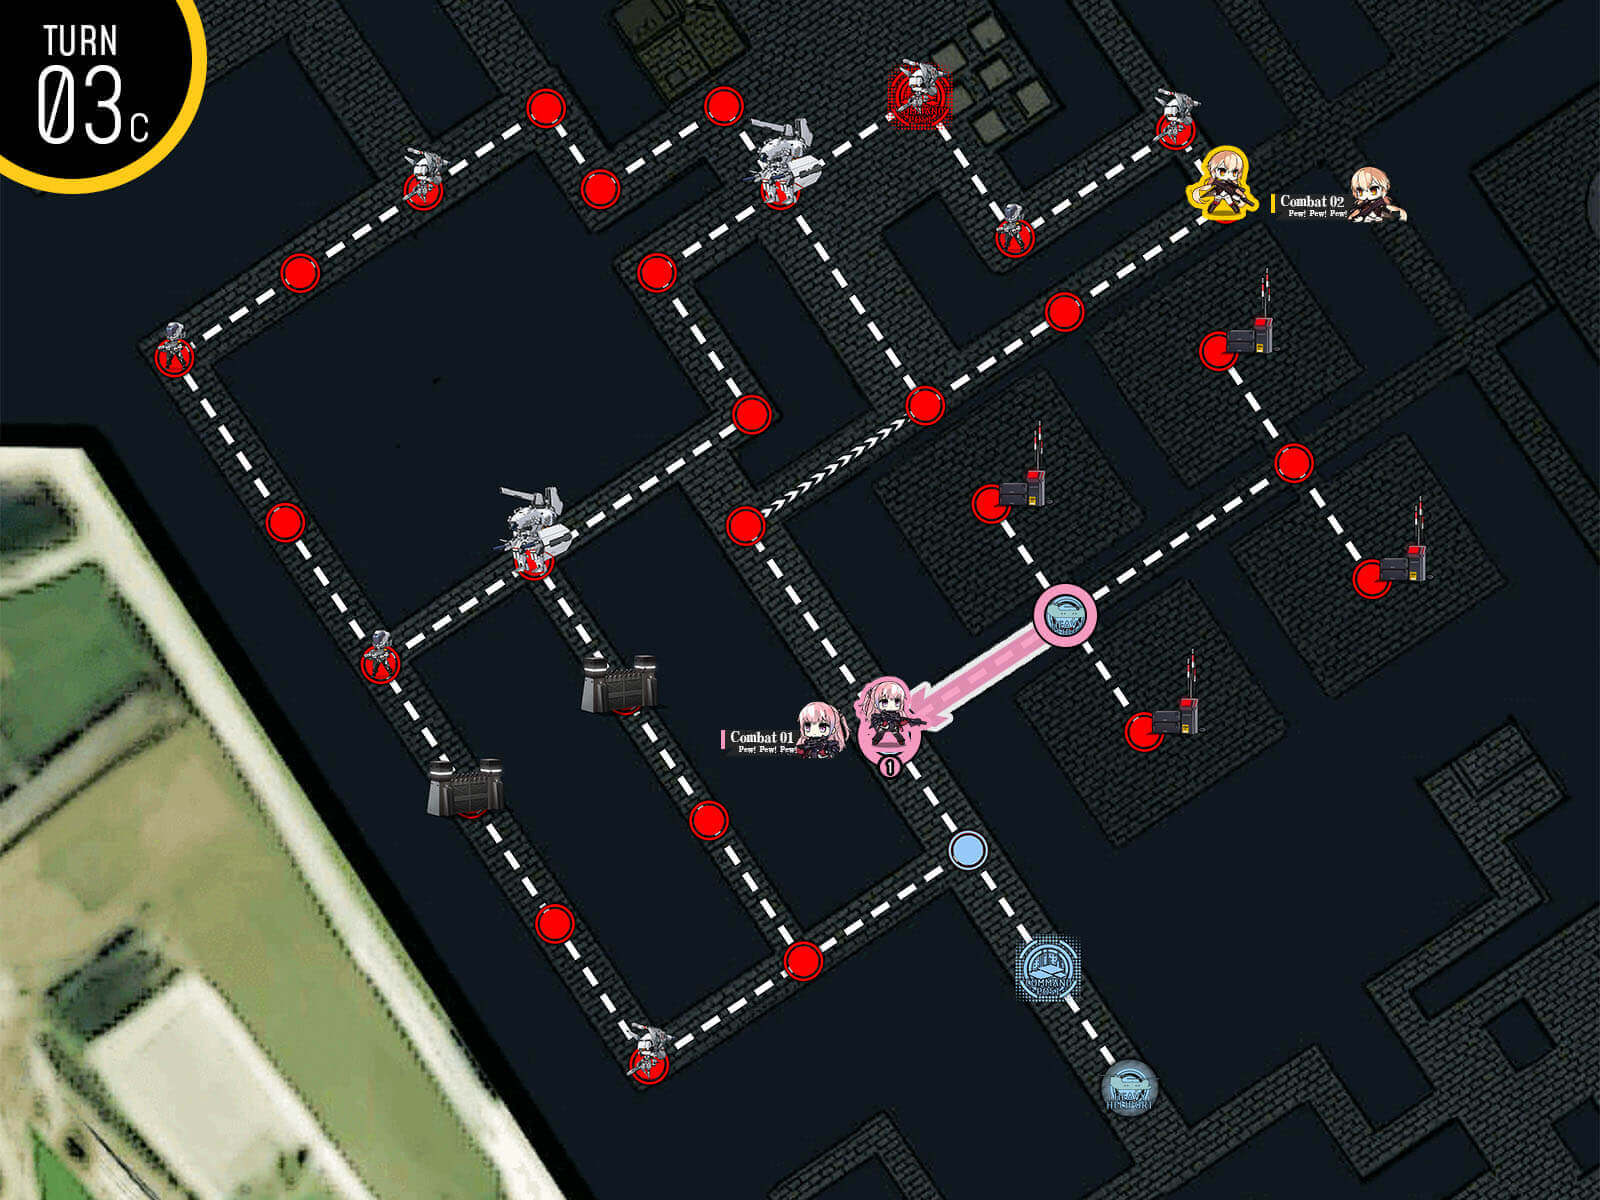
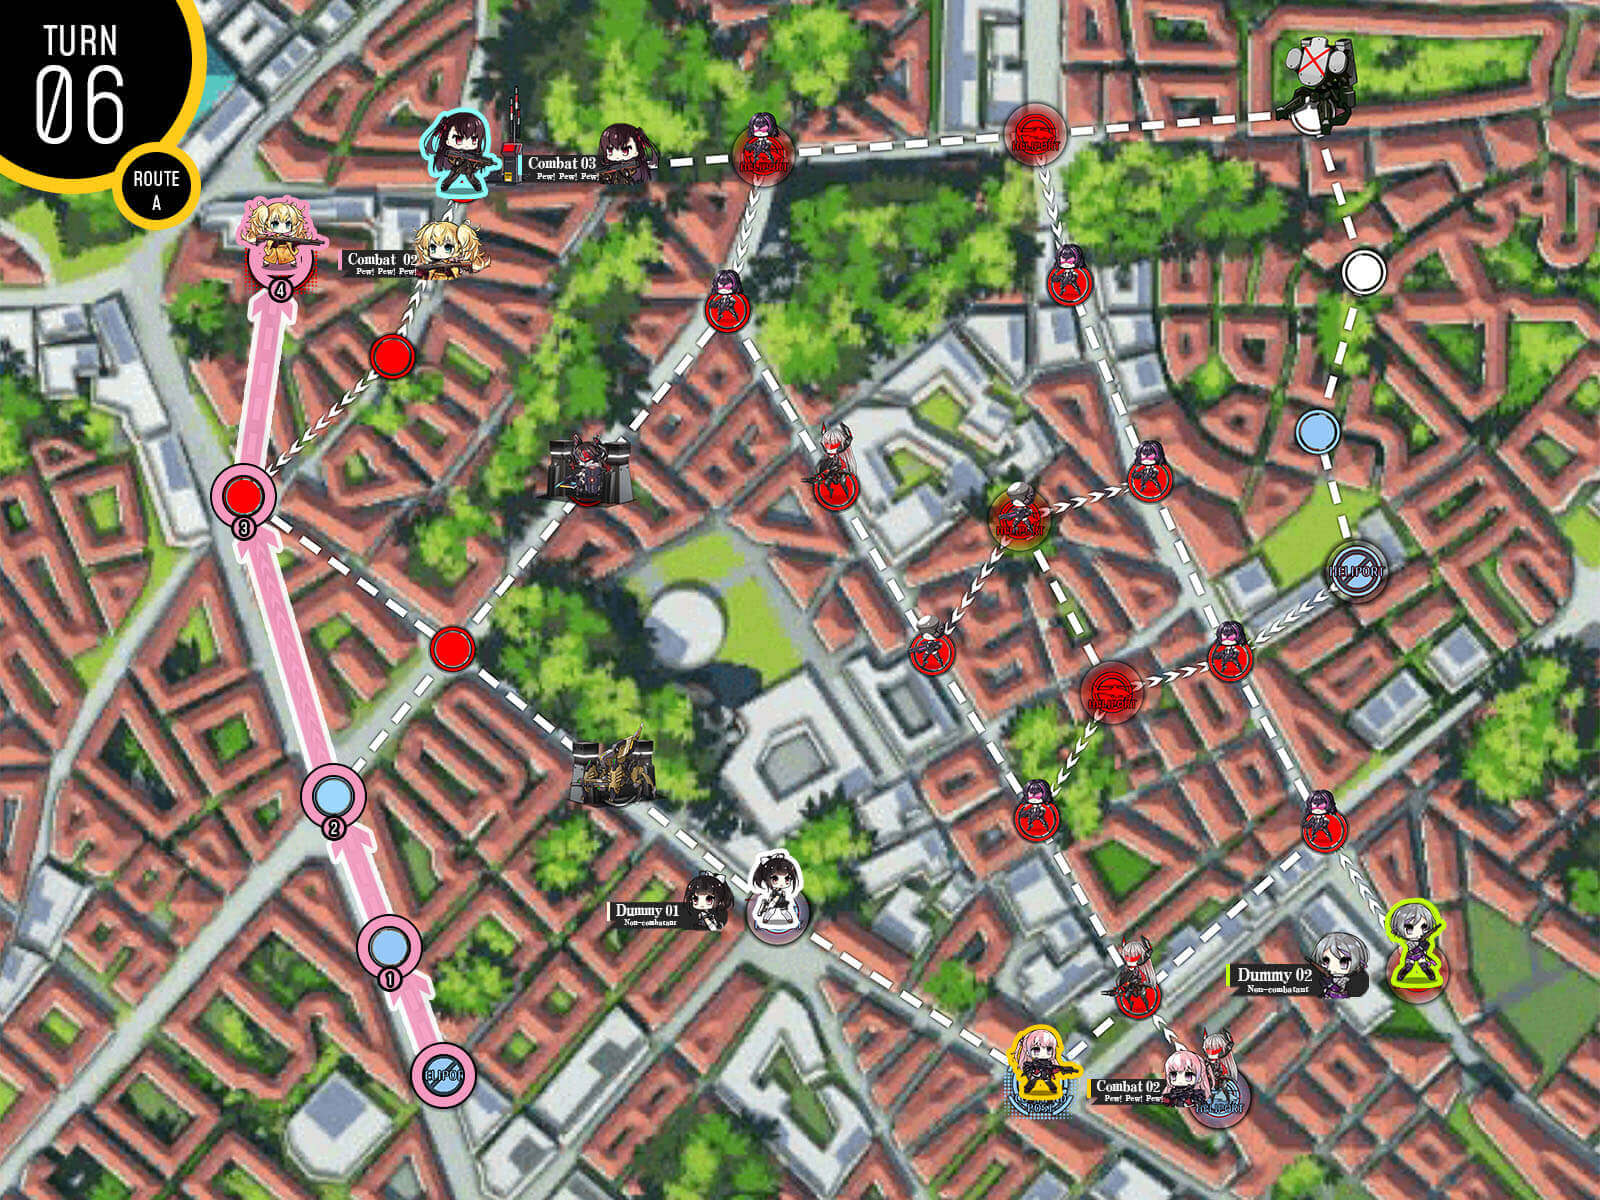
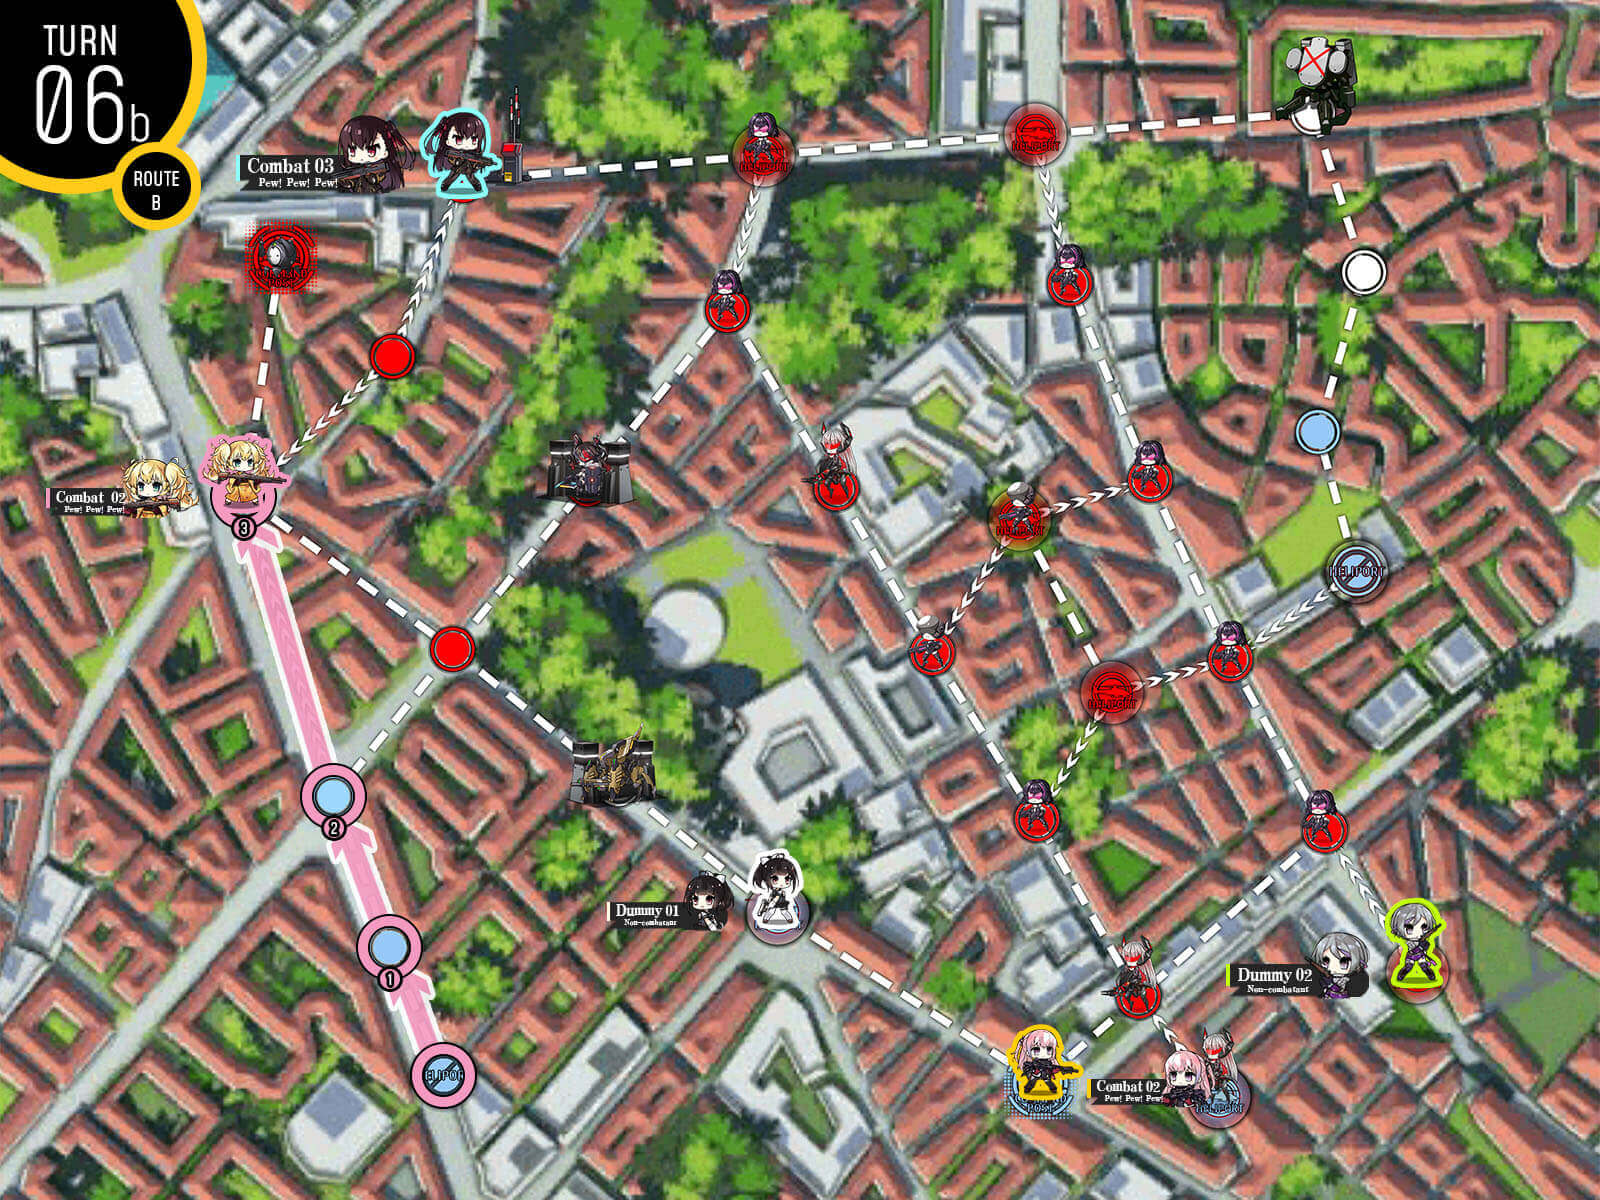
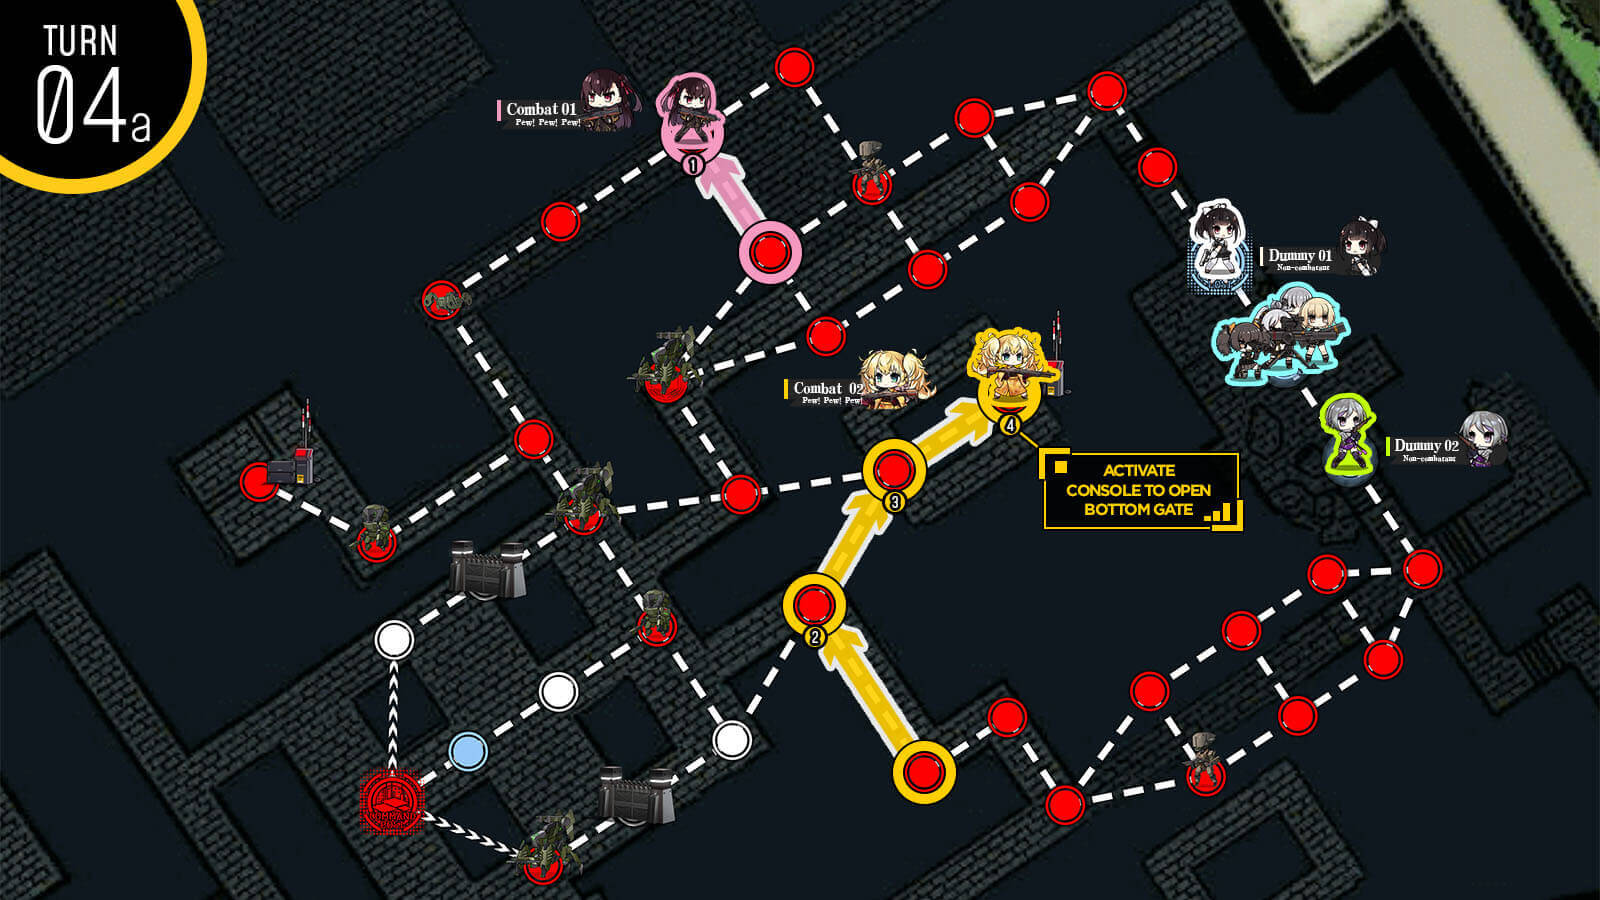
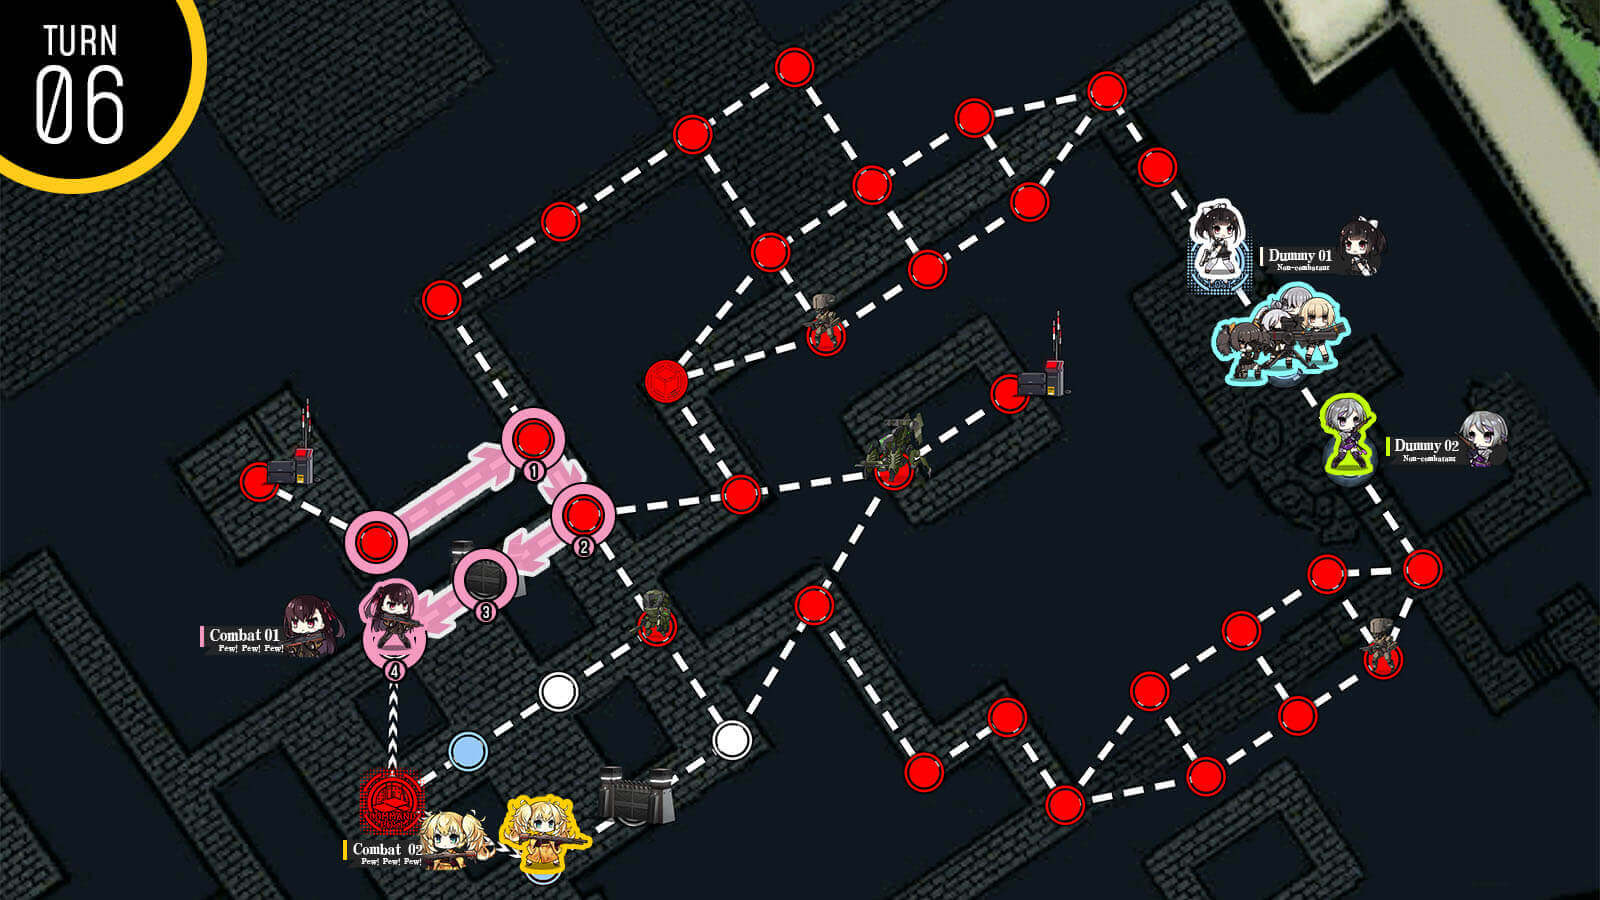
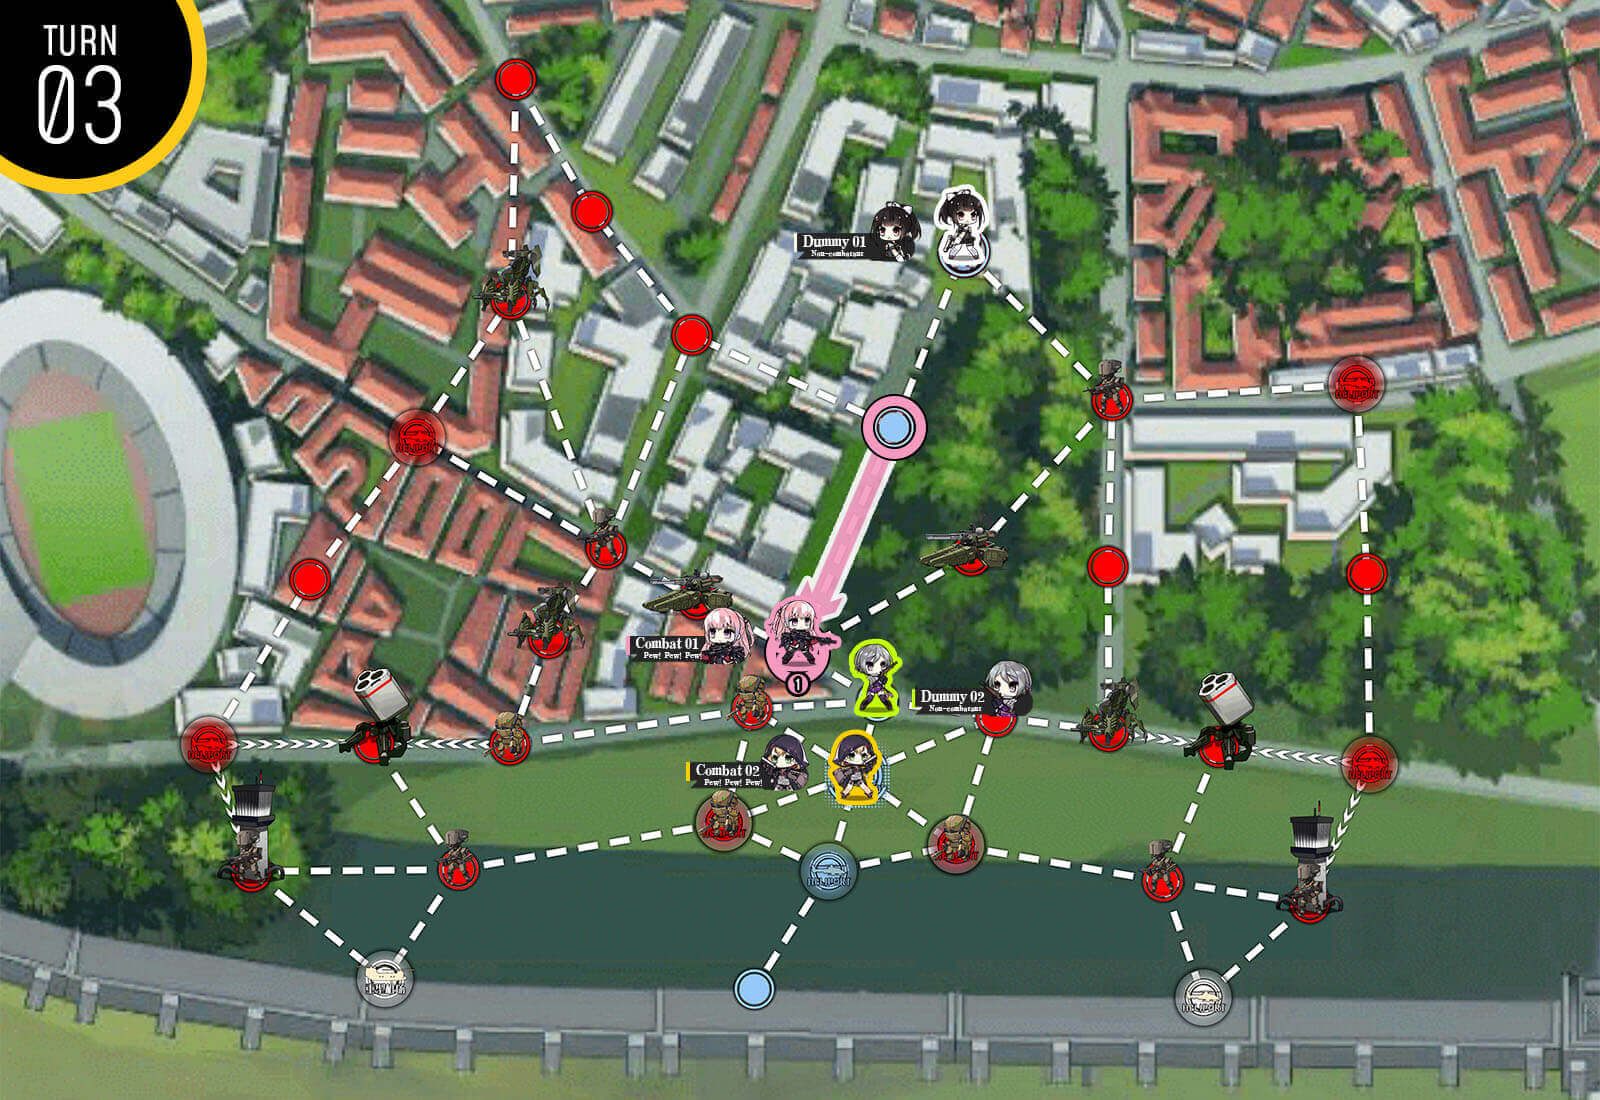
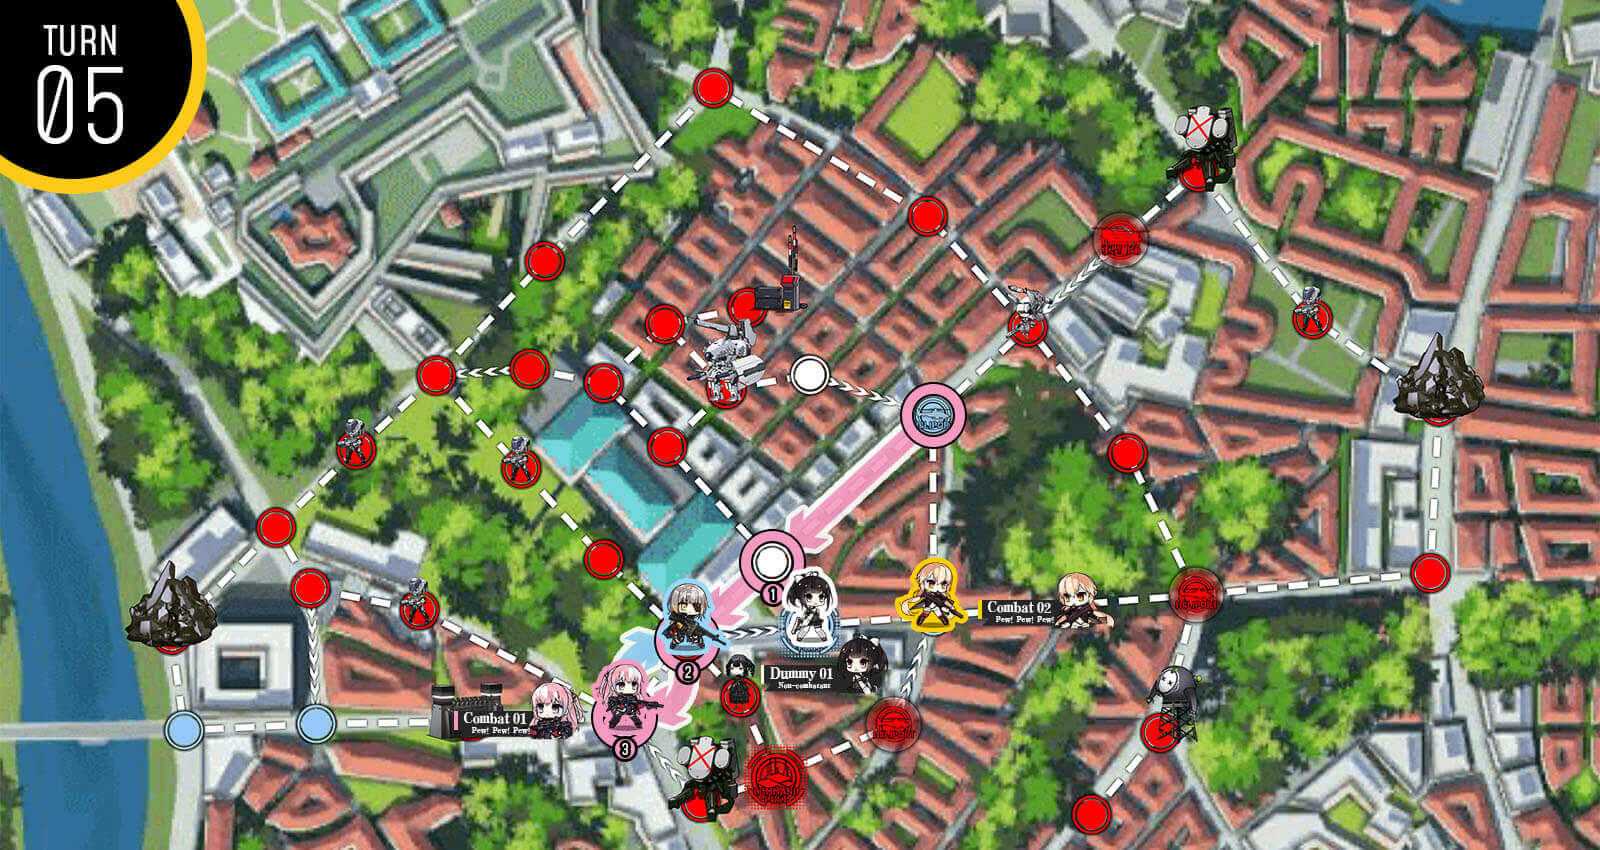
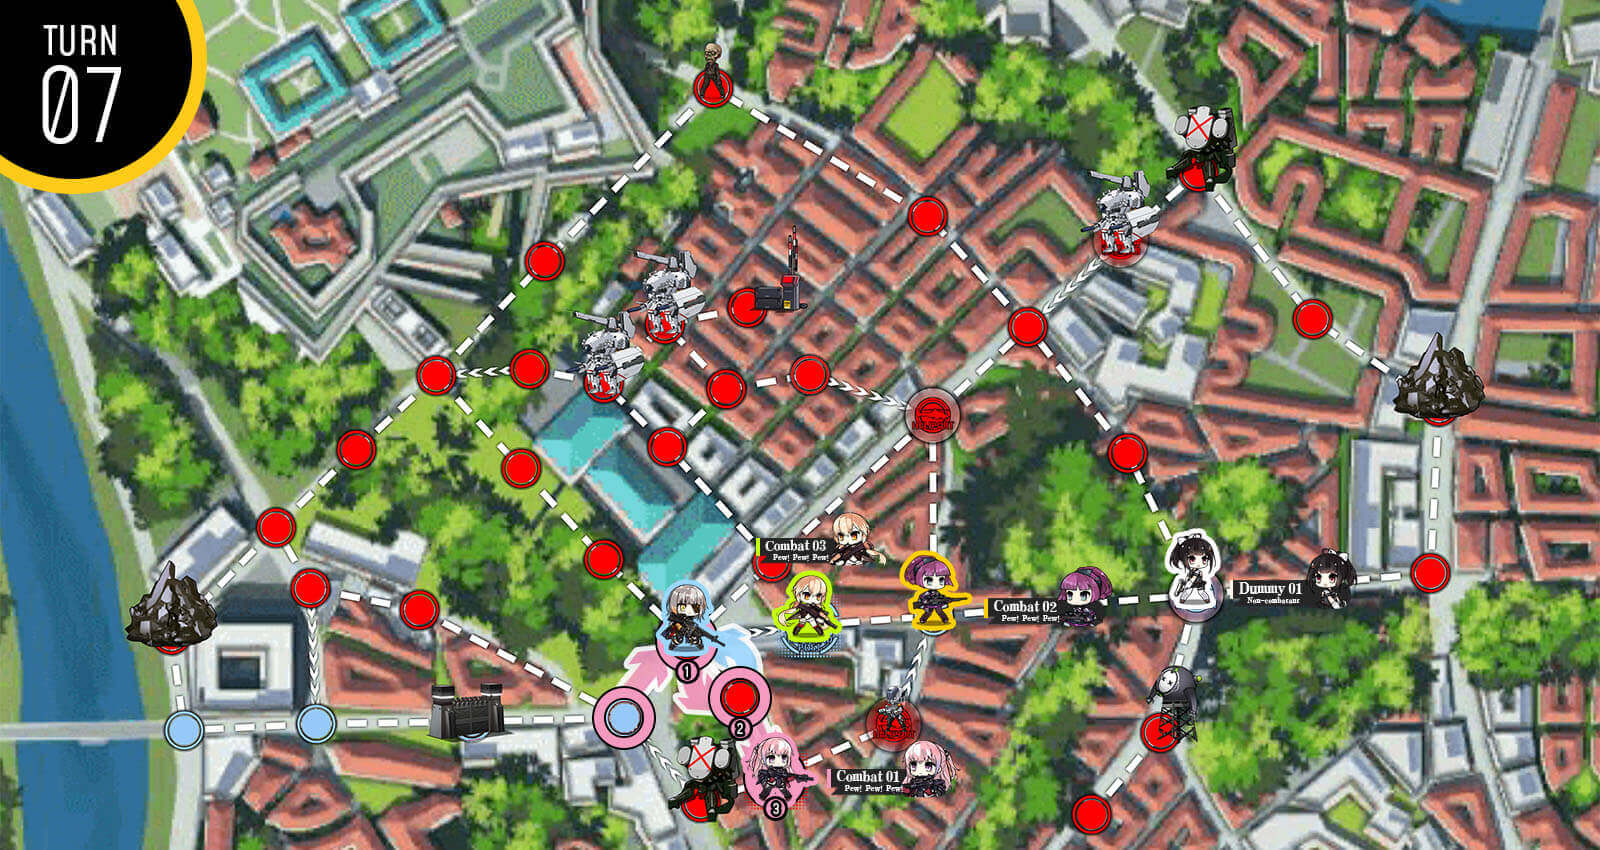
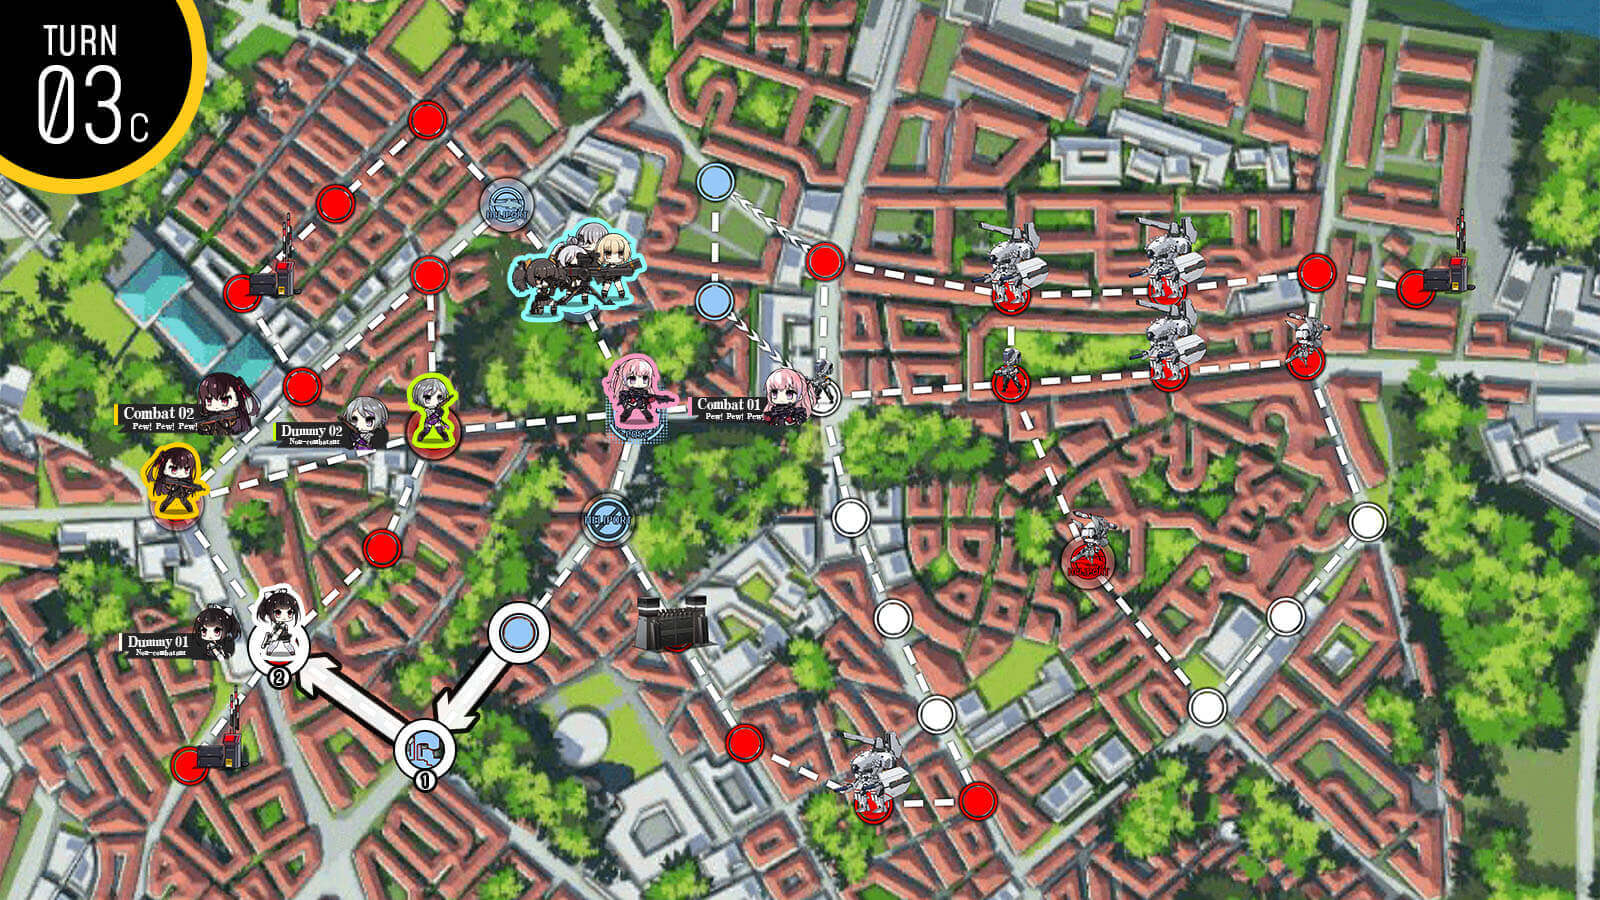
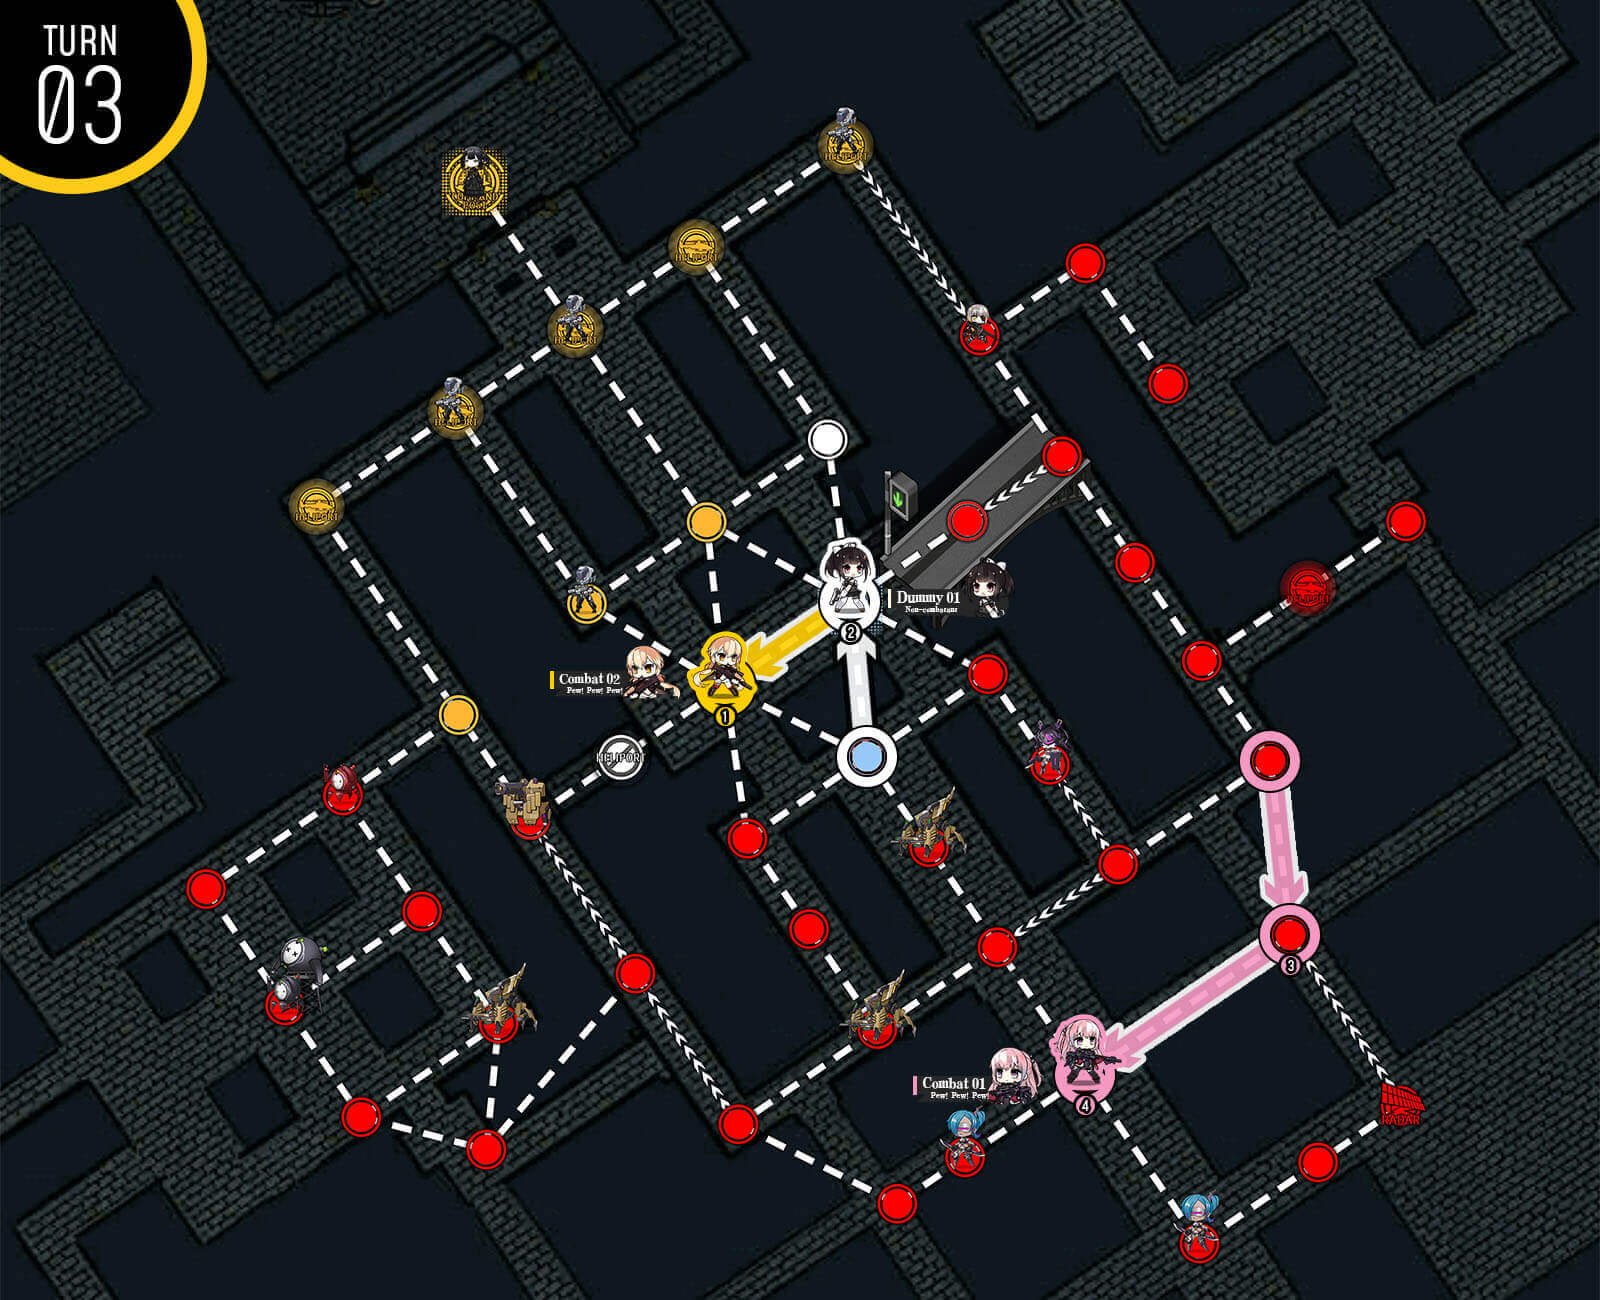
Combat echelon at the very bottom stays put and blocks any more enemy units from leaking from the right. Combat echelon closer to HQ moves around in large circle and blocks the last spawning helipad.
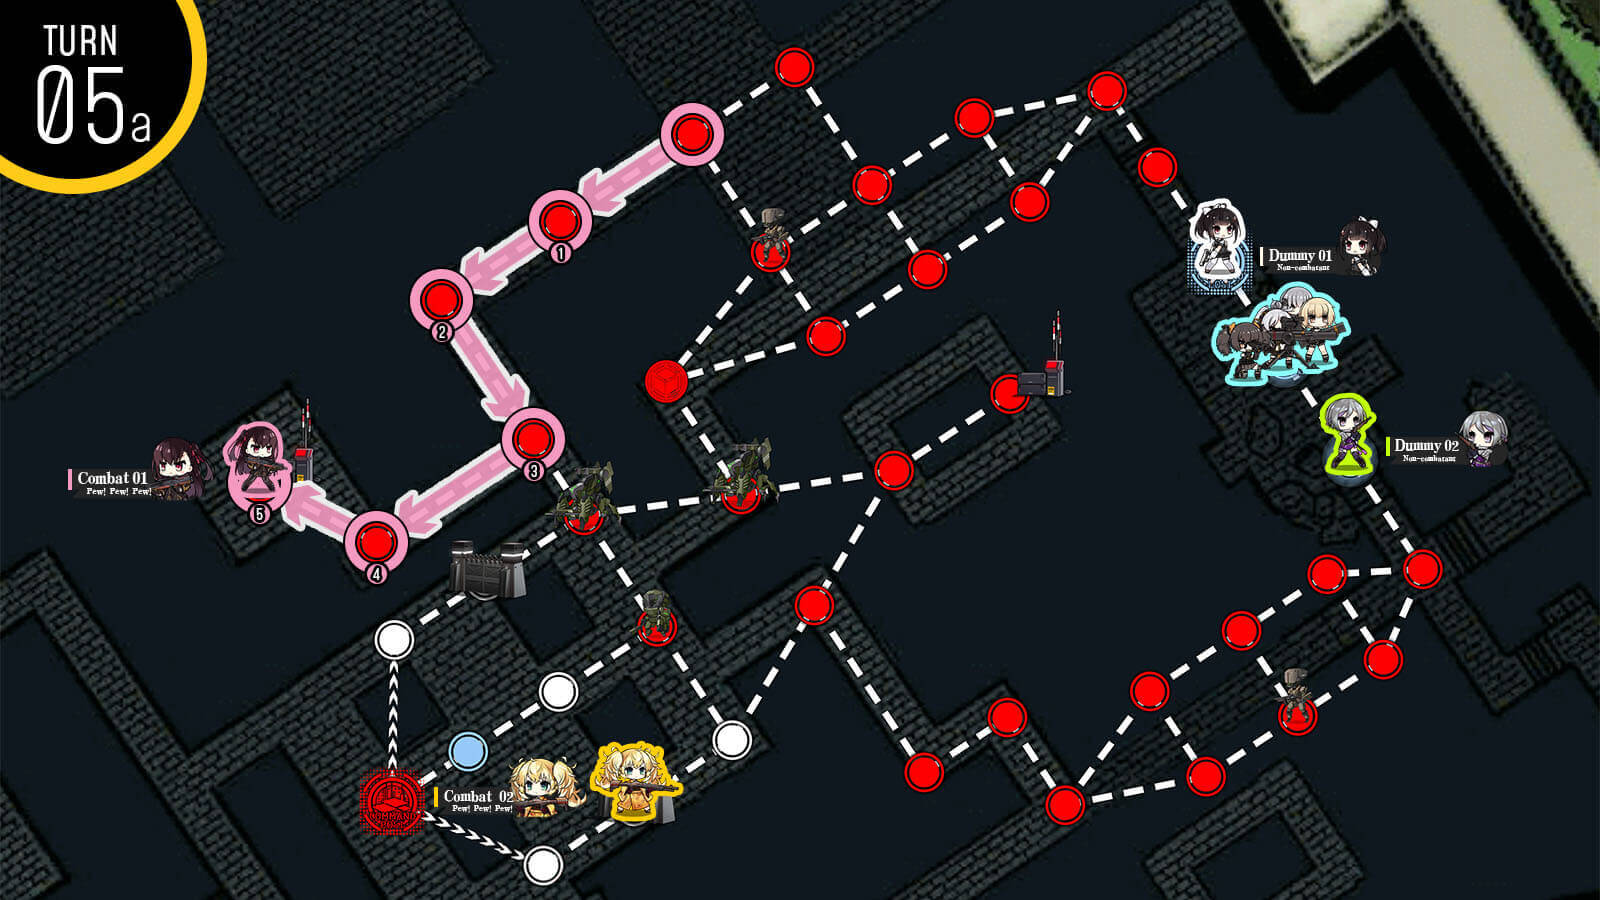
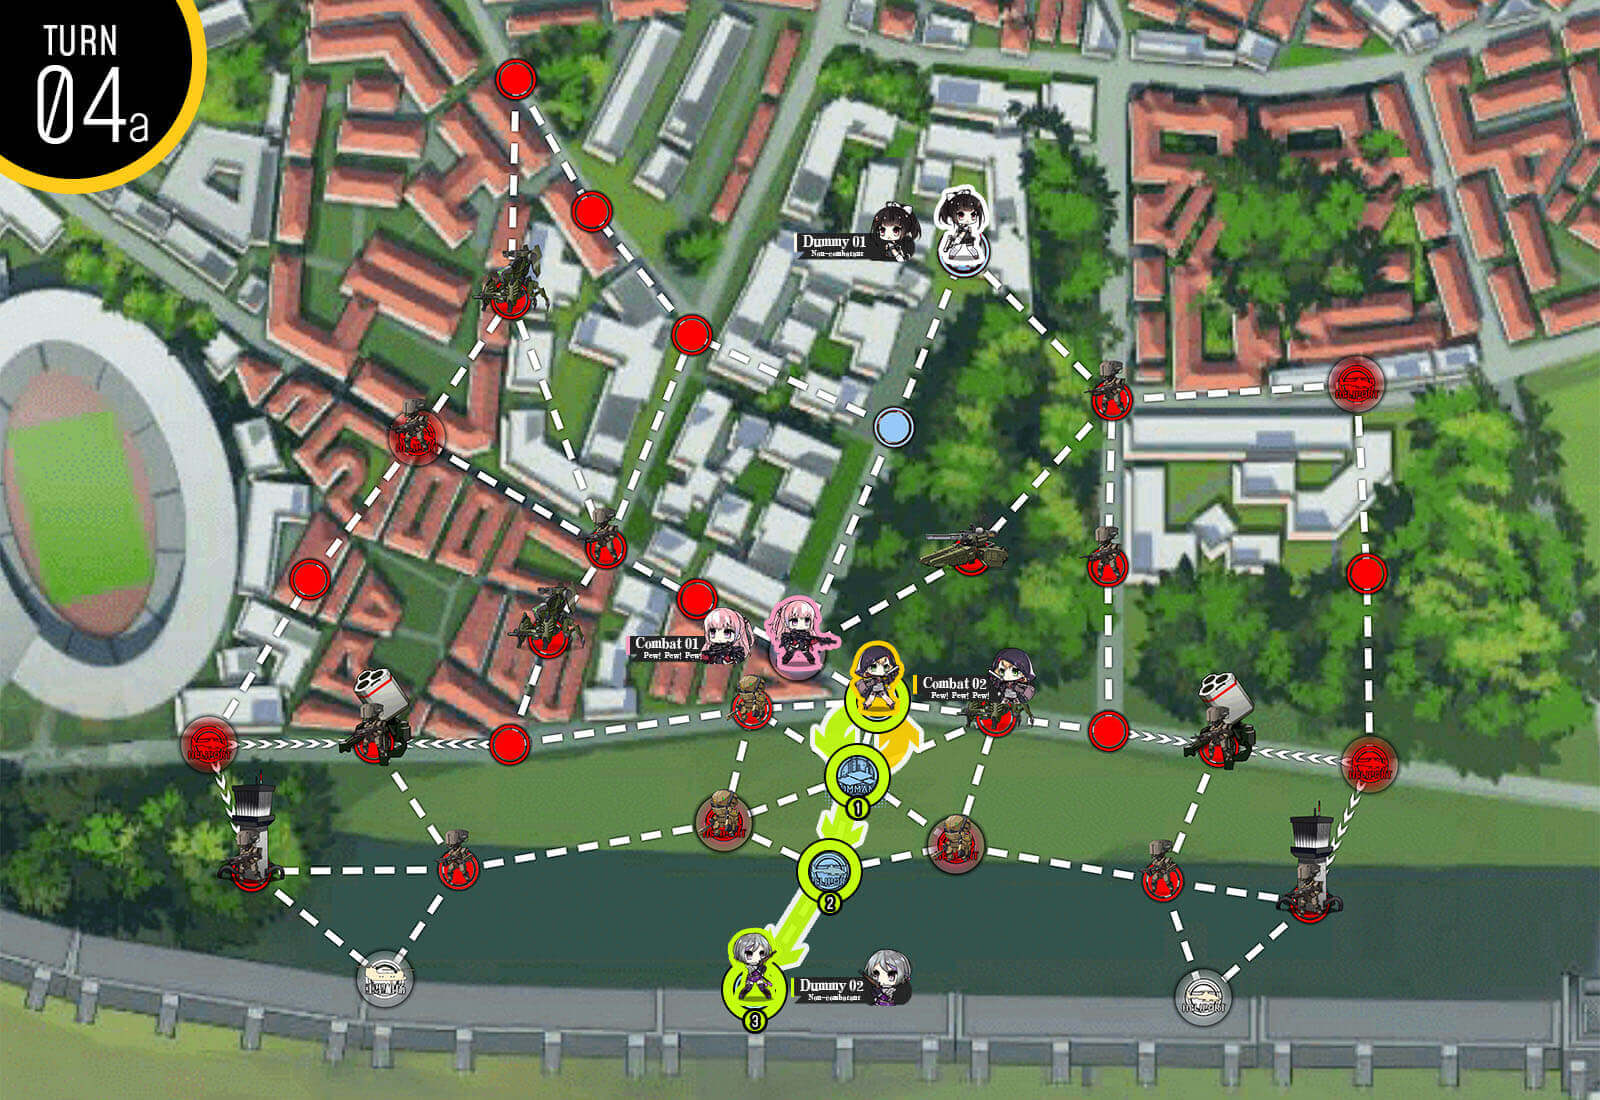
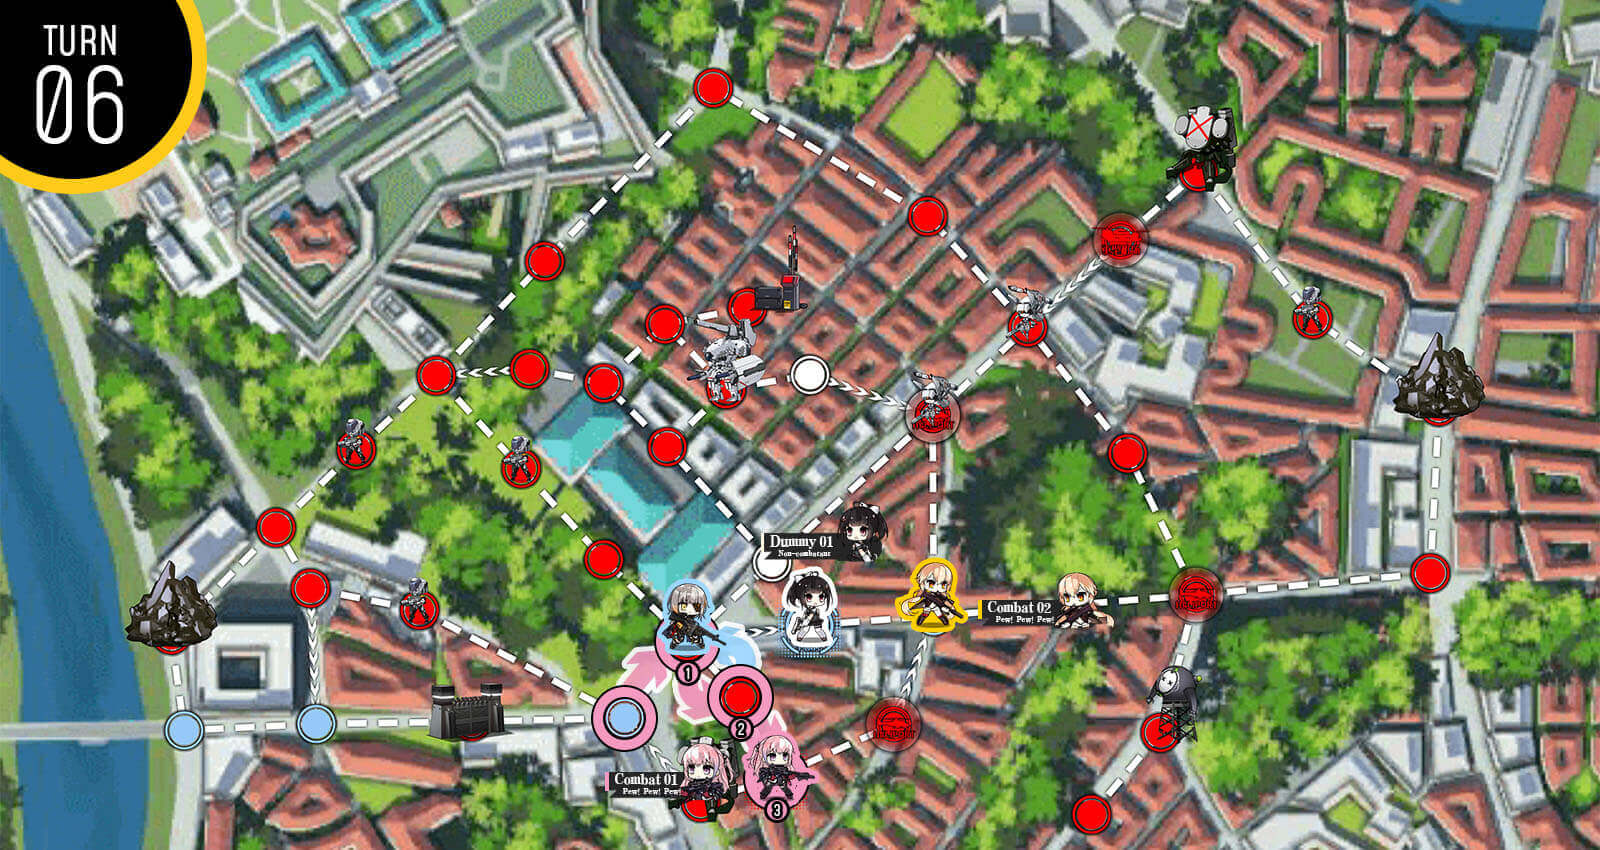
All that's left to do now is to control all nodes on the map before killing the last enemy unit in the bottom left corner. If RNG prevents you from keeping control of the helipads via surround capture, move the combat echelon unit at the bottom as shown to clear out the enemy near the center.
Continue moving echelons around to capture all nodes on the map.
Once you have all nodes under your control, kill the last enemy unit at the bottom left.
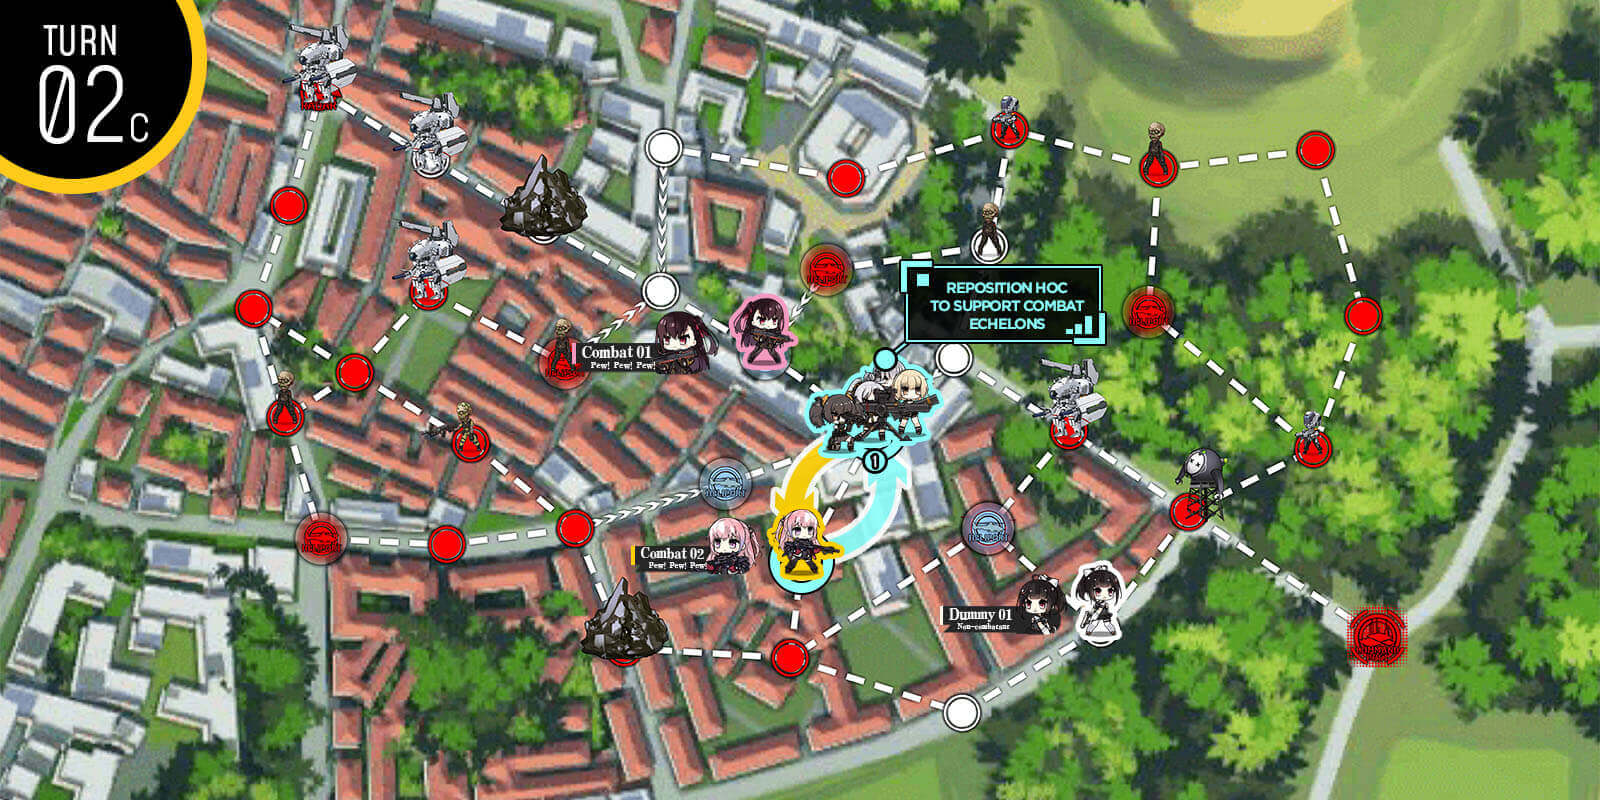
Swap echelon on the HQ and the HOC and remotely destroy enemy fire support platform. Revert the swap back to starting positions. Then combat echelon at the HQ goes through the bottom left corner to clear out the enemies near the destroyed enemy structure.
We then swap our other combat echelon with the HOC and move down to the bottom so that we can surround capture the helipad with one-way paths next turn.
Finally we need to defend the top helipad in the center. Deploy 3rd combat echelon at the large helipad then swap location with the HOC.
We now work on getting the top left helipad under our control. First deploy a dummy echelon on the HQ that we can use to swap and resupply for the combat echelon.
Once we bring the combat echelon back up to the left of the HQ, swap and resupply the echelon. Move the 3rd combat echelon and HOC at the center so that HOC can provide support against the Gundam fight.
Once we bring the combat echelon back up to the left of the HQ, swap and resupply the echelon. Move the 3rd combat echelon and HOC at the center so that HOC can provide support against the Gundam fight.
Once we bring the combat echelon back up to the left of the HQ, swap and resupply the echelon. Move the 3rd combat echelon and HOC at the center so that HOC can provide support against the Gundam fight.
Once we bring the combat echelon back up to the left of the HQ, swap and resupply the echelon. Move the 3rd combat echelon and HOC at the center so that HOC can provide support against the Gundam fight.
Once we bring the combat echelon back up to the left of the HQ, swap and resupply the echelon. Move the 3rd combat echelon and HOC at the center so that HOC can provide support against the Gundam fight.
Once we bring the combat echelon back up to the left of the HQ, swap and resupply the echelon. Move the 3rd combat echelon and HOC at the center so that HOC can provide support against the Gundam fight.
Deploy the dummy echelon on the HQ and just hit end turn. You will see that we will gain lots of helipads on the center area.
Move your dummy to extract the hostage then trigger the gate console to open gates. We are taking the bottom route. As you move, you will notice that stepping on certain nodes will change the AI units in the middle from friendly to enemy. Once you get to the end of the path, DO NOT CROSS over the one-way path.
Change the AI settings of friendly units marked red to "Wait", and one marked with yellow to "Eliminate". This is very important. Then hit end turn. When the AI unit attacks, just quickly retreat as it has done its job.
Now there is a path cleared by one AI unit. Take the middle one-way path then swap your way to the AA platform to the left. This being destroyed allows you to use the helipad at the top center and safely extract to clear the mission.
Continue swapping your way in a clockwise fashion and go directly to the helipad to extract the hostage and get your secret achievement reward.
Start with a combat echelon on the HQ and dummy in the helipad. Move combat echelon down one and deploy a 2nd dummy echelon.
Move 2nd dummy up to the gate console then deploy 2nd combat echelon on HQ and end your turn.
Use dummy echelon to toggle console. Take your combat echelon through the first gate and kill the unit at the center before activating the second console to open the next gate. Proceed to move towards the third console at the bottom of the map.
Combat echelon at the bottom moves to activate the third console which opens the gate to the radar node. Combat echelon at the HQ moves to the center node.
Once the Boss unit moves out of the way to the third gate, we go around the top side to the radar node and end turn to clear the mission.
Start with a combat echelon at the HQ and dummy on the helipad. Combat echelon moves down one so that we can deploy dummy echelon at the HQ.
Dummy echelon moves up to control panel and opens the gate to the bottom right. With remaining move, deploy 2nd combat echelon.
1st combat echelon moves through opened gate and reaches the 2nd control panel to open the bottom left gate near the HQ.
Combat echelon at the HQ moves down one.
Combat echelon near the HQ moves through the new gate that opened and actives the 3rd control panel at the center. This should open the last gate in the way to the radar node. Then move up to the left.
Now you should have enough move points to get to the radar node without fighting Nyto. If you wish to fight Nyto you can wait another turn until she is at the gate, then crush her with the gate a few times until she is weakened. Go through and get to radar turn after that.
Start with a combat echelon that is able to reliably handle armored units with 54 armor. If you have a high level RFHG echelon that can kill hydra with 199 armor, deploy that instead. Combat echelon swaps with hostage [but not rescue], then moves to the occupied helipad.
Move down your combat echelon down one then deploy a 2nd combat echelon at the helipad. This combat echelon does need to be able to beat at least one 54 armor enemy towards the end. Swap the combat echelons' locations and the 2nd combat echelon moves down to the yellow helipad at the bottom.
2nd Combat echelon at the bottom moves to the console panel that is farther away from the helipad. Deploy a dummy echelon at the bottom helipad and move it to the console panel adjacent to the helipad. These consoles will be used when Hydra units are passing through the nodes with fire support platforms on either side.
Before you move check both console panels to trigger correct fire support platform to deal damage to the Hydra. 2nd combat echelon then moves to the bottom left so we can capture the helipad on the other side of the one way next turn. Move Combat echelon at the center helipad up one node towards the hostage then deploy 2nd dummy echelon at the helipad.
We are going to swap location with dummy and hostage, making it getting run over by the tank. This triggers the hidden achievement where hostage unit dies.
Finally last thing to do is to retreat the combat echelon near the HQ and redeploy at the open helipad next to one way path. Then move straight for the enemy HQ Another option is to deploy and third combat echelon if you are aiming for S-rank.
Start with combat echelon at the HQ and move to fight the weak[?] Hydra unit at the helipad.
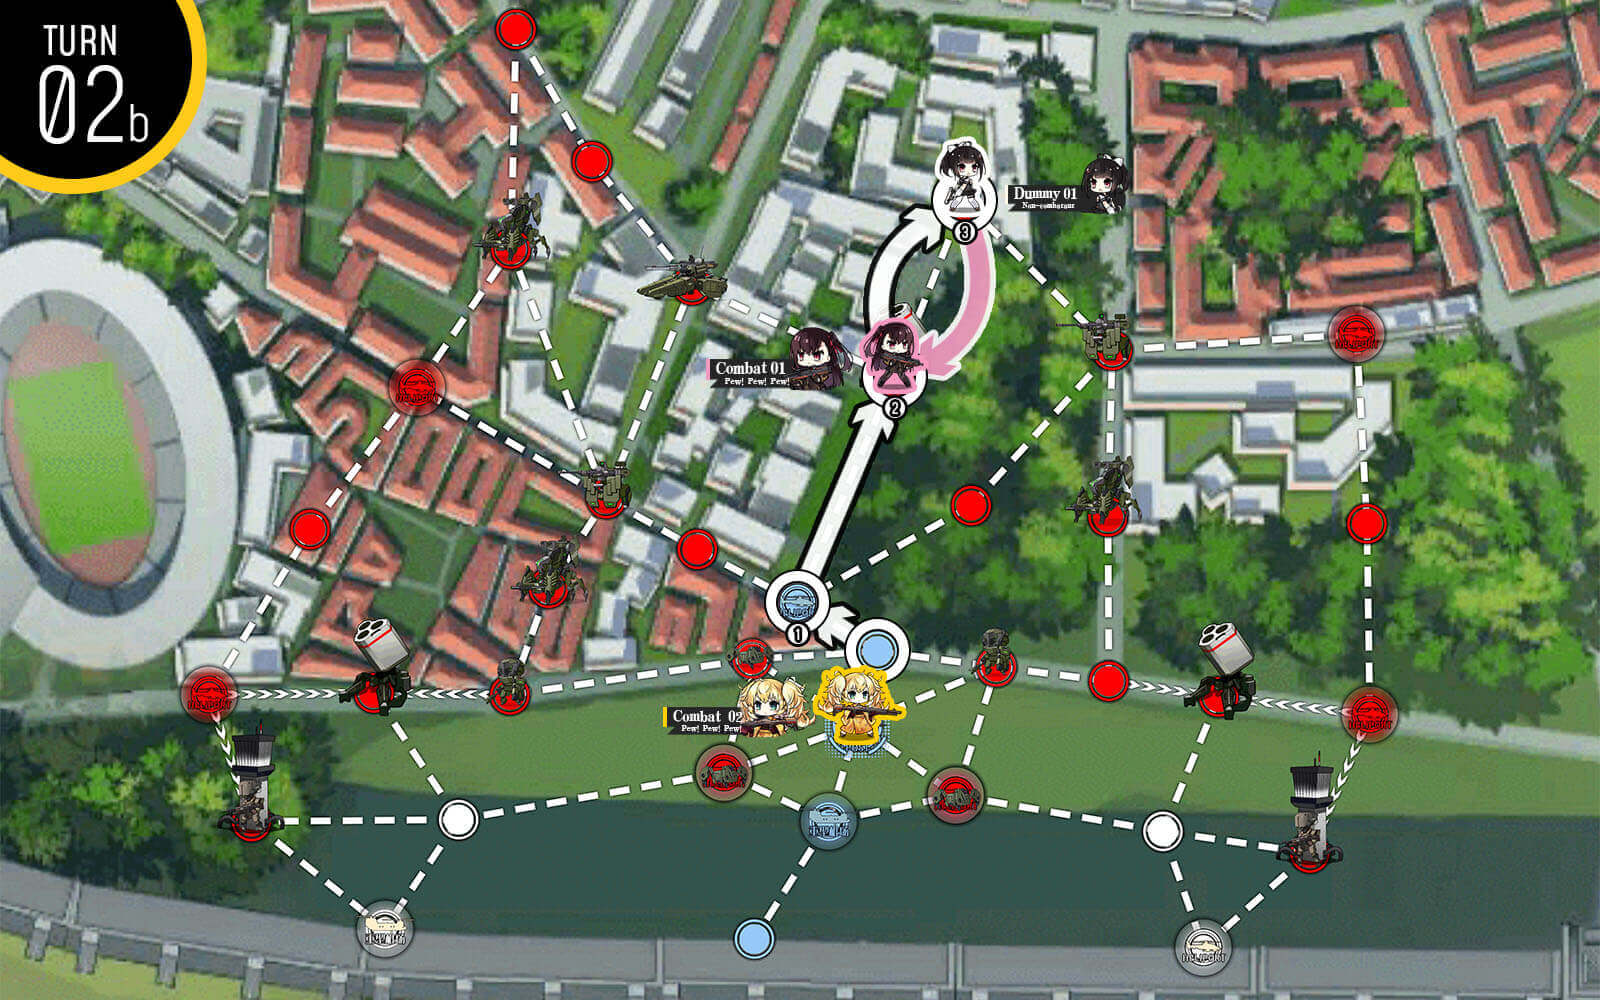
Combat echelon moves down one and deploys the 2nd combat echelon. 2nd Combat echelon moves down to take helipad at the bottom.
Both combat echelons move one node to the left each. we then deploy 2 dummy echelons right next to combat echelons.
There are two control panels that activates two of the artillery platforms which can weaken the 30 Hydras to manageable level.
Use the bottom dummy echelon to trigger the one that can damage the Hydra on the left then proceed to move along the bottom to capture the node next to the one-way path. This ensures that we have another way to get to enemy HQ without fighting the Hydra unit.
Here you can take either this or the path on the next image.
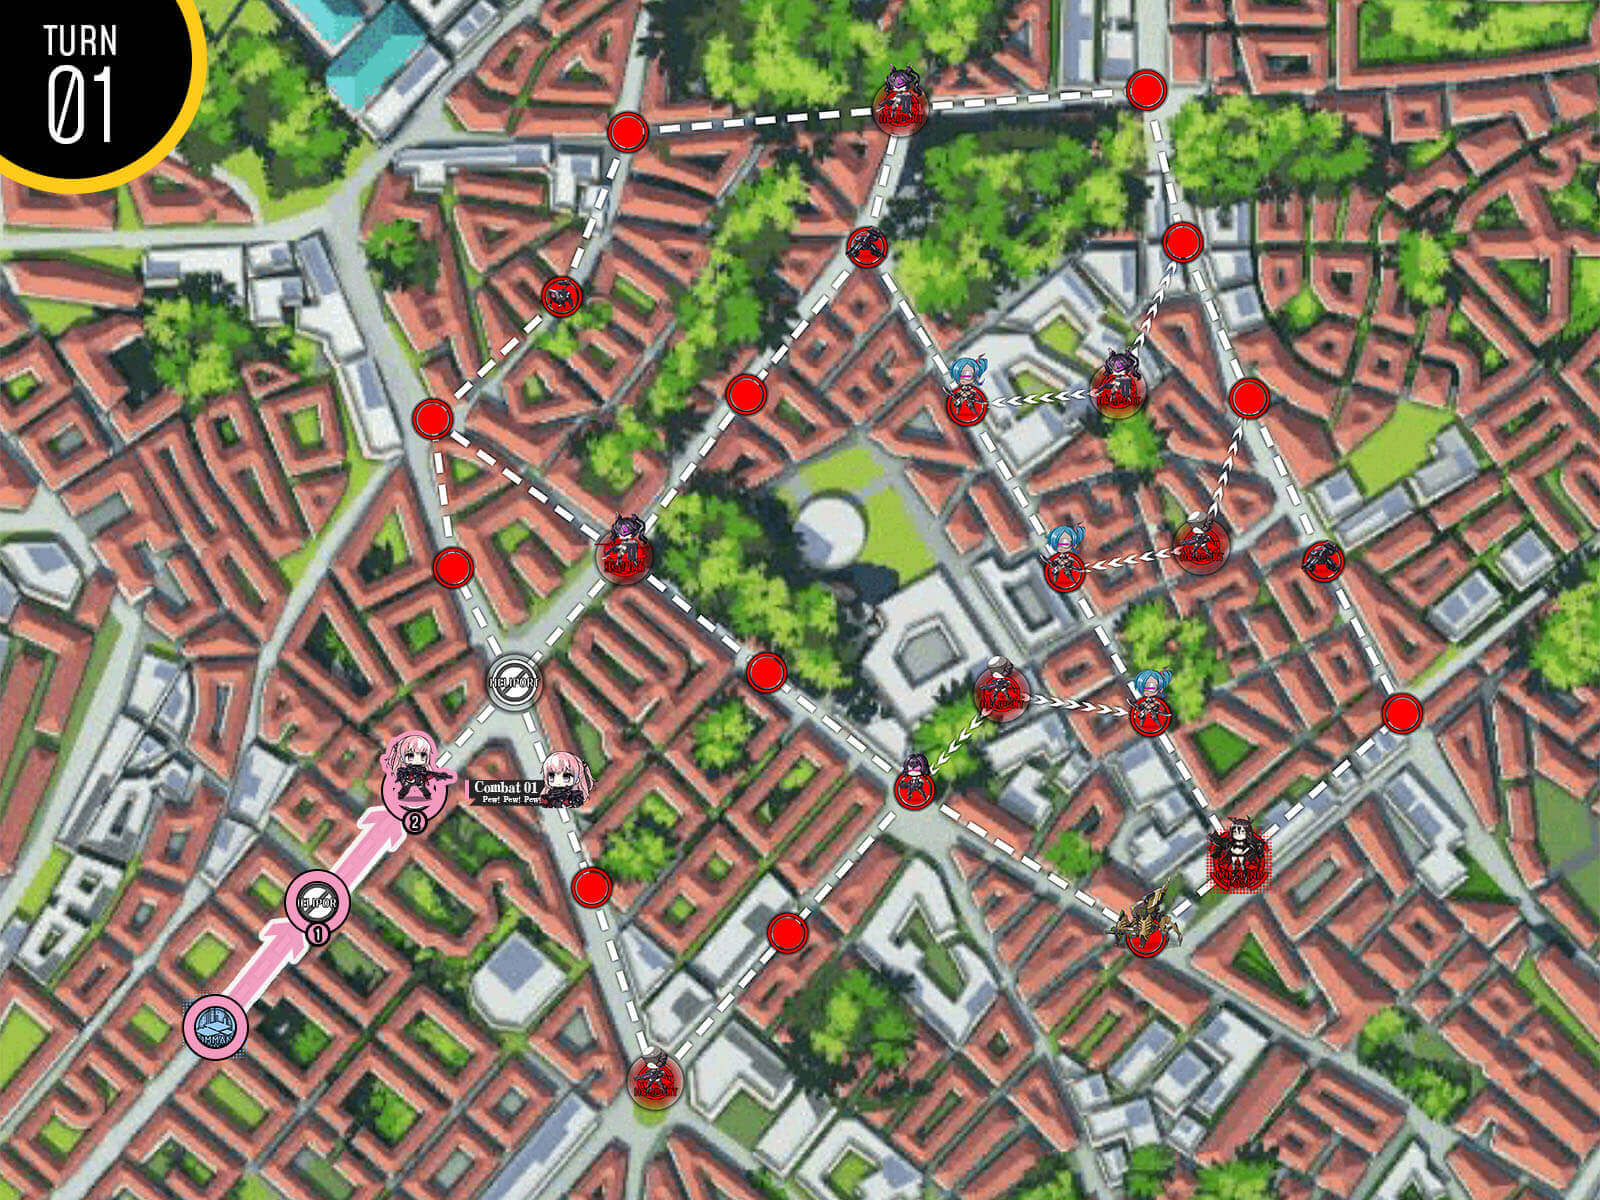
Start with two combat echelon on each starting location, with the stronger echelon on the HQ. Combat echelon on the HQ heads down the path with two hostages, swapping locations with both of them. Combat echelon at the right side of the map moves left and takes the open helipad.
Rescue the hostage at the bottom of the map then move back up the street to the node right below the HQ. Deploy dummy echelon on the HQ and swap with combat echelon to manually extract the hostage. If there's an enemy unit next to the HQ, leave the combat echelon on the HQ to prevent it from being attacked.
On our 3rd turn we get the last hostage down the street by swapping then rescuing.
Return back to HQ then manually extract to clear the mission.
Start with two combat echelons on each starting location. Move combat echelons to take the nearby helipads then deploys dummy echelons on both starting locations. Dummy echelon on the HQ moves right to capture another helipad.
On turn 2, combat echelon on the right side fights its way through to the hostage and swaps first before rescuing. Then combat echelon at the HQ side moves down the street to swap with the hostage in front of the gate. Deploy HOC at the large helipad under the HQ then move it down to swap with the hostage as well. If you see an enemy unit at the spot marked above, you will have to deploy 3rd combat echelon instead and sandwich the hostage between the combat echelons to protect it. Then deploy HOC next turn.
RNG will either have kept the Gundam alive at the bottom or made it kill itself by running into the hostage. If it's still alive use HOC's support to clear it with the combat echelon and return to starting position. [Remember to swap before rescuing!]. Then combat echelon on the right side returns to the helipad next to dummy echelon.
Now all we have to do is to rescue two hostages and you should have plenty of move points to do so without any issue.
Start with a combat echelon on the HQ. Move up one node then deploy the 2nd combat echelon.
Combat echelon moves to the helipad near the console panels and 2nd combat echelon follows right behind.
Make sure to resupply all echelons prior to moving!
Combat echelon not on the helipad moves towards the HQ avoiding the Gundam. Move to kill 4 units and use last move point to move the other combat echelon off the helipad.
Combat echelon that moved ahead is now out of ammo so we bring the combat echelon at the bottom and swap positions.
Combat echelon finishes moving to HQ and clears the mission.
Start with combat echelon on the HQ and move up one then deploy 2nd combat echelon.
On the 2nd turn we move combat echelons up one each then deploy HOC at the large helipad then move it up to form a conga line.
Before we get moving, make sure both echelons are topped off on supplies. Then first echelon moves into the one-way path with HOC's support [Swap HOC's position and swap back after the battle].
2nd combat echelon near the HQ follow behind and goes through the one-way path. Swap 2nd combat echelon to the front so that it's prepared to fight 5 times to the HQ.
Move one node to the right to fight the Gundam. It's important to leave the three-way intersection open so that we don't have to fight the strong Gundam.
All that's left to do is fight your way to the HQ to clear the mission.
Start with combat echelon at the HQ. Move up towards the red zone [left] and deploy dummy echelon on the HQ.
Combat echelon moves down and kills the big zombie tagged as "Boss". This one actually doesn't have the Smasher in it [?]. The other two zombies are dangerous and should be avoided.
Swap with hostage unit.
Take the one way path to the right then up to HQ to manually extract the hostage. Resupply while you are here.
Move the combat echelon back down two nodes from the HQ and the dummy echelon down one so that we can deploy the 2nd combat echelon at the HQ
Swap.
At the beginning of the turn, resupply combat echelon at the bottom via swapping to HQ then back to starting position. Move towards the hostage then swap before rescuing. This is very important or you may have to fight the dangerous Smasher unit.
You have options where if you don't care about S-rank and want to minimize potential repair cost, you can move up one node and take helipad to extract next turn. Other way is to move back towards the HQ the way you came from. If you are short on ammo, see if you can the swap 2nd combat echelon down one node to clear out the enemy unit.
Start with combat echelon at the HQ and move down to deploy 2nd combat echelon.
At the beginning of 2nd turn, make sure combat echelons are all fully supplied before moving. Combat echelon below the HQ moves down one node to aggro the strong KCCO unit at the center.
Combat echelon at the HQ moves to the right then deploy dummy echelon at the HQ. Swap position so that dummy echelon is tucked away safely.
Combat echelon at the HQ moves through the left side of the map and parks itself between the two smasher units. One on the right always have the priority on moving first, so you should be able to handle this. Combat echelon at the bottom moves one node to the right to avoid fighting strong KCCO unit.
Combat echelon in the red zone moves to the right then swaps with the hostage unit before rescuing. Combat echelon in the yellow zone moves to the hostage and swaps position but does not rescue to avoid fighting the Smasher unit.
Combat echelon in the red zone takes one-way path to the right and moves to the node below the HQ. Dummy echelon moves to HQ from the right and swaps position to rescue hostage manually. With remaining move, rescue hostage on the right side.
If your combat echelon on the right side is looking rough, you can move up one node instead of going through the middle section to extract the hostage next turn. Otherwise, if you don't mind killing extra ELIDs, move through the middle section of the map and swap your way to the HQ and manually extract to clear the mission this turn.
Or do this.
Start with 2 combat echelons on the HQ and top helipad and dummy echelon on the left helipad. Combat echelon at the HQ goes around the bottom to surround capture the helipad with an ELID standing on it. There's an element of RNG where the dummy echelon could be attacked by the enemy unit from the left or not. If you do not get attacked, you can head straight to radar node on turn 2.
I have simulated the situation where you do get attacked and dummy was forced to retreat. In this case you call back the AR echelon near HQ to retake the helipad to the left then redeploy the dummy on the HQ. Combat echelon to the north of HQ moves up and left to activate the console panel which opens the gate. If you got lucky and dummy echelon did not get attacked last turn, you instead activate the console then head straight for the radar node to clear the mission this turn.
Now that we have enough move points to the radar node, head straight to it.
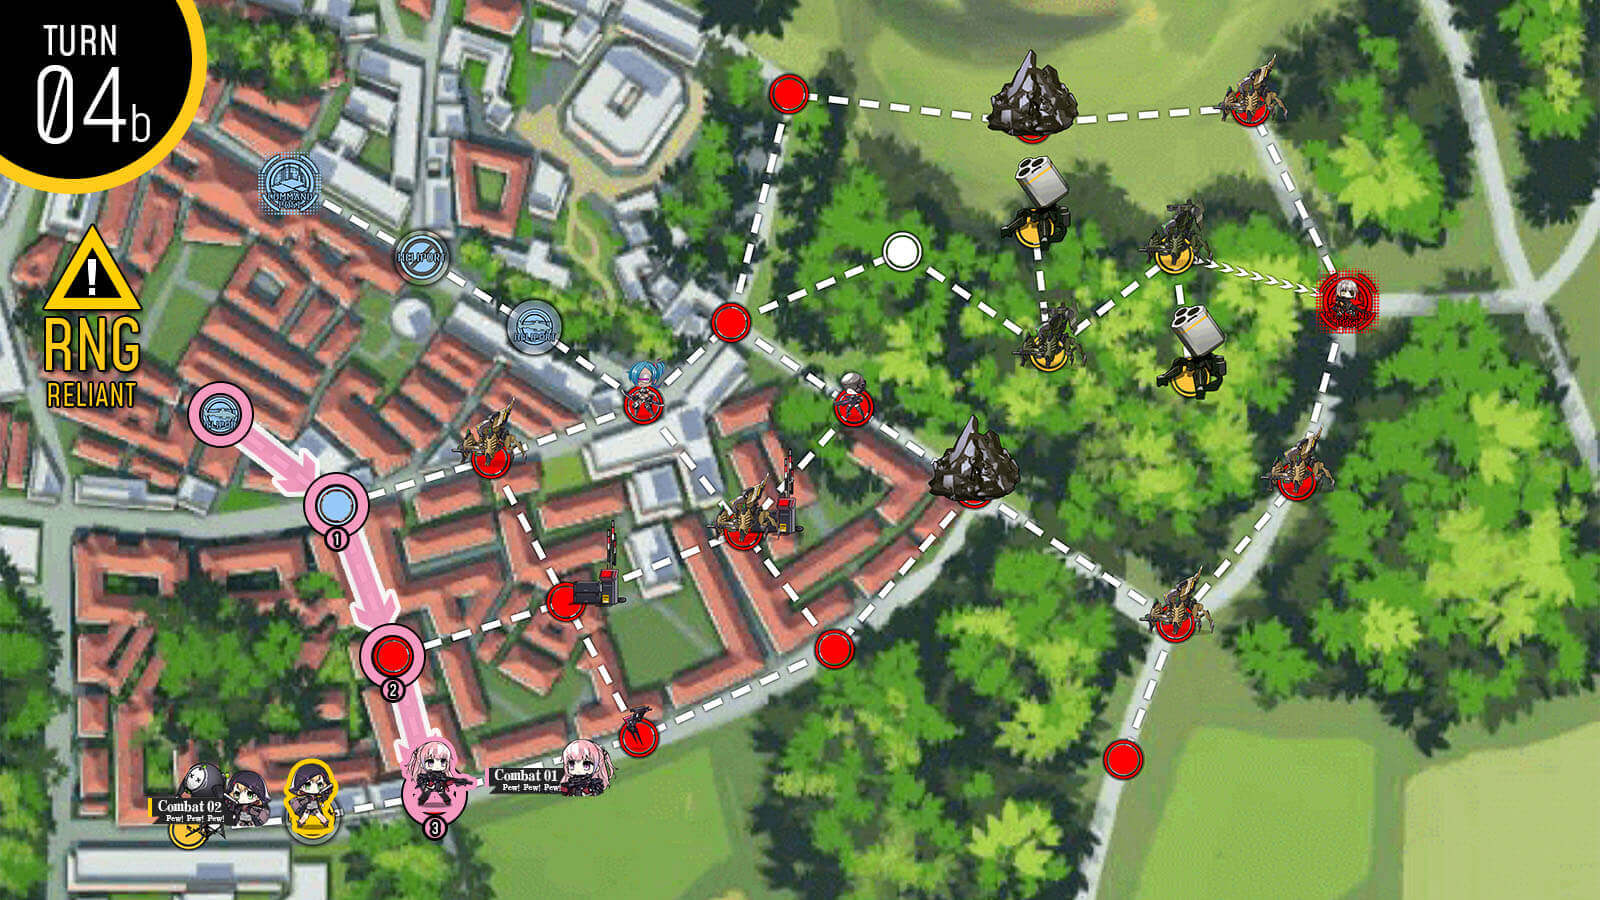
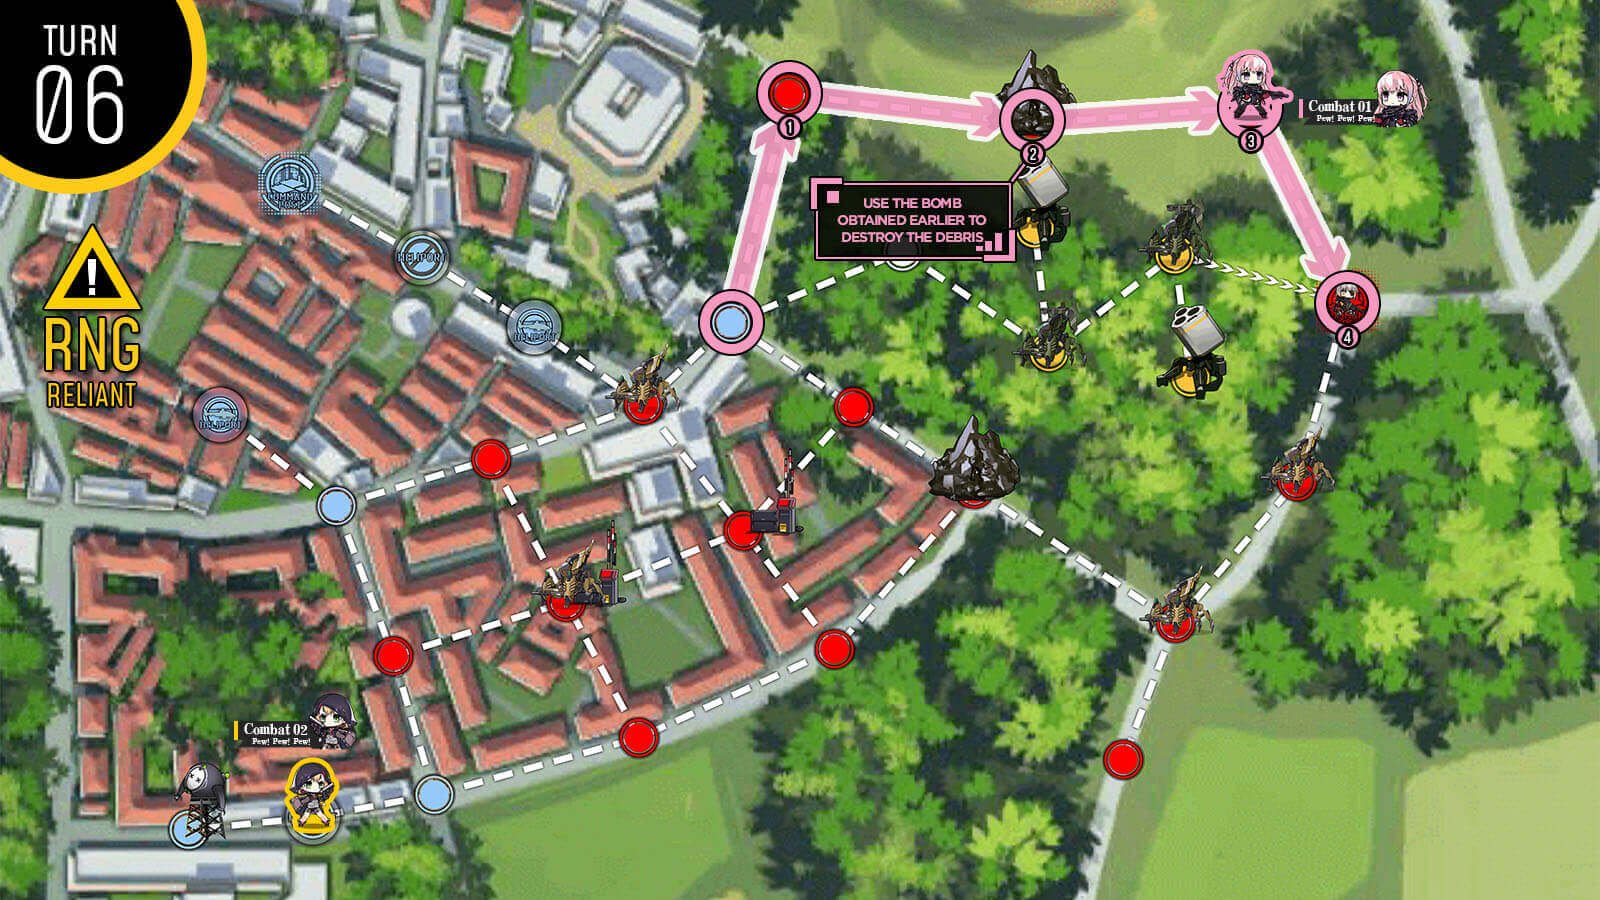
Start with Combat echelons on the bottom two helipads and HOC of your choice at the large helipad. Like normal map we are using combat echelon on the helipad to move towards the bottom but stopping short of the helipad near the Gundam. Then move combat echelon near the HQ moves to swap with HOC so that its protected from the zombie next turn. You are not required but could deploy another combat echelon at the empty helipad to gain more move points.
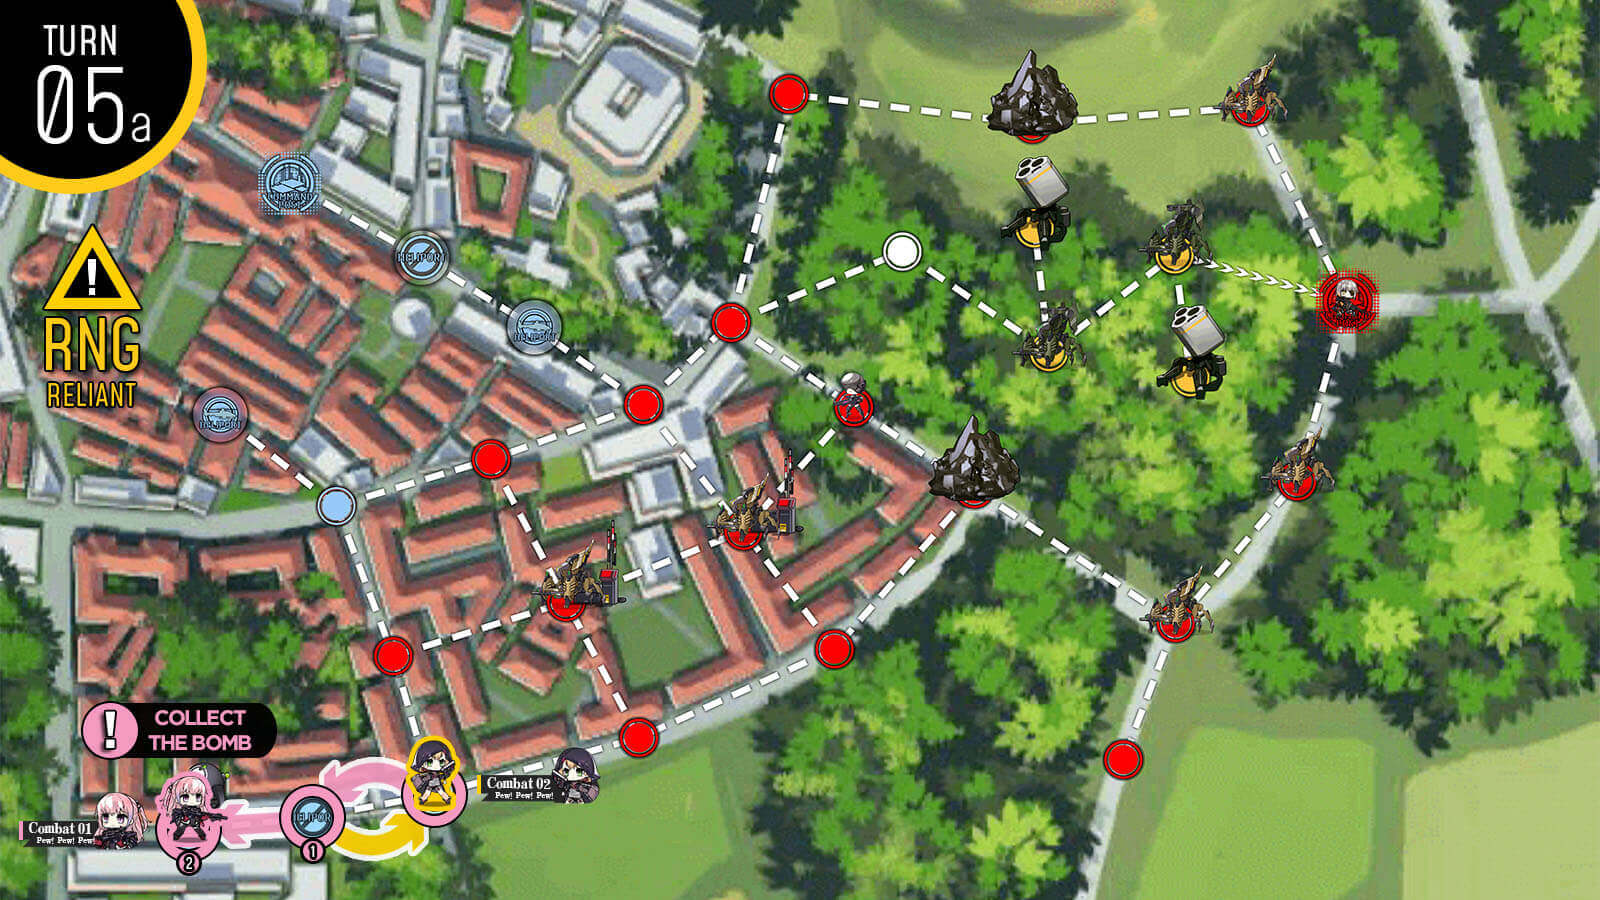
Combat echelon at the bottom helipad avoids the Gundam and goes towards the bomb and picks it up. We are also deploying a dummy echelon at the helipad the combat echelon just took off from.
Combat echelon with the bomb moves and swap with dummy so that dummy is least two nodes away from the Gundam. Then proceed to move back to HQ and swap onto the top helipad.
Once you make sure that the combat echelon and HOC is supplied, move to destroy the rockpile and beat the Gundams in the way with HOC's support. End your turn on the radar node to clear the mission.
Start with two combat echelon on the HQ and the helipad. Then move each of them down one node each. Deploy 2 dummy echelons at the HQ and helipad.
Make sure the combat echelon at the front [one that will fight the most] full supply then go for the right control panel on the top side of the map. Activating it does not open the gate as it requires the 2nd control panel right next to it.
Combat echelon moves to the control panel on the other side. Once activated this should open the gate at the bottom near the starting location.
Deploying HOC is entirely optional and doesn't provide any additional benefit other than giving you one additional move point per turn.
2nd combat echelon at the bottom goes through the open gate and triggers the upper console panel on the further side.
Combat echelon then moves down and triggers the bottom panel on the closer side. This should open remaining gates towards the radar node.
Then we move towards the radar node.
Because there's a strong Gundam with 100% shields blocking the way we have to draw aggro and make it move. Move to the gate on the same row as the Gundam and end turn.
Once the Gundam moves out of the way, go around and take the radar to clear the mission.
Start with a dummy echelon on the HQ and the combat echelon on the helipad next to it. Move combat echelon down then out to the right. Deploy 2nd dummy echelon on the helipad then move it down to capture bottom two helipads.
At the start of the 2nd turn, deploy 2nd combat echelon on the helipad right of the HQ and swap with the dummy echelon below. Resupply both combat echelons by swapping positions and move two nodes to the right each. With one move left, deploy either HOC or 3rd dummy echelon on the empty large helipad.
Combat echelon that is further out moves up to the left and triggers the control panel. Move back one node to surround capture the helipad. 2nd combat echelon next to the gate goes through and takes another helipad next to the control panels.
combat echelon at the bottom triggers two control panels marked so that all six gates are open. Combat echelon at the top moves down and move to the closest gate to draw aggro of the Gundam.
Once Gundam moves out of the way, go around it and take the radar to clear the mission.
Start with combat echelon on the HQ. Move to the right then deploy 2nd combat echelon that will defend the HQ from being surrounded from the spawned enemies from the helipad just below.
Move combat echelon up one node to take helipad. Then move 2nd combat echelon right one and deploy dummy echelon at the HQ. Enemy on the left side of HQ does not move so it is safe to put a dummy there.
Combat echelon at the center helipad moves to activate the console as the Gundam moves out of the way. Make sure that M16's AI is set to "Eliminate".
Combat echelon at the console panel moves back to center helipad. We are just waiting for M16 to make her way towards the HQ.
To speed up the process, send combat echelon at the center helipad to node adjacent to M16. Then swap locations so that M16 can take out the Boss. If you are confident in your echelon's ability, you can fight the Nyto boss yourself and take the HQ this turn.
Now that M16 cleared the boss for us, swap the location and take the enemy HQ to clear the mission.
Start with combat echelon on the HQ and move to the right. Then deploy 2nd combat echelon. We do need to fight one Gundam with 189 armor so I suggest you bring out echelons capable of defeating one.
Both combat echelons each move one to the right. Deploy dummy echelon on the HQ and end turn.
Shuffle so that the dummy echelon is at the far right helipad away from fights.
1st combat echelon goes to the middle and 2nd combat echelon swaps position to HQ. 1st combat echelon moves up and goes into the nook near the gate console so that it's out of the strong Gundam's detection range.
1st combat echelon moves to activate the gate console which frees M16. Make sure M16 is set to "Eliminate". HQ is in danger of being surround captured. So we move combat echelon on the HQ to the right and deploy 3rd combat echelon on the HQ to defend from ELIDs.
Combat echelon at the console moves out of the death wheel to the left through one-way path. Get in position so that it is ready to swap with M16 next turn.
Move down with combat echelon and swap with M16 so that she can fight Nyto for us. If you are confident in your abilities and T-dolls, just fight Nyto yourself and take the HQ this turn.
*If attempting to fight Nyto, take over the heavy helipad at the top right corner and deploy HOC from there
Now that Nyto is out of the way, swap with M16 and take the HQ.
Start with combat echelon at the HQ and a dummy on the helipad. Move combat echelon to the top right helipad occupied by 90wish. Then deploy a 2nd combat echelon at the HQ to defend it.
Combat echelon at the top helipad resupplies and heads down the one way path, to a point where we are two nodes away from the Manticore. Dummy echelon moves towards the Manticore unit to draw aggro and also to avoid incoming enemy unit from the side.
Combat echelon moves to the left to retake the helipad and dummy echelon moves to the HQ. Combat echelon at the bottom moves towards the radar node.
Combat echelon at the bottom reaches the radar node and we can clear the mission. If you want to get S-rank, clear a few more enemy units near the HQ to meet the requirement.
The strategy is exactly same as the normal version of the map, just with more difficult units. Start with combat echelon at the HQ and a dummy or another combat echelon on the helipad. Move straight up to the top right helipad controlled by 90wish. Then deploy another combat echelon at the HQ.
Combat echelon resupplies and moves down 5 nodes. Dummy echelon moves down to the center column to draw Manticore's aggro.
Combat echelon moves to retake the helipad then dummy echelon moves back to the HQ away from Manticore. Combat echelon continues to move towards the radar node at the bottom.
Combat echelon moves on top of the radar node to end turn. If you are going for S-rank, use combat echelon near the HQ to kill a few more units to meet requirement.
Start with combat echelons on all starting positions with your weakest one on the right side since it only needs to fight once or twice at most [none if you are lucky]. Combat echelon on the HQ moves straight down to the rally point while combat echelon at the top helipad moves to open helipad south of the HQ. Deploy dummy echelon at the HQ then end turn.
The combat echelon at the helipad right of the HQ moves to control panel at the right side of the map and activate it to close the gate. Dummy echelon swaps location with combat echelon below then moves down to node above rally point so that we can establish the supply route. You should have your 1st combat echelon on the HQ and your 2nd combat echelon on the rally point with the dummy right above it.
All that's left to do is to defend HQ and rally point node from incoming enemy units until mission is cleared.
Donezo.
If you have a Parachute Fairy, you can establish supply route on turn 1 and don't need to worry about Gundams breaking your supply route. For non-para guide, start with 2 Combat echelons on each starting location. Move combat echelon at the top up one node and 2nd echelon one node to the left from the HQ. Deploy dummy echelons and end turn.
Combat echelon to left of the HQ moves down to the rally point. Dummy echelon at the HQ moves down to establish the supply route. Dummy echelon at the large helipad moves down to the HQ so we can deploy HOC next turn.
Sometimes Dummy cannot move to node adjacent to the rally point due to enemy RNG. We do have plenty of movement points left over, so just go ahead and use the Combat echelon at the rally point to clear out the enemy.
With the enemy tank approaching, we deploy HOC and use the combat echelon at the top to take out the Uhlan. Combat echelon on the upper helipad then moves to the left to capture the helipad.
Combat echelon at the rally point moves back up through the left path and back to HQ to defend from enemy units from the right side. Dummy echelons move in position so that we have multiple supply routes established through the left side.
Now that we have multiple supply routes, all we need to do is make sure that one of the routes remains intact at all times until we clear the mission.
Start with dummy echelon on the HQ and combat echelon on the right side. This combat echelon needs to fight against the weak Gundam with 77 armor. If you had issues with armor units in earlier chapters, I recommend mixing in a RF or using RFHG echelon. Move combat echelon two nodes to the right. We are planning to surround capture the helipad next turn.
Combat echelon moves towards the control panel. This opens the gate in the middle of the map. Dummy echelon moves up one node from the HQ so that we can get more move points in future turns.
Move dummy back to the HQ as it is now threatened by the Gundam. Deploy 2nd combat echelon and move through the gate towards the hostage.
Move up and swap with hostage before rescuing. Once rescued head straight to the helipad near the HQ as you should have just enough moves. Manually extract to clear the mission.
We are taking bit of different route this time compared to the normal map. Start with combat echelon on the helipad and dummy on the HQ. Move combat echelon to take the unoccupied helipad.
You will notice that Gundam unit near the one-way path has moved towards the combat echelon. We move away from the Gundam and have the combat echelon take the large helipad above the HQ. Then deploy 2nd dummy echelon on the HQ.
Move combat echelon up two nodes right next to the Gundam near the one-way path. This draws aggro of both Gundams to the left and opens a path behind them.
Now that path is open, go around the Gundams and take the back route to the hostage.
Go all the way to the hostage, swap then rescue. Then end your turn on the helipad below so that hostage is extracted automatically next turn.
Start with two combat echelons at the HQ and bottom center helipad. Deploy dummy echelon on the helipad on the right side. Move both combat echelon up 3 nodes each to take the helipads in the center area.
Combat echelon on the right side is threatened by the Smasher so we move around it to activate the console panel. Deploy either the dummy echelon on the HQ or combat echelon on the helipad to the left if aiming for S-rank.
Combat echelon on the center left helipad moves through the open gate on the left side to pick up the bomb. Use it on the rock pile on the right then go around the Smasher to take the enemy HQ.
Start with combat echelons at the bottom two starting location and dummy on the right large helipad. We do need to fight one Gundam unit so bring a RFHG team. Move combat echelons up to the helipads then end turn.
Combat echelon to the left moves up and takes out the weaker Gundam by the control panel. This opens the gate to the south. Deploy dummy echelon at the open helipad at the center.
Combat echelon returns back down, swaps with the dummy at the helipad then swaps again with the ARSMG echelon. ARSMG echelon then moves down two nodes.
ARSMG echelon runs straight to the enemy HQ and clears the mission. If you are looking for S-rank in this map, you can wait a turn and take out additional units by the bomb and the Rodel by the HQ.
Start with a combat echelon on the HQ. Move two nodes to the upwards and deploy 2nd combat echelon on the HQ.
Combat echelon on the upper side of the map moves up so that we can surround capture the helipad. Move combat echelon at the HQ upwards and deploy dummy echelon on the HQ and the bottom right helipad. Dummy at the HQ moves left to take the helipad.
Once closed helipad opens on the right side you can either deploy 3rd combat echelon or retreat the echelon at the bottom side via HQ then redeploy it. Then move straight for the console panel on the top side of the map. This opens the gates to allow Manticore units to move out of the way.
Start with combat echelon at the HQ then move two nodes upward. Deploy 2nd combat echelon and end turn.
Combat echelon at the HQ moves one node upwards so we can deploy a dummy echelon on the HQ. Dummy moves up to take the helipad. Combat echelon on the upper side also moves up to surround capture the helipad to the right side that opens up next turn.
This is the recommended place to keep an eye on, where you can spot the Beak's skill prior to doing actual damage. Keep your fingers between the skill buttons to quicken your reaction time.
The up and down button moves M4 up or down one row. This becomes important as there's obstacles that blocks one or two rows. Since two rows could be blocked, it is best to keep M4 in the middle row as much as you can since these skills have short cooldowns.
This is the recommended place to keep an eye on, where you can spot the Beak's skill prior to doing actual damage. Keep your fingers between the skill buttons to quicken your reaction time.
Combat echelon moves up two nodes to the next open helipad.
Move combat echelon up two nodes and head to the four-way intersection.
Deploy combat echelon that can fight Judge at the helipad then move up to the closed helipad below the 1st combat echelon.
Resupply 1st combat echelon then take the long way to the helipad at the bottom.
Deploy dummy echelon at the helipad then position it between the two combat echelon by swapping their positions.
Swap the echelons so the 1st combat echelon is on the closed helipad and the Judge echelon is on the bottom helipad with the dummy still in the middle. Deploy HOC at the large helipad.
If you don't have HOC available to you, deploy 2nd dummy or 3rd combat echelon capable of fighting against Judge. If HOC is deployed, swap so that combat echelon is defending the helipad.
Manticore has a 50/50 chance on moving either to the left or the bottom towards either helipad. All you have to do is to shuffle echelons positions and go around the Manticore.
Approach Judge along with HOC [or 3rd combat echelon to fight Judge 2nd time].
This is the recommended place to keep an eye on, where you can spot the Beak's skill prior to doing actual damage. Keep your fingers between the skill buttons to quicken your reaction time.
When you see the warning markers on the ground hit AN94's skill which will automatically evade all 3 carpet bombings. You don't have to click 3 times in rapid succession.
If you see the 3 drone/orb spawning near the M16, quickly tap AK-12's skill which will generate shields to block the lasers from hitting the bikes.
If you see the 3 drone/orb spawning near the M16, quickly tap AK-12's skill which will generate shields to block the lasers from hitting the bikes.
If you see multiple canisters being thrown by Beak, tap ST AR-15's skill to shoot them down.
Lastly, when you successfully perform 3 evasion skills you should see Beak's shield come down. Use M4's skill to deal damage as this is the only significant source of damage. Repeat until Beak is down. Difficulty is increased as interval between attacks decrease. Tip: If you see the missiles and laser drones appear at the same time, always click AK-12's skill first then ST AR-15's skill 2nd.
Start with combat echelon at the HQ and move up two nodes to capture the open helipad. You do enter the Manticore's detection range but they will not be able to move this turn since they move first on the enemy's turn.
The enemy helipad at the left center continues to spawn new enemy units so it's important to block it.
Deploy 2nd combat echelon and bring it adjacent to the blocked helipad. This gives us a place to resupply and increases our move points.
Depending on RNG you can use a single echelon to grab the bomb and the helipad to increase the move point. If this is not the case you can move both echelon shown in the image. If you can't do this, take an extra turn to move one echelon at a time. I recommend using RFHG echelon to grab the bomb since you will need to fight Manticores at least once.
Take the bomb and move towards the rock pile at the top of the map. Take care not to stop next to the Manticore unit and resupply at the helipad nearby if you are out of ammo or taken too much damage.
Once you reach the rock pile, use the bomb to blow it up and take out the Hydra unit. Beat M16 or bring a fresh echelon from helipad near the HQ if your echelon is too damaged to fight.
Start with combat echelon at the HQ and move to capture helipad 2 nodes down. Again Manticore unit will not move even if it's in the range due to the Brute that is in the way.
We move to clear the enemy helipad in the left corner just like the normal version.
Deploy a new combat echelon and move to capture helipad together with 1st combat echelon.
Again we have a situation where it could be different for everyone where we just need one echelon to capture the helipad and acquire the bomb located at the bottom left corner of the map. If you require both echelons, adapt accordingly.
This is an example of what I've done to capture using both combat echelons [simulated].
Combat echelon moves to pick up the bomb and moves as closes as it can to the rock pile at the top of the map without being threatened by the Manticores in the center of the map.
If you need to repair and resupply, take an extra turn visiting the helipad located at the left corner.
Once you get to the rock pile, destroy it then fight your way through the Manticore to finish M16 off. If you fail on first attempt, you can redeploy more combat echelons at the HQ or nearby helipads and try again since there's no turn limit.