


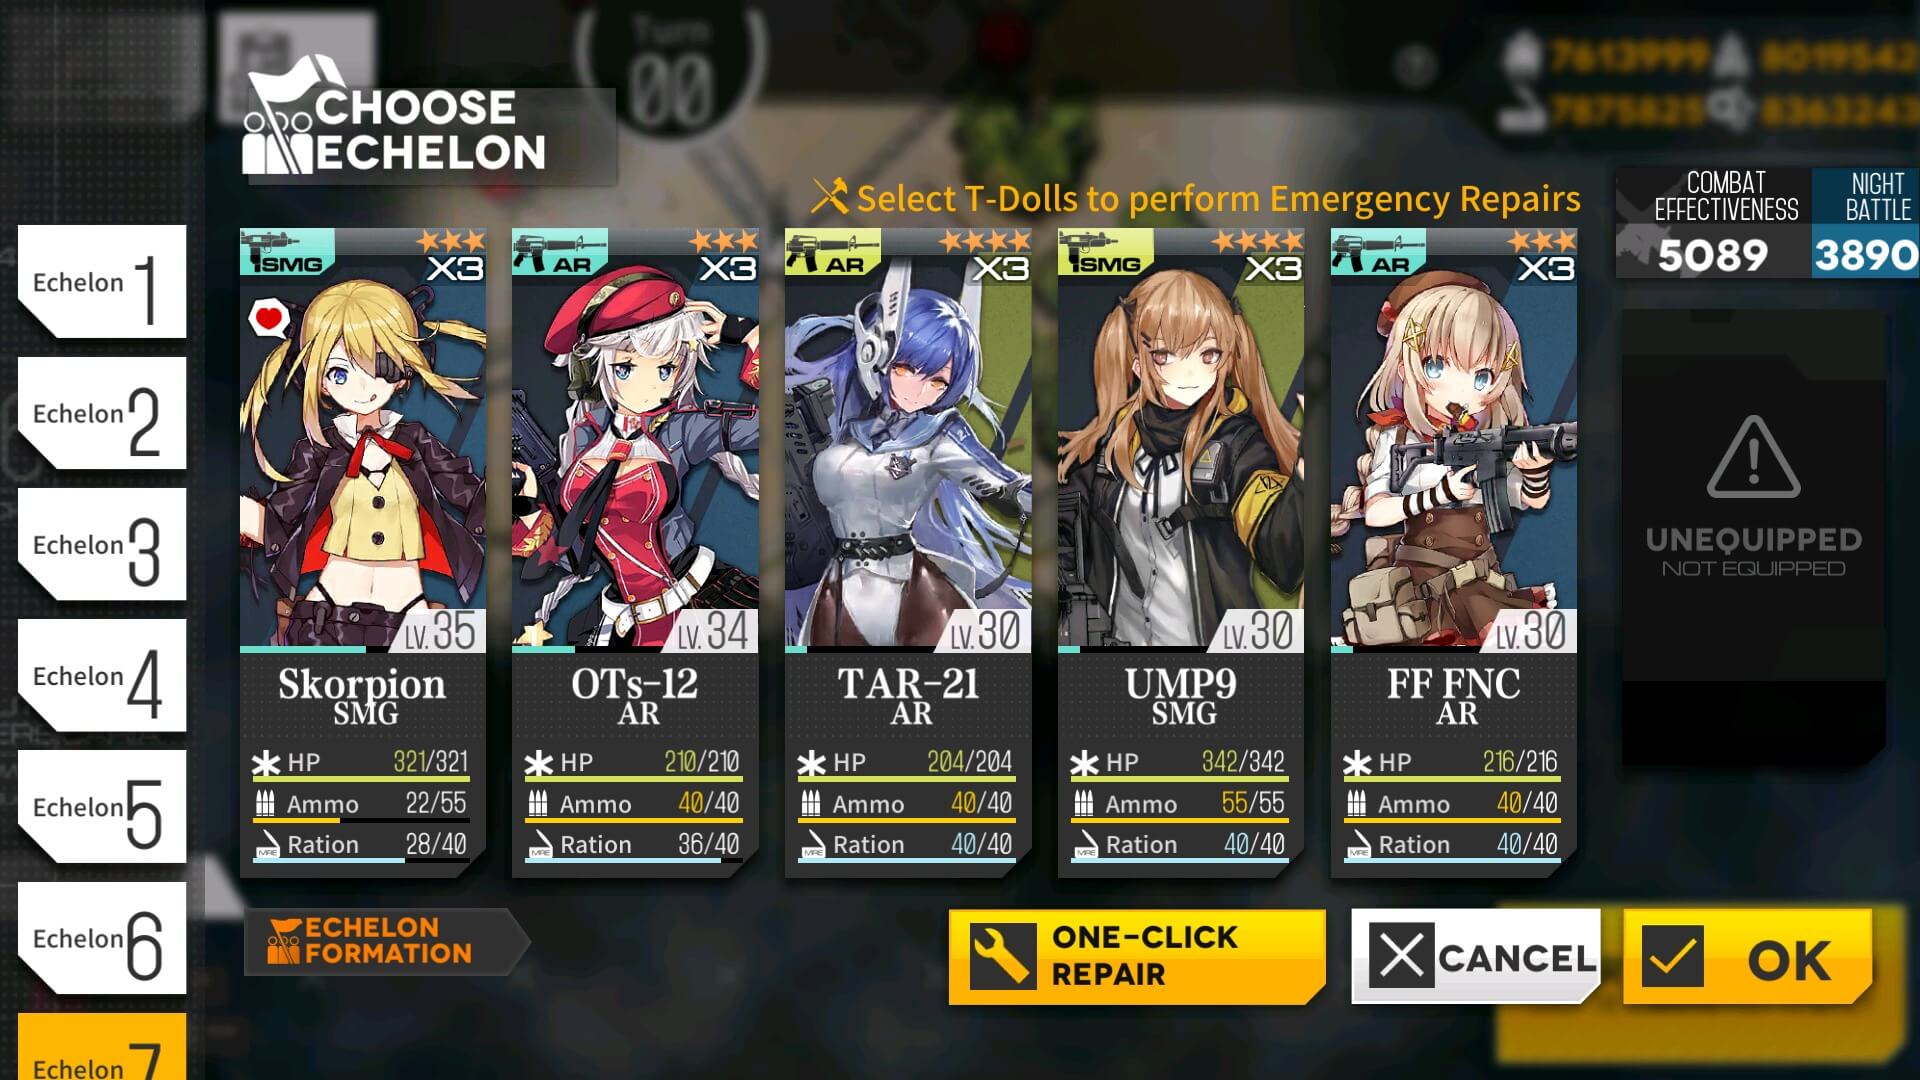
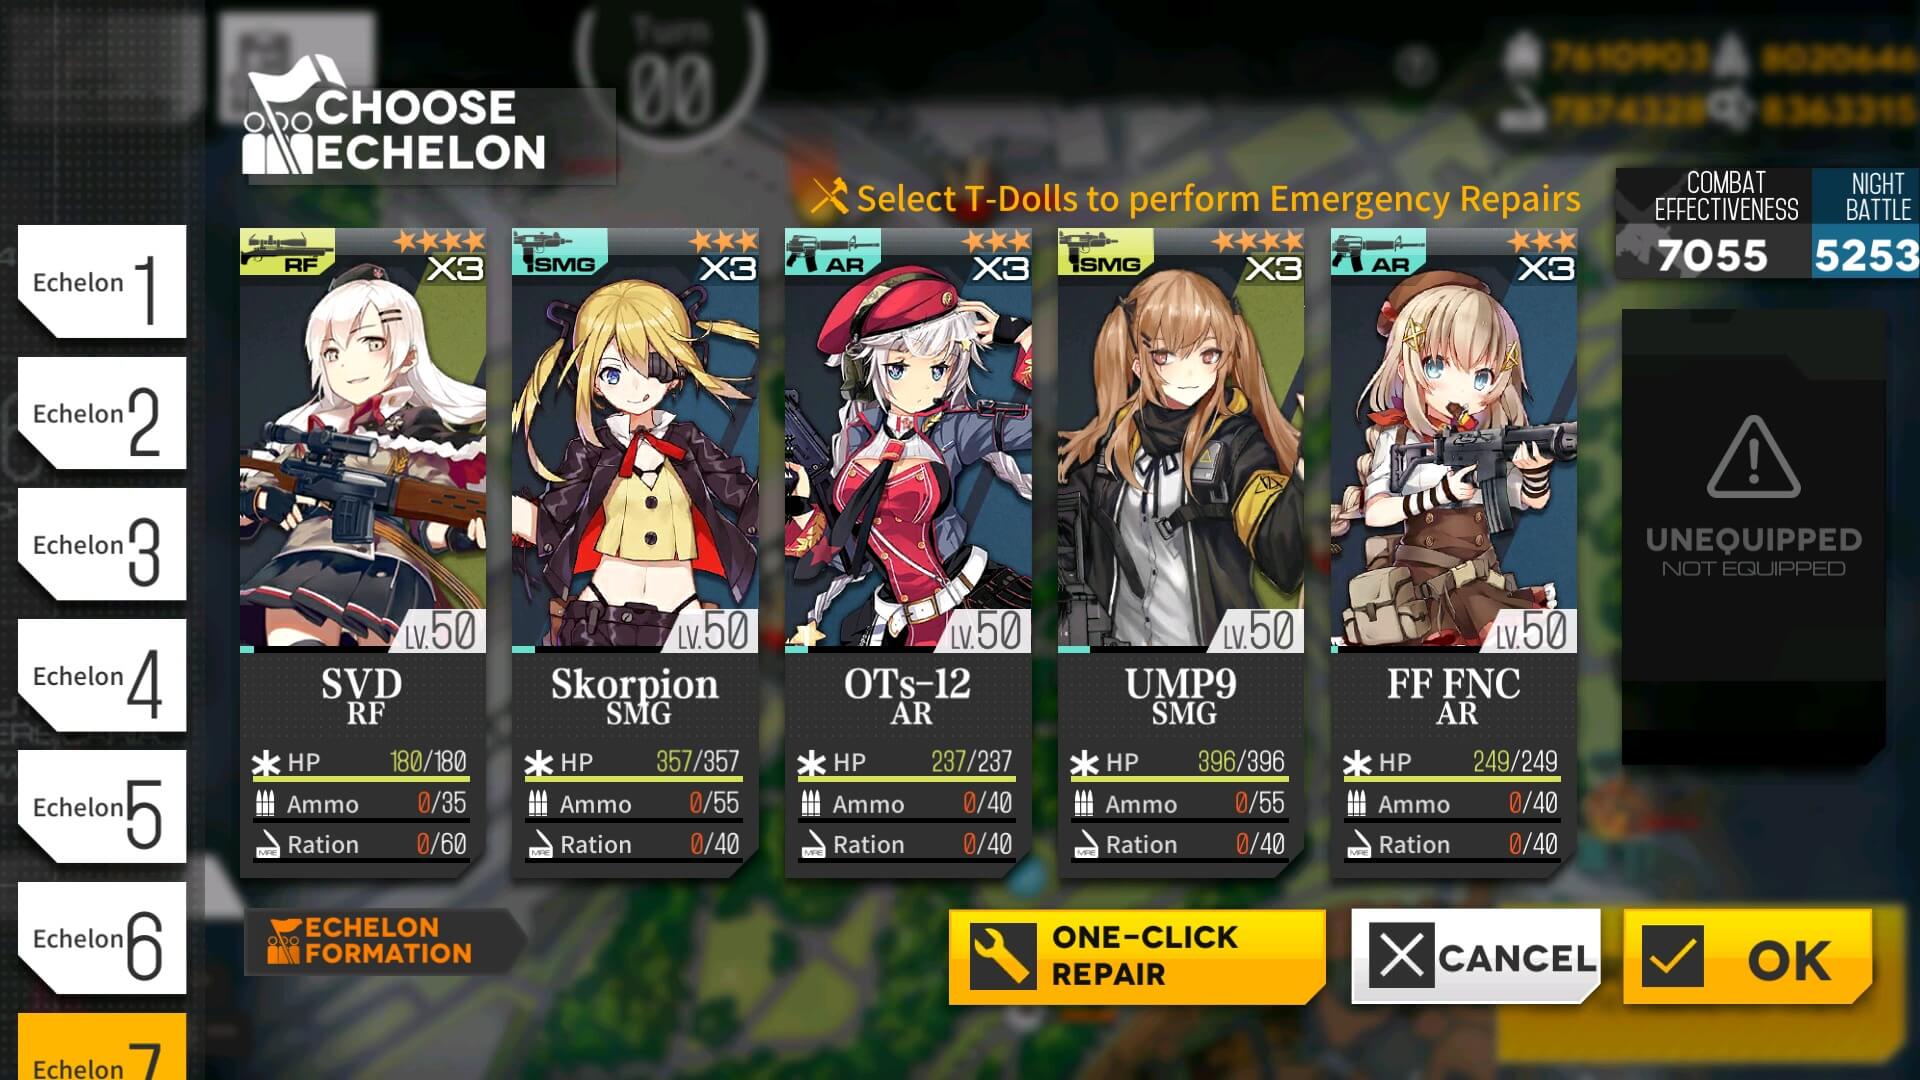
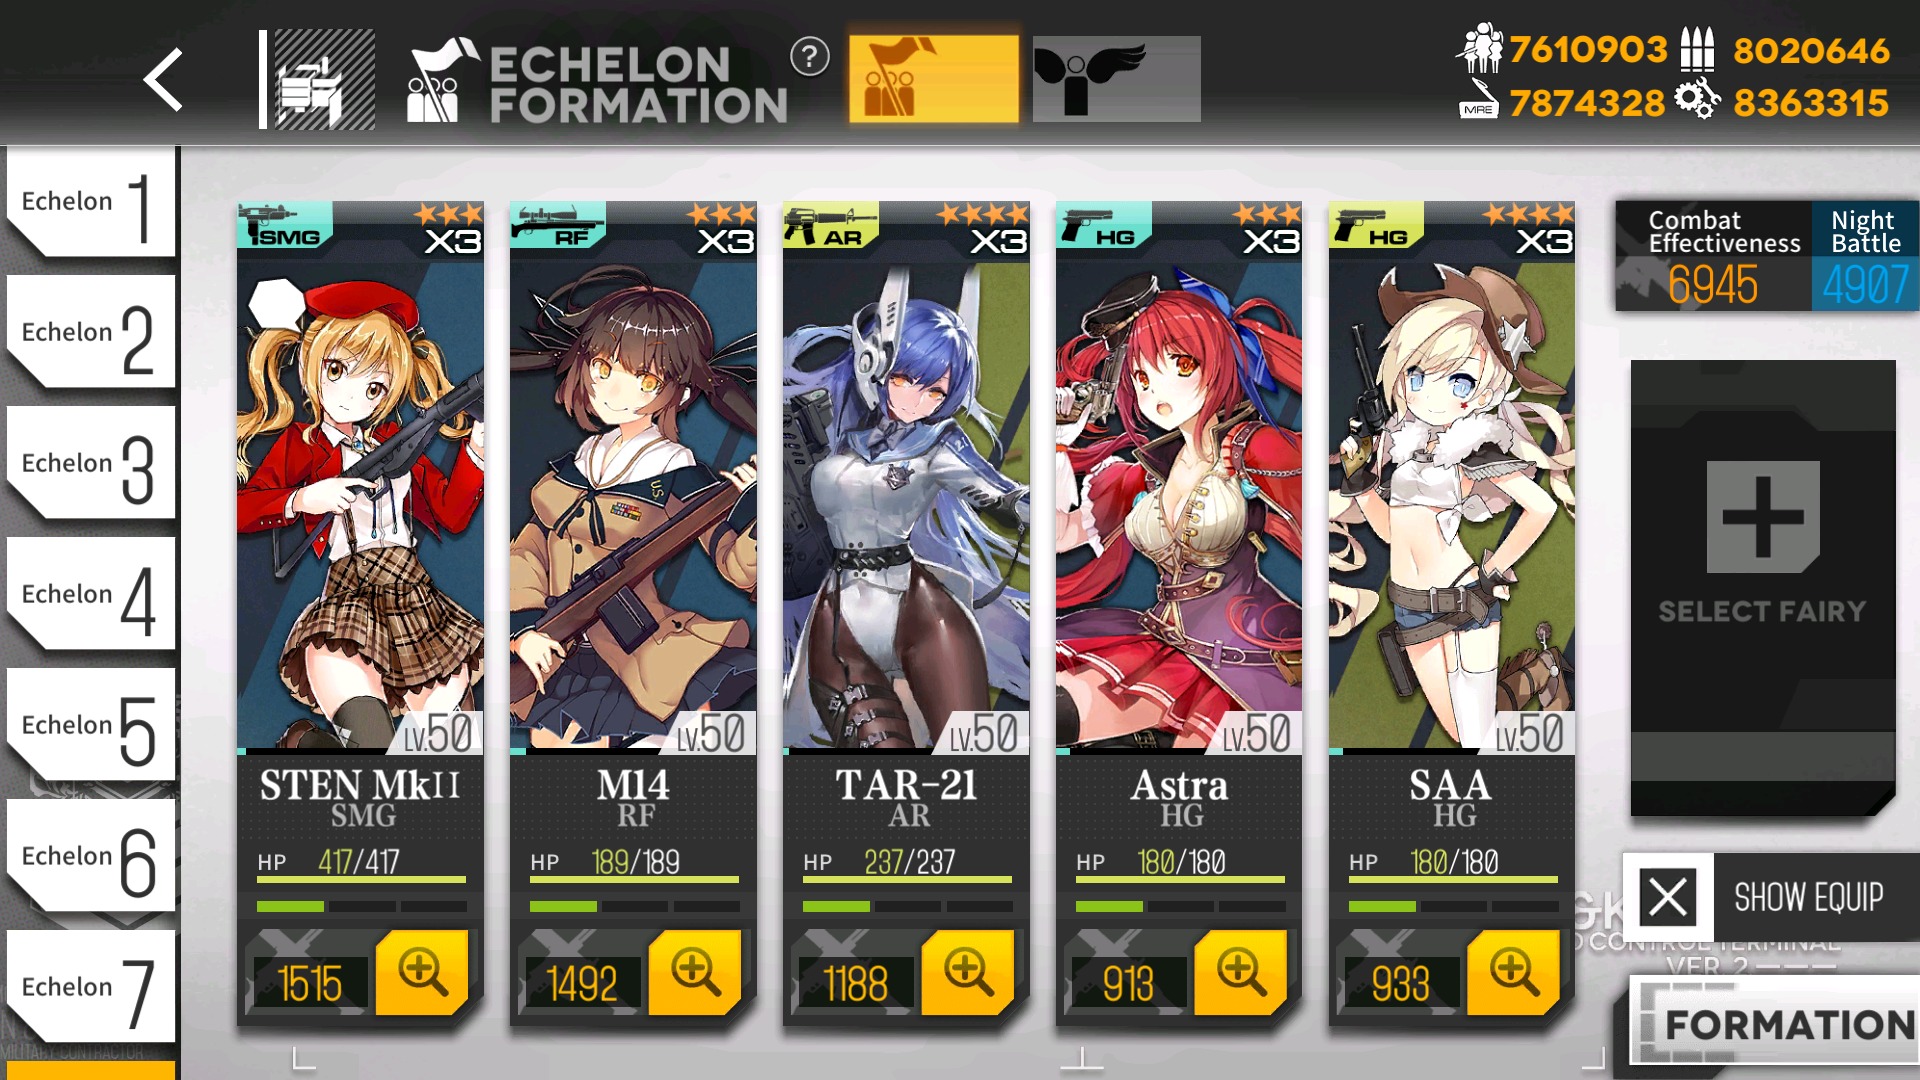
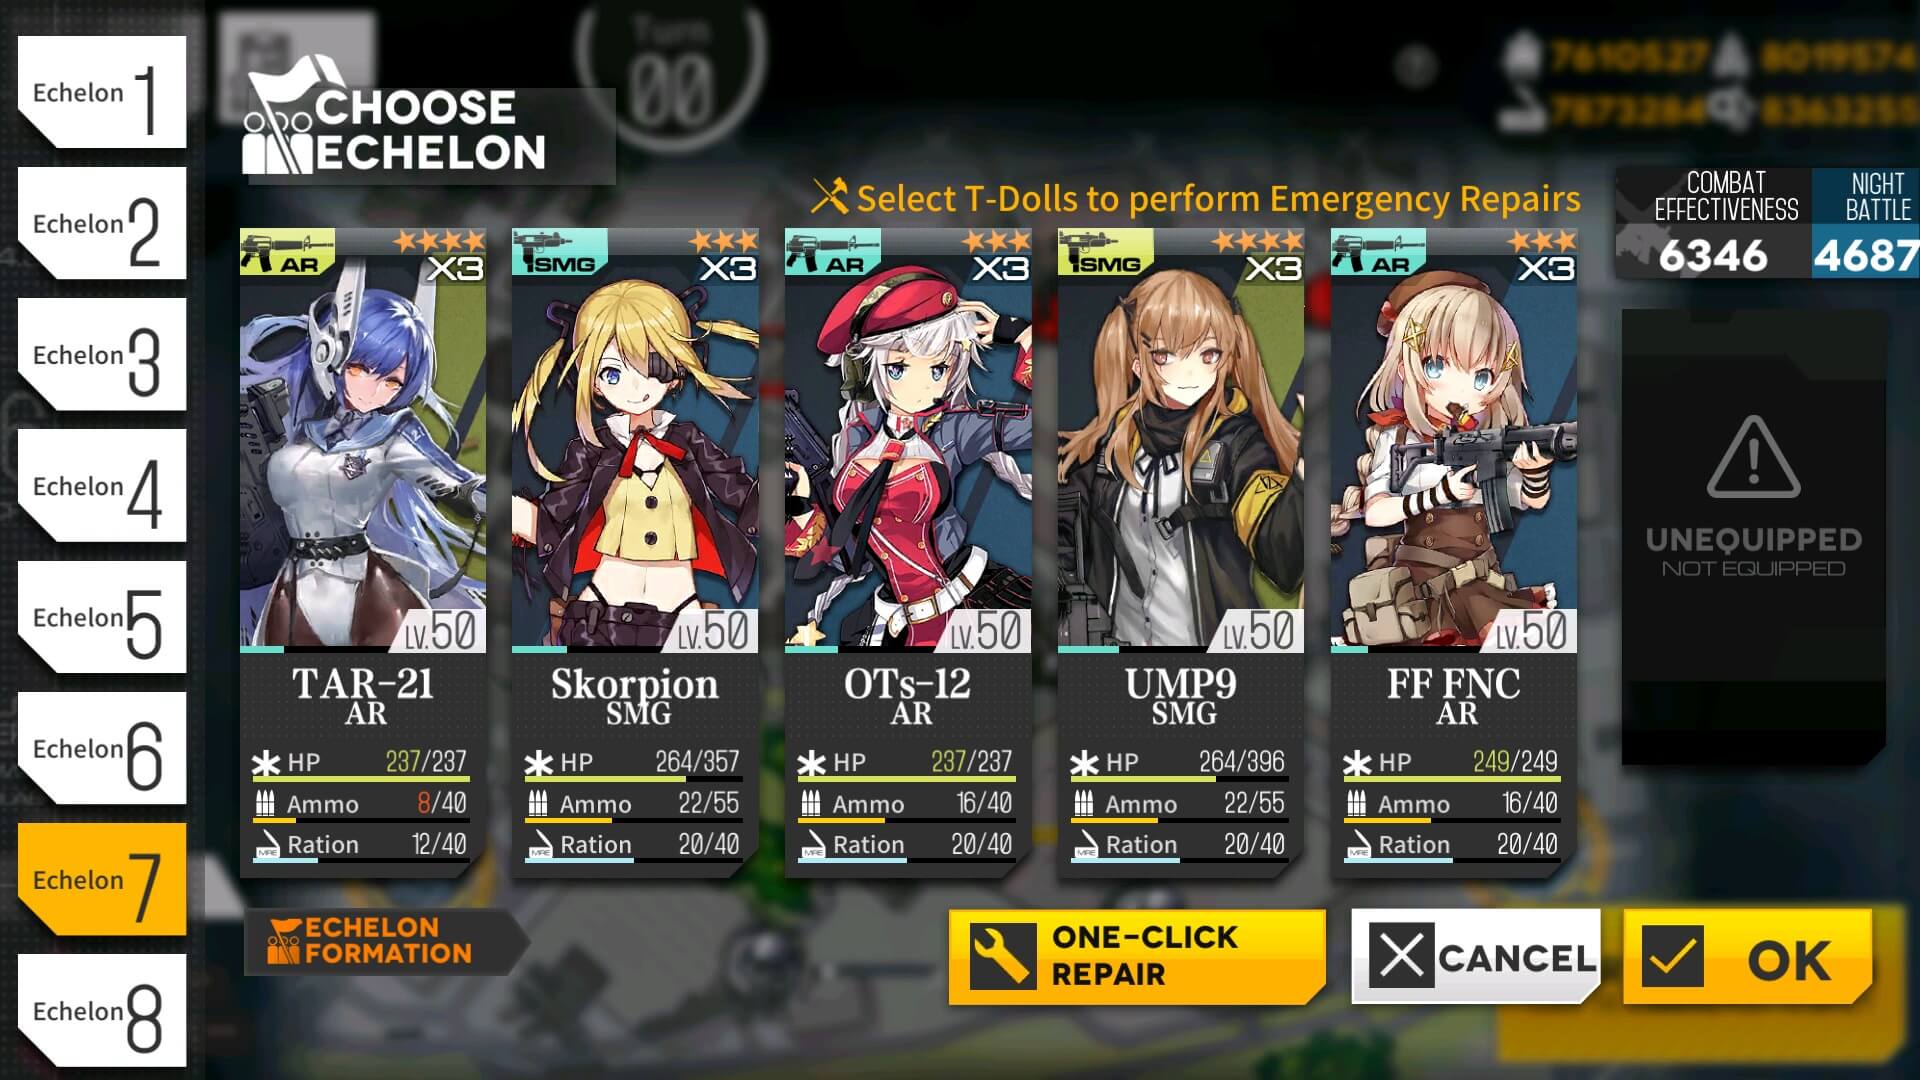
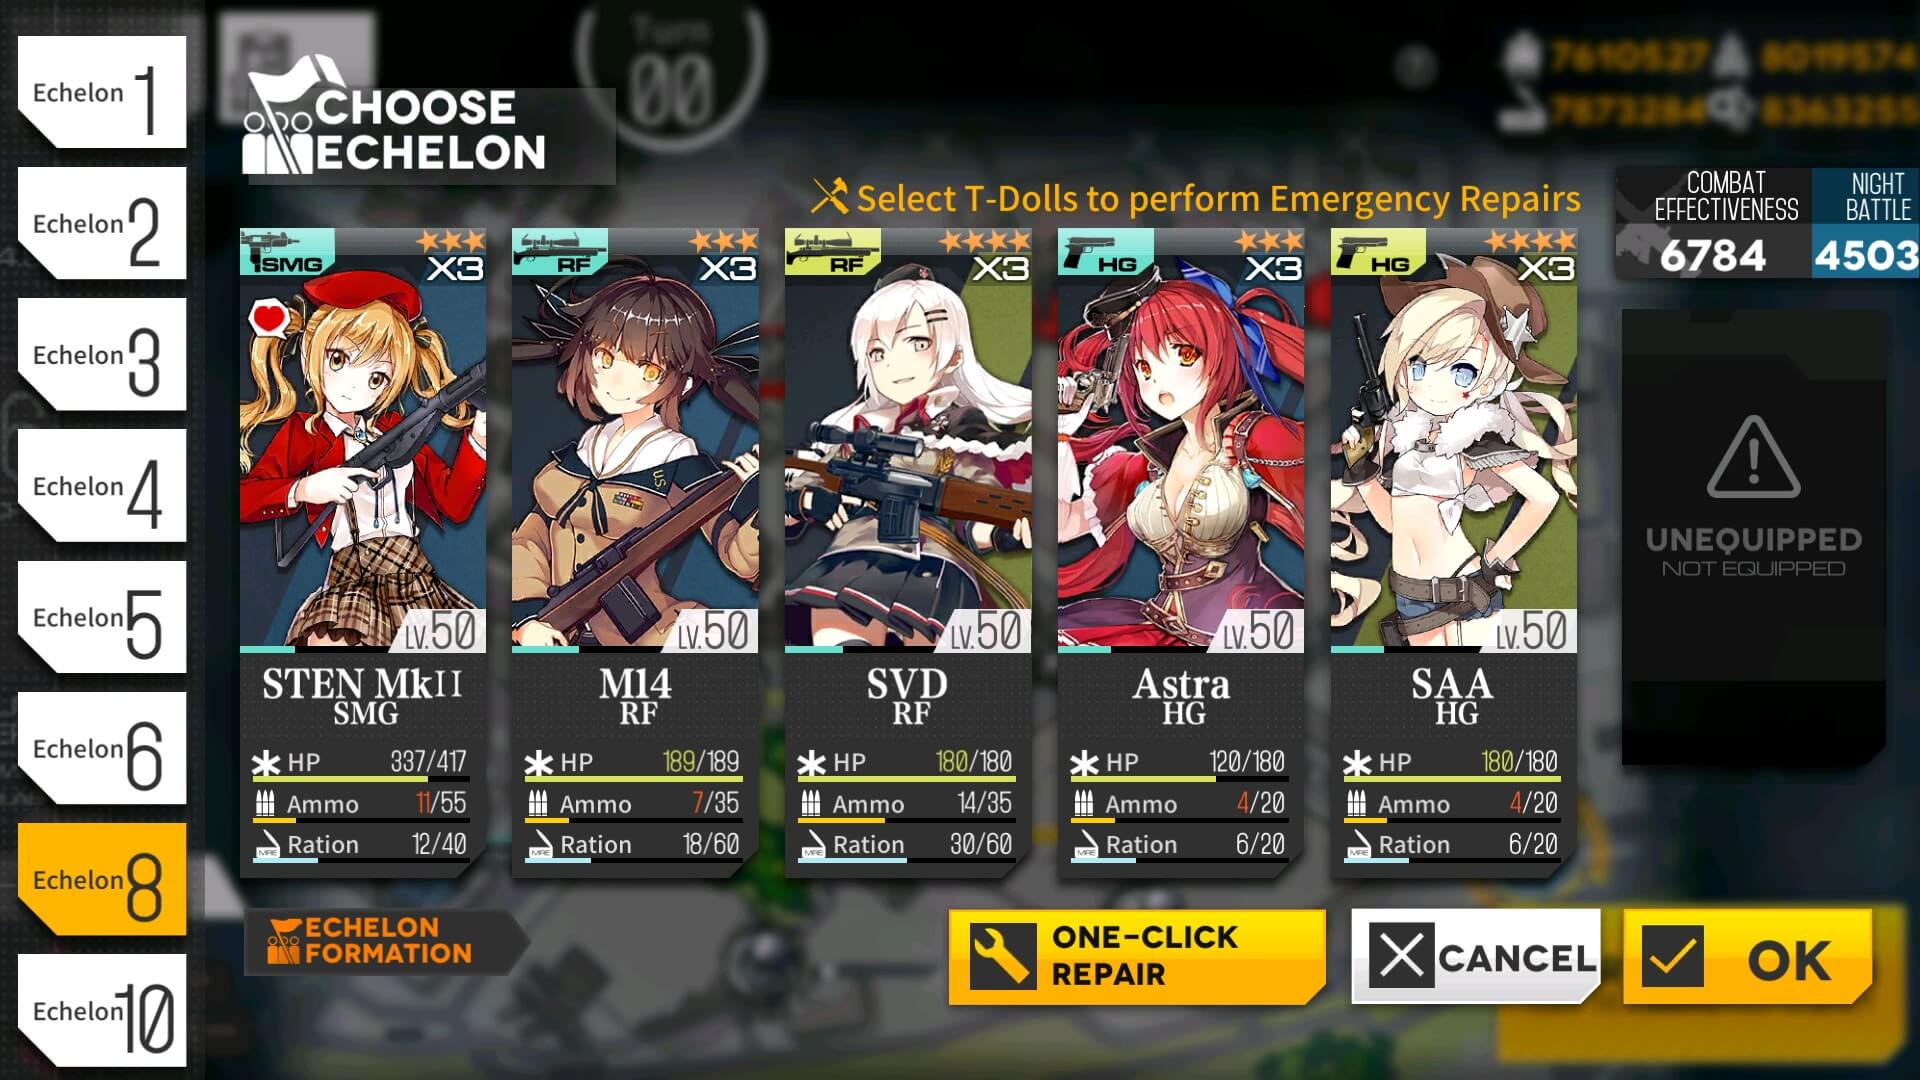
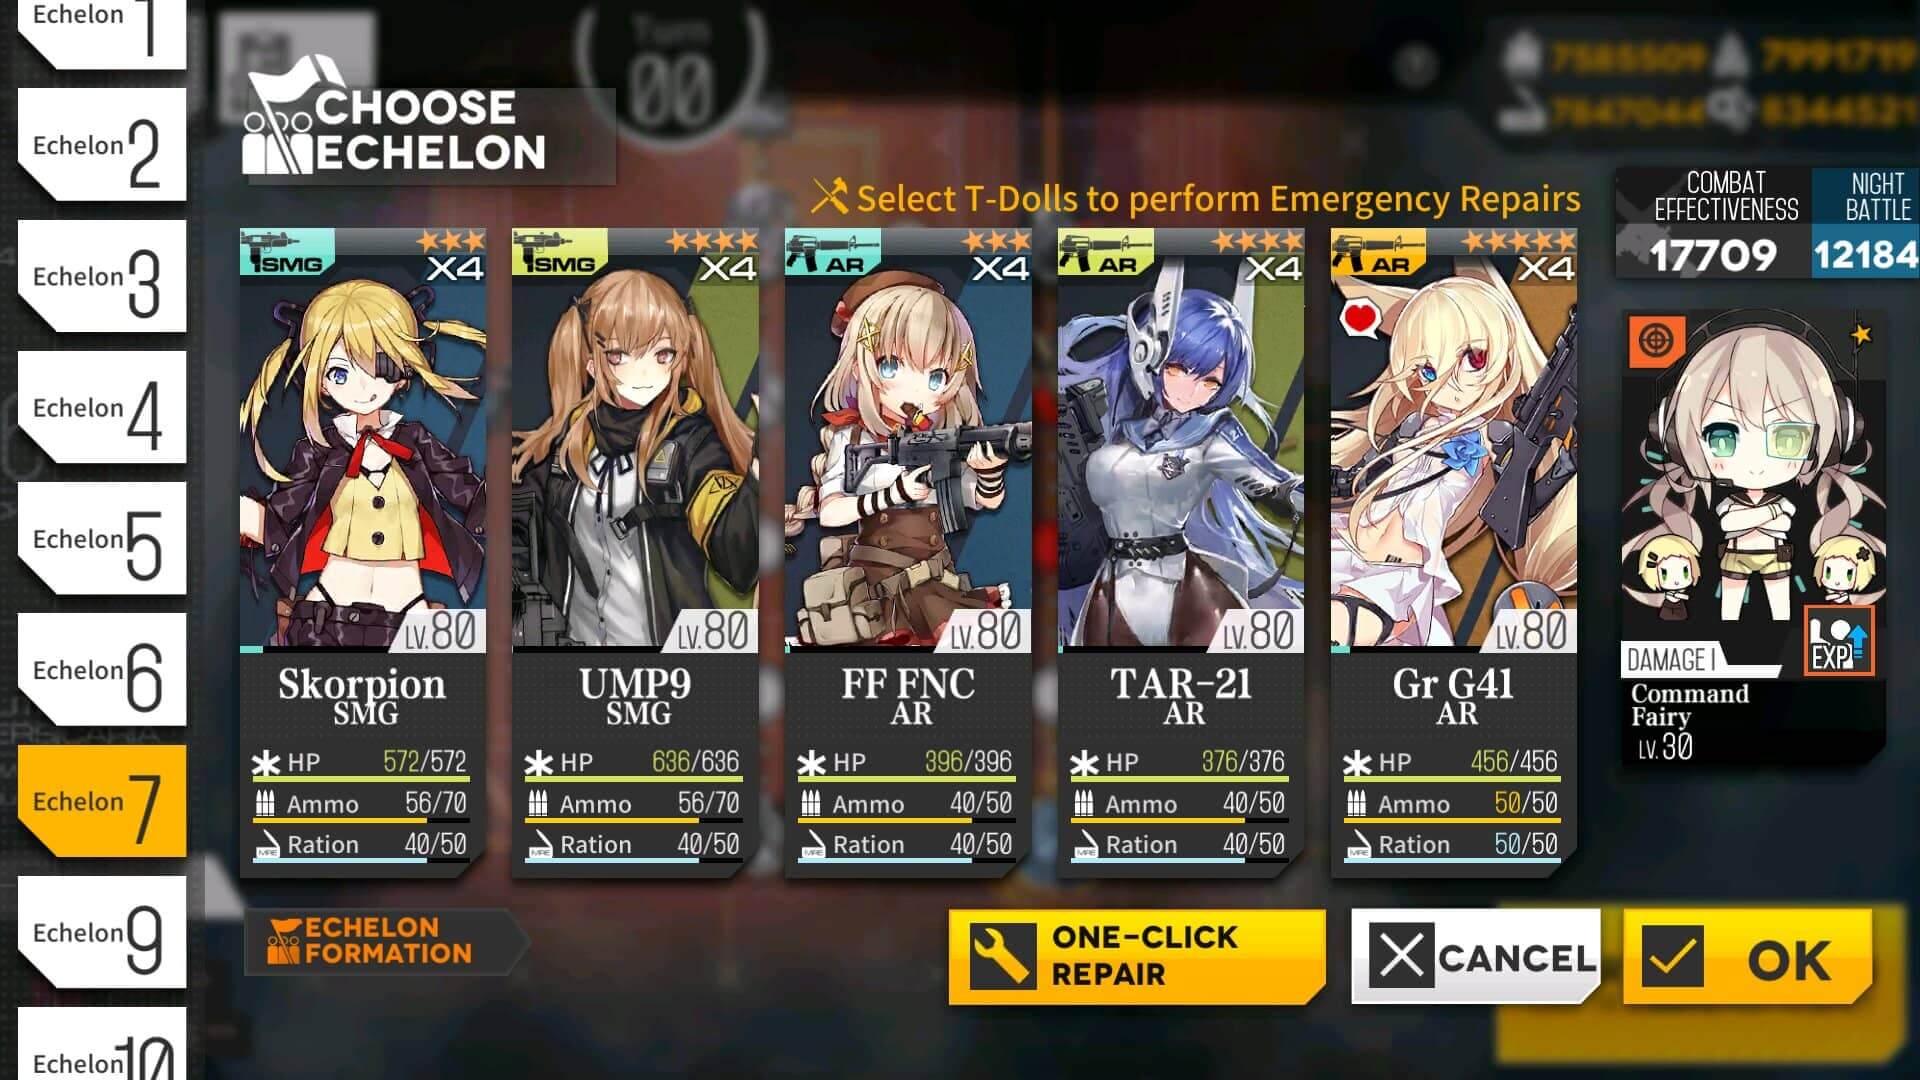
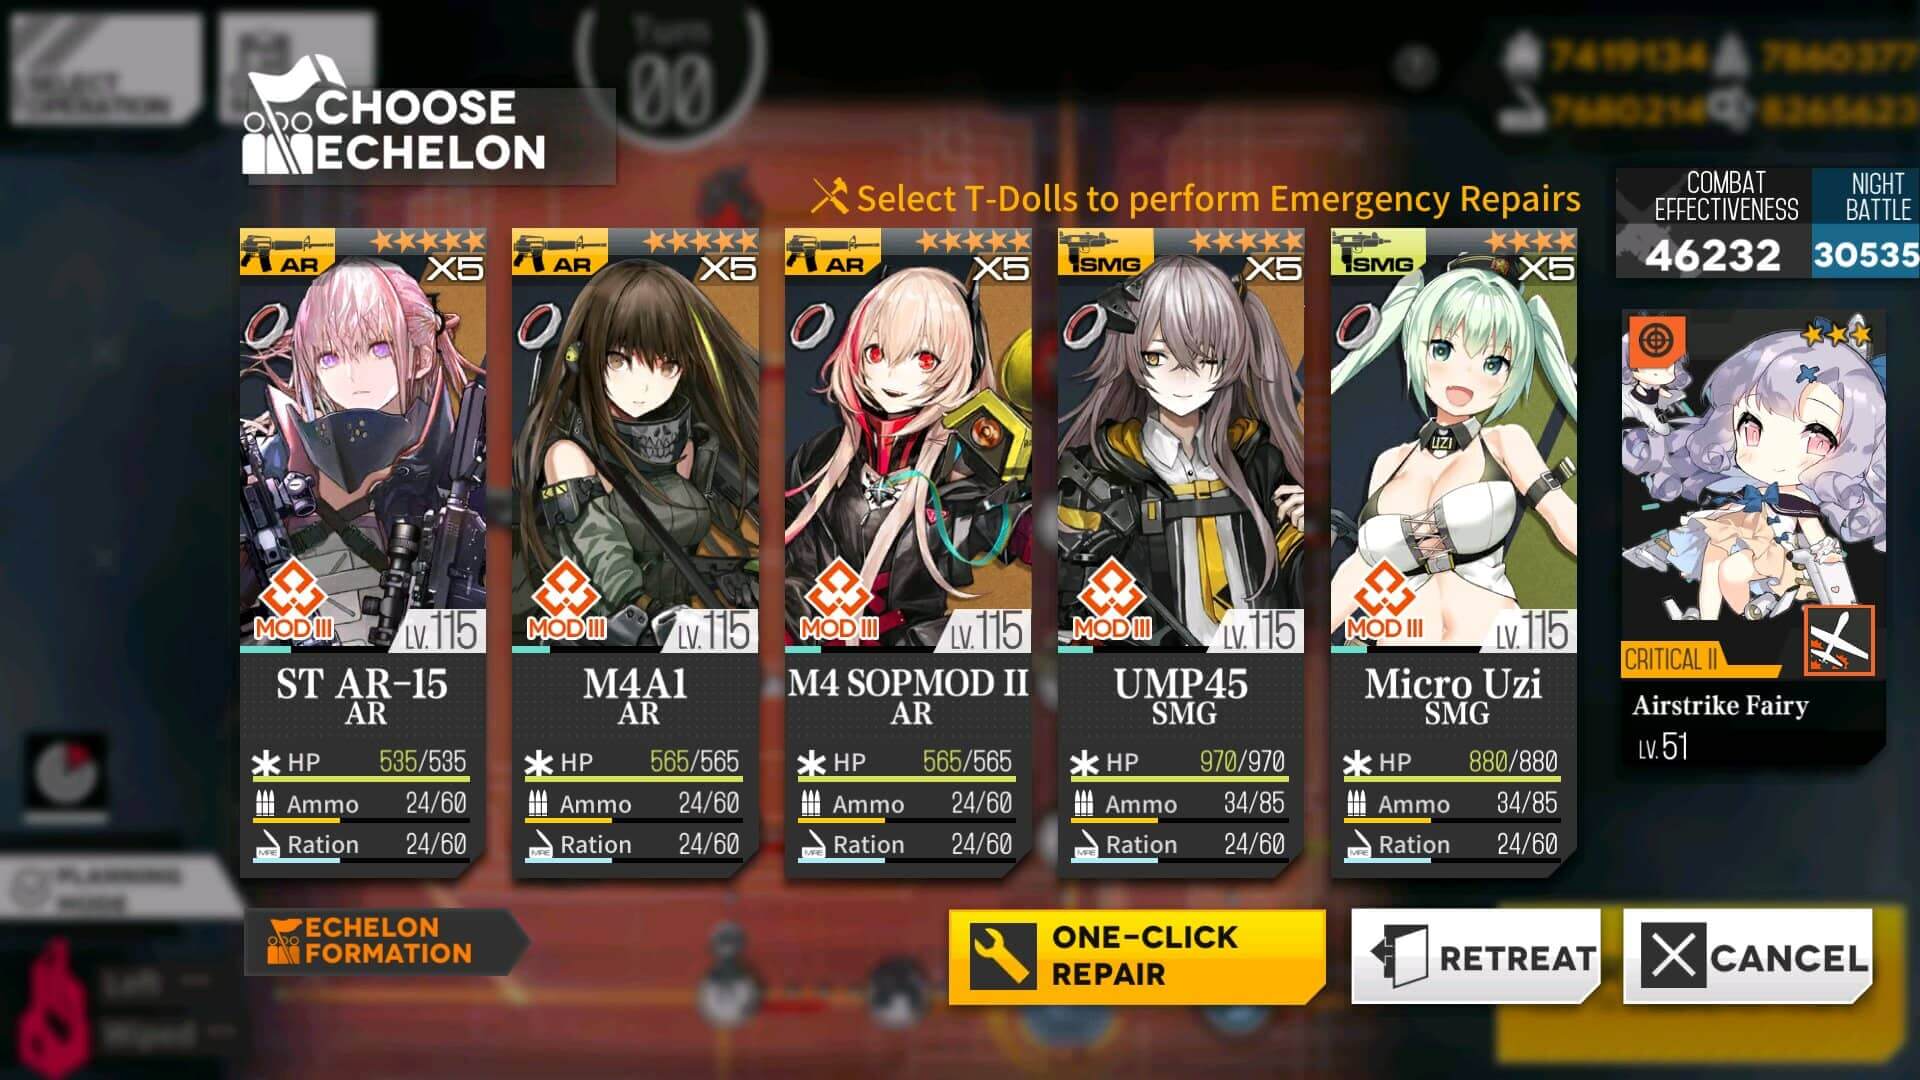
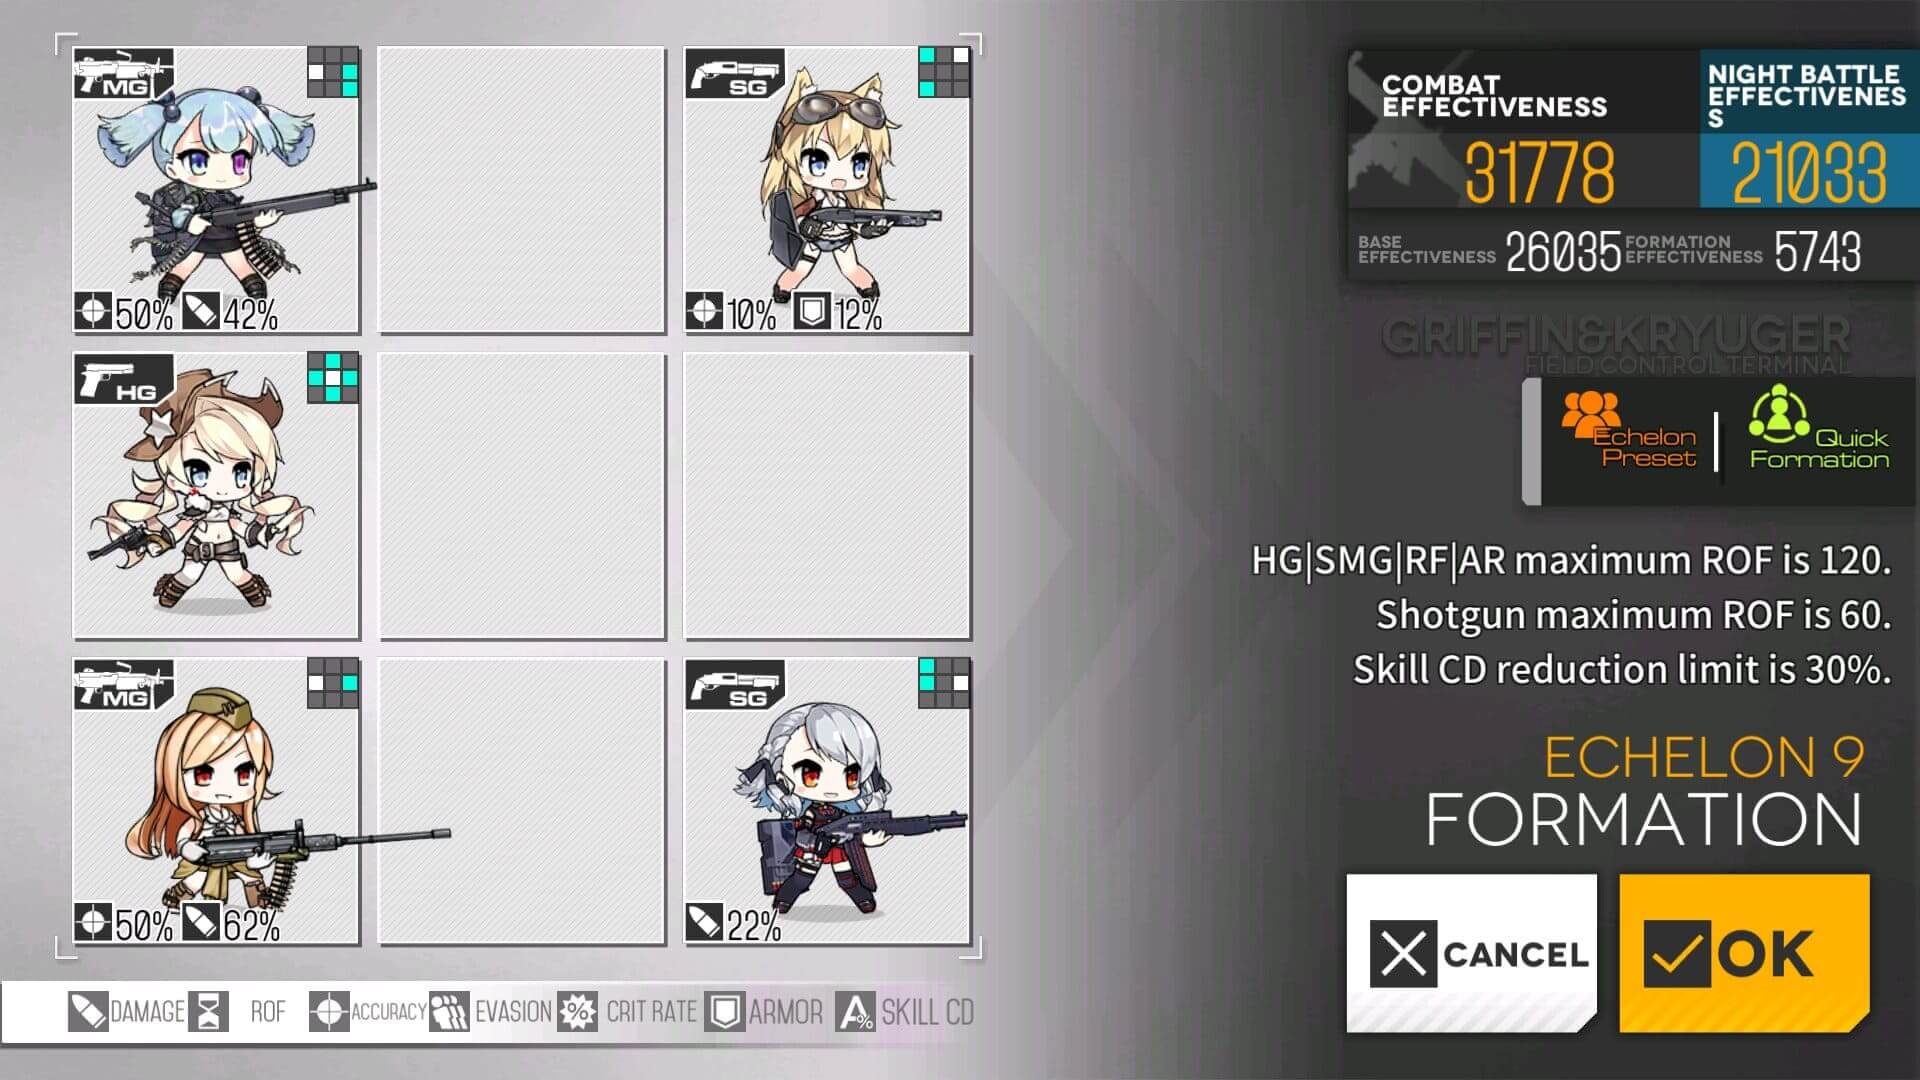
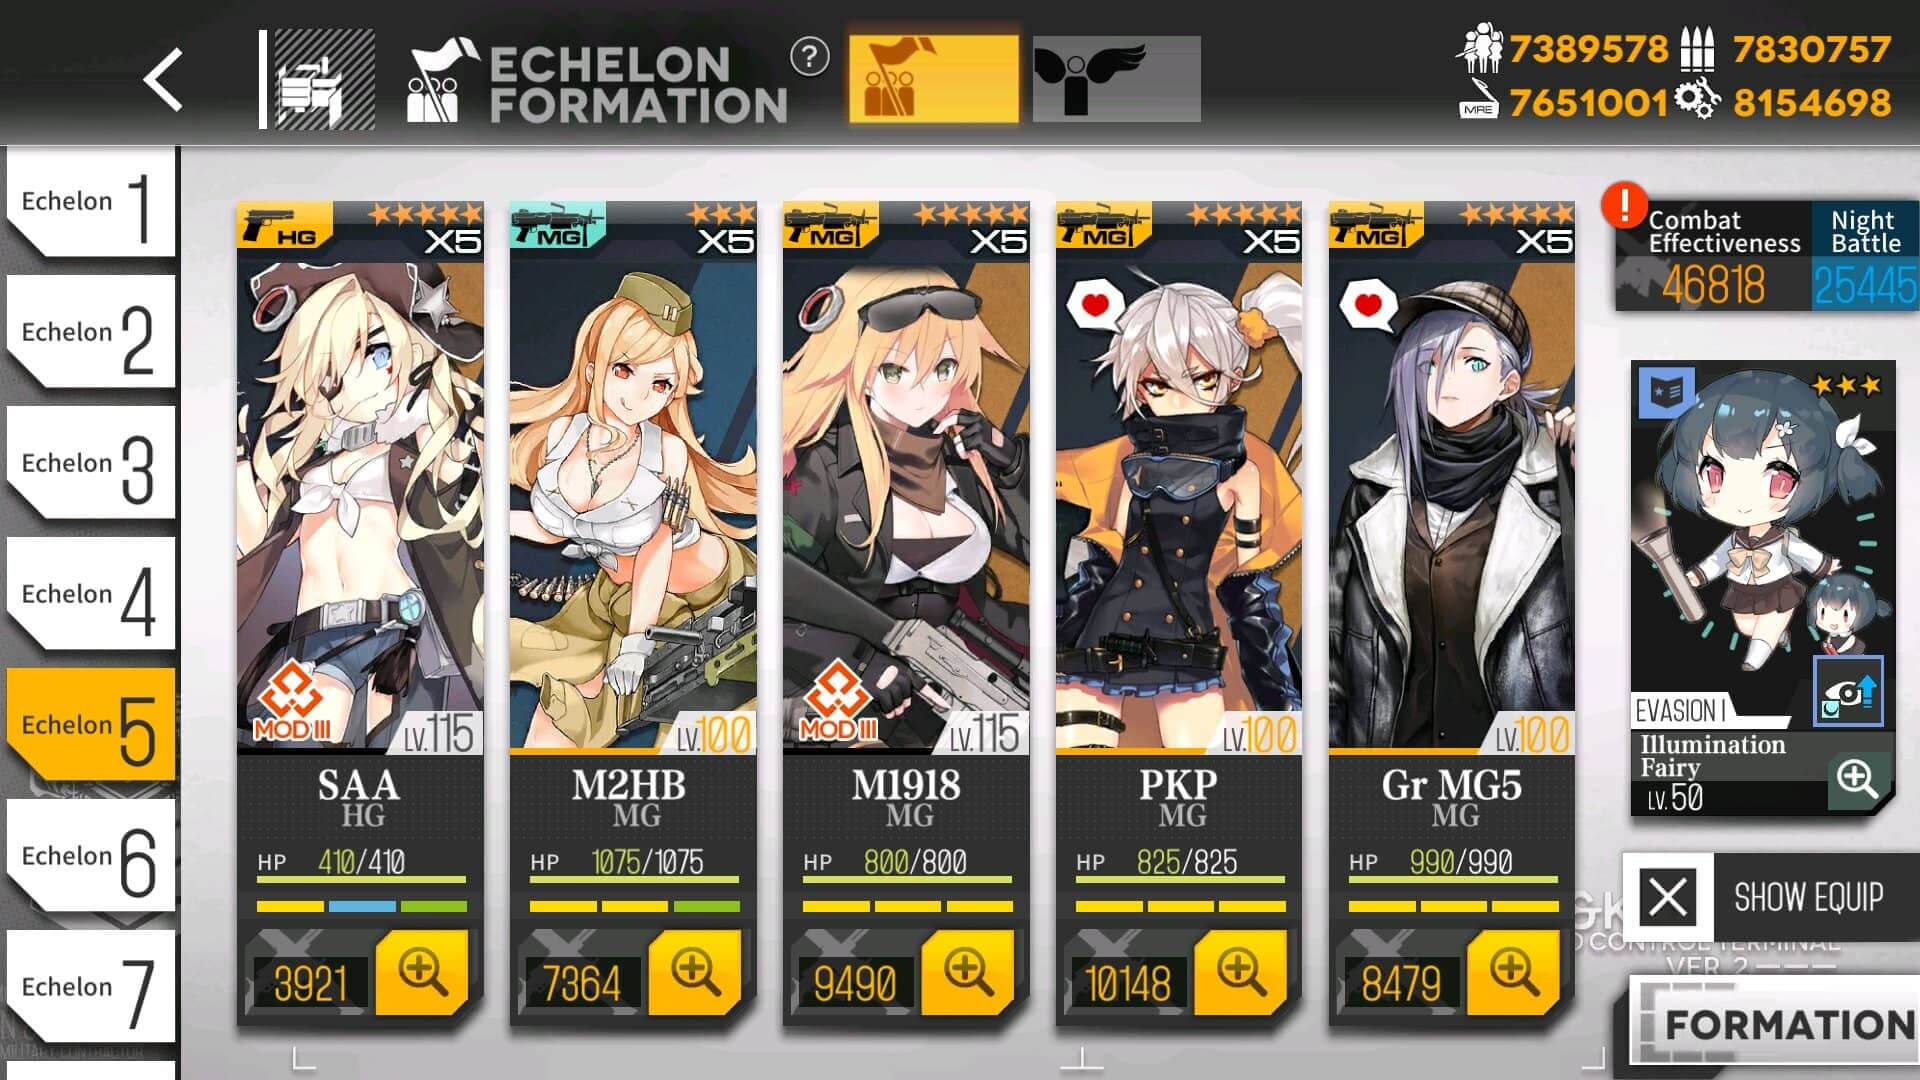
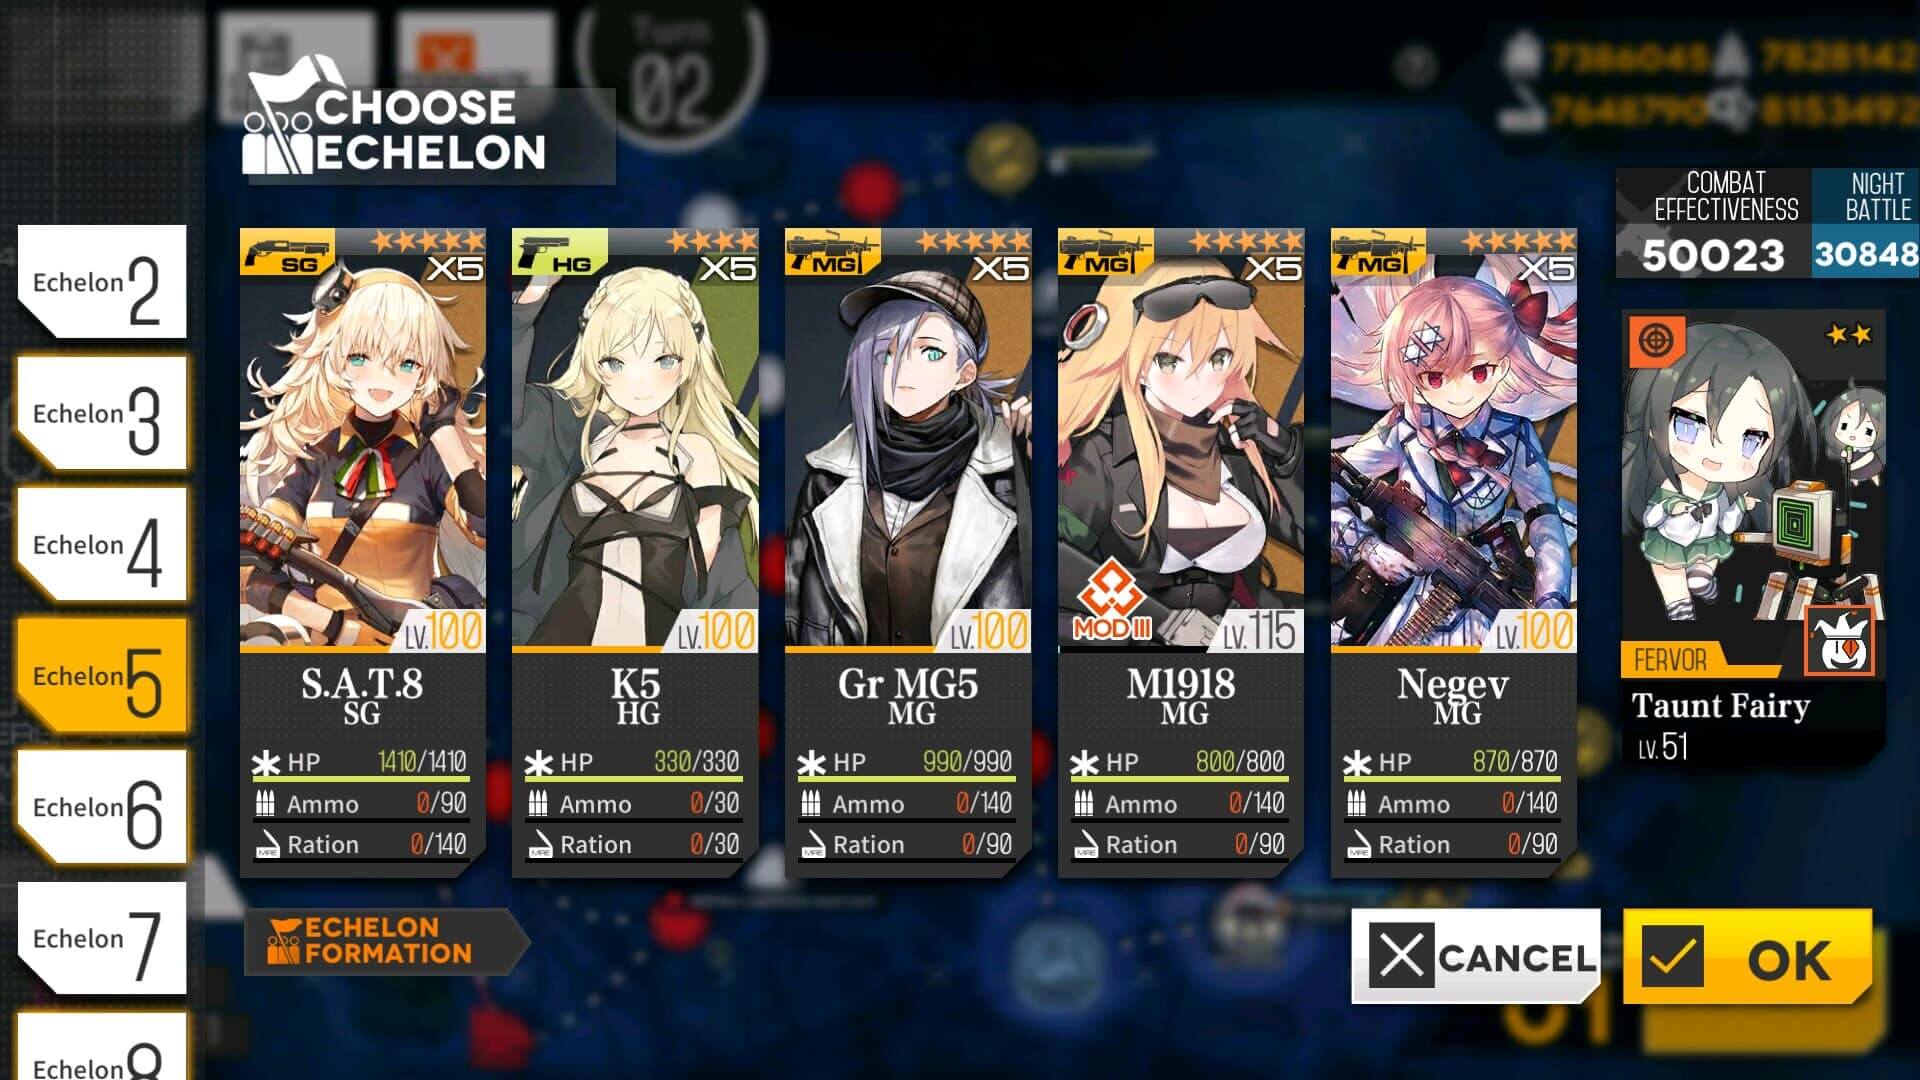
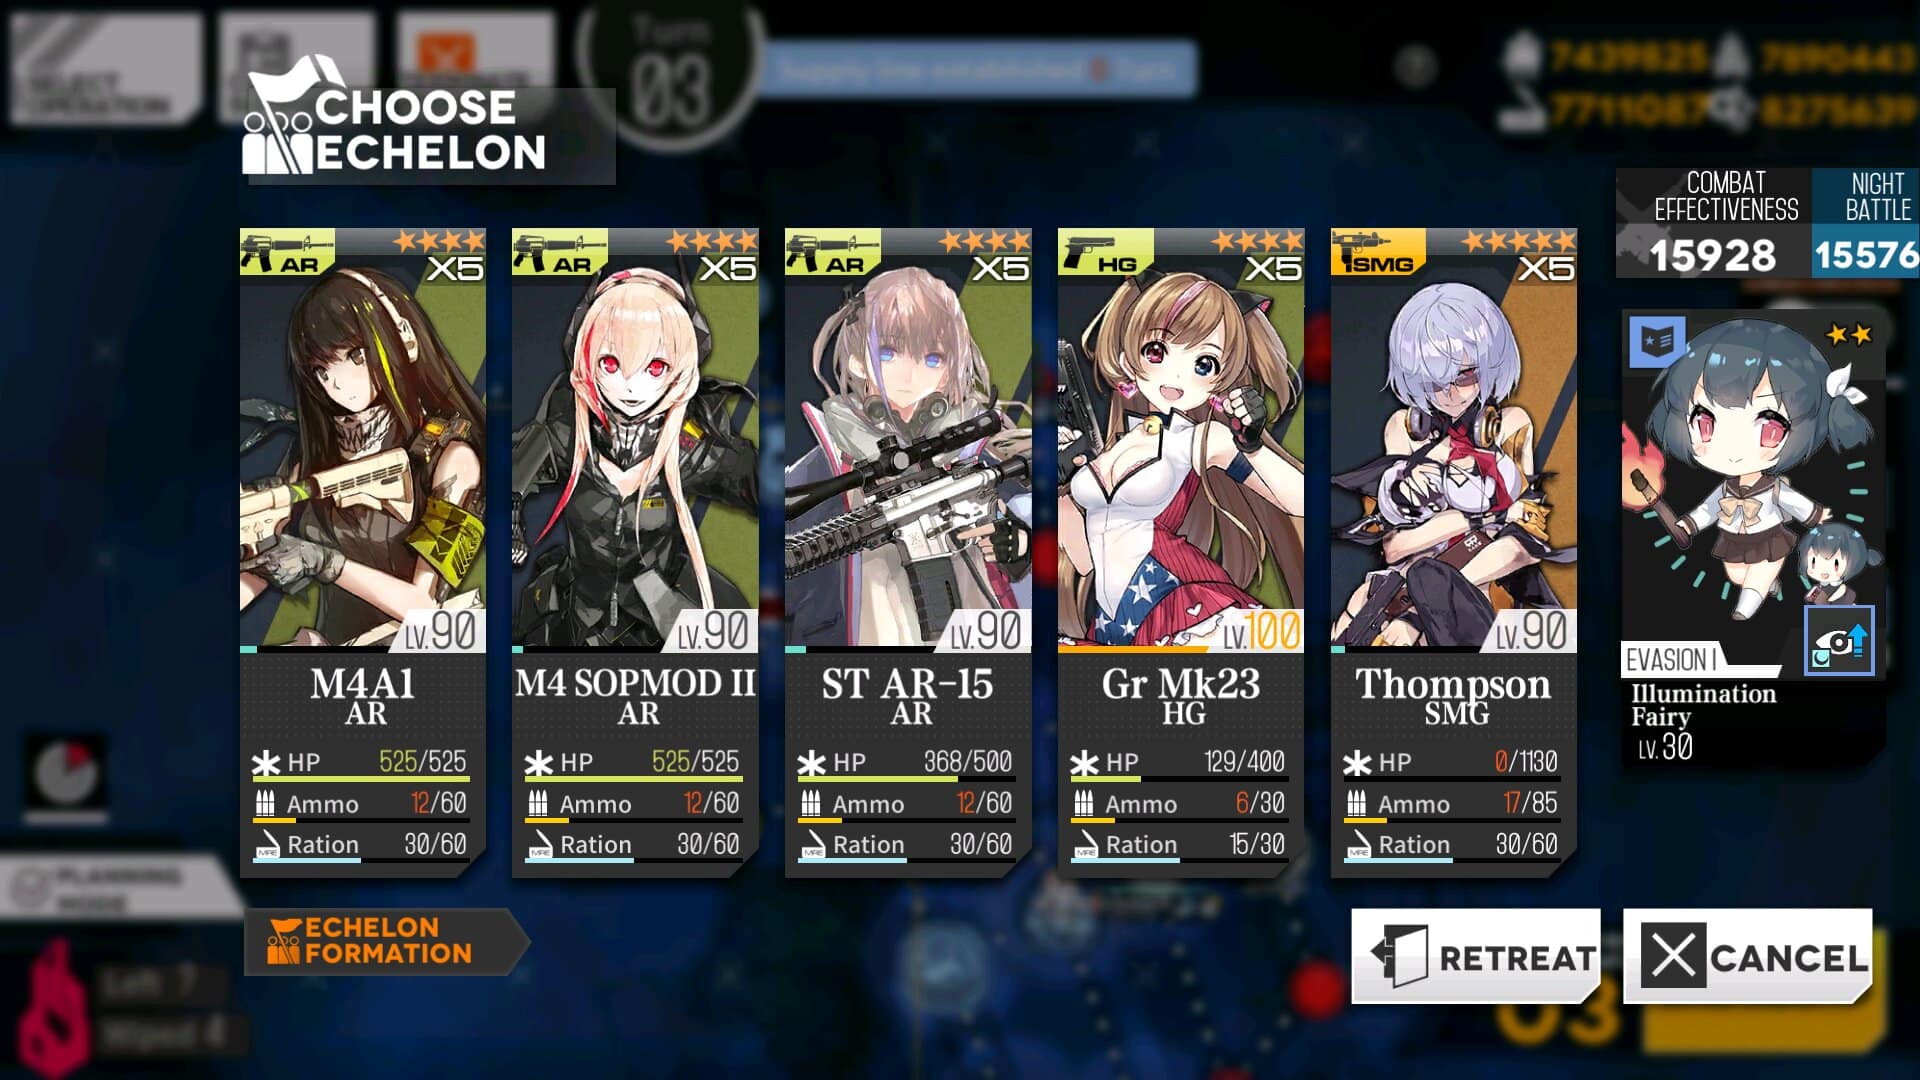
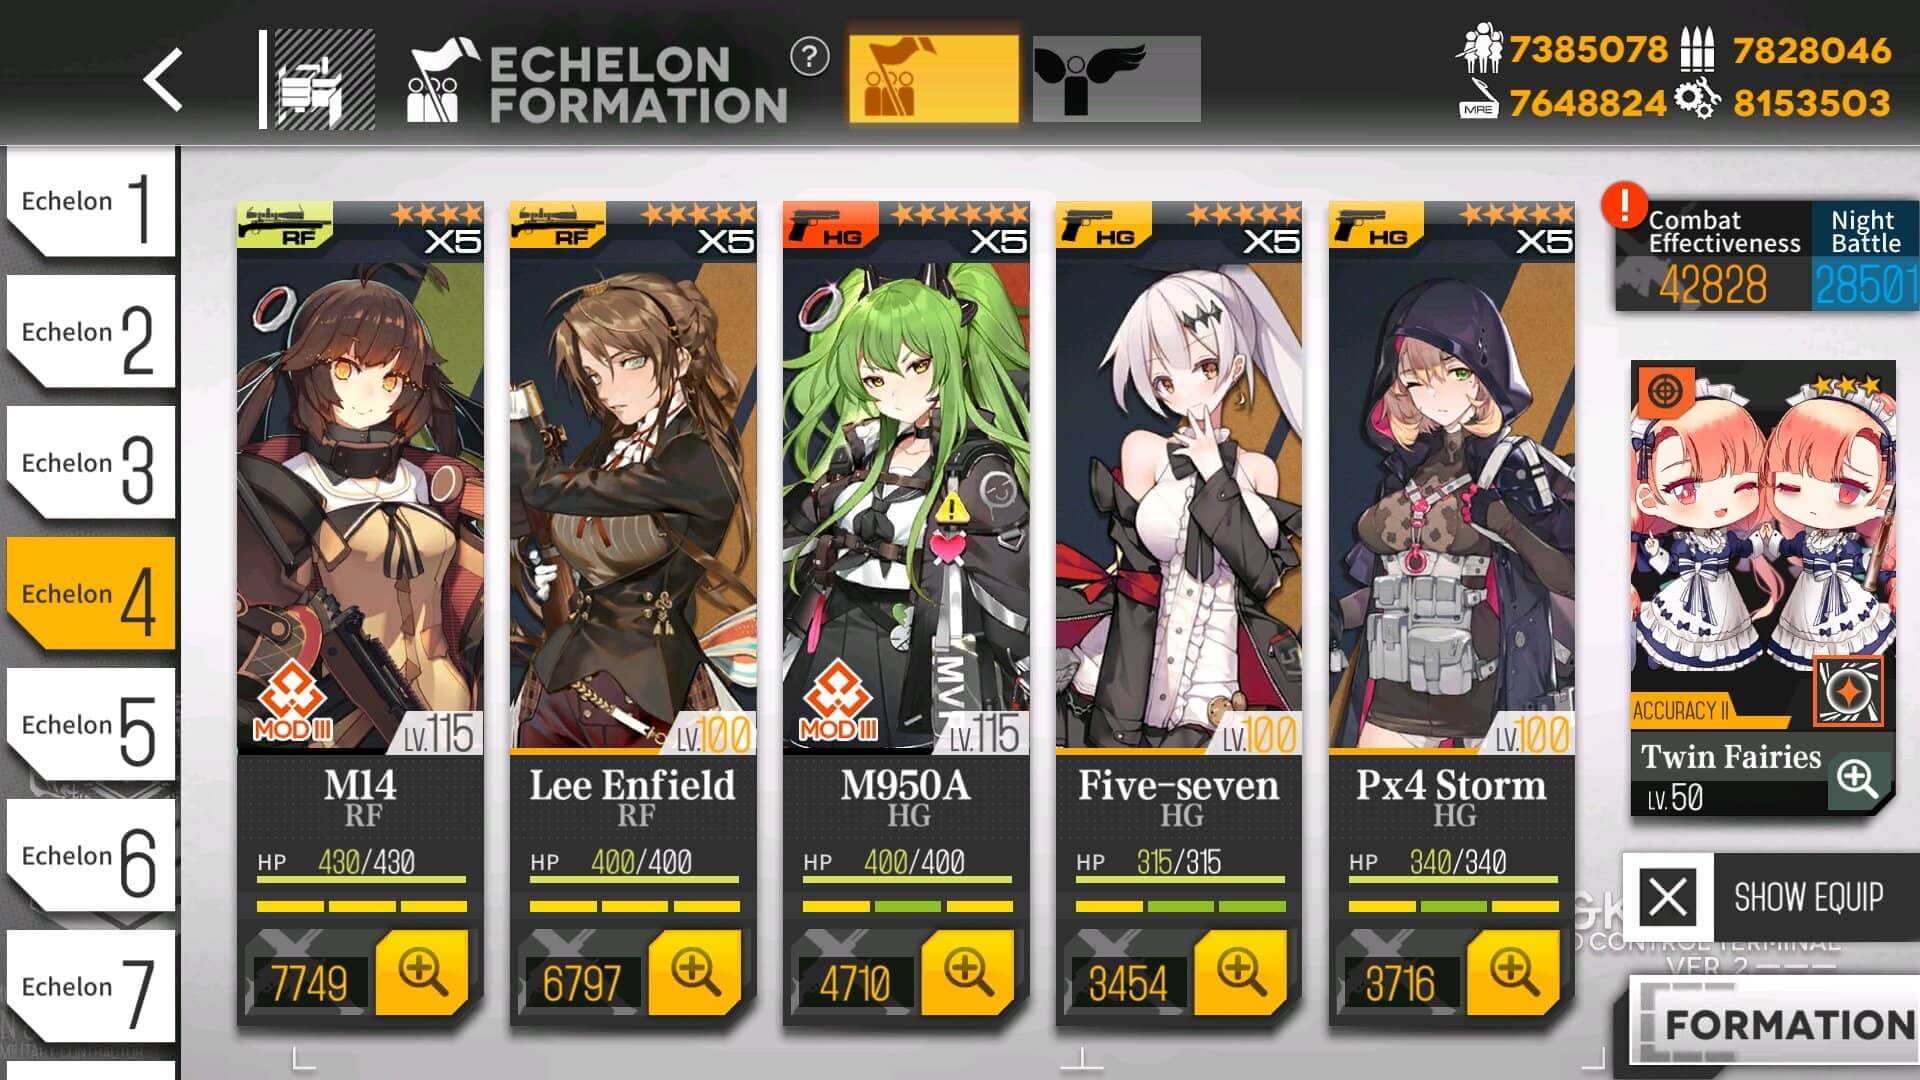
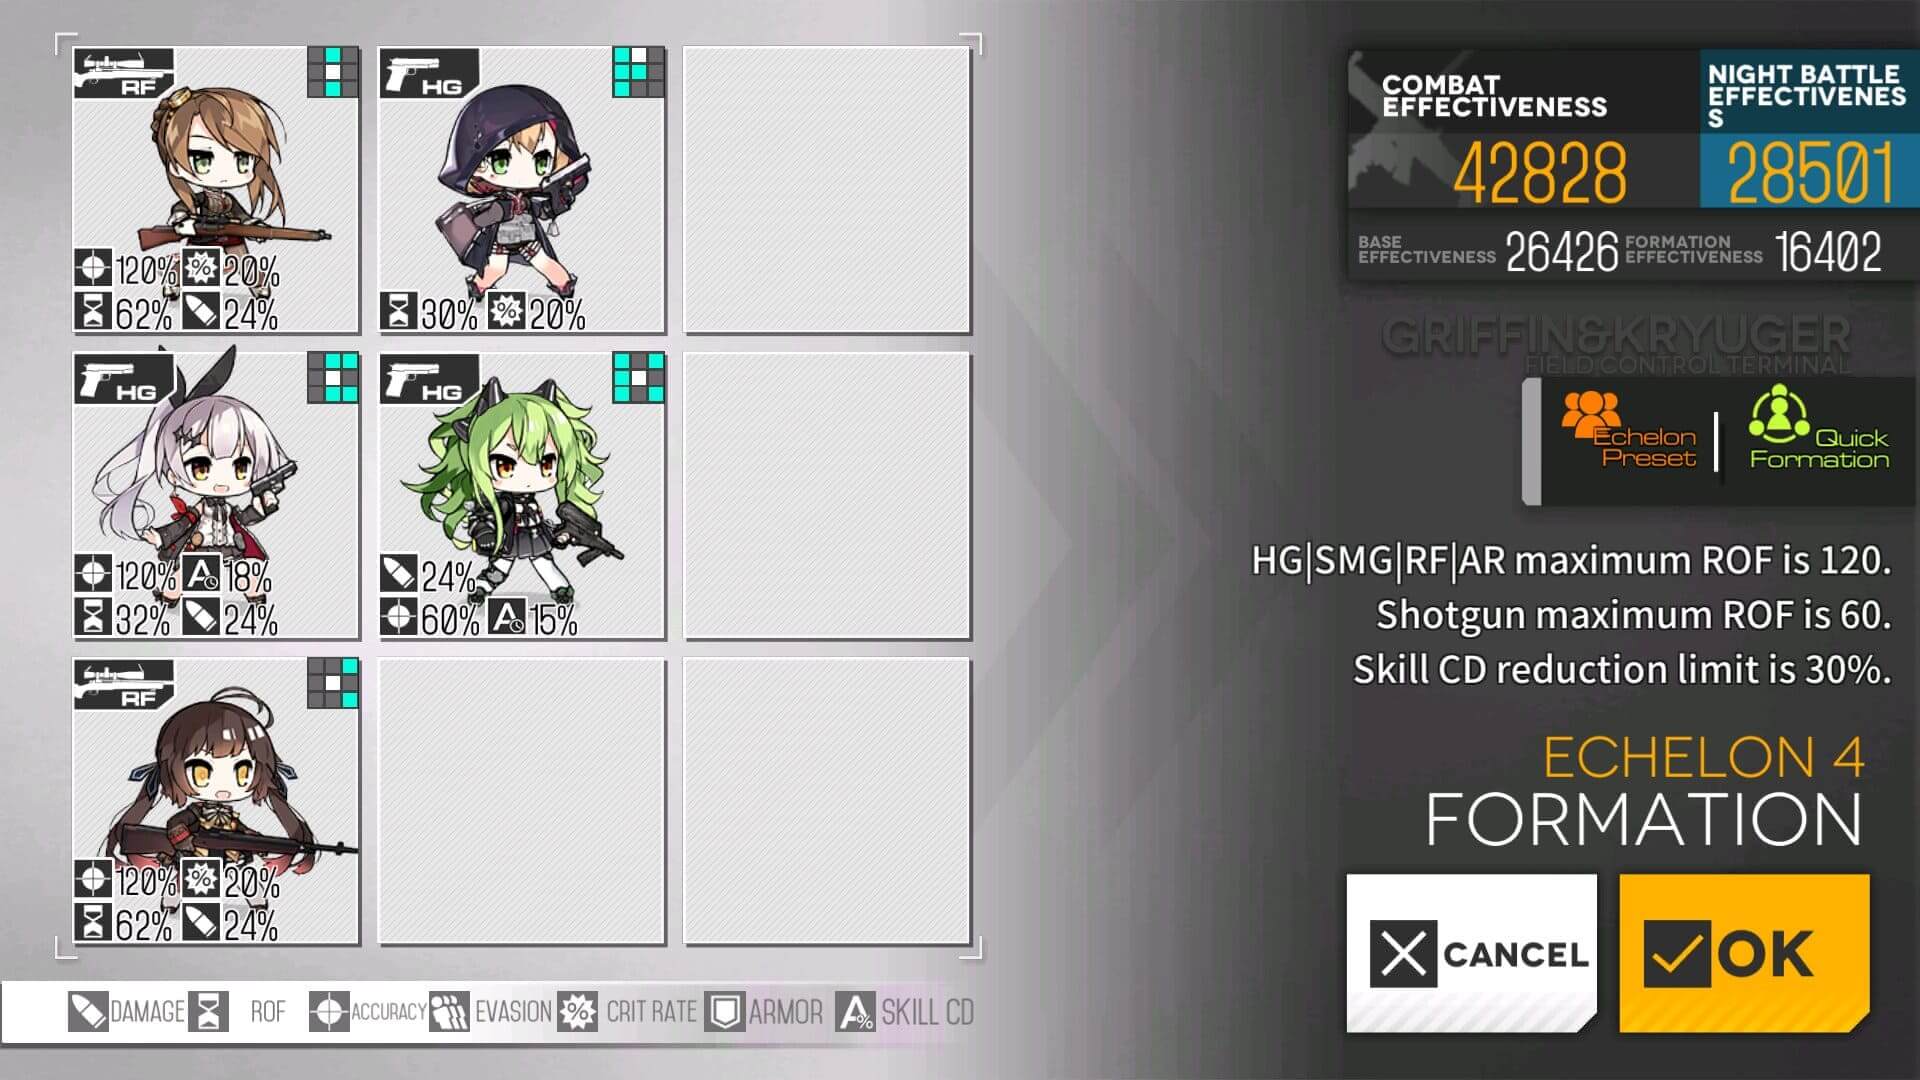
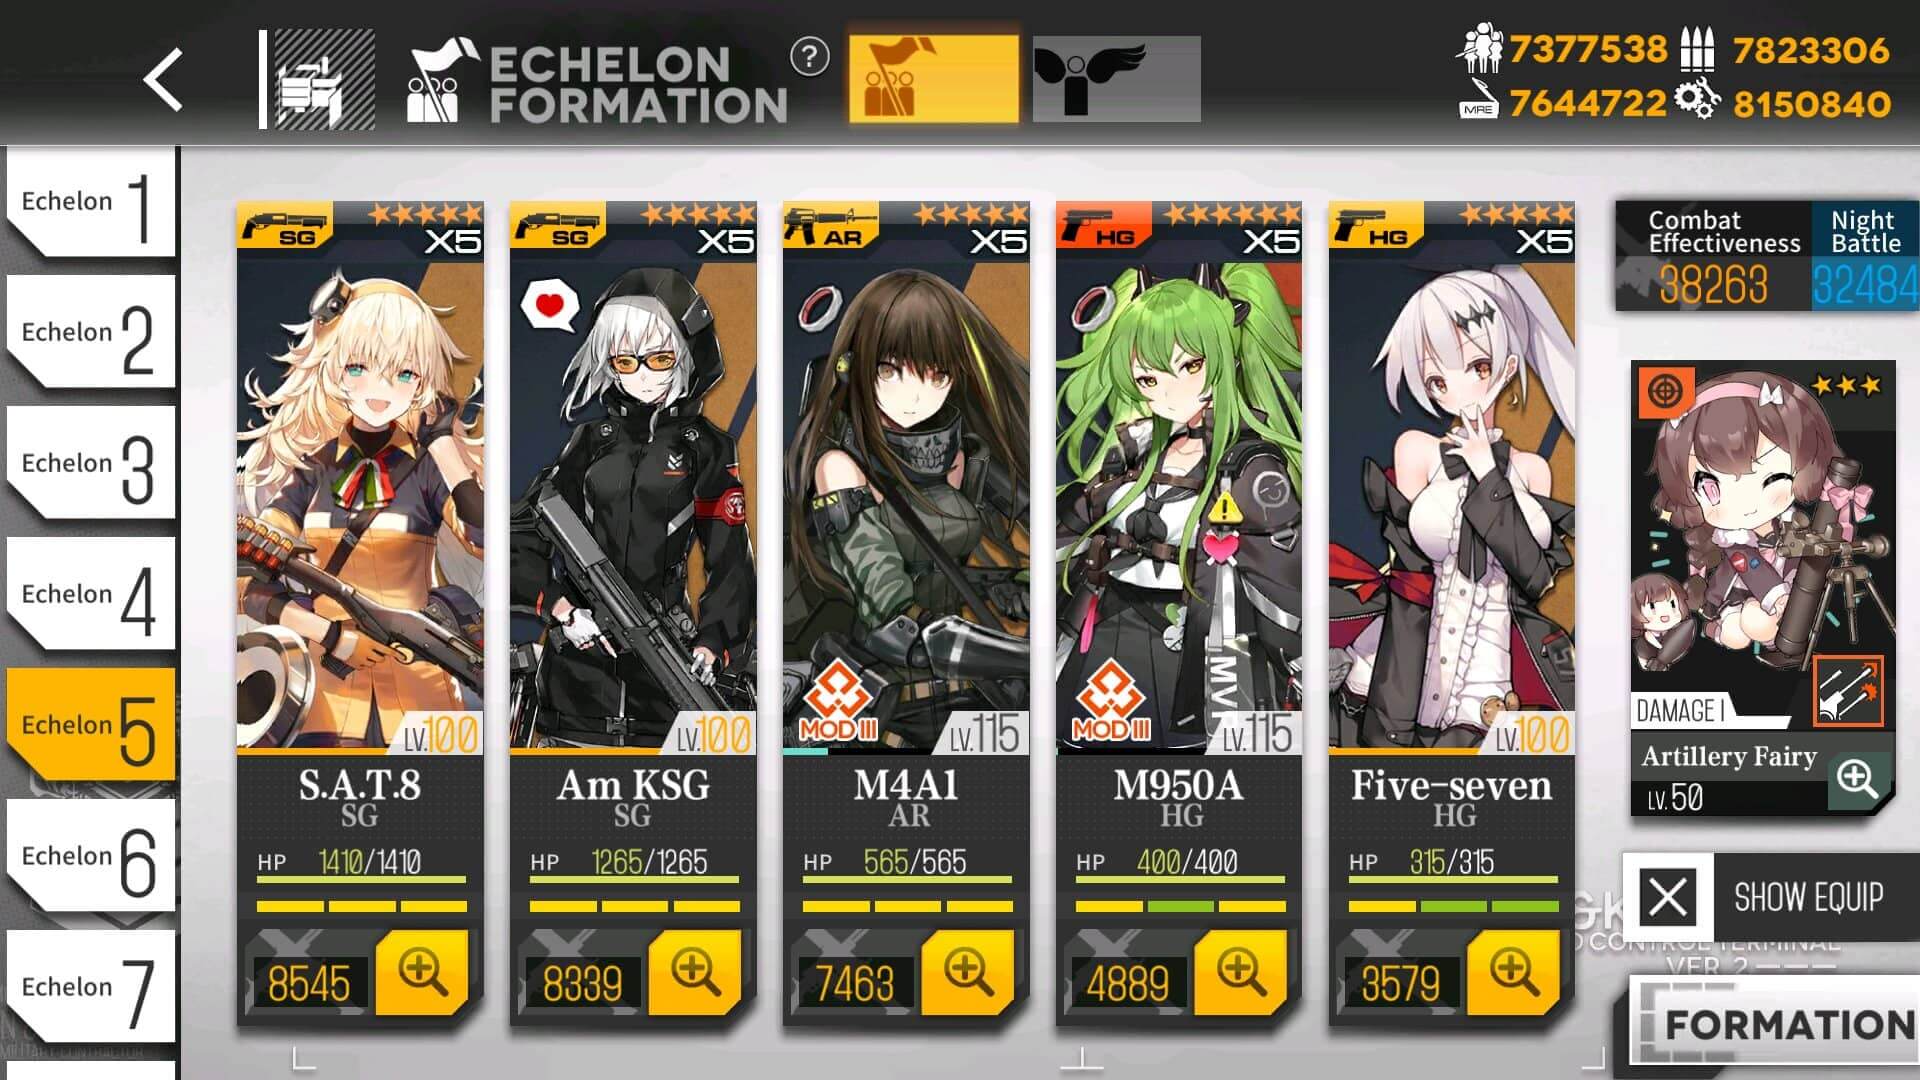
Here is example echelon used for the duration of the campaign on normal difficulty. You should have no issue clearing first 4 chapters with these T-dolls with further leveling and skill training.
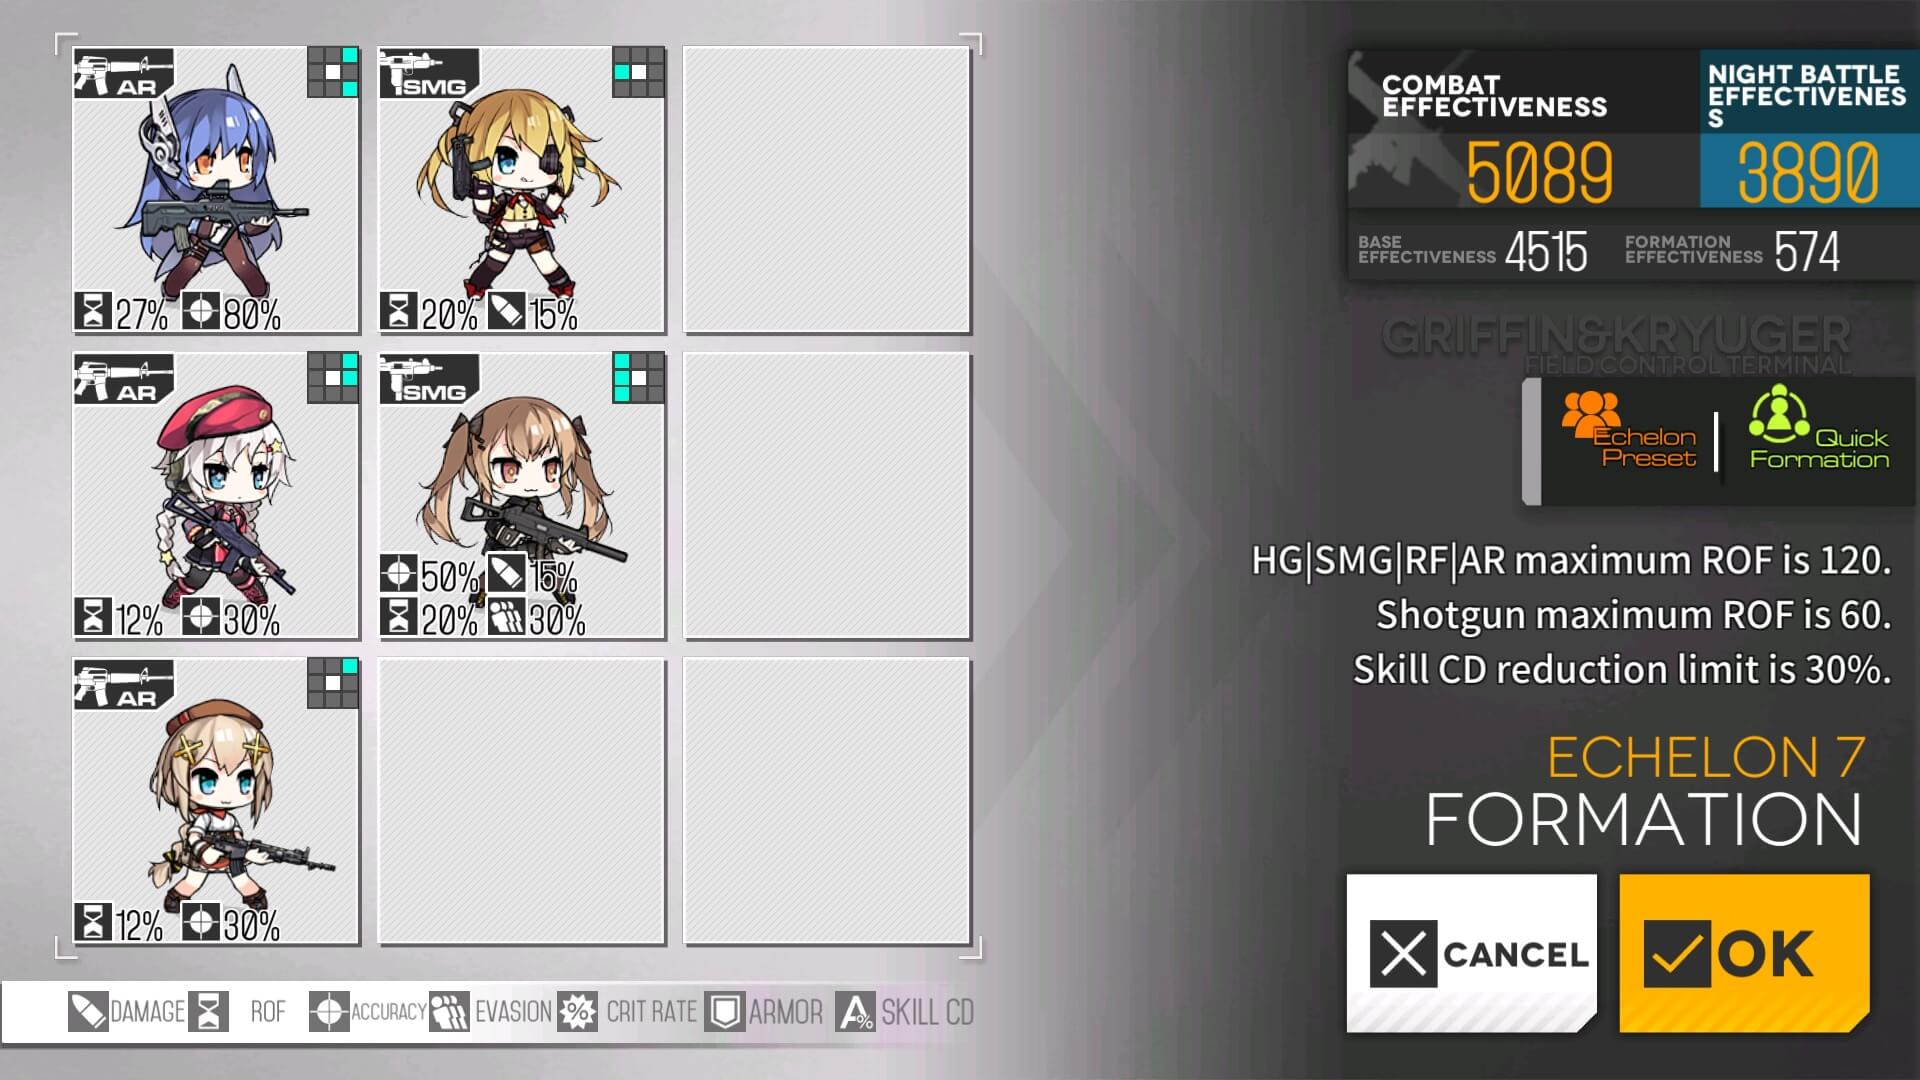
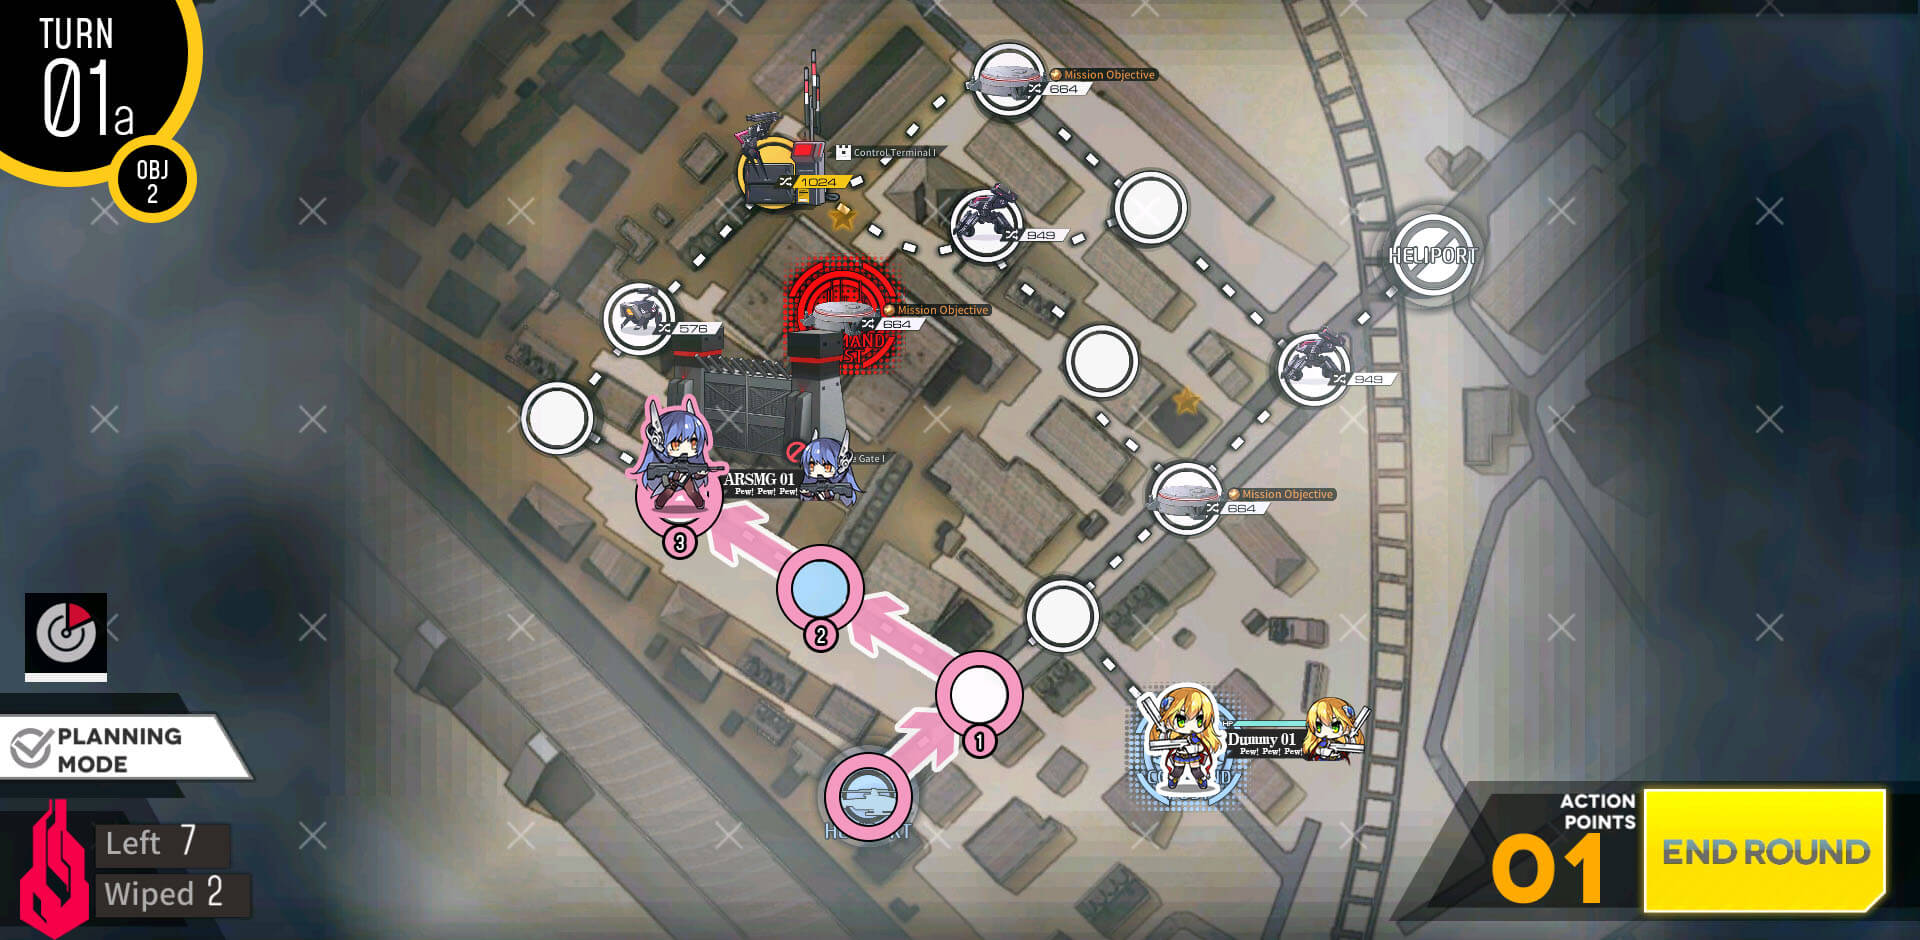
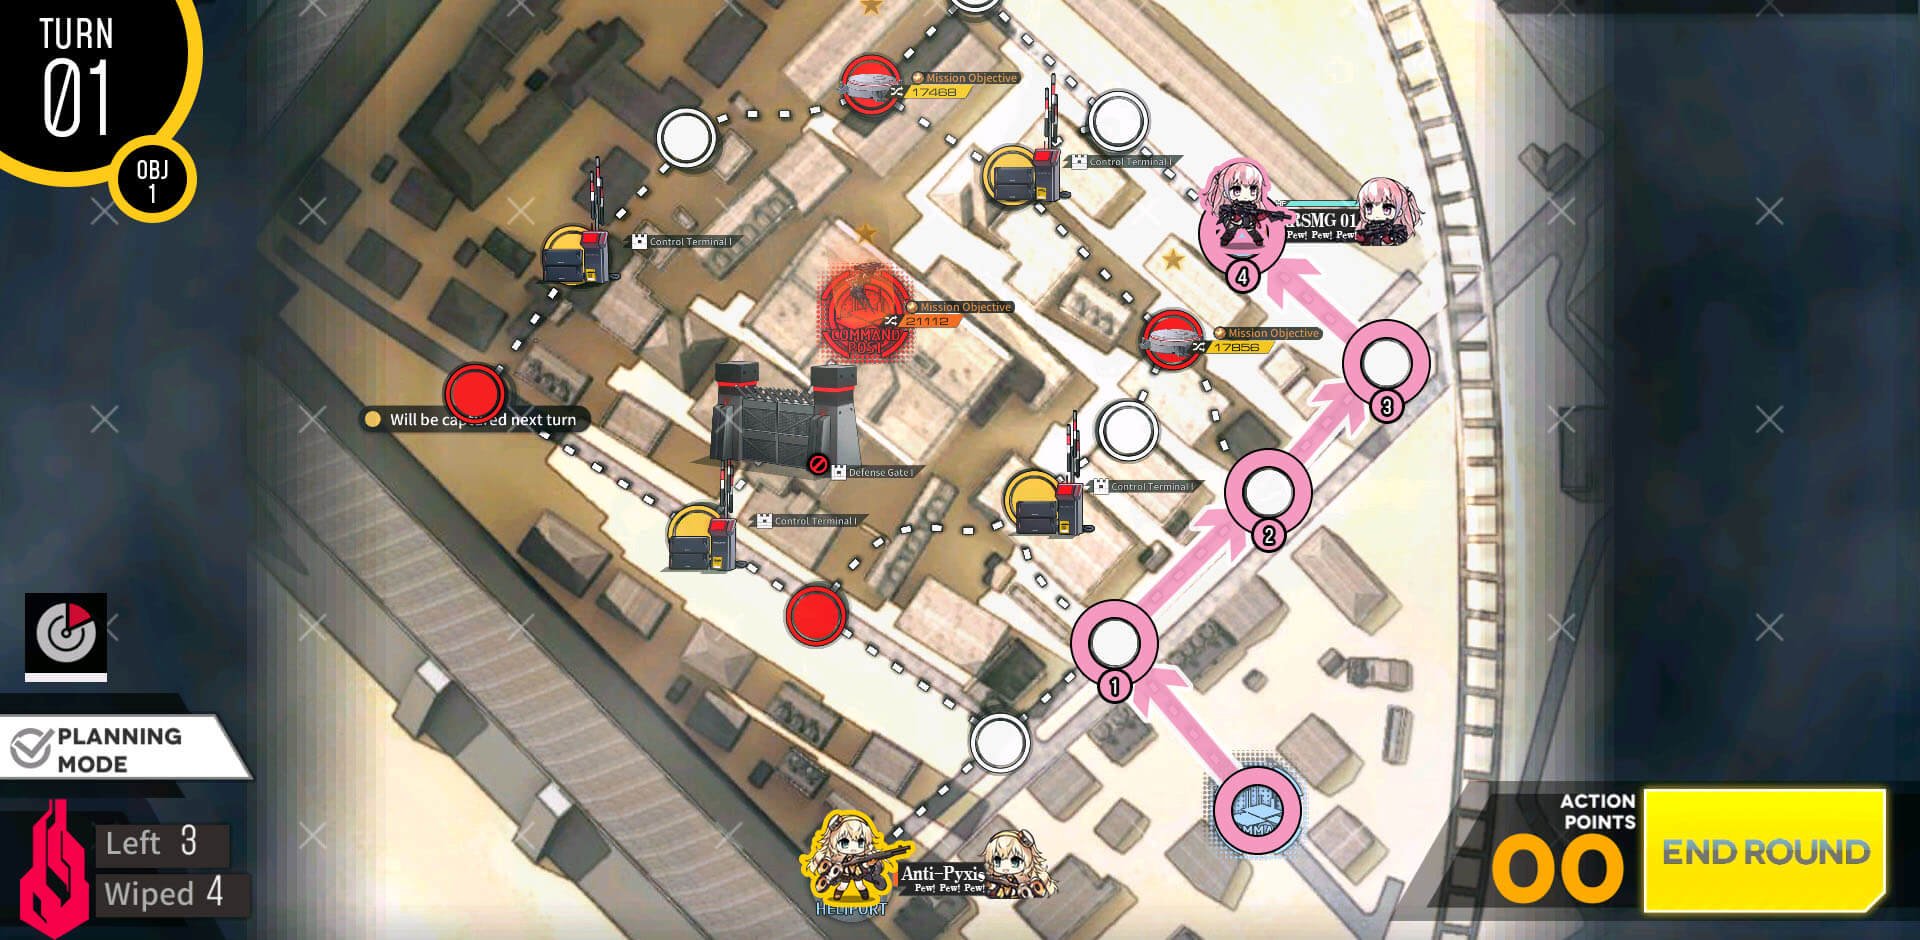
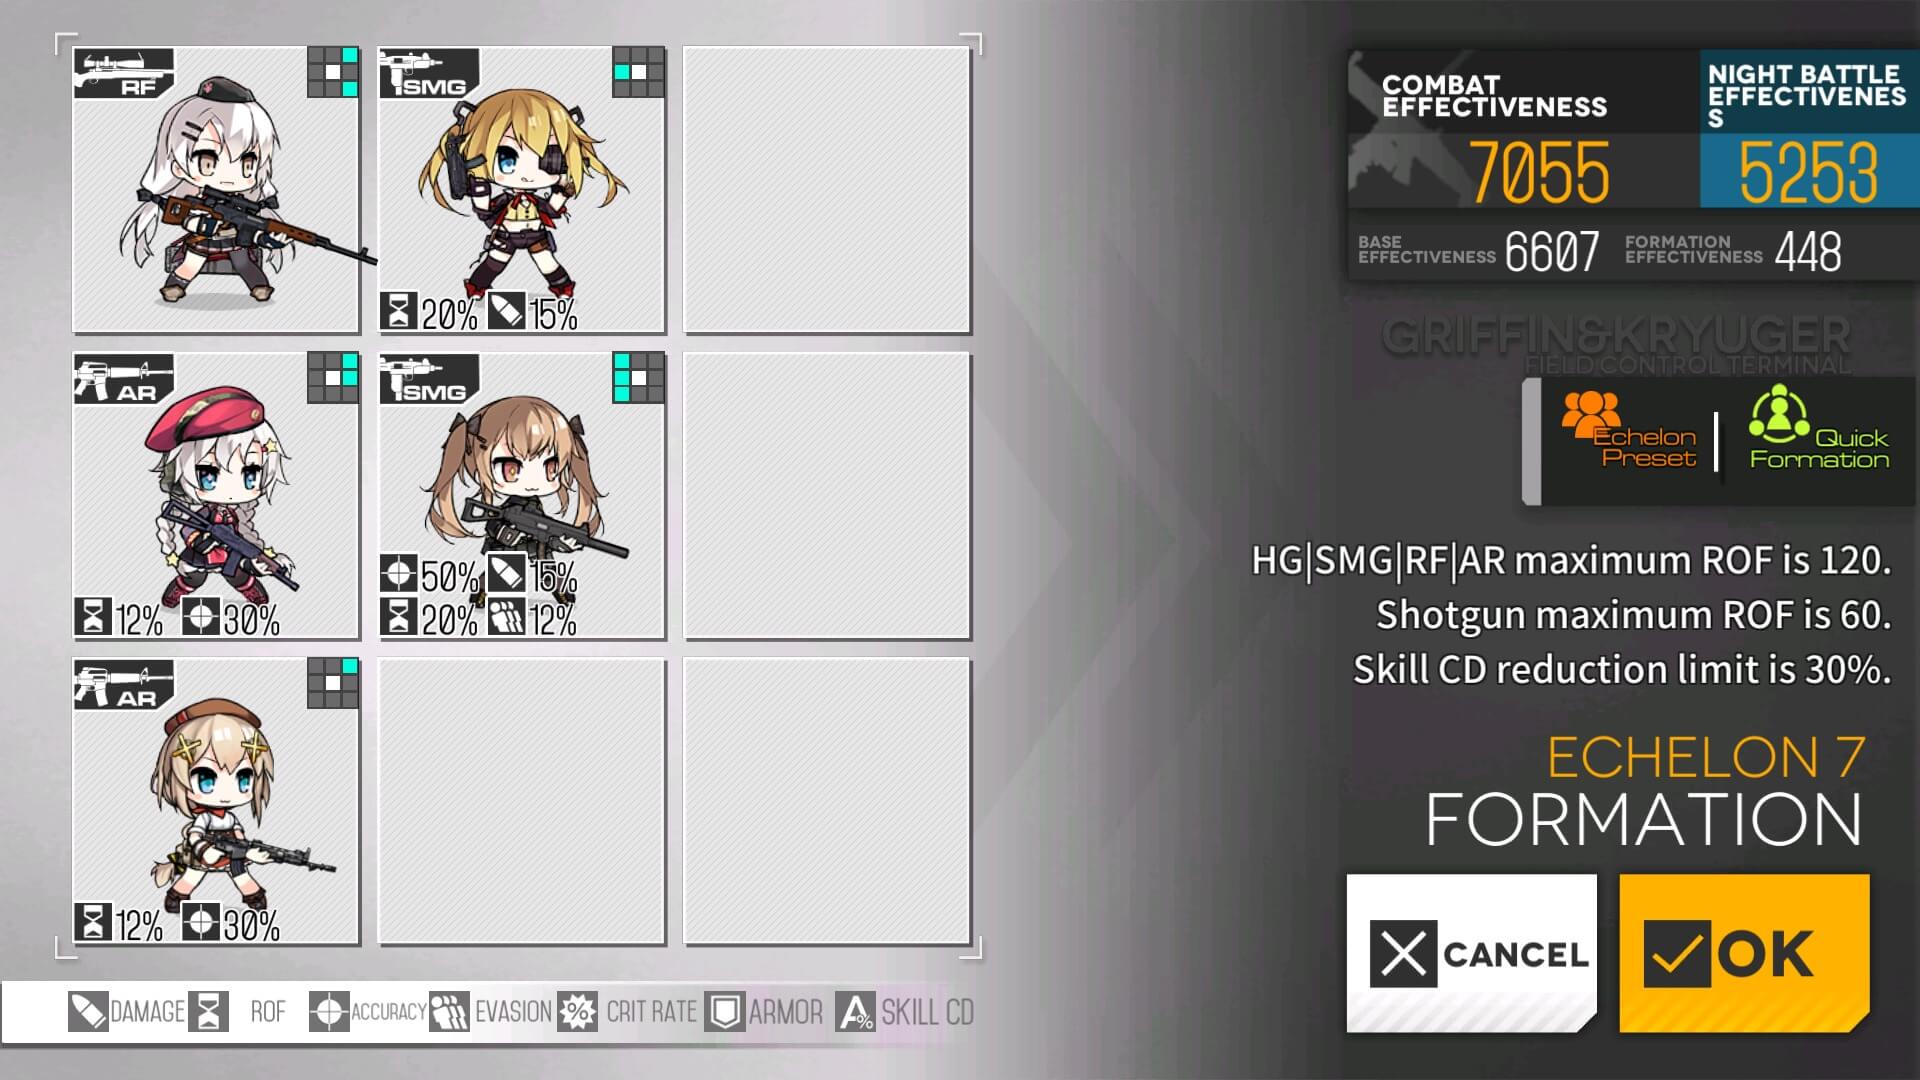
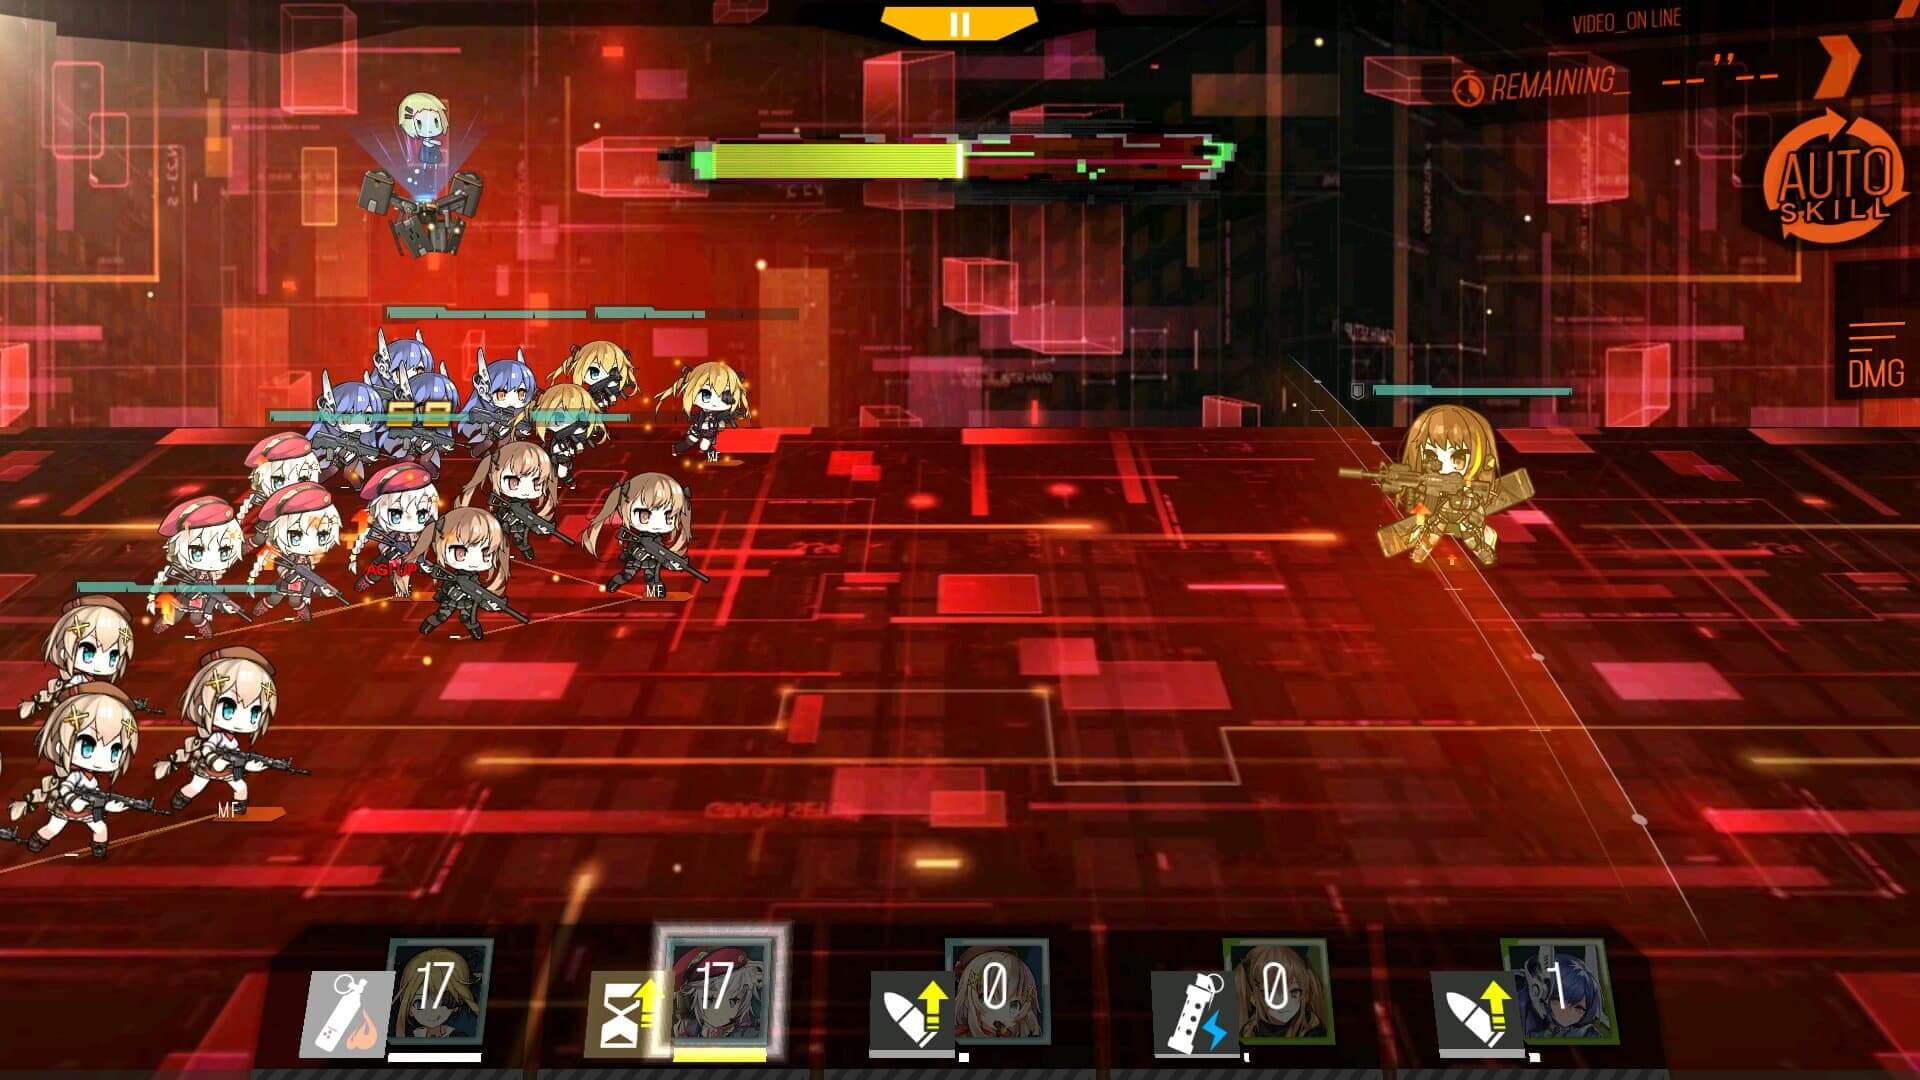
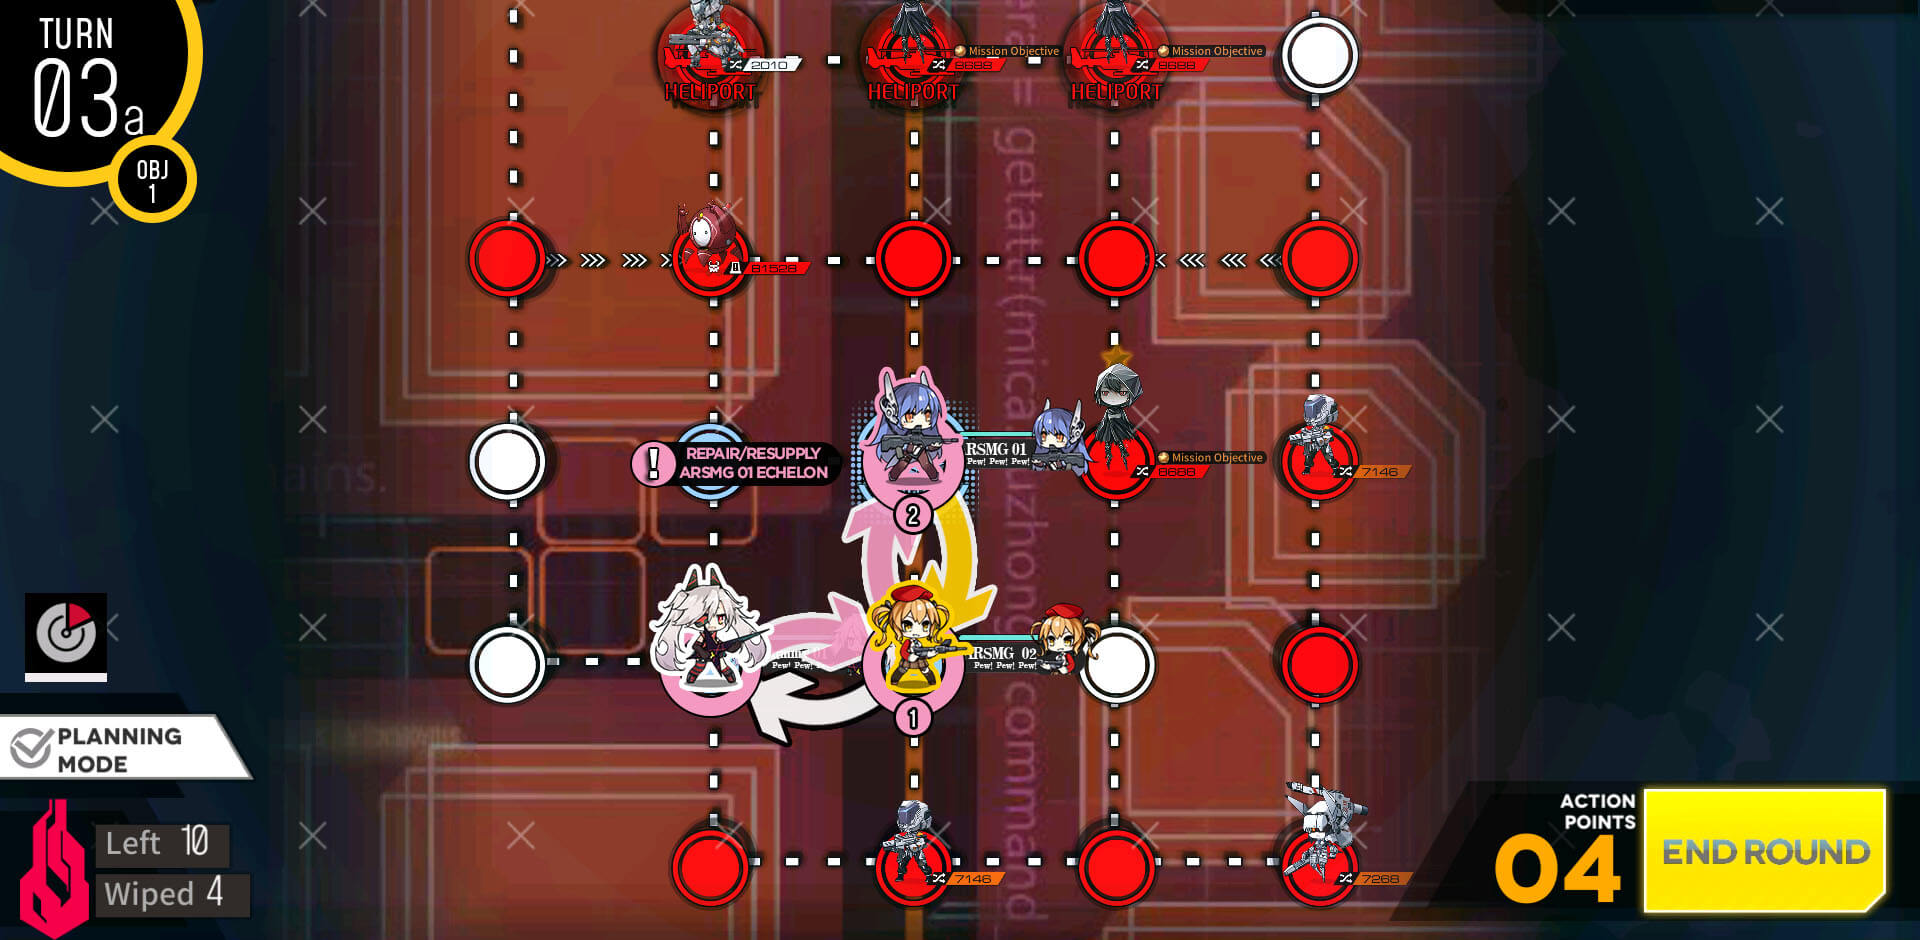
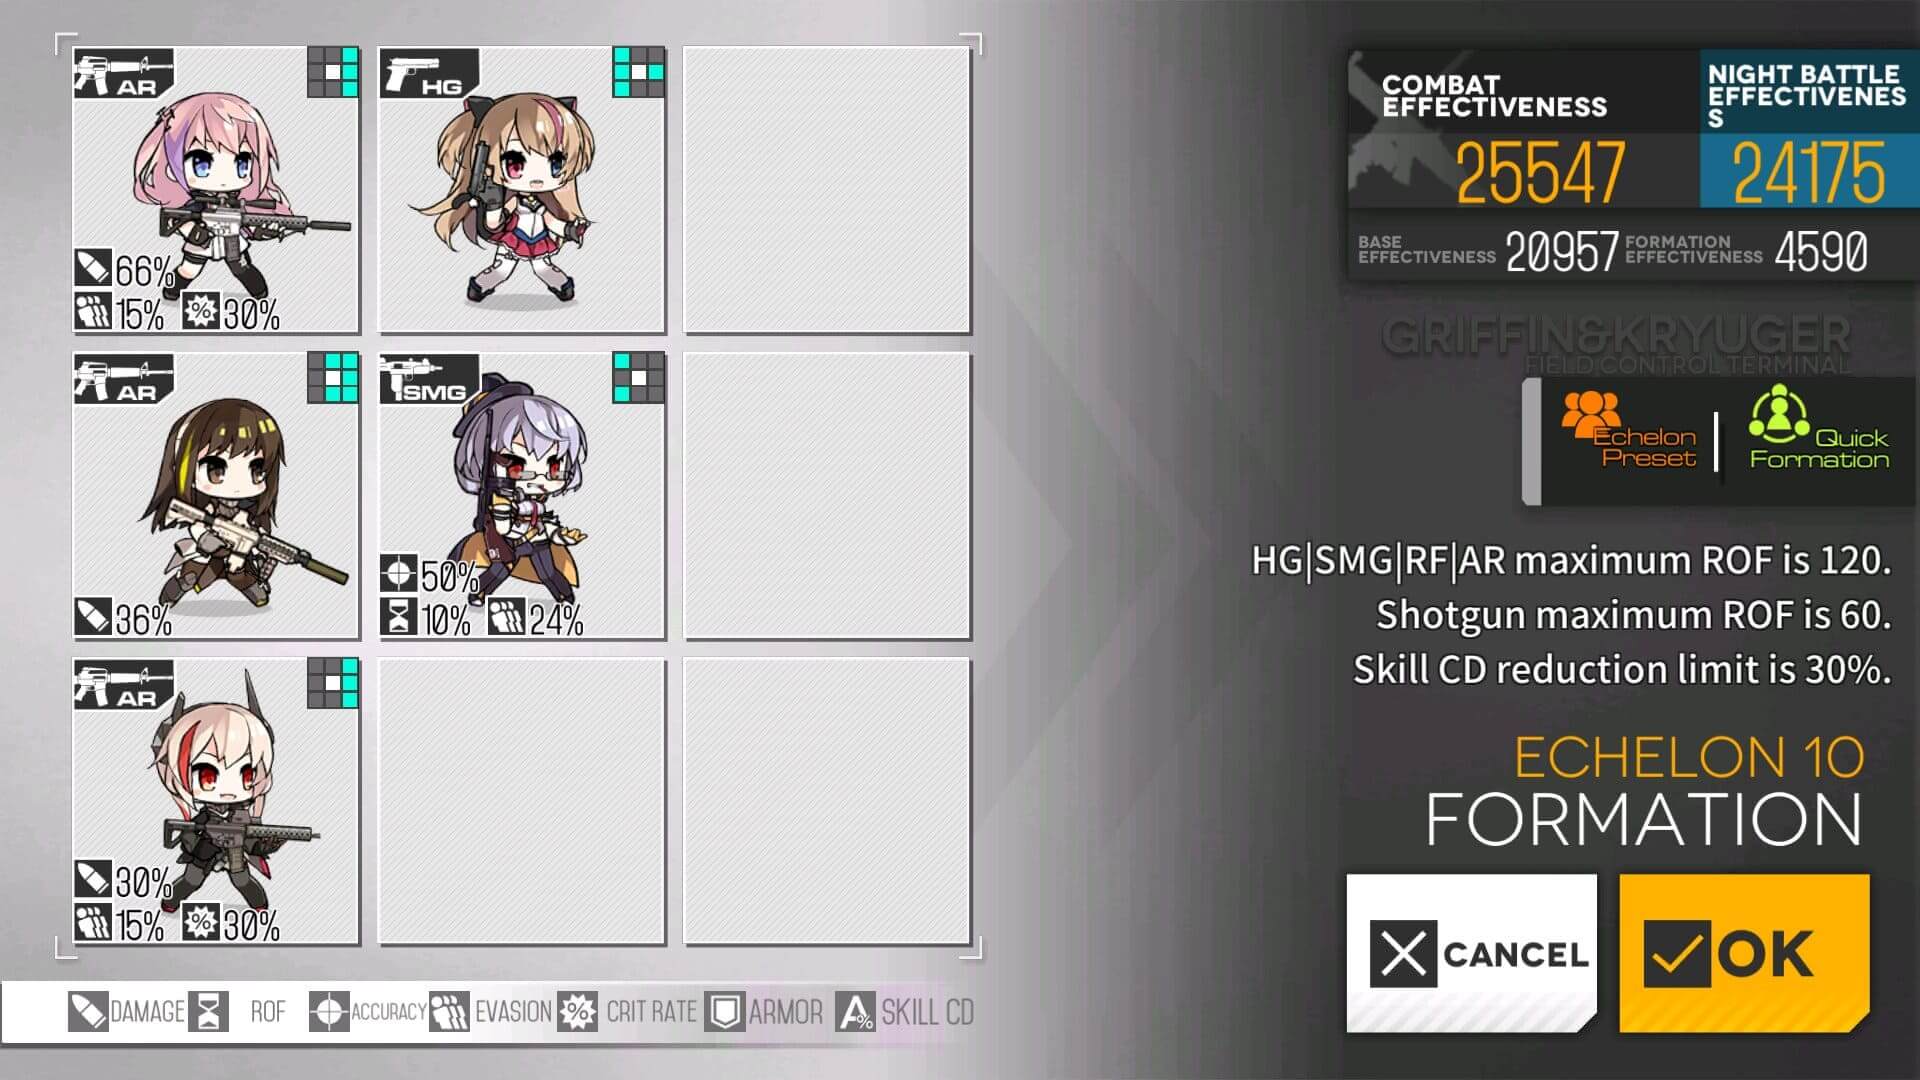
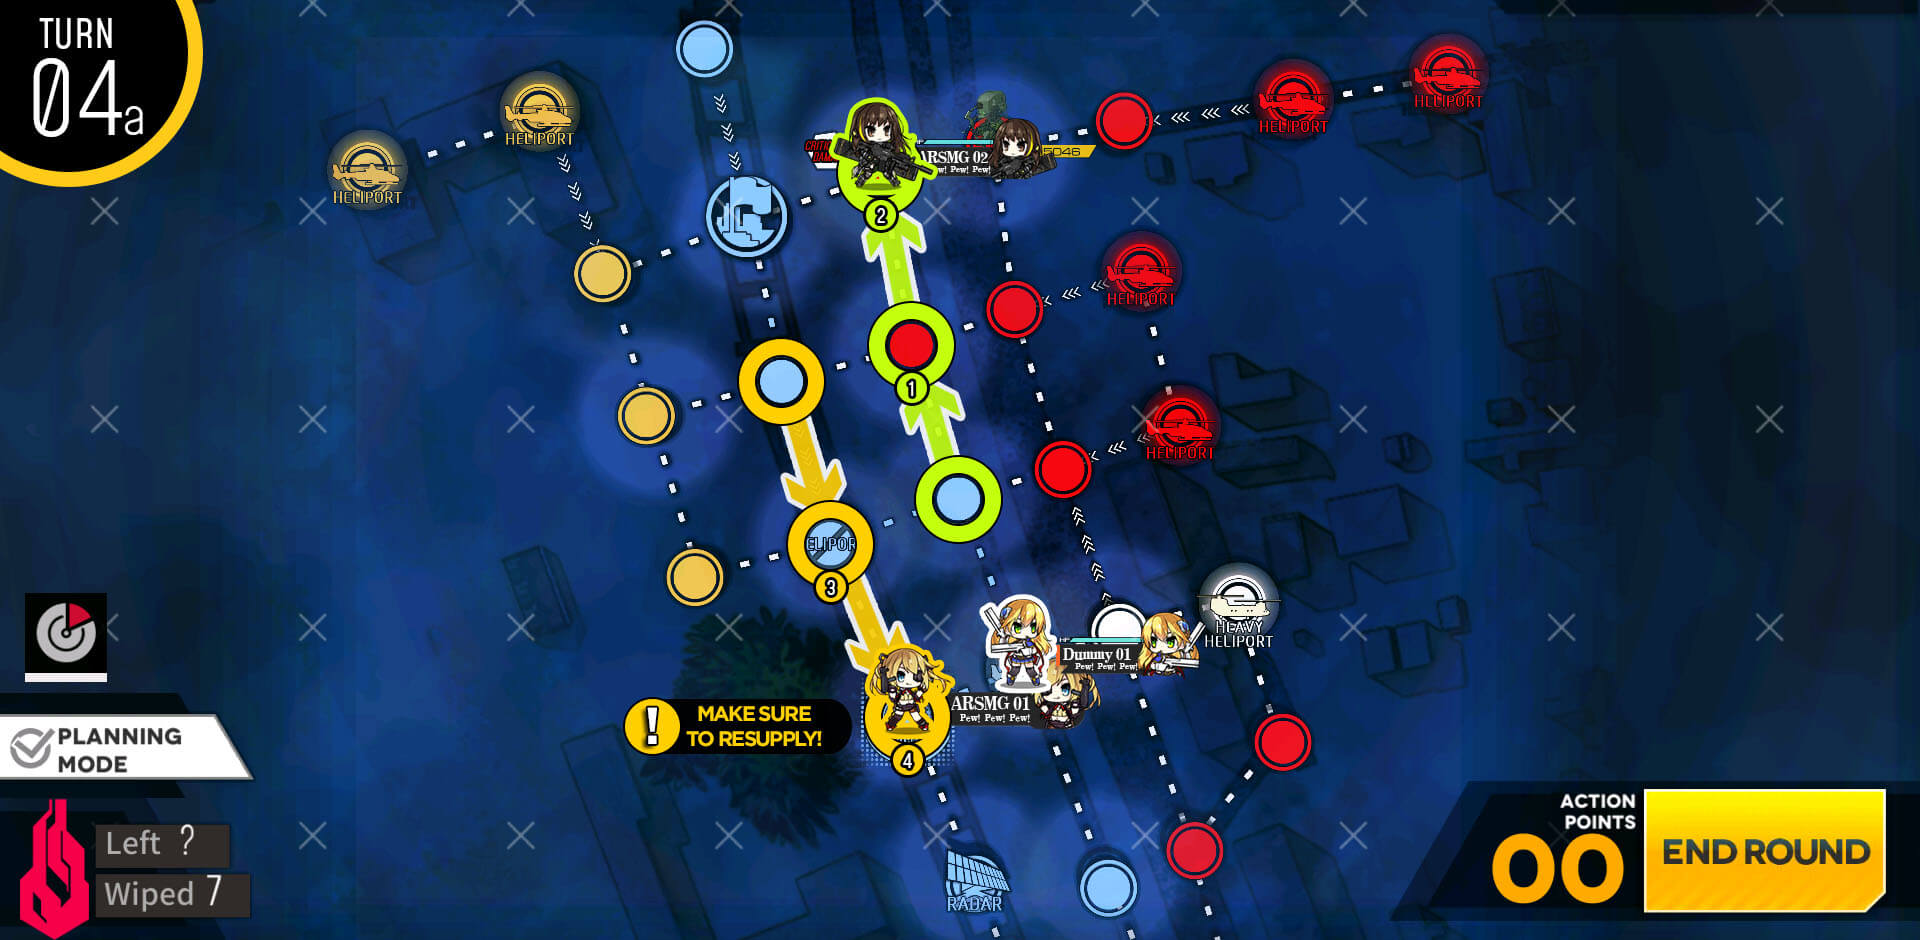
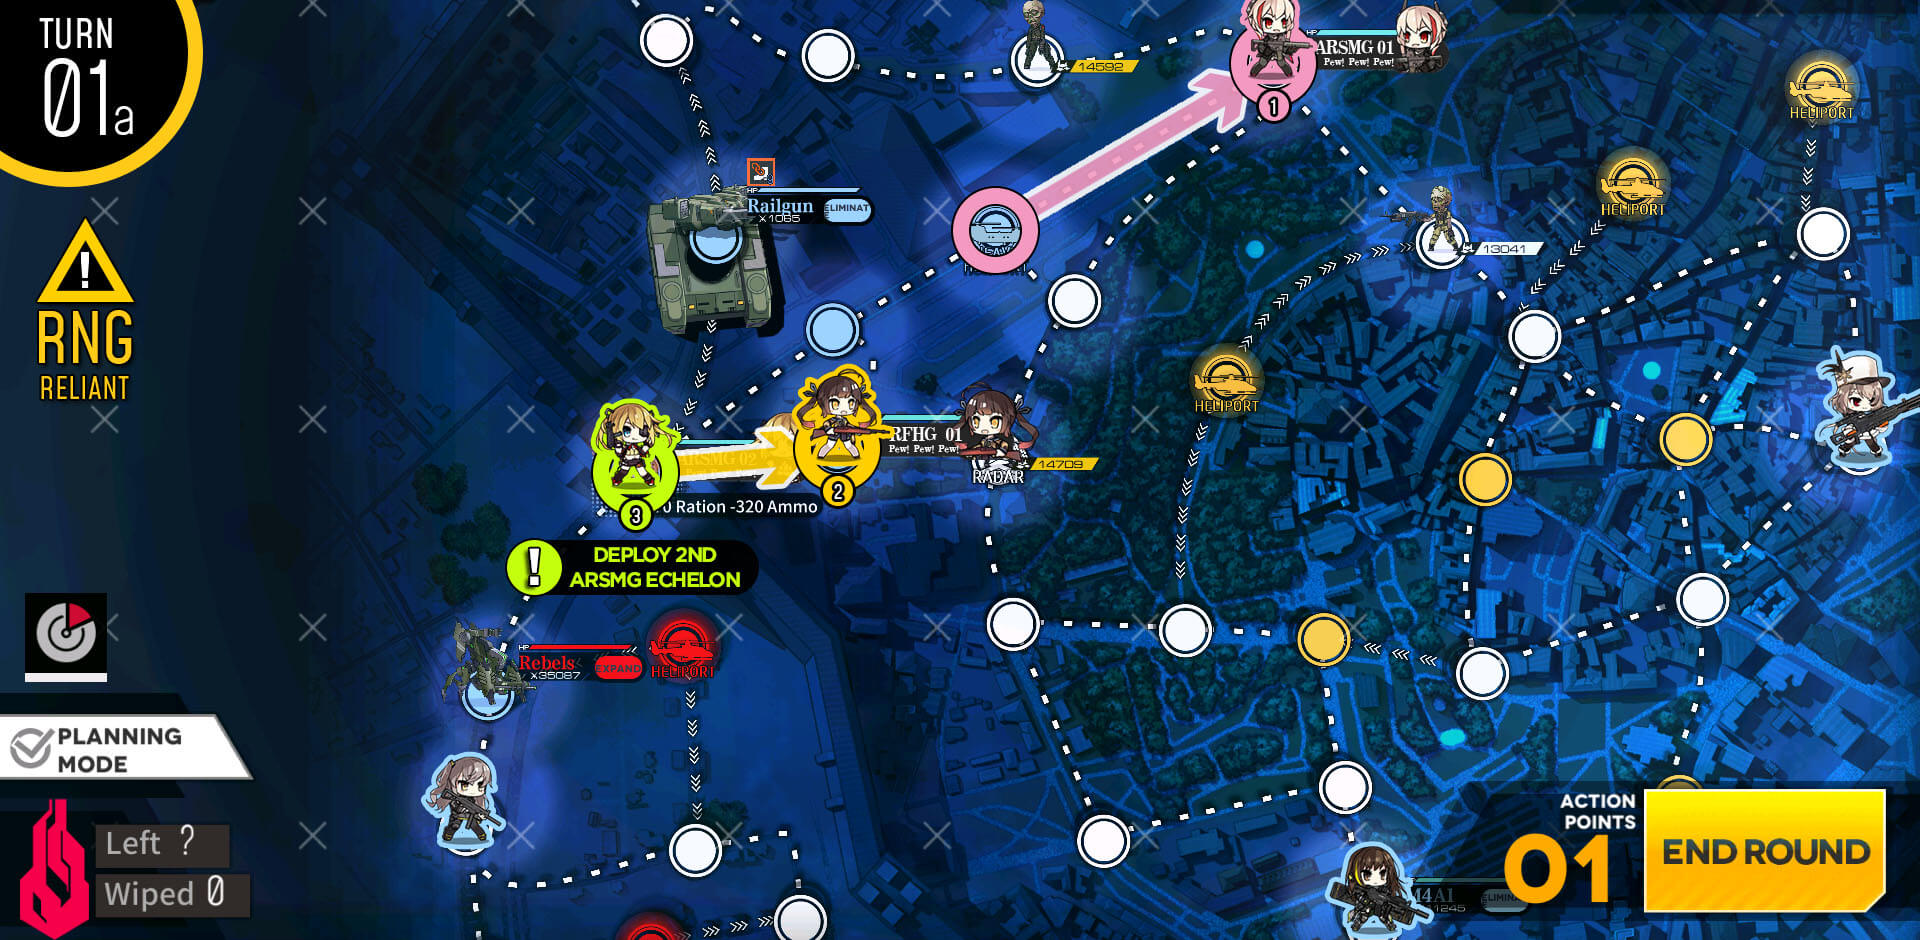
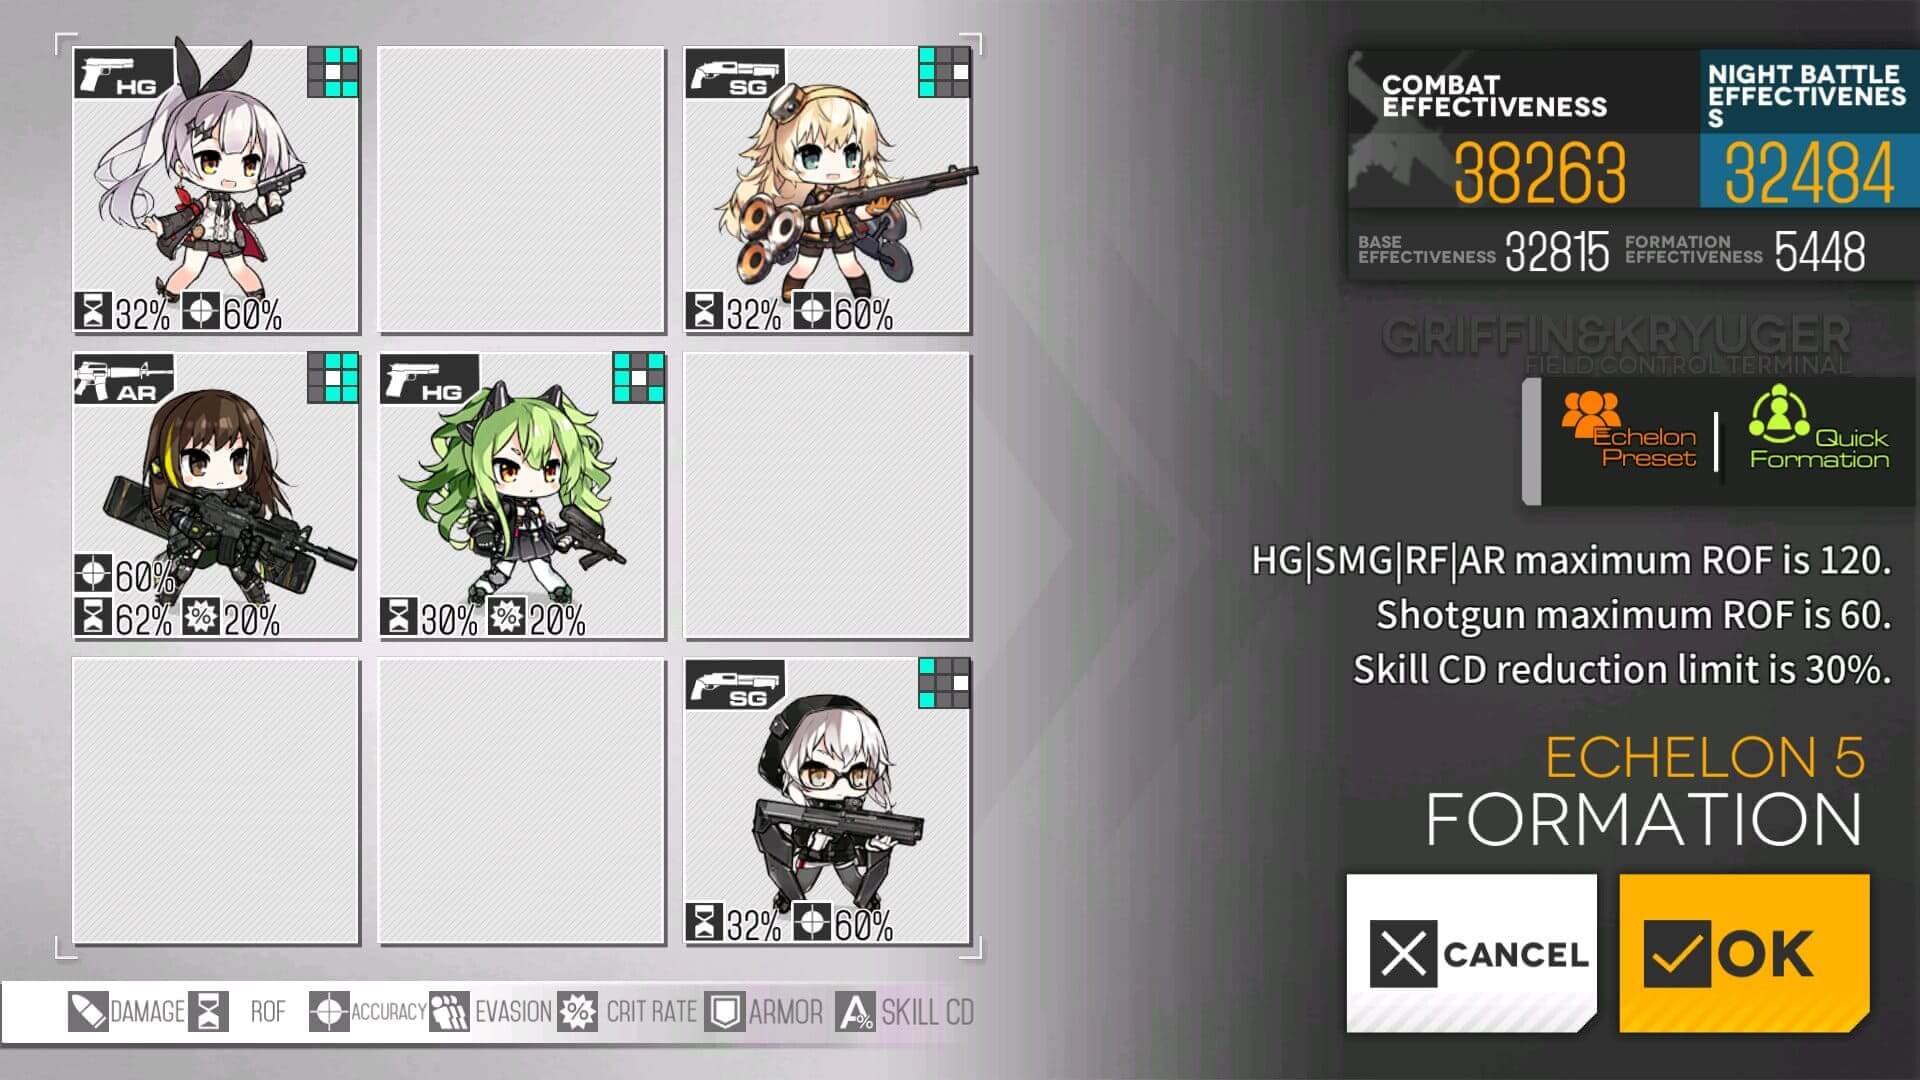
Standard F formation for ARSMG.
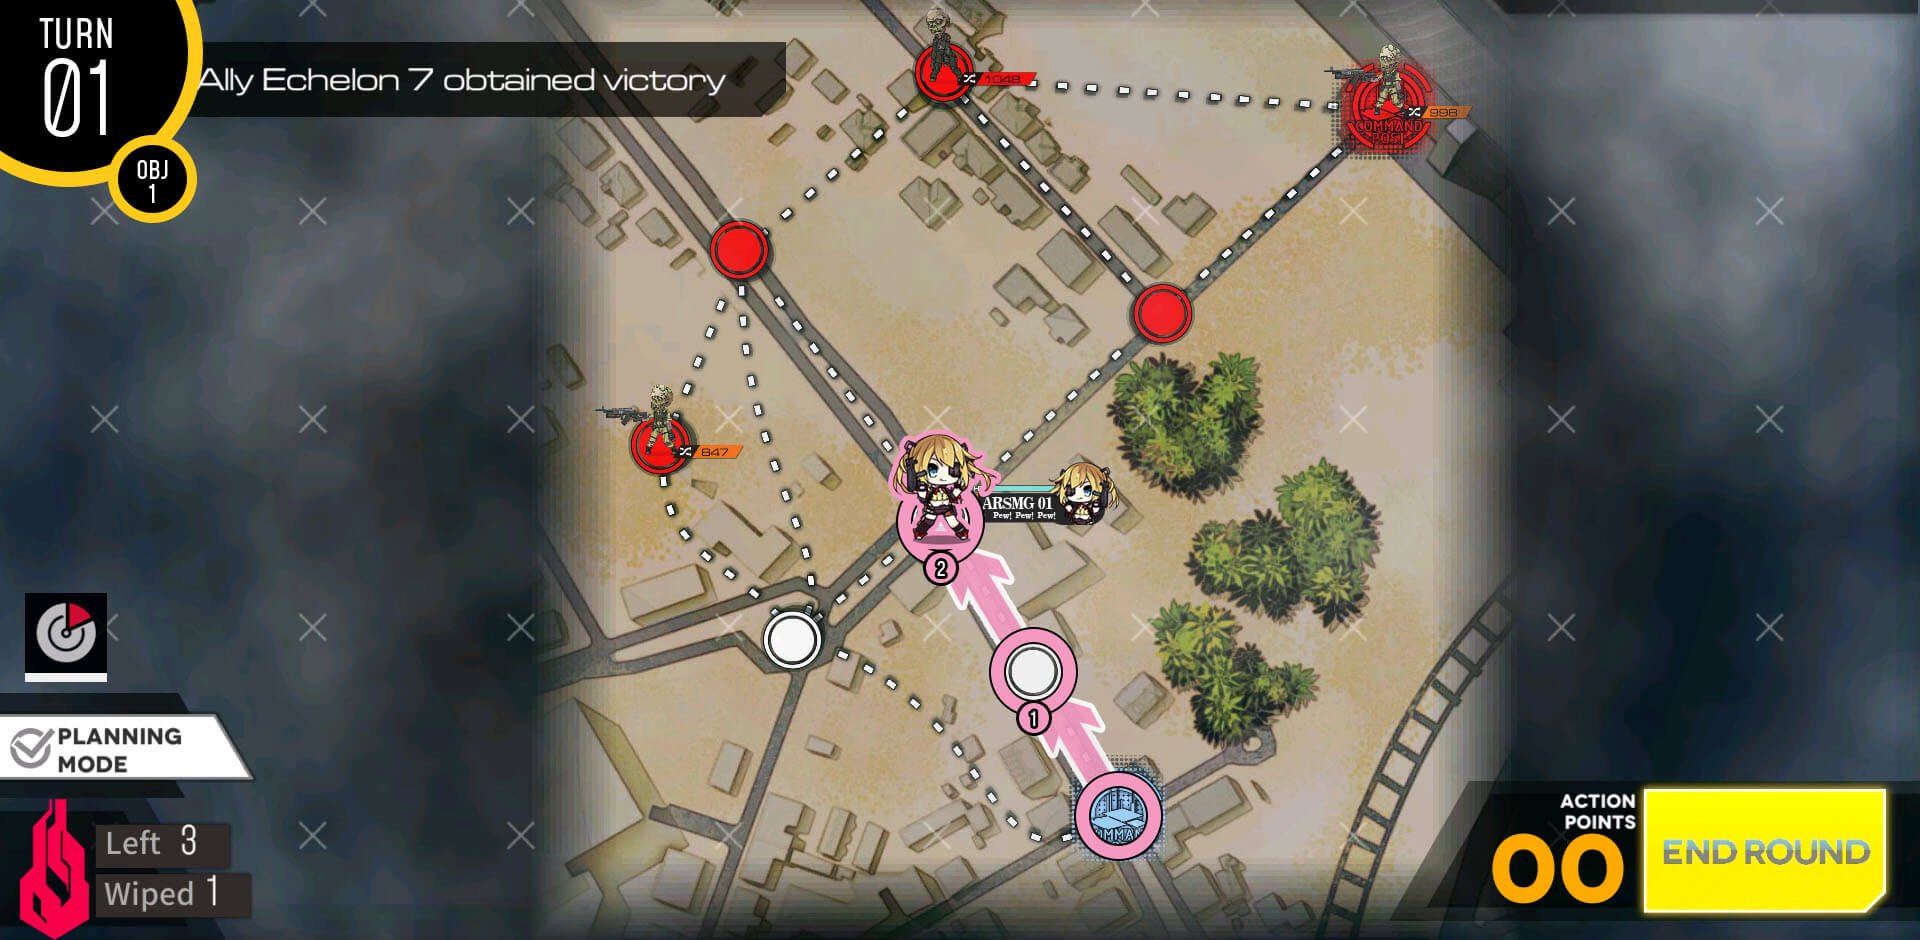
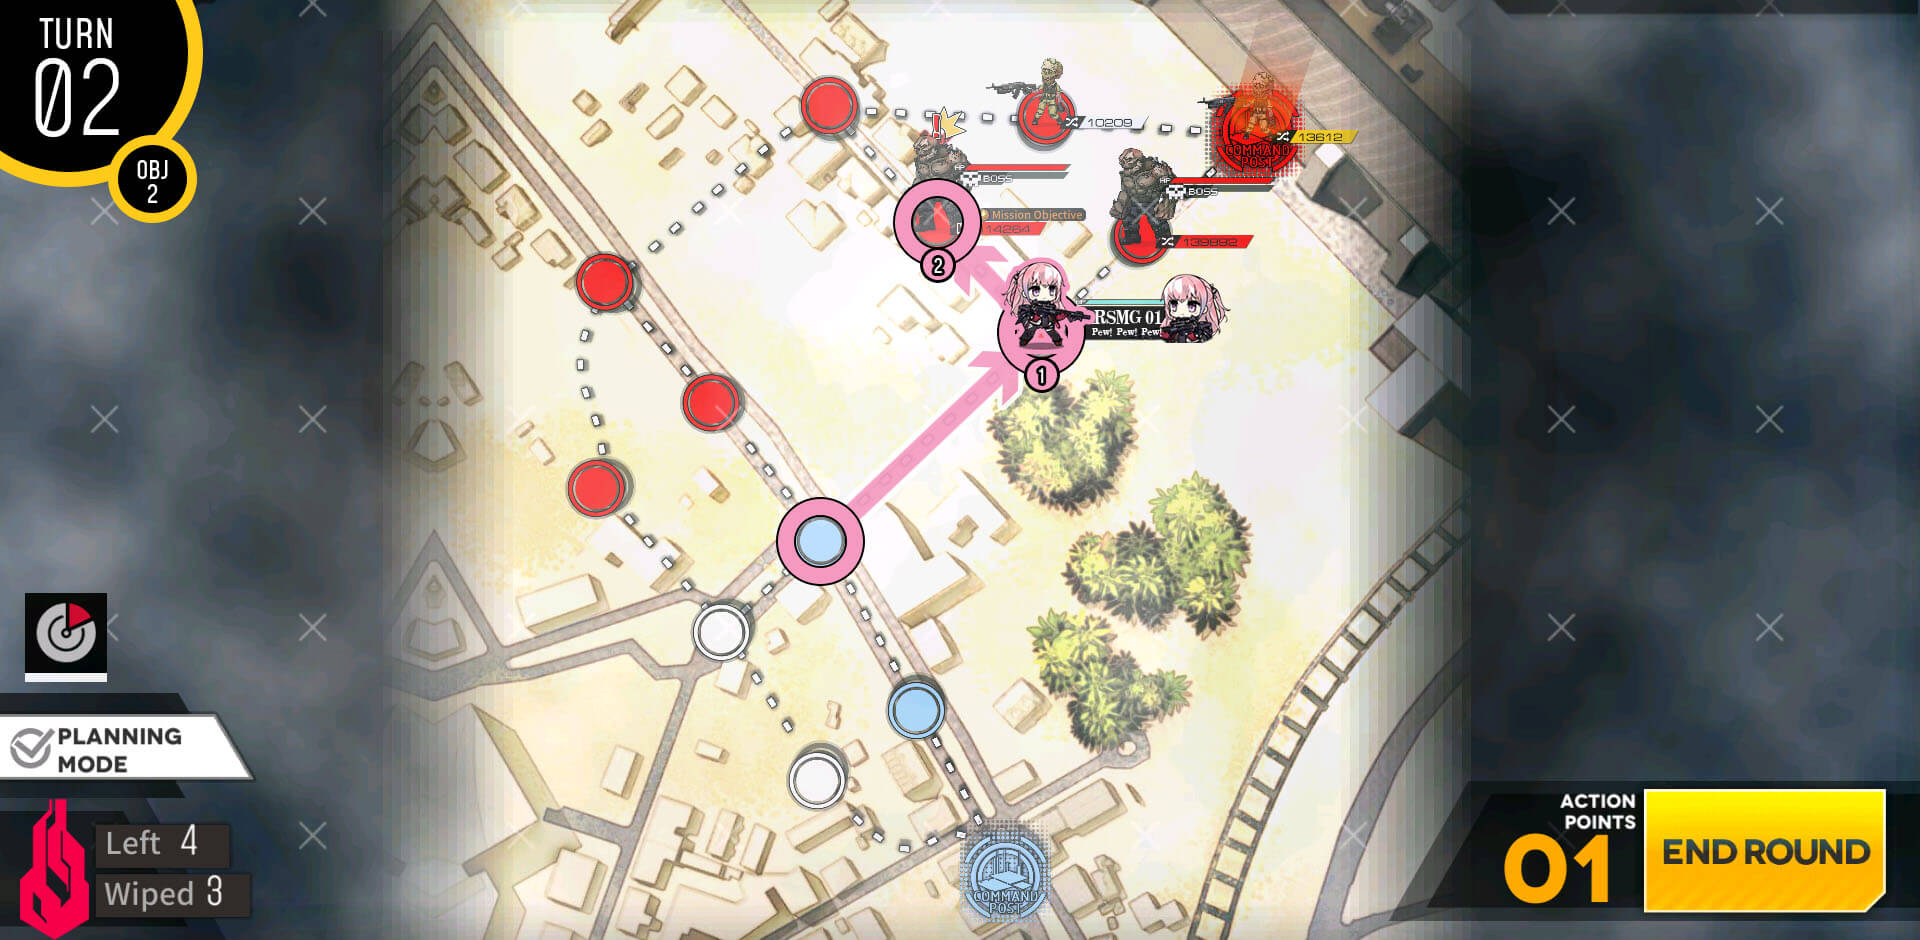
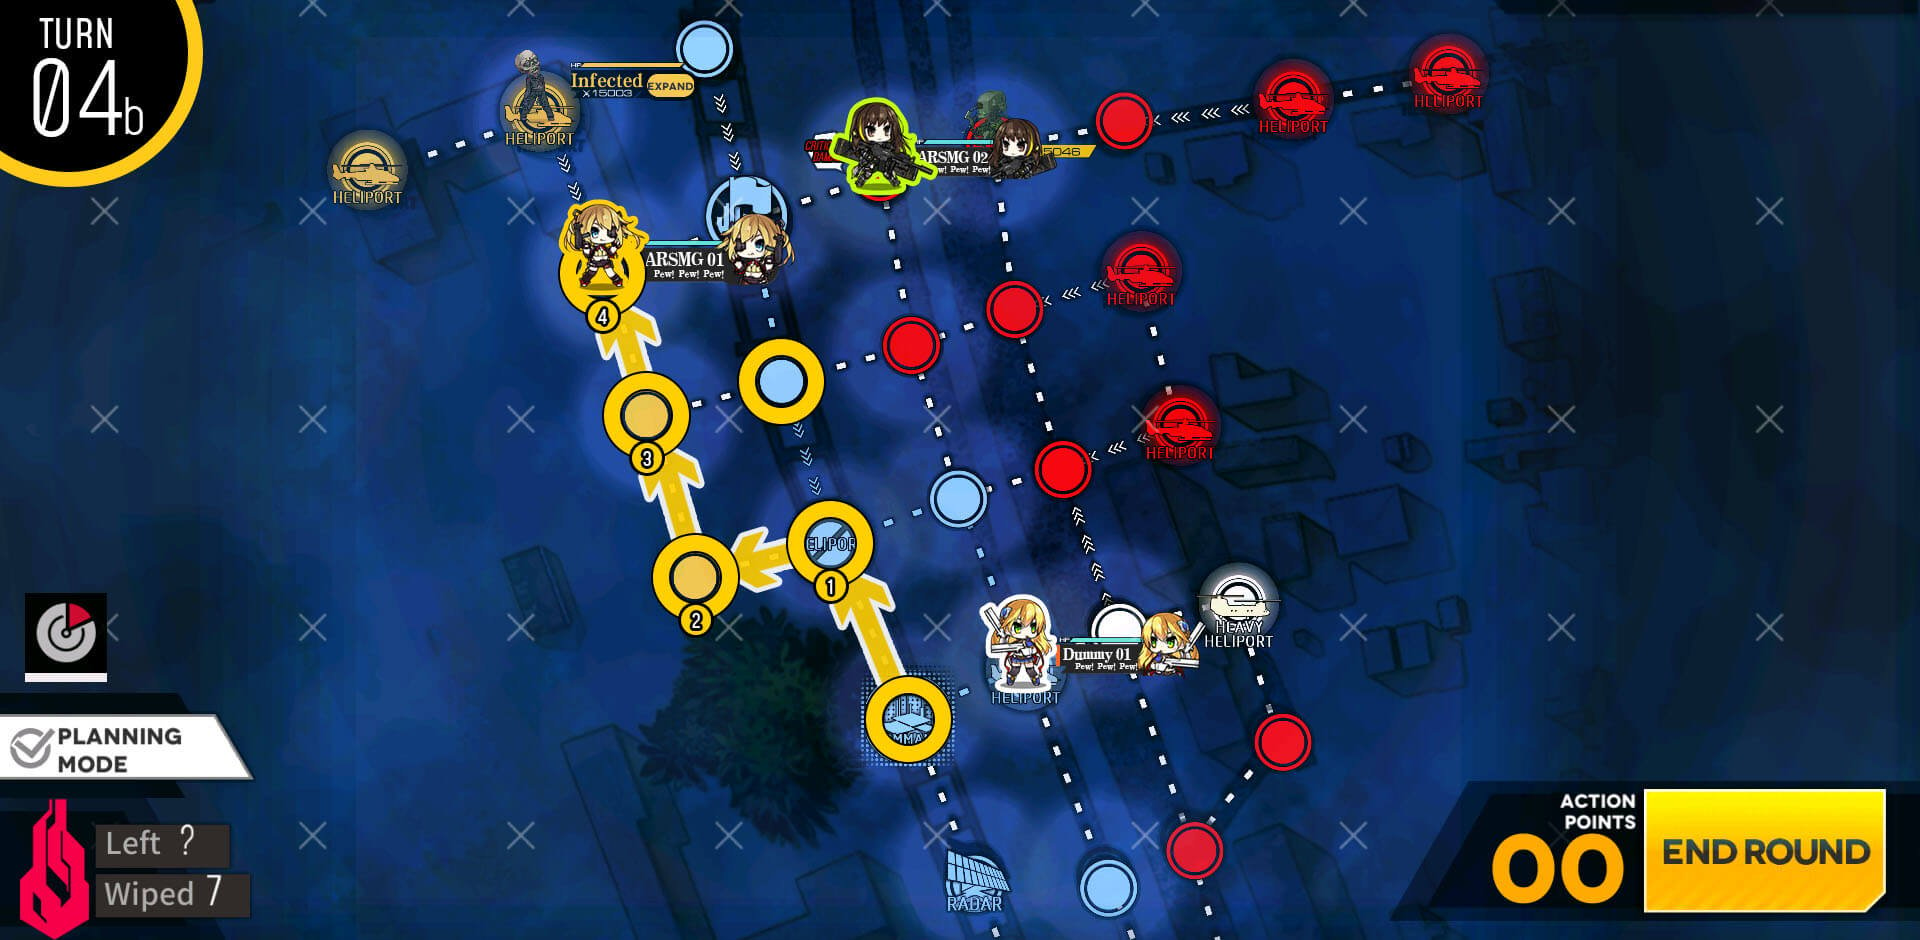
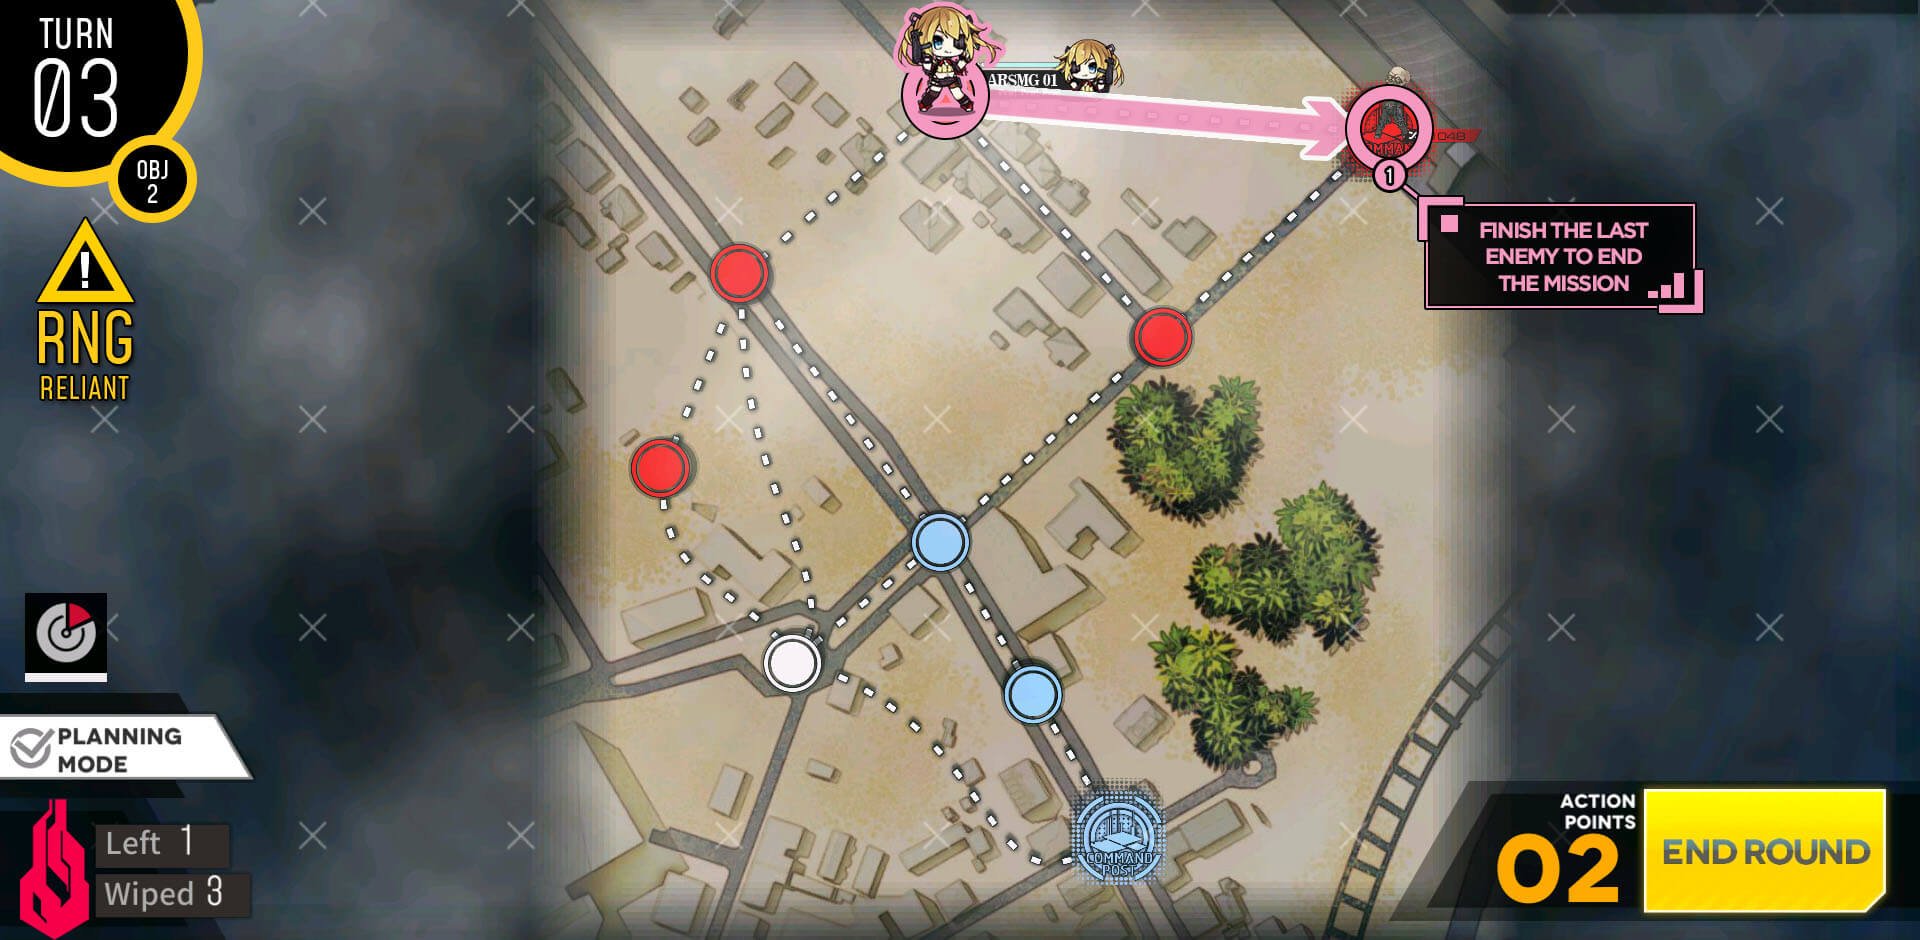
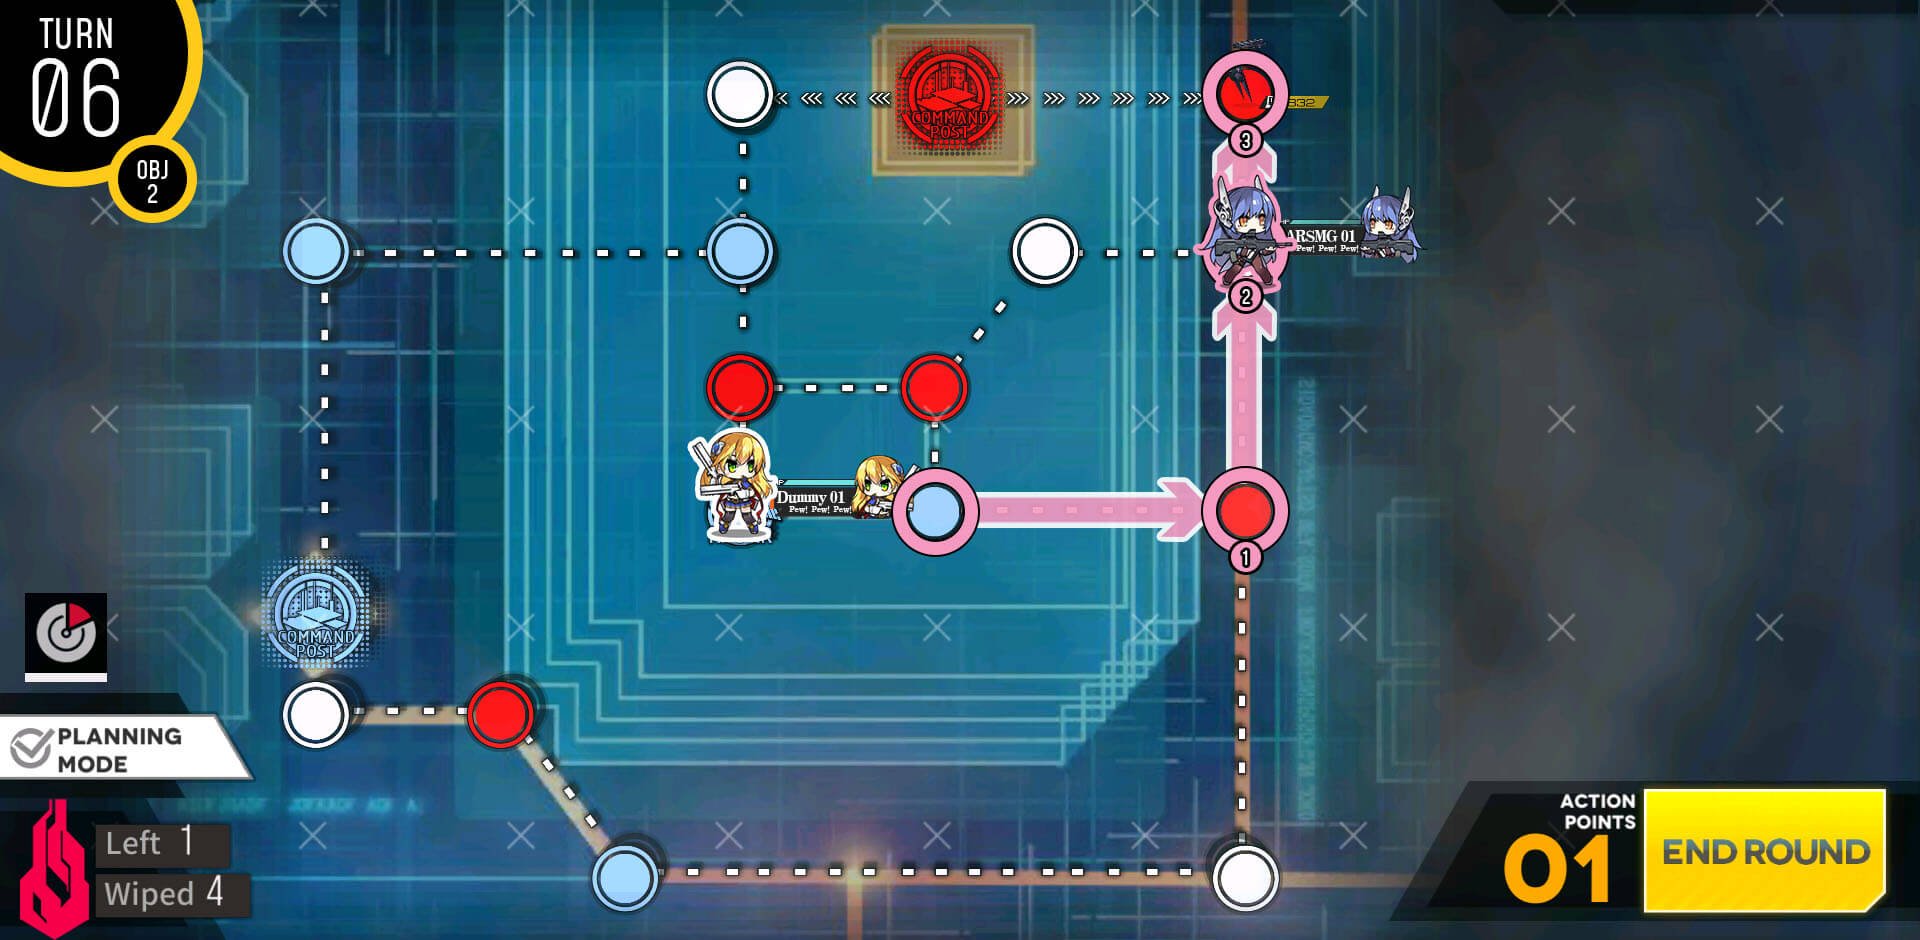
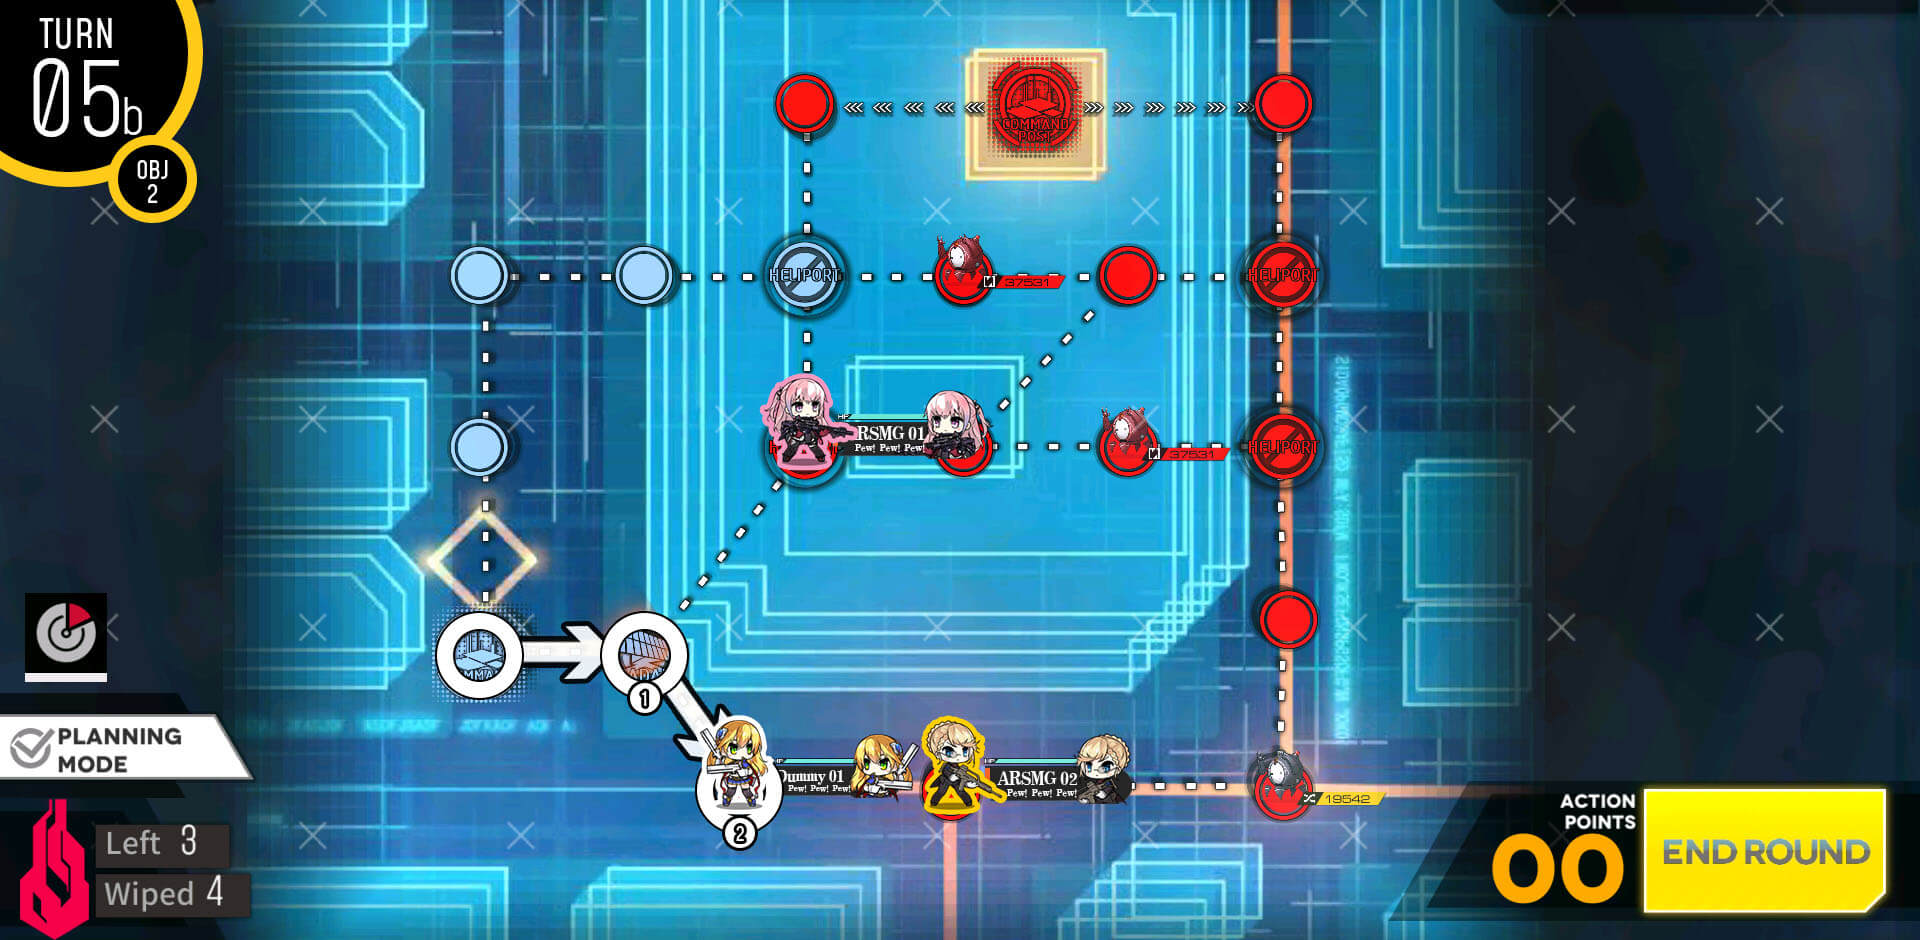
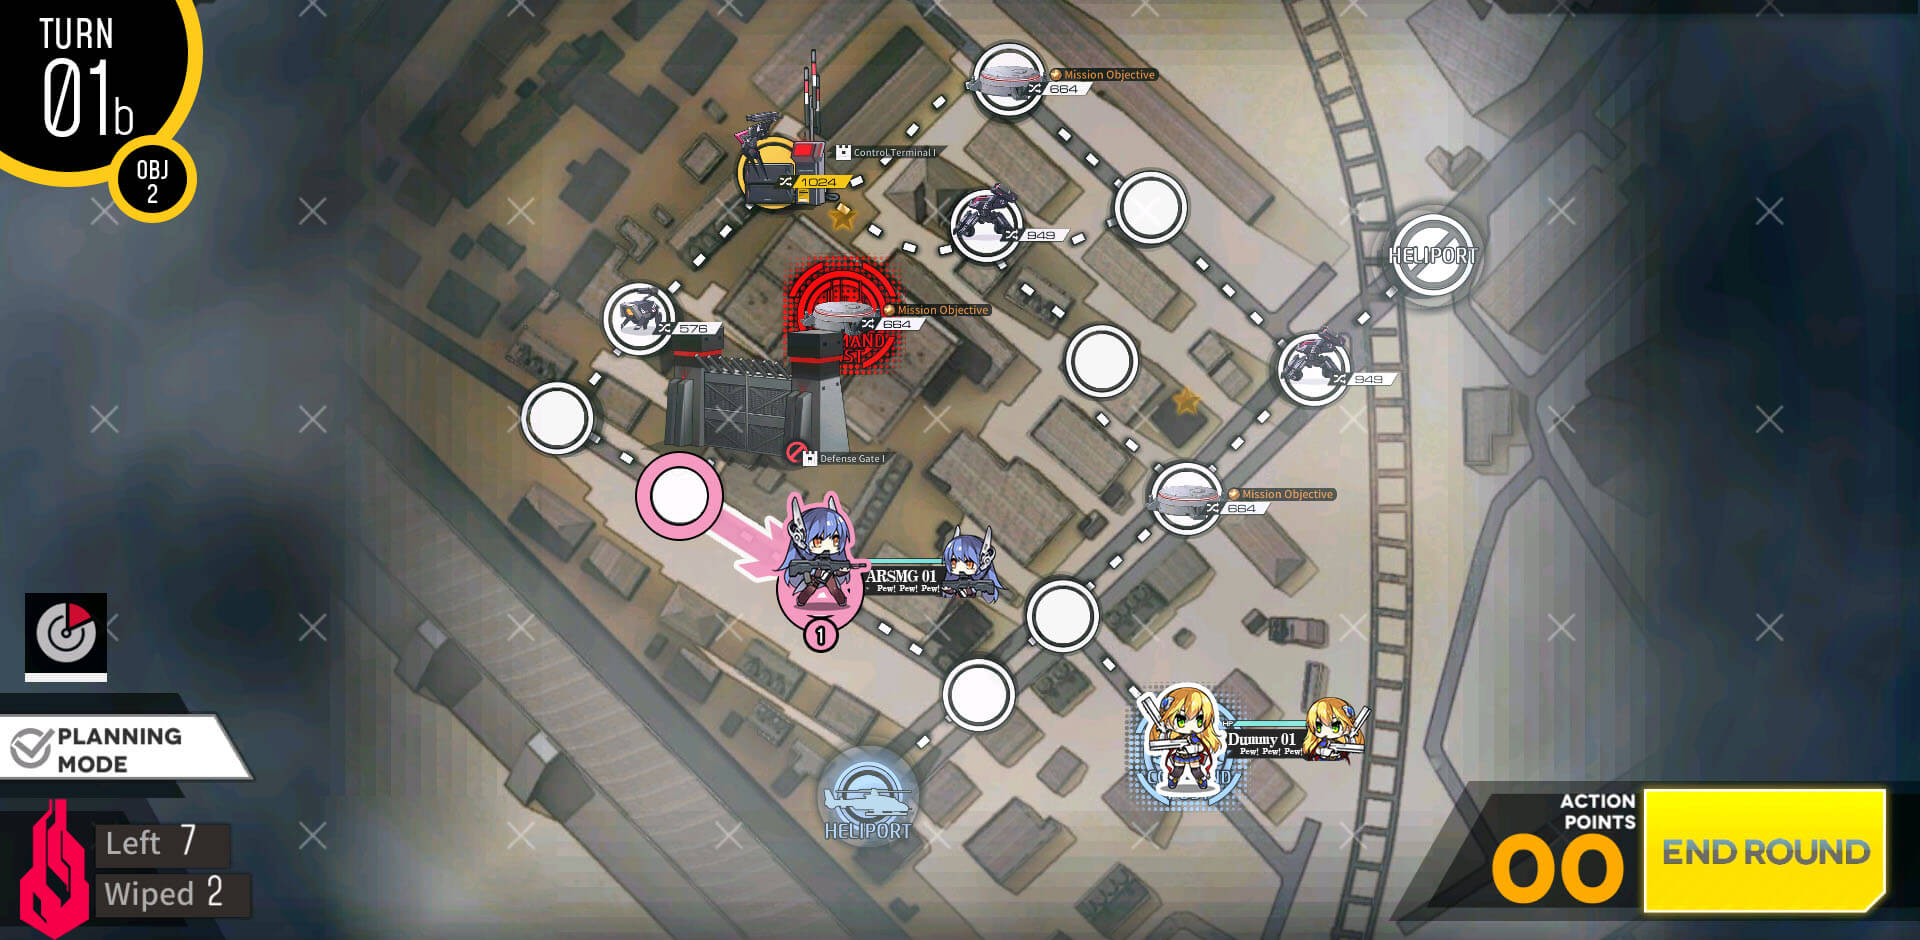
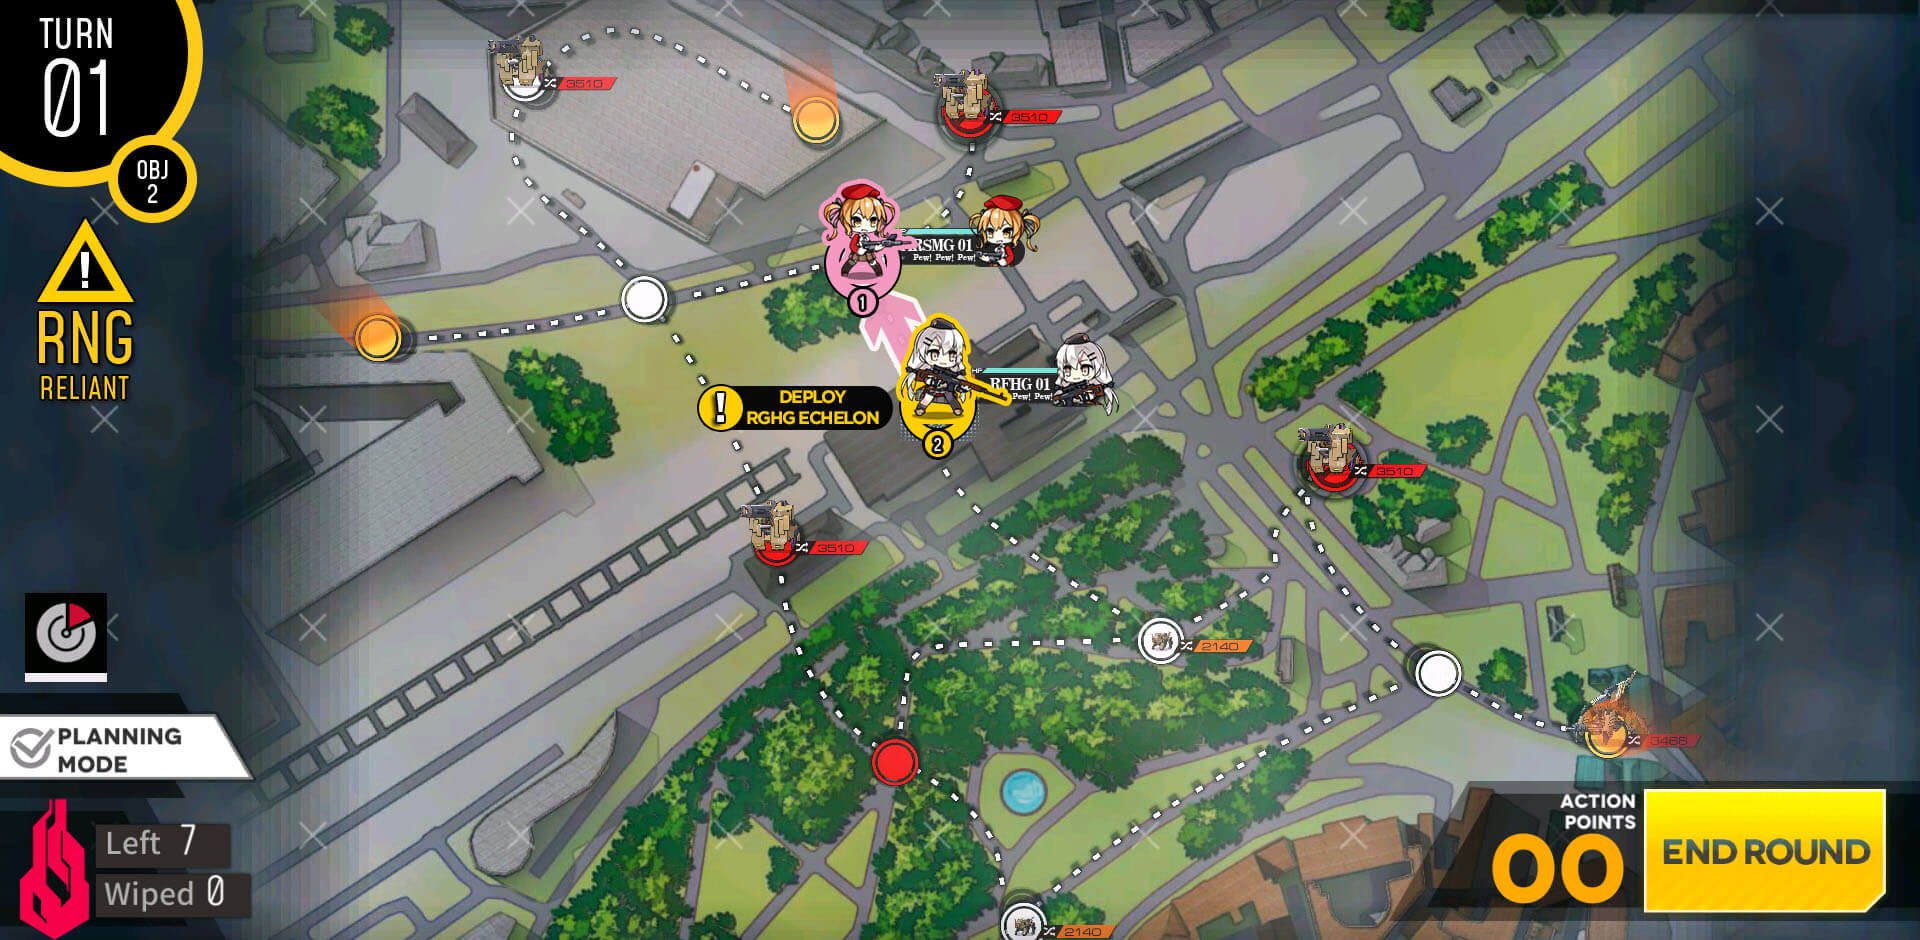
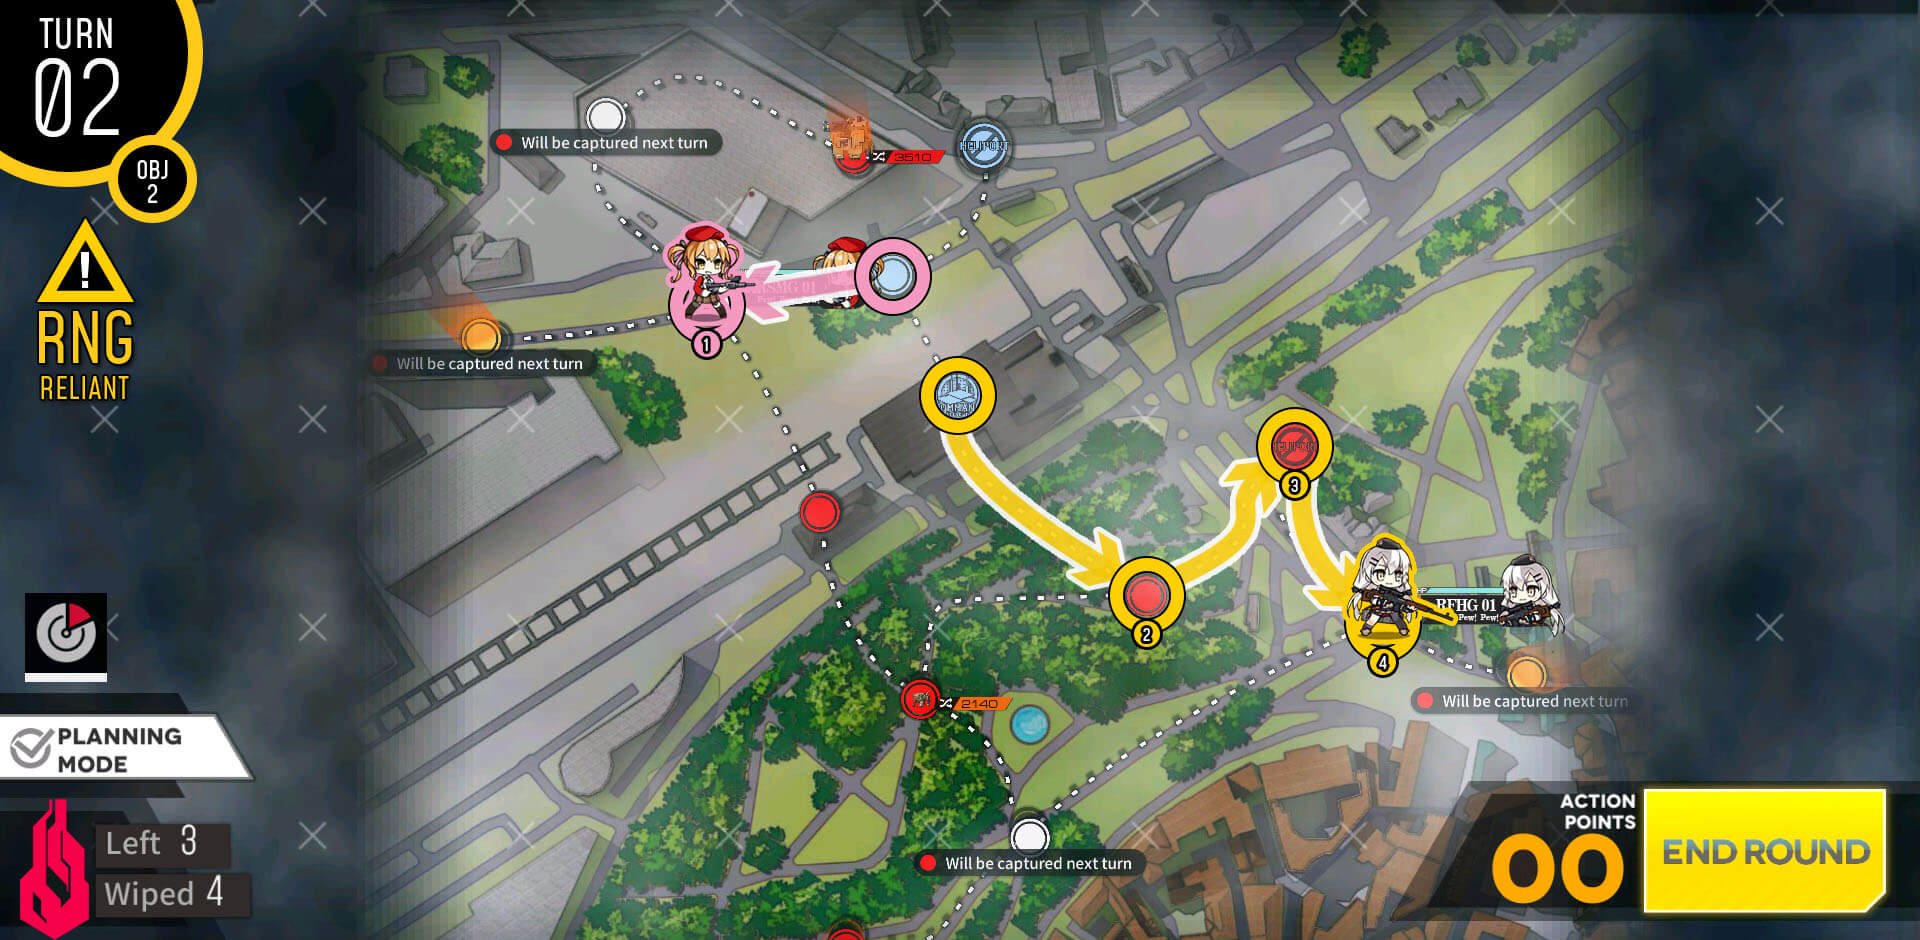
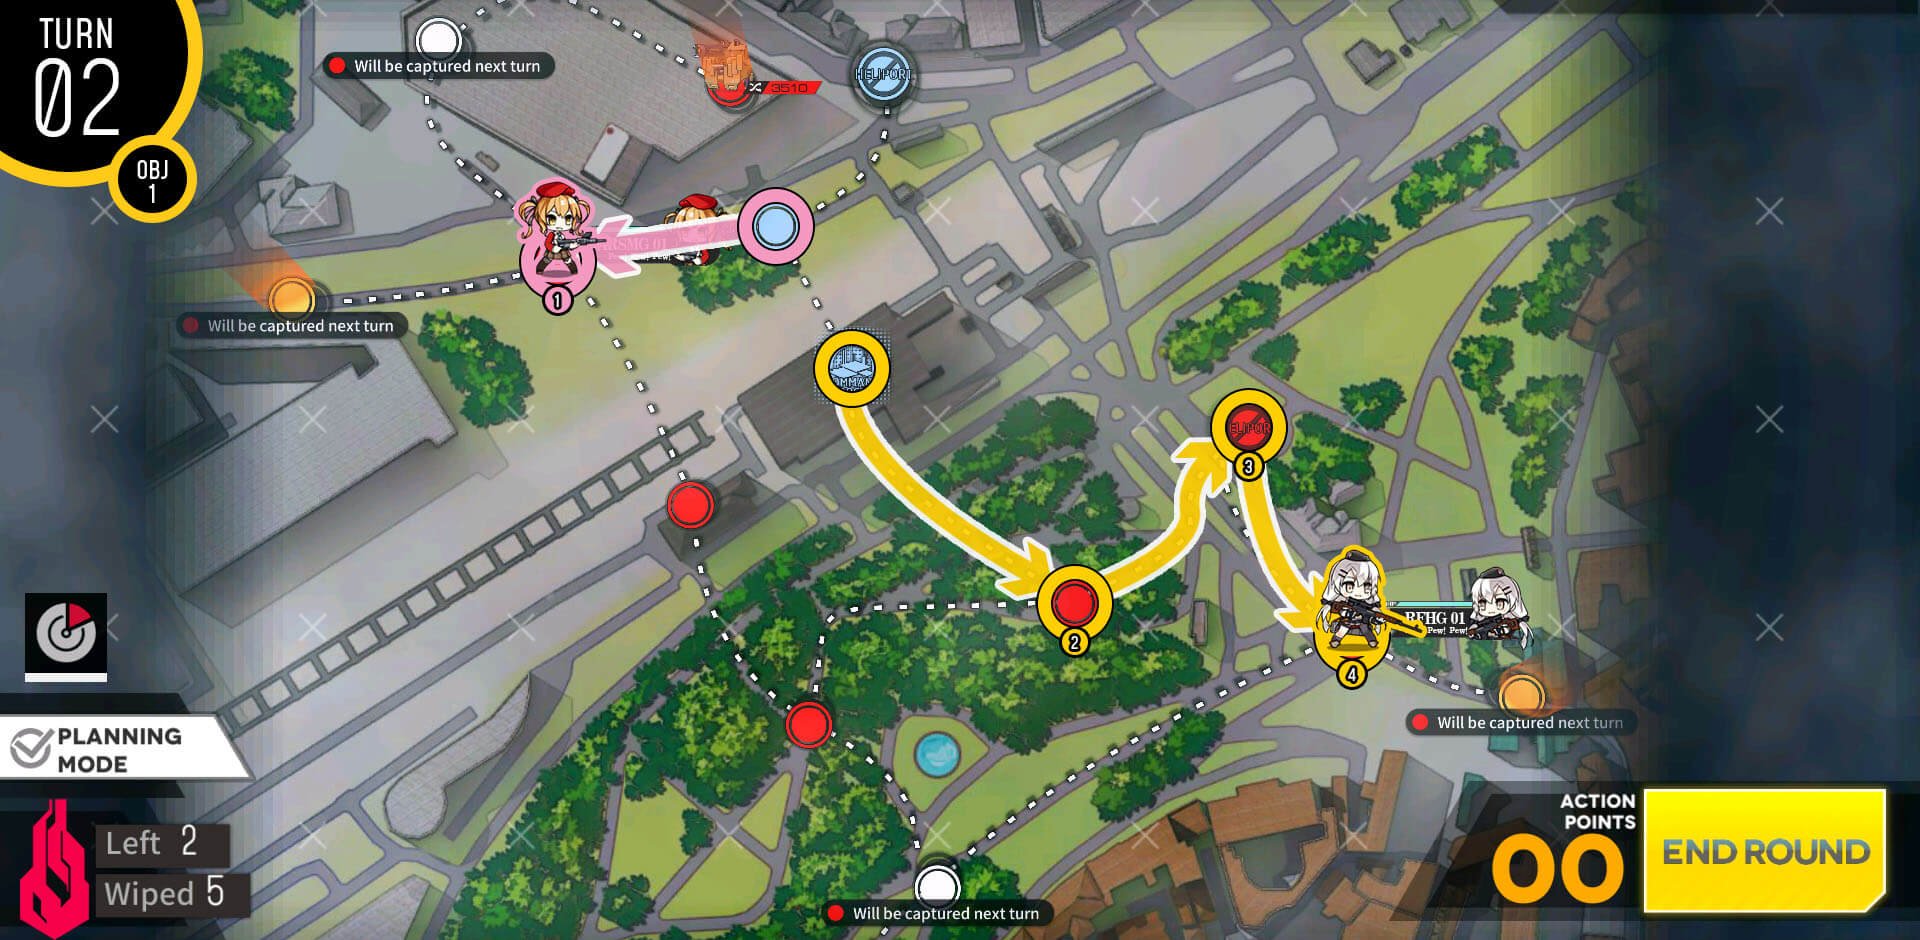
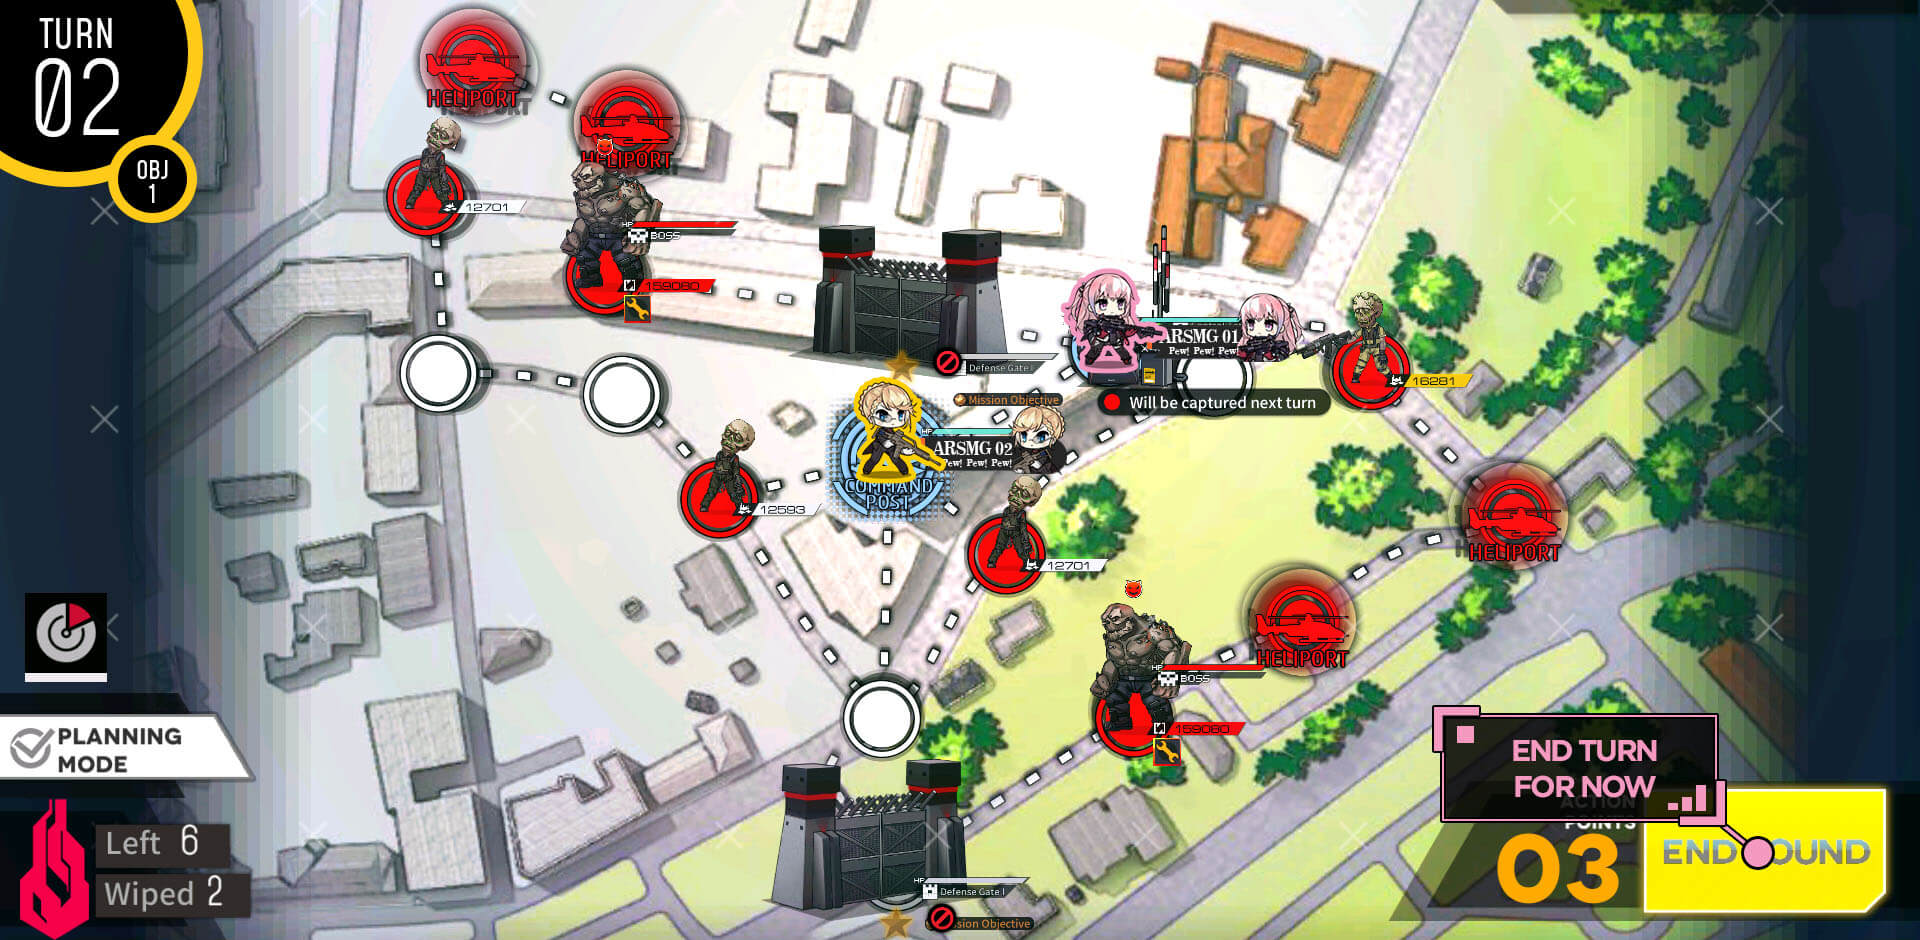
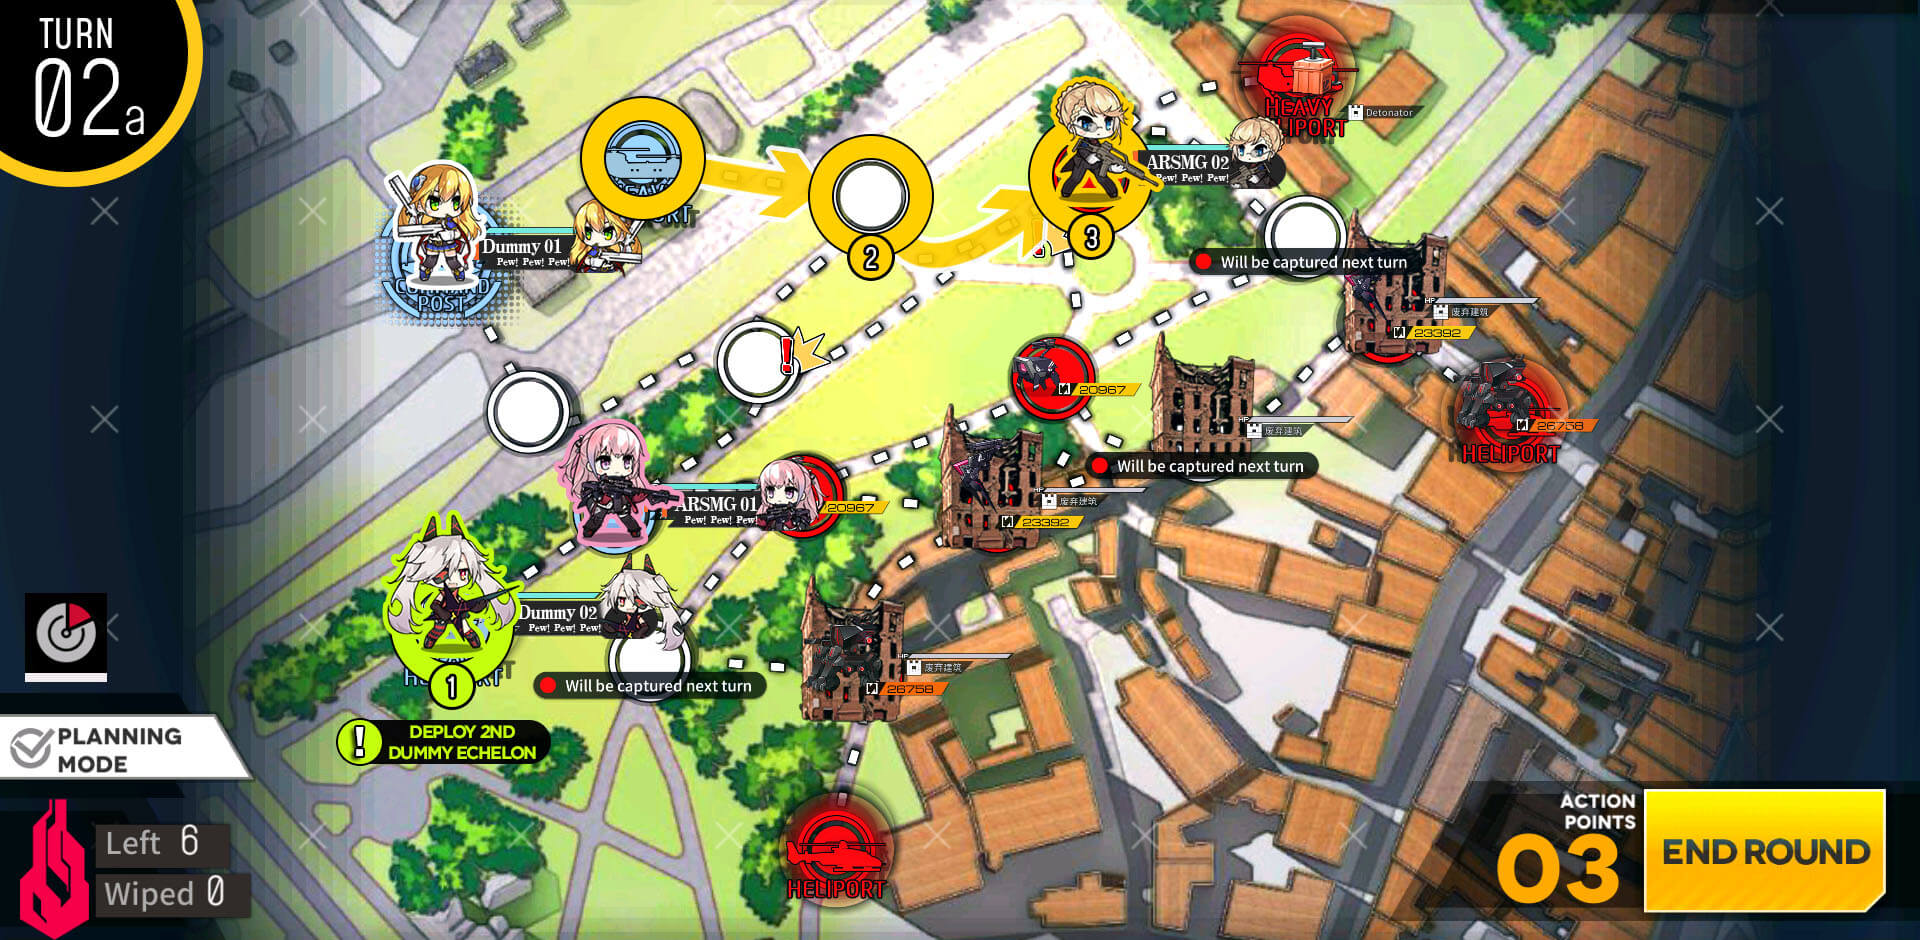
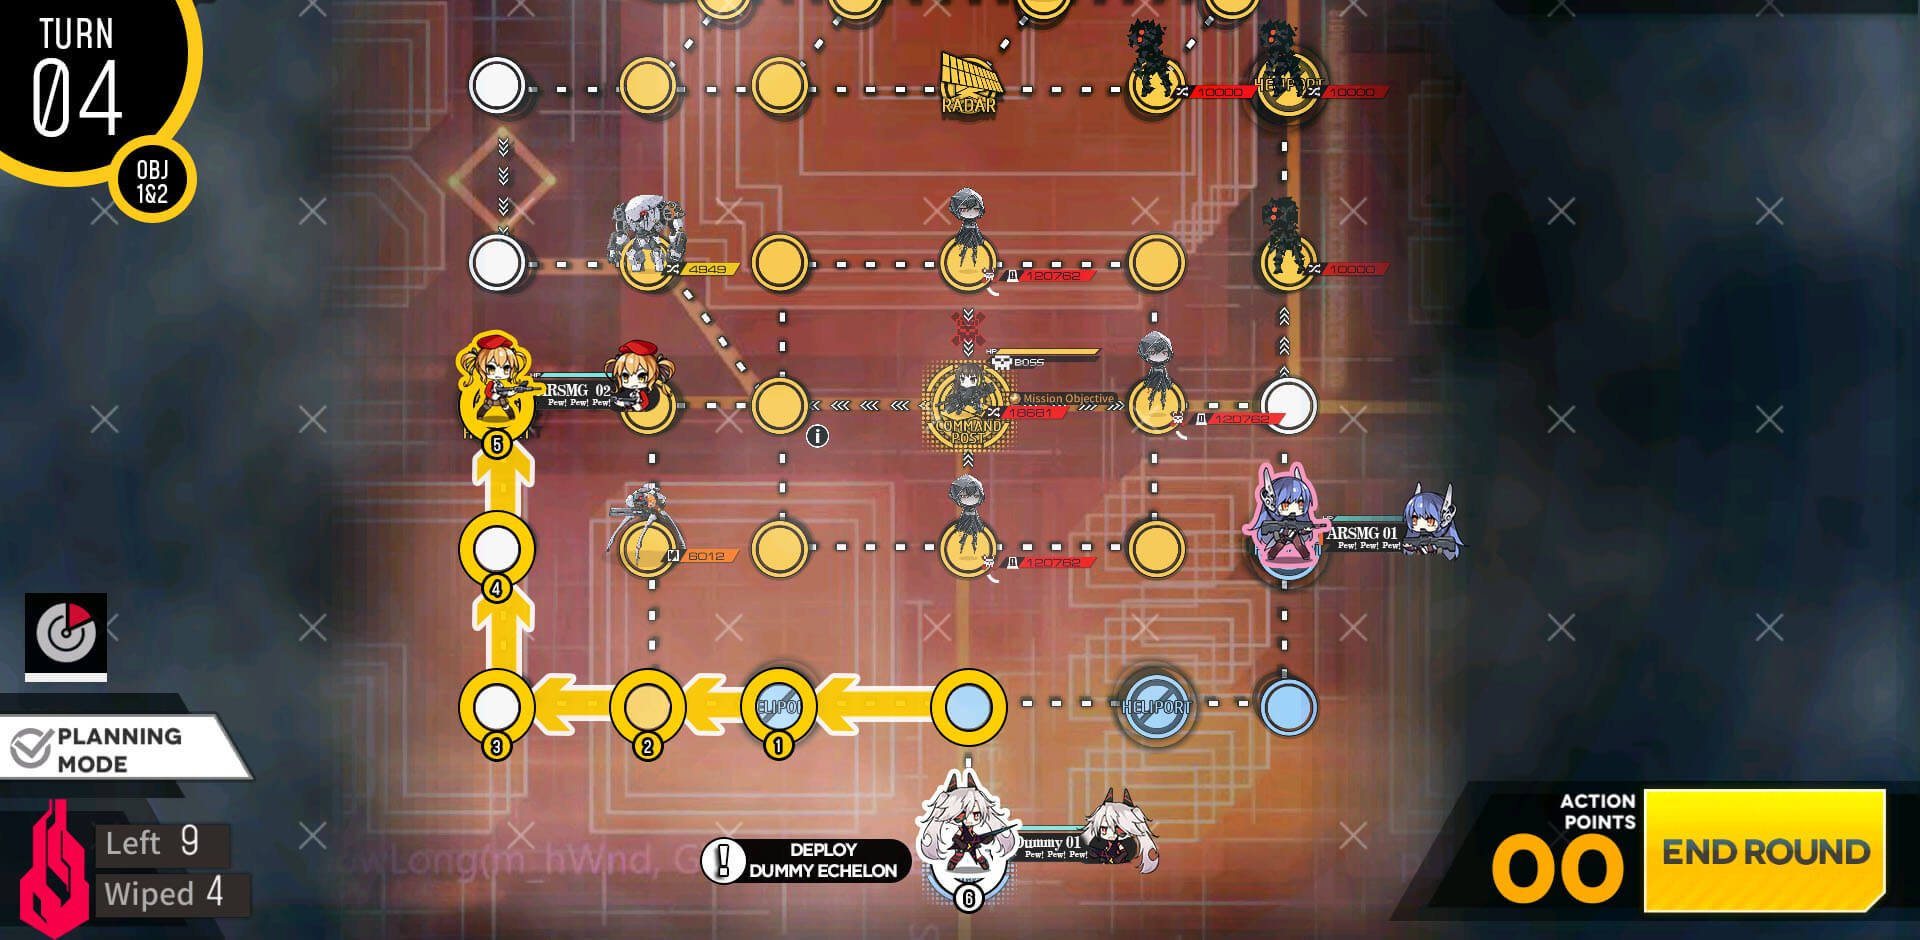
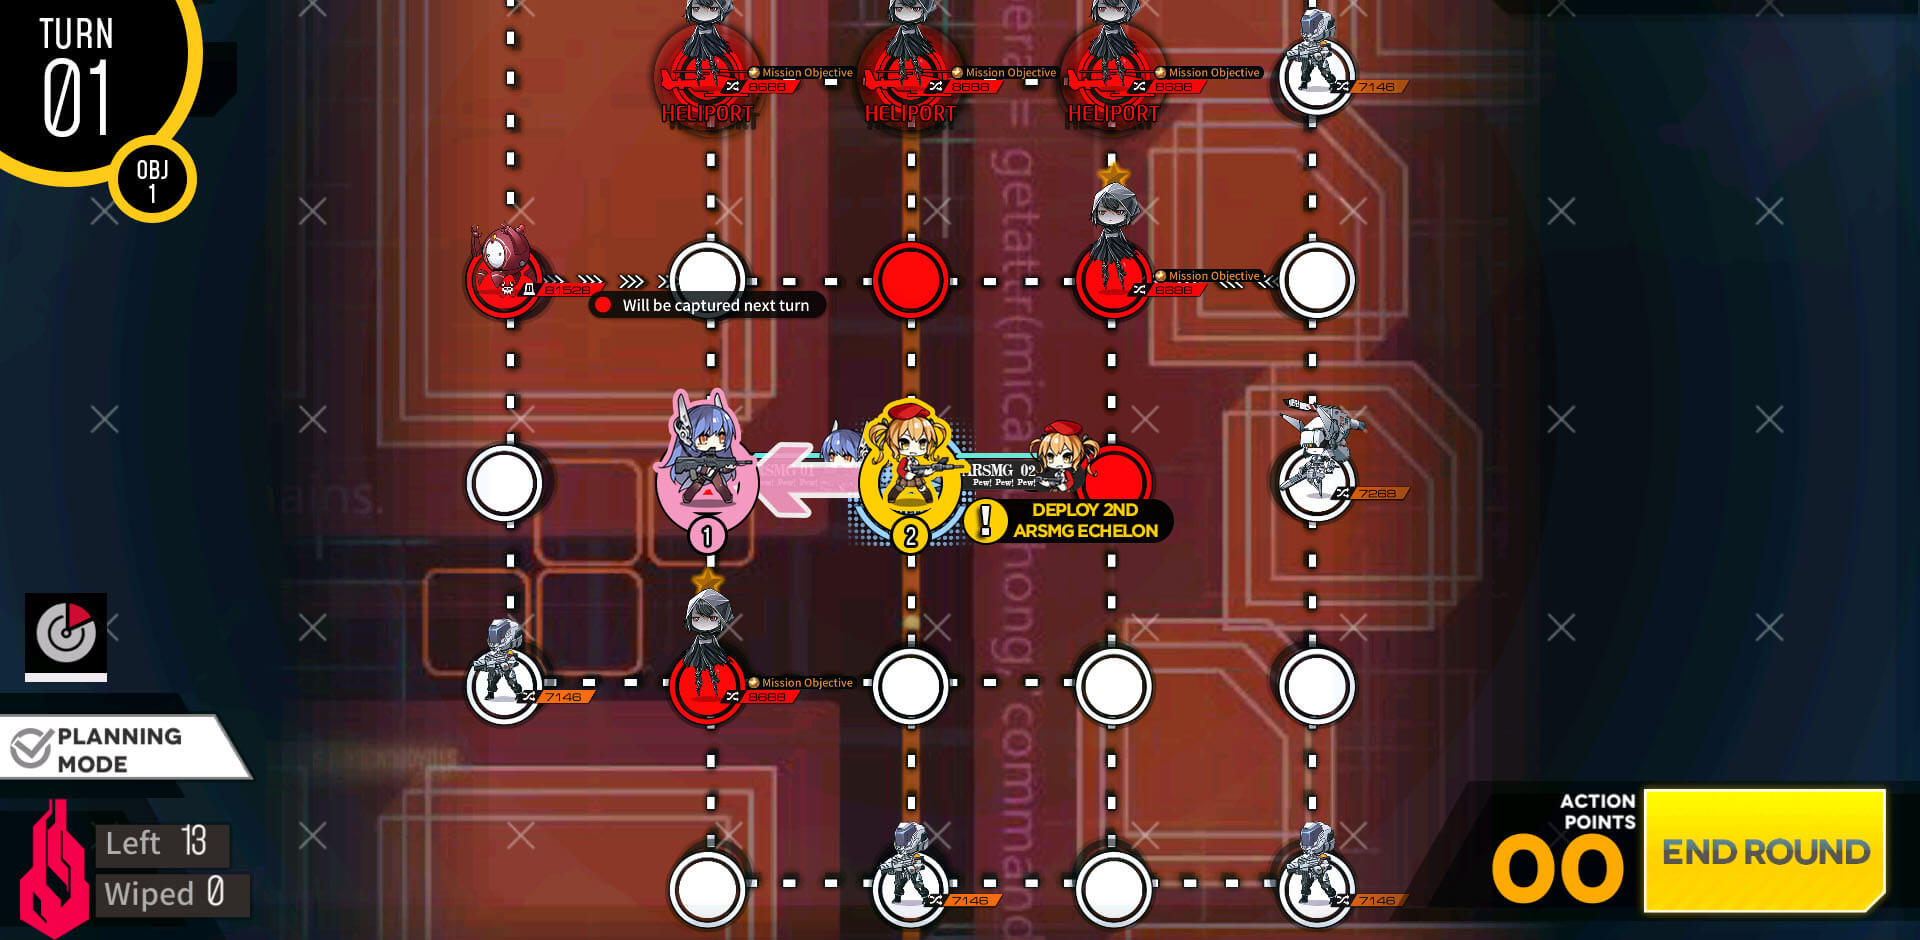
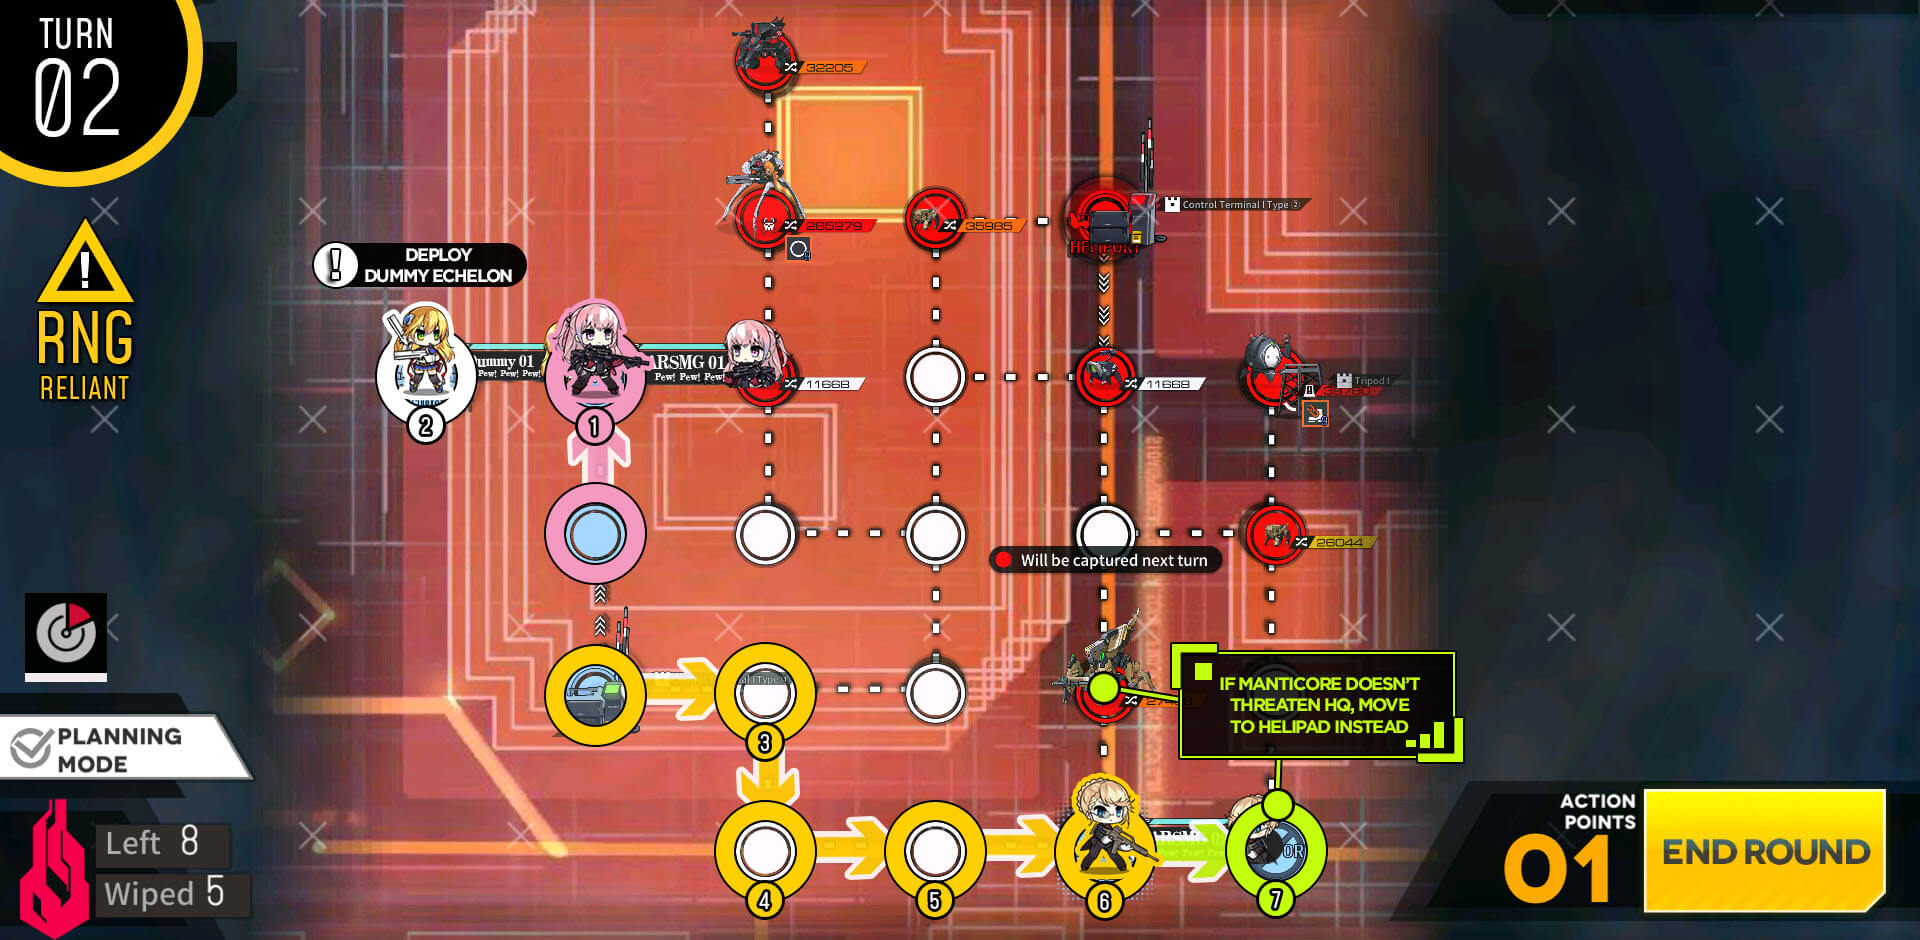
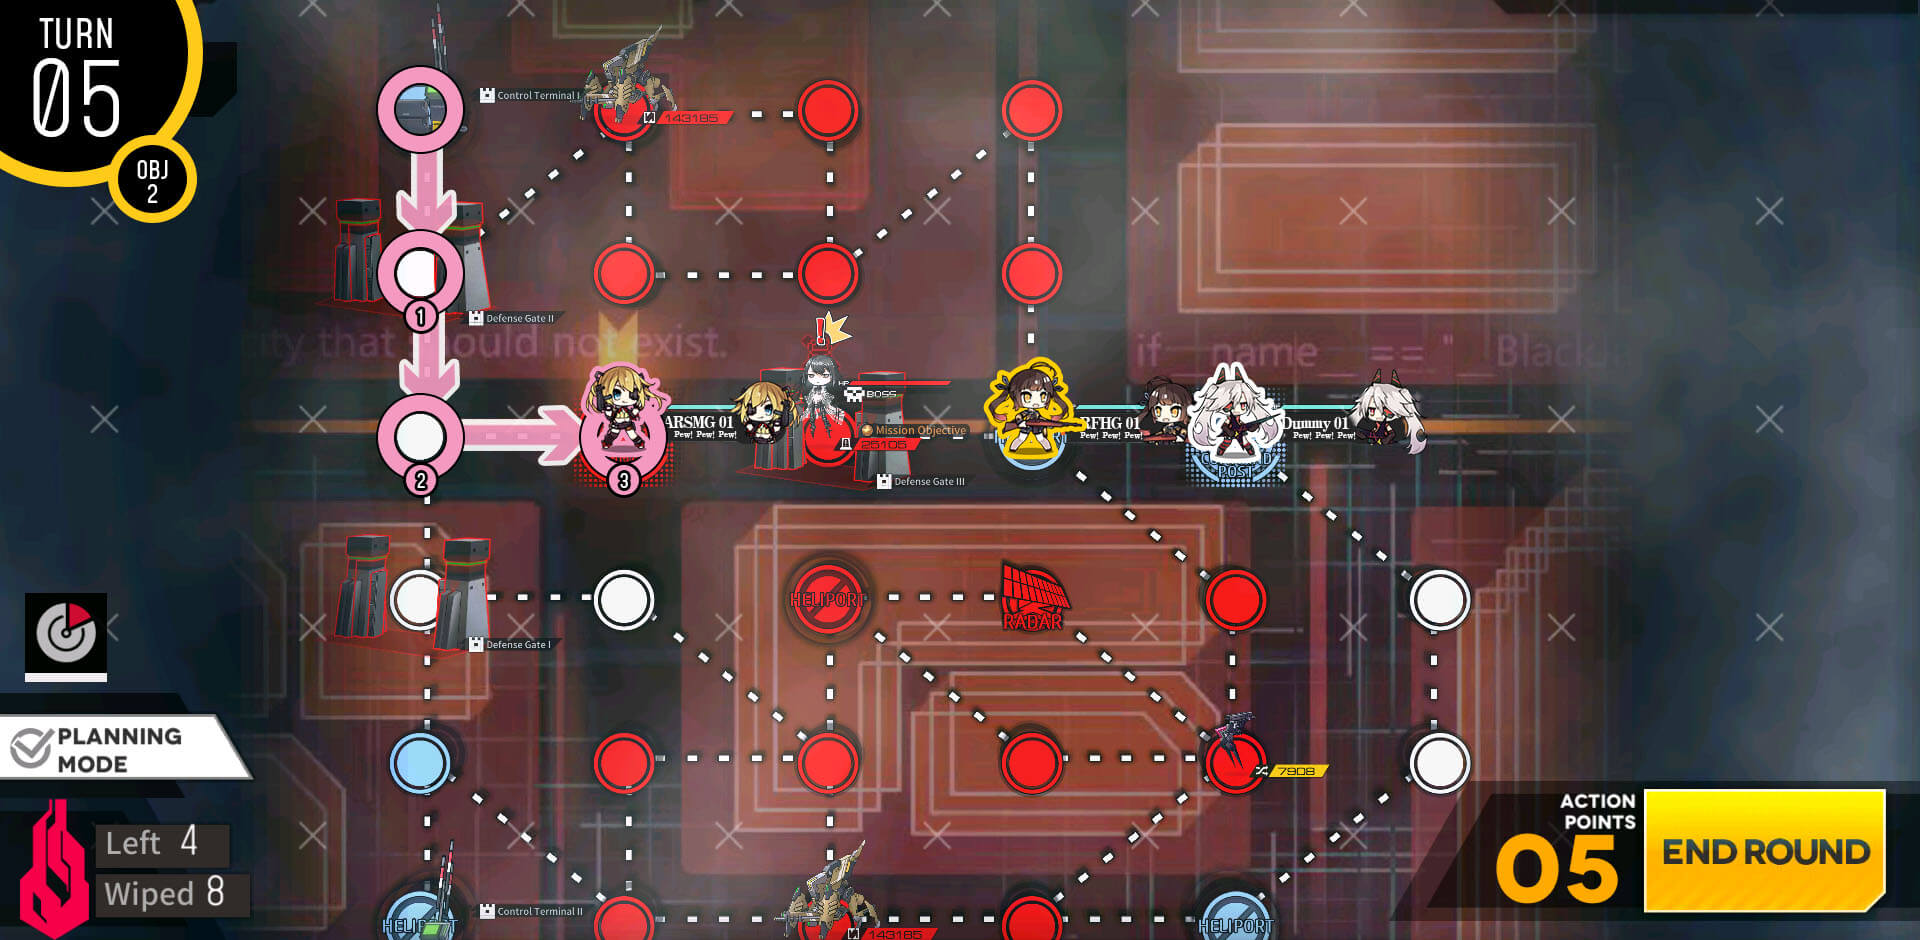
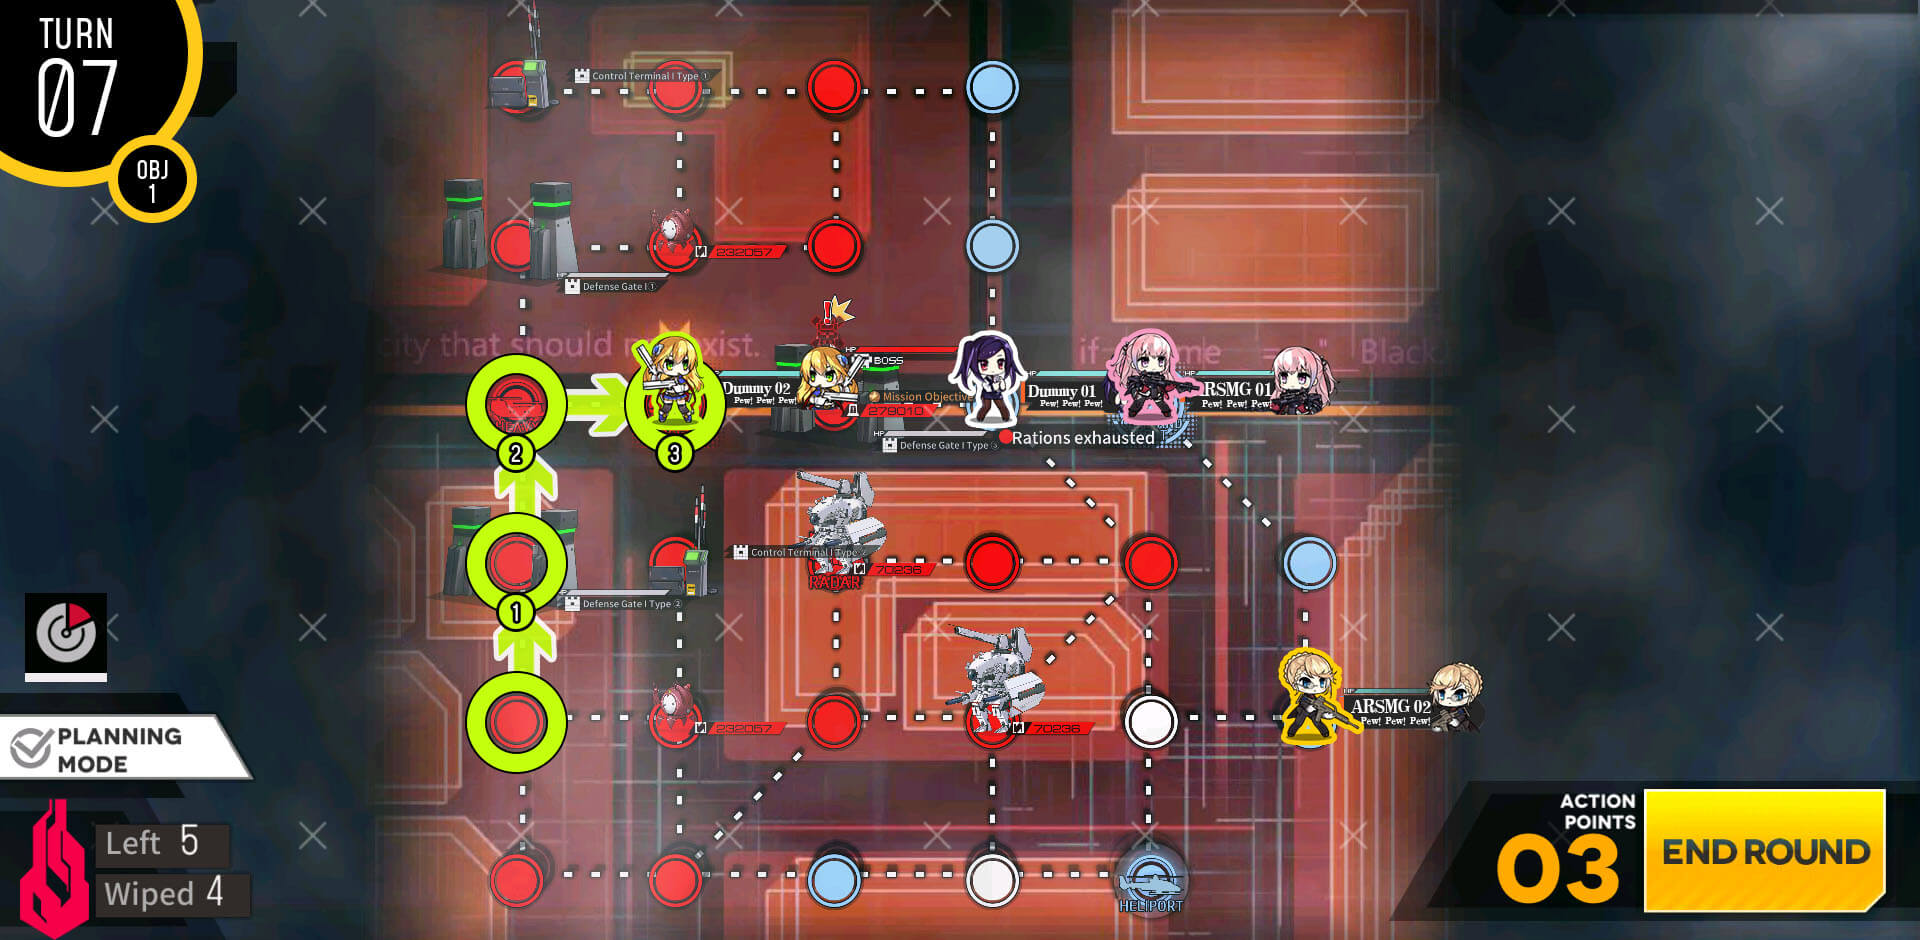
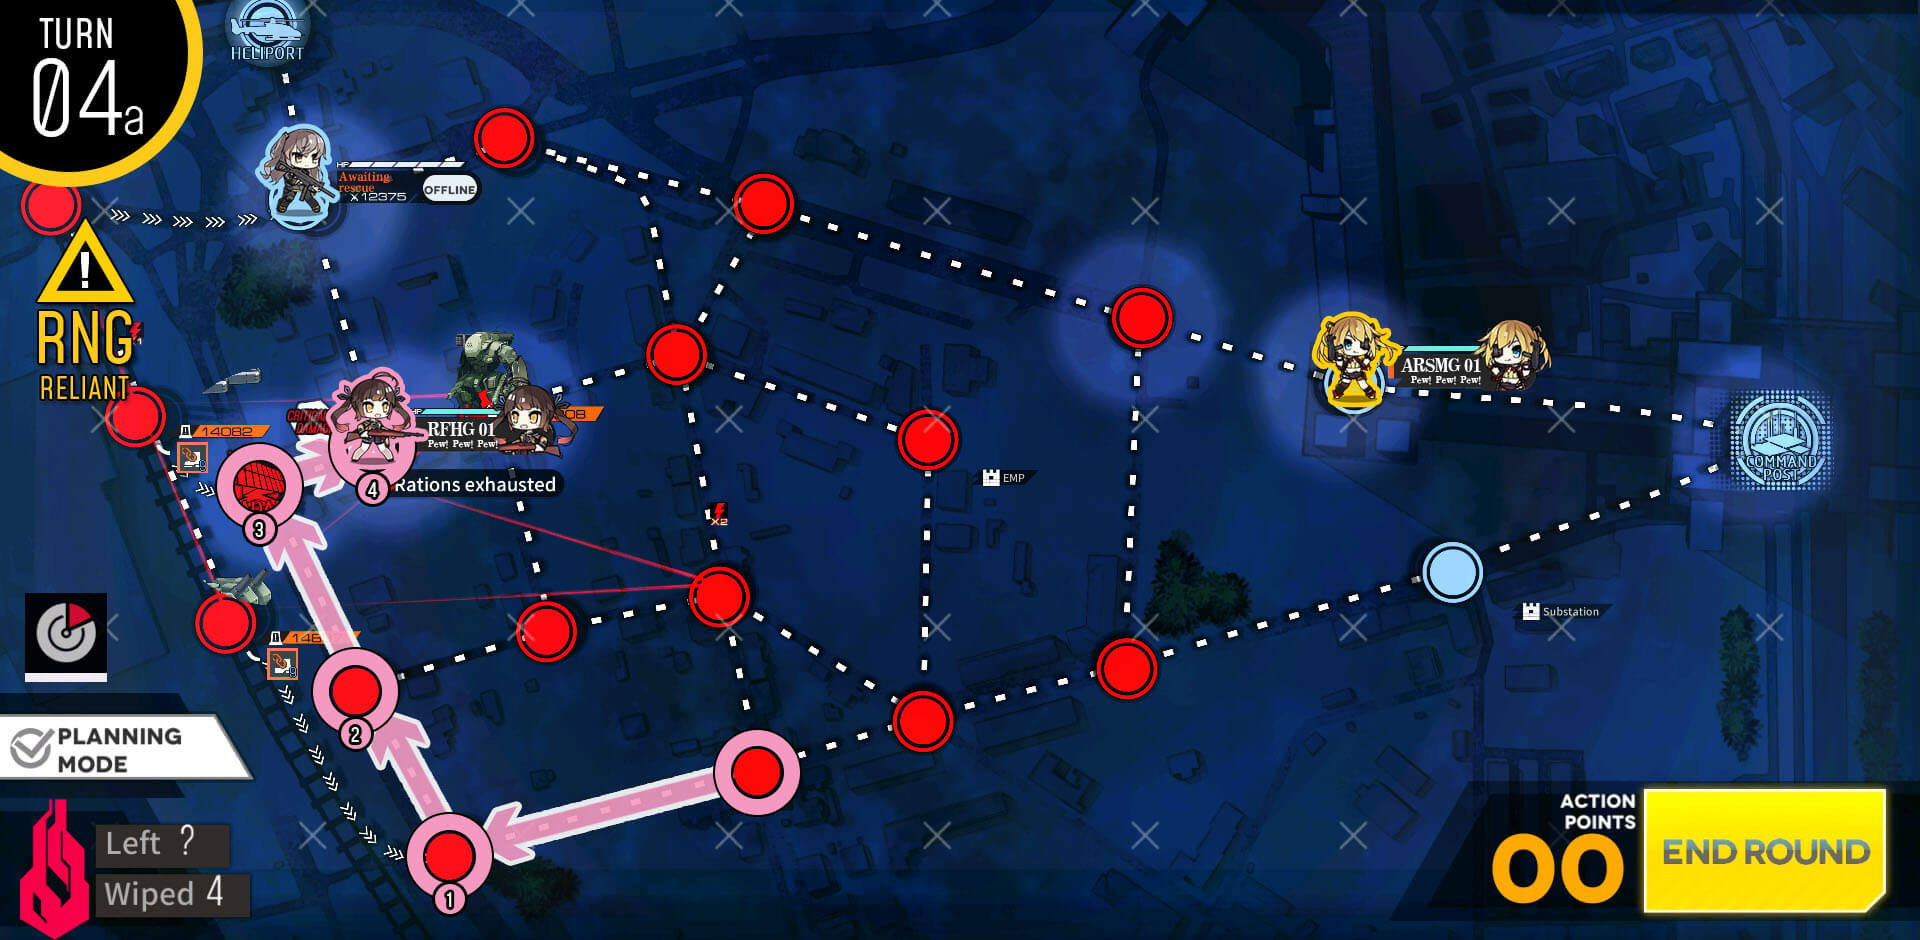
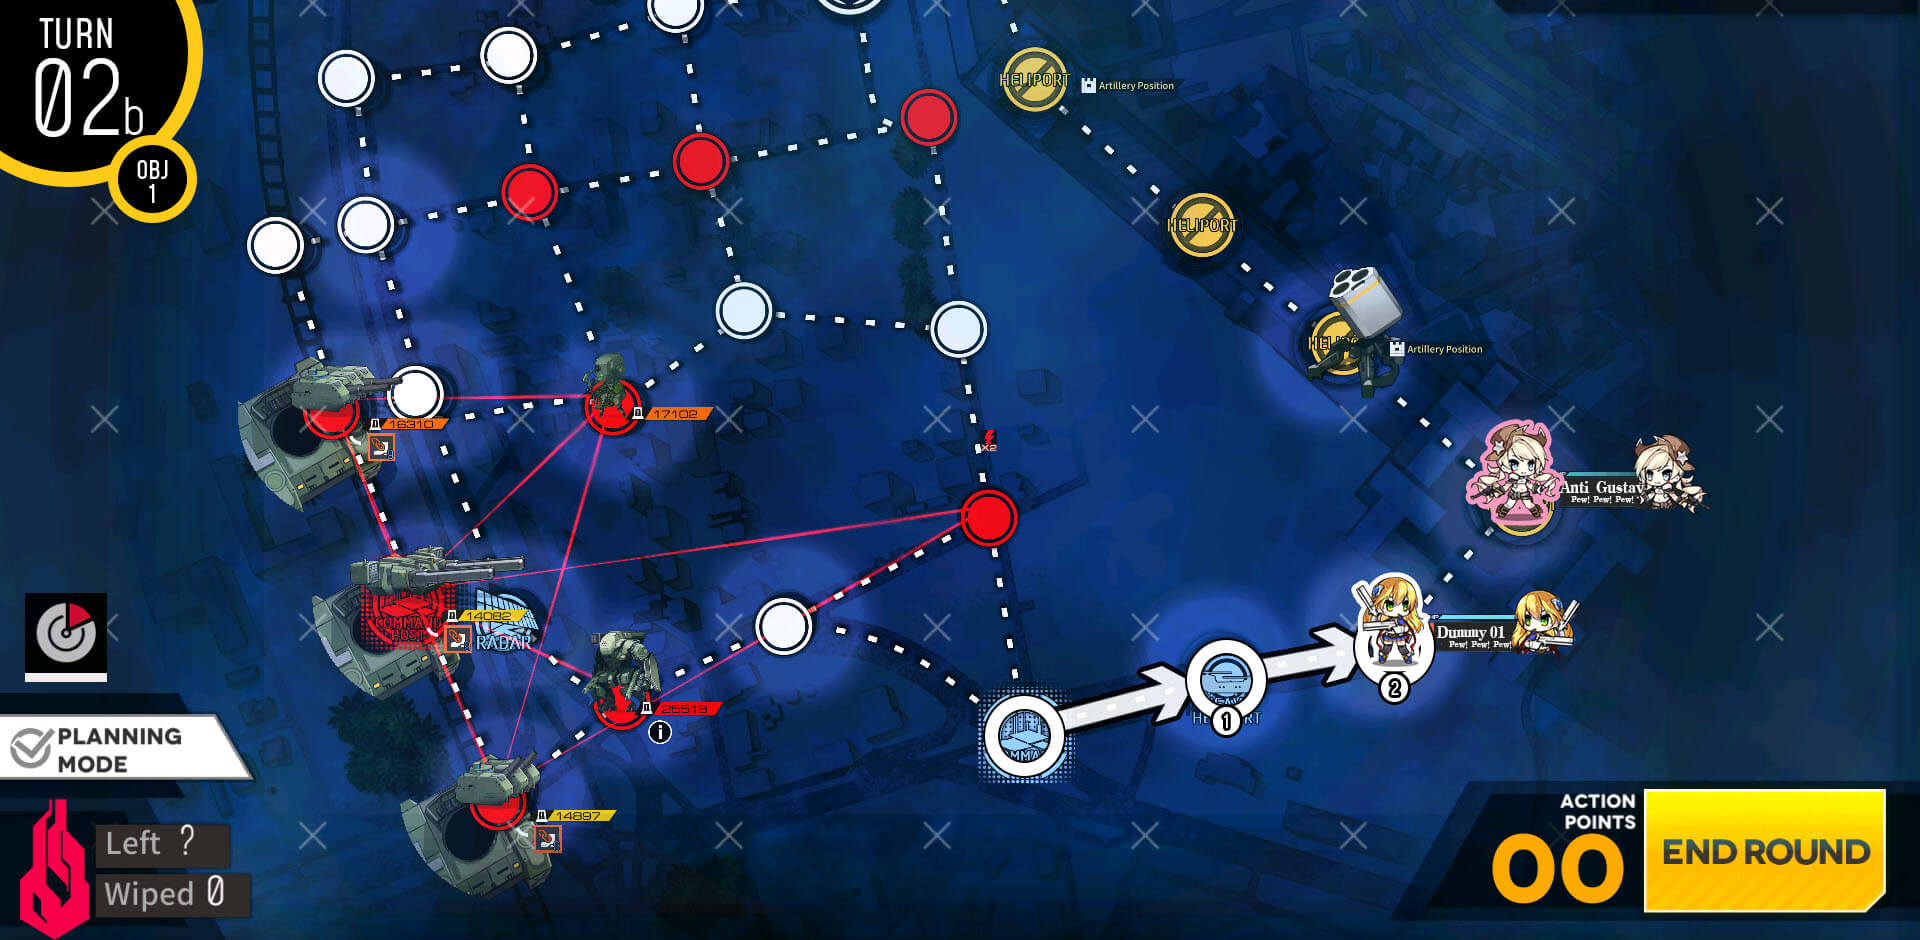
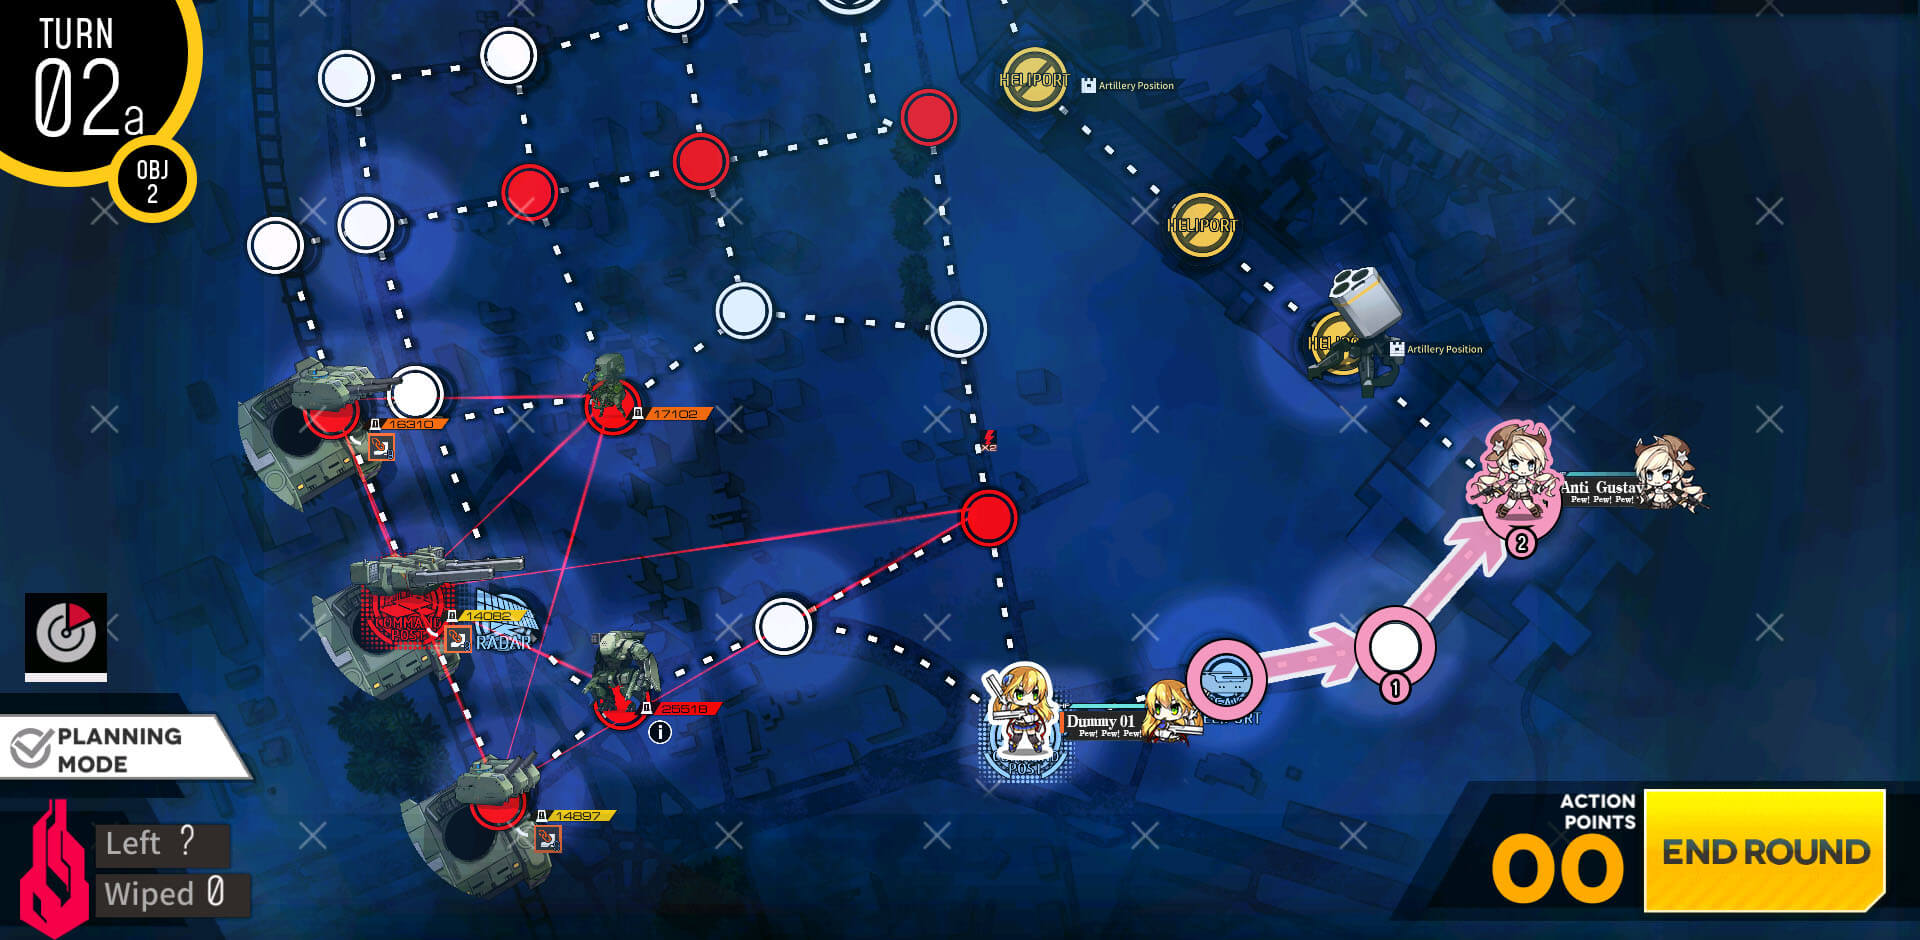
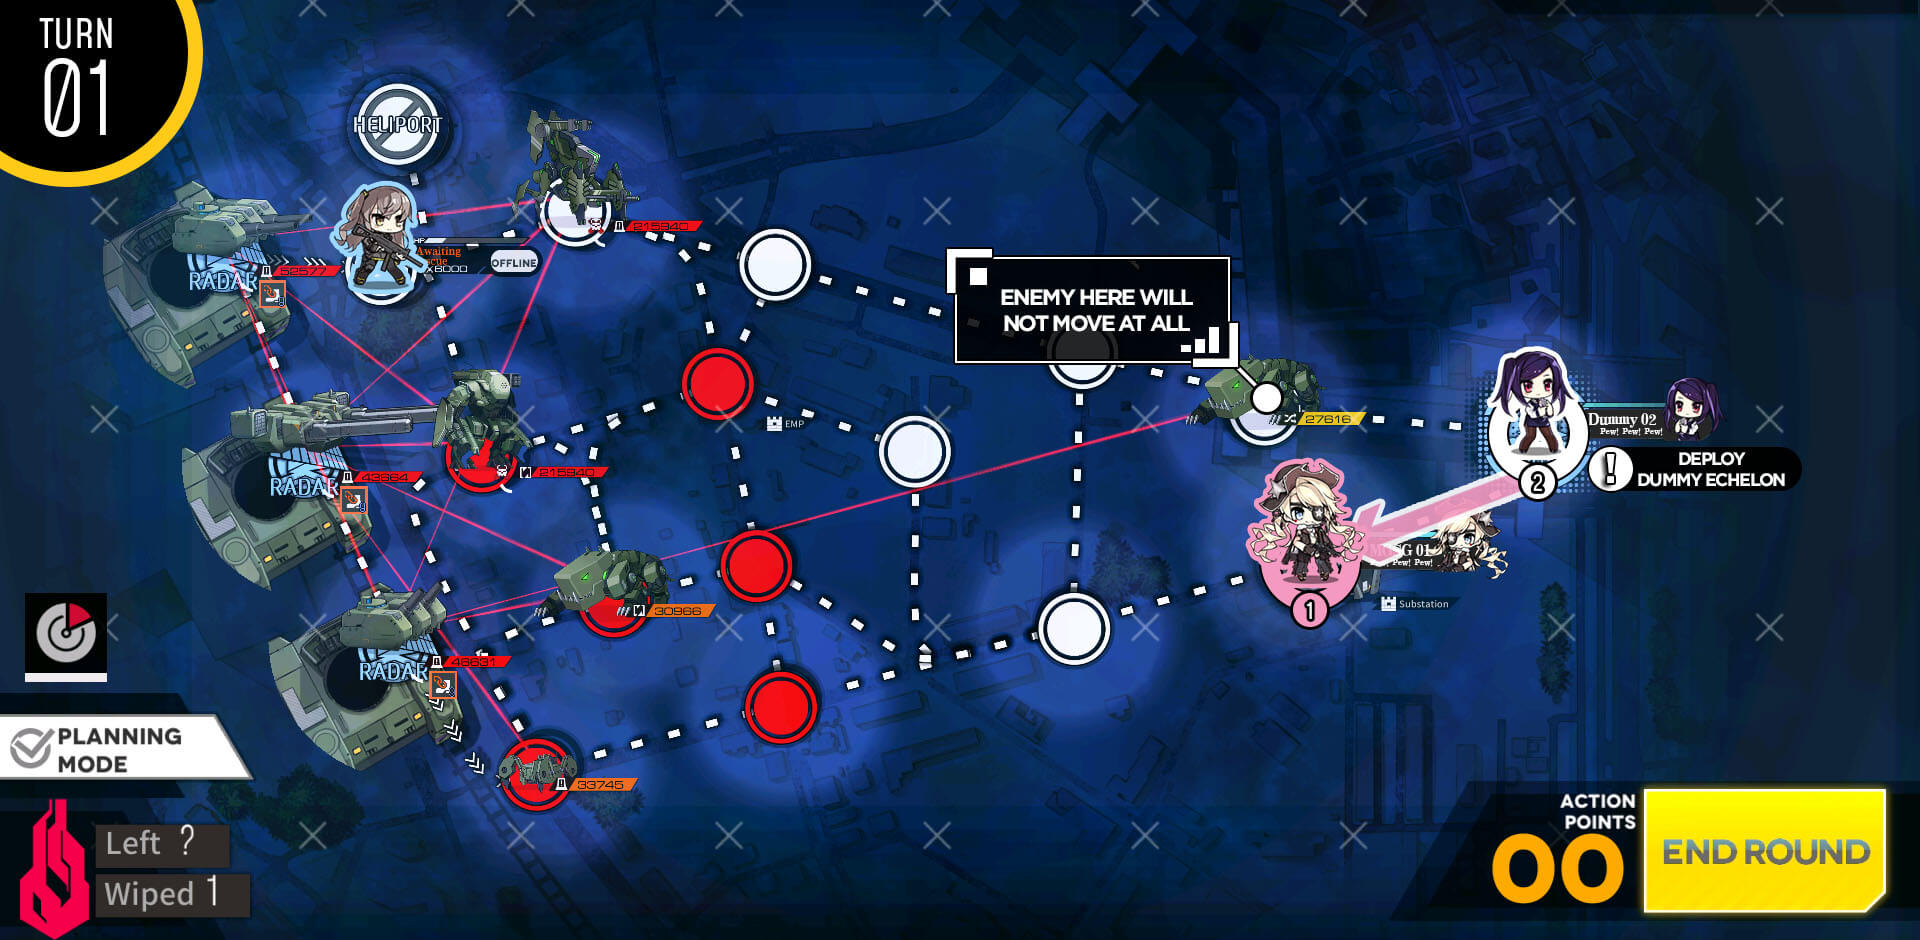
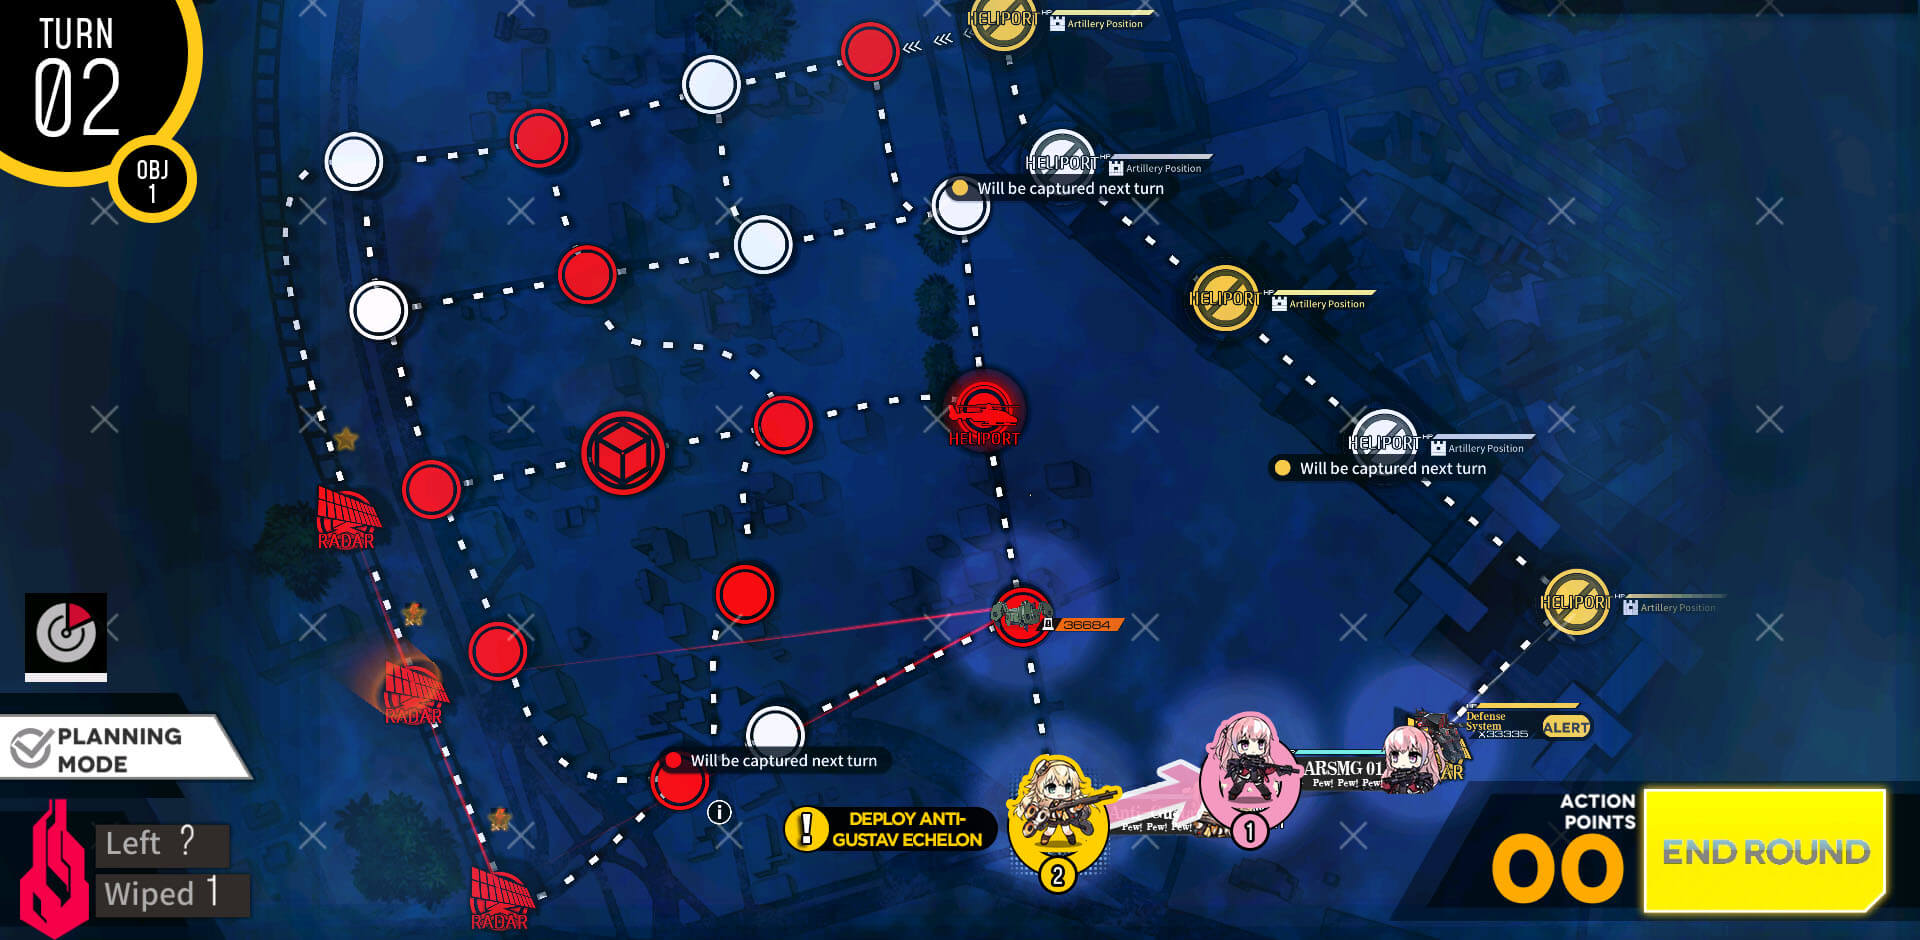
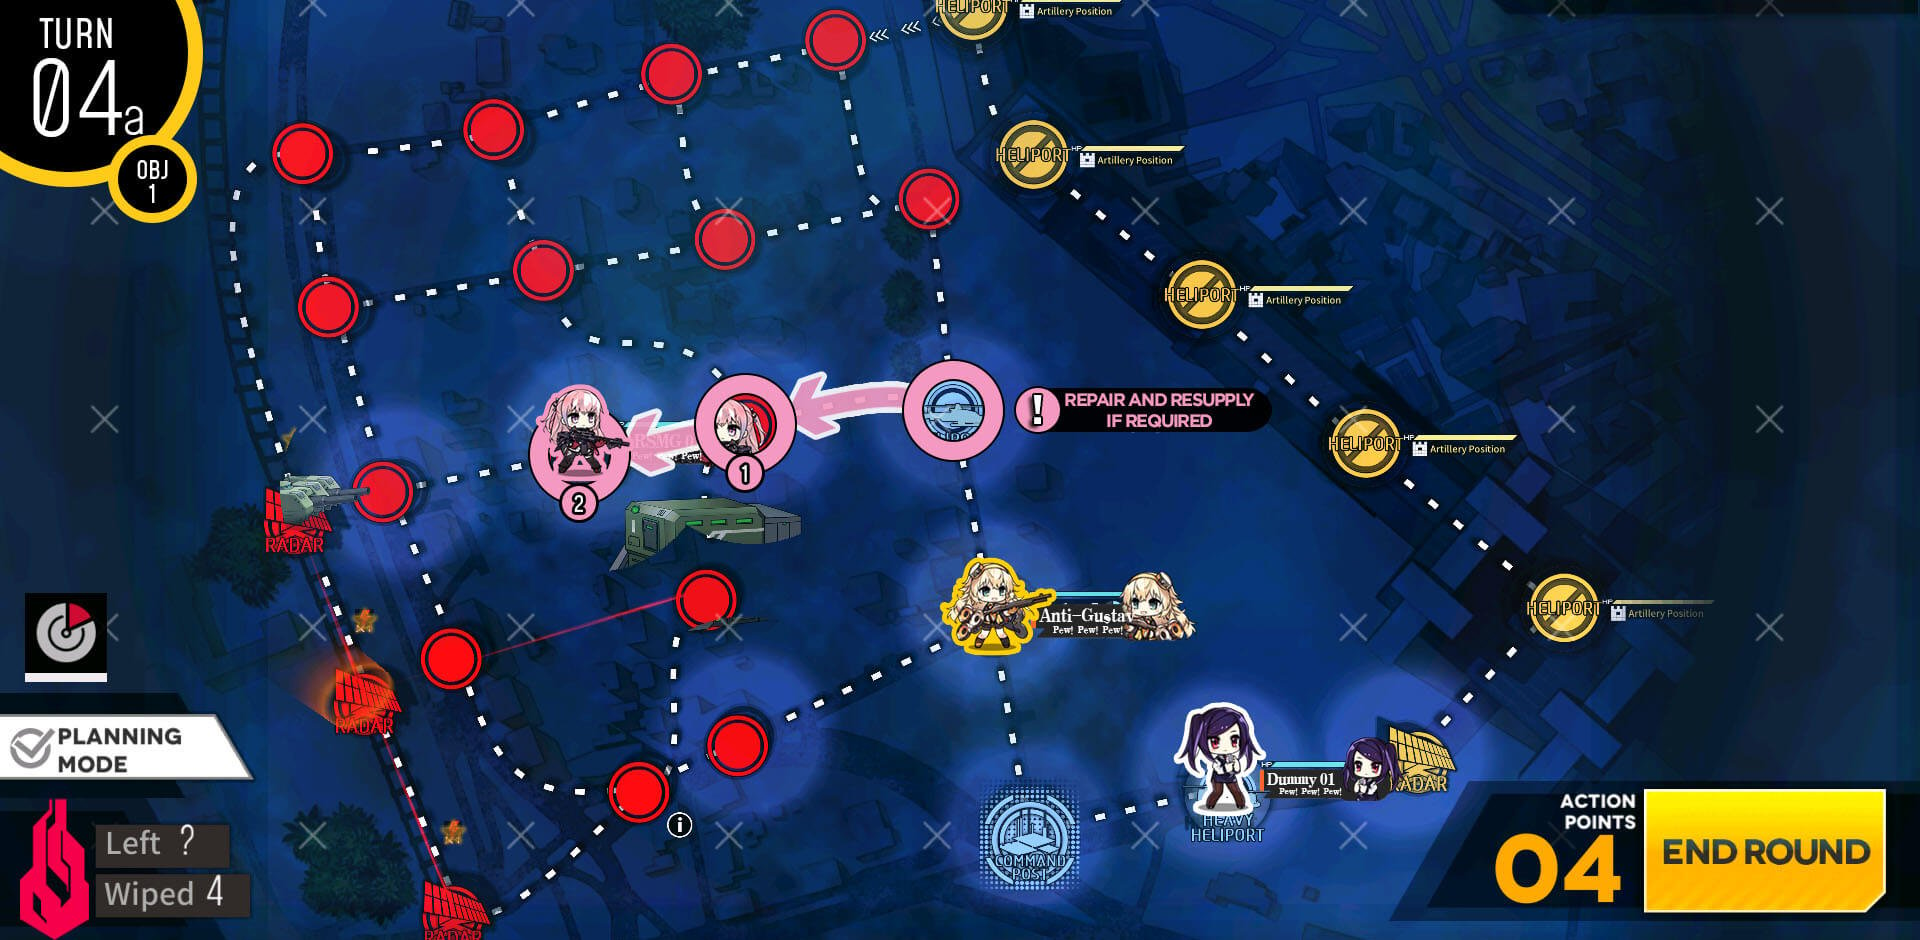
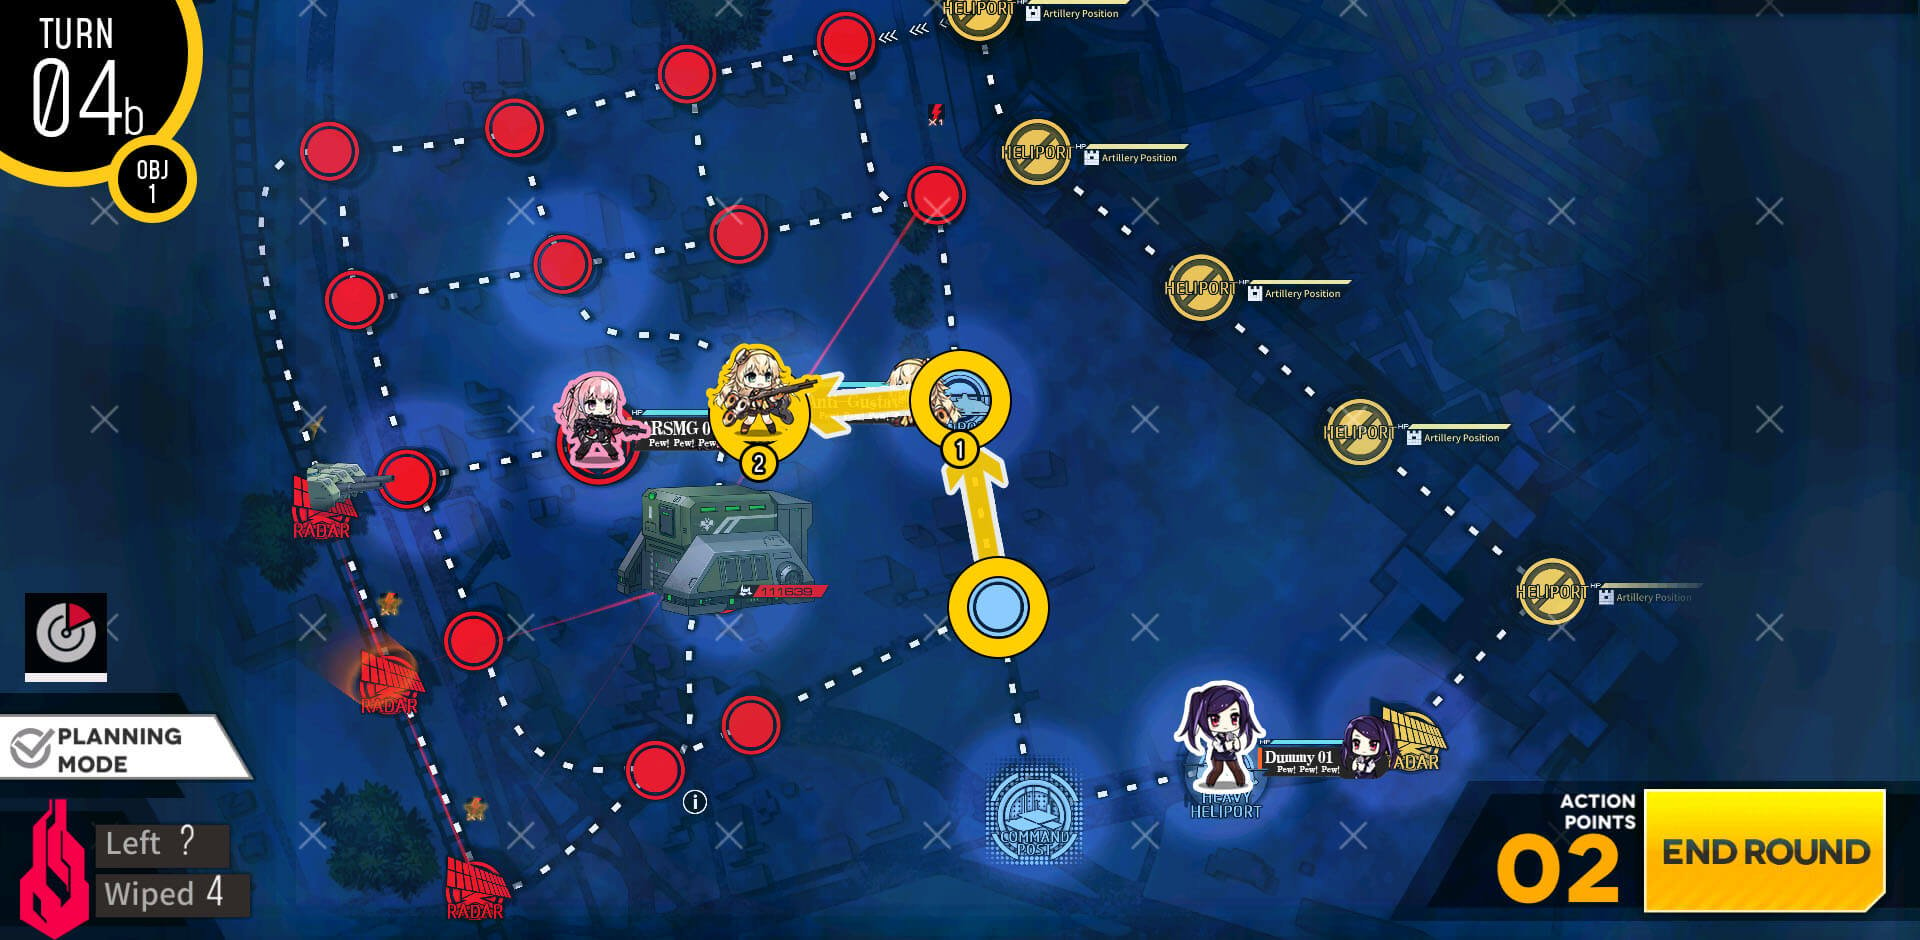
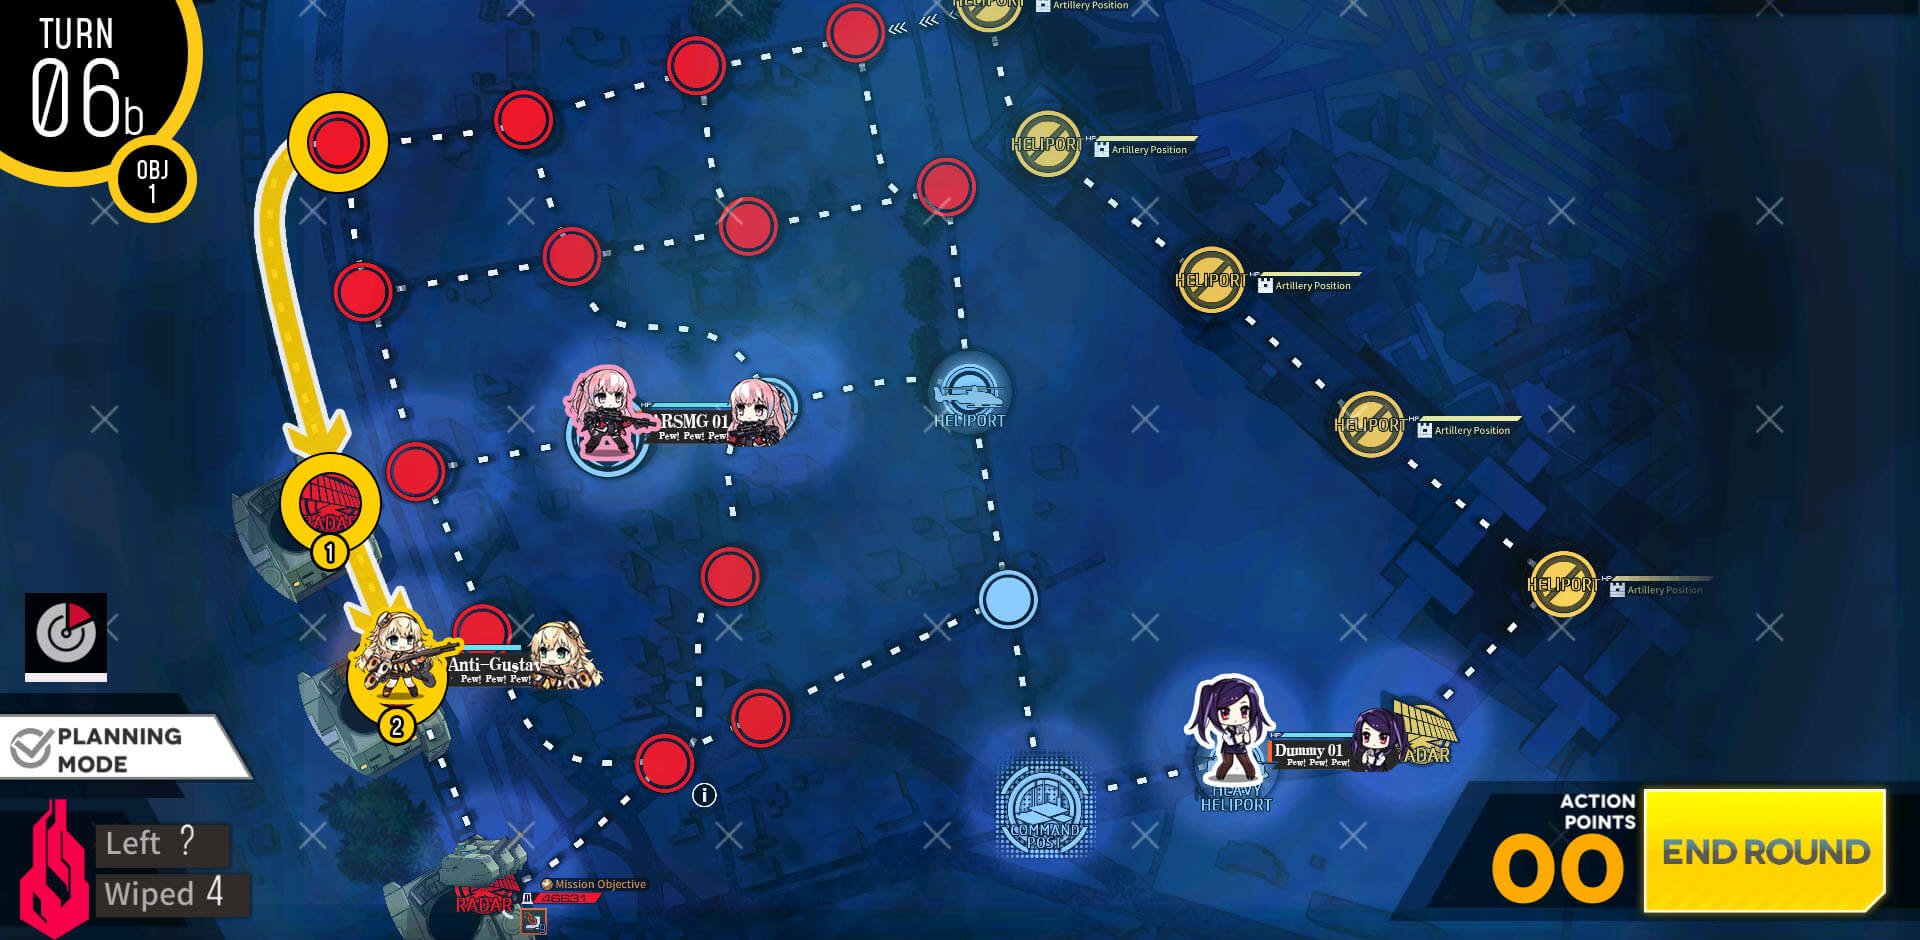
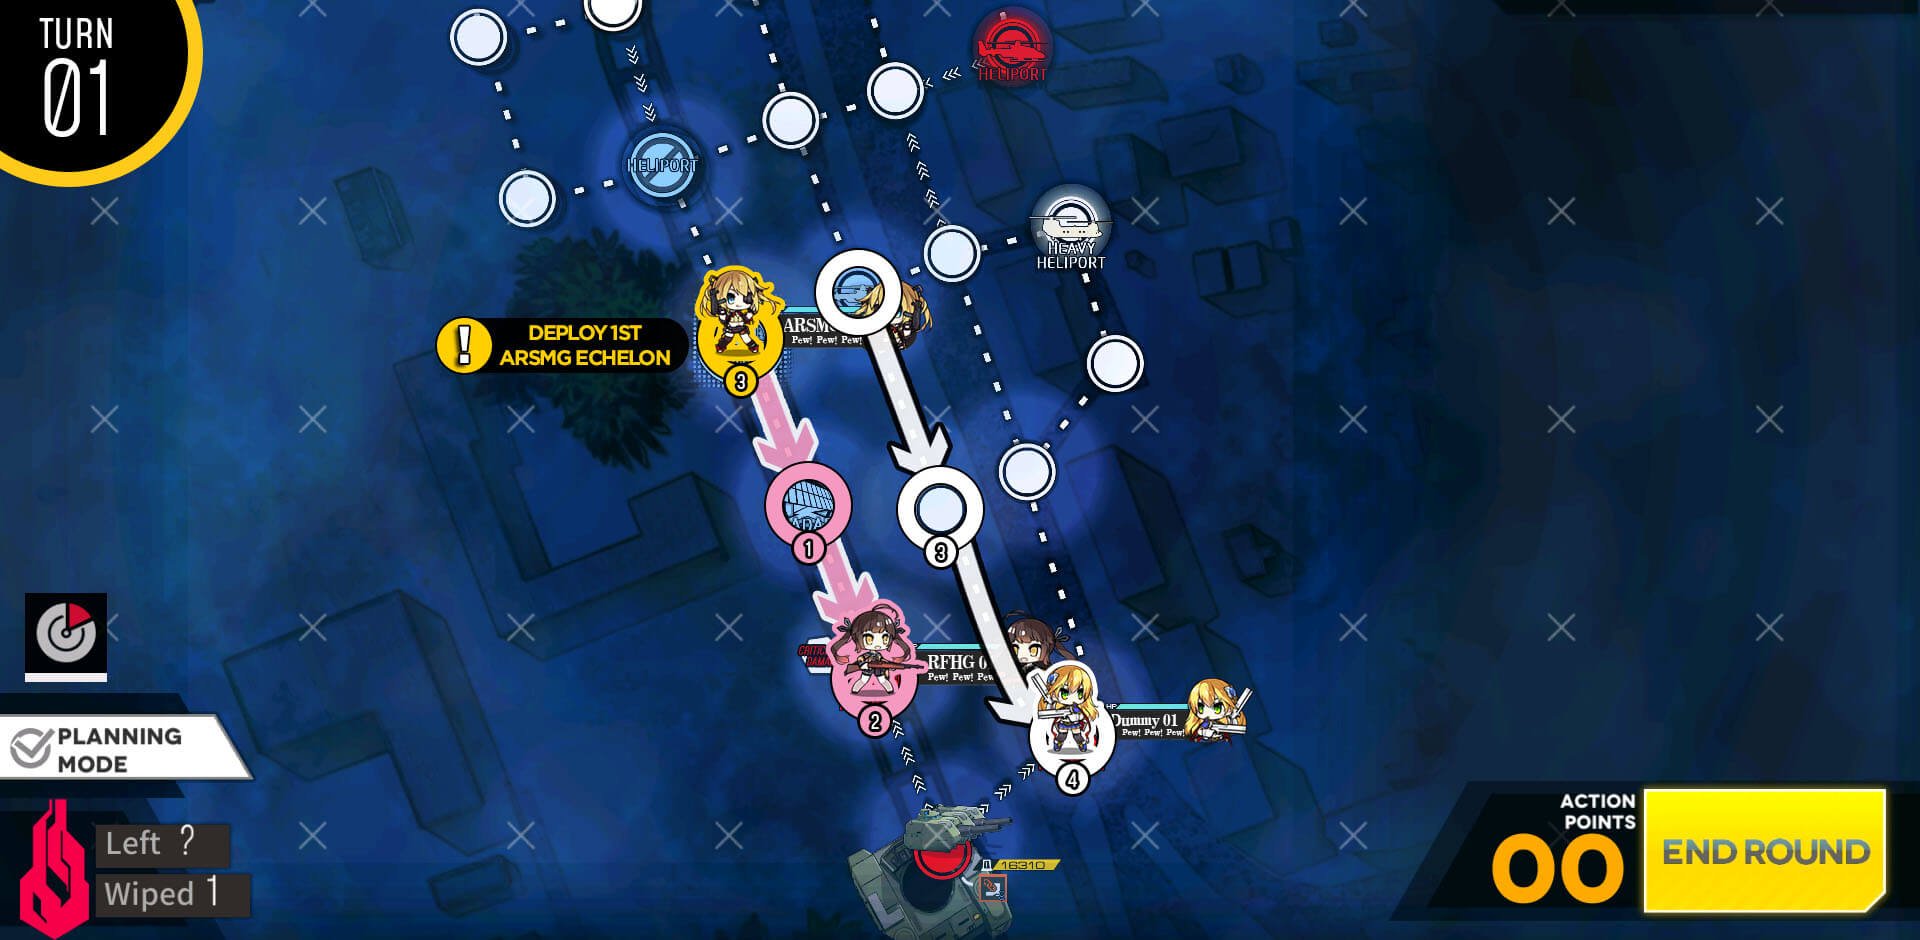
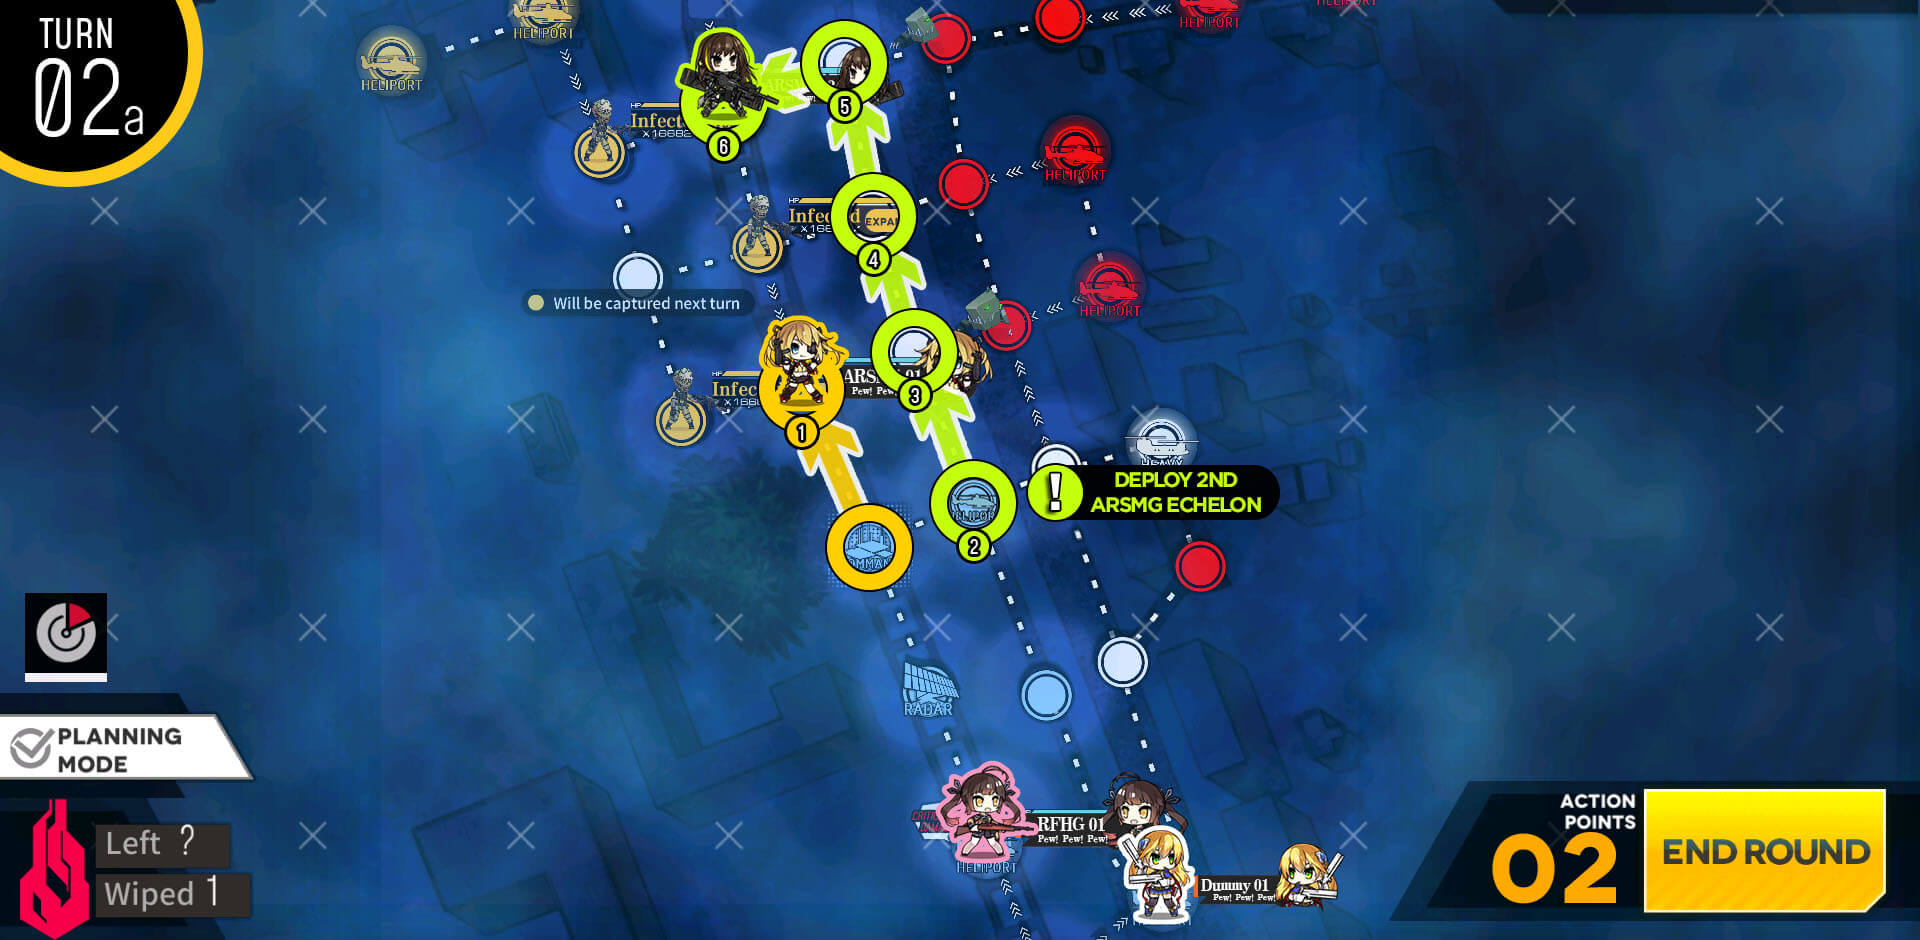
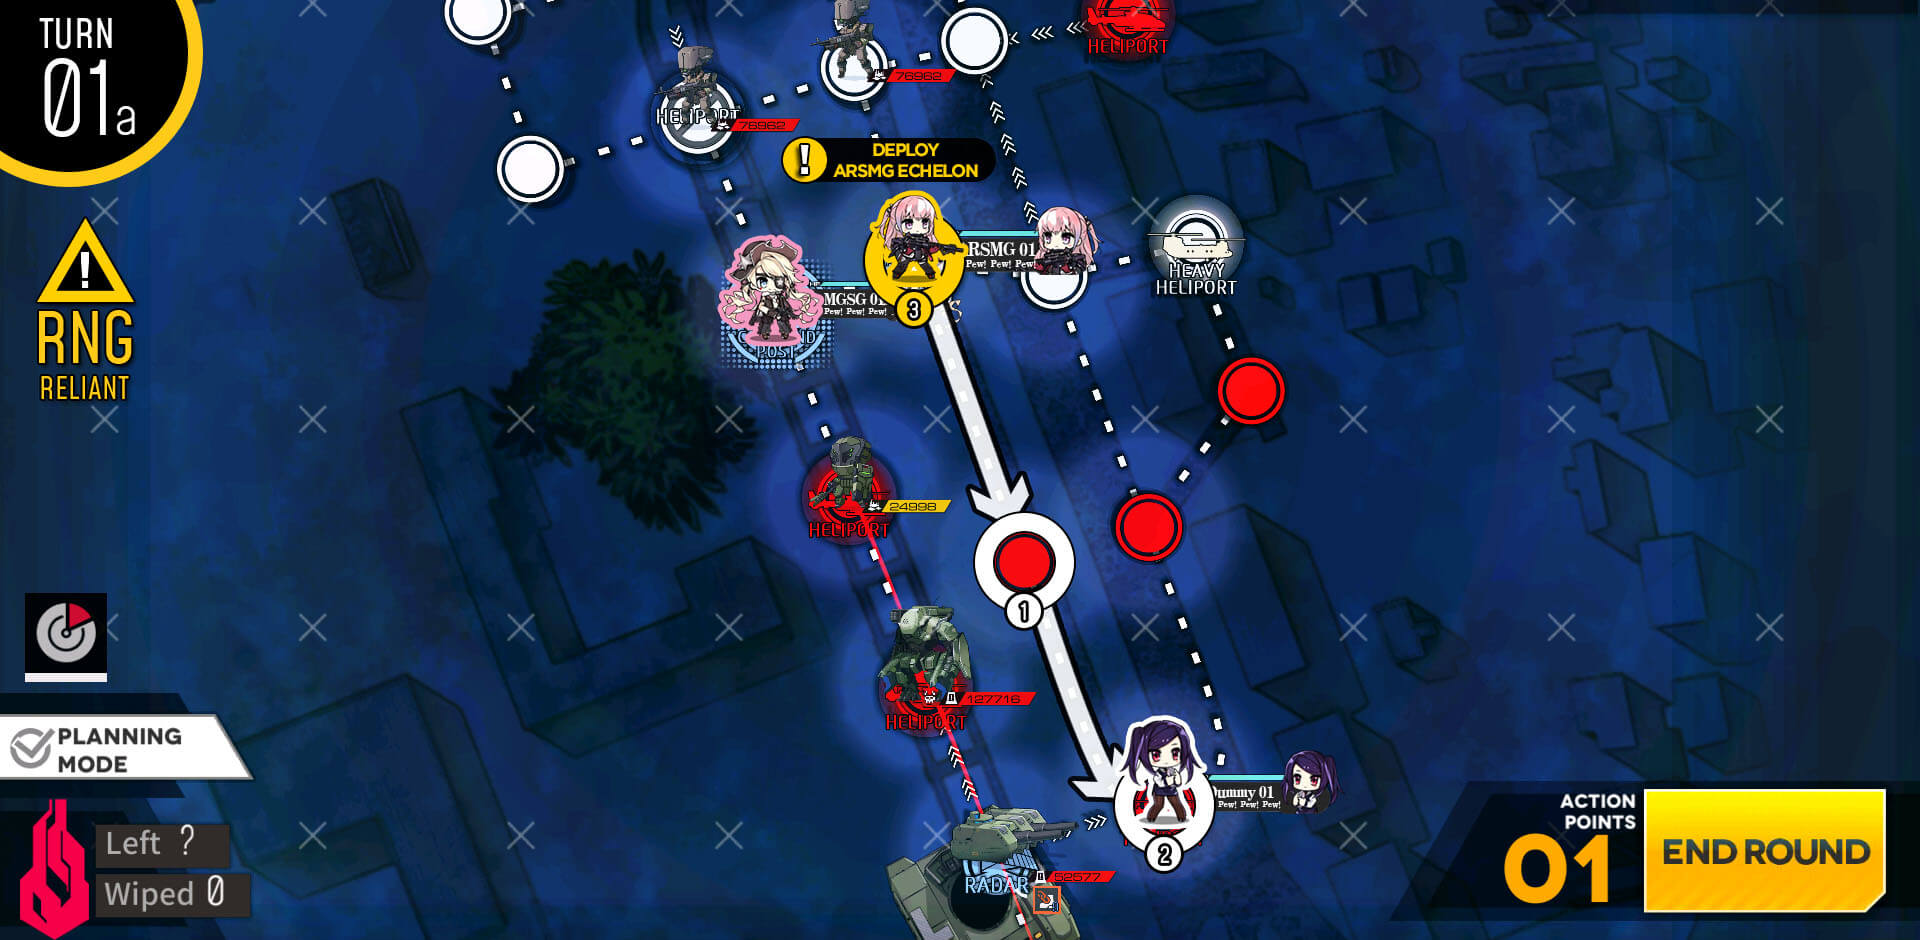
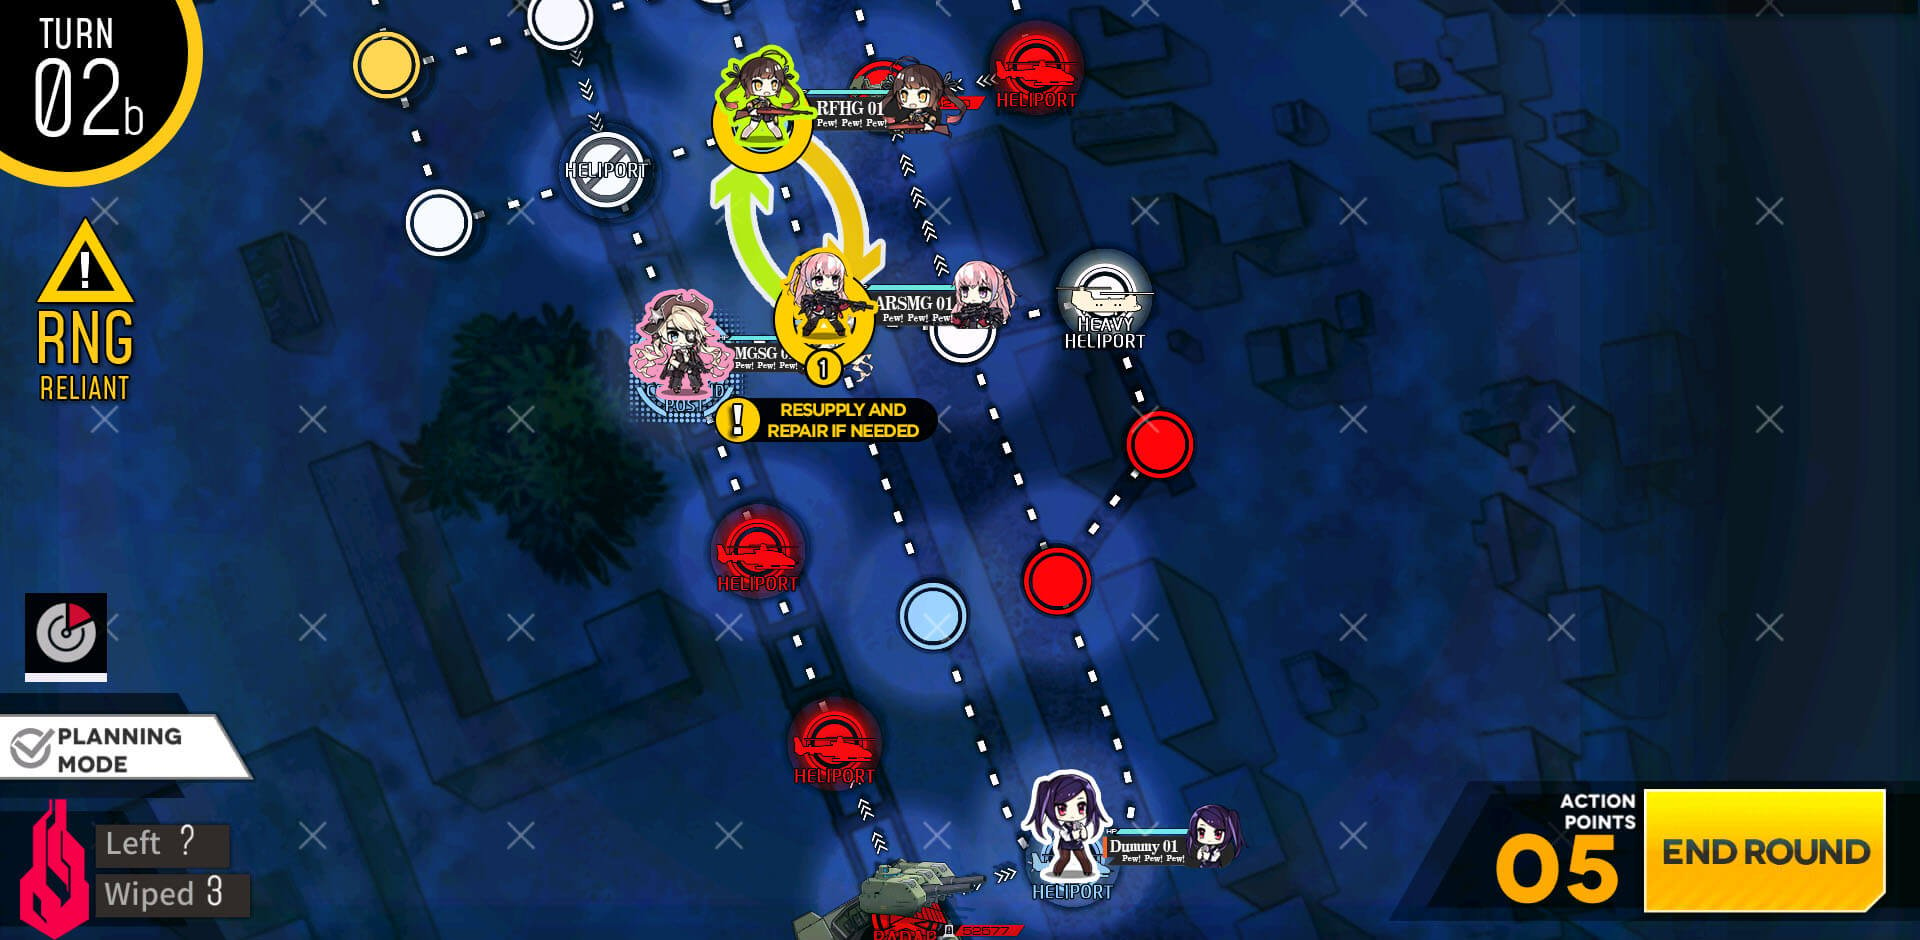
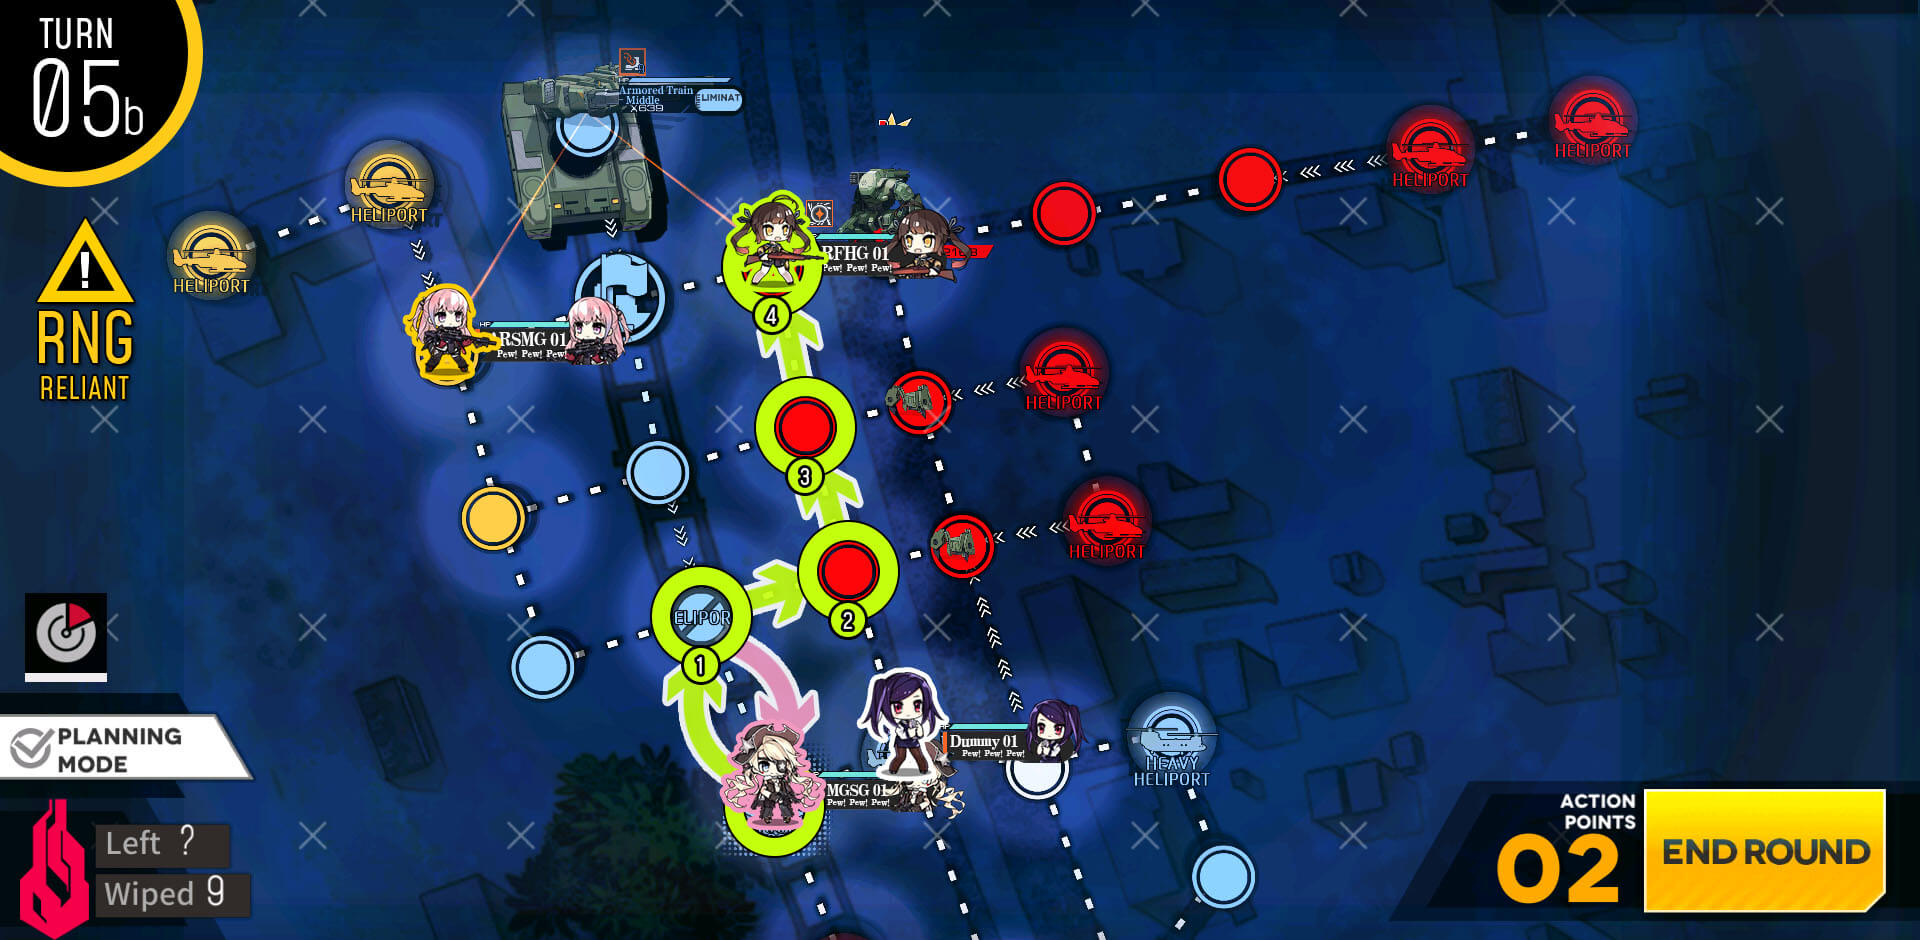
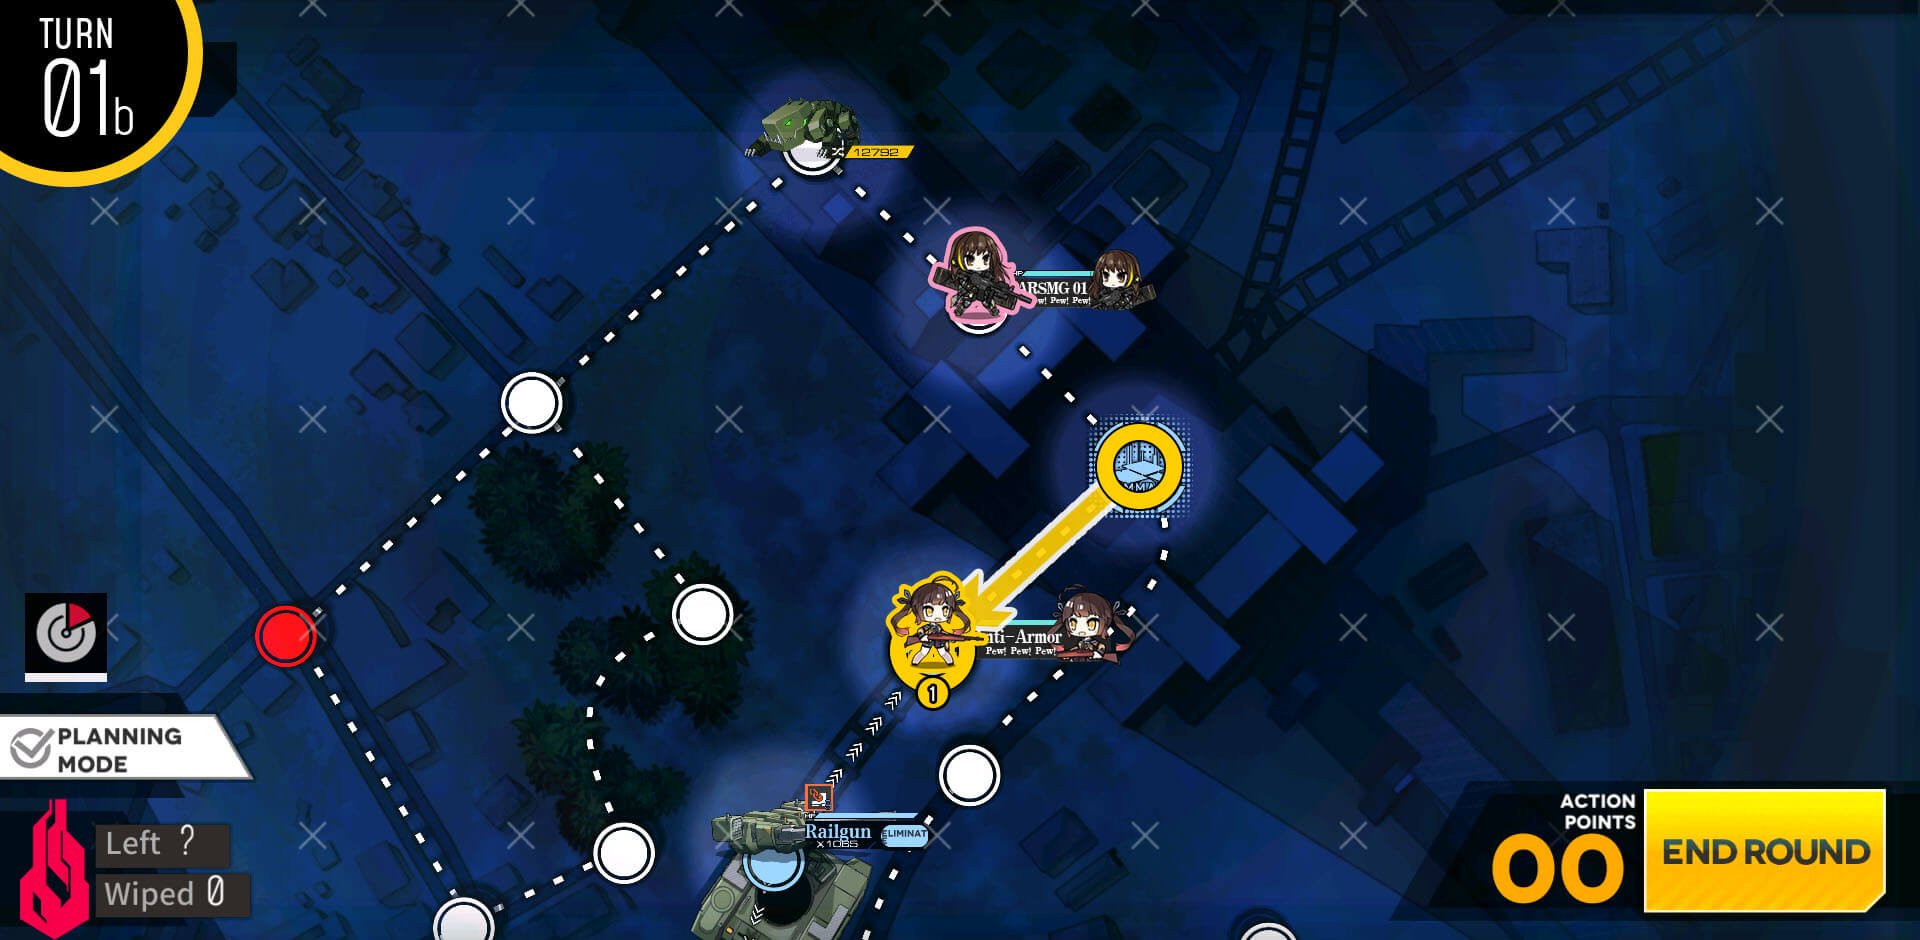
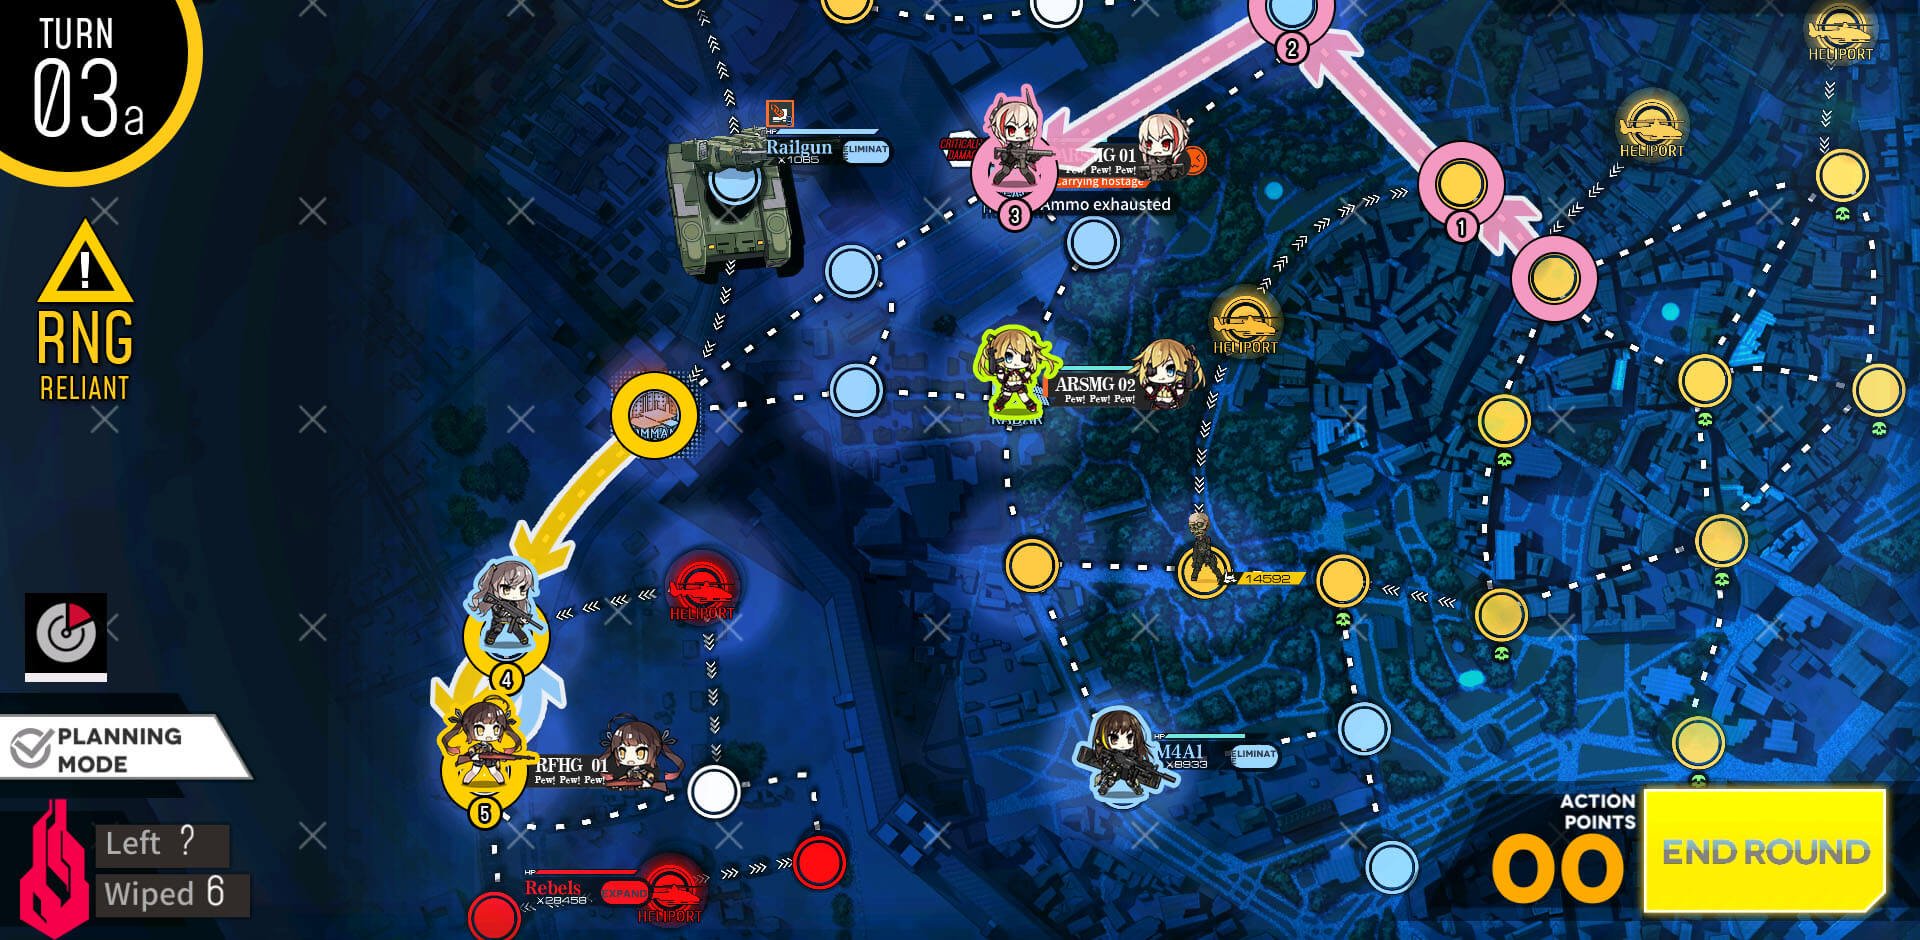
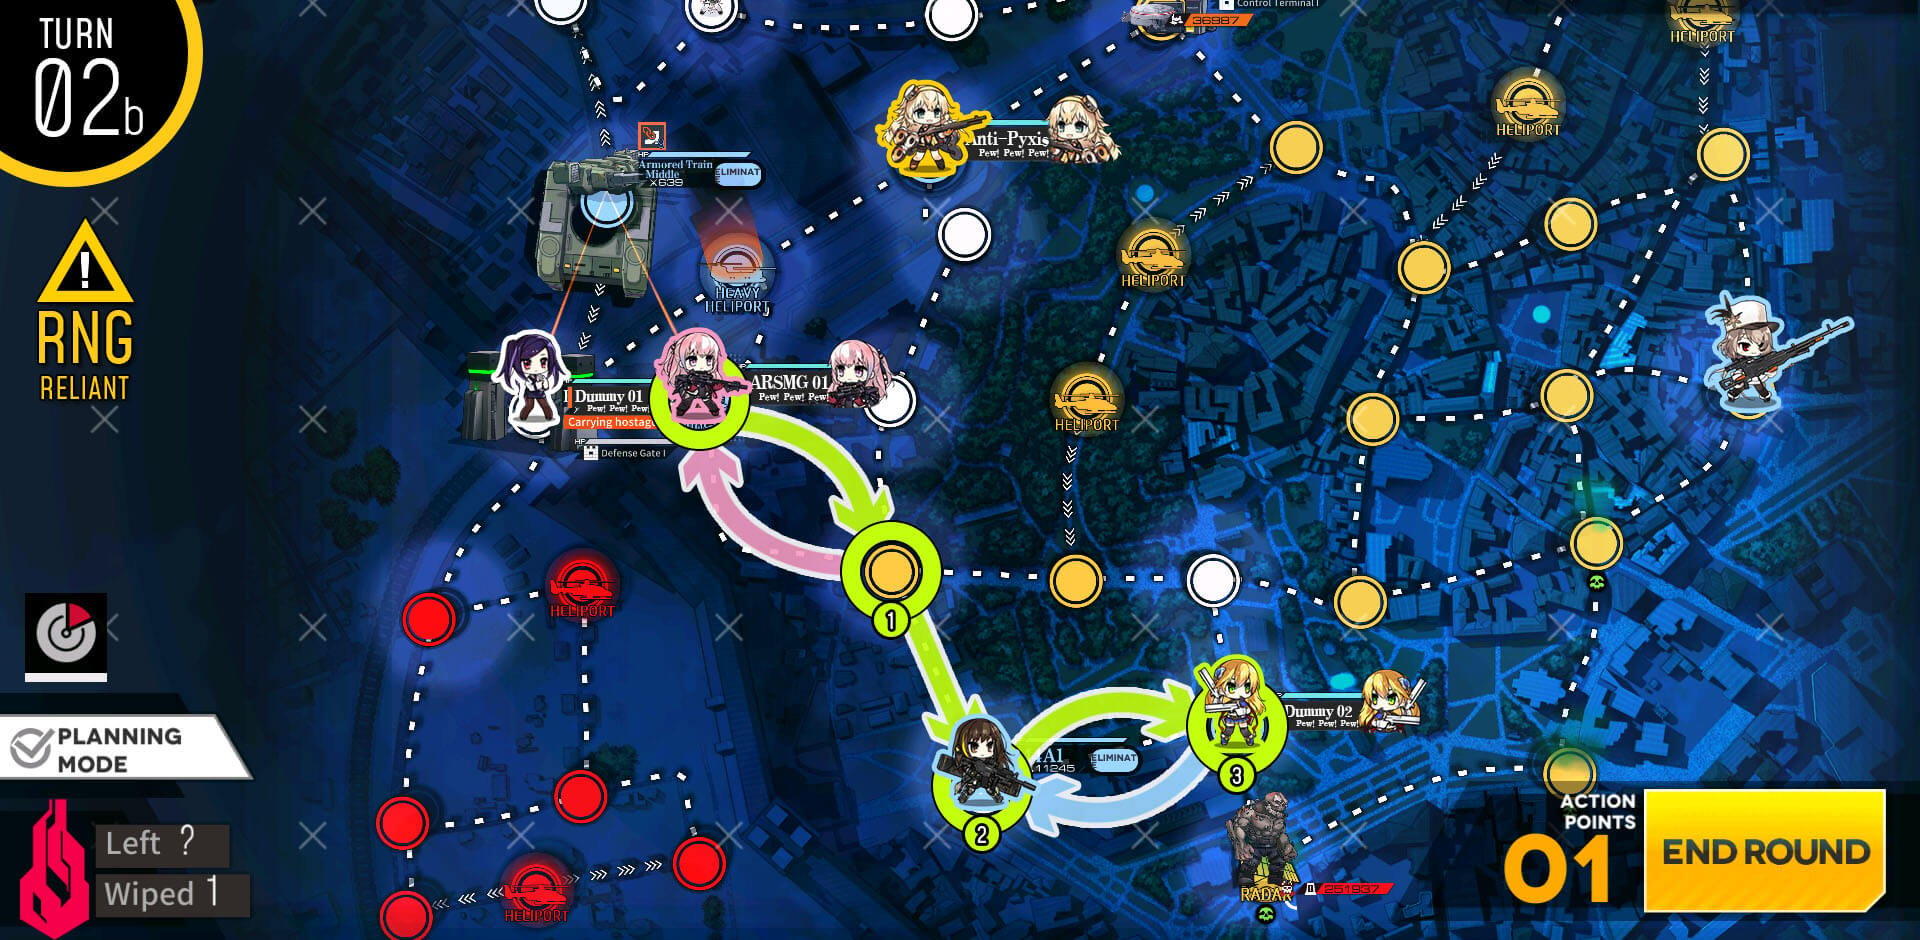
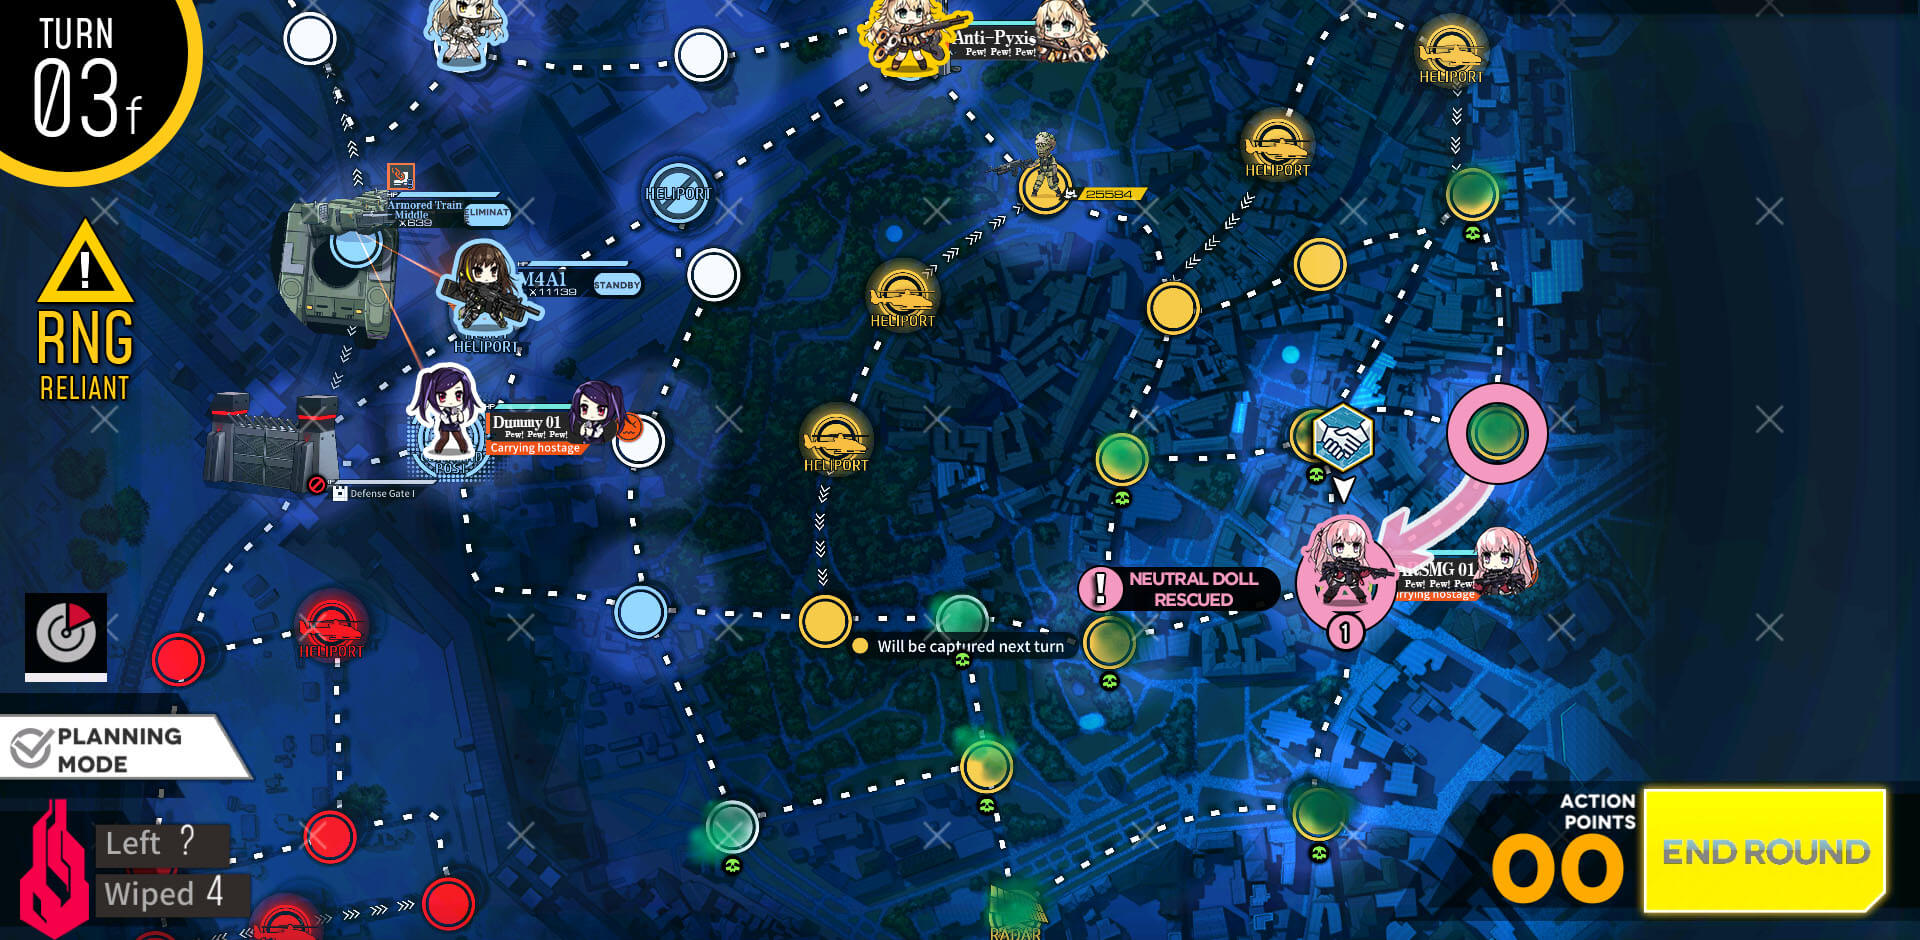
Since we are not looking to kill all units right now, just head straight for the enemy HQ.

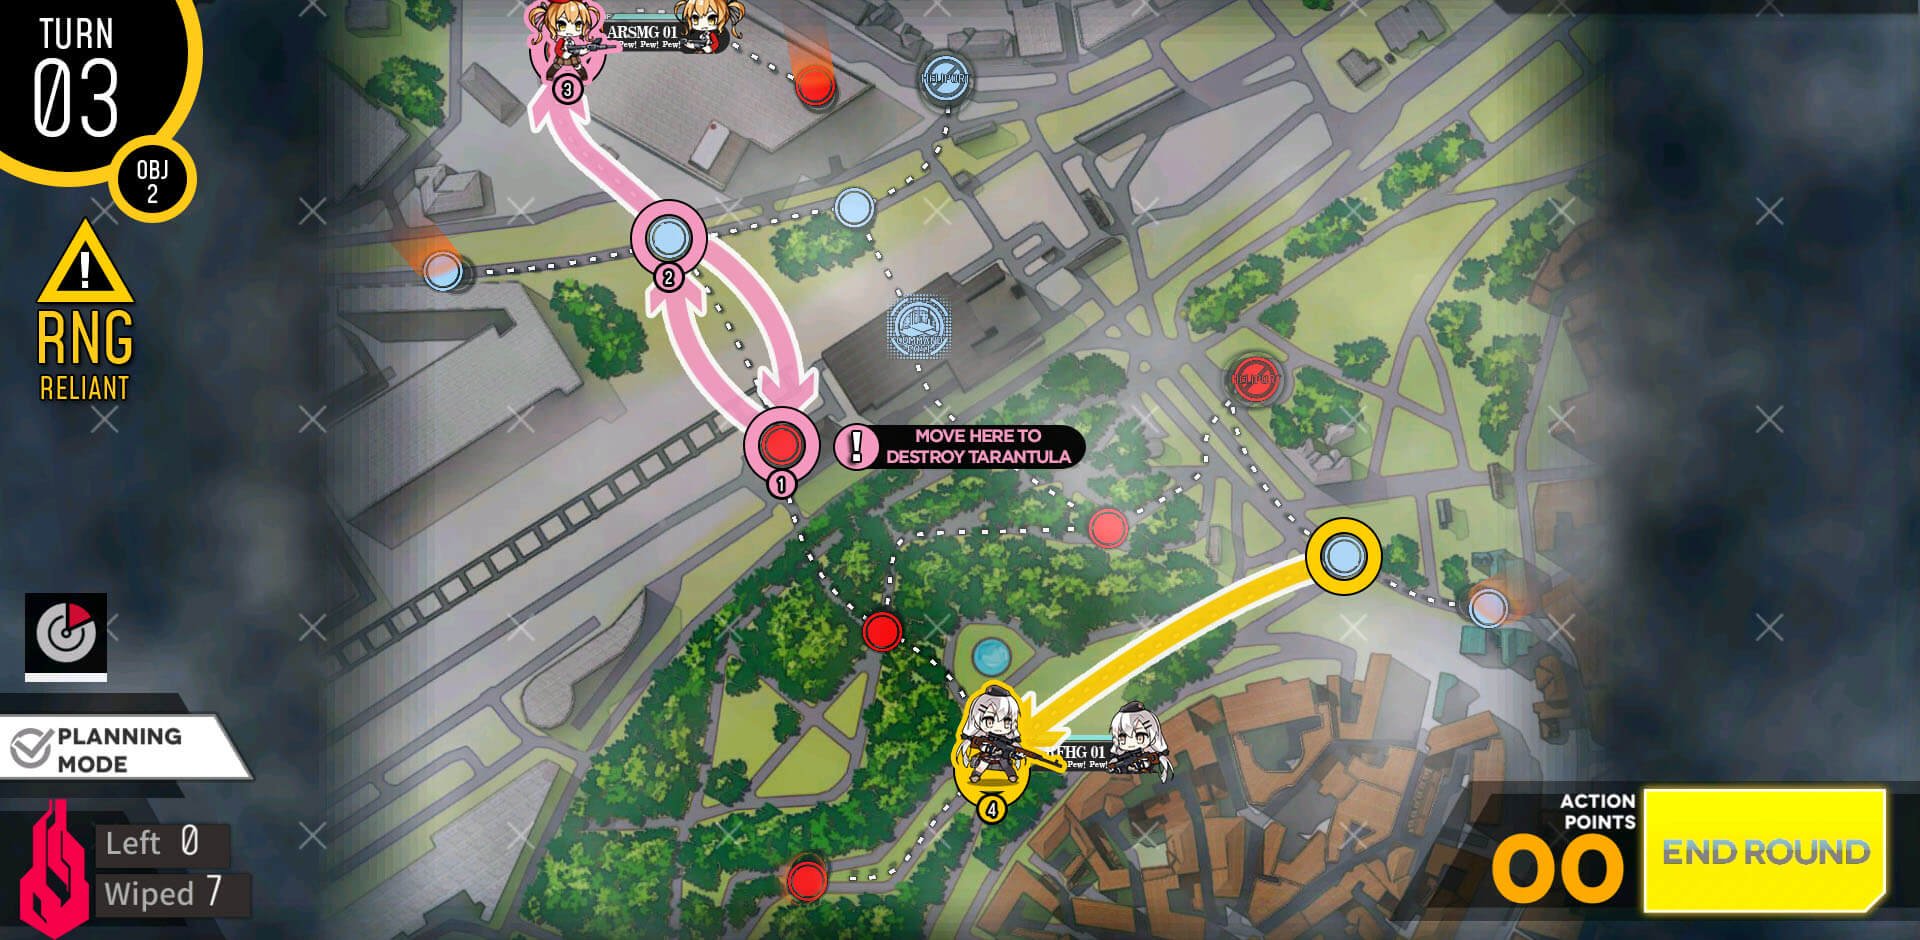
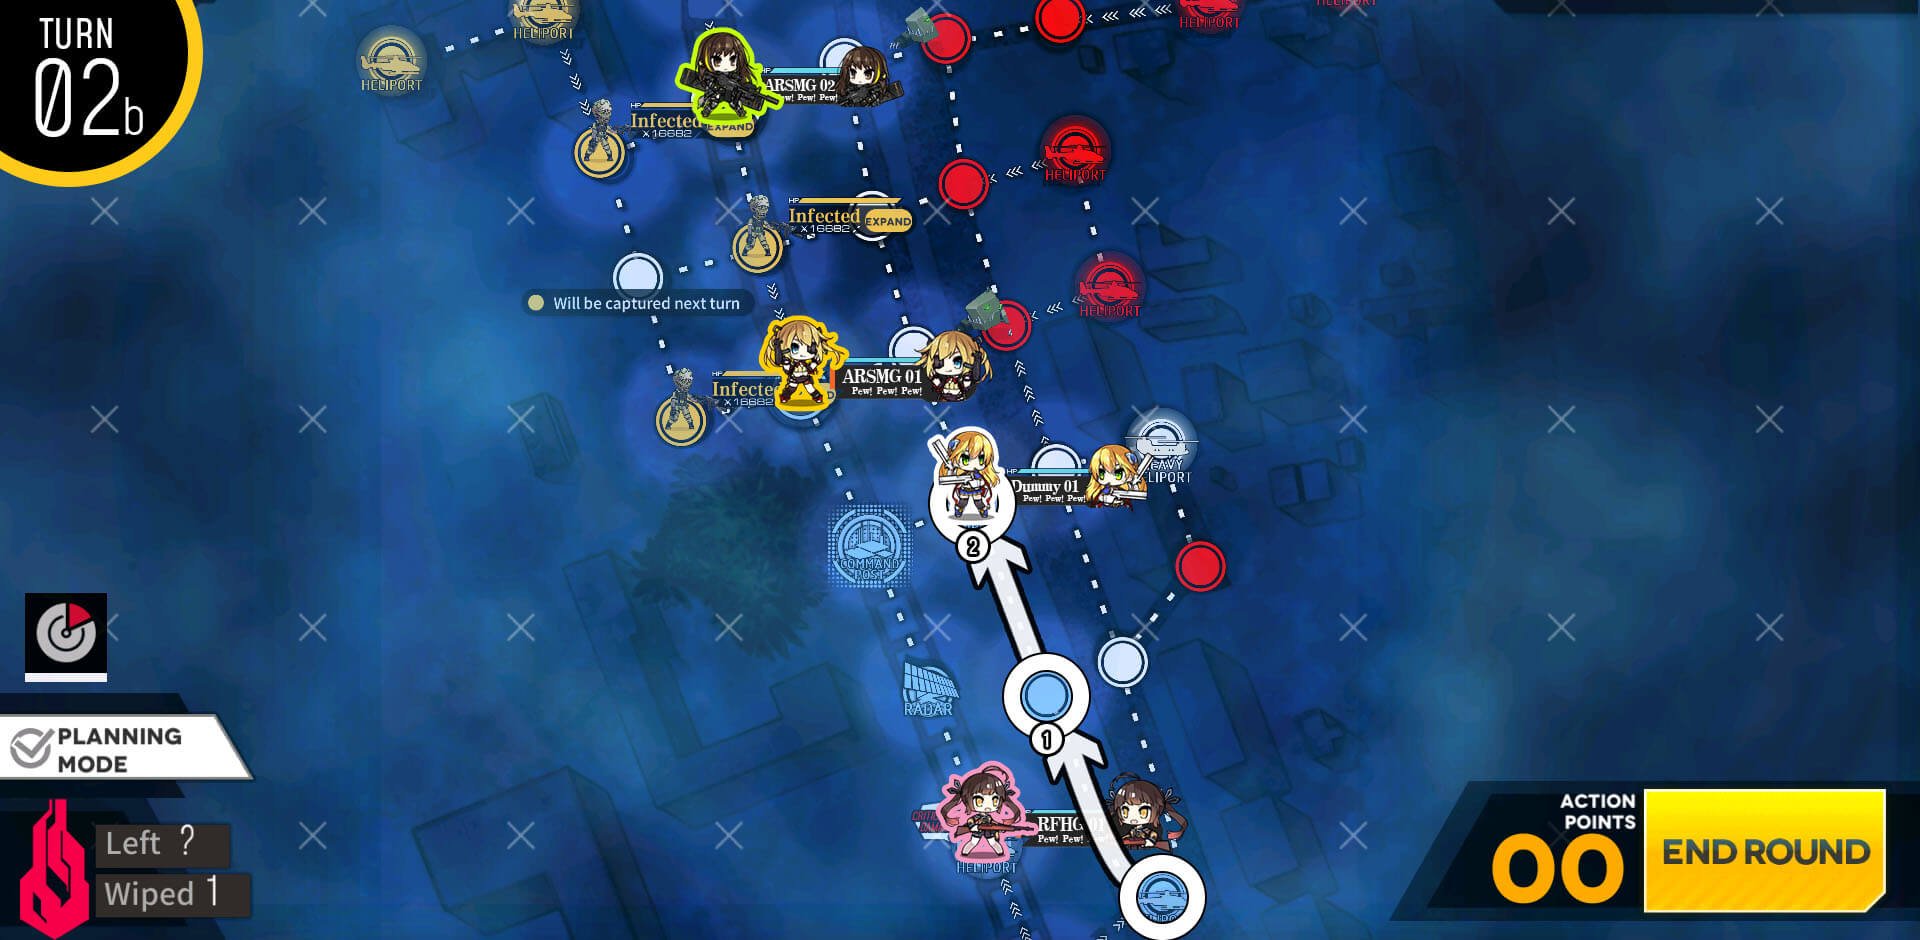
Easy clear.
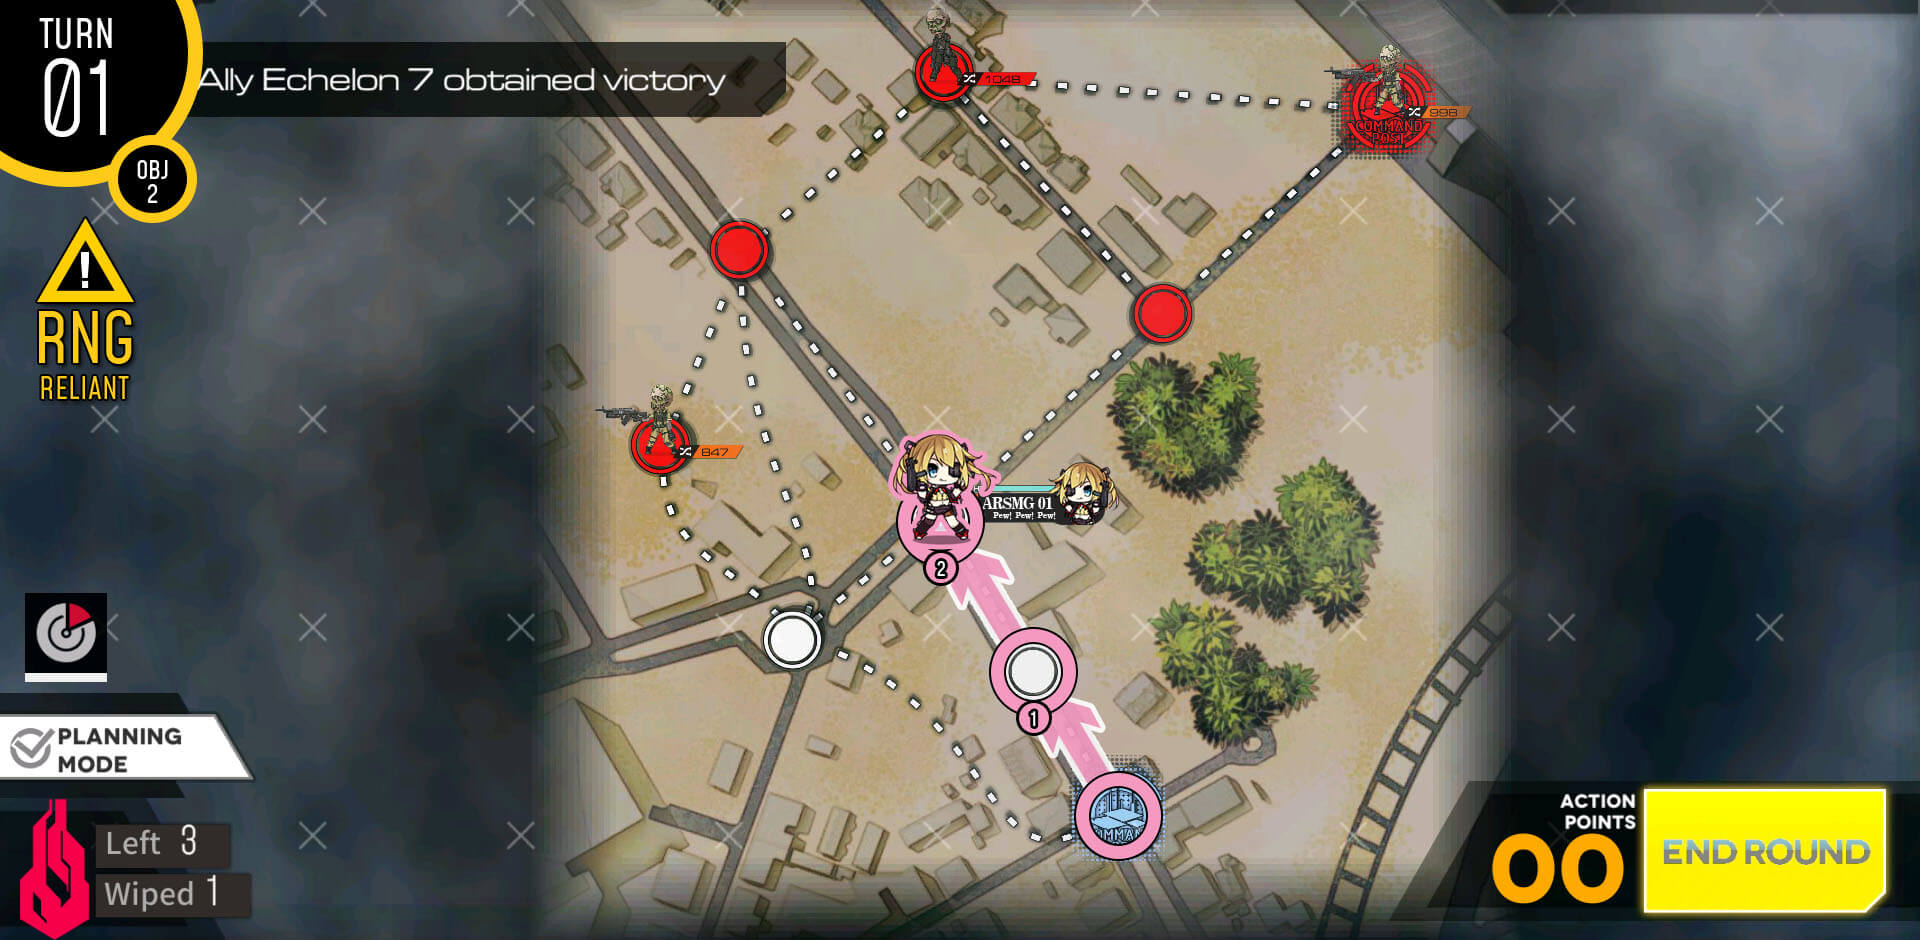
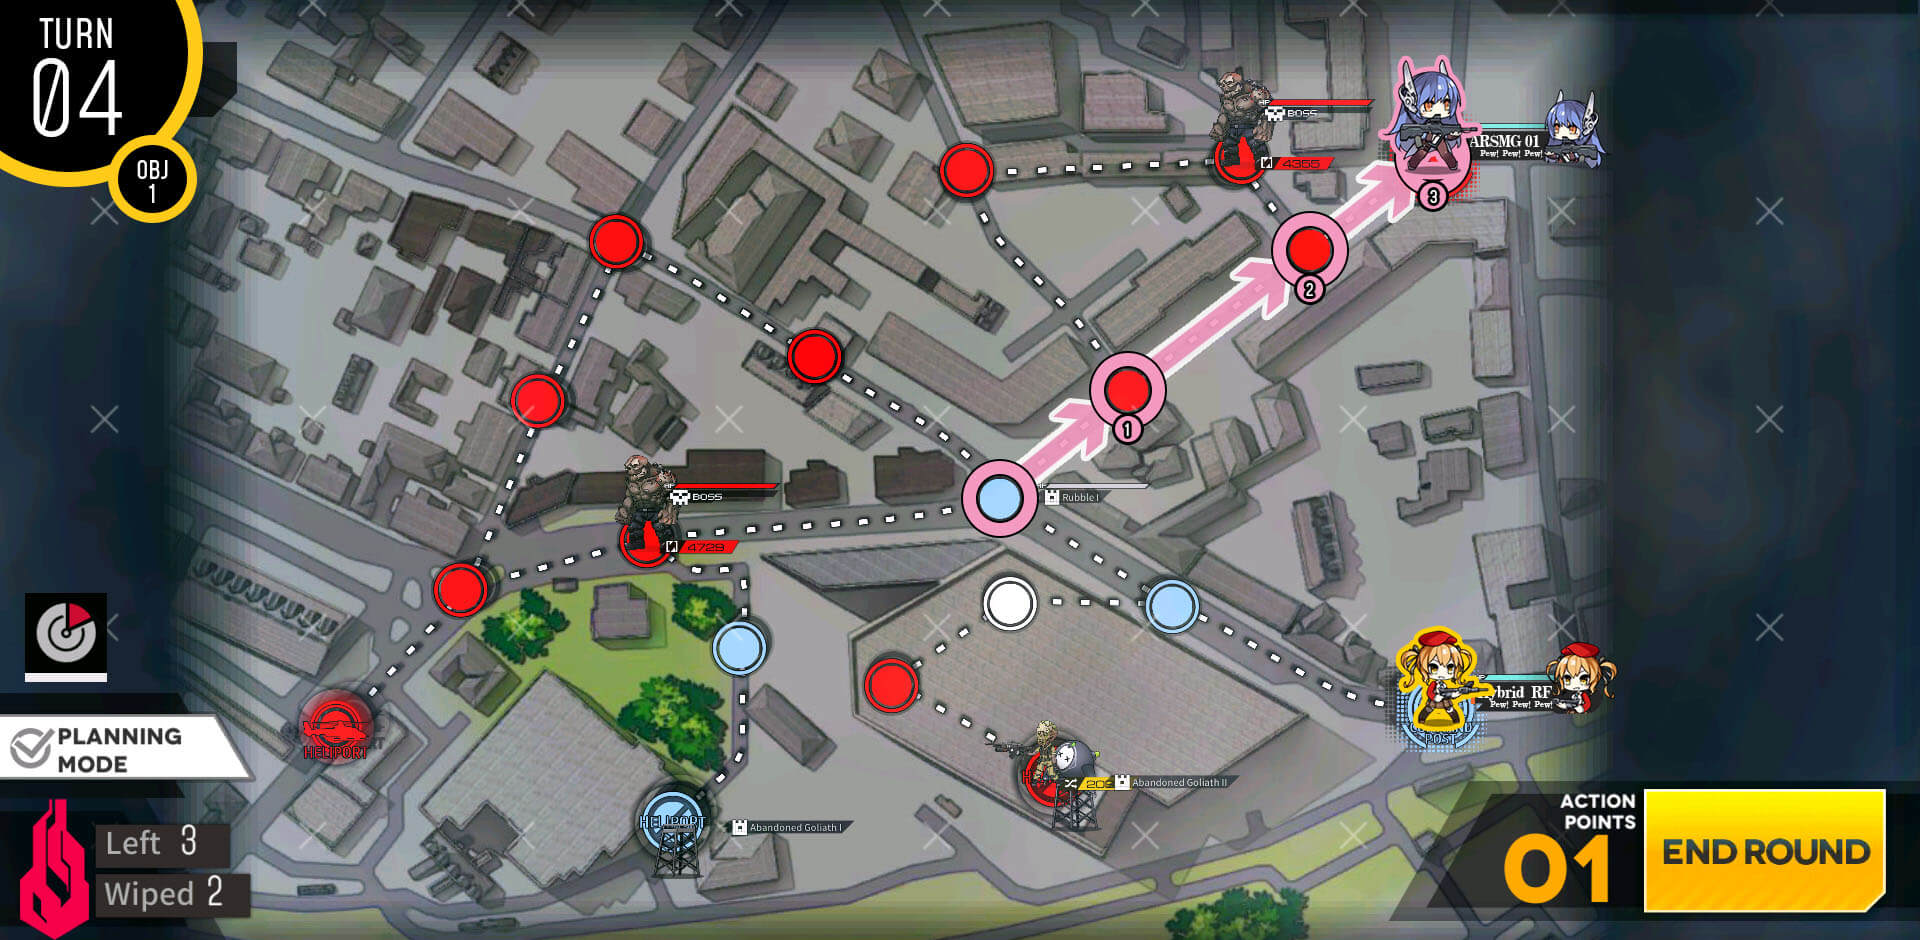
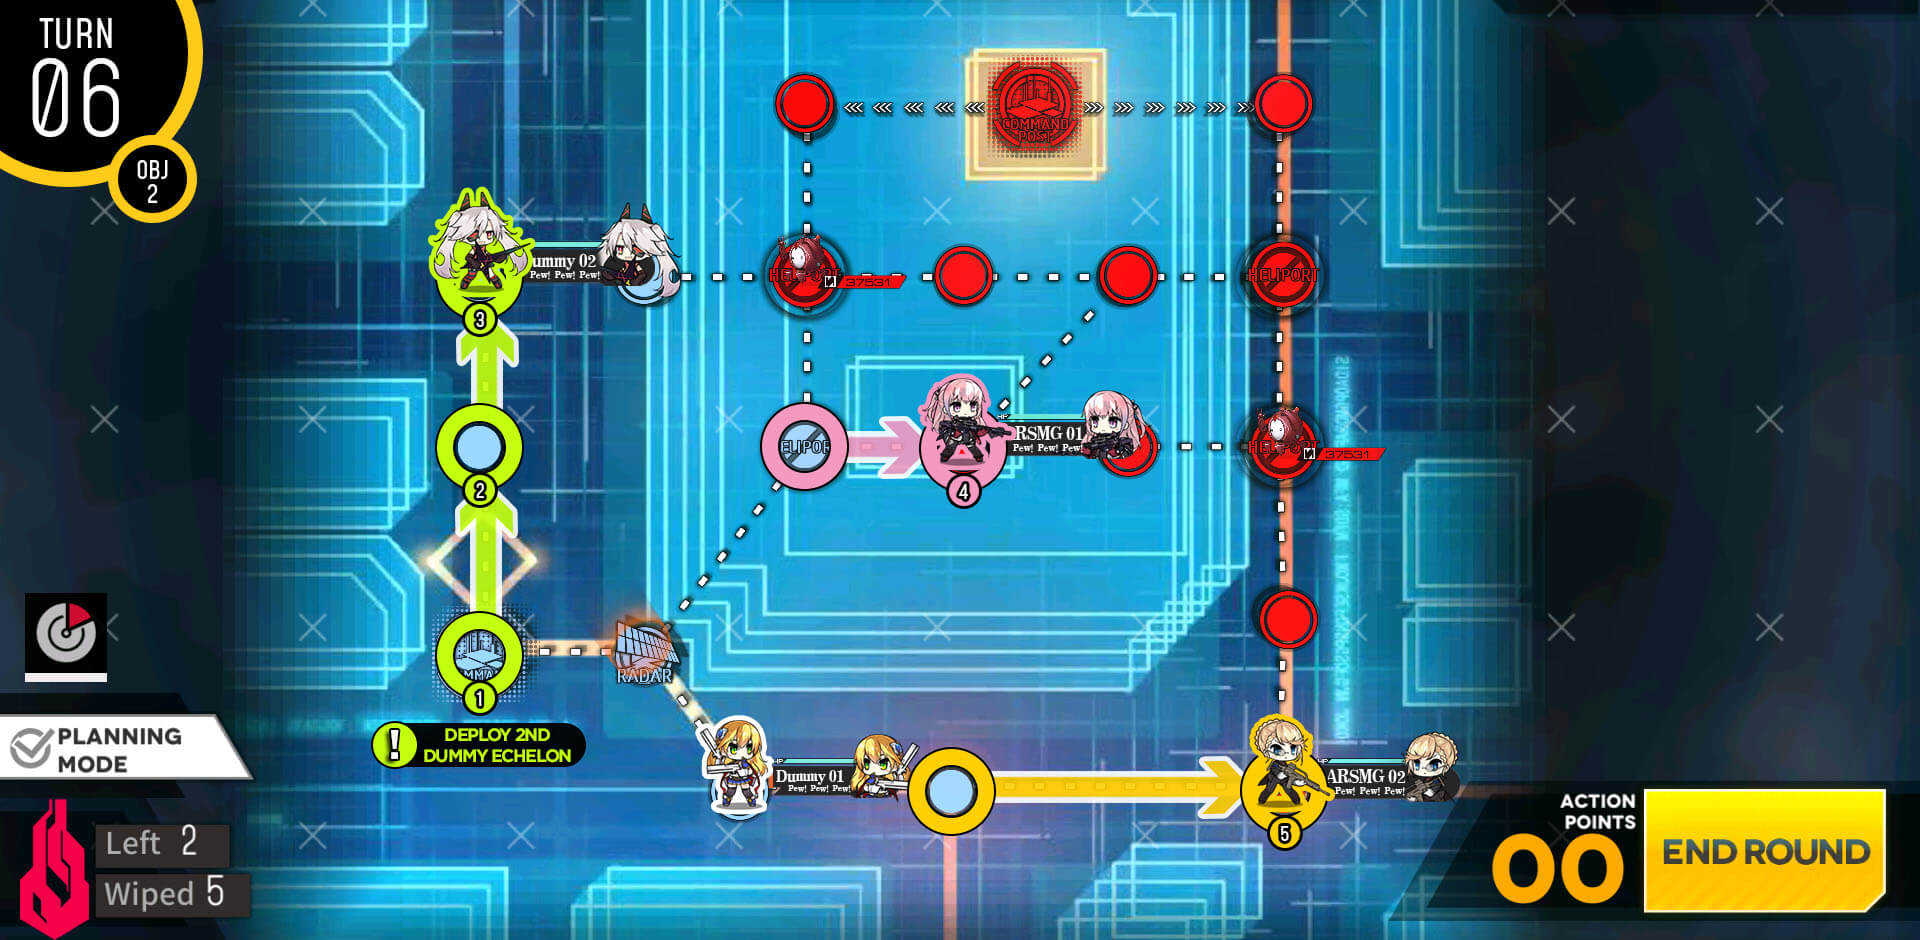
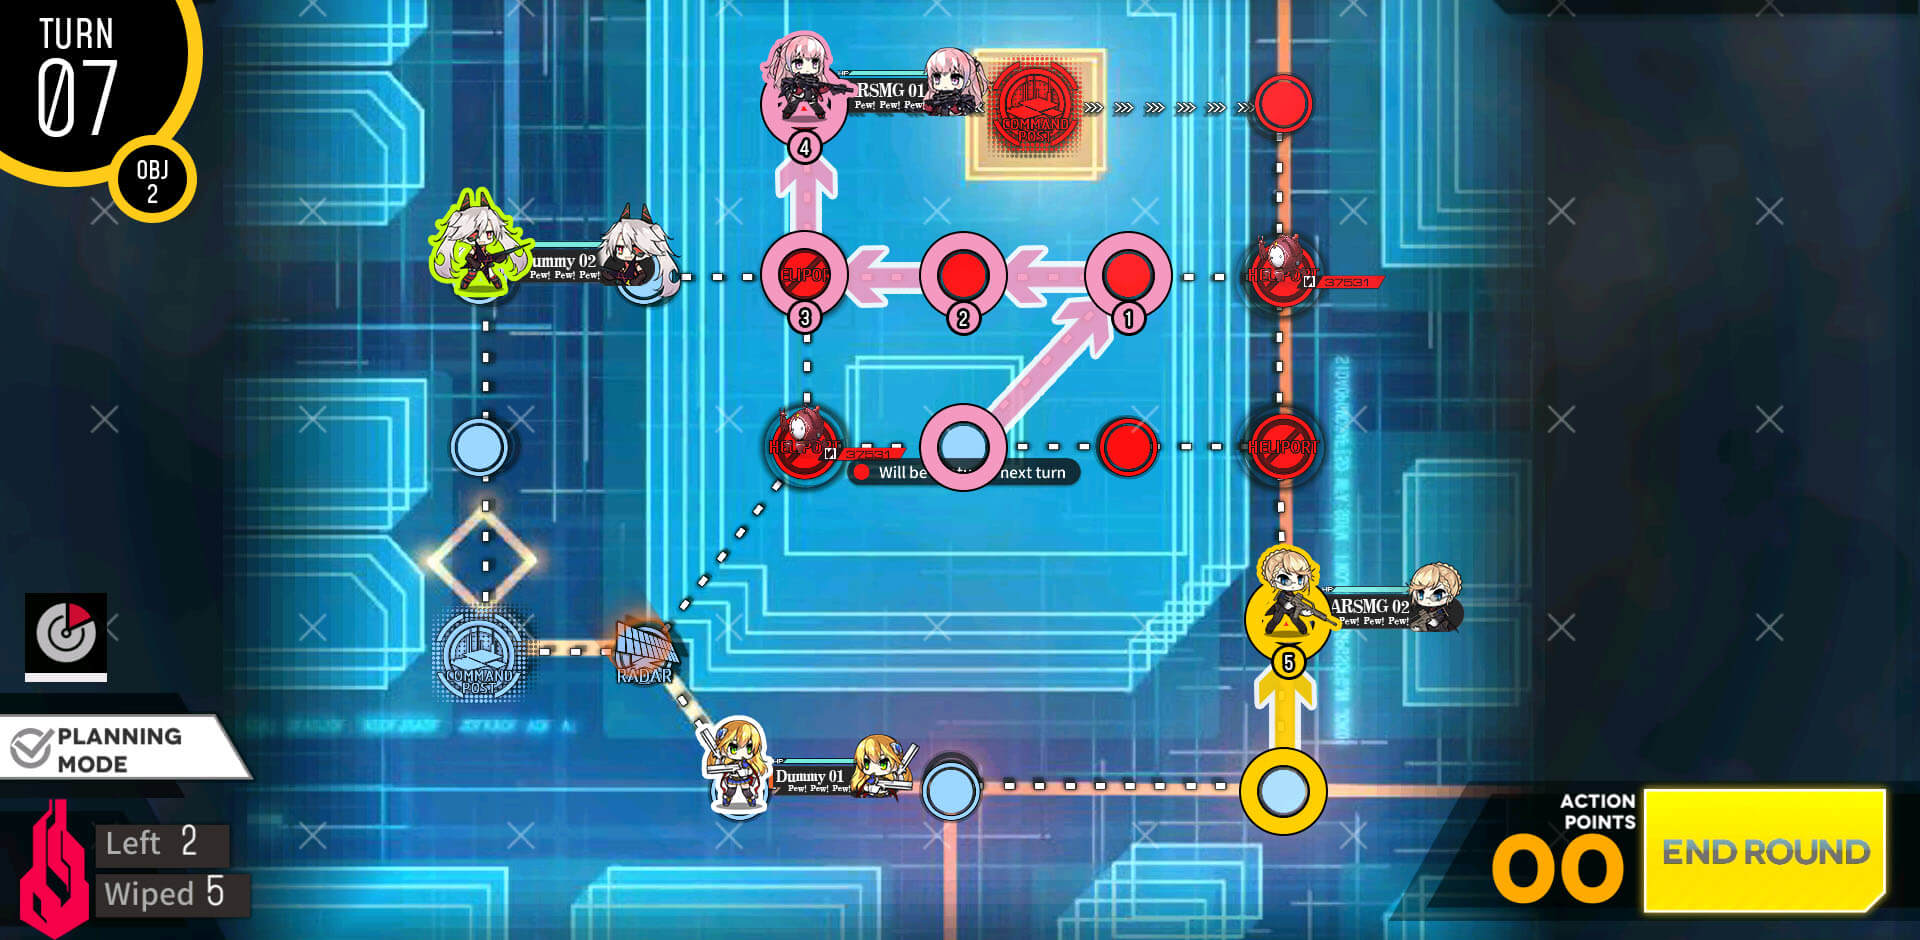
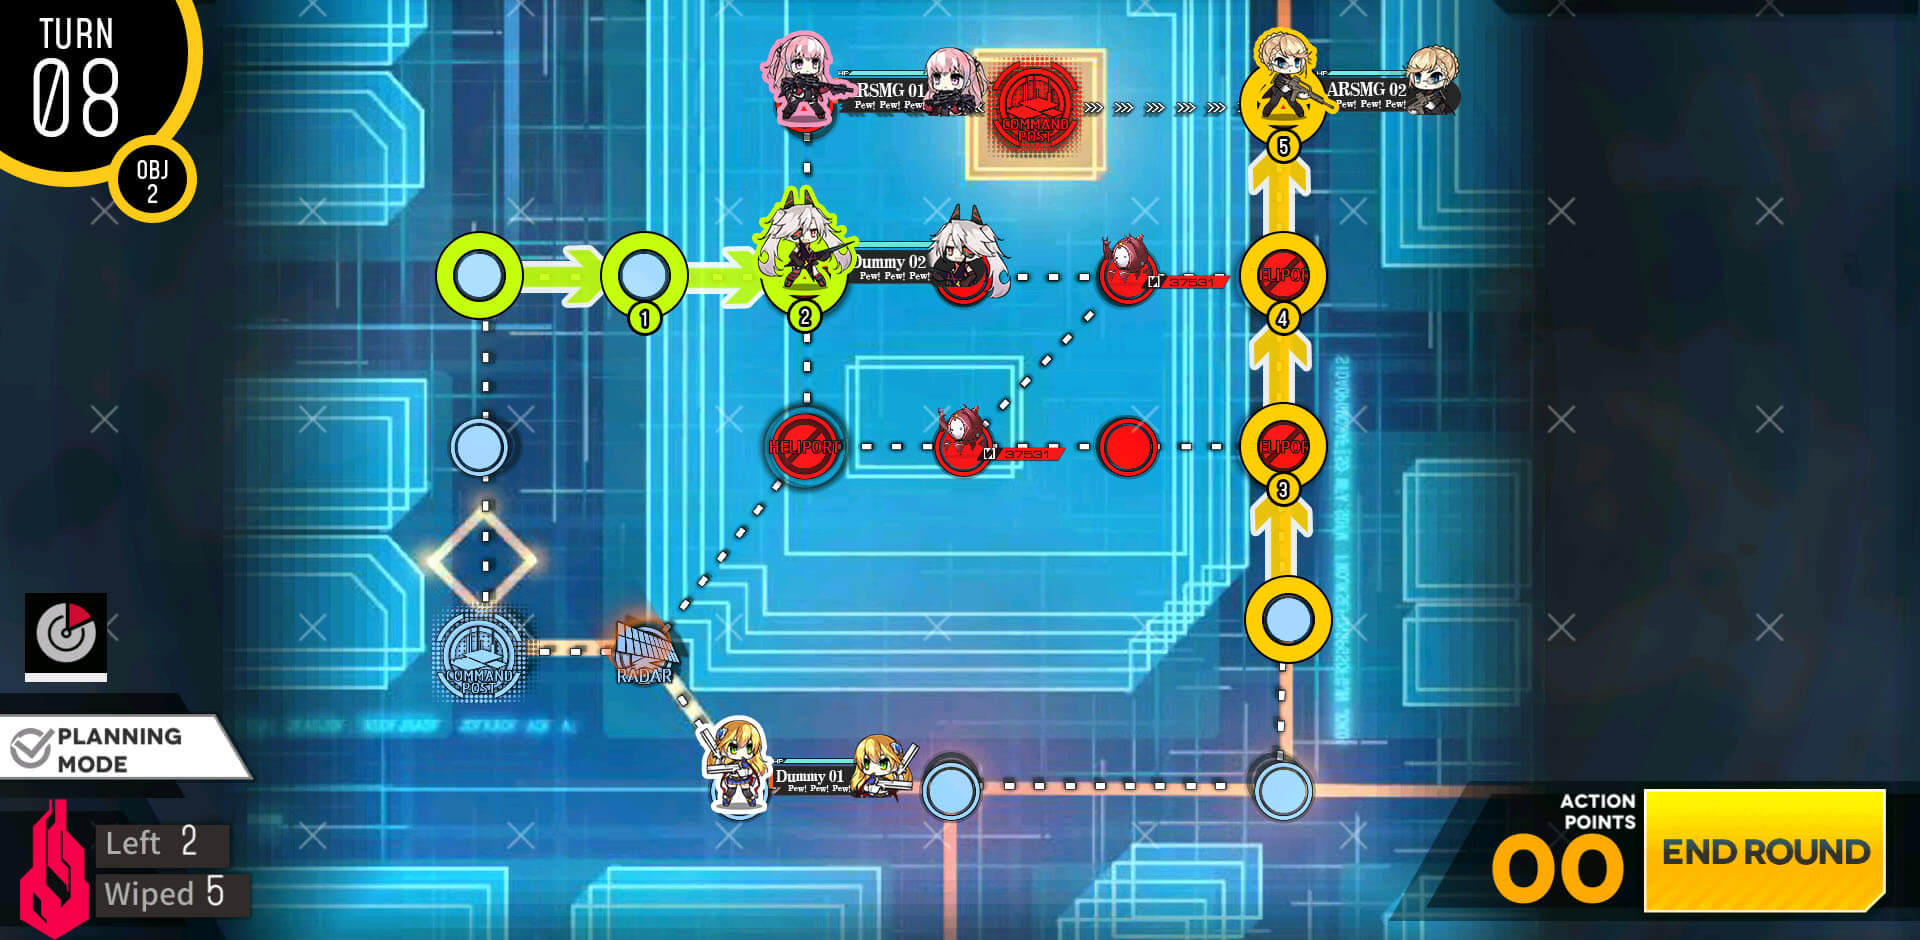
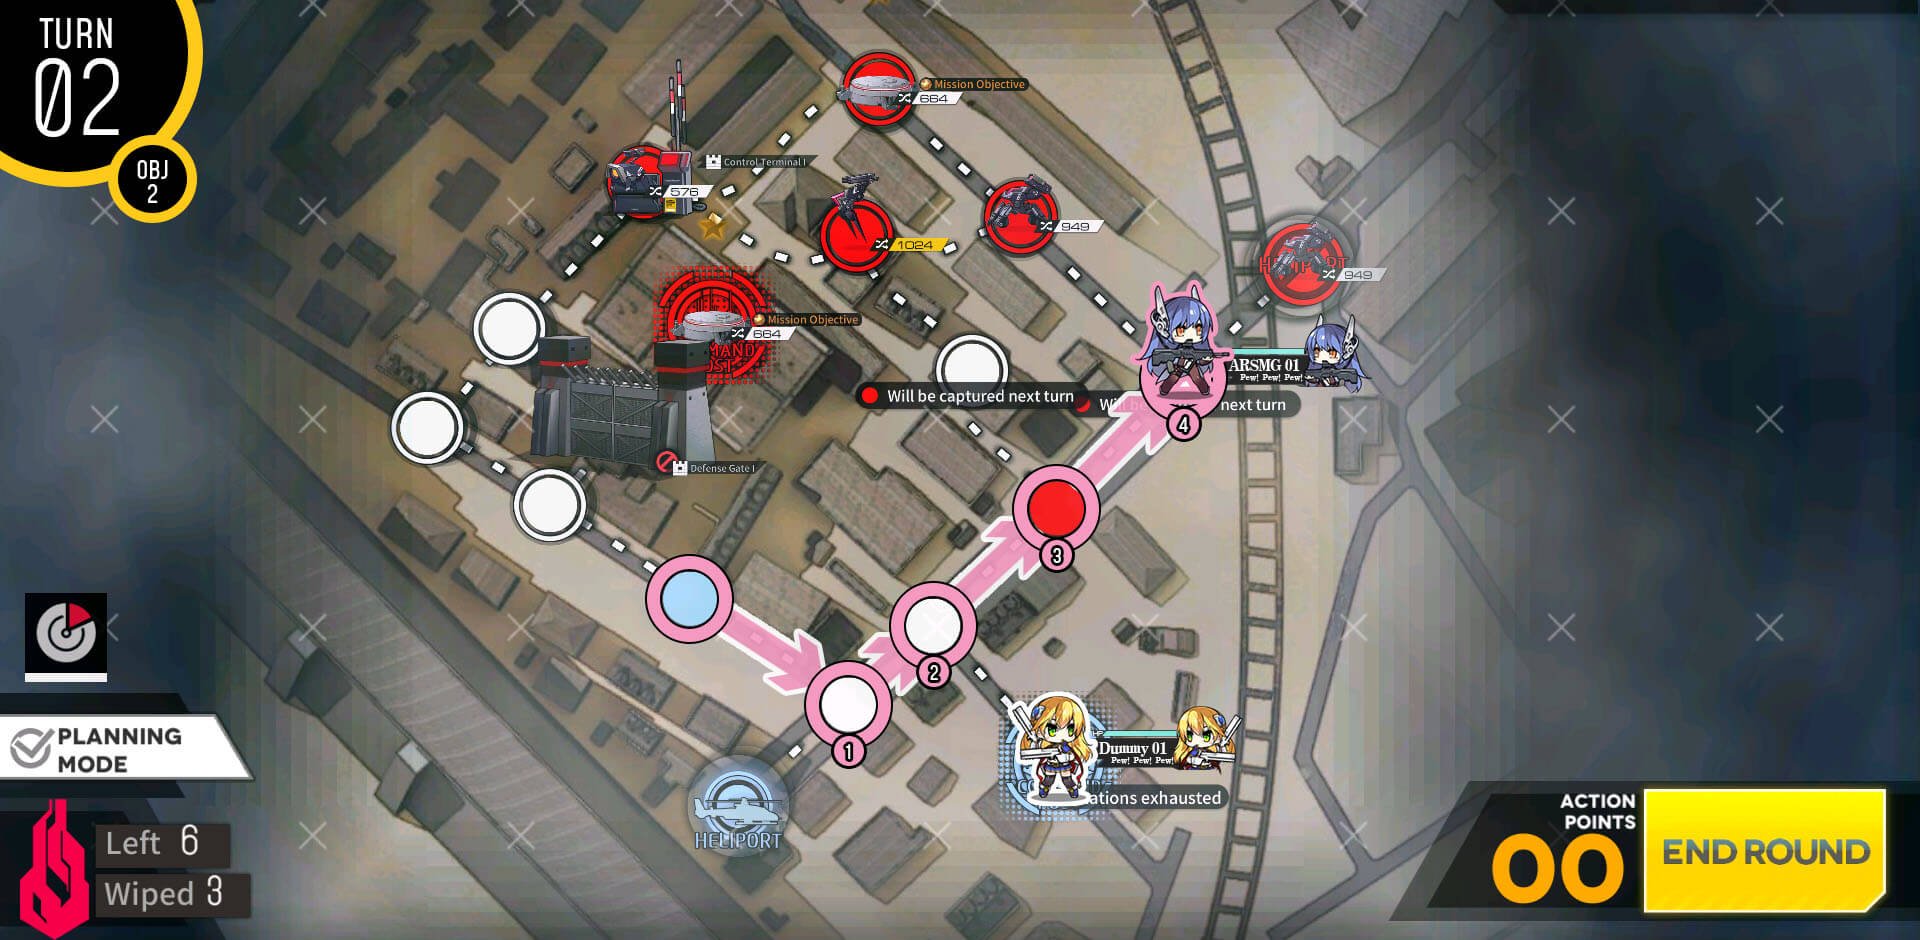
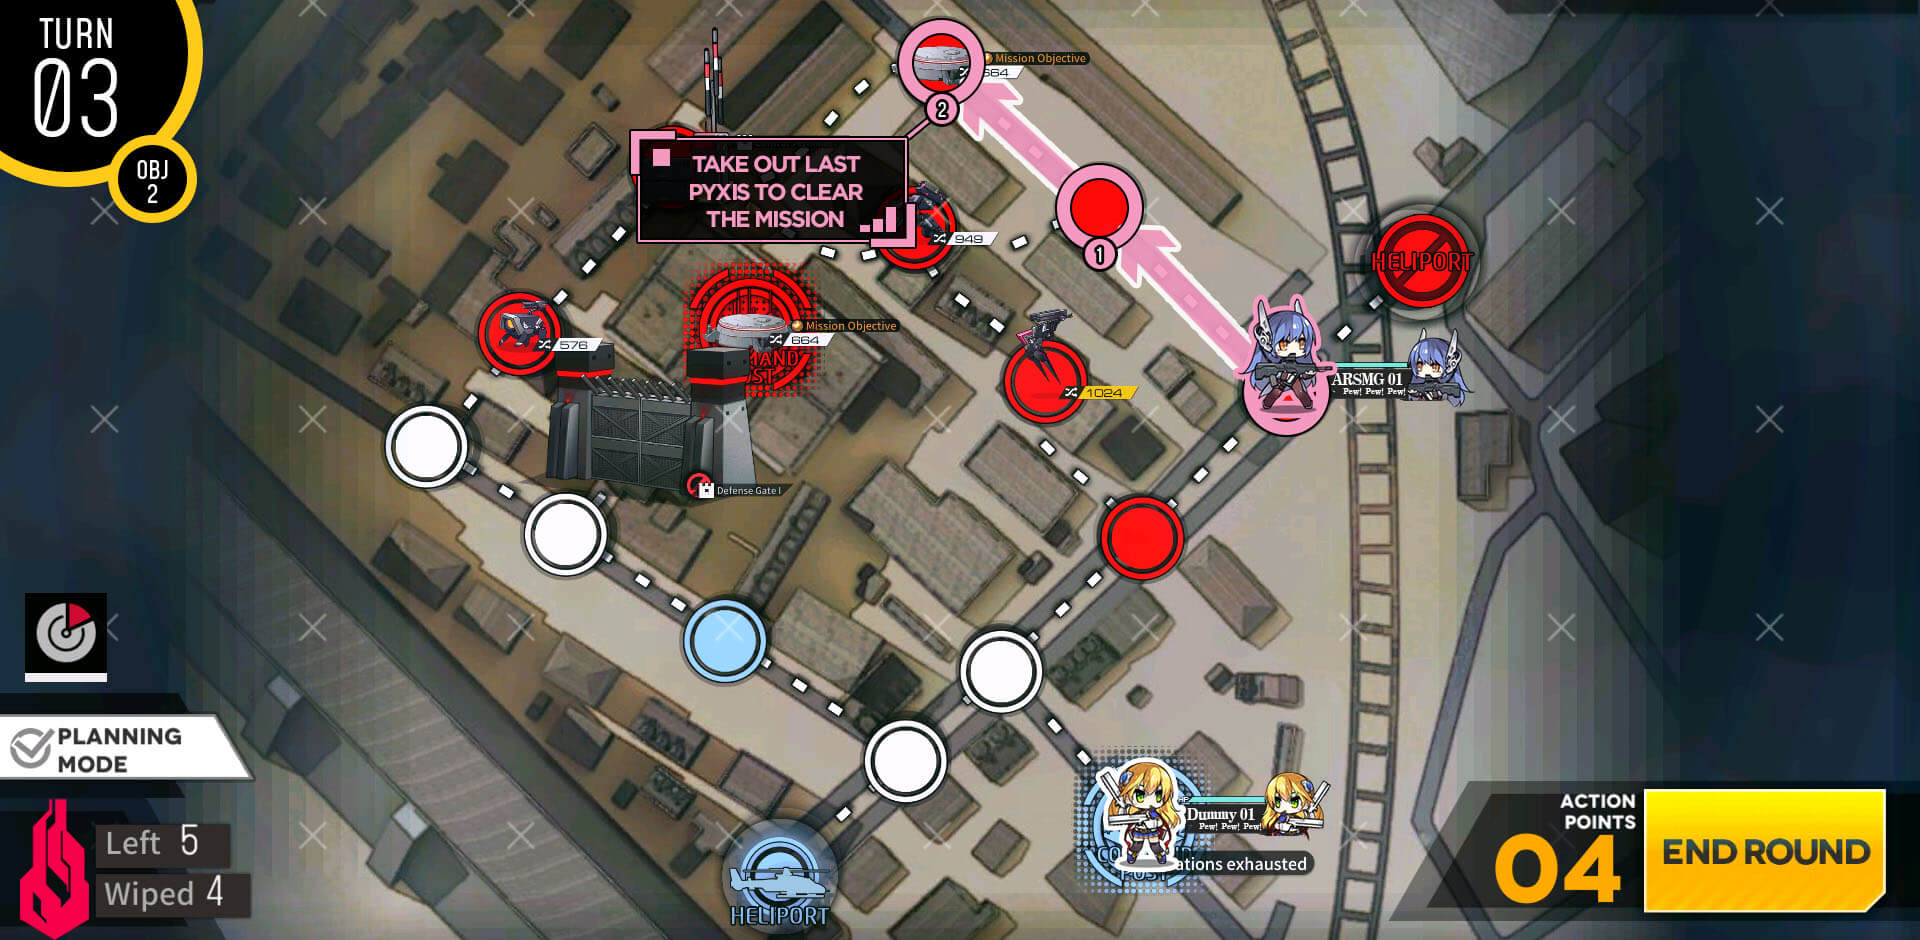
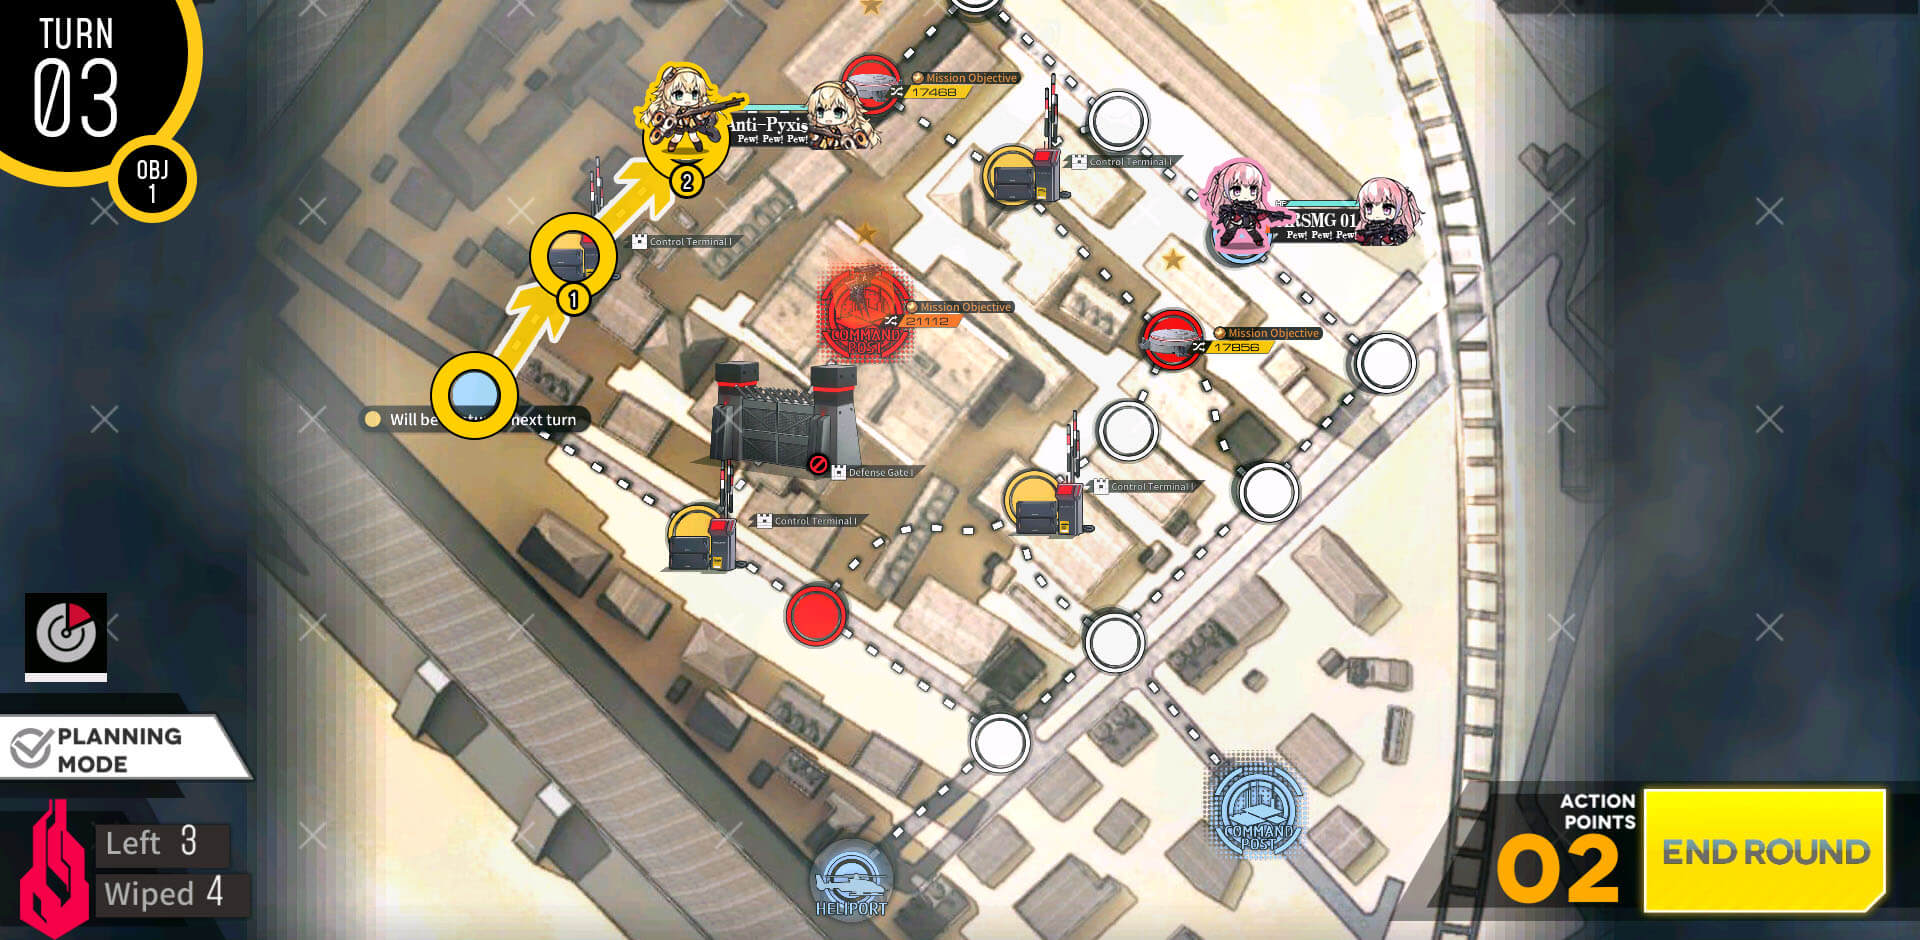
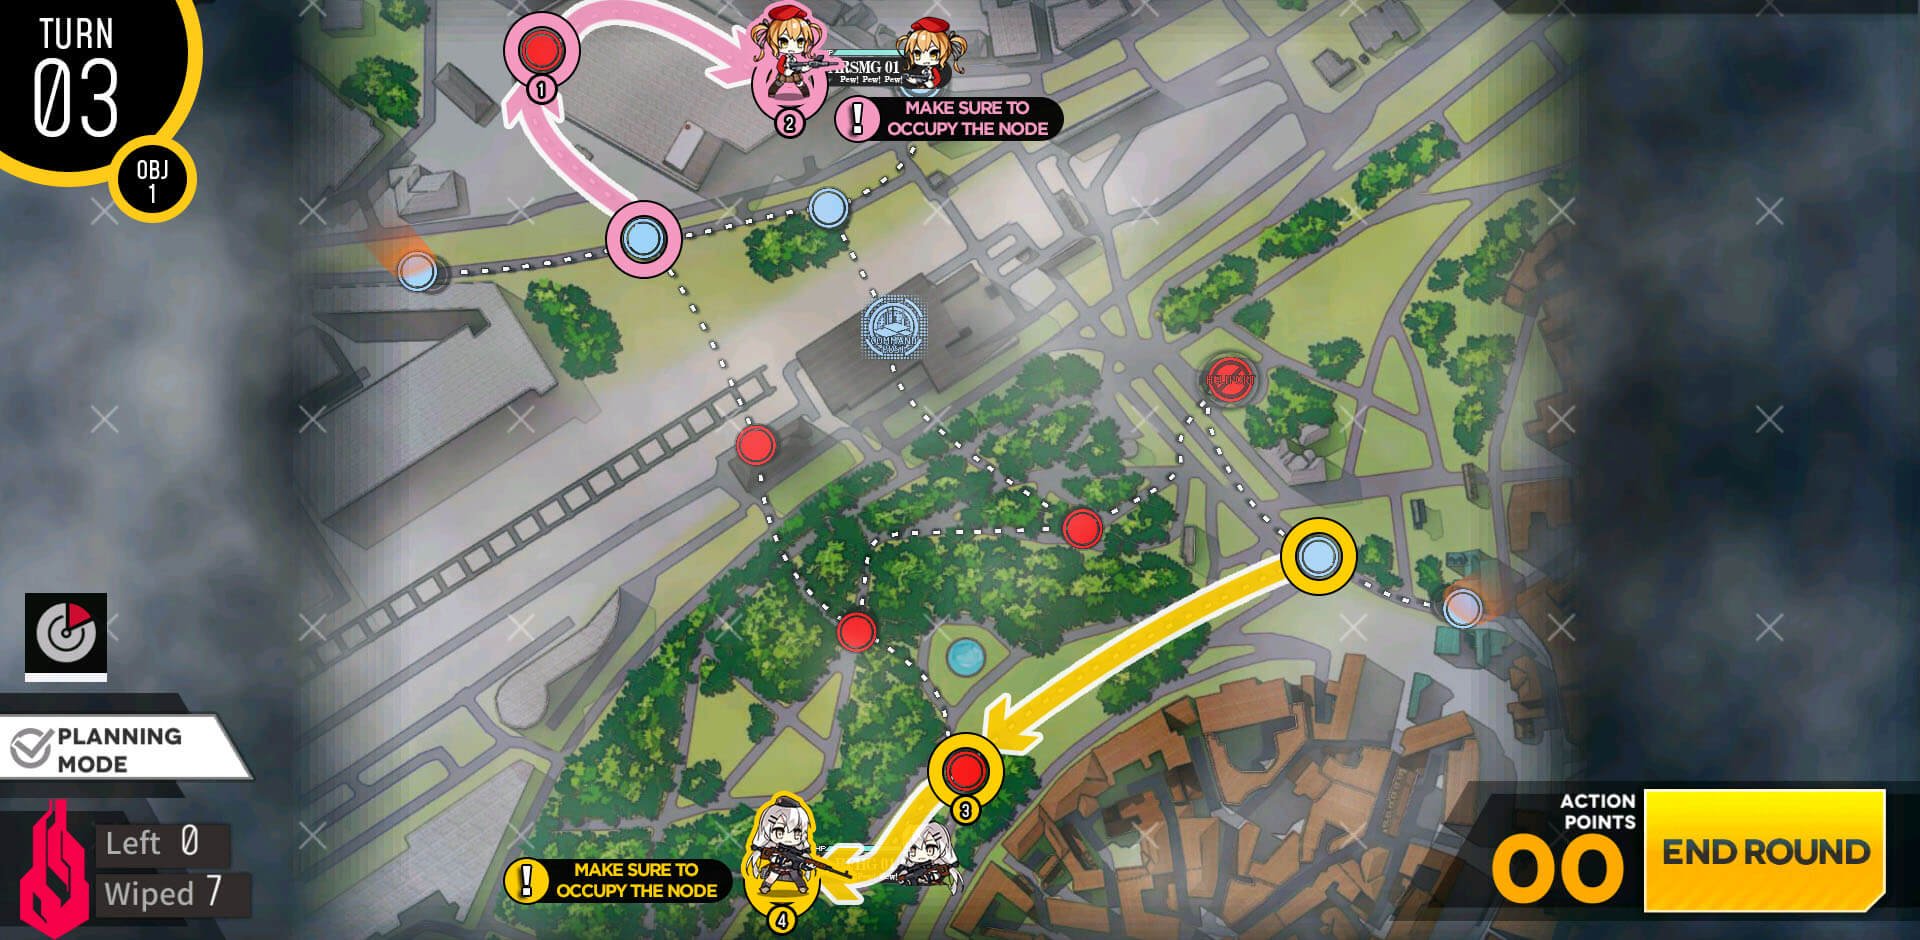
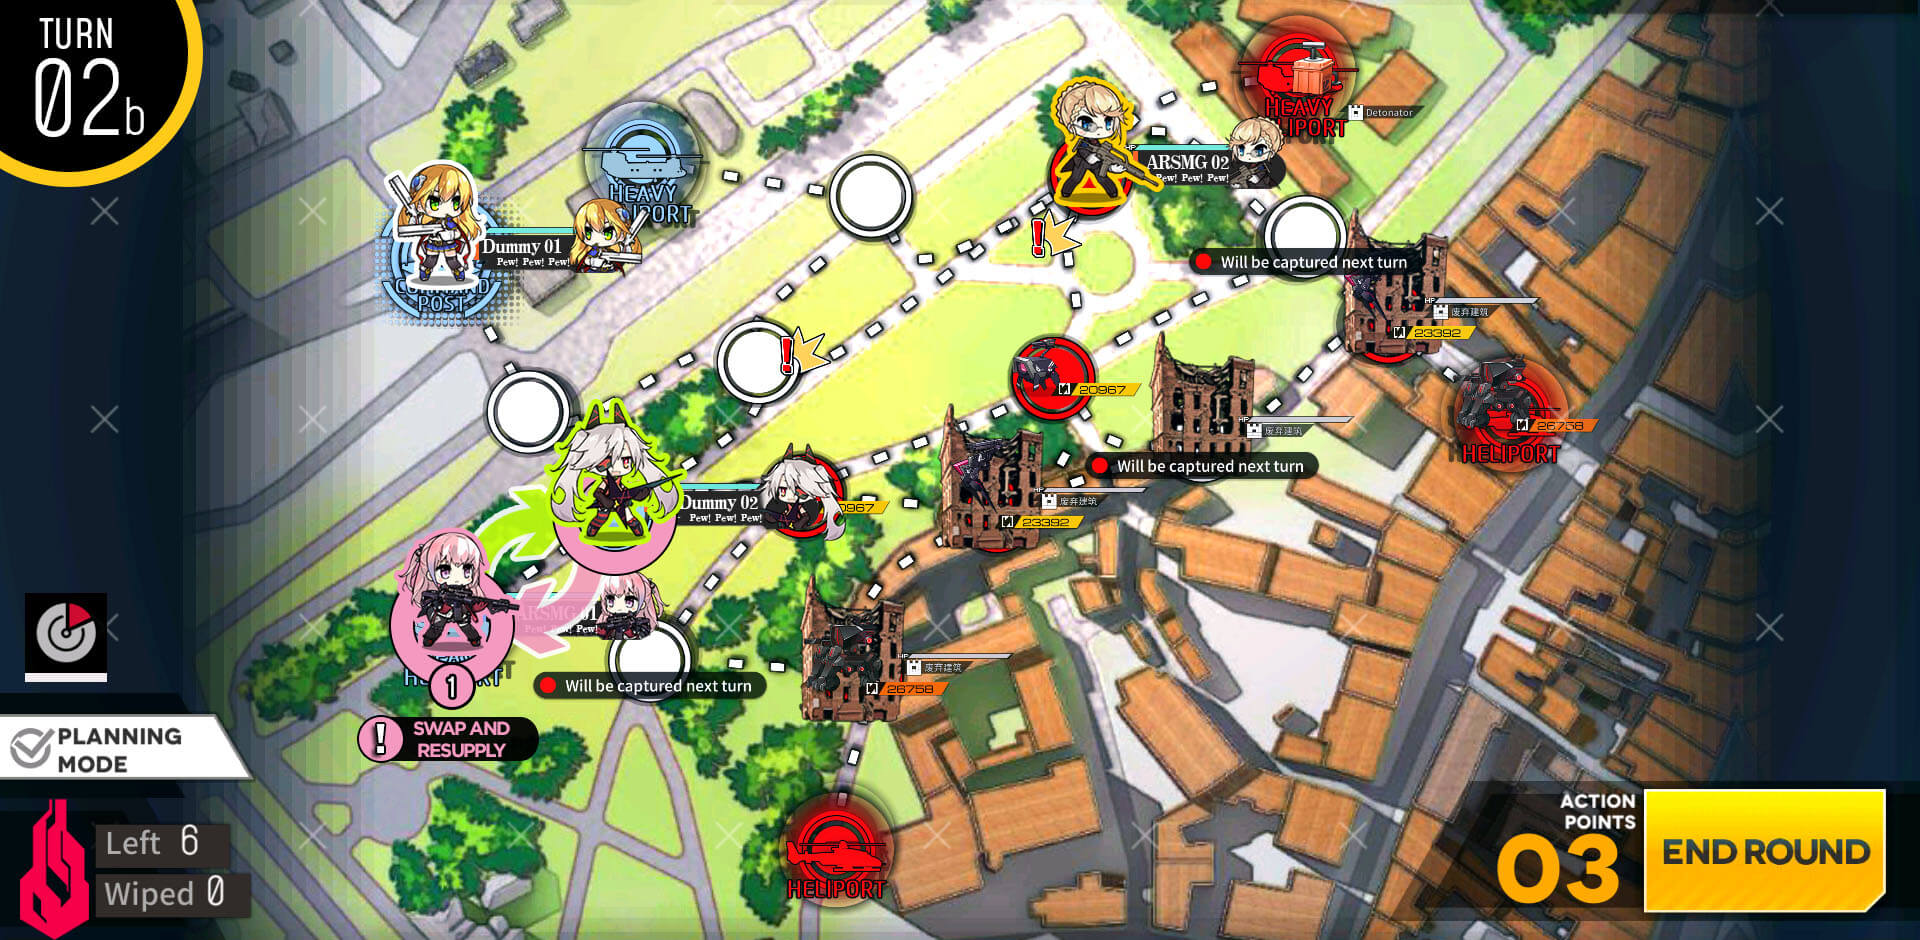
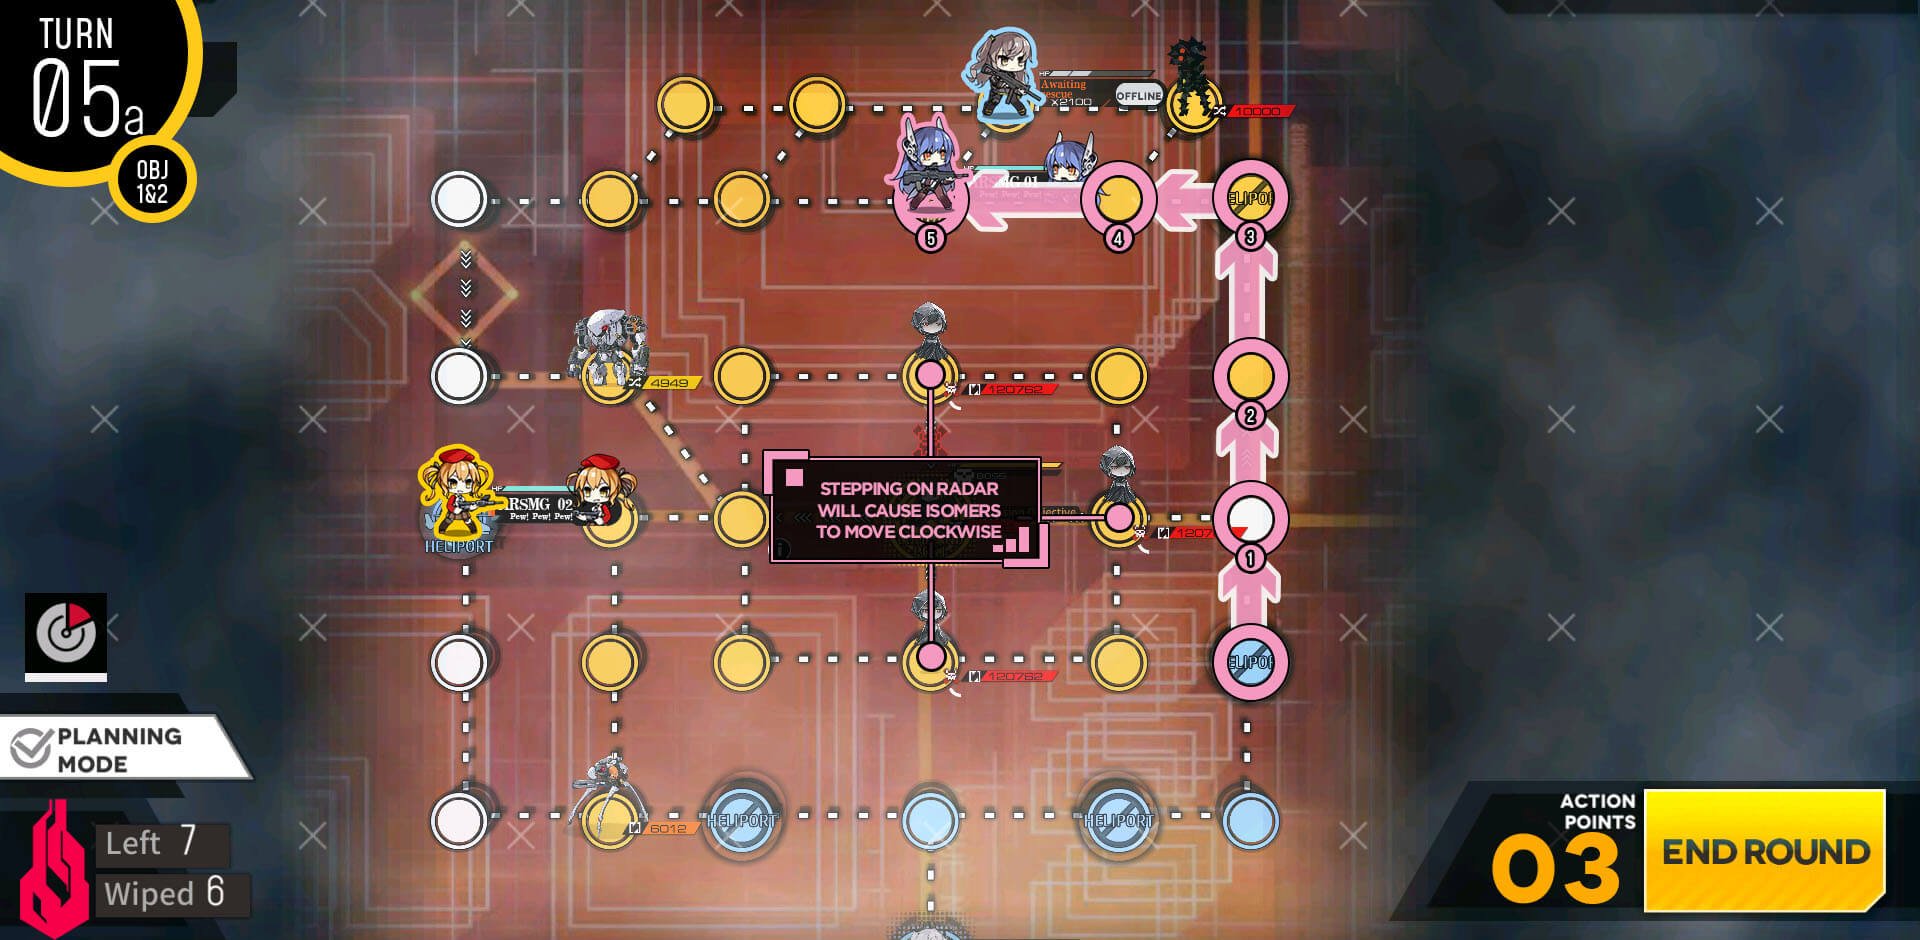
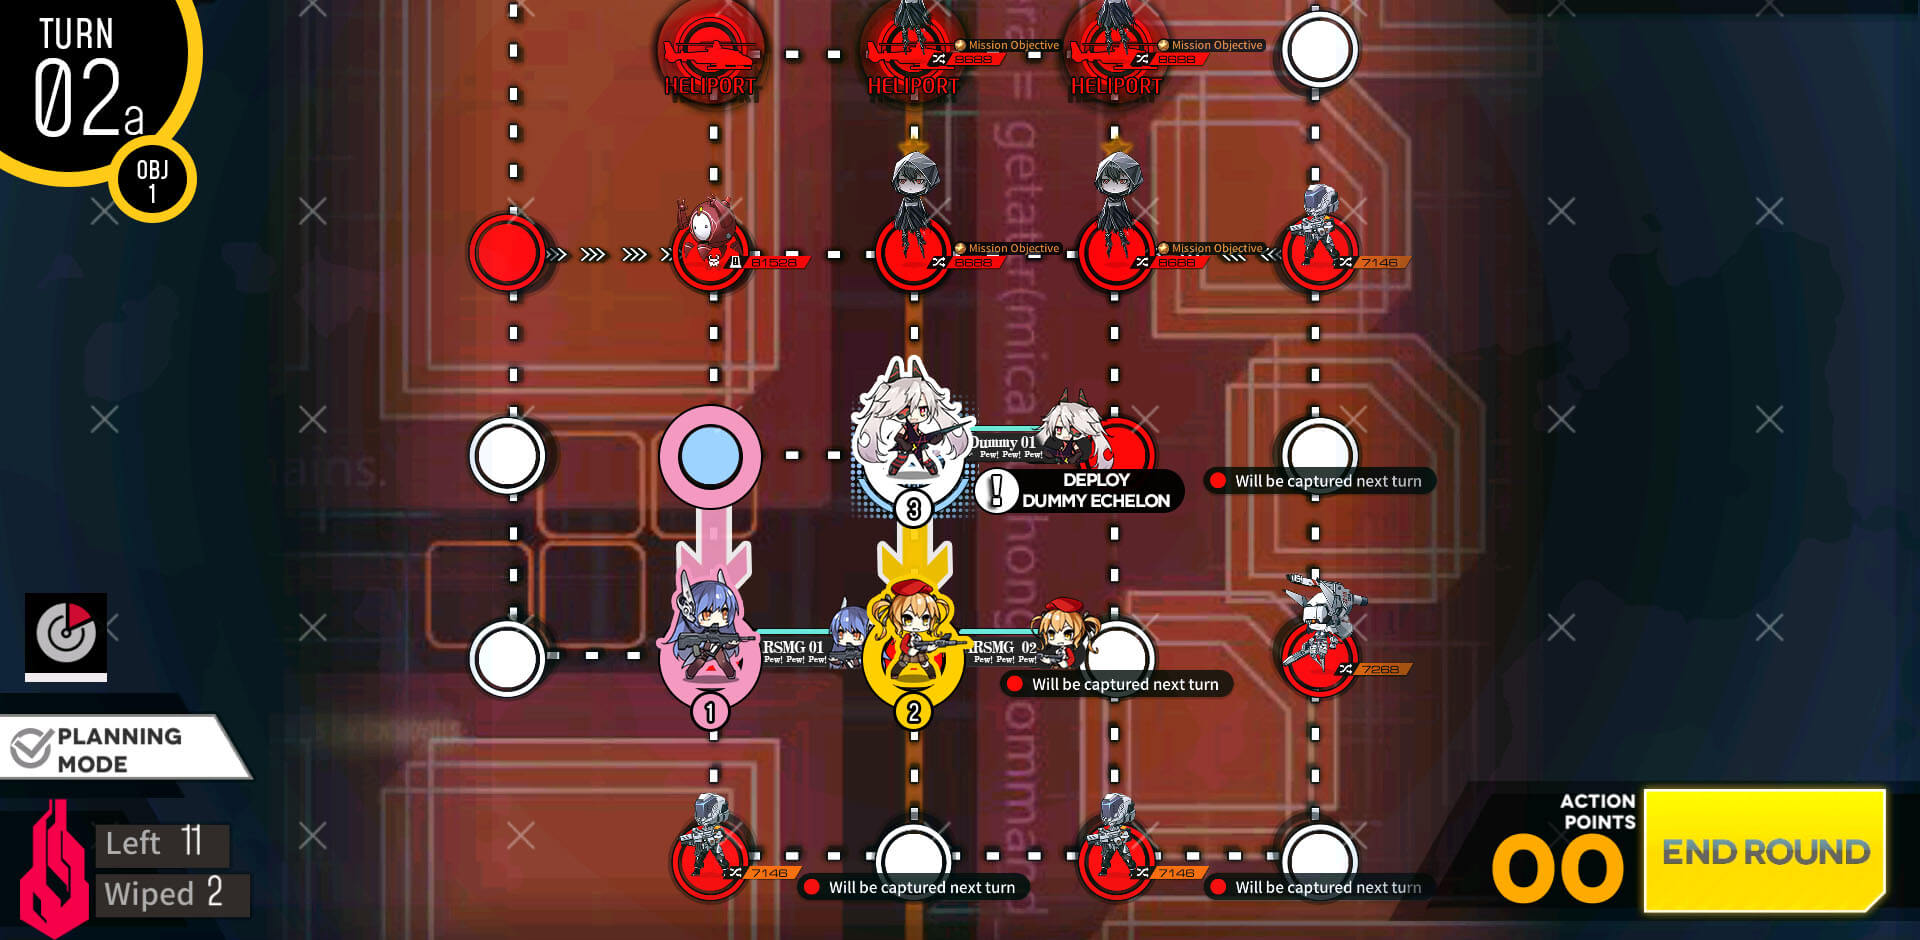
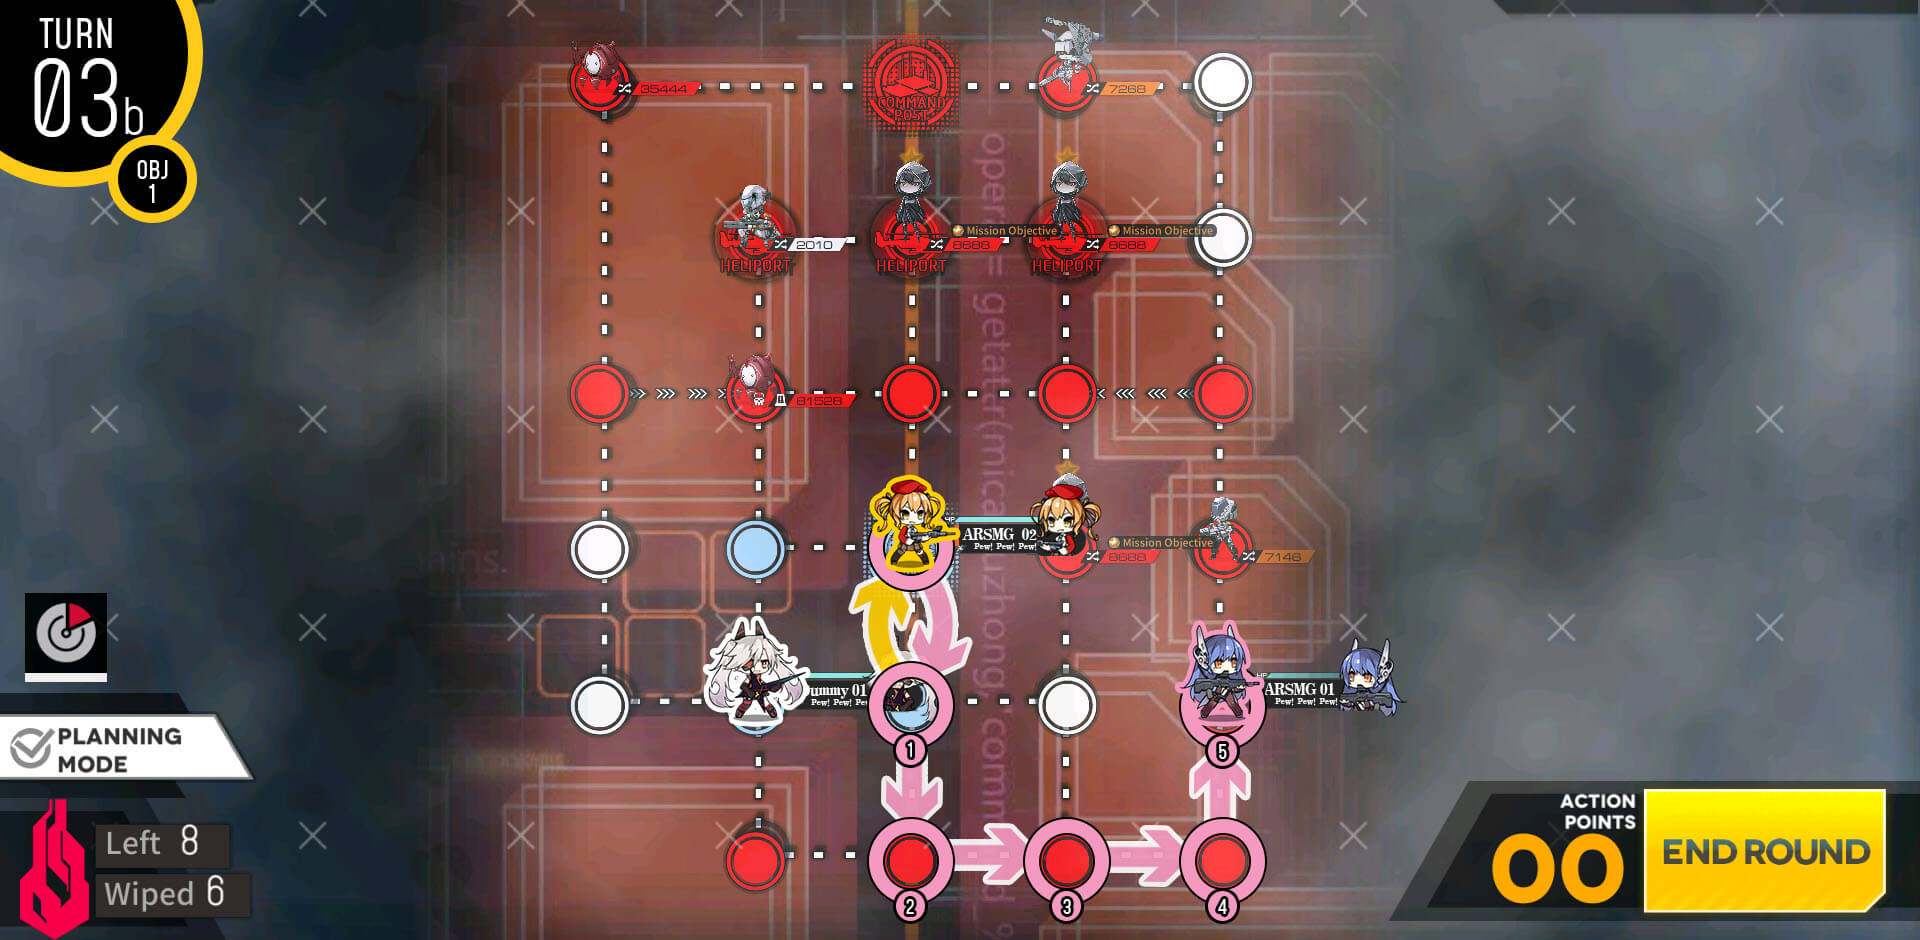
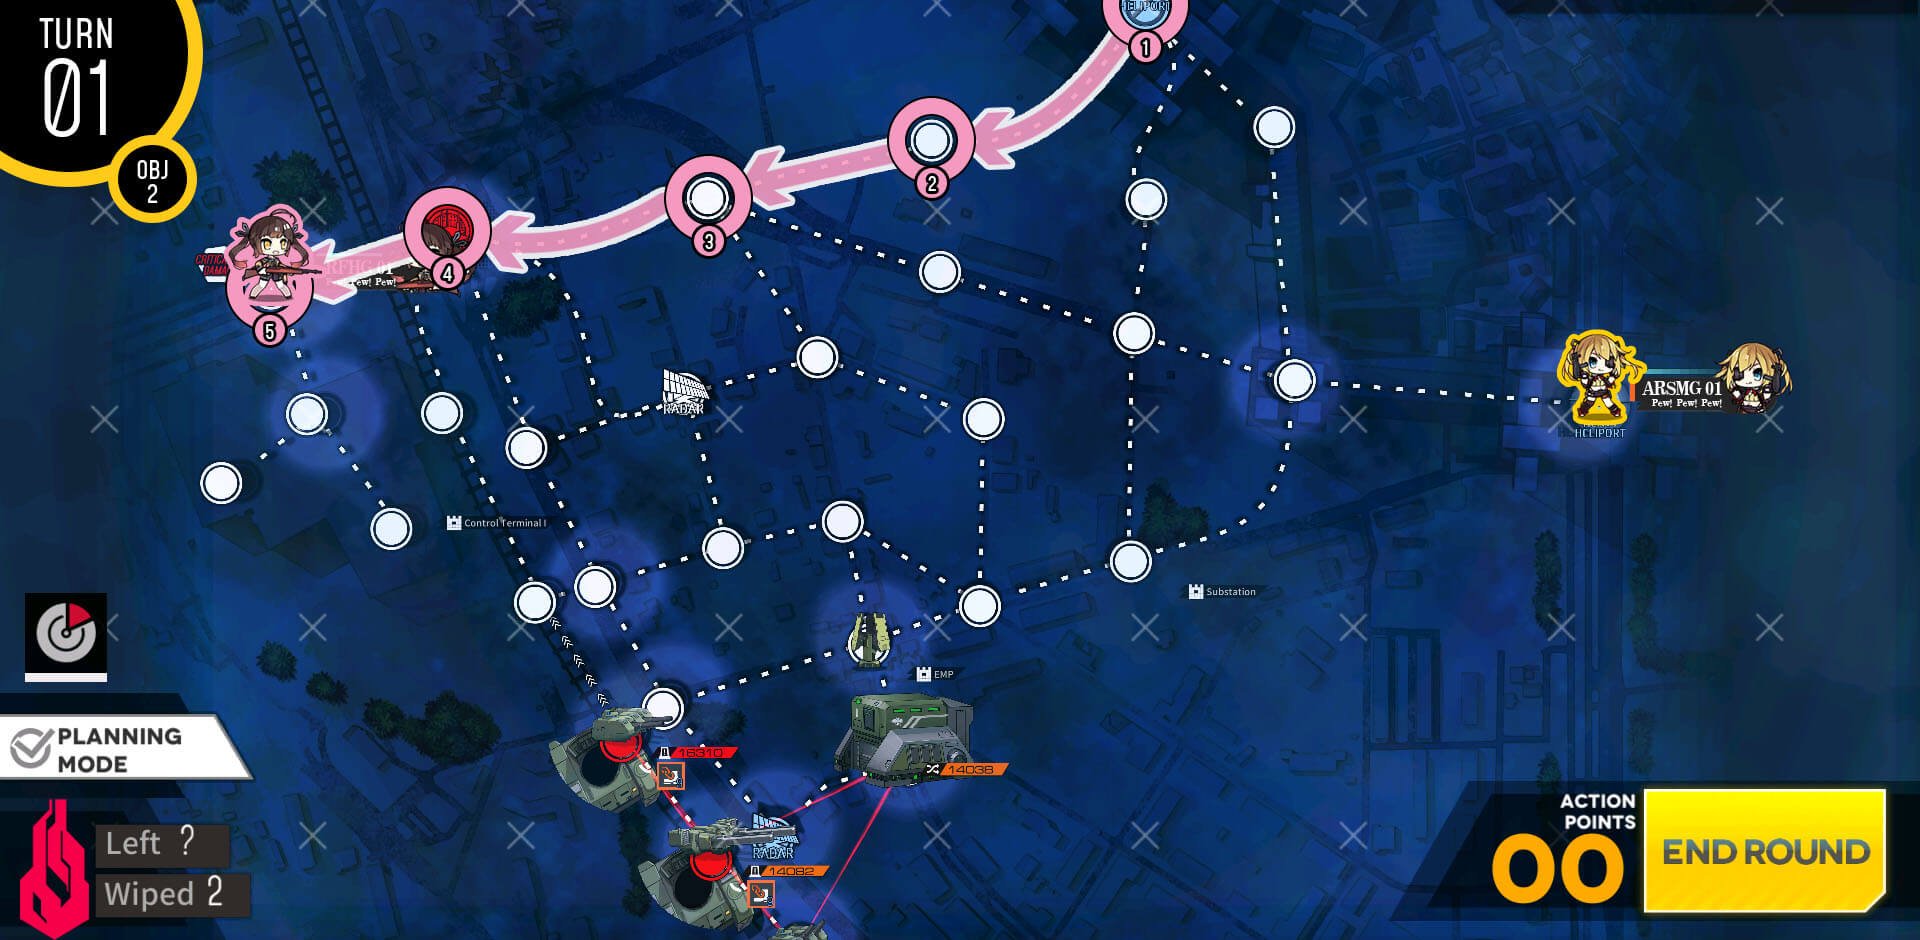
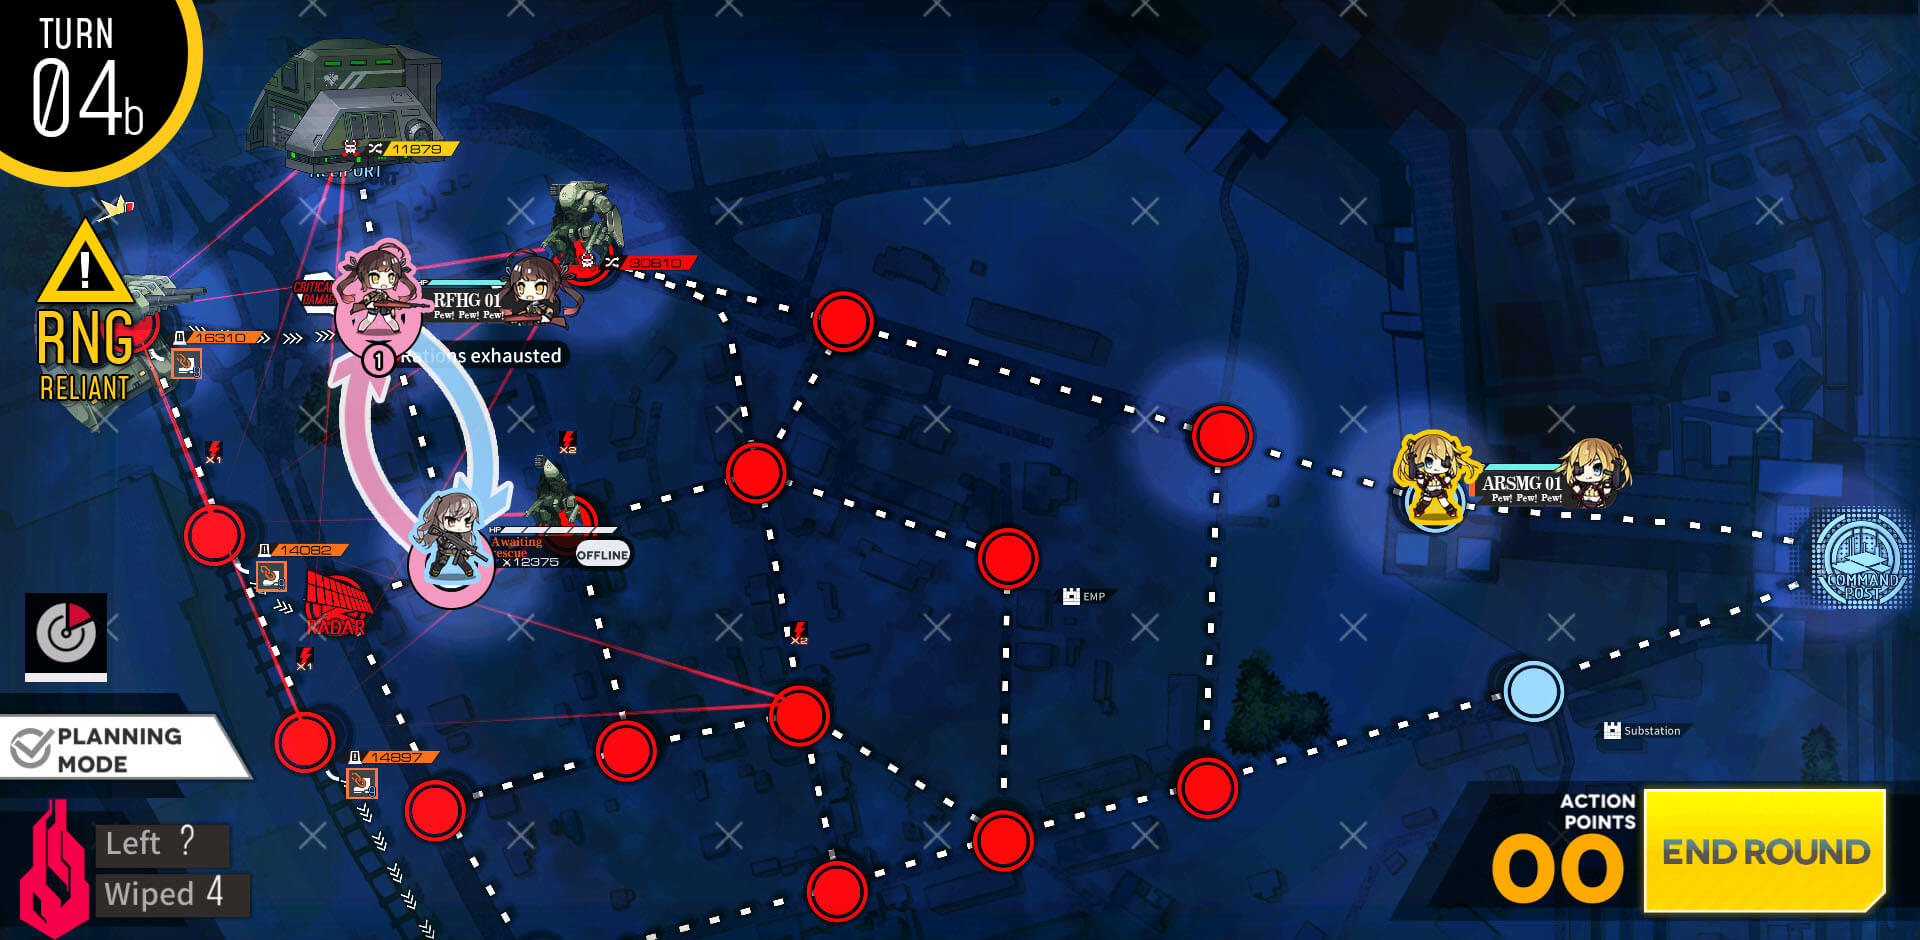
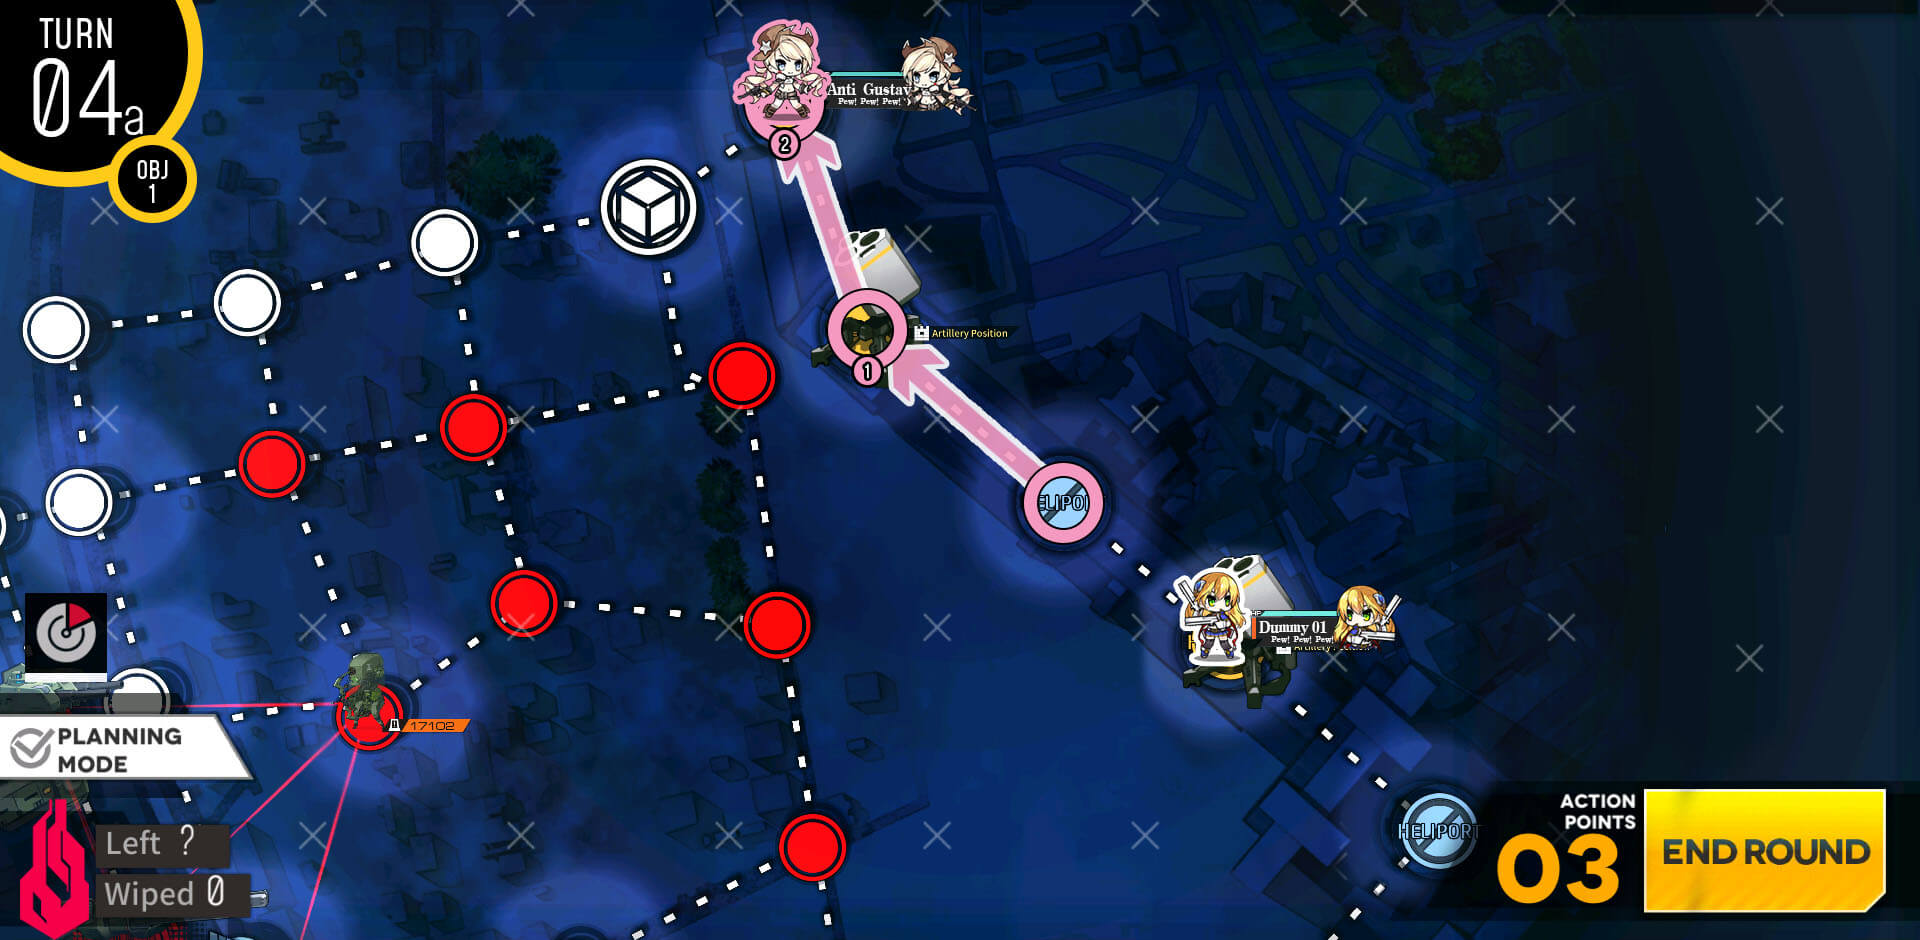
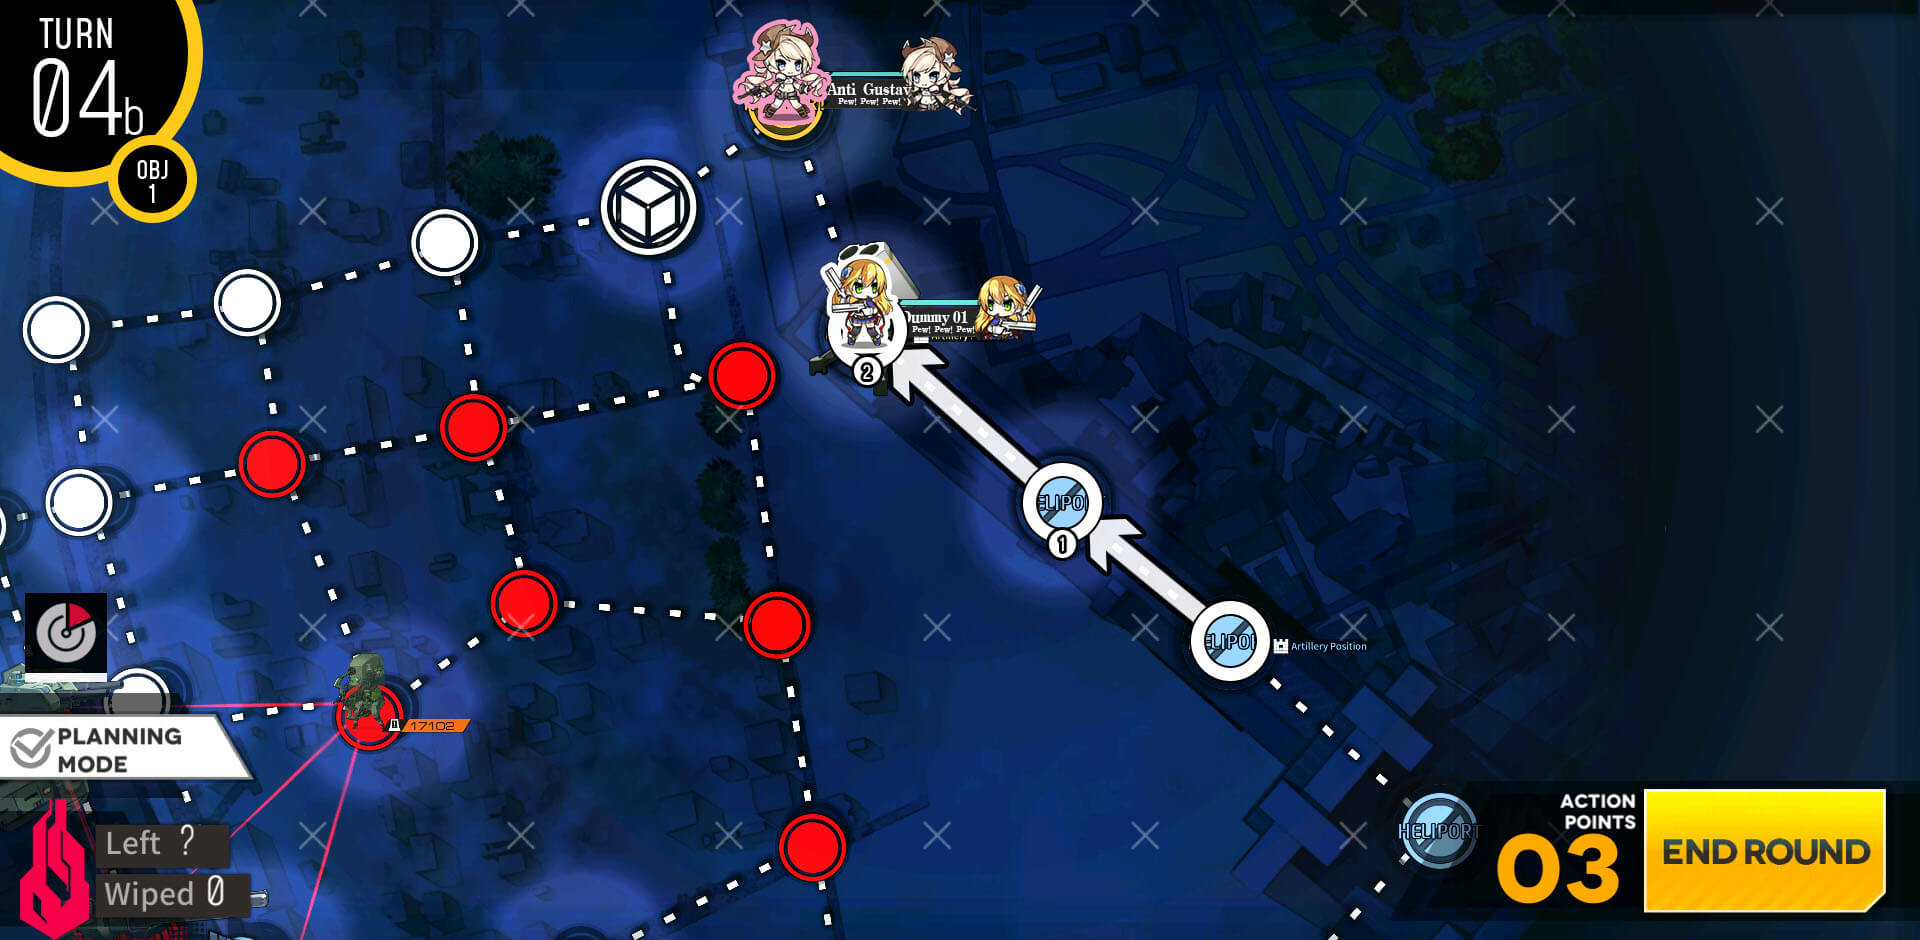
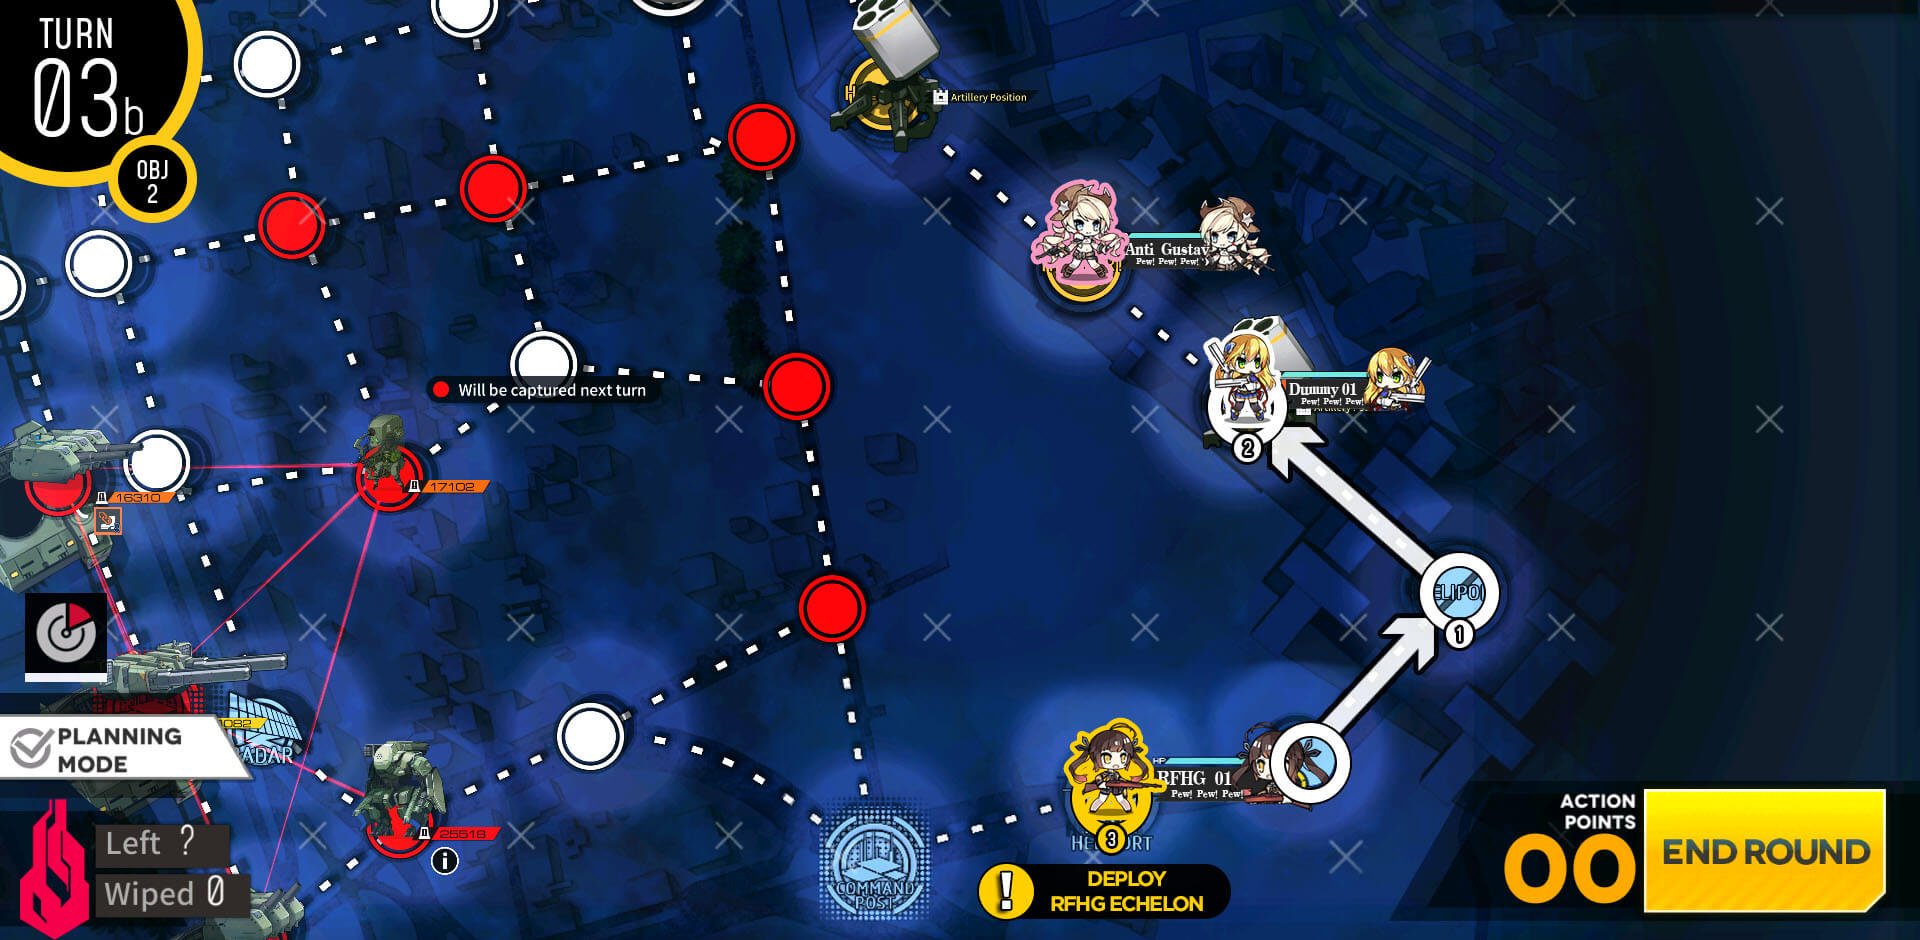
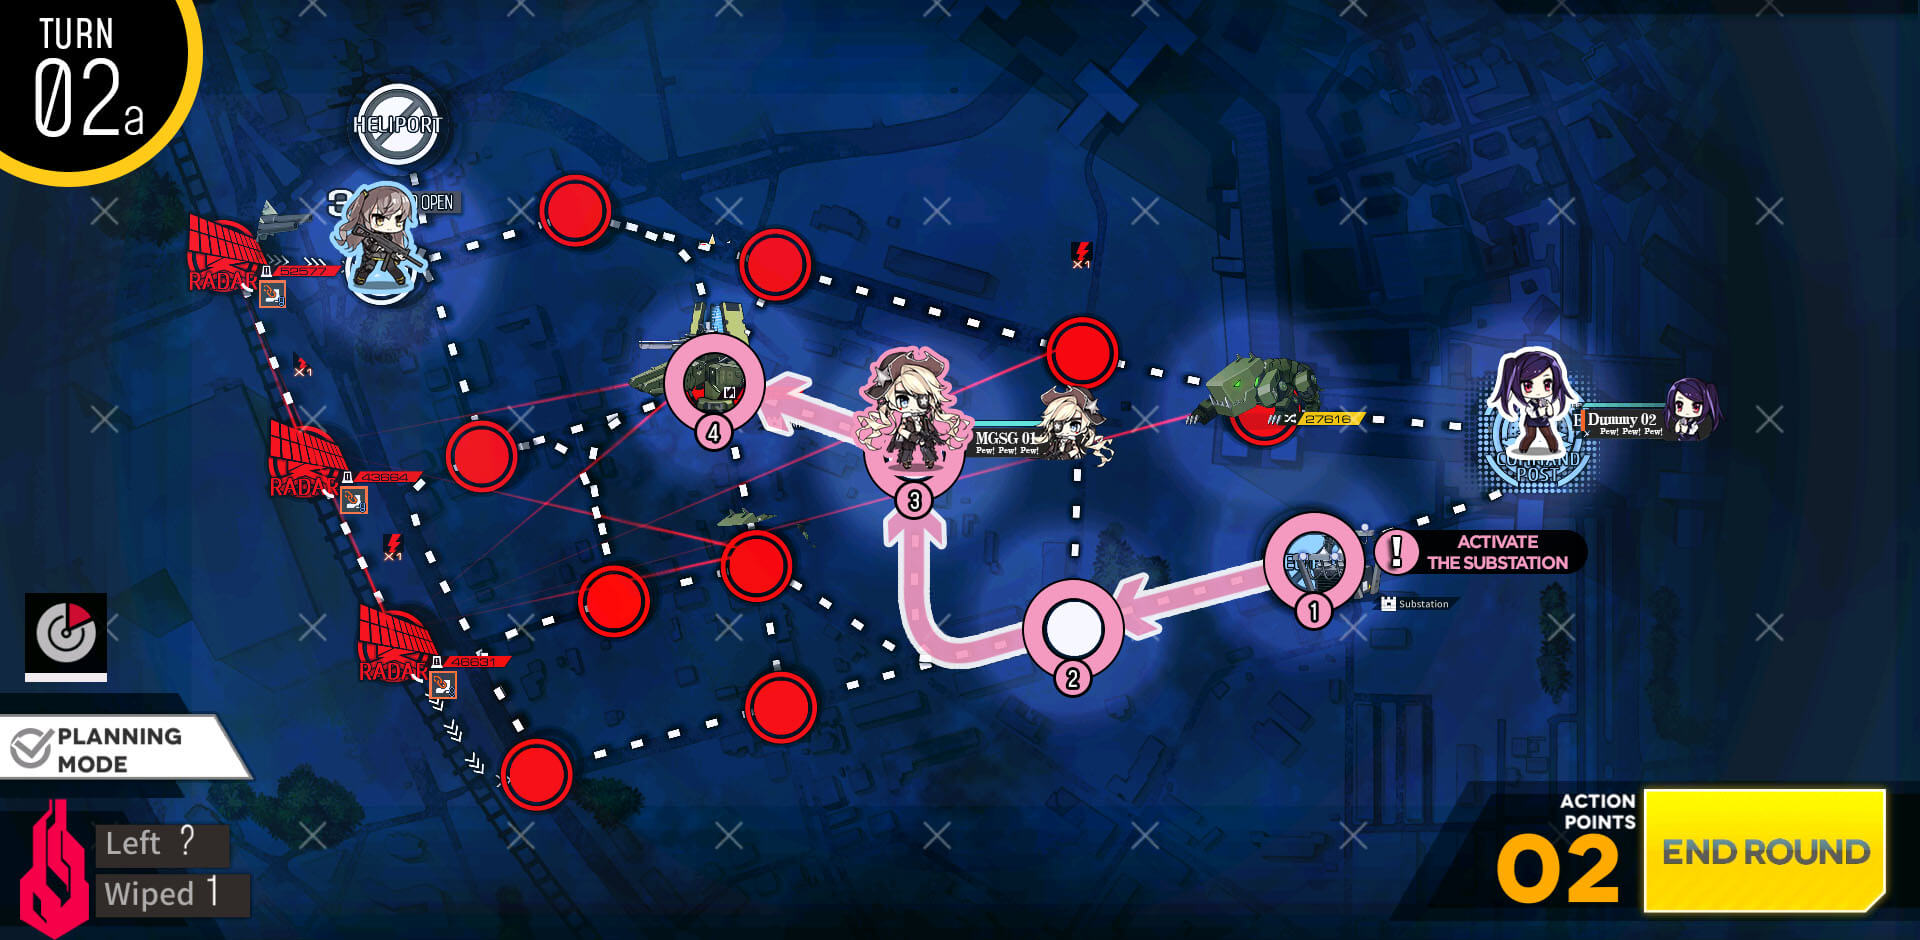
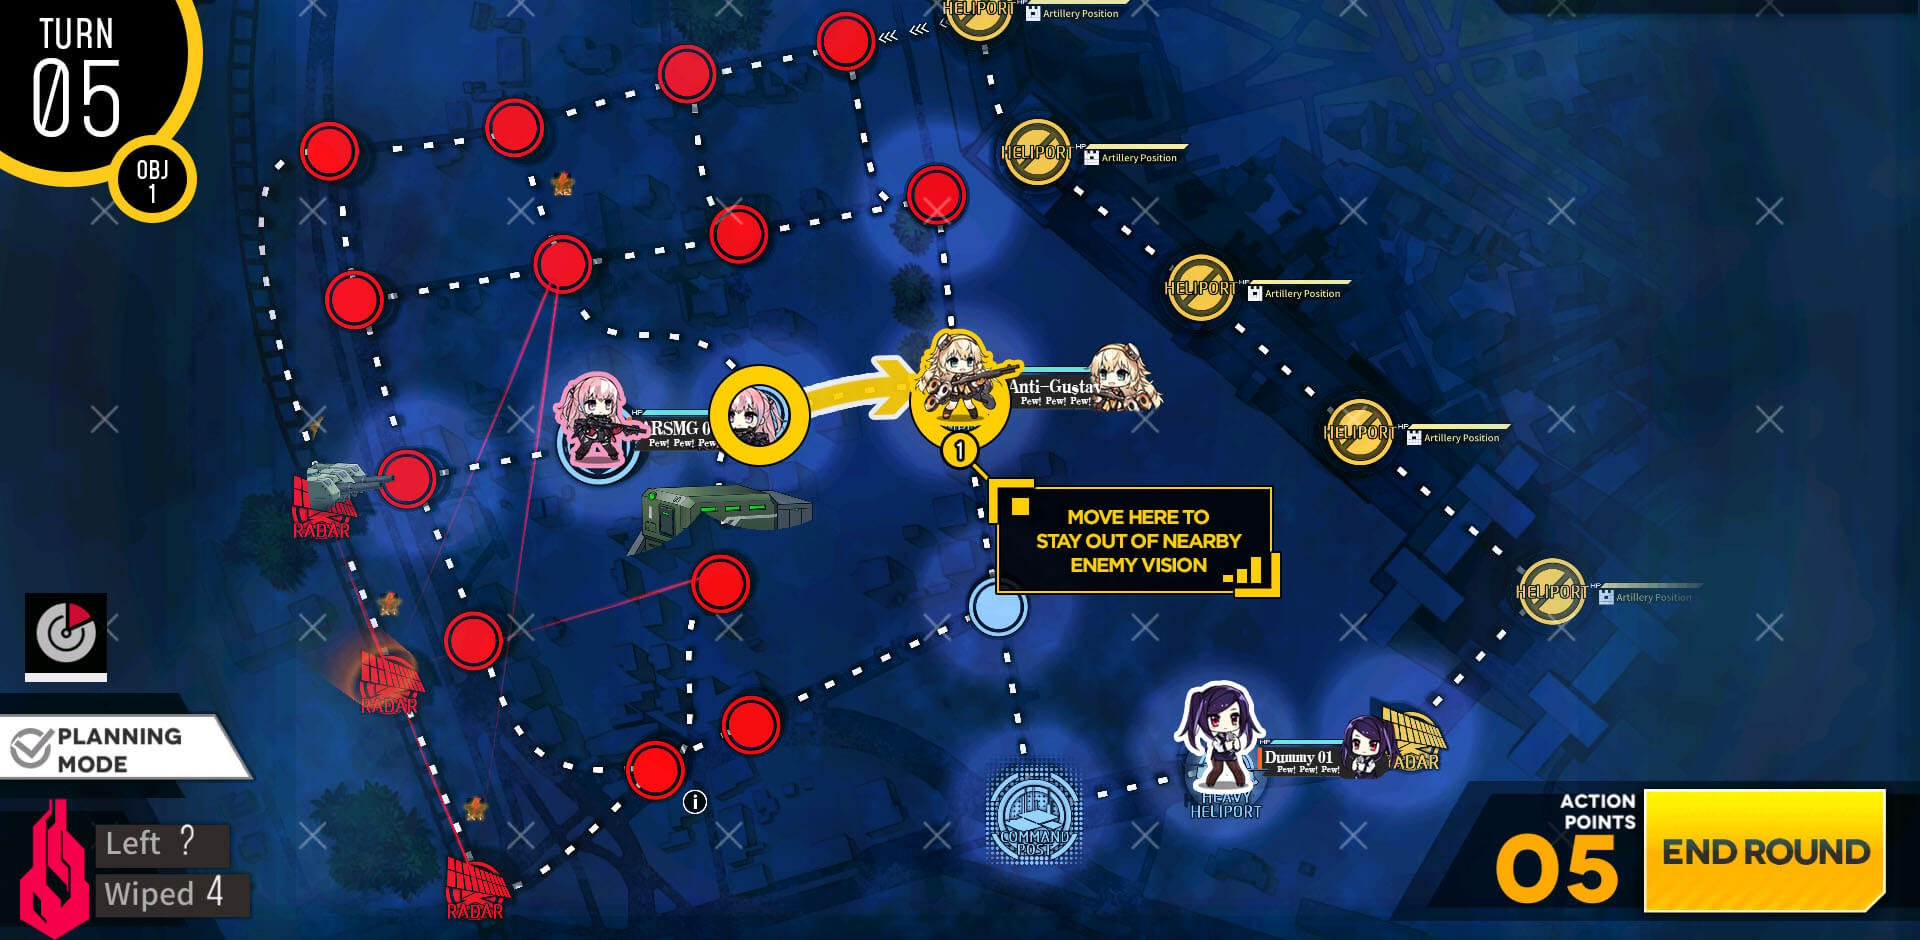
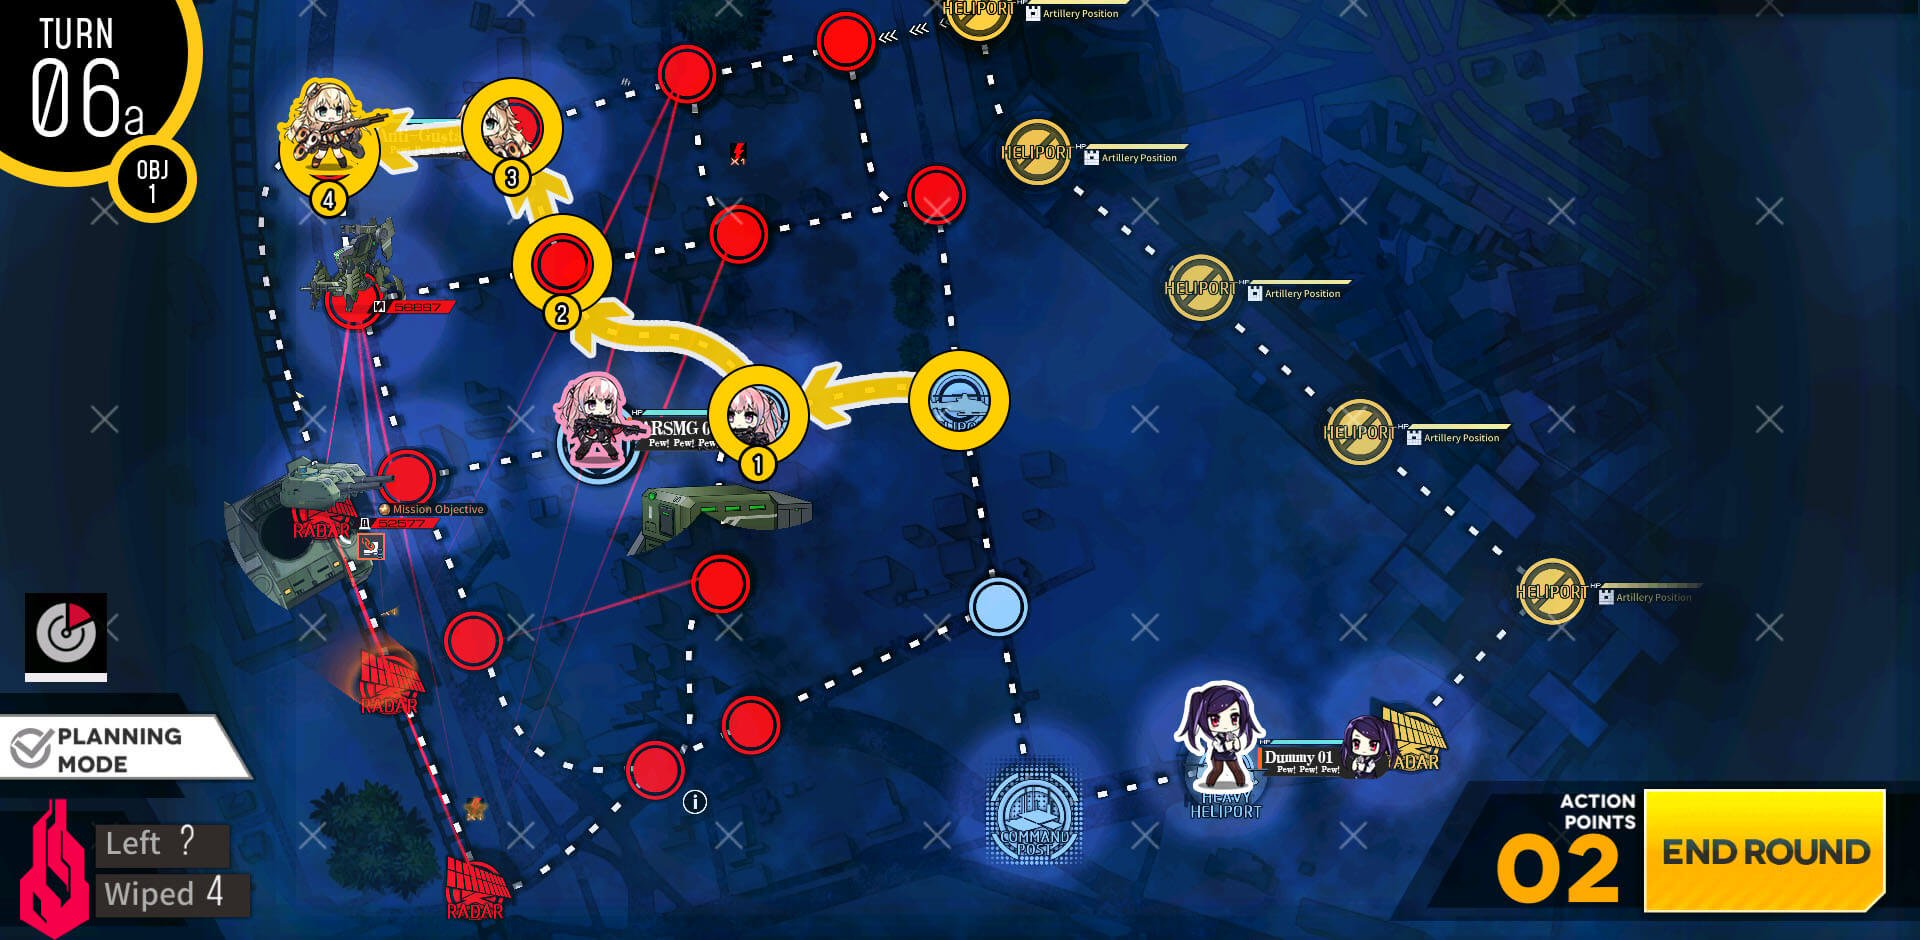
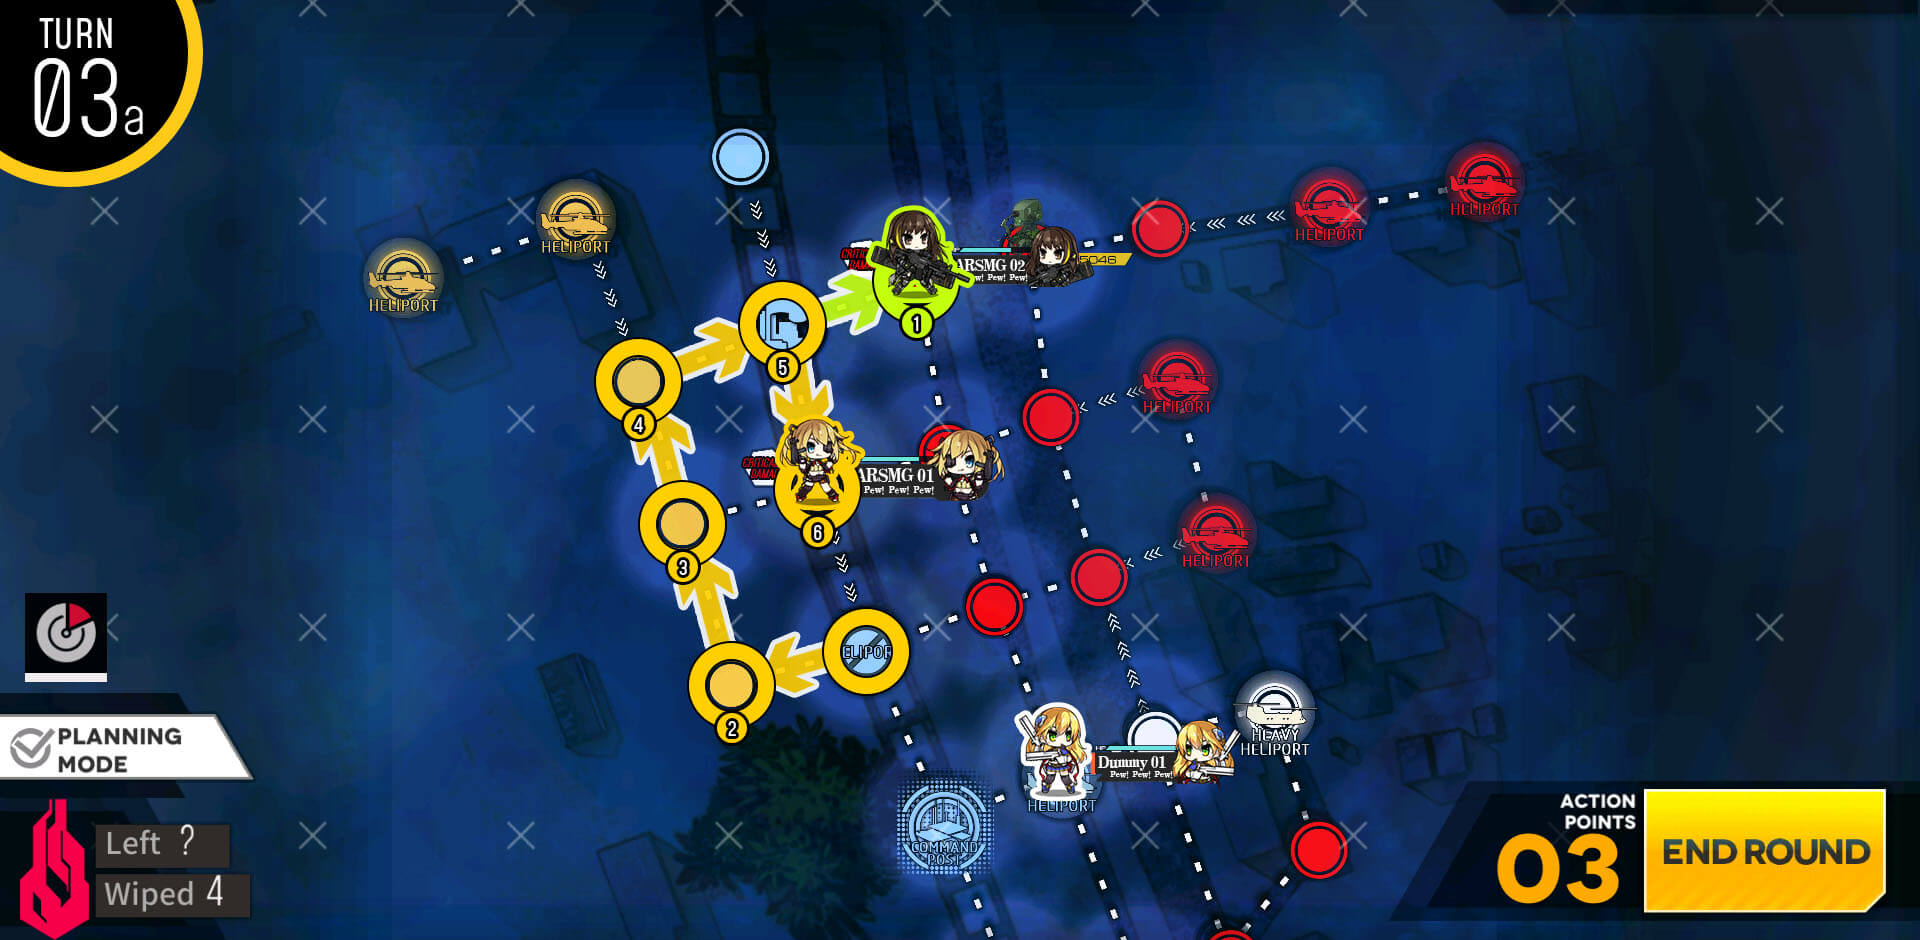
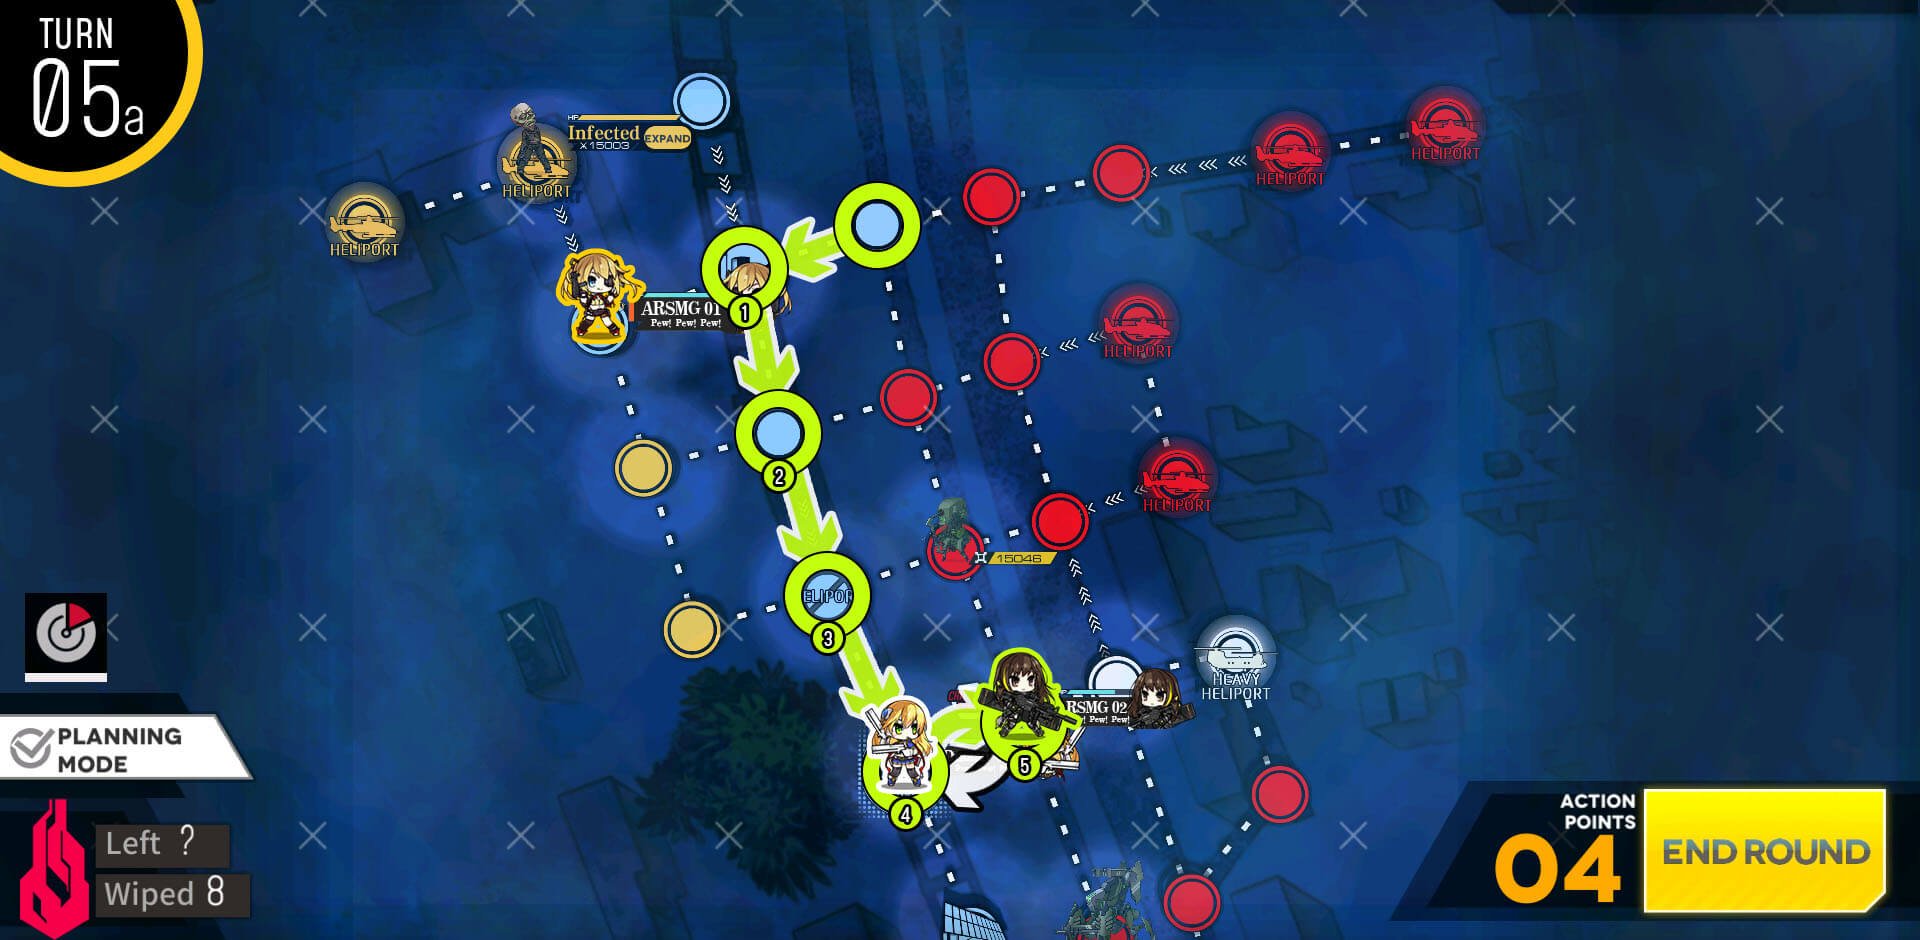
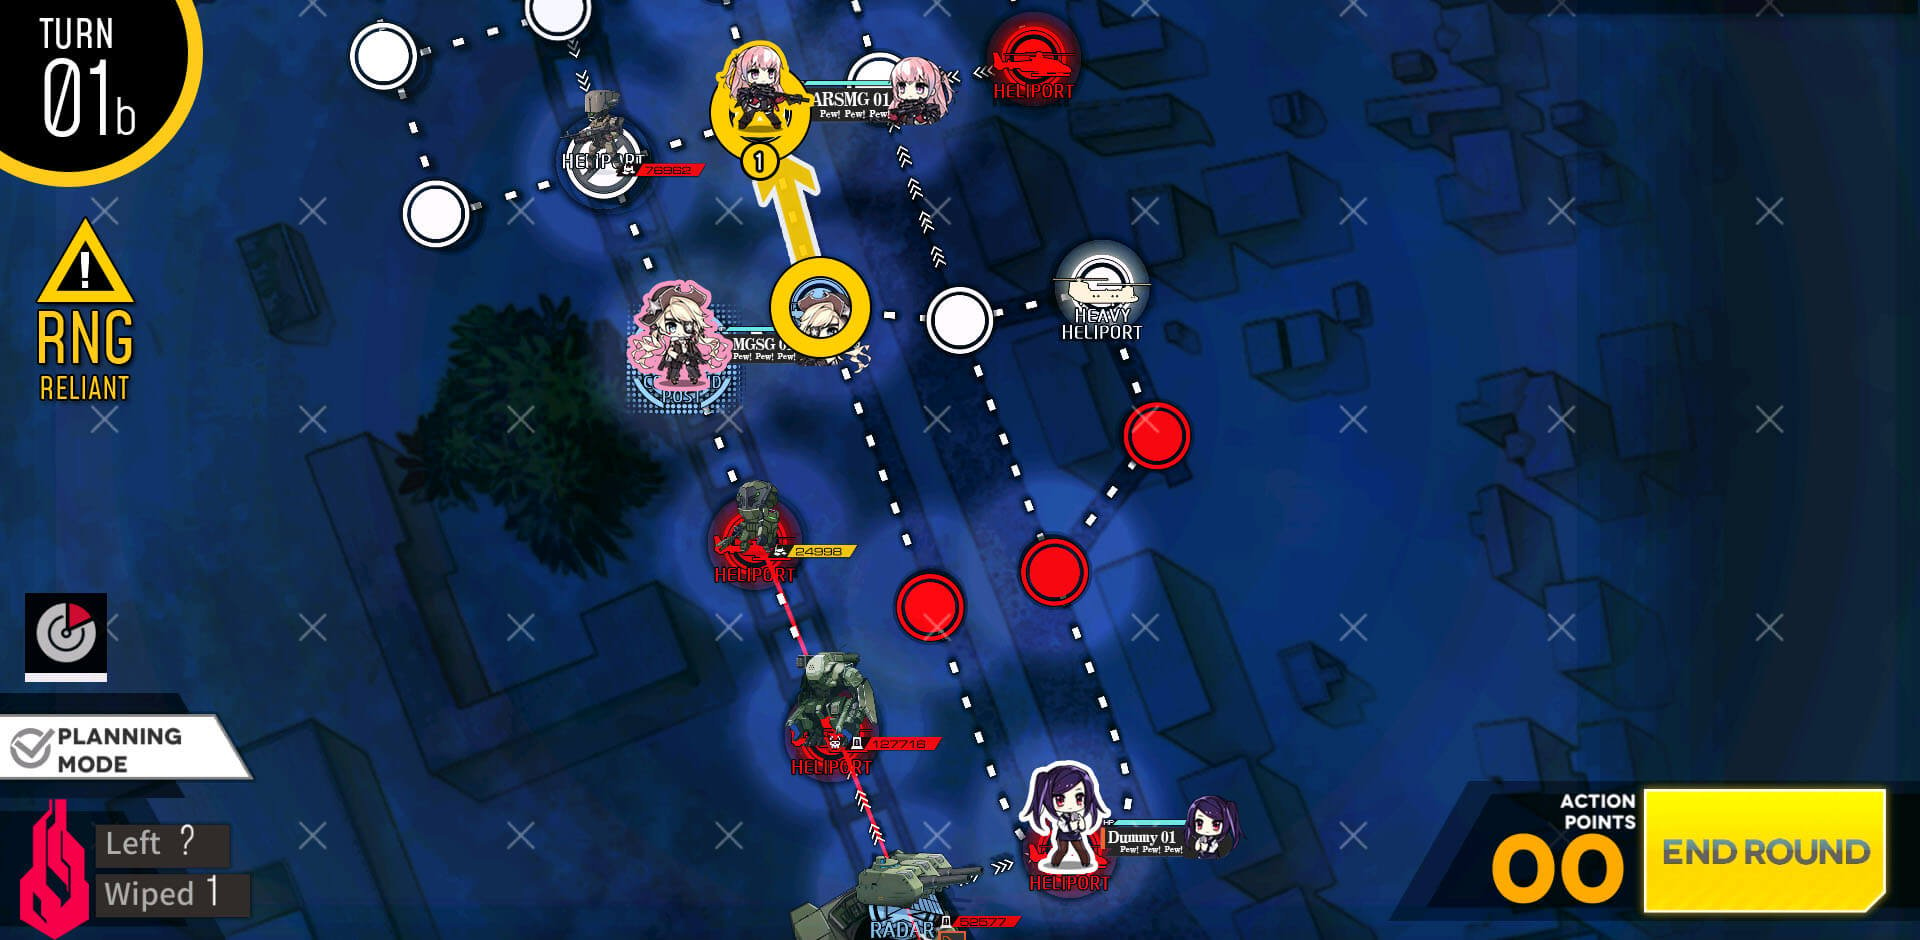
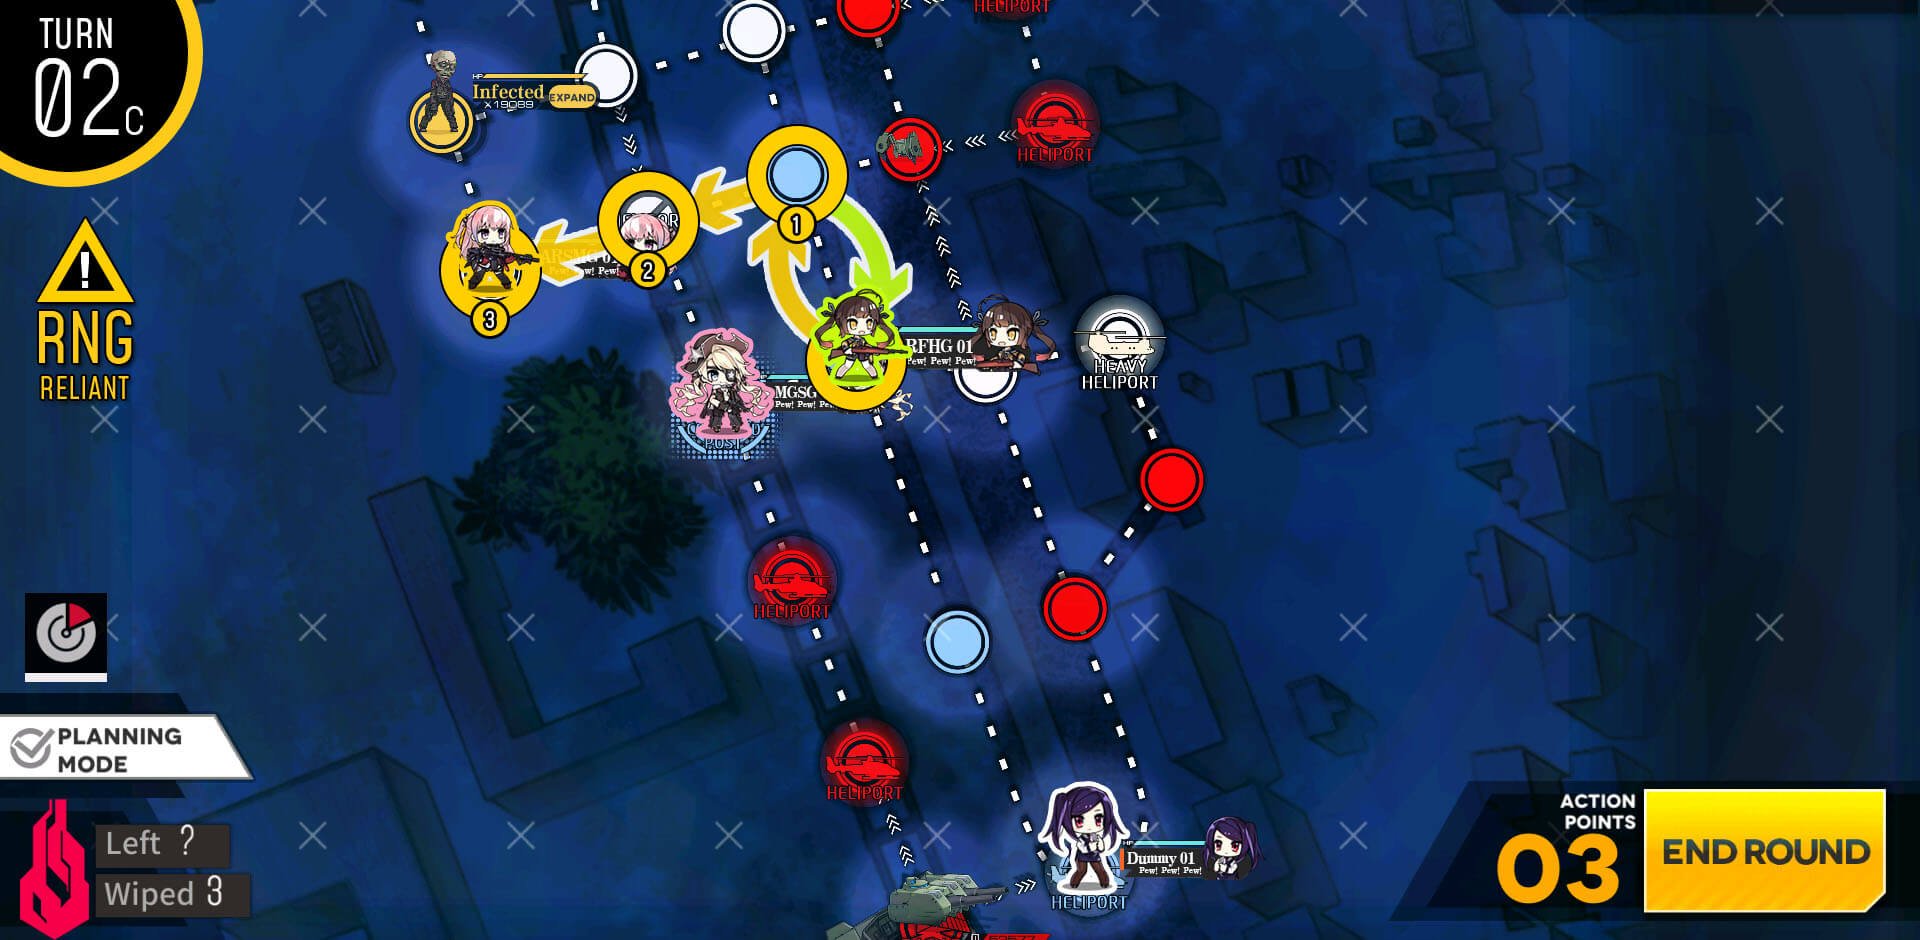
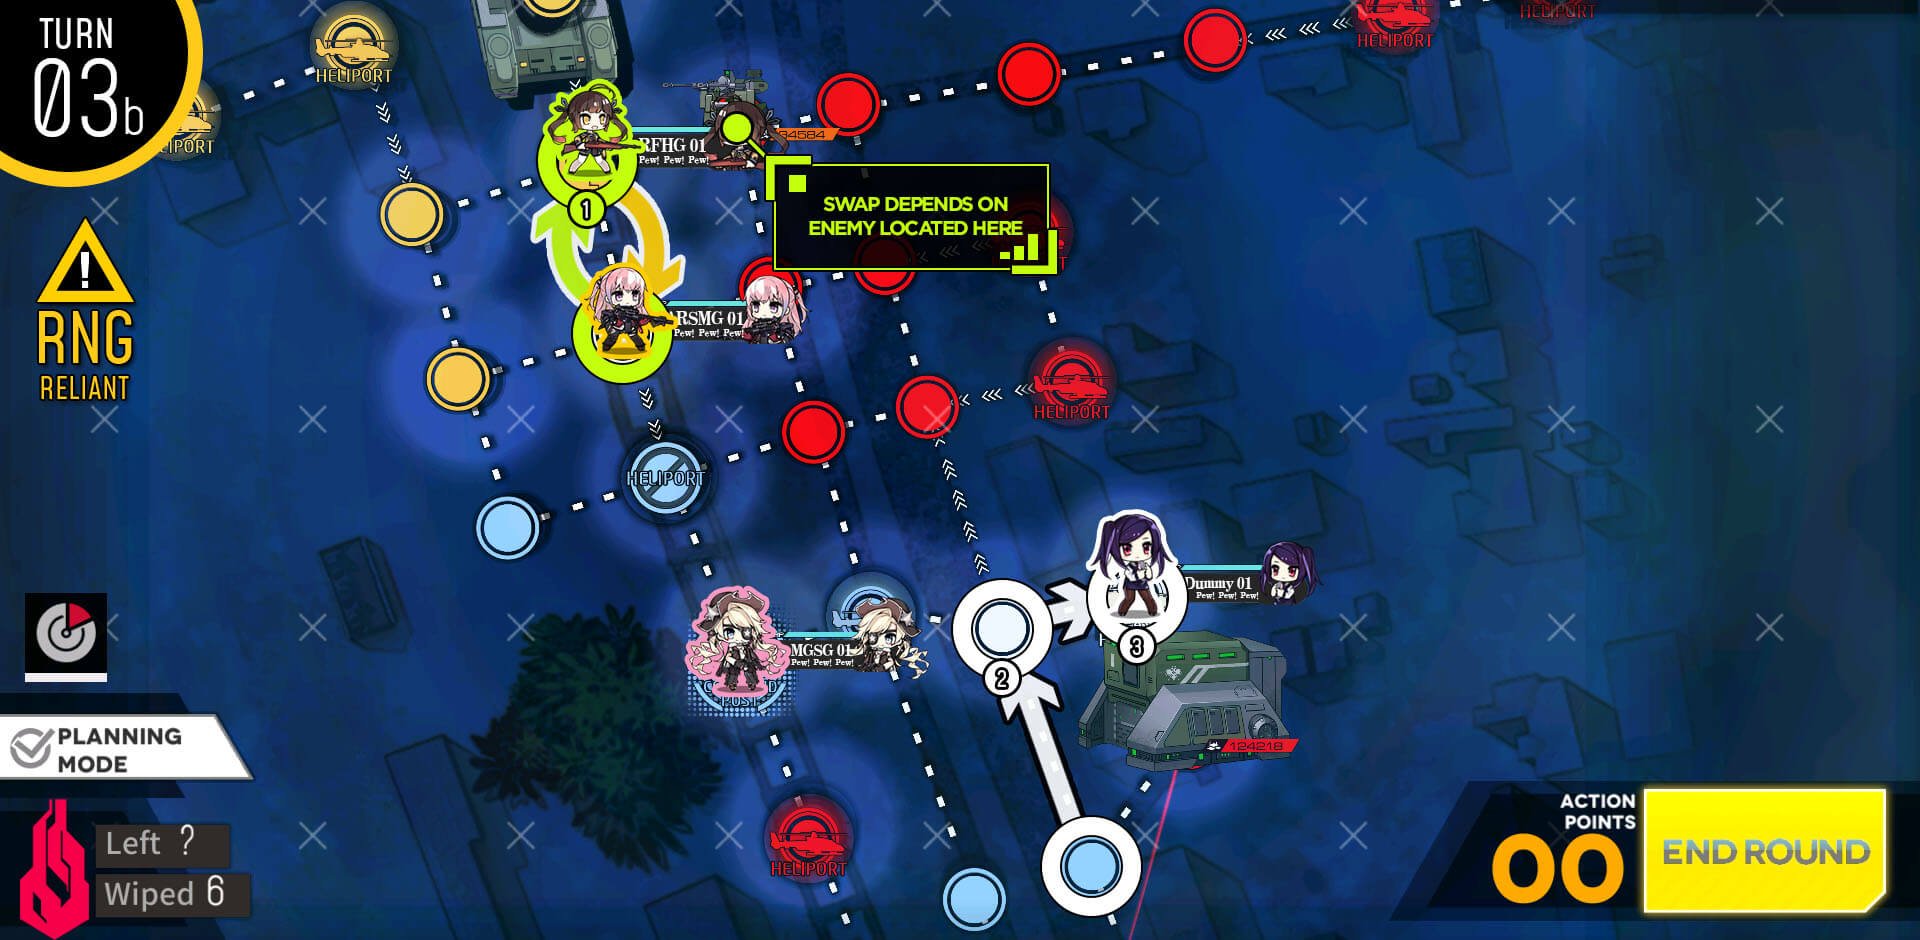
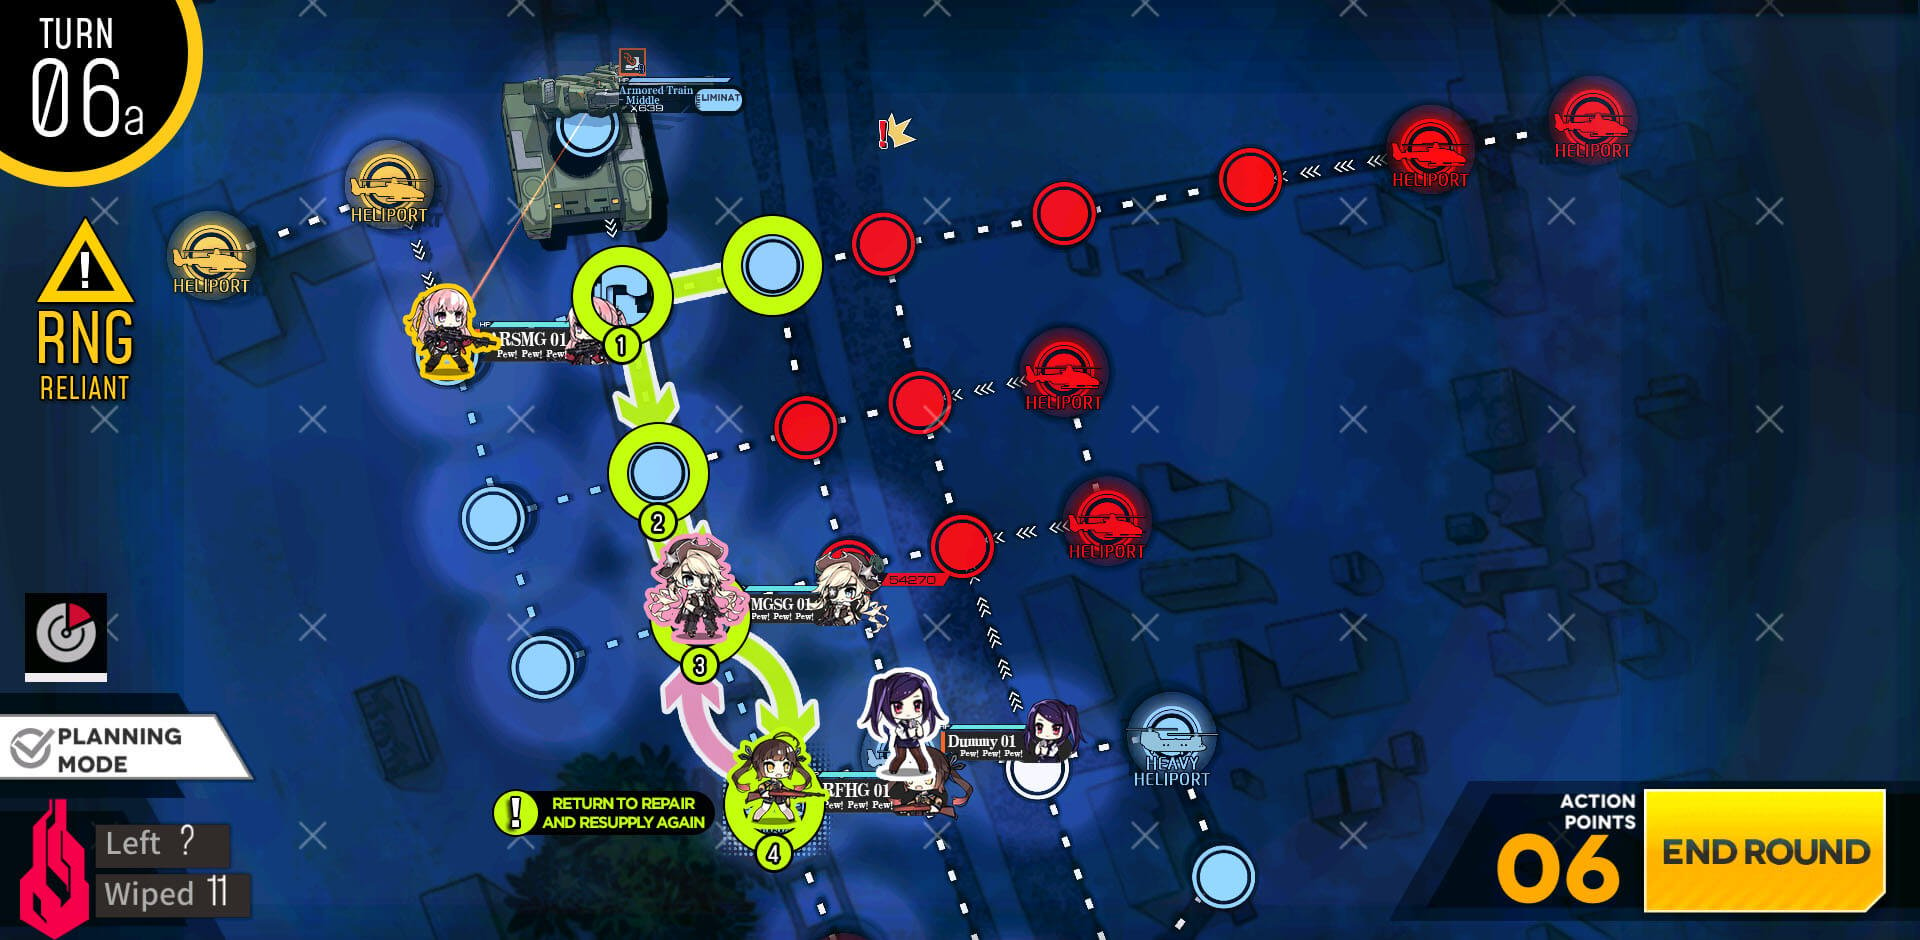
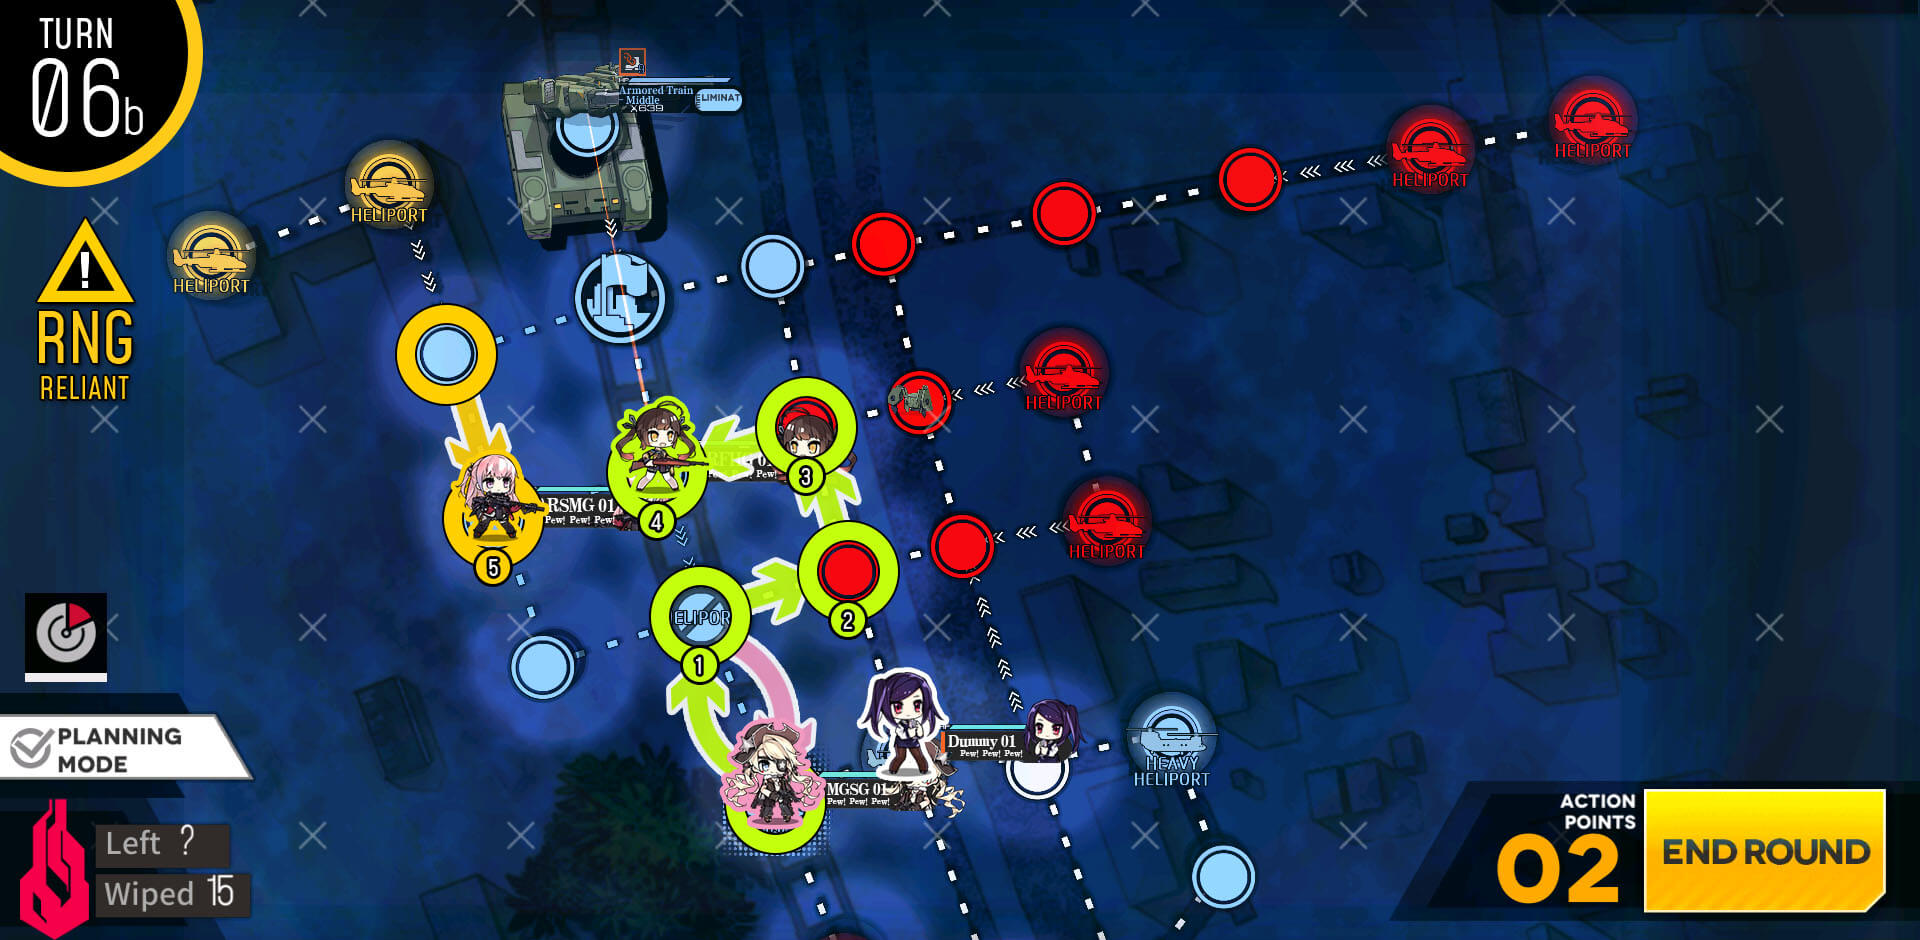
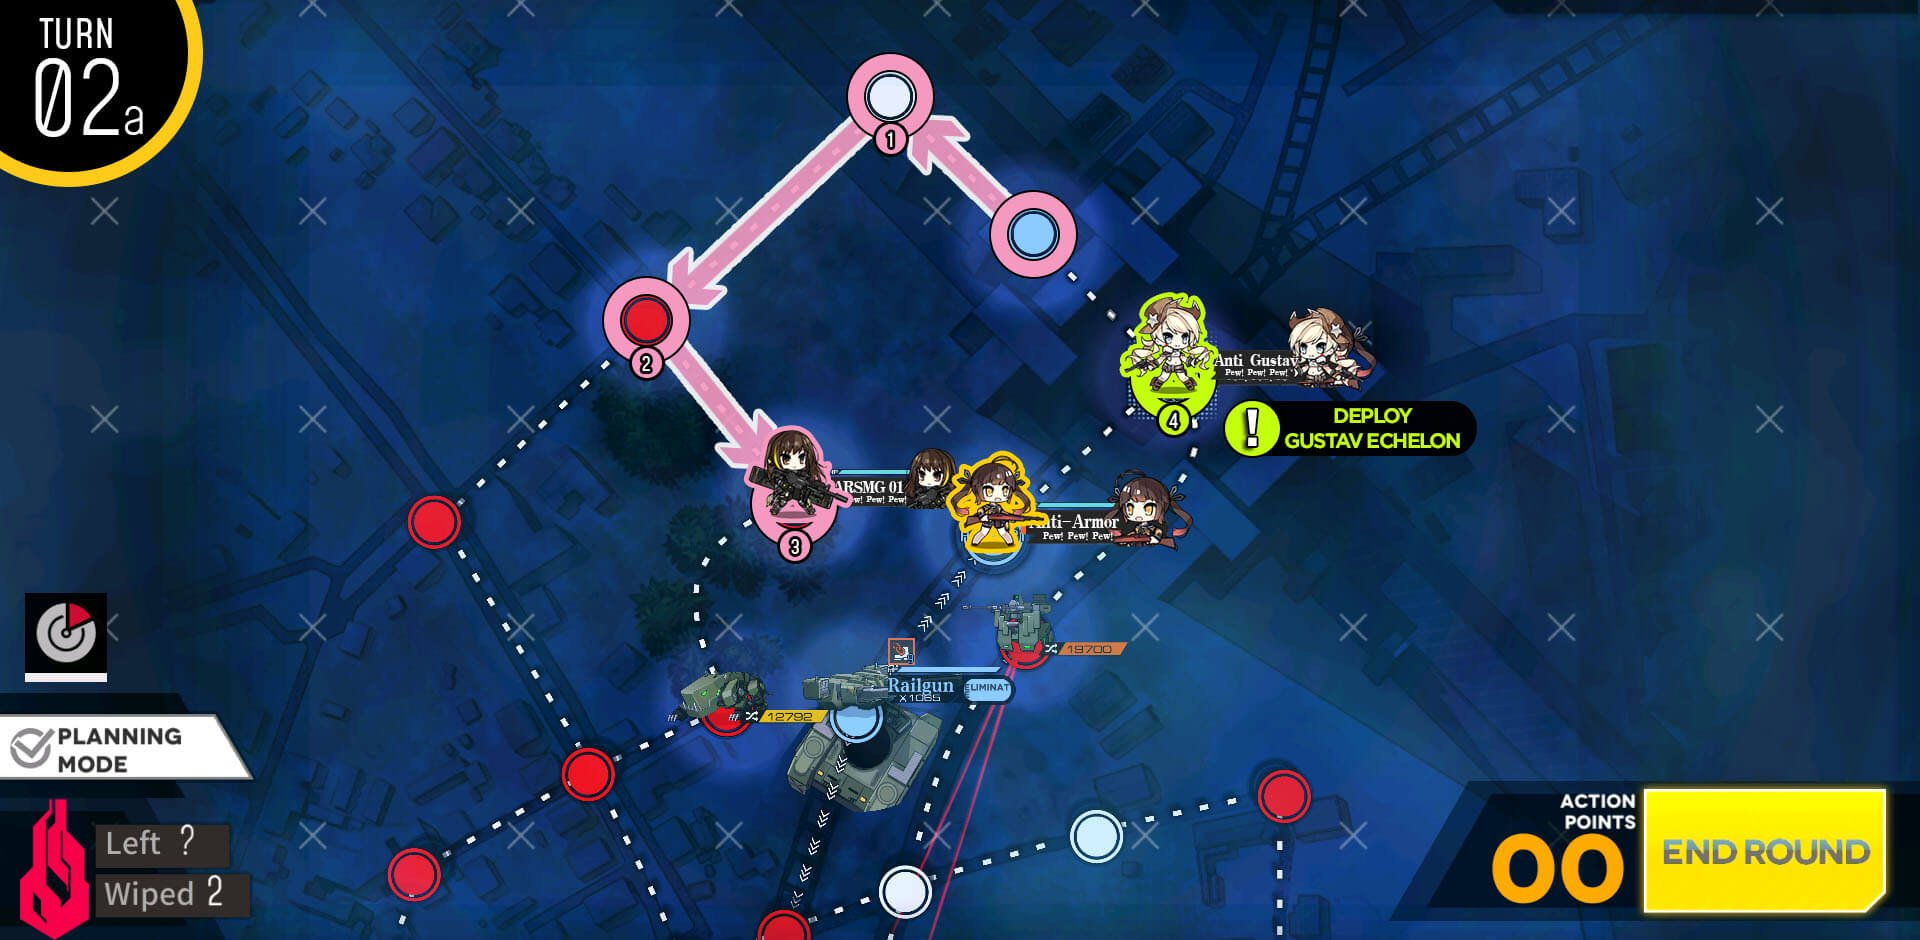
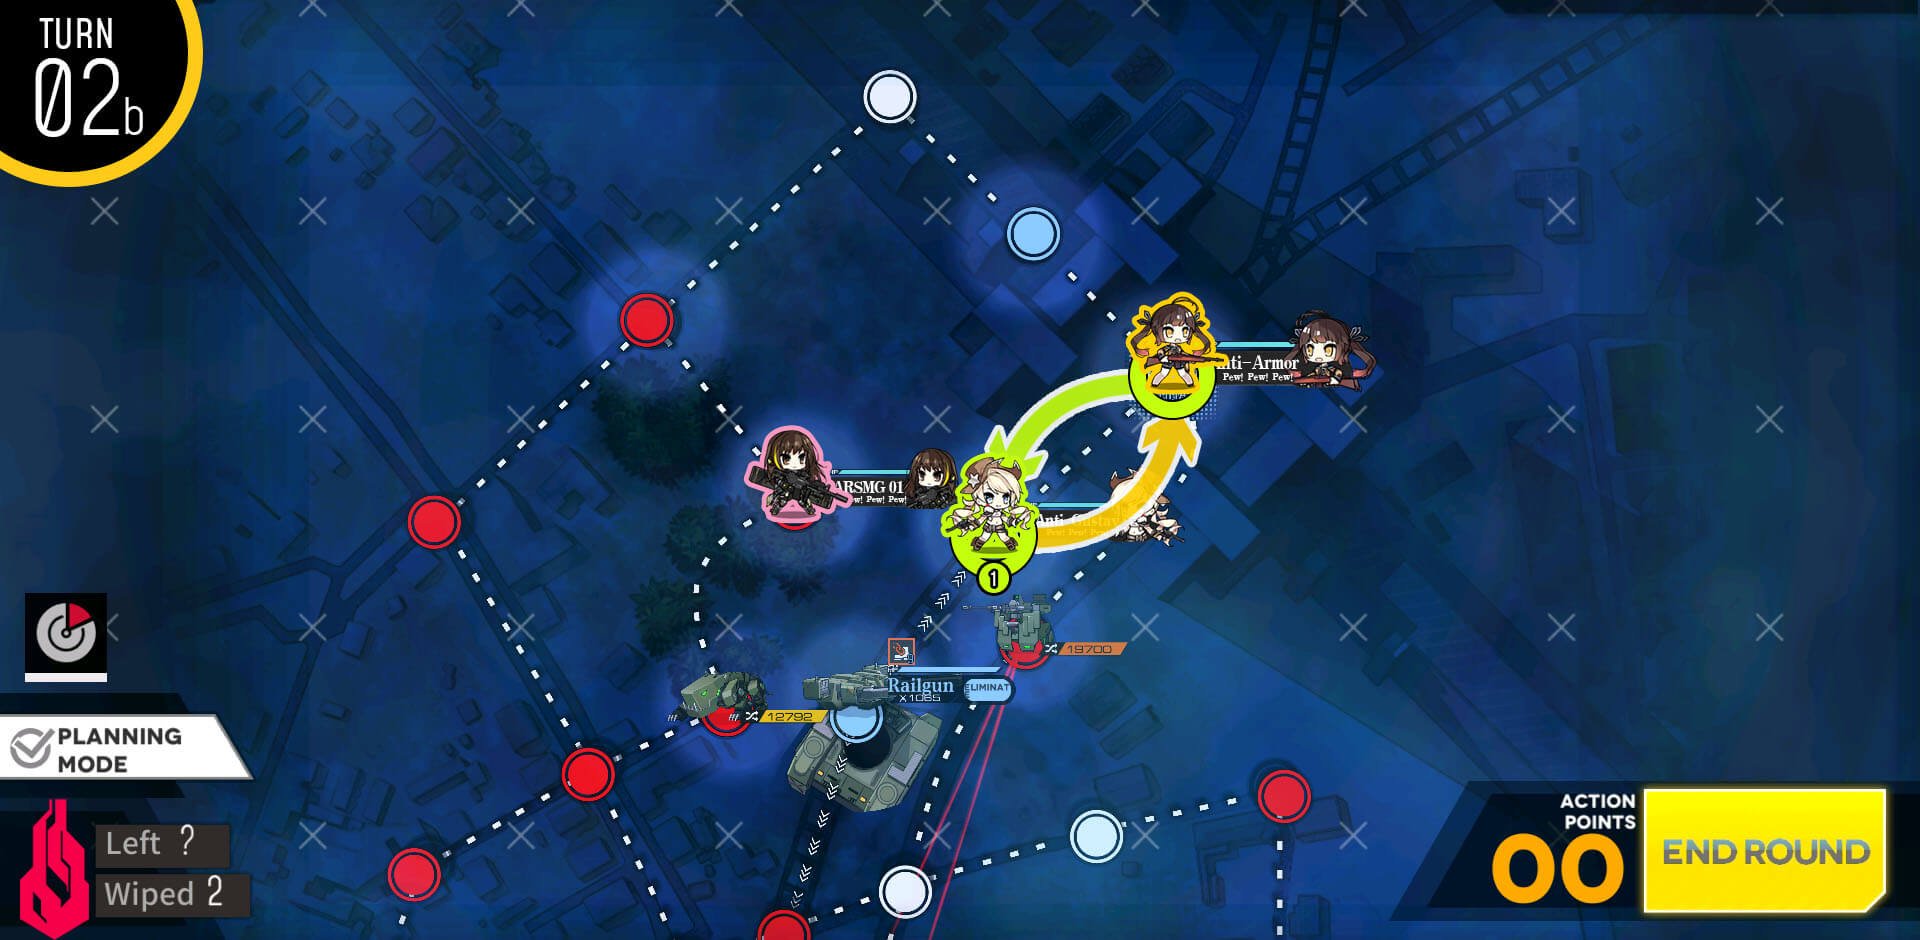
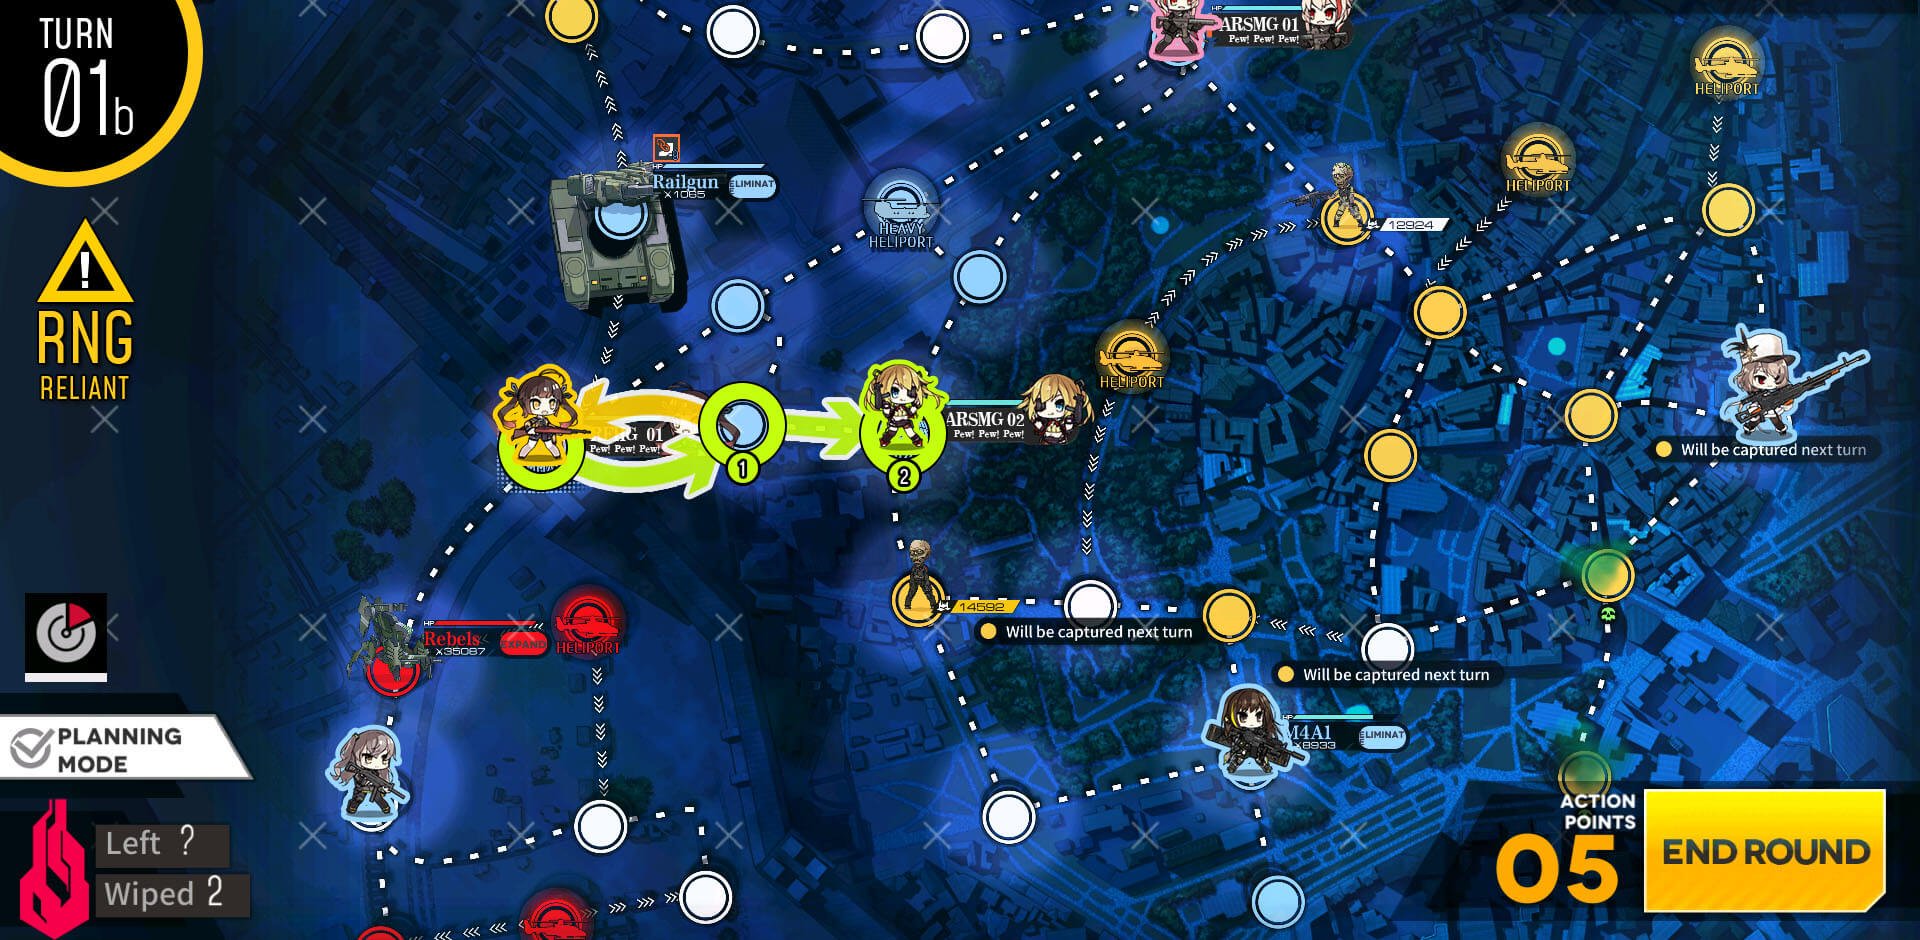
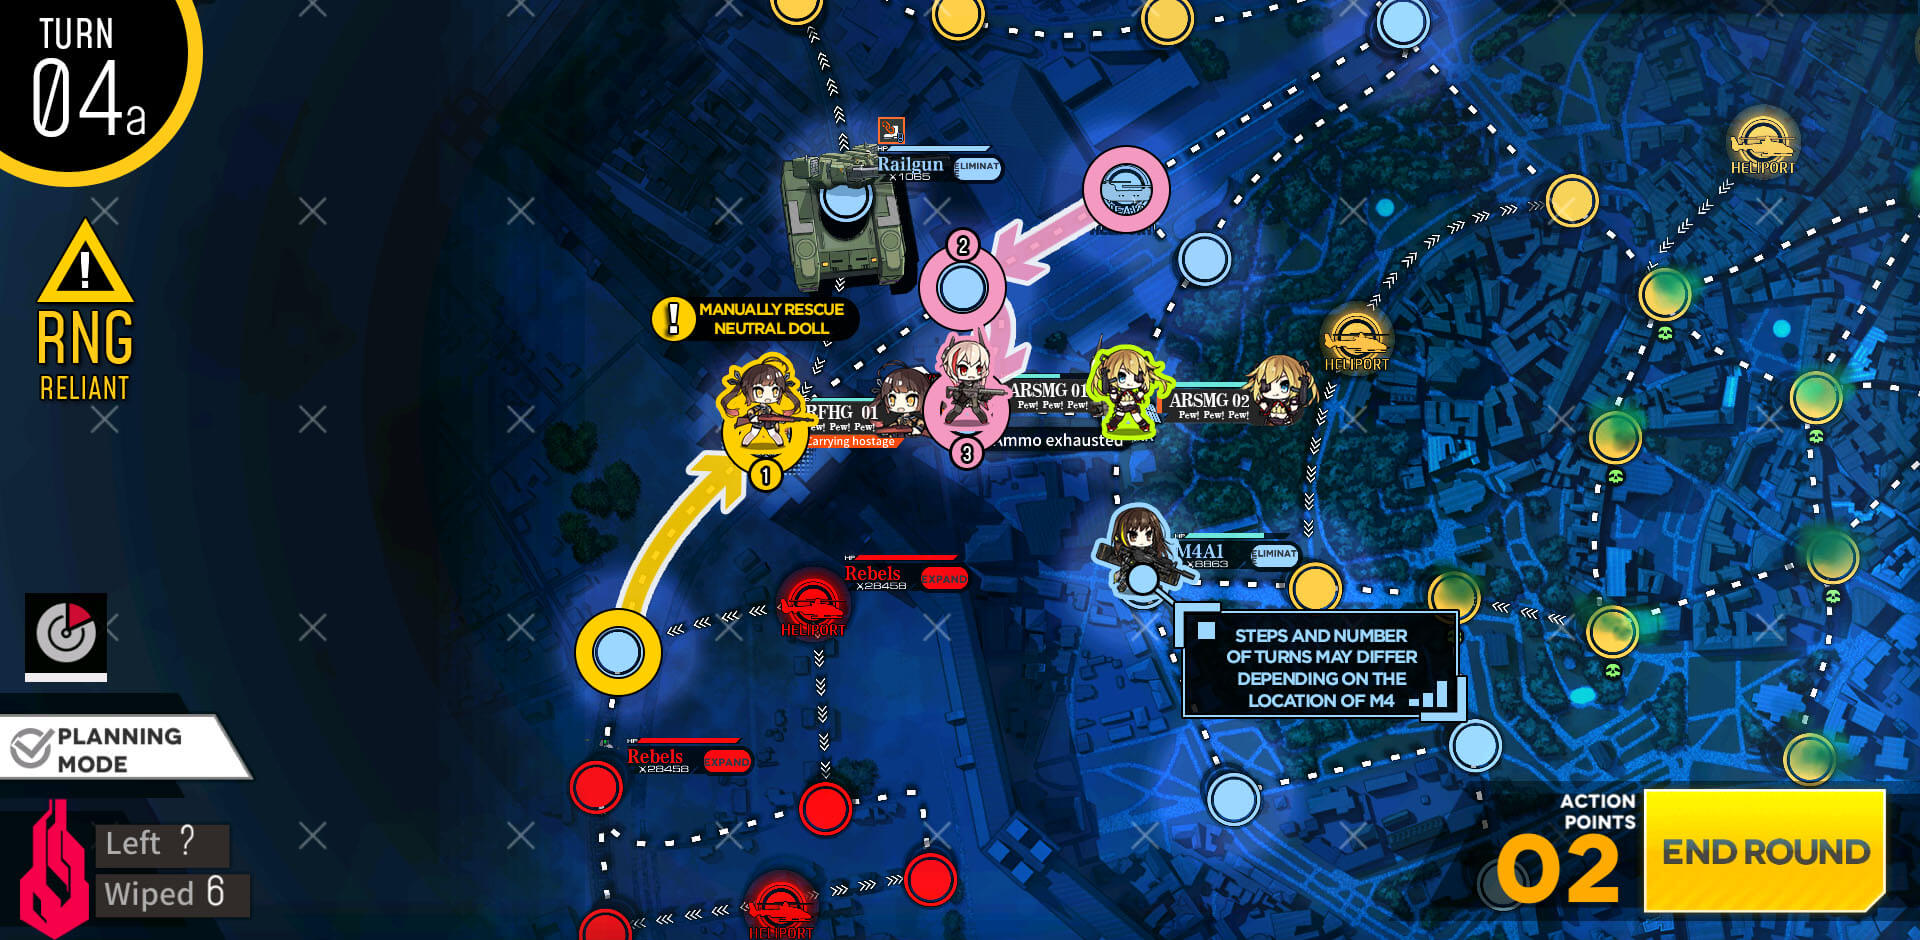
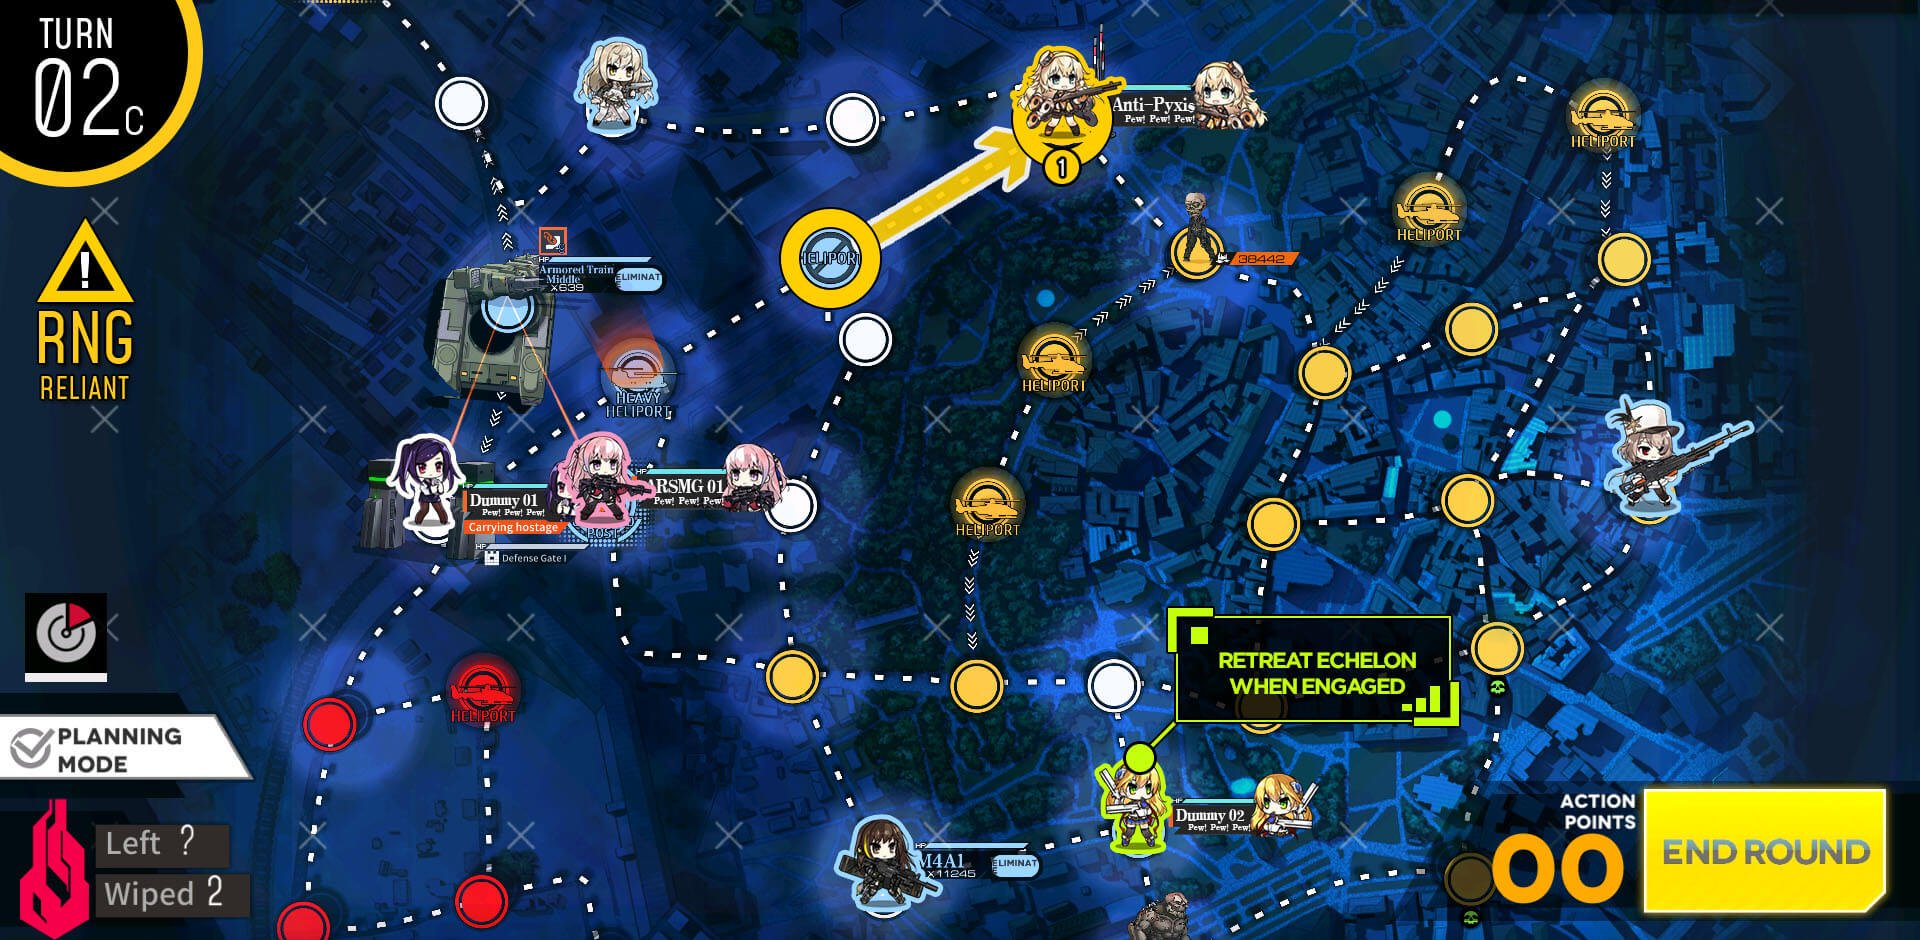
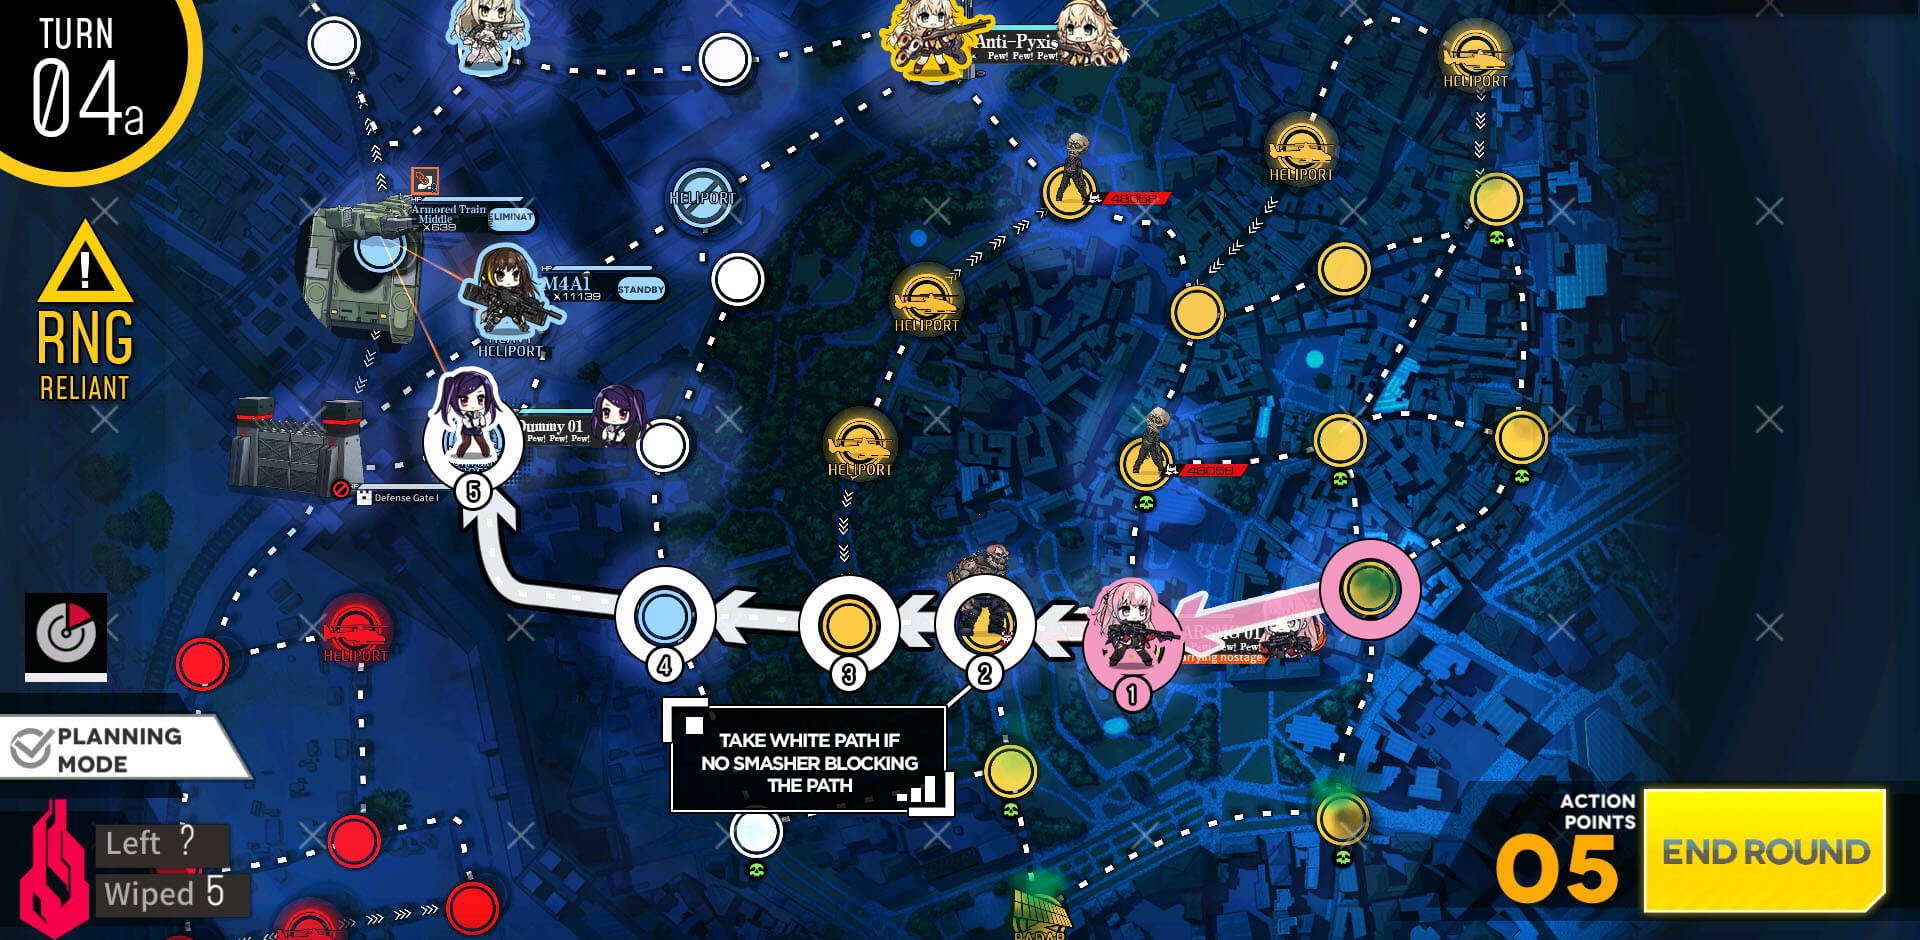
Start is mostly the same, but enemy unit on the left can go either bottom or top, which can add additional turn to the play.

In my case the zombie moved to the top and was on the way to kill other zombies.
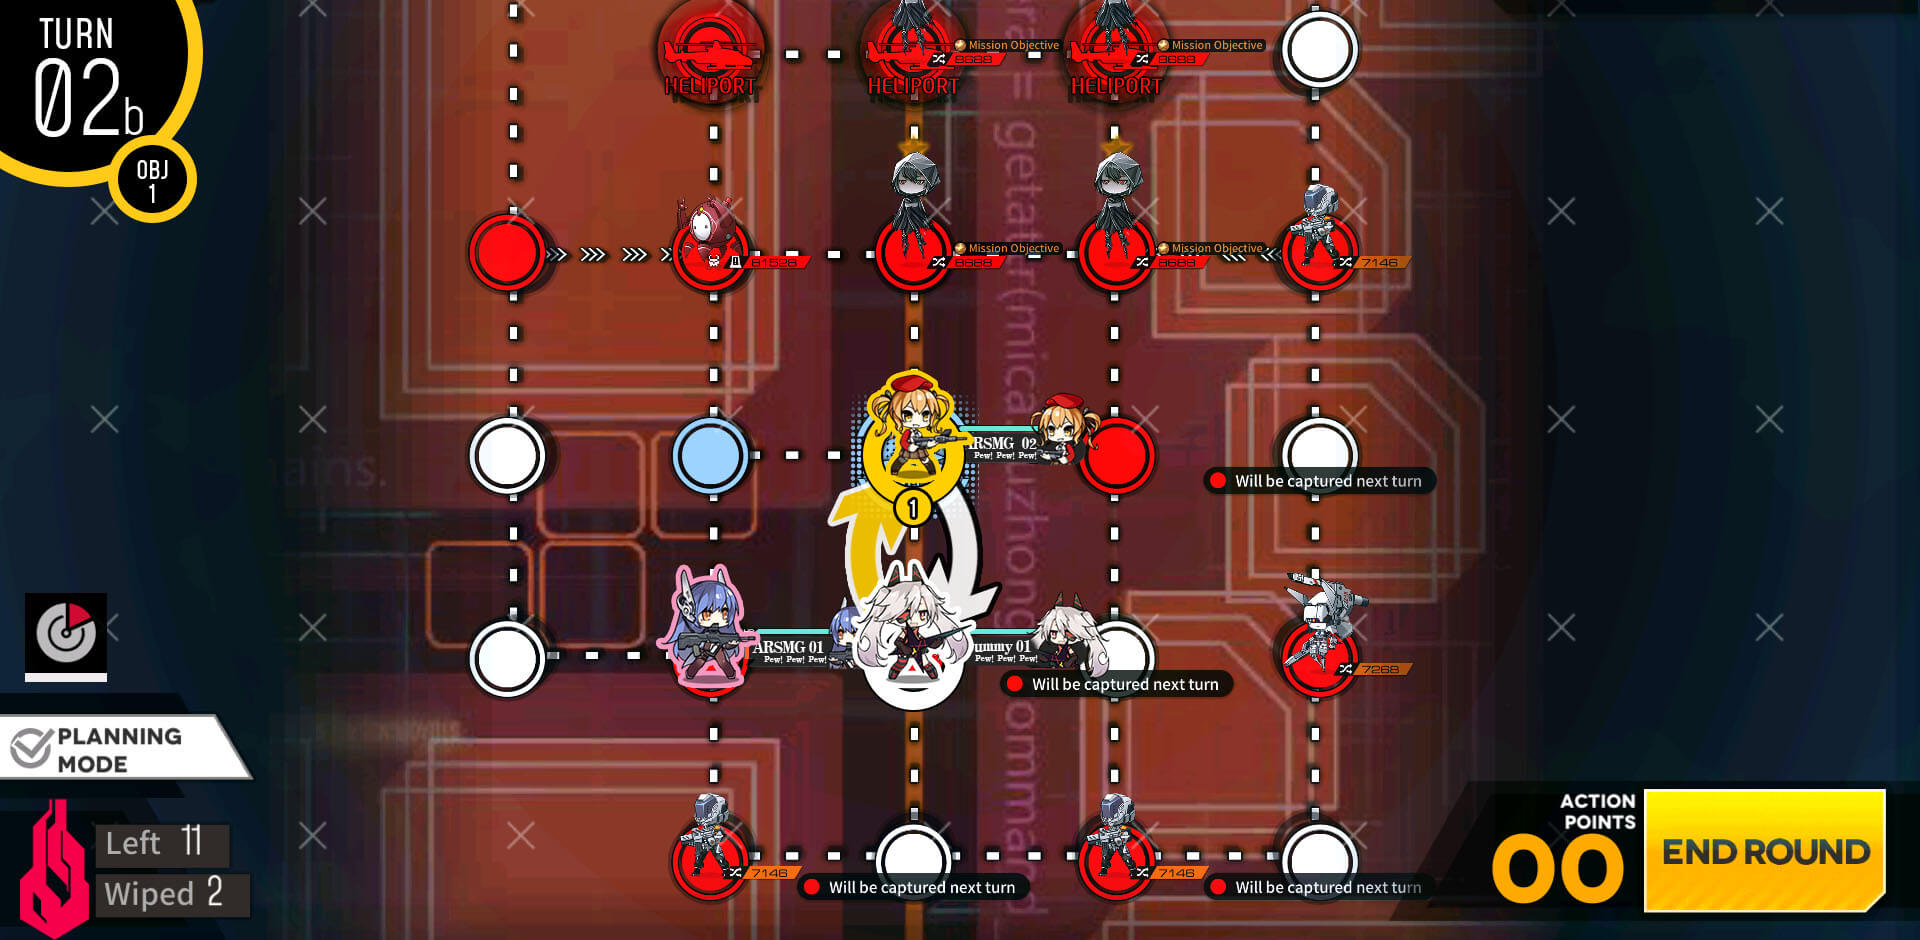
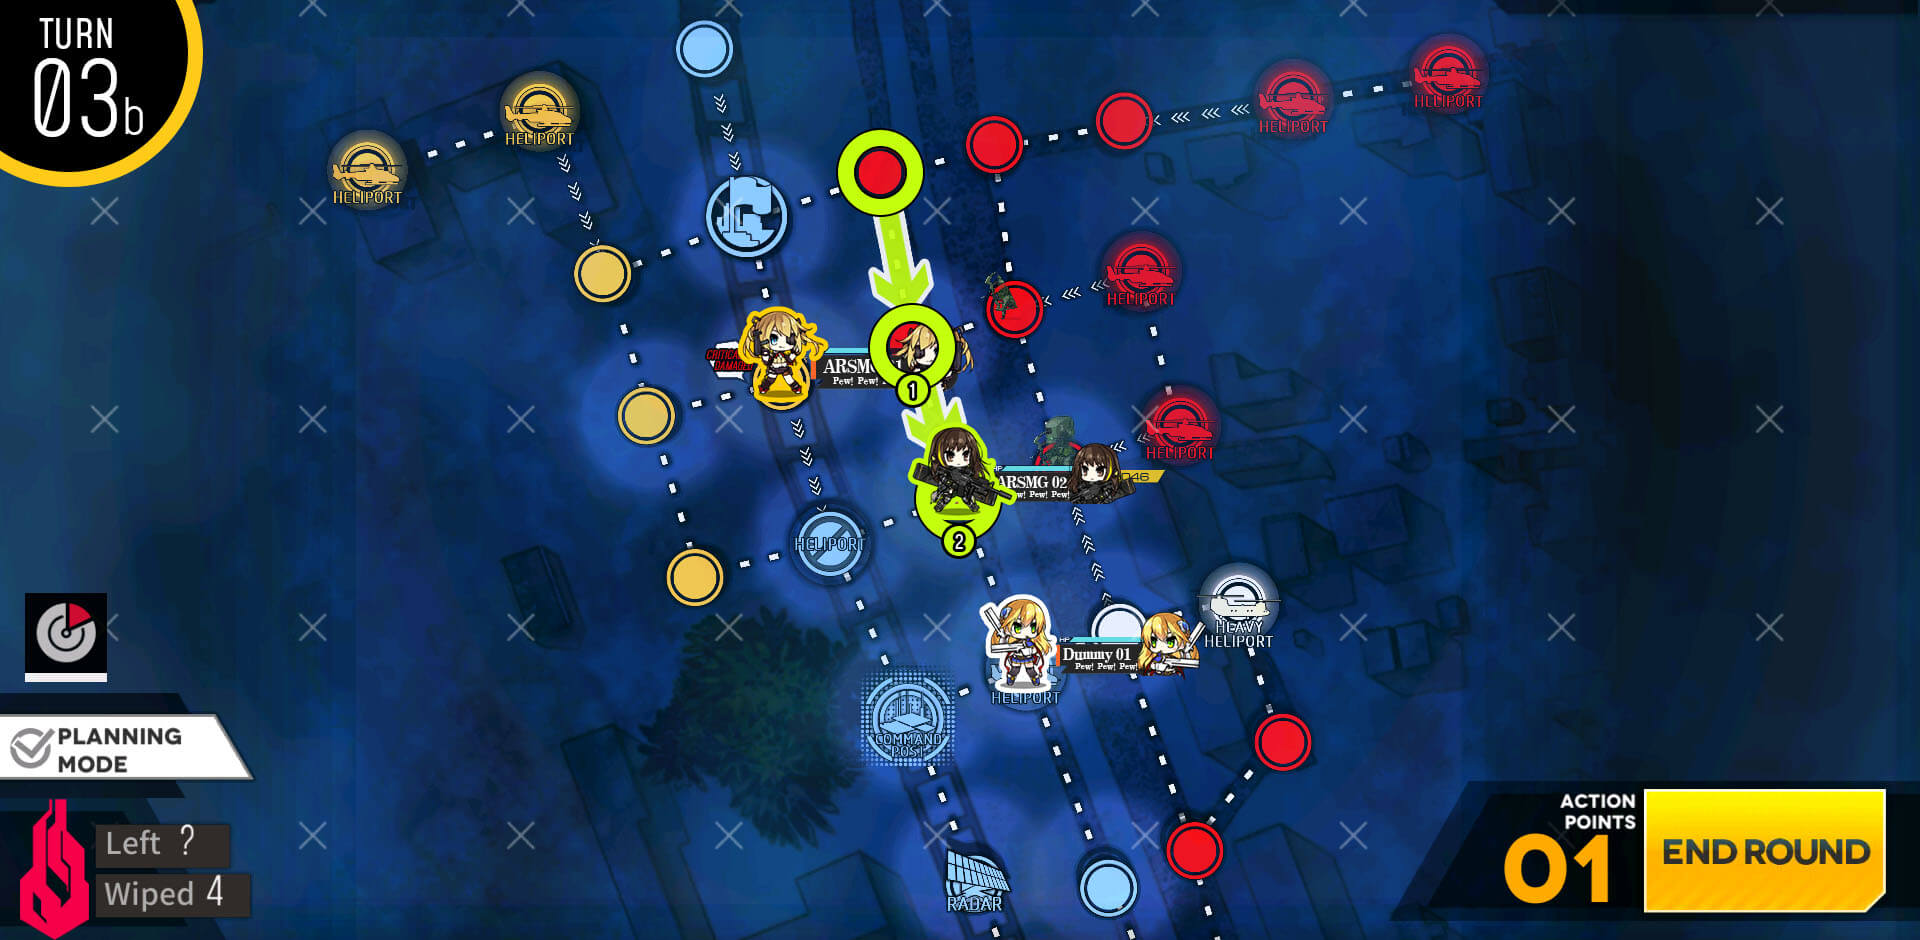
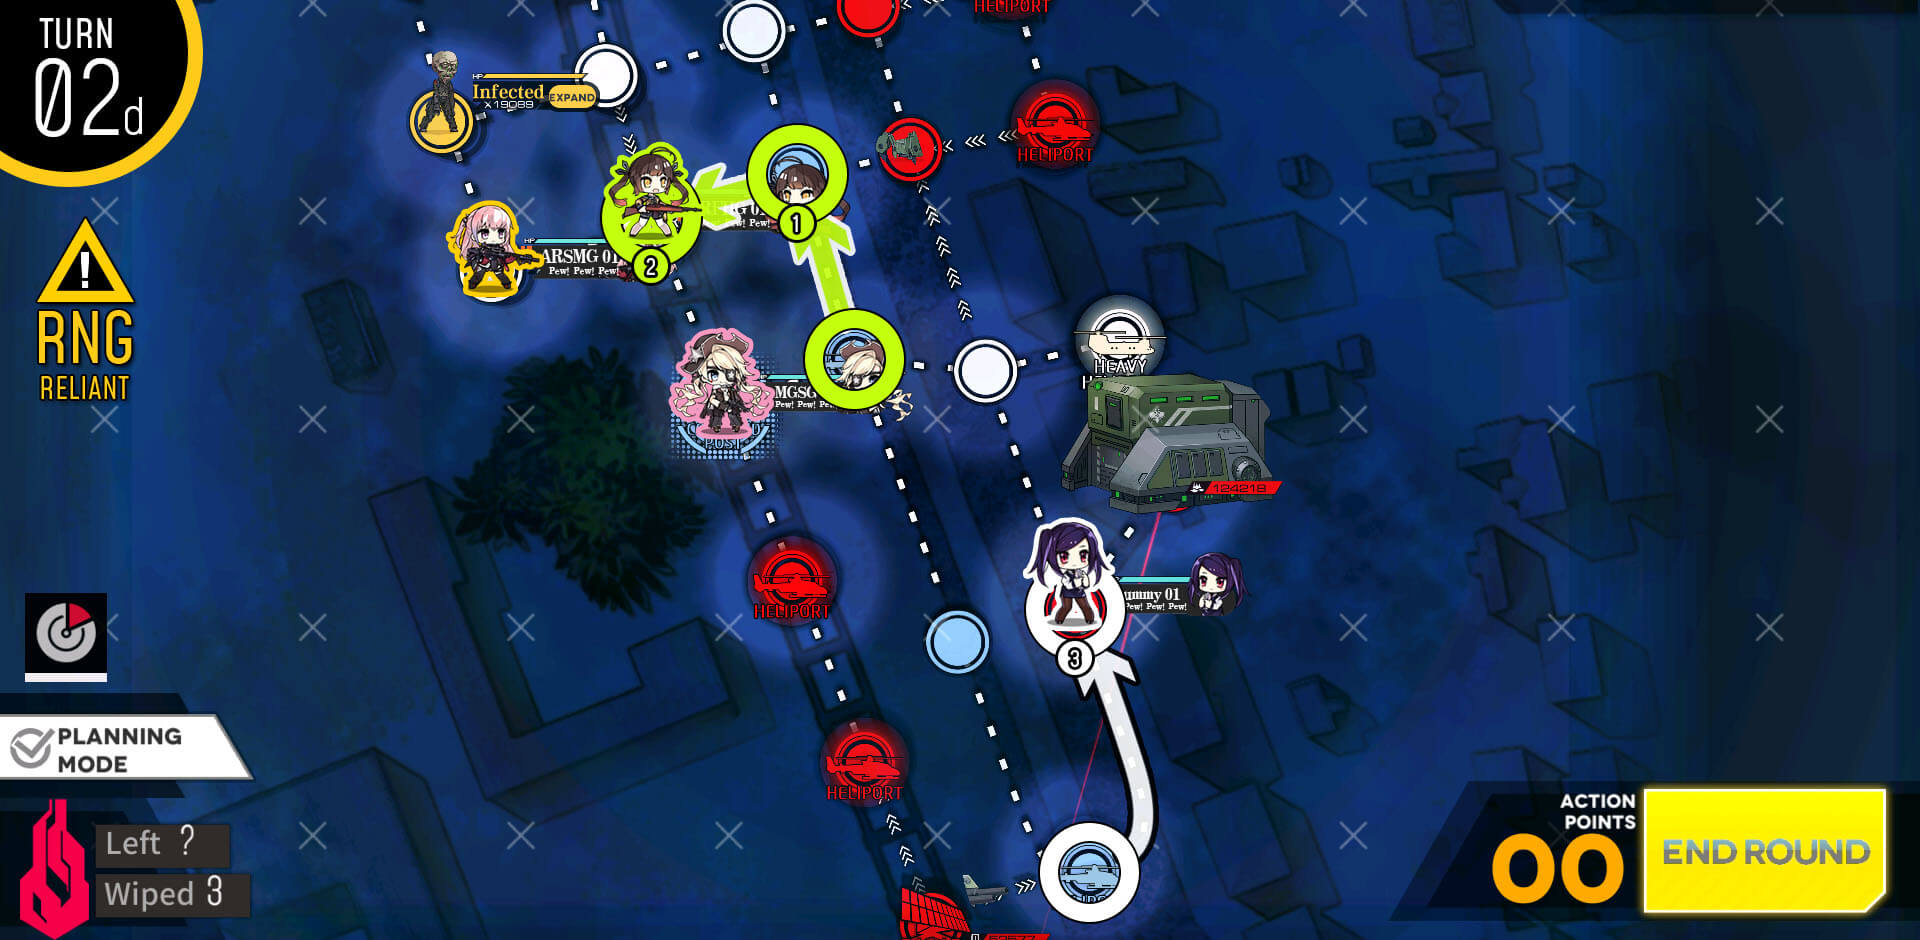
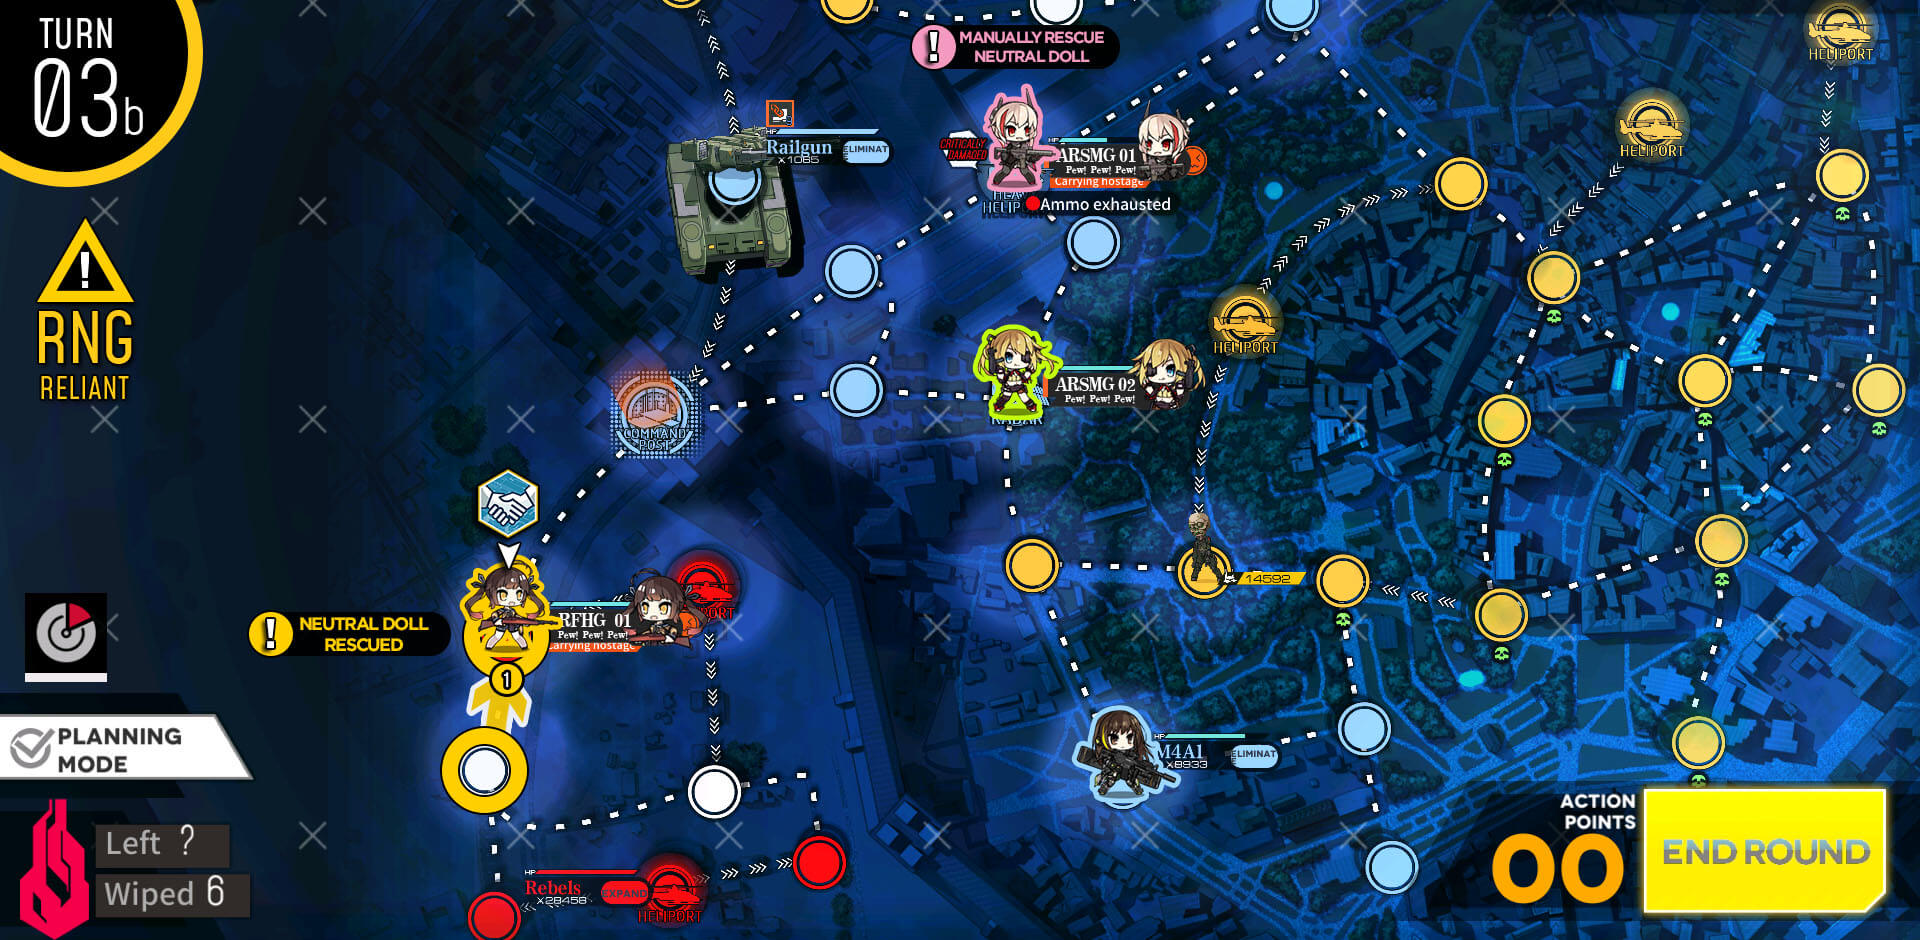
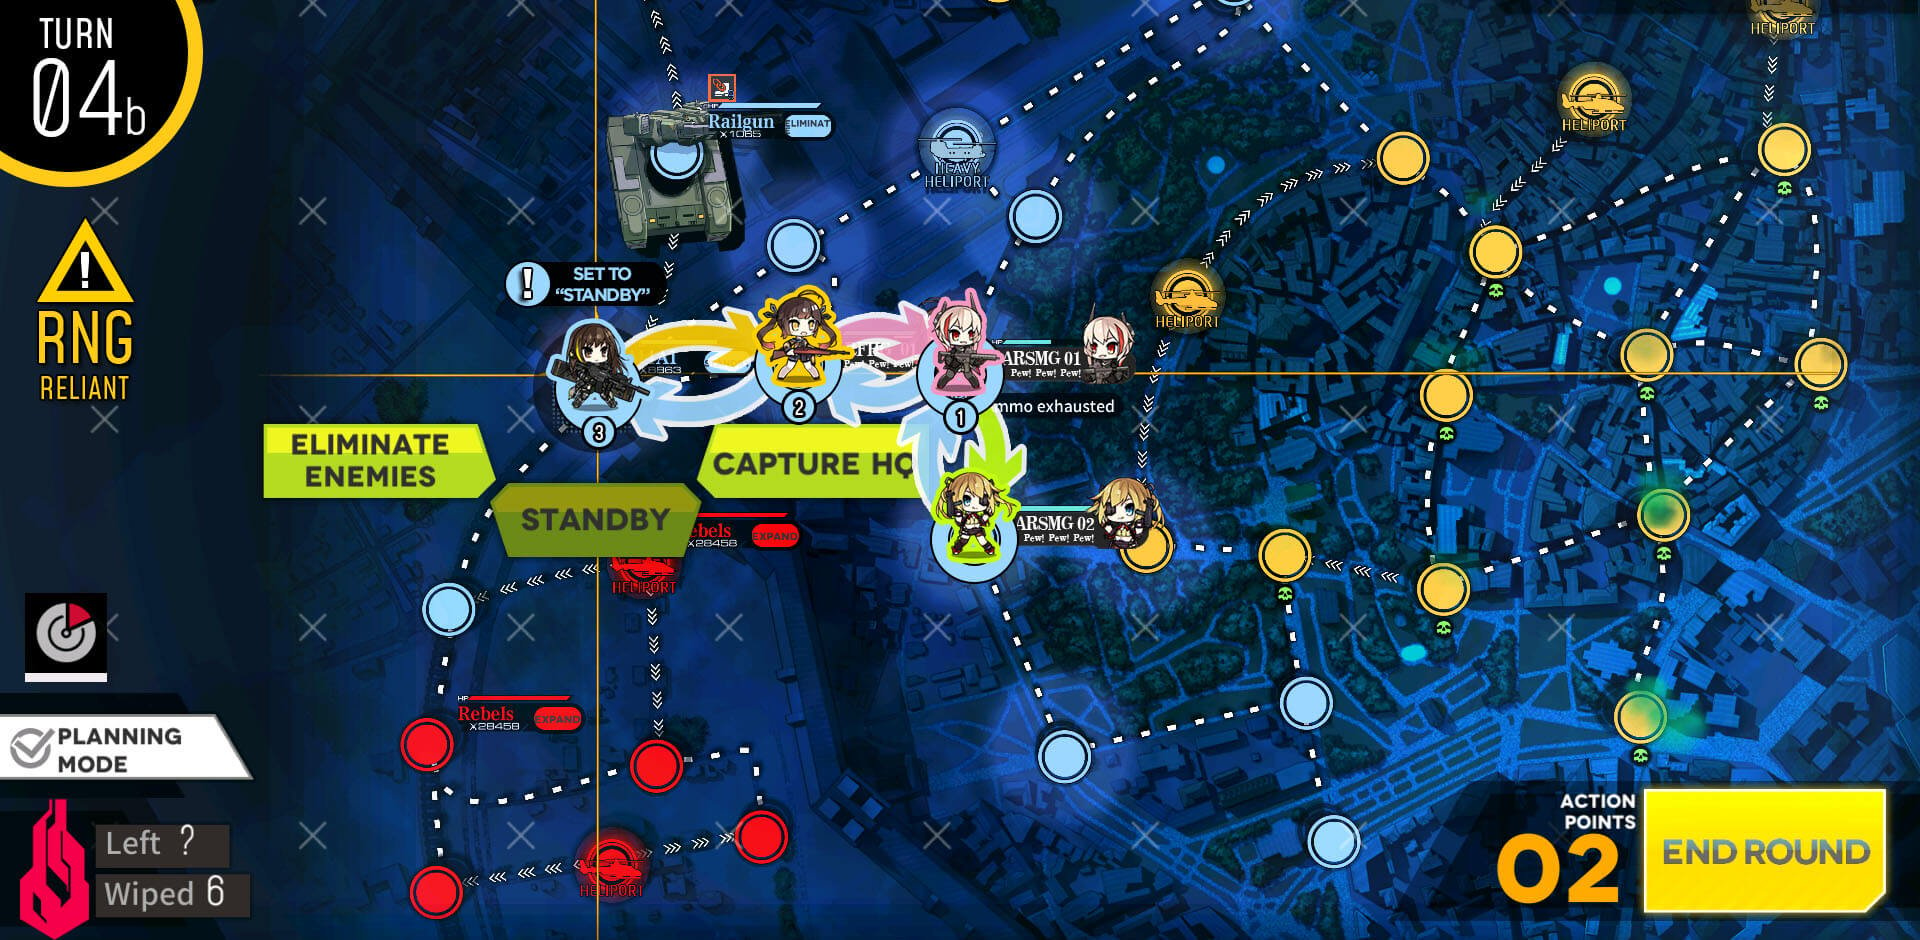
Again just make sure to not end your turn on the enemy HQ and you should be clearing objective B no problem.
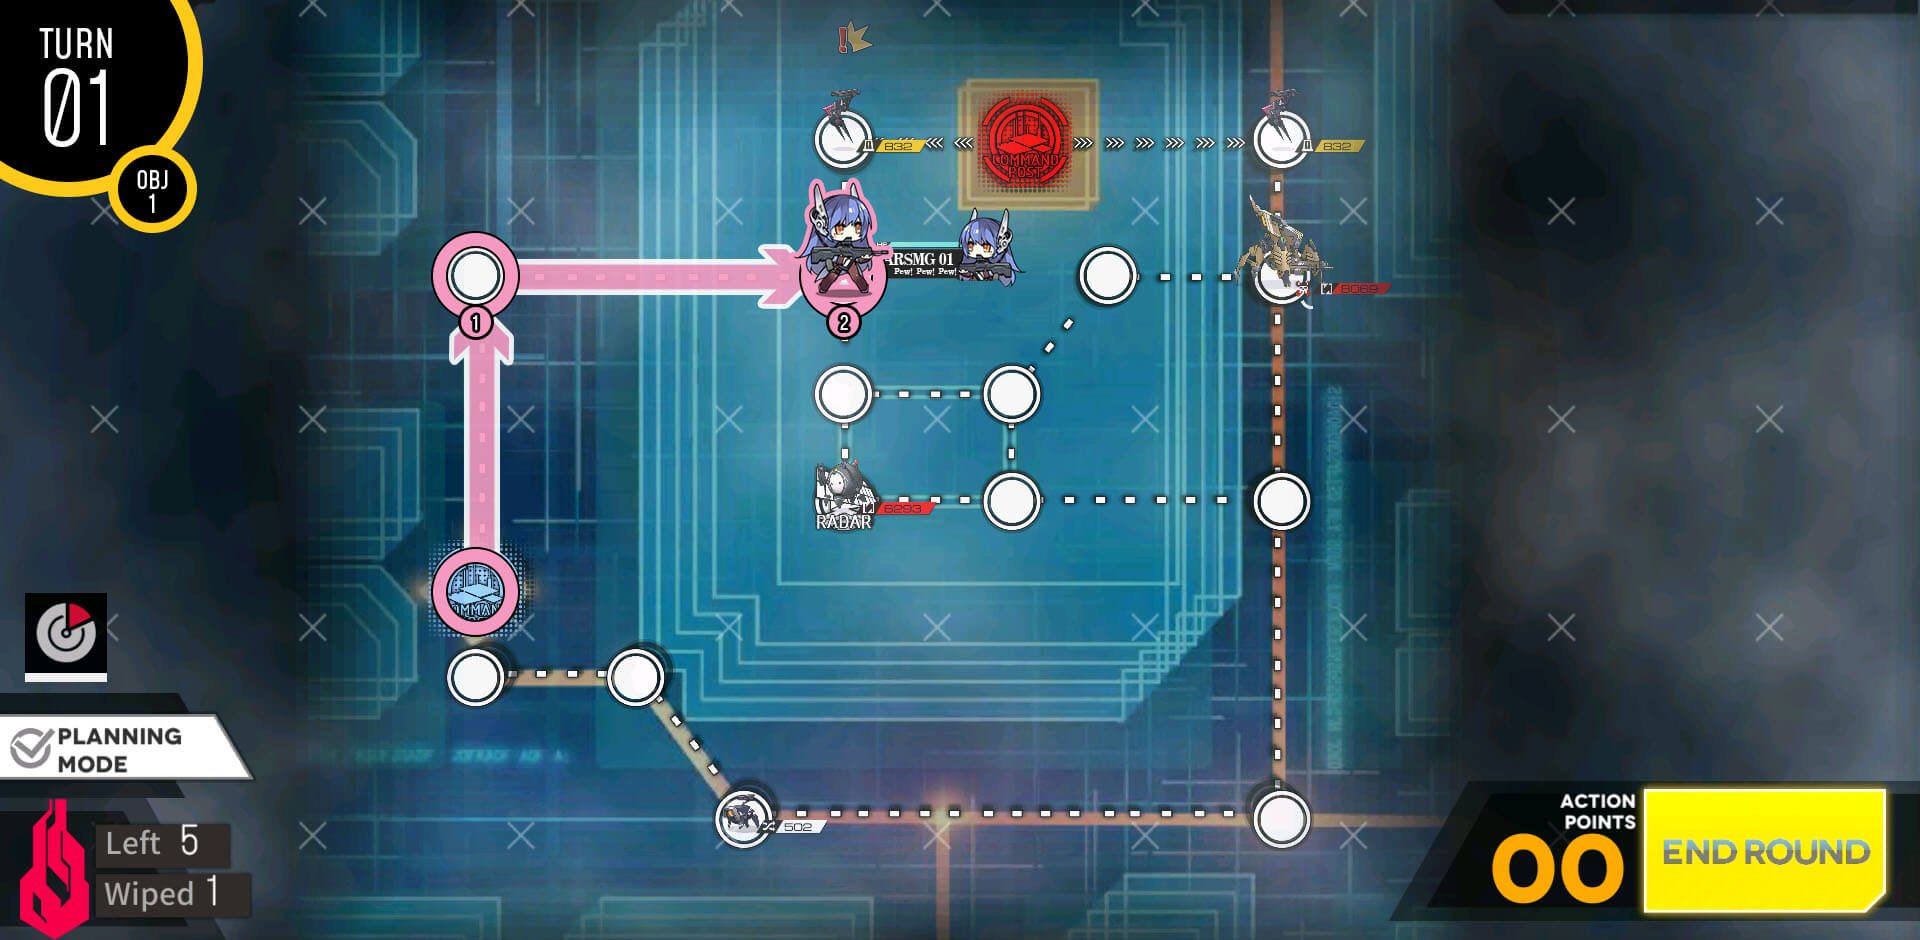
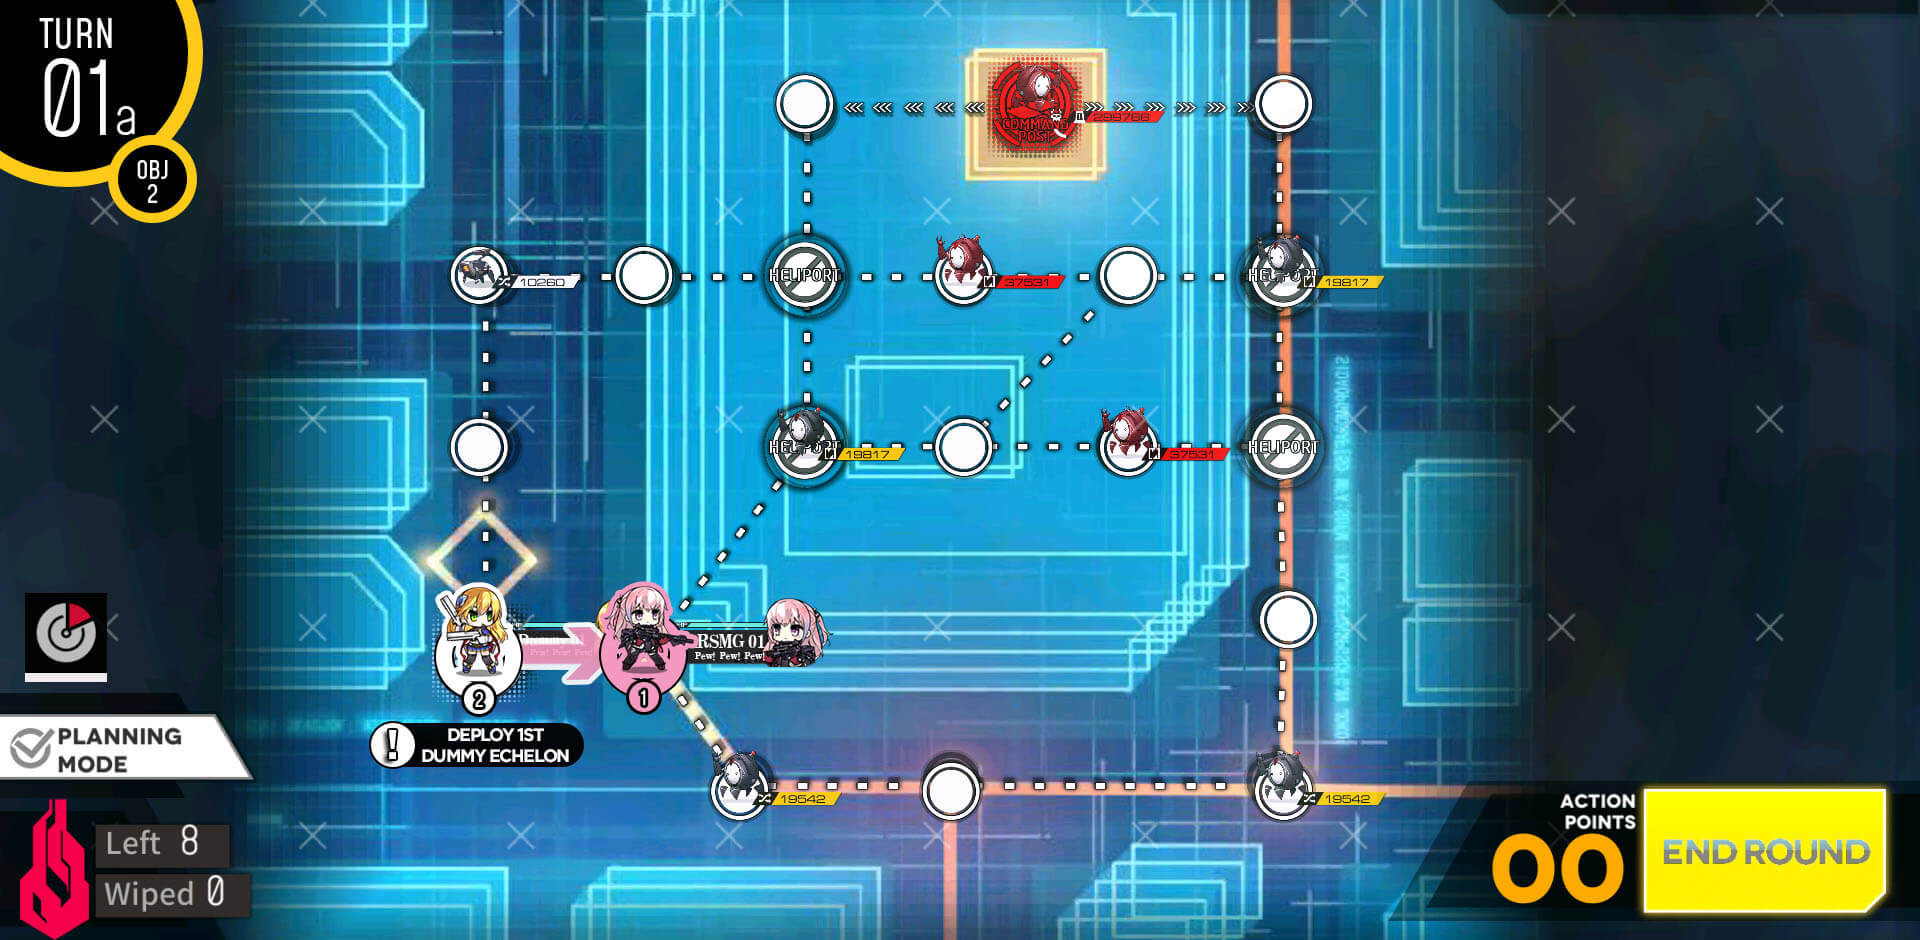
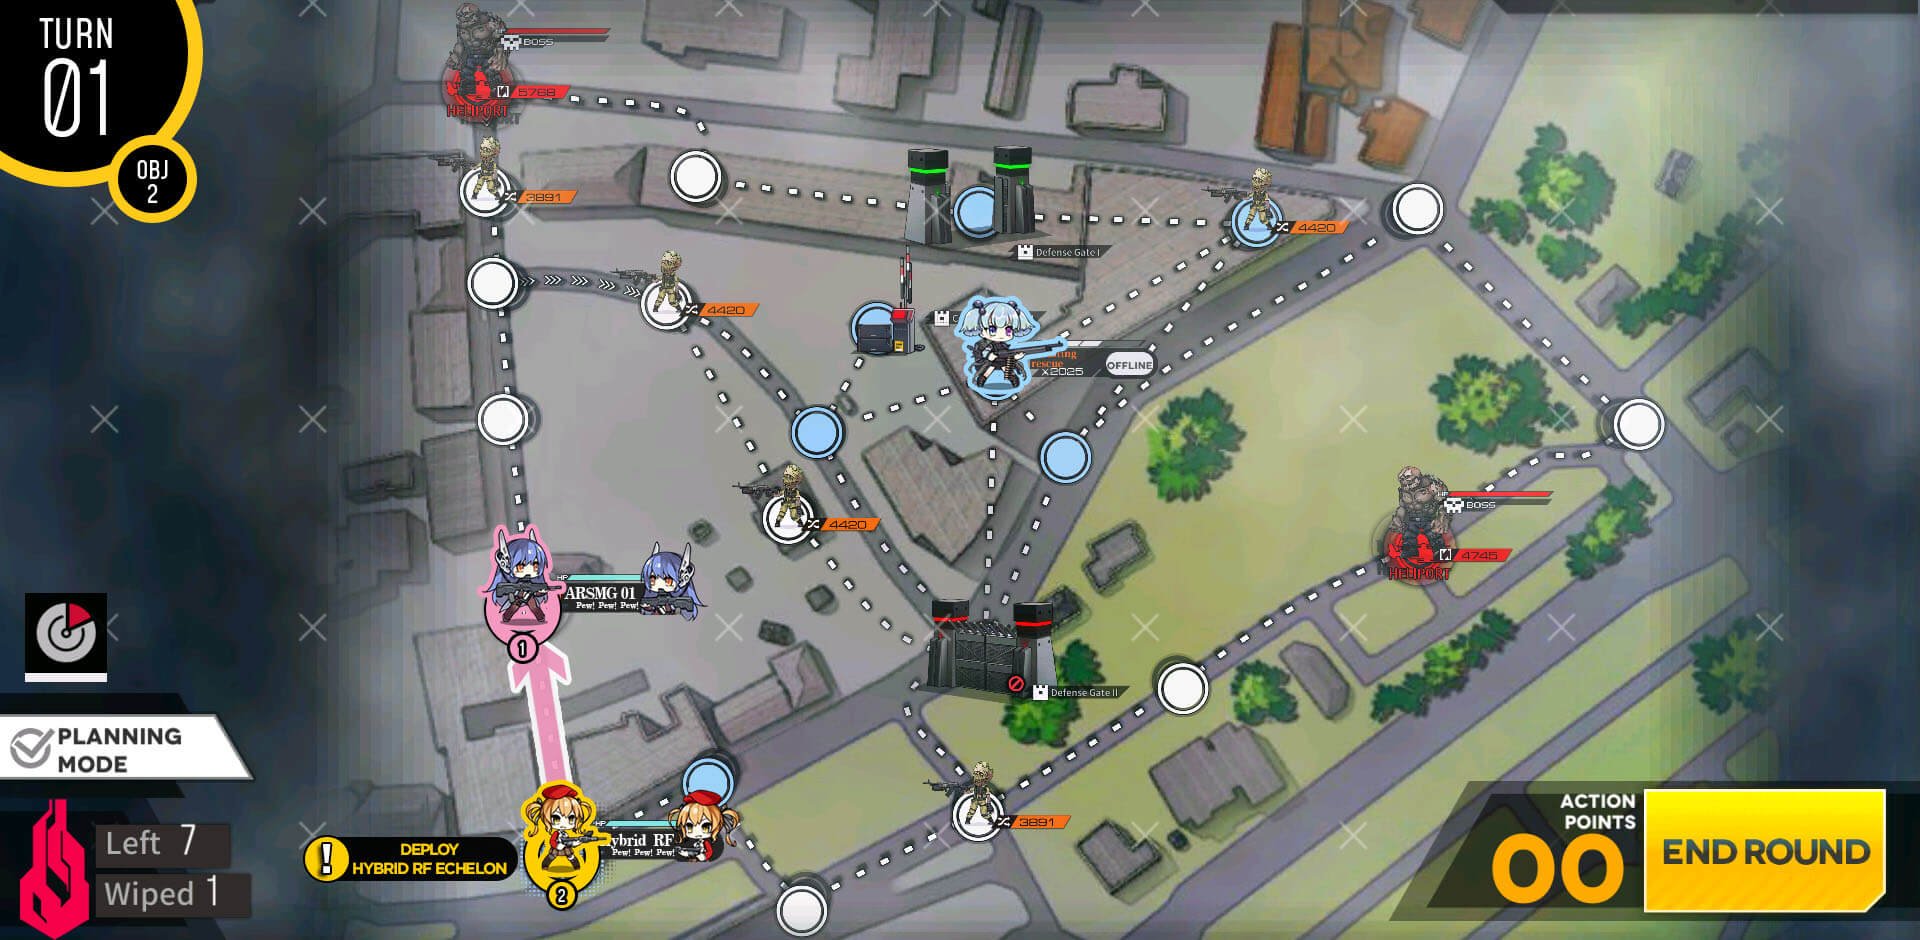
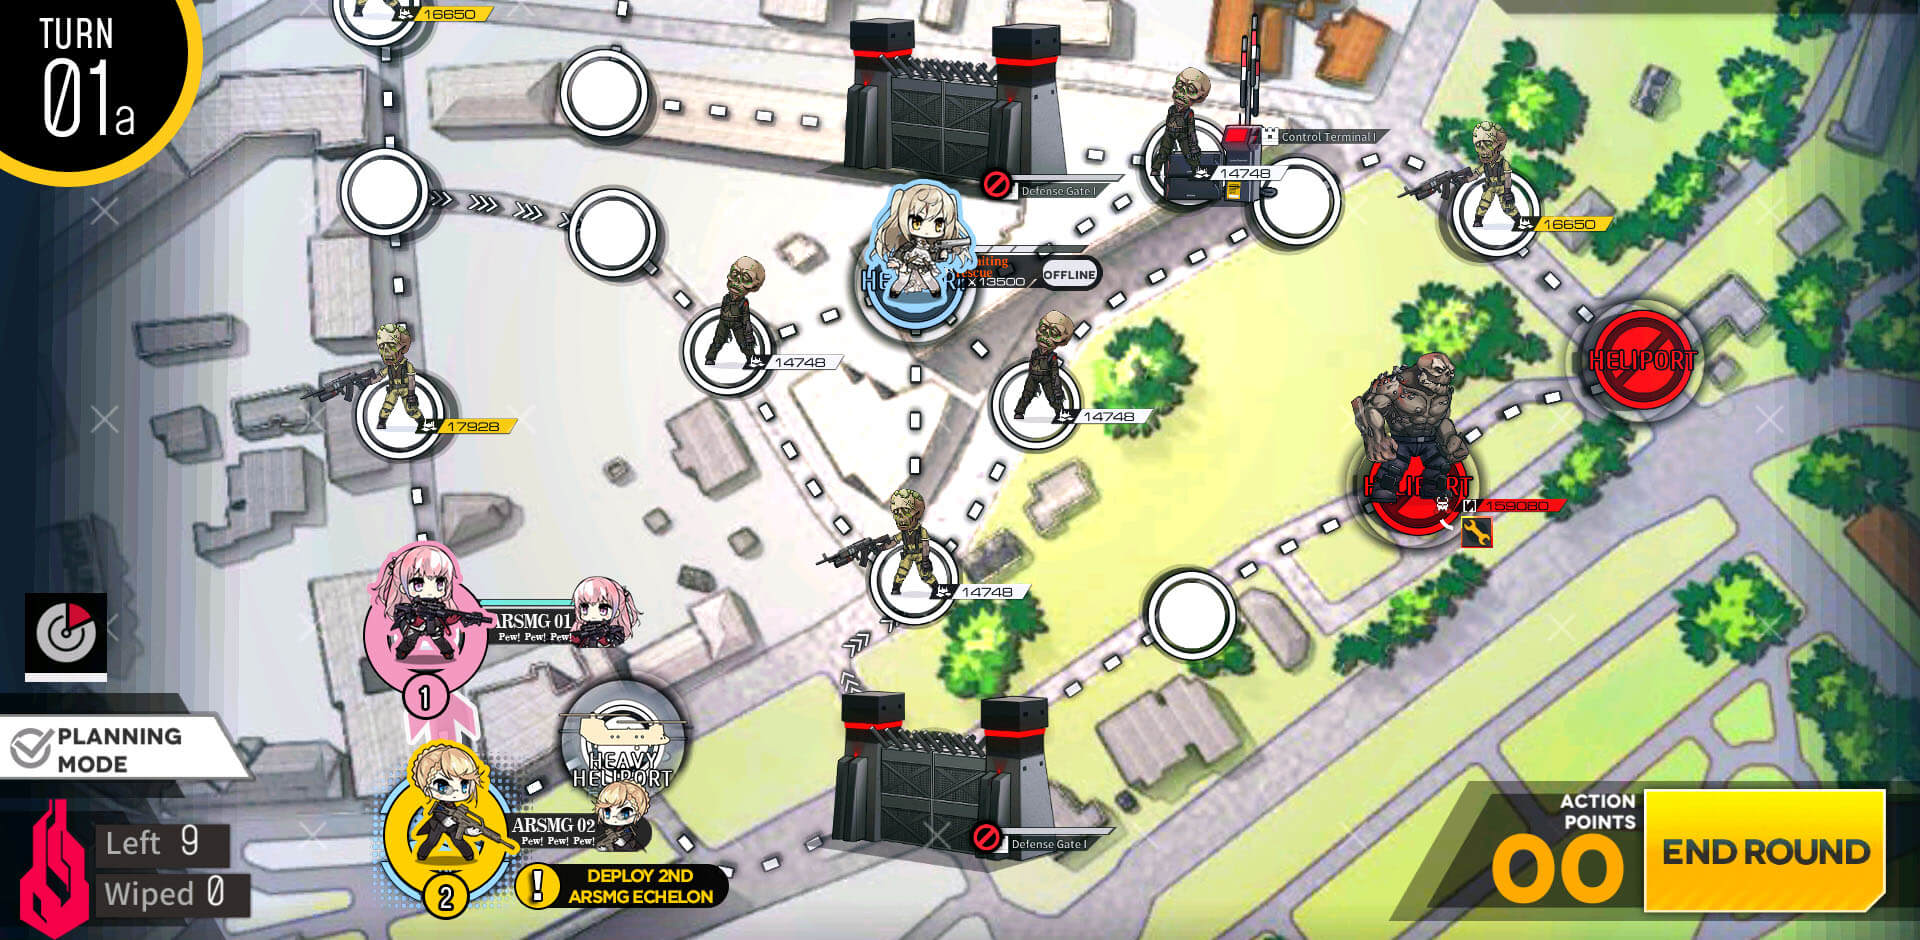
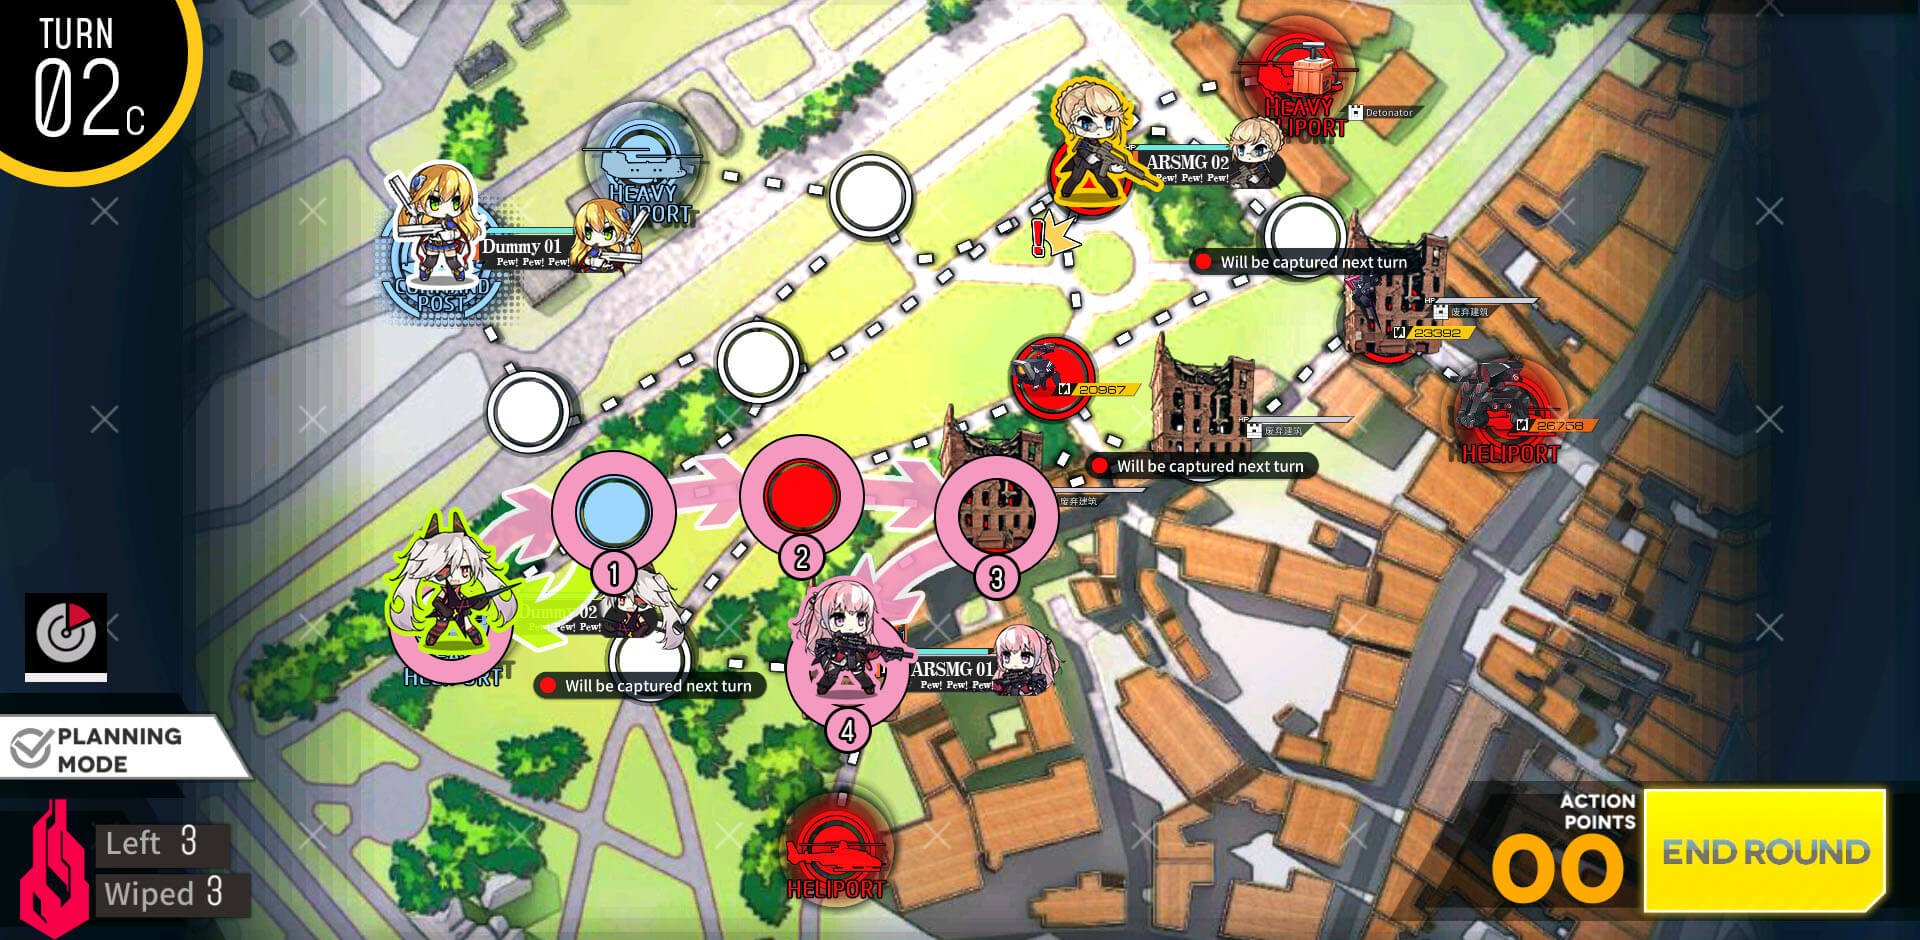
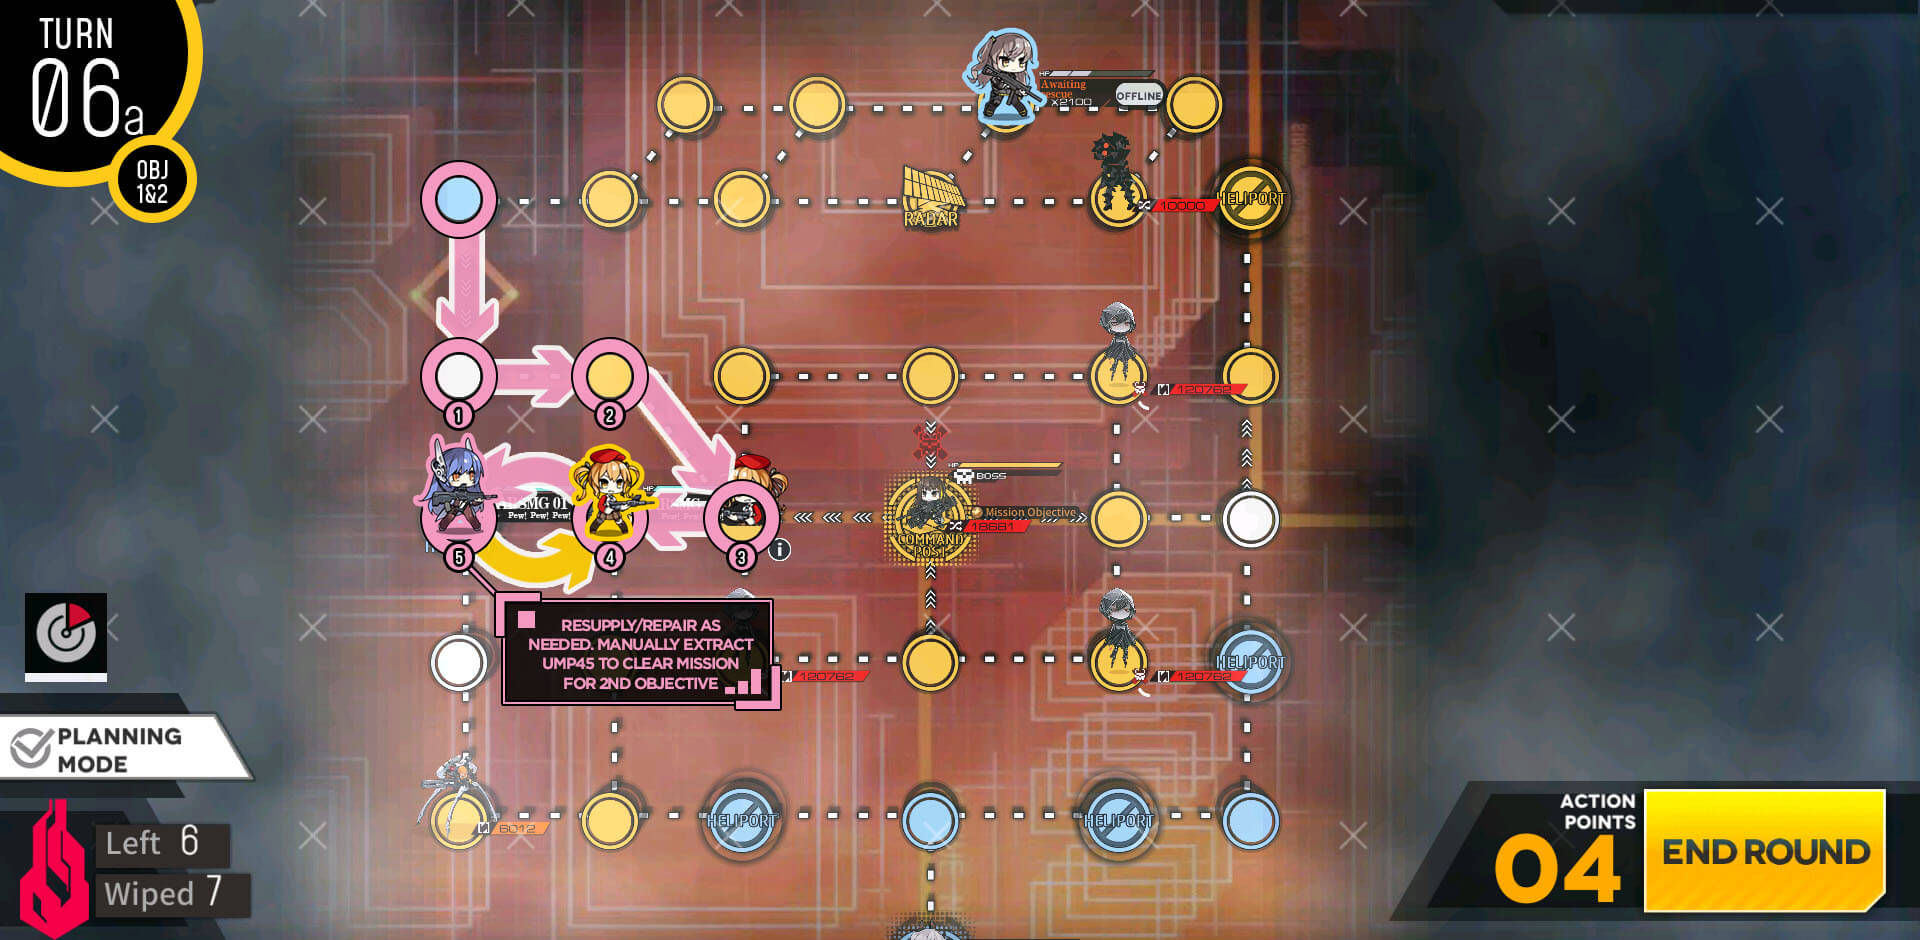
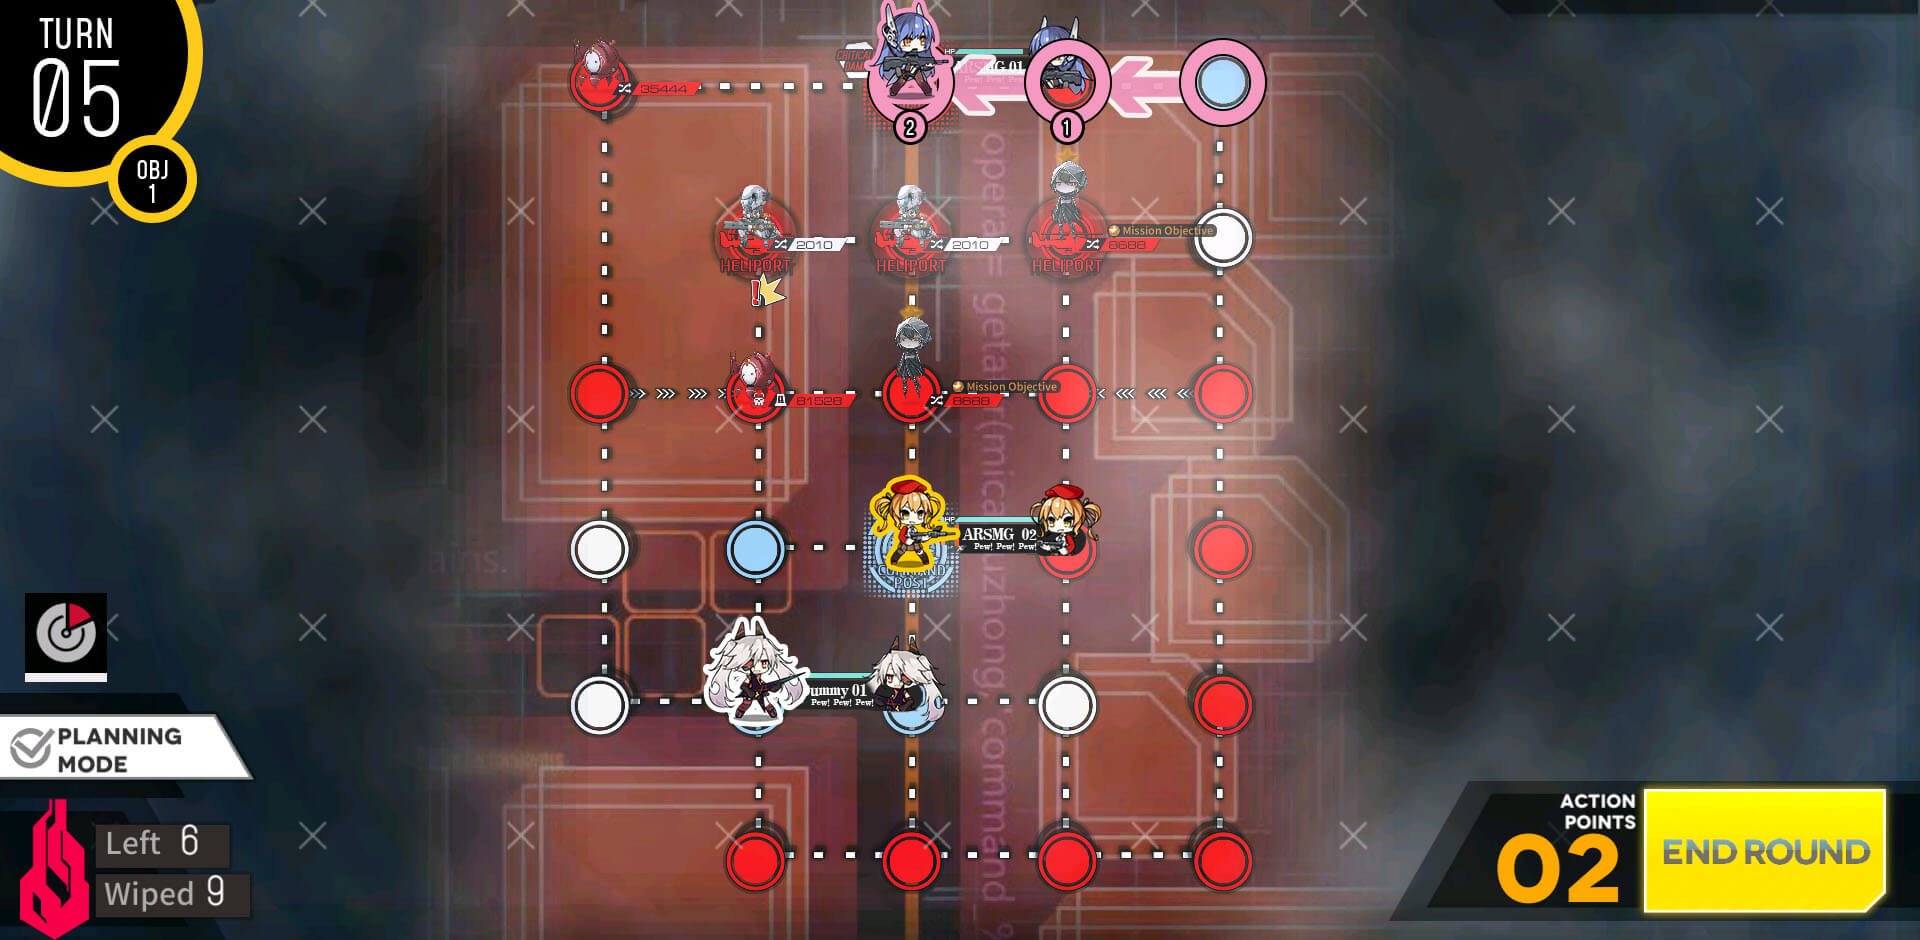
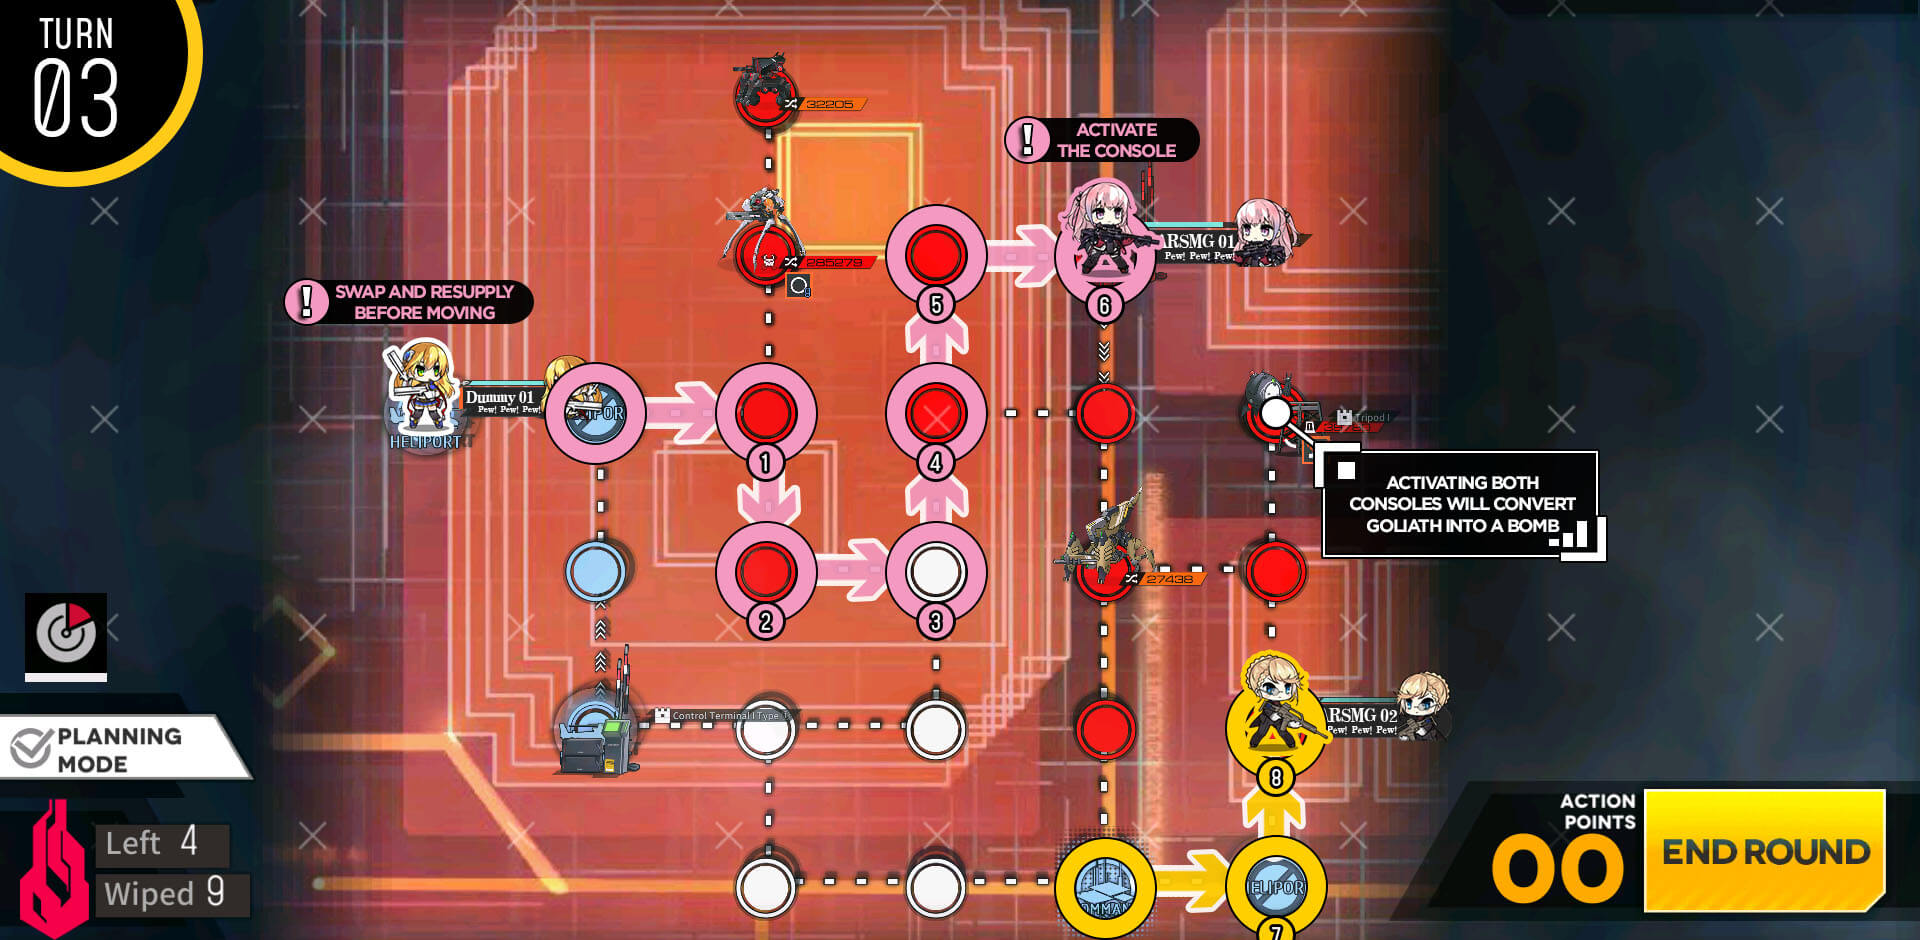
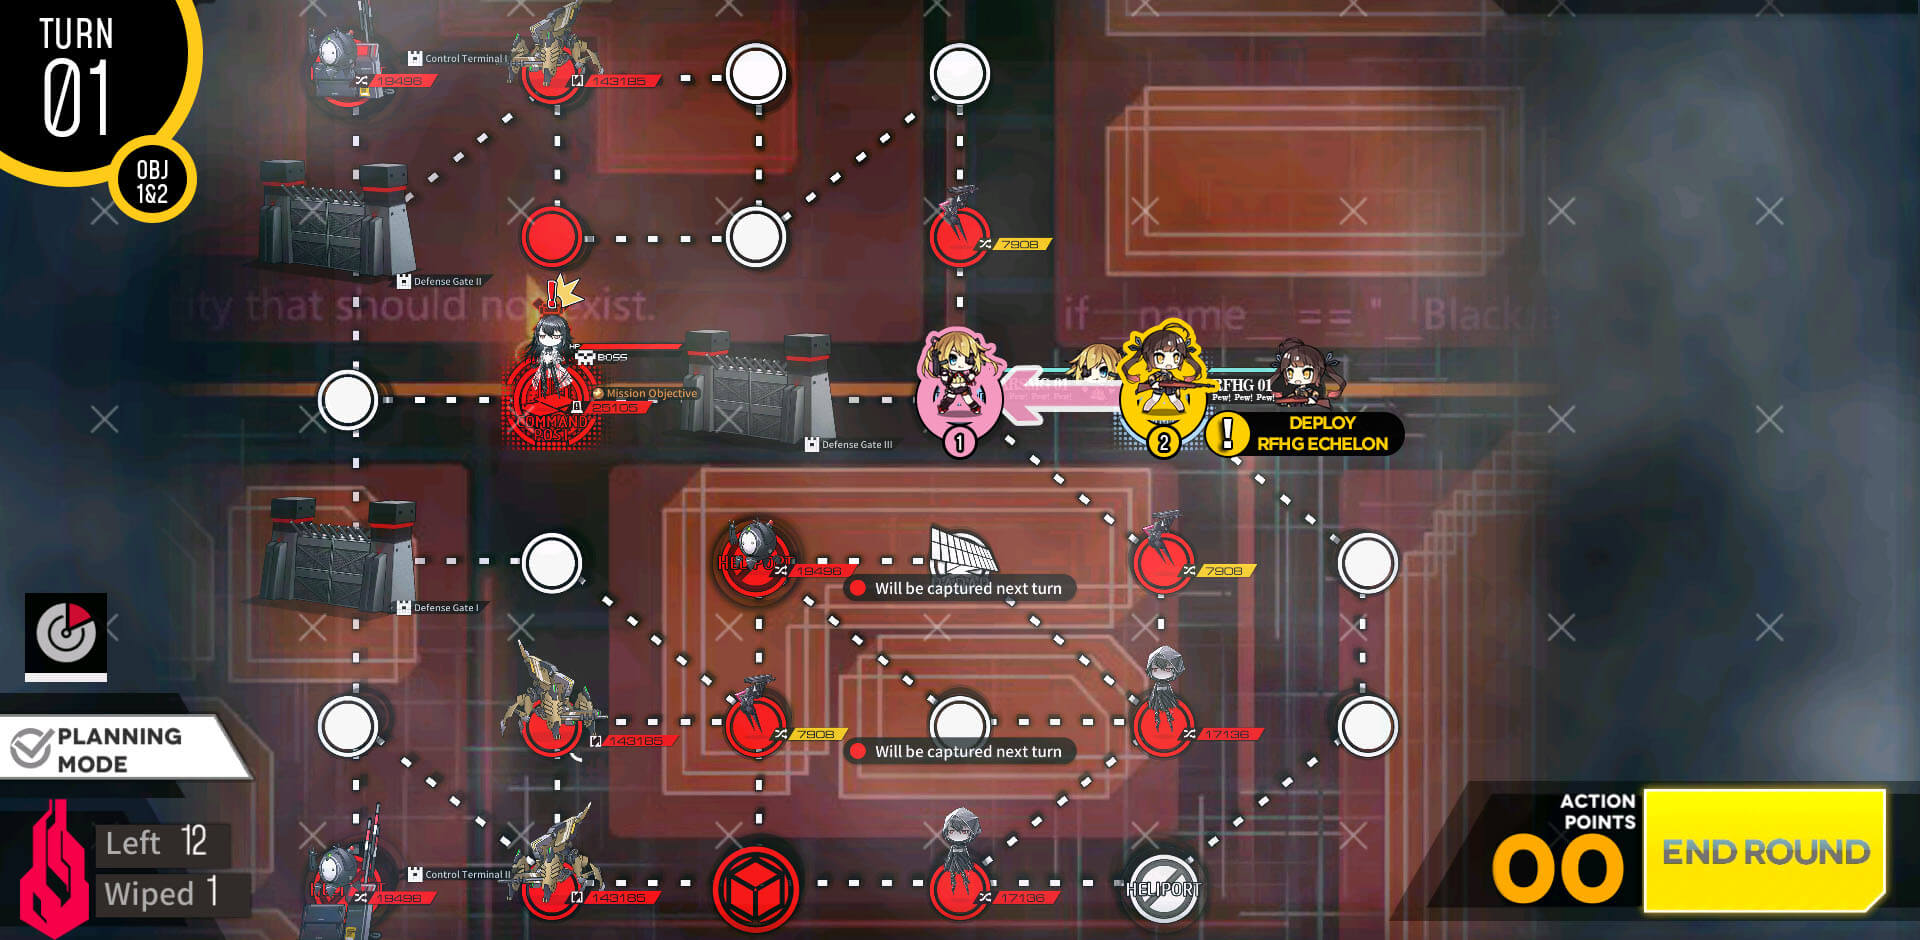
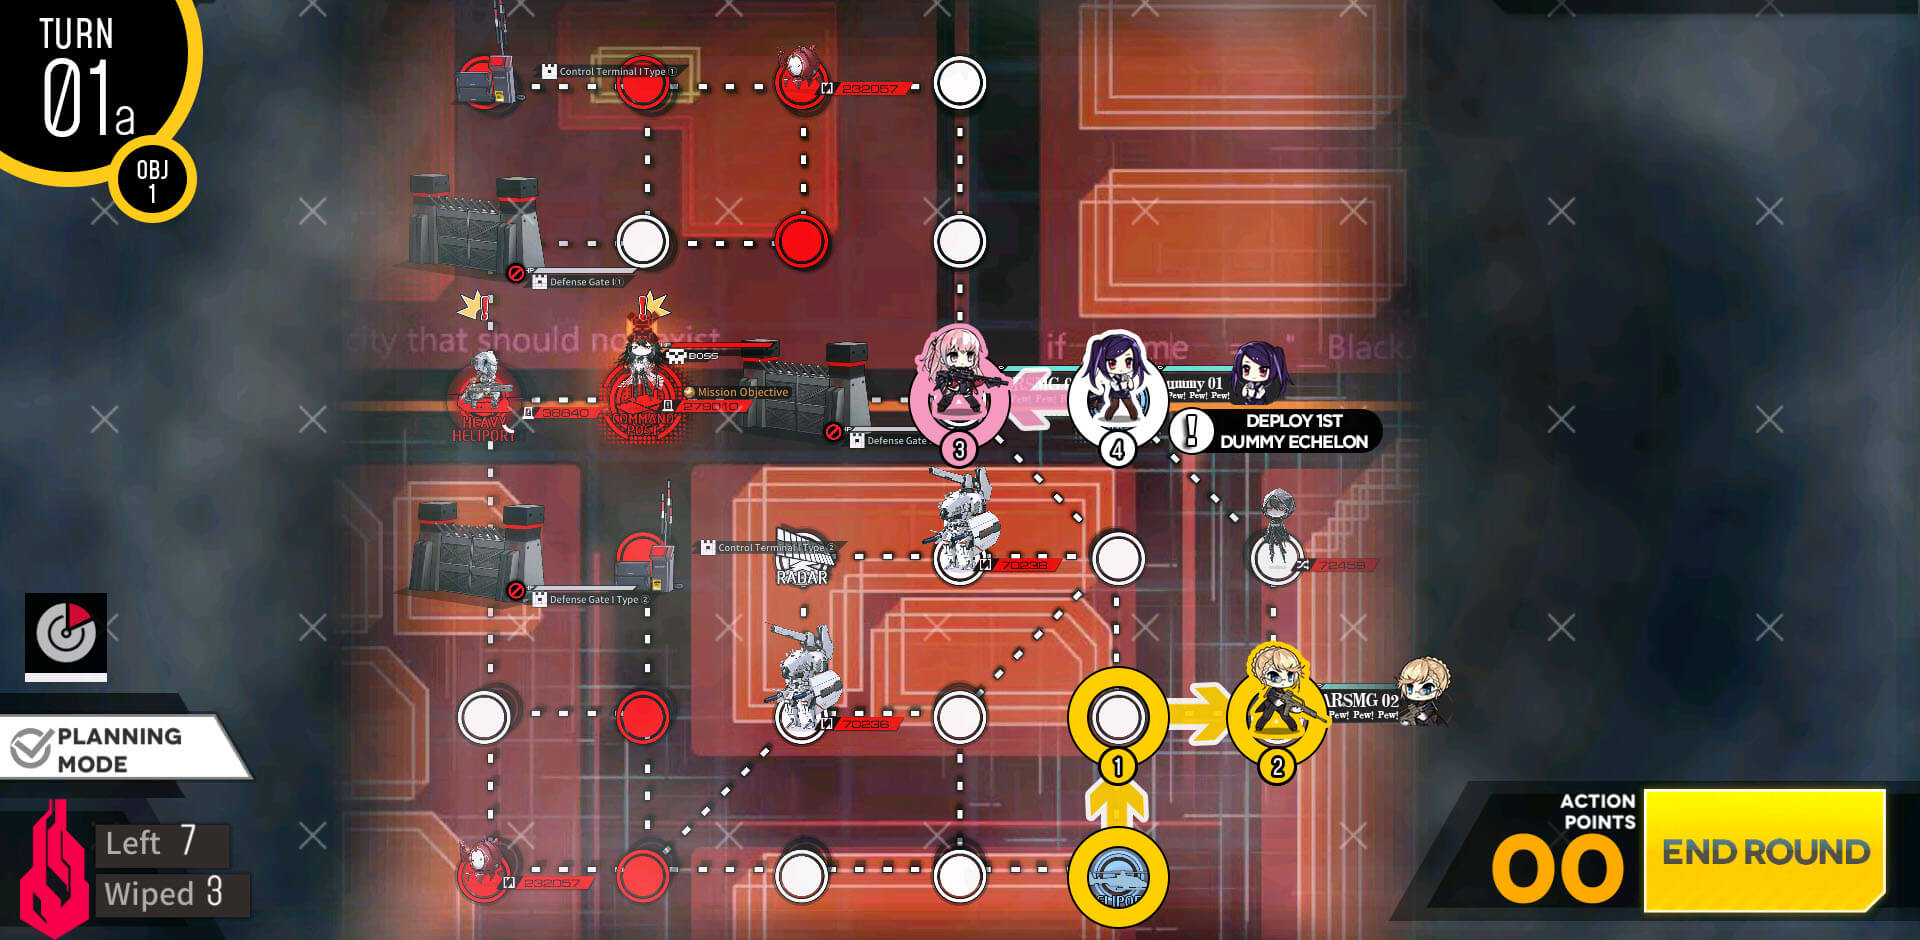
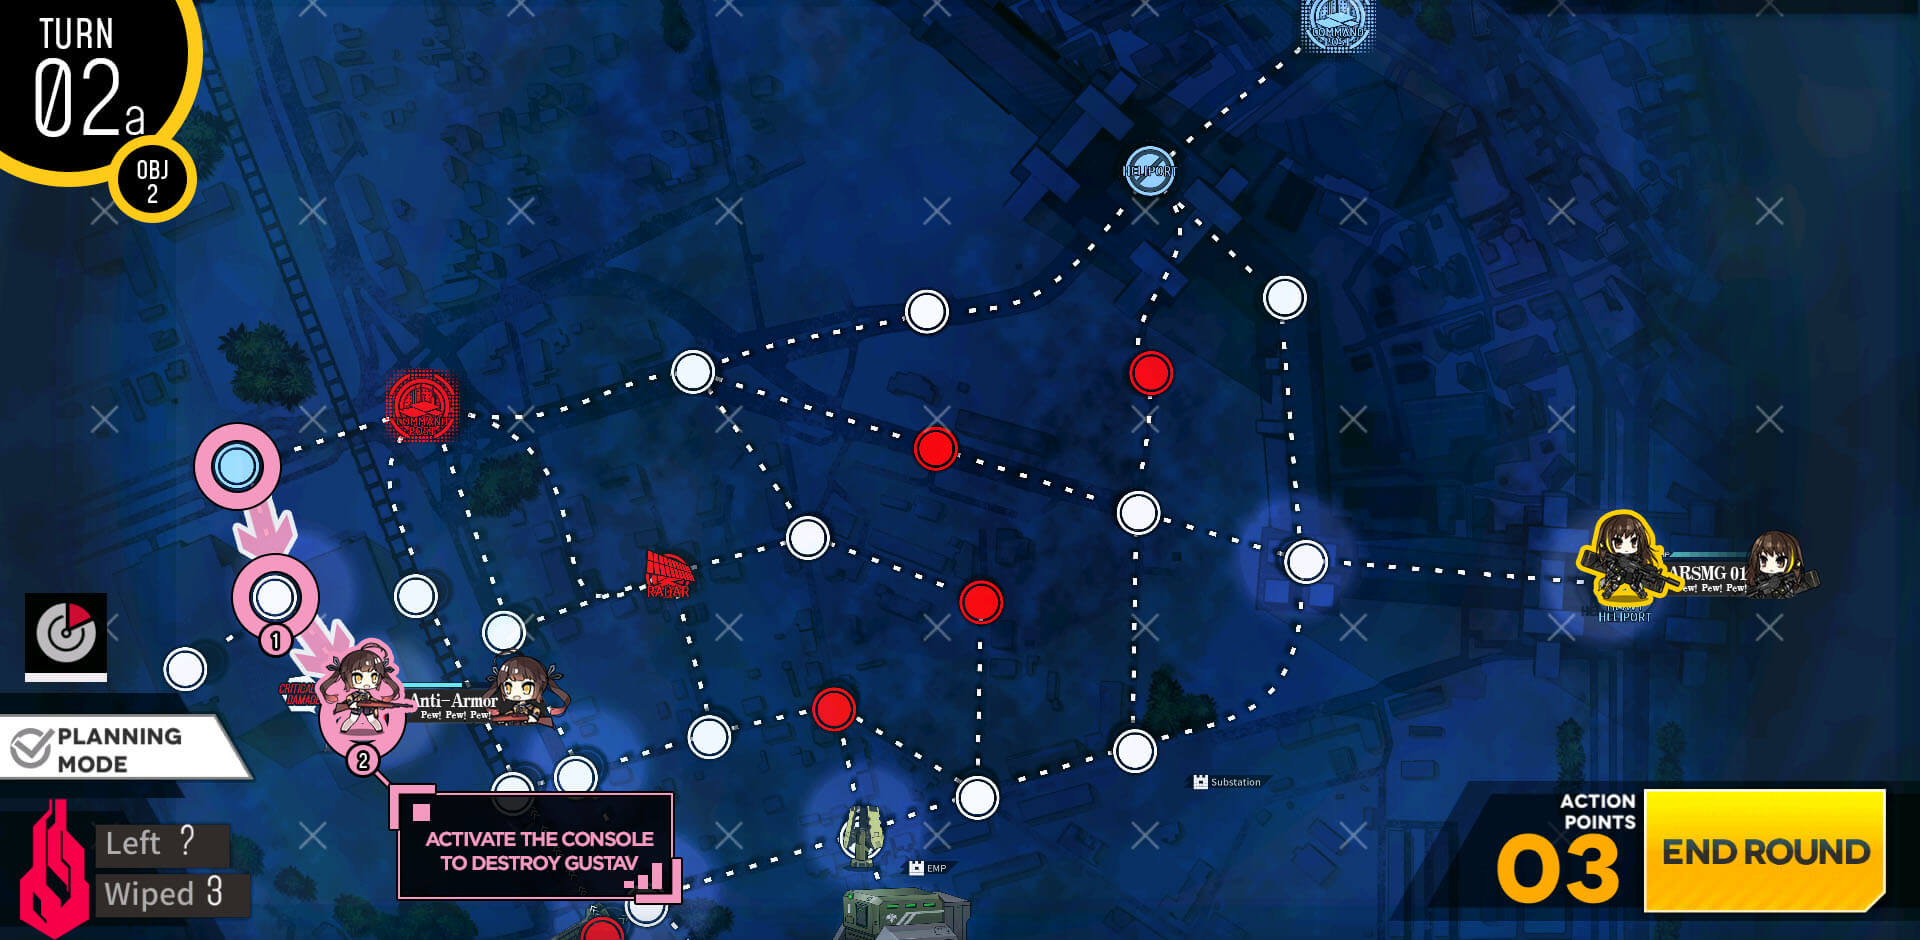
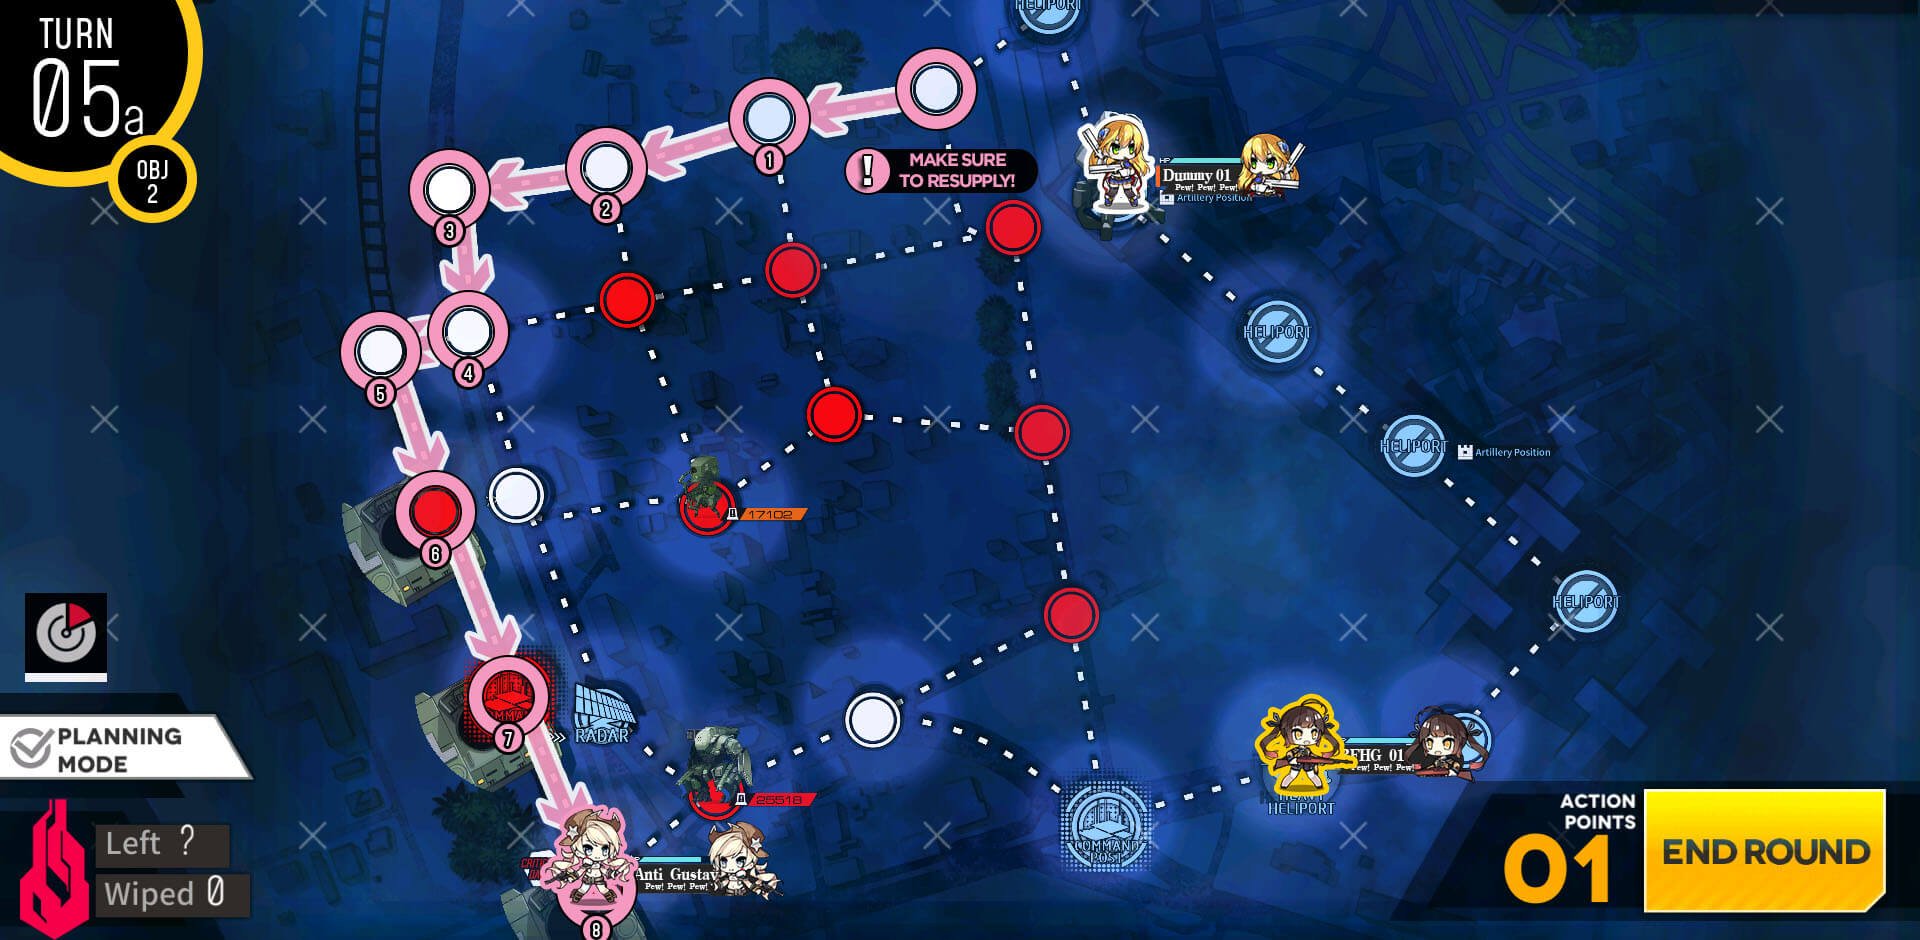
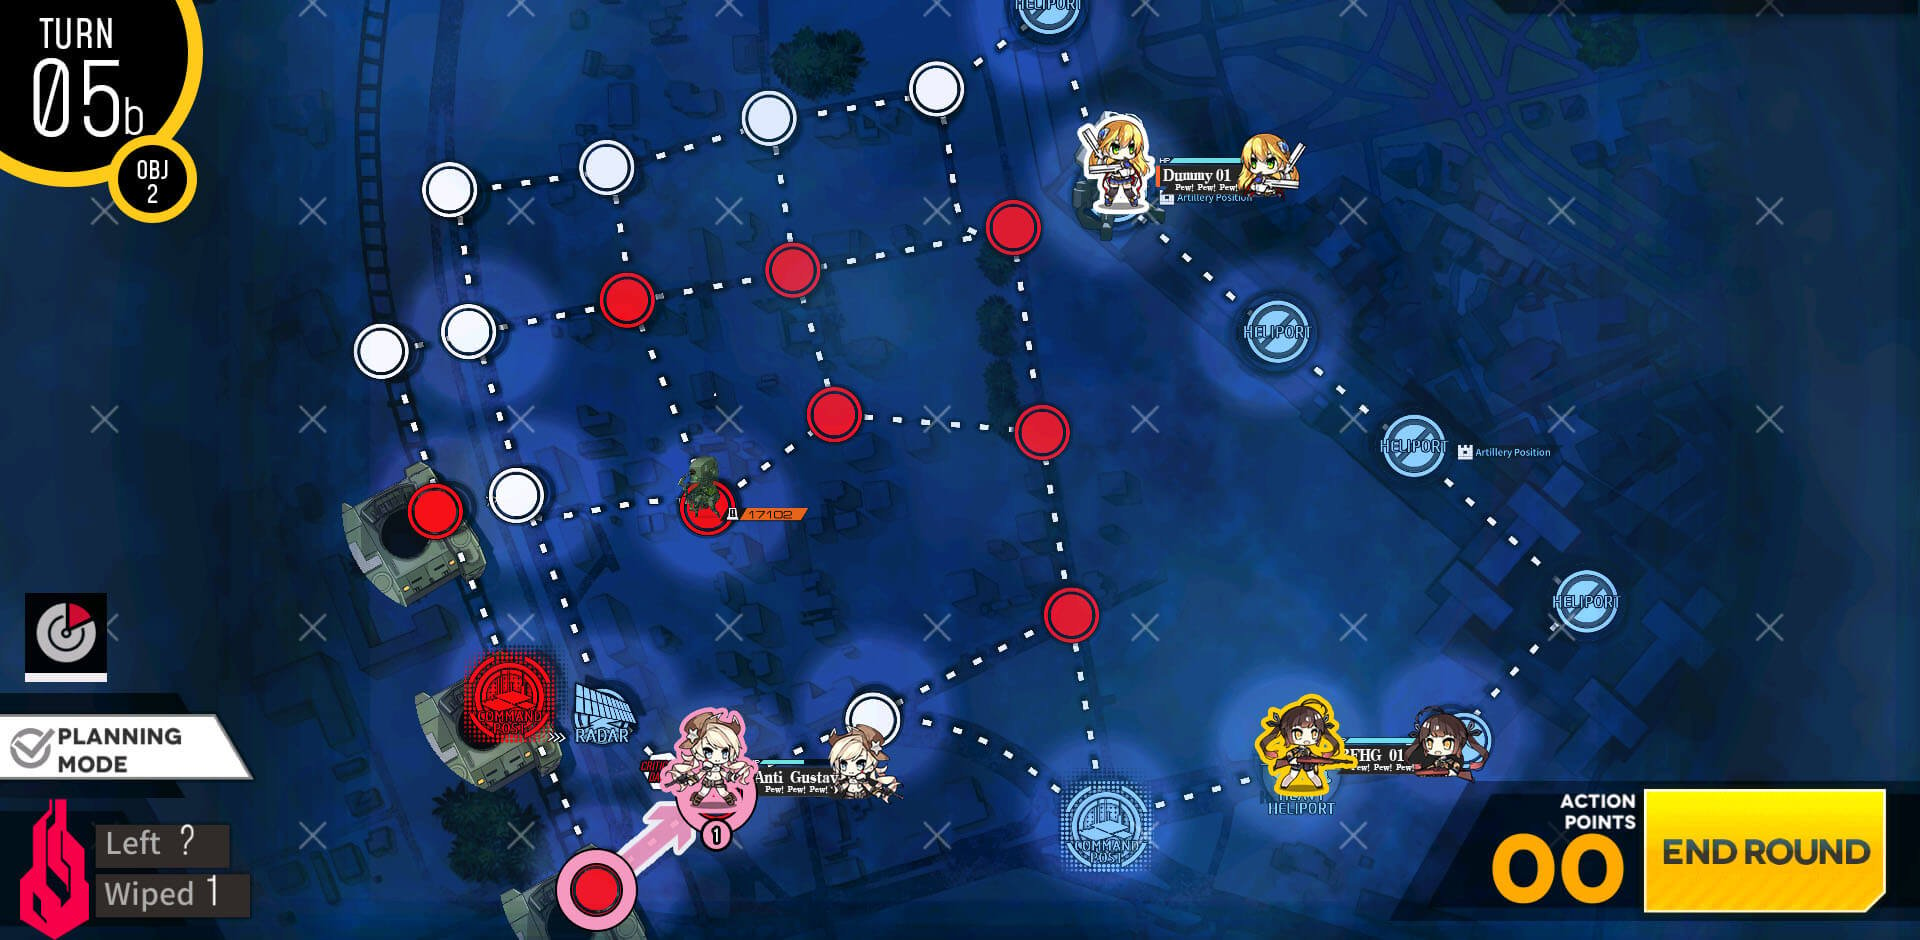
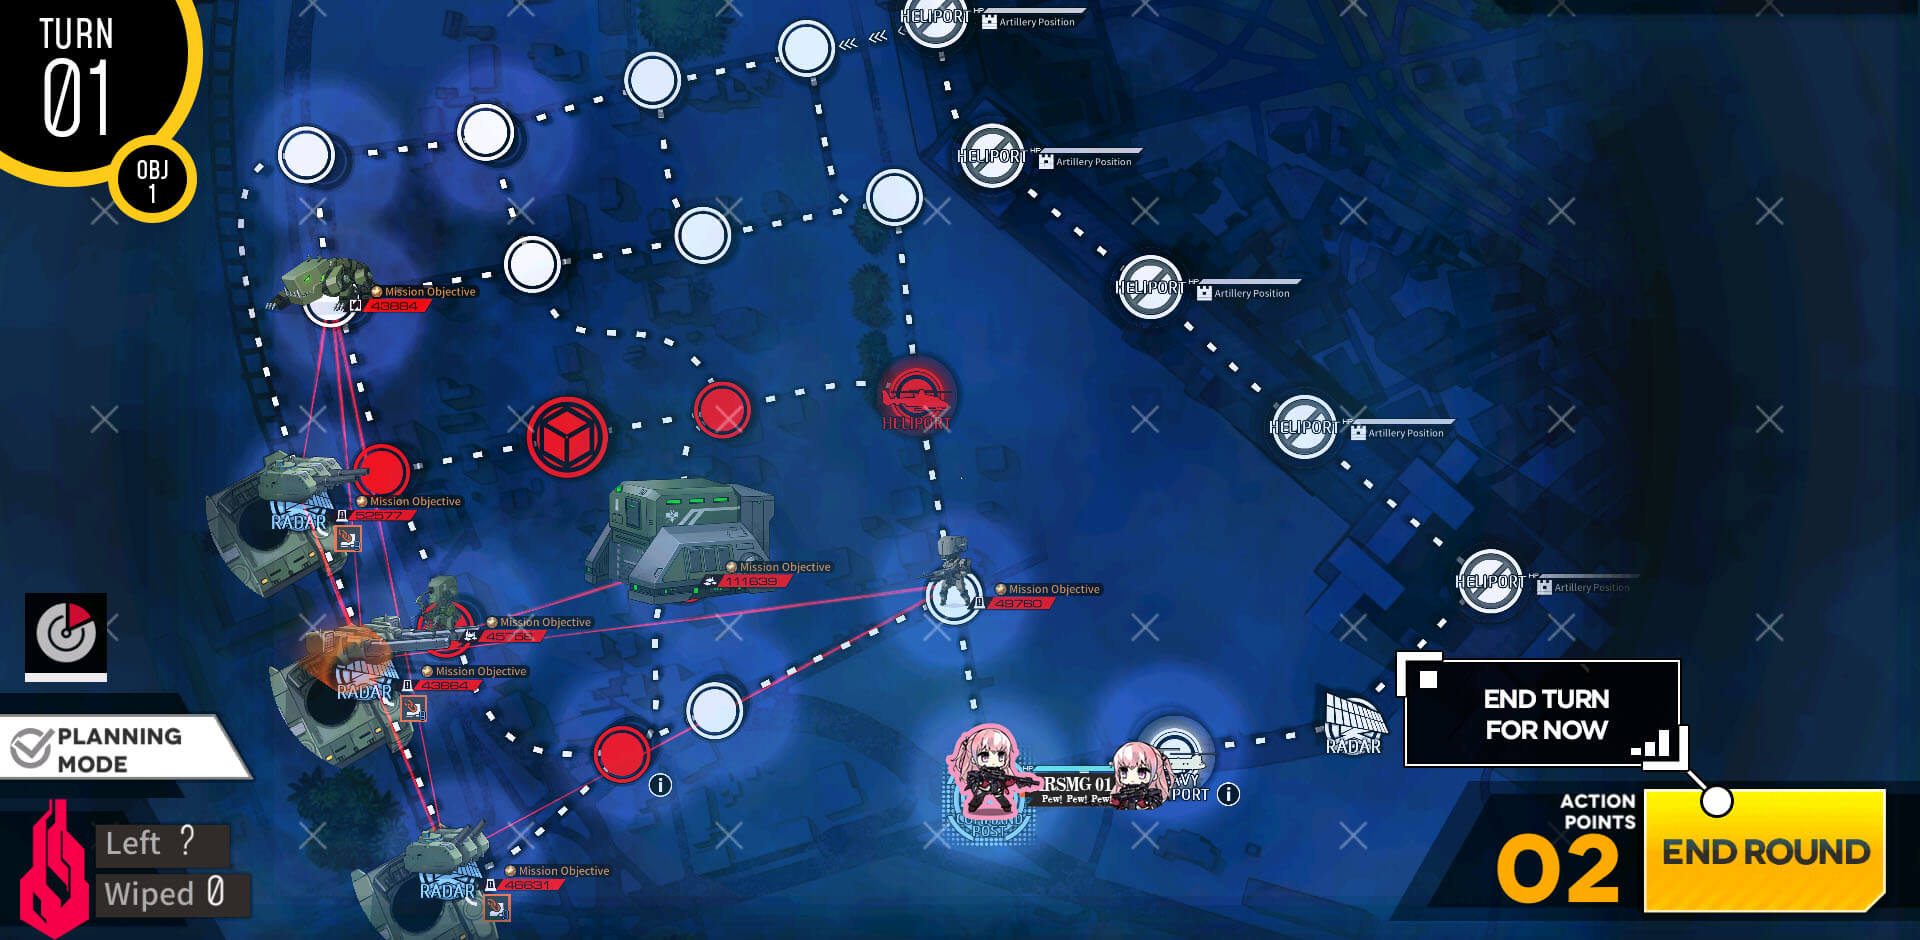
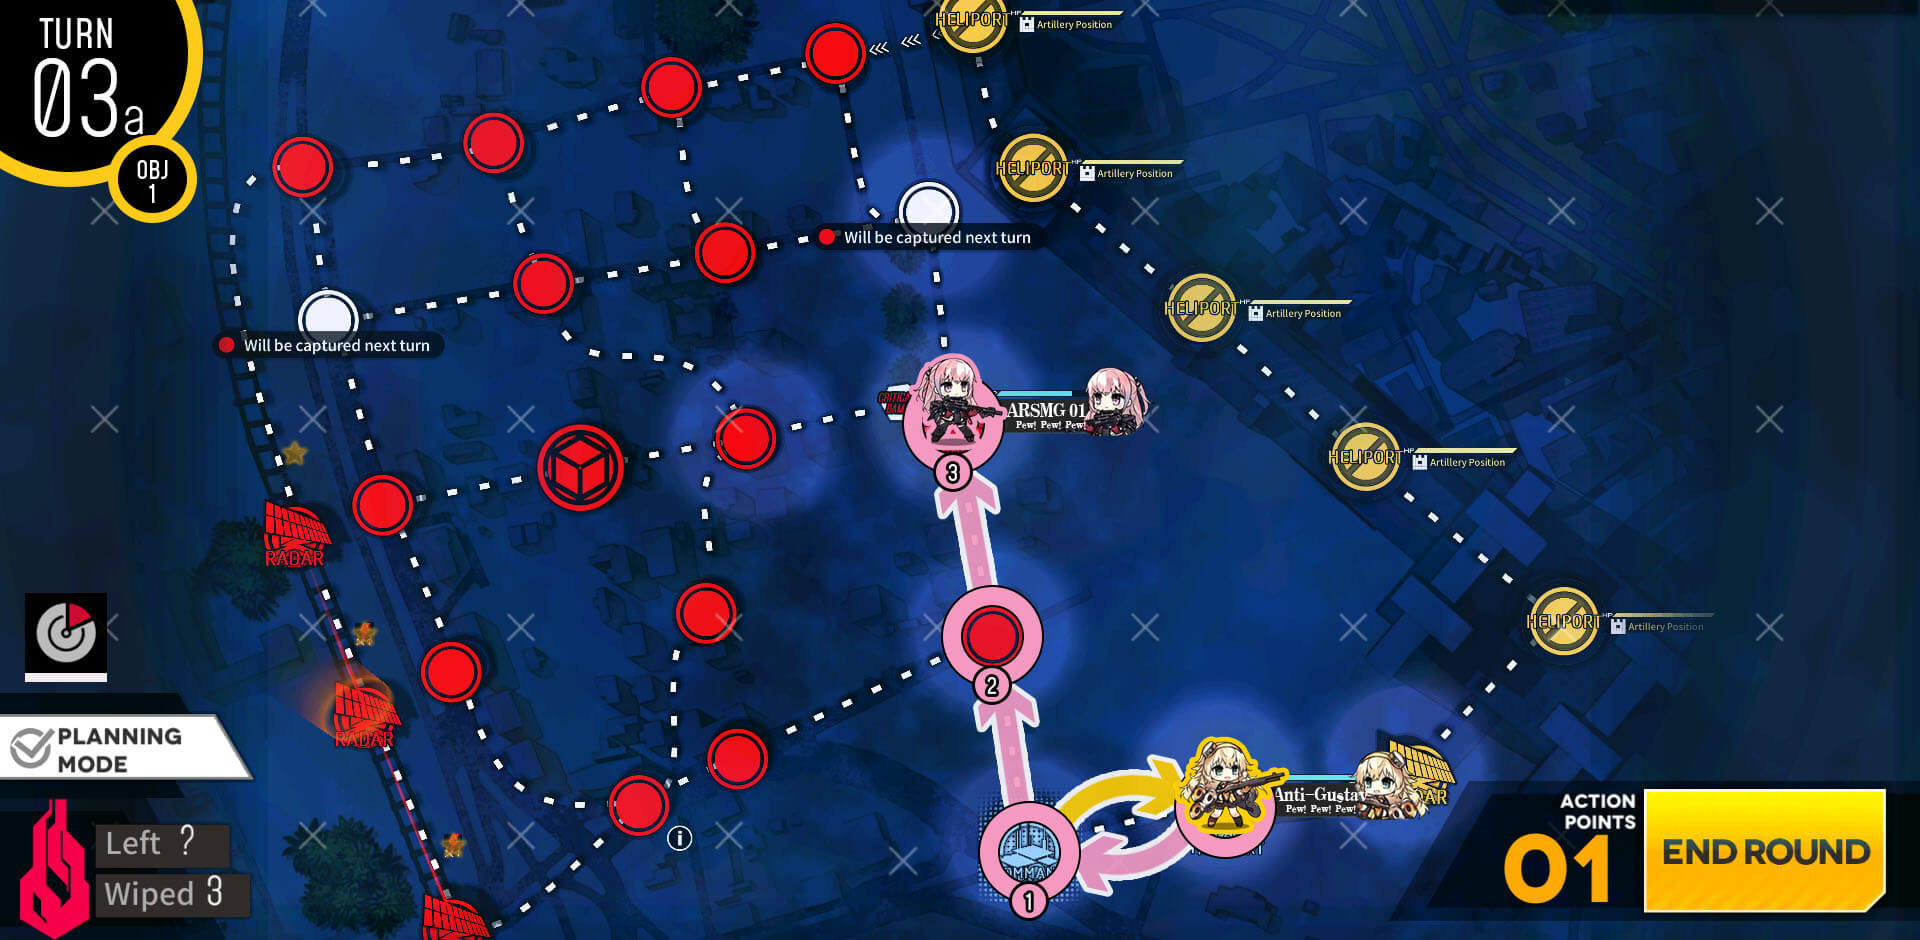
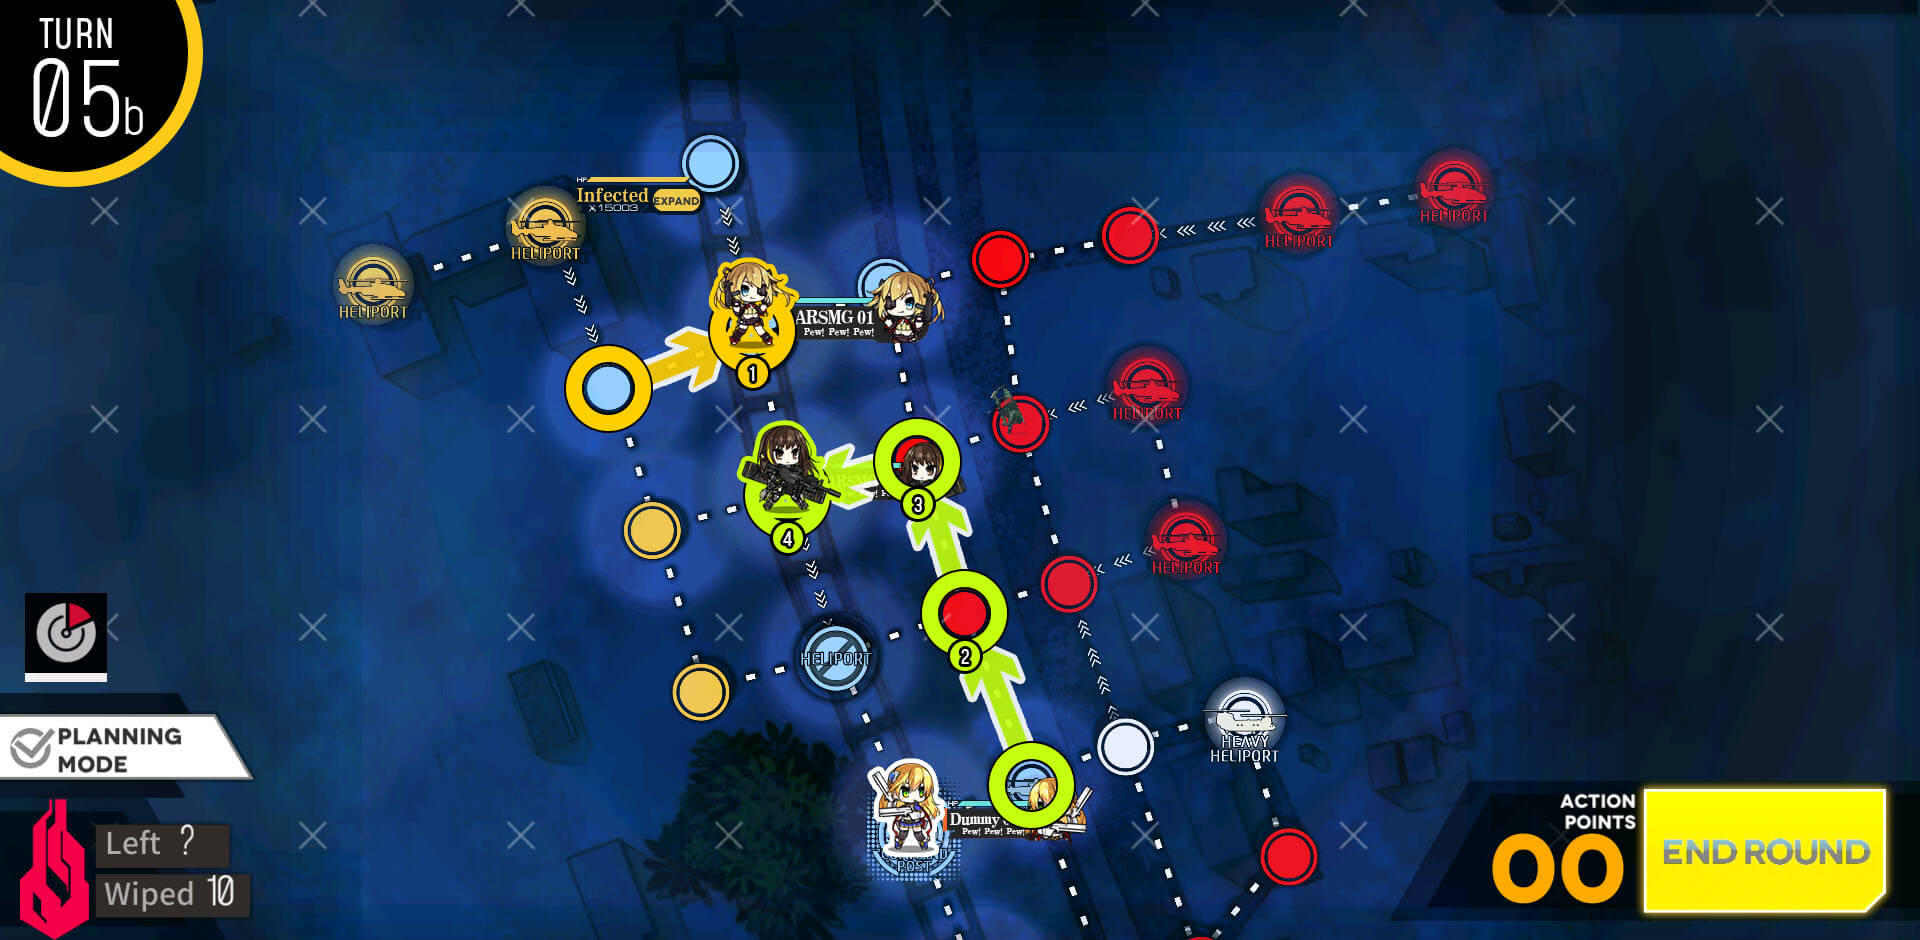
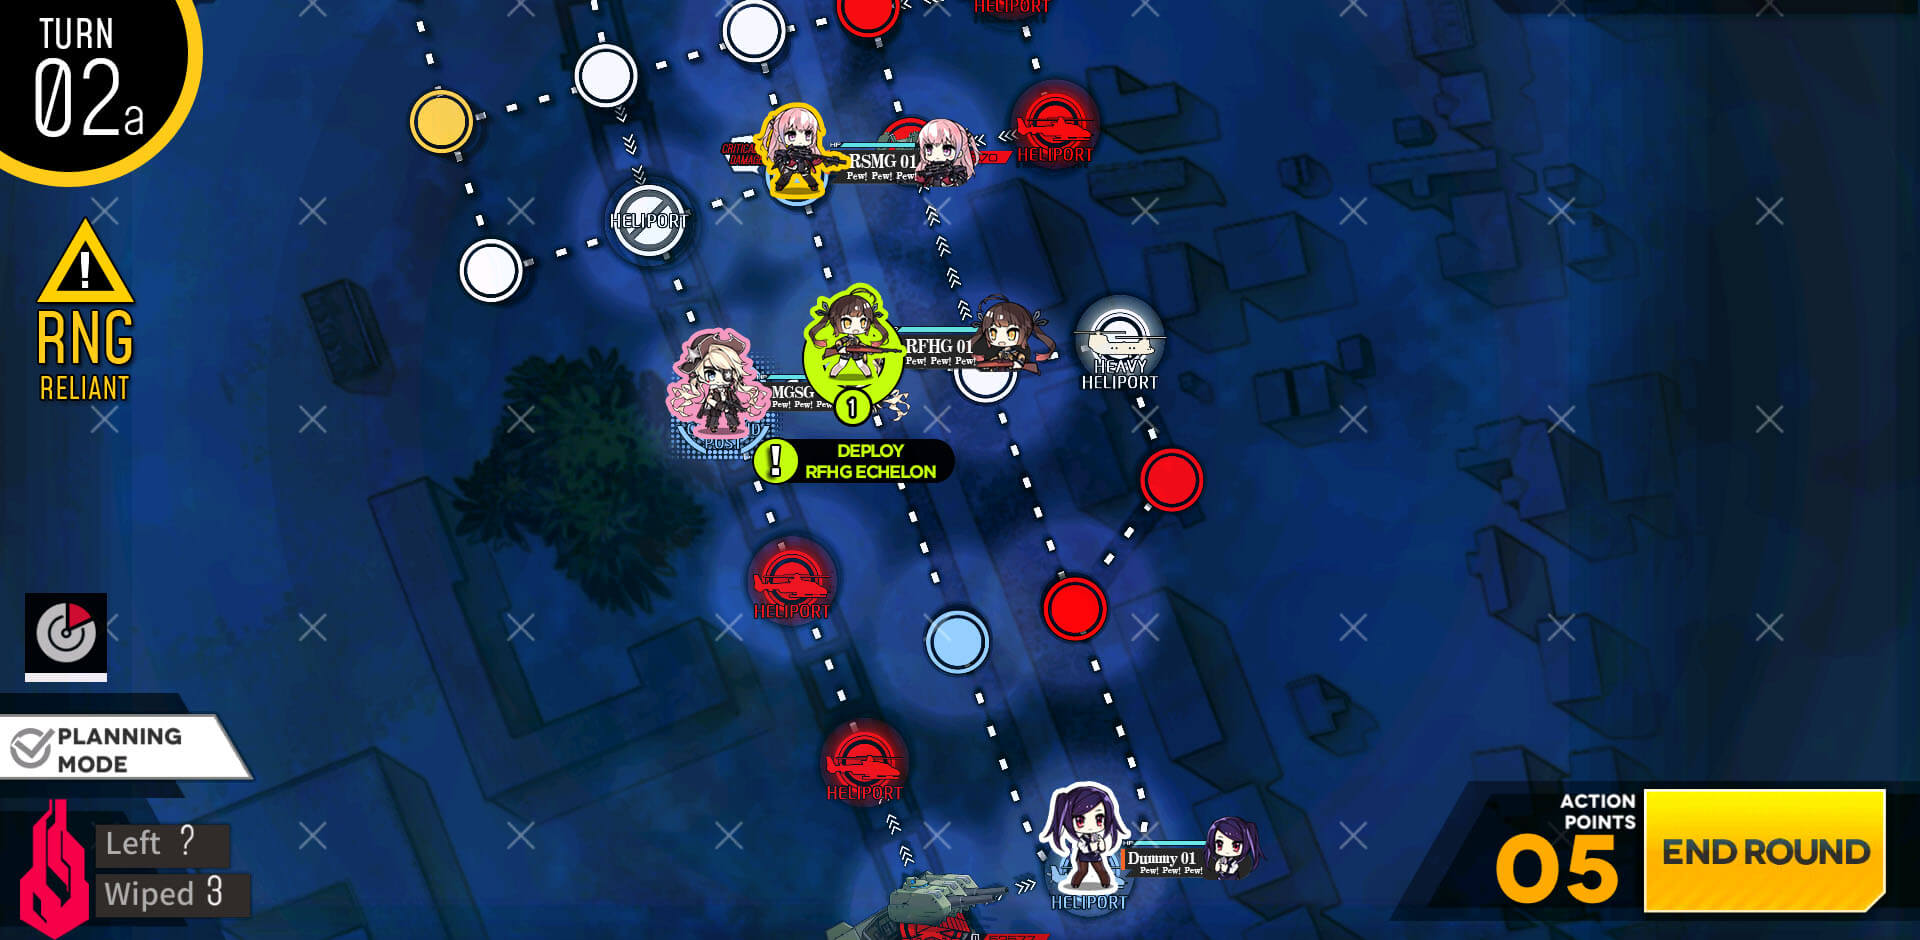
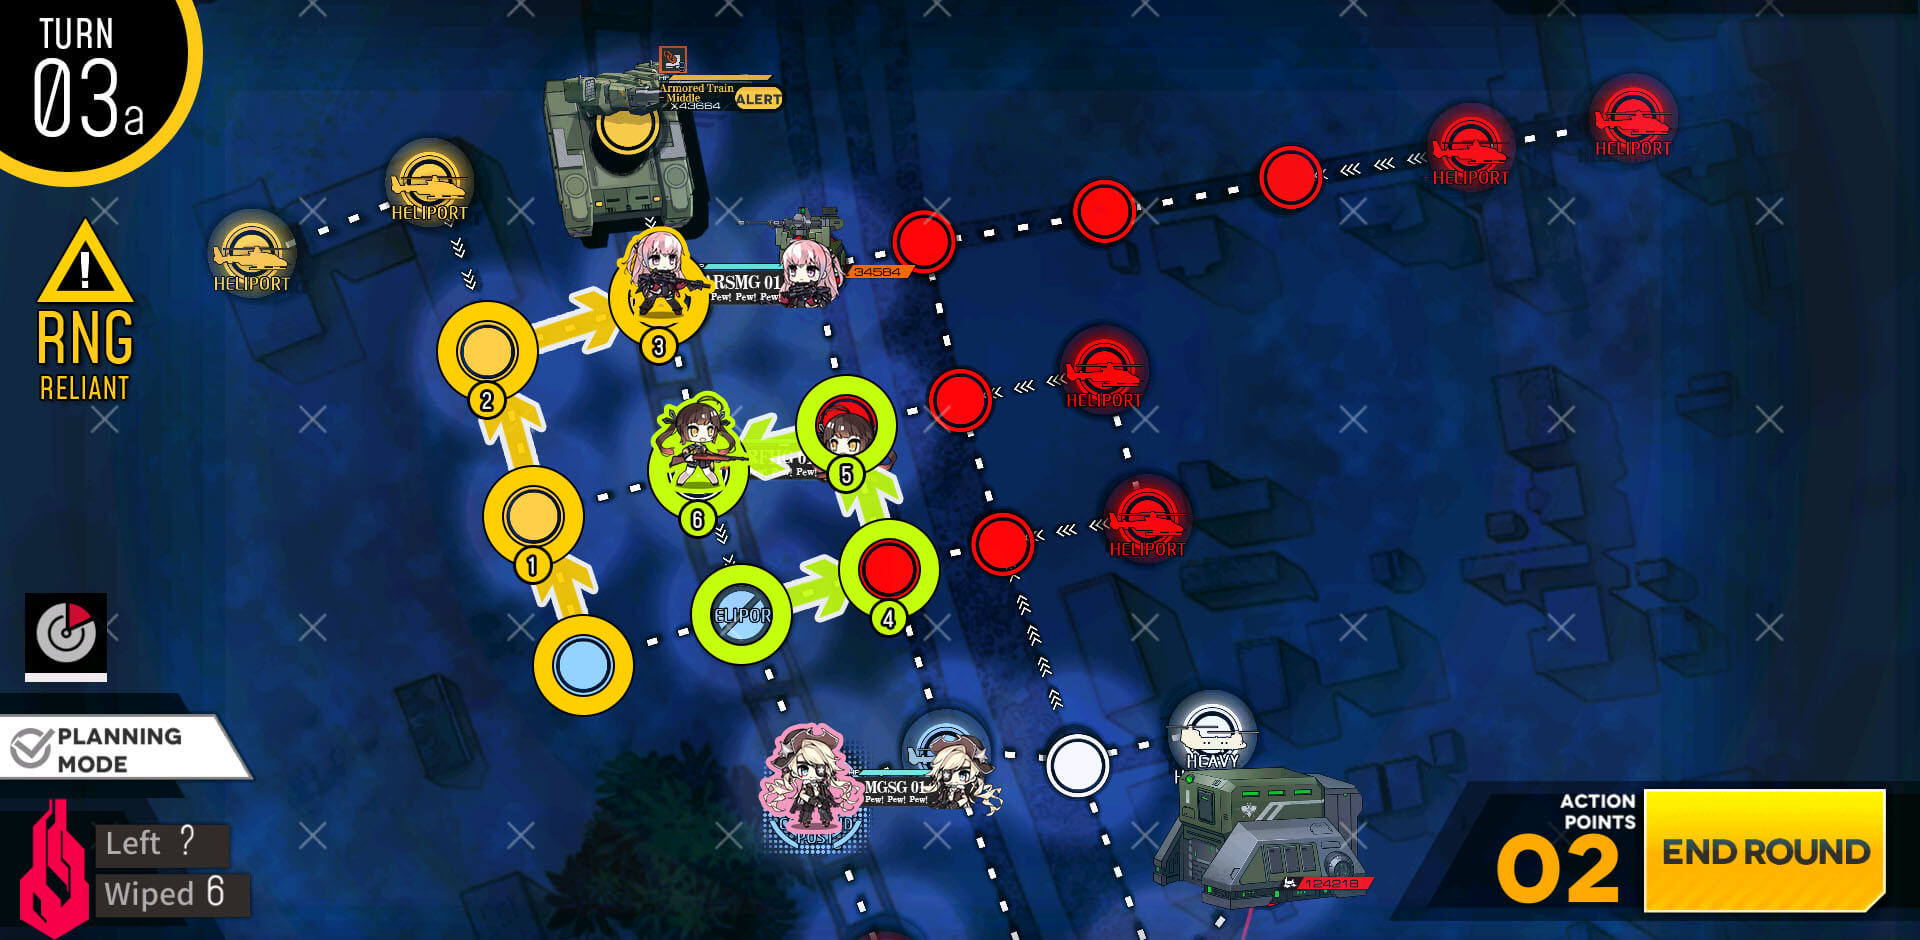
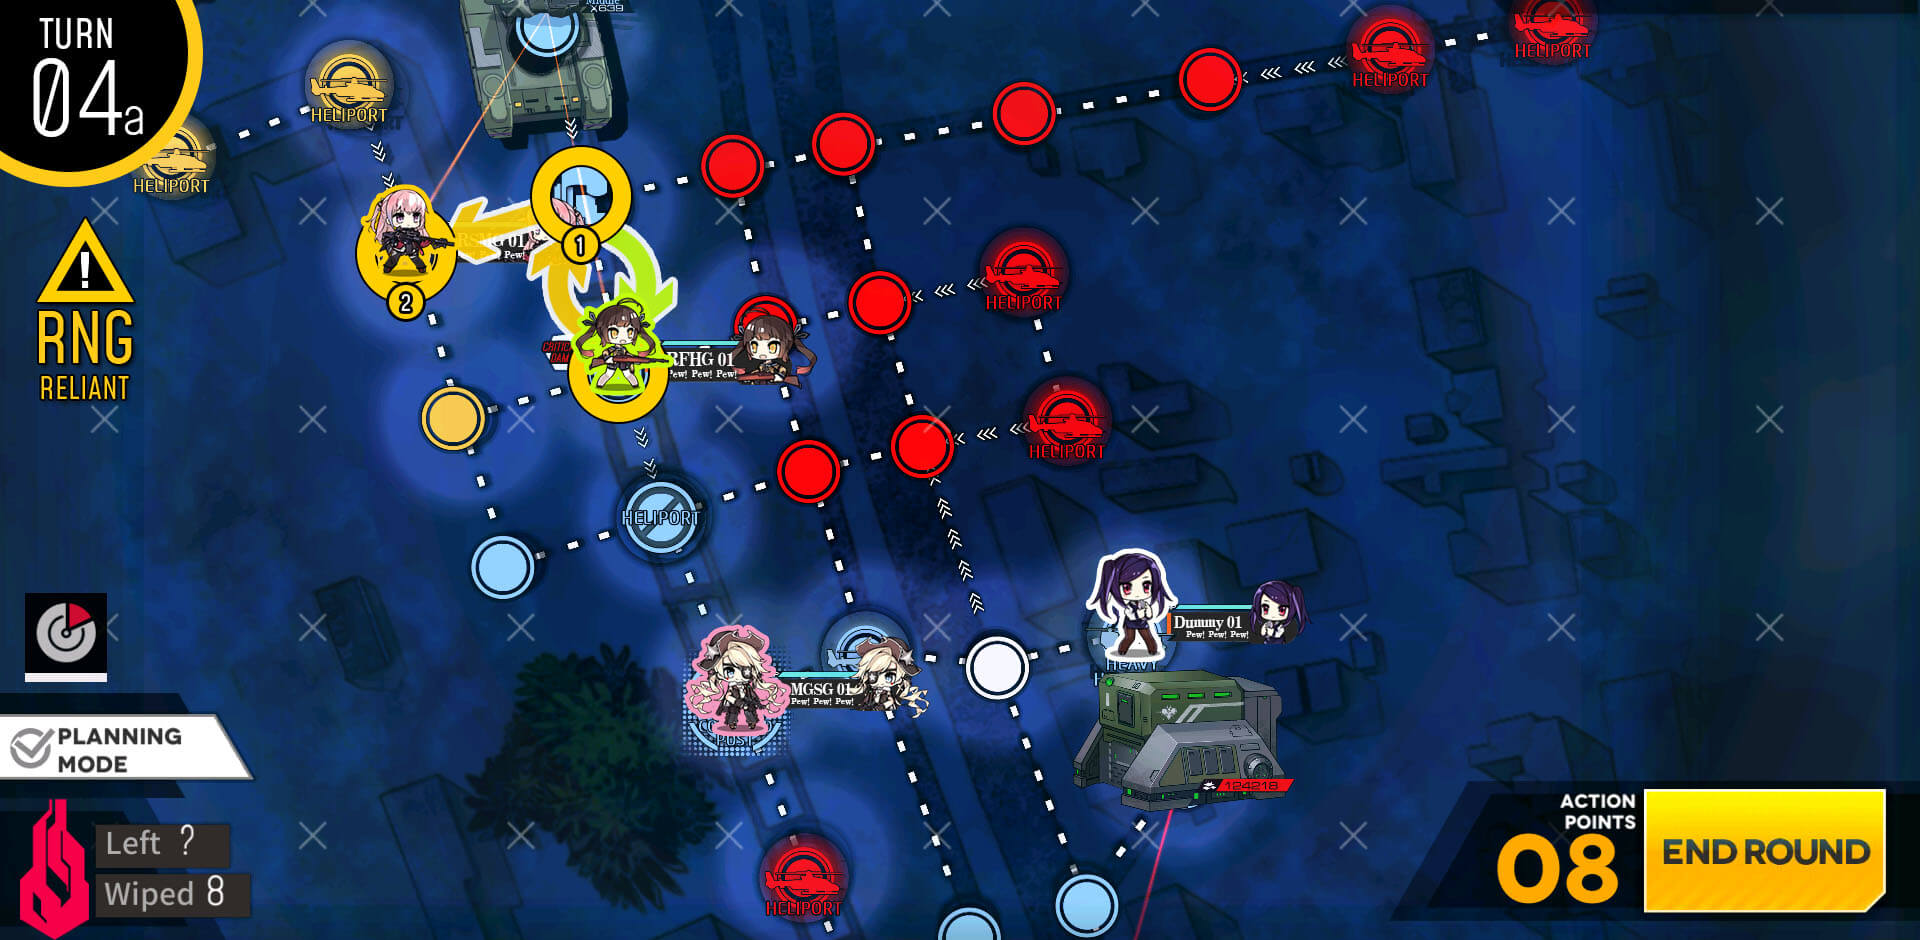
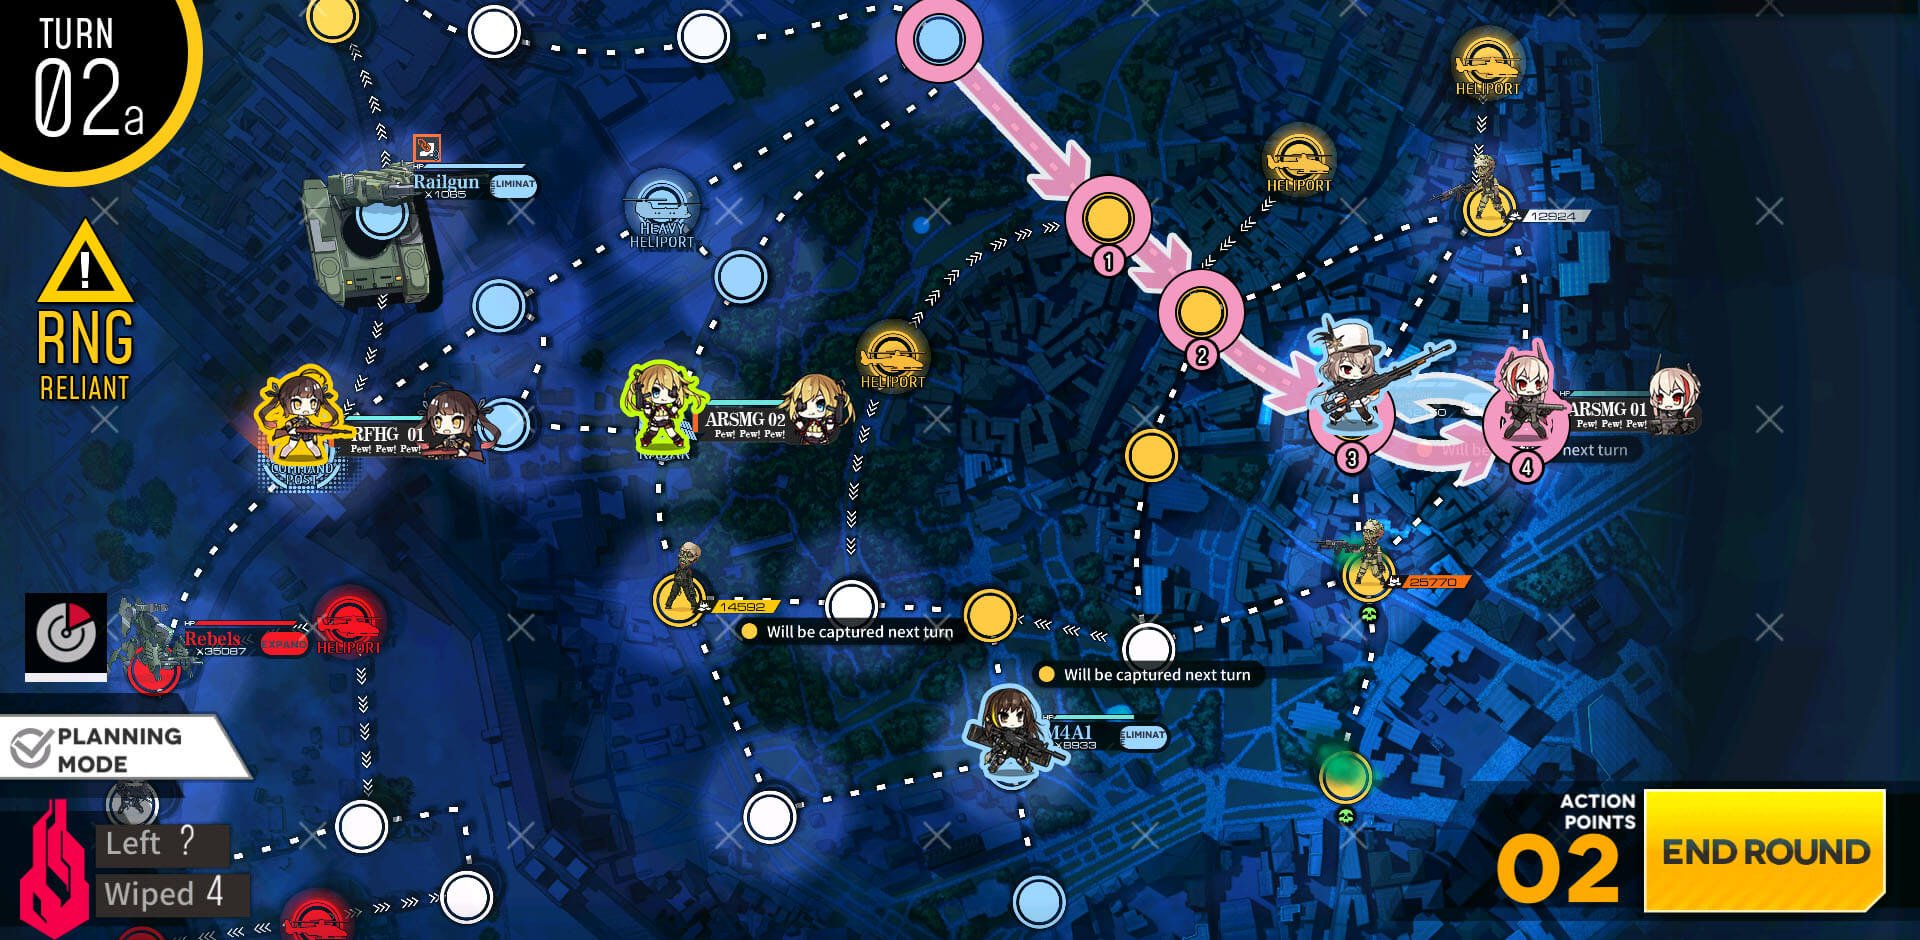
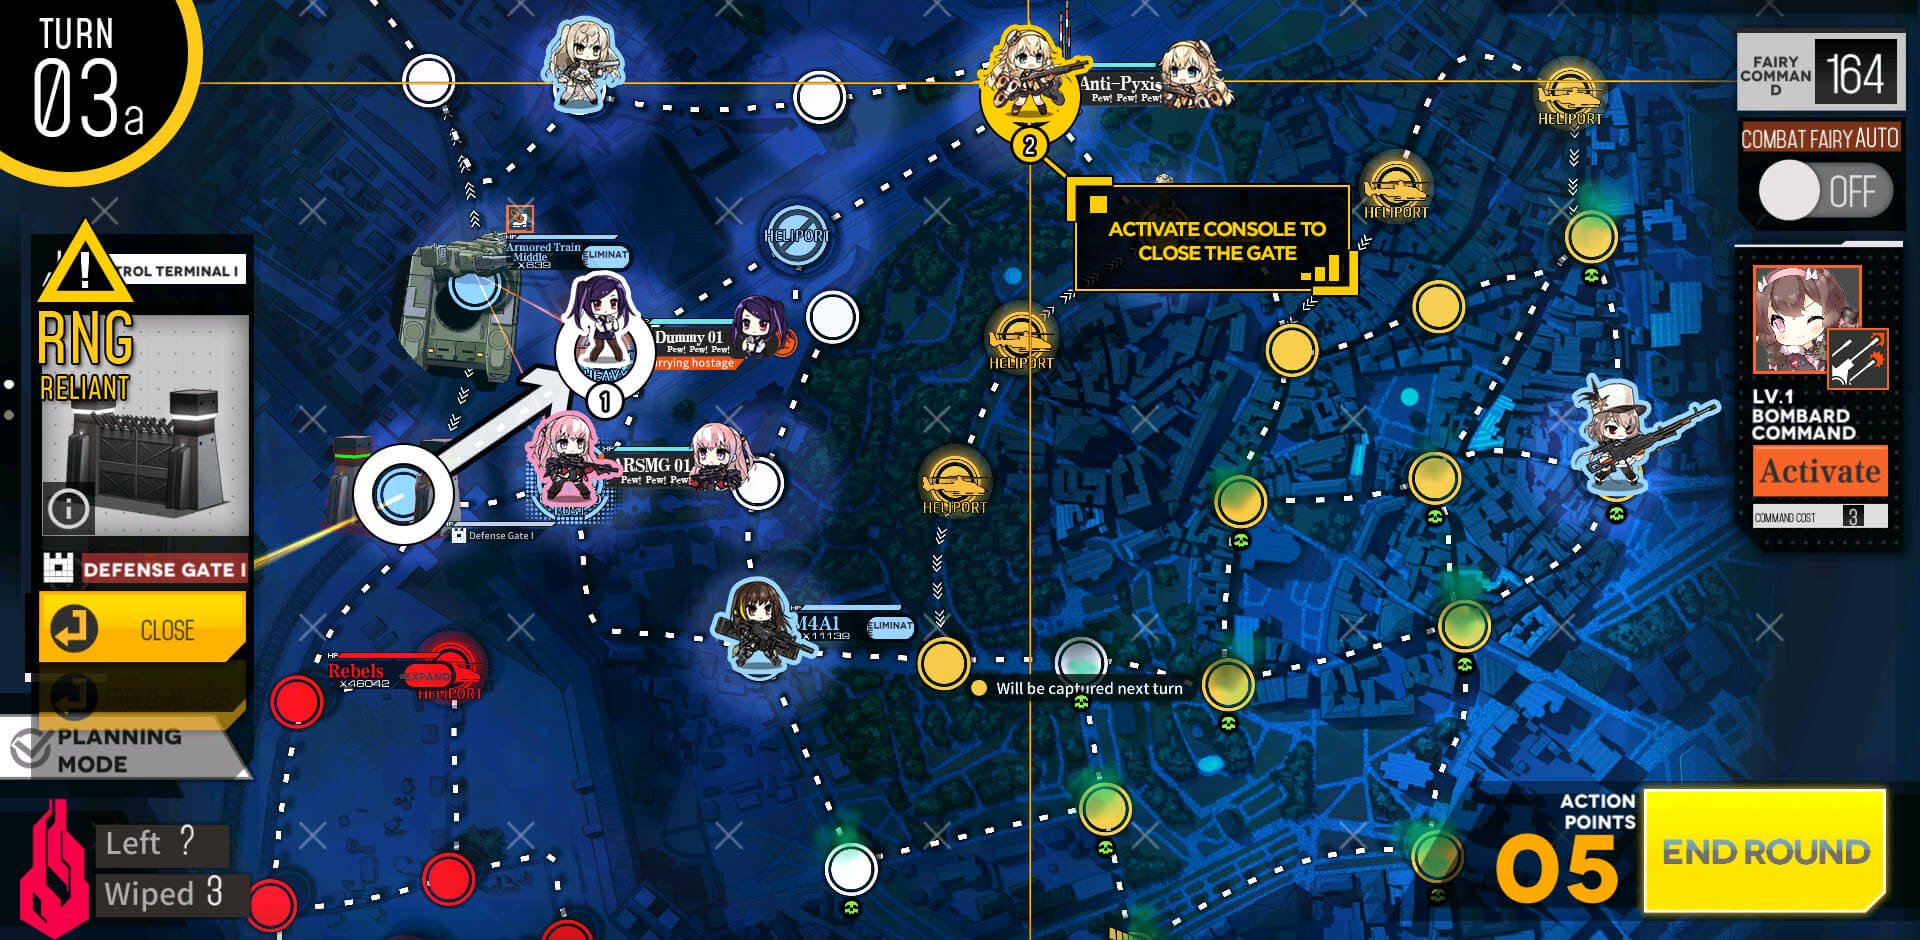
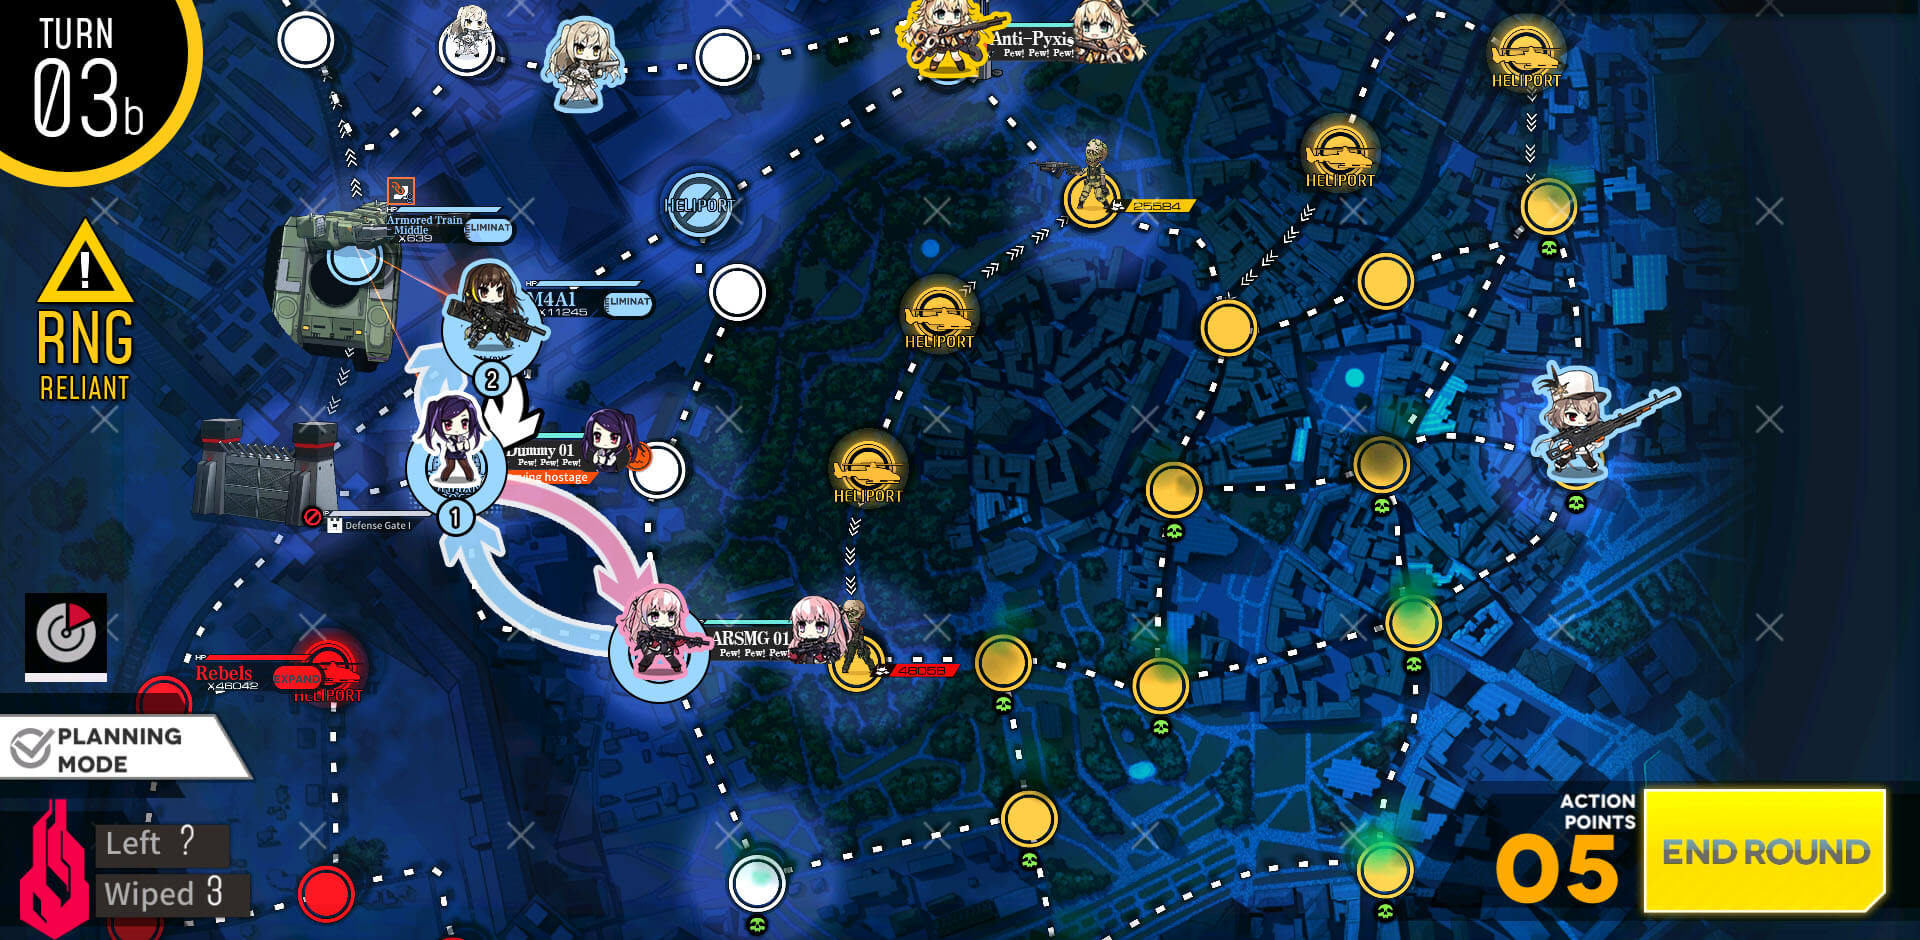
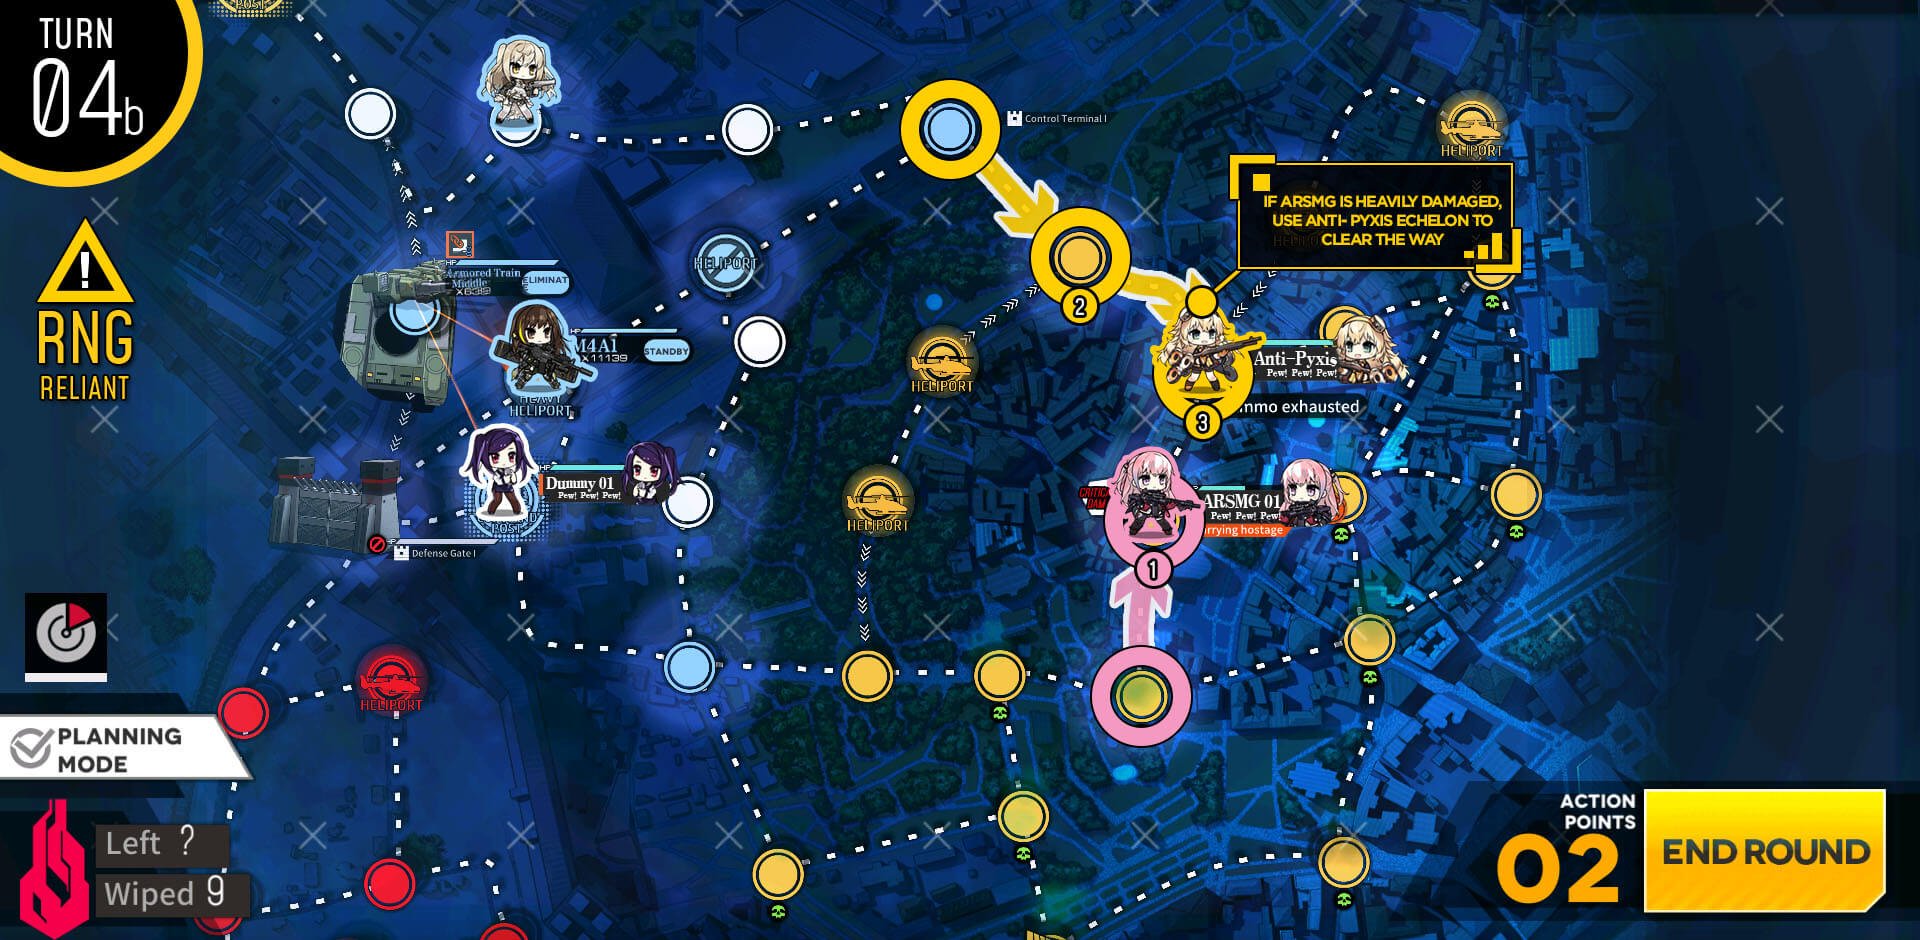
Start with ARSMG on HQ and head straight for left side of enemy HQ.

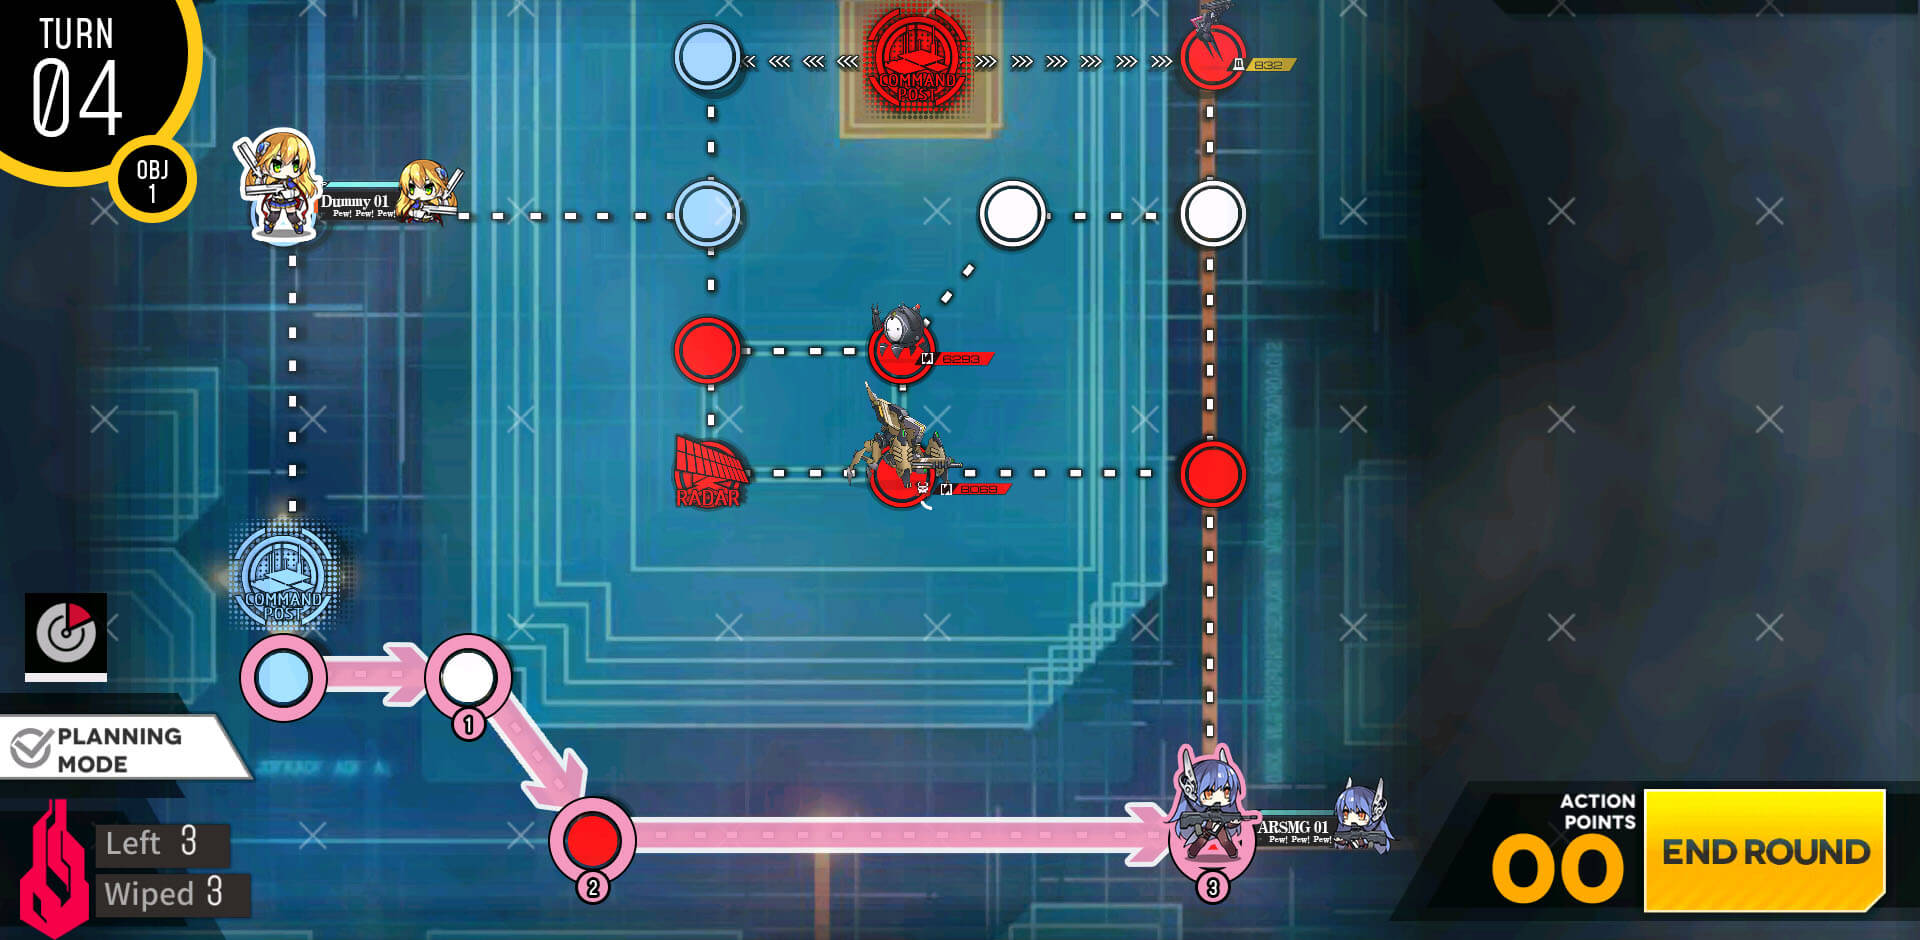
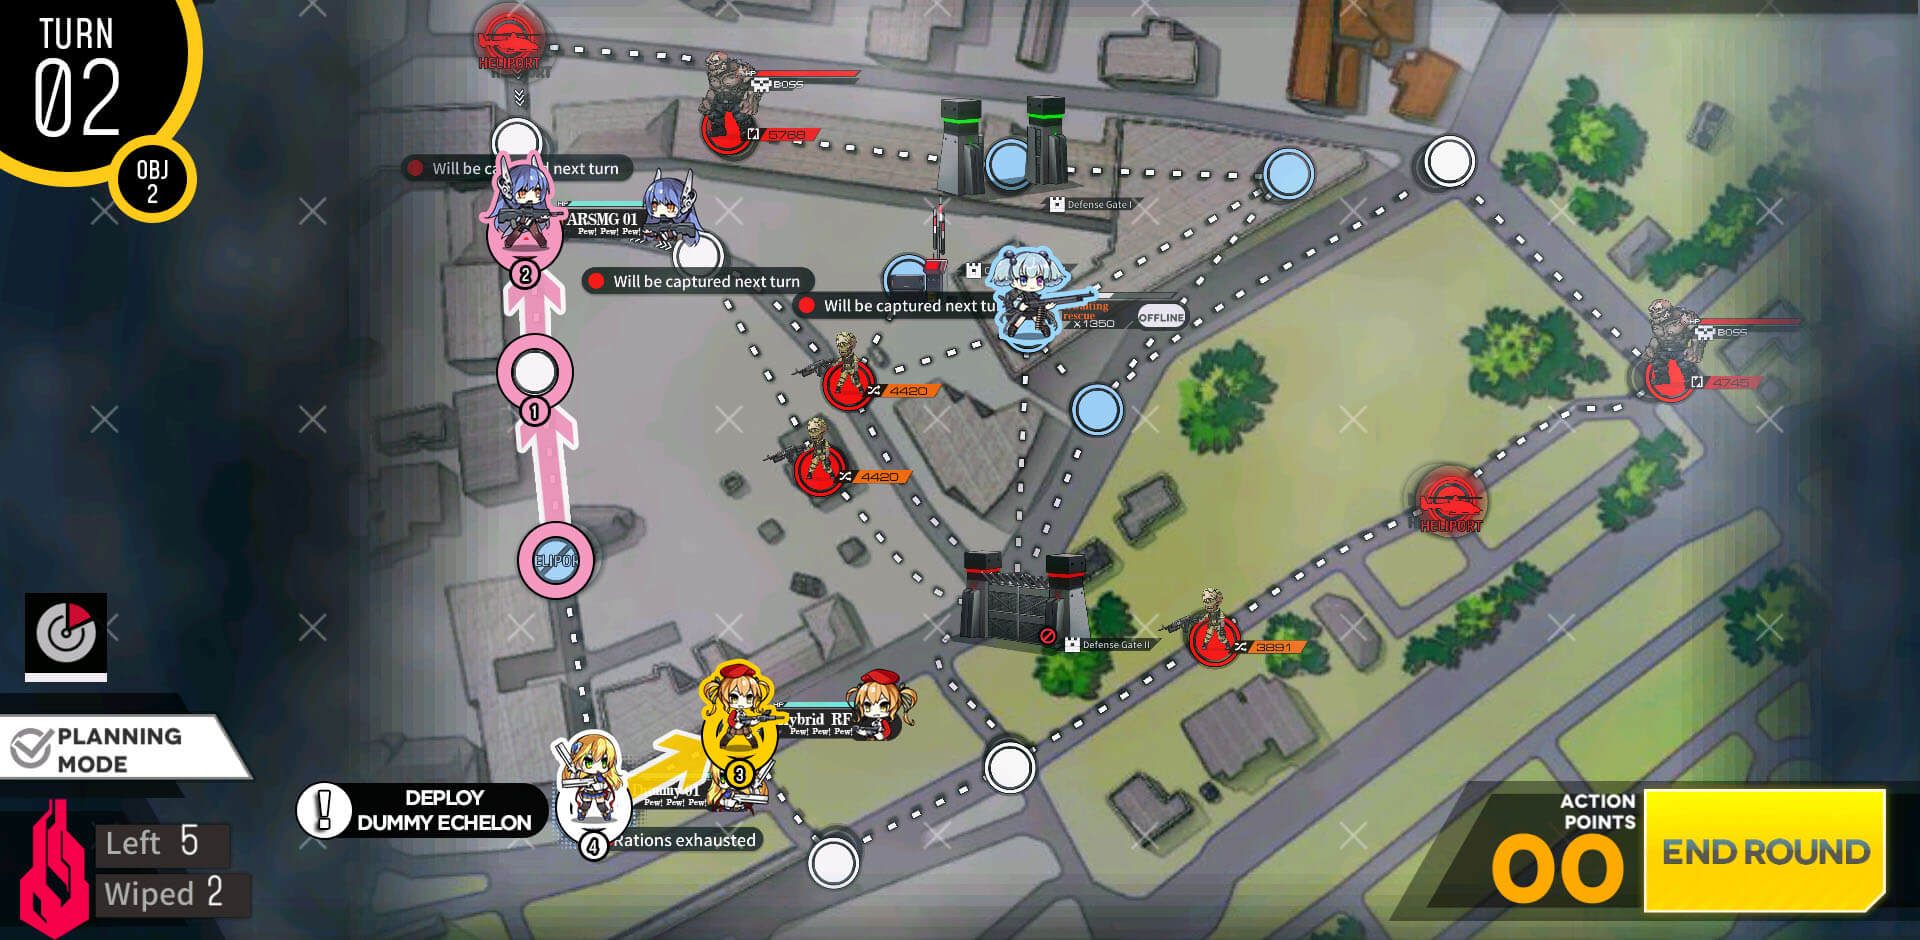
ARSMG moves up to take node left to HQ and we deploy dummy on our HQ.

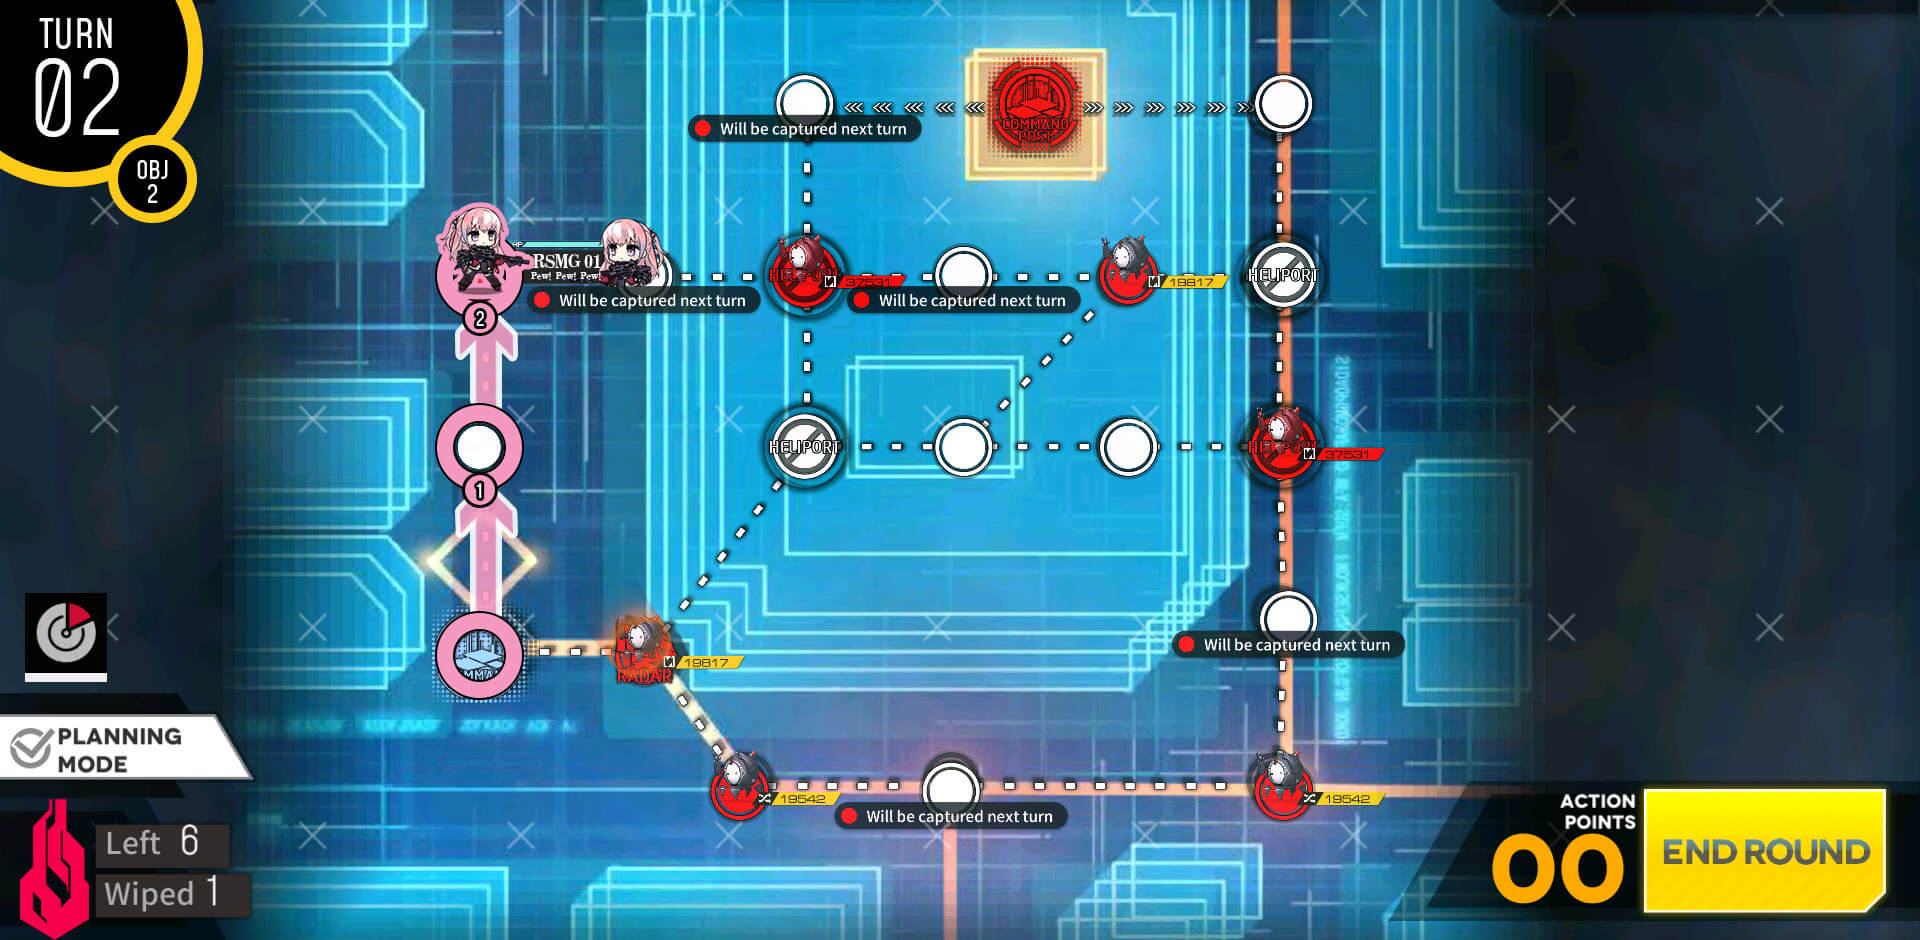
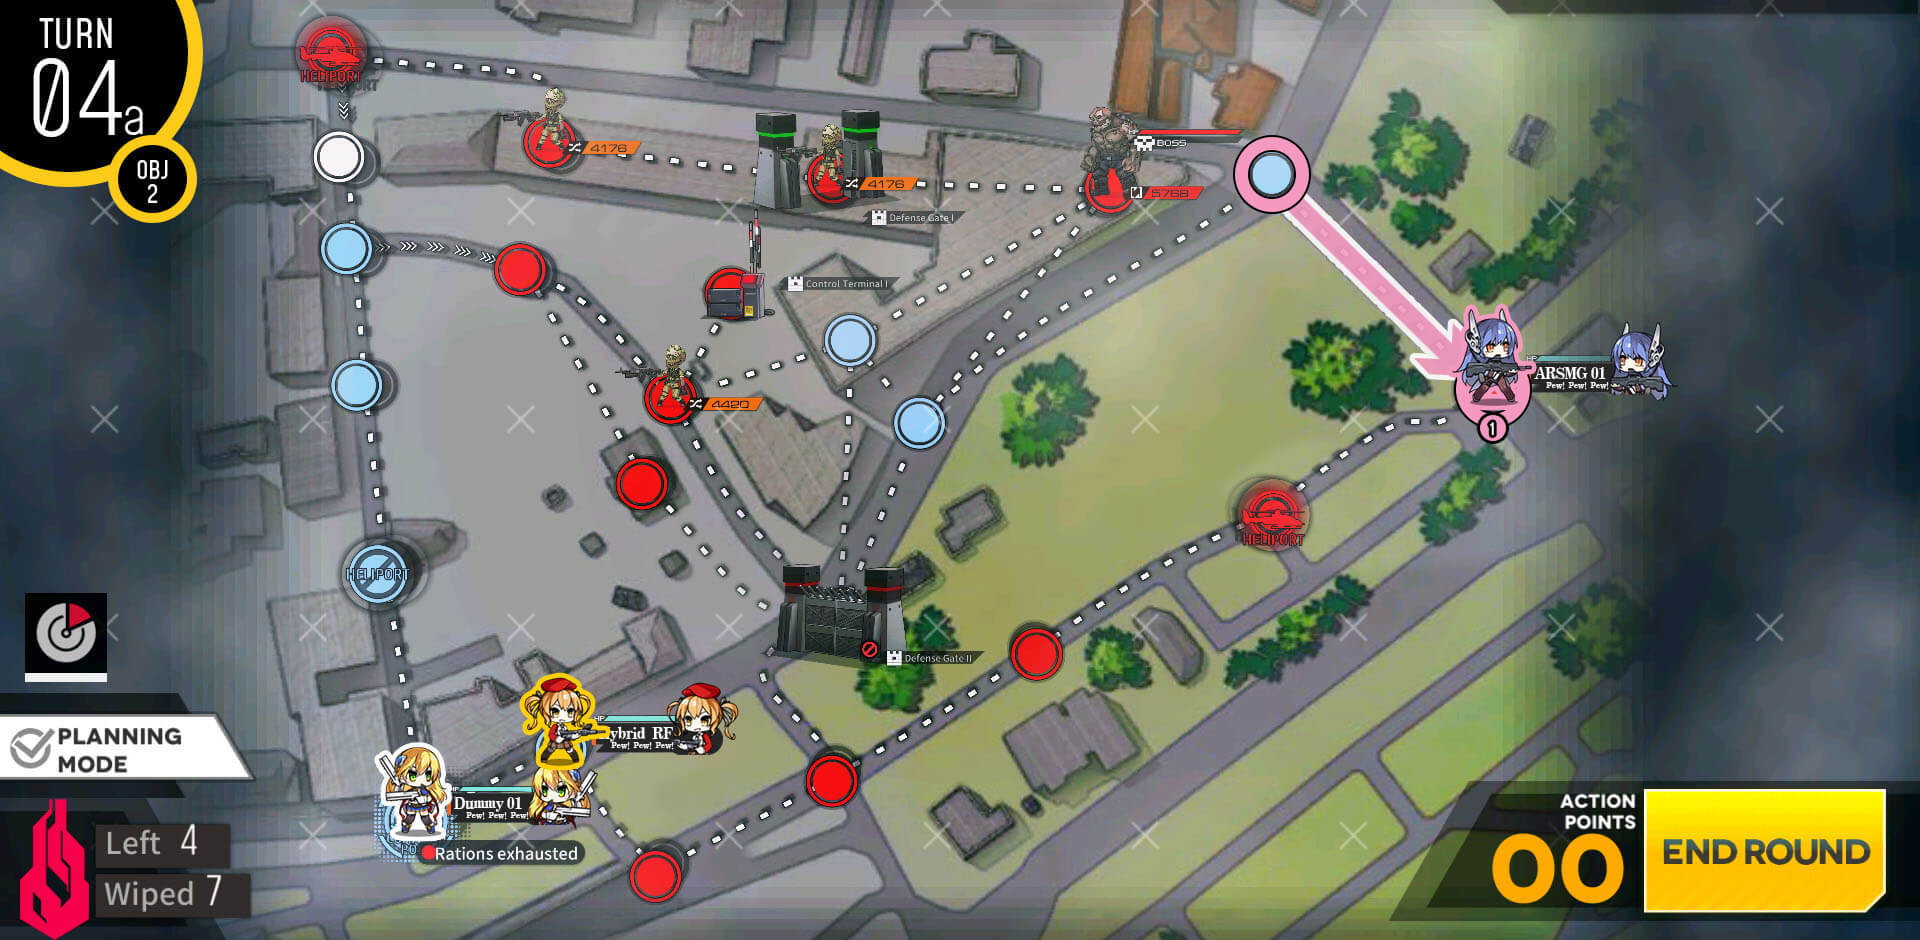
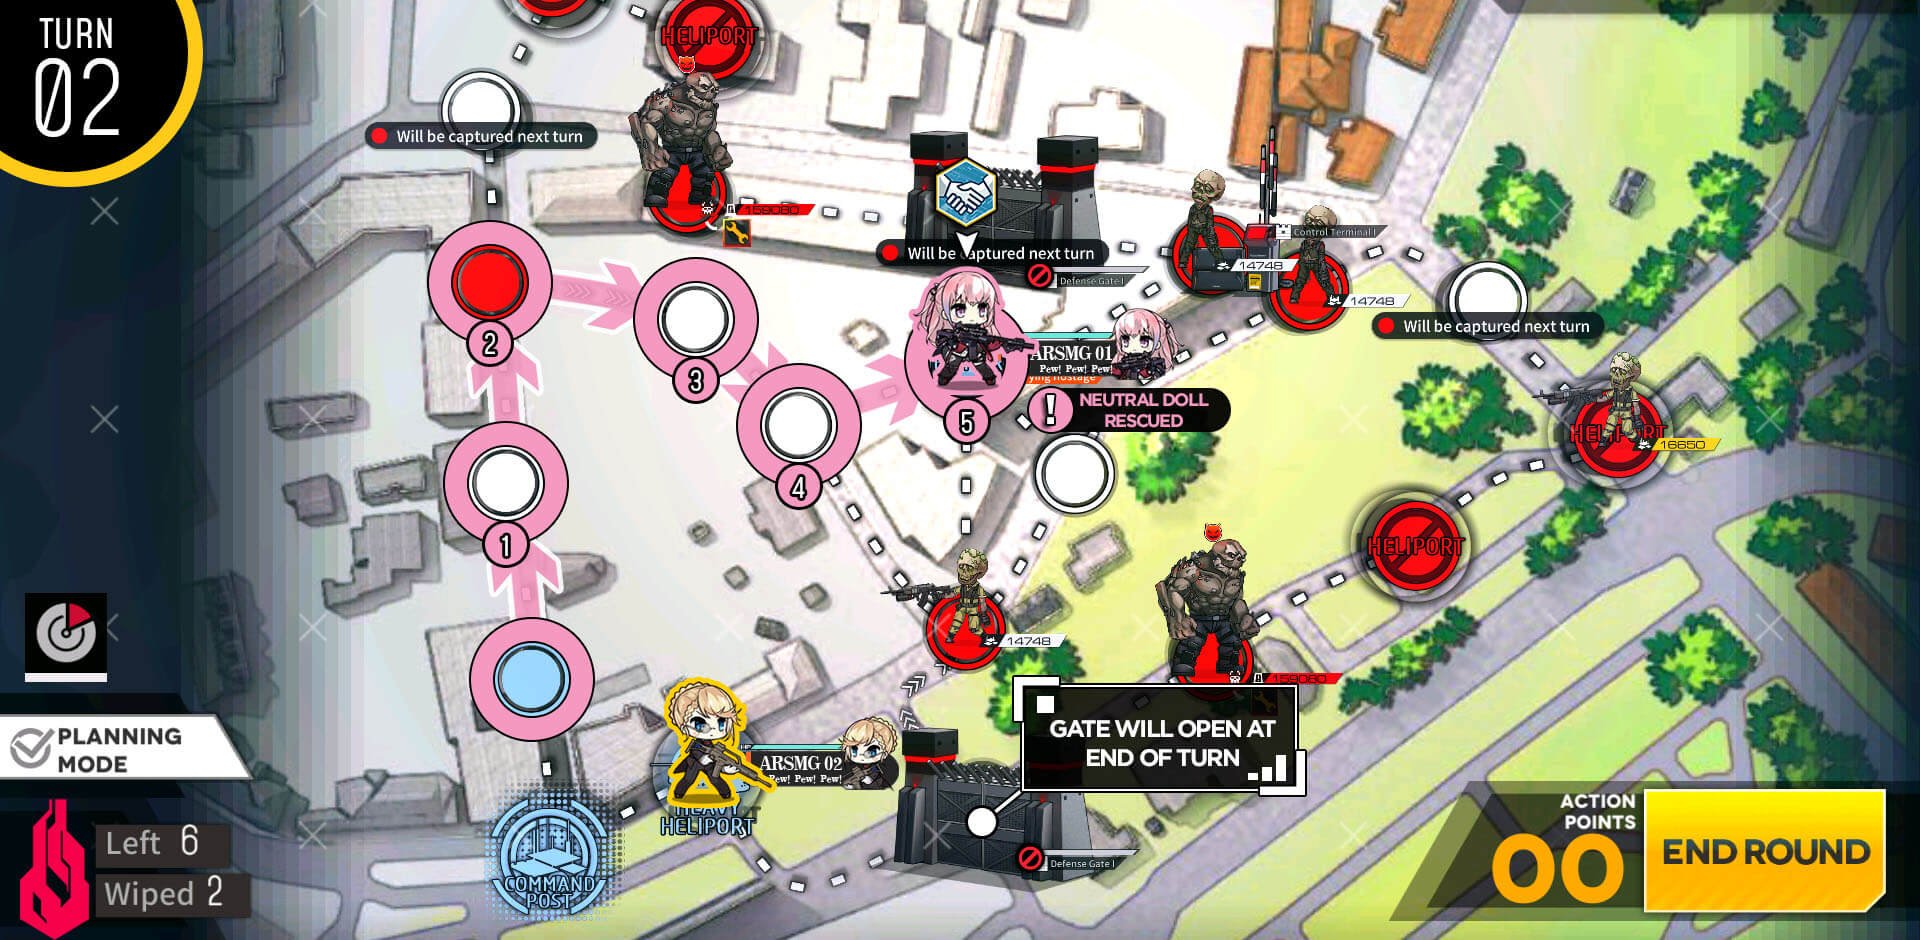
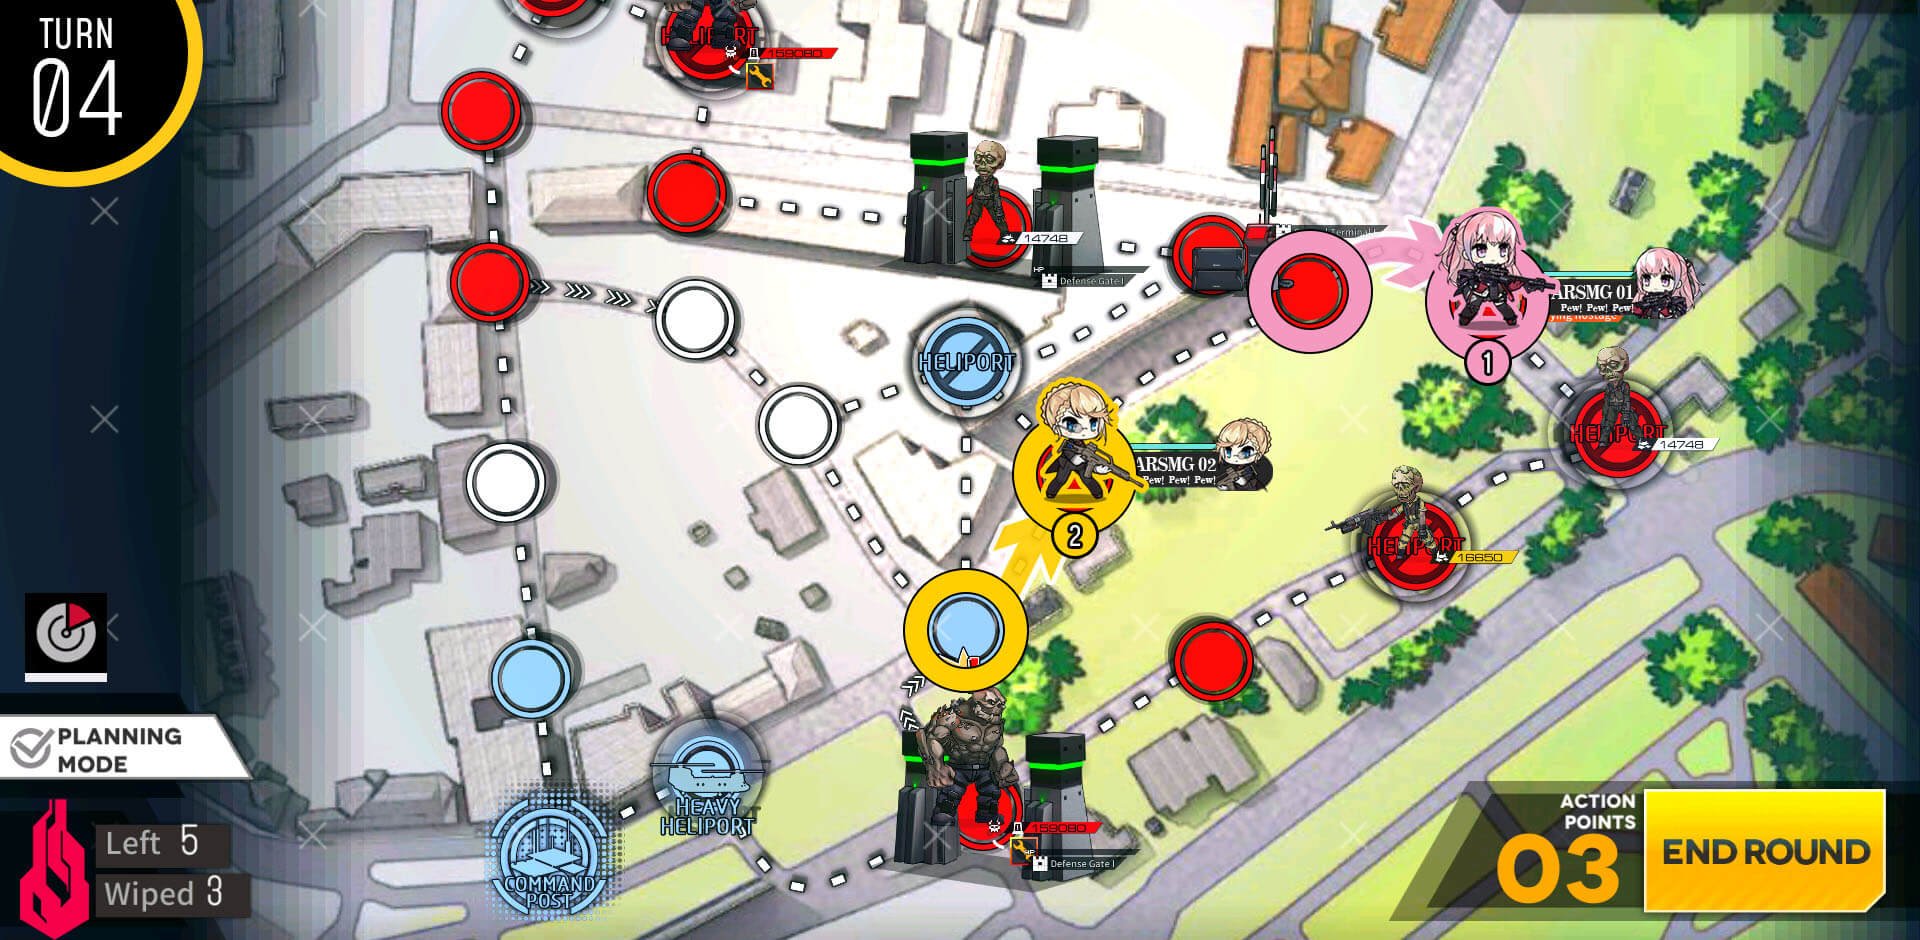
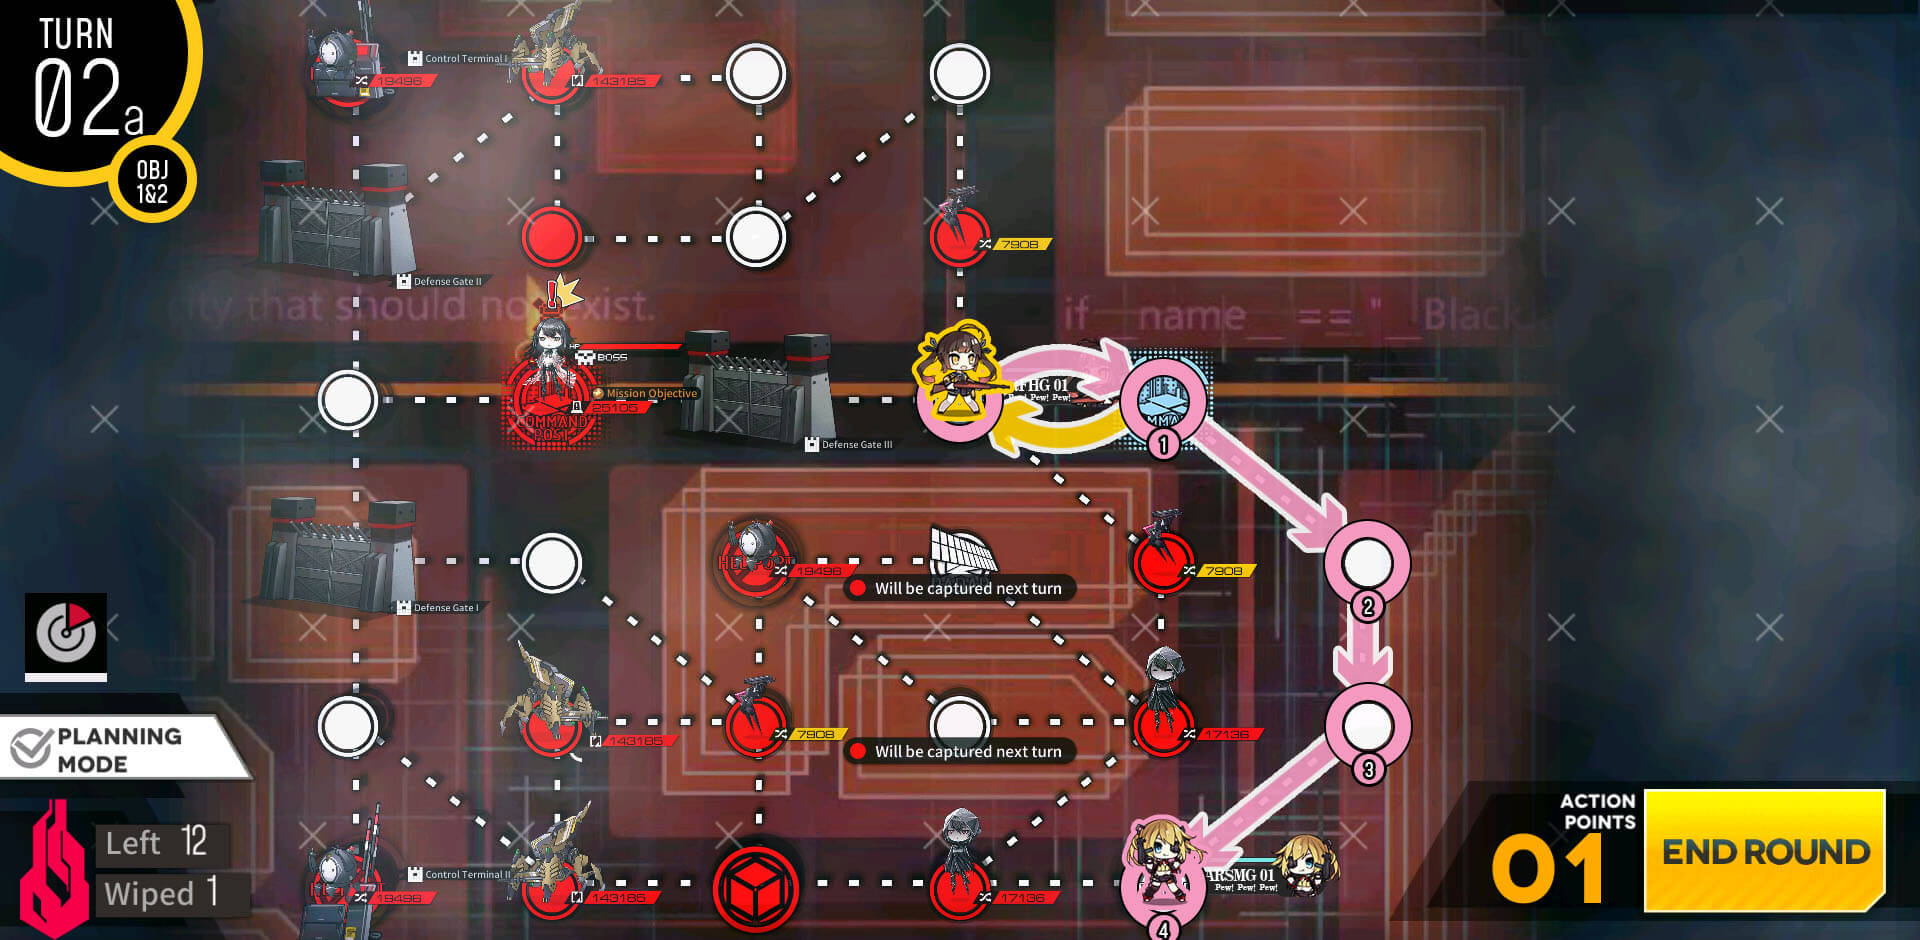
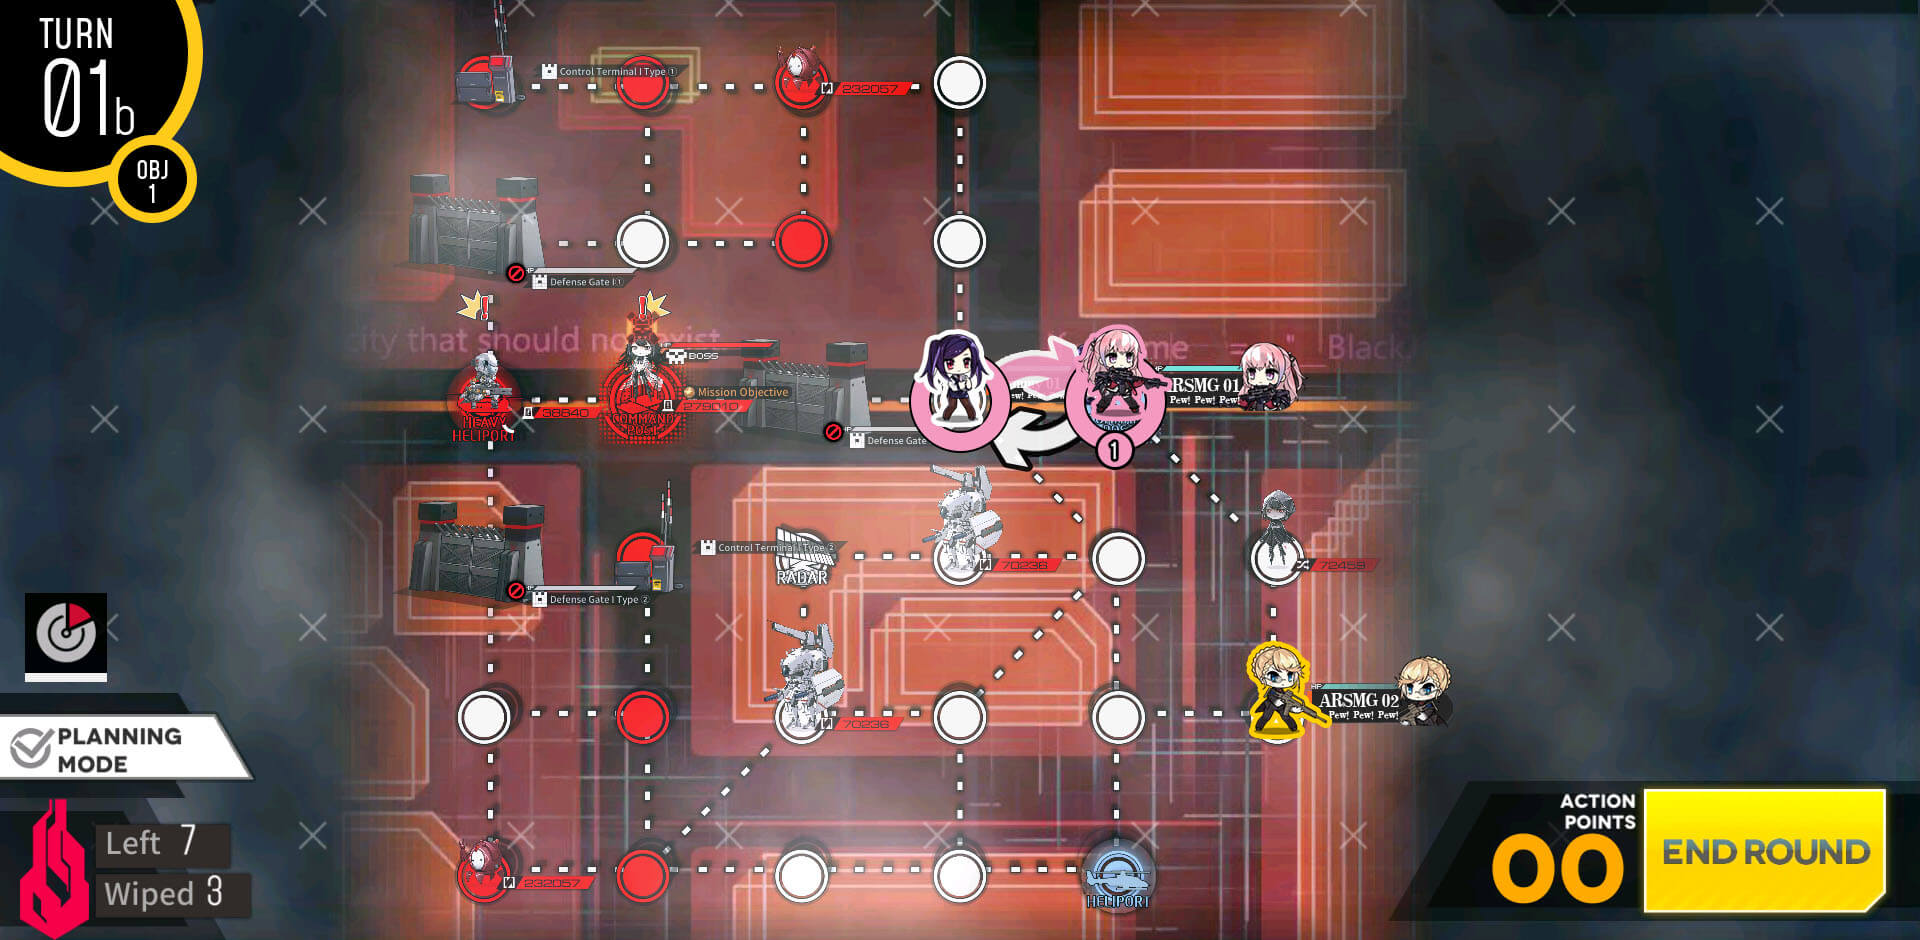
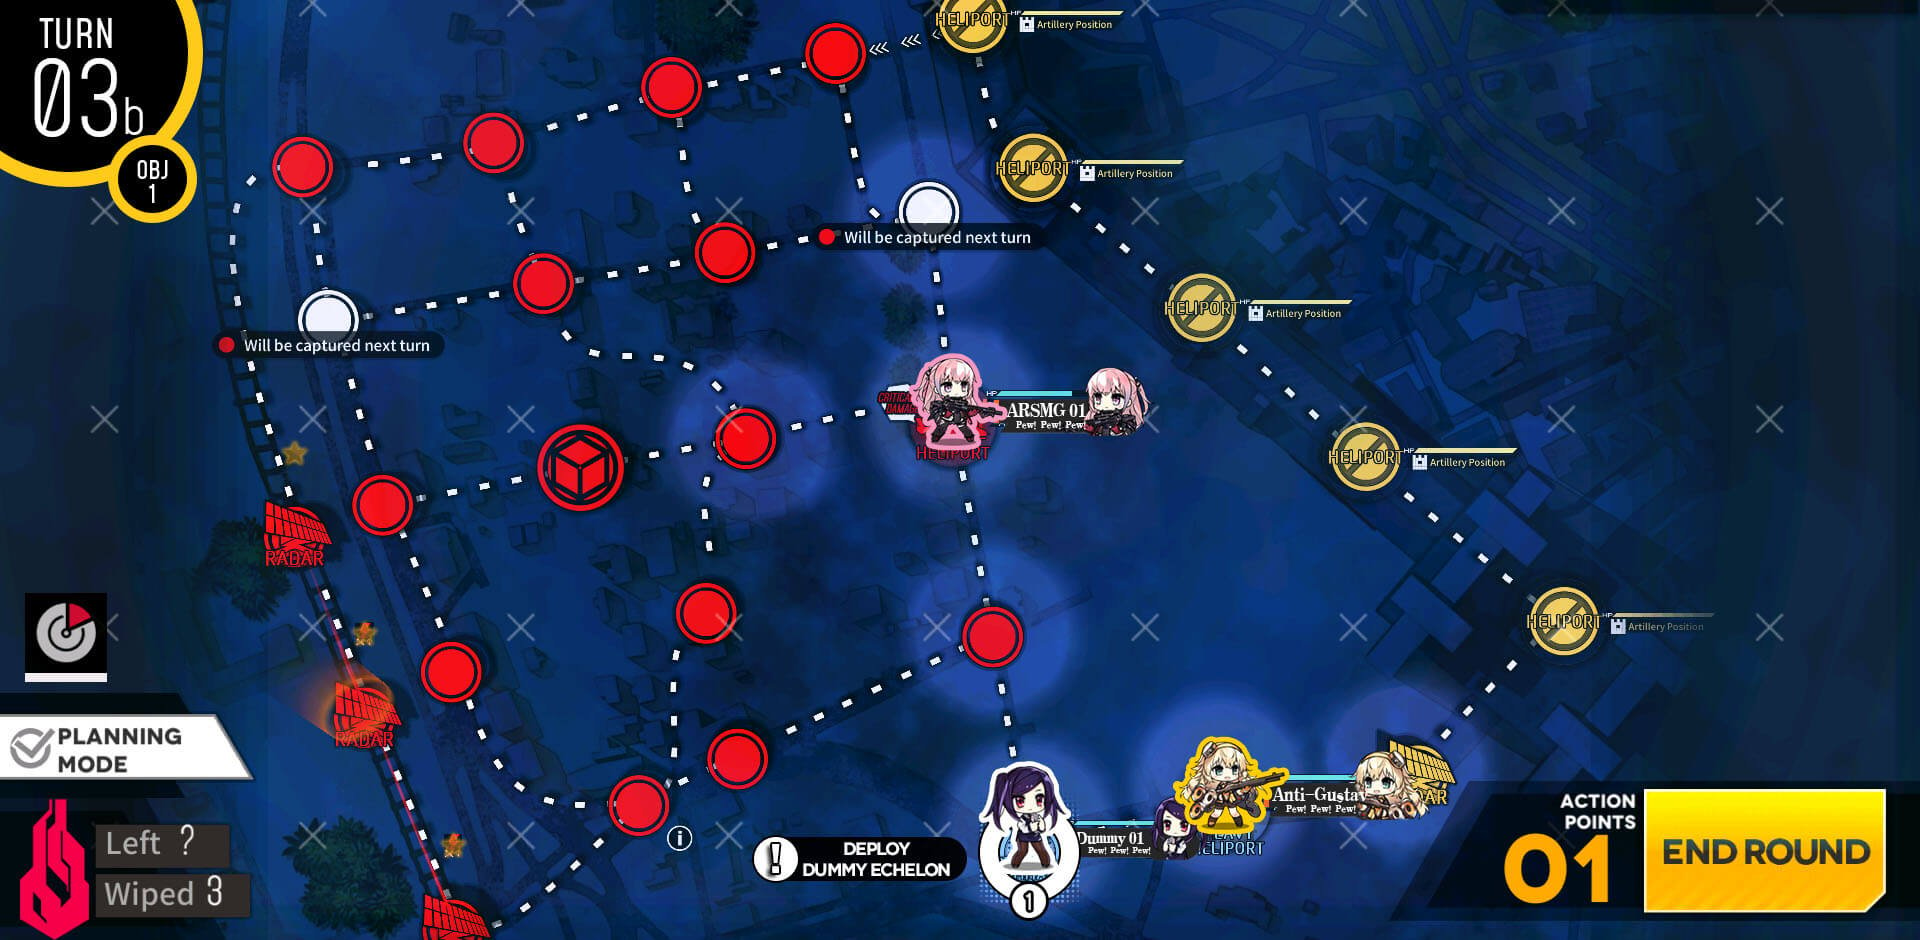
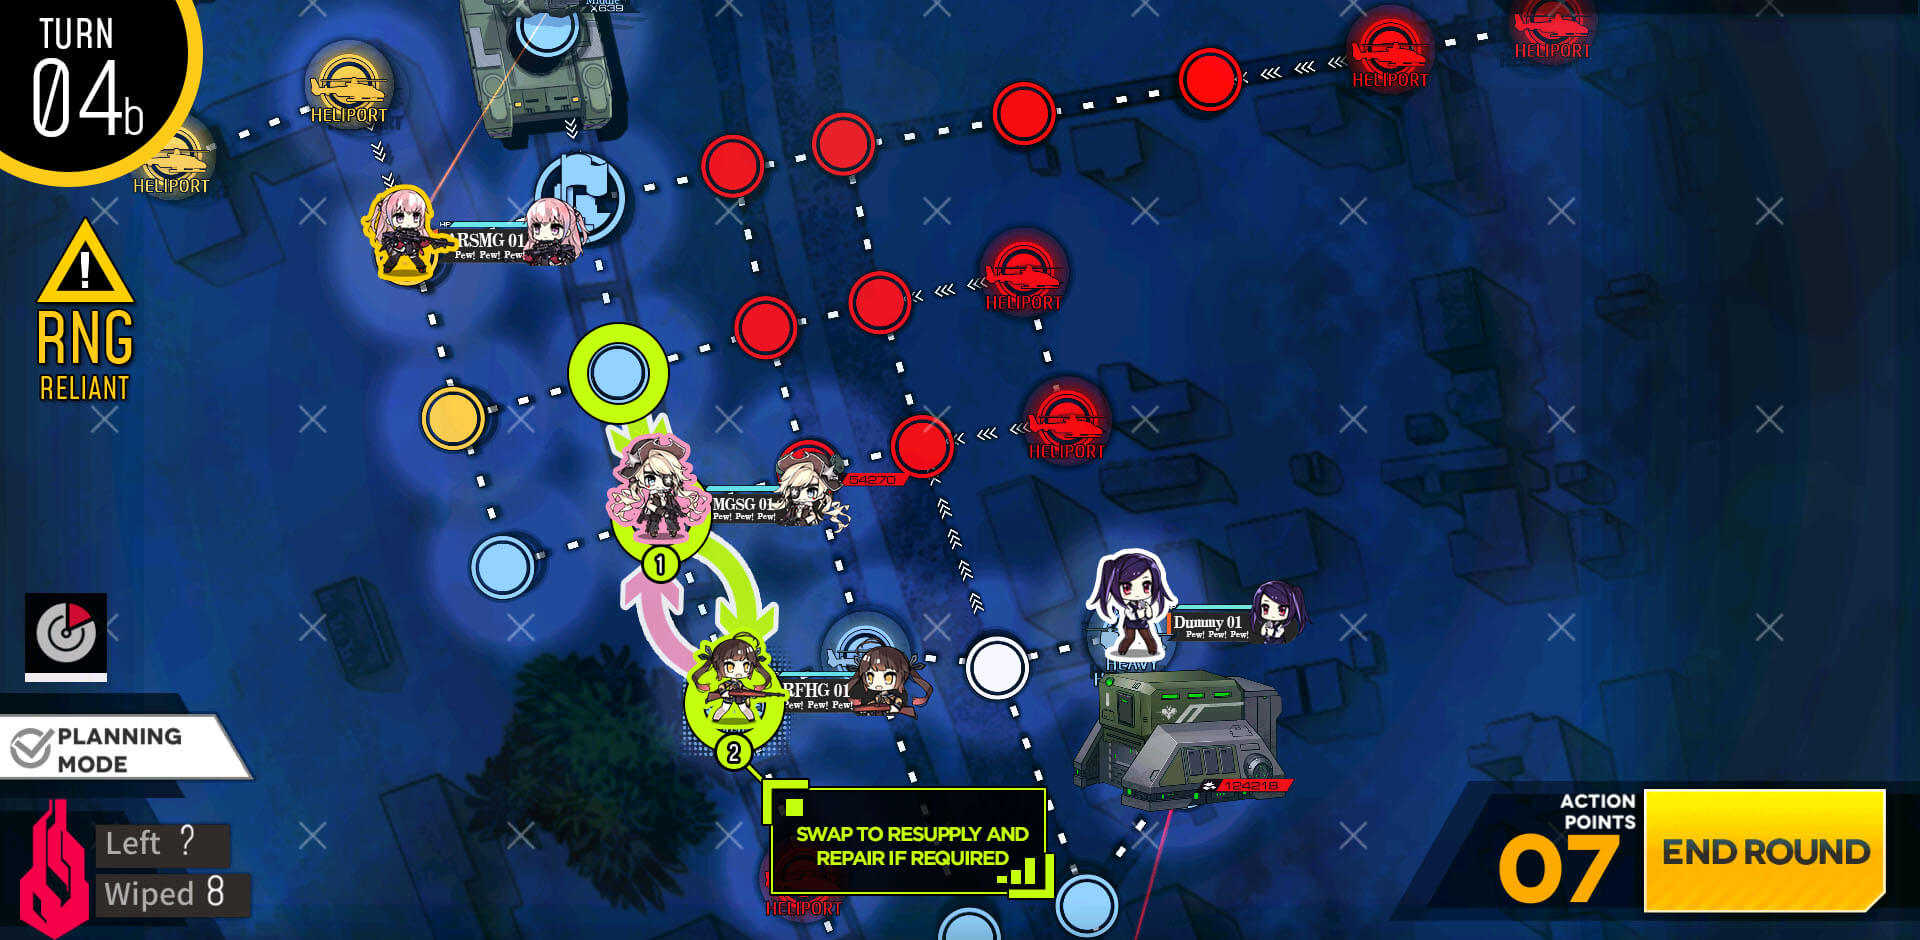
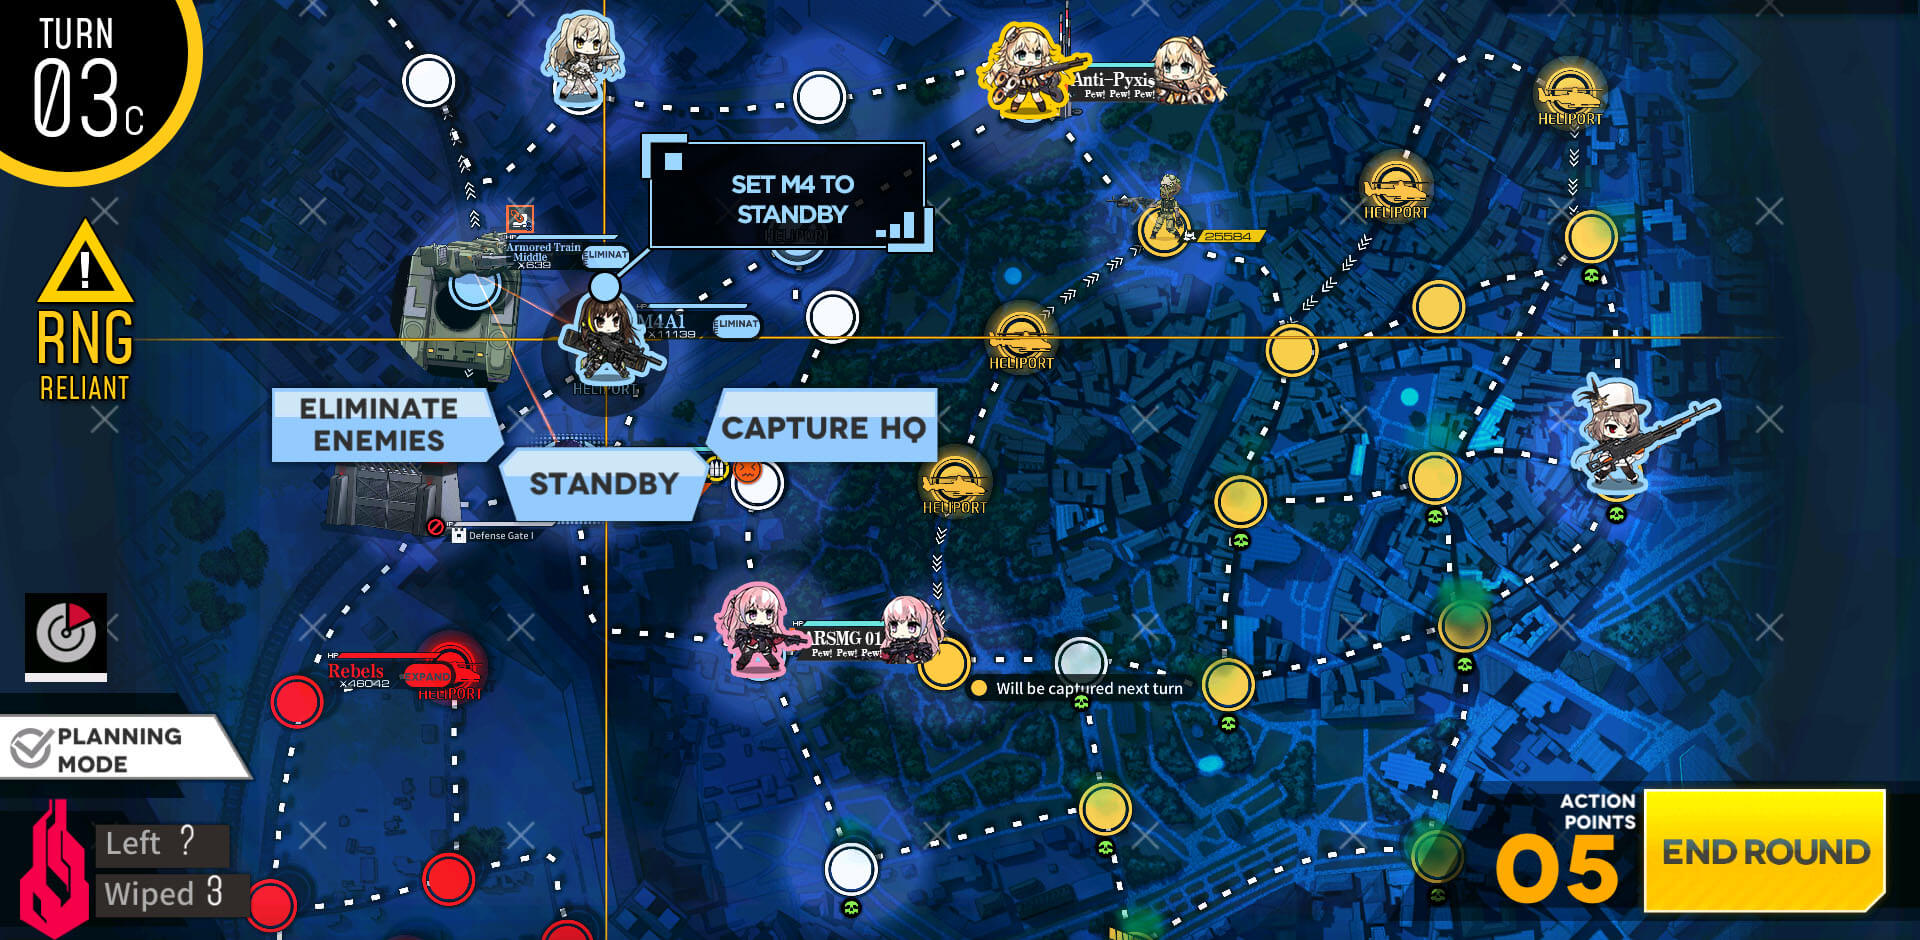
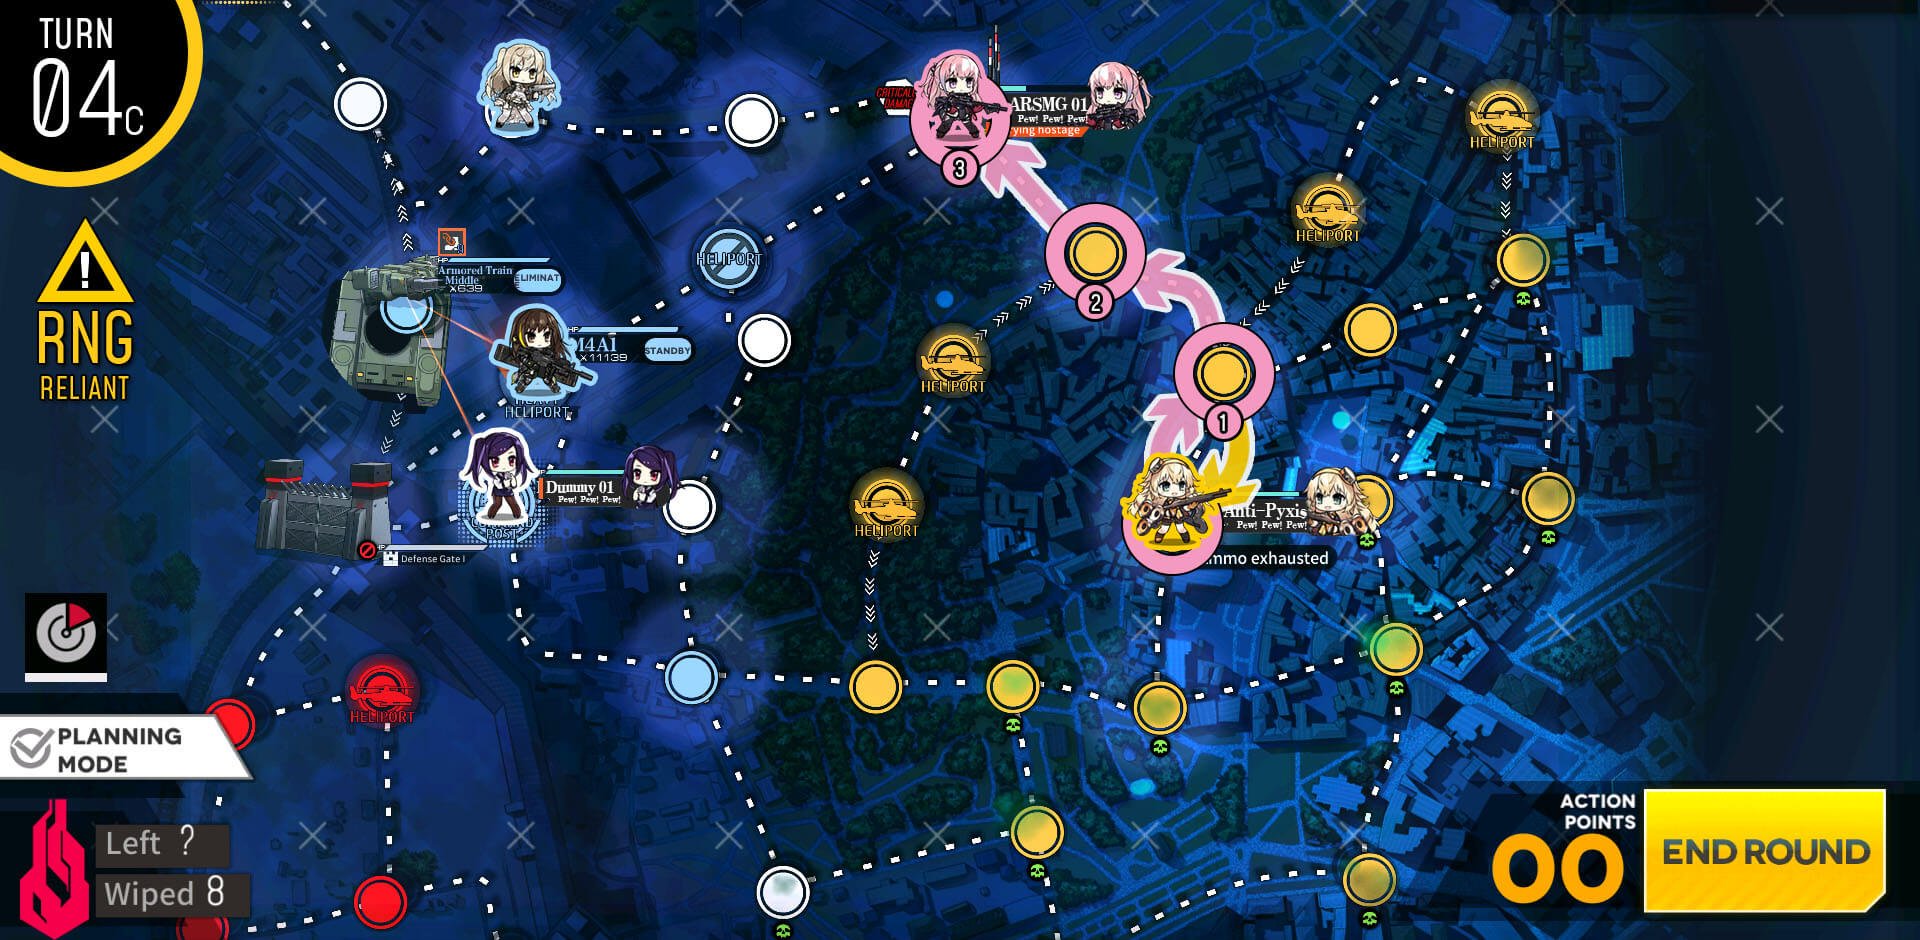
ARSMG echelon moves back to HQ and swaps and moves down to take the long way around to the other side.
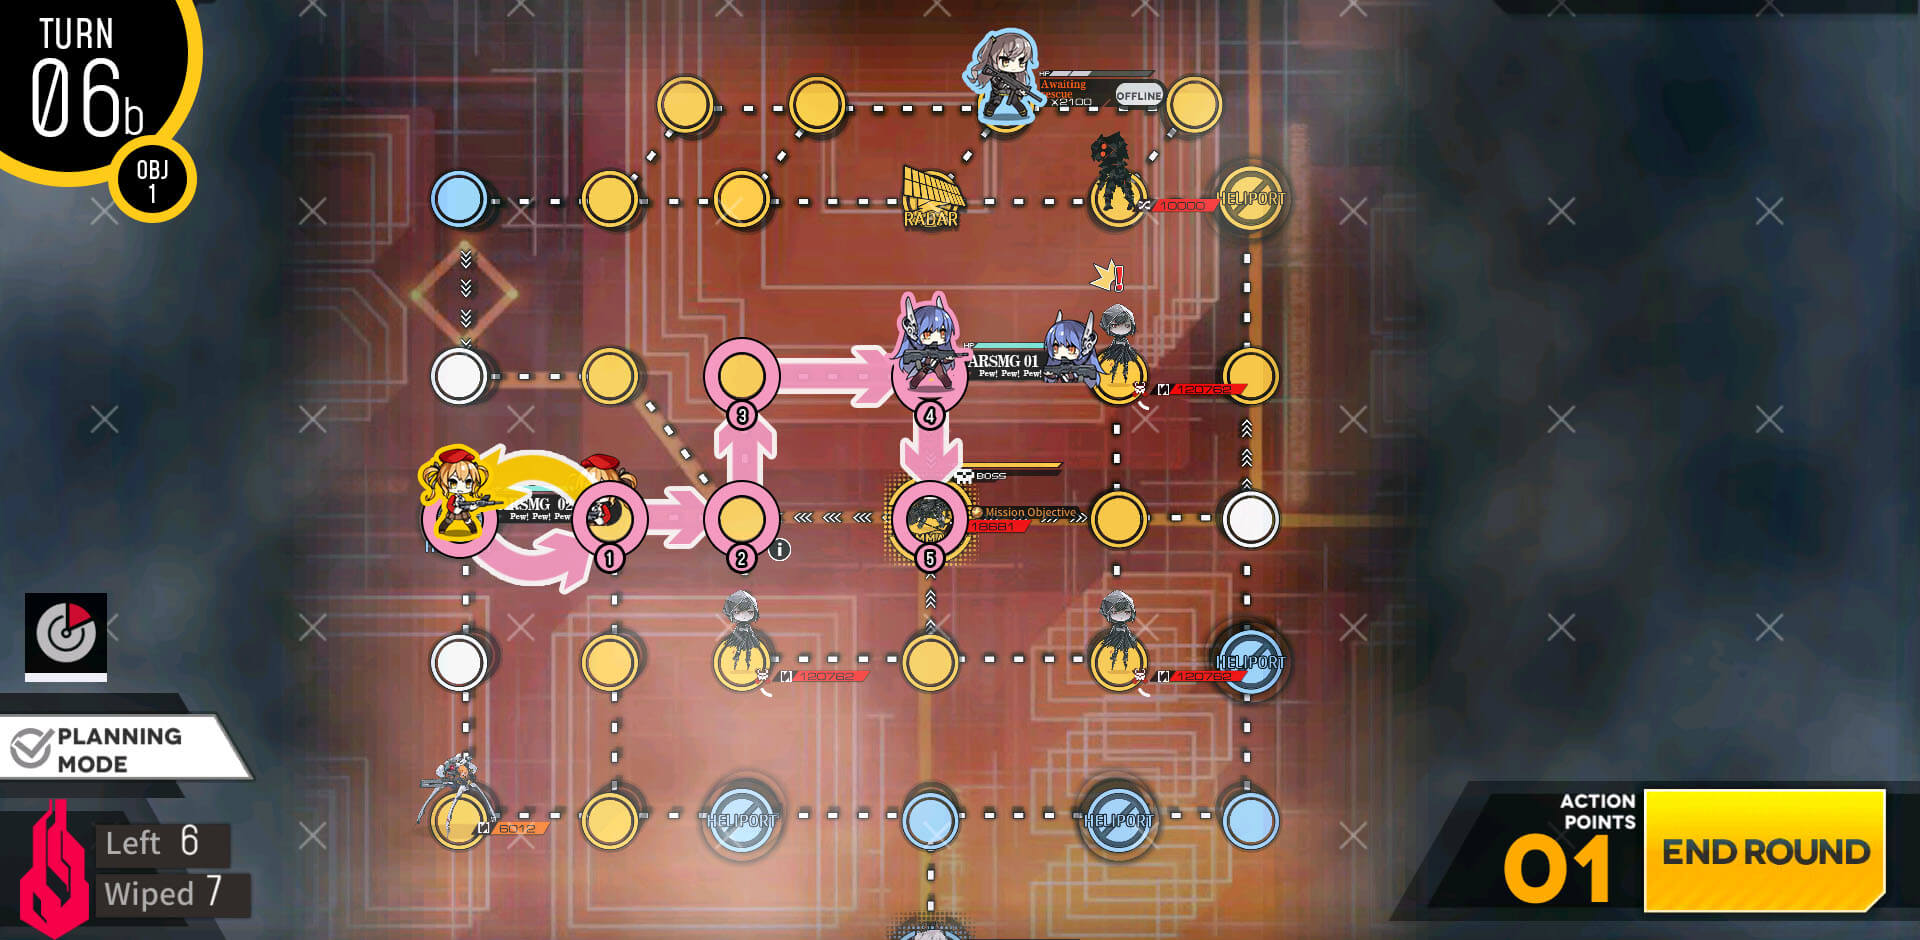
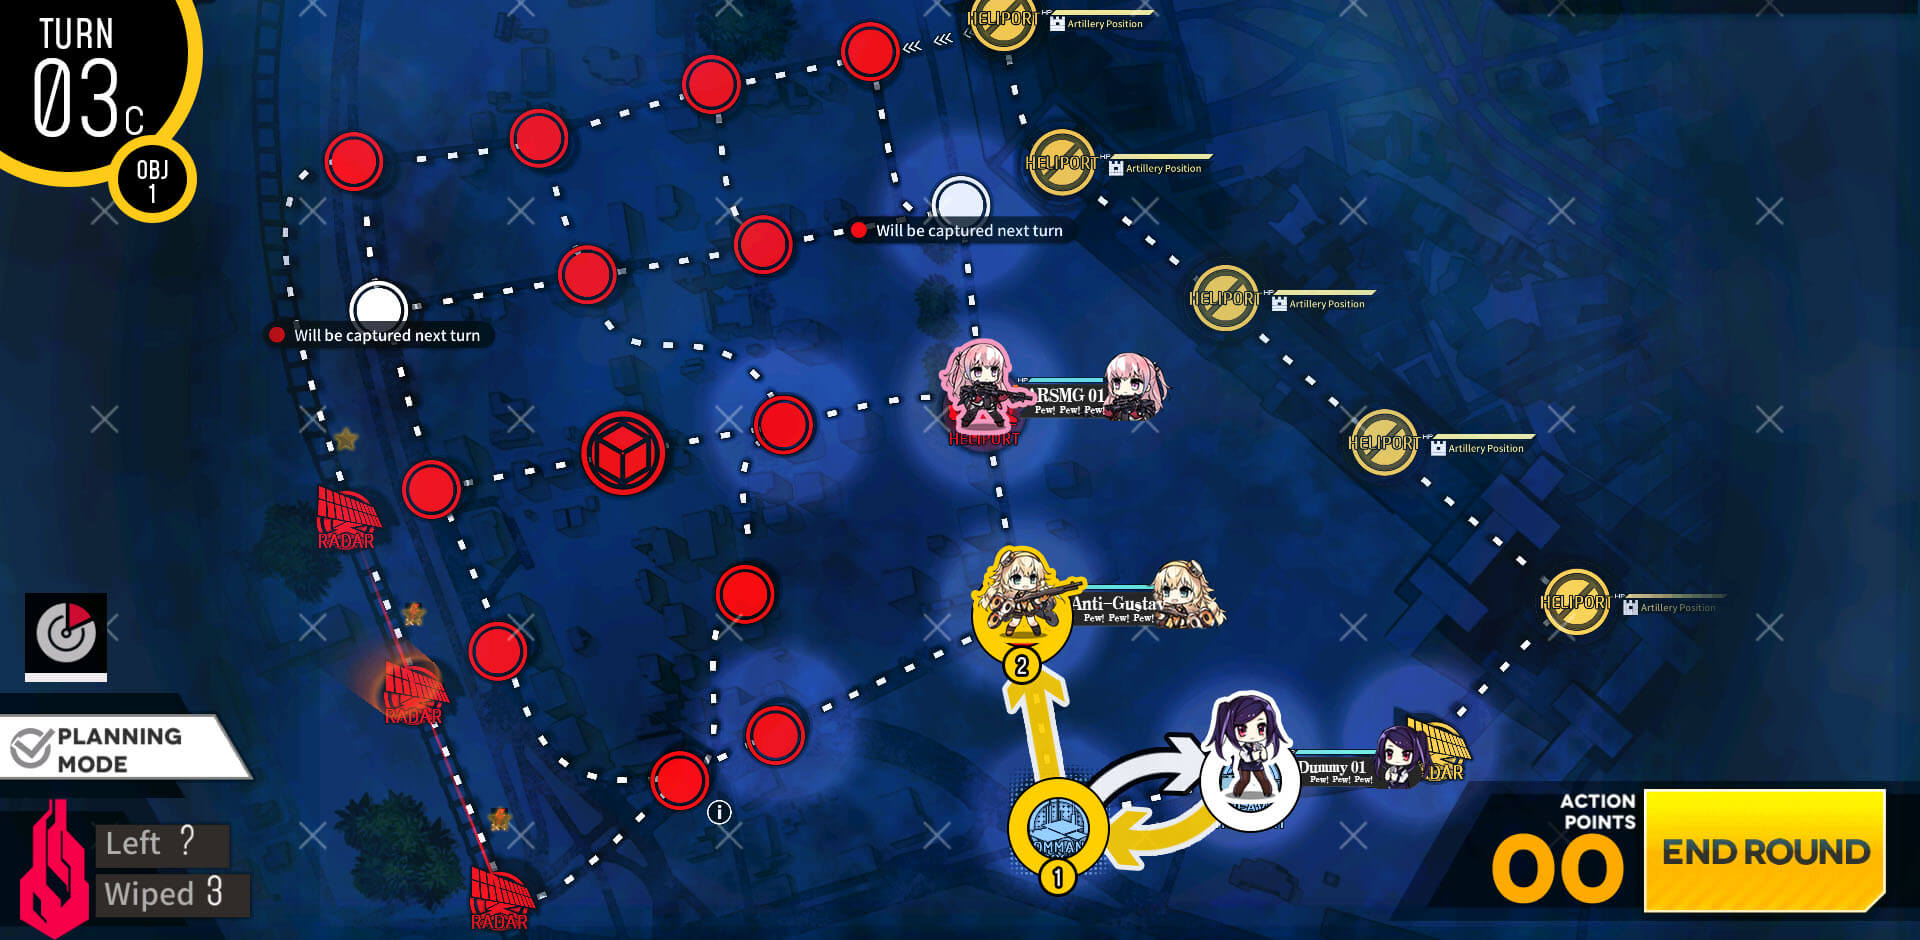
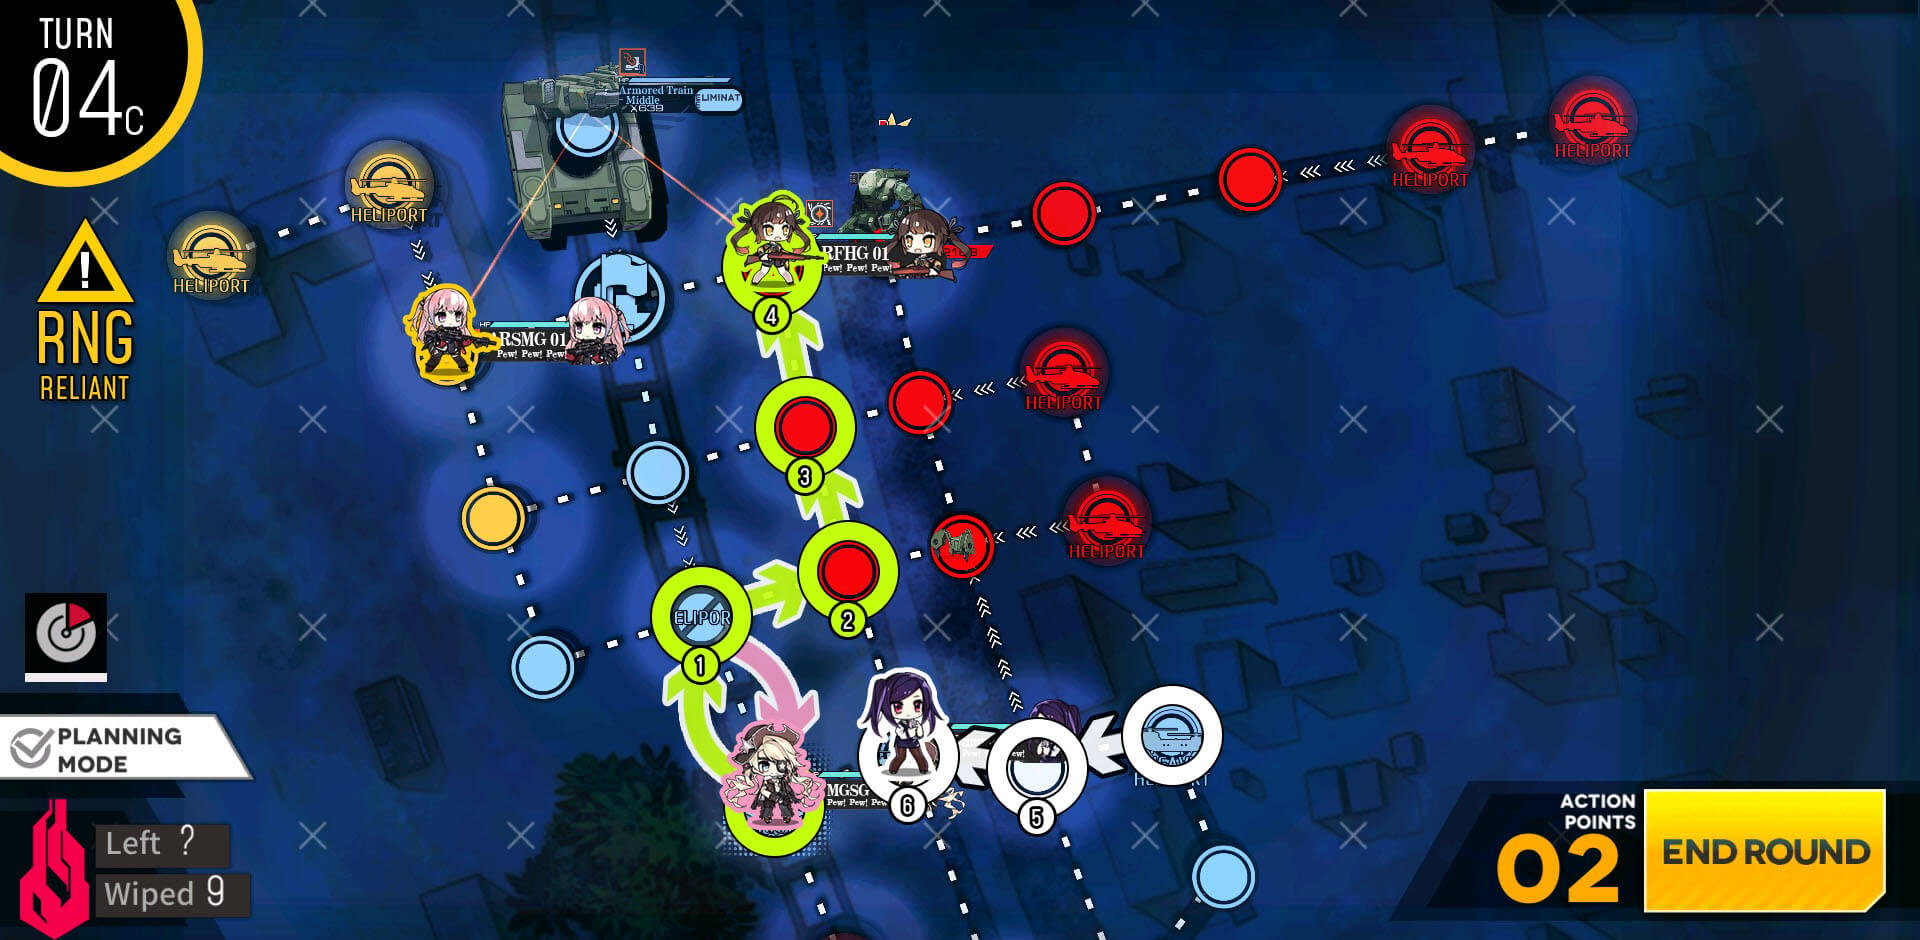
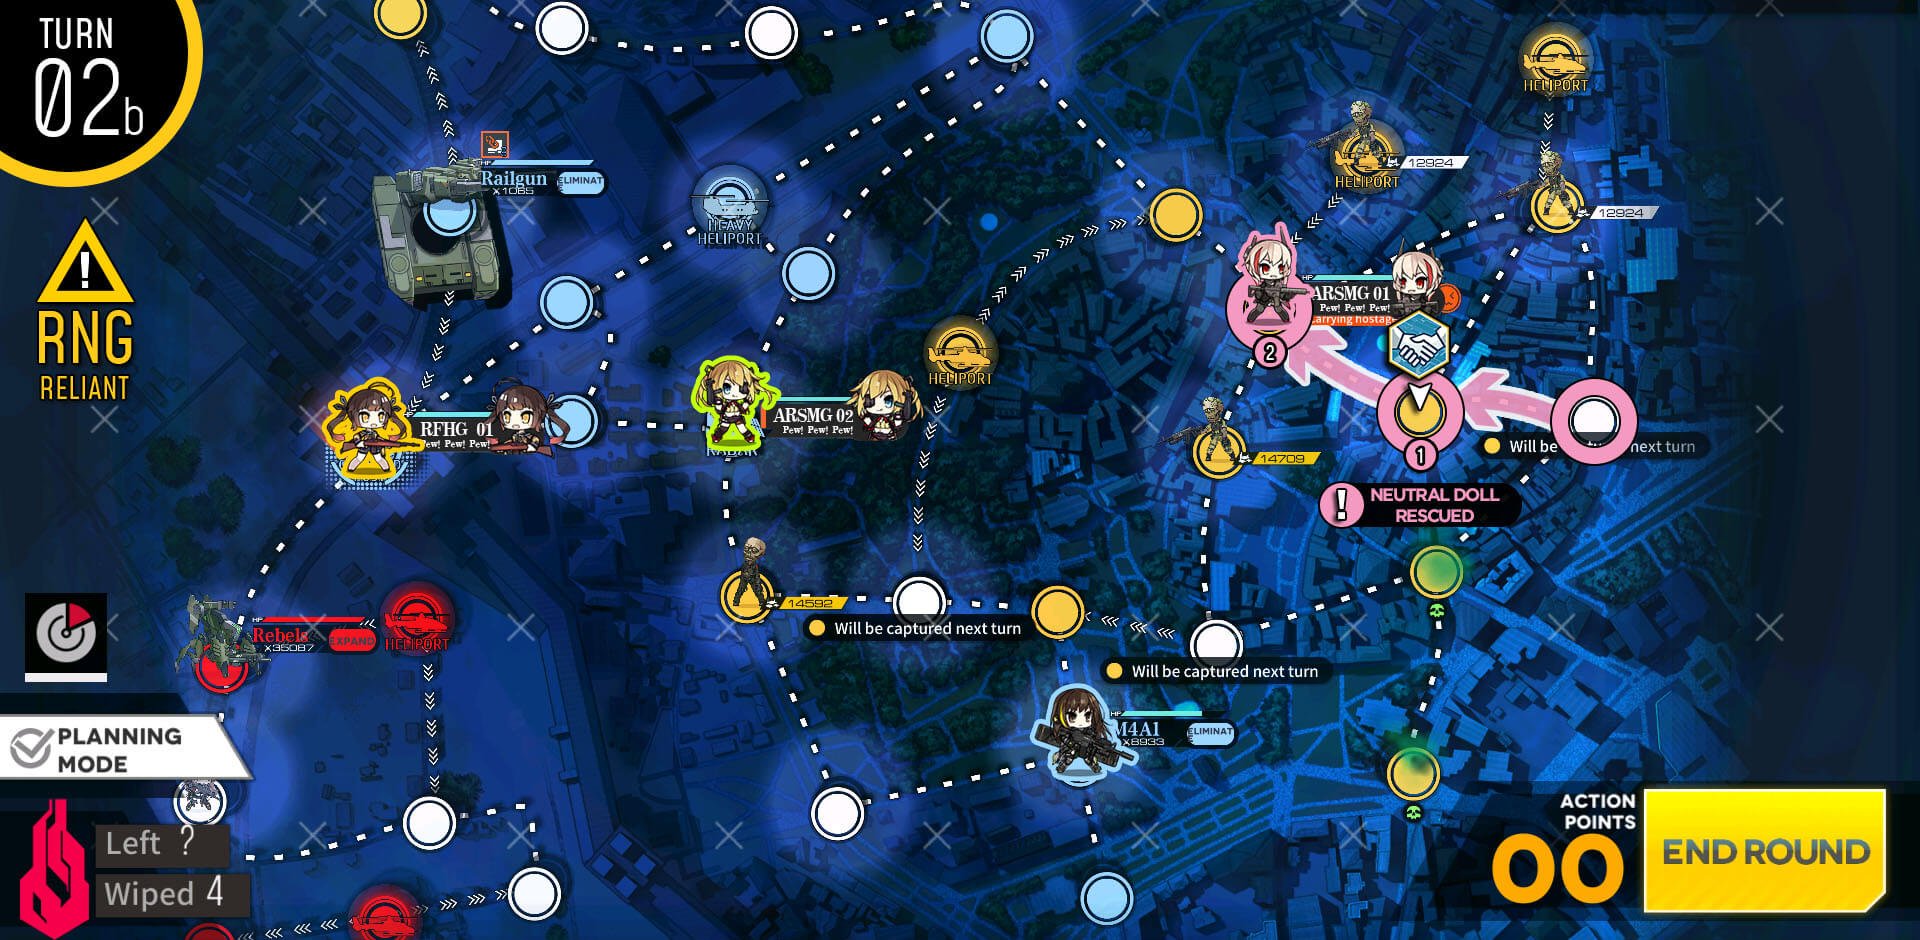
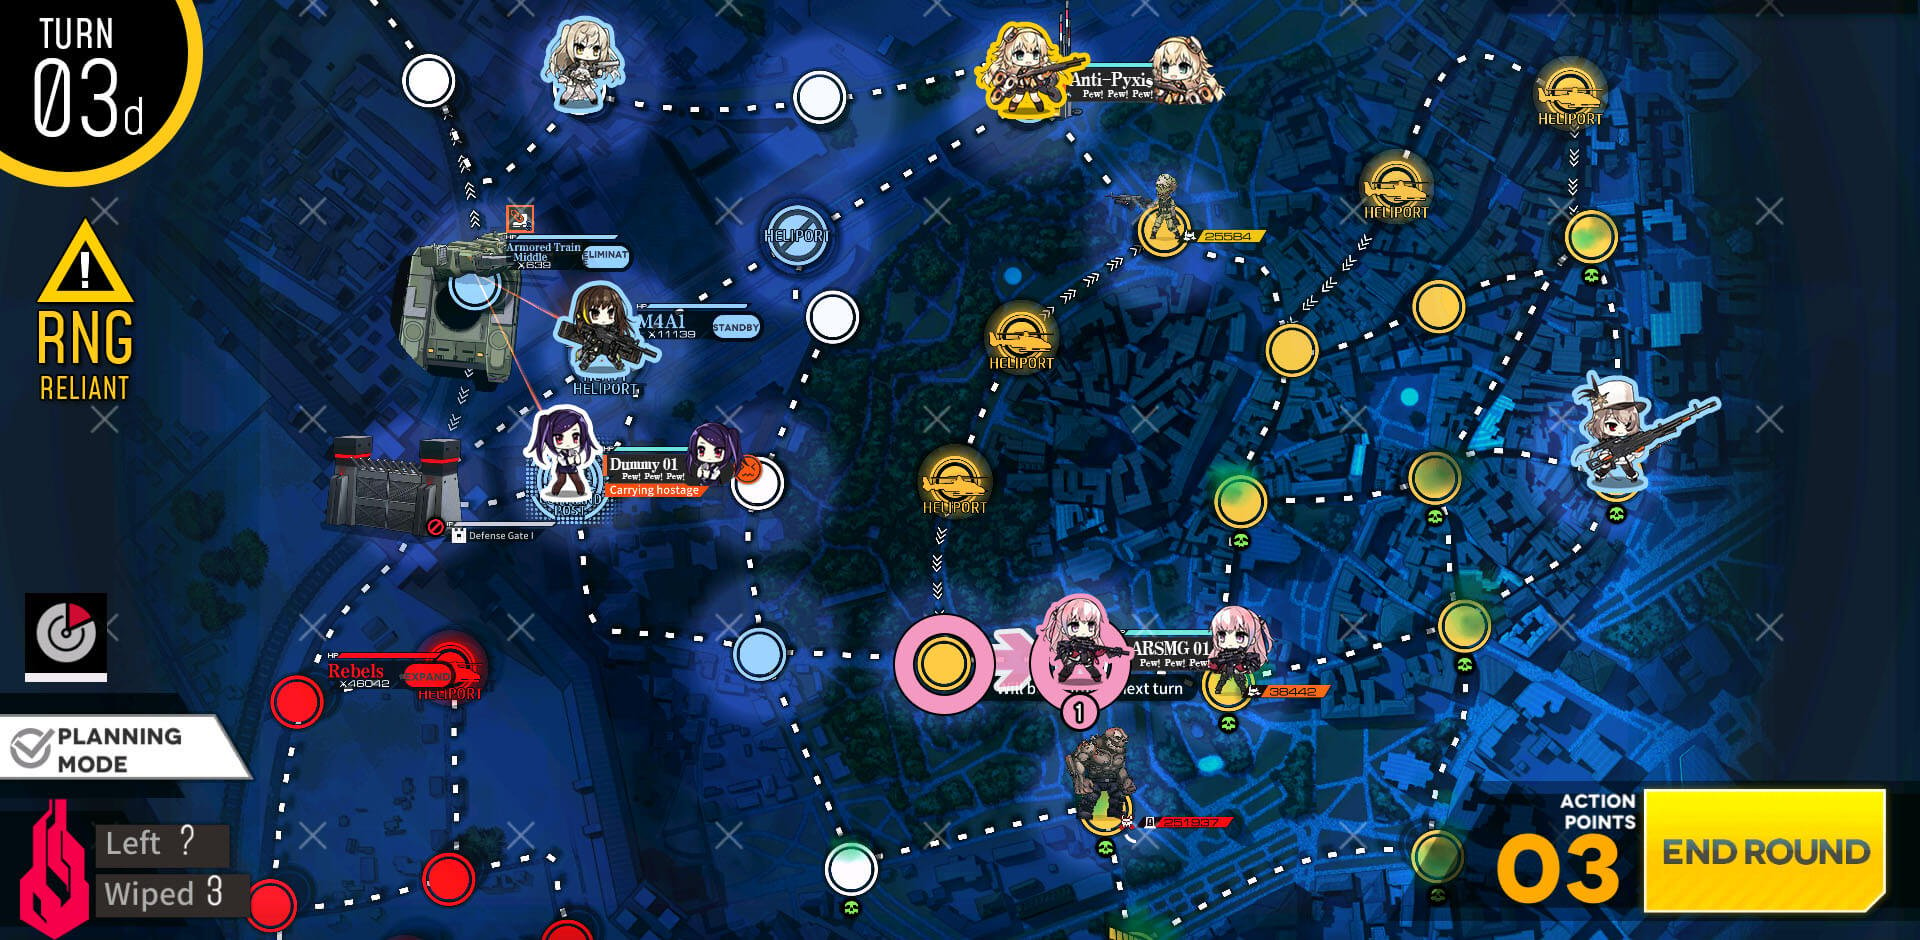
Continue to head to the right side of the enemy HQ.
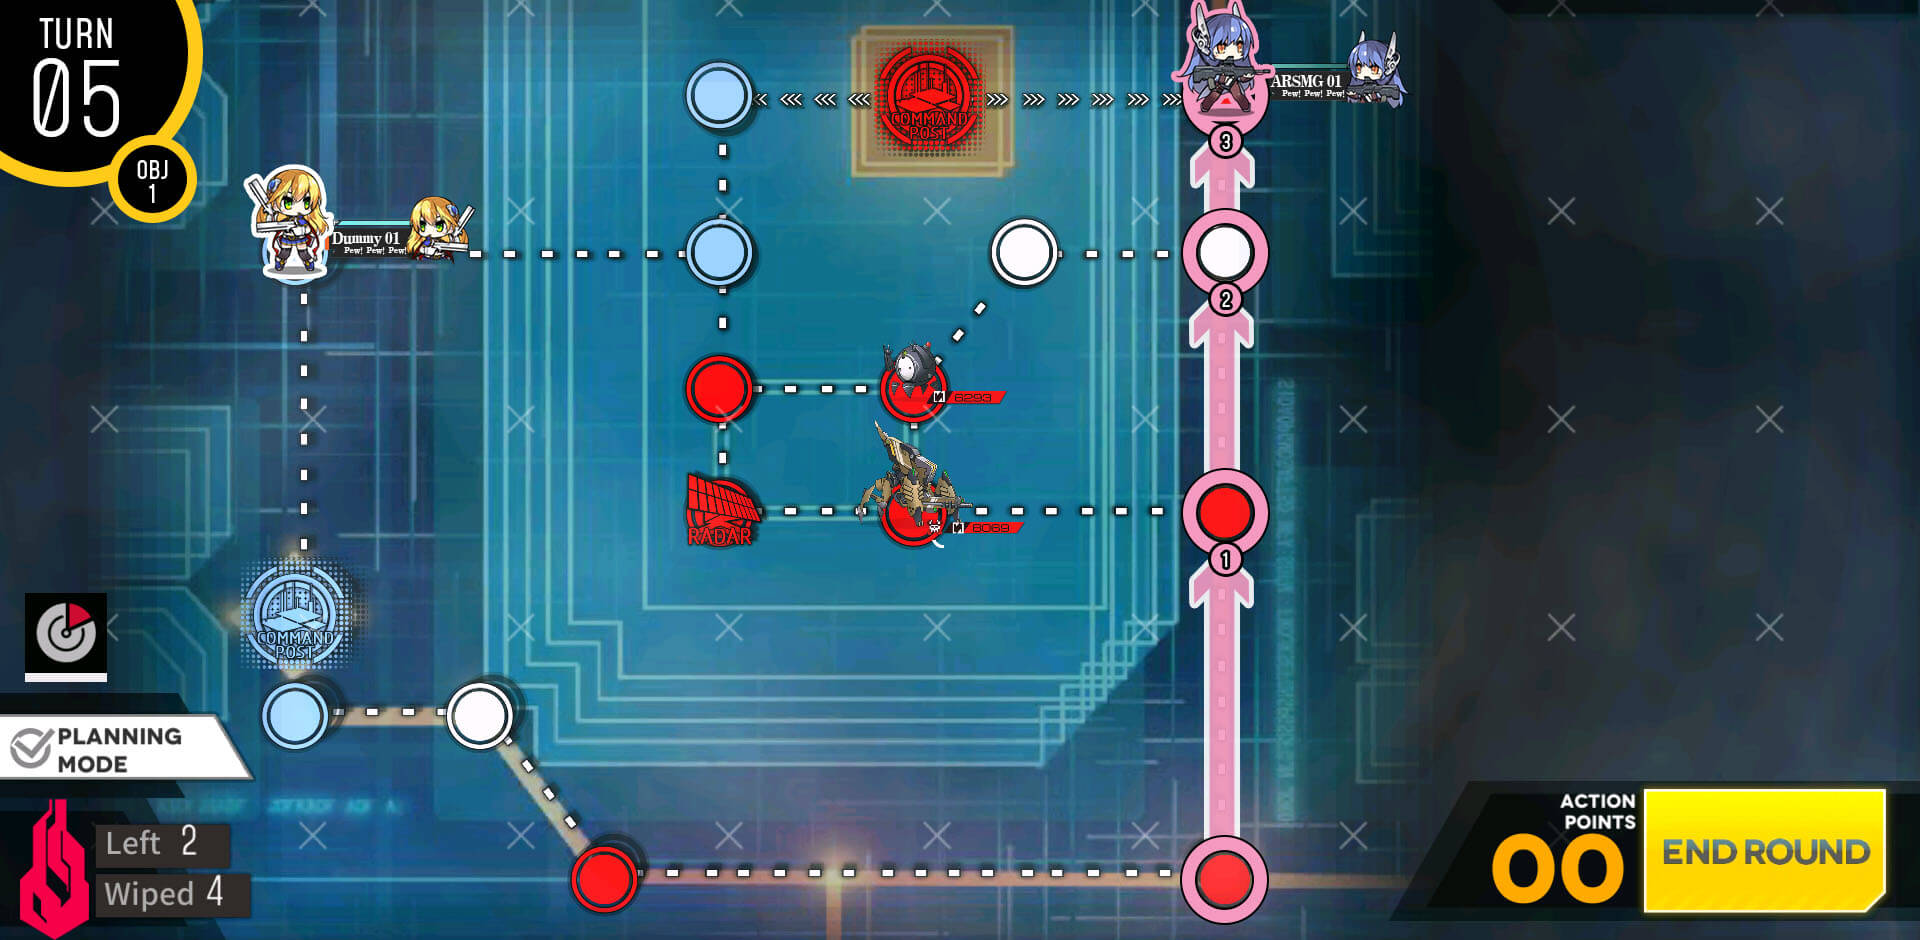
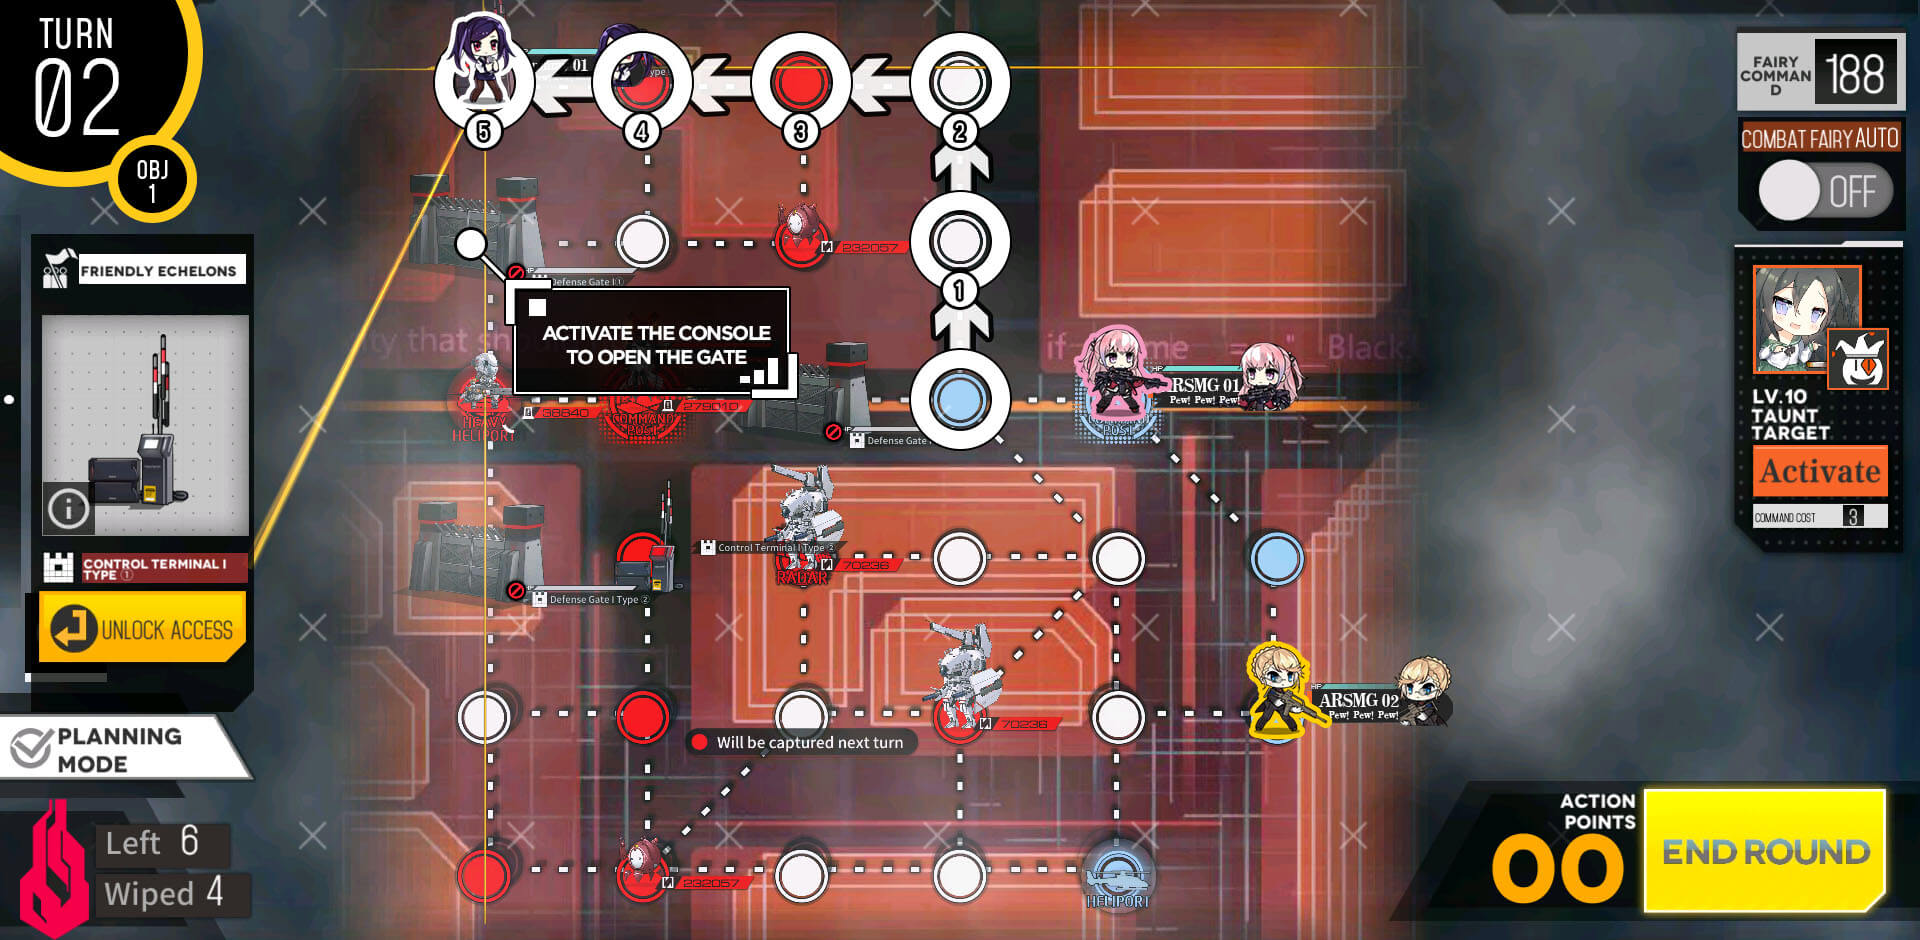
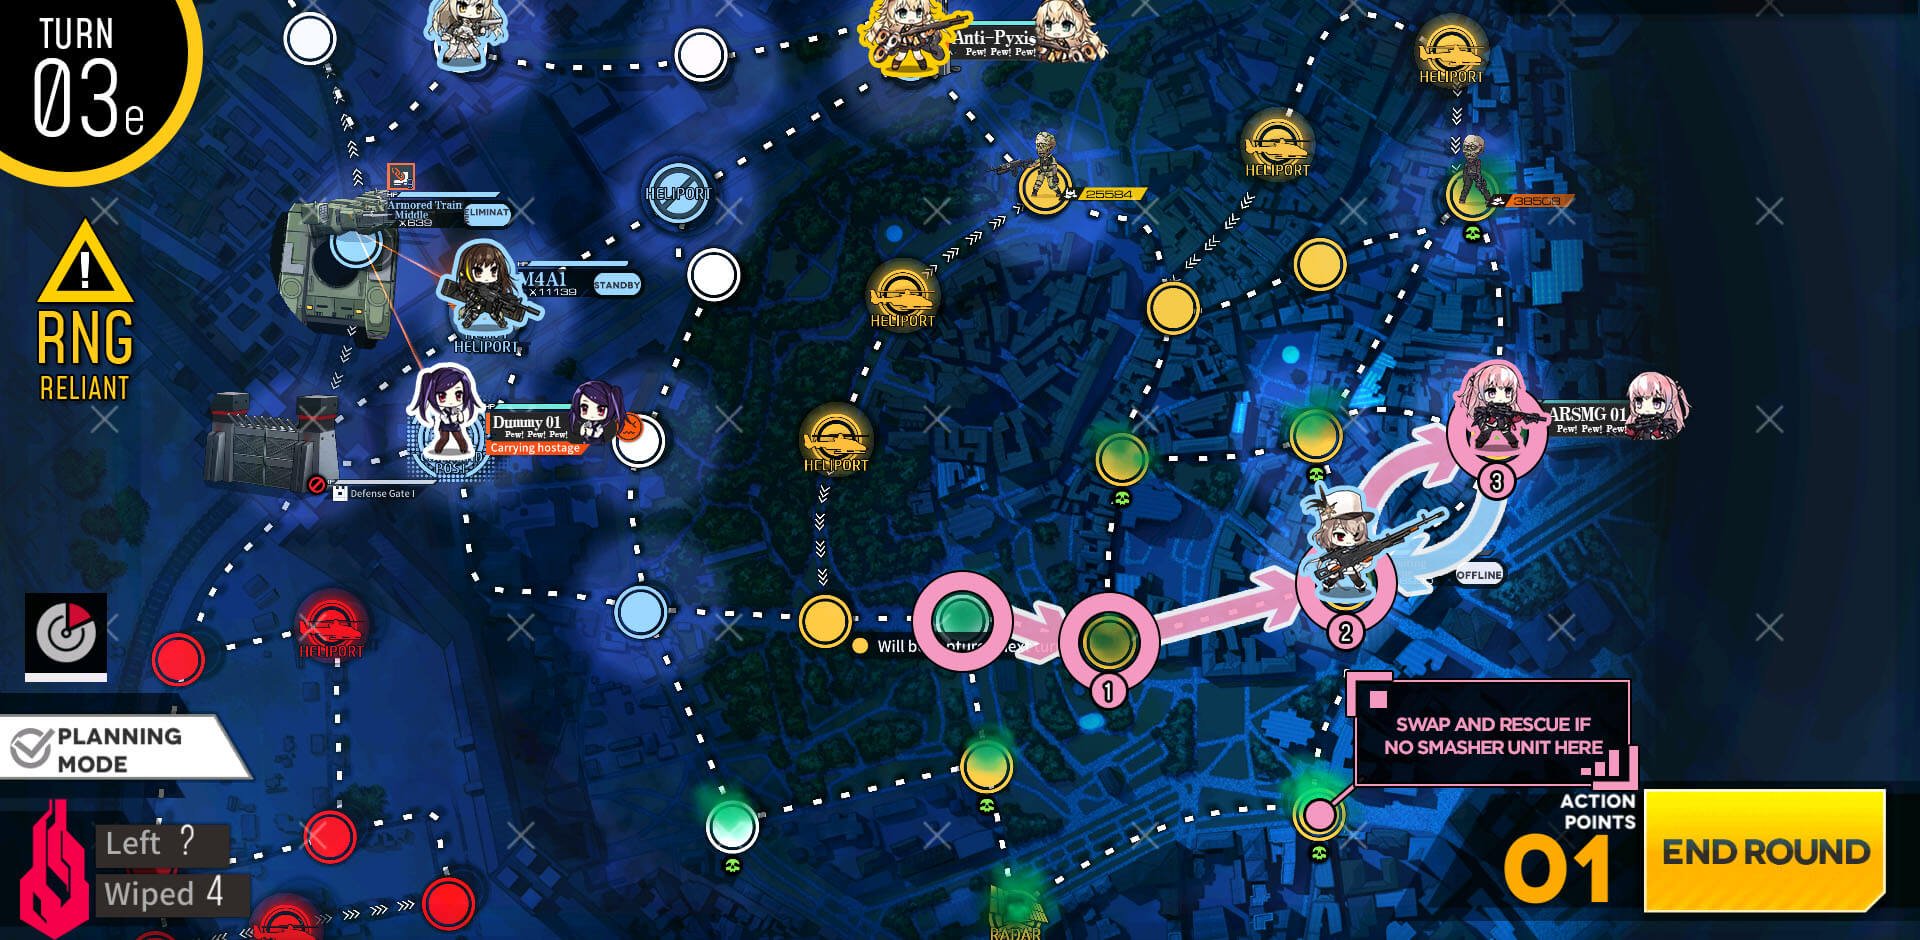
Once ARSMG takes the node on the right side, mission should be cleared next turn.

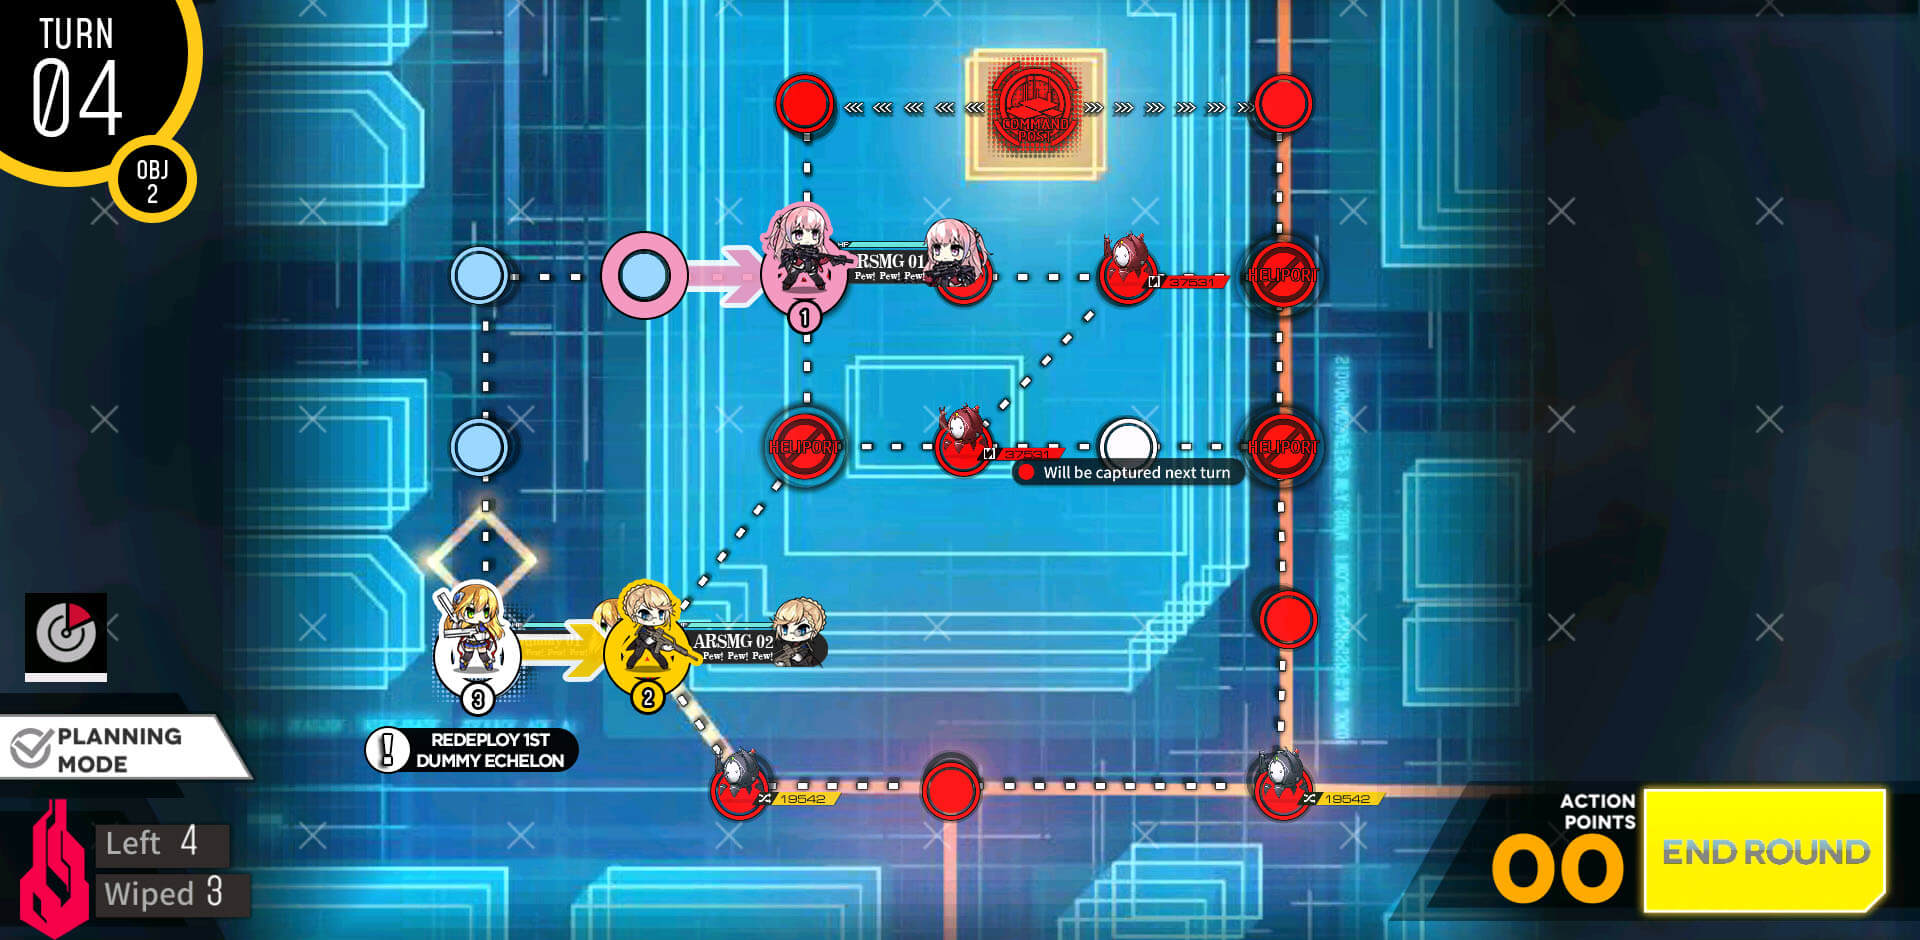
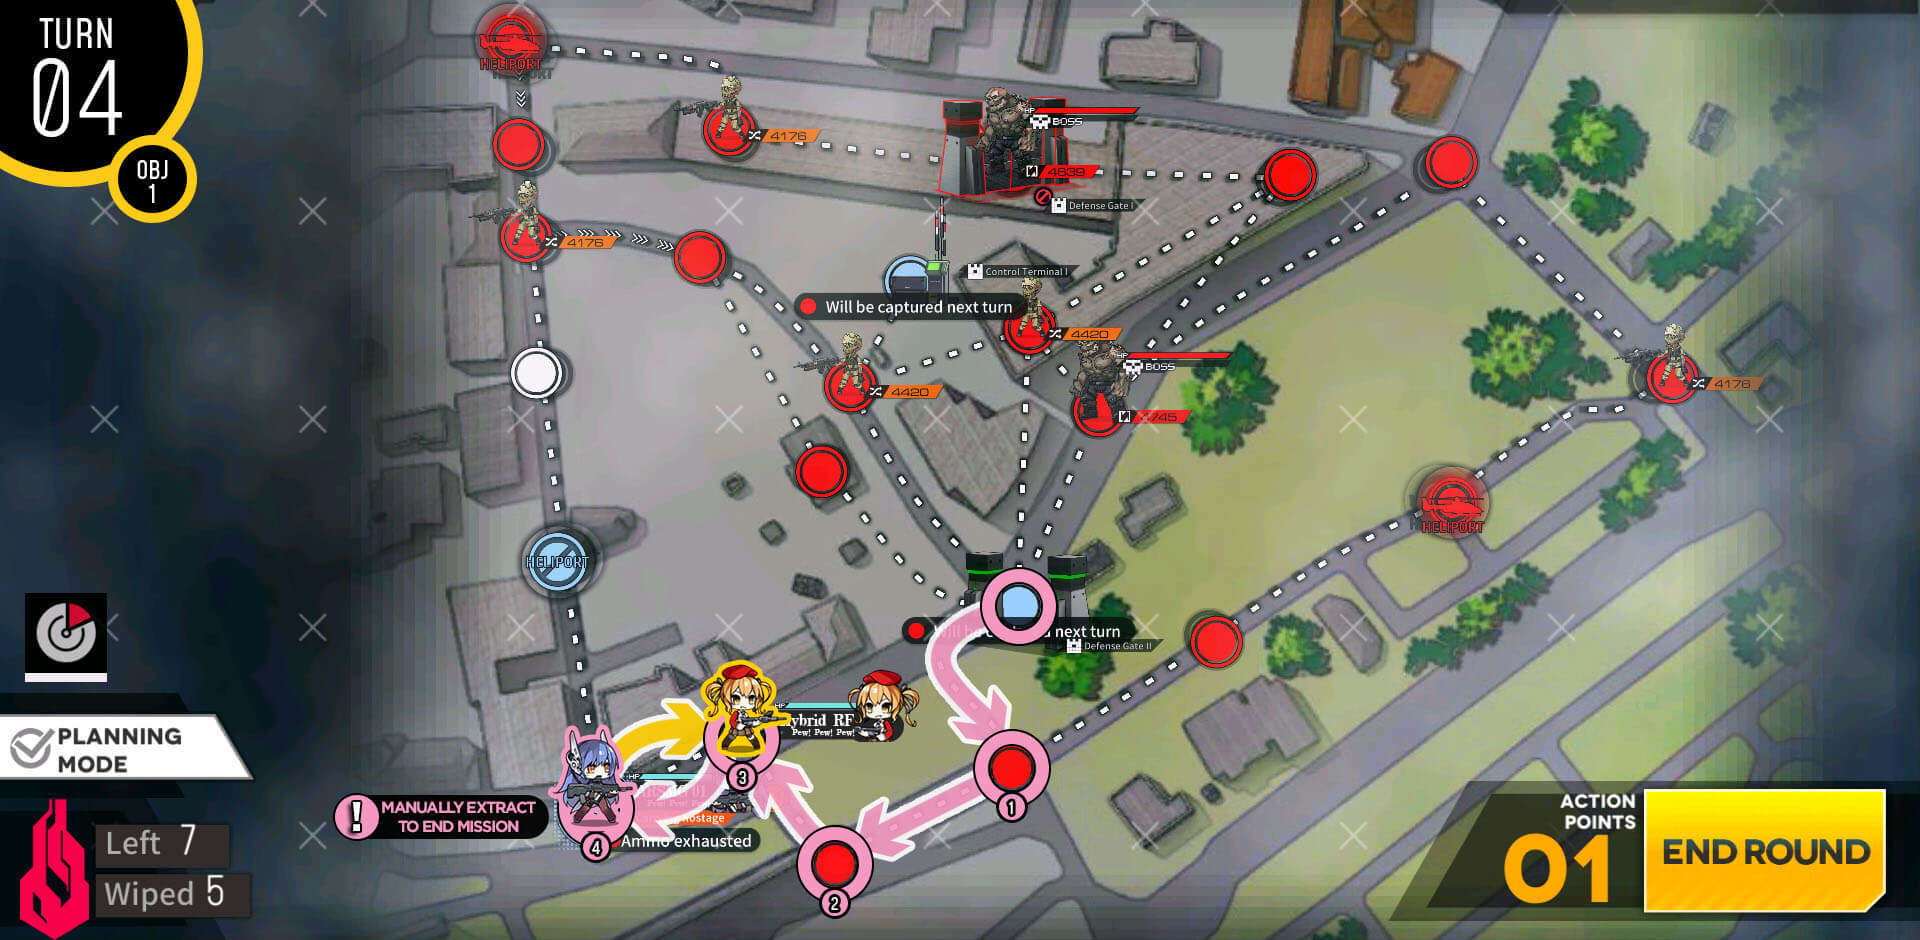
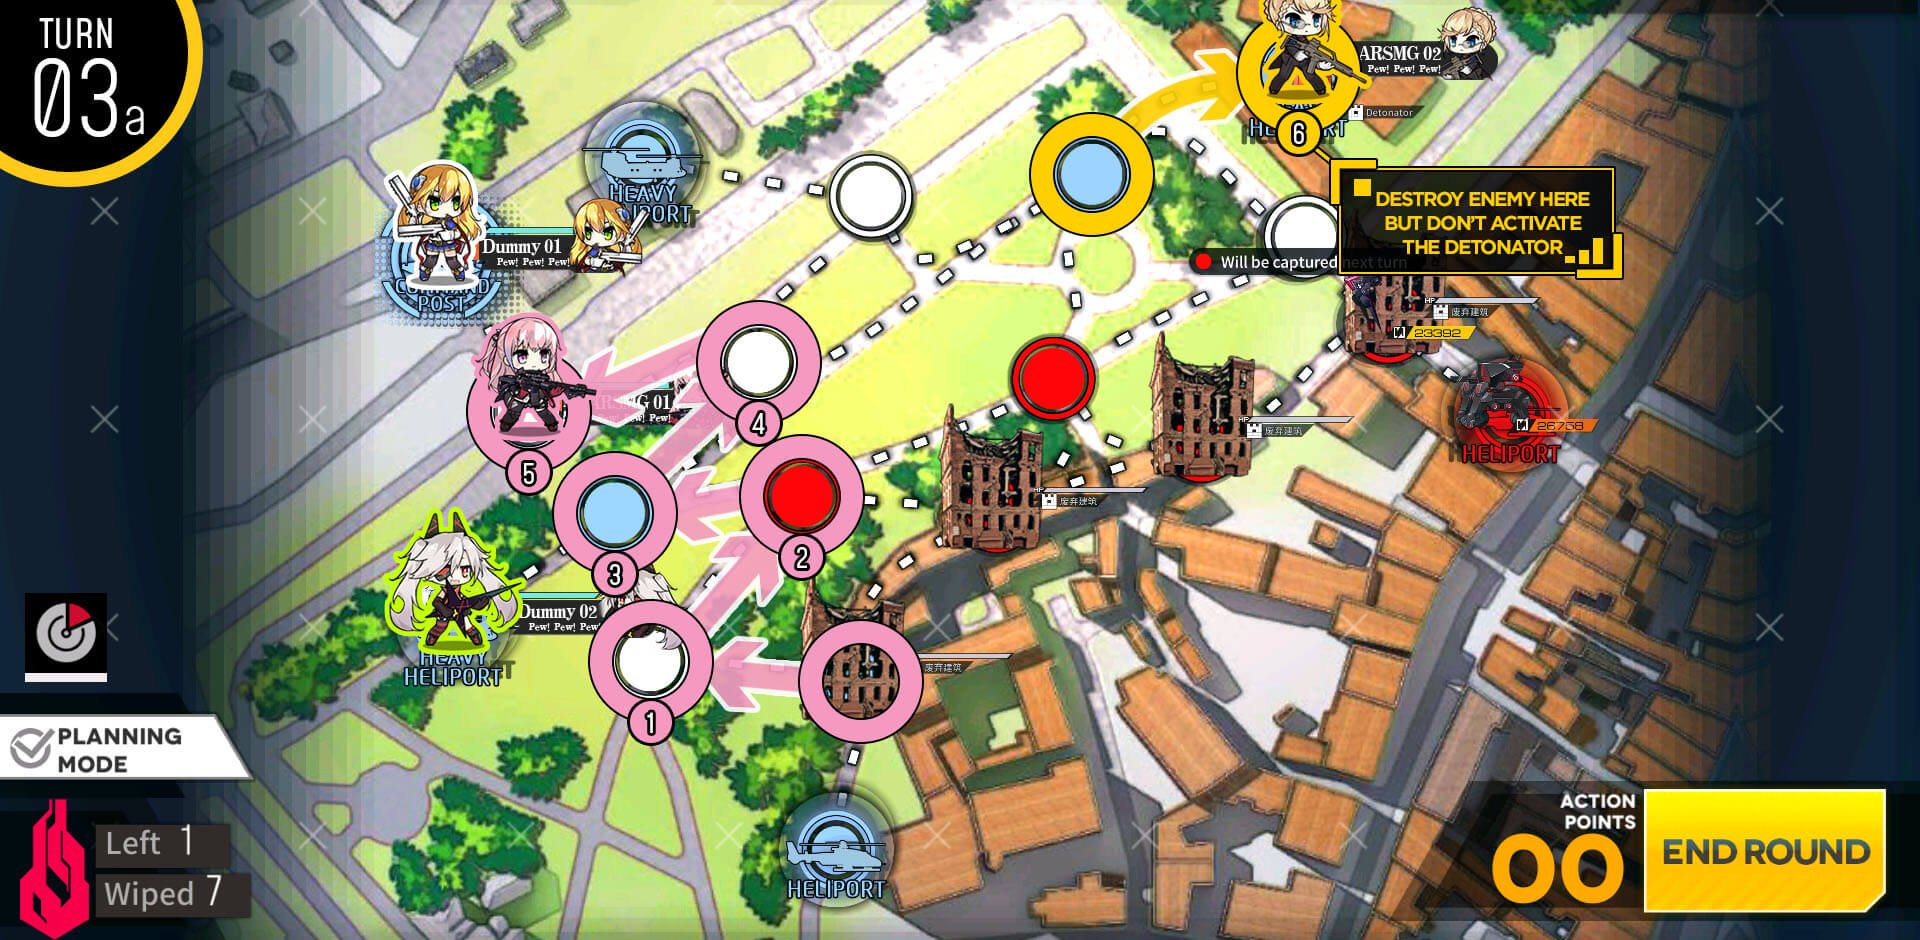
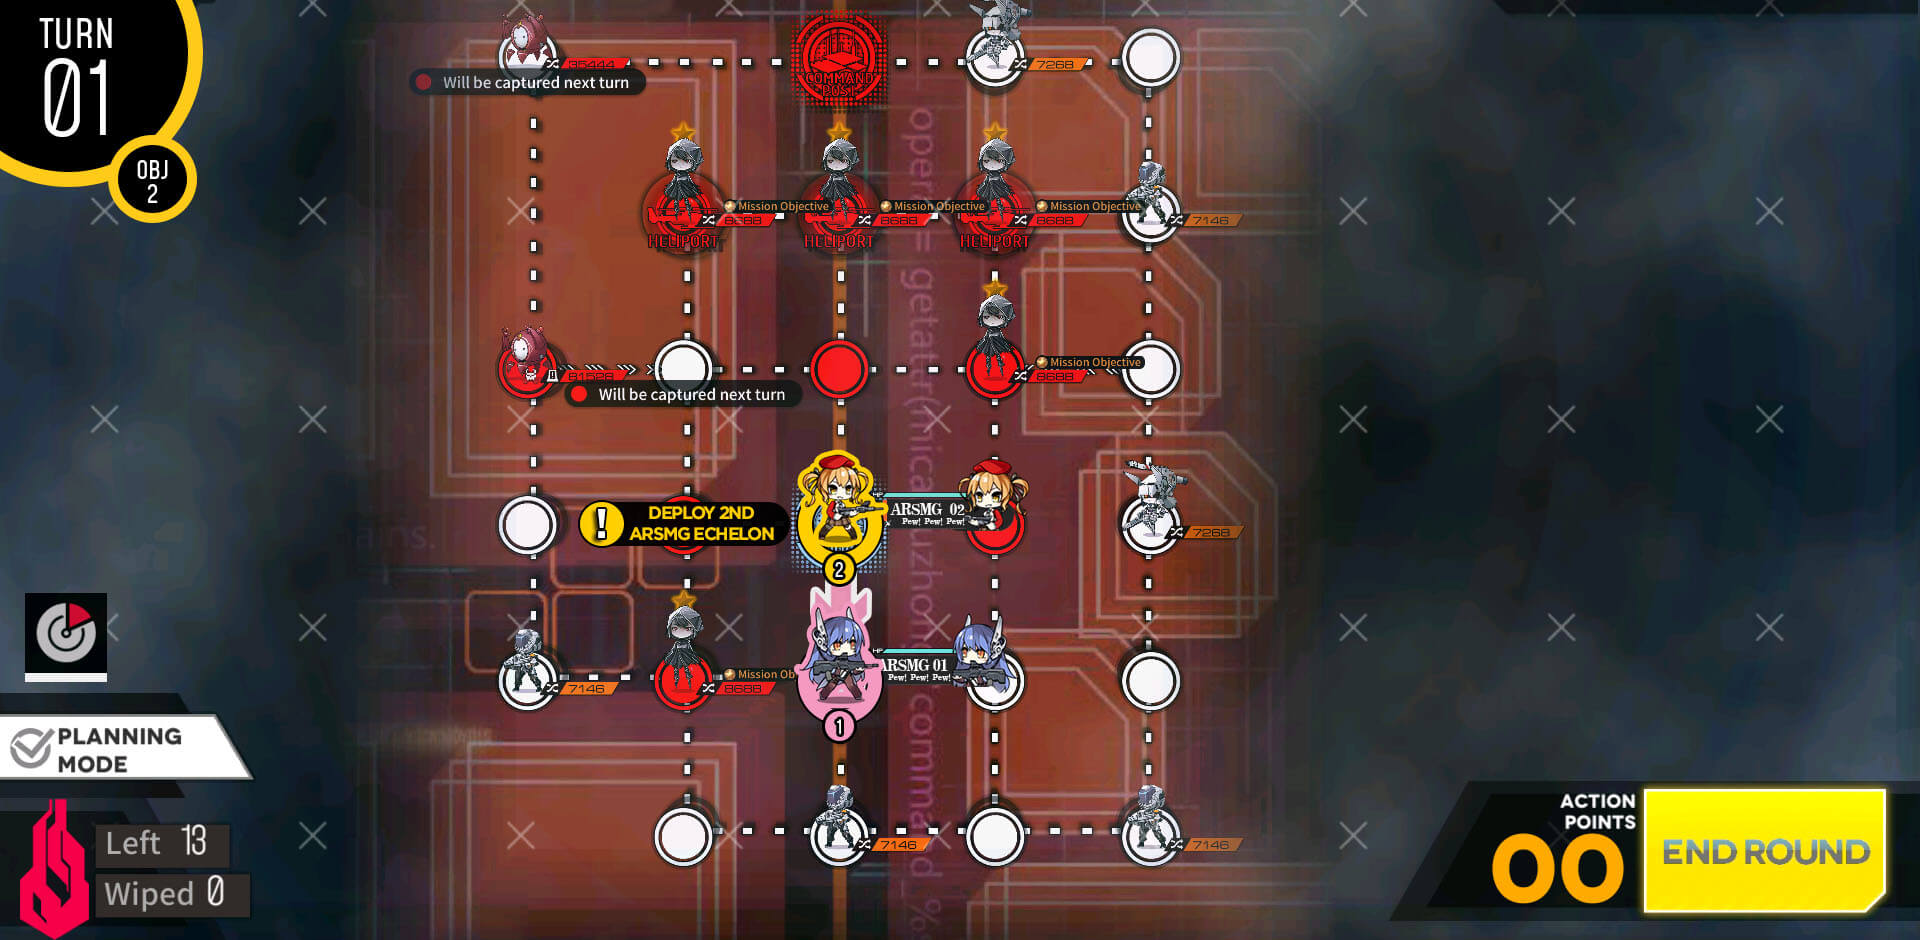
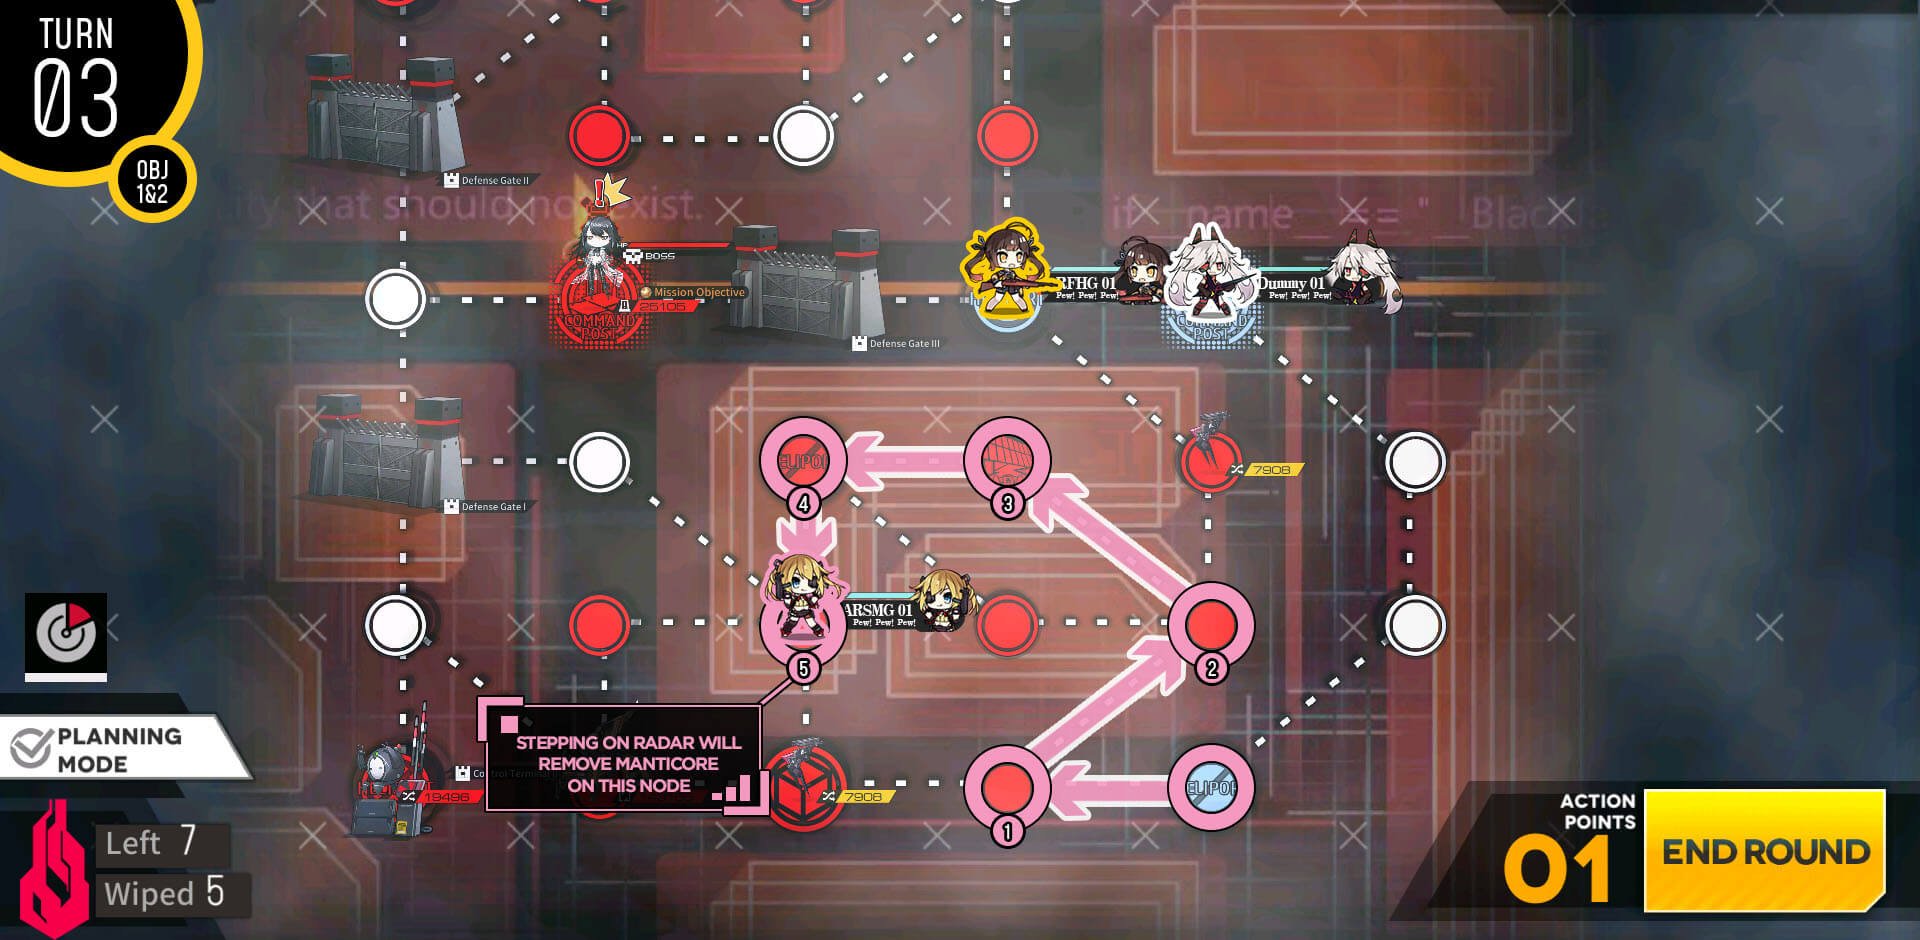
Start is identical as objective A with ARSMG echelon moving up then right.
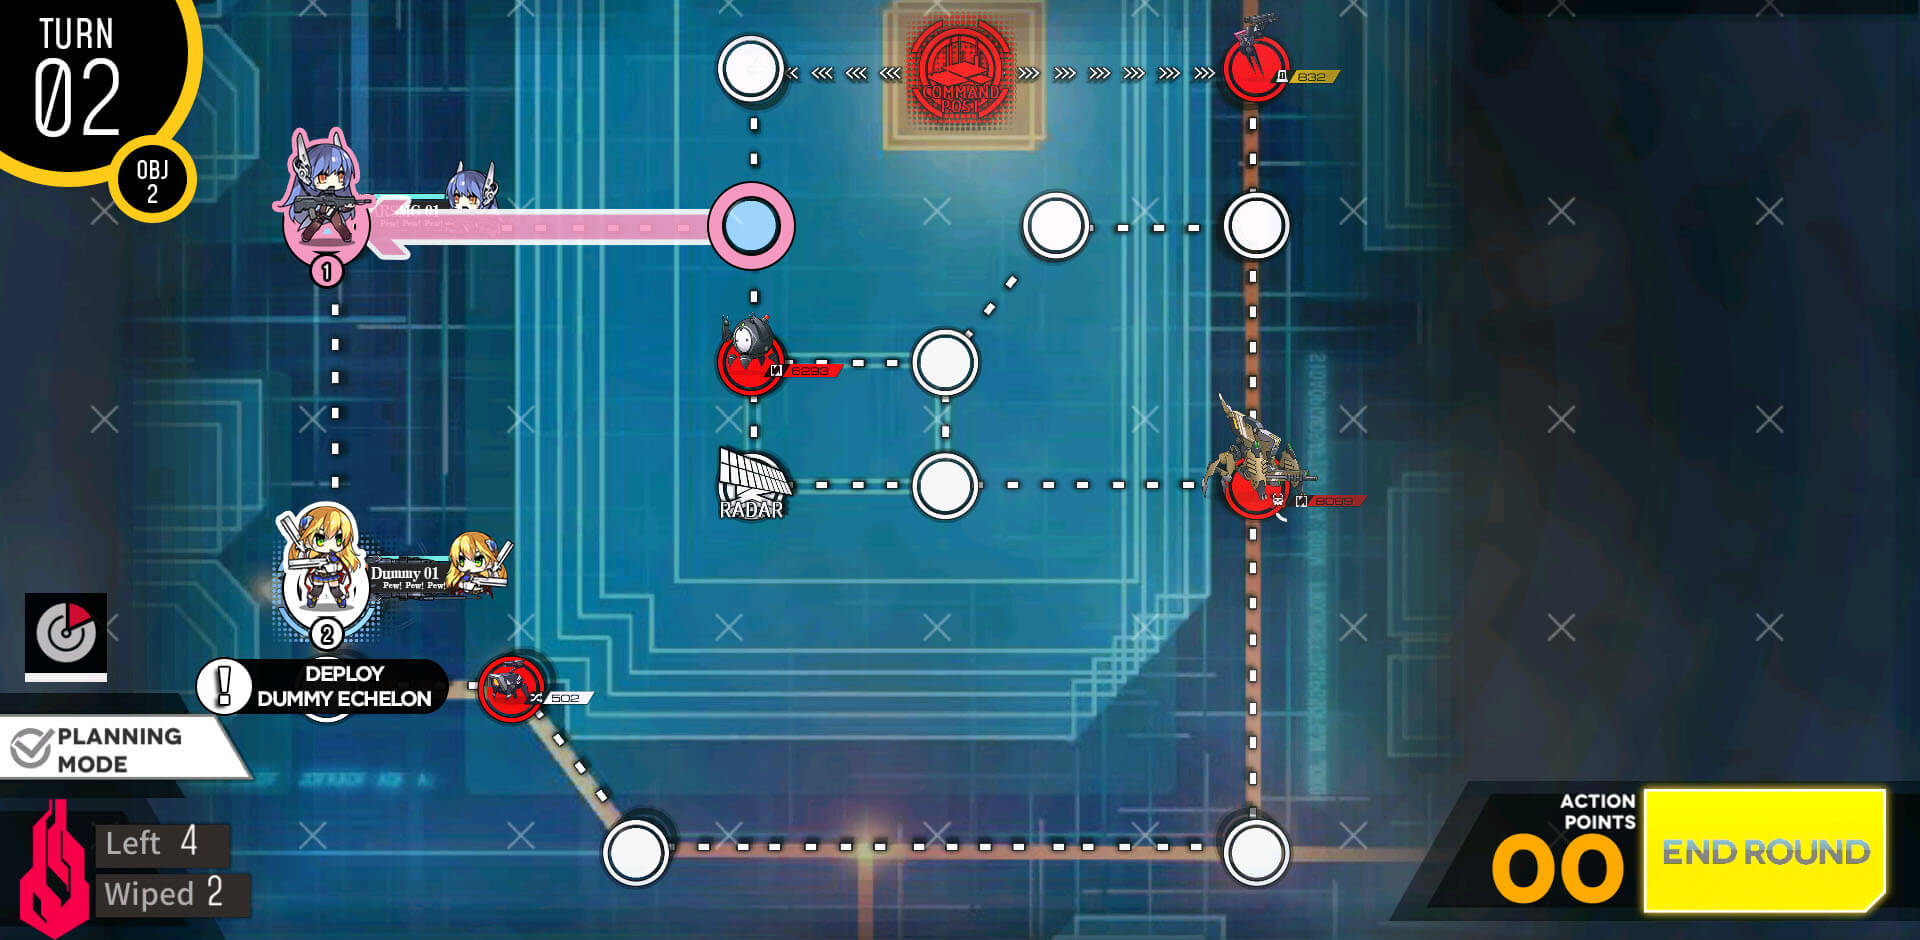
After taking out enemy unit near the HQ, move back towards HQ and deploy the dummy.
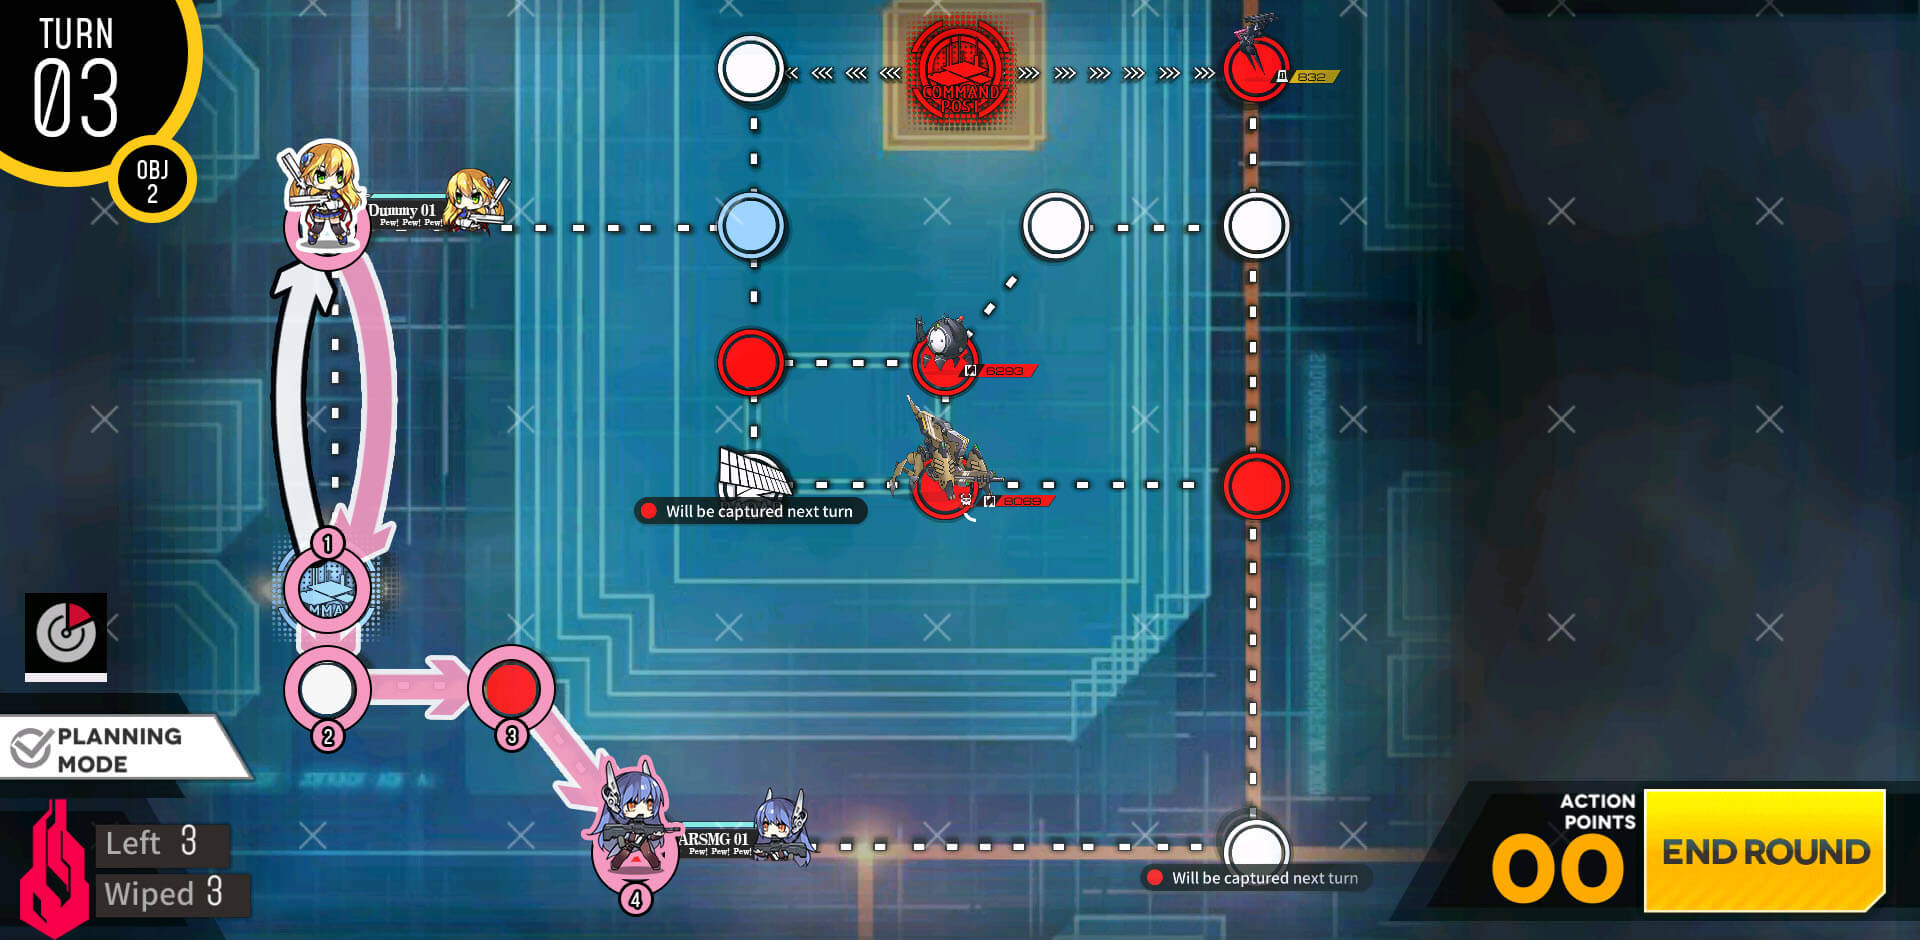
We are taking same route to the other side of the HQ through the bottom.
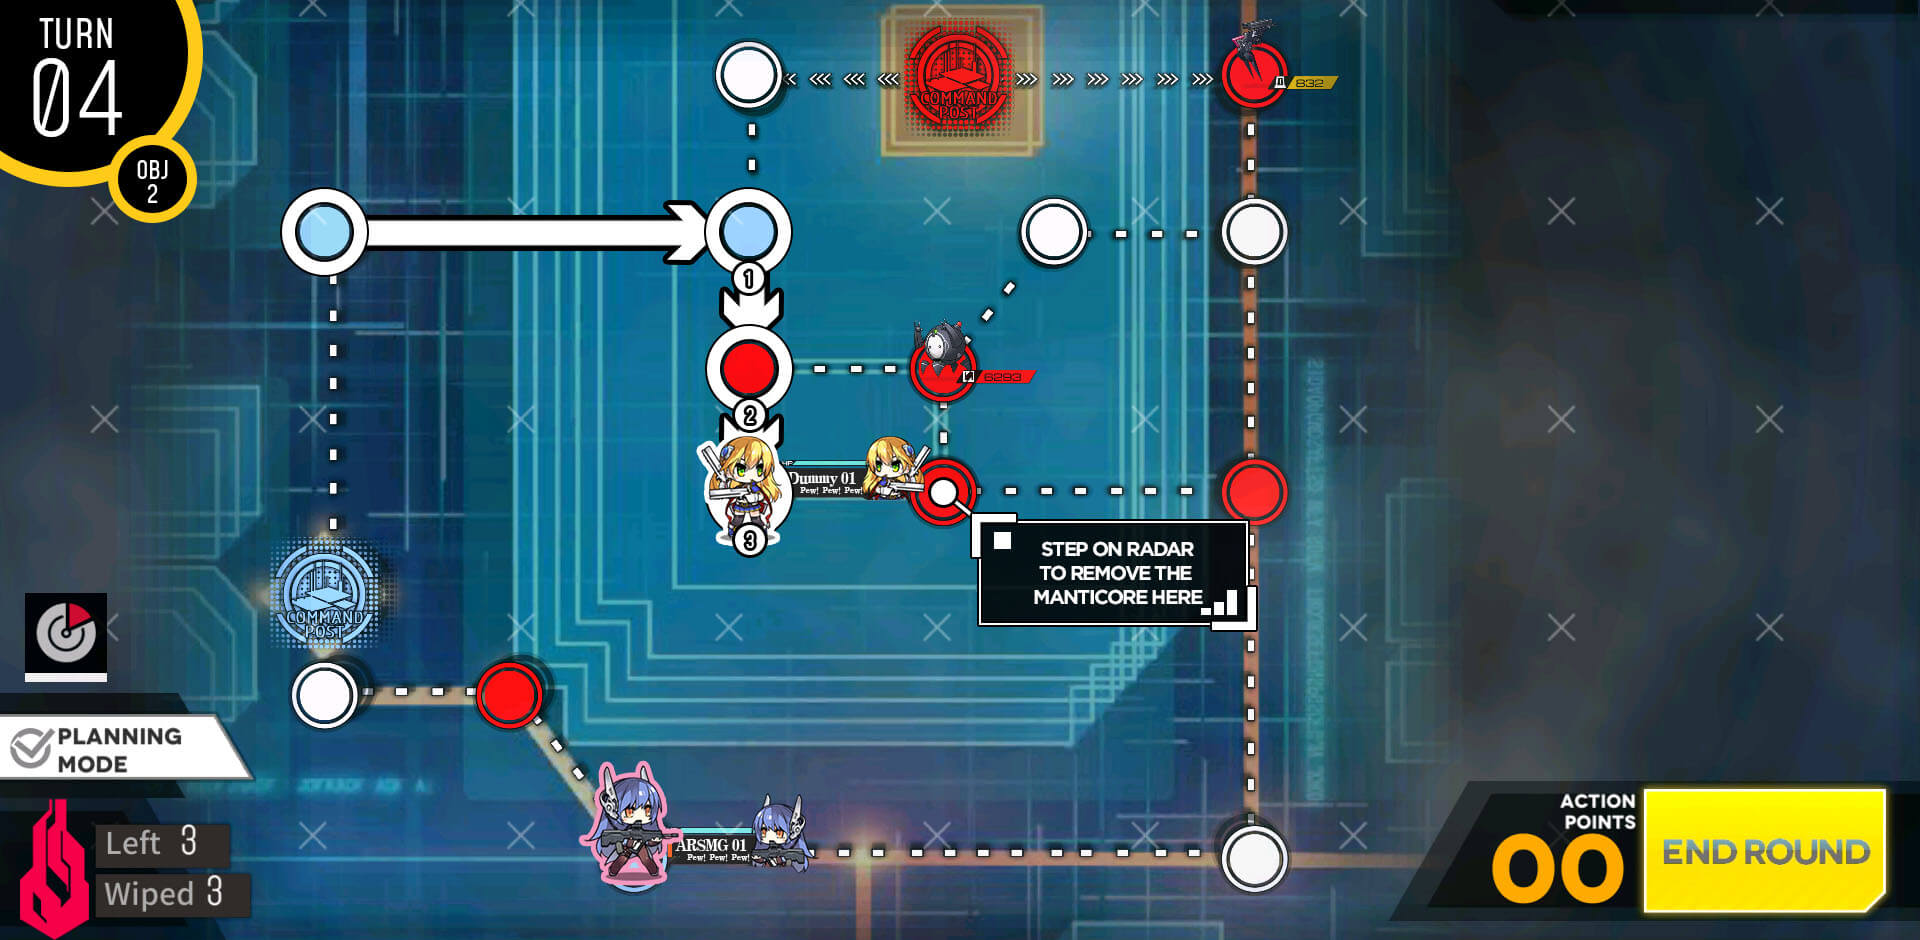
Dummy unit moves to step on the radar and this eliminates the manticore unit, leaving just Goliath and Scout on the top right.
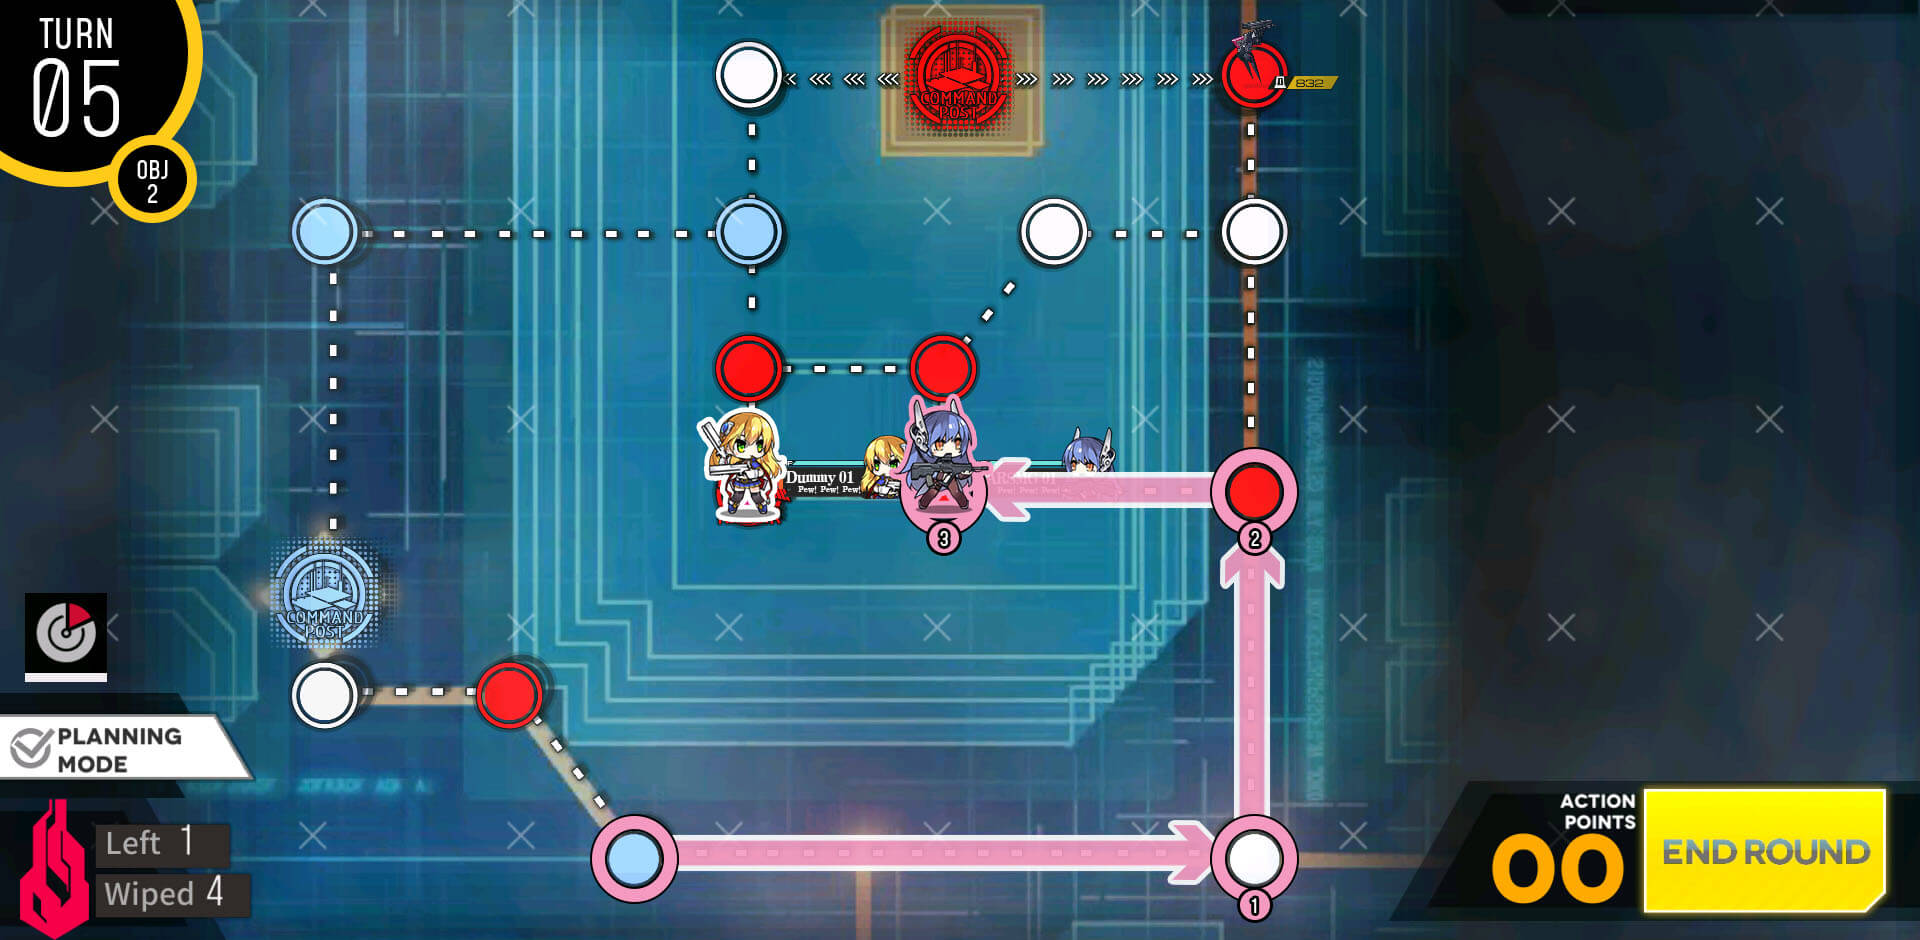
Take out the Goliath unit first. IF you failed to kill it before blowing it up, simply repair at the HQ and clear the mission.
Once you take care of last unit on the map, mission should be cleared automatically.
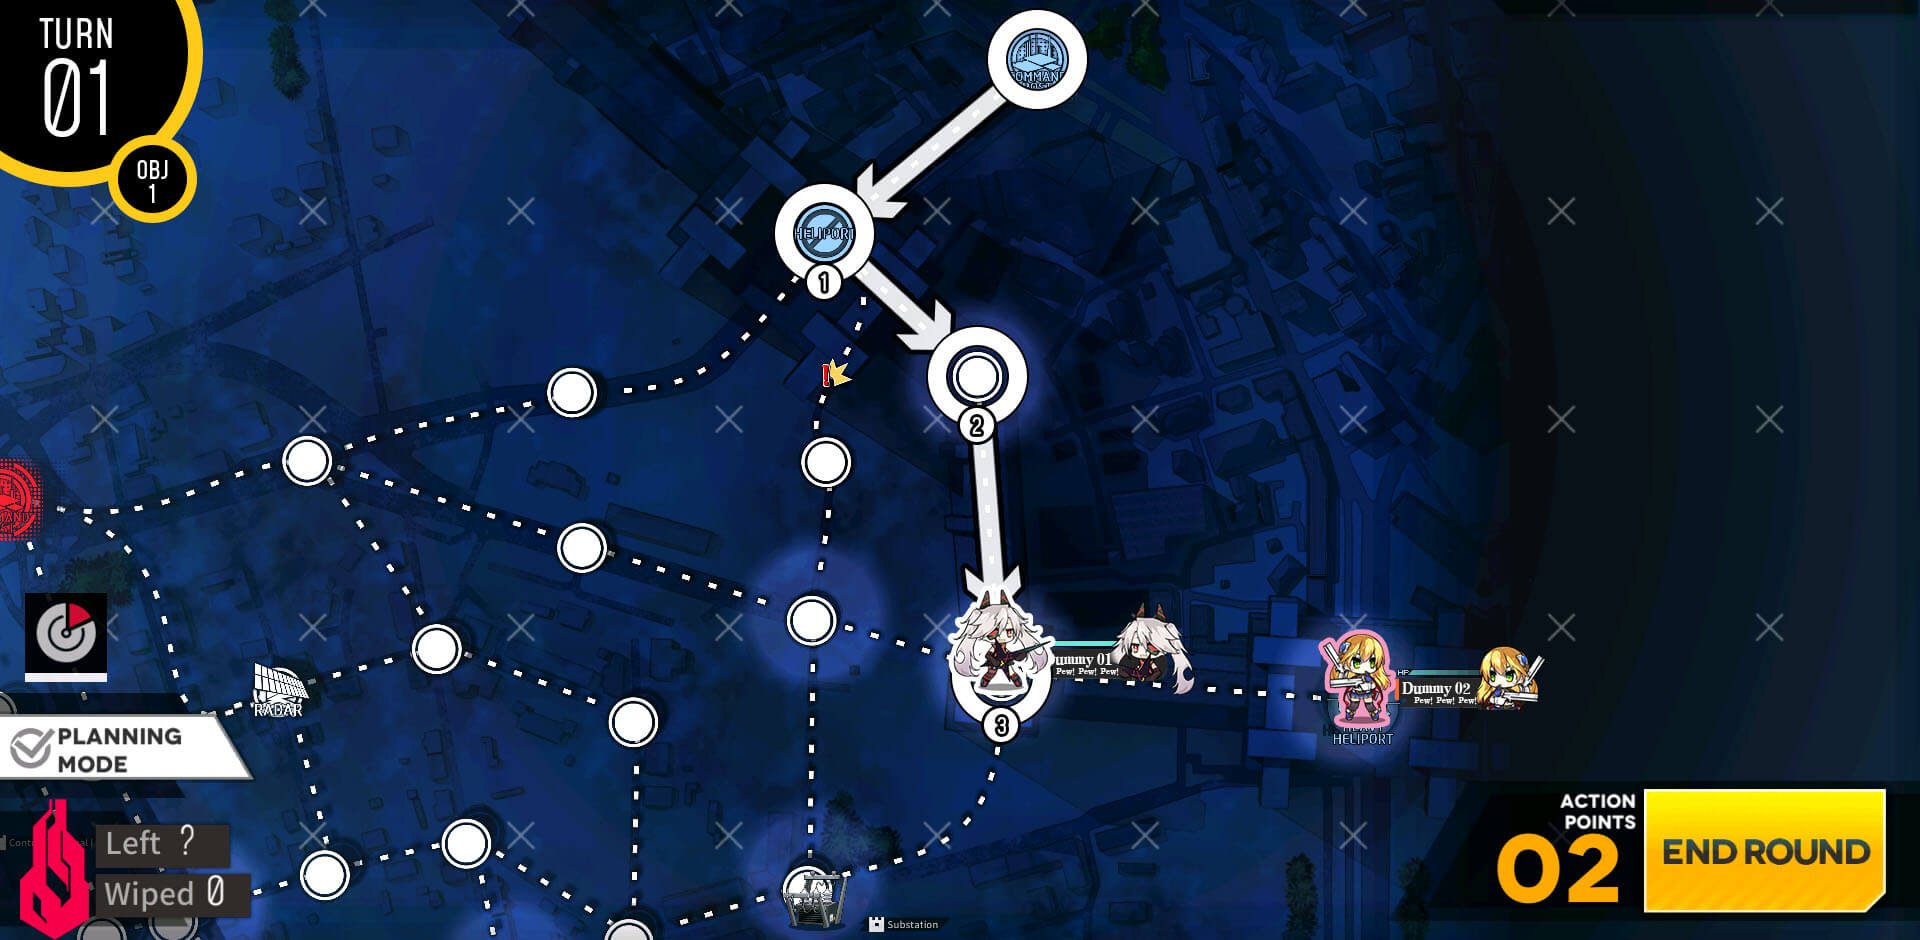
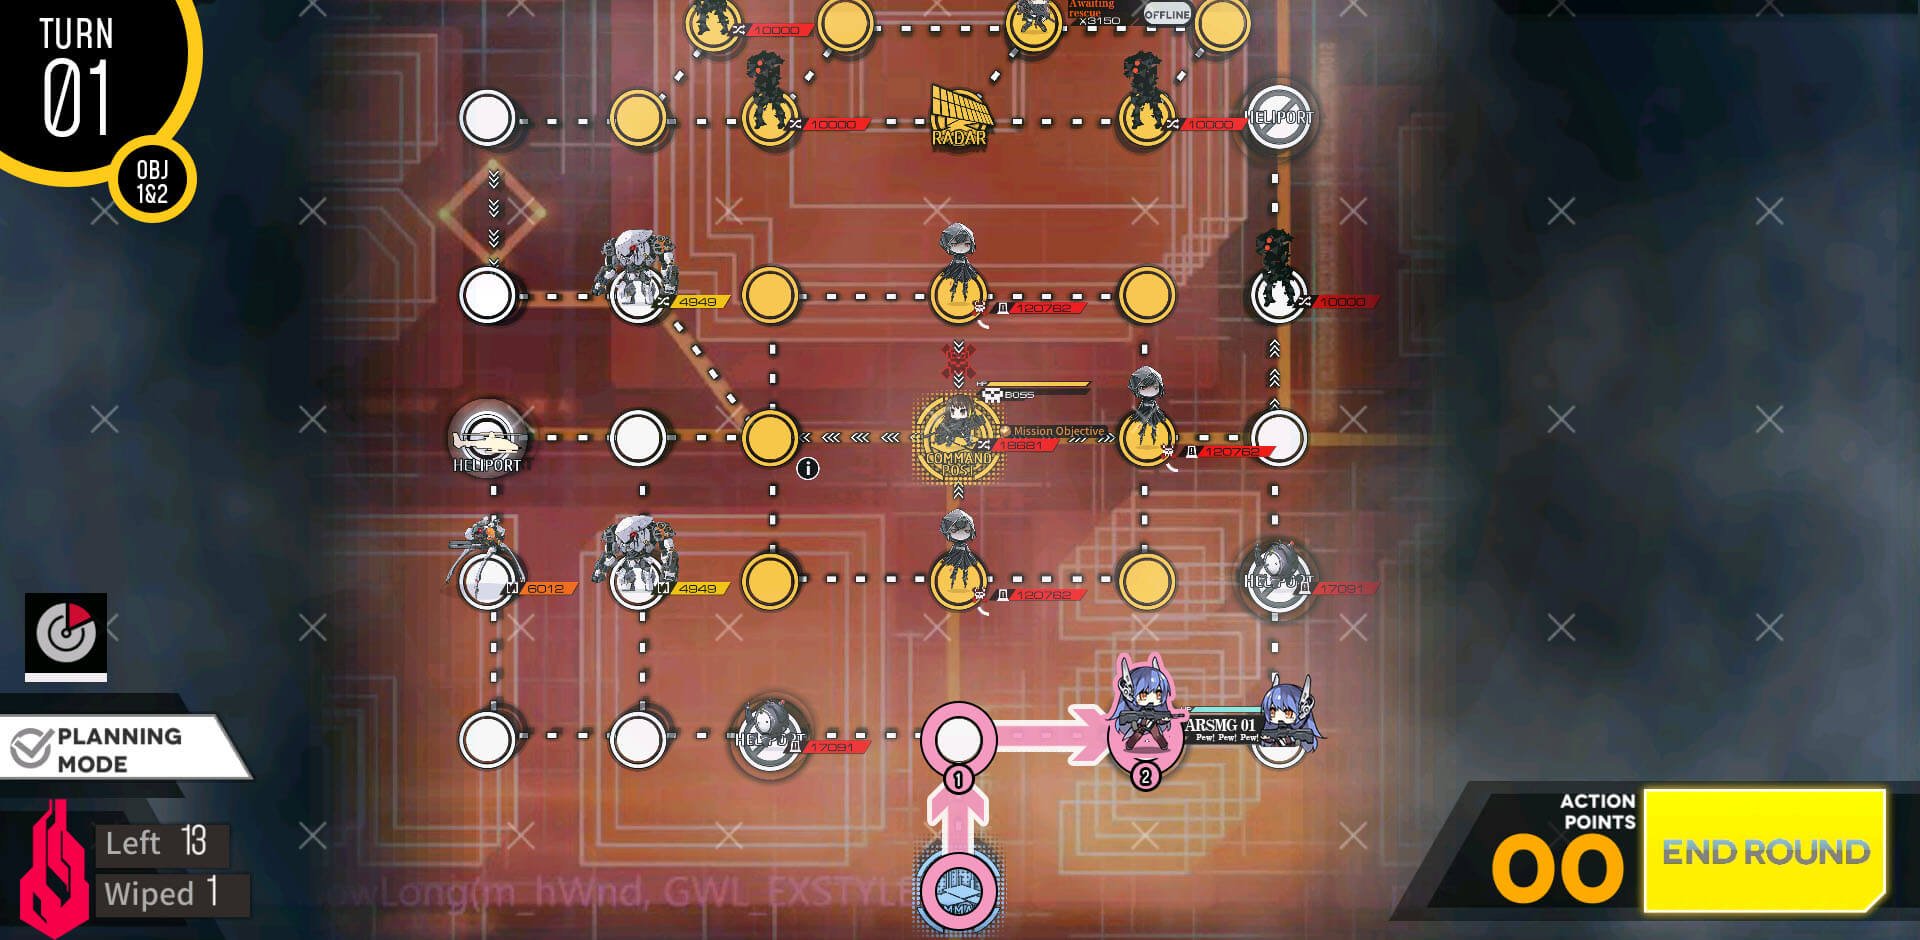
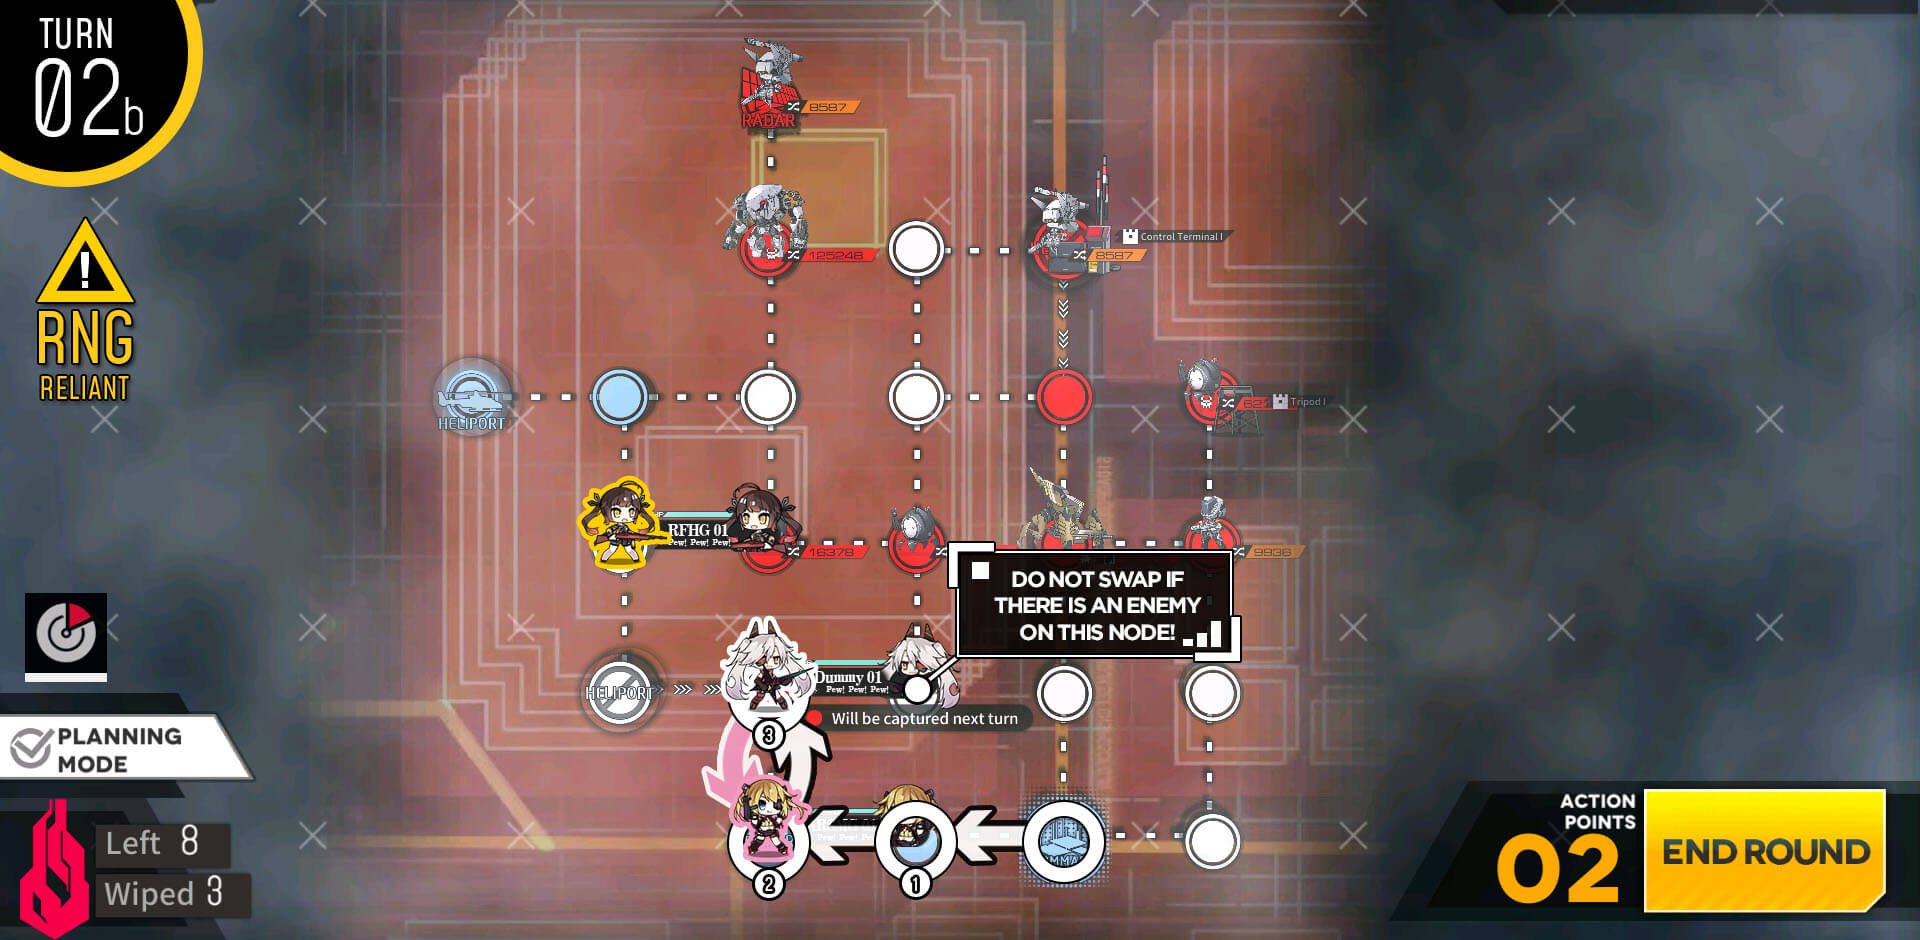
Start with Combat echelon on the HQ and move to the Radar node. Then deploy dummy echelon.

Swap location of dummy and combat echelon. This is to draw Goliath unit to the radar node to remove the Goliath Plus unit on the HQ. Simply retreat the dummy when battle starts.
Move ARSMG echelon up two nodes towards the top.

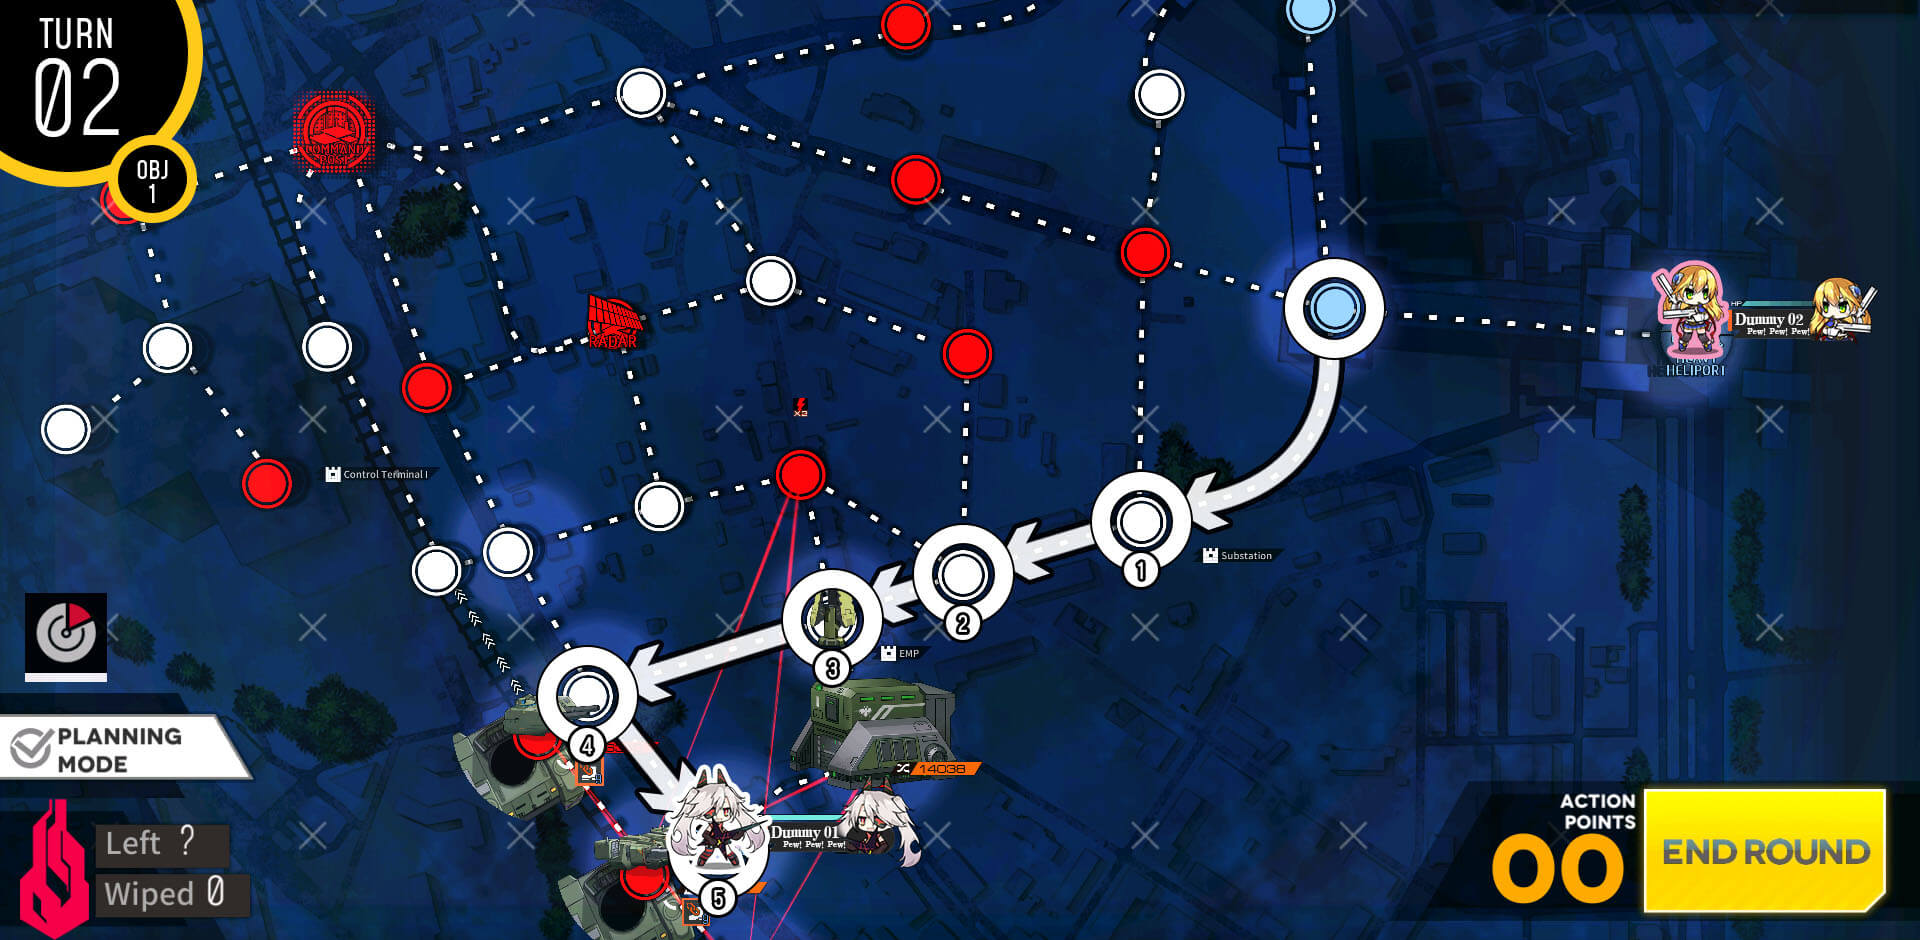
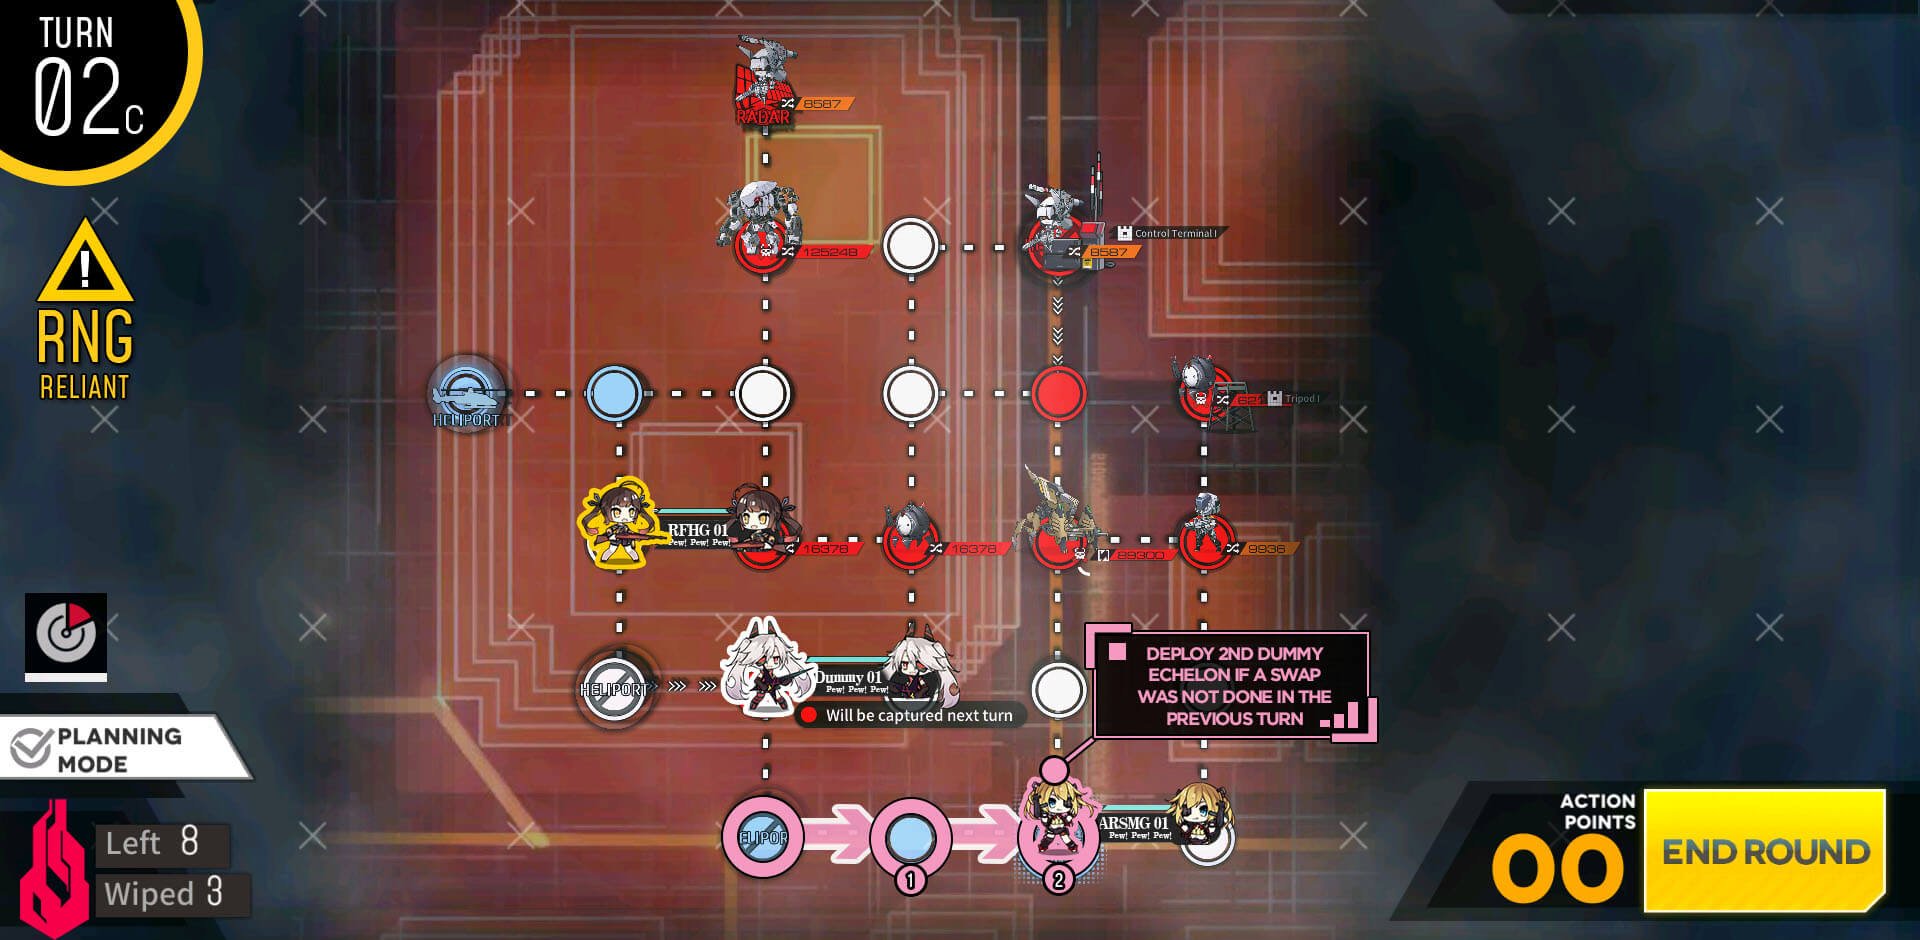
Move 1st echelon to the right then deploy 2nd ARSMG echelon on the HQ.
1st echelon moves right one node again, then move 2nd echelon to the radar node. Redeploy dummy echelon on the HQ.

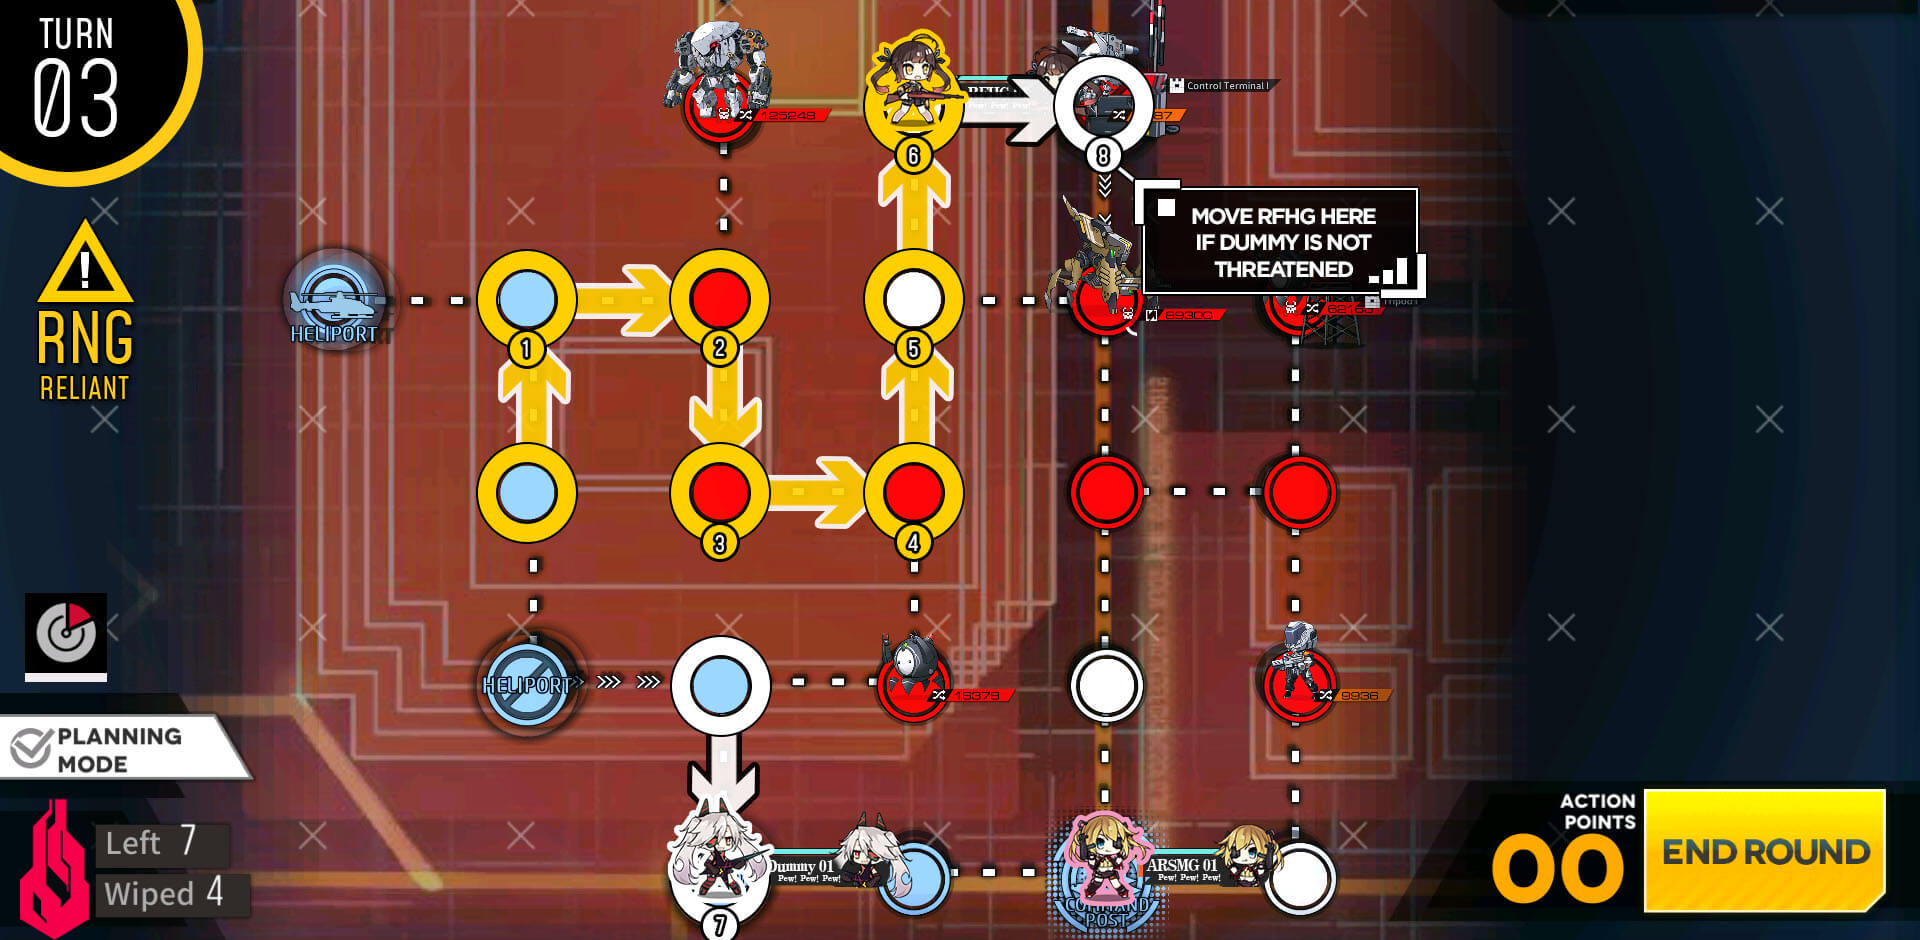
1st echelon moves down 1 node, staying away from Goliath Plus unit. 2nd echelon takes the bottom route.
Dummy will then follow behind so that we can capture 2 nodes at once this turn.
Deploy 2nd dummy on the HQ and send it up two nodes. 1st & 2nd echelon will move to the right 1 node each.
1st echelon will use the diagonal path in the middle to reach the node left of the enemy HQ. 2nd echelon will move up 1 node to continue its path towards the right side of enemy HQ.
Now that Goliath plus units are in the middle, it is safe to move the 2nd dummy right below the 1st echelon.
Now that we have left side captured, simply move 2nd dummy echelon through the diagonal path to the other side below the 2nd echelon.

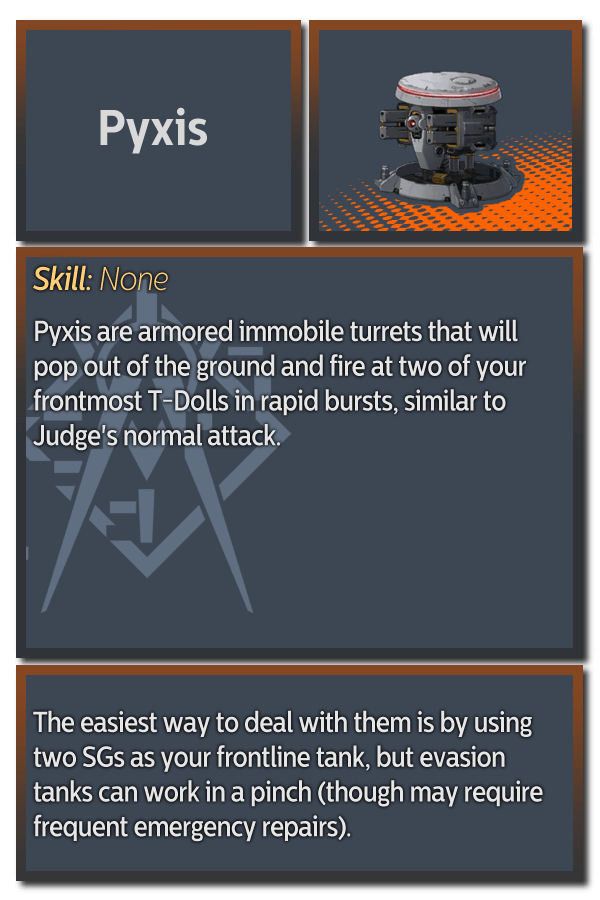
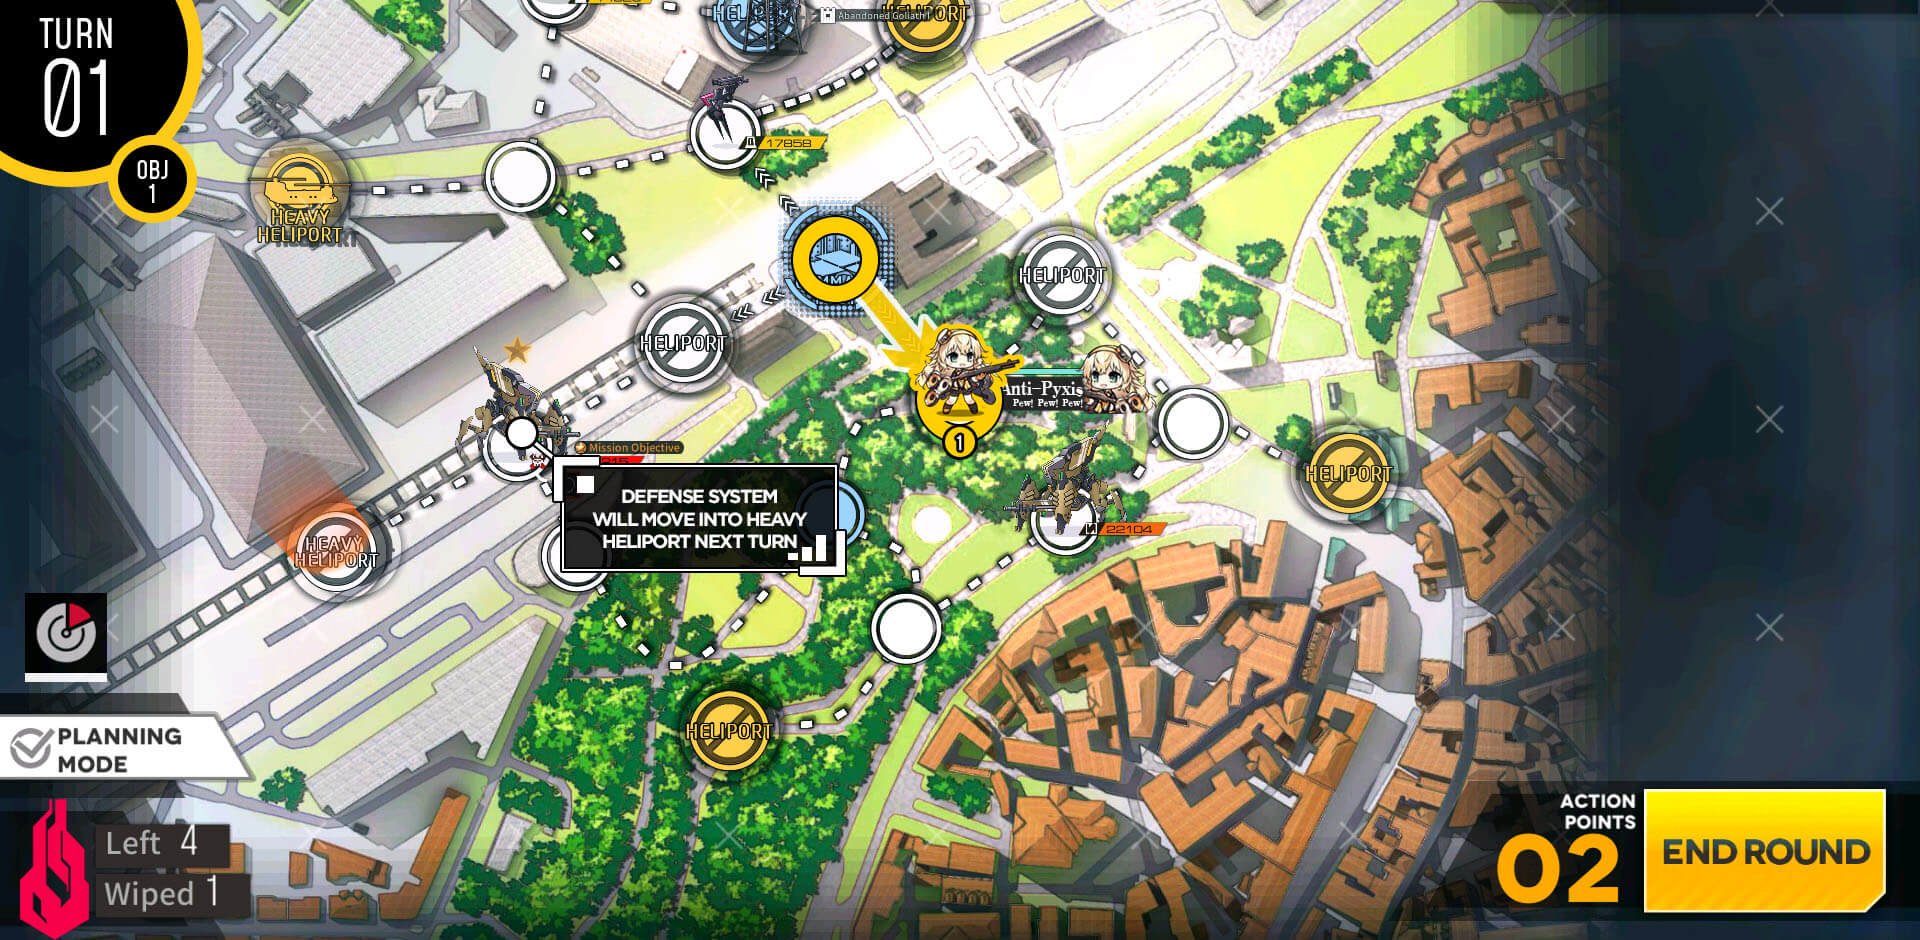
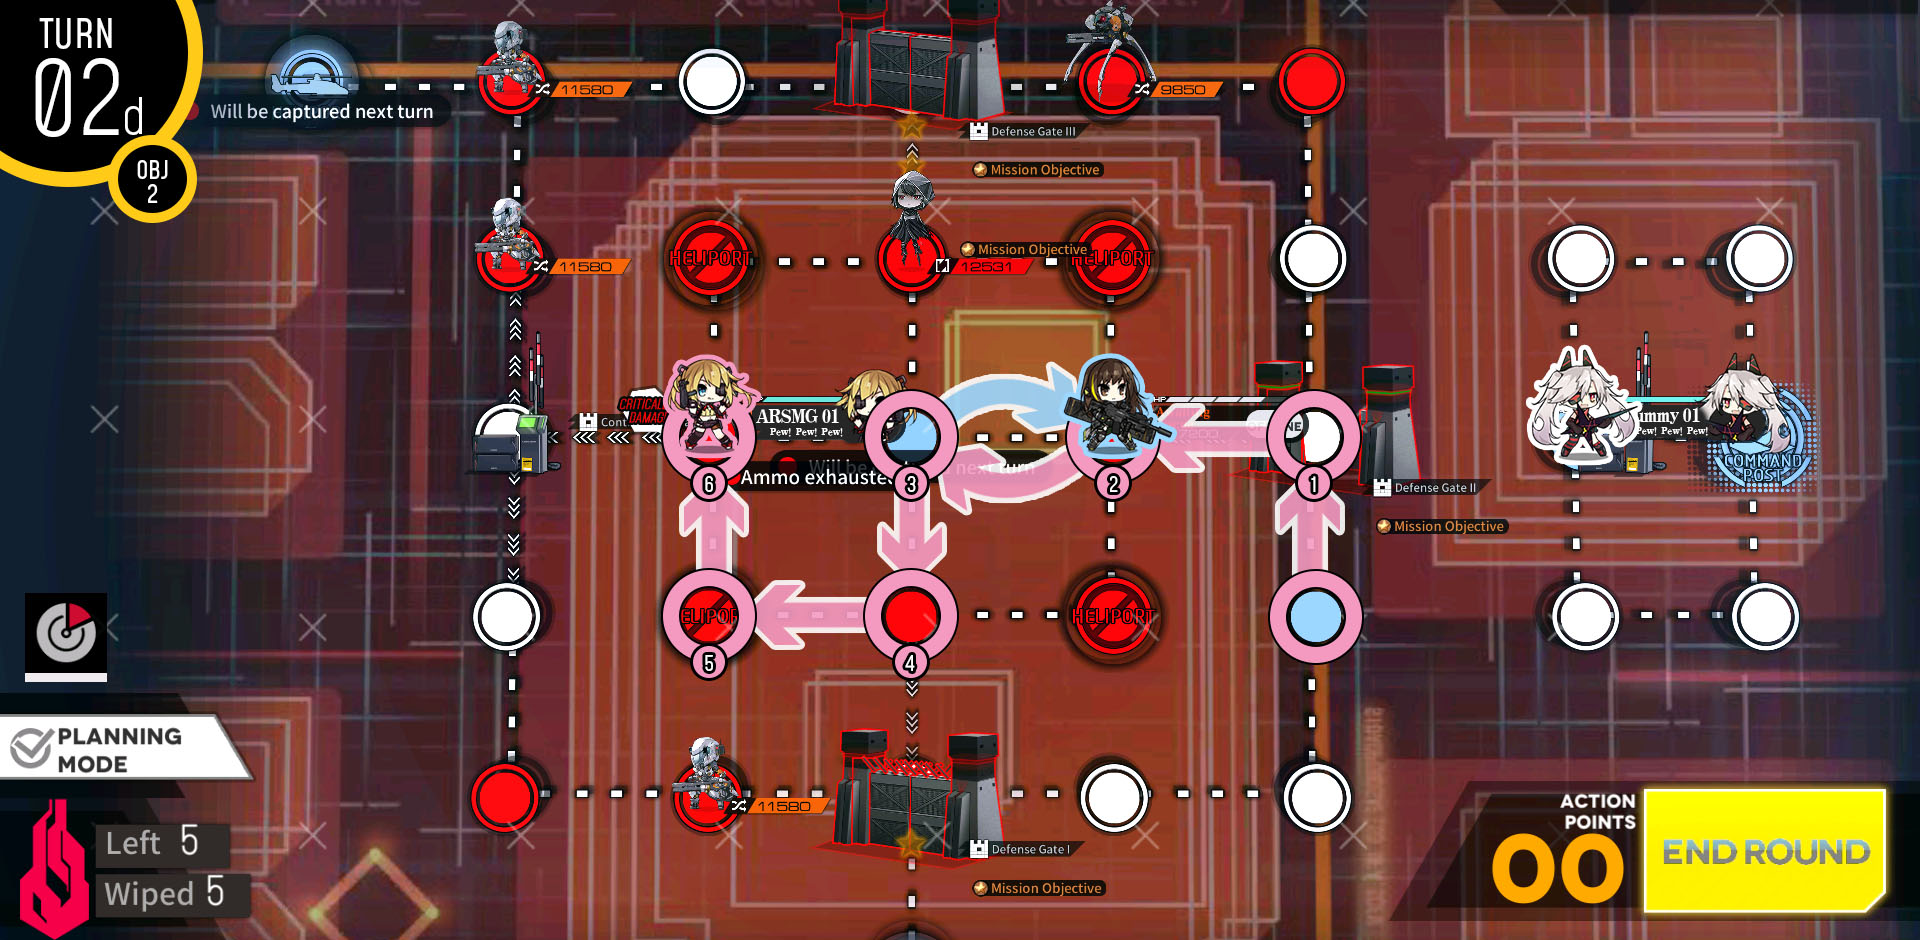
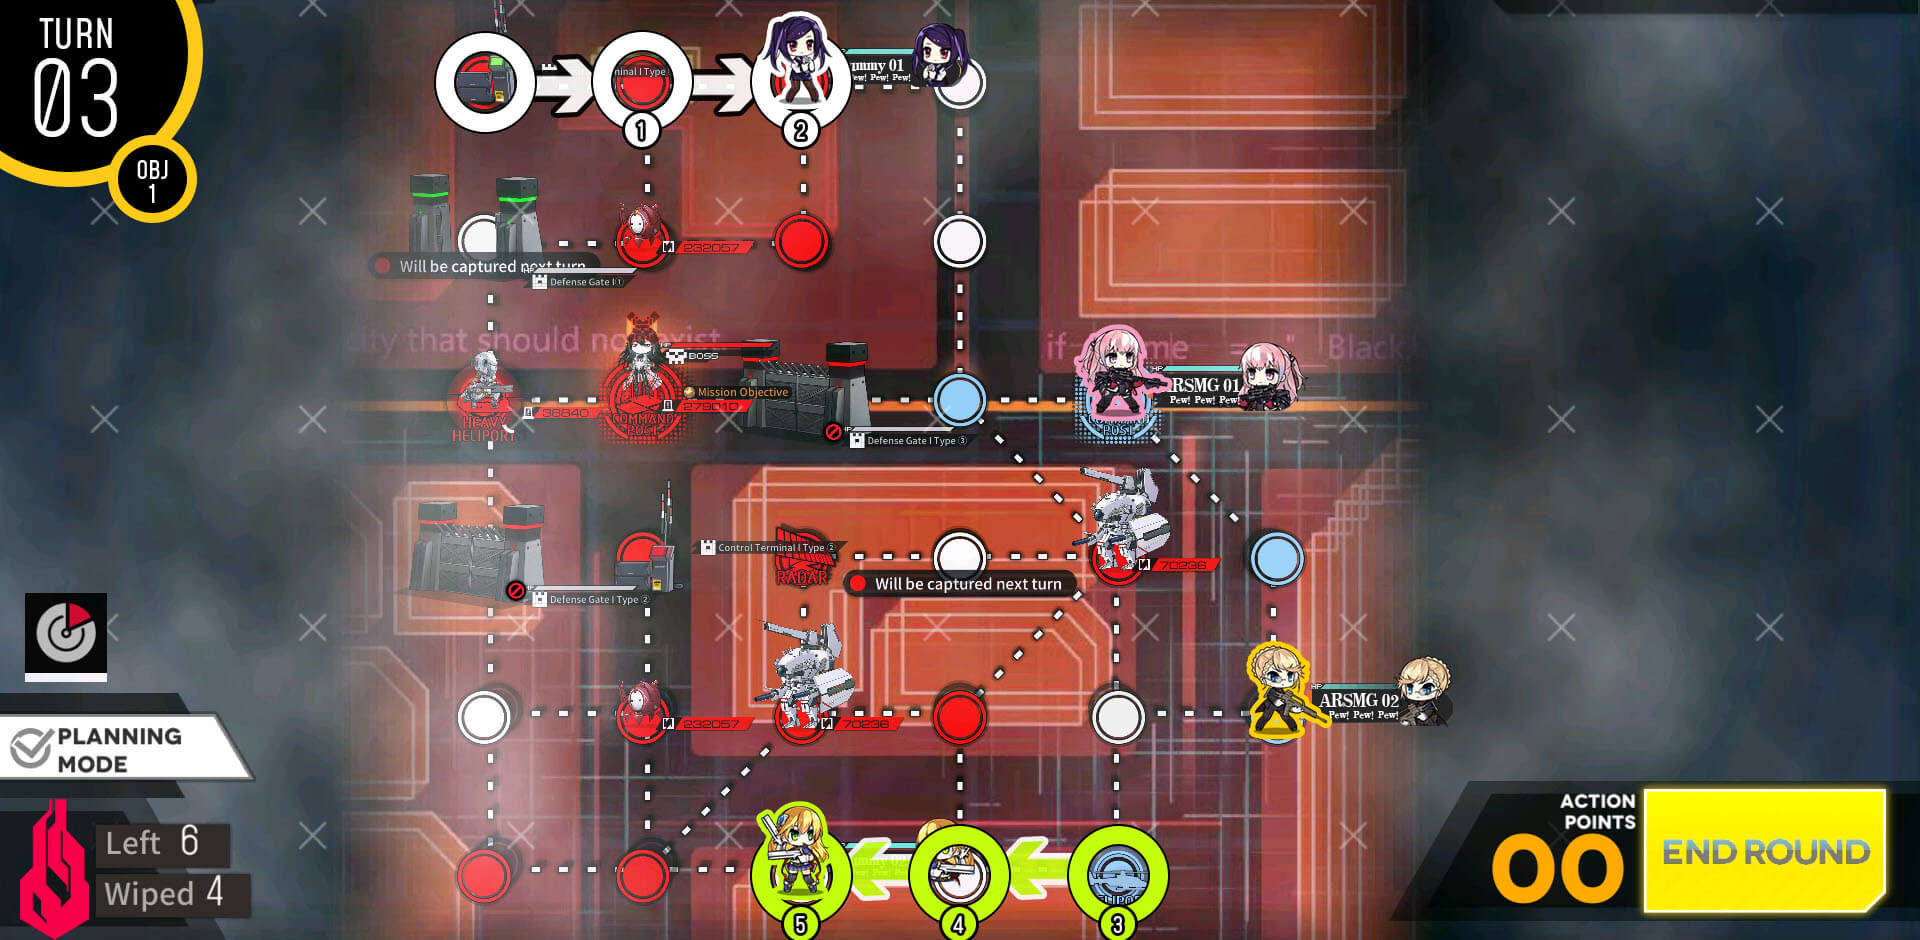
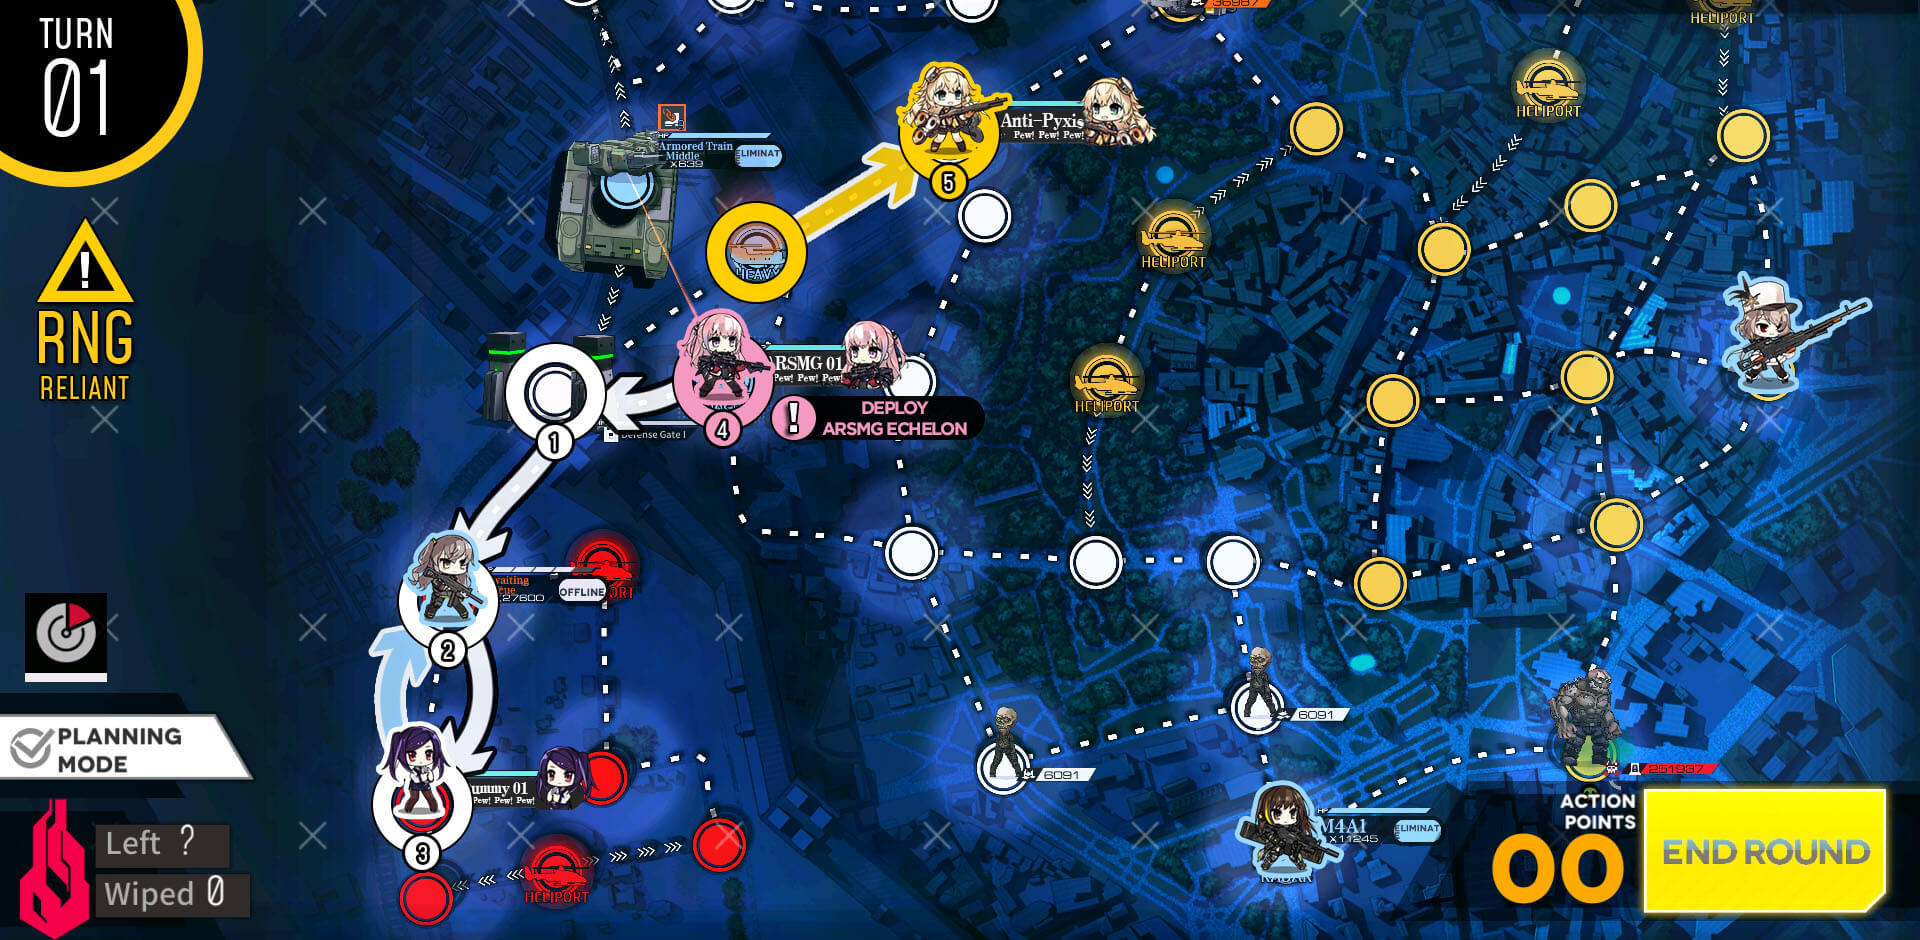
Because you have to move up to hit Pyxis, we are putting our echelons forward instead of in the back.
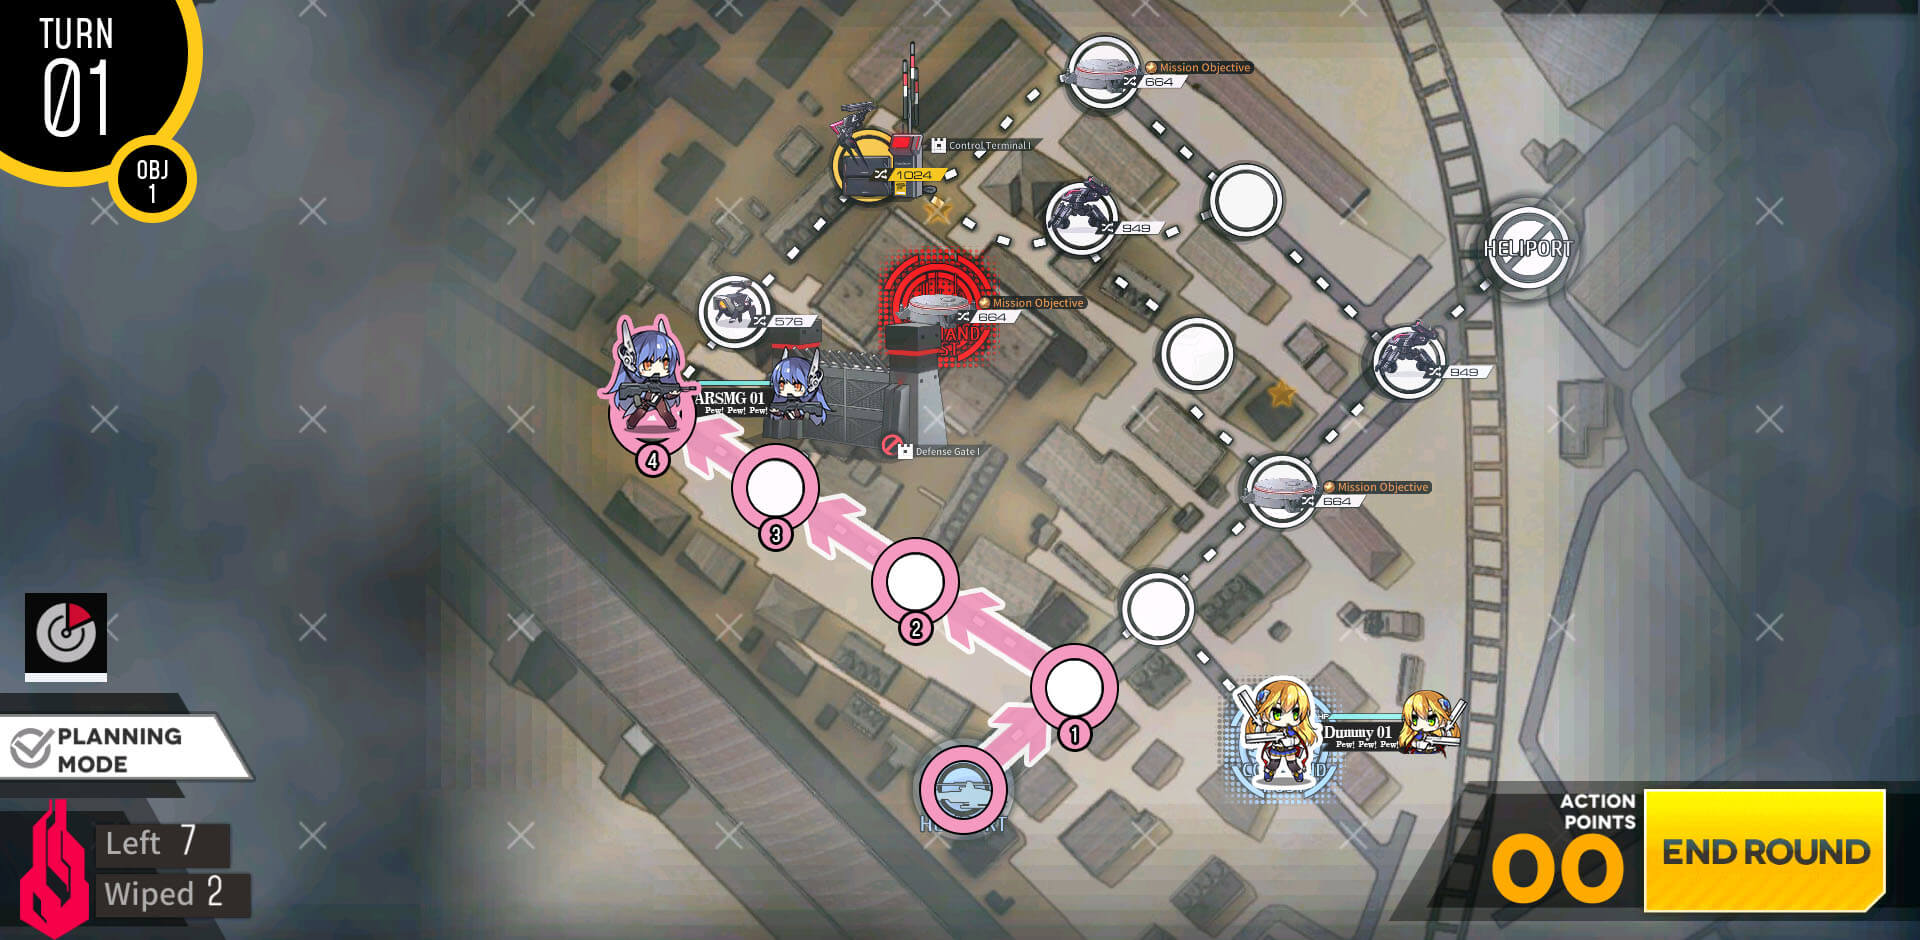
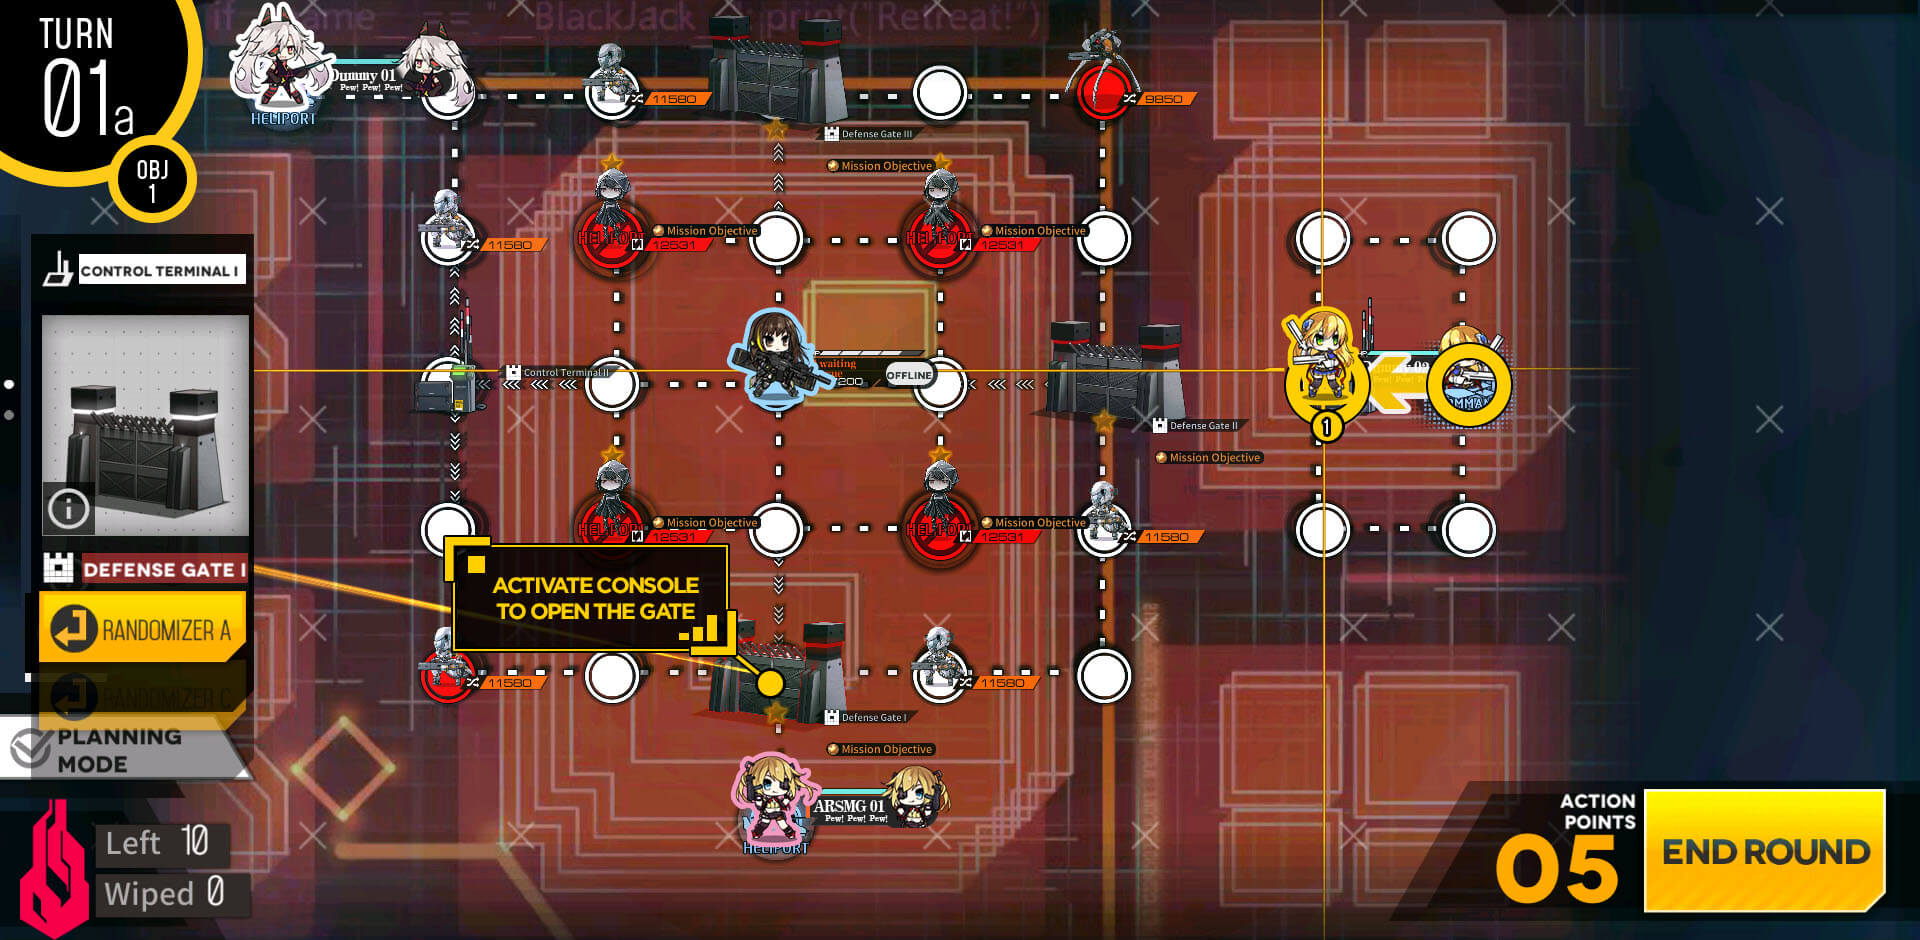
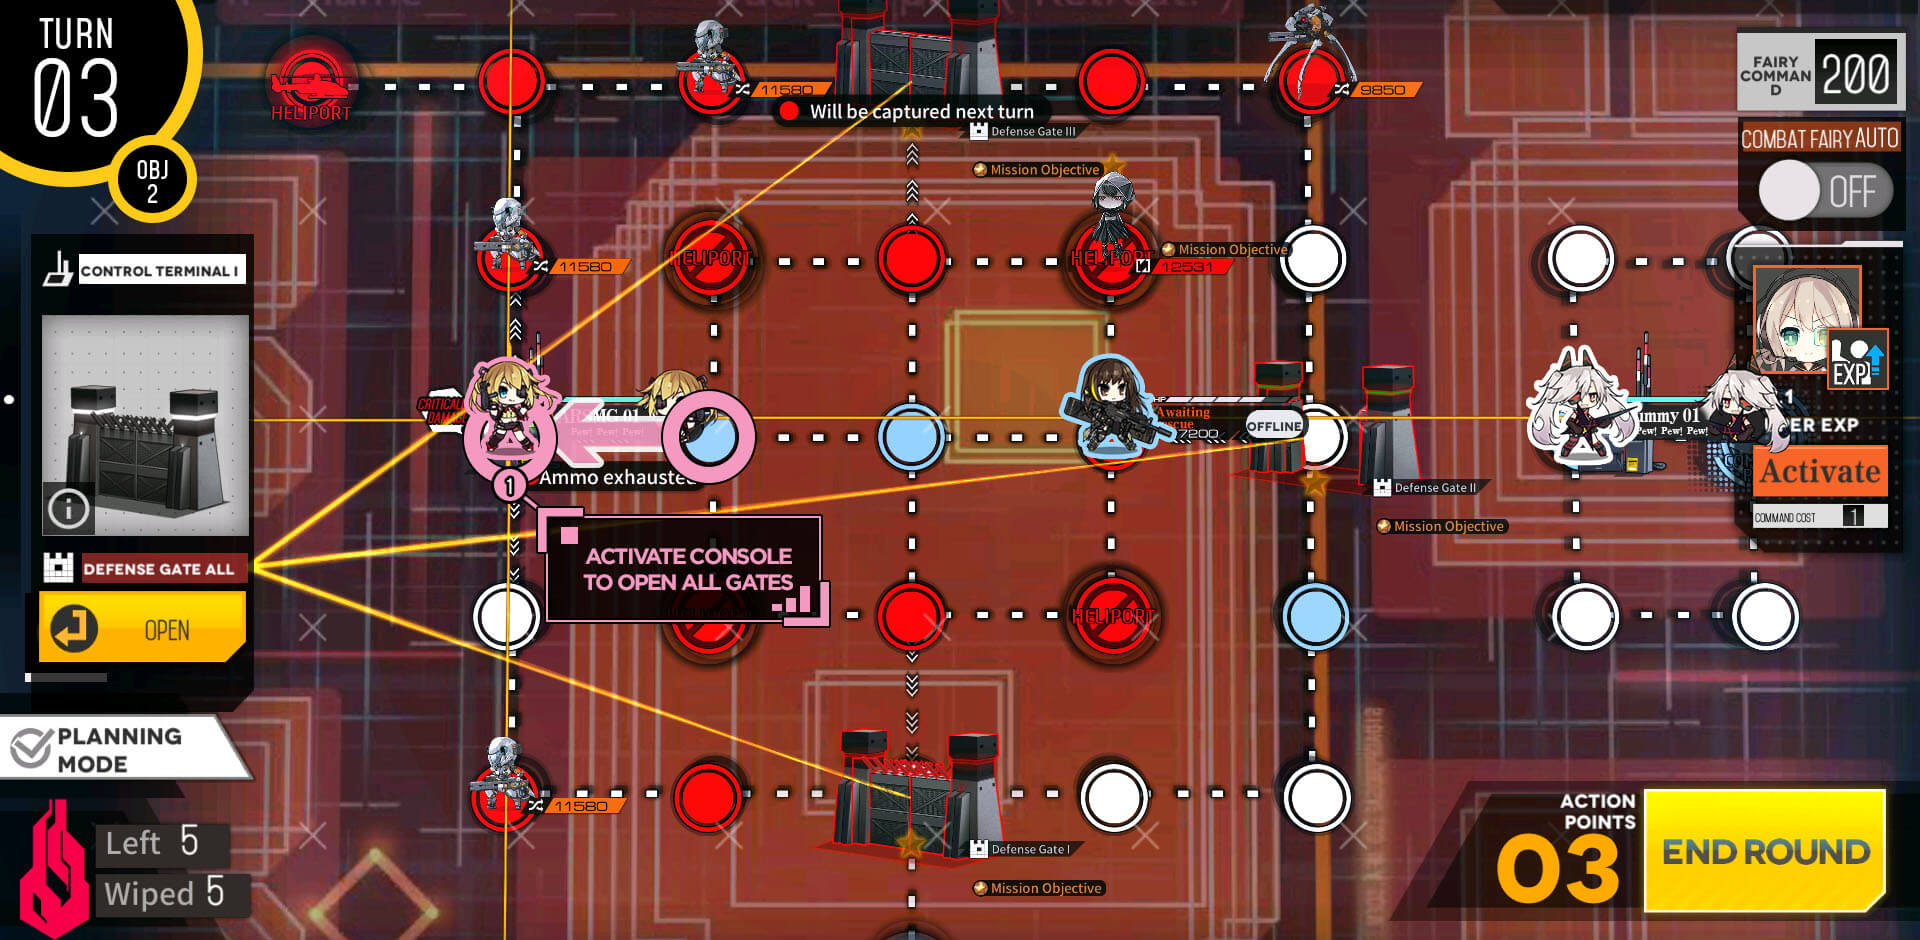
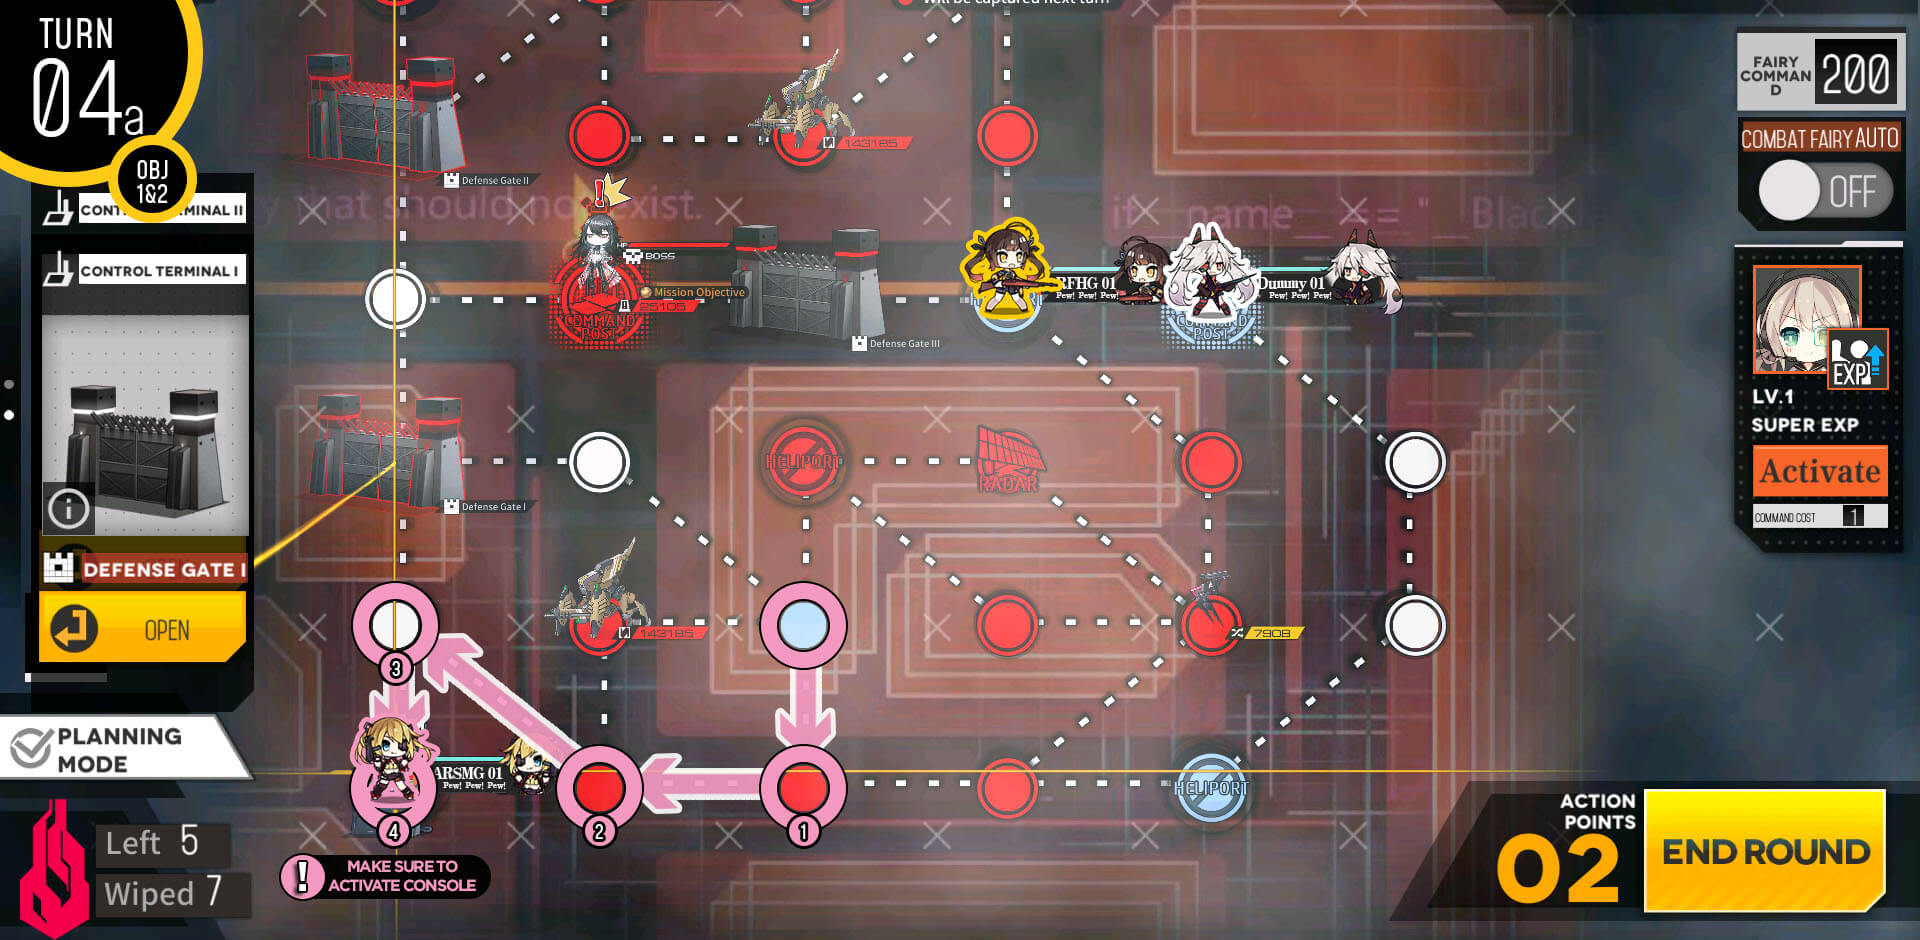
We start with ARSMG unit on the left helipad and dummy on the HQ. ARSMG moves along the bottom left and clears path to the console.
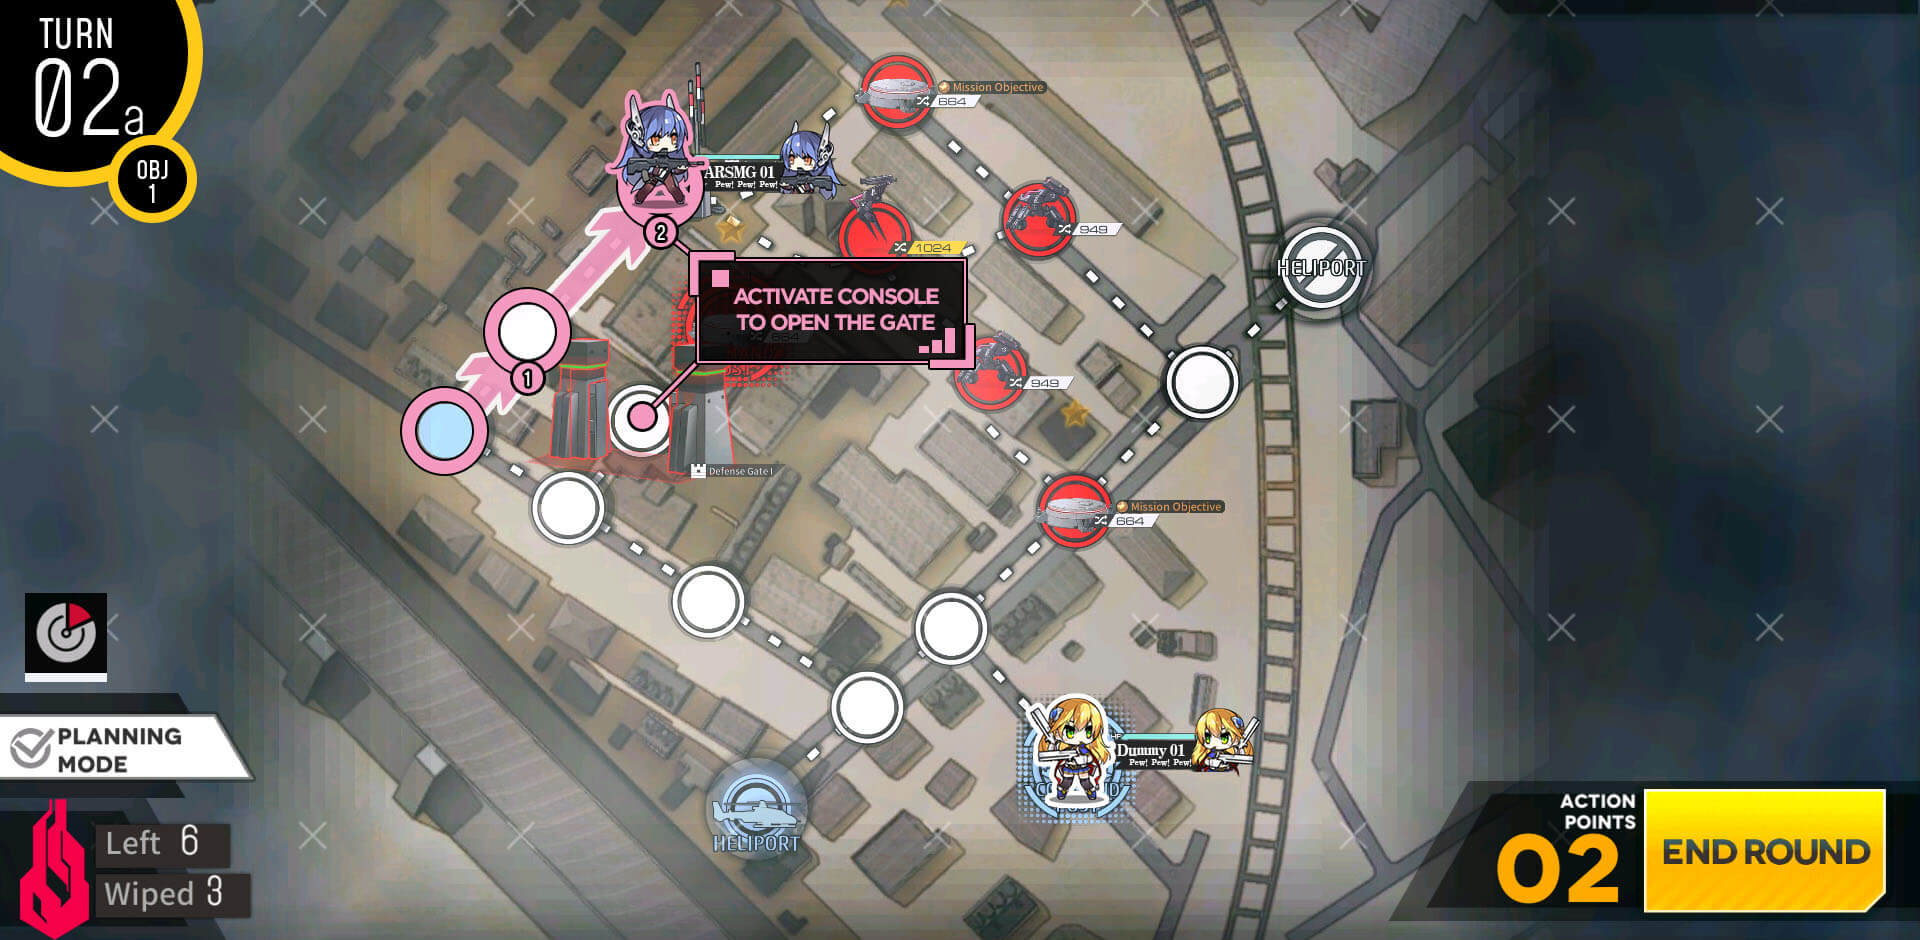
Once you move to the console, activate to open the gate blocking the path to the HQ.
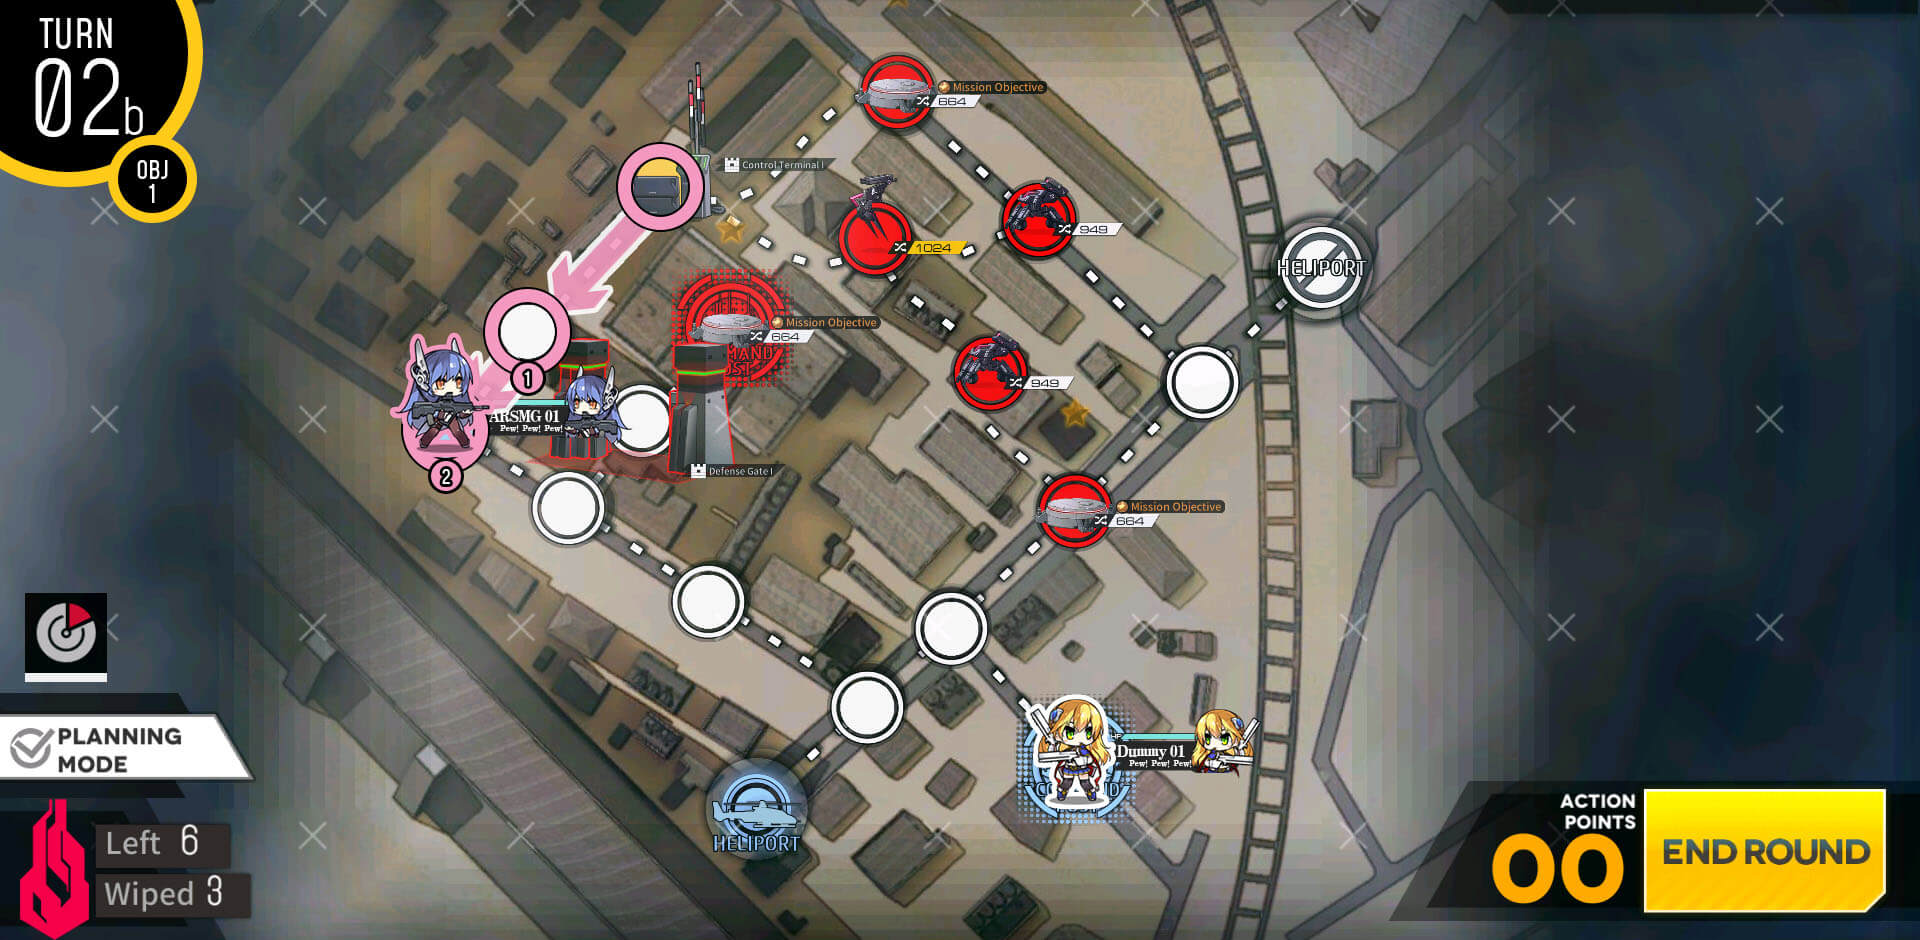
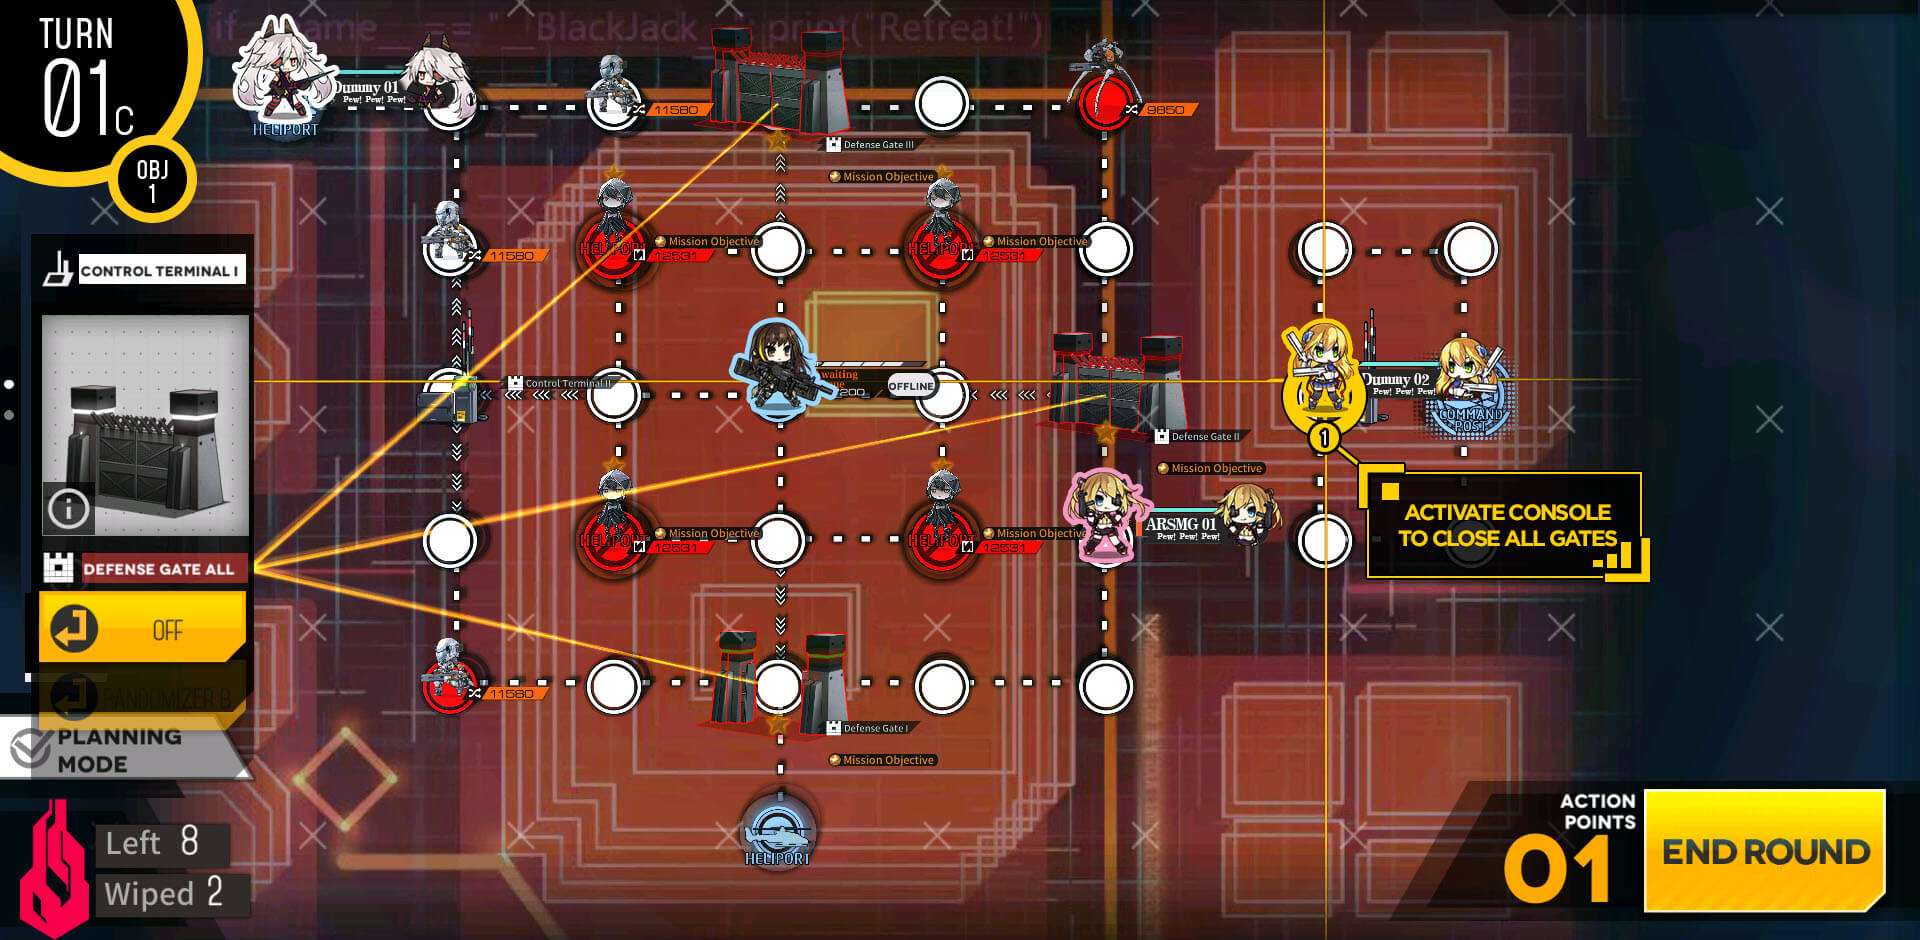
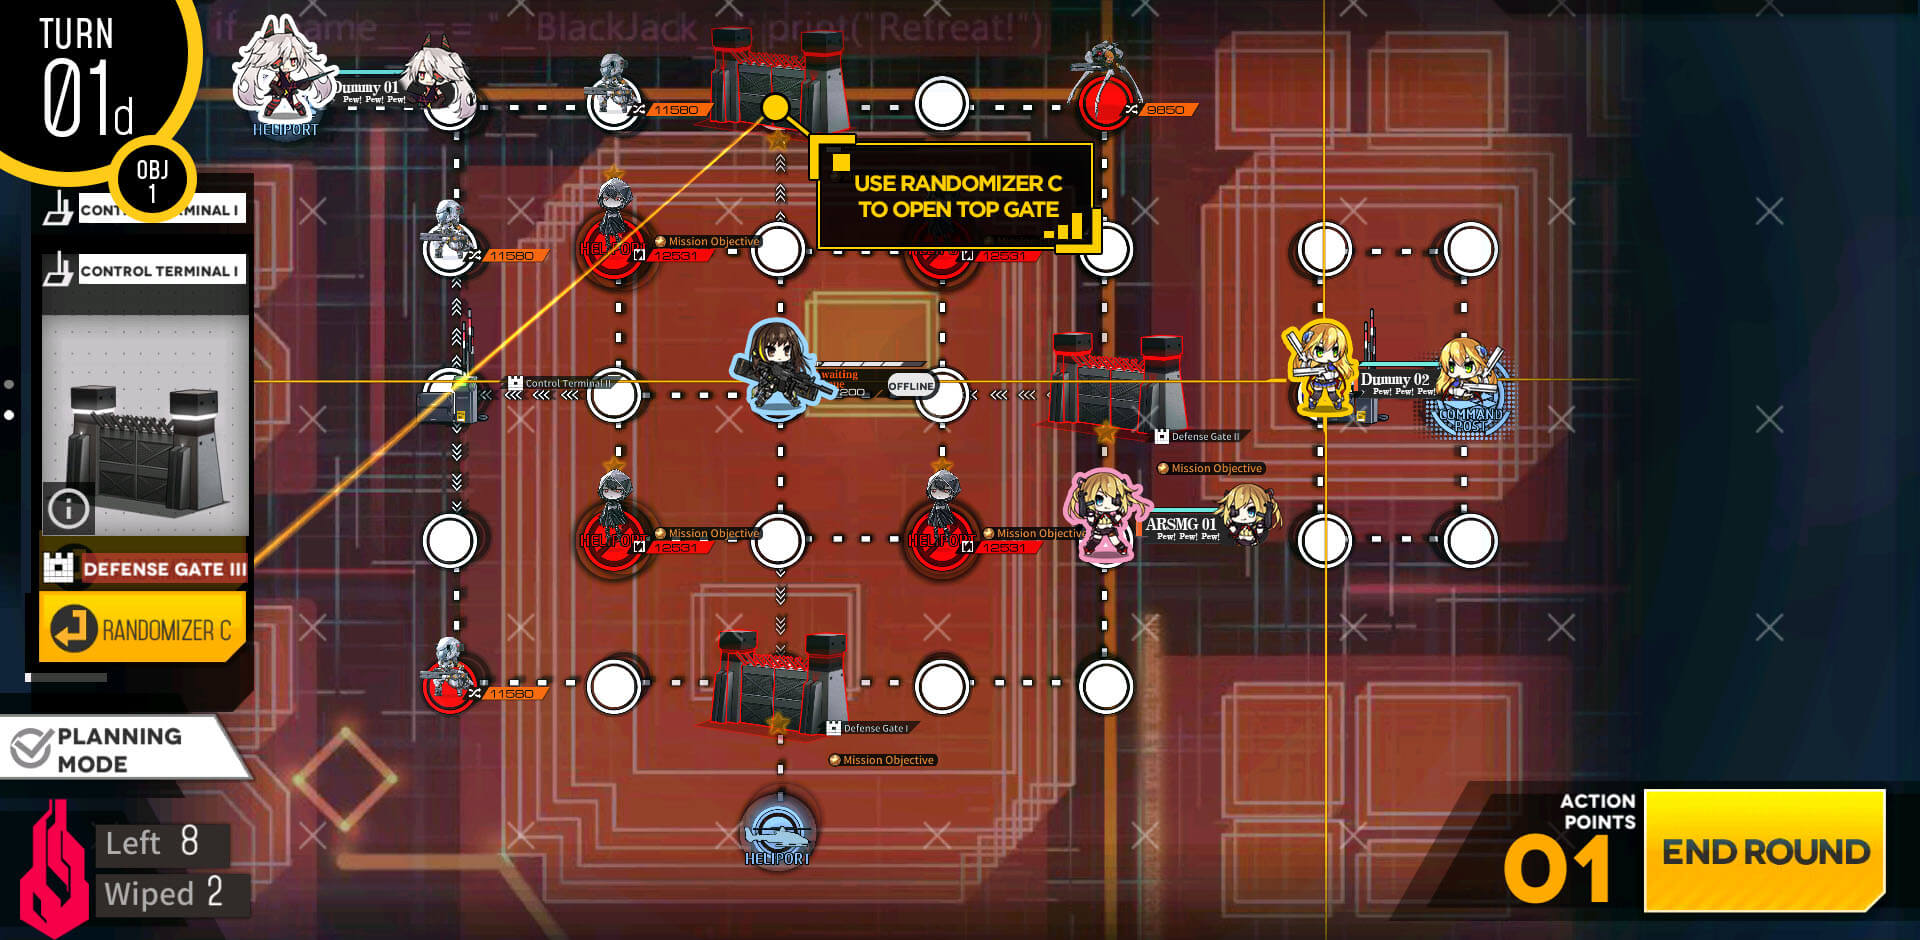
Then simply move towards enemy HQ.

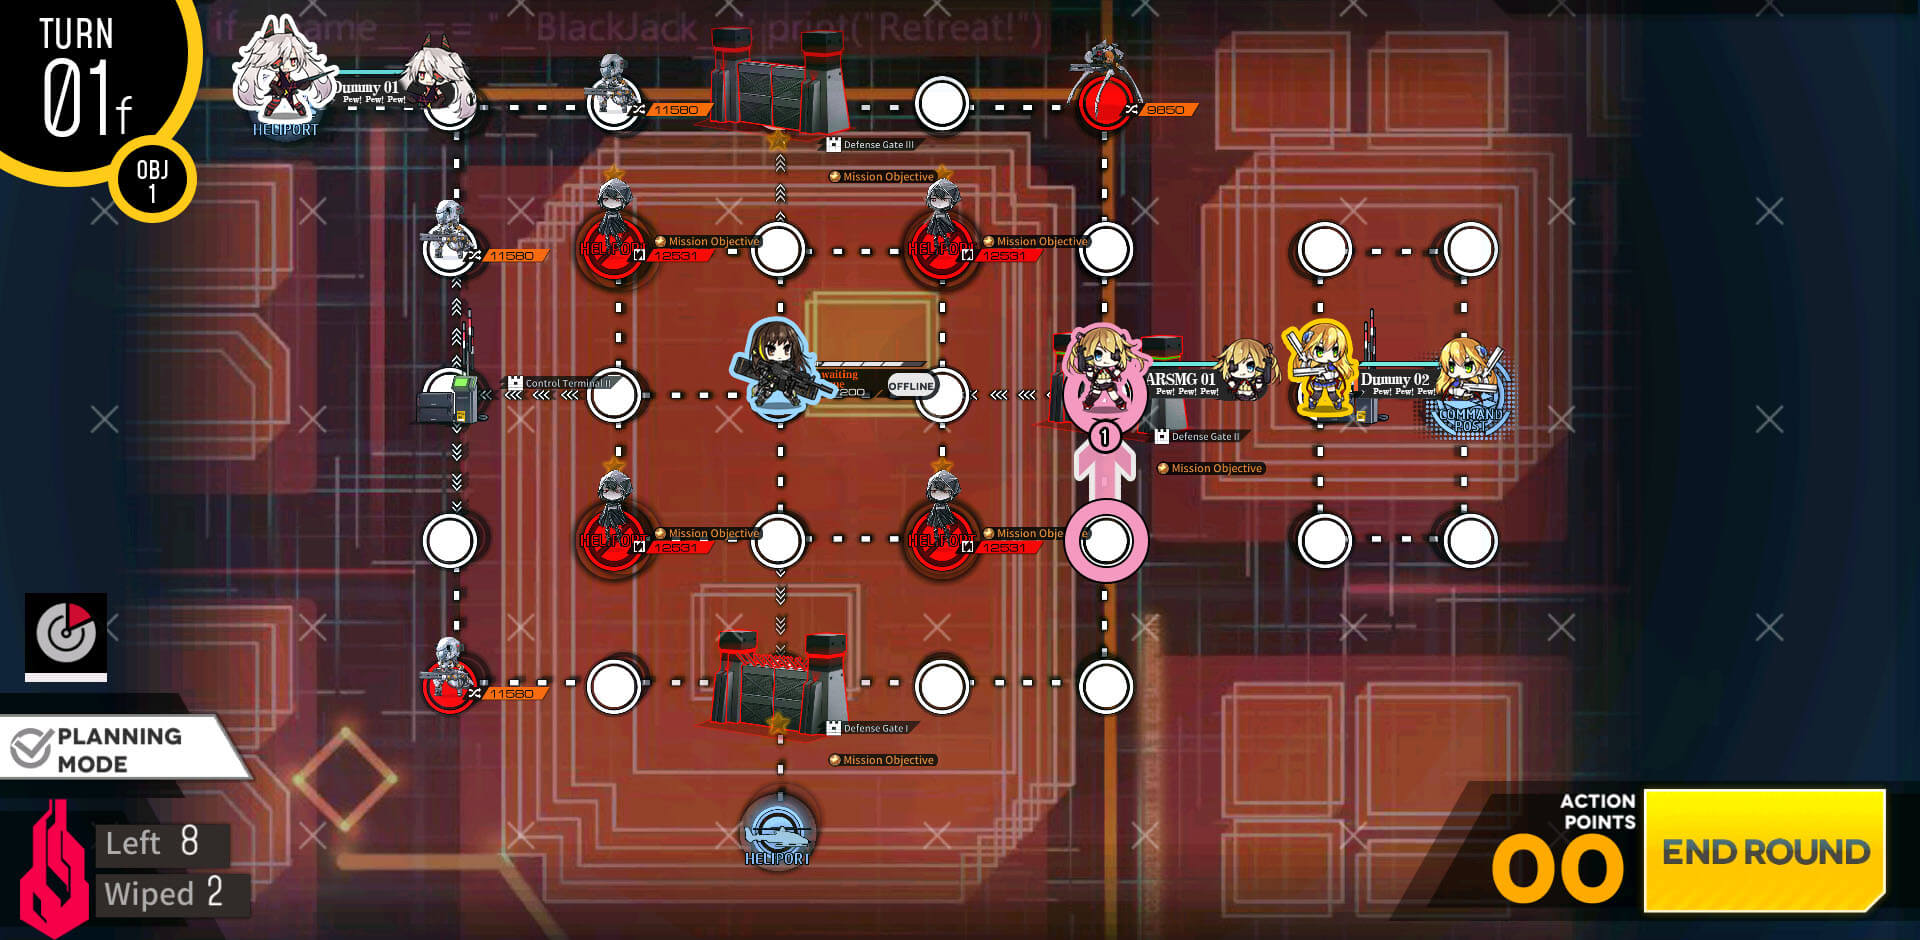
You do not have to kill the unit on the HQ, and just surround capture it by ending your turn on the gate.
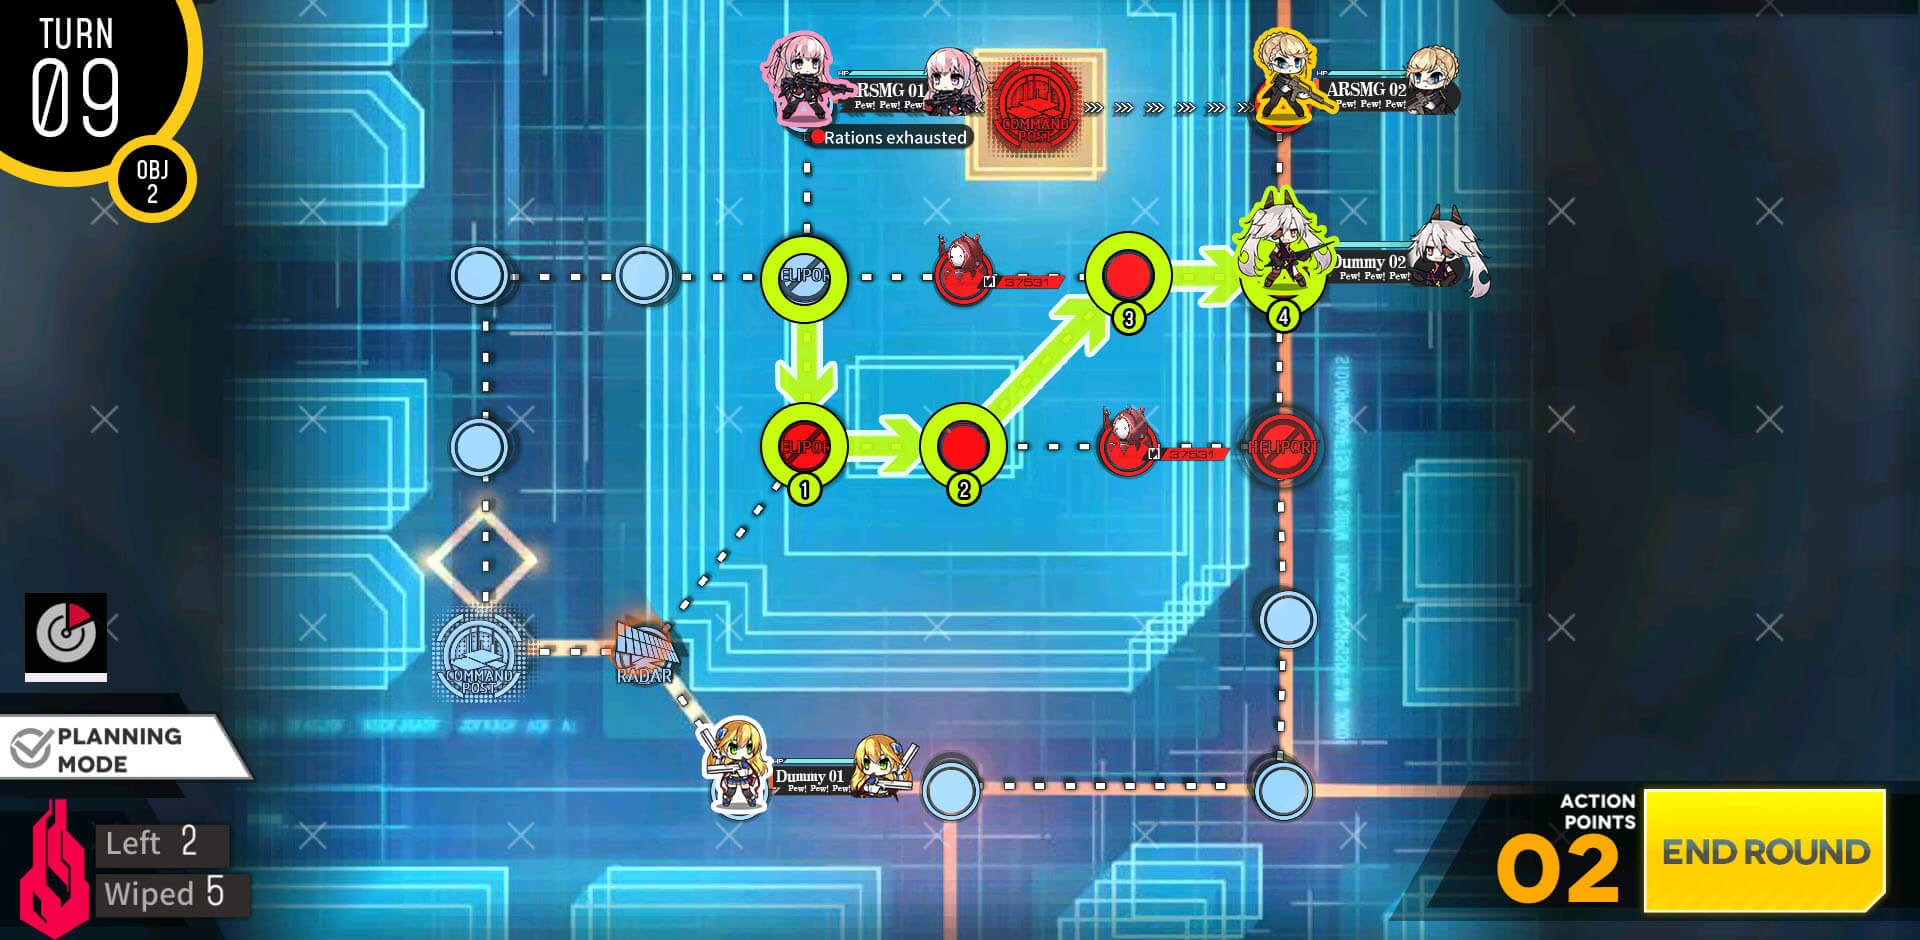
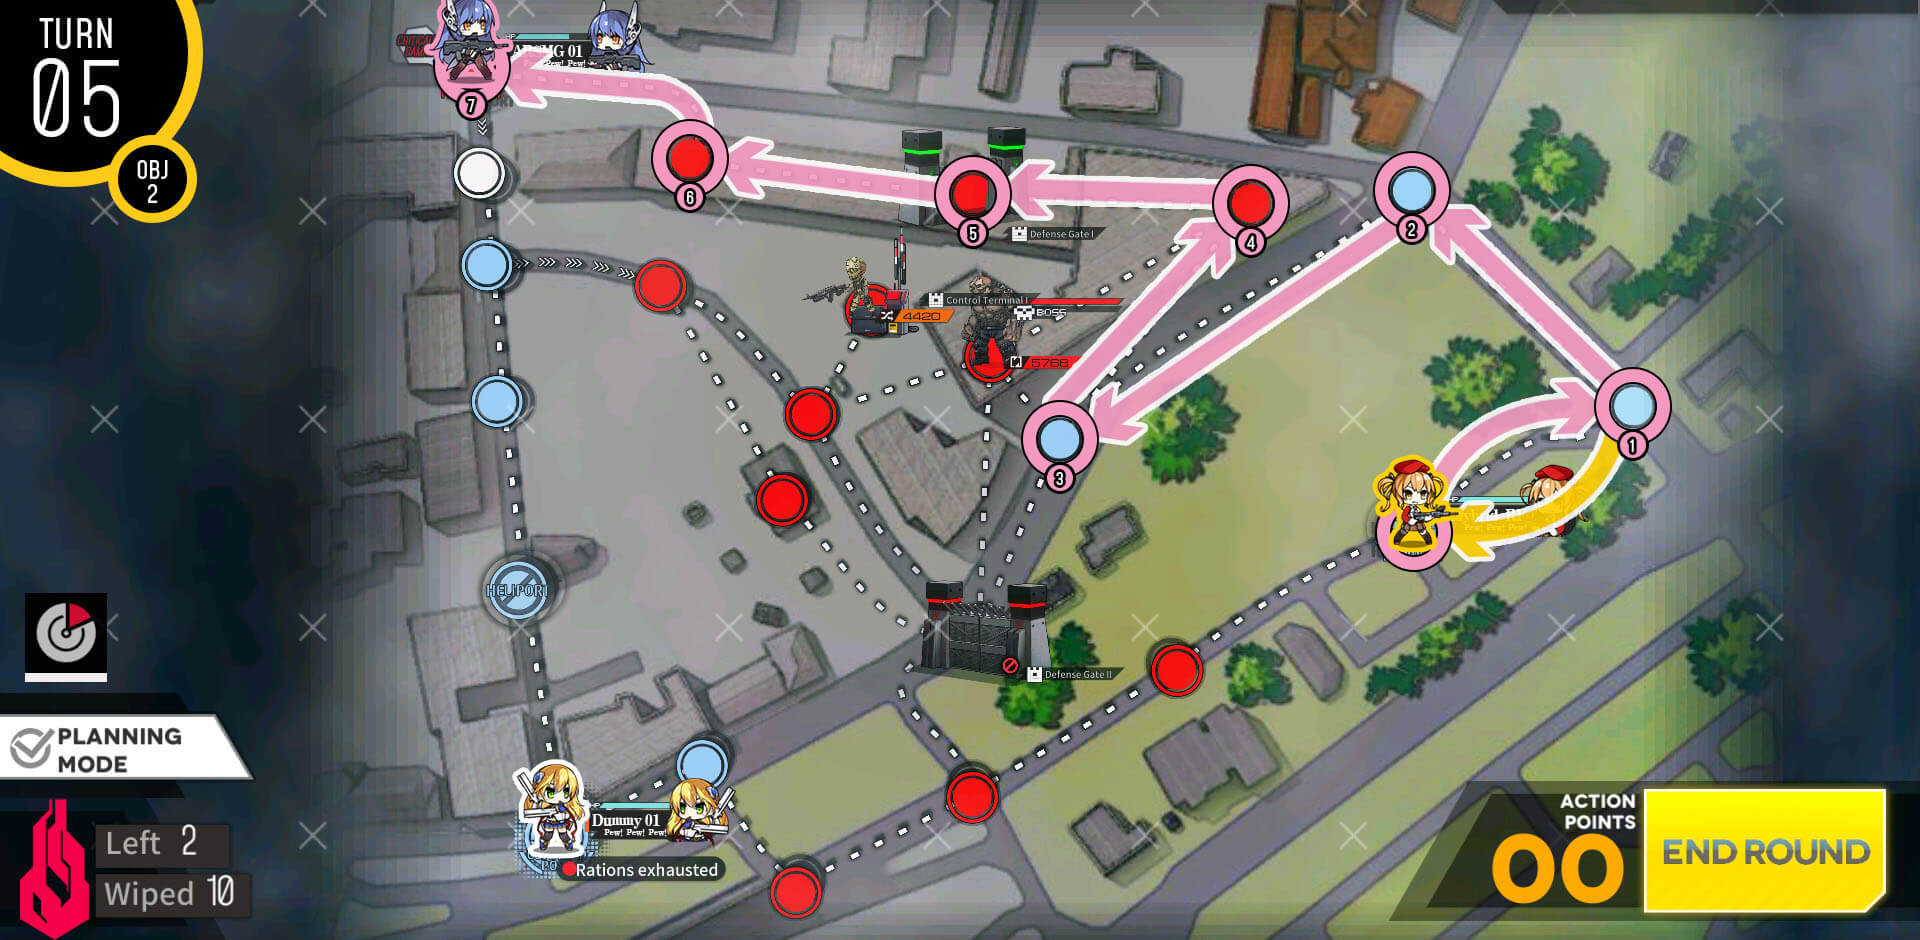
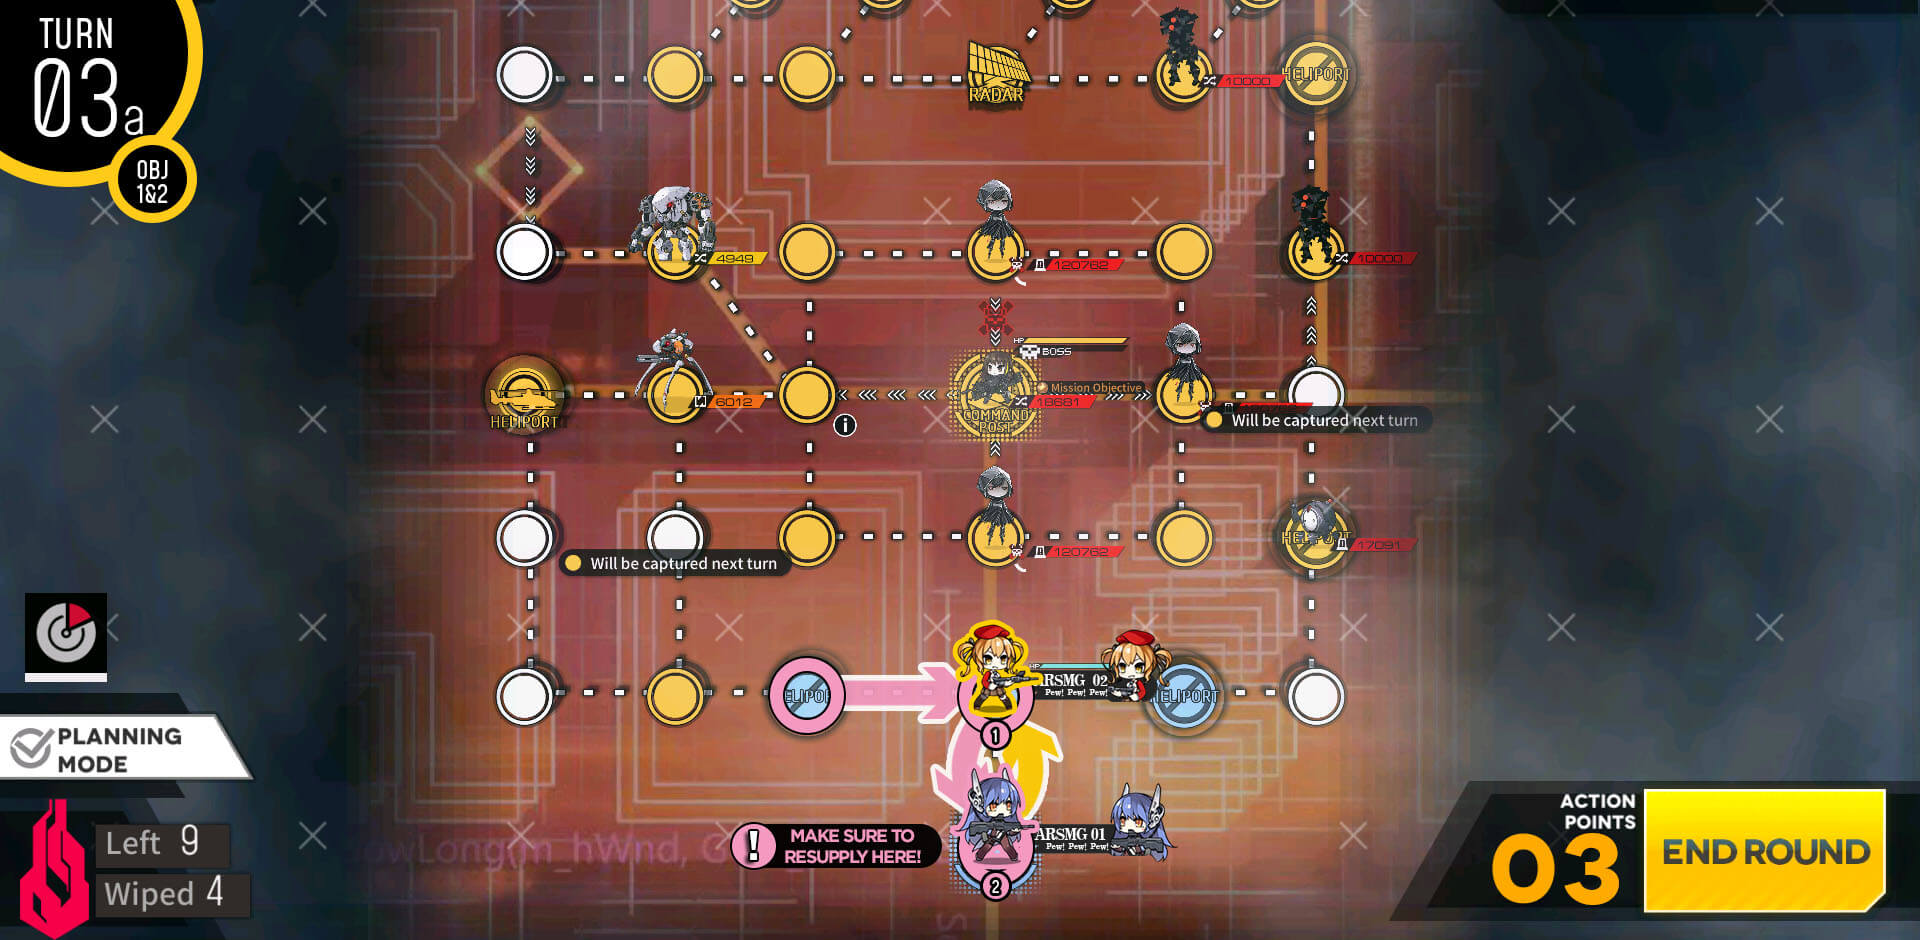
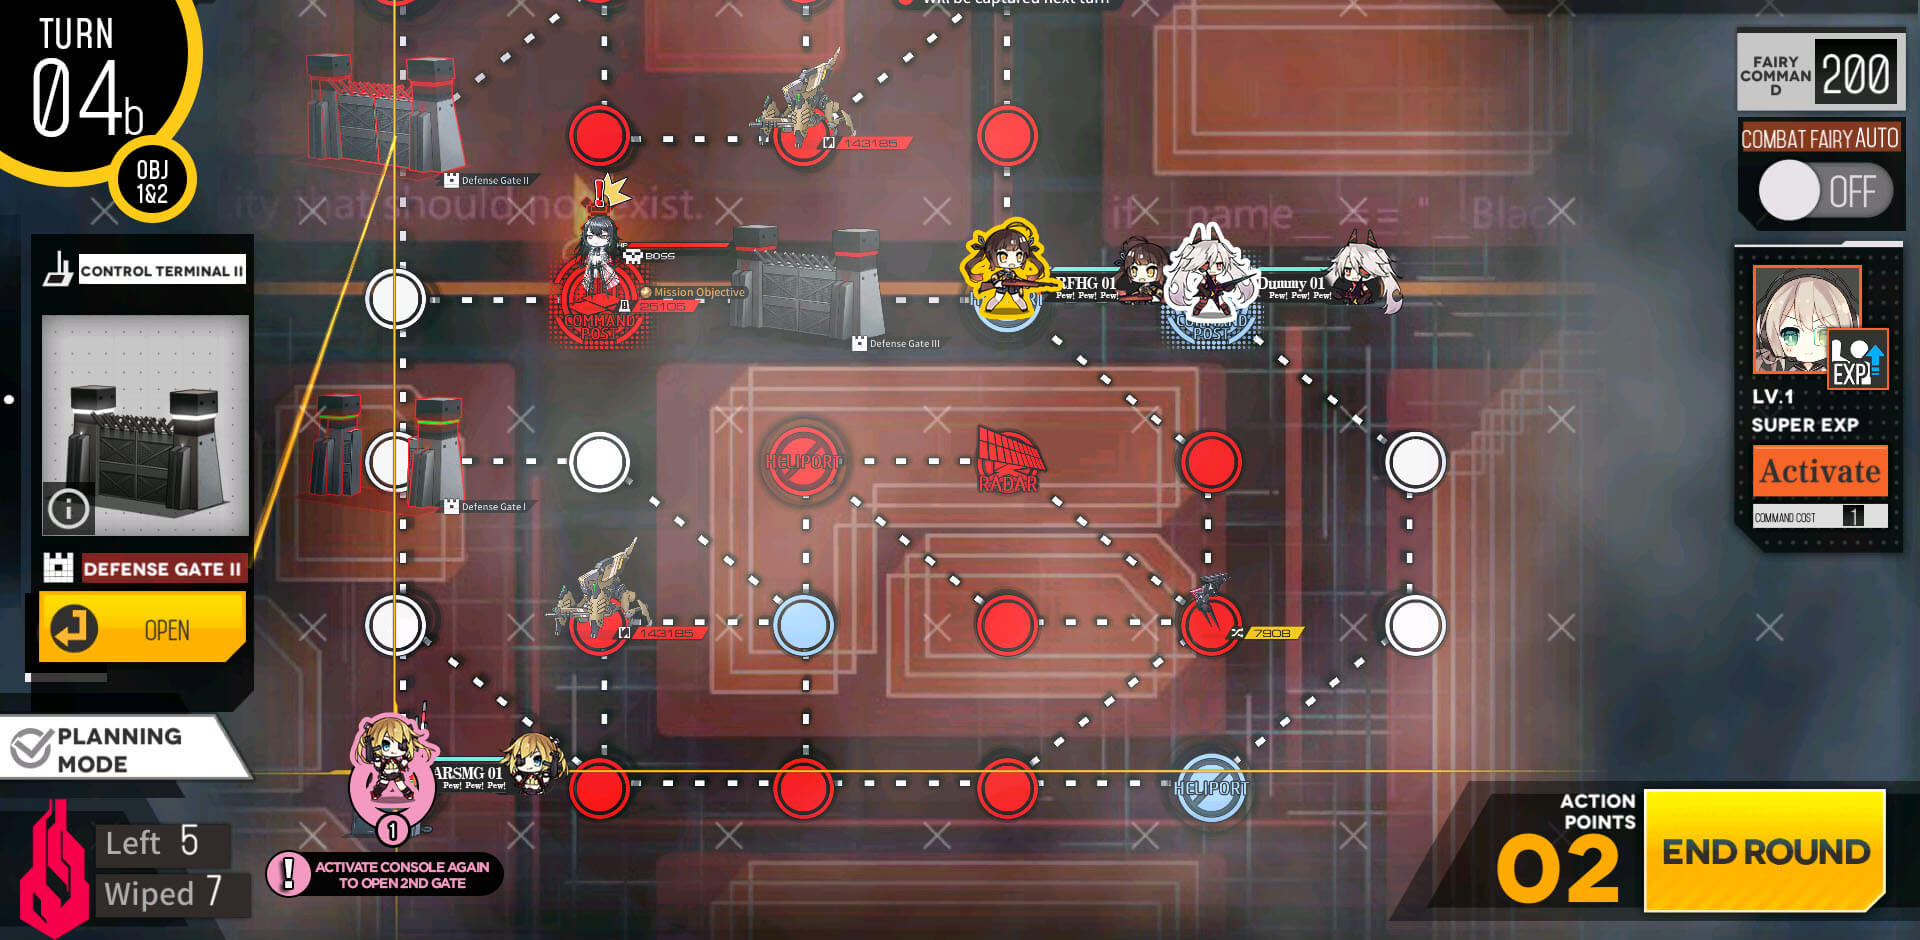
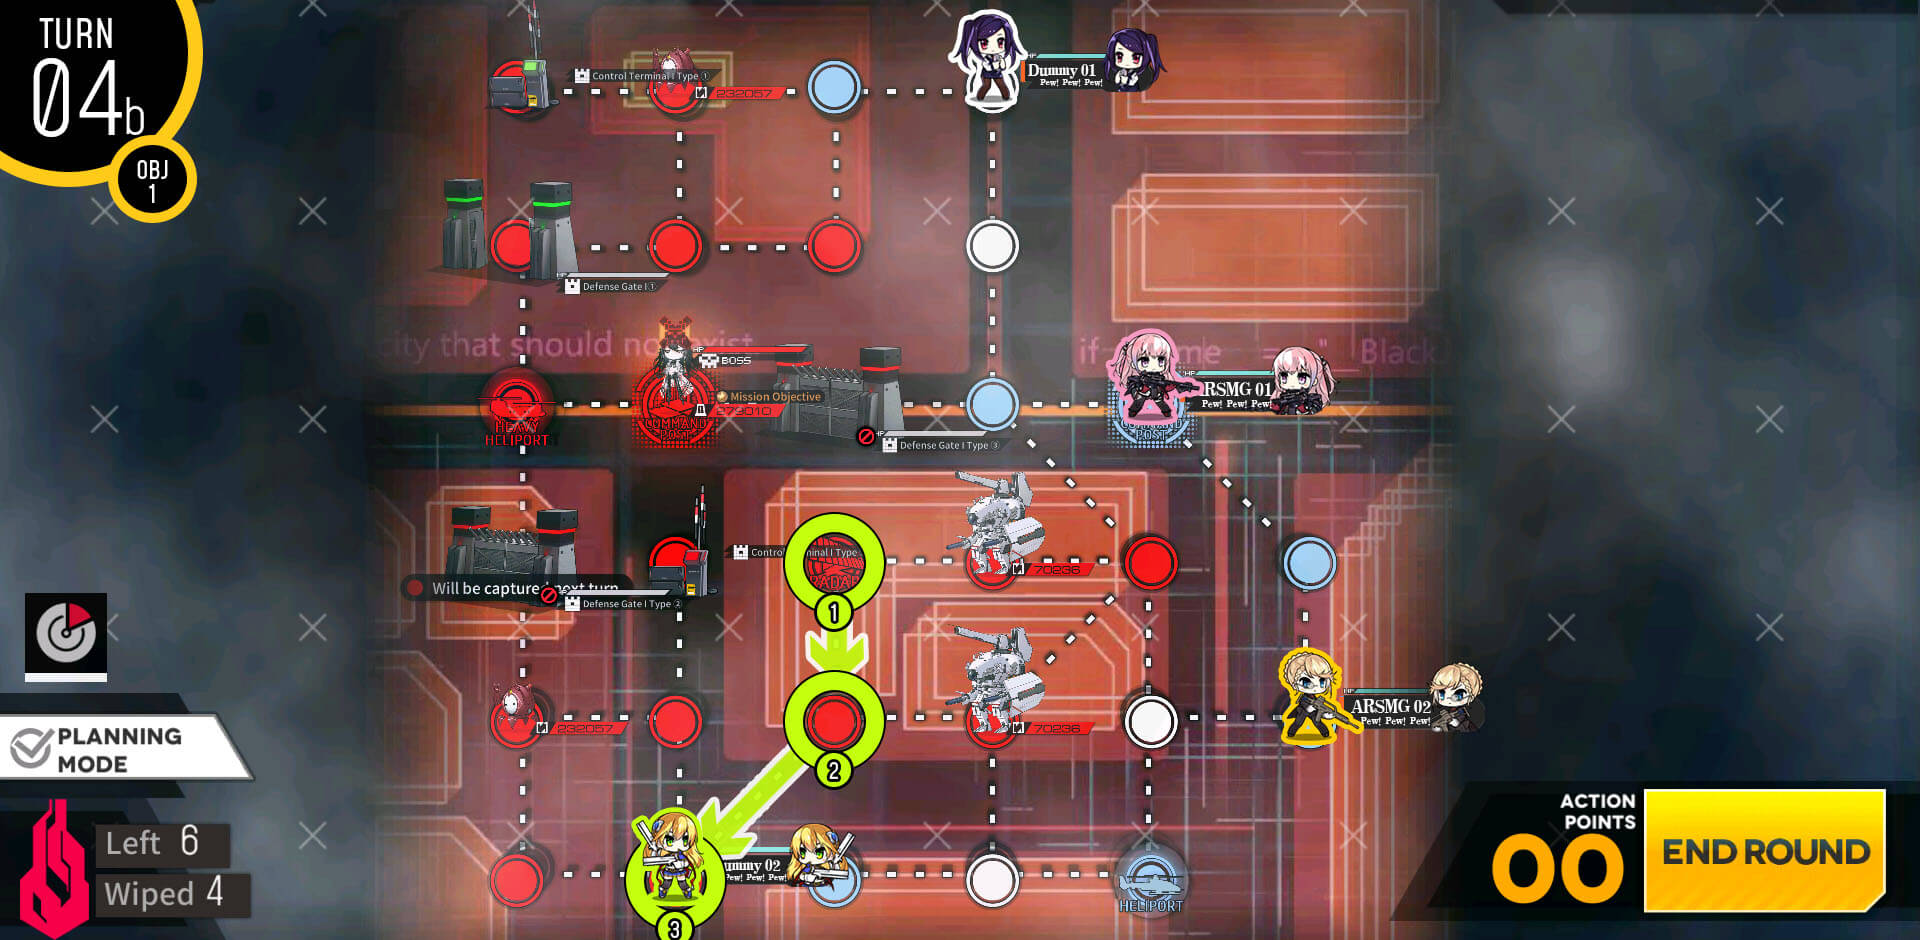
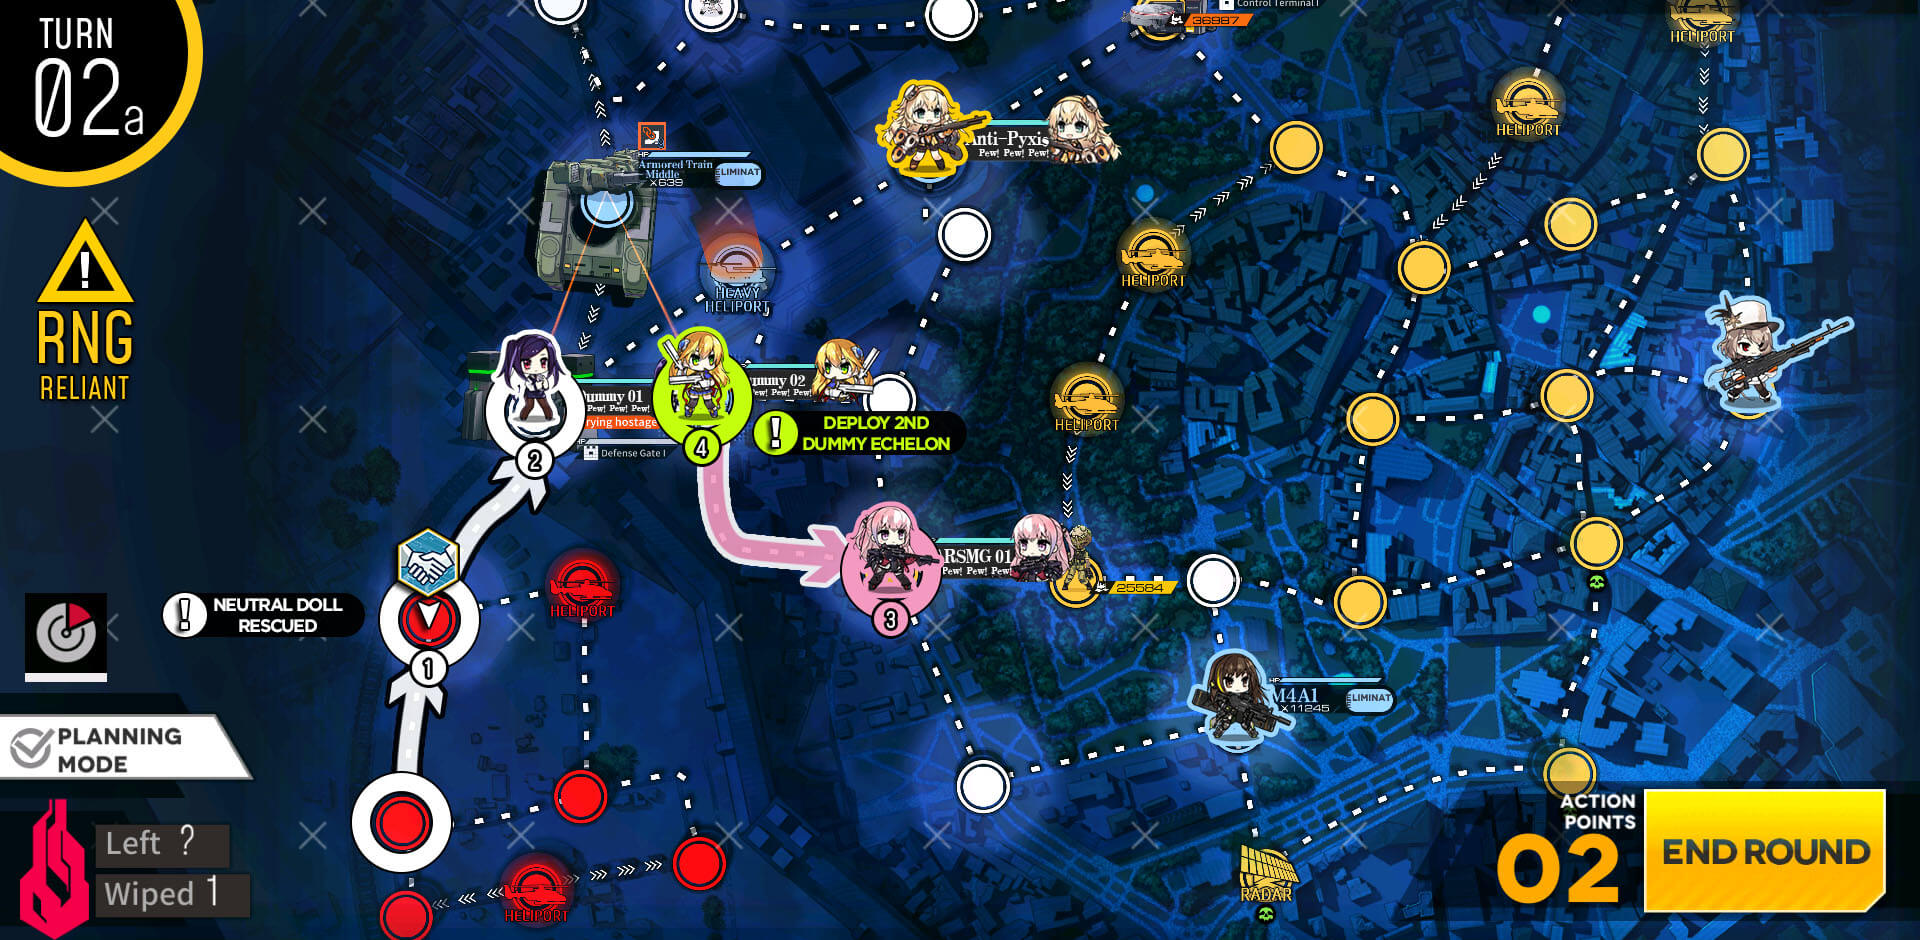
We are going to take out the first Pyxis unit on the bottom left with ARSMG then walk back to the starting helipad.
If for some reason if you forgot to repair/resupply your ARSMG, simply swap with dummy on next turn at the HQ to do so.
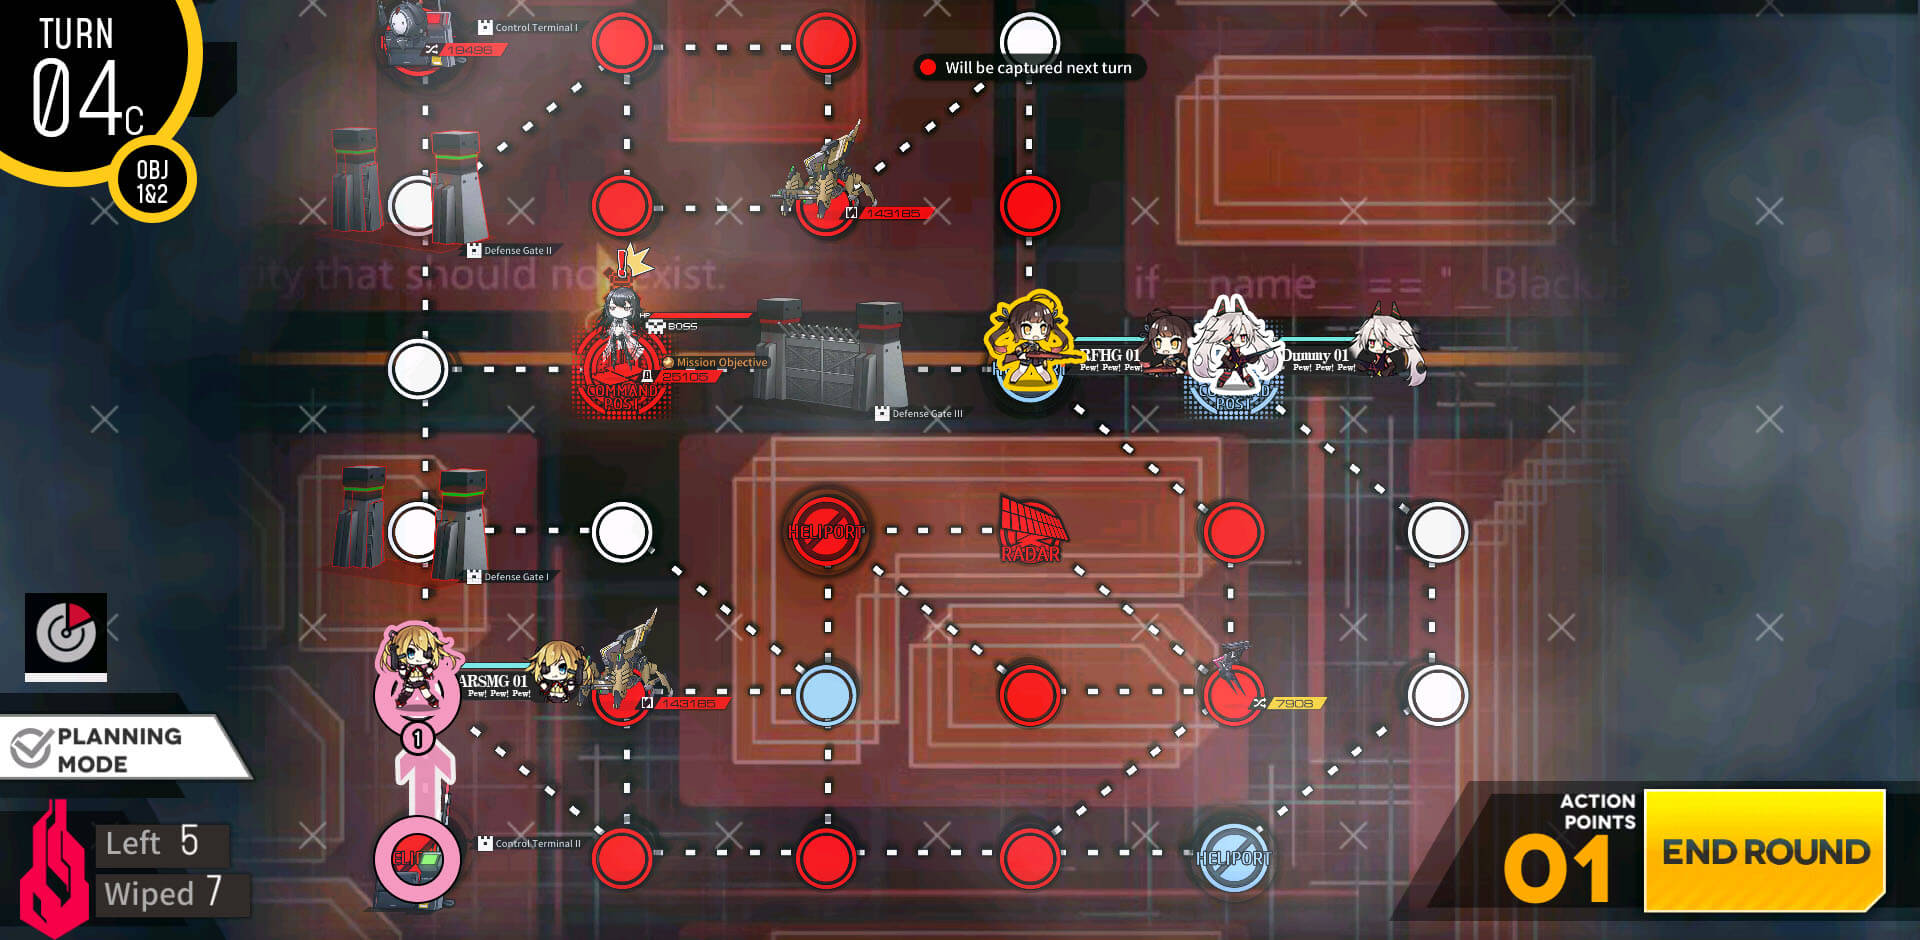
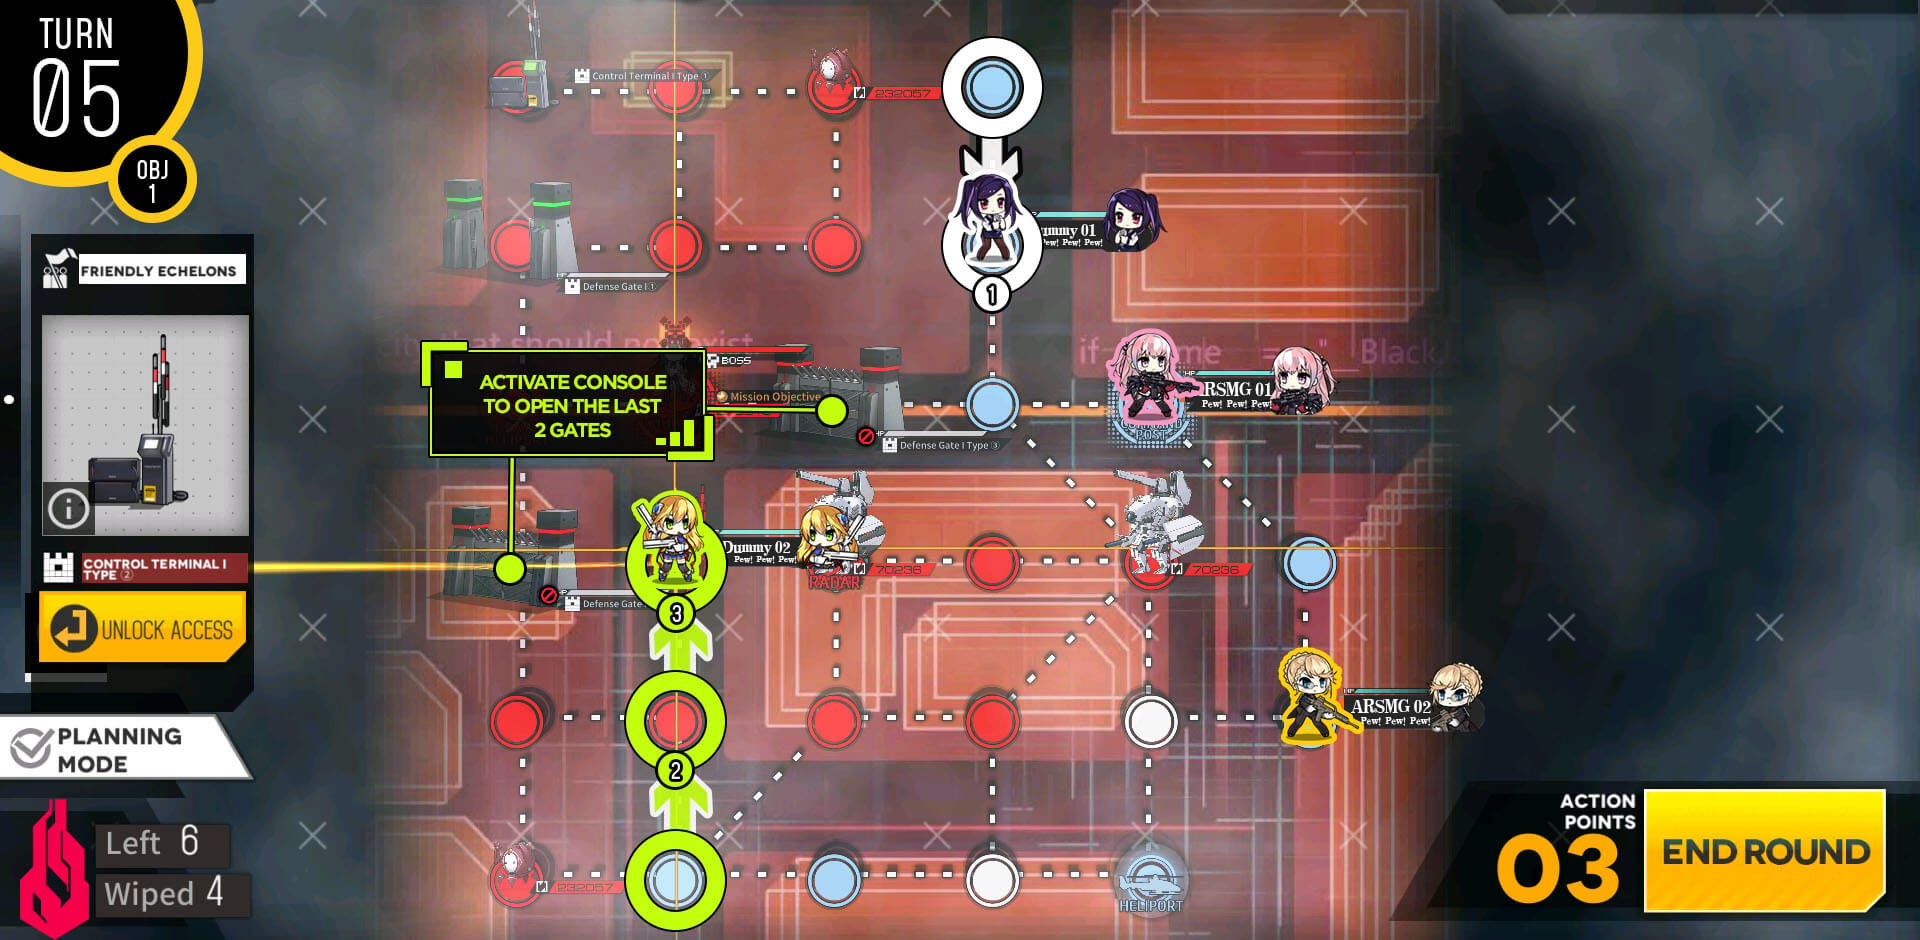
ARSMG moves to the right side and takes out the second Pyxis unit. Beware of Jaguar units that can surprise you if you get hit with mortar damage.
Lastly take out the 3rd Pyxis on the top of the map and it should clear the mission automatically.

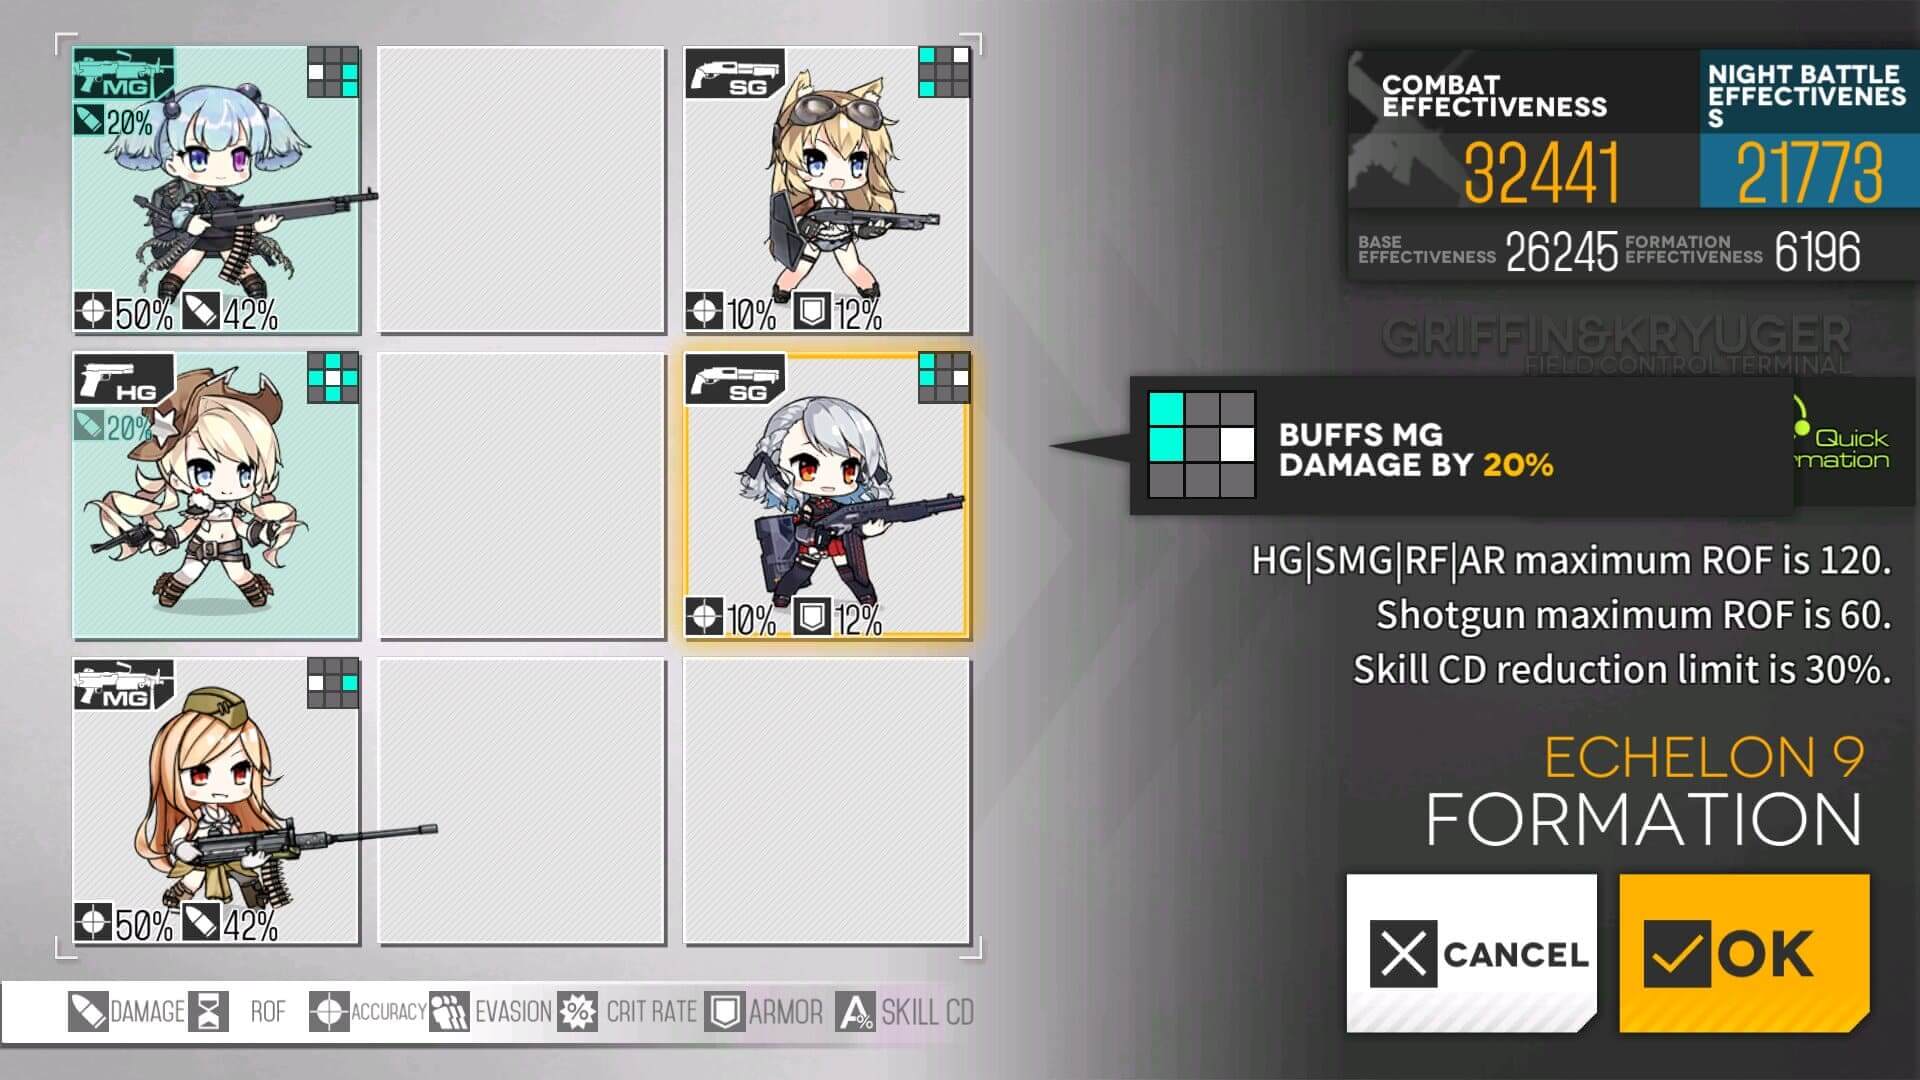
We will be using MGSG echelon with 2 SG to fight against Pyxis. Now that there's more than one of them and are much stronger, it is best to us SG as tankers while MGs melt them from the rear. This one is overkill so test your MGSG squad against Pyxis.
Start with ARSMG echelon on the HQ and MGSG echelon on the left helipad. ARSMG will sweep the right side first to kill non-Pyxis enemy units.

Now all that's left to do is to kill the enemy units on the bottom side and meet 5 kills requirement.
Simply move up and attack last Pyxis unit and mission clears automatically.

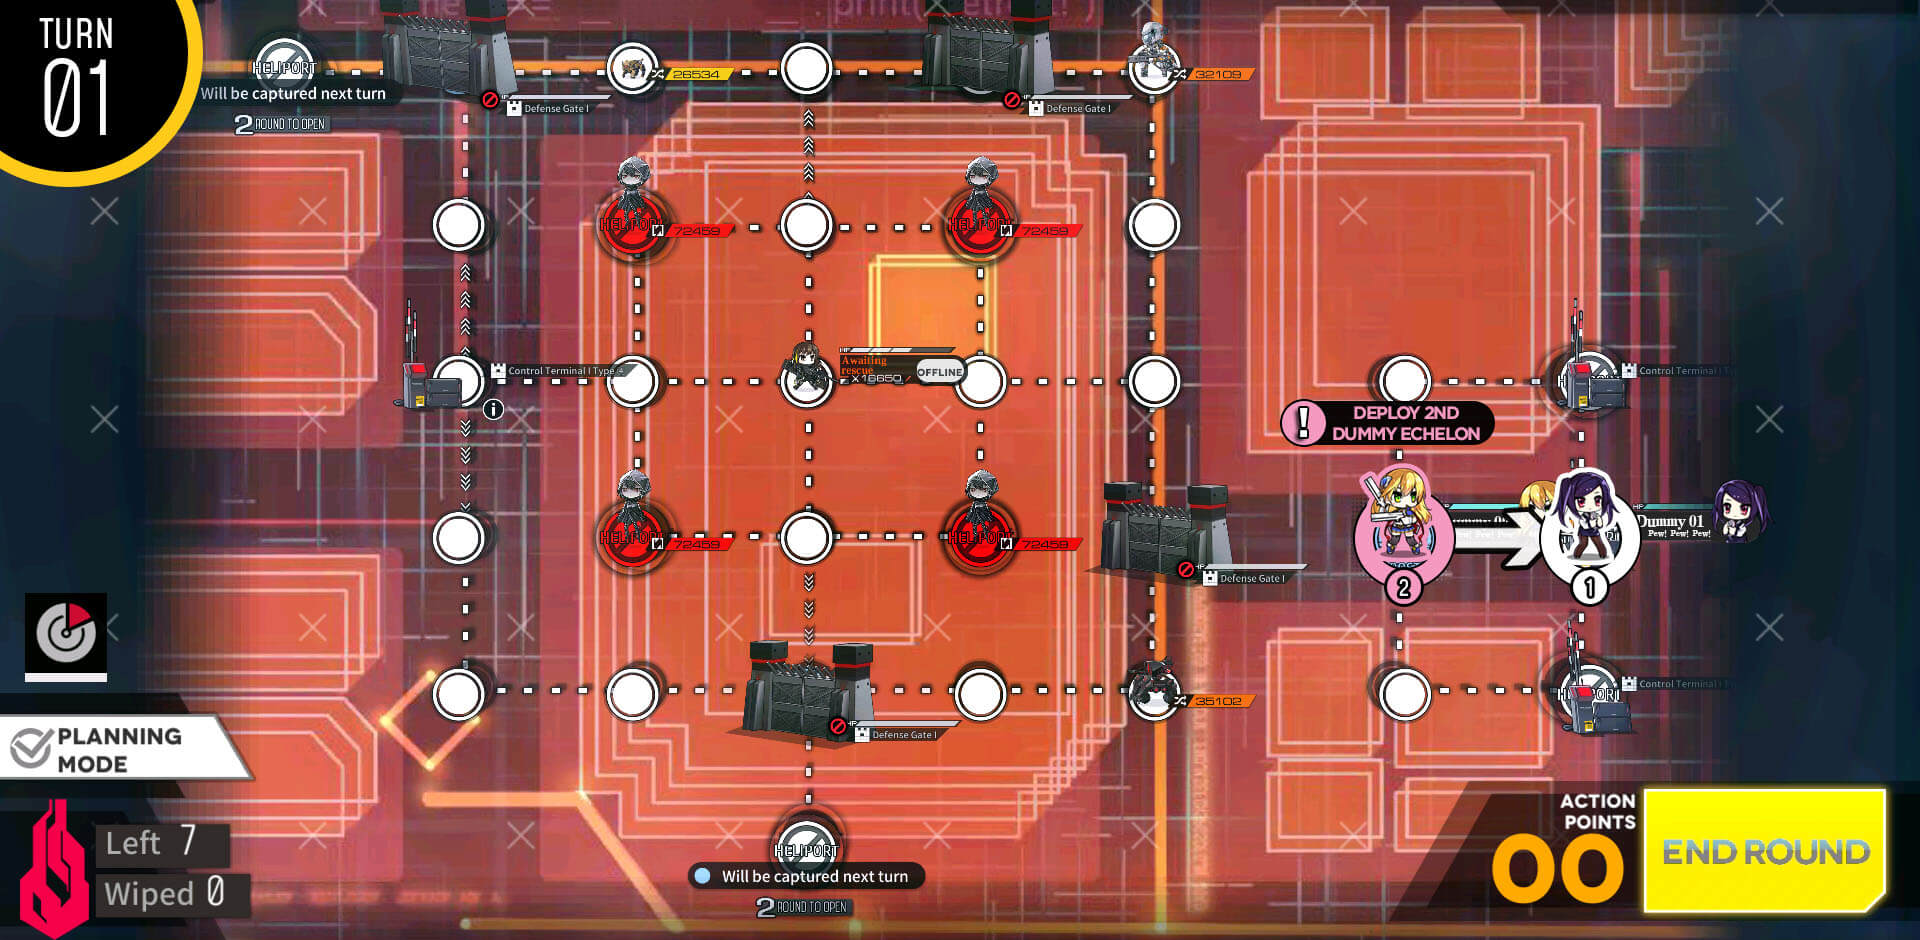
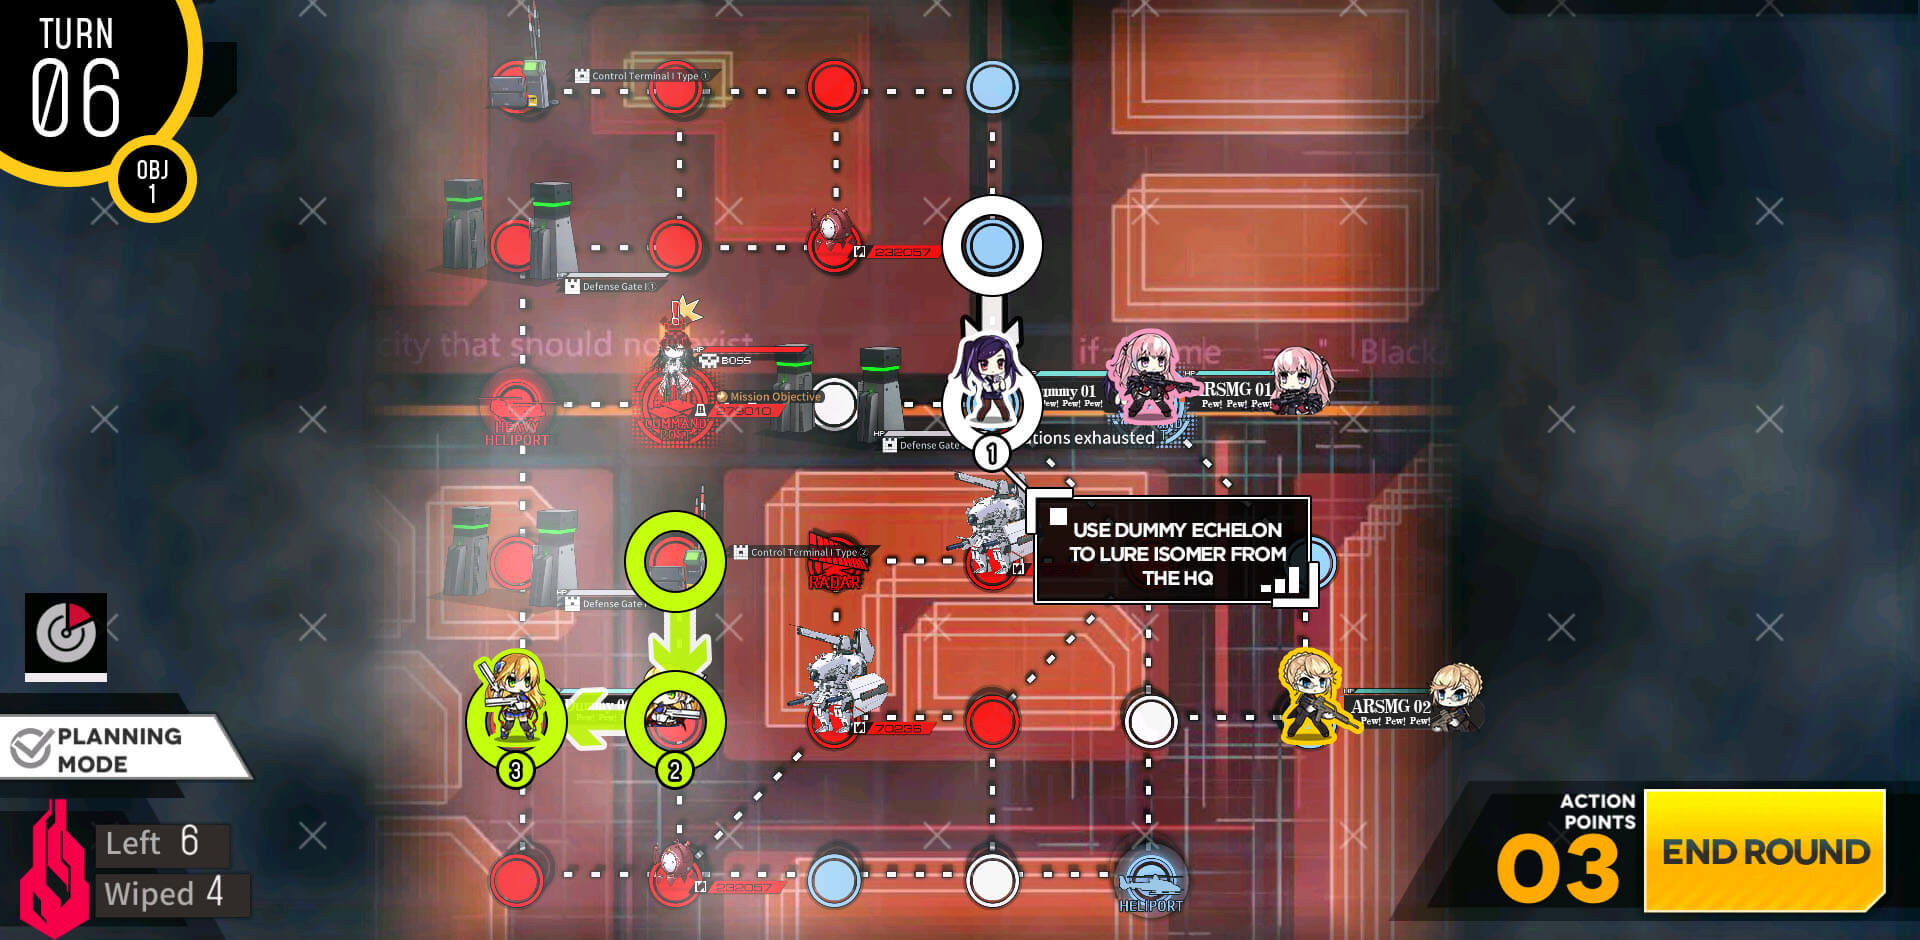
Start with weaker combat echelon on the HQ. Then move it up and deploy stronger combat echelon on the HQ.
1st Combat echelon move to the left to capture another helipad. 2nd combat echelon on the HQ moves to bottom right to capture and kill the Manticore unit.
2nd combat echelon moves one node to the left, and 1st combat echelon clears unit below and move up to capture the 2 nodes at the top.

Finally we capture the remaining nodes via surround capture. Just make sure at the end that all enemy nodes are surrounded by friendly node.

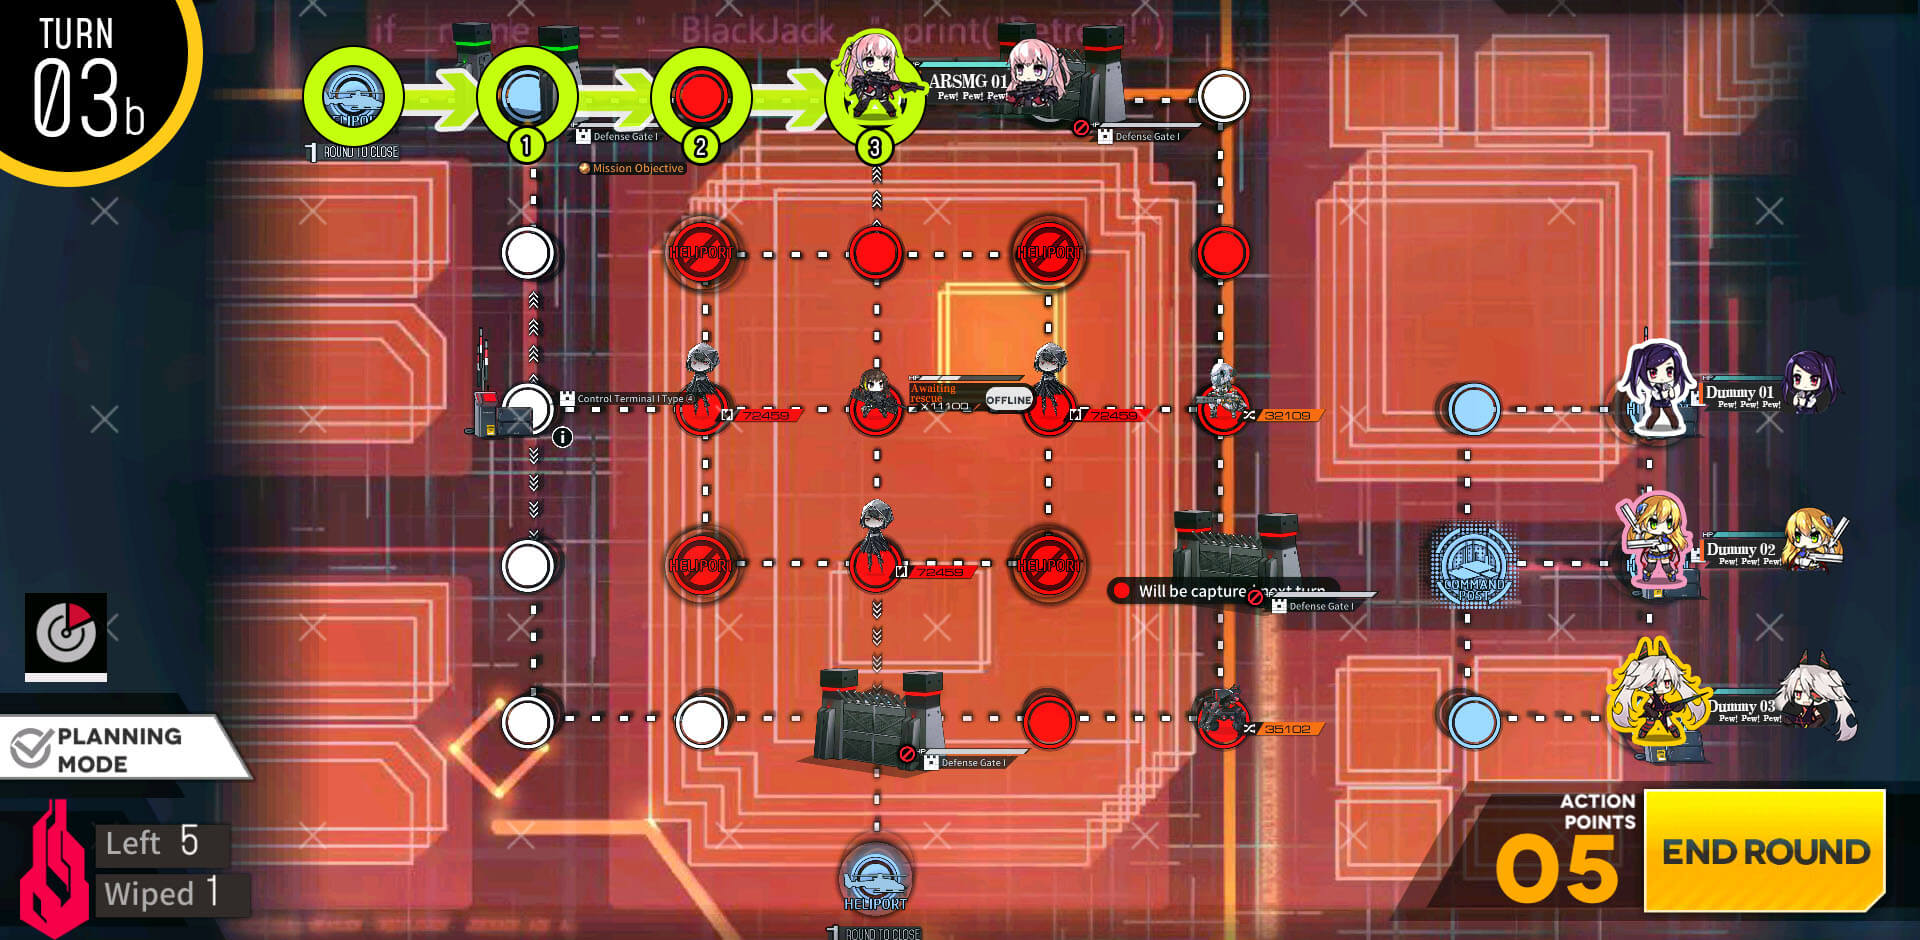
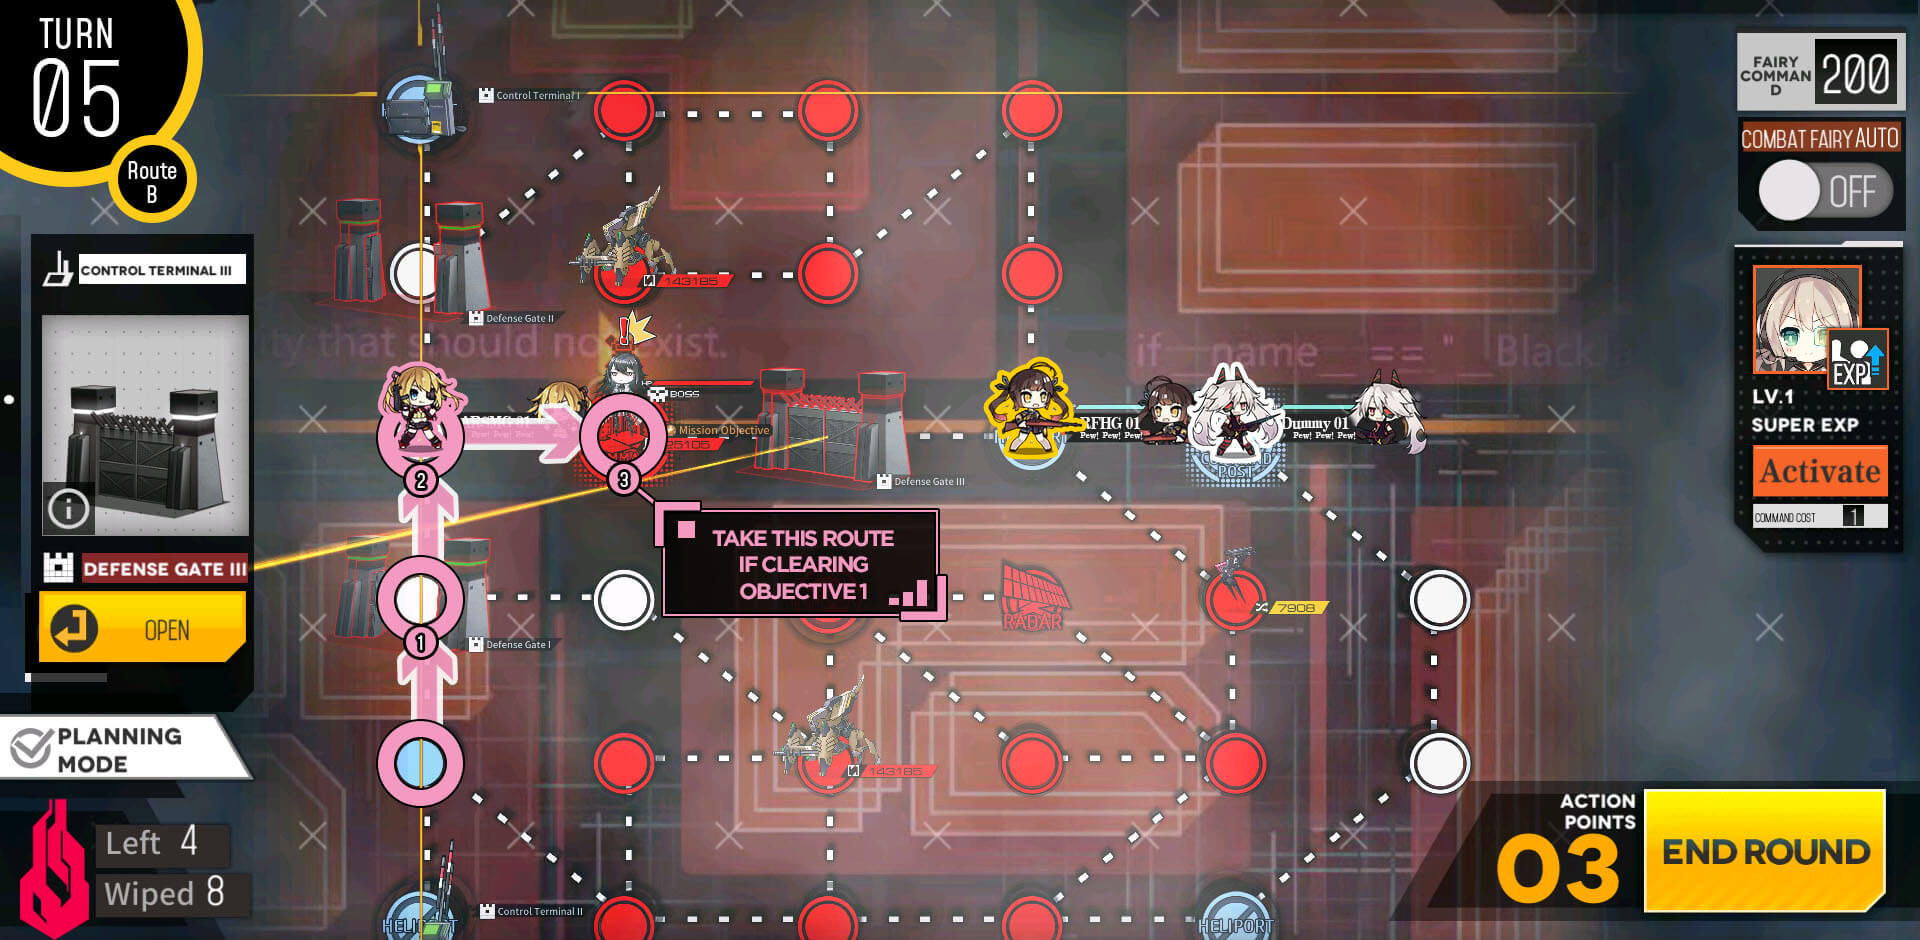
Start is identical with weaker echelon start and deploying stronger echelon on the HQ.
Turn two is also identical with capturing 2 of the nodes with surround capture.
On turn 3, instead of surround capturing the nodes that are highlighted, you need to physically step on the marked nodes and end the turn in order to clear the objective B.
This map is incredibly simple to do, just need the 2SG MG echelon that we used for Pyxis units in EX.
Deploy at the HQ, then move down to attack the Pyxis unit below. Once done, Manticore will move onto marked location and clears the mission.

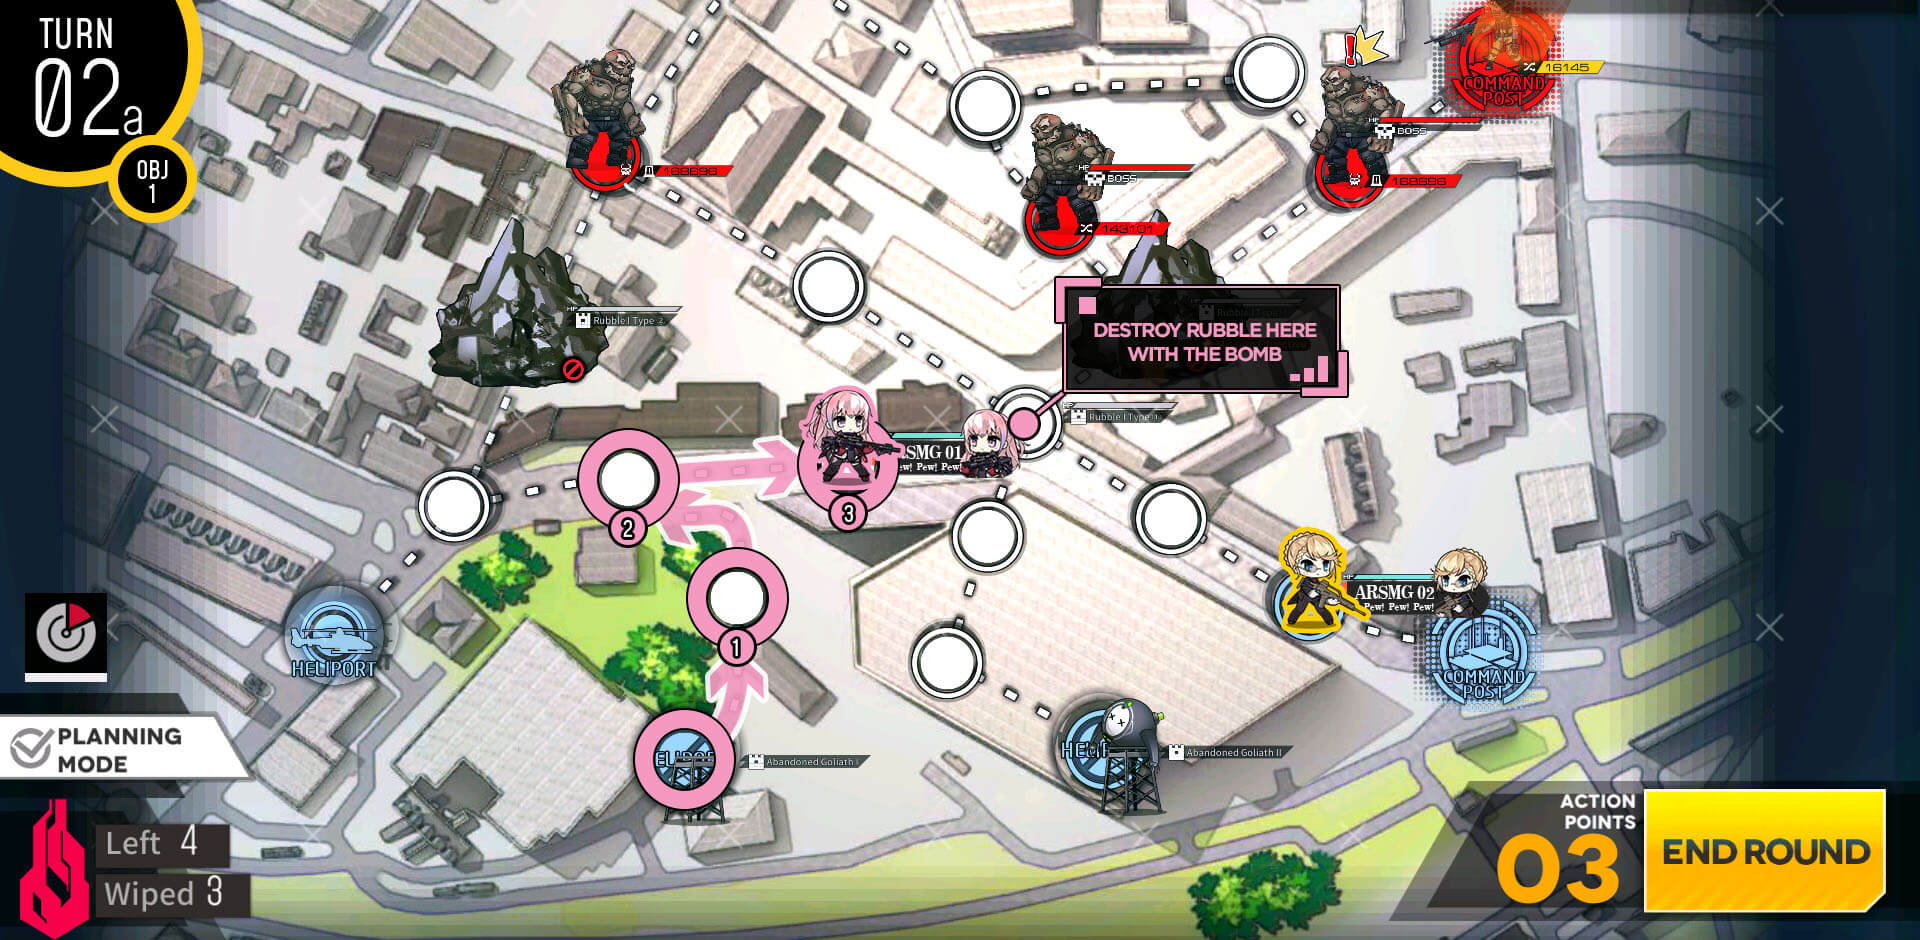
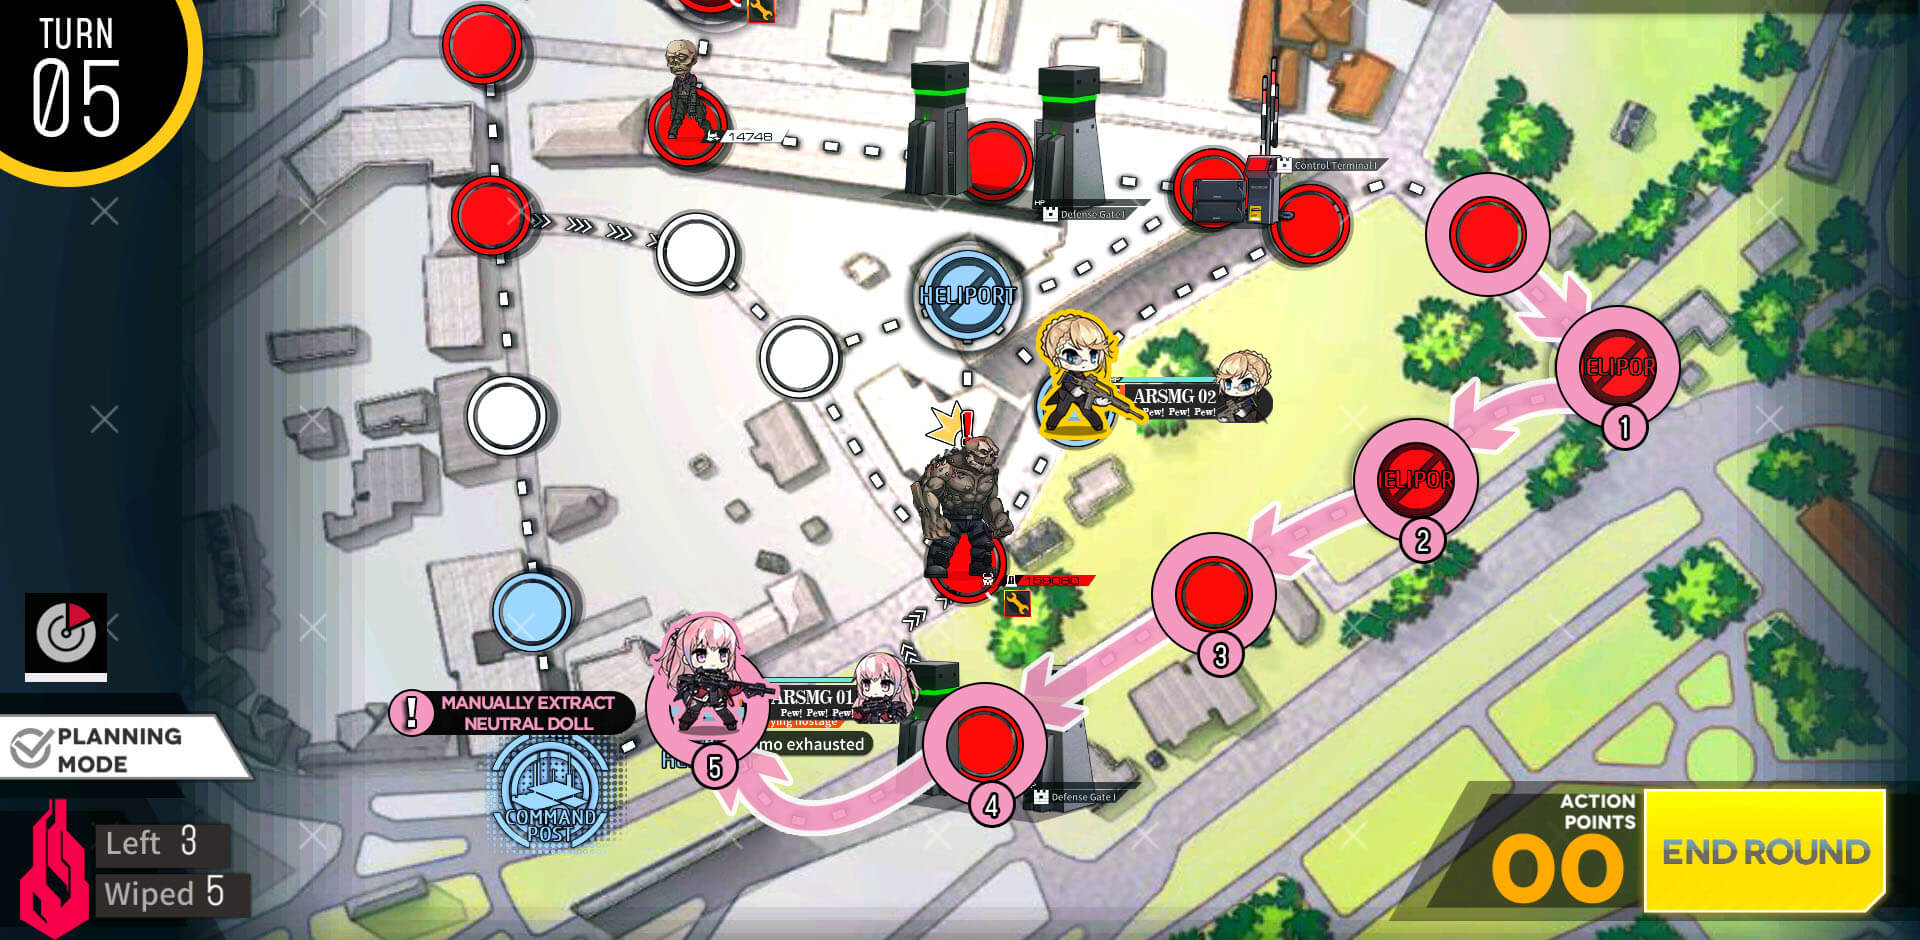
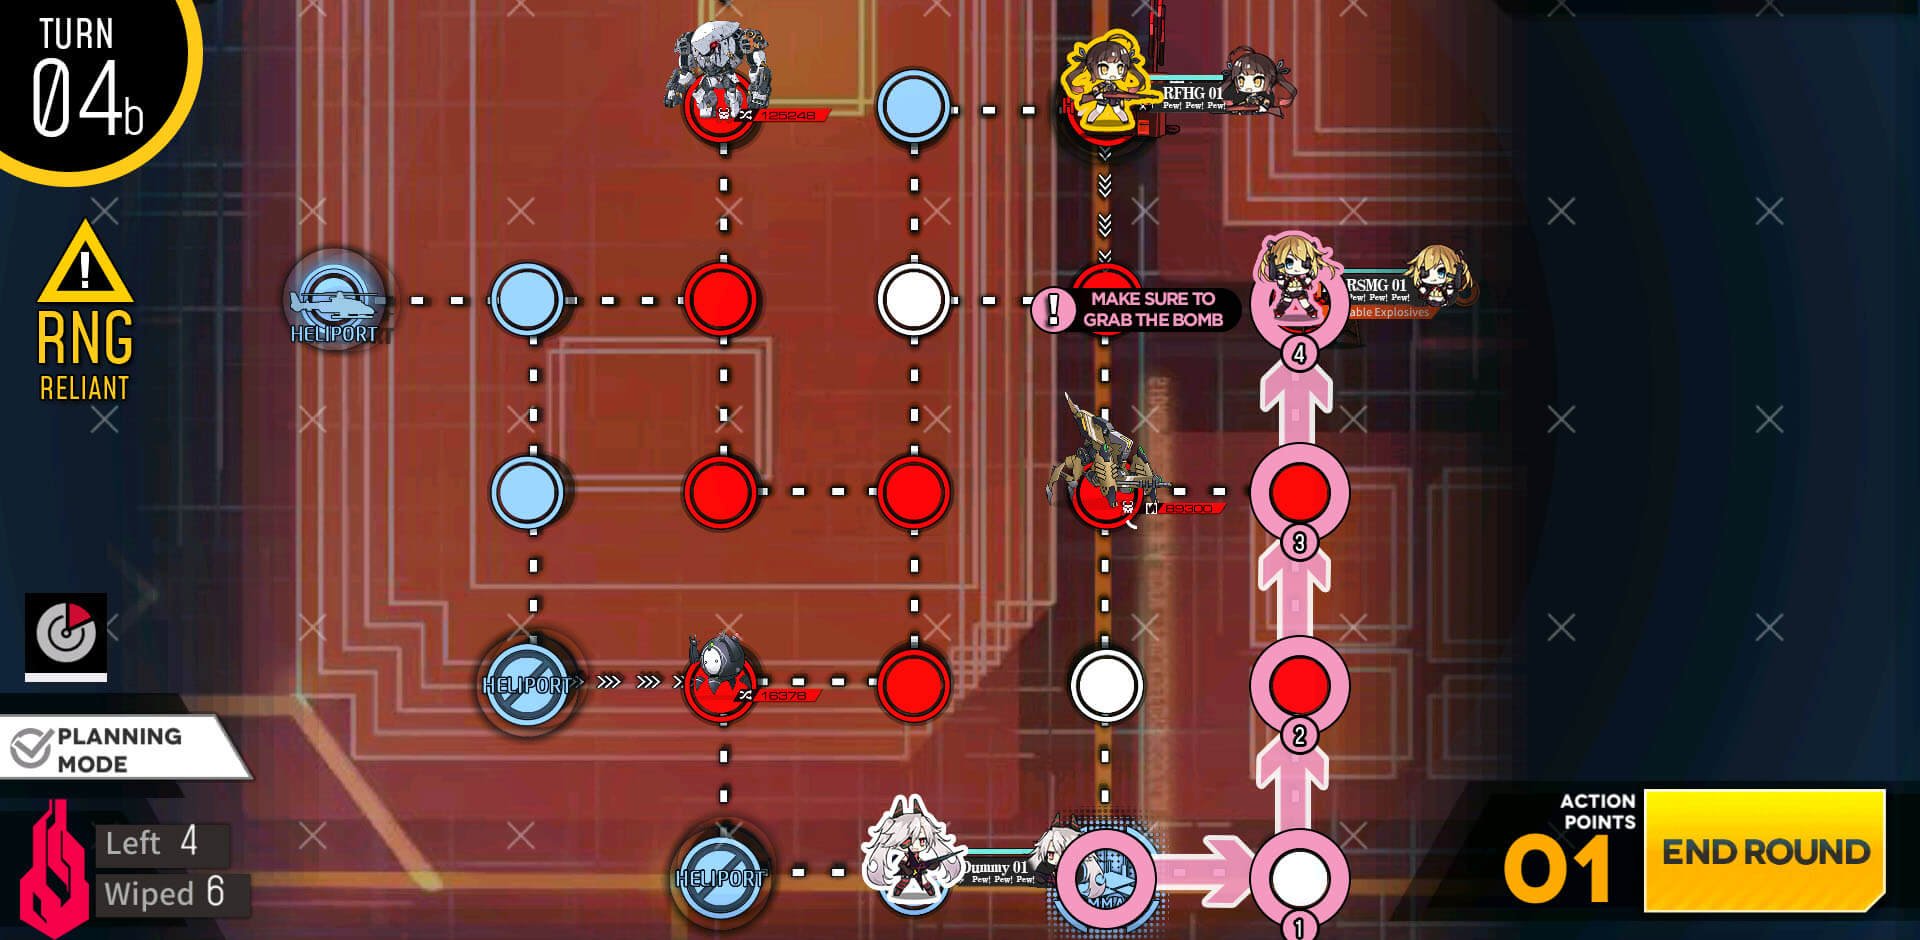
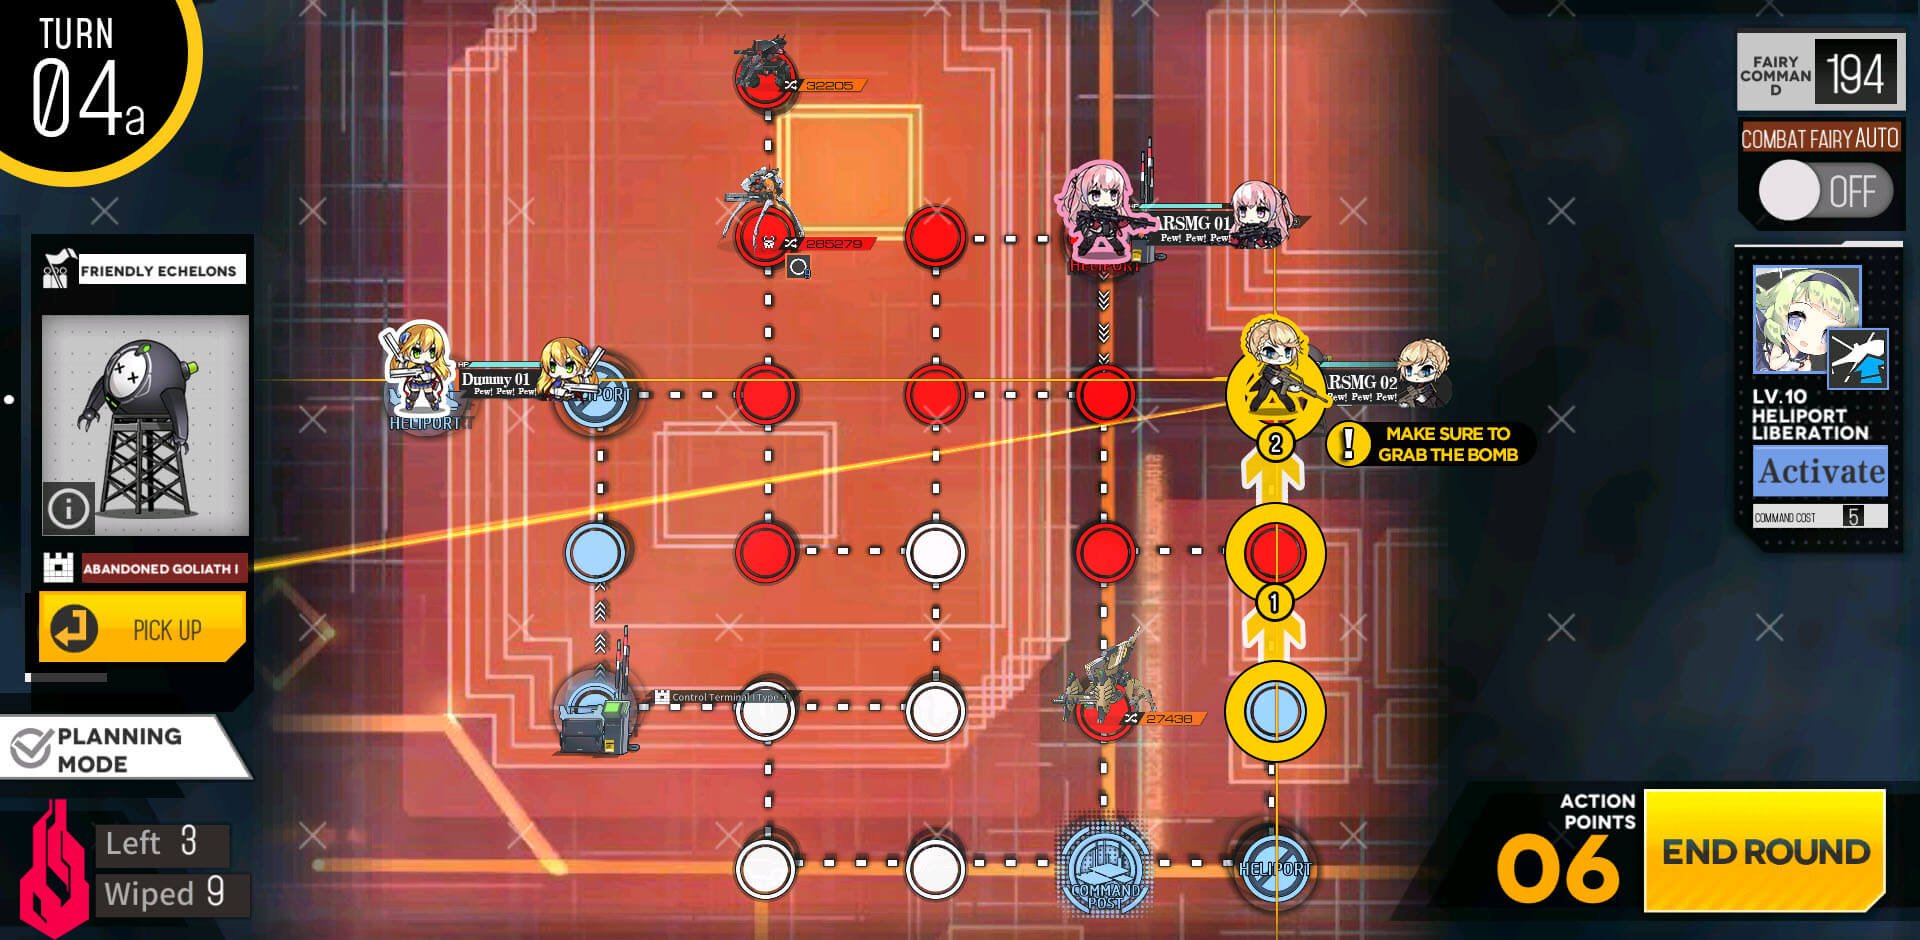
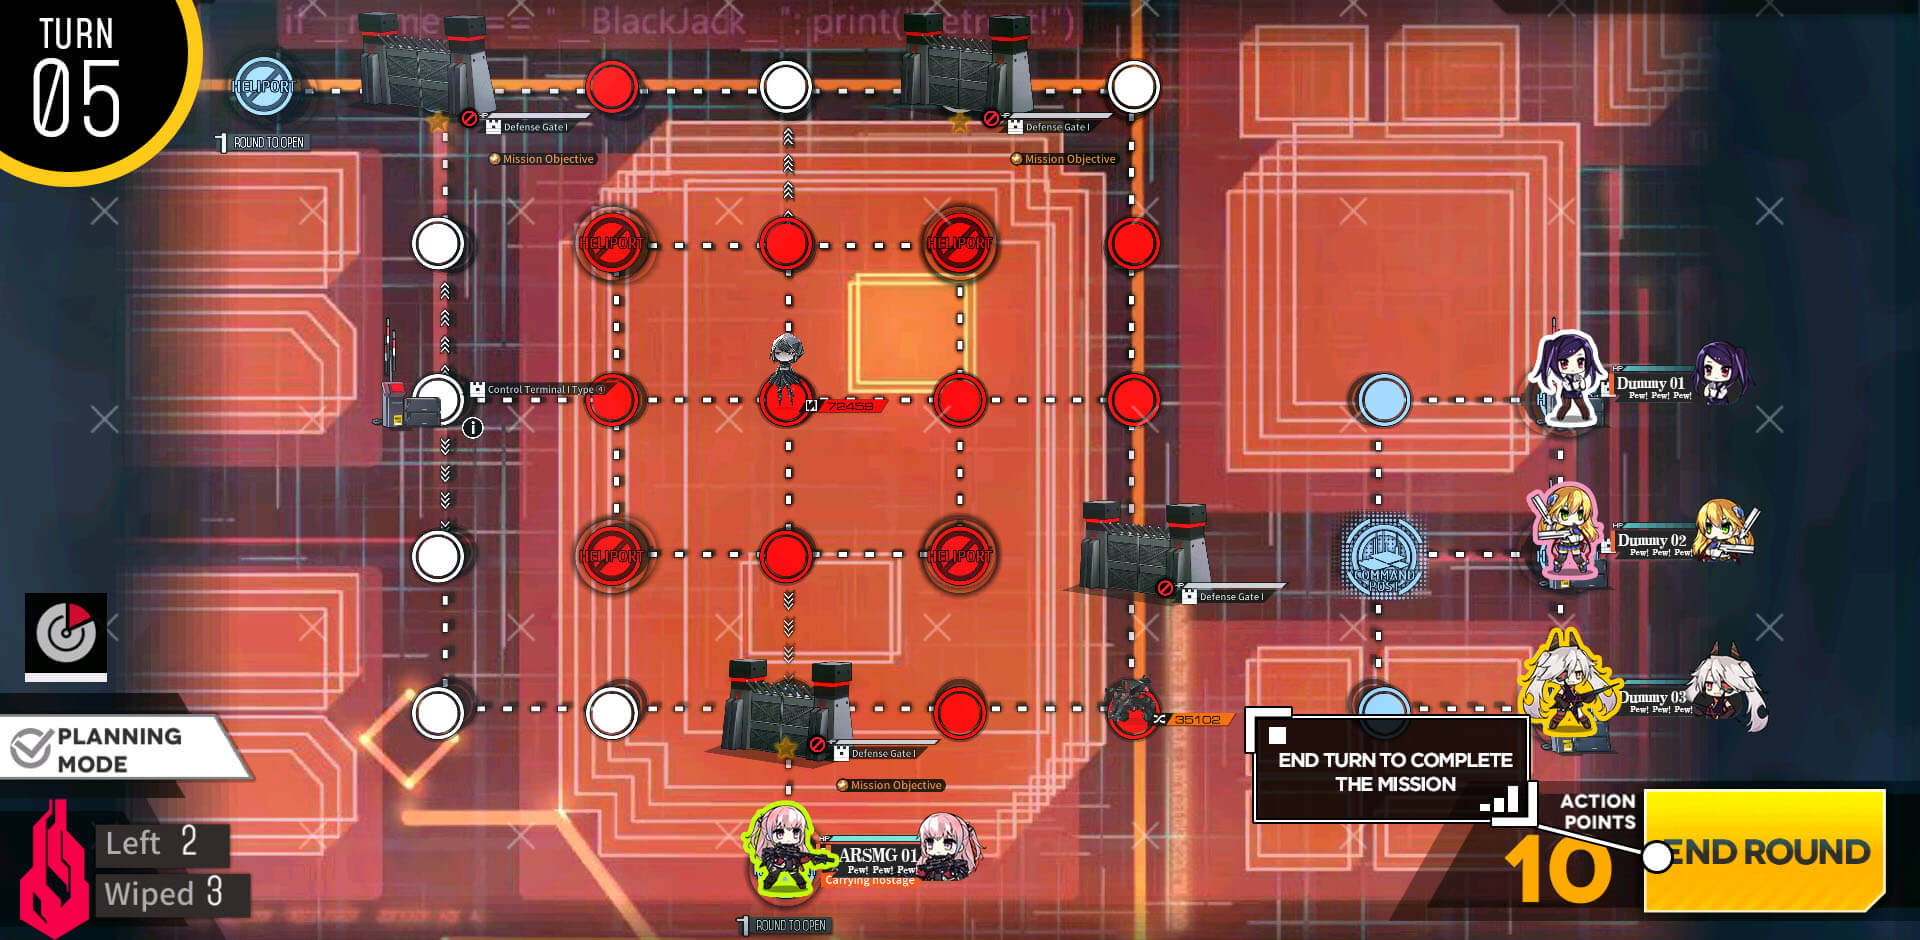
ARSMG echelon starts on the left helipad and moves straight to the helipad with bomb on it. Pick it up and end the turn.
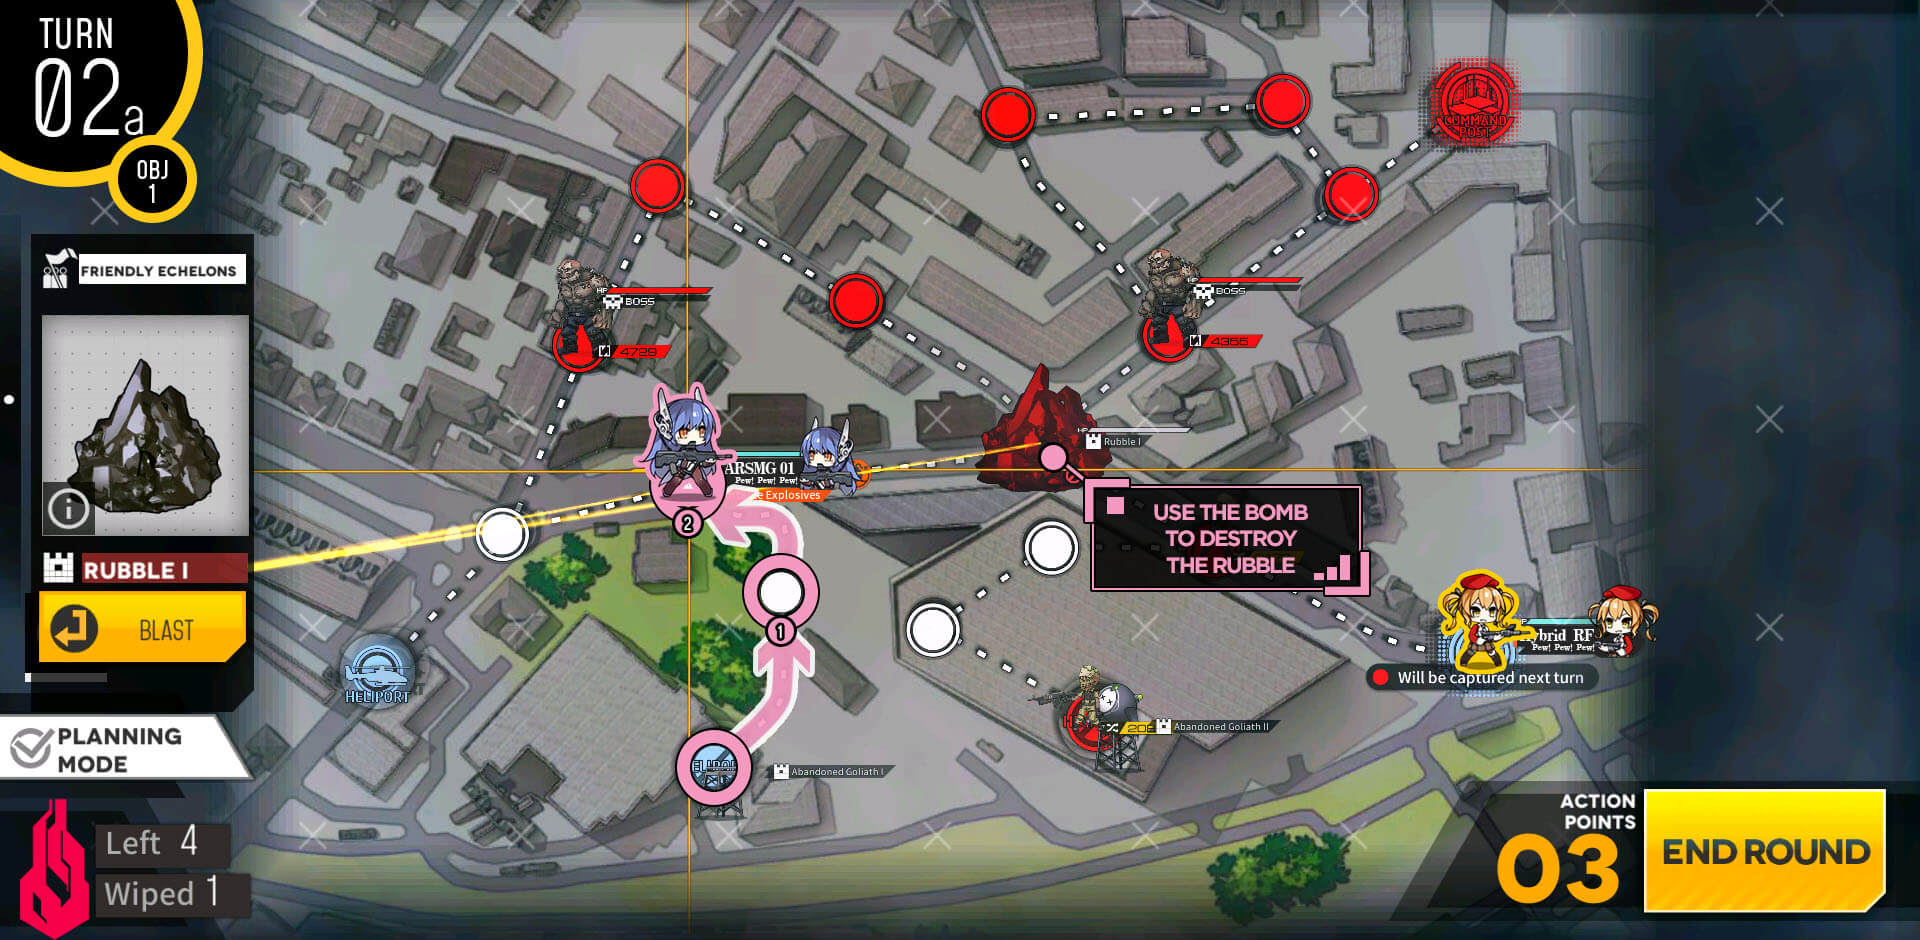
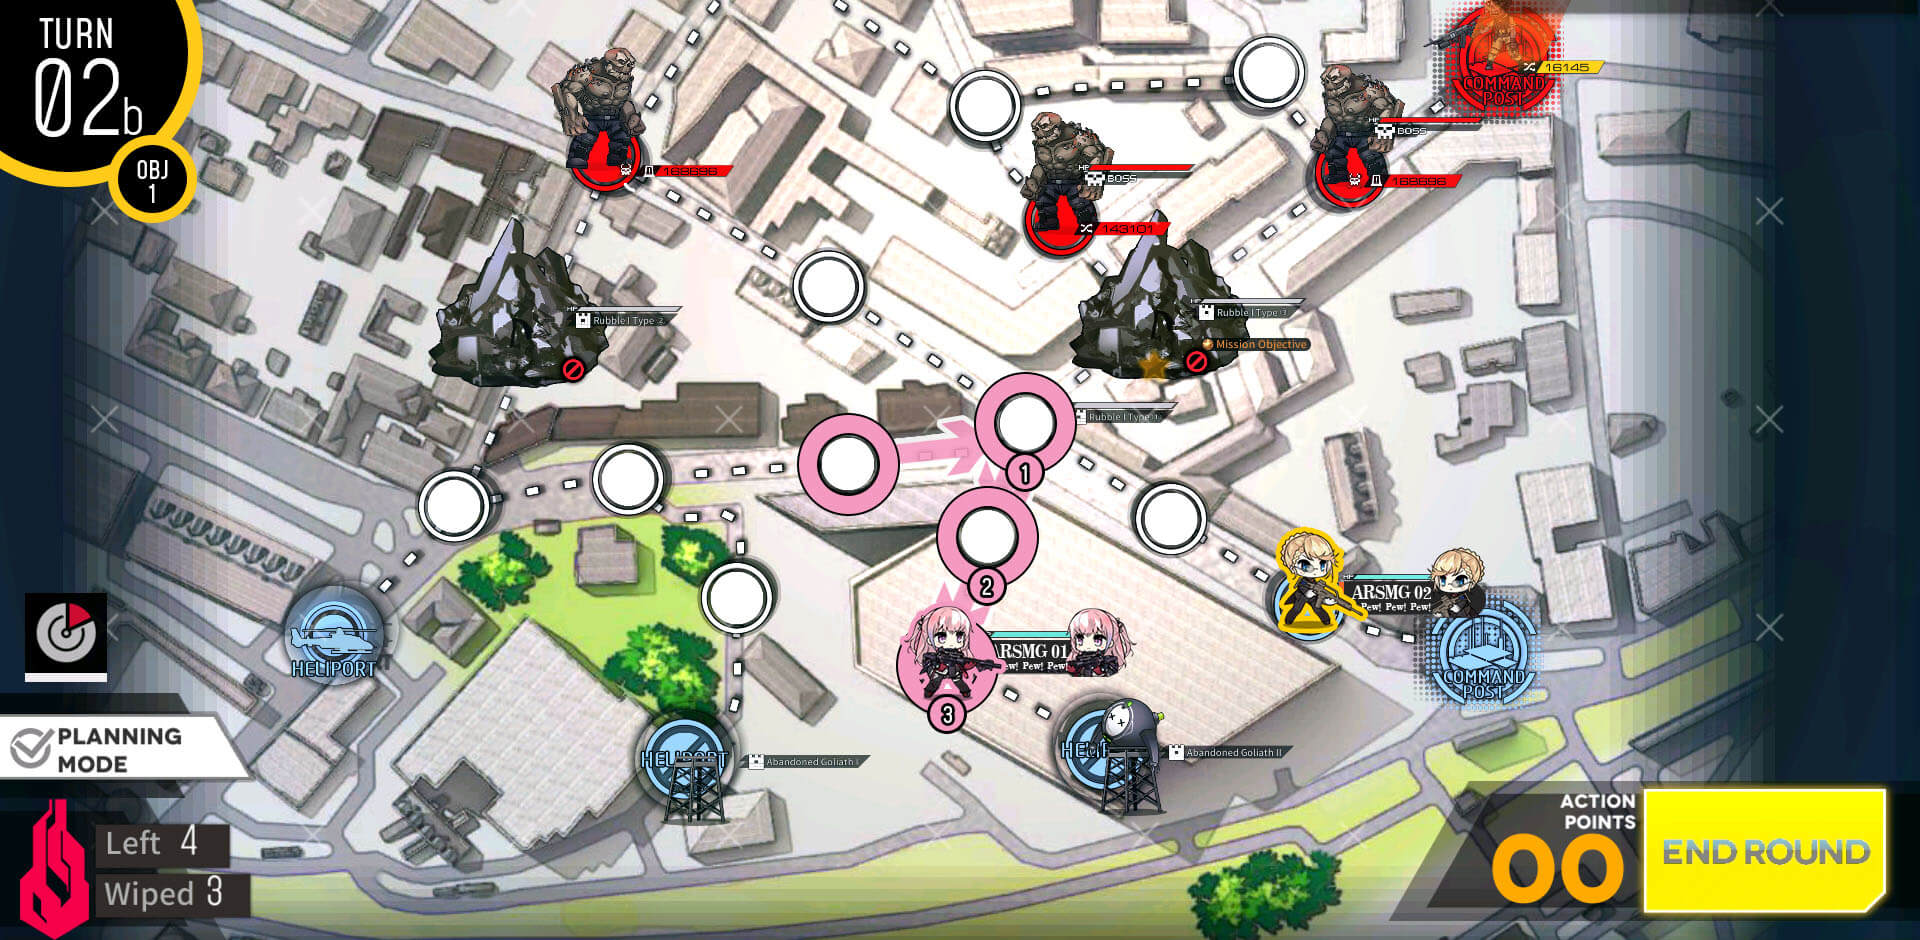
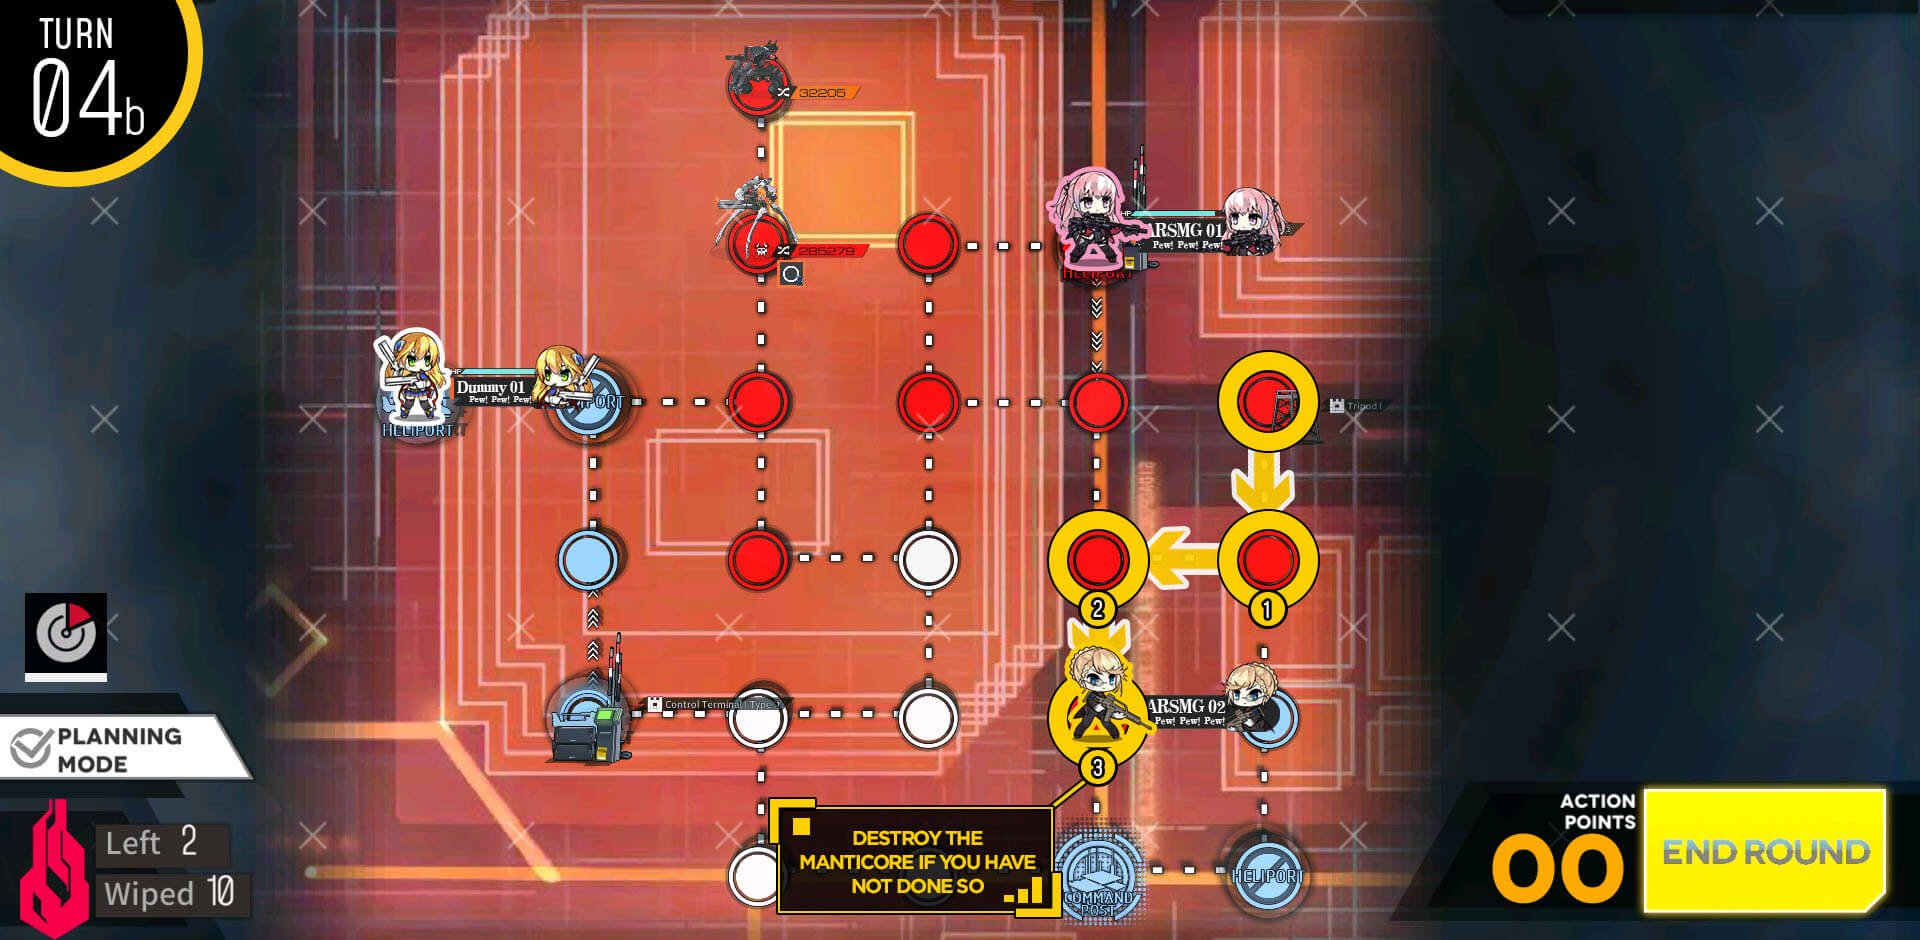
Now we move adjacent to the rubble blocking the path and blow it up using the bomb.
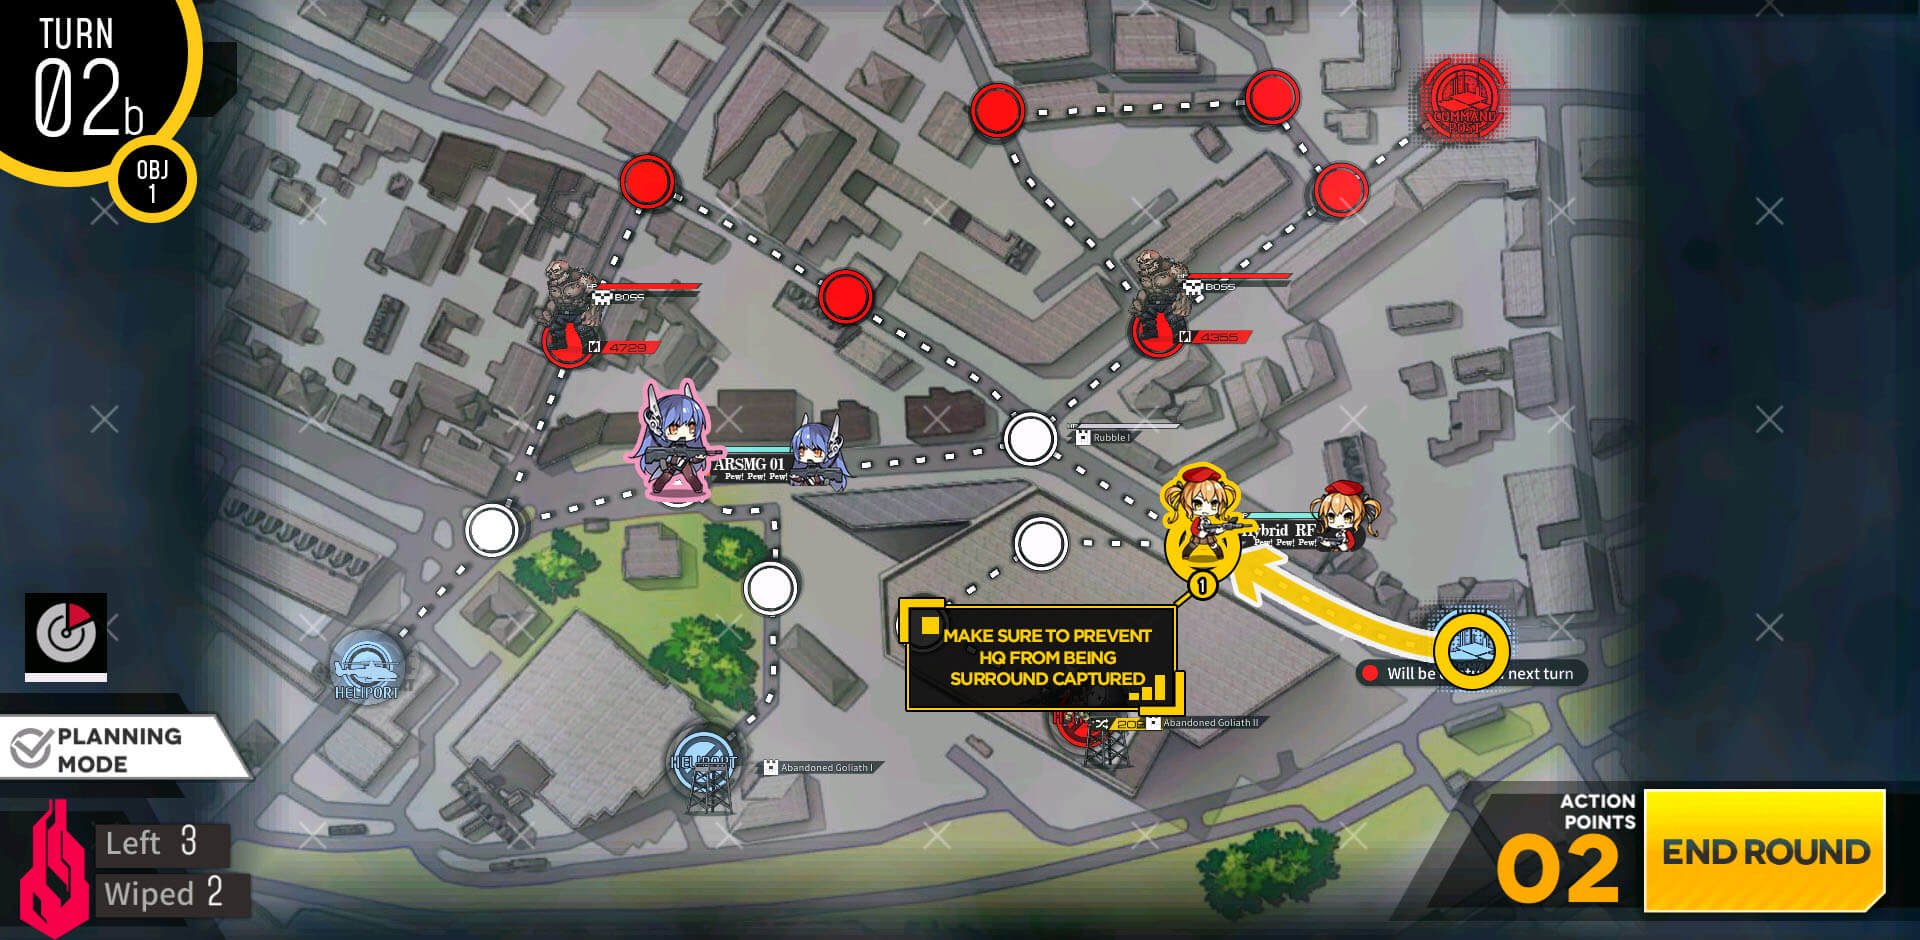
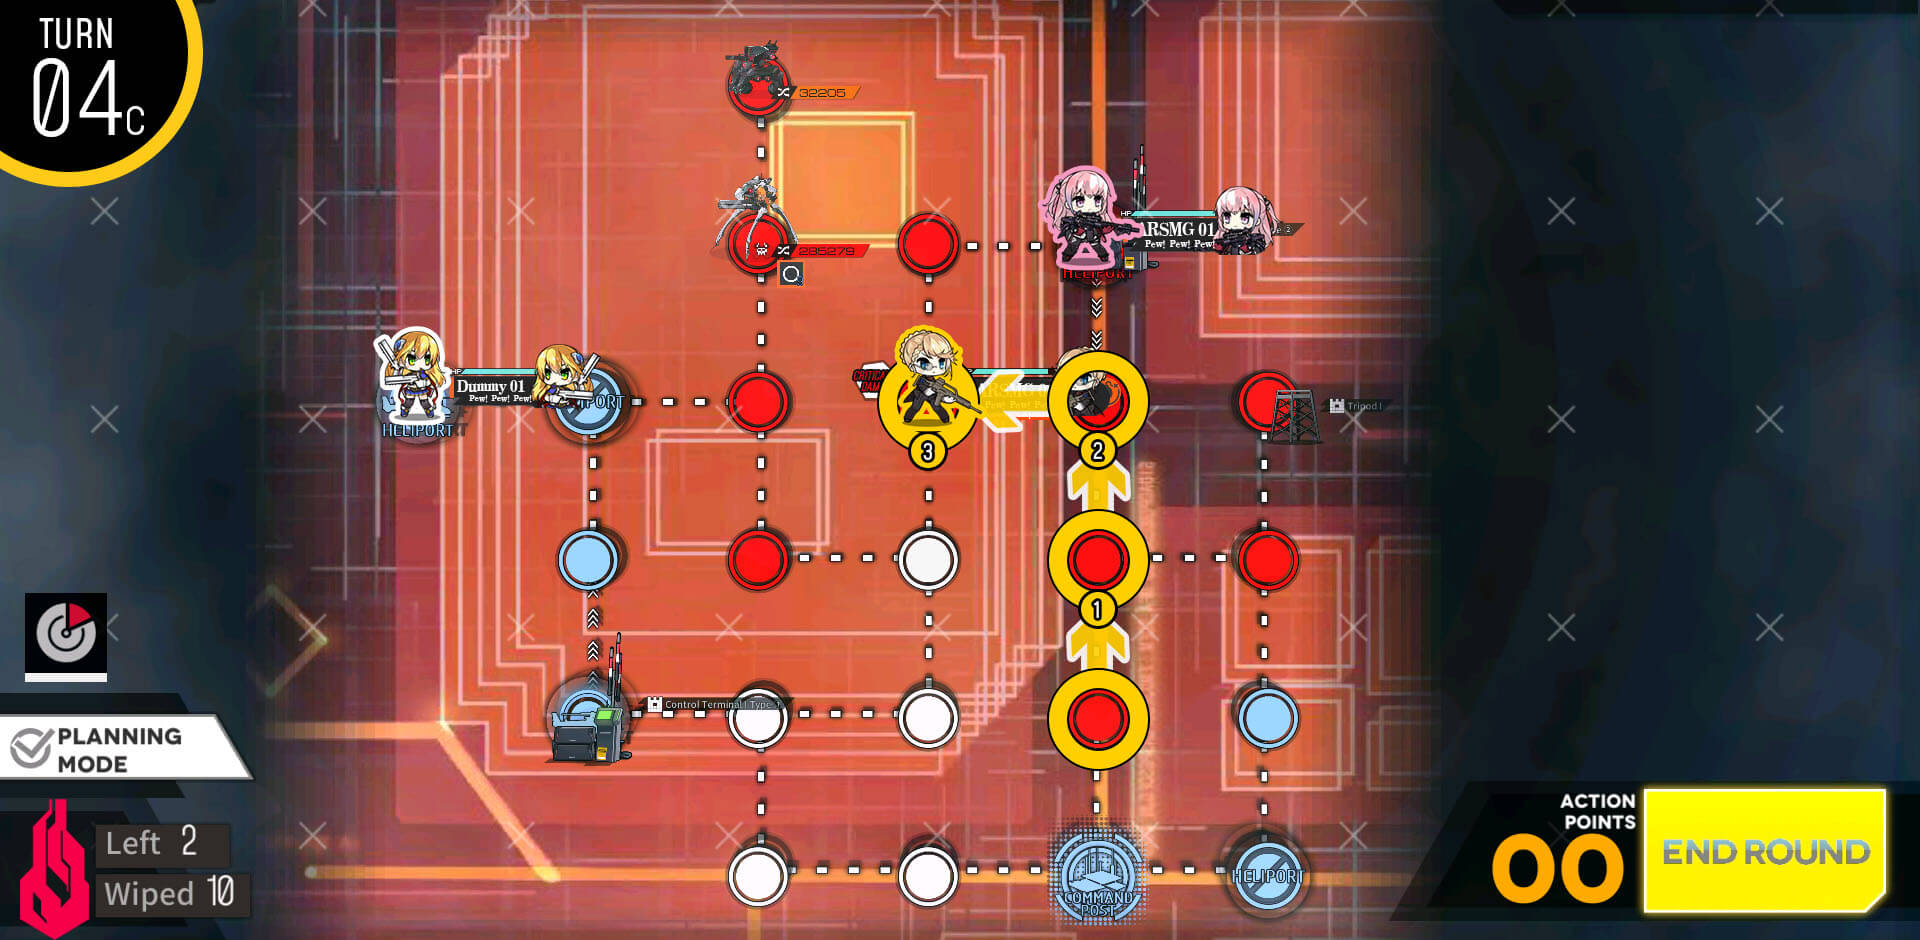
As predicted, our HQ is in danger of being surround captured, move up to clear the enemy unit.
Now that we have fought 2 units, we cannot fight anymore.
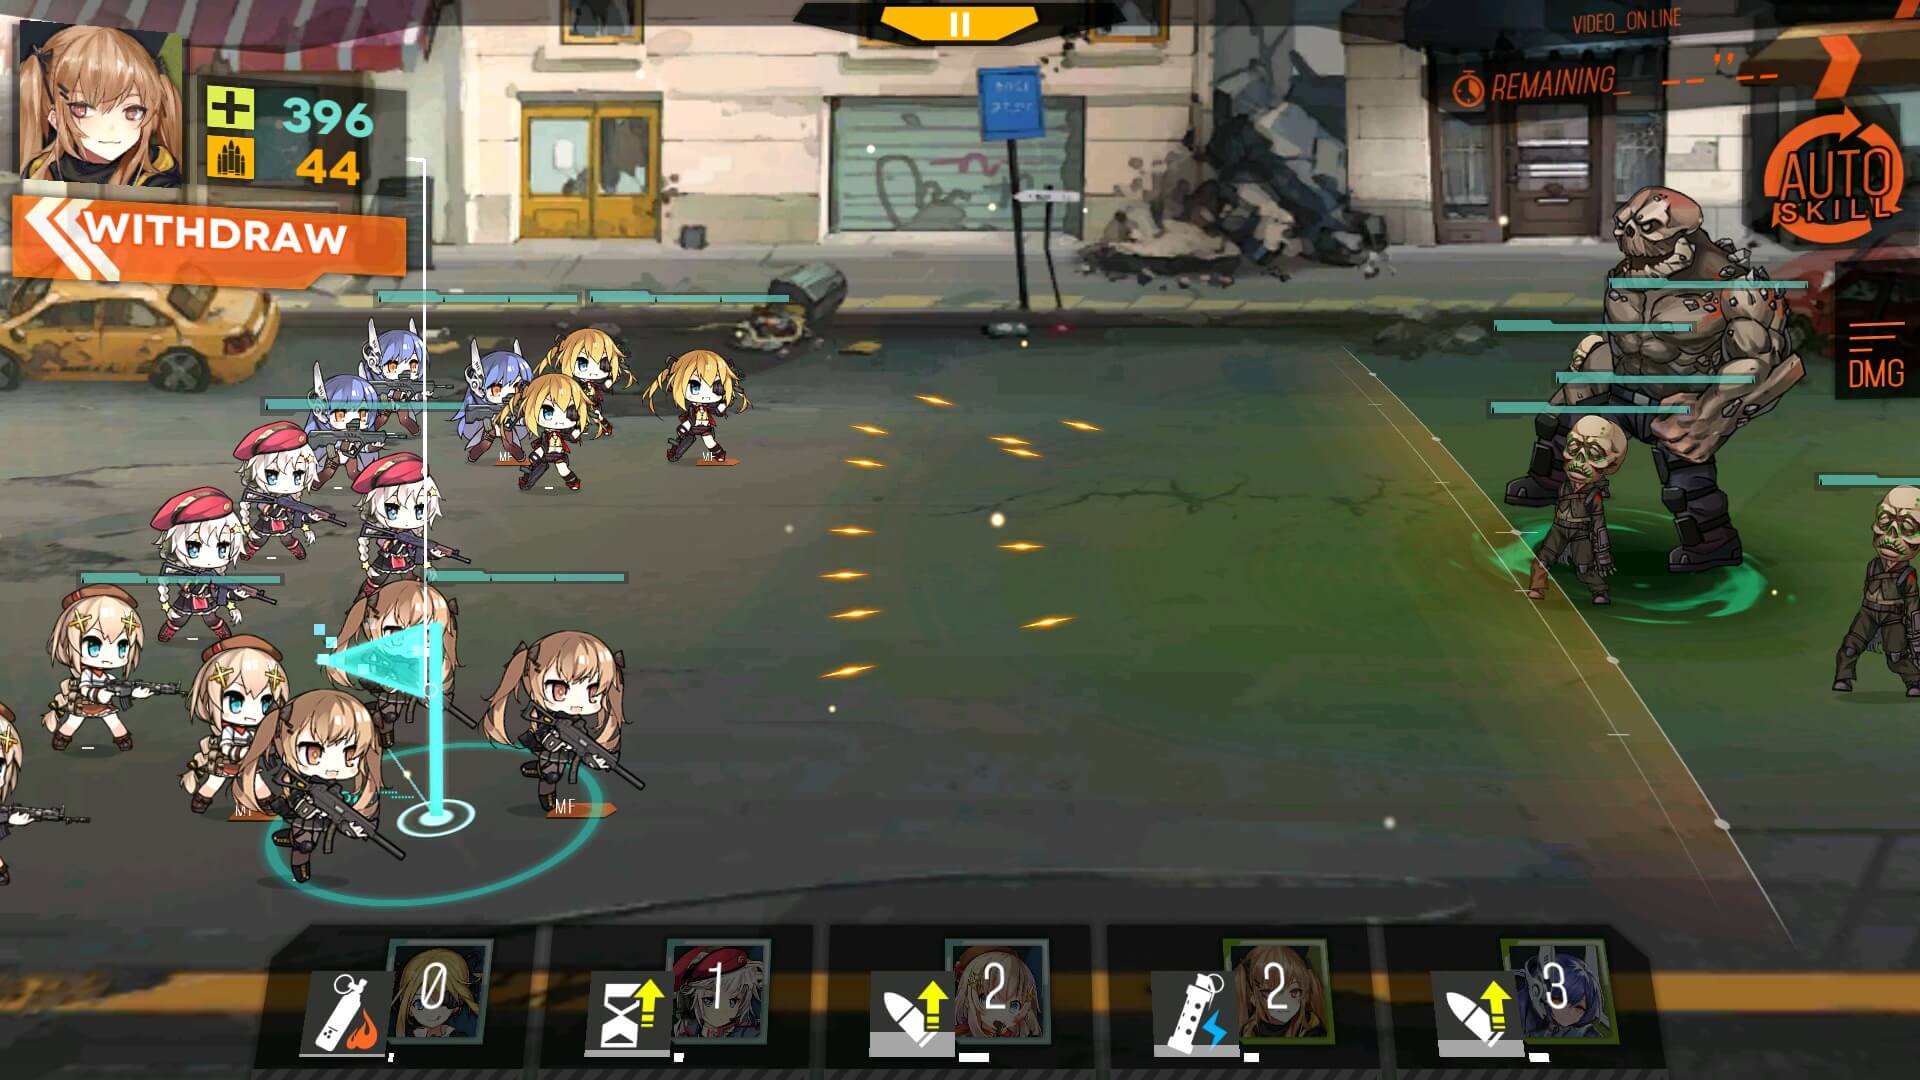
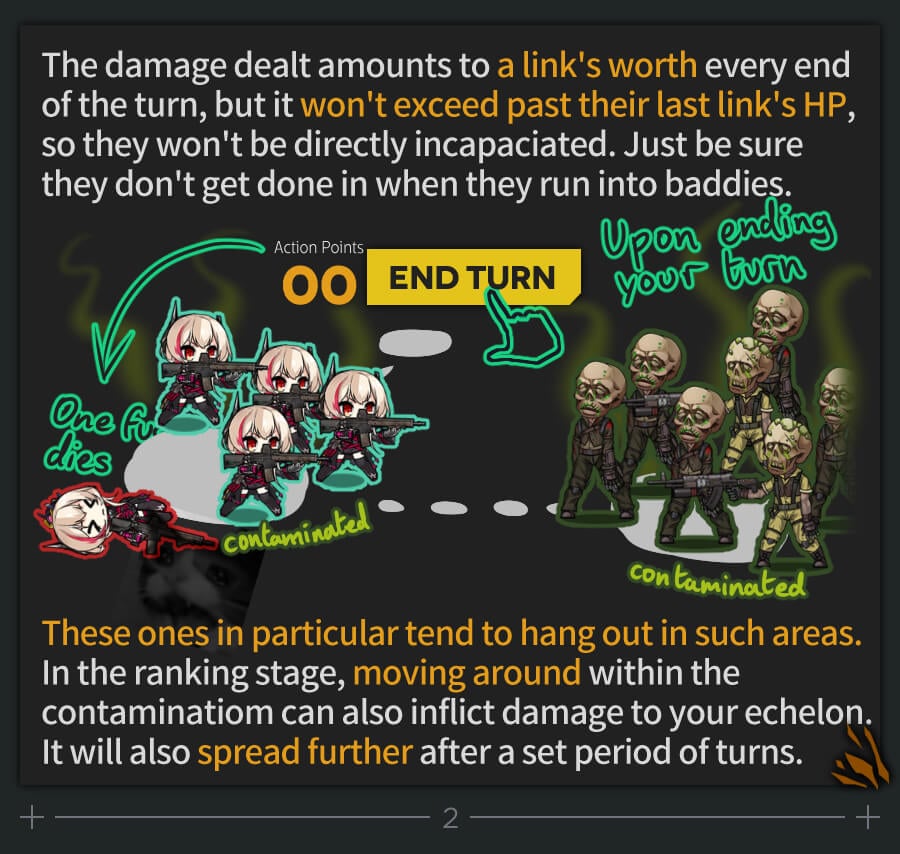
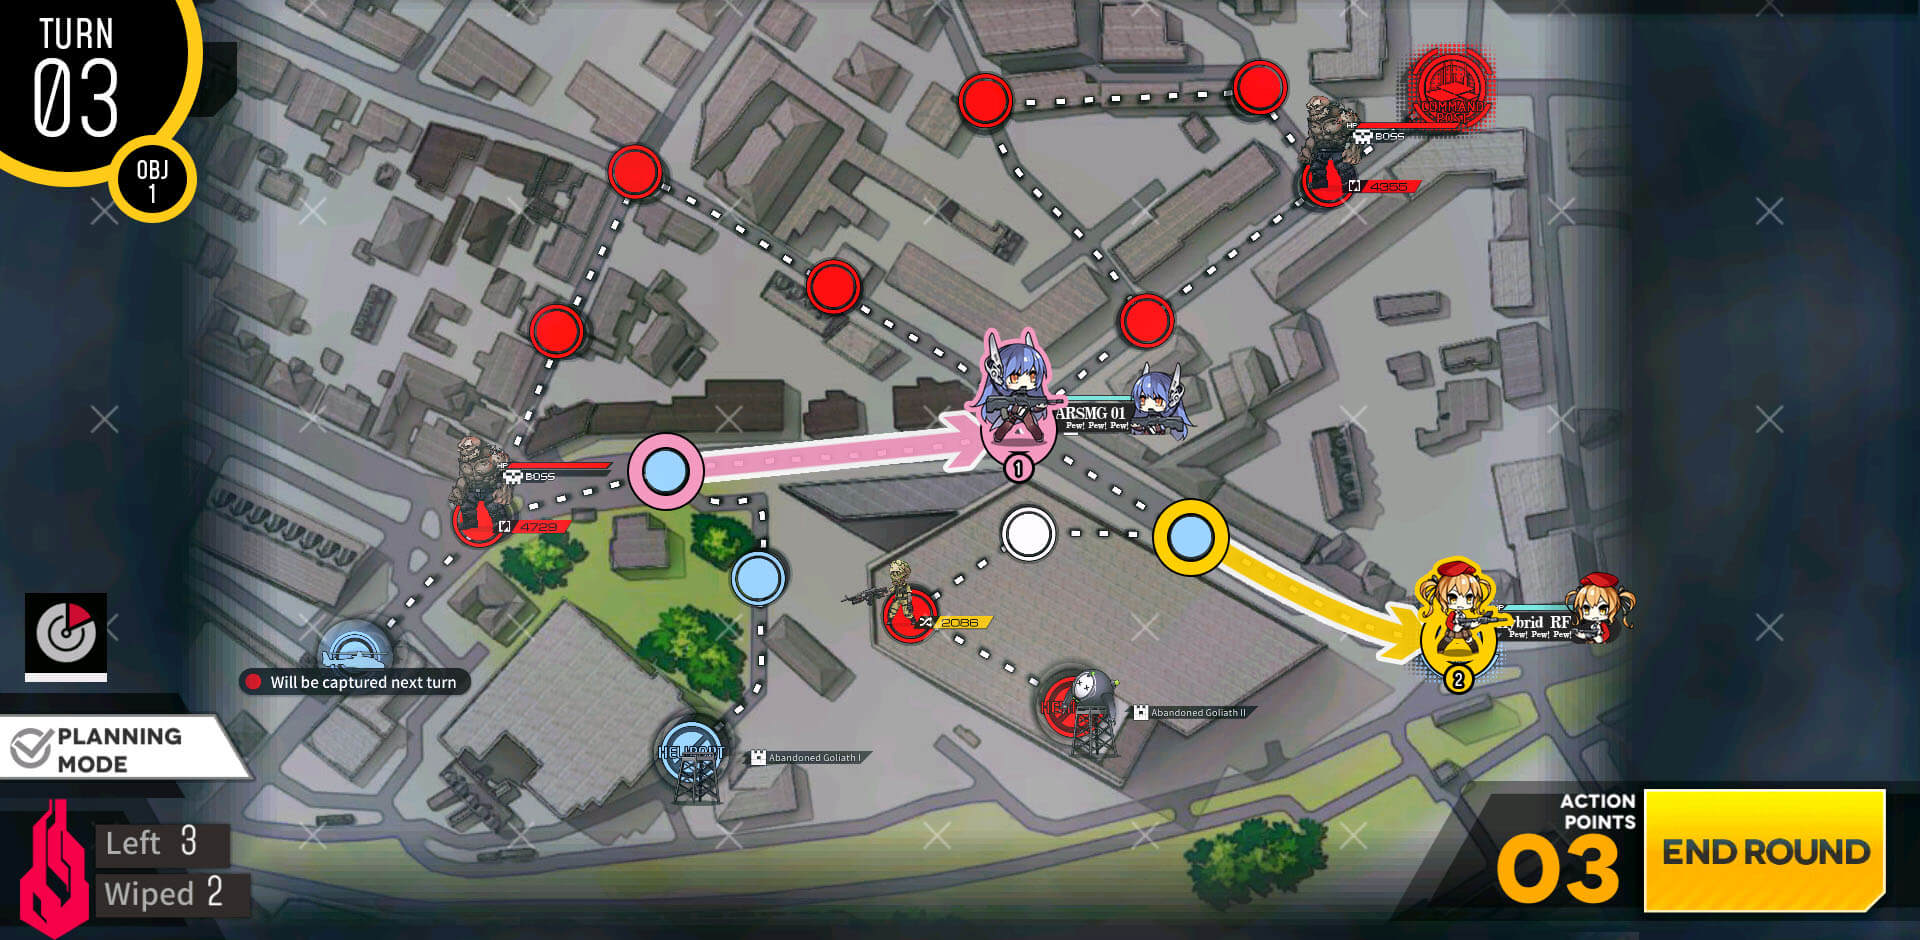
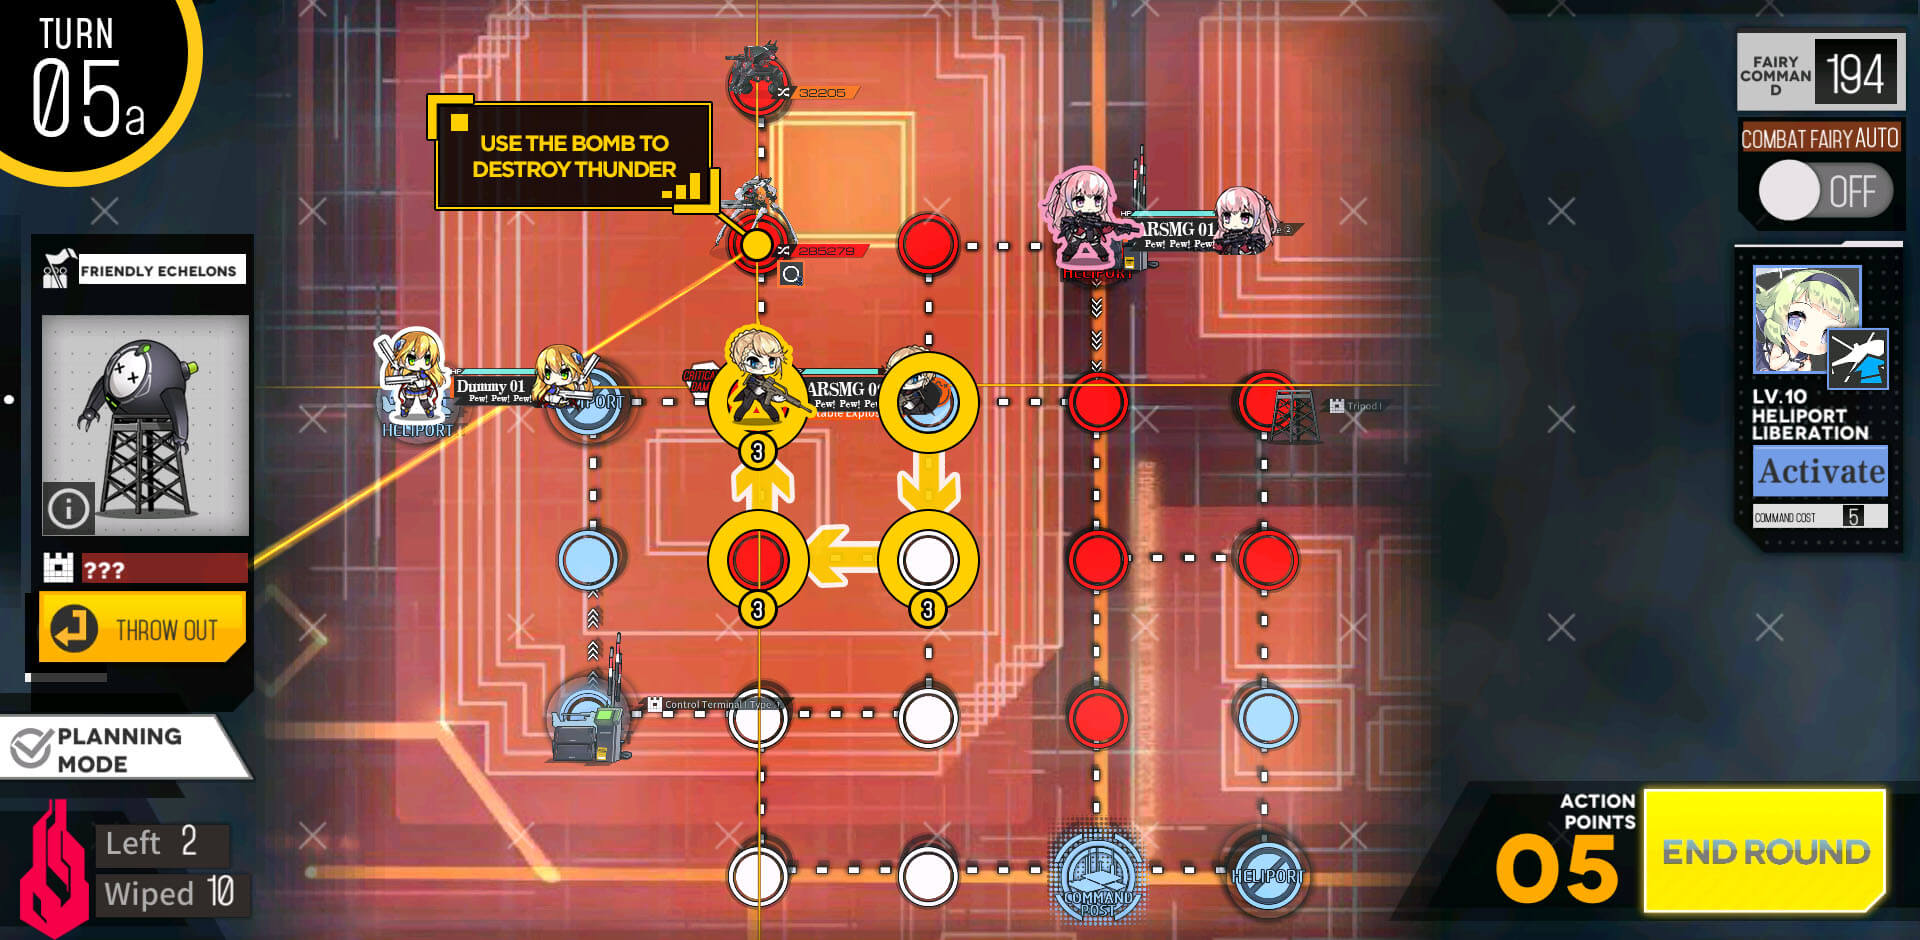
Key thing to remember during smasher battle is to keep the position 5 open as radiation emitted by Smasher unit deals damage over time in circle around it. If zombies appear from the rear, simply shuffle ARs to reset the targeting.
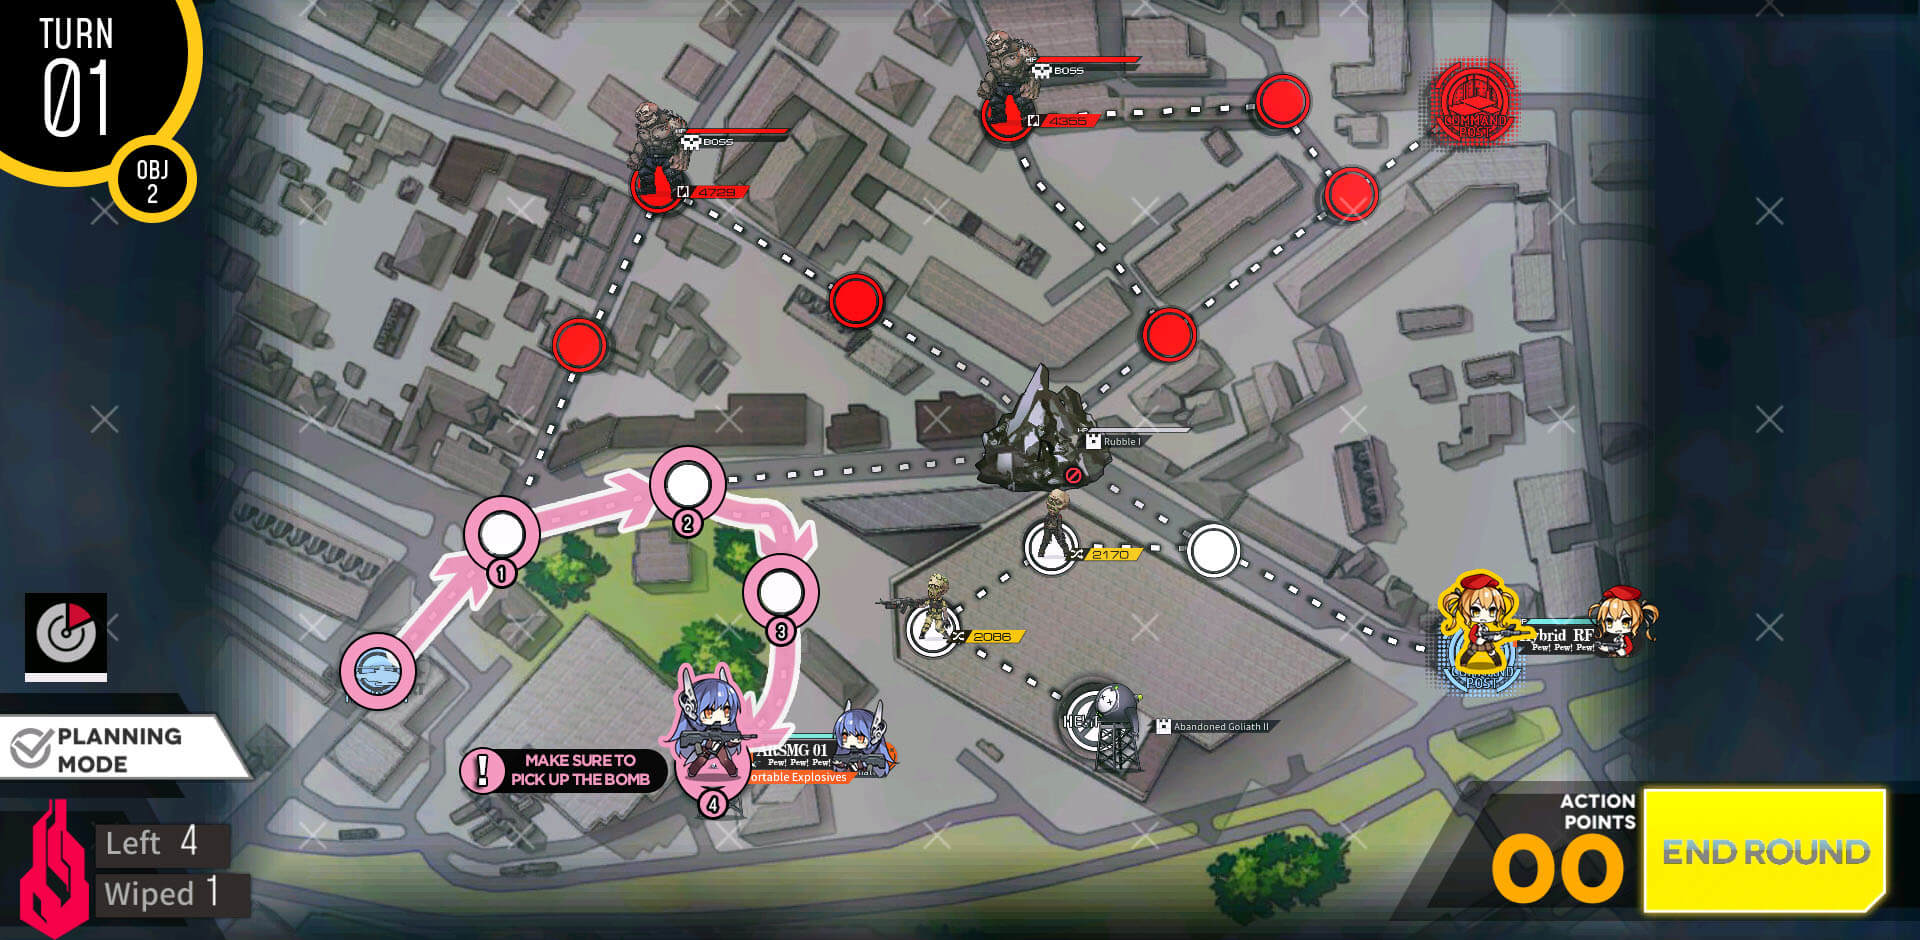
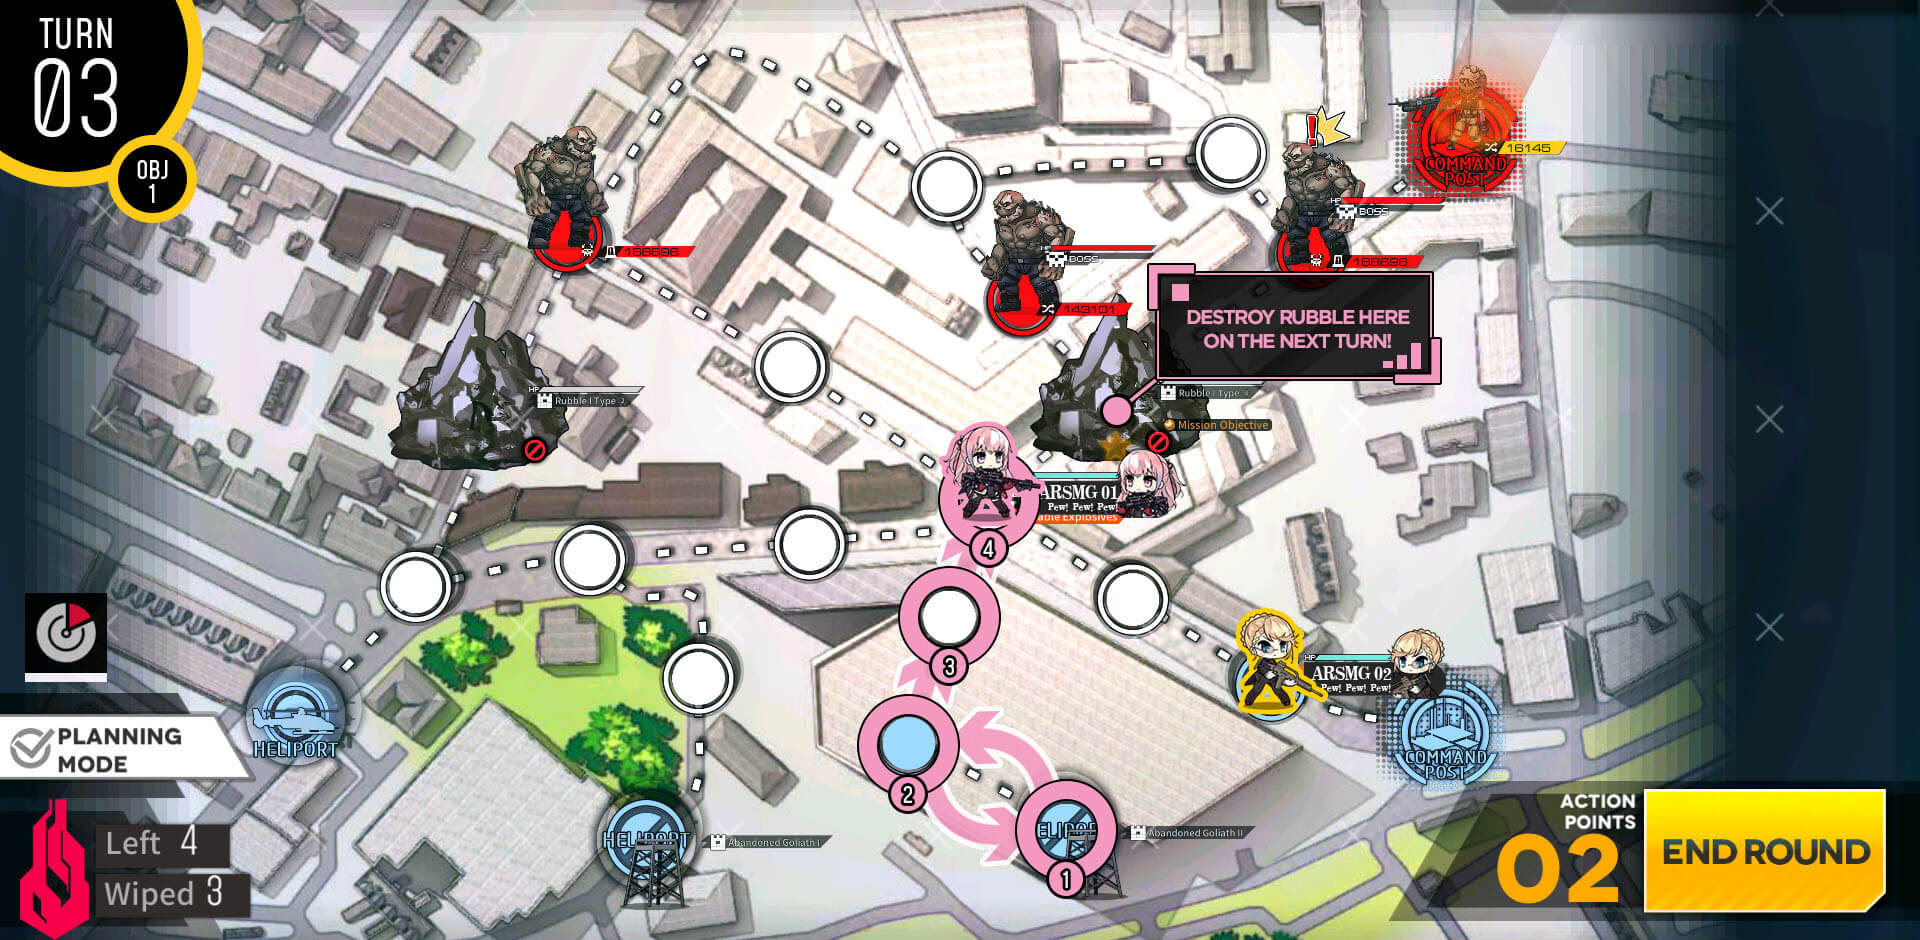
Start with ARSMG echelon heading to pick up the bomb.
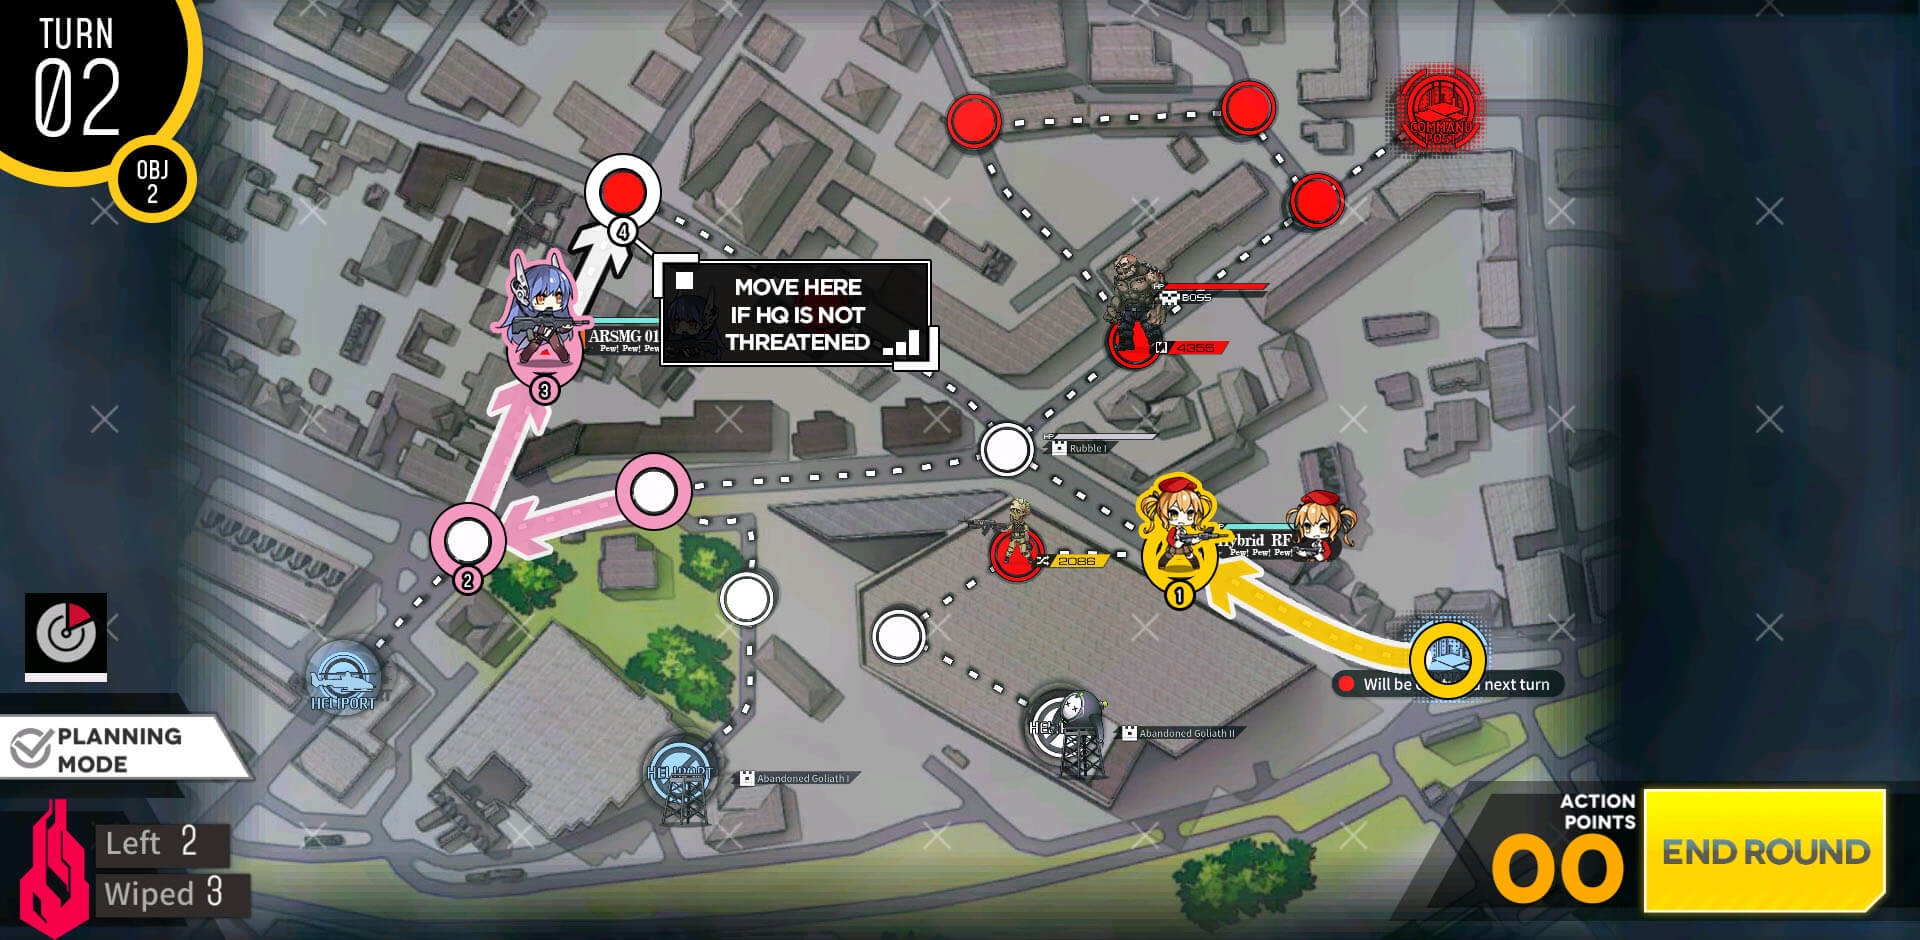
Turn two could look bit different but if HQ is being threatened, take out the enemy with 2nd combat echelon. Then we move 1st combat echelon, blowing up the rock mid way and fighting smasher unit on the left side.

1st combat echelon moves through and fights the remaining smasher boss. If you didn't have to move 2nd combat echelon, you should be able to take the HQ this turn.

Take enemy HQ to clear the mission.
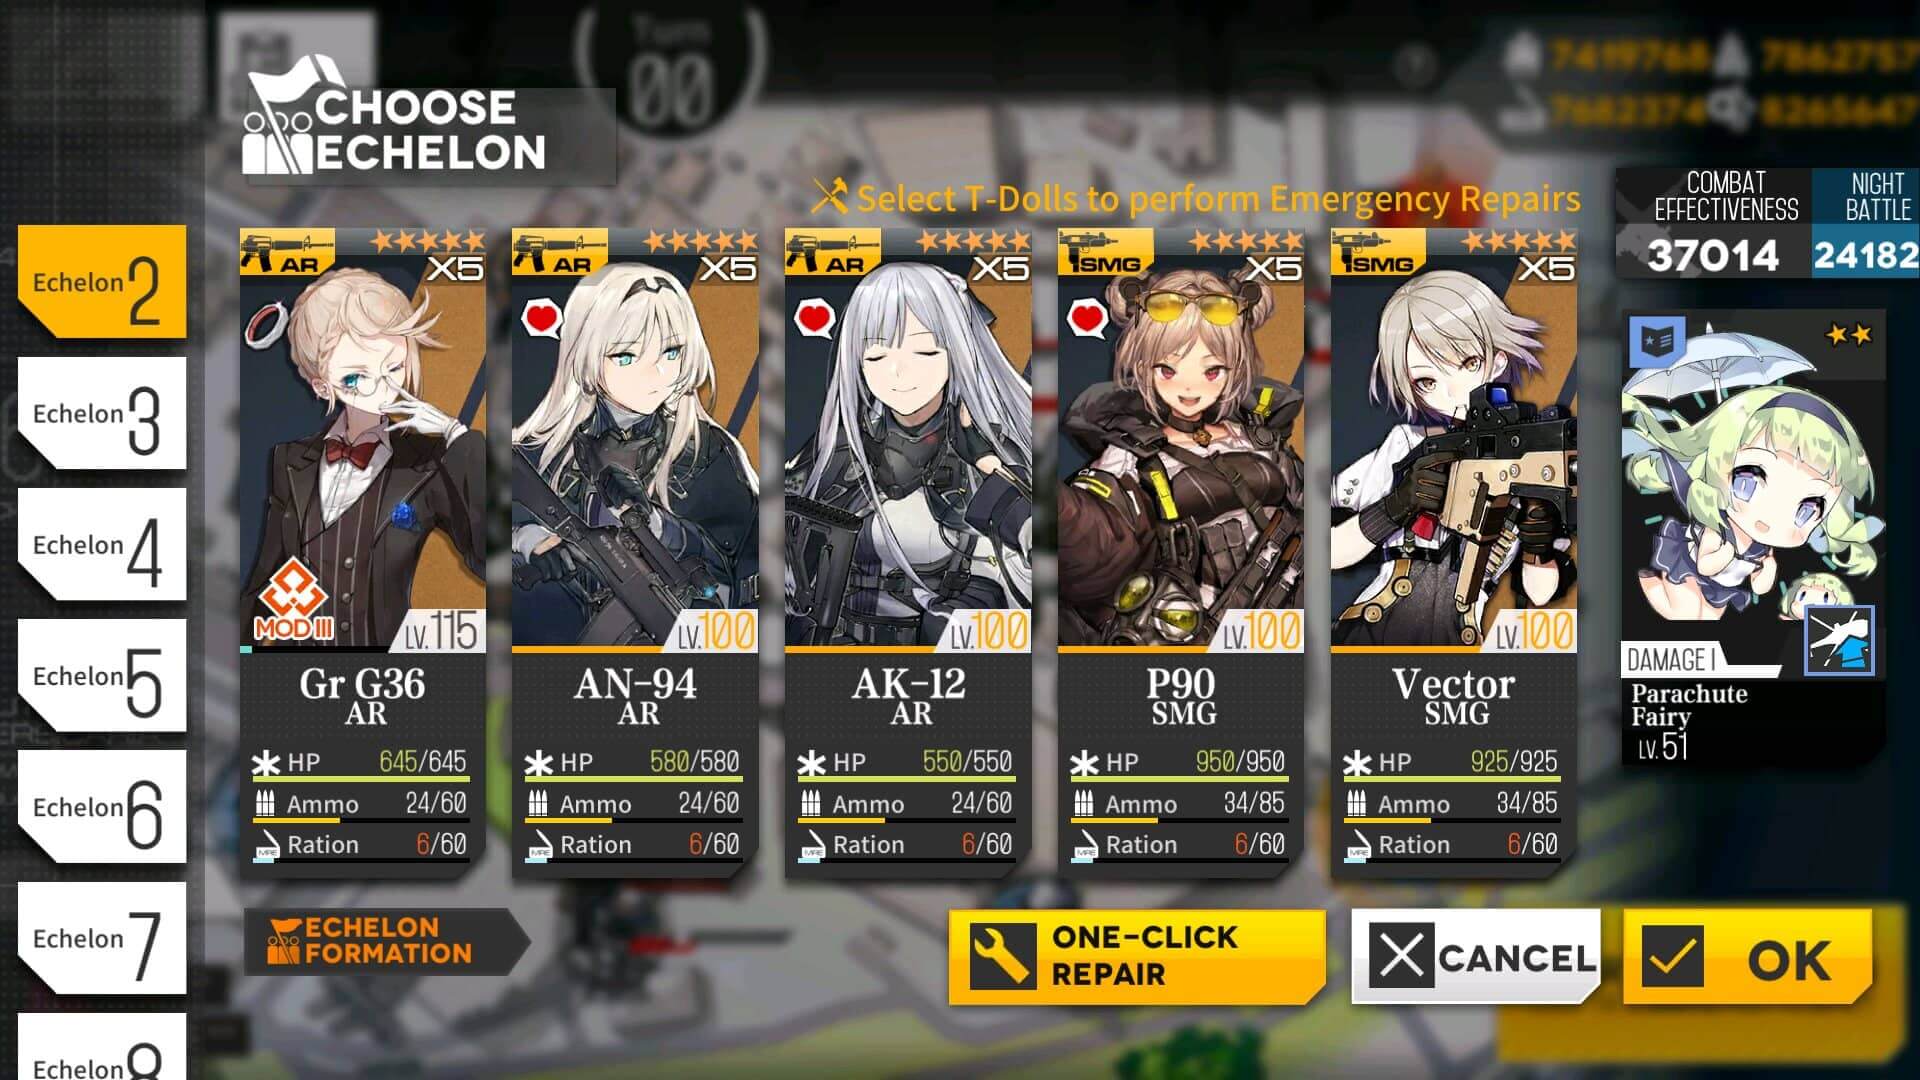
Here are the echelons used to clear the mission. We don't have to fight smasher unit so having AoE skills will be better to deal with ELID mobs.
We will be using both bombs to blow up the path to the HQ.

Start with bot echelon on each side of the map. Then left echelon moves to pick up the bomb. Echelon on the HQ moves up to protect HQ from being surround captured.
Move to the rock blocking the path to 2nd bomb and blow it up.
Then move as closes as we can get to it.
Pick up the bomb and move to the rock, but do not use it this turn. By standing here for a turn, we can make Smasher blocking the path to HQ step aside.

Now that all smasher units are out of the way to HQ, blow up the rubble and take enemy HQ.
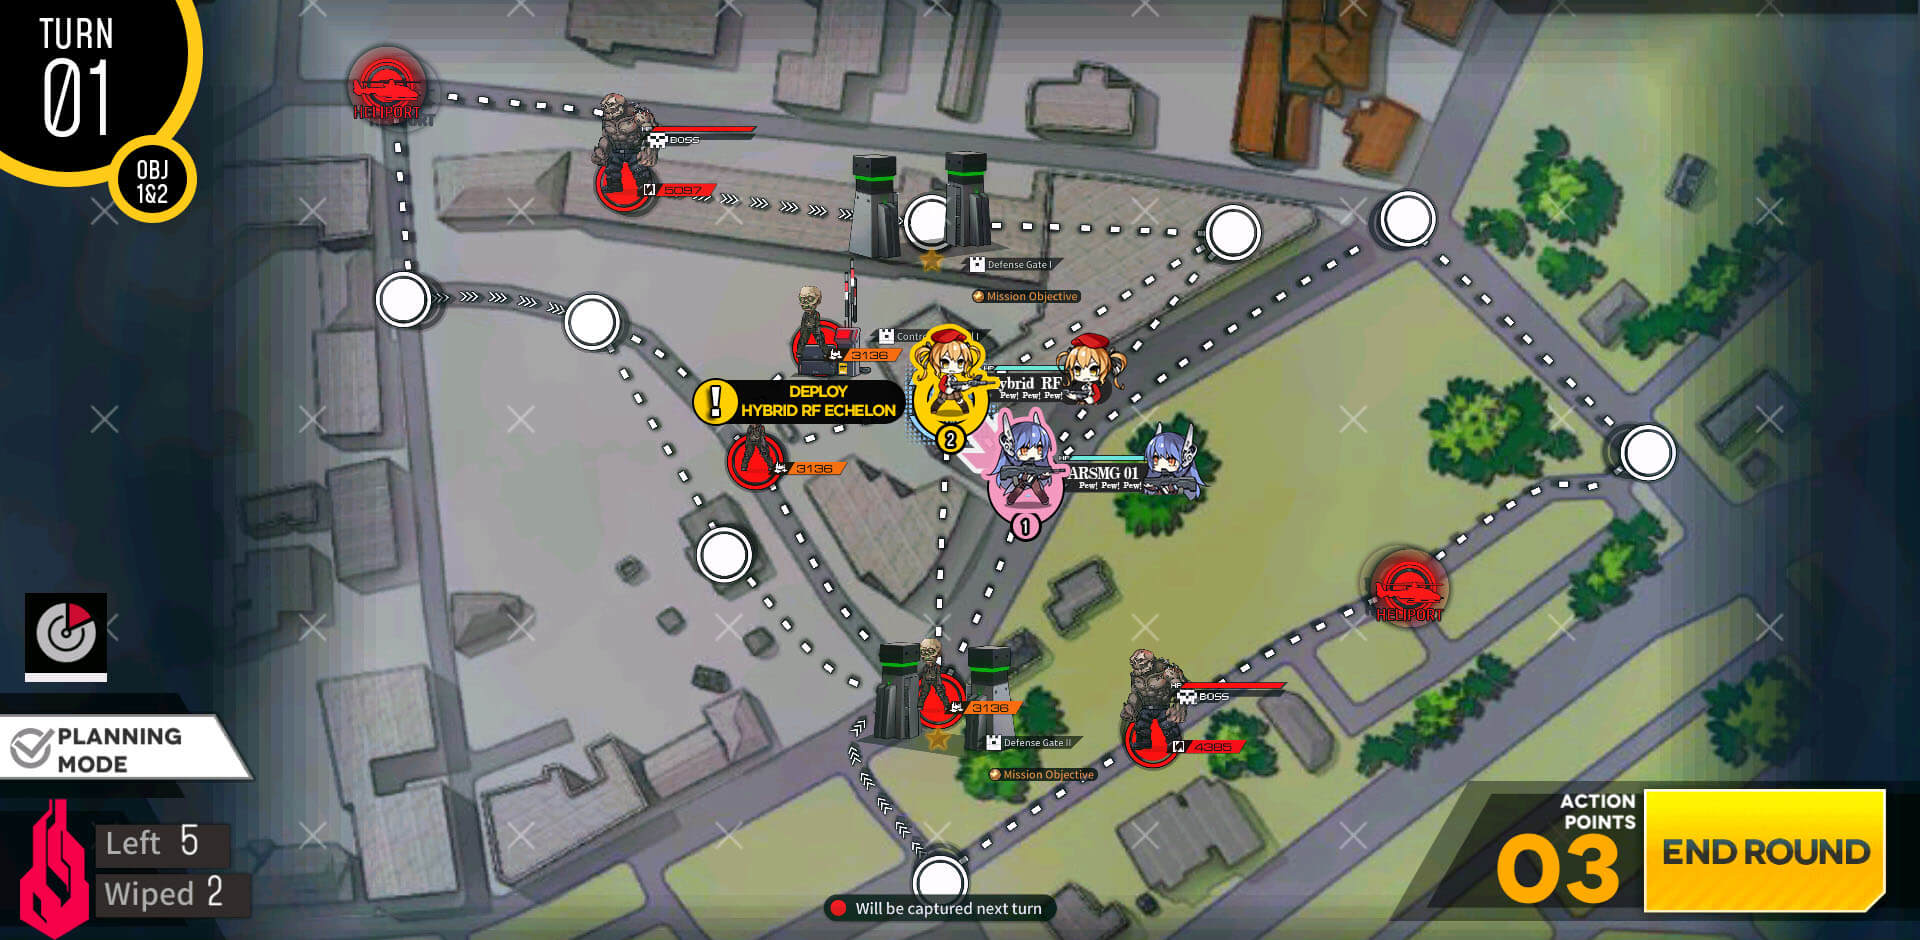
Start with any of 2 echelon on the HQ. Move down and right one node then deploy 2nd combat echelon on HQ.
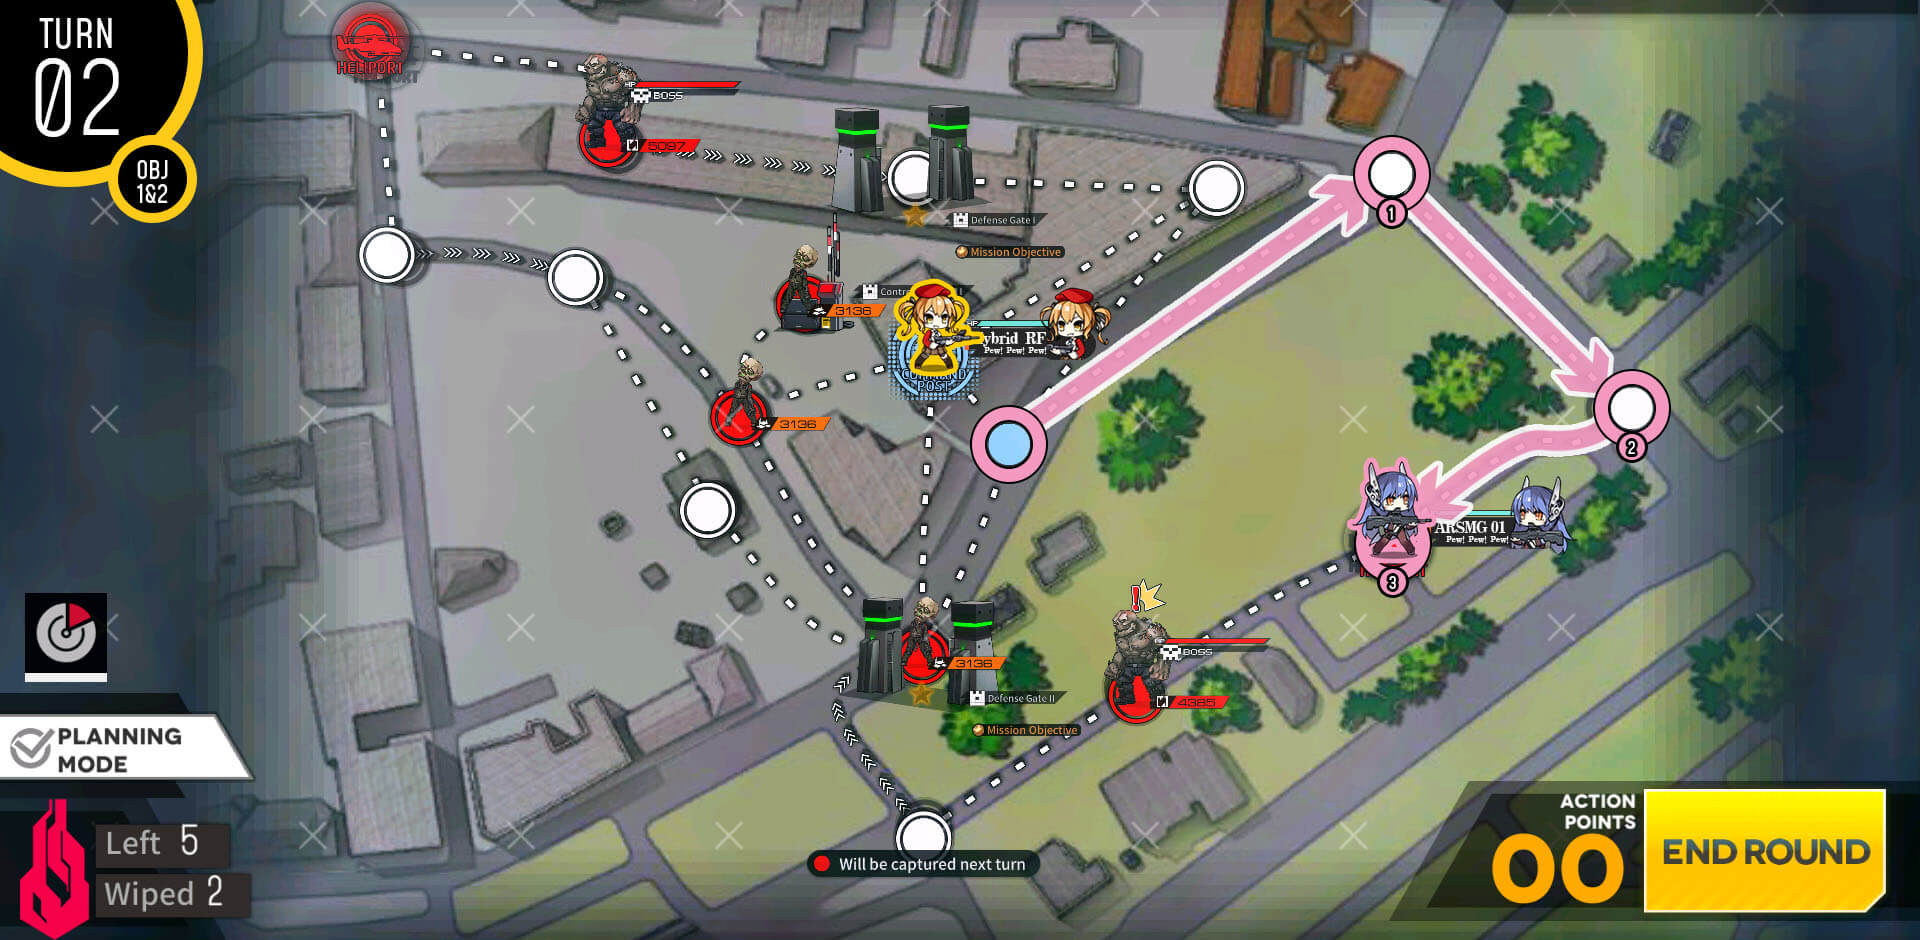
Combat echelon below the HQ moves down the path on the right side and loop towards the bottom. Smasher unit is going to be identical fight as E2-2.
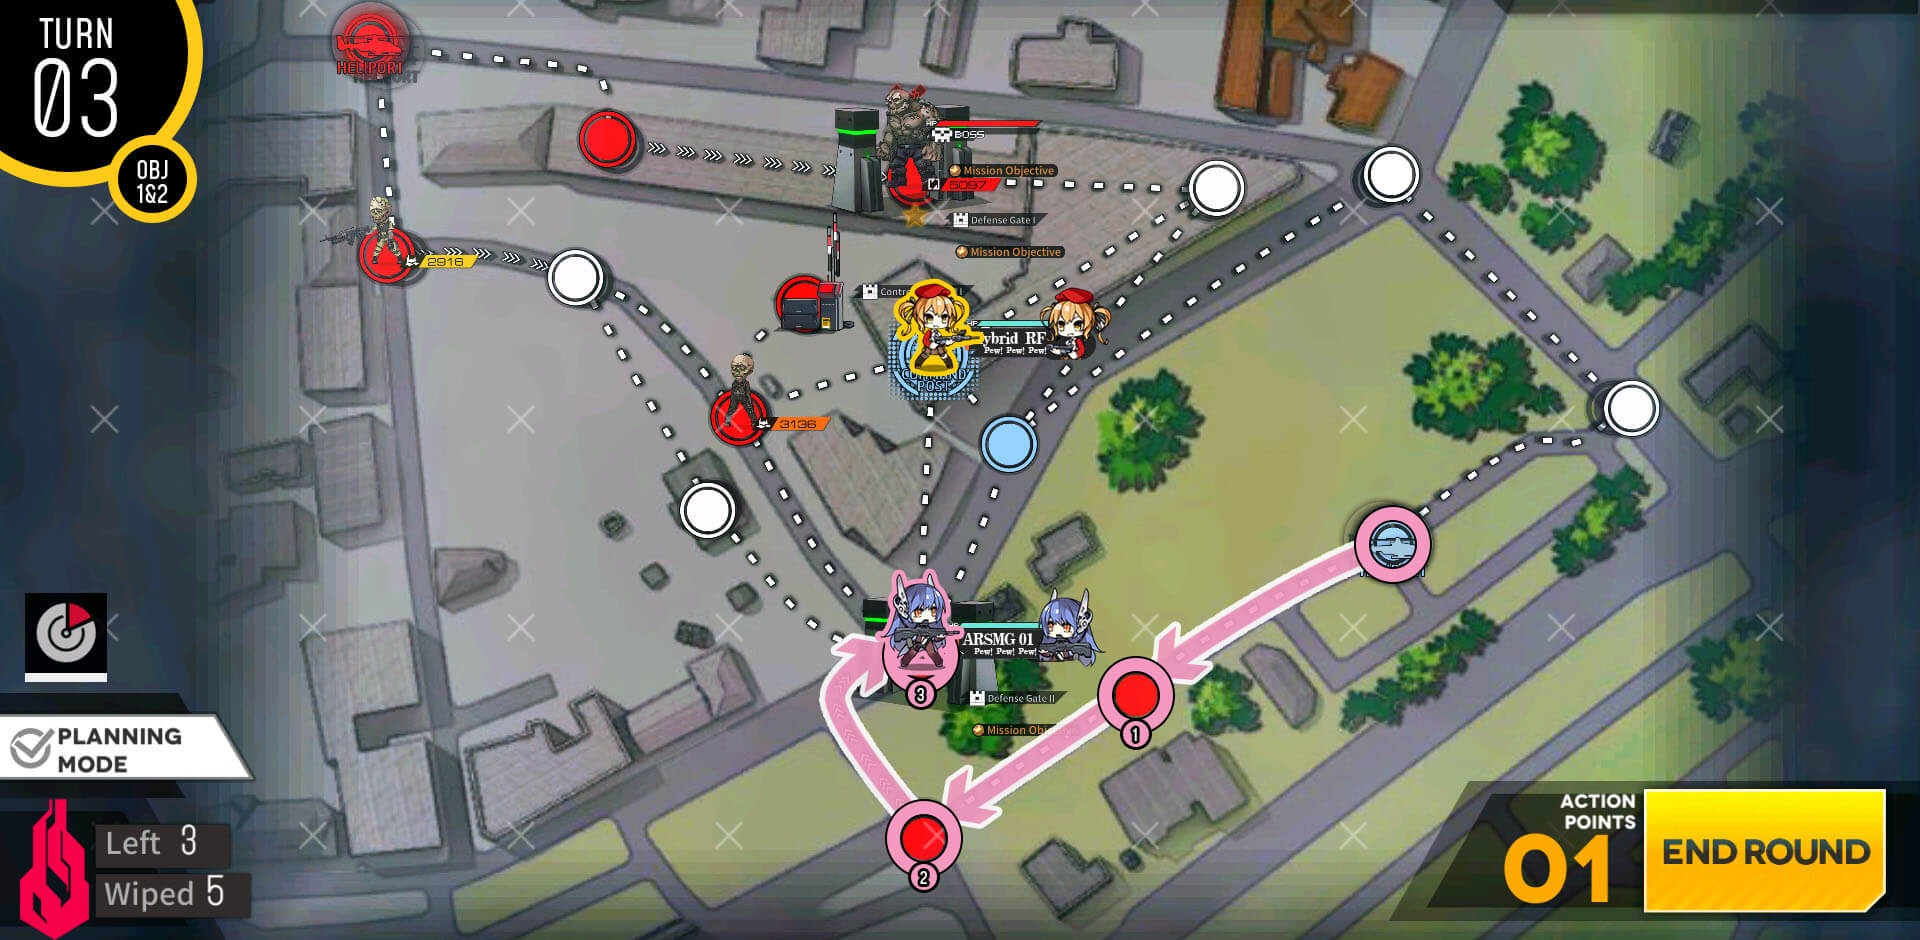
1st combat echelon repairs/resupply as needed then move to the gate at the bottom.
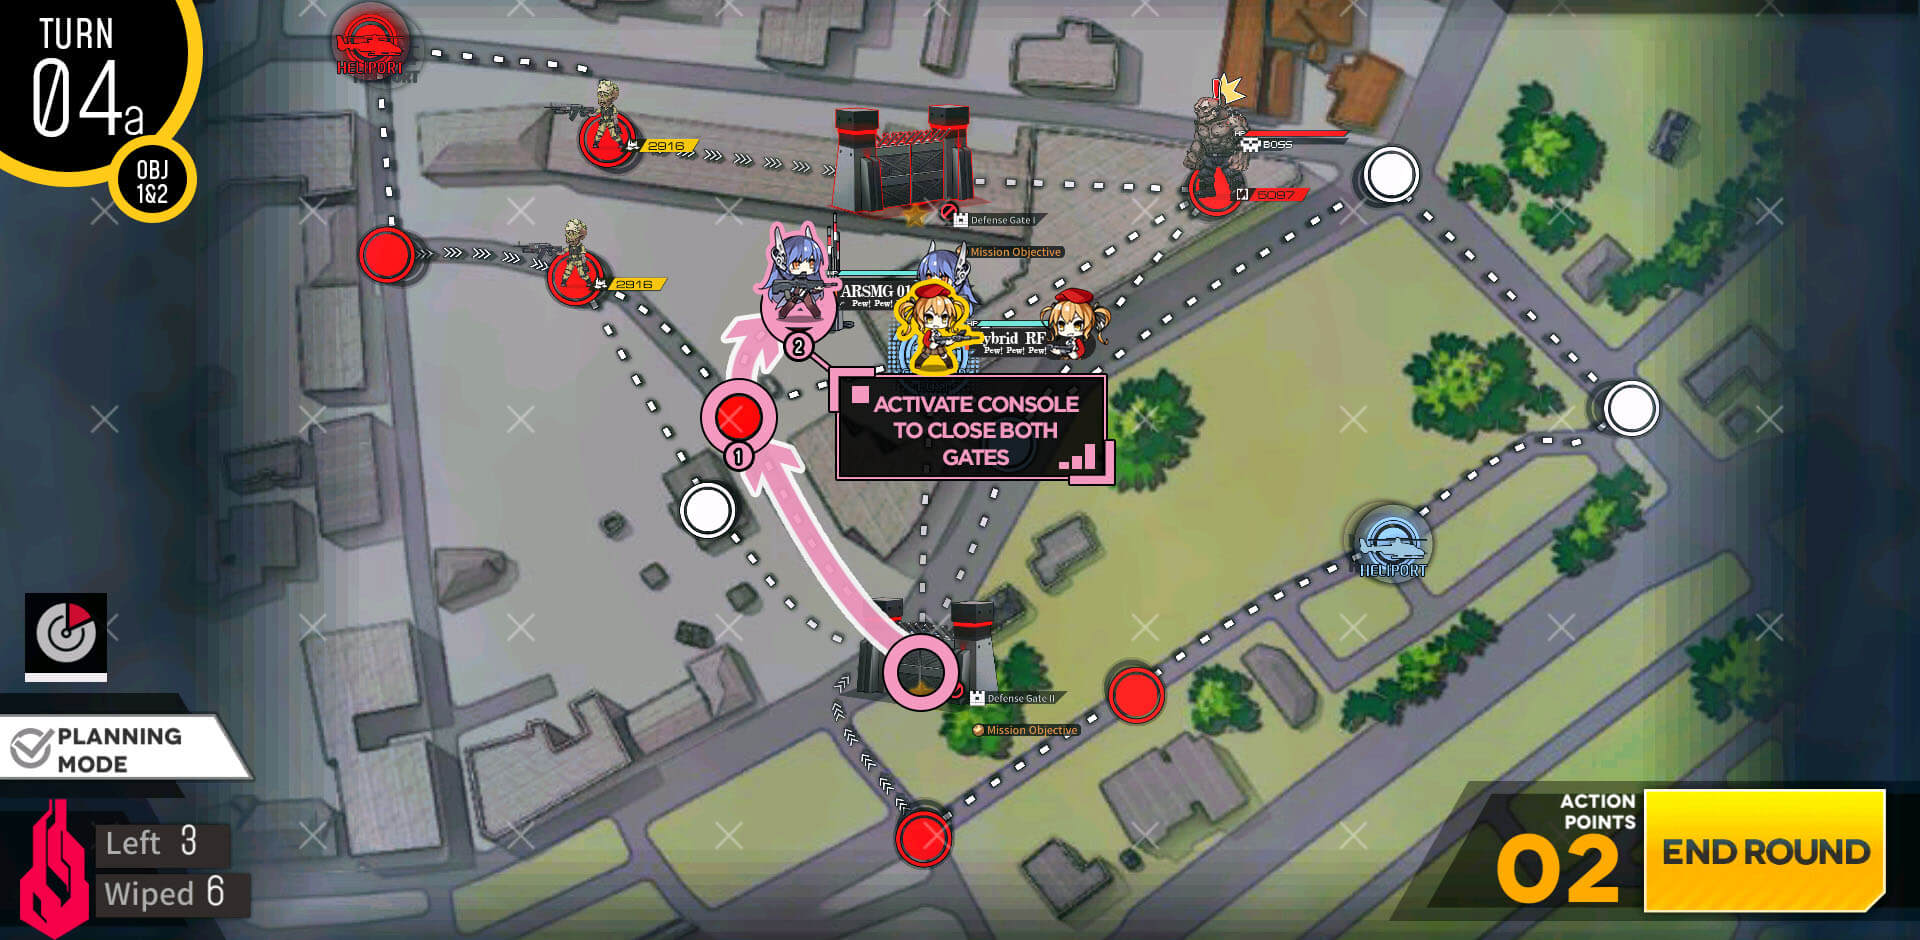
On 4th turn, bottom echelon moves to the gate console and closes both gate.

Move combat echelon down one node from the console so that we can capture 2 nodes total by next turn. This allows to meet requirement for both objectives at once. If you prefer to use one echelon to fight both Smasher boss, swap locations.

This map is straight forward in terms of clearing as Smasher units on each side will do the job for us to demolish the gates from now to turn 5. All we have to do is deploy 2 combat echelons to defend the HQ and the node with console.
Then we close the both gates so that it is ready to be smashed.
Now all we have to do is wait and just hit end turn. ARSMG echelons should be more than sufficient to clear out any ELIDs mobs.

On turn 3 or 4, simply move each echelon to the left one node each, this is to get away from the top smasher unit that will come through the gate.

Just hit end turn again until mission is cleared automatically.
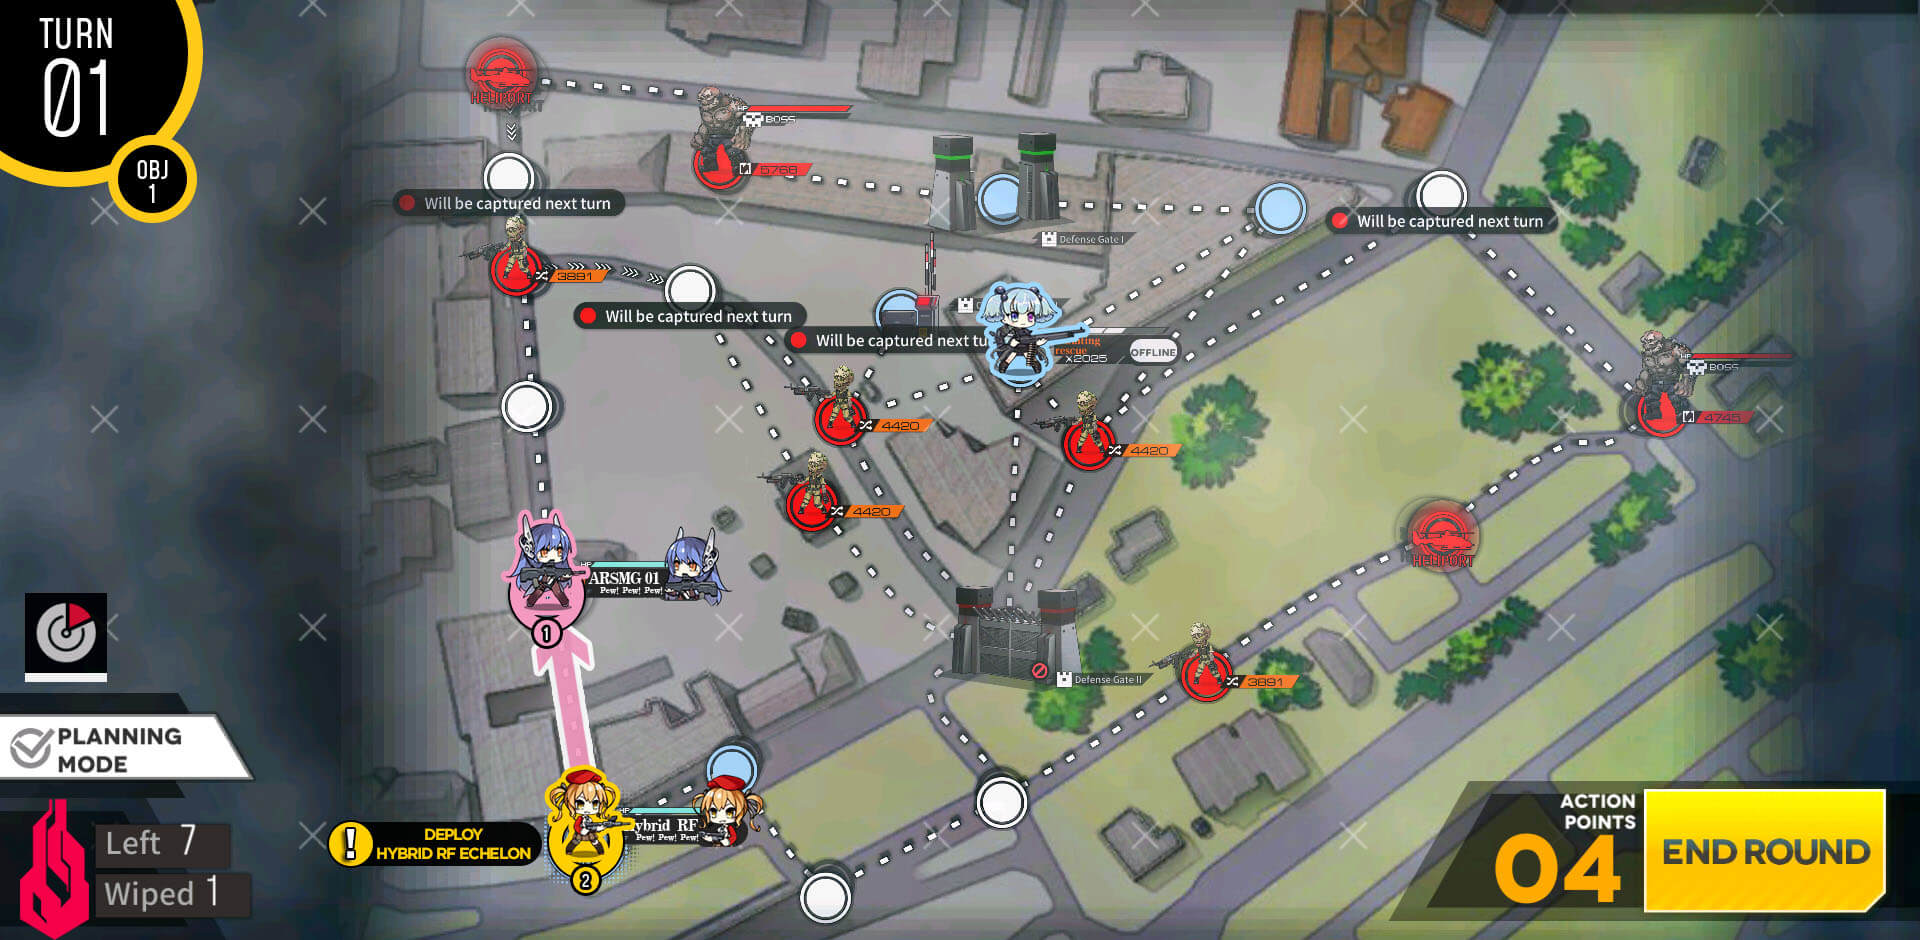
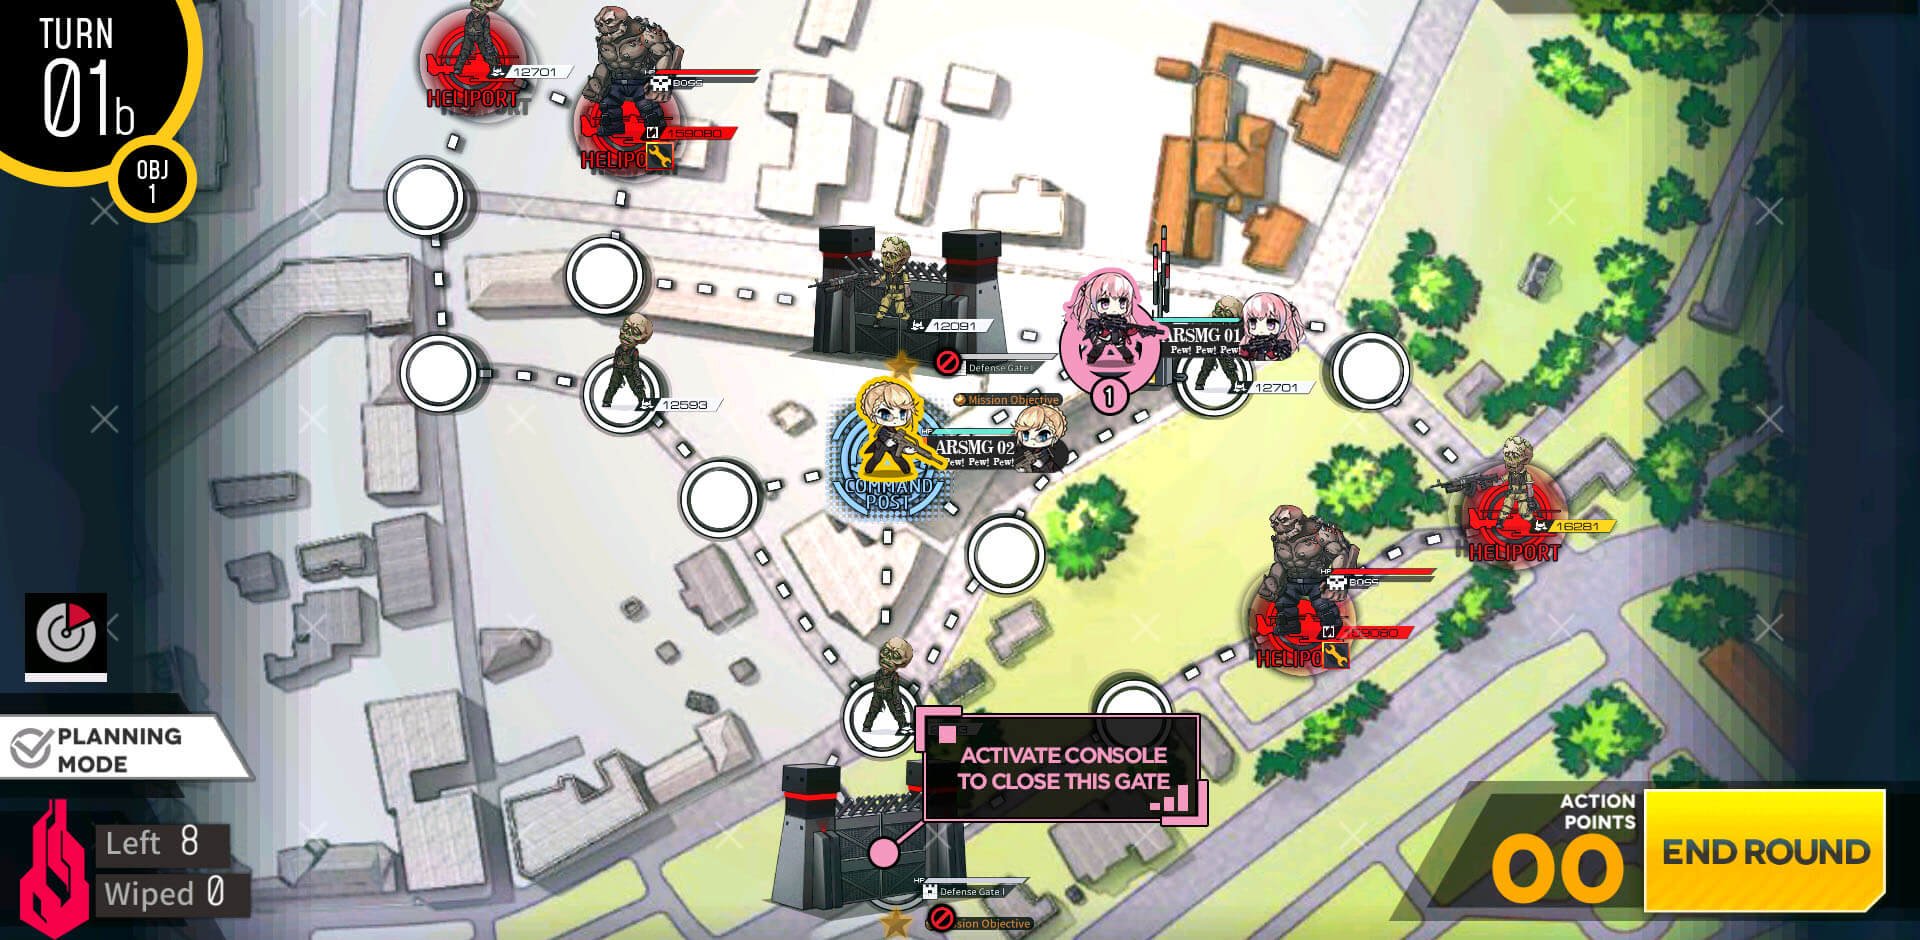
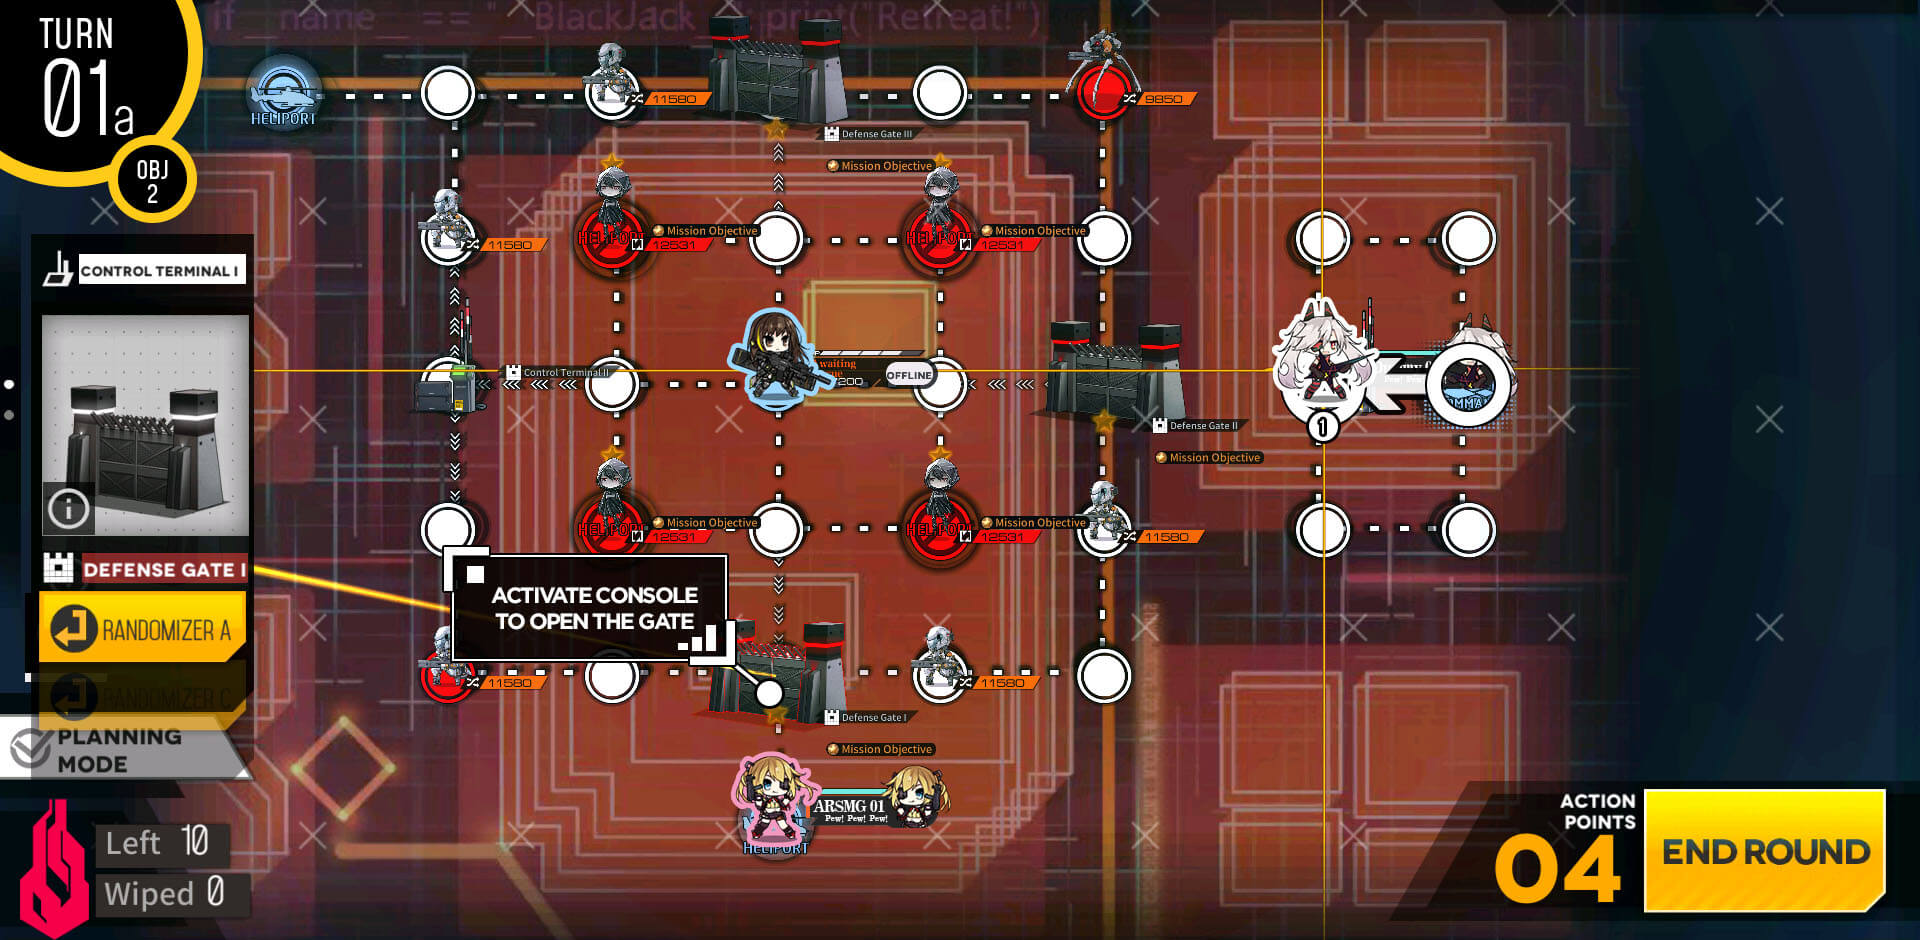
Deploy 2 combat echelons next to each other from the starting location towards north. Honestly dummy could work but this is just in case of bad RNG.
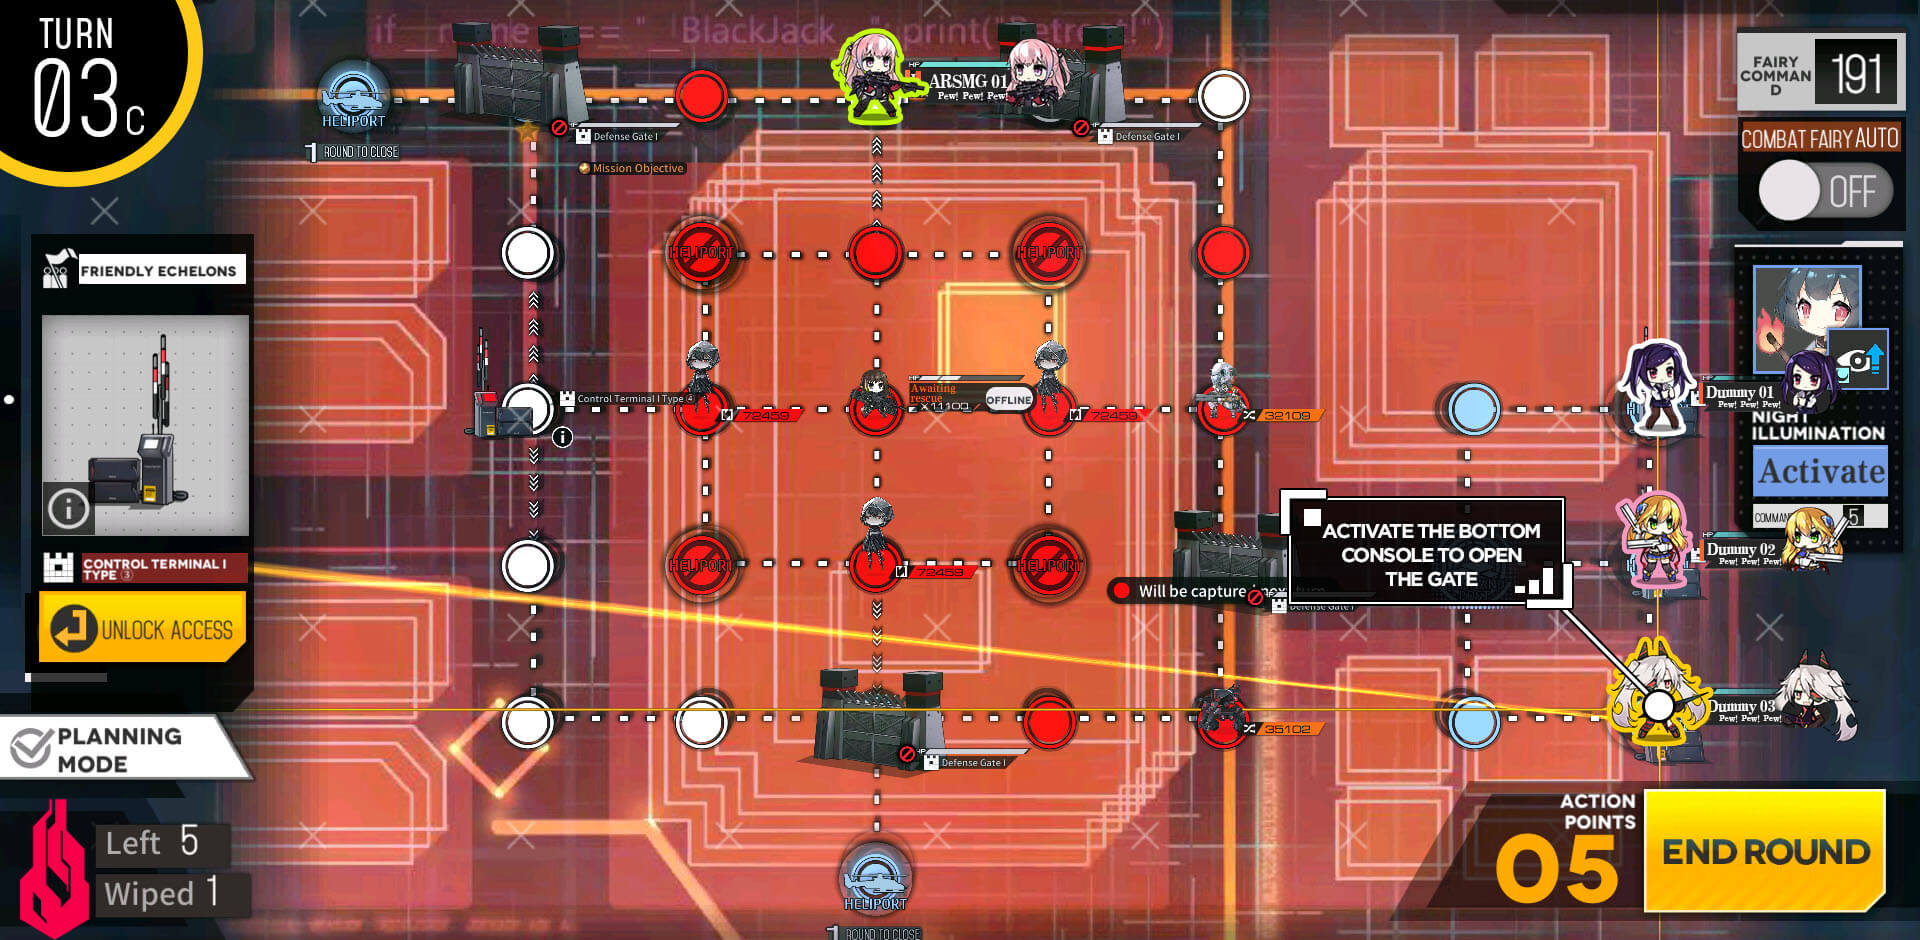
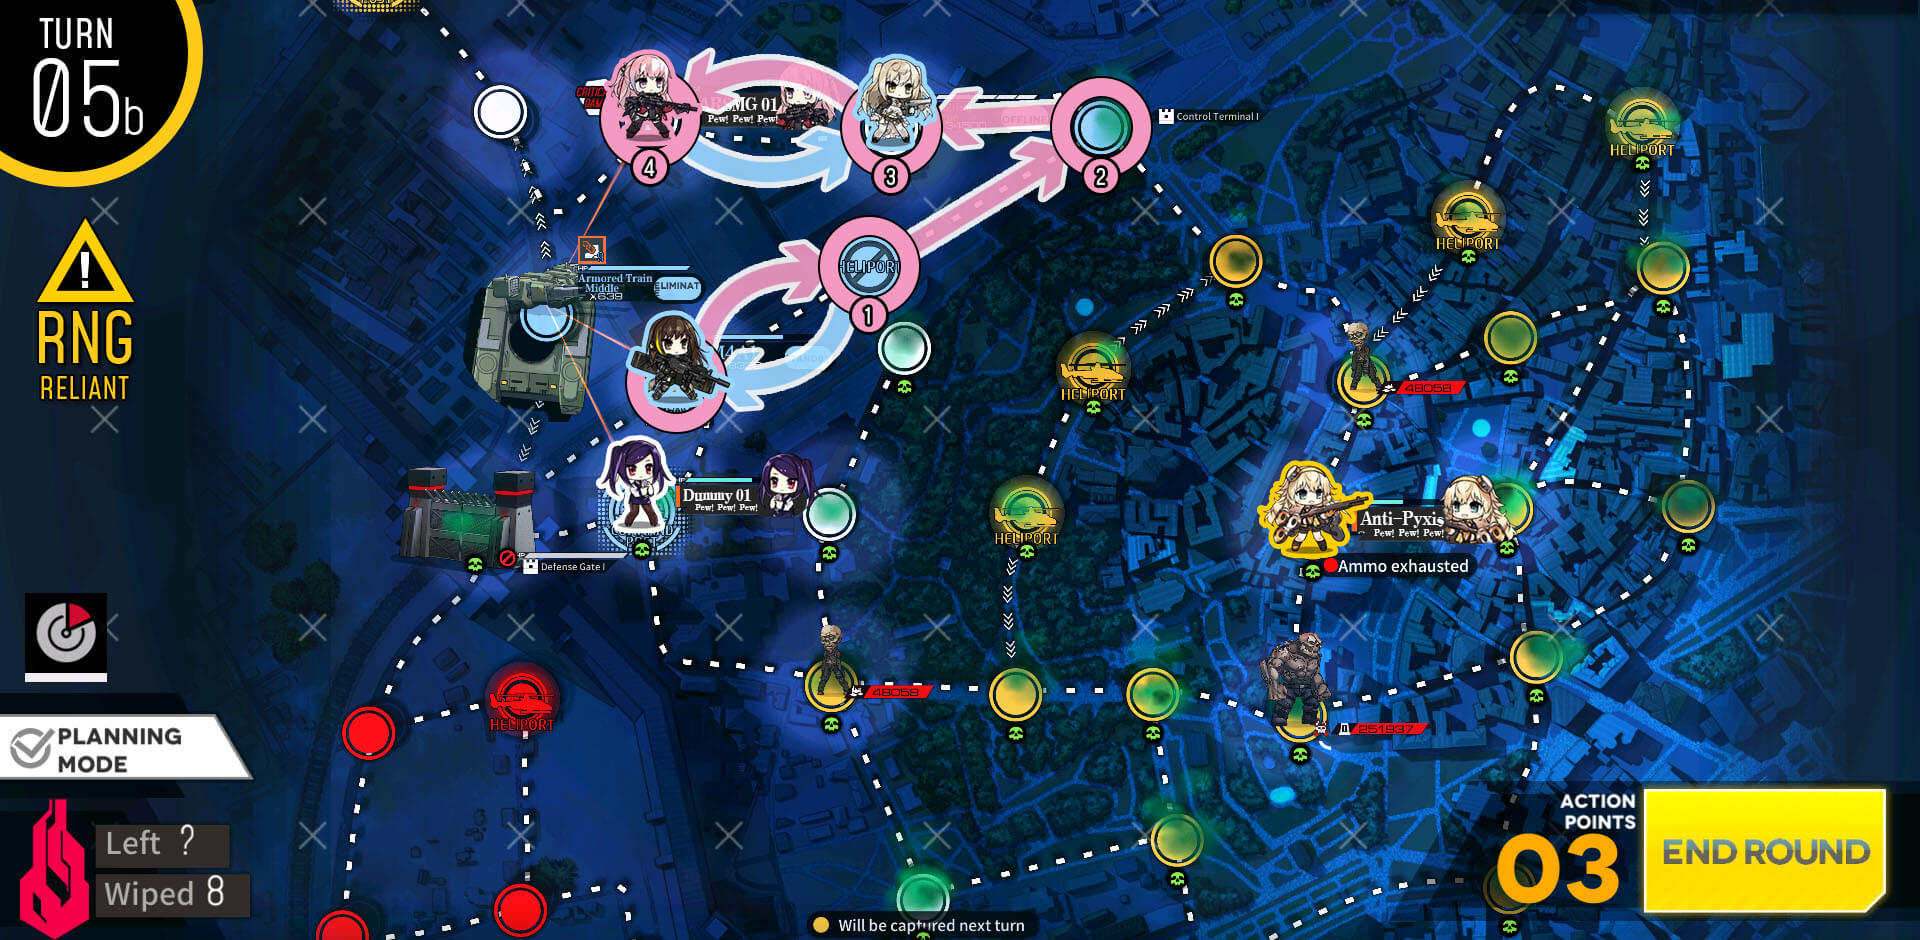
Move combat echelon all the way to the node right below the console panel that operates the gates.

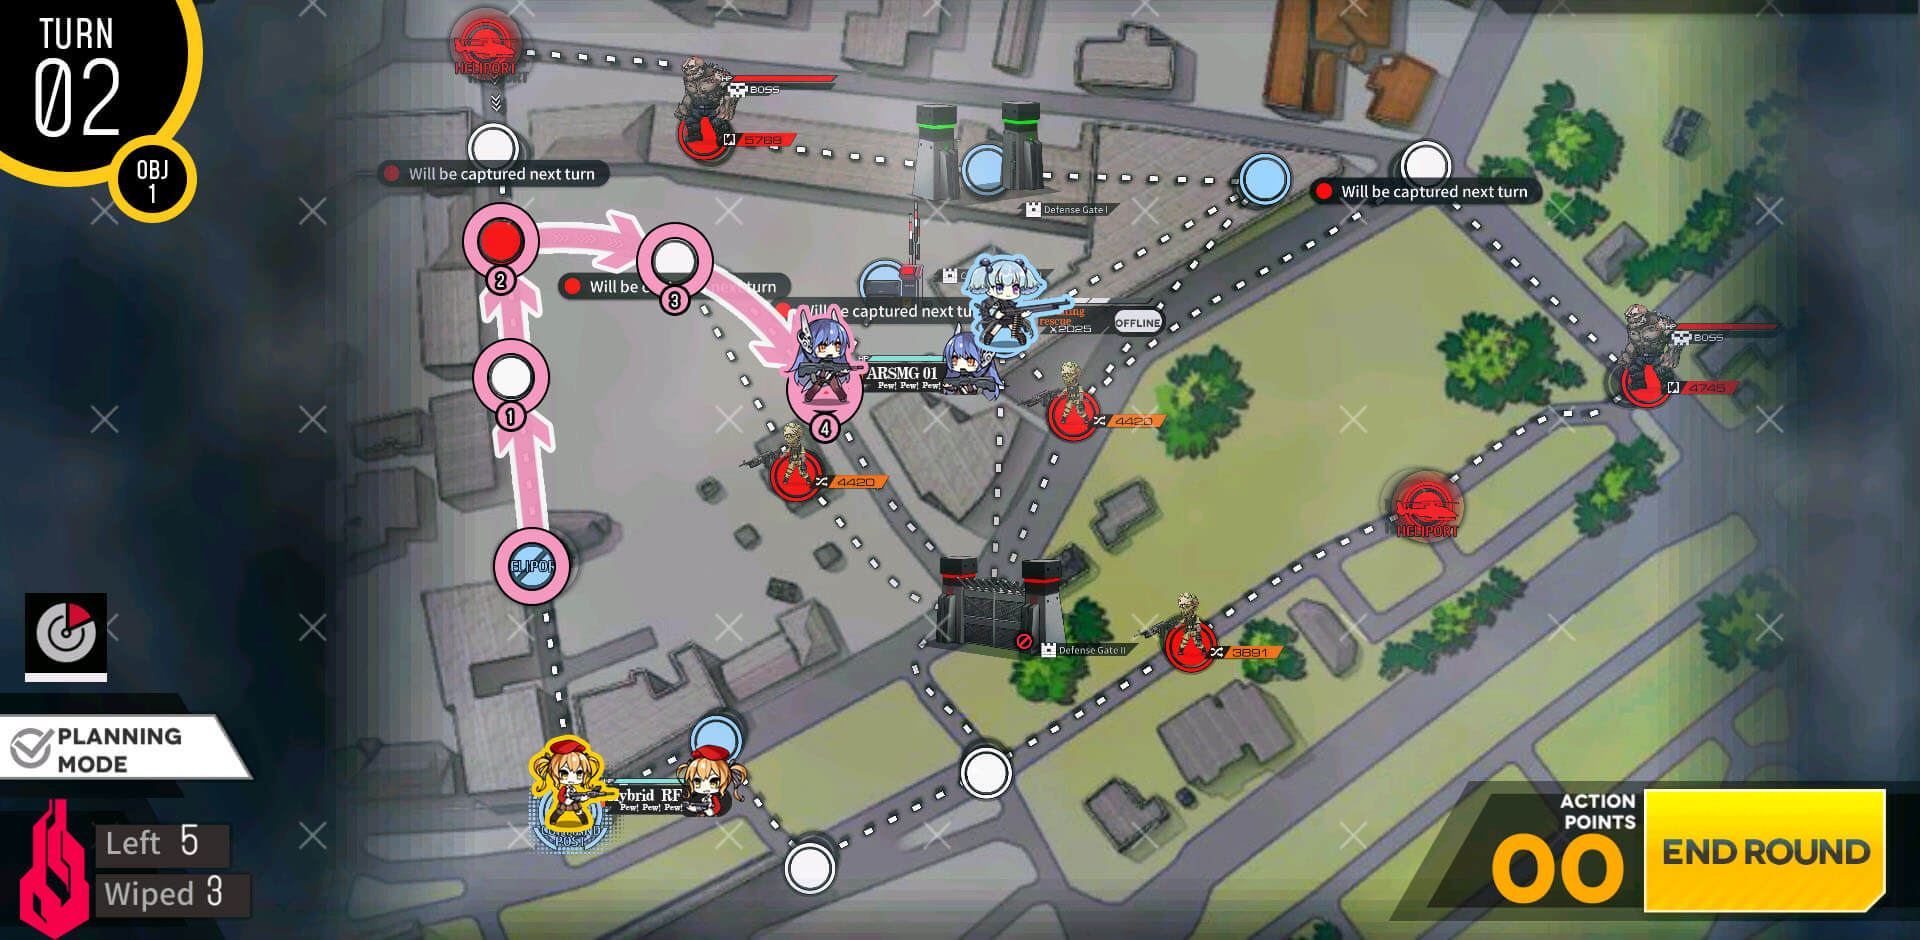
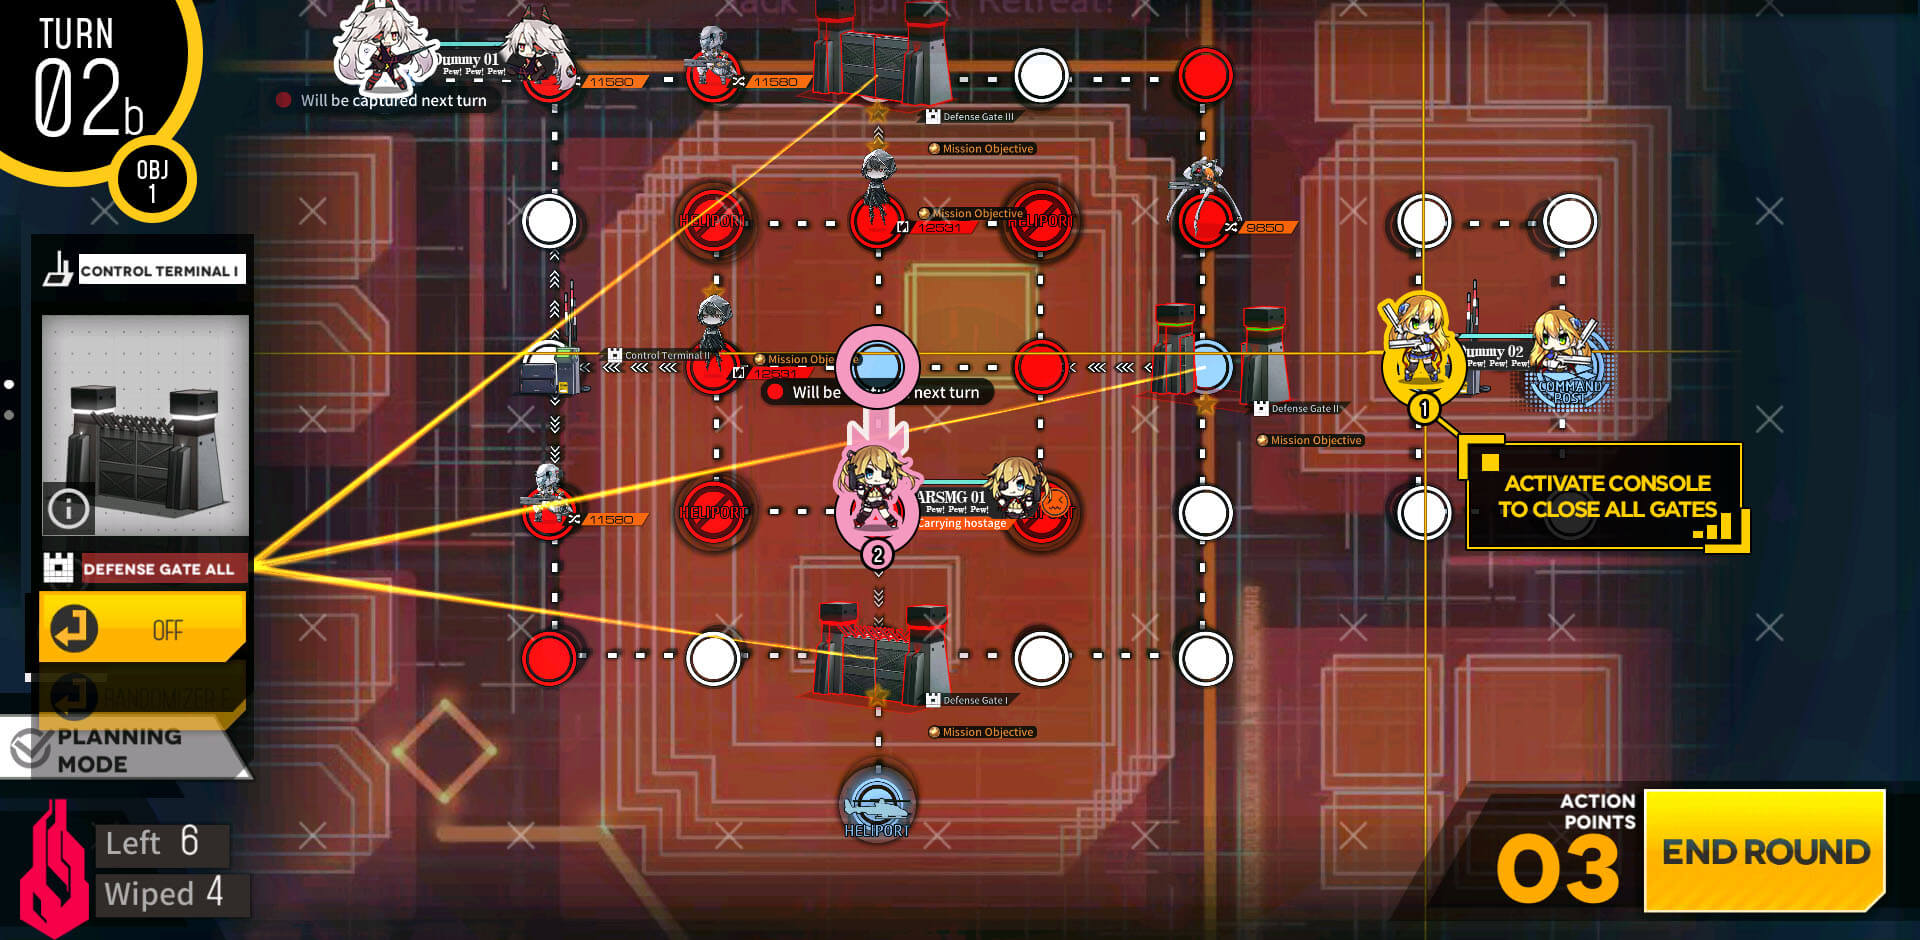
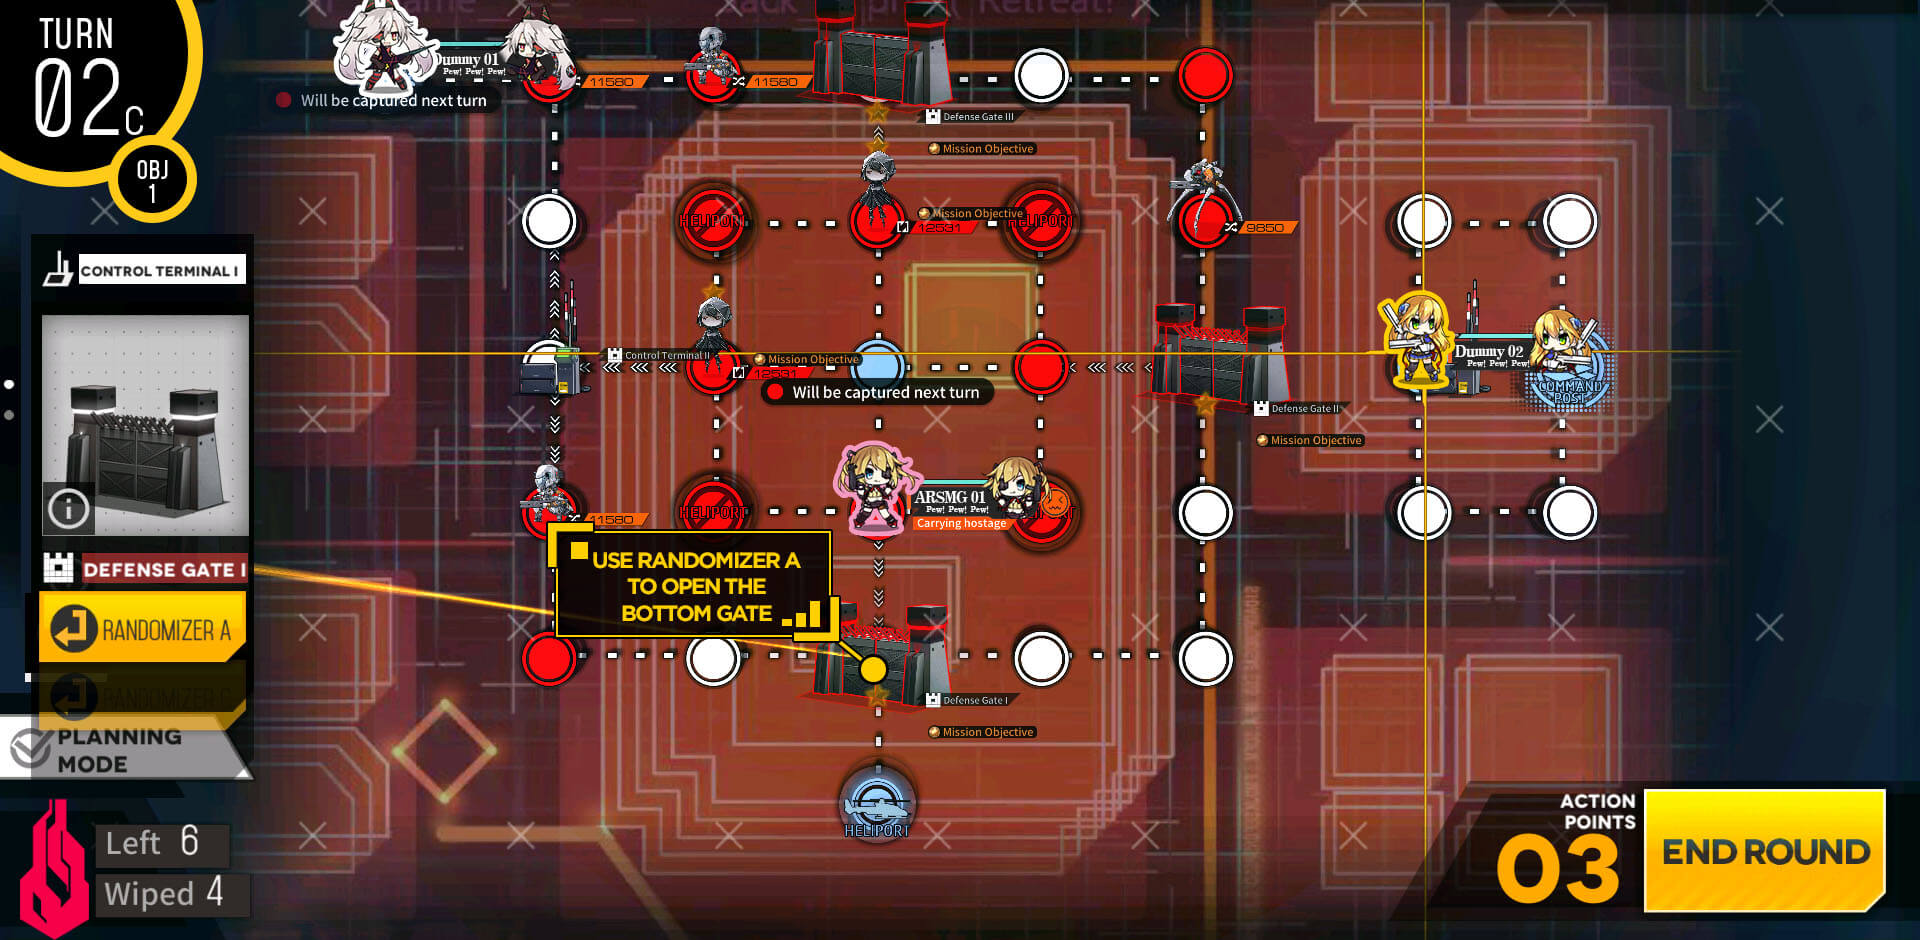
Move up to open the bottom gate. Closing top gate is not a must.
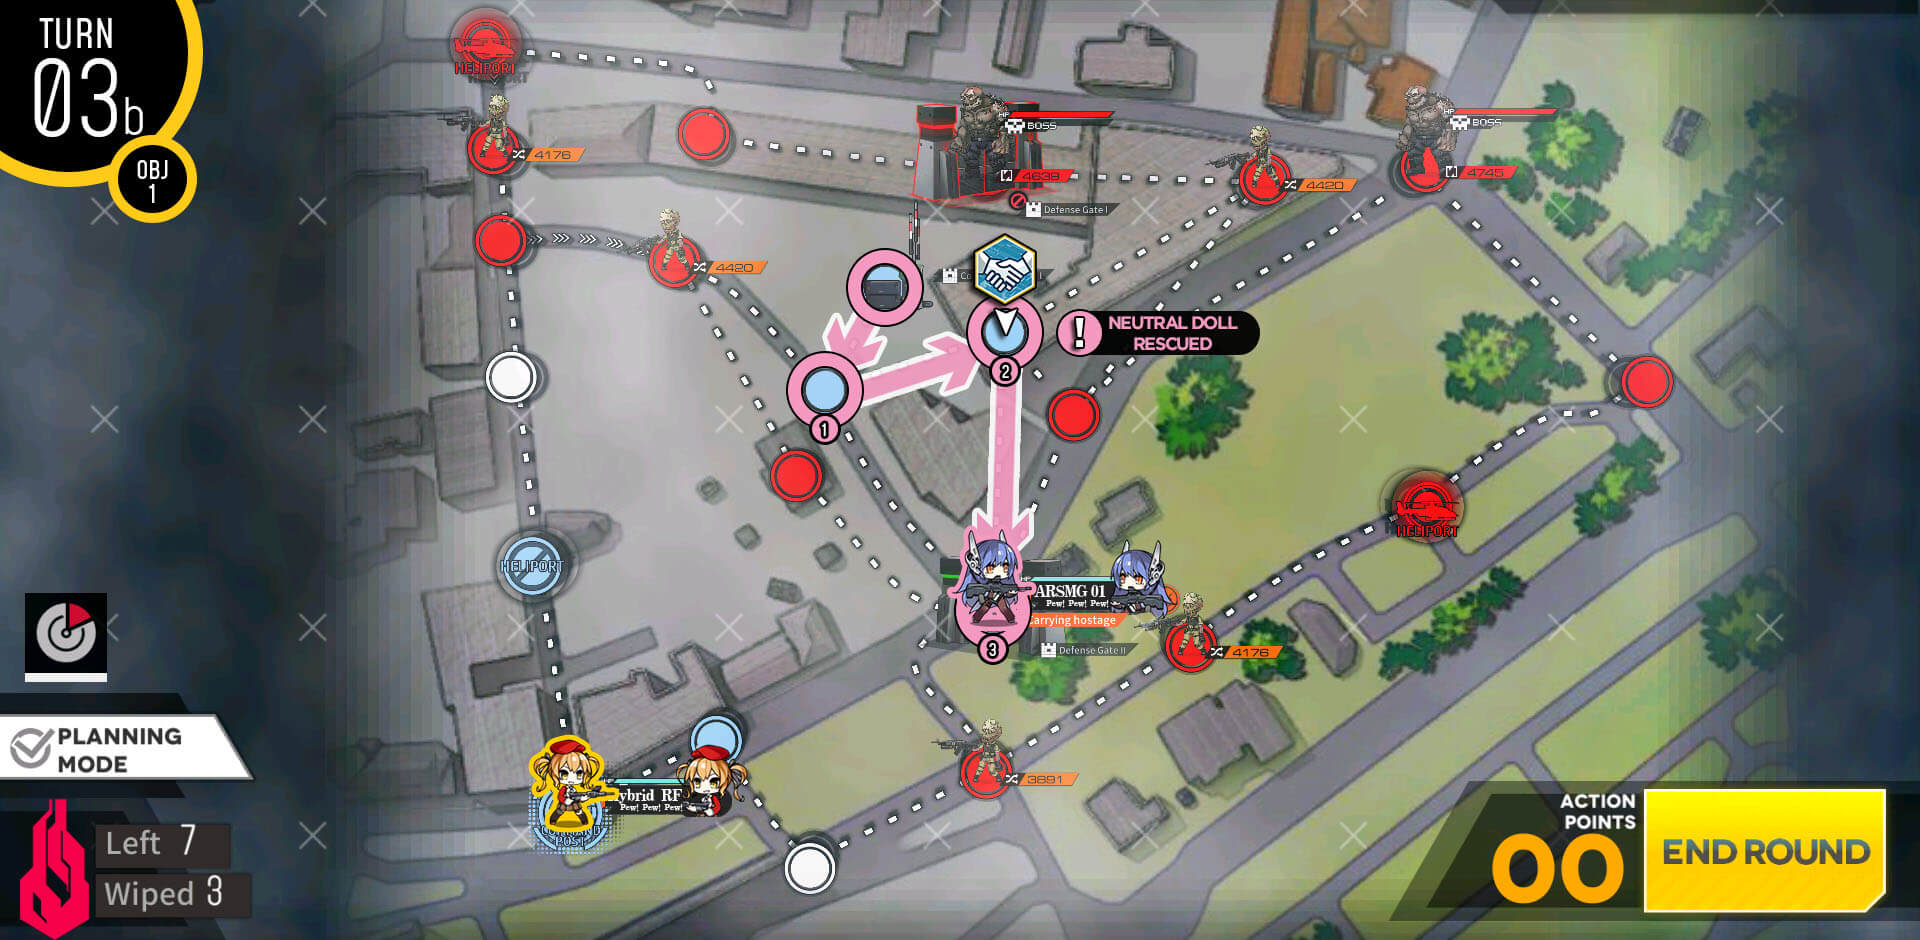
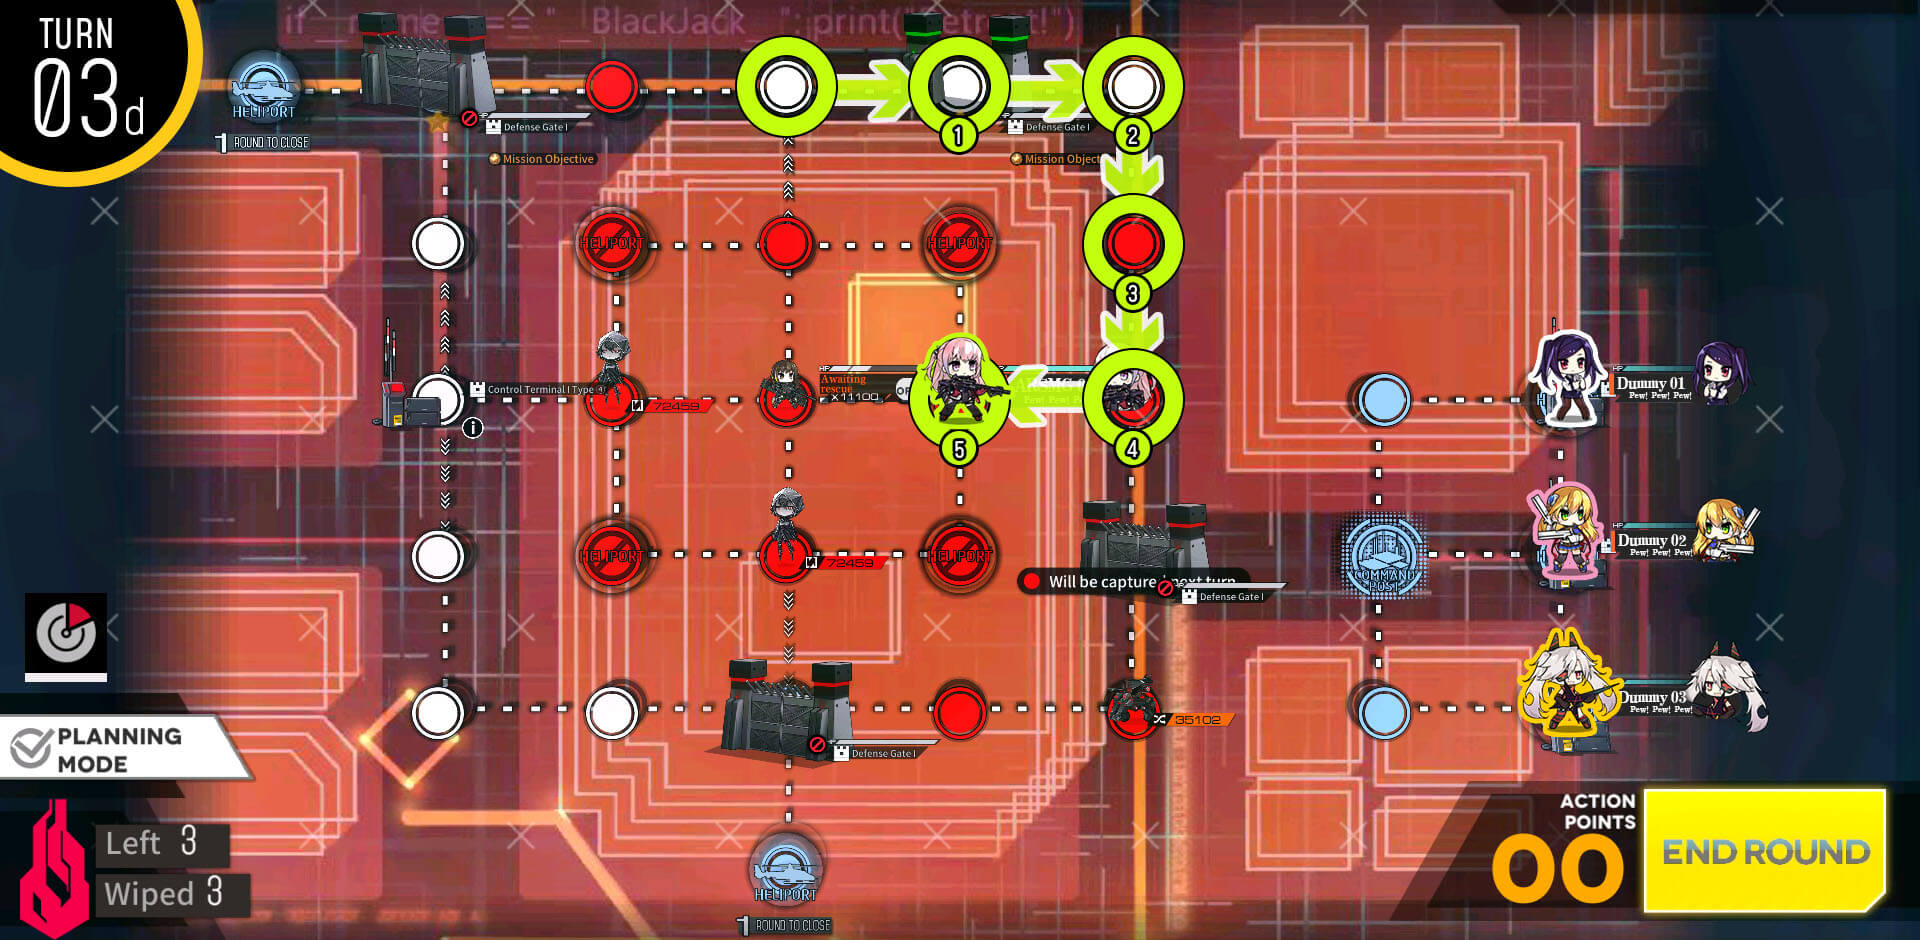
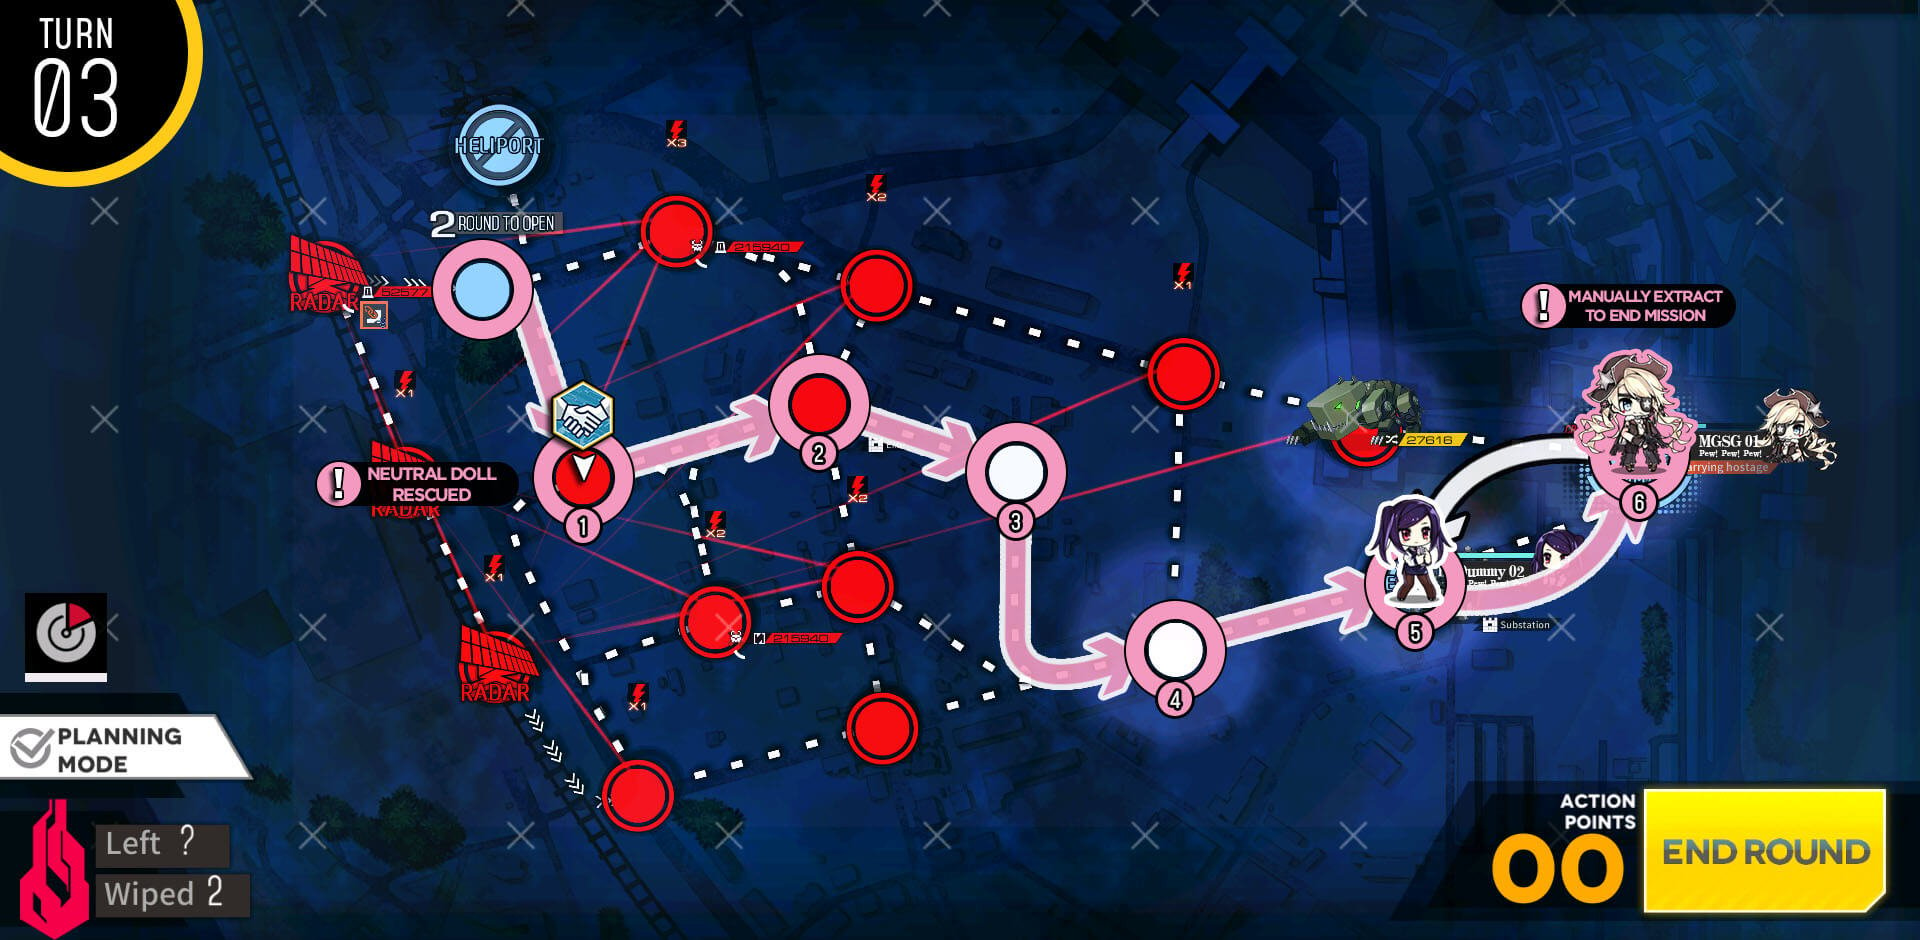
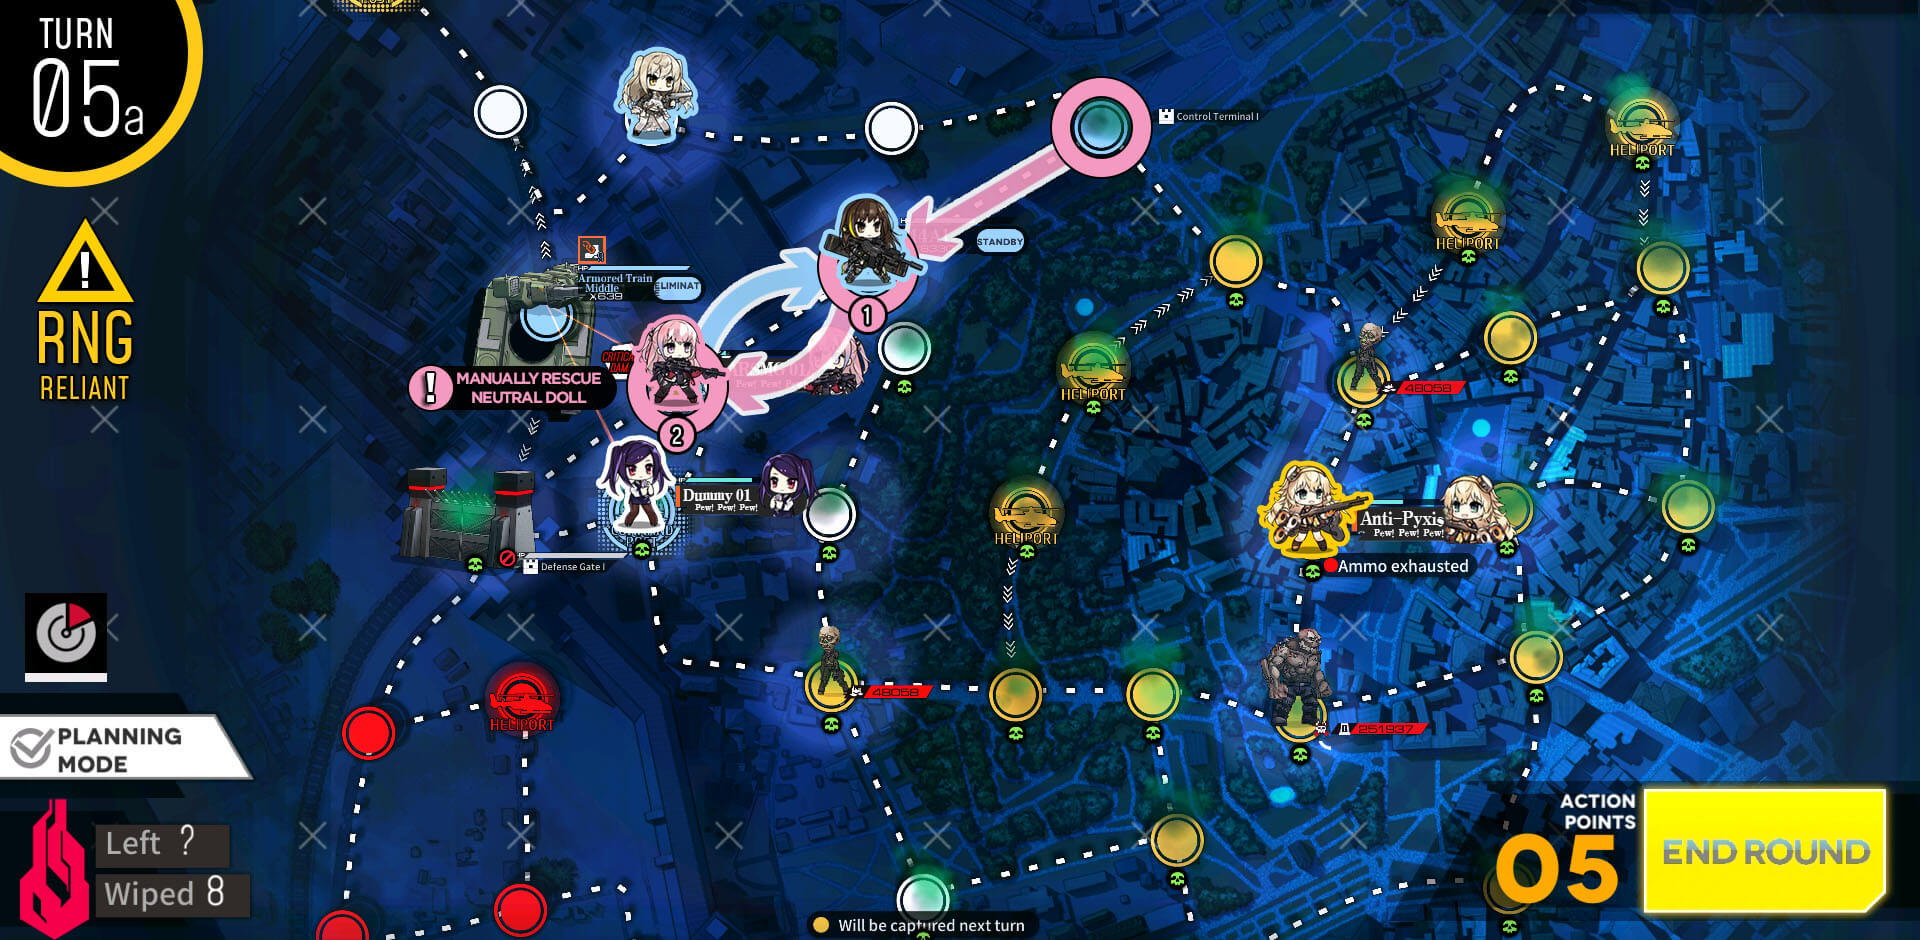
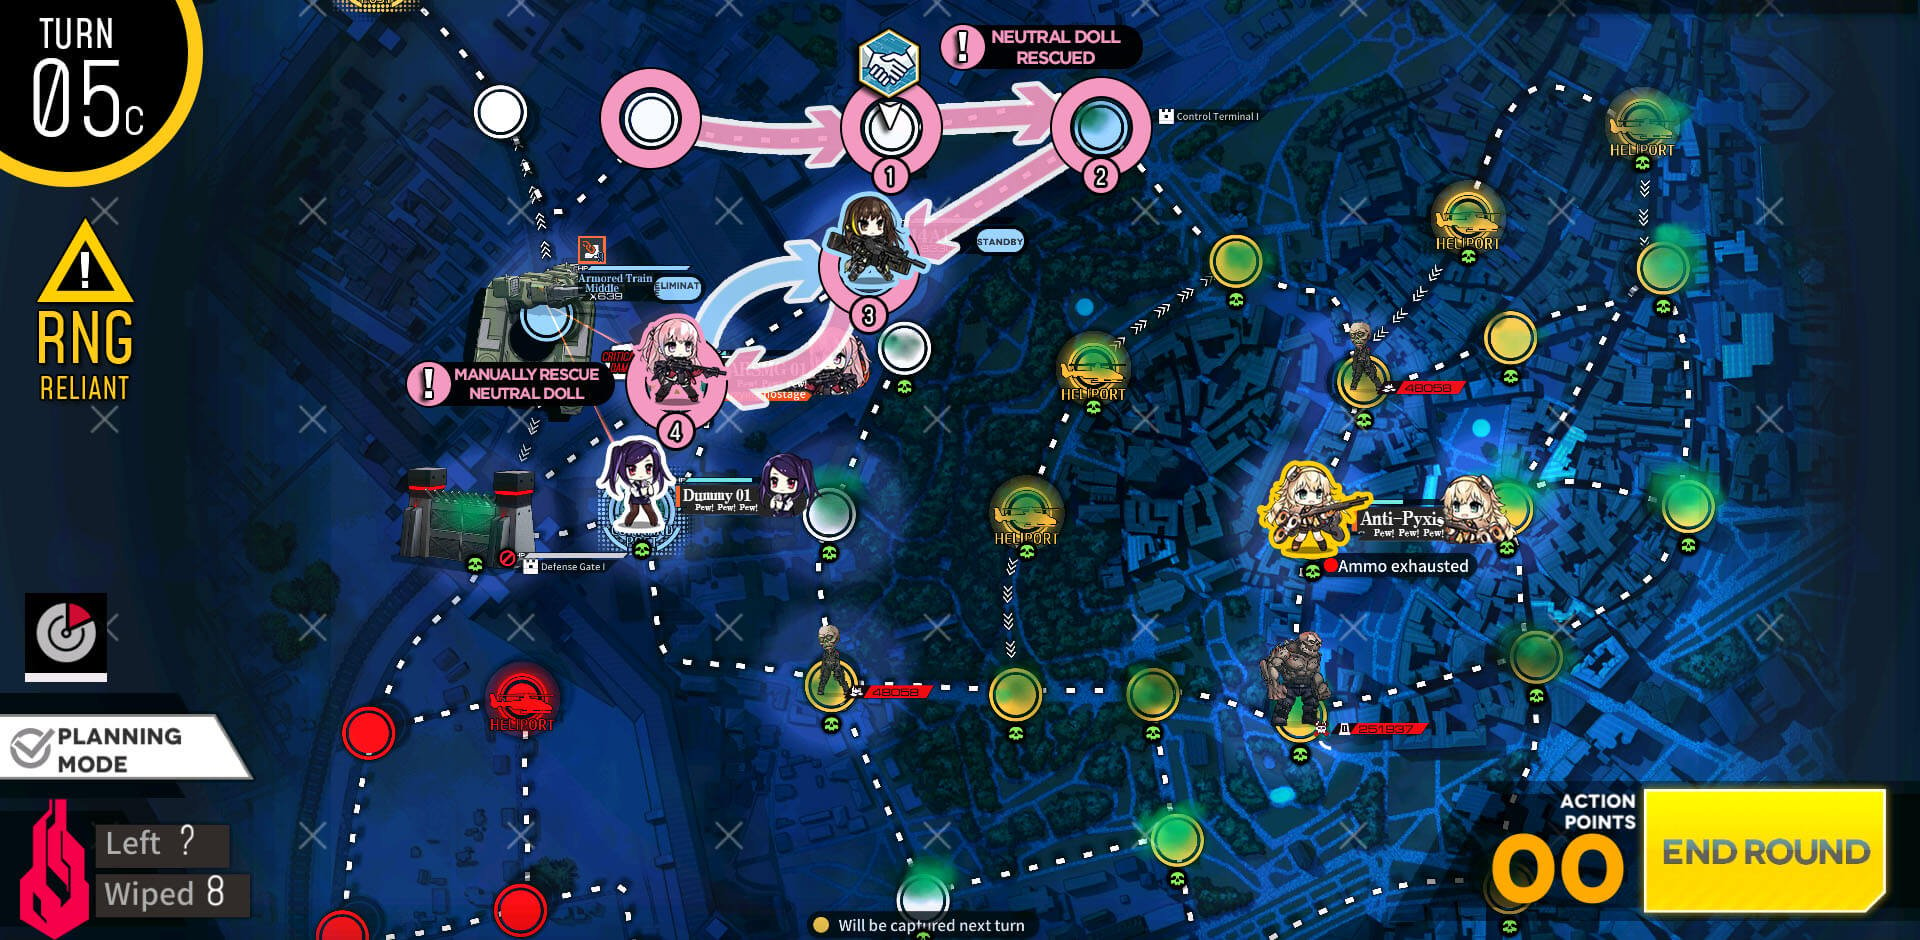
Then proceed to rescue the hostage and move on to the bottom gate.
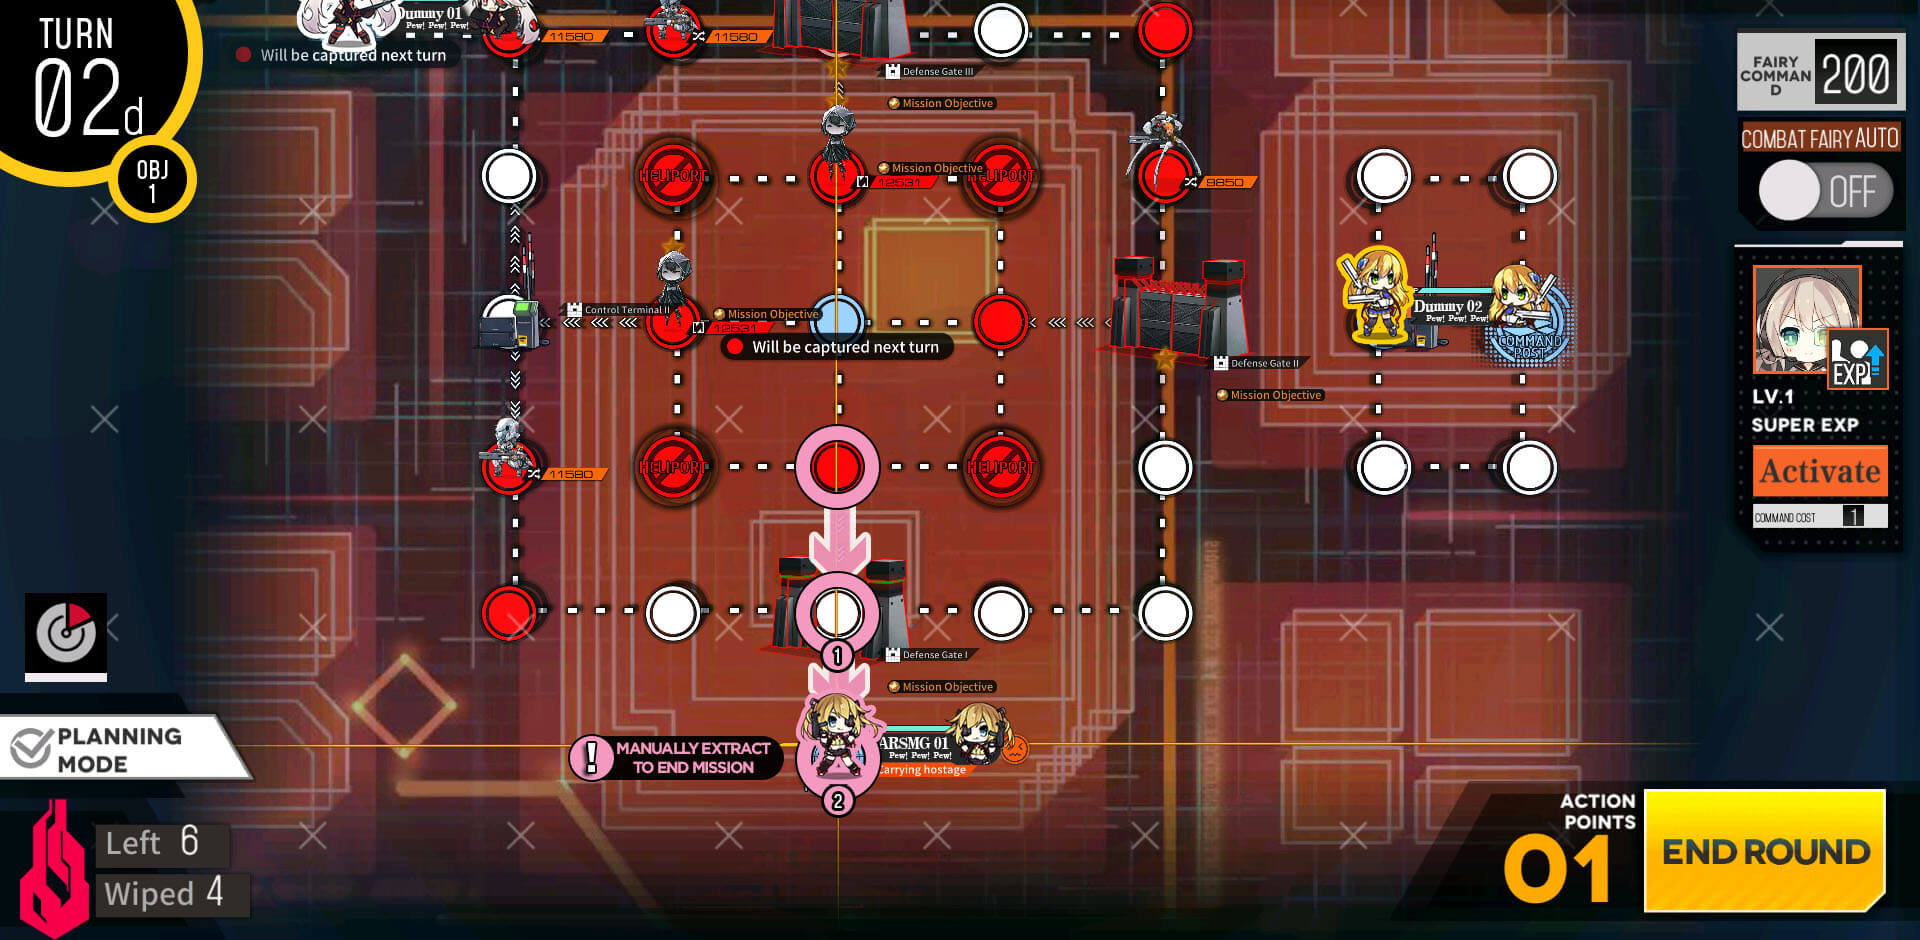
All you have to do it move back to HQ, swap with 2nd echelon and manually extract the hostage.
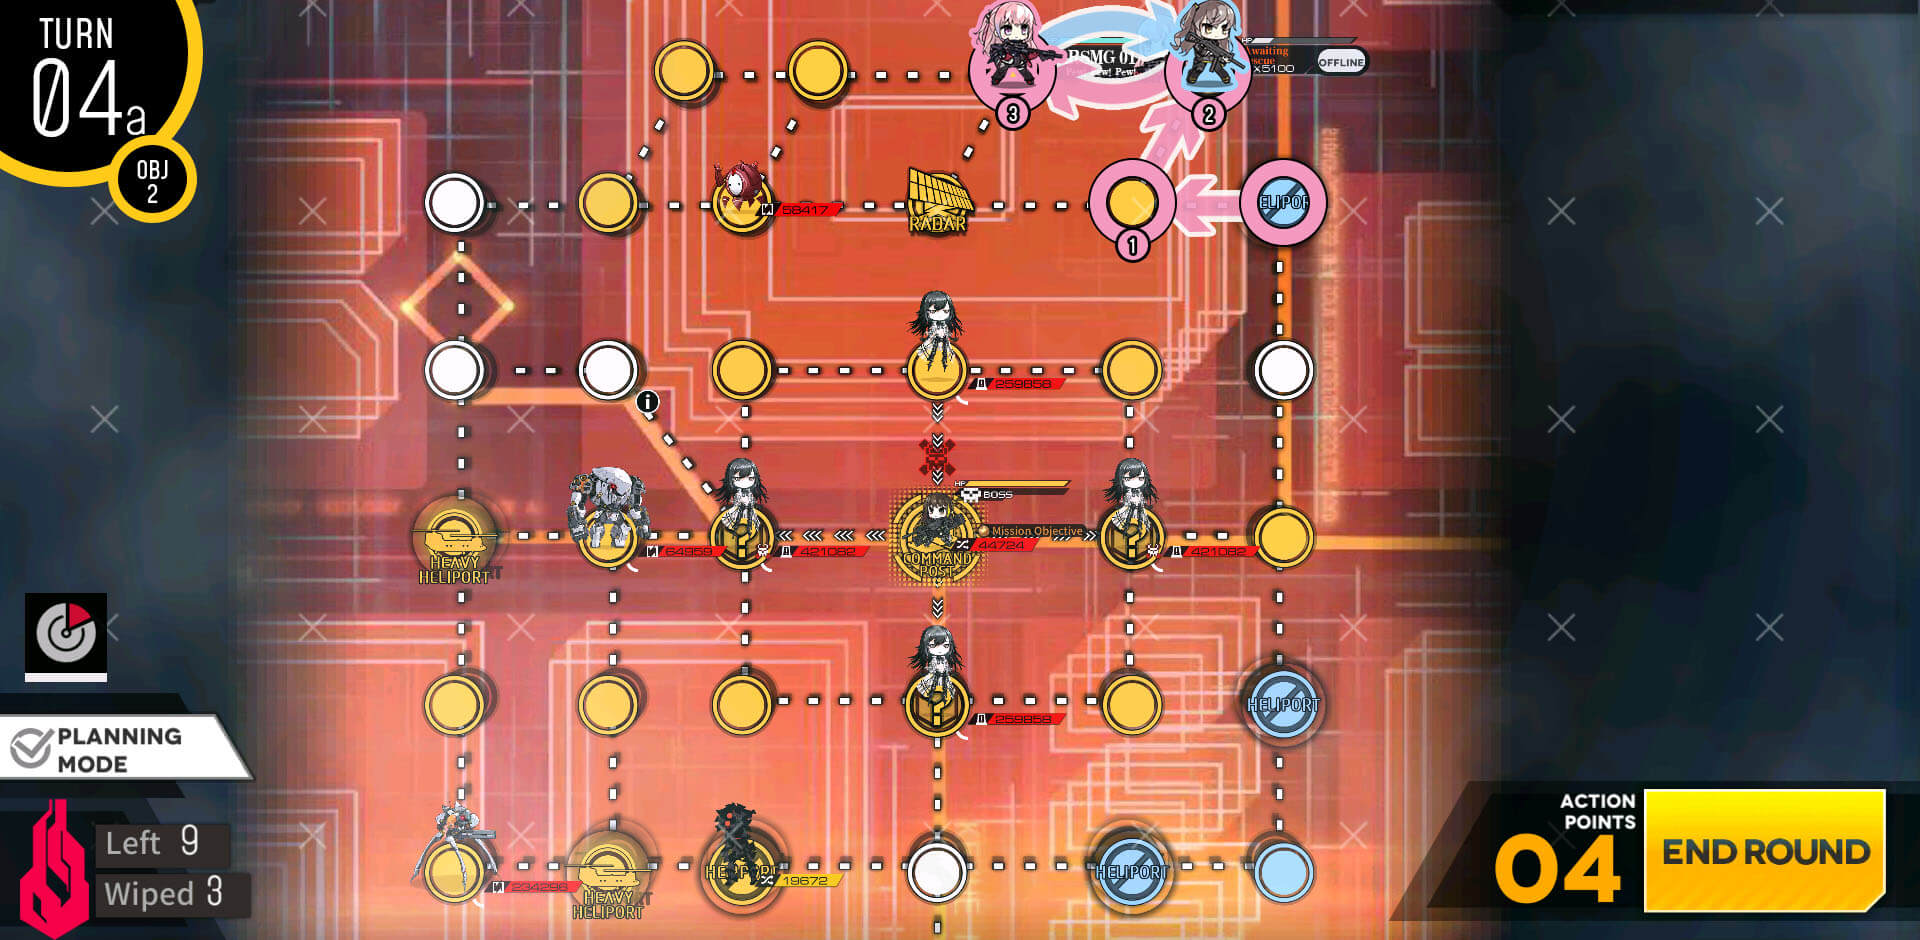
Start is same with first objective to deploy 2 combat echelons at the HQ facing north.
We then move 2nd combat echelon at the HQ to the right and deploy a dummy on the HQ. Combat echelon on the left side moves far as it can towards the hostage.

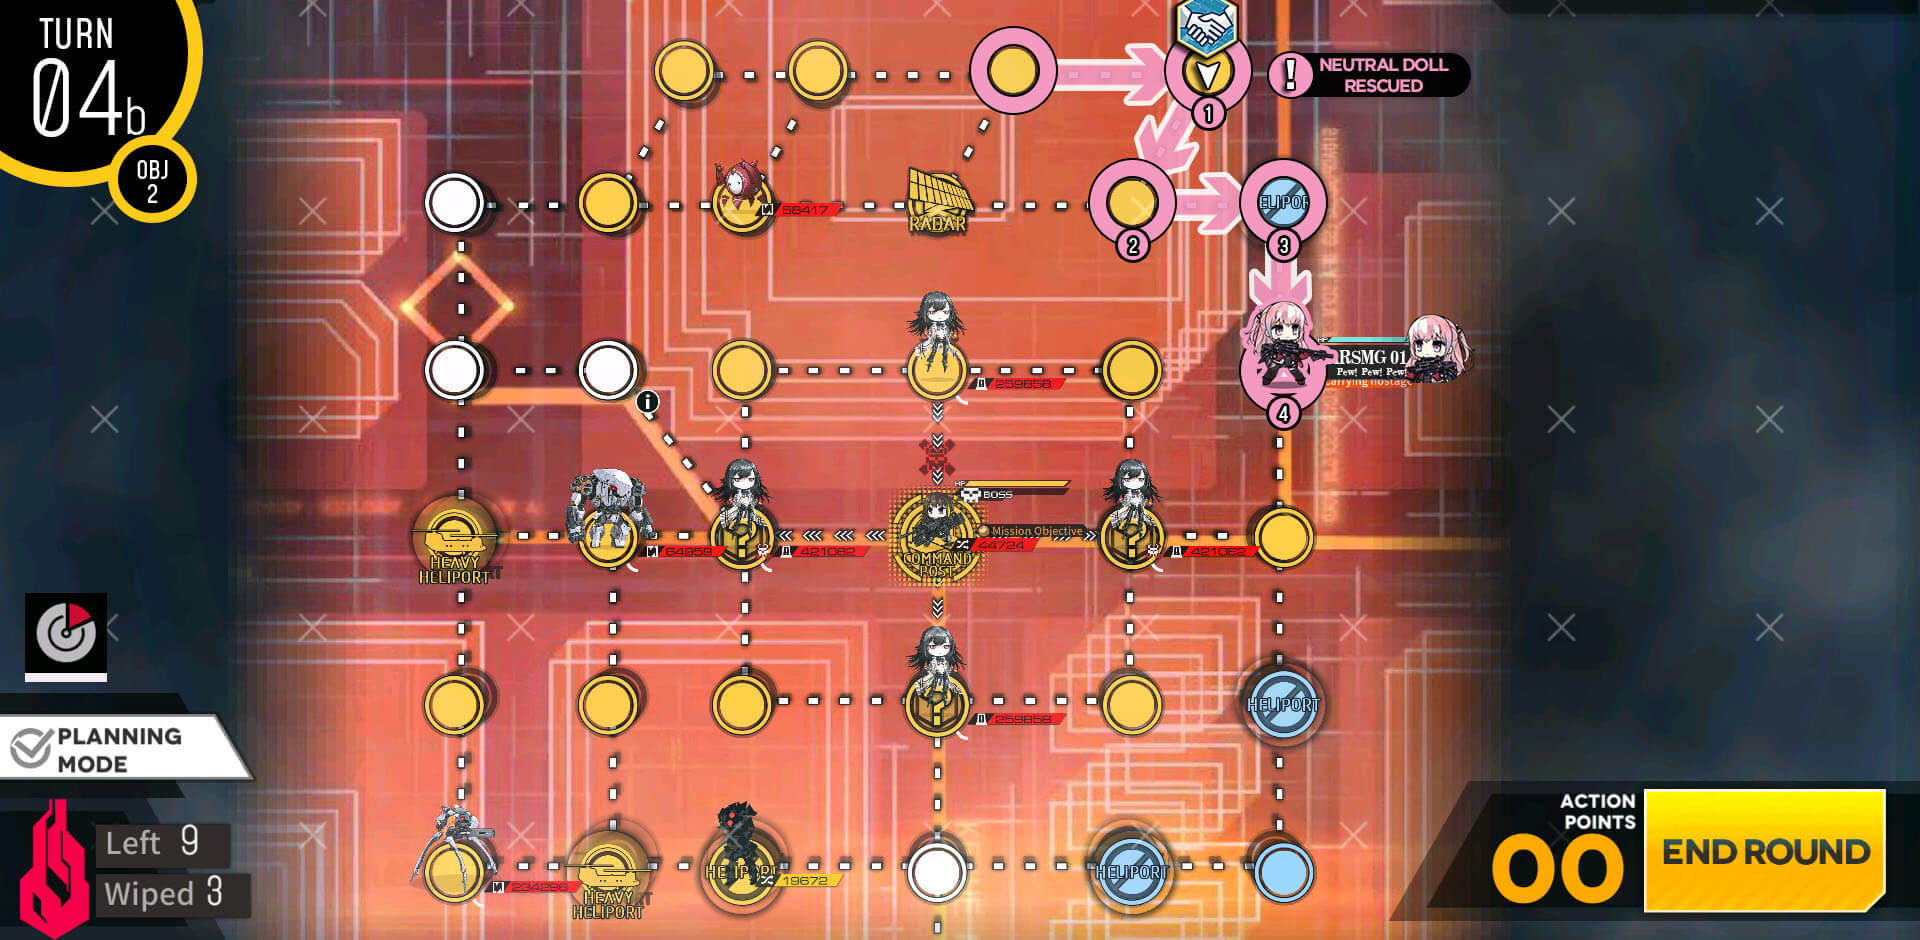
1st combat echelon rescues the hostage then moves towards the helipad on the right side of the map..
On turn 4 we move 1st combat echelon with hostage down one node.

2nd combat echelon by the HQ moves to meet up with 1st combat echelon then swap location so that hostage is rescued automatically at the beginning of the next turn.
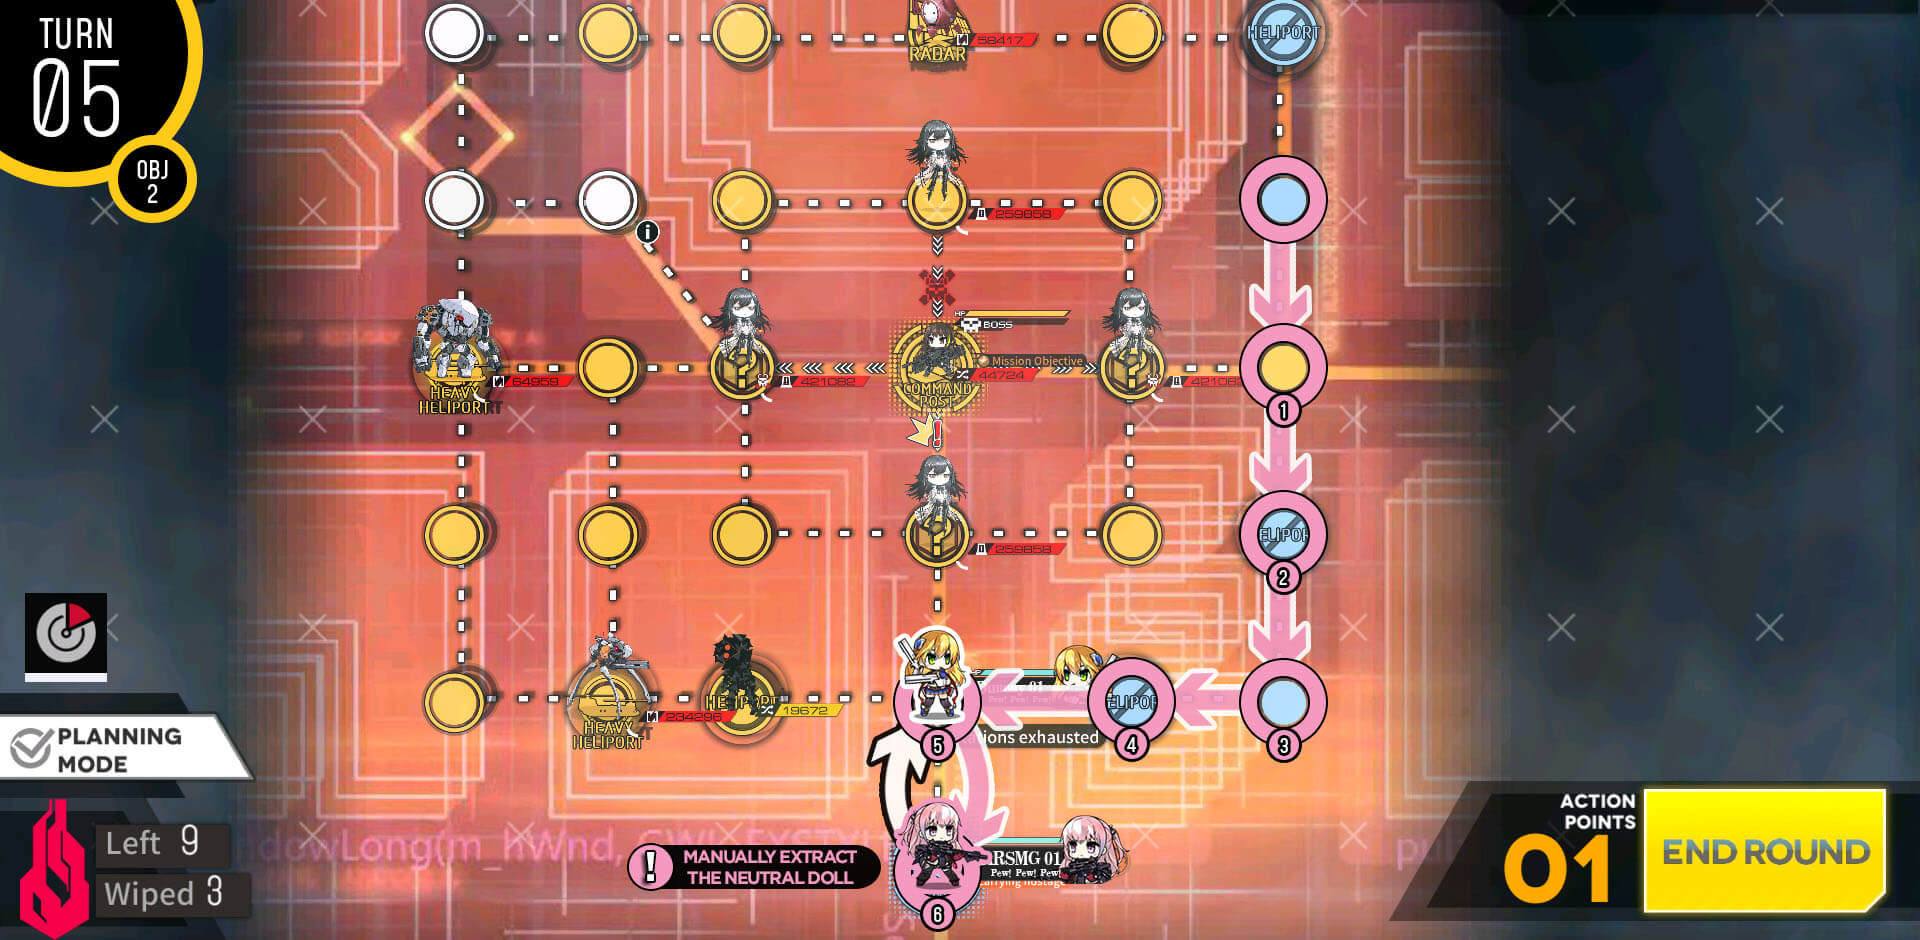
1st combat echelon or 2nd combat echelon then resupply/repair at the helipad then moves to capture the last helipad at the top left.
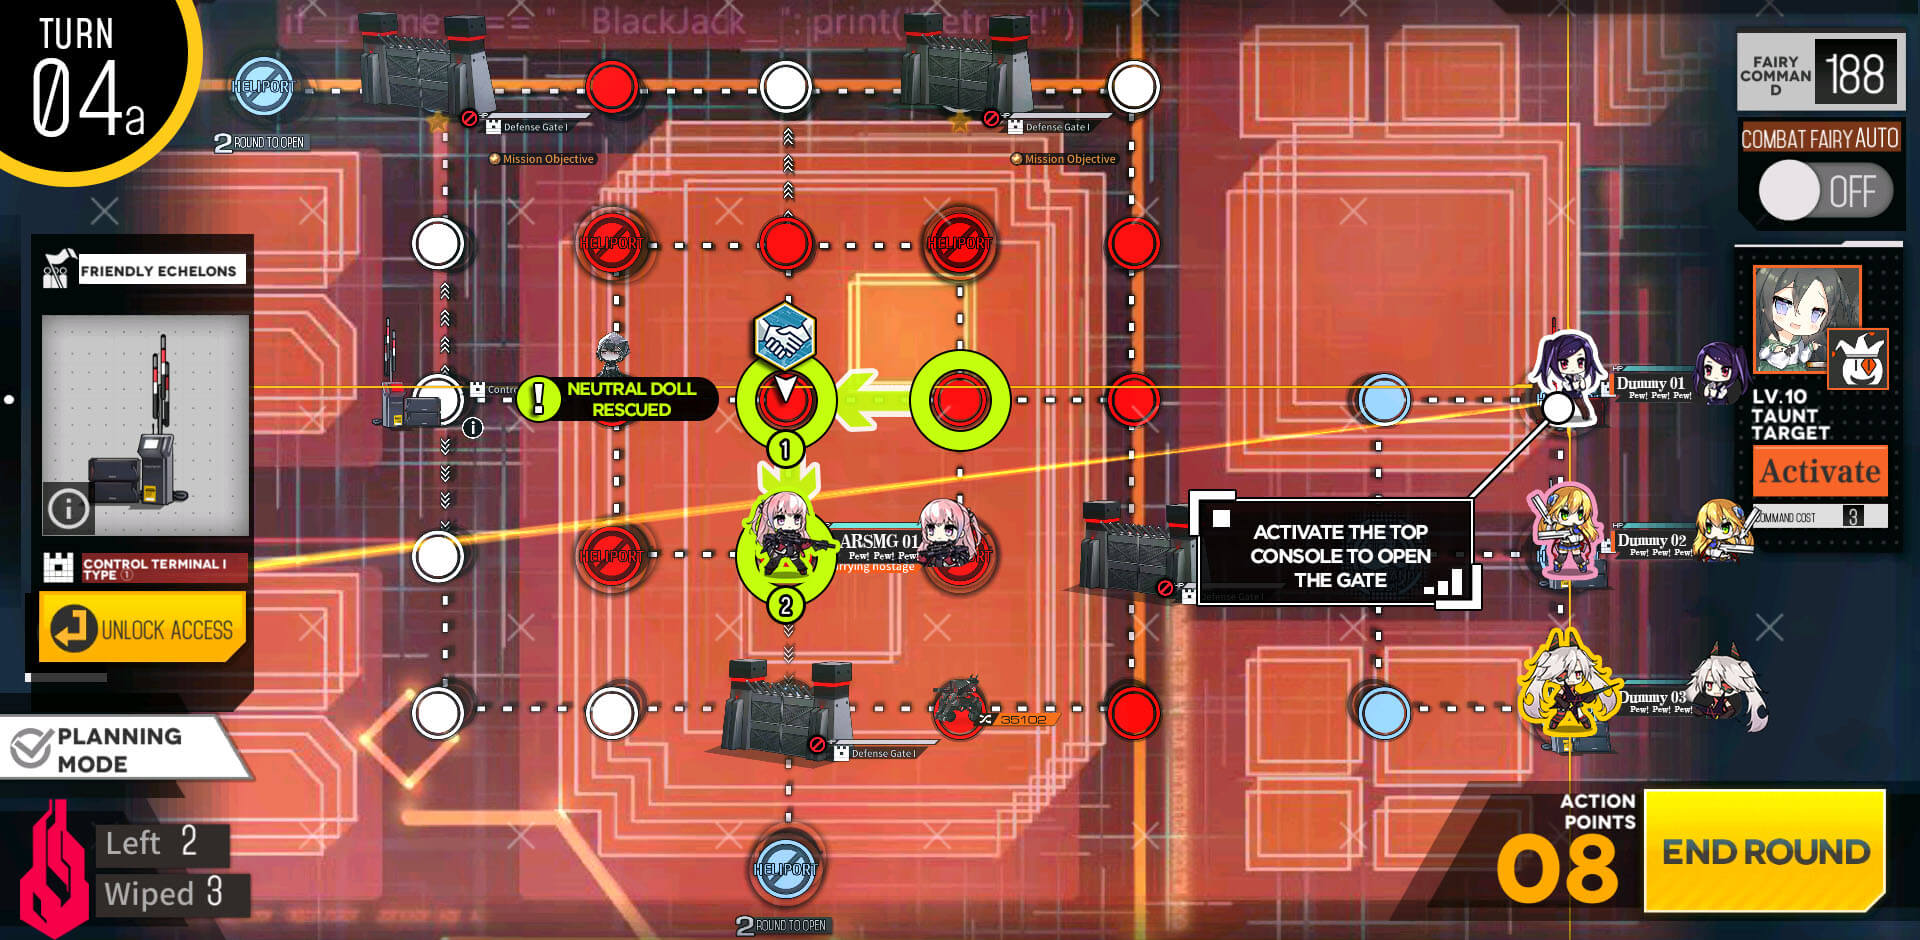
Map is near identical to the normal version of the map so we will play it similarly. Spend 1st turn with deploying two combat echelons heading north from the HQ.

Then with remaining move, 2nd echelon moves to capture the heavy helipad on the right of the HQ.
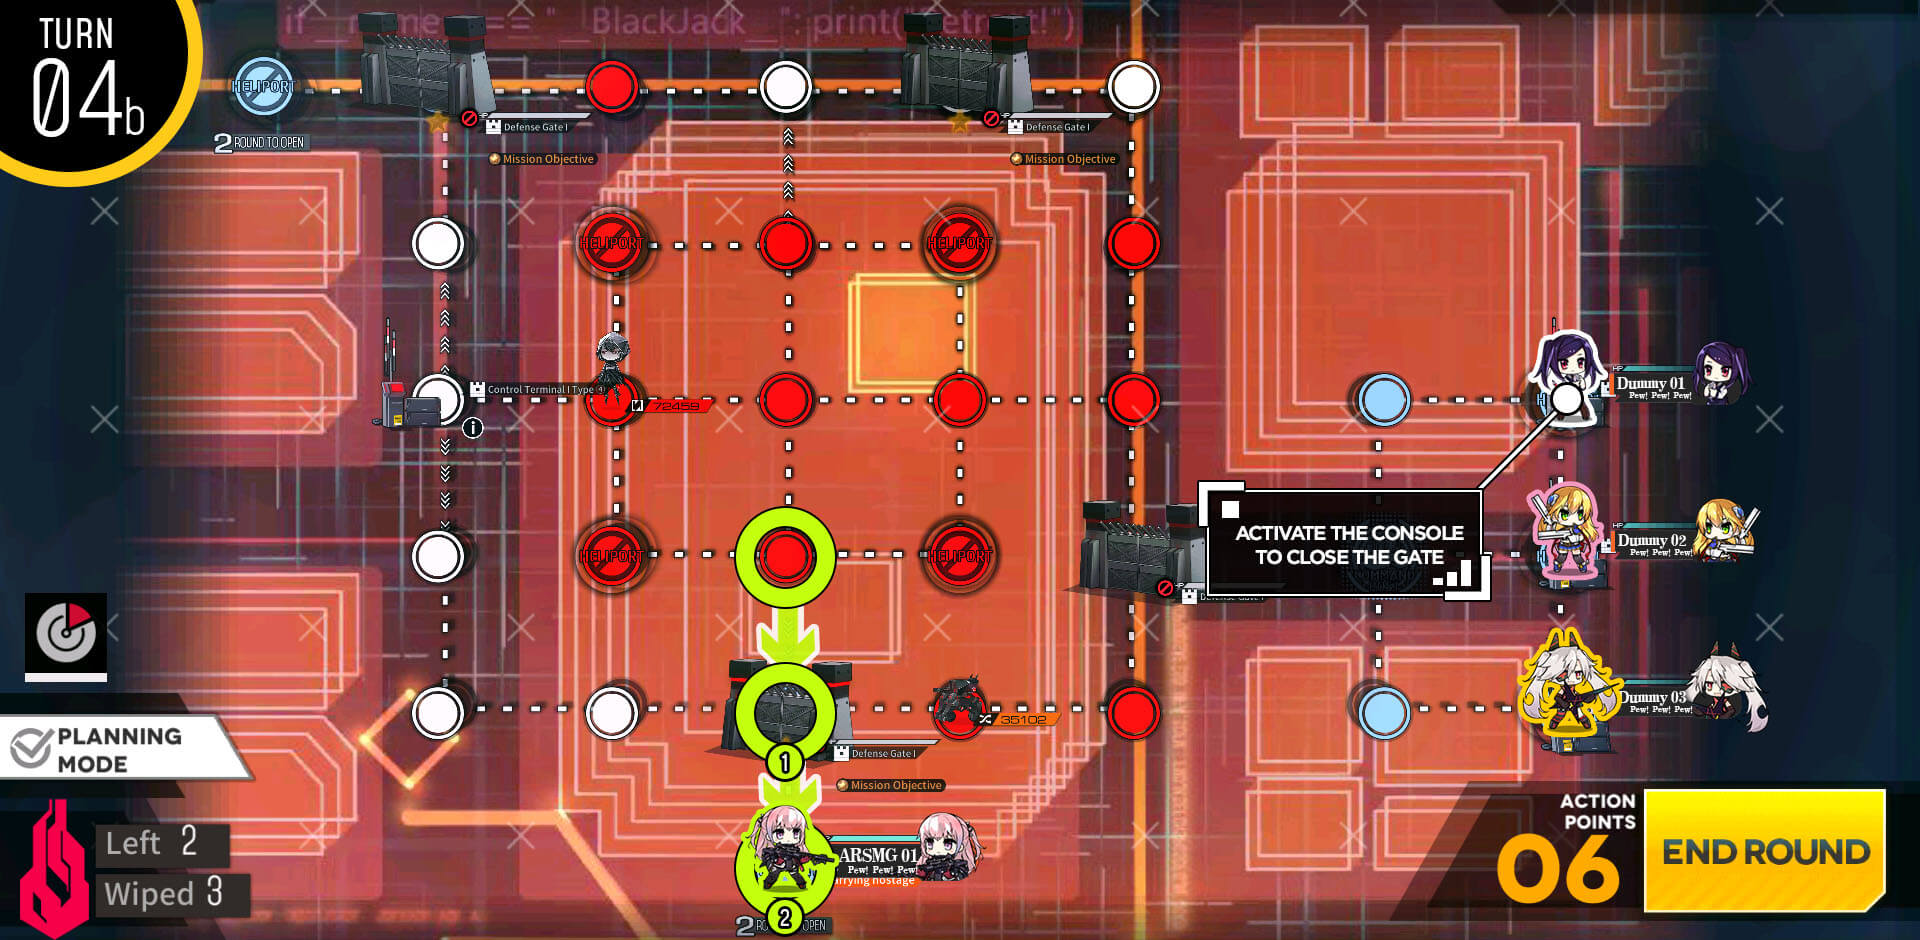
Combat echelon above the HQ moves to rescue the hostage at the center of the map. Once hostage is rescued there will be some changes to AI mechanics of enemy units on the map, but you don't have to worry about it.

Now that bottom gate has opened, we are going to use 2nd echelon to draw aggro from the bottom Smasher unit. combat echelon with the hostage will continue moving towards the right side, but making sure to stay further away from Smasher unit than the other echelon.
Continue the shuffle of echelons to further distract Smasher unit at the bottom of the map.
Once Smasher unit has moved out of the bottom path back to the HQ, Echelon with Hostage heads to heavy helipad and manually extracts hostage to clear the mission.
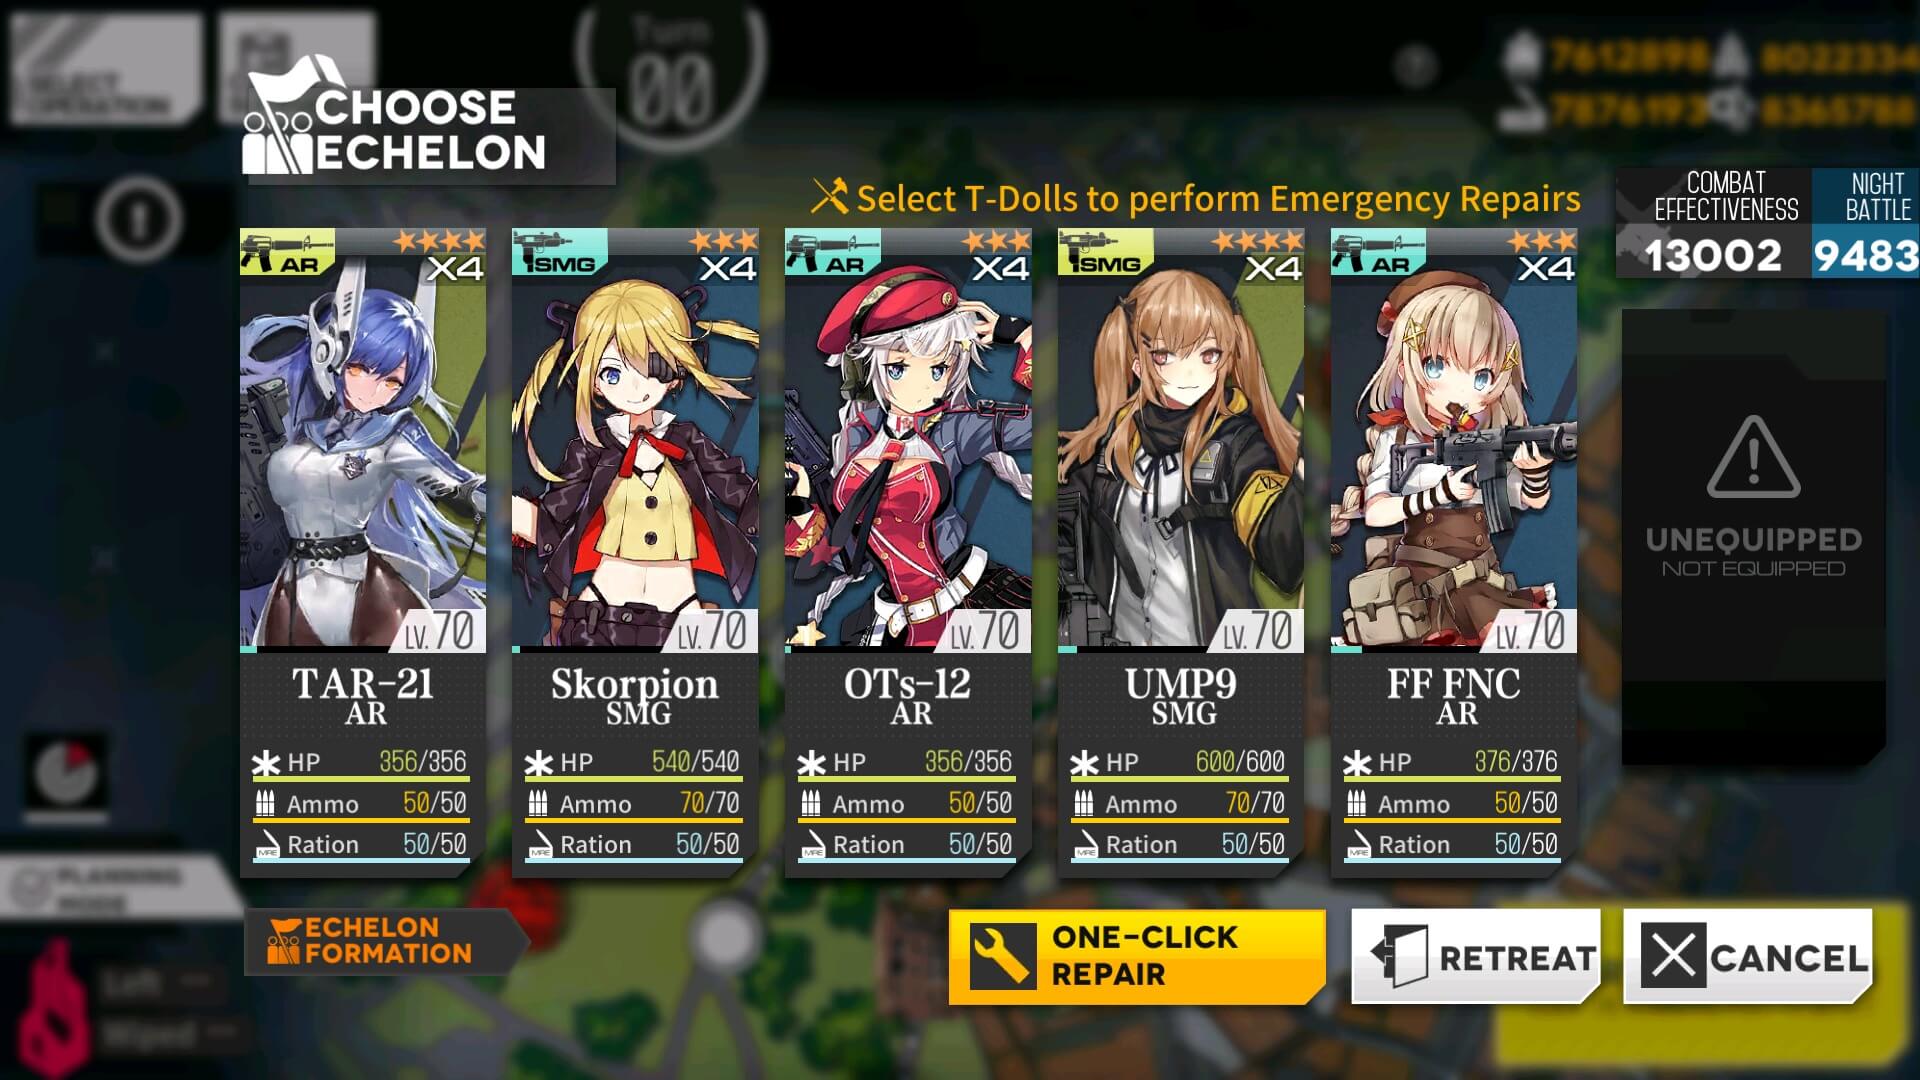
I have also gone ahead and leveled up echelon to level 70 and 4x links to keep up with the difficulty scale. This is more now towards the minimum rather than required, so if you can raise your ARSMG echelon more, I strongly suggest that you go at least level 80 or even 90.
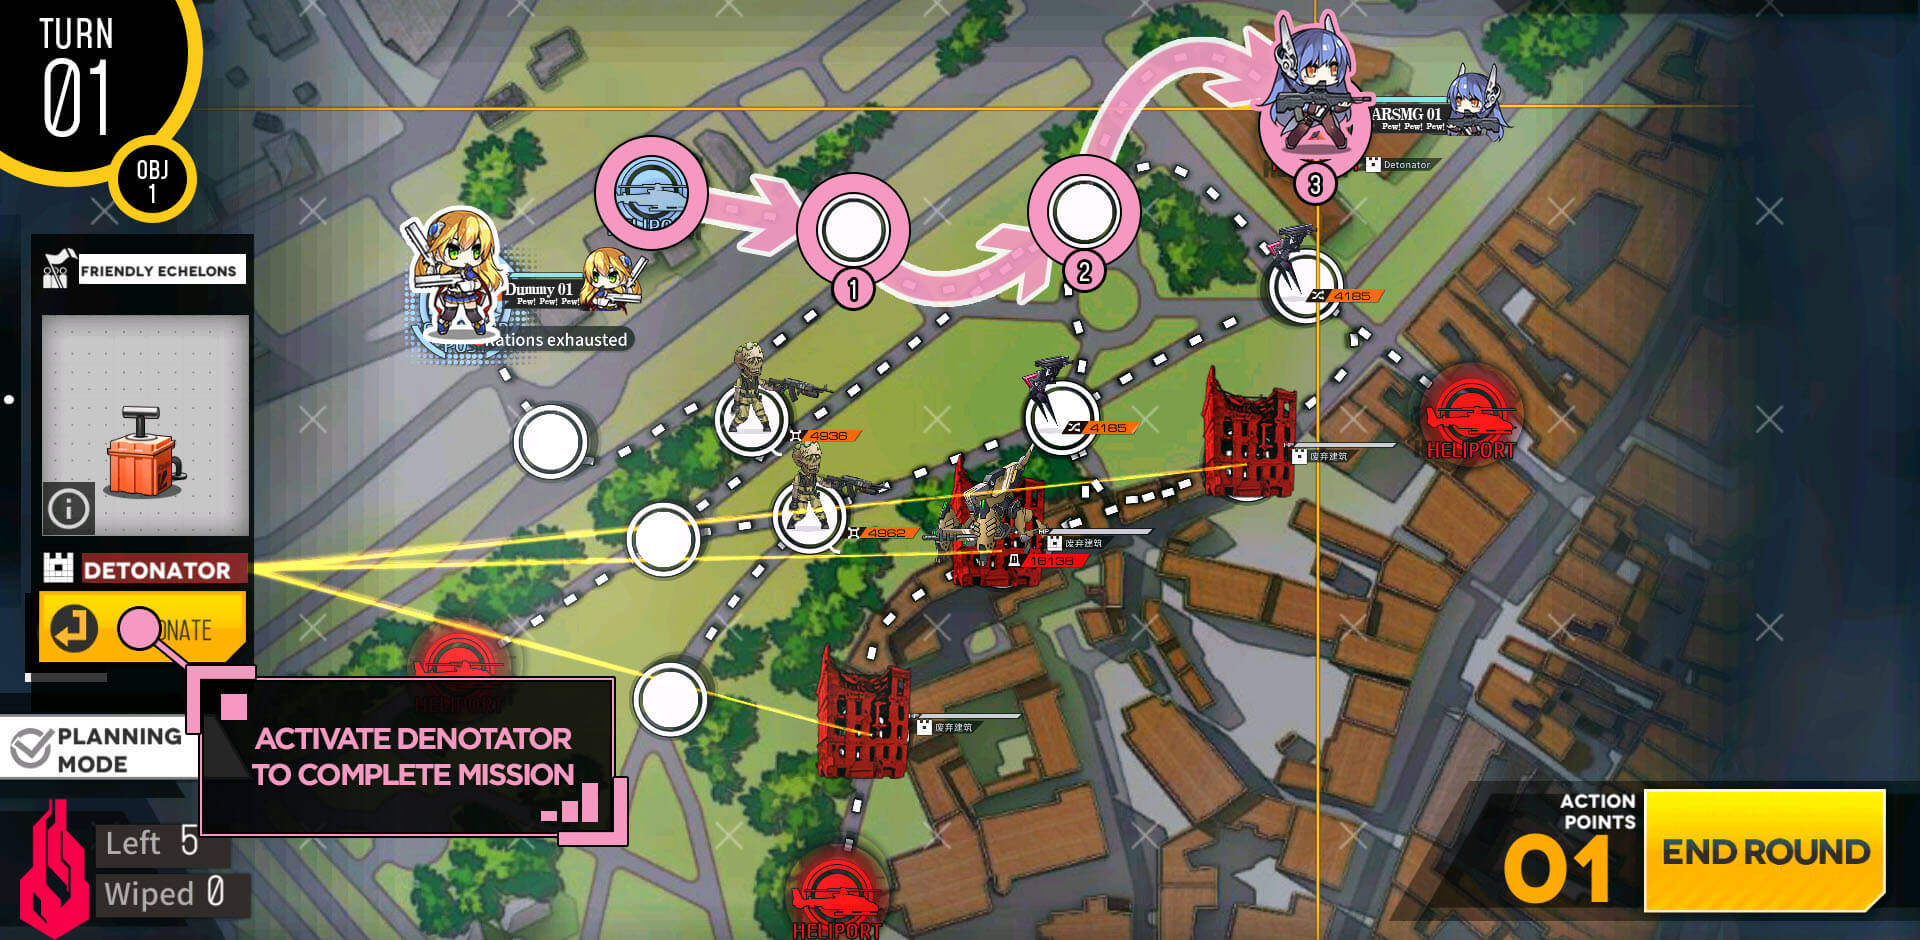
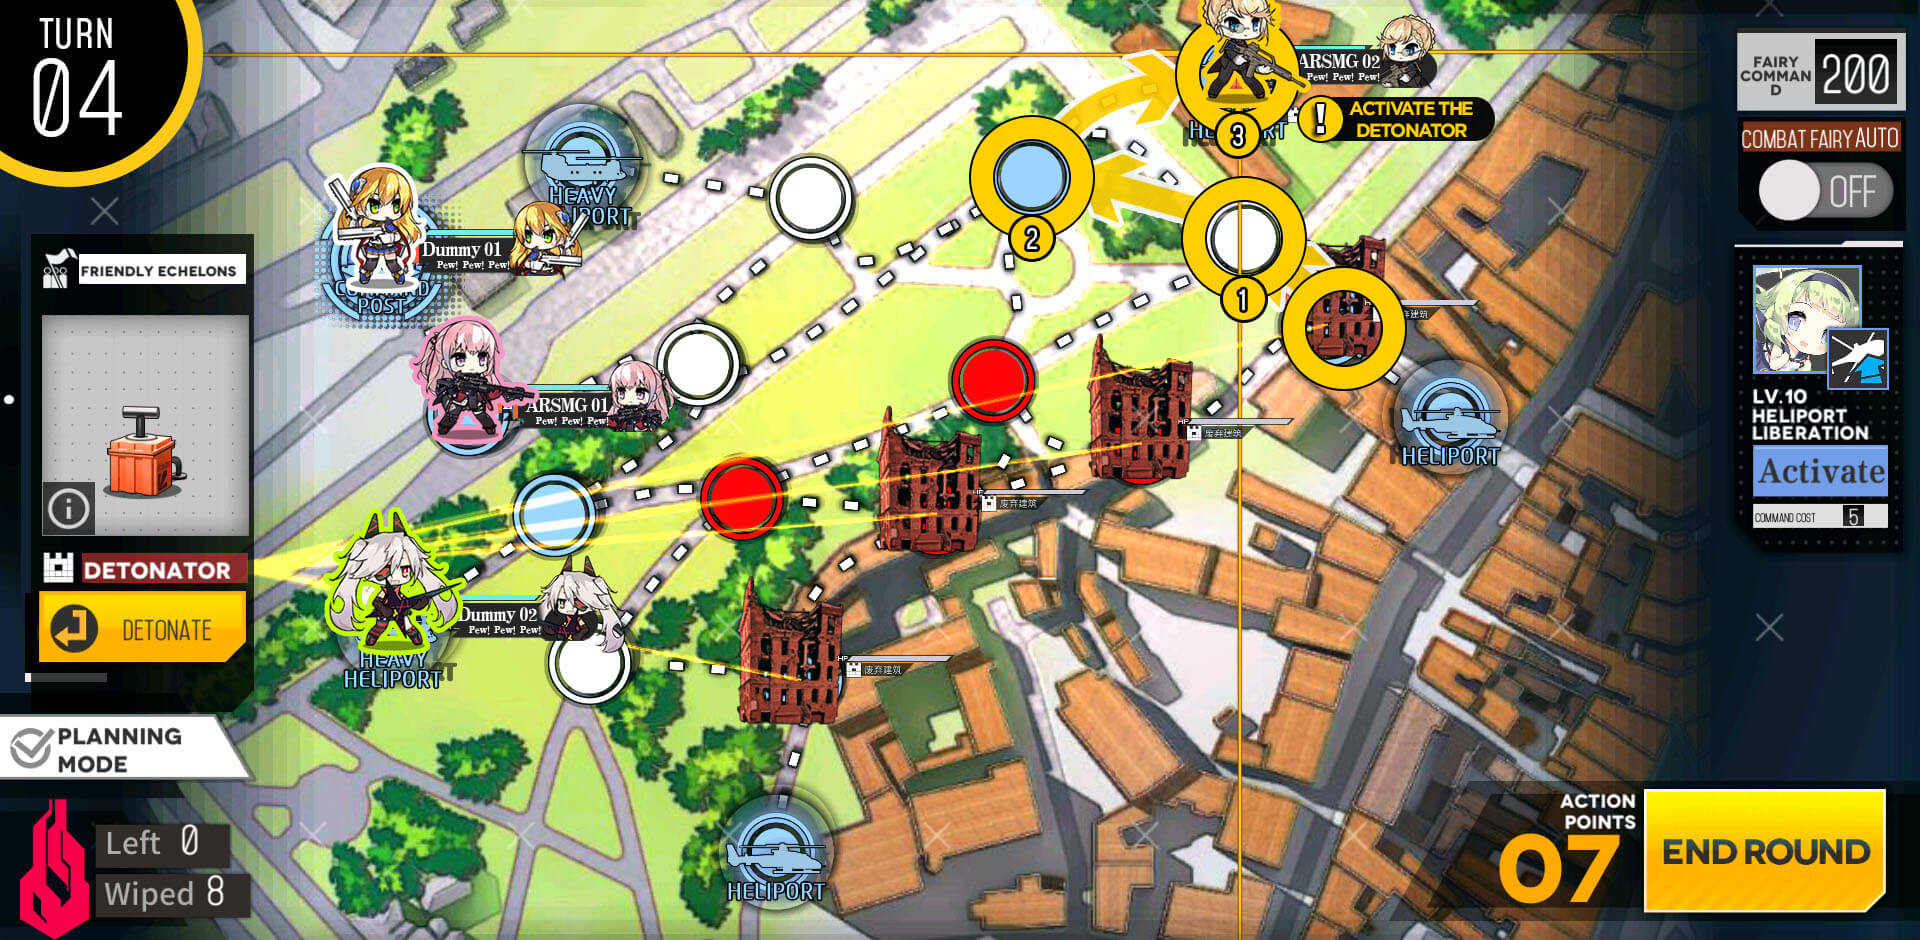
Start with dummy on the HQ and combat echelon on the right helipad. Move straight to the marked helipad with the detonator and blow it up. After that simply end the turn to clear the mission.
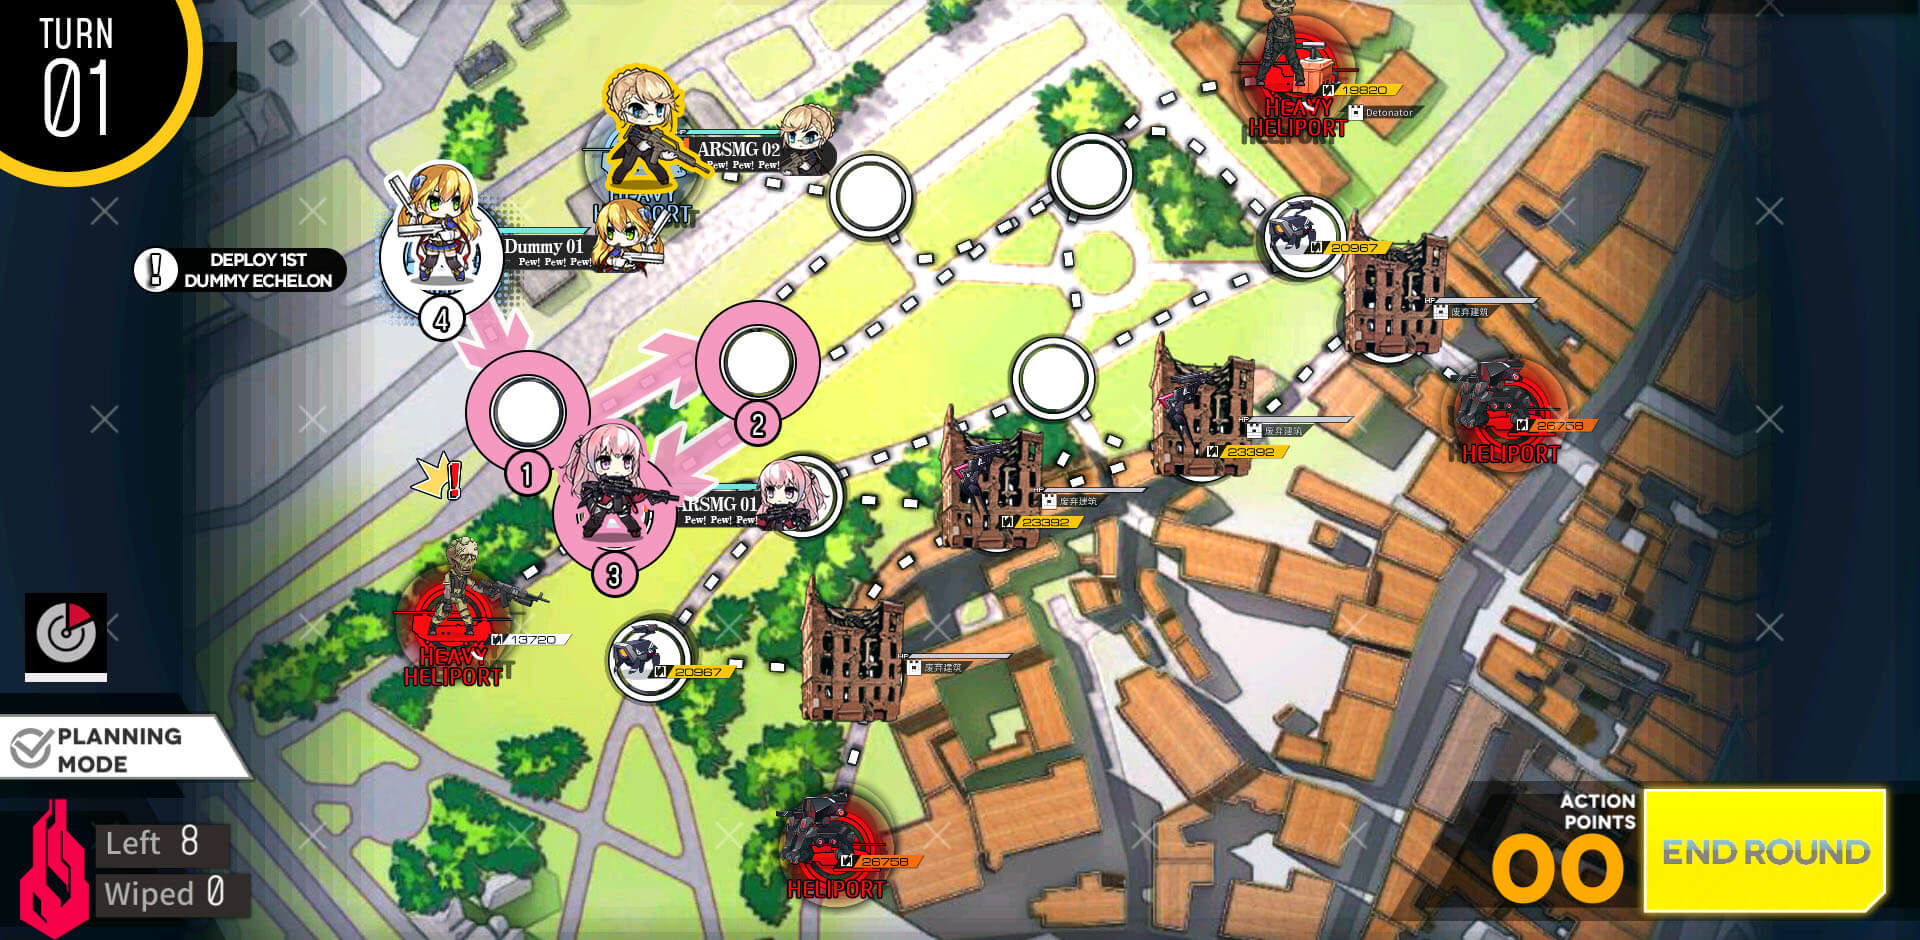
We are working to wipe out all units on the map, which means all helipads needs to be captured to stop the flow. Start with both combat echelons on starting locations. Combat echelon on the HQ moves down and prepare to surround capture the helipad below the HQ. With a remaining move, deploy dummy on the HQ.
Combat echelon on the right side of HQ moves to surround capture the helipad with detonator. We deploy another dummy on the helipad south of the HQ.
Then we are swapping the 2nd dummy with combat echelon to resupply/repair as needed.
Resupplied combat echelon moves to capture the next nearest helipad to the bottom of the map. Fighting enemy units in the abandoned building gives them a buff but with AoE skills, it should not be a difficult fight.
A random 3rd faction enemy has spawned on the helipad with the detonator. Destroy the enemy with 2nd echelon and resupply/repair as needed. 1st combat echelon moves back to HQ so that it is safely out of the blast range of detonator.

Finally combat echelon moves to capture the last helipad behind the abandoned building.
Now that we have no enemy units on the map, move to the detonator and blow up the buildings.
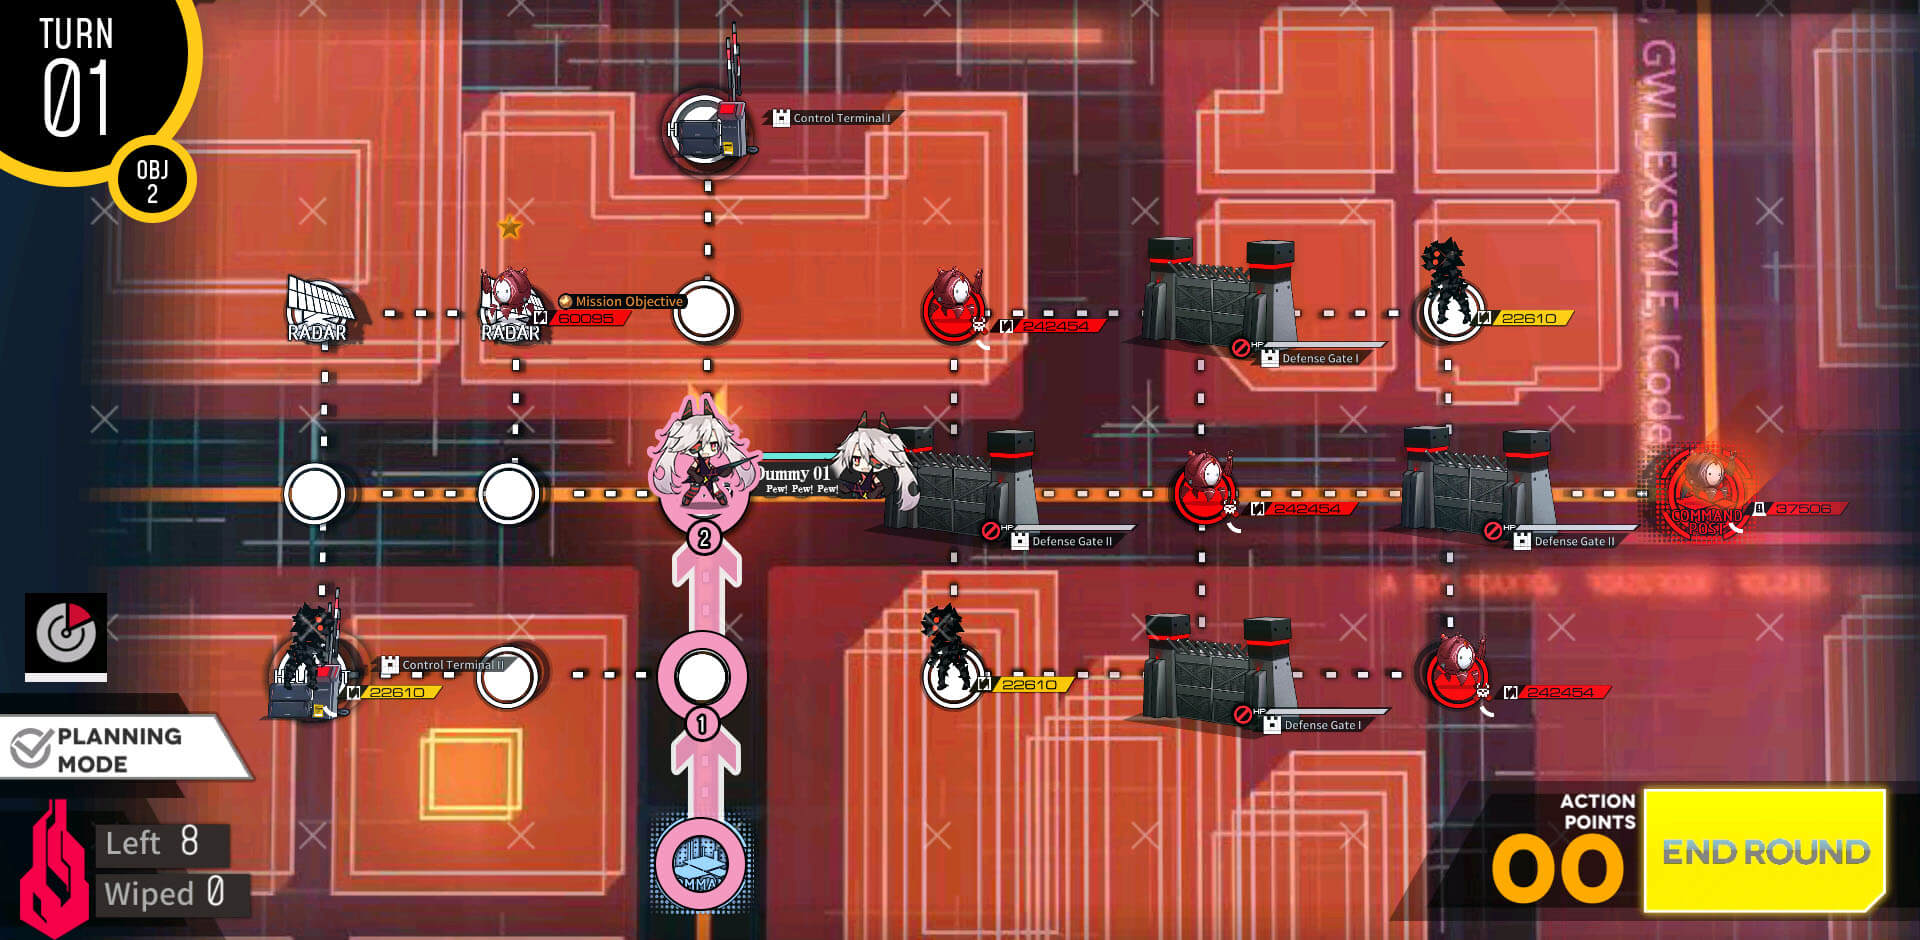
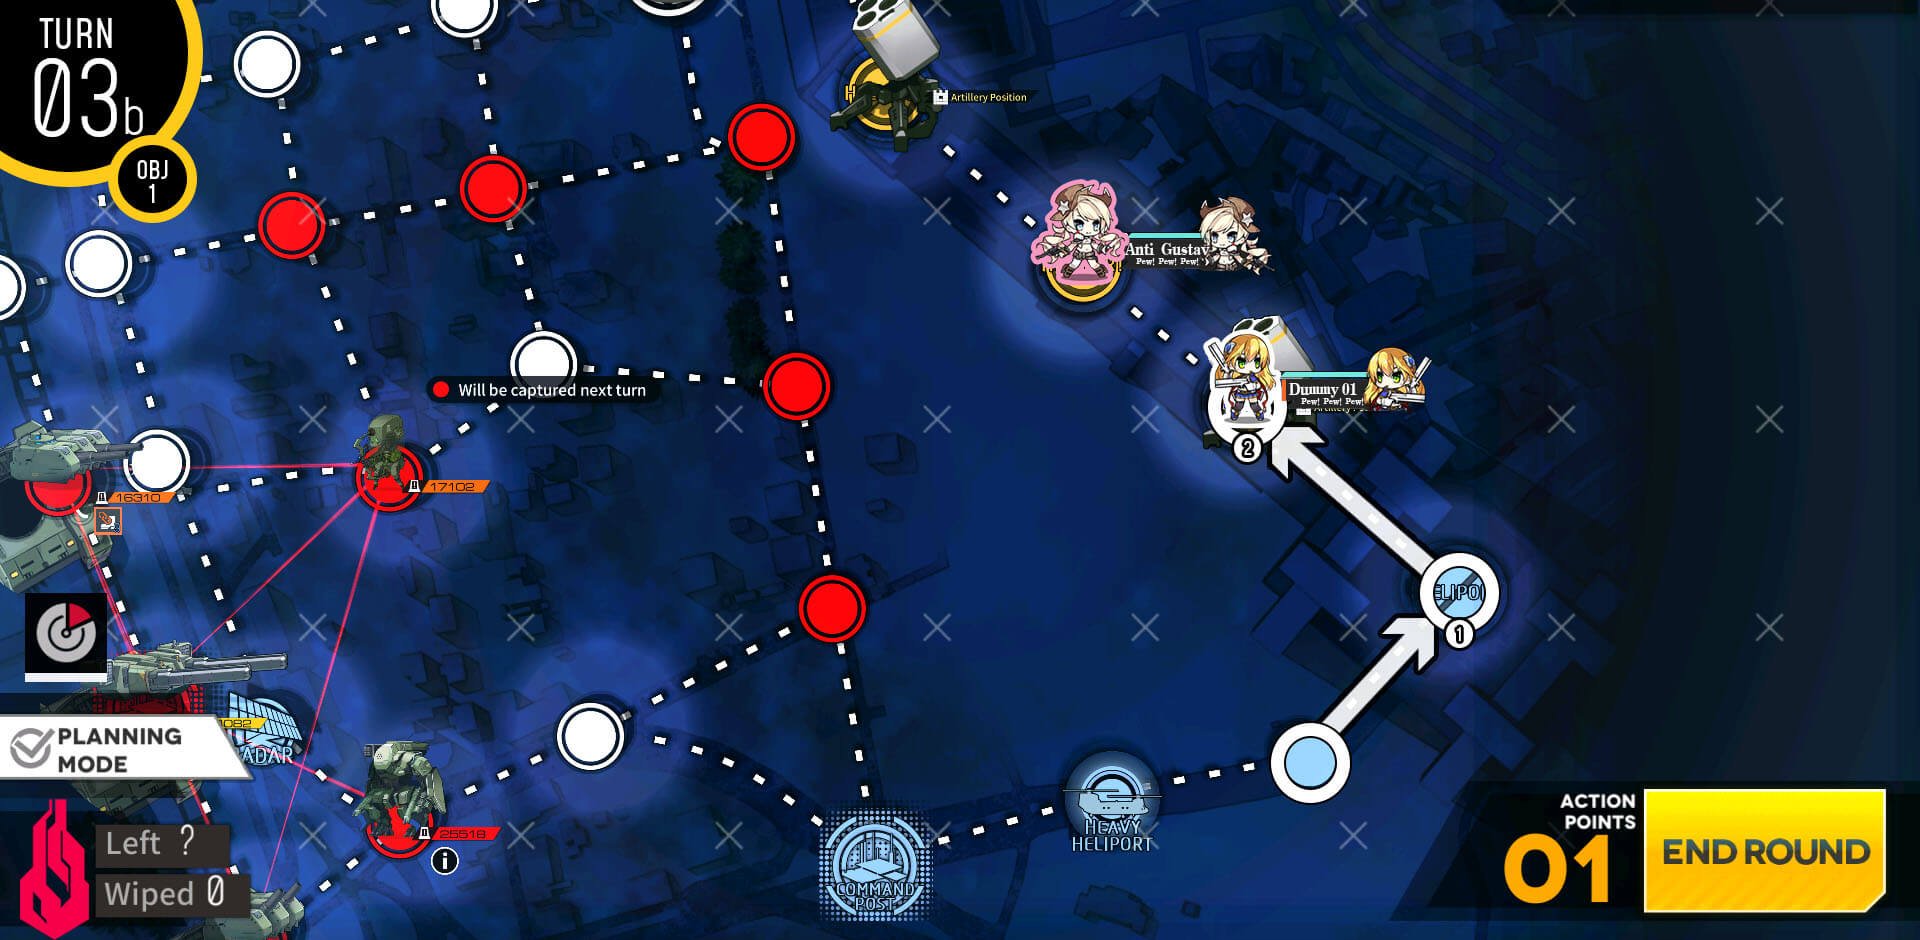
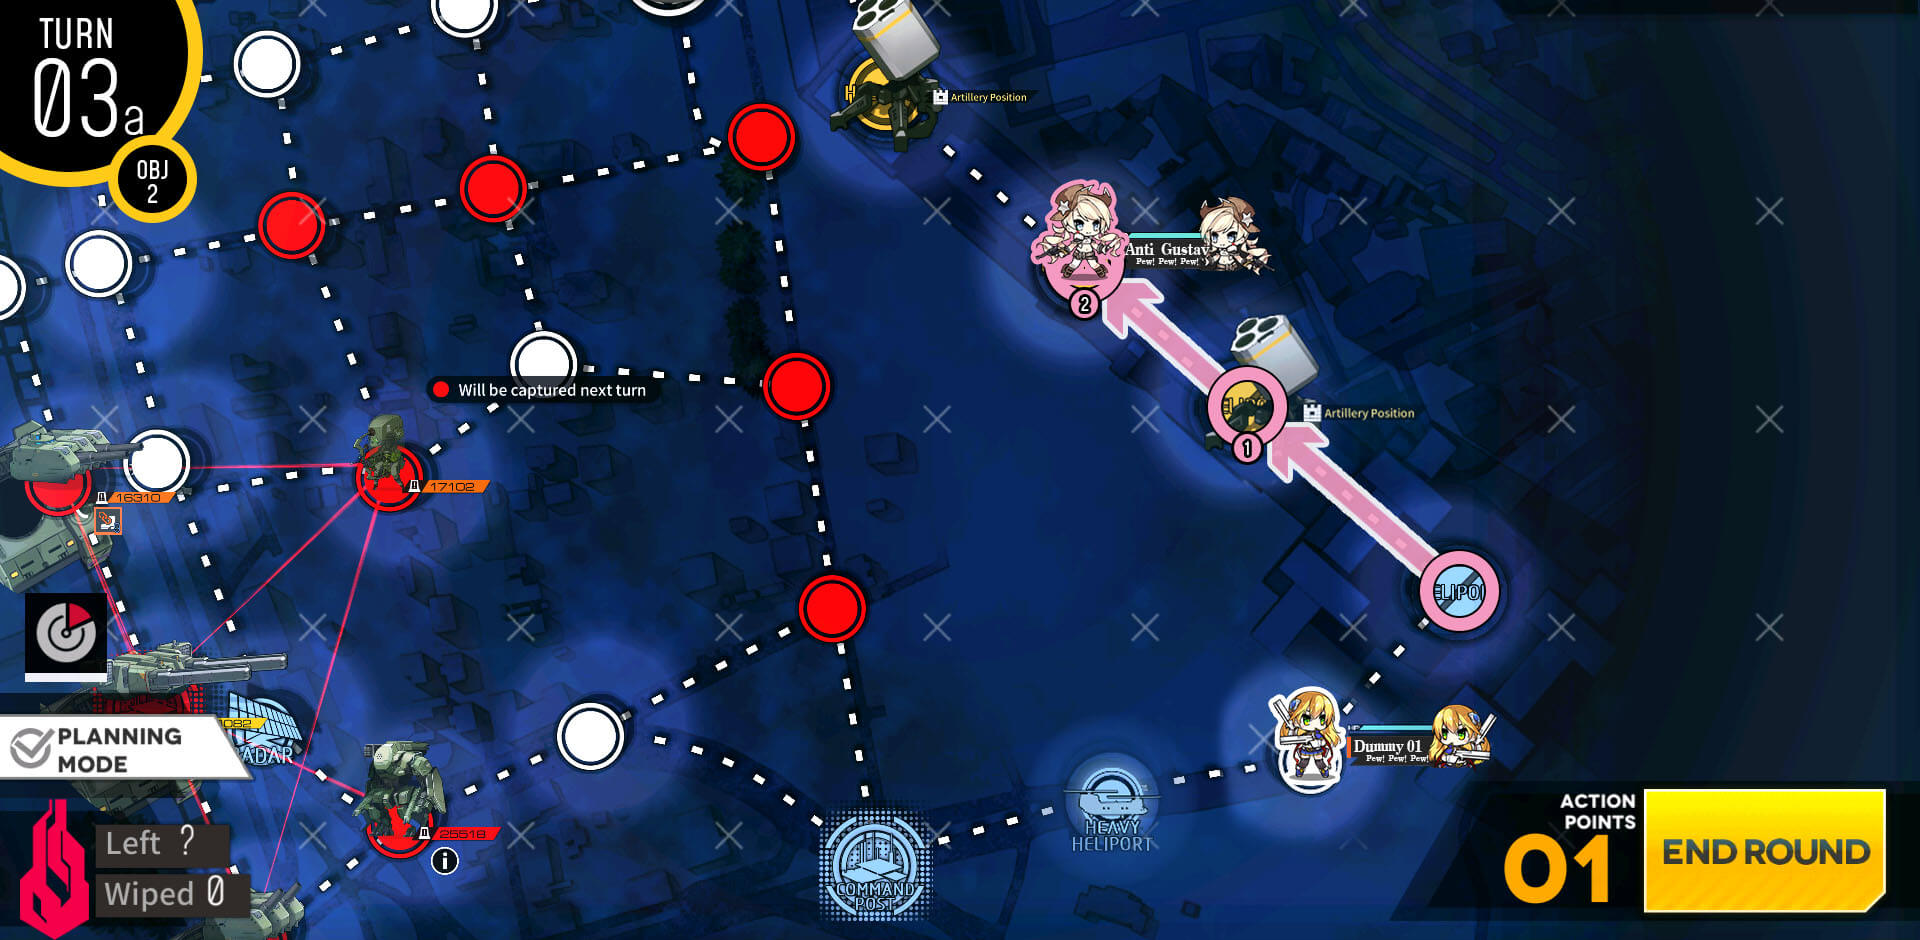
Start with dummy on HQ then move up towards the console at the top.

Deploy 2nd dummy at the HQ and dummy in the middle of the map moves up to the console. But we DO NOT OPERATE THE CONSOLE THIS TURN.
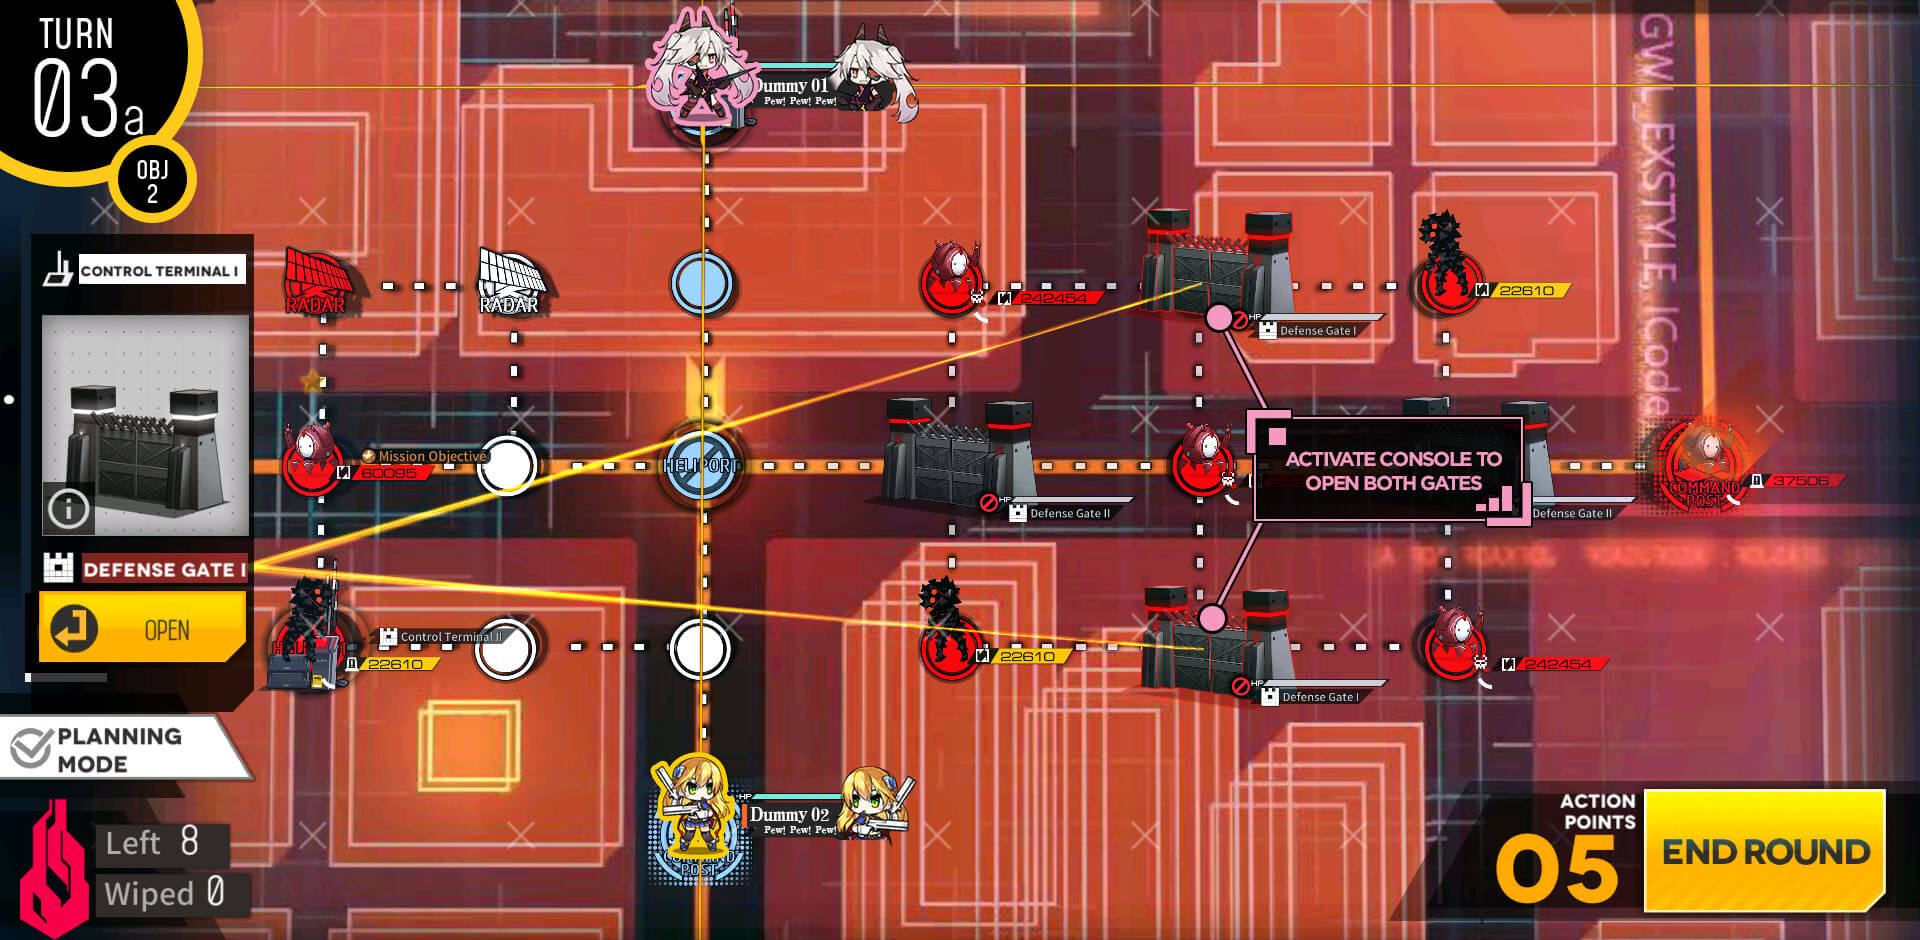
On 3rd turn we operate the console to open the gates. This allows Goliath plus in the middle to patrol up and down at the timing we want.

Dummy unit at the console then moves to the radar unit near by.
Dummy unit on the radar moves to the left and dummy at the HQ moves to the node below the console.
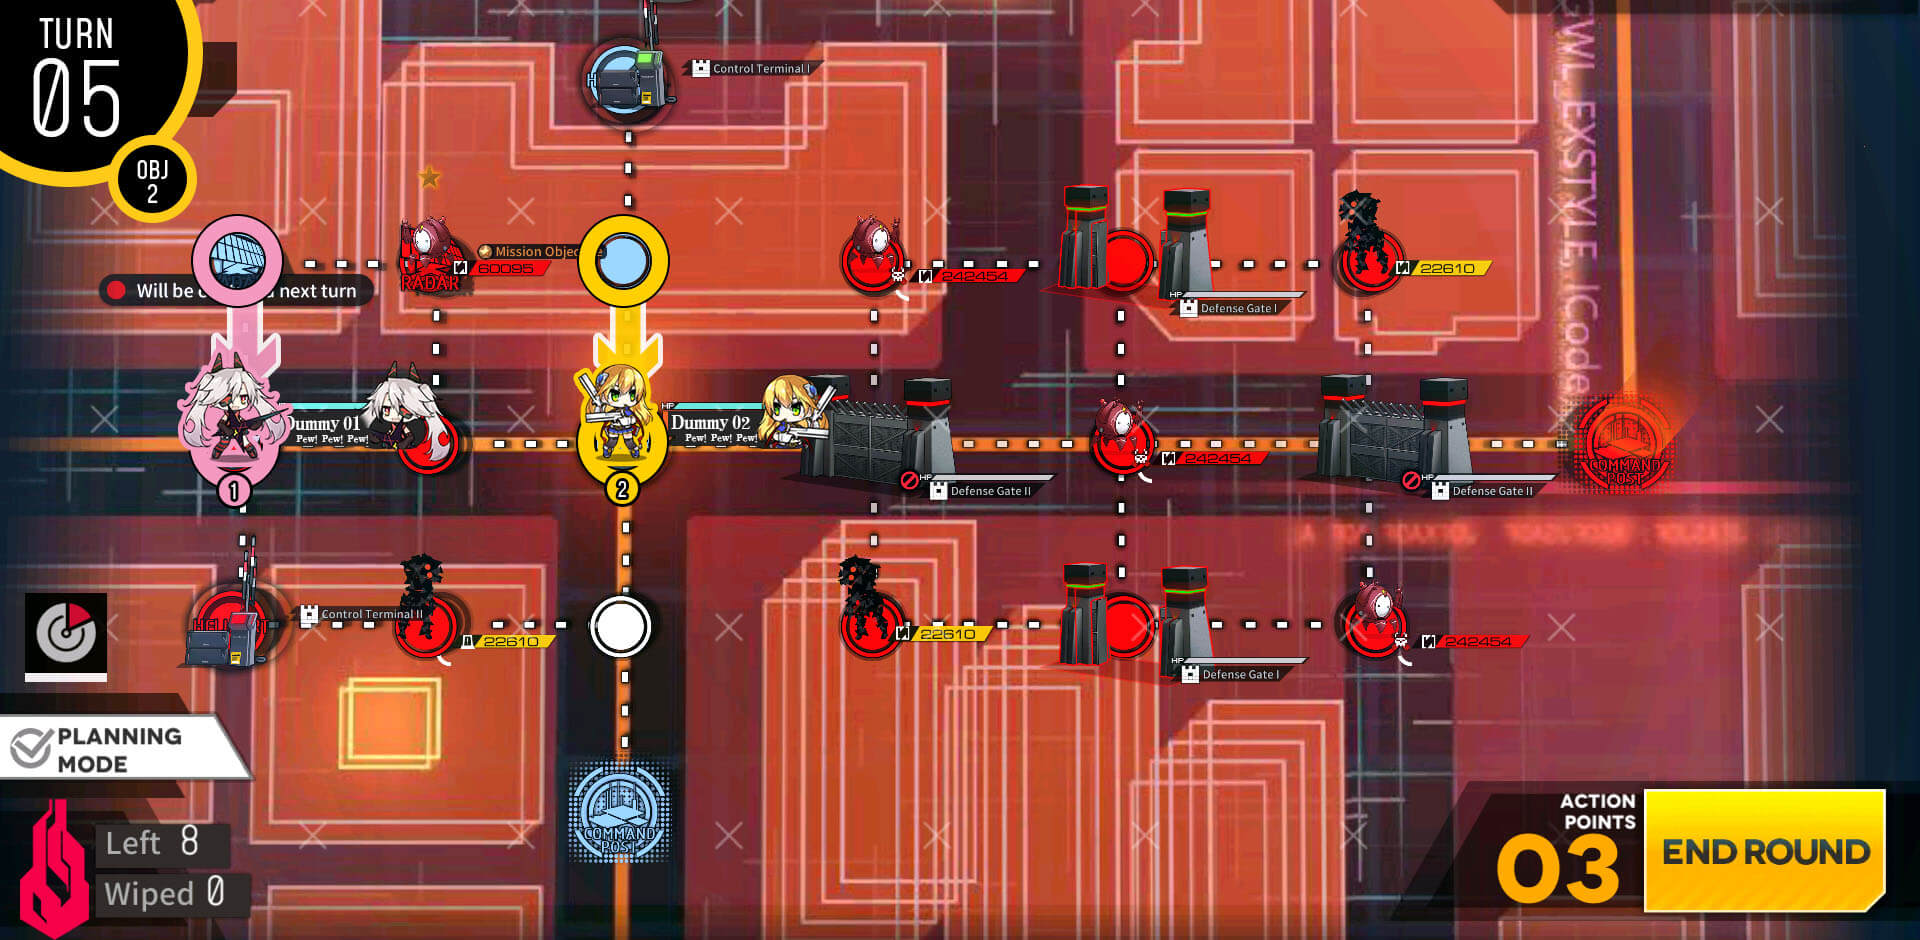
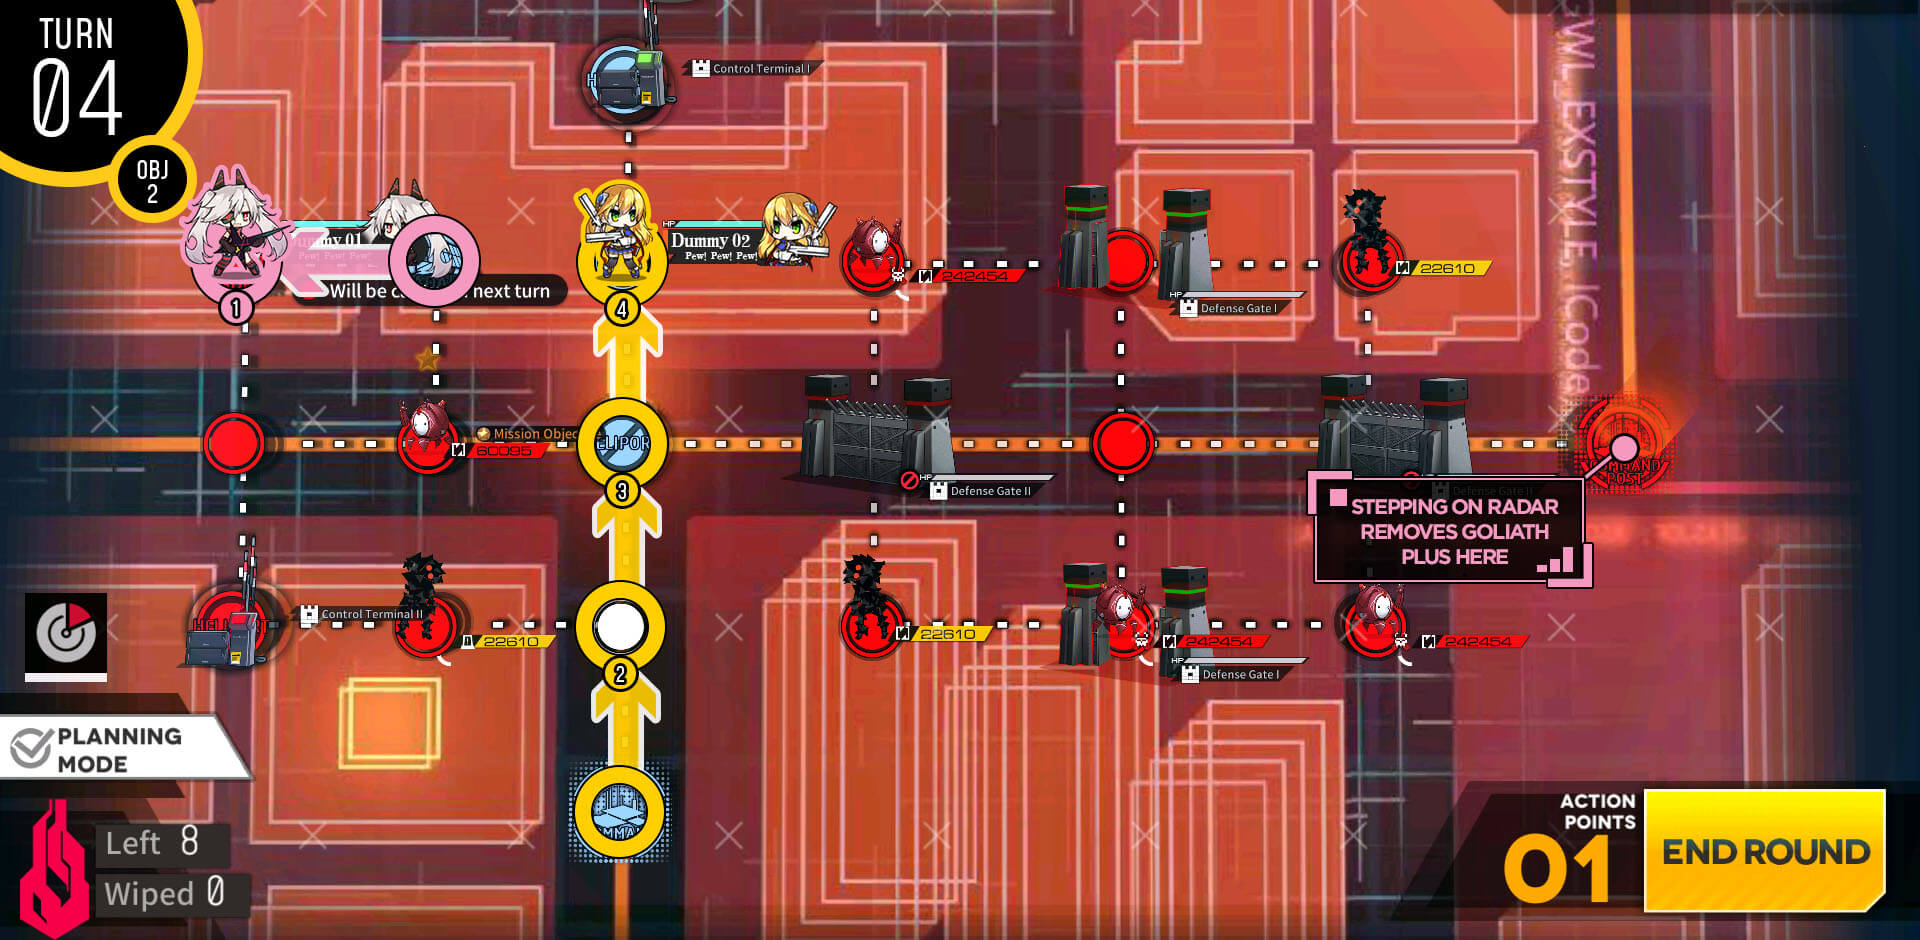
We move both dummy units down one node each.

On turn 6 we open the gates blocking path to the enemy HQ using the bottom console.
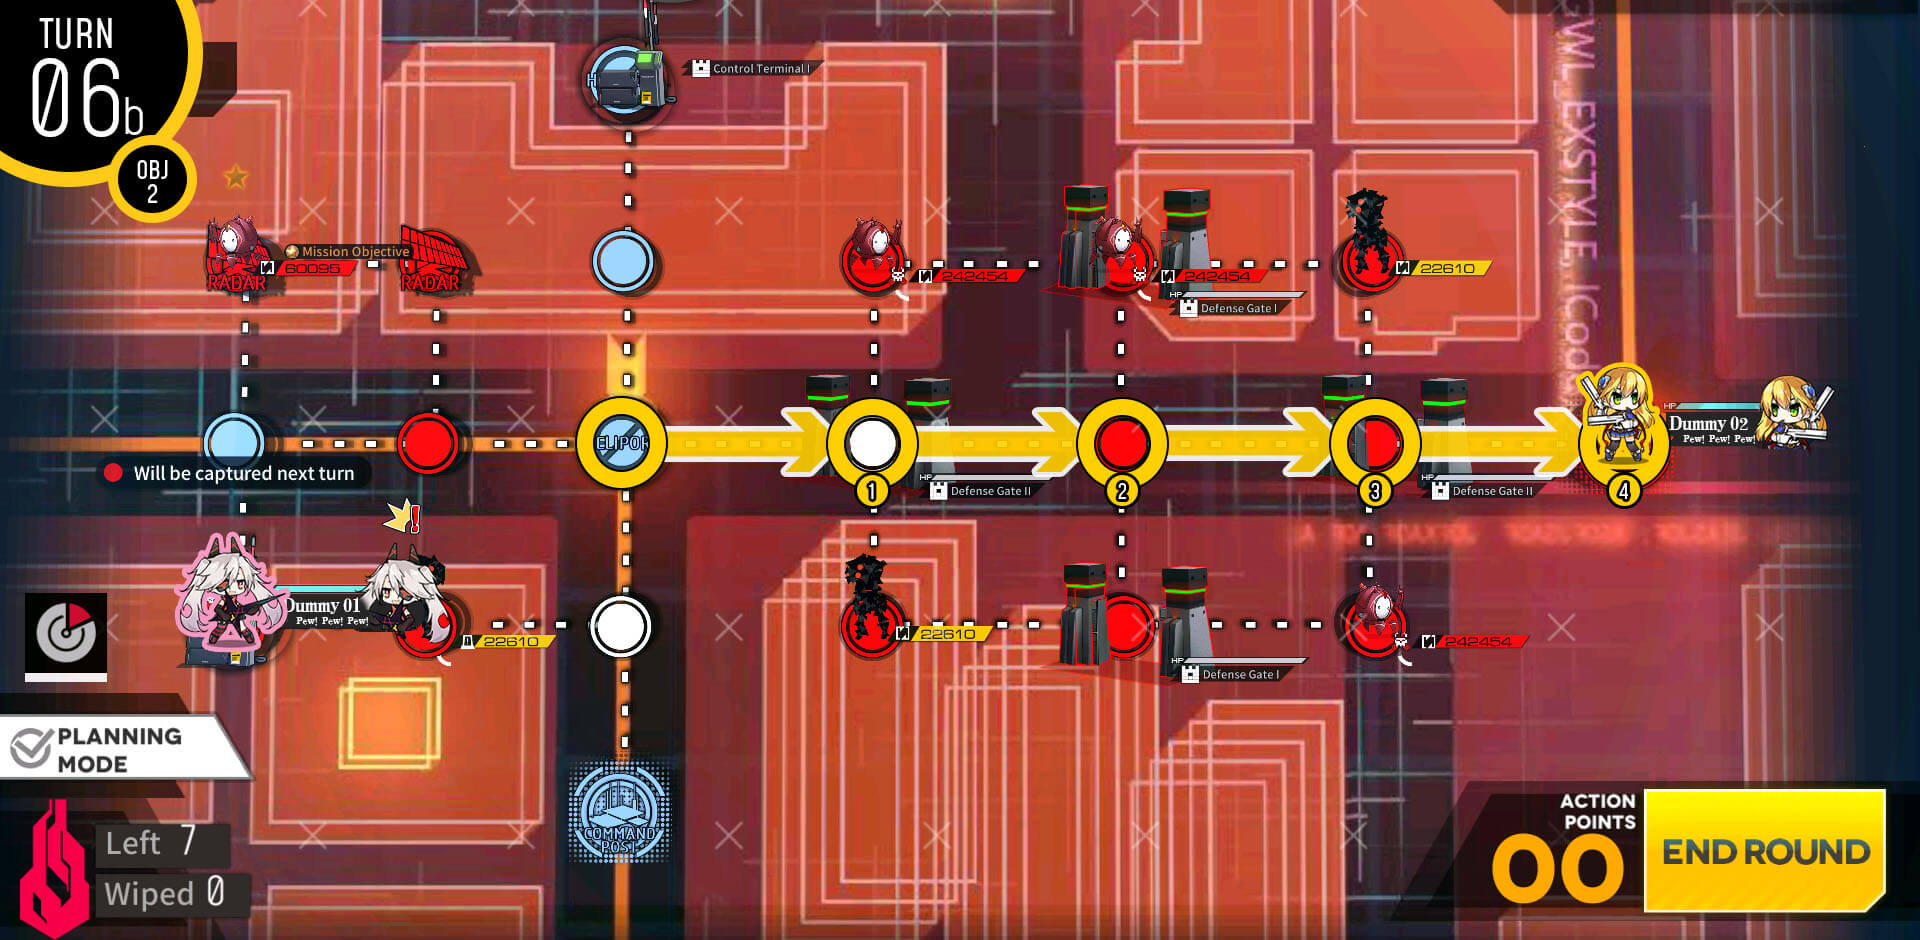
The dummy at the center should have clear path to the HQ.
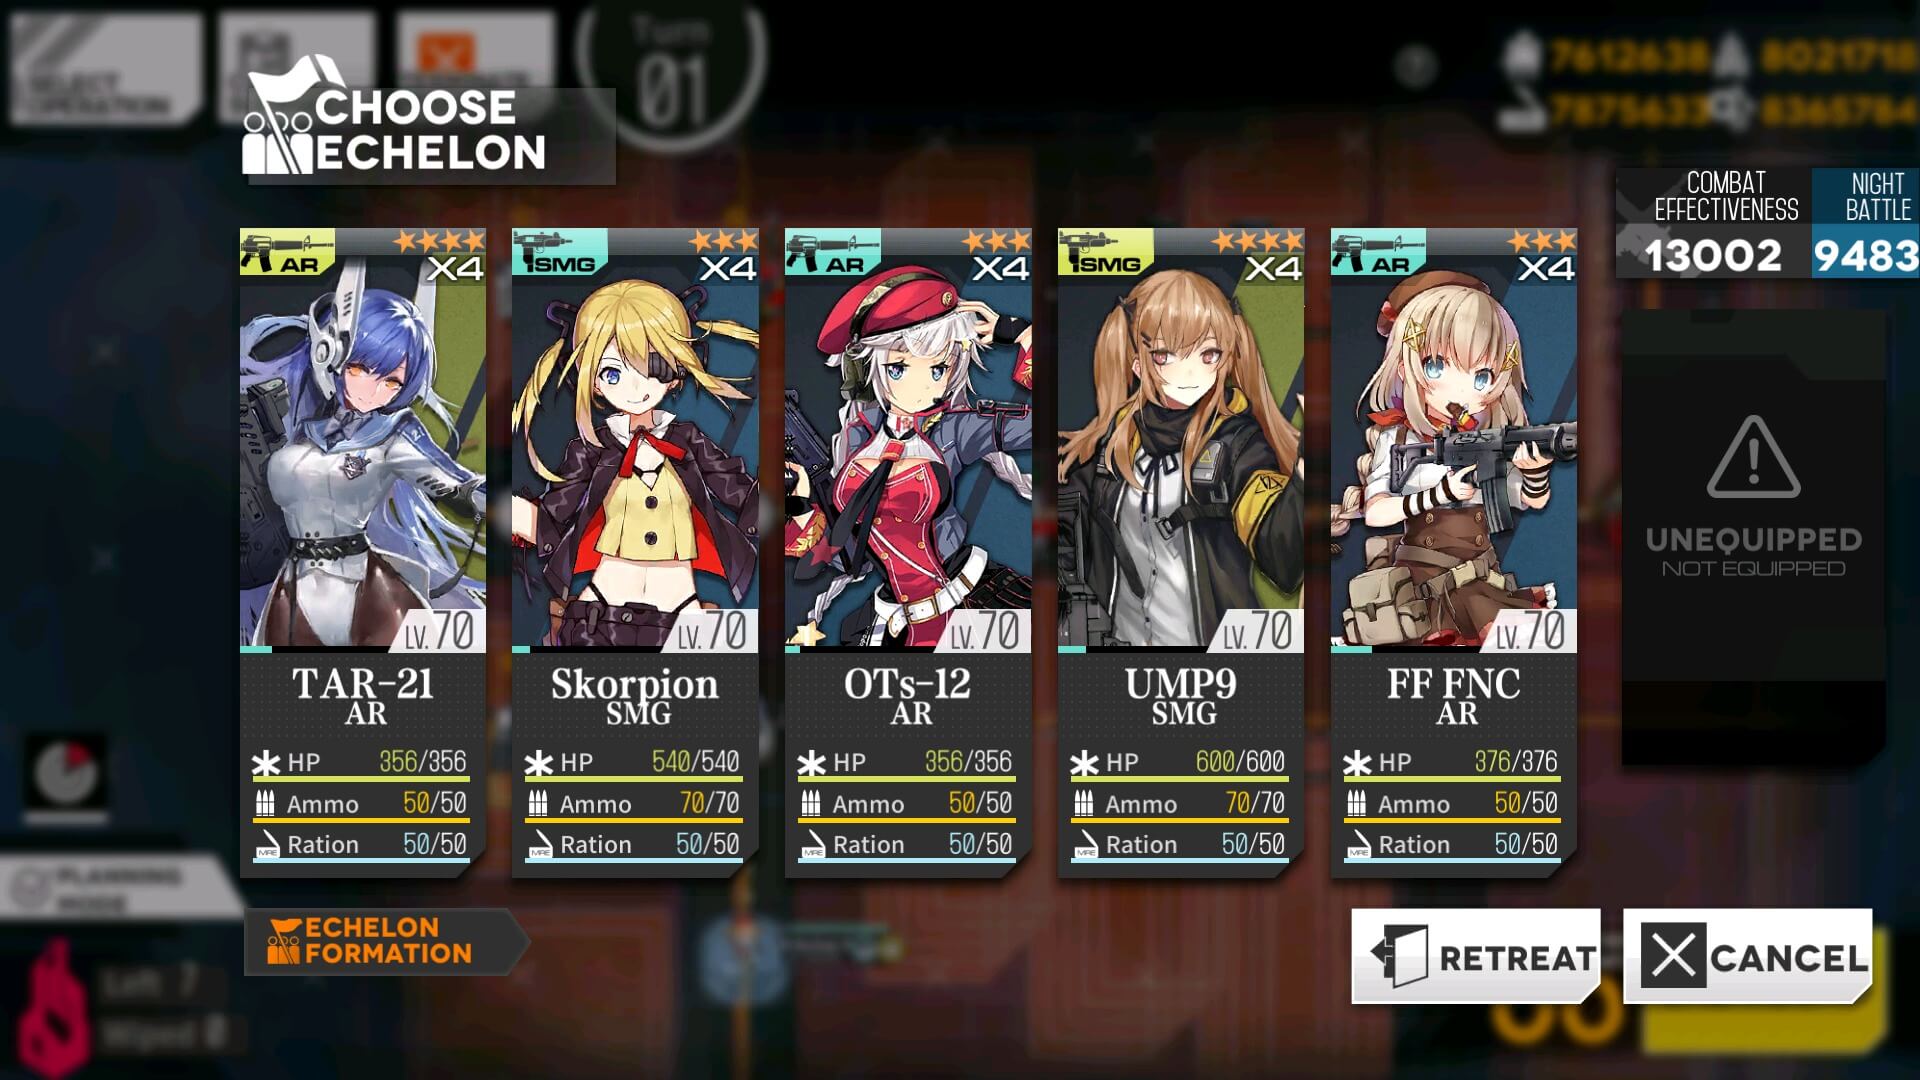

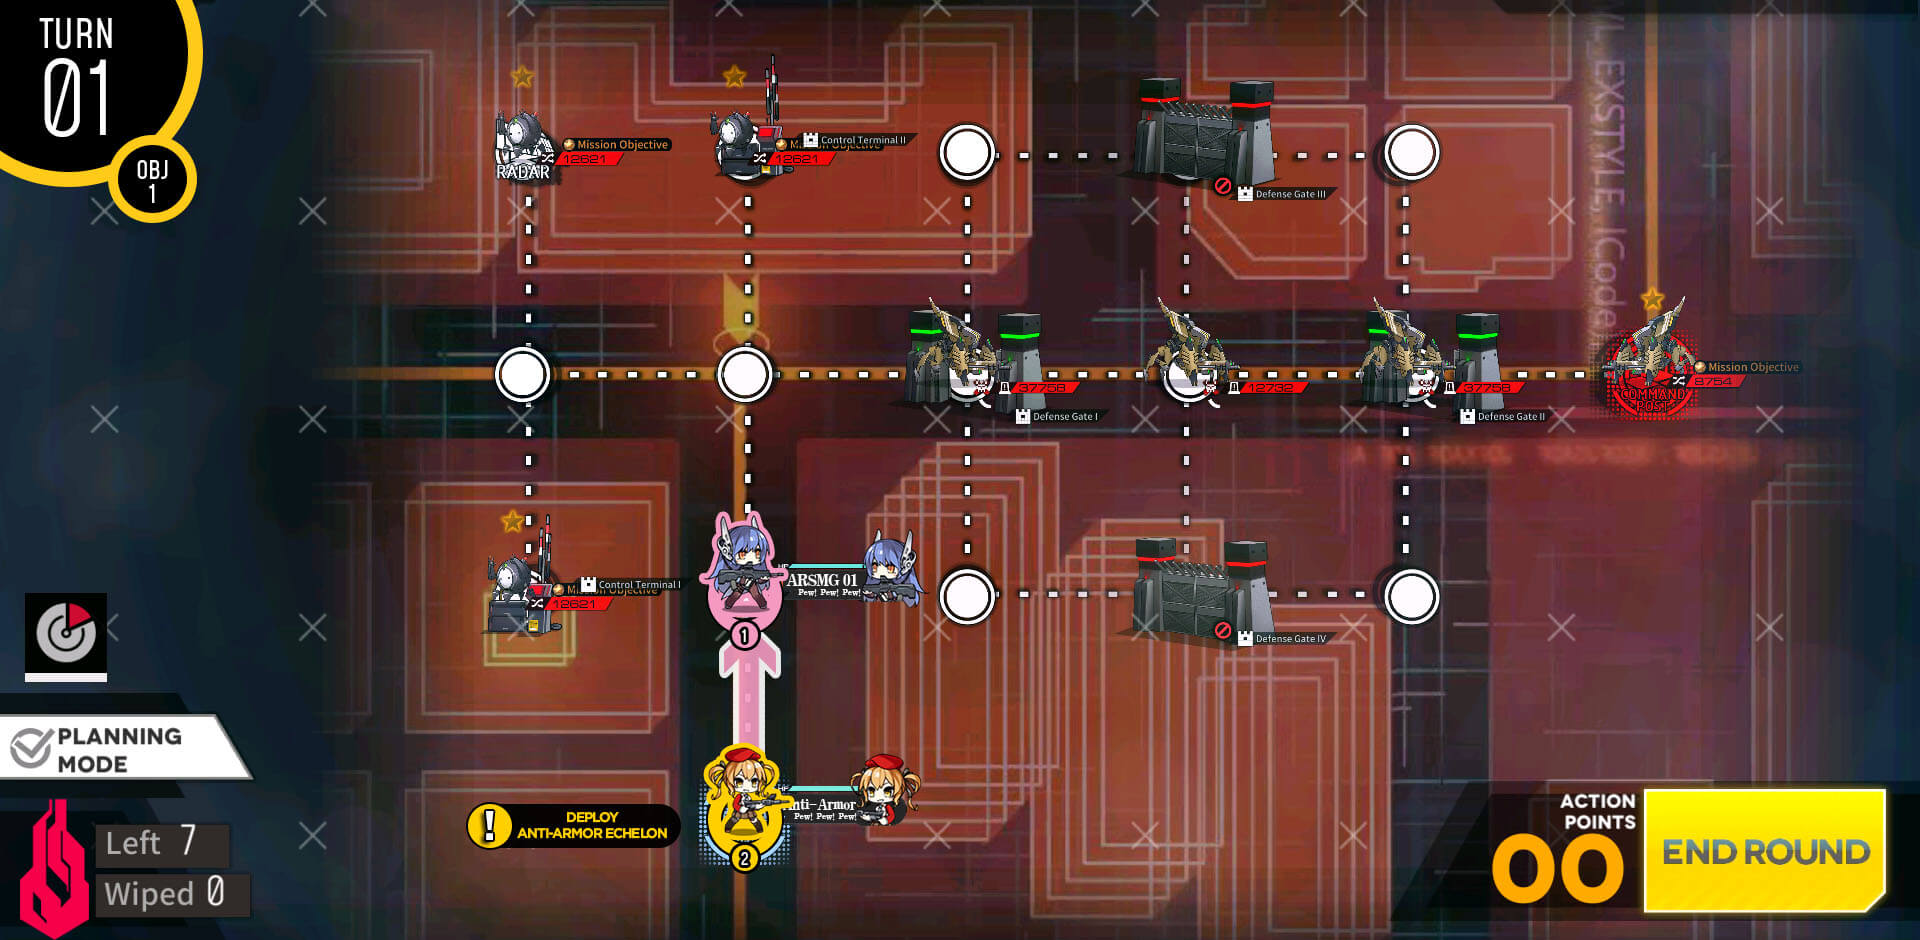
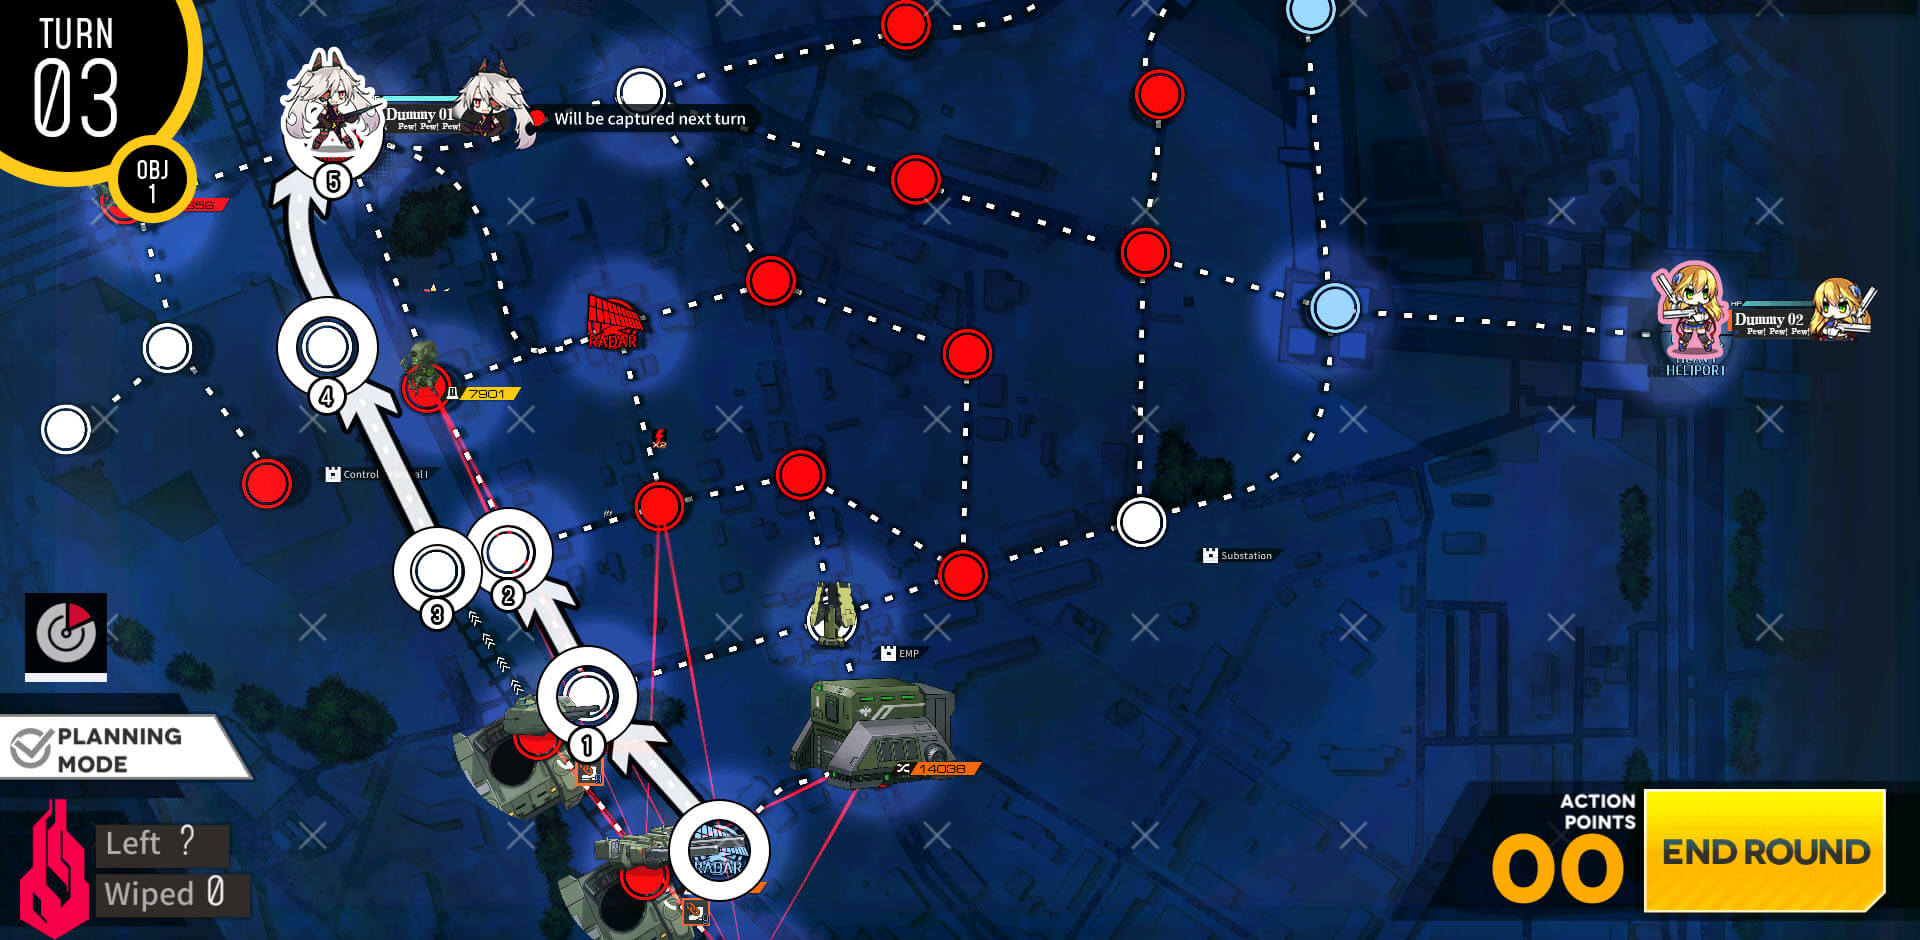
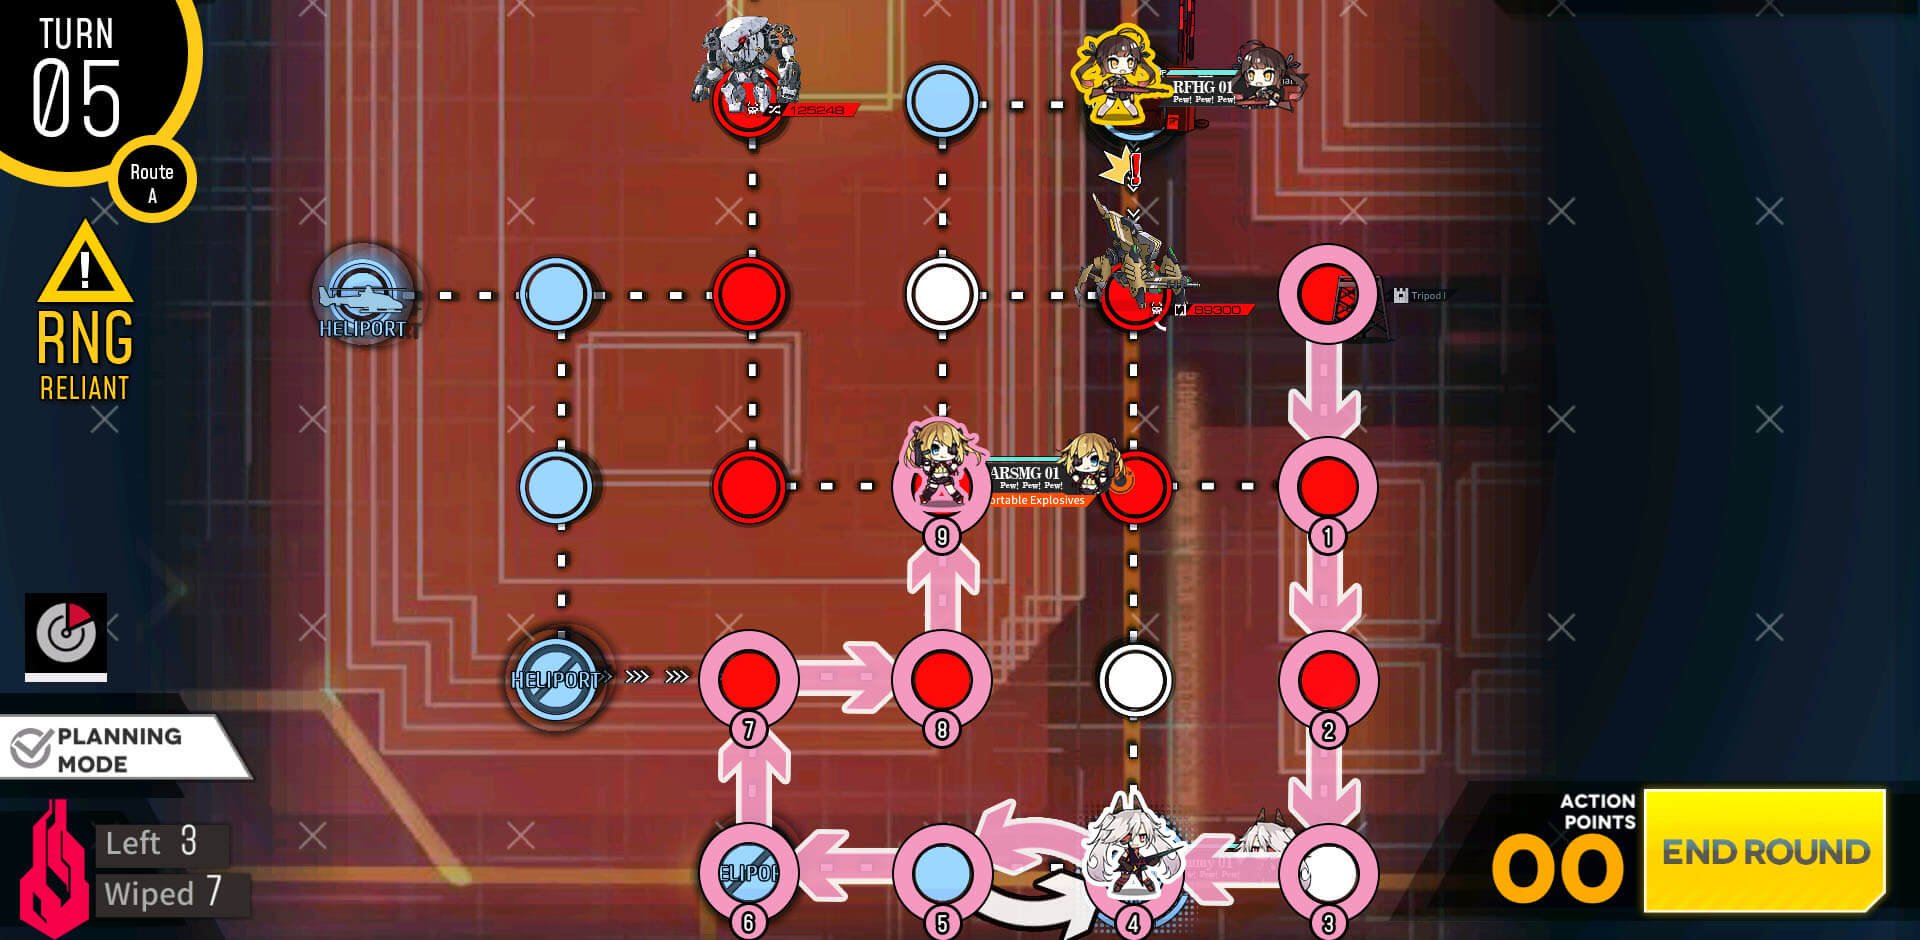
Start with ARSMG on the HQ and move up so that we can deploy RFHG echelon.
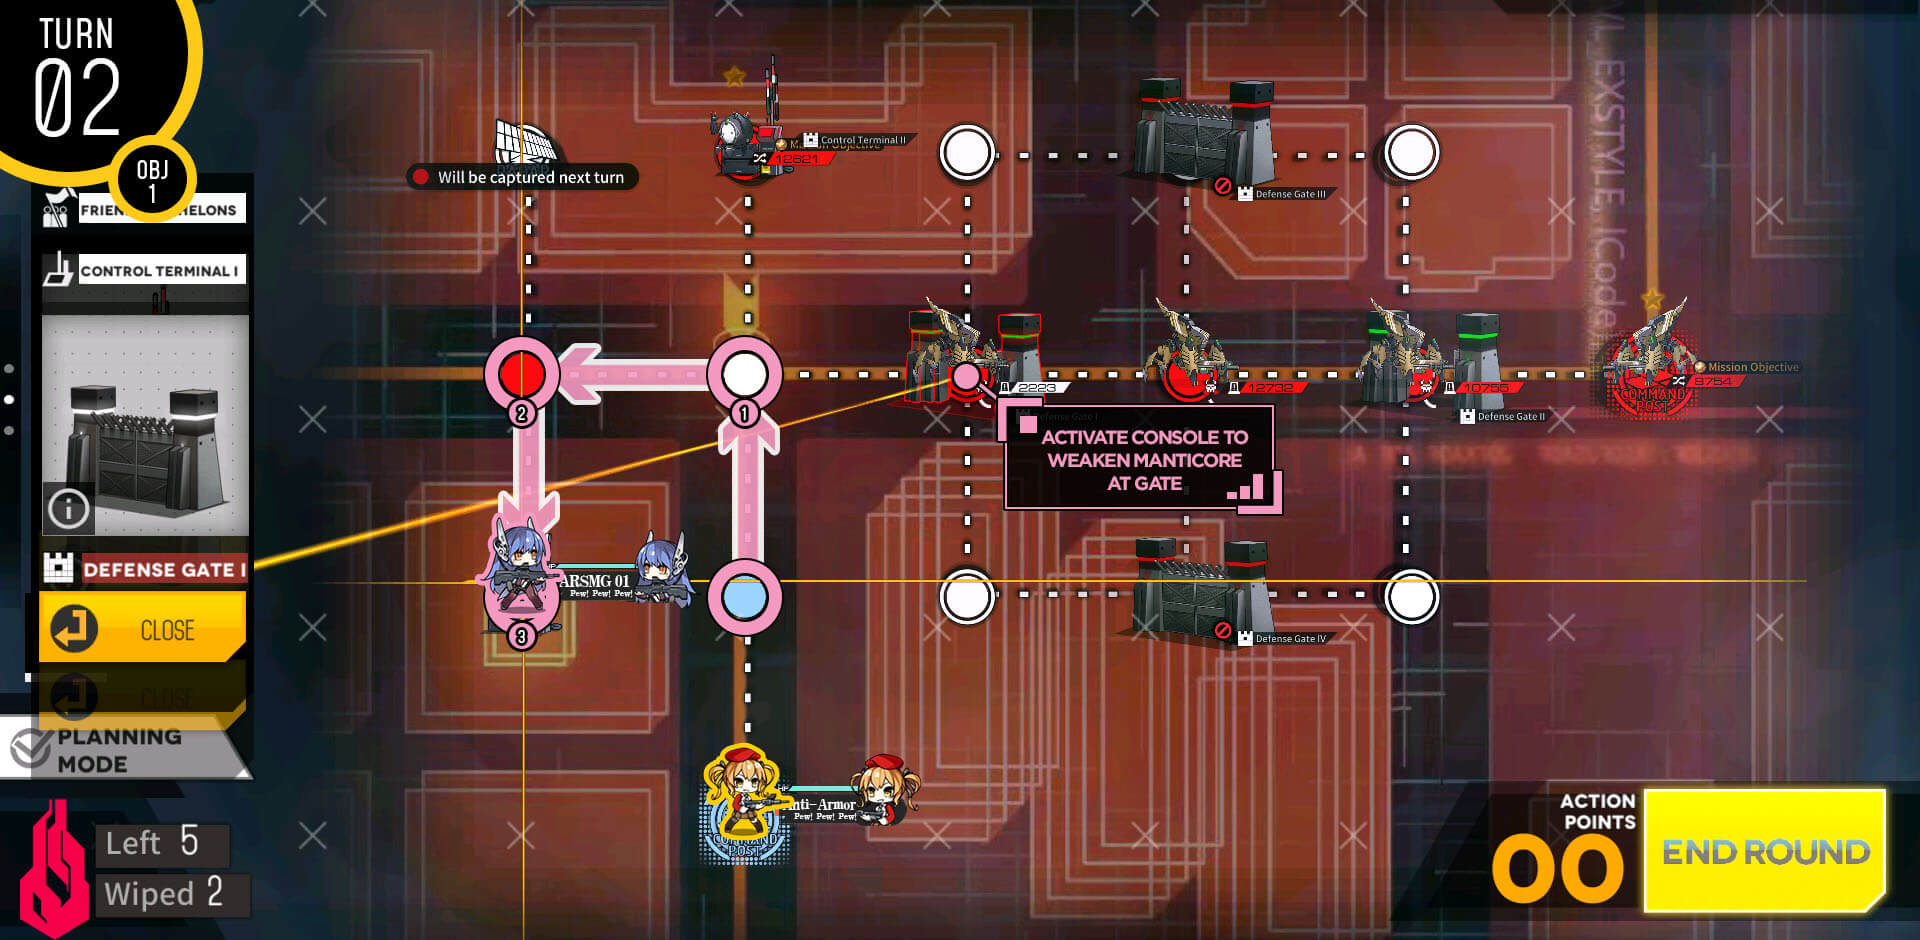
ARSMG then moves to the bottom left console and operate repeatedly to weaken the Manticore unit on the gate. You can stop when the enemy CE stops going down.
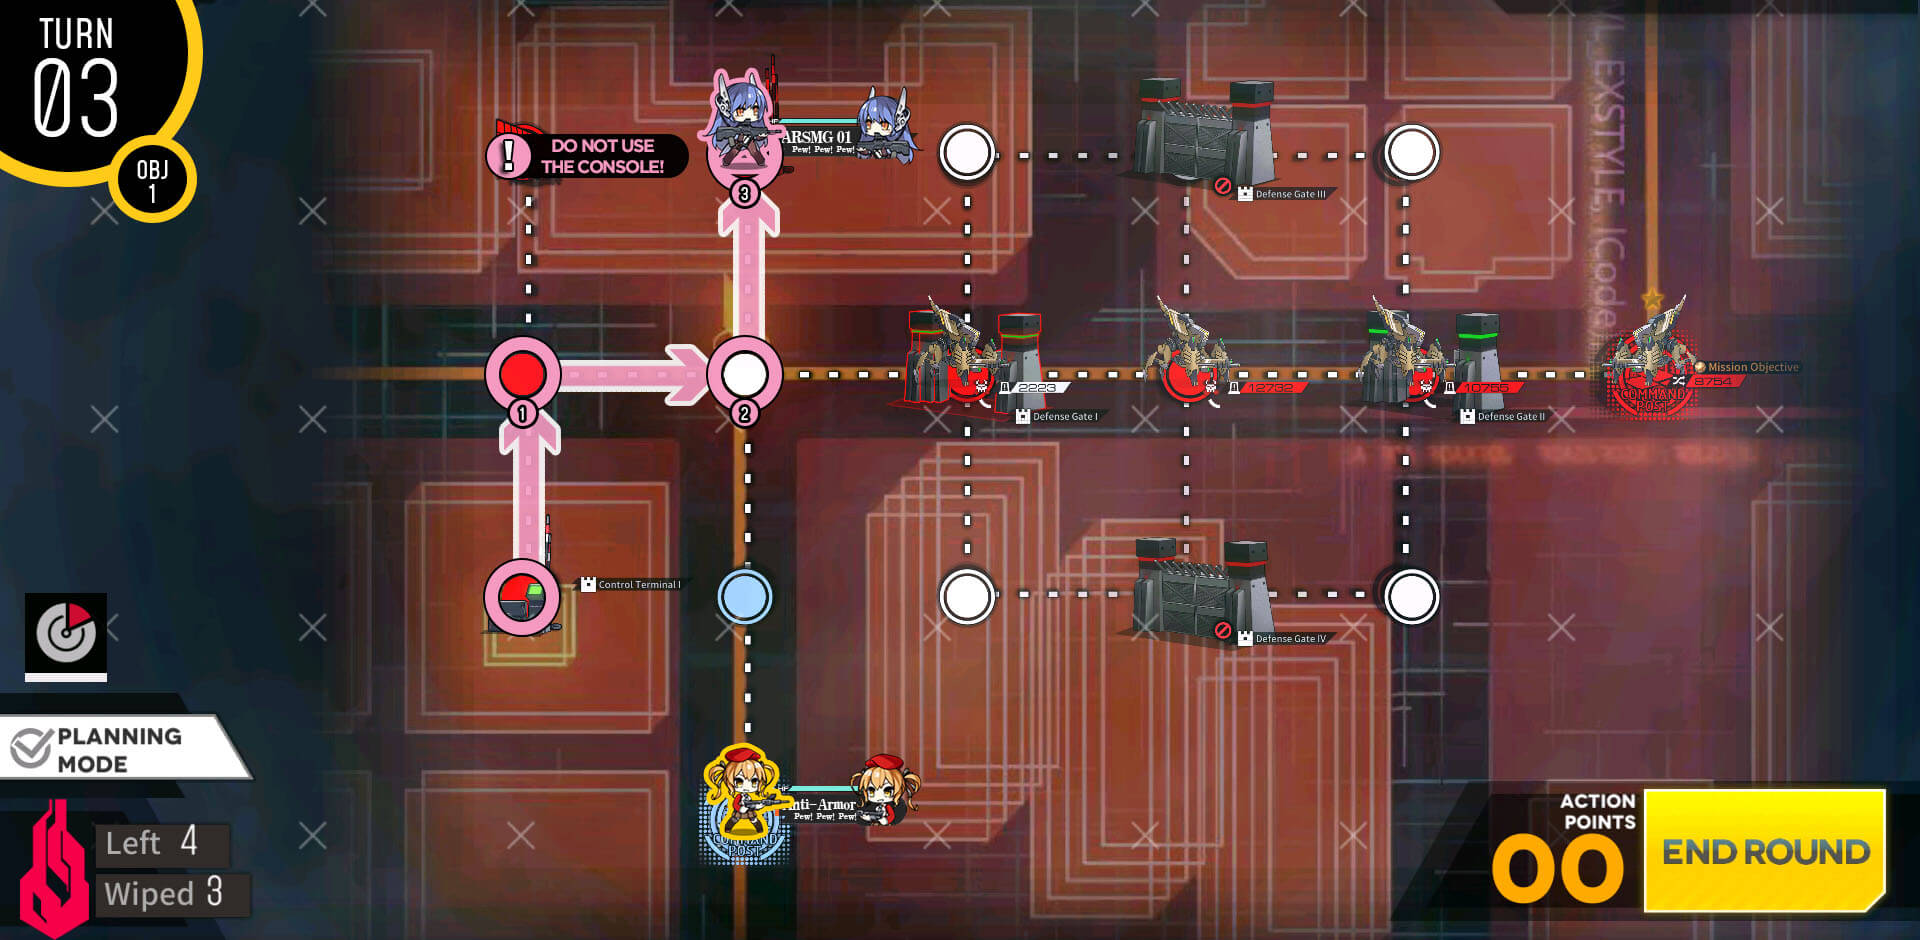
Wipe out the remaining Goliath unit by the upper console but do not operate it. Once you open it it will not let you reclose.

All you have to do now is to use RFHG echelon to defeat the weakened Manticore and fight the full health Manticore to clear the mission.
Start with your strongest ARSMG echelon and take the helipad to the right of the HQ.

ARSMG echelon then moves to the left side to take another helipad. Deploy 2nd combat echelon or dummy on the HQ.
1st Combat echelon moves back to the left side, but before we do, swap with 2nd echelon on the HQ to resupply and repair if needed before moving.

Once fully resupplied, ARSMG echelon moves to take another helipad on the right side.

2nd echelon moves up 1 node then end the turn.
We have a open path to the helipad on the left side which we need for the both objective. So move 2nd echelon to it then deploy a dummy echelon on the HQ.
Now we move ARSMG echelon on the right side all the way to the radar node below the hostage unit. This changes the AI of new units near the M4 from stationary to patrol.

If you want to rescue the hostage, all you have to do is to swap and rescue prior to moving to the left side. If you are looking to interact with M4, you can ignore this step.
Fight through the gladiator unit blocking the path to the helipad on the left side. Here you can rescue hostage by swapping and manually extracting to clear the objective B. If you are looking to clear objective A, resupply then head to M4.
There's one way path to M4 from the top side. If you fail, you are better of restarting the mission unless you can fight off the long legged enemy and willing to wait 8 more turns.
In this battle we are not trying to kill M4 but to destroy the Nyto units that spawns around the M4, if your echelon is not fully leveled to 100 and well-equipped, you do not have to worry about your echelon killing M4 by accident.

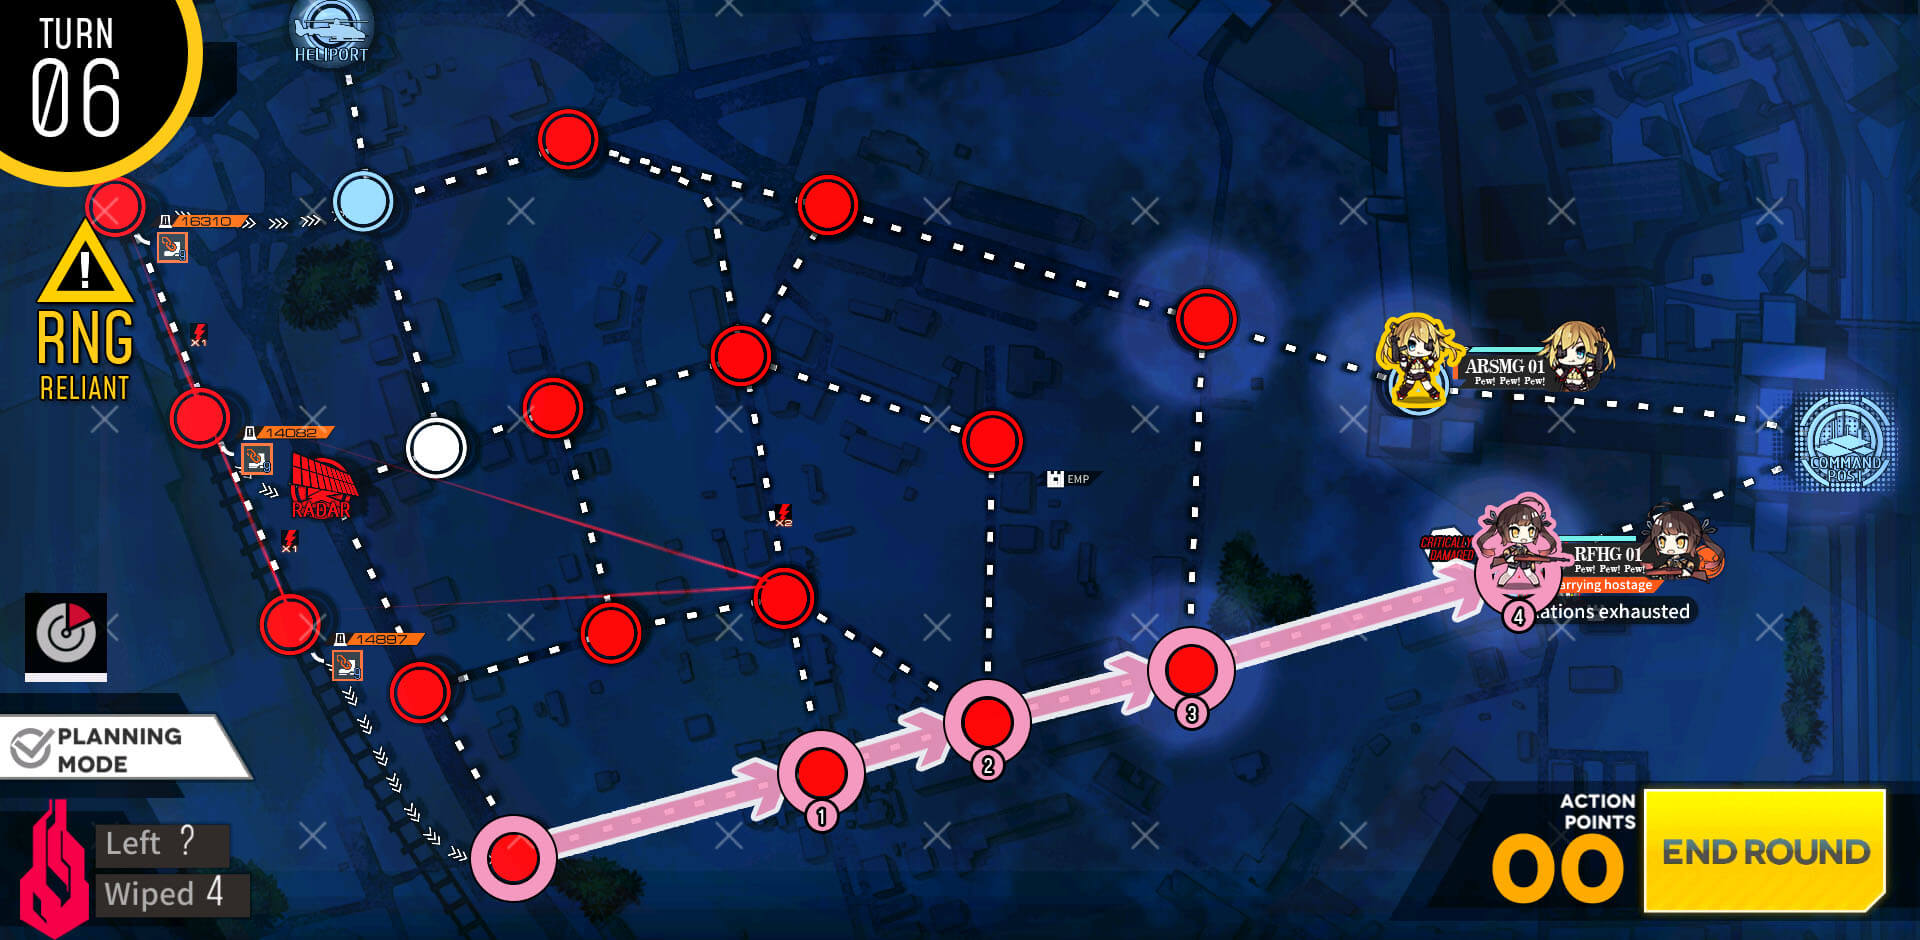
We are going for the easier objective here instead of fighting M4 with souped up bodyguards in the center of the map. Start with ARSMG echelon then capture the helipad to the right.

ARSMG moves to capture the next helipad to its right. Then deploy dummy echelon on the HQ.

Continue to capture another helipad to the north near the hostage.
On turn 4 we move up to swap position with hostage first to save action point.
Once rescued, move back down the path traveled to HQ.
Travel back to HQ, swap with dummy and manually extract to clear the mission.
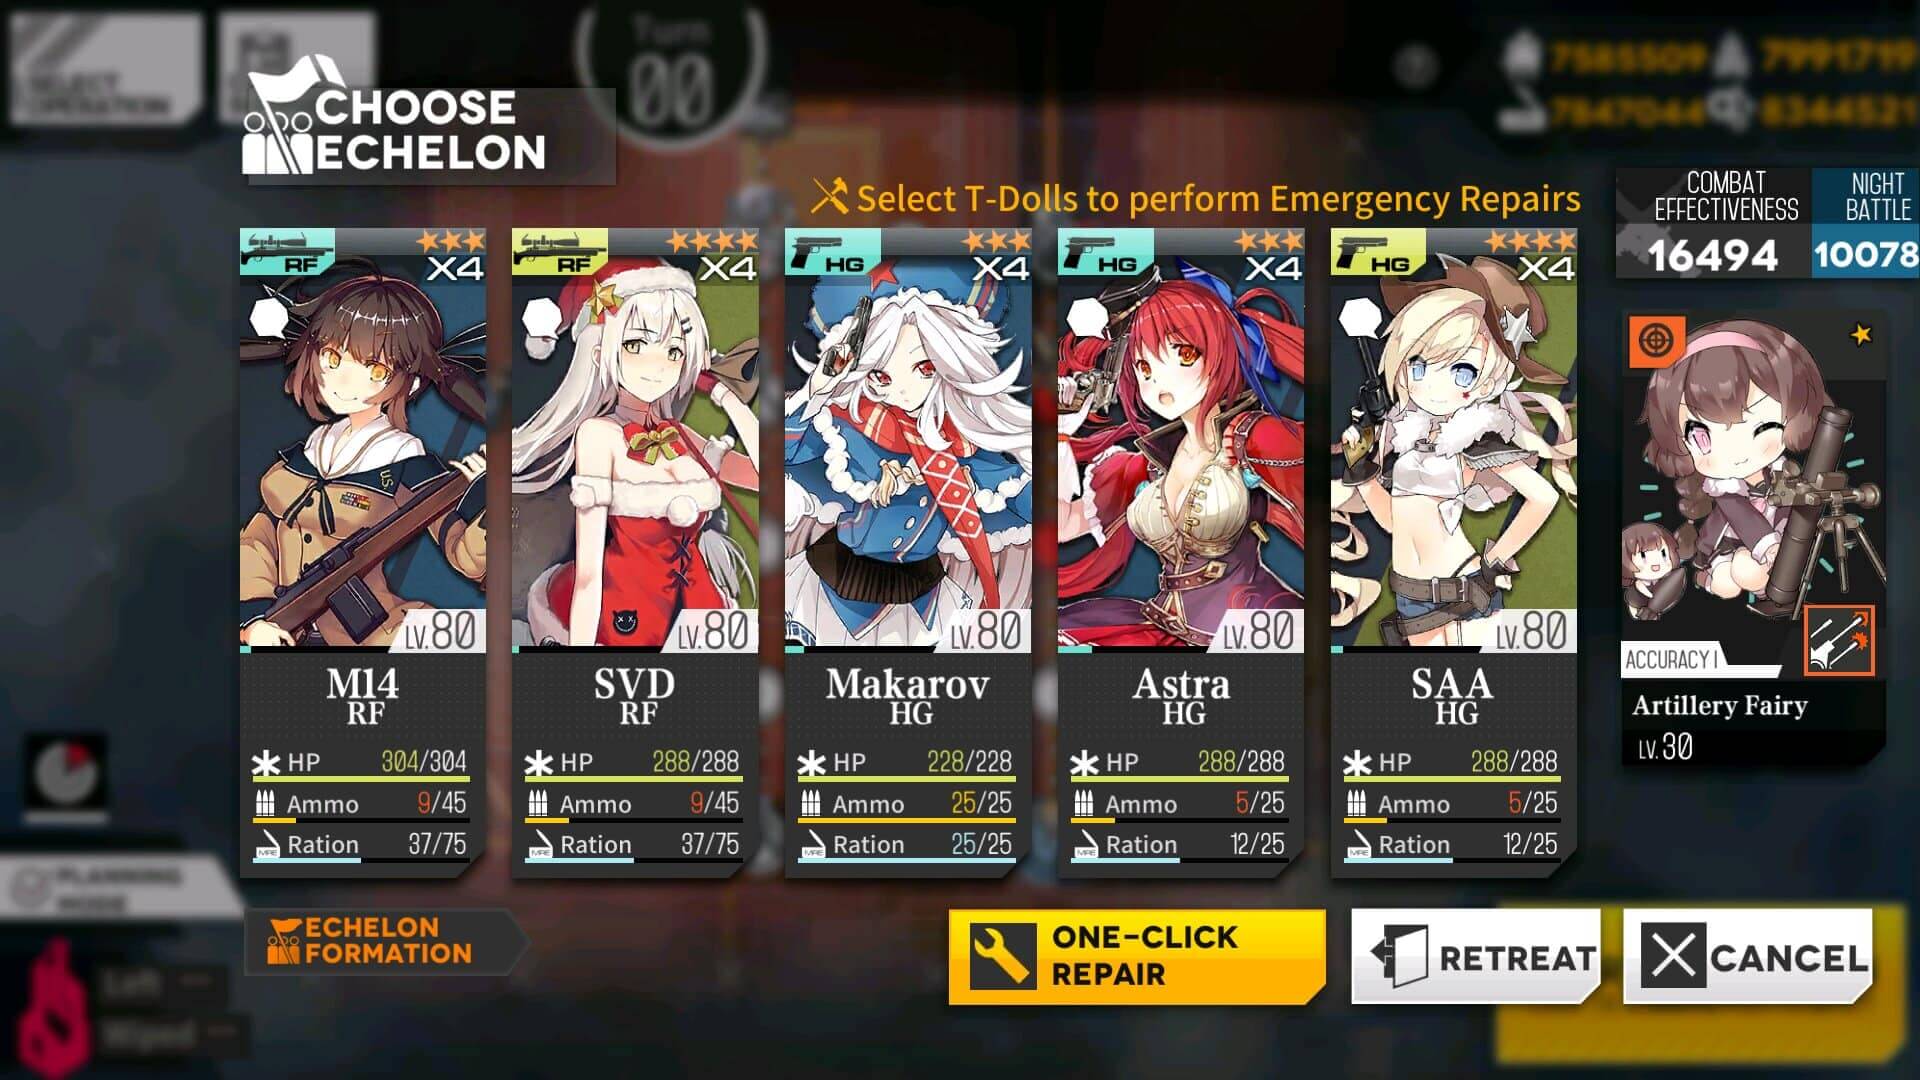
New addition to echelon is fairy for the aura buff it provides. It is just 1 star and level 30, easily achievable with few combat reports. During the leveling process I have also picked up G41. Use M4, ST AR-15, or Sopomod II if you need strong ARs. We have also leveled T-dolls to 80.
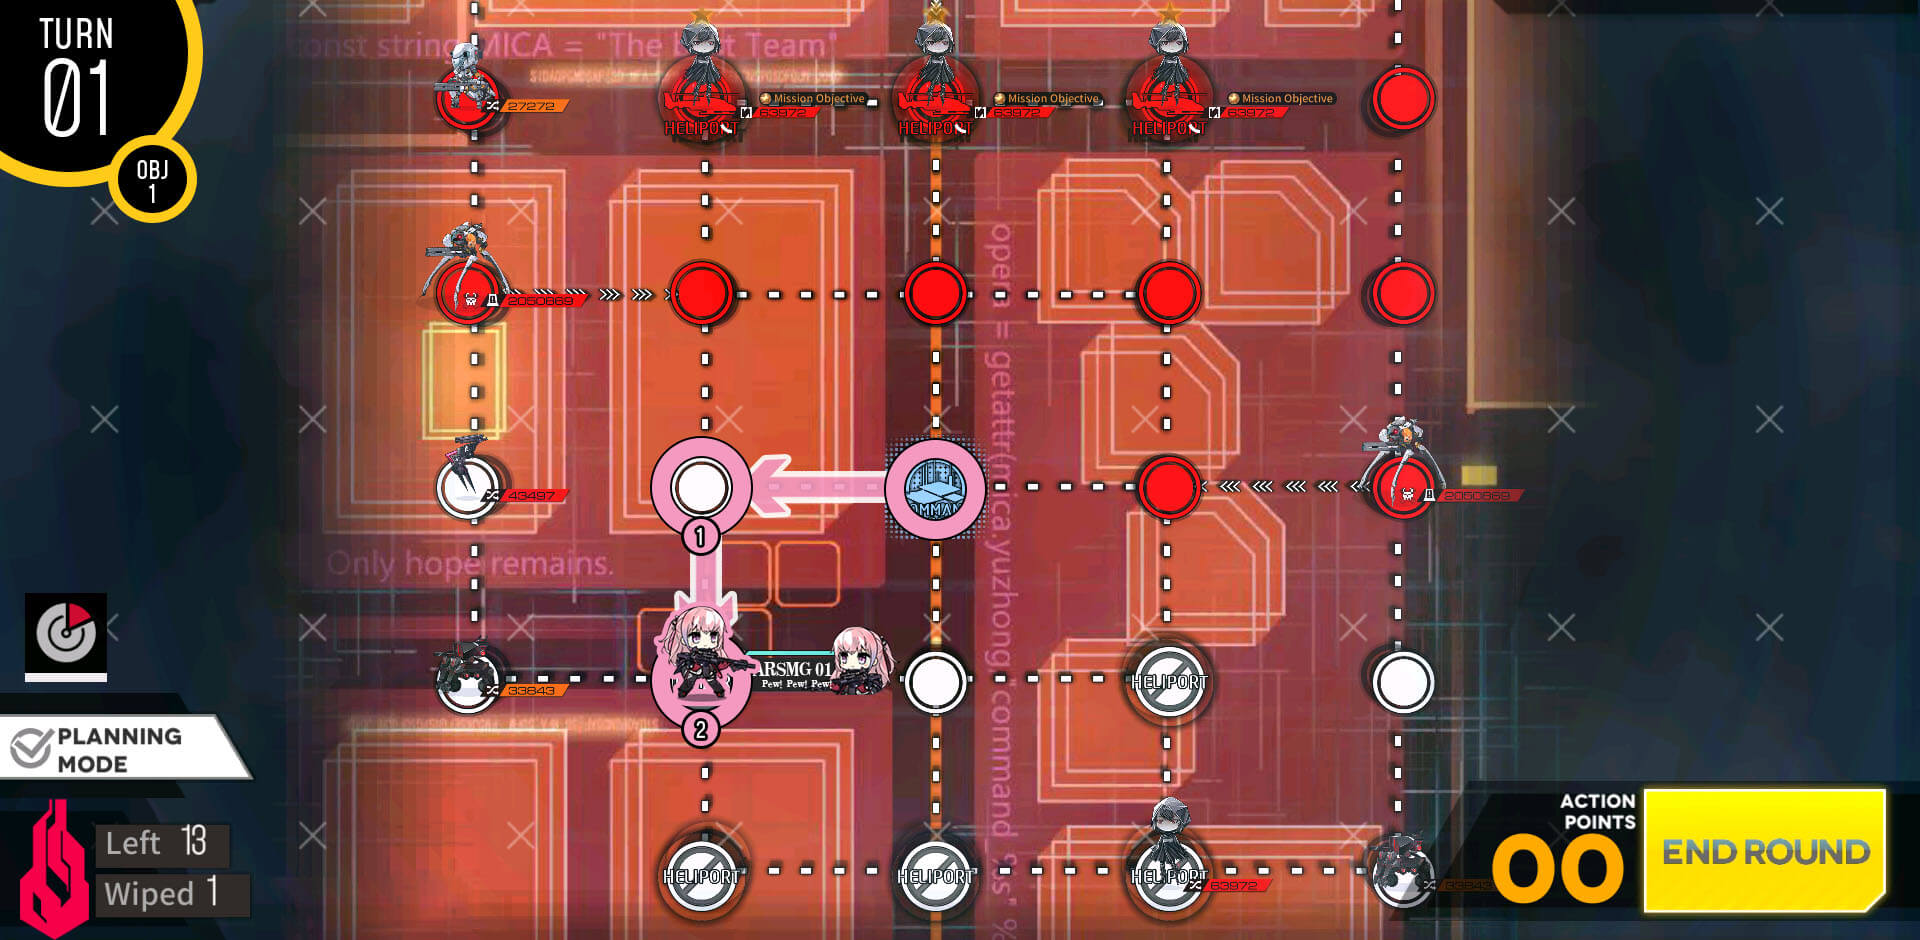
We start the mission with deploying 2 combat echelons side by side facing left.
Bring both combat echelon down 1 node each and deploy dummy echelon on the HQ.
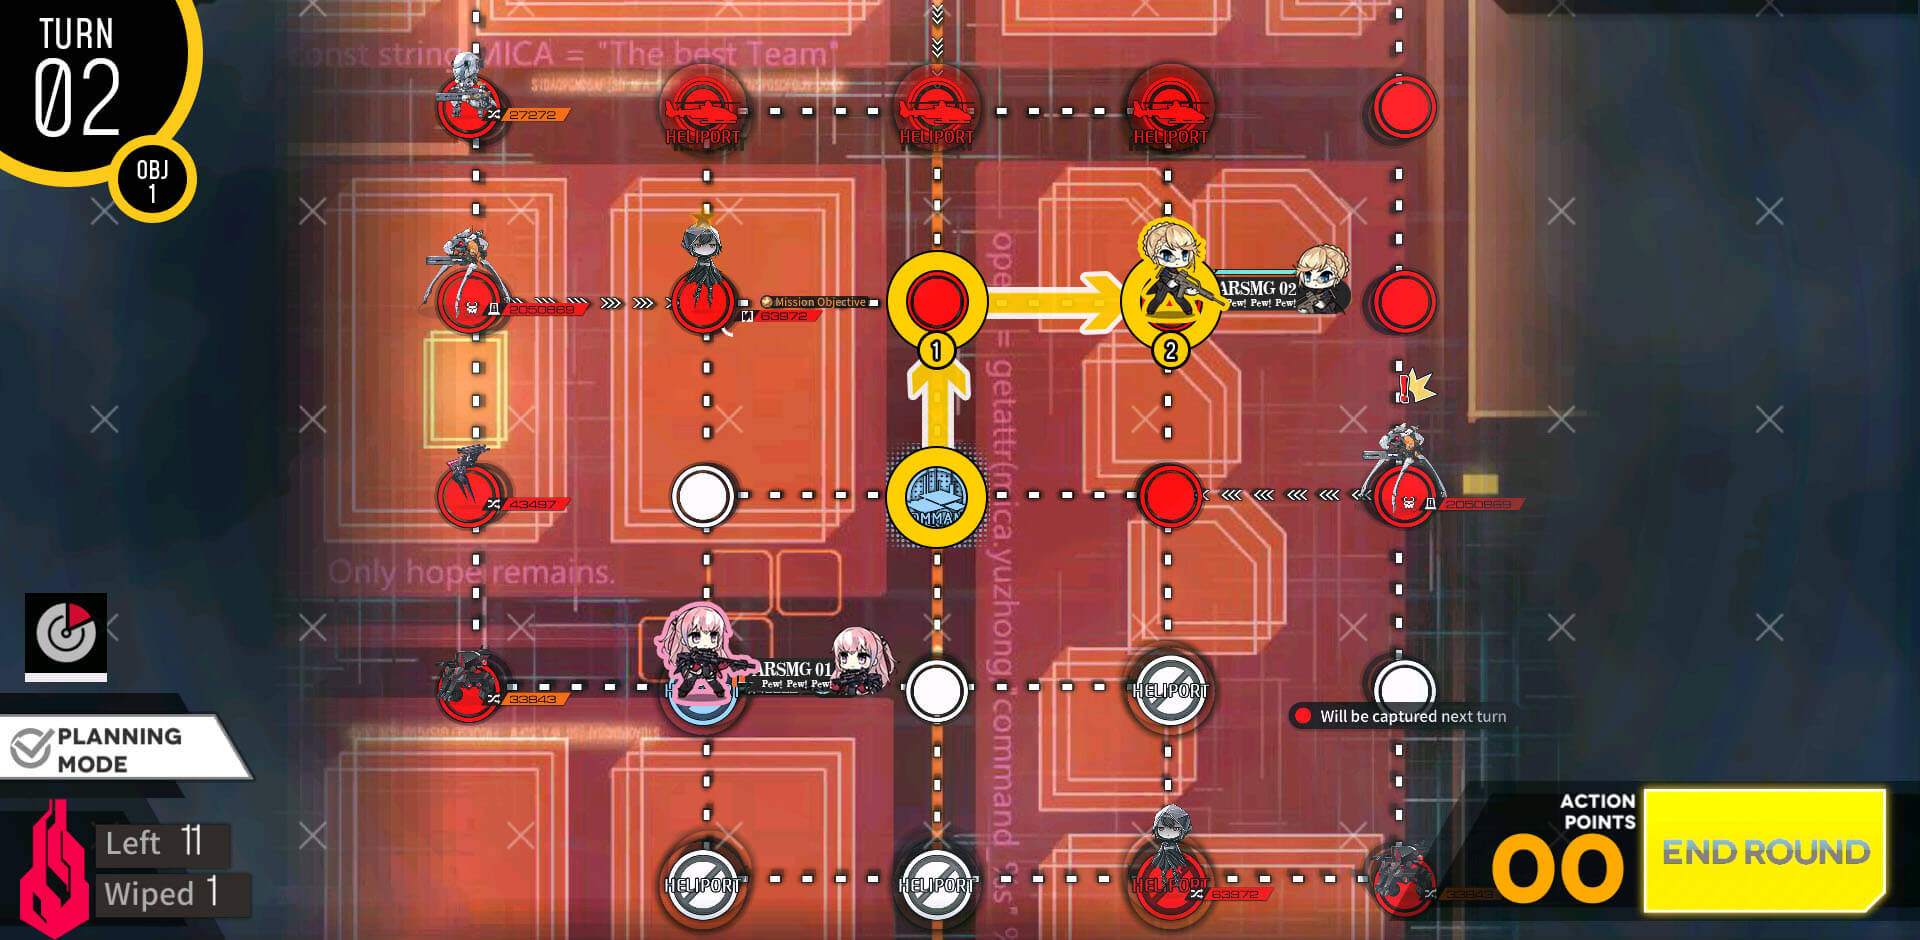
We then swap location so that Dummy is at the bottom and combat echelon at the HQ.
Swap to put dummy away from any potential fight and put 2nd combat echelon to dummy's right.
We then resupplies ARSMG echelon on the HQ and swap with combat echelon below. Then clear the path to enemy HQ through bottom right path.

Continue moving toward the enemy HQ.
Take the enemy HQ and end the turn.
Start with ARSMG echelon on the HQ and deploy 2nd echelon on the HQ after moving down one node.
At this point Isomer on the bottom left should have run into you, if it did not clear it first, then clear out the remaining units on the top side while making sure HQ is safe from being captured.
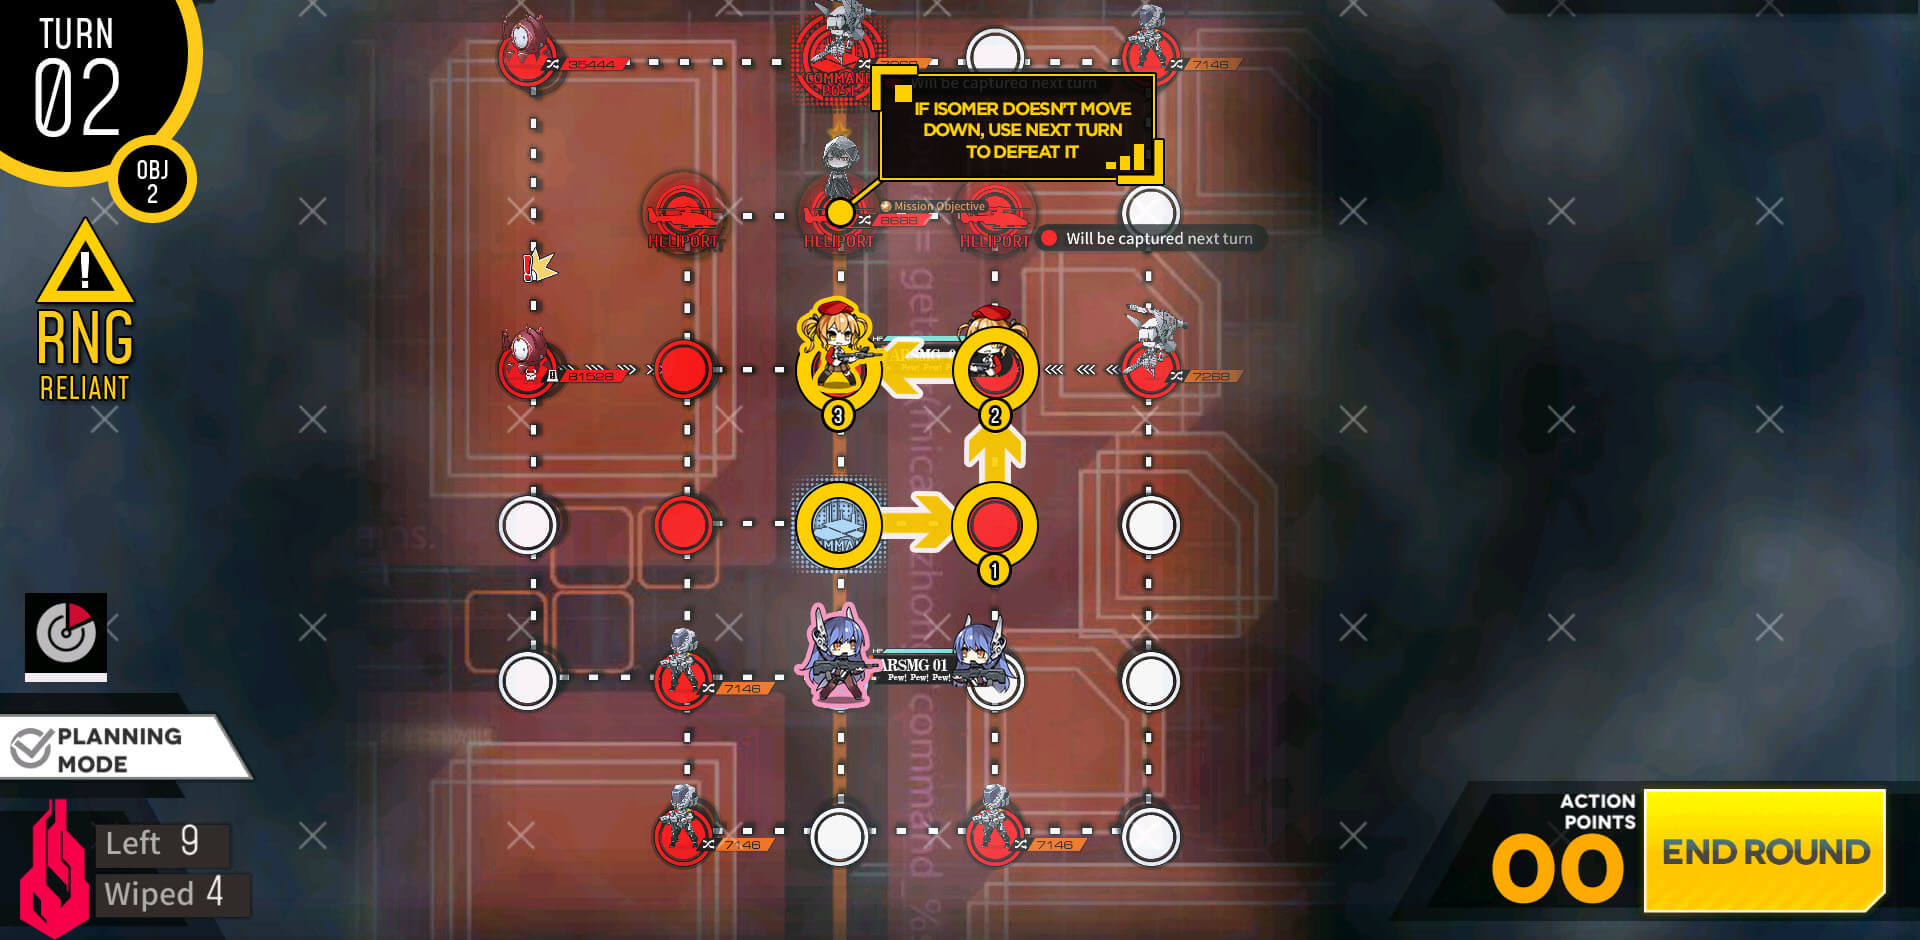
This map is also pretty similar in solution to the objective of killing all the Isomers present on the map. Start with combat echelon the HQ and take out the Isomer on the bottom left.
Deploy 2nd ARSMG echelon on the HQ and sweep to top then to right side of the map.

Combat echelon at the bottom of the map takes out the Isomer to the left of the map then returns to the position. 2nd combat echelon to the right moves to spot between helipads and the enemy HQ to get the Isomer coming down next turn.

With one Isomer remaining, simply walk over with 1st combat echelon then clear the mission.
Again we are using the updated ARSMG echelon [Lvl 80+ / 4x links / fairy added]. Make sure to pay attention to their skill levels and equipment as well. Since we have to fight Goliath units, DPS check is going to be the bottleneck to the progress if you can't kill them.
I have also included RFHG echelon as example to show that you can use them if you have them instead of 2nd ARSMG echelon. However using ARSMG echelon is more likely to be quicker and safer at this level/links.

Start with both combat echelon on the deployment zone. Move 1st combat echelon on HQ to the helipad to the left and deploy dummy on the HQ. Wait remaining move, 2nd combat echelon moves to the right.

Work to capture the helipad between two starting location by taking surrounding nodes with combat echelons.
Then dummy moves to the closed helipad and swaps with 1st combat echelon.
Then 1st combat echelon moves back to the HQ.
If you have bad RNG you will have to move dummy away from the Goliath unit. Then move 2nd combat echelon towards the console panel. If you didn't have to move your dummy, you can get to console and activate it this turn.

Activating the console puts goliath unit on the right side to sleep mode, turning into a bomb. If Goliath unit moves next to dummy again, simply move it again.
1st combat echelon on the HQ moves to pick up the bomb.
Combat echelon with the bomb loops back through HQ, resupplies and repairs as needed then move towards the Gladiator unit on the top left.

Stopping right below the enemy unit, you can use the bomb to destroy it and open the path to the radar.

Once you defeat the enemy and step on the radar, Manticore unit disappears, clearing the mission.
For this map, it is recommended to have Airstrike Fairy along with your ARSMG echelon as it will fight against Armor units at least once. RFHG echelon is not recommended as it will have tough time against the Tarantulas.

With Airstrike active, even at lower skill level, it will eliminate threats and safely defeat armor units as Tarantulas will die right away.

Start with combat echelons on each starting locations. Then move to capture the node with console panel. We also clear majority of the units on the map. Activate it now.
Depending on where the Manticore unit is at, move the combat echelon to near or on the HQ accordingly. If you have spare action point, use to deploy dummy at the helipad. If you don't simply deploy it next turn. Depending on RNG, you might have just enough action point to move echelon to the HQ.
Repair/Resupply combat echelons as needed then move combat echelon near the HQ to the node below the Goliath unit that will turn into a bomb. Combat echelon at the left side moves to the console panel above the Manticore unit and activates the console.
Now that Goliath is a bomb, combat echelon below it picks up the bomb and moves to take out the Manticore if it has not been taken out already. If you are struggling to take out the Manticore with ARSMG, deploy RFHG echelon at the HQ instead.
Make sure to eliminate all enemy units save for two at the top left.
Travel back with the bomb to the last two enemy units.
Near the enemy, use the bomb to remove the strong enemy.

With strong enemy removed, take out the last unit and clear the mission.
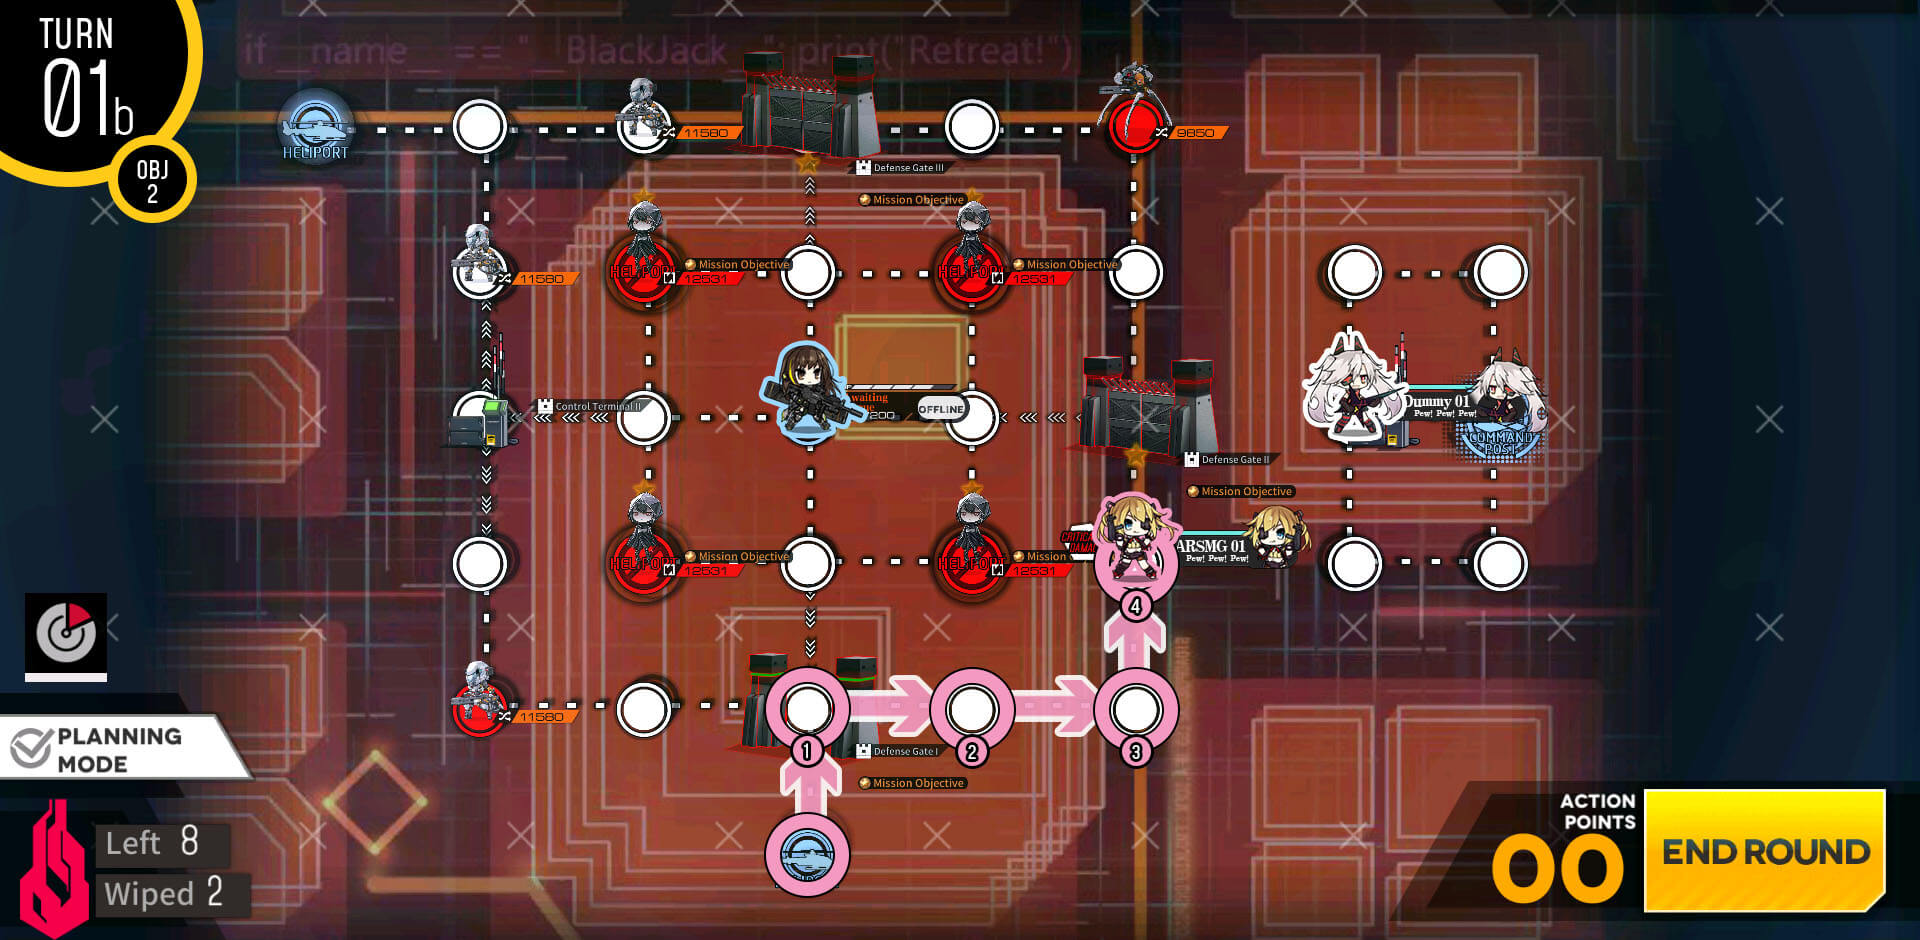
Deploy ARSMG on the bottom helipad, followed by 2 dummies on the other locations. First thing we do is move dummy on HQ to console to open the gate using Randomizer A.

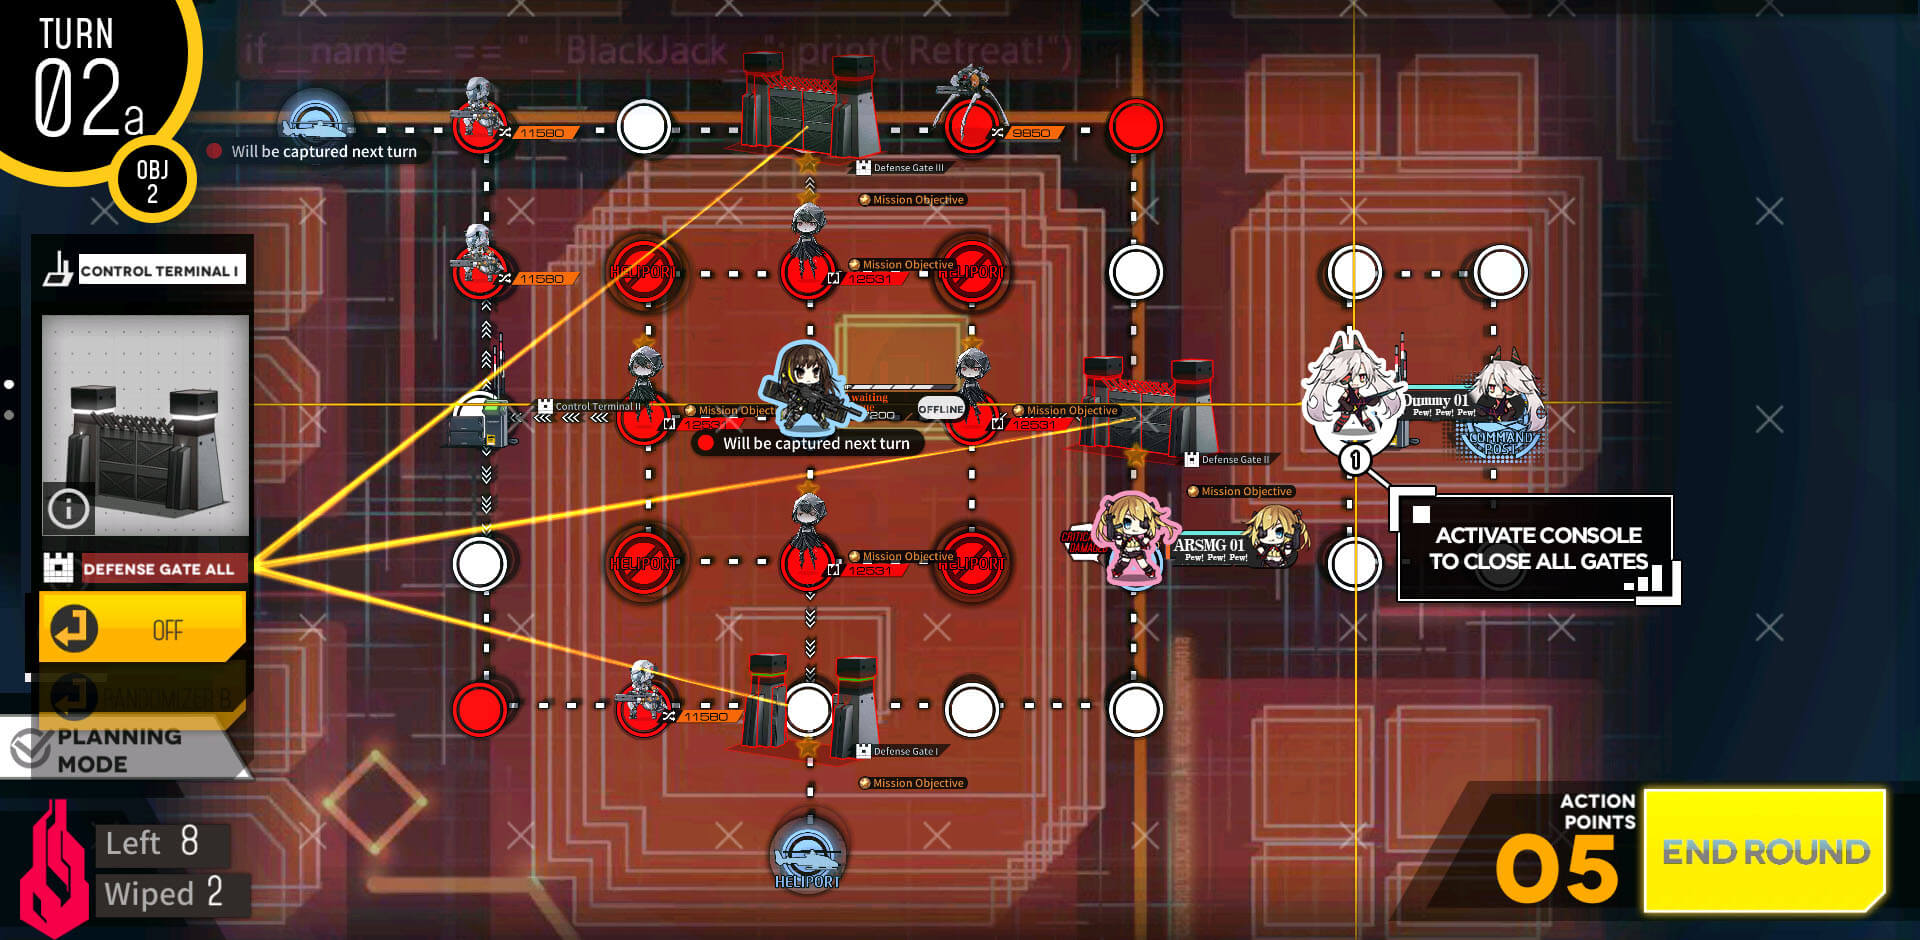
ARSMG moves to the next gate on the right side.
We have to reset the gates by closing them all before opening new gate.
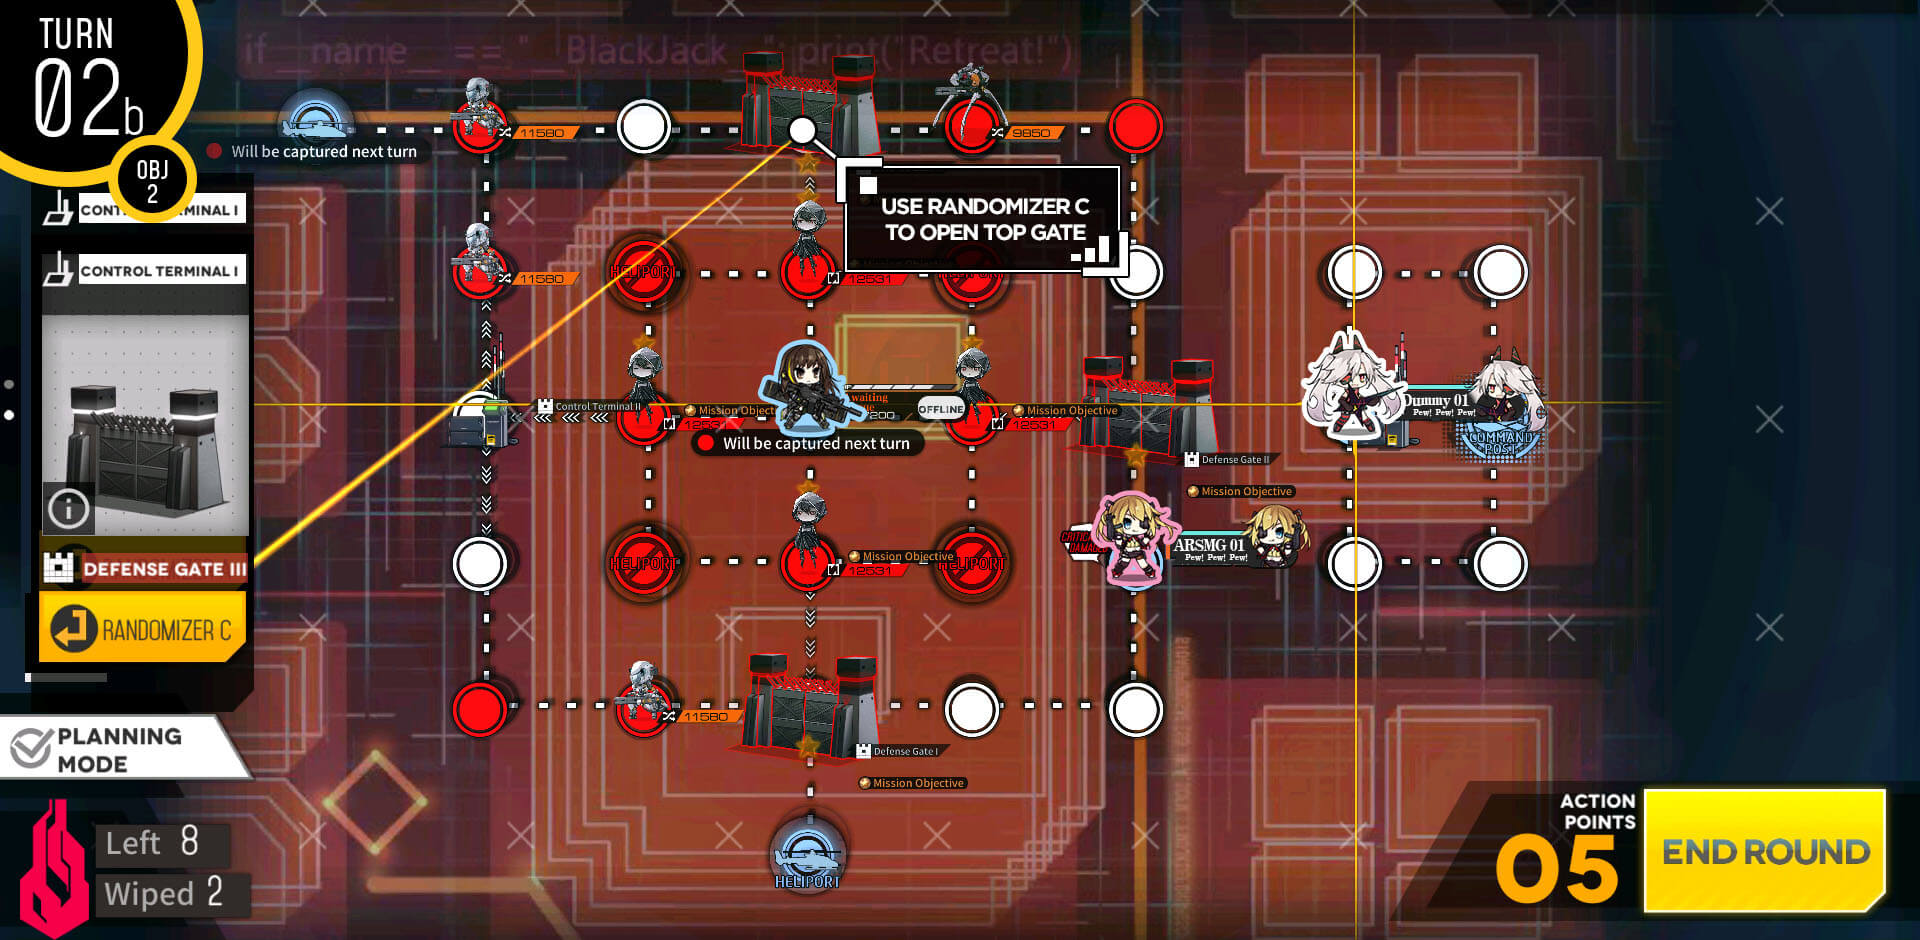
Scroll the gate options and pick Randomizer C.

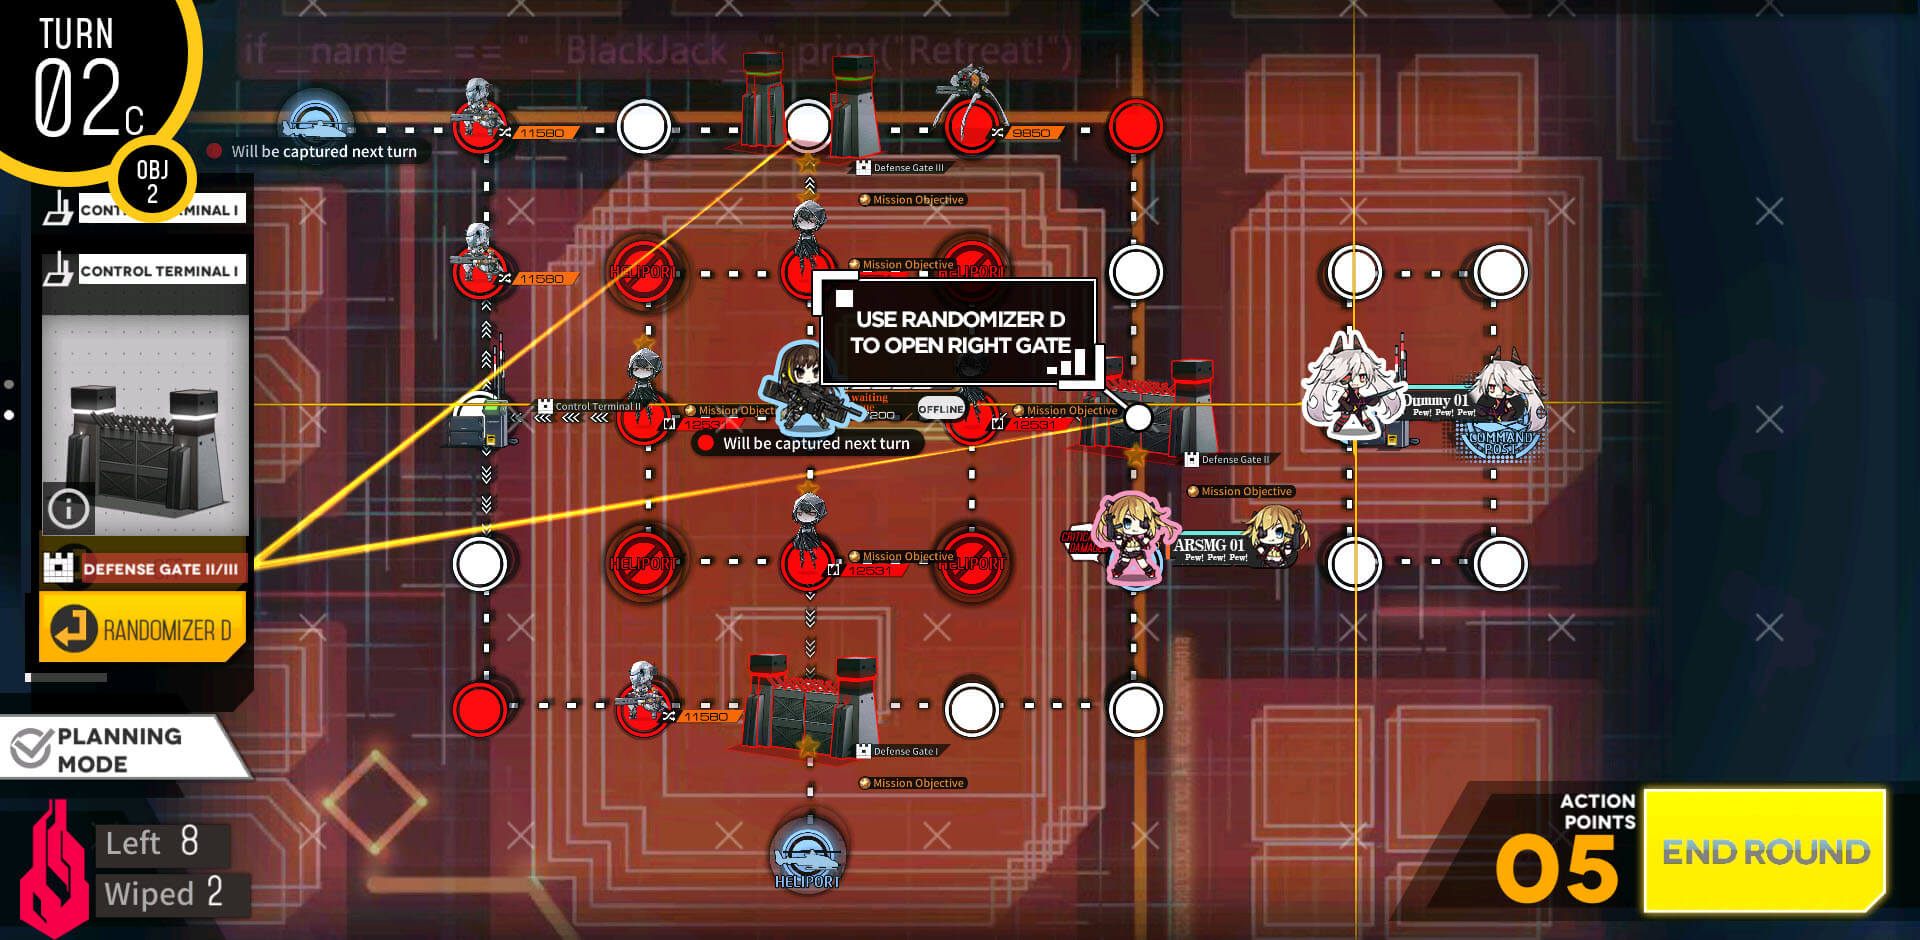
Then use Randomizer D right after to open the gate in front of ARSMG.
Move the ARSMG on to the gate and end the turn.

ARSMG moves to rescue the M4.
Then we once again reset all gates to closed state.
Then open the bottom gate again by using Randomizer A.
Safely move the echelon down to the helipad then extract hostage to clear the mission.
Setup and Start is Identical except for not having dummy on the top left helipad.
Randomizer A, Move echelon, then close all gates.
Now to open the gate on the right side, close all gates first.
Activate Randomizer C, then Randomizer D
After you pass through, you do not have to operate console using dummy again.
Now all that's left to do is to take out Isomer units. One thing to note is that you don't have to kill them yourself and M4 can act as shield to take out the last Isomer on the top side.
Move towards the console on the left side which let you open all gates at once.

On turn 4, last Isomer should have run into M4 and eliminated itself. Just click end round button to clear the mission.
Here we are using 1 echelon to do all the fight, and with Tarantula on the map again, you would be best set with Airstrike Fairy to blow away the problem.
Start with Dummy echelon at the HQ as we will not be able to deploy the combat echelon until turn 3. Deploy another dummy and move them towards the panels next turn.

Deploy total of 3 dummy units on the HQ side of the map and have them ready to activate the consoles.

Now that we have access to the helipads, deploy ARSMG echelon on the top left side of the map. Then activate the middle panel to open the nearest gate to ARSMG.
ARSMG fights through the Tarantula unit and stops at the 2nd gate.
Bottom panel opens the 2nd gate which leads straight to the M4.
Travel to center of the map but do not swap with M4.
We rescue M4 and move down to the gate which opens when you use the top panel near the HQ.
Once ARSMG echelon travels to the helipad, simply close the gate again and hit end turn until helipad opens again.
Hitting end turn again will clear the mission for us.
Start with deploying two combat echelon near the HQ facing left towards the gate. Stronger echelon will be the one on the left side.
Swap with combat echelons' position. Resupply then move to the bottom side of the map, capturing the helipad.

Deploy dummy at the HQ and end the turn.
ARSMG echelon moves to step on the radar node in the middle, which eliminates one of the Manticore units in the bottom left, opening the gap next turn. Then move to node above the temporary supply node.
Make sure to resupply at the node below and move to take out the Goliath unit at the console. This opens two gates above the echelon.
Open both if you want to clear the objective B, which is to capture the enemy HQ.
Then move up 1 node to end the turn.

For Objective B, we need to activate the console at the top in order to open the 3rd gate between enemy HQ and friendly HQ. Then hit end round so that Failed Isomer moves out of enemy HQ.
If you are looking to clear objective A however, just simply work into enemy boss and clear the fight.
Once Failed Isomer has moved out of enemy HQ, simply move on to it and end turn to clear the mission.
Just like Normal version of the map, you can choose to kill Failed Isomer as alternative mission. Start with combat echelons on each starting location. Combat echelon on the HQ moves to the left and one at the bottom helipad moves up then to the right. Deploy dummy at the HQ.
Then we swap the location of dummy and combat echelon.
Dummy echelon moves straight to the control panel on the top left of the map and activate it. This opens the top portion of the gate.
We move the dummy back two node to the right and deploy 2nd dummy at the bottom helipad. Then move the dummy 2 nodes to the left.

Dummy at the top moves one node to the right, then dummy at the bottom moves up to step on the radar. This eliminates the enemy unit to the left of the boss unit.
Dummy at the radar moves back down to stay out of enemy unit's threat.
Dummy at the bottom moves to the control panel and opens the rest of the gates. Then we move the Dummy echelon at the top down one node, making sure to stay away from the Goliath Plus.
Now that we have all gates open, we bring down the dummy to draw the aggro of Failed Isomer boss. Then the other Dummy moves right before the bottom gate.
Once boss unit moved out of the HQ, move dummy over to take it and clear the mission.
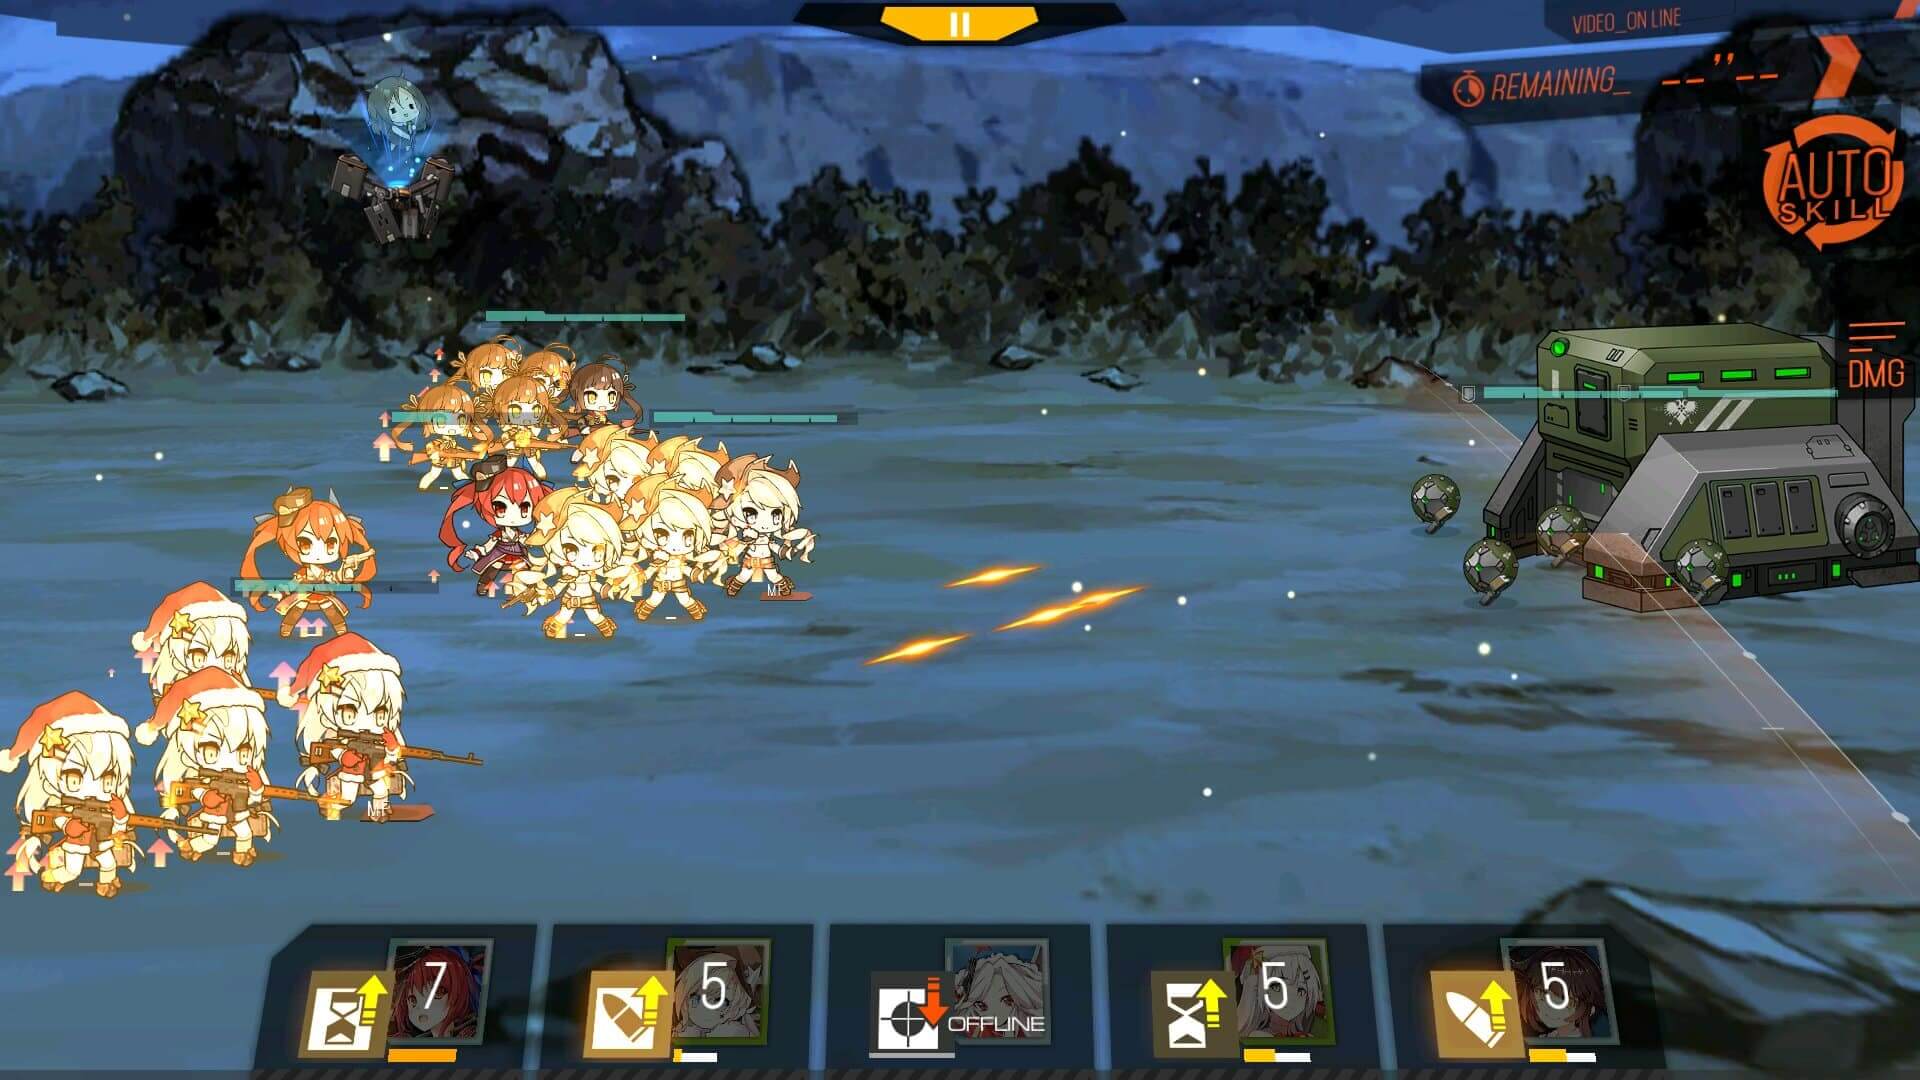
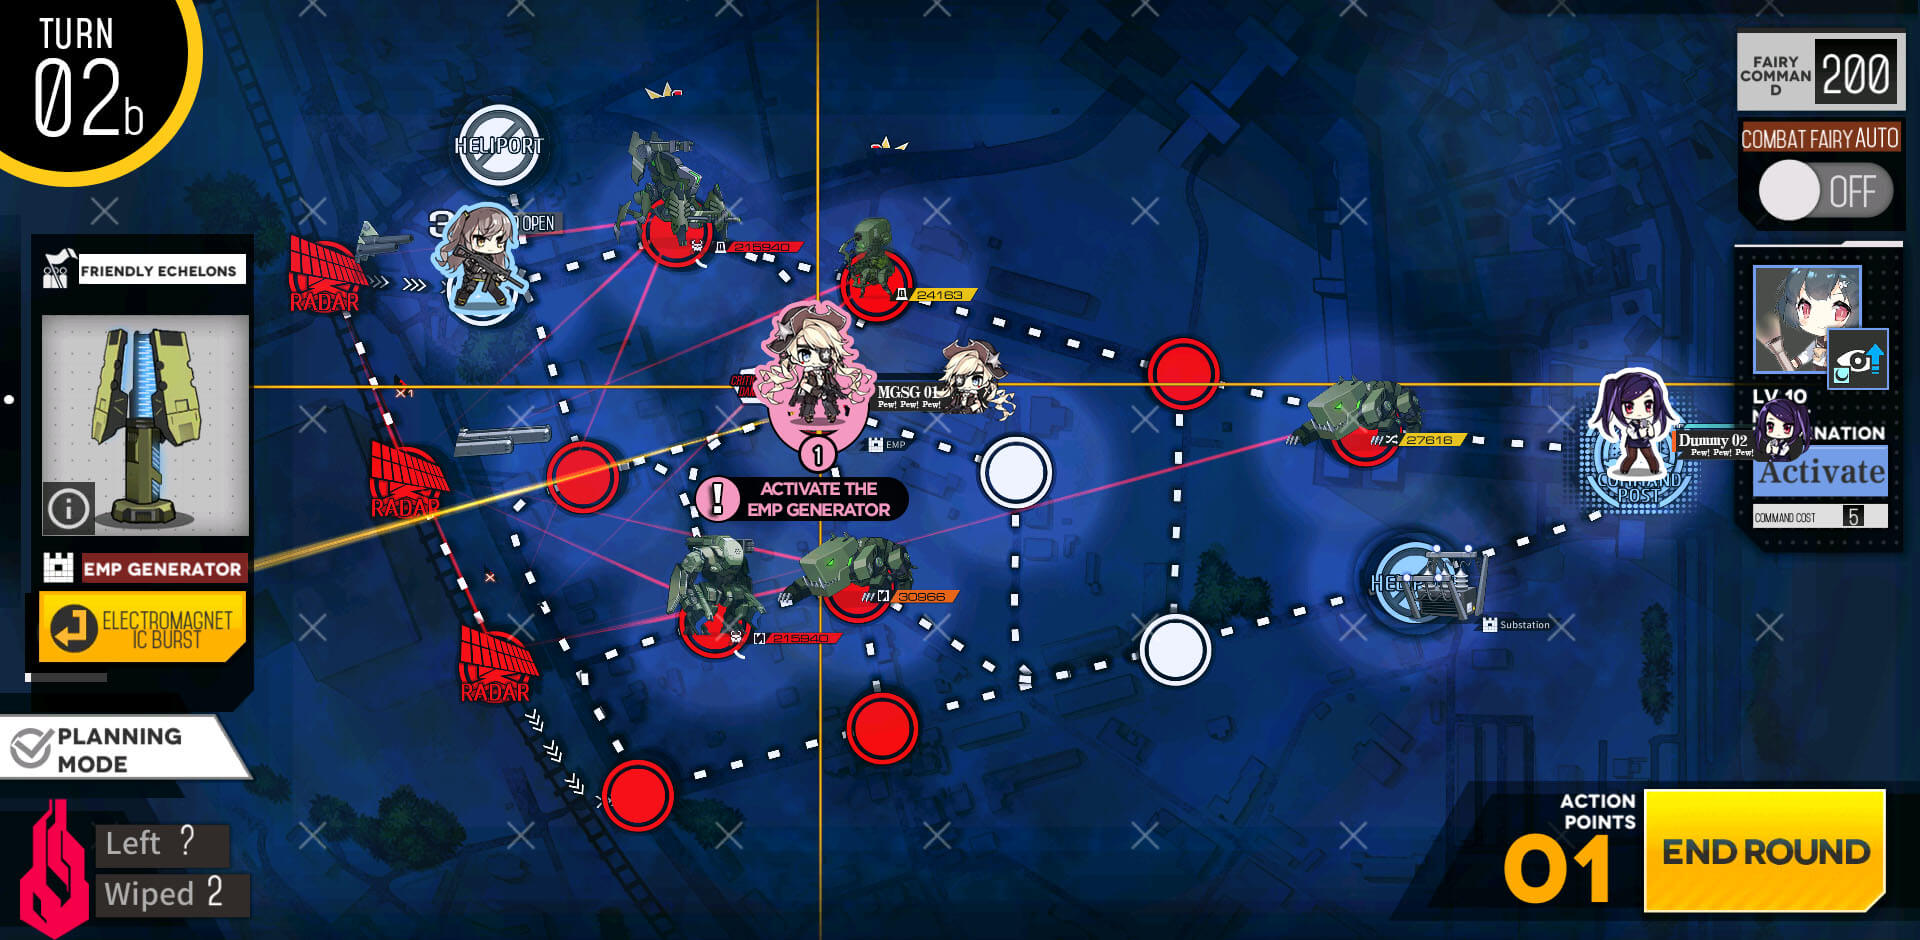
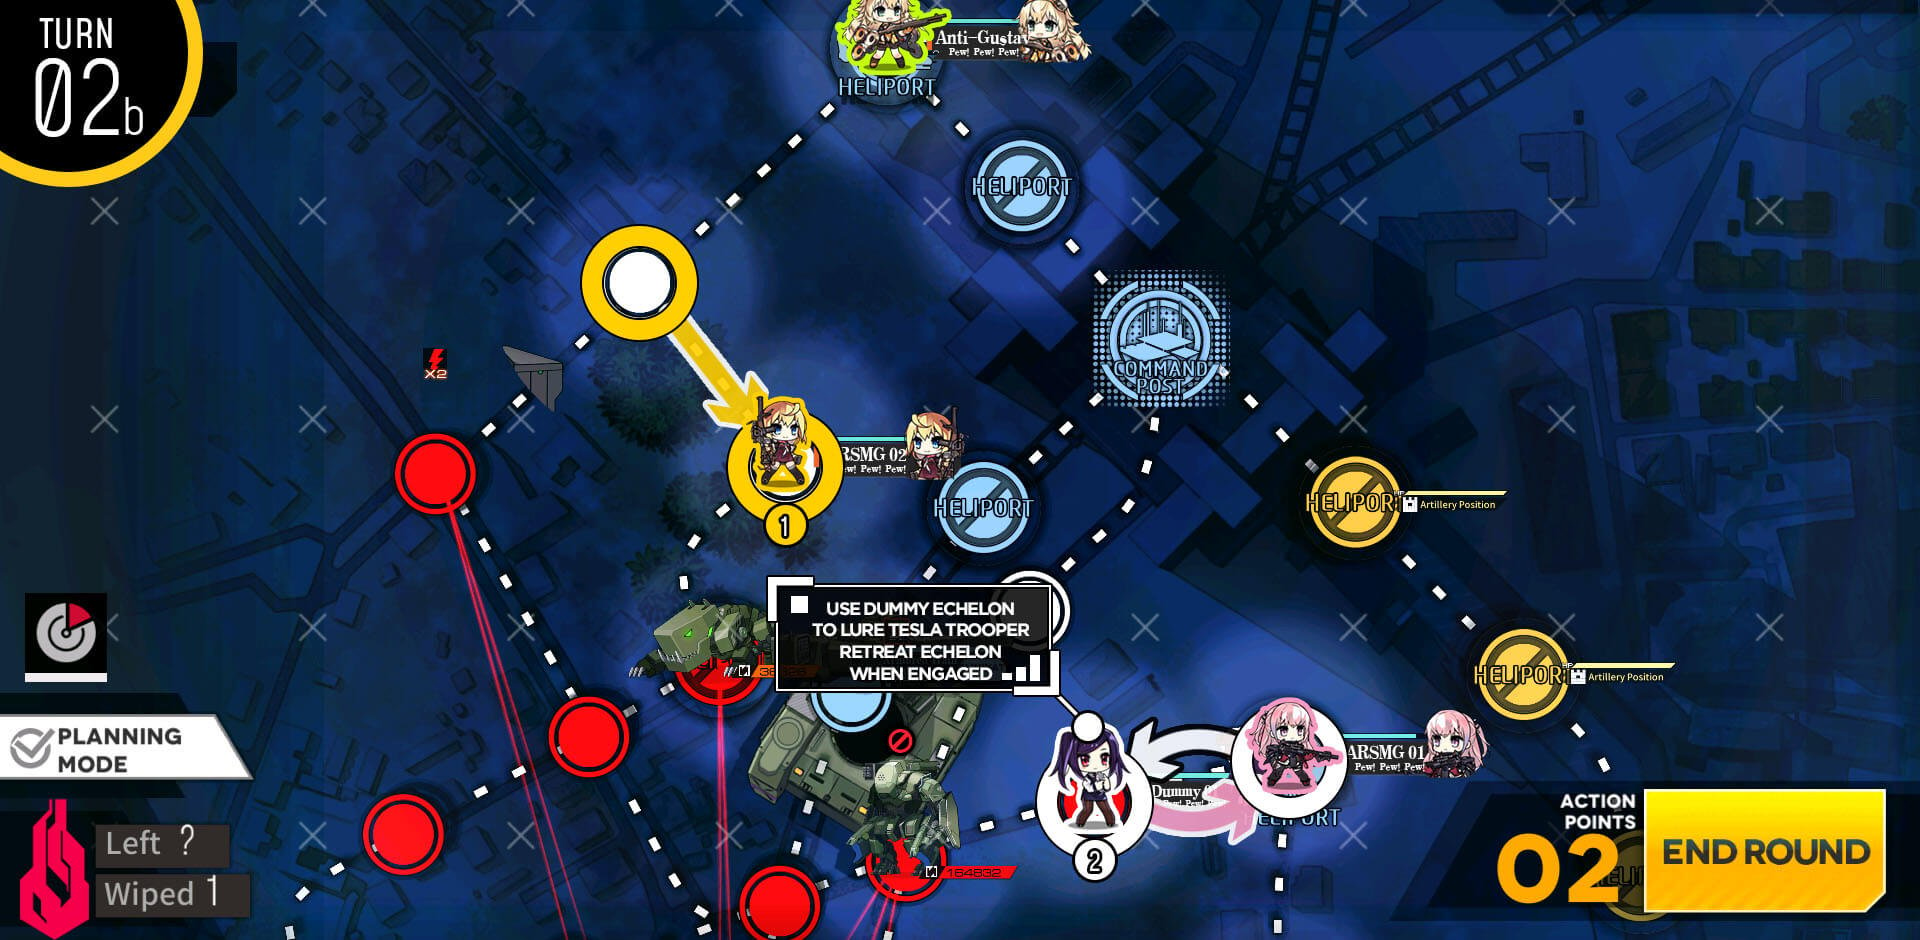
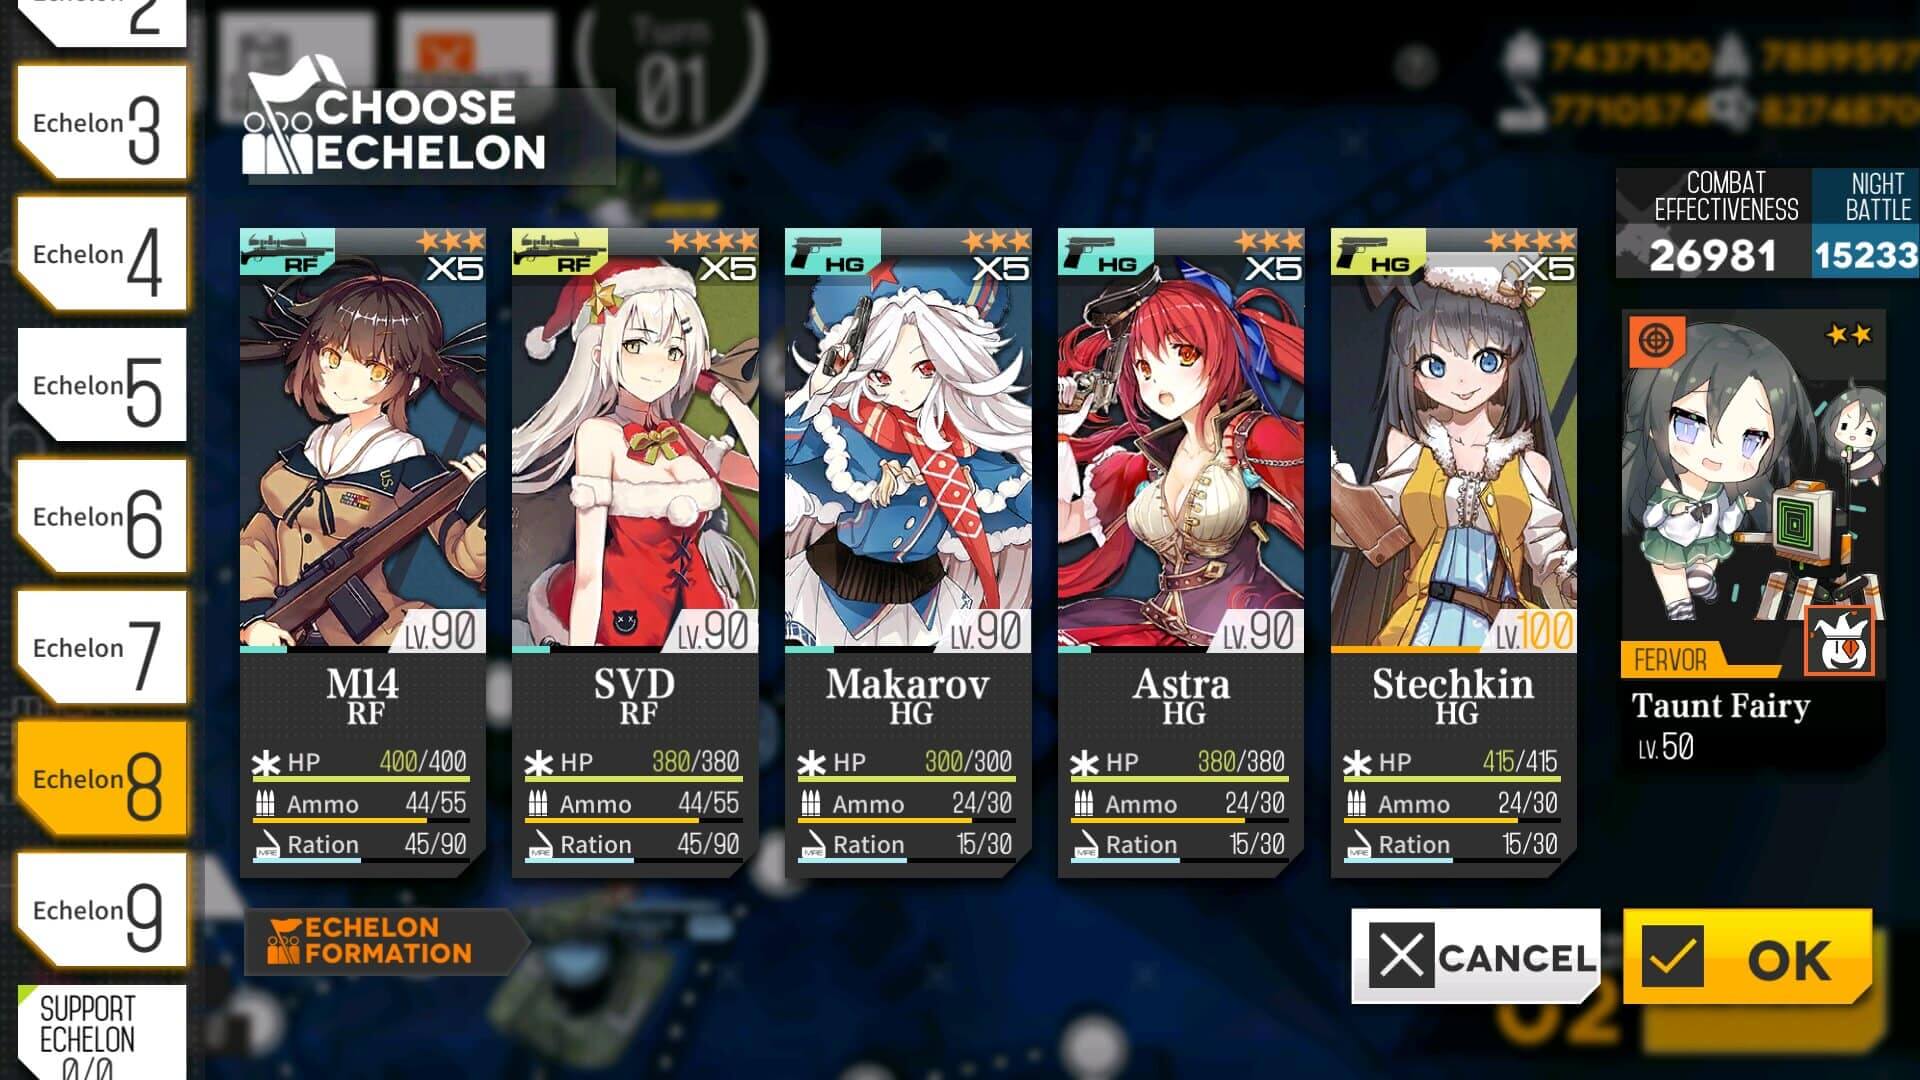
Start with RFHG echelon at the HQ and night ARSMG echelon at the helipad. Then RFHG echelon heads directly to enemy HQ and move pass it to the left. I strongly recommend giving EFHG echelon either a Twin Fairy or Taunt fairy to help against the Tesla Troopers.
If you don't have Taunt Fairy or Twin fairy, you will have to throw your HGs in front of them to take the shock attack and missile attack while RF T-dolls hopefully burst them down quick. It's okay if HGs are badly damaged after this battle as long as RF T-dolls are mostly healthy.
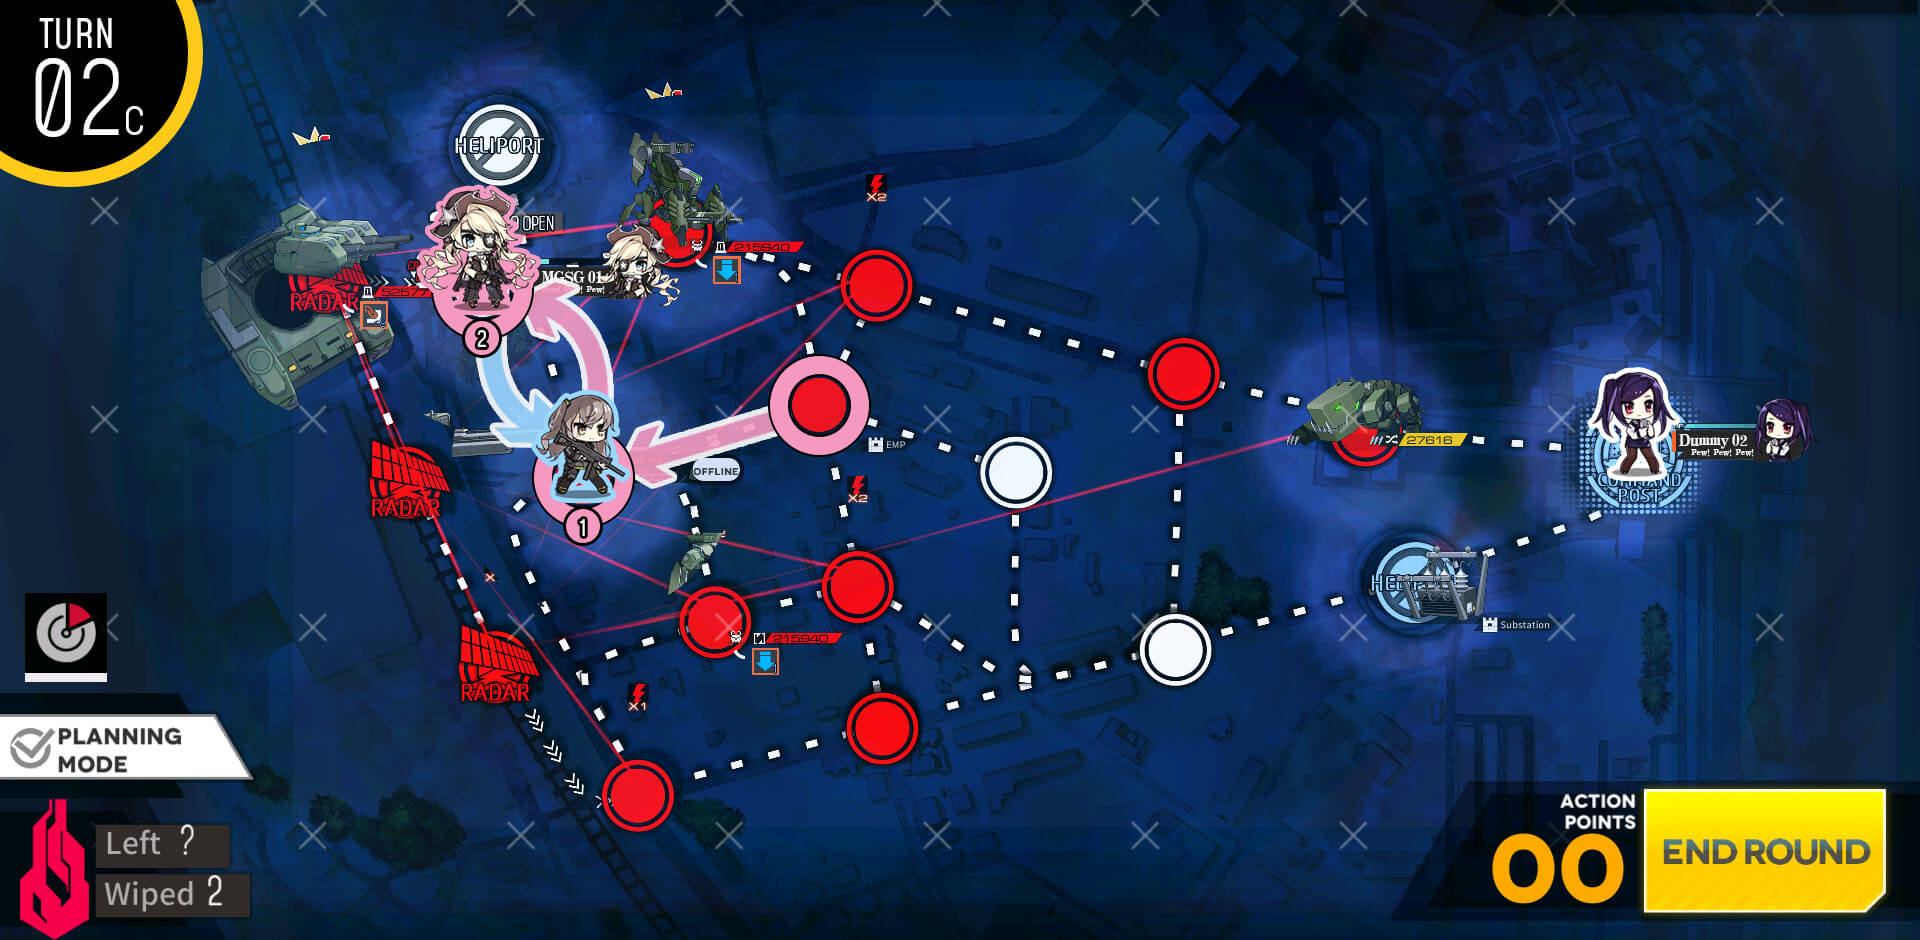
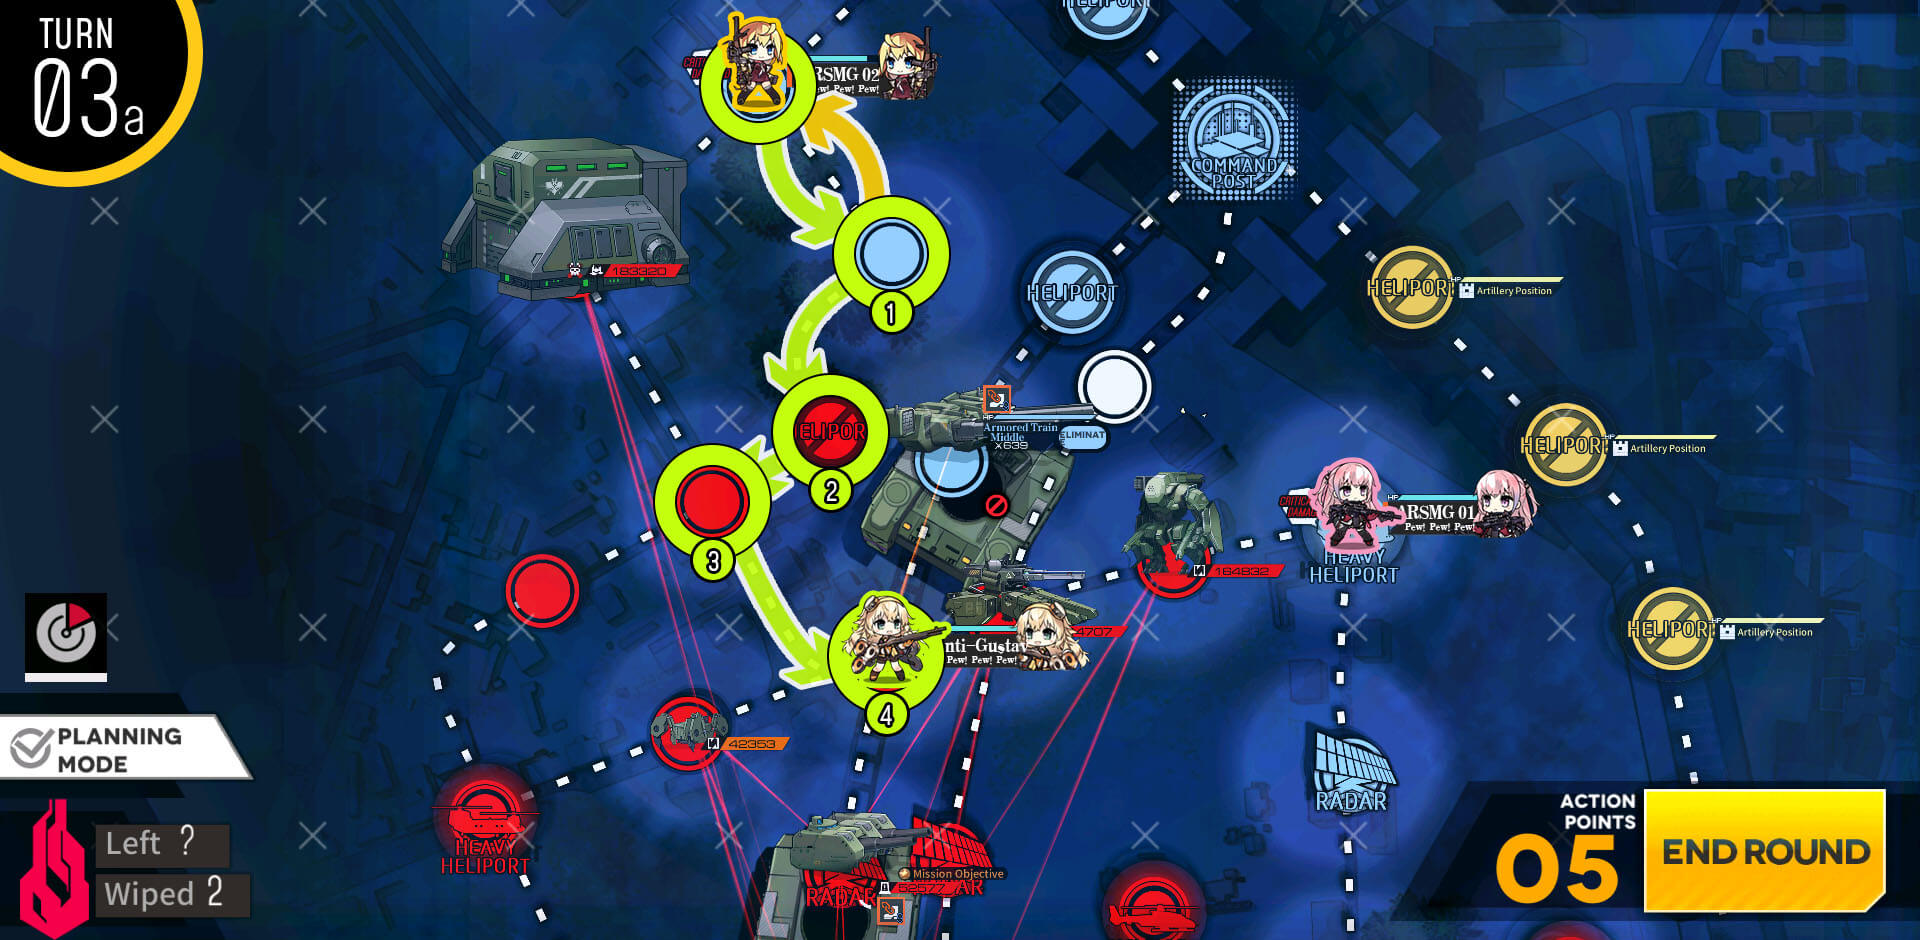
On next turn, RFHG echelon moves down to the node with a console that can eliminate the enemy fire support. However we have to fight the factory that creates tiny ball robots. IMPORTANT: There's currently a bug in which enemy fire support does not disappear until client is restarted after console activation. Do not fight enemy units until you restart the client or the bug is fixed completely.
Only way to take them out really is to DPS the down and have the Twin or Taunt fairy really helps with tanking while RFs focus away from hitting ball robots.
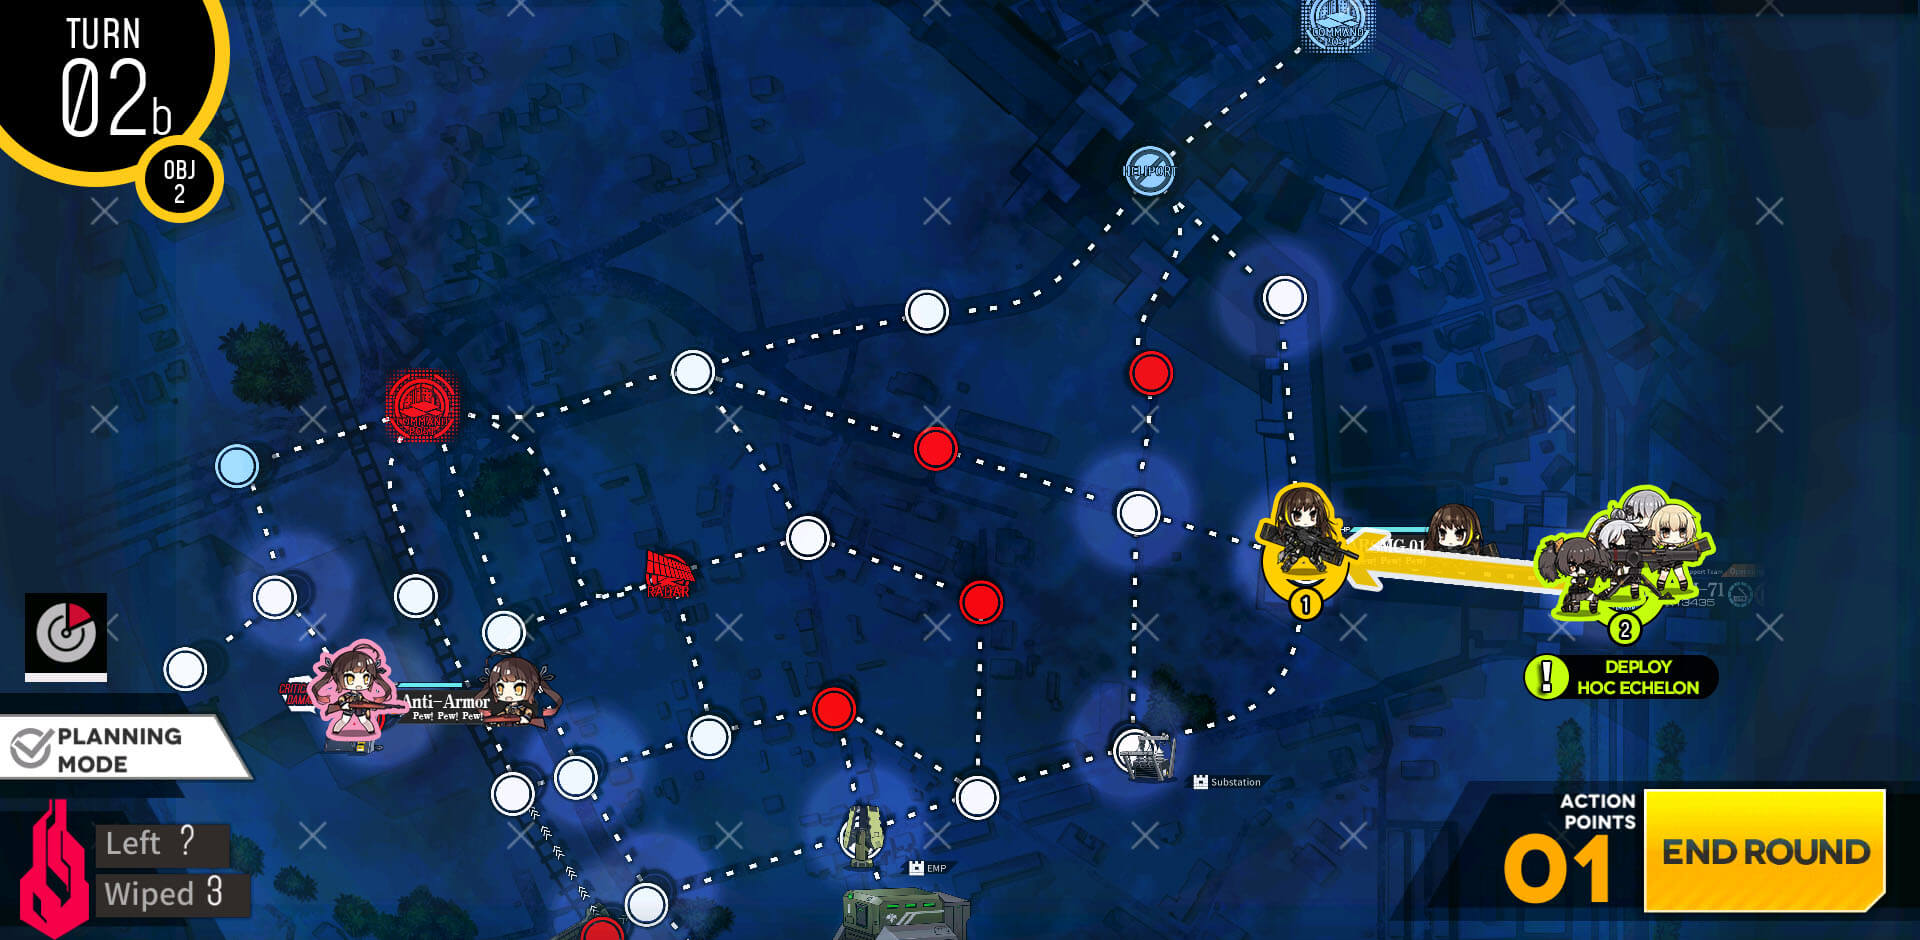
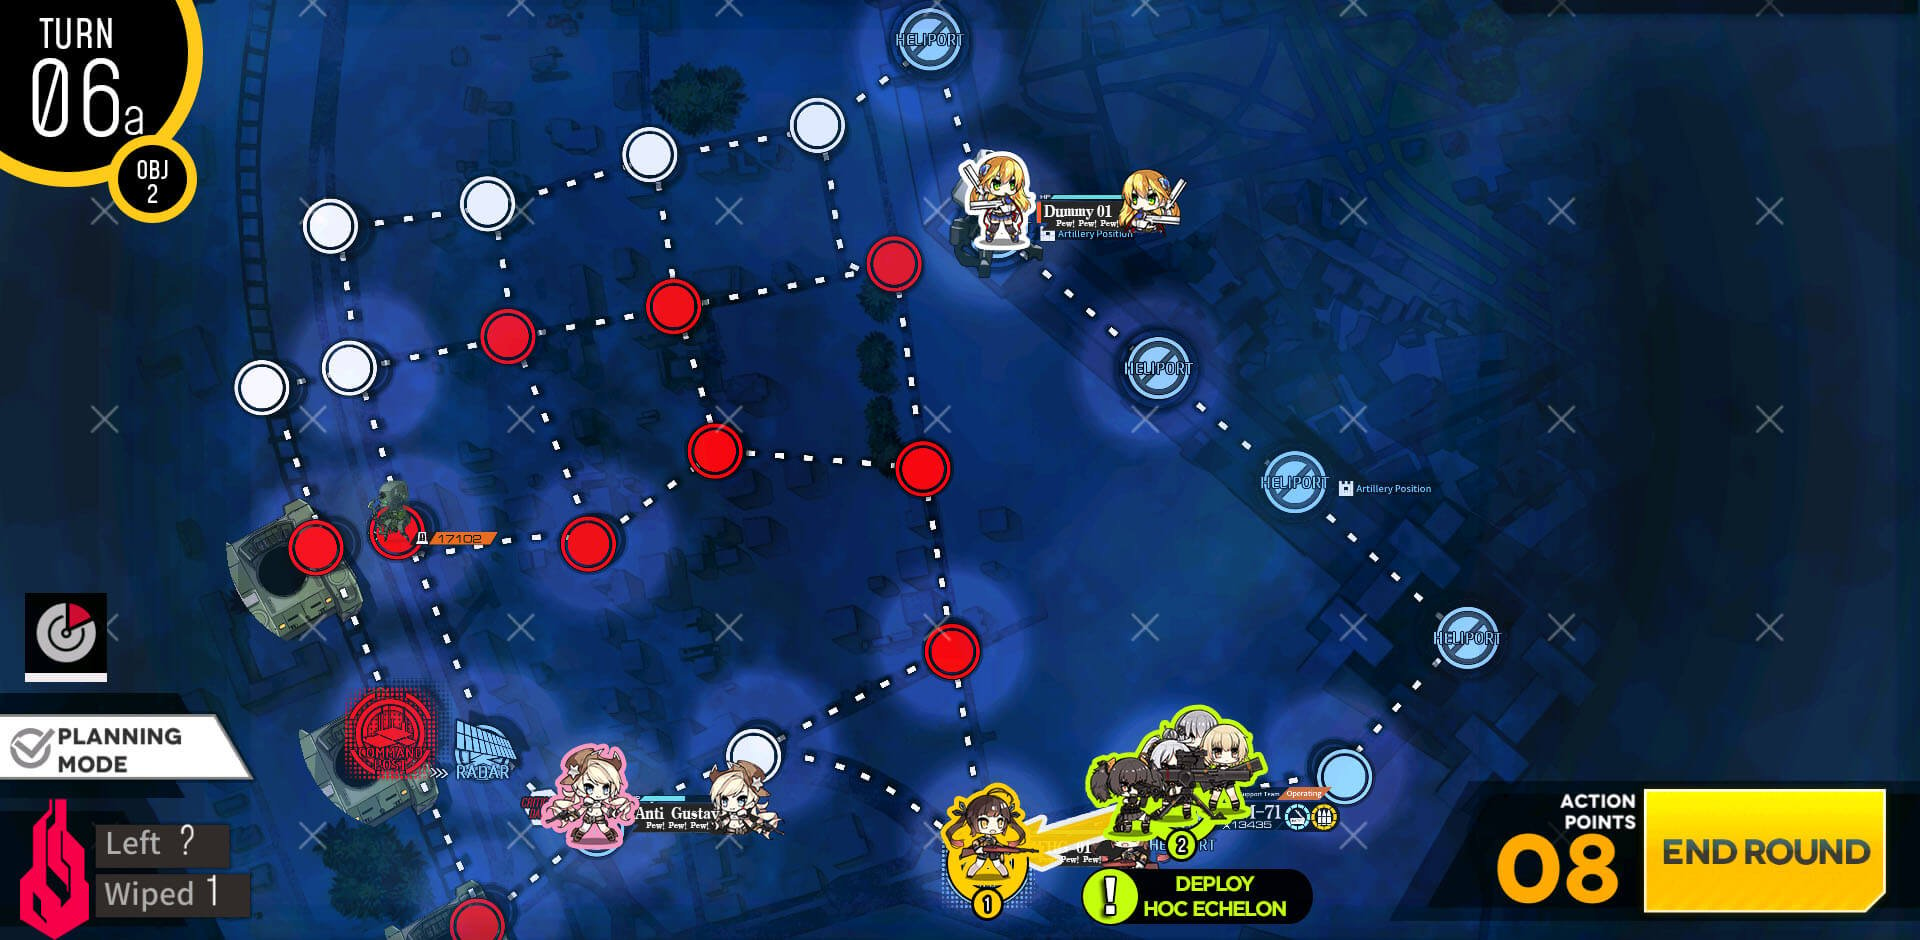
With remaining move, move night ARSMG echelon out one, then deploy either a HOC or dummy depending on your need.
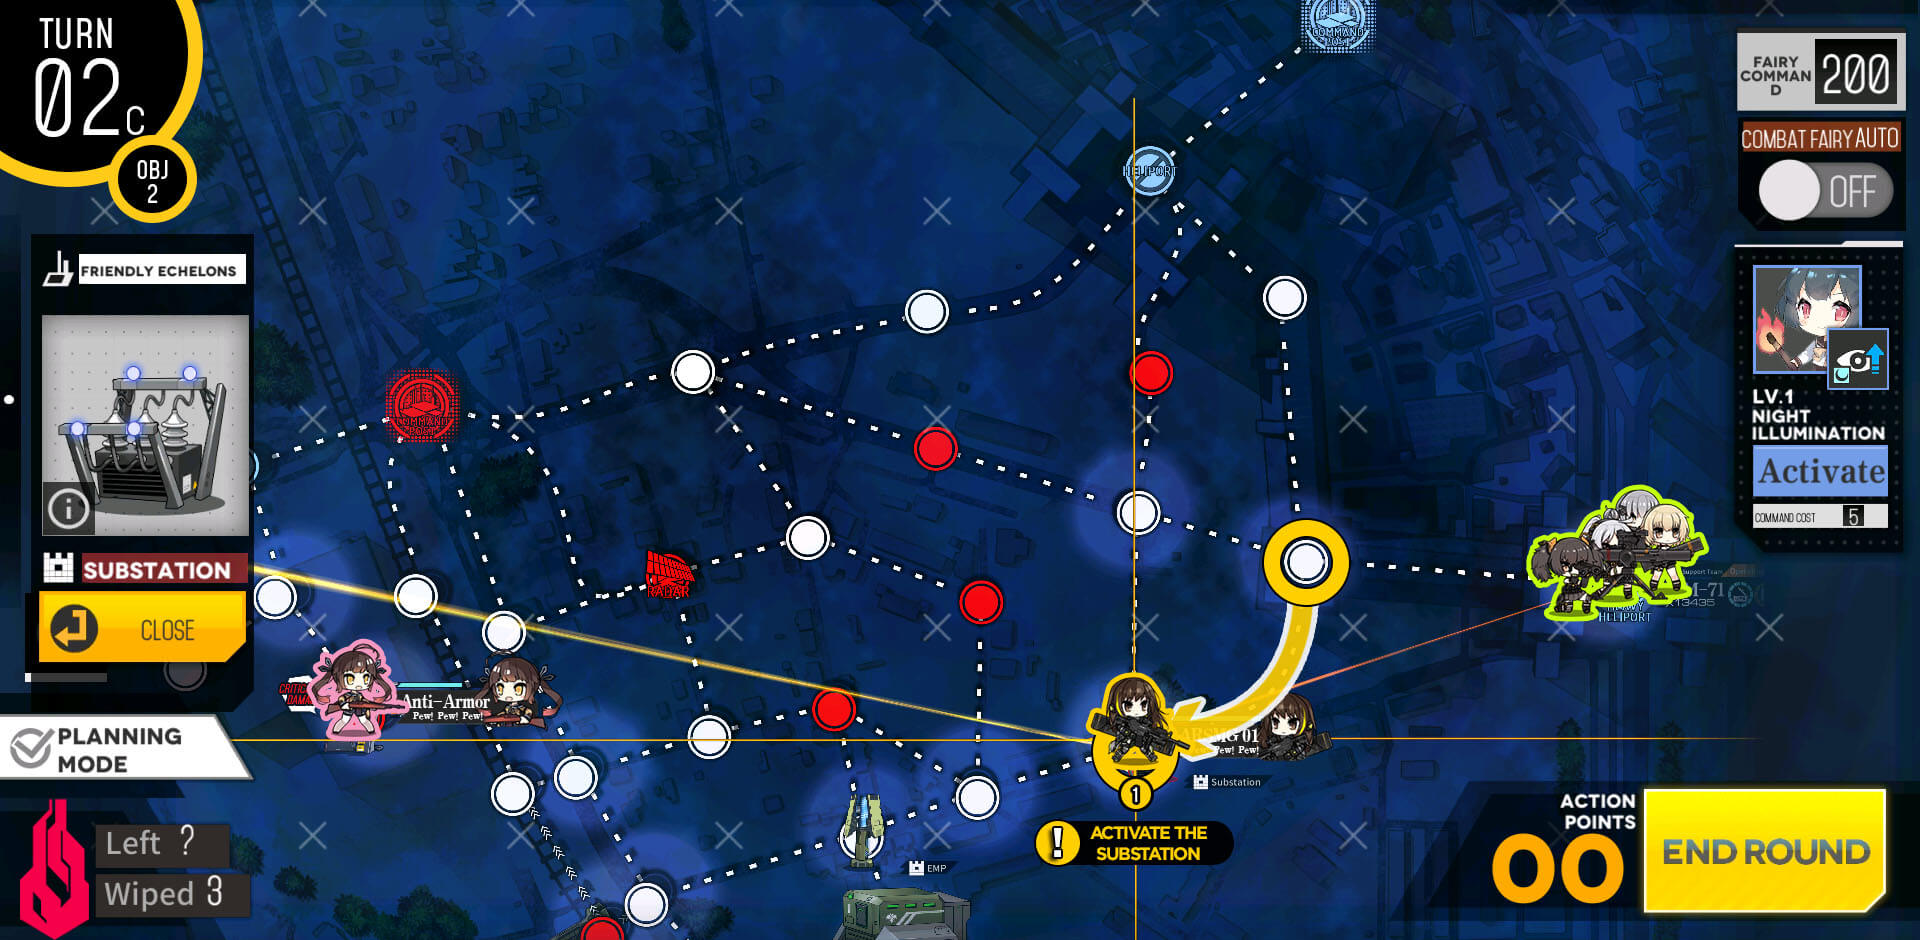
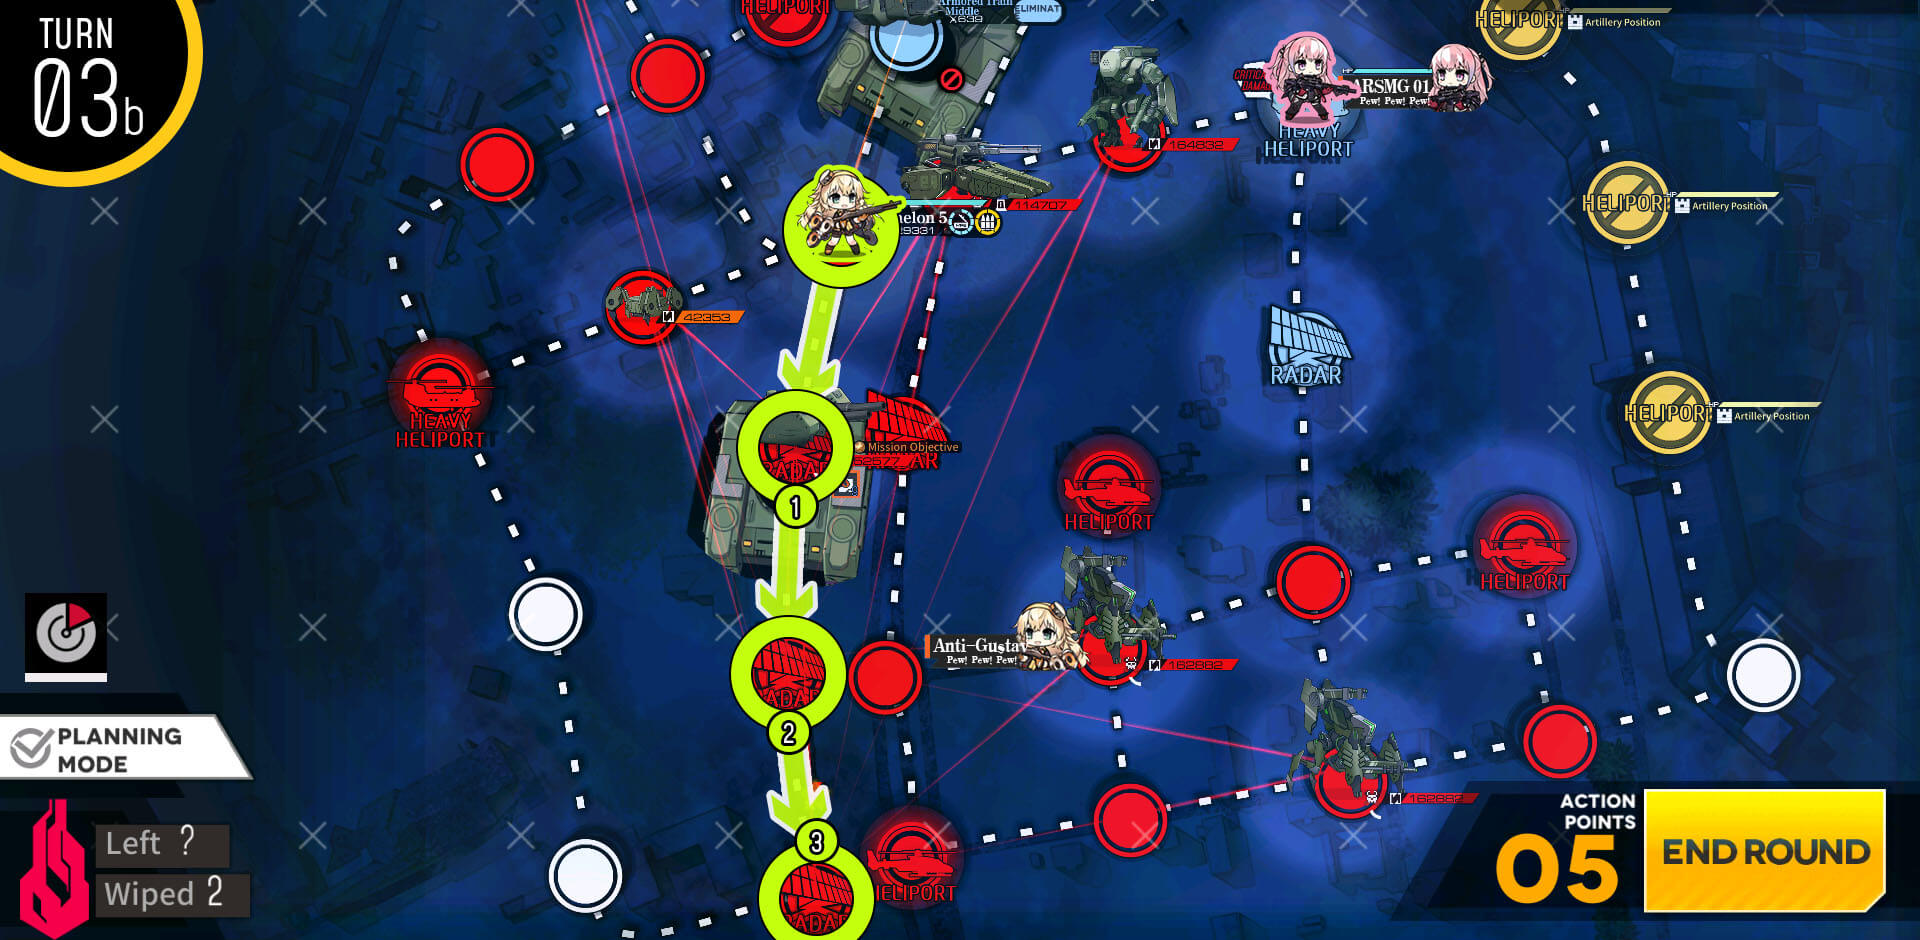
Move to substation below and charge it for later use.
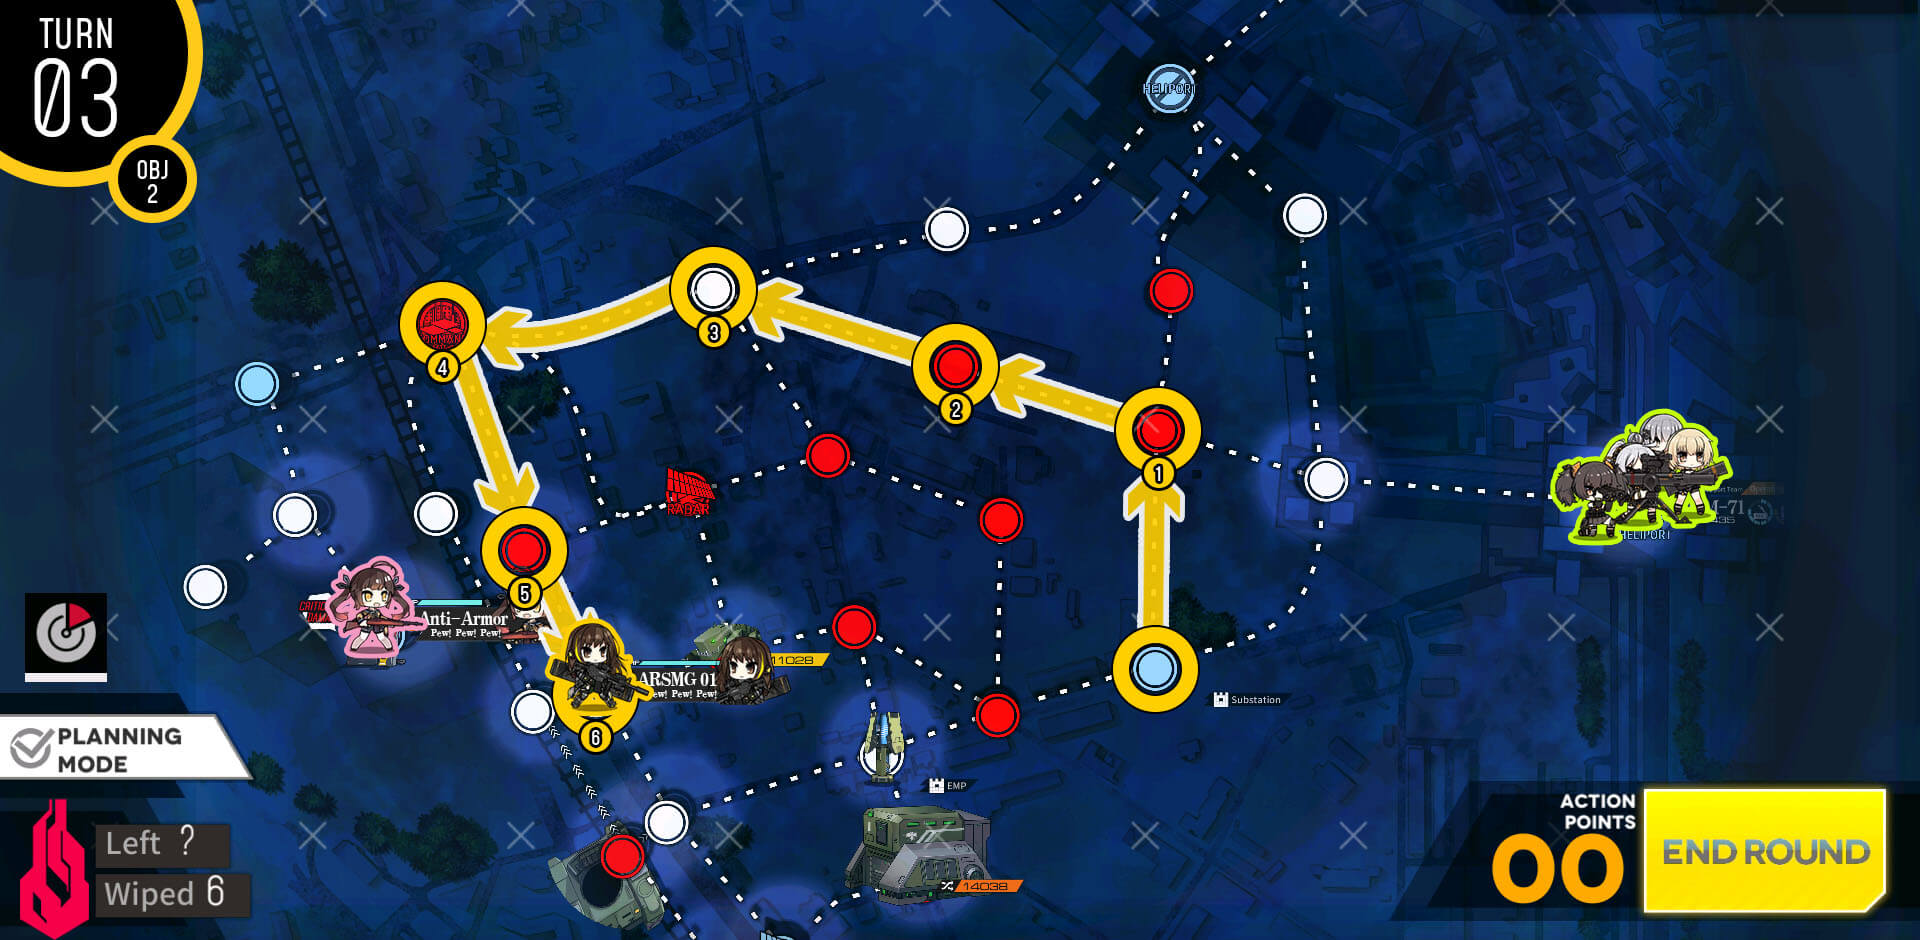
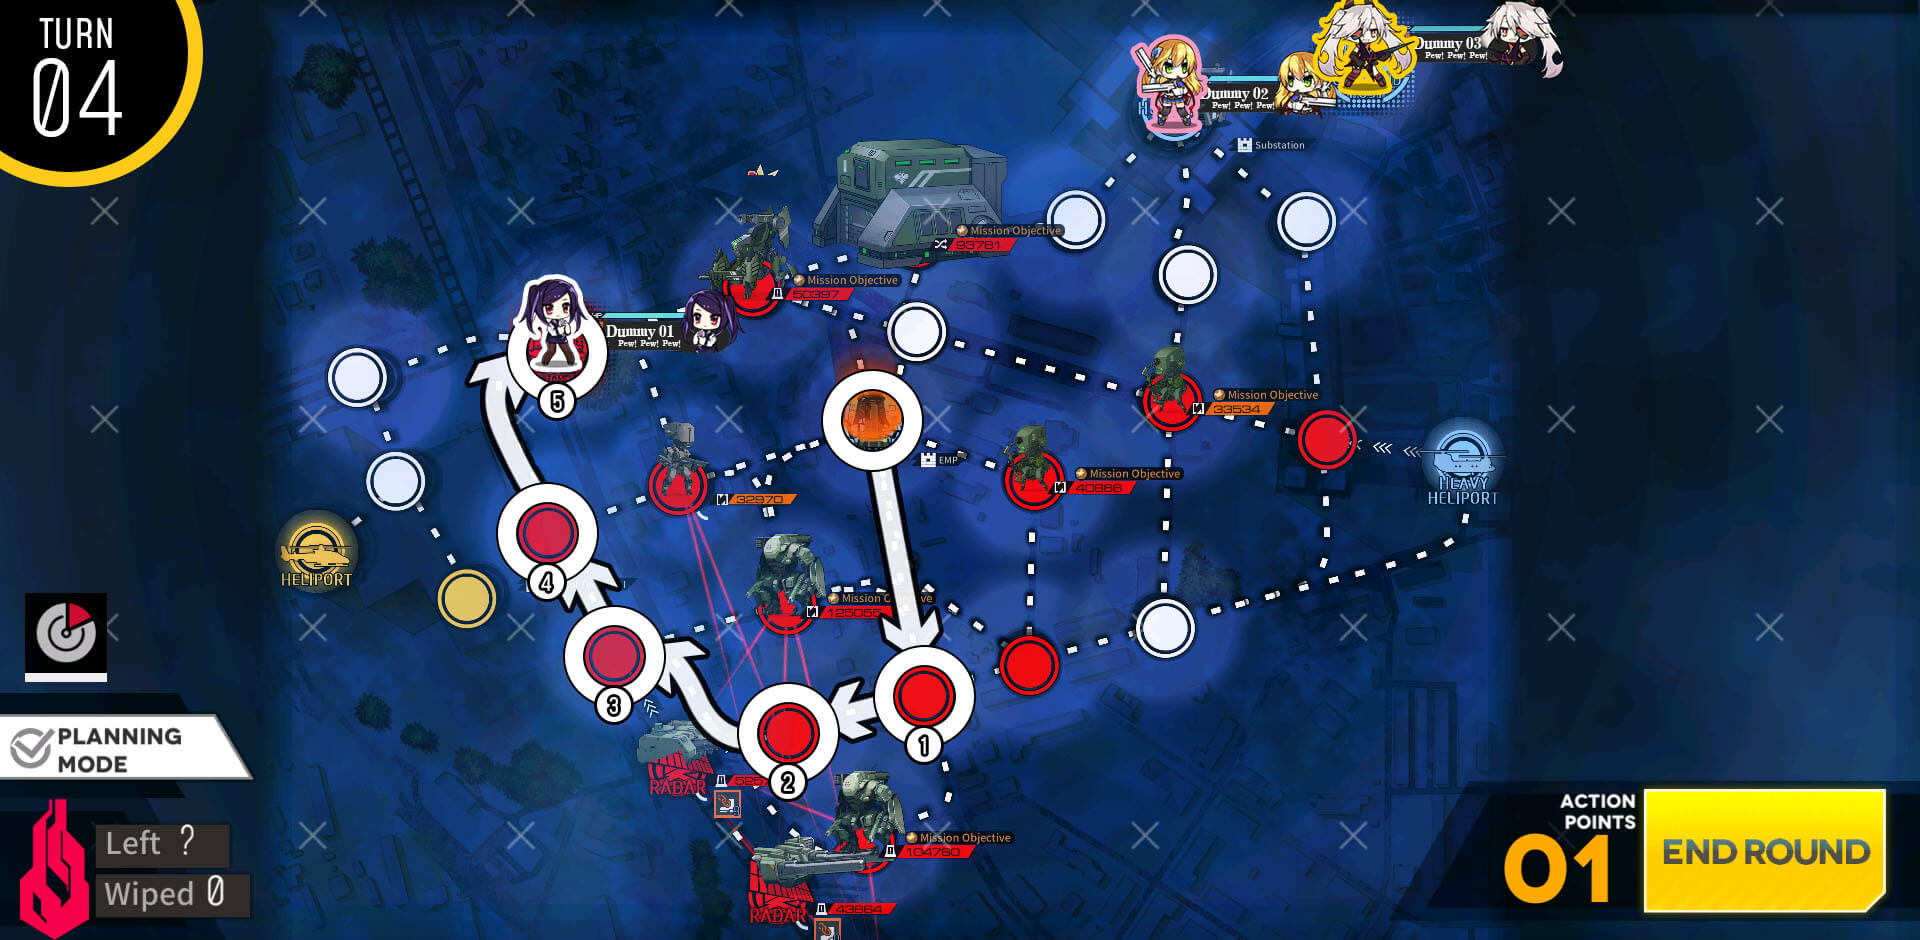
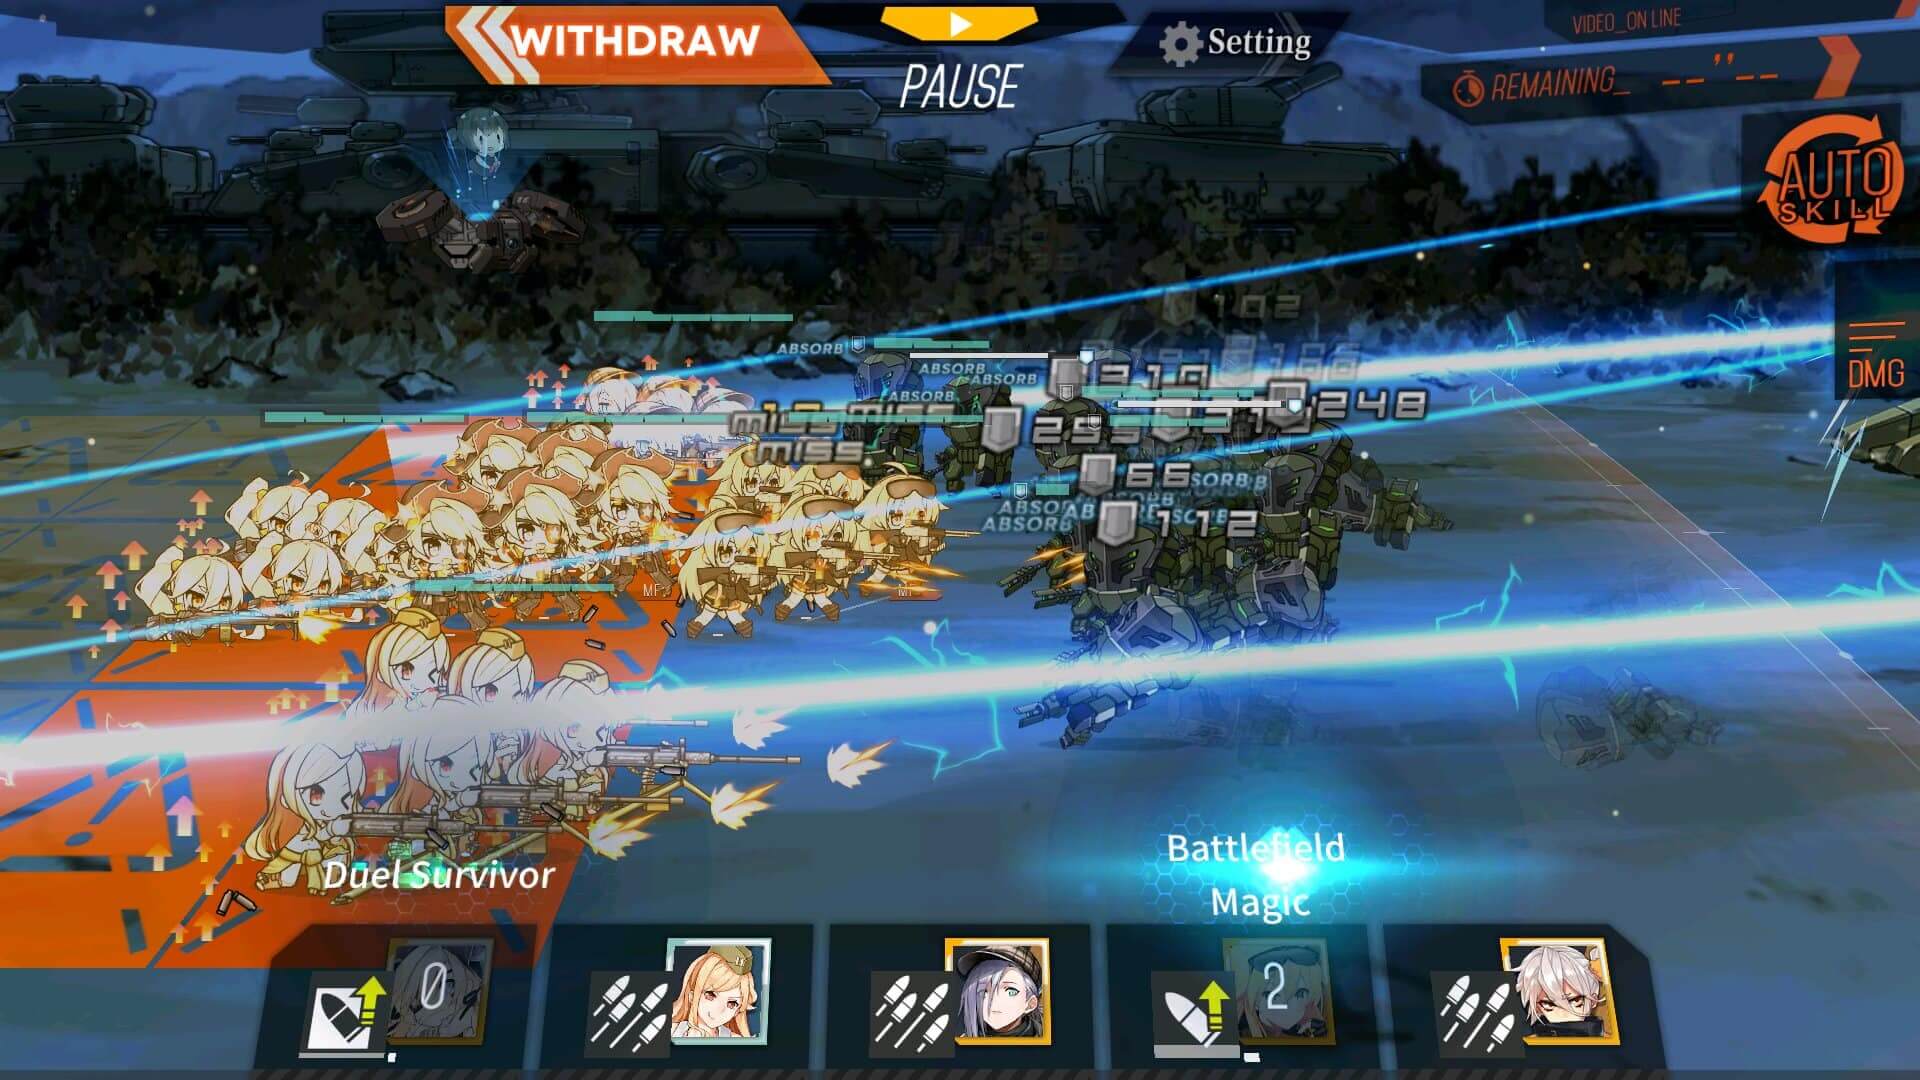
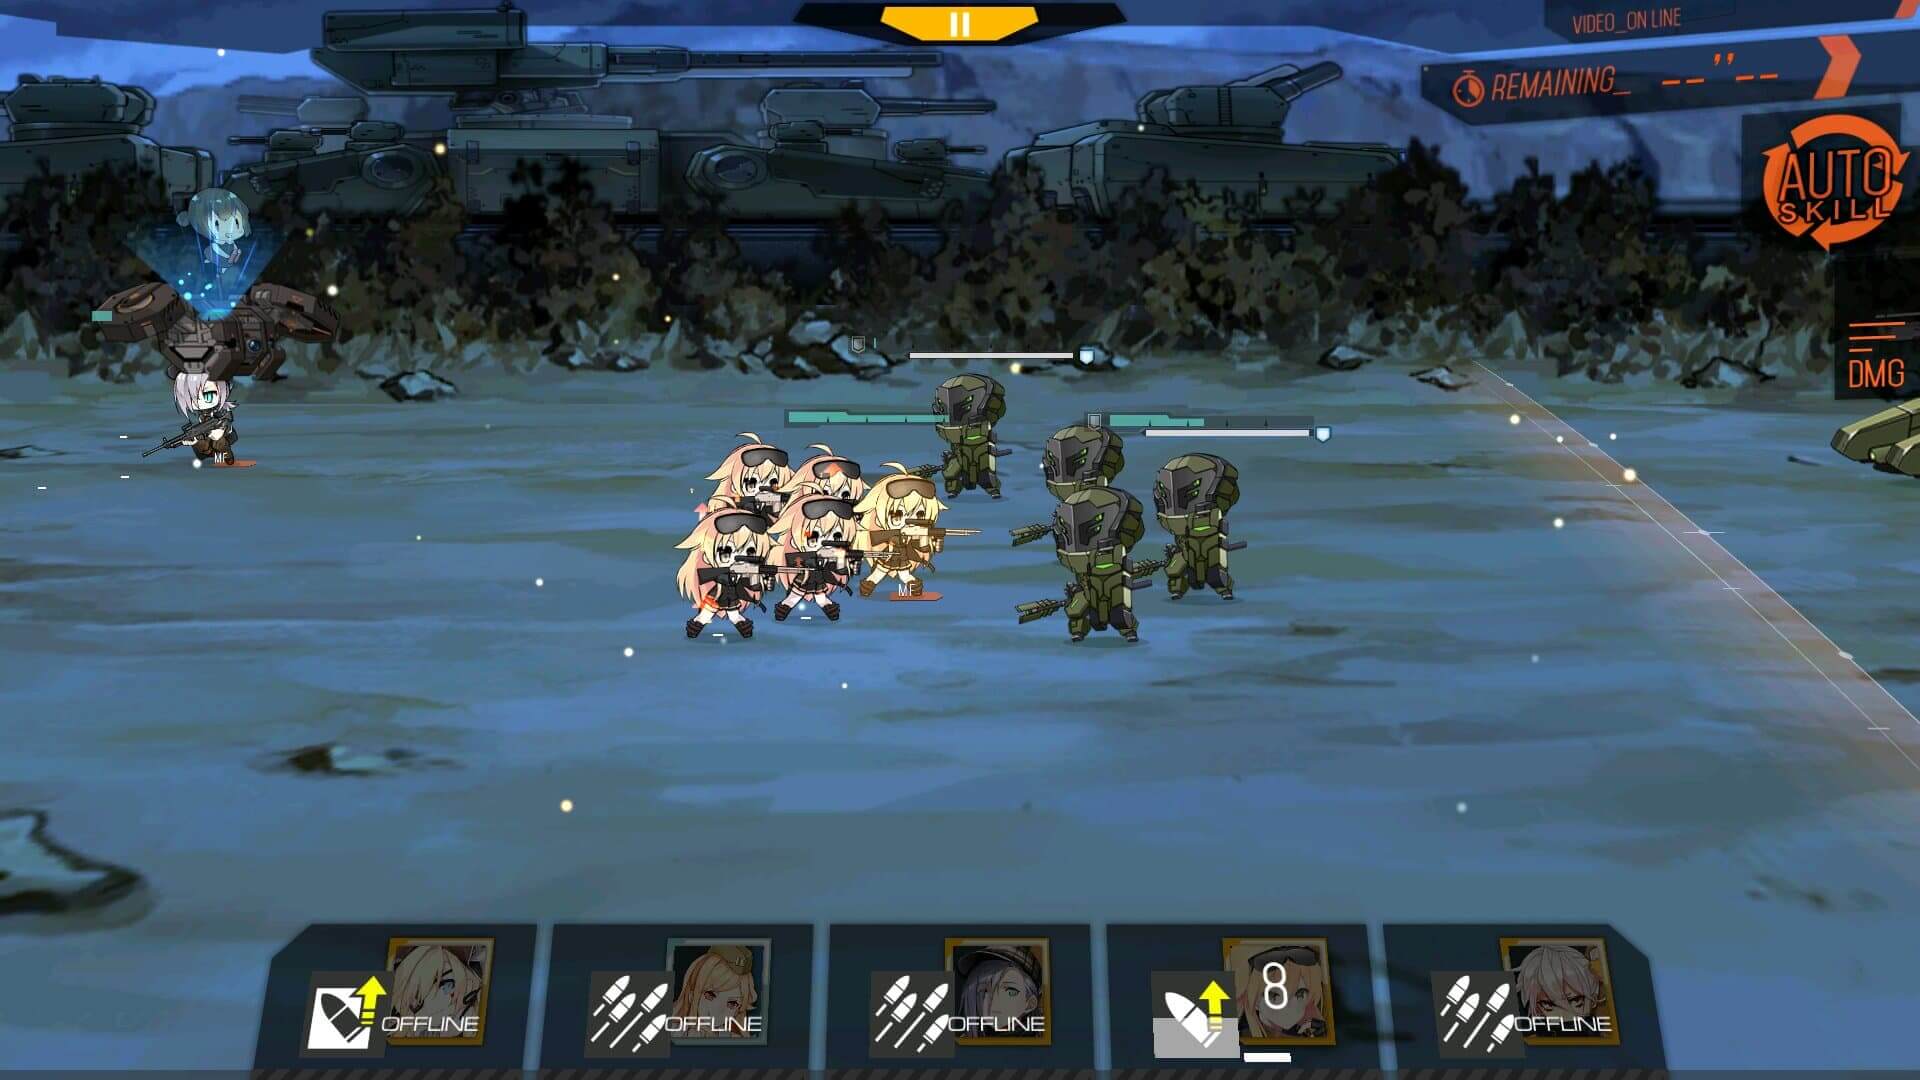
After Turn 2 is more of commander's choice, but I decided to clear out the enemy units on the outer ring first then work towards the inner ring near the EMP device that I can use against them.
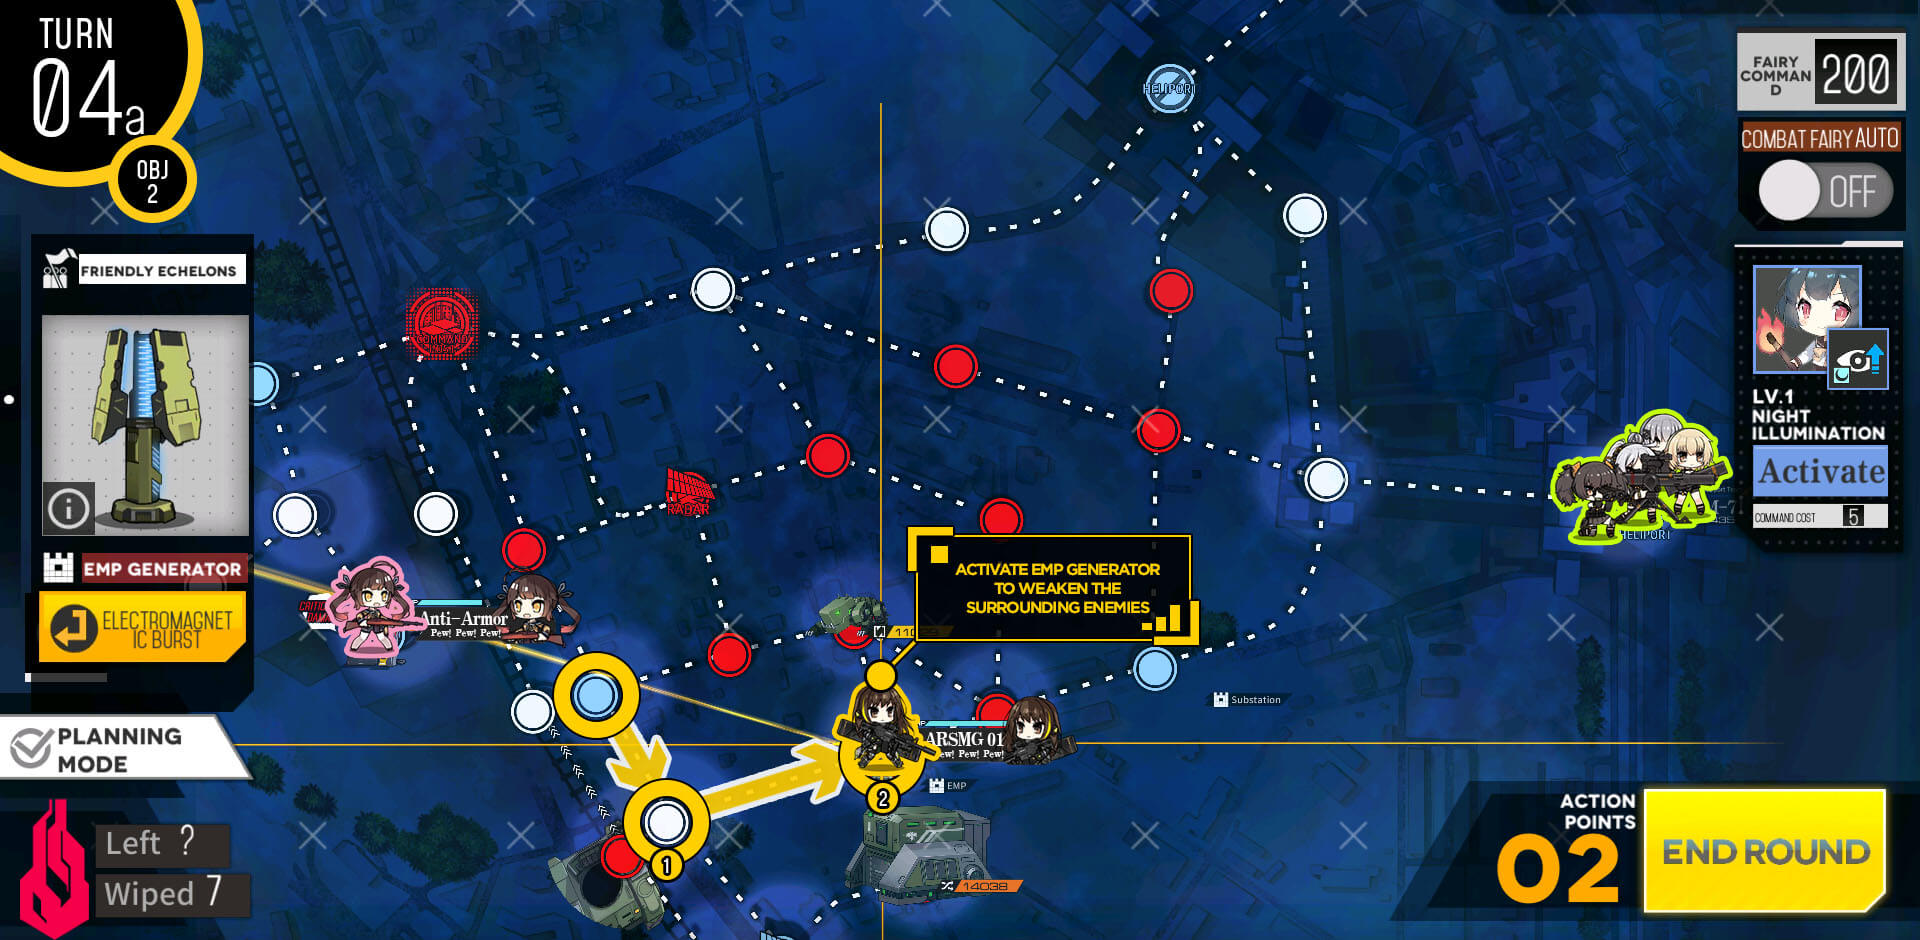
Make sure to keep an eye on the supply of ammo and rations as you go about clearing out the enemy units on the map. Using EMP debuffs enemy unit to be killed more easily.
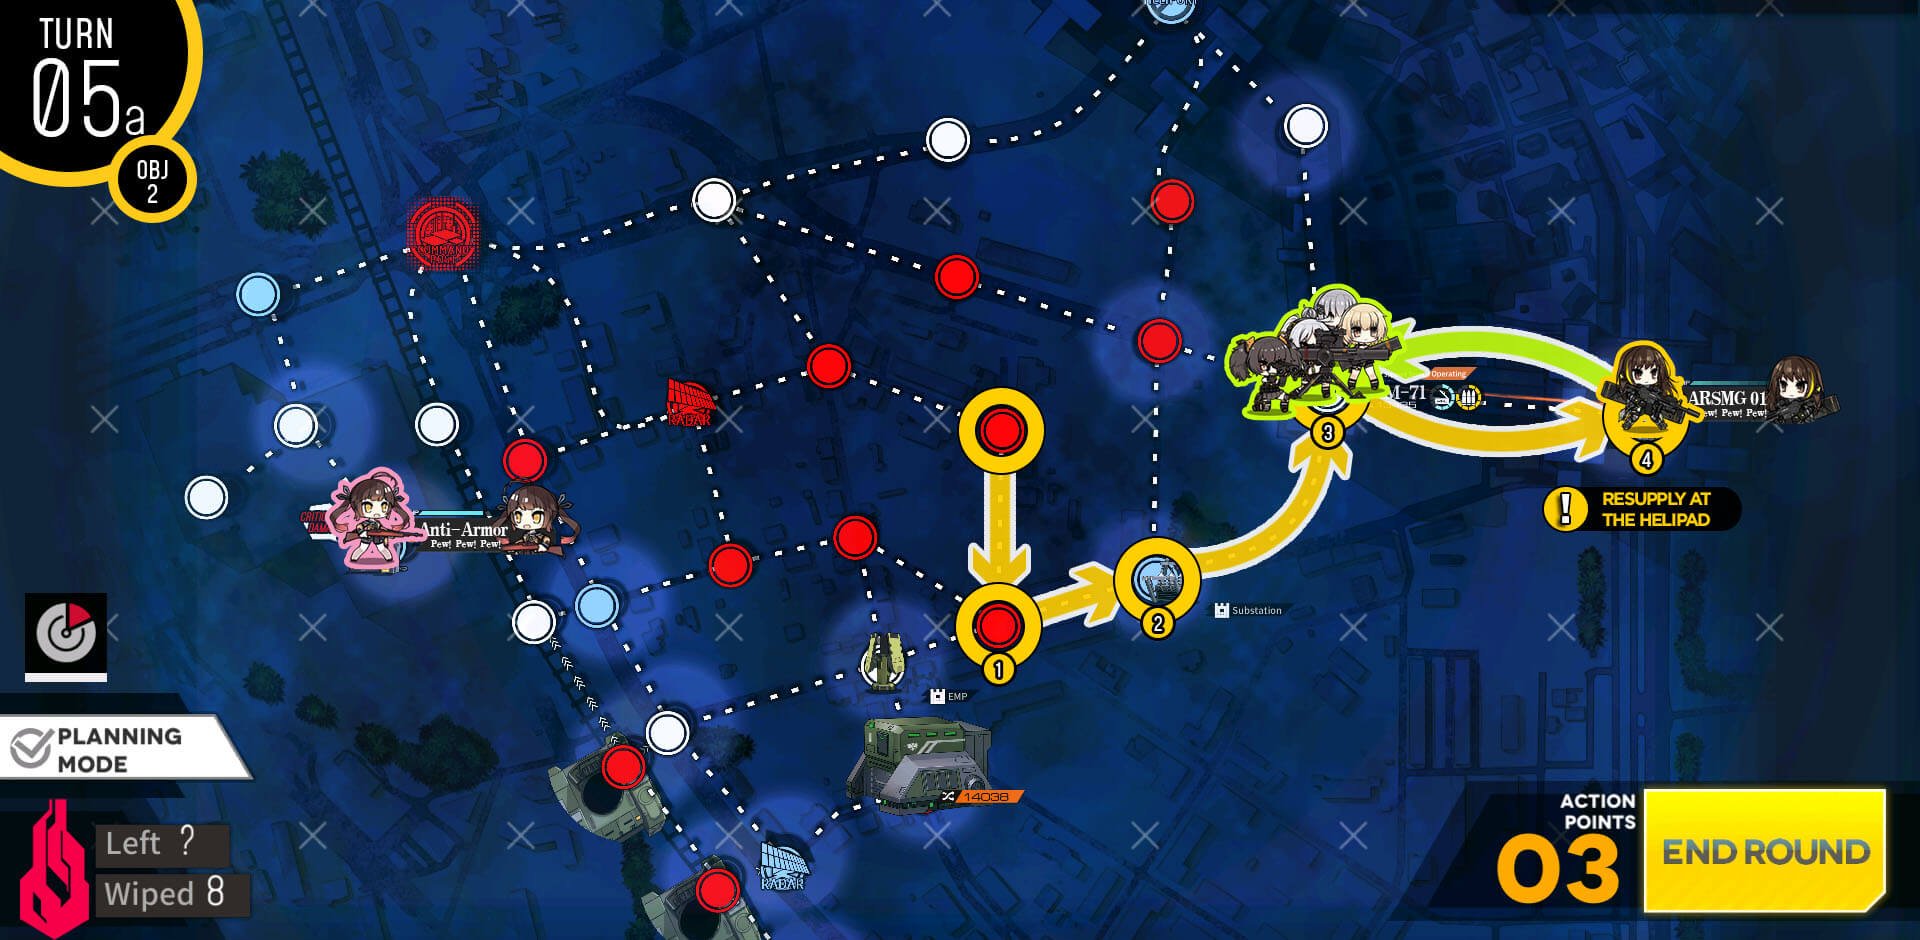
If your supplies have run dry, return to helipad for resupply/repair.
Once you taken out total of 10 enemy units, you have gotten them all.
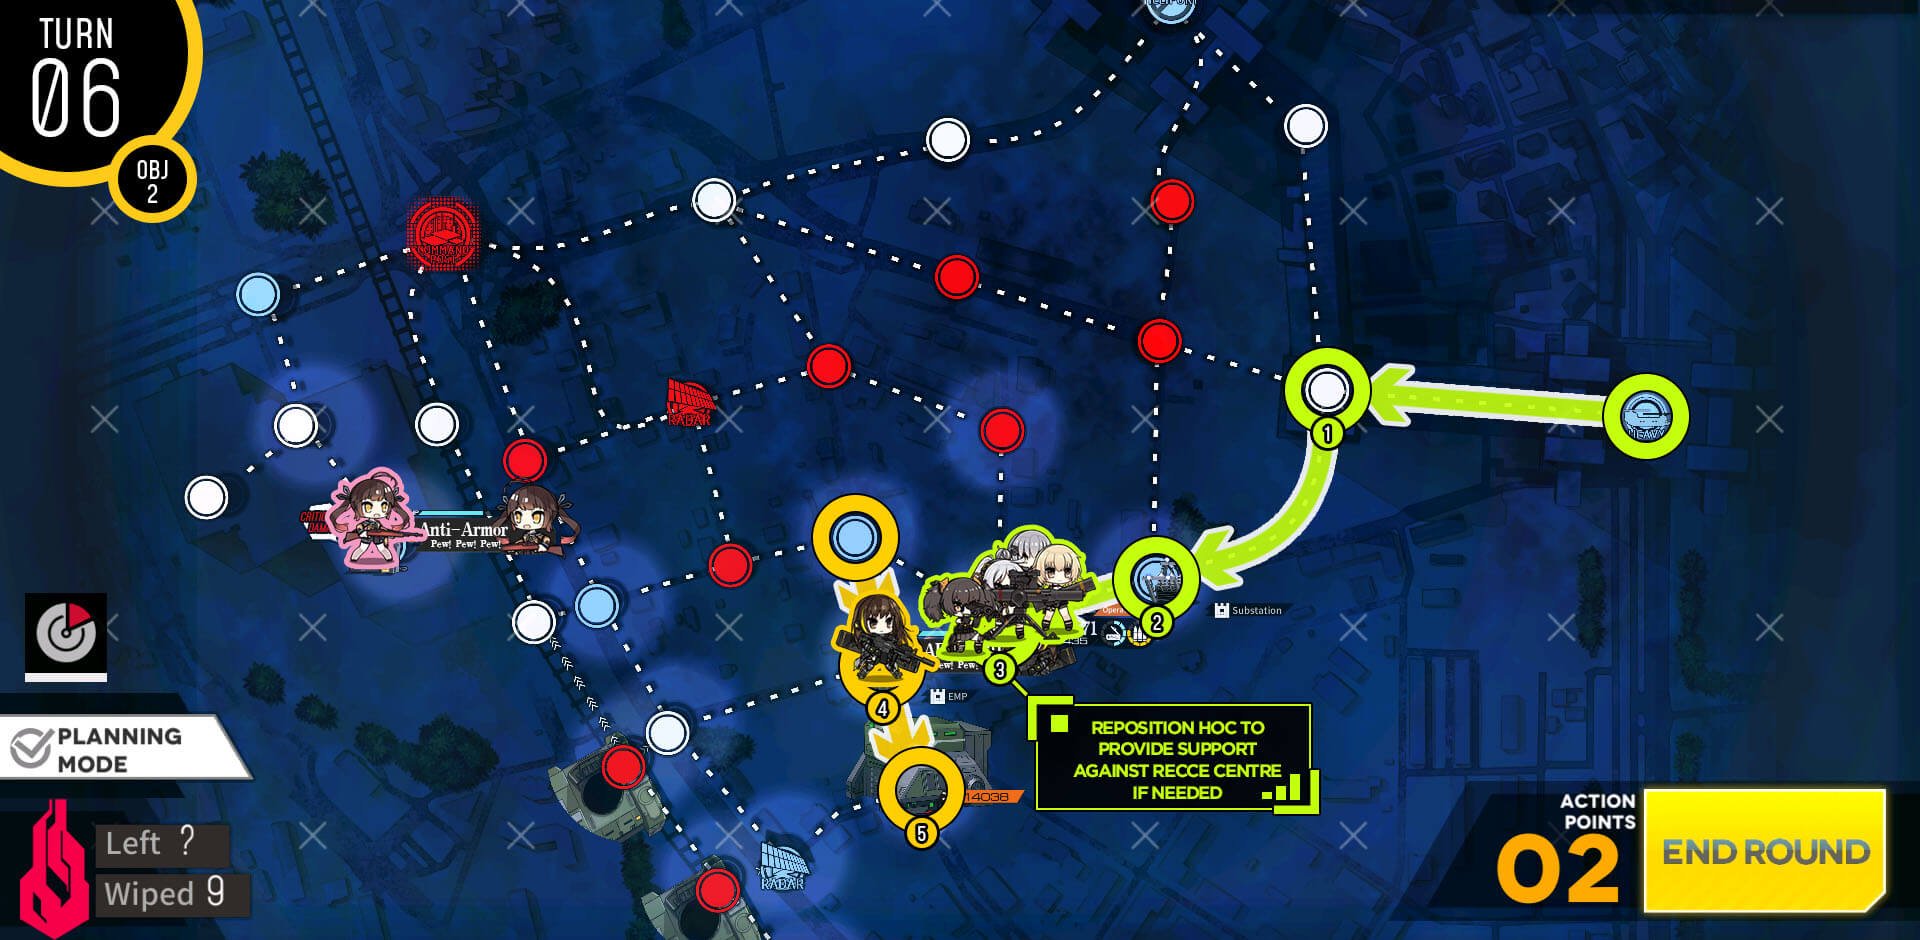
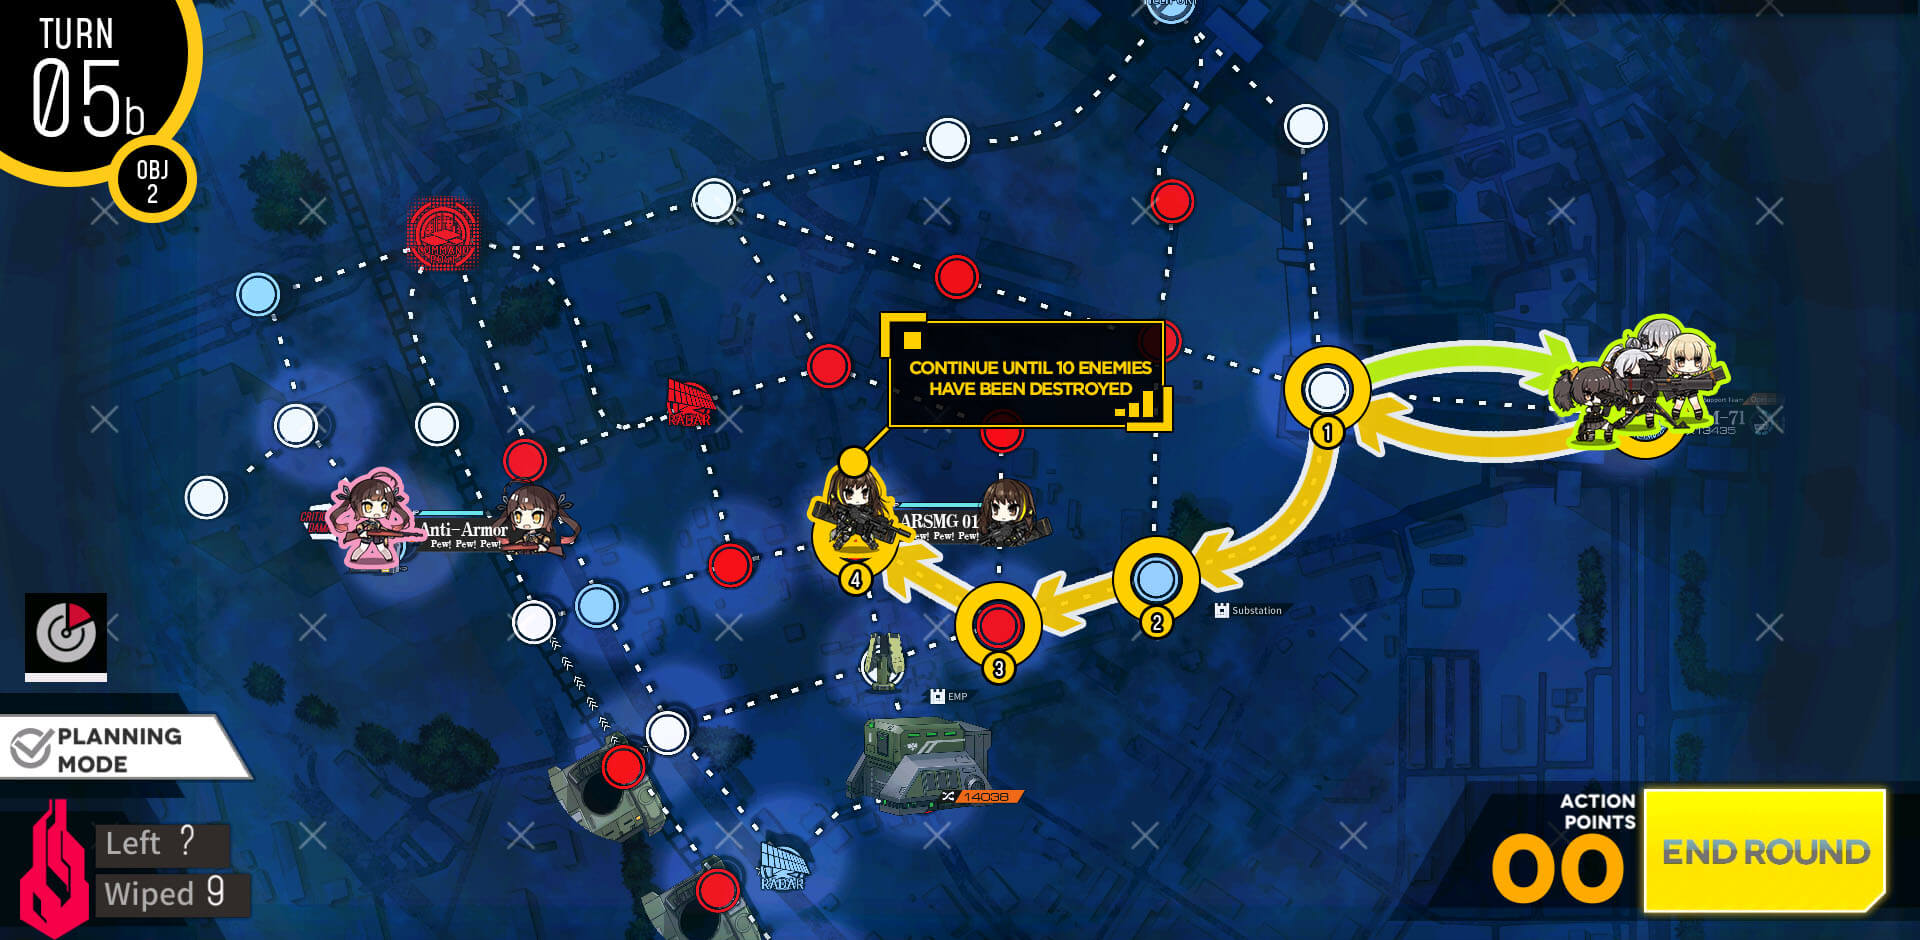
For the Factory, because it has armor, ARSMG echelon might take some time to kill it. If so, HOC is good addition to quicken the process along with EMP.

Once 10 enemy units has been killed, use RFHG echelon near the enemy HQ to clear the mission.
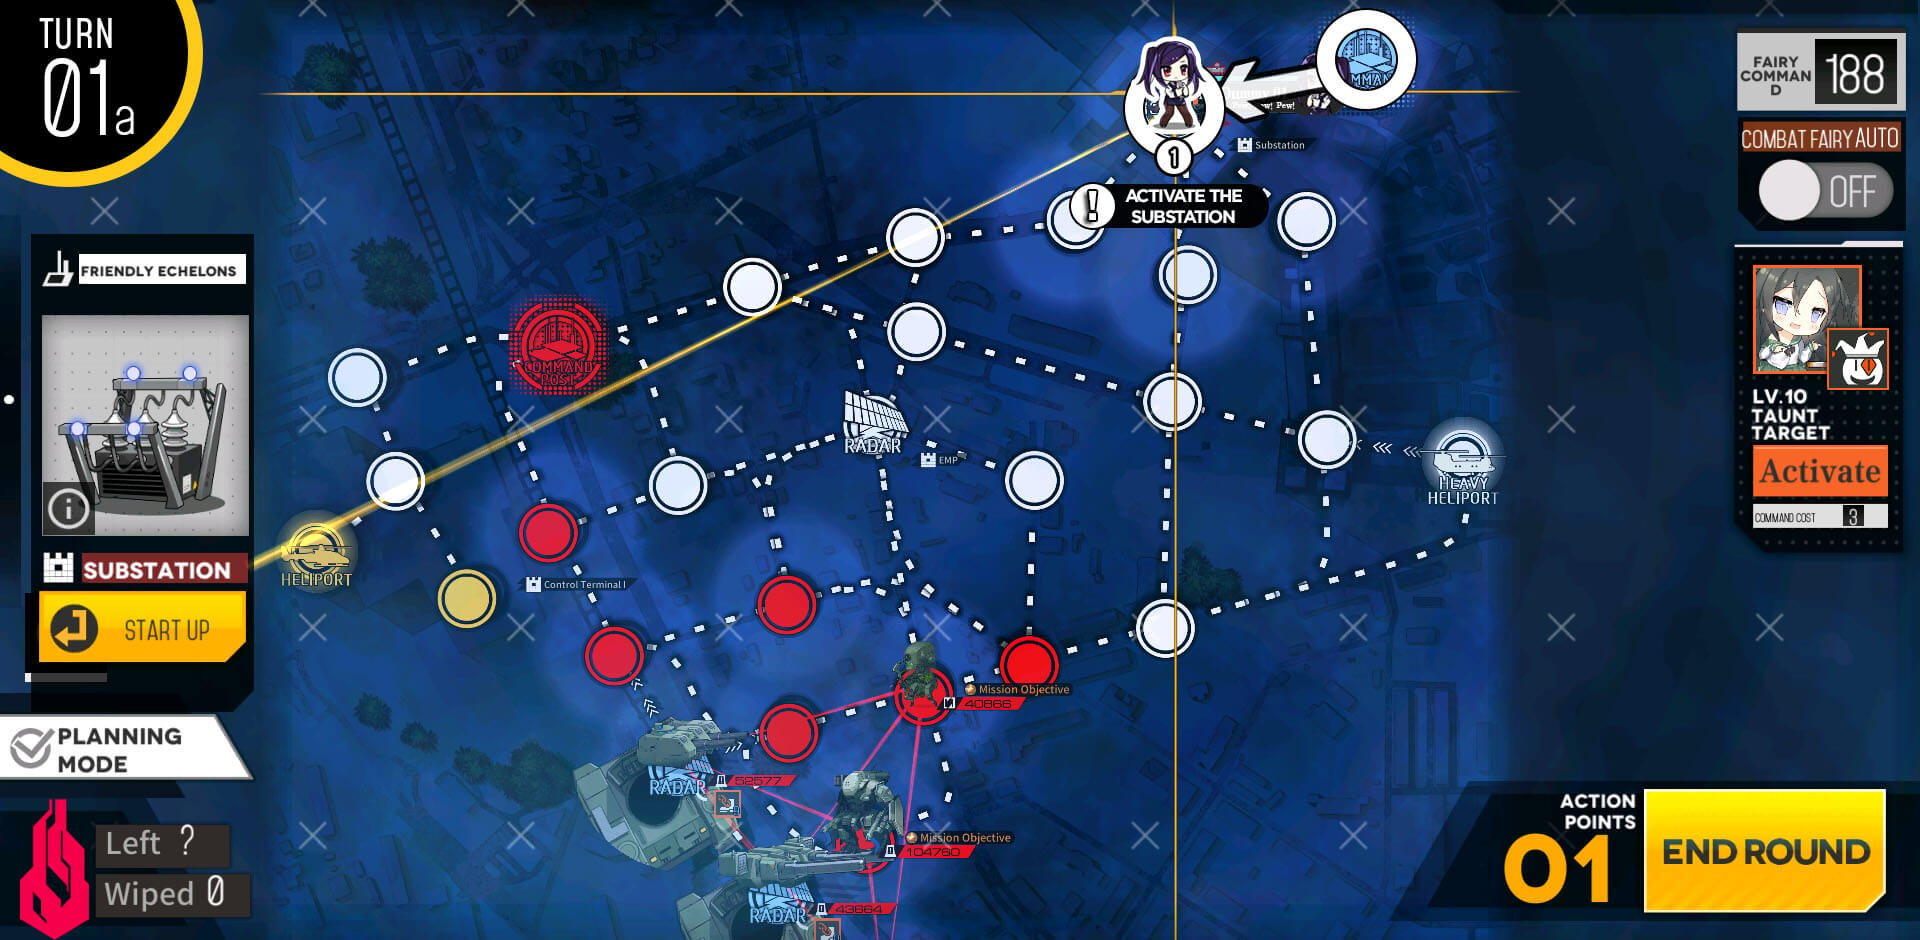
Since this map does not require any battle to clear the mission, we will use dummy echelons. Start with a dummy on the HQ. Then move to the left to activate the substation for later use.
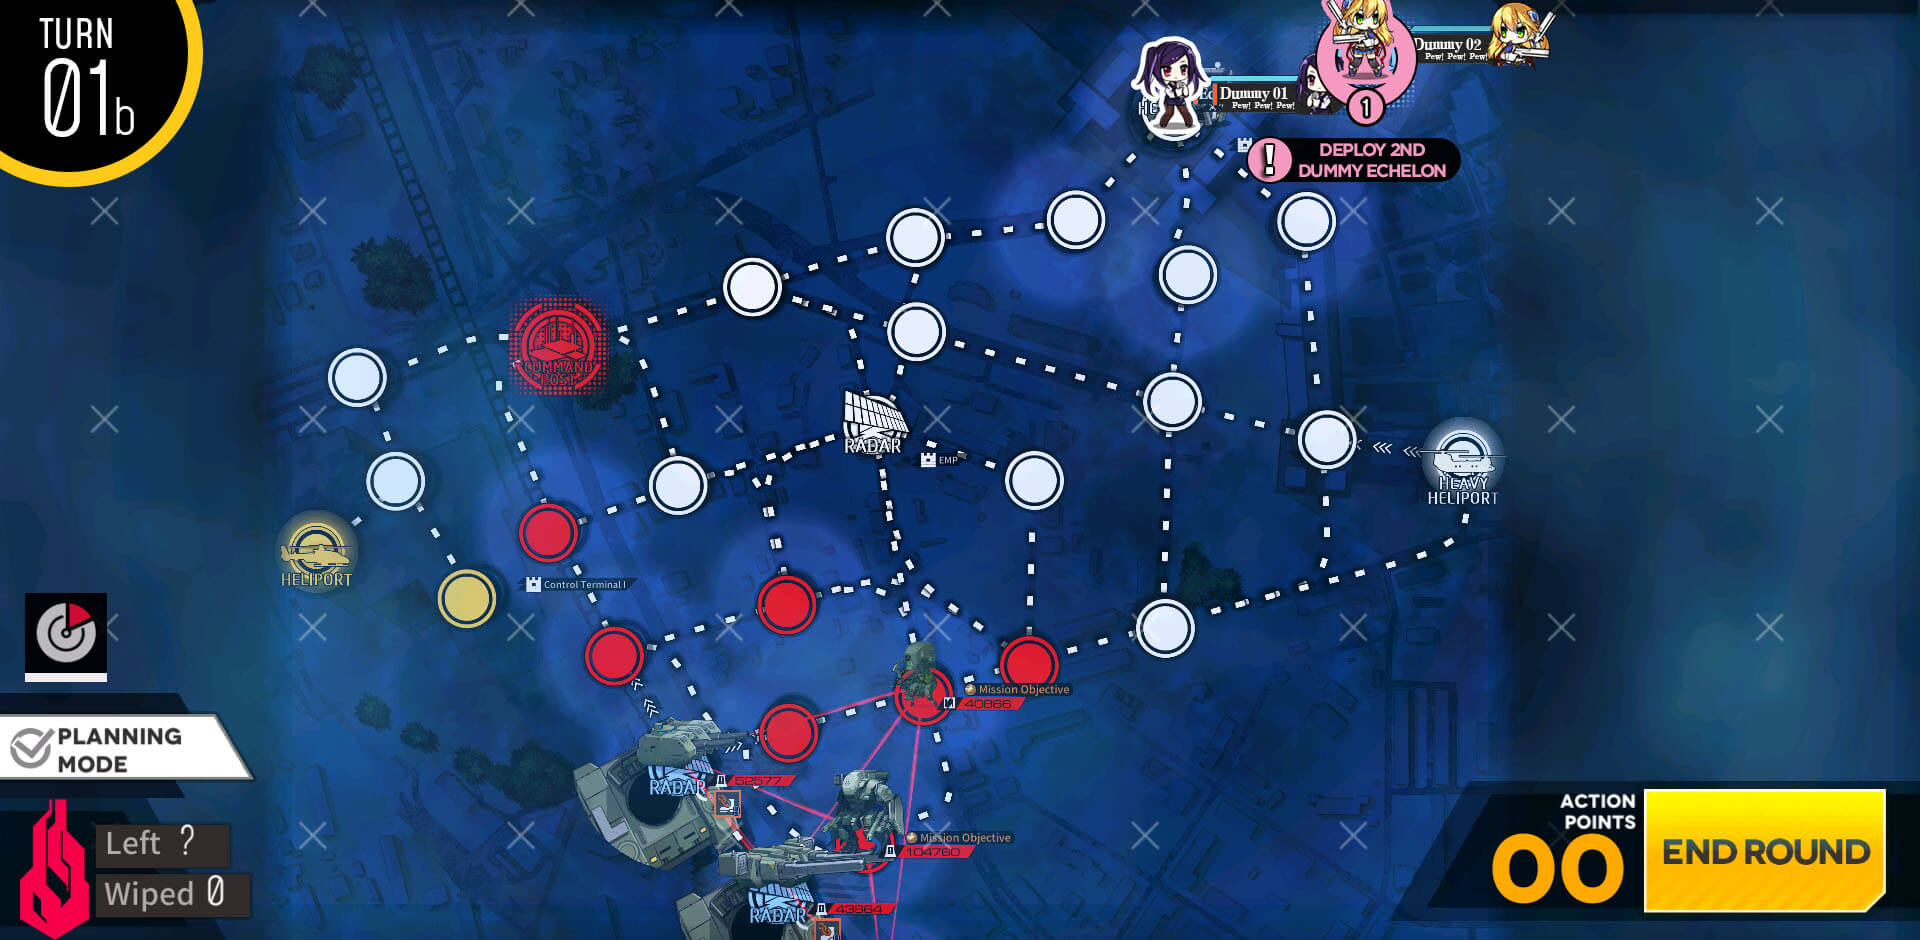
Deploy 2nd dummy echelon on the HQ and end the turn.
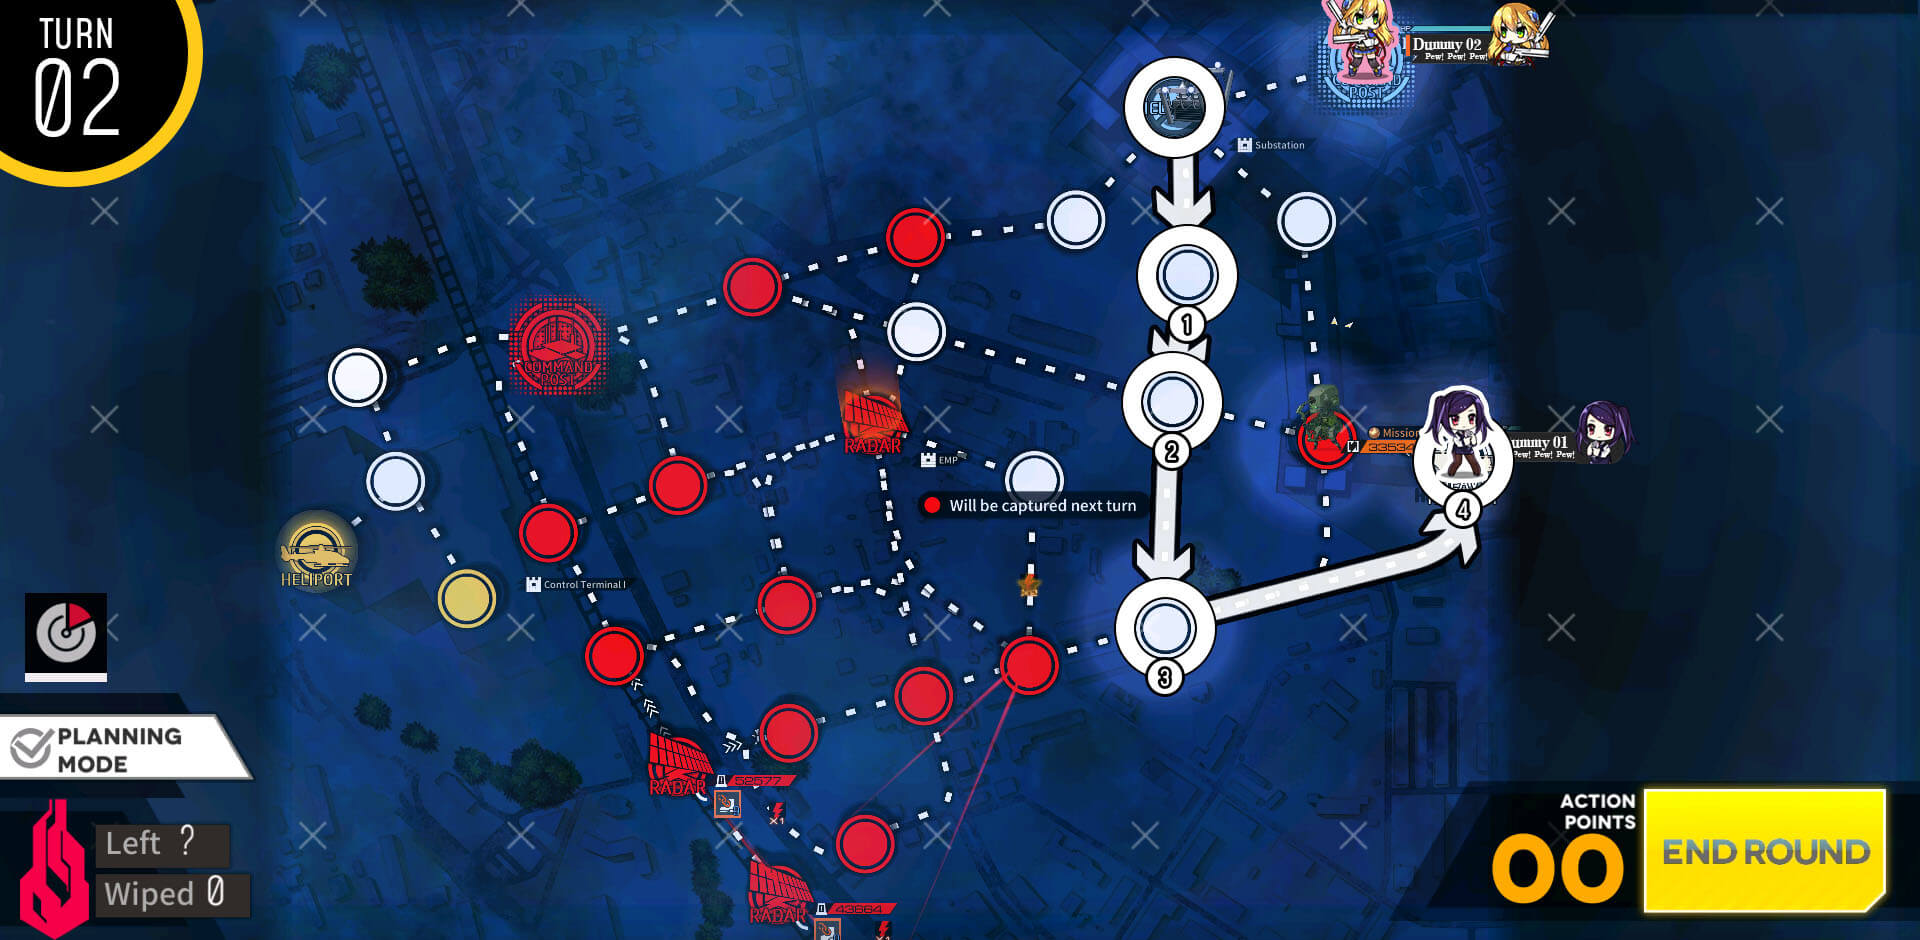
Dummy on the substation travels down and around to capture the heavy helipad on the right side.
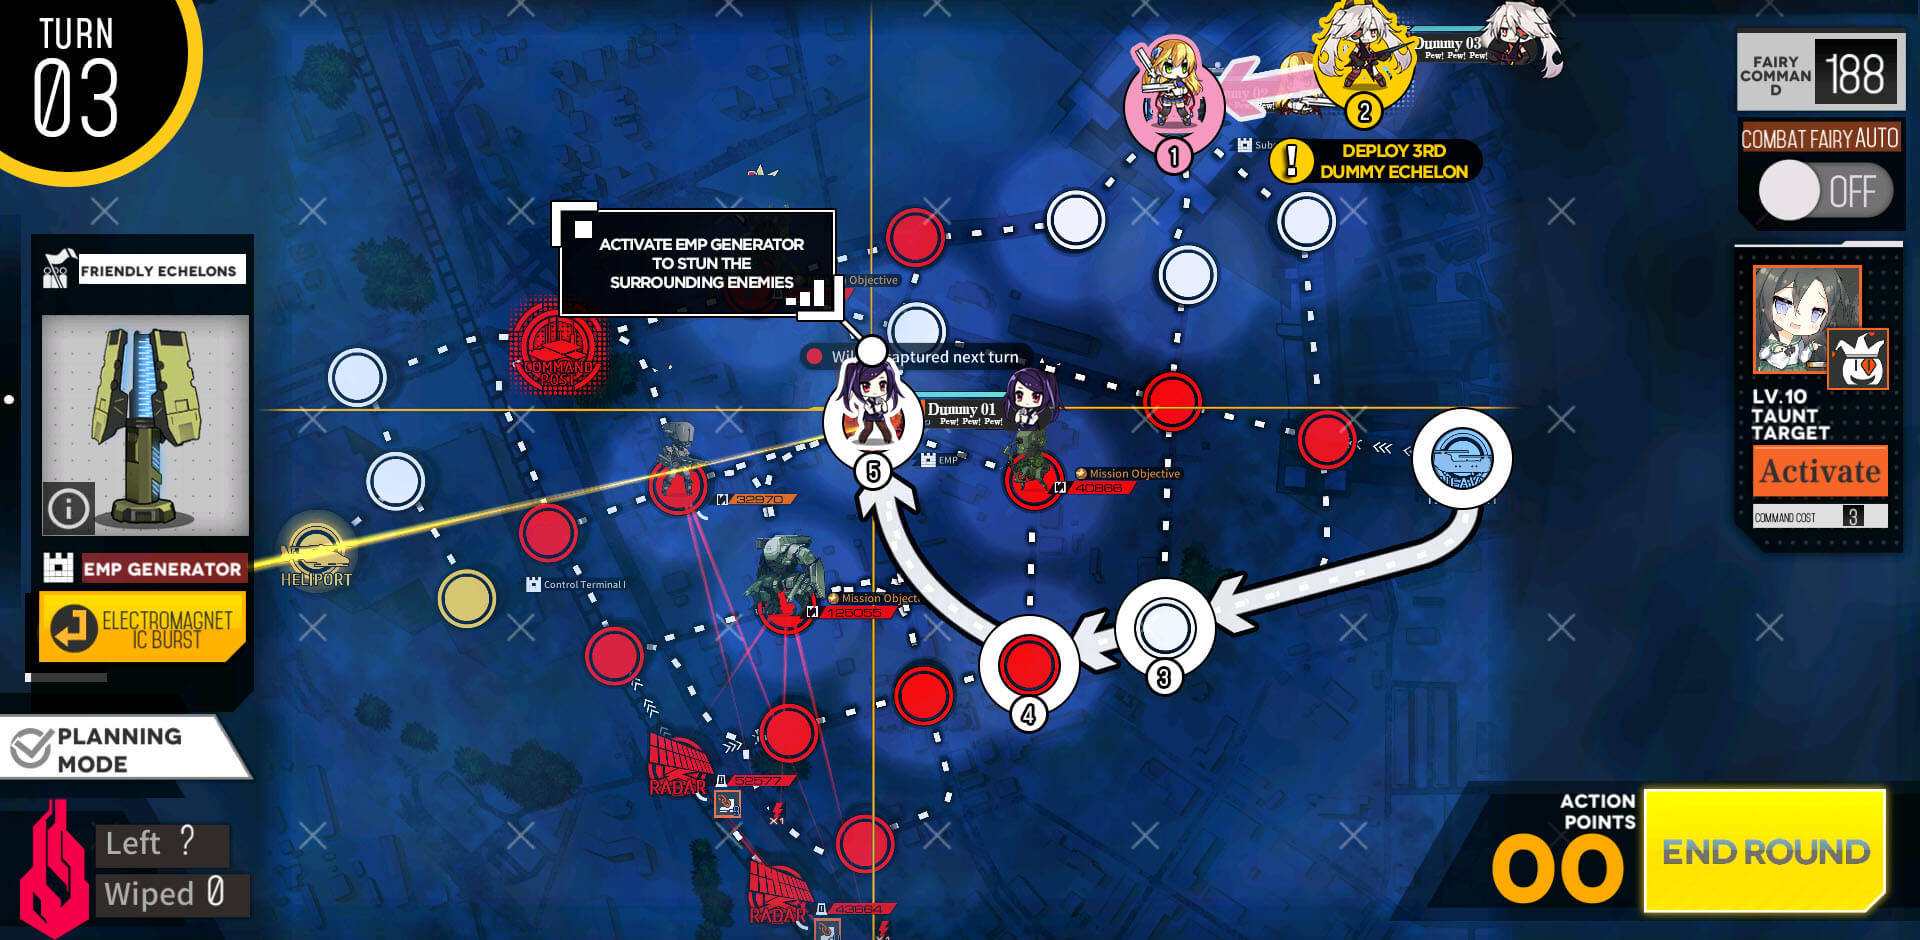
Move dummy on the heavy helipad to the EMP device in the middle of the map and activate it. If you have forgotten to turn on the substation you can move dummy at the HQ to do so now. 3rd dummy is not required for clearing the mission.
On turn 4, take the long way around the map to get to the enemy HQ and clear the mission.
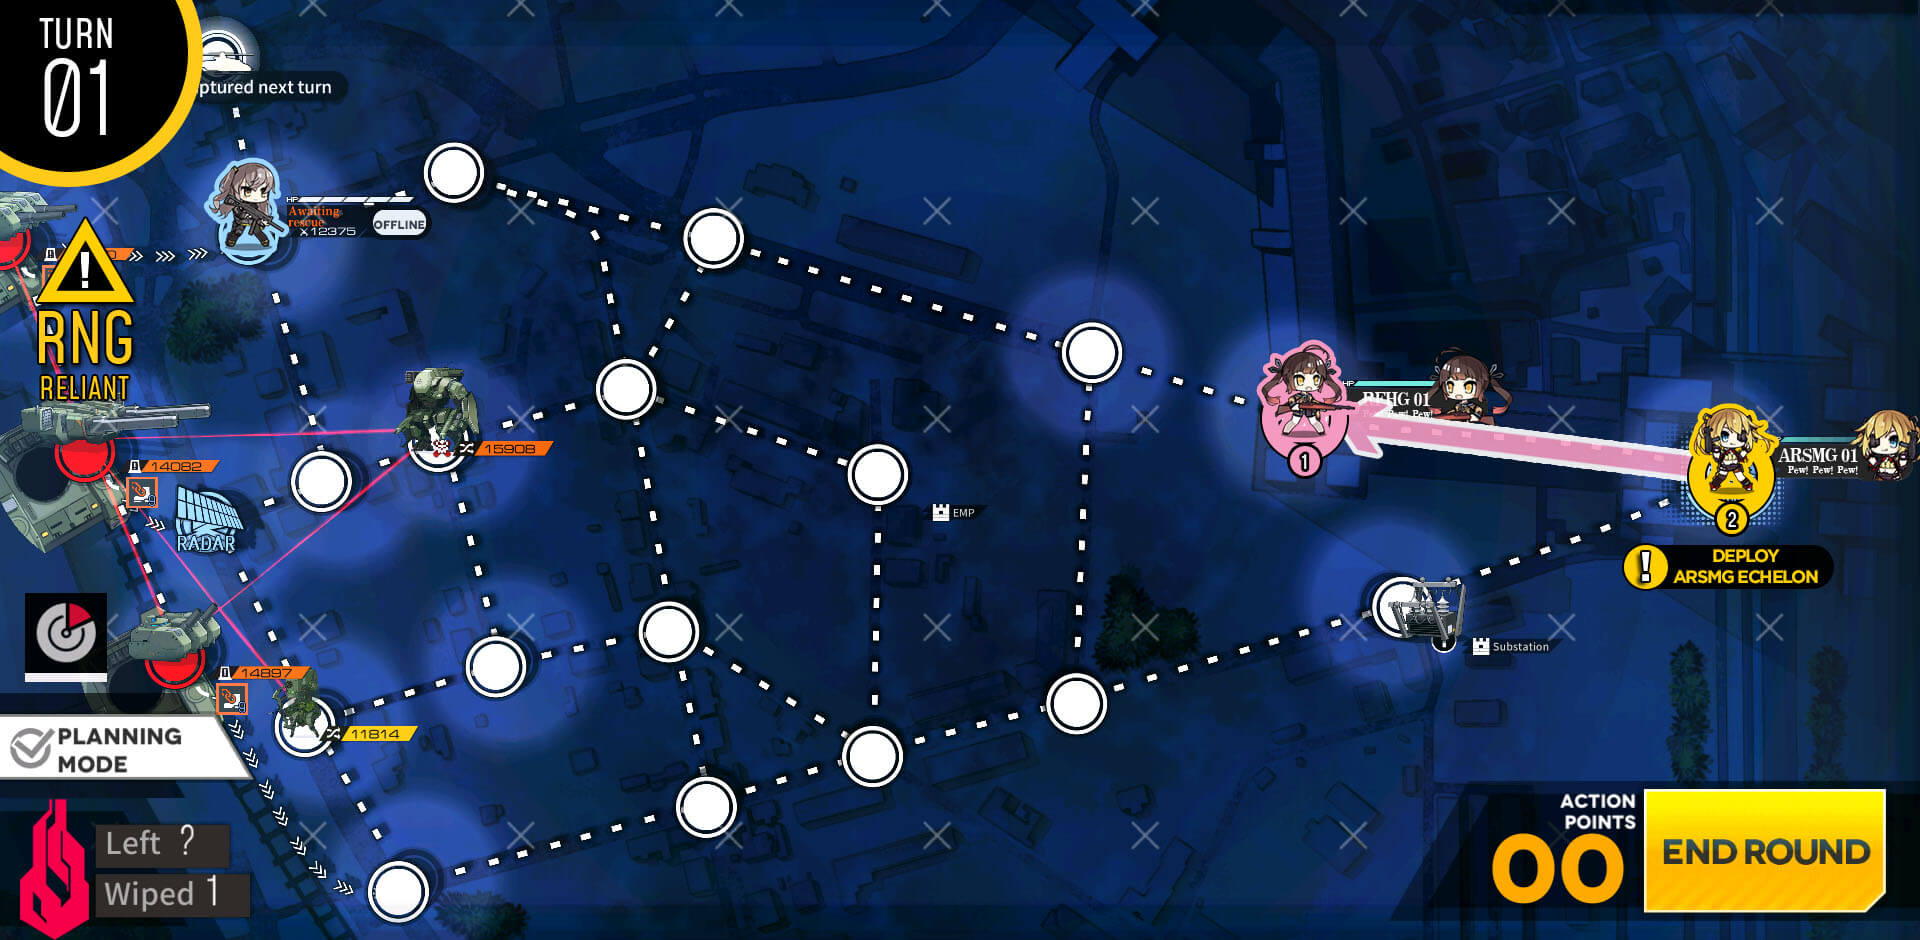
Start by deploying ARSMG echelon and moving to take node to the upper left of HQ. Then deploy 2nd combat echelon.
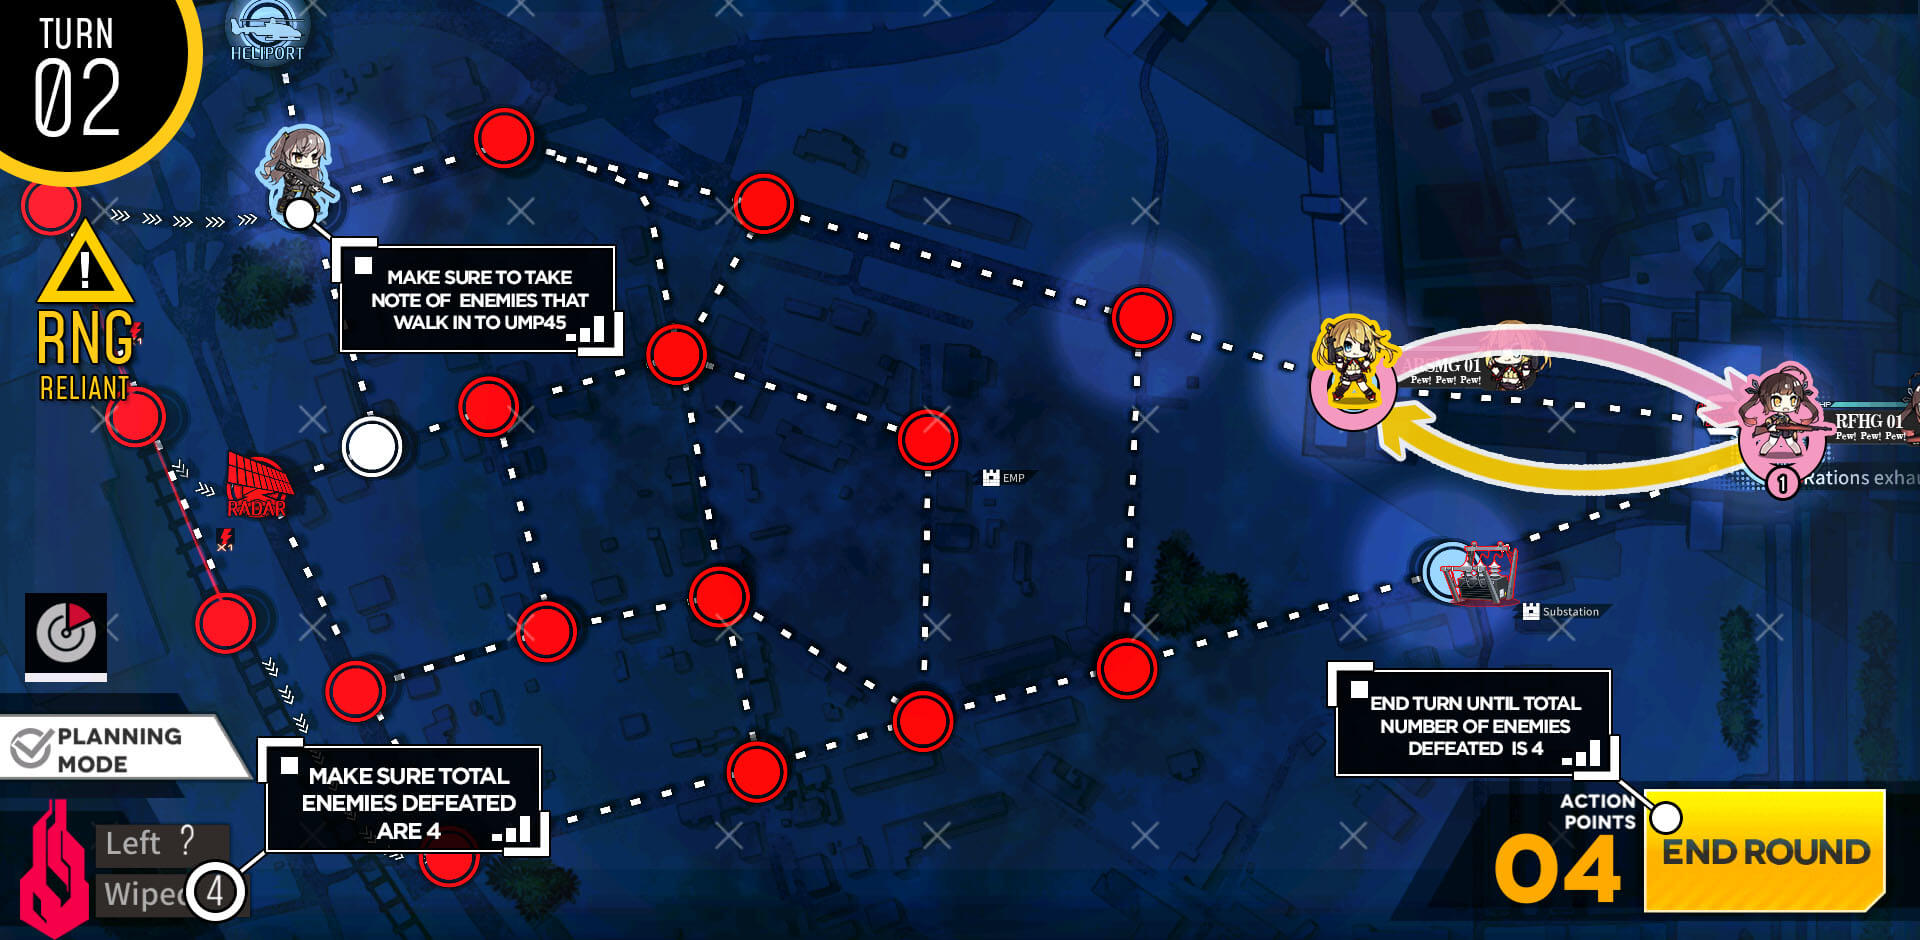
Now we wait... Until we either fight a total of 4 enemy units, or we fight 3 enemy units and one of the enemy units on the map runs into the hostage and kills itself. It is important to keep track of how many units are left on the field. In my case, this took me anywhere between 10 turns to about 20 turns depending on your RNG.
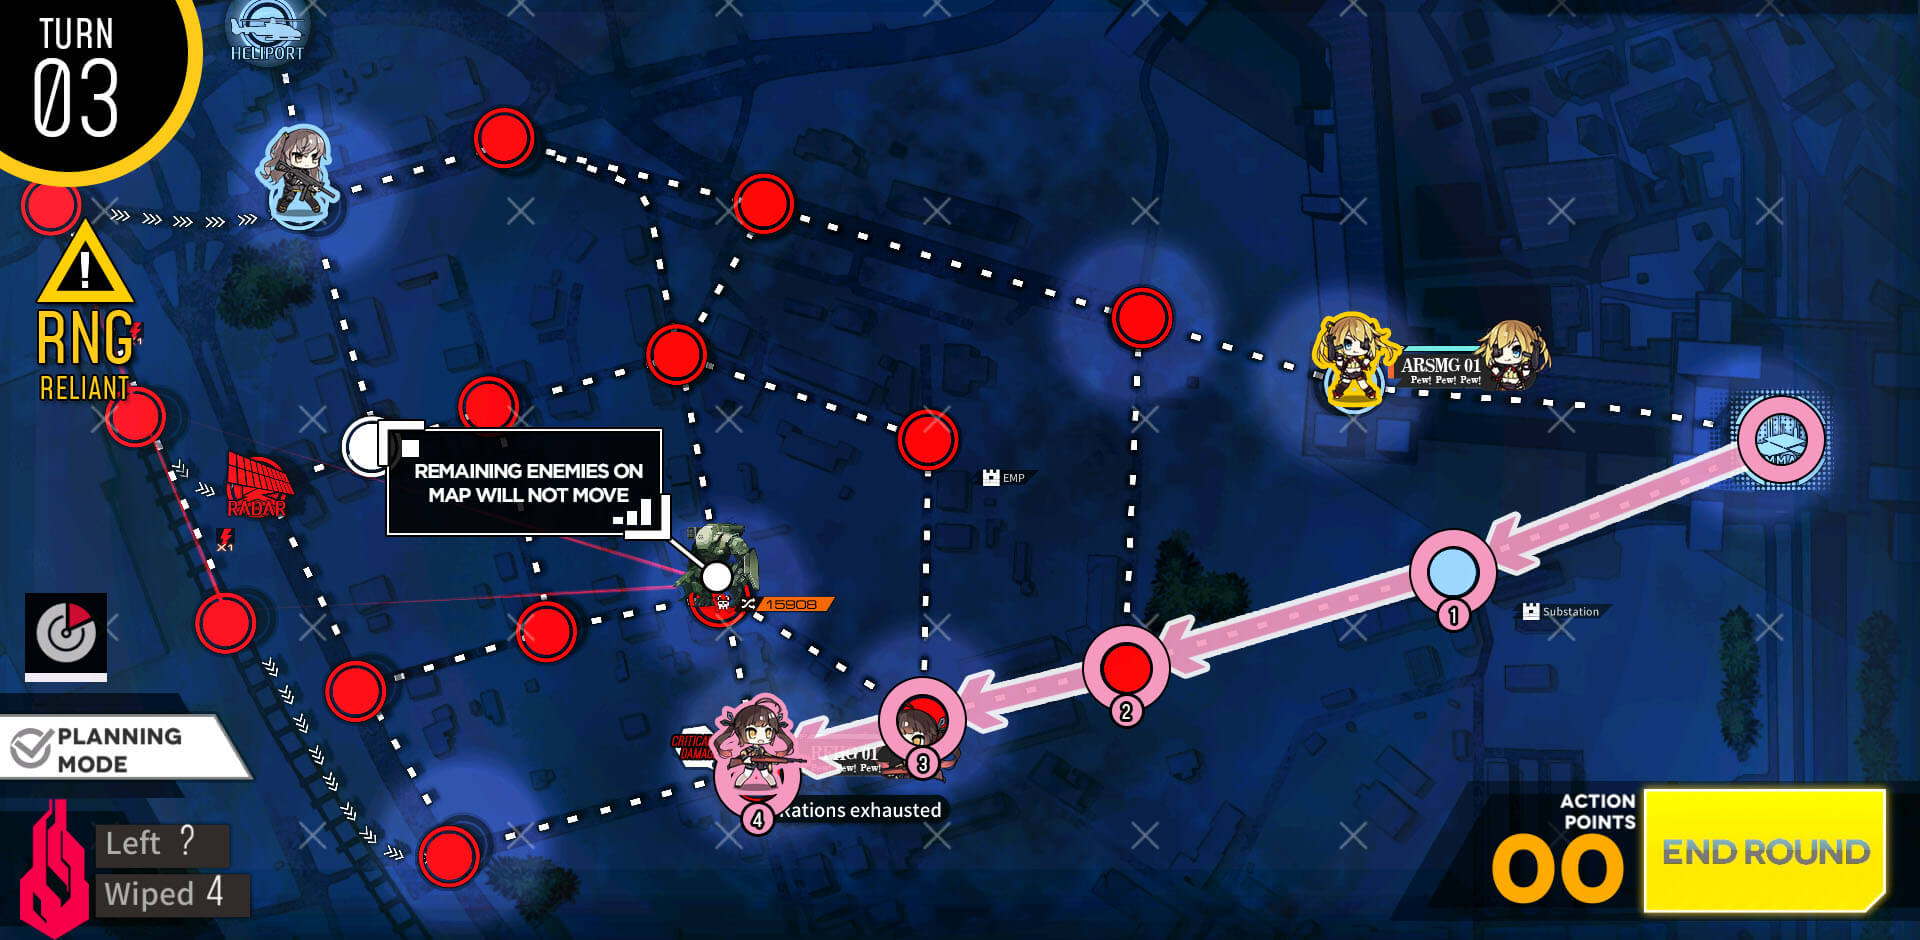
Once you have confirmed that all 4 enemy units that move around the map has been eliminated, you can start move around the map freely. Take the bottom route first. Don't worry about Tesla Troopers as they will not move even if you end your turn next to them.
Next turn, you move around the Tesla Troopers and reach hostage unit.
Make sure to swap now before rescuing next turn. The factory unit above is stronger than many think, so best to leave it alone.
When new turn begins, rescue the hostage and retrace the route back in which we came from.
Once we return to HQ, manually extract the hostage to clear the mission.
I have, received rewards through Chapter 1 to 7 and acquired 2 SGs by clearing some career quests: M500 and SPAS-12. Other MGs and HG you also earn by clearing the missions, including the SC mission reward. Just bit of feeding reports and skill leveling them, you can be set to clear the mission on fresh account in just few days! This is how I put them together. In terms of formation. As long as we have either 2 SG or 1 SG with a Taunt fairy, we should be set to go.

Start with MGSG echelon on the HQ and move to the right. Then deploy dummy echelon on the HQ.

MGSG echelon moves to first yellow node to the right.
Then dummy follows behind. This is mainly to capture two nodes at once.

Continue to move both MGSG and dummy echelon two nodes at a time through the yellow zone.
Continue to move both MGSG and dummy echelon two nodes at a time through the yellow zone.
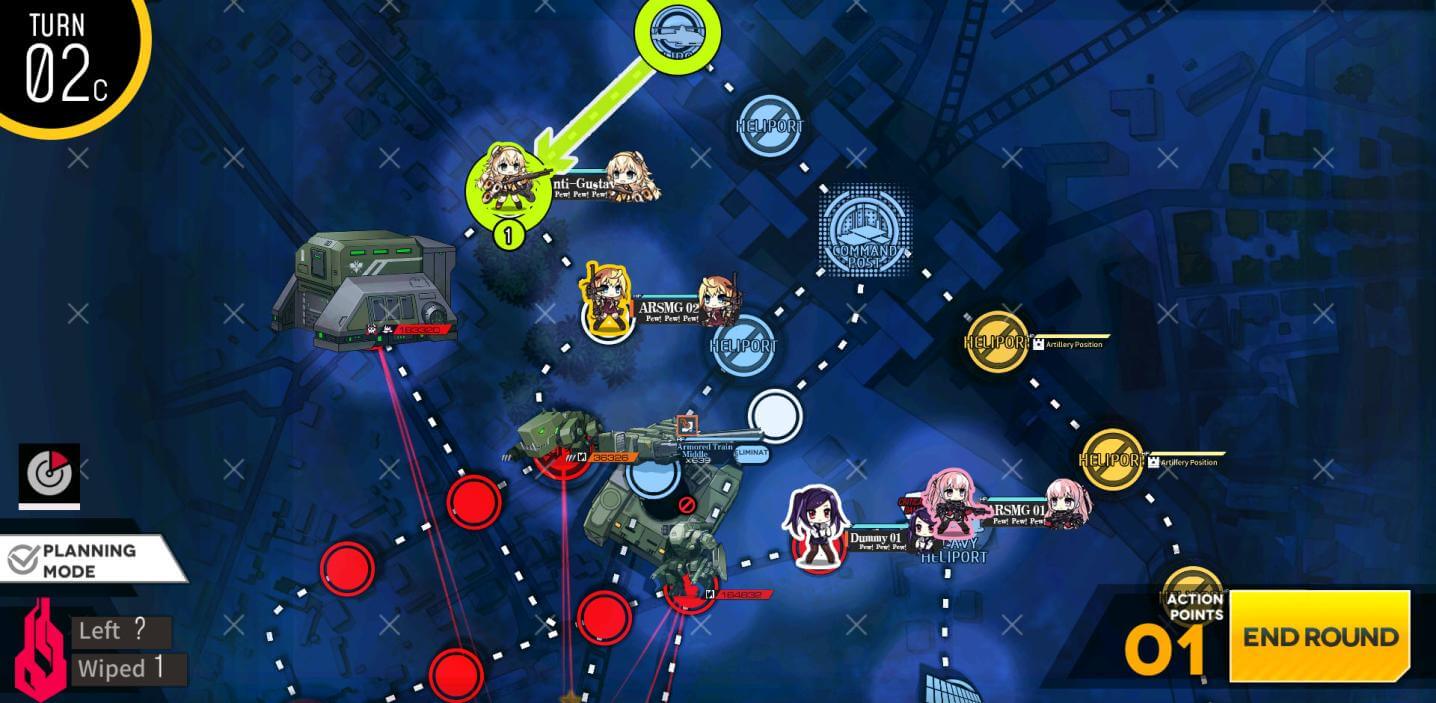
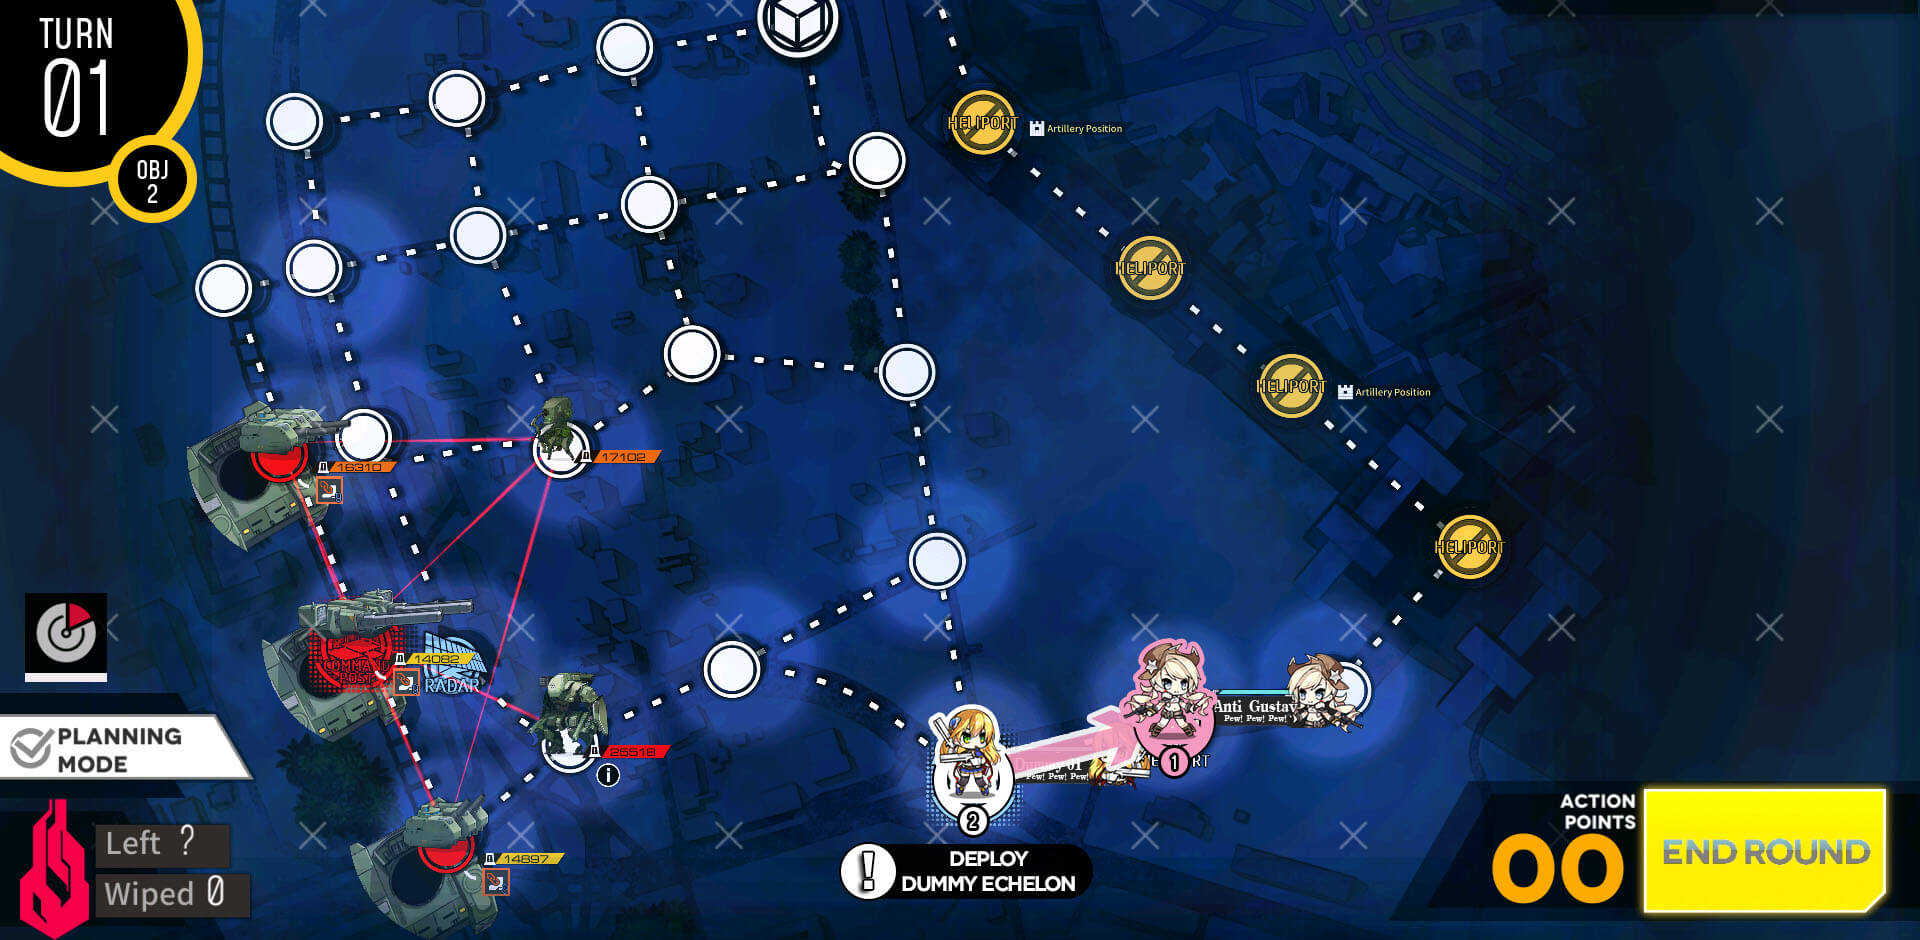
Now that we have enough action points, we are going all the way to enemy HQ in one go, but first resupply at the supply node in the front.
Then take the route on the outskirts to avoid unnecessary fights to the Gustav train.
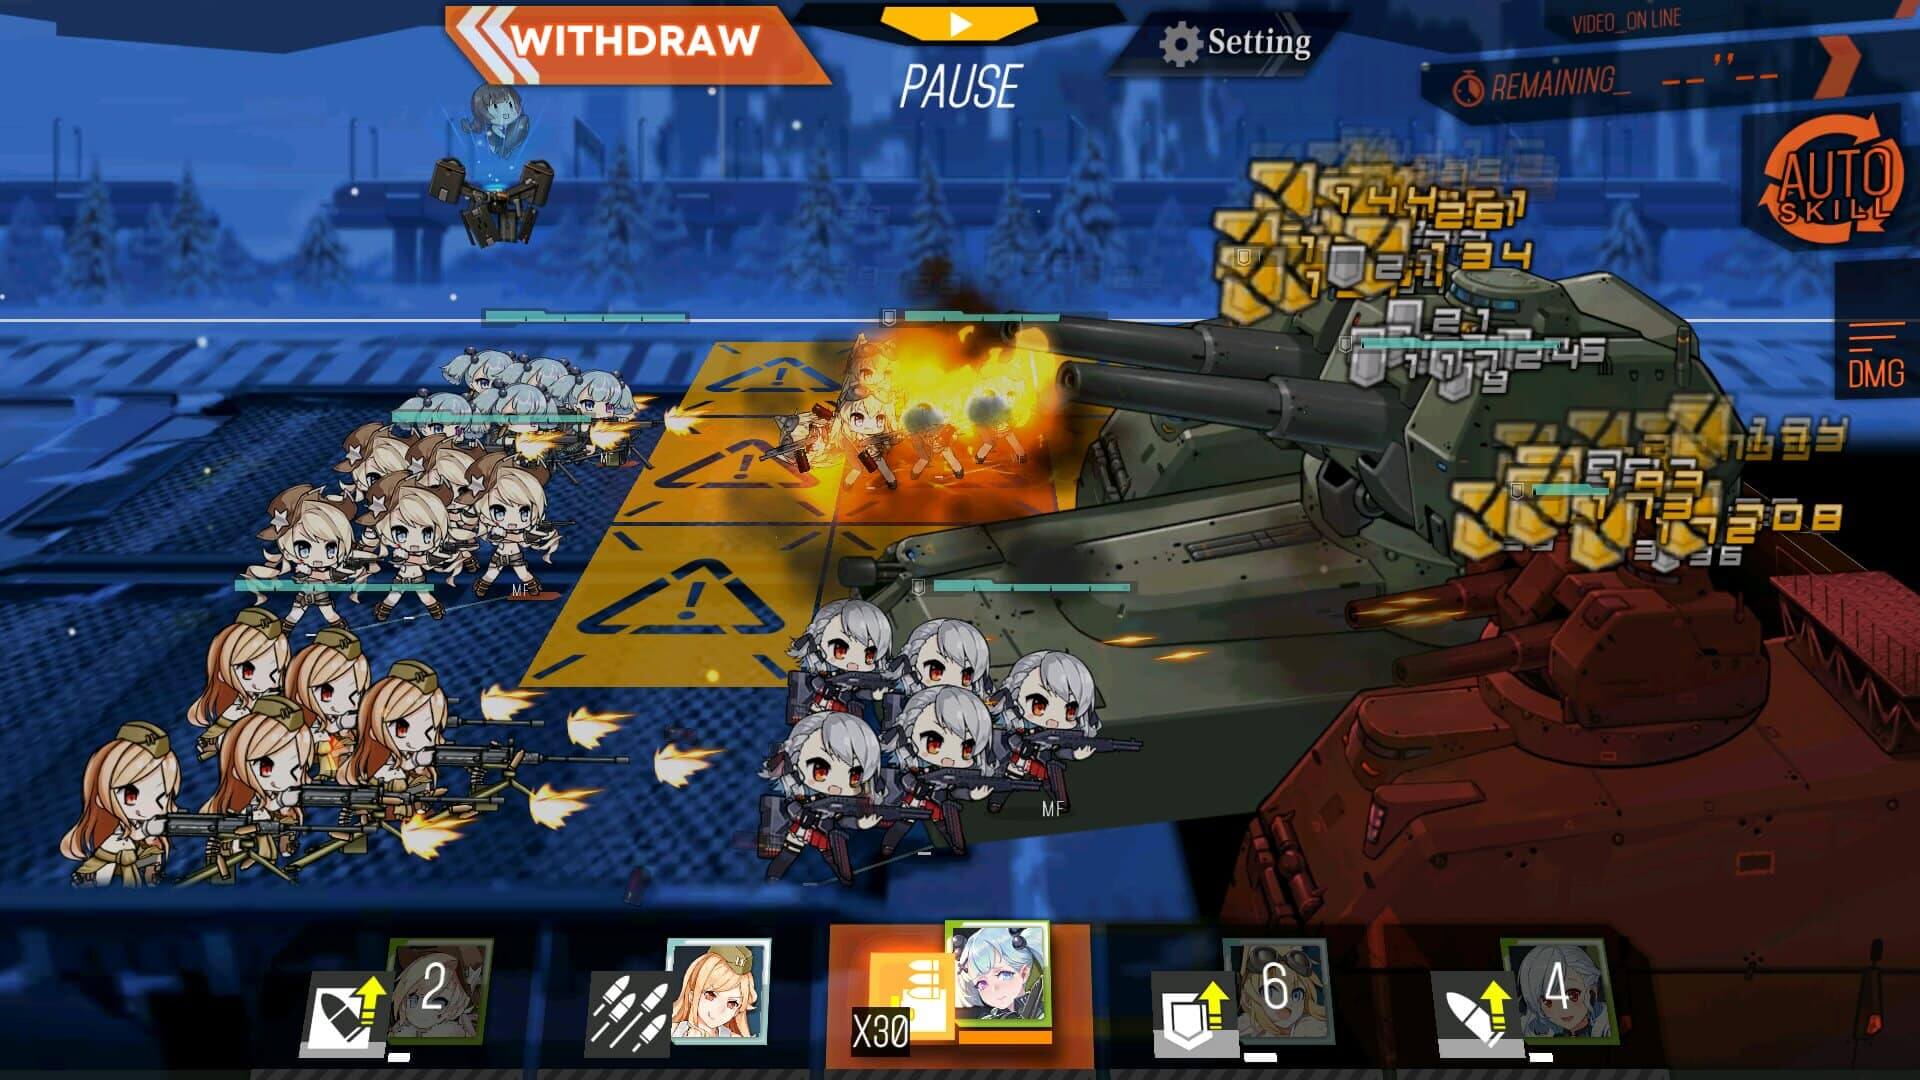
In first fight you do not have to change the formation, but to retreat the SG when it gets targeted by the main cannon, which will show warning tiles of 3x3 grid centered on the SG. Again simply retreat it before cannon fires. Repeat the process with 2nd SG and move the HG to the spot where first SG retreated. If you have Taunt fairy or 3rd MG, at this point you should have killed the first fire support.
On the second battle that is on the enemy HQ, you want to put the SG. When battle starts, drag both MGs to position 3 and 9 respectively, and when main weapon is about to fire, retreat any T-dolls not in the first column closest to the enemy.
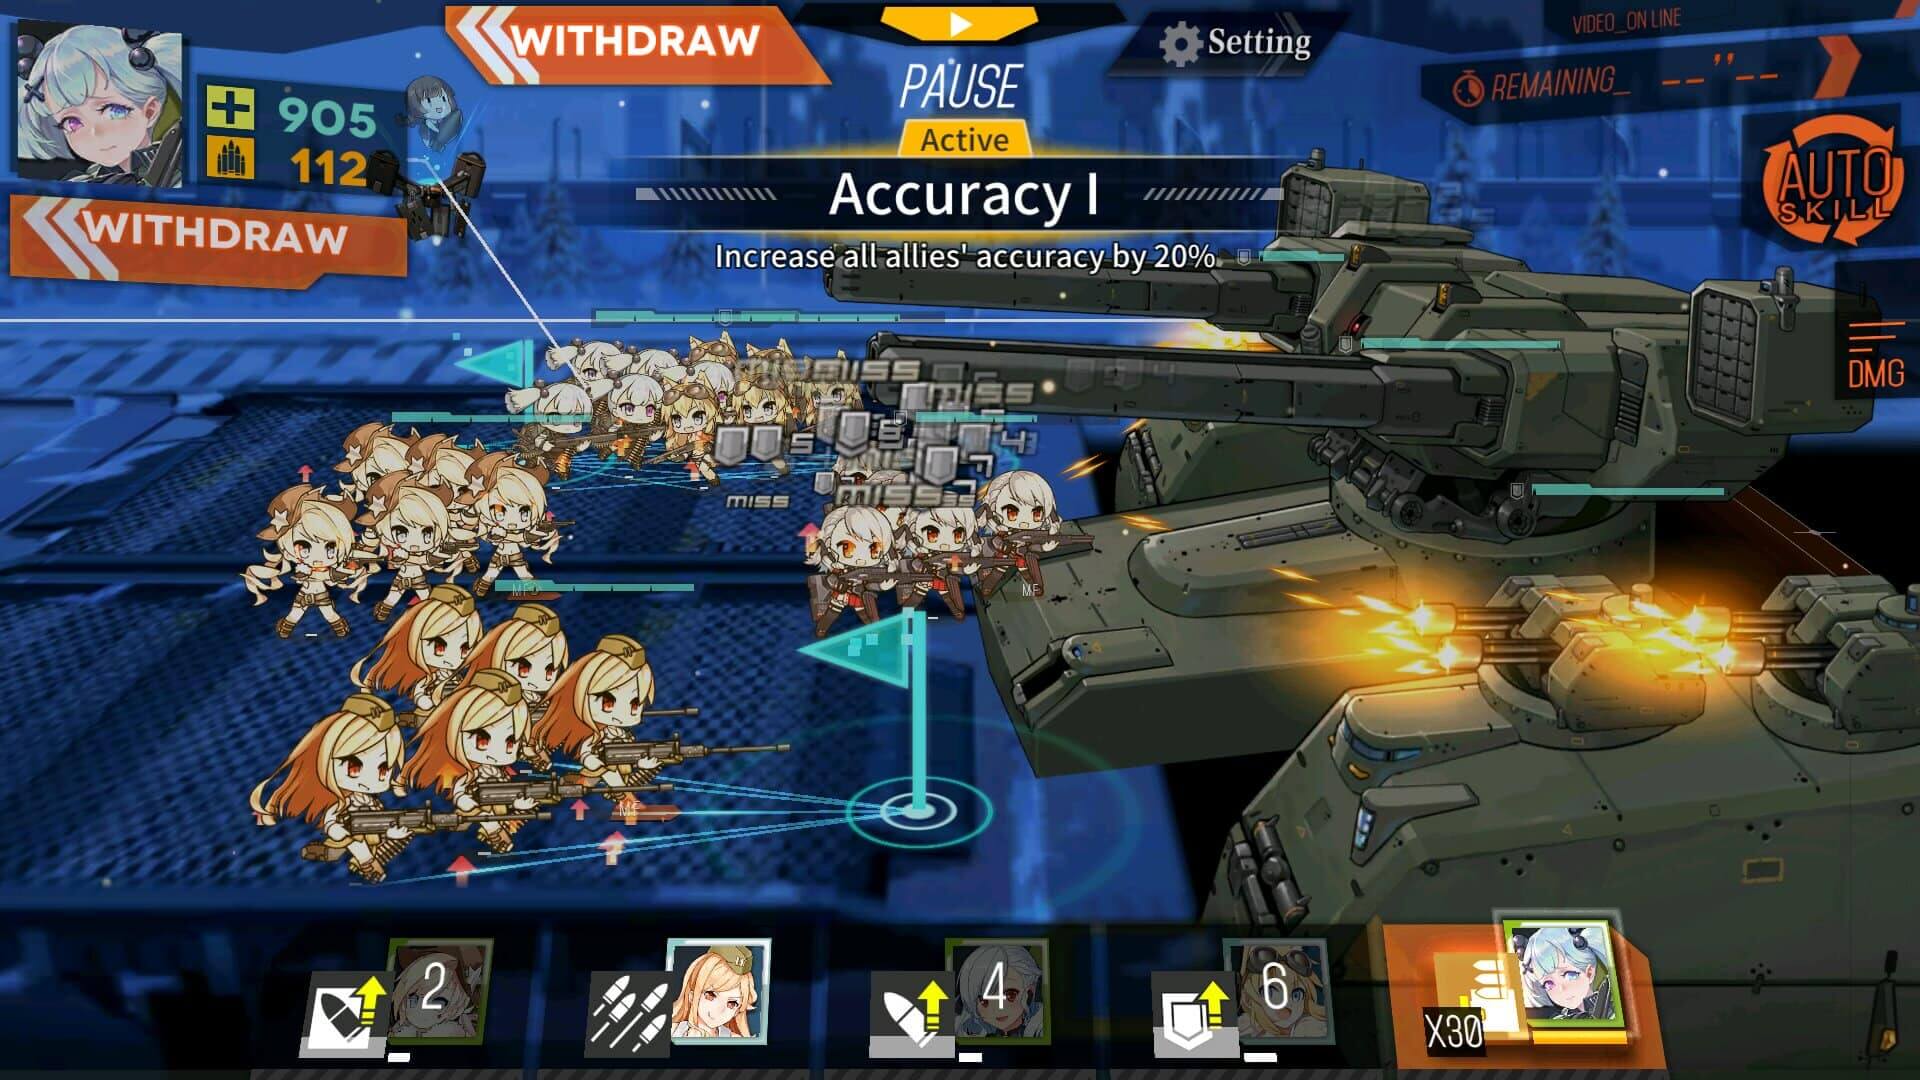
Moving MGs in a straight line from back line to the front should get them in the safe zone before the main weapon firing. If you have taunt fairy, you don't need to worry about SG and simply retreat them and move MGs forward.
Once you clear out two of the Gustav train, end turn to clear the mission.
Once you clear out two of the Gustav train, end turn to clear the mission.
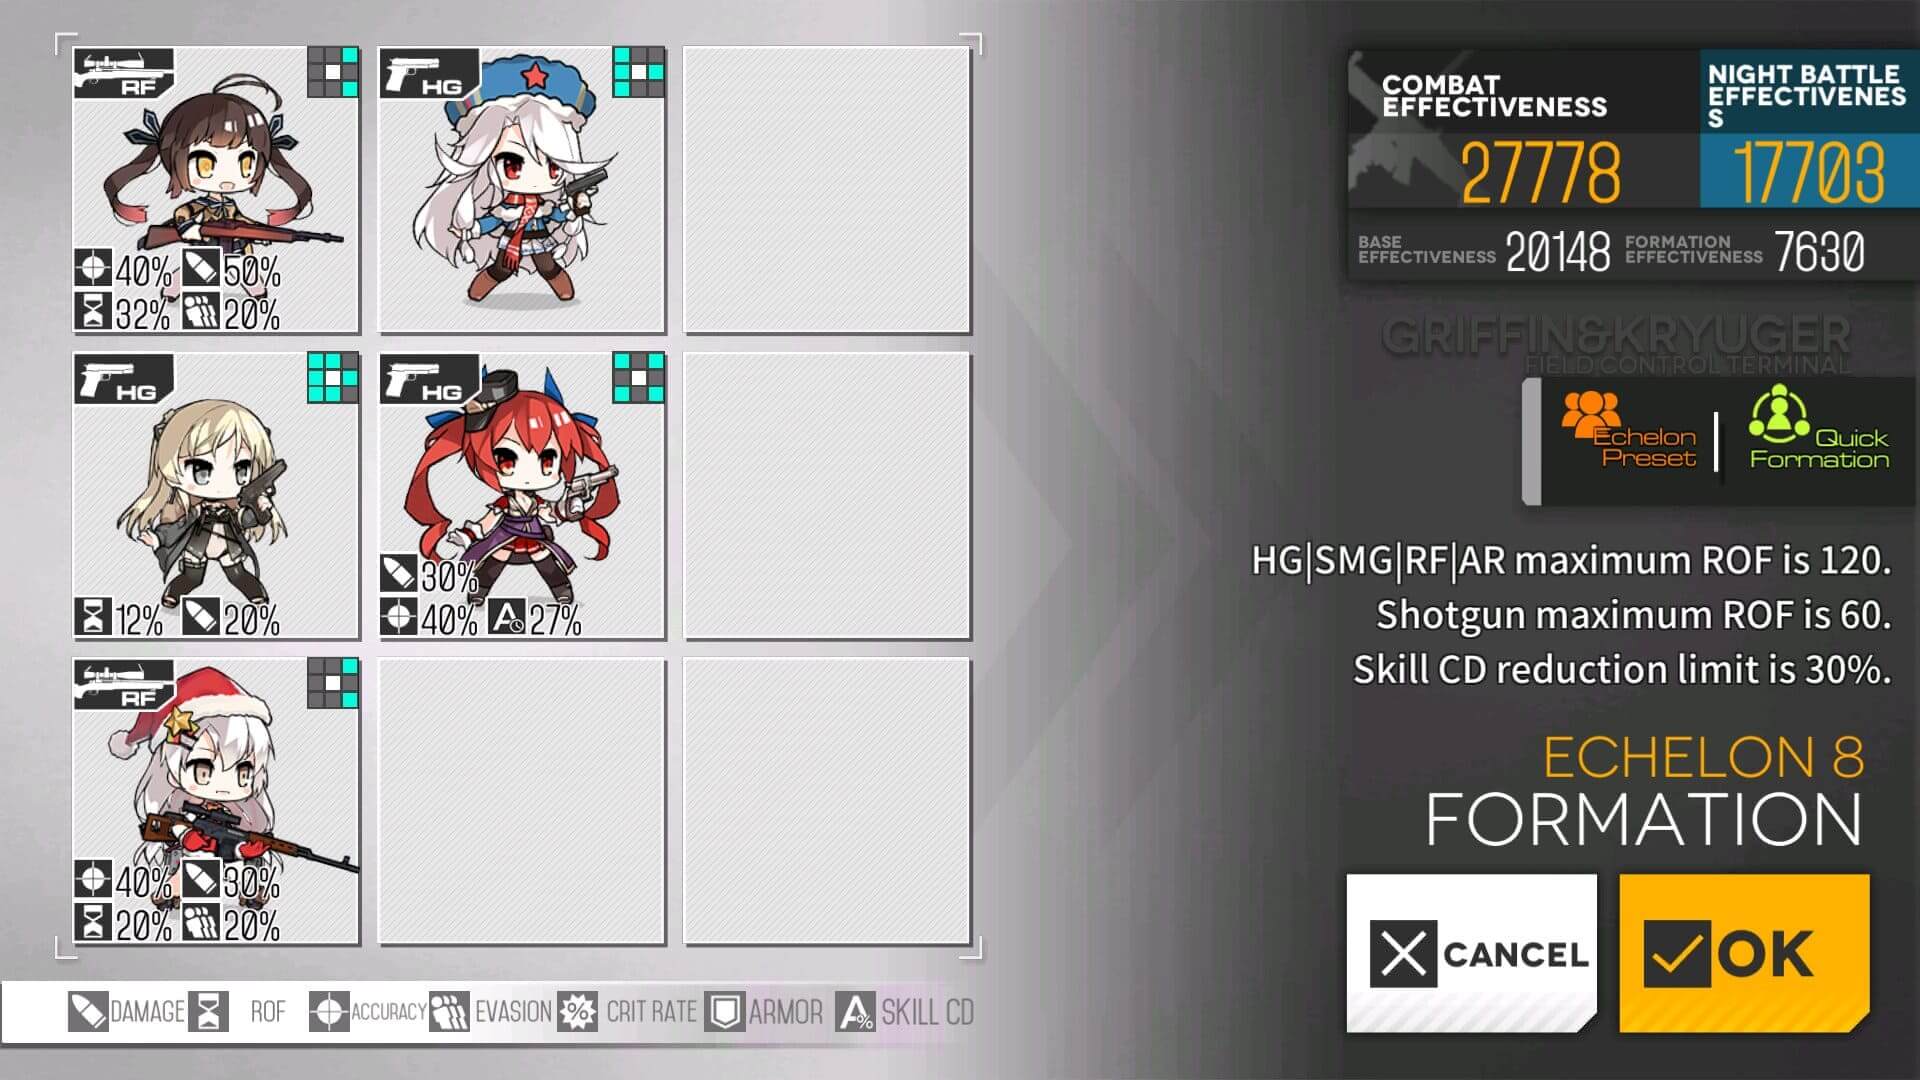
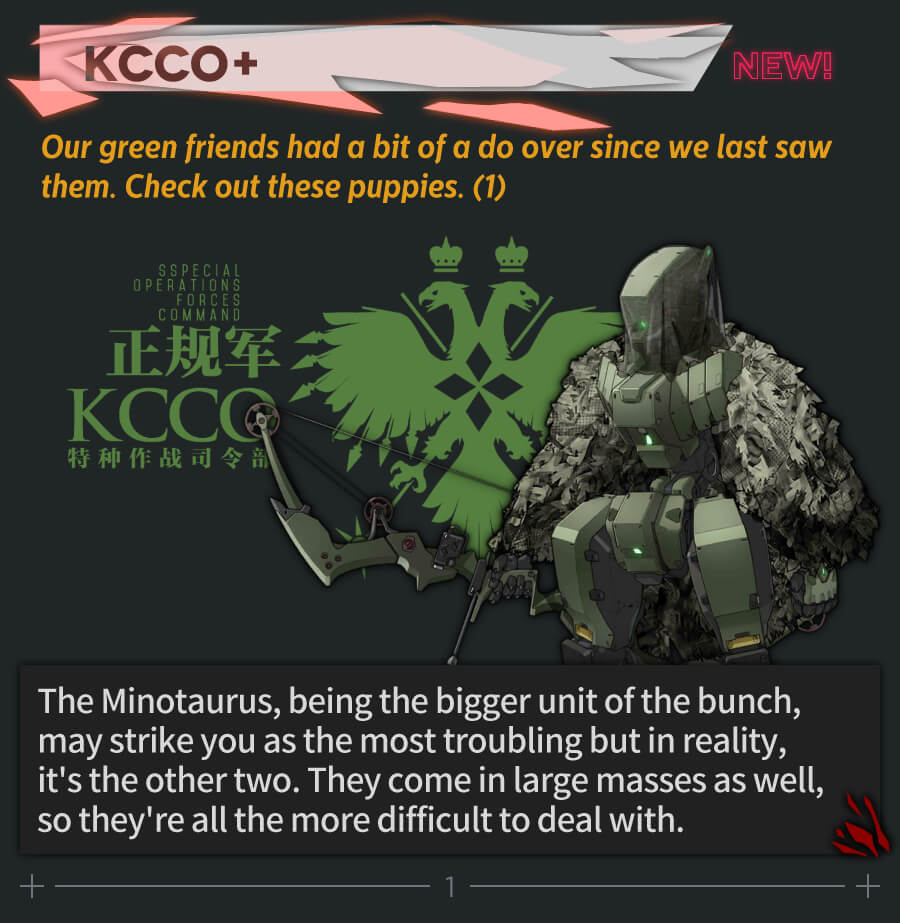
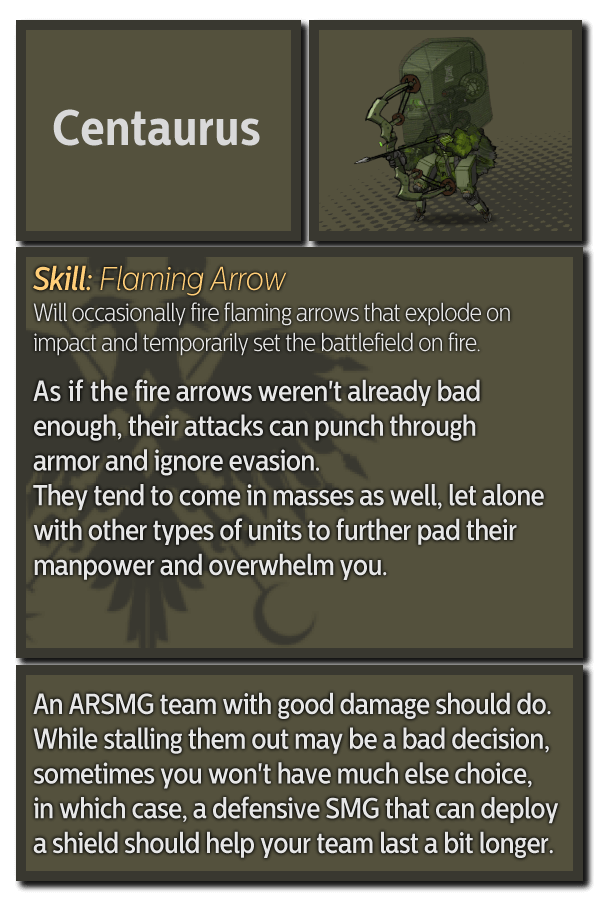
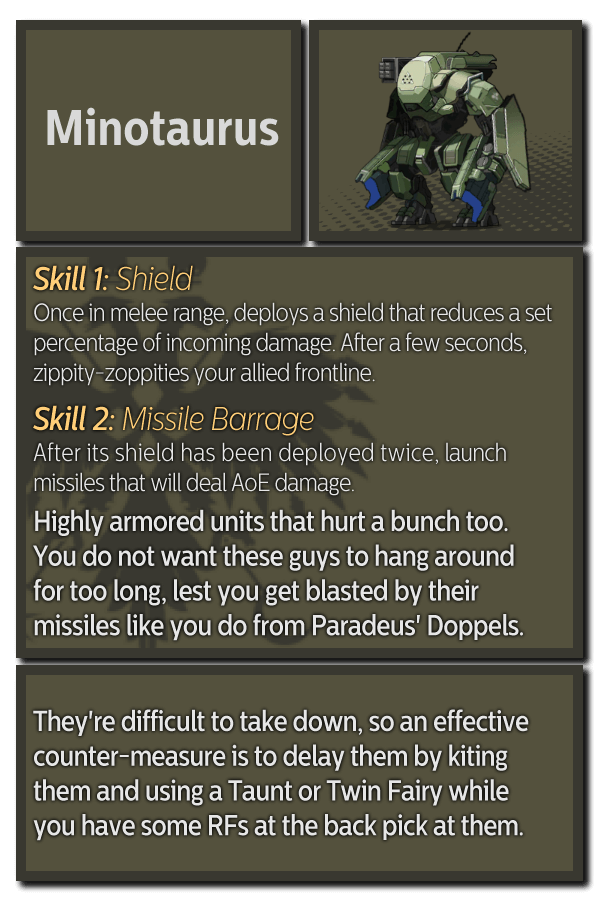
On this map there is a Minotaurus that needs to be killed on the top right, so I decided to use RFHG echelon with Taunt fairy. However if you have a Twin fairy, I recommend it over Taunt as it covers more of the front, and as durable as Taunt fairy is. Standard F formation for the RFHG echelon. It should have no issue against Centaurus units as well, but steer clear of any units with Beast enemy unit.
Start is Identical with first objective as we are moving to kill the Gustav fire support prior to taking out enemy units on the map.
Then we will move two nodes at a time through yellow zone again with both echelons.
The different on turn 3 is that before dummy echelon moves out, we deploy RFHG echelon on the heavy helipad then continue to move along with MGSG echelon.

Then we continue moving as planned up to last helipad on top right.
Resupply and fight all the way through the Gustav train. 3rd fight is handled identically as the 2nd train fight, but change the formation so that SG with higher HP is on the position 6 prior to 3rd engagement.
Once Gustav train is destroyed, move to take out the Tesla trooper with MGSG echelon. It should be able to defeat them even on low SG hp.
All that's left to do is to clear out the enemy units on the Red nodes. Deploy HOC if you have it or another combat echelon to assist in battle.
Taking out the Tesla trooper unit on the top should leave you with one or two Archer units on the field, which can be hunt down between repairs and resupplies. If using HOC, make sure to stay in range of support by moving them along with RFHG echelon.
This map is one map that immediately off the start all nodes are within the fire support range of Gustav train. So it is necessary to fight through enemy unit while raining death. To combat one unit in the way to hostage we need a burst of damage up front against enemy units with no evasion, so we are using MGs, with single HG for the vision and buff. Any HG that can provide firepower buff is better. For formation, just select the one that HG tiles can cover all MGs. It is also important for least one of the MGs to be in the front column as it is the safe spot from the Gustav railgun.
Start with combat echelon in the HQ and move to node with substation and activate it. There's quick battle there but you should not have problem killing them. Deploy dummy echelon at the HQ and end the turn. The Beast unit near the HQ will not move.
If your MGHG echelon was damaged last battle, make sure to repair prior to moving. Then check that substation is on before heading to EMP device in the middle of the map. You will have to fight the tank units but it will be manageable.
Once the battle begins, it is important to take out as much armor units in the front before MGs retreat so that single MG can finish the job. This is the only battle in the entire mission, so do let MGs go into single link if you have to.
Once all the MGs retreat in the back columns, Just let MG in the front finish the job and move to take out 2 Typhoon tanks in the rear.
Once you defeat the tanks, activate the EMP to stun all enemy units on the map.
Then move the echelon towards hostage unit and swap positions so we can capture the helipad next turn.
With newly captured helipad, we have exactly enough action points to get back to the HQ, then manually extract to clear the mission.

In this map we also have to fight with some of the Gustav fire support so ARSMG echelon that is going to fight needs have different formation.

Have all units up front so that you can run away from the mortar and the rail gun fires quickly.
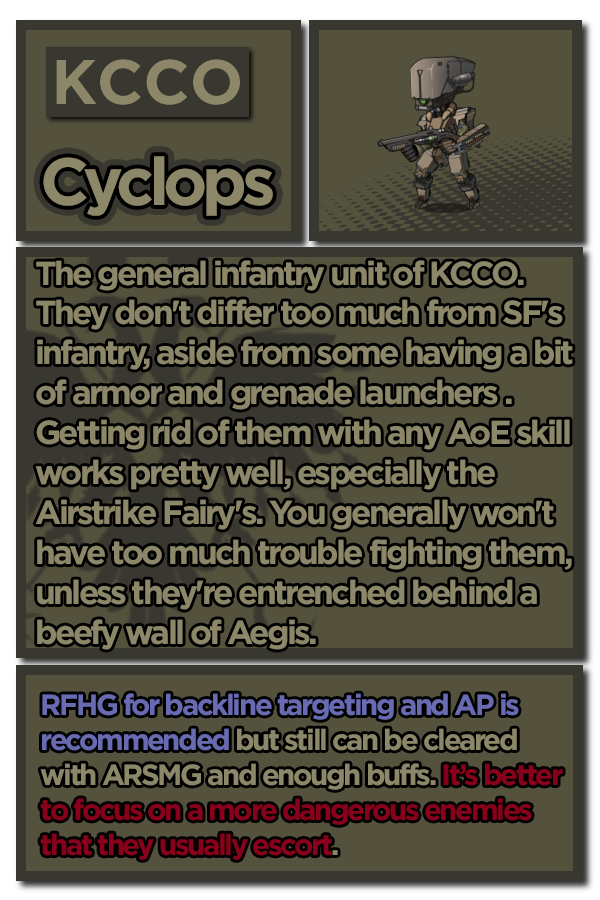
Battle against Cyclops infantry units should be manageable if you have least one AoE skill in the echelon and remembering to retreat the T-dolls in the back when you see the warning sign.
For EX, you will need much more DPS as Gustav train in EX mode has lot more HP than the normal version [Negev is really good]. Shield SG and Taunt fairy is strong recommendation for the team.
Start with ARSMG echelon on the HQ and end the turn without moving.
Repair echelon on the HQ if needed then take the heavy helipad to the right. Then deploy the MGSG echelon on the HQ.
Swap ARSMG echelon on MGSG echelon then push up to helipad in the middle of the map with ARSMG.
Then deploy the Dummy echelon on the HQ and swap with the MGSG echelon.
MGSG echelon moves up behind the ARSMG echelon.
Repair/resupply as needed before moving ARSMG to the node with resupply on it.
SGMG echelon follows behind as well, repairing/resupply at the helipad if needed.
On turn 5, you need to move MGSG back one node to stay out of the detection range of enemy unit above. Other than that, that's all there's to this turn.
After making sure that MGSG echelon is ready to go, take the route to the top left of the map while avoiding enemy units nearby.
Then fight two of the Gustav fire support and end your turn on the radar to clear the mission. Killing two fire support will still count for the 6 kill requirements so don't worry about having killed enough enemy units.
This is the ARSMG echelon used for multiple battles. Sopomod II is not really ideal in the situation, if you have faster rof based AR, it would be ideal to combat Beast units.
Here is standard F formation but with HG included for vision.
Start with RFHG echelon on the HQ and the dummy echelon on the helipad. RFHG echelon moves down to fight a Hydra unit with Gustav support, just need to fight once to stop the wave of enemies being spawn. Dummy also moves down to take helipad to the right of Gustav. Deploy ARSMG echelon on the HQ and end the turn. This ARSMG unit is mainly to fight the ELIDs in yellow zone.
On turn 2 ARSMG echelon moves up one node from HQ. We then deploy 2nd ARSMG echelon with force shield SMG on the helipad next to HQ and head straight to the rally point.
With remaining moves, dummy returns to the helipad next to HQ.
ARSMG for ELIDs sweeps the left side of the map and connects the supply route for the turn.
ARSMG with force shield fights way through to helipad with dummy on it so that it can repair and resupply as needed by swapping.
Now that all we have to do is protect the supply route. If any echelon is damaged or out of supply, return to HQ or helipad to resupply/repair and return to their spot. Force shield ARSMG echelon continues to sweep the right side so that no enemy is within 1 node of supply route.
Once we defended for 3 turns, we can retreat combat echelons to the supply route and avoid the fight for the last turn. Make sure so that all enemy units are least 2 nodes away from the supply route and all unit is safe from battle before ending turn.
Once turn is over, mission should be cleared automatically.
This map requires MGHG echelon used back in the 5-2EX to burst down the armor units before the Gustav fire support gets to hit the T-dolls. I recommend using Artillery Fairy for the pure firepower buff than other fairies.
ARSMG echelon is set to take on ELIDs from the yellow zone on the map. AoE skills will serve you well and this echelon will require the least maintenance.
For the Mine robots and Tesla Trooper side of the map, I recommend RFHG echelon with Twin Fairies to cover the front and protect the HGs from damage as long as you can. This team requires little repair between turns.
Also standard formation for the RFHG echelon.
Start with MGHG echelon on the HQ and Dummy echelon on the helipad. Dummy echelon moves to capture the helipad at the bottom to prevent enemy units from spawning. Deploy ARSMG echelon to fight Cyclops above.
After clearing out the Cyclops above, end the turn.
At the beginning of the combat, repair any damaged echelons if needed be. Then deploy RFHG echelon for the right side of the map.
Repair and resupply ARSMG echelon by swapping with RFHG.
Swap back to the front and move into the Yellow zone.
RFHG echelon follows behind and take helipad between two echelons. Dummy move up through the right side to eventually capturing the heavy helipad.
ARSMG echelon sweeps the yellow zone and arrive at the rally point. RFHG echelon sweeps around the other direction and captures the node needed to establish supply route.
Because there's an armor unit next to the rally point, swap RFHG with ARSMG echelon for better matchup. Then dummy moves to capture the heavy helipad. You can deploy HOC later if you need extra help against armor units.
After defending the route for a turn, place ARSMG echelon in front of the helipad where ELID spawns.
RFHG echelon returns to HQ to repair and resupply as needed.
Then RFHG echelon sweeps the right side of the supply route. At this point I recommend just having Fairy command used automatically at all times.

All that's left now is to repeat the process of sweeping the nodes near the supply route and repair/resupply the echelons as needed between the turns.
Once you pass turn 5, you can sweep then retreat to the supply route and not fight last turn.
On turn 6, all you have to do is to sweep nearby nodes. Resupply/repair as needed.
If you are confident that no enemy unit can break the route this turn, retreat echelons from the frontline and end the turn.
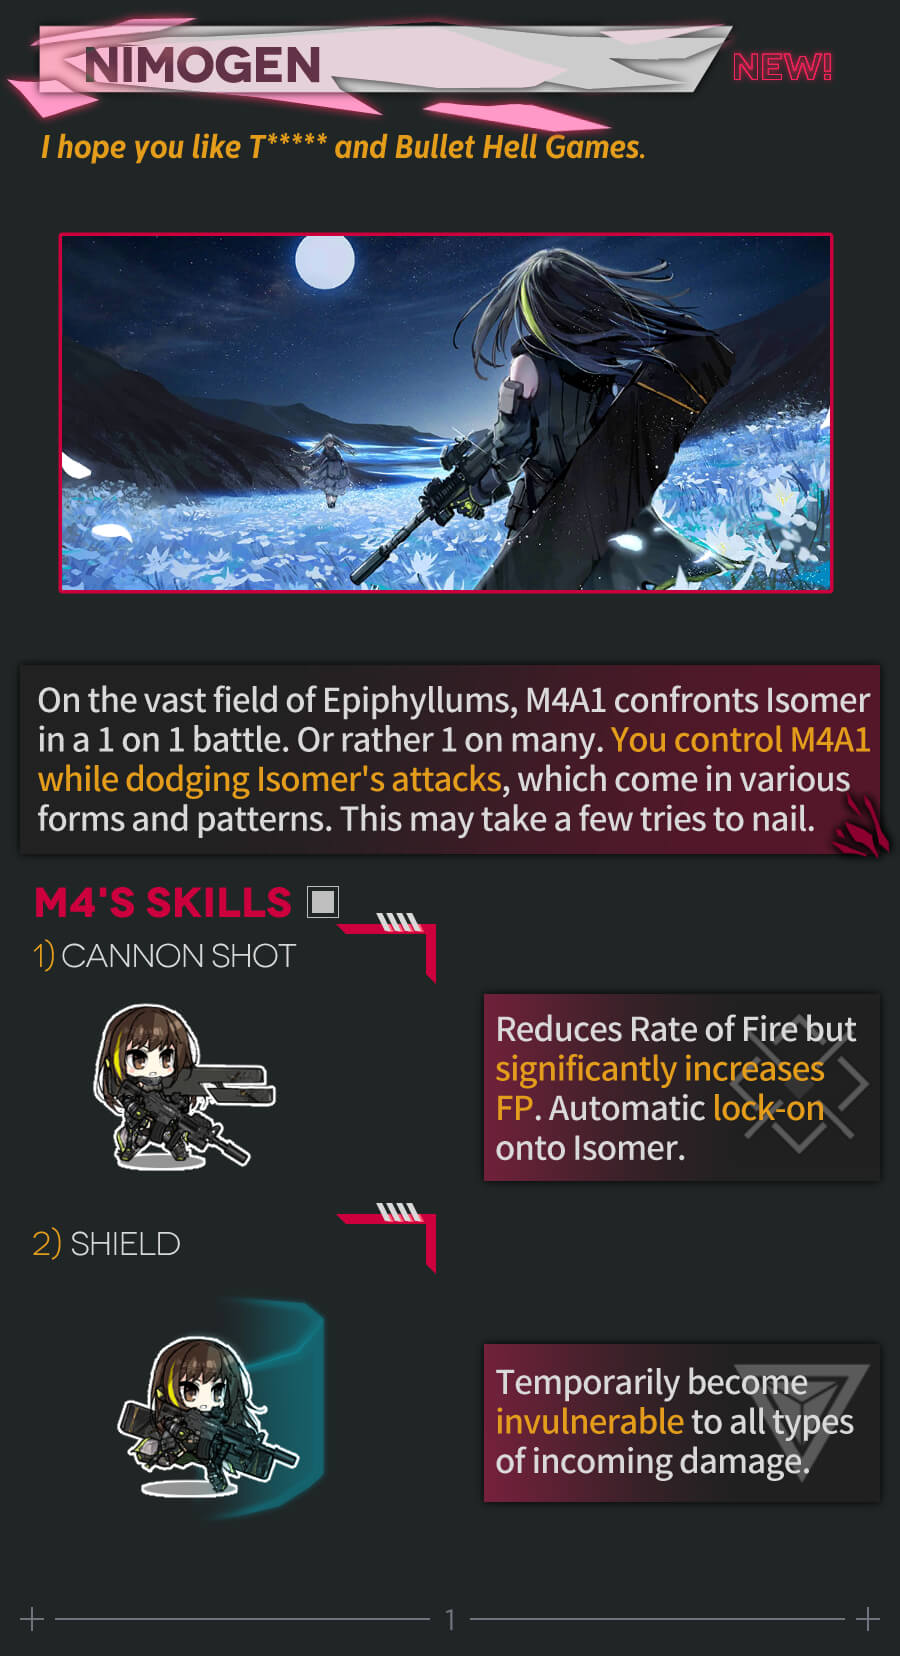
This is a Bullet hell type of mini game where you control M4 with joystick on the left side of the screen and using 3 skills shown at the bottom right side of the screen.
Failed Isomer has few patterns that will target where M4 is standing, so if you are always on the move you will be safe. The left most skill is the Cannon which significantly increase the damage output of M4, and this is great to use along with the right most skill that increases her rate of fire.

Finally if you are on a tight spot and cannot dodge, middle skill activates the shield that prevents damage for short period of time.

We are reusing ARSMG echelon with force shield to take out Beast and Archer units on the left side.
There is one armor unit near HQ that needs to be taken care of, so RFHG echelon or MGSG echelon can fulfill that task.

Start with ARSMG echelon on HQ. Move it up then deploy RFHG echelon on the HQ.
Then move it down to make space for MGSG echelon to deploy next turn.
ARSMG echelon moves to kill enemy units on the left side of the map, and we deploy our MGSG echelon at the HQ.
Since enemy armor unit is just below, I swapped location to keep MGSG echelon in mint condition.
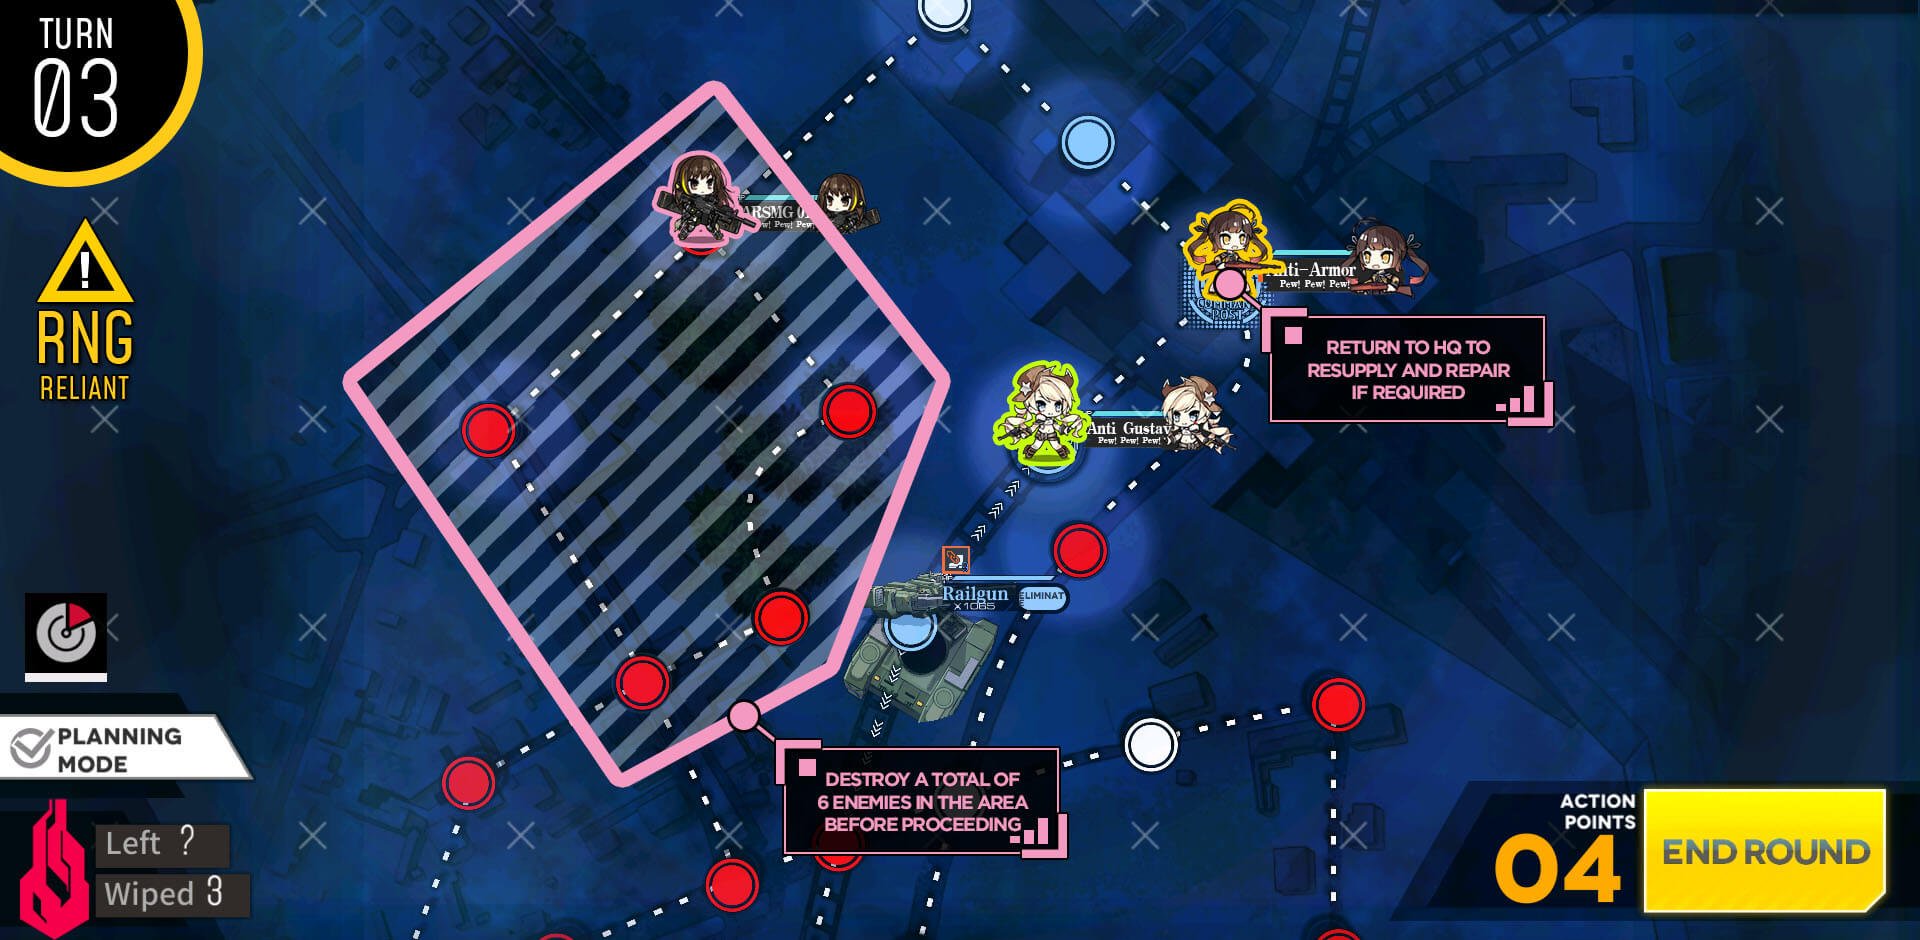
Now we play the waiting game, trying to eliminate total of 6 enemy units on the map while staying out of Gustav fire support range. ARSMG will patrol the marked area for enemy units and kill them. Do not fight on the intersection node as it will be within the fire support's range.
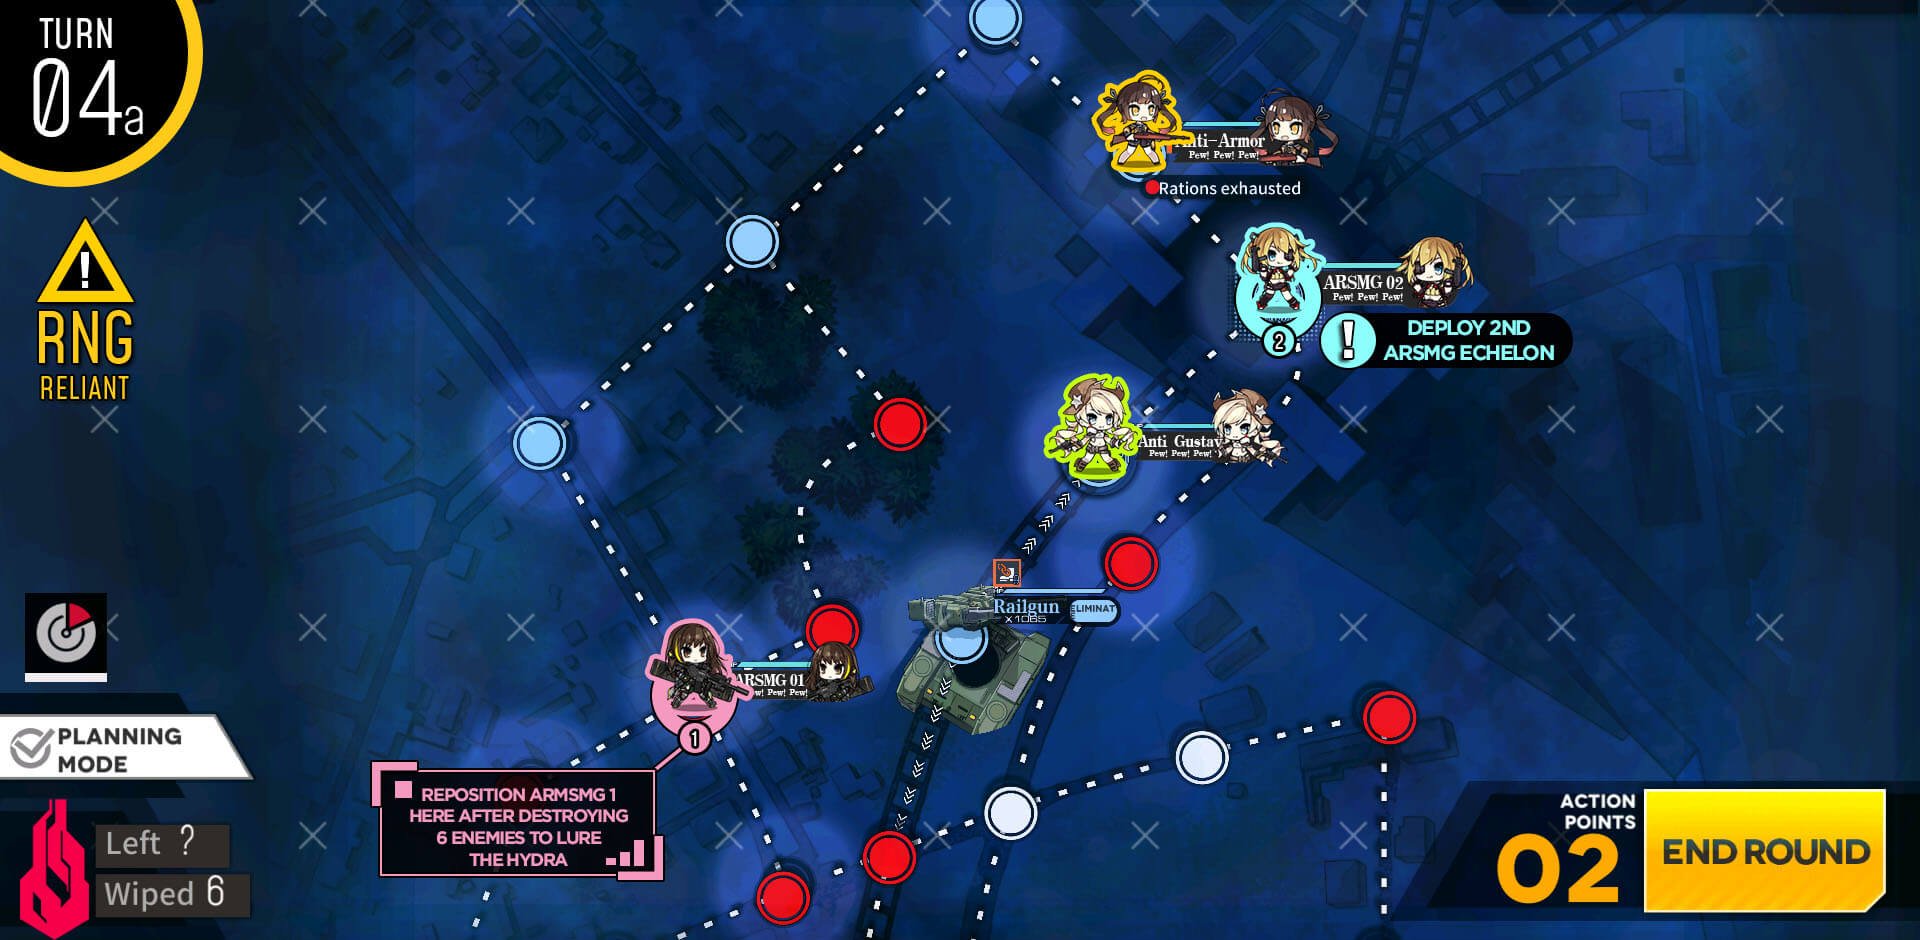
Once you cleared 6 roaming enemy units, park ARSMG unit at the intersection node to draw the aggro of Hydra unit blocking the path. And meanwhile deploy additional echelon [can be a dummy] in order to increase action points for next turn at the HQ.

Resupply and swap so that MGSG echelon is at the HQ ready to go next turn.
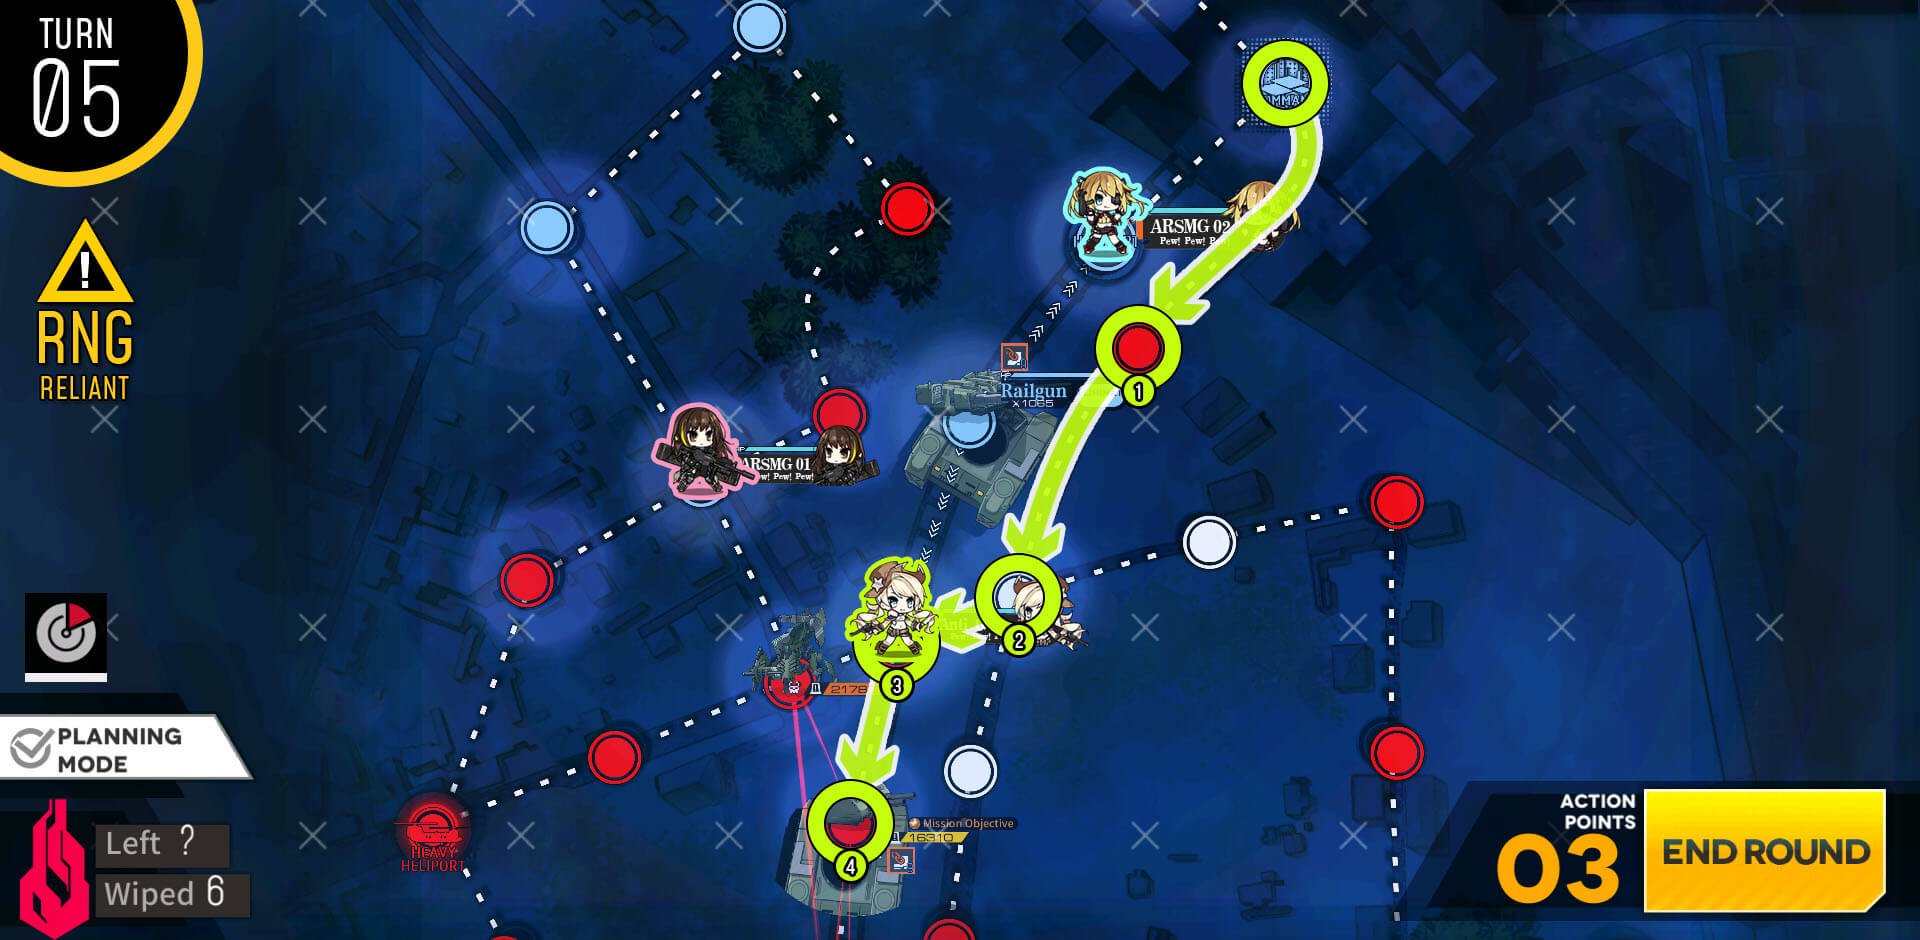
Once Hydra unit moves out of the path, run down the MGSG through the right side of the map and clear the Gustave train with same method from previous map.
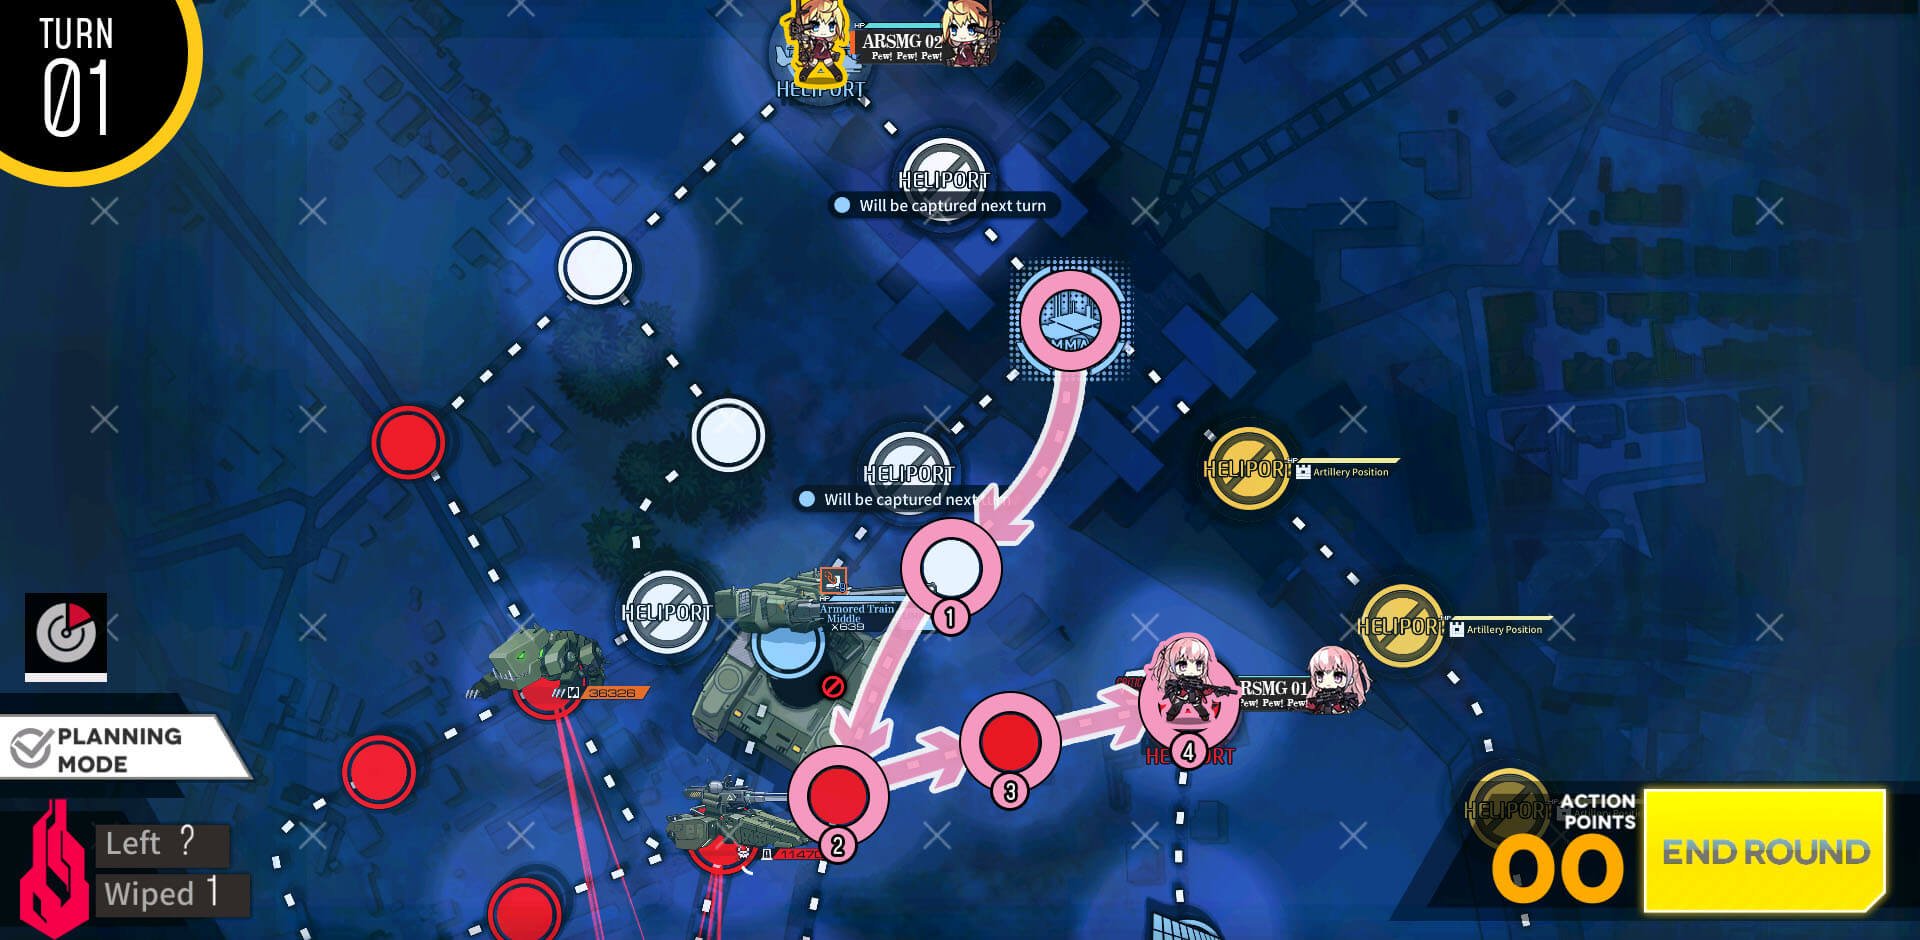
In this map you will need 2 ARSMG echelon that can fight against Archer/Beast enemy types, which I recommend having force field SMG as tanker. Start with both ARSMG echelons on the HQ and helipad. ARSMG echelon on the HQ moves down and captures the helipad between the ally Gustav and radar node.

On turn 2, move ARSMG echelon to the left and deploy dummy to be used as bait against Tesla Trooper. Then at the top helipad, 2nd ARSMG echelon moves down and we deploy our MGSG echelon that will destroy the Gustav fire supports.
Swap dummy and 1st ARSMG echelon's location. Then 2nd ARSMG echelon moves down to the right, and MGSG echelon follows behind. Dummy will retreat when battle starts.
Thanks to dummy's sacrifice, path has opened up for MGSG echelon to attack the Gustav fire supports. Swap with 2nd ARSMG echelon and head for the train.
The fighting will be identical to the 5-3EX and you can use same echelon and same tactic.
Because there's a hydra unit at the bottom towards a hostage unit, we do need a RFHG echelon. You don't really need Taunt fairy as it is at most 1 or 2 shot blocker. Controlling HGs will be the key.
ARSMG echelon will be dealing with ELIDs mainly so having SMG with AoE skills will be better than Thompson here. Using Nade ARs like Sopomod, FAL, or HK416 is also recommended.
Start with RFHG echelon at the HQ, and ARSMG echelon on the upper helipad. Then move ARSMG echelon up north, and RFHG echelon to the right to deploy additional ARSMG echelon on the HQ.
Swap location with the RFHG and move to the right to take the radar node.
On turn 2, we are moving to rescue the Kord hostage on the far right side of the map. ARSMG moves in straight line than swaps prior to rescuing Kord. If you have a parachute fairy, this will be a good time to use it back to starting location.
For those without, simply move back as much as you can back to the top.
Continue moving echelon with hostage back to the heavy helipad. Then with remaining action points, RFHG echelon moves down and swaps with the hostage below the HQ.
Then rescue the hostage so that it is not in risk of dying.
RFHG echelon moves back to HQ and manually extracts the hostage. At this point M4's location might not be where it is on the image shown, and that's the RNG part of the map. Simply use multiple echelons you have in range to swap her to the Command center. This can take additional turn depending on her location.
Once M4 is on the HQ, make sure to set her at the standby mode and end the turn to clear the mission.
For general purpose combat against ELIDs and Pyxis I set up an echelon that can handle both well with help of MOD M4's cannon. 2 HGs are there to provide rate of fire buff to M4 and will retreat when battle starts.
SGs will tank the Pyxis attacks and M4 will blast away the enemy units.
Start with M4 MOD echelon at the heavy helipad and dummy at the HQ. Dummy moves down and swaps with the hostage unit below, and deploy the ARSMG team on HQ. Then with spare point, move the M4 MOD echelon as shown.
Dummy rescues hostage and returns to gate near the HQ. ARSMG echelon moves down so that we can deploy 2nd dummy at the HQ.
2nd dummy swaps with the ARSMG and heads down to swap with M4 ally unit. This fixes where M4 will be next turn. Simply retreat the 2nd dummy when it enters combat.
Lastly, M4 MOD echelon moves up to fight Pyxis unit.
With Mod's cannon ability, M4 can handle both large groups of enemy and armor units with ease. Make sure to retreat HGs before M4 uses the skill.
At the beginning of the 3rd turn, move dummy with hostage to the heavy helipad then close the gate below it.
ARSMG echelon then swaps location with M4 ally unit and dummy swaps with M4 so that ally unit is at the designated spot.
It is important that you make sure to set M4 to standby mode or she will move next turn. If you let her move, you can still finish the mission however.
ARSMG echelon will now move to rescue the Kord unit on the far right. It is important to check where the Smasher unit is on the way. For example it is currently at the spot that can block travel back next turn.
If Smasher unit is not at the spot but below where Kord is, do not swap and rescue. In our case since Smasher unit is further out, swap prior to rescuing.
Keep in mind that due to radiation damage, echelon will be damaged and will need to fight least once or twice in order to get out. So Keep in mind as you continue next turn. If you have Parachute fairy, this will be a great time to use it [With few alterations to the moves, fly back to heavy helipad with M4 on it after moving her out of the way].
Now we find out where the Smasher unit is. If Smasher unit did not block the path, we can return to HQ the way we came from and extract manually this turn.
And as often is, if Smasher unit is blocking the path, we need to travel up through ELIDs in order to get back to the HQ. If your echelon is not in condition to fight, you can use M4's echelon to clear the path as shown.
ARSMG echelon then travels back to the top side of the map.
On our last turn, we make sure to rescue and extract all 3 hostage. First swap with M4 and deposit Kord.
Then we move back up to pick up our last hostage. Make sure to swap prior to rescuing to save an action point.
Then repeat the steps to manually extract the last hostage.

Once finished, make sure the M4 ally unit is on the heavy helipad and end the turn to clear the mission.