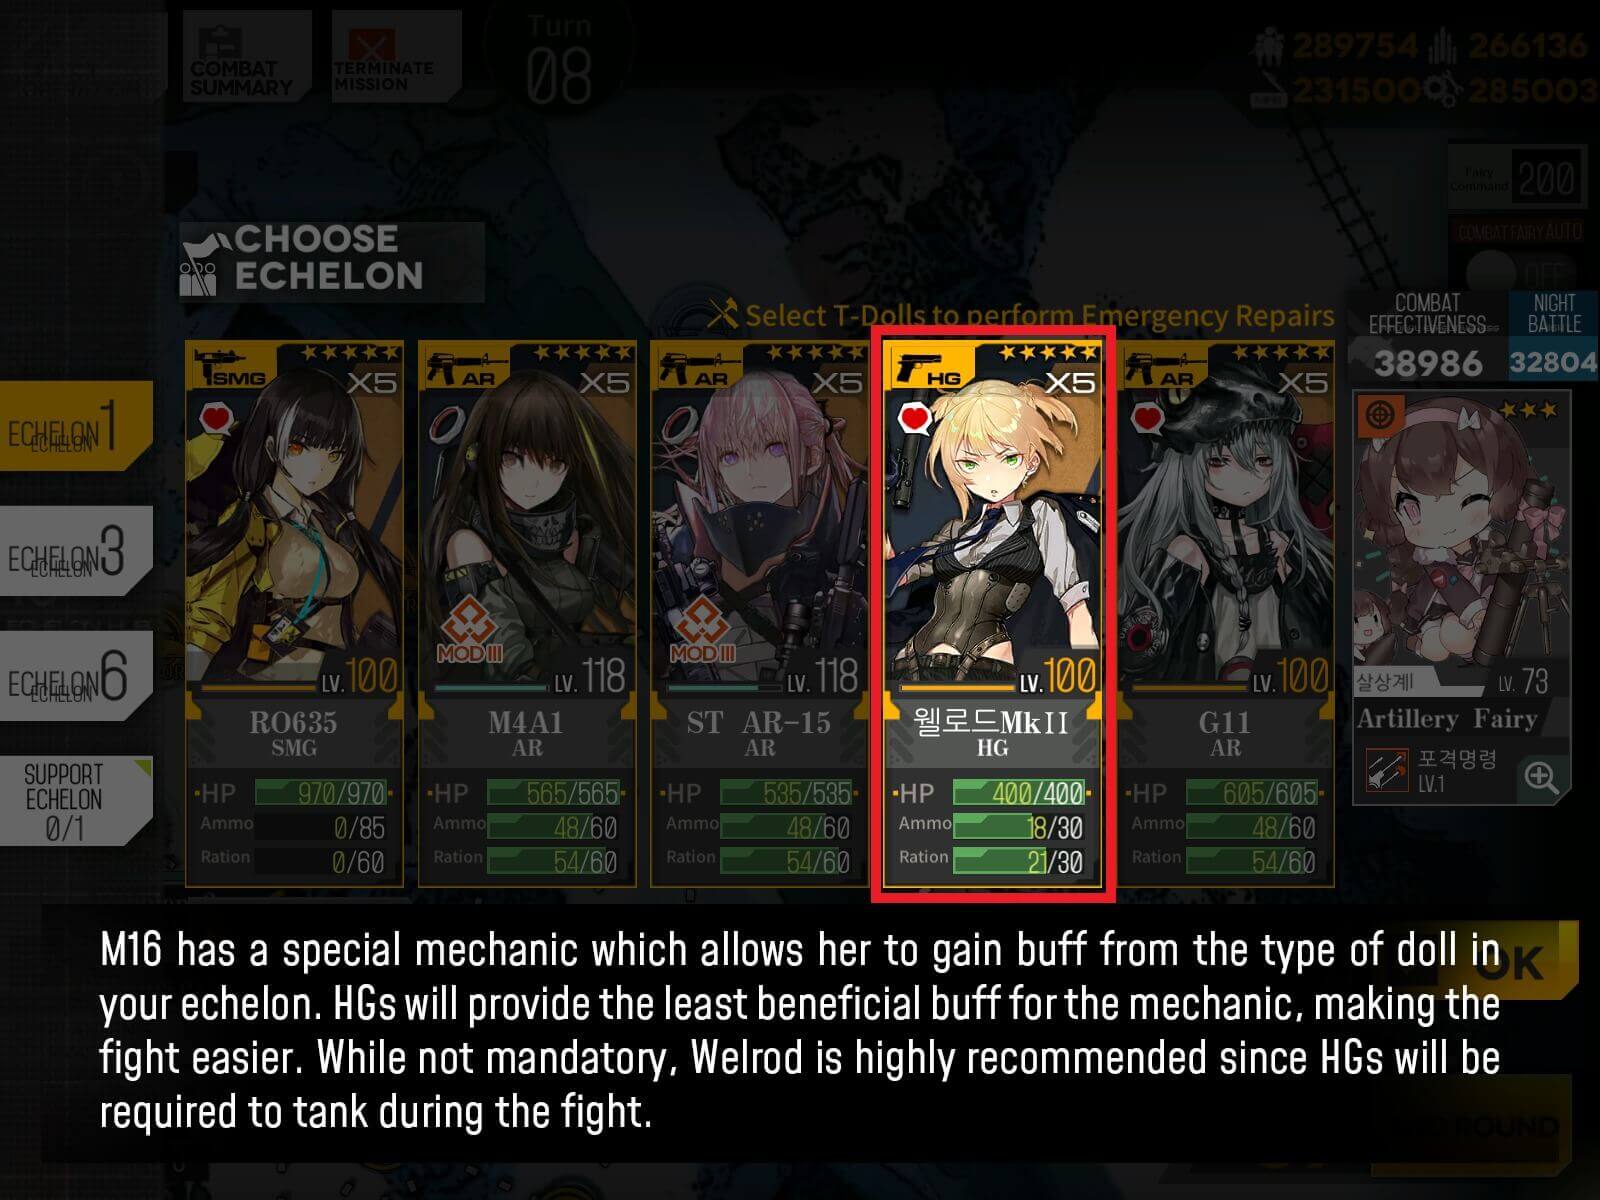


Chapter I


Turn 1
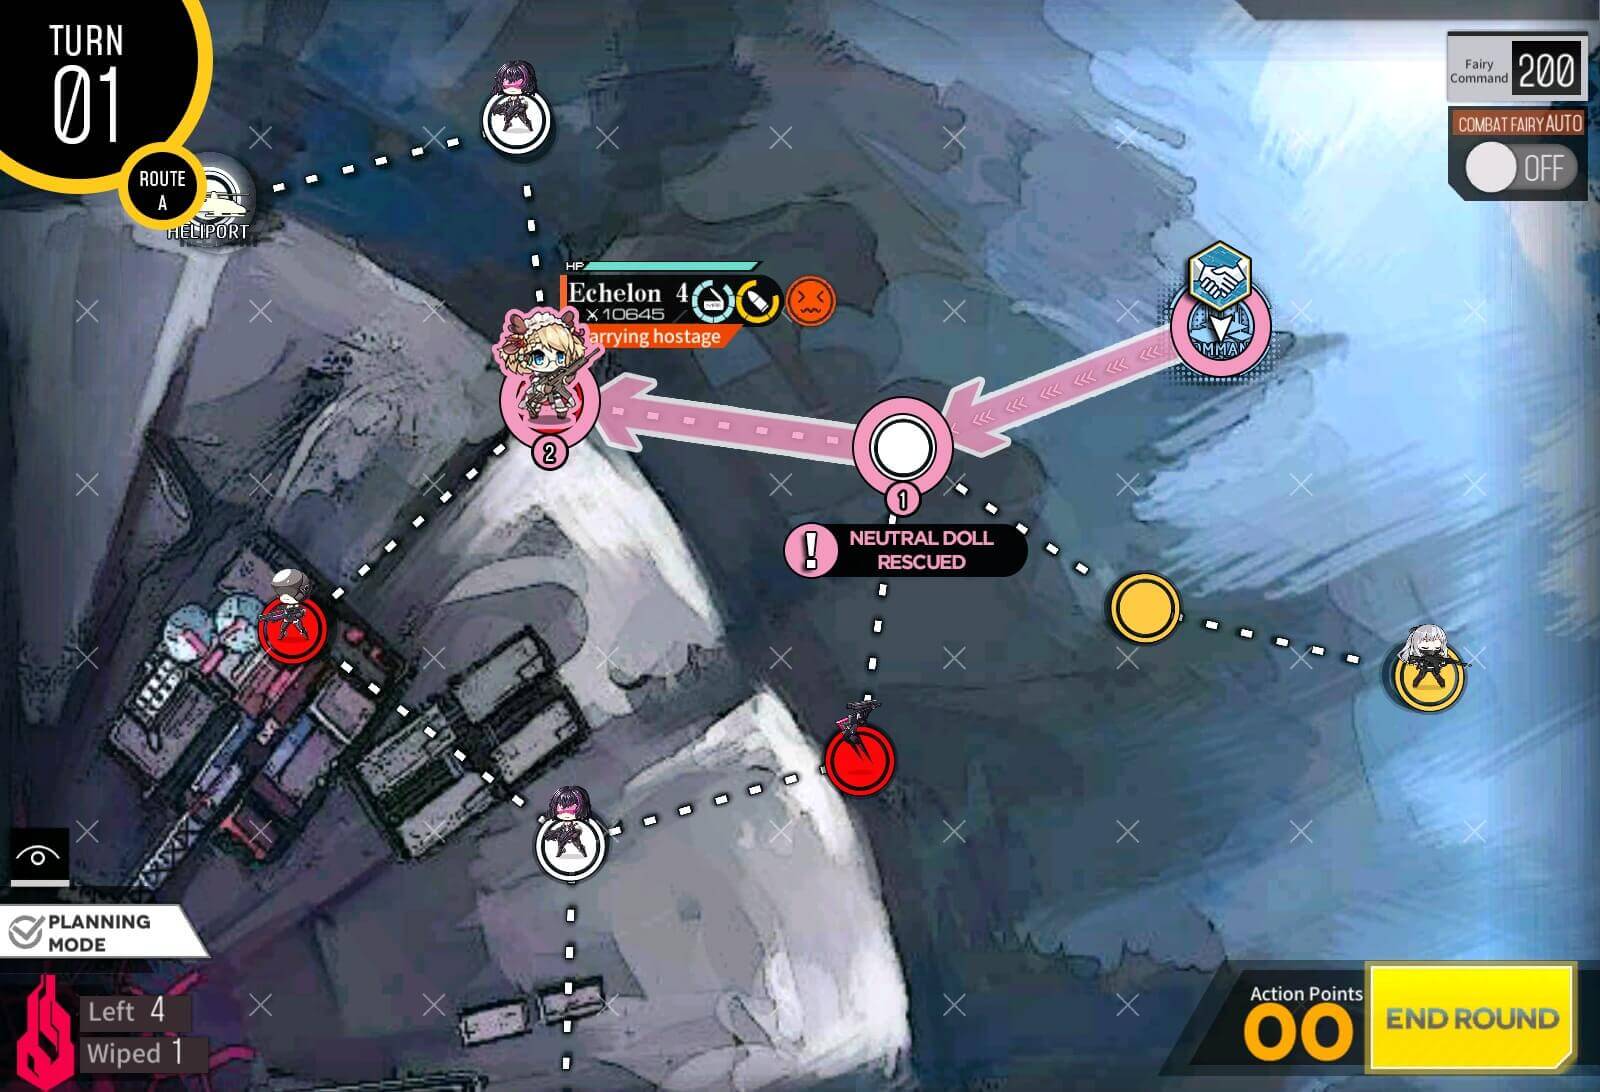
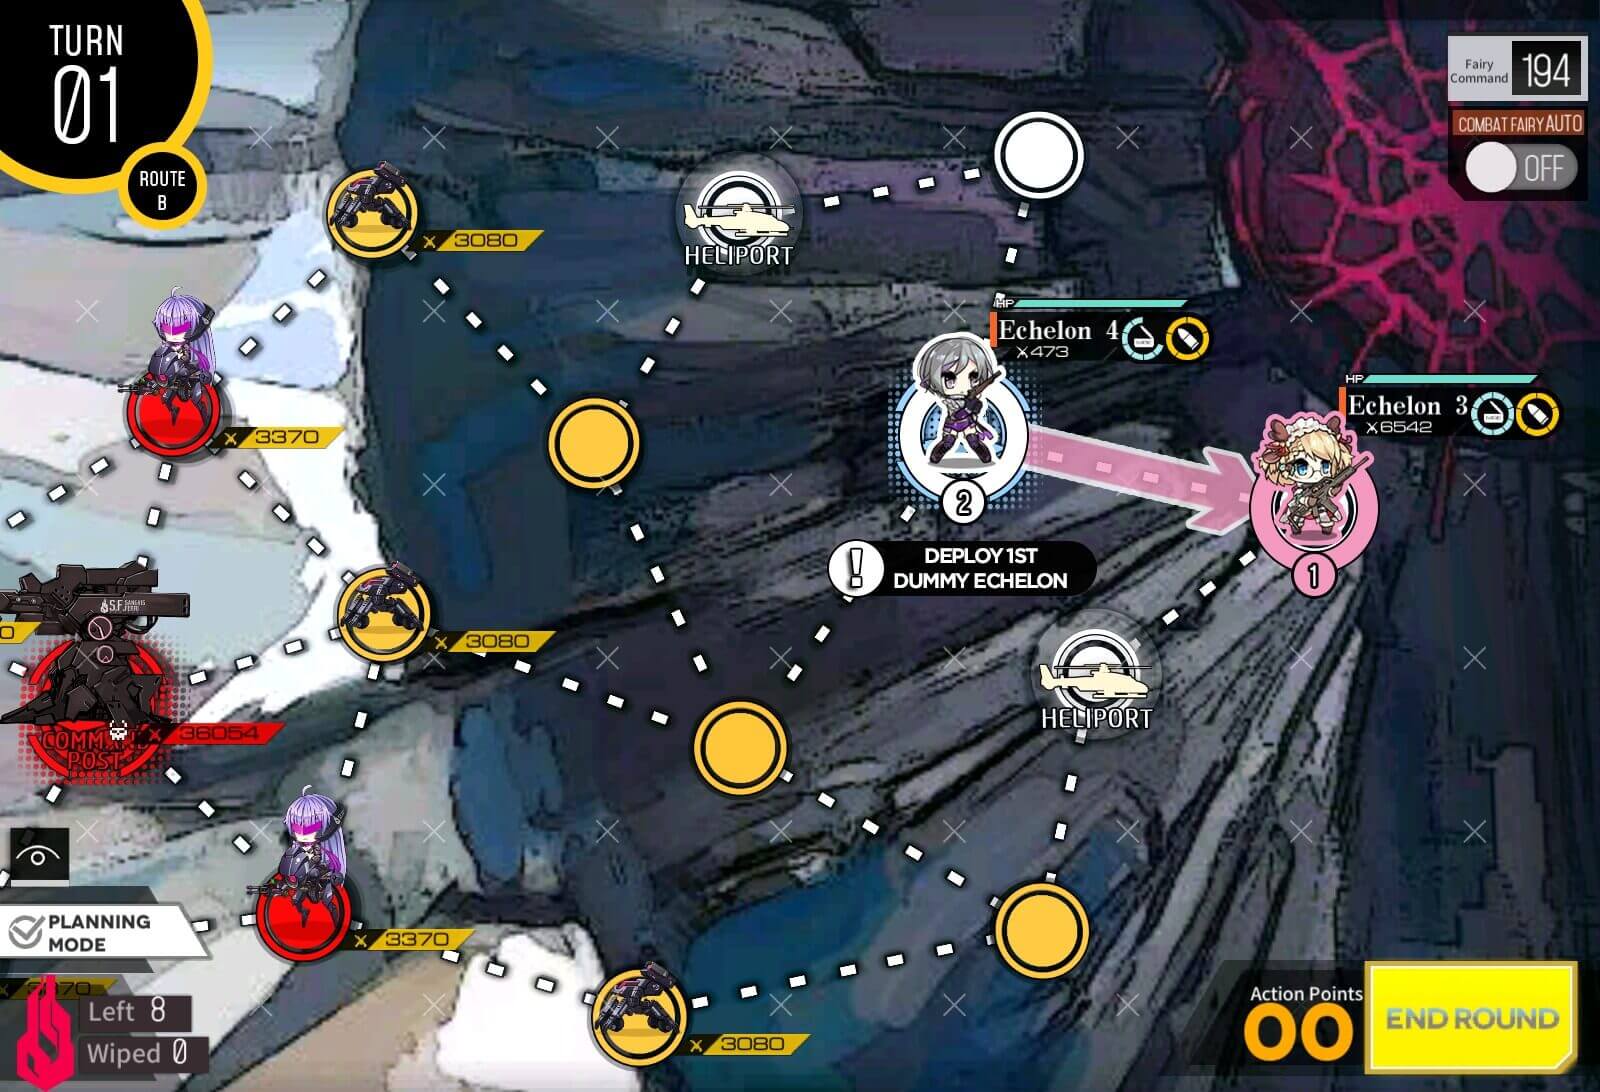
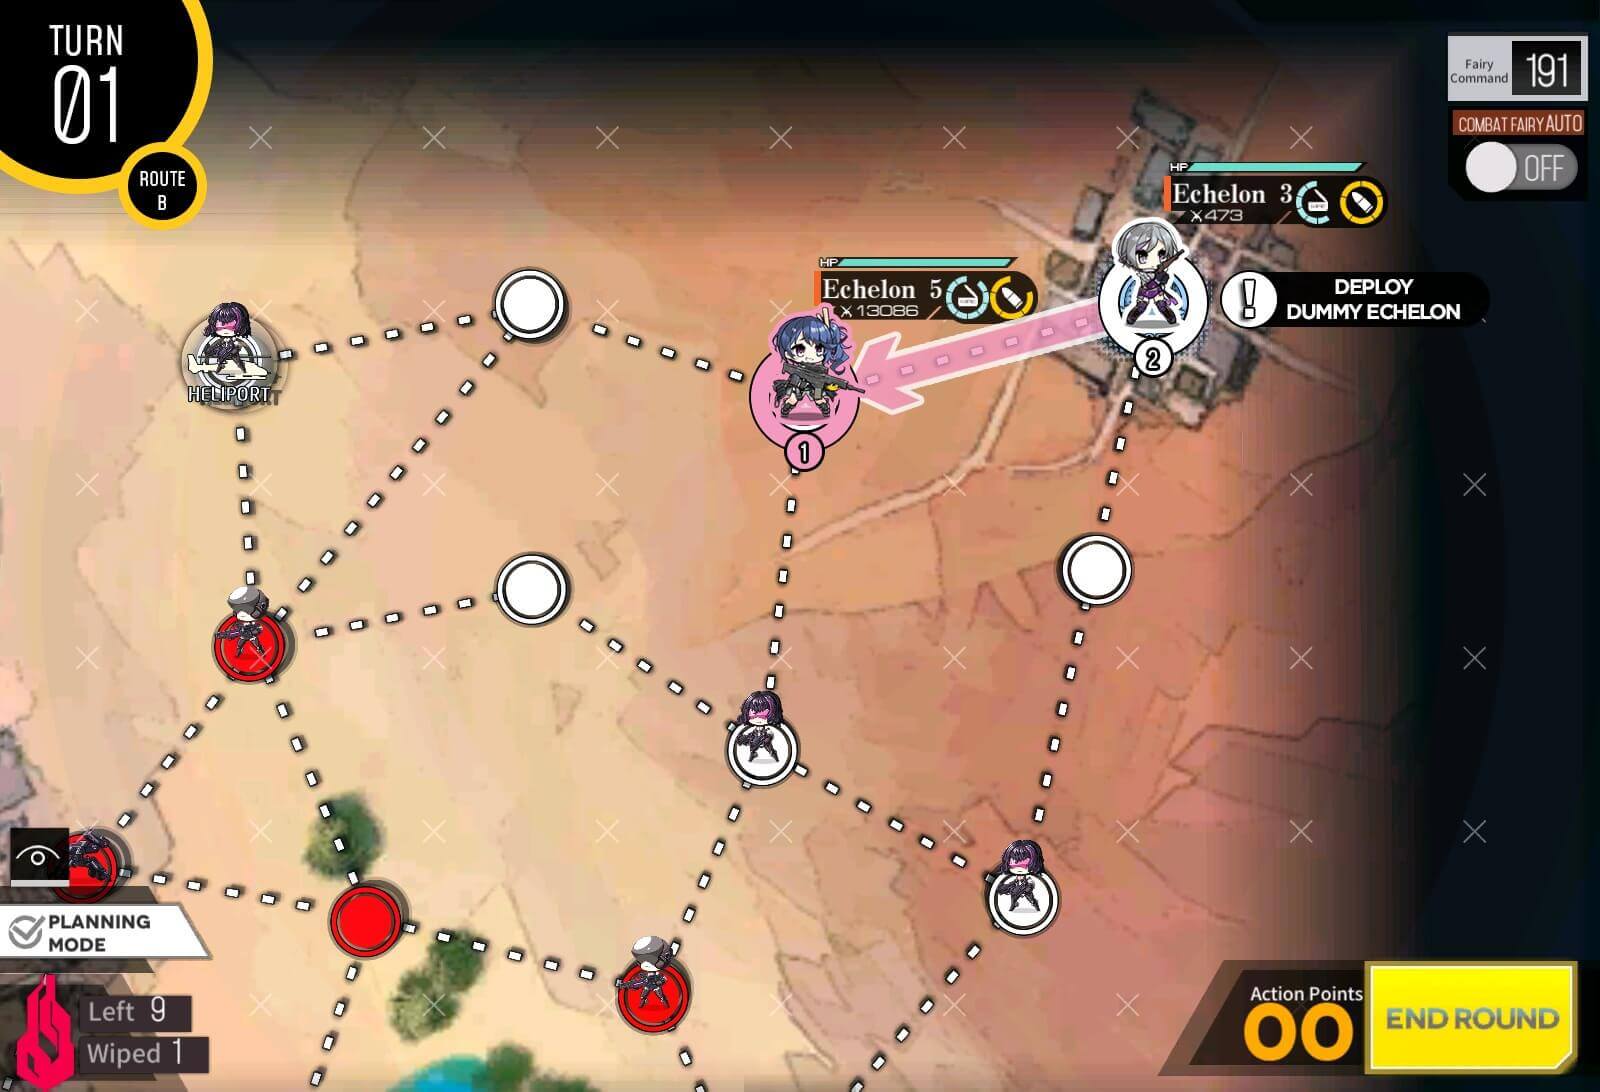
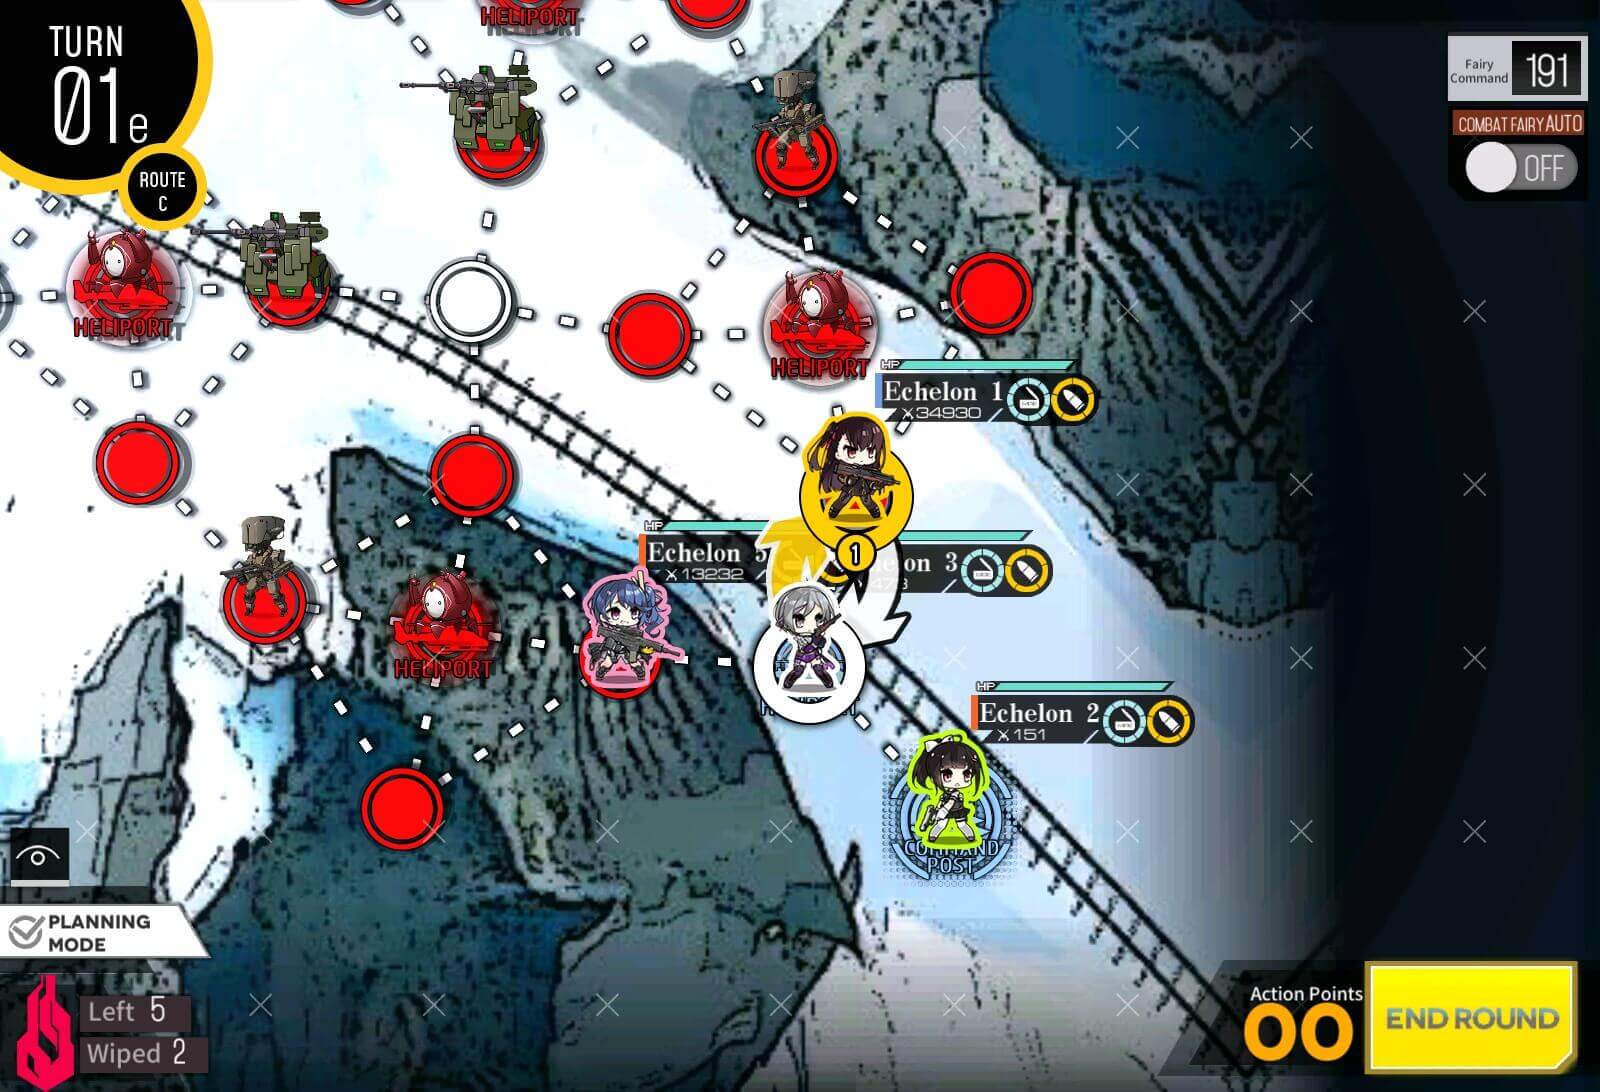
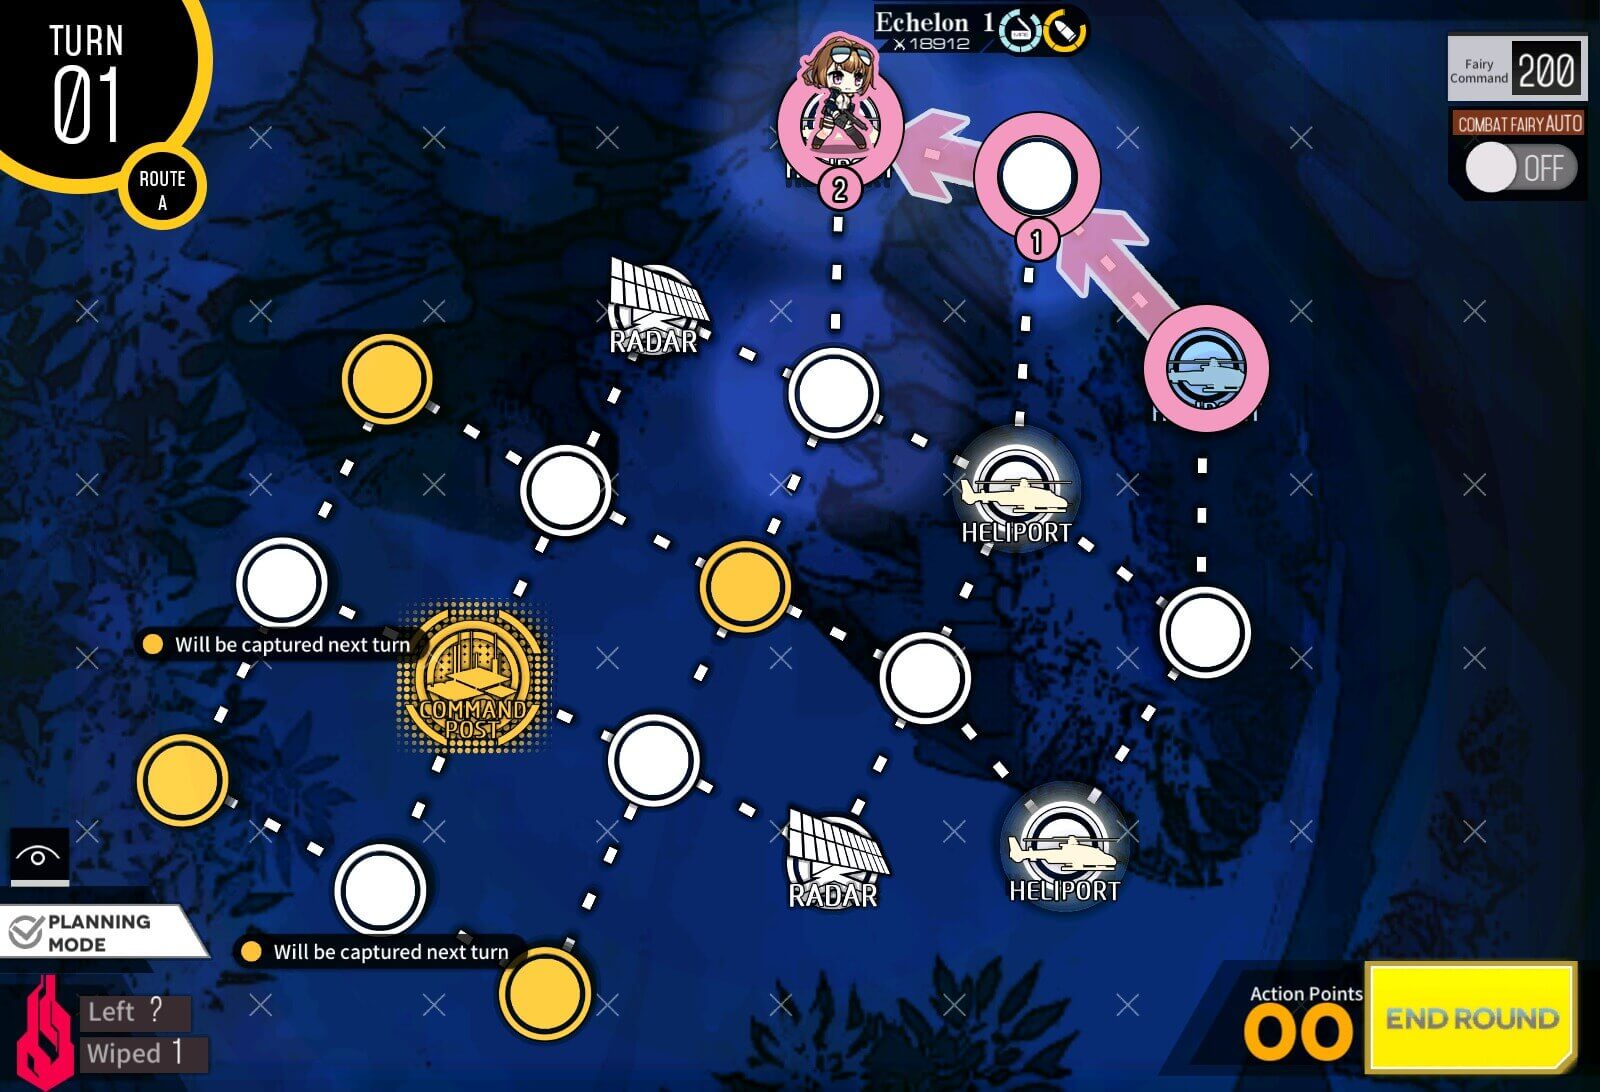
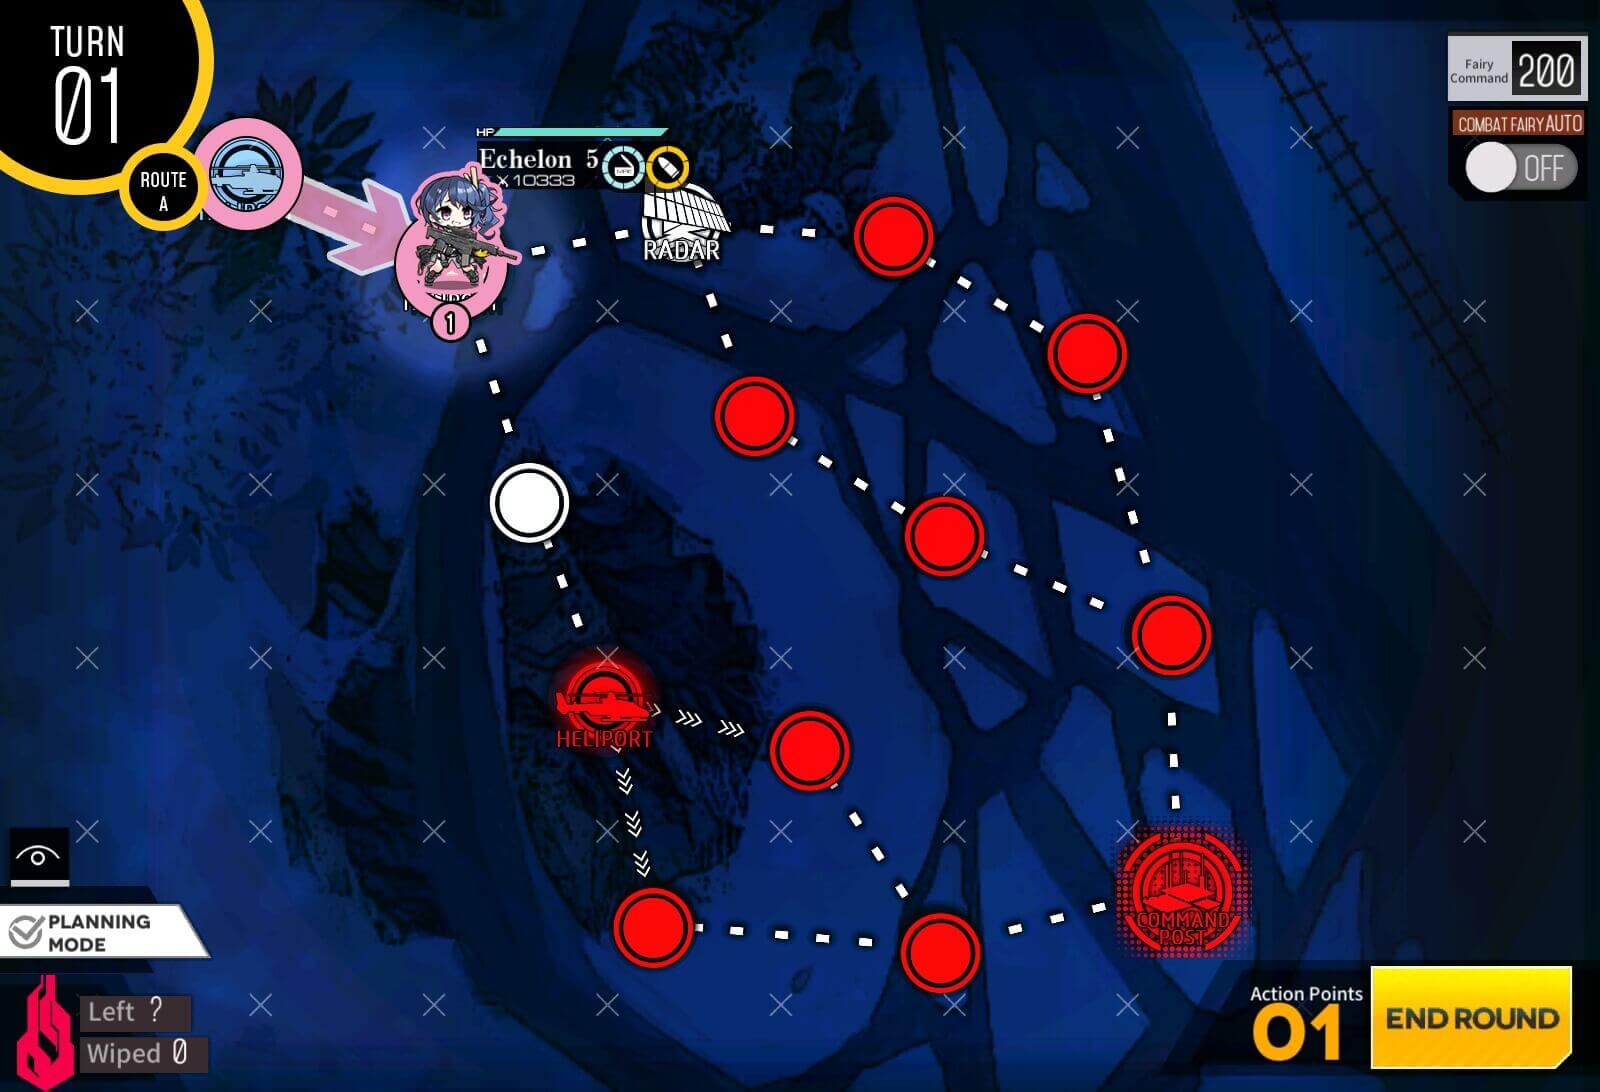
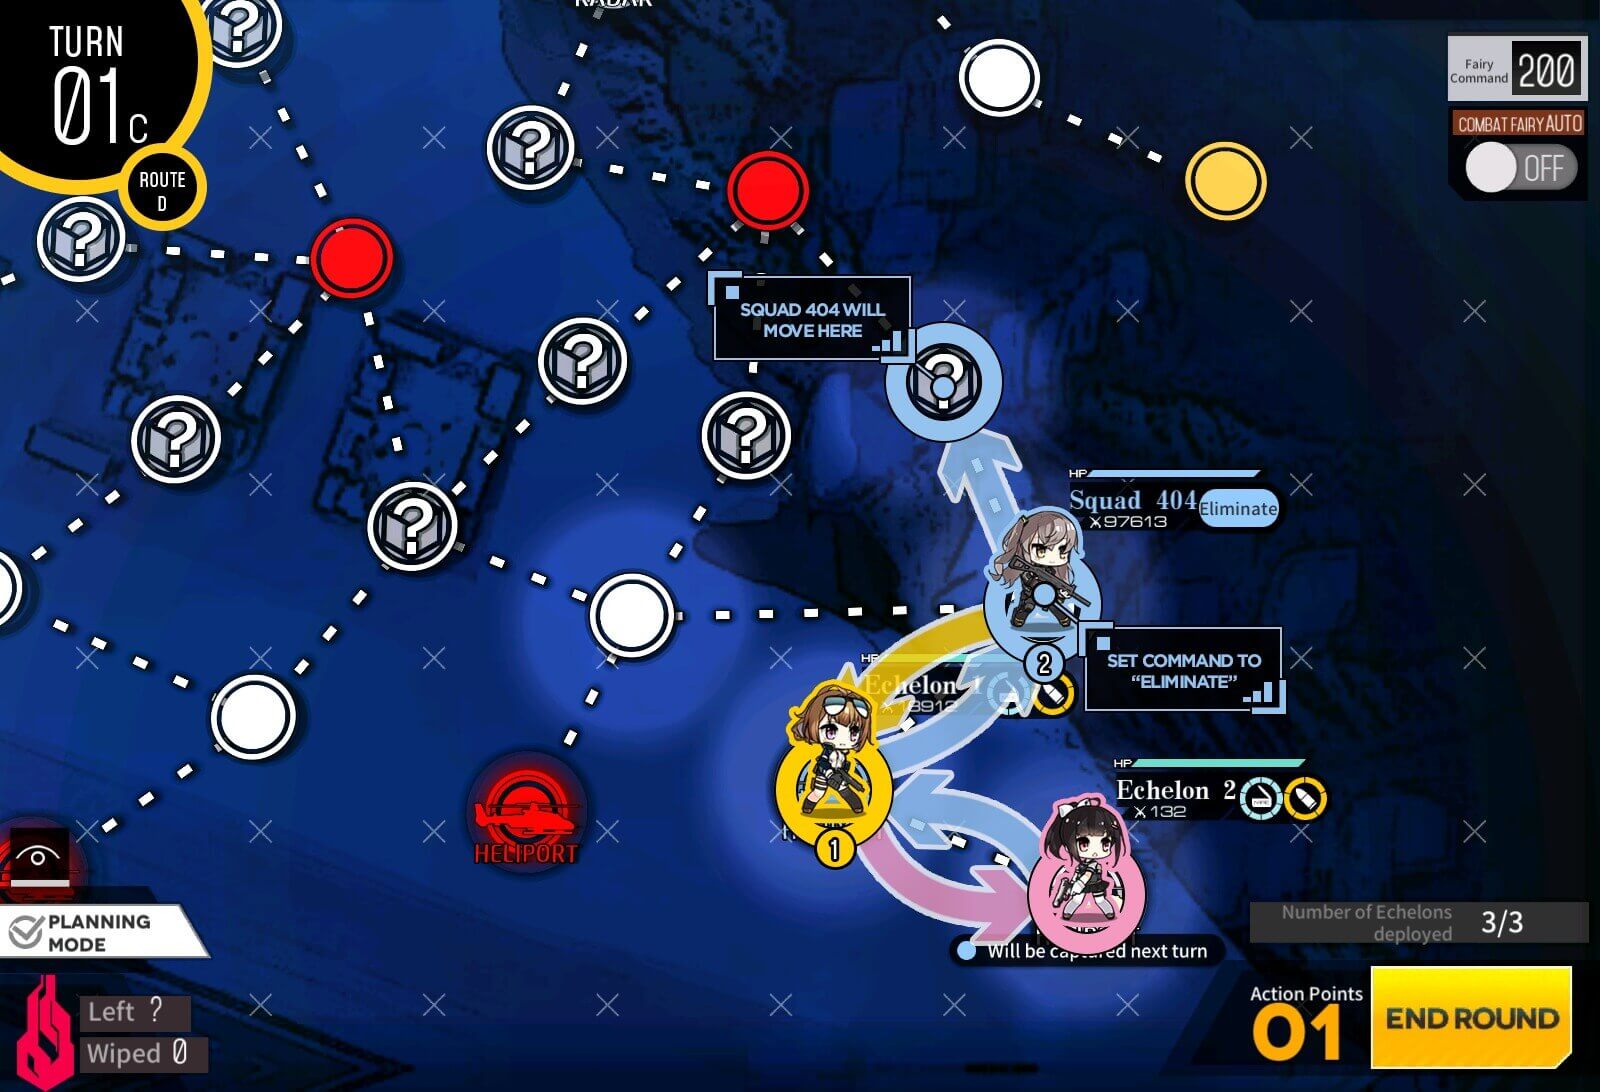
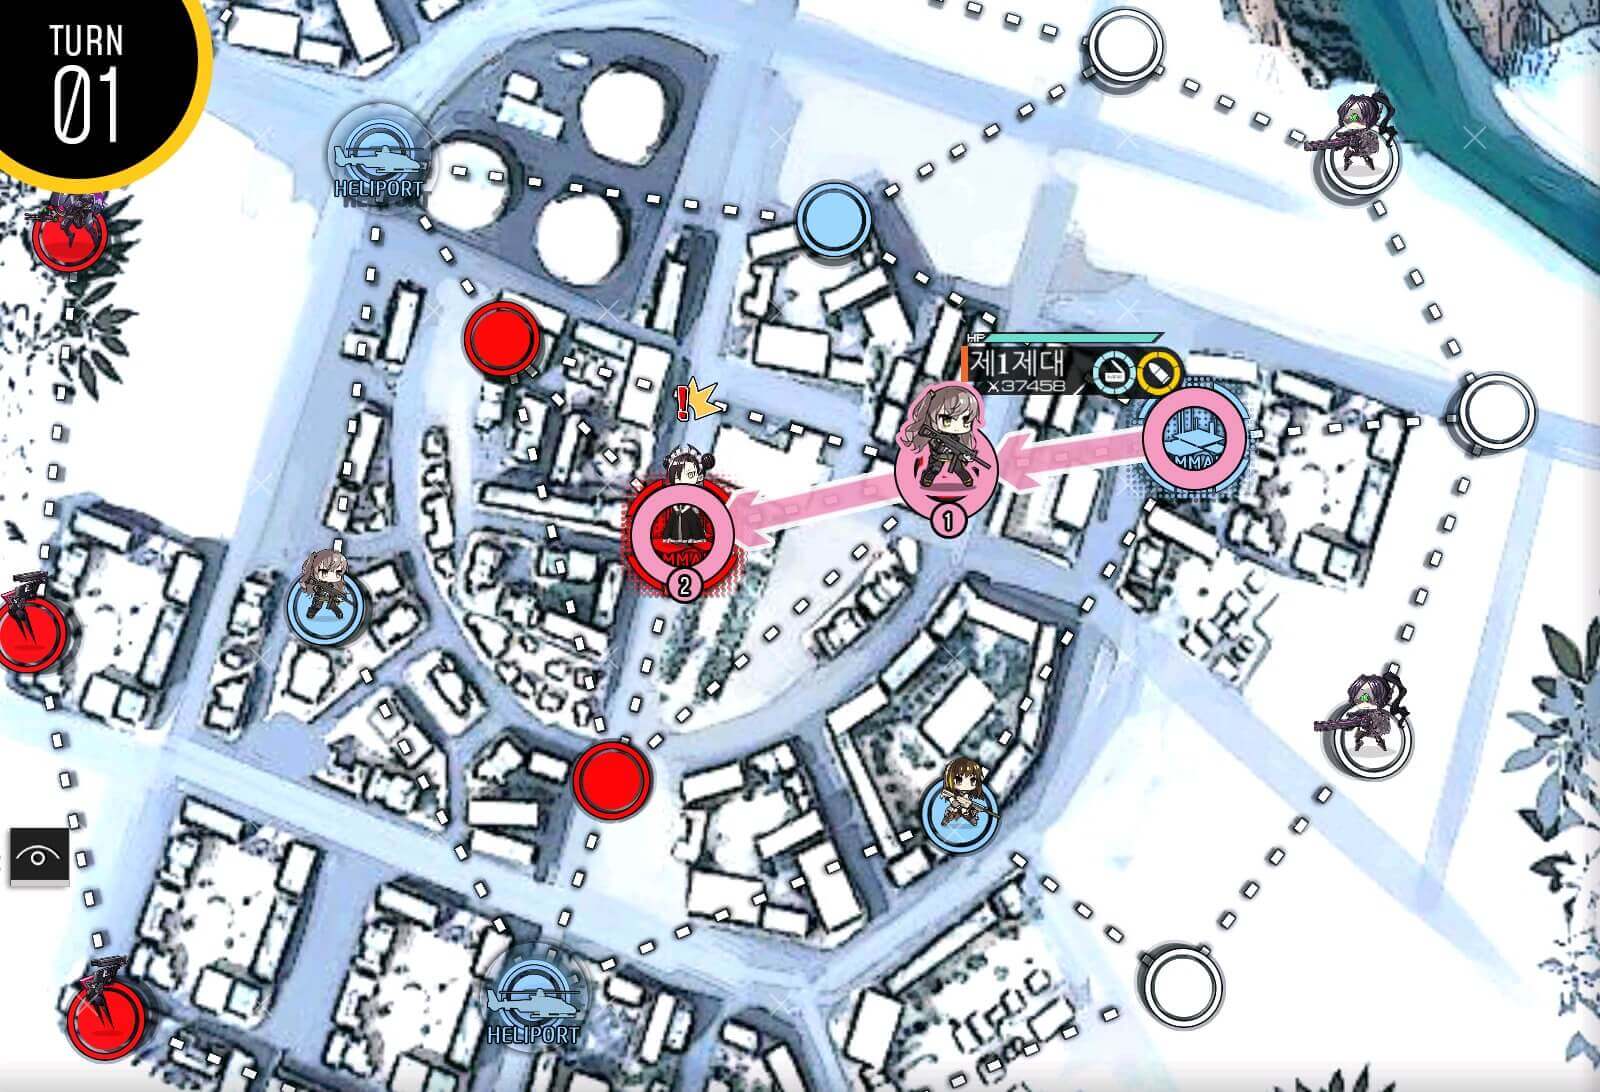
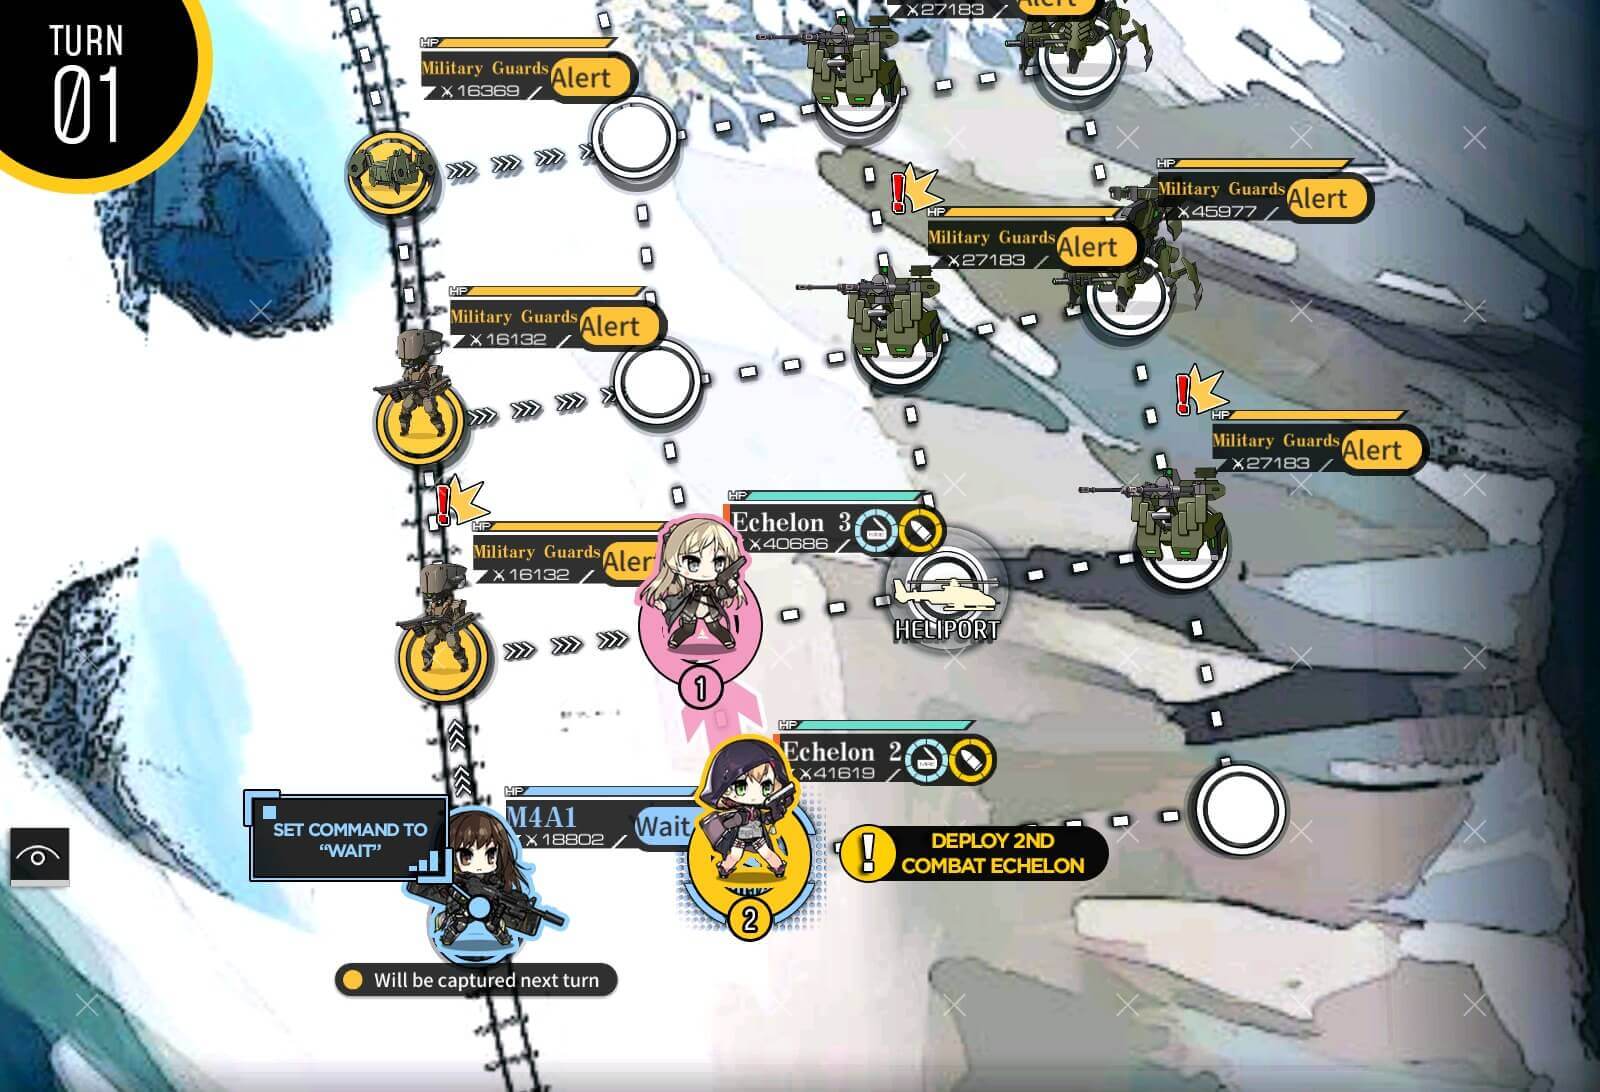
Combat echelon moves on top of neutral helipad south of the HQ, this also activates Hydra unit at the top next turn when radar turns blue.

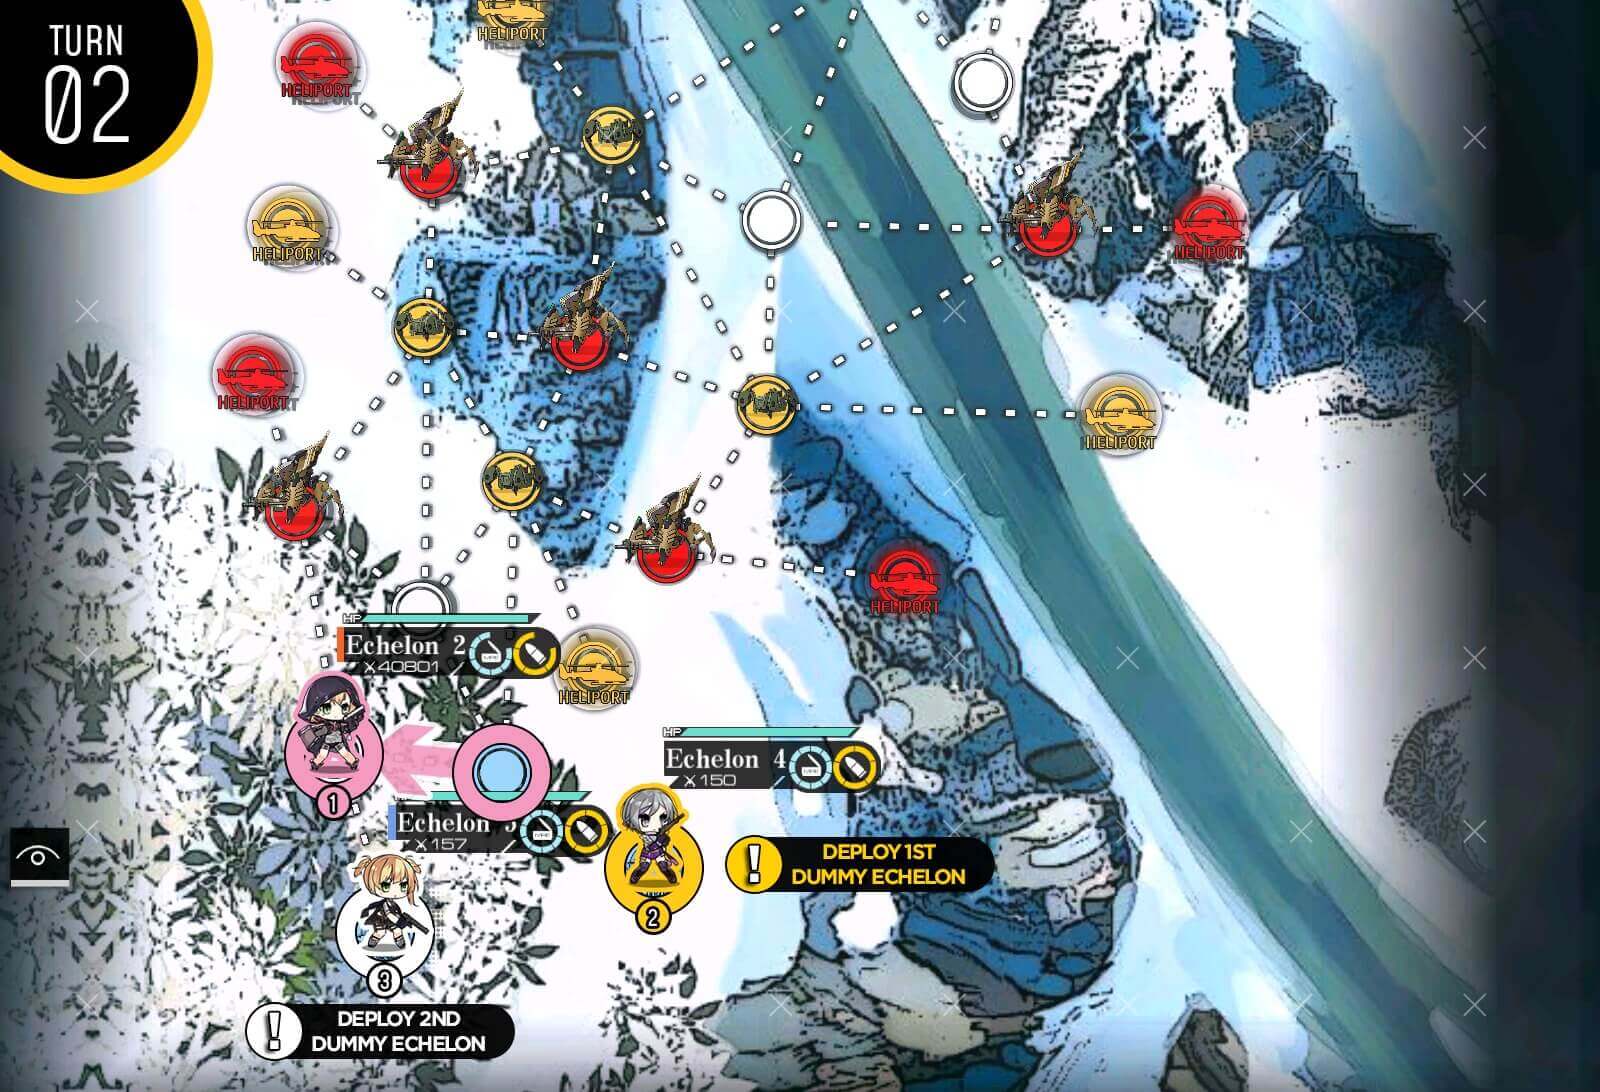
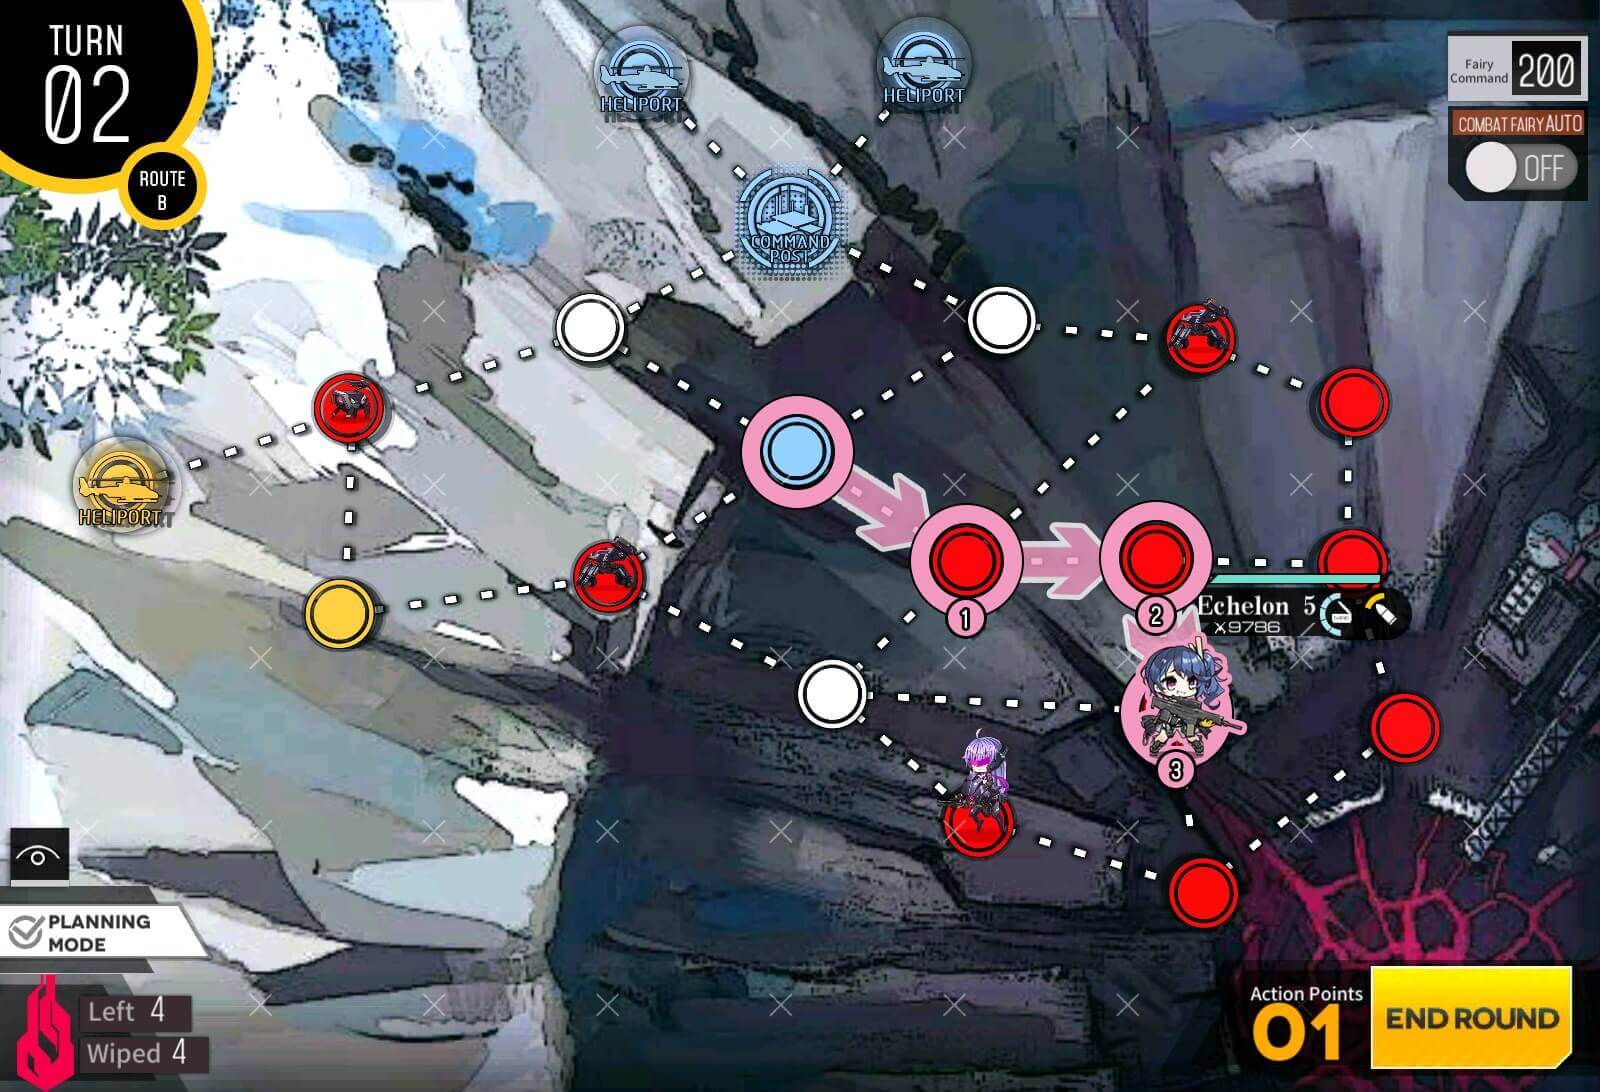
Turn 2
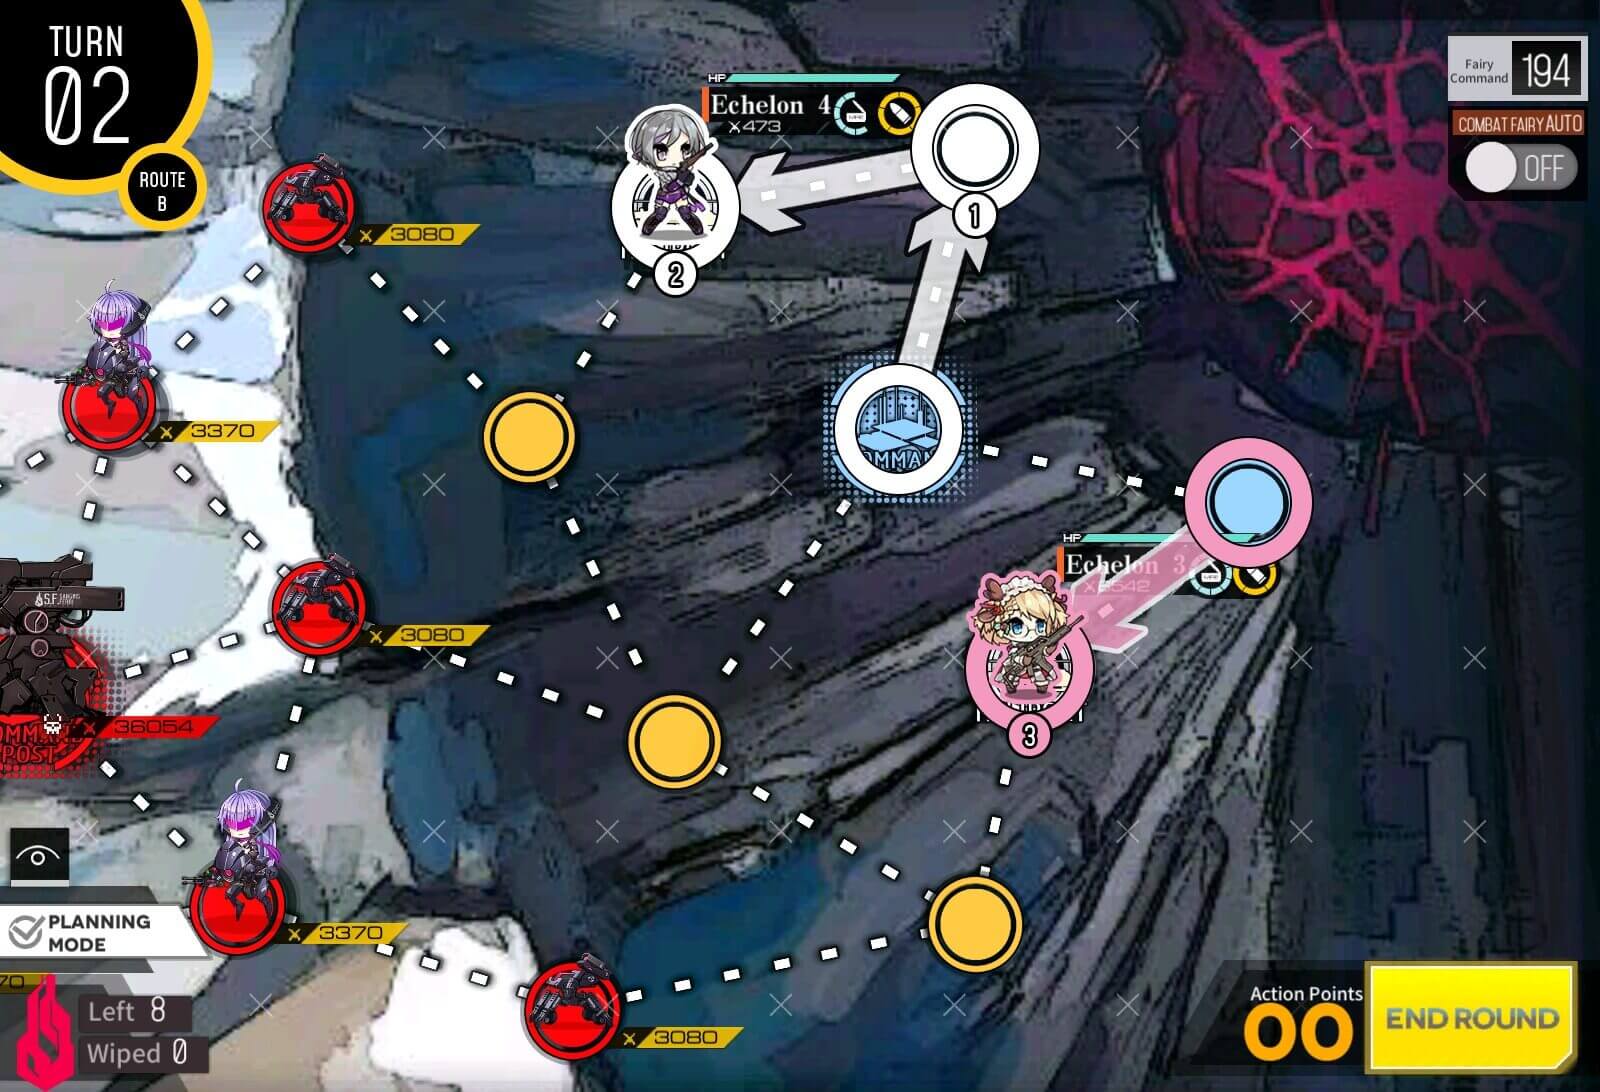
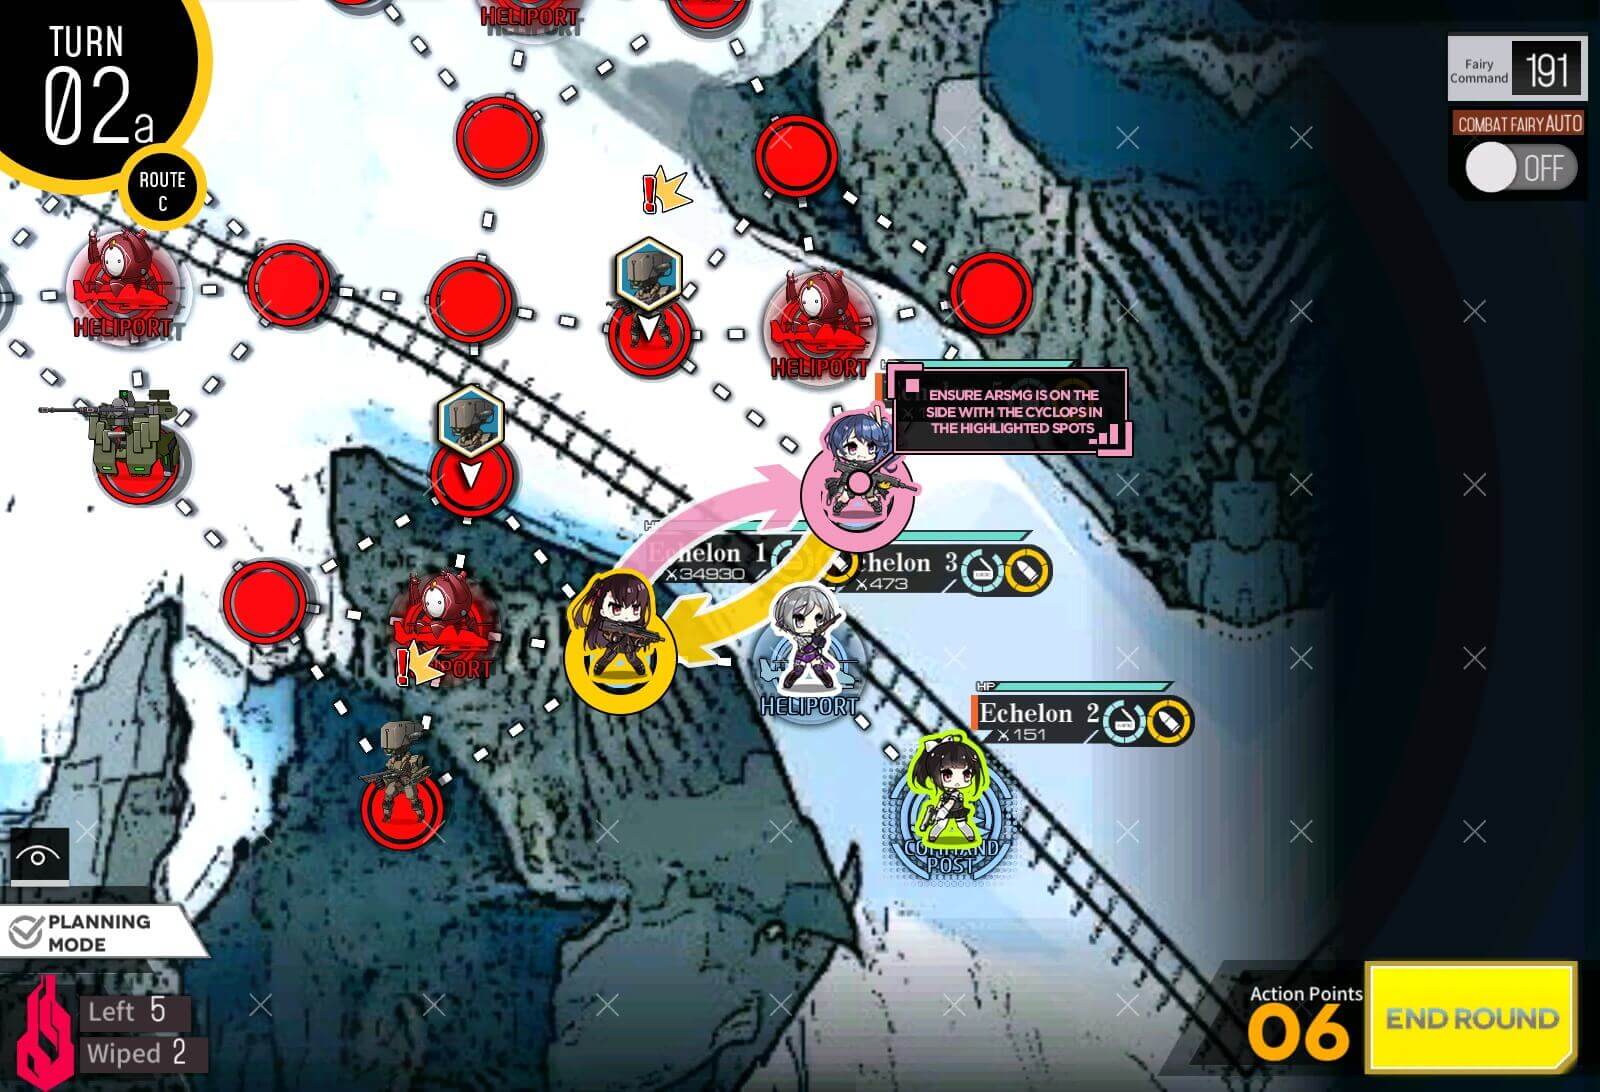
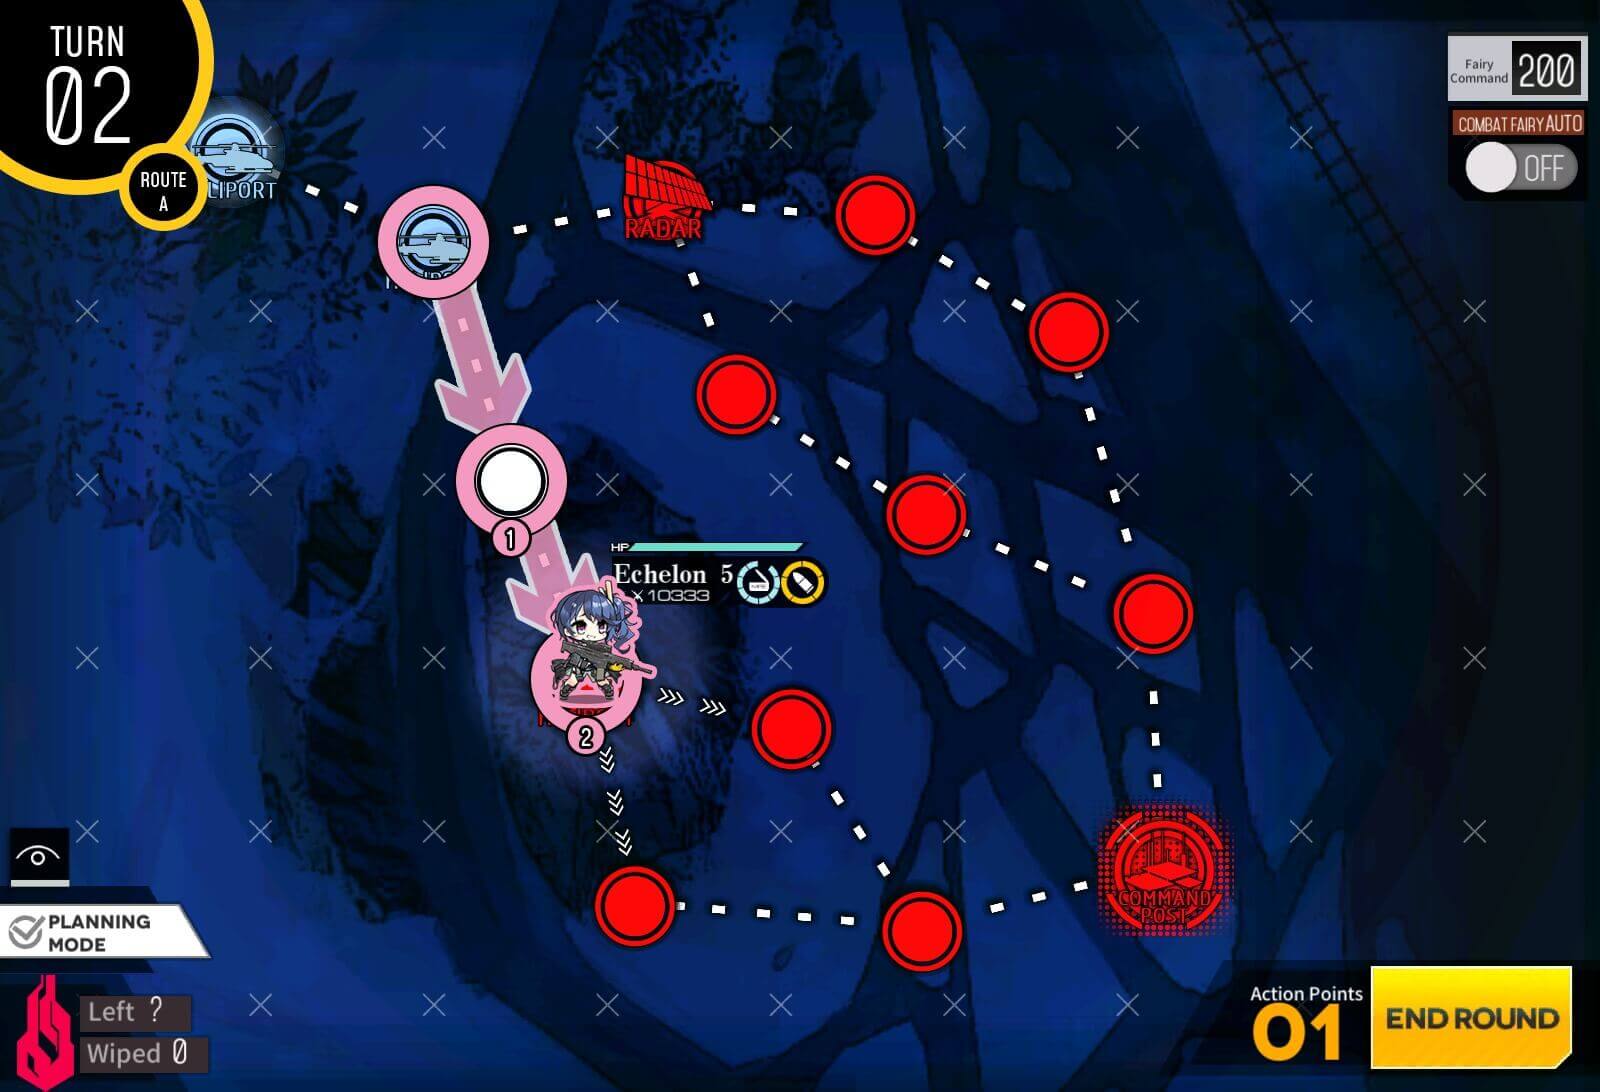
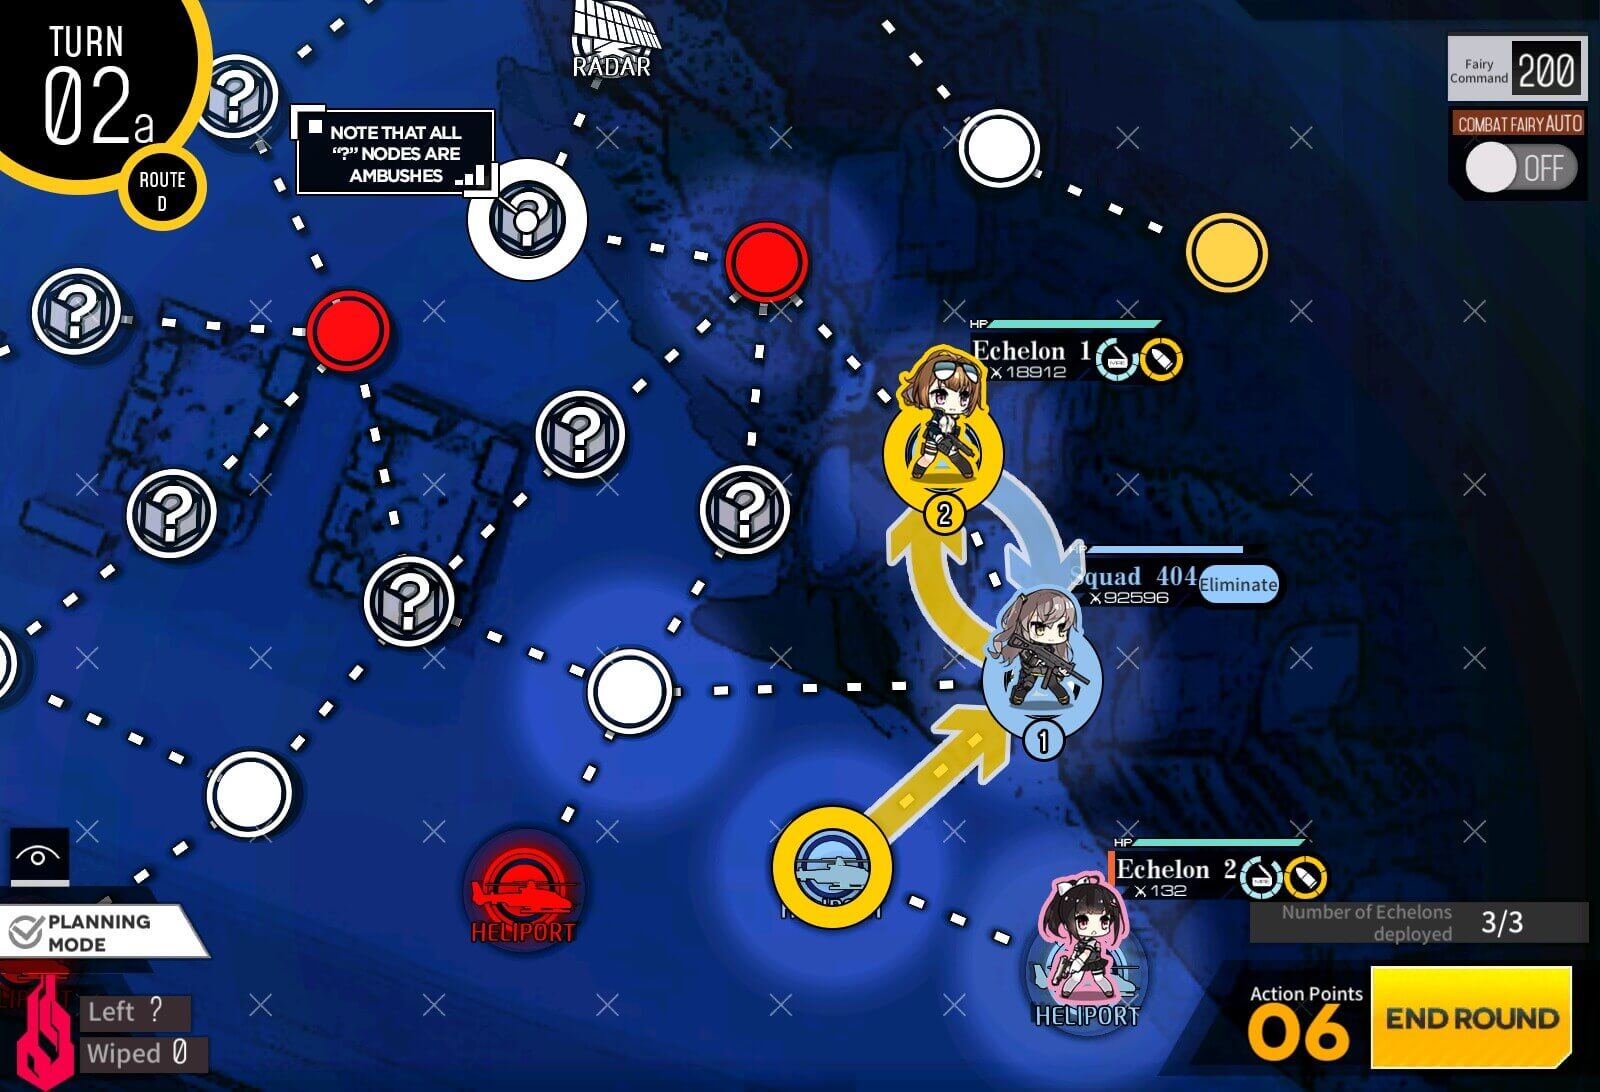
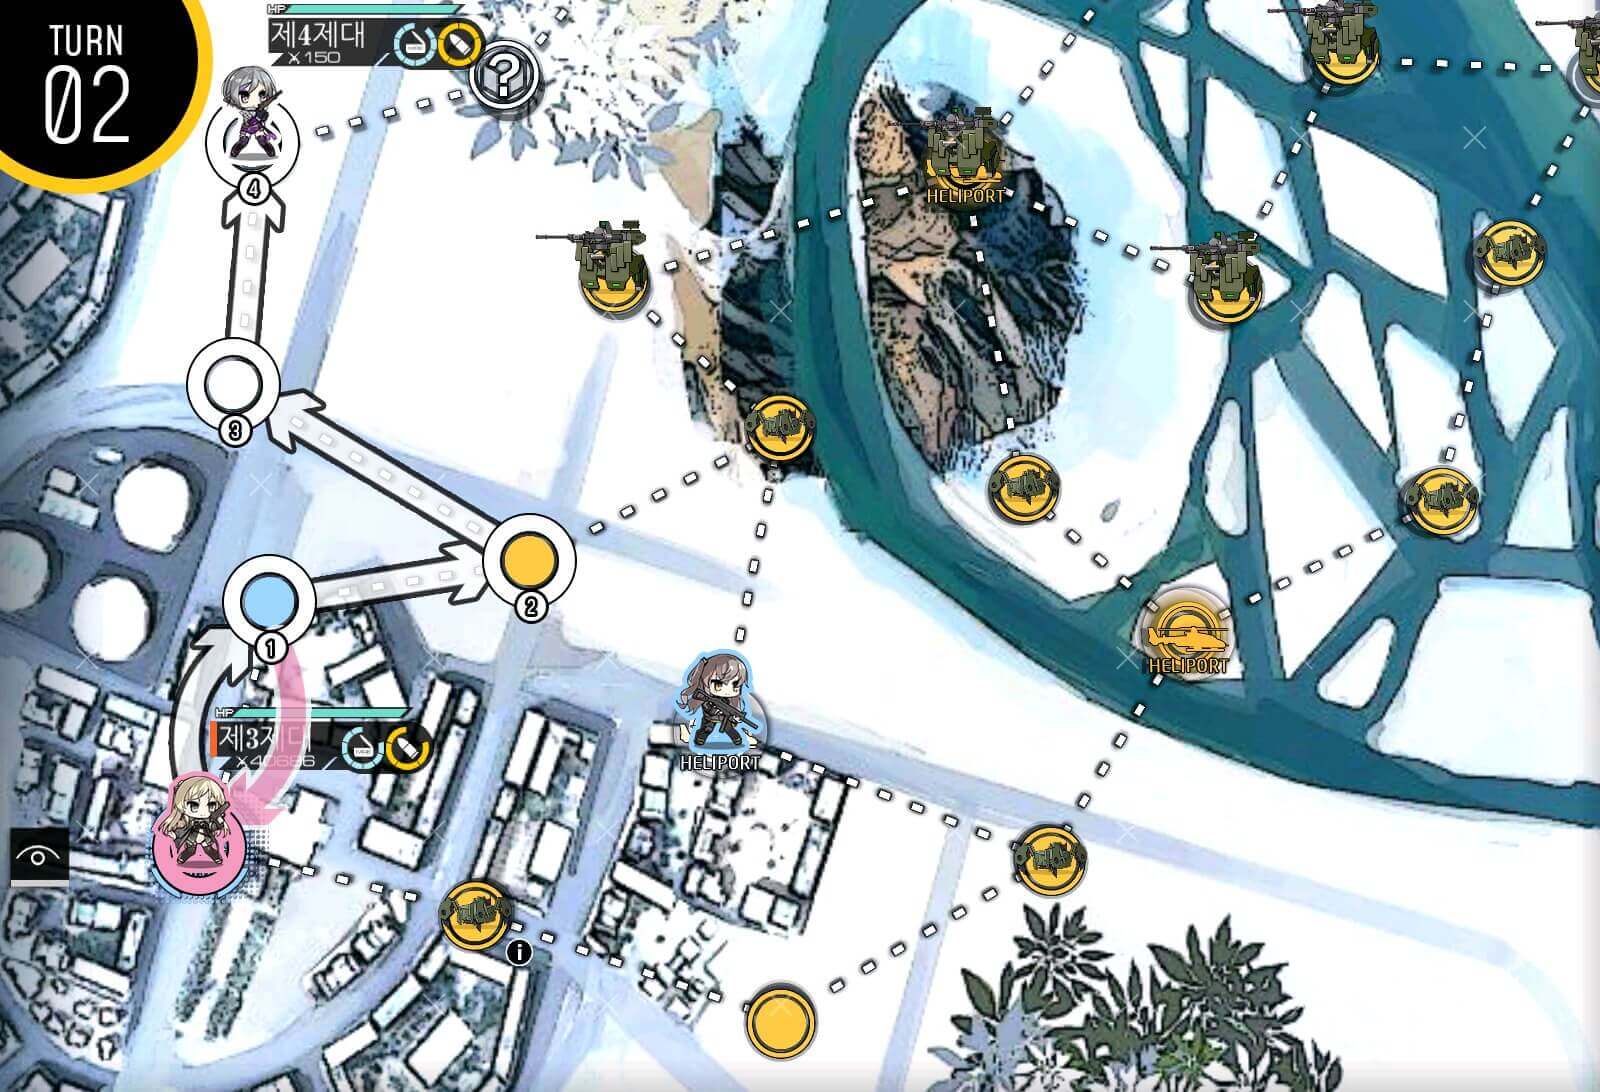
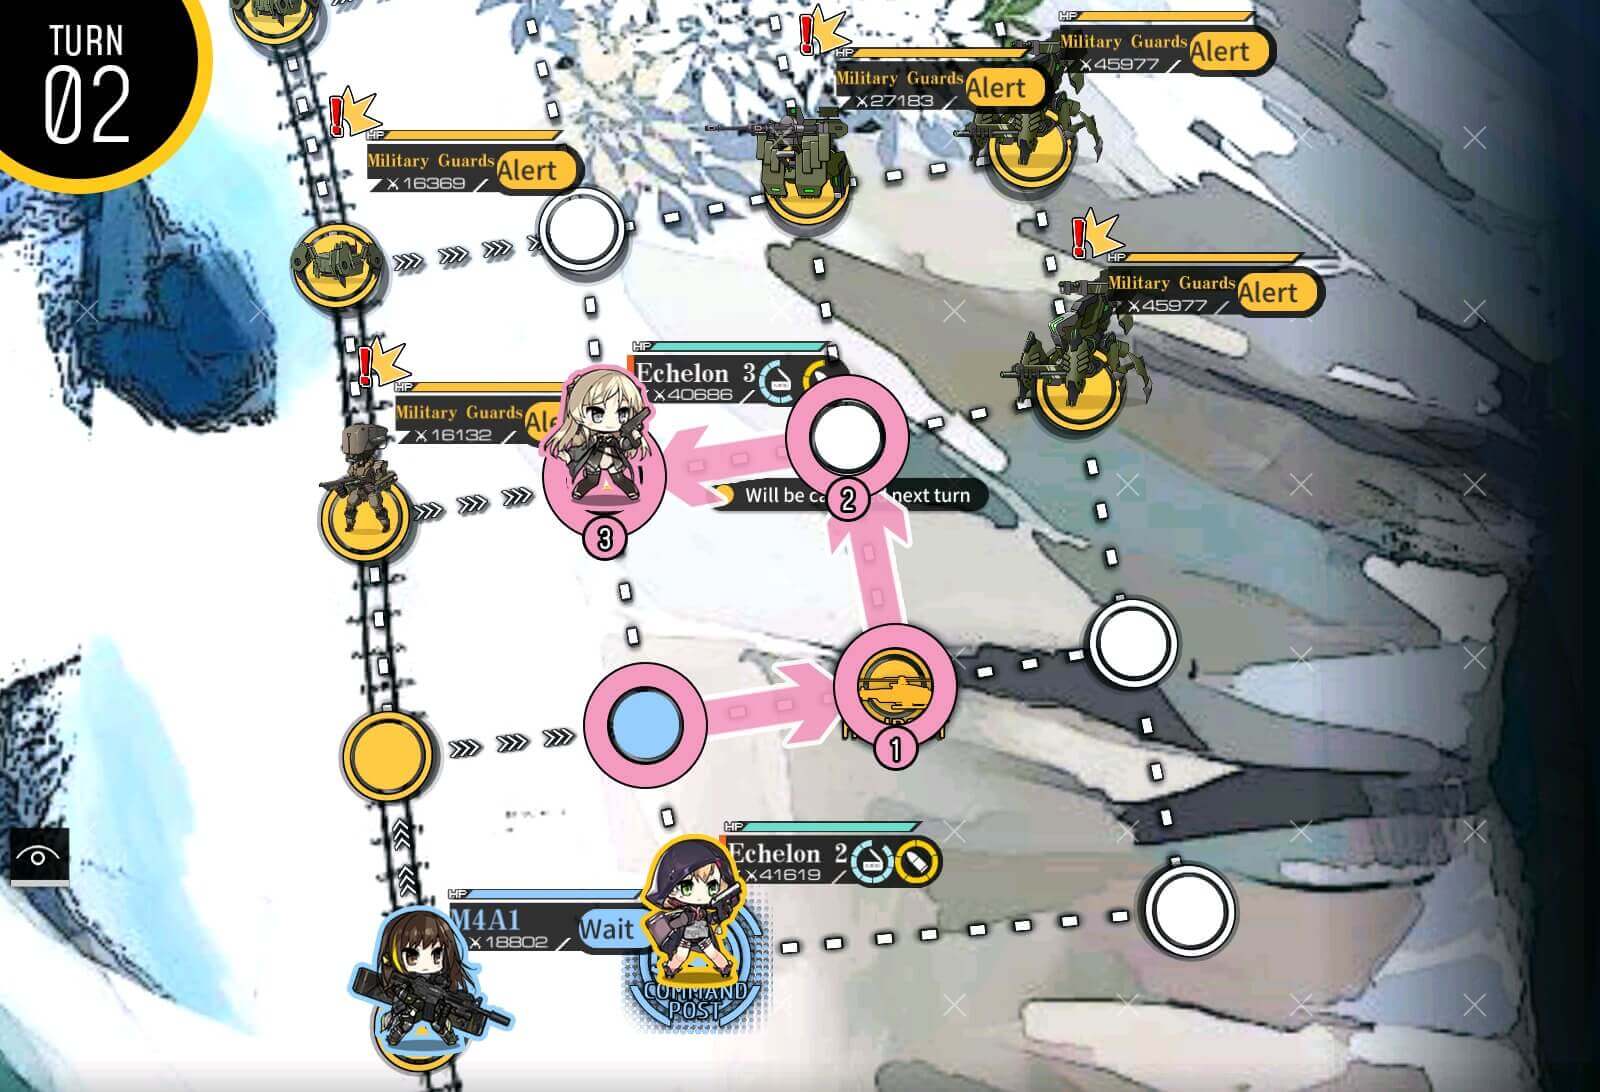
Always resupply if you are ever unsure of future combat number.

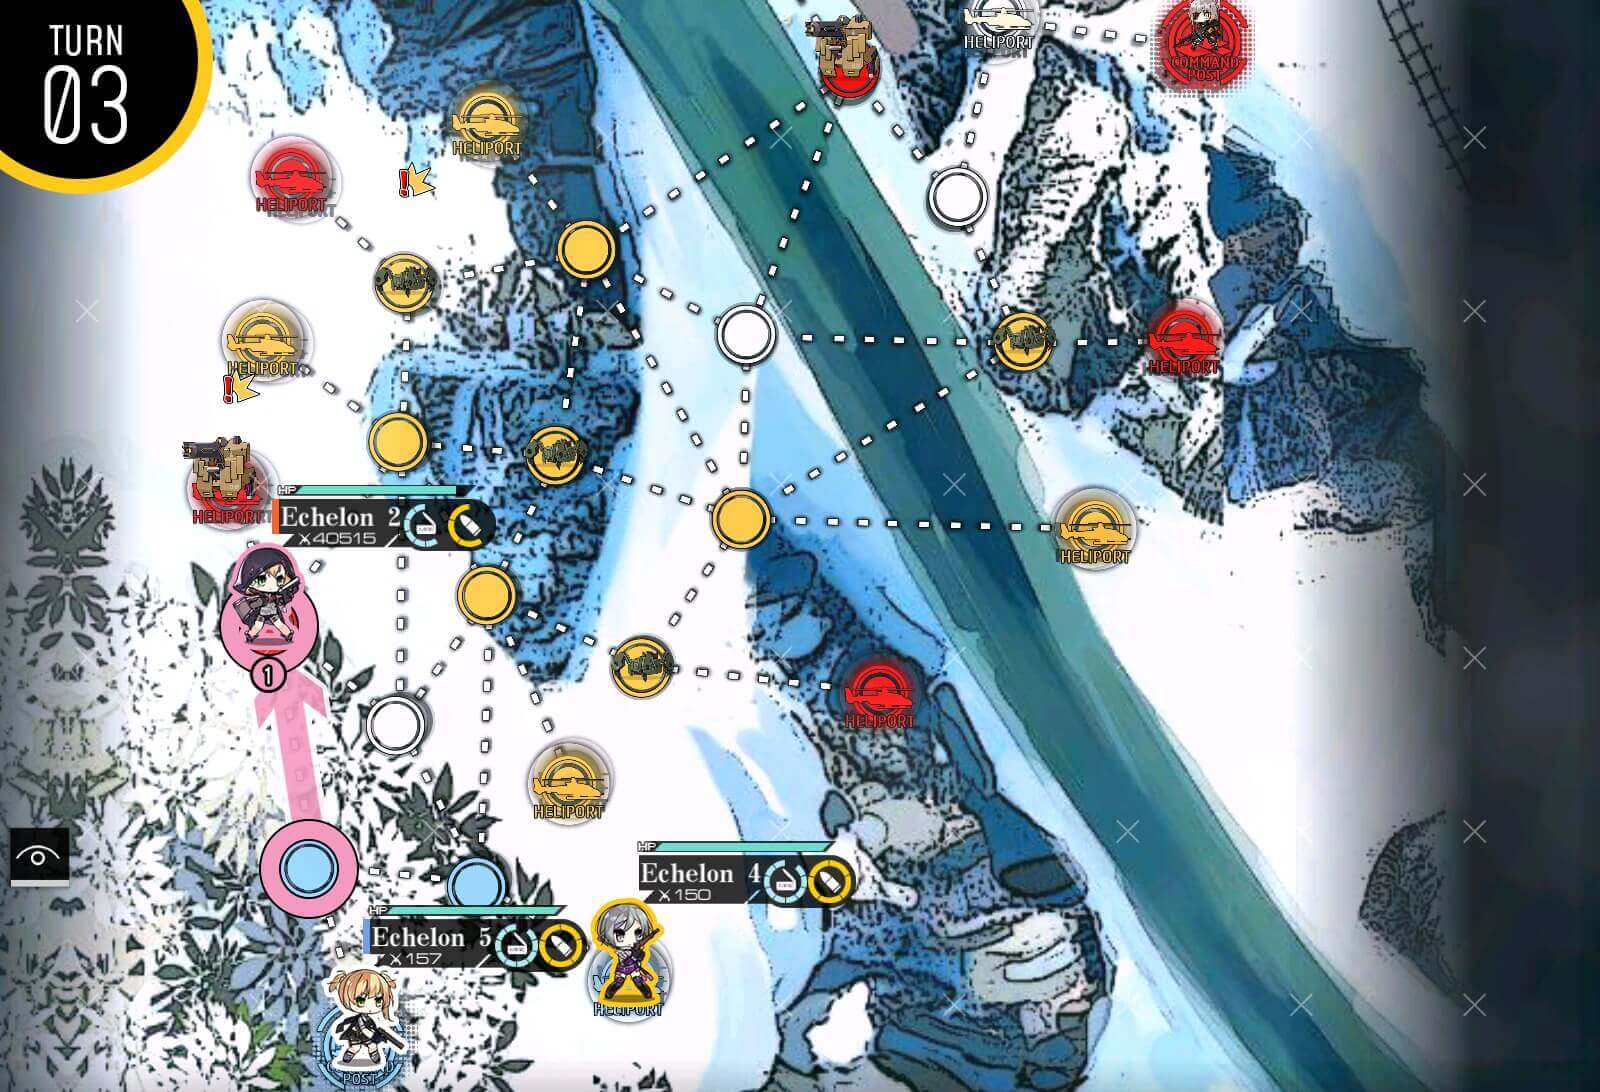
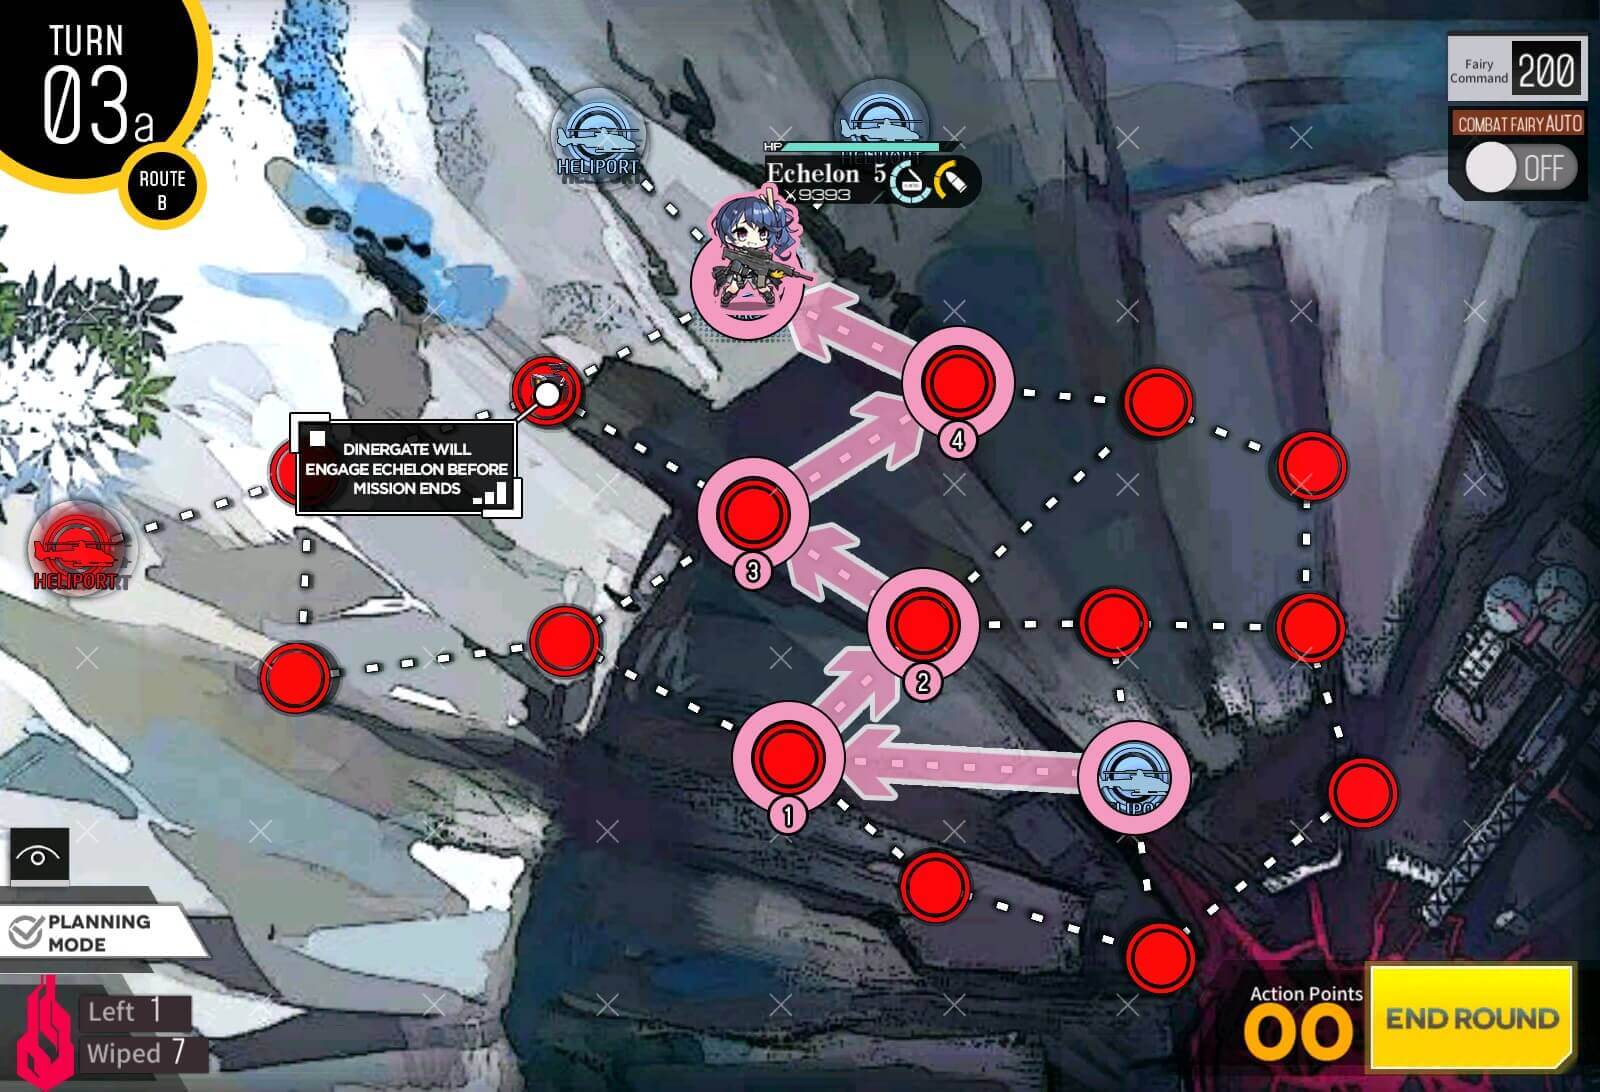
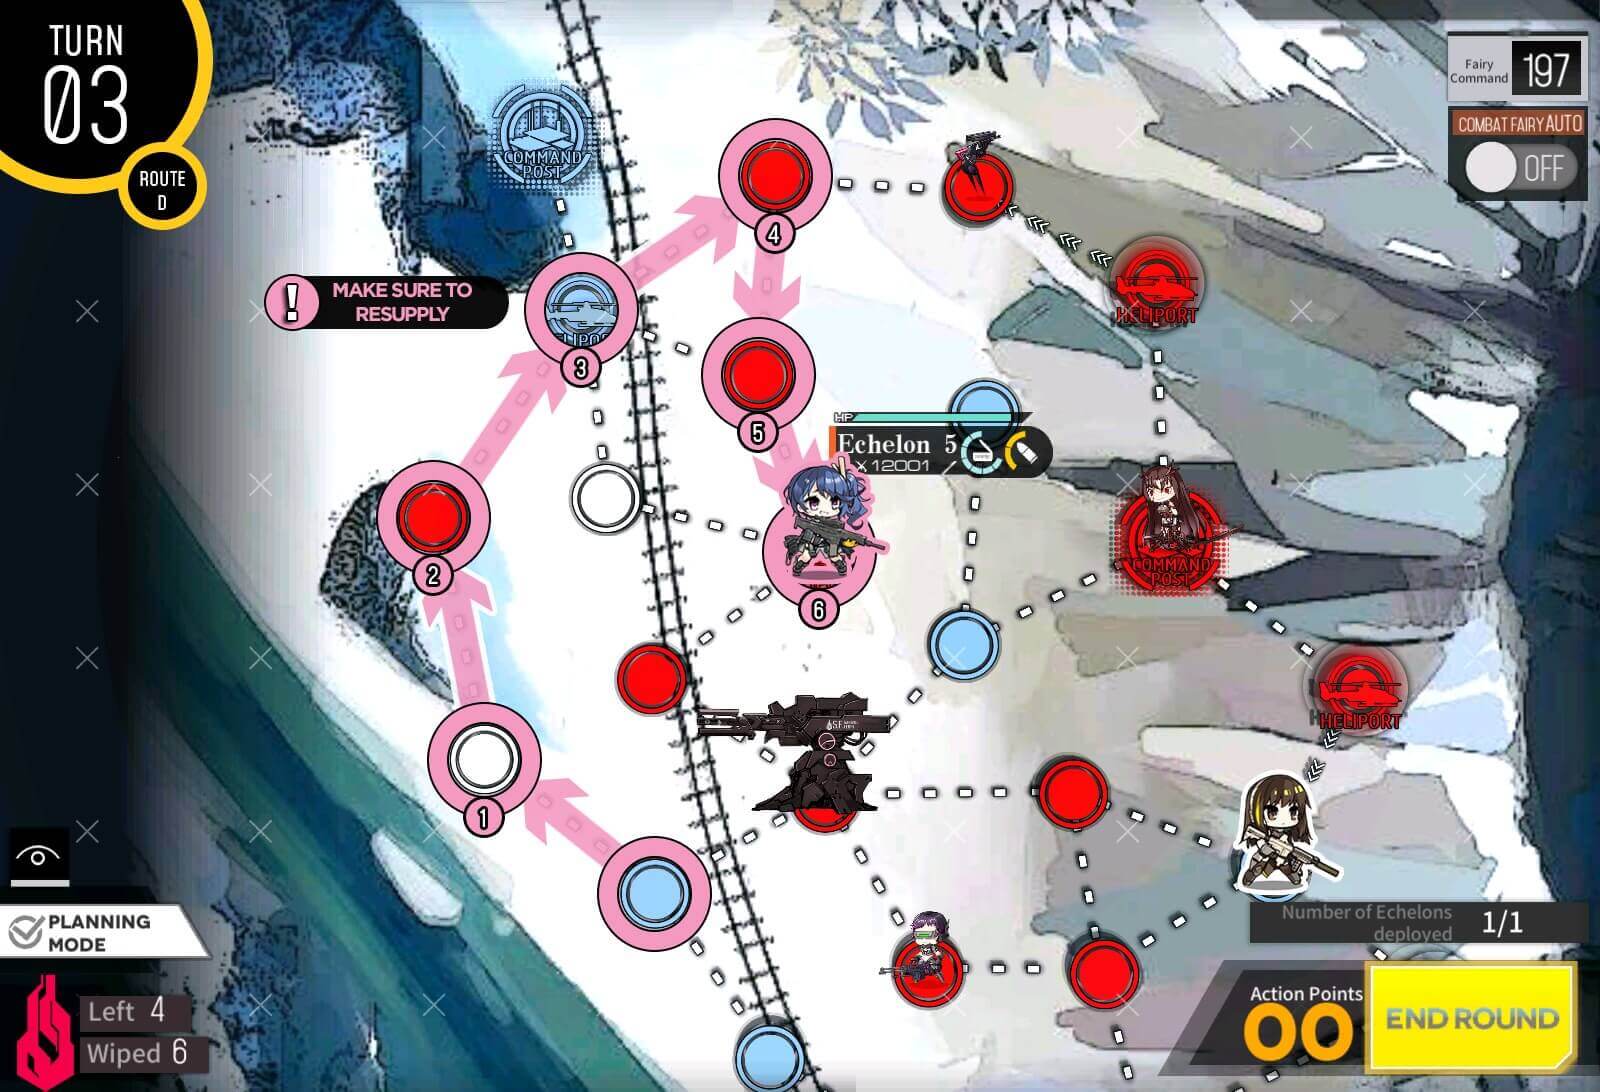
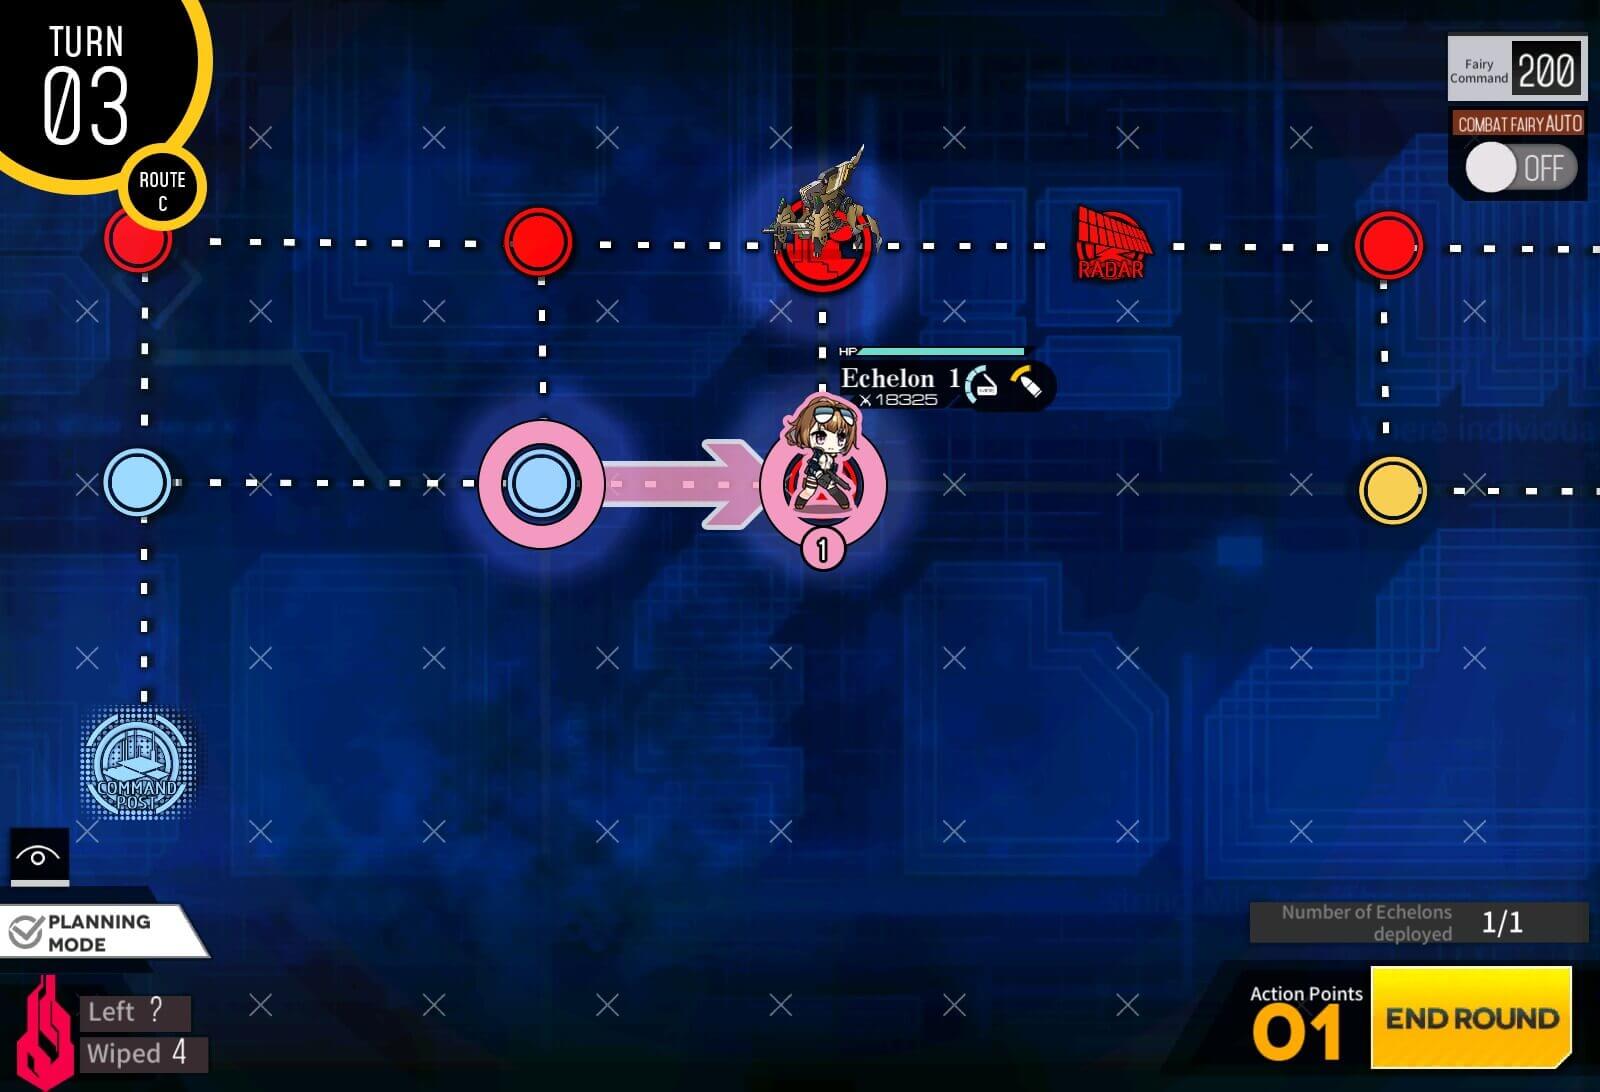
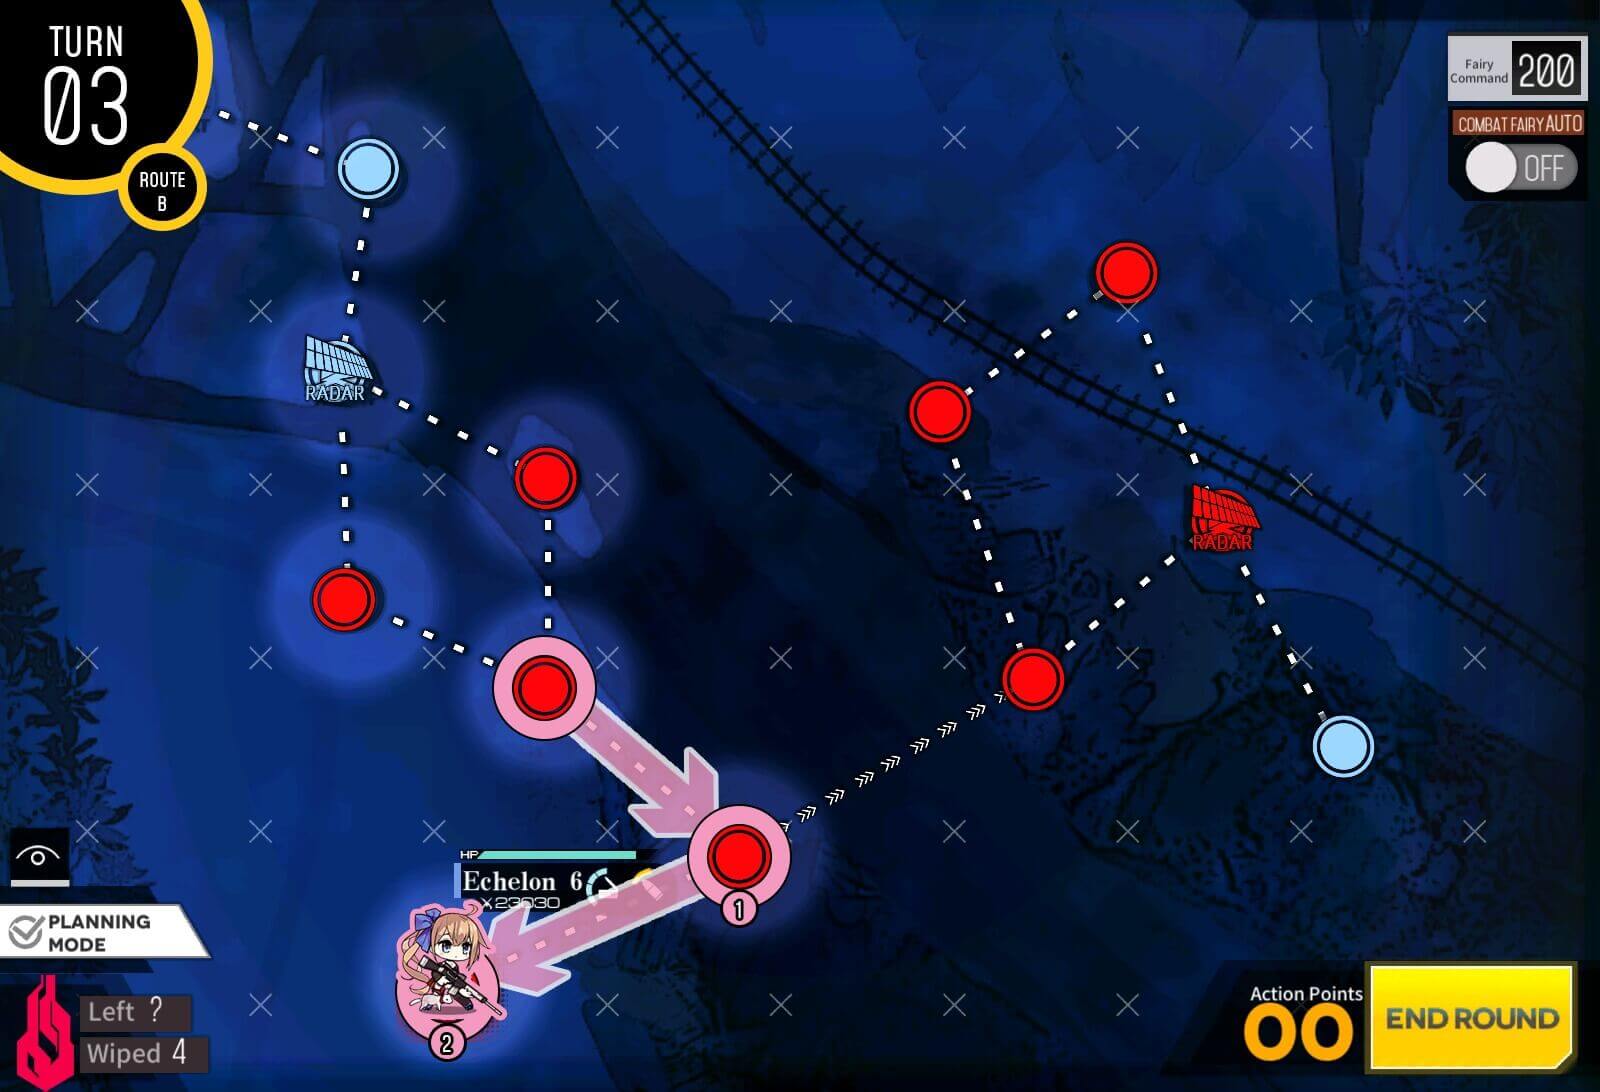
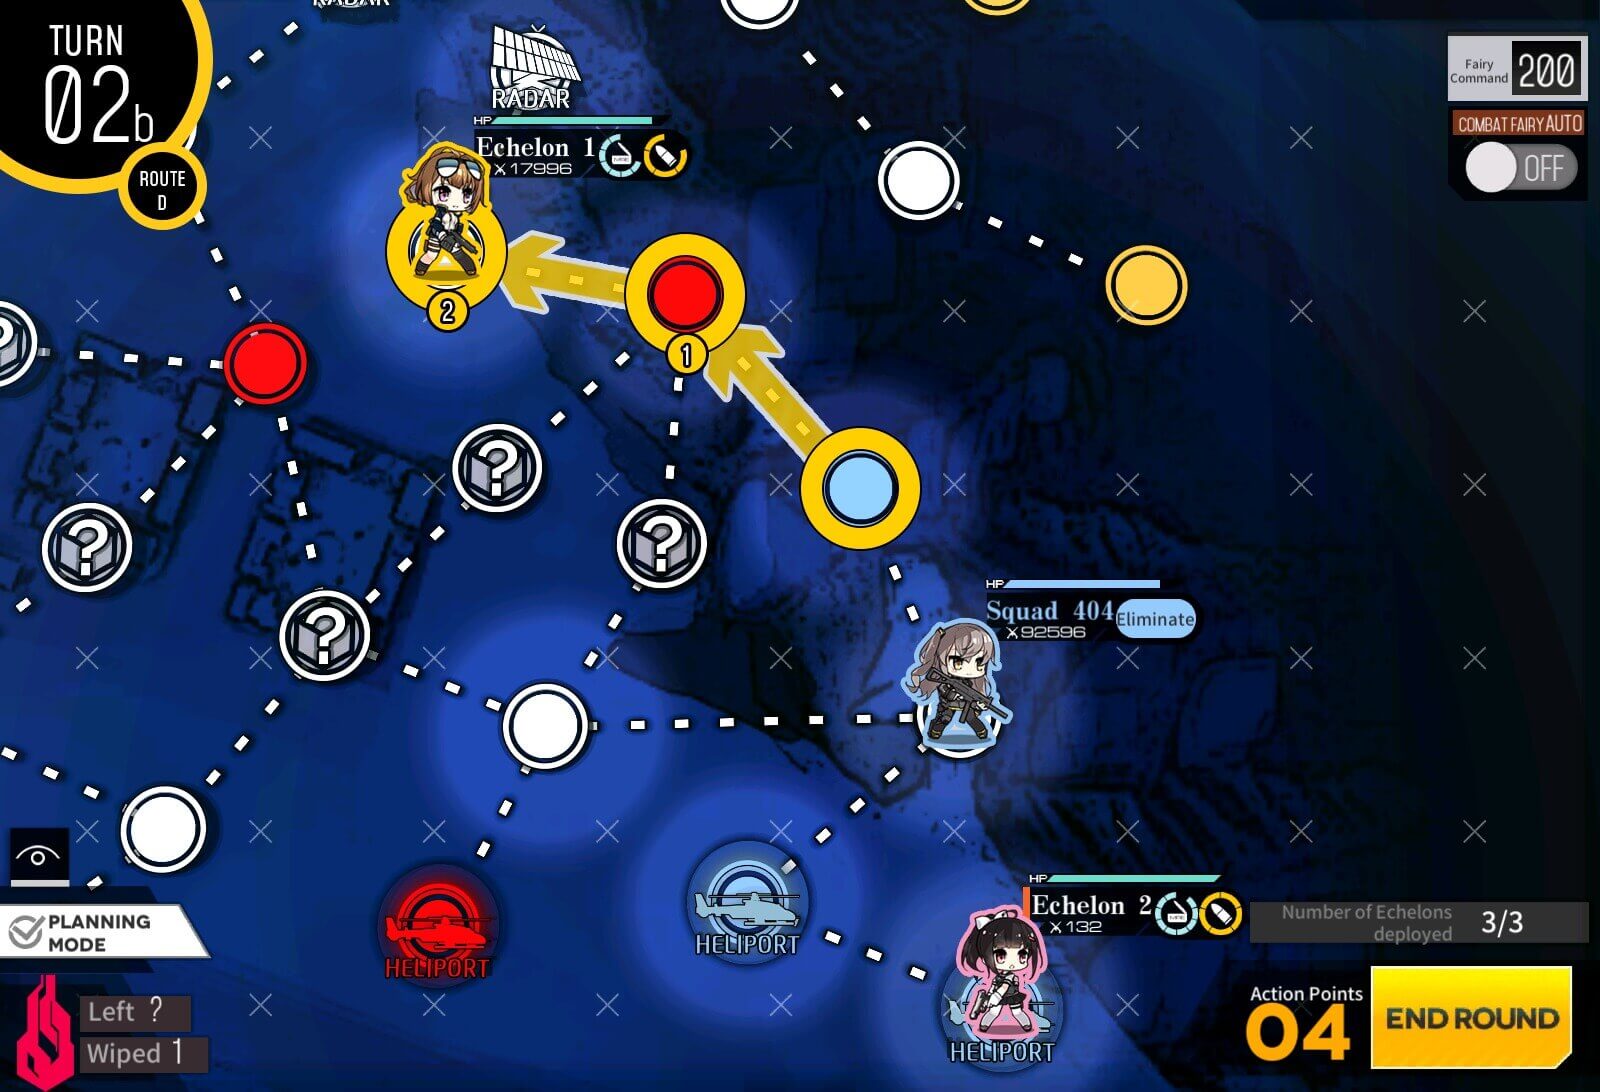
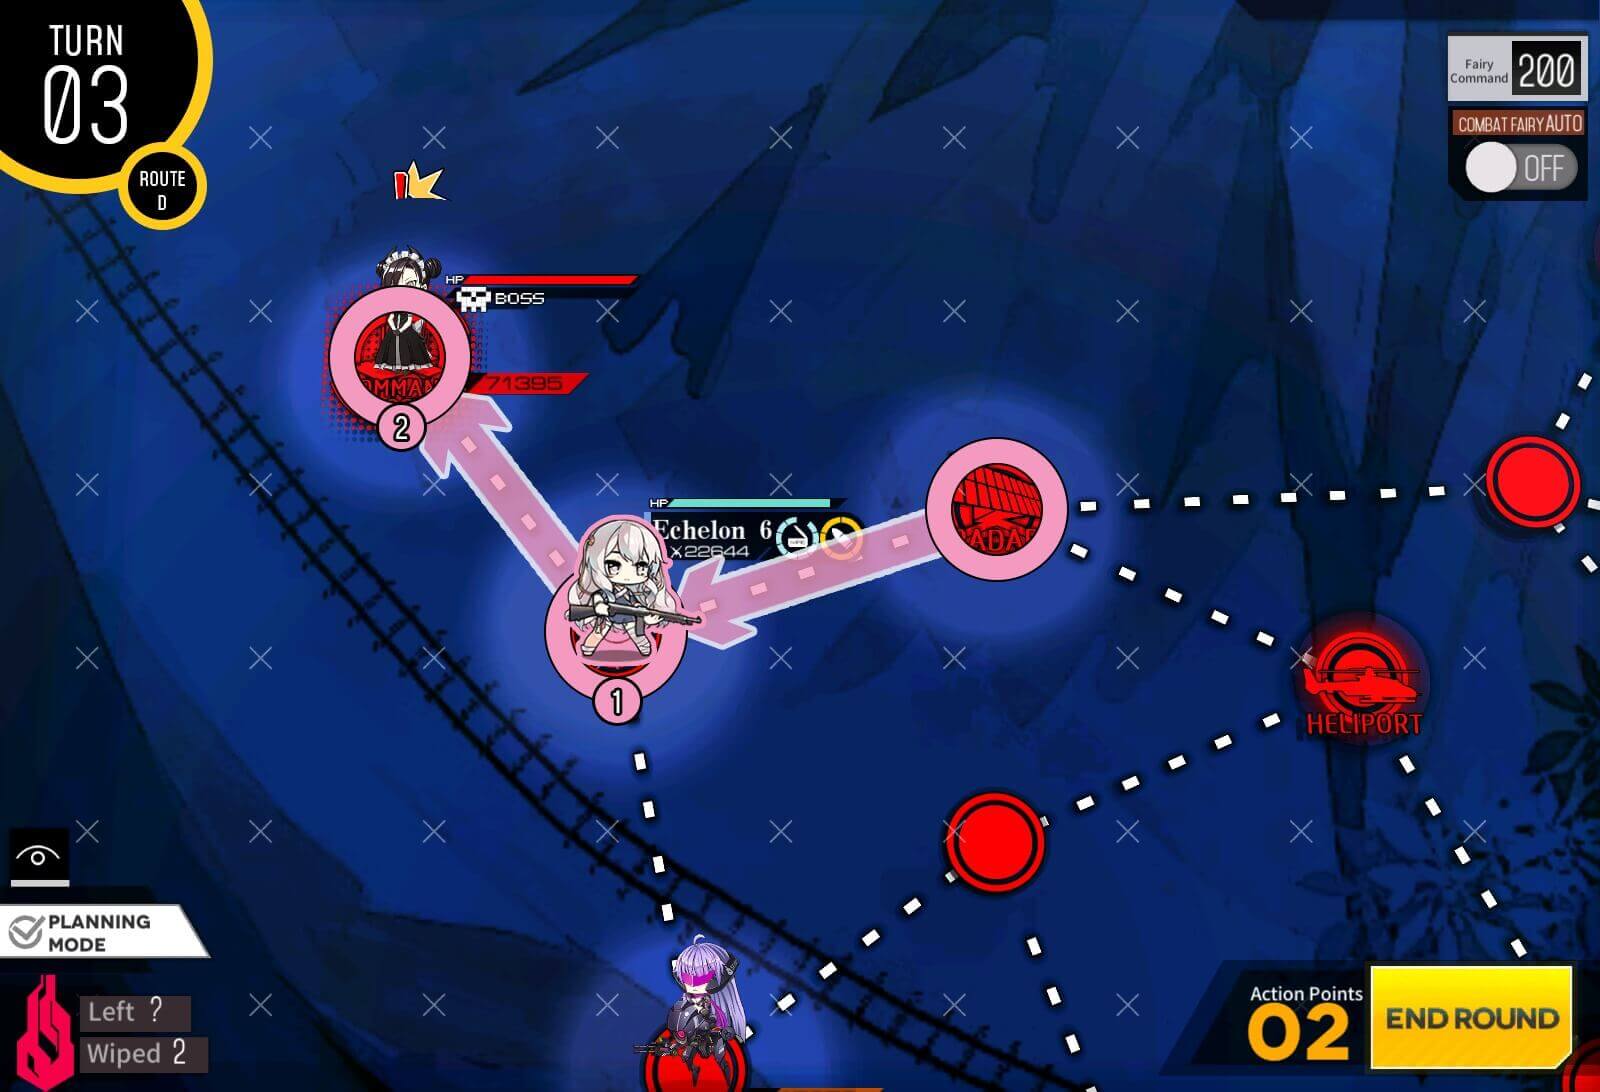
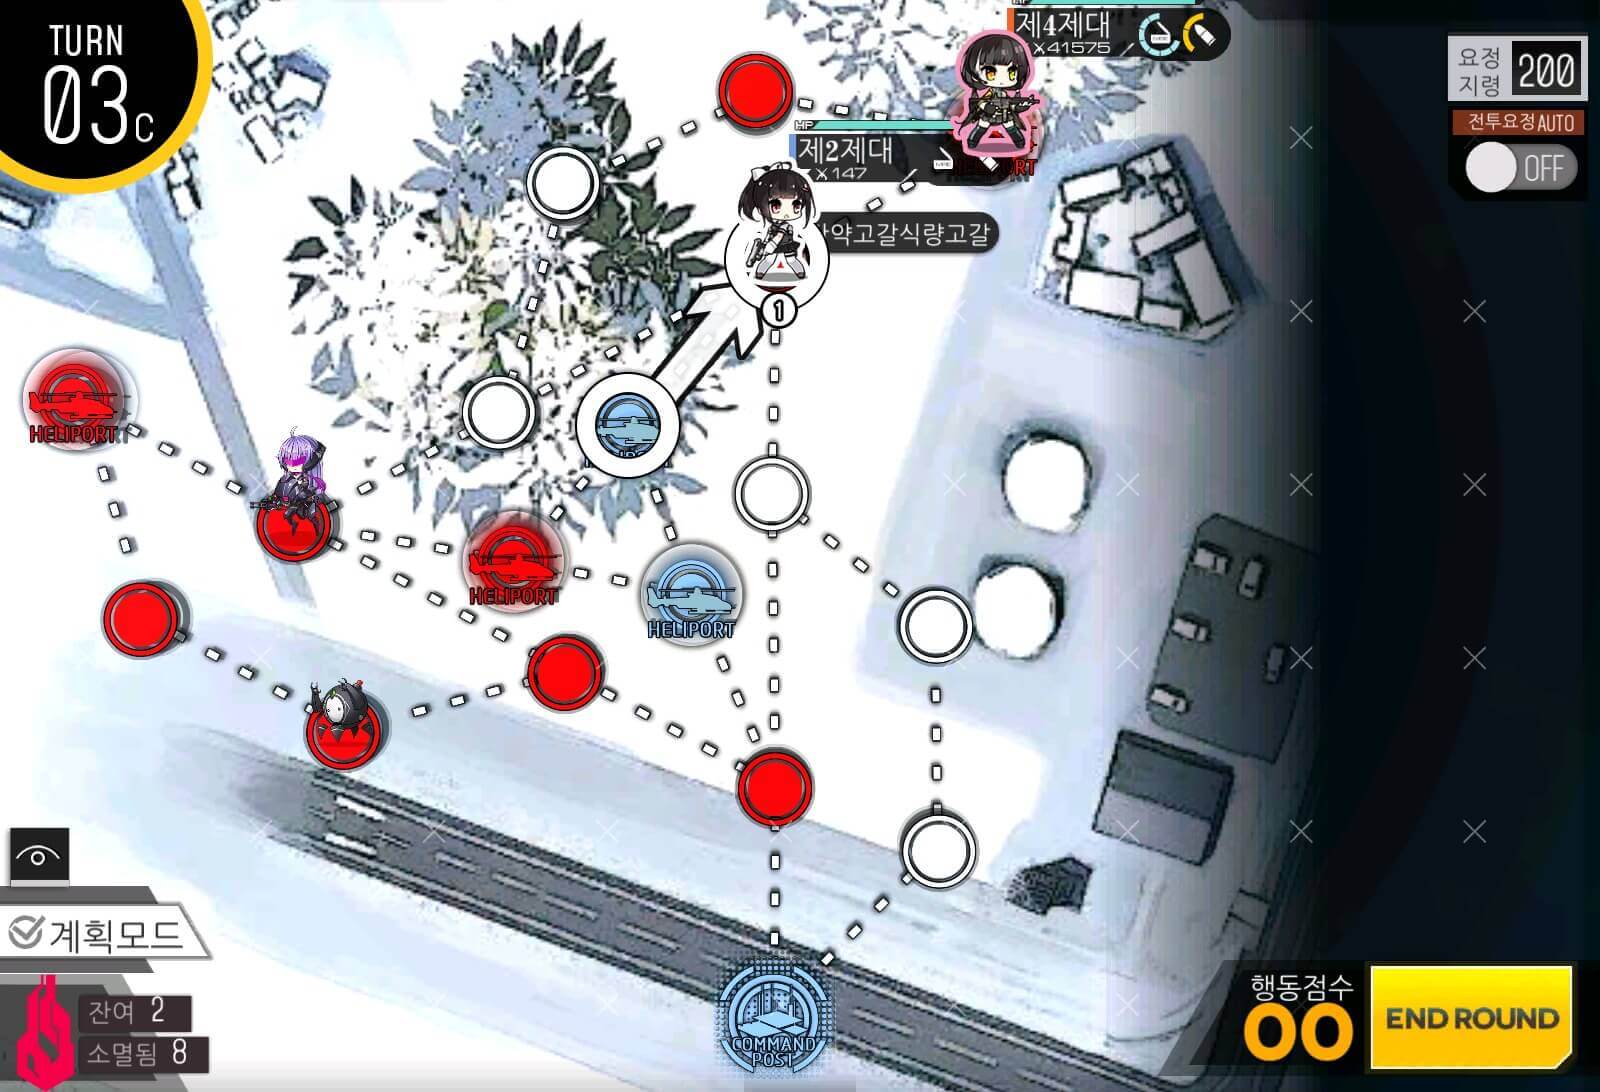
Turn 3
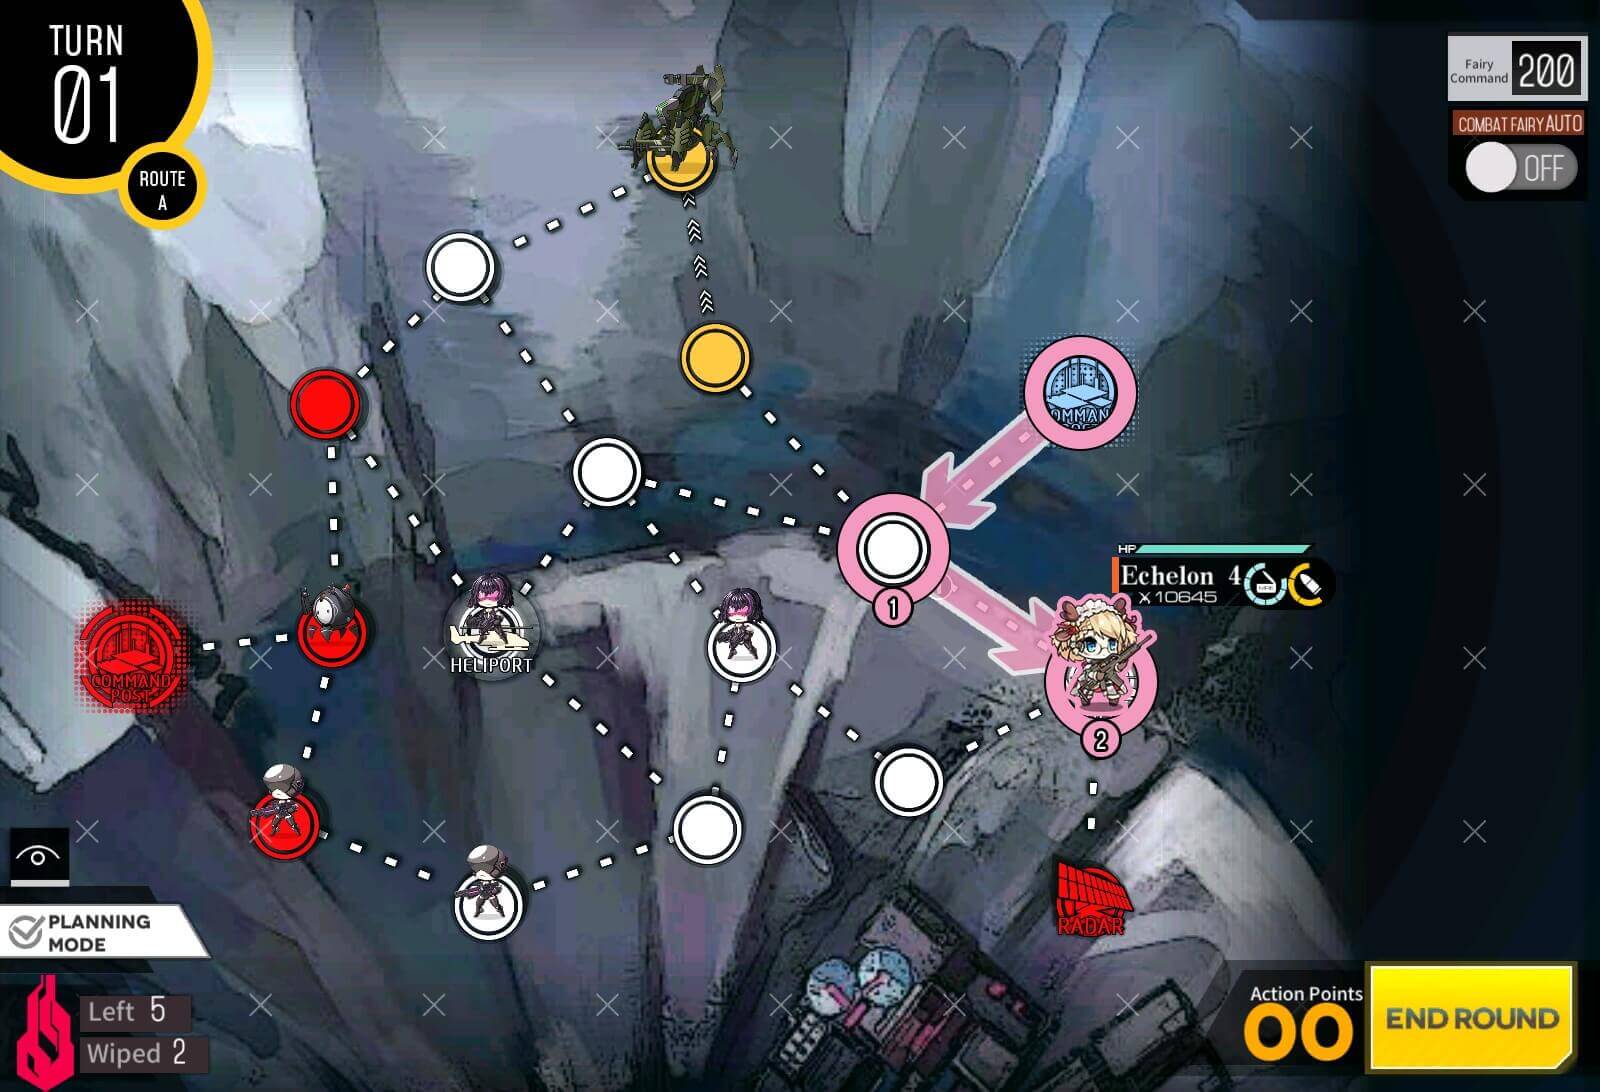
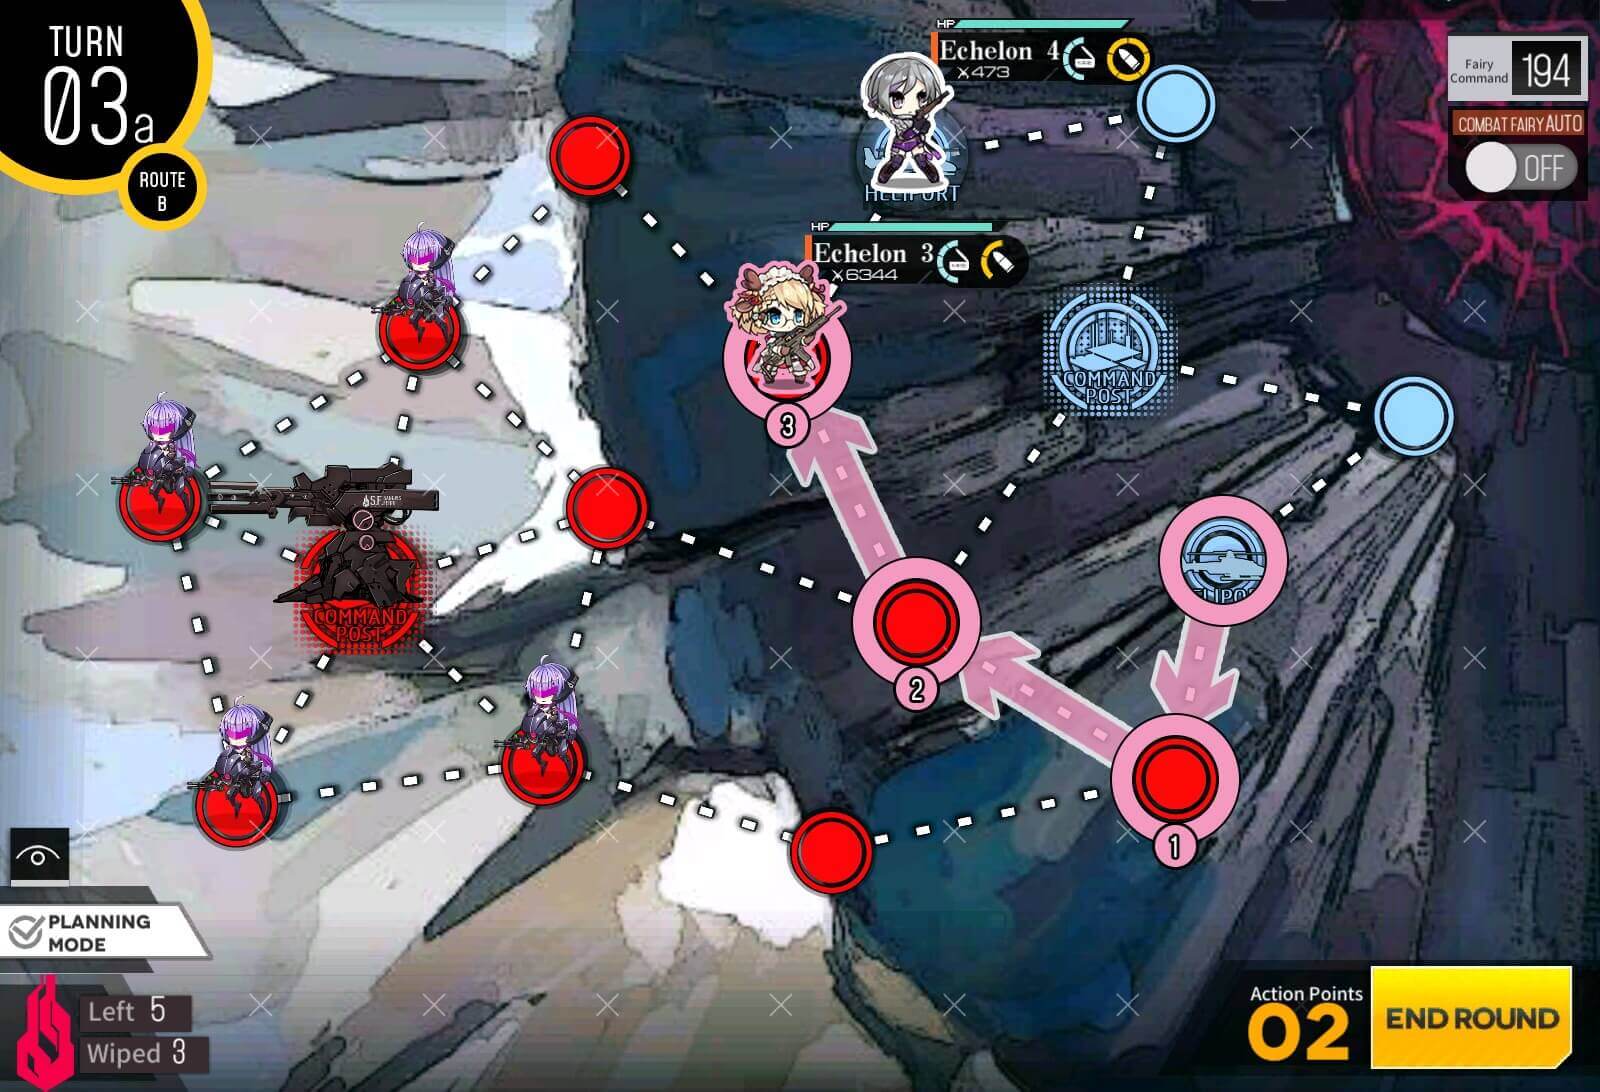
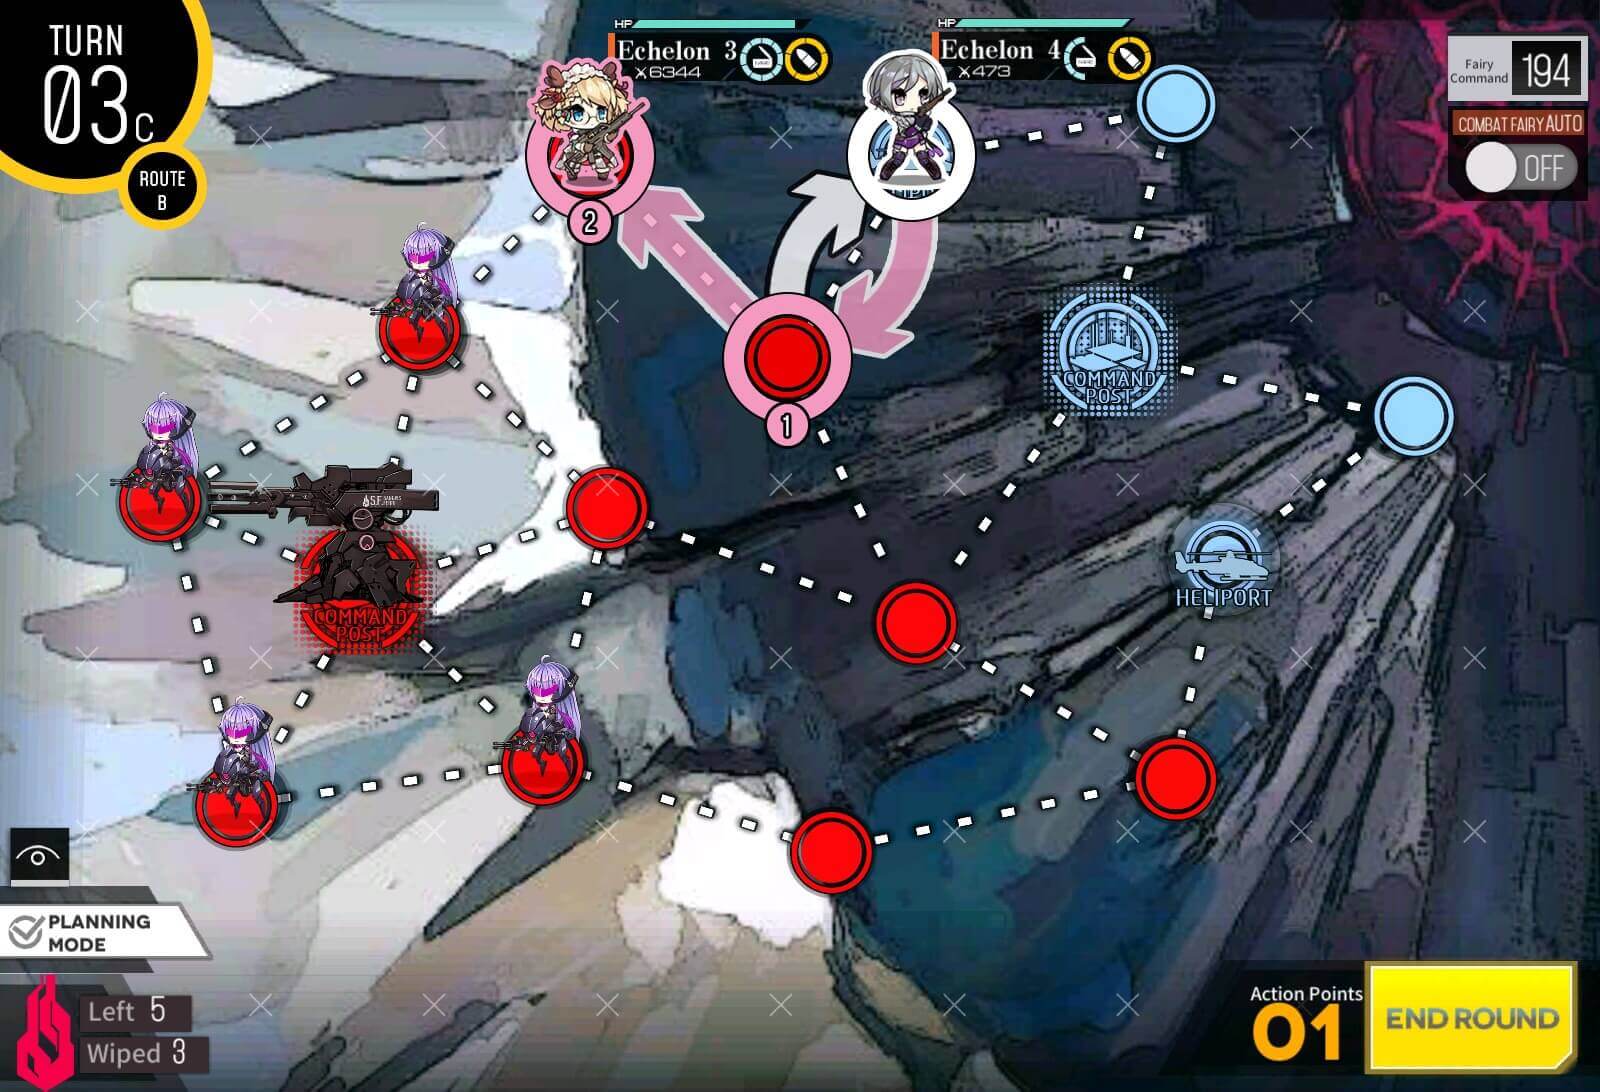
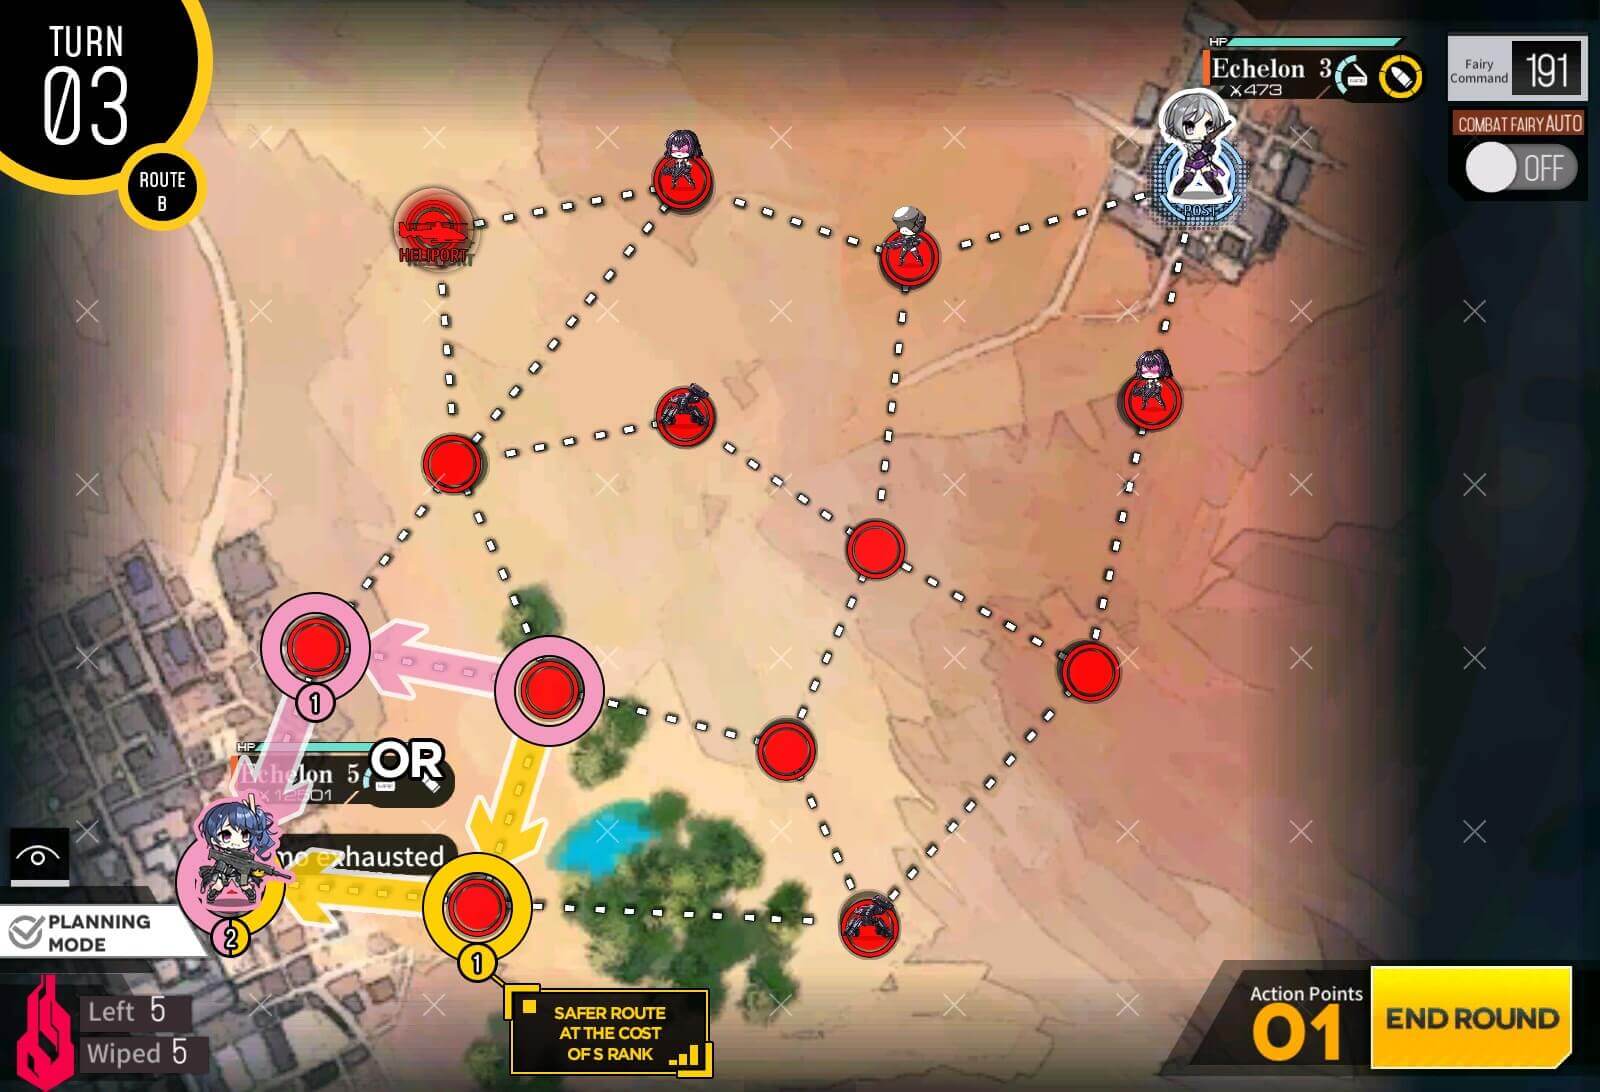
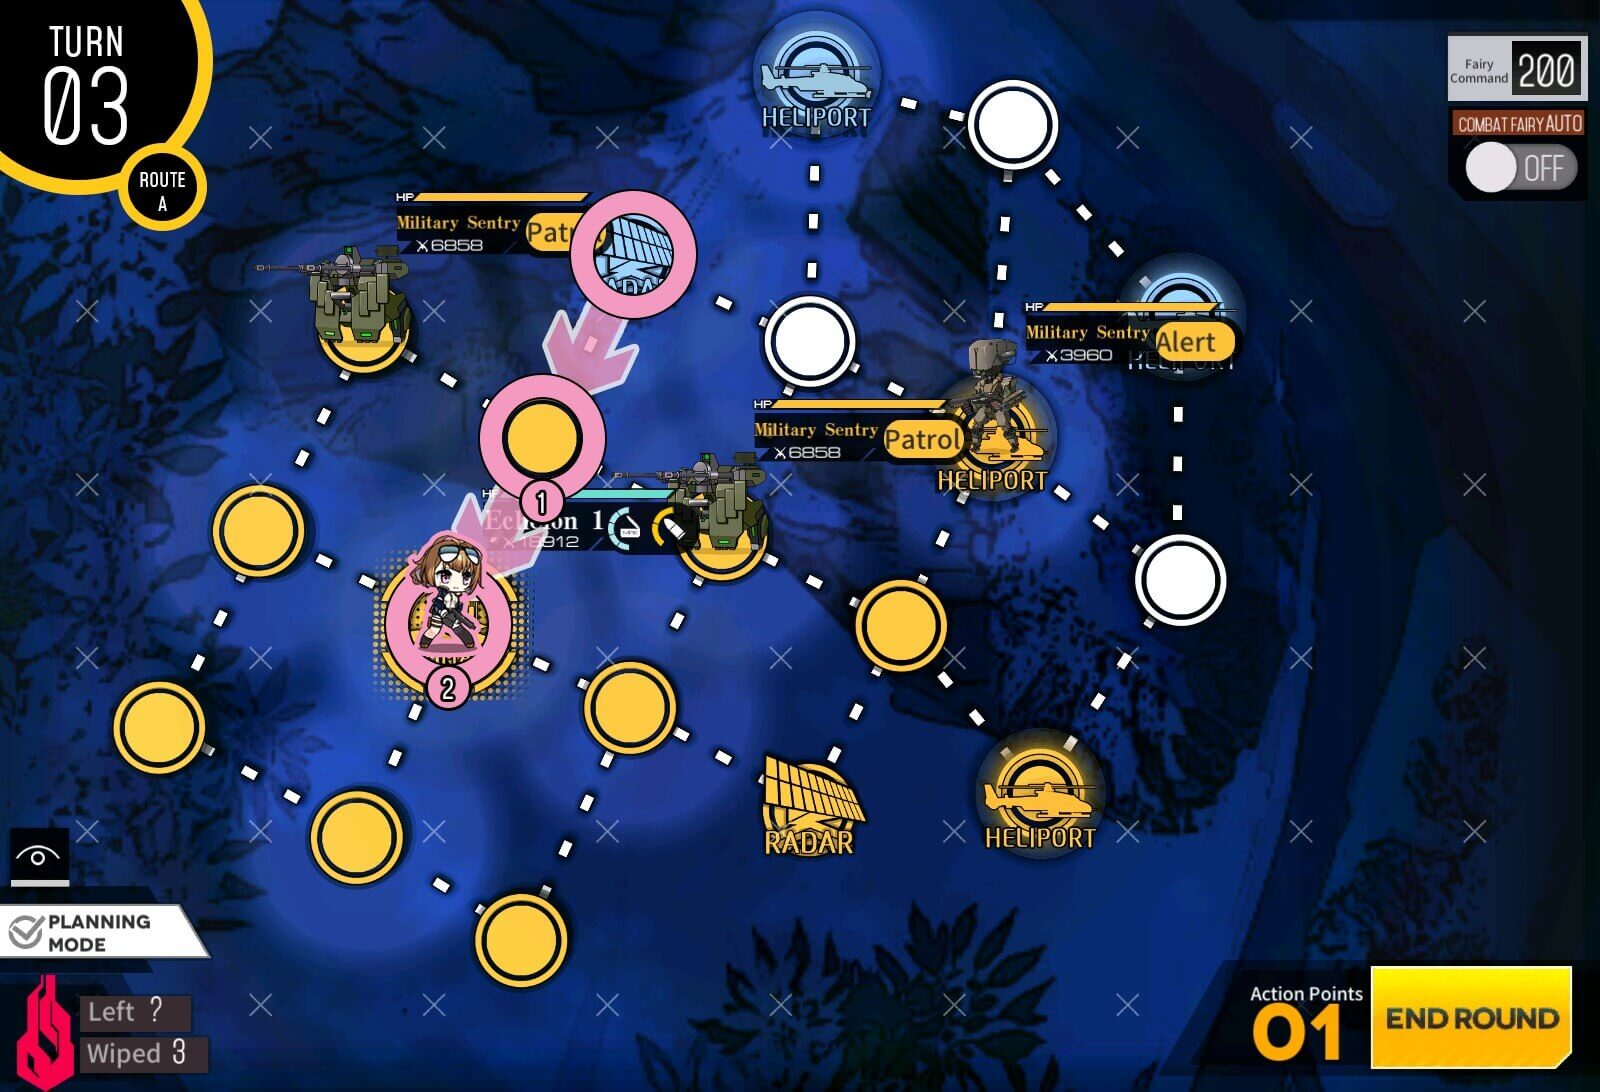
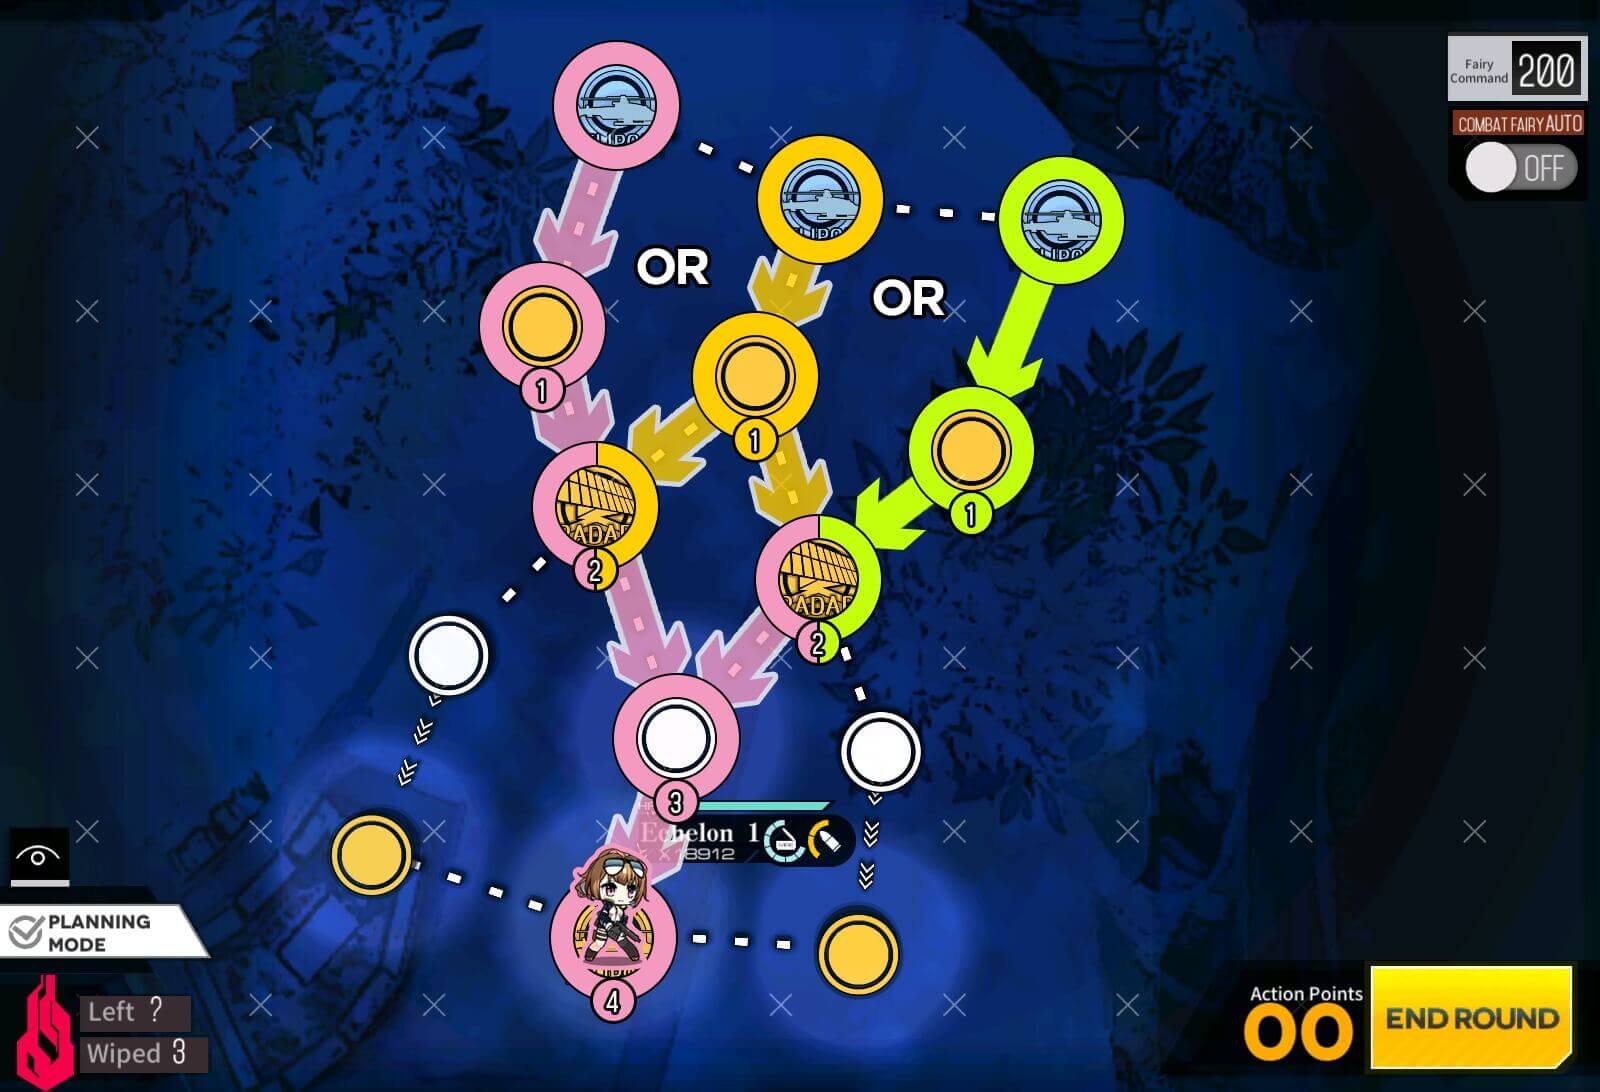
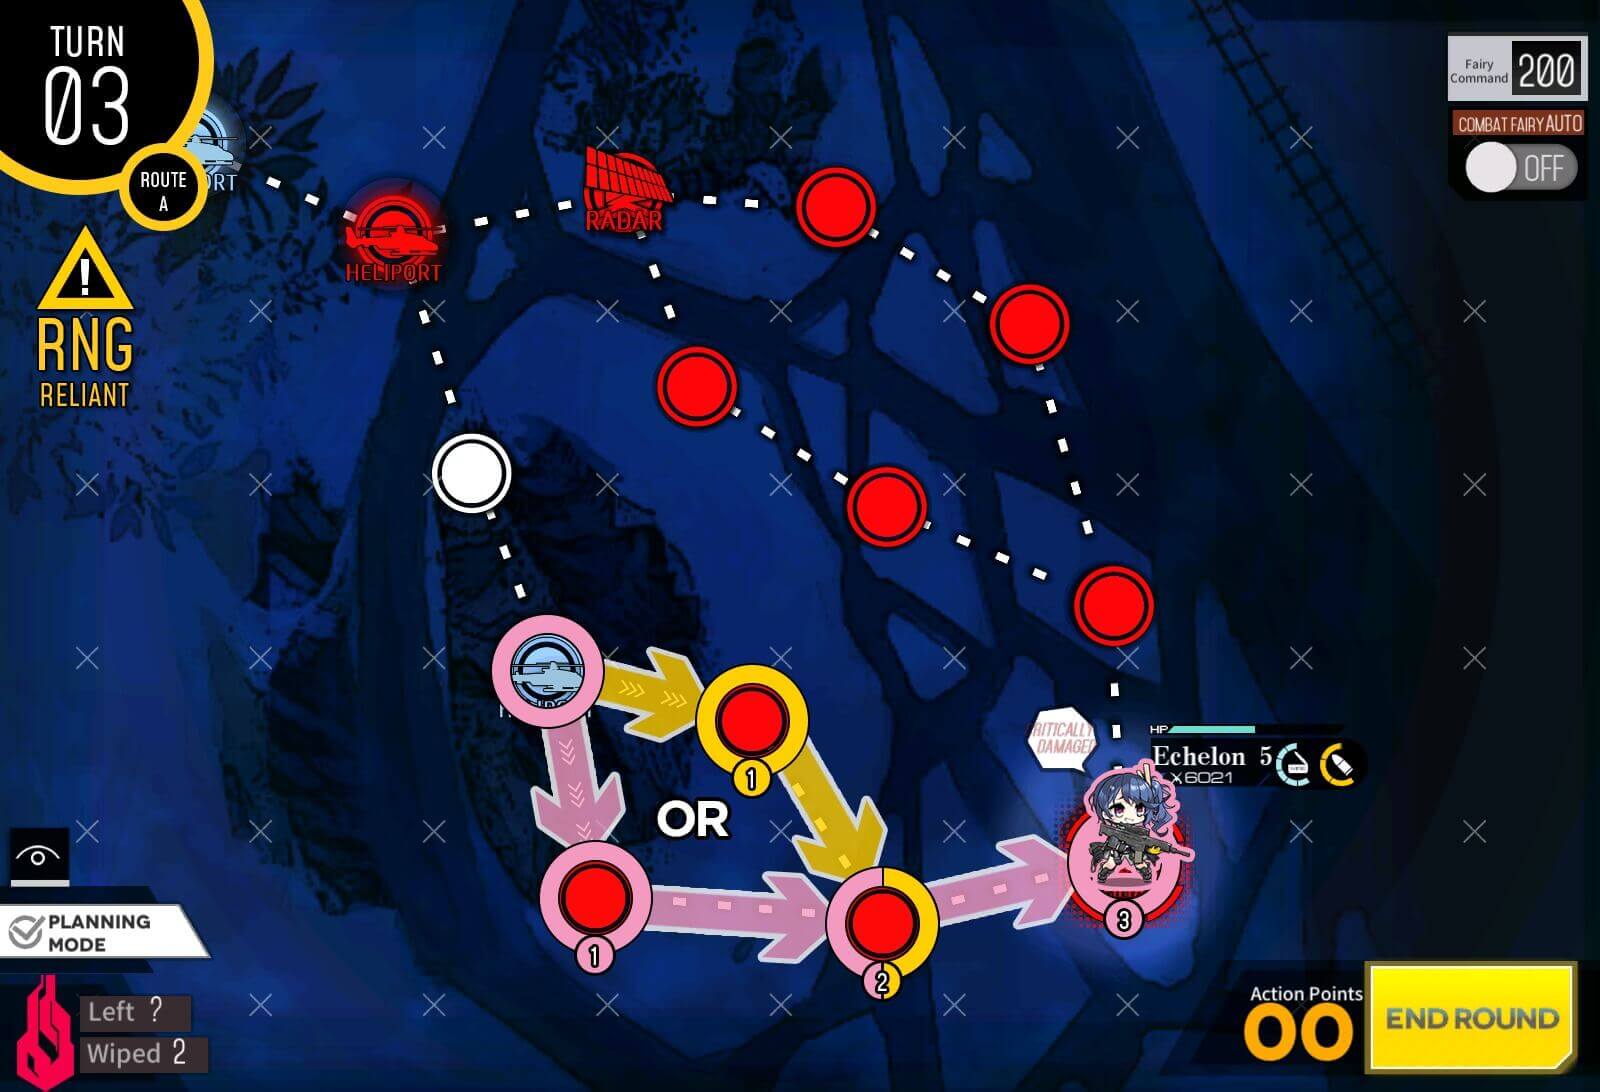
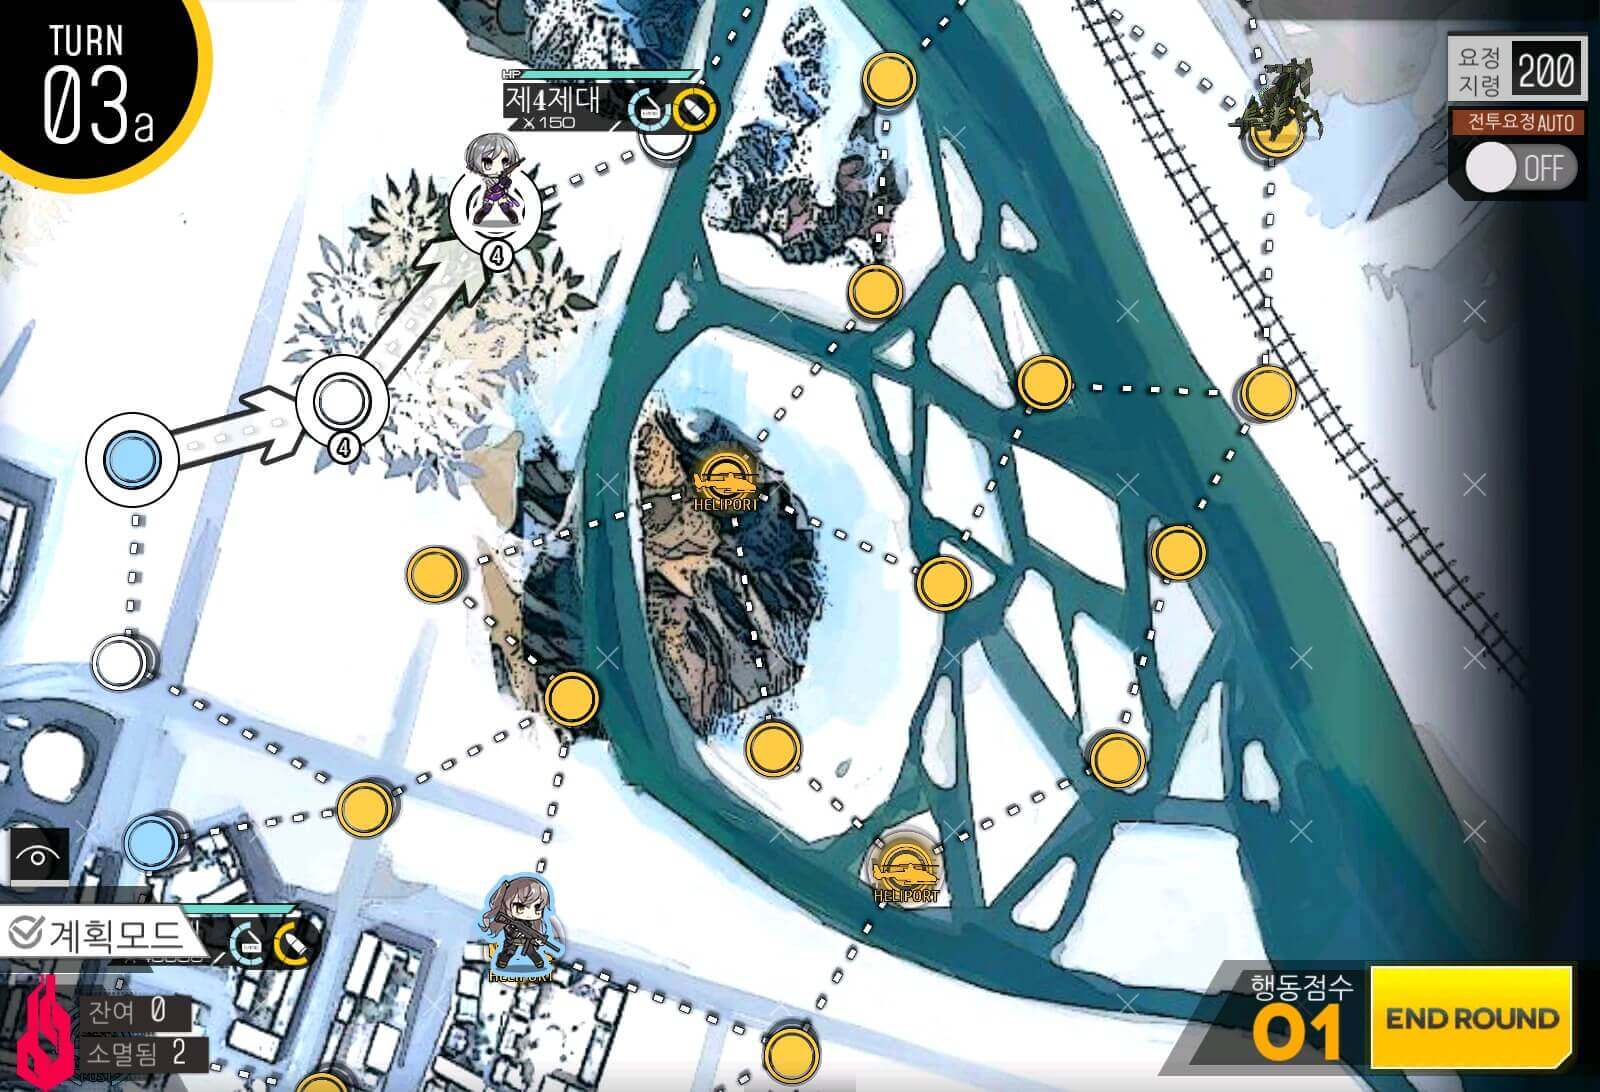
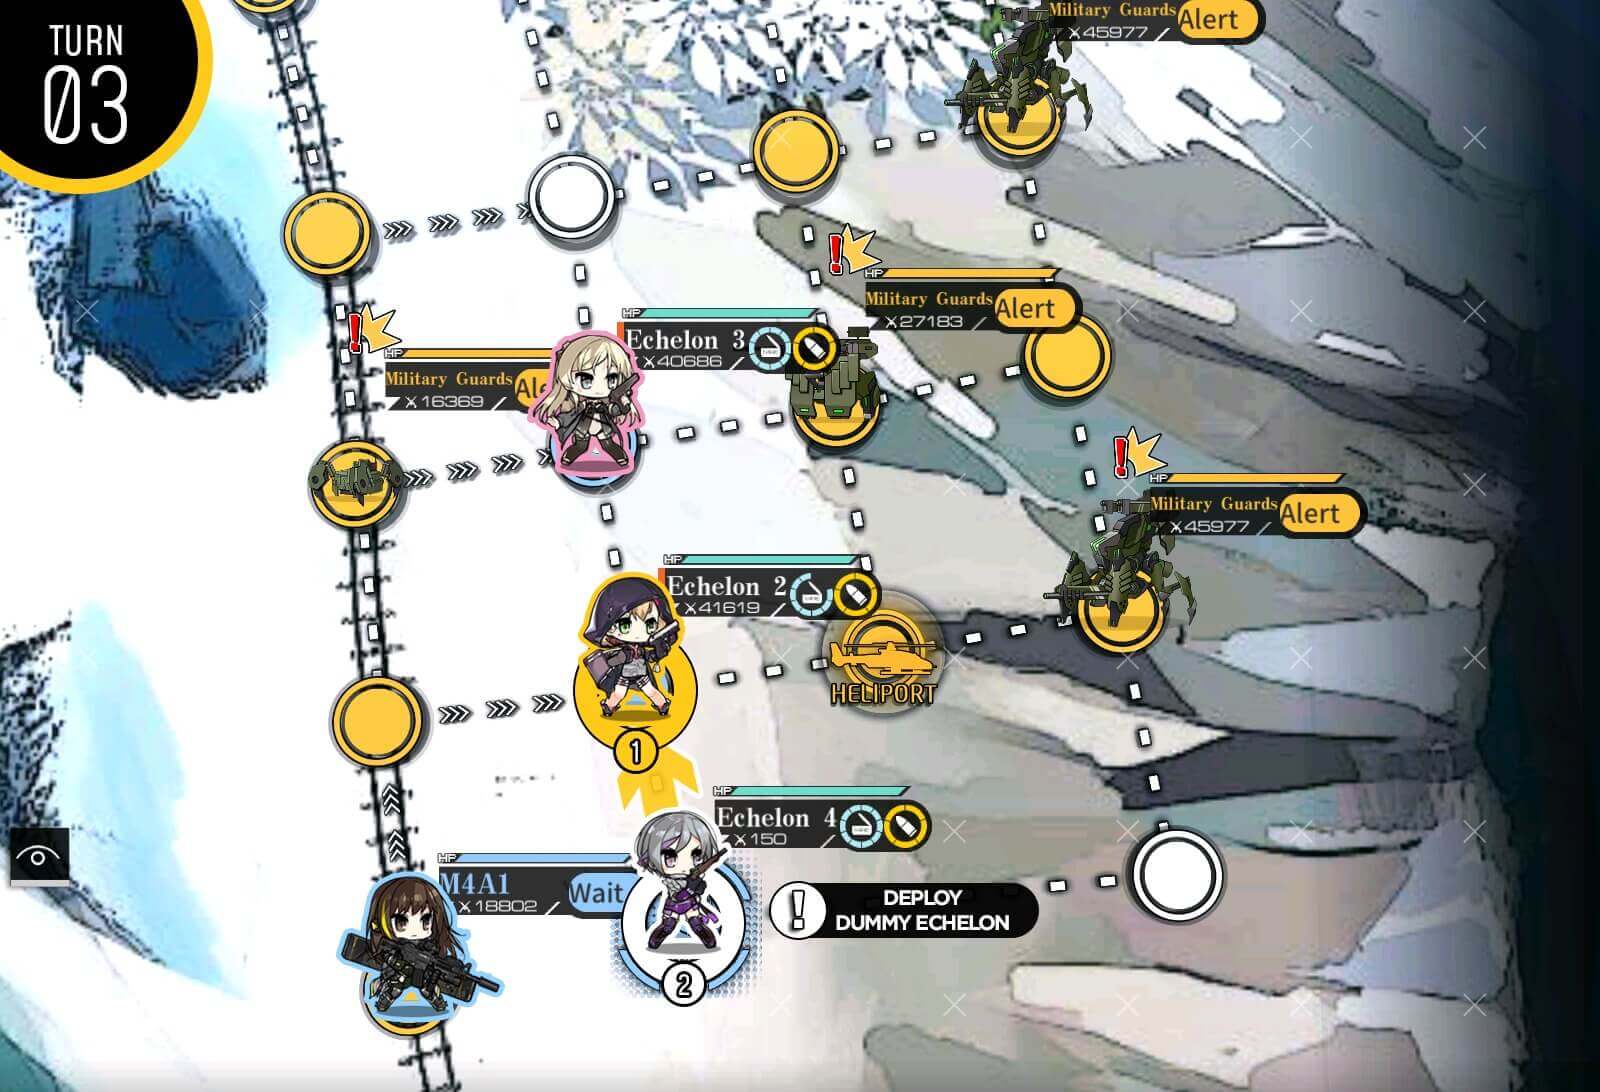
For the beginners we are going to avoid the route that has Goliath unit. Sweep the units at the bottom side by going counter-clockwise.
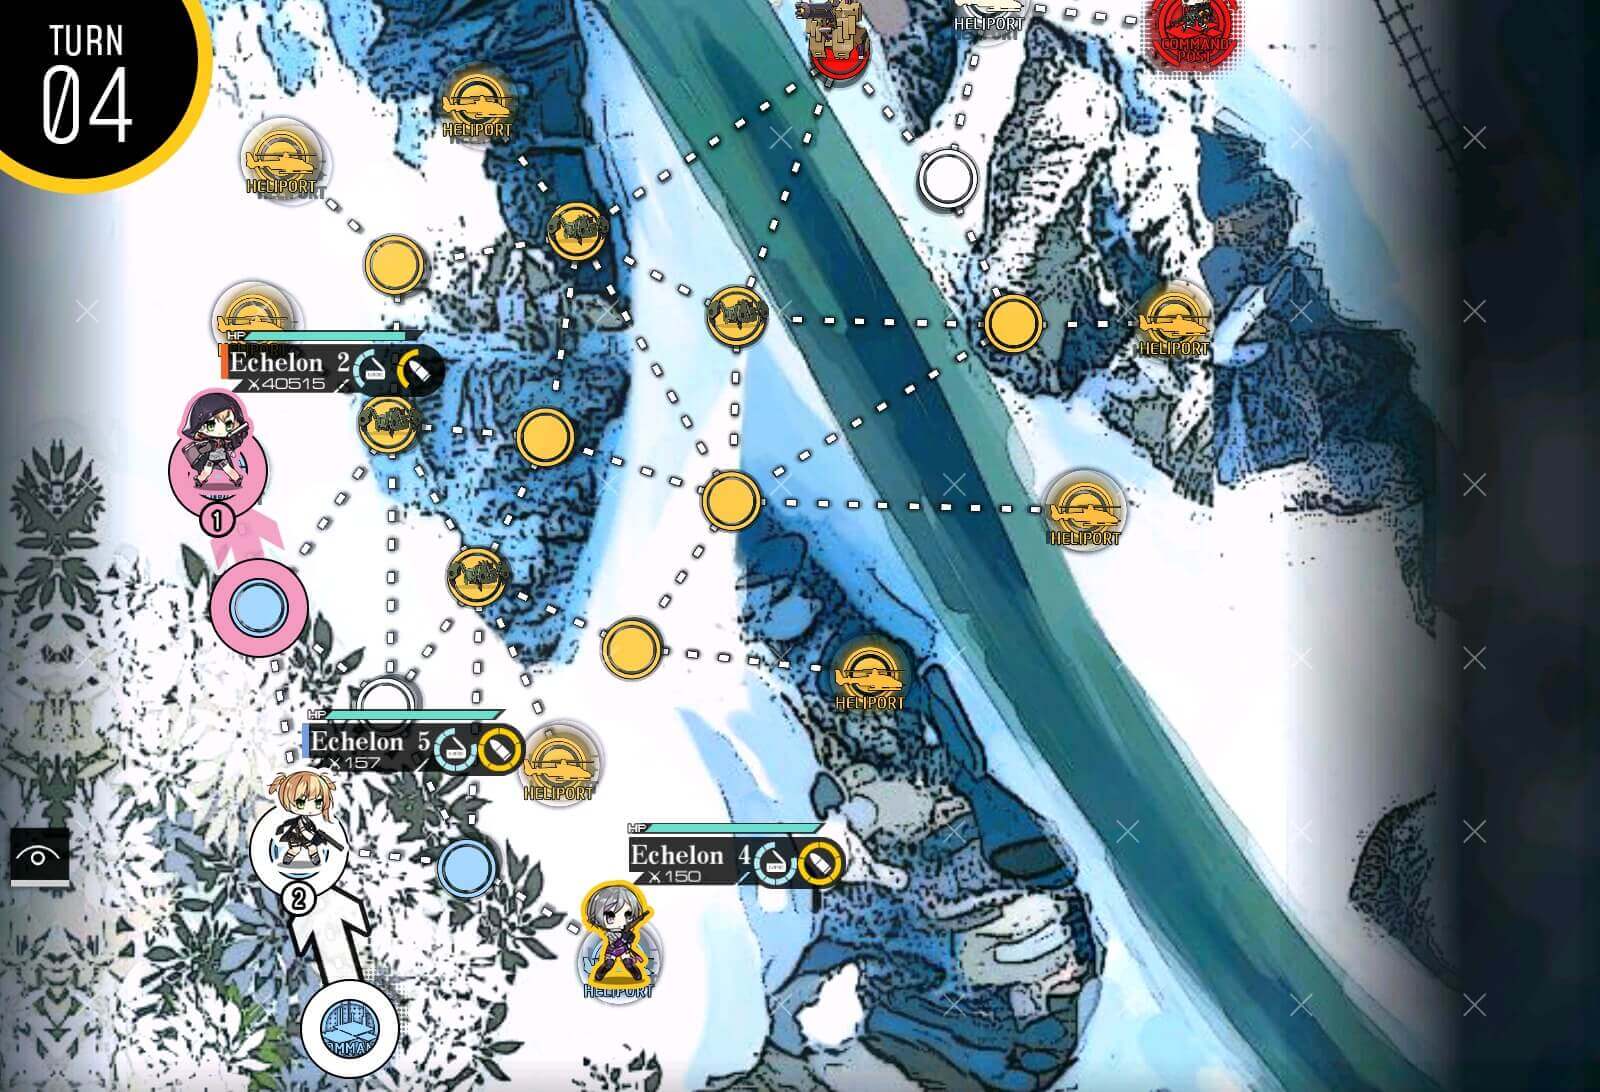
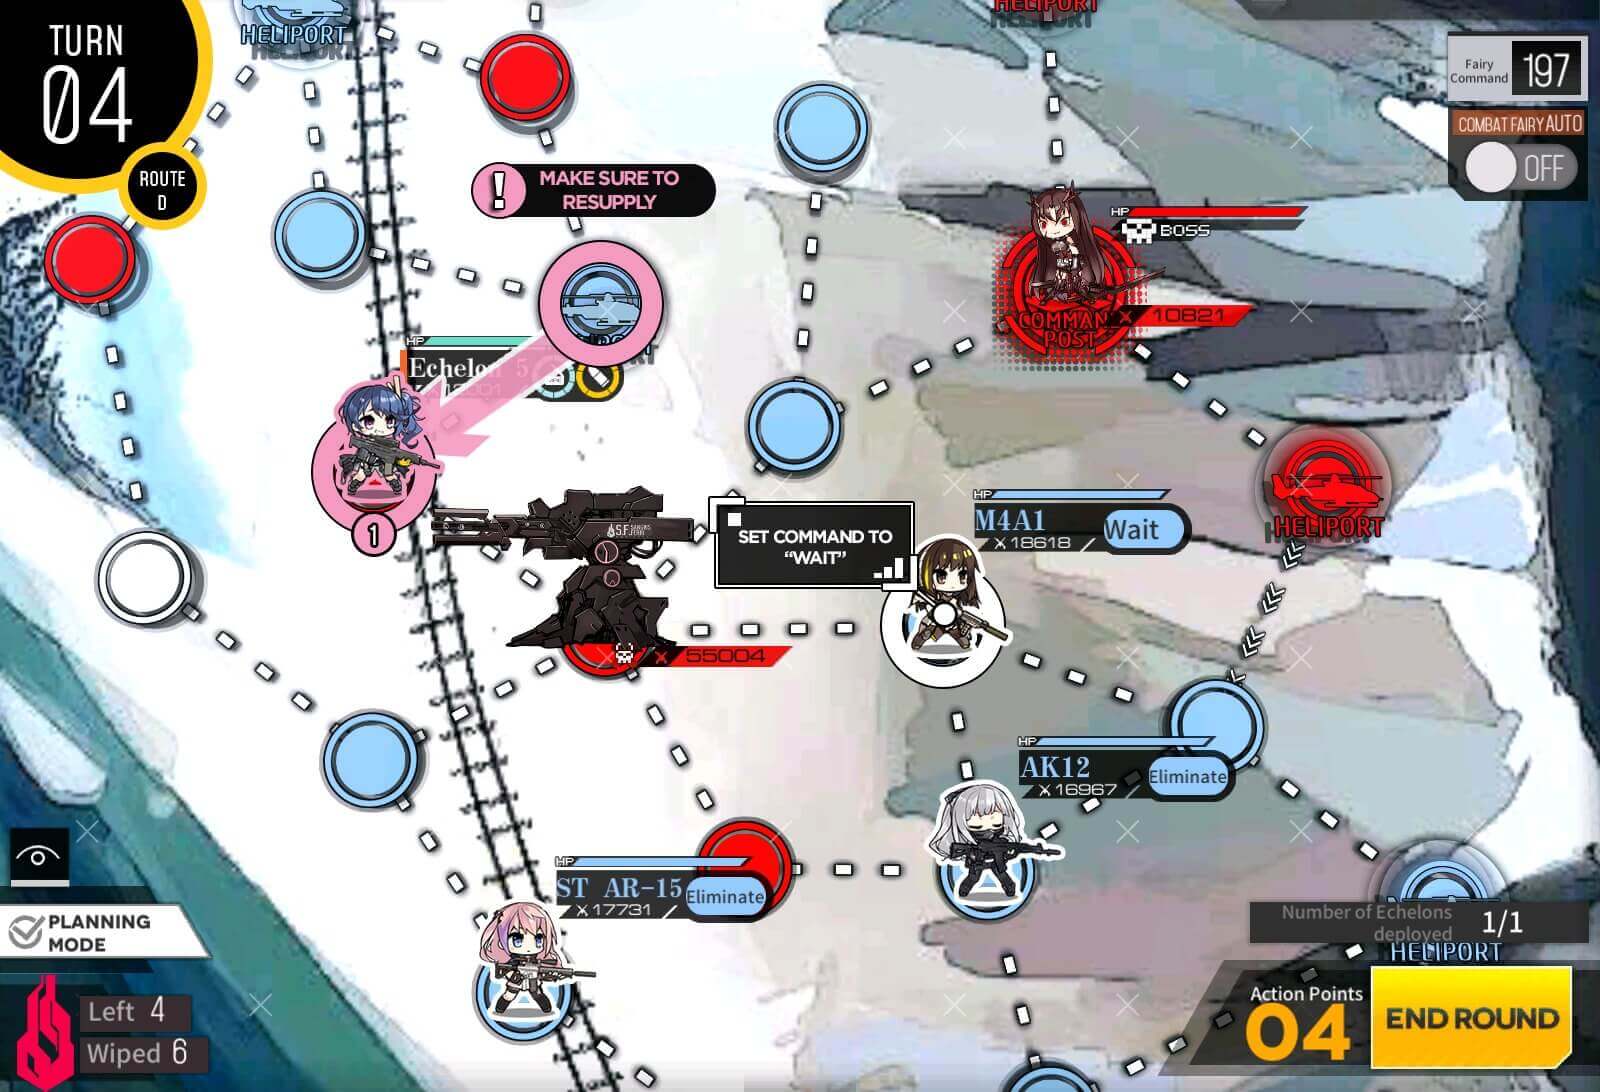
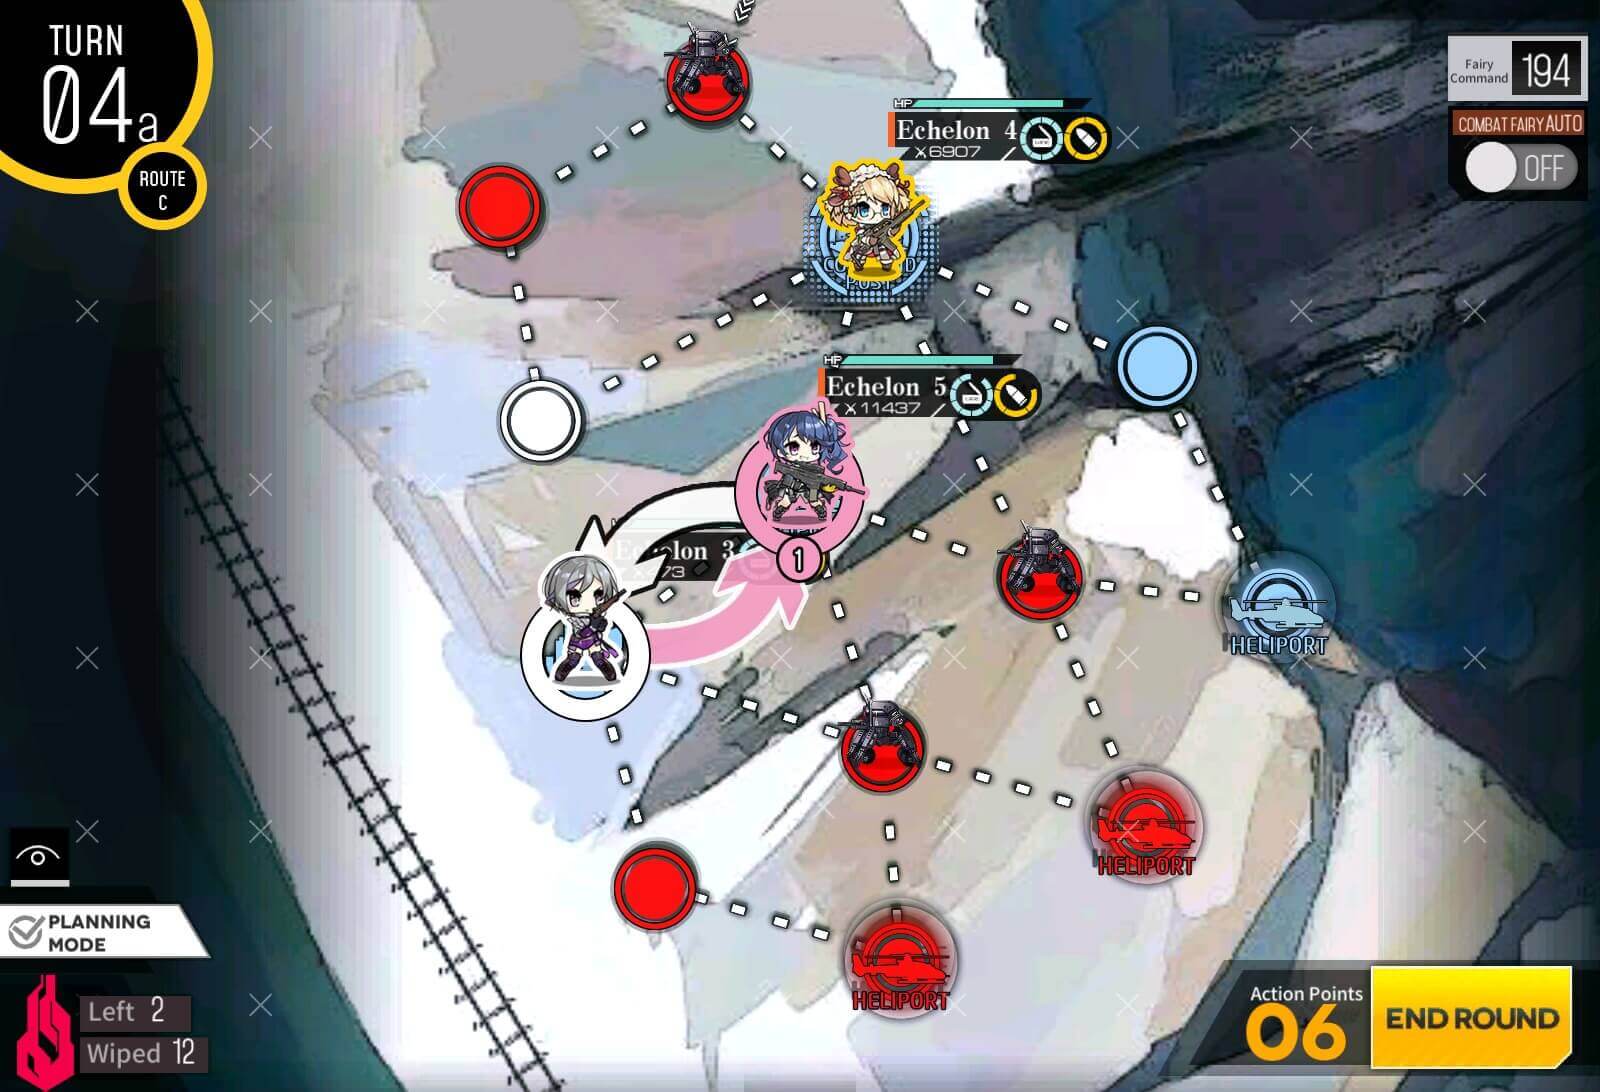
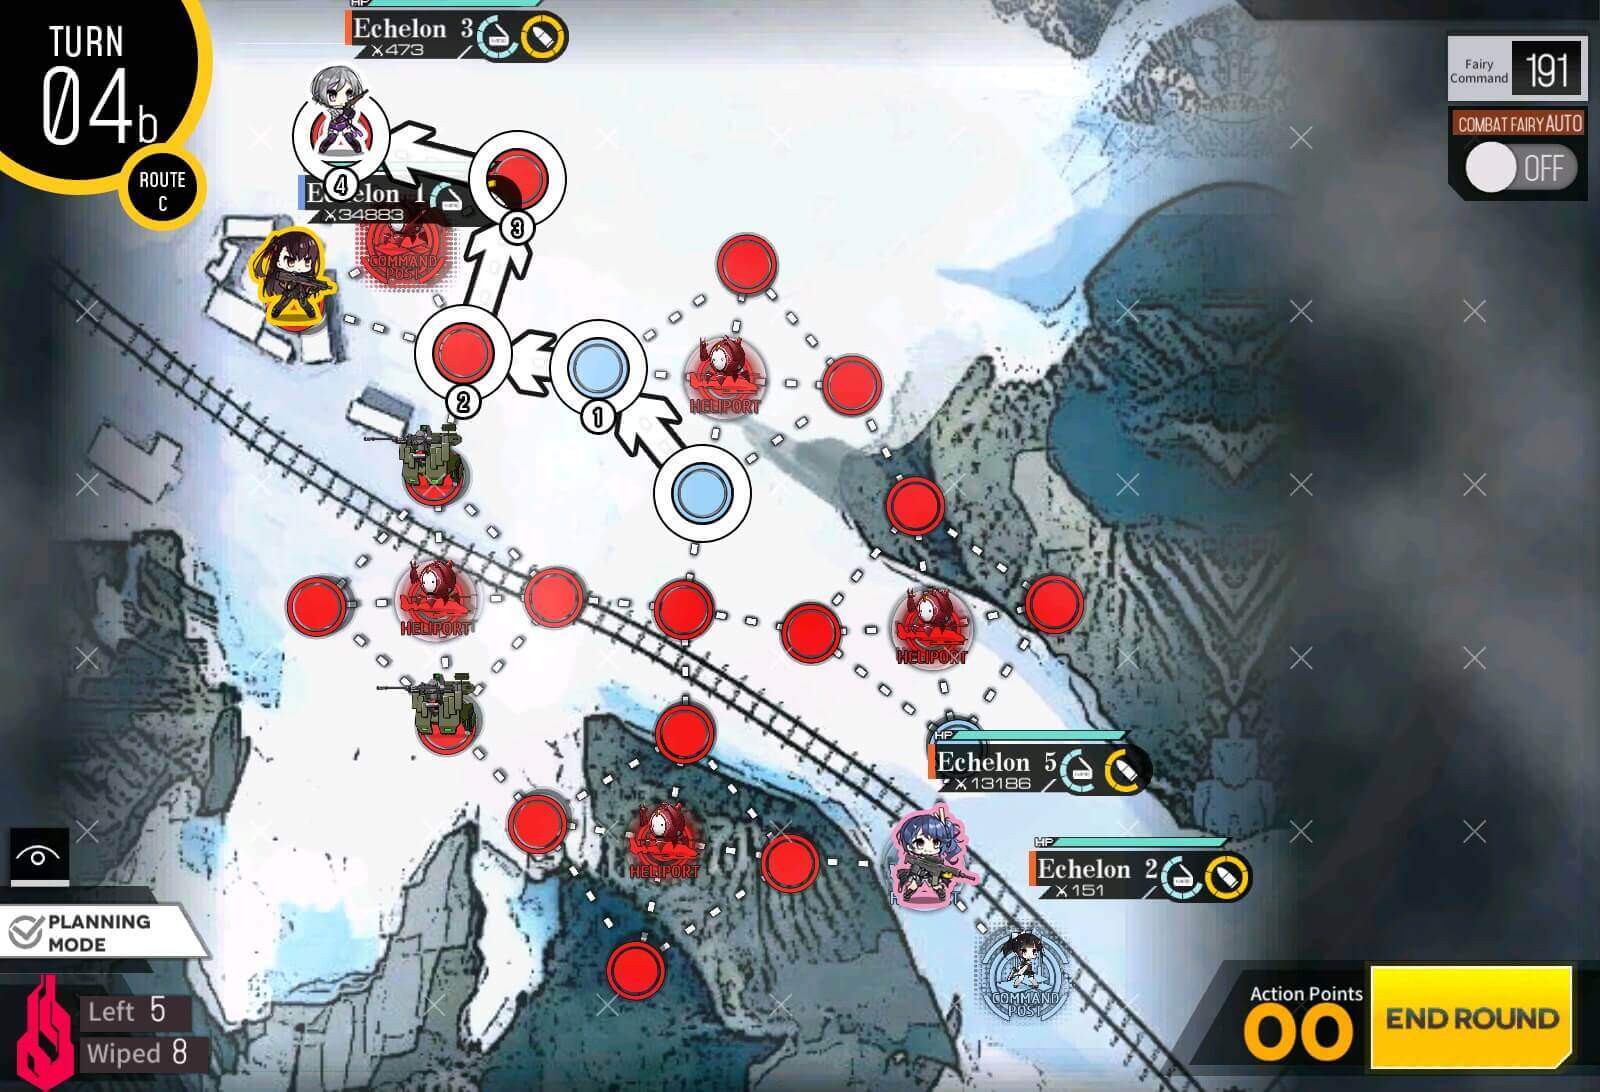
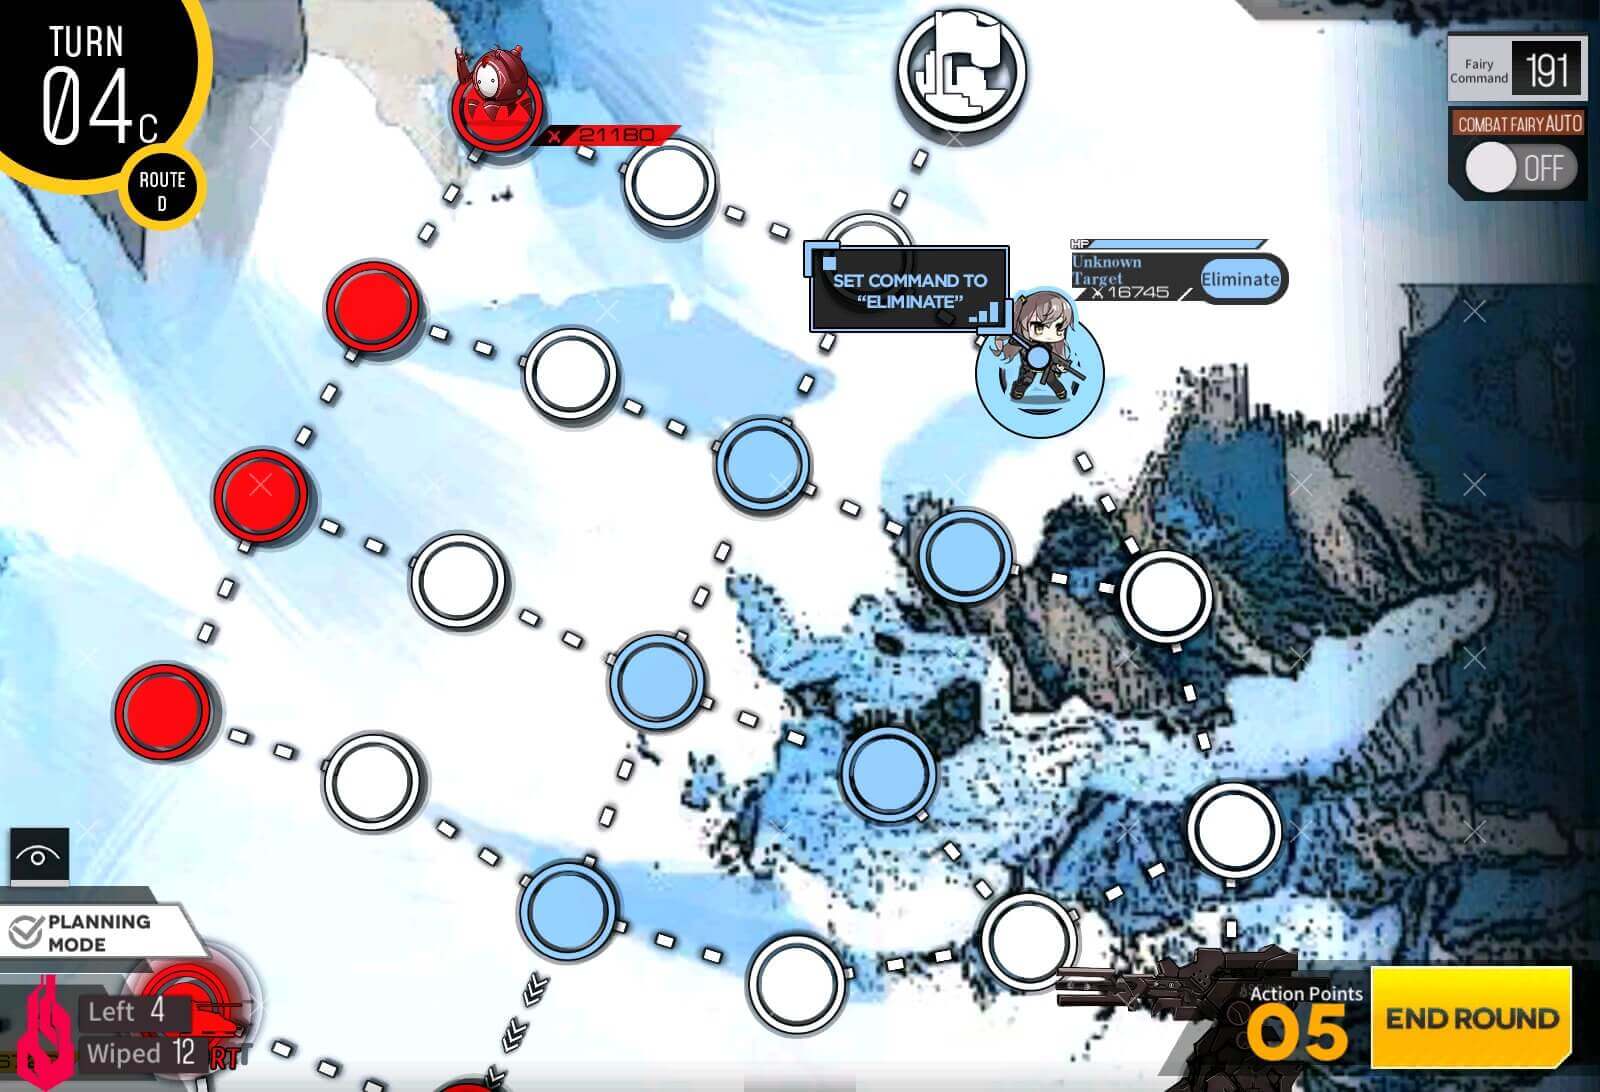
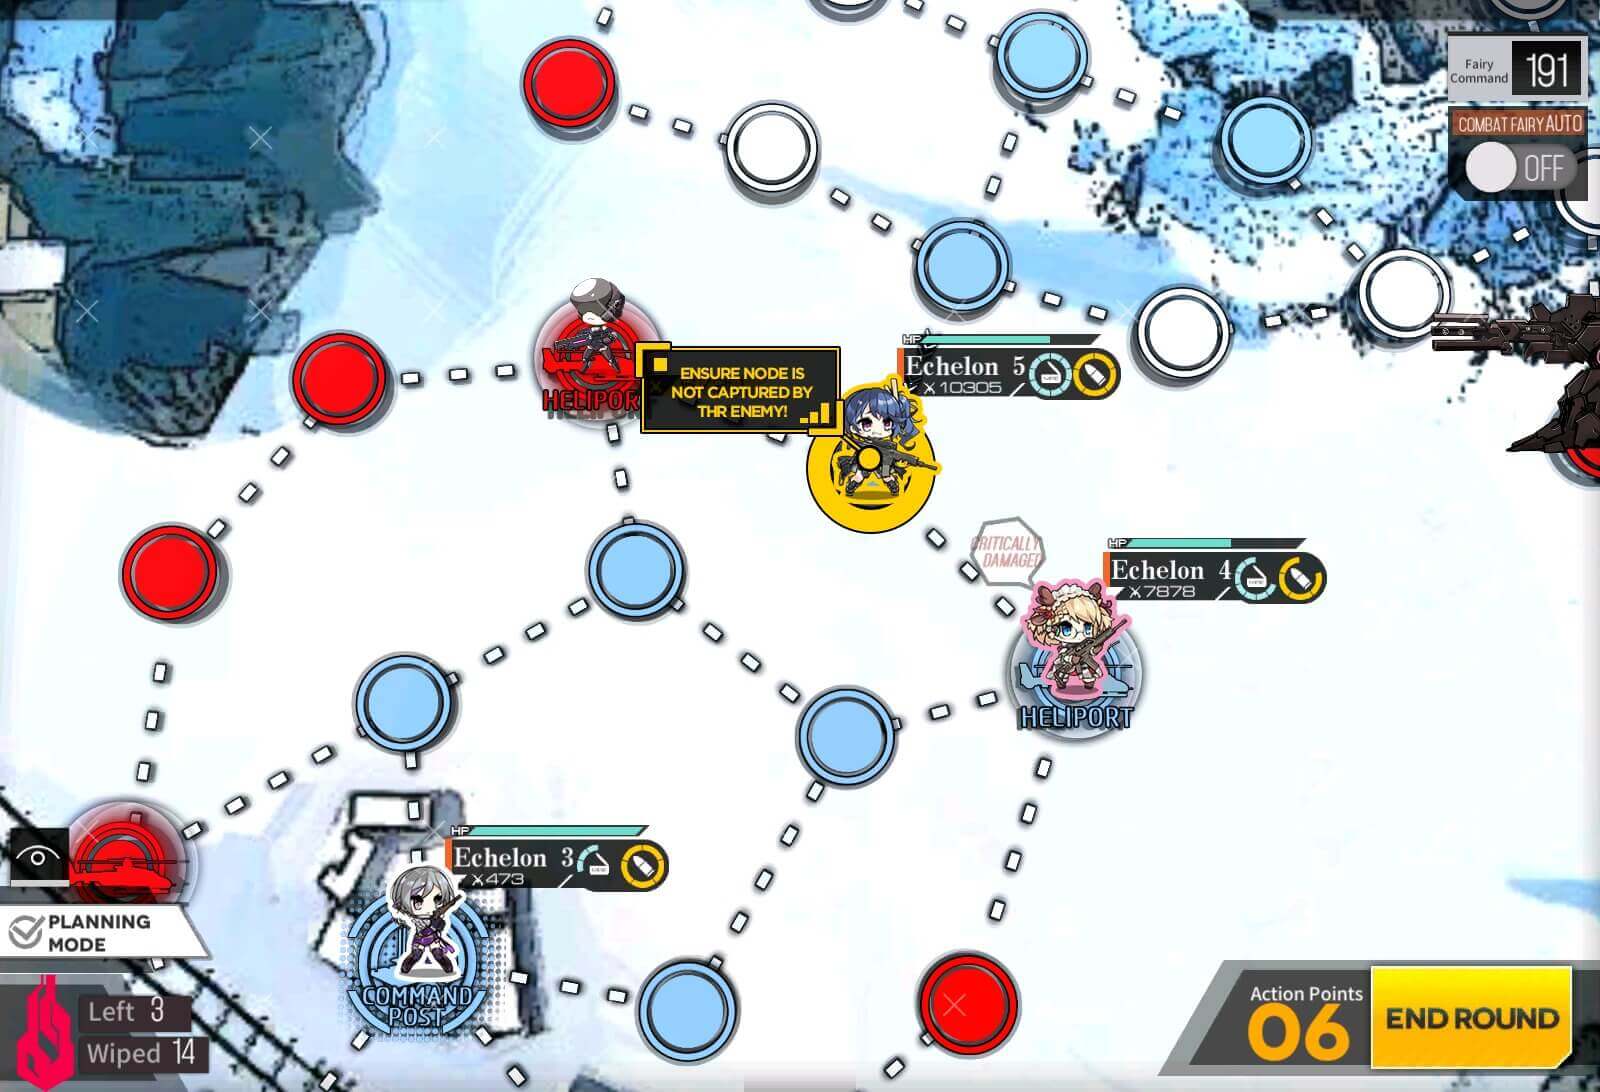
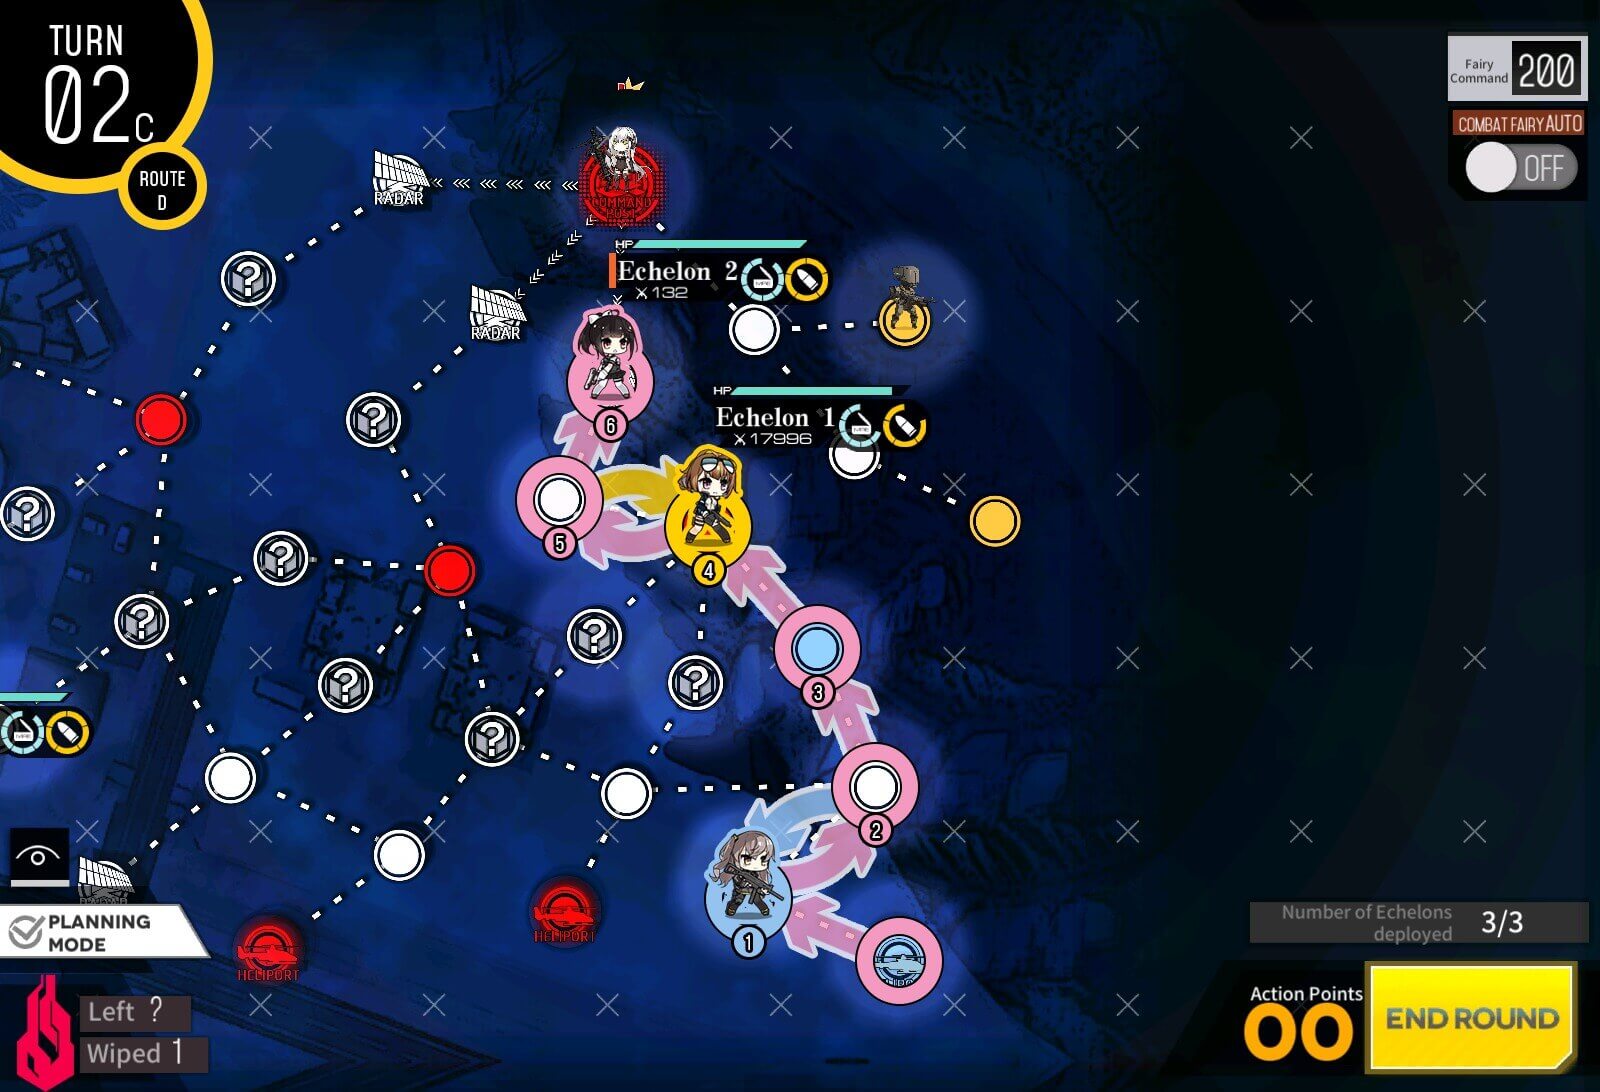
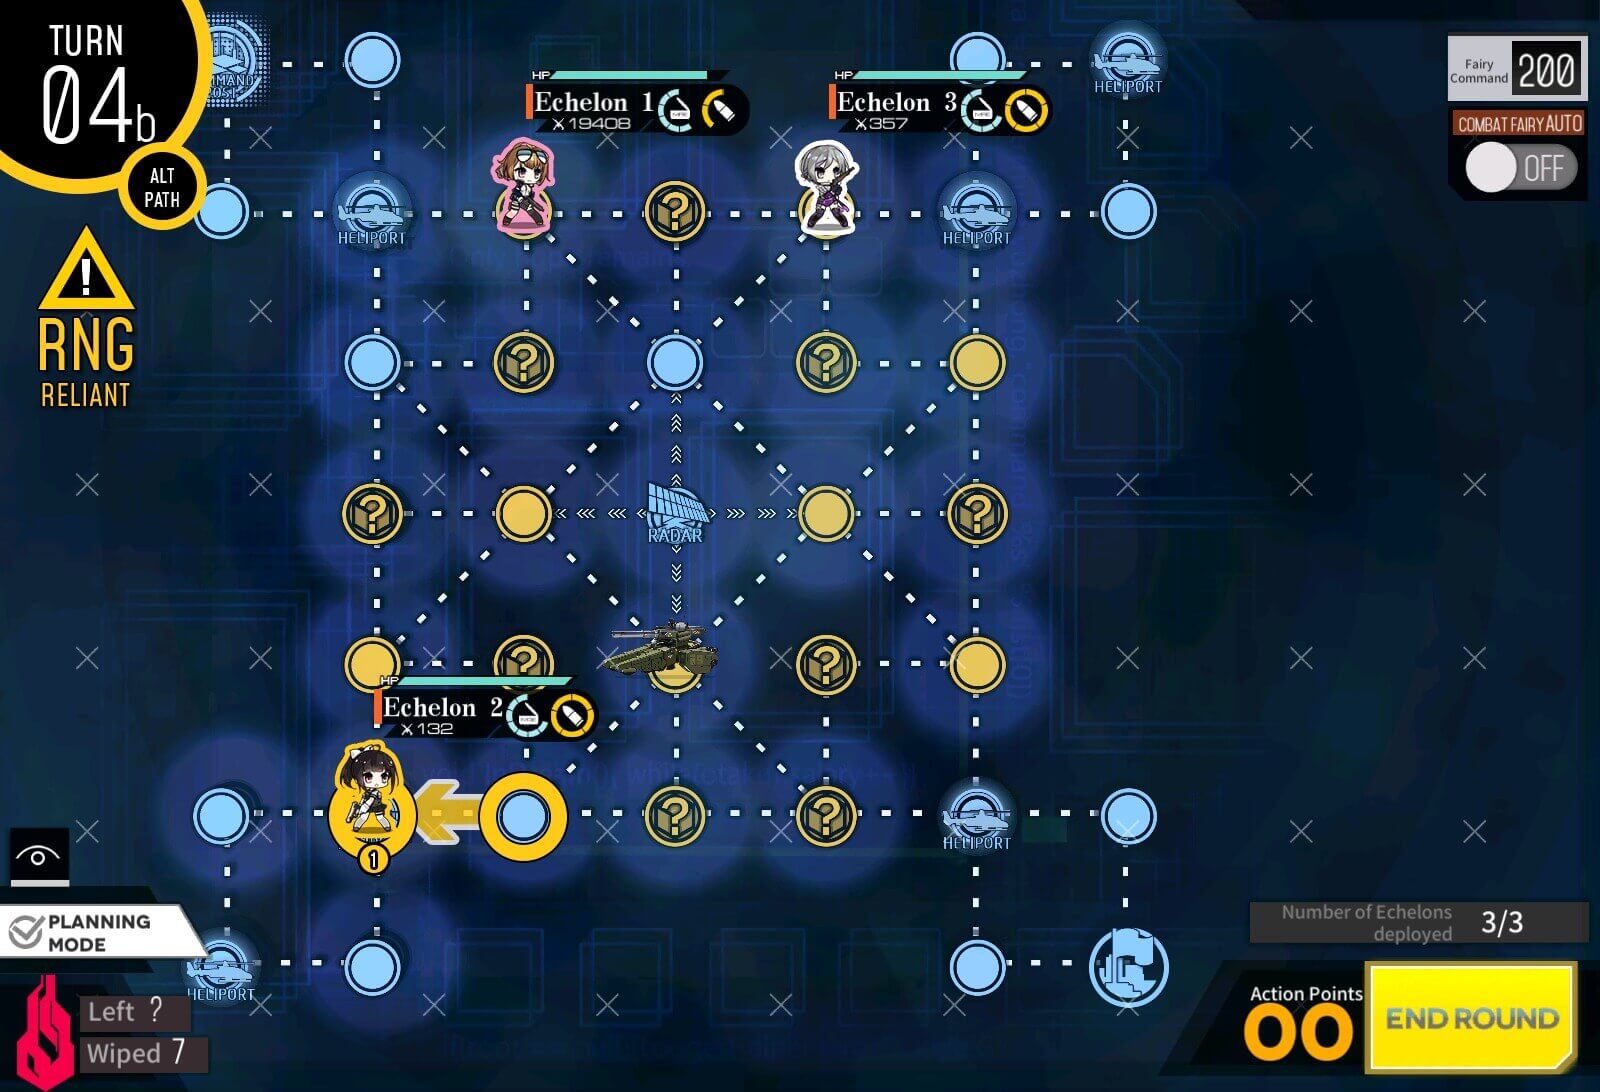
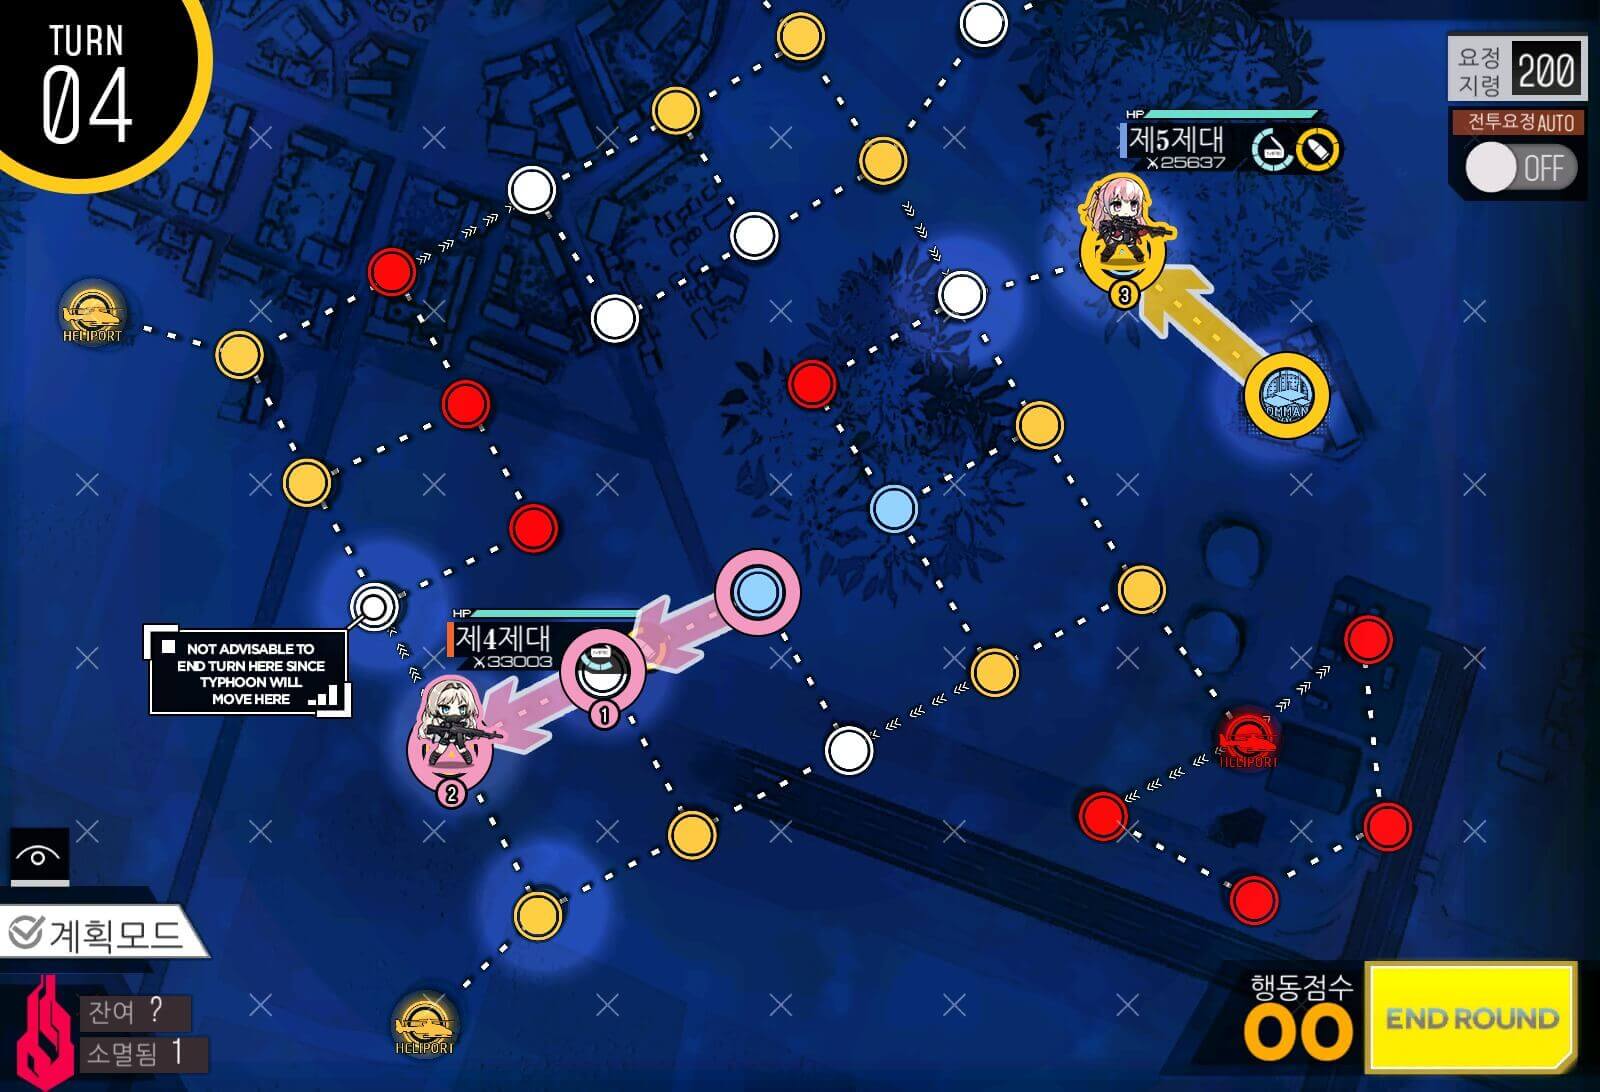
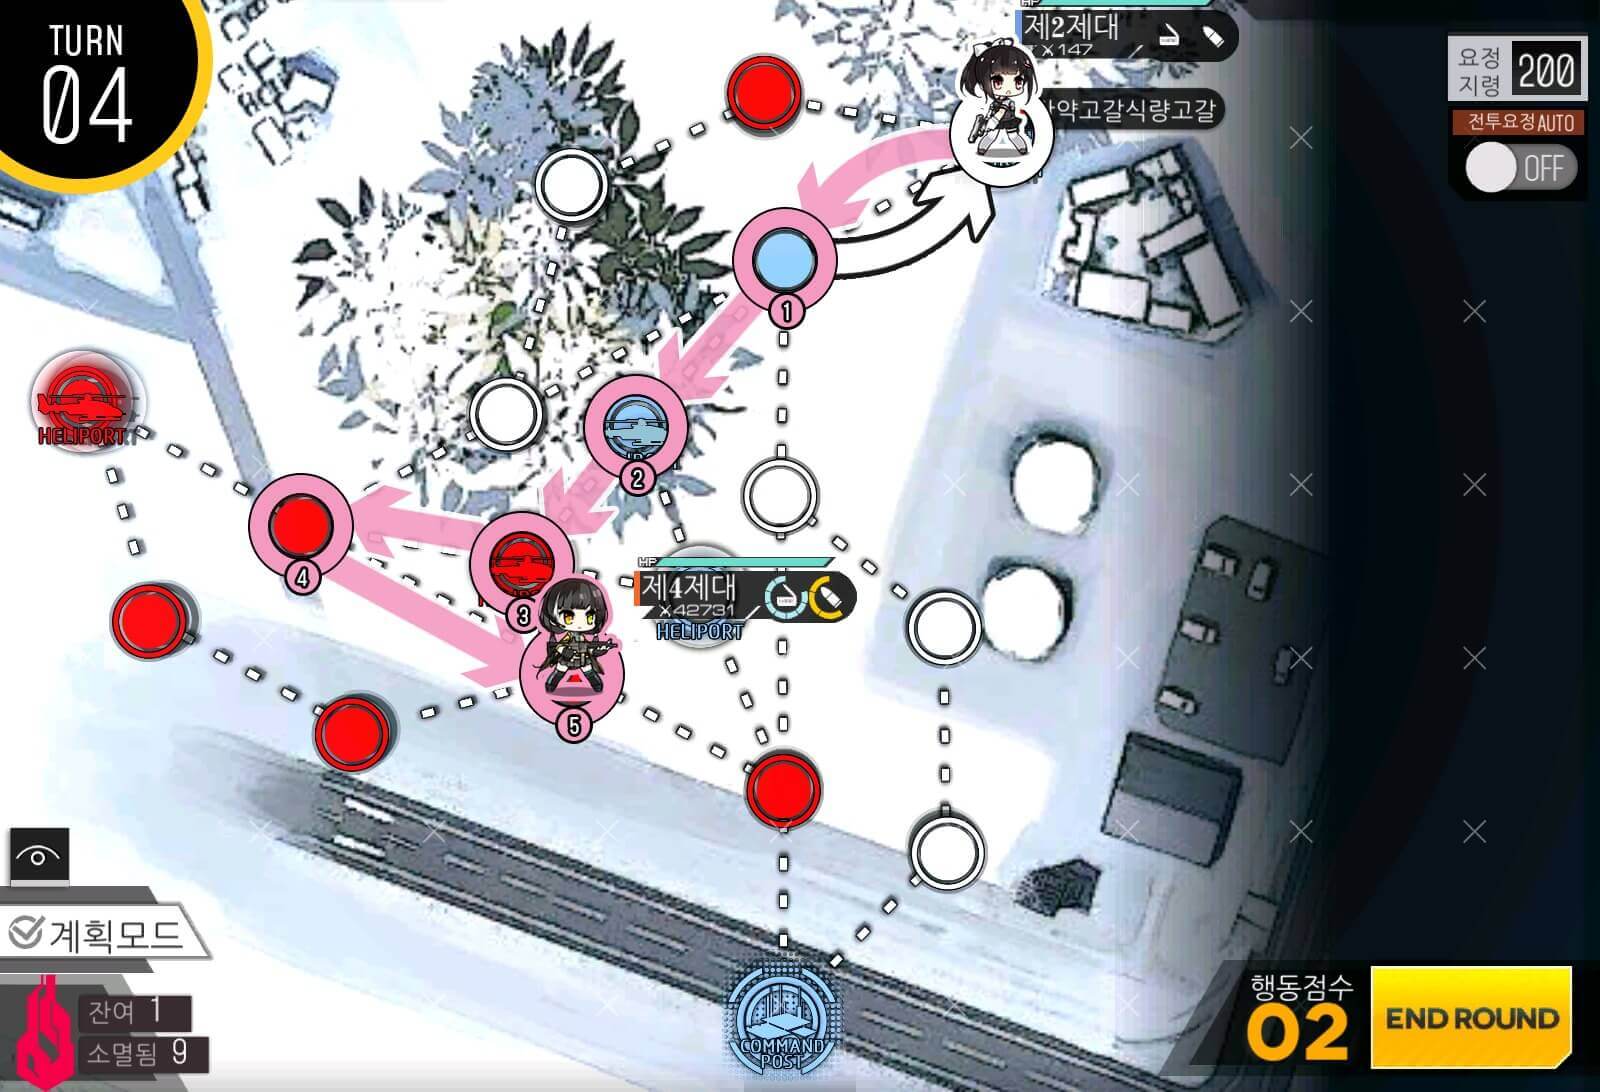
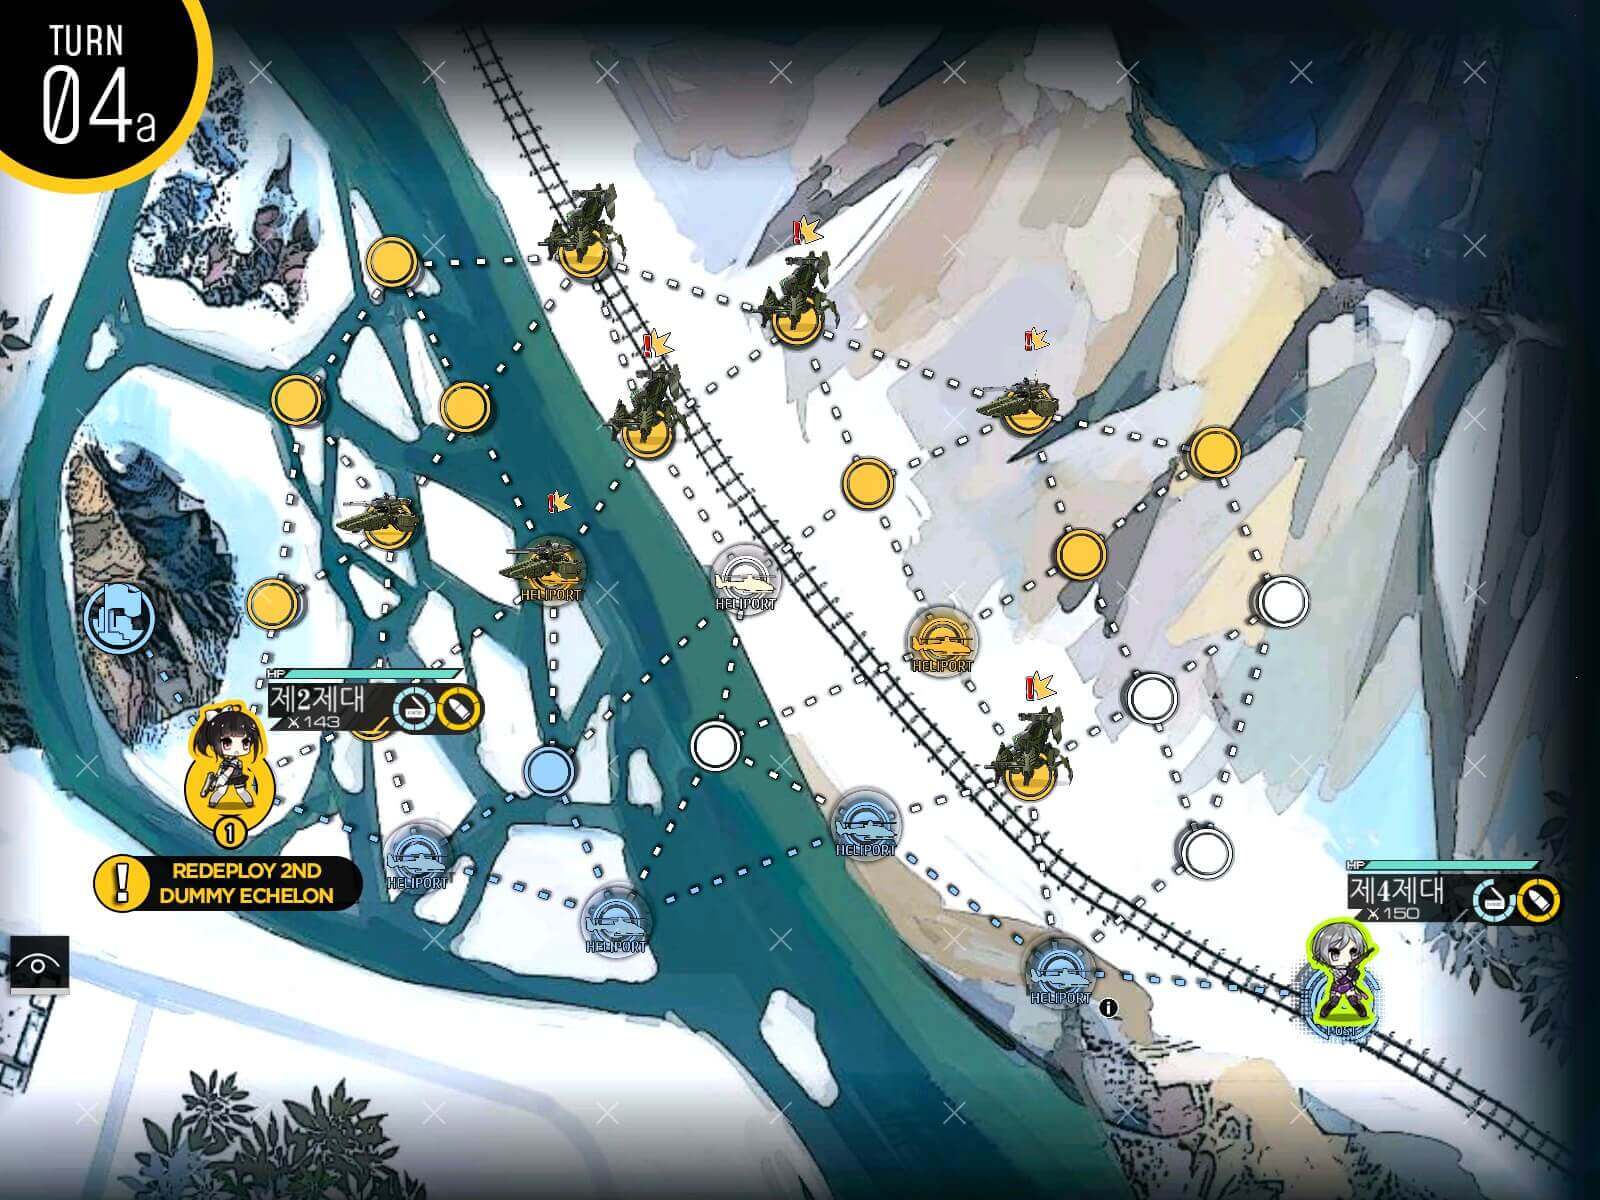
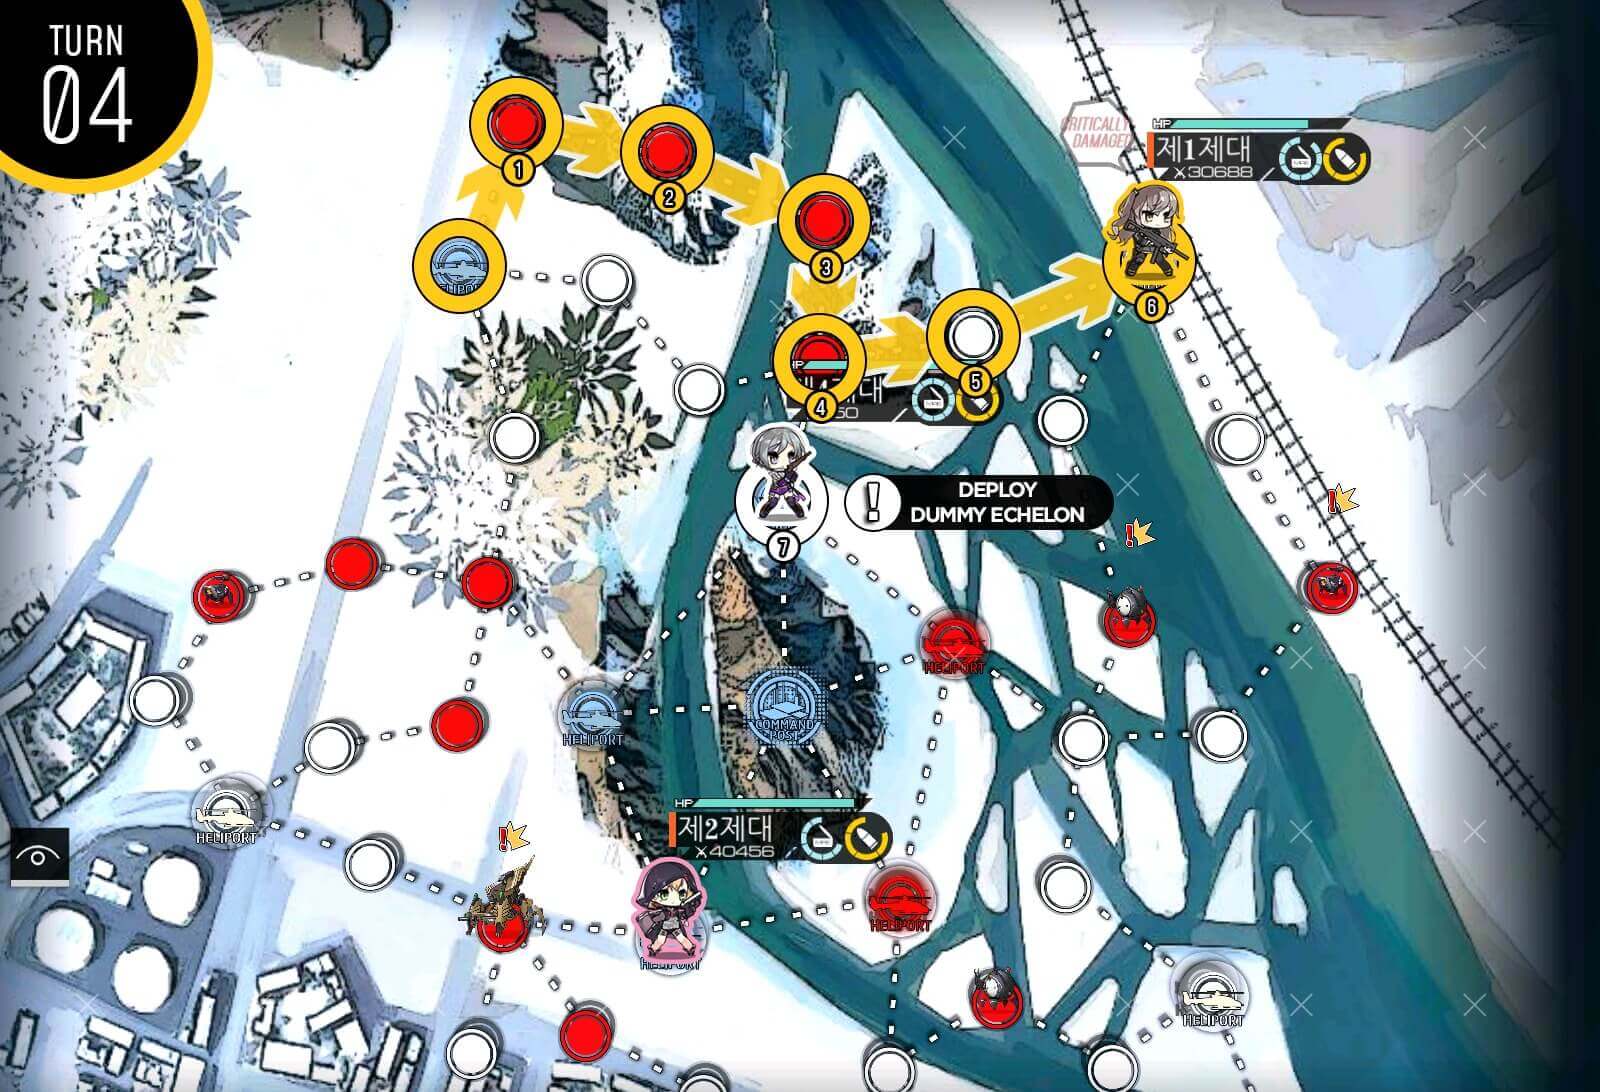
Turn 4
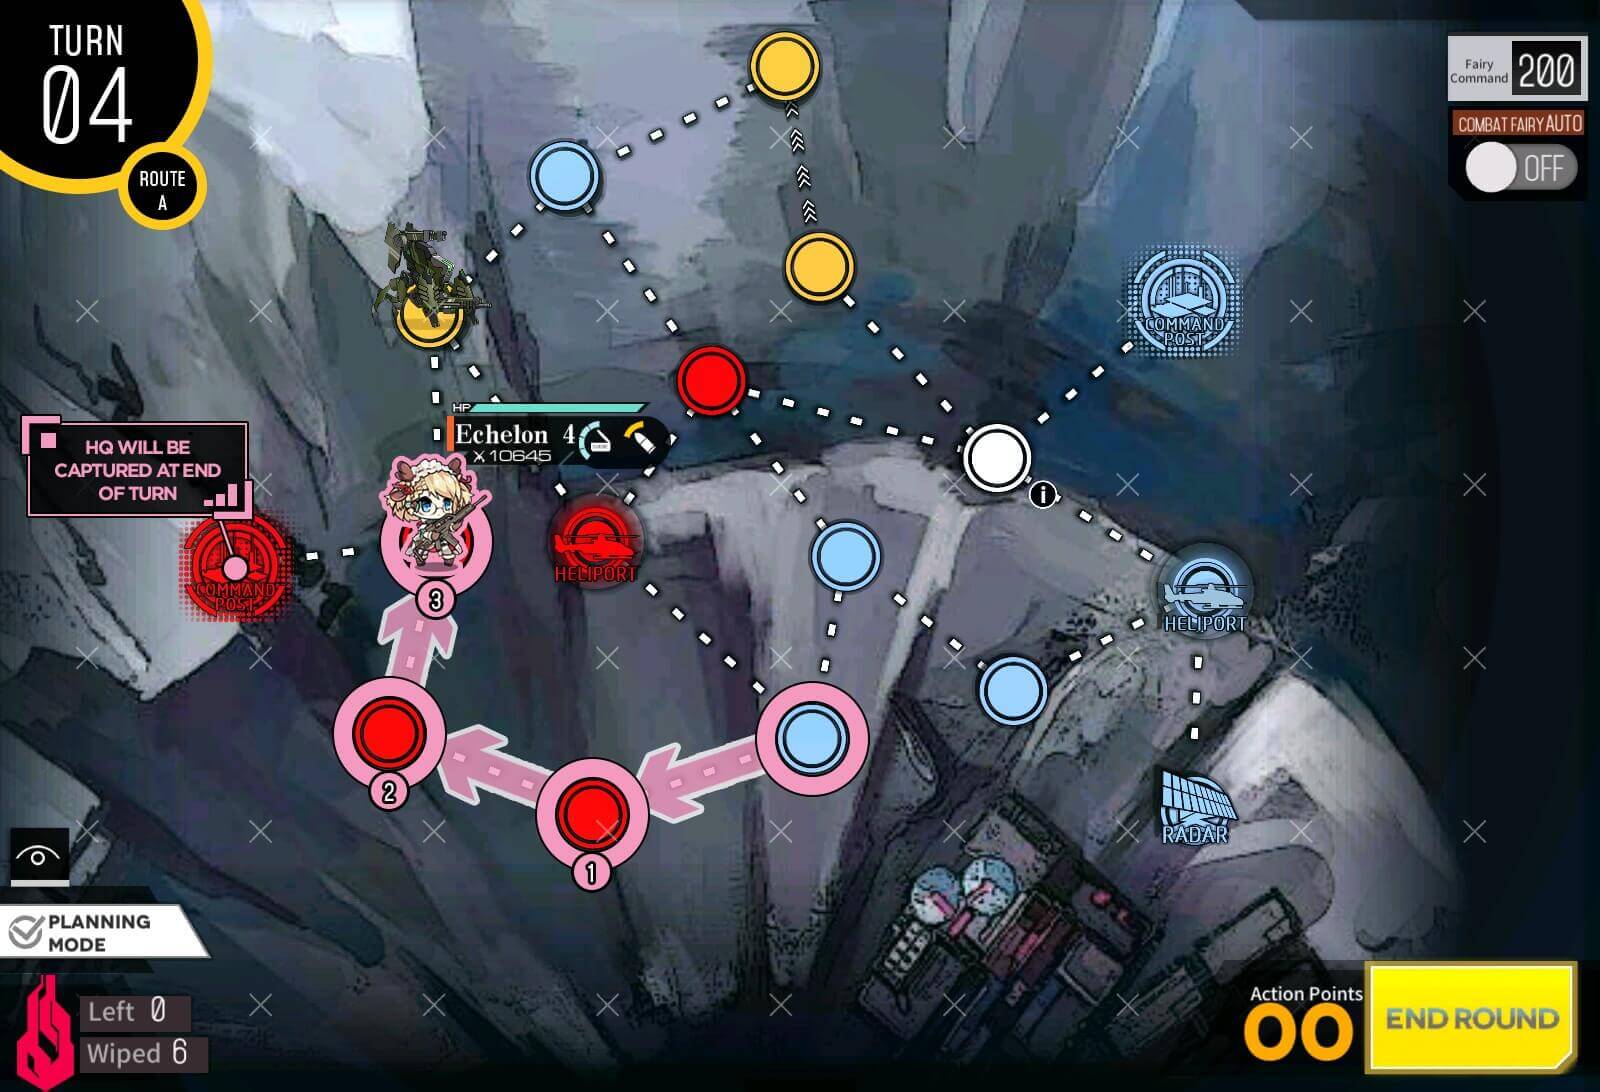
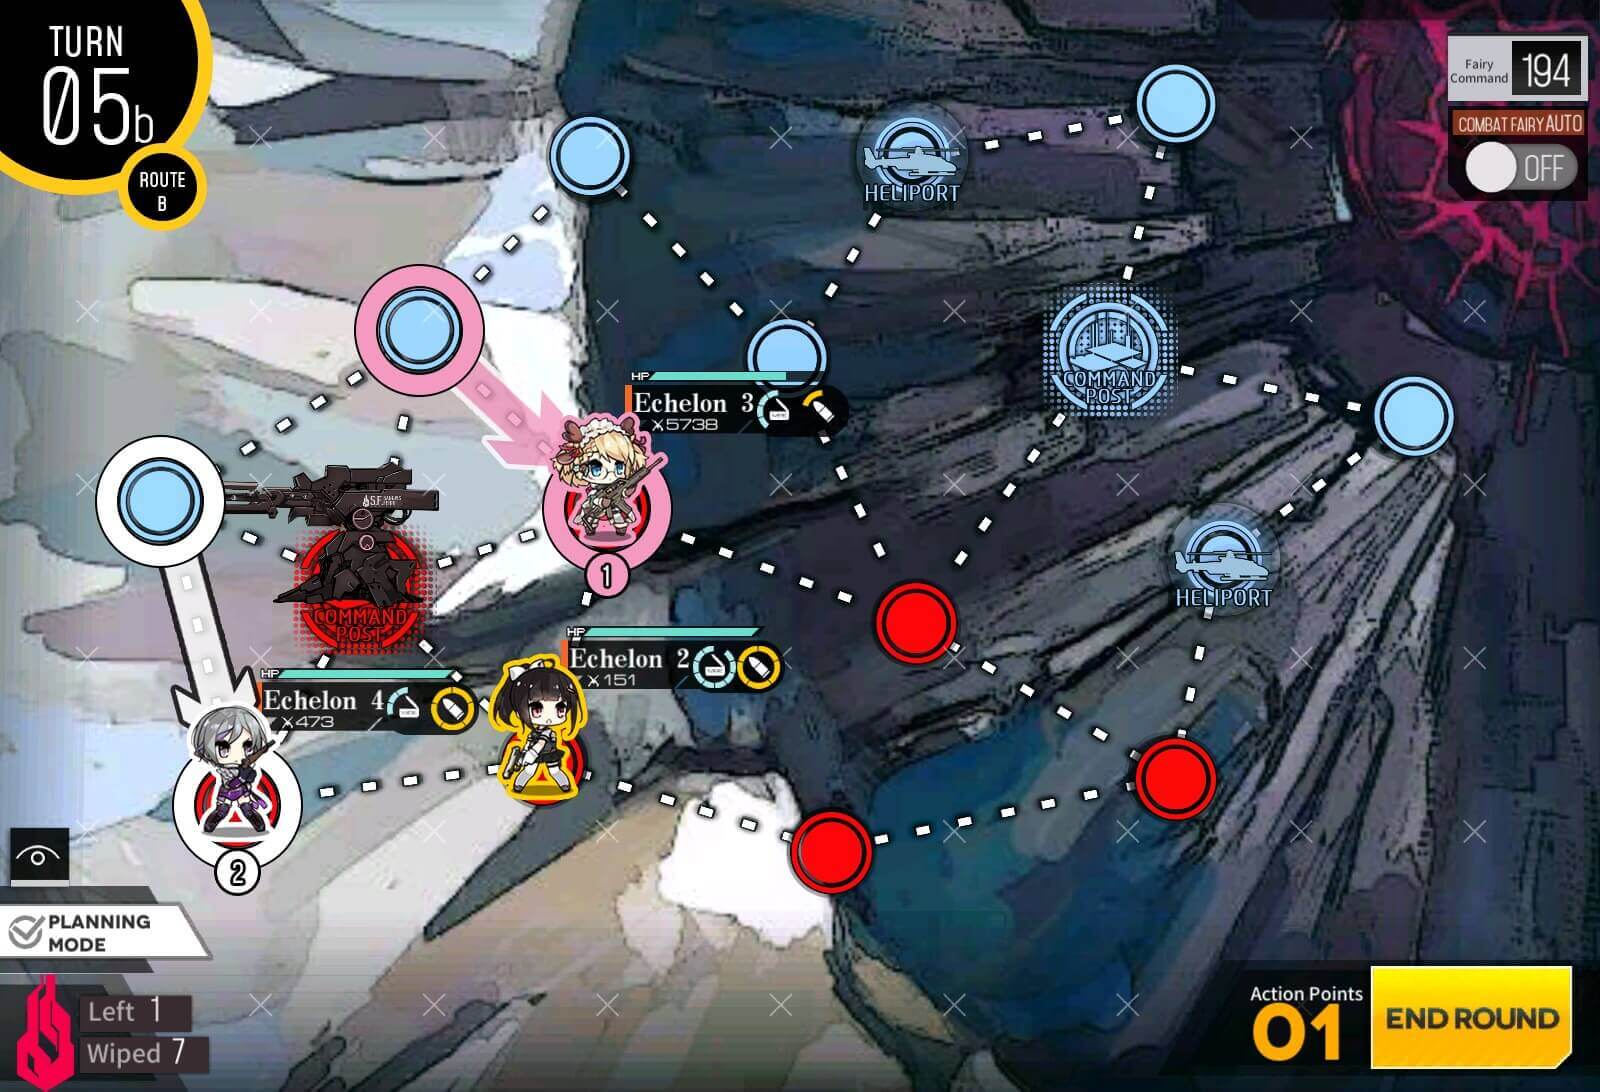
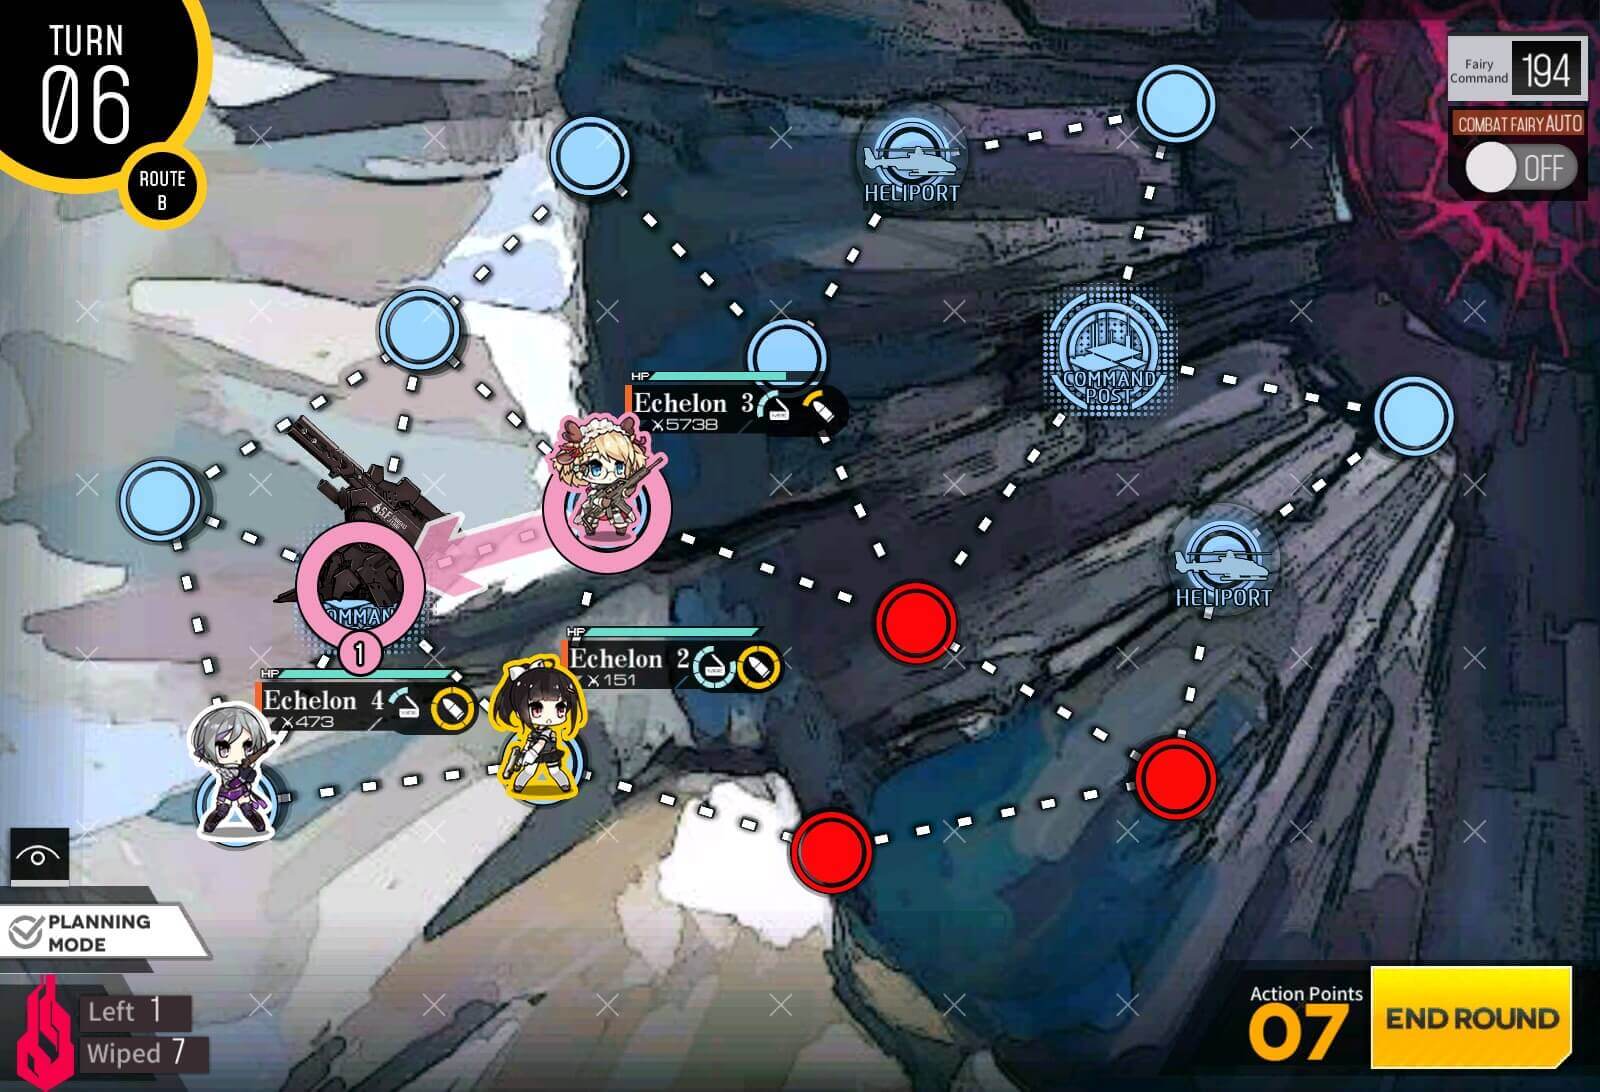
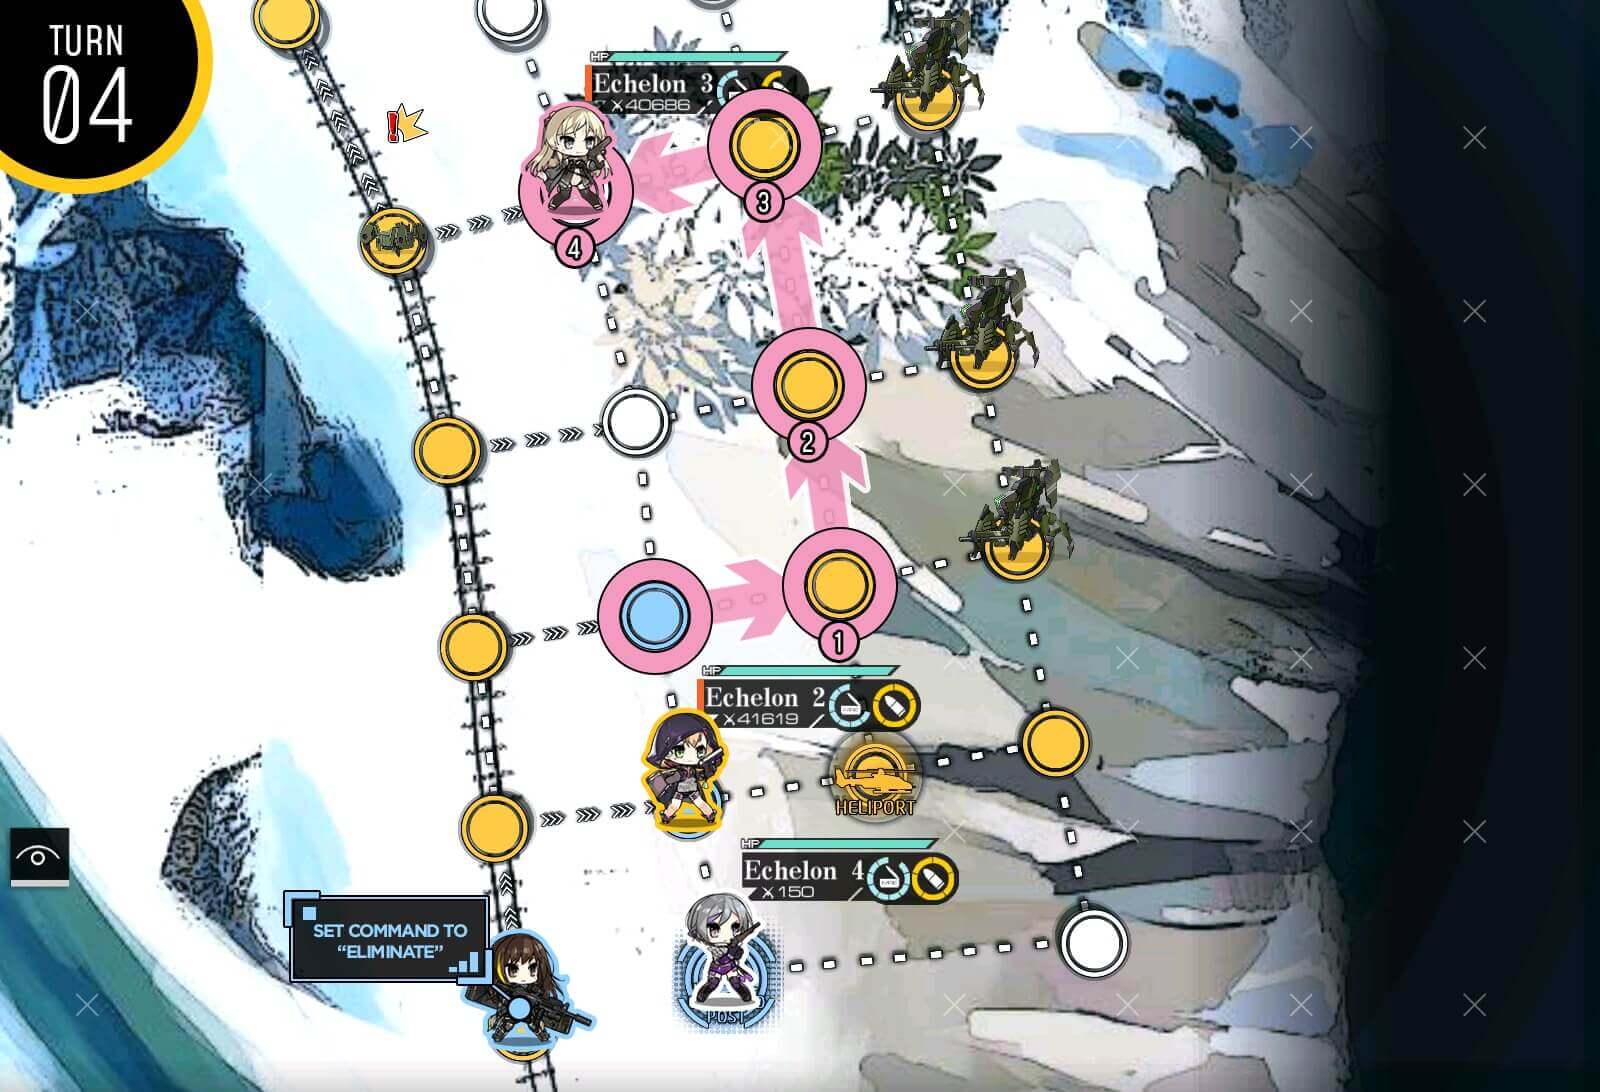
All you have to do now is to move to node adjacent to the enemy HQ, and it will be surround captured next turn.
Turn 1
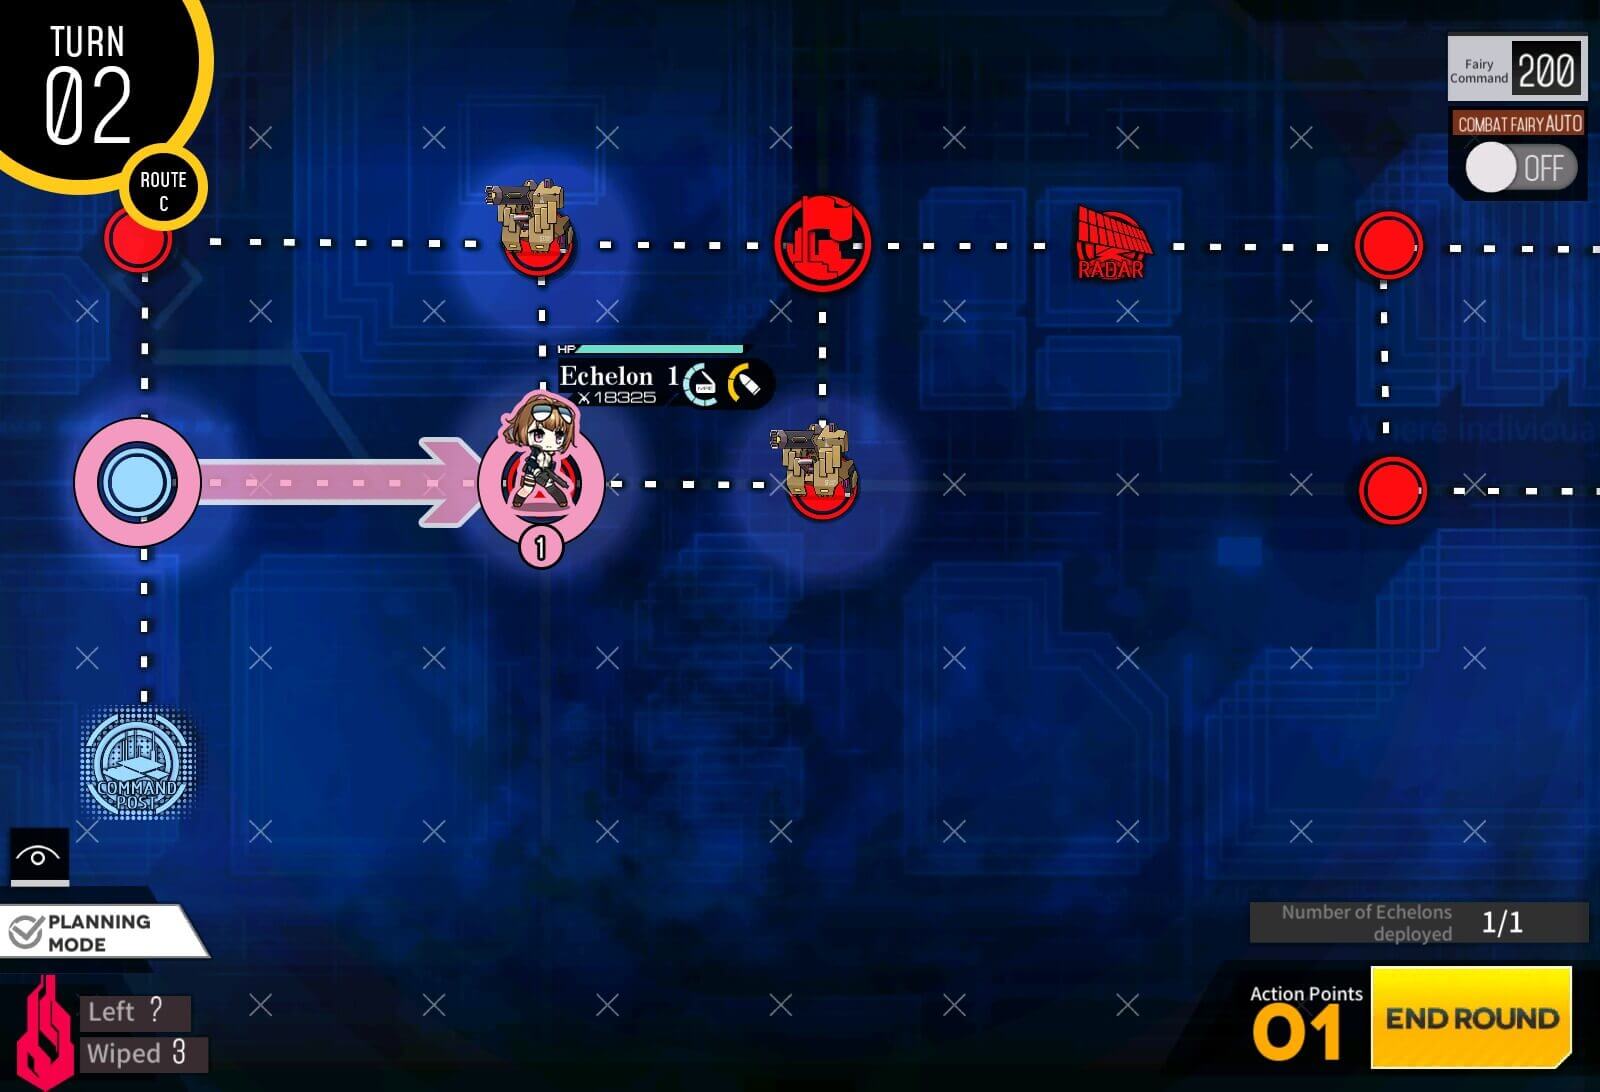
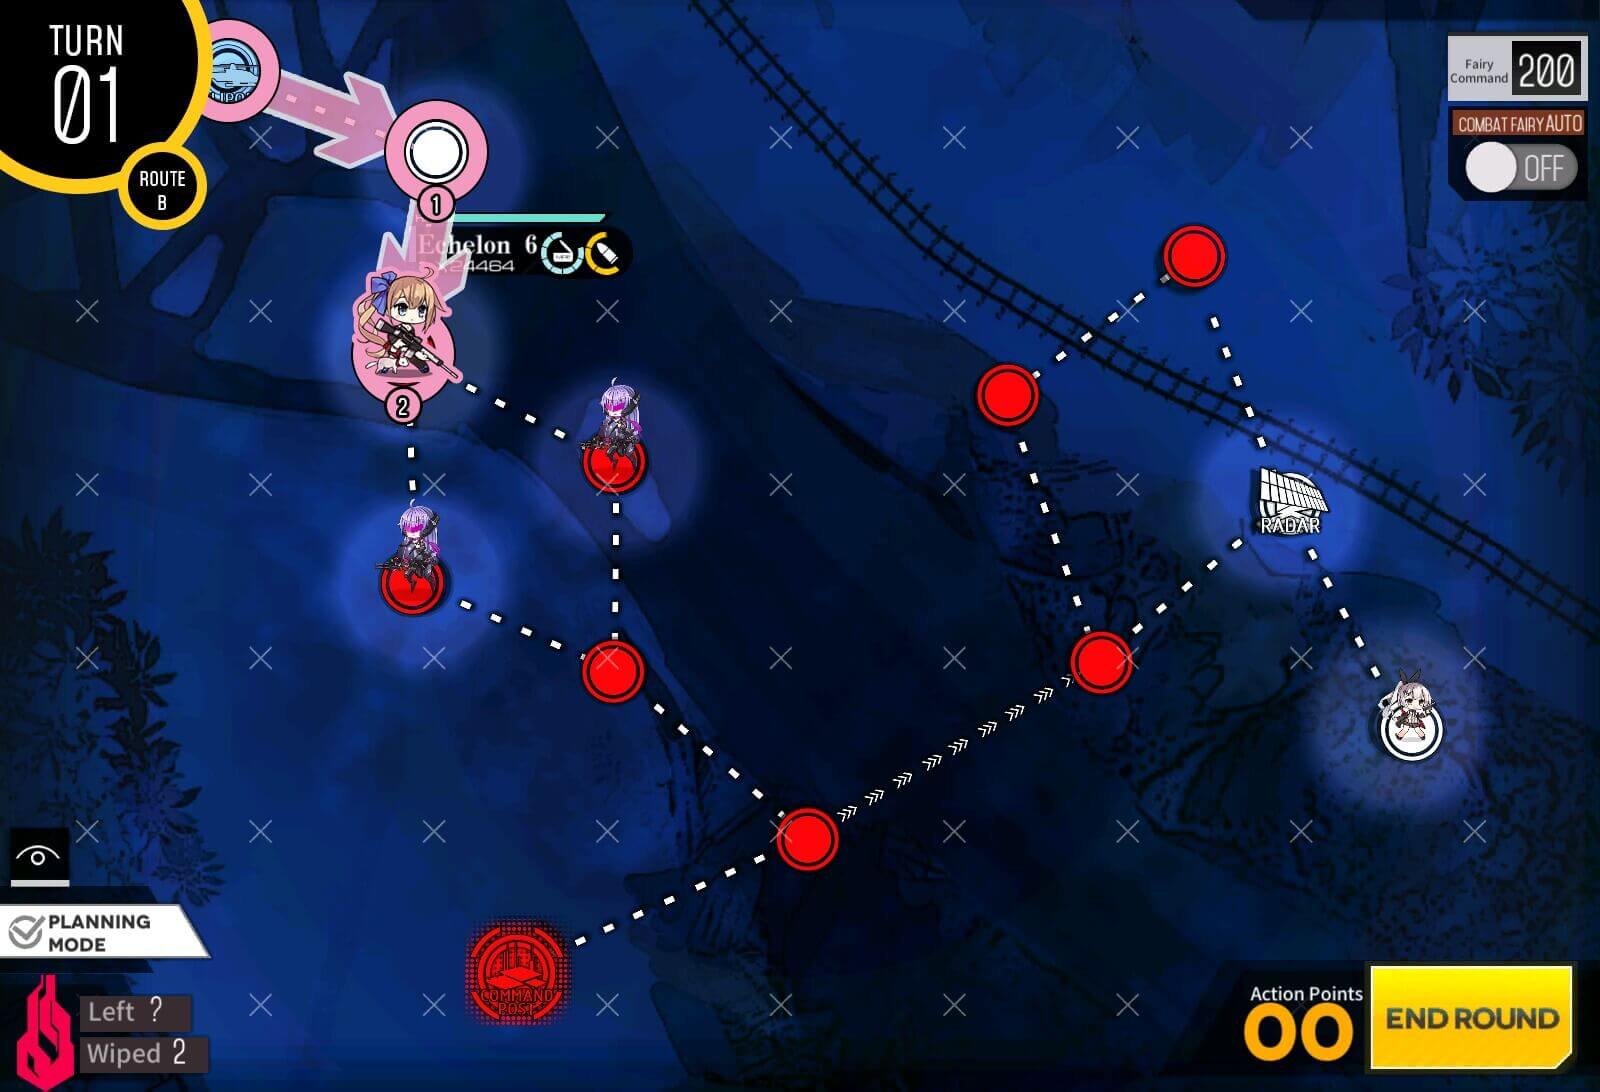
Take care to avoid mortar shells during combat if you are a beginner.
Turn 2
Move to take helipad so we can resupply at the beginning of next turn. It has to be captured at turn 2 or it will be impossible to use.
Turn 3
Resupply and follow shown path back to HQ, when you end turn, last remaining unit should run into combat echelon.
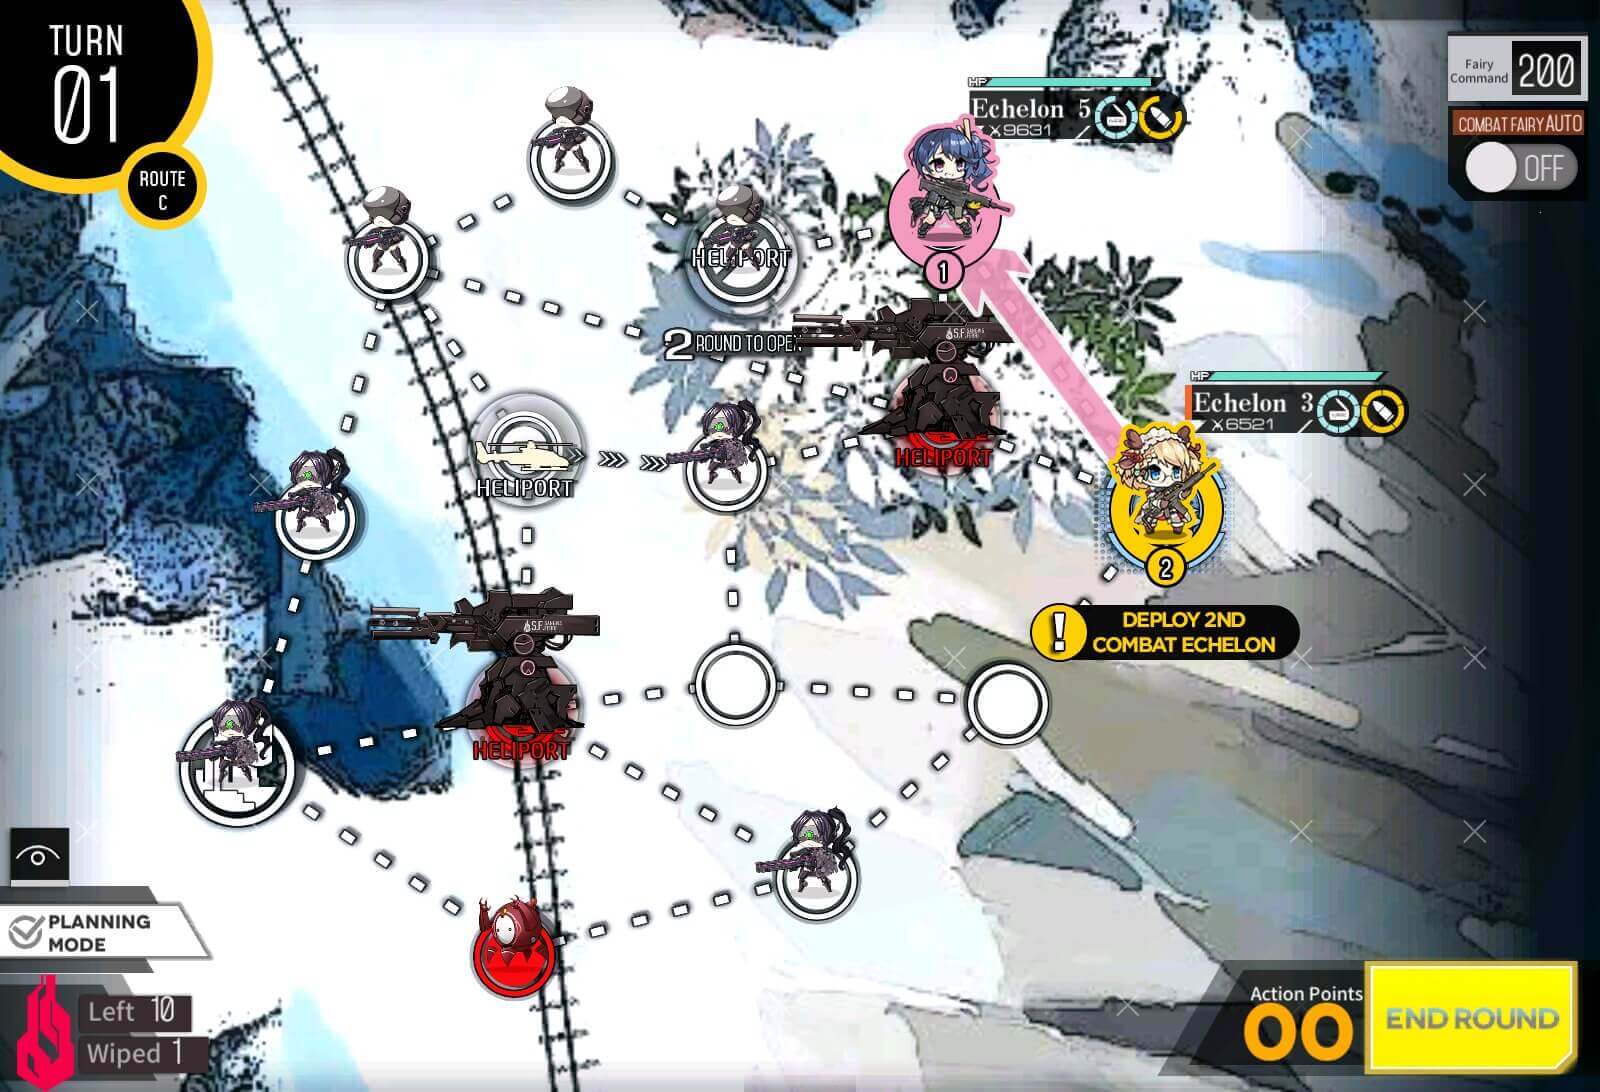
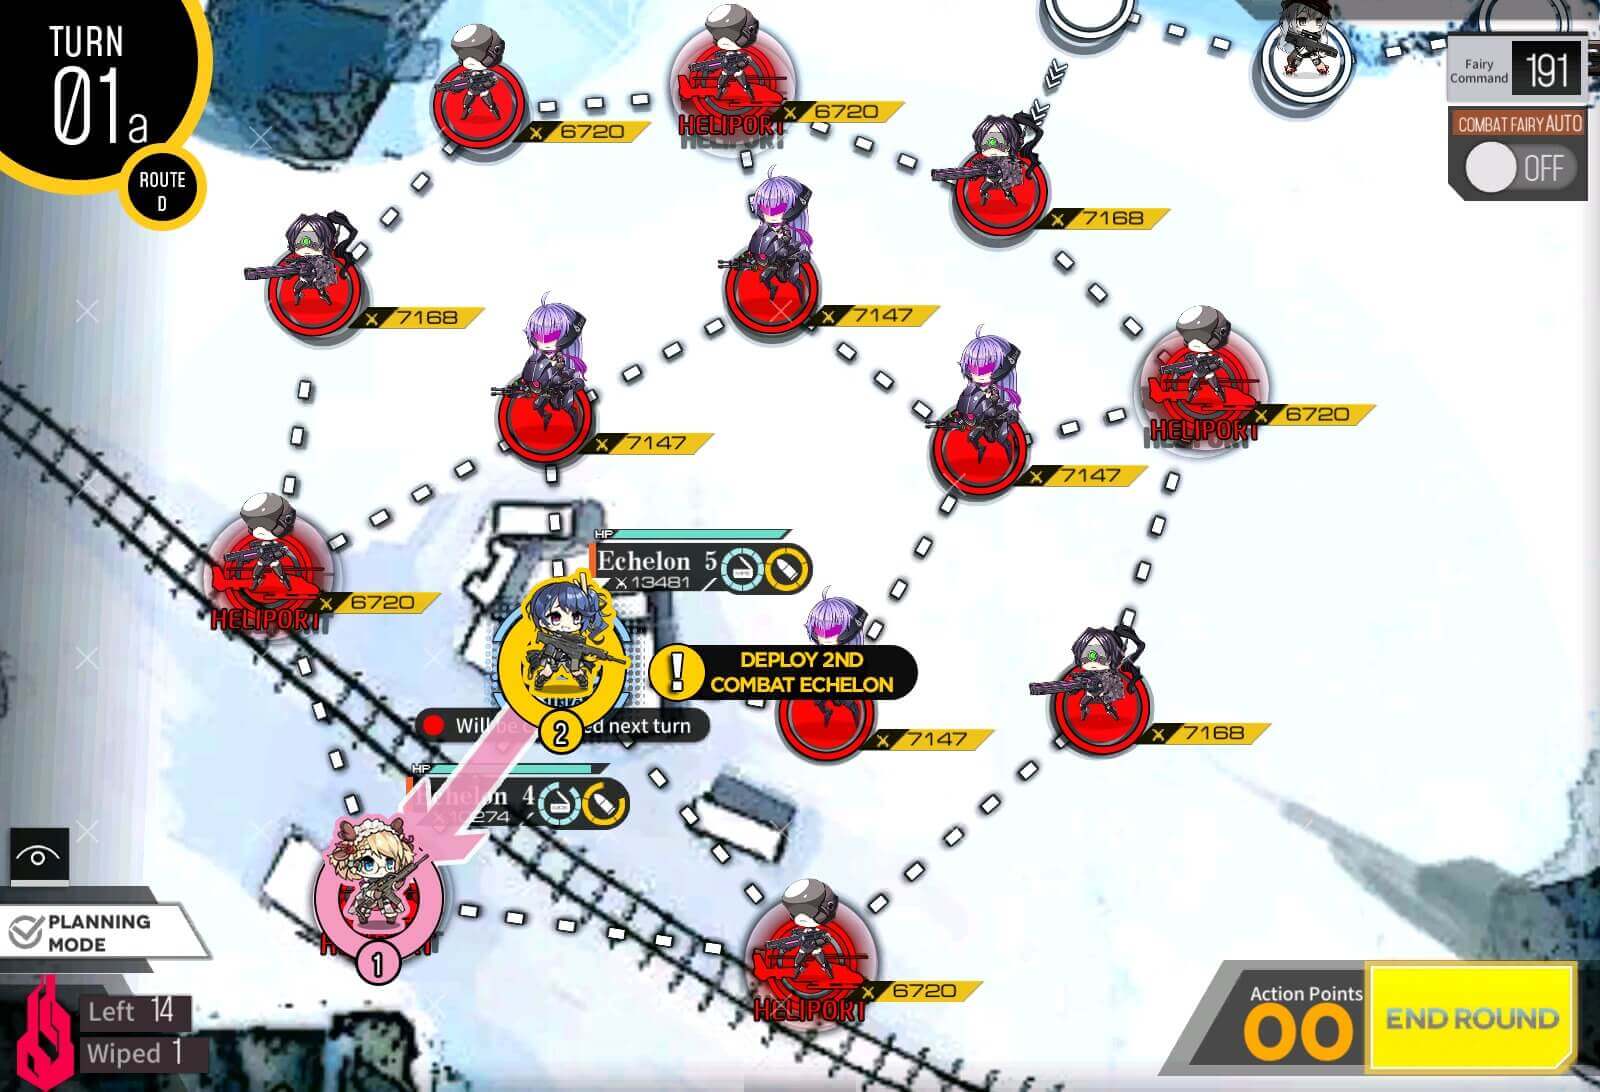
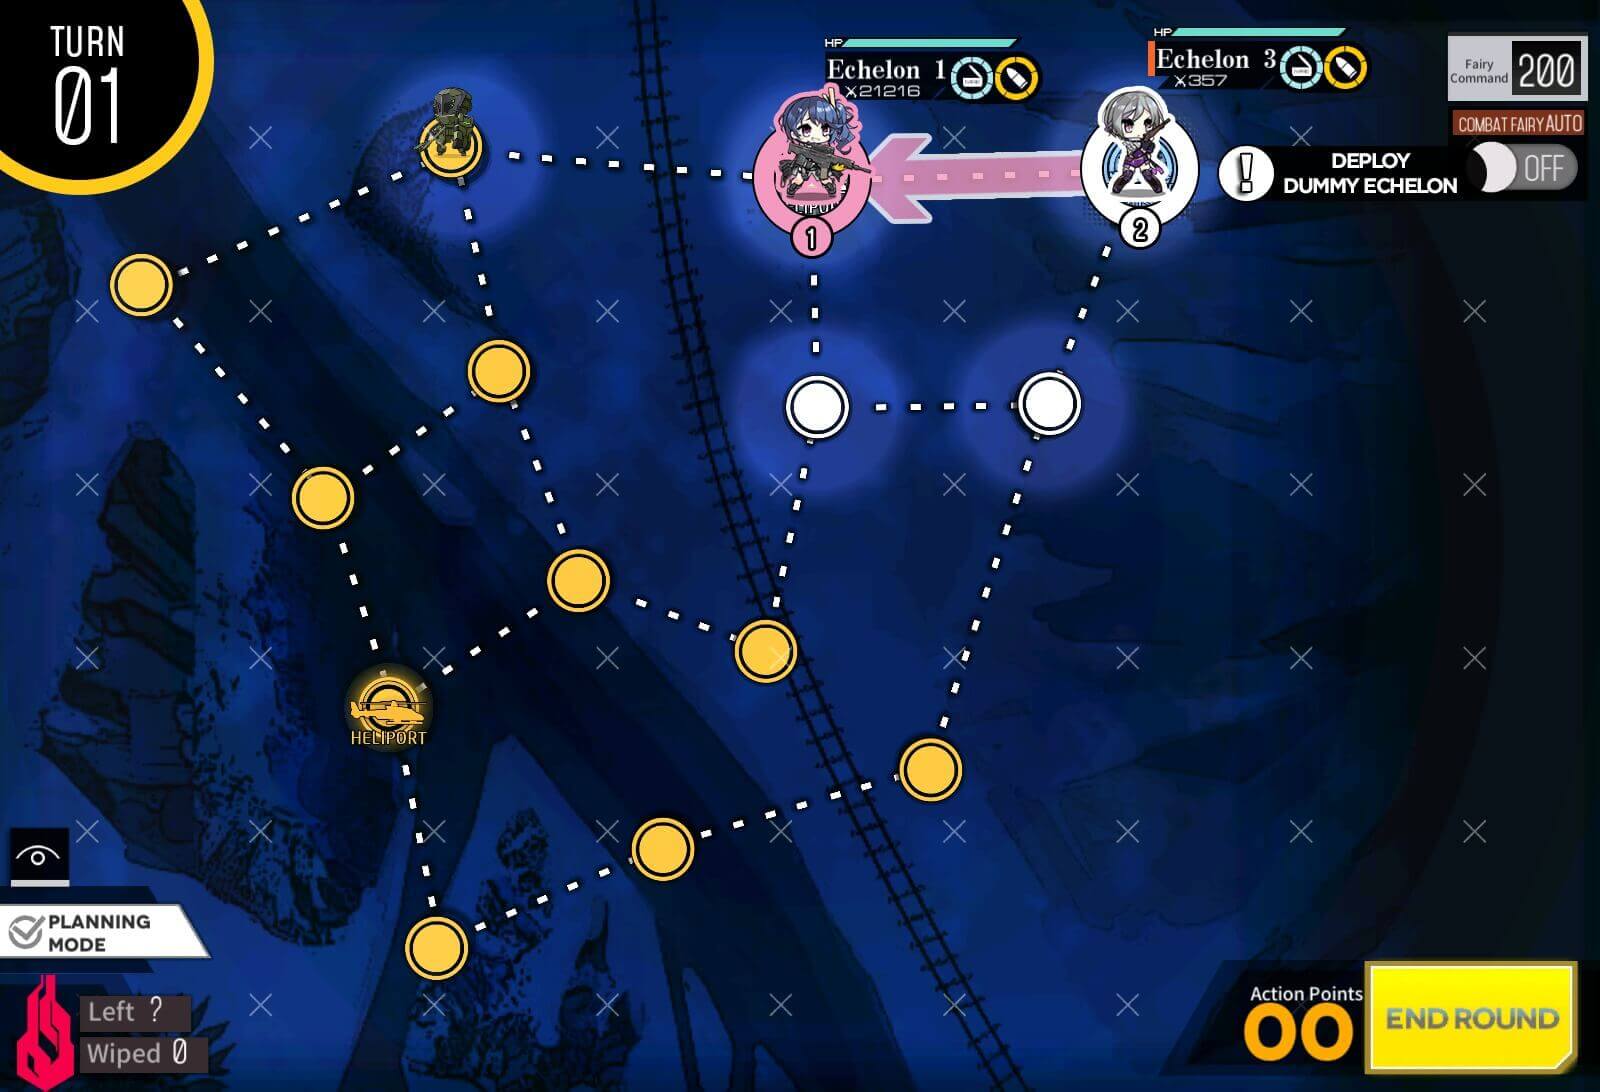
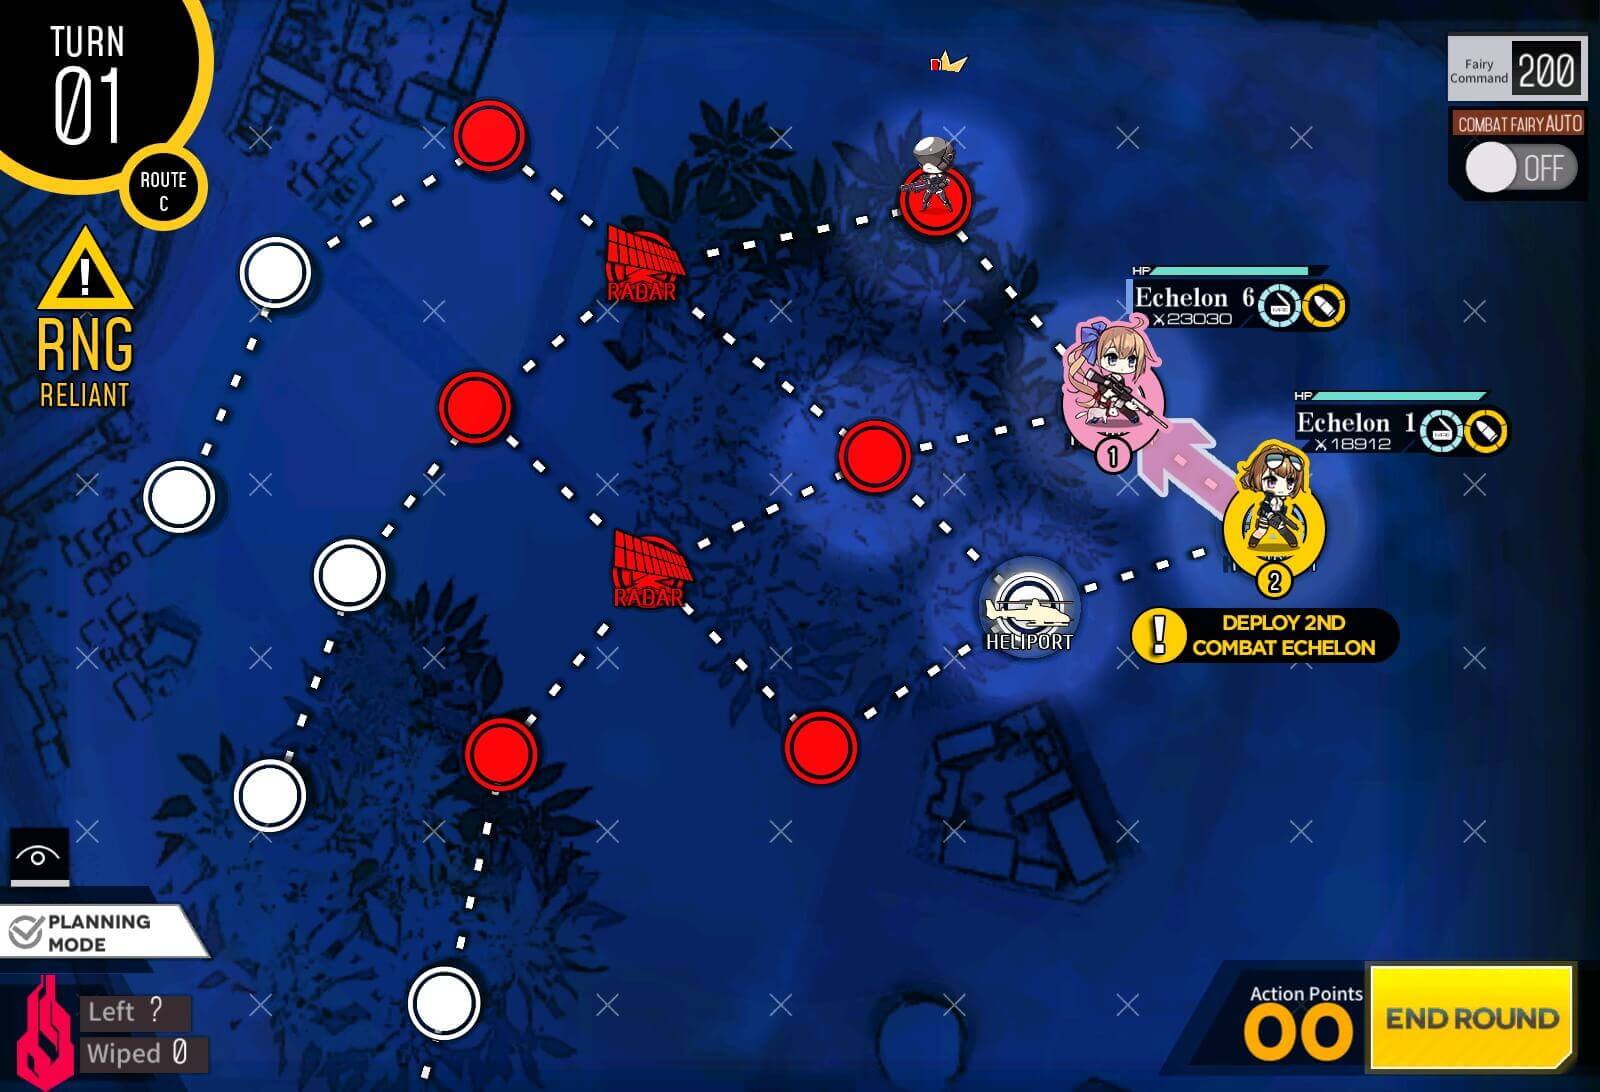
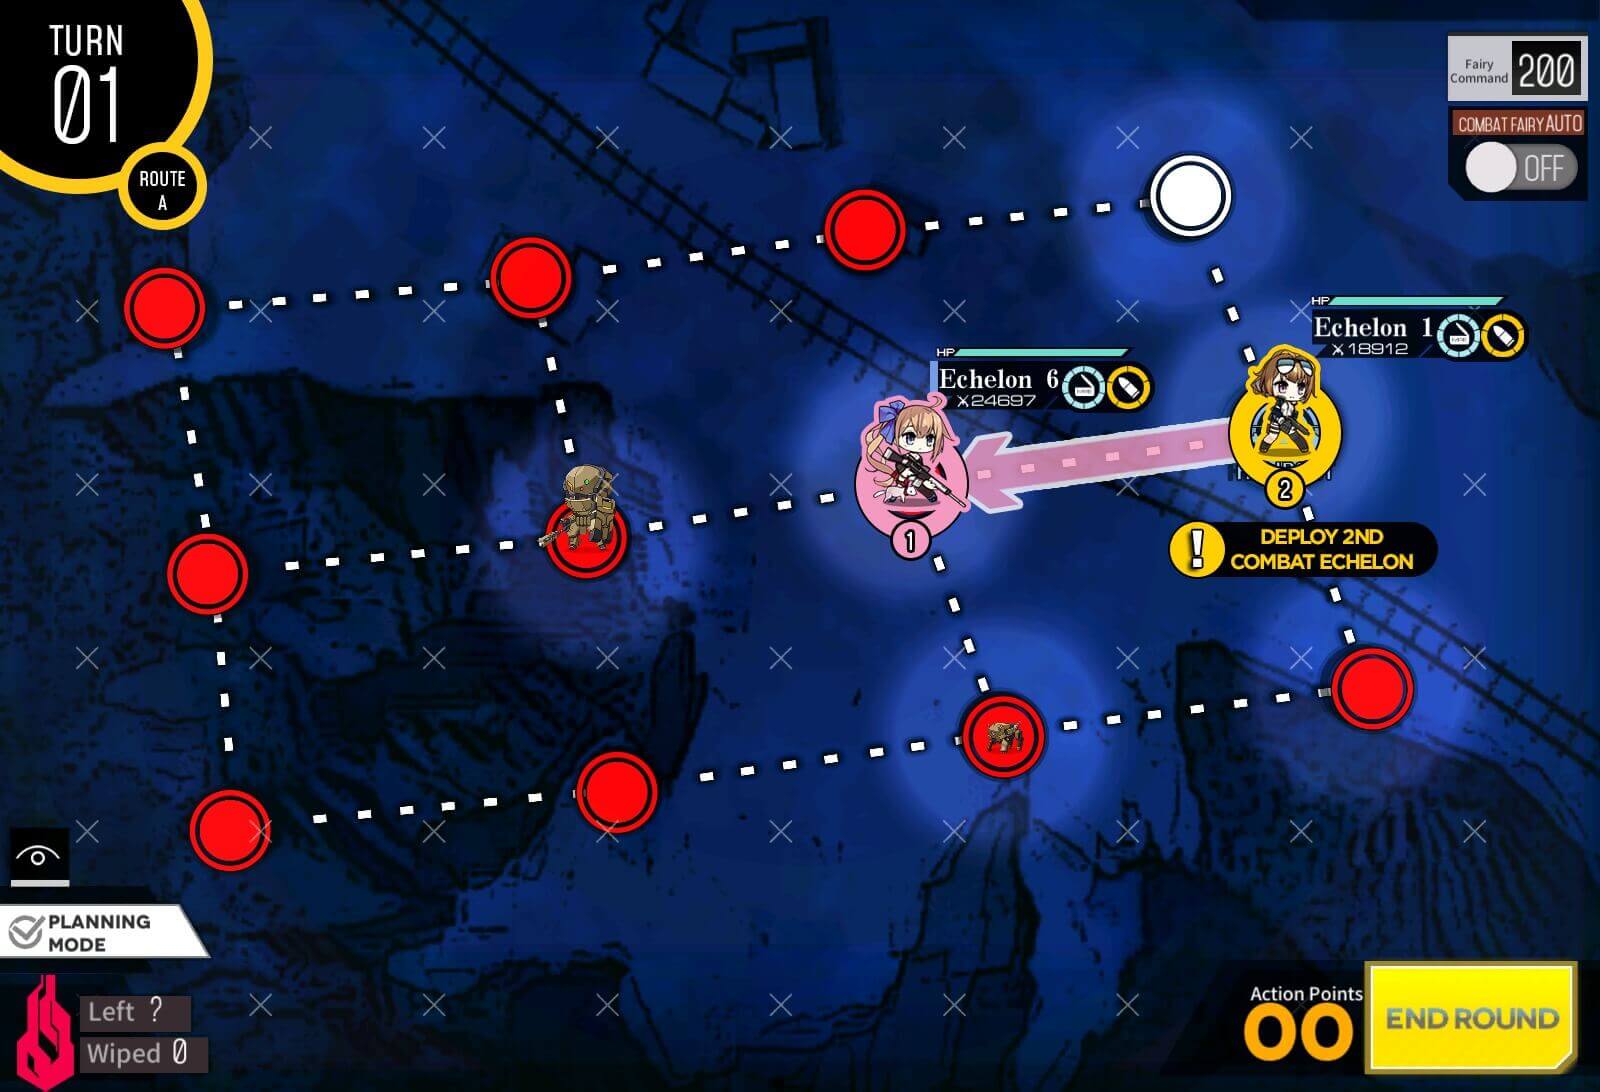
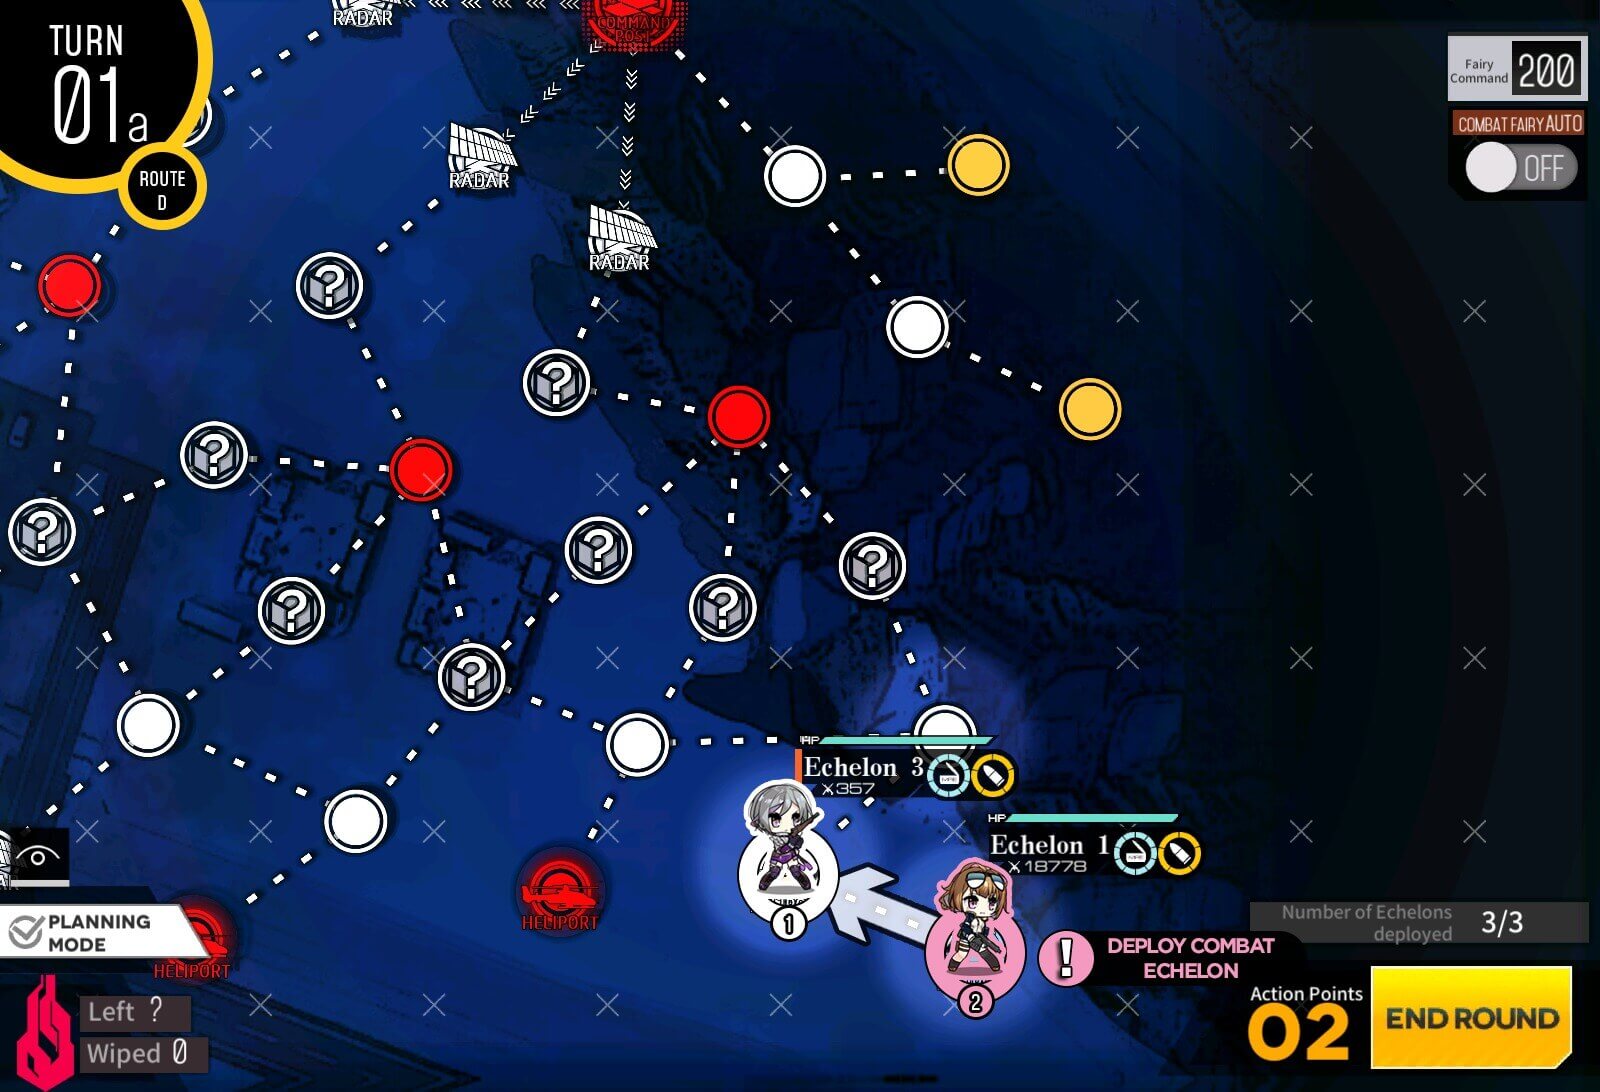
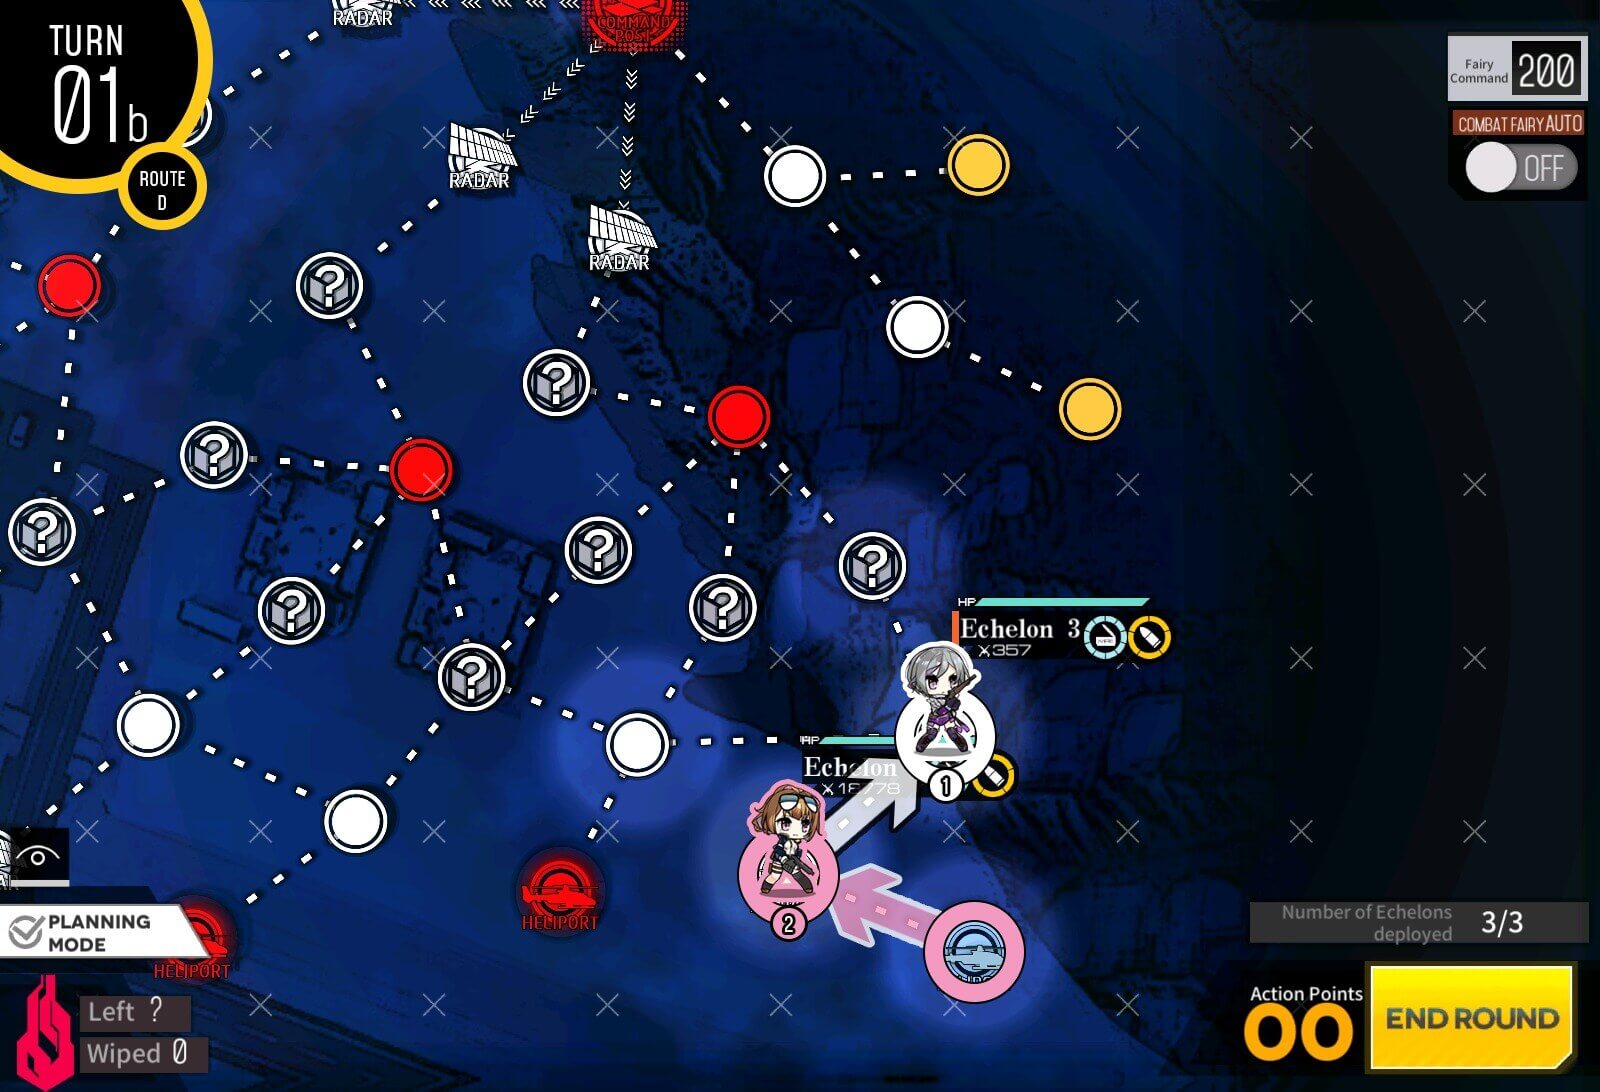
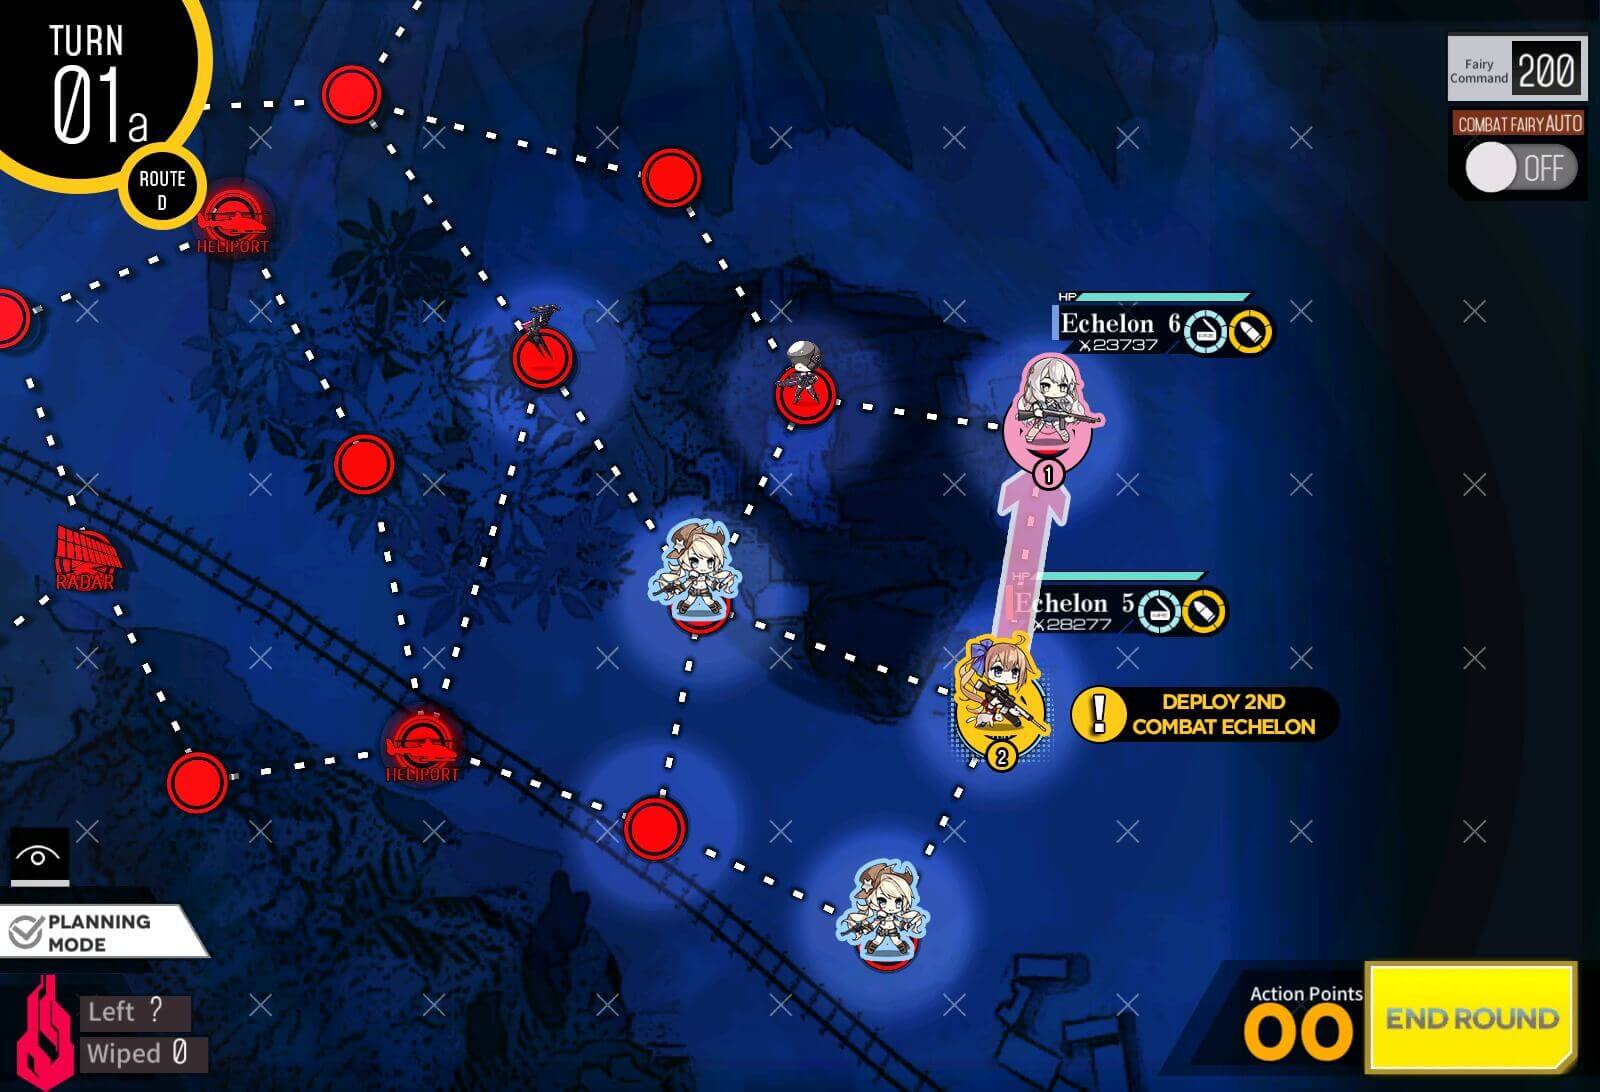
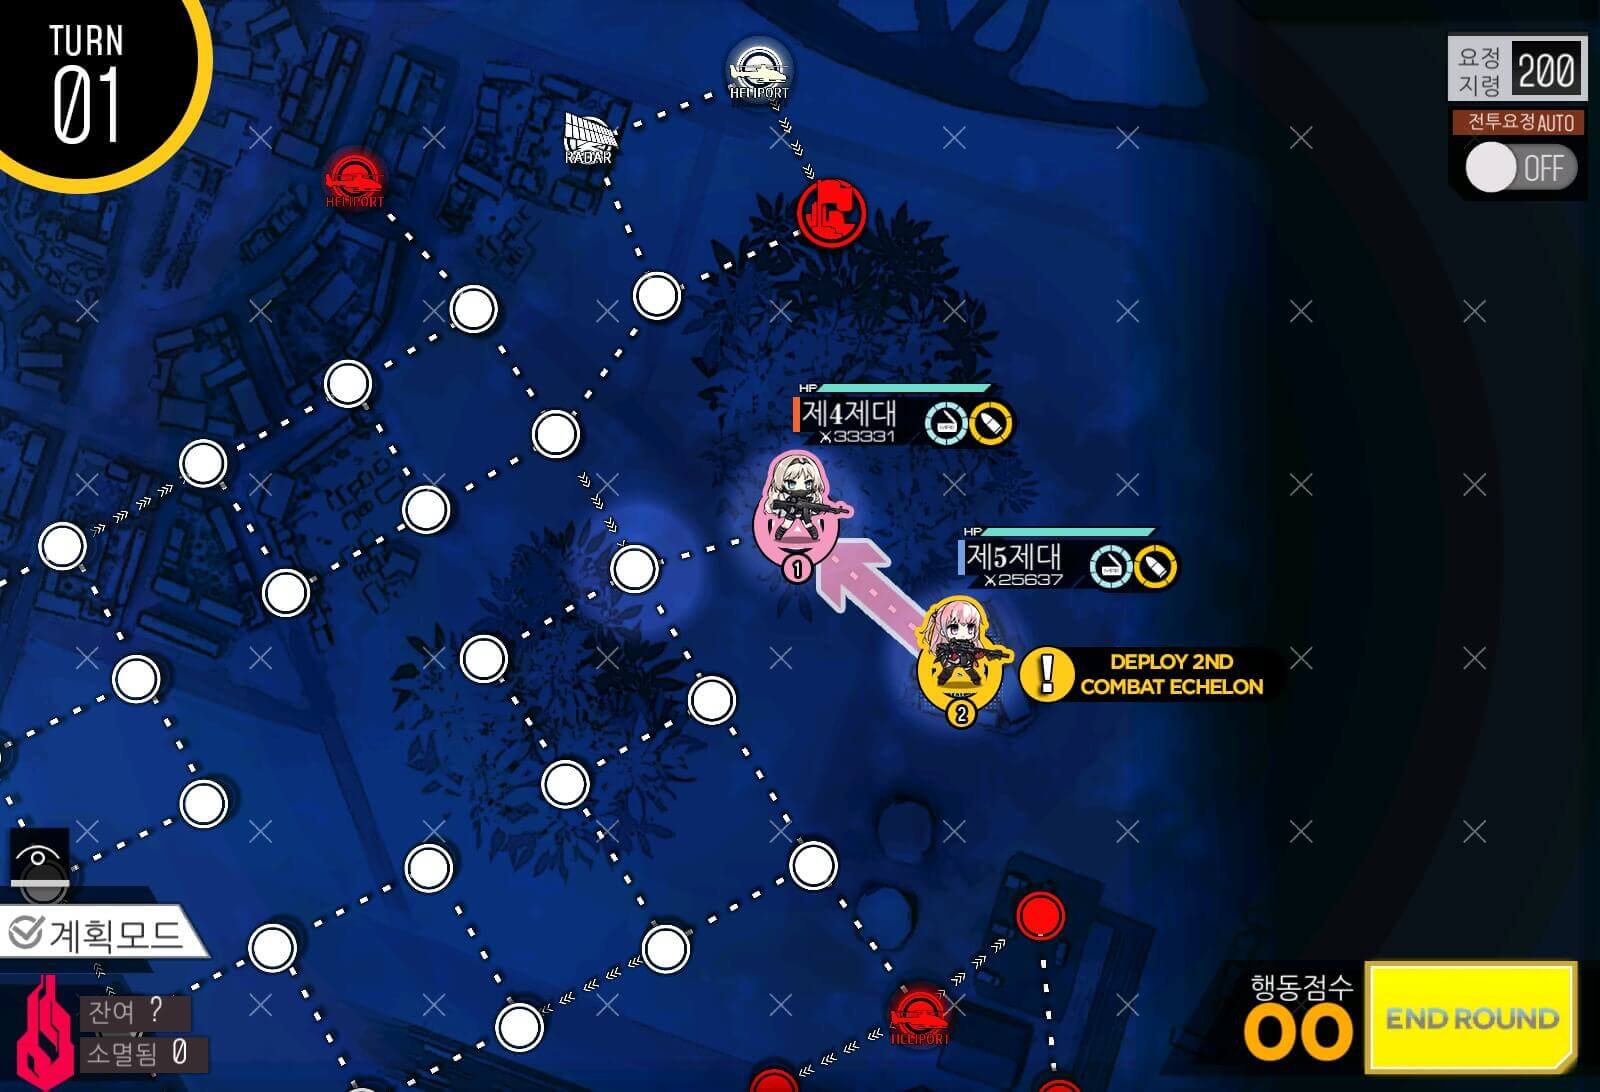
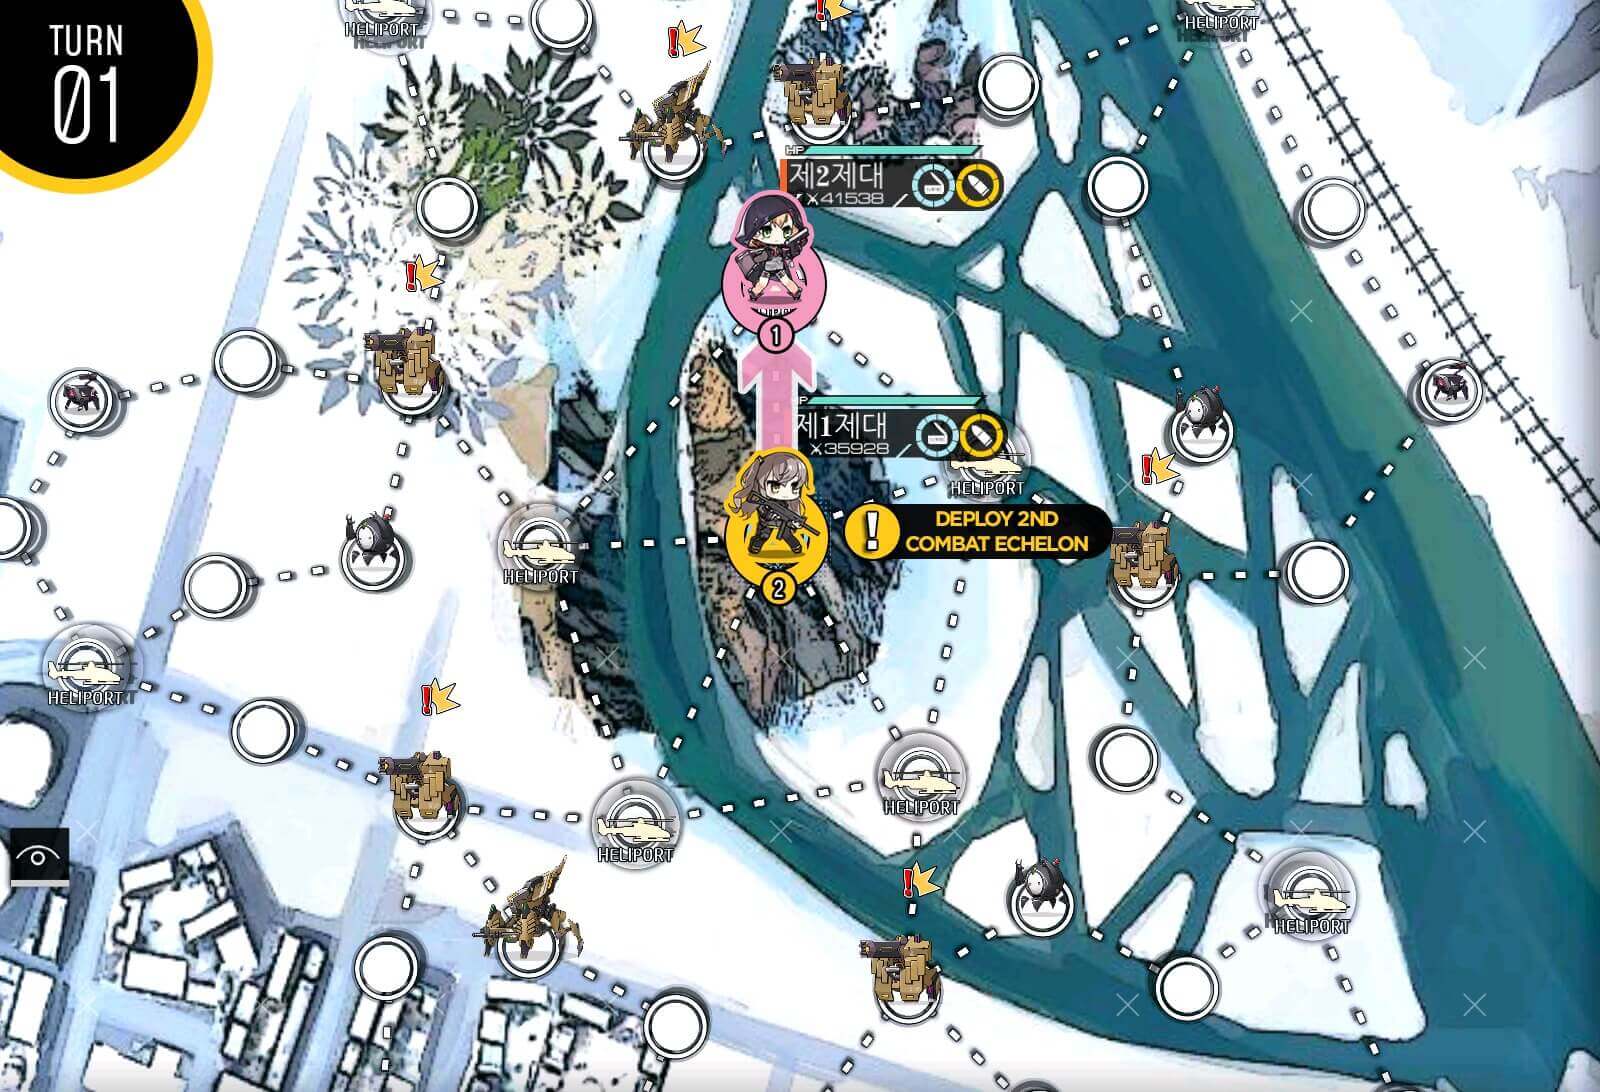
Turn 1
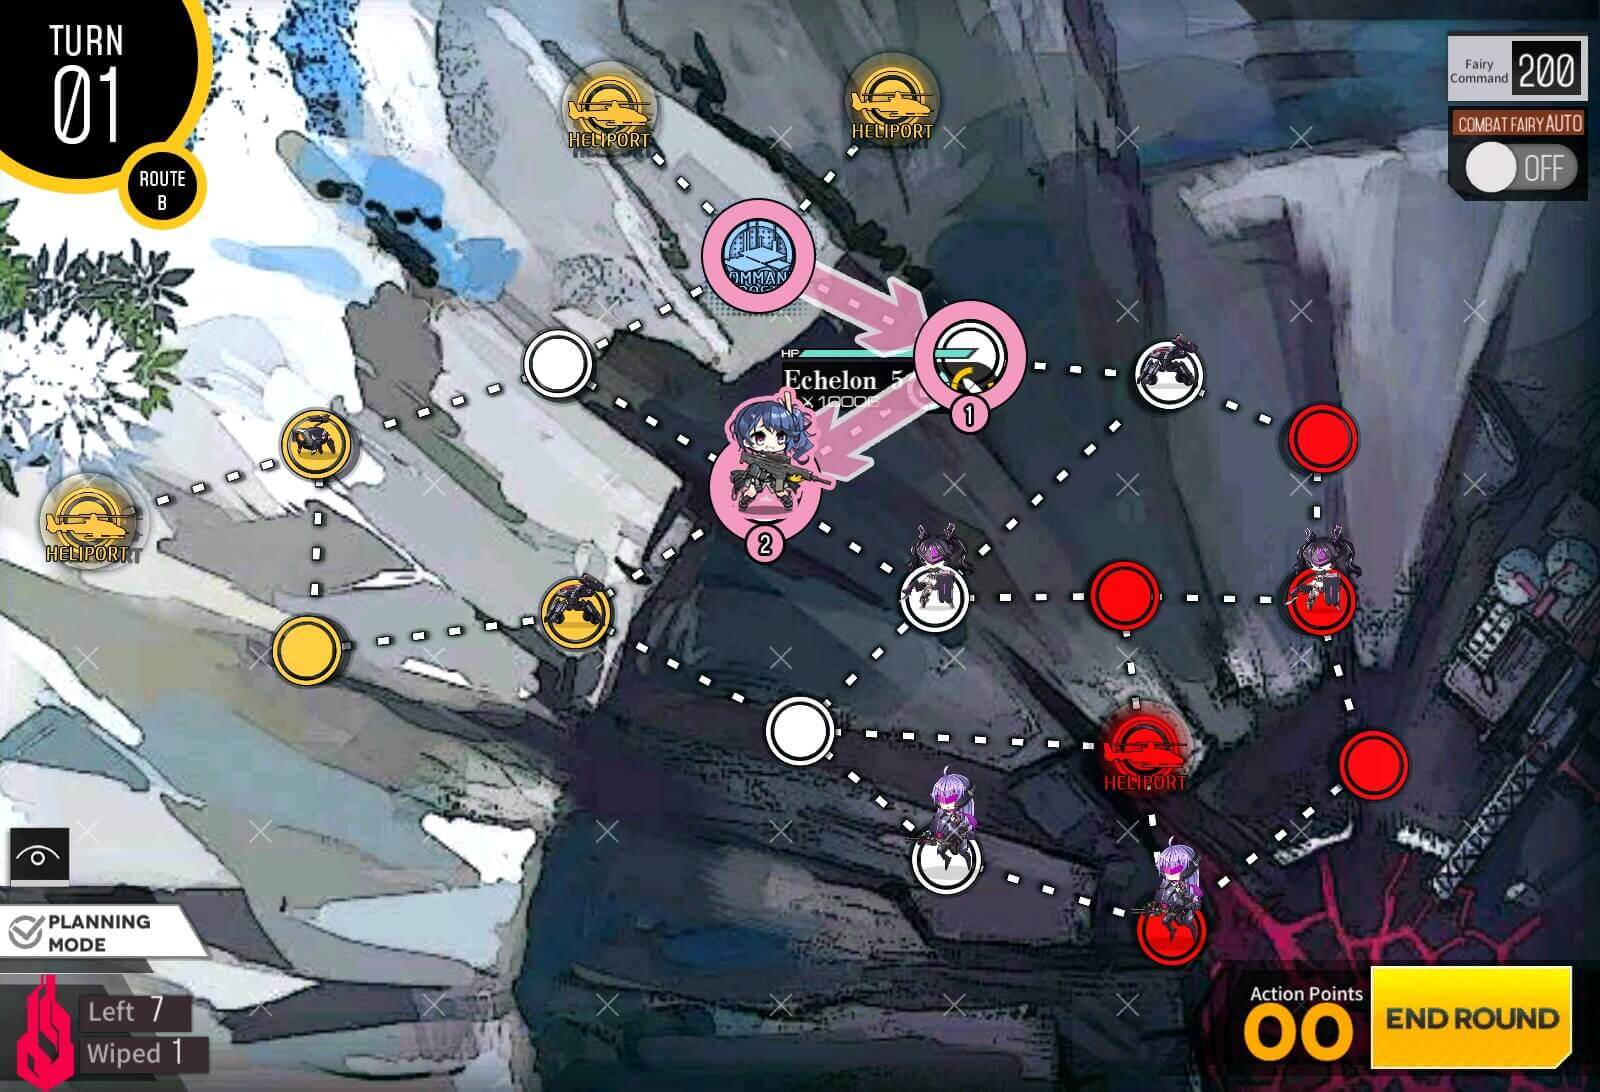
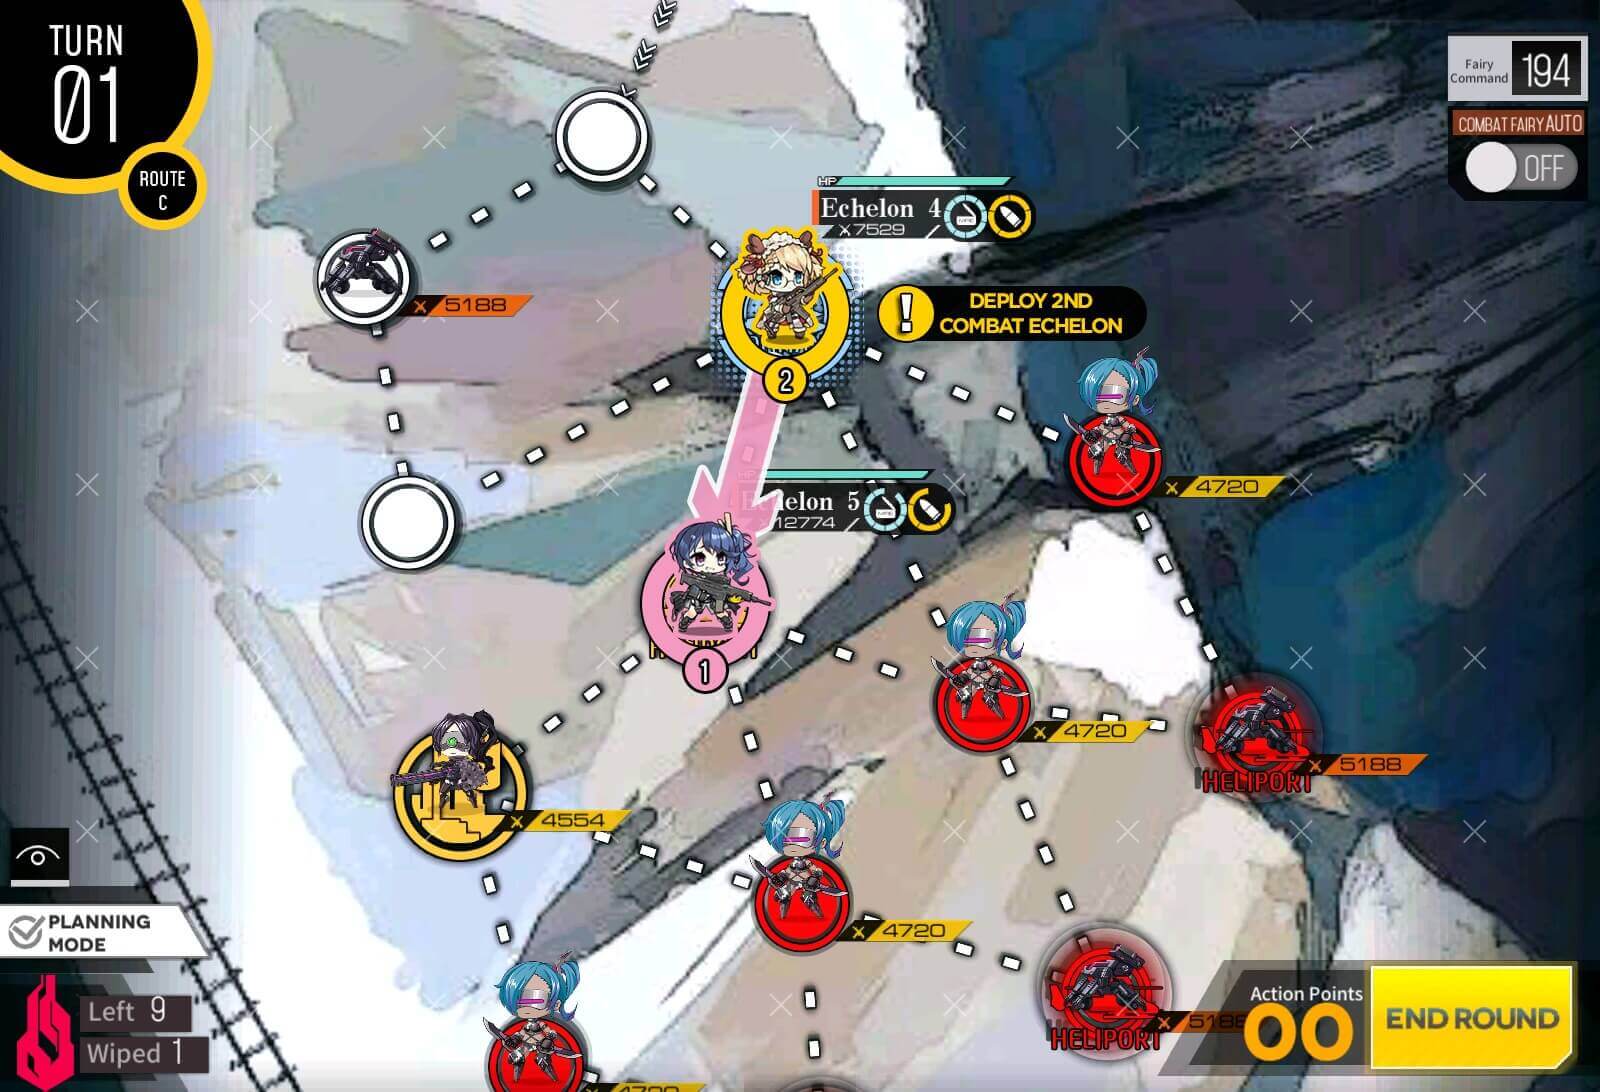
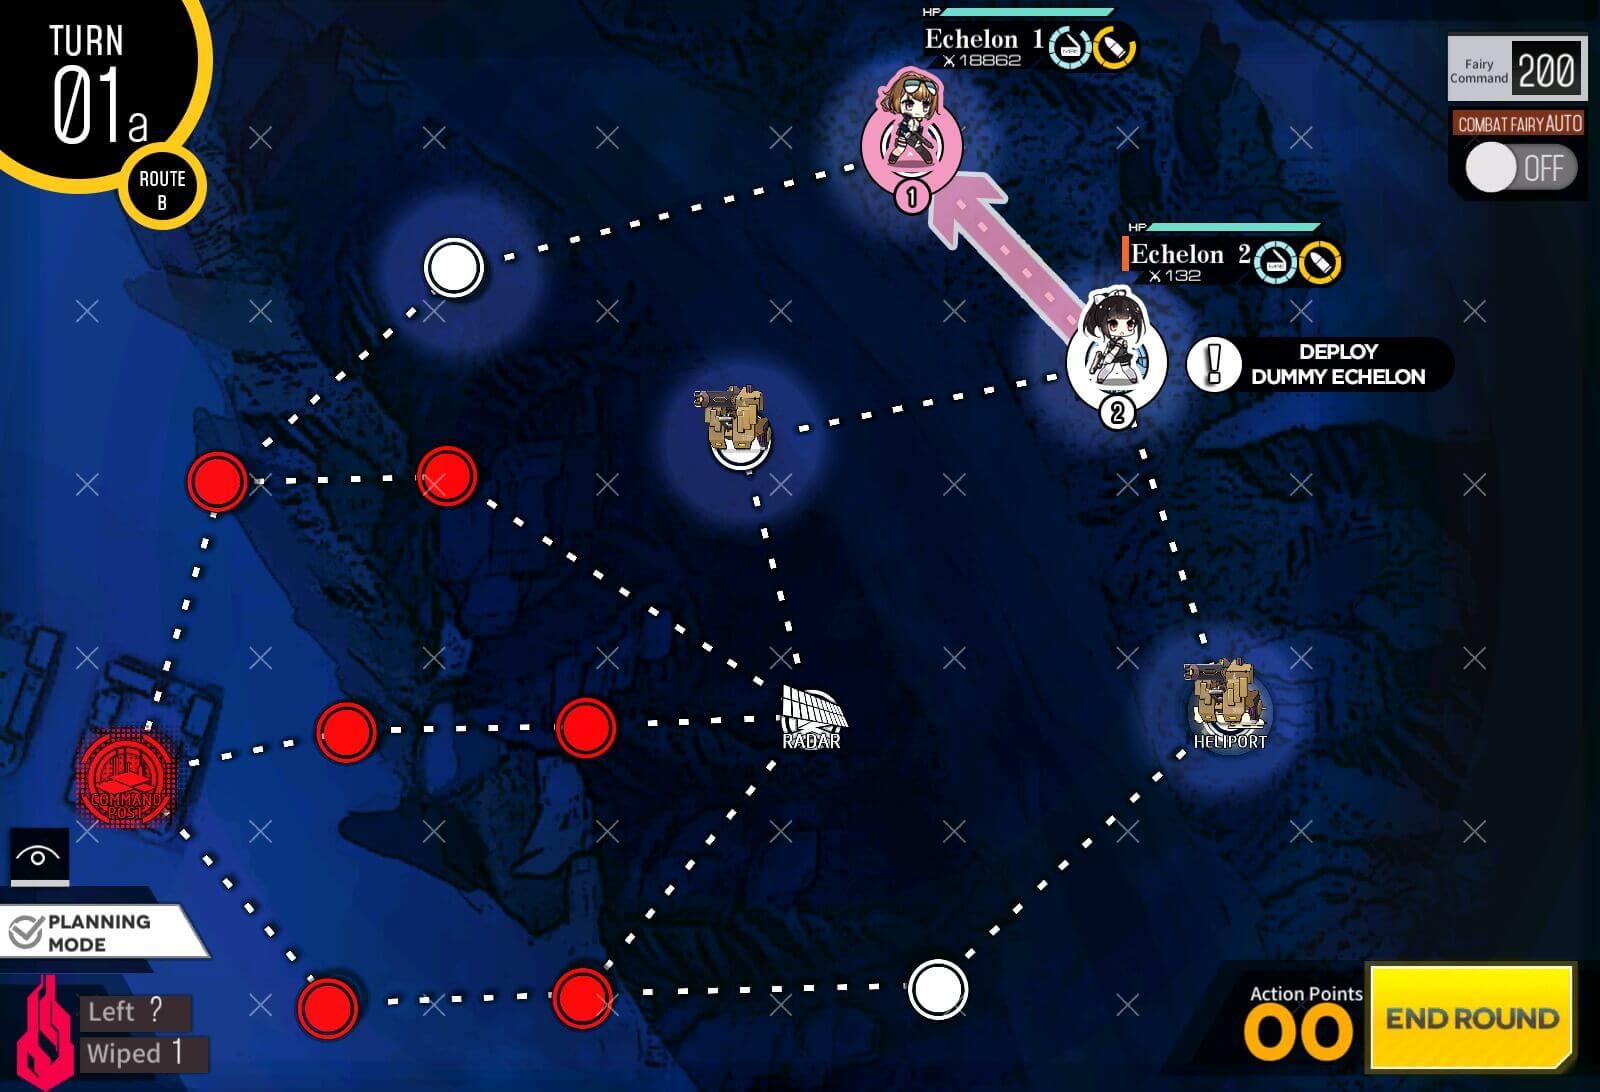
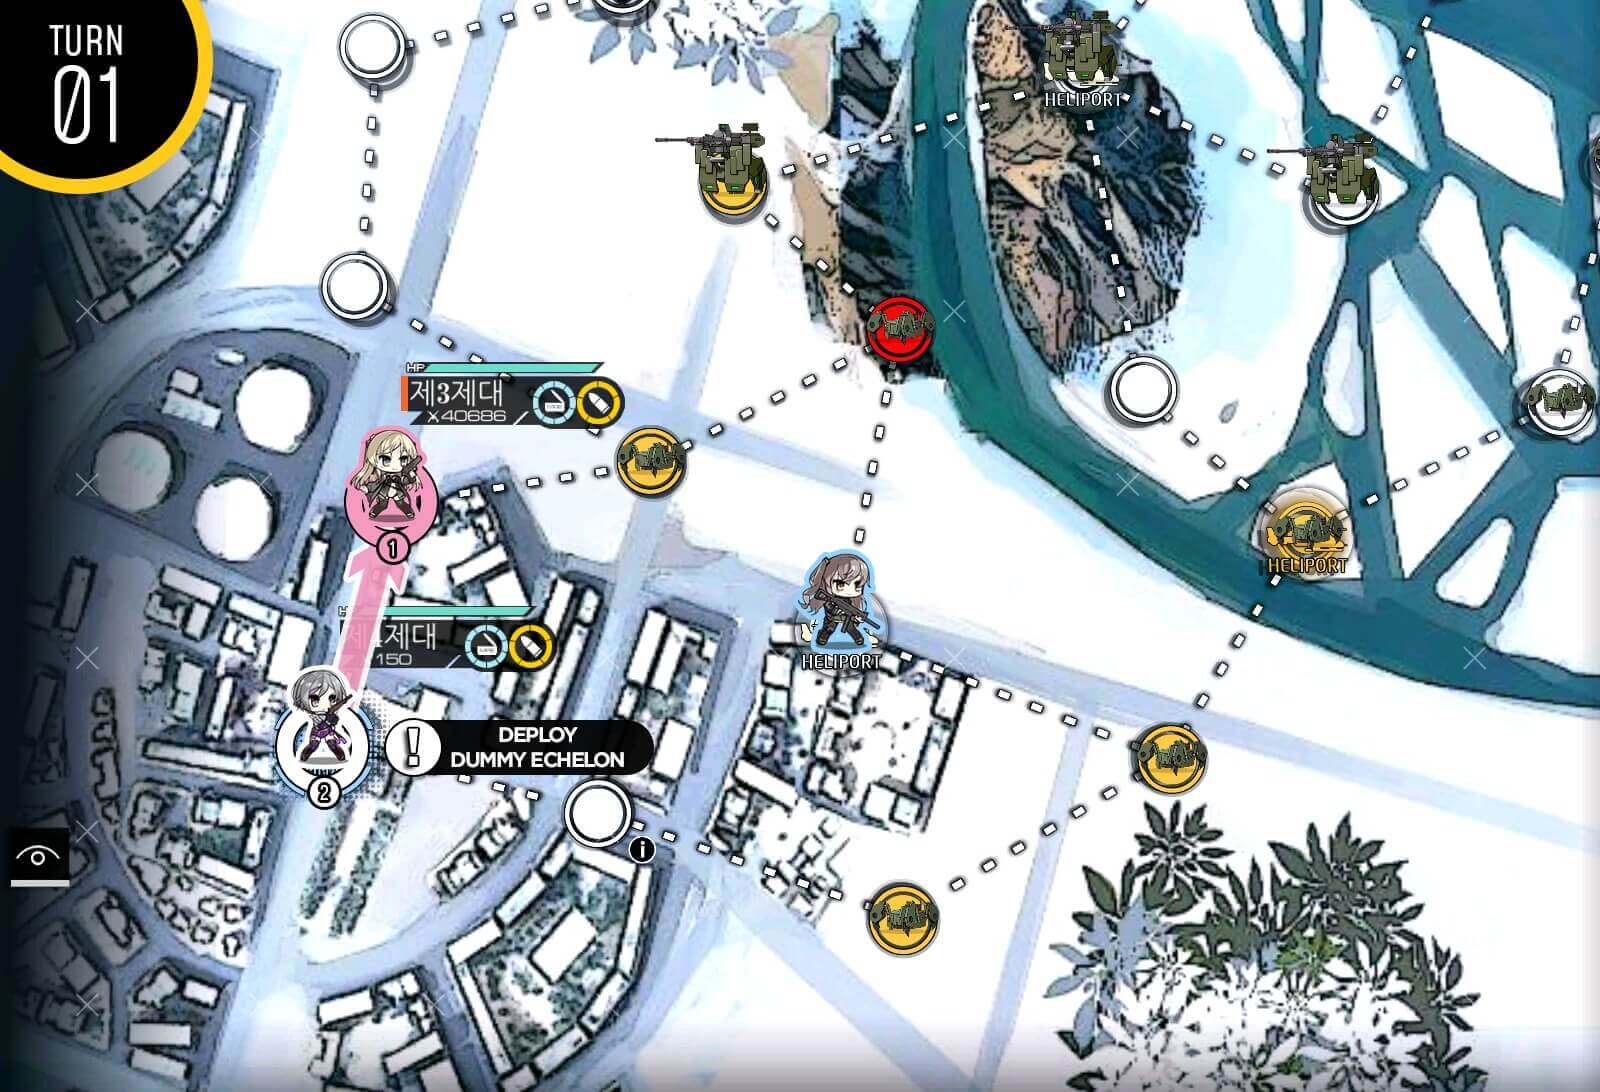
Move combat echelon up one, then deploy 2nd combat echelon.
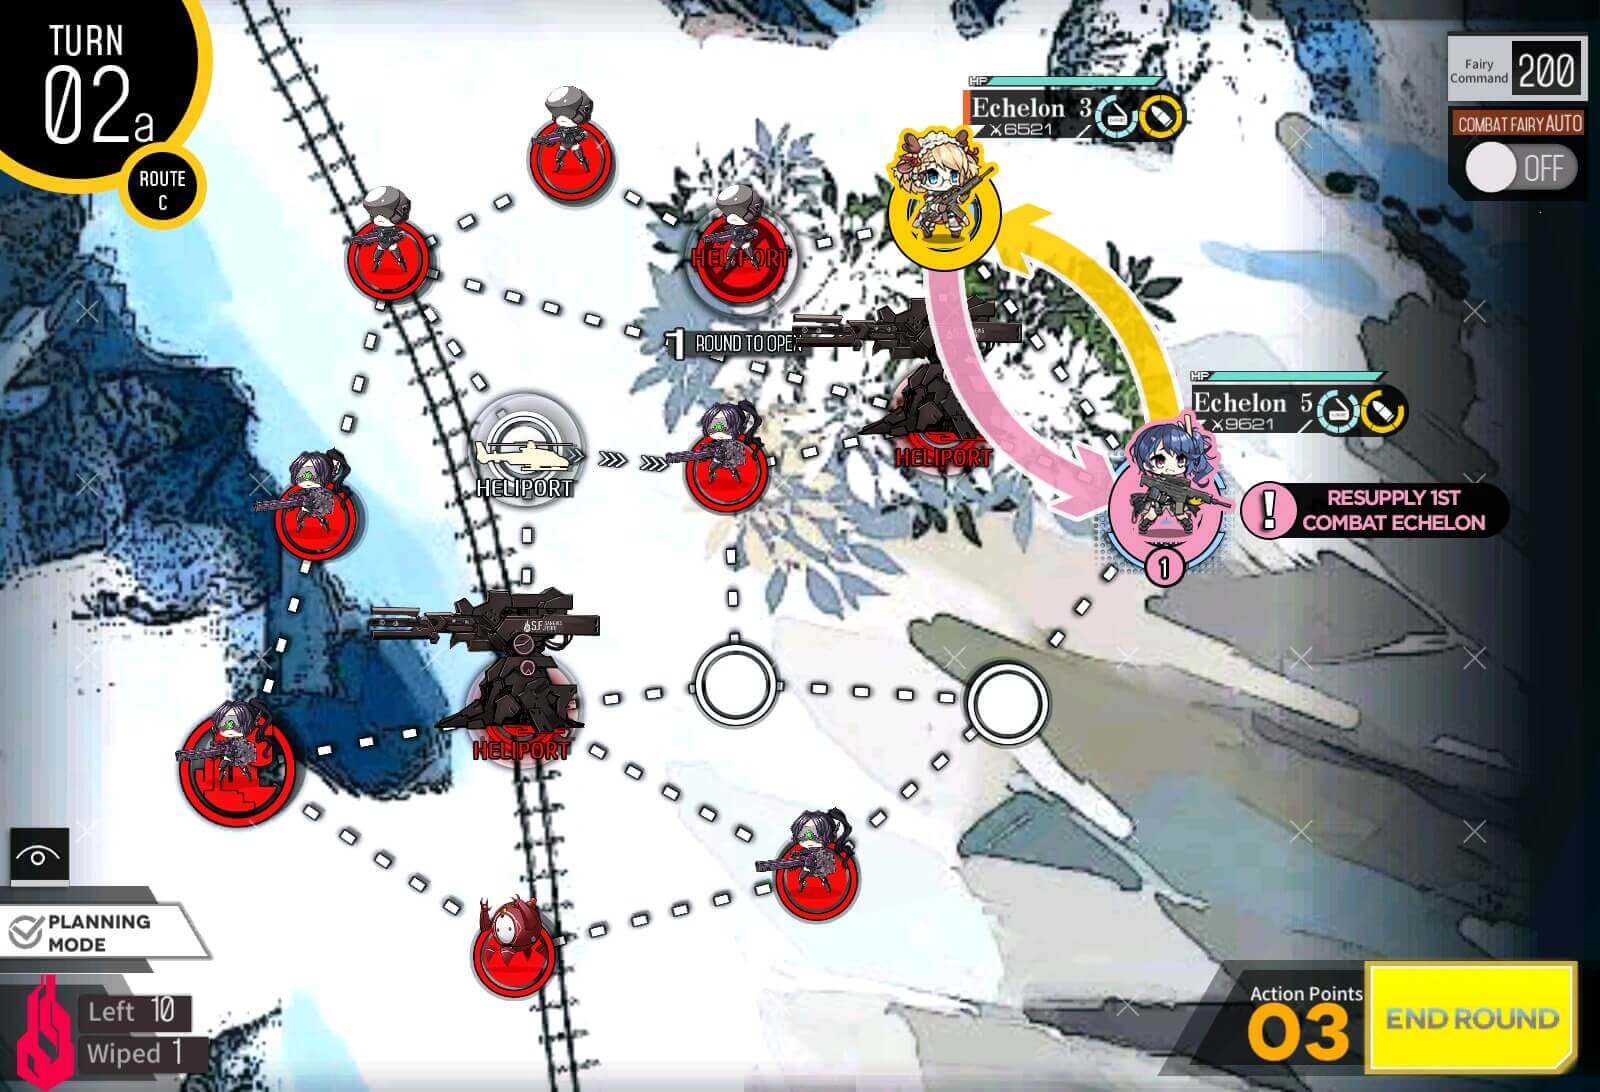
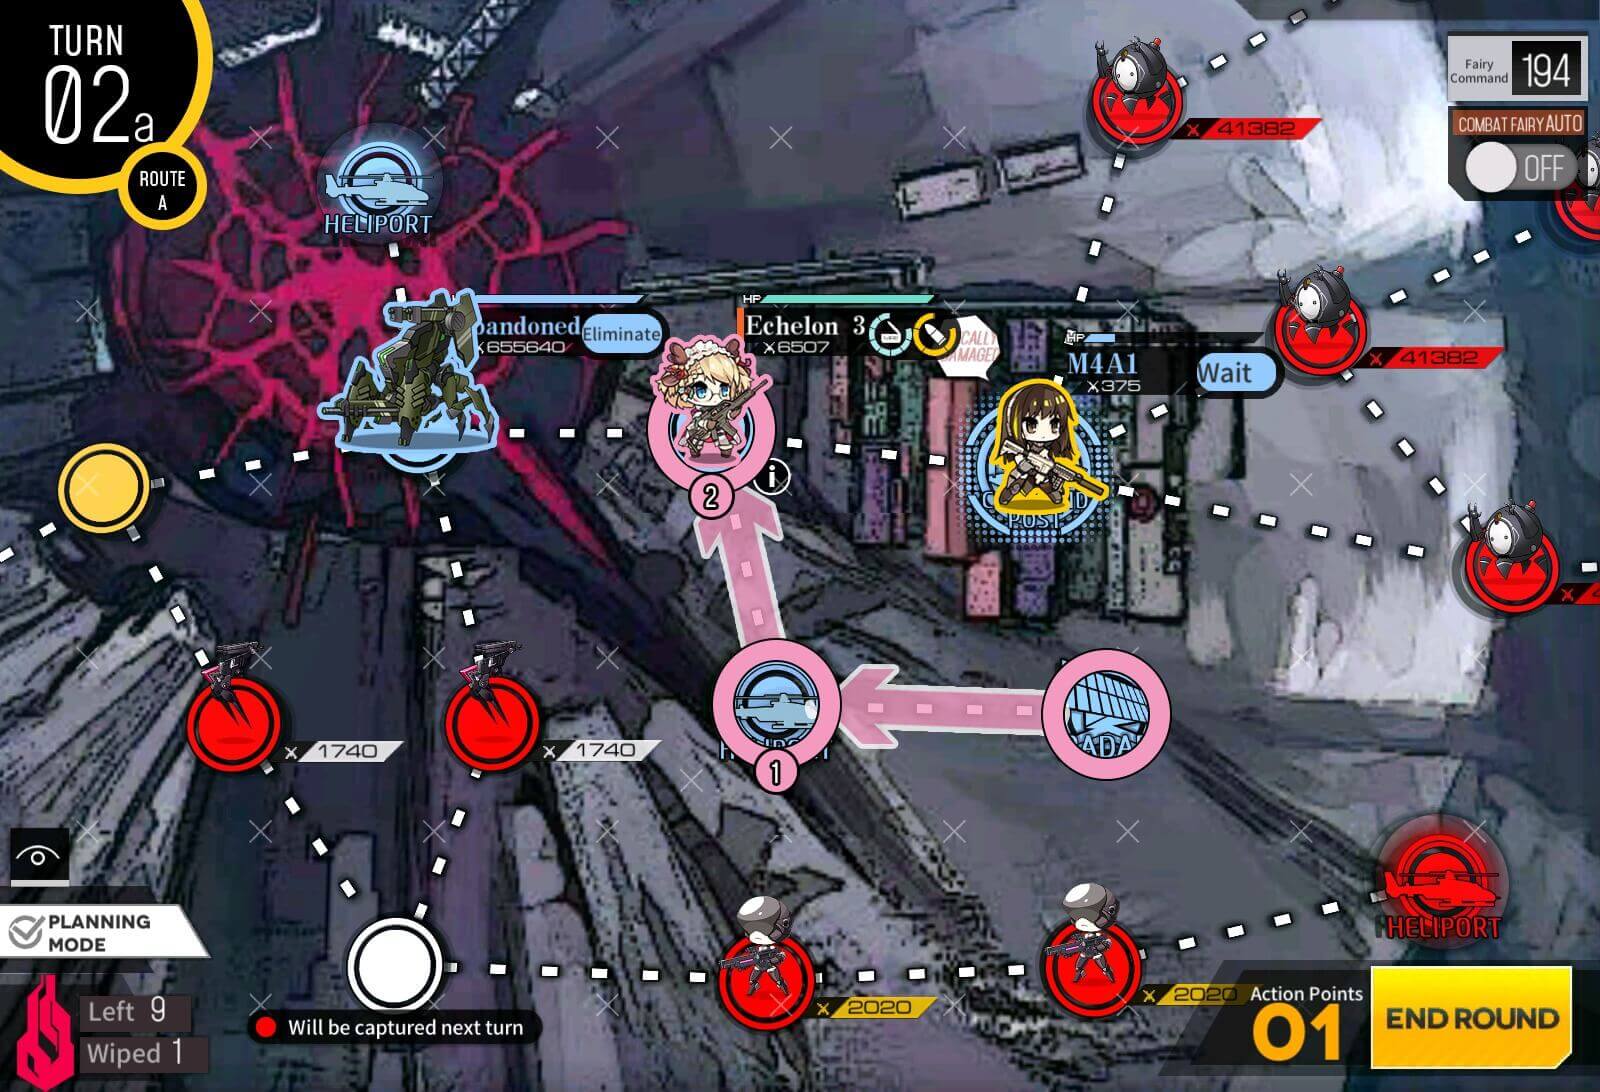
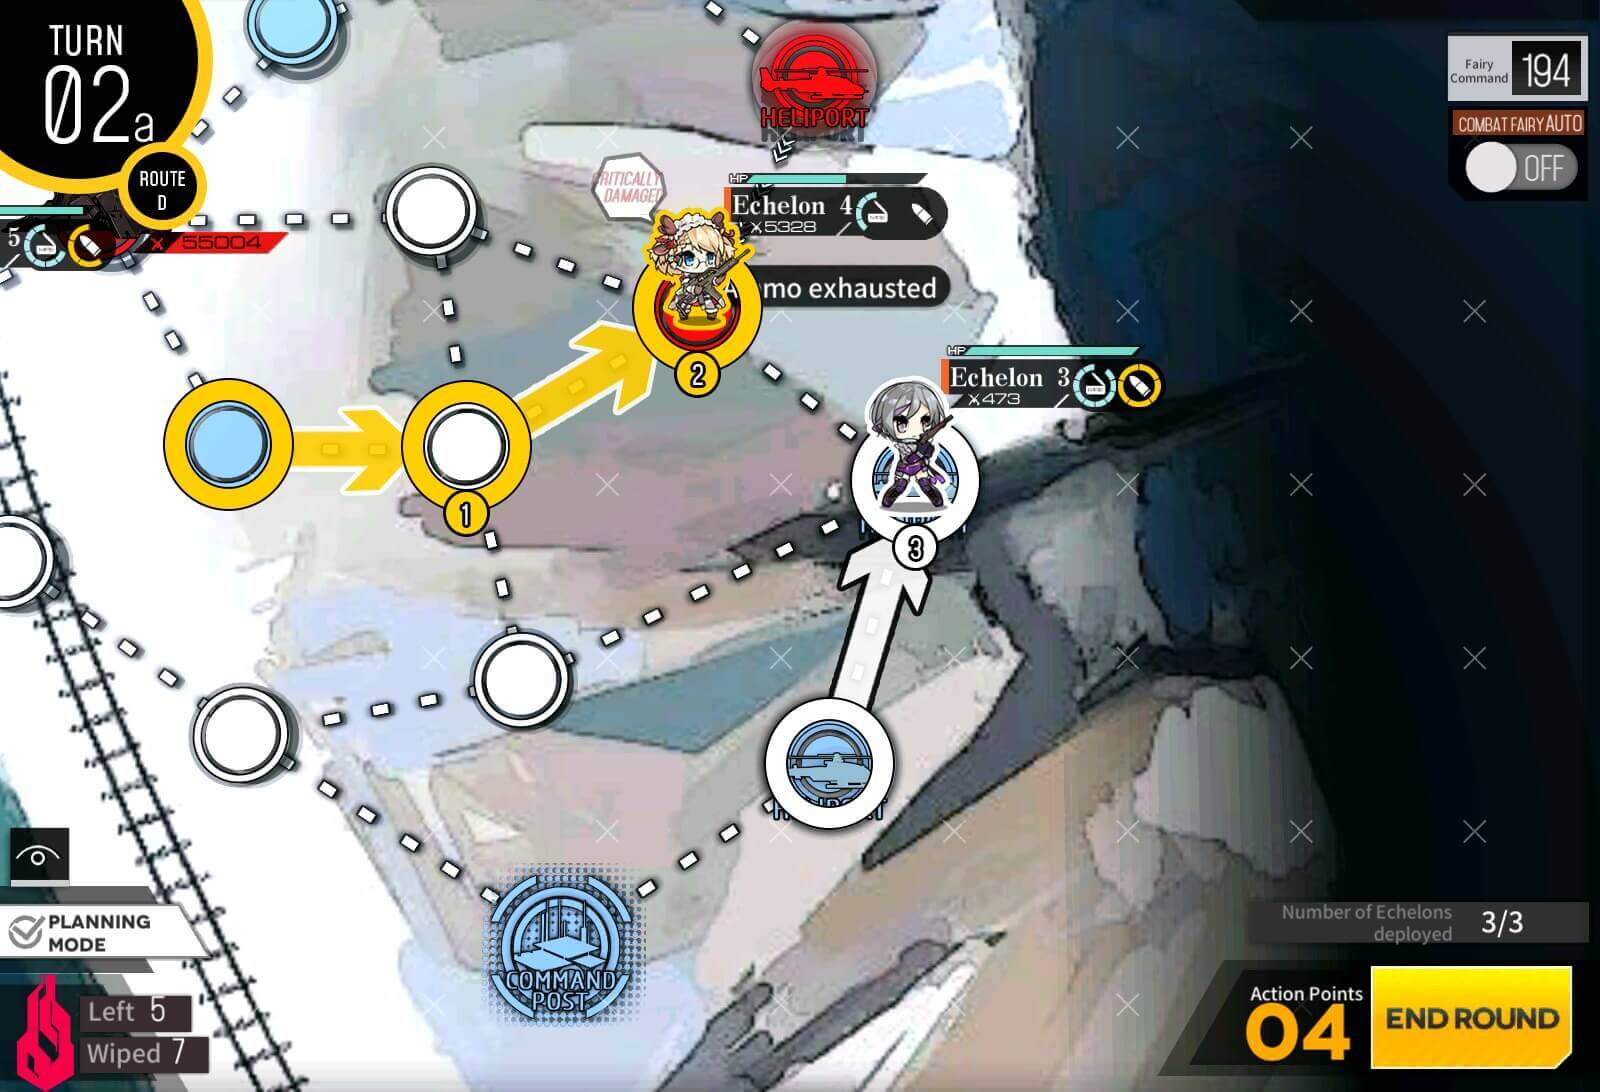
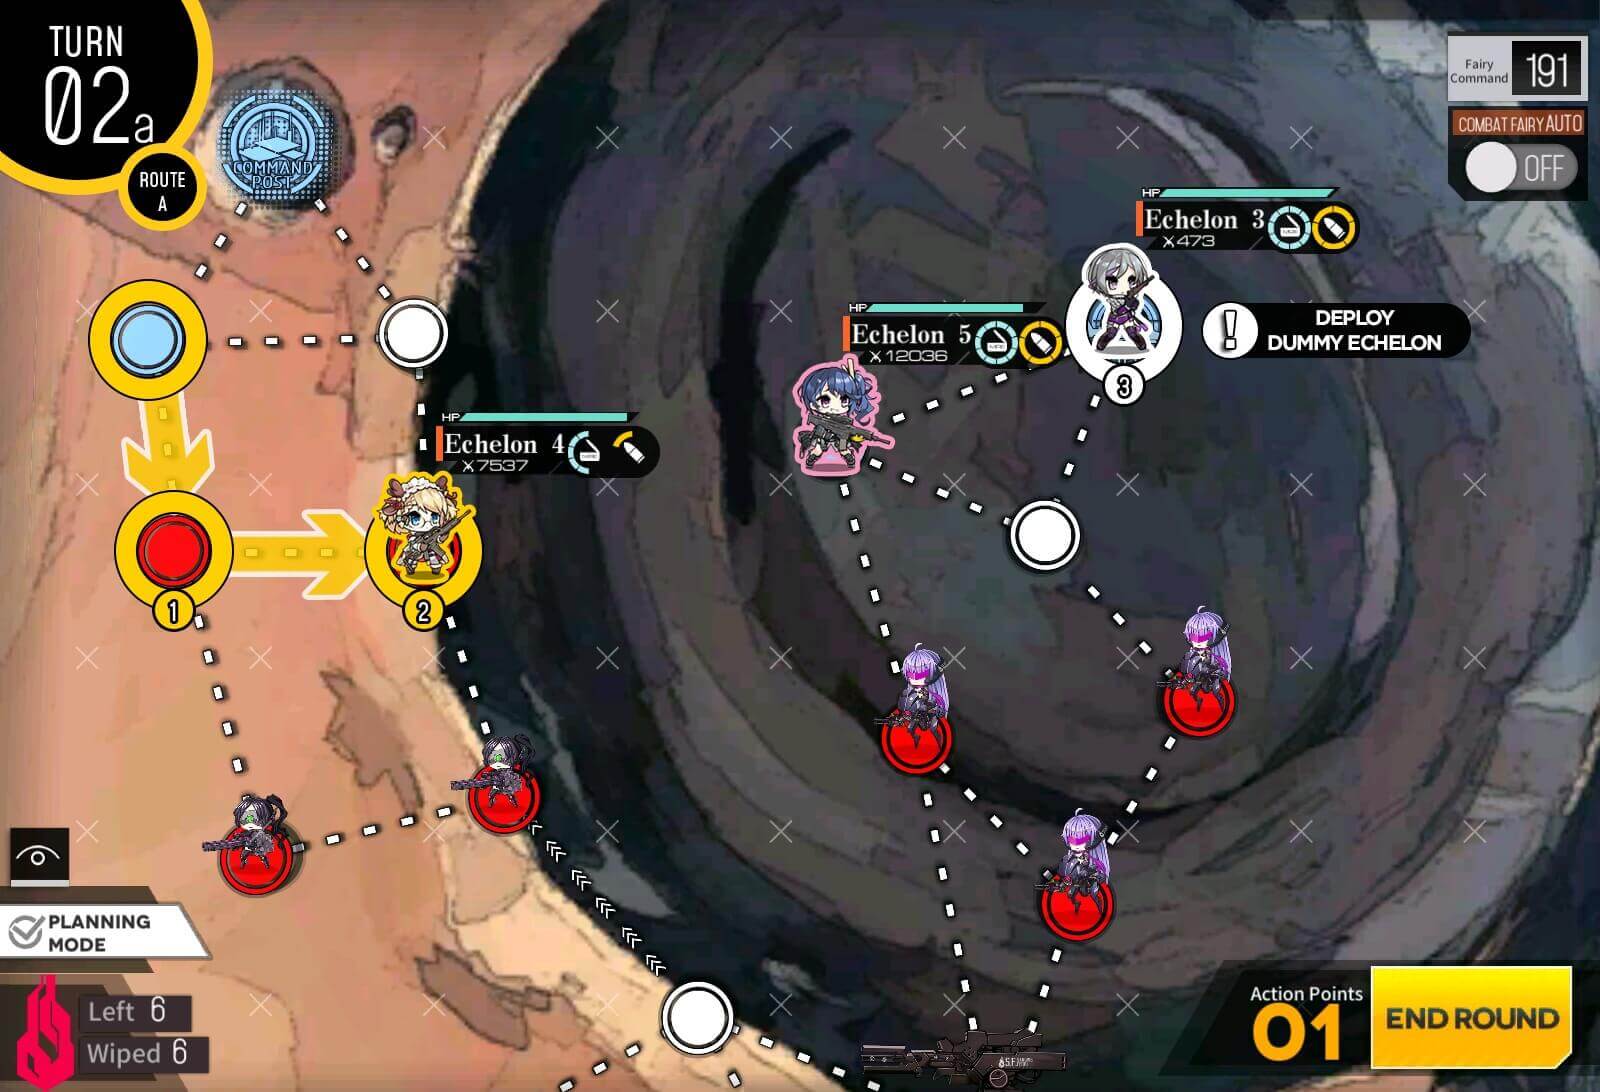
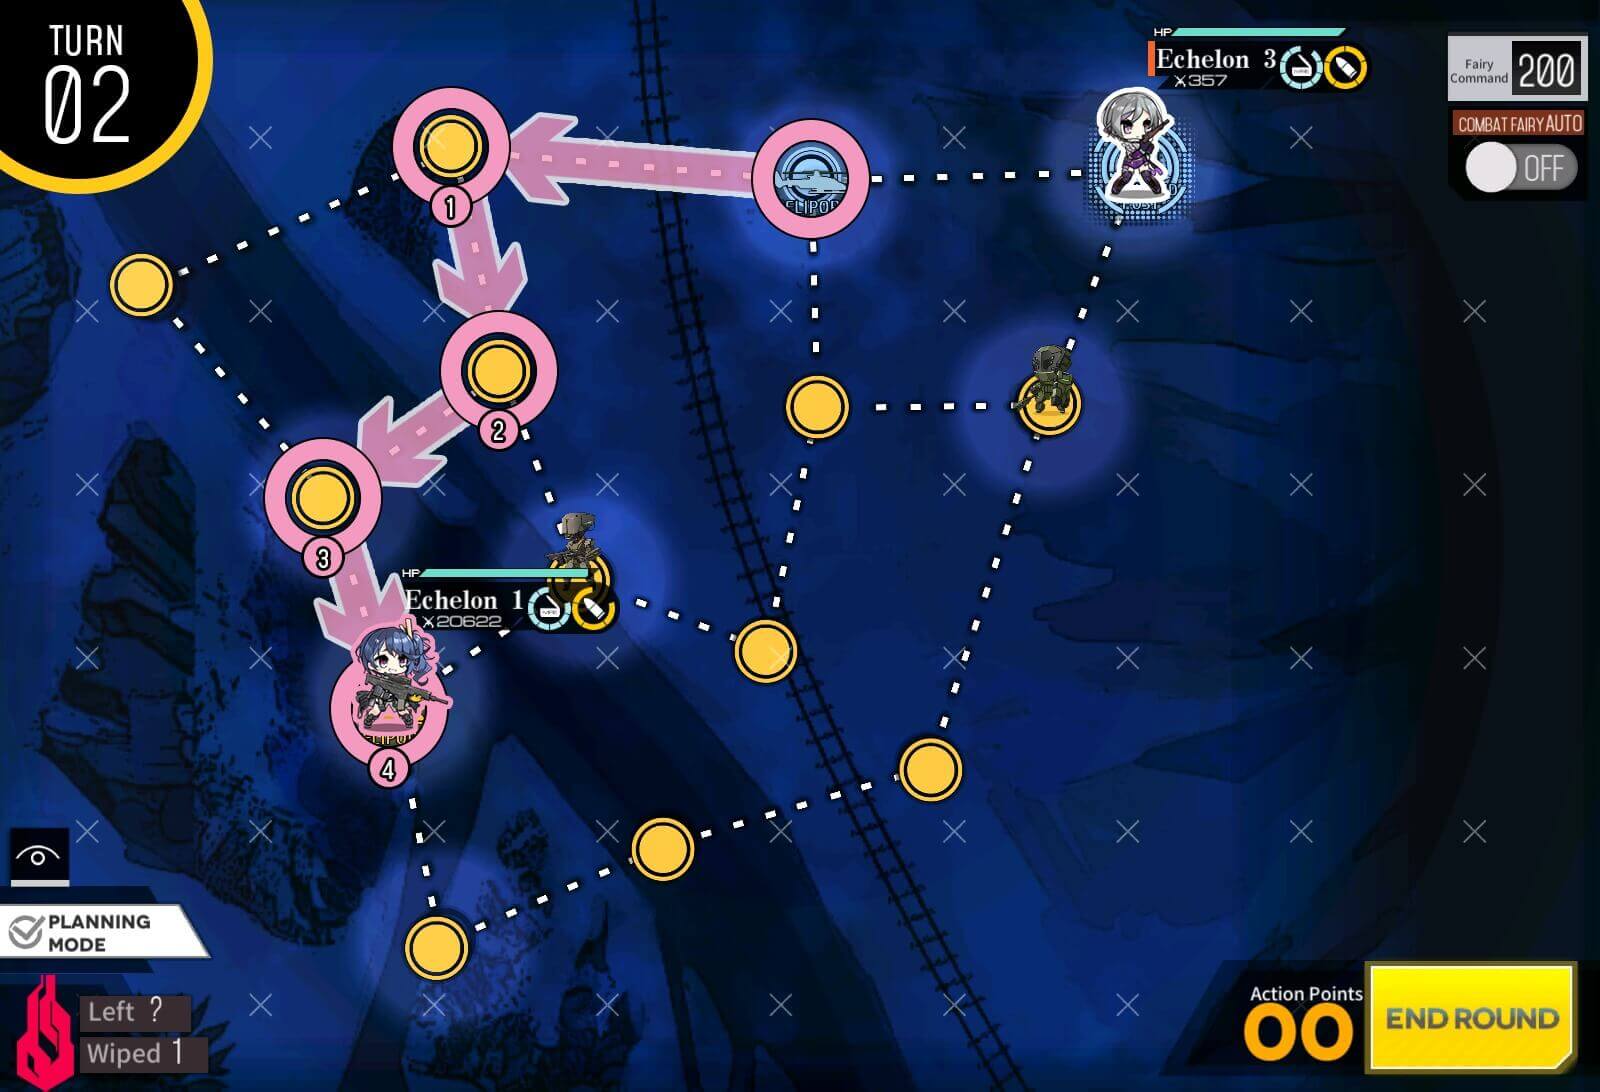
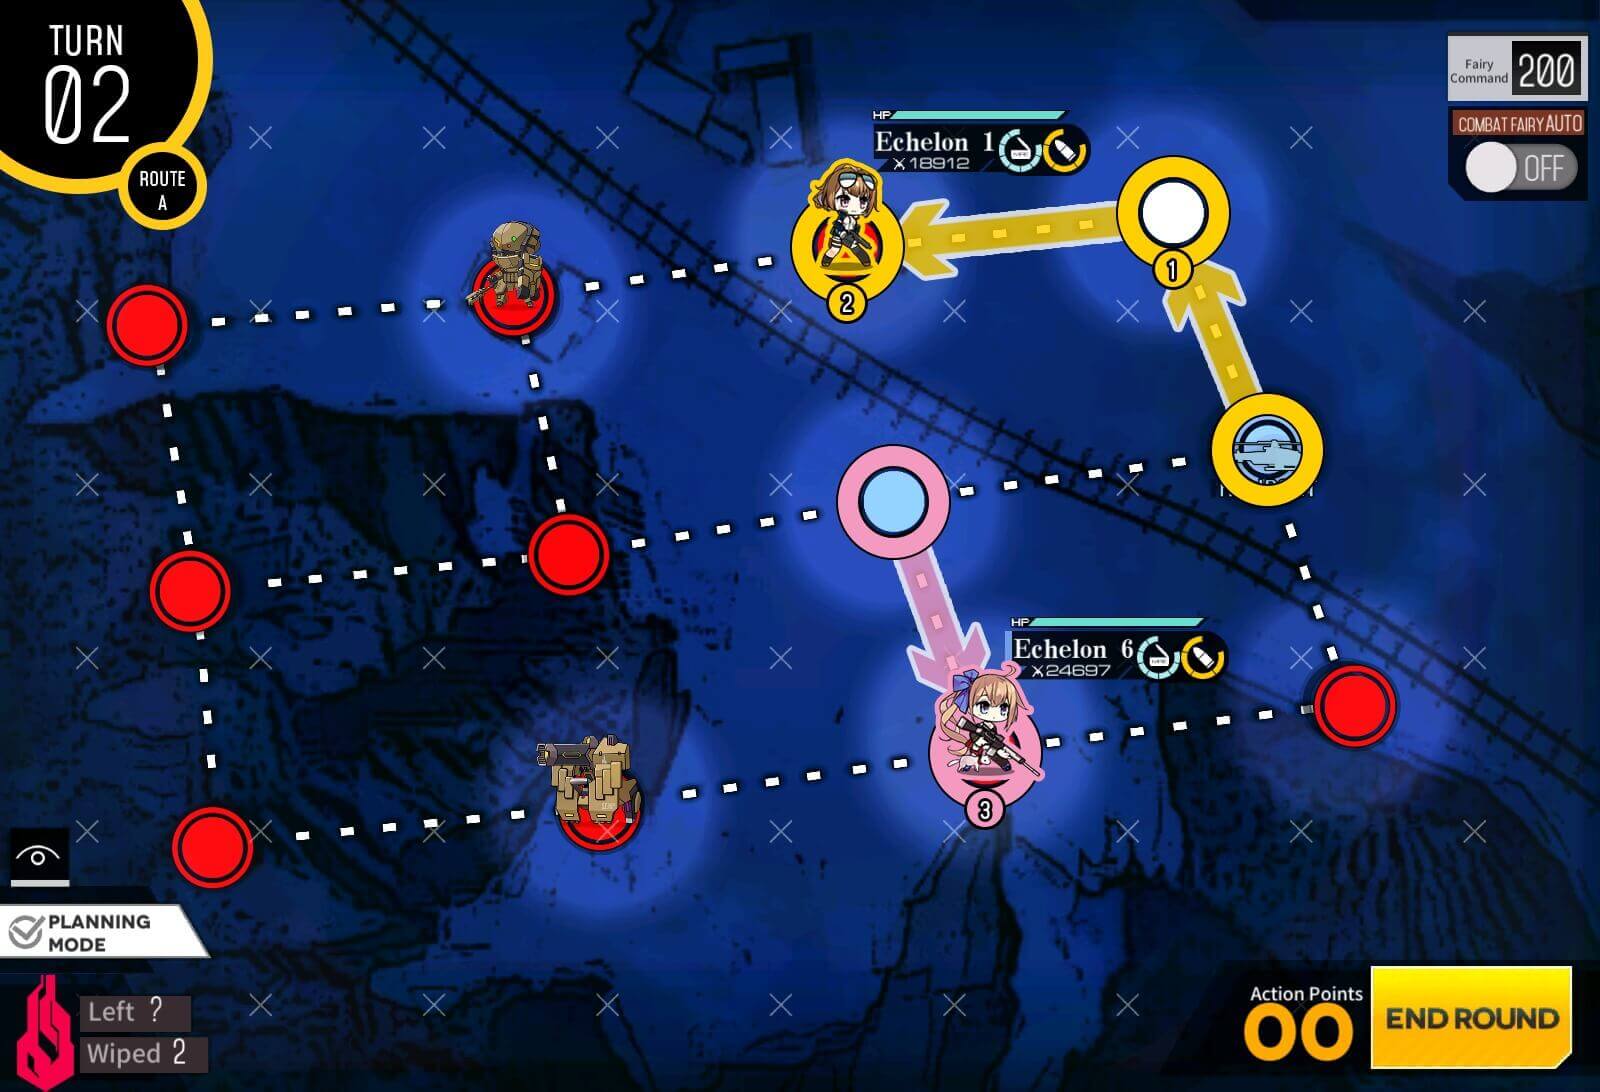
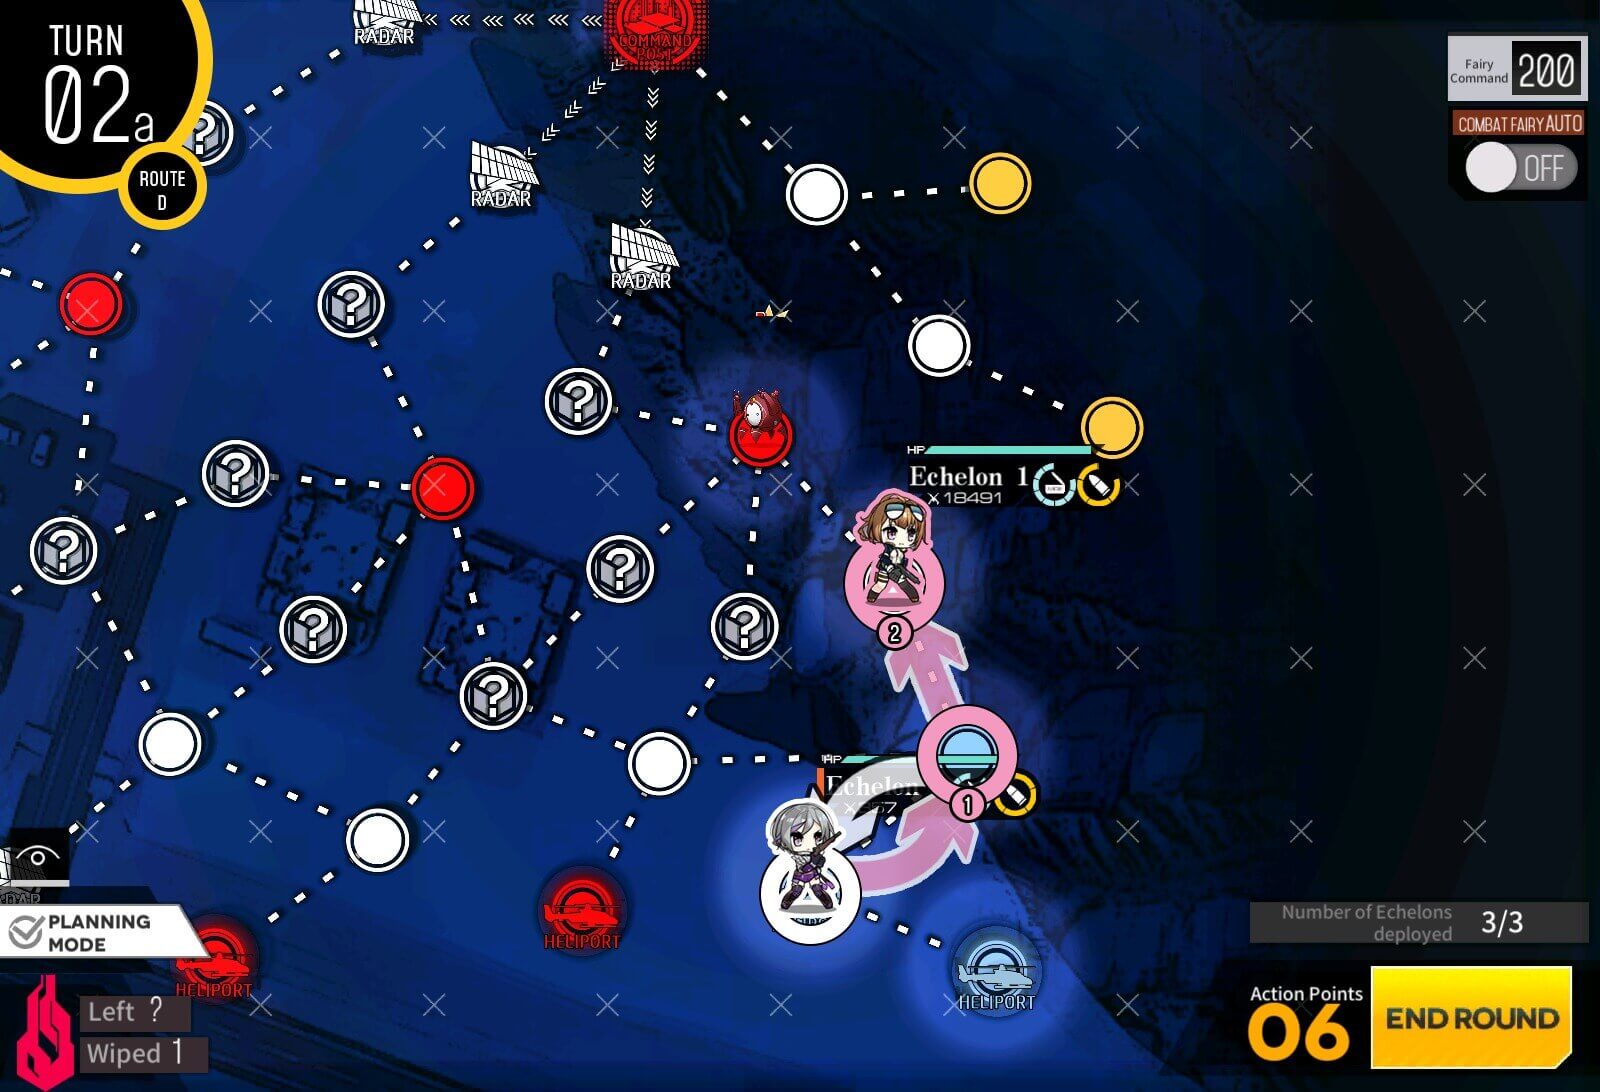
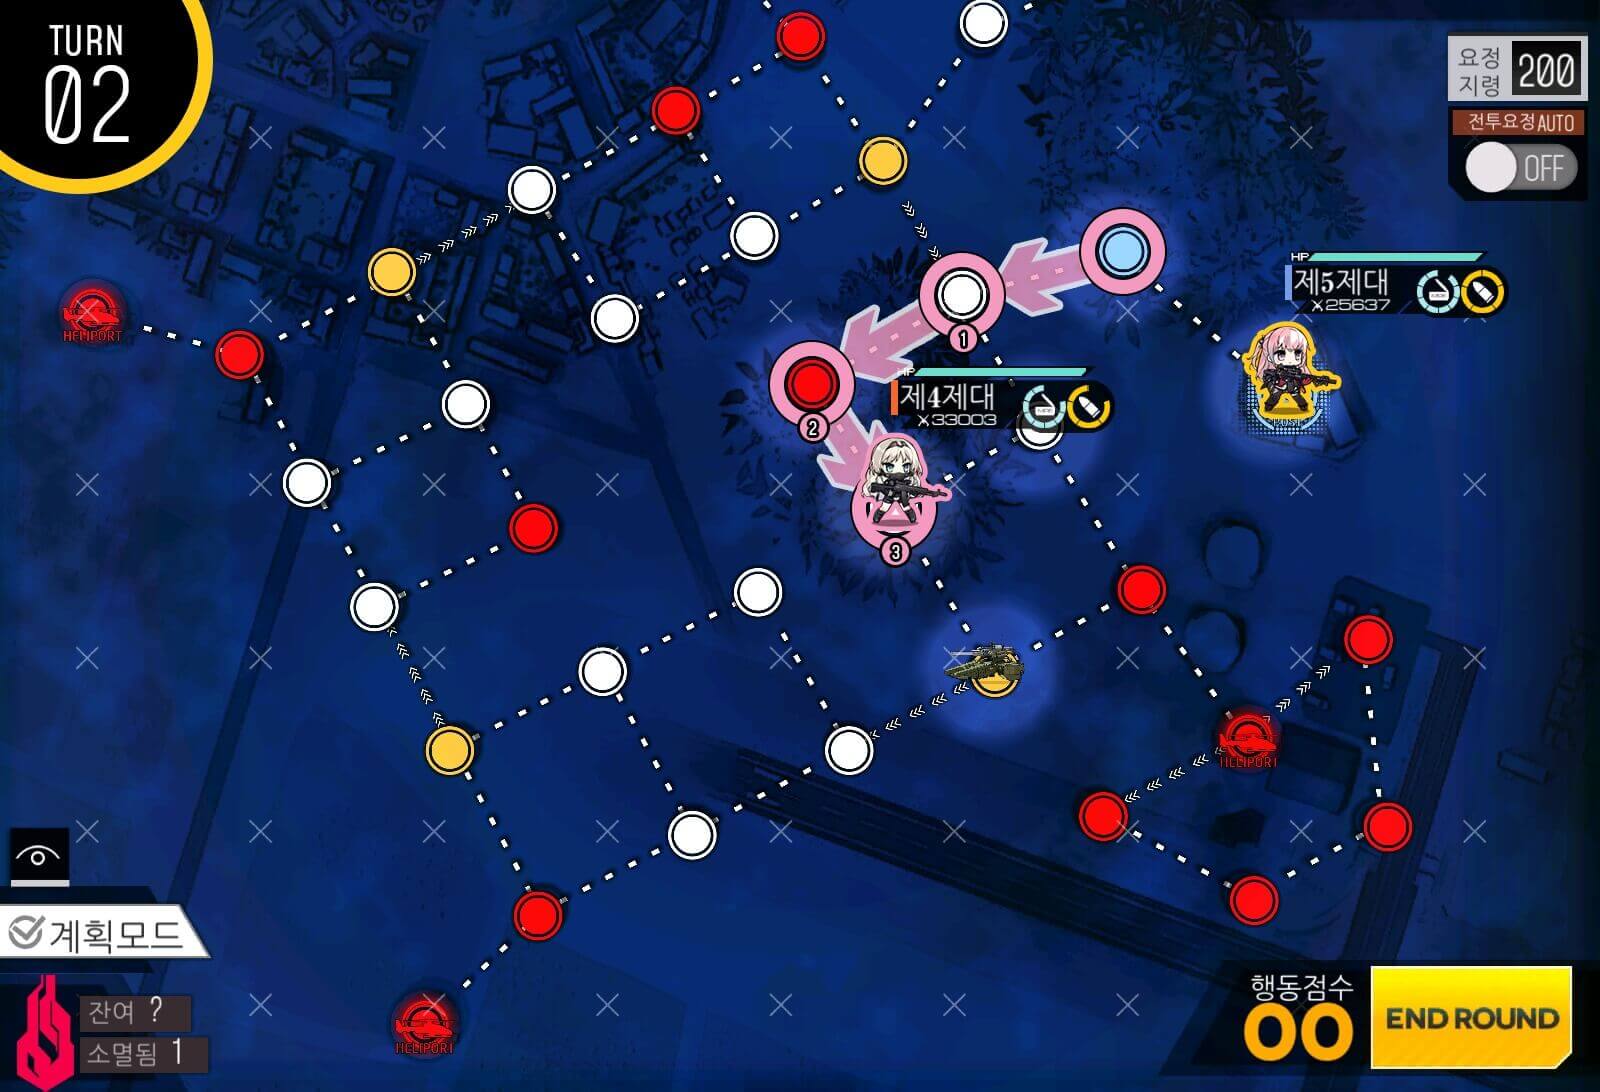
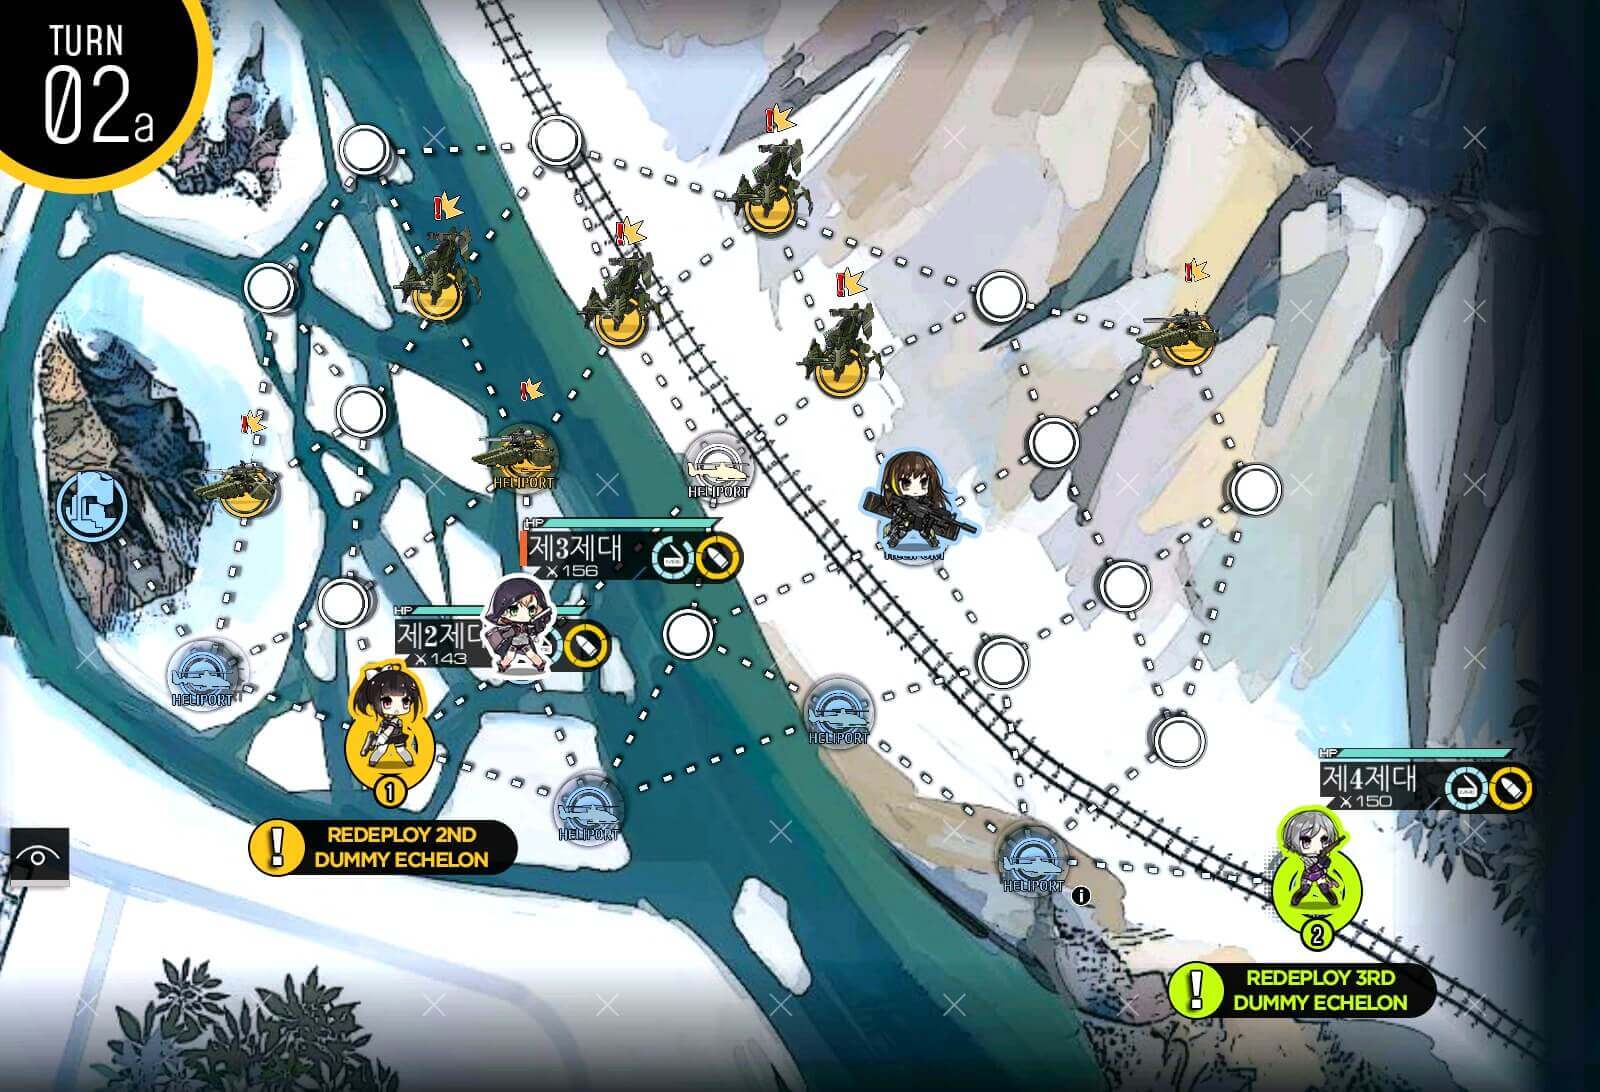
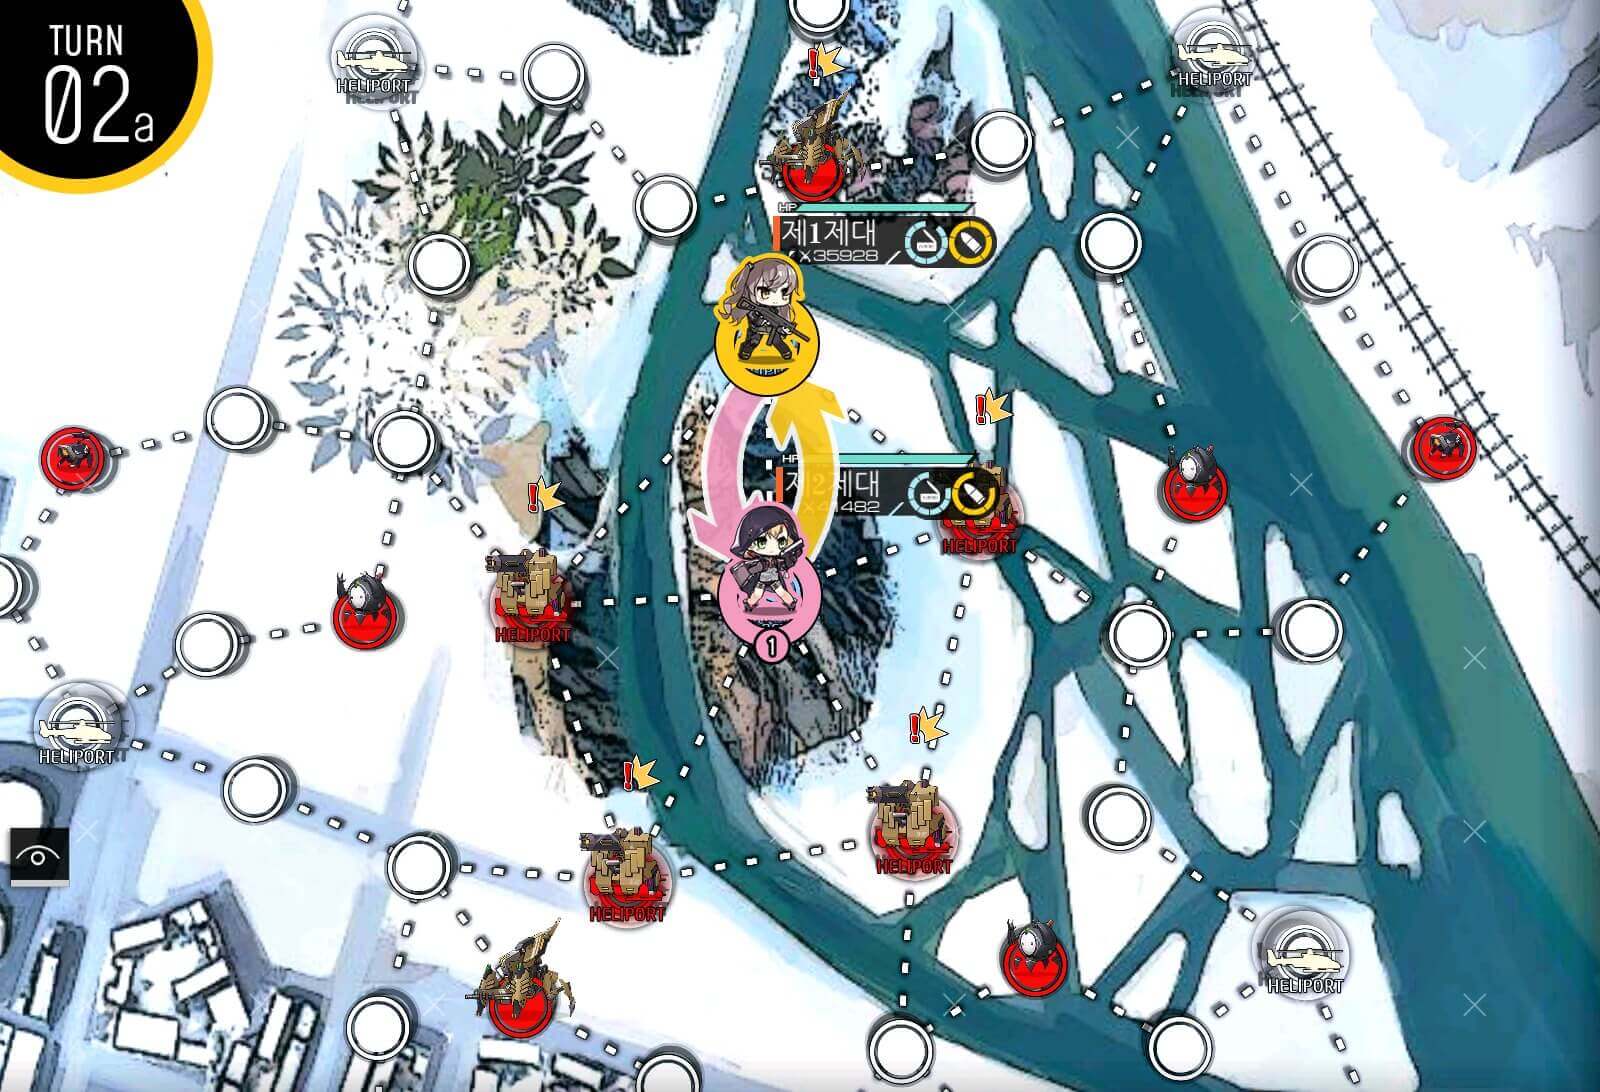
Turn 2a
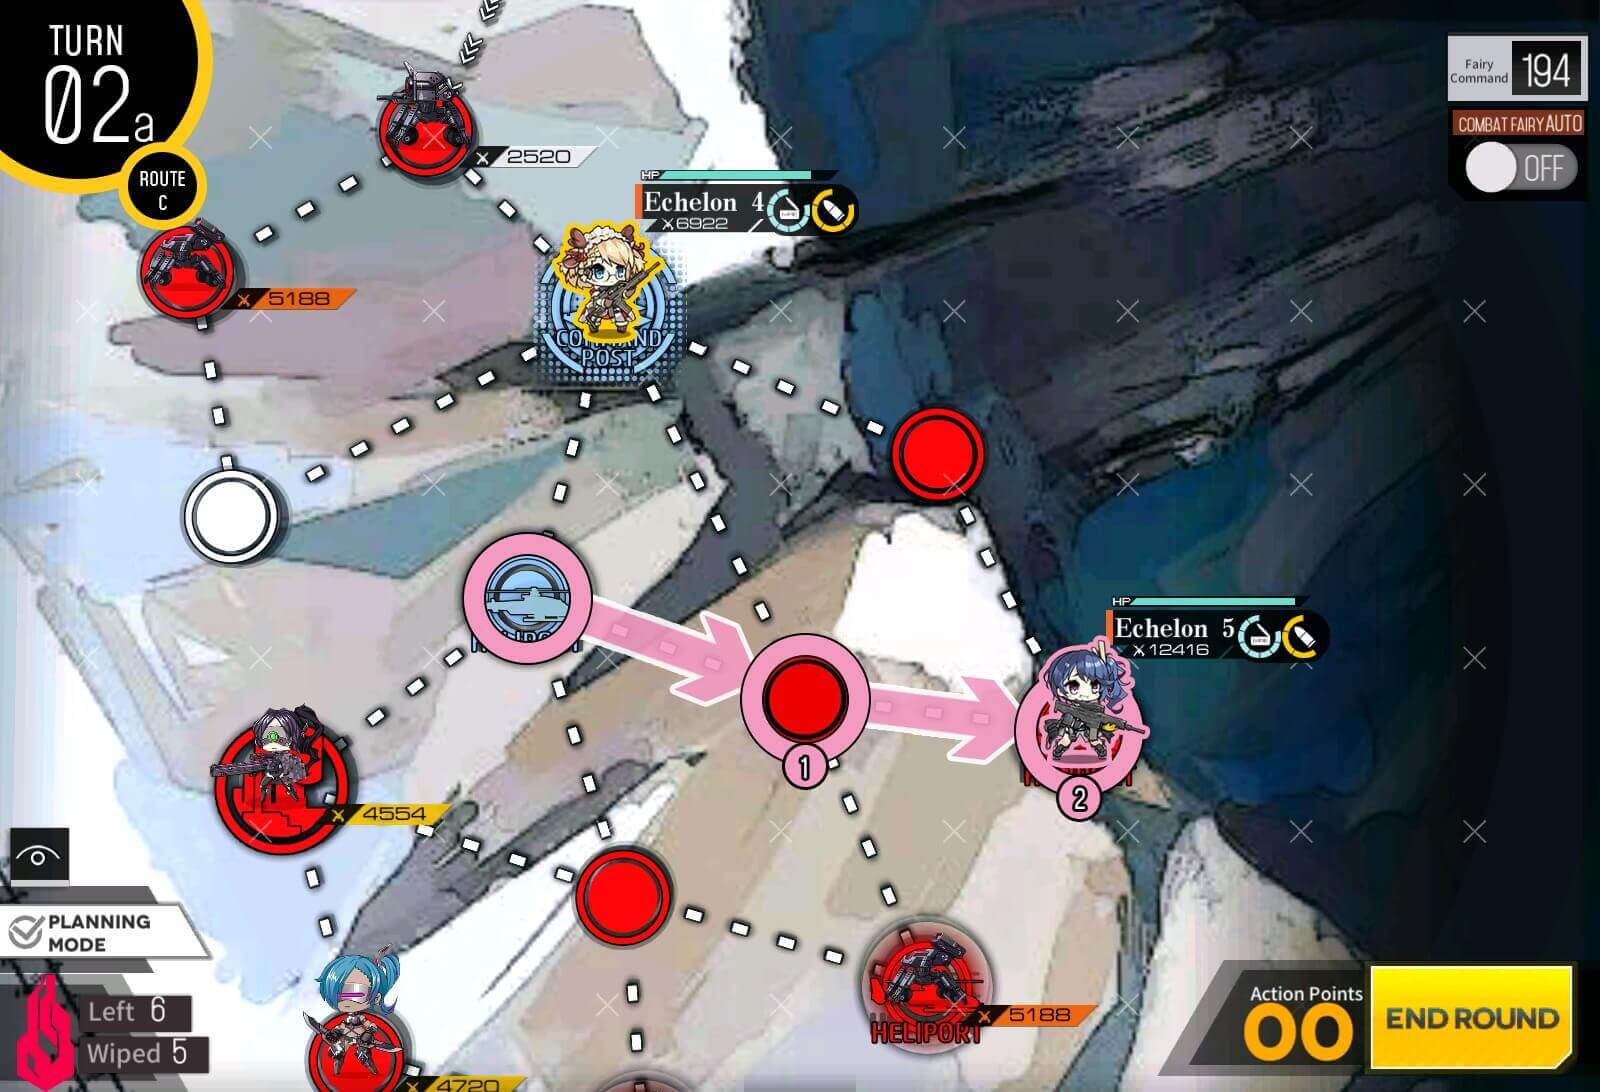
Before moving on turn 2, make sure to swap and resupply as it will need to fight five more times.
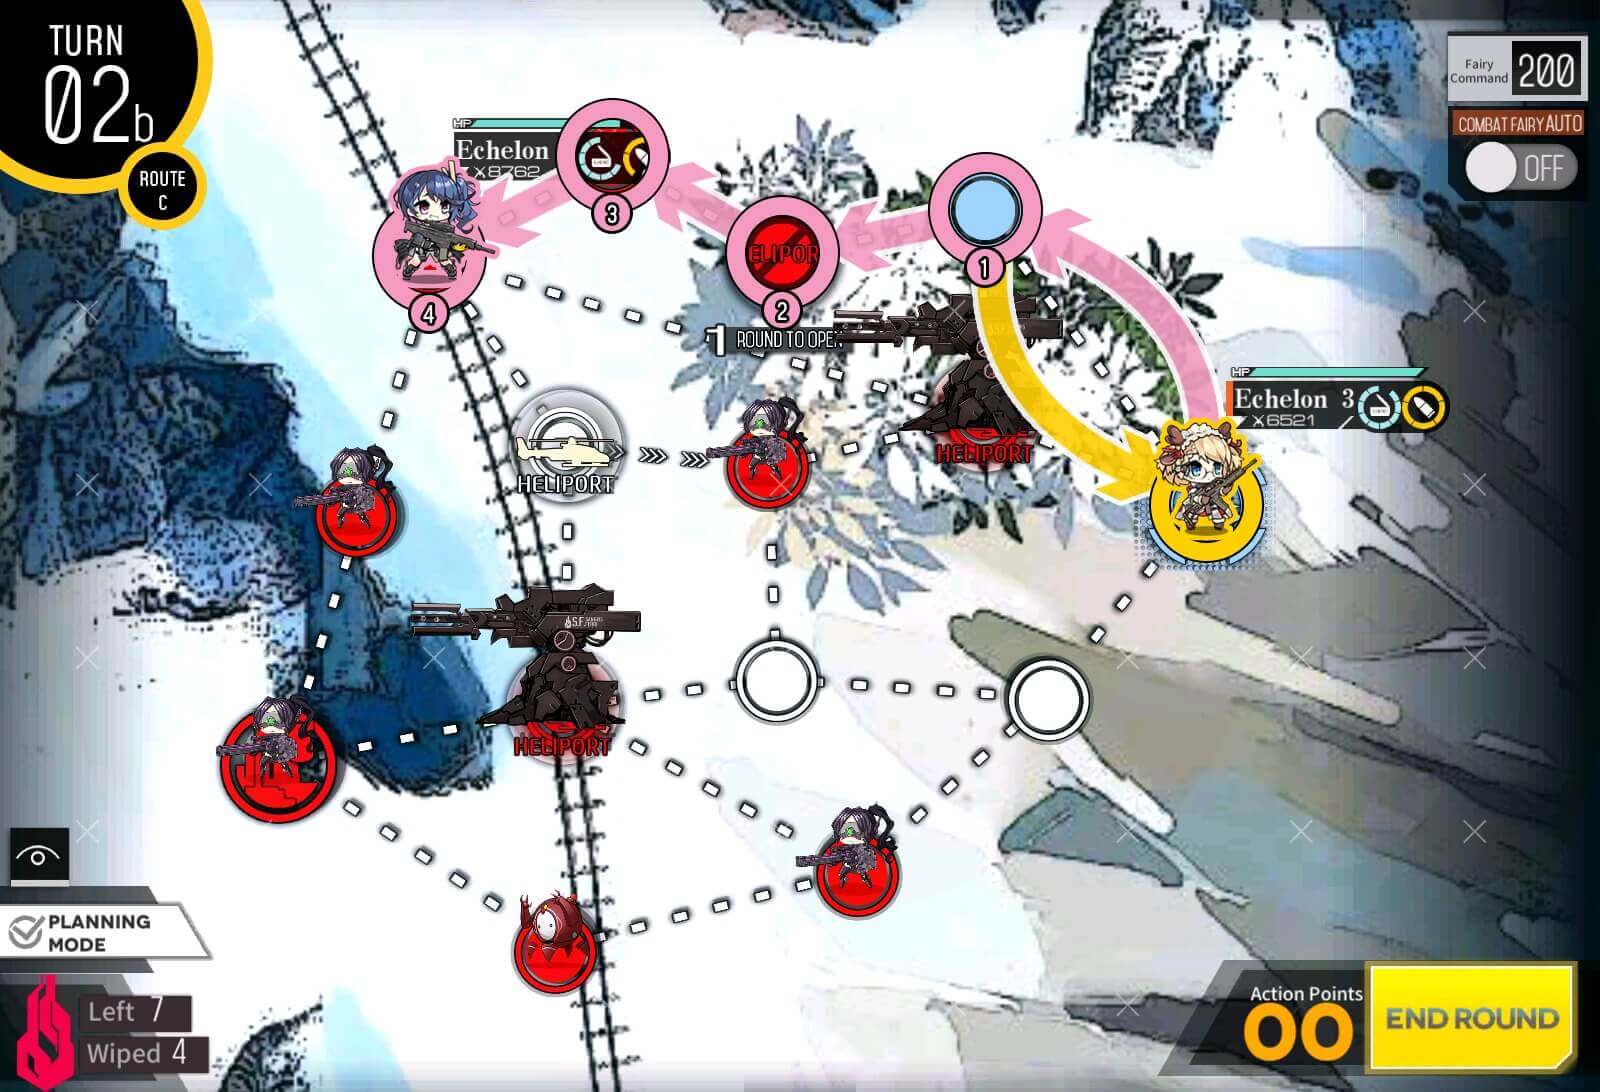
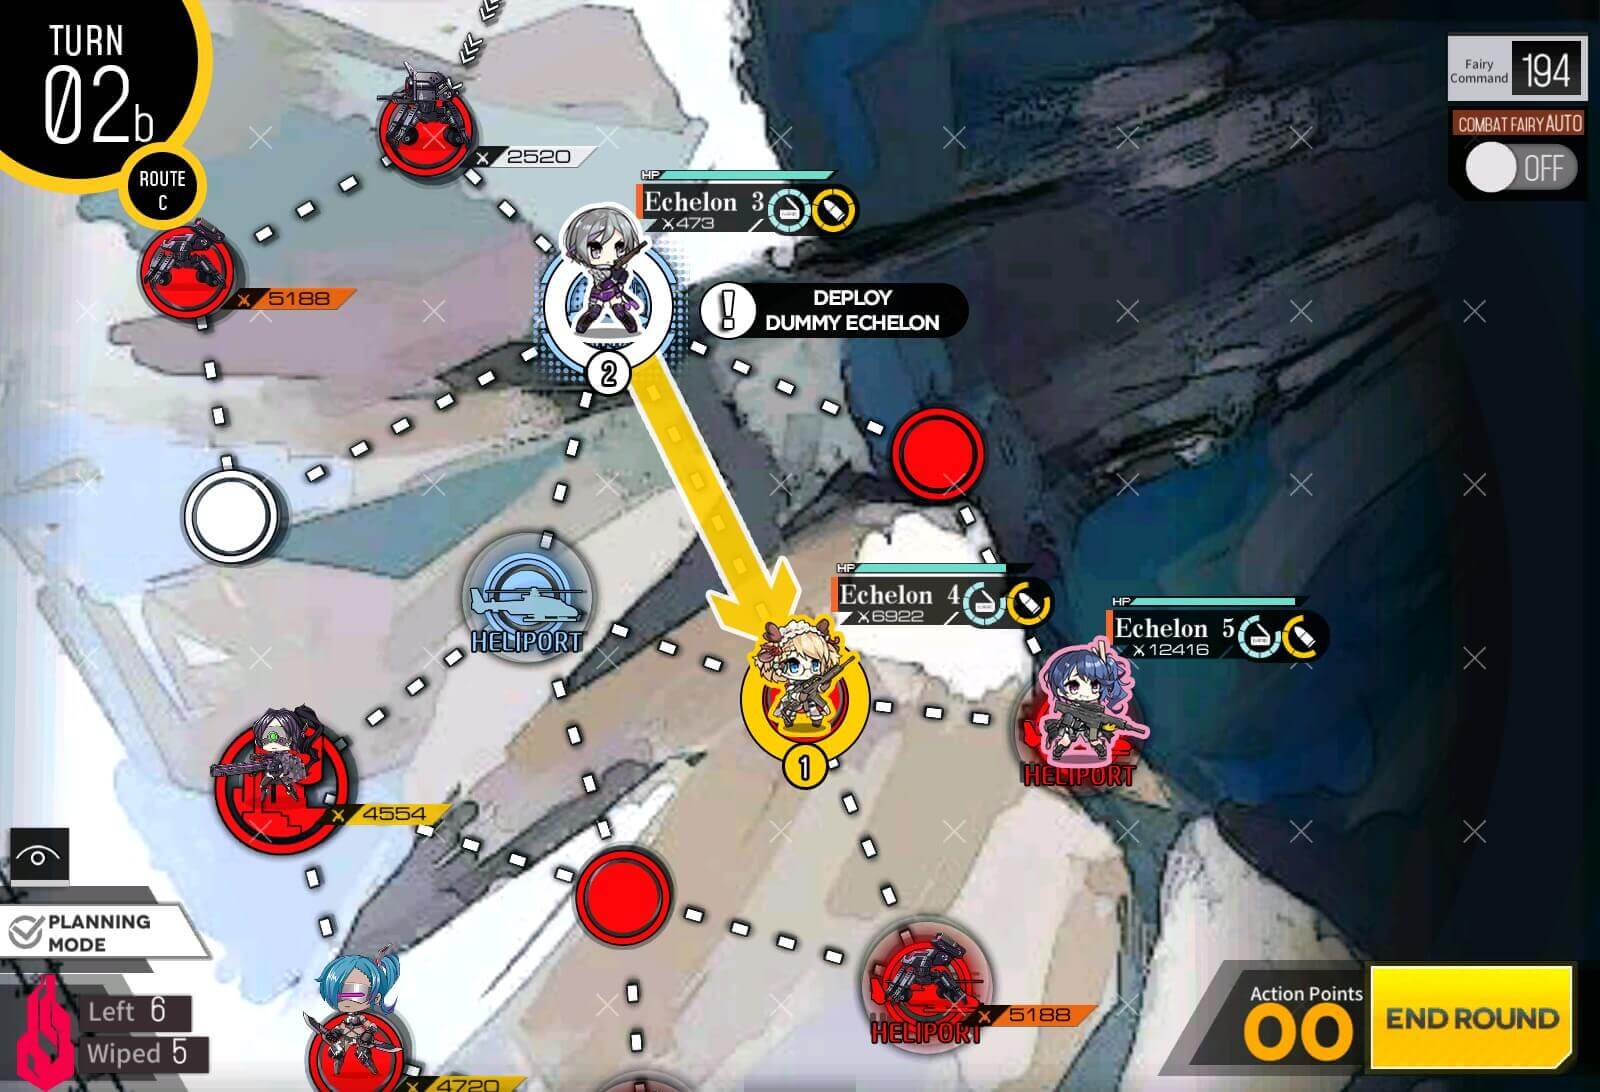
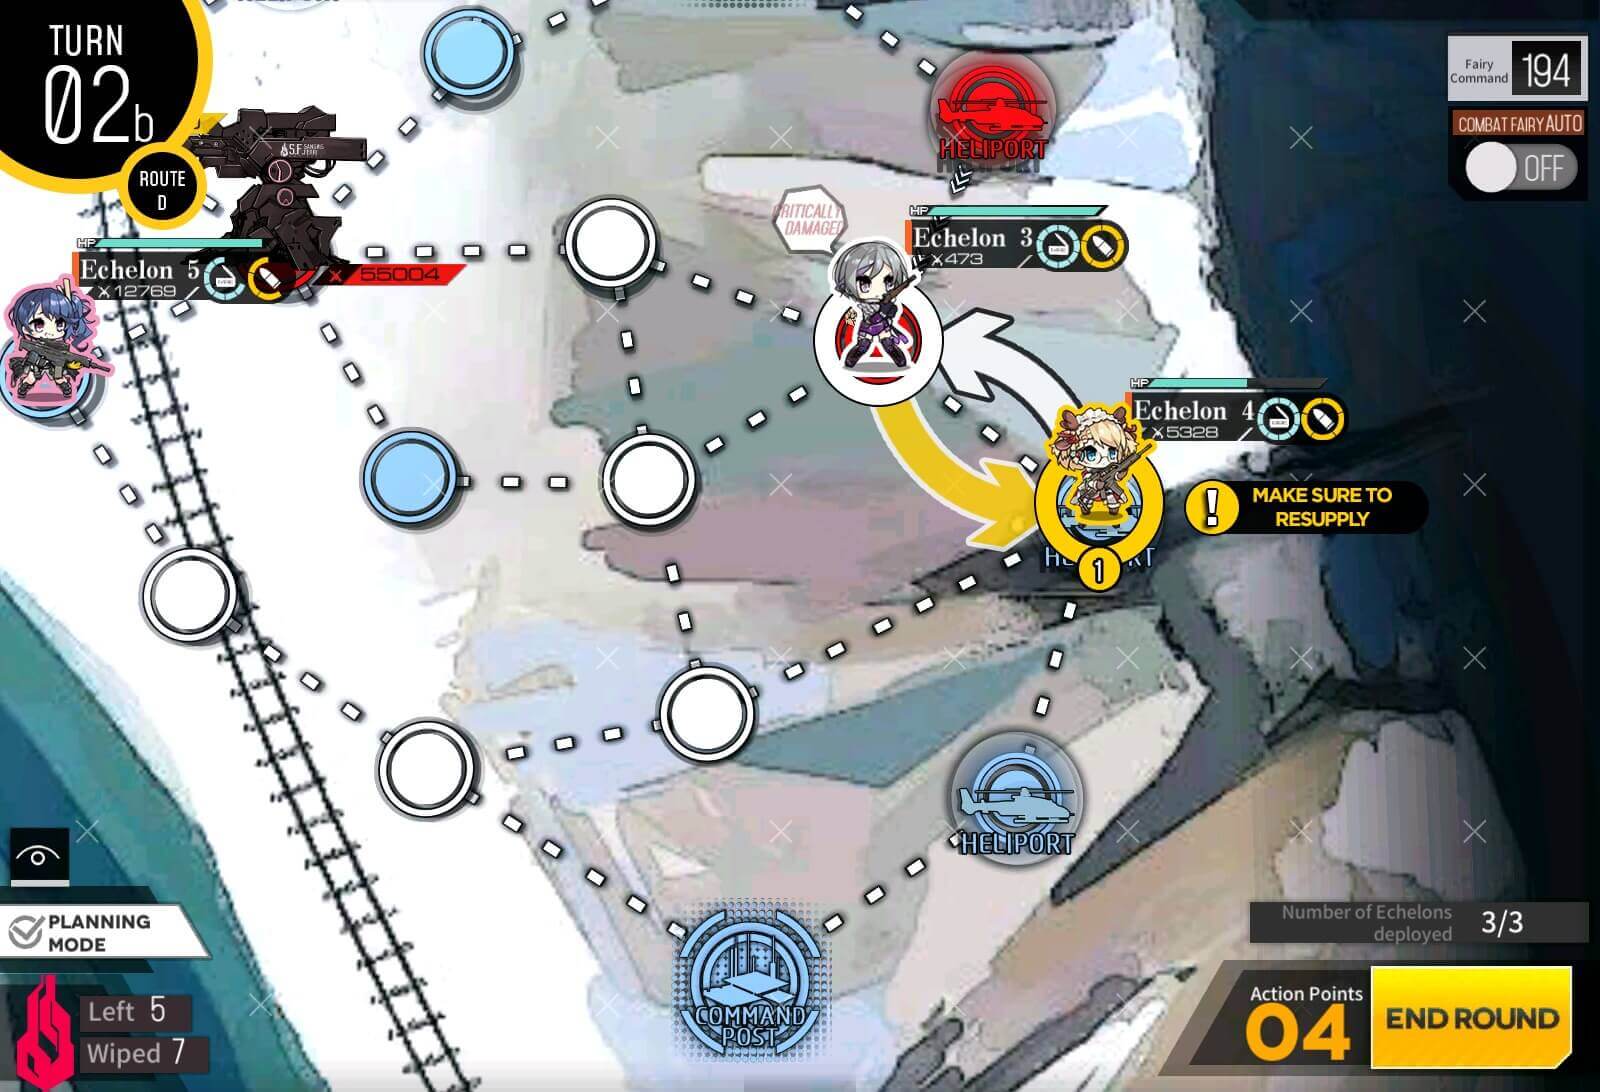
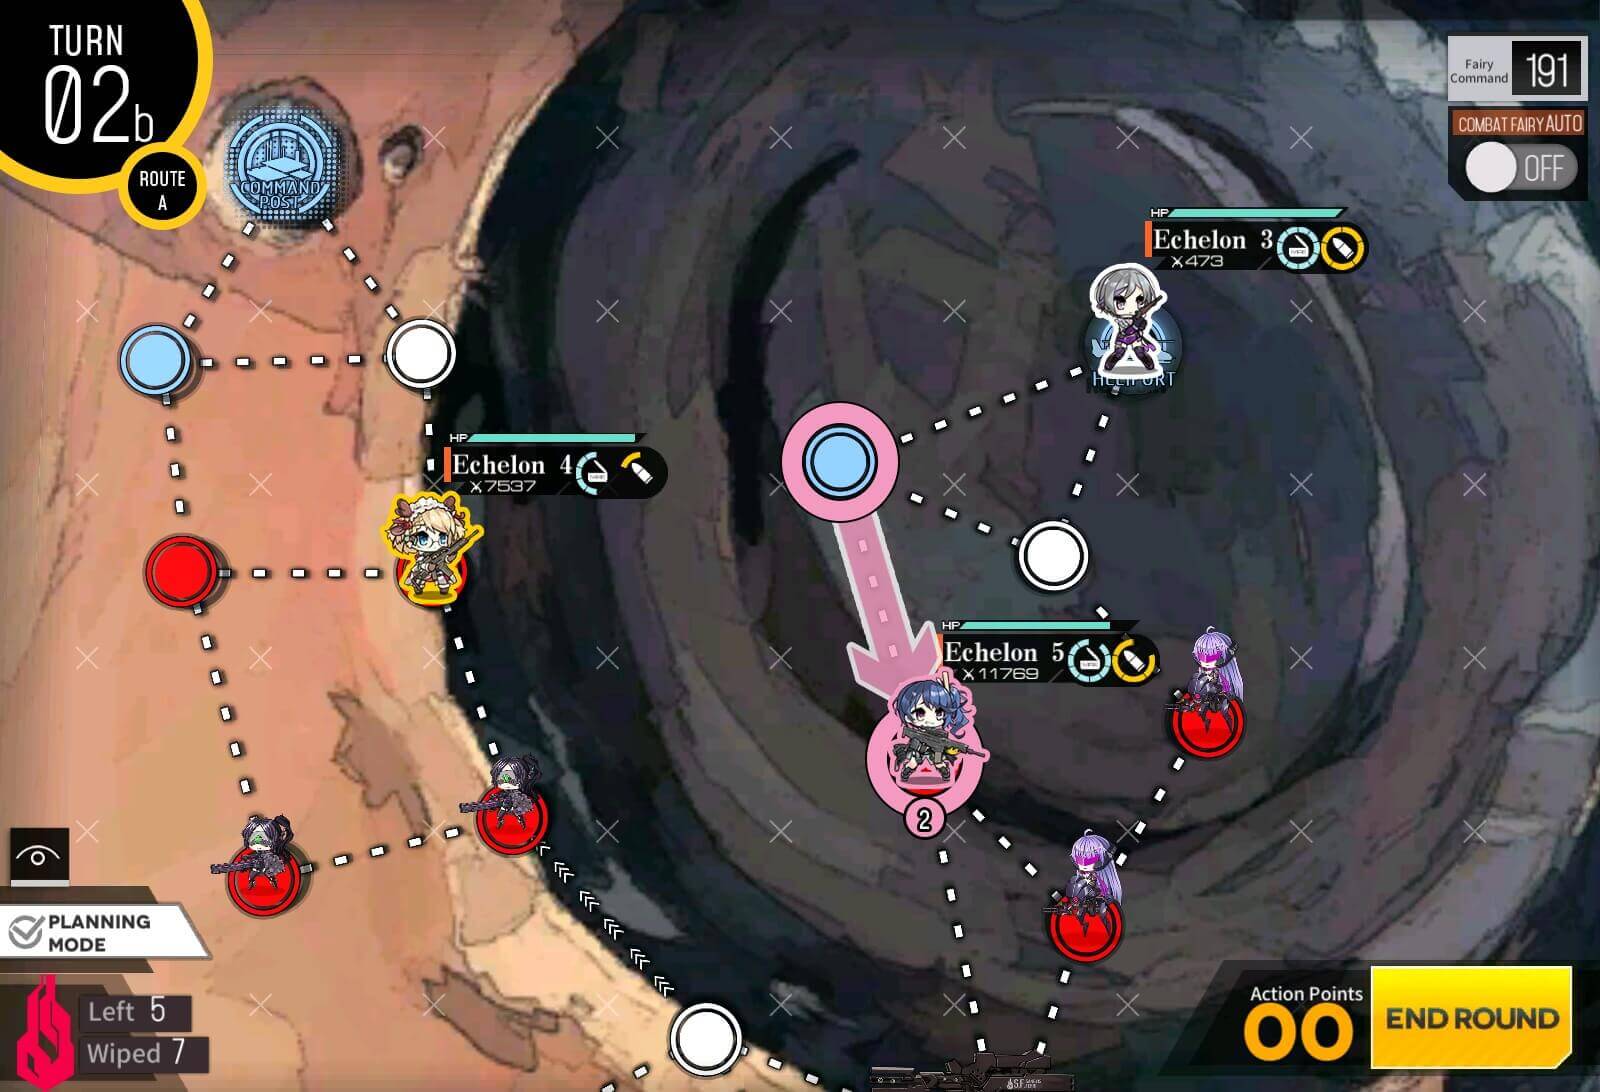
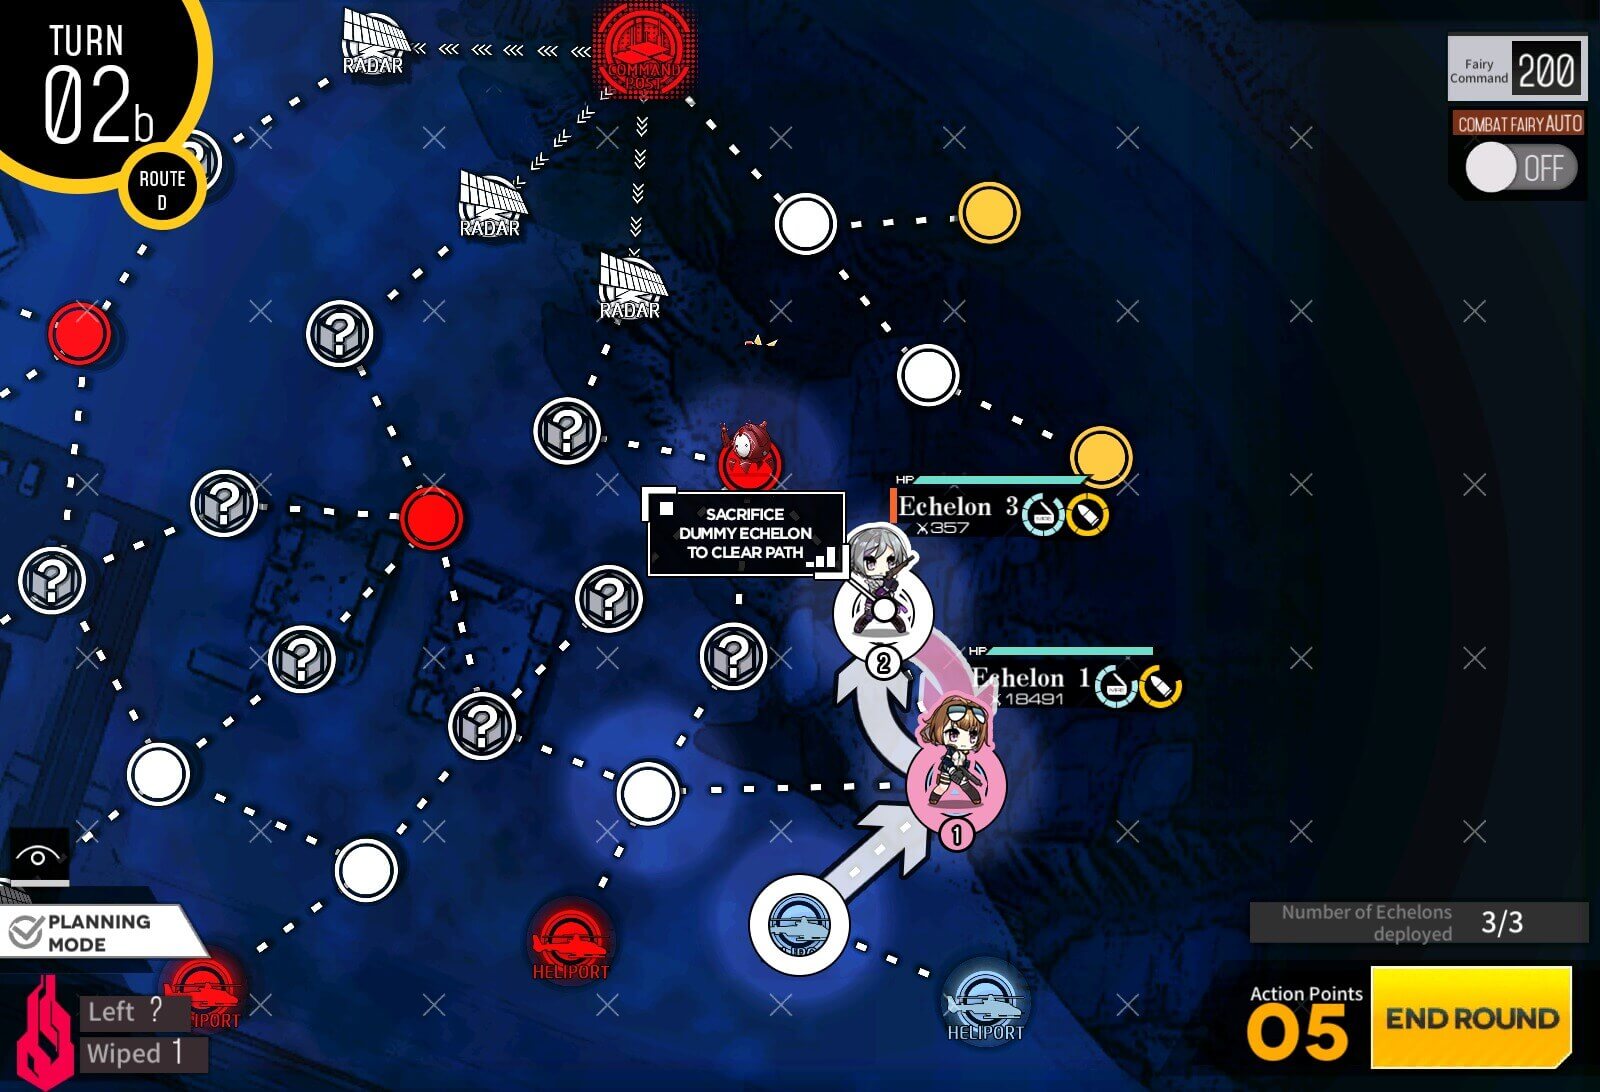
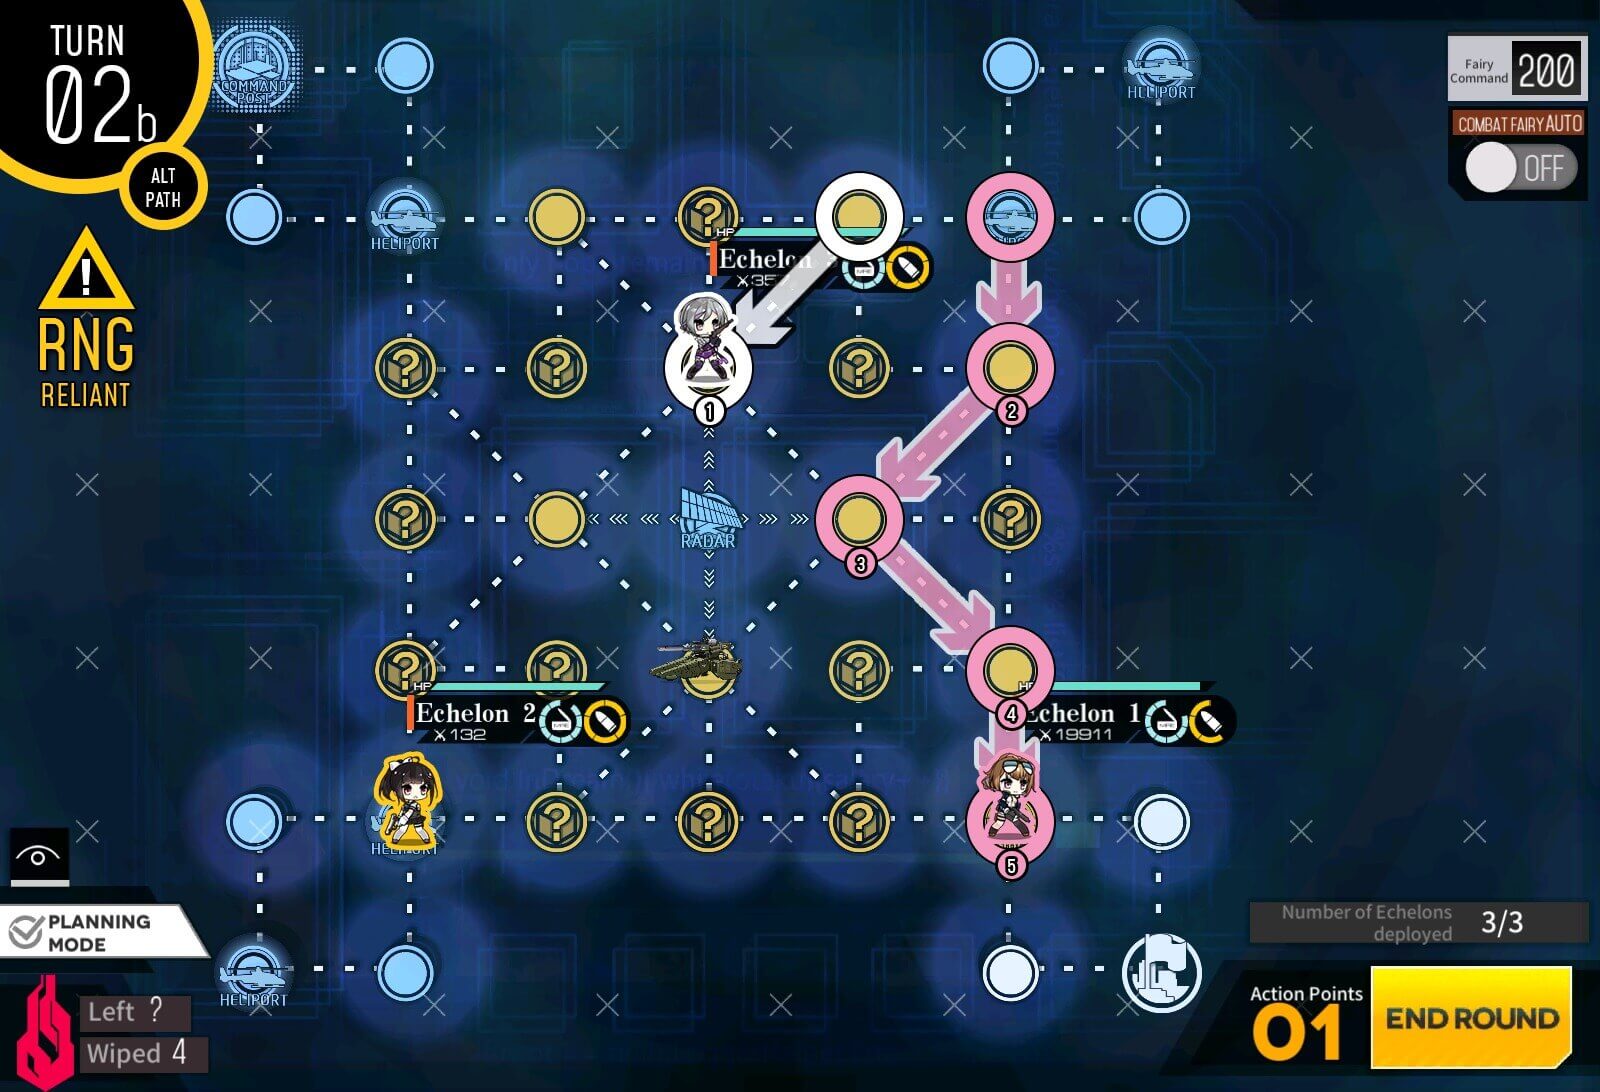
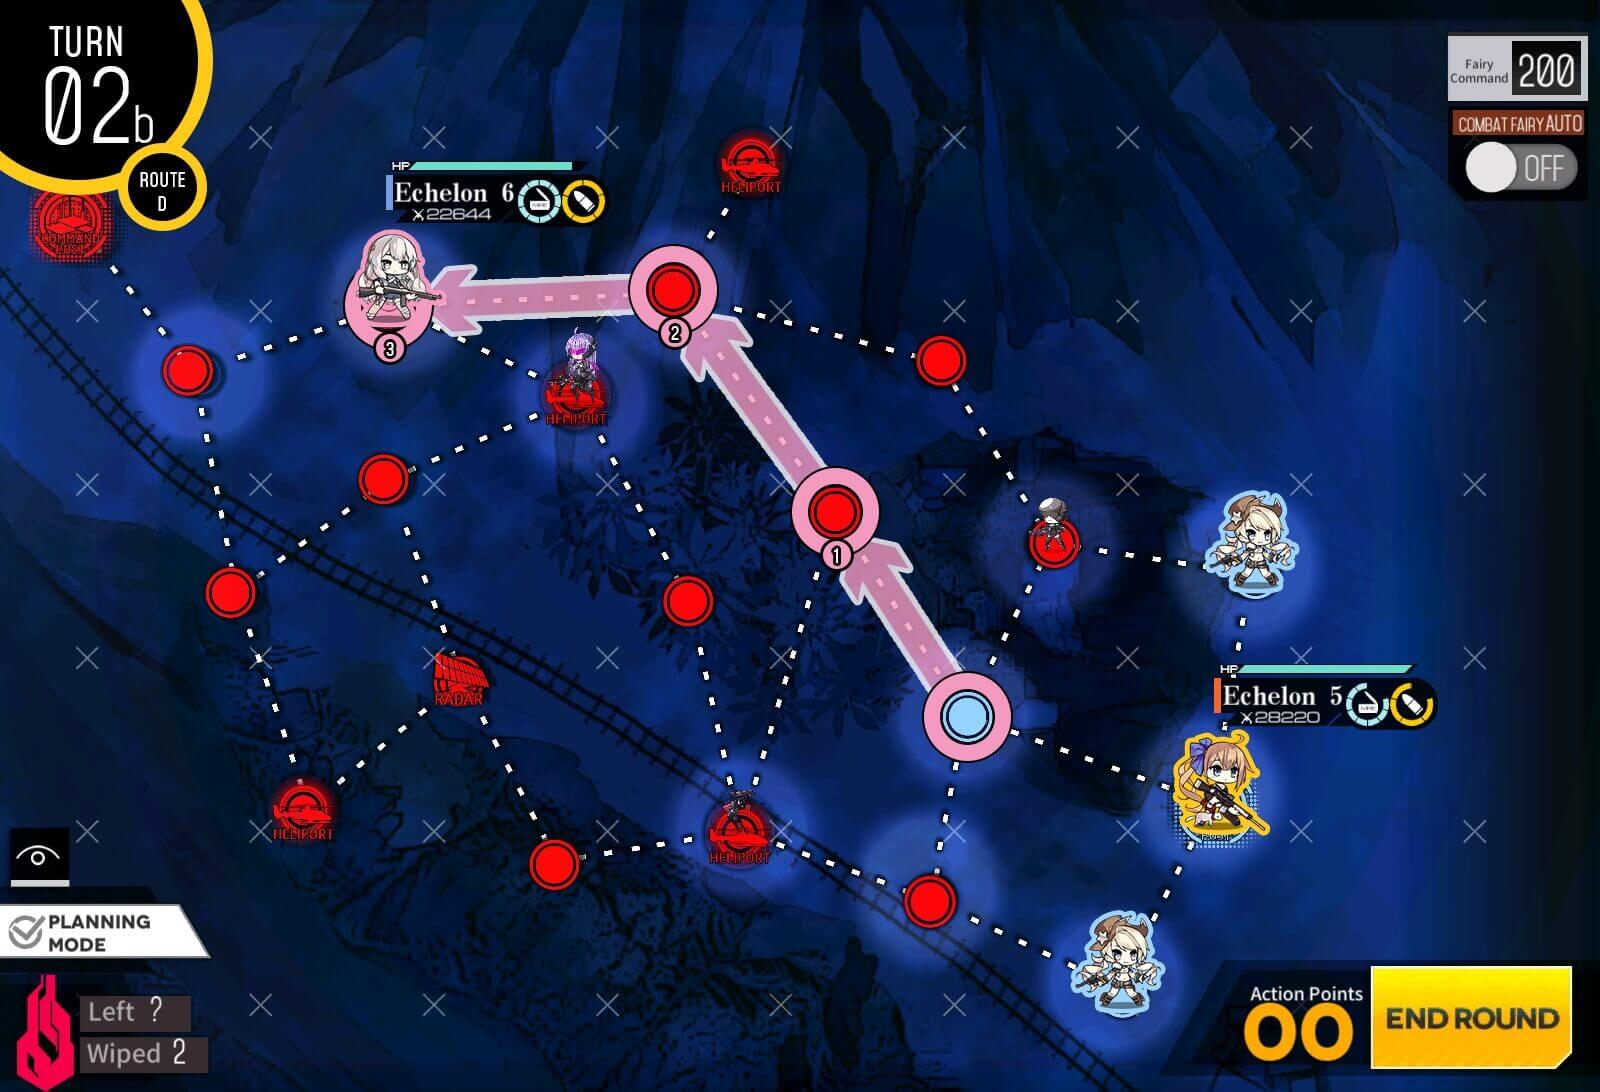
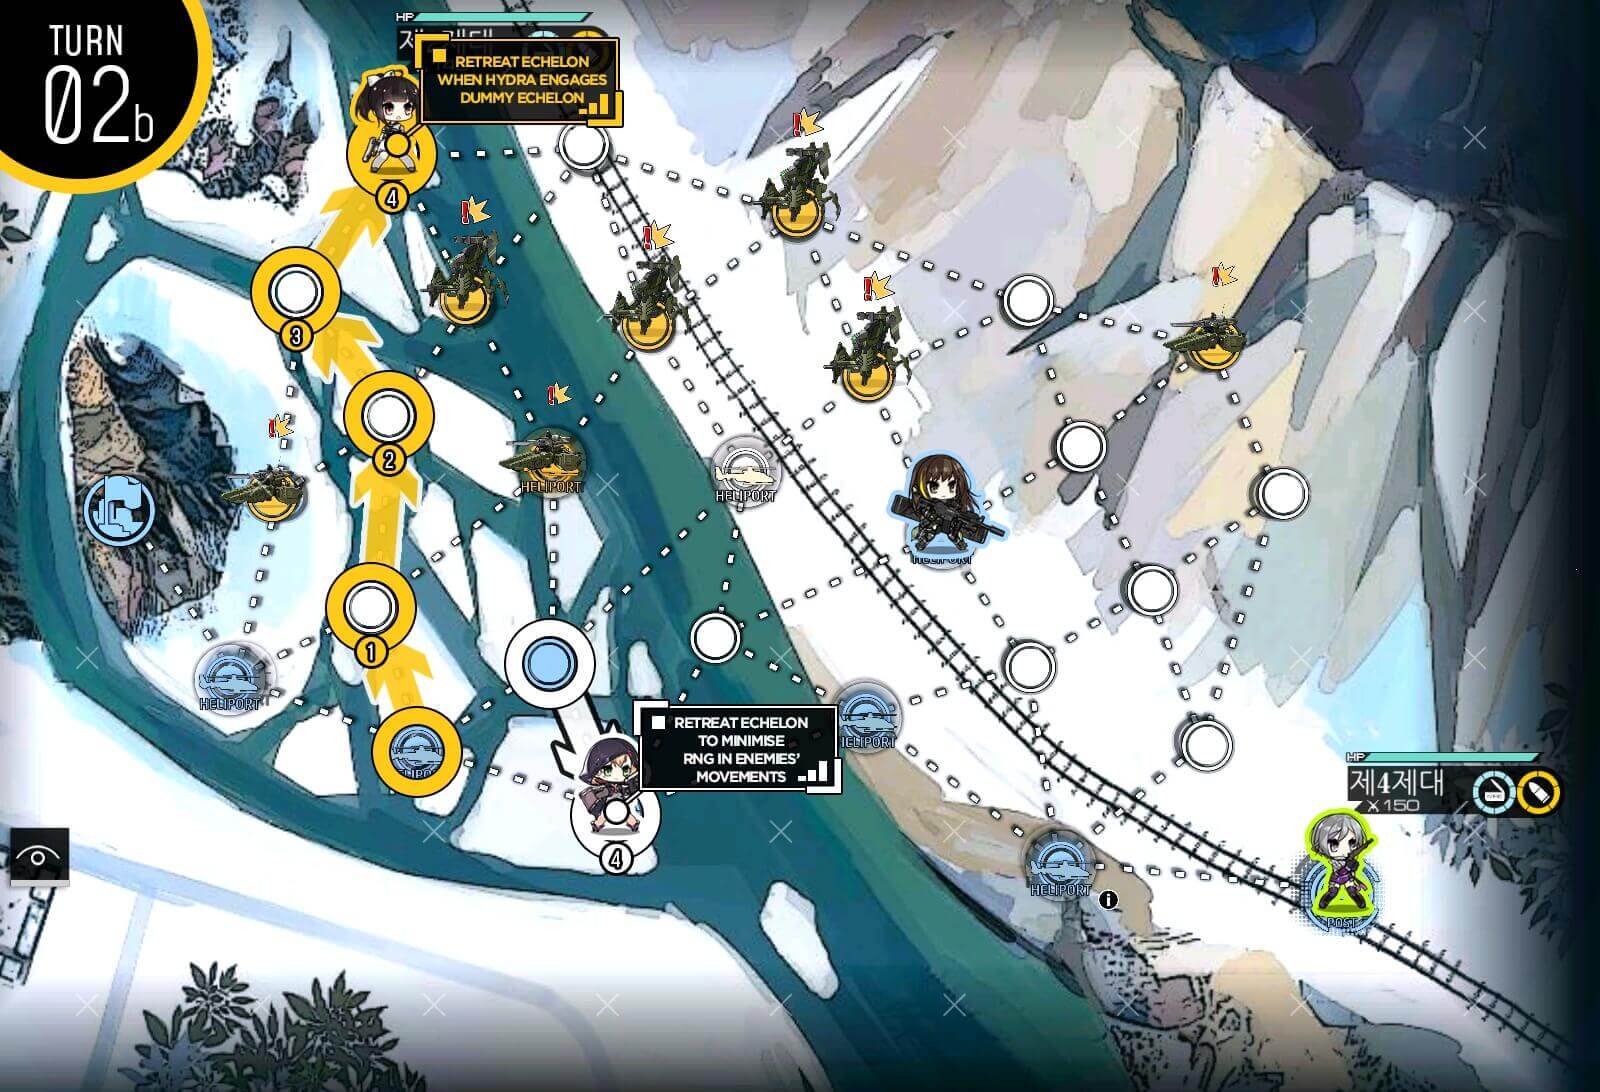
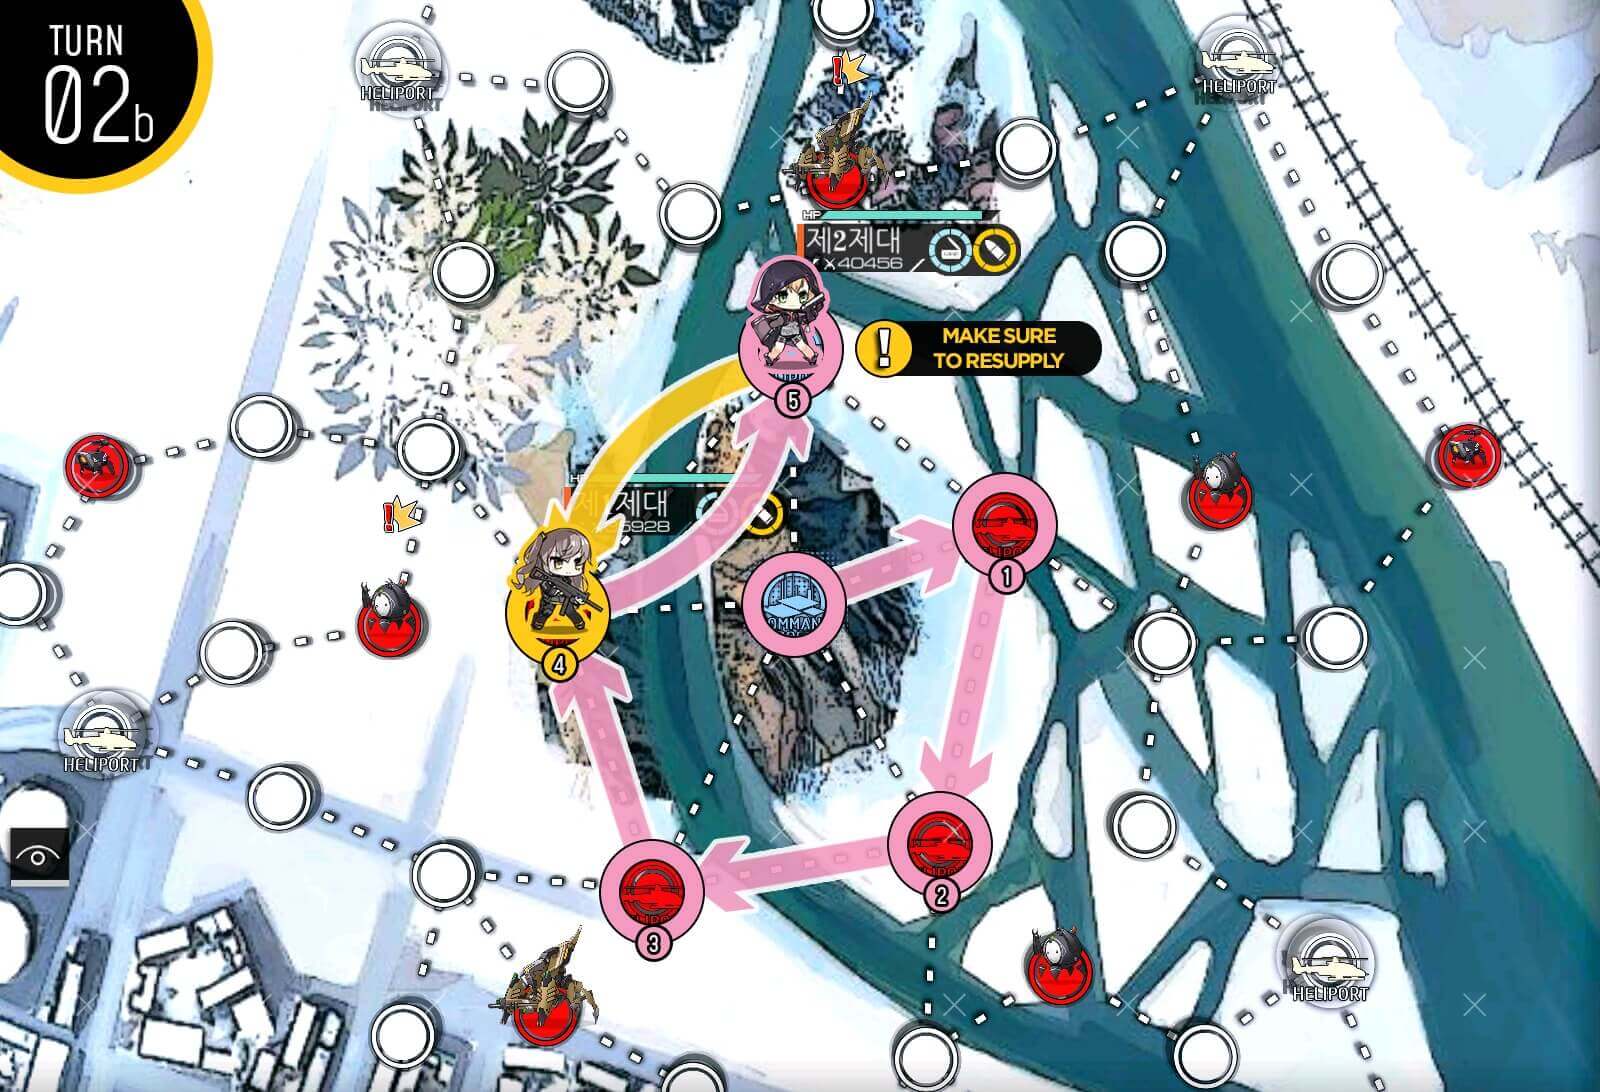
Turn 2b
Swap back to the front and move 3 to the left, this prevents helipad from being surrounded if you forgotten to resupply, giving you another location to resupply.

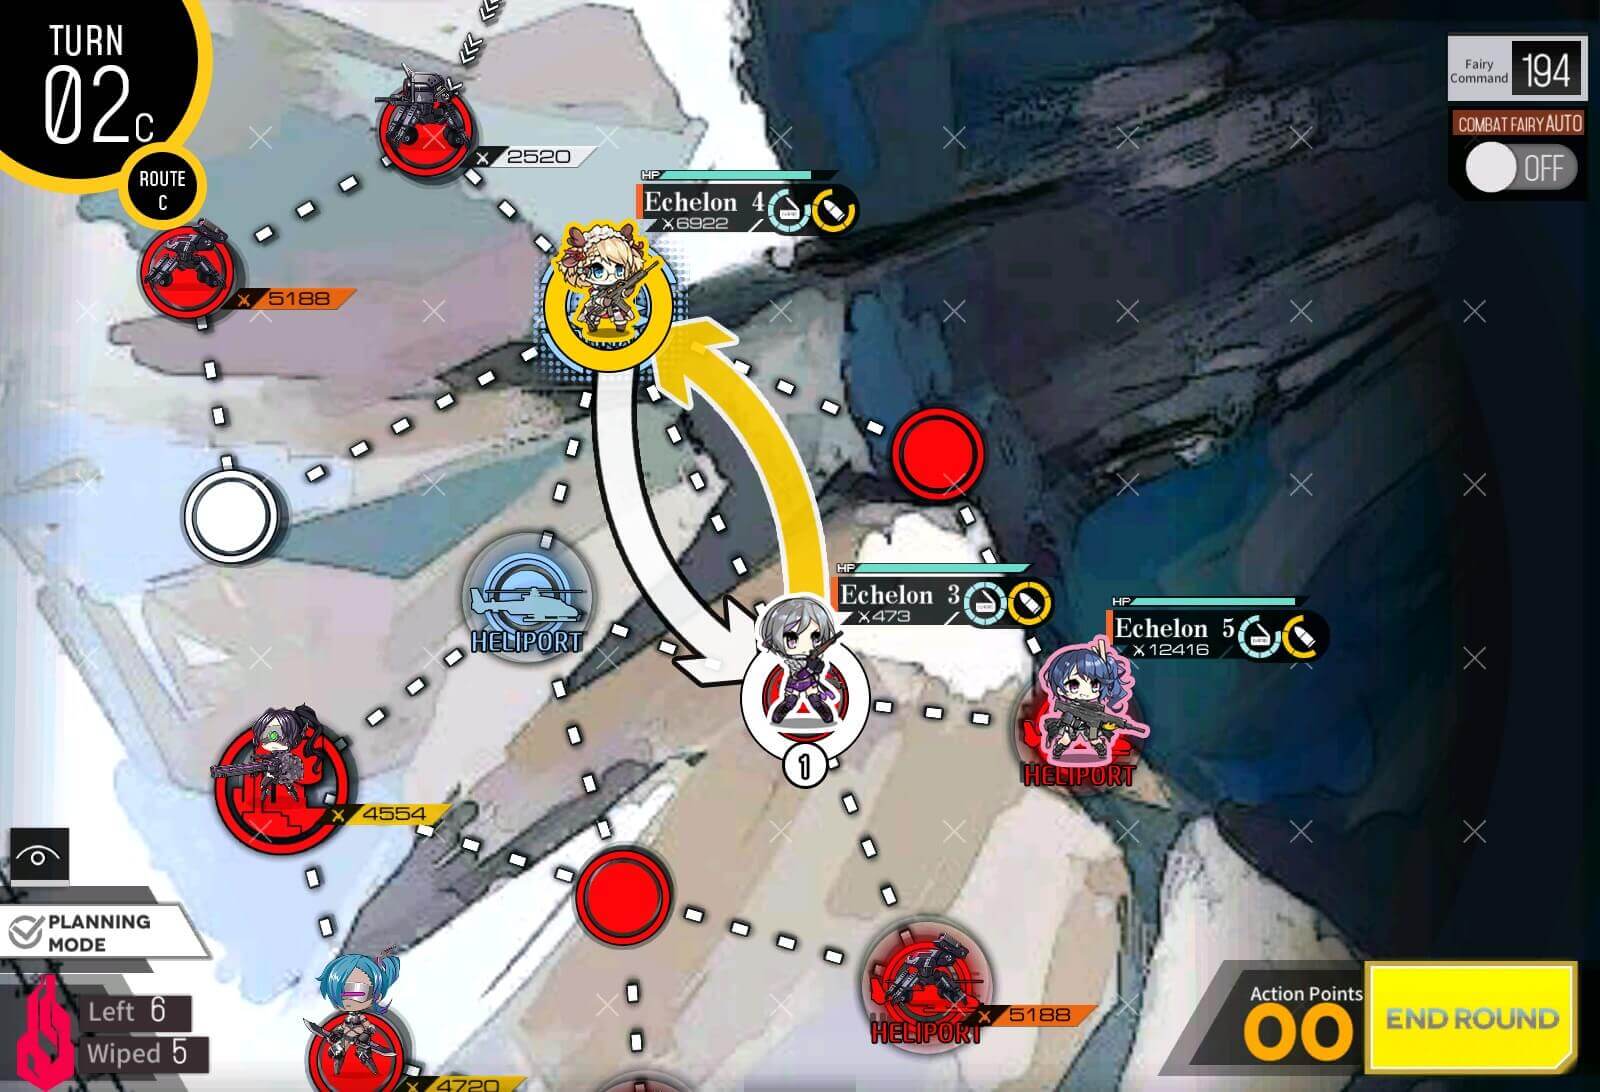
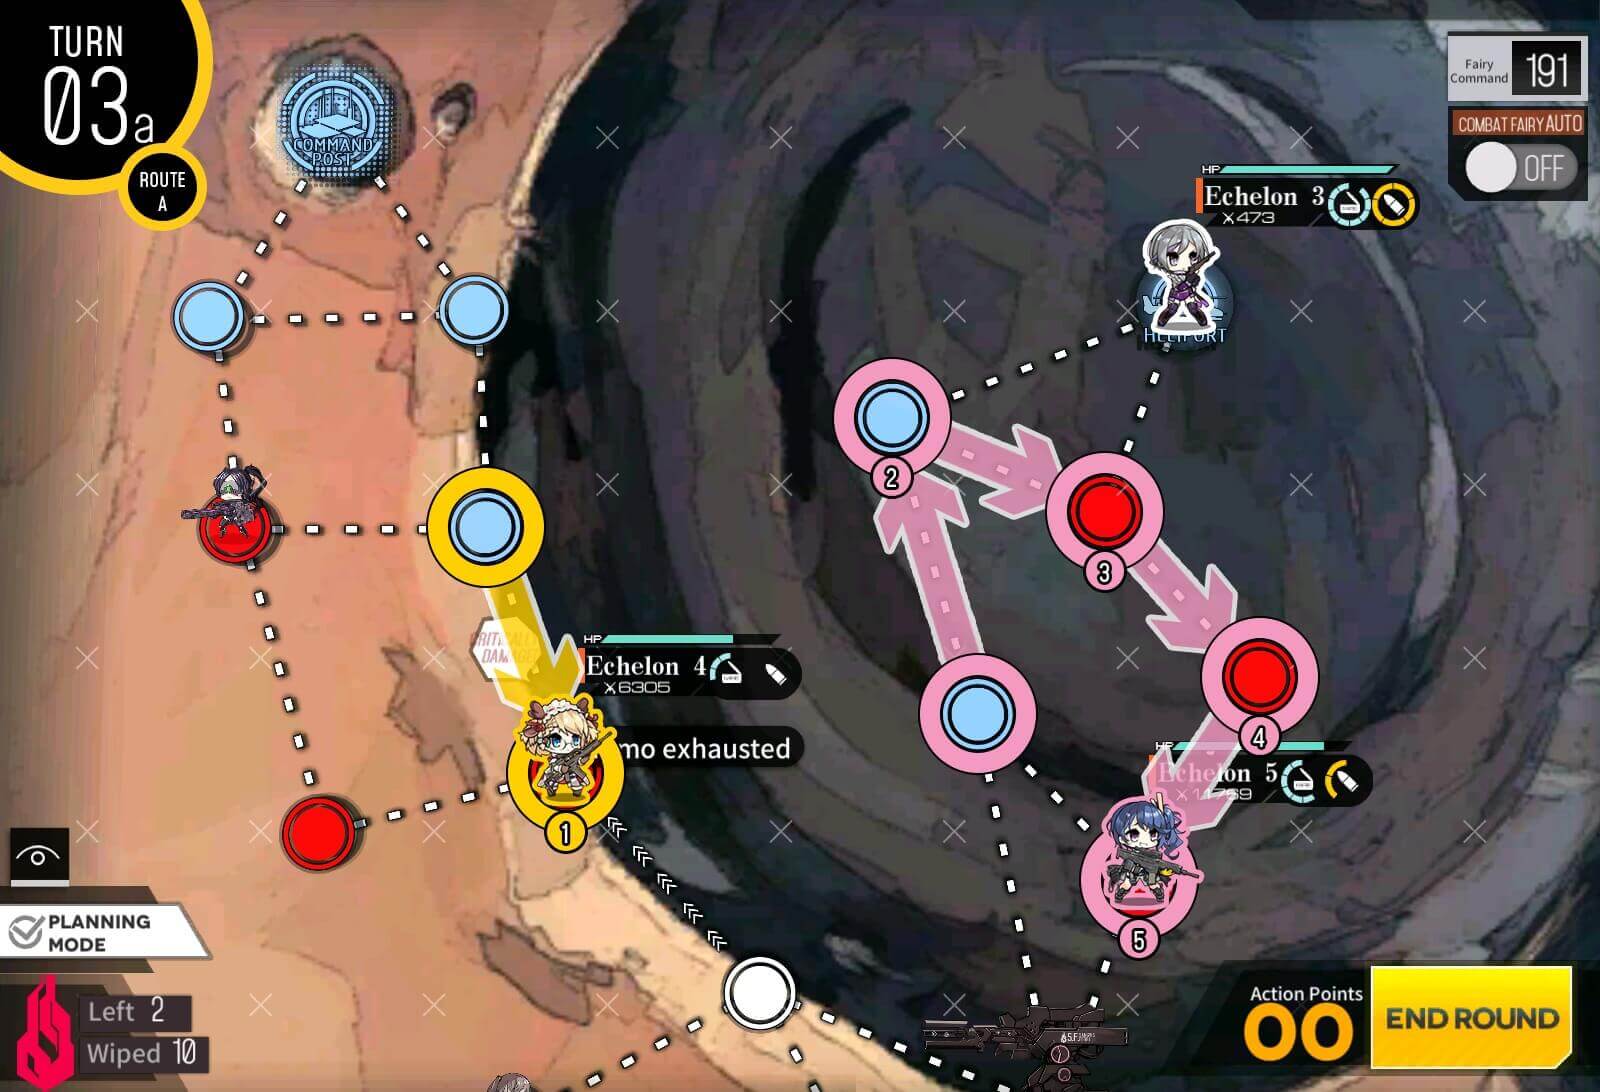
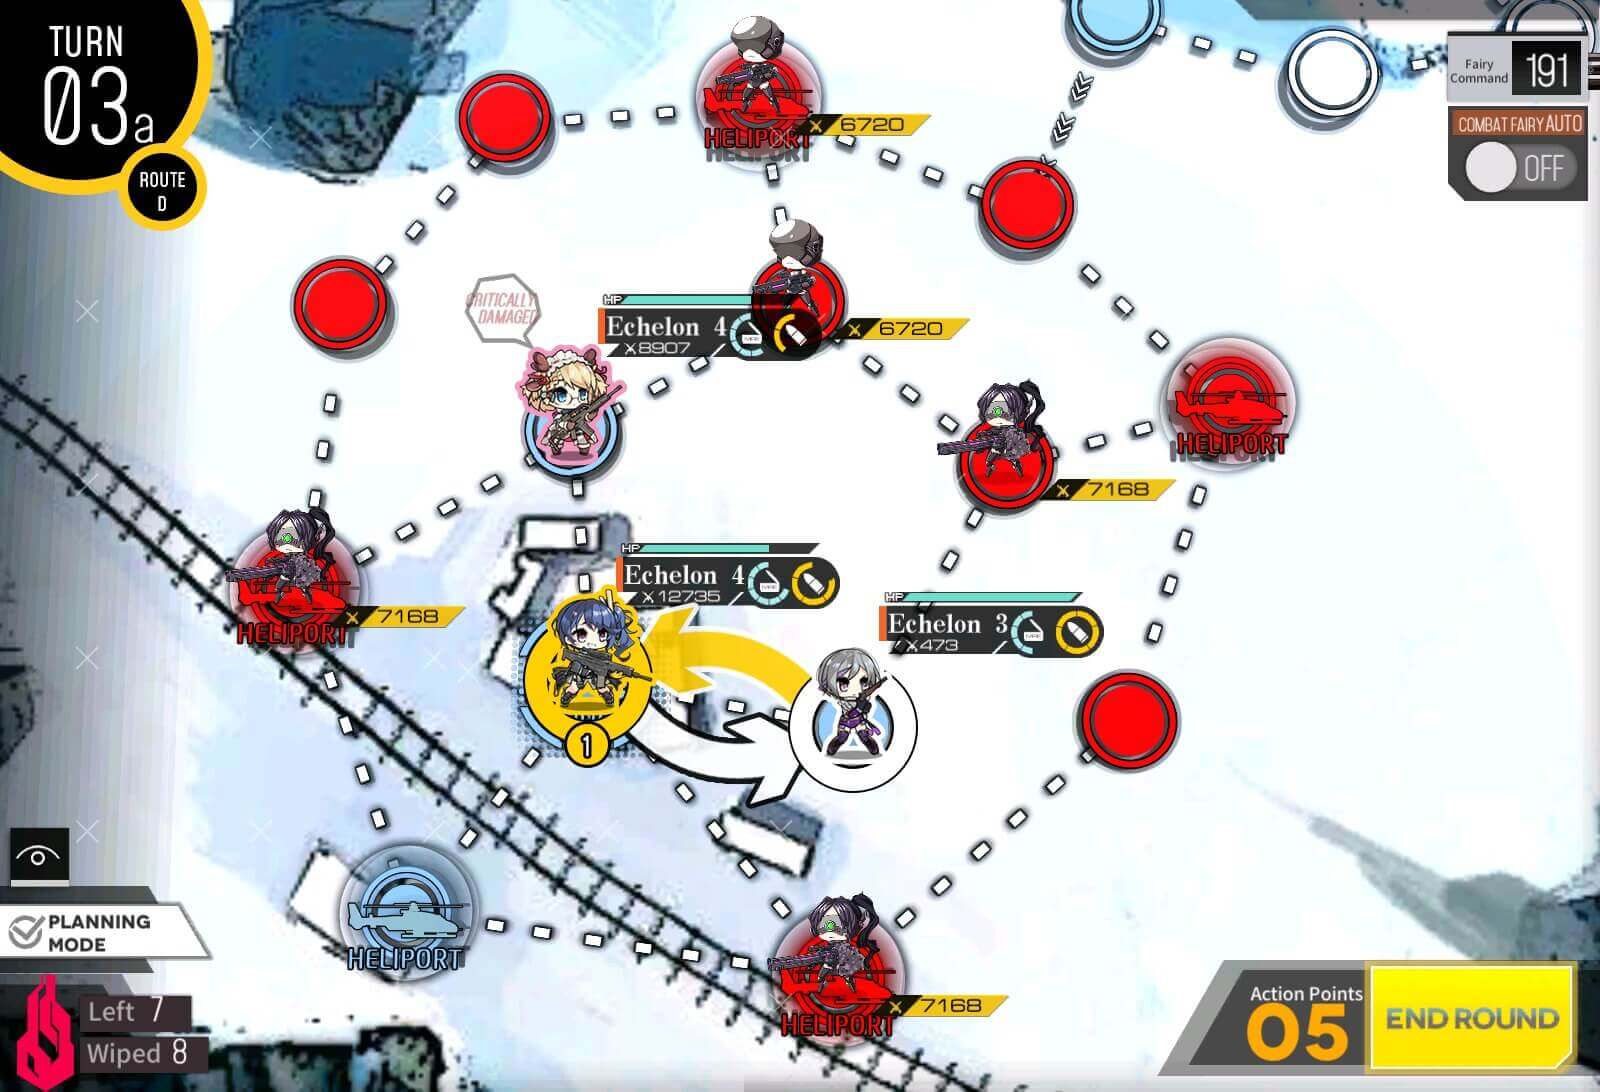
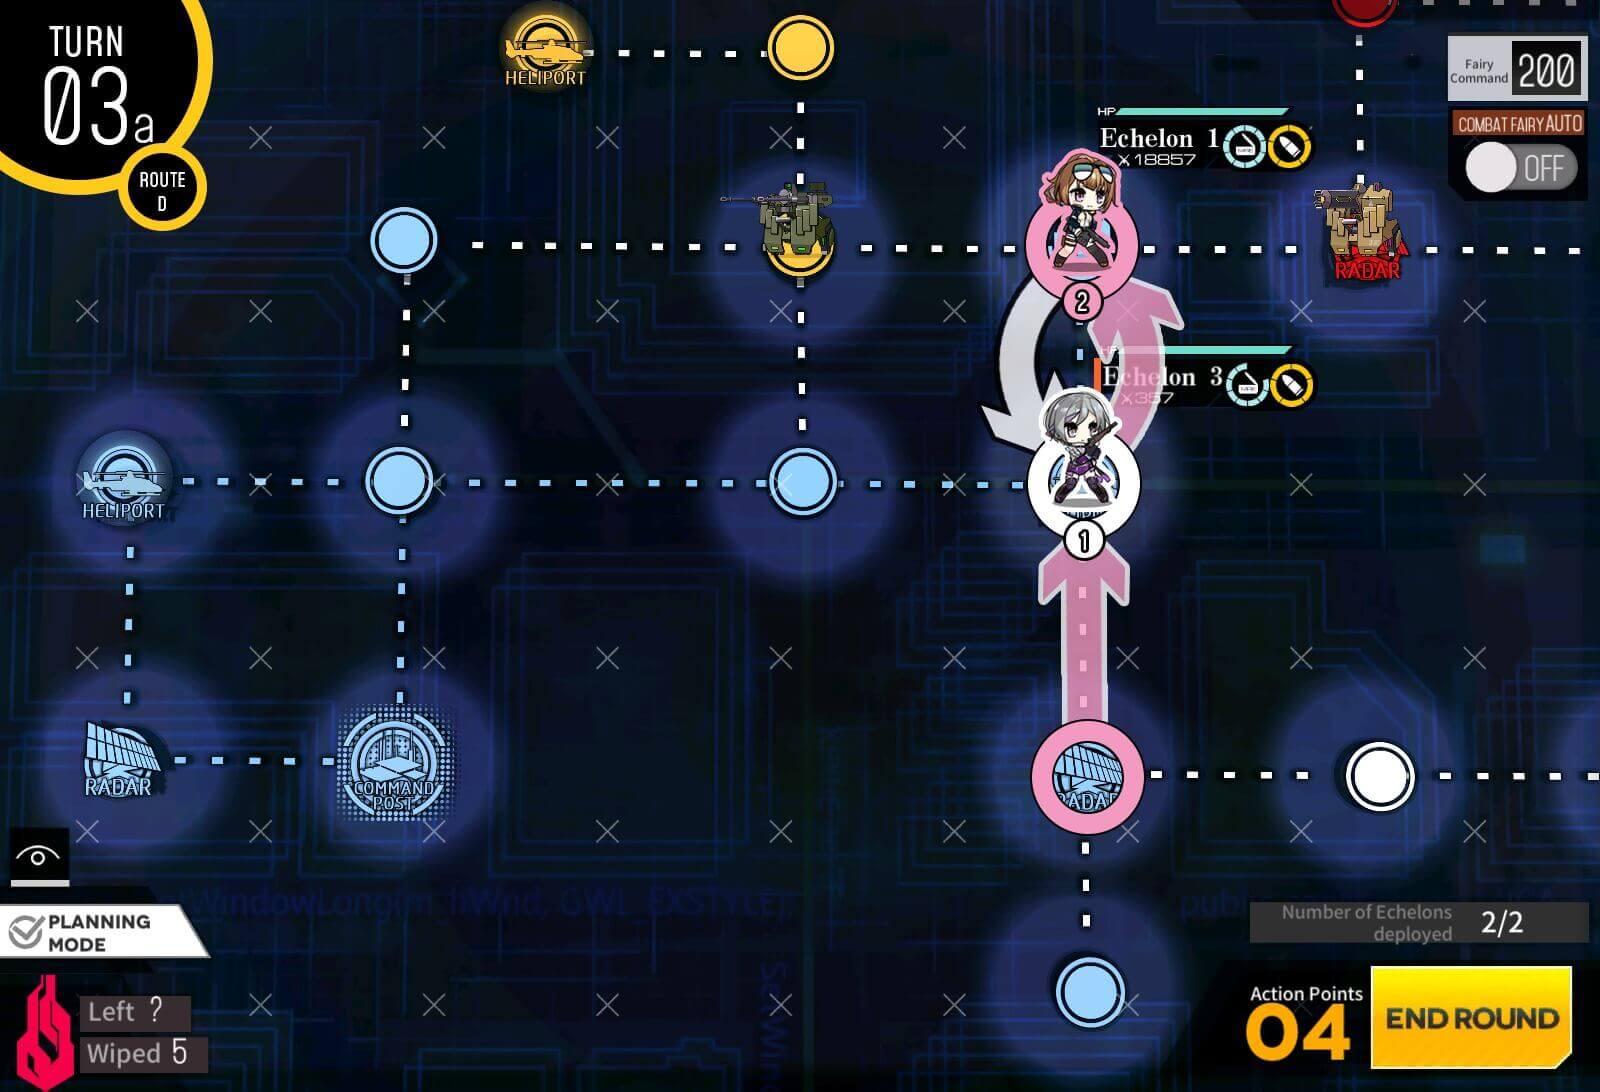
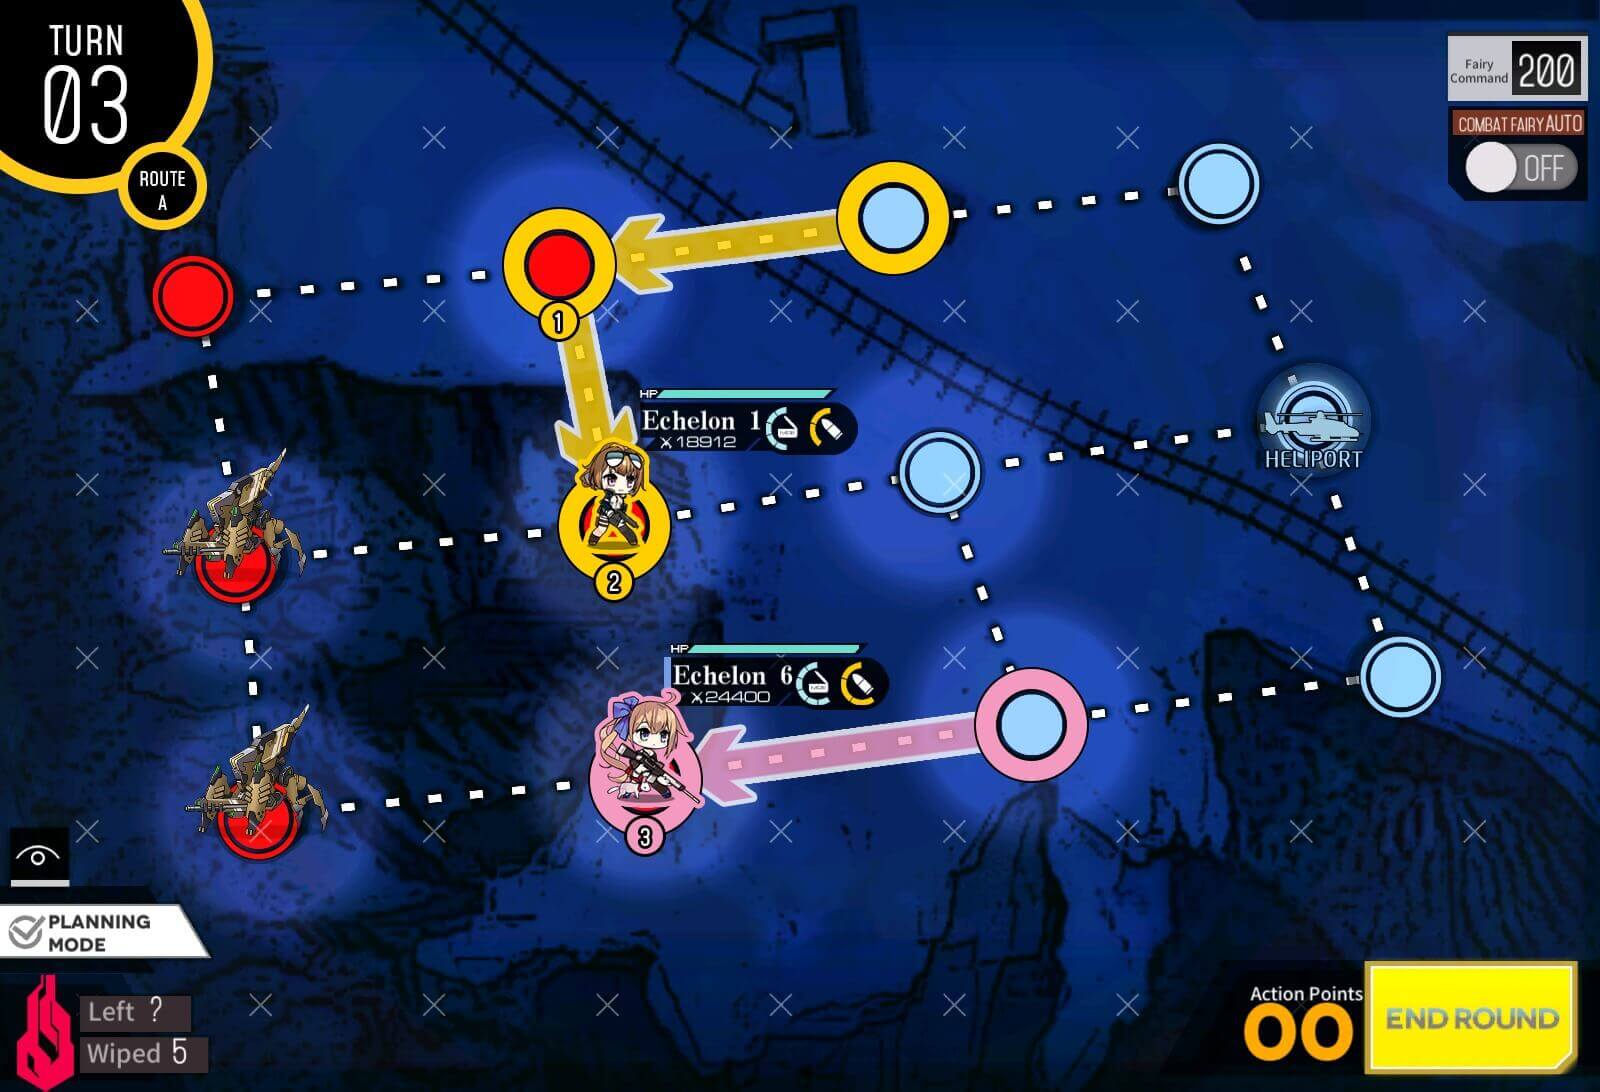
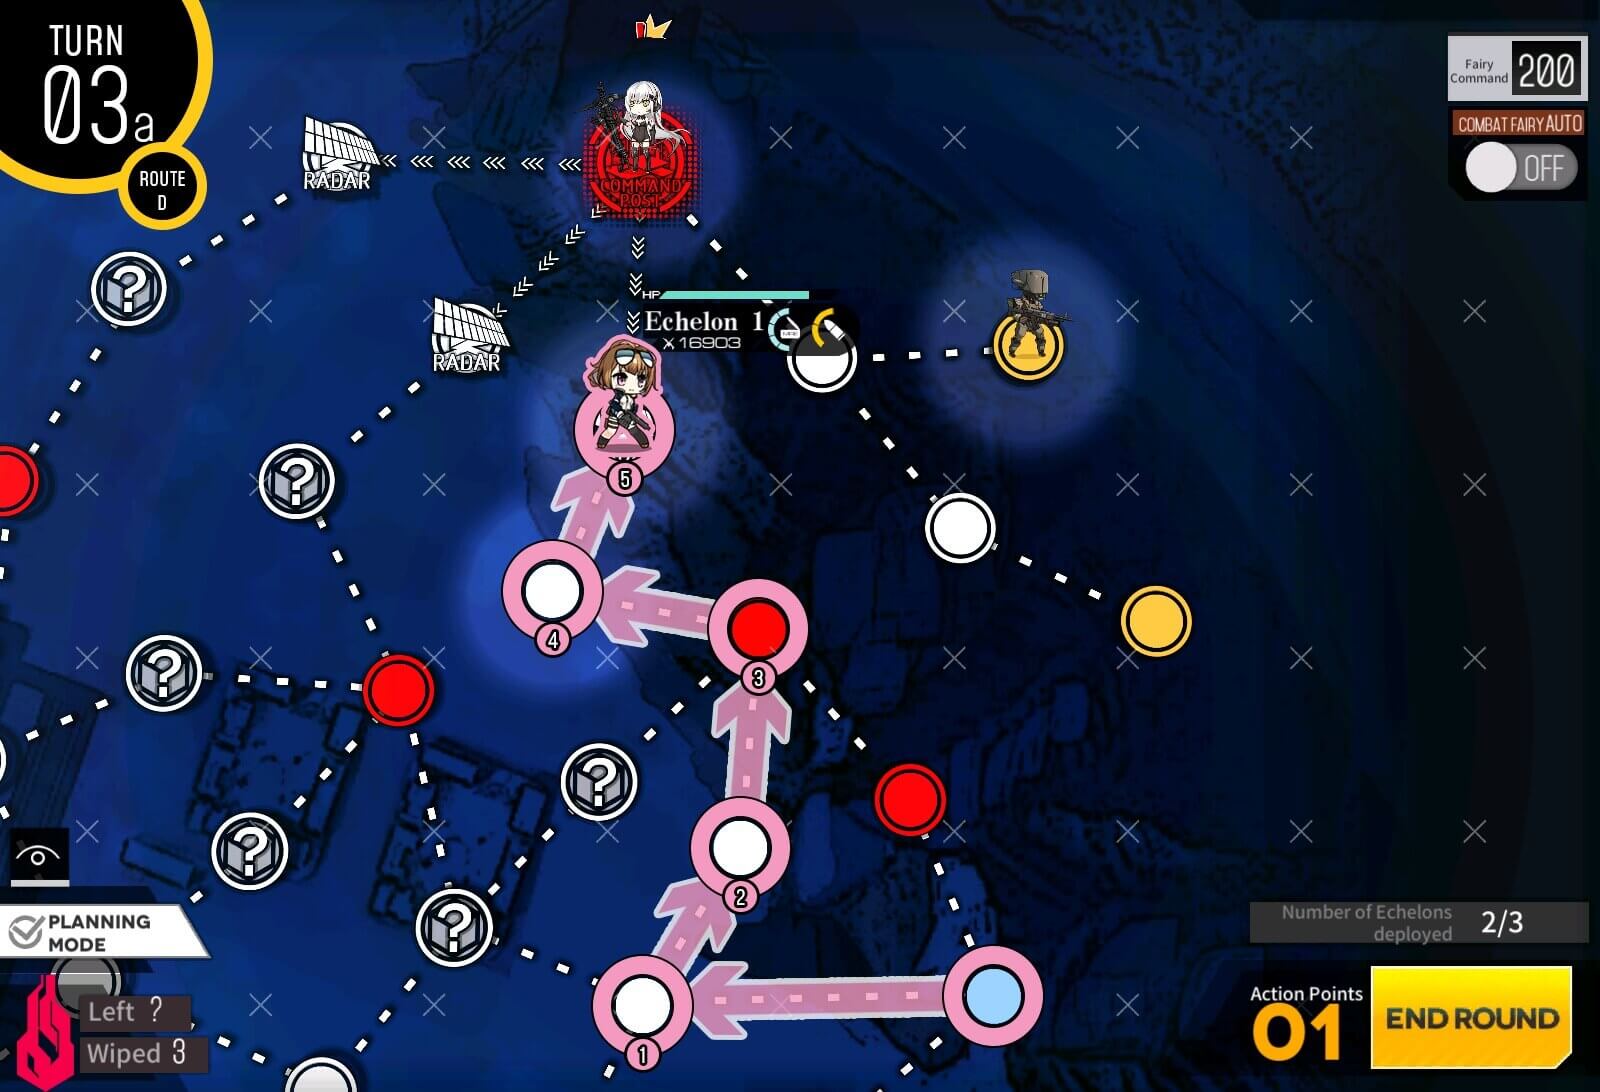
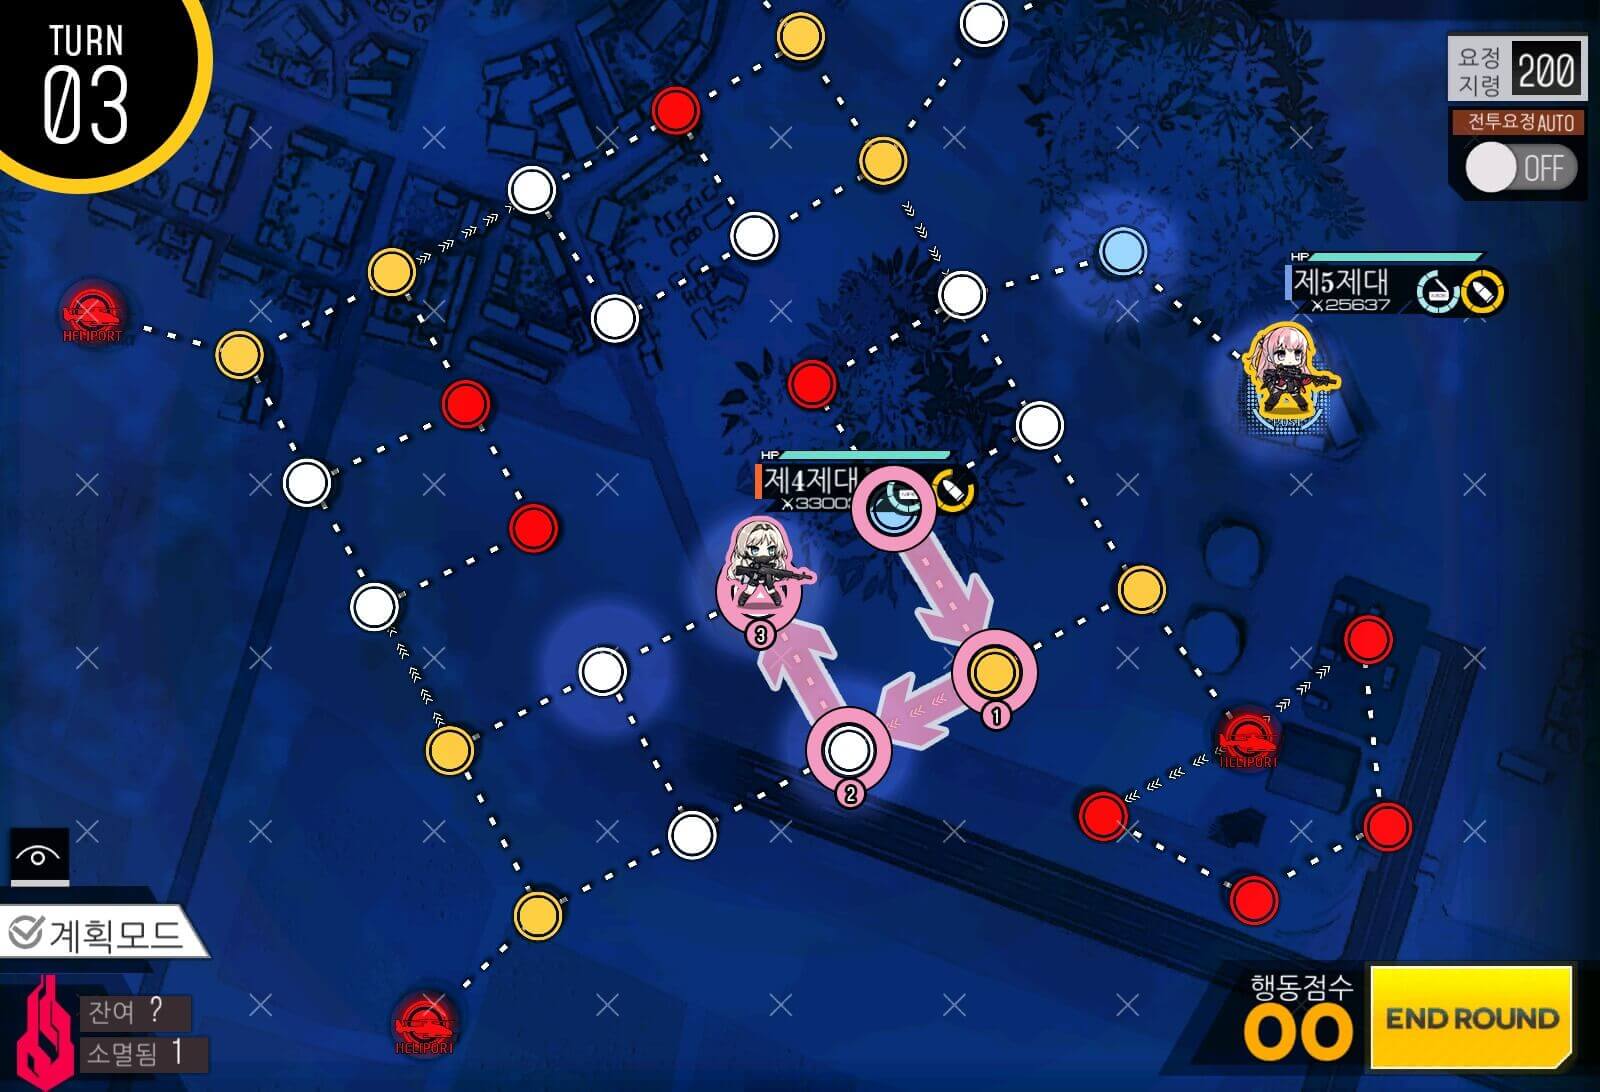
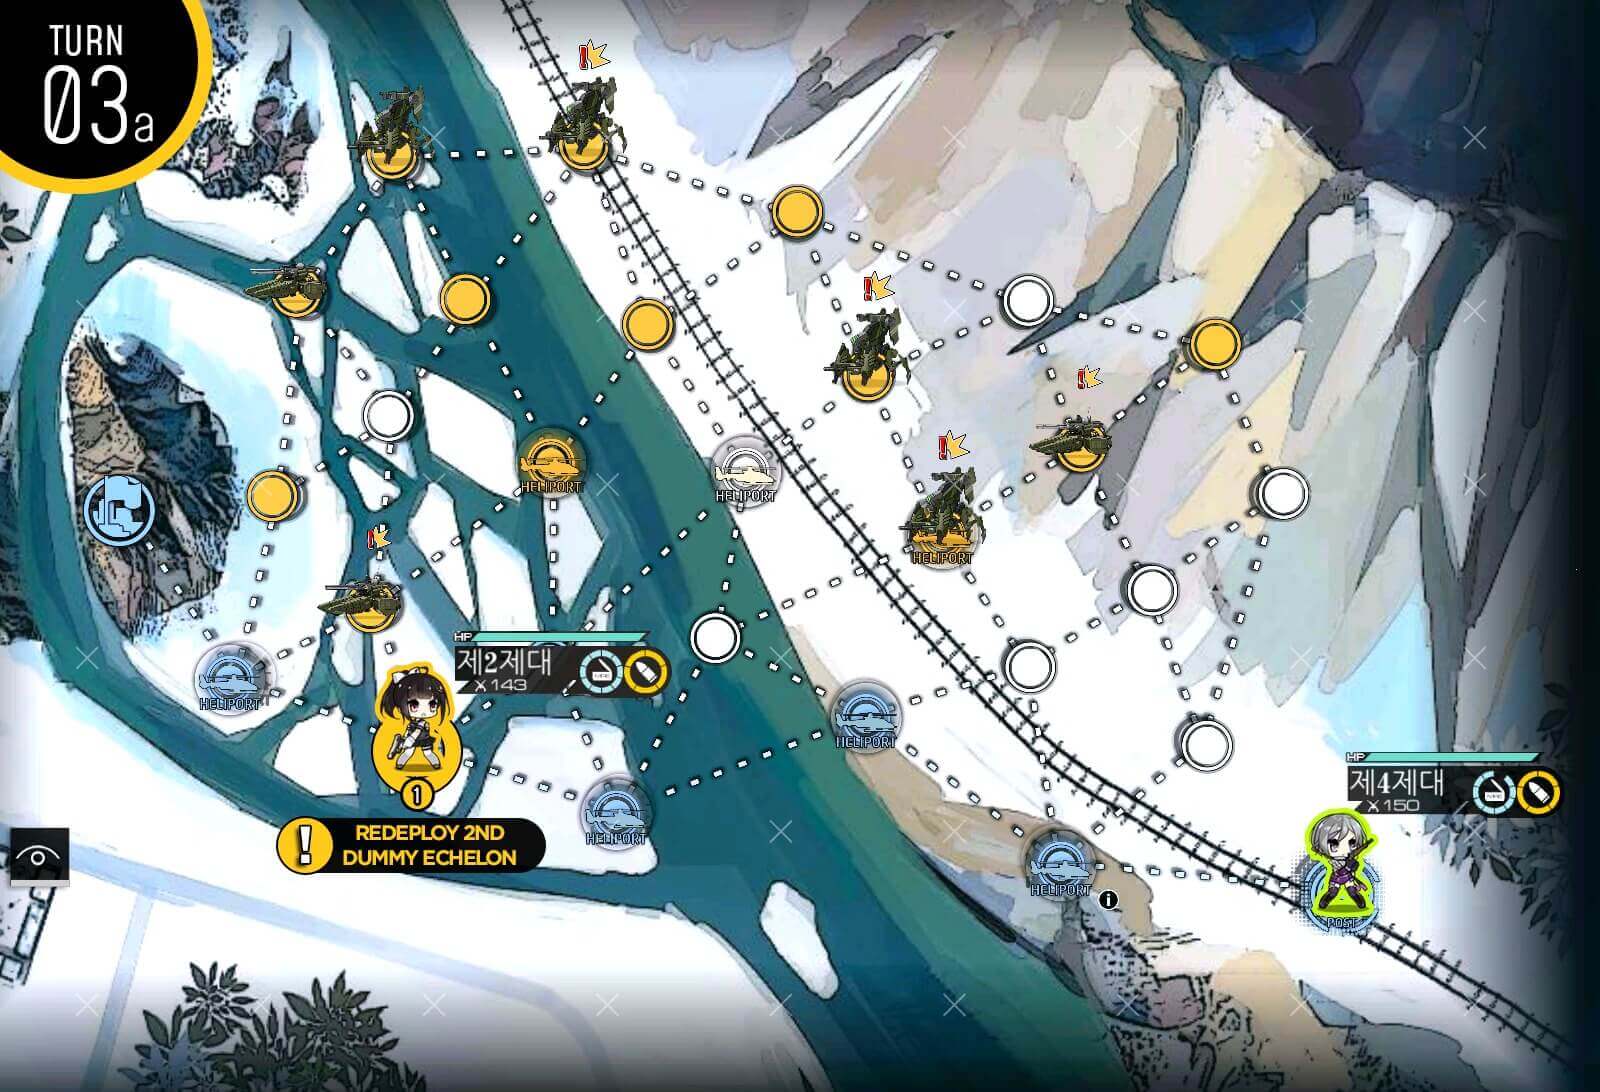
Turn 3a
Move combat echelon up one from HQ so that dummy echelon could be deployed. Combat echelon near supply point move down one.

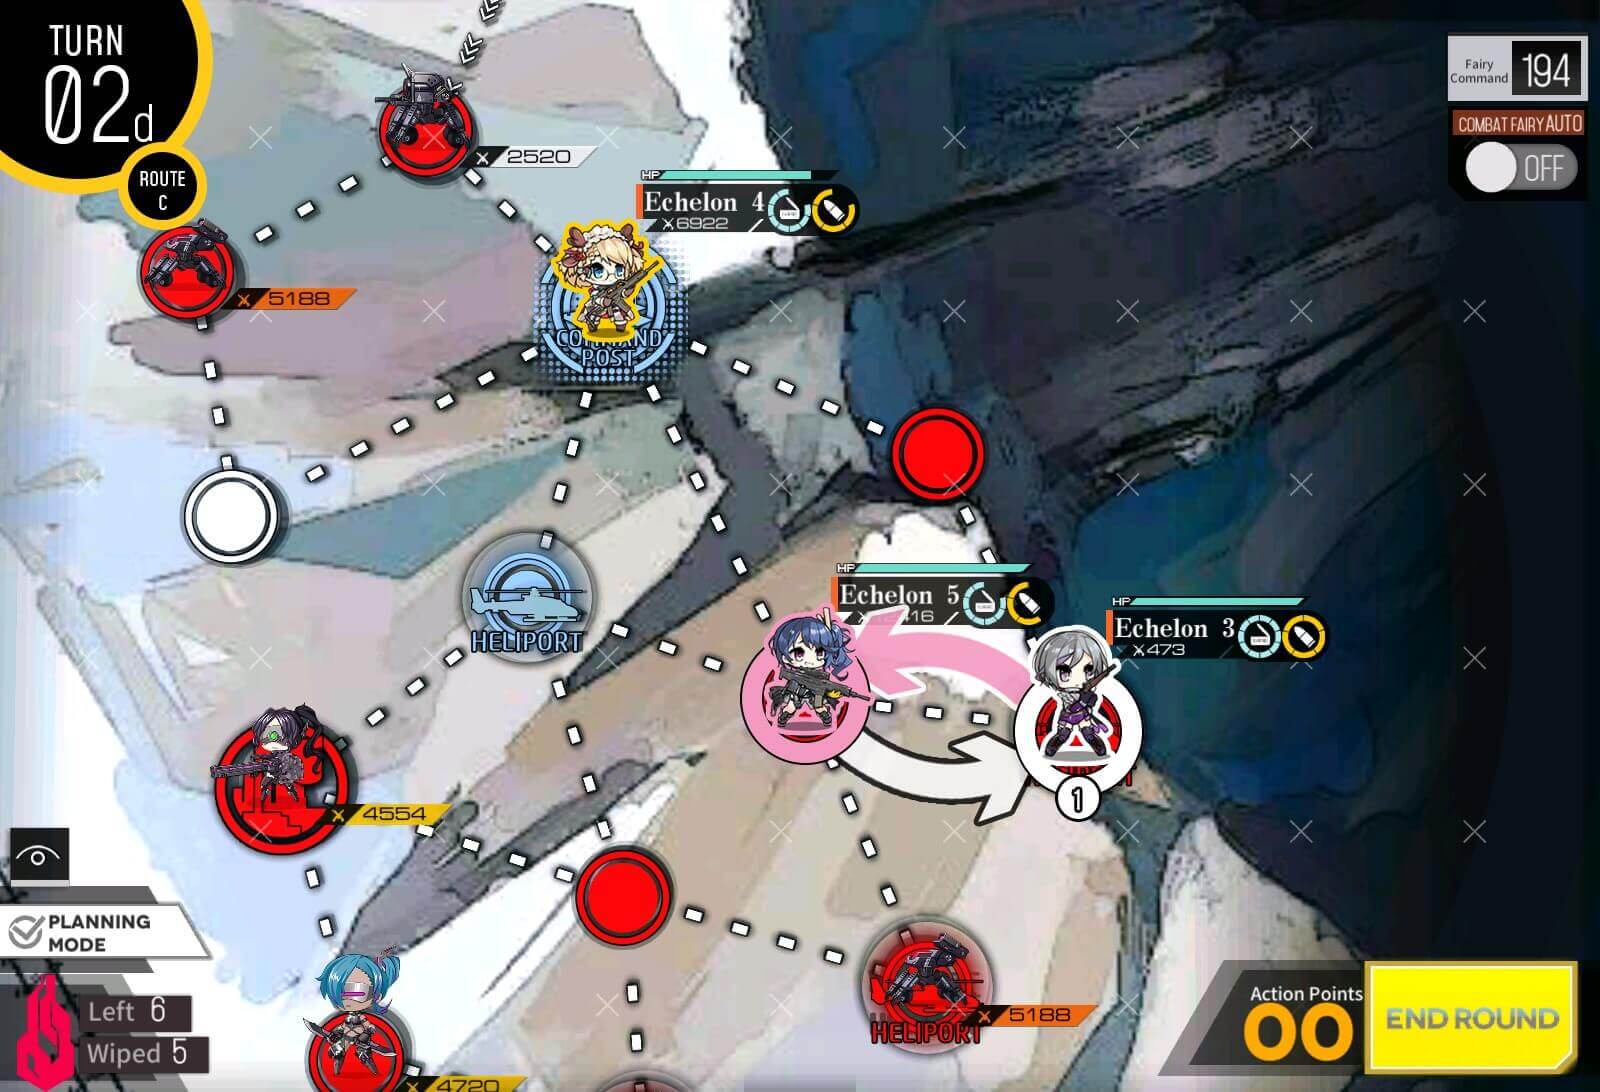
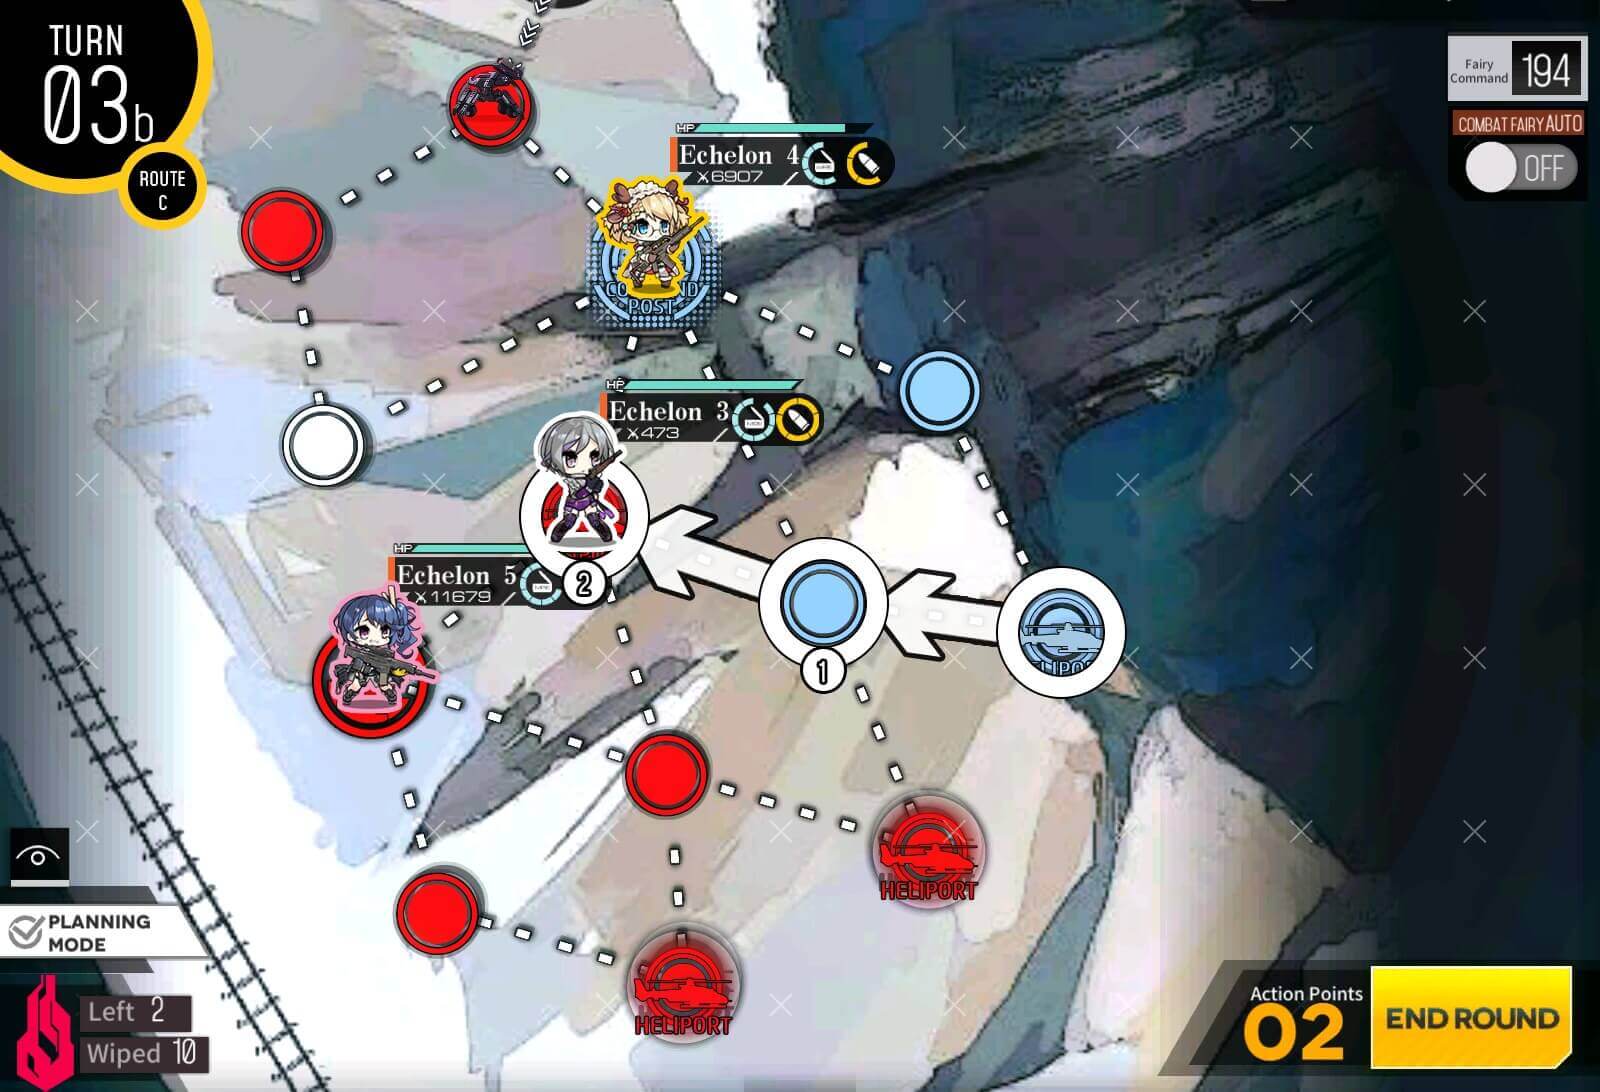
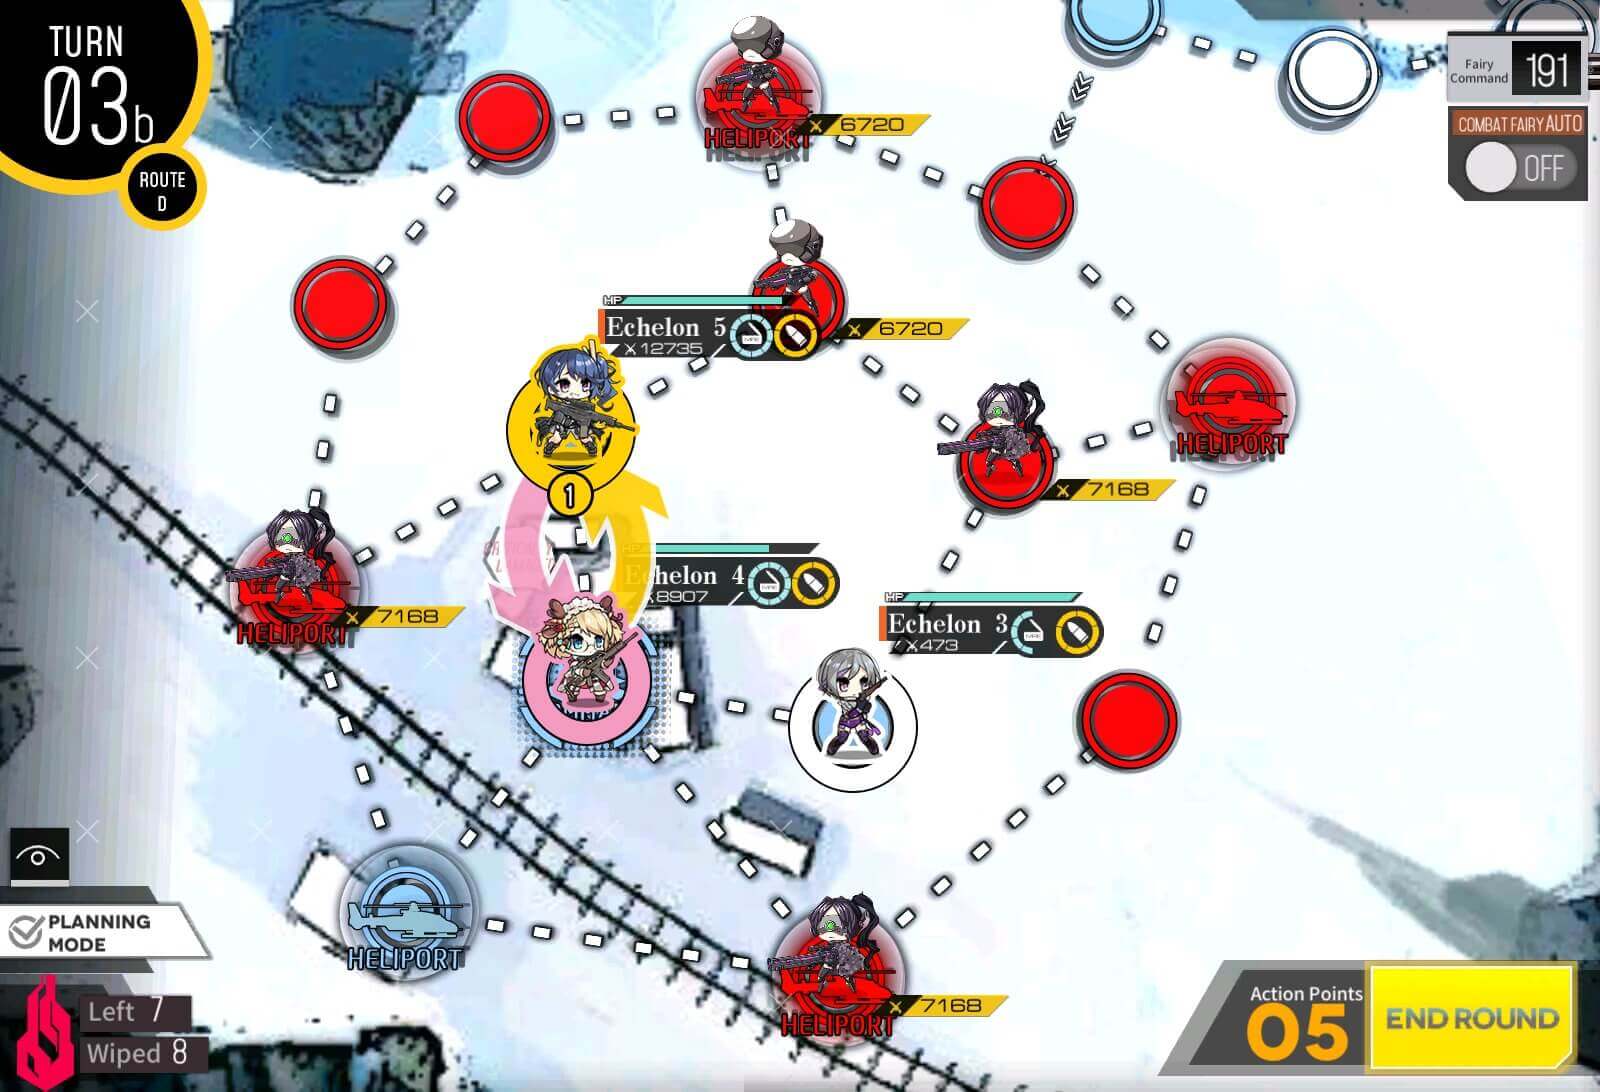
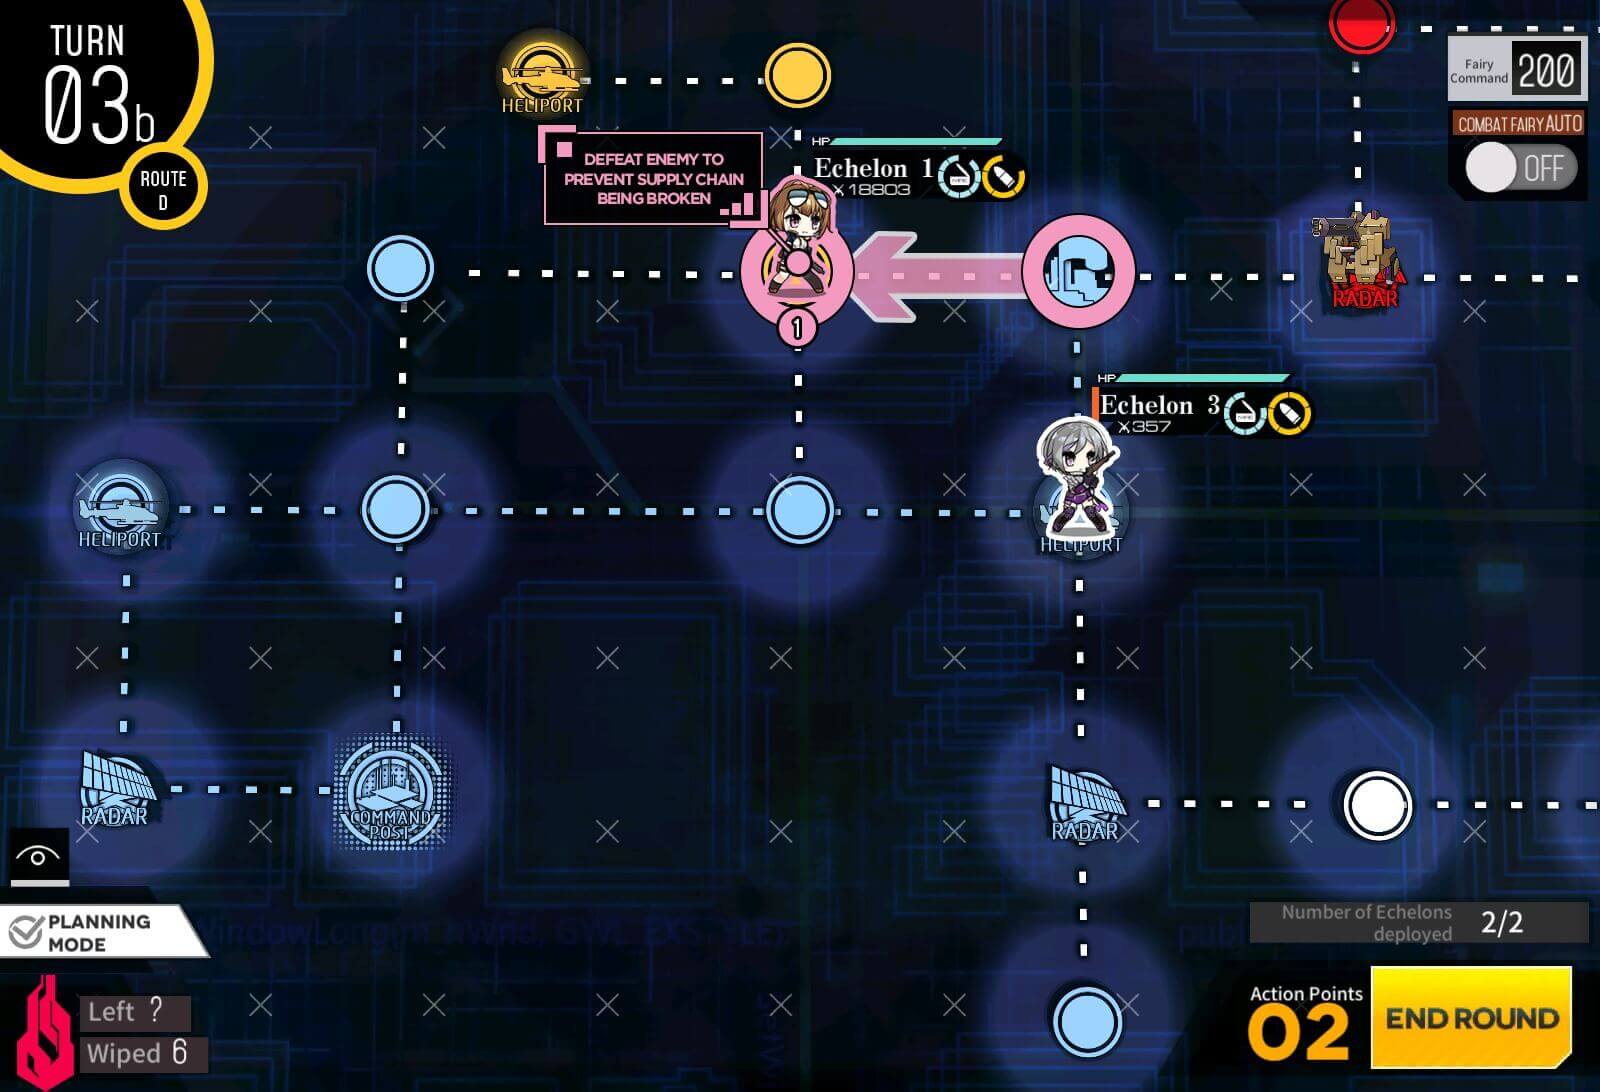
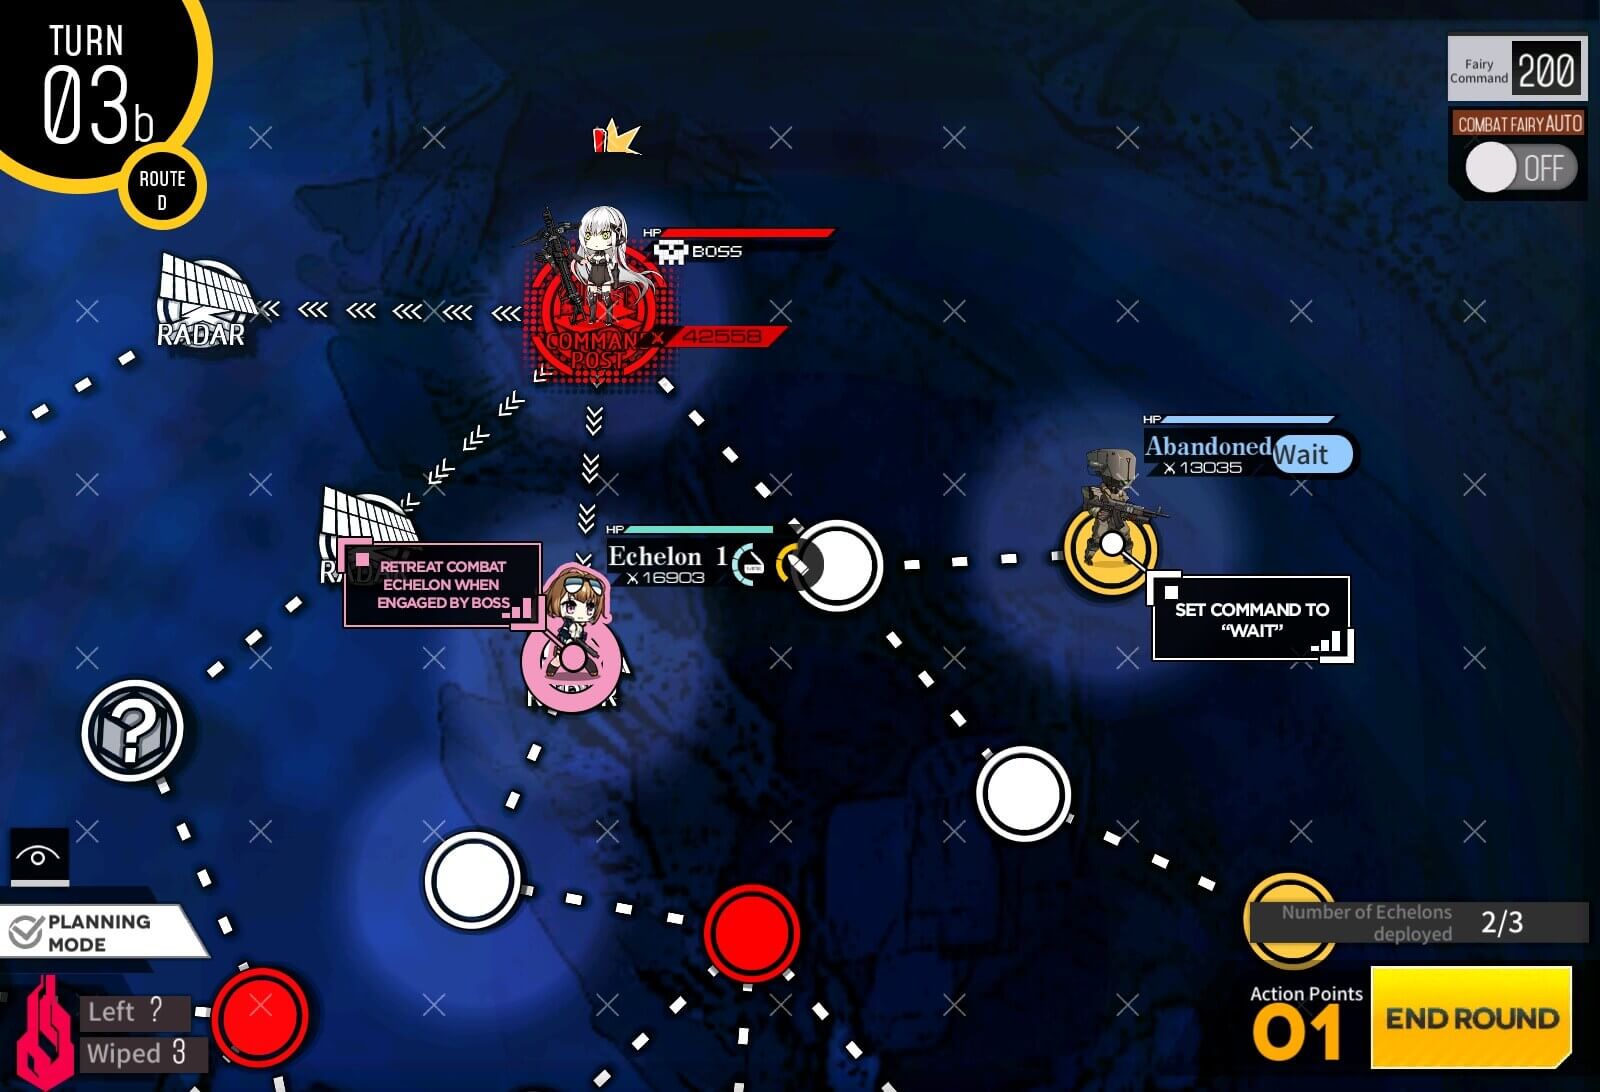
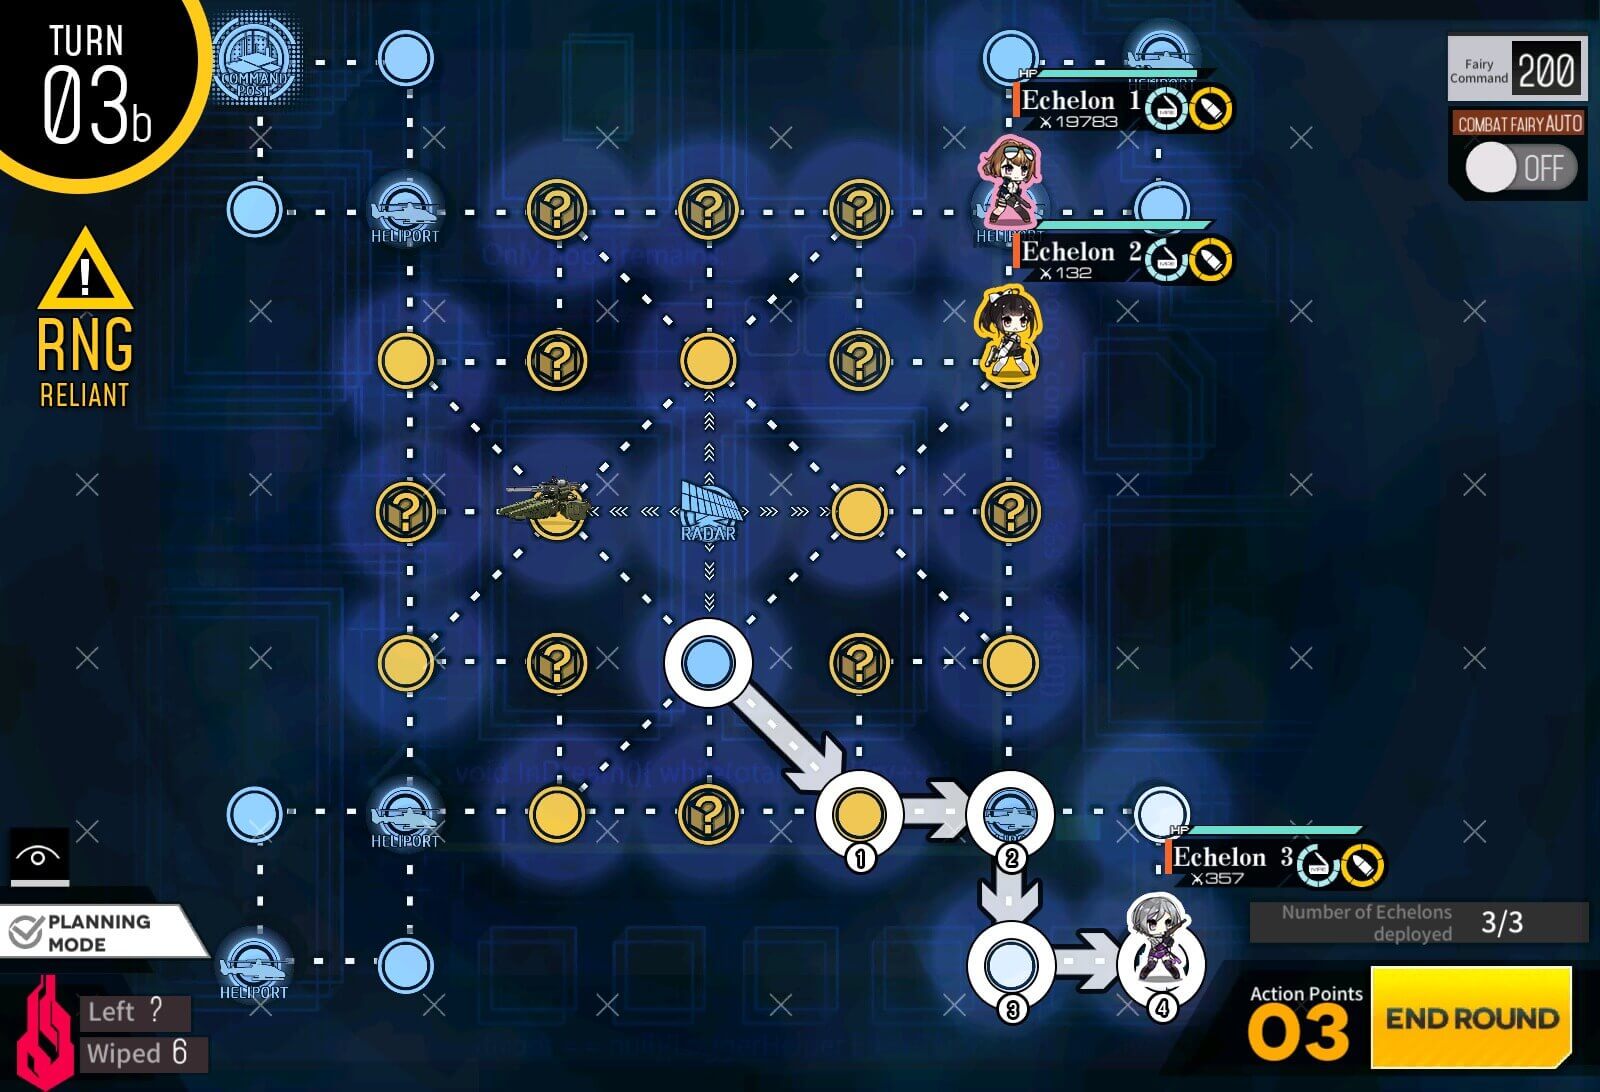
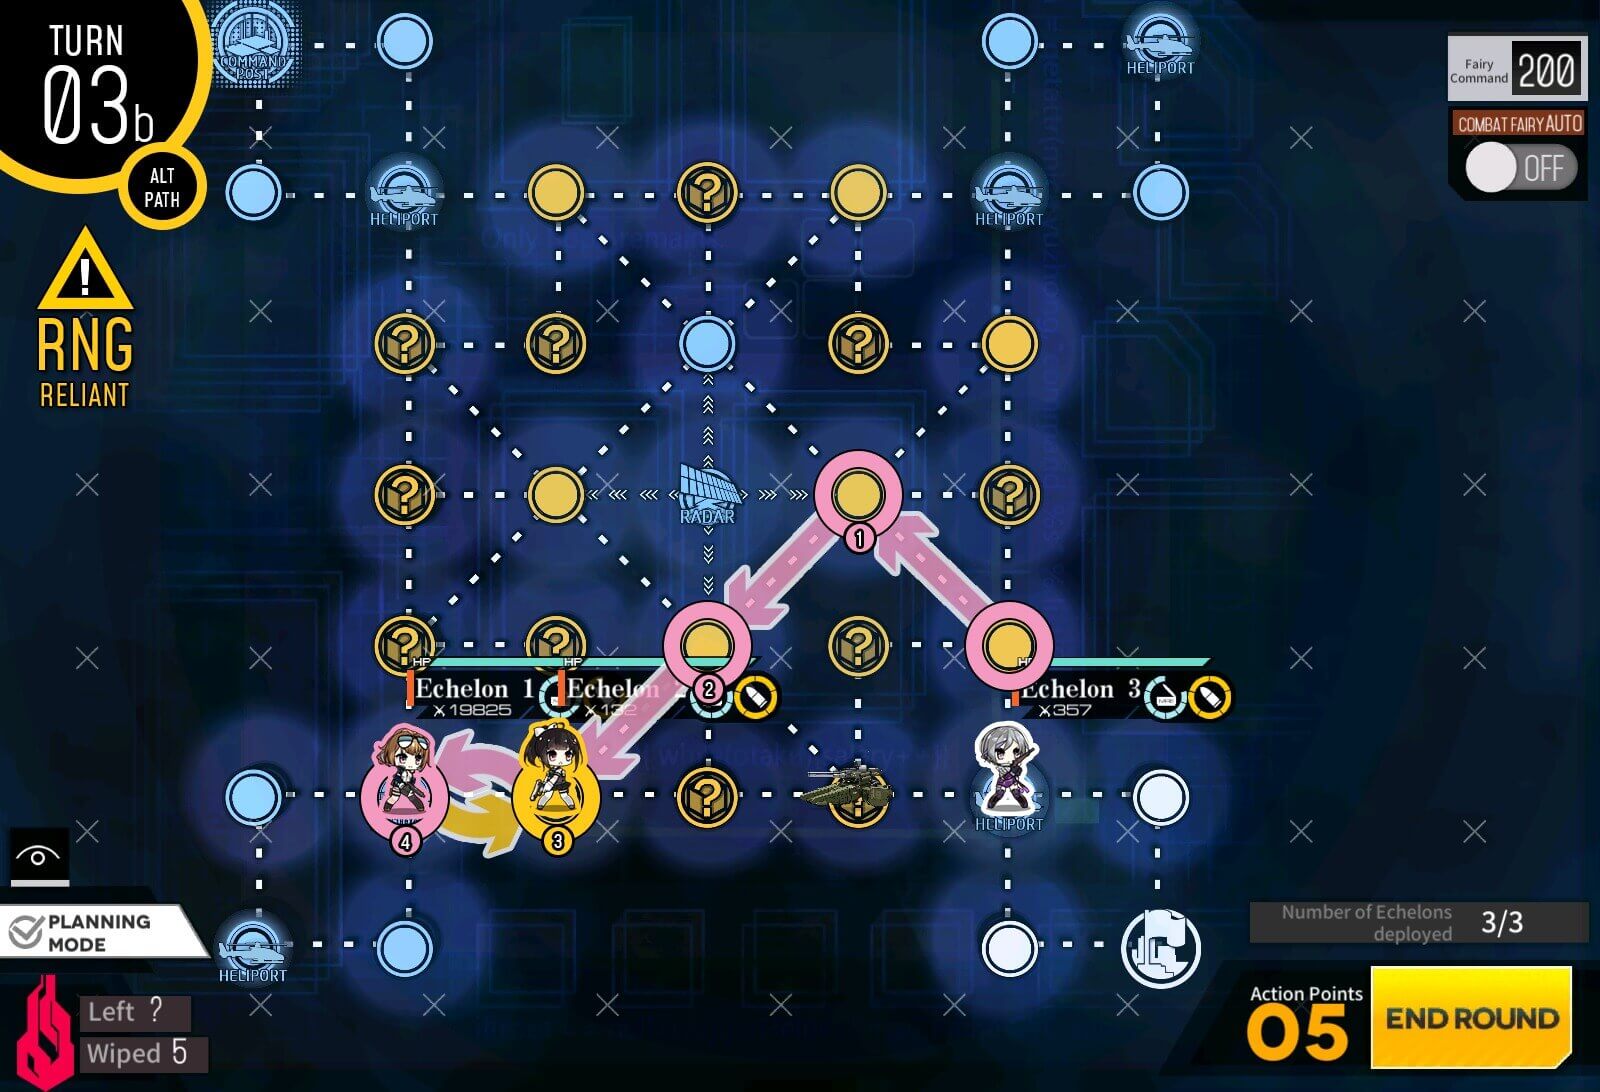
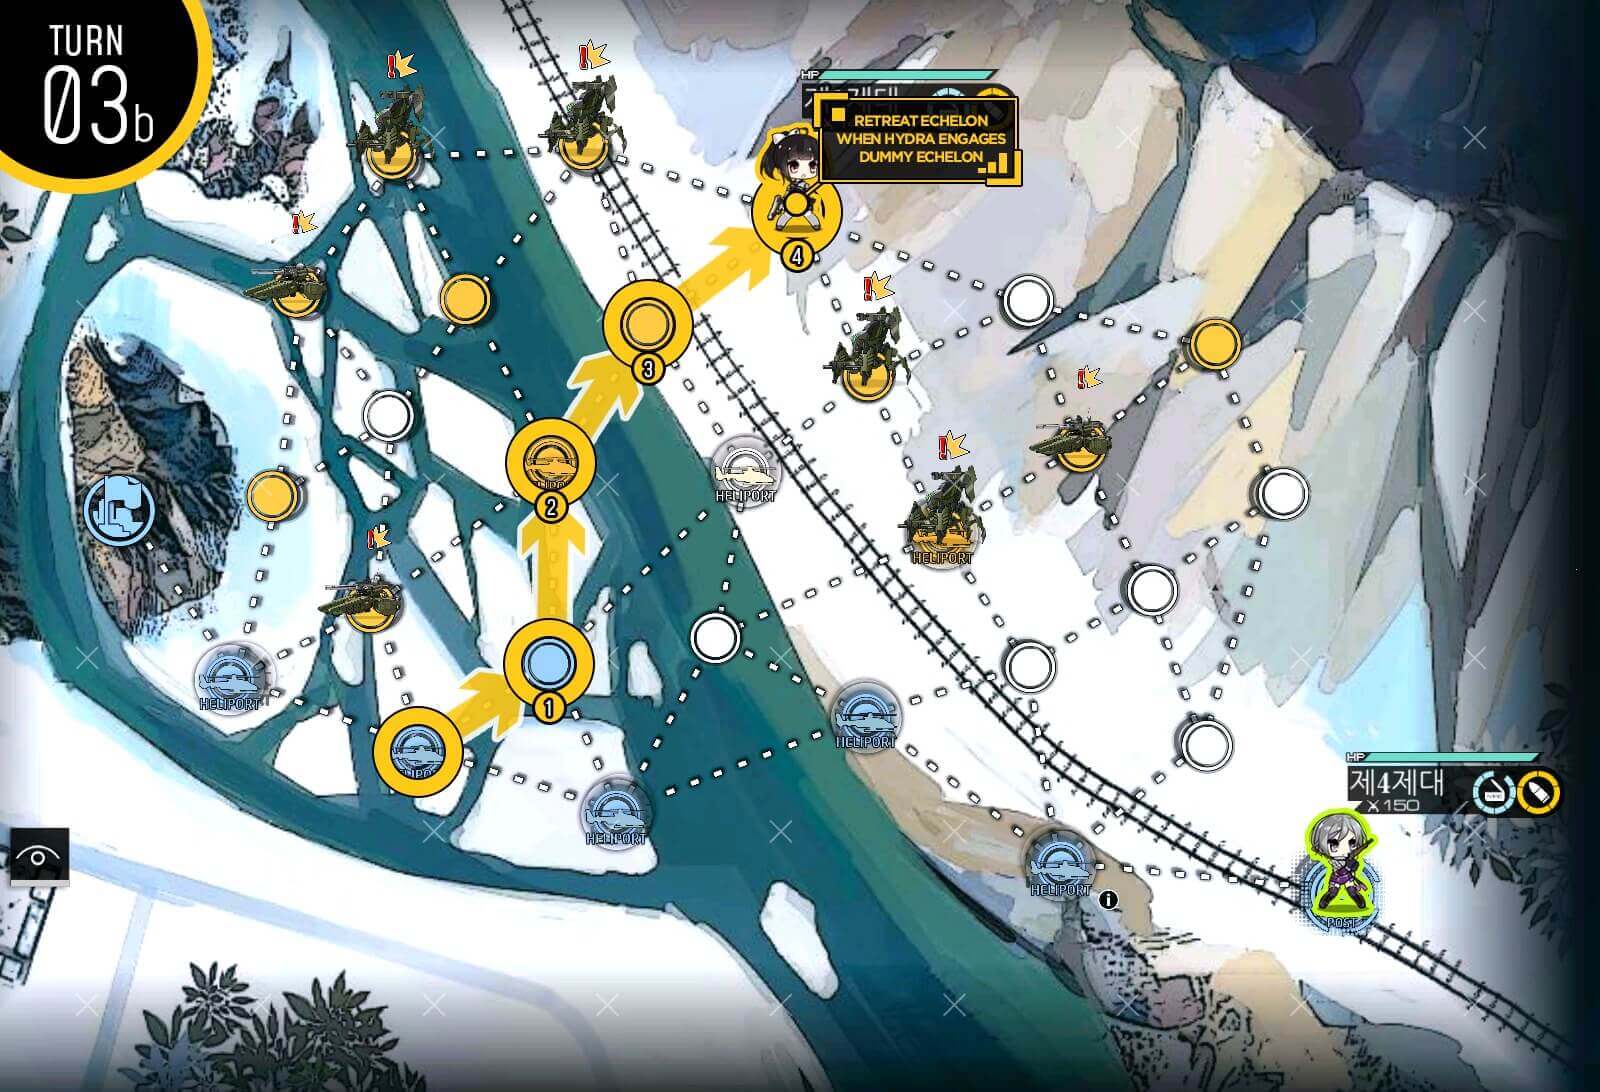
Turn 3b
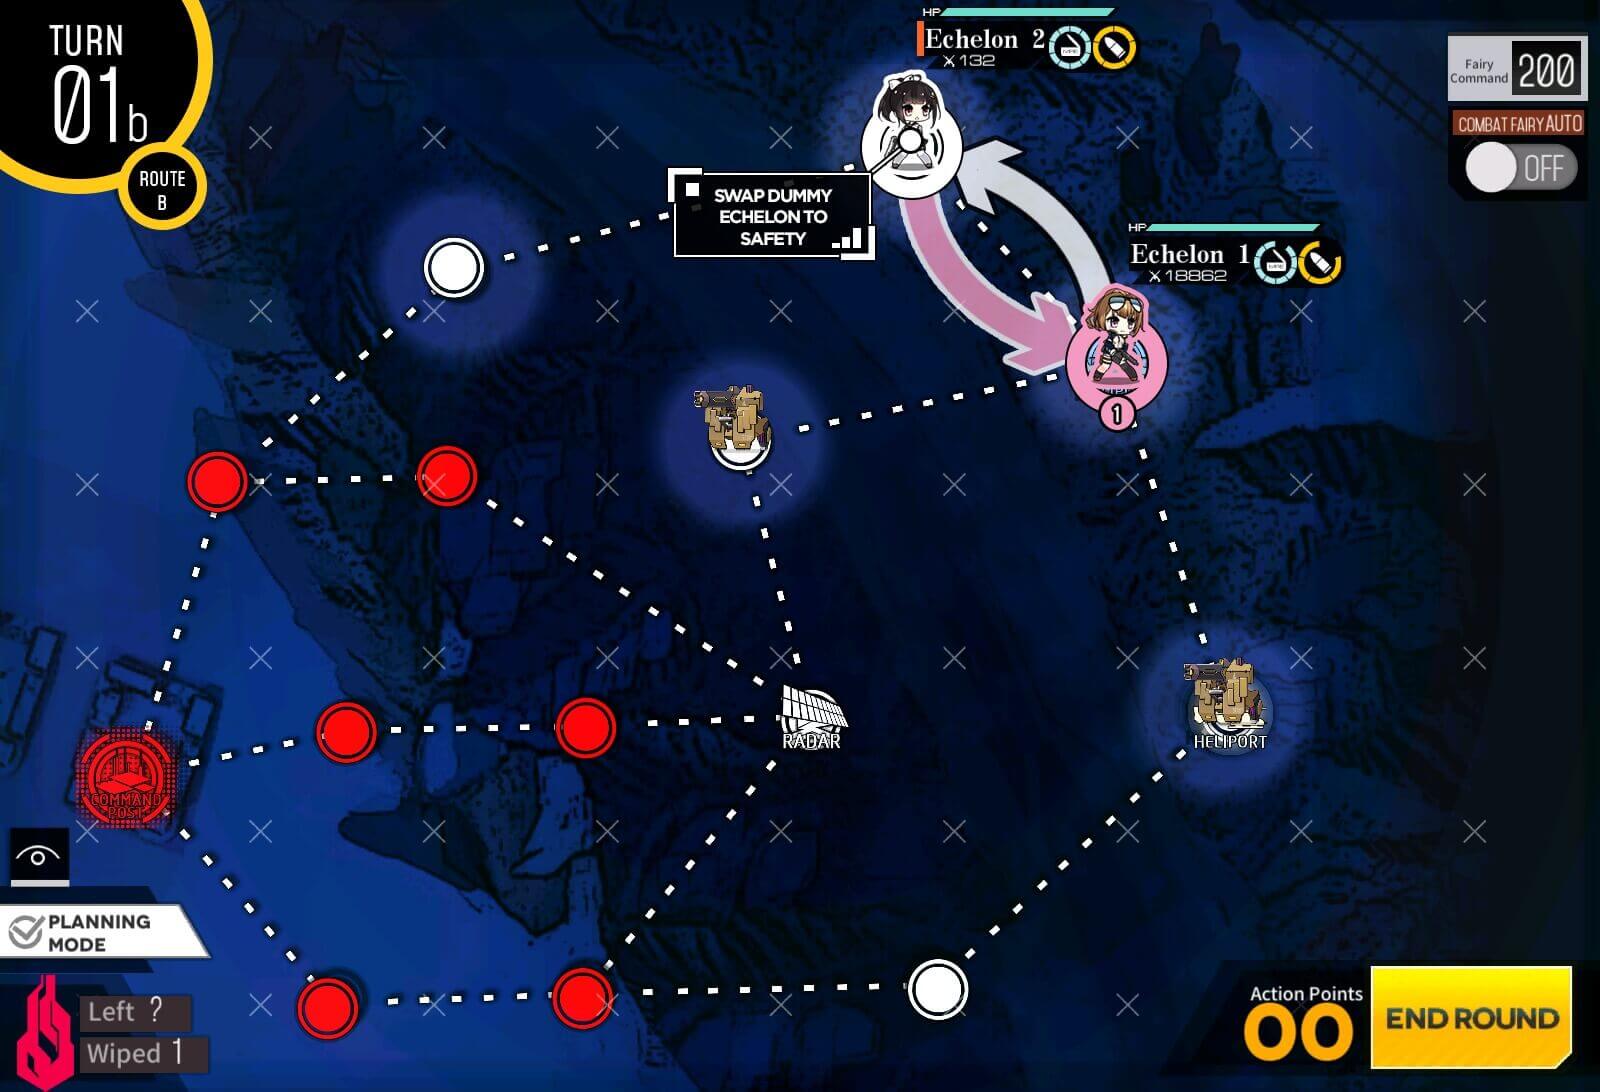
Since there is a chance that HQ could be attacked next turn, swap dummy and 2nd combat echelon as safety measure.
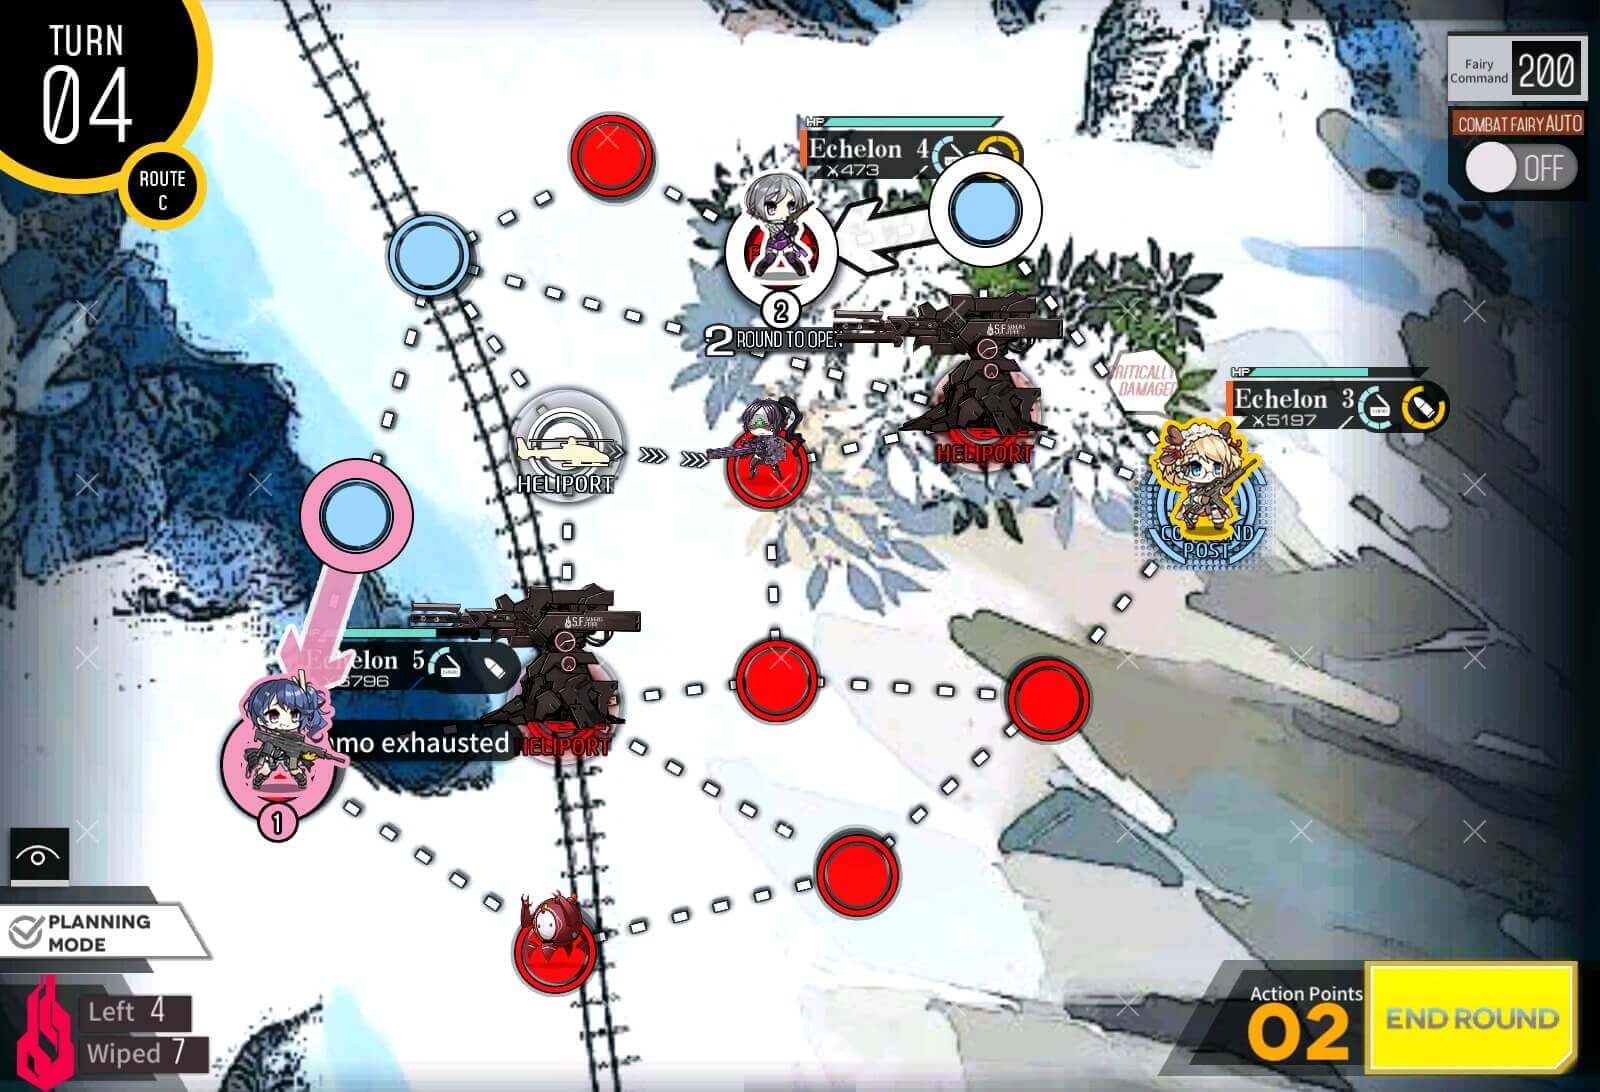
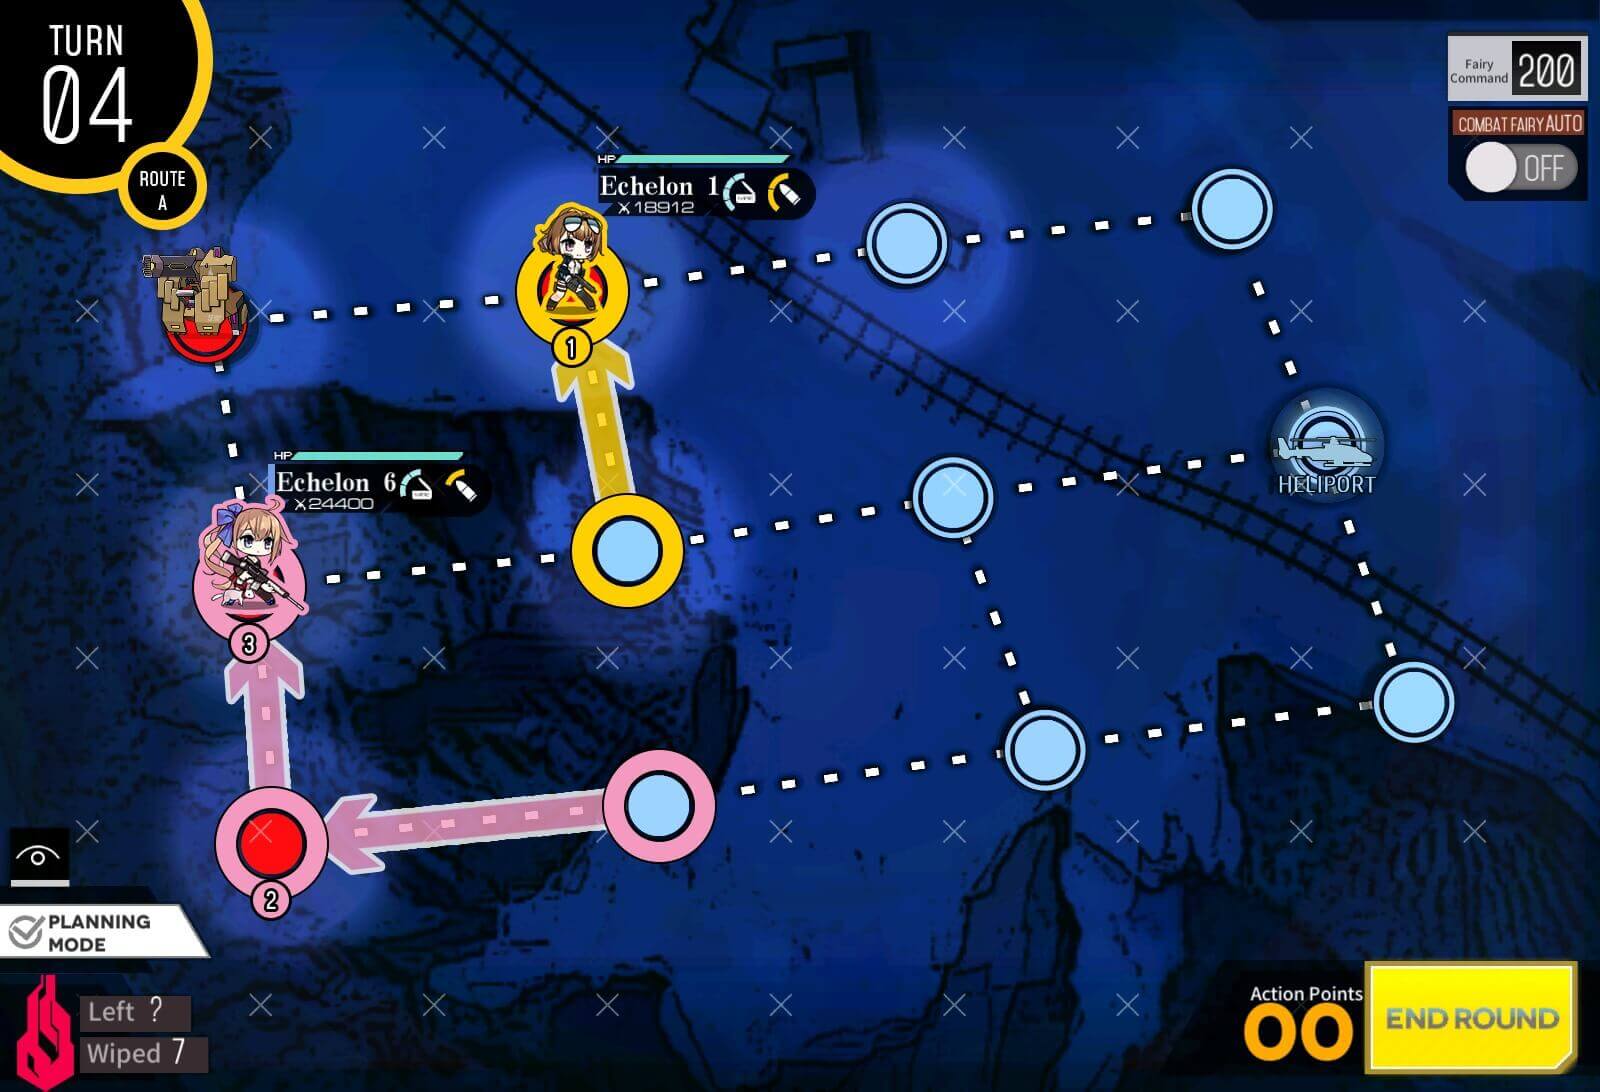
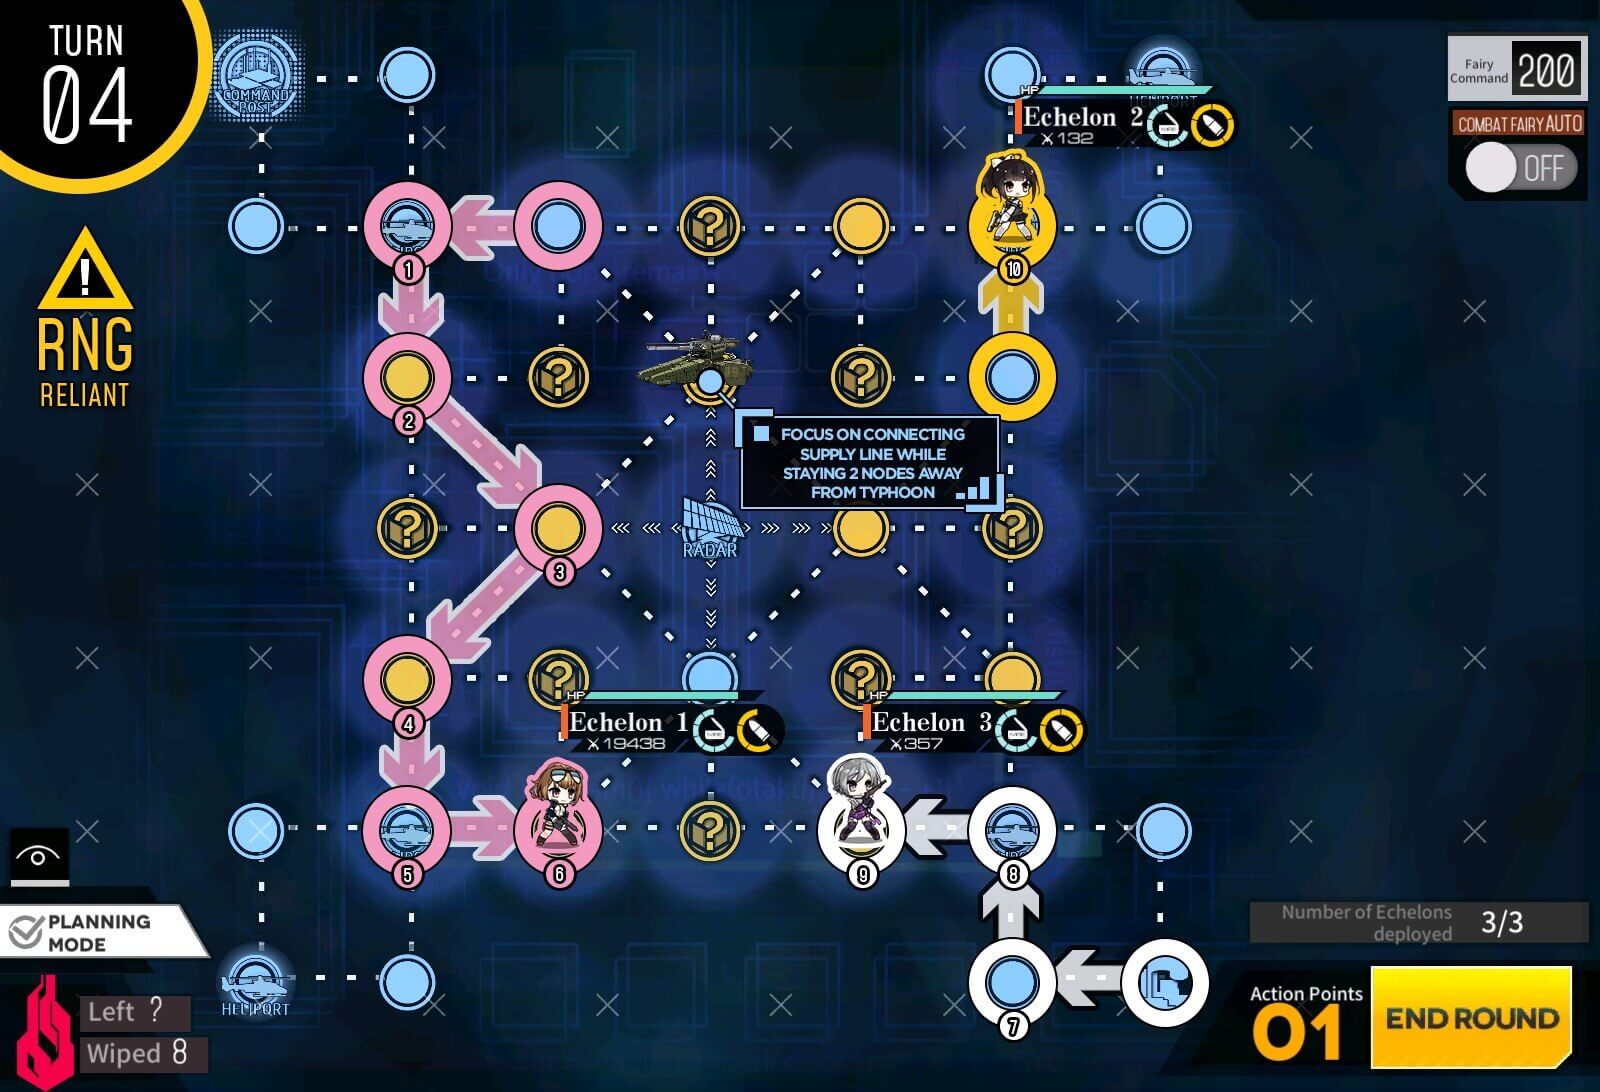
Turn 4
Combat echelon moves on top of supply point and then dummy moves one to left to finish connecting the route. All you have to do now is end turn until map is cleared.
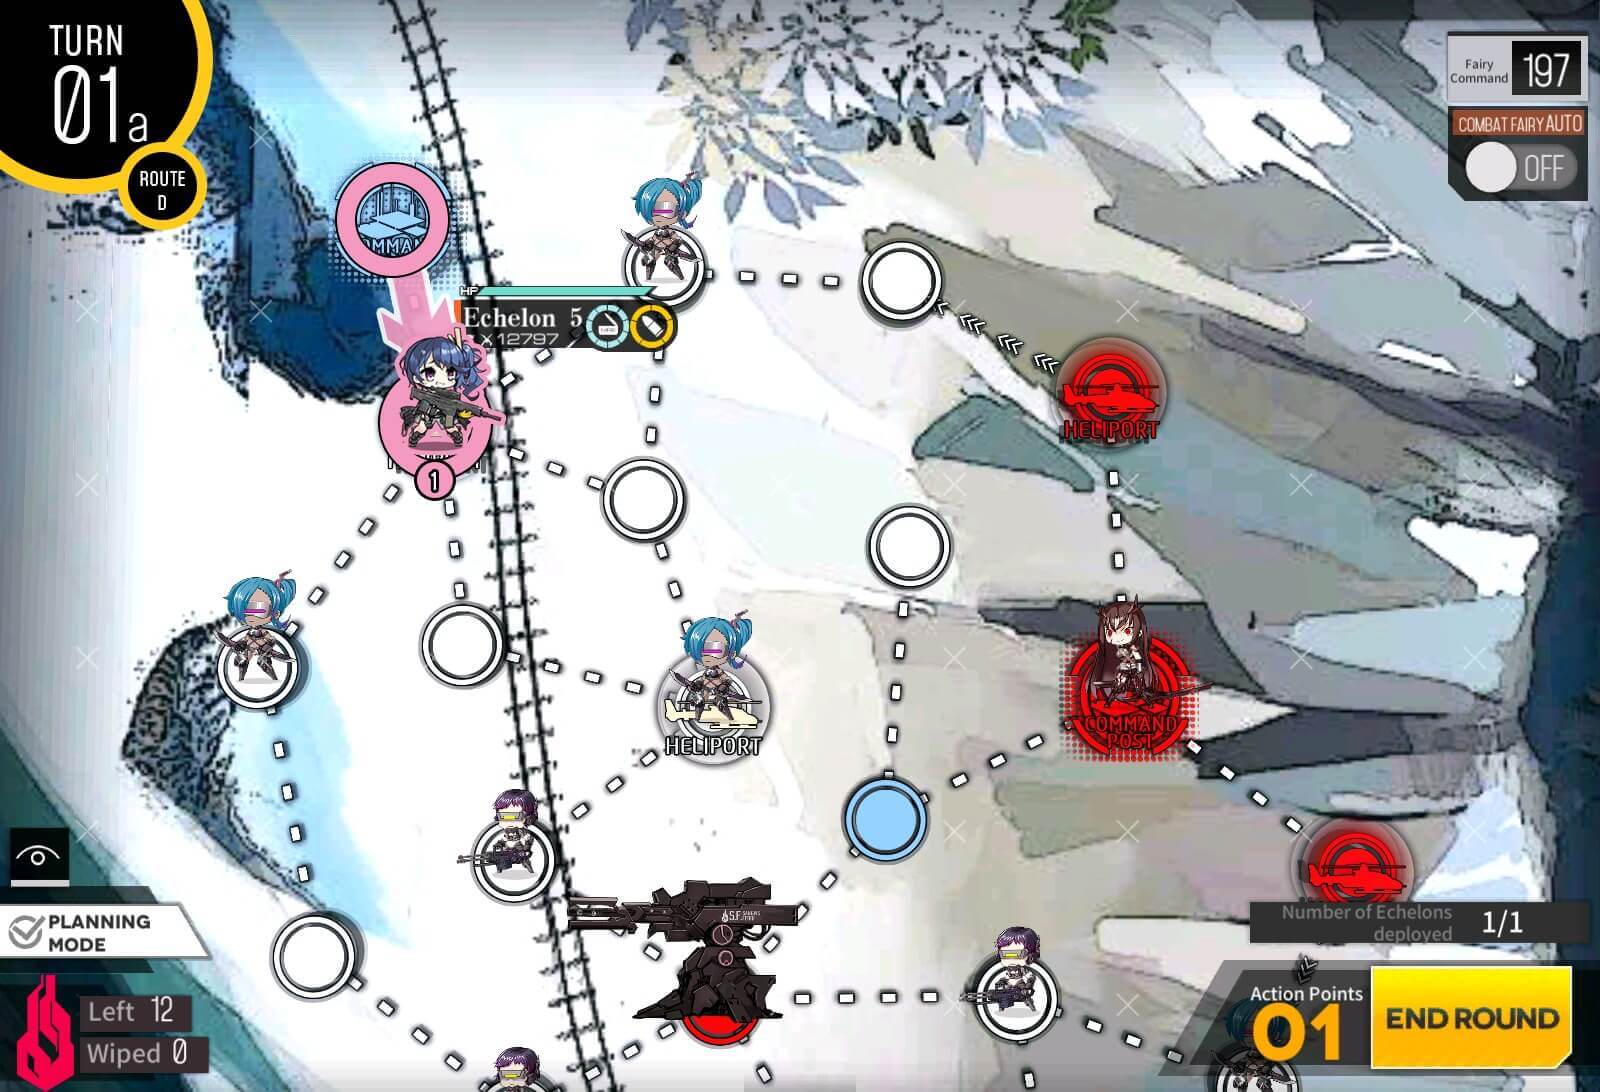
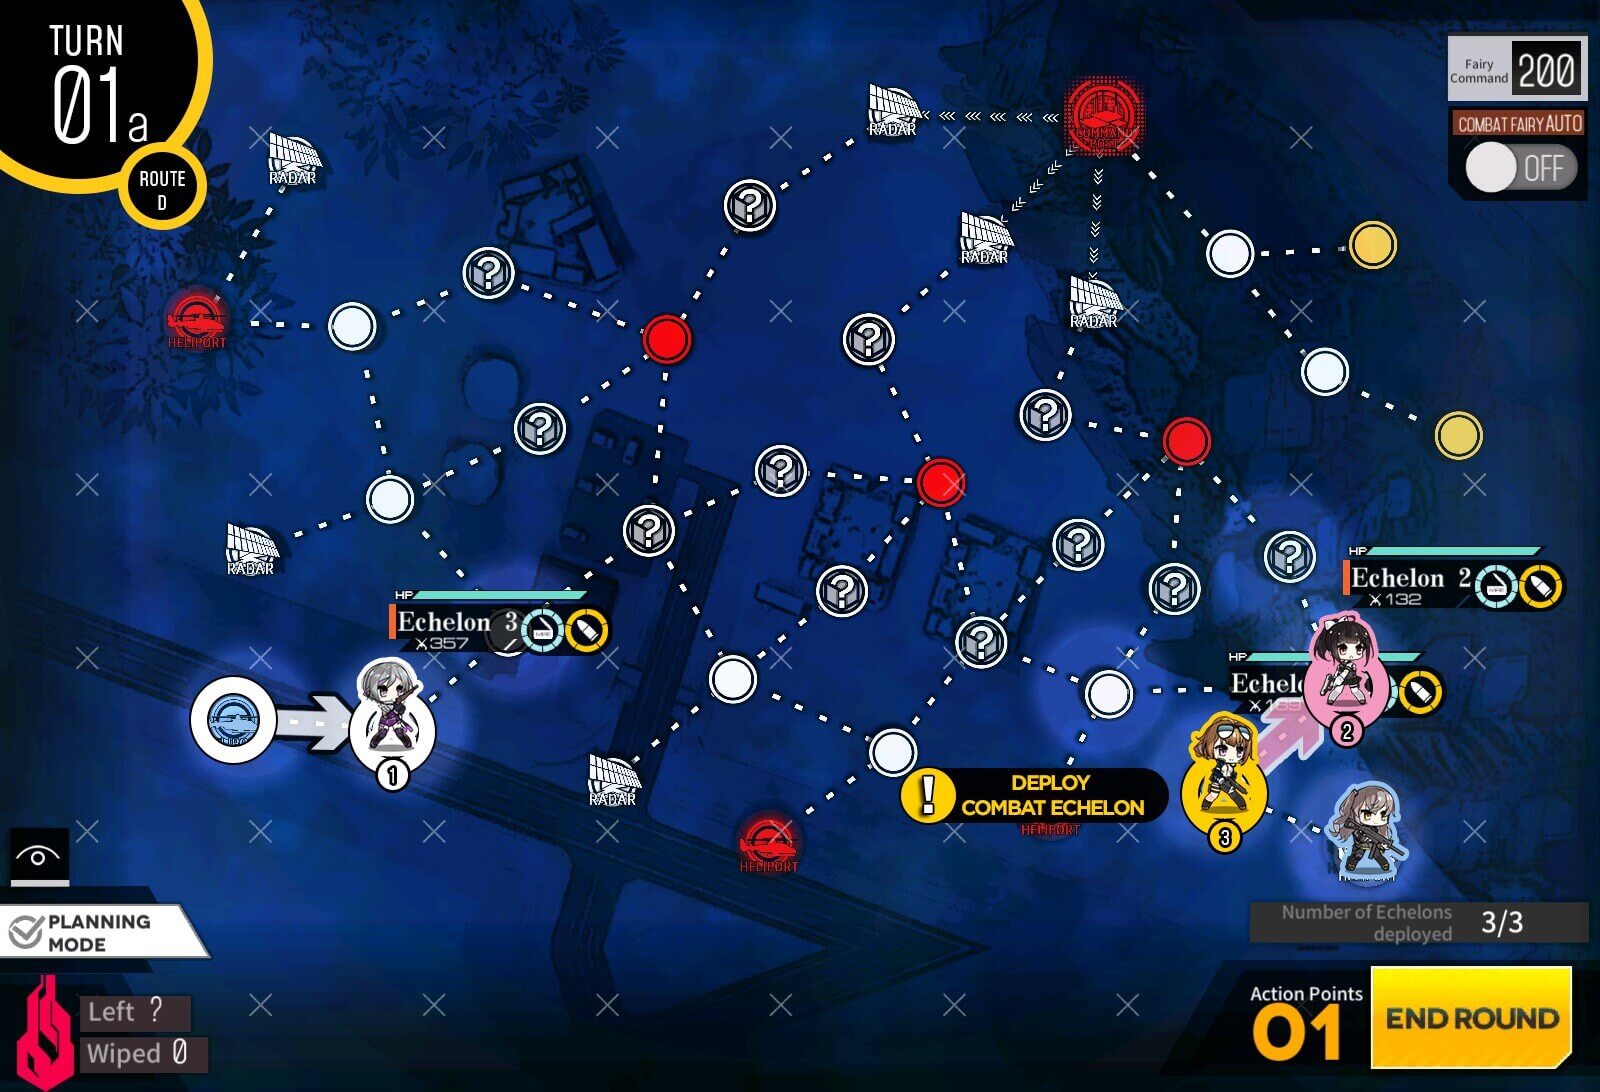
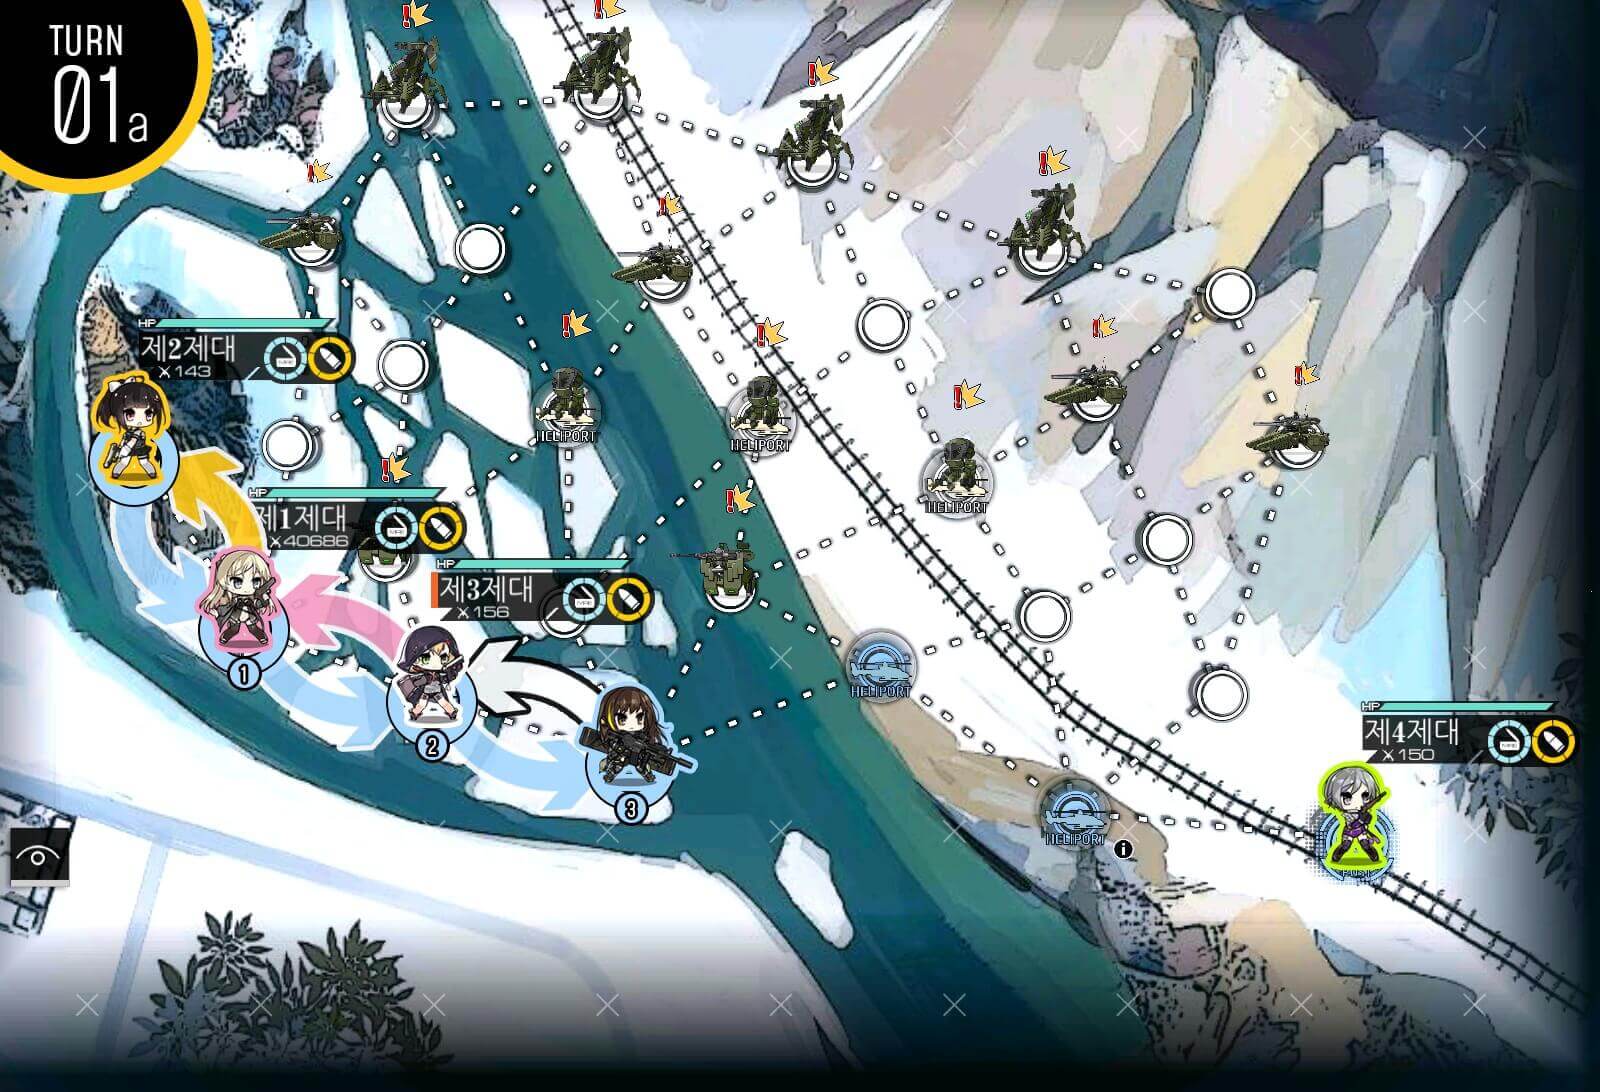
Turn 1a
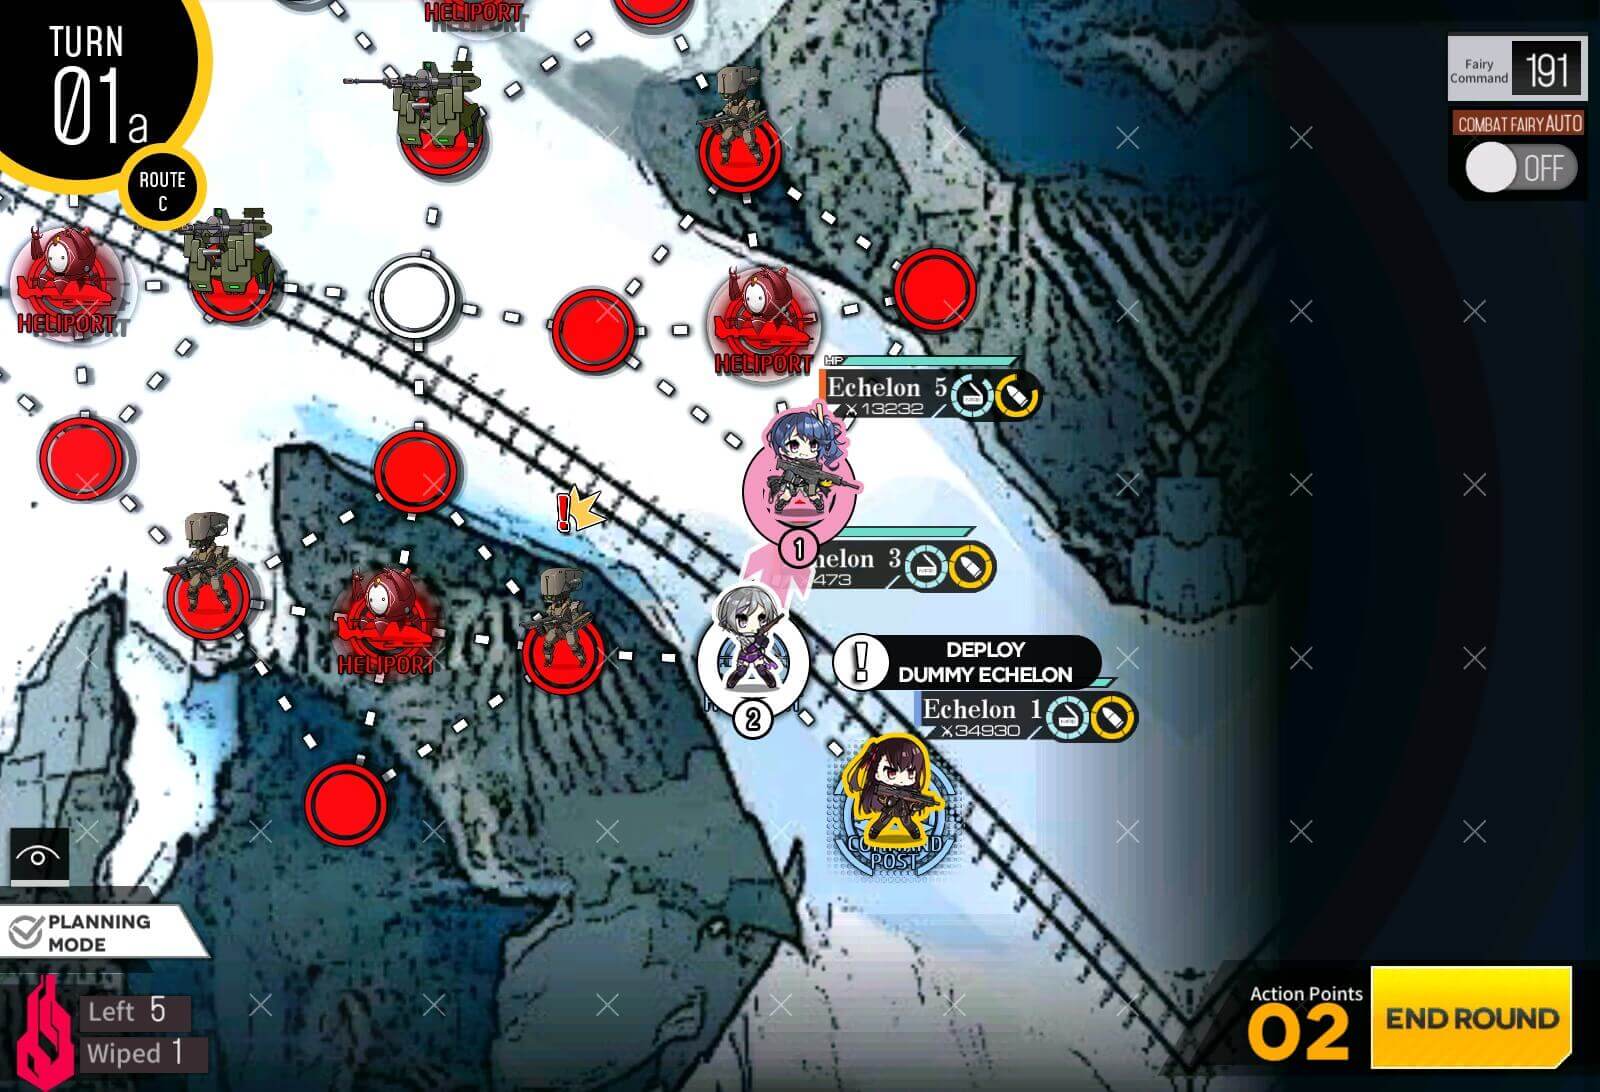
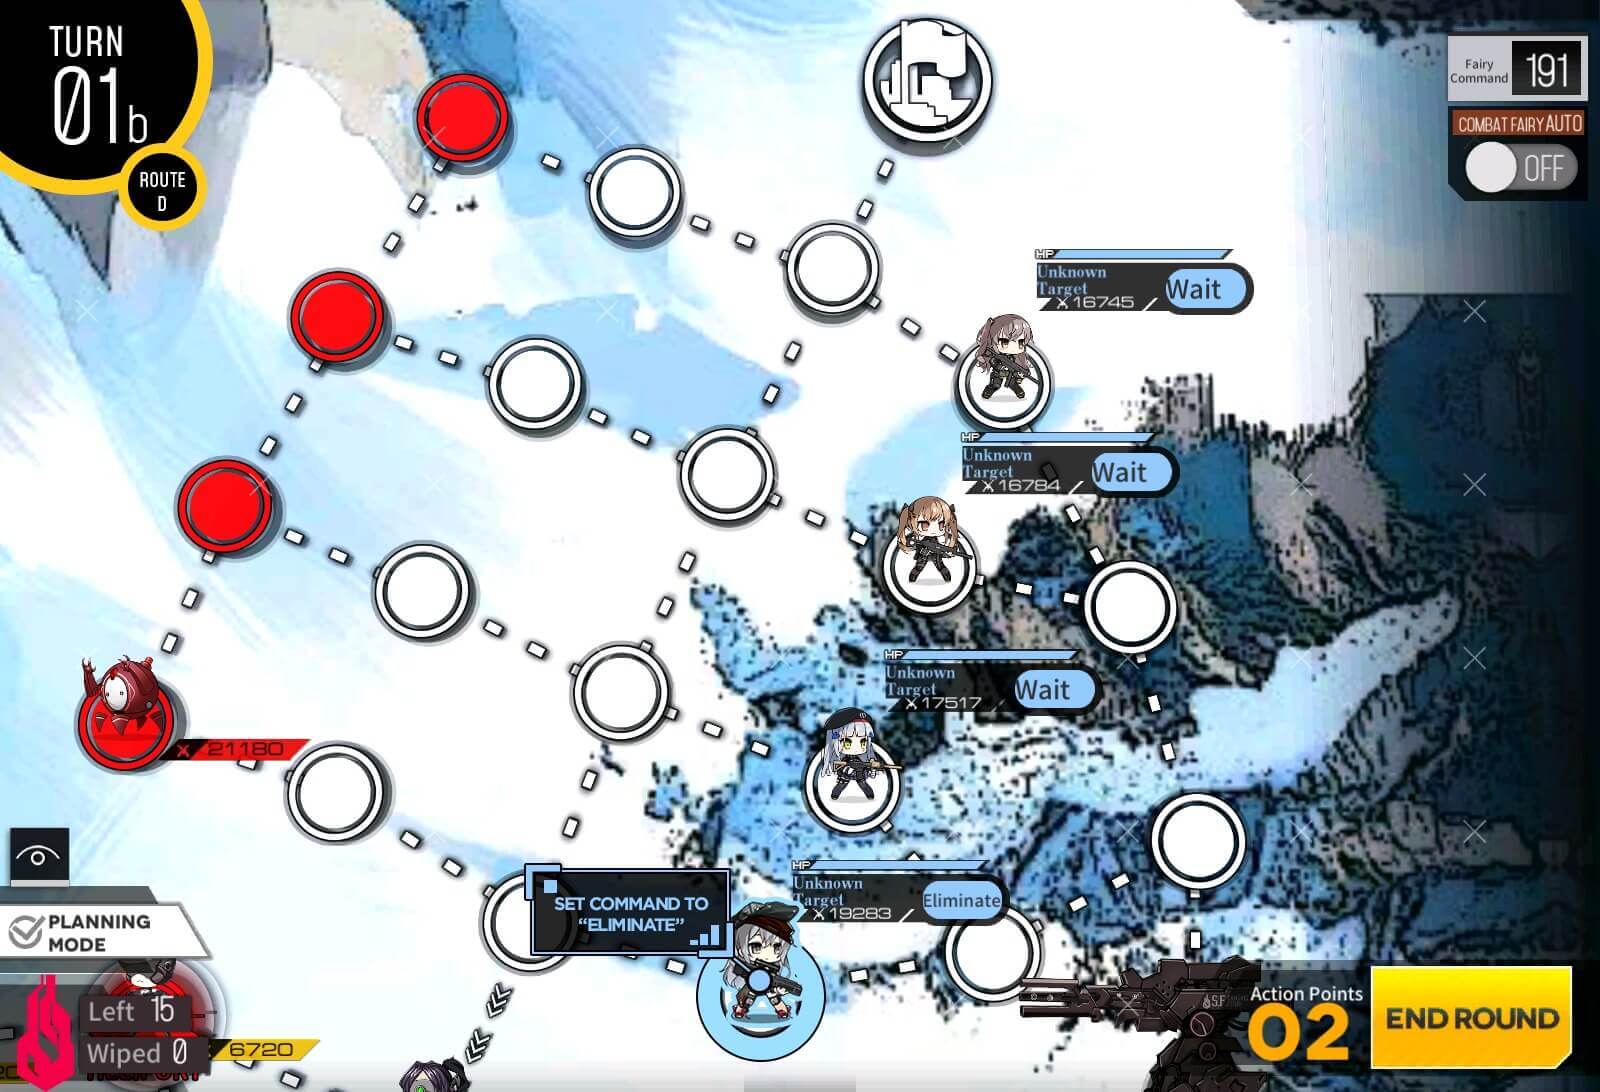
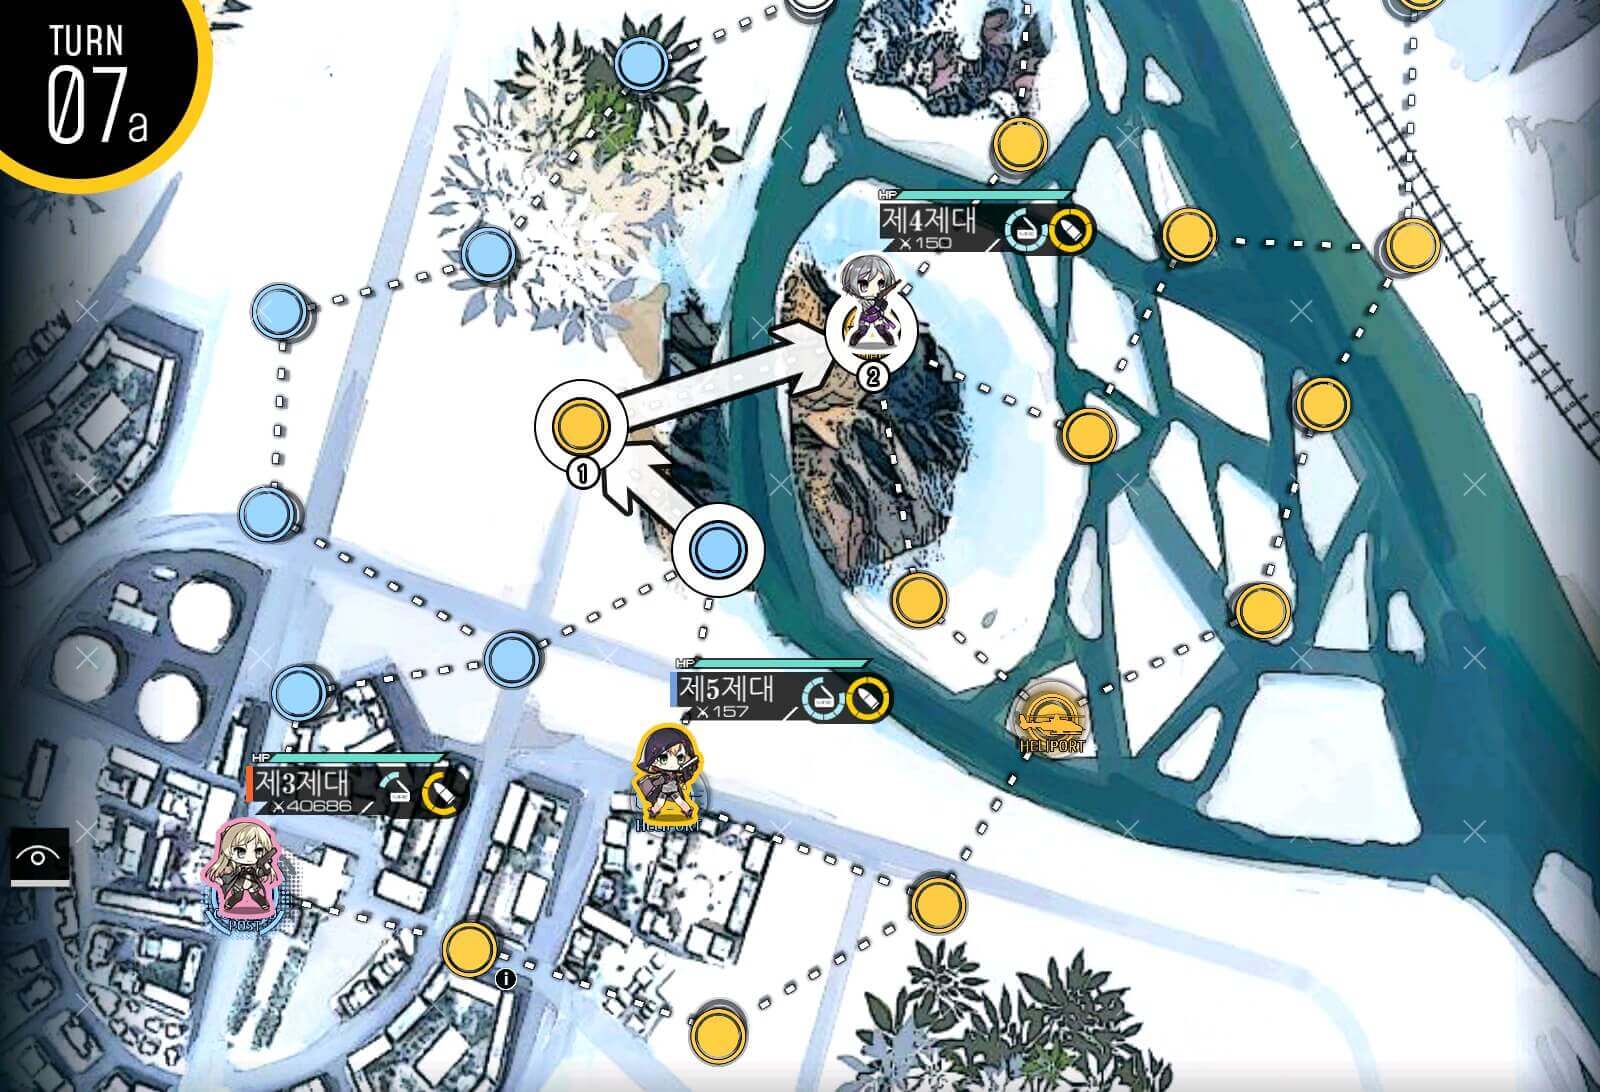
We are mainly responsible for top half of the map while friend units are taking care of bottom side. Take helipad node south of HQ to increase move points.
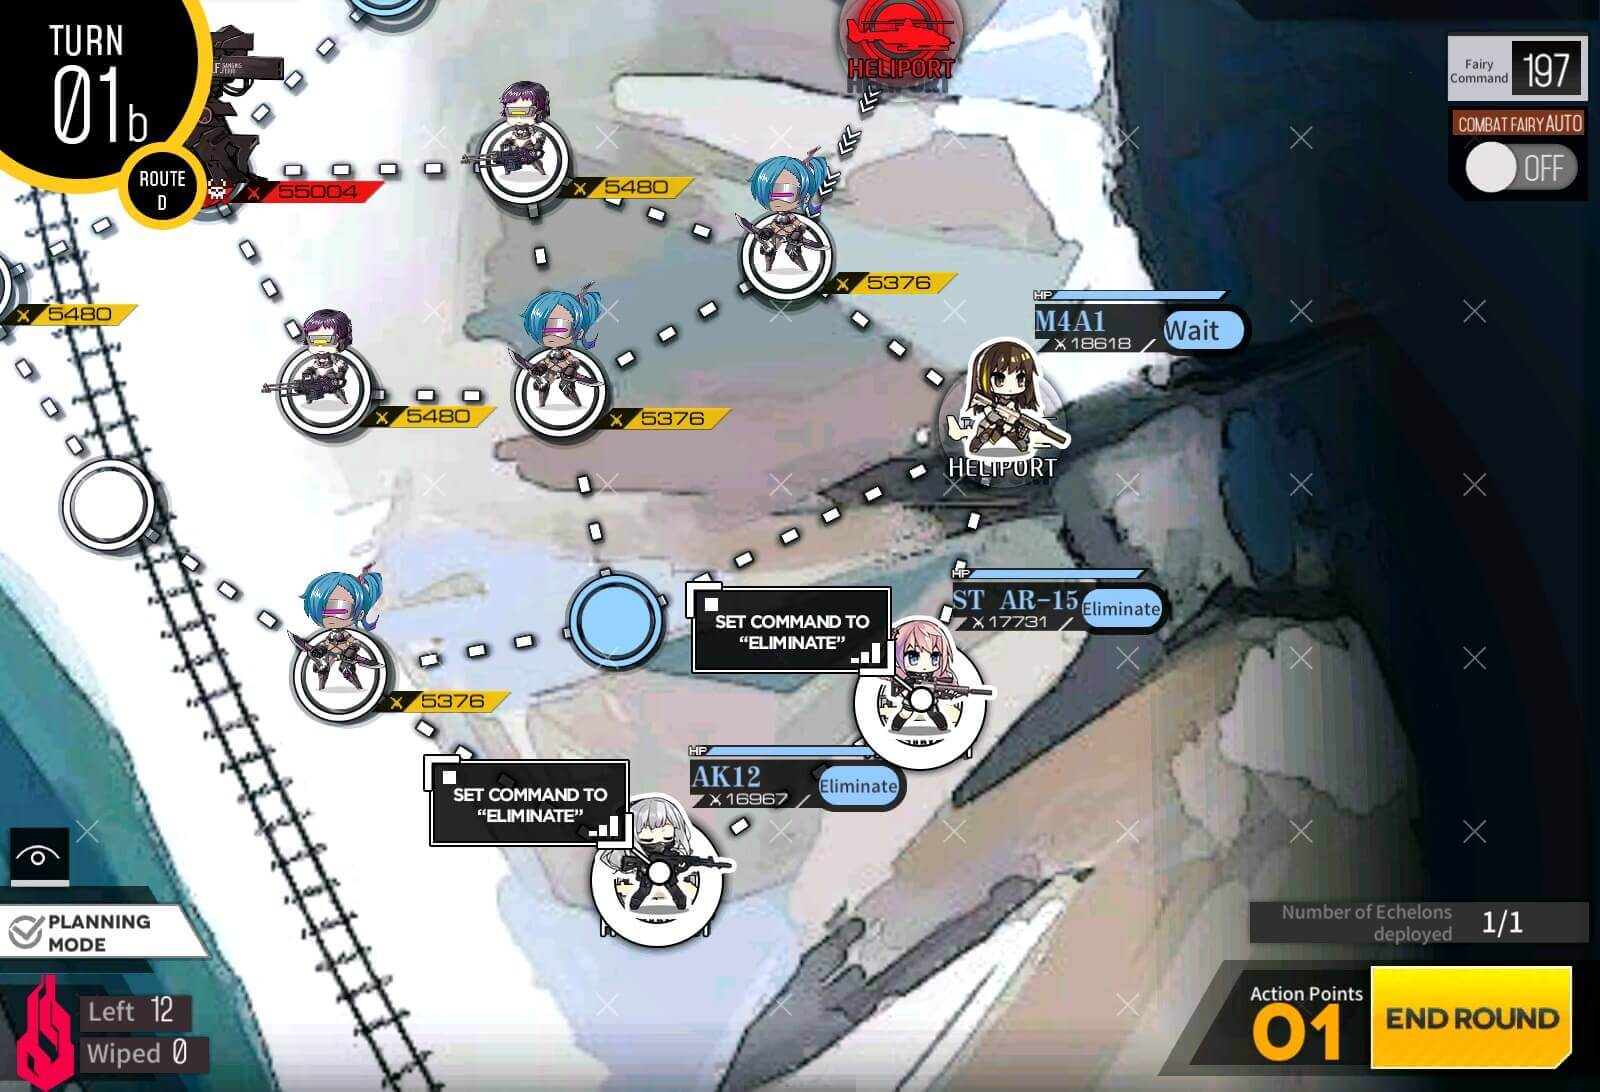
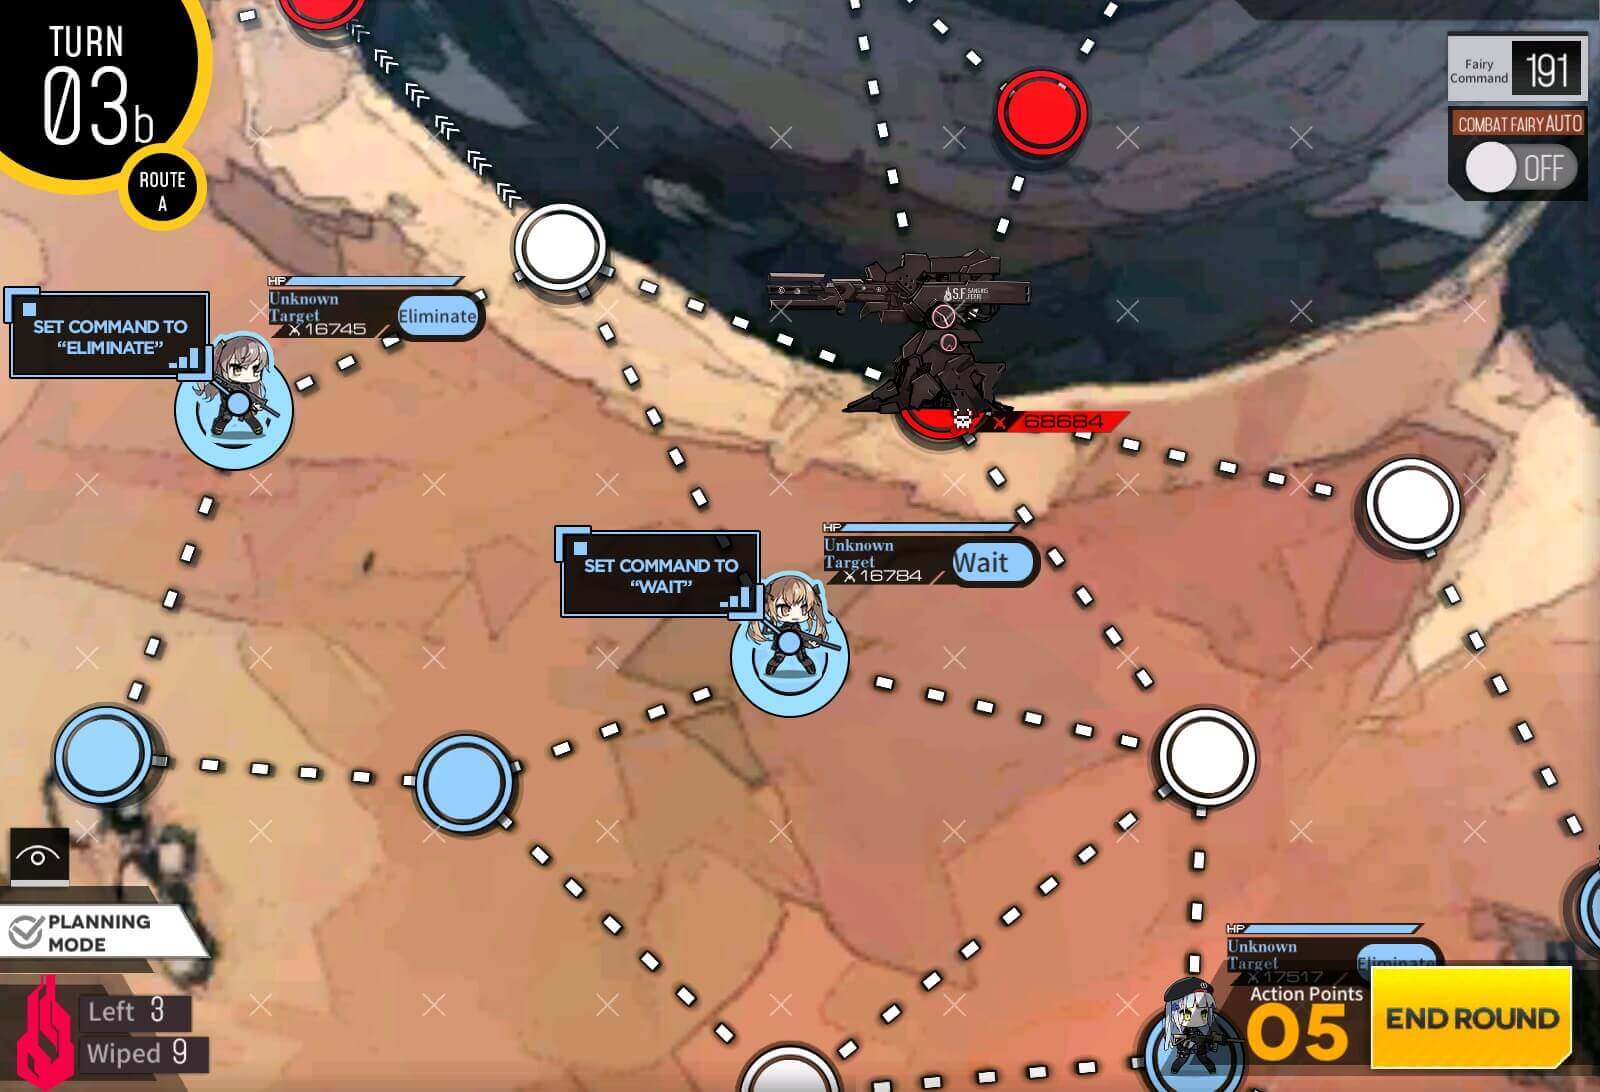
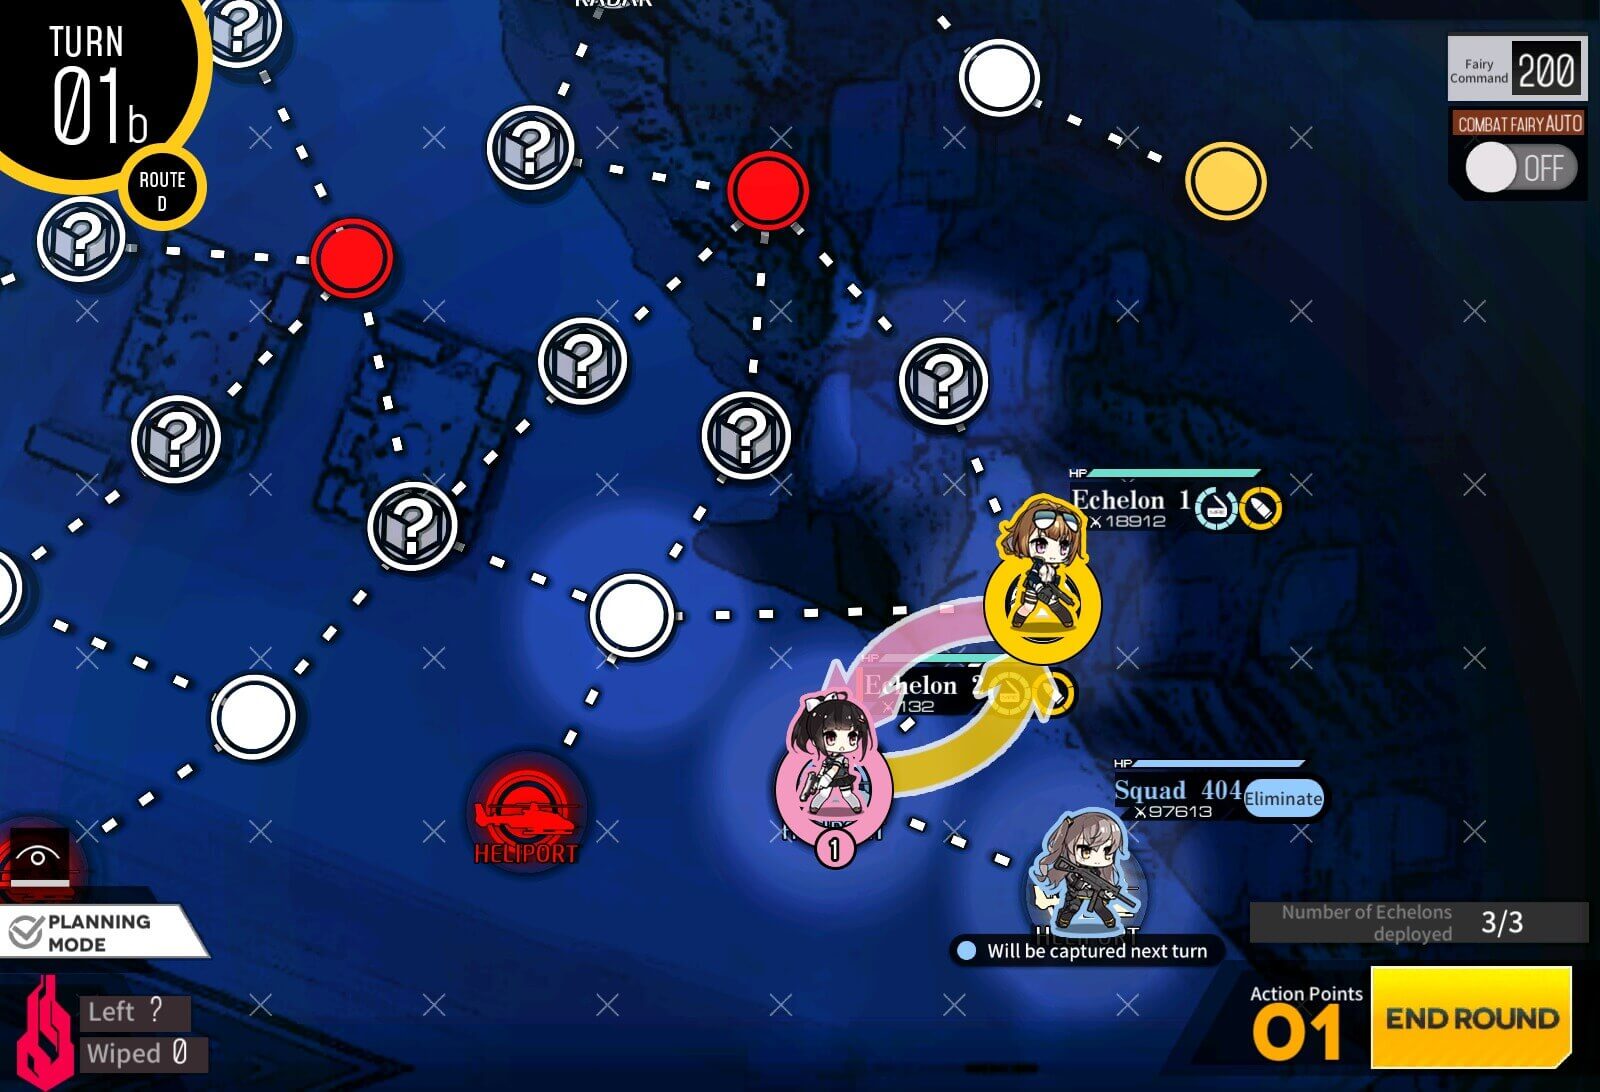
Turn 1b
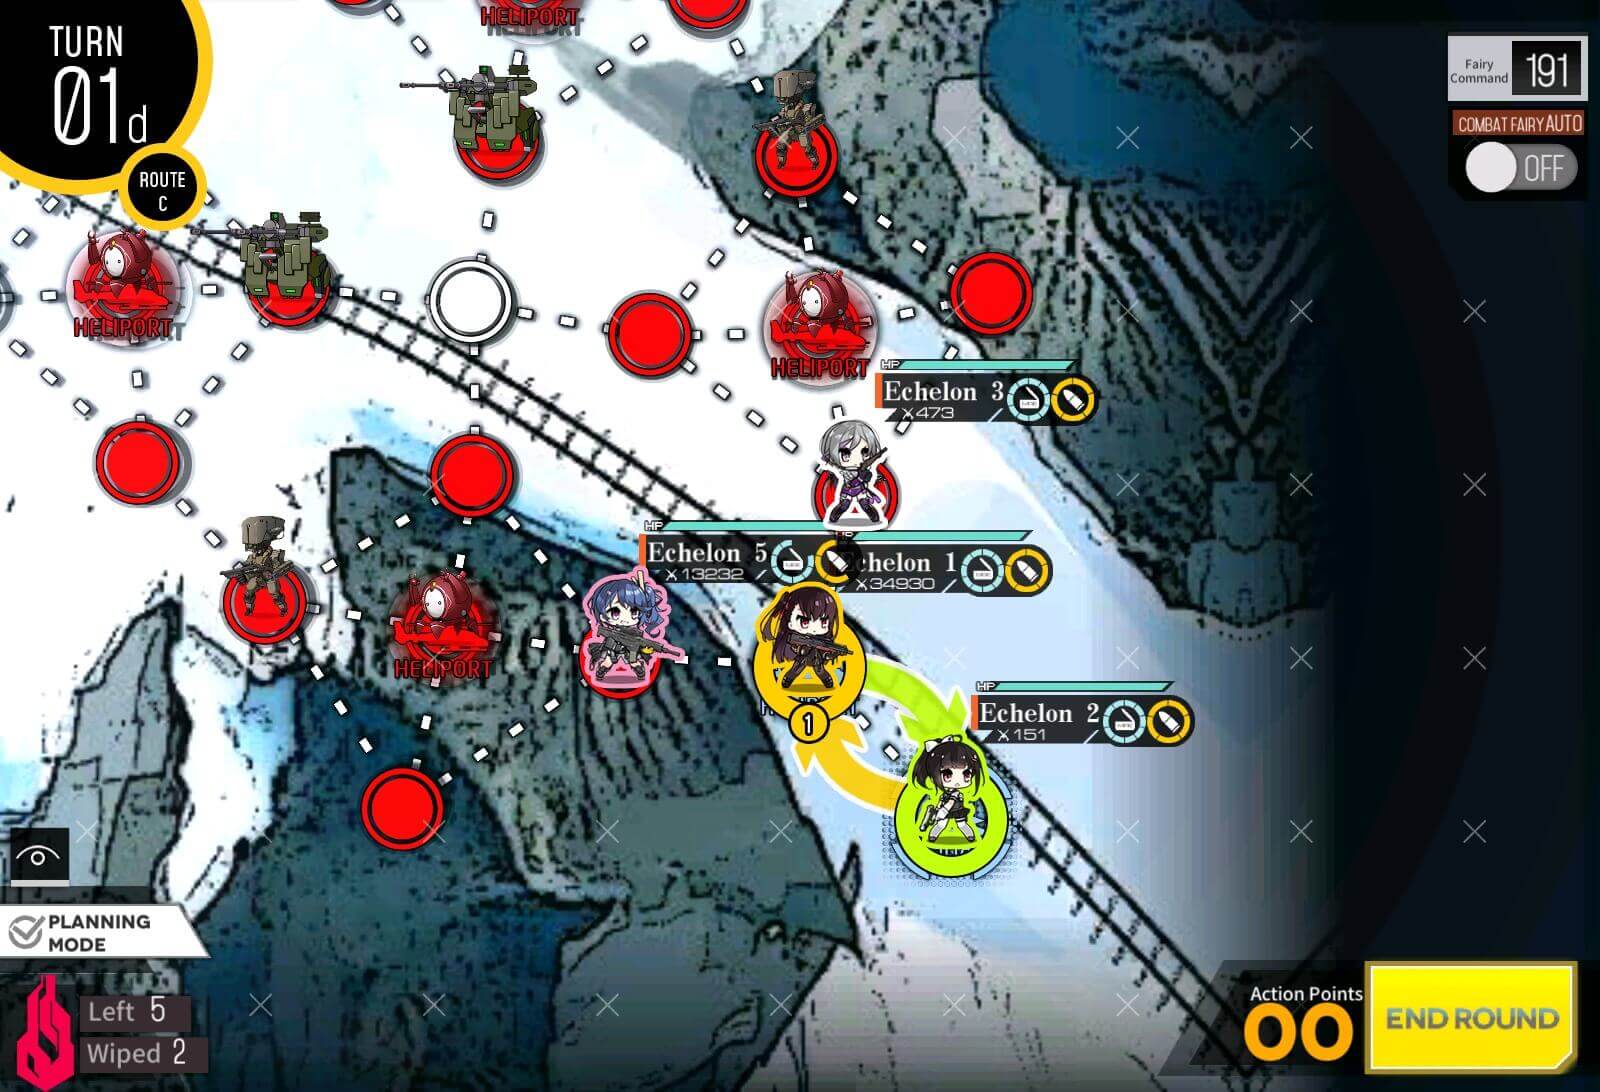
This is important and wasting less turn, make sure to set M4 to "Wait" while other two units are set to "Eliminate".
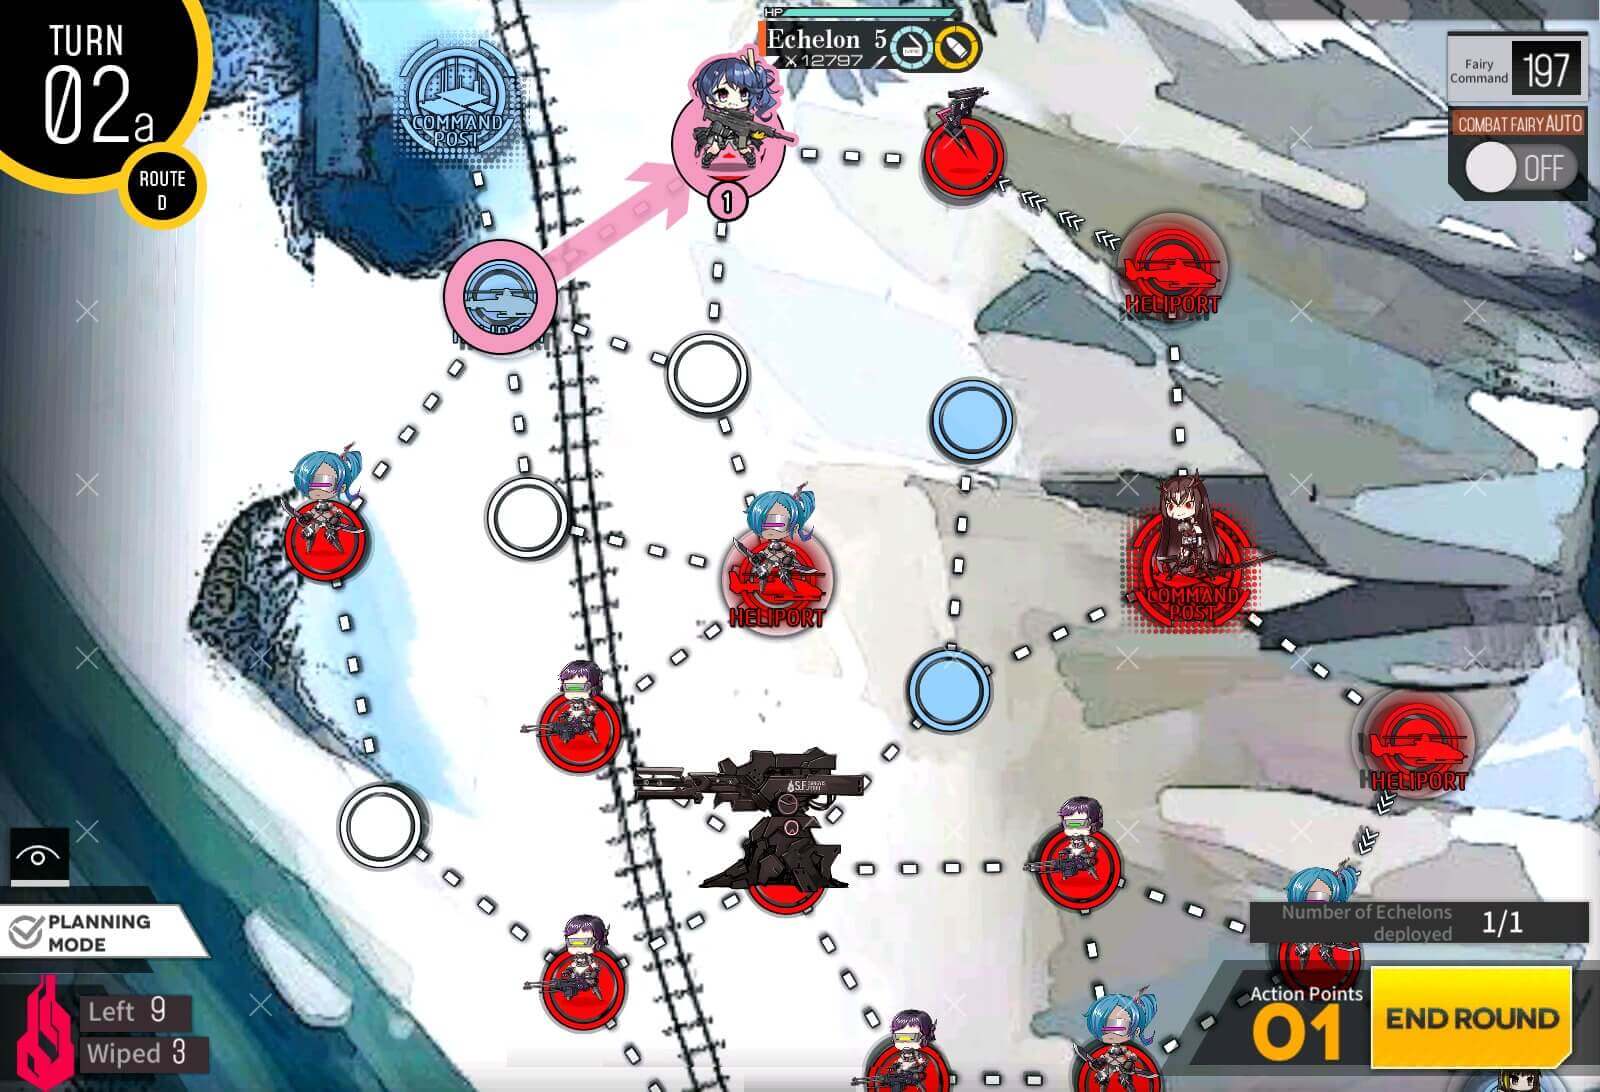
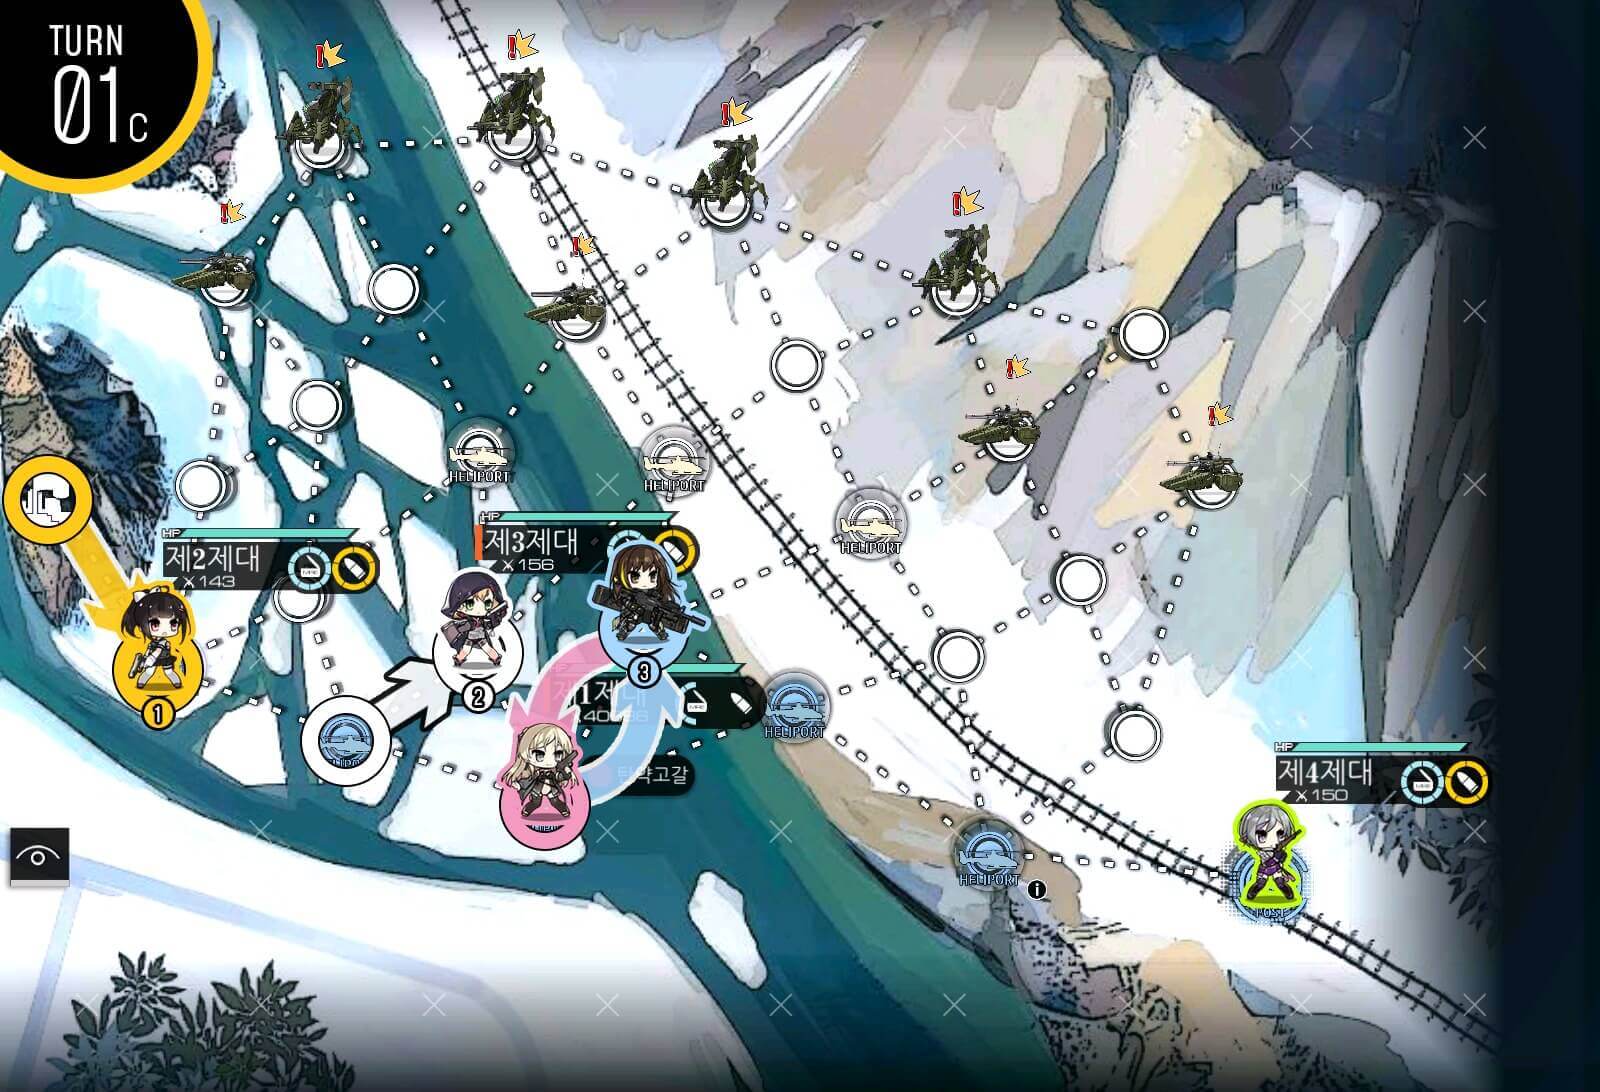
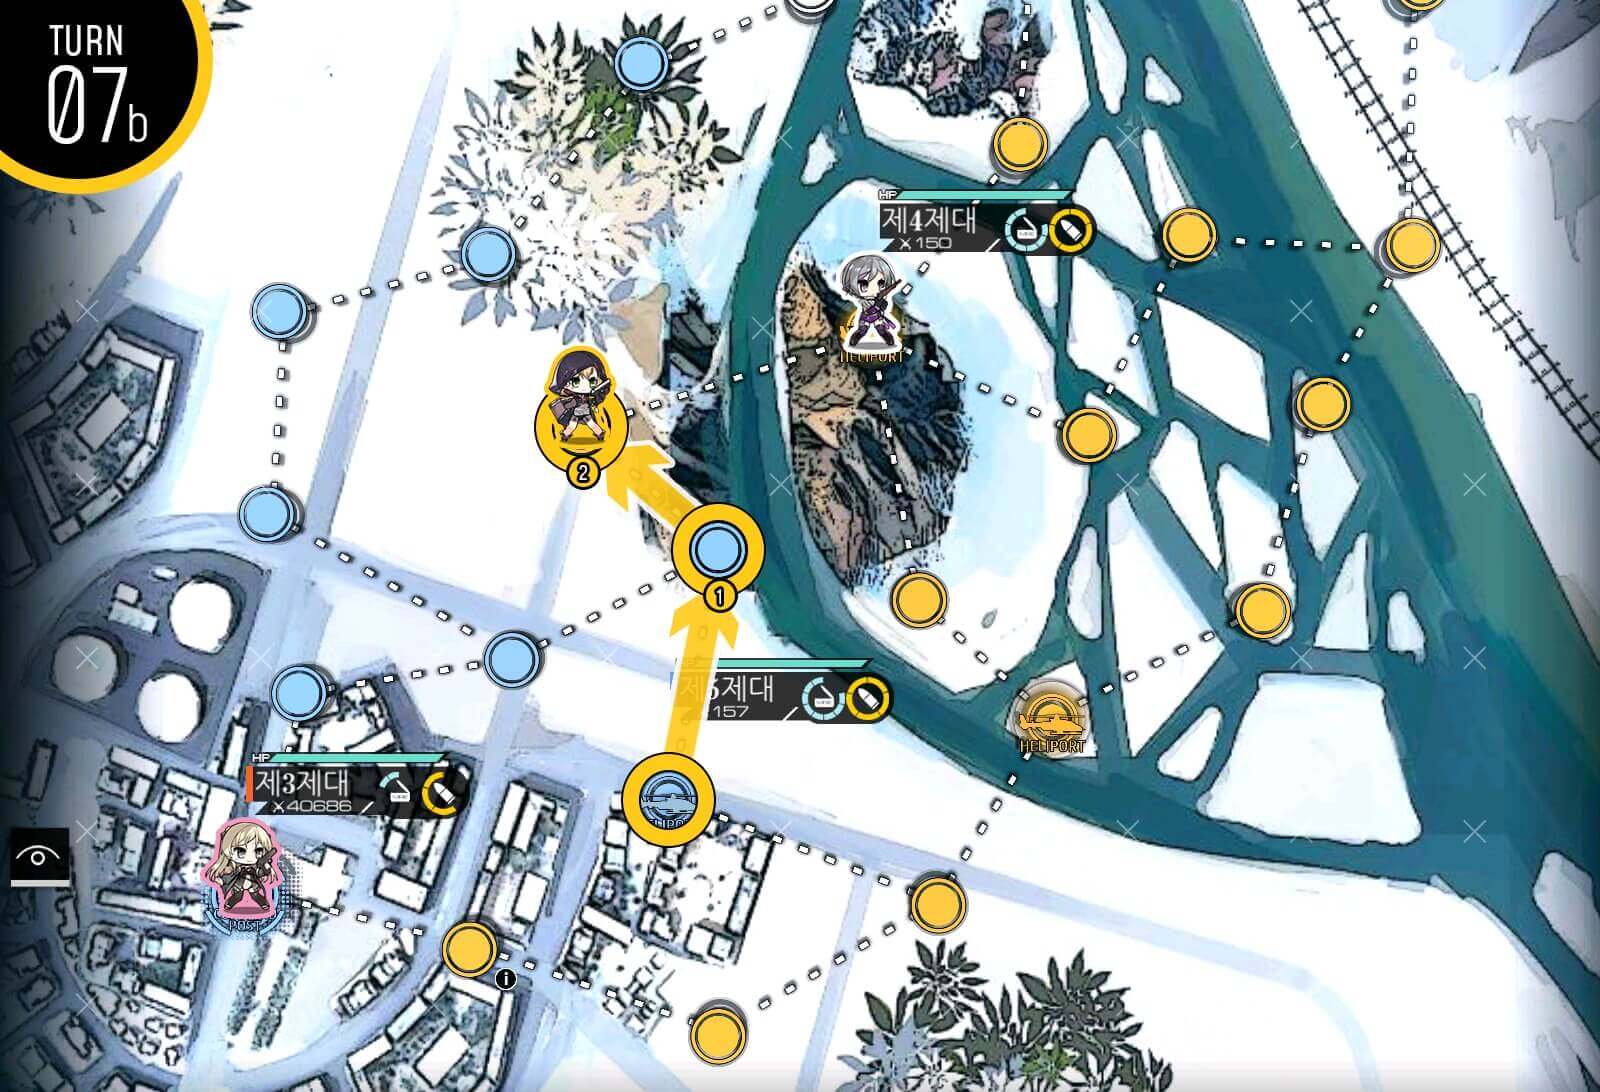
Turn 2a
Combat echelon moves up one to take care of scout. This prevents helipad from being taken next turn.
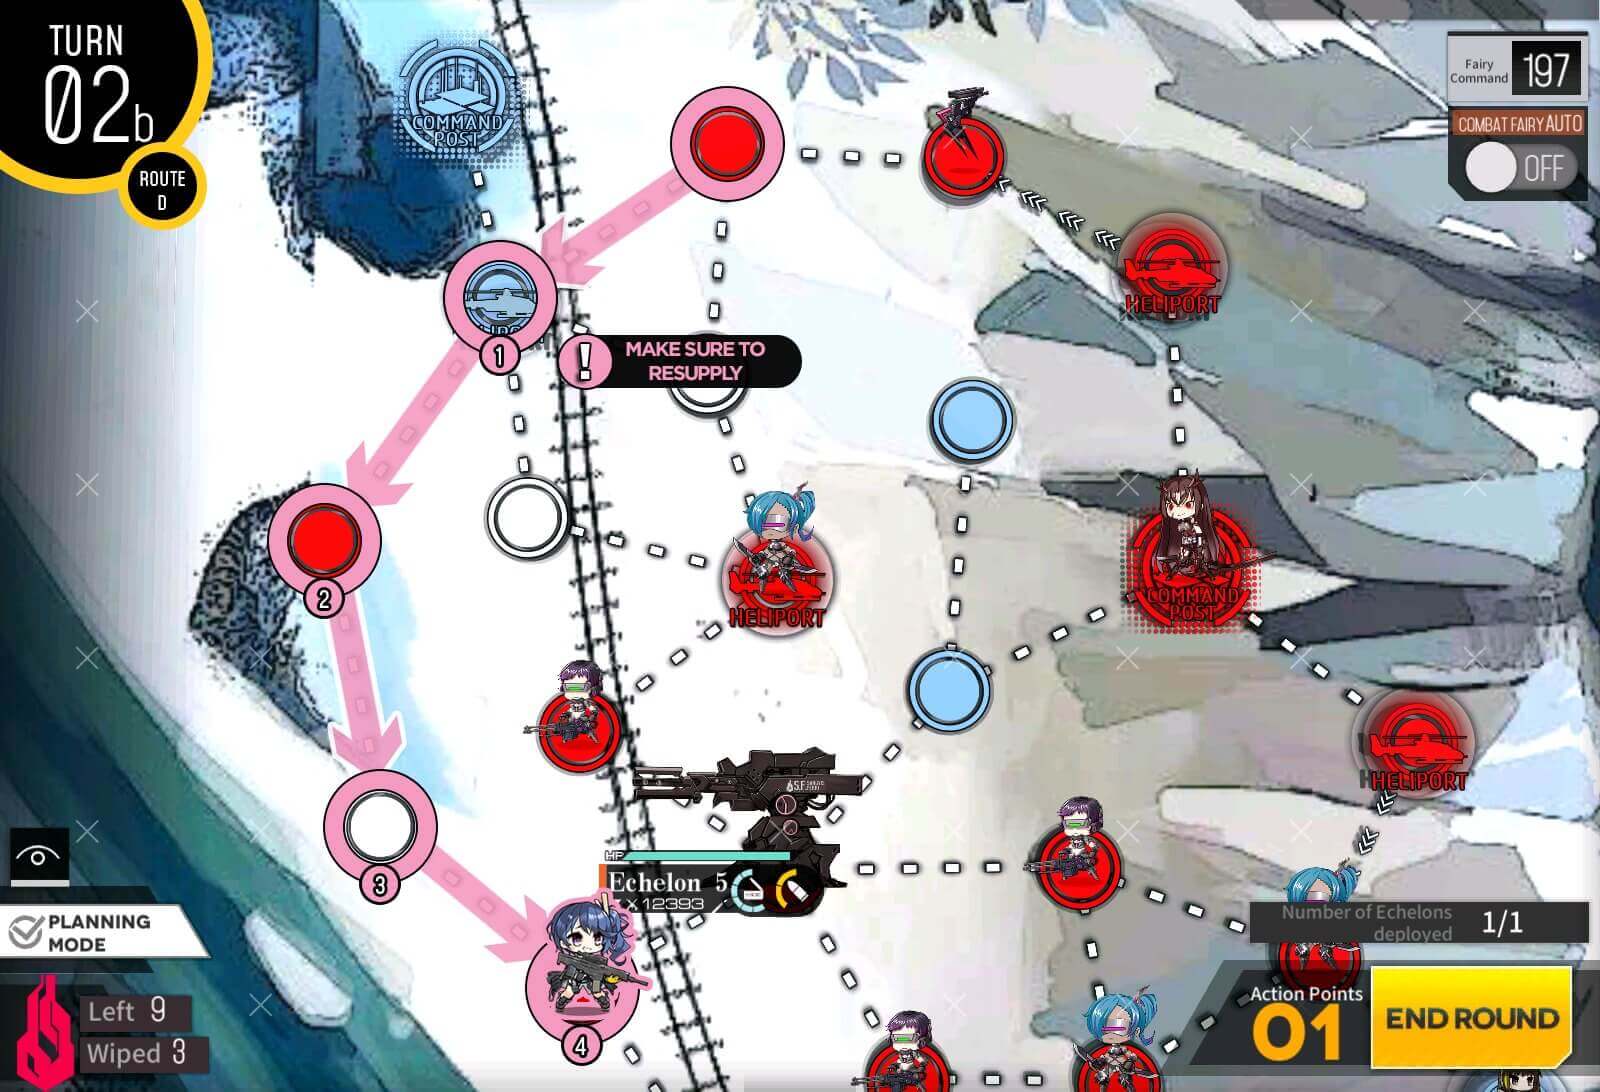
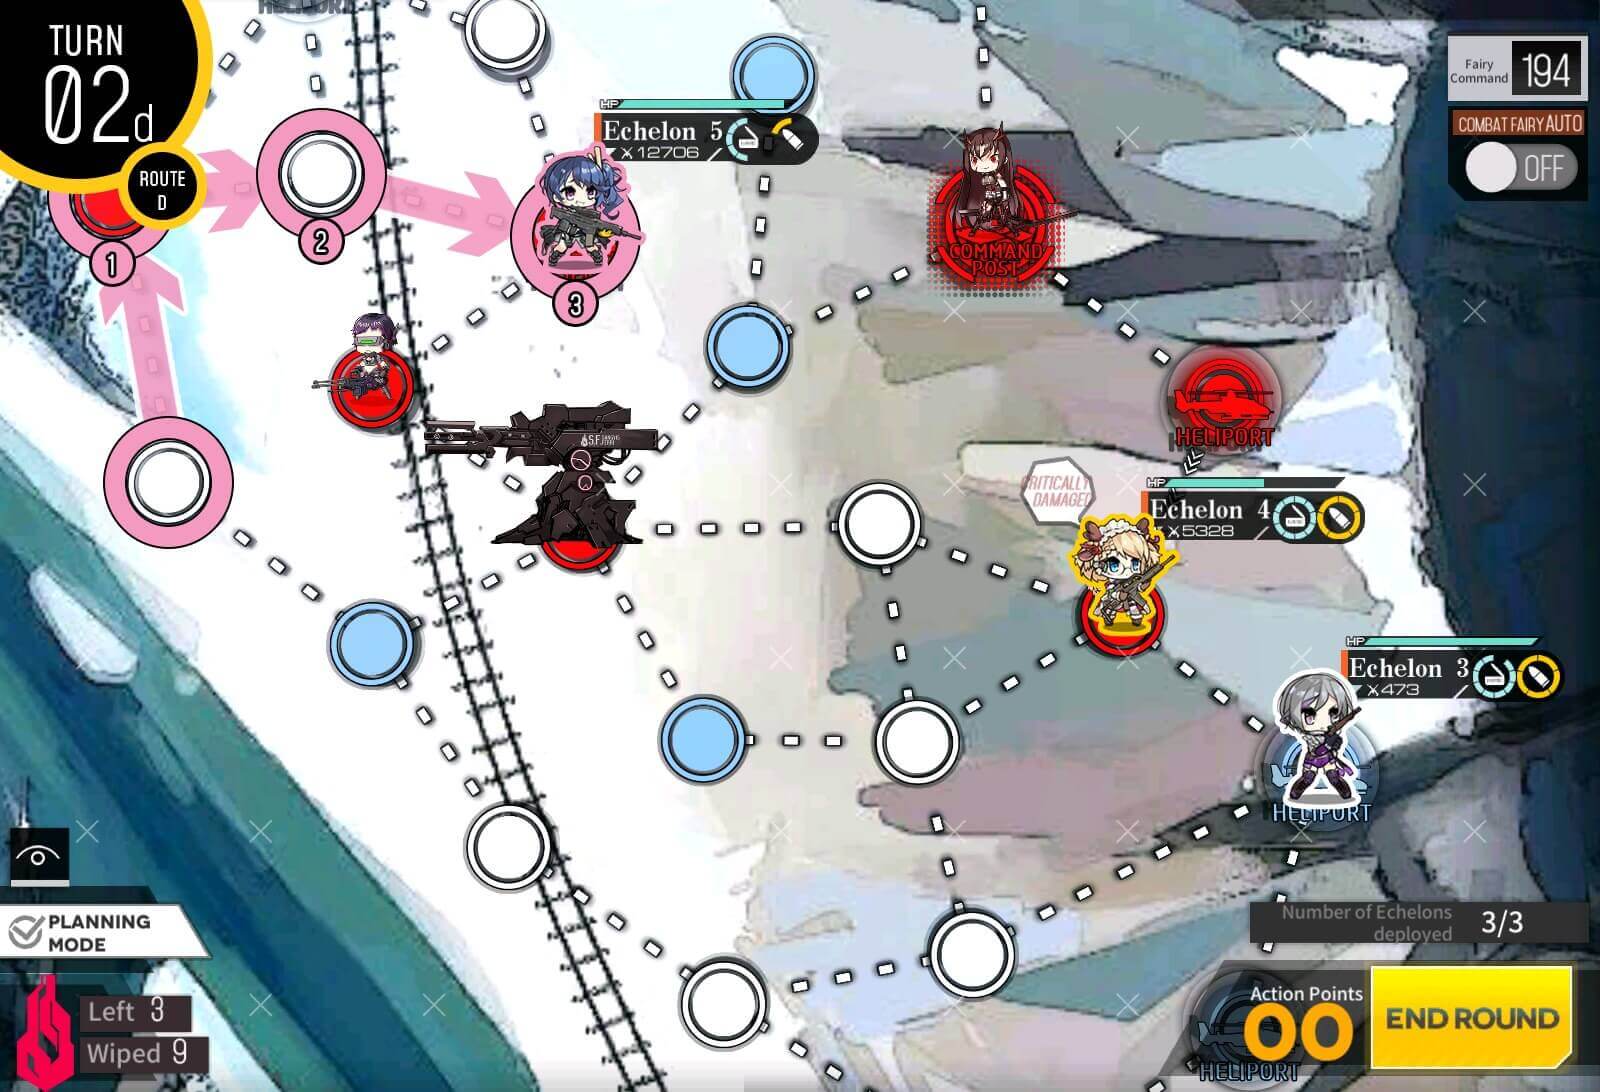
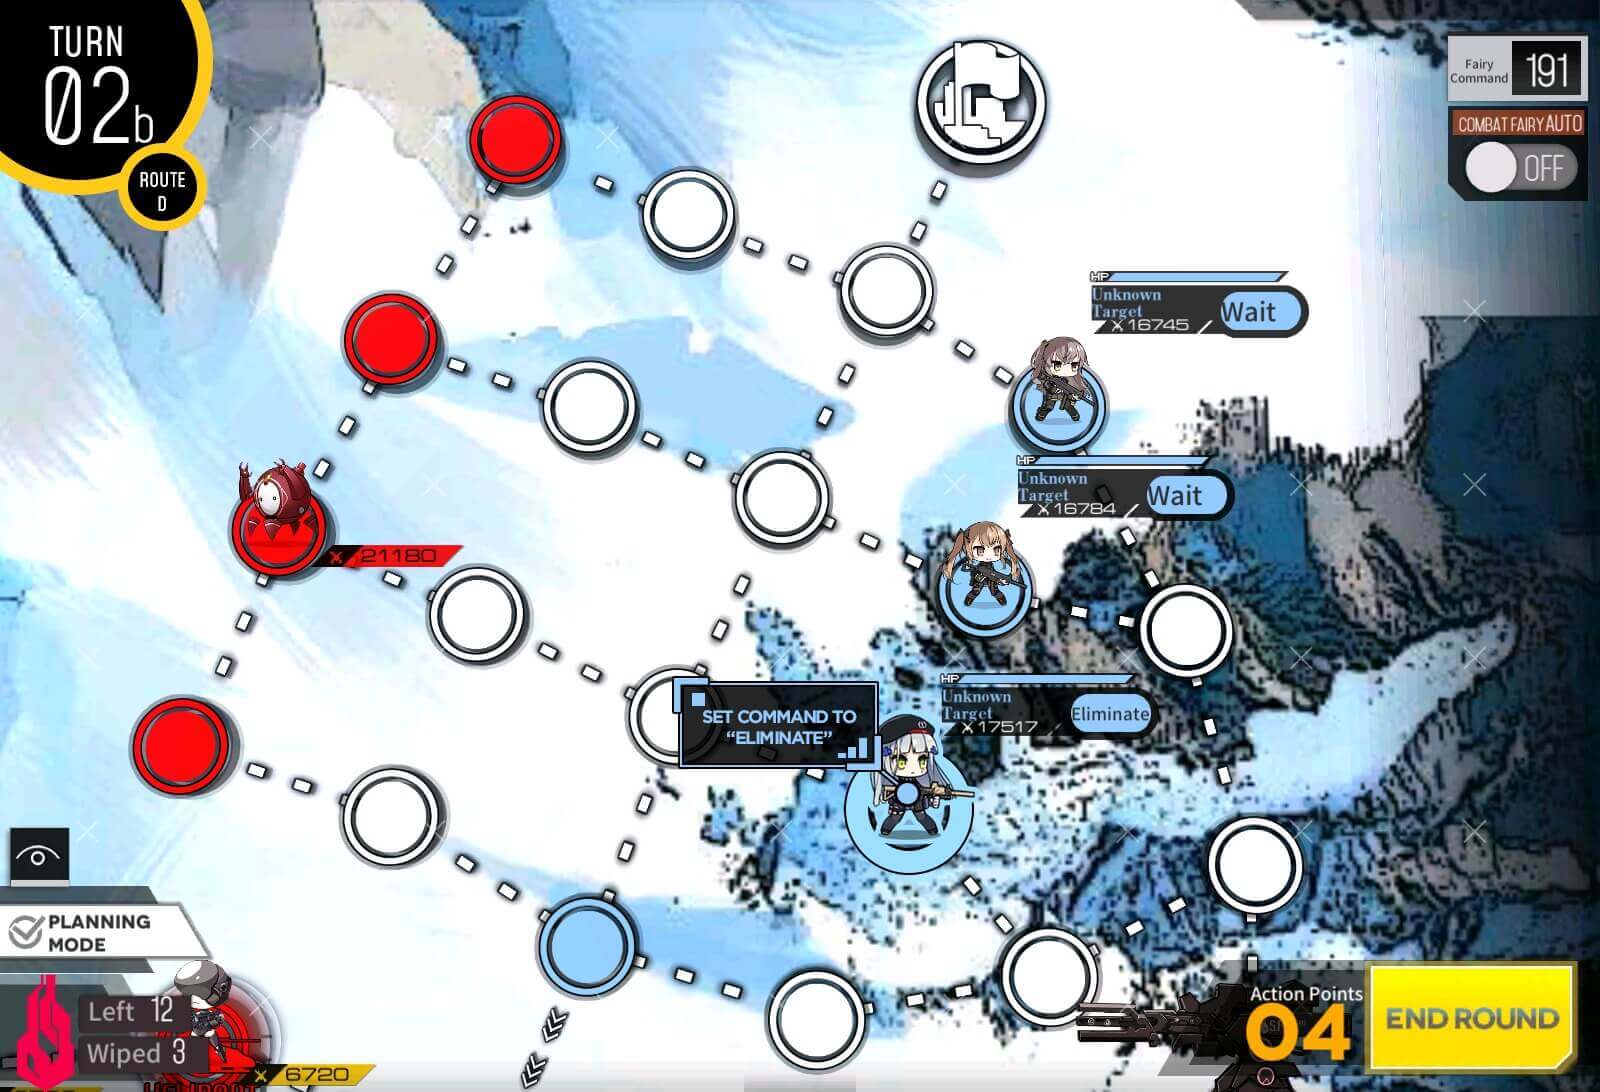
Turn 2b
Move back on to helipad and resupply before moving all the way down to node adjacent to Jupiter cannon. You should have plenty of move points.
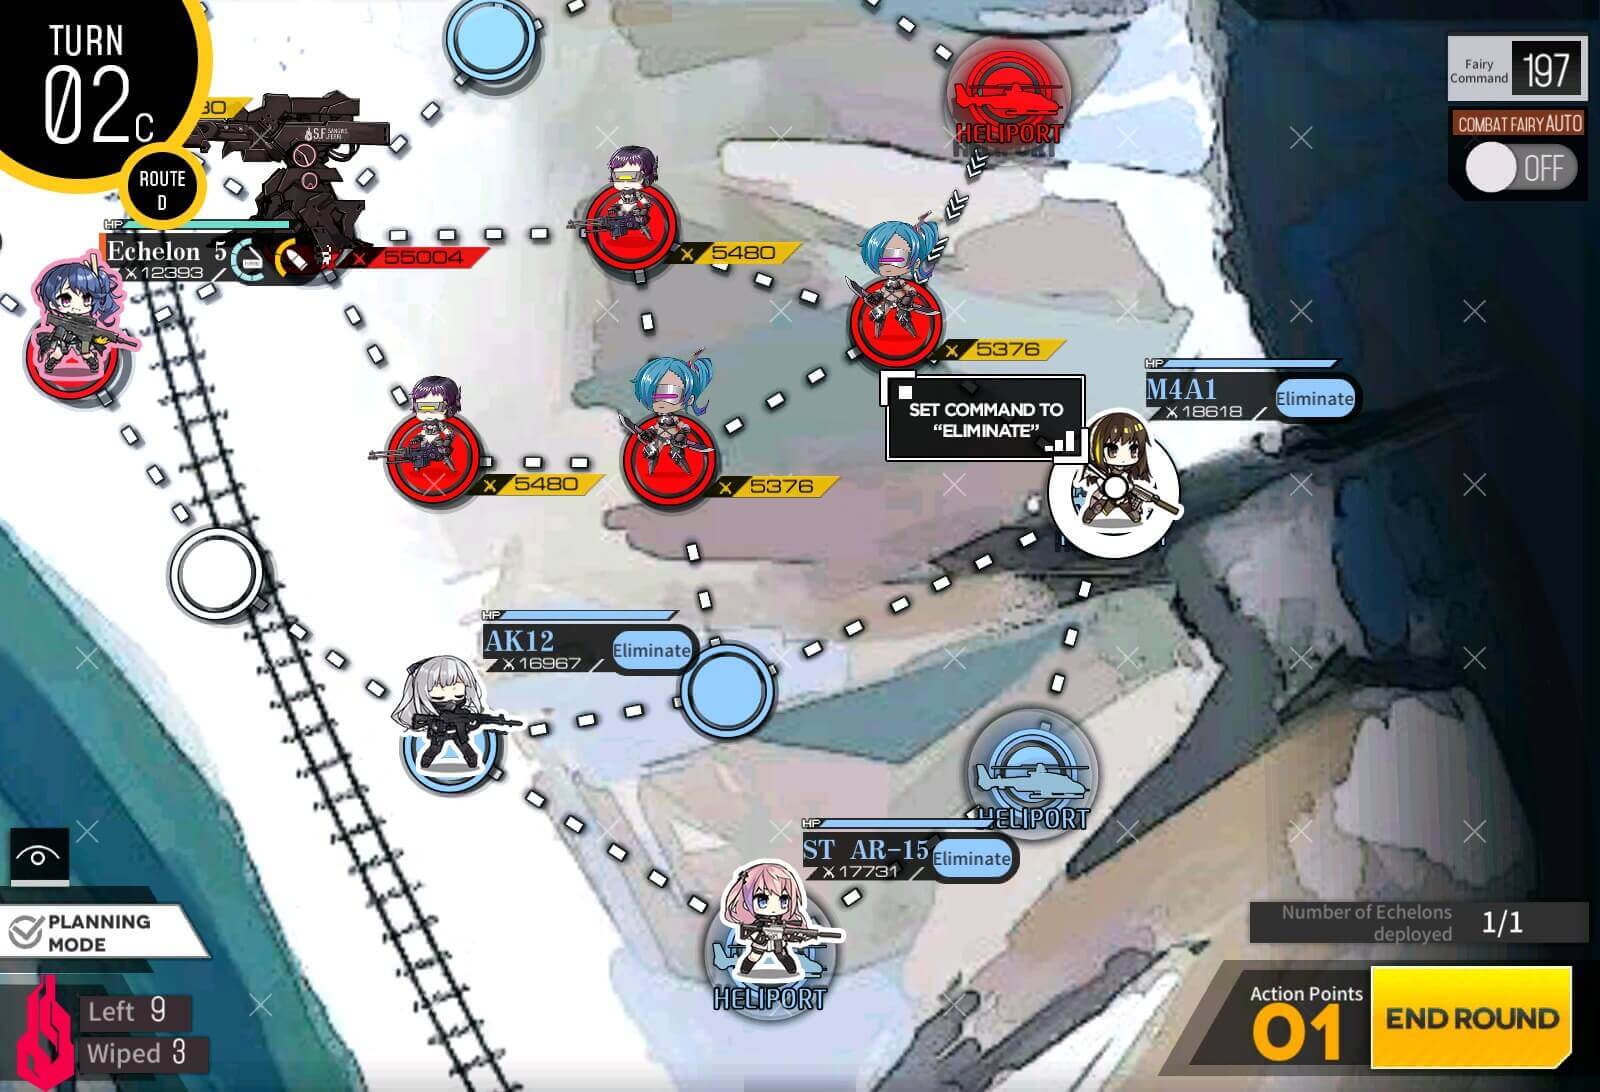
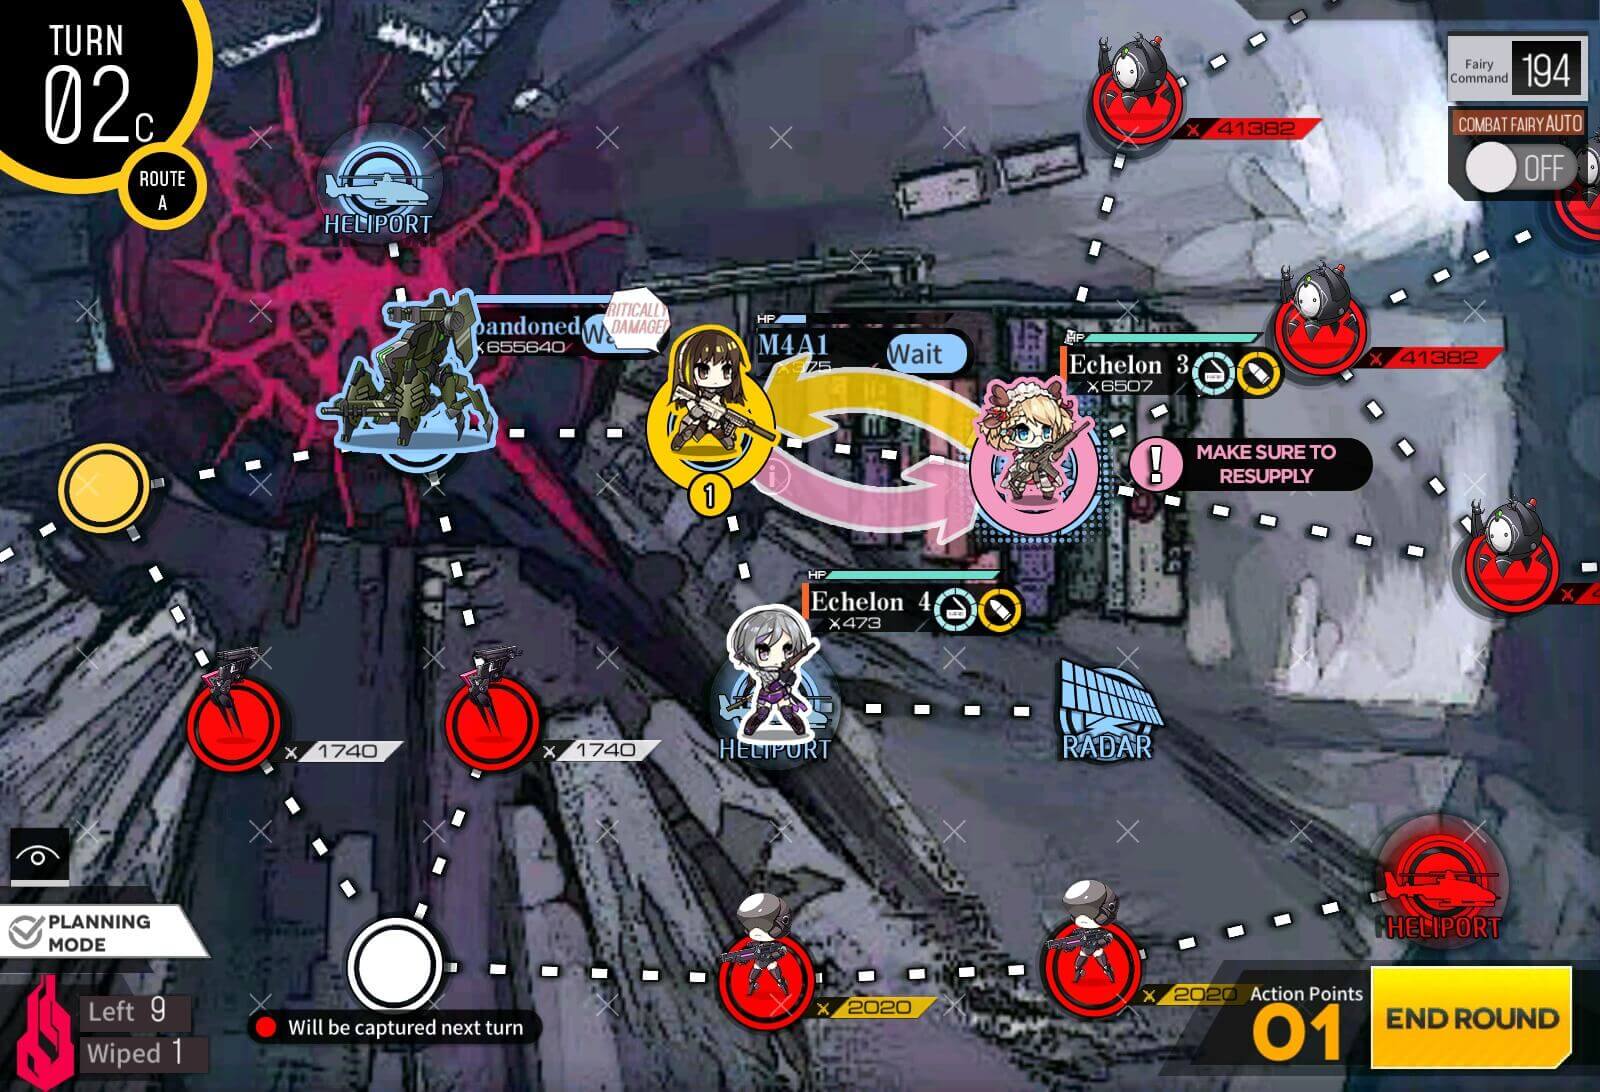
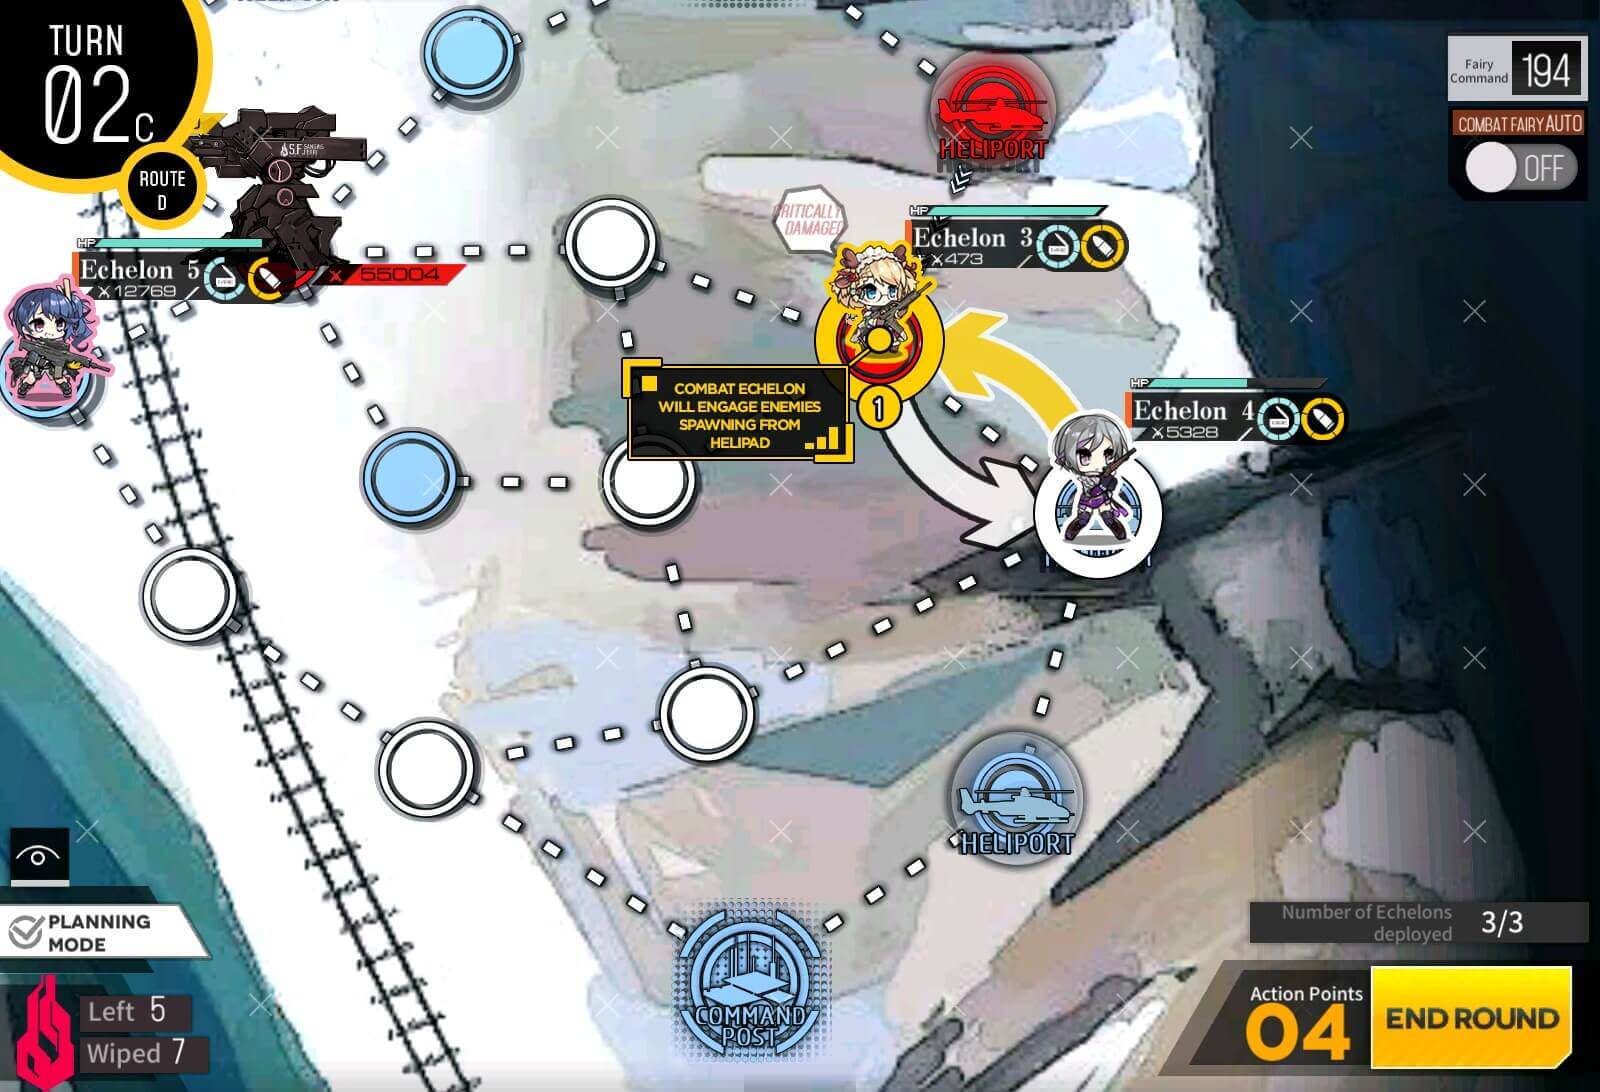
Turn 2c
Make sure to change AI command to "Eliminate" on M4 before ending turn.
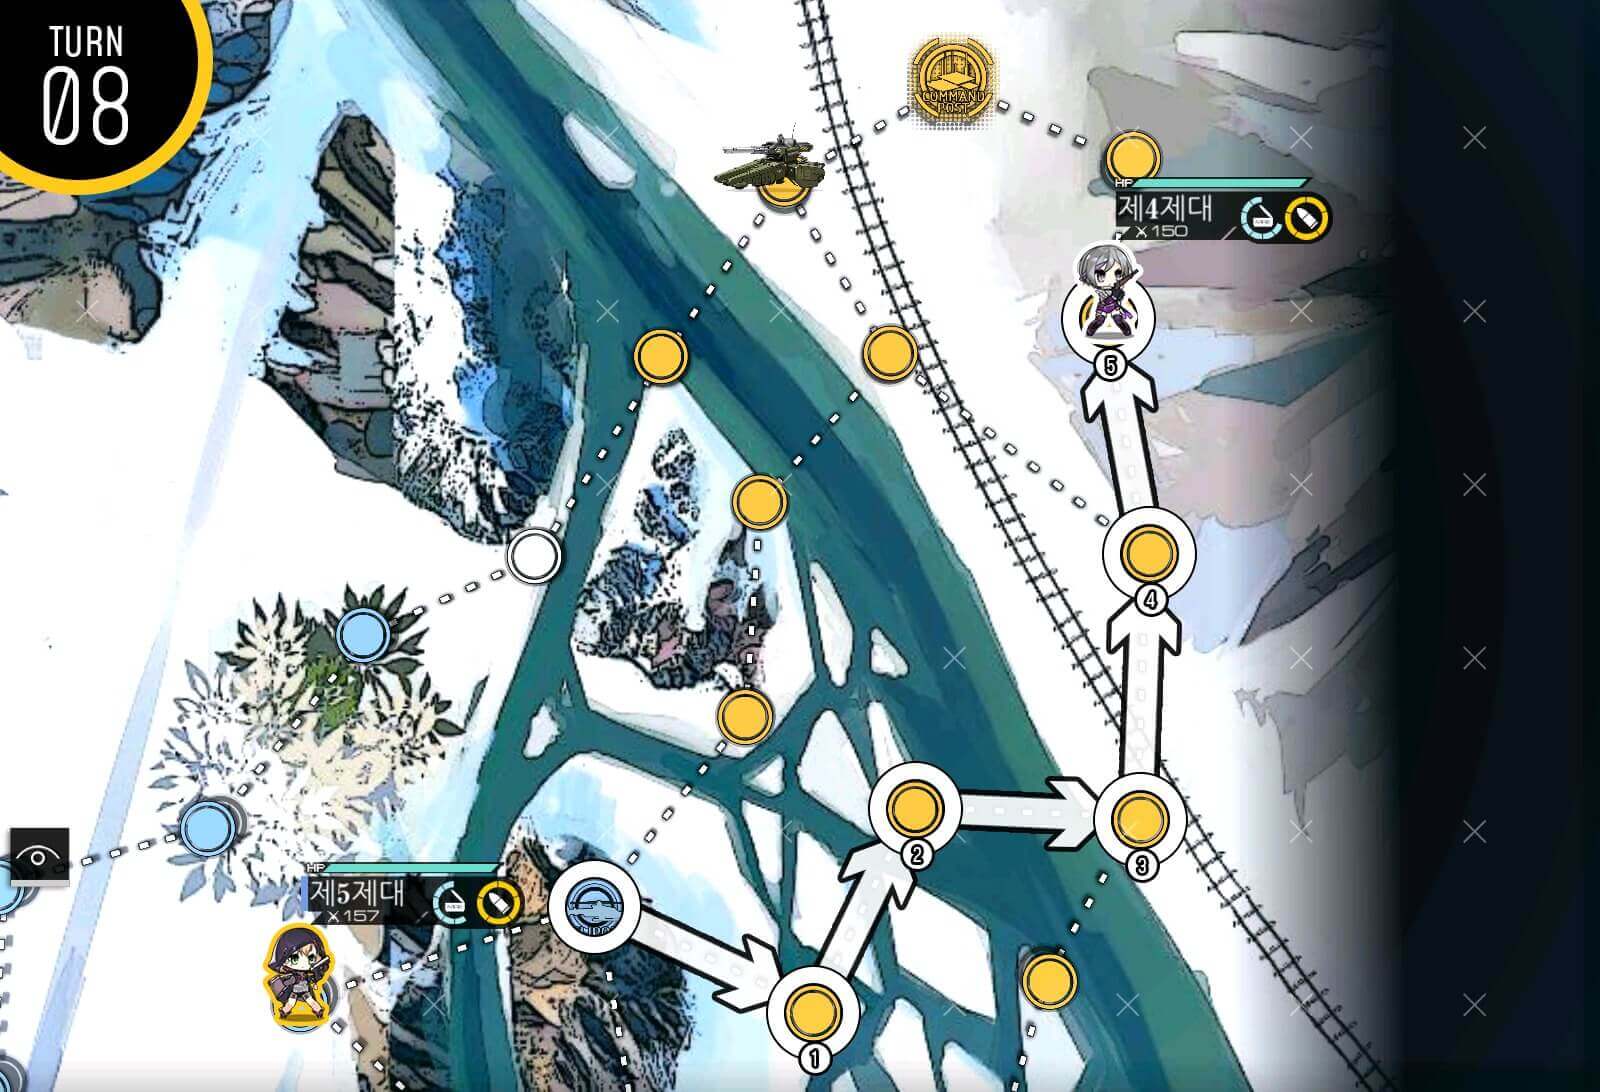
Turn 3
We backtrack the route we took last turn, always making sure to resupply on helipad. Then move down to take the helipad near the Jupiter cannon.
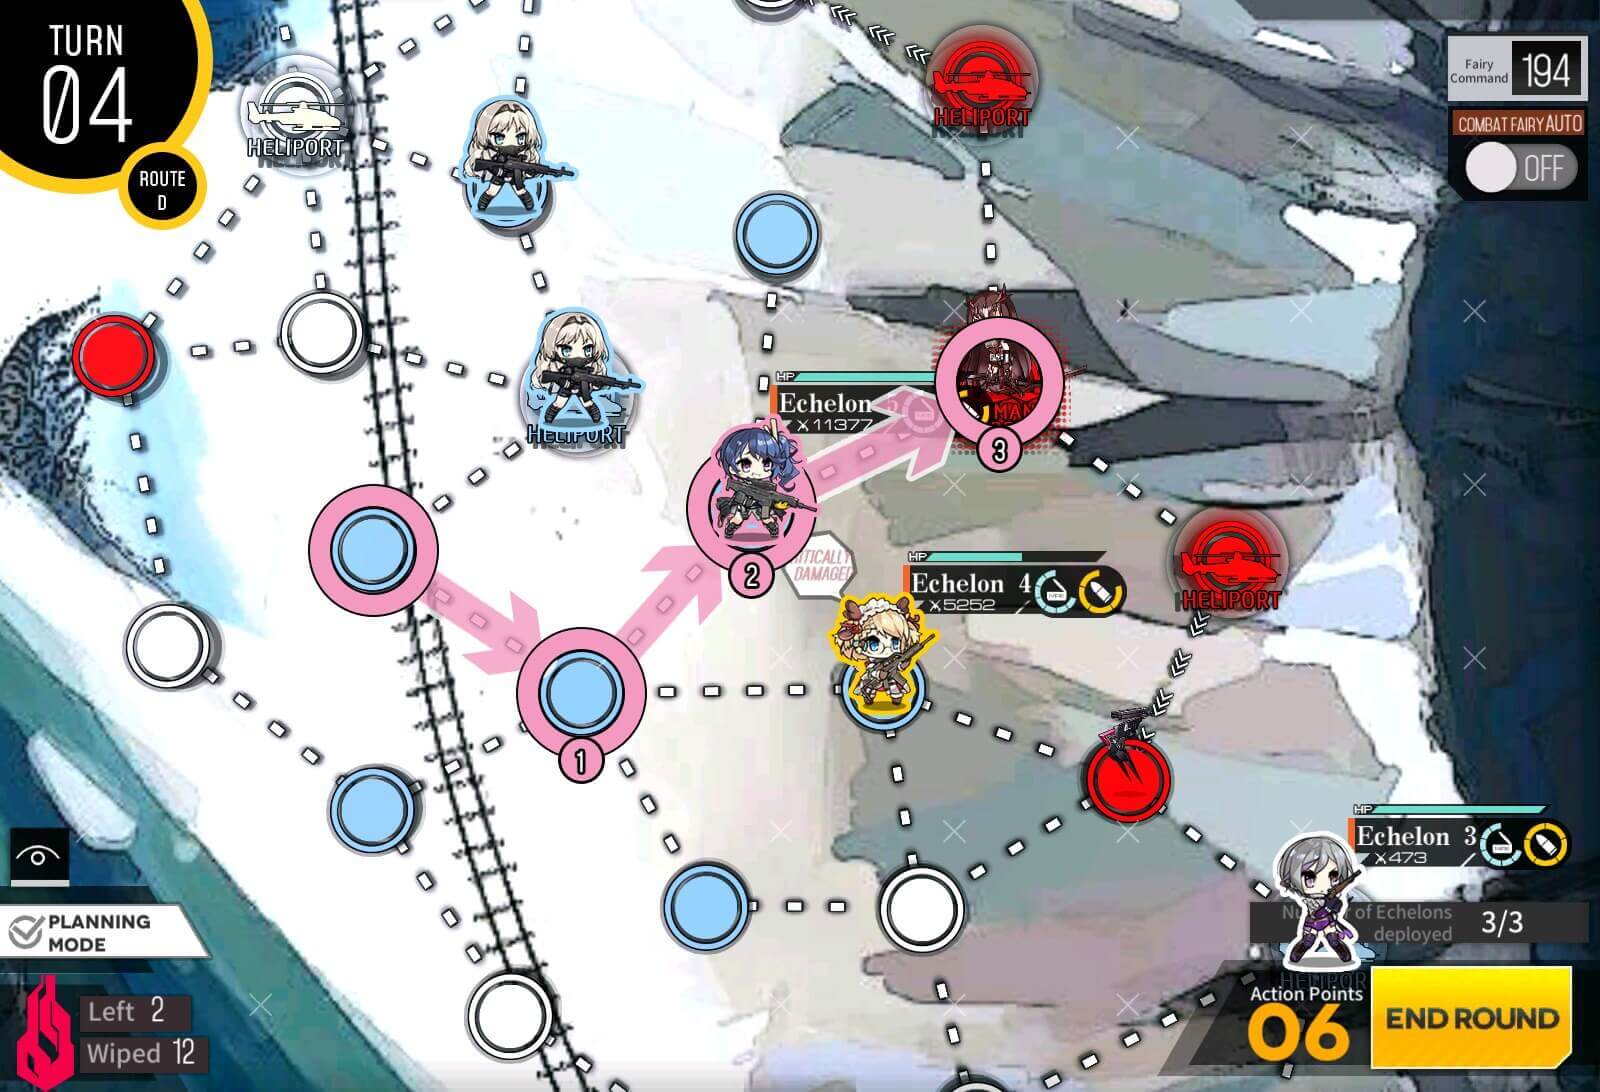
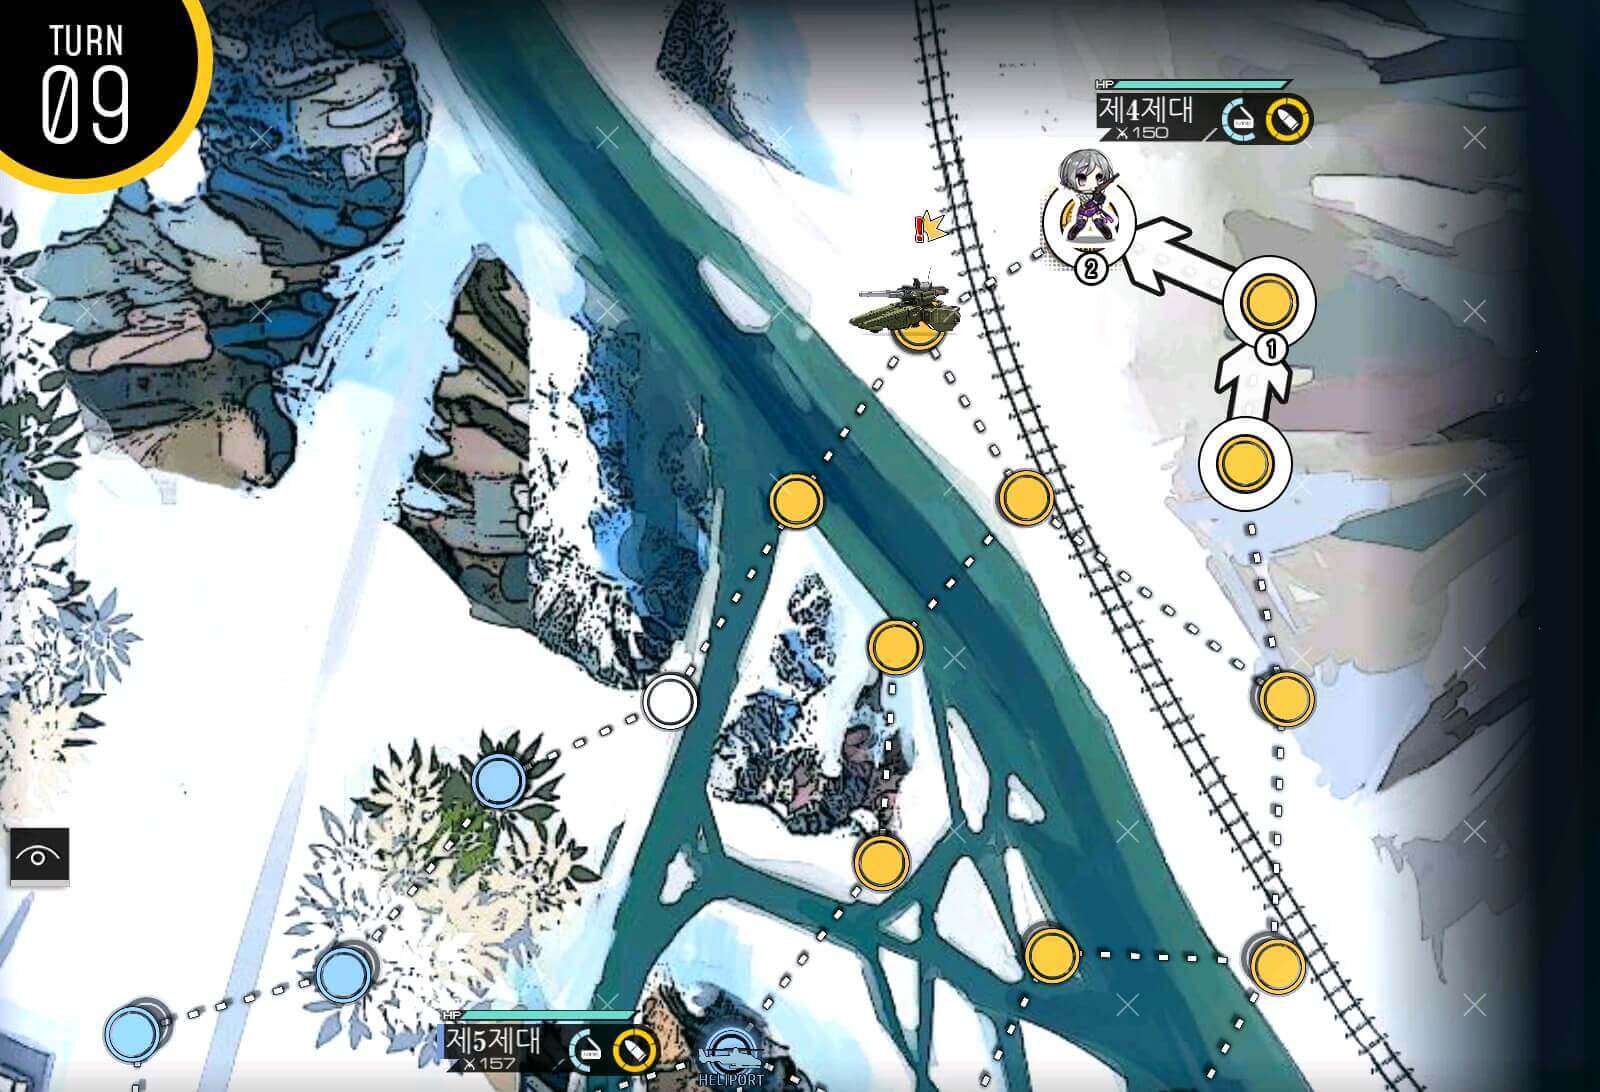
Turn 4
Move combat echelon down one, and set M4 to "wait" command once more or she will run into cannon and blow up. Jupiter cannon should be weakened for us to plow through next turn.
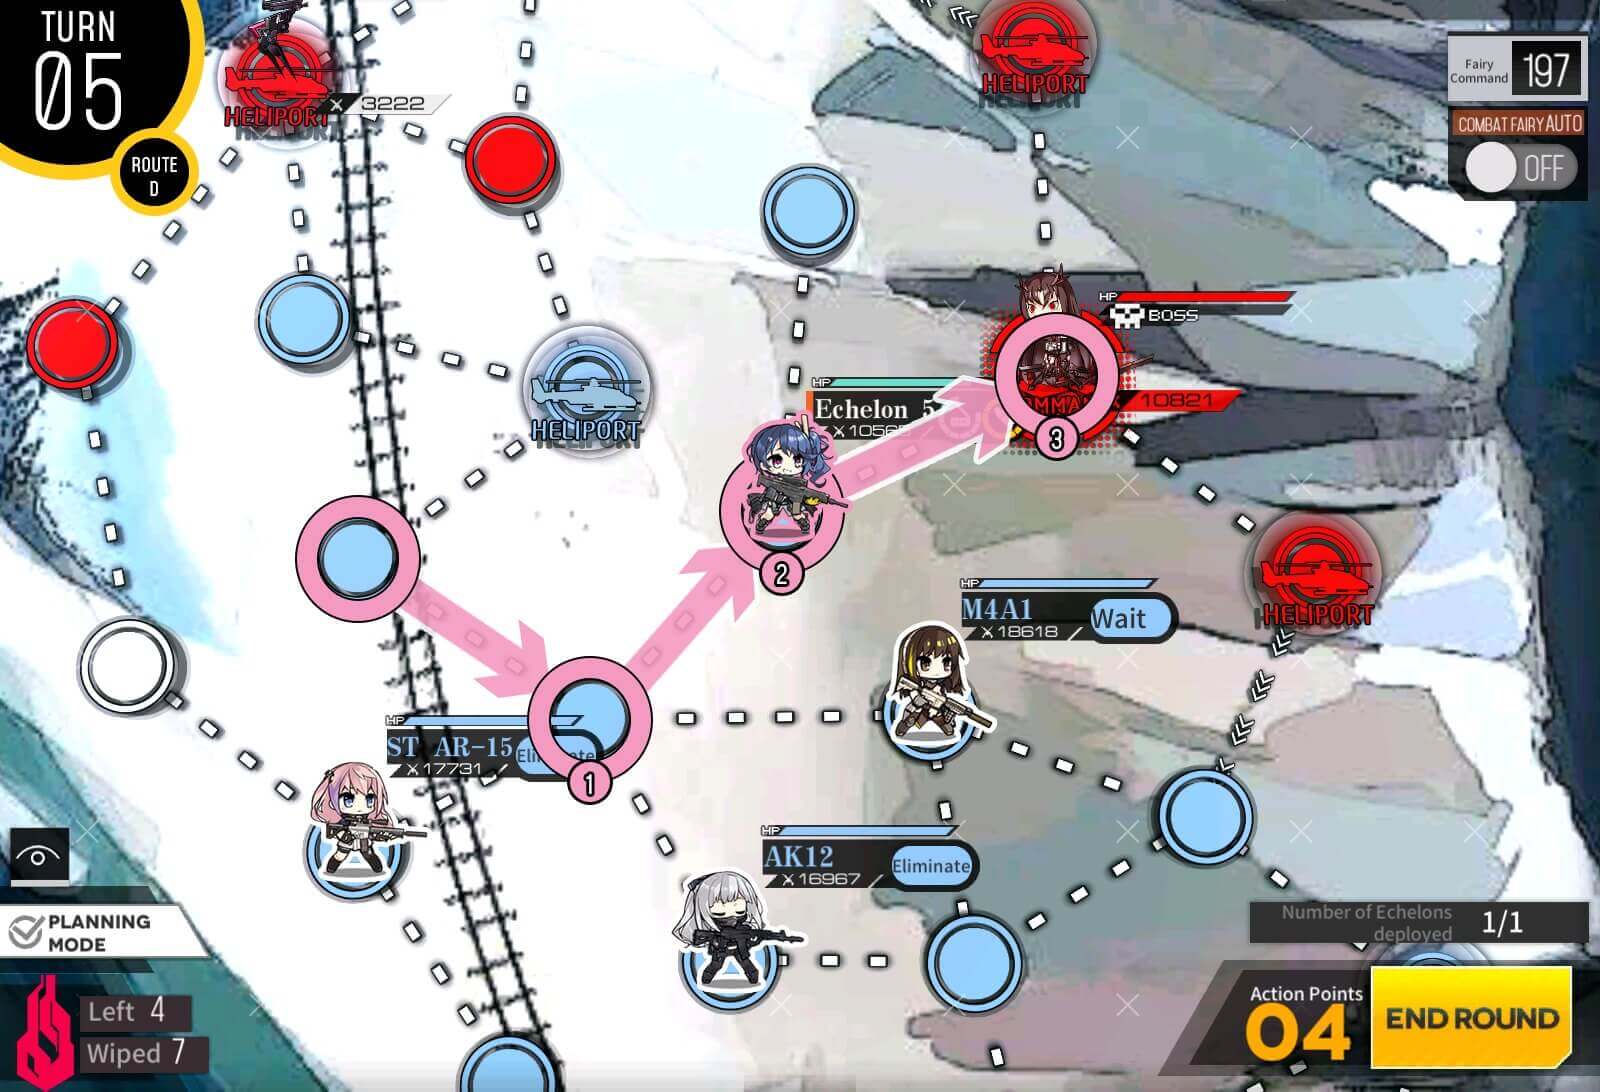
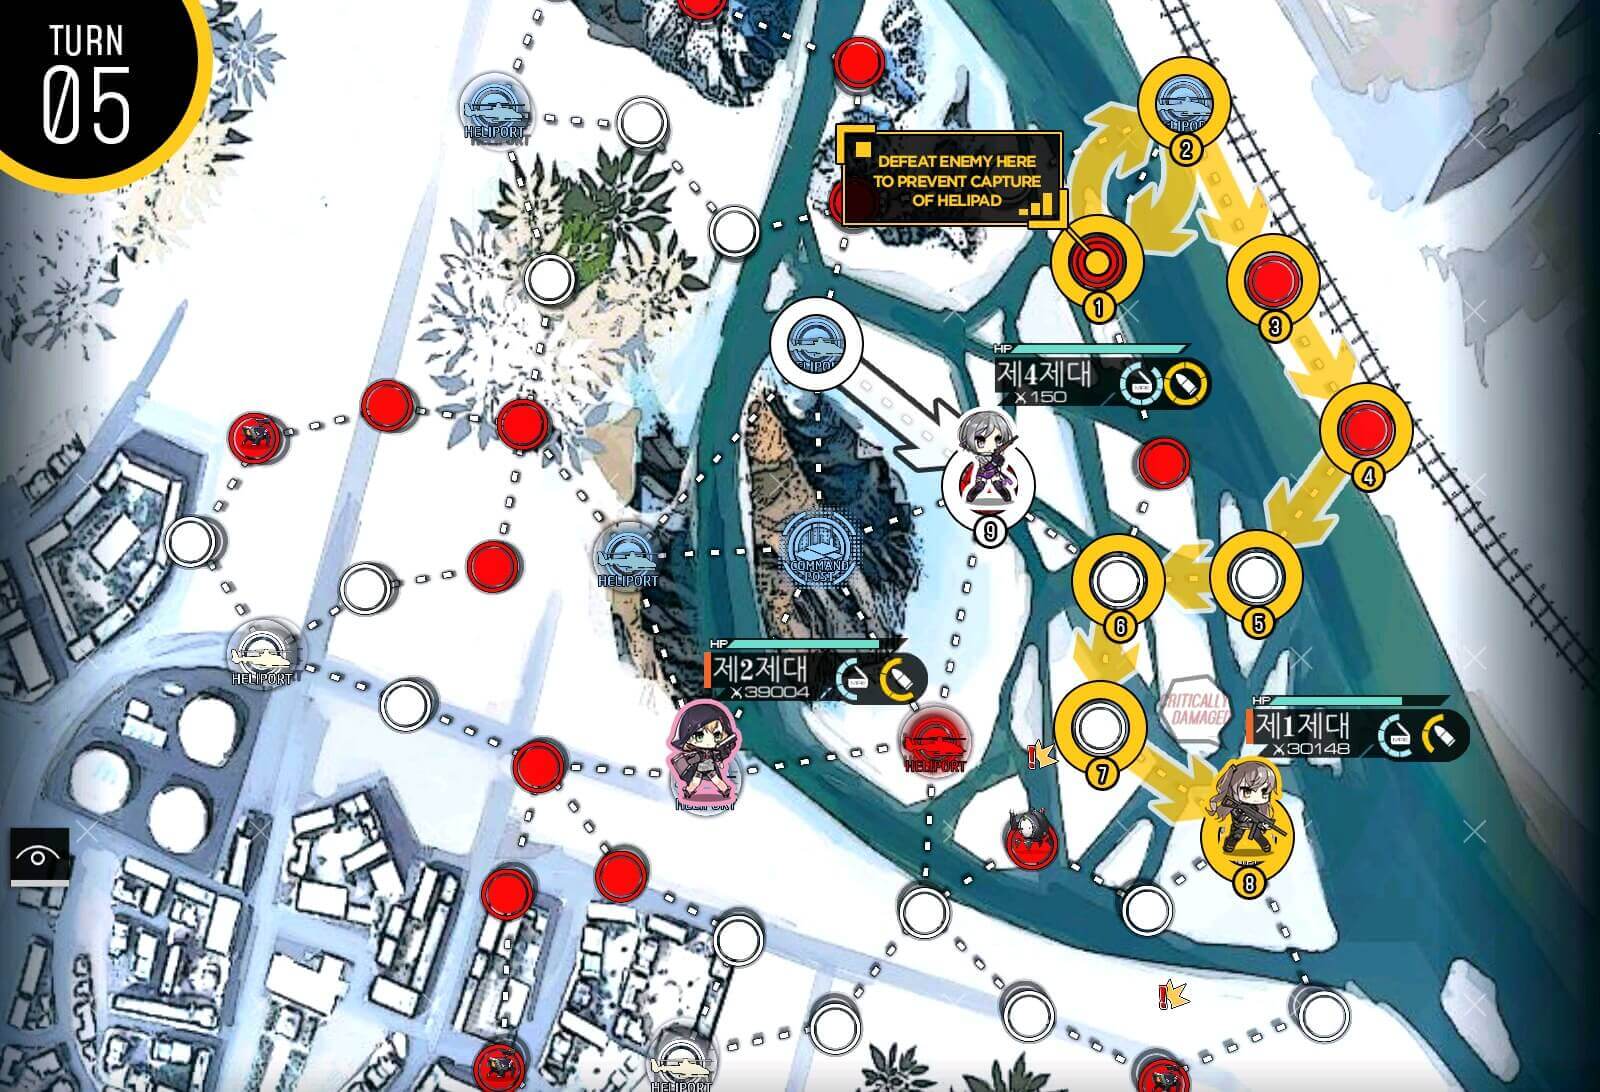
Turn 5
If your echelon is damaged, heal up at the helipad near by before taking on the boss. Killing the boss clears the map.
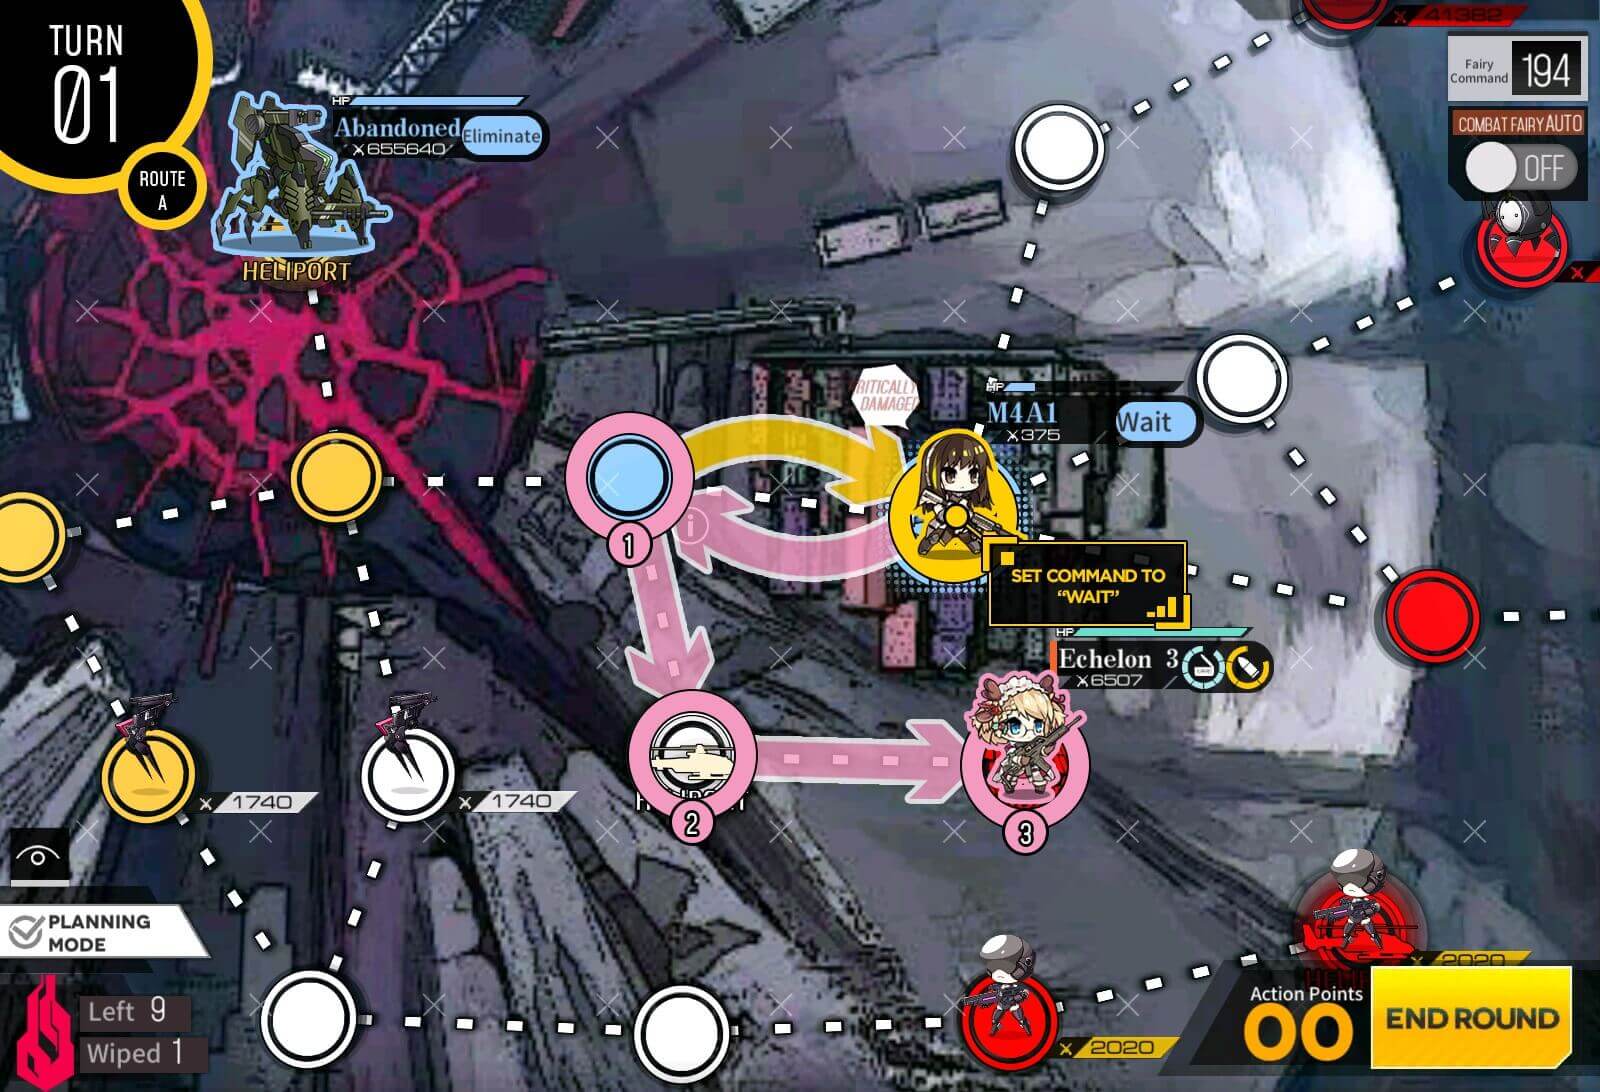
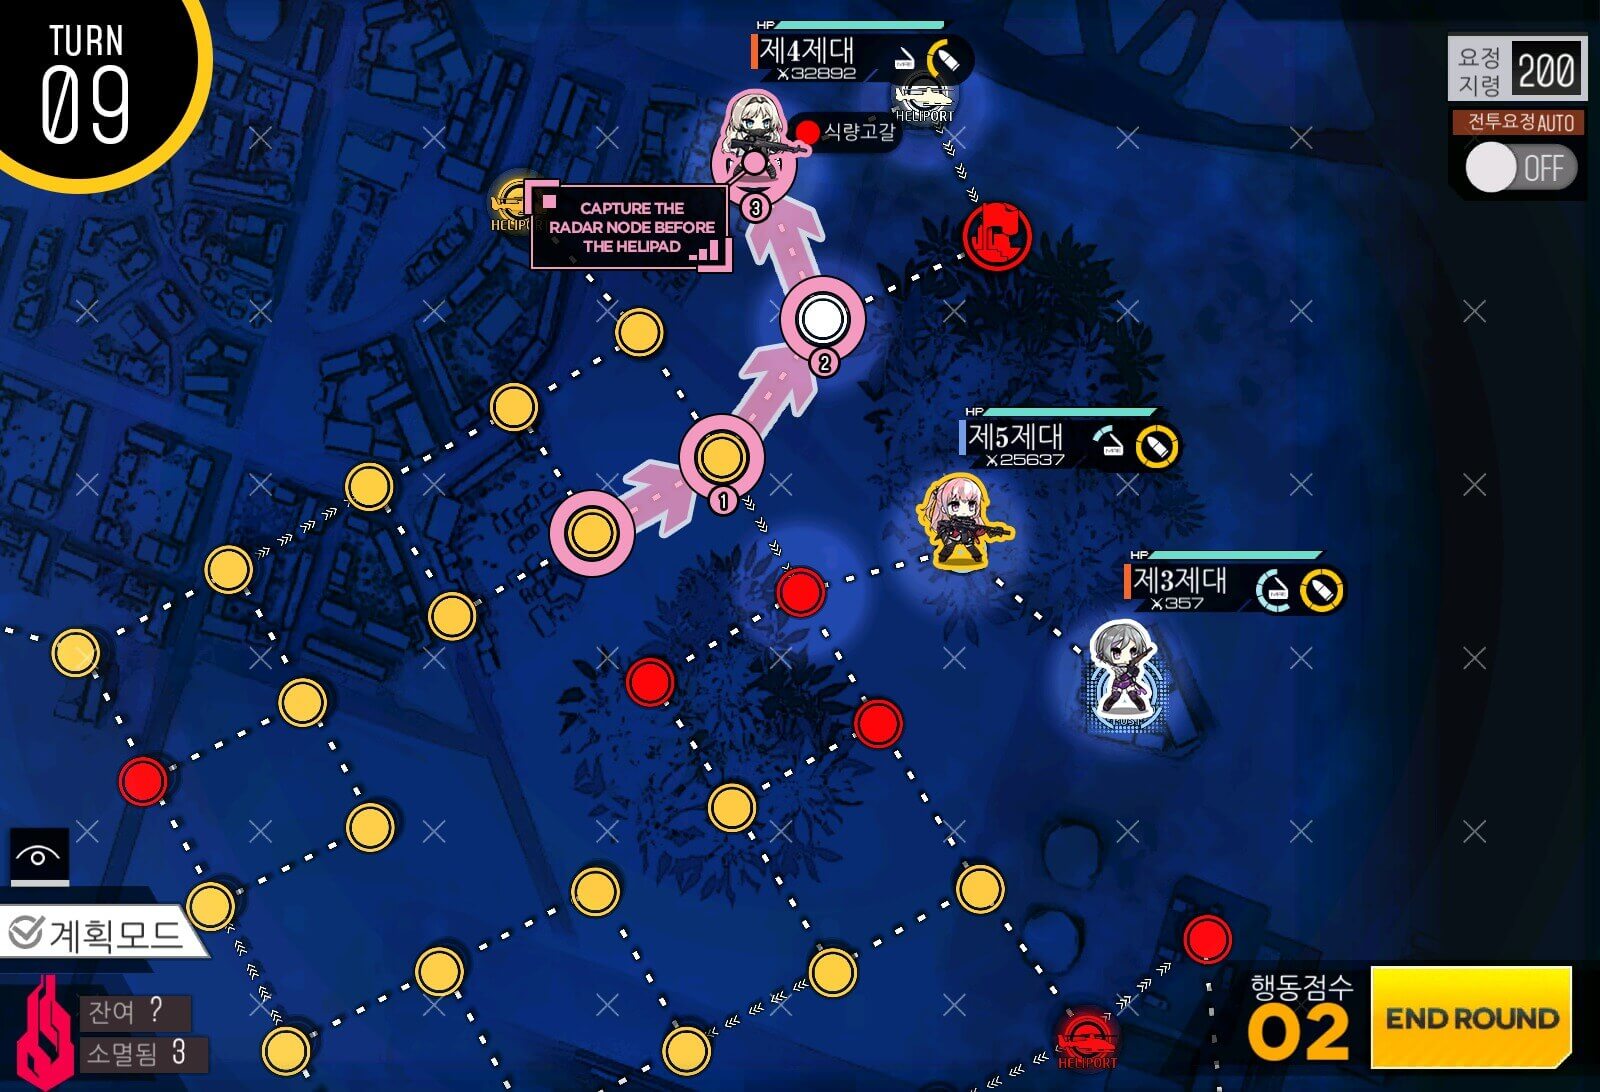
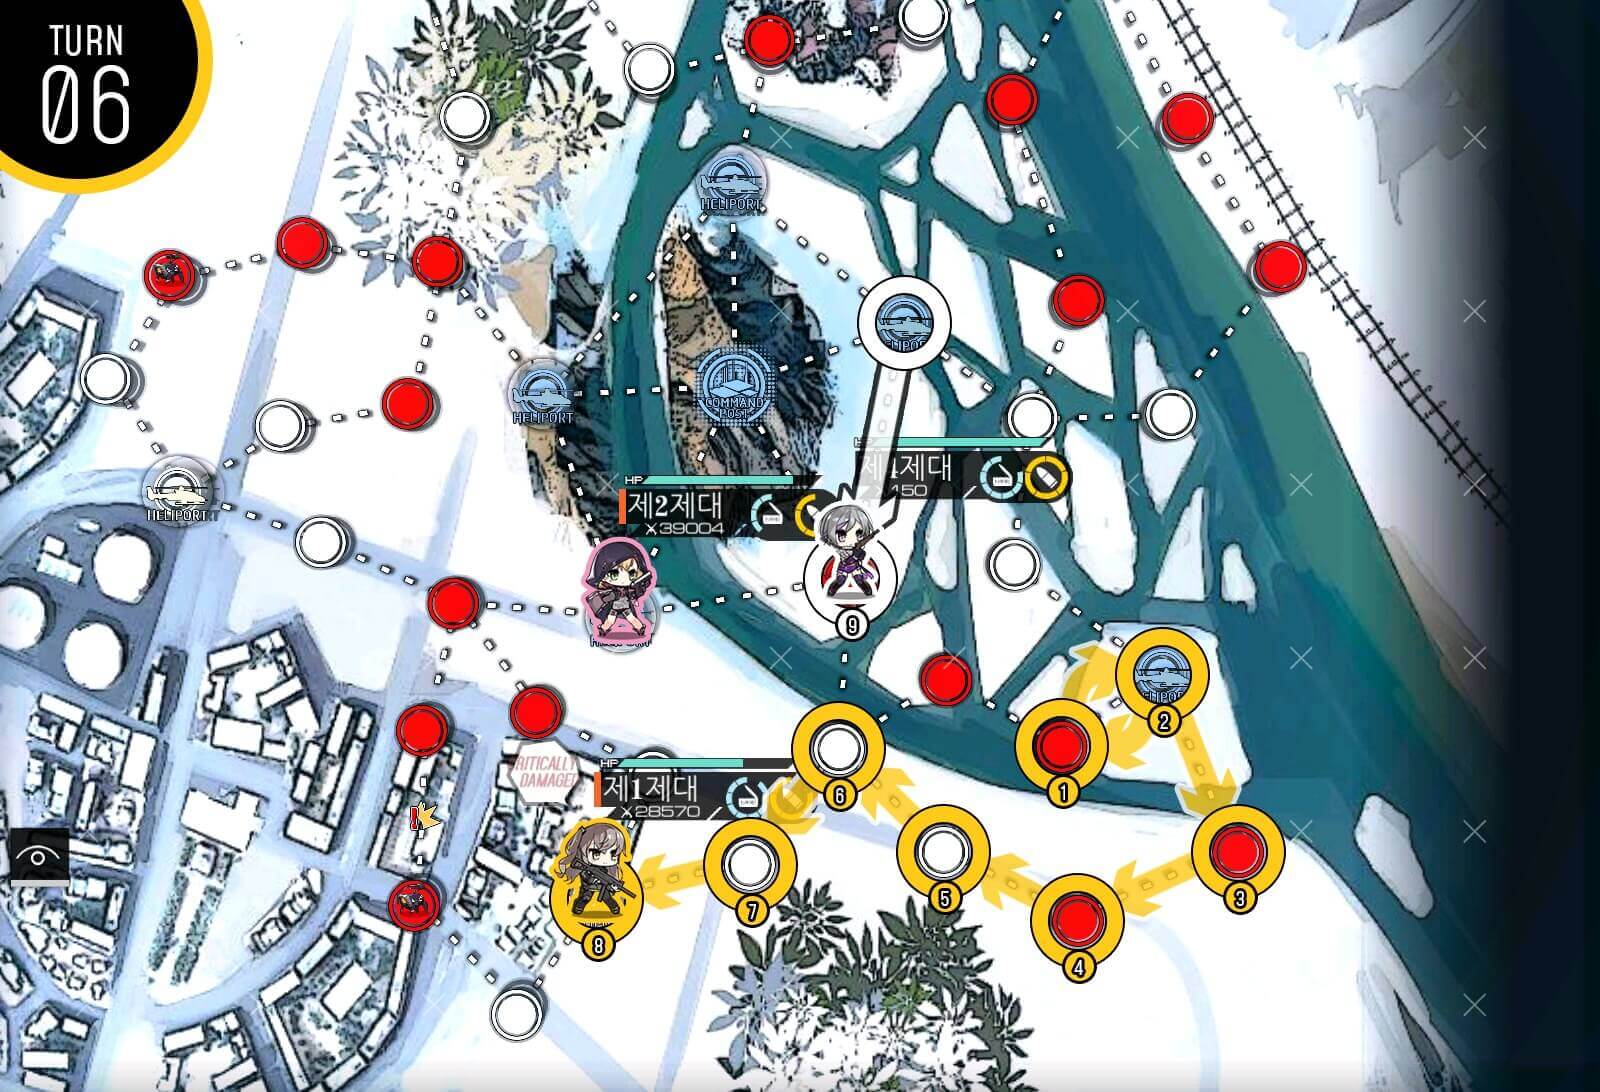
Turn 1
Combat Echelon swaps with M4 unit then moves all the way to radar node, which activates the Hydra tank as ally. End turn and you will also surround capture helipad next turn. M4's command should be set to "wait"
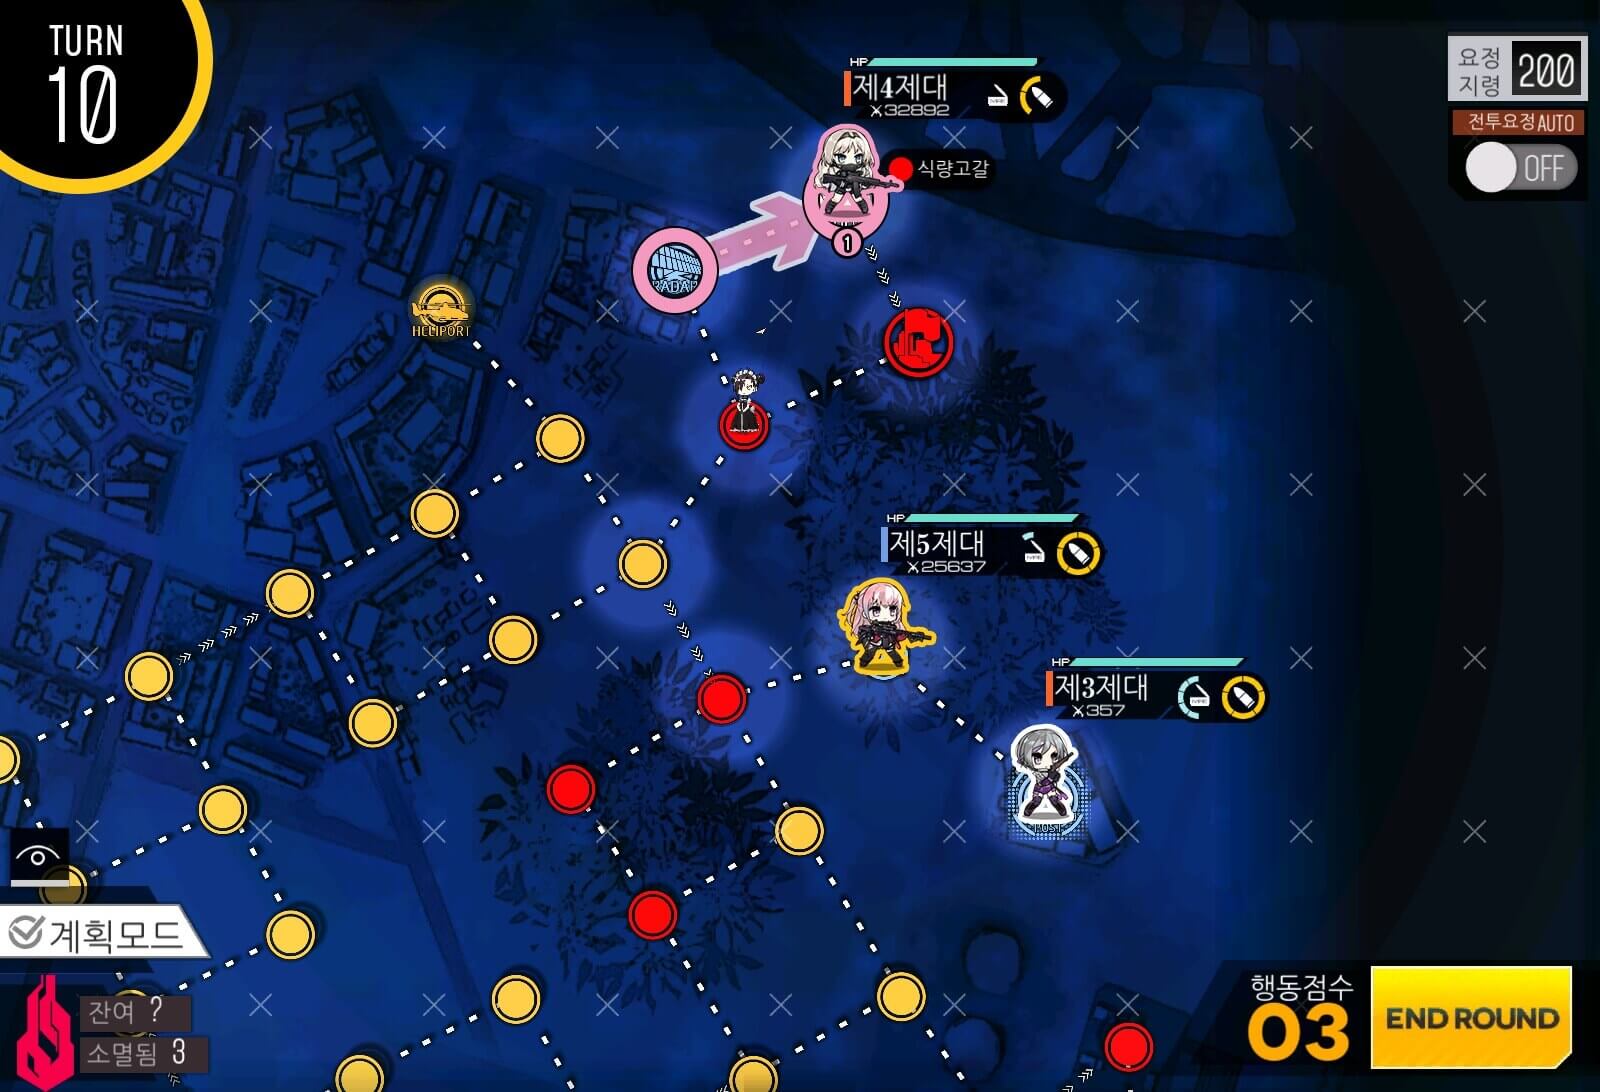
Turn 2a
Move combat echelon between Hydra and M4.

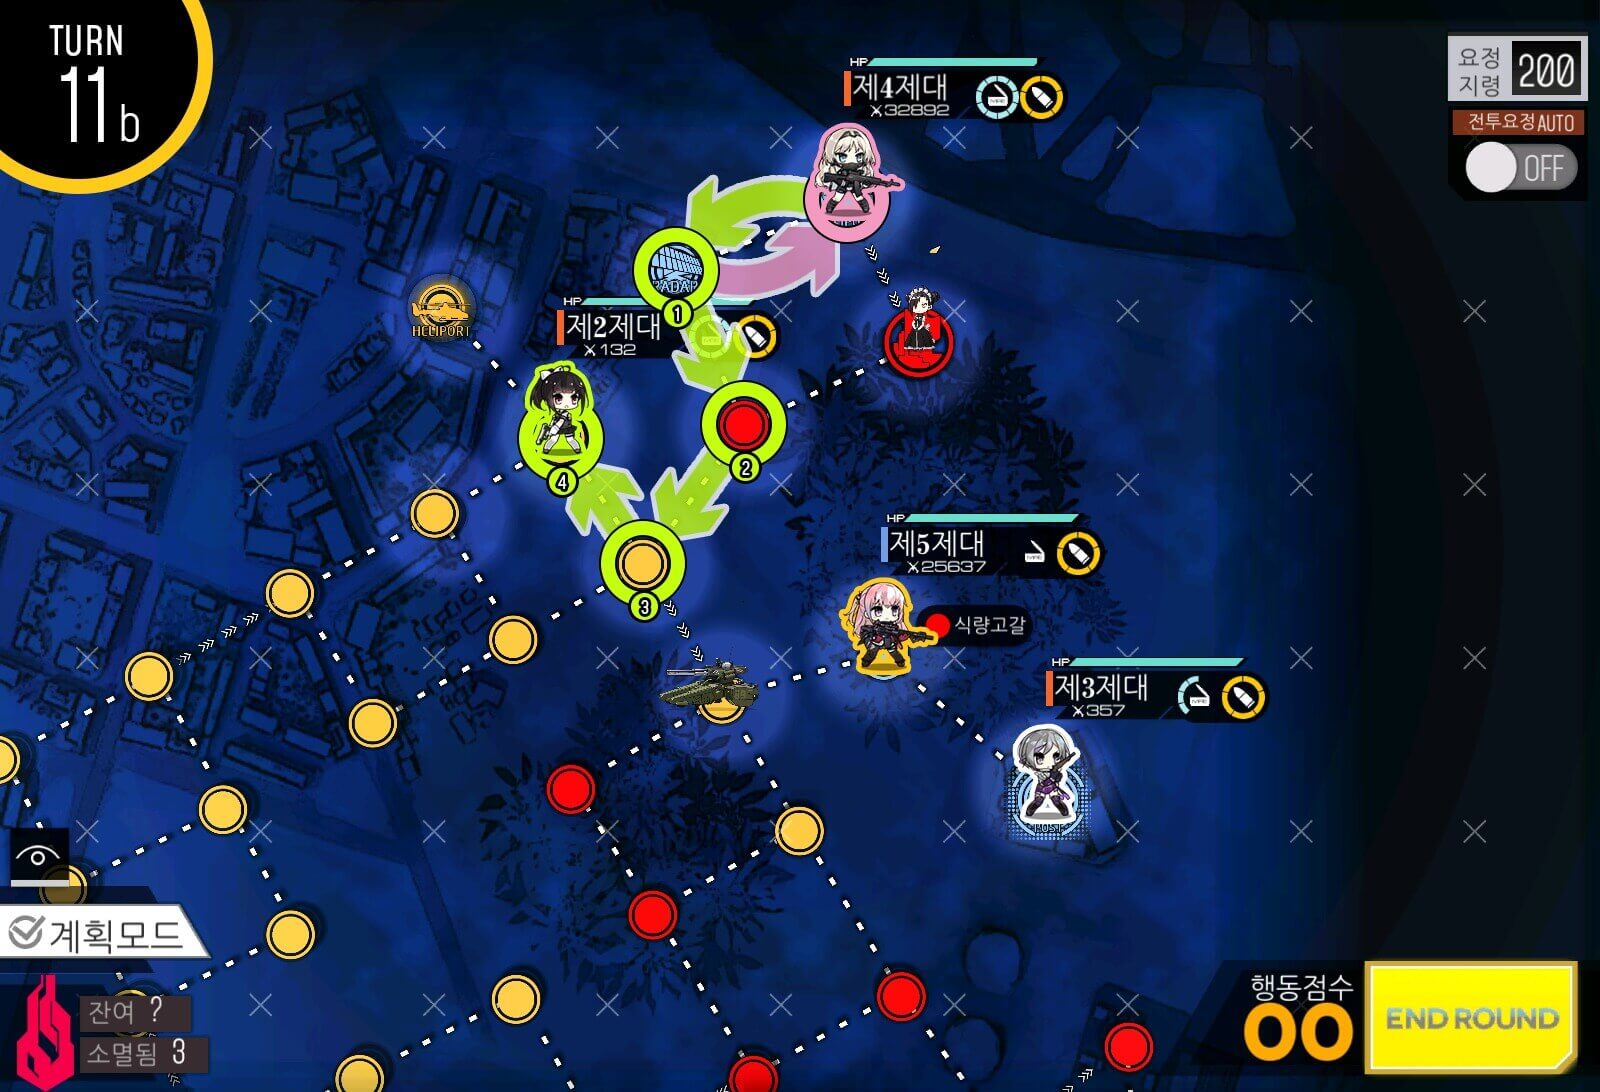
Turn 2b
Spawn the dummy echelon at the helipad. Now we are going to move M4 out of harm's way by swapping. Also make sure that Hydra Ally is set to "Wait" command.
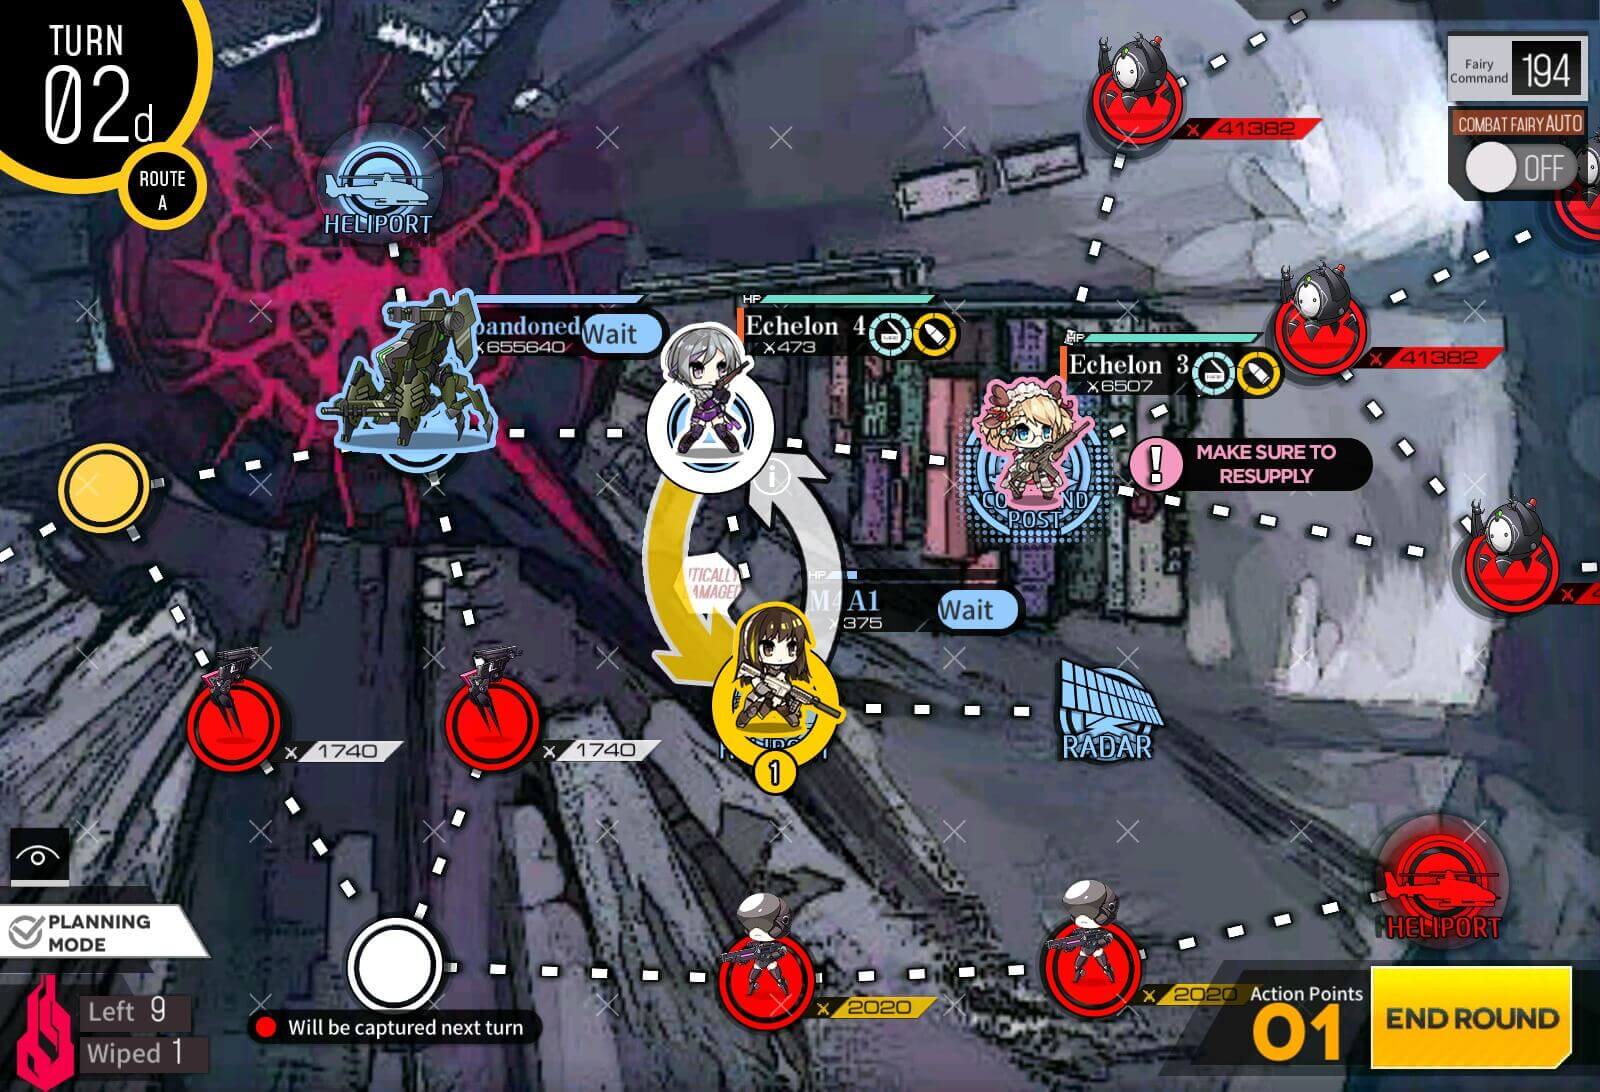
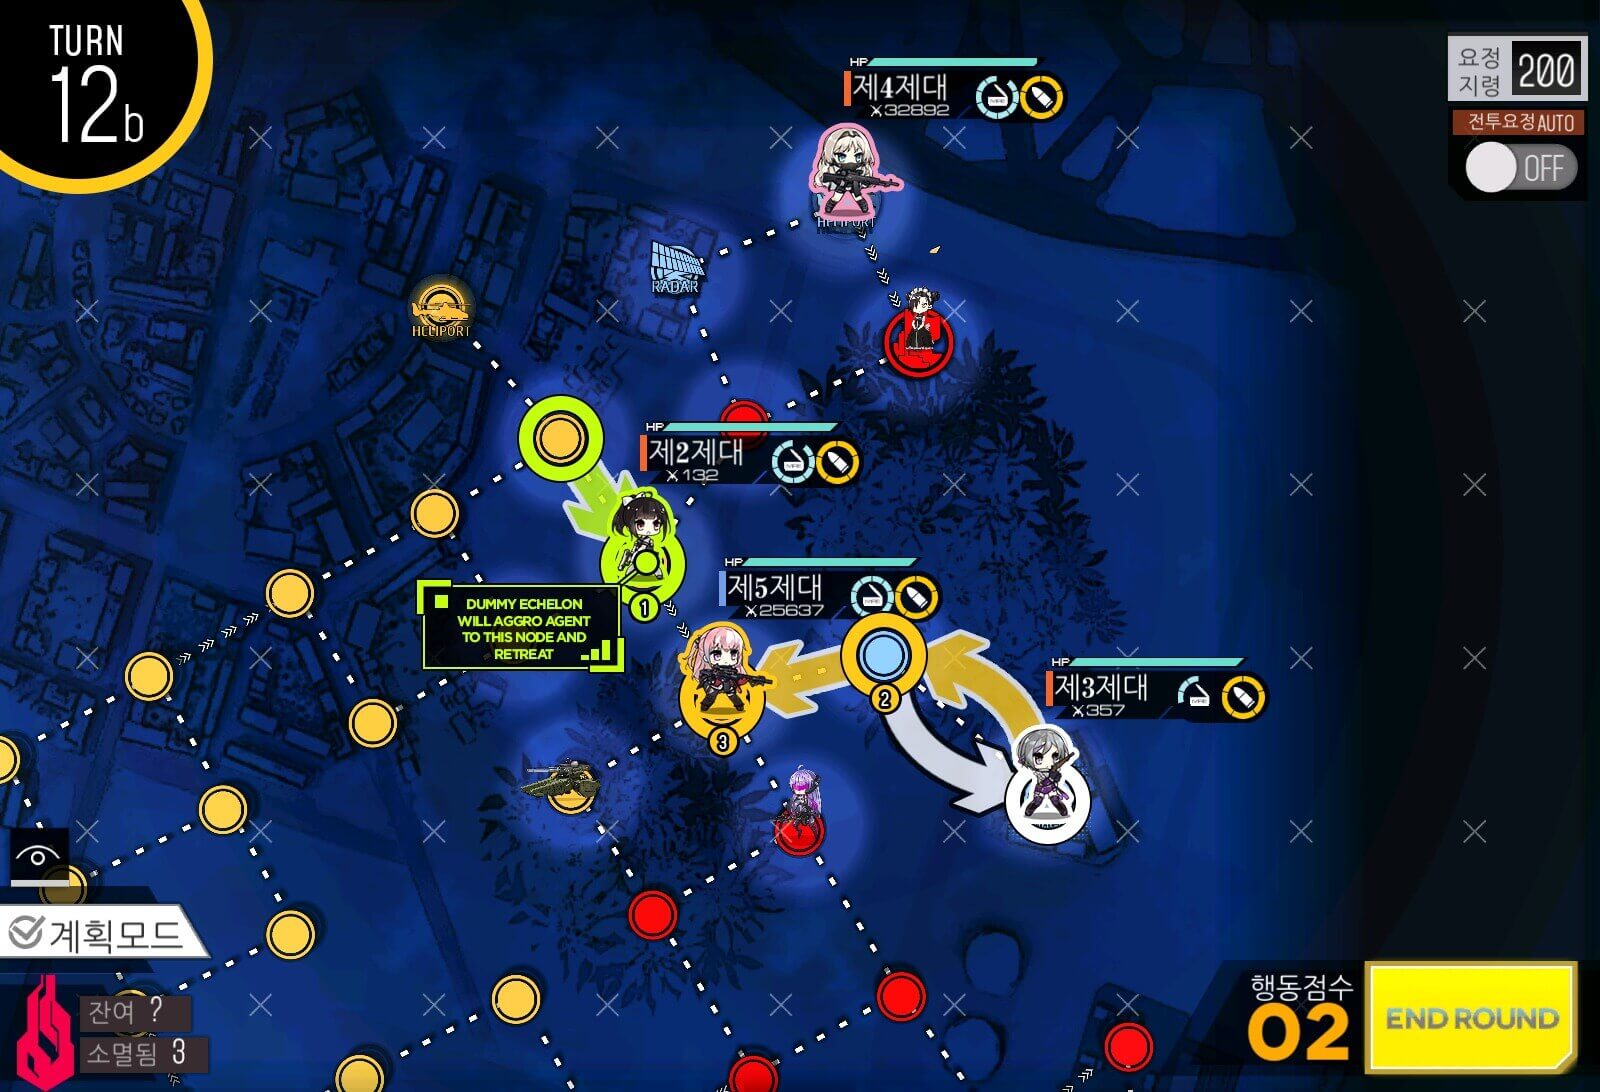
Turn 2d
The end result is that M4 will be on helipad next to radar node. Then we are going to Move Hydra ally all the way to HQ by Swapping as well.
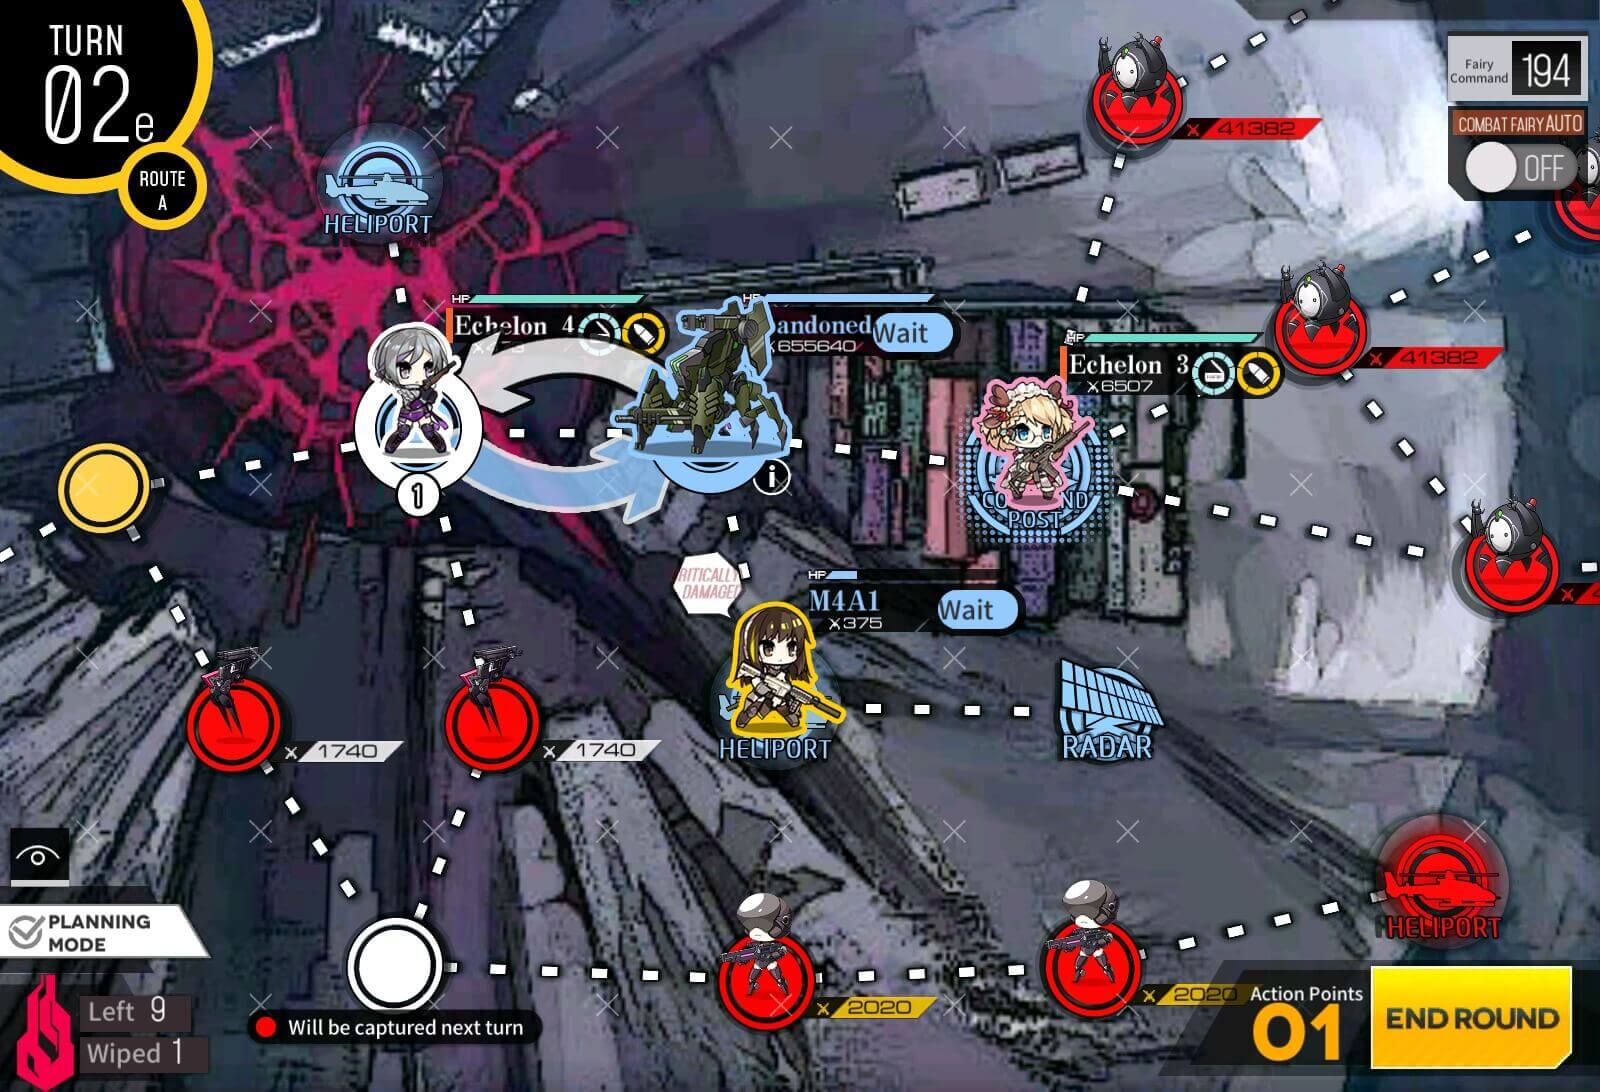
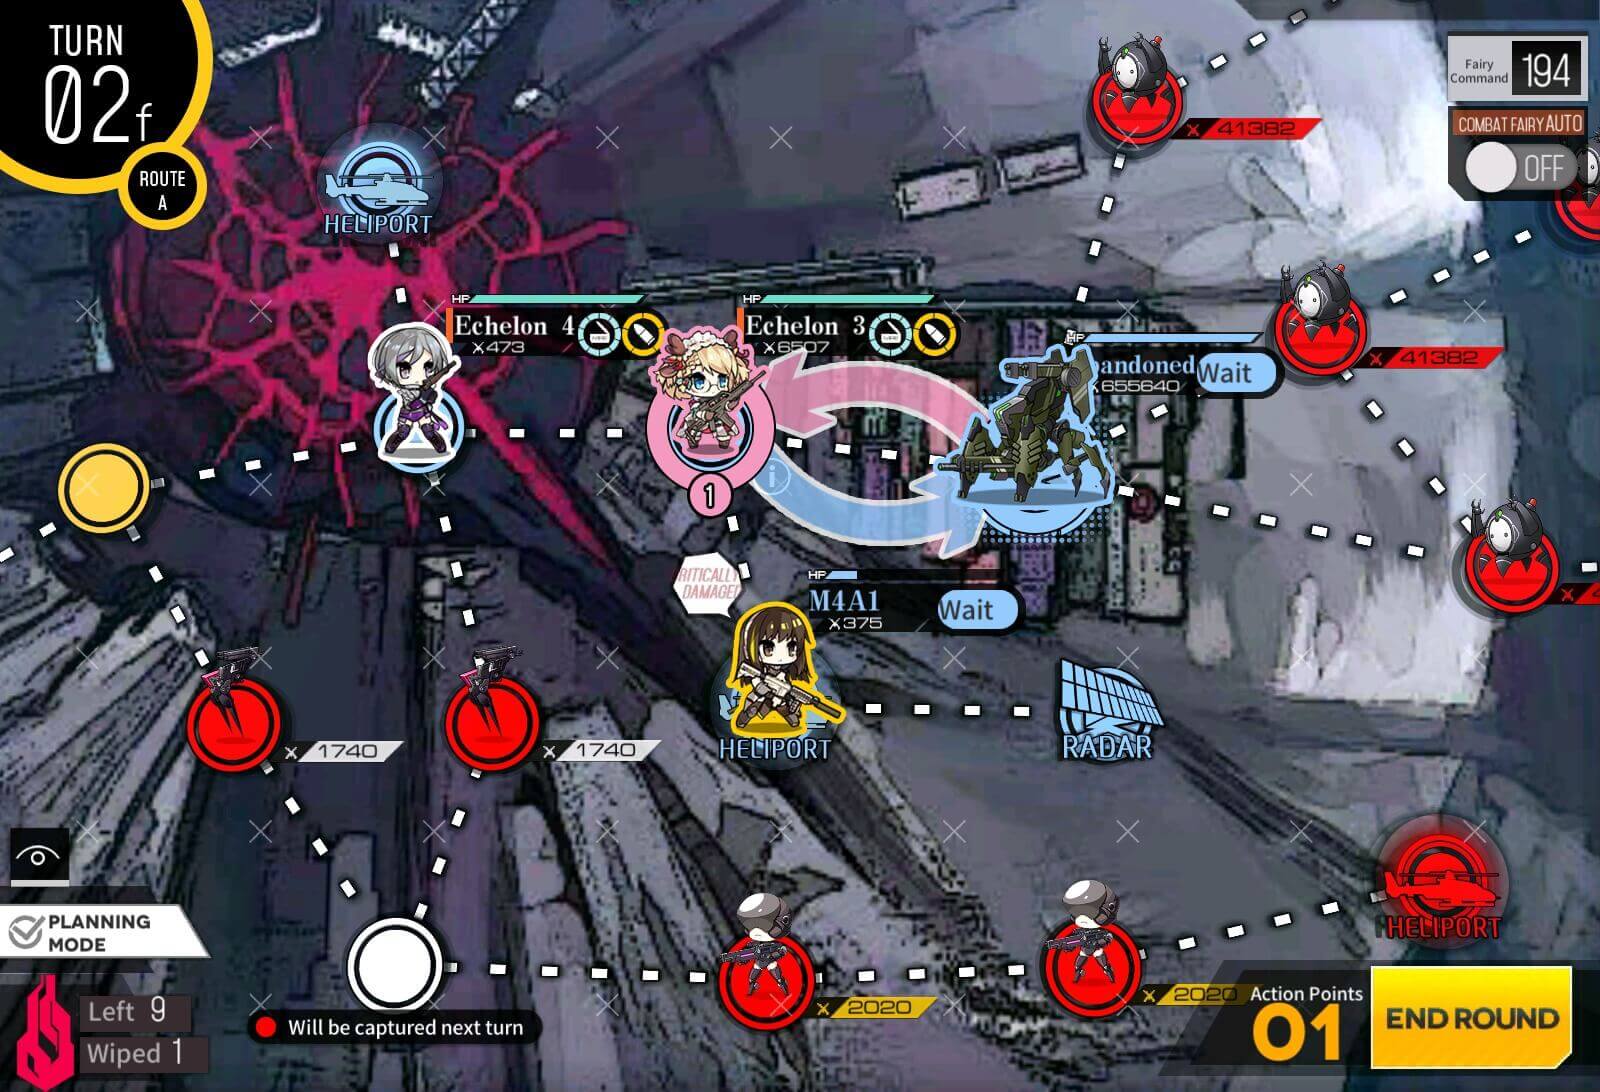
Turn 2f
We are almost done, now we have to make sure that dummy echelon is also out of harm's way. Swap with Combat echelon and we should be set for this turn.
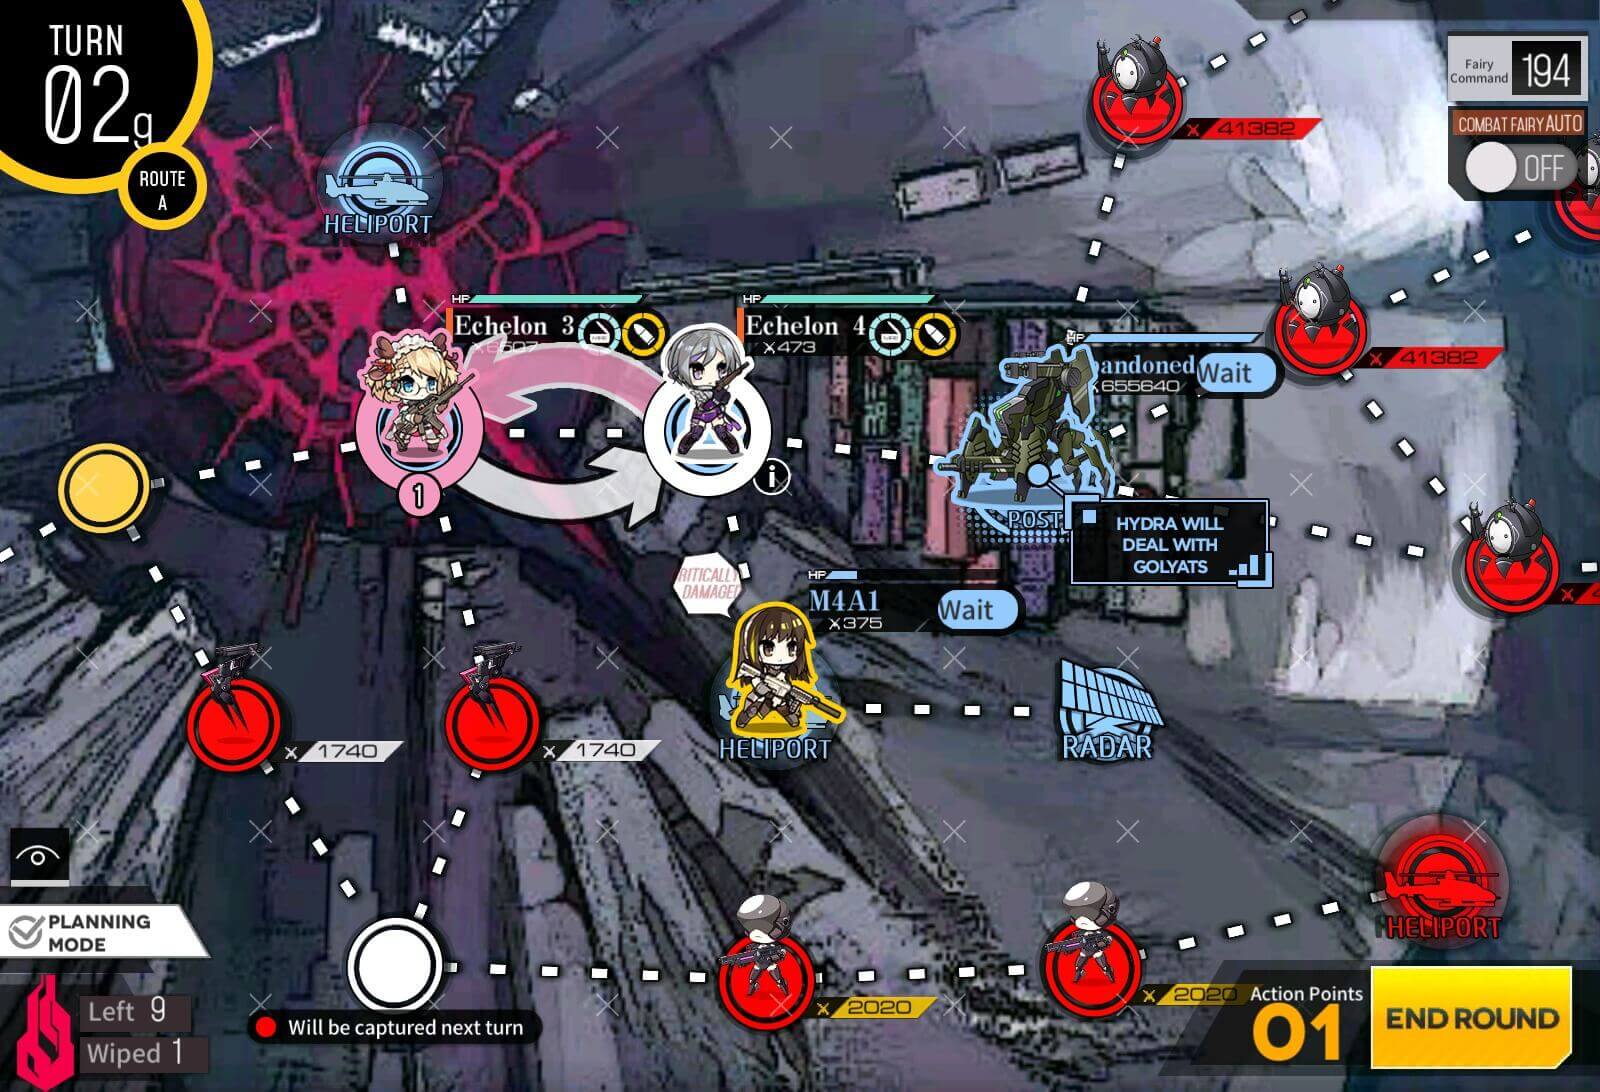
Turn 2g
Make sure that Hydra Ally is set to "Wait" Command before ending the round. Double check!
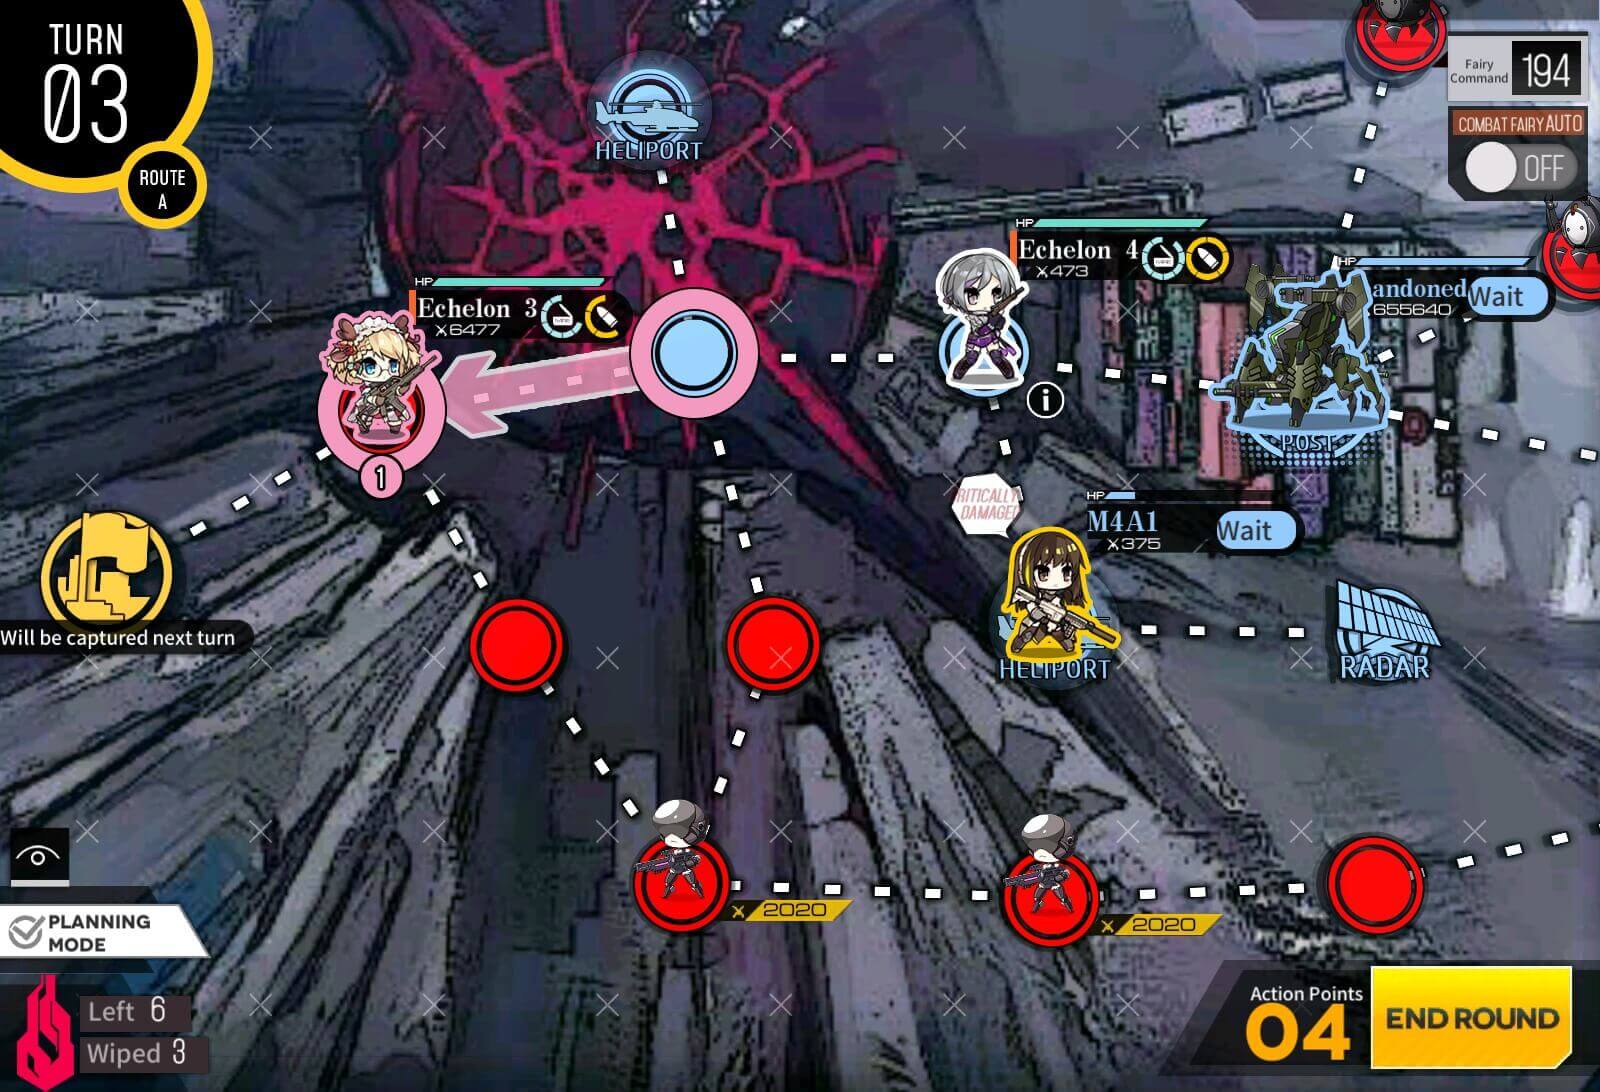
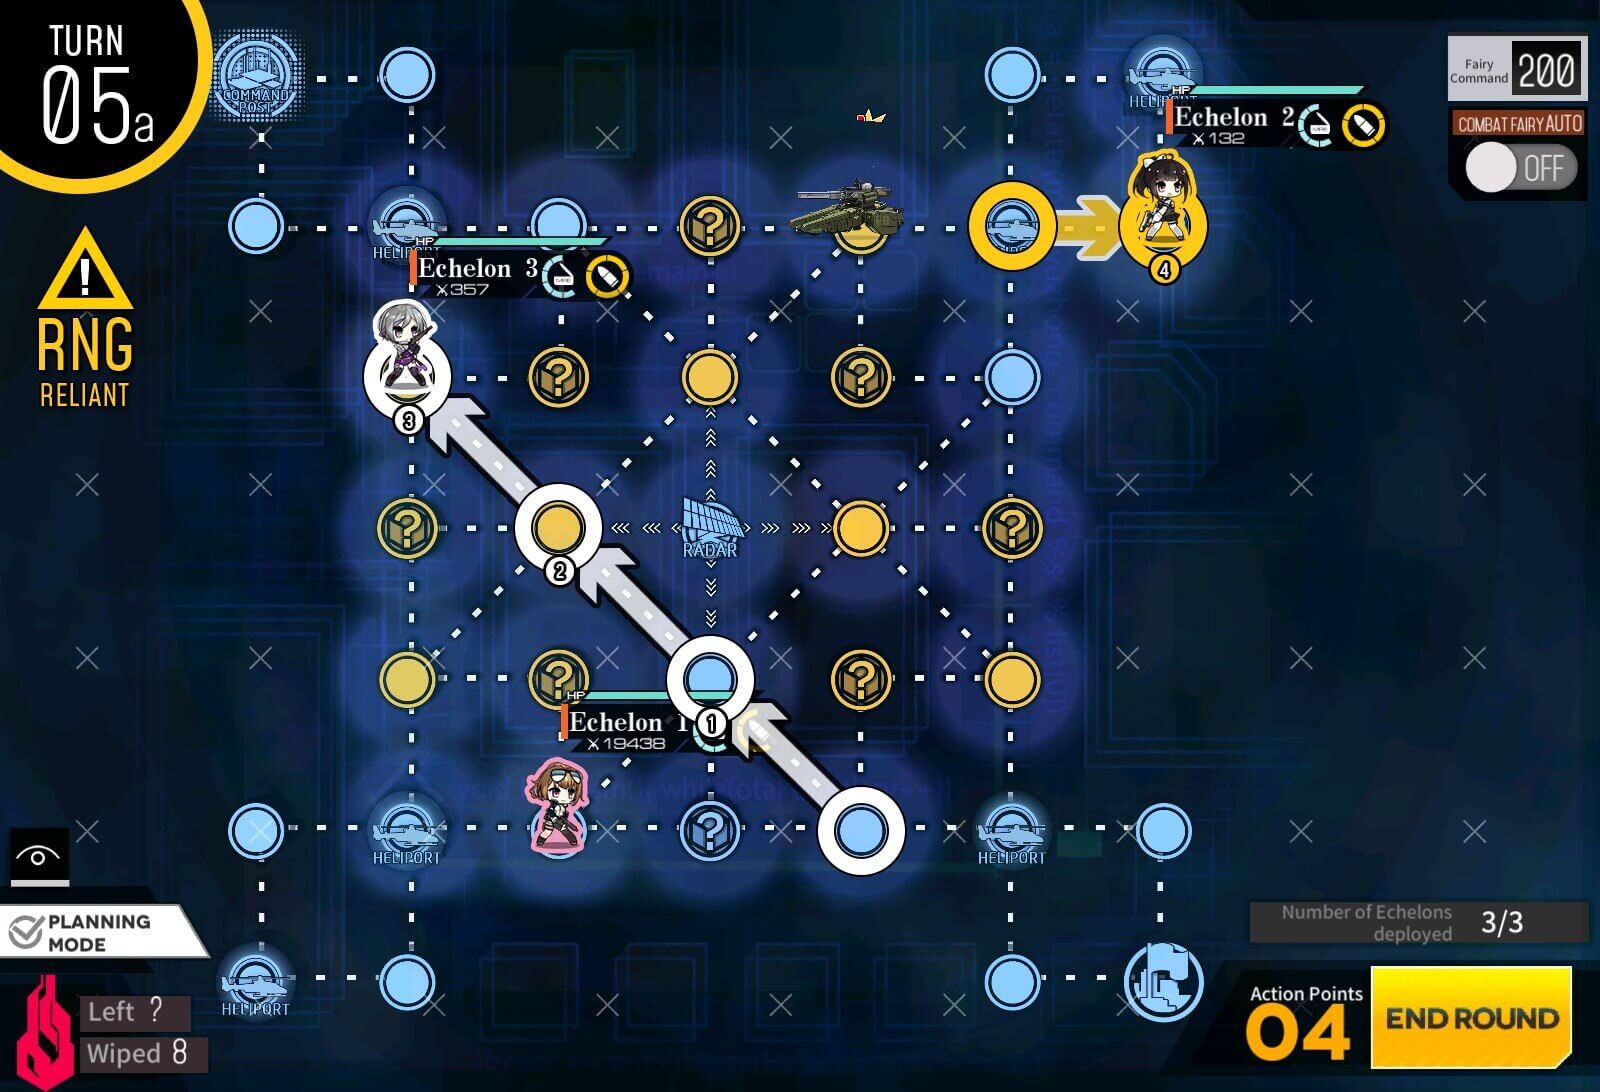
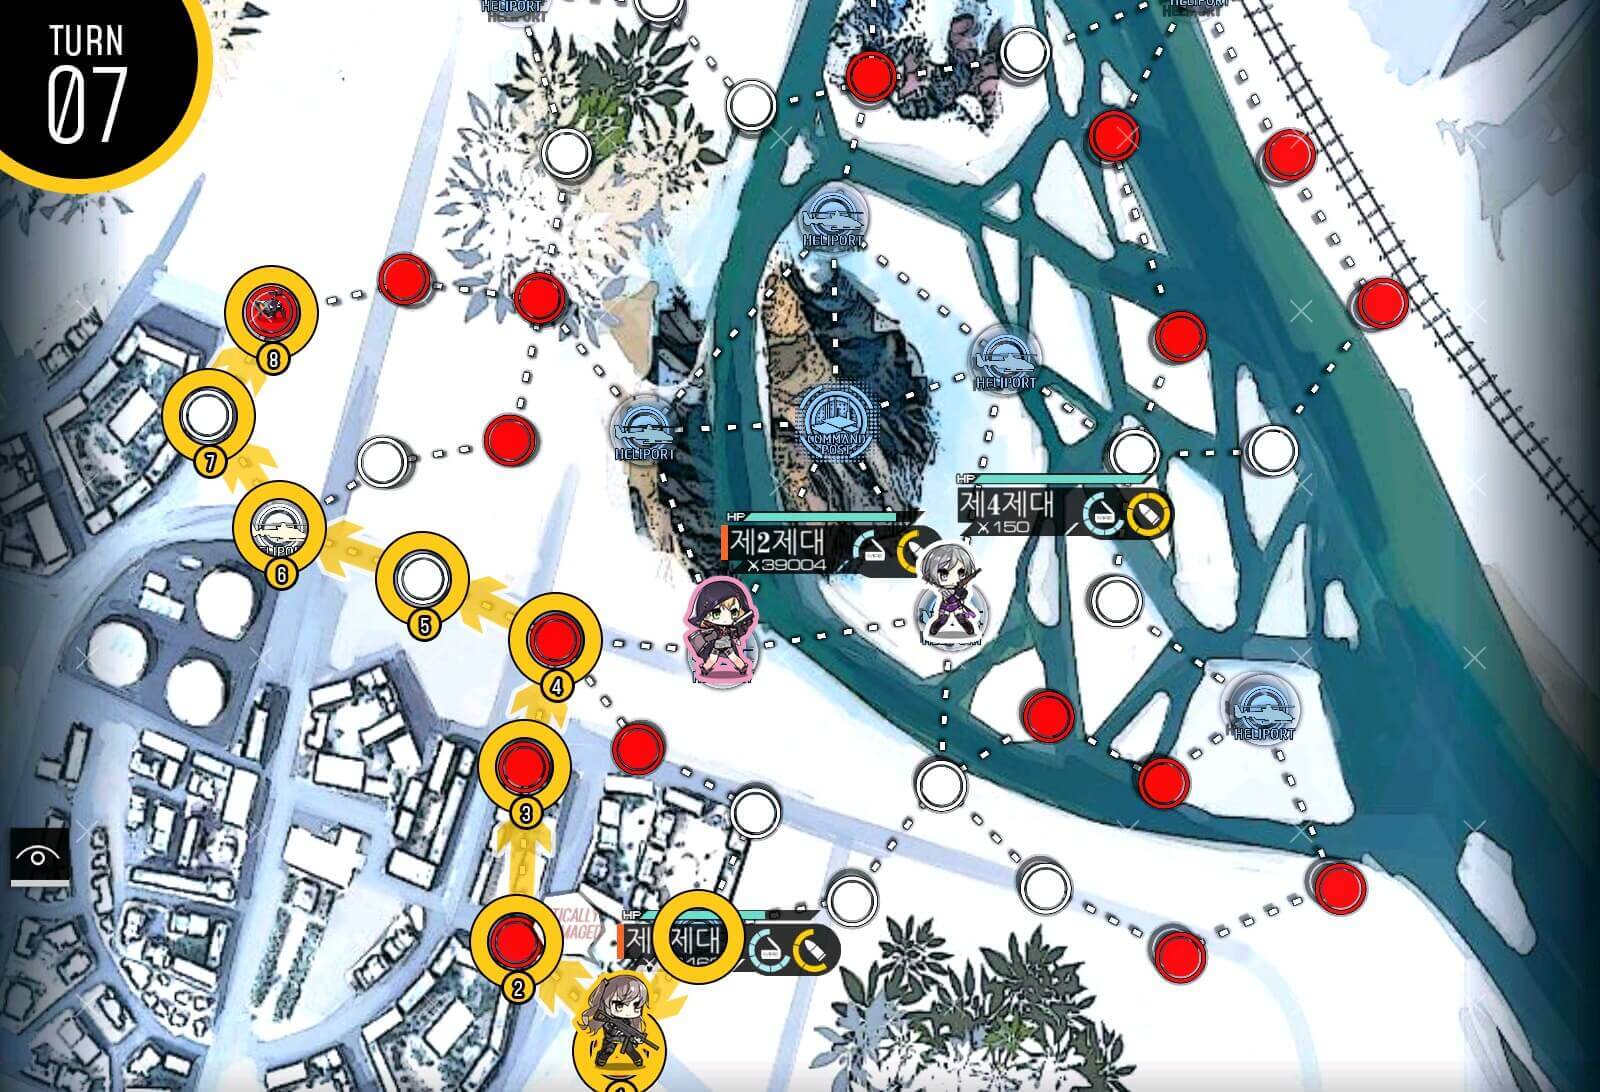
Turn 3
All that remains now is moving combat echelon to connect the supply route.

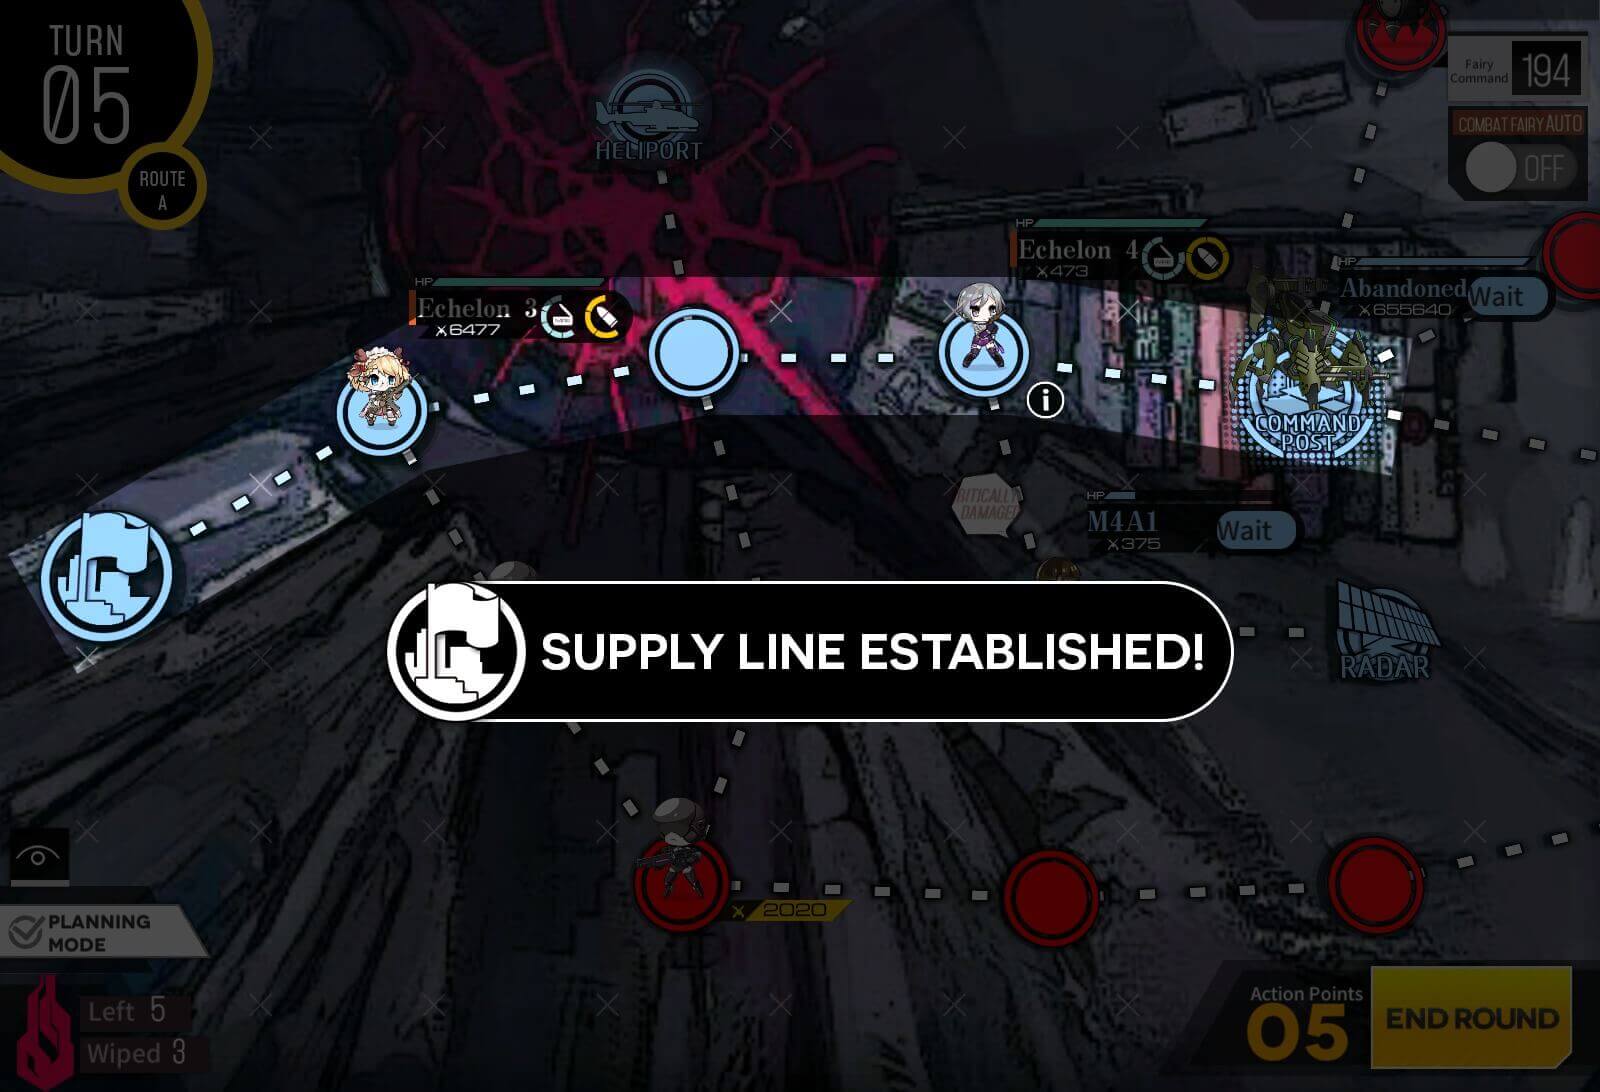
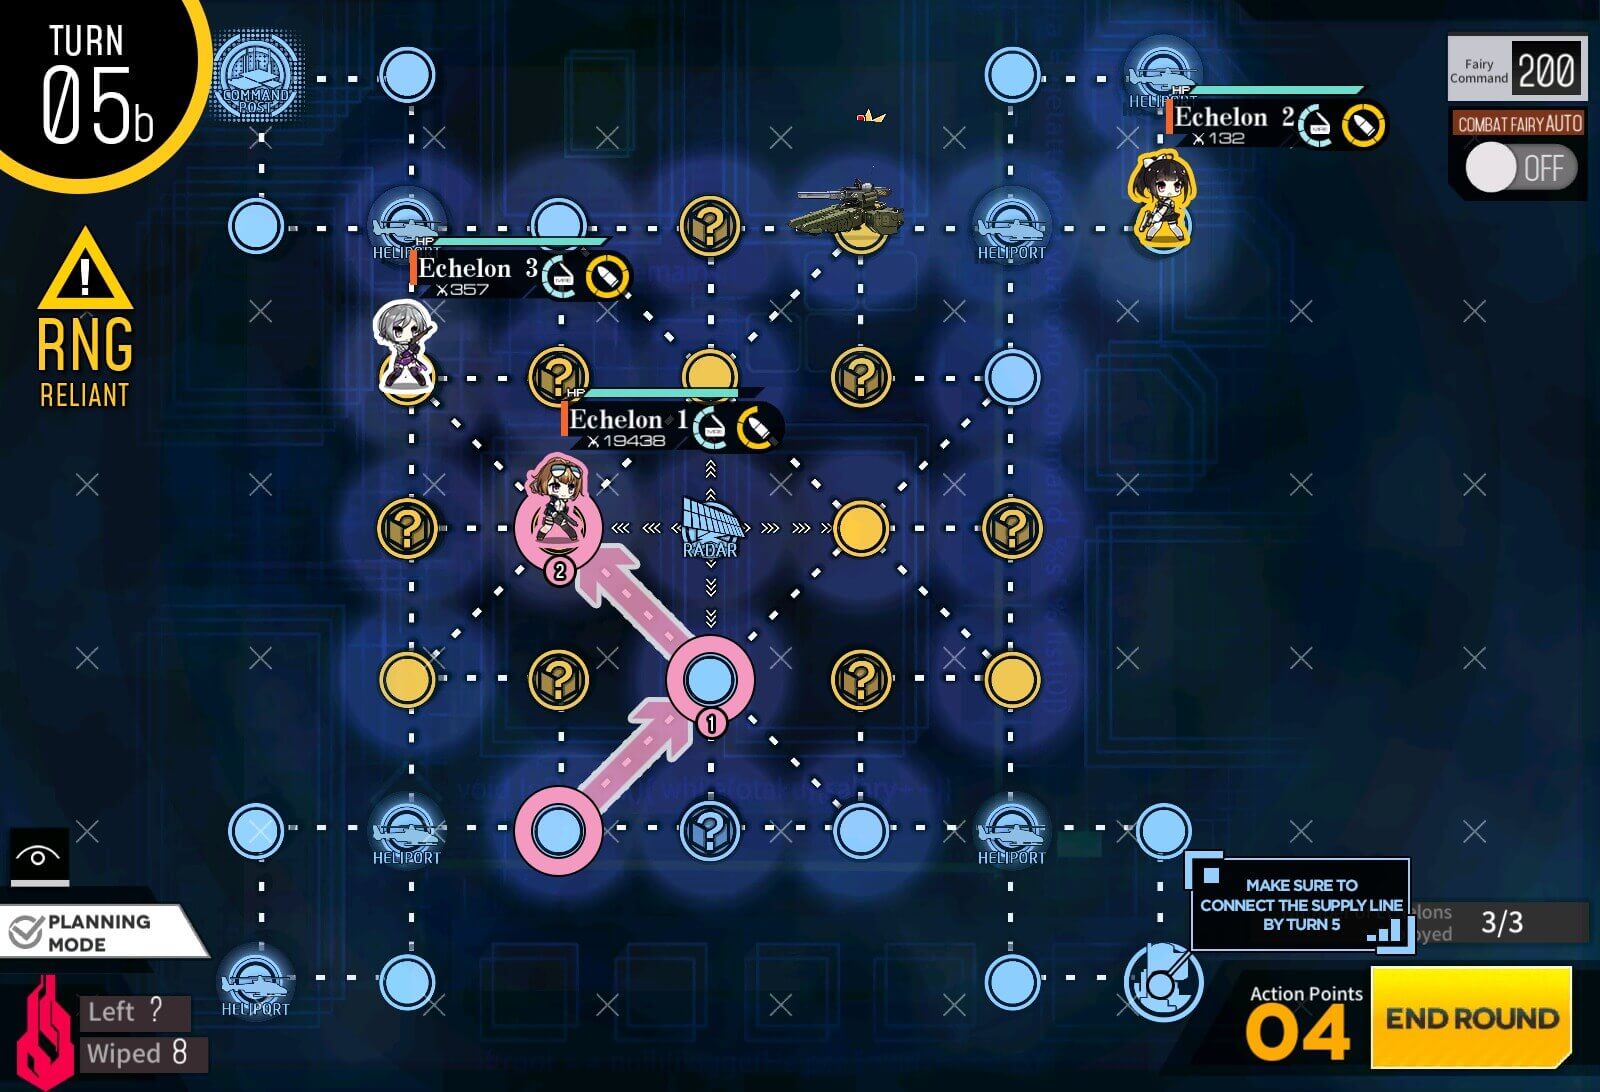
Turn 4
All you have to do now is defend the node that is threaten by the enemy units that can break the route. Afterwards map will be cleared.
Turn 1
Goal for first 2 turn is to maximize move points. Deploy Dummy echelon after moving Combat echelon right one from HQ.
Turn 2
Both dummy and combat echelon are going to take a helipad on each side of HQ.
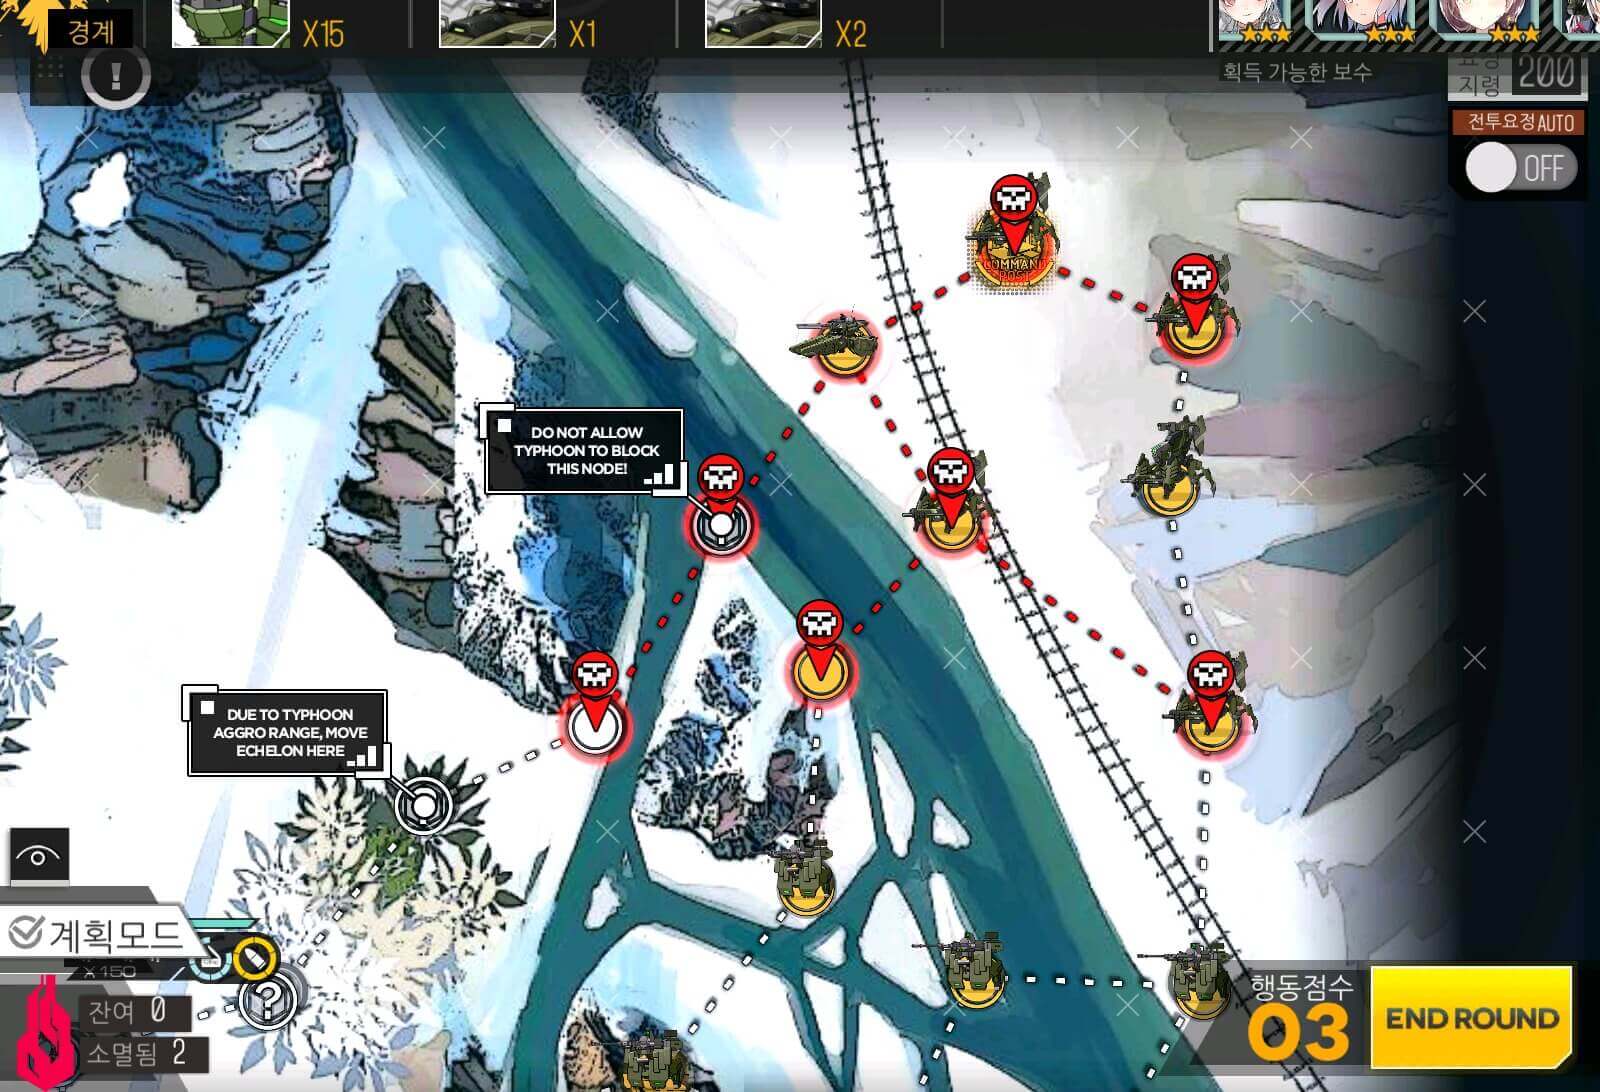
Turn 3a
There should be 3 mortar units threatening nodes near helipads. Combat echelon moves to take care of them all.

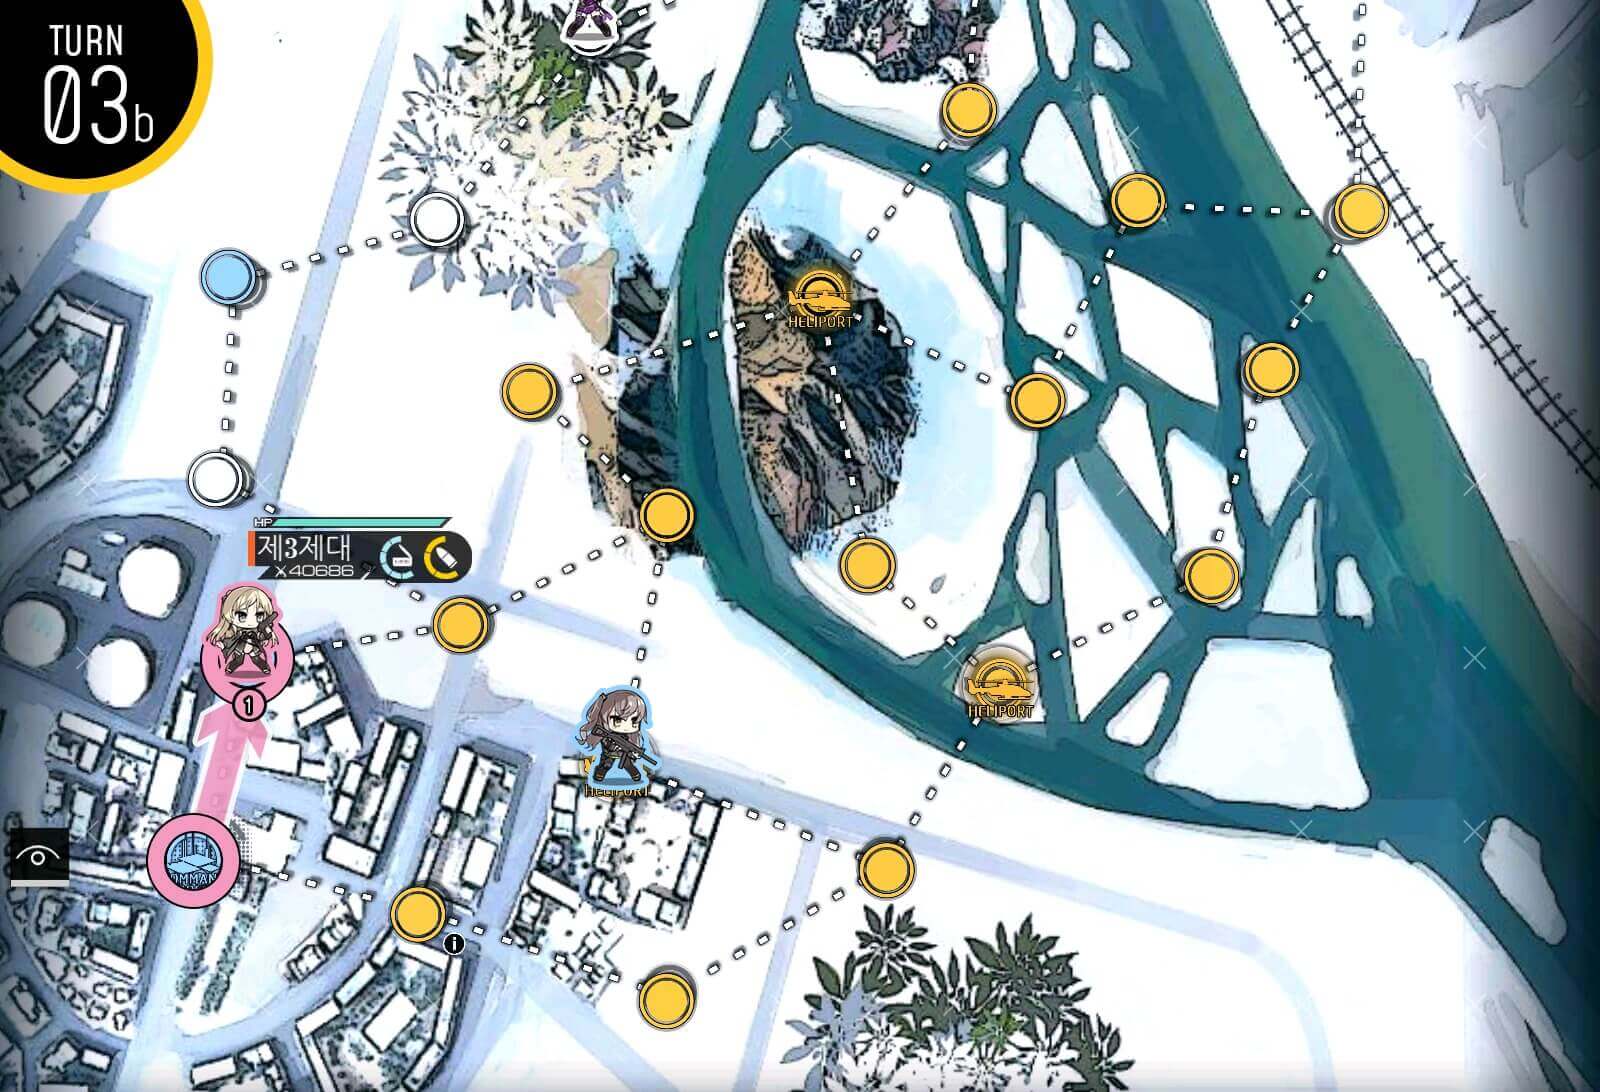
Turn 3b
Before continuing, swap with dummy echelon to resupply combat echelon.
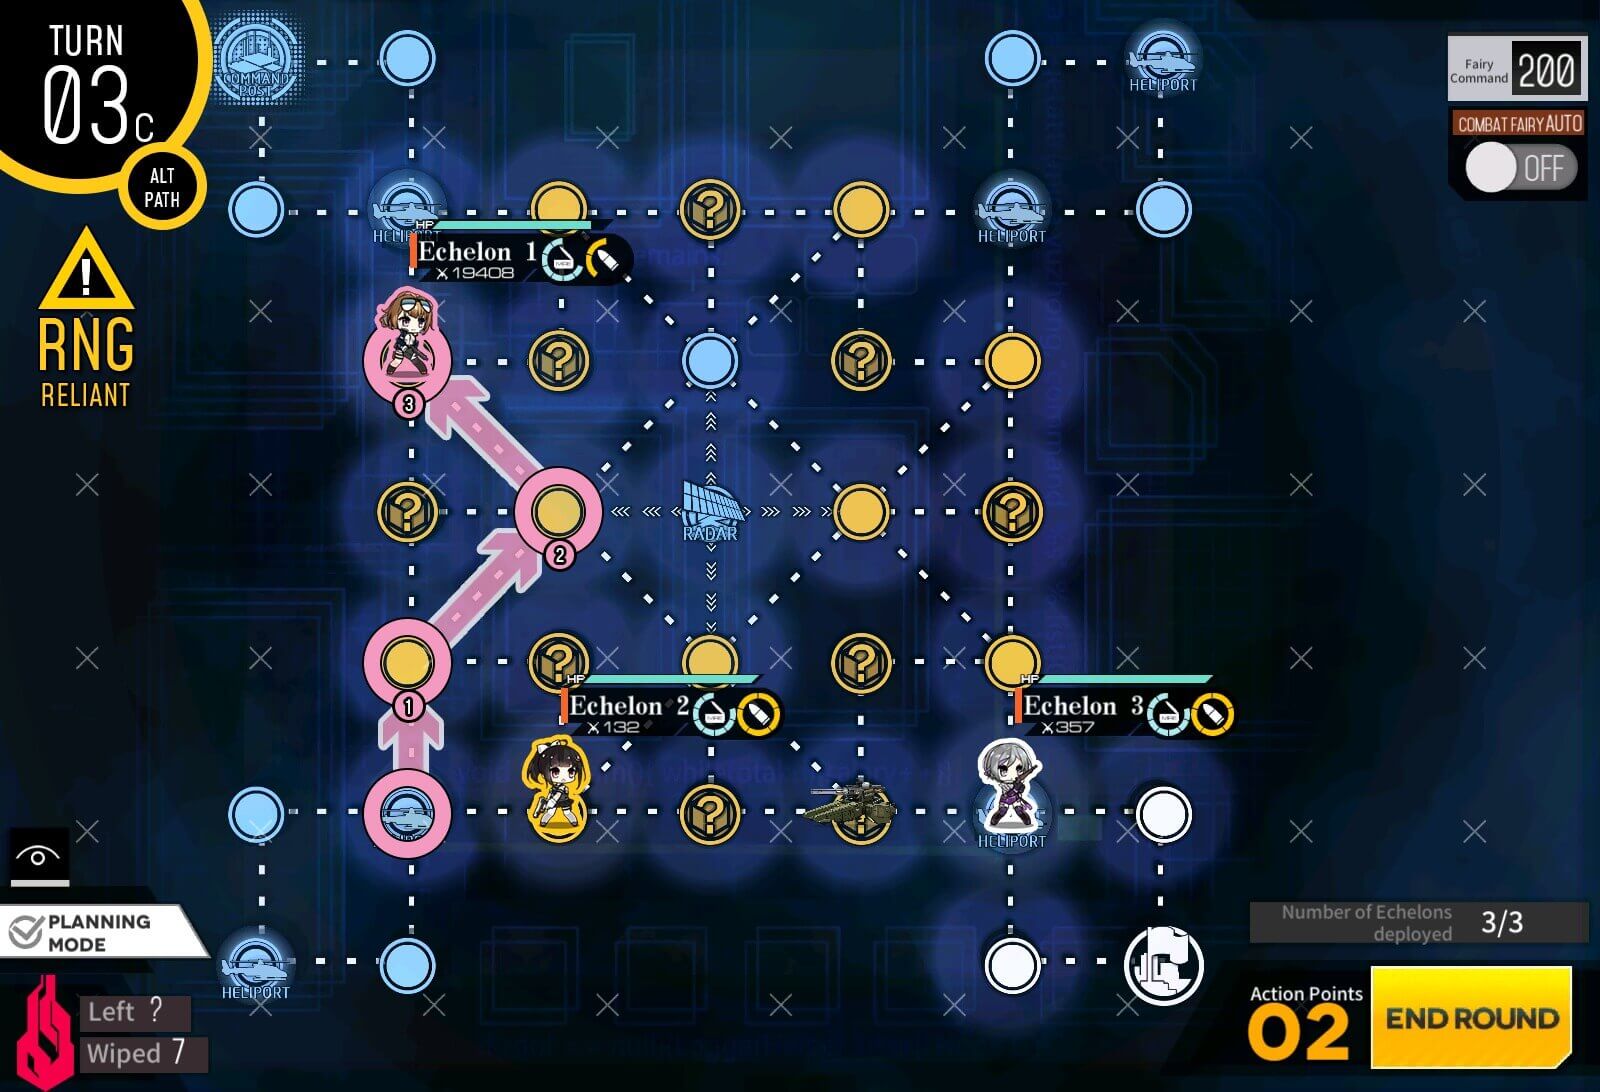
Turn 3c
Swap back then move left one.
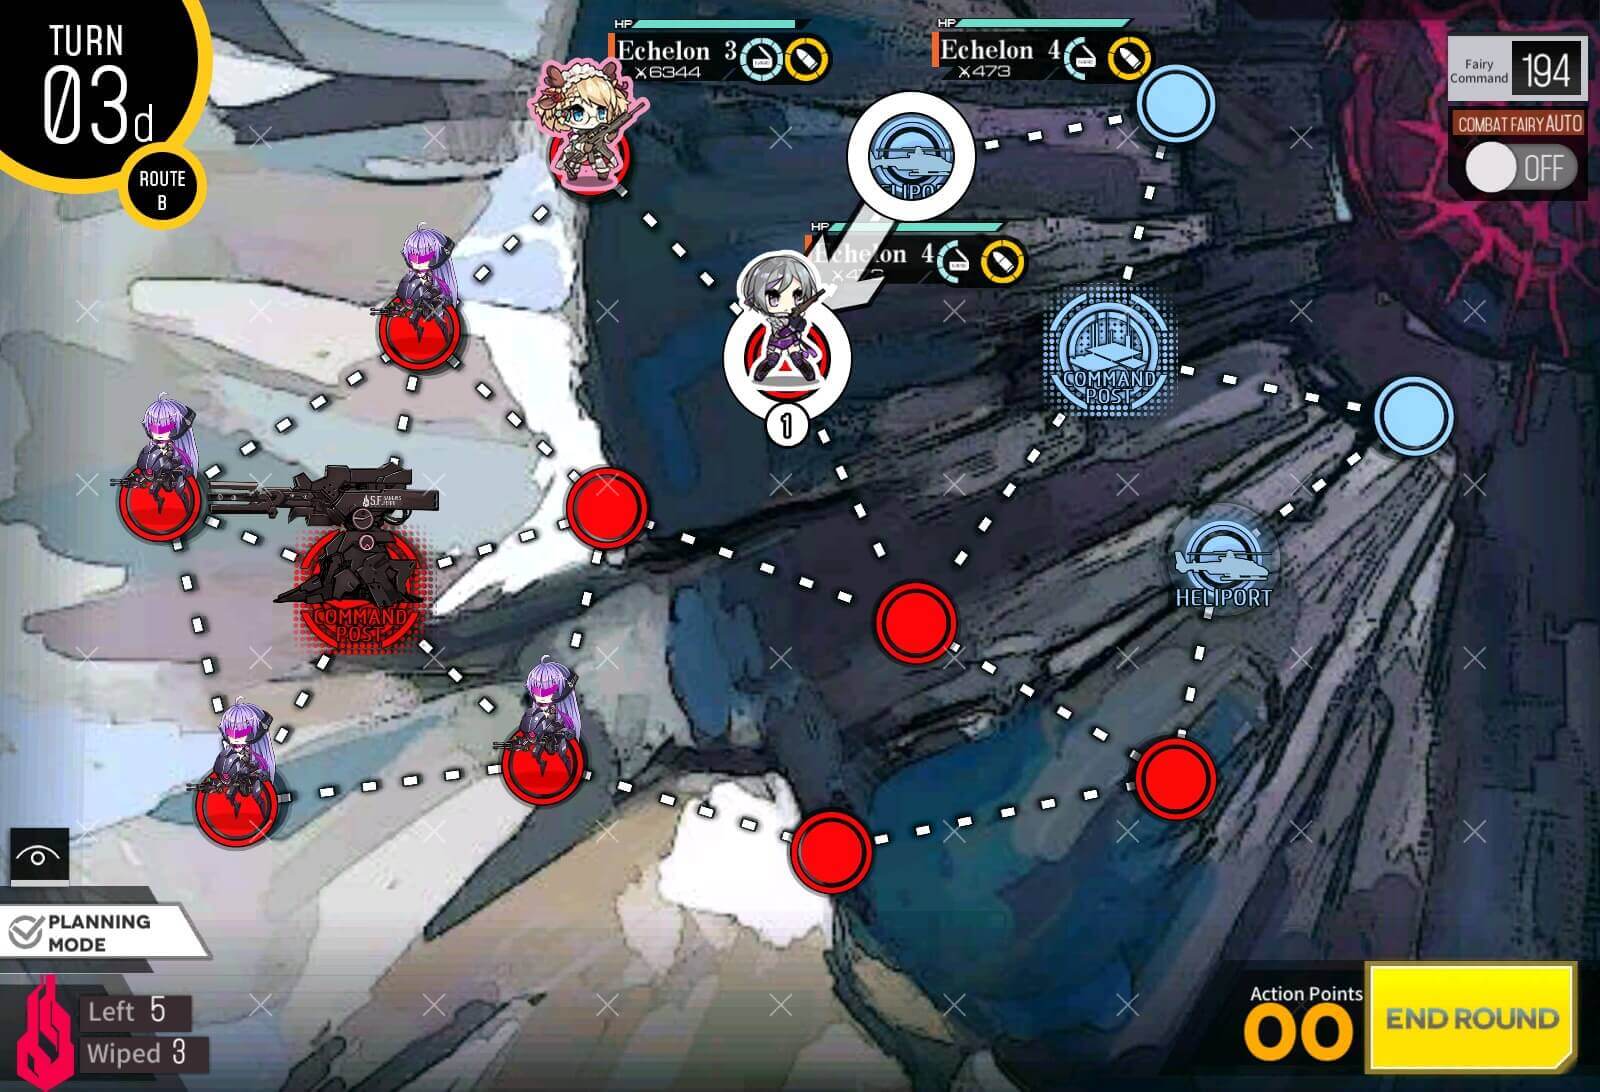
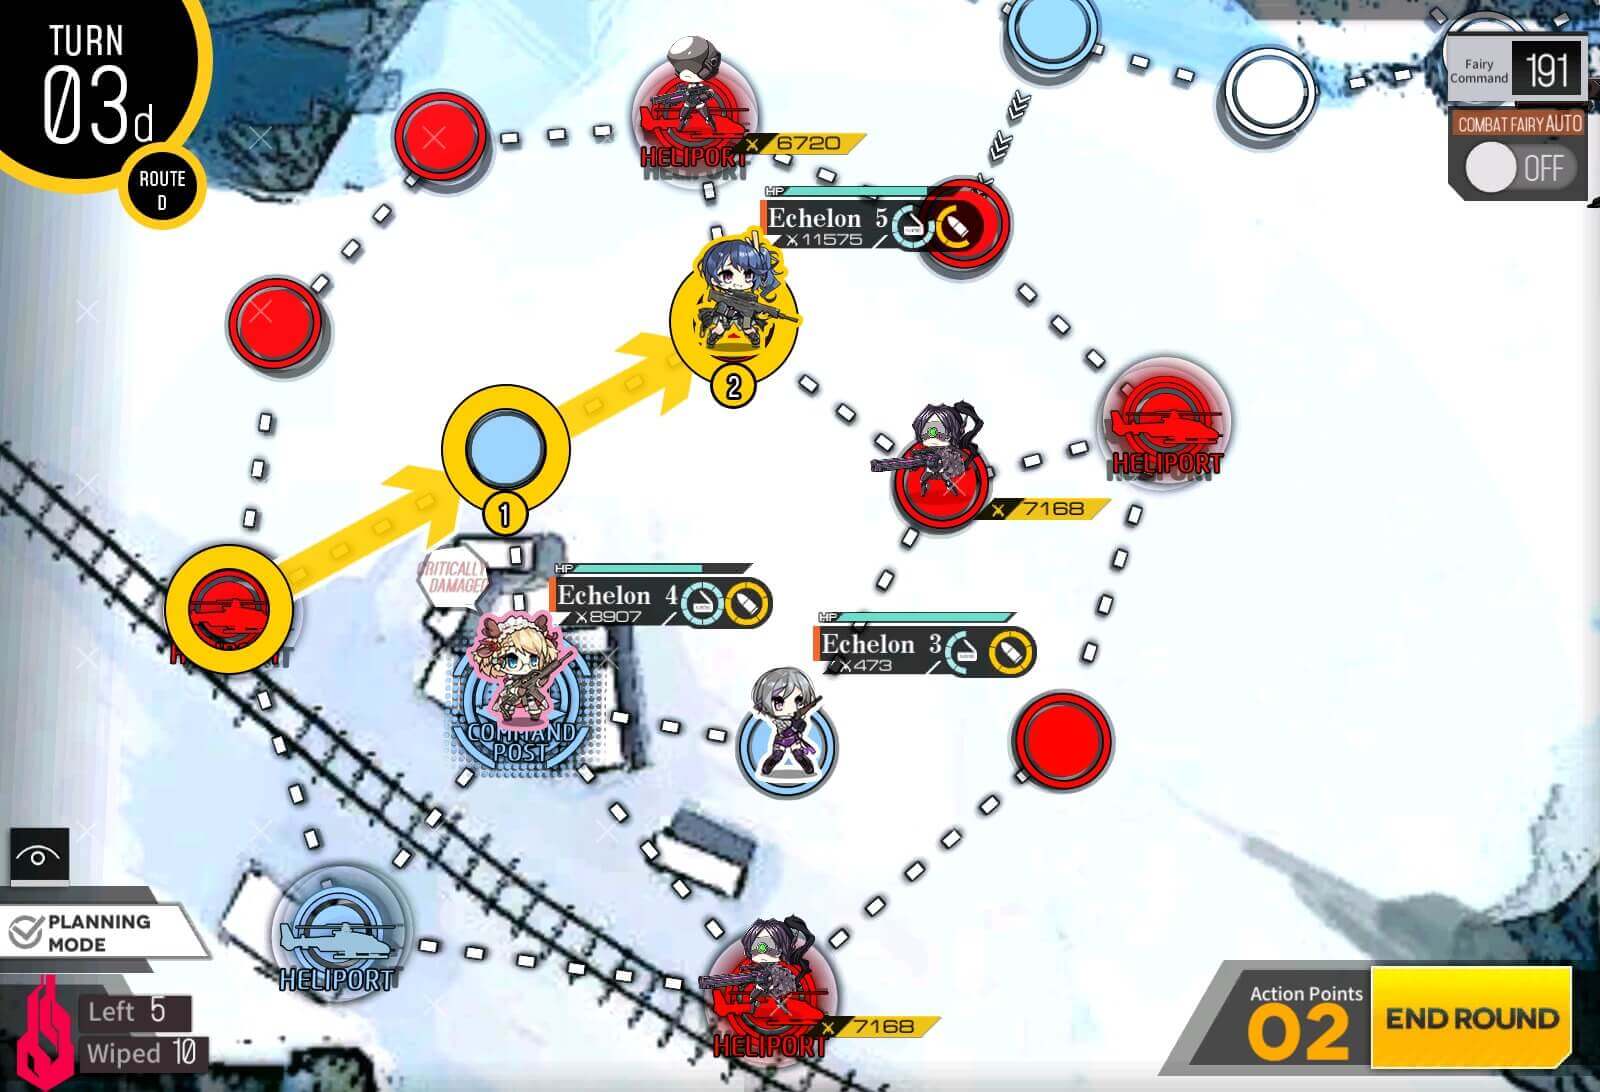
Turn 3d
Dummy echelon will move behind combat echelon.

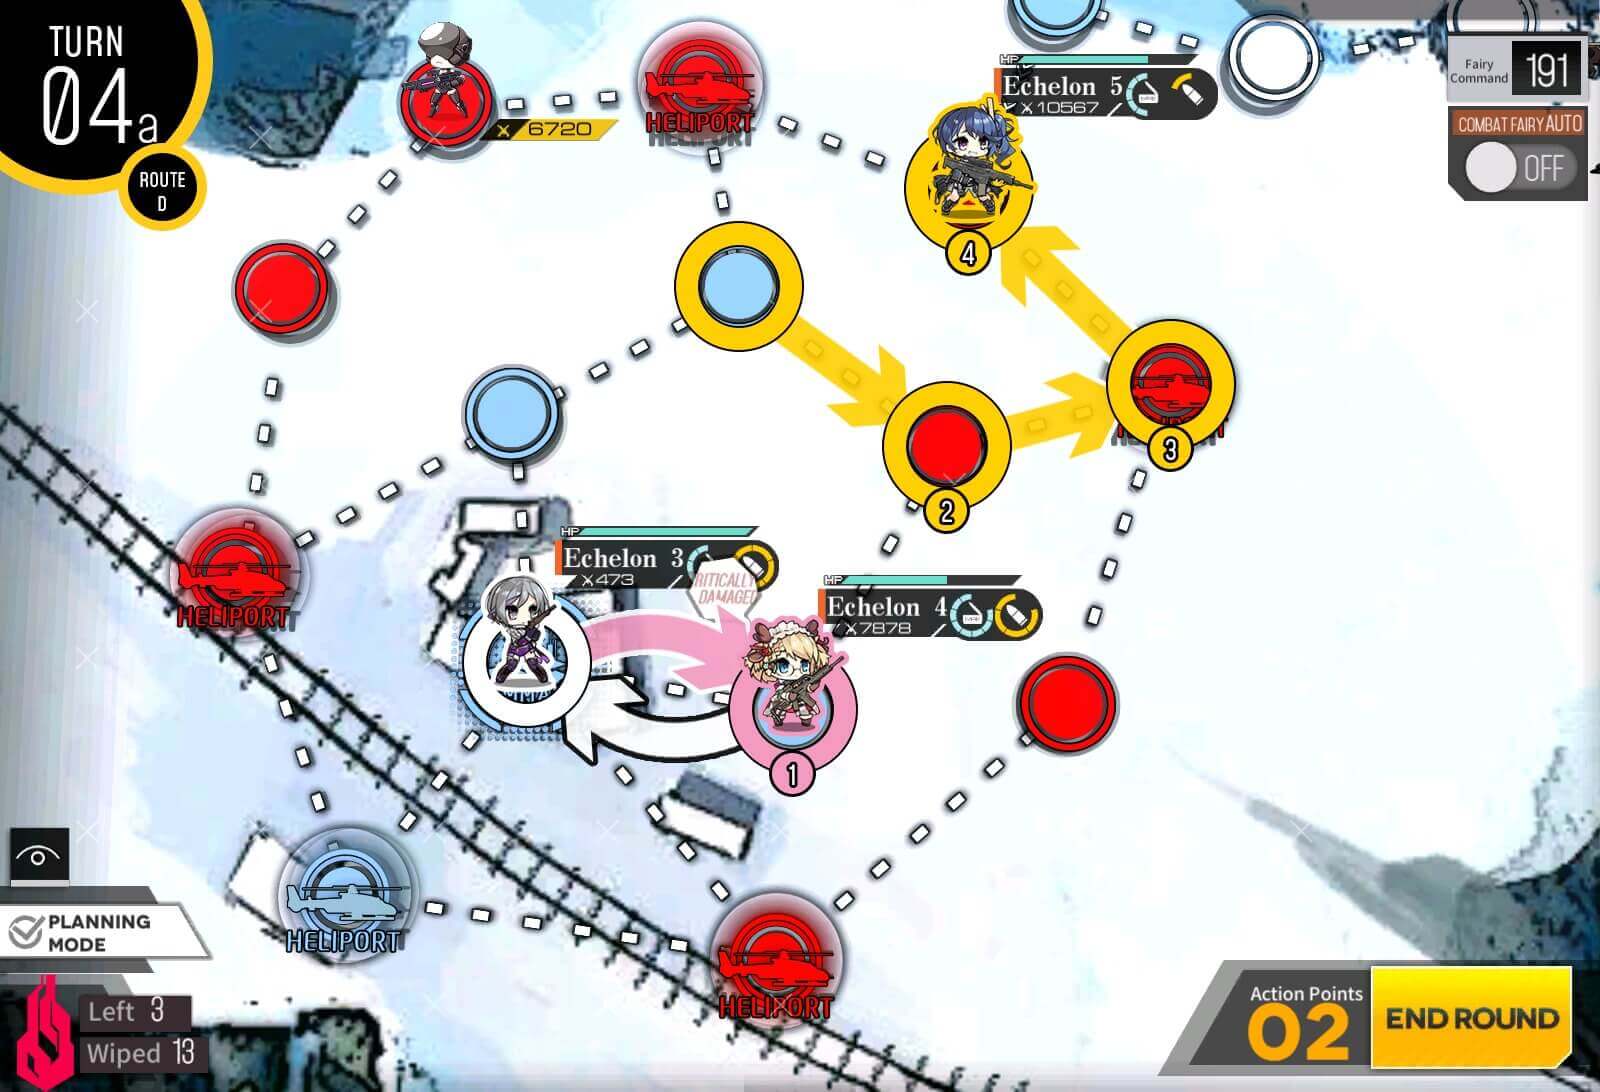
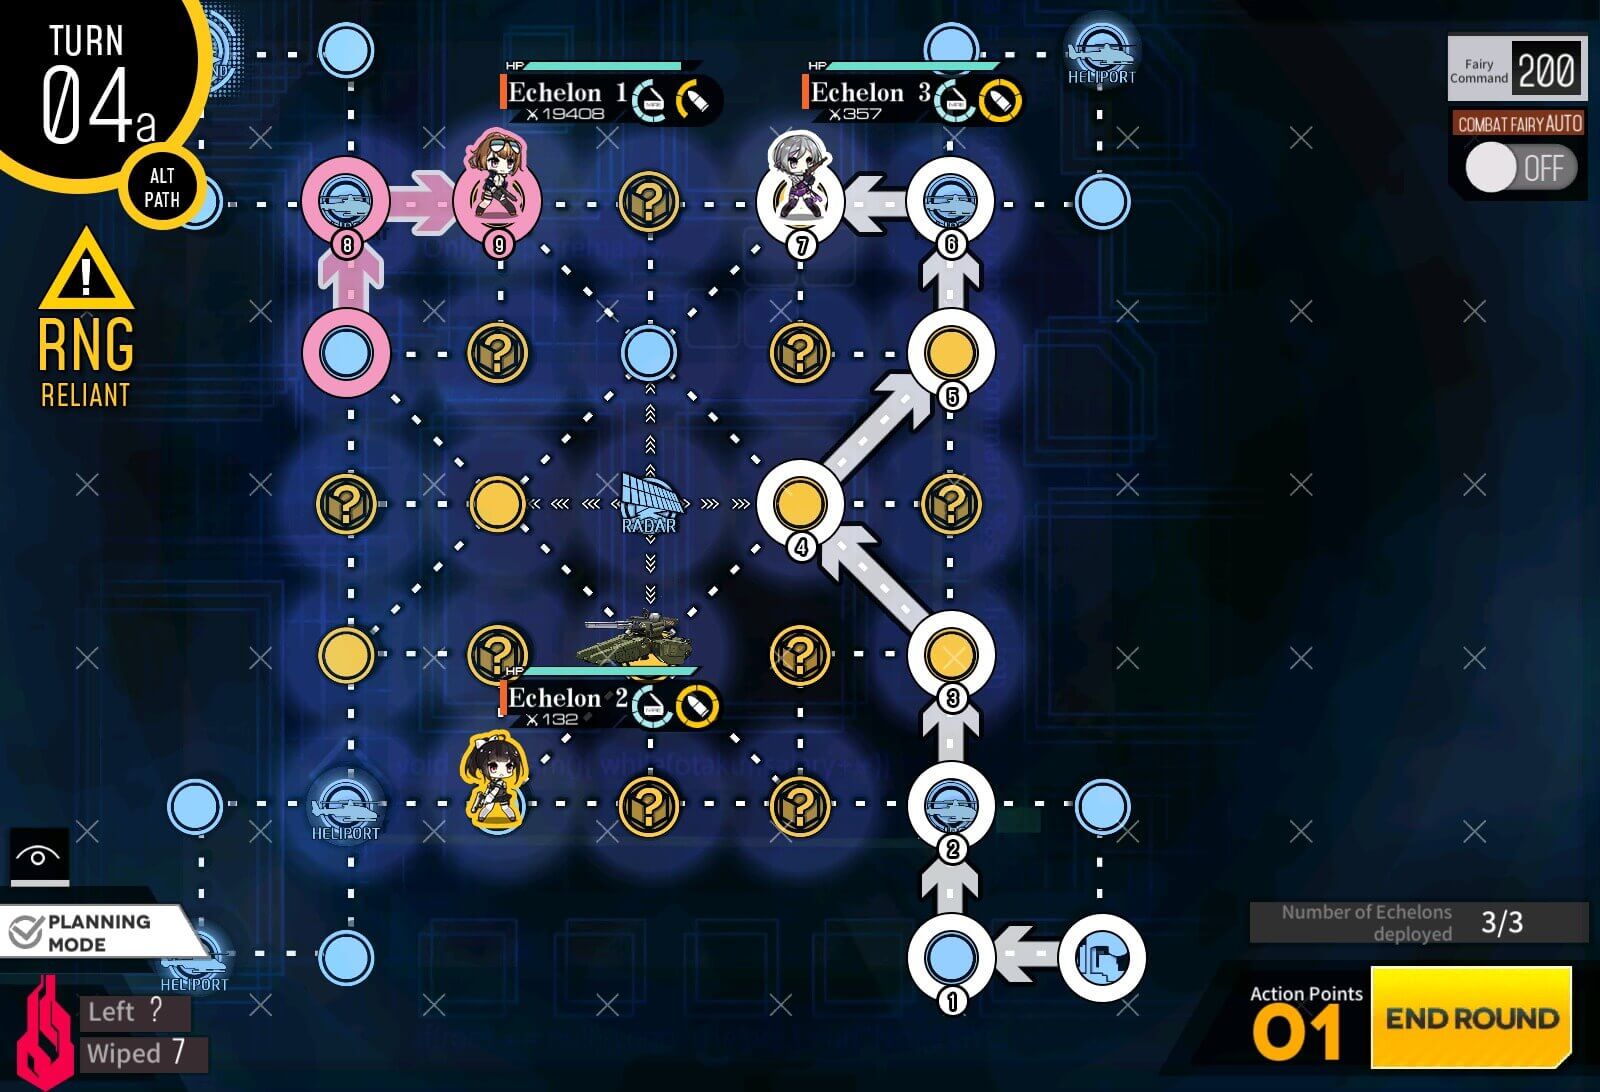
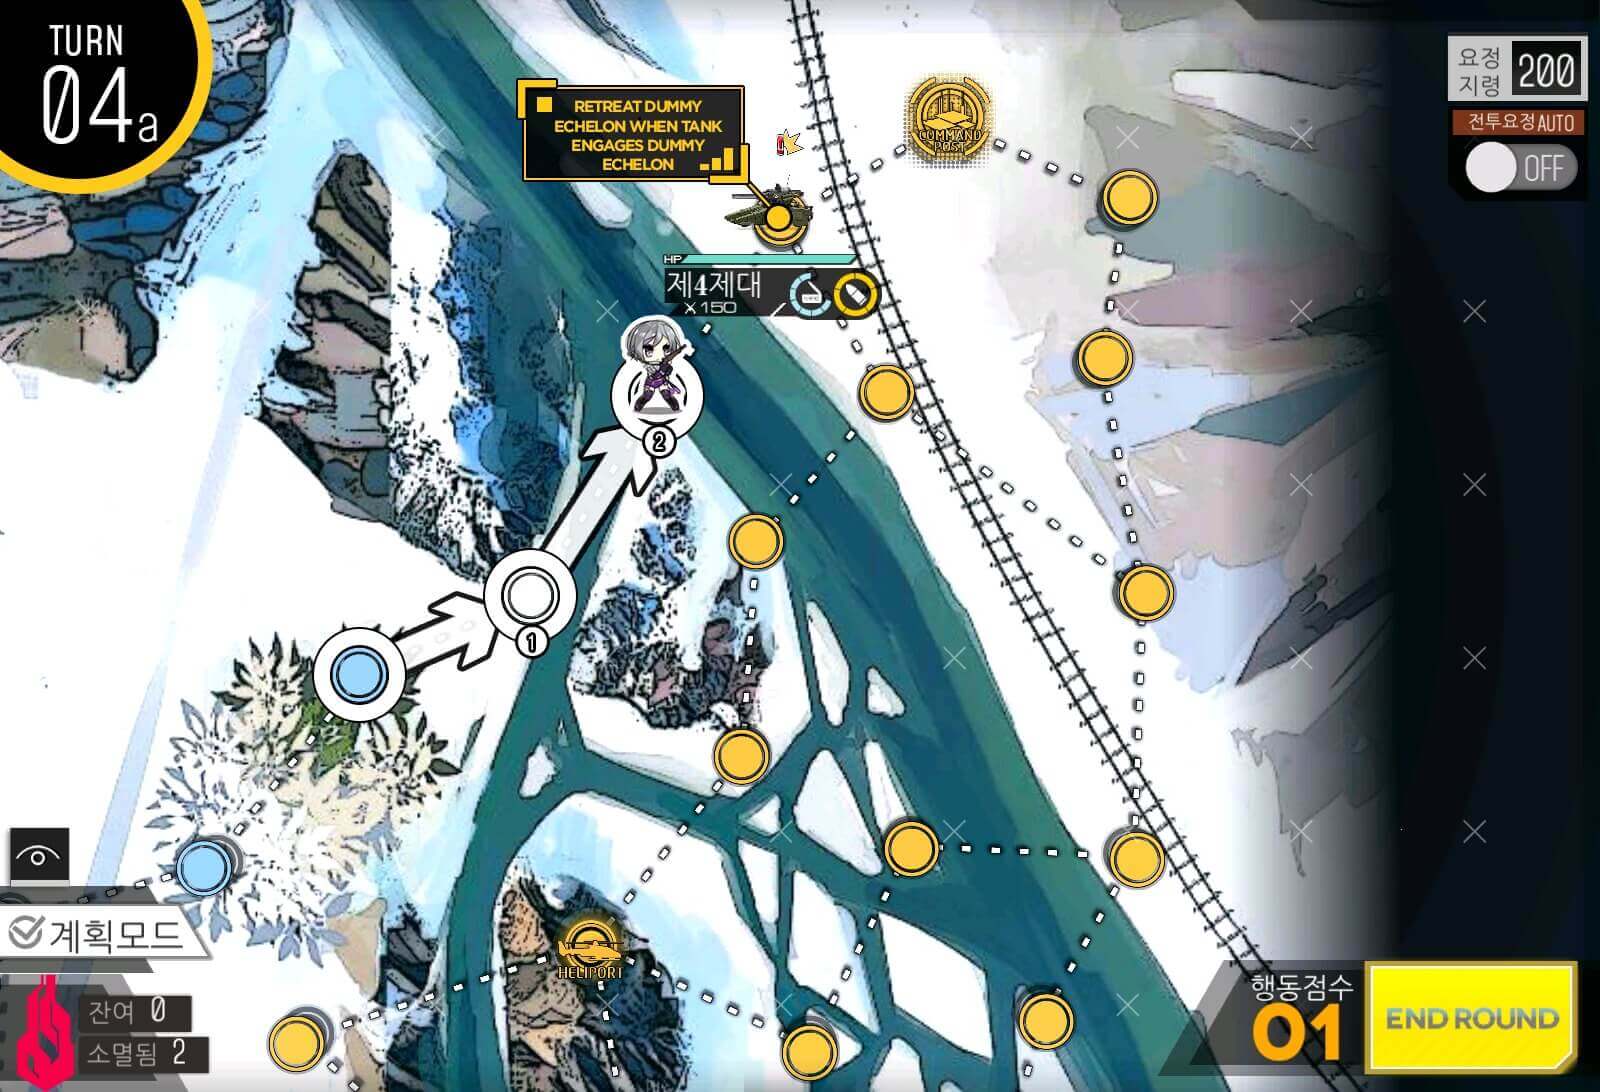
Turn 4a
Combat echelon moves to take care of enemy units on the left edge of the map.
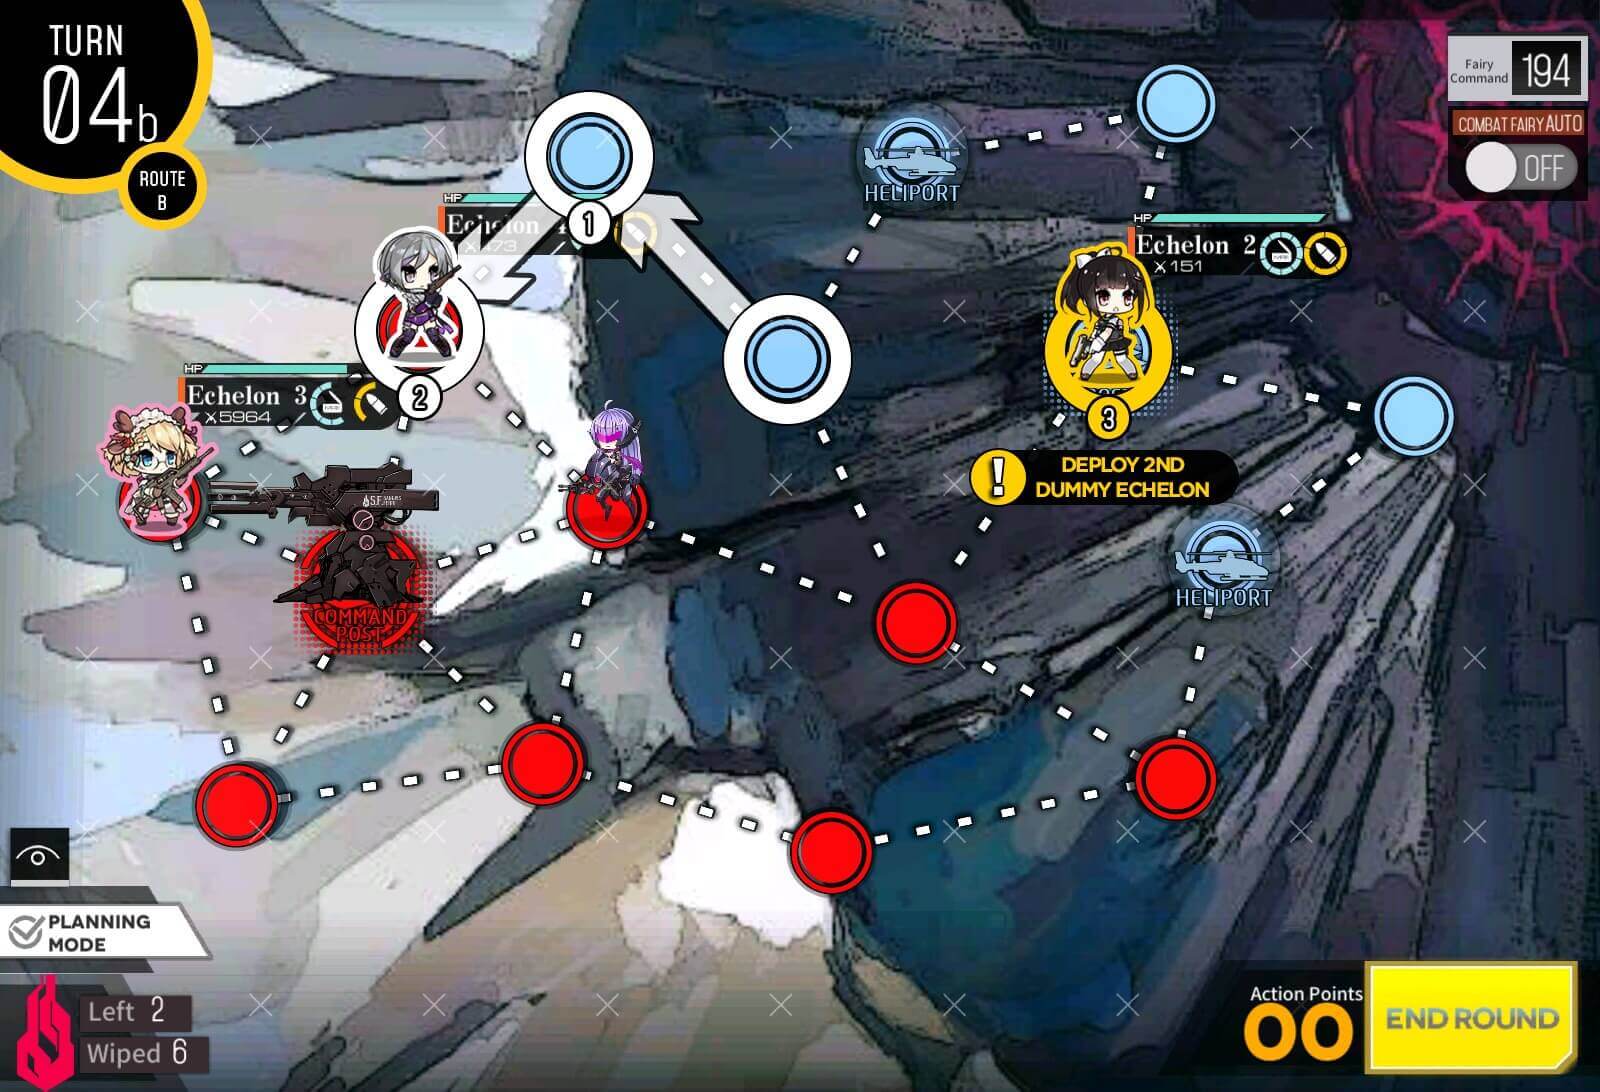
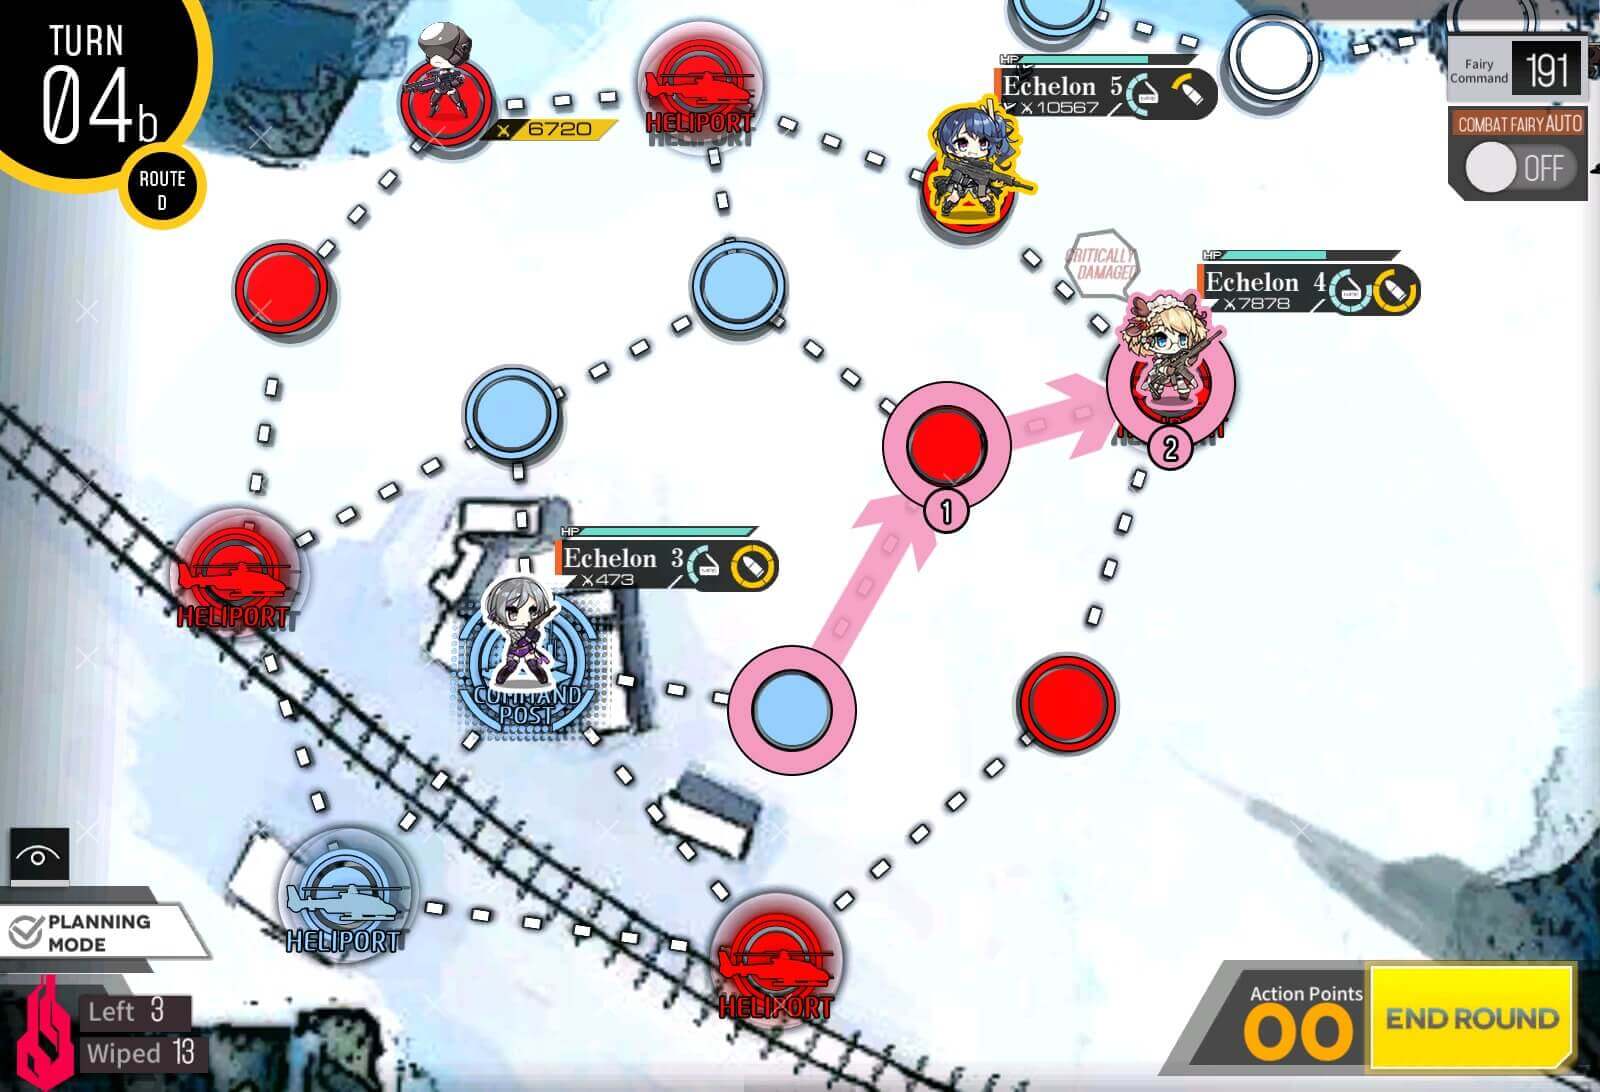
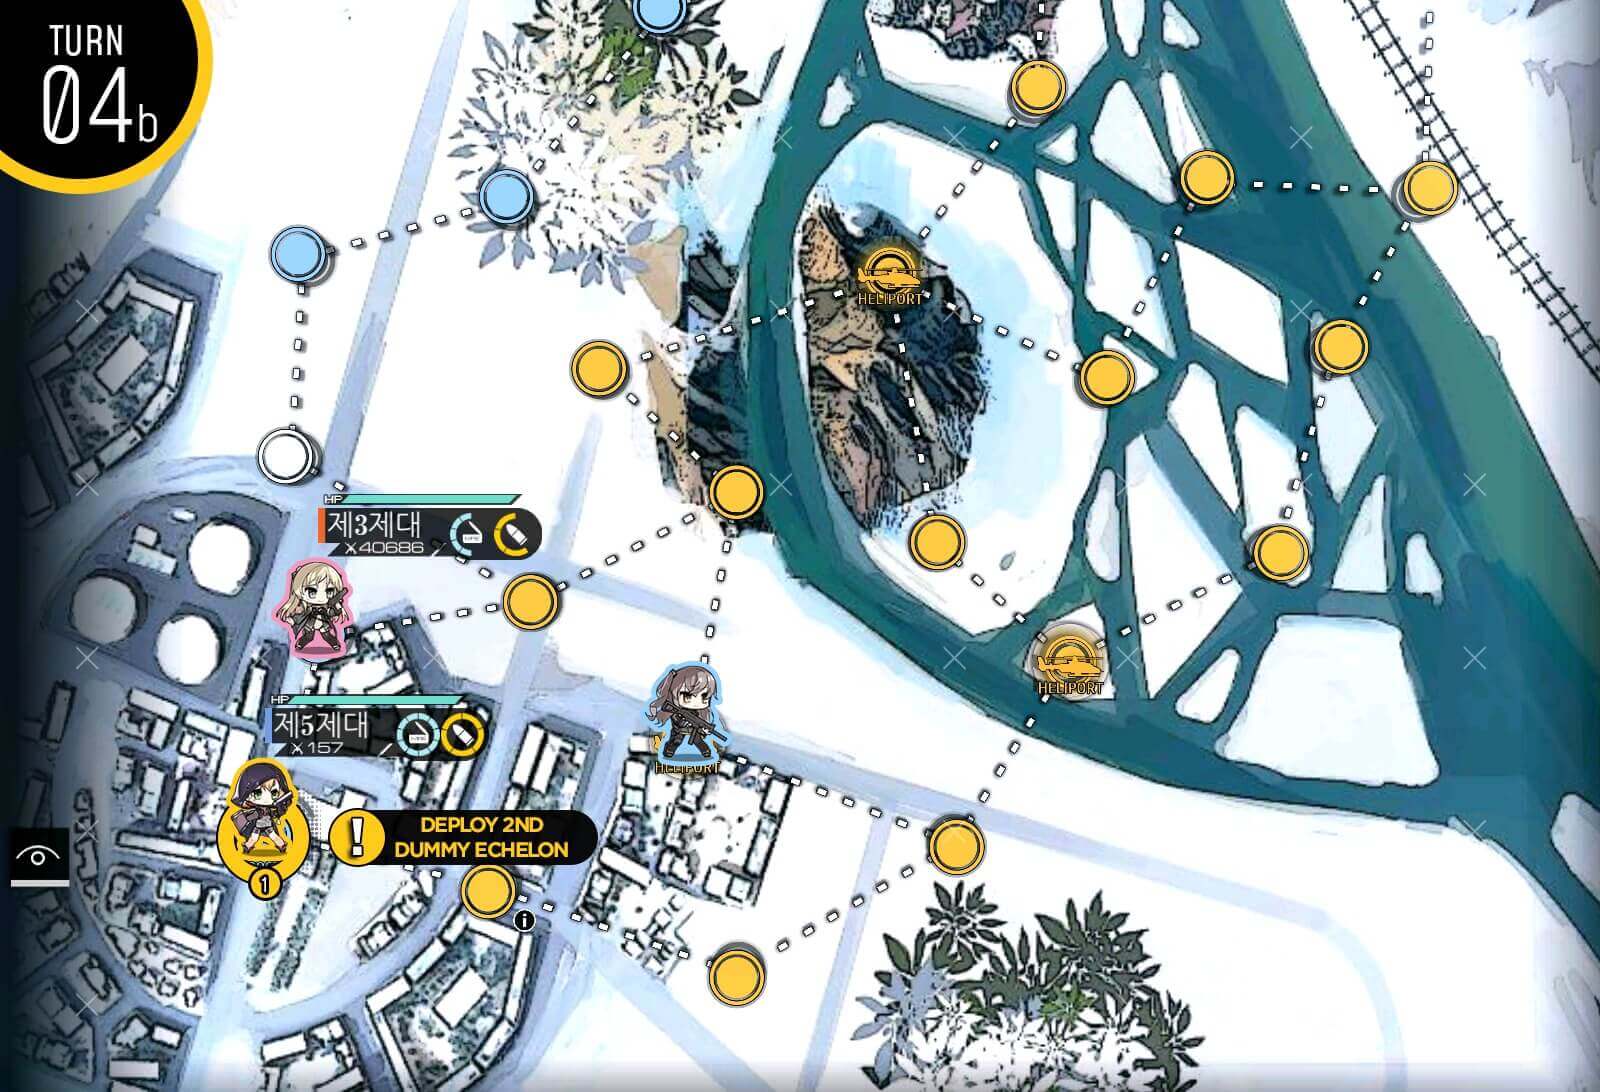
Turn 4b
Dummy echelon follows behind combat echelon. Then spawn 2nd dummy echelon on HQ.
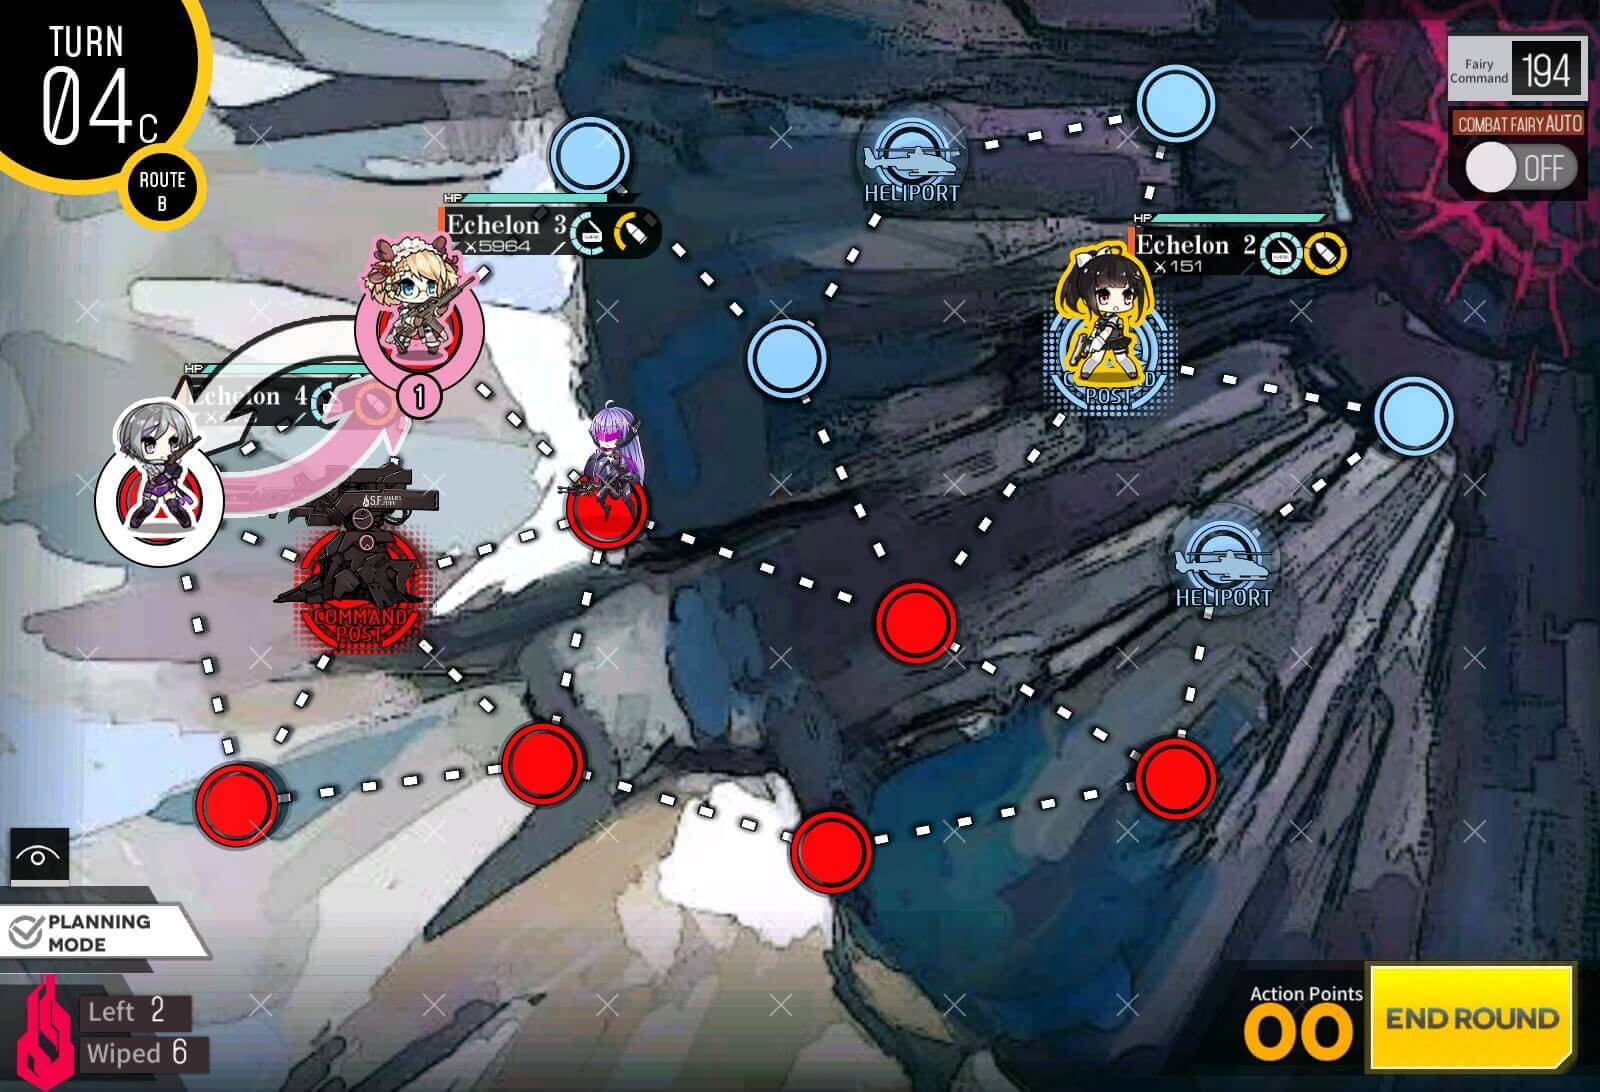
Turn 4c
Swap dummy echelon and combat echelon and dragoon unit will run into combat echelon at the end of this turn.
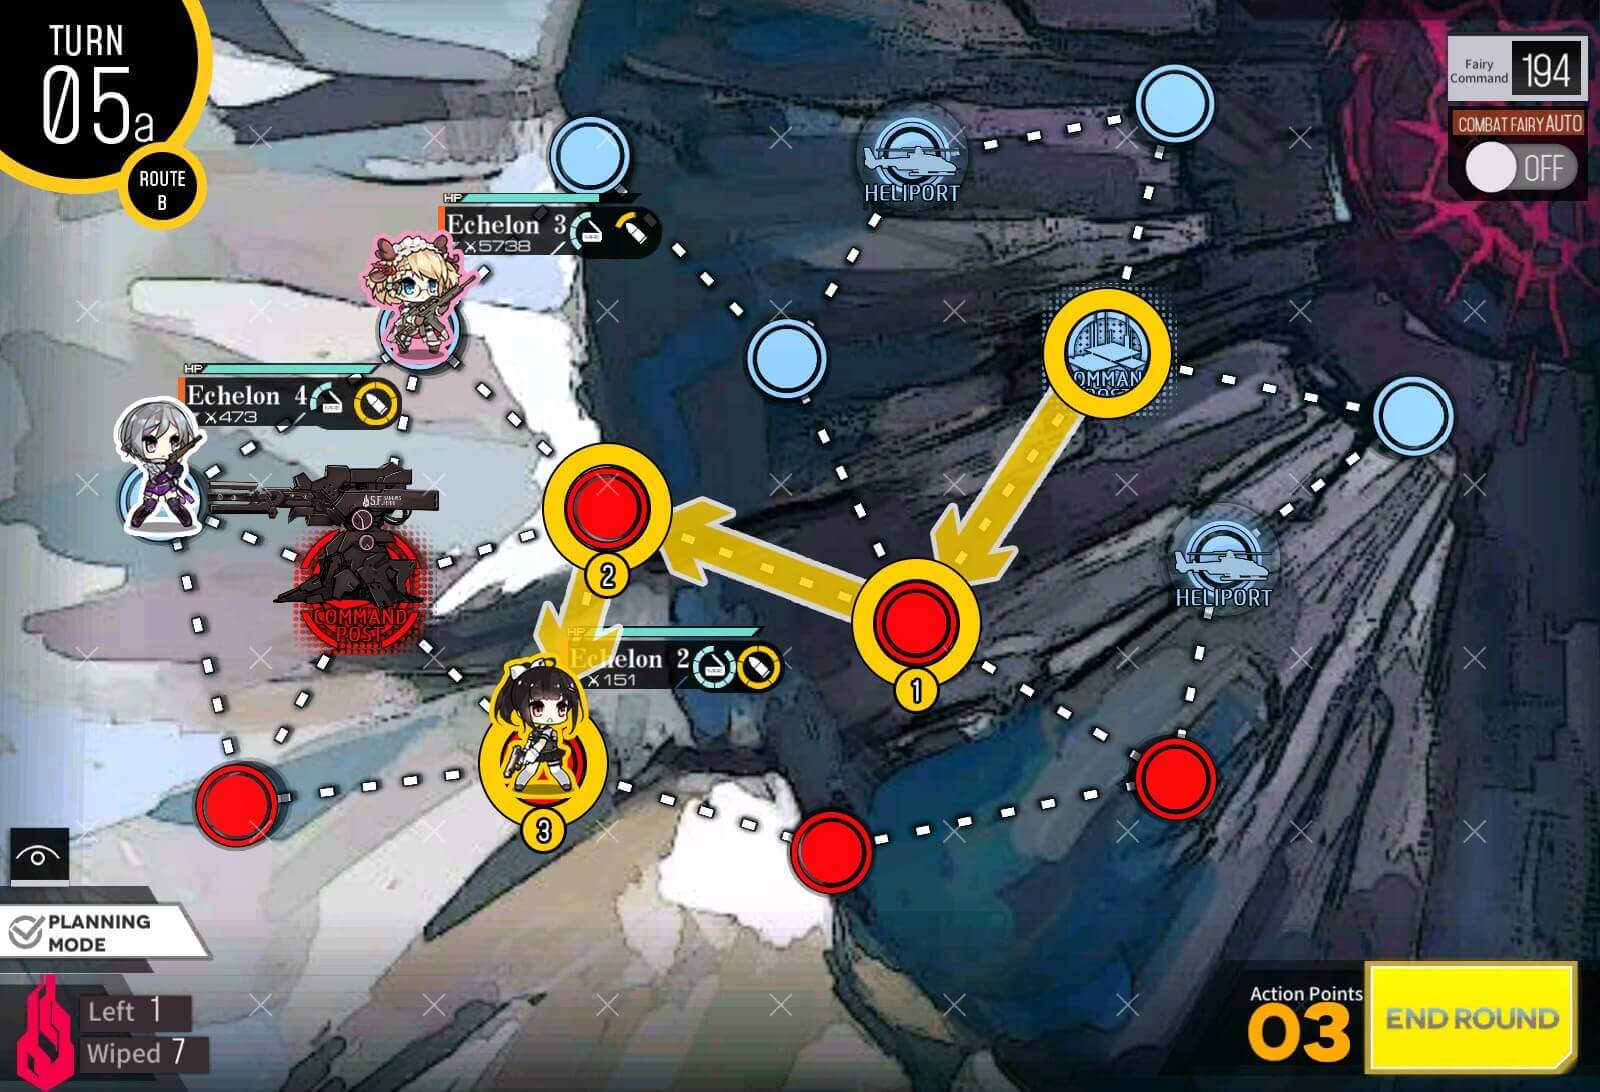
Turn 5a
Last thing to do is surround capture the Jupiter. Move dummy echelon on HQ to bottom right node near Jupiter.
Turn 5b
Combat echelon and 1st dummy echelon moves onto remaining node that is not under friendly control.
Turn 6
Combat echelon takes out weakened Jupiter and you are all set!
Turn 1
Start by taking helipad south of HQ, then deploy 2nd combat echelon on the HQ.
Turn 2a
1st combat echelon moves to helipad to right after resupplying.
Turn 2b
2nd combat echelon moves diagonally down one, then deploy dummy echelon on HQ.
Turn 2c
Goal is to keep dummy echelon out of harm's reach while keeping it useful. We are going to swap back 2nd combat echelon to HQ.
Turn 2d
Dummy echelon swaps one more time with 1st combat echelon.

Turn 3a
Make sure to resupply 1st combat echelon by swapping with dummy echelon. Swap back then move in zigzag line towards Supply point.
Turn 3b
Dummy moves between two combat echelon and form a supply route.
Turn 4a
All you have to do now is to defend the supply route. Make sure the dummy echelon stays out of danger by moving combat echelon where it needs to go.

Turn 4b
Once you maintain the route for 2 turns, you should clear the map automatically.

Turn 1
We are starting with 2 combat echelons on either side and 1 Dummy echelon on the center helipad. Move to clear all units near Jupiter cannon as shown above. Try to keep your best echelon in good health, as it will need to fight boss.
Turn 2a
As you realized by now, enemy units spawn every turn from the helipad that is inaccessible due to one-way path. Park your combat echelon and dummy echelon near by so that you can resupply by swapping.
Turn 2c
Make sure to swap back or dummy echelon will get run over by spawning unit.
Turn 2d
Combat echelon on the left end moves around to take the helipad near the center of the map. Turn ally units back to "Eliminate" before ending the turn.

Turn 3
Combat echelons move to take remaining node near Jupiter cannon to surround capture.
Turn 4
All that remain is fight with the boss once more.
Turn 1
Start off with 2 combat echelon on each place. Only one that we have to toggle is UMP 45 to "wait" and leave rest of ally units as is.
Turn 2a
Continue to clear out the enemy units in each pocket. Spawn dummy echelon on the right side of the map.
Turn 3a
Combat echelon on the right side clears out the remaining units. Combat echelon on the left continues to make route to be connected later.
Turn 3b
Before ending turn, make sure UMP 45 is toggled back to "Eliminate" and UMP 9 is toggled to "Wait".

Turn 4
Last thing to do is combat echelon near HQ to go all the way back up to resupply then kill the last enemy unit in the pocket. For reference, Jupiter cannon drops limited doll, so here's one chance you can get it by attacking weakened Jupiter.
Turn 1
Move combat echelon to left then spawn Dummy on HQ.

Turn 2
If you move to the node shown, there is a chance where you can avoid fights with mortar and Goliath units. Do this if your combat echelon is heavily damaged or you don't care about limited-doll.
Turn 3
Either safely go around the enemy units or go through them for chance at limited drops. Ending turn on Radar node clears the map.
Turn 1a
Start with two combat echelons on starting point. Move combat echelon up one, then deploy Dummy Echelon.

Turn 1b
Swap location as dummy is safe from combat this turn.

Turn 1c
Repeat the steps with other side, deploy 2nd dummy echelon.
Turn 1d
Swap Combat echelon forward using 2nd dummy echelon.
Turn 1e
Repeat process and bring 2nd combat echelon all the way forward.
Turn 2a
Beginning of turn 2, one of the enemy units will be blocking a path, in this case top side. If one combat echelon is weaker than the other, use the weaker one by swapping towards it.

Turn 2b
The stronger echelon then [bottom side in this case] moves all the way to node near enemy HQ following this path. Goal is to use the stronger echelon to remove all armor units on one side of the map, making it safe for dummy echelon or weaker echelon to move up.

Turn 3
Now that dummy echelon near HQ is threatened, swap with combat echelon. Then dummy echelon moves up along safe side of the map to meet up with combat echelon.

Turn 4a
Once all hostile units are taken care of for dummy echelon, move in position to surround capture the enemy HQ.

Turn 5
All you have to do now is take last two nodes by enemy HQ and you will clear the mission.
Turn 1a
Start off by moving combat echelon to helipad bottom left. Spawn 2nd combat echelon.
Turn 1b
Set Ally commands so that only G11 is on "Eliminate" and rest on "Wait".

Turn 2a
Combat echelon on bottom left move up and to right and combat echelon on HQ move to right. Deploy Dummy echelon on HQ.
Turn 2b
As you noticed, Goliath Plus unit also moved up one, as same line as HK416. We now change HK to "Eliminate" while rest stays on standby.
Turn 3a
Depending on your combat echelon's health level, swap out between two combat echelons so no echelon goes too low. Resupply by swapping as you see fit.
Turn 3b
Here i swapped between Pink and Yellow echelon because one was too low on health.

Turn 3c
Eliminate enemy units near the combat echelon.
Turn 3d
If you are worried about dummy echelon being exposed to battle, it will not move towards dummy. [At least during numerous trials]
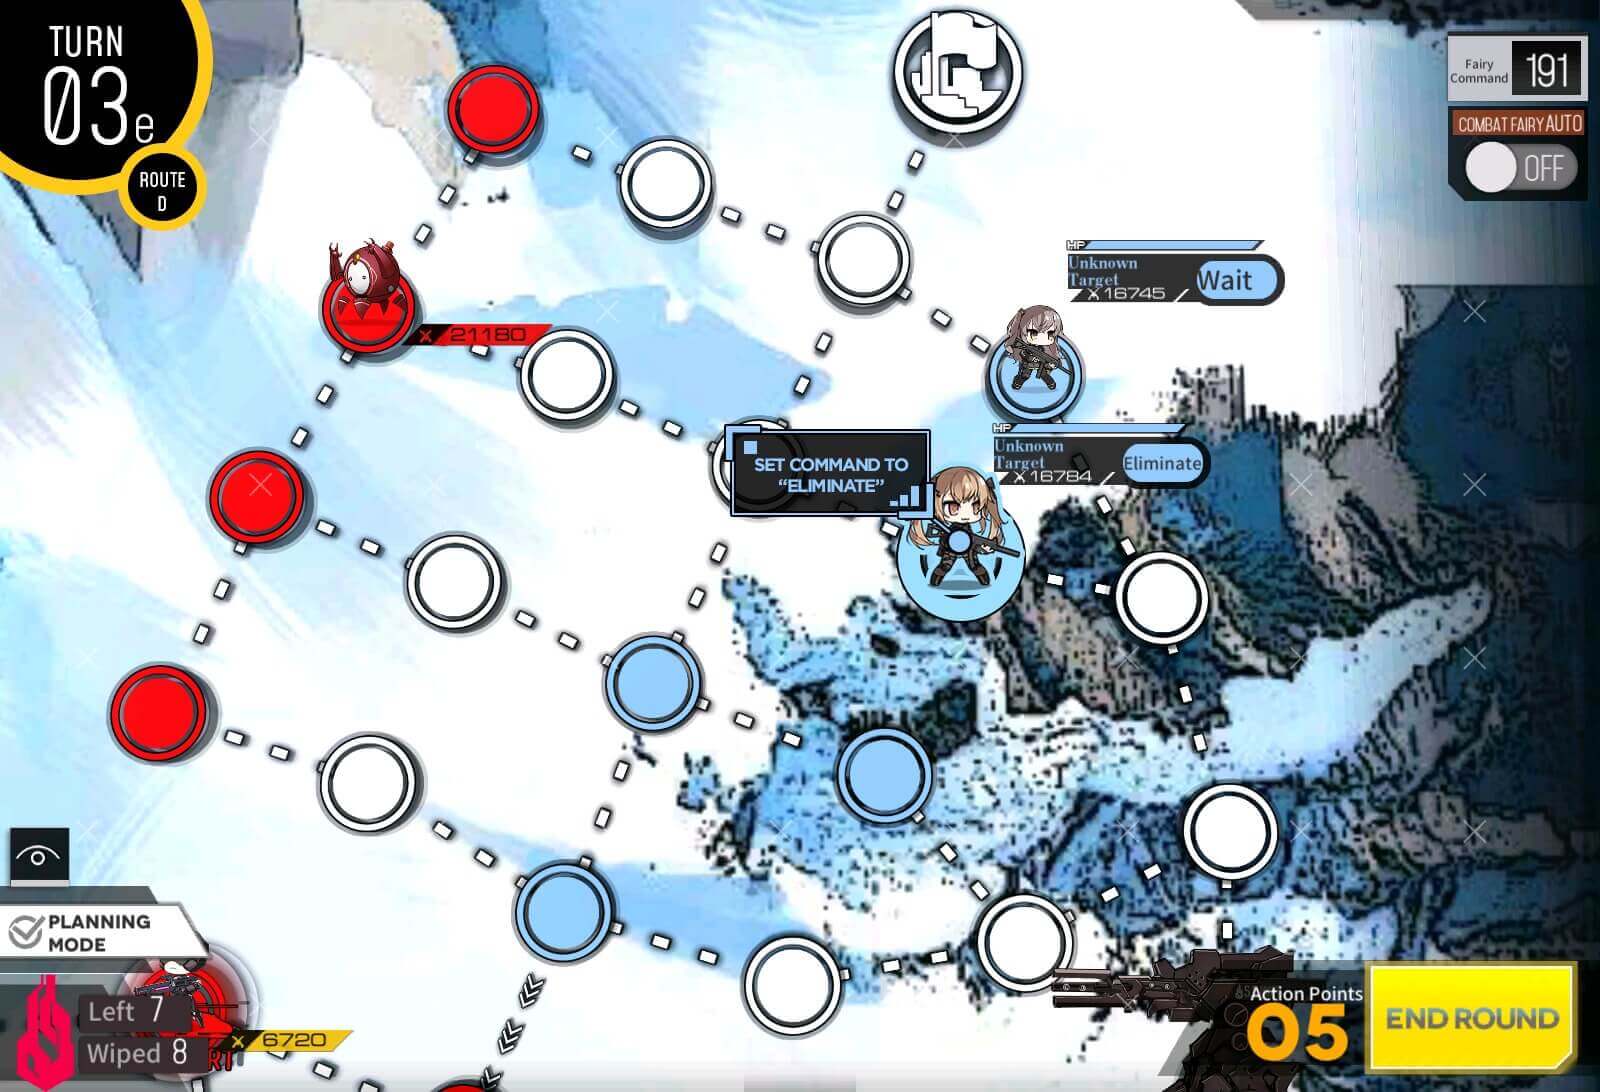
Turn 3e
Don't forget to change UMP 9's command to "Eliminate" before ending turn.
Turn 4a
Combat echelon moves to connect route to HQ. Swap echelon on HQ and dummy to save move points.
Turn 4c
Lastly, UMP 45 is set to "Eliminate".
Turn 5
Your route should be established now, all you have to do is defend it from the enemy units from being broken for 2 turns.

Chapter II
Turn 1
Another simple map where you can go either top or bottom route. For sake of guide I took top route. Take the helipad for additional move point.

Turn 2
We are short on move point to get to the HQ this turn, so we take radar and wait a turn.
Turn 3
There's a really weak tank that all you have to do is empty the middle row so that no T-doll can be shot by tank. Should be a easy win.
Turn 1
You can start anywhere, all you have to do is get to the helipad on the other end of the map. There's new enemy unit that plants mines as it approaches, if you cannot kill it before it reaches your T-dolls, you will have to either retreat dolls on that row or move the dolls out of the way. Should be an easy fight regardless.

Turn 1
Combat echelon will move 1 node per turn so that it can establish supply route to destination.
Turn 2
There's shouldn't be much of challenge other than managing health of your echelon if T-dolls are under-leveled or under equipped.
Turn 3
Just move single node per turn.

Turn 4
Your echelon should be out of ammo but with two enemy units near by. This is perfectly fine as no enemy units near you will attack you. Just keep hitting End round button until map is cleared.

Turn 1
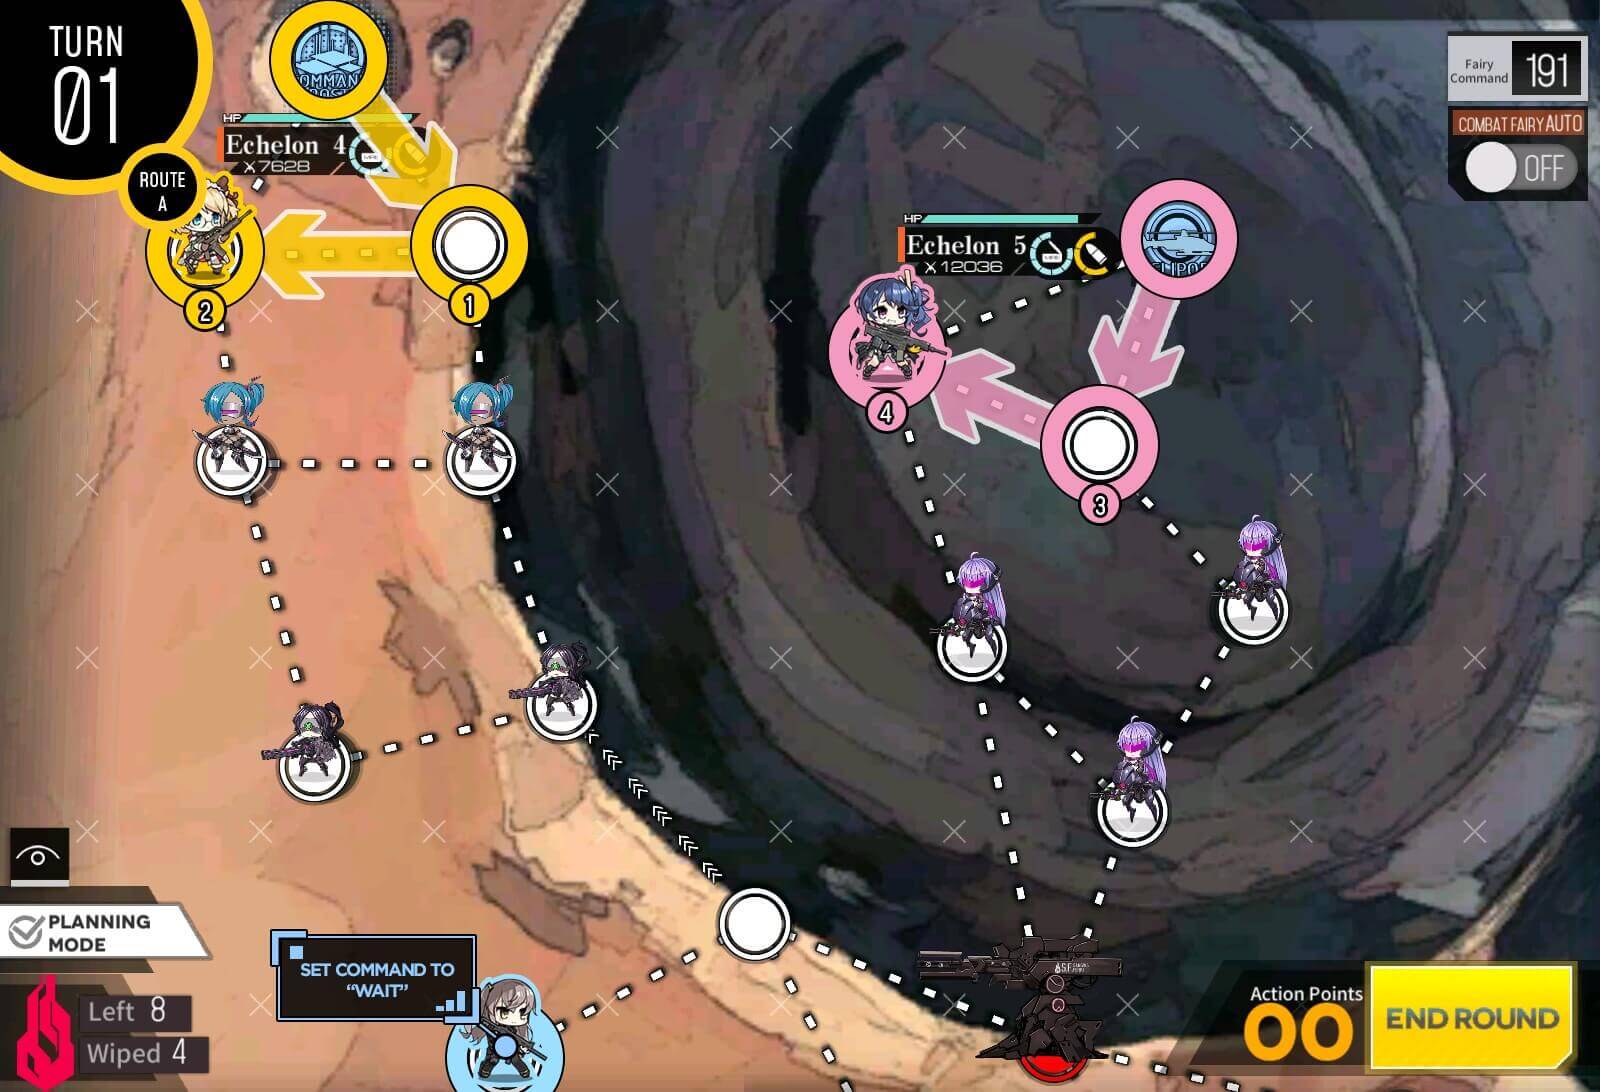
This map has bit of RNG where if you only have 1 Combat Echelon, your Supply point can be taken by enemy units and will have to test your luck once more later down the line. However this method is fairly consistent if supply point is not taken at the end of 1st turn. Combat echelon starts at the HQ and move to take helipad Northwest of HQ.

Turn 2a
Combat echelon resupplies then Sweep its way to Supply point. Then swap with dummy unit on helipad.

Turn 2b
Just to provide buffer zone for later turns, take out the armor unit that's on radar.
Turn 3a
As you can see now that there's two enemy units threatening the supply point. Move up the combat echelon and swap so that dummy echelon is out of harm's way.
Turn 3b
Kill the armor unit on the left side that can sever the supply route.

Turn 3c
After that you should not see any more units coming from the yellow helipad until end of the mission. Guard the Supply point with your combat echelon.

Turn 1
Take helipad in front of starting point then end turn.
Turn 2
I found that taking the left route is best way and has least number of enemies on the way to HQ. Because you are going to lose the helipad up top, take the helipad here in case if you need to resupply.
Turn 3
You can choose the route that has least number of enemies on the way to enemy HQ.

Turn 1
But start is always same by taking helipad and deploying 2nd combat echelon.

Turn 2
By now you should see a single red node in one of 3 "tendrils" that shoots out from the left side of the map. That's where one of the enemy unit is. I have marked such location with Green diamond shape [there is one more below that is cut off from image]. If you want to have spare move point next turn, spawning dummy echelon here would be recommended.

Turn 3
On turn 3, you have will have enough move point to find remaining 2 enemy units and a spare turn to kill them.
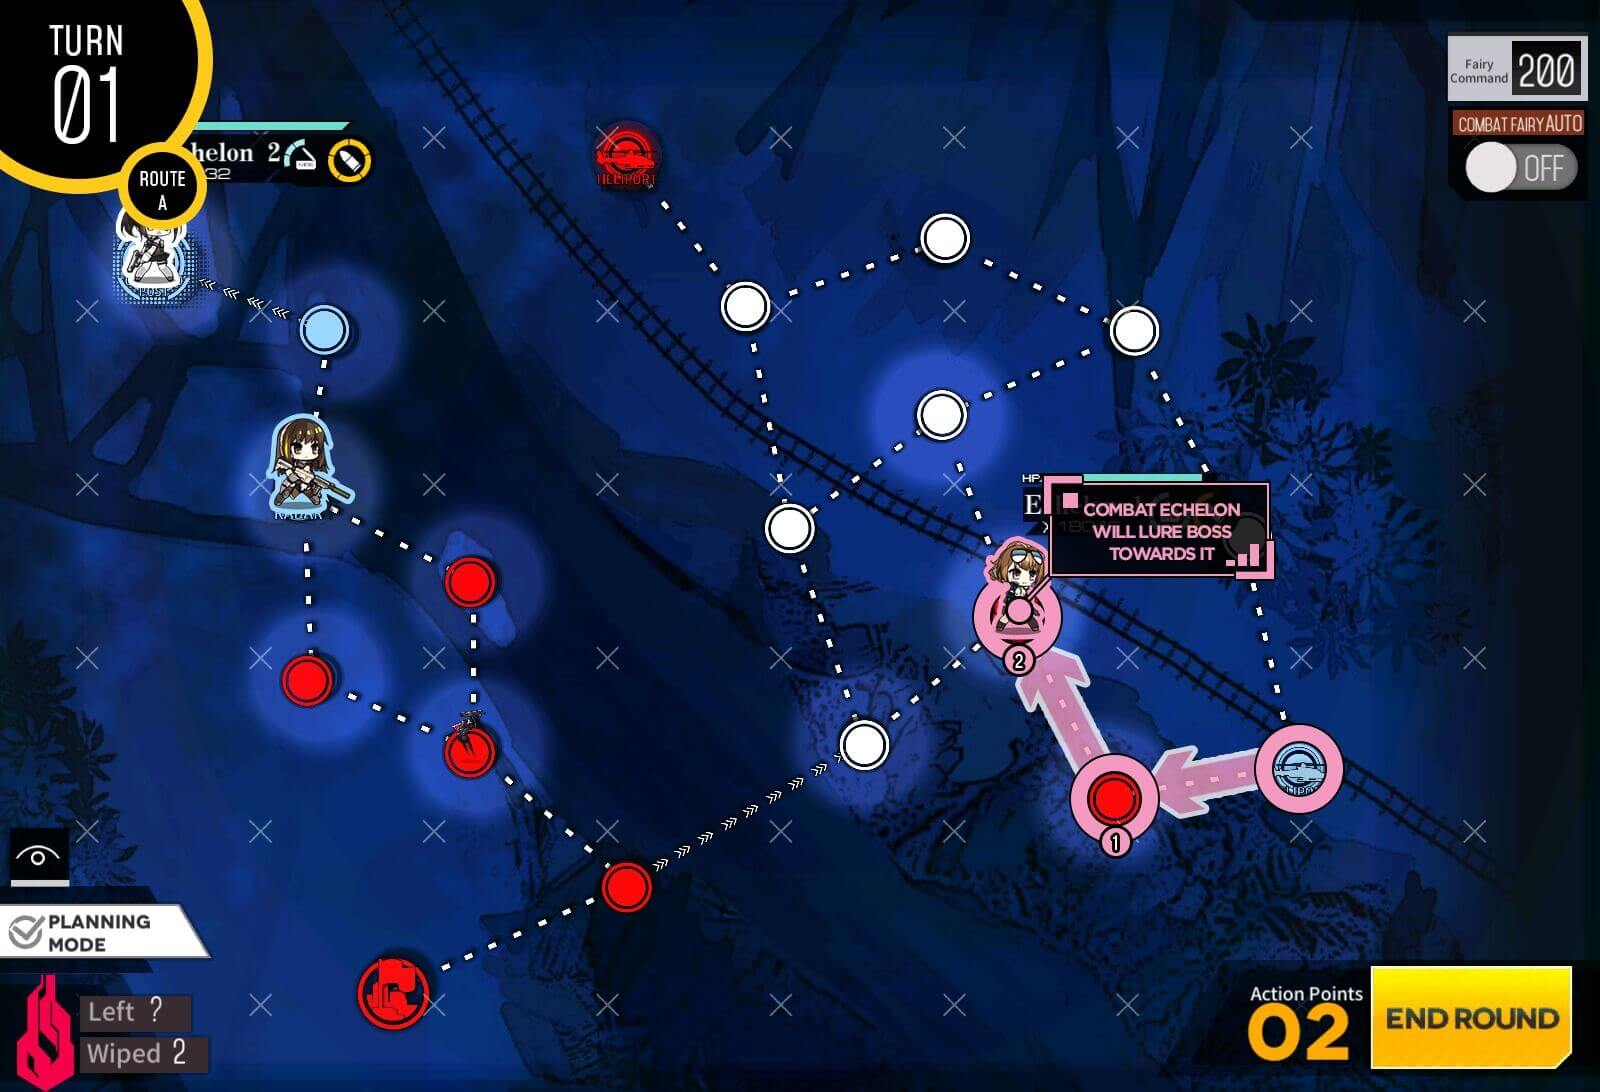
Turn 1a
Again we are going to ignore the entirety of left side of the map other than moving dummy one to the right to take helipad. Then on the right side, Move dummy up 1 then spawn your combat echelon. Combat echelon is going to be going against Striker units, so if you can't burst front line quickly, I recommend RFHG team.
Turn 1b
Swap the dummy and combat echelon's location.
Turn 1c
Then we are going to swap so that Ally echelon is going to be all the way in the front, followed by Combat echelon then dummy echelon at the rear. Make sure the ally echelon is set to "Eliminate" before ending turn.
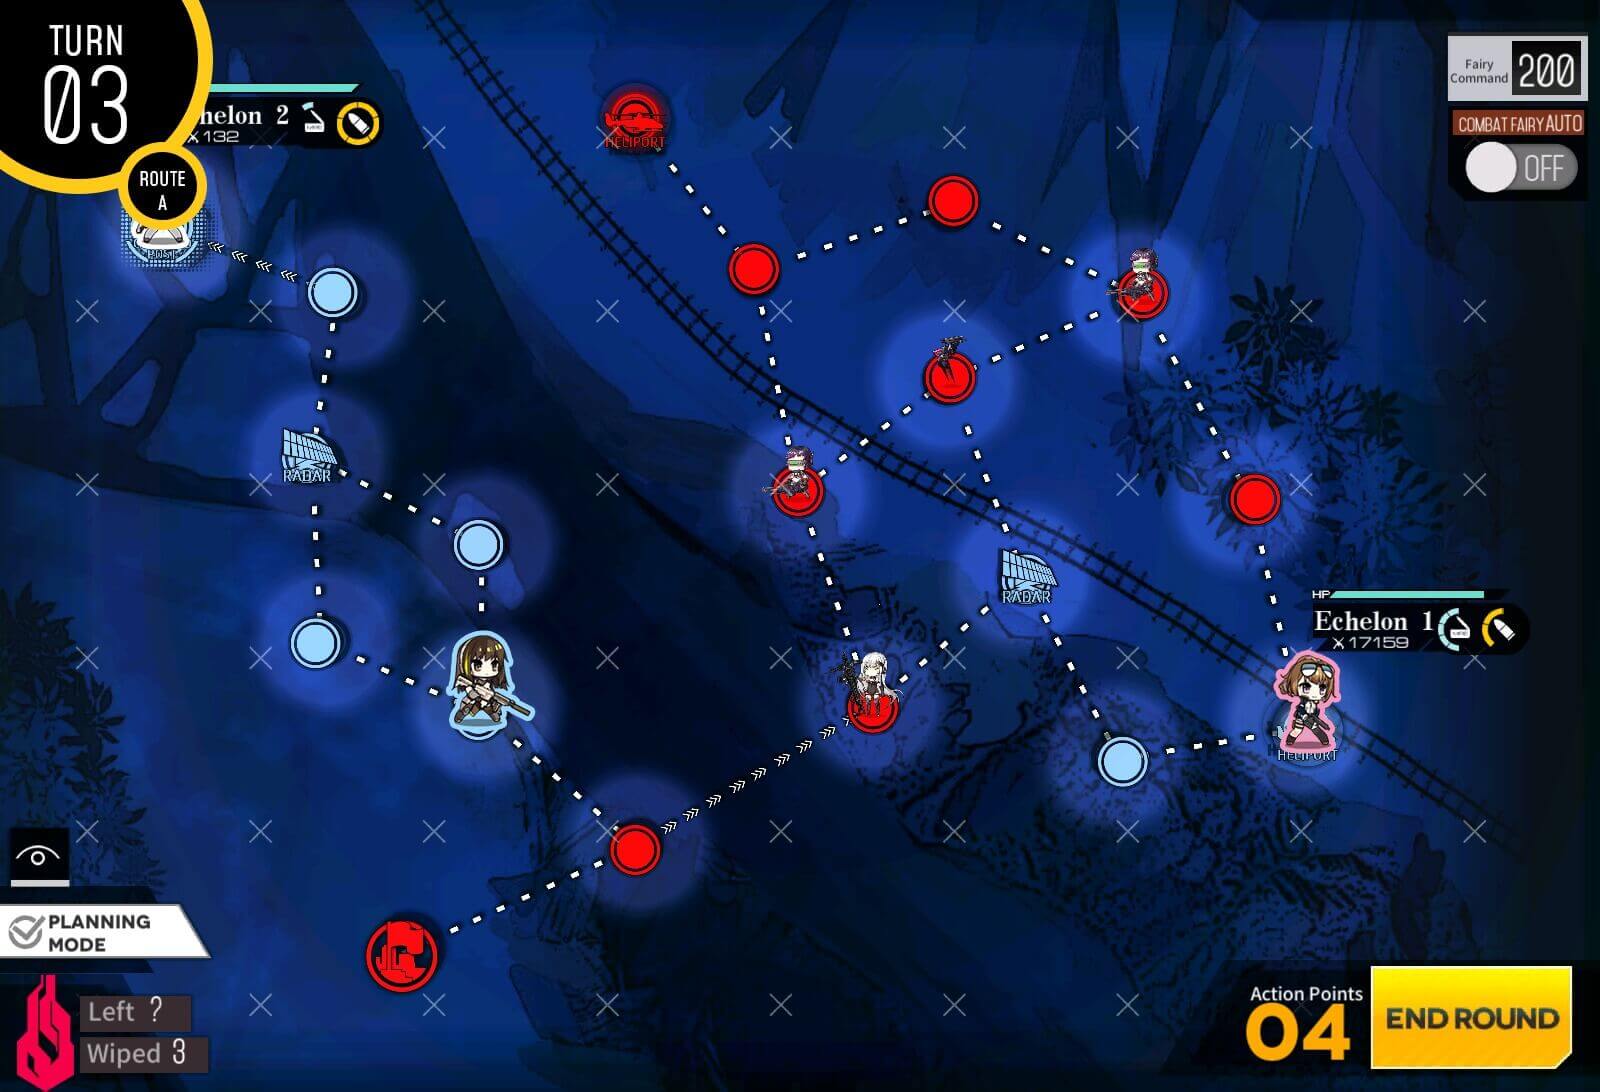
Turn 2a
At this point, Ally echelon should have taken care of Goliath Plus unit, which cleared the way for combat echelon to move forward. Move up one with combat echelon then swap with ally unit.
Turn 2b
Combat echelon move all the way to the "?" node which is the ambush node. Kill the striker units and clear the path way for dummy echelon.
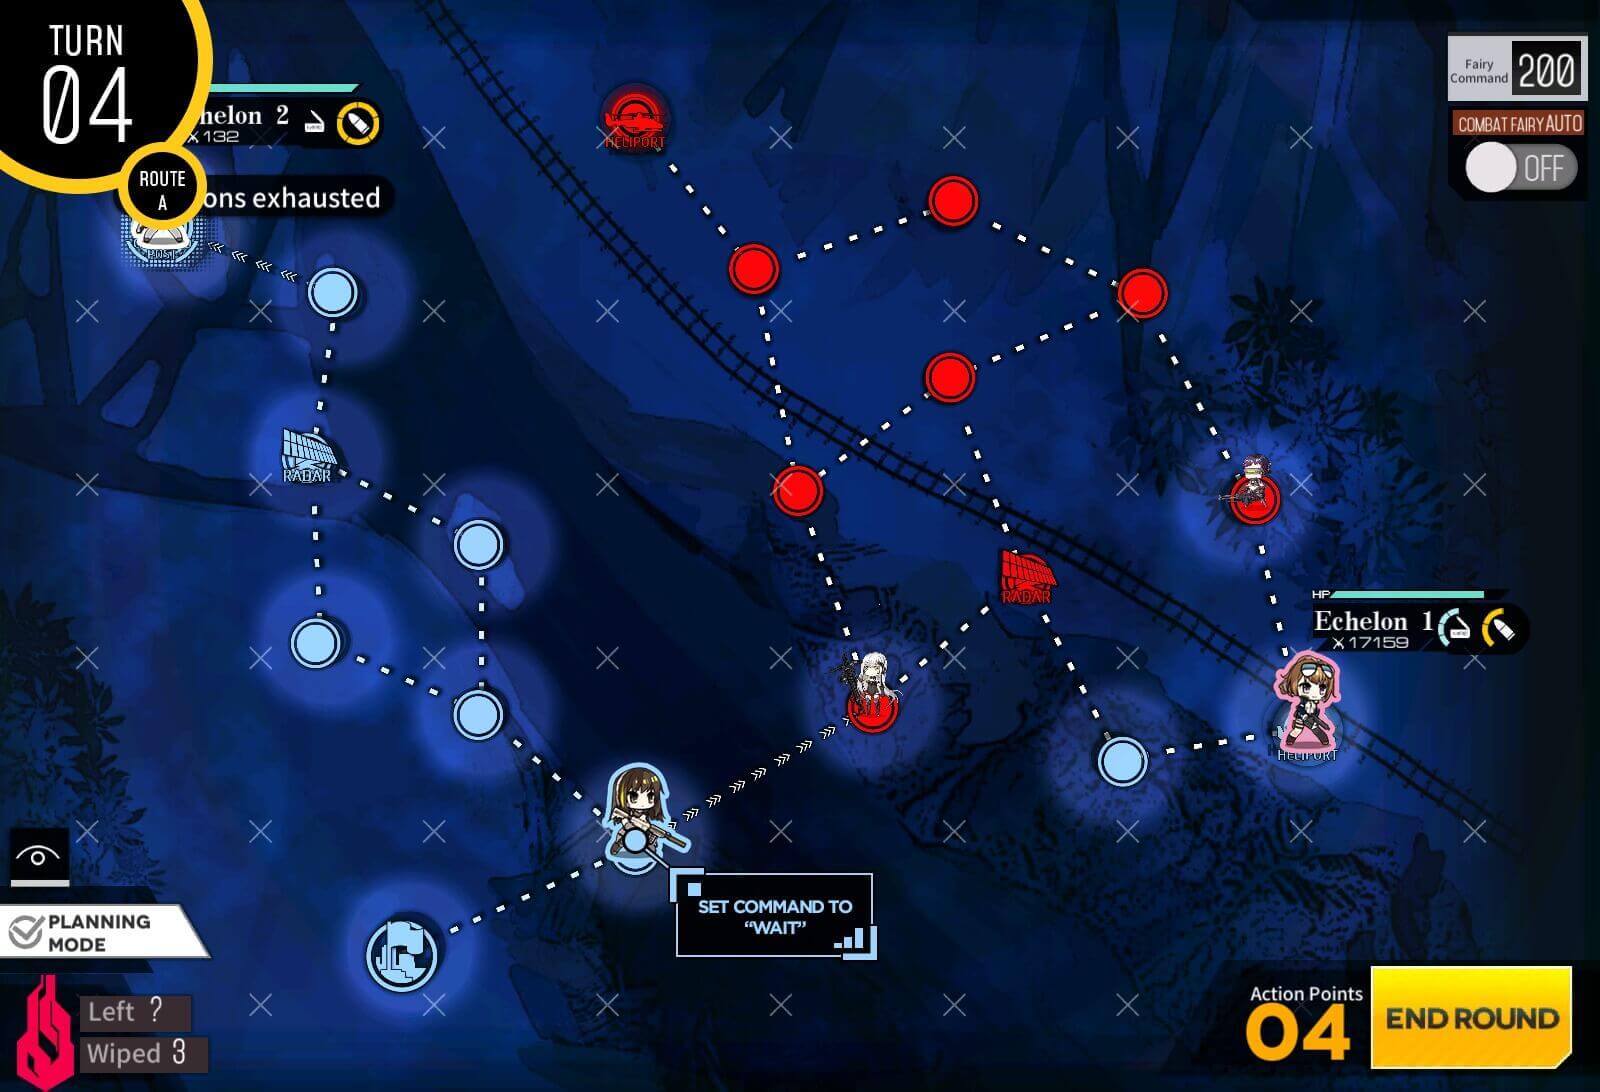
Turn 2c
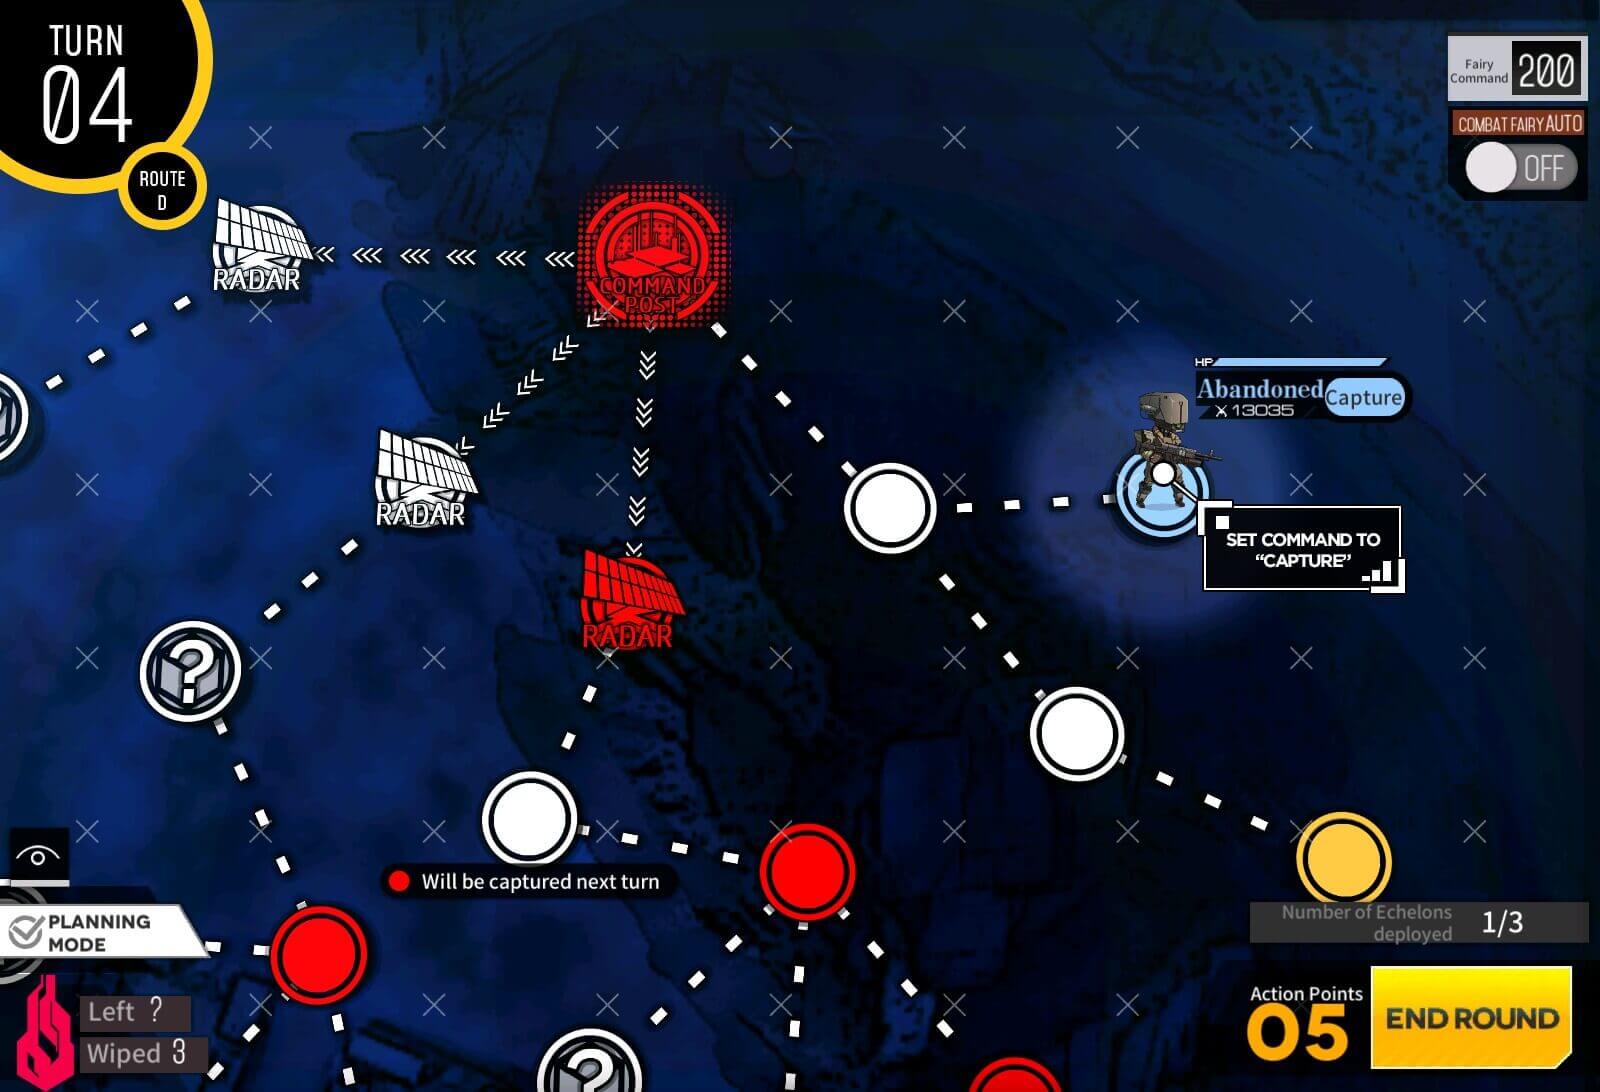
Dummy echelon now move all the way up to the radar right below enemy HQ. Make sure to follow the path that is cleared of ambush tiles. Stepping on the radar unit activates abandoned robot unit on the right side of the map.

Turn 2d
If you want to be absolutely sure of not messing with RNG, you can wait a turn for Boss to move before setting ally robot unit to "Capture" command. I have tried about 10 times and each time boss went for dummy, but I could be just lucky.

Turn 3
Once Boss unit moves out of the way and robot makes its way to enemy HQ, map is cleared. If you waited a turn for boss to move before activating the ally robot, move combat echelon away from Boss unit so it doesn't fight it.
Turn 1
Start by moving combat echelon left one then deploying 2nd combat echelon.
Turn 2
1st combat echelon moves down one and 2nd combat echelon goes to top row. If you are having issue with armored doggos, airstrike fairy or adding an MG to echelon solves this issue.
Turn 3
Continue to sweep forward using both echelons shown above. Again goal is to control all nodes when we kill last enemy.
Turn 4
1st combat echelon sweeps bottom to middle row then 2nd combat echelon moves up 1. This should surround capture remaining enemy node, and you can kill the last enemy unit next turn.
Turn 1a
The Map presents you choice with routes to enemy HQ. Move combat echelon up one, then spawn dummy echelon.
Alternatively, to check for the red bean spawn location, move the combat team left instead so you can take the radar on Turn 1b instead (if you do this method, spawn a friend echelon instead so you have the extra AP).
Turn 1b
Swap combat echelon and dummy echelon so that dummy echelon is out of harm's way.

Turn 2
Next turn, you swap with dummy echelon and move straight to HQ using top route. As you can see, middle and bottom route is blocked by Goliath Plus units.
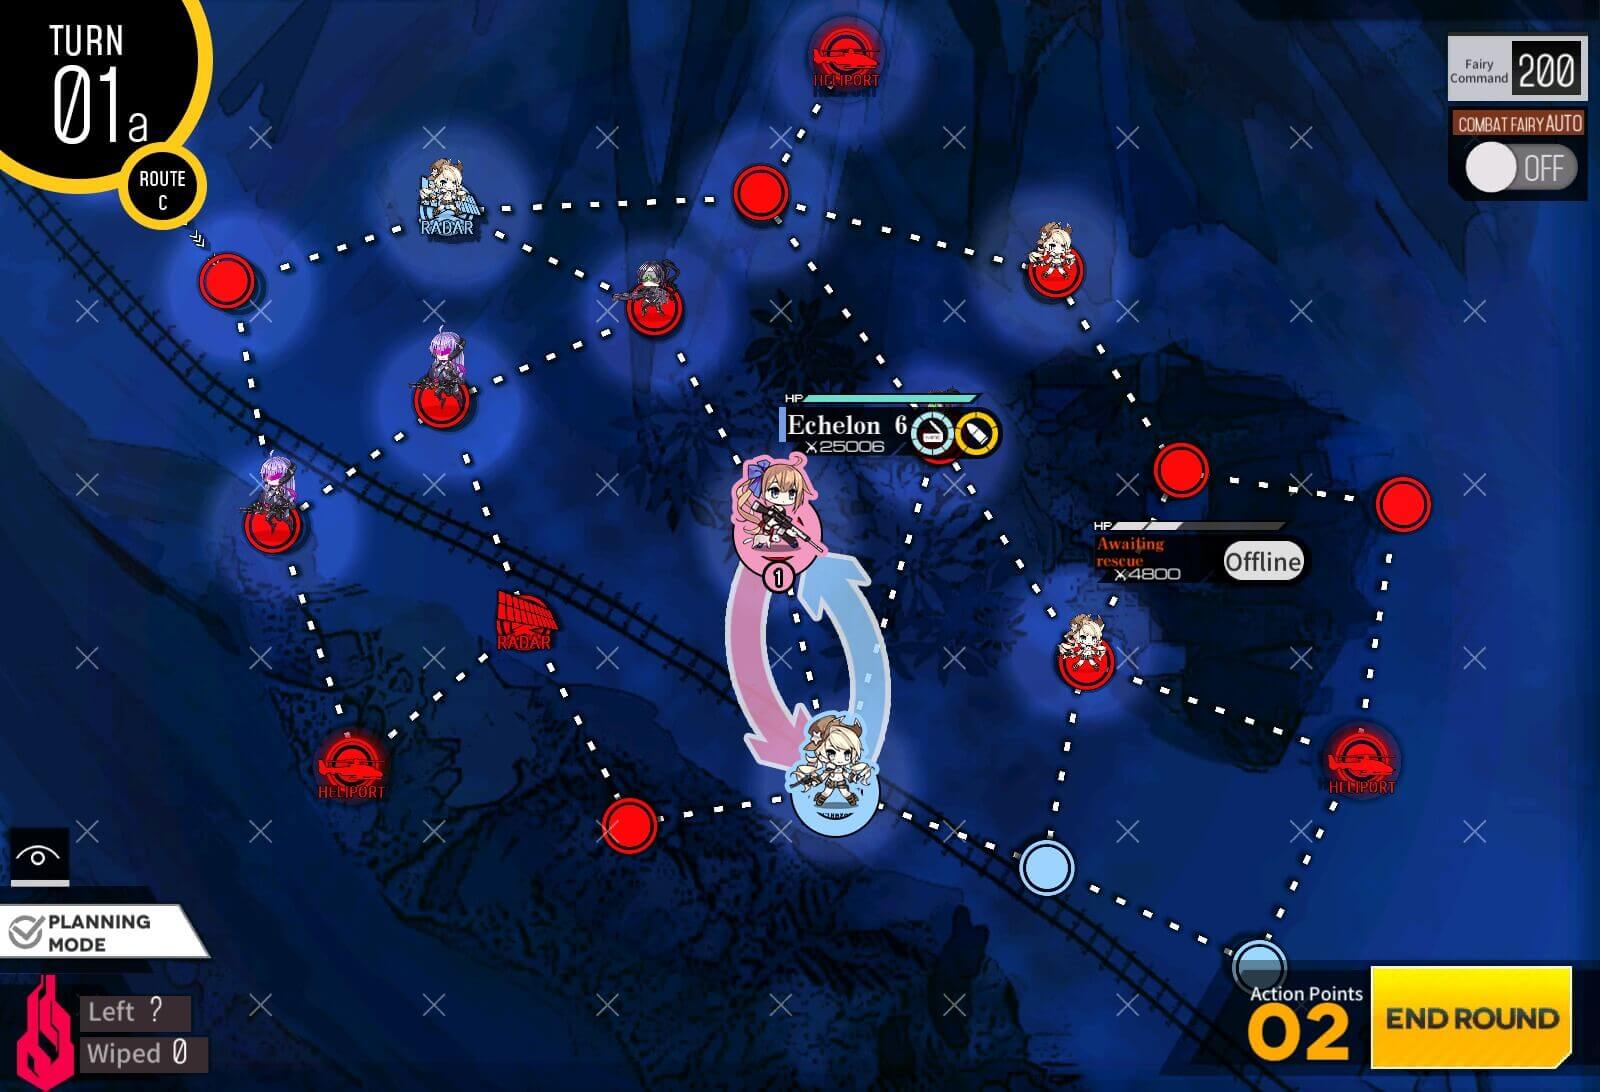
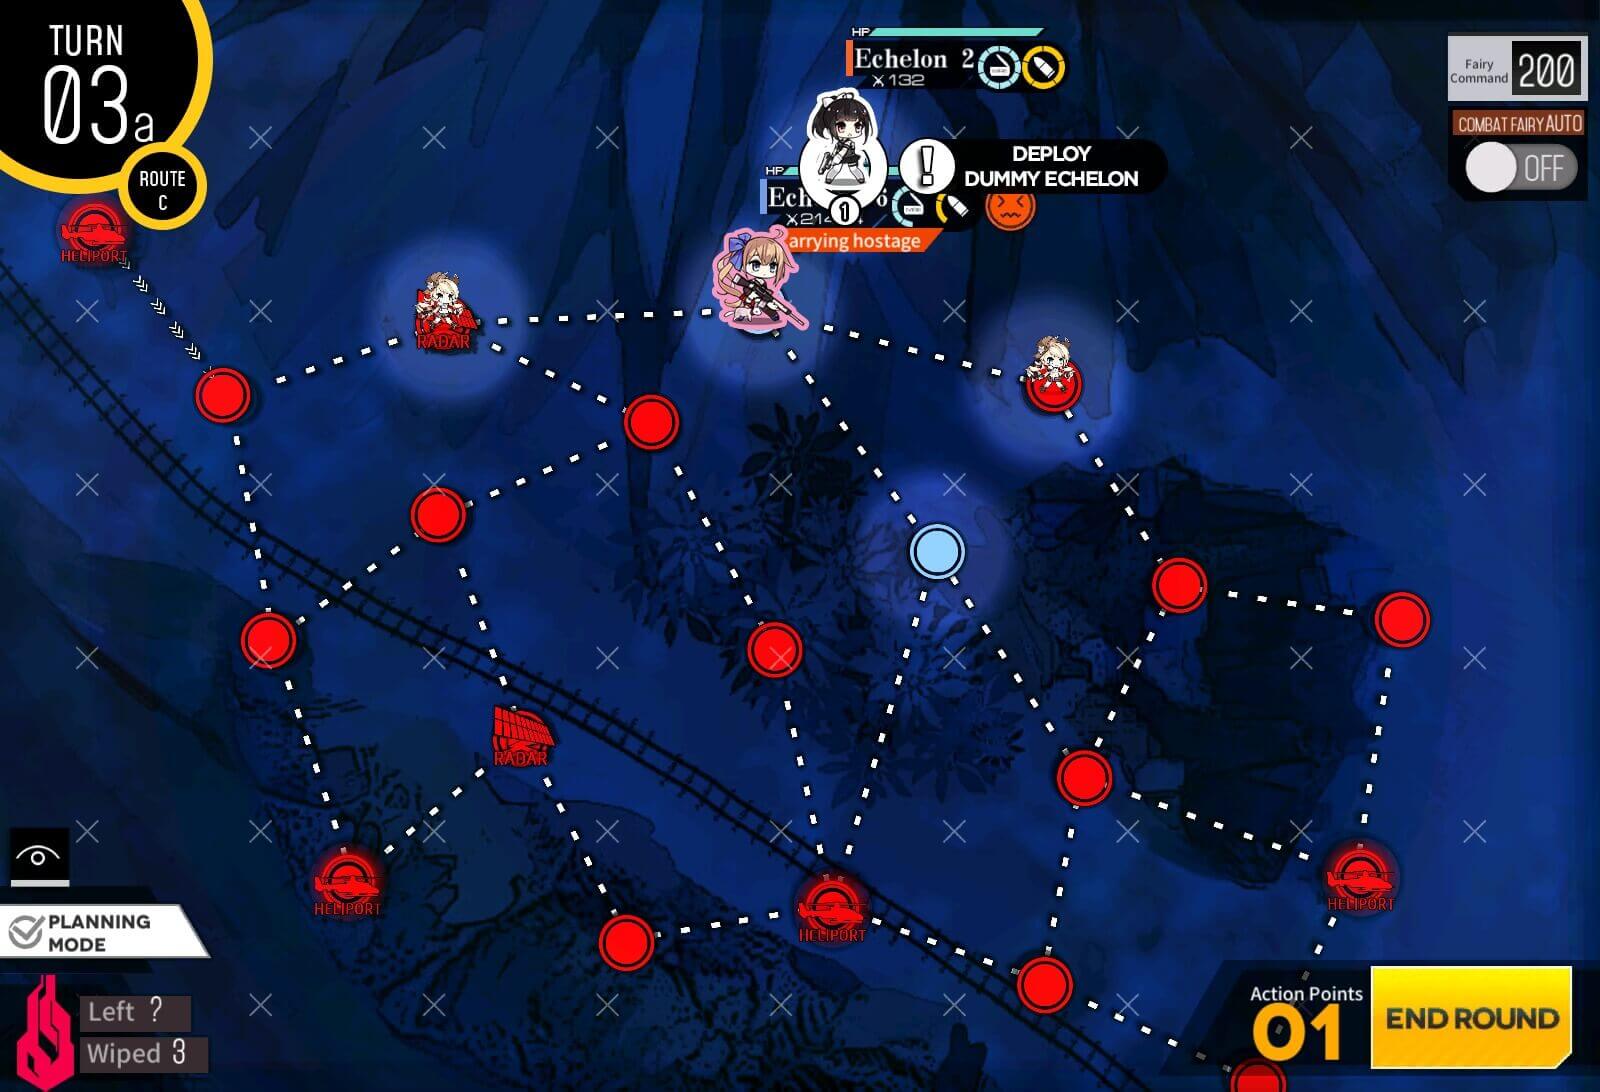
Turn 1
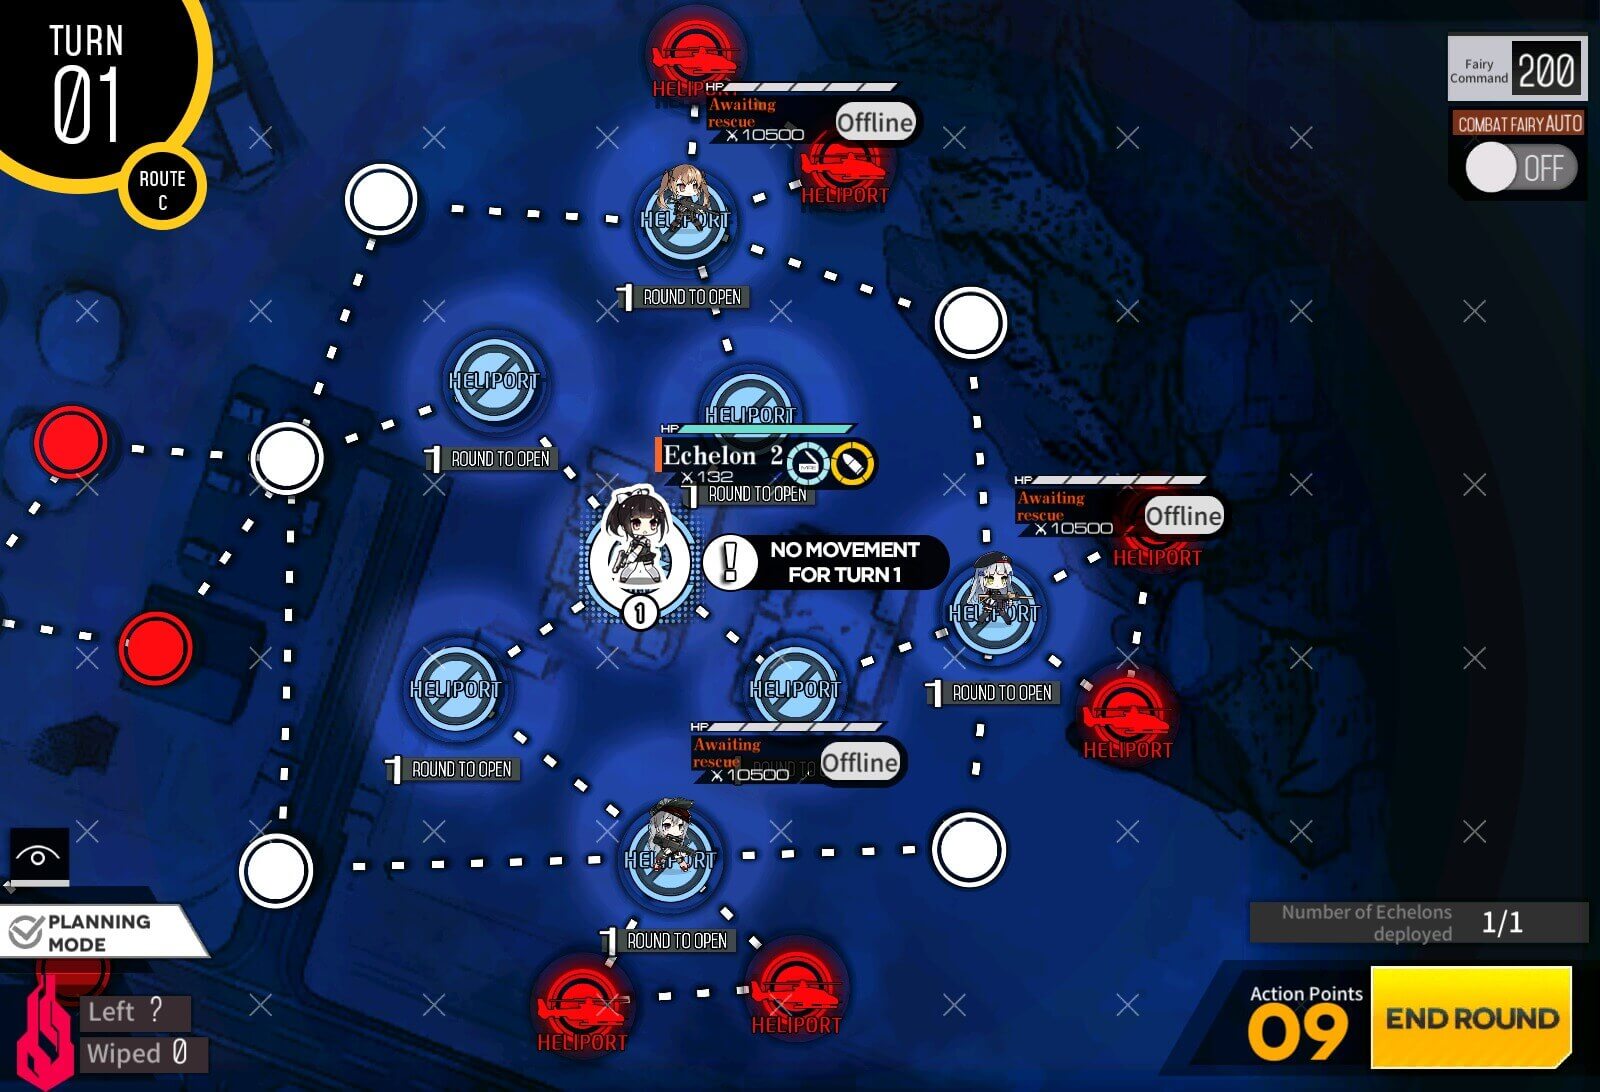
Start with single dummy at the HQ then end turn.
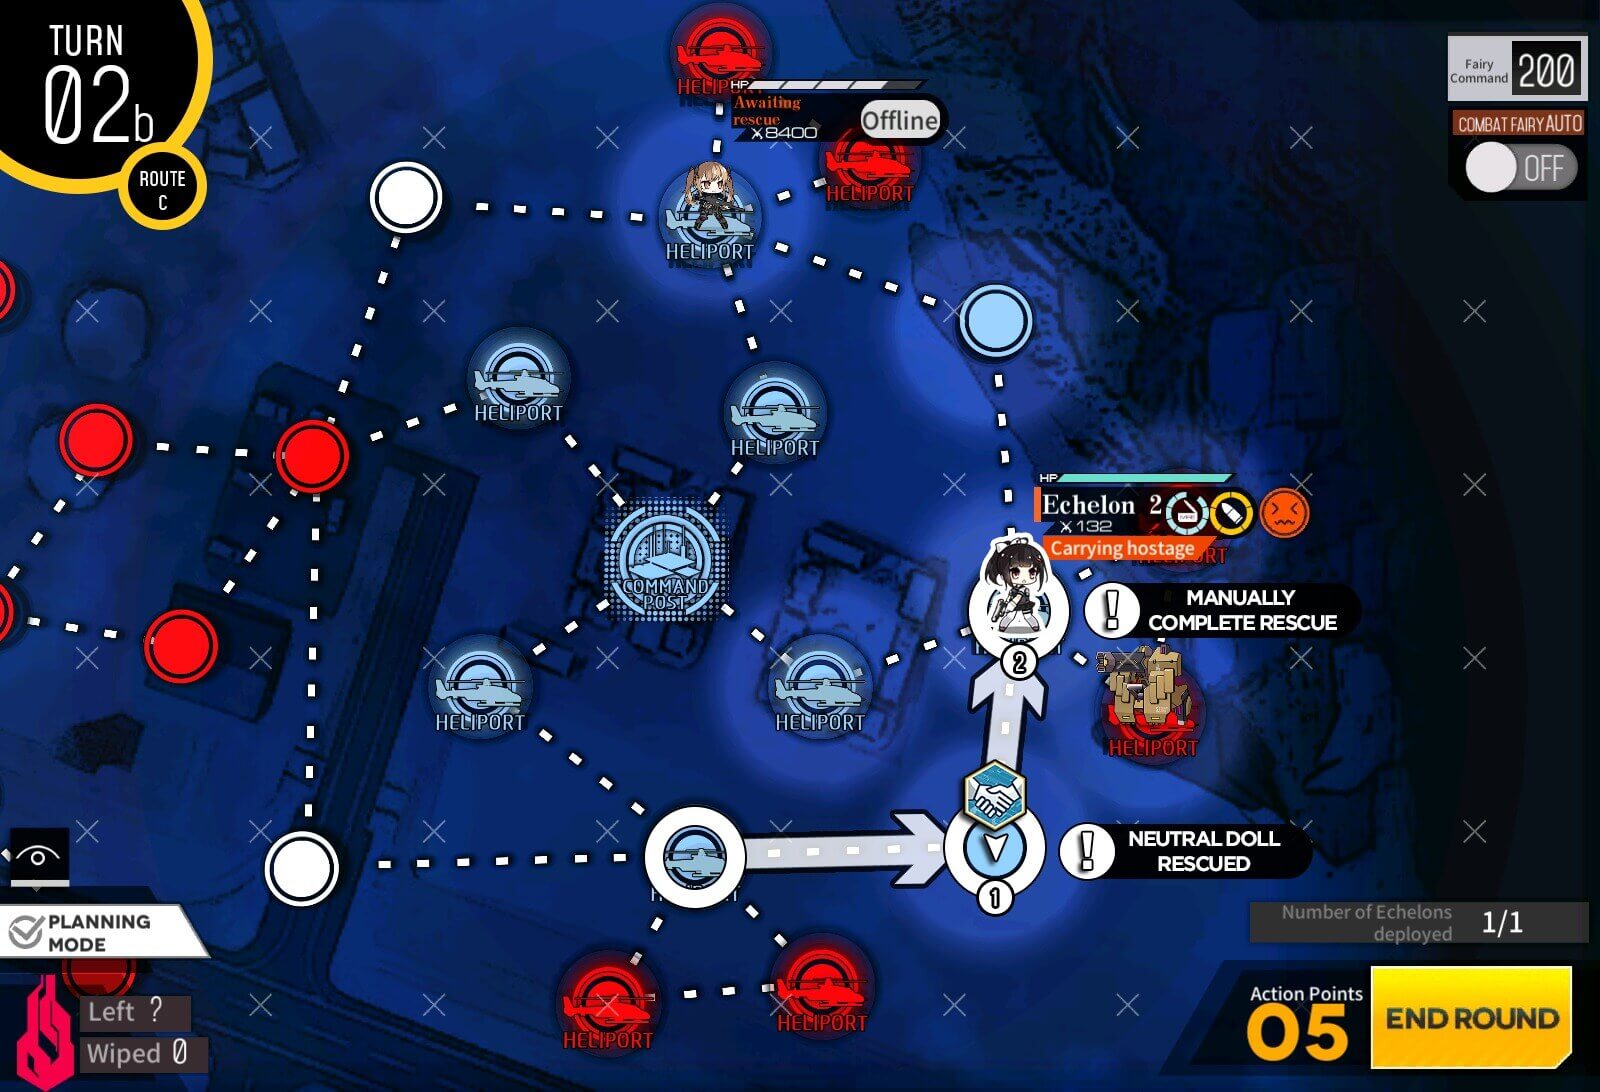
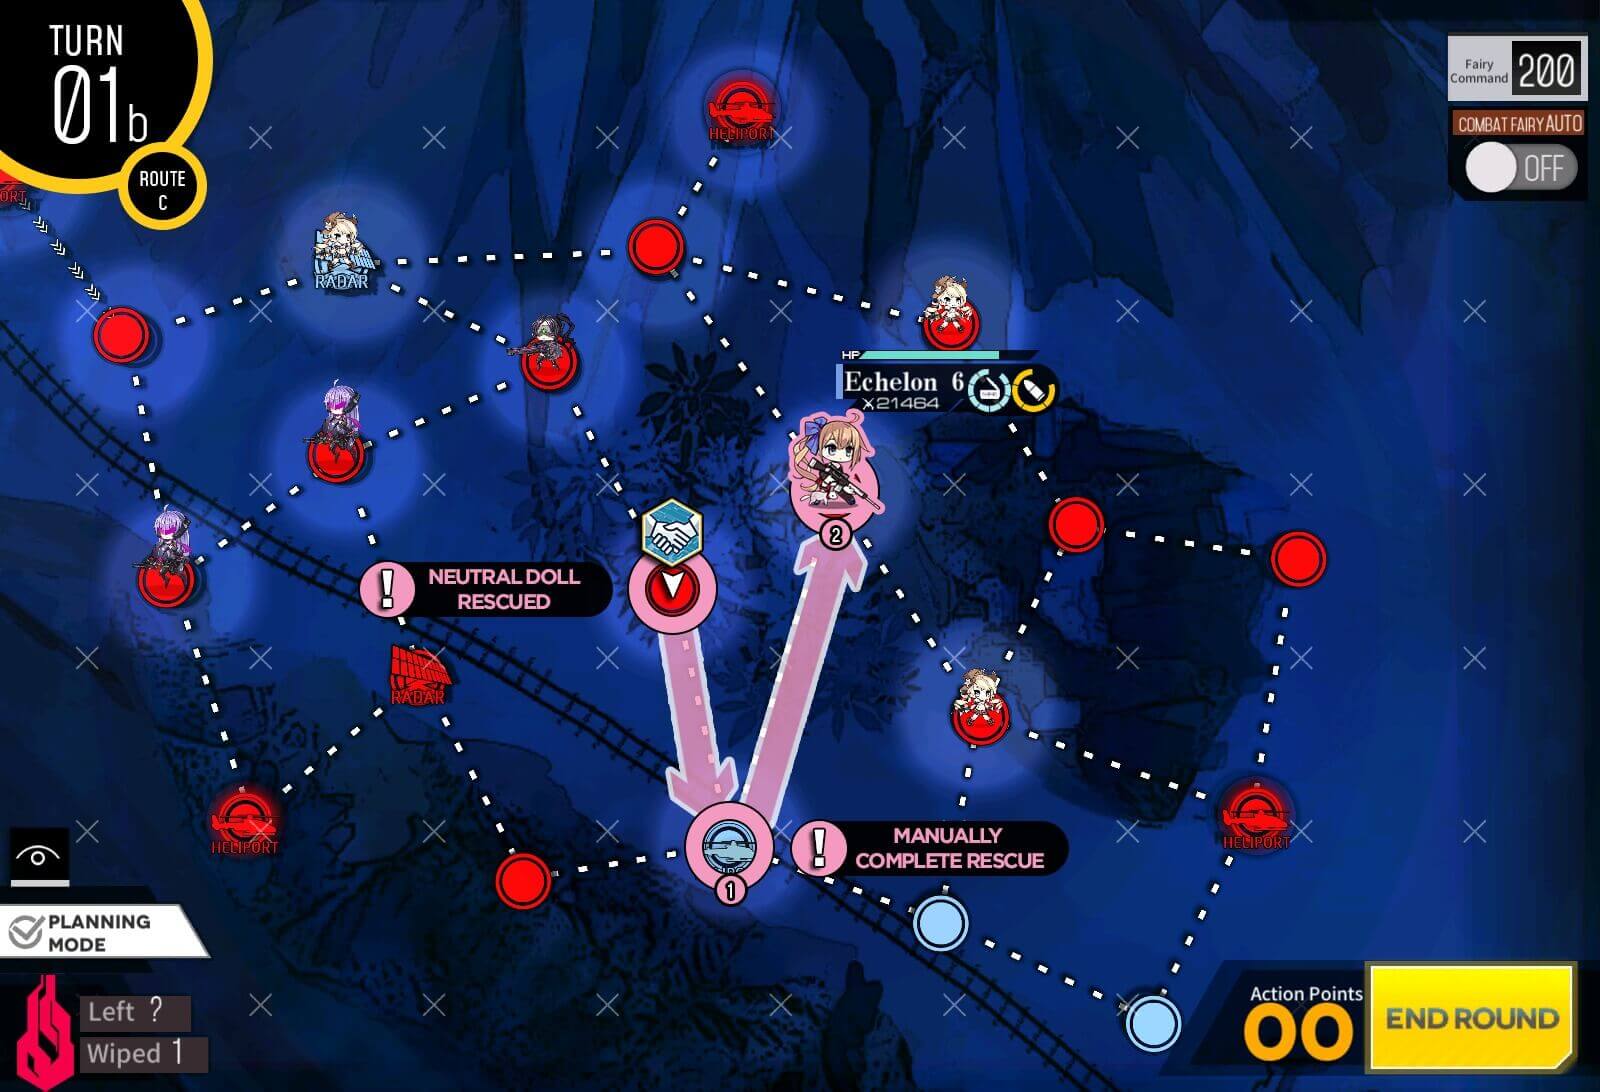
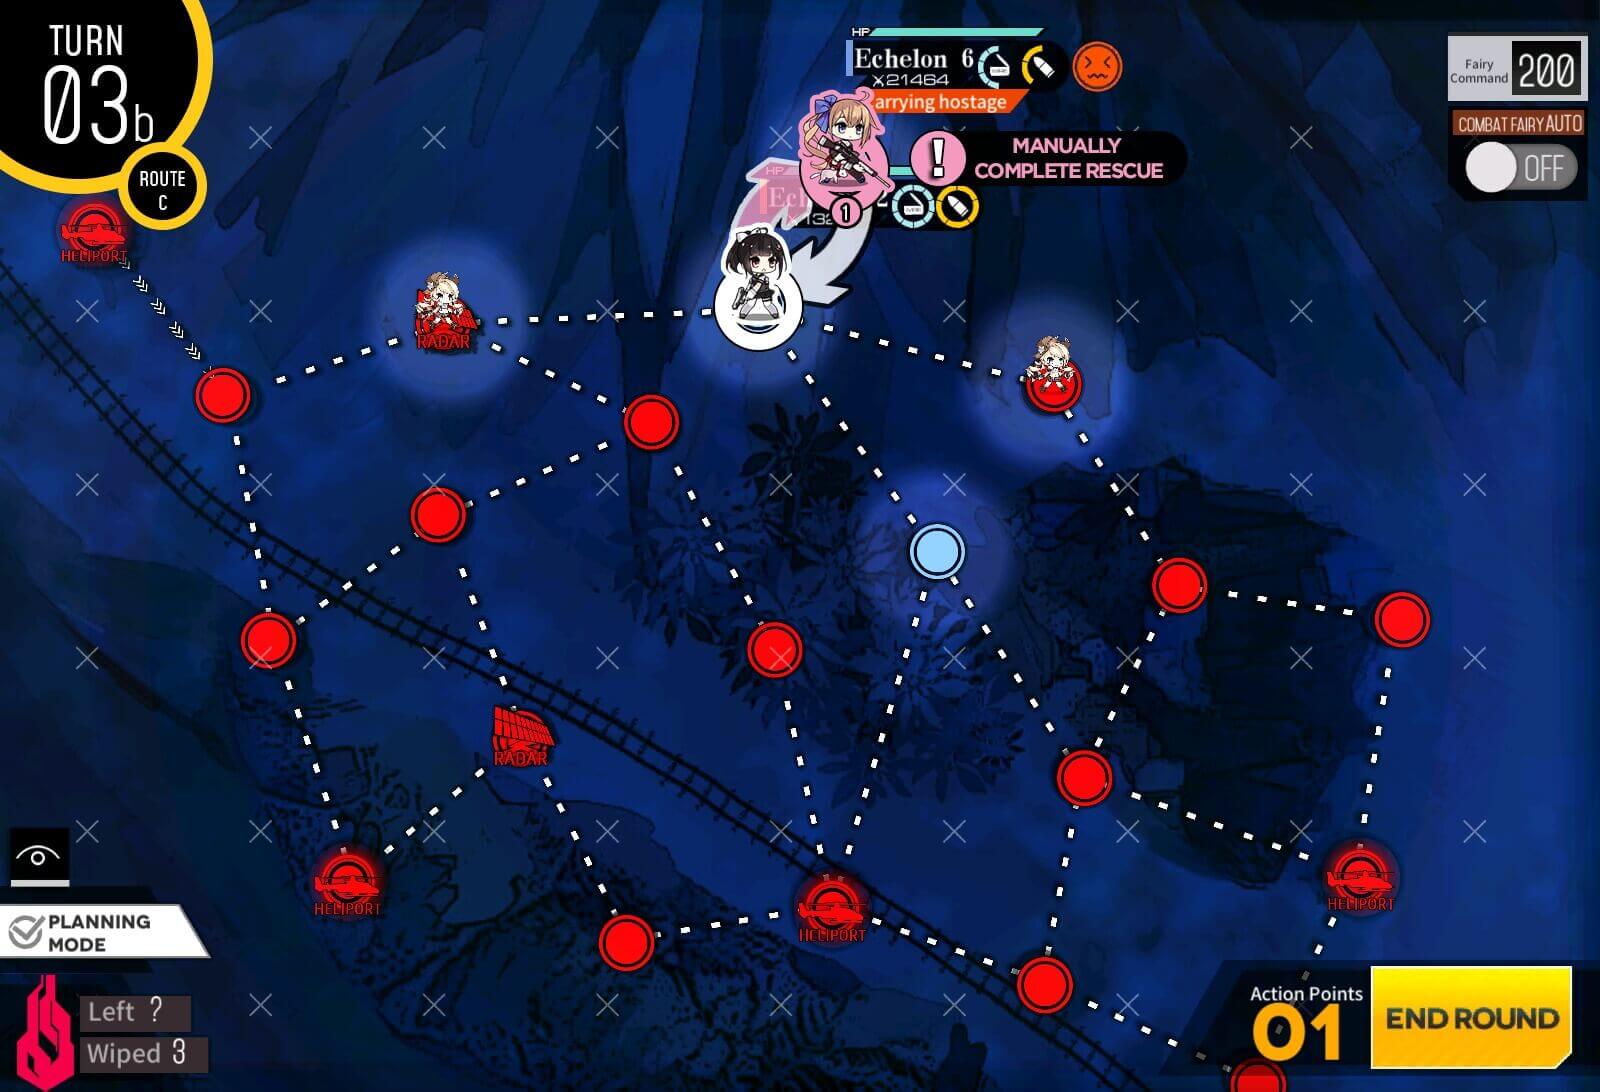
Turn 2a
Beginning of 2nd turn, you notice that all the temporary helipad below hostage units have opened up. All you have to do now is rescue hostages and manually extract them on the spot before moving to next hostage.
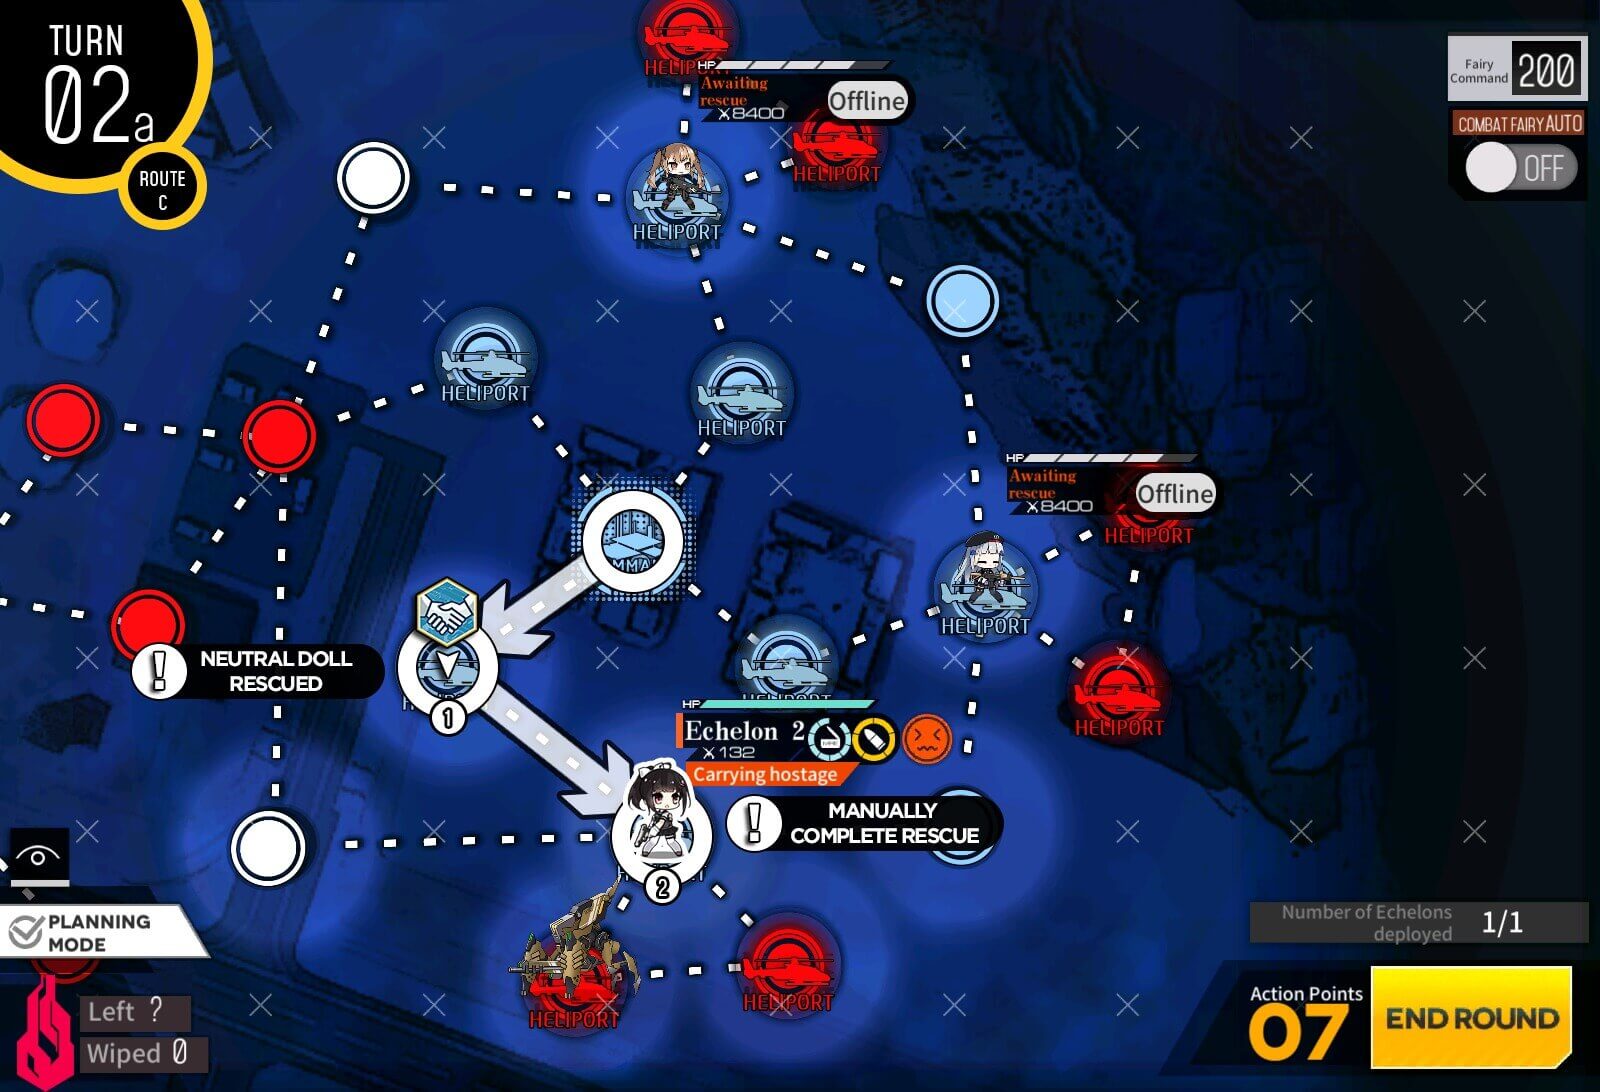
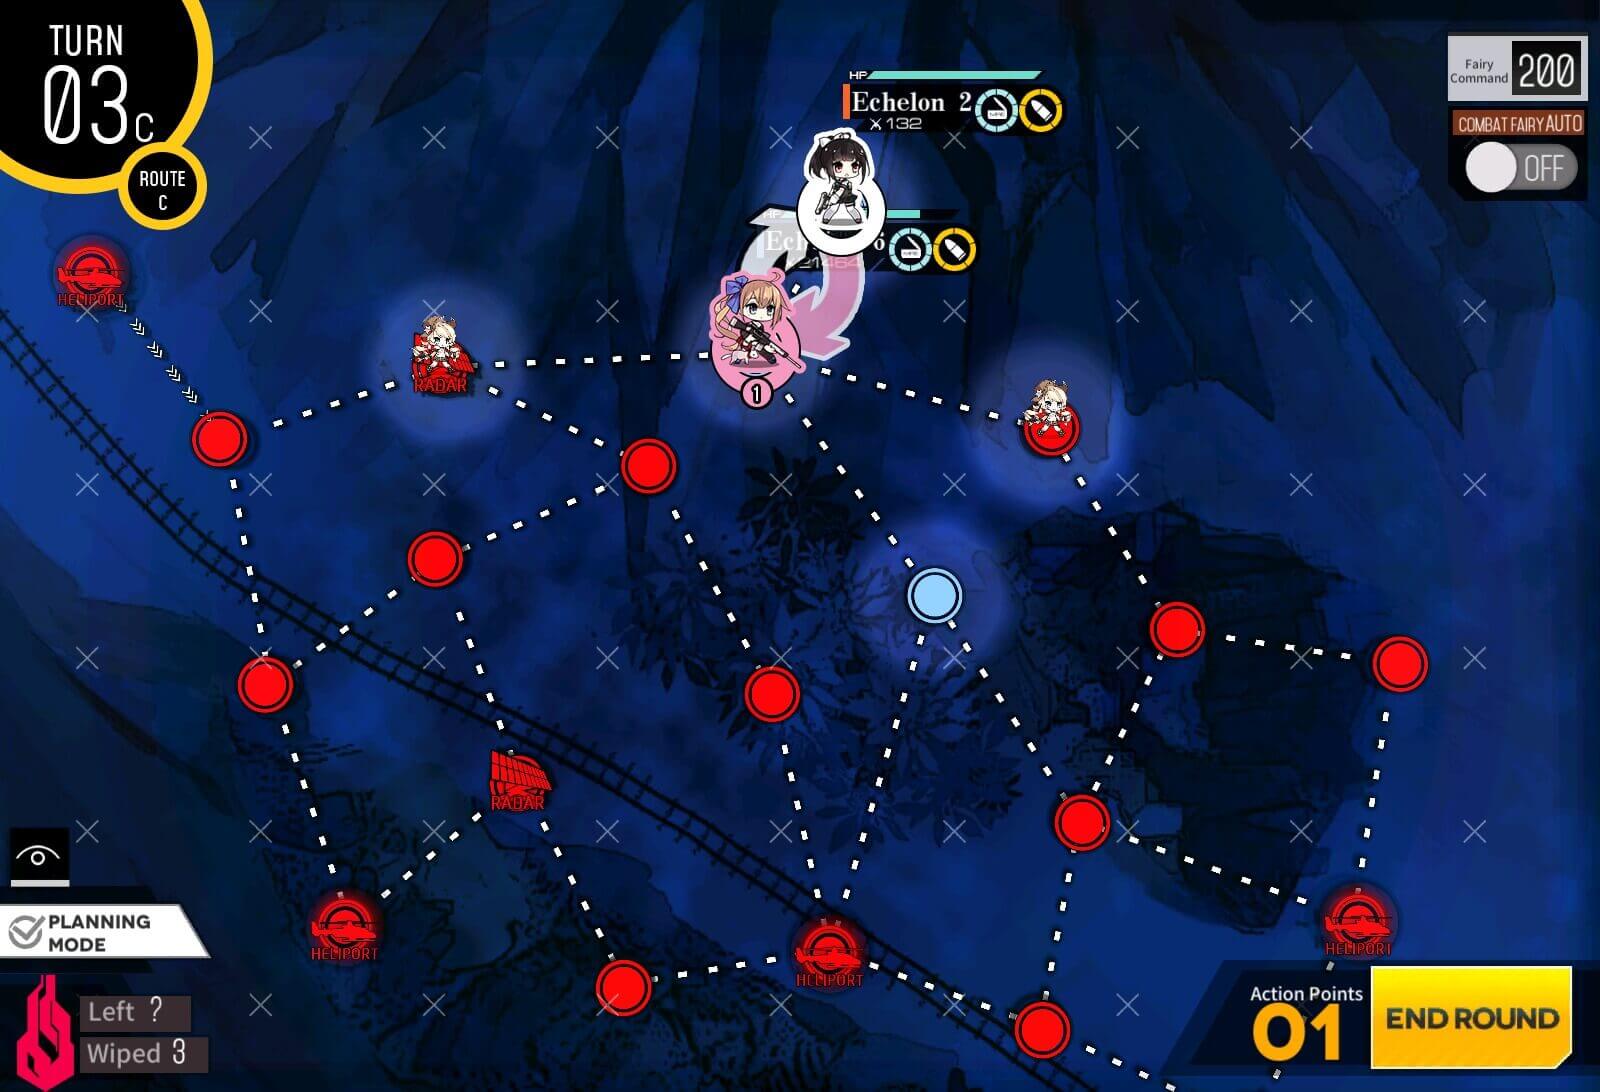
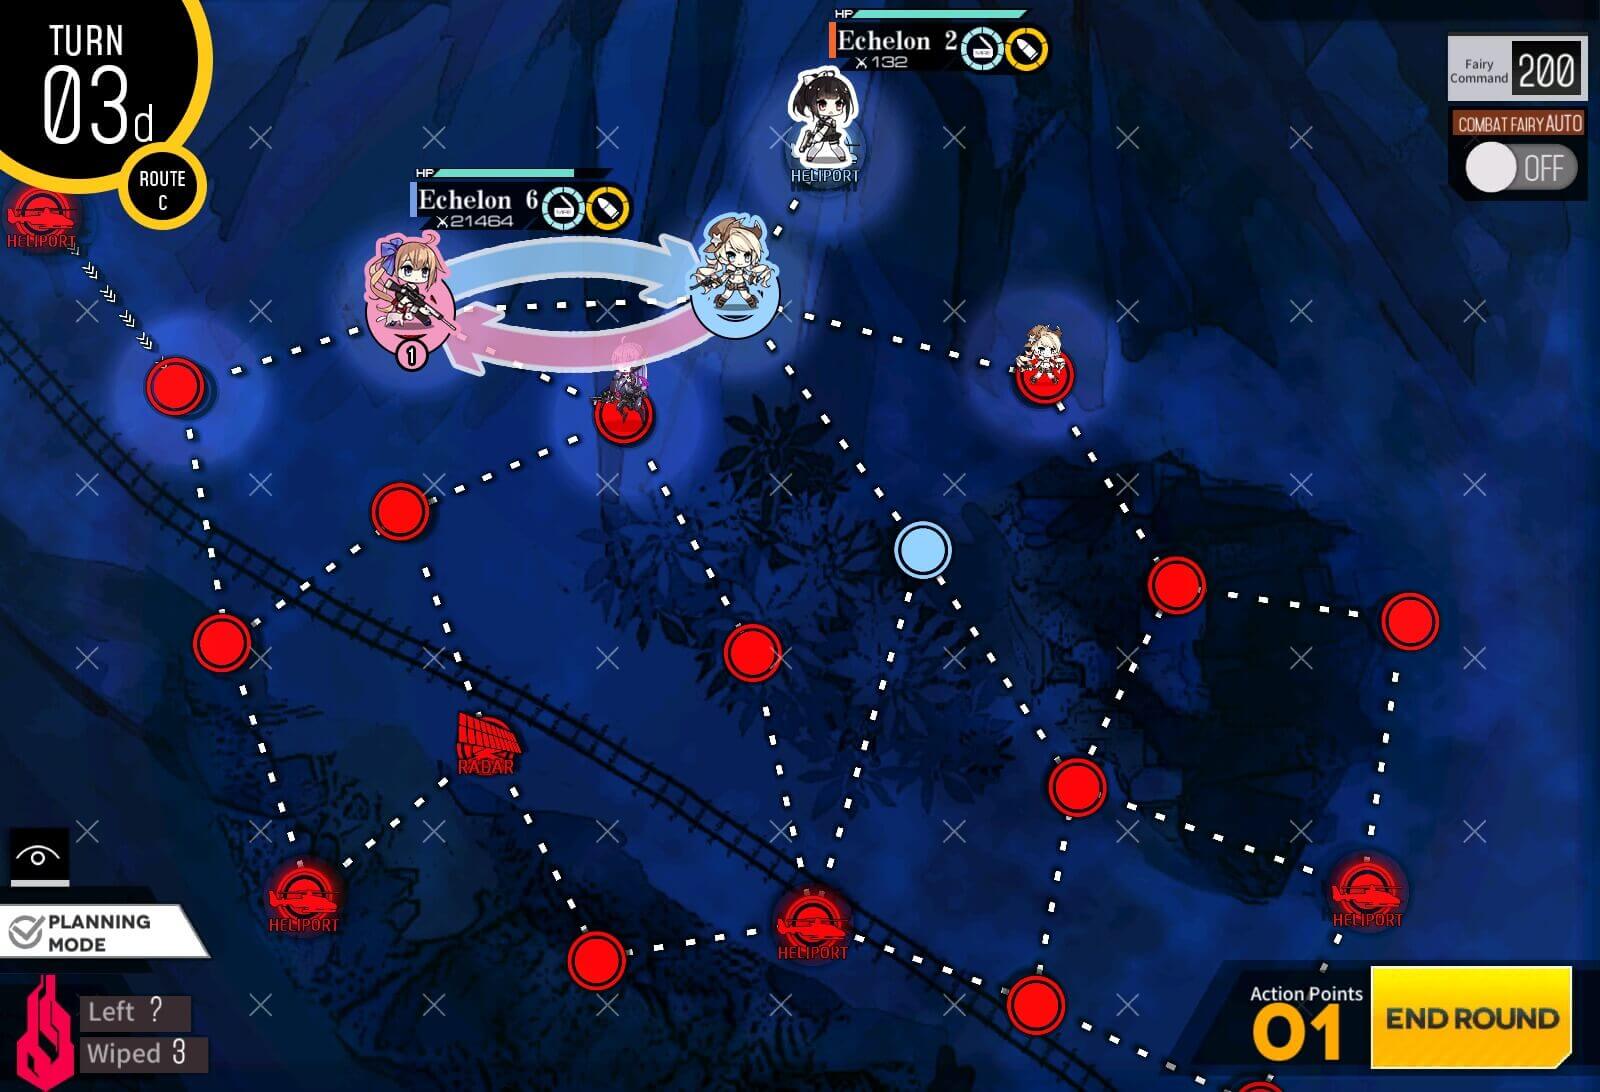
Turn 2b
Again repeat the process.
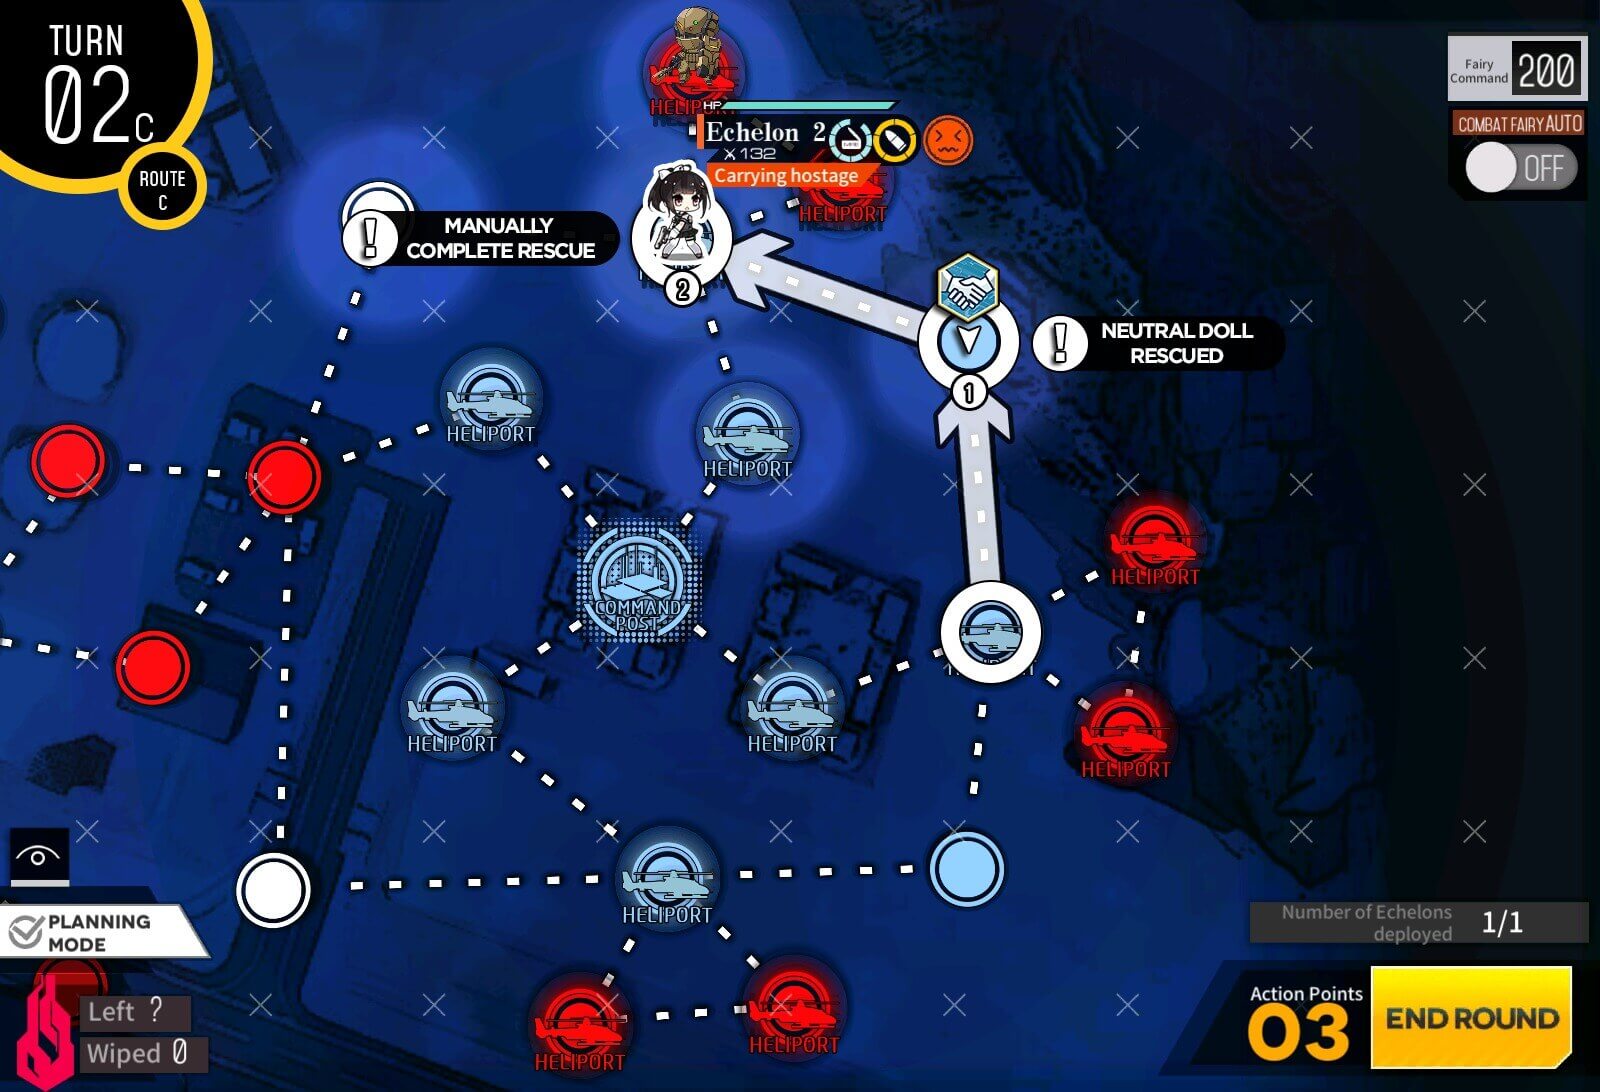
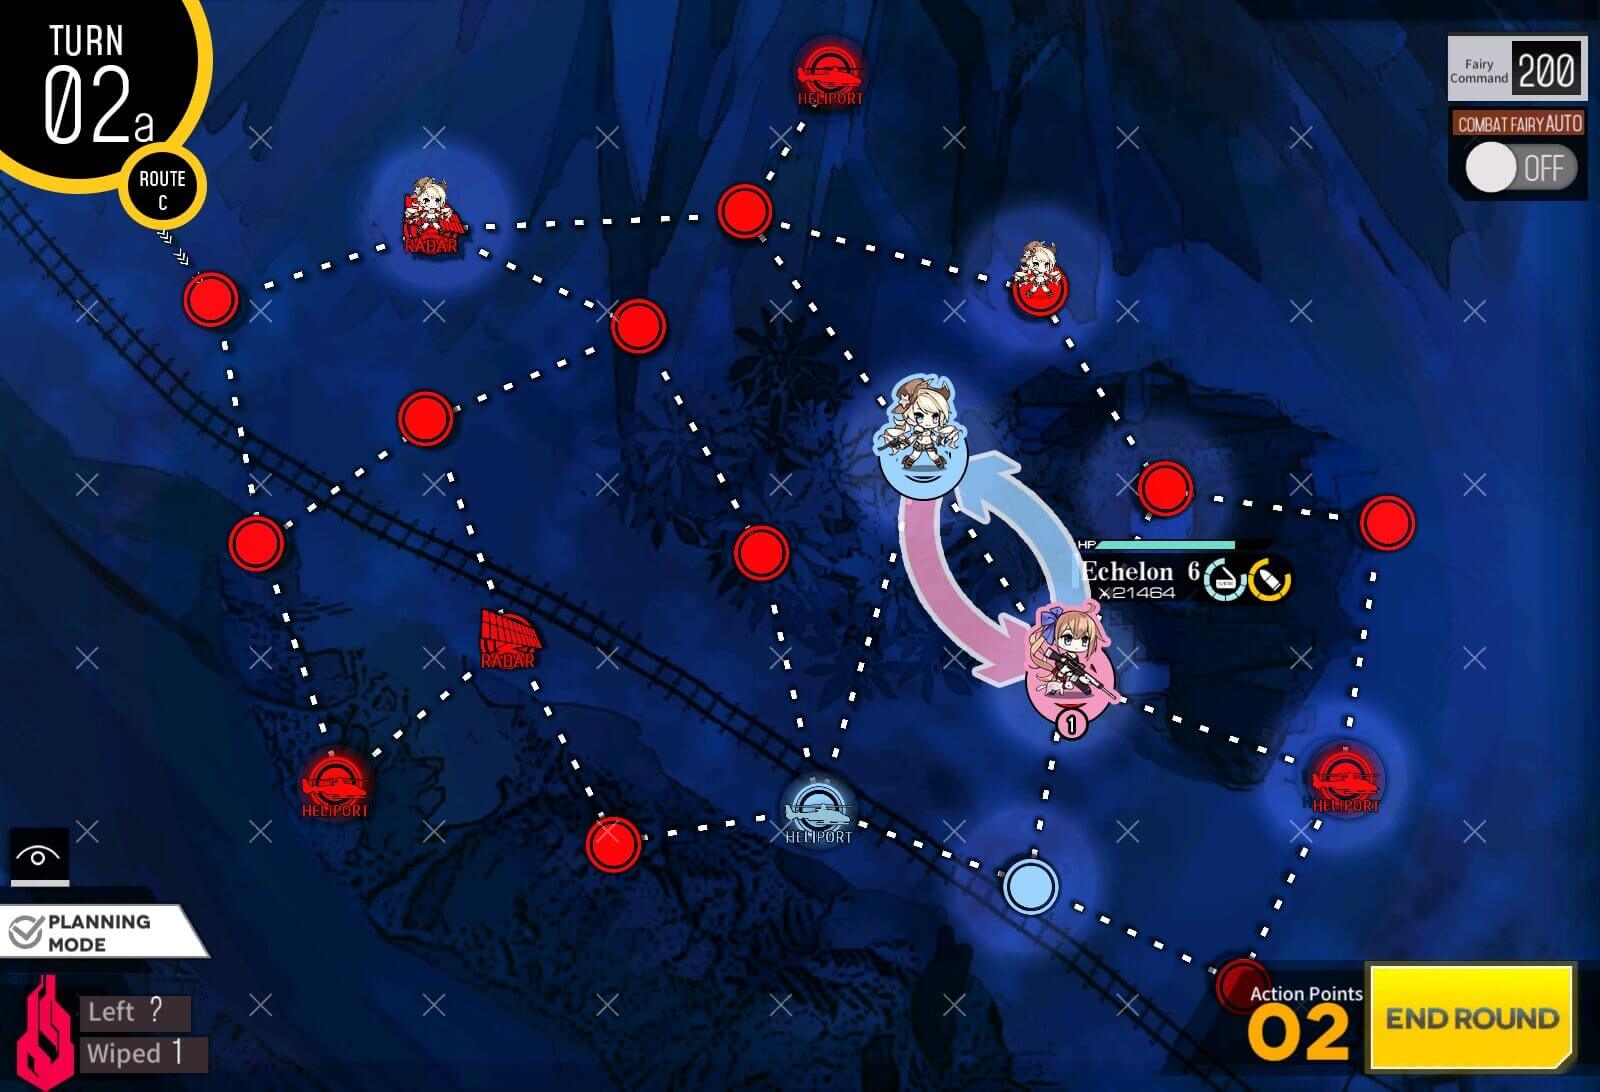
Turn 2c
And you are done!.
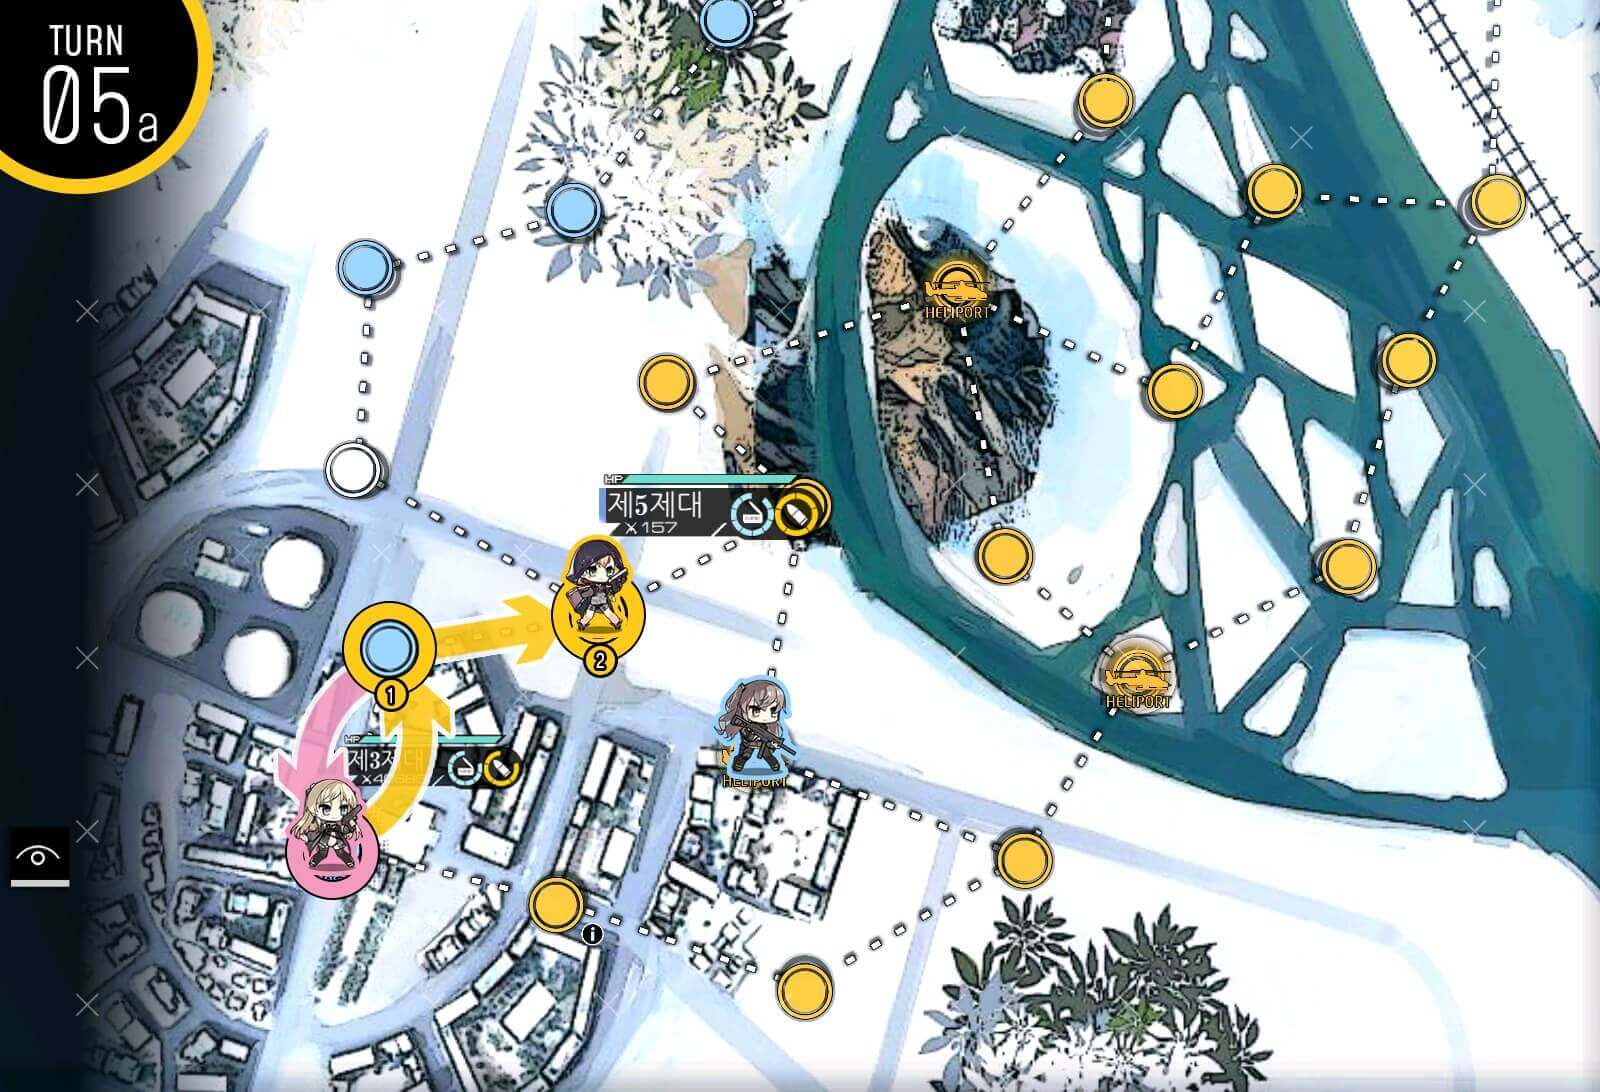
Turn 1a
Move up dummy up one then deploy combat echelon.
Turn 1b
Then we are going to scoot everyone up one node each.
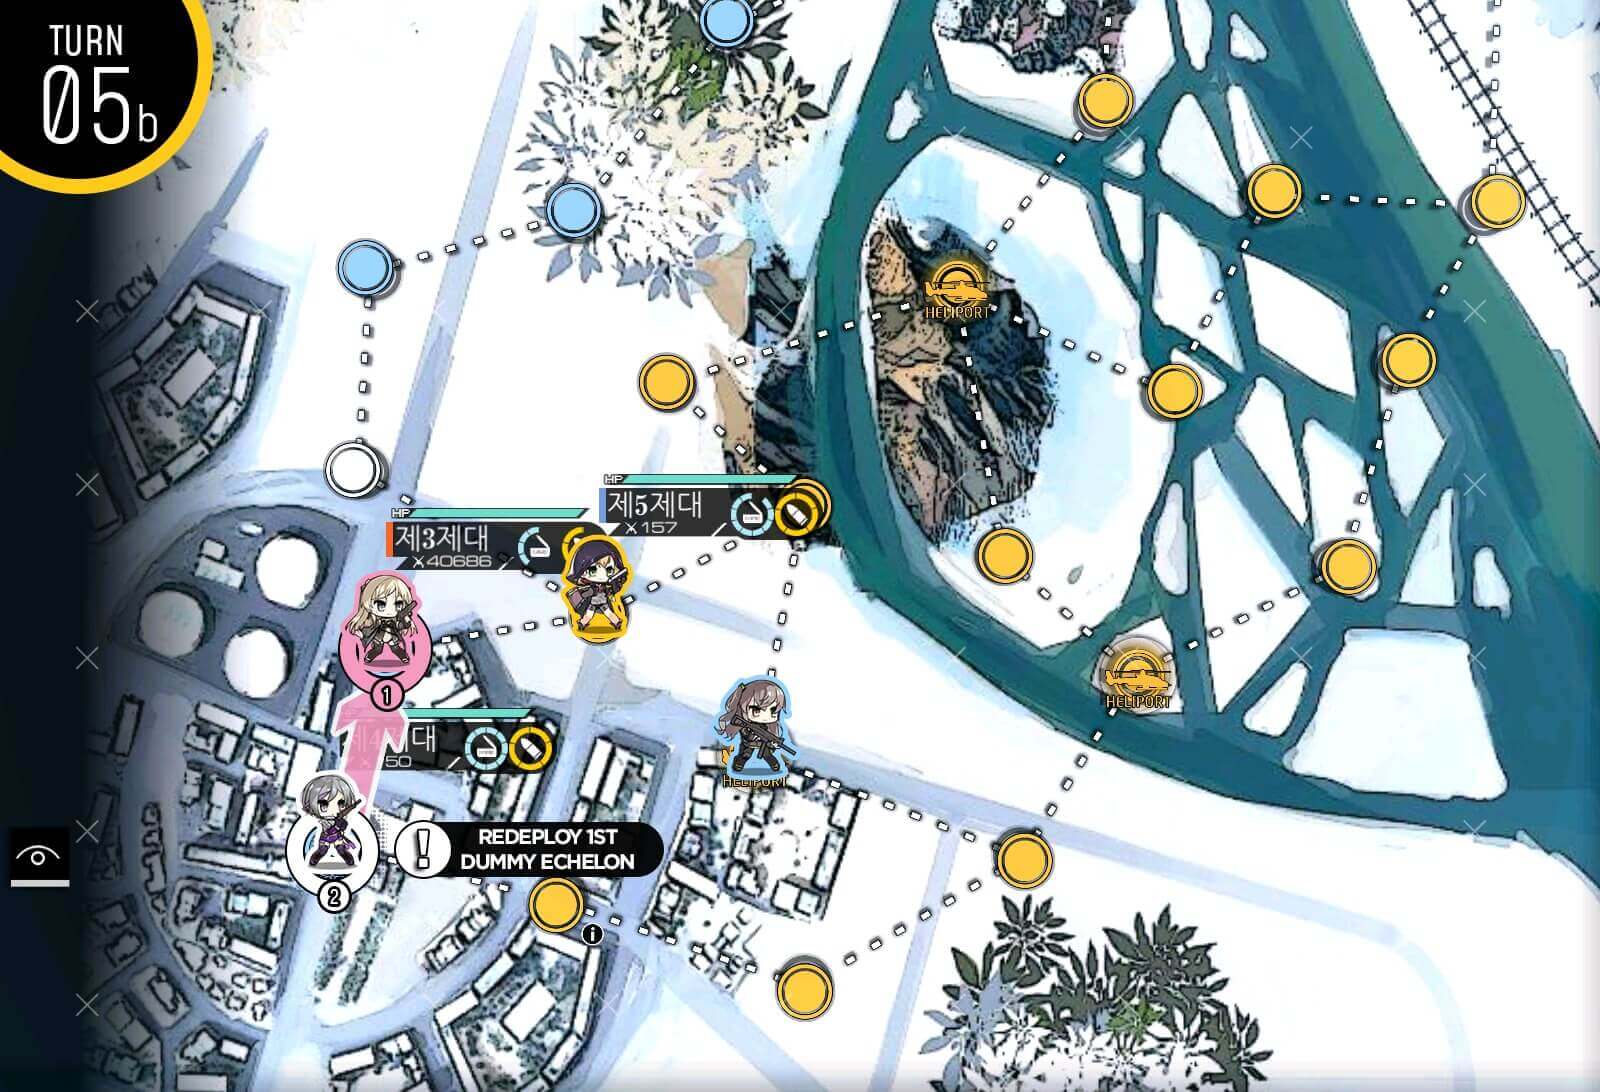
Turn 2a
Beginning of turn 2, as usual all "?" node is ambush nodes so combat echelon move up to clear it for dummy echelon.
Turn 2b
Dummy echelon moves up and swaps with combat echelon, offering itself to be the sacrifice to Goliath Plus unit. When Dummy echelon gets attacked, just retreat immediately.
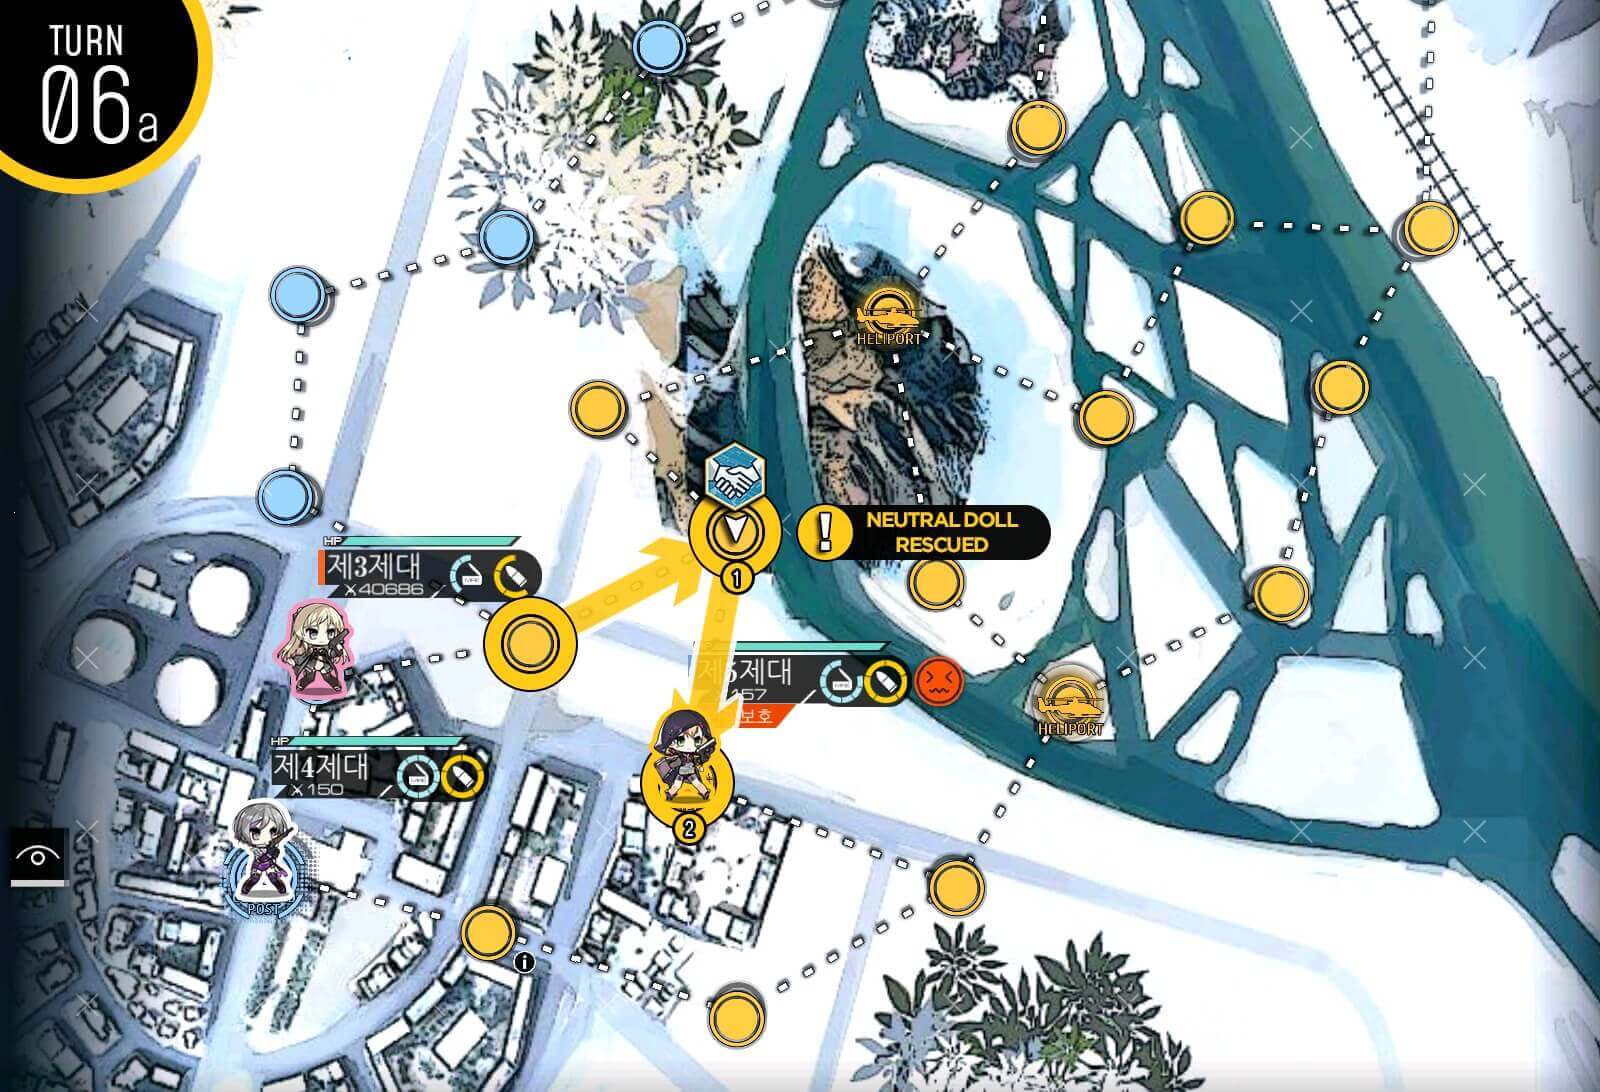
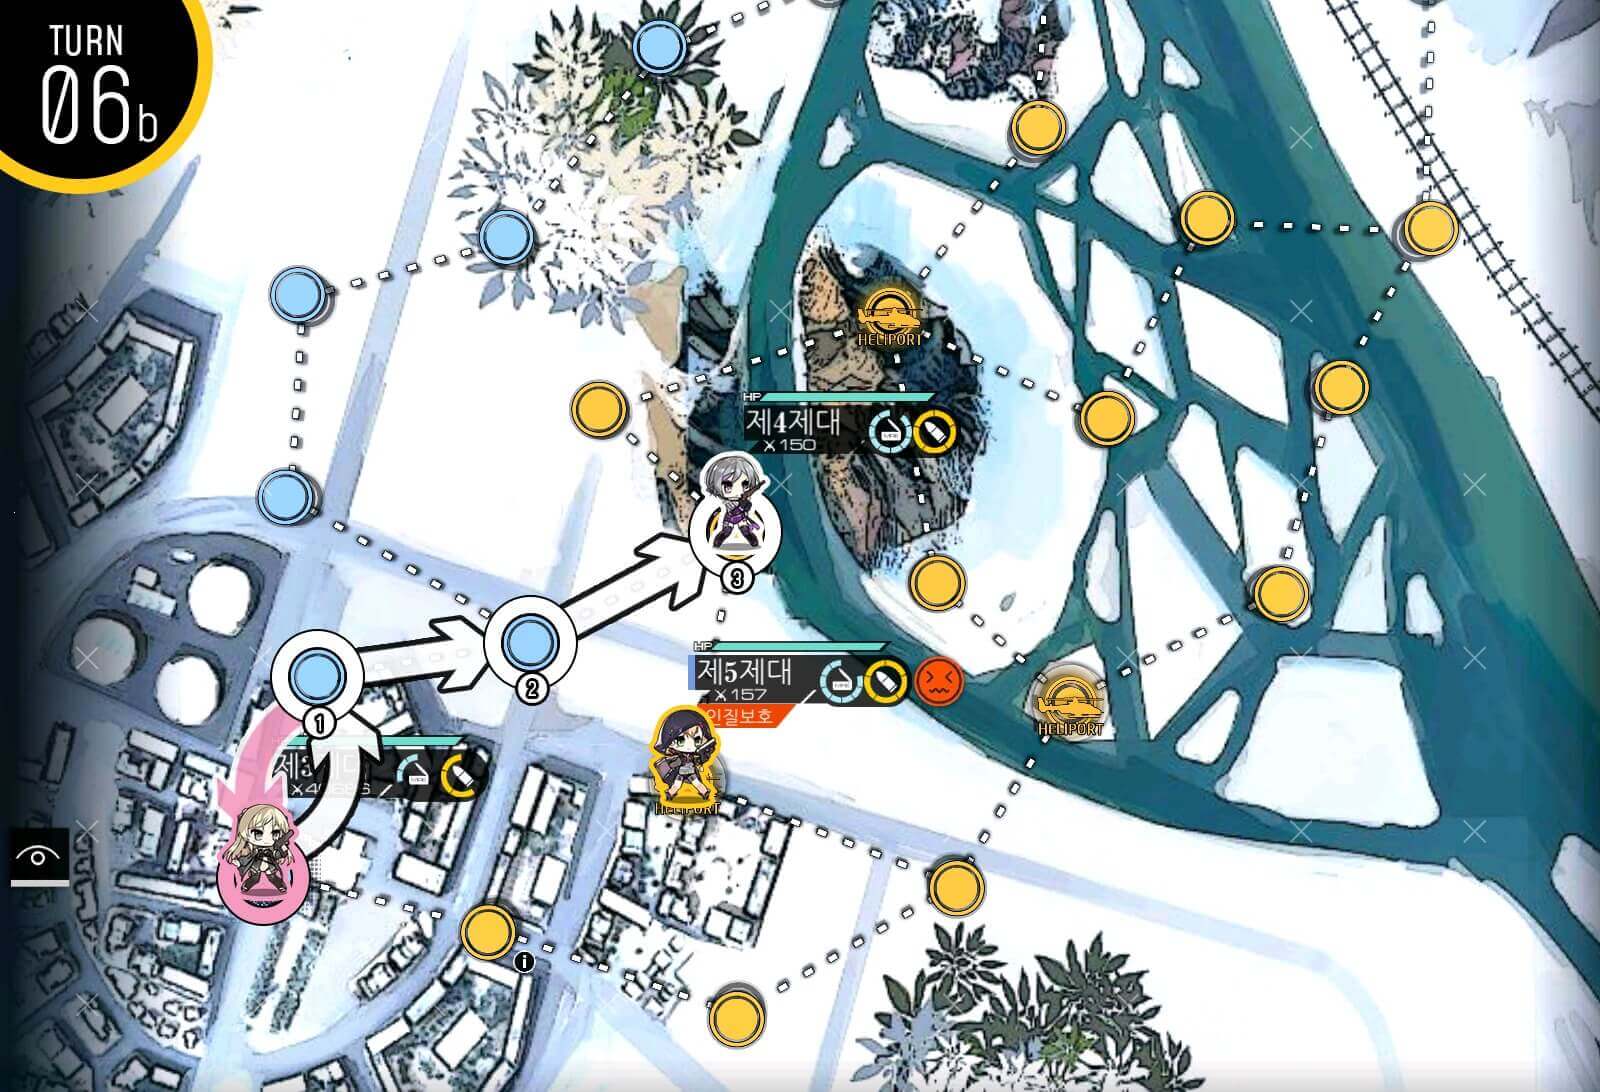
Turn 3a
All that's left to do is for combat echelon to take path around the Goliath Plus unit to the radar, activating the abandoned robot ally.
Turn 3b
I recommend you change the command to "Wait" so that there's no chance for robot to be attacked by boss instead of your combat echelon. When boss unit runs into combat echelon, you can either fight it or retreat to save repair cost.
Turn 4
Now that boss unit is out of the way, change the robot command to "capture" Then all you have to do is push "end round" button until map is cleared.

Turn 1
Start with combat echelon at the bottom helipad and dummy on the HQ. You don't have to worry about M4 unit here. Combat echelon move to take radar node.

Turn 2
Soon as you see that boss unit moved towards combat echelon, we run back to helipad and sit tight for next few turns. Boss unit will not come to you from here.
Turn 3
M4 slowly makes her way to the supply point. Just let her do her work.
Turn 4
And supply route is established. You can either change m4's command to wait or watch her run into boss and die. Keep hitting "End round" button until you are victorious. Oh and keep an eye out for your combat echelon's health and ammo supply.

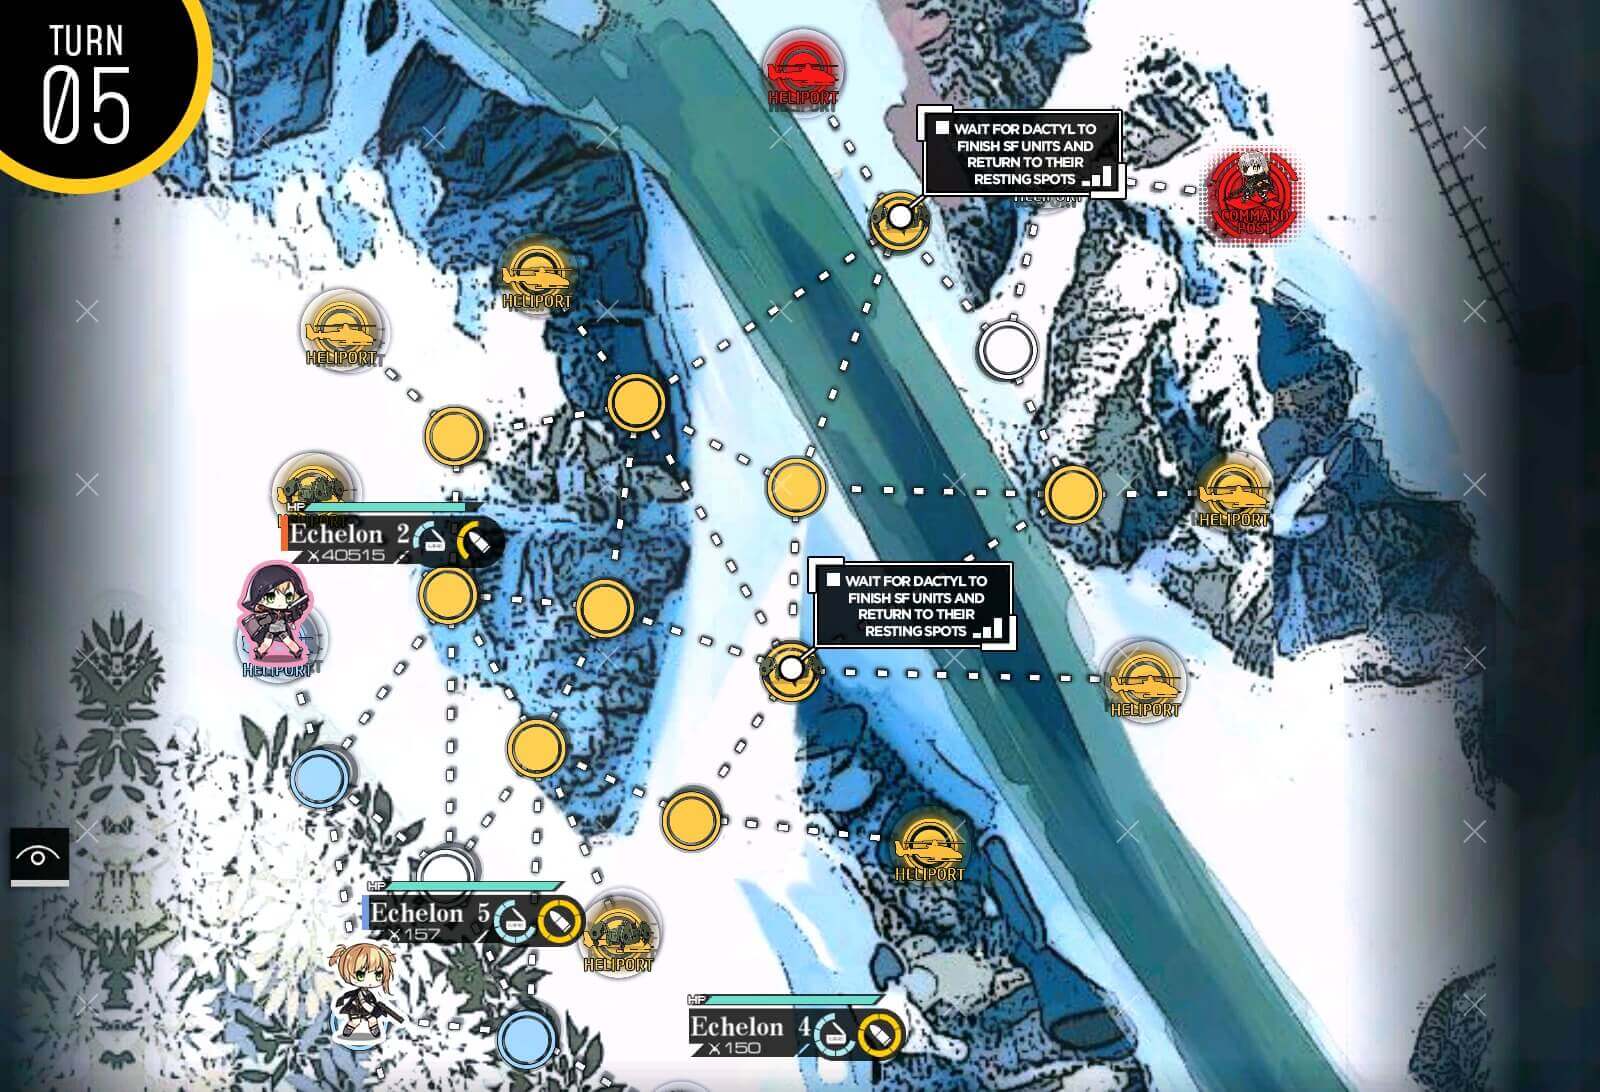
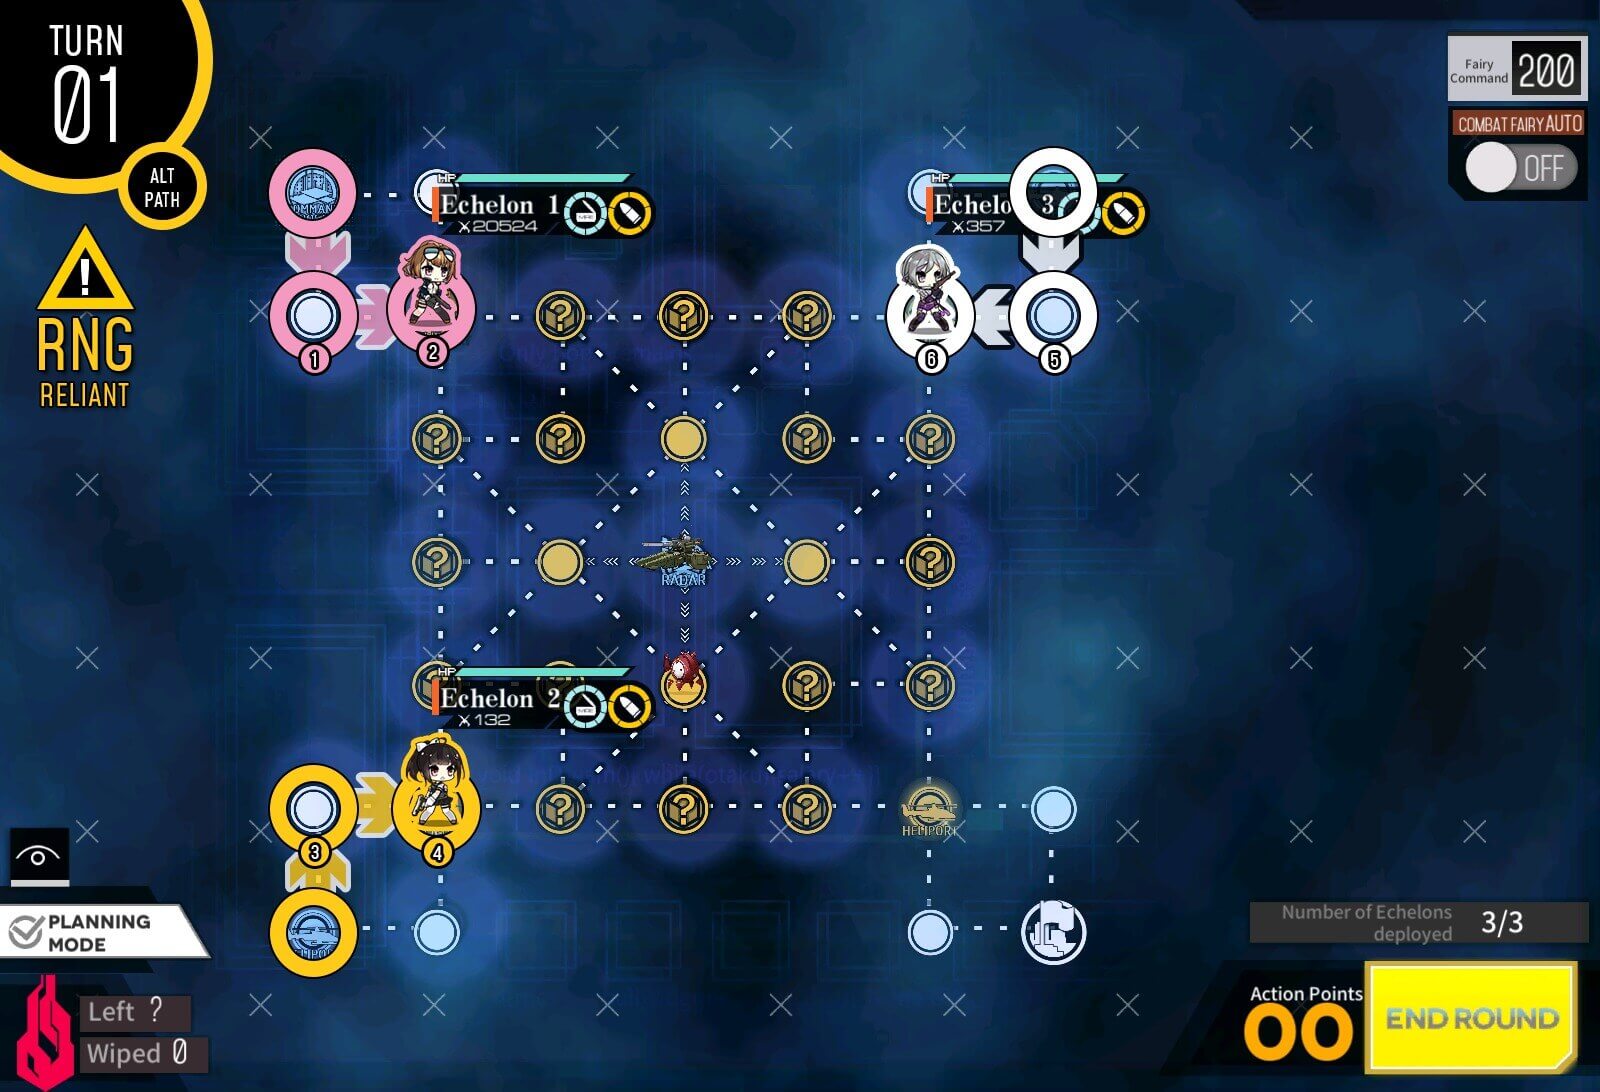
Turn 1
This map is RNG reliant due to the random spawn location of the Goliath Plus unit. It will determine where the tank will go on first turn. Regardless, let's move all units to nearby helipad so that we have more move points next turn. Important note: All "?" nodes are ambush nodes.
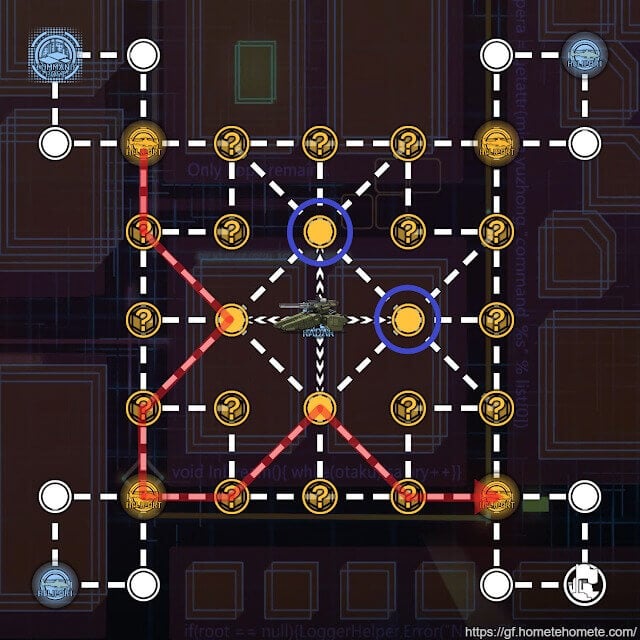
Note
Now because Tank in the center has moved to "top" half of the map [blue circles], we are going to take the bottom route [Red arrow]. There are slight variations but it will be best to divide them this way. There's also reason we are not moving in straight line: the route we took will provide only the weak enemy units, other "?" nodes will spawn stronger armor units.

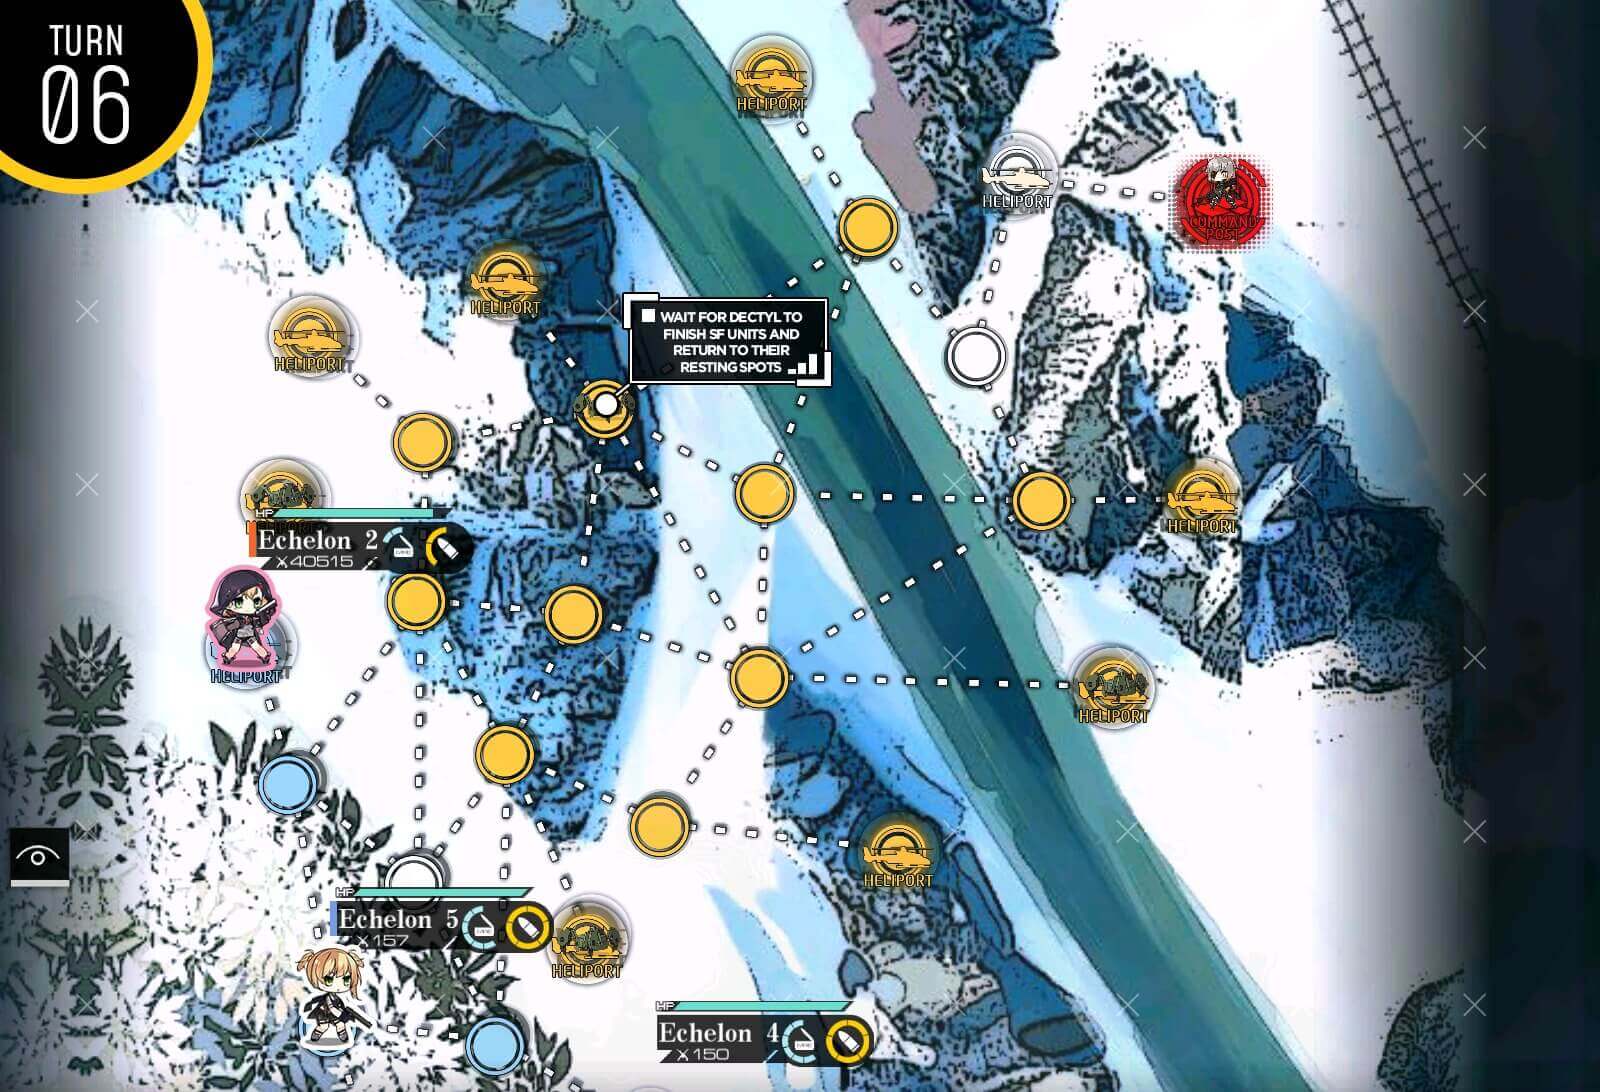
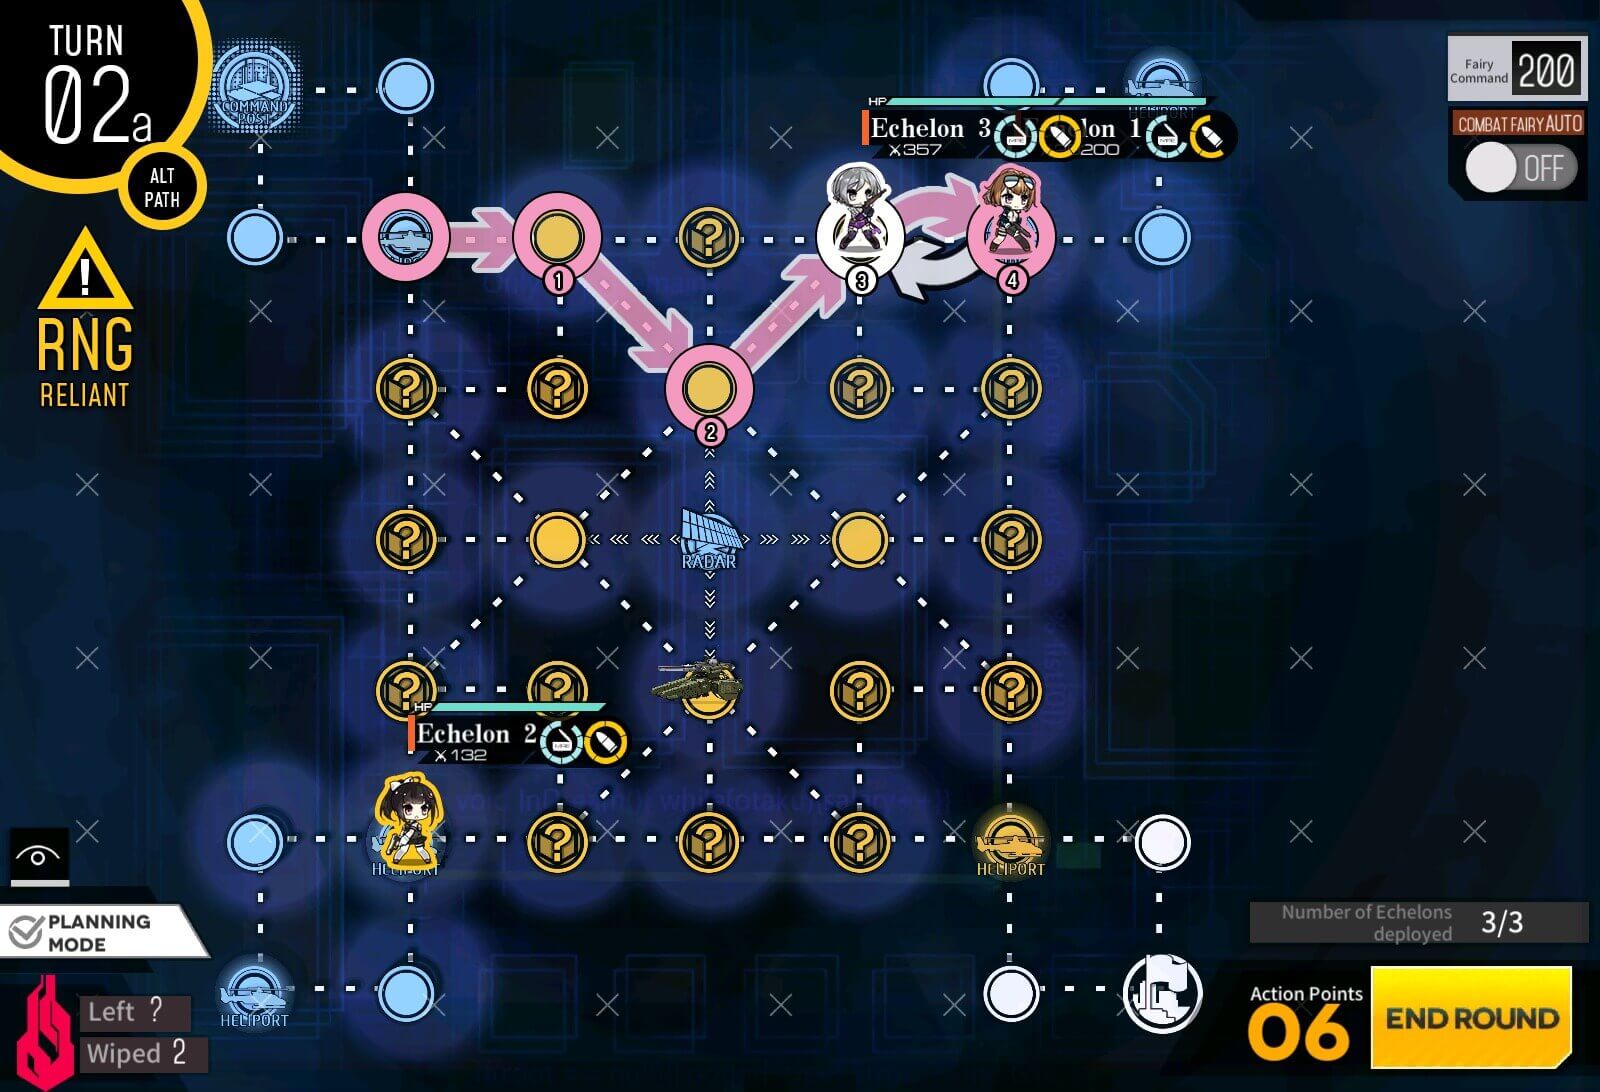
Turn 2a
Following the image above, Combat echelon moves towards dummy at the bottom helipad then swaps with it. Make sure to resupply before continuing.

Turn 2b
Again we follow the route shown.
Turn 2c
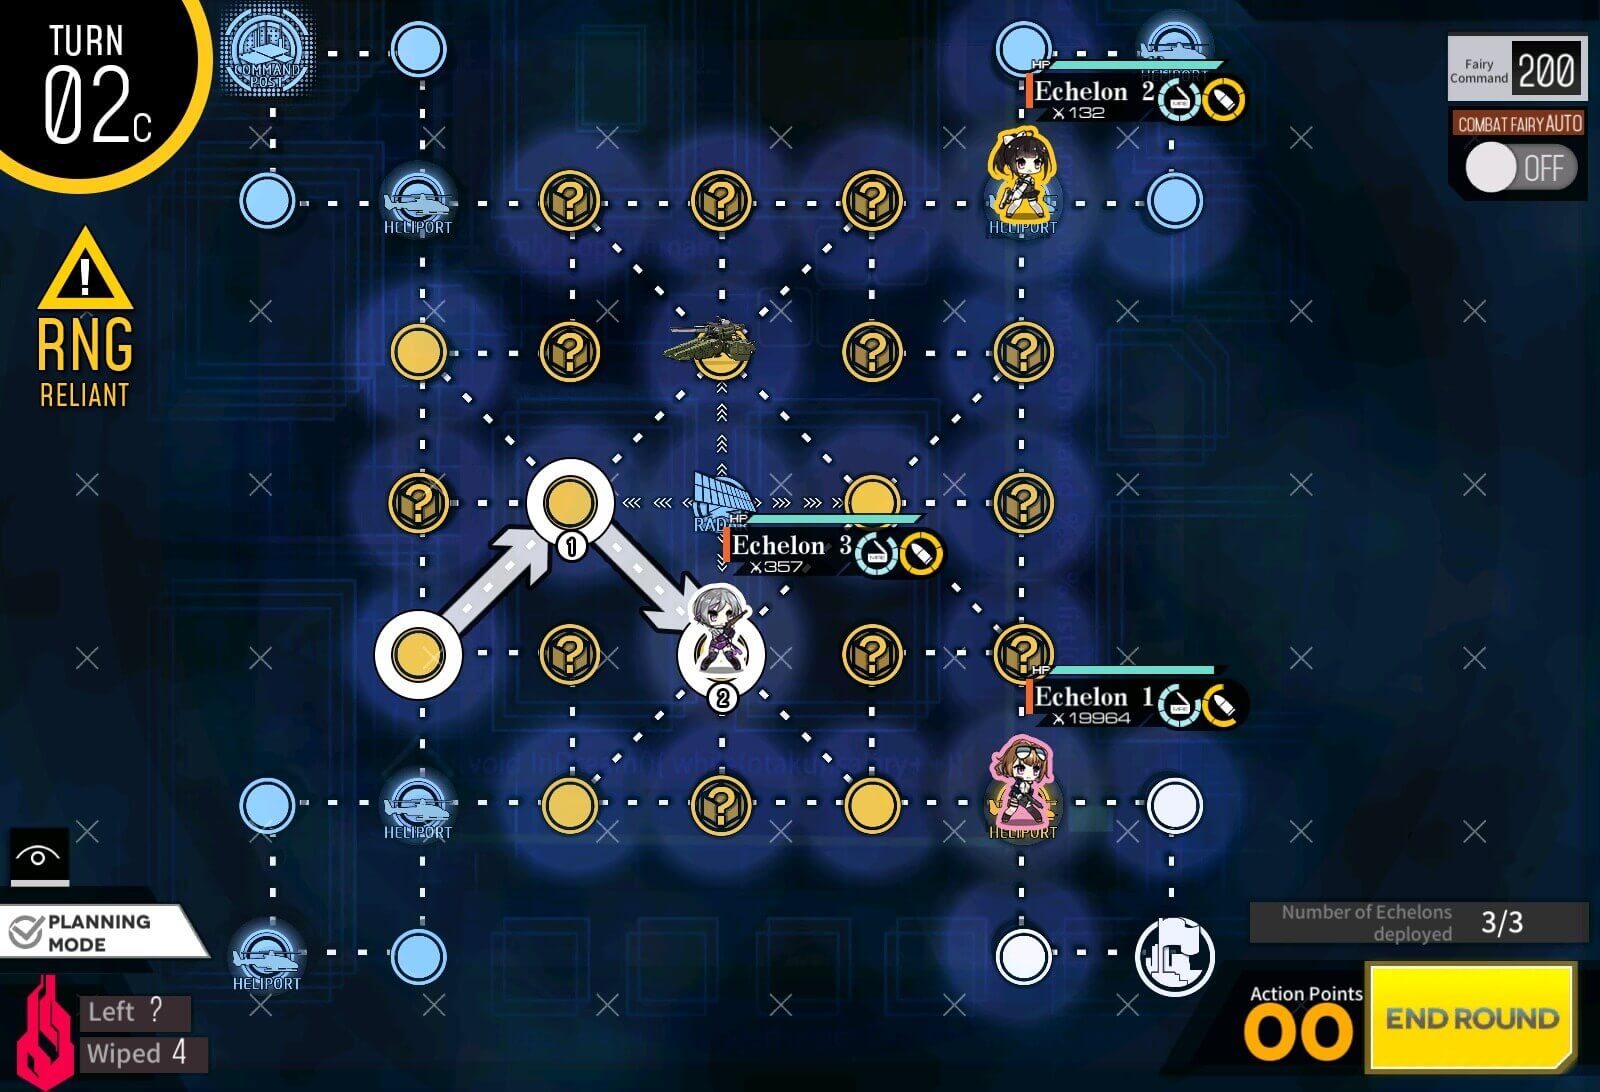
Because we need the radar in the center to see where tank is going, we need to have a node adjacent to radar under control during the mission. Dummy that swapped with combat echelon moves to opposite end of where tank is so it will not get attacked this turn. This is very important.
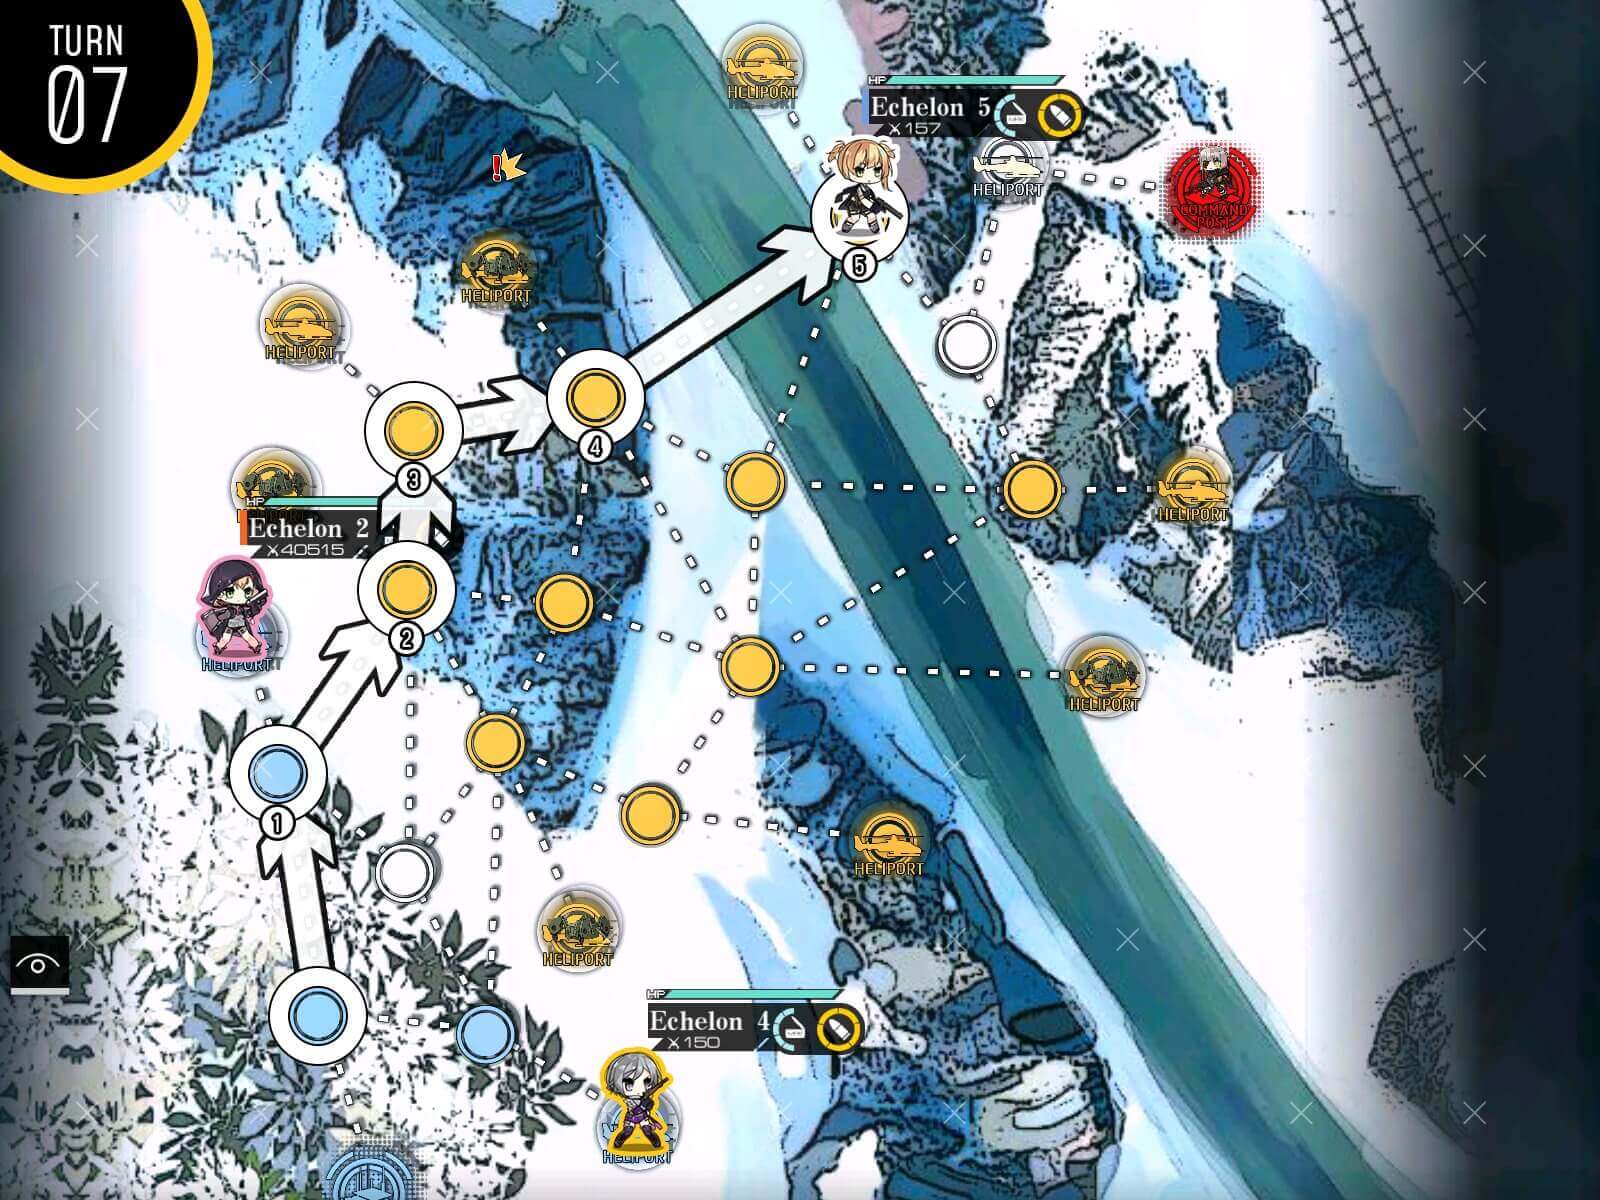
Turn 3a
Combat echelon resupplies again then move to free up the other dummy echelon, following similar route. Swap with dummy echelon to save move point.
Turn 3b
Dummy echelon that is at the center of the map moves to supply point. Care to not step on any "?" node by accident on the way.

Turn 3c
What's left now is to connect the route between HQ and supply point. Combat echelon moves to clear remaining "?" nodes on it's way back to HQ. This is where you will start to have variation with guide so be flexible.
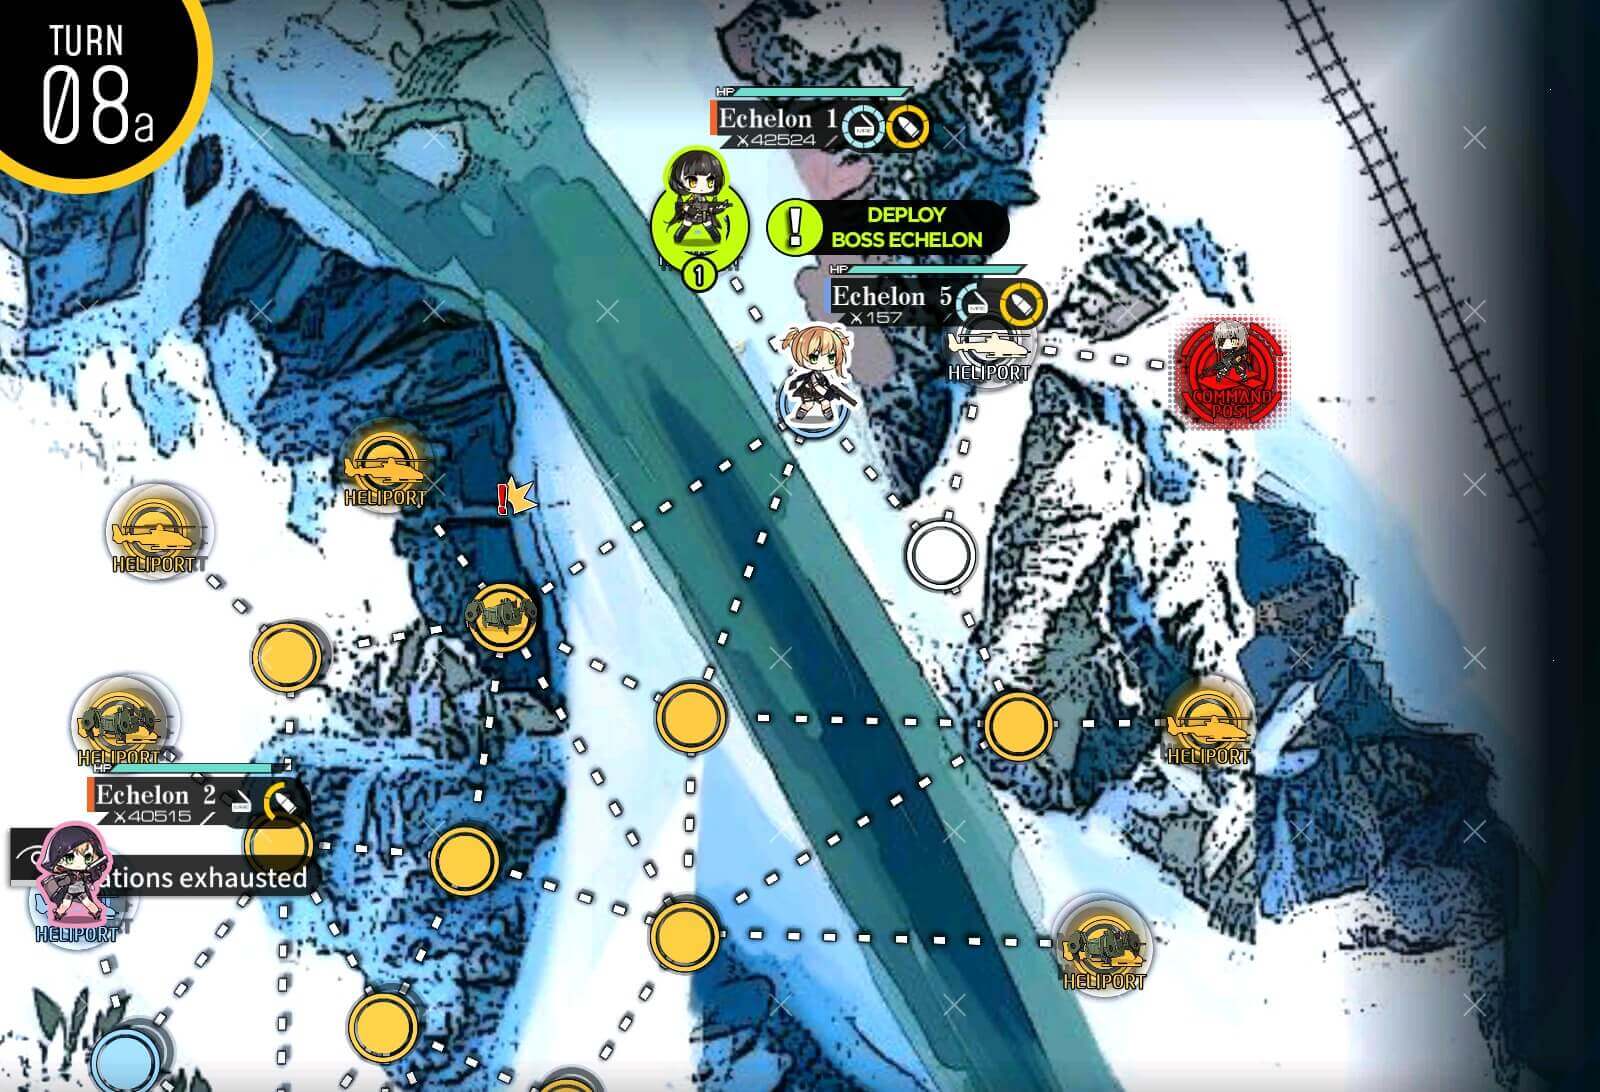
Turn 4
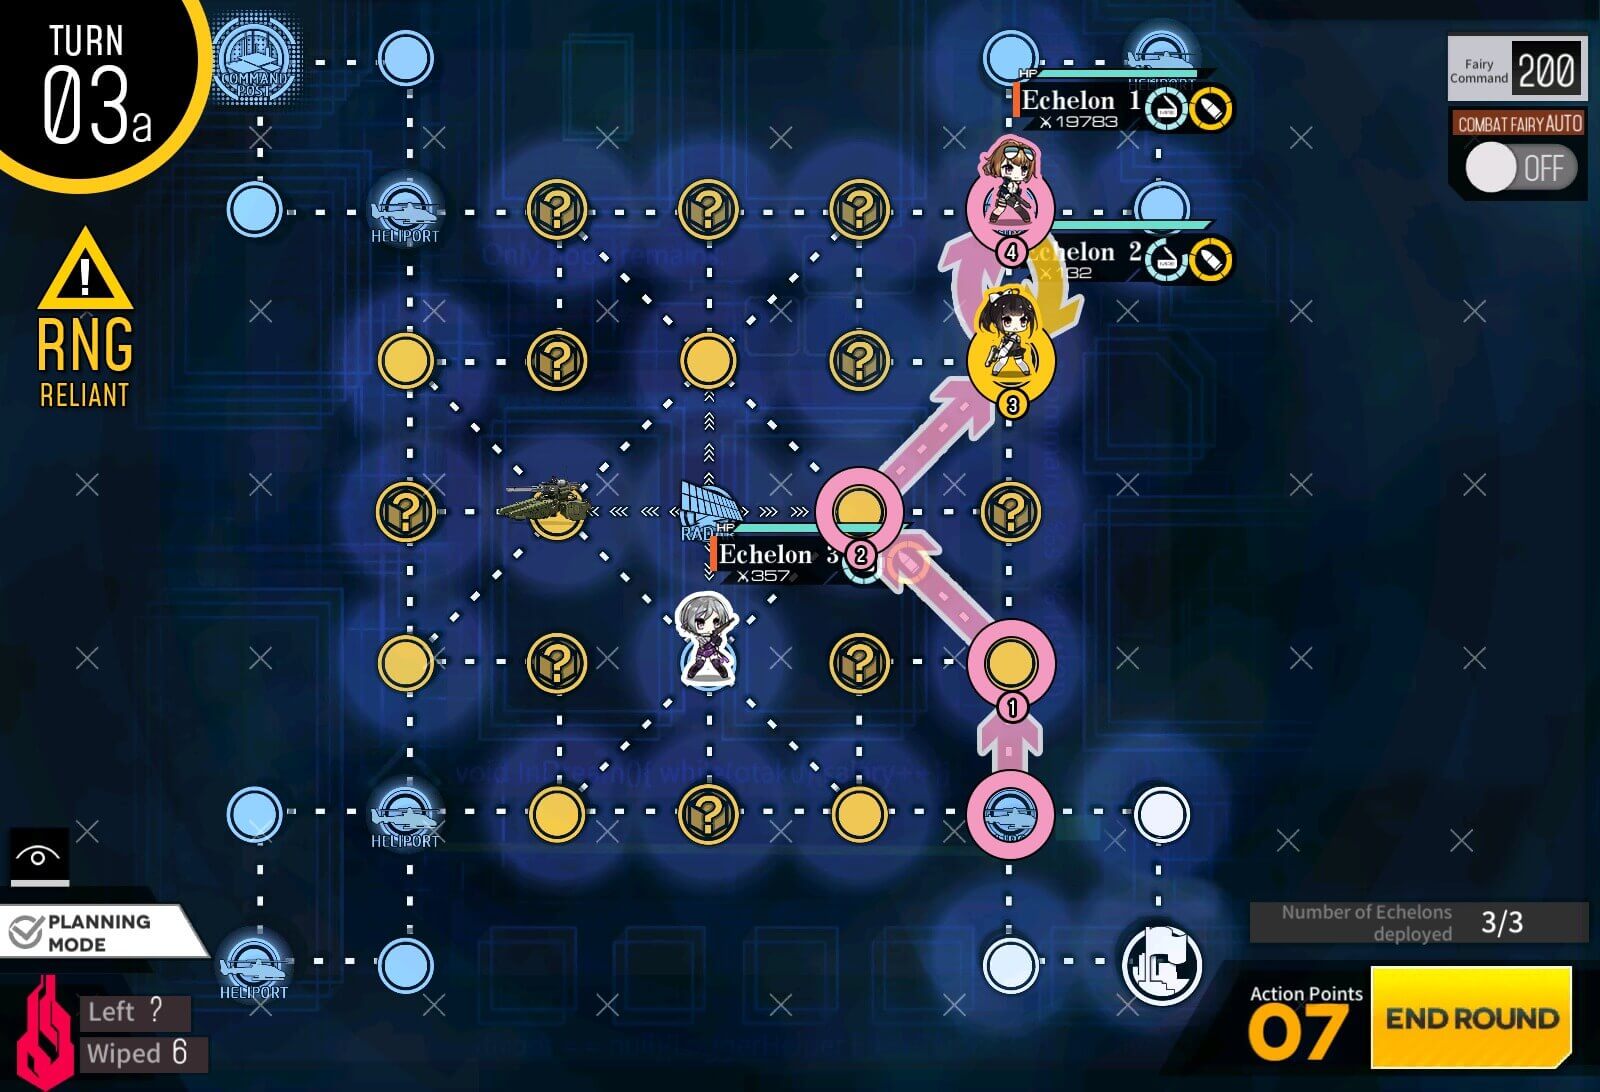
The Tank has moved up towards combat echelon since it is the closest unit to it. This opens up the path at the bottom to be connected. Move combat echelon and dummy echelon to link bottom two routes. Then Dummy echelon at the top right corner continues to draw aggro of tank by staying in range but not being threatened.
Turn 5a
All that's left now is to connect last two nodes between supply route and HQ. Move either dummy or combat echelon to take control of the node. Dummy echelon on top right retreats into the corner, outside of tank's patrol range.

Turn 6
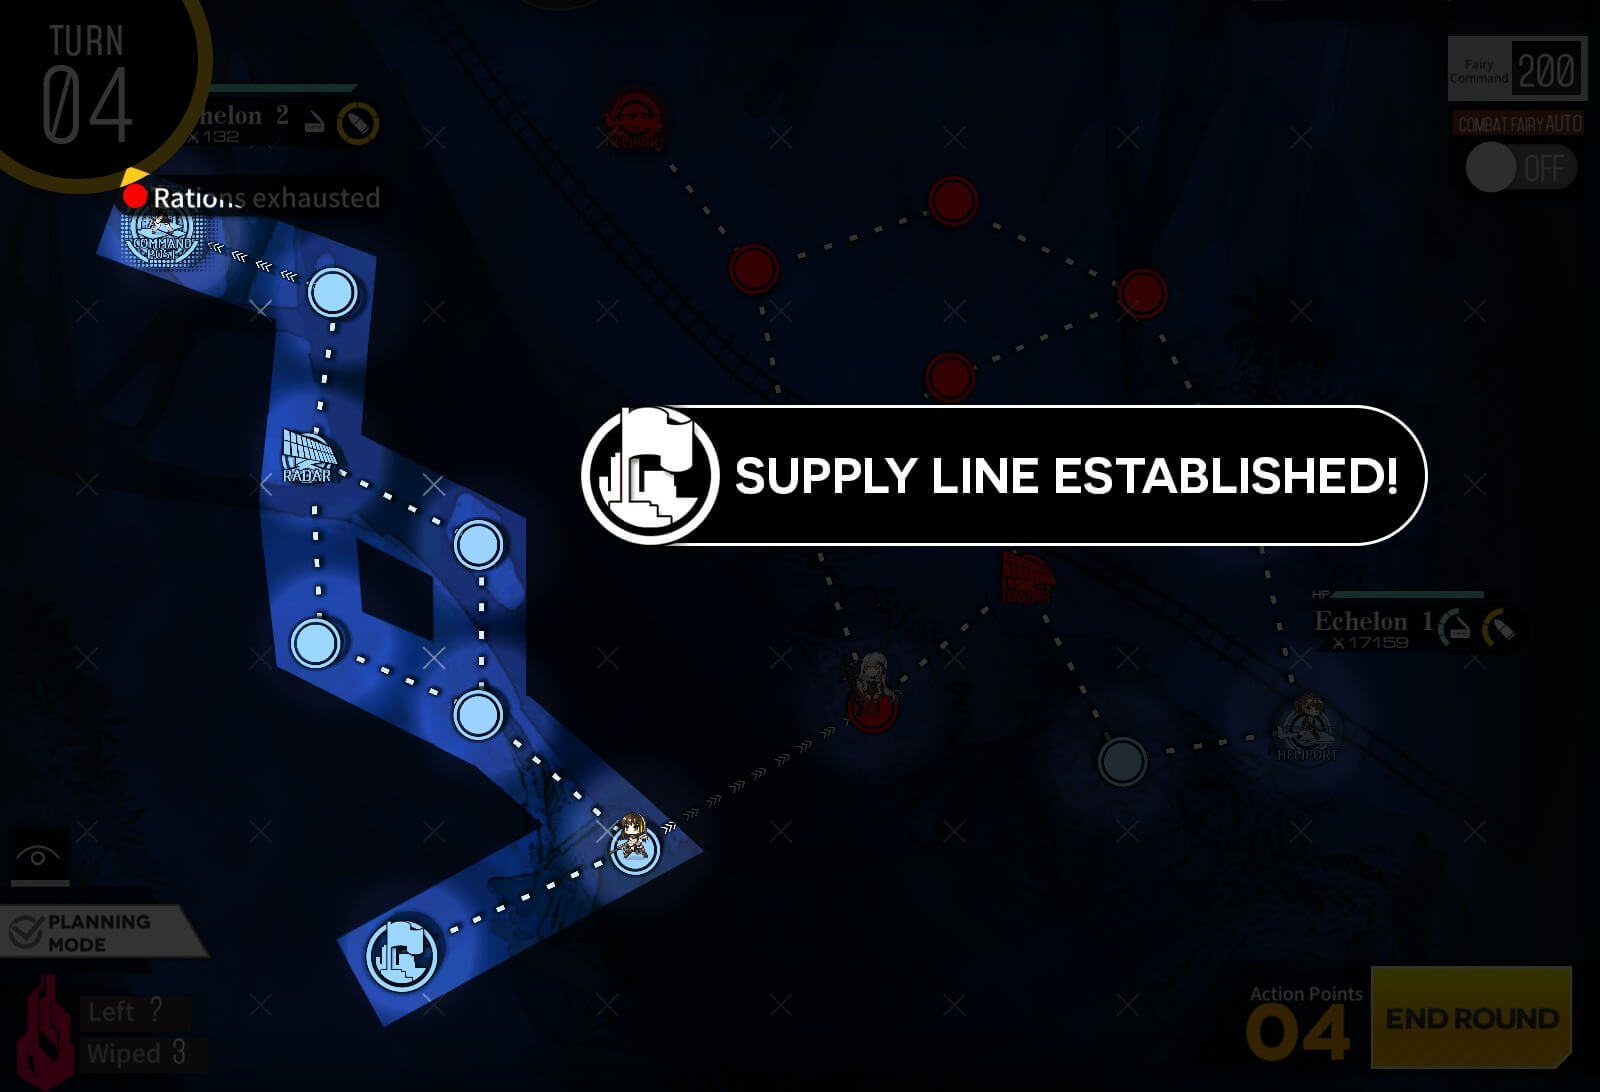
Once route is established, move all echelons out of the center square map, which de-aggros the tank and it will stop moving, keeping the supply route safe from being severed.
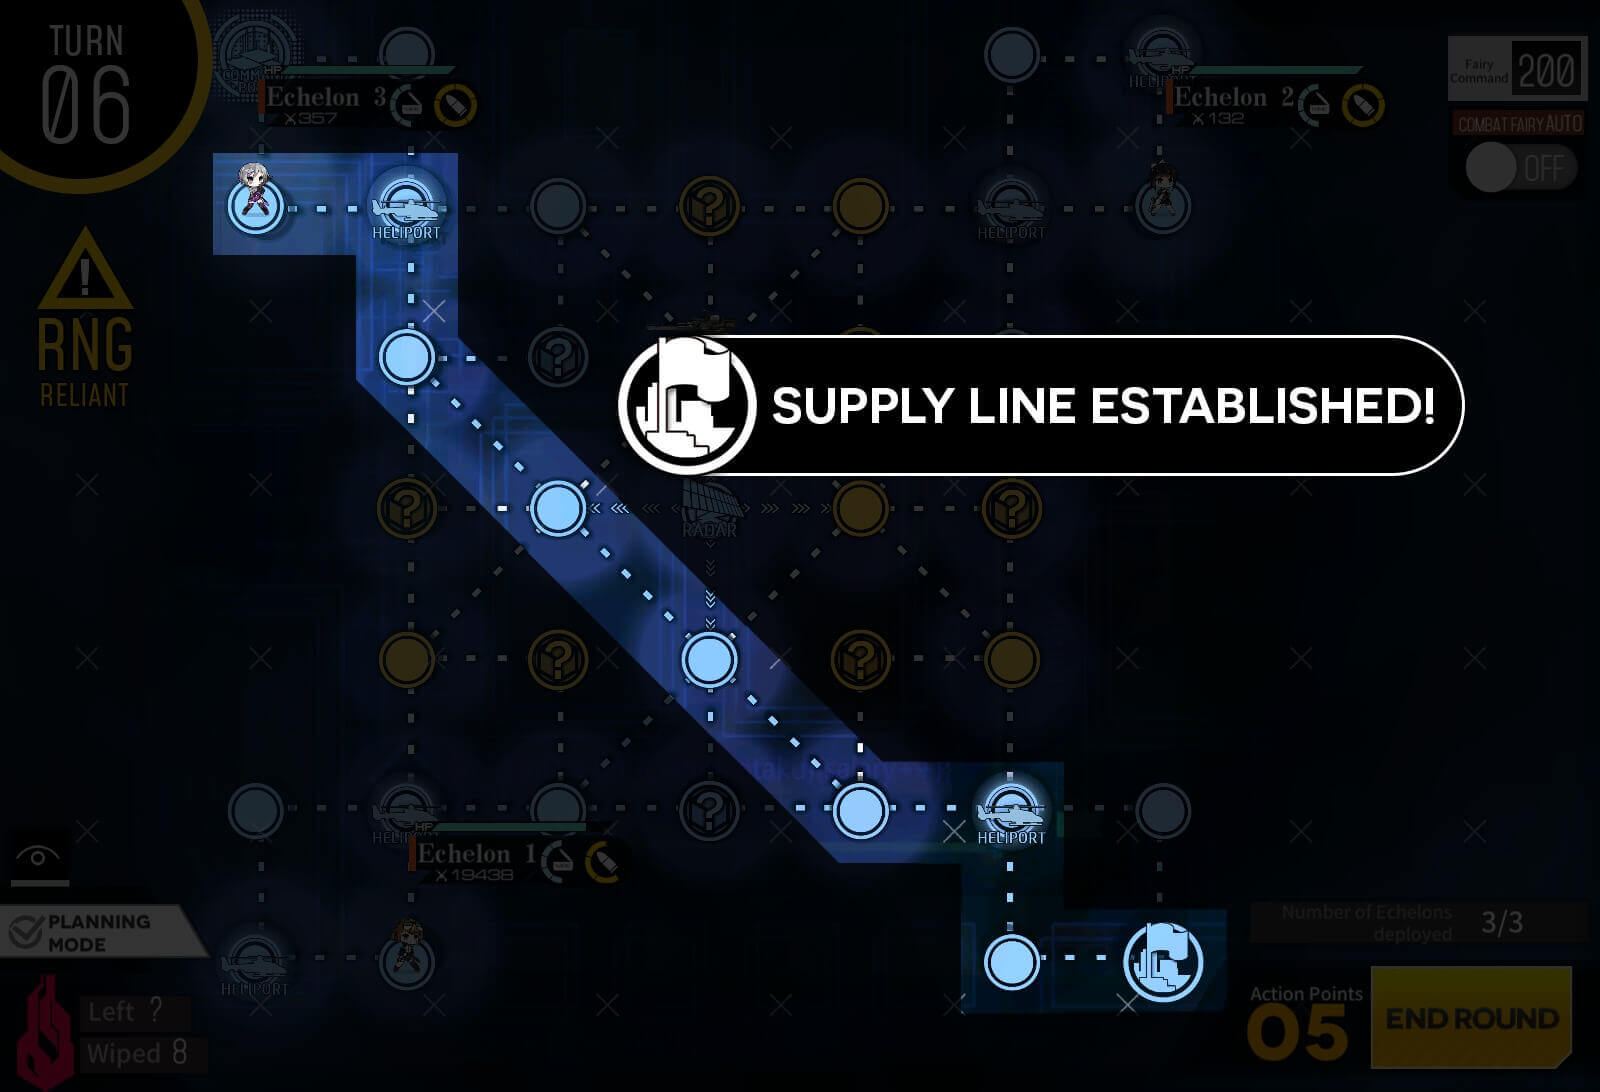
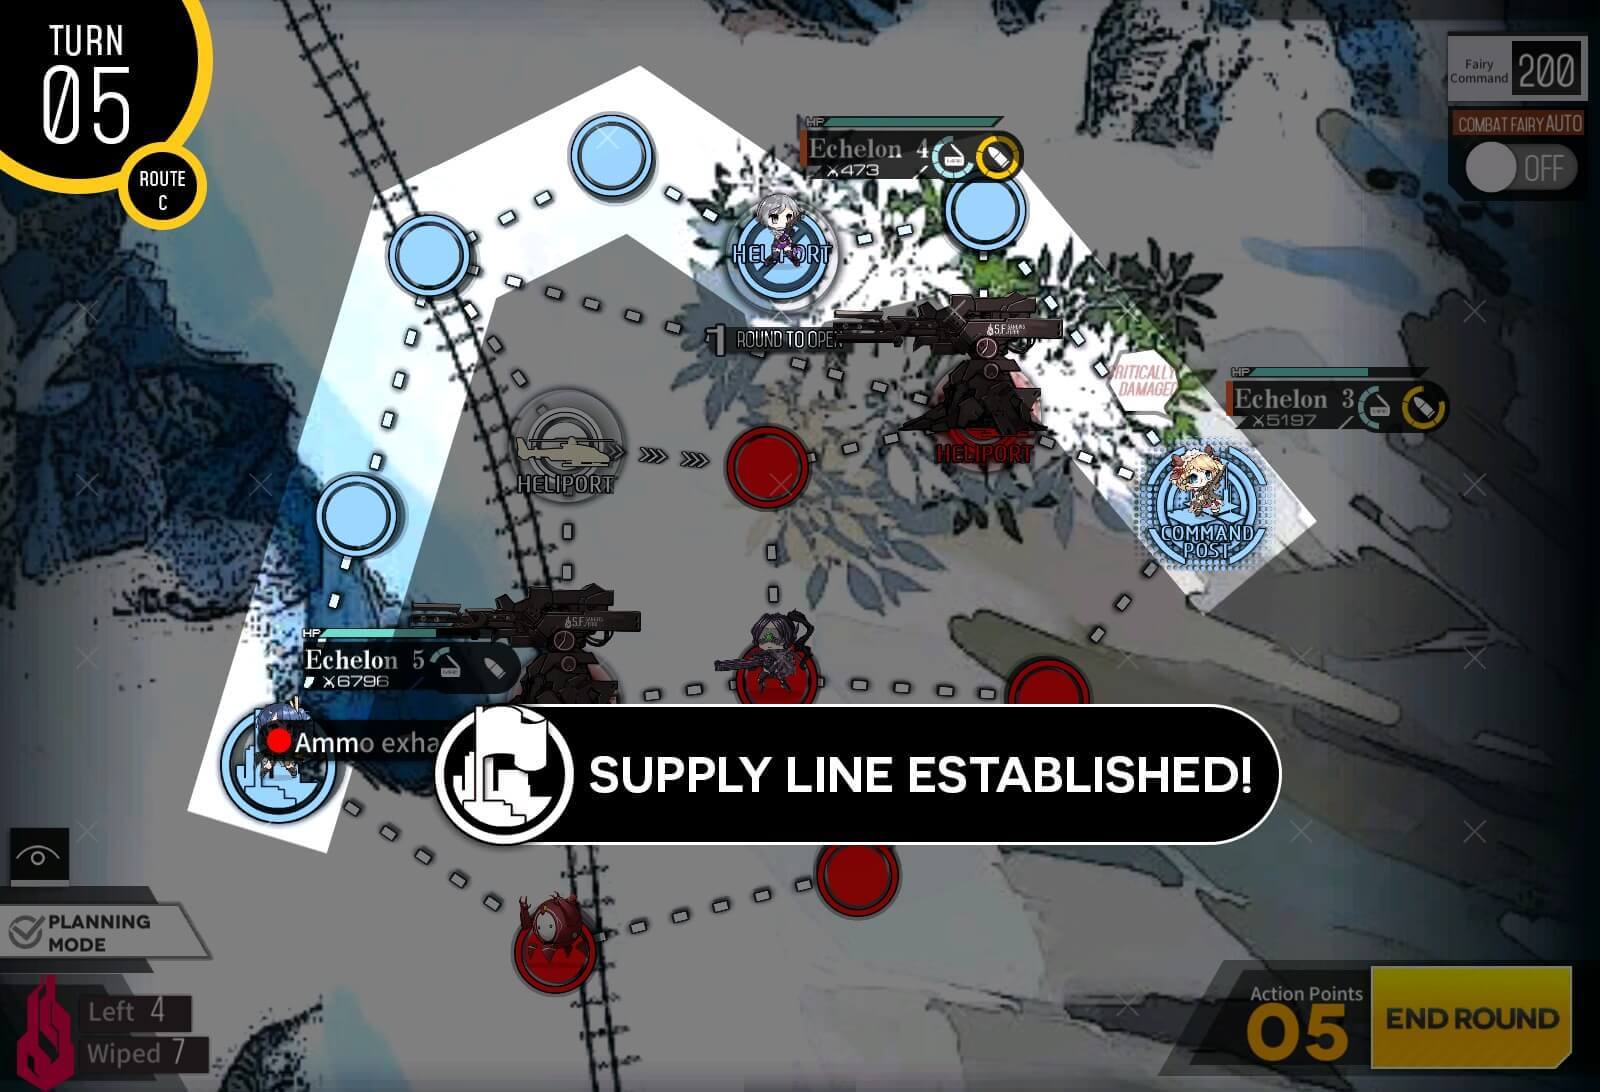
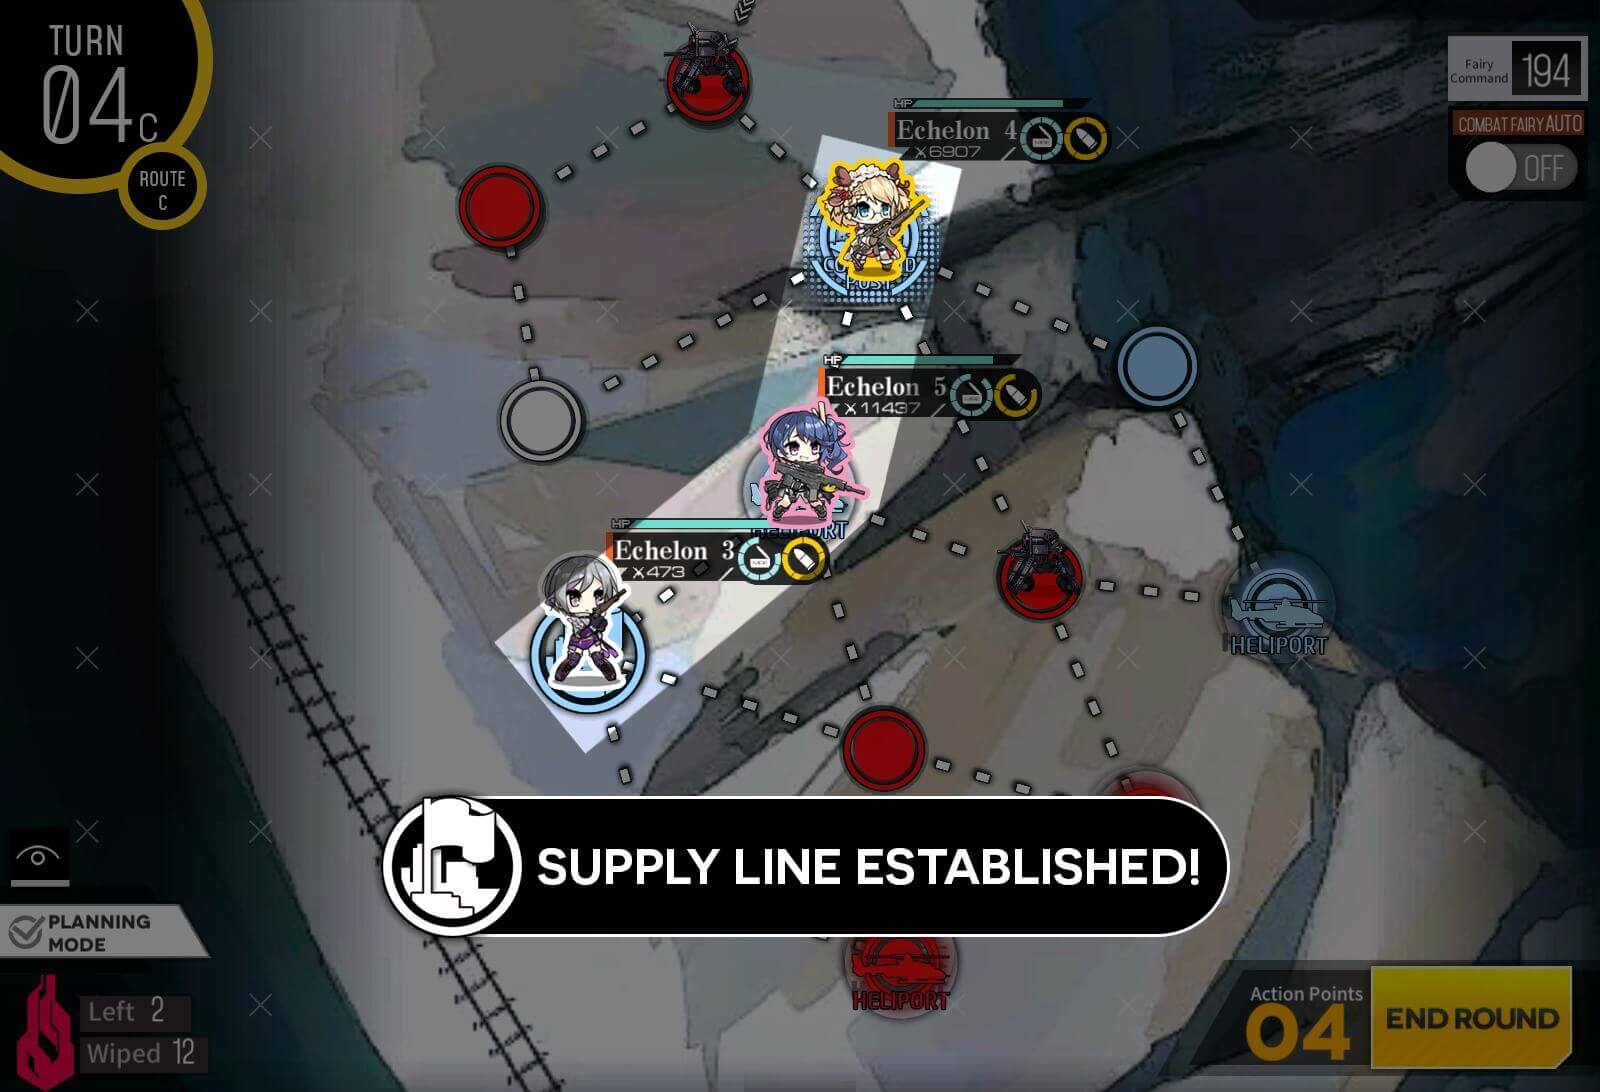
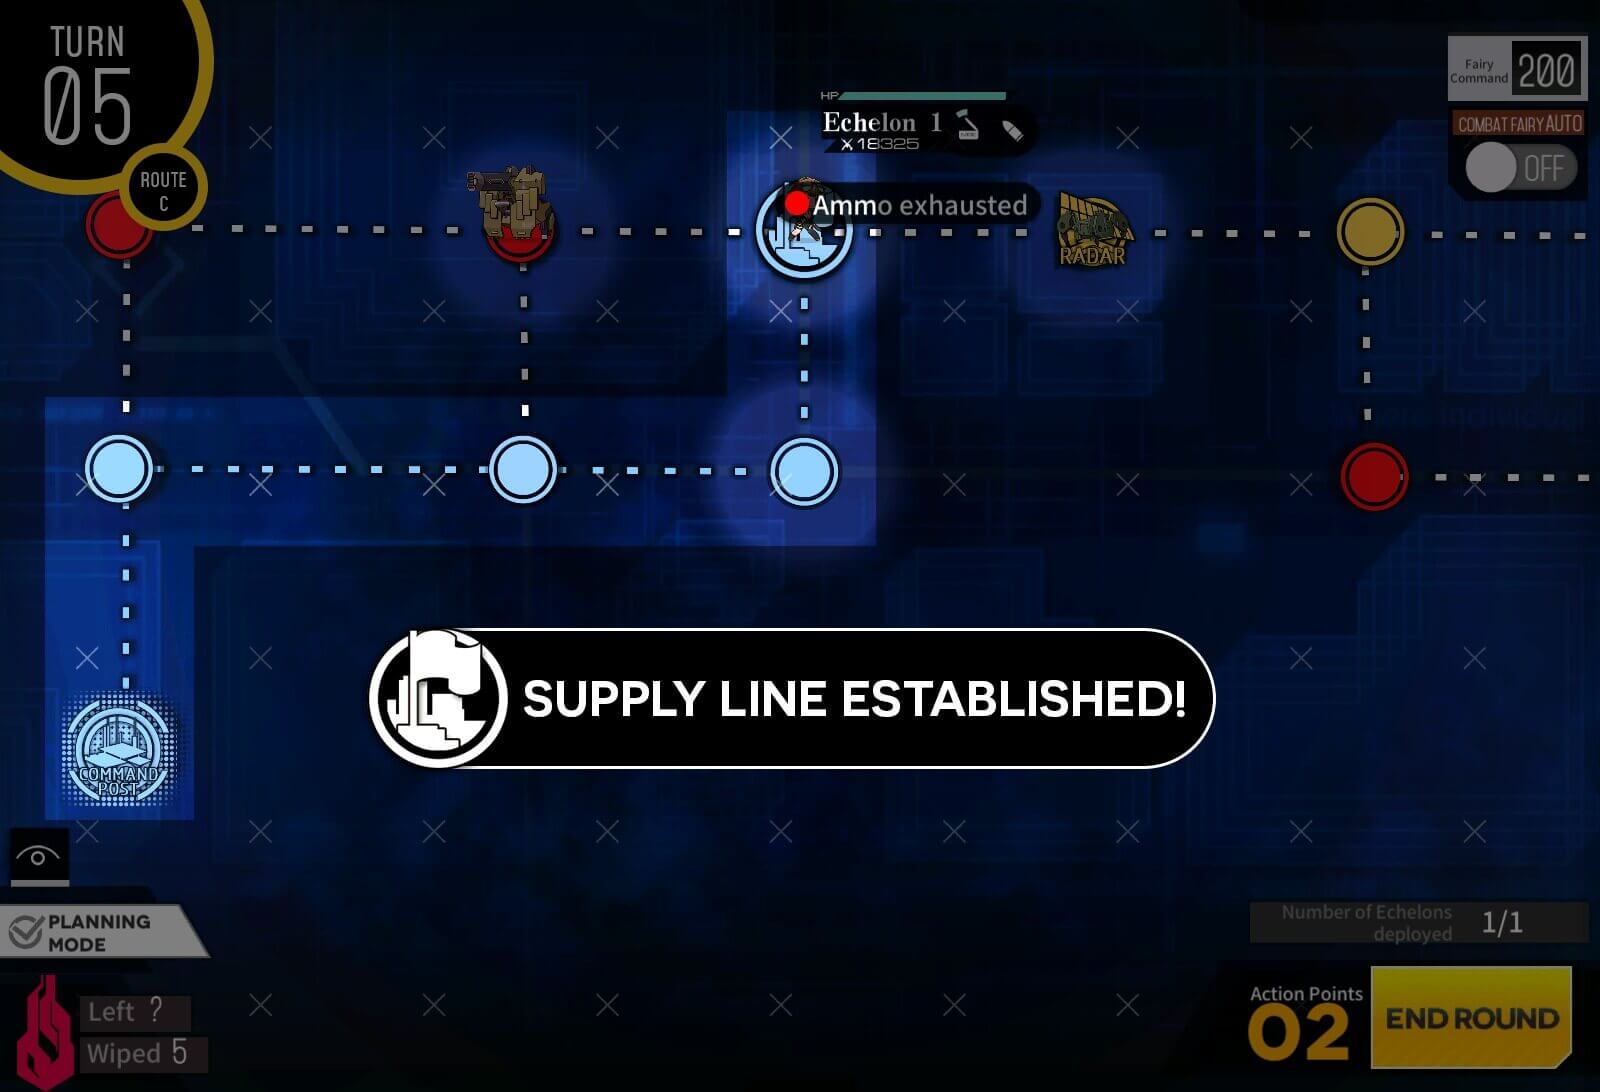
Supply Line Established
Now all you have to do is hit "End Round" button until map is cleared!
Turn 1
The start is the same as always. Note that the Goliath Plus unit is at the bottom this time. So let's review the image of which route to take in this case.
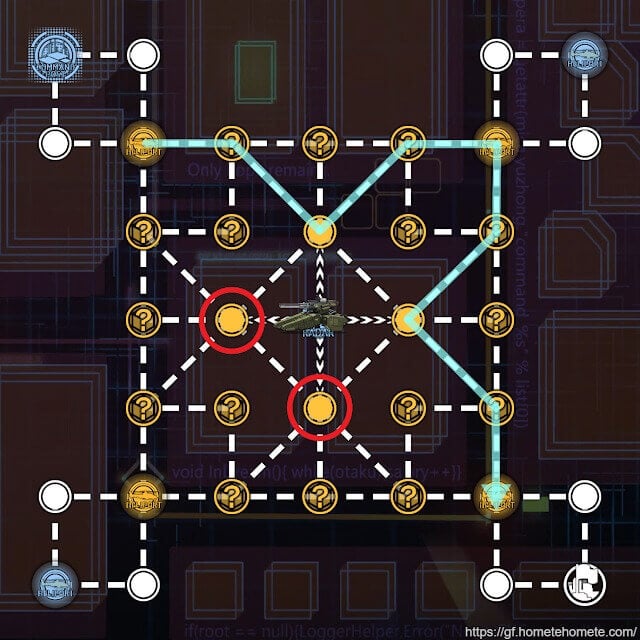
Note
Now that the tank is set to move into one of the red circles shown here, we are going to follow the blue route at the top to get to the supply point this time.
Turn 2a
Do exactly what is shown in the previous image guide, but with a dummy echelon at the top-right.
Turn 2b
Again, make sure your dummy echelon is at least 2 nodes away from the tank and is adjacent to the radar node in the center.

Turn 3a
Now, because the tank blocked the path to the dummy echelon at the bottom helipad, you'll need to take a bit of a detour. In this case, bring your dummy echelon to save a move point.
Turn 3b
We approach the other dummy echelon on the bottom-left.

Turn 3d
Take the dummy echelon to supply the point.
Turn 4a
As usual, move the dummy echelon and combat echelon to start linking up the supply route to HQ. This time, the bottom dummy is the bait for the tank.
Turn 4b
Again keep all echelons at least 2 nodes away from the tank at all times.


Turn 6
Once the route is established, move all echelons out of the tank's area of patrol and wait until the mission is cleared.

Turn 1a
Start off by swapping with the adjacent hostage T-doll.
Turn 1b
Rescue, then manually extract the hostage T-dolls at the starting helipad, then move up towards the 2nd hostage T-doll.
Turn 2a
Swap with the adjacent T-doll once more as a start.

Turn 2b
Rescue the T-doll and end the turn on the node below the top helipad. We should surround capture it at the end of this turn.
Turn 3a
Spawn a dummy echelon on the helipad at the beginning of the turn.
Turn 3b
Swap with the dummy, then manually rescue the hostage. Also resupply, just as a safety measure.
Turn 3c
Swap back and we are going to swap witht the T-doll to our left.
Turn 3d
Swap, then rescue the T-doll.
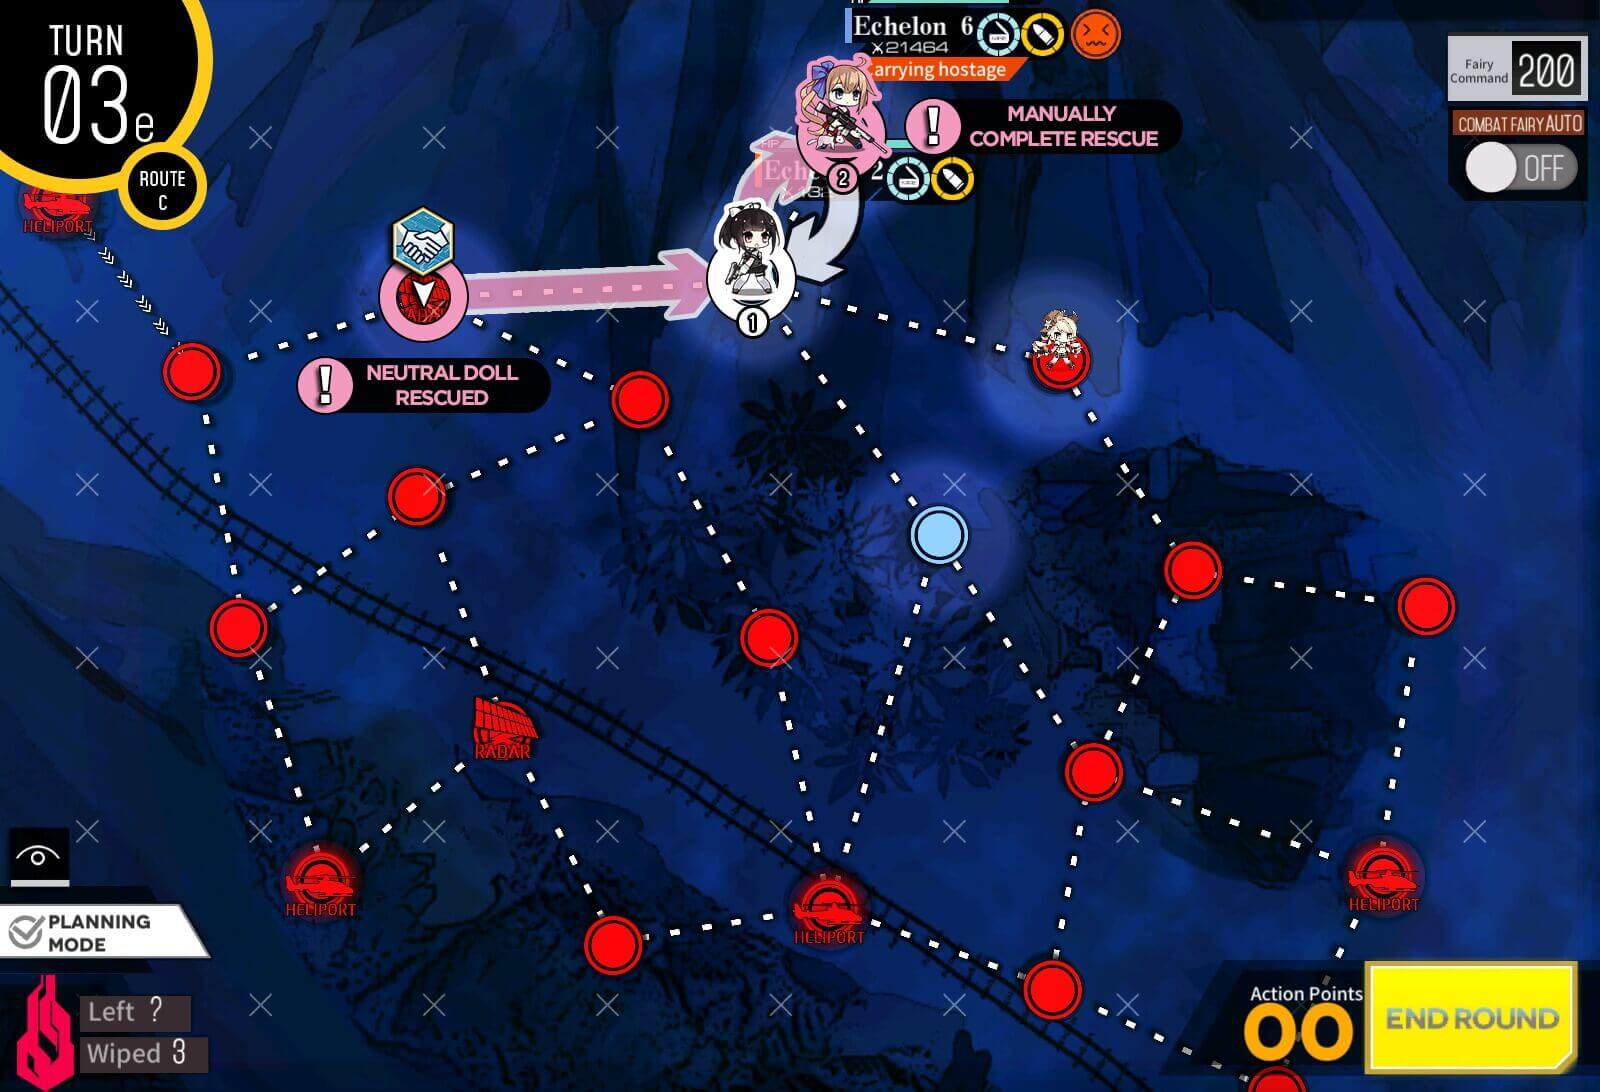
Turn 3e
We swap with the dummy echelon once more to manually extract the hostage T-doll.
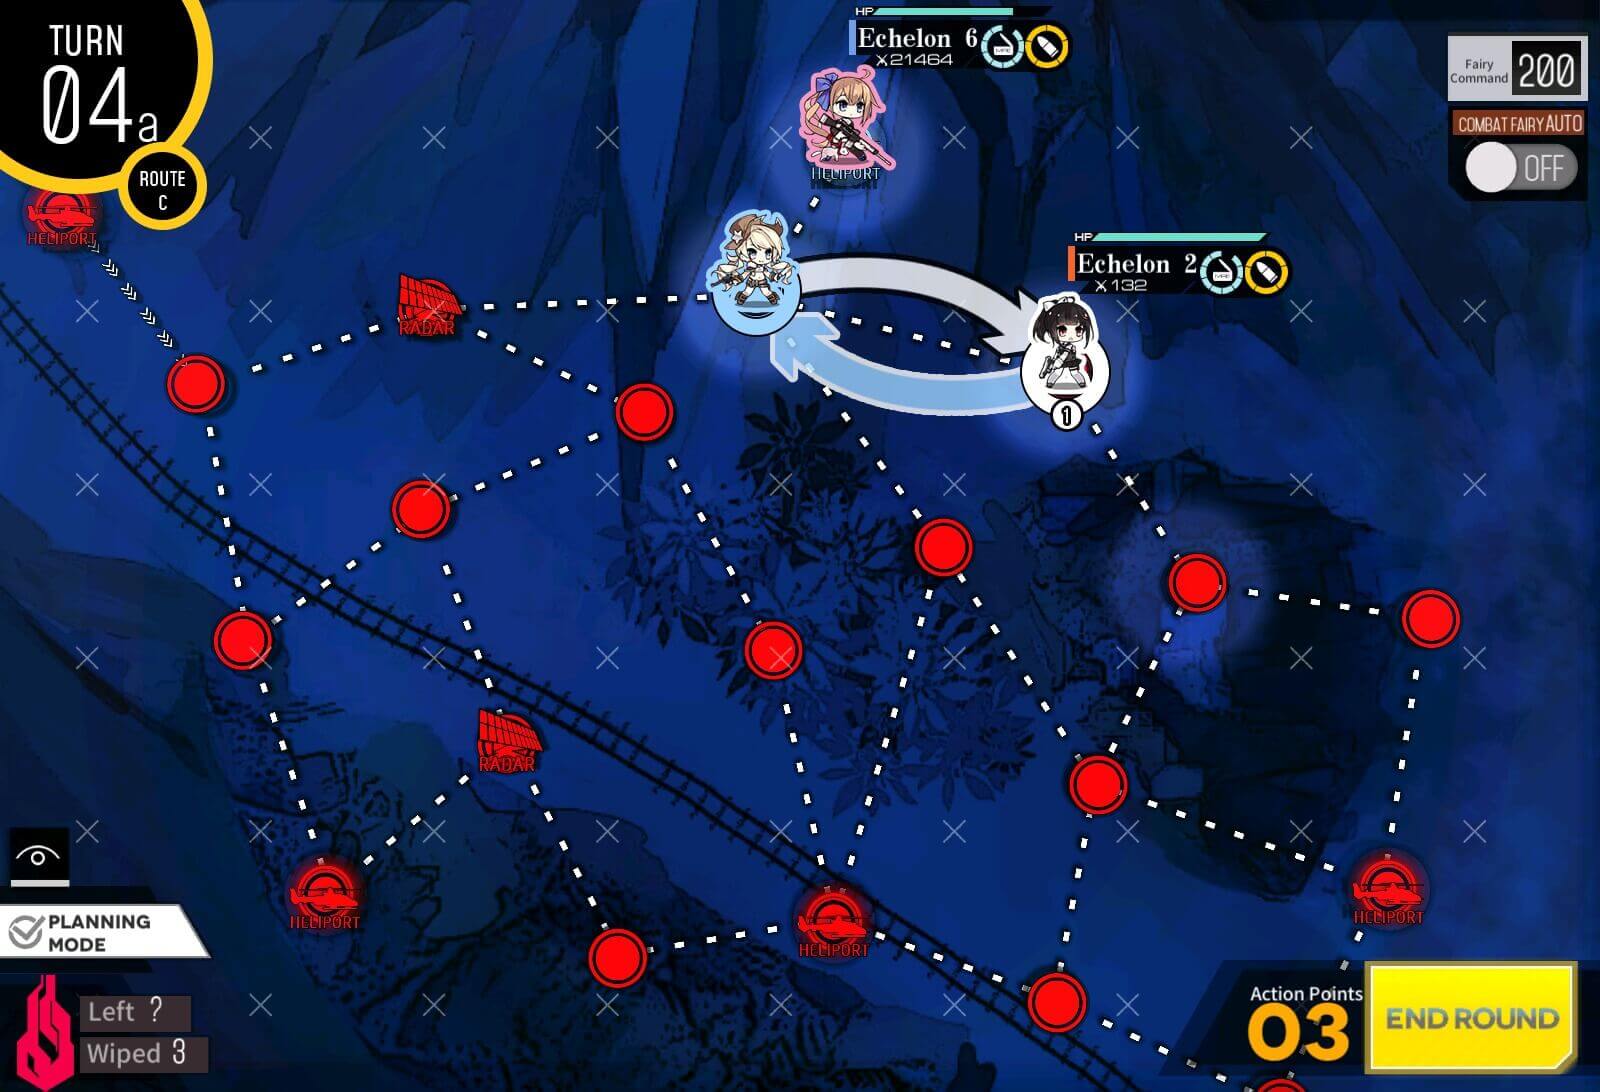
Turn 4a
Dummy echelon swaps with the hostage T-doll. Finally, rescue it.

Turn 4b
The last thing to do is swap with the combat echelon, then manually extract the last hostage, clearing the mission and earning the achievement reward.
Turn 1a
There are two allied dolls, basically for the sole purpose of swapping positions with. Recommend just changing their command to "wait". Spawn two combat echelons. There are no armored units on this map.

Turn 1b
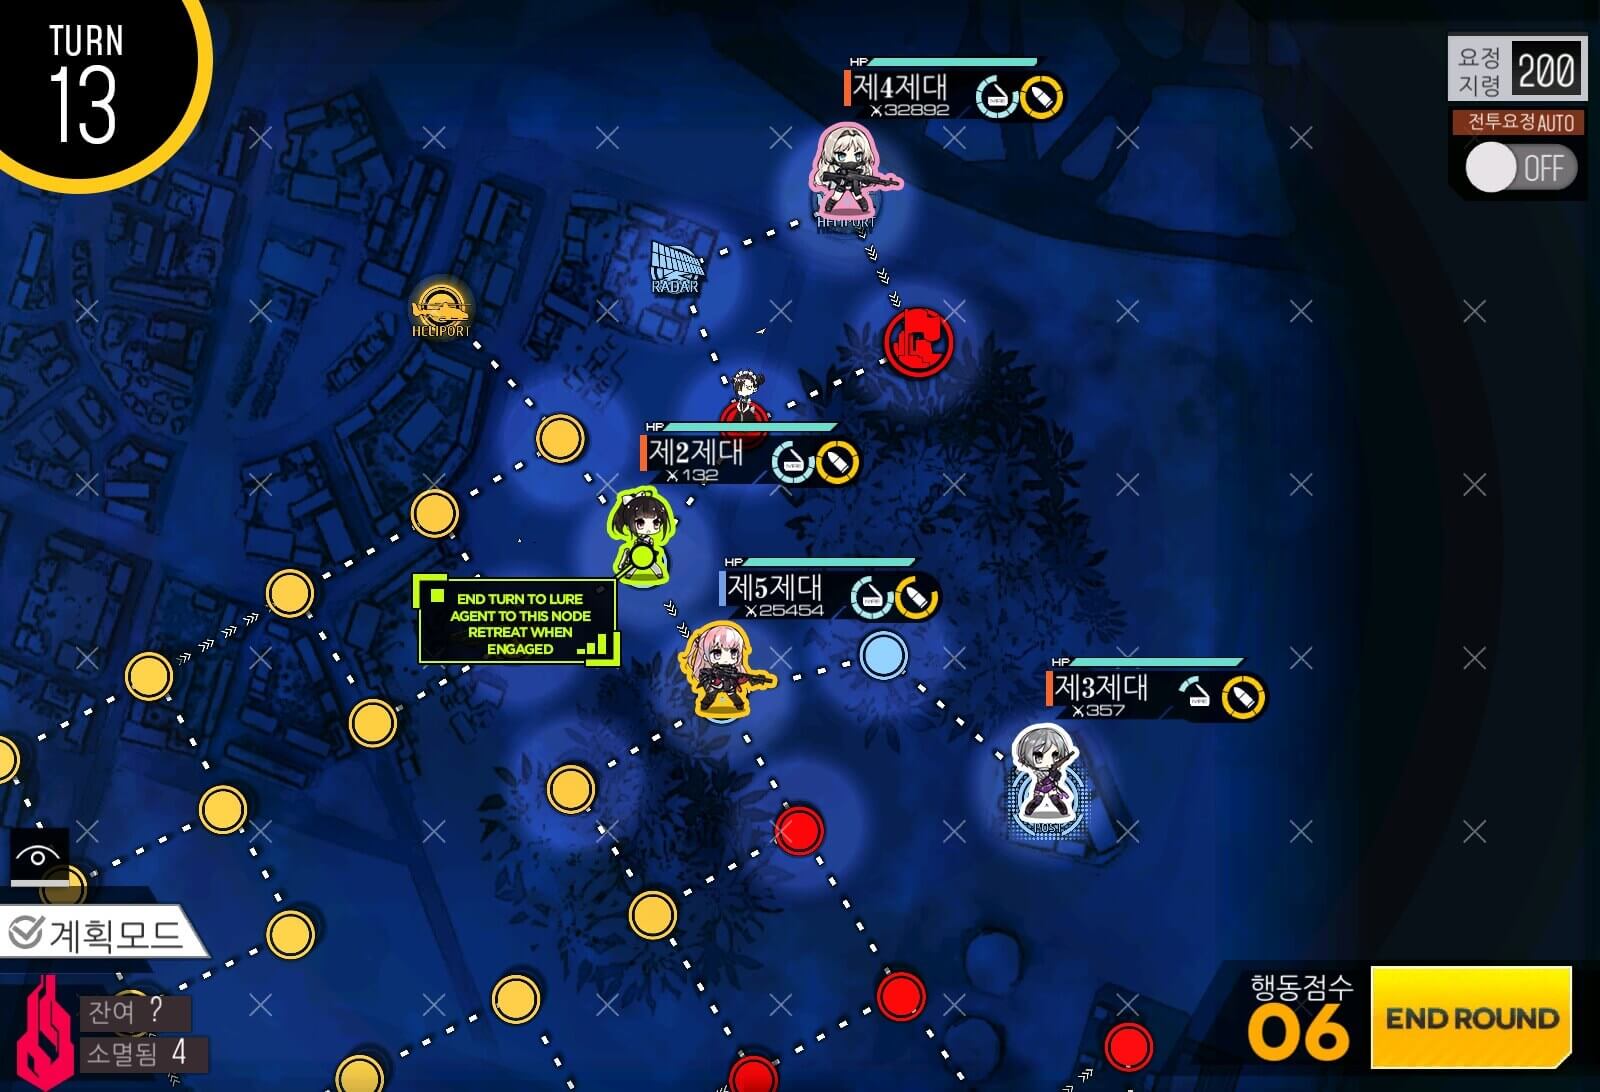
Place a defending force in the front and try to save the health for an echelon that is going to go kill Agent.

Turn 2a
Swap the boss kill echelon all the way with the front of the line, make sure that it's fully supplied.
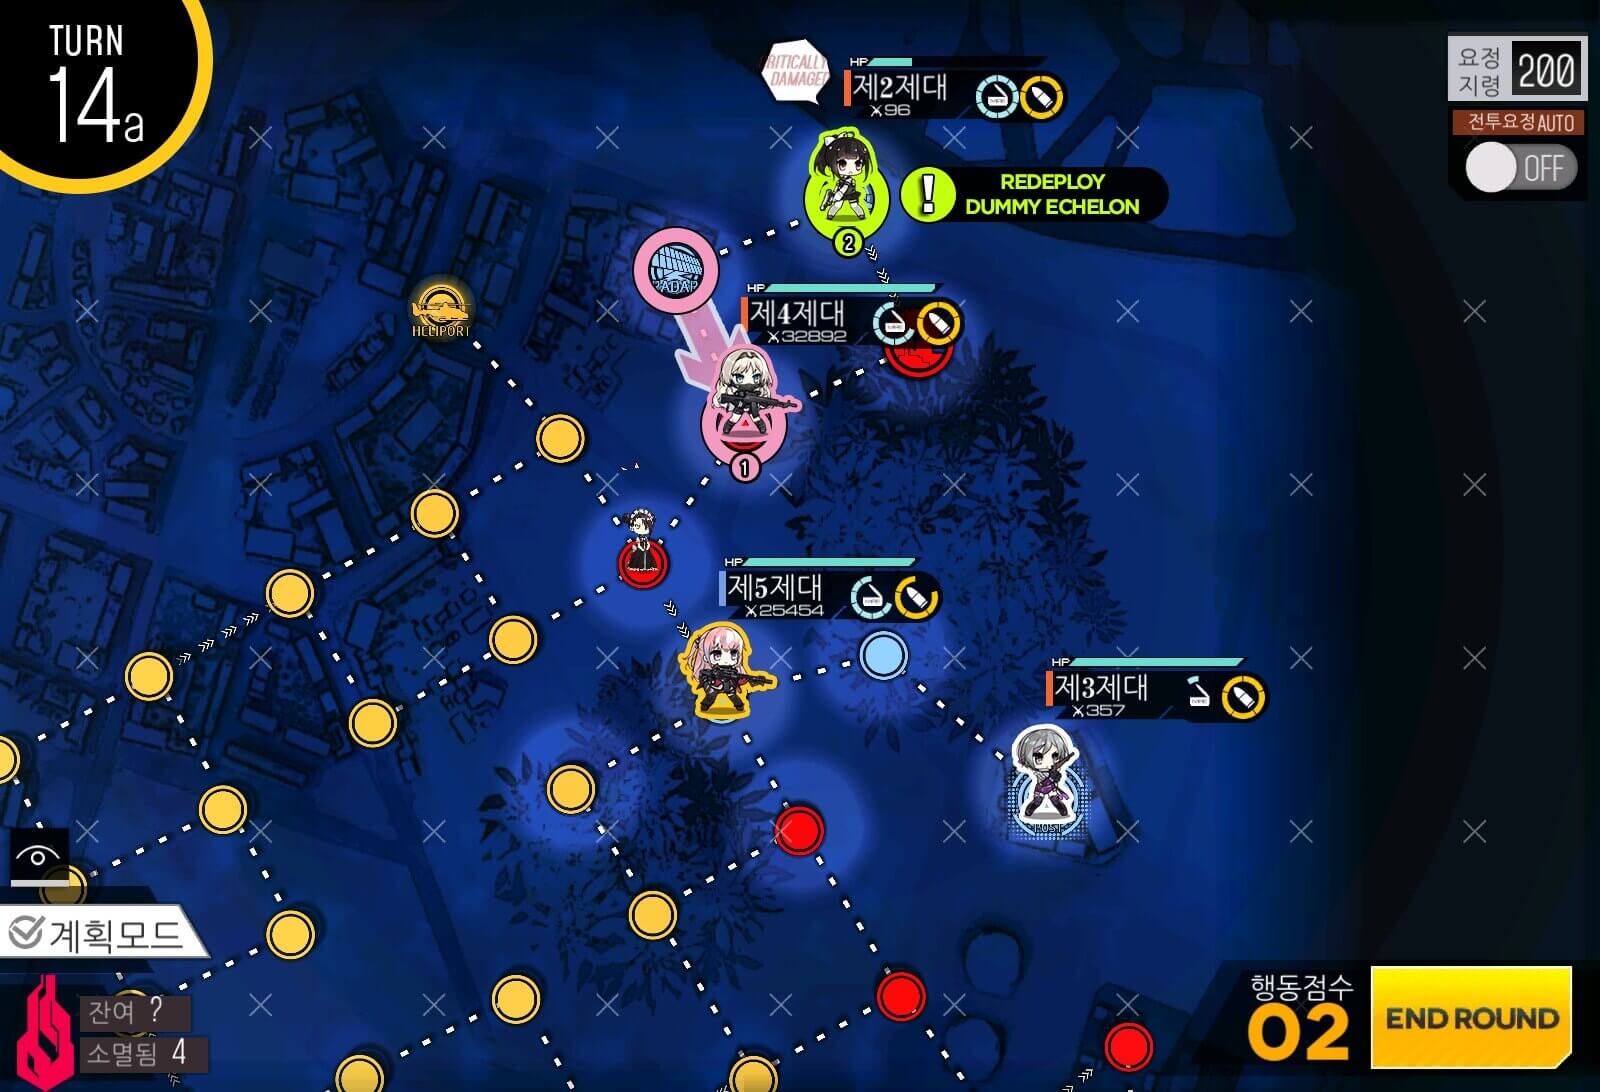
Turn 2b
Your goal is to get to Agent with the least amount of battles in between. For me, I was lucky enough to get to Agent without any at all. This part is purely RNG dependant, unfortunately. Your routes may vary.
Turn 3
Go and kill Agent. Best of luck.


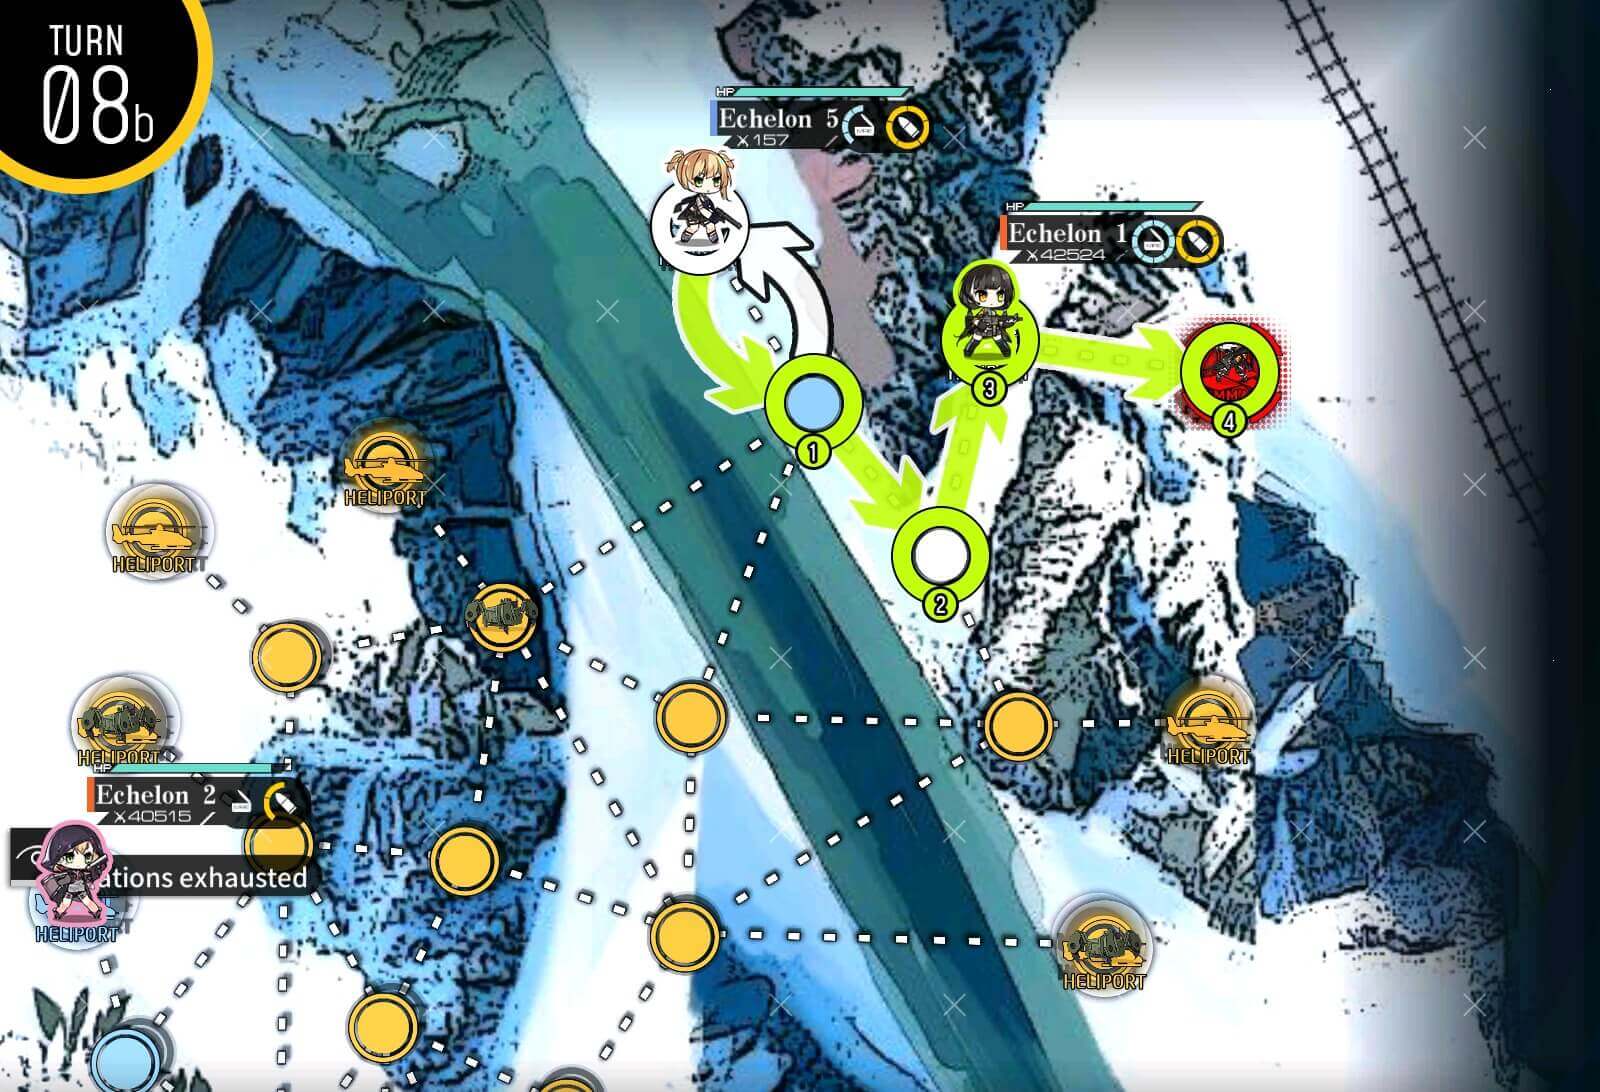
Chapter III

Turn 1
Start with a combat echelon at full supply moving to one of central helipad.
Turn 2
It is important that you deploy a dummy echelon with NO AMMO. If you don't have one already, just deploy a dummy in any map, then terminate the mission it's in right away.
Turn 3a
Swap the combat echelon and resupply it when there's 5 enemy units left on the map.

Turn 3b
Move as shown to clear the right side of the map.
Turn 3c
Move the dummy echelon closer to the combat echelon.
Turn 4
Swap with the dummy echelon and kill the remaining units. You should have 0 ammo by the end of the mission and get the achievement.
Turn 1a
Swap M4 all the way to the right most helipad like shown above.

Turn 1b
Now MG/anti-armor echelon is going to sweep weak armor units in the front, ending on a node north of M4. This is important that you do so.
Turn 1c
Swap anti-armor echelon with M4 and move dummy echelon as shown above. This is done for manipulating the enemy AI.

Turn 1d
Now except for Dummy echelon nest to M4, retreat all echelons. Again this is to remove RNG for where the enemy units will go. M4 will fight a tank, and with little bit of control, you should be able to win handily. This helps with dealing with less armor units.
Turn 2a
Beginning of 2nd turn we notice that one of tank is threatening the supply route. In order to prevent it from severing it, spawn a sacrificial echelon to satisfy its hunger. Spawn additional dummy echelon at HQ.
Turn 2b
To make all units move towards top left corner we are also going to retreat the dummy echelon that is in the middle. Critical thing to remember: you need to have at least one dummy echelon out of harms way each turn or you will lose the mission.
Turn 3a
We have another tank threatening the supply route, again to fix this issue we are deploying dummy echelon from helipad.
Turn 3b
Drawing aggro away from the supply route is your key priority.
Turn 4a
Now we have hydra unit threatening the supply route on the right side, so we are going to sacrifice the dummy echelon on the HQ as bait.

Turn 4b
Since i have additional space for dummy on the right side i decided to push both dummies up. Only do this if you know one is safe from being run over.

Turn 5a
Repeat the process as needed. Once this turn is over you should be finished.

Turn 5b
Fin
Turn 1
Start with an Anti-armor echelon and take the helipad north of the HQ. Then spawn in a 2nd combat echelon.
Turn 2a
Swap with the 2nd combat echelon, then resupply.
Turn 2b
Go clockwise around the loop then swap back with the 2nd combat echelon. Resupply before ending your turn.

Turn 3
The 2nd combat echelon moves to the helipad at the top end of the map, while the anti-armor echelon moves to the south of the HQ to take another helipad.
Turn 4
The 2nd combat echelon moves to the helipad at the top end of the map, while the anti-armor echelon moves to the south of the HQ to take another helipad.
Turn 5
There's an enemy near the helipad on the top right that needs to be taken care of before moving to the next helipad. You should have plenty of move points to do so.
Turn 6
Don't forget to resupply as you go. Again, repeat the previous step making sure there's no enemy left behind.
Turn 7
Once you cover the last area, you should be all set.
Turn 1
There's no easy way out of this one. You have to kill Agent in order to clear this mission. At least it's during the day this time!
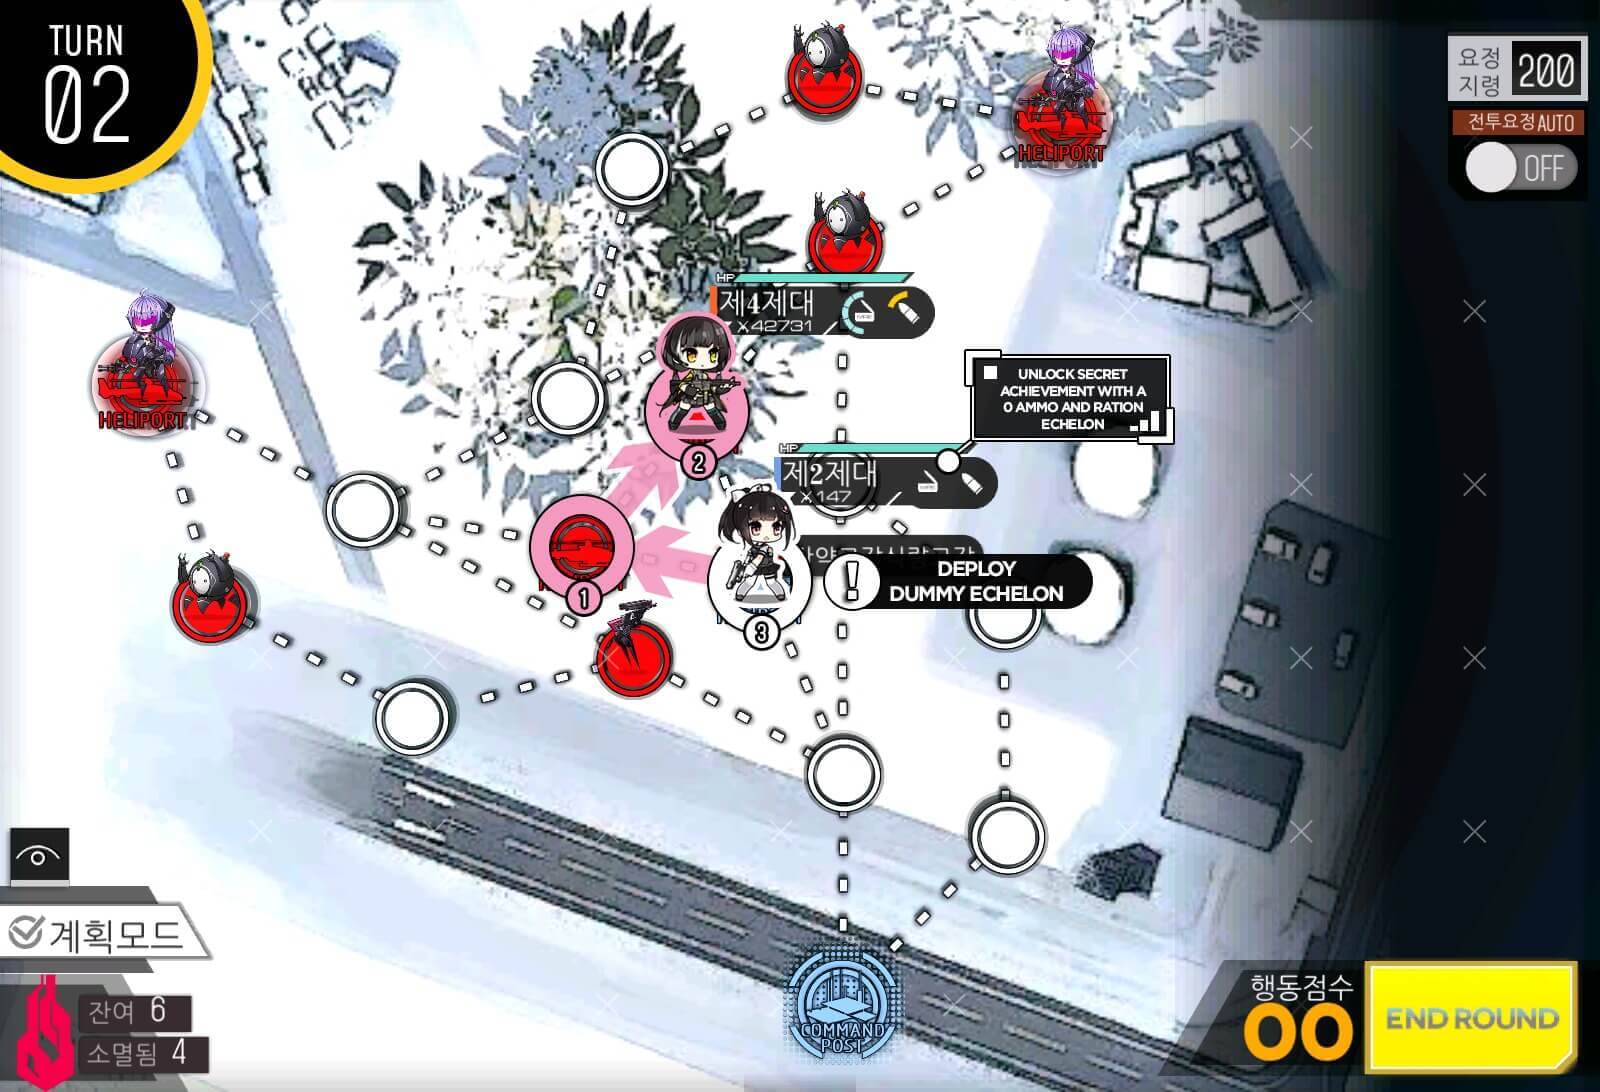
Turn 1
We are basically going to ignore the hostage T-doll and operate normally. Get your anti-armor/anti-mine echelon [mostly MG echelons] up once, then spawn a dummy echelon.
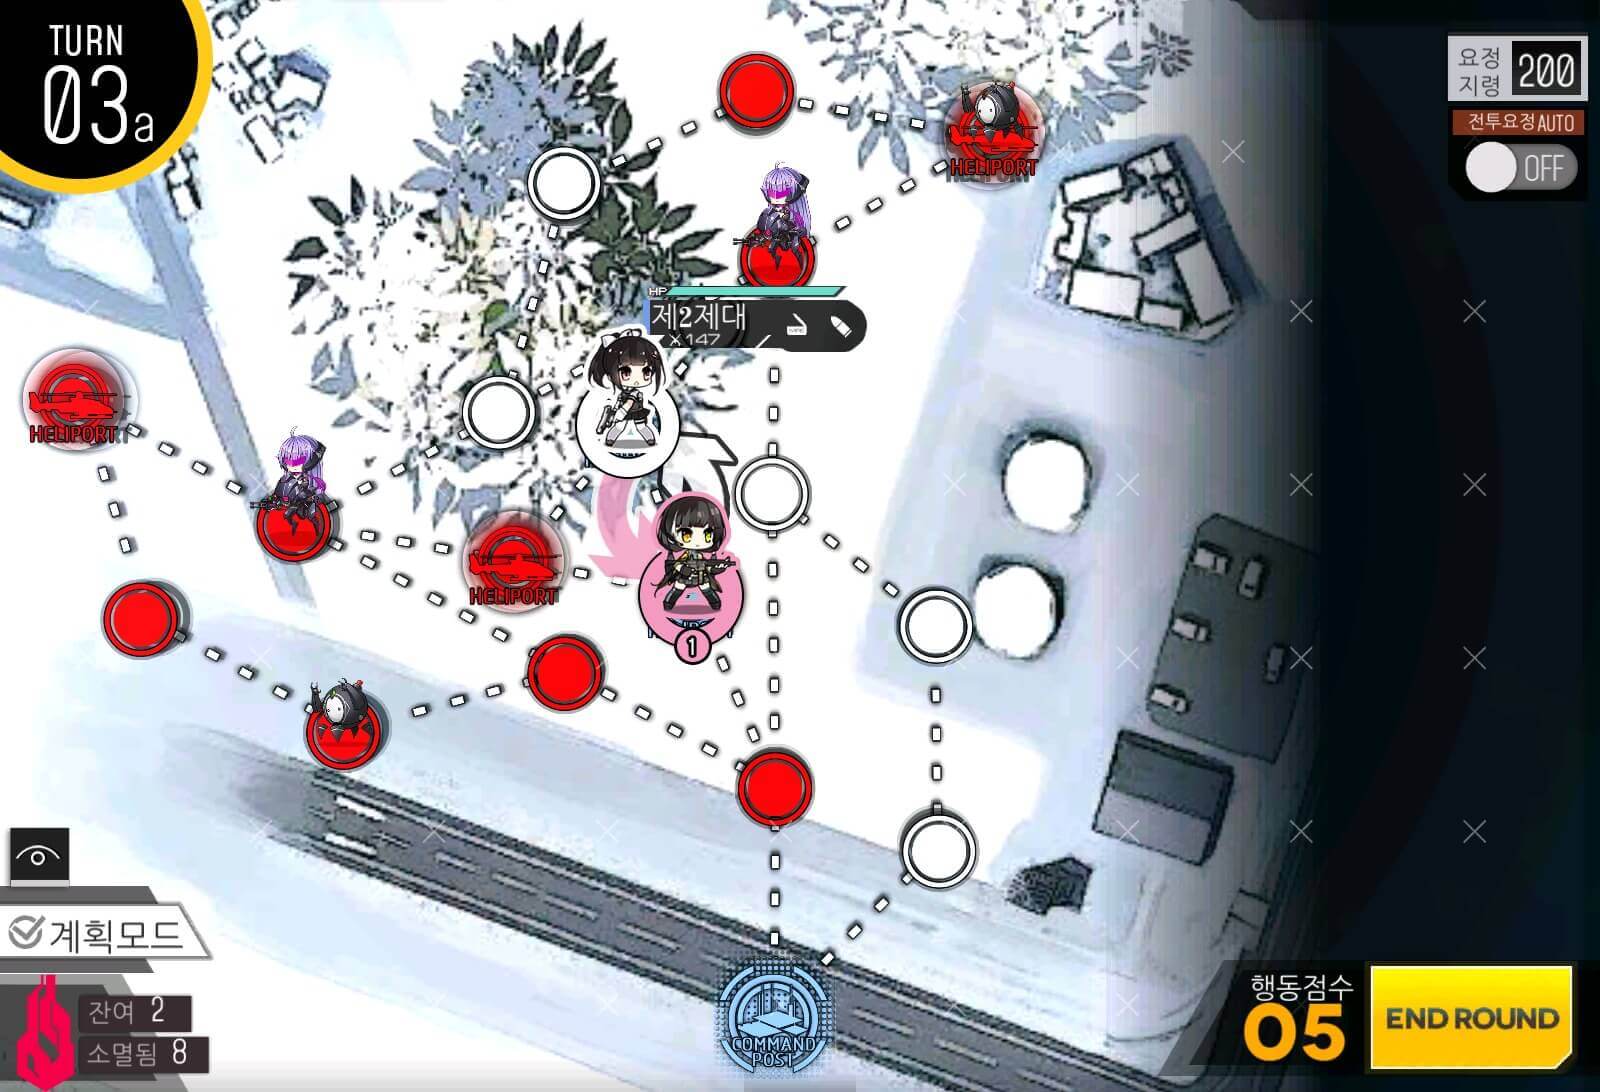
Turn 2
Swap the dummy echelon and anti-armor echelon. The dummy echelon then takes the route with "?" nodes on the left.
Turn 3a
Take only the first 2 "?" nodes. Proceed any further and you will enter the threat range. Each node taken will rob you of 750 ammo, but it's a small price to pay, as you can see how it kills all units in the map.
Turn 3a (2)
As you can see we need to hit that final "?" node but if we move up we will make the tank to move on top of it. Just be patient!
Turn 3b
Move the combat echelon up once from the helipad.
Turn 4a
Move all the way up to the last "?" node. You can see that the Hydra units are no more. The tank will attack your dummies, all you have to do is retreat them right away.
Turn 4b
With your last remaining moves, spawn another dummy echelon at the bottom.
Turn 5a
Move the dummy echelon forward after swapping.
Turn 5b
Shift up your combat echelon and spawn a 2nd dummy [the one that retreated earlier].
Turn 6a
To get an extra move, we are going to take the helipad that hostage doll is standing on.
Turn 6b
Move the 2nd dummy above the 1st dummy echelon.
Turn 7a
2nd dummy echelon moves to the next helipad up north.
Turn 7b
Dummy echelon follows up so that it can be taken.
Turn 8
Move up to this specific node, this is the one spot near the enemy HQ that is outside of that Tank's patrol range.
Turn 9
Move to the enemy's HQ and end your turn.
Turn 1
Deploy 2 combat echelons from the HQ on your 1st turn, both need to be capable of handling armor units.
Turn 2
Sweep counter clockwise to take out armor units.
Turn 3
Move the 2nd combat echelon up once, then spawn a dummy unit at HQ. Swap back combat echelons back to HQ to resupply as needed.
Turn 4
Once you resupplied the combat echelon, sweep in large half circle once more. Then set the allied M4 unit to "Eliminate"
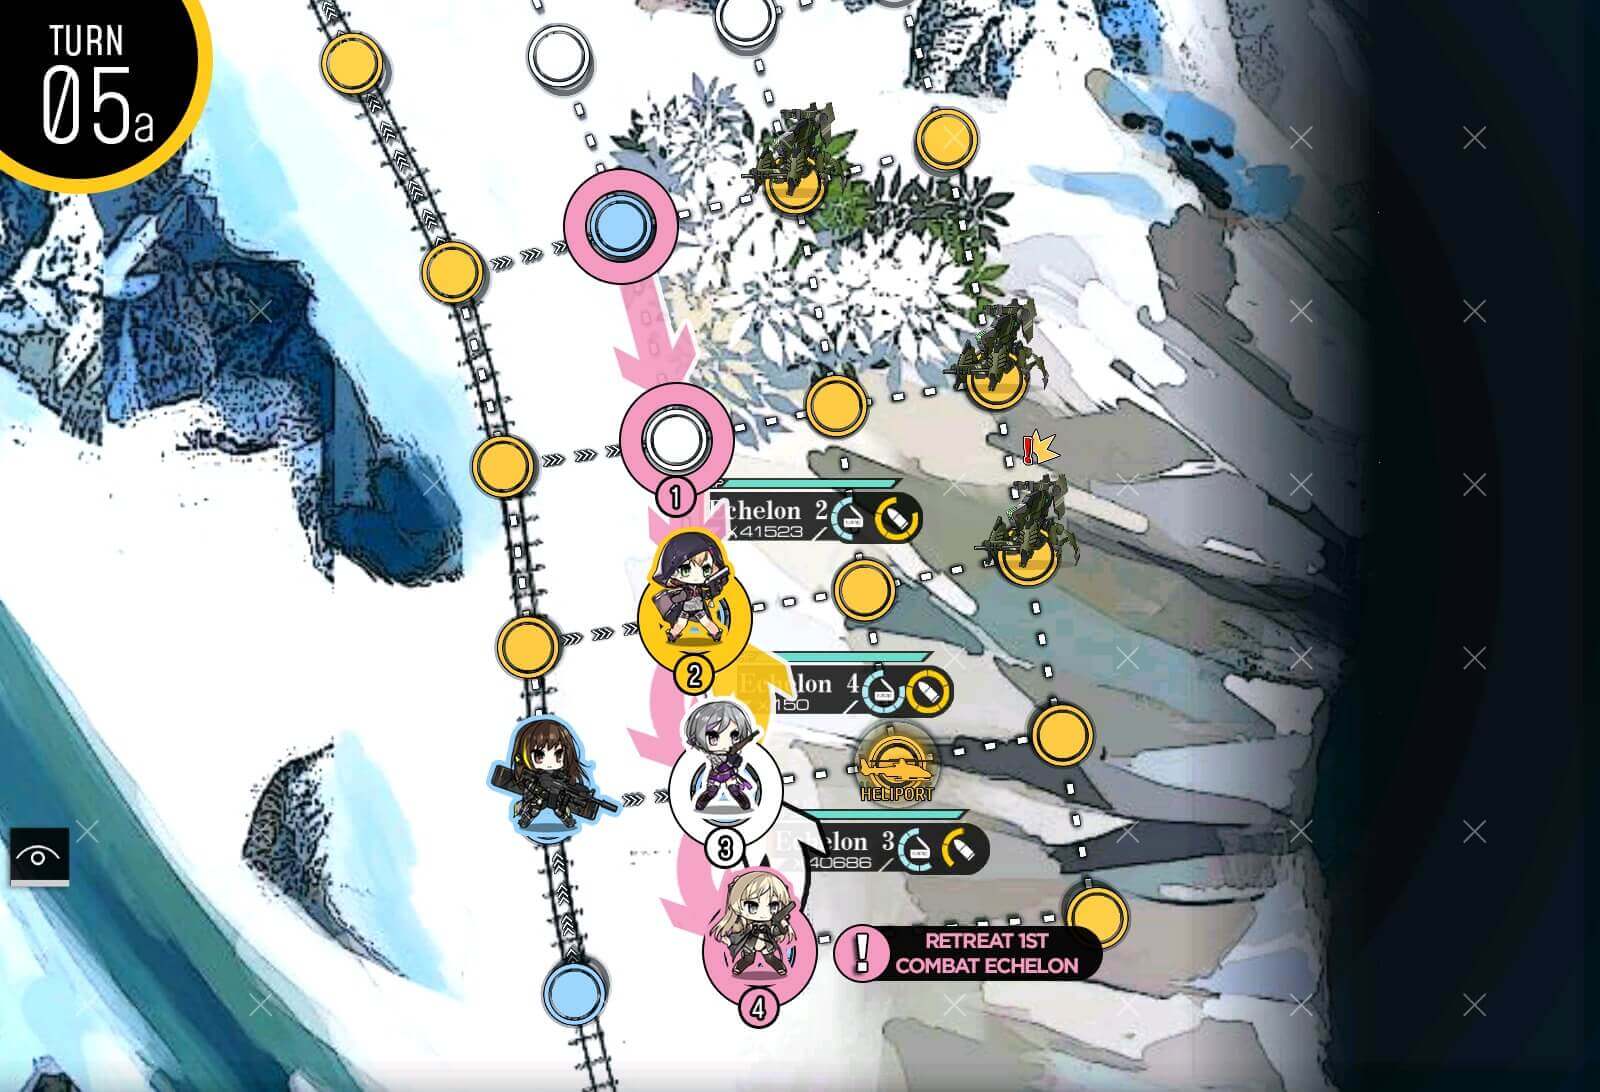
Turn 5a
1st combat echelon moves back, then swaps all the way back to HQ to retreat.
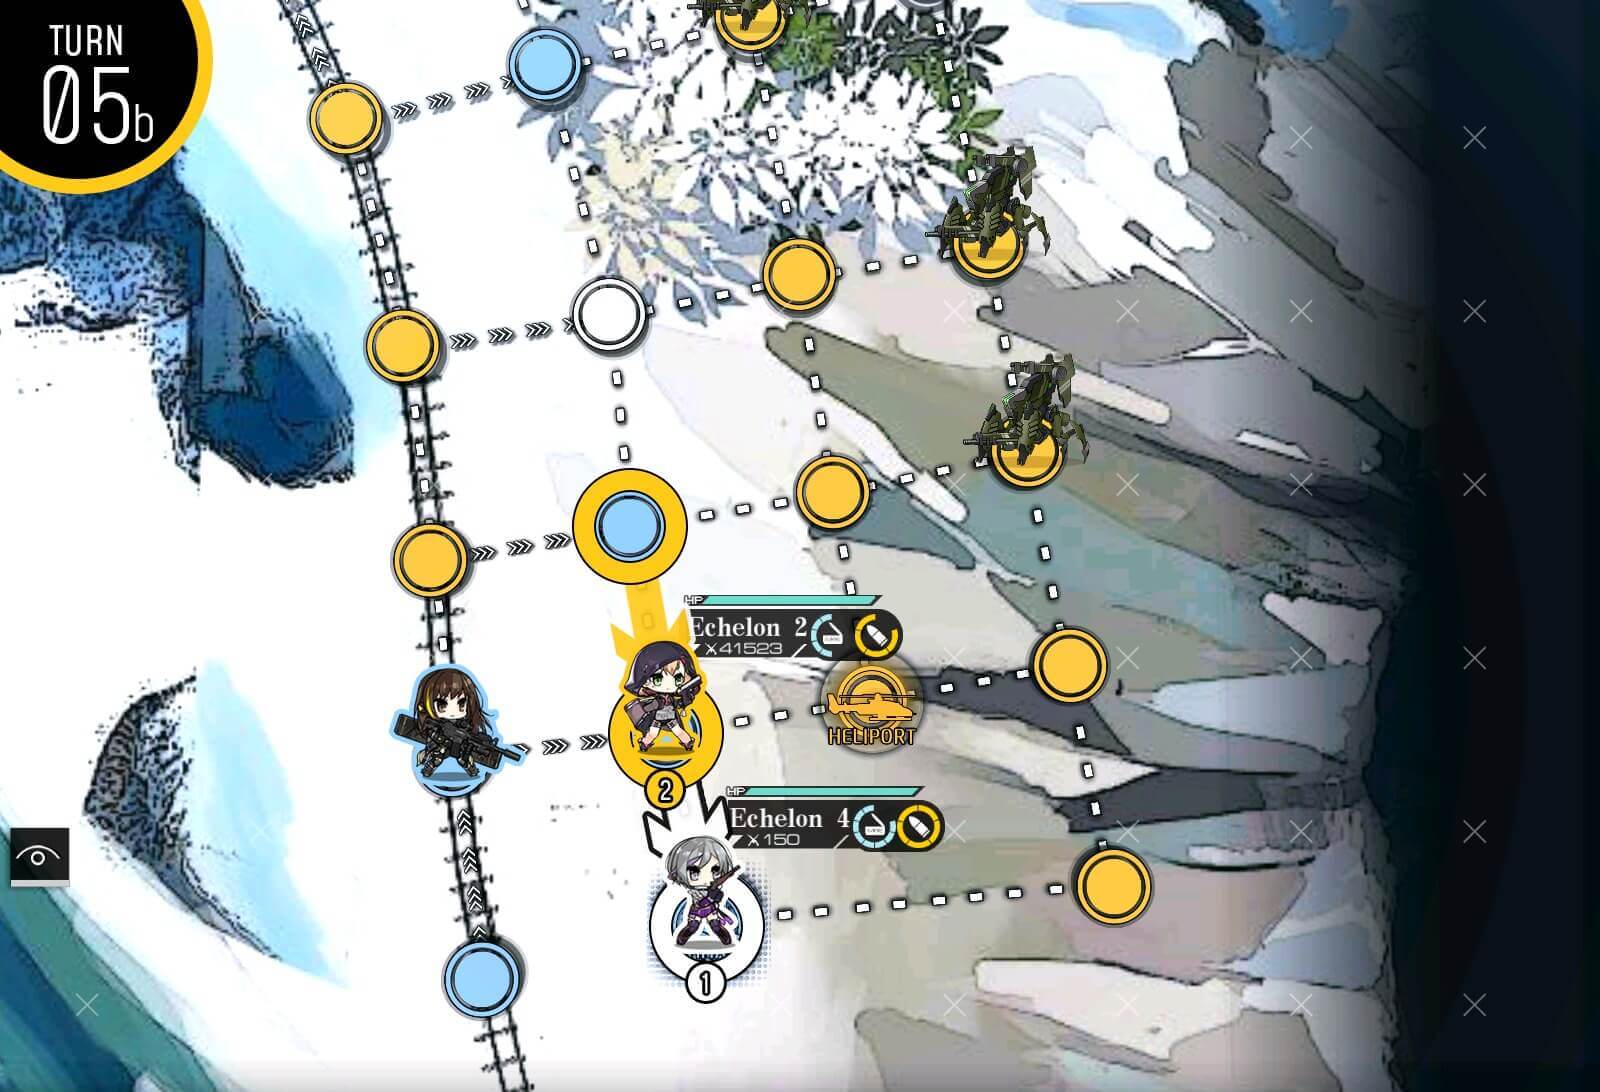
Turn 5b
Shift all the units down once towards HQ. This removes them all from the Hydras' threat range.
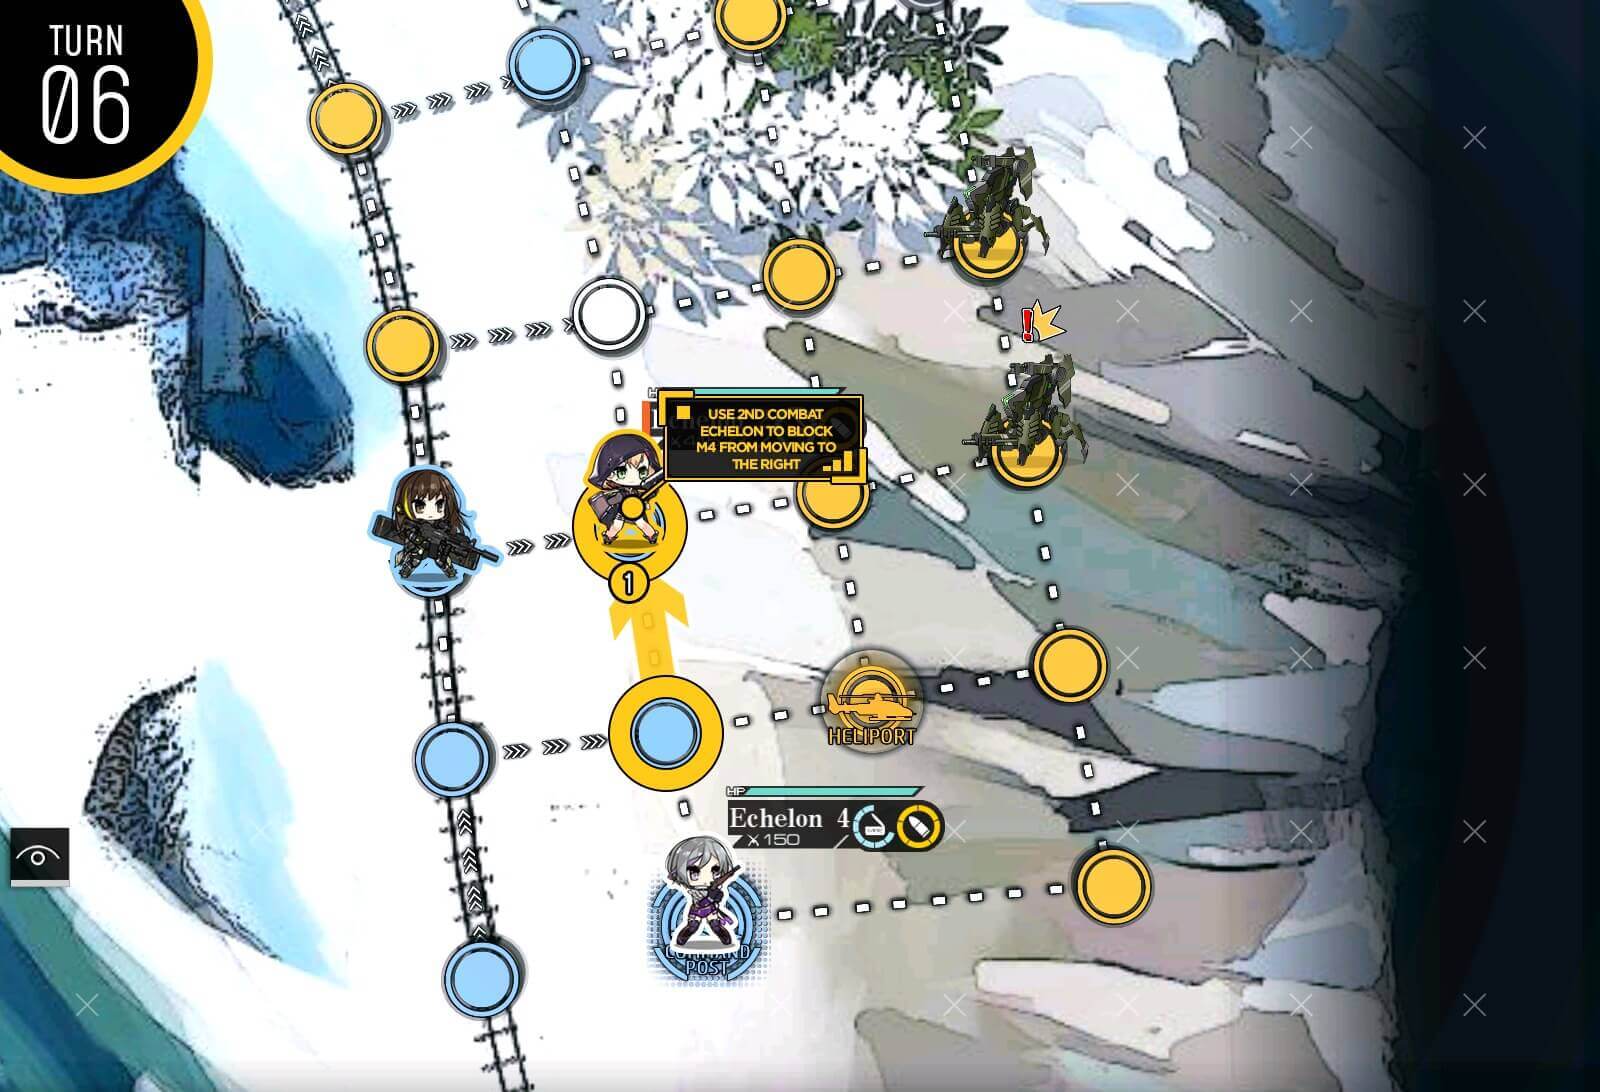
Turn 6
Now all you have to do is keep up with M4, besides her, so that M4 doesn't move to the right, going over the one directional path.
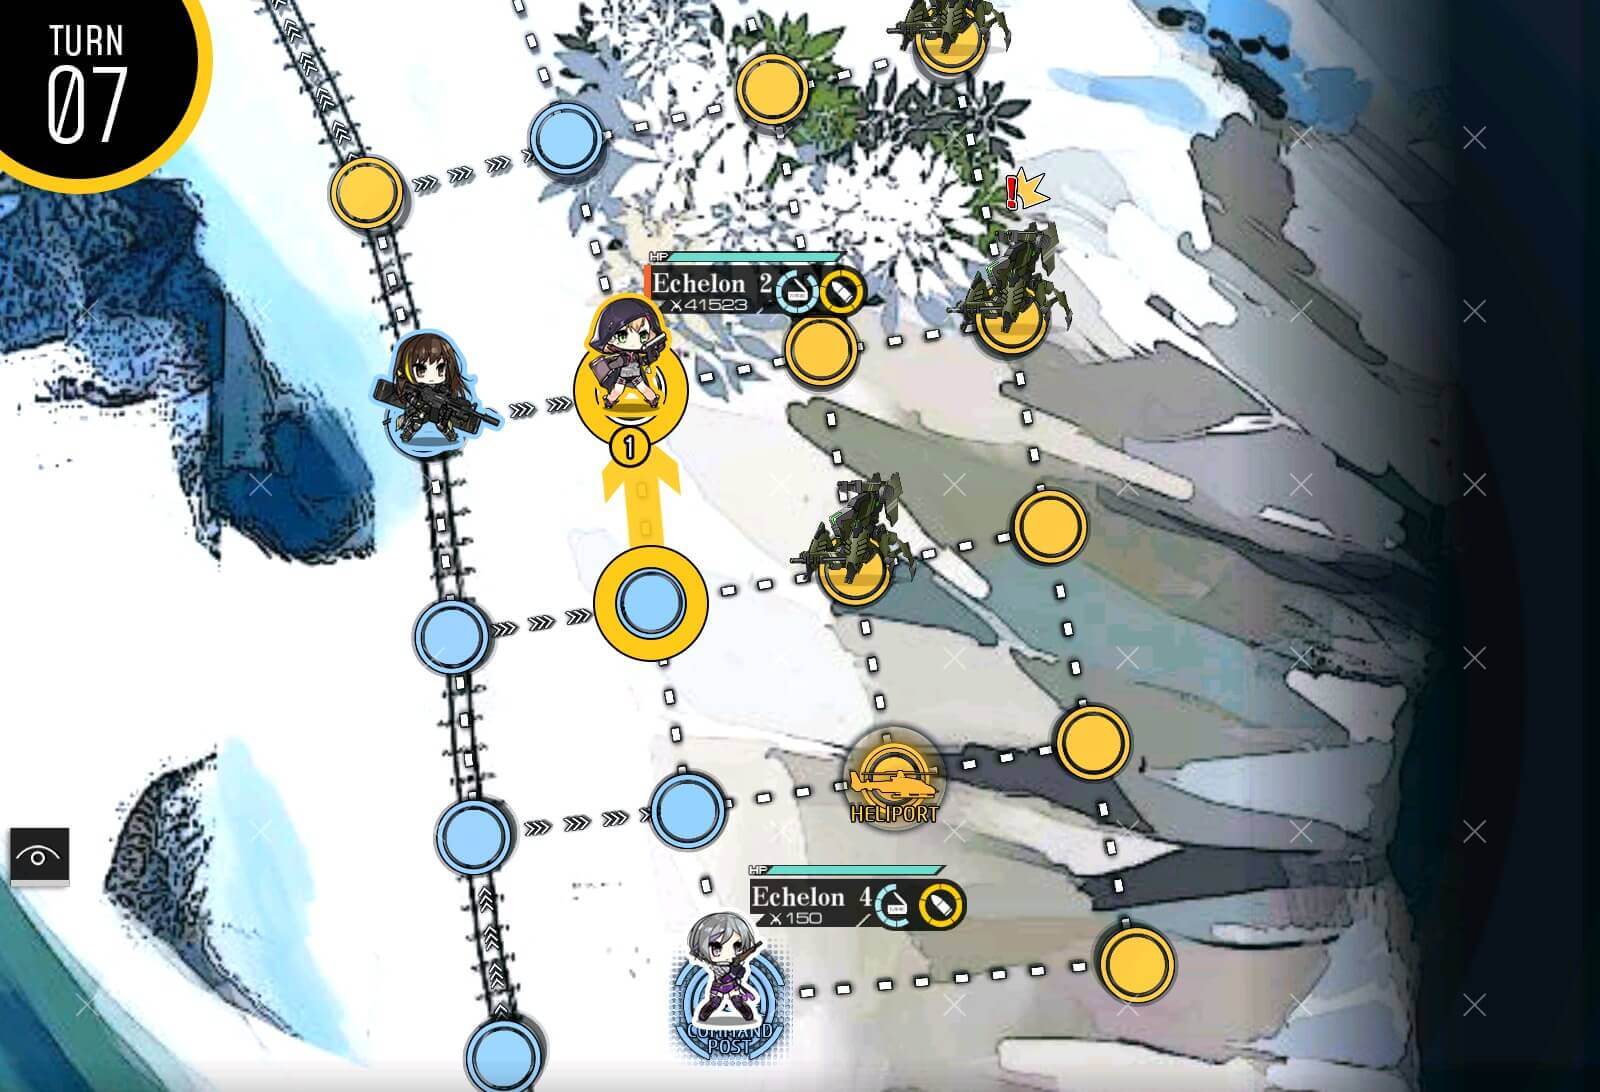
Turn 7
Again move up to match with M4's position.
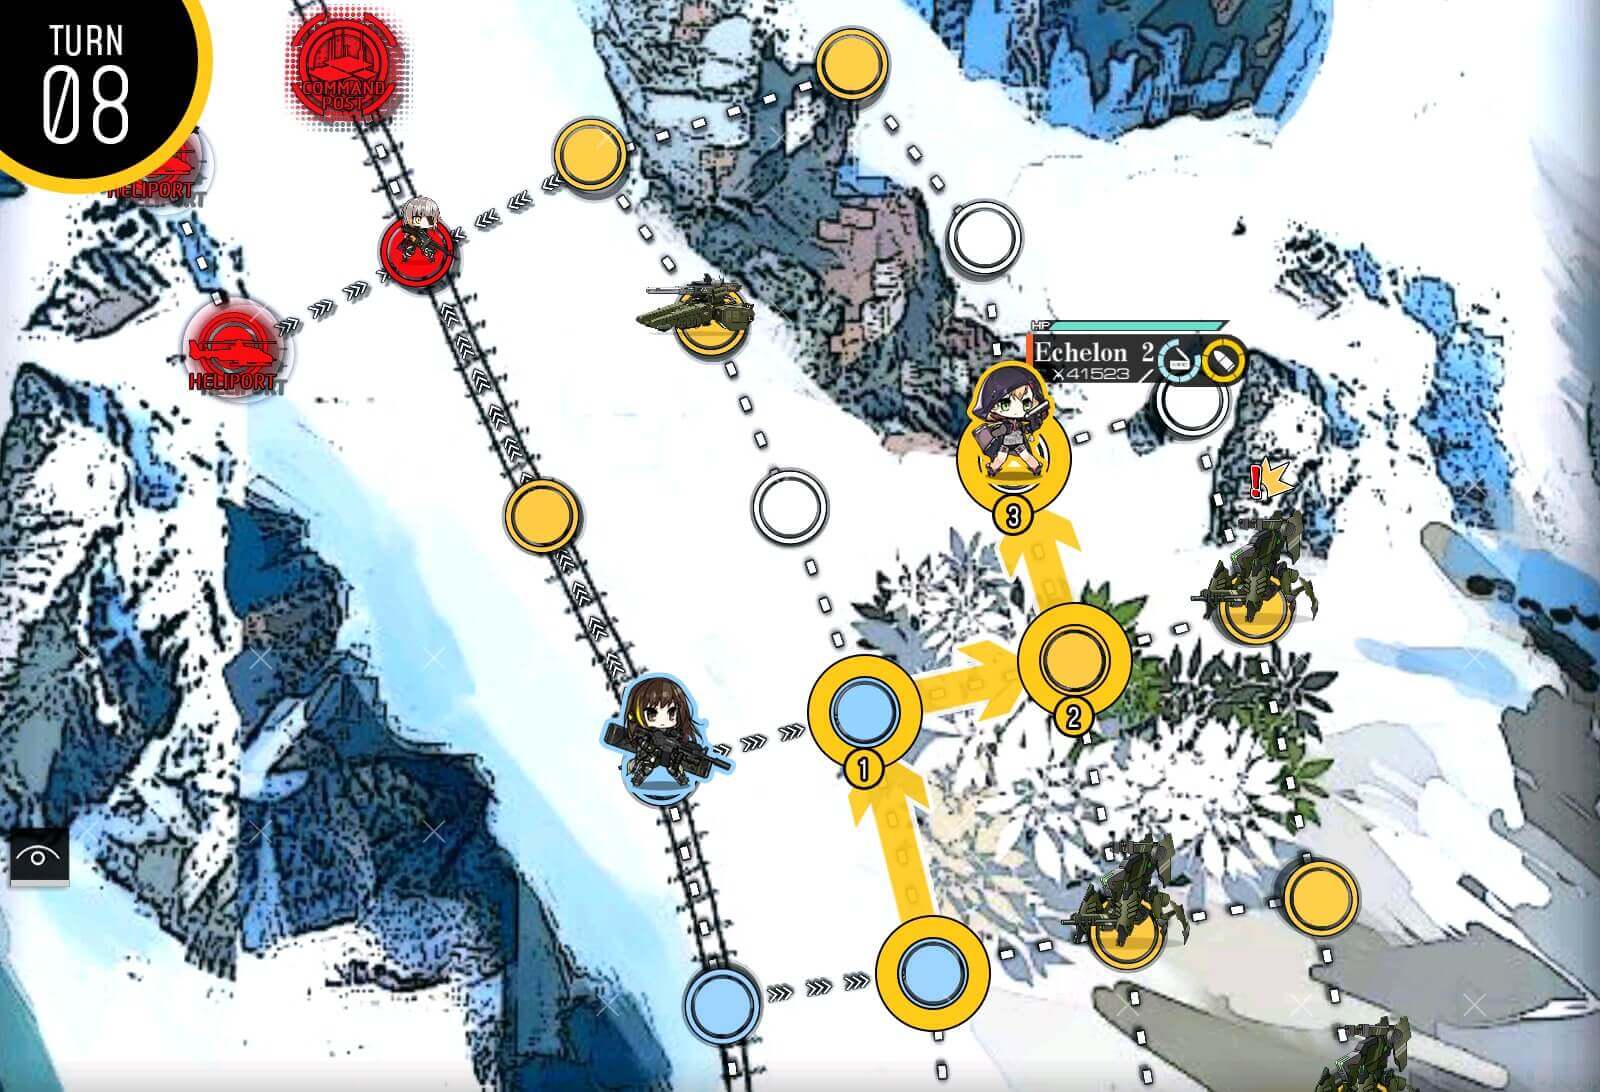
Turn 8
On turn 8, move the combat echelon up then to side, going to the route that doesn't have a tank in the middle.
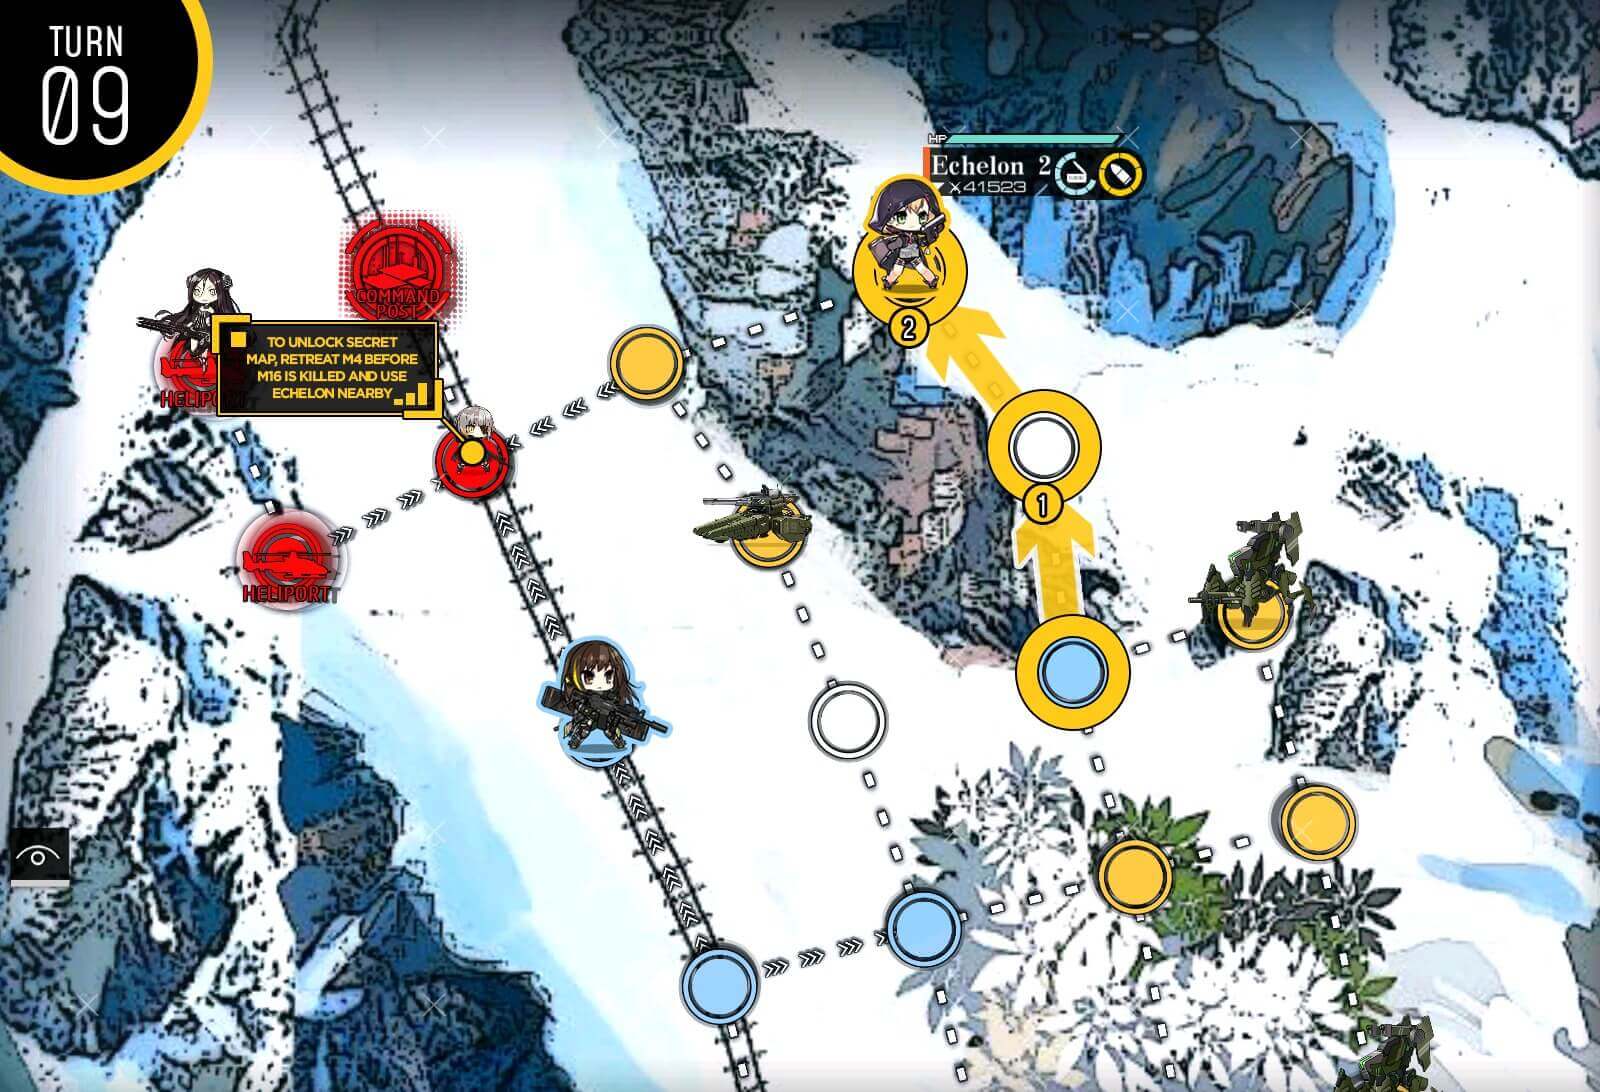
Turn 9
From here you are free to choose whether to engage the boss unit either with just the allied M4 [intended], or use your own team to beat the boss, which is a requirement to unlock the hidden map in this chapter.