


Chapter I

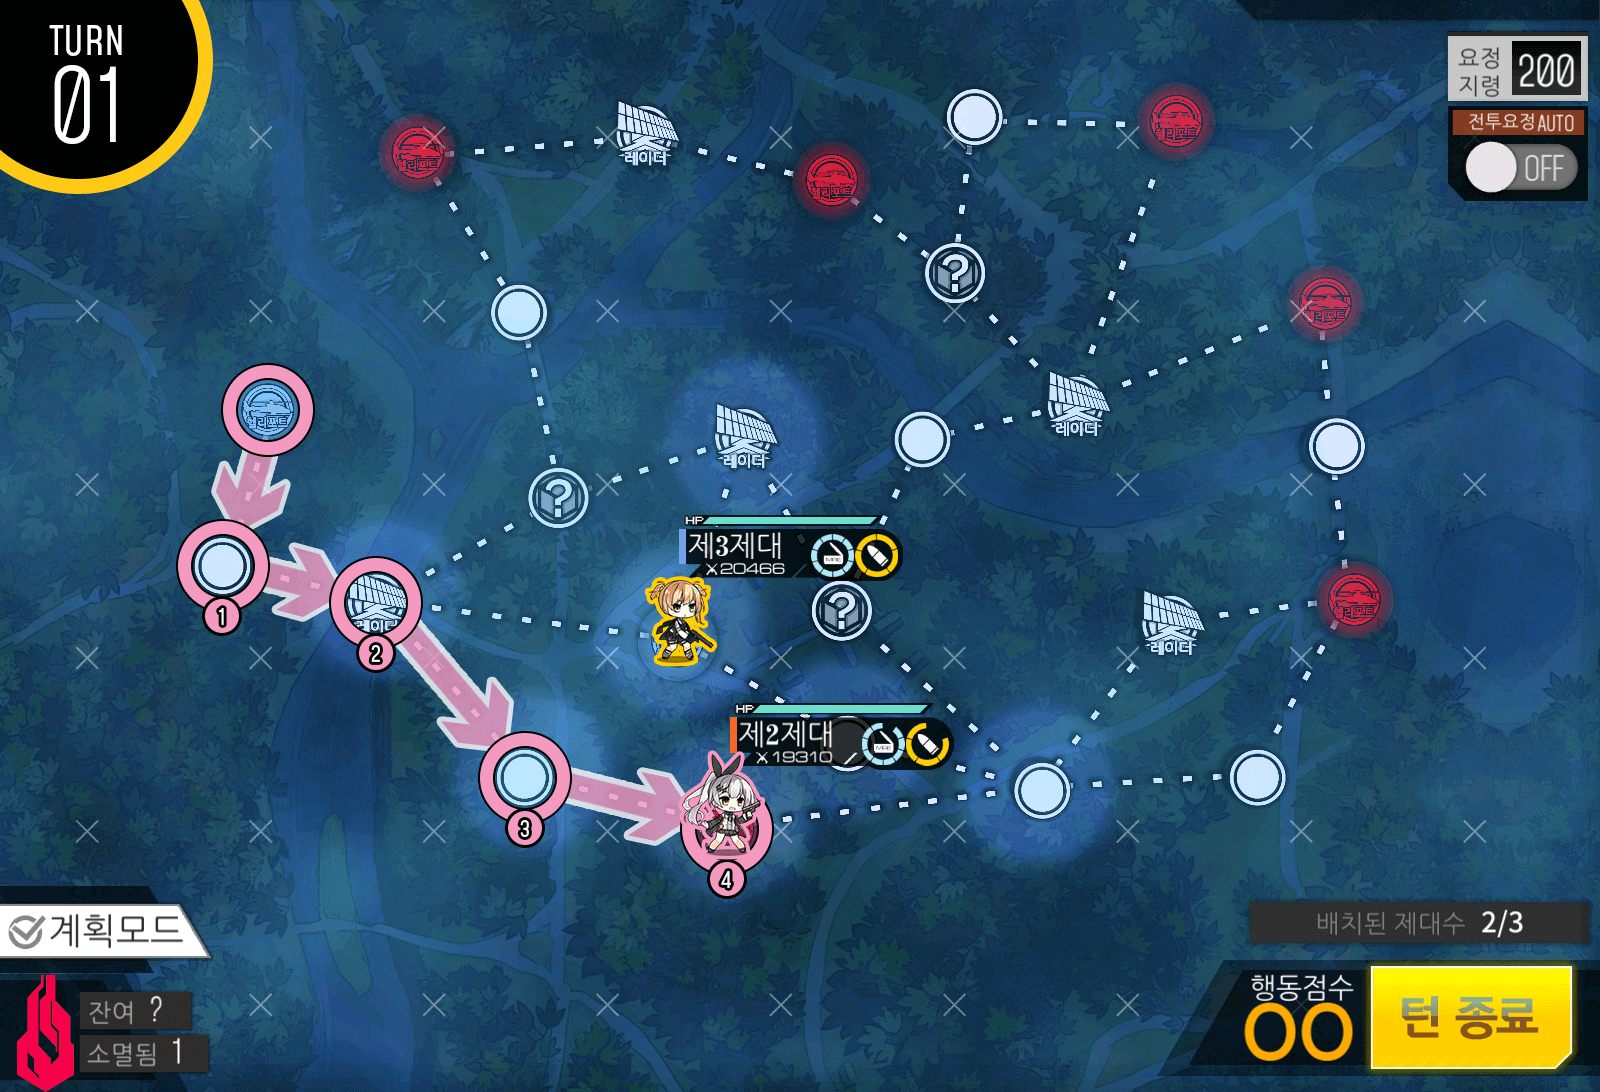
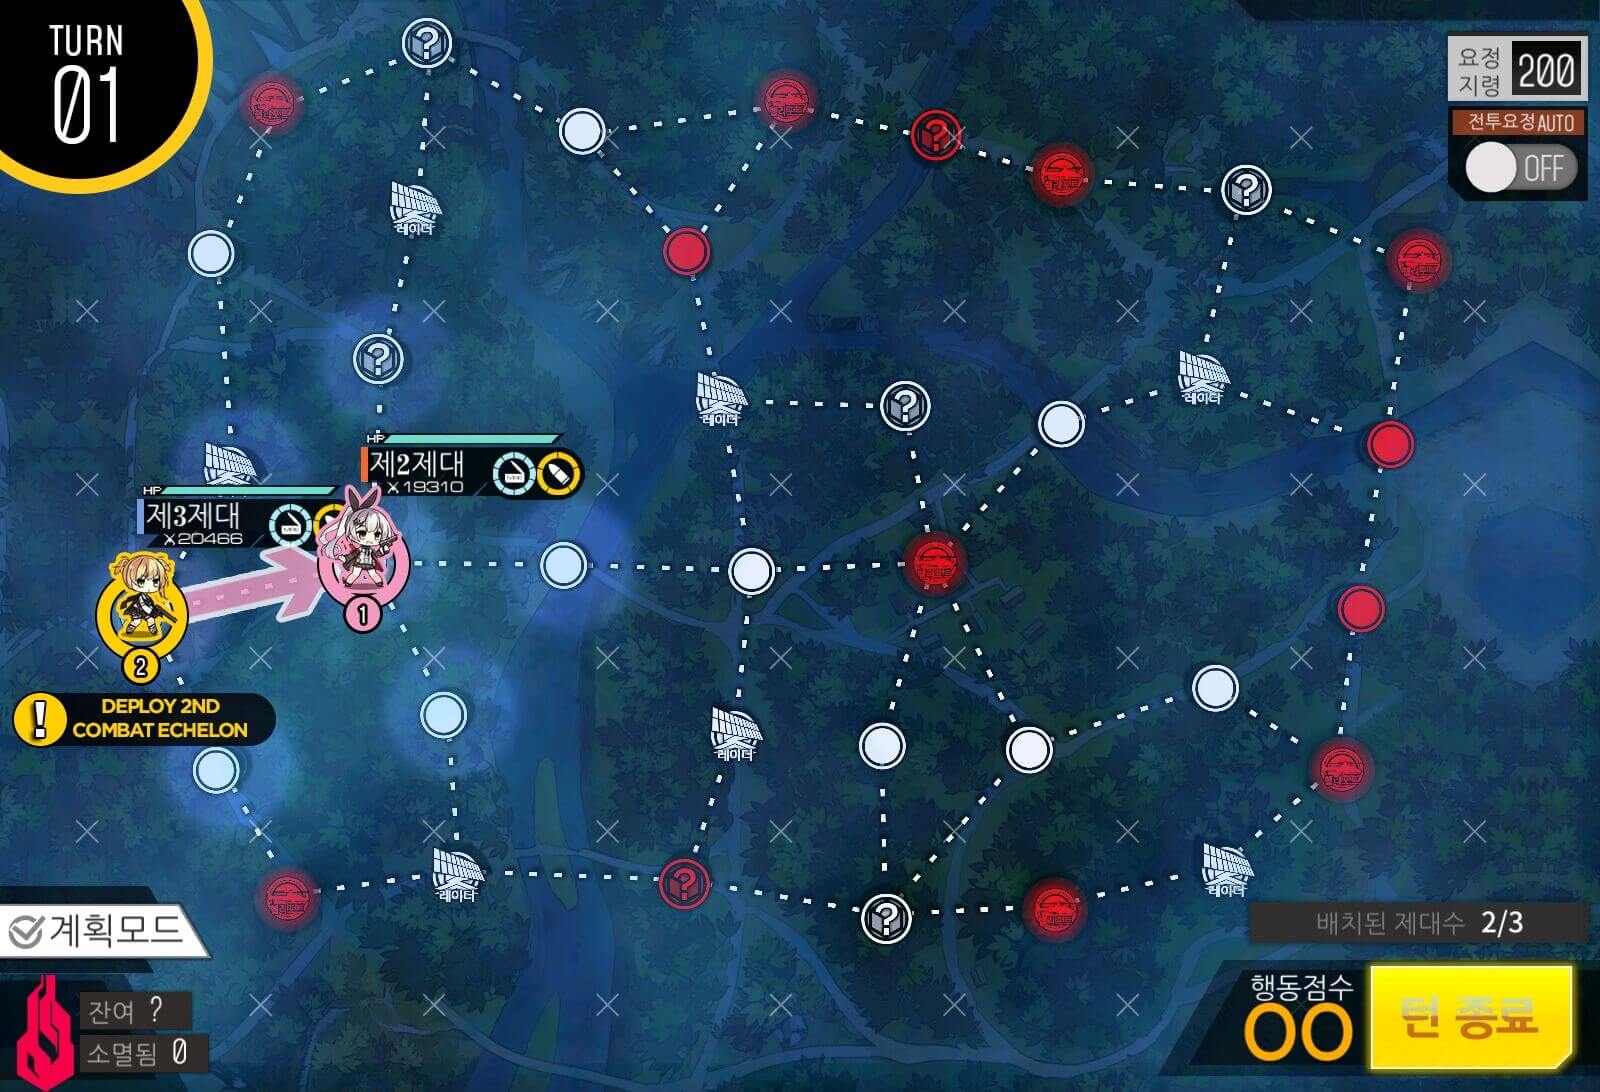
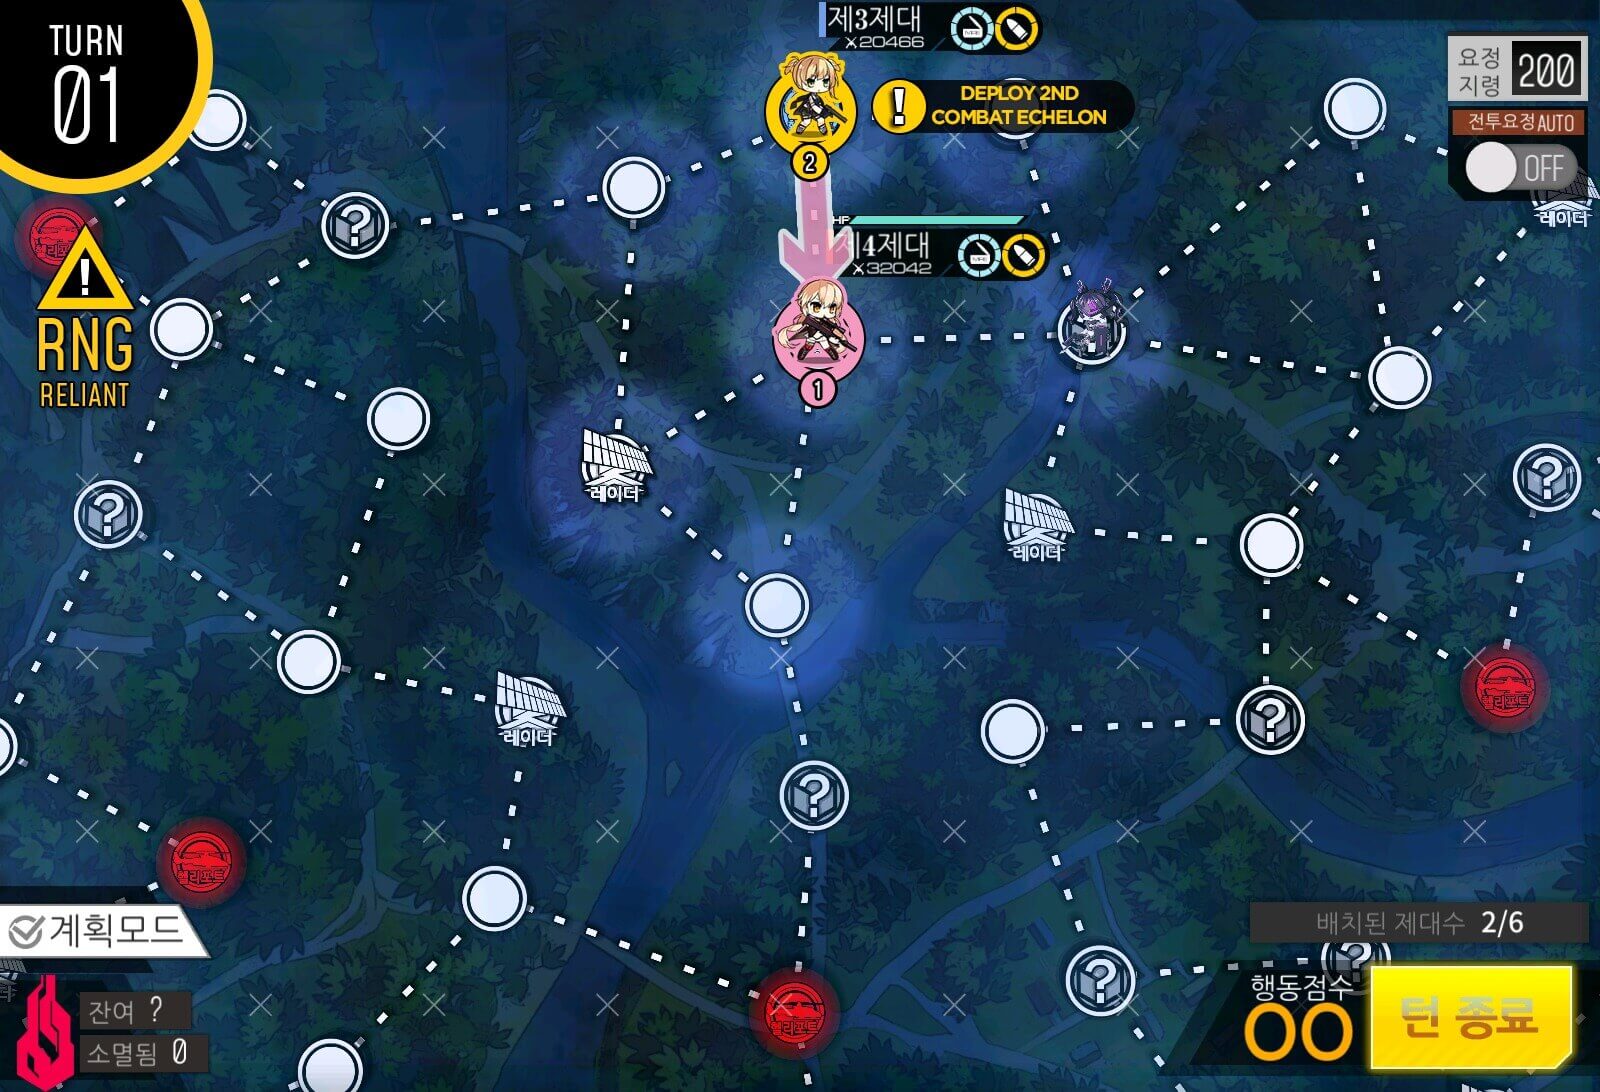
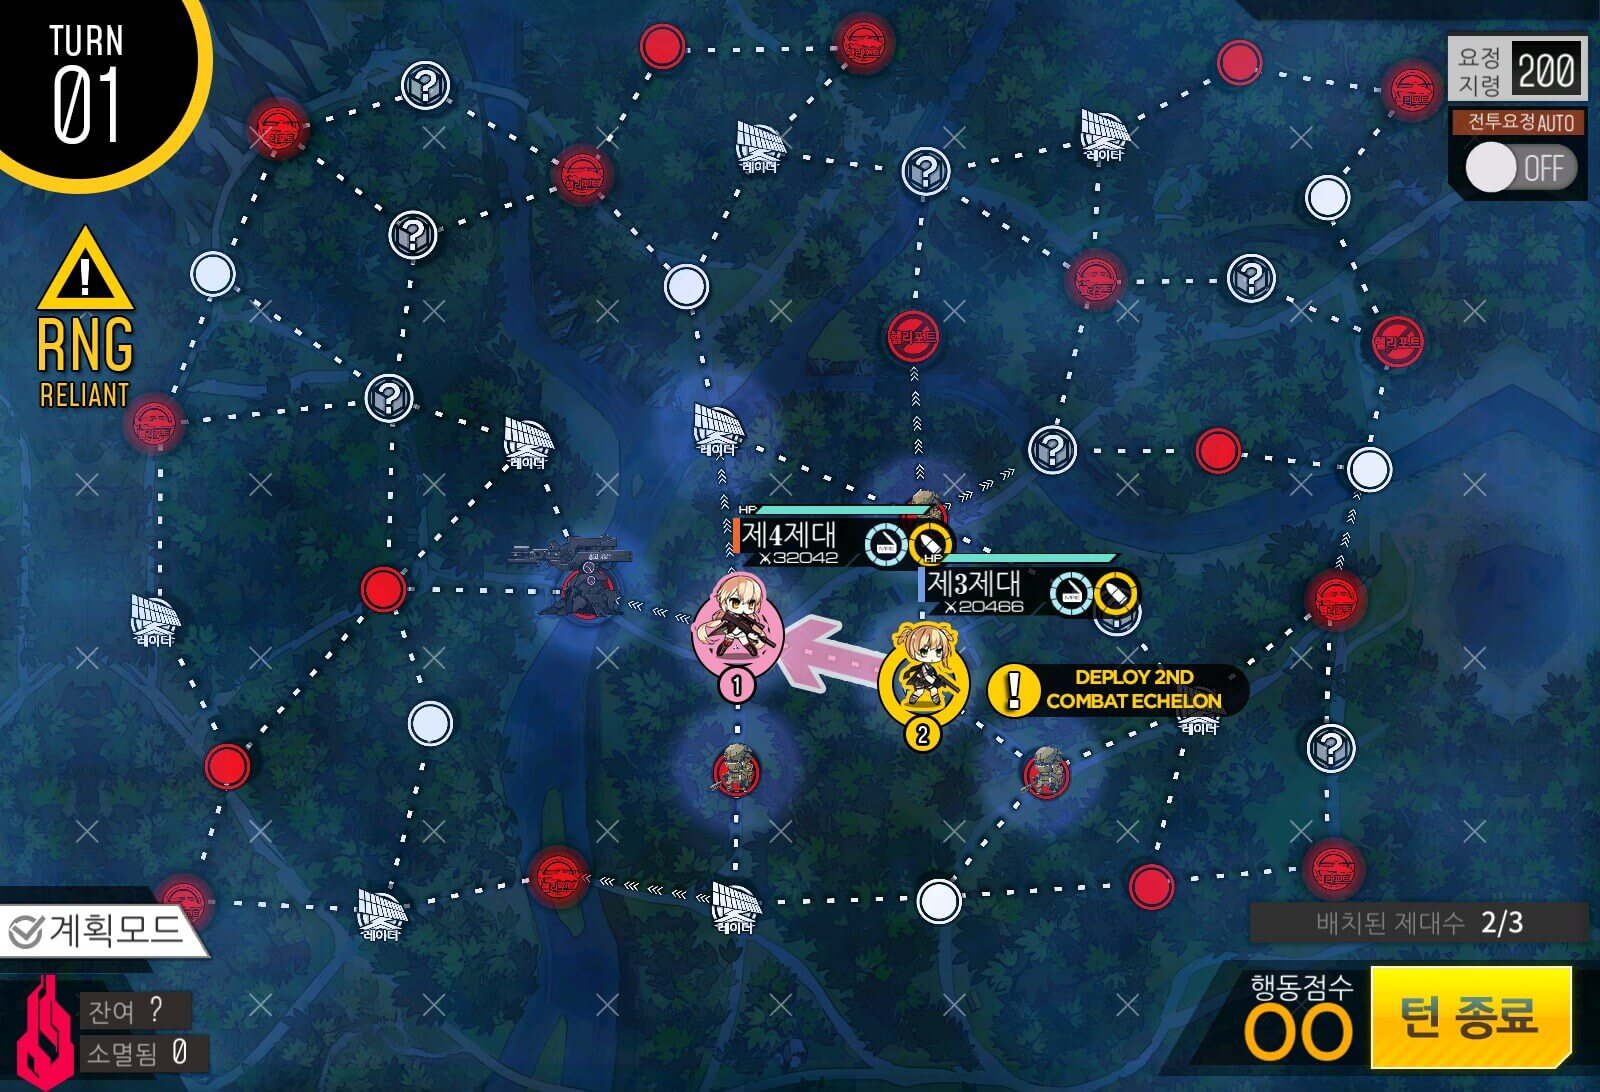
Turn 1
Turn 1 consists of capturing another helipad at the bottom of the map.
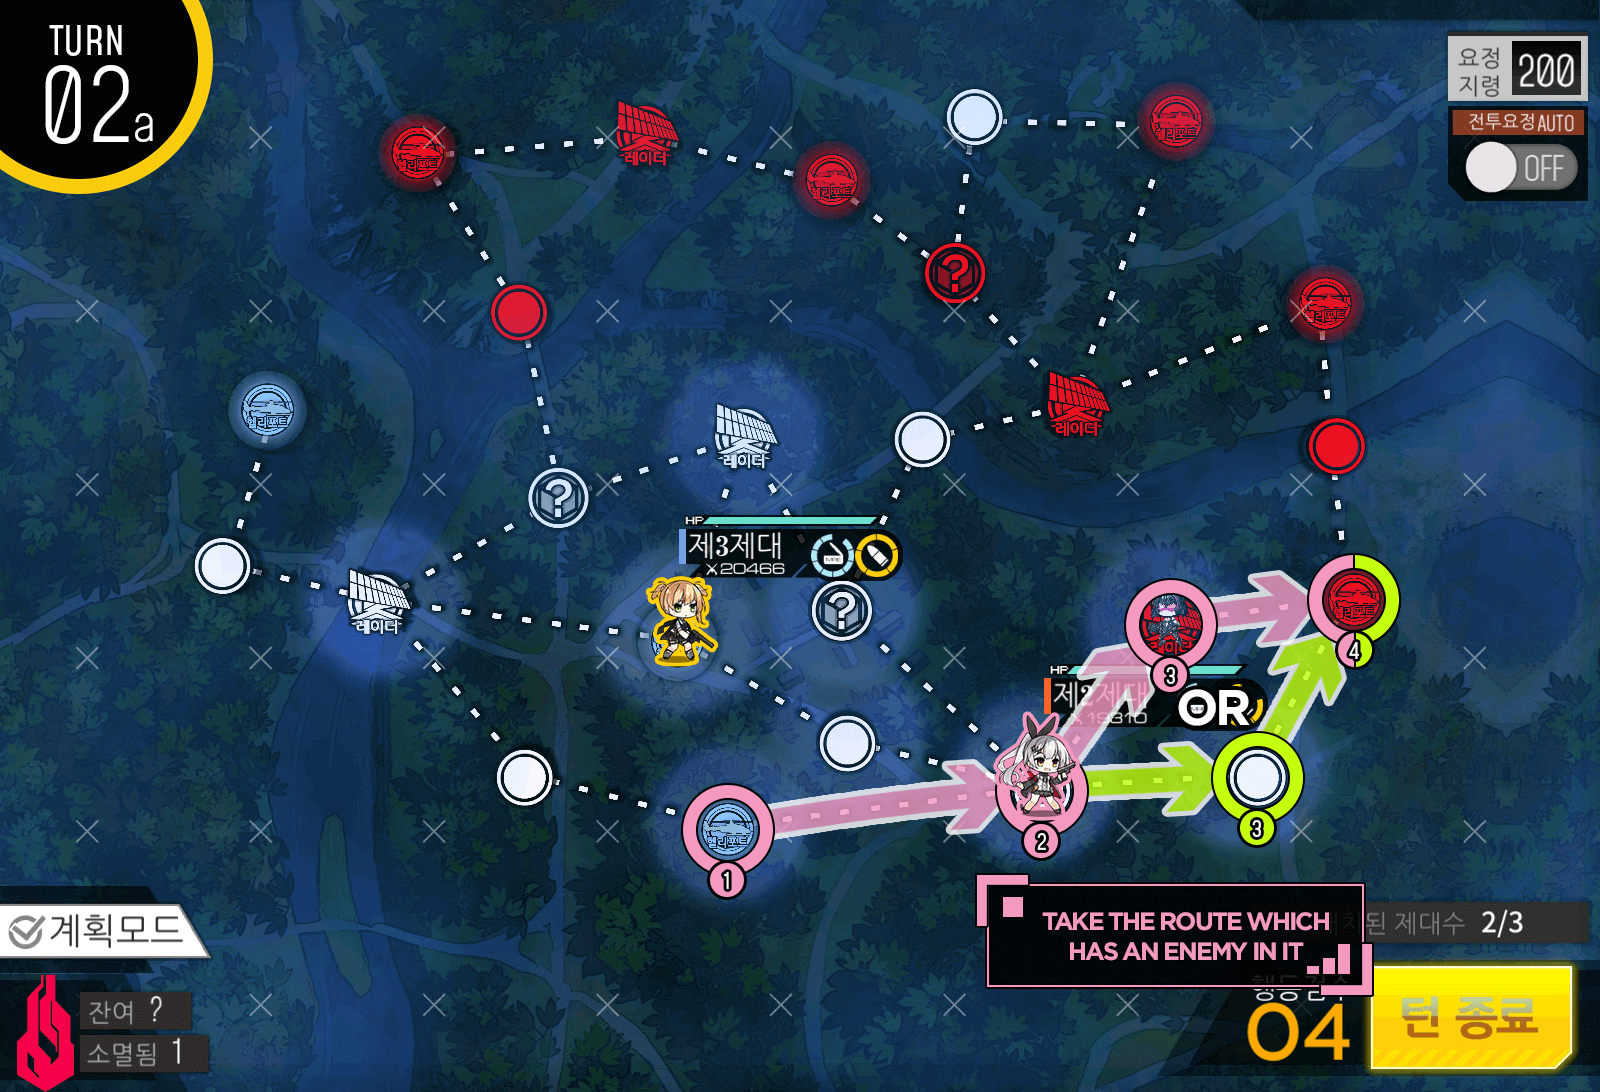
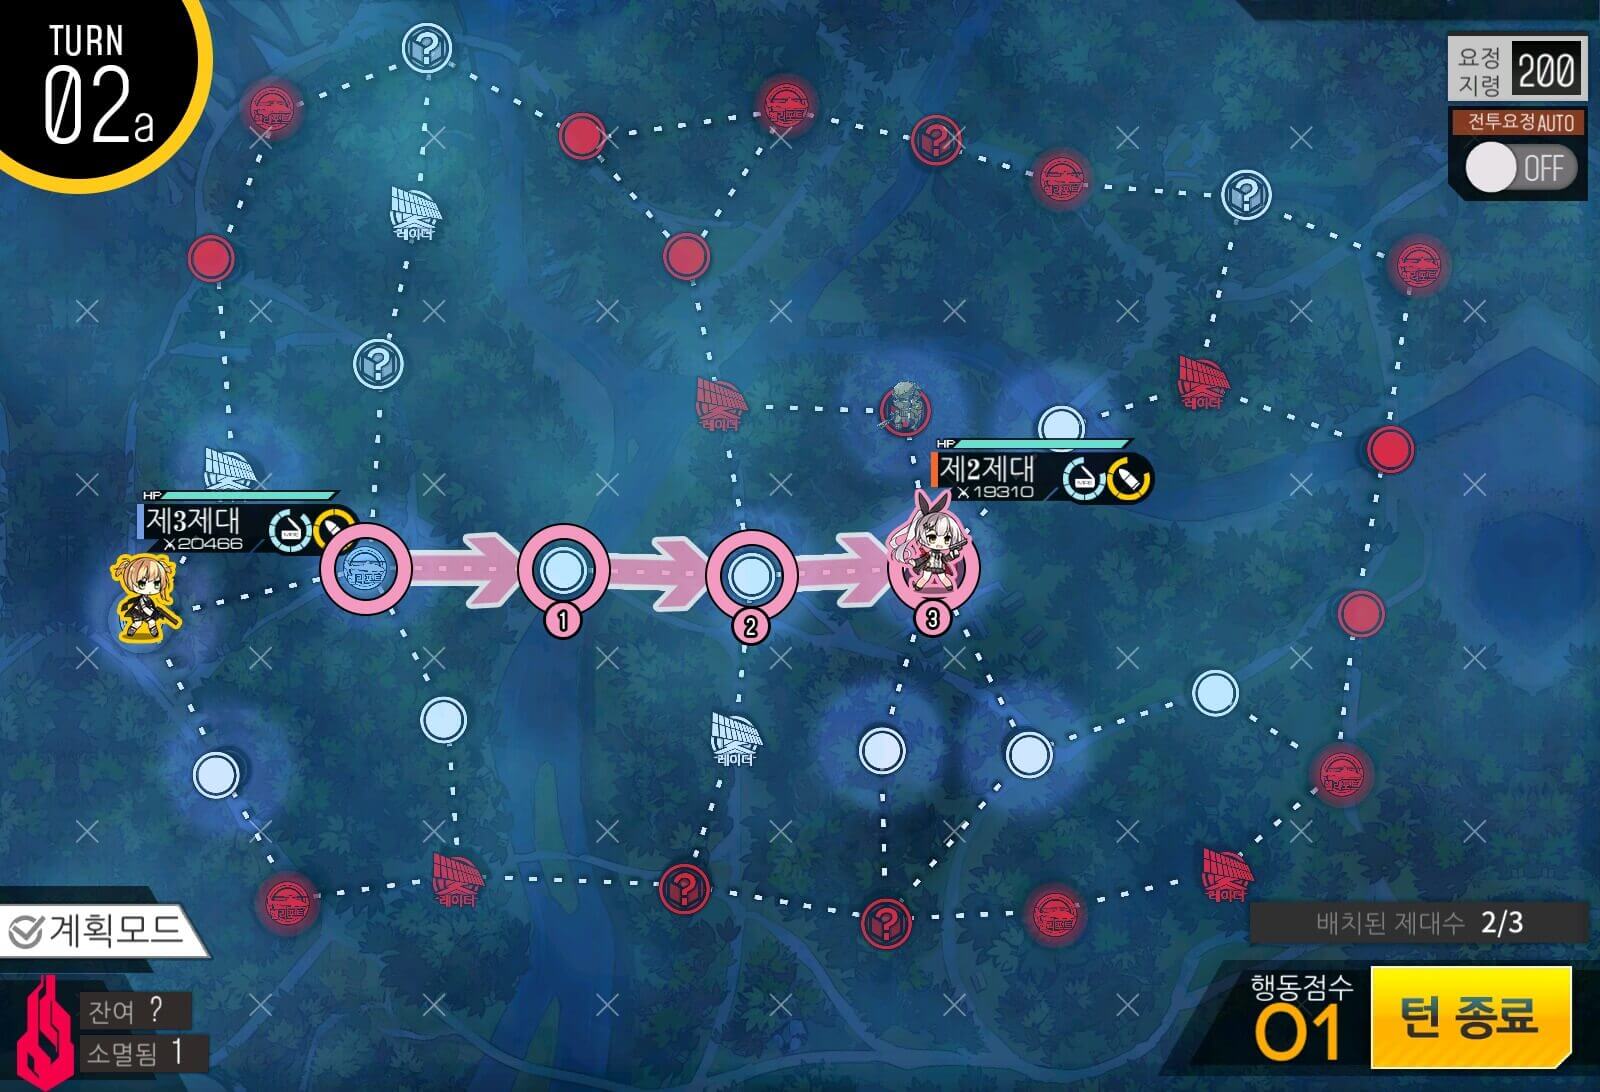
Turn 2a
Turn 2 follows either of the following routes on the bottom right, depending on whether an enemy unit is on the radar or the bottom node. This helipad does spawn units, so it would be best to cap it now.
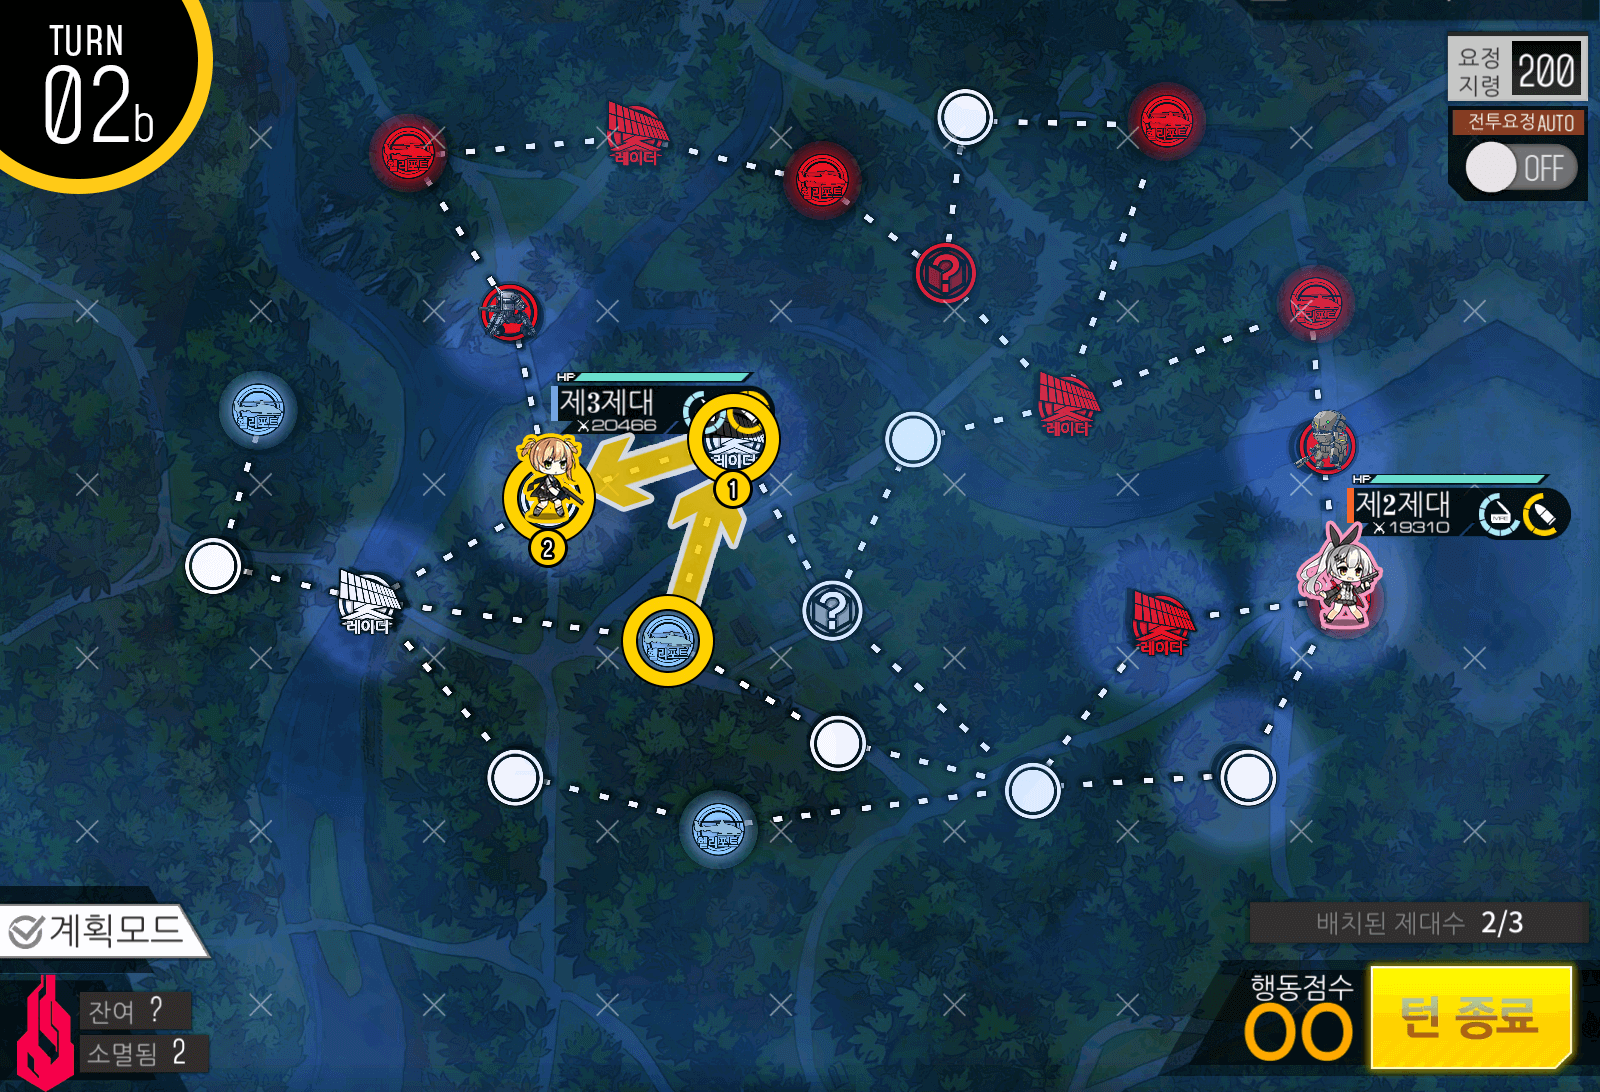
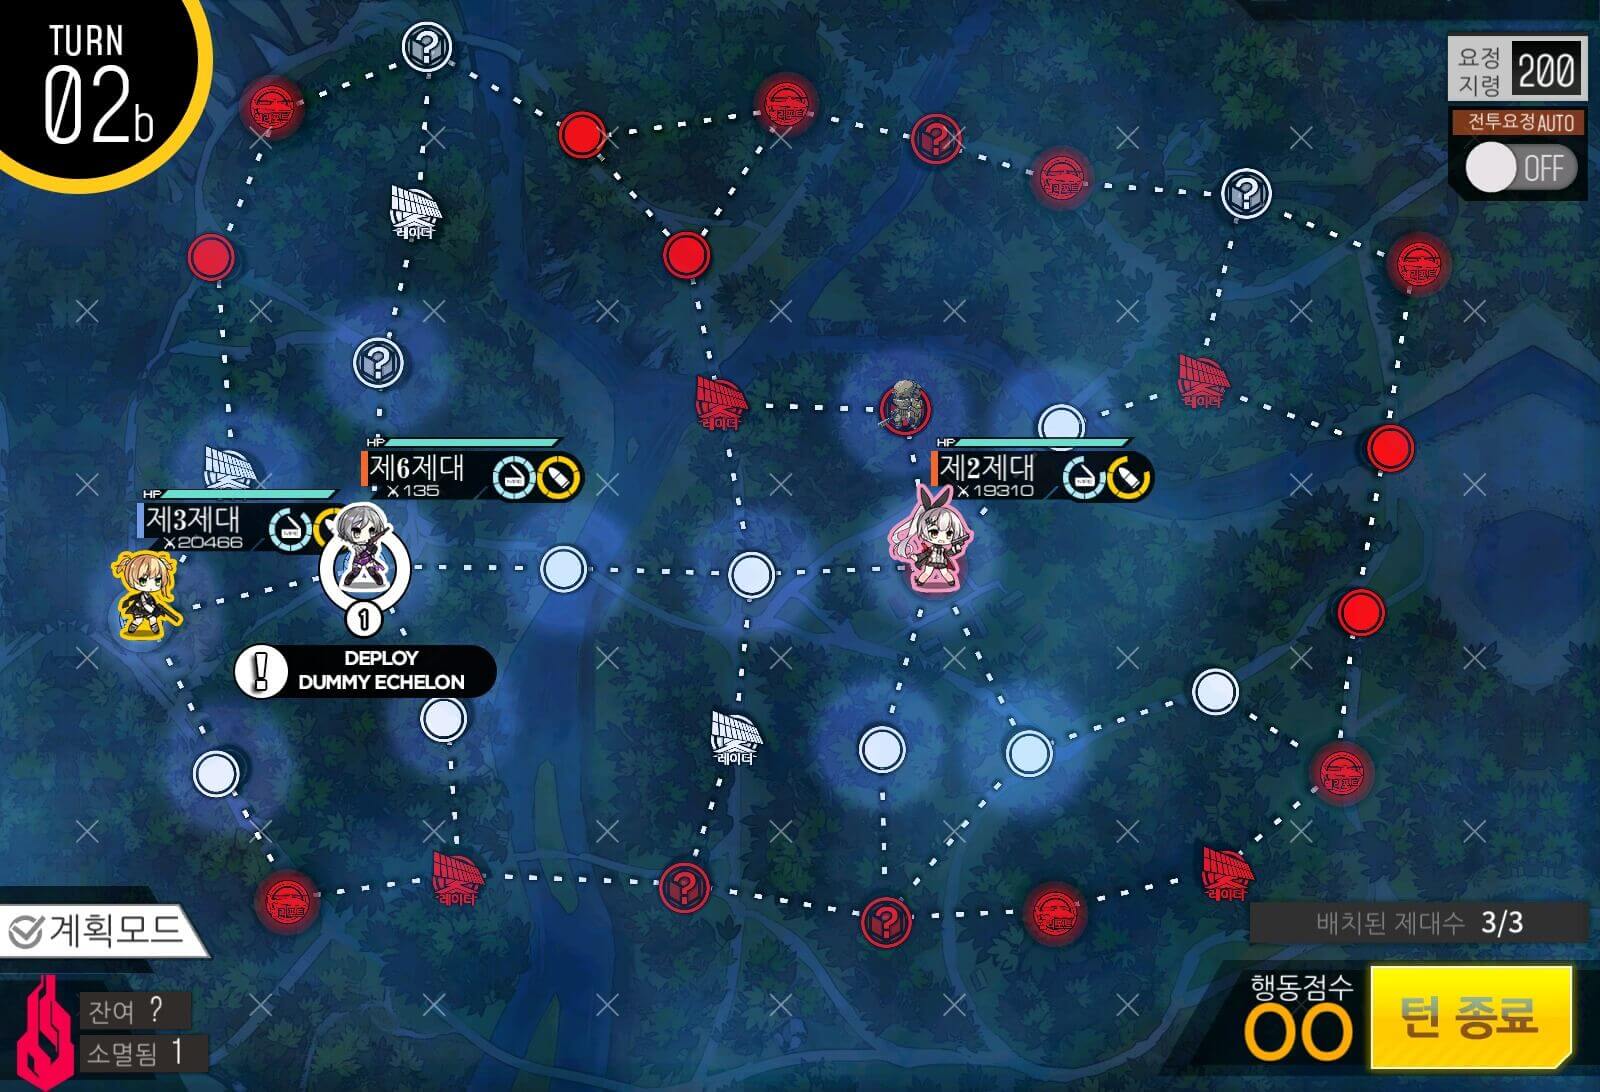
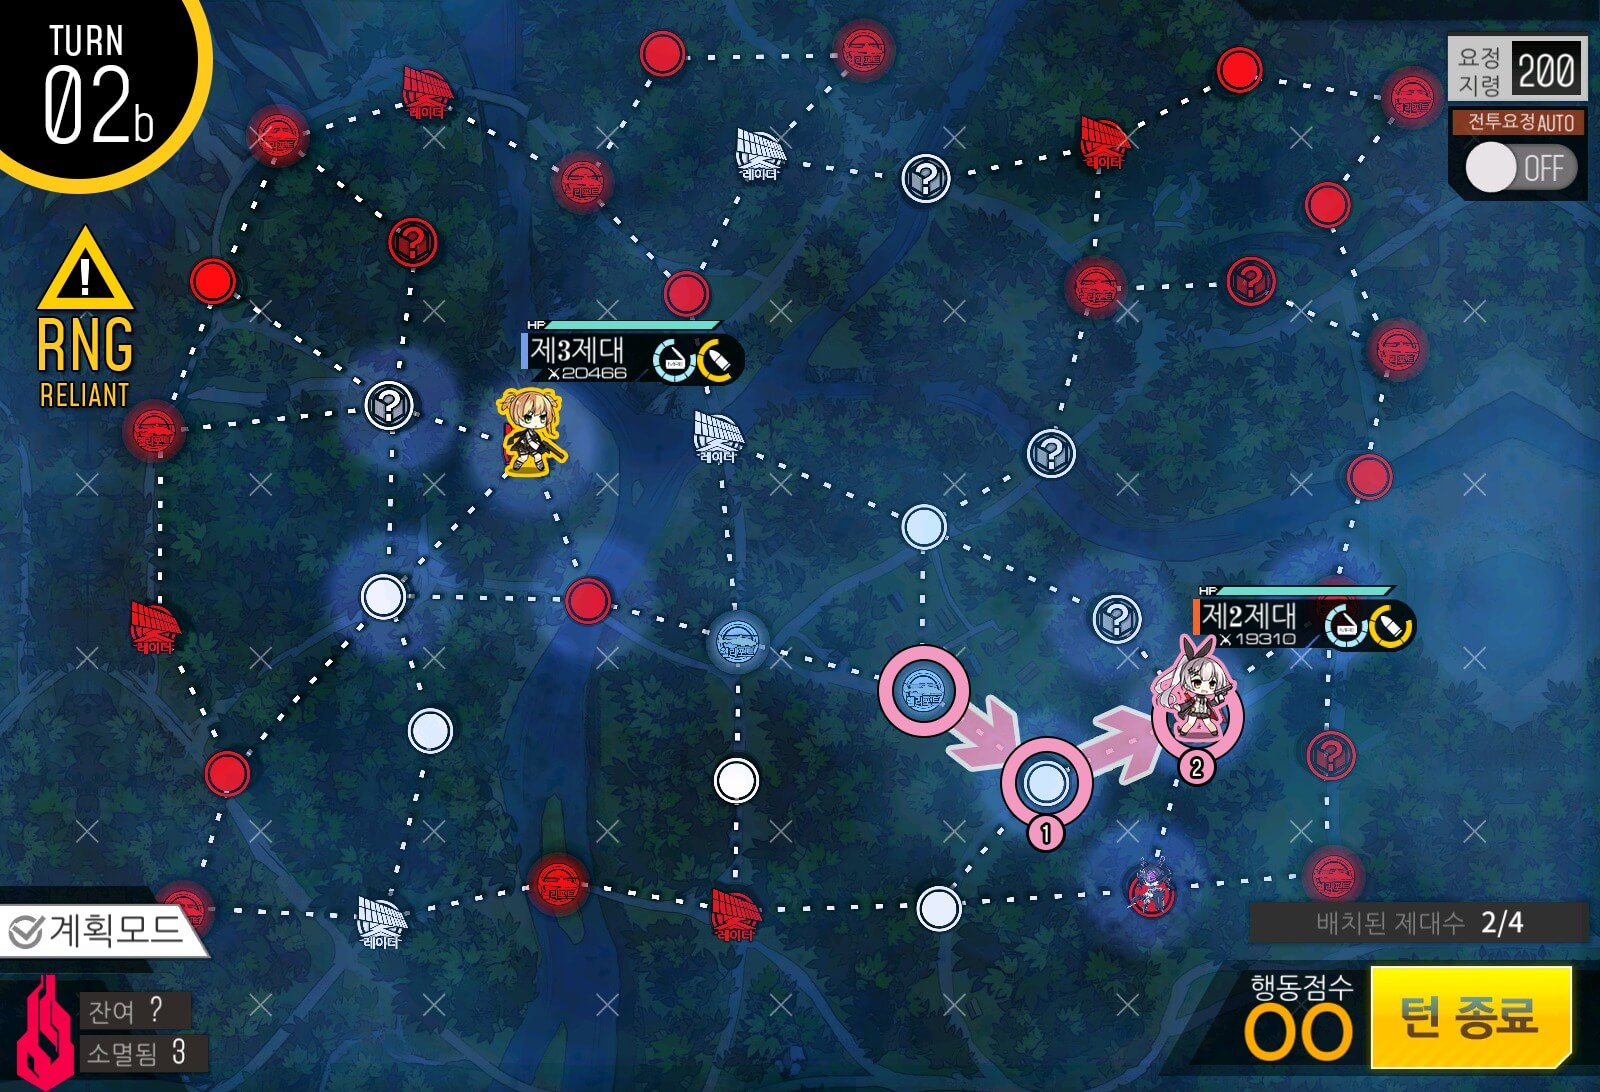
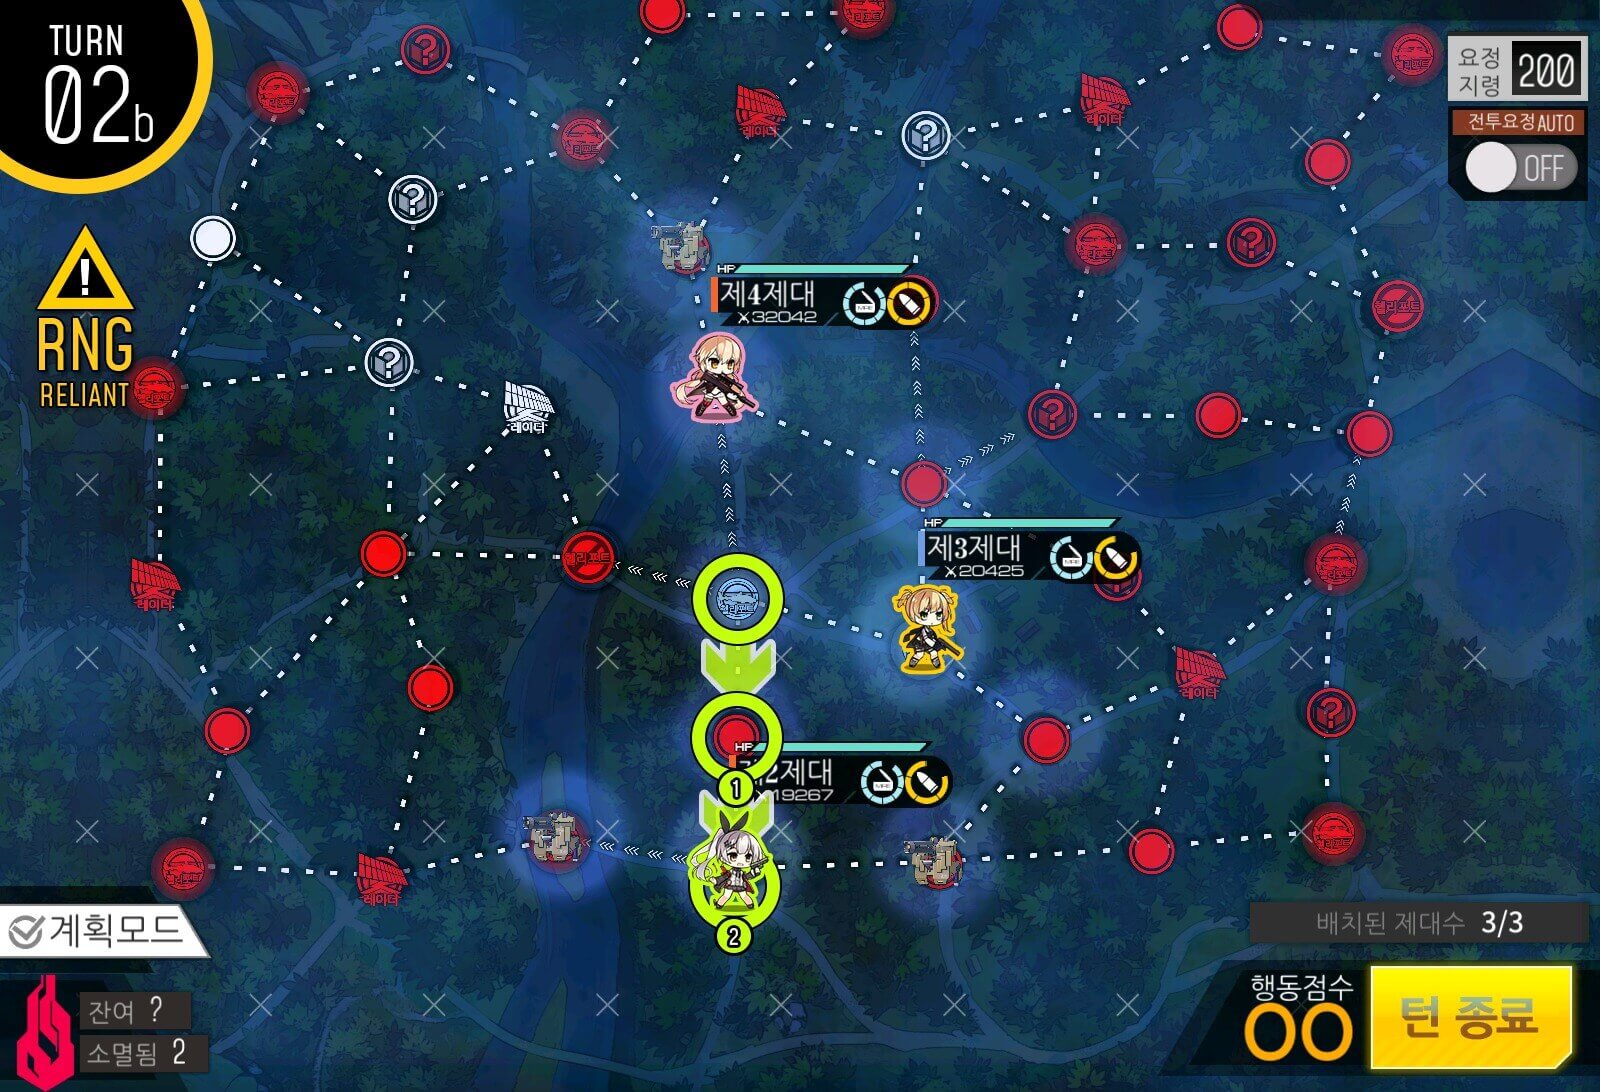
Turn 2b
Echelon in the center can move to the left.
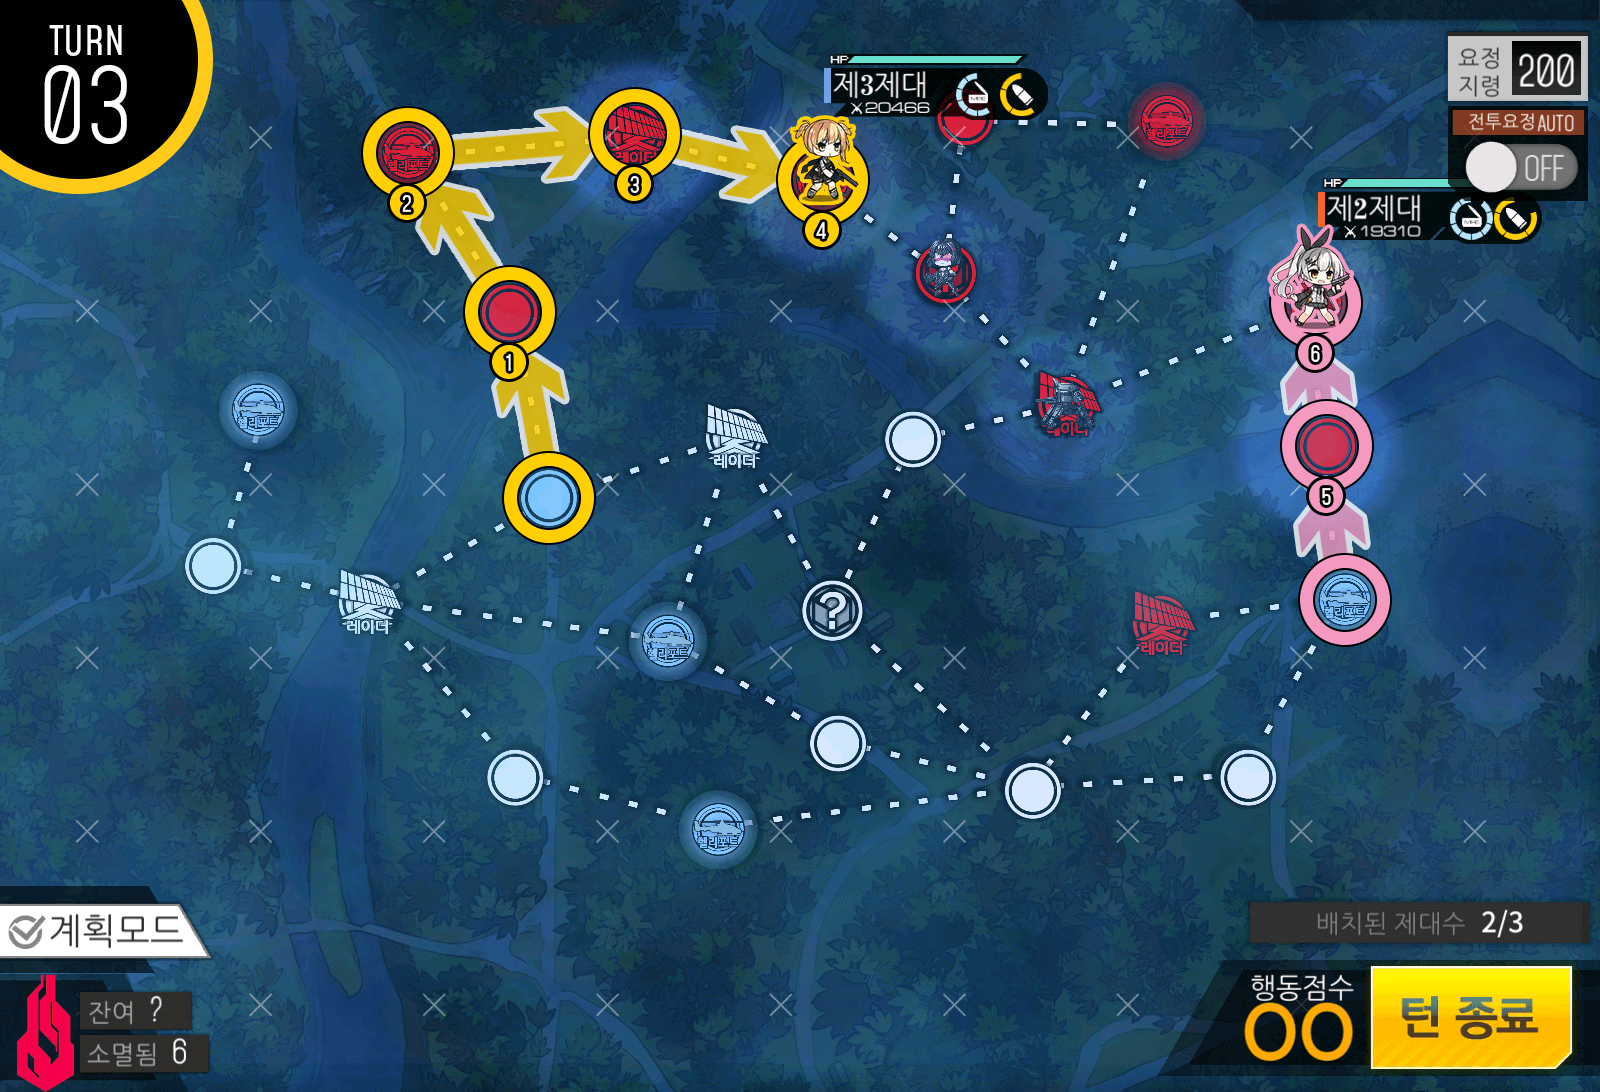
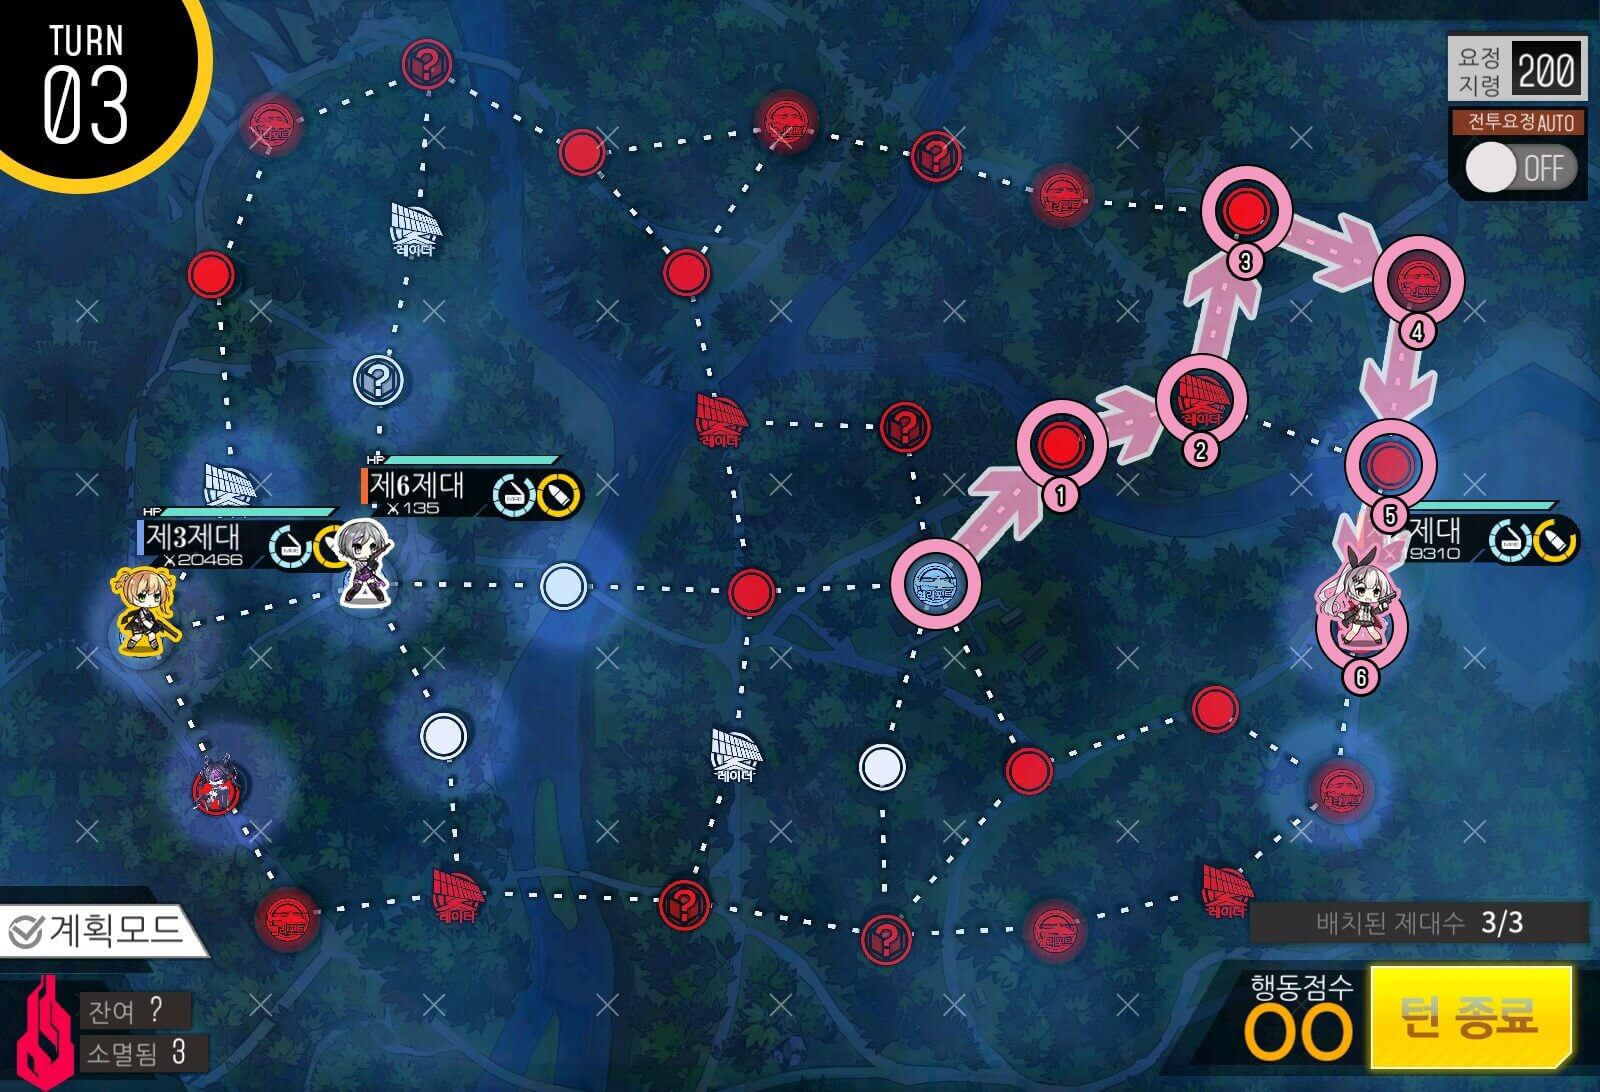
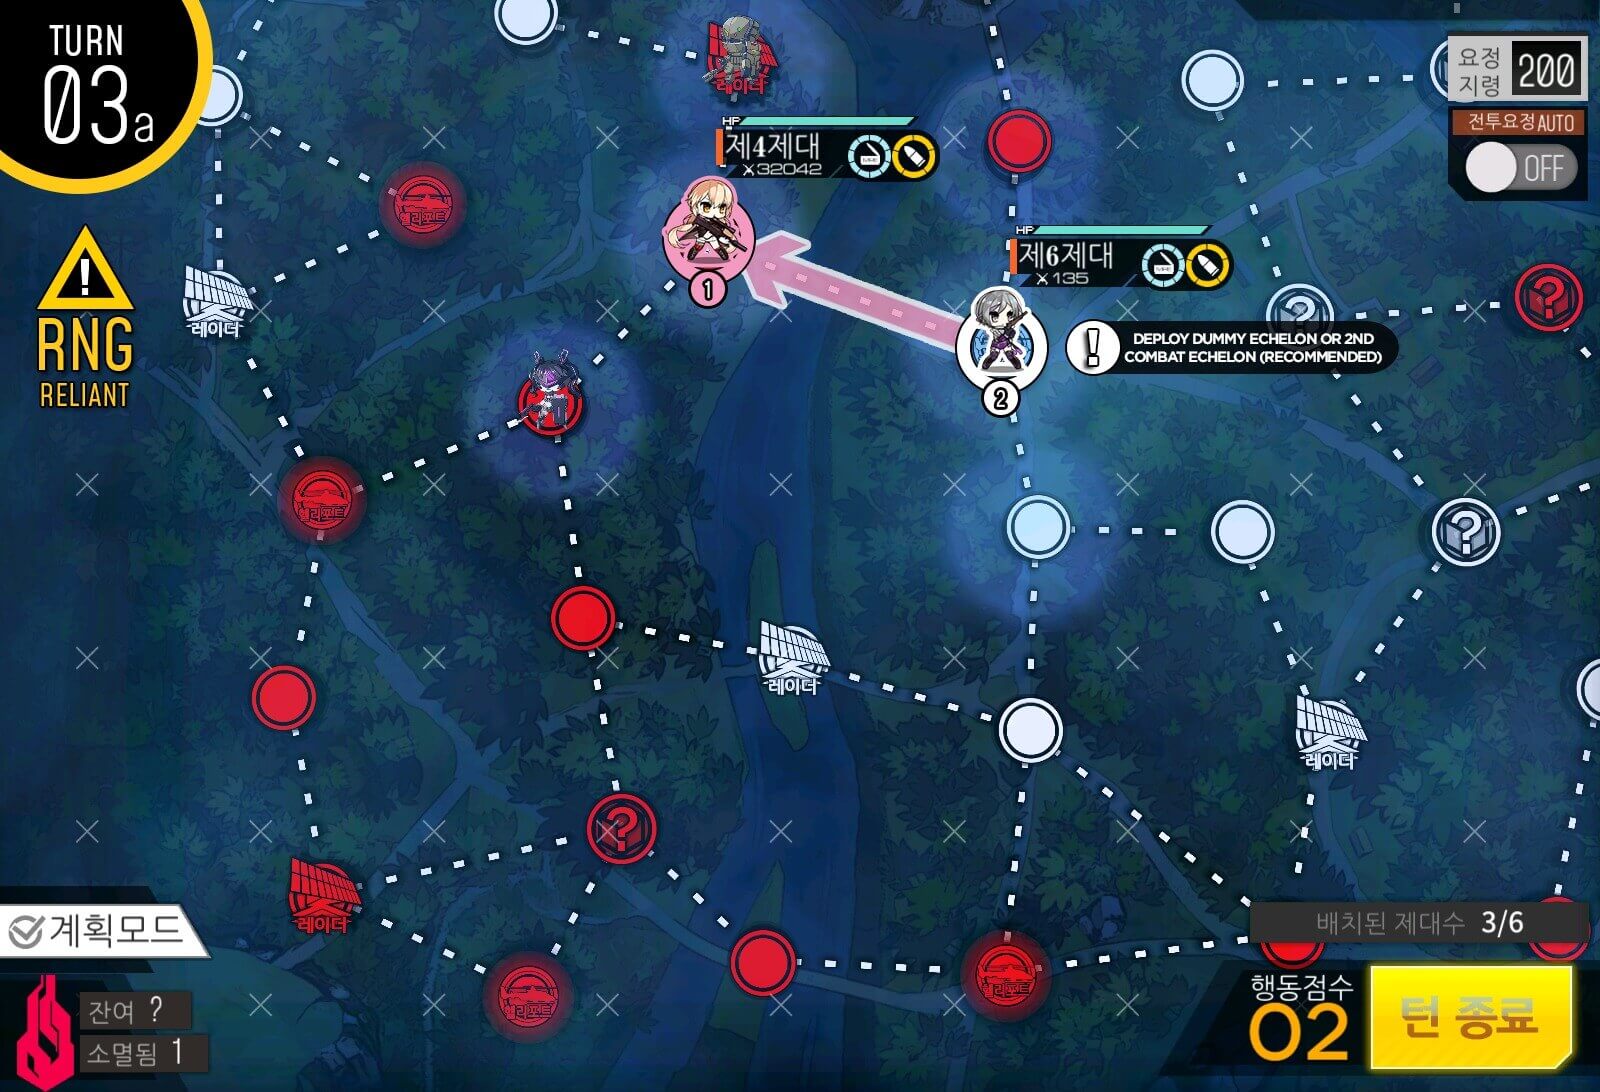
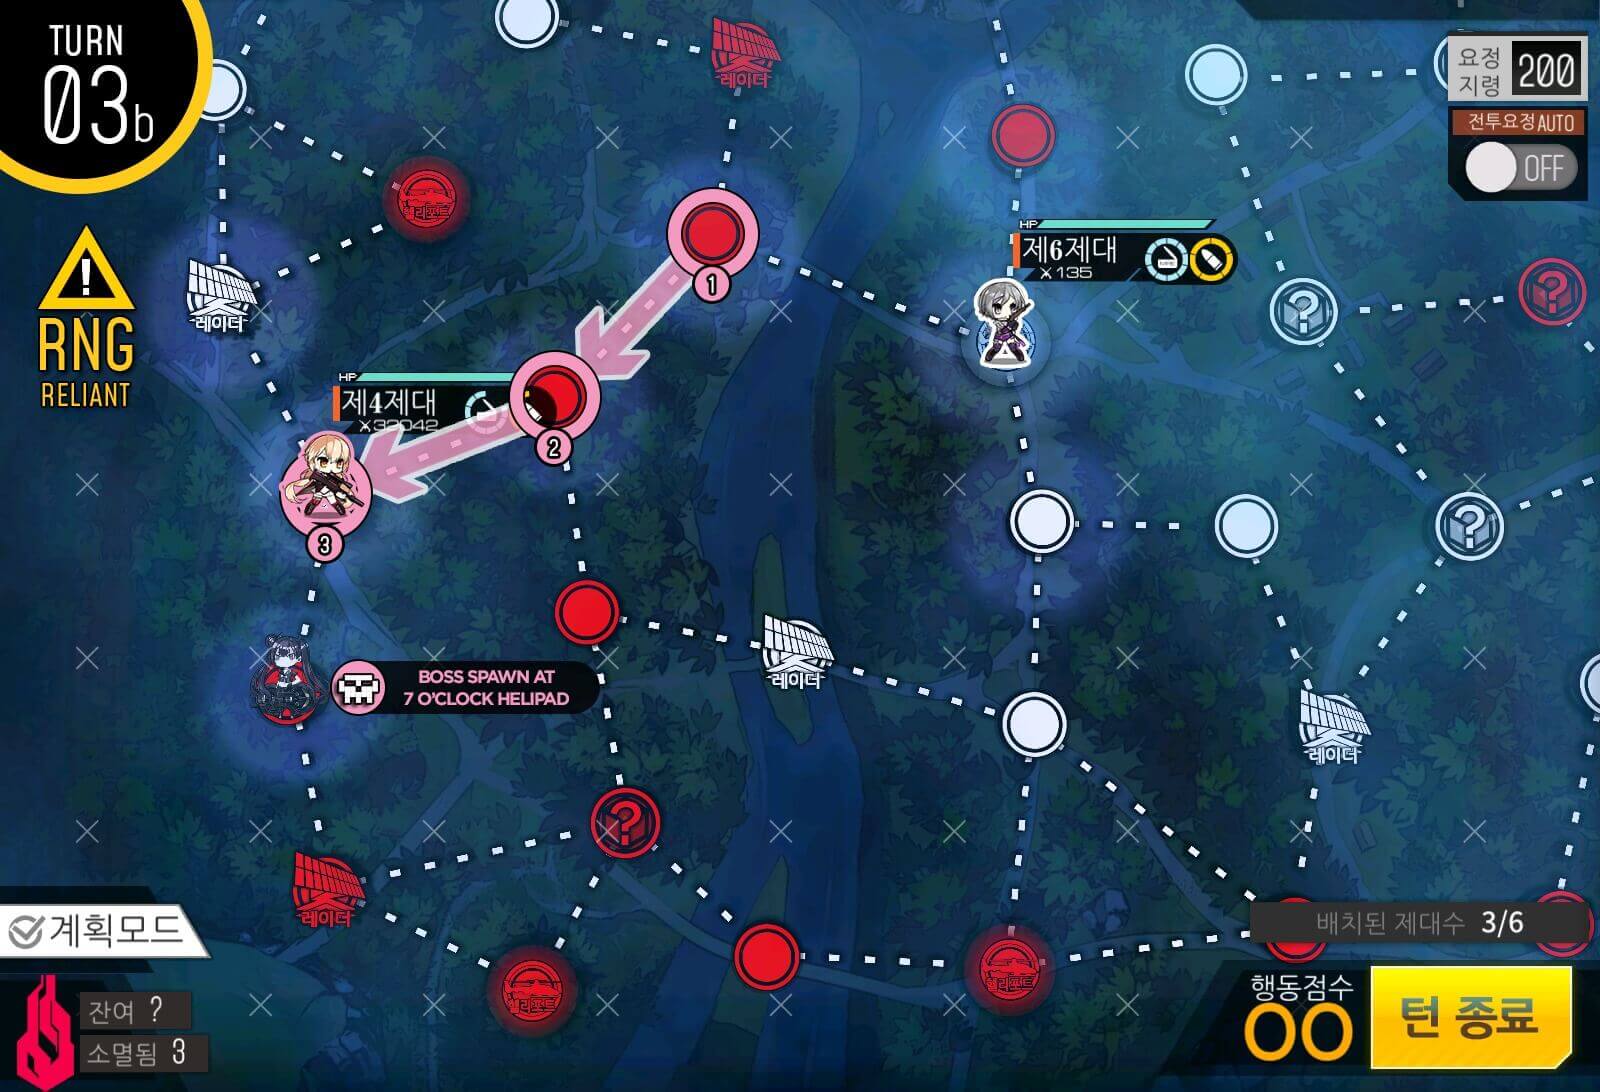
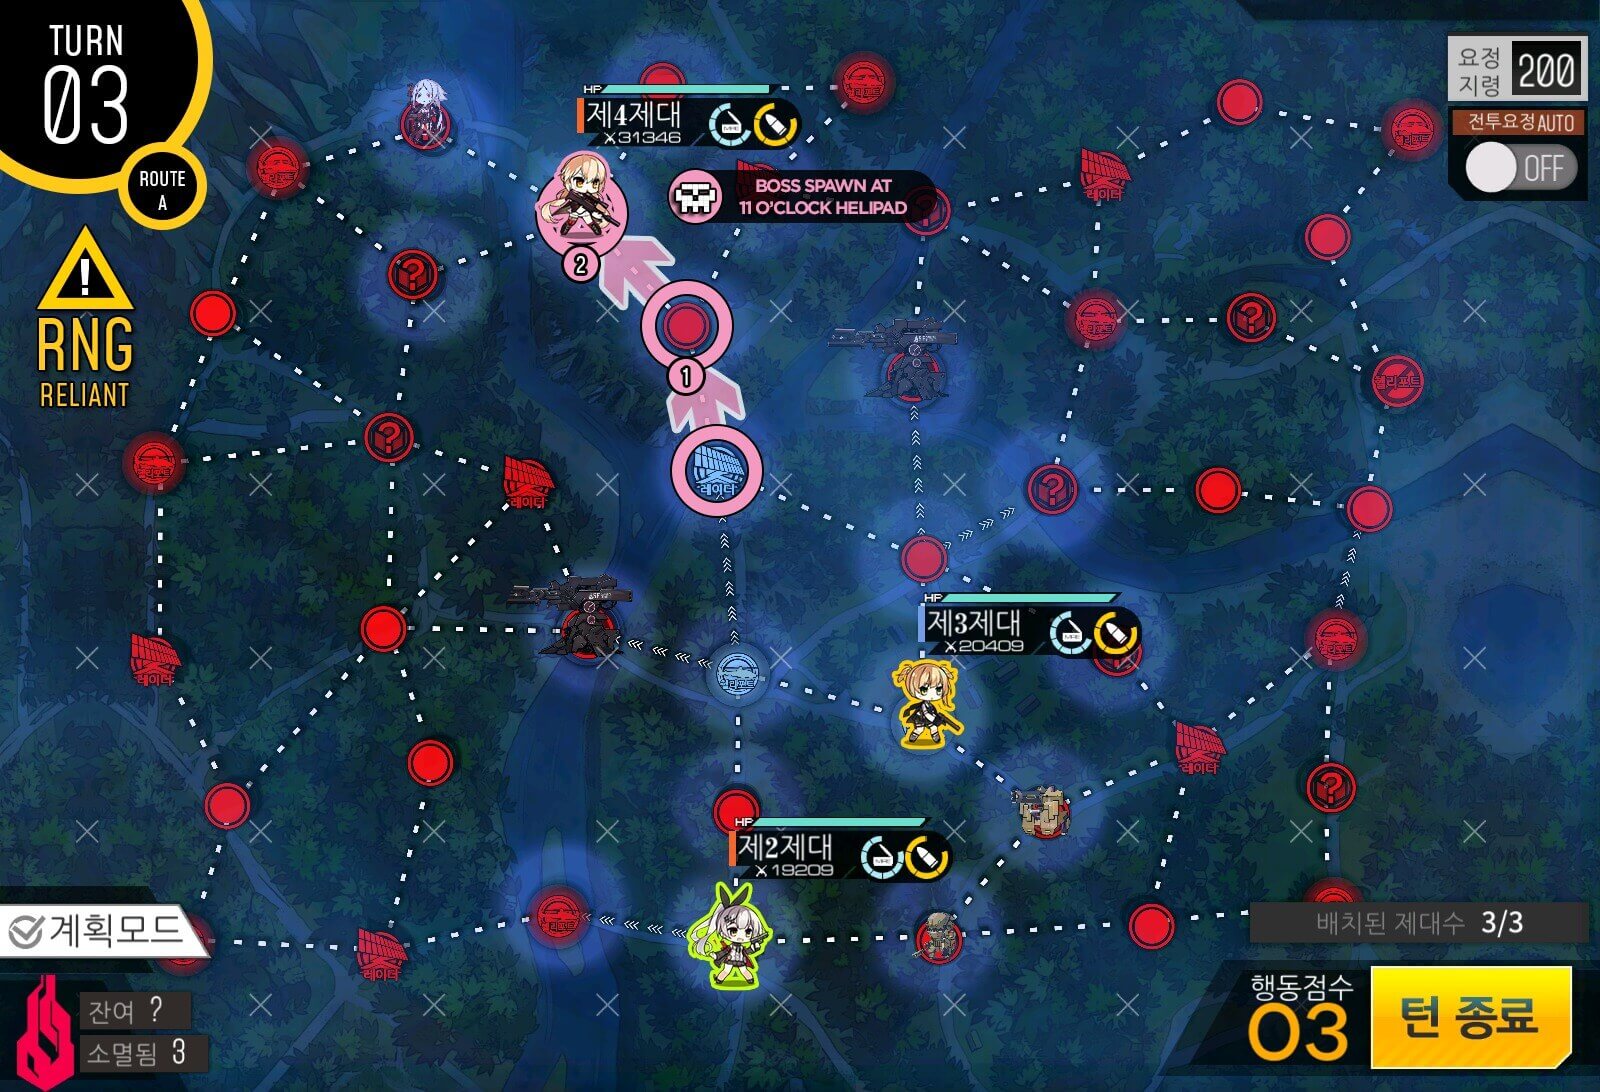
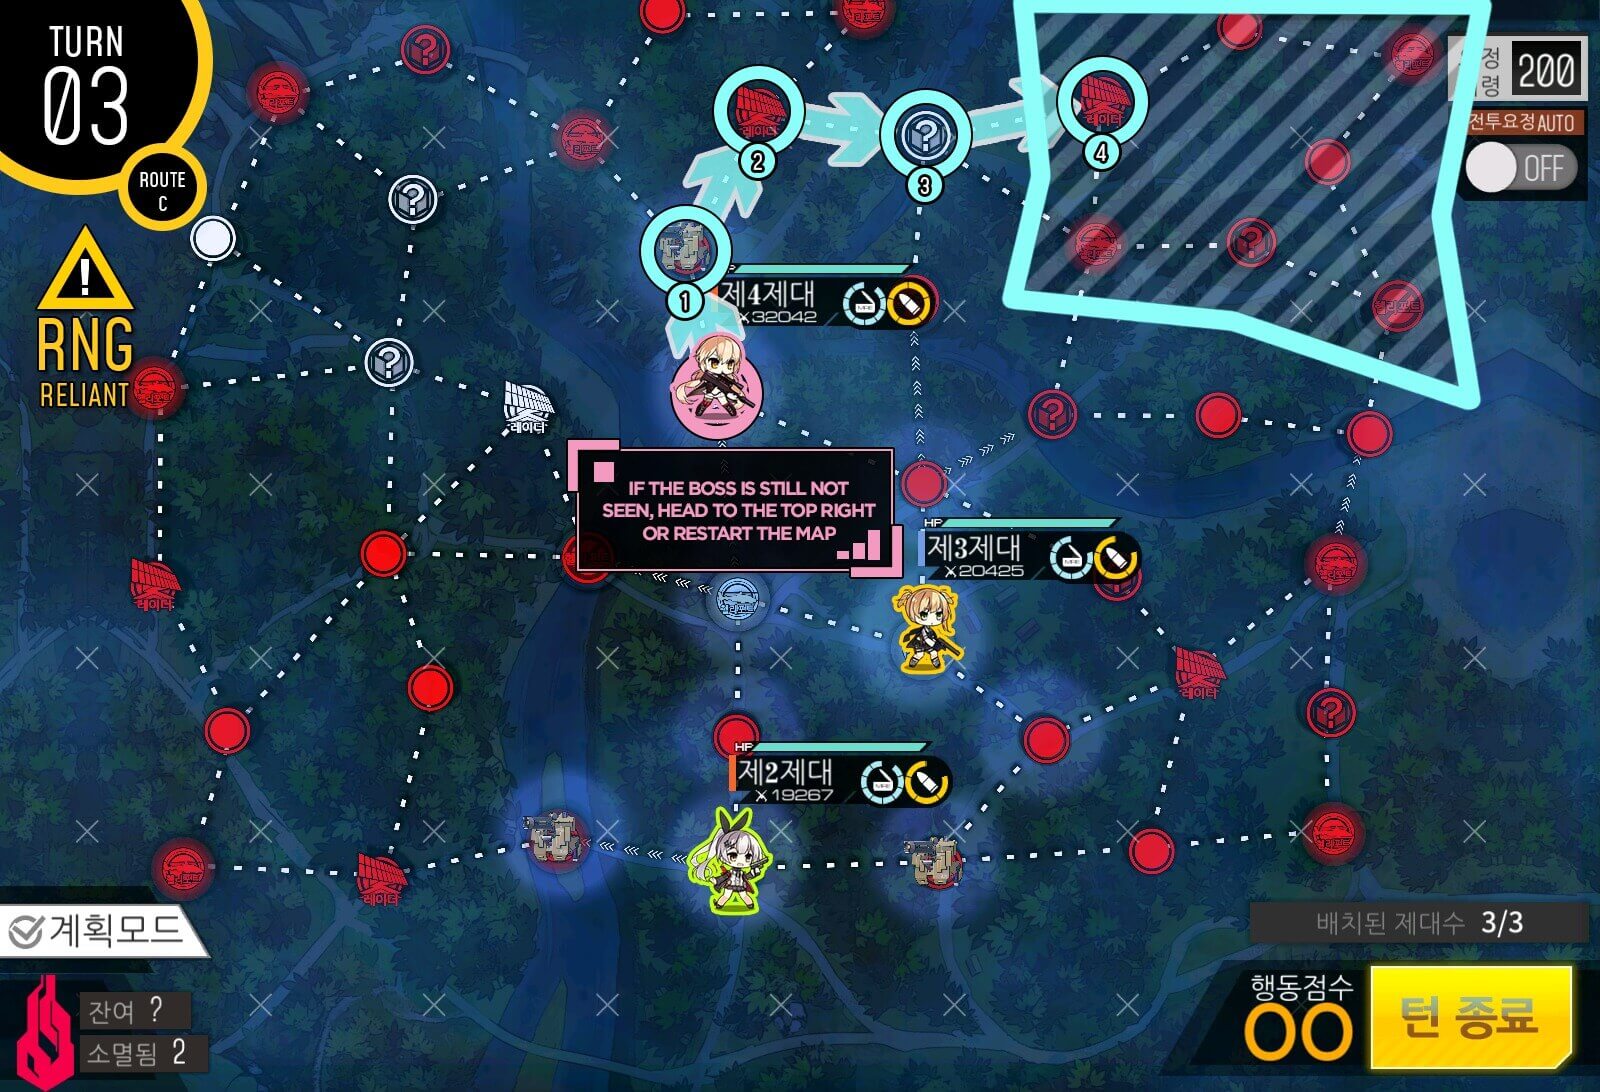
Turn 3
Since we know that the enemy helipad on the top-left doesn’t spawn units, we can ignore it and capture the next helipad on the list. Right side will do the same.
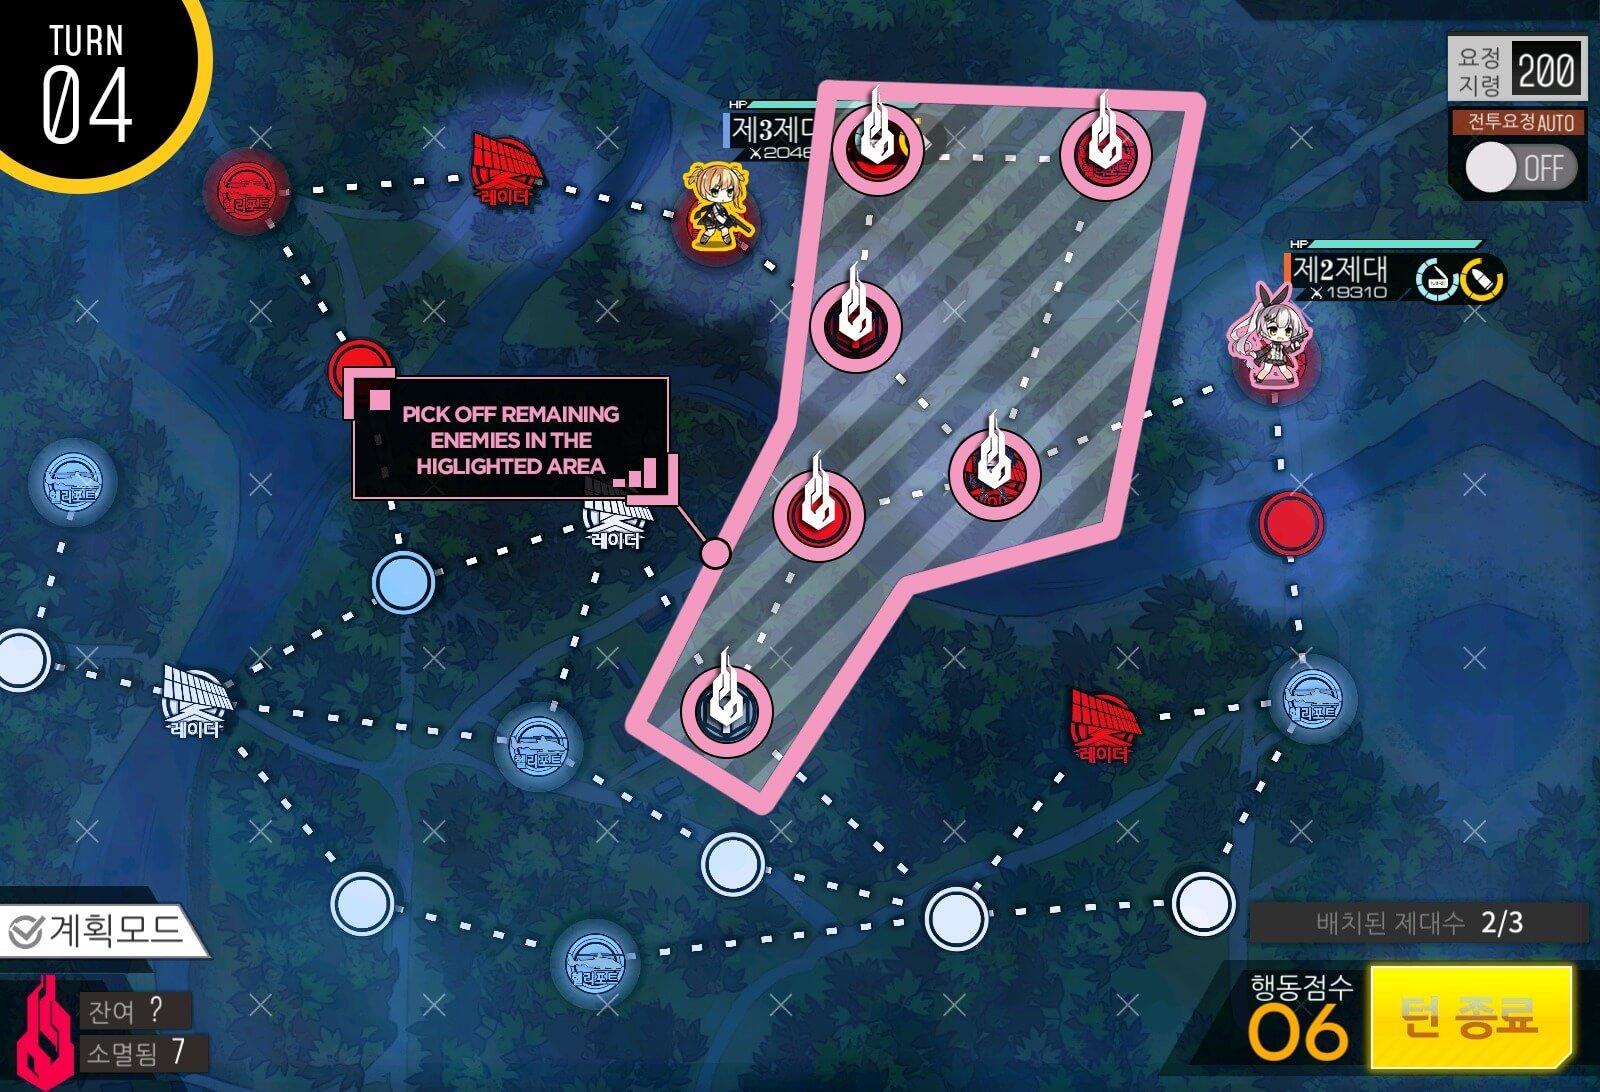
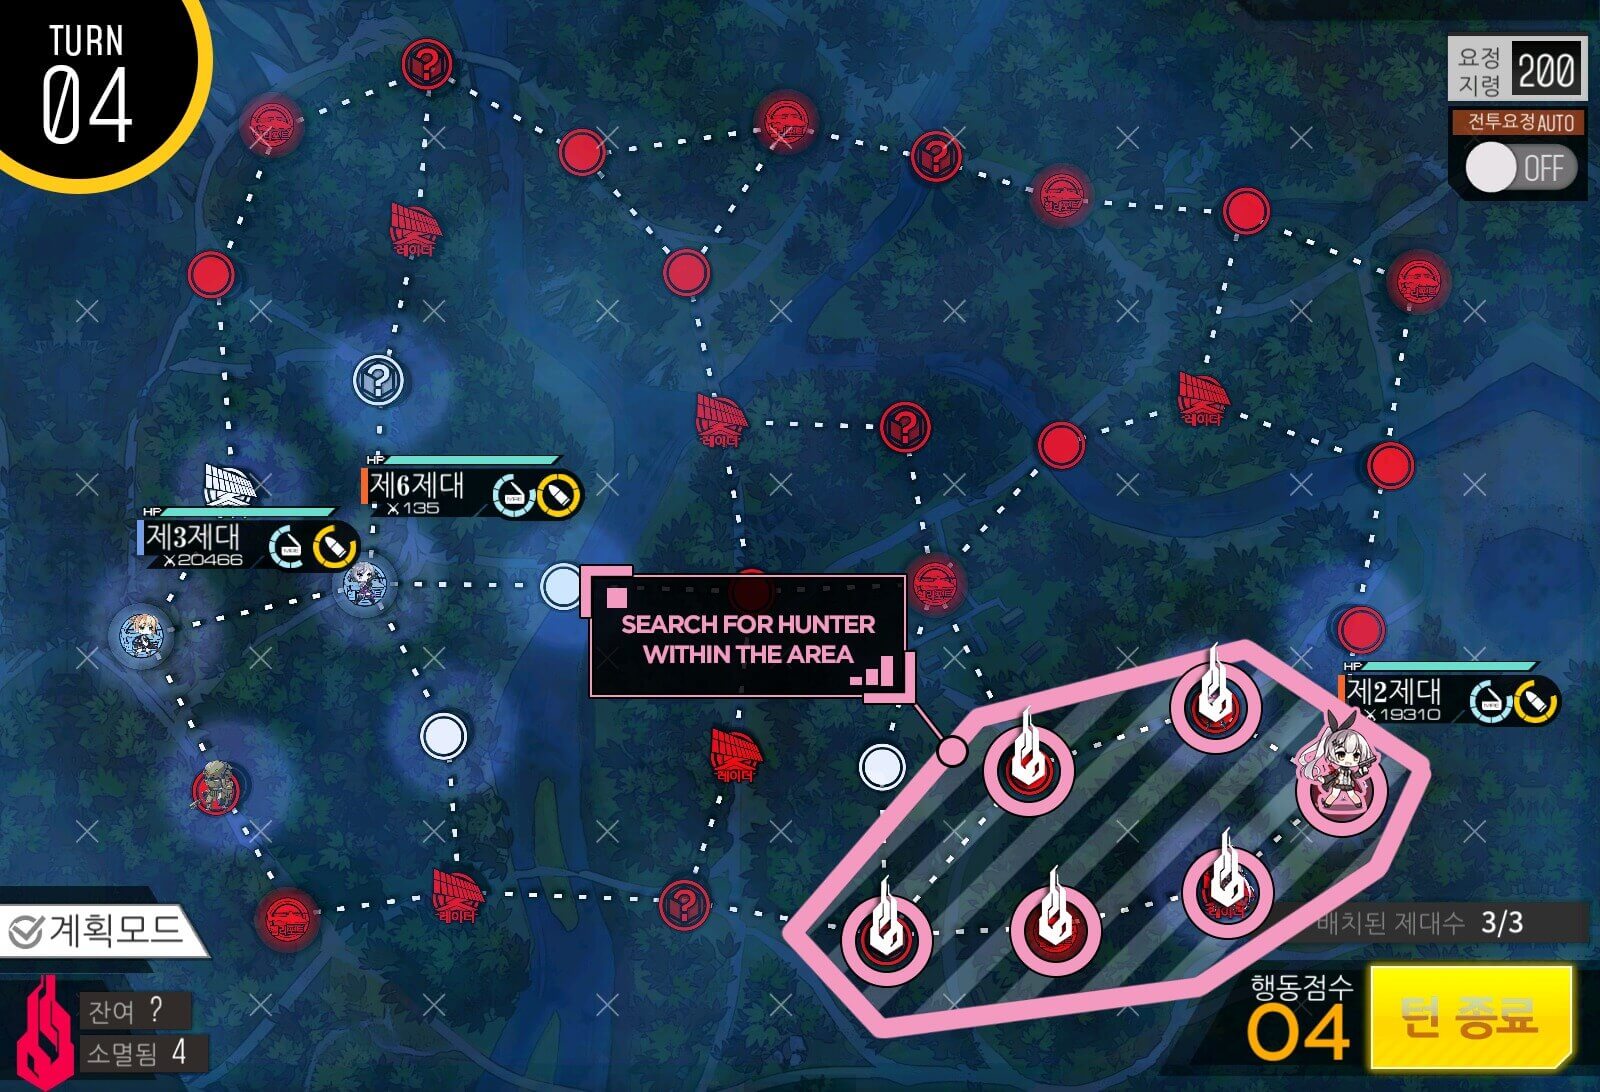
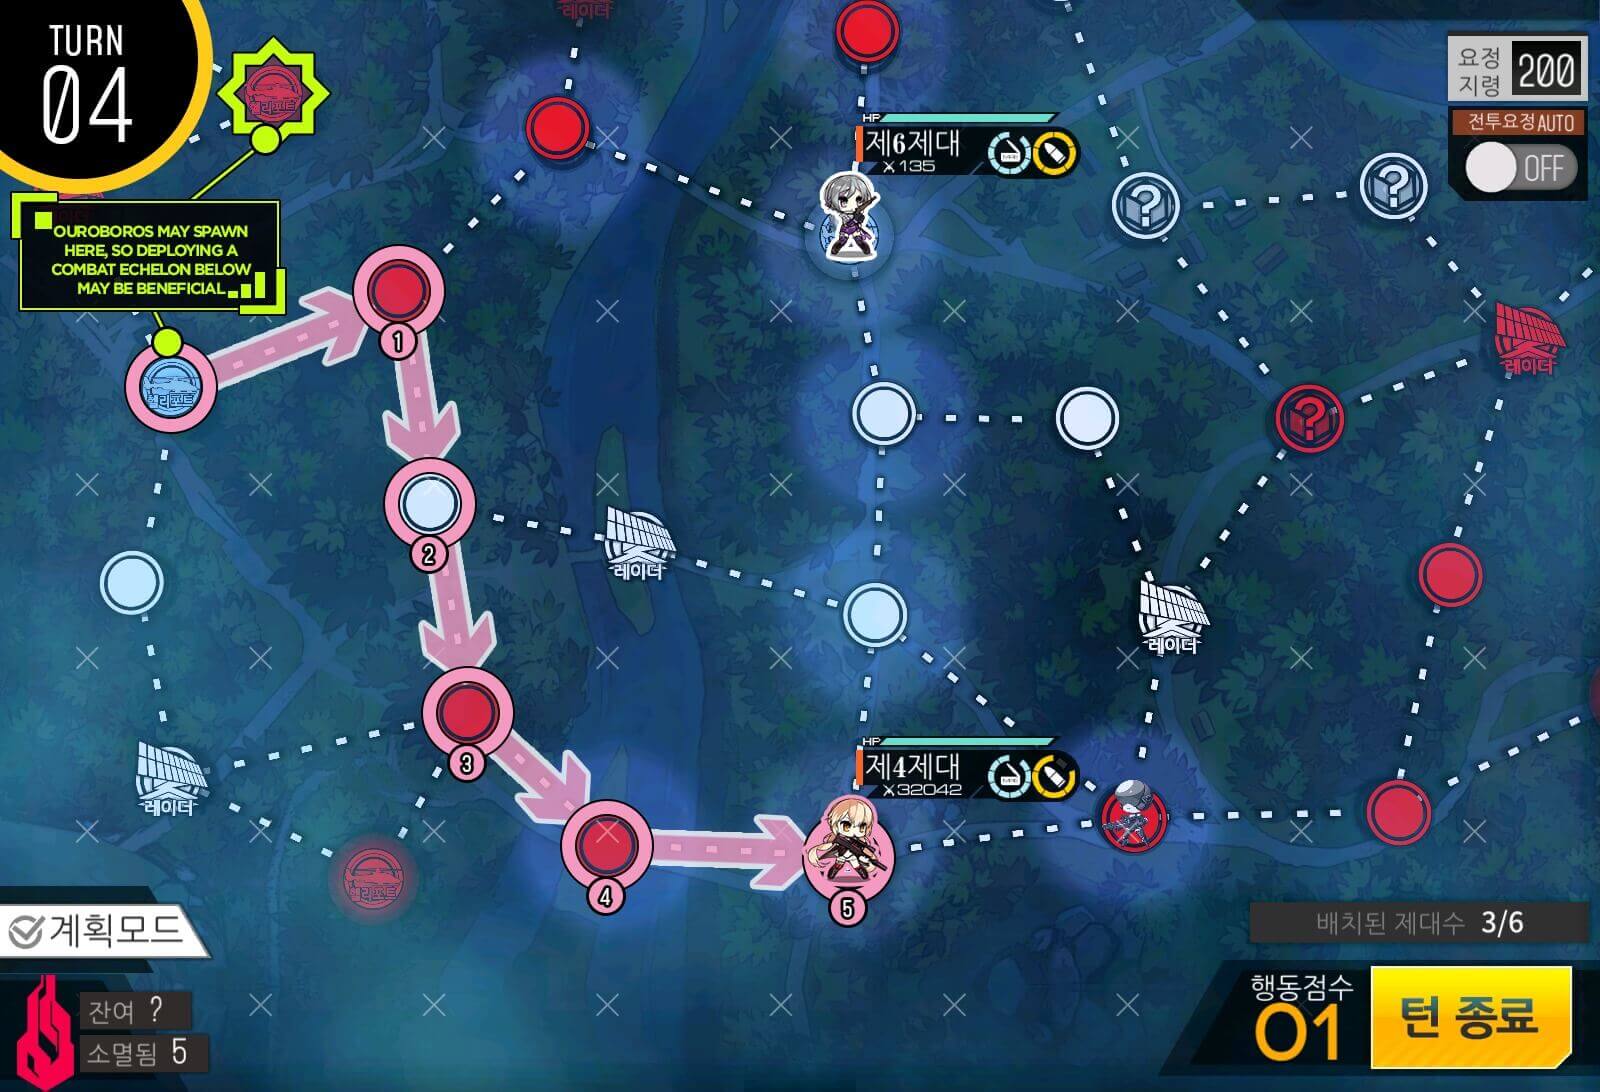
Turn 4
You should have 7 movement points at the beginning of this turn and only a few areas to cover. Kill remaining units.
Turn 1
Start Turn 1 by grabbing the subsequent helipad and spawning another Echelon. There's a possibility this Echelon will encounter either armored or regular enemy type units, so plan your Echelon accordingly.
Turn 2a
Echelon in charge of hunting down Hunter is moving to take the Helipad in the center.
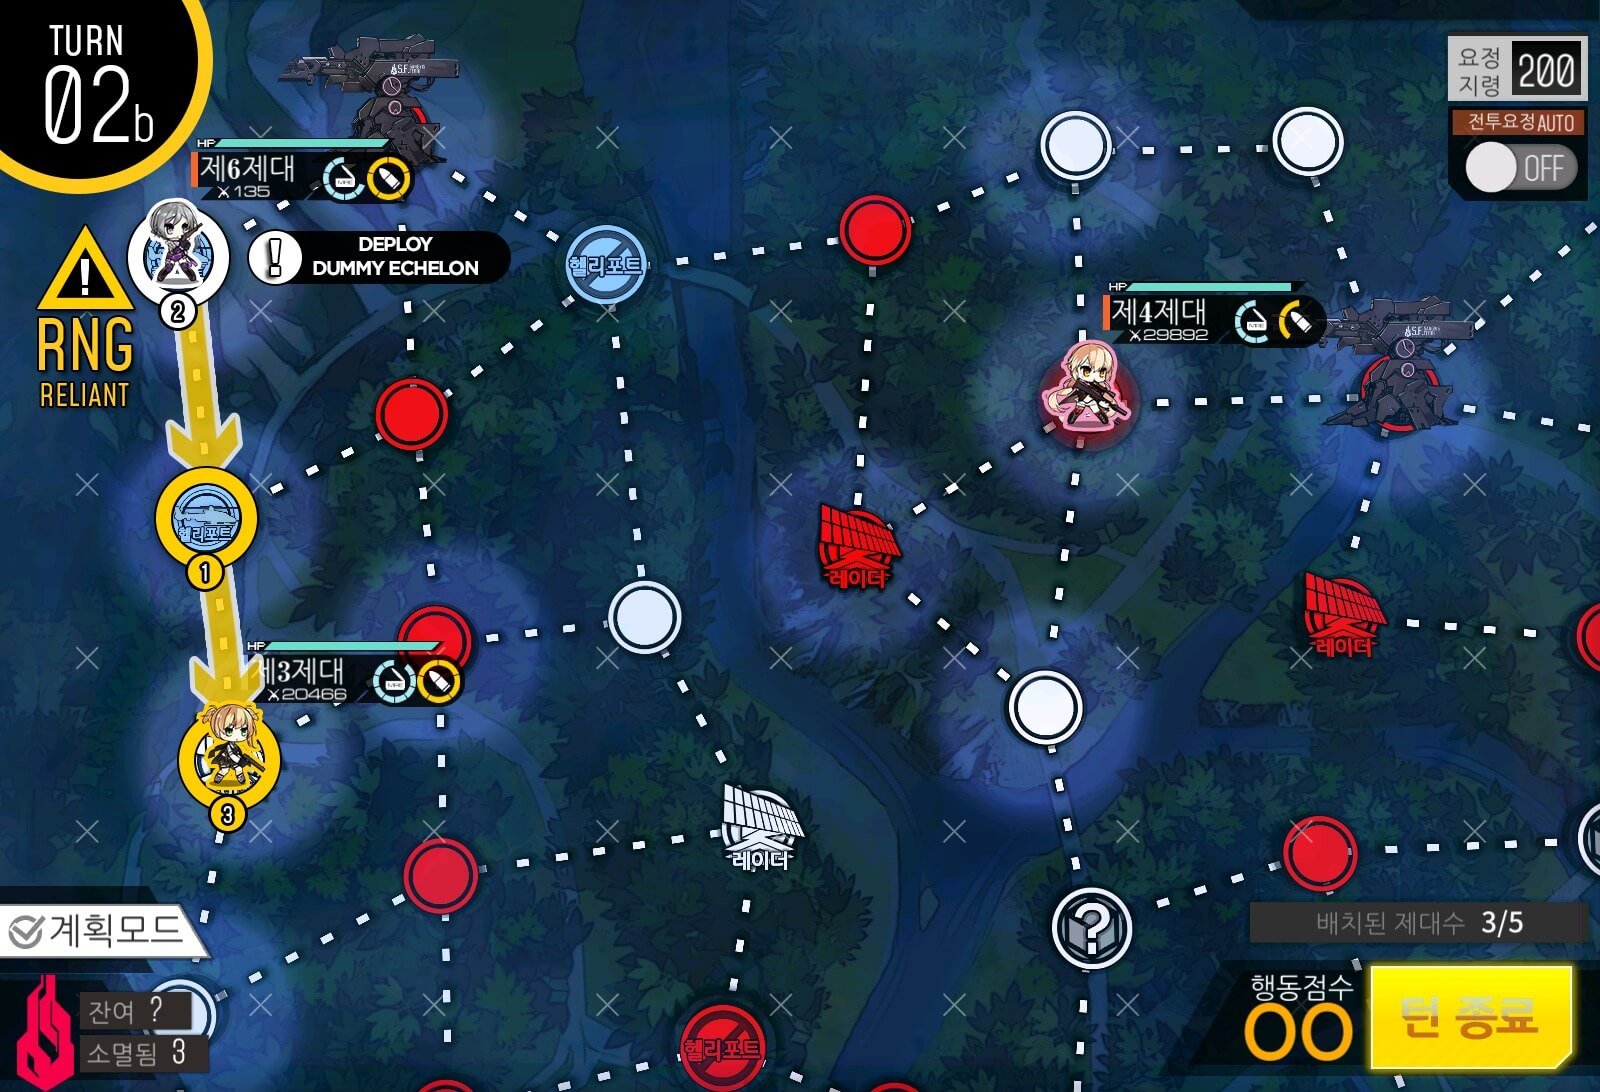
Turn 2b
Spawn a Dummy Echelon by your other echelon on the 1st helipad. End turn.
Turn 3
This is where little bit of analogy comes in. You'd want to take the route that has more red nodes on the path, in my case, the upper route. If you do no find Hunter after moving along either of the paths, you'll just need to search for an uncovered area next turn and you should see her eventually.

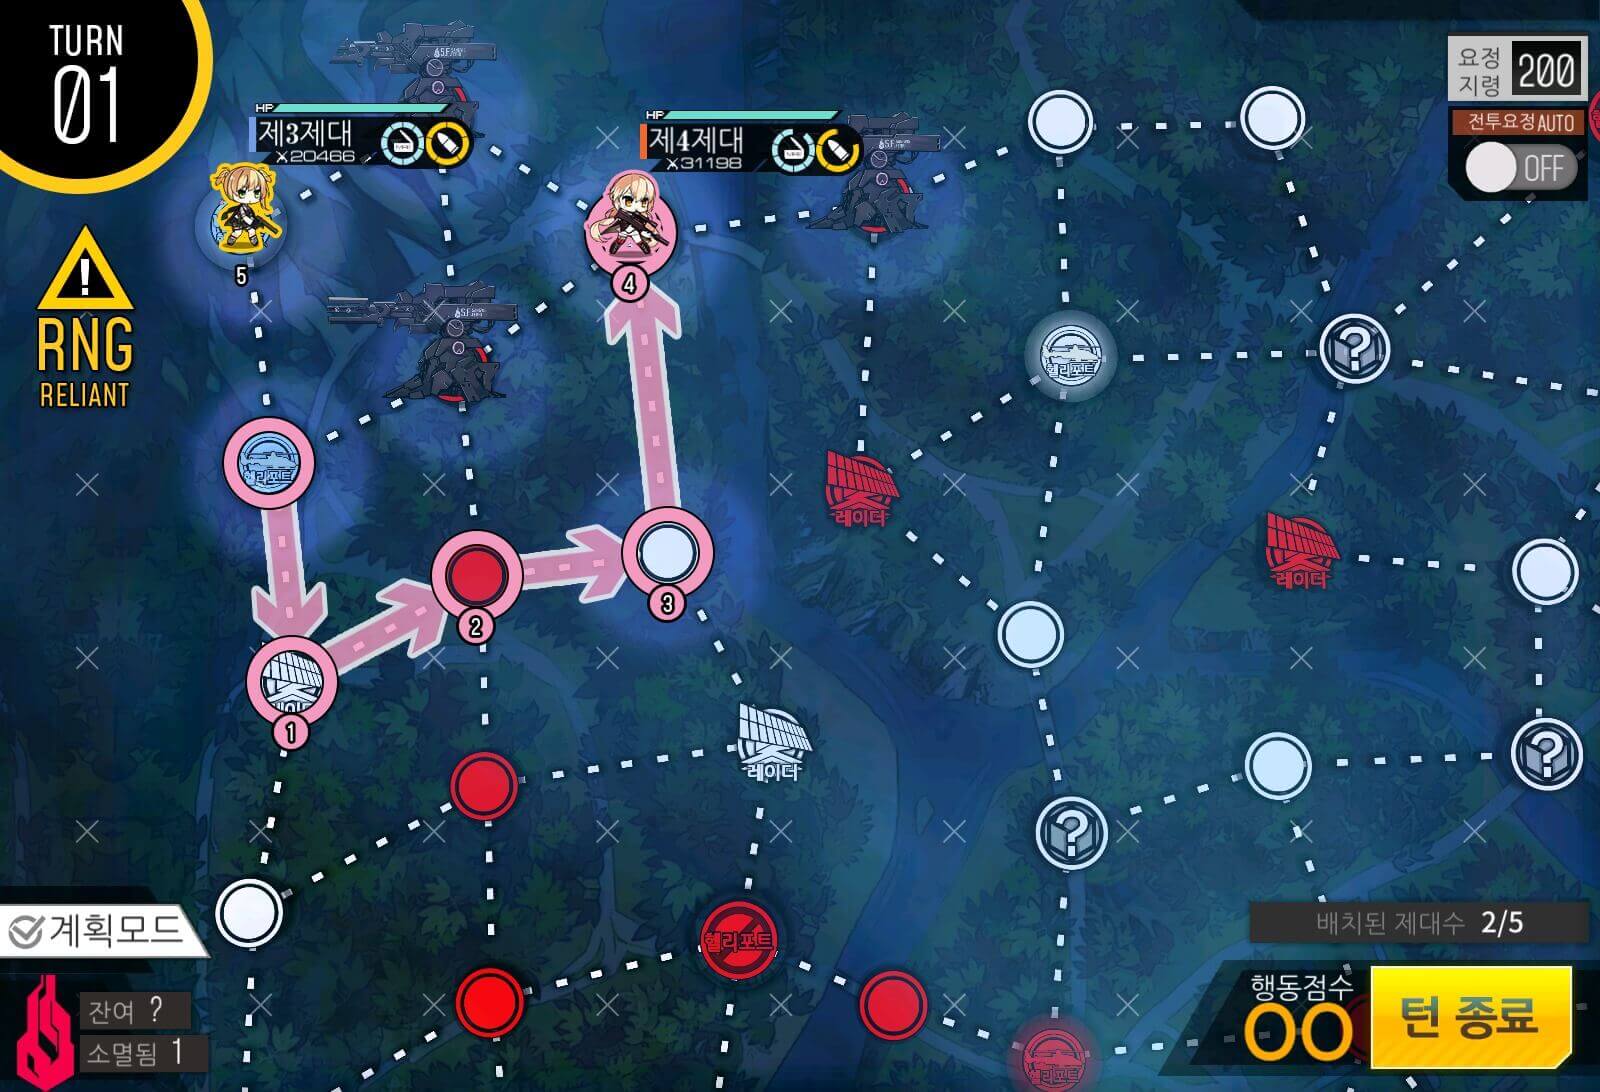
Turn 1
Similar to the last mission, we are moving an echelon onto another helipad nearby and spawning another at least somewhat combat capable Echelon. You “can” use an AR echelon here, but a RF or mixed echelon would be strongly recommended.

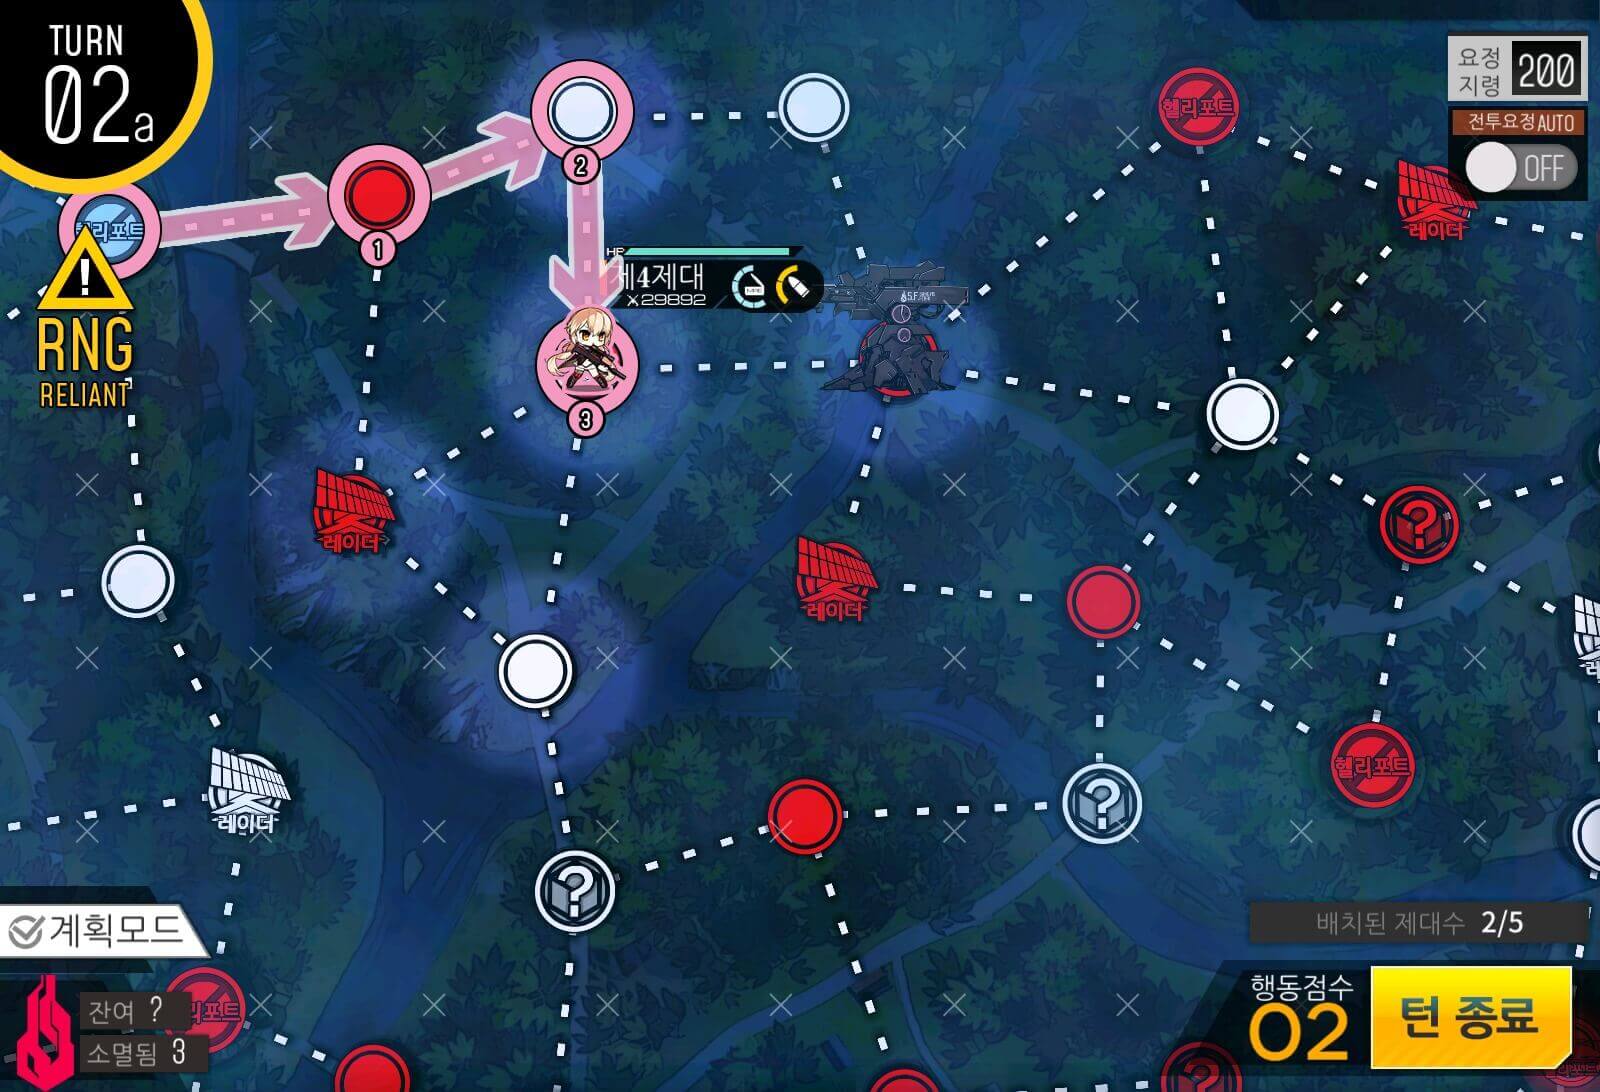
Turn 2a
With the 4 movement points you have, you'd want to take 2 Radar stations on the center left and bottom right. These 2 radars will reveal about 70% of the map and sometimes reveal Executioner right away either on the bottom left or top left. Once you see her, move in for the kill.

Turn 3
If you do not see Executioner at the start of Turn 3, you can either reset the mission to try again to save yourself some time, or search the highlighted areas on the left. Trailing off to additionally capture the top-center radar node within the route highlighted in blue should further ensure the reveal of Executioner's location, otherwise in an ‘unlucky’ case, she should be somewhere within the blue area.


Example Ouro Team
This is obviously overkill, use it as a guideline. ARSMG with one HG at level 70 x4 can wipe Snek.
Turn 1
Move your Echelon down once, then spawn a helipad defending echelon. Doesn’t have to be strong since it'll only have to deal with low strength units.

Turn 2
Move it down 3 more times to capture center helipad. On the way there’s a chance you'll run into a Manticore, albeit a rare occasion. Make sure your echelon can handle armored units regardless. This is where you pay close attention to what nodes are captured, for now we'll proceed with a more all-rounder method though, which will about 30% of the time guarantee you find Ouroboros.
Turn 3a
Move your main Echelon unit left once, spawn a dummy unit. 99% of the time, this helipad will be untouched once taken, but if you want to be absolutely sure, spawn another combat-capable Echelon here. Next, move your main Echelon left 2 more times to take the next helipad. There will be times when this helipad will be impossible to take. Do proceed however, as simply restarting here probably wouldn't be worth it.
Turn 4
Everything after will just be you trying to find Snek in the dark along a route in which you may find her. Making use of an Illumination Fairy with a maxed skill will prevent this as well as wasting your time.
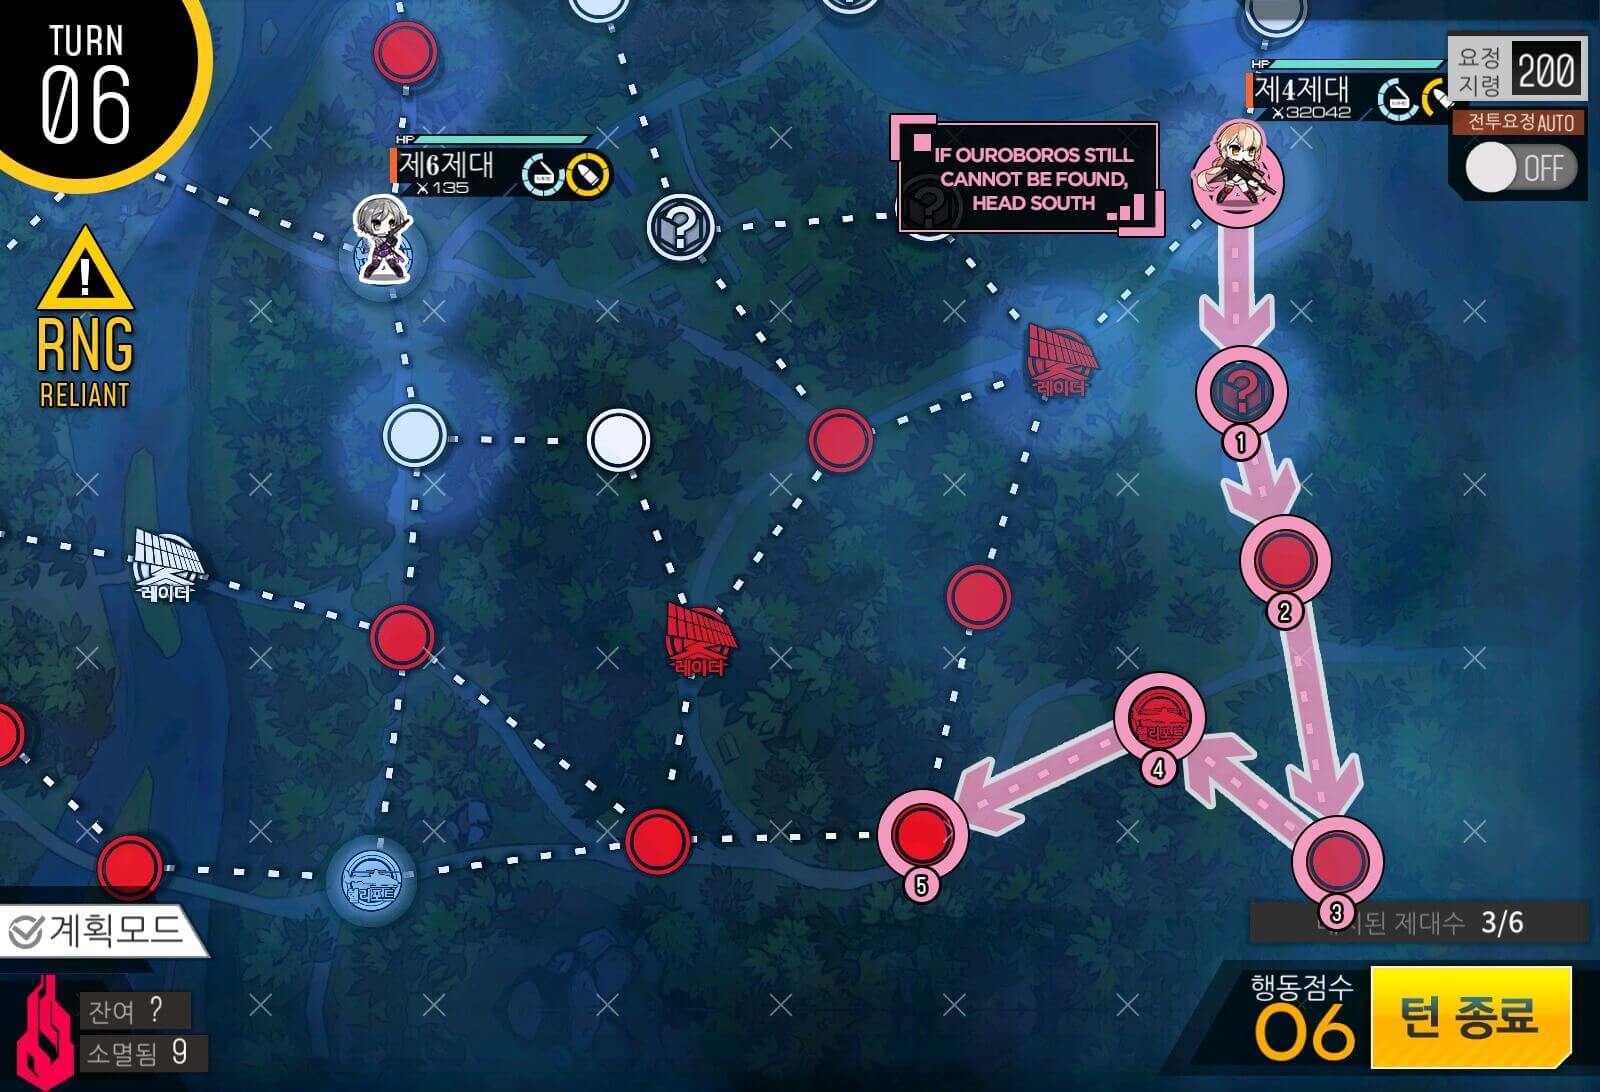
Go along the following route demonstrated in the images if you have yet to find her. Remember that there's always a next time!
Chapter II
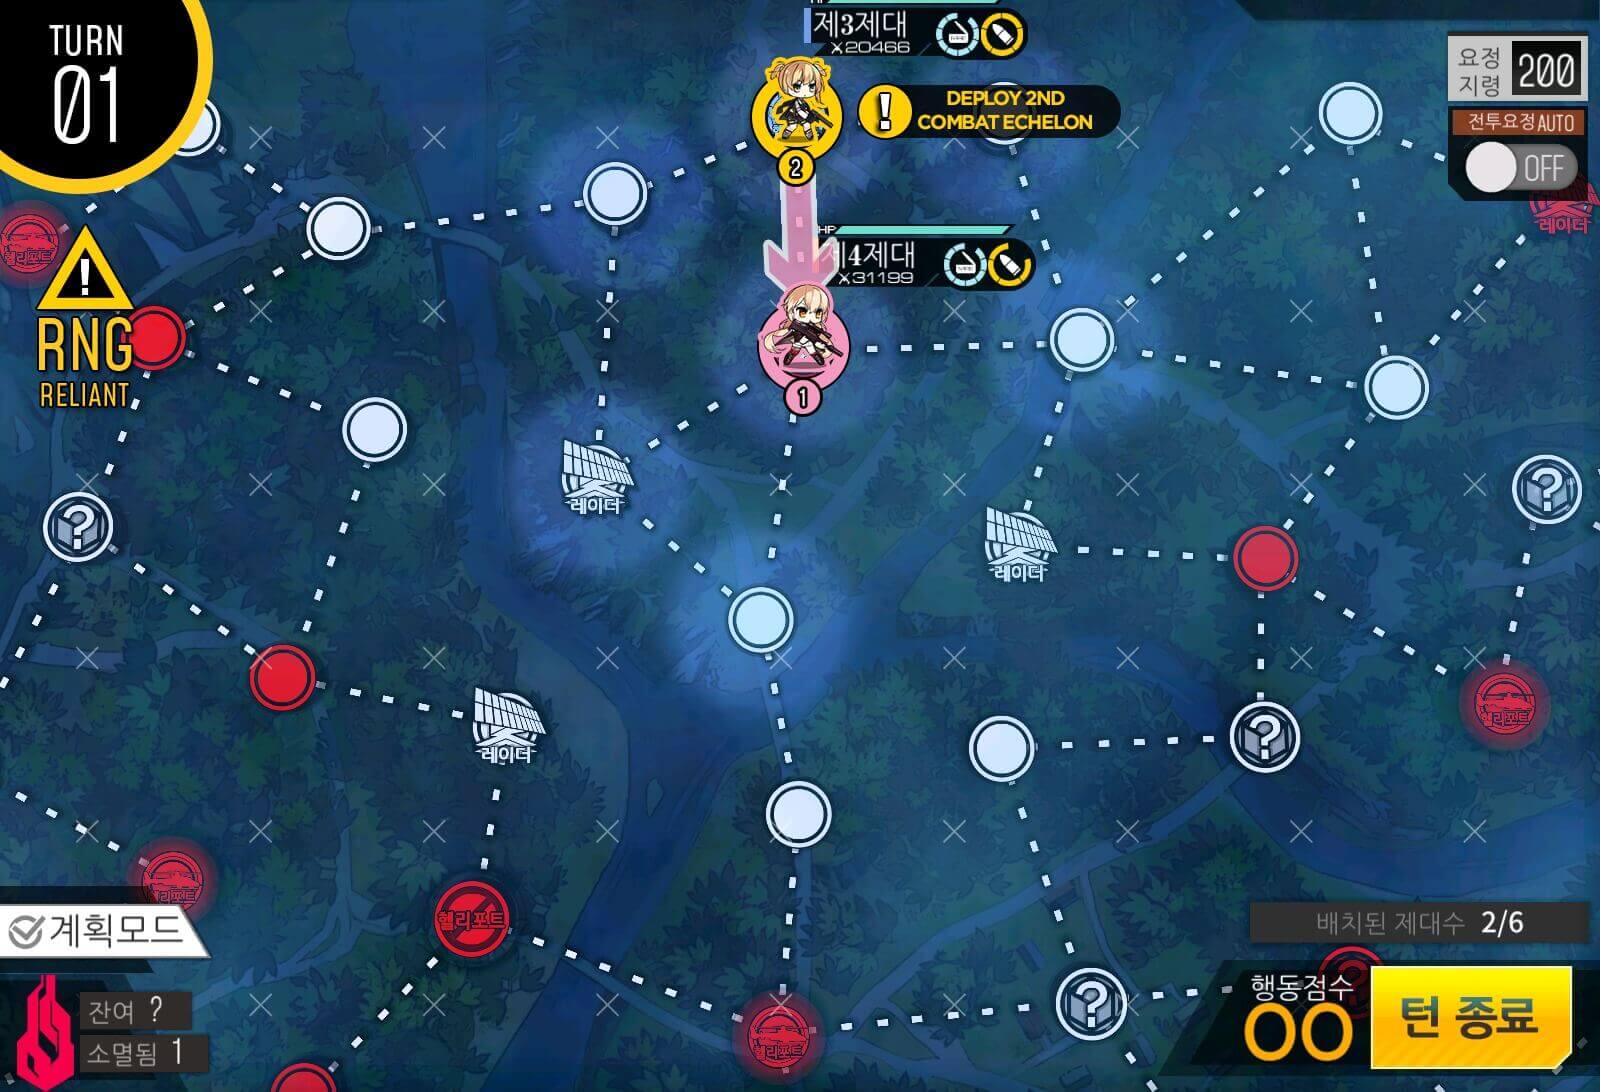
Turn 1
Self-explanatory. 2nd combat echelon only fights once or twice so it doesn’t have to be as strong as the other.

Turn 2a
Move the 1st echelon up once tvia the one-directional path AFTER resupplying, then spawn another combat echelon and send it to the radar at the bottom.
Turn 3a
On Turn 3, you will try to locate Hunter by checking the corner helipads using 2 echelons. This will show the boss around 75% of the time. In the case that she does not show, you will have to move the echelon on top to check the top right corner of the map. Or you can retry the map to get the desired spawn location.

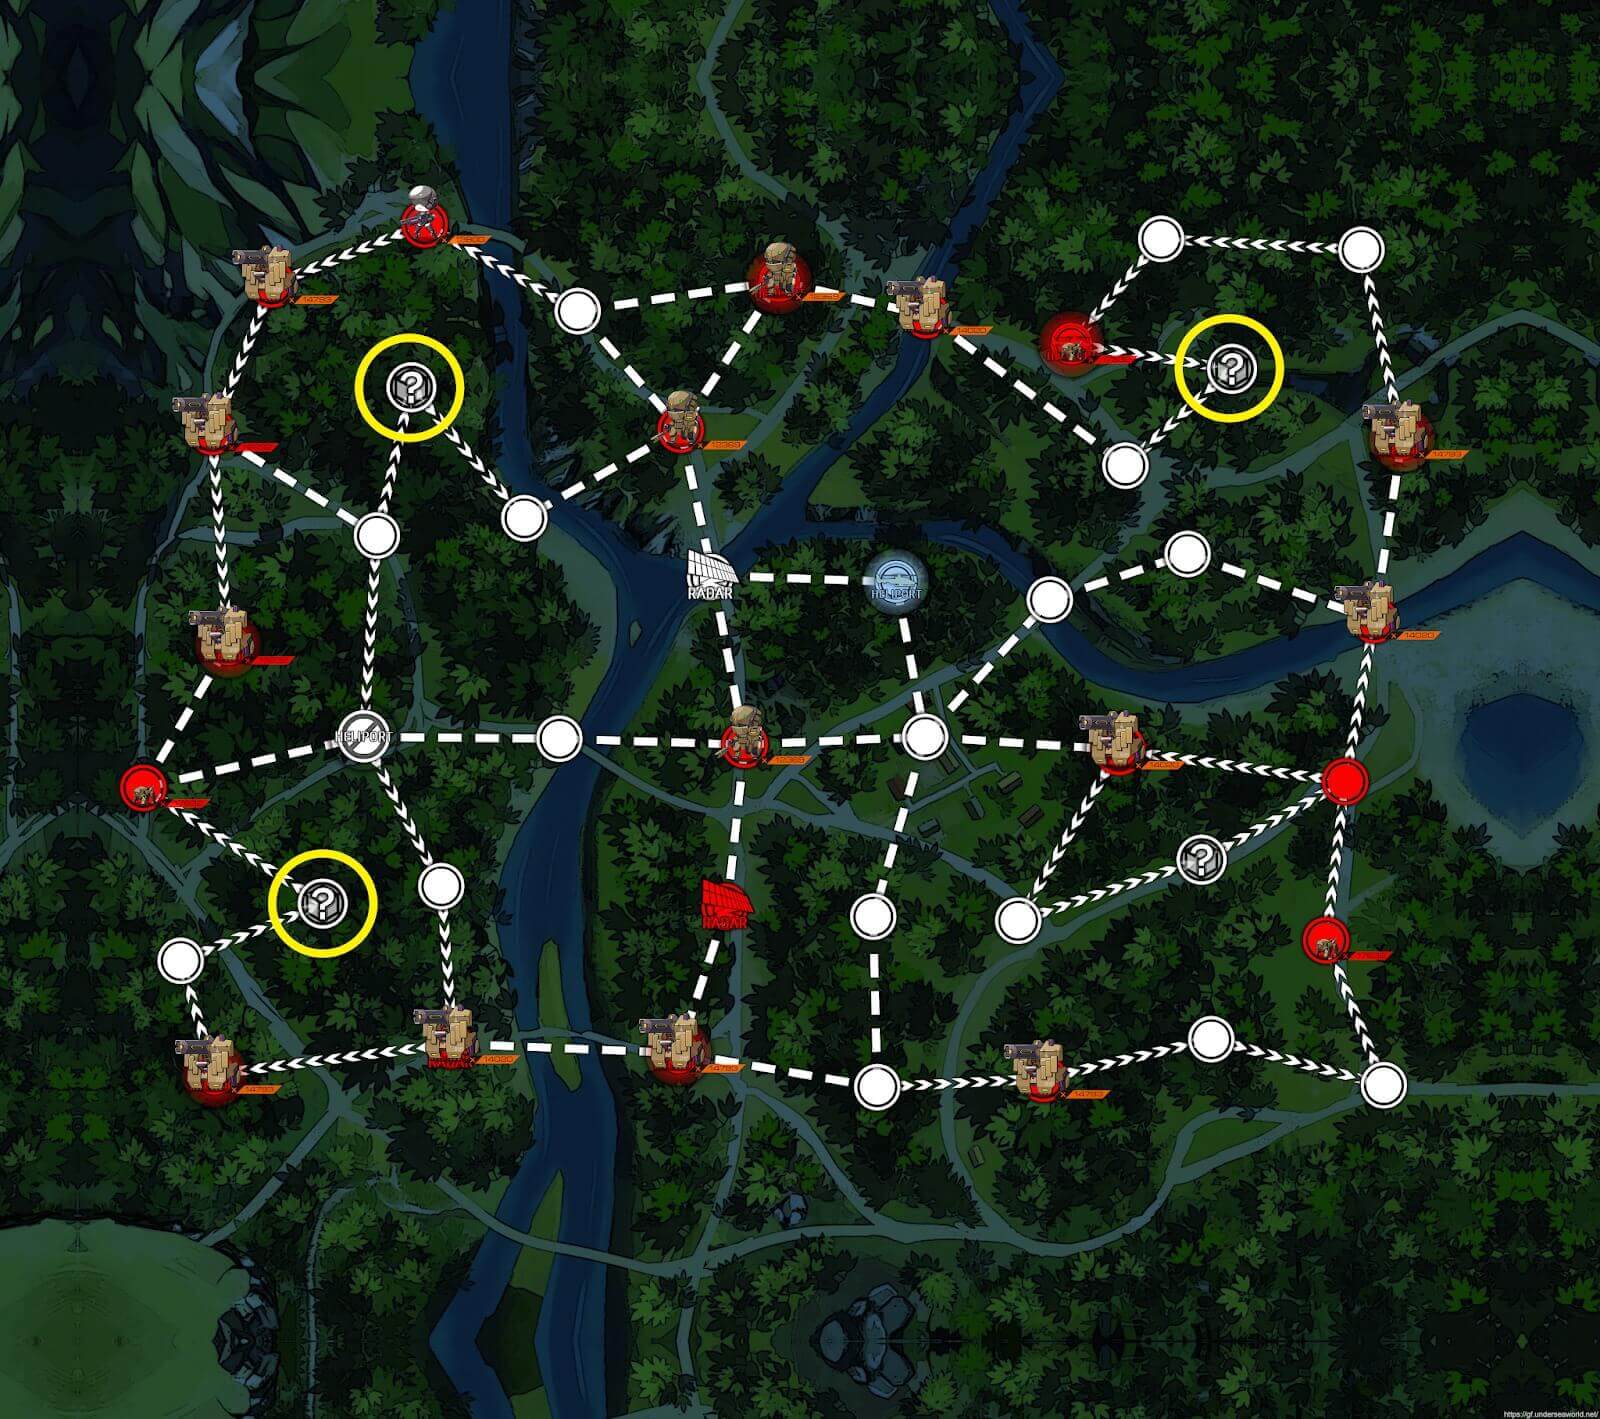
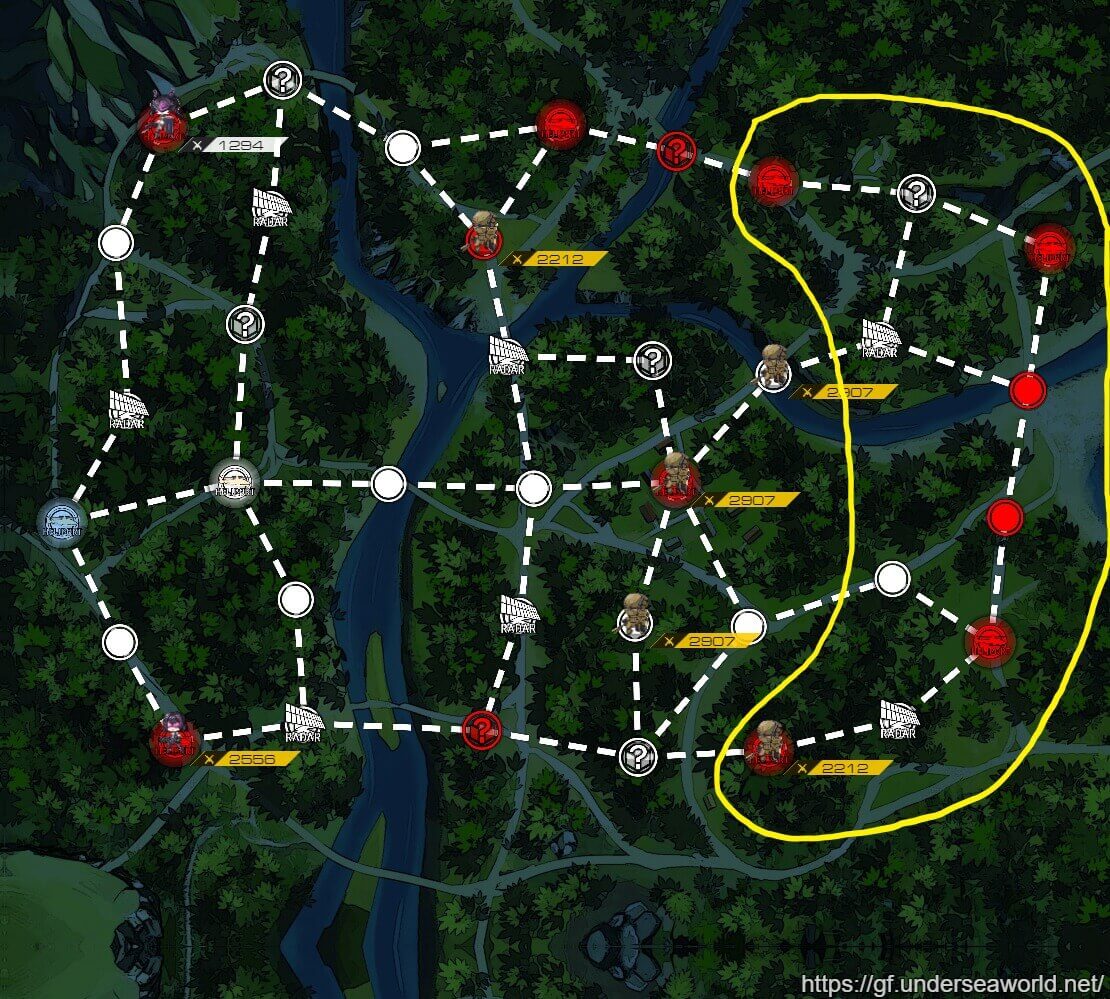
Boss Spawn Locations
The ? nodes are possible spawn locations. We've recently been informed that Executioner can indeed spawn on the bottom right ? node as well.

Turn 1
Self-explanatory first turn. Now we will pay attention to the top center area to guess where the boss unit will be.

Turn 2 Route A
If you are lucky, you will see Executioner right away on the top left spot. Just run into her and smack her. Now let’s talk about how to spot other indicators for her 2 alternative locations.

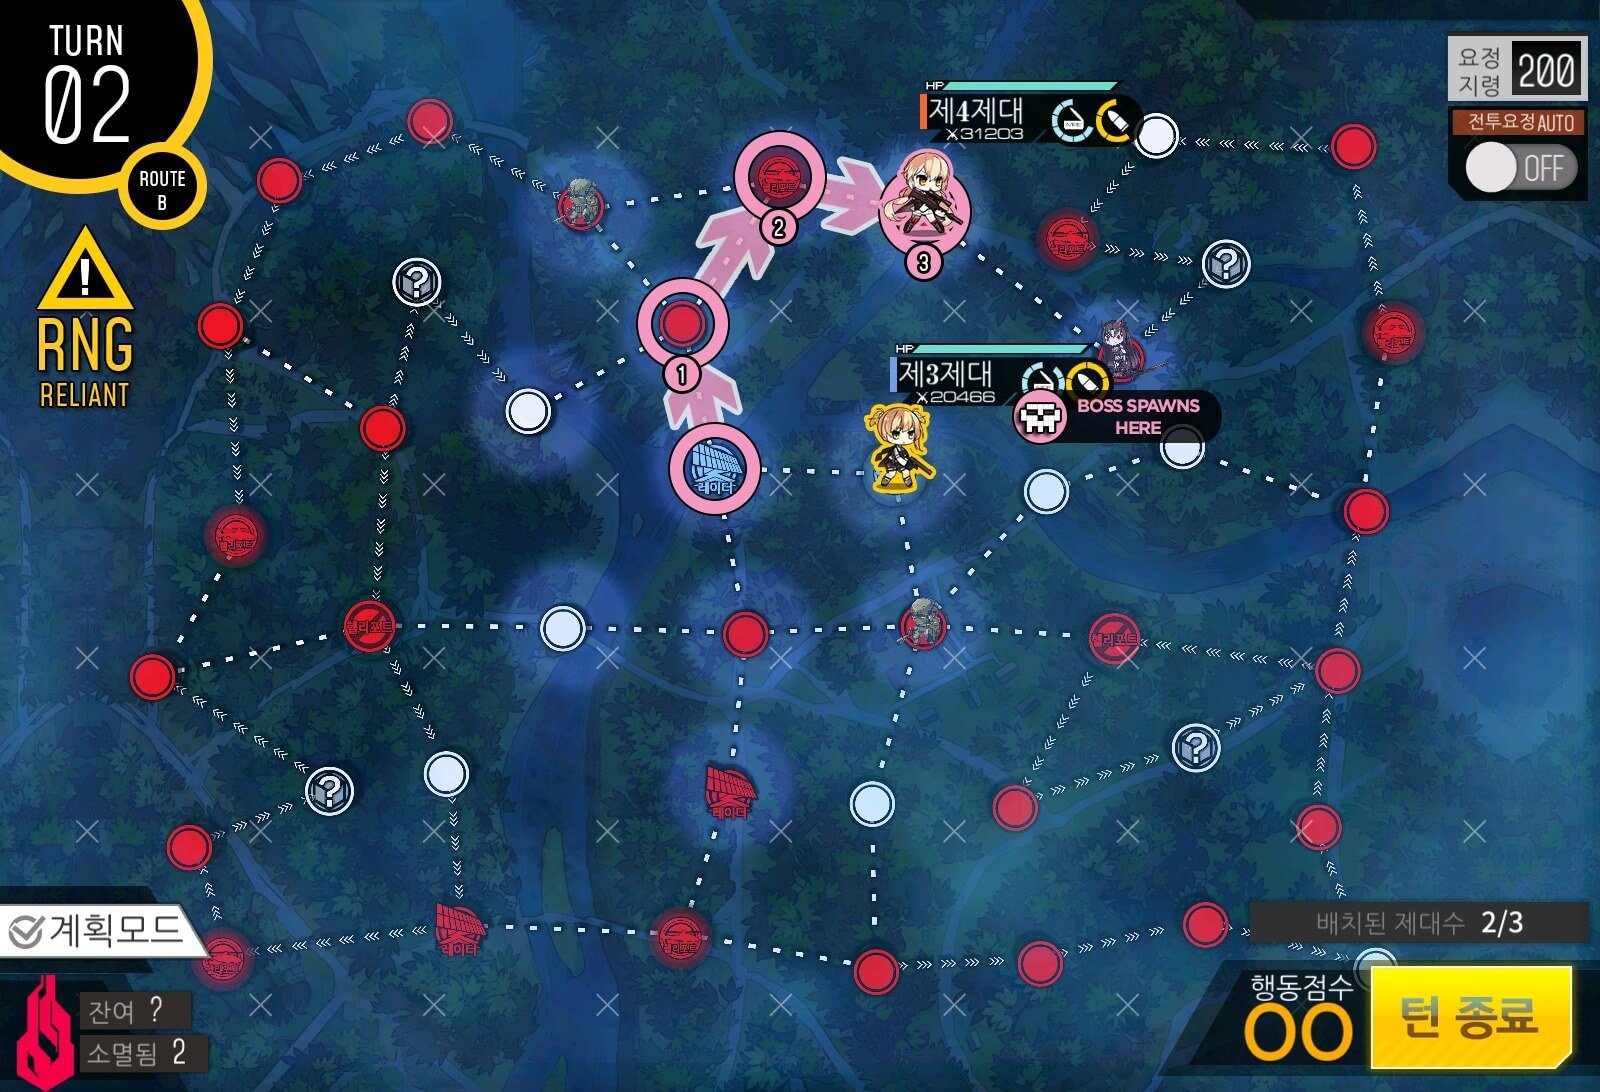
Turn 2 Route B
The most obvious indicator for the top right will be that 2 nodes surrounding the “?” node will be taken but not the “?” node itself. However you also have to check that the Nemeum unit highlighted in green is visible as well. This is only possible because the Boss unit has a slower move priority than the Tarantula unit.
Turn 2 Route B
As you can see, we have Executioner right where we want her to be. End the turn and she will run into you.
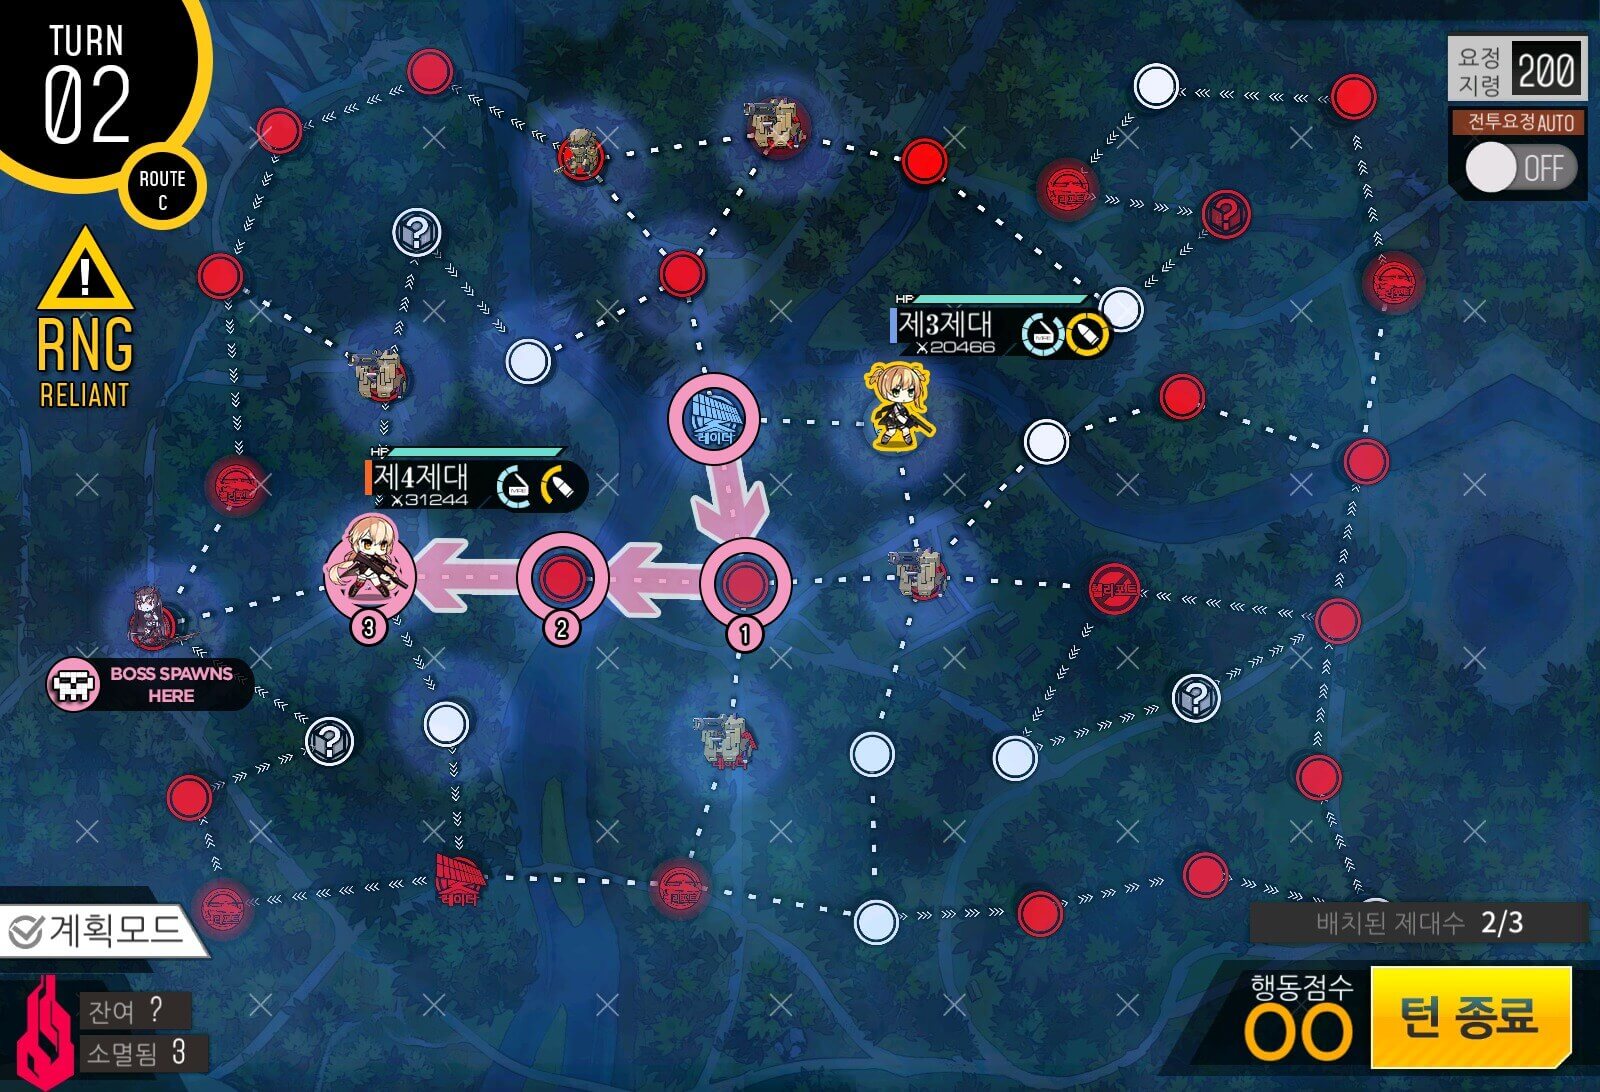
Turn 2 Route C
If you don’t see Executioner on the radar, AND you see that random node is taken at the beginning of turn 2, then it is 99% likely for her to be near the helipad on the bottom left. Take the route shown and you should see Executioner waiting for you.
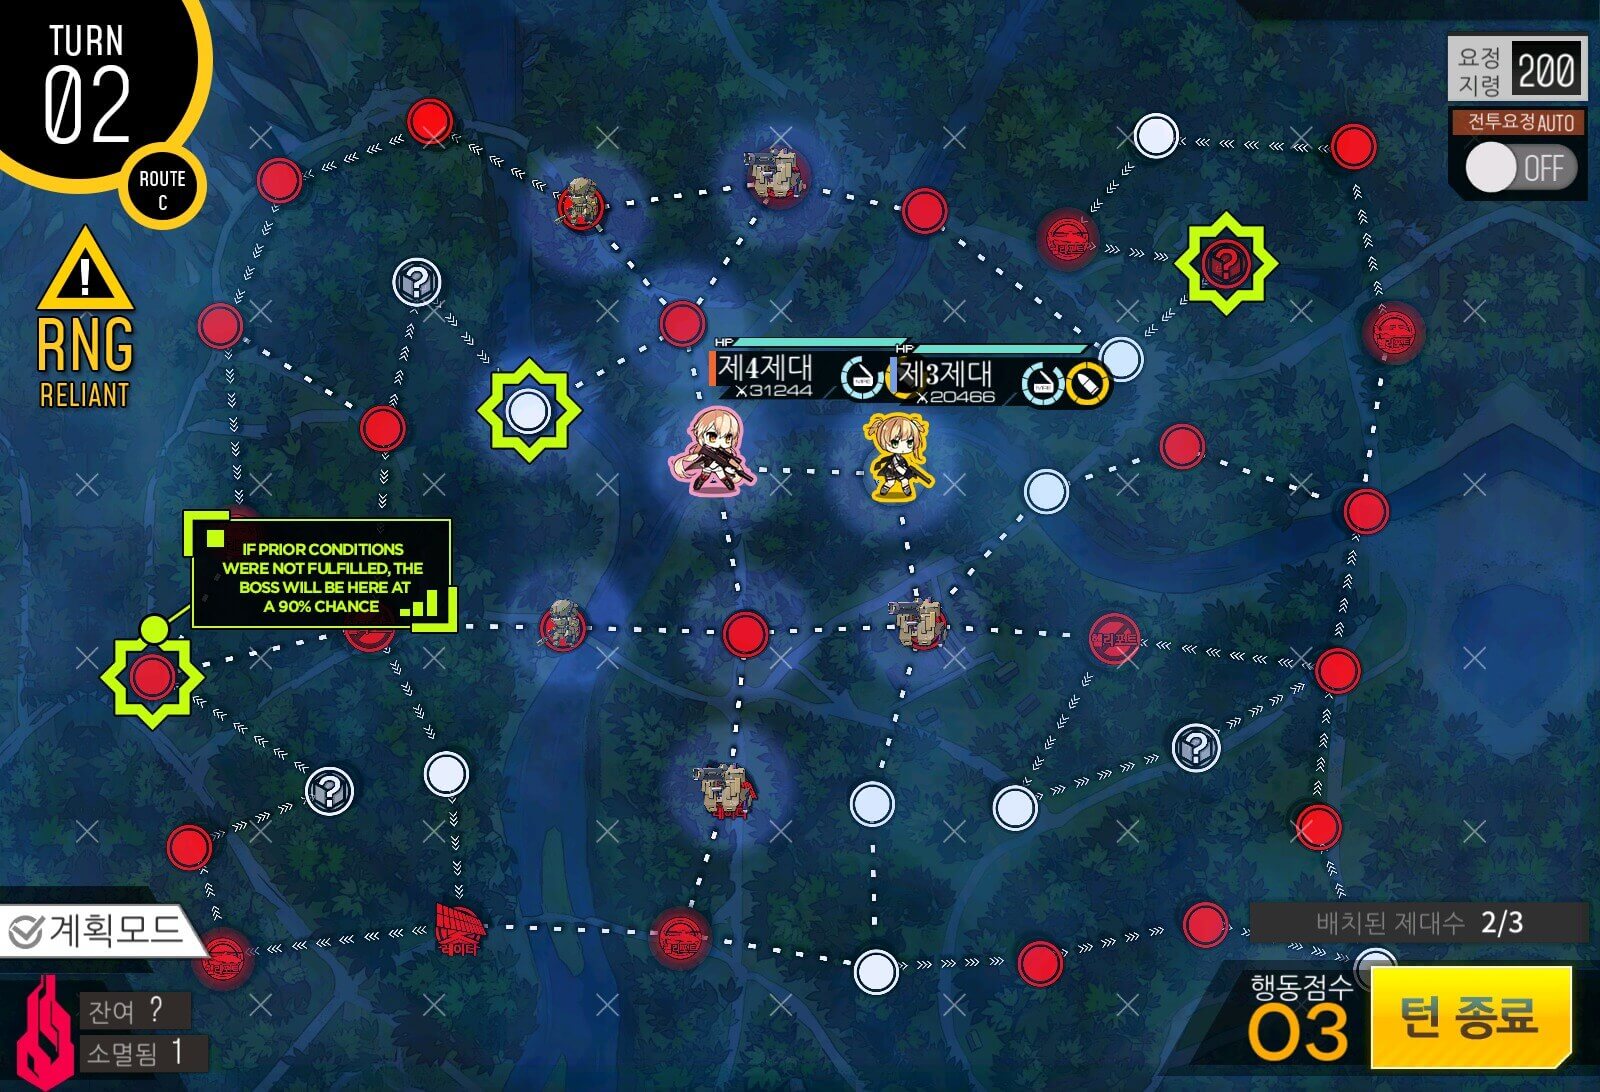
Turn 2 Route C
This should cover your bases for hunting Executioner.
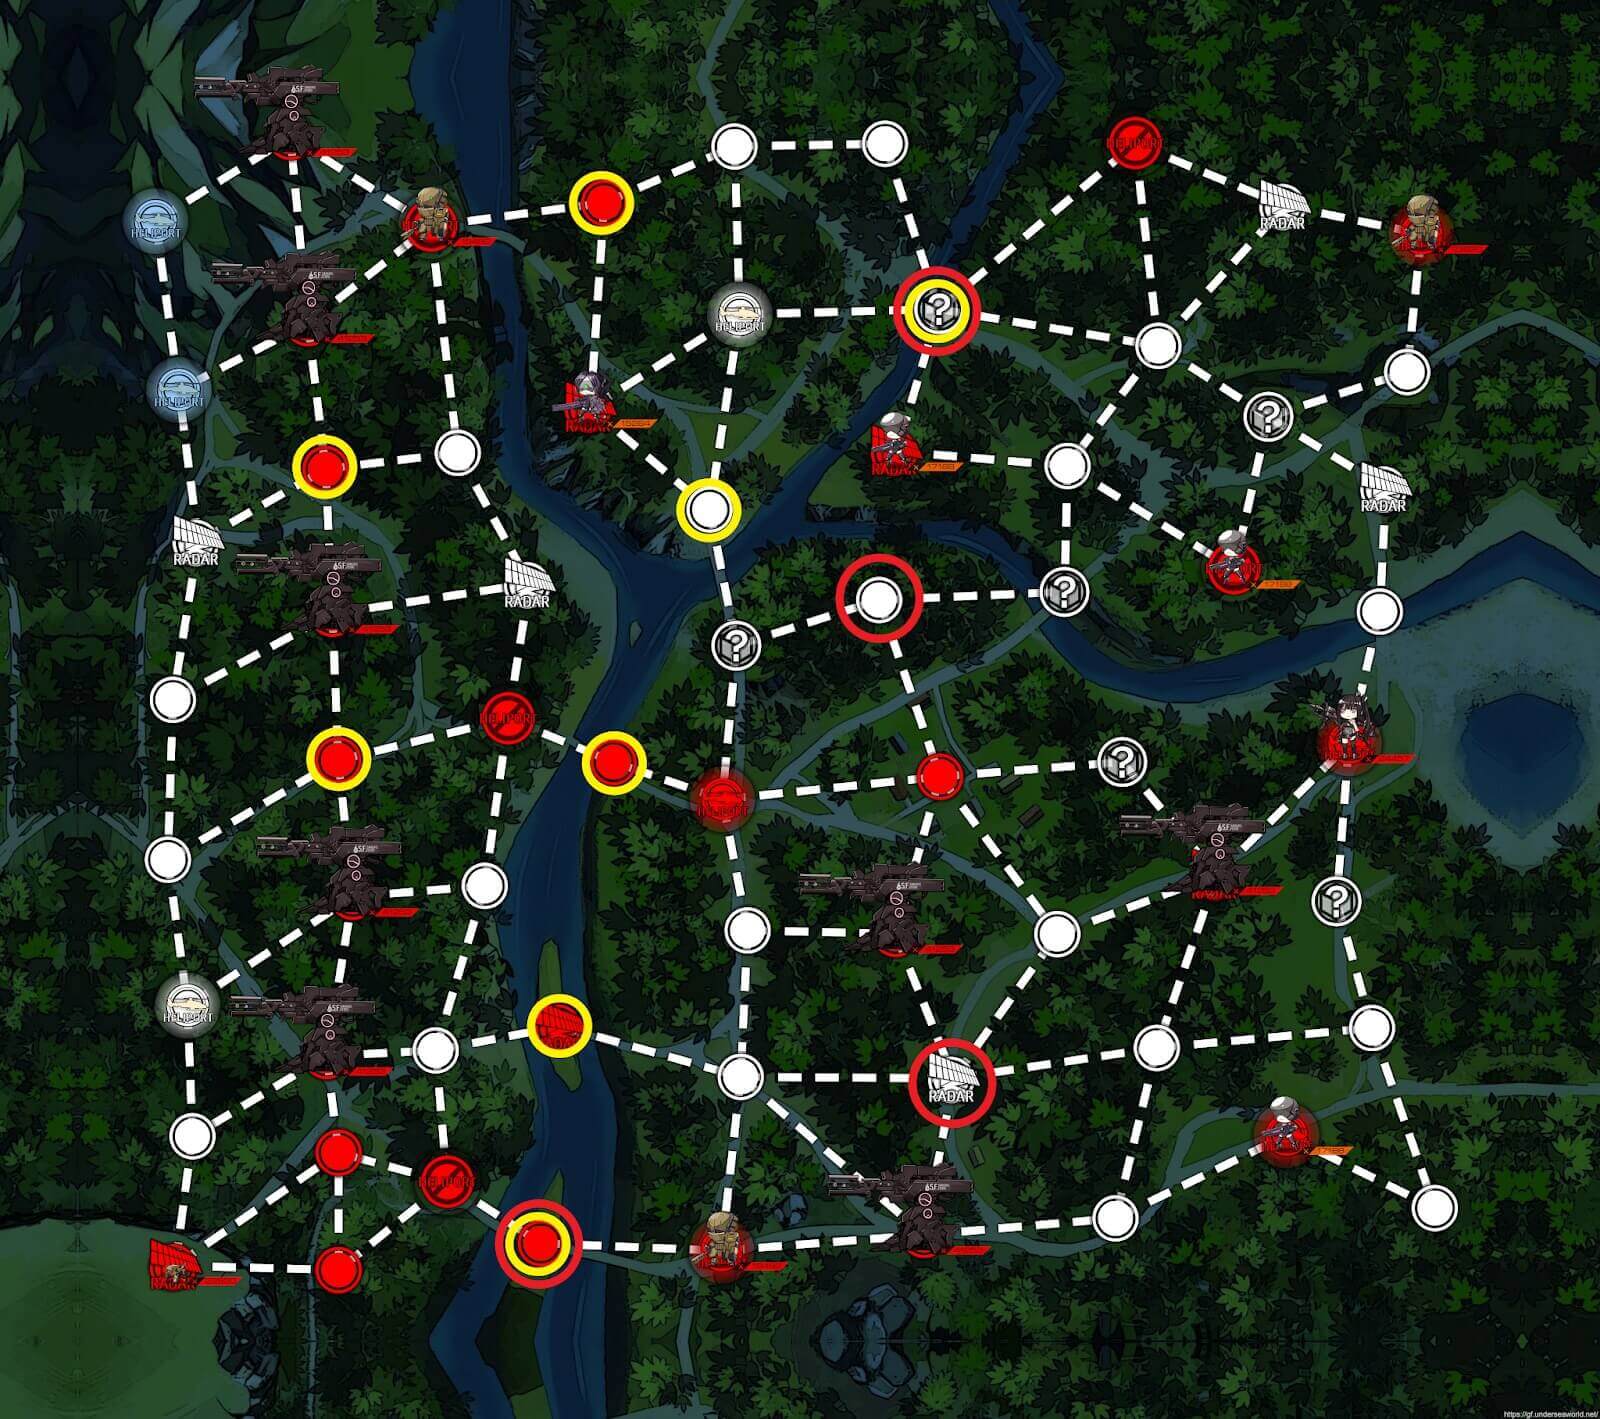
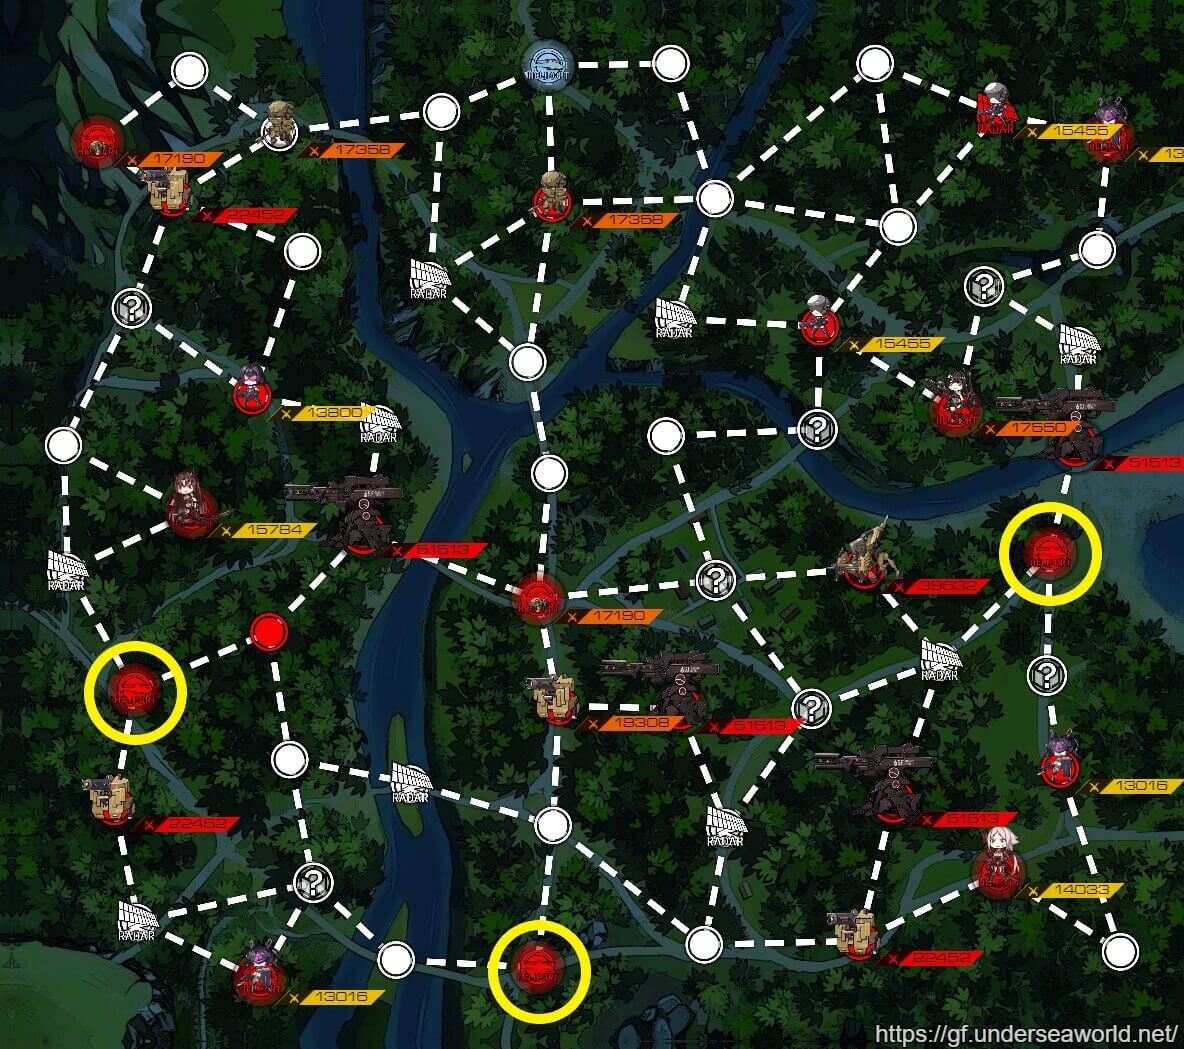
Jupiter spawn locations
Map locations highlighted in yellow are possible weak Jupiter spawn locations, and ones in red are possible strong Jupiter cannon spawn locations. Note that boss spawn location is fixed on this map.
Jupiter Brute Force Team [Undefined]
In case you have forgotten how to blast through a weakened Jupiter, this is the ideal set up in which if you quickly retreat the SMG on tile 3 when Jupiter is about to fire, you should have no trouble.
Turn 1
Start with a dummy echelon on the top helipad and a combat echelon on the bottom. The combat Echelon will go all the way around the strong Jupiter cannon to take the helipad. There can be a weakened or no Jupiter cannon to the right of it. In this case there was one.
Turn 2a
Move the combat echelon to take over the helipad. This is the first checkpoint in which we have to figure out the route to the boss. Currently, the shortest route is blocked by a strong Jupiter cannon, so we will go around next turn.
Turn 2b
This is where you spawn an additional dummy echelon. They are highly unlikely to get into a fight if you leave them on the helipad.

Turn 3 Bottom Route
In the most unfortunate of cases, the 2 highlighted nodes will both be blocked by strong Jupiters. Side note, the radar node can also be blocked by a strong Jupiter cannon. If this happens, just reset the map.

Turn 3 Middle Route
This is the middle route which is most often open to go through. Make sure to resupply before heading in.
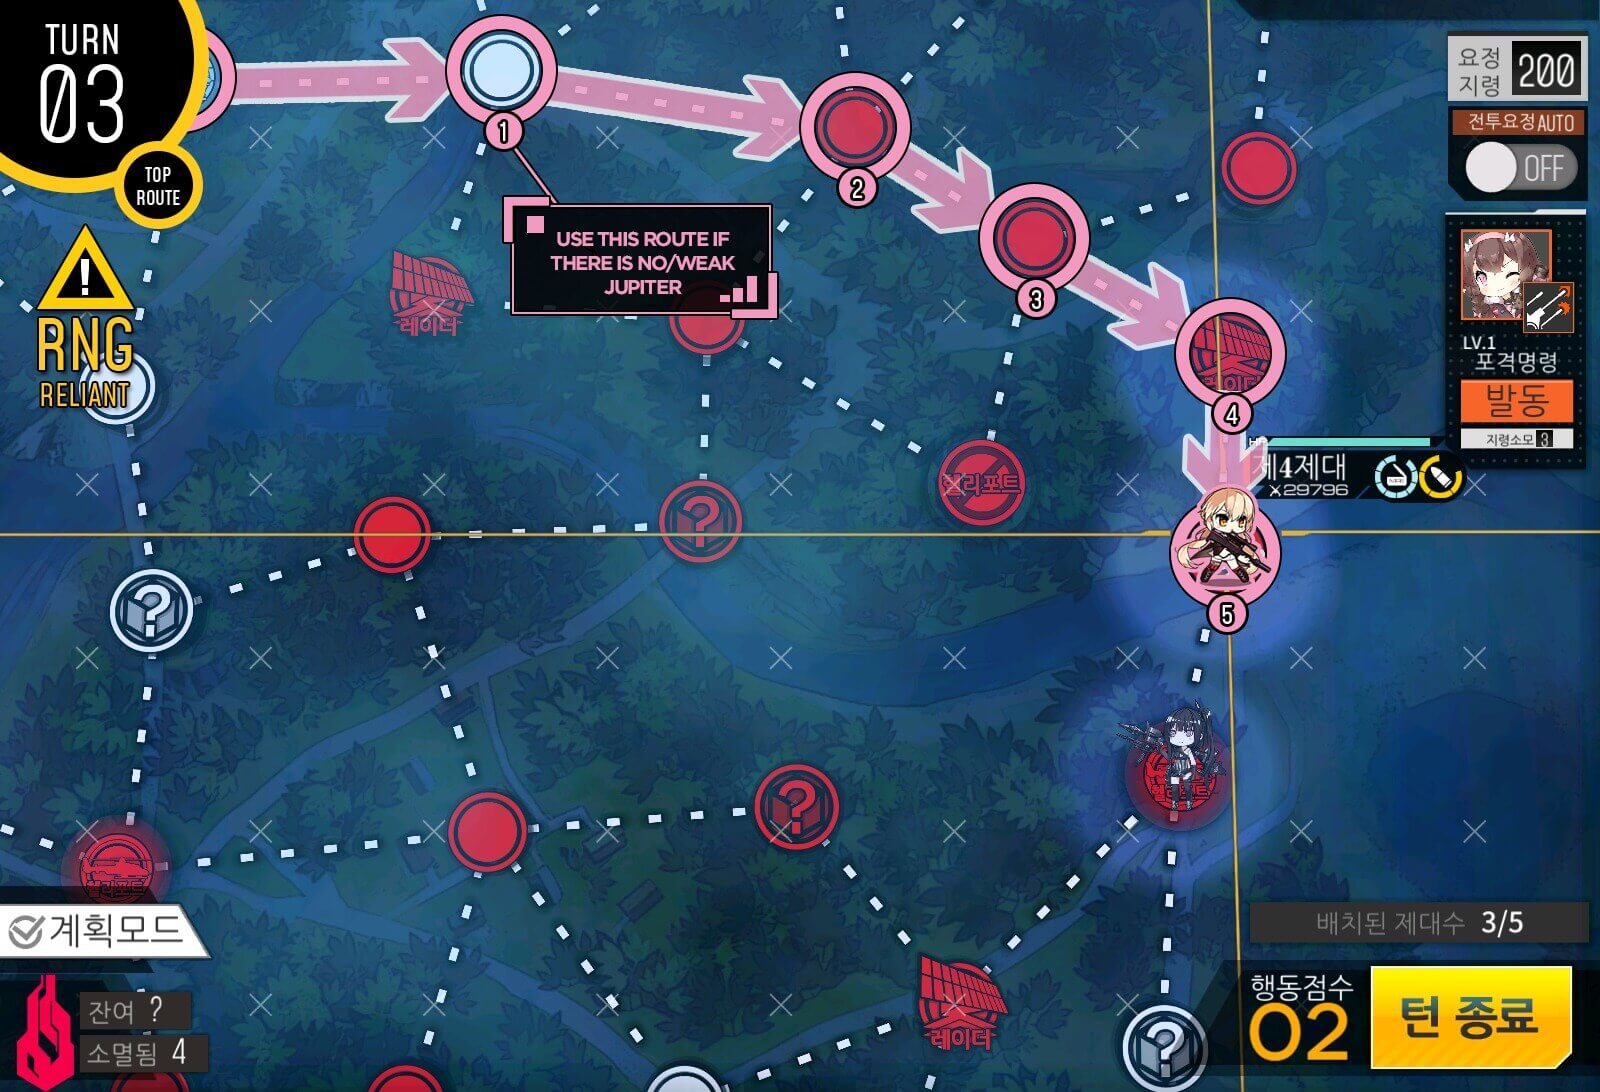
Turn 3 Top Route
This is the quick top route that will get you to the boss right away. Remember that Architect has a wide AoE skill so that you want to spread out your team to minimize the damage.
If you'd like to know Architect's attack patterns, check our Enemy Analytics sheet.
Map is again very similar to E1-4 of Cube, but with stronger enemies and Jupiter cannons blocking the path. Unfortunately the Snek Finder’s dead ![]() so brace yourself. IMPORTANT: Only Ouro counts as a legitimate boss unit. so if you get wiped by other “boss” units like Hunter and Executioner you will lose affection! Stay alert.
so brace yourself. IMPORTANT: Only Ouro counts as a legitimate boss unit. so if you get wiped by other “boss” units like Hunter and Executioner you will lose affection! Stay alert.
WARNING – you need to clear this map 4 times to get rewards!
Boss Spawn Locations
Because there is more stuff on the map, it is somehow easier[?] to predict where Ouroboros will be. I will discuss a few key indicators in a bit.
Turn 1
Move your combat echelon south to take over the center helipad. This is the first checkpoint in which we have to figure out the route to the boss. Currently, the shortest route is blocked by a strong Jupiter cannon, so we will go around in the next turns.
Turn 2 or How to find The Snek
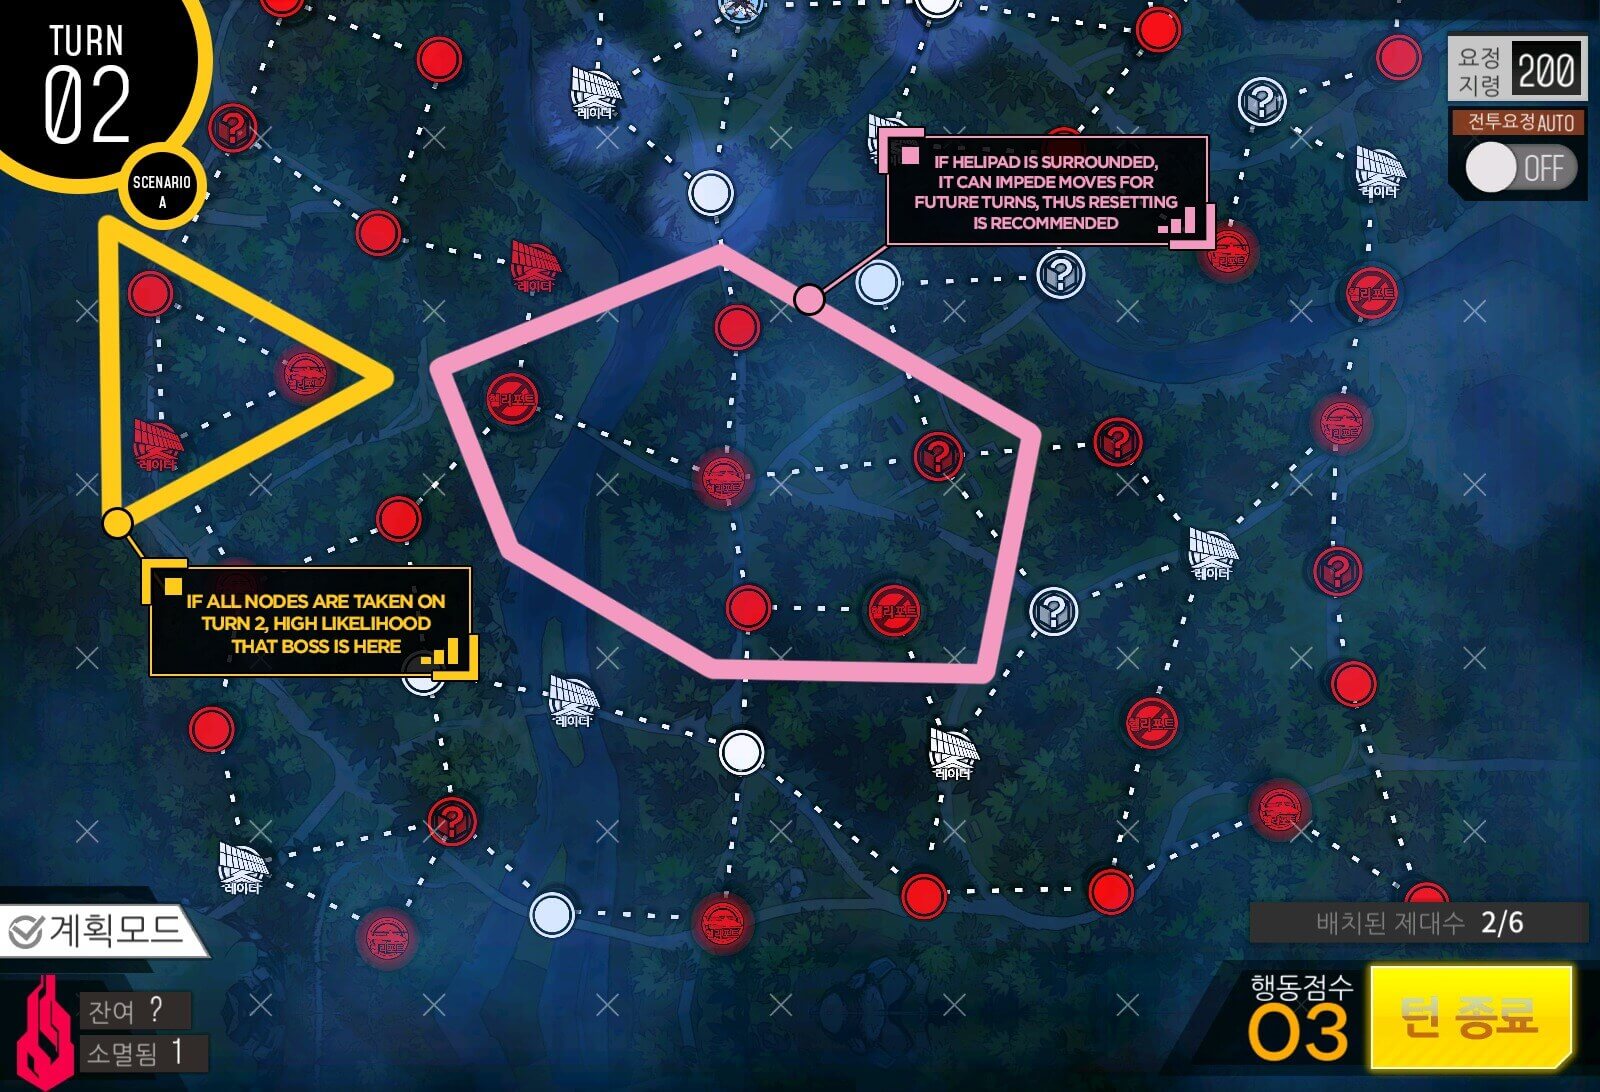
The main indicator that shows where Ouro is, arethe triangle nodes on the 9 O’clock helipad. If all nodes that make out the triangle shape are taken, Ouro will be there 95%. If such is the case you can either choose to go counterclockwise from the starting helipad or take the path to the middle then go around to avoid Executioner.
How to find The Snek pt.2
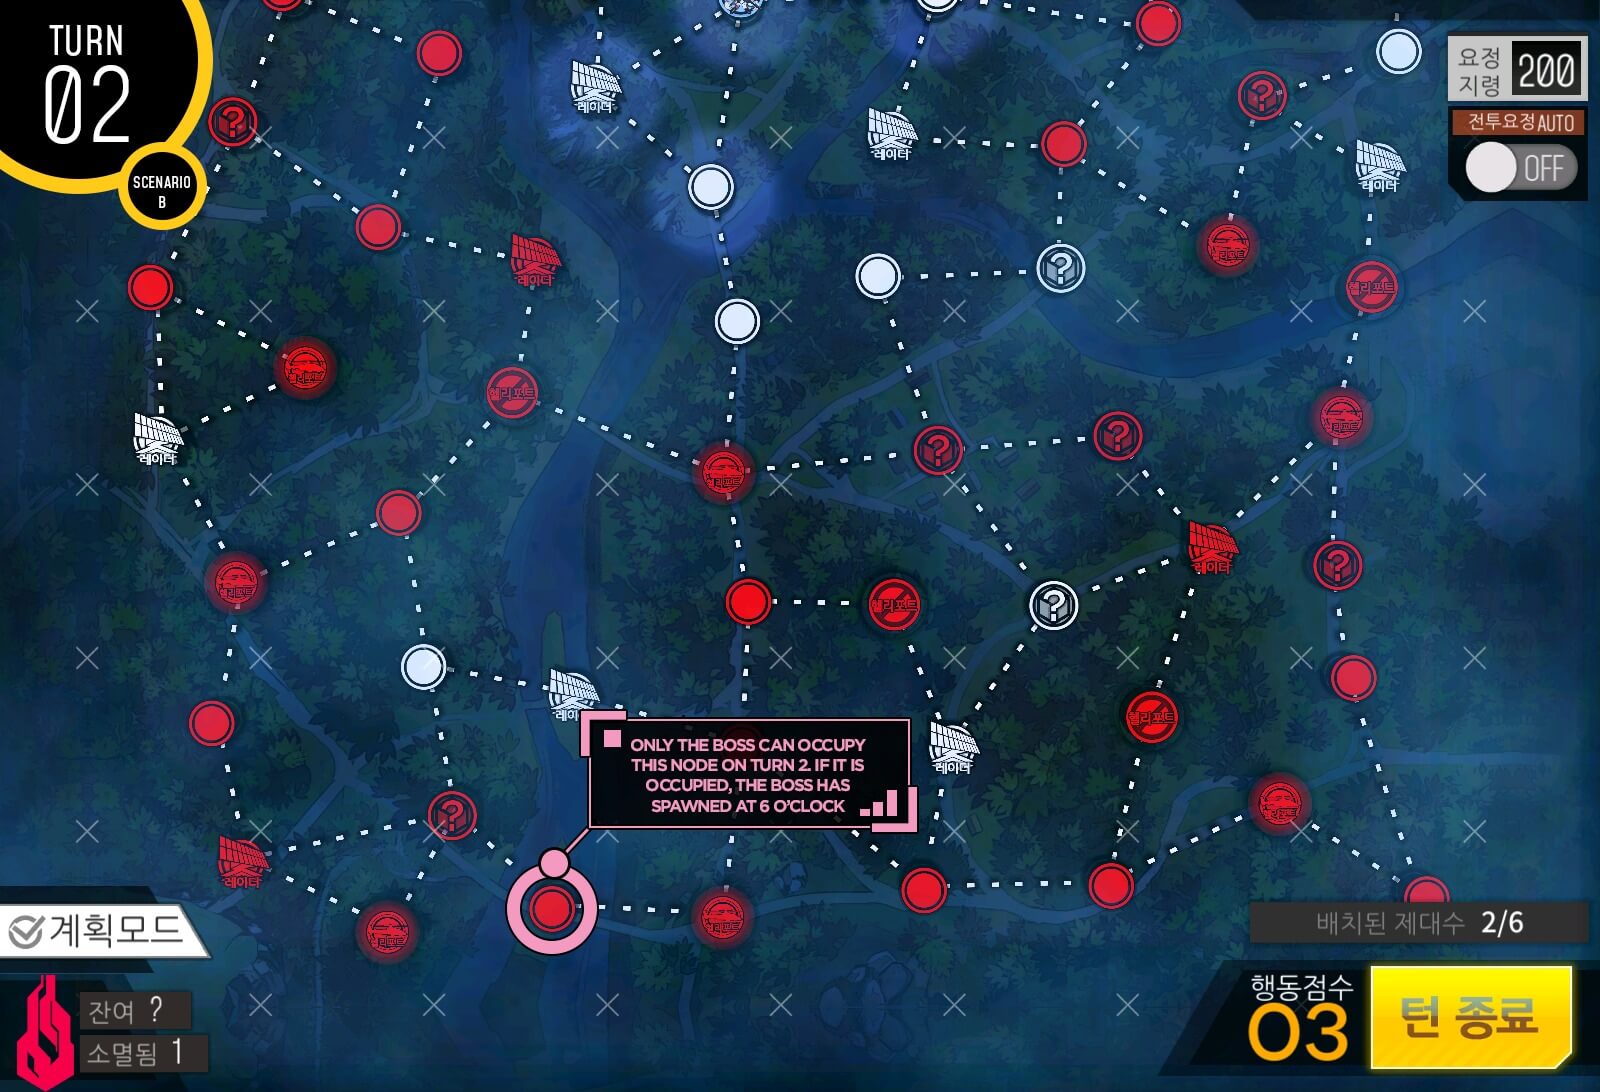
The easiest way to spot the whereabouts of Ouro is that the node adjacent to the helipad at 6 O’clock is taken in the beginning of turn 2. This is only possible if Ouro moves to the left, otherwise in normal cases, it would be neutral in turn 3. One additional tip is that if the center helipad is surrounded on turn 2, it can hinder your future moves. Therefore it is advised to either reset the map or take an additional turn to capture the node above and move to capture the helipad on turn 3.

How to find The Snek pt.3
Worse case scenario would be not seeing either of the indicators. If this is the case, restarting would be strongly recommend unless you happen to be a highly capable commander, because on the path to the helipad you have a chance to meet Architect and 8 Manticore units. Afterwards you'd likely be fighting Ouro with a bogged down team.

Turn 2
In my case it was the best case at 6 O’clock helipad, so we will go to the bottom route. This is where some people will be having issues due to large amounts of Tarantulas. If you have C-MS, give her some armor piercing ammo and you should be fine, otherwise I would recommend mixing in a MG or utilizing the Airstrike fairy.
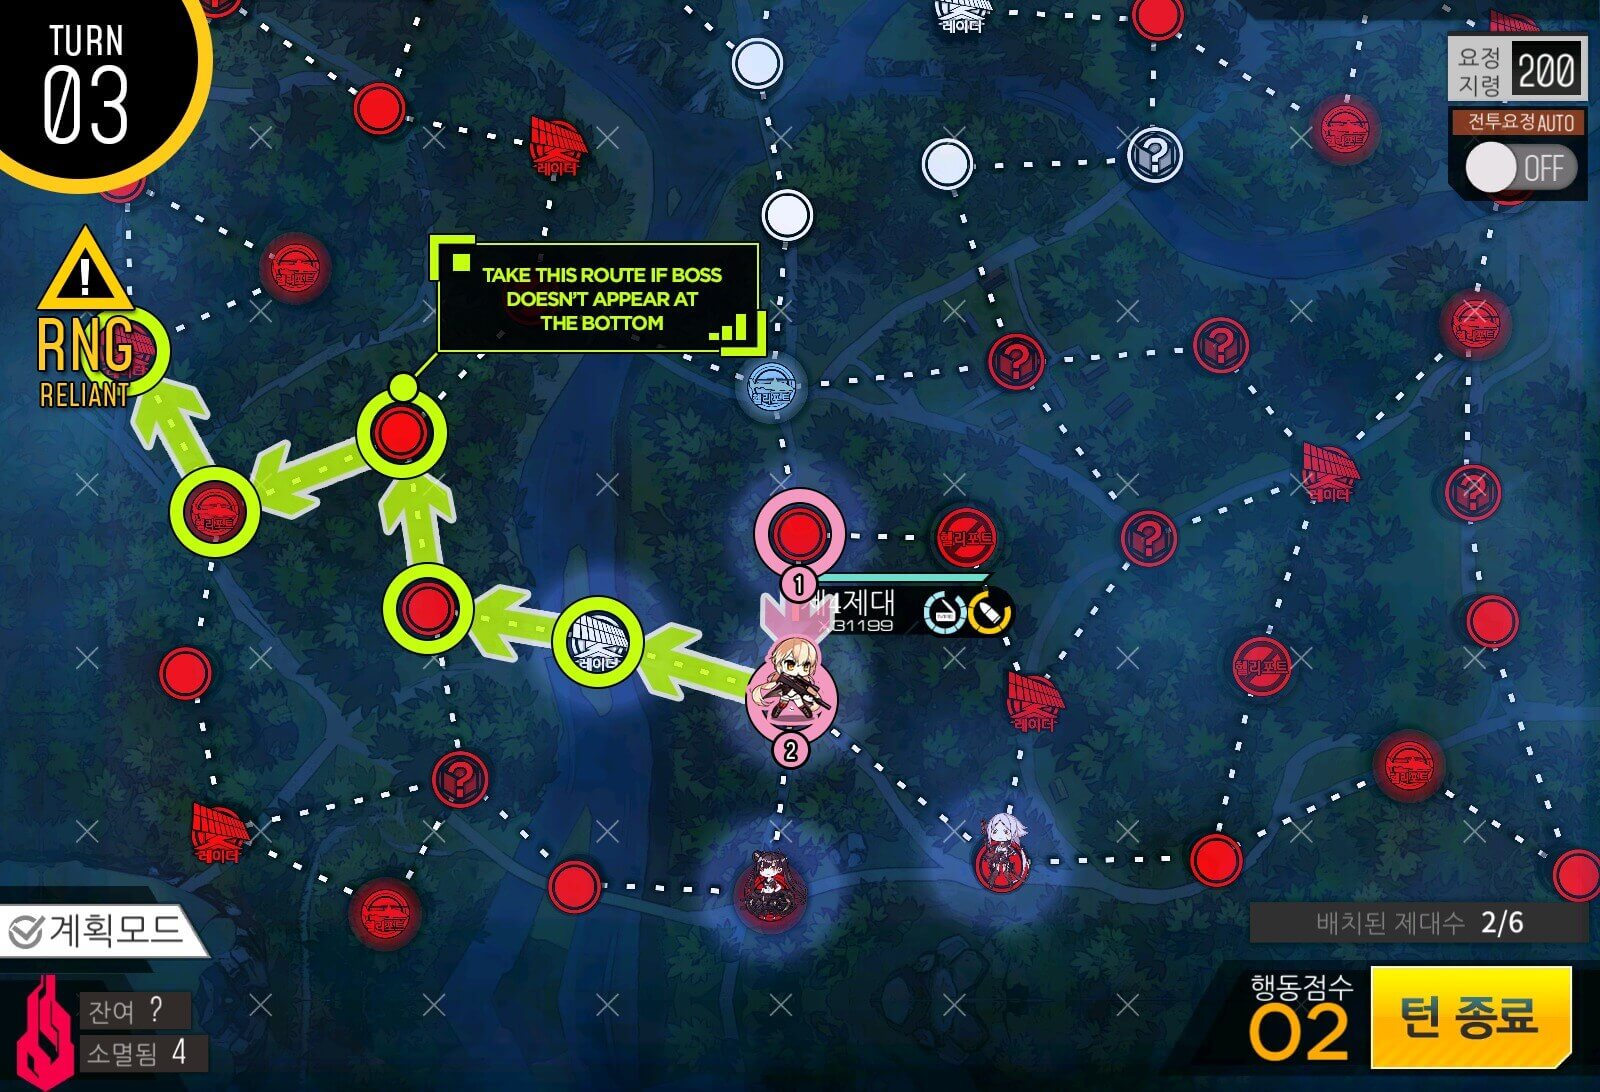
Turn 3
If you are going to the 9 O’clock helipad, take the alternative route shown, otherwise search for Ouro near the 6 O’clock helipad. There is a chance that Hunter will block your path.
